Embed Size (px)
Citation preview

1
LABORATORY OF EMBEDDED SYSTEMS ARCHITECTURE
Exercise 2
Topic: Installing Microsoft Windows and drivers on the Intel Galileo Gen2.
1. Laboratory stand
The laboratory stand consists of a PC, Intel evaluation board Galileo Gen2, a set of wiring and
basic sensors cooperating with the Base Shield from the Grove Starter Kit Plus Intel IoT Edition
(Fig. 1).
Fig.1. A set of sensors and wiring includes in Grove Starter Kit Plus Intel IoT Edition
Grove Starter Kit Plus for IoT Intel Edition includes also:
• transition plate (Base Shield) to enable connection sensors to the Intel Galileo Board,
• alphanumeric LCD display (2 lines of 16 characters) with backlight RGB,
• push button,
• rotary potentiometer,

2
• electromagnetic relay module,
• buzzer module,
• microphone module,
• light sensor,
• temperature sensor,
• touch sensor,
• servo,
• three LED diodes (blue, green and red) cooperating with LED module Socket Kit,
• battery adapter,
• information brochure,
• 8GB SD card.
To do the exercise Visual Studio 2013 Express for Windows Desktop with Windows Developer
Program for IoT (https://connect.microsoft.com/windowsembeddedIoT/Downloads) is needed. The
mentioned additive installs on PC system software (Galileo Watcher), which allows communication
Visual Studio 2013 Express with Intel Galileo platform via Ethernet network.
Fig. 2. Micro SD card slot used for laboratory
2. Windows system installation on Intel Galileo Gen2 platform.
Microsoft Windows system installation on Intel Galileo platform should start with getting (after
registration on Microsoft Connect site) the relevant software from Microsoft company site:
https://connect.microsoft.com/windowsembeddedIoT/Downloads.
The required software, which is subject to automatic update:
1. The image of Windows system in WIM file format (Windows Developer Program For IoT –
Windows Image):
9600.16384.x86fre.winblue_rtm_iotbuild.150309-310_galileo_v2.wim(available 2015-03-12)

3
2. Script, that allows to prepare SD card from Windows system image (Windows Developer
Program For IoT – apply-bootmedia.cmd):
apply-BootMedia.cmd (available 2015-02-05)
Unfortunately Windows system image to the Galileo platform provided by Microsoft does not
contain drivers for wireless network card. The drivers should be installed independently by using the
Deployment Image Servicing and Management tool (DISM). To do this the necessary drivers should
be downloaded from the Internet, for example from:
https://downloadcenter.intel.com/download/24575/Intel-PROSet-Wireless-Software-and-Drivers-
for-IT-Administrators.
The drivers should be dedicated for 32-bit version of Windows 8.1, that means
Wireless_17.13.11_De132.zip should be downloaded.
Fig.3. Formatting micro SD card
Fig.4. How to run the Command line
4
Downloaded files should be placed in SW folder on disk E. In case problems with downloading
files, instructor will indicate alternative sources of required software. Downloaded files should be
organized in a clear structure of folders:
Image files -> E:\SW\Image
Drivers’ files -> E:\SW\Drivers
Mounted image files -> E:\SW\Offline
Insert carefully the micro SD memory card included in Grove Starter Kit Plus Intel IoT Edition into
memory card reader (Fig. 2). Format micro SD card using FAT32 files system (Fig. 3).
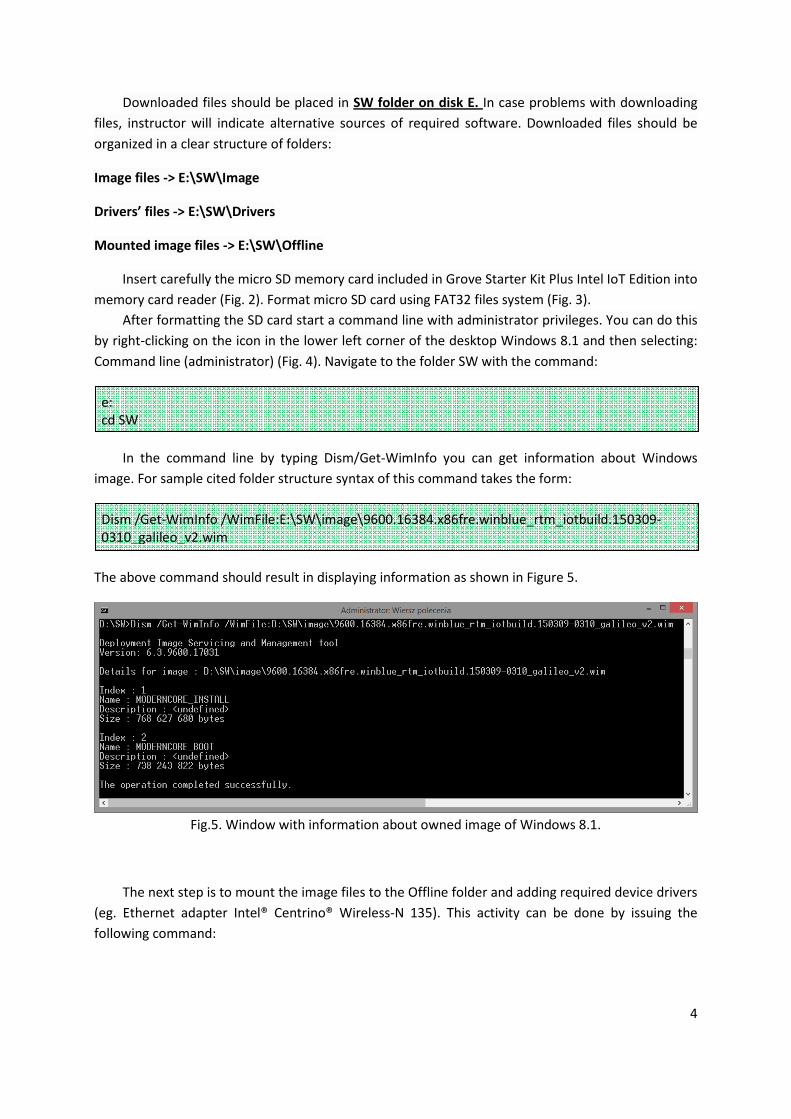
After formatting the SD card start a command line with administrator privileges. You can do this
by right-clicking on the icon in the lower left corner of the desktop Windows 8.1 and then selecting:
Command line (administrator) (Fig. 4). Navigate to the folder SW with the command:
In the command line by typing Dism/Get-WimInfo you can get information about Windows
image. For sample cited folder structure syntax of this command takes the form:
The above command should result in displaying information as shown in Figure 5.
Fig.5. Window with information about owned image of Windows 8.1.
The next step is to mount the image files to the Offline folder and adding required device drivers
(eg. Ethernet adapter Intel® Centrino® Wireless-N 135). This activity can be done by issuing the
following command:
Dism /Get-WimInfo /WimFile:E:\SW\image\9600.16384.x86fre.winblue_rtm_iotbuild.150309-
0310_galileo_v2.wim
e:
cd SW

5
The correct execution of this command will be reported by a message as in Figure 6.
Fig.6. Window informing about the successful mounting of Windows 8.1 image.
After mounting the Windows in folder E:\SW\Offline, folder structure and files appear as in any
Windows system (Fig. 7).
Fig.7. Folder structure of Windows 8.1 on the Intel Galileo platform.
Adding drivers to the mounted Windows image can be performed using the command
Dism/Add-Driver. For the proposed folder structure, it will take the form of:
where, as the name of the driver the names of the files with the extension *.inf must be given. In
case the network card drivers Intel® Centrino® Wireless-N 135, there are three files with the
extension *.inf. Therefore it is more comfortable to point out once all the drivers from E:\SW\Drivers
folder. This can be done by enter the following command:
After issuing this command Deployment Image Servicing and Management tool (DISM)
automatically detects all the drivers located in the directory specified in the command and installs
them in the mounted Windows image. The window shown in Figure 8 informs about the correctness
of this action.
Dism /Image:E:\SW\offline /Add-Driver /Driver:E:\SW\driver\ /Recurse
Dism /Image:E:\SW\offline /Add-Driver /Driver:E:\SW\drivers\driver_name.inf
Dism /Mount-Wim /WimFile:E:\SW\image\9600.16384.x86fre.winblue_rtm_iotbuild.150309-
0310_galileo_v2.wim /Name:"MODERNCORE_INSTALL" /MountDir:E:\SW\offline

6
Fig.8. Window informing about the correct installation of the drivers in the system
Windows 8.1 on Intel Galileo.
Mounted and enriched with the appropriate drivers Windows 8.1 image should be unmounted
with the command:
This action should be confirmed with message as in Figure 9.
Fig.9. A window informing that image of Windows 8.1 was correctly unmounted.
To place prepared earlier Windows image to an SD card, use script apply-bootmedia.cmd
provided by Microsoft Company.
Check, under which letter in Windows SD card reader is seen. Prepare bootable SD card with
Windows for Galileo platform issuing the command:
As the host name unique string of the characters in Ethernet network should be written (eg. The
name or initials of performing the exercise). Host name and password should be written down in the
protocol they will be needed later in a laboratory. Examples of calling the script apply-
bootmedia.cmd might look like this:
apply-bootmedia.cmd -destination F: -image
D:\SW\image\9600.16384.x86fre.winblue_rtm_iotbuild.150309-0310_galileo_v2.wim –hostname
Kowalski -password Quark
Dism /Unmount-Wim /MountDir:E:\SW\offline /Commit
apply-bootmedia.cmd -destination {path to SD card} -image {path to Windows system image in
WIM format } -hostname {host_name} -password {password}

7
Depending on the speed of your computer procedure for creating a bootable SD card with
Windows may take several to tens of minutes. The progress in the preparations SD card will be
presented in the Command Line window (Fig. 10).
Rys.10. Progress preparation procedure SD card with Windows for Intel Galileo.
After completion of the creation of a bootable SD card with Windows you will get the
message as in Figure 11.
Rys.11. End of the procedure of preparing the SD card with Windows 8.1.
Note 1!
The Tab key may make it easier to type the file name *.wim.

8
Insert the prepared SD card in the slot on the Intel Galileo board and connect the power cord.
On your PC, launch the Galileo Watcher application. The shortcut to this application should be on
your Windows desktop. Connect the power and wait for the launch of Windows 8.1 on Intel Galileo.
During the startup process "SD" LED diode placed next to the USB host port should be blinking.
Fig.12. The main window of the Galileo Watcher application.
After several seconds, the Galileo Watcher application should detect a new host in local area
network (new Intel Galileo board) with the name specified when creating a bootable SD card (Fig.
12). In the window of application, there are several information such as a host name, MAC address of
network wired adapter and an assigned IP address.
Fig.13. Logging window to Windows 8.1 on Intel Galileo.
Note 3!
Make sure that host name and password was correctly written down.
Note 2!
When you create a bootable SD card script apply-bootmedia.cmd on a PC changes the time zone.
Make sure that after this procedure, the time setting will return to the original time zone.

9
By using the Telnet protocol through an option “Telnet Here” connect with your own Galileo
board by clicking right mouse button on it. After entering the Administrator username and password
provided in the preparation of the SD card you will be logged into the operating system on the
Galileo board (Fig. 13).
The correct of installation of a wireless network card driver Intel® Centrino® Wireless-N 135 can
be checked by searching all devices running on a Galileo platform issuing the command:
Finding on the displayed list wireless network card, we learn that it has a device ID as shown in
Figure 14.
Fig.14. List of devices operating on the Intel Galileo under Windows 8.1.
Knowing the hardware identifier, you can get information about the status of the installed
network card driver by typing:
The message from Figure 15 shows that installation of the drivers for the network card was
correct. Otherwise, the command: devcon status *DEV_0892* would display an error message 28,
which means no installed drivers.
Fig.15. Status of the wireless network adapter Intel® Centrino® Wireless-N 135 drivers
Programming of Intel Galileo platform running under the Windows operating system 8.1 is done
using Visual Studio Express 2013 for Windows Desktop.
Start Visual Studio Express 2013 for Windows Desktop. From the menu, select Plik->Nowy
projekt, and then in the window as shown in Figure 16, the template of Visual C++ application,
Windows for IoT. Name the project and click OK.
devcon status *DEV_0892*
devcon find *

10
Fig.16. The Nowy projekt window of Visual Studio Express 2013 for Windows Desktop
By default each new project is filled with Blink program code known from the Arduino IDE. Its
task is to alternate lighting and blanking the LED "L" next to the USB host post on the board of Intel
Galileo.
Fig.17. The main window of Visual Studio Express 2013 for Windows Desktop
Compiling and implementation an application follow after clicking on the button: "Zdalny
debuger Windows" (Fig.17.). Sometimes the environment does not find the Arduino platform
libraries and the appropriate functions declarations from the Arduino IDE.

11
Then in the menu Narzędzia->Menadżer pakietów NuGet->Zarządzaj pakietami NuGet for
solutions the appropriate package files should be attached to the project. In this case it will be
Microsoft IoT C ++ SDK package available from 2 December 2014 (Fig.18.).
Release package date is important because the previous version of this package called Galileo
C++ SDK is no longer compatible with the latest version of the system Windows 8.1.
Fig.18 Adding packages Nuget Visual Studio Express 2013 for Windows Desktop
After attaching the necessary packages the project properties must still be changed. In the field
Właściwości konfiguracji->Debugowanie the name of the remote server should be changed for the
hostname given on the stage of creating a bootable SD card (Fig.19).
After changing the properties and start the compilation stage of implementation (project
transfer to a Galileo board) begins with entering user name and password provided at the stage of
creating the SD card.
Programming of Intel Galileo board under Windows 8.1 controll in Visual Studio Express 2013 for
Windows Desktop is done using the syntax of the language used in the Arduino IDE. Each compilation
of new applications write on the SD card EXE file (Fig.20) in the folder specified in the project
properties. This file can be run from the Galileo platform level. Access to this folder can be achieved
by right-clicking on the Intel Galileo board detected in the Galileo Watcher application and selecting
Open Network Share position.

12
Fig.19. Project Properties window of Visual Studio Express 2013 for Windows Desktop
Fig.20. The folder containing the executable files on Intel Galileo under Windows 8.1 control.
Shutting down the Windows system working on Intel Galileo board follows after issuing in the
Telnet window command:
After the „SD” diode is not more flashing power the power can be turn off. Disconnecting the power
without properly shutting down Windows will greatly extending the launch of the system on reboot,
which is associated with searching for errors on the disk (SD card) just as happens in the case of PCs.
shutdown /s /t 0

13
3. End tasks
1. Using the sound sensor and a relay from the Grove Starter Kit Plus write a program, which
realizes the function of the switch reacting to clap hands. The number of switching the
transmitter display on the LCD screen.
2. Write a program of twilight sensor (Light sensor), whose sensitivity is adjustable via
a potentiometer connected to the port A0 on Base Shields board of the Grove Starter Kit
Plus.
During the final task, you can use the example programs (ie. Sketches) supplied by the producer
of Grove Starter Kit Plus Intel IoT Edition, for the Arduino IDE. The website: https://ms-
iot.github.io/content/SampleApps.htm can be helpful as well.


![Galileo - Manuale d'usogalileo-ofrm.ised.it/galileo/Galileo - Manuale utente.pdf · Manuale d’uso [OFR] - Progetto GALILEO - Manuale d’uso Documento di proprietà di ISED S.p.A](https://img.pdfslide.net/doc/110x75/5b7292867f8b9a95348d2403/galileo-manuale-dusogalileo-ofrmiseditgalileogalileo-manuale-manuale.jpg)