Embed Size (px)
Citation preview

LAGAN Enterprise – Script Flow Exercise Book
2
Notices
© KANA Software, Inc. 2013
All contents of this documentation are the property of KANA Software, Inc. ("KANA") (and if relevant its third-party licensors) and protected by United States and international copyright laws. All Rights Reserved.
Information contained in this document is subject to change without notice and does not represent a commitment on the part of KANA. No part of this document may be reproduced or transmitted in any form or by any means, electronic or mechanical, including photocopying and recording, for any purpose other than the purchaser's personal use without the written permission of KANA.
Unless specifically noted, all addresses, data, characters and persons referenced herein, and all examples involving names of companies and products are fictitious examples designed solely to illustrate the use of KANA and it components.
If you find errors or problems with this documentation, please notify KANA's Education Services [email protected]. KANA does not guarantee that this document is error free.
KANA Software, Inc.
840 W California Avenue, Suite 100
Sunnyvale, CA 94086

3
Contents
Notices .............................................................................................................................. 2
Reader Feedback .......................................................................................................... 4
Errata ............................................................................................................................. 4
Your LAGAN Installation ................................................................................................ 5
Exercise 1: The Standard Welcome Script Flow ................................................................ 6
Exercise 2: Client Details Script Flow .............................................................................. 15
Exercise 3: Complete one branch of the Welcome Script Flow ........................................ 33
Exercise 4: Testing in the Agent Desktop 1 ..................................................................... 39
Exercise 5: Create a Branch ............................................................................................ 43
Exercise 6: Events & Classification in a Script Flow ......................................................... 46
Exercise 7: Testing in the Agent Desktop 2 ..................................................................... 53
Exercise 8: Blue Badge Exercise (less instruction) .......................................................... 57
Exercise 9: Residents Parking Permit Exercise (even less instruction) ............................ 60
Exercise 10: An Alternative Design .................................................................................. 61
Case Study 1 ................................................................................................................... 63
Property Tax Services Processes ................................................................................ 63
Banding Query ............................................................................................................. 63
Change of Tax Banding ............................................................................................... 64
VO Address ................................................................................................................. 64
Empty Property Exemption .......................................................................................... 65
Discount Enquiry .......................................................................................................... 65
Bankruptcy ................................................................................................................... 65
Case Study 2 ................................................................................................................... 66
Environmental Services ............................................................................................... 66
Arrange collection of a large item ................................................................................. 66
Missed Refuse Collection ............................................................................................. 67
Bigger Bin Request ...................................................................................................... 67
Extra Green Bin Request ............................................................................................. 68
Recycling in Rural Areas .............................................................................................. 68
Appendix ......................................................................................................................... 69
Appendix A: Script Node - Command Strings ............................................................... 69
Appendix B: Data Capture Types ................................................................................. 70
Appendix C: Branch Node ............................................................................................ 70
Appendix D: Hints and Tips .......................................................................................... 70
Appendix E: Using Spell Checker ................................................................................ 76

4
Reader Feedback
Feedback on the course exercise book and/or PowerPoint presentation is always welcome.
Let us know what you think about this manual, what you liked or may have disliked. Reader
feedback is important for us to develop materials that you really get the most out of.
Feedback can be given in the course evaluation form provided at the end of the session or
you can send us general feedback by simply dropping an email to [email protected]
making sure you mention the title of the manual in the message.
Errata
Although we have taken every care to ensure the accuracy of our contents, mistakes do
happen. If you find a mistake in one of our books – maybe a mistake in text or code – we
would be grateful if you would report this to us. By doing this you can save other readers
from frustration, and help to improve subsequent versions of this manual. If you find any
errata, report them by sending an email to [email protected] making sure you mention the
title of the manual in the message and the page on which the mistake is found.

5
Your LAGAN Installation
Complete the table below, with the help of the instructor, with the details of the LAGAN
system you’ll be using during this training session; you’ll need to refer to this information
during the practice scenarios.
Trainee Number i.e. 01, 02,
03, etc:
LAGAN Configuration Studio
URL:
Username for the LAGAN
Configuration Studio:
Password for the LAGAN
Configuration Studio:
LAGAN Agent Desktop URL:
Username for the LAGAN
Agent Desktop:
Password for the LAGAN
Agent Desktop:

6
Exercise 1: The Standard Welcome Script Flow
Perform the following steps
1 Login to Configuration Studio and click on Configuration on the menu bar.
2 Open up the Script Flow branch from the left tree menu | Next select Design | Next click on Edit Tree on the tool bar (Figure 1):
Note: Only one user can edit the tree at a time, please inform other users when you have completed this stage.
Figure 1
3 Click the Script Flows folder | Next click on the Add Folder button on the toolbar in the Edit Script Flow Tree dialog box (Figure 2):
Figure 2

7
4 Input: trainee## (## should be replaced by your trainee number, if you are ‘trainee04’ this will be ‘04’ in place of ##) in the field (Figure 3) | Click OK and OK:
Figure 3
5 Click trainee## in the tree menu (Figure 4) | Click the New… button to create a new Script Flow:
Figure 4
6 Insert the following into the Details tab of the Create Script Flow dialog box (Figure 5):
Name: standardWelcome## | Description: Standard Welcome Script Flow | Ensure trainee## folder is selected | Save (## should be replaced by your trainee number, if you are ‘trainee04’ this will be ‘04’ in place of ##):
Figure 5
8
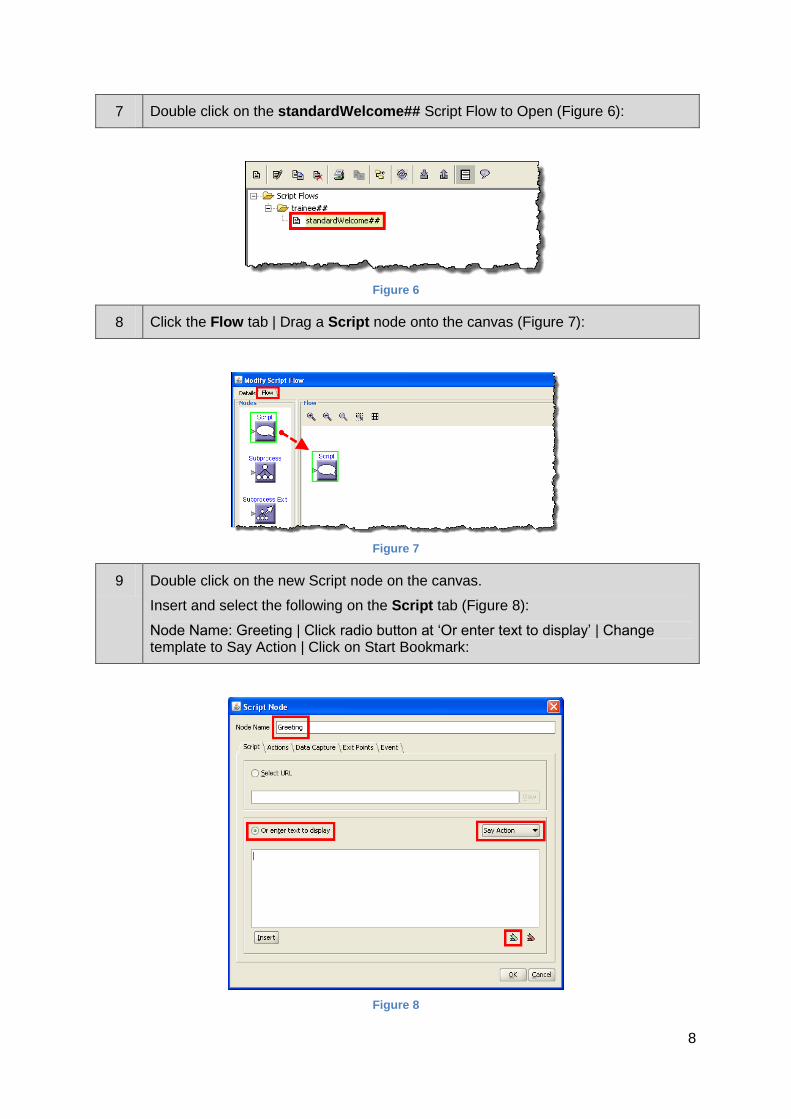
7 Double click on the standardWelcome## Script Flow to Open (Figure 6):
Figure 6
8 Click the Flow tab | Drag a Script node onto the canvas (Figure 7):
Figure 7
9 Double click on the new Script node on the canvas.
Insert and select the following on the Script tab (Figure 8):
Node Name: Greeting | Click radio button at ‘Or enter text to display’ | Change template to Say Action | Click on Start Bookmark:
Figure 8

9
10 Ensure the Bookmark Name is set to: Say | Click OK (Figure 9):
Figure 9
11 Input: Hello, you are through to Anytown Council, my name is | Click the Insert button (Figure 10):
Figure 10
12 Select Schema > Agent Information > Name from the tree | Click on OK to insert this field (Figure 11):
Figure 11
10
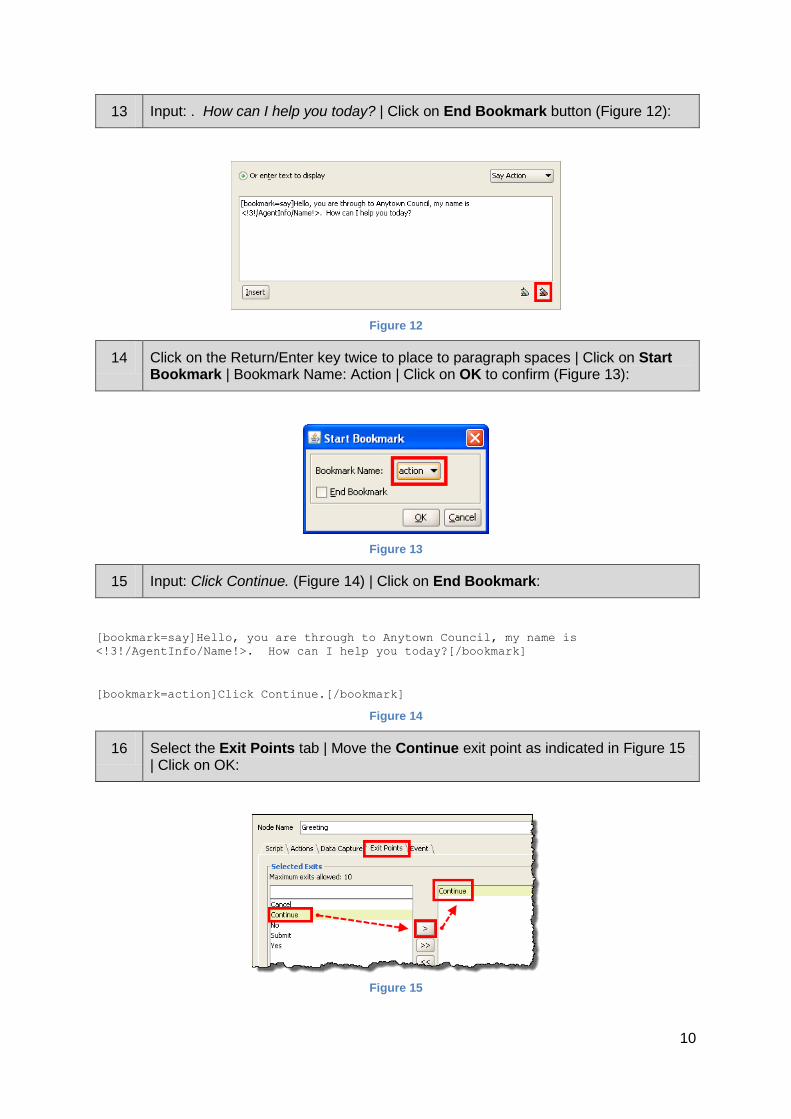
13 Input: . How can I help you today? | Click on End Bookmark button (Figure 12):
Figure 12
14 Click on the Return/Enter key twice to place to paragraph spaces | Click on Start Bookmark | Bookmark Name: Action | Click on OK to confirm (Figure 13):
Figure 13
15 Input: Click Continue. (Figure 14) | Click on End Bookmark:
[bookmark=say]Hello, you are through to Anytown Council, my name is
<!3!/AgentInfo/Name!>. How can I help you today?[/bookmark]
[bookmark=action]Click Continue.[/bookmark]
Figure 14
16 Select the Exit Points tab | Move the Continue exit point as indicated in Figure 15 | Click on OK:
Figure 15
11
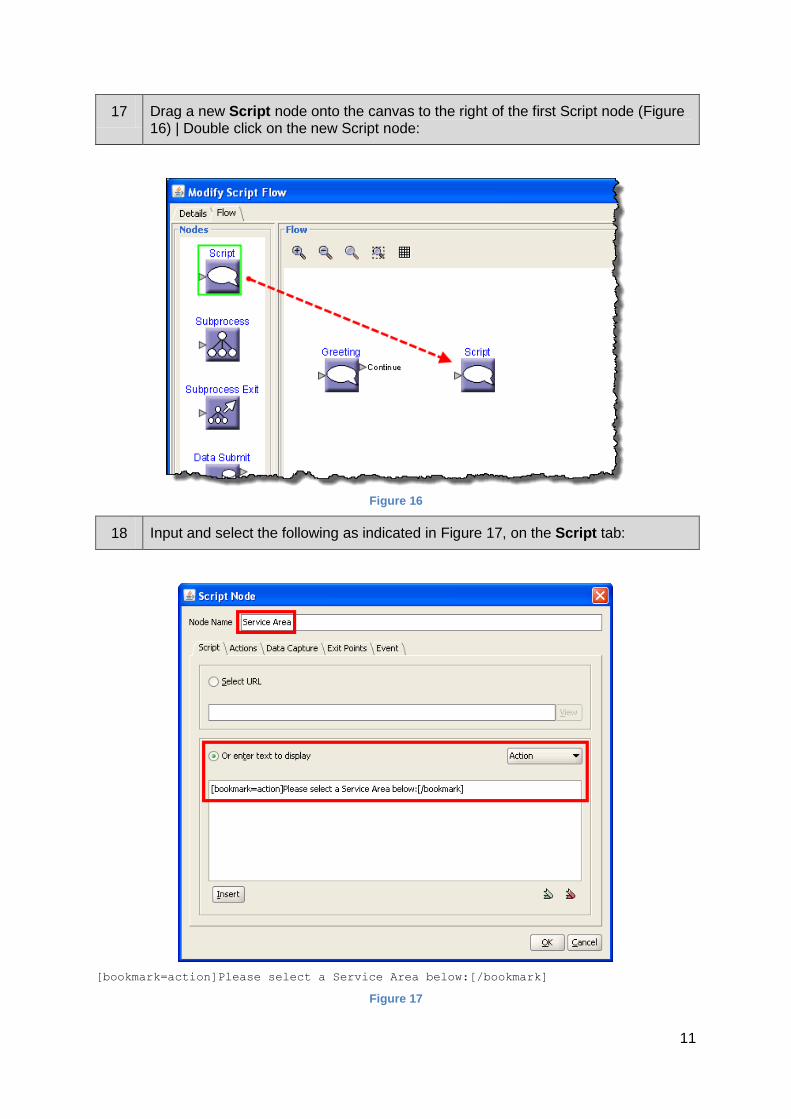
17 Drag a new Script node onto the canvas to the right of the first Script node (Figure 16) | Double click on the new Script node:
Figure 16
18 Input and select the following as indicated in Figure 17, on the Script tab:
[bookmark=action]Please select a Service Area below:[/bookmark]
Figure 17

12
19 Select the Exit Points tab (Figure 18):
Figure 18
20 Enter the exit name: Transport and Streets into the field as presented in Figure 19 | Click Add | Click OK:
Figure 19
21 Drag a line from the Exit Point arrow head (Greeting/Continue) to the Entry Point of the new Script Node (Service Area). See Figure 20:
Figure 20
13
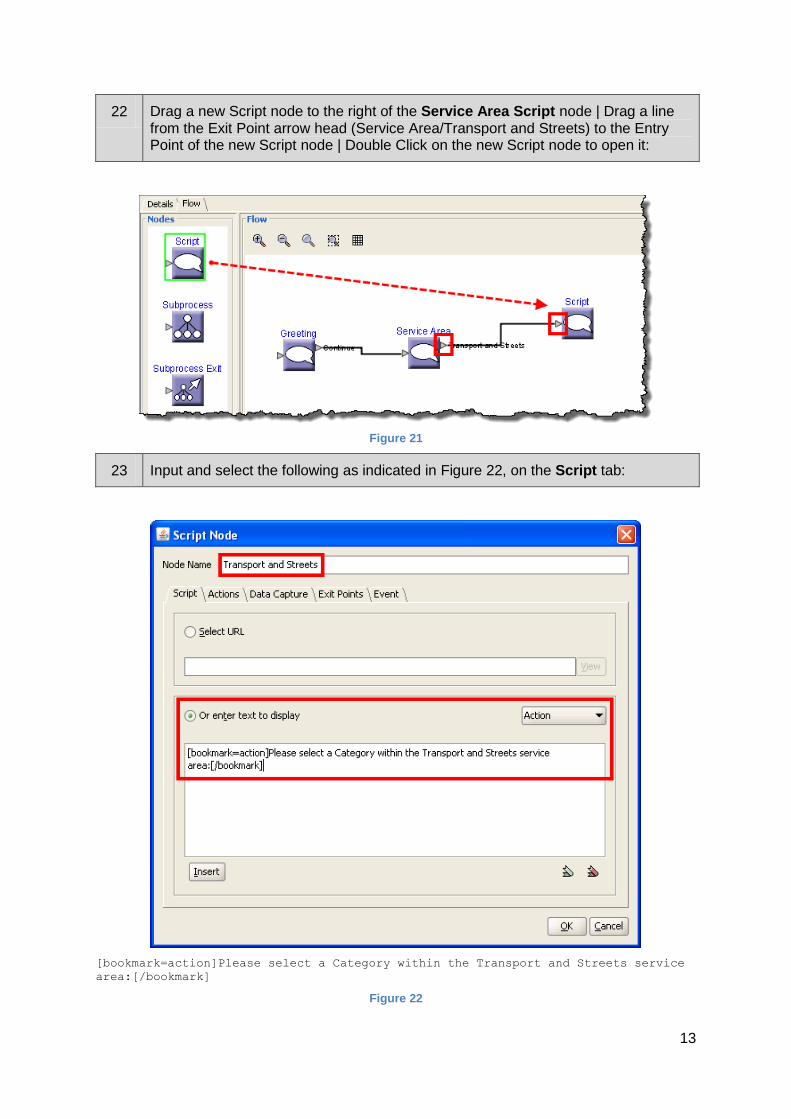
22 Drag a new Script node to the right of the Service Area Script node | Drag a line from the Exit Point arrow head (Service Area/Transport and Streets) to the Entry Point of the new Script node | Double Click on the new Script node to open it:
Figure 21
23 Input and select the following as indicated in Figure 22, on the Script tab:
[bookmark=action]Please select a Category within the Transport and Streets service
area:[/bookmark]
Figure 22
14
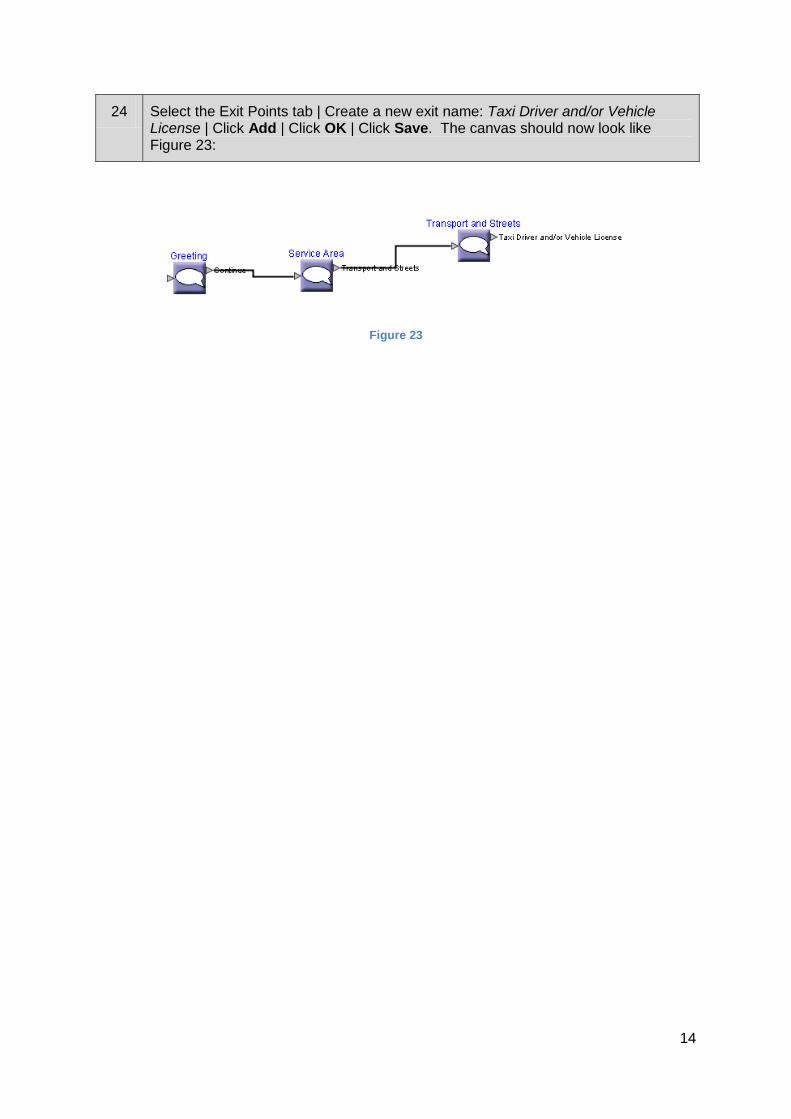
24 Select the Exit Points tab | Create a new exit name: Taxi Driver and/or Vehicle License | Click Add | Click OK | Click Save. The canvas should now look like Figure 23:
Figure 23
15
Exercise 2: Client Details Script Flow
Perform the following steps
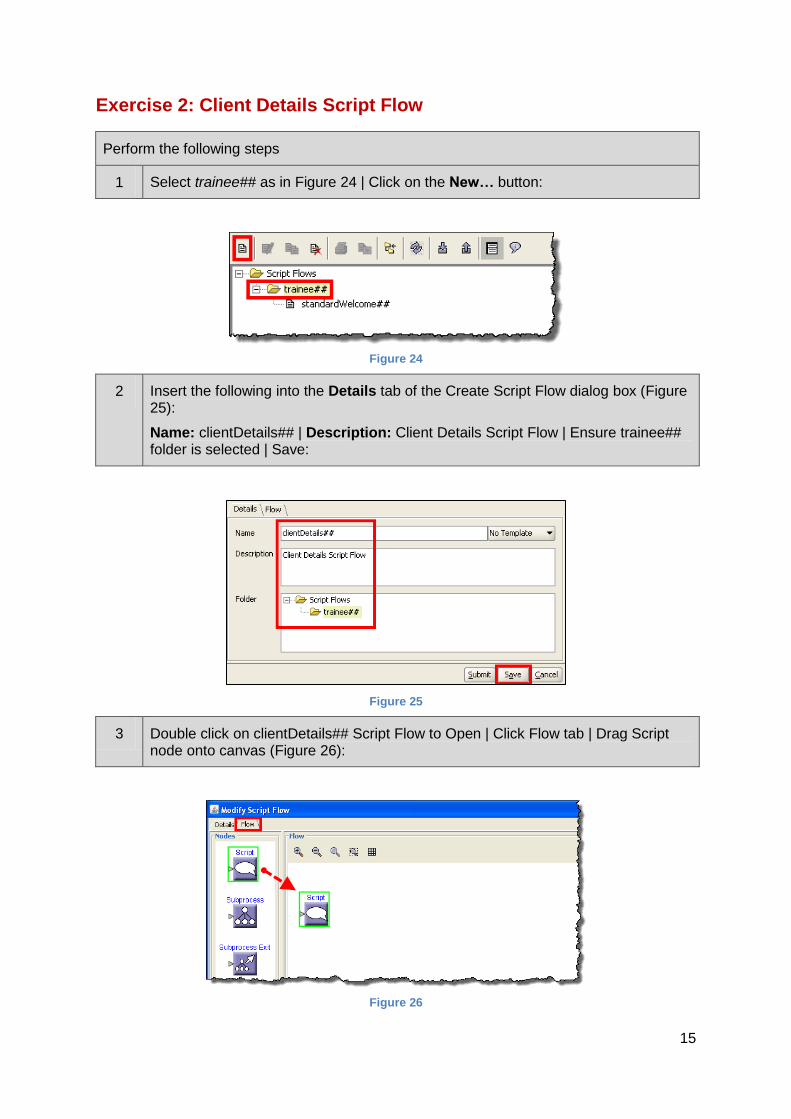
1 Select trainee## as in Figure 24 | Click on the New… button:
Figure 24
2 Insert the following into the Details tab of the Create Script Flow dialog box (Figure 25):
Name: clientDetails## | Description: Client Details Script Flow | Ensure trainee## folder is selected | Save:
Figure 25
3 Double click on clientDetails## Script Flow to Open | Click Flow tab | Drag Script node onto canvas (Figure 26):
Figure 26
16
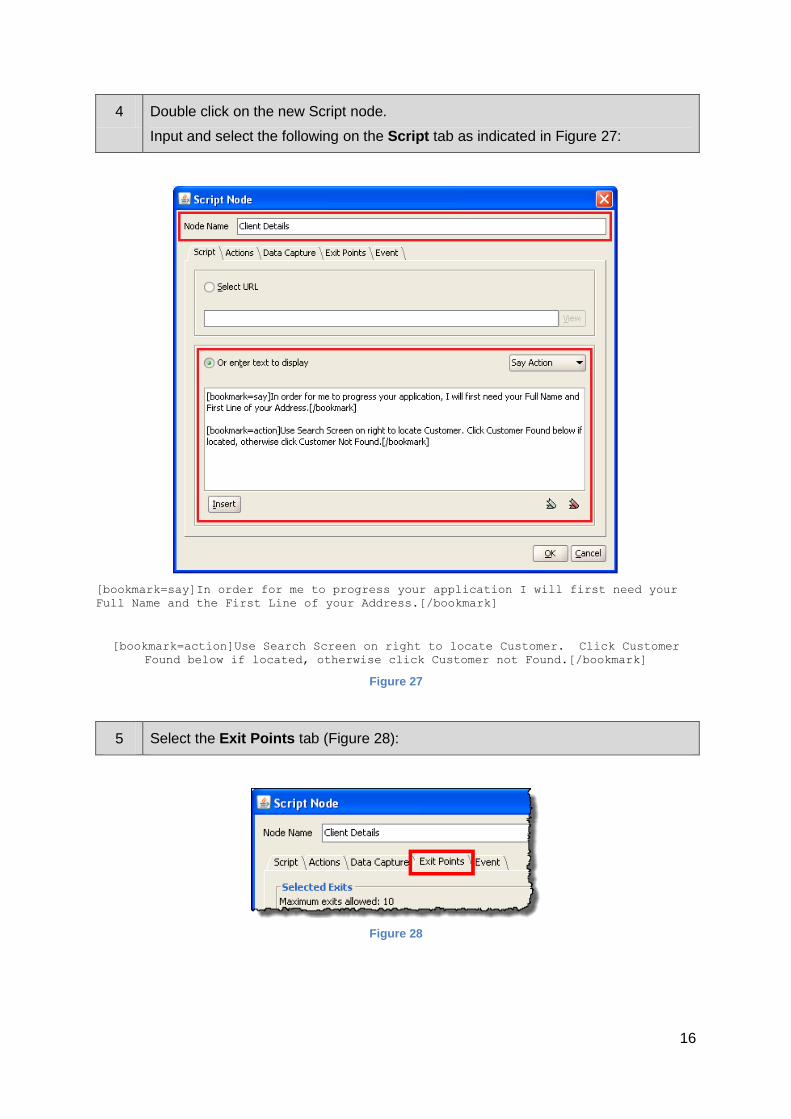
4 Double click on the new Script node.
Input and select the following on the Script tab as indicated in Figure 27:
[bookmark=say]In order for me to progress your application I will first need your
Full Name and the First Line of your Address.[/bookmark]
[bookmark=action]Use Search Screen on right to locate Customer. Click Customer
Found below if located, otherwise click Customer not Found.[/bookmark]
Figure 27
5 Select the Exit Points tab (Figure 28):
Figure 28
17
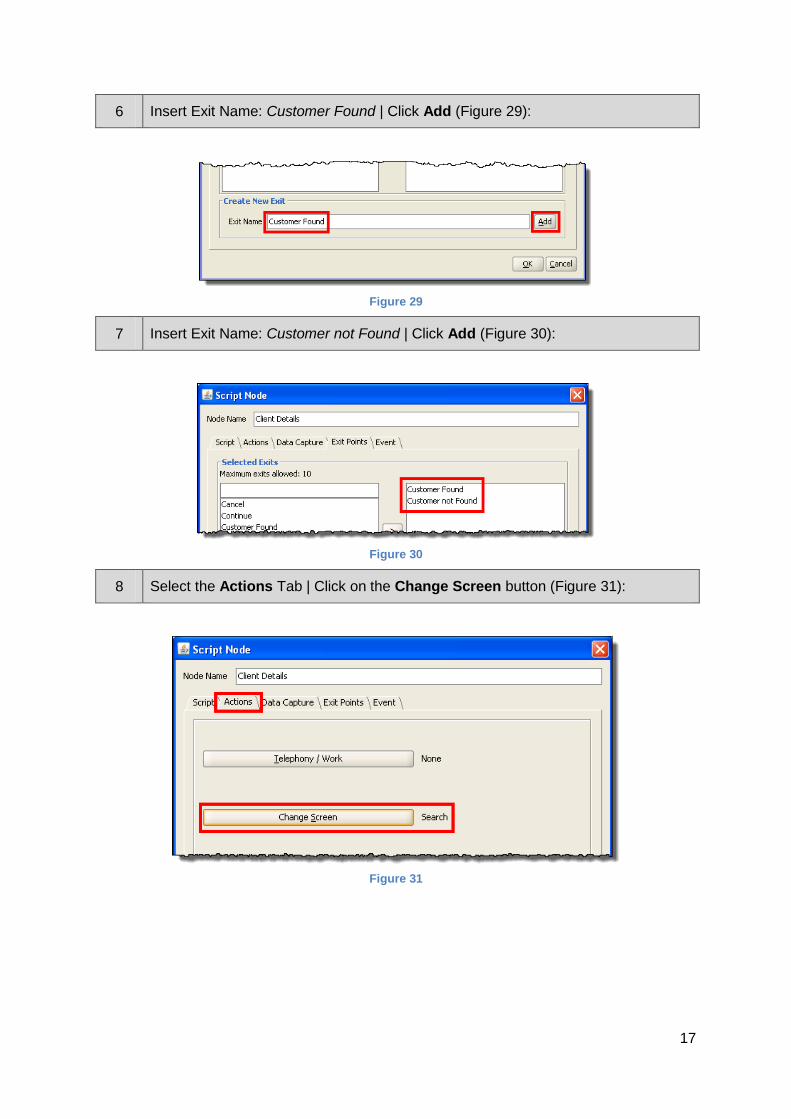
6 Insert Exit Name: Customer Found | Click Add (Figure 29):
Figure 29
7 Insert Exit Name: Customer not Found | Click Add (Figure 30):
Figure 30
8 Select the Actions Tab | Click on the Change Screen button (Figure 31):
Figure 31
18
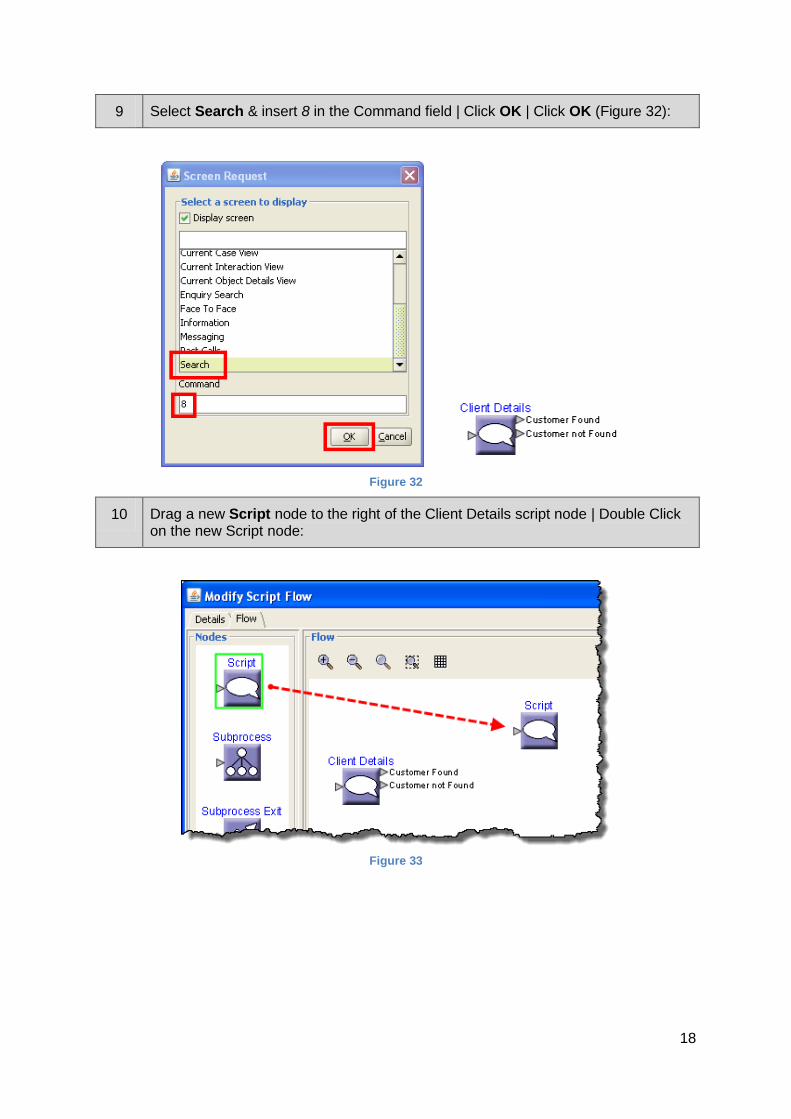
9 Select Search & insert 8 in the Command field | Click OK | Click OK (Figure 32):
Figure 32
10 Drag a new Script node to the right of the Client Details script node | Double Click on the new Script node:
Figure 33

19
11 Input and select the following on the Script tab as indicated in Figure 34:
[bookmark=say]Can I please confirm your Post Code?[/bookmark]
[bookmark=action]Confirm Post Code using Brief Details window below or click on
Current Details on menu for extra confirmation details (email, phone number etc).
Select Customer Verified or Customer Not Confirmed below:[/bookmark]
Figure 34
11 Select the Actions tab | Click on the Other Actions button | Select Set Interaction Client from the drop down | Click OK (Figure 35):
Figure 35

20
12 Select the Exit Points tab | Create 2 new Exit Points as indicated in Figure 36 | Click OK:
Figure 36
13 Drag a line from the Exit Point arrow head (Customer Found) to the Entry Point of the new Script Node (Set Customer). See Figure 37:
Figure 37
14 Drag a new Script node to the top right of the Set Customer Script node | Drag a line from the Exit Point arrow head (Customer Verified) to the Entry Point of the new Script node (Figure 38):
Figure 38

21
15 Double Click on new Script node.
Input and select the following on the Script tab as indicated in Figure 39:
[bookmark=say]Thank you for the information you have supplied.[/bookmark]
[bookmark=action]Please select Continue below:[/bookmark]
Figure 39
16 Select the Actions tab | Click the Other Actions button | Select Verify Interaction Client from the drop down | Click OK (Figure 40):
Figure 40

22
17 Select the Exit Point tab | Create 1 new Exit Point as indicated in Figure 41 | Click OK:
Figure 41
18 Drag a new Script node to the bottom right of the Client Details Script node | Drag a line from the Exit Point arrow head (Customer not Found) to the Entry Point of the new Script node (Figure 41):
Figure 42

23
19 Double Click on new Script node.
Input and select the following on the Script tab as indicated in Figure 43:
[bookmark=say]Can I please request some details from you in order to add you as a
new customer?[/bookmark]
[bookmark=action]Use form to the right to create a new customer record. Click
<b>Continue</b> once created.[/bookmark]
Figure 43
20 Select the Actions tab | Click the Other Actions button | Select Display Create Individual Dialog from the drop down | Click OK (Figure 44):
Figure 44
24
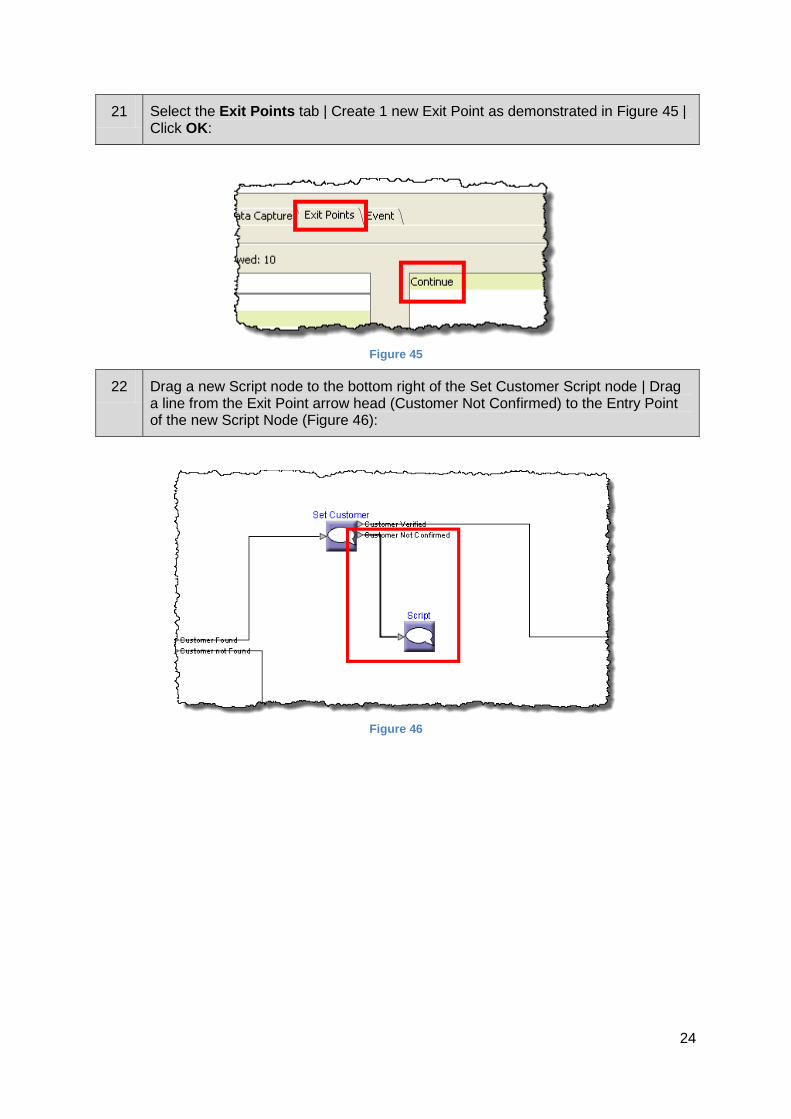
21 Select the Exit Points tab | Create 1 new Exit Point as demonstrated in Figure 45 | Click OK:
Figure 45
22 Drag a new Script node to the bottom right of the Set Customer Script node | Drag a line from the Exit Point arrow head (Customer Not Confirmed) to the Entry Point of the new Script Node (Figure 46):
Figure 46

25
23 Double Click on new Script node.
Input and select the following on the Script tab as indicated in Figure 47:
[bookmark=say]I cannot find your details on our system, would it be ok to request
some details so I can add you to our system?[/bookmark]
[bookmark=action]Select <b>Yes</b> if the customer agrees, select <b>No</b> if they
do not agree.[/bookmark]
Figure 47
24 Select the Exit Points tab | Create 2 new Exit Point as demonstrated in Figure 48 | Click OK:
Figure 48

26
25 Drag a line from the ‘Yes’ Exit Point arrow head of the Request Details? node to the Entry Point of the New Customer node (Figure 49):
Figure 49
26 Drag a new Script node to the bottom right of the Request Details? Script node | Drag a line from the ‘No’ Exit Point arrow head of the Request Details? Node to the Entry Point of the new Script node (Figure 50):
Figure 50
27
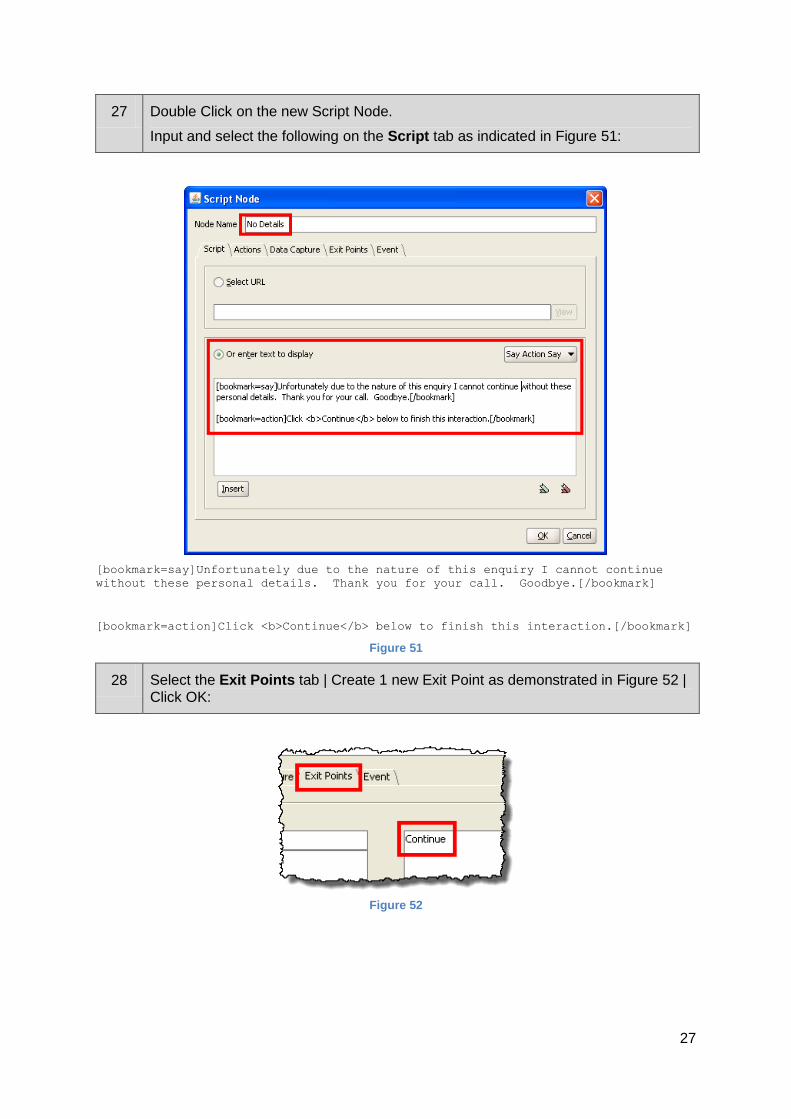
27 Double Click on the new Script Node.
Input and select the following on the Script tab as indicated in Figure 51:
[bookmark=say]Unfortunately due to the nature of this enquiry I cannot continue
without these personal details. Thank you for your call. Goodbye.[/bookmark]
[bookmark=action]Click <b>Continue</b> below to finish this interaction.[/bookmark]
Figure 51
28 Select the Exit Points tab | Create 1 new Exit Point as demonstrated in Figure 52 | Click OK:
Figure 52
28
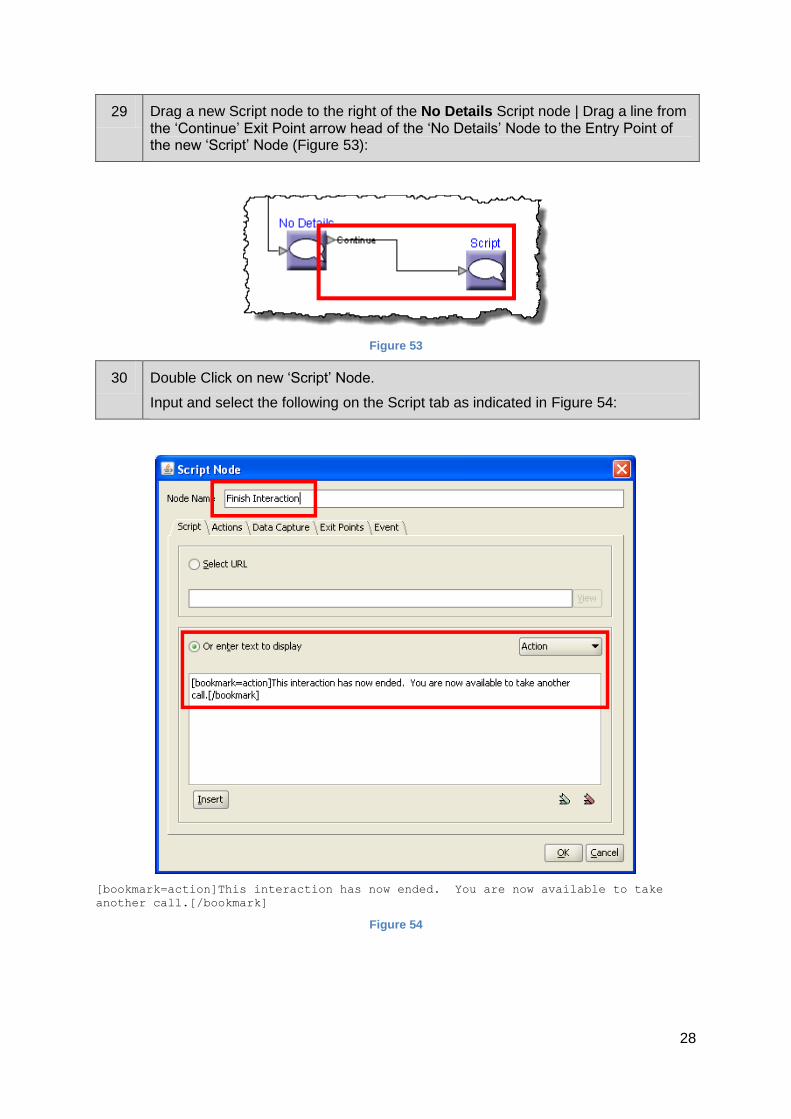
29 Drag a new Script node to the right of the No Details Script node | Drag a line from the ‘Continue’ Exit Point arrow head of the ‘No Details’ Node to the Entry Point of the new ‘Script’ Node (Figure 53):
Figure 53
30 Double Click on new ‘Script’ Node.
Input and select the following on the Script tab as indicated in Figure 54:
[bookmark=action]This interaction has now ended. You are now available to take
another call.[/bookmark]
Figure 54

29
31 Select the Actions tab | Click the Other Actions button | Select End Interaction from the drop down (Figure 55) | Click OK | Click OK:
Figure 55
32 Drag a new Script node to the right of the New Customer Script node | Drag a line from the Continue Exit Point arrow head of the New Customer node to the Entry Point of the new Script node (Figure 56):
Figure 56

30
33 Double Click on new ‘Script’ Node.
Input and select the following on the Script tab as indicated in Figure 57:
[bookmark=action]The customer has now been set as the interaction client. Click
<b>Continue</b> to automatically verify the customer also.[/bookmark]
Figure 57
34 Select the Actions tab | Click the Other Actions button | Select Set Interaction Client from the drop down | Click OK:
Figure 58

31
35 Select the Exit Points tab | Create 1 new Exit Point as demonstrated in Figure 59 | Click OK:
Figure 59
36 Drag a line from the Continue Exit Point arrow head of the Set New Customer node to the Entry Point of the Verify Customer node (Figure 60):
Figure 60

32
37 Drag Subprocess exit to the right of the Verify Customer node | Drag a line from the Continue Exit Point arrow head of the Verify Customer Node to the Entry Point of the Subprocess exit node (Figure 61):
Figure 61
38 Click on Submit on the clientDetails## Script Flow. There should be a check at the
Script Flow clientDetails## in the folder view to indicate it is successfully submitted
for use in the Agent Desktop (Figure 62).
Figure 62
33
Exercise 3: Complete one branch of the Welcome Script Flow
Perform the following steps
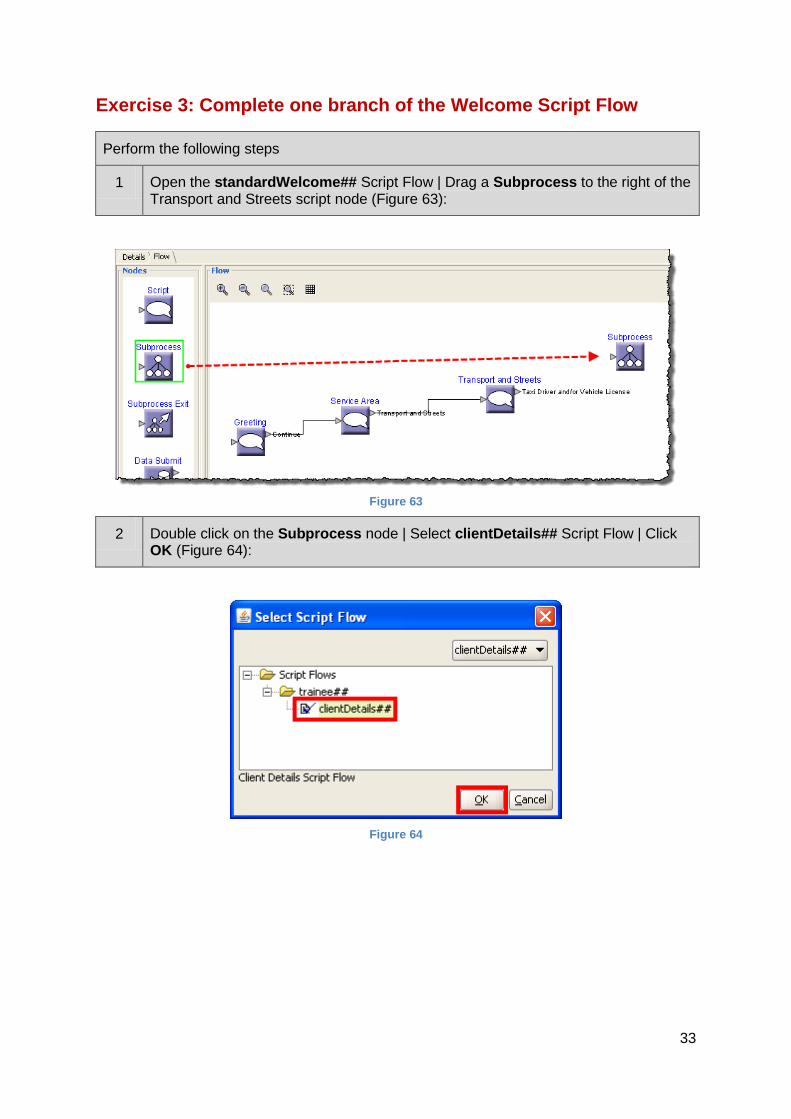
1 Open the standardWelcome## Script Flow | Drag a Subprocess to the right of the Transport and Streets script node (Figure 63):
Figure 63
2 Double click on the Subprocess node | Select clientDetails## Script Flow | Click OK (Figure 64):
Figure 64
34
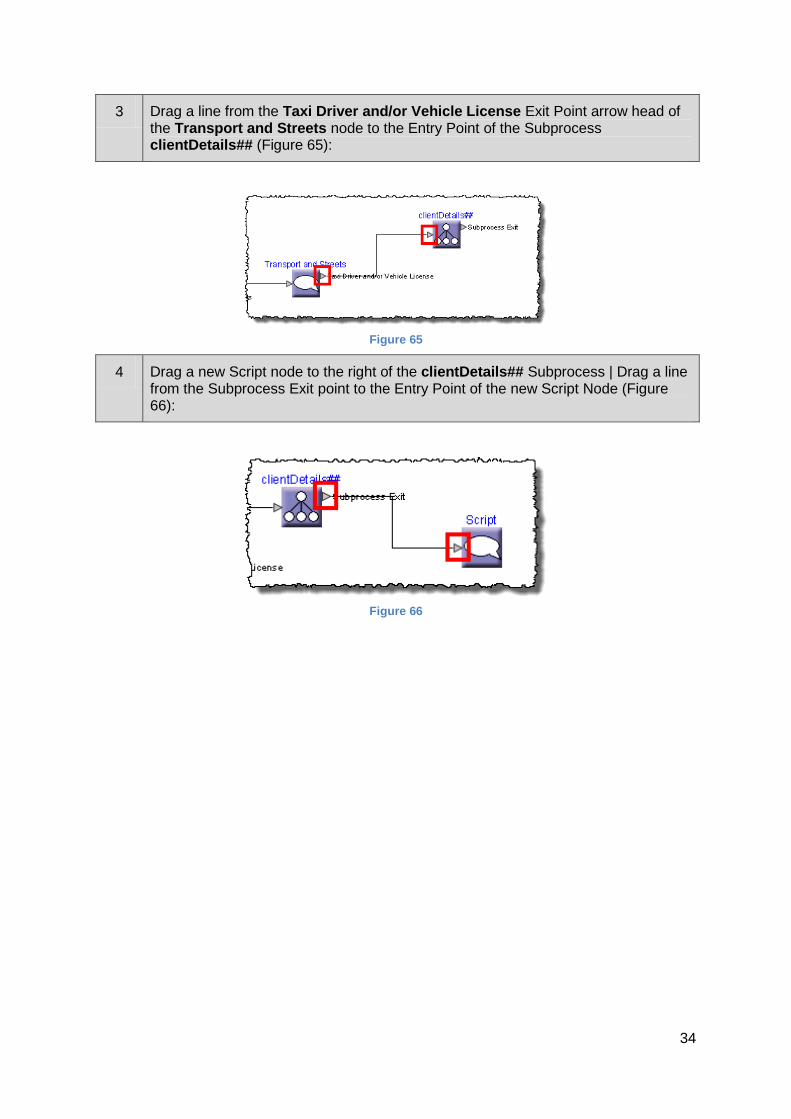
3 Drag a line from the Taxi Driver and/or Vehicle License Exit Point arrow head of the Transport and Streets node to the Entry Point of the Subprocess clientDetails## (Figure 65):
Figure 65
4 Drag a new Script node to the right of the clientDetails## Subprocess | Drag a line from the Subprocess Exit point to the Entry Point of the new Script Node (Figure 66):
Figure 66

35
5 Double Click on new Script Node.
Input and select the following on the Script tab as indicated in Figure 67:
[bookmark=say]Is there anything else I can help you with?[/bookmark]
[bookmark=action]Select Yes or No below:[/bookmark]
Figure 67
6 Select the Exit Points tab | Create 2 new Exit Point as demonstrated in Figure 68 | Click OK:
Figure 68

36
7 Drag a line from the Exit point Yes on the Anything Else scripting node to the entry point of the Service Area scripting node (Figure 69):
Figure 69
8 Drag a new Script node to the right of the Anything Else script node | Drag a line from the No exit point of the Anything Else scripting node to the entry point of the new Script node (Figure 70):
Figure 70
9 Double Click on new Script node.
Input and select the following on the Script tab as indicated in Figure 71:
[bookmark=say]Thank you very much for your call, goodbye.[/bookmark]
[bookmark=action]Click Continue to finish this interaction.[/bookmark]
Figure 71

37
10 Select the Exit Points tab | Create 1 new Exit Point as demonstrated in Figure 72 | Click OK:
Figure 72
11 Drag a new Script node to the right of the Goodbye Script node | Drag a line from the Continue exit point of the Goodbye scripting node to the entry point of the new Script node (Figure 73):
Figure 73
12 Double Click on new Script node.
Input and select the following on the Script tab as indicated in Figure 74:
[bookmark=action]This interaction has now ended. You are now available to take
another call.[/bookmark]
Figure 74

38
13 Select the Actions tab | Click the Other Actions button | Select End Interaction from the drop down | Click OK | Click OK (Figure 75) | Click Submit:
Figure 75

39
Exercise 4: Testing in the Agent Desktop 1
Perform the following steps
1 Within the Configuration Studio navigation tree select Script Flow > Association | Click on New (Figure 76):
Figure 76
2 Click the Select Event button | Select the Interaction Created event | Click OK | Click on Select Flow and click on the Script Flow: standardWelcome## | Click OK | Click OK (Figure 77):
Figure 77
40
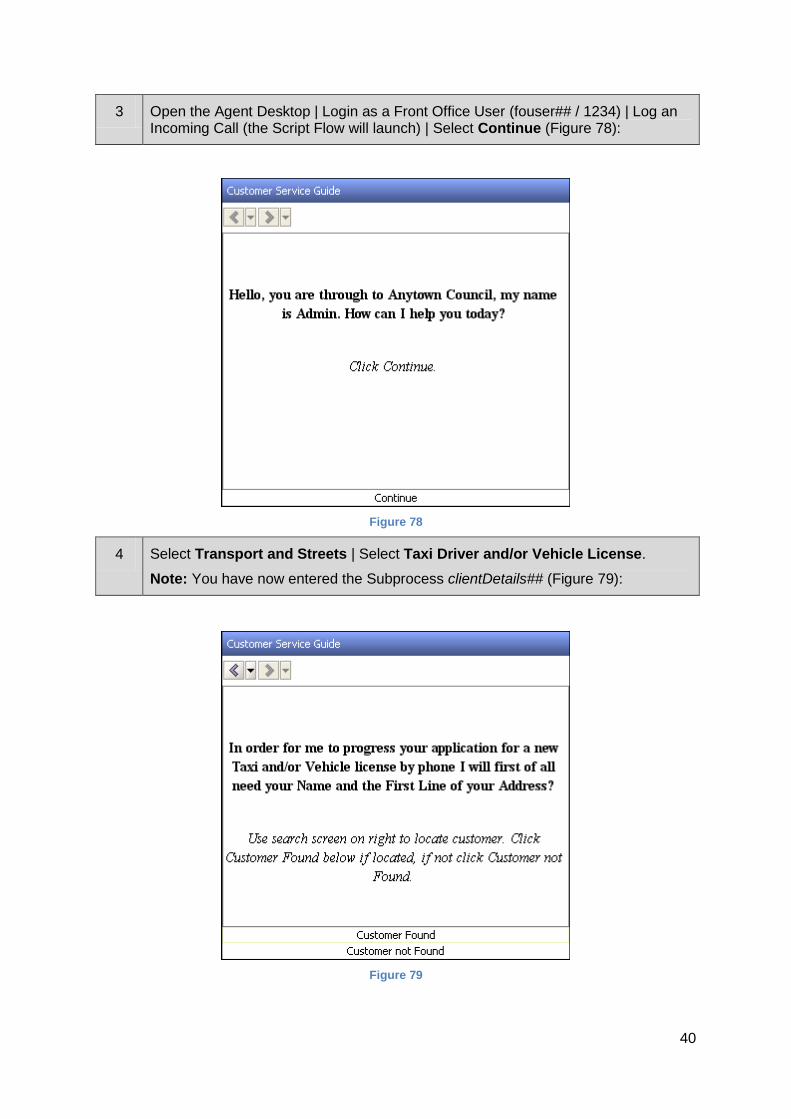
3 Open the Agent Desktop | Login as a Front Office User (fouser## / 1234) | Log an Incoming Call (the Script Flow will launch) | Select Continue (Figure 78):
Figure 78
4 Select Transport and Streets | Select Taxi Driver and/or Vehicle License.
Note: You have now entered the Subprocess clientDetails## (Figure 79):
Figure 79

41
5 Type ‘Johnson##’ into the Surname field of the Search dialog and ‘Robert’ into the Forename field and click on the Search button (Figure 80).
No results will be returned.
Figure 80
6 Click Customer not Found on Script Flow options (Figure 81):
Figure 81
7 Create the following new user in the Individual Details dialog that appears | Click Finish (Figure 82):
Title: Mr | Forename: Robert | Surname: Johnson##
Figure 82
42
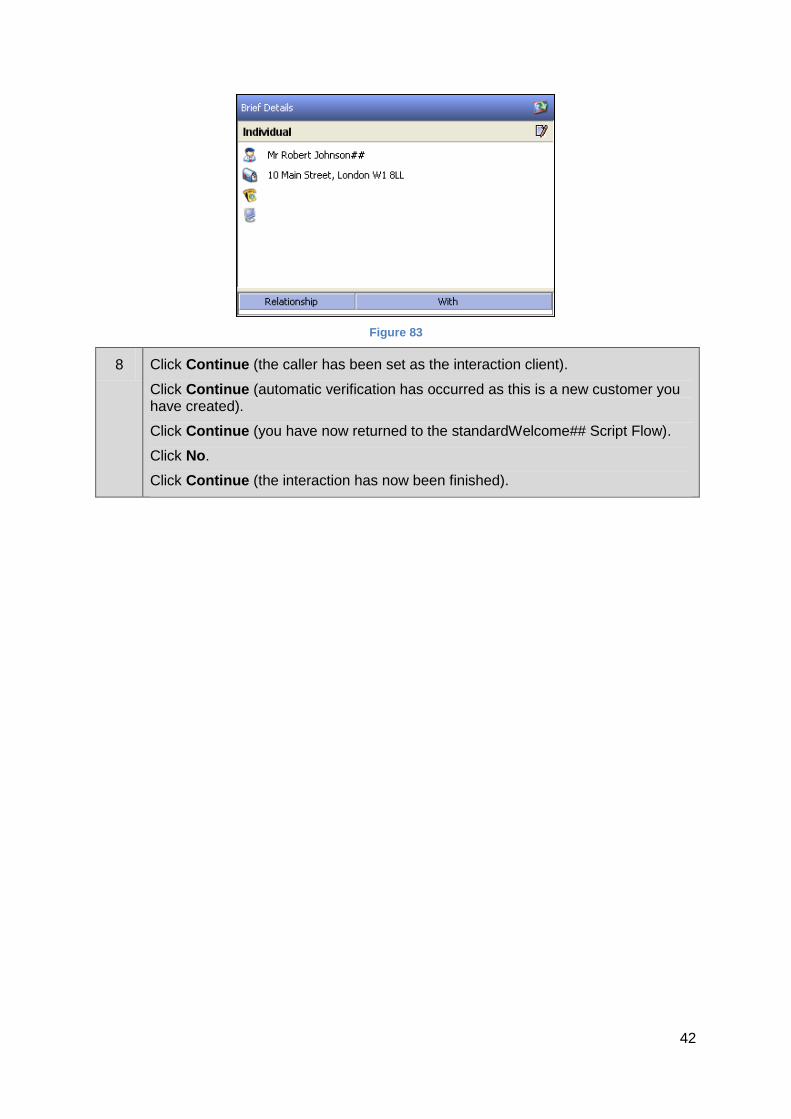
Figure 83
8 Click Continue (the caller has been set as the interaction client).
Click Continue (automatic verification has occurred as this is a new customer you have created).
Click Continue (you have now returned to the standardWelcome## Script Flow).
Click No.
Click Continue (the interaction has now been finished).
43
Exercise 5: Create a Branch
Perform the following steps
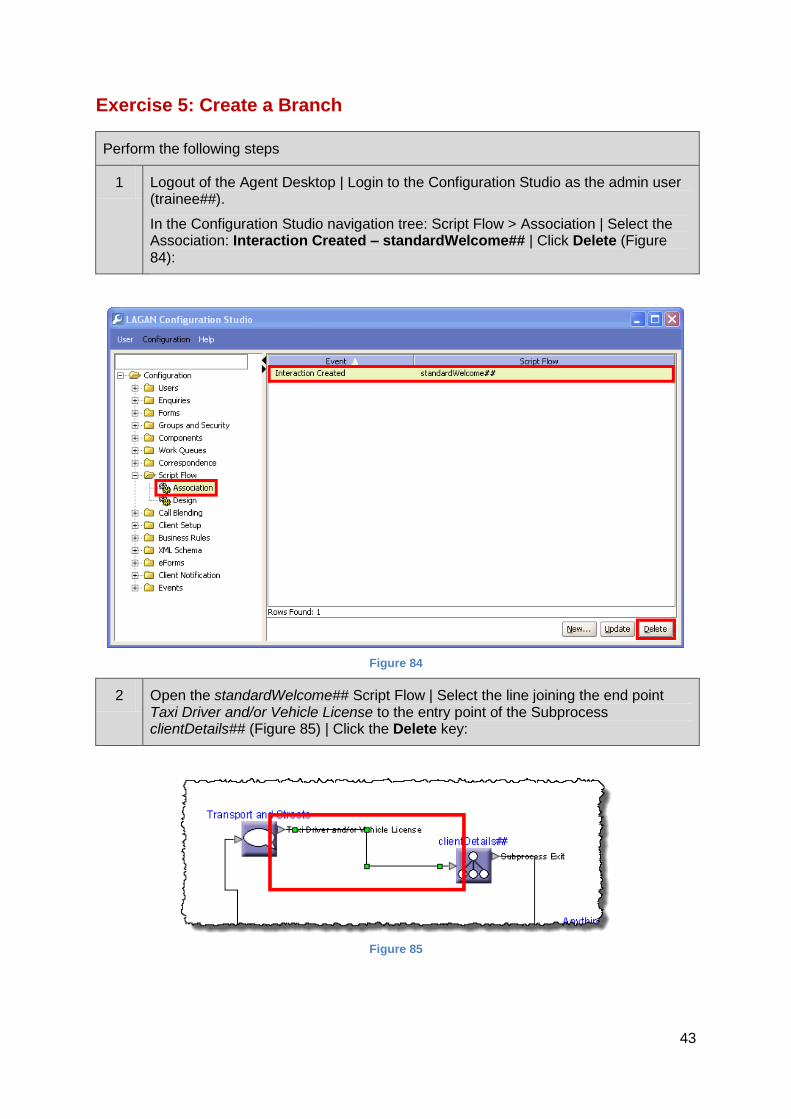
1 Logout of the Agent Desktop | Login to the Configuration Studio as the admin user (trainee##).
In the Configuration Studio navigation tree: Script Flow > Association | Select the Association: Interaction Created – standardWelcome## | Click Delete (Figure 84):
Figure 84
2 Open the standardWelcome## Script Flow | Select the line joining the end point Taxi Driver and/or Vehicle License to the entry point of the Subprocess clientDetails## (Figure 85) | Click the Delete key:
Figure 85

44
3 Drag a Branch node into the space | Drag a line from the end point Taxi Driver and/or Vehicle License into the entry point on the branching node (Figure 86):
Figure 86
4 Double click on the Branching node.
Input and select the following as indicated in Figure 87:
Figure 87

45
5 Drag a line from Default & Client not set end points to the entry point of the clientDetails## Subprocess | Drag a line from the Client set end point to the entry point of the Anything Else Script node (Figure 88):
Figure 88
46
Exercise 6: Events & Classification in a Script Flow
Perform the following steps
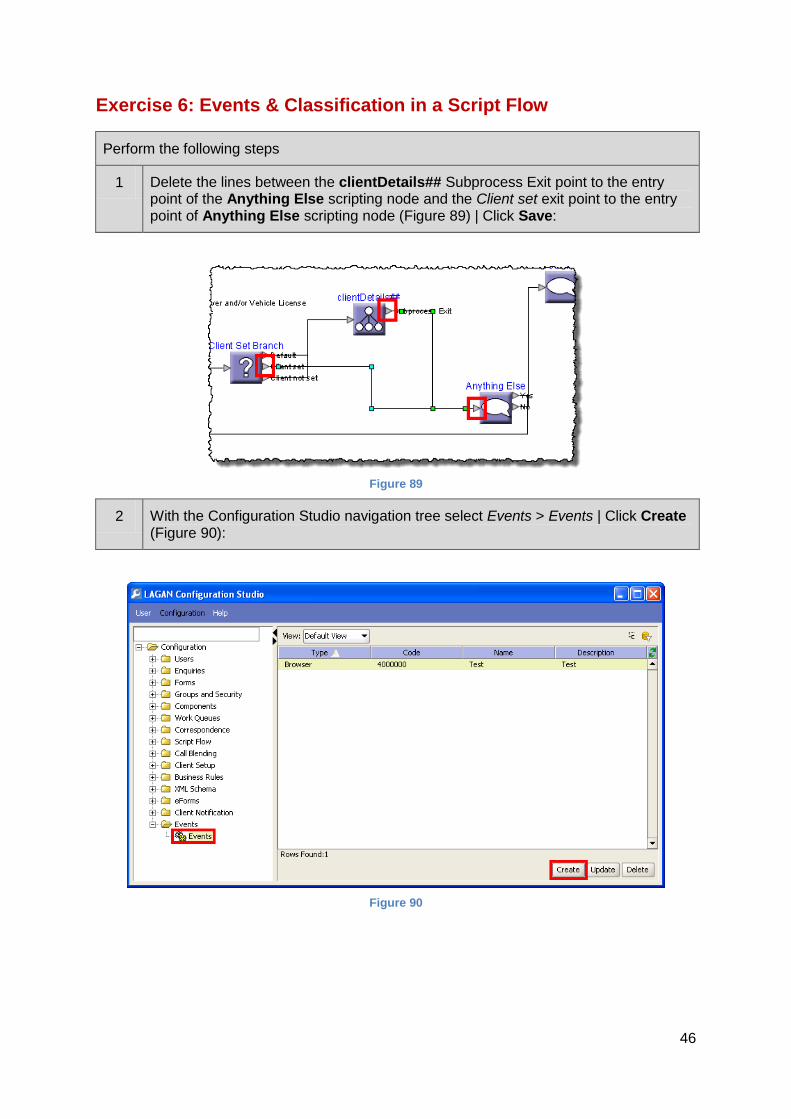
1 Delete the lines between the clientDetails## Subprocess Exit point to the entry point of the Anything Else scripting node and the Client set exit point to the entry point of Anything Else scripting node (Figure 89) | Click Save:
Figure 89
2 With the Configuration Studio navigation tree select Events > Events | Click Create (Figure 90):
Figure 90

47
3 Select & Input what is demonstrated in Figure 91 | Click OK:
Taxi Driver and/or Vehicle License##
Figure 91
4 With the Configuration Studio navigation tree select: Enquiries > Event Mapping | Click New (Figure 92):
Figure 92

48
5 Click the Select an Event button indicated in Figure 93:
Figure 93
6 Select the Taxi Driver/Vehicle License## event | Click OK (Figure 94):
Figure 94
7 Click the Classification button (Figure 95):
Figure 95
49
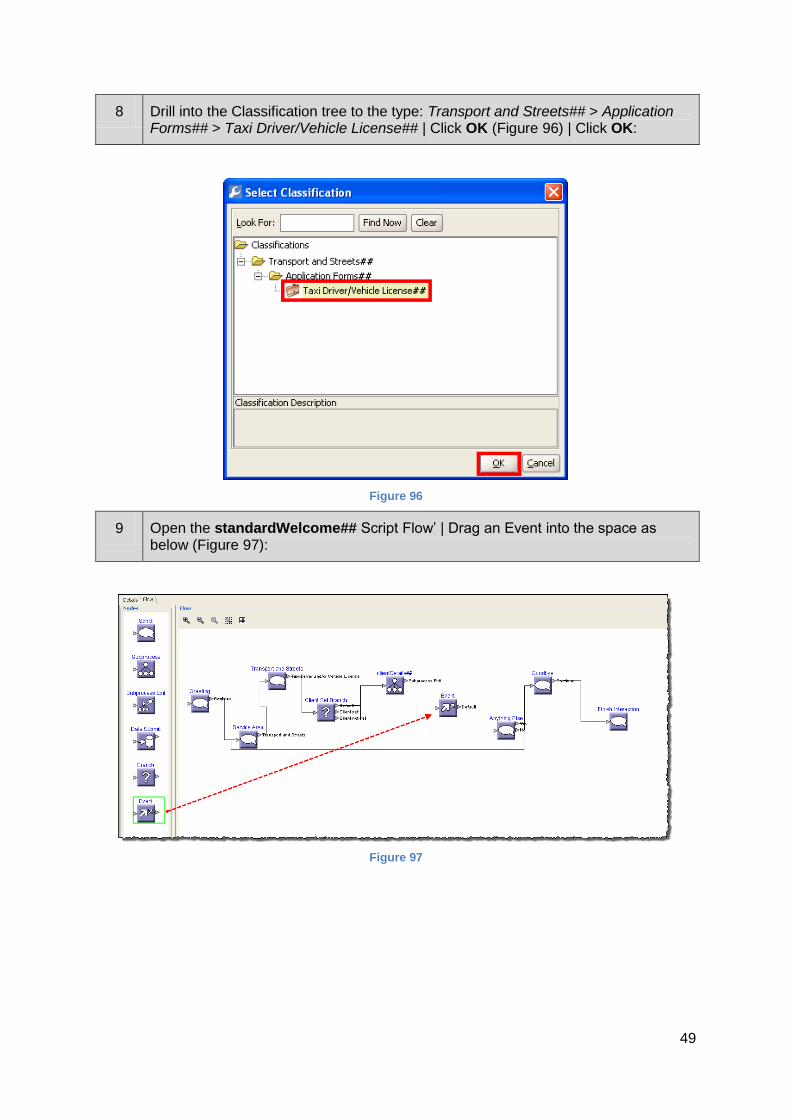
8 Drill into the Classification tree to the type: Transport and Streets## > Application Forms## > Taxi Driver/Vehicle License## | Click OK (Figure 96) | Click OK:
Figure 96
9 Open the standardWelcome## Script Flow’ | Drag an Event into the space as below (Figure 97):
Figure 97

50
10 Drag a line from the Subprocess Exit on clientDetails## and Client set on Client Set Branch into the entry point of the new Event node | Drag a line from the Default exit point on the new Event node to the entry point on the Anything Else scripting node (Figure 98):
Figure 98
11 Double click on the new Event node | Select your custom event (Taxi Driver/Vehicle License##) | Click OK (Figure 99) | Click OK | Click Submit:
Figure 99

51
Completed ‘standardWelcome##’ Script Flow (Figure 100):
Figure 100

52
Completed ‘clientDetails##’ Script Flow (Figure 101):
Figure 101

53
Exercise 7: Testing in the Agent Desktop 2
Perform the following steps
1 Within the Configuration Studio navigation tree select Script Flow > Association | Click on New (Figure 102):
Figure 102
2 Click the Select Event button | Select the Interaction Created event | Click OK | Click on Select Flow and click on the Script Flow: standardWelcome## | Click OK | Click OK (Figure 103):
Figure 103

54
3 Open the Agent Desktop | Login as a Front Office User (foffice##) | Log an Incoming Call (Script Flow will launch) | Click Continue (Figure 104):
Figure 104
4 Select Transport and Streets | Select Taxi Driver and/or Vehicle License
Note: You have now entered the subprocess clientDetails## (Figure 105):
Figure 105
55
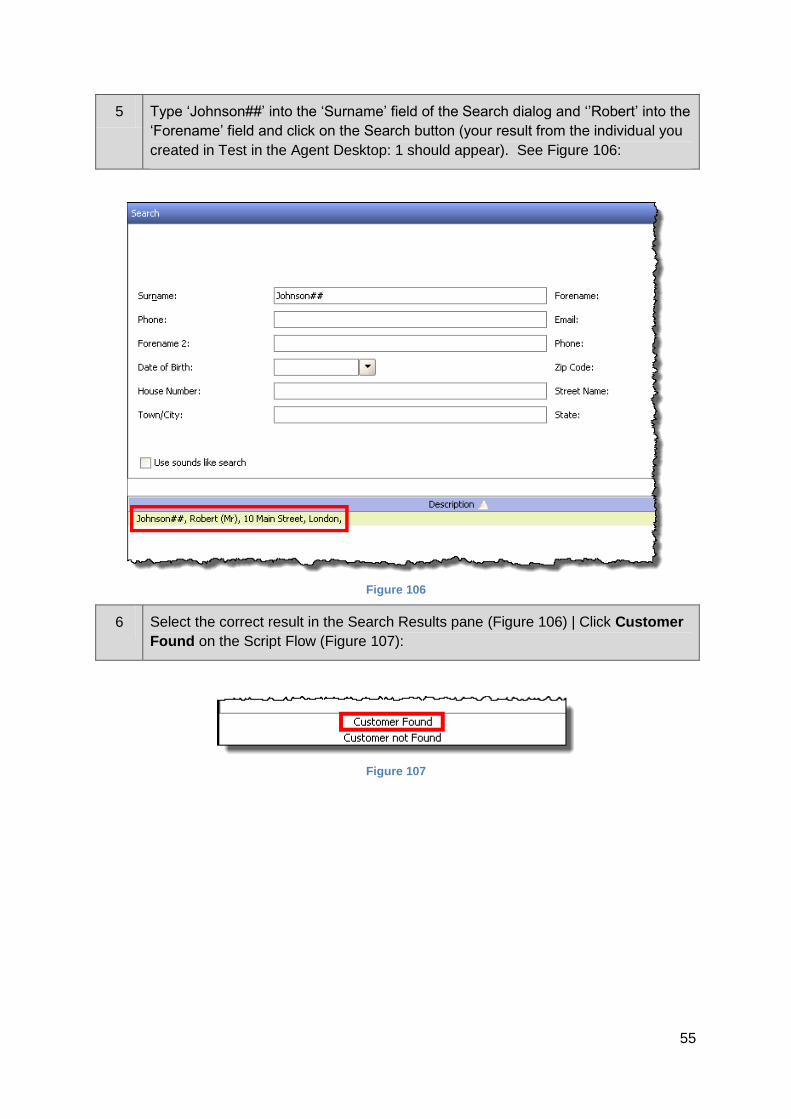
5 Type ‘Johnson##’ into the ‘Surname’ field of the Search dialog and ‘’Robert’ into the
‘Forename’ field and click on the Search button (your result from the individual you
created in Test in the Agent Desktop: 1 should appear). See Figure 106:
Figure 106
6 Select the correct result in the Search Results pane (Figure 106) | Click Customer
Found on the Script Flow (Figure 107):
Figure 107

56
7 Click Customer Verified.
Click Continue (returned to ‘standardWelcome##’ Script Flow).
The New Case dialog has been launched (The Event node classified the call and
launched the appropriate Process Definition)
Type:
Ford into the Make field of the form
Galaxy into Model
R## 41LP into the Car Reg.
Leave the Start Date and Driver license also required fields as default | Click OK:
Figure 108
8 Click No | Click Continue.

57
Exercise 8: Blue Badge Exercise (less instruction)
Perform the following steps
1 Logout of the Agent Desktop | Login to the Configuration Studio as the admin user (trainee##).
In the Configuration Studio navigation tree: Script Flow > Association | Select the Association: Interaction Created – standardWelcome## | Click Delete (Figure 109):
Figure 109
2 With the Configuration Studio navigation tree select Events > Events | Click Create.
Select & Input what is demonstrated in Figure 110 | Click OK:
Blue Badge##
Figure 110

58
3 With the Configuration Studio navigation tree select: Enquiries > Event Mapping |
Click New.
Select Blue Badge## as an event.
Select Blue Badge## as the classification type | Click OK (Figure 111).
Figure 111
4 Open the standardWelcome## Script Flow | Double click on the Transport and Streets scripting node | Select the Exit Points tab | Create a new Exit Name: Blue Badge as demonstrated in Figure 112 | Click OK.
Figure 112
59
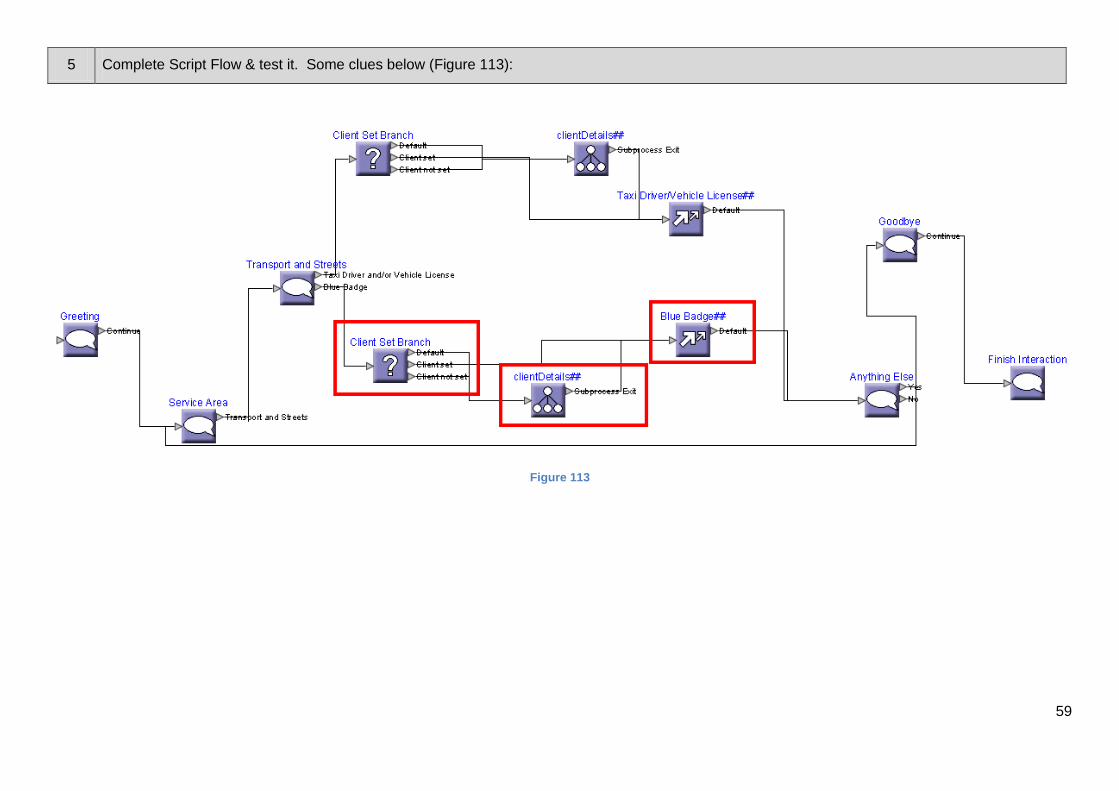
5 Complete Script Flow & test it. Some clues below (Figure 113):
Figure 113
60
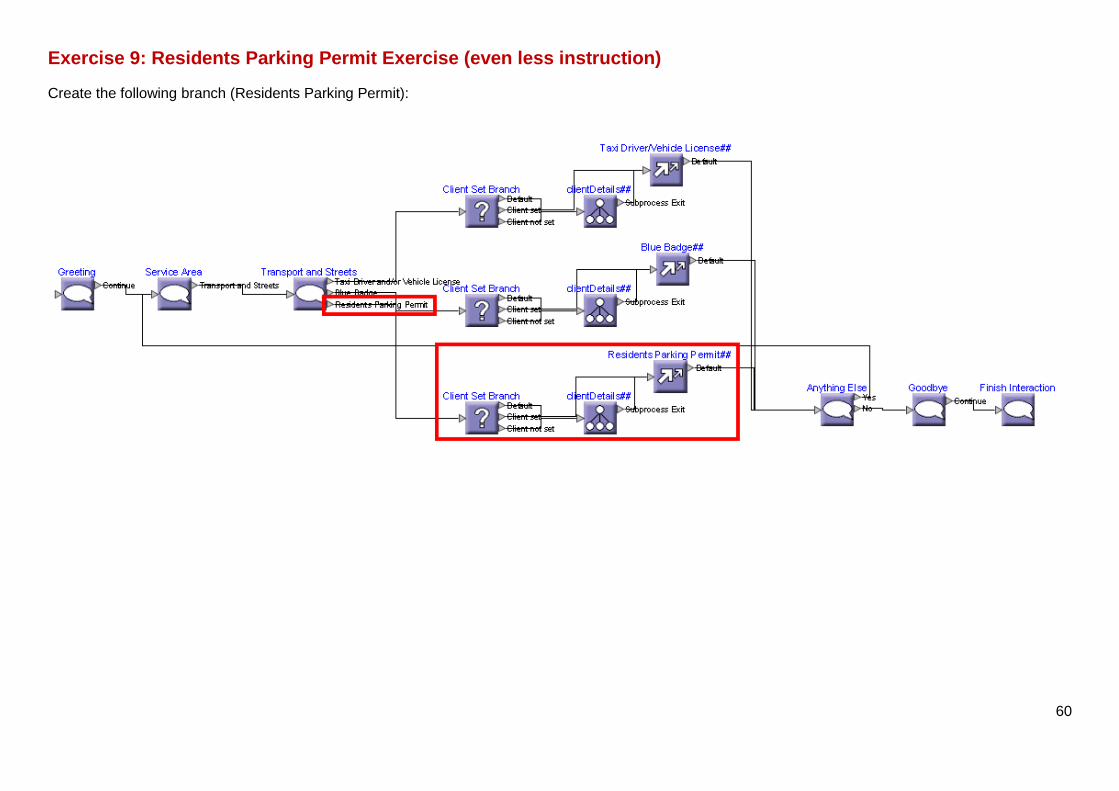
Exercise 9: Residents Parking Permit Exercise (even less instruction)
Create the following branch (Residents Parking Permit):
61
Exercise 10: An Alternative Design
As a system configurator you have been requested to add some further questions into the script flow before the service request (case) is created.
Why would you do this?
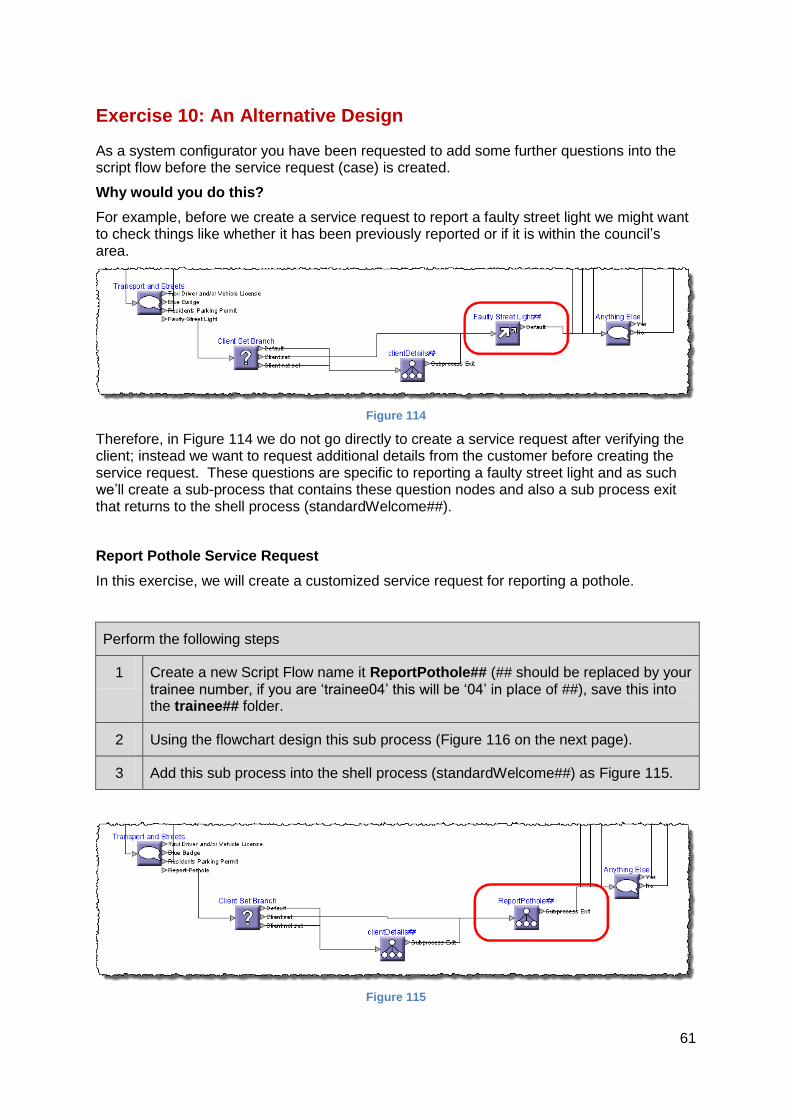
For example, before we create a service request to report a faulty street light we might want to check things like whether it has been previously reported or if it is within the council’s area.
Figure 114
Therefore, in Figure 114 we do not go directly to create a service request after verifying the client; instead we want to request additional details from the customer before creating the service request. These questions are specific to reporting a faulty street light and as such we’ll create a sub-process that contains these question nodes and also a sub process exit that returns to the shell process (standardWelcome##).
Report Pothole Service Request
In this exercise, we will create a customized service request for reporting a pothole.
Perform the following steps
1 Create a new Script Flow name it ReportPothole## (## should be replaced by your trainee number, if you are ‘trainee04’ this will be ‘04’ in place of ##), save this into the trainee## folder.
2 Using the flowchart design this sub process (Figure 116 on the next page).
3 Add this sub process into the shell process (standardWelcome##) as Figure 115.
Figure 115

62
Figure 116 – Reporting a Pothole Flow Chart

63
Case Study 1
LAGAN Technologies has been selected as the prime contractor to AnyCity City to provide the comprehensive CRM solution that they need.
It has been decided that the CRM solution will be implemented via a phased methodology, covering different operational departments over a three year period. In the first phase, AnyCity City will implement the following services:
Environmental
Property Tax
You should expand upon the main script flow created in the previous exercises to include these new processes.
Property Tax Services Processes
The following processes are to be implemented within Property Tax Services:
Banding query.
Change of Tax Banding
VO Address
Empty Property Exemption
Bankruptcy
Discount Inquiry
Banding Query
1. Ask the customer for the address of the property they are enquiring about.
2. Search for the property within LAGAN Configuration Studio. Is the property found?
a. If no, request additional information and search again. If the property cannot
be found the enquiry cannot continue.
b. If yes, check the AnyCity property tax system to see if the property has been
allocated a tax band. Has a tax band been allocated?
As this is the first phase of the CRM project no integration has
been completed between The LAGAN Configuration Studio
and the AnyCity property tax system. It is assumed that the
end-users will simply switch between the two applications.
i. If no, advise the customer to contact the Valuation Office (VO) to
confirm when a tax band will be allocated. Provide the address and
telephone number of VO. [Revenues and Benefits >> Property Tax >>
Banding (Prov_Info)]. End.
The address of the VO can be obtained from their web site, the
address of which is http://www.voa.gov.uk/where/index.htm.

64
ii. If yes, confirm the band with the customer and the property tax
amount that is payable. Does the customer dispute the band?
If no, classify as [Revenues and Benefits >> Property Tax >>
Banding (Prov_Info)]. End.
If Yes, ask the customer if they have own the property or are
liable for property tax? If they do not own the property, inform
the customer they cannot dispute the band.
If they do own the property, ask the customer have they owned
it for less than six months. If so, inform the customer they
should contact the VO directly. Provide the address and
telephone for the VO.
If not, inform the customer that they cannot dispute the band
and should contact the VO if they are not satisfied. Provide the
customer with the address and telephone of the VO.
[Revenues and Benefits >> Property Tax >> Banding
(Prov_Info)]. End.
Change of Tax Banding
1. Ask the customer have they received notification of their banding from the Valuation
Office?
a. If no, inform the customer that the request is still with the VO and they will
contact the customer. Provide the address and phone number of VO.
[Revenues and Benefits >> Property Tax >> Banding (Prov_Info)]. End.
The address of the VO can be obtained from their web site, the
address of which is http://www.voa.gov.uk/where/index.htm
b. If yes, inform the customer that the VO will contact the city directly after which
they will receive notification, in writing, from the city. End. [Revenues &
Benefits >> Property Tax >> Banding (Prov_Info)]. End.
VO Address
1. Advise customer of address of the Valuation Office (VO). End. [Revenues Benefits
>> Property Tax >> Contact Valuation Office].
The address of the VO can be obtained from their web site, the
address of which is http://www.voa.gov.uk/where/index.htm

65
Empty Property Exemption
1. Identify customer and verify the customer.
Use the processes you developed in exercise 1.
2. Ask the customer if this is an existing enquiry?
a. Yes, check contact history screen and locate previous enquiry. Relay the
status to the customer. [Revenues and Benefits >> Property Tax >> Empty
Property Exemption(Prov_Info)]. End.
b. No, raise a case. The Empty Property Exemption eForm should be attached
to the case. Provide the customer with case number for any future contact.
[Revenues and Benefits >> Property Tax >> Empty Property
Exemption(App_Serv)]. End.
Discount Enquiry
1. Identify and verify the customer.
Use the processes you developed in exercises 1 and 2
2. Is the contact regarding an existing enquiry?
a. If yes, check contact history screen and locate previous enquiry. Relay the
status to the customer [Revenues and Benefits >> Property Tax >> Discount
Enquiry(Prov_Info)]. End.
b. If no, raise a case. The Discount Enquiry eForm should be attached to the
case. Provide customer with case number for any future contact. [Revenues
and Benefits >> Property Tax >>Discount Enquiry(App_Serv)]. End.
Bankruptcy
1. Identify and verify the customer.
Use the processes you developed in exercise 1.
2. Check the contact history and see if information has already been provided. Has user
provided this information?
a. Yes, relay the status to customer and advise customer as to what will happen
next. [Revenues and Benefits >> Property Tax >> Bankruptcy(Prov_Info)].
End.
Tip: This information is available from the city’s web site
http://anycity/propertyltax/bankruptcy.html
b. No, raise a case to record the customer’s information. The Insolvency eForm
should be associated with the case. Provide the customer with the case
number and information as to what will happen next. [Revenues and Benefits
>> Property Tax >> Bankruptcy(App_Serv)]. End.
66
Case Study 2
With the information below add the appropriate Script Flows and Nodes required manage these processes. to the ‘standardWelcome##’ Script Flow.
Environmental Services
The following processes are to be implemented within an Environment and Planning Services Area:
Arrange Collection of a large item
Missed refuse collection
Extra request for a green bin
Bigger bin request
Recycling (in rural areas)
Arrange collection of a large item
1. Inform customer there is charge of £20 for this service. Does the customer wish to
continue with their request?
a. If no, inform customer the item cannot be collected unless the charge is paid.
[Environmental Services >> Bulky Waste >> Charge Unacceptable]. End.
b. If yes, identify the customer (use the process developed in exercise 1).
Search for the address from which the item(s) is to be collected. Is it within
the city?
i. If no, inform the customer that the enquiry cannot be dealt with.
[Environmental Services >> Bulky Waste >> Outside City]. End.
ii. If yes, request the item(s) the customer wants collected from this
address. Verify the item(s) is acceptable or unacceptable.
This information can be found on the AnyCity website
http://www.Anycity.co.uk/bulkyWaste.html
If unacceptable inform the customer that the city will not collect
this type of bulky waste. End. [Environmental Services >>
Bulky Waste >> Unacceptable Item].
If acceptable, create a case that gathers the following
information: date for collection, time slot (morning or
afternoon), item to be collected, contact name and number.
[Environmental Services >> Bulky Waste >> Arrange
Collection]. Provide customer with case number. End.
67
Missed Refuse Collection
1. Ask the customer was the refuse presented on the correct day at 7am in the correct
place?
a. If no, inform the customer that the refuse must be presented by 7am on the
correct day of collection and materials must be presented at the nearest
suitable point of the adopted highway. Resident can either hold onto refuse
until next scheduled collection or take it to their nearest Civic Amenity Site.
[Environmental Services >> Missed Collection >> Incorrect Time/Place]. End.
b. If yes, ask the customer if the refuse was presented in non returnable sack?
i. If no, inform the customer that the refuse needs to be presented in a
non returnable sack. The resident can either hold onto refuse until
next scheduled collection or take it to their nearest Civic Amenity Site.
[Environmental Services >> Missed Collection >> No Non-Returnable
Sack]. End.
ii. If yes, ask the customer whether the refuse was normal household
waste (not garden or trade waste).
If the rubbish contained garden or trade waste, inform
customer that if the refuse contains items other than normal
household waste, it must be presented in the appropriate sack.
Garden waster must be presented in a prepaid green AnyCity
sack or have an AnyCity sticker. Trade waster must be
presented in a red sack. The resident can either hold into
refuse until next scheduled collection or take it to their nearest
civic Amenity Site. [Environmental Services >> Missed
Collection >> Not House hold Waste]. End.
If the rubbish contained only household waste, identify the
customer and raise a case with the following information:
customers address and telephone number. Provide the
customer with the case number. [Environmental Services >>
Missed Collection >> Arrange Pickup]. End.
Bigger Bin Request
1. Inform the customer that larger bins are only issued after assessing individual needs
and discussing them with the household. Ask the customer if they are happy that a
site visit/call is made?
68
a. If yes, identify the customer and raise a case that captures the customers
name, address, contact number, and reason for requesting a larger bin.
[Wheeled Bin >> Bigger Bin Request >> Site Visit.]. End.
b. If no, inform customer that their request cannot be processed. [Wheeled Bin
>> Bigger Bin Request >> Site Visit Declined]. End.
Extra Green Bin Request
1. Explain to customer that it is possible to have another green bin.
2. Raise a case to capture the following information: customers name, address, and
contact number. [Wheeled Bin >> Green Bin >> Extra Bin Required].
3. Inform customer that the bin will be delivered as soon as possible, however in the
mean time the customer should dispose of the extra waste themselves. End.
Recycling in Rural Areas
1. Ask the customer which area is of concern. Refer to the recycling list and inform the
customer where the nearest recycling centre is.
This recycling list is available on the AnyCity web site, the
address is http://www.anycity.co.uk/recyclingcentres.html.
2. If the area is not on the list, ask the customer for the nearest town/village. Suggest to
the customer to combine it with another trip such as the weekly shop. [Environmental
Services >> Recycling >> Rural(Prov_Info)]. End.
69
Appendix
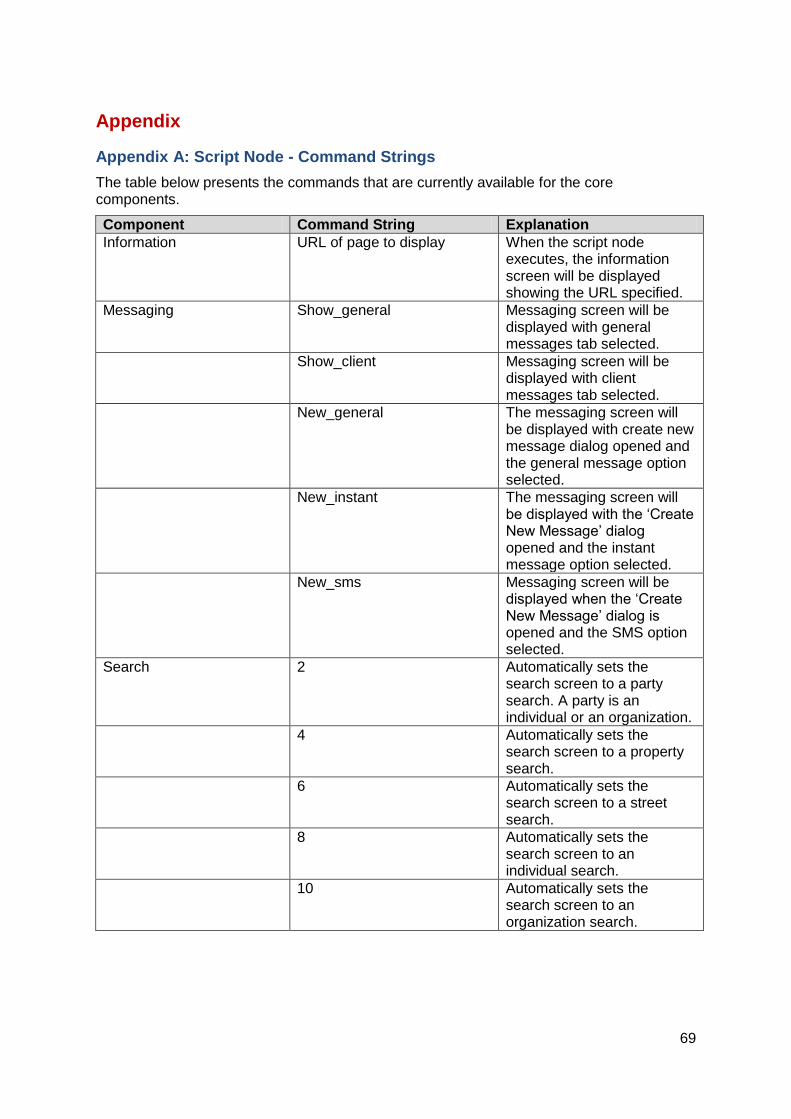
Appendix A: Script Node - Command Strings
The table below presents the commands that are currently available for the core components.
Component Command String Explanation
Information URL of page to display When the script node executes, the information screen will be displayed showing the URL specified.
Messaging Show_general Messaging screen will be displayed with general messages tab selected.
Show_client Messaging screen will be displayed with client messages tab selected.
New_general The messaging screen will be displayed with create new message dialog opened and the general message option selected.
New_instant The messaging screen will be displayed with the ‘Create New Message’ dialog opened and the instant message option selected.
New_sms Messaging screen will be displayed when the ‘Create New Message’ dialog is opened and the SMS option selected.
Search 2 Automatically sets the search screen to a party search. A party is an individual or an organization.
4 Automatically sets the search screen to a property search.
6 Automatically sets the search screen to a street search.
8 Automatically sets the search screen to an individual search.
10 Automatically sets the search screen to an organization search.

70
Appendix B: Data Capture Types
The table below presents the data capture types and their associated attributes that can be defined for a script node.
Data Capture Type Attributes Description
Edit Type#length#mandatory Type: 1 = numeric, 2 = alphanumeric, 3 = alpha, 4 = any Length: Indicates the length of the edit field e.g. 30 (allows 30 characters). Mandatory: 0 = false, 1 = true
Date Type Type: 0 = date, 1 = time, 2 = date and time
Combo Item1#item2#item3 Each item in the combo box should be separated by the hash key #
Checkbox 0 or 1 Where 0 = unchecked, 1 = checked
Number InitialInteger#MinimumInteger#MaximumInteger
Appendix C: Branch Node
Branch Area Types
Interaction Client Set
Client Verified
Force Classification
Interaction Classified
Channel
Inbound Call Dialed Number
Transfer Reason
CLI
Agent Work Work Type
Work Queue
Campaigns Campaign ID
XML The conditions defined within the Business Rules
Appendix D: Hints and Tips
The following list provides practical hints and tips when implementing the script flows.
Provide a clear description for the script flow.
This is particularly useful if the script flow search functionality has been enabled for the end-users. This functionality permits them to search for a specific script flow based on a key word. If the keyword is contained in the name, description and/or text of multiple script flows then a list of these script flows are displayed to the user. The latter must then decide which script flow is most appropriate to run and it is likely that they will use the description text to help them make this decision.
The screen shots below illustrate how a user searches for a script flow and also the results returned from the search functionality if multiple script flows are found.

71
Figure 117
Figure 118
To enable the script flow search functionality, ensure the search feature of the scripting component within the Group Configuration is enabled.
It is recommended that the search functionality is given to experienced users.
Naming script flow nodes.
Give each node in the script flow a clear name to indicate its purpose; whilst this might seem obvious, it is often a step that is forgotten. Naming the nodes appropriately will help to ensure that other system configurators, at a later date, can understand the flow of the process at a glance.
In addition the node names are displayed to the end user via the back and forward arrow buttons so having sensible names will make it easier for them to navigate through the script; this is illustrated in the screen shot below.
Search Functionality
72
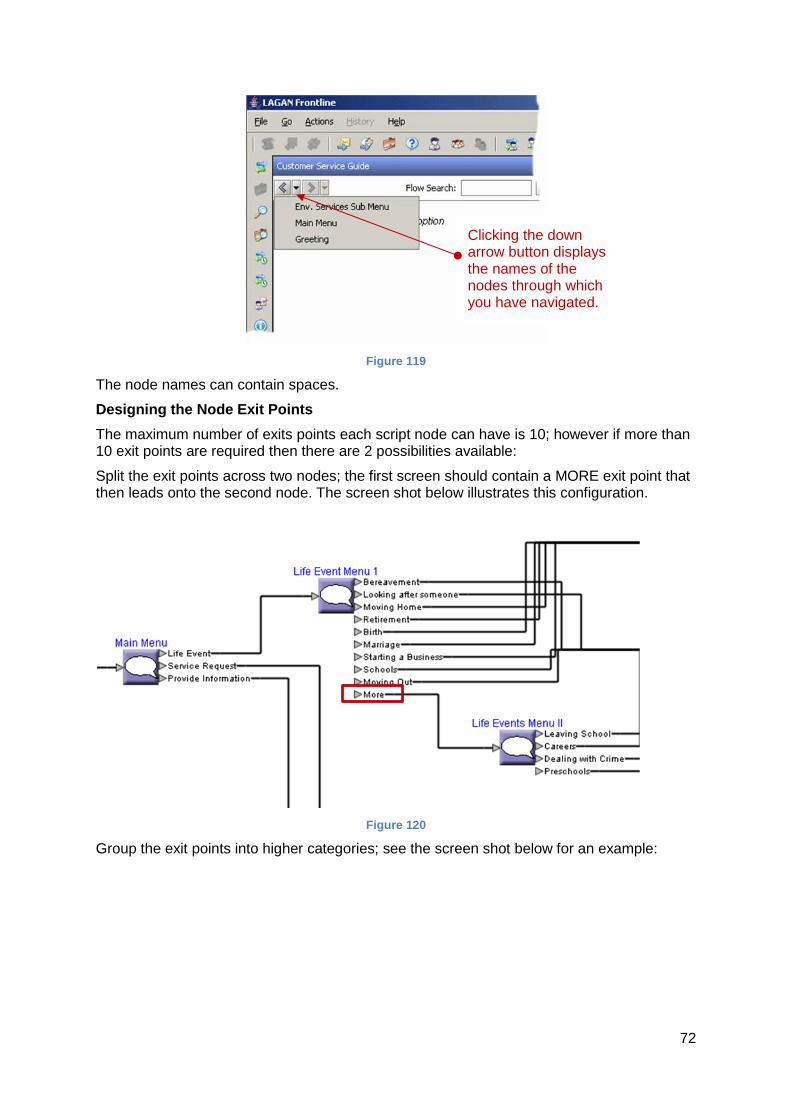
Figure 119
The node names can contain spaces.
Designing the Node Exit Points
The maximum number of exits points each script node can have is 10; however if more than 10 exit points are required then there are 2 possibilities available:
Split the exit points across two nodes; the first screen should contain a MORE exit point that then leads onto the second node. The screen shot below illustrates this configuration.
Figure 120
Group the exit points into higher categories; see the screen shot below for an example:
Clicking the down arrow button displays the names of the nodes through which you have navigated.
73
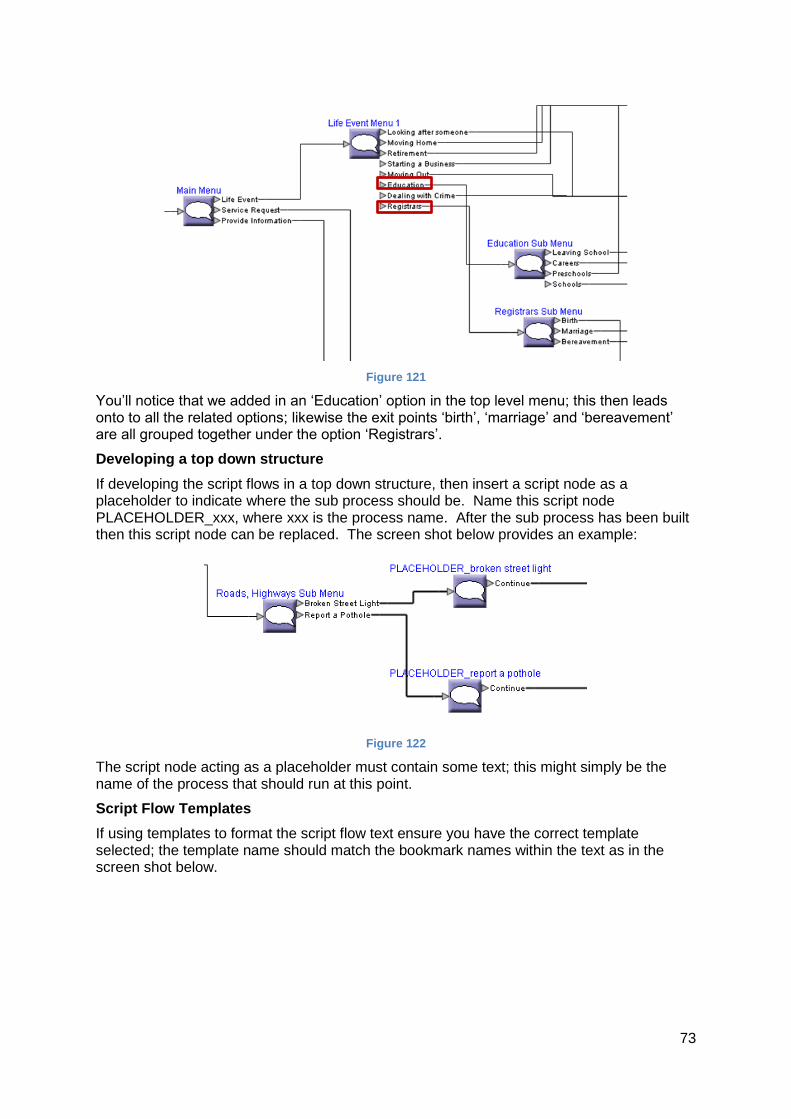
Figure 121
You’ll notice that we added in an ‘Education’ option in the top level menu; this then leads onto to all the related options; likewise the exit points ‘birth’, ‘marriage’ and ‘bereavement’ are all grouped together under the option ‘Registrars’.
Developing a top down structure
If developing the script flows in a top down structure, then insert a script node as a placeholder to indicate where the sub process should be. Name this script node PLACEHOLDER_xxx, where xxx is the process name. After the sub process has been built then this script node can be replaced. The screen shot below provides an example:
Figure 122
The script node acting as a placeholder must contain some text; this might simply be the name of the process that should run at this point.
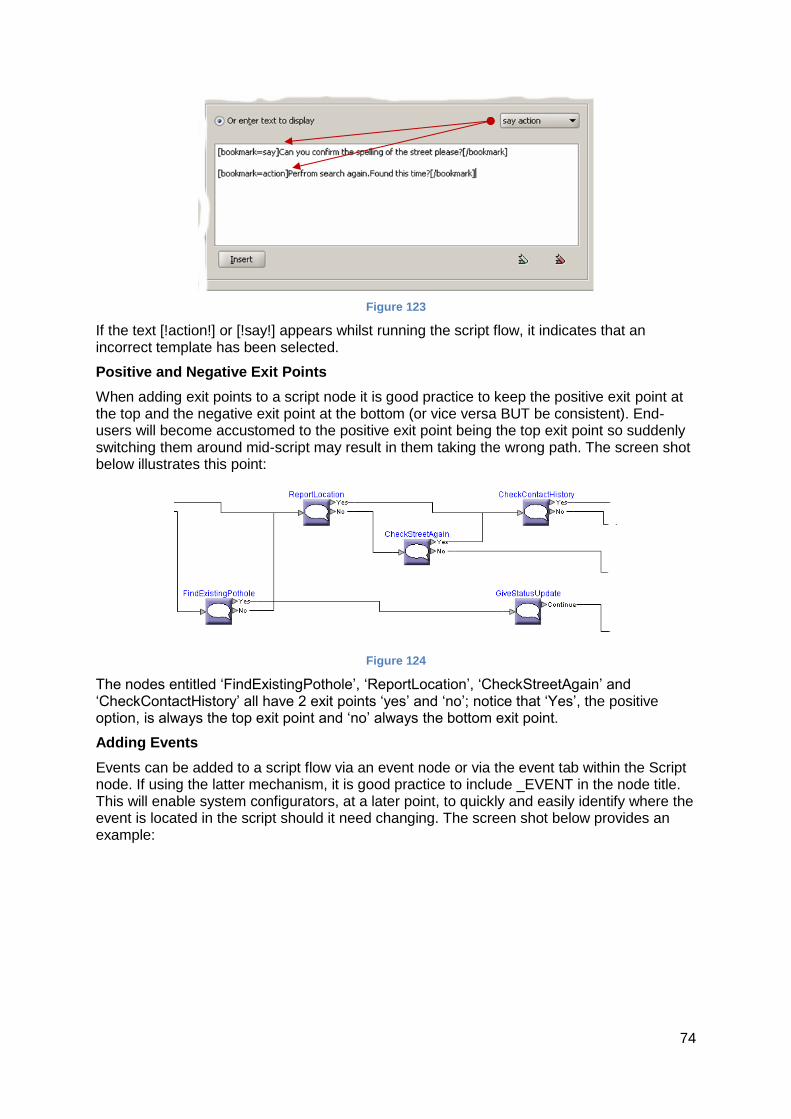
Script Flow Templates
If using templates to format the script flow text ensure you have the correct template selected; the template name should match the bookmark names within the text as in the screen shot below.
74
Figure 123
If the text [!action!] or [!say!] appears whilst running the script flow, it indicates that an incorrect template has been selected.
Positive and Negative Exit Points
When adding exit points to a script node it is good practice to keep the positive exit point at the top and the negative exit point at the bottom (or vice versa BUT be consistent). End-users will become accustomed to the positive exit point being the top exit point so suddenly switching them around mid-script may result in them taking the wrong path. The screen shot below illustrates this point:
Figure 124
The nodes entitled ‘FindExistingPothole’, ‘ReportLocation’, ‘CheckStreetAgain’ and ‘CheckContactHistory’ all have 2 exit points ‘yes’ and ‘no’; notice that ‘Yes’, the positive option, is always the top exit point and ‘no’ always the bottom exit point.
Adding Events
Events can be added to a script flow via an event node or via the event tab within the Script node. If using the latter mechanism, it is good practice to include _EVENT in the node title. This will enable system configurators, at a later point, to quickly and easily identify where the event is located in the script should it need changing. The screen shot below provides an example:

75
Figure 125
Changing the Screen
Before starting to implement a script flow consider which screen the user will need to access at each point in the process flow and remember that for certain components a command can be provided, for example:
To display a web page at a particular point in the script flow, select the information component then enter the full URL address in the command field.
Figure 126
To automatically display a street search, select the search component and enter 6 in the command field.
To automatically display an individual search, select the search component and enter 8 in the command field.
To automatically display an organization search, select the search component and enter 10 in the command field.
To automatically display a property search, select the search component and enter 4 in the command field.

76
Event Names
The event name cannot be longer than 30 characters in length; however there is no limitation on the event description. It is useful to enter the classification to which the event will link as the event description. This will aid other system configurators who may take on developing/managing the script flows.
Classifying the Interaction
Consider at which point in the script flow you will want to classify the interaction. Some sites immediately classify the interaction to a generic ‘Voice-In’ classification thereby enabling them to quickly obtain data on the number of calls they have received on a daily, weekly or yearly basis. In addition to this generic classification you will most likely want to record the specific reason (classification) for the customer calling.
Script Flow Text
Summarize the text to be entered in the script node and keep it well spaced out (use <br> to do this – see the screen shot below); this will make it easier for the end-user to read.
Figure 127
Appendix E: Using Spell Checker
The spell checker dialog provides options for the following:
Option Description
Ignore Ignore this instance of the selected word.
Ignore All Ignore all instances of the selected word.
Change Replace this instance of the selected word with the corrected spelling typed in the ‘Change to’ field, or the selected ‘suggested’ spelling.
Change All Replace all instances of the selected word with the selected ‘suggested’ spelling.
Suggest Additional suggested words.
Add Add the word to the dictionary. The Dictionary resides on the user’s local machine; the location which is given in the text field ‘Add words to:’ in this dialog box.
Undo Undo last spelling change
Cancel Close the dialog
By inserting <br><br> it will move the text ‘Was the location found? Onto the next line in the Script flow panel.

77
A screen shot of the spell checker dialog can be seen below:
Figure 128
The spell checker can be invoked in two ways:
Pressing the F7 key.
This will launch the spell checker dialog if there are spelling mistakes in the form that you are currently editing.
On form submission (If configured).
The spell checker dialog will be displayed if there are spelling mistakes present.
If spelling mistakes are present in the form that you are currently editing and you invoke the spell checker then the spell checker dialog will be displayed. This will display one spelling mistake at a time and allow you to correct or ignore it before moving on to the next spelling mistake if one exists.
Spell Checker Availability
The following lists outline the forms that the Spell Checker will be available from within each LAGAN application:
LAGAN Agent Desktop
Case Dialog
Case Forms
New Email
New Letter
Case / Inquiry Note
Case Event
Manual Case Task
Task Note
LAGAN Configuration Studio
Work Queue Notification
Correspondence
Client Notifications

78
Escalation Rules
Script Flow Node
Task Type
Task Priority
Task Rule Recipient
Task Definition
Task List
Create a Code Book
New Code
New Group
New Business Rule Action
Create Event
Create / Modify Script Flow