Embed Size (px)
Citation preview
TED §T TE§ CETER§ GUJI
USFG
§LE Promoting the art, skill and teaching of faceting.
Expanding the knowledge of natural and man-made crystals.
Developing and promoting uniform rules for faceting competitions within the U.S.A. and among other countries.
Sponsoring or assisting in managed competitions.
Serving as a national repository and clearing-house for faceting designs, published materials and general information for faceters everywhere.
D ecein 1er, 199 9 Volum.e 9, Num.lber 4
U.S.F.G. Newsletter Vol. 9 No. 4 December, 1999
Officers and Appointed Staff 2000-2002
President
Secretary
Vice President
Treasurer
Membership
Editor
Glenn E. Klein 949-458-5803 24001 Muirlands Blvd SP 79 Lake Forest, CA 92630 [email protected]
Janene Dailey Low 360-247-5579 273 Yale Village Rd. Amboy, WA 98601 [email protected]
Jerry L. Capps 608-795-4565 11061 US HWY 14
Mazomanie, WI 53560 [email protected]
Don Dunn 937-426-5112 993 Renown Rd. Dayton, OH 45430-1112 ddunndtn@AoLcom
Jean Marr 336-595-3870 P.O. Box 1815 Kernersville, NC 27285 [email protected]
Jack E. Gross 406-755-1279 227 Segiab Way Kalispell, MT 59901 [email protected]
SEND US YOUR E-MAIL ADDRESS Since communication in the USFG is very difficult, due to our widespread membership, and you are a USFG member and have an email address, please send it to our Vice President Jerry Capps at his email address. A complete membership listing with email addresses included will make communications much more viable. Jerry will compile and distribute the list to the officers and staff of the Guild. The USFG Newsletter is a quarterly publication of the United States Faceters Guild It is delivered by first class mail to all paid members of the Guild at the end of March, June, September, and December. Membership dues are $18 per year and are payable to the USFG treasurer.
Correspondence concerning the content of the newsletter, exchange bulletins and newsletters should be sent to the editor. NOTICE: The opinions expressed in the newsletter are those of the editor, contributing members, or quoted authors, and do not necessarily represent the United States Faceters Guild or its membership. The newsletter is for the express purpose of sharing information with the members and other faceting guilds, and has no intent to show preference to or cause damage to any product, manufacturer or commercial company.
2
IN THIS ISSUE
HOW TO GO FROM NOVICE TO WORLD CLASS FACETER 3 COLD DOPPING REVISITED 6 USFG ANNOUNCES A "SINGLE STONE COMPETITION" AND "WORLD CLASS FACETER" TRAINING PROGRAM 8 RECOGNIZING FLAWS IN GEMSTONE ROUGH� THOUGHTS ON A NEW STONE-DESIGN CLASSIFICATION SYSTEM ________ --=1:.:..5 FOR OUR MEMBERS WITH E-MAIL CAP ABILITY ___li USFG FACETING DICTIONARY STONE HEIGHT FORMULA BRIGHINESS PATTERNS ABOUT DATAVUE2 SOME FACETING TIPS NEW MEMBERS LET'S GET ACQUAINTED FACETER'S FORUM USFG MEMBERS' WEBSITES INFORMATION NEEDED LIFETIME MEMBERSIIlP AW ARD DUES CHANGES FACET-CUTTING SEQUENCES: A VEXING PROBLEM USFG MEMBERSHIP APPLICATION FORM
DUESA D
EWSLETTER
NOTICE
19 23 24
25 26
26 27 27 32 34 34 34 35 36
As of this issue, memberships that expire on this publication date, or will have expired before the next issue, will be noted with the following statement after the member's name on the mailing label (in the place where the anniversary date is printed):
LAST ISSUE

U.S.F.G. Newsletter Vol .. 9 No.4 December, 1999
HOW TO GO FROM NOVICE TO WORLD CLASS FACETOR Part Three of Three
By Glenn Klein Part Three: Single Stone Competitions. Cutting the single stone is the real heart of faceting competition. As you progress to higher levels you try to cut a more perfect individual stone than you did before. You cannot accept cutting faults which were acceptable in lower level competitions. In the past each competitor more or less went along doing his or her best while keeping secrets as to what worked well. Since the international competition began there has been much better teamwork. We United States facetors are exchanging solutions to cutting problems. Of course we are not about to help the other country's team, but are glad to do what we can to help our team. If you have a good idea to share, your idea can become meaningful once others know about it. The various guilds have newsletters which offer articles by many facetors. These articles often show procedures or products which worked well for the author. These suggestions may work for you, or they may not. However, all of the input is beneficial. Most competitors start by entering those competitions which only require one stone, or possibly up to three stones. After all, it takes years to assemble good stones in large quantities like twenty to forty stones for a large case. You may sell gems, give them to your friends, or give them to your spouse (where the gems end up in mountings to wear). In any case, having twenty very well cut loose stones for a competition is not easy to come by. I wish we could all go to shows and see more full cases of faceted stones. However, in the last six or seven years I have seen a trend where some shows have one case or none at all. Get a good book on faceting so you will be able to refer to it from time to time as to how light travels into-through-out of your particular gem material. The book will also give hints on cutting characteristics of the various materials. Every facetor should have a copy of FACETING FOR AMATEURS by Glenn and Martha Vargas. I feel it is the best book ever written about our hobby. I have two copies; the first one is worn out from use. I am a very slow facetor. I check a gem often while I am cutting. I strain my eyes for a perfect meet on each facet
3
junction. I usually facet for about two to three hours three times a week. The longest time I have spent on a single stone is 1 10 hours on a Kunzite. I have never finished a gem in one day. The worst competition experience I have had happened many years ago, when I was talked into entering a "who can cut a stone the fastest" contest. Needless to say I was the one with the worst score that time. I hated every minute of that attempt. Cutting fast is not an art in my mind. You can see why I am not in the business of cutting for money. I am too slow. I try for a perfect job at ten-power magnification. But I have never succeeded in cutting a stone to my complete satisfaction. Maybe a ten-power stone with perfect meets, good polish, excellent alignment, all at one time is not possible for me. I do the best I can each time, and hope that it is very good work in relation to the standards set by the judges. The number of those competing with you may be two or three facetors, or it may be fifteen. That does not matter. What matters is that you are trying to do your best each time. With each new material that you work with, try a small inexpensive piece of it first so that you will get a feel for how it cuts and polishes. You might try just four or five facets, with a variety of polishing laps and powders. When you find the best combination that works for you, make a record so that you will not have to experiment on the same type of material when you cut it in the future. It seems that no two facetors agree on what powders or laps are best. Just find a combination that works for you. On your record sheet you should also make a note of the combinations that did NOT work for you. The choice of rough is very important. Use only excellent rough for competition stones. Poor color, included material, or fractured pieces will not get you a trophy. If a colored material is called for, use a very light shade of color. The deeper the color the more light is lost in traveling from facet to facet. If you must submit a colored topaz, do not choose a deep blue one. Find a very pale blue or a golden one. You will get a much brighter gem. I feel that natural ruby & sapphire are ugly gems. The light is absorbed in them, and cannot result in a winning gem. Lazer ruby yes, natural ruby no. Most natural material that we get has inclusions. These inclusions give us trouble in polishing when they reach the surface of our facets. You are not going to score well with a piece which is full of surface faults, and which has many inclusions that are stopping the light rays as they bounce around inside of the gem. So, do not waste time on poor material. Do buy the best grade rough you can afford. Each mineral has a Refractive Index or R.I. The higher value R.l. material results in brighter gems. Quartz has a R.I. of only 1 .55; cubic zirconia has a R.I. of2.18. You know ahead

U.S.F.G. Newsletter Vol. 9 No.-4 . December, 1999
HOW TO of time that the design cut in CZ is going to be a sparkler compared to the same design cut in quartz. Consult your books to find the R.I. values of the other minerals.
I seldom use my saw to shape the gem rough. I have found that I usually waste more material by trying to save little corners, etc. Often I have gotten a fracture started even though I use a very fine saw blade with plenty of coolant. About the only time I use the saw now is when the rough has a fracture, and I want to cut right through that fracture.
I also do not pre-form on a grinding wheel. In fact I do not even have a grinder. All the grinding wheel would do is allow the possibility of shocking the rough. A fracture would just start or an existing one would be enlarged.
The place to do your shaping or pre-forming is right on your faceting machine. I use my 325 Crystalite sintered lap. It shapes materials fast enough for me, and it leaves a smooth finish too. On sensitive materials or small pieces I start with a diamond bonded 600-mesh lap, nothing coarser.
By doing the pre-forming on the faceting machine, you give yourself a chance to see flaws that you might have missed earlier. You may decide to re-dop the stone to a different position so as to get a better gem. Try to get the worst inclusions under the crown facets near the girdle. Do not place them directly under the table. Try to get areas of desired color into the culet. That will distribute the color more evenly throughout the gem. Small inclusions will not noticeably affect brilliance or dispersion.
You cannot cut until all inclusions are gone, so you have to get down to the point at which you feel the gem will be acceptable. Once that first main facet reaches that point, you can then go around the gem so that all mains are about the same depth.
I usually end up with a finished gem that weighs less than 25% of the weight of the original rough (3/4 of the rough is lost). You can end up with more if you use a step-cut design or even more if you do a free-form cut of your own design.
My pre-forming is not much more than getting the gem somewhat to size in girdle diameter, and then getting the main facets of the pavilion in. This gets most of the unwanted material out of the way.
I usually cut the pavilion first because I want to be sure to have enough material to get proper angles so that I do not exceed the critical angle for the material. Proper light reflection and refraction will then take place. You can skimp on crown height and angles, as well as the size of the table if necessary.
4
Each mineral has an angle, where if you cut below it you will leak light instead of bouncing it around the interior of the gem, and then back out of the crown to your eye. This CRITICAL ANGLE depends upon the R.I. of the mineral. Quartz has a critical angle of 40 degrees; cubic zirconia's is 28 degrees. Be sure to cut the pavilion mains or closing facets on the culet at least two to three degrees higher (quartz 43 degrees and topaz 40 degrees). Otherwise you will have a window down through and out the bottom of your gem. Your gem will be one that will not reflect the light back to you in the form of brilliance and dispersion. That is UNPLANNED light leakage.
What we want is for the light to enter the crown and be reflected off of the pavilion facets, then emerge as brilliance through the table and crown facets. The light will also emerge through the crown facets as dispersion. This is all PLANNED light leakage.
If you want more color in your gem, choose a step cut or a free-form cut. They are deeper designs: more material means that the light rays are absorbed resulting in a greater intensity of the color. If you want more brilliance, choose a Brilliant or Barion design. If your material is very dark like most garnets, choose a type of cut which has a shallow pavilion, one that may approach the critical angle, or choose a cut which has a large table size. If you have to make a choice on crown or pavilion angles, be sure to choose correct angles for the PAVILION. You can adjust the crown angles quite a bit, without a great loss of light. Be sure to consult at least one good source such as Vargas' book as to the recommended main (culet) angles for your material.
I like to use a 96 tooth index on my faceting machine whenever possible, then I am able to adjust to a lot of in-between settings without having to use much cheater control.
I usually go from my 325 pre-forming lap to my copper lap, which I have charged with 1200 grit diamond compound. The lap cuts slowly, but this is when I am really getting serious putting in the facet meets exactly.
I finish re-cutting the facets with my Crystalite diamond bonded 3000 lap. Some of the smallest facets of the design are now put on with this lap. This is a well-worn lap. I use very little pressure, letting the lap do its work. With this lap I fine-tune all meets with the use of my ten-power hand loupe. It saves time in polishing if you do an exceptional job with the 3000 lap. Do not expect to polish facets into the desired shapes later.
Anytime you change a setting such as index, angles, cheater, etc., touch lightly when the gem reaches the lap. Listen for a smooth sound. Touch the lap for only a second, and then take a look at the facet. If it looks good, touch the lap a bit longer this time, and inspect again. It does not pay to be in a hurry. A slight error like one tooth off on the index, and you

U.S.F.G. Newsletter Vol. 9 No.4 December, 1999
HOW TO may have hours of work correcting all the facets. And, occasionally you WILL make a mistake, especially if you are tired, upset about something, or if you have finished that glass of wine. Competition faceting requires a clear head on your shoulders. I keep a record sheet for each gem that I cut. I keep them in a binder. My record sheets are elaborate. You probably would not be interested in half of the things I have listed. But identifying characteristics of minerals are always interesting to me, along with laps used, powders used, etc. The information is all there including index settings, angles, cheater amounts, and so on. Now we come to the last step in the cutting process. The polishing of our gem is the most important step. POLISHING IS THE PROOF OF YOUR TALENT. I do not mean we just want a shiny finish on our facets. Someone else might achieve a better shine than you. No, I mean we want facets which have a reasonably shiny finish, are flat all across the facets from comer to comer, and meet precisely where they should at junctions with the surrounding facets. The sum of all of these things is POLISHING. A gem might be cut to perfection. However, if not polished to perfection the cutting does not matter. The judges will be grading your finished polishing, not all that other stuff. When I polish a gem I do not use any brushes or sponges in applying powder to the lap. It seems to me that would just be a way of contaminating the lap, resulting in scratches on the facets. I keep a plastic container filled with fresh water next to my container of dry polish powder. I dip my fingertip into the water to be sure that I do not carry any dirt into the polish powder container. I get just a little bit of powder on my fingertip, and apply that to the turning lap. Then I spread it somewhat before touching the stone-to-lap. The powder will help to speed up the polishing process, but it can also leave tiny scratches which are seen by the judges. So, I let the powder get well diluted by the steady drip of water from the faceting machines water storage reservoir. Very often I finish up a facet by using medium pressure on the stone, with very short movement back and forth on the lap ( 1 I 2"area), and lots of water. I am polishing on water. The scratches are then gone. Do not use great sweeping motions across the entire lap for any polishing. Your lap will not be exactly flat all the way across. Any misalignment of your machine will cause trouble here. Try to get flat on the facet right at the start. Do not try to work your way across the facet. You will save time and get
5
better meets if you start correctly. You want the facet edges sharp where they meet. Sometimes you will have to finish a facet by running your lap counter clockwise, or you will have to use different areas of the lap to remove those final little scratches. Inclusions which reach the surface often cause this problem, or the crystal structure of the material is showing itself. The amount of pressure applied stone to lap may have to be varied as well. The quartz gems give me some of my biggest problems in polishing. Most books recommend a lucite lap and a slurry of cerium-oxide powder. This has never been satisfactory for me. I say forget that process. Use an aluminum lap with an Ultra-Lap cerium oxide ADHESIVE-BACKED disc. This gives you a fast and excellent polish. It does round the meets, however. It takes a light touch because the more pressure you apply, the more the facets will be roW1ded. If you have a lucite lap make a frisbee out of it. Sail it off a high cliff somewhere and forget it. Gas, liquid, and solid inclusions which reach the surface can give you fits when it comes to polishing. Most of these you will not even see in your cutting. Sometimes they appear just from shock that you have given the material, whether it was heat in <lopping or too coarse a pre-forming lap. Most materials have facets that vary greatly in hardness, depending on direction. This is due to the crystal axis directions of the material. Often you will find that one facet polishes fast as if it were butter, yet the very next facet to it will be much harder--taking five times as long to polish properly. Make experiments. Find out which lap, polishing agent, speed of lap, direction of lap, or area of lap works best for you. Make notes. Go by your past experiences until a better way comes along. What works for me may not work for you. Experiment. I have found that a well-worn tin lap is a good polishing lap. If the lap is scored it must be well used before trying for a competition finish. I have not re-scored any of my laps for ten years. Scoring is supposed to hold the powders, but all I get are tiny parallel ridges on the facets. My process of a used tin lap with plenty of water and very little powder is a very slow process--but it works. My newest method of polishing some gems is with the use of a typemetal lap, along with the machinist tool called the Norbide Dressing Stick. The Typemetal lap is good for polishing the harder materials like corundum and cubic zirconia. The most difficult facets to polish to good meets are the ones on low crowns, or the types that are long and narrow.

U.S.F.G. Newsletter Vol. 9 No. 4 December, 1999
HOW TO
Often these facets are from thirty degrees down to just five degrees. I do the job with the very flat typemetal lap along with the Norbide Dressing Stick, and 1 OOk spray diamond. The Norbide Stick looks like a piece of slate, like a school chalkboard. It is only W' x 1/2" x 3" in size. It is an expensive tool, which will chew your home garage grinding wheel as if the wheel were made of butter.
Here is the procedure I use on facets, especially the ones with low angles. Wipe the turning typemetal lap with a tissue wet with alcohol ( the kind you get at the paint store, not your Martini). You want the lap to be perfectly clean. Spray a short burst of the 1 OOk diamond on the turning lap, the shortest burst you can. Hold the 3" long EDGE of the Norbide stick onto the turning lap. Use a fair amount of pressure as you go back and forth across the lap from center to outer edge. This forces the diamond into the lap, you are charging it. Stop the lap. Set the facet angle needed to work against the stop of your machine (if it has one). Lower the gem until it just reaches the highest part of your stationary lap (where you have marked the lap with a felt pen). Now start the lap turning at about one third up from the slowest RPM possible. With just light pressure on the dop which is working against the stop, try a one or two second period of polishing. Inspect the gem for the desired results. I use a Qtip slightly wet with alcohol to clean the greasy Slh�ace of the facet ( too wet will run down and soften your dopping wax). Then wipe with tissue. Listen to the sound when the facet touches the lap, it should be quiet. A high-pitched squeal means it is too late, you goofed! Now try longer periods of polishing, but look frequently. No big sweeps,just a small 3/4" area of the lap. A little diamond goes a long way. If you saturate the lap you will have all kinds of troubles. Your gemstone will just ride along on top of a greasy lap surface. Finish the days polishing session by again wiping the turning lap with an alcohol tissue, and press across the lap again with the Norbide tool. Now put the lap into its own clean plastic bag for storage until next time.
For success in the higher levels of competition you will first have to conquer the art of polishing. You can shape the stone, put in all the facets to ten-power perfection, but it all is useless if you do a poor job of polishing. This is why so many articles are written about polishing methods. Spend most of your time in getting as good a polish on your facets as you can get. Get facets that are flat and which have precise meets with the surrounding facets. This is what singlestone competitions are all about. Take one facet at a time, or you will go out of your cotton-pickin' mind.
P.S.
Someone said you should reach for the ring, because you only go around once.
6
COLD DOPPING REVISITED
JCF
A couple of years ago our newsletter published an article on cold dopping by Charles Covill, and the techniques he uses for cold <lopping. Generally cold <lopping is used in preference to hot <lopping (using heated wax) when the stone to be cut is fragile or sensitive to heat. Also, some faceters prefer cold <lopping for convenience, as no source of heat is required and there is no finger burning, also for very small stones wax can be a bit fiddley.
Before reading the Covill article I had used wax exclusively, accepting the odd damaged stone as "par for the course." However, I decided to try the cold dopping techniques detailed in the article to see how I got on with it and so that I could discuss the process from a position of actually having tried it rather than just having read about it I also wanted to establish whether we had any UK equivalents to the optimum adhesives recommended by Charles Covill.
I should stress at this time that some of the points discussed in this article do not come from the Covill article but from other literature on the same subject.
It seems to be generally accepted that except for exceptional designs the pavilion of a stone should be cut before the crown. This means that the axis of the stone should first be determined then a flat cut in the rough where the table will eventually be. Some faceters go so far as to polish this initial flat and use it as the final table. Personally, I don't do this as I might end up having to cut away this polished "table" because it is not in the right place and then have to polish another table which is in the right place. After having cut the table flat (I use 600 grit to ensure a good bond with the adhesive) in preparation for cutting the pavilion, we are now ready to apply the adhesive.
The normal procedure now is to bond the dop to the stone with super glue ready for cutting. However, I have found it very difficult to subsequently break the super glue bond if the stone is attached directly to the dop. The methods described in the literature for removal after transfer include heating, sharp blow on a hard object, a tuning fork and acetone. I have tried them all with the exception of the tuning fork reasoning that if the bond remains good while roughing out on a 150 grit lap then a tuning fork is not likely to have much effect on it. I will deal with the others later. To resolve the removal problem I have adopted an idea from Philippe Glastre. Because he uses wooden dops he coats the ends of his dops with wax before using the adhesive. This seemed to be an excellent idea for metal dops also. Now, I clean the dop, heat it and pick up a blob of hot wax which I then cool and flatten by placing it, dop vertical, on a cold piece of flat copper (any horizontal, flat cold surface would do equally well). The wax end is then cleaned off using the 45° table dop on an old 600 grit lap, taking care not to cut

U.S.F.G. Newsletter Vol. 09 No. 4 December, 1999
� too much wax away to reveal the metal dop. I will now bond this clean, square wax end to the stone with the super glue (See Fig. 1 ).
--- DOPSTICK
-- WAX -- SUPER GLUE
t237-STONE
Fig. 1 . Clean the stone with alcohol and apply one small spot of super glue to either the stone or the waxed dop. I have been using the Bostik Super Glue in a 5ml container, obtained from B&Q. I have used it on about a dozen stones and I guess the one bottle could do at least 100 stones. I bought this bottle about a year ago and there is no sign of any deterioration. You must know exactly where you want the dop positioned as the super glue goes off in about 5 seconds. With wax I could always warm the wax and move the dop if it was not exactly where you wanted it. Not so with super glue. I was actually very surprised how well the super glue bonded. In my experience, the problem is not with the bond but with breaking the bond after transfer. I have read that some super glues are prone to attack by water. To prevent any such problem I coat the joint with nail varnish which takes about half an hour to dry. The pavilion is now ready for cutting. When the pavilion has been cut and polished the stone needs to be transferred to cut the crown. This time fast setting epoxy is used in order to provide some support for the completed pavilion. I tend to use about as much Araldite as I would use if l was using wax, giving it a good fillet round the joint. I have been using CIBA rapid Araldite (R2) which comes in a twin plunger container, also bought from B&Q. This may be a little more expensive than the double tube pack but there is no fiddling with tops and equal quantities of adhesive and hardener are easy to measure. This sets up hard in about half an hour, but I invariably leave it overnight to harden. When hard it should not be possible to leave a nail mark in the Araldite. I have two reservations regarding this Araldite which I will come to in a moment. When the Araldite is set it is now time to remove the super glue bond. If you used the wax blob method detailed above there is no problem. With a heat sensitive stone just cut away the surplus wax with a hot knife, then heat the dopstick slightly to soften the wax between the end of the dop-
7
stick and the stone: no excessive heat, no problems. The method recommended by Coville (not using the wax blob) is to lower the super glue dop into a container of acetone until the acetone just covers the super glue bond. This is a real challenge, especially with small stones where the super glue bond is very close to the epoxy bond ( which is also affected by acetone). The two occasions that I did this the super glue bond did indeed release but the Araldite had become rubbery. I guess with the acetone vapour. This rubbery material had to be picked off and replaced with fresh Araldite before cutting could continue. Another method touted in the literature for breaking the super glue/metal/stone bond is by heating the original dop. I also tried this a couple of times. Each time very considerable heat was required and even with the stone wrapped in a wet cloth the Araldite on the opposite side of the stone was softened by the heat transferred across the stone. Clearly, if the stone being cut had been heat sensitive it would not have survived. In both cases the alignment was saved by returning the assembly to the transfer jig where the Araldite hardened after a few minutes. In neither case did the super glue bond break. Both were subsequently broken by fairly determined tapping on a glass bottle. The heating must have weakened the bond somewhat because no amount of reasonable tapping caused the unheated super glue bond to break. It could be that I am just timid when it comes to breaking a metal dopstick from a stone I have spent five hours cutting, but the thought of really walloping that dopstick in the hope that it will break cleanly away from the stone makes my hair stand on end. My two reservations about the Araldite are these: First, I don't believe that the acetone vapour in the jar dissolving the super glue bond should have affected the Araldite as extensively as it did; and secondly, from past experience and from the literature I would expect heat ( as transferred across the stone) to help cure the Araldite rather than soften it. I will be looking at other formulations of epoxy resin to see if these "deficiencies" can be eliminated. In the meanwhile using the wax blob method means that these deficiencies are not a problem. When the crown has been cut and polished, immerse the stone and Araldite bond in a small covered jar of paint stripper. All paint strippers have a base of dichloromethane which will dissolve the Araldite. Some paint strippers are formulated as a gel, for better adhesion to vertical surfaces. These are not ideal for our purpose. I use ''Nitro Mors" paint and varnish remover, again from B&Q, which is a liquid rather than a gel. I leave the stone in a sealed glass jar overnight, although it probably does not need this long. A clean up in alcohol completes the process. Please read and obsen-e all the precautions supplied with the commercial products mentioned in this article.
(From FACEI'ERS' STONECHA T. 3/98 via. NORTH YORK FACETING GUILD, 10/98)
U.S.F.G. Newsletter Vol. 9 No. 4 December, 1999
USFG ANNOUNCES A "SINGLE-STONE COMPETITION"
AND "WORLD CLASS FACETER"
TRAINING PROGRAM
The September issue of this newsletter referenced the WORLD CLASS FACETER program that the USFG is in the process on initiating (See the "Introductory Comments" in the article "A New Approach To Competition Judging" in the September issue). This current article describes the WORLD CLASS FACETER program in more detail and explains its relationship to the USFG's SINGLE-STONE COMPETITION program, also being introduced in this issue. Although the two programs have different "short.term rewards" for the participant, both are designed to produce faceters who can successfully compete in world class competitions. tA@\W�twtw�twt& A TIDS ARTICLE SERVES AS AN A I\D INVITATION � A FOR INTERESTED MEMBERS OF THE A � UNITED STATES FACETERS GUT..LD TO ft � ENTER THE SINGLE-STONE COMPETI-
I�
A TION.
A @'iw��� SINGLE-STONE COMPETITION PROGRAM Although the overall mission of the two programs is to produce faceters that can successfully compete in the "Australian Olympics," the SINGLE-STONE COMPETITION program is designed to accommodate faceters with current skills at the NOVICE, ADVANCED, or MASTERS categories. The SINGLE-STONE COMPETITION program, with NOVICE, ADVANCED and MASTERS categories, will be conducted as a typical single stone competition in which winners of the categories will be recognized and presented with awards (Note: these awards will acknowledge that the stone was judged according to world class standards). The SINGLE-STONE COMPETITION has three primary purposes related to the WORLD CLASS FACETER program: (1) To provide interested Guild members with a convenient and familiar format to become involved in improving their faceting skills; (2) To provide the participant with an initial measure of his/her faceting skill as evaluated by world class judging criteria and world class judges; and (3) To provide the USFG's PANEL OF EXAMINERS with a field of candidates from which to identify potential participants for the WORLD CLASS FACETER
8
program. Thus, the single-stone competition is the "stepping stone" for entry into the WORLD CLASS FACETER program. As currently planned, a number of the top scorers in each category of the SINGLE-STONE COMPETfflON program will be offered the opportunity ( and indeed encouraged) to participate in the WORLD CLASS FACETER program. But winners or high scorers in the SINGLESTONE COMPETITION are under no obligation to move into the WORLD CLASS FACETER program. HOWEVER, ALL PARTICIPANTS IN THE WORLD CLASS FACETER PROGRAM ARE REQUIRED TO QUALIFY BY ENTERING STONES IN THE SINGLESTONE COMPETITION PROGRAM.
Participants in the SINGLE-STONE COMPETITION should carefully consider the category most appropriate for their current skills. By entering a category in which the cutting difficulty exceeds the participant's cutting skill, the resulting score may position the participant below a "cut-off score" that will be the minimum score for acceptance into the WORLD CLASS FACETER program. It is recommended that participants who have placed in the high 90's in the ADVANCED or MASTERS categories in local or regional competitions enter one or the other of the same categories, primarily because their skills will probably be commensurate with the designs required for these categories. However, participants are free to enter the category of their choice. A participant may enter only ONE of the three categories. Since the USFG wishes to accommodate all faceters regardless of their current skill level, all beginning faceters, whether or not having won or placed high in the NOVICE category in a local or regional competition, are encouraged to enter the NOVICE category. It is important to take special note of the second item in the foregoing three purposes of the SINGLE-STONE COMPETITION, i.e., the judging will be maintained at the world class level , which in everyday terms means that the judges will be extraordinarily "picky." This feature is likely to result in markedly different stone scores than some competitors have previously experienced, but should not be considered a deterrent for participants. There will still be top scorers in all three categories in the SINGLE-STONE COMPETITION; however, the highest scorer in each category will be recognized and awarded a trophy. Actually, it can be considered that there will be multiple winners in each category because of the opportunity provided to advance into the WORLD CLASS FACETER program It must be stressed that submitting a stone in any one of the SINGLE-STONE COMPETITION categories will not

U.S.F.G. Newsletter Vol. 9- --No. 4 December, 1999
USFG ANNOUNCES necessarily restrict a WORLD CLASS FACETER trainee's cutting efforts to stones in that category of difficulty. The single-stone competition categories are only an aid which the PANEL OF EXAMINERS will use to determine which level of design-difficulty will be suggested for the trainees that advance to the WORLD CLASS FACETER program. (More on this in a following section). STONE REQUIREMENTS
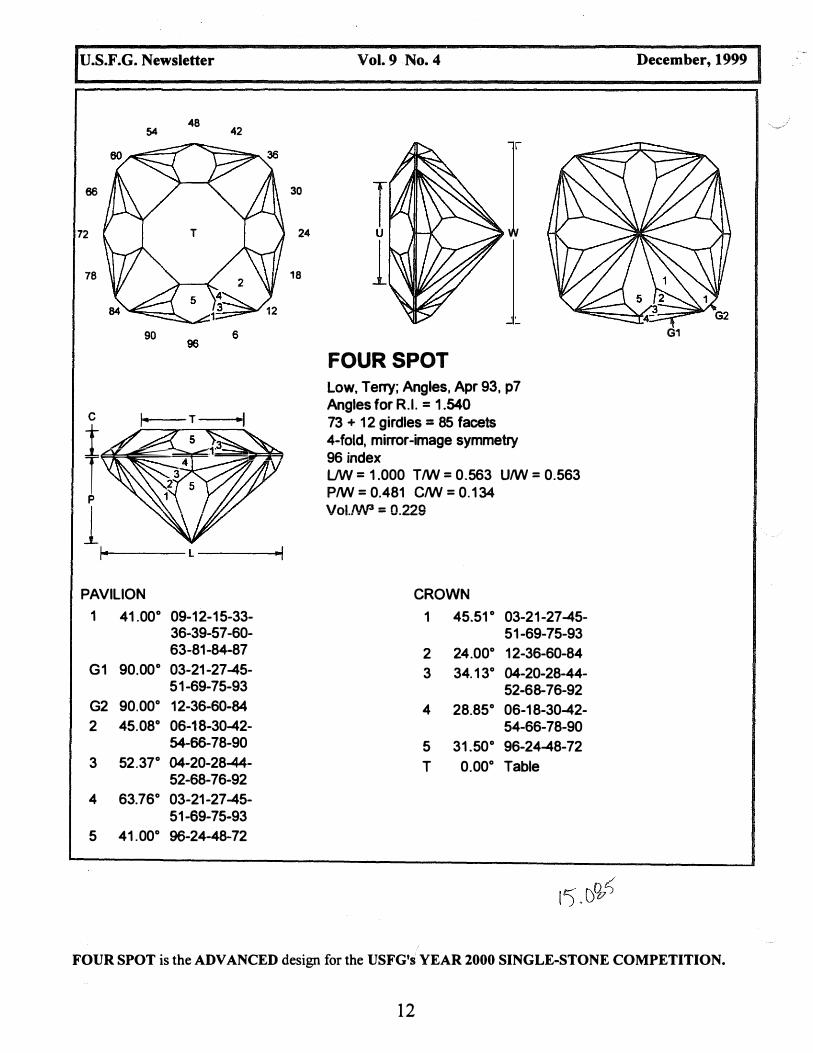
Patterns for three categories ( as diagramed on pages 1 1 , 12 and 13) are: NOVICE: DART. Material to be quartz, clear or any color. ADVANCED: FOUR SPOT. Material to be quartz, clear or any color. MASTERS: EAGLE EYE. Material to be topaz, clear or any color. STONE WIDTH for all categories is to be from 10 to 14mm. LENGTH/WIDTH ratio for all categories to be within plus or minus 0.1mm.
SHIPPING AND HANDLING 1 . Place the stone in a round plastic gemstone display cup with foam insert and cap. 2. Place the following in a bubble-protected envelope:
The display cup containing the stone; A bubble-protected self-addressed and stamped envelope (For returning the stone to the cutter); A $20 check or money order made out to Charles L. Moon (entry fee).
3. Mail the package to: Charles L. Moon 1 55 Myrtle Ct. Arcata, CA 95521 -65 1 1
4. At the participant's discretion, packages should be sent by certified mail and/or insured. 5. Stones will be returned to the participant in the manner selected by the participant as in 4 above.
9
6. THE POSTMARK DEADLINE FOR SUBMITIING INITIAL STONES IS JUNE 20, 2000. Mr. Moon will code the stone (for anonymity), repack and send to a selected judge. The judged stone and comprehensive "mark-up sheet" will be returned to Mr. Moon who will decode, repackage the stone with score sheet and return to the individual contestant. WORLD CLASS FACETER PROGRAM The WORLD CLASS FACETER program has one goal for its participants: to prepare the participant to successfully participate in the Australian International Faceting Competition. The USFG considers that goal to be achievable by participants who the Guild's PANEL OF EXAMINERS certify as having achieved WORLD CLASS FACETER skills. The program is intended to be an exercise in which the WORLD CLASS FACETER trainee will participate in a series of "stone cutting/stone evaluation" cycles which will be designed to develop the trainee's faceting skill to a level that produces world class competition stones. The program's procedures, judging rules, judging expertise, and skill-improvement guidance will operate under the auspices of several USFG members (i.e., PANEL OF EXAMINERS) who have competed in the biannual Australian world class faceting competitions and thus have first-hand knowledge and expectations for "coaching" faceters to achieve world class perfection. However, the program is not designed to advance a student's faceting-skills stepwise through the traditional faceting-skill categories (i.e., novice, intermediate, advanced, masters). Rather, as stated in the September USFG Newsletter, the only skill level to be achieved by a student is certification as a WORLD CLASS FACETER. Thus, whether a student's cutting skills are currently at the NOVICE, ADVANCED or MASTERS level, the student can advance to WORLD CLASS FACETER certification as quickly as his/her skills develop to that level. There is no specific number of stones that a student will be offered to cut. Neither is there a "skillachievement" time-limit deadline that a student should adhere to. The step-wise cutting sequence of increasing design difficulty will be entirely under the control and advice of the Guild's world class PANEL OF EXAMINERS. The general sequence of training will be as follows: 1. The PANEL OF EXAMINERS will assign a trainee a stone design to be cut ( the initial design difficulty will be based on the quality and design difficulty of the trainee's submission in the SINGLE-STONE COMPETITION). 2. The trainee will cut the stone and send it to the "panel." 3. The "panel" will:

U.S.F.Ge Newsletter Vol. 9 No. 4 December, 1999
USFG ANNOUNCES A. Evaluate the technical quality of the stone; B. Return the stone to the trainee with a detailed critique of cutting-skill improvements that are needed; C. Supply the trainee with a new stone design to be cut.
Although the program is designed to advise the student on faceting skills that need improvemen4 the standard to which all stones will be compared is a world class level score of 99. This stone-score is demanding, but 99 is the minimum technical level that a stone must exhibit to be competitive in the Australian competitions. However, it must be stressed that initial skill levels which fall short of this world class level of perfection will not be adversely or non-benevolently viewed by the PANEL OF EXAMINERS. Rather, it is the progress of technical quality in the stones that the panel will be evaluating. The WORLD CLASS FACETER training will be conducted as a "private assessment" program under the guidance of a PANEL OF EXAMINERS as described in the December 1998 issue of this newsletter. The following is an excerpt of the pertinent parts from the "private assessment" article:
The core of this PRIVATE STONE ASSESSMENT program is a procedure wherein stones are sent to qualified faceters who will examine the stones within the format of features that are specified in the USFG's newly promulgated rules for judging competition stones. But the conclusions of the examination will not be based on the traditional numerical scoring of competitions. Rather, the conclusions will be documented in a "mark-up" sheet with detailed comments which will clearly indicate those features of the stone that require improved skills. In this manner, the faceter is not faced with a numerical score and cursory verbiage that conveys little or no information on the specific faceting skills that need to be improved. Furthermore, the "non-competition" environment in which the assessment will be conducted is just what the title implies, private, and thus removes, for the most Pfil4 any fear that the stone will cause some assault on pride-of-accomplishment. The program is a one-on-one arrangement but with complete anonymity between the faceter and the examiner. The following is a excerpt of the pertinent parts from the PANEL OF EXAMINERS article:
The USFG BOARD OF DIRECTORS takes great pleasure in announcing the creation of a PANEL
1 0
OF EXAMINERS and the appointment of a blueribbon group of the Guild's members to that panel. The PANEL OF EXAMINERS establishes the cornerstone of the Guild's new program to increase the faceting skills of its members by providing a forum for the PRIVATE STONE ASSESSMENT of their faceting skills. The PANEL OF EXAMINERS is currently composed of nine members, who, listed in alphabetical order are: Paul Ahlsted4 Jim Ball, Walter Carss, Charles Covill, Don Dunn, Ewing Evans, Glenn Klein, Ralph Mathewson, Jill Rowland. The achievements of this group of individuals in the arena of competition faceting clearly justifies the Board in referring to them as a Blue-ribbon panel that is eminently qualified to perform the judging responsibilities of the private stone assessment program. Six of these examiners have distinguished themselves as winners in the International Faceting Challenge (The Australian Olympics of Faceting), not just once but many times during the past five bi-annual competitions from 1990 through 1998. Tnese six, plus u'ie other examiners were winners in every possible USA competition whether the competition was a Guild or Professional (AGTA) competition. Everyone of these evaluators have published their own designs; one person is a well known designer. All of the examiners are teachers of faceting and all have been evaluators in past Guild competitions in the USA. To have one of your stones assessed by any one of these evaluators will truly be an outstanding learning experience.
The names of trainees who have been selected for the WORLD CLASS FACETER program will be announced in the first newsletter issue published after the judging in the SINGLE-STONE COMPETITION is completed. The training program will also begin at that time and procedures for the training program will be detailed. FUTURE COMPEITI10N AND TRAINING PROGRAMS As currently planned! the USFG will conduct a SINGLE STONE COMPETITION and start a new WORLD CLASS TRAINING group each year. New members of the USFG or those who do not enter the current competition will thus have the opportunity to enter the competition and compete for a position in the WORLD CLASS FACETER program.

U.S.F.G. Newsletter
96
72
48
1--- u ----I
L •I
PAVILION
P1 90.00° 96-08-1 6-24-32-40-48-56-64-72-80-88
P2 50.60° 08-24-40-56-72-88
P3 43.30° 96-16-32-48-64-80
P4 41 .00° 08-24-40-56-72-88
24
Vol •. 9 . .. No. . 4 December, 1999
w
P1
DART Stanoyev, Bill ; 1 993 NW/International Conference Novice cut. First published for a "72" index high RI in FACETS, Jul 86. This is Rl=1 .54 and 96 index. Angles for R. I. = 1 .540 37 + 12 girdles = 49 facets 6-fold radial symmetry 96 index l/W = 1 .000 T/W = 0.585 U/W = 0.506 P/W = 0.450 C/W = 0. 1 59 Vol.lW3 = 0 .2 17
CROWN
C1 42.00° 96-16-32-48-64·80
C2 35.00° 08-24-40-56-72-88
C3 20.00° 08-24-40-56-72-88
C4 0.00° Table
Note that the pavilion contains two groups of facets that have no meet points and thus must be positioned by eye. Summetry of this placement is thus critical.
DART is the NOVICE design for the USFG's YEAR 2000 SINGLE-STONE COMPETITION.
1 1
U.S.F.G. Newsletter
54 48
42
66
72
78
90
C ,_. T 11f r����
PAVILION
1 41 .00° 09-12-1 5-33-36-39-57-60-63-81-84-87
G1 90.00° 03-21 -27-45-51 -69-75-93
G2 90.00° 12-36-60-84
2 45.08° 06-1 8-30-42-54-66-78-90
3 52 .37° 04-20-28-44-52-68-76-92
4 63.76° 03-21 -27-45-51 -69-75-93
5 41 .00° 96-24-48-72
30
24
18
Vol. 9 . . No. 4
w
FOUR SPOT
Low, Terry; Angles, Apr 93, p7 Angles for R.I . = 1 .540 73 + 1 2 girdles = 85 facets 4-fold, mirror-image symmetry 96 index l/W = 1 .000 T/W = 0.563 U/W = 0.563 P/W = 0.481 C/W = 0. 1 34 Vol./W3 = 0.229
CROWN
1 45.51 ° 03-21 -27-45-51 -69-75-93
2 24.00° 1 2-36-60-84
3 34. 1 3° 04-20-28-44-52-68-76-92
4 28.85° 06-1 8-30-42-54-66-78-90
5 31 .50° 96-24-48-72
T 0.00° Table
December, 1999
G1
FOUR SPOT is the ADVANCED design for the USFG's YEAR 2000 SINGLE-STONE COMPETITION.
1 2
U.S.F.G. Newsletter
1 8
24
30
T
C
6 90
42 54 48
.-1.. ��======::======��
I l_
----- L -----J
PAVILION
78
72
66
T I u f-*-+f-.:::::::::::==::�� w
1��---¥' G1
l
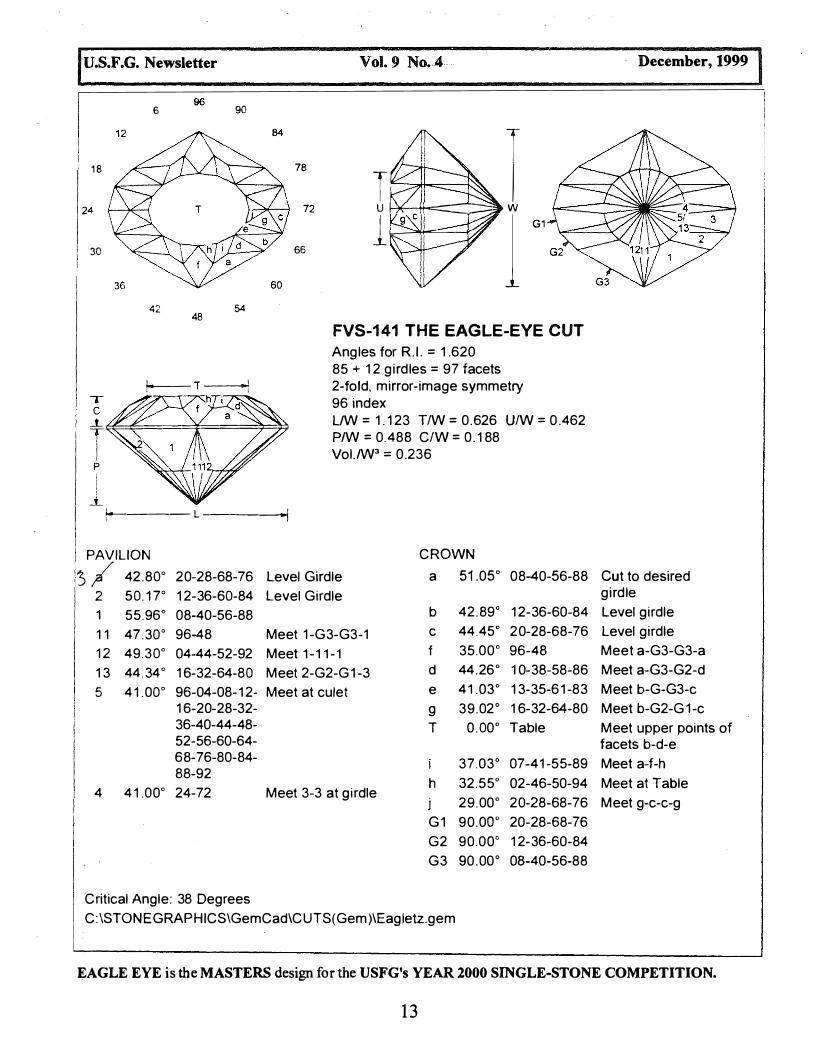
FVS-1 41 THE EAGLE-EYE CUT
Angles for R. I . = 1 .620 85 + 1 2 g ird les = 97 facets 2-fold, mirror-image symmetry 96 index L/W = 1 . 1 23 T/W = 0 .626 U/W = 0 .462 P/W = 0.488 C/W = 0 . 1 88 Vol . /W3 = 0 .236
CROWN
December, 1999
3 / 42 .80° 20-28-68-76 Level Girdle a 51 .05° 08-40-56-88 Cut to desired 2 50 . 1 7° 1 2-36-60-84 Level Girdle 1 55 .96° 08-40-56-88 1 1 47 . 30 ° 96-48 Meet 1 -G3-G3-1 1 2 49 .30° 04-44-52-92 Meet 1 - 1 1 - 1 1 3 44 . 34 ° 1 6-32-64-80 Meet 2-G2-G 1 -3 5
4
4 1 .00° 96-04-08- 1 2- Meet at culet 1 6-20-28-32-36-40-44-48-52-56-60-64-68-76-80-84-88-92
4 1 .00° 24-72 Meet 3-3 at g i rdle
g ird le b 42 . 89° 1 2-36-60-84 Level girdle c 44 .45° 20-28-68-76 Level girdle f 35 .00 ° 96-48 Meet a-G3-G3-a d 44 .26 ° 1 0-38-58-86 Meet a-G3-G2-d e 4 1 . 03 ° 1 3-35-6 1 -83 Meet b-G-G3-c g 39 .02 ° 1 6-32-64-80 Meet b-G2-G 1 -c T 0 . 00 ° Table Meet upper points of
facets b-d-e 37 .03° 07-4 1 -55-89 Meet a-f-h
h 32 .55° 02-46-50-94 Meet at Table J 29 .00 ° 20-28-68-76 Meet g-c-c-g G 1 90 .00 ° 20-28-68-76 G2 90.00 ° 1 2-36-60-84 G3 90 .00 ° 08-40-56-88
Critical Angle: 38 Degrees C : \STONEGRAPHICS\GemCad\CUTS(Gem)\Eagletz.gem
EAGLE EYE is the MASTERS design for the USFG's YEAR 2000 SINGLE-STONE COMPETITION.
1 3
U.S.F.G. Newsletter Vol. 9 No. 4 December, 1999
RECOGNIZING FLAWS IN
GEMSTONE ROUGH
by Des Bumpstead One of the frustrations of faceting is when, having cut your gem to prepolish stage or even starting to polish, you find flaws or inclusions you did not see in the rough. Wouldn't it be an advantage to be able to see these internal features before you started cutting? I feel the use of immersion fluids is a much neglected aid in helping to identify flaws and inclusions in gem rough. If you can see these in the rough, you can map your gem to position them so they are hidden under the girdle facets, and not in the table or pavilion where they can be seen and spoil the optical performance of the finished stone. To quote an old saying, "To be forewarned is to be forearmed." What are Immersion Fluids? They are fluids which have a similar optical density to your rough, therefore they have a similar refractive index to the gem rough you want to examine. The Use of Immersion Fluids. The majority of transparent gem rough is either frosted through being tumbled on a riverbed, or covered with irregular fractures. This makes it difficult, if not impossible, to identify by eye internal features such as patches of colour, inclusion, fractures, etc. Immersion fluids help overcome this problem. Ideally the fluid should have a refractive index within + 0.1 of the material to be studied, but a fluid with a greater variation than this is still quite satisfactory. Even water is better than nothing. A liquid at least fills the small pits on the surface, giving a smooth surface that helps stop the scattering of light, allowing some internal viewing. Given the principle that light will travel in a straight line so long as it is travelling in a medium of constant optical density, these fluids with a refractive index similar to the gem rough being studied, permit the light to enter the rough as if the two were a constant medium, filling the surface irregularities. If the rough is at or near the refractive index of the fluid, its outline will become barely discernible or may disappear. Nothing is visible unless an inclusion or fracture interferes with the straight light ray. This interference causes the light to reflect off these surfaces, or refract through them, allowing them to become visible. Colour zoning and colour patches are best seen by this method.
14
Fluids That Can be Used. Many of the commercial immersion fluids are costly and can be hazardous if not used correctly. However there are many safe fluids you can use that are normally found in the home or the workshop. Here is a list of some examples:
FLUID REFRACTIVE INDEX WATER 1 .33
RANGE
BRAKE FLUID 1 .44 FLUORITE 1 .43-0UARTZ 1 .55 TURPENTINE, KEROSENE, MINERAL OIL, BABY OIL 1 .46 FLUORITE 1 .43-0UARTZ 1 .55 GLYCERINE, COOKING OIL, OLIVE OIL, ETC. 1 .47 FLUORITE 1 .43--0UARTZ 1 .55 OIL OF CLOVES 1 .52 FLUORITE 1 .43--0UARTZ 1 .55 OIL OF CINNAMON 1 .58 QUARTZ 1.55-TOPAZ 1 .63 SPINEL 1 .73 How to Use Immersion Fluids. Use a small wide-mouthed jar and add enough fluid to completely cover the rough you wish to examine. Hold the piece of rough in locking tweezers and immerse it into the fluid. Hold the jar with the immersed rough up to the rim of a shaded light. This will allow the light to illuminate the jar and its contents. Your head must be above the rim of the light to shade your eyes. Now, if the immersion fluid is near the RI of the material, it [the material] will virtually disappear. By rotating the tweezers holding the rough, any inclusions will become visible, as described above. Another method of using immersion fluids, though not as satisfactory, is to put a drop on the rough and rub it over the surface. This fills the pits and uneven surfaces. Being close to the RI of the material, it gives a polish-like surface, allowing you to see into the rough. Now examine the material under the rim of the light as described previously. NOTE. The outline of the rough can only disappear if the rough is colourless. When it is coloured, you can still see the colour. For this reason, immersion fluids are ideal for orienting patches of colour banding in the gem.
(From FACET TALK, March/April, 1999)
U.S.F.G. Newsletter Vol • . 9 - -No. 4 December, 1999
THOUGHTS ON A NEW STONE
DESIGN CLASSIFICATION SYSTEM
By Fred Vansant
(See the design descriptions on pages 16, 17 and 18)
As well known, John Franke has updated Datavue2, to bring it current to January I , 1999. In corresponding with John by e-mail, I mentioned running across a design with my name on it which I did not do. It was the 41.029, the "CBS Brooklyn Bridge", which also appeared as 41.059 by Jerry Capps. In conjunction with this needed correction were two other corrections that needed to be made. Our discussion led to a need for a set of guidelines to assist the database cataloguer in putting designs into the proper shape classes. Recently I set about writing these, but as the complications grew I gave up in frustration, and understood why Norm Steele never did it either. For example, where do you draw the line between a Keystone (19) and a Trapeze (24) shape--the only difference is that the Keystone is taller. Or how should one mark the difference between a Shield (23) and a Calfs Head (26)? These are but two of many problems. It appeared to me that the amount of work, the large number of decisions and exceptions, and the fact that with the best guidelines the system would still be prone to errors, all indicated that it would be far easier and more efficient in the long run to simplify and rewrite the whole system.
Some years ago I did write a new shape classification system, but it was too complicated for use by persons who were not being paid to put in the time required to make it work, and so was not practical in the present circumstances. But that work taught me the importance of girdle facets which can be counted.
This later new DESIGN CLASSIFICATION system is much simpler, even than the one in current use. It is easy to understand, and easy to place designs into the proper class. You will notice that in each of the 23 and higher classes there will be a variety of different shapes, which is why this is not called a Shape Classification System as it started out to be, but is called a Design Classification System instead. I had a difficult time getting over the idea that designs had to be classified by their SHAPE, and you may also find that troubling. But once you get over that hurdle, the system becomes easy to visualize. Because shapes do merge gradually from one into the other we can never have distinct design classes until we abandon the idea of classifying designs by their shapes. The basic distinction here is the number of girdle facets.
1 5
Notice that there are no provisions yet for designs without a girdle, such as circular pendants and spheres.
Most of the class examples were made from designs reduced to their outlines, but in some instances I left in the pavilion or crown lines to help in counting the number of girdle facets. Anyway, the examples are not final. For all of these shapes the proper class number can be determined even if the stone is mounted. There will be a problem where the shape is almost round but not quite, but I think that problem would occur with any system one could devise.
I think the conversion of design numbers from Datavue2 into this new system could be easily made; it would be time consuming but there should be no major problems. The sequencing of numbers after the decimal should be chronological, as with Datavue2, so older design had lower numbers.
The restriction on the corner index for cut-corner squares and rectangles is to prevent their merging with the barrel shapes.
The format of the design numbers (XX.XXX) would be the same as used in the current system, so those would be the only changes needed for this system to run under GemLib. Of course the bit maps would reauire changing to match.
�
FOR OUR MEMBERS WITH
E-MAIL CAPABILITY Just wanted to let you know that all of us are NOW blessed not only with the original "Faceting Digest,' the Gemking Digest , but now a new one, sponsored by the AFMS. Hopefully, all of you will get involved with contributing and lurking on all three networks; there's great faceting information out there for all of us. Here are their respective e-mail addresses:
"Faceters Digest Members" [email protected],
managed by Don Clark;
"Gemking Daily Digest" [email protected], managed by Paul Ahlstedt; and
"AFMS Faceters List" [email protected], managed by Bob Keller.

U.S.F .G. Newsletter Vol. 9 No. 4 December, 1999
THOUGHTS
01 All round designs whose crown and pavilion points do not l ine up across the gird le, and therefor MUST have rol led gird les . Even if the original design shows a rol led girdle , if the g ird le can be faceted it will be treated as if it were a faceted g i rd le . - ---- -----> 0 o 2 A s above f o r n o n - ro u n d s h ap e s - - - - - - - - - - - - - - - - - - - - - - - - - - - - - - - - - - - > Q 0 3 thru 1 2, 1 9, 20 : Al l s ides are even length and a l l g irdle poi nts l ie on a c i rcle .
0 3
0 4
0 5
0 6
0 7
0 8
0 9
1 0
1 1
1 2
- - - - - - - - - - - - - - - - - - - - - - - - - - - - - - - - - > � D Tr i a n g l e : l s o c e l e s o n l y
S q u a r e - - - - - - - - - - - - - - - - - - - - - - - - - - - - - - - - - ->
P e n t a g o n - - - - - - - - - - - - - - - - - - - - - - - >
Hexagon --> Q H e ptag o n - - - - - - - - > 0
- - - - - - - - - - - - - - - - - - > �
- -::: : : : : : : : : : : : : �:� :����� - -�> 0 _ _ _ _ _ _ _ _ _ _ _ _ _ _ _ _ : _ _ _ _ _ _ _ _ _ _ _ _ _ _ _ _ _ _ _ _ _ _ _
> �
O ct a g o n
N o n a g o n
D e c a g o n
U n d e c a g o n
D o d e c a g o n - - - - - - - - - - - - - - - - - - - - - - - - - - - - - - - - - - - - - - - - - - - - - - - > 0 1 3 thru 1 8 are same as 0 3 thru 0 8 except they have added cut corners. The c ut corners m ust be smaller than the main sides, and they must all be uniform as to size and indexing . All points will lie on a circle. S ides wi l l be of two l engths on ly LJ Corner i ndex sp l its adjacent ind ices even ly.
: : : �: c:::::r
Tr
:::�:e
- - -
::: : : : : : :�- - - - - - - - - - - > D 1 s C ut - C o r n e r P e n t a g o n - - - - - - - - - - - - - - - - - - - - - - - - - - > 0
C u t - C o r n e r H e x a g o n - - - - - - - - - - - - - - - - - - - - - - - - - - - - - - - - - - - > 0 1 6
C ut-C orner H e ptagon - - - - - - - > 0 C u t - C o r n e r O cta g o n - - - - - - - - - - - - - - - - - - > 0
0 Rounds : 1 3 , 1 4 , 1 5 , and 1 6 s ides -- - - - - - - - - - -- - -- - - - ->
R ou n d s : M ore t h a n s ixtee n s i d es - - - - - - - - - - - - - - - - - - - - - - - - - - - - - - - - >
Also contains rounds with more than eight sides having cut corners.
1 7
1 8
1 9
0 2 0
2 1 Recta n g le - - - - - - - > D 2 2 C ut-C o rn e r R e cta n g le - - - - - - - > 0
1 6
Corners are smaller than ends. Comer index splits adjacent indices evenly. Sides will be of three lengths only.
U.S.F .G. Newsletter Vol. 9 No. 4 December, 1999
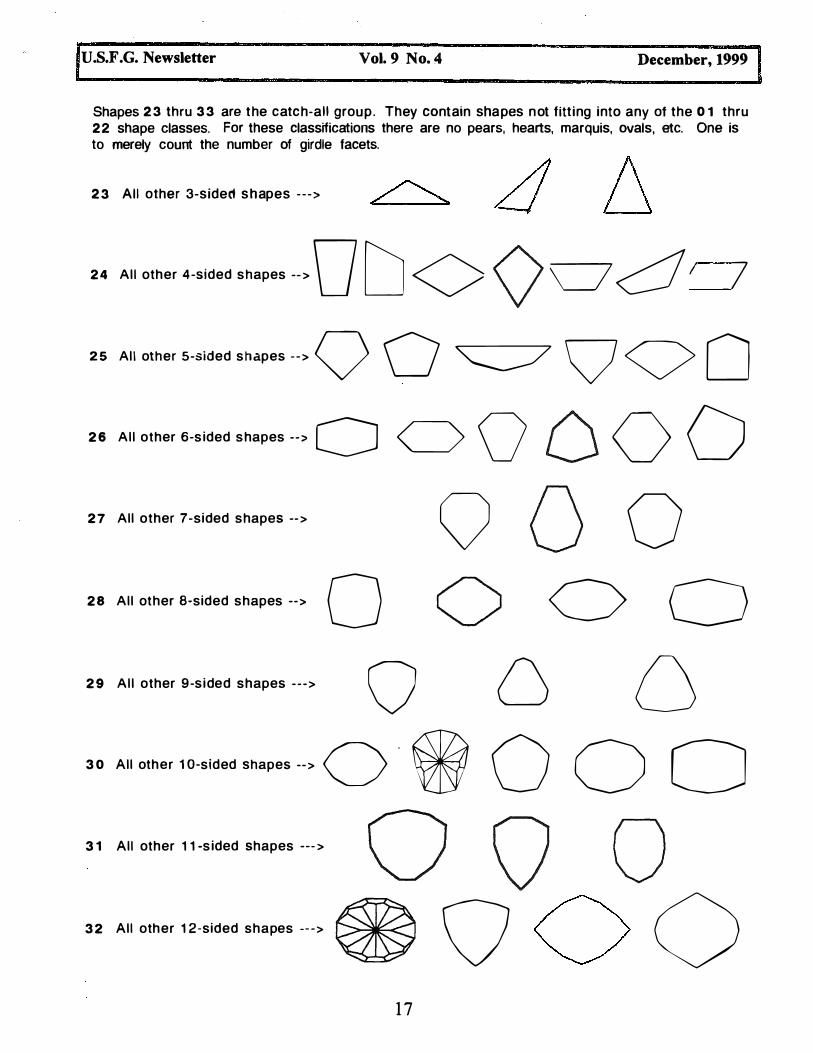
Shapes 2 3 thru 3 3 are the catch-all group . They contain shapes not fitt ing into any of the o 1 thru 22 shape classes. For these classifications there are no pears, hearts, marquis, ovals, etc. One is to merely count the number of girdle facets.
2 3 Al l other 3-sided shapes - - ->
2 4 Al l other 4-Sided shapes -- > 0 D O <)'(JO I /
2 5 Al l other 5-sided shapes - -> Q O � Q
Q 0
2 6 Al l other 6-s ided s hapes -- > 0 C) 0 0 0 0
2 7 Al l other 7-sided shapes -- > Q O 0 2 8 Al l other a-sided shapes --> 0 0 0 0
2 9 Al l other 9-s ided shapes - - -> 0 LJ Q 3 0 Al l other 1 0-sided shapes -- > 0 . @ 0 0 0 3 1 Al l other 1 1 -s ided shapes --- > 0 Q 0 3 2 Al l other 1 2-sided shapes -- -> � Q 0
1 7

U.S.F.G. Newsletter Vol. 9 No •. 4 December, 1999 I
3 3 A l l other 1 3-sided shapes ---> o O O *
3 4 Al l other 1 4-sided shapes ---> 0 0 0 3 5 All other 1 5-s ided shapes - - - ,Q O 0 36 Al l other 1 6-sided shapes --- > @ 0 3 7 Al l other 1 7-sided shapes --->
3 8 Al l other 1 8-sided shapes - - -> 0 3 9 Al l other 1 9-sided shapes -- ->
4 0 A l l other 20-sided shapes - - -> -
4 1 , 4 2 , Etc . contain all other 21 and 22 sided shapes, and so on for as many classes as are needed. This system is simple and easy to remember, and can be applied by anyone immediately upon
seeing that other than c lasses o 1 , o 2 , 2 1 , and 2 2 there are on ly three main groups--g roup 1 based on the circle, group 2 same with cut corners , and group 3 based on number of g irdle facets. The problems of one shape gradually merging into another are eliminated. Those that have been merging are usually found in the same new class , such as the four-sided "Trapeze" and the foursided "Keystone11 in class 2 4 . The shapes cal led Pear, Heart, Marquis, Shield, etc. are eliminated for classification purposes, but they would of course continue to be used for descriptions.
It takes 3 l ines to enclose a space , and all three main g roups start w ith a "3 " -- - 03 , 1 3 , and 23; this makes memorizing easy.
1 8

U.S.F.G. Newsletter Vol. 9 No. 4 December, 1999
USFG FACETING DICTIONARY Jan. 15, 1994, by Fred Van Sant Revised Sept. 15, 1999
(Note: For terms dealing with crystal structure, geology, and other such technical subjects, see a textbook.) Adjacent Facets: Two facets on a stone which fonn a line between them. If facet A shares a line with facet B they are adjacent. Alignment: The positioning of the crown break facets across from the pavilion break facets, as they are shown on the diagram sheet. Angle: Used alone, "angle" refers to the angle which a facet makes with the girdle plane. Angle of Incidence: A ray striking a facet's surface at 90°
has an angle of incidence of zero; its deviation from 90° is its angle of incidence. Apex: A single point on the crown farthest from the girdle plane. Apex Facets: All facets meeting at the Apex. If there is a Line Apex, then these are both facets forming the line plus all facets meeting at either of the two points on the end of the line. Arc: A smoothly curving line which is a segment of a circle. The term "arc" usually refers to a girdle section made using an offset device. Baguette: A small step-cut stone, usually set in a row around a larger stone. Barion Cut: A type of cut that retains the brilliant type culet area by having steep half-moon facets hanging down from the girdle. The crown is often a step-cut. Baroque, or Freeform: A stone which is non-symmetrical in shape, and lacks repetition of a pattern of facets at regular intervals. It has neither rotational nor mirror-image symmetry. Bearing, Bearing Angle: The angle of a facet's nonnal intercept, as measured on the girdle plane. This is also called the "Circumference Angle", and is used mainly for describing girdle facets. The Zero Degrees line lies on the X axis, to the right of the Point of Origin. On faceting machines, the bearing angle is the tooth of an index gear times DPI. Breakpoint Method: A special sequence of meetpoint cutting which makes the shape. A set of facets is cut to a center
1 9
point. Then a set of Break Facets is cut in a chaining manner. Then a set of 90° girdle facets is cut using the Break Facets' index numbers, to make a level girdle line. This produces the shape. Brightness: The amount of light returned back through the crown, expressed as a percentage of the light which entered the crown. The determination of brightness may be expressed as a subjective evaluation, or as the result of a computer analysis; in the latter case it is relative to the lighting model used and other program characteristics. Brilliance: A general term used to describe a stone's overall appearance. It always includes Brightness, and often includes Color Spread or Scintillation. C: The height of the crown as shown on the diagram sheet. It is measured parallel to the vertical axis of the stone CAM: The �enterpoint Angle Method of making a preform. 1 ) Facets are cut to a temporary centered culet point at given angles and indexes. 2) The dop arm is then set parallel to the lap (90° on protractor), and facets are cut using the same index numbers to make a level line around the stone. This results in the desired prefonn shape. CAM Facets: The sets of facets--their angles and indexes-which are used to make the CAM preform. Carat: A unit of weight. Equals 1/5 of a gram, or 200 milligrams, or 100 points. CEO: Center-to-Edge Distance. This refers mainly to a girdle facet, and is the length of its normal intercept on the girdle plane. Cheater: A bearing angle adjustment which allows "indexing" between teeth. This is usually a worm gear with a knob that is turned by hand. Chip: A break-out of material from the surface of the stone. Circumference Angle: See Bearing Angle. CLAM: The kOmer Locator ,Angle Method for locating a comer on a preform. For the pavilion, two temporary facets make a line from cul et to comer. Color Spread: The spreading out of white light rays into various colors after they enter the crown and as they pass through the stone. Cone: A rolled facet shaped like a cone, whose point is centered on the dop arm axis. Cone Point: The �of a cone, usually made to serve as a temporary or permanent center point at the culet.

U.S.F.G. Newsletter Vol. 9 No. 4 December, 1999
DICTIONARY Continuous Girdle: One which has no vertical break line, as in an oval or circular stone where the entire girdle is polished by rolling the stone on the lap. Critical Angle: The angle of incidence at which total reflection occurs. At the surface of two differing mediums, usually the gem material and air, if the light ray is below the critical angle of incidence, light will pass from one medium to the other. See Angle of Incidence. Crown: That part of the stone above the girdle. Culet: I ) A small facet parallel to the girdle plane made to prevent chipping the culet point; 2) A single point on the pavilion farthest from the girdle plane; 3) A bottom line on the pavilion parallel to the girdle plane (also called culet line); 4) Definition 2 or 3 plus the facets attached - the area of the cul et. Culet Facets: All facets meeting at the culet. If there is a Line Culet, then these are both facets forming the line plus all facets meeting at either of the points on the end of the line. DPT: ]2egrees fer Iooth: This is equal to 360 divided by the Gear Number Direction: The rotational direction in which the index numbers increase in magnitude on the diagram sheet. It is either Clockwise (CW) or Counterclockwise (CCW). The highest number on the index gear normally lies on the Y axis of the plan view. Dispersion: Gemology--See dispersion charts for various minerals. Generally--the degree to which white light passing through the stone is changed into various colors; "Color Spread" is preferable for describing finished cut stone performance. Double Rose Cut: Same as Rose Cut but having a pavilion which is shallow like the crown and usually is a duplicate of the crown pattern. ECED: ffiqual �enter to �ge ]2istance) This term refers to the length of an imaginary line on the girdle plane which extends from the center of the girdle plane to connect at 90 degrees with a girdle facet, as seen in a plan view. A design labeled ECED indicates the stone can be preformed at a single mast height setting. See also Normal Intercept. Elevation: The height of a point above the girdle plane. In discussing pavilion points, assume stone is held upside down as you would normally do when examining the pavilion, so all point elevations are positive. Elevation Angle: The angle a plane or facet makes with the
20
girdle plane. See also Angle. Ellipse: A curving line whose every point conforms to a precise mathematical formula. Elliptical: A stone shape whose perimeter is an ellipse. Facet: Any bounded surface on the stone. A facet is not a plane, but flat facets are small areas of the plane on which they lie. Facet Edge: See Line. Faceted Girdle: A girdle made up of a series of flat facets. In the plan view they appear as a series of straight lines. Fixed Point: Any point where four or more facets meet (as opposed to Floating Point). Fisheye: If the stone is held closely over newsprint which can be read by looking straight down through the table and through the main culet facets, it is a fisheye. Flatness: If a facet is perfectly flat, the entire surface of the facet lies on a single geometrical plane. If any part of the facet curves away from the exact plane, it is calied "rounding." If a break line is seen on the facet's surface it is not flat--it is called a "double-facet." Flaws: These are visible cleavage planes, fractures, inclusions, gas bubbles, etc. If a flaw breaks the surface it becomes a surface flaw. Floating Facet: A facet whose perimeter points are all floating points. The facet is not anchored to a fixed point, so its size is adjustable. Floating Point: A point formed by only three facets ( as opposed to Fixed Point). Four-Part Design: A stone whose facet pattern consists of four quarters which mirror each other BOTH left/right AND top/bottom in the plan view, such as the Oval, Square, Rectangle, Lozenge, and Marquis. It has a symmetry of2Y or 4N. Freeform: See Baroque. Gear Number: The number of teeth on the index gear; the highest numbered tooth on the gear. Girdle: The girdle is a thin cross-section of the stone situated between the crown and the pavilion and at 90 degrees to the vertical axis. Its perimeter may be faceted or continuous or a combination of both, and is usually parallel to the vertical axis.

U.S.F.G. Newsletter Vol • . 9 .... No. 4 December, 1999
DICTIONARY Girdle Plane: A theoretical plane inside the stone in the center of the girdle, at 90 degrees to the vertical axis. Gram: The unit weight of the metric system. 1 gram = 5 carats = 1000 milligrams. G V F: The Qirdle Yolume E.actor; a mathematical constant used to determine the volume of the girdle. Girdle Volume = GVF x W x W x W, based on the girdle thickness being 2% of W. The Volume Factor VF includes the 2% girdle; GVF is used only to adjust the volume if the girdle varies from 2%. H: H is the total height of the stone as shown on the diagram sheet. It is expressed as a decimal fraction of W. HI W=C/W+P/W+.02 Half-Light: The greyed edge of an incandescent bulb's reflection on a polished facet. For observing the surface of a polished facet, the direct reflection of the light blinds the eye and does not reveal errors on a facet's surface as well as half-light does. Hardness: A material's resistance to scratching or abrasion. Hard Stop: Also called a "Positive Stop." A solid mechanical metalic contact which prevents the dop ann from being lowered past a set position. Index Gear: Toothed wheel used on faceting machines for setting the circumference angle. Index Line: A line whose slope, divided by DPT, results in a whole number. Index Number: The number of the tooth on the index gear. Teeth are numbered consecutively in whole numbers, starting from the highest number, which is also number zero, around the gear. Index 0: Index Zero refers to the highest number on any gear. This is useful for discussing gears in general, or a general rule. Keel: The bottommost line on the pavilion, one end of which is the culet point. This is like a line culet except that it is not parallel to the girdle plane. L: The length as shown on a diagram sheet. This is normally the longest dimension on the girdle plane. It usually lies along the X or Y axis. Level Line: A line whose points are at the same elevation. A line parallel to the girdle plane. Line: A line, or ridge, or facet edge, on the stone is the
21
juncture of two adjacent planes. Line Apex: A line on the crown parallel to the girdle plane and farthest from it. Line Culet: A line on the pavilion farthest from, and parallel to, the girdle plane. L/W: The length/width ratio, where length and width are designated on the diagram. Both measures are on the girdle plane. L/W is never less than 1. Main Facets, Crown or Pavilion: A set of large facets which extend from girdle to table on the crown, or from girdle to culet on the pavilion. Man-Made Material: A faceting material made by man which has no corresponding content and structure in nature. See Synthetic for contrast. Max. CAM Angle: This is the highest angle usable when making a CAM Preform on an ECED shape, which will contain all the pavilion facets; it allows the culet point made to be permanent. MaL Cone Angle: This is the highest angle usable for a cone culet facet (rolled) which will contain the given single CAM angle or set of CAM Preform angles. Meet: A term used in judging how well facets come to a point. Meetpoint: Any point on the stone used in meetpoint cutting. A point to which a facet is cut to meet. This is a functional term. Mohs Scale: The most commonly used scale for approximating the relative hardness of minerals: I -talc; 2-gypsum; 3-calcite; 4-fluorite; 5-apatite; 6-orthoclase; 7-quartz; 8-topaz; 9-corundum; 10-diamond. Natural Material: A faceting material wholly formed by nature. Normal: The bearing and distance of an imaginary straight line in 3D space, which is connected to a line or plane at 90 degrees, and connects at its other end to a distant point. The shortest distance between a line or plane and a distant point. Normal Intercept: Same as a Normal except the distant point is the Point of Origin. OM, Offset Multiplier: The number multiplied by the stone width W to obtain the amount of offset for rolled girdle arcs. Omni Preform: A special sequence of meetpoint cutting
U.S.F.G. Newsletter Vol. 9 ·No. 4 December, 1999 DICTIONARY which makes the shape. A set of facets is cut to a center point. Then a set of 90° facets is cut, using index numbers different from the culets, in a chaining fashion. The shape is made but the girdle is not level. Oval: A shape which is more or less eliptical. P: The height of the pavilion as shown on the diagram sheet. Pavilion: That part of the stone below the girdle. Pendeloque: A pointed pear shape. Plane: A geometrical flat surface, having infinite twodimensional extension. Flat facets are restricted areas of the plane on which they lie. Plan View: A view looking down the stone's vertical axis at the crown, or up the vertical axis at the pavilion. Point of Origin: The center of the Cartesian, or Rectangular, coordinate system, where the X axis, the Y axis, and the Z axis intersect. The center of the girdle plane. Point: A unit of weight. Equals 1 /100 of a carat. Polish: The smoothness of the surface of a facet. A wellpolished facet is free of any unevenness, pitting or grooving, and of all traces of the cutting done by the previous lap. Preform: A piece of rough material with a set of facets at 90 degrees or a curving girdle at 90 degrees which, when the stone is viewed along the vertical axis, has the same shape as the design to be cut. Protractor: The angle indicator on a faceting machine. The protractor should read 90° when the dop arm is parallel to the lap. Quill: Part of the faceting machine that holds the dop, also called the dop arm. Race-Track Oval: An oblong shape whose sides are straight parallel lines and whose ends are half a circle. Reference Point: Any point on the stone, permanent or temporary, to which a facet can be cut (a catch-all term). Retra'ction: In general, the bending of a light ray as it passes from one medium into another. Refractive Index: Index of Refraction, represented by a number or pair of numbers. See a book on Gemology, as this is too complex to go into here.
22
Rhomboid: A stone whose general shape is that of a parallelogram. It has no mirrorimage symmetry and its rotational symmetry is 2. (Sym = 2N). RI: See Refractive Index. Rolled Girdle: A girdle section made by setting the dop arm in free-wheeling, and turning it while grinding or polishing the girdle. If there are no vertical break lines then is is called a "continuous girdle. " Rose Cut: A faceted stone having a crown with no table and without a pavilion. Scratch: A linear gouging on the facet's surface. Scintillation: The degree of break-up of light passing through a faceted stone into more and smaller flashes of returning light. Semi-f'nsheye: Sarne as fisheye, except that newsprint may be read only by very slightly tipping the stone off from the line of sight along the vertical axis of the stone. Set, or Sets, of Facets. Facet Set: I . Several facets having the same shape or mirrored shape, the same surface area and angle, which occur at patterned intervals around the stone. 2. Whatever occurs on the same line in a facet list on a diagram sheet. Shape: The stone's shape is its outline form when viewed along the vertical axis. Side View: The side view is any view looking along the girdle plane, at right angles to the vertical axis, with both crown and pavilion in equal view. The terms Top View, Bottom View, Left View, and Right View are all side views, which refer to the edge of the diagram sheet from which the crown plan view is being observed. Single Cut: A stone whose crown consists ot a single row of facets between girdle and table, and a single row of facets on the pavilion. Slope: The angle a line makes with respect to the X axis, as measured on the girdle plane. Sloping Table: A large facet on the crown which functions like a table, but is not parallel to the girdle plane. Soft Stop: A modification of a hard stop which allows the dop ann to move further downward under pressure after contact is made. The amount of further arm movement is metered by a micrometer gauge or by an electrical measure. SRB: ,Standard .Round �rilliant.

U.S.F.G. Newsletter Vol • . 9. No. 4 December, 1999 I DICTONARY Staggered Facets: A set of facets whose index numbers evenly split the index numbers of the set of facets below it or above it. Step Facet: A facet having the same index number as an adjacent facet. Symmetry: This refers to the pattern of facets on the stone. In general parlance, there are two kinds of symmetry, rotational symmetry and mirror-image symmetry. Rotational symmetry is illustrated by a pie, where each slice is the same as every other slice. Mirror-image symmetry is illustrated by folding a design plan view along its Y axis so that the two halves overlap, with points and lines coinciding. A design may have both mirror-image and rotational symmetry. The term "symmetry" should not be used to denote similarity of shape among facets of a set; that is referred to as "Uniformity". Also the term Symmetry should not be used to describe the outline of the stone or the outline of the table as to how even it is. Synthetic Material: A faceting material which is made by man to imitate a natural material. It has a content and structure that corresponds to a natural material. T: Table width as shown on a diagram sheet. Table: A facet on the crown parallel to the girdle plane. Tangent Ratio: The ratio of the tangent of one angle to the tangent of a second angle. Used for translating one set of angles to another while holding the plan view constant. Tier: A tier of facets consists of a group of facets at the same elevation around the stone. It may be made up of one or more sets of facets. Two-Part Design: A stone whose facet pattern consists of two halves which mirror each other left/right in the plan view, such as the Pear and Heart. It has a Symmetry of 1 and mirror-image (Sym = IY). Uniformity: The degree of sameness of the facets within a facet set as to their size and shape (or mirror-image shape). Vertical Axis: An imaginary straight line through the stone which, as in a standard round brilliant, runs through the center of the table and through the cul et point. VF: Yolume .Eactor. A mathematical constant, unique for each design, for determining a stone's volume from its width W. Volume=VF x WxWxW.
23
View Arrow: An arrow on the diagram sheet which indicates, in a sideways view, how the crown plan view is being viewed. W: The width of the stone as shown on a diagram sheet. Usually at 90° to the Length dimension. X-Axis: An imaginary line passing left-to-right through the center of the plan view. The left-right direction on the diagram sheet is when it is held in the position to read the text. Y-Axis: An imaginary line passing top-to-bottom through the center of the plan view. The vertical direction on the diagram sheet is when it is held in the position to read the text. Z-Axis: An imaginary line at right angles to the X and Y axes. Usually the same as the vertical axis. Zero Vertical Loss Method: A method used to compute CAM angles, such that the culet point made can be the permanent culet point.
STONE HEIGHT FORMULA By Fred Van Sant
The equation which GemCad puts on the diagram sheet is: H/W = (P+C)/W+0.02. For clarity, in general algebra it might be written: H/W = ((P+c)/W) + 0.02, to insure that the operation within the parentheses is performed first, and then the 0.02 added on afterward. Note: H/W = P/W + C/W + 0.02 is the same as either of the first two equations. They are all the same. So you see there is no adding of 0.02 to the width . . 02 is part of the height dimension. In computers all multiplication and division is performed BEFORE addition and subtraction, so in the first equation above, P and C must first be divided by W, and THEN the 0.02 is added on. This standard practice in computers eliminates the need for the extra parentheses, reducing the amount of code. The problem is that computer programmers should not assume that non-programmers know how computers work. We tend to take some things for granted. The 0.02 is a constant figure for all stones except the very large ones where a slightly thicker girdle is required, but in actual cutting the girdle thickness is a matter of cutters choice. After cutting a pavilion, you might want to see if you have enough crown, so H/W minus ((P/W) + 0.02) is how much crown you need.

U.S.F.G. Newsletter Vol. 9- . No •.. 4 December, 1999
BRIGHTNESS PATTERNS
By NORMAN STEELE Boeing Employees Mineralogical Society (EDITOR'S NOTE: Please read Editor's note at the end of Norm's Article before reading the article.) Brightness Patterns are generated on a computer by tracing simulated light rays through a three-dimensional model of the facet pattern of a design. Just as in a real stone, rays which strike a simulated surface are either (1) reflected off the surface or (2) enter the stone where it is first refracted and then travels in a straight path until it strikes another surface. This assumes the surface is bounded by materials of different refractive indices and everything complies with known laws of optics. Because some of the incident light ray is reflected, the light ray loses some of its original intensity each time it hits a new surface ( i.e. facet). So the job of the computer is to keep track of how many rays are simulated, which facets will be penetrated, and how many rays will survive to be seen by an observer. The final "Brightness Pattern" is a record in shades of gray of how the stone should appear to an observer. Brightness patterns depend on assumed: (I) Lighting conditions; (2) Viewing position; (3) Material (RI) and absorption; (4) Polish (assumed perfect); (5) Facet design; ( 6) Number of shades of gray available. WHY DIFFERENT LIGHTING MODELS To do all this, the computer requires a plan called a "model." The lighting model simulates ( on the computer) lighting position relative to view position and the stone. Presently there are four lighting models in common use: ( 1 ) ISO (Uniform); (2) SPOT + Ambient; (3) COSINE; (4) RANDOM. The ISO �ni!orm) model simulates uniform light coming from all directions (no shadows, non directional). Easy to calculate. However, not easy to obtain in the real world. It was much used in early trials, but not used very often now. The SPOT & Ambient model simulates lighting such as � �or j':1dging coi:ipeti�ve displays. A directional high mtensity hght (spotlight) 1s located above and in front of the viewing position. The COSINE model simulates a single intense point light source directly at the viewing position. Eliminates the "head shadow" in an early model which had the light source offset from the centerline to account for the head being in the light
24
path. This is difficult to achieve but might be approximated by a "miners lamp" attached to the viewer's head. It is the easiest and quickest to calculate because direction cosines are needed in raytracing anyway. The RANDOM ( Showcase ) model simulates multiplepoint light sources at random positions. This tends to obscure relationship between facets, but gives interesting "sparkle." It is approximated in the real world by multiple lights in a bright showcase with reflective walls. WHY BRIGHTNESS PATTERNS? With all the complexities of computer models, you might ask why take all the trouble to compute them. There are reasons. Brightness Patterns provides a quick non-destructive means to compare a single design under different lighting conditions, with different materials or with different angles. For study purposes being able to repeat a test many times under varying conditions without destroying any hard to obtain rough is a big plus. One could get facet design comparisons by cutting many stones under varying conditions. Before computers, this is the way it was done. But with computer simulation it can be done much faster, minutes instead of hours. No rough is wasted and design change significance can be communicated to others without risking the actual stone. Our early Brightness Patterns were based on the ISO �odel based on. 99� transmission, but since uniform light is difficult to obtam this was not the ultimate answer and some designs provided surprises. SOP + Ambient at 99% was an improvement, but did not adequately account for dark materials like garnet or dark amethyst. Now we have gone to SPOT + Ambient at 60% to make the diagrams more closely look like the actual brightness patterns in "typical colored gemstone" materials such as most of us cut. Darker materials absorb more of the light that enters them than clear uncolored or lightly colored materials. The result is that more light is bounced around within a given stone the weaker the rays become. This is most notice��le when a substantial portion of the "brightness pattern is due to secondary rays created when a ray is reflected with the stone several times before it finally exits to be counted. One important thing to remember about Brightness Patterns is that you must consider which model was used to generate the pattern. Designs can be directly compared only when the same assumptions are used, i.e., same material and lighting model. The Brightness Patterns are in "black/white" shades of gray. In an actual stone these shades of gray represent color hue and intensity changes. In general the lighter the shade of gray the more intense and colorful is that area of the stone
U.S.F.G. Newsletter Vol. 9 No. 4 December, 1999
BRIGHTNESS under the assumed lighting conditions. Lightest gray is brightest. The numerical "brightness" figure given with the diagram is a dimensionless ratio of how many of the original rays projected onto the stone can be observed after they have passed through the stone. Rays can exit the stone via the pavilion or be attenuated by multiple reflections within the stone. However, often the most interesting stone is one that has "contrasting" colors or hues, not necessarily the most "brightness." Certain facet design's facet-combinations either concentrate or disperse the light, others might cause dispersion (breaking up the light into colored bands as a prism does), some combinations give facets that are too small while others are too big. Studying the brightness patterns along with the actual design pattern helps us to correlate "why" some designs seem to be better than others at giving the results we desire. One does not have to know anything about "brightness diagrams" to cut faceted stones, but if you are serious about not wasting time they can be used to shorten the "learning curve" for selecting promising facet designs. EDITOR'S NOTE ( C. Moon): The above article, "BRIGHTNESS PATIERNS" was written by Norman Steele in order to explain further, and to make more comprehensible the lighting procedures associated with the computer and its capability of reproducing "Brightness Patterns" of faceting designs. He wrote and published it primarily for the faceters in "The Seattle Faceting Club." Quote: "As editor of'THE TUMBLER" from time to time I receive phone calls or letters about articles published in "The Tumbler." Such is the case recently when one of the readers sent a letter asking for an explanation of the "Brightness Patterns" often included with the faceting design information. Since this is a frequent discussion item at our Seattle Faceting Club meetings, covered in depth in the Seattle Facetor Design Notes (which I also edit), and I gave an illustrated lecture "Use ofRaytrace and Brightness Patterns" at the most recent ''Northwest Faceting Conference" at Sun Valley, Idaho (1994), it never occurred to me, that "Tumbler" readers may not be familiar with the subject. Sort of a case of "not being able to see the forest because of the trees." End Quote If those closely associated with Norm - those from his club publication, "The Tumbler" and the Seattle Faceting Club meetings -- couldn't see the forest for the trees, how much more are we going to benefit from Norm's printed explanations of this 'brightness pattern' phenomena. The reprinting of this article may help to serve the same purpose for all of us who are still faced with trying to understand and interpret all aspects of 'brightness patterns' at the computer and from the computer screen to the printed page. Since Norm is deceased, I asked Bob Long, if he would like to add any additional information, particularly, if he had done any further experimentation in the area of "Brightness Patterns." Bob's reply was: "I think Norm pretty well de-
25
scribed the situation with respect to brightness patterns. I could answer specific questions if they come along. (Bob continued by recommending that those interested in contemporary research in "Brightness Patterns" should read the following:) A fellow named Michael Cowing is the latest to get involved with computer simulation of brightness patterns, in response to the latest GIA work. You might want to read his article at http://www.geocities.com/acagemlab or <http://www.geocities.com/silicon V alley/Drive/6855/> signed - Bob" The name of the article is "Reconciling the GIA Analysis of Brilliance Study with the Experience and Theories of Tolkowsky, the GIA Diamond Course and Others in the Diamond Trade" by Michael Cowing, MS, FGA, NJA Copyright 1999 All rights reserved. At the end of Michael Cowing's most excellent article, Mr. Cowling makes the following acknowledgments: "Thank you to Bruce Harding and Robert Strickland and Martin Haske for many hours of intense discussion, peer review, ideas and suggestions gratefully received which contributed greatly to this research." ( I wholeheartedly recommend the reading and the study of this article. C. Moon)
(From WHAT ARE BR!Glll'NFSS PA'JTERNS? Northwest Newsletter, October 1994)
ABOUT DATA VUE-2
By Fred Van Sant When Datavue first started it was a way for cutters to find what designs had been done, who designed them, and where they had been published or were to be found. The picturesplan views or side views--needed to be only accurate enough to give the cutter an idea of the pattern. No one could cut the stone from the data used to make the views; it was not available. One had to go to the designer or to a publication to get the cutting da� so a lot of designs were copied and passed around from cutter to cutter; so much so that it almost seemed that published designs belonged to the public. Of course it wasn't true because there were copyright laws, but nobody seemed to care very much. Later on, I don't know the exact date, when the "browser" programs written by R. Long and R. Strickland were rewritten to contain a button that transferred the user over to the GemCad program, a couple of important changes occurred. First, and most importantly, it made available the data used to produce the views--data that in the earlier designs was never intended to be used for cutting stones, and was often inaccurate, and data that was inaccurate for later designs because Norm Steele, who was doing all the input for several

U.S.F.G. Newsletter Vol.-9 No. 4 December, 1999
years, was overworked and had to scramble to keep up. And for the years after the button was installed, new designs kept coming faster, and Norm would not ask for help. So if you use cutting data from Datavue2, be warned that it may not work the way you expect. Also some of the views in Datavue2 are not the designers; they are variations of the original with the designers name on them. My #262 incorrectly shows an apex crown; my #288 shows a grossly distorted crown. I counted approx. sixty errors in my first 300 designs--a 20% error ratio. For the approx. 3000 designs this would indicate about 600 designs with errors. The second change was that, in my opinion, making the cutting data available from Datavue2 without consent of the designer constituted a form of electronic publishing, and was a violation of copyright. This does not mean that anyone is going to sue, but they could. I am sorry that access button to GemCad was ever installed. I think it creates more problems than it solves. There may be more stone errors made from using bad data than there are benefits from using GemCad to fix things, because most users are not very proficient in the use ofGemCad. But I don't suppose we'll ever know; we love to show our good stones and hide our botched ones.
first Facet on the tier. No more "cut and look" method for the following facets. This helps if the dop is running out. For small stones until you develop this method use the stop but make sure no pressure is on it. 3. When starting to polish the stone set the angle stop about half of one degree lower than the cutting angle so that the facet starts to polish nearest the culet or the table. When you have picked up this point on the Stone, DISENGAGE the angle stop again. This time use only the cheater and the micrometer height adjuster" to pick up the whole facet. Using this method it is very easy to polish in the meets." 4. This method works when polishing with diamond. I hope some of you faceters out there find this article of some use and give it a try. When I teach new faceters this is the method I use and the newcomers usually cut good stones right from the word go.
(From FACET TALK. May/June, 1999)
'1J NEW MEMBERS II • The USFG extends a hearty welcome to the fol- •
____ S_O
_M_E_F
_A_
C_E_T_I_N
_G_T_IP_S ___ _, • lowing new members: • � � ELIZABETH ALLEN, OK �
By George Beard "FIRSTLY DO NOT "FLEX" THE "MAST'' BY BAD FACETING TECHNIQUE"
The Mast is only the method of presenting the stone to the lap and not for putting pressure on the angle stop, although the angle stop is used, great care must be taken not to use it wrongly. Most problems are caused by blunt laps that do not cut and having to use excessive pressure to remove material. The following method may make you nervous but it really works for me and since I have mastered it, most of my problems have disappeared. The method comes into play at the point when cutting the facets on your PRE-POLISHING lap. 1. Make sure the stone is round or a true shape as to what is being cut. A good sharp course 1 80 diamond lap will be OK. A fine diamond lap will give trouble. Round stones: Mark the high spots and note the indexes and true up. Hexagons, octagons, etc: measure across the flats and do the same. Care taken now is time saved later. 2. Make sure the angle stop is disengaged after cutting the
26
� ..,. TIMOTHY R. BALLENTINE, FL ll8r' • • OLIN BANKS, GA " � •. GERALD G. BOYKIN, CA ... RICHARD E. BUNCH, CA � .• DONALD CLARK, CA ... SOL CORBO, NY " • FRANK CRANE, GA � � � DAVID DUTCHER, CA .,-... .,. WILLIAM W EV ANS, OH 8'111 ! PAUL GENTRY, GA .,. V LAUREN HARDY, CA ._'t •.
JACK A. JACKSON, FL .,. JAMES E. JENNINGS, MS " • CHARLES J PERKINS, OH �'I � RON REDMOND, CA ... ... JOHN SCHUY, WA •111 � JAMES E. SMITH, NC ..,. .,. DELIA SONNENBURG, CA " • ARISTEDES TSIROPOULOS, CYPRESS .. 11! ! CARL M. UNRUH, WA .,.. ,,. RICHARD C WALKER, OR • + MIKE MCHUGH,CA

U.S.F.G. Newsletter Vol. 9 No. 4 December, 1999
LET'S GET ACQUAINTED
JERRY CAPPS
My name is Jerry Capps. I retired in 1988 from the University of Wisconsin, having a position as Photographic Coordinator for 1 10 professors A-V requirements. I used a Raytech-Shaw to earn my CSM from the old ASG and also won the ASG Pinnacle A ward for best new design. After receiving the David B. Miller award from the Midwest F aceters Guild for best new design, I felt confident and entered the 1994 USFG competition (whole new ballgame). Several of my GemCad designs found their way to Lapidary Journal. (I always cut a design before submitting it for publication.) My recent designs emphasize brightness and scintillation when tilted 20 degrees - - not just face up, and are generally intended for the moderately skilled. Controllinglight is my passion ( extension of photography background). In 1997-98 I taught the GemCad seminar for the Midwest Faceters Guild at Hartland and Flint, Michigan. I prefer keeping my faceting and designing a hobby - - I don't sell, thereby preserving the luxury of telling the facts as I honestly see them. Though I have tried a Graves, and a Lee, my latest acquisition is a Facetron.
FACETER'S FORUM: TOPIC FOR nns ISSUE: DOPPING AND TRANSFERRING EDITOR'S NOTE: The following forum articles were originally submitted to the FACETERS DIGEST. Due to the need to conserve space in order to include everyone's posting, the articles may have been edited to present what is intended to be the essential points of each author. There is no intent to alter the author's point of view. Each author has given written permission to print their articles but such permission does not waive the author's copyright. In some cases, parts of an author's post include a "snip" from a previous author. The snips from these previous authors are shown in italics.
FROM: MEL ALBRIGHT SUBJECT: DOPPING, EPOXY Although the label says 5 minute, I have found by hard experience that it does NOT hold properly for faceting for at least 6-8 hours. So, I just resign myself to wait overnight. If you're too eager to facet something, consider buying another dop holder. I've found with my Ultra Tee that there is no
27
problem changing back and forth between two stones this way. FROM: CHARLES W. COVILL
SUBJECT: TRANSFERRING, GIRDLE Much has been said about the causes of stair steps in girdles, girdles thick on one side thin on other. But what do you do in the real world to keep this from happening? Here is my simple solution, I stress this in all my classes and also in private lessons. After transfer, cut your first girdle facet to only a fraction of the depth required, leaving plenty of room for correction. Now cut all girdle facets completely around stone, each facet should connect to the previous facet with no offset, to form a continuous line around stone. After you have gone around stone, your last facet should line up perfectly with the first facet cut. If it does you will have a constant thickness girdle! If it is above or below the first facet, girdle will vary in thickness. To correct this adjust cheater slightly and go around stone again. Do this until first facet and last facet line up then your girdle will be uniform in thickness and there will be no stairsteps. Now cut girdle to desired thickness. This works on all cuts regardless of shape. With a little practice you will be able to tell when you need and how much to adjust cheater. As you progress this will not take long and you will be able to tell with only a couple of facets if correction is needed. The people at UltraTee have written a very good article on the causes of variable thickness girdles. I have some thoughts about the F acetron that I will give you at a later date.
FROM TOM DONAHUE Subject: DOPPING I use a Sapphire machine so this method of dopping, more than likely will not work on some machines. I start by mounting my master lap on my machine. On the master lap I place two tool and die utility blocks ( 2x3xl 1 /2" ) on opposite sides of the lap to even the weight. On the near block I place the stone table down. Now I set the protractor to 90', so the quill is parallel to the lap. I put an empty dop in a hand piece, using cone dops for pointed culets and V dops for keel type stones. Then I put the hand piece in my table cutting jig and slide it onto the quill. Now the dop is perpendicular to the master lap and the utility block. I lower the head down the mast till the dop is almost touching the stone, then finishing lowering it with the fine adjustment till it just touches the stone. Check to make sure everything looks good by eye. If everything is okay I raise the head with the fine adjuster till it clears the stone and remove the jig hand piece assembly and apply a two part epoxy to the dop and replae the assembly. Lower the dop onto the stone with the fine mast adjuster till you just get a reading on the multimeter. This method gives me a near perfect stone alignment. If your repairs are on the crown all you have to do is

U.S.F.G. Newsletter Vol •. 9 No. 4 December, 1999
FACETERS FORUM
index with the gear wheel and you're all set. If your repairs are on pavilion just make a standard transfer. I hope this helps some one. FROM CARL DOWNEY
SUBJECT: TRANSFERRING, EPOXY, CRAZY GLUE, FINGER NAIL POLISH, CORN ST ARCH I thought cornstarch was primarily to help THICKEN the epoxy. What I have noticed is that the cornstarch helps locate scratches while polishing as it stops light from entering from the doped end of the stone. Scratches show up as white marks and if using clear epoxy they can be harder to find.
GREAT observation! The 5 Minute epoxy is a quick way to get going but can take quite a while in the Attack jar before you can admire your work. Don't most people wrap their stone in wet paper toweling and "break the bond" by applying heat to the dop? (probably still need cleanup in solvent)
Some transfer using wax and "Crazy Glue" without heating the stone at all. Heat the wax on the new dop while mounted in the transfer jig and then press to the stone. Skin oil on t.he stone as well as the stone being cold prevent a bond. Pull the dop back away from the stone and apply a drop of Crazy Glue and press back against the stone. Let cure and coat with nail polish to keep moisture from breaking down the bond. This last method looks best to me right now. The skin oil should not hinder the bond as Crazy Glue seems to work best on fingers and the nail polish will add some flash to the dop. Several people I know swear by this method and it does have some advantages. There's no reason you couldn't clean off the stone with an alcohol swab. Also, there's no reason you couldn't make one or more "back up" dop/impressions in case of a 'drop-off/knock-out' type of disaster. Just make SURE you use a 'Sharpie' type marker and mark the zero index pos. on the girdle or pavilion so stone could be oriented properly in backup dop. And when you're finished a little heat and VIOLA, the stone is offi EDITOR'S NOTE: Carl wishes to give credit where credit is due and thus acknowledges that Errol Faeth taught him this process.
FROM: BETH ECHOLS
SUBJECT: TRANSFERRING, EPOXY, V-DOPS Reference the discussion on epoxy use in transferring when using a V-dop. I too had a shift when using epoxy and this type of dop and it was with a fairly large stone (marquise cut). Some one in an earlier digest in which I mentioned
28
this . . . suggested I might be putting too much pressure on the stone as it entered the epoxy so that it bottomed out in the dop and consequently shifted. This would make sense if as the recent writer suggested it usually happened to him with large stones. I primarily have used super glue for initial dop to cut pavilion and then gold stick shellac/wax for the transfer. I had hoped the epoxy would be easier. I also use nail polish around the super glue to prevent moisture from getting in. Never have had a super glue dop give way on me. Also I use it for <lopping when cabbing opal. Use debonder and a little heat to break the bond . . . . haven't lost an opal yet . . . . "knock on wood." FROM WILLIAM EHNEY
Subject: DOPPING Paul, rll answer this one on the forum, and perhaps it will draw some additional comments. Gotta be more than one way to dop a stone for repair. This is my way. First you need a table dop ( a dop that fits your machine with a large circular flat surface). Mine has grid lines and circles cut in it. Kinda looks like a target Next you need a glue that will hold the stone to the dop, but is not difficult to remove. I use 527 Multipurpose cement. Put your table dop in the bottom of your transfer fixture, and put the stone table down on the table dop. If the stone is a round with a pointed culet, put the proper size cone dop in the other end of the transfer fixture and push it down over the culet of the stone. This will align the stone with the cone dop. While the stone is clamped between the two dops, put some 527 glue around the stone and table dop. · A few spots are usually enough. when this glue is dry, you can release the cone dop without disturbing the stone. Put what ever kind of dopping cement you use in the cone dop, and close it down on the stone again to attach the stone to the dop for working the crown. I usually turn the rig upside down so the cone dop is on the bottom, to make the final attachment easier to work with. When the glue is dry on the cone dop, the table dop can be removed from your stone very easily, the 527 breaks away nicely. If you are working with a stone that has a keel instead of culet, use a V dop. This takes a bit of eyeball alignment, and you will quickly find out why most table dops are scribed with cross lines and concentric circles. You can usually get the stone close enough in alignment so that it is not difficult to work on it. If your stone is chipped through the girdle, yes, you are probably going to have to reduce its diameter to close the wound. If the chip does not break the girdle, perhaps you can get by with only lowering the crown height. Small chips and scratches can usually be worked out without altering either of the above, but you sound like you have a pretty major wound. Good luck. If I have confused you, or you need more help, I am available off line.
FROM PAUL A. HEAD Subject: MACHINE PRECISION, DOPPING
U.S.F .G. Newsletter Vol. 9 No. 4 December, 1999
FACETERS FORUM For Jim Perkins; An extension to your excellent comments. It is a given that no machine is perfect and once off the showroom floor, is out of adjustment. All we can do is strive to put our faceting machine into a condition that works to our own satisfaction. Jam pegs work fine if you can accept them! I usually emulate the ancient Roman's stone work, producing a gem stone having at least one imperfection, thus not offending the Gods. For Charlie Covill; The lowly mistreated dop. Your post points out one of the most common faceting problems and one that is easy to avoid. The dop must be precisely sized to fit the dop chuck, if it is not, it will surely be deflected from the quill axis, probably angularly and laterally. The problem will not be seen until after a stone is transferred. Too often the <lopping technique or the transfer block is blamed when the fault is with improper treatment of the dops. I made a simple test gauge for my dops and check them with every use. It is a precision tube the length of the dop shank with an internal diameter 0.0005 inches larger than the dop diameter. Bent dops should be tossed out. Minor burrs, such as set screw marks, can be filed off. If stair-step girdle facets persist then there is a problem with the vertical pivot (mast) or the horizontal facet head axis.--Happy Lapping. FROM FLOYD HOSKINS
SUBJECT: DOPPIN"G, POLISHING; WAX I have read the many comments on different ways to dop stones, and the intricacies of setting the stone and removing it. Some of the methods are time consuming. I am a commercial cutter and teacher. I use black wax for all stones, including those down to l/2ct. Getting both the stone warm (repeat warm), and the dop rather hot, then make contact. I have no slippage in faceting, and am always conscious of heat. Transferring the stone is no problem using the same procedure. And I use the same for cutting sensitive stones, kunzite, yes and opal, that I get from Australia. Careful not to really heat the opal, just get it warm. Checked this out with Paul Downey, one of the best opal experts in the country, and got his ok. Floyd Hoskins SUBJECT: HEAT, BLACK WAX Reading problems relating to slippage of stones on <lops, and the polishing of sapphire, may I add some suggestions. I cut sapphire stones almost weekly. Use black wax and ensure that the stone is well seated on the dop. Final prepolish is with copper lap. I charge the lap with 3,000 and then when dry.a light spray of Teflon. This lasts for about three, repeat three, months. Then for final polish I go to ceramic with a 14,000 coat Slow speed, and with water drip -- light, repeat light, pressure -- result in a fine polish and no heat. Then if I choose, then turn the ceramic lap over that is charged with 50,000. And use the same procedure. My stones don't slip. However for the past six months am using my Turbofan cor-
29
rundum lap for fast polishing, which supersedes the ceramic lap, but there is an expense involved if you don't cut corundum on a regular basis. The stone slippage is due to heat. And what causes heat? Too much pressure, not enough coolant, and too much speed. Slow down, ease up on the pressure, use ample coolant (water).or a spray of (vinegar). And if your lap has been charged -- sometimes you have to add a few drops or spray. There is a delicate balance, between speed, pressure on the dop, and amount of polishing material on the lap. Experiment--- slow speed--coolant--and amount of diamond or oxide compound whatever you are using for your stone. I do strongly recommend black wax, as it has a higher melting point. I will be glad to answer any questions, email me. FROM ED KATZ
SUBJECT: TRANSFERRING In response to the problem Beth Echols ( aka futuregem) was having transferring a marquis cut using "epoxy and a facetron transfer jig." The problem lies not with either the epoxy nor with the transfer jig as some of "motor fingered" experts would lead you to believe but with the dops. It is not a secret that there are many sets of F acetron dops out there in facet land that evidently escaped any kind of quality control before they left the factory. This fact was published in a well known faceting guild newsletter. One of my students, who is now an excellent faceter, was an instrument repairman and an excellent machinist, has a facetron and showed me how badly out of line his "V" dops were in relationship to the flat index on the dop. There is no chance to have a good transfer if you push the dops together tightly. When using epoxy you need only a minimal amount of adhesive and only where the stone touches the dop unlike wax where "the more the merrier." Wax is more forgiving if your dops are not touched. I would suggest that you check to see if the "V" groove is exactly parallel to the flat index on these dops and if not send them back to the manufacturer ASAP for replacements.
FROM ART KA VAN Subject: DOPPING How do you dop a cut stone accurately enough to maximize yield? Paul Cordes Paul I am not an expert with this and I know there are others on this list that are, but here is one method that is quick and works well. First, take your transfer block and put a large table dop in one side, now take a table dop that you want to dop on the stone and wax it up as you would normally do. While the wax is still hot on the dop put it in the transfer block and push them together so you have a flat. I use a small piece of wet paper towel so I don't burn my fingers. If the wax gets to hard hold it over the heat while it is in the transfer block. Now take out the large dop and put in a cone dop that the culet of your stone won't touch the bottom of.

U.S.F.G. Newsletter Vol. 9 No. 4 December, 1999
FACETERS FORUM Stand your transfer block up so the cone dop will hold your stone. Now put just a very small drop of super glue on the table of the stone and bring the waxed dop down on the table. Everything should square up very close. All that is left is to loosen your index, line up the girdle, tighten the index and you should be able to re-cut or repair with very litte loss. I give Errol Faith credit for this method as he helped me out a year ago.
FROM ROY KERSEY SUBJECT: DOPPING, V-DOPS, ELMER'S GLUE I did a little thinking about this, and although one would think an emerald cut would require a V-dop, a cone dop will also center an emerald cut, assuming, as Jon Rolfe has pointed out, that the dop and the pavilion are both cut accurately. Many stones will respond to the technique of "cold stone, shellac wash, wax," but those which won't stand contact with warm wax may need epoxy or even Elmer's glue. I hear you can dop with Elmer's, but you have to watch getting the Elmer's wet (use nail polish?).
FROM DIANNE KILE SUBJECT: TRANSFERRING, DOPPING, SUPER GLUE I use super glue gel for doping and dislike the standard "trial by fire" of heat transfers. Instead, I soak the stone and first dop in acetone until no more glue is visible. This takes 1 5 minutes to an hour - set a timer so you don't forget about it! Then I gingerly use the jig and attach the new dop. To remove the first dop, use heat (it won't take much) -- or -- hold the stone in your fingertips, with the new dop in your palm, and gently rap the old dop on a padded countertop. This is not advisable for something with perfect cleavage, but works fine with quartz, garnet, cz, etc. What I'd really like to pick your brains about is how to <lop/transfer materials which are too heat or shock sensitive for the above method. What do people do with sphalerite? I've got some excellent rough we self-collected, but am unsure how to best proceed. Thanks! EDITOR'S NOTE: In recent correspondence Dianne adds the following: As an update, now I generally just soak the first dop (with stone) for 20 minutes. Immediately after attaching the new dop, and with the whole assembly in the transfer jig, I gently scrape away the remaining glue from the initial <lopping with a good, sharp scalpel. The residue will be gummy and come off easily; if allowed to dry it becomes brittle and is more difficult to remove. Quite often the first dop just falls off at this point. Done carefully, this has worked well on fragile stones.
30
FROM GLENN LINKER SUBJECT: DOPPING, ACETONE, EPOXY Glenn on this end--try this sequence. All things are equally important when dopping up a gemstone. Whatever you do things have to be almost perfect. If you use super glue you must have the same texture on both surfaces-stone and dop. All my flat dops are polished with 1 ,200 grit with a slight champher on the end--just a hair--not too much-it gives it some more strength when dry. Be sure your stone is flattened with the 1 ,200 grit. Mark the center of the spot with alum or brass pencil, put just a tiny spot of super glue on the area and hold for 10 seconds. It will not hold if you don't have both surfaces the same texture. Wipe the stone to be dopped with acetone-alki has a natural oil in it. It will not come off without taking some of the stone with it. I cut the pav first and cut and polish the girdle. When finished back tilt the stone and lightly cut the 2 and 62 (on a 64 index) that's where your mains will be when you have it transferred. Put on a plastic lap and be sure the index is in the right sequence-place the proper flat on the plastic lap and tighten. You should be in perfect alignment. When transferring use a good 5 min epoxy. Put equal amounts and stir for l min minimum. Wipe the stone with acetone and align in the transfer jig. Fill the cone dop and add some around the end and gently push the two together and back off a tiny bit--you have plenty of time left Pick up the fixture and tilt it one way and then the other to make a cone shape while turning until it hardens enough to keep from running and making a mess. Put it under a 100 watt light bulb--1 use a gooseneck lamp. Set the fixture on end with the dop with the 5 min epoxy on the top-if it does run a little you can cut it off with a blade later. By the time I finish with the next pav on the new stone it is done and I can take it apart. Wrap a wet paper towel around the end that has the epoxy on it and hold the superglue end in a pliers or other device over an alcohol lamp and heat until it drops in your hand. There will be no distortion if you keep the paper wet. It keeps the epoxy cold and hard. I have been doing this for so many years I don't want to think that far back. All of my students use this method and it has not failed yet. When you are ready to cut the crown--use a plastic lap and set your index on the right number--be sure it is in the right direction--align the flat and tighten the fixture and your in business. Don't forget the crown is only for dressing--the pavilion is the main culprit that brings out the fire-if your material is a little too thin you can change the angles to suit the material. Just keep track of the angles if you are cutting pairs so they look the same. This is a long explanation but you try it--it works. To take the stone off the dop from the epoxy--cover the stone with a wet paper towel thick enough to protect it from the heat of an alcohol lamp-hold the dop in the flame until you see the epoxy tum brown--pull the stone off--scrape the excess epoxy off the dop before cooling it while letting the stone cool off and if there is any left on the stone it will peel right off. The people who wanted to know which diamond repli-
U.S.F.G. Newsletter Vol. 9 No. 4 December, 1999
FACETERS FORUM cas I had trouble with. Ovals and marq's--the numbers just didn't quite do right. I don't think anyone cuts the sequences before printing them or they did not proof read them. EDITOR'S NOTE: In recent correspondence Glenn adds the following: On the cone dops--ifyou take your Foredom Flex shaft grinder ( everyone has one) put a .010 or .015 dia drill in and drill about 4 holes equally spaced thru the sides of the cone. This enables the epoxy to fill the hole and become solid when the outside of the cone is coated too. It will hold and is impossible for it to come off the end. It also works very well on wax.
FROM CHARLES L. MOON SUBJECT: EPOXY, TRANSFERRING If one heats the stone and dop-cup in order to release the stone from the softened epoxy, the cul et can easily be broken off. The following suggestions might be considered by those of you who still like to use epoxy in the cup-dop. I have had most all of my cup dops deepened, even rounded out at the bottom by at least 2 mm; then two holes on opposite sides of the cup were drilled ( at the bottom of the cup, of course). This allows me to look through to see if the culet is free from epoxy, or if it is encased in epoxy. If the culet is free then I know that I can heat the dop and stone, which will release the stone safely. If the culet is encased with epoxy then I soak it in acetone or attack. The holes at the bottom of the cup allow the acetone/attack to enter at the bottom of the cup -- the soaking time is shortened. I will even fill a syringe with acetone, insert the needle point into one of the tiny holes and help clear up the culet, after it has soaked for some time; once clear, then I can use heat. Most often rather than filling the cup full of epoxy I will paint the sides with epoxy leaving an air space in the middle of the cup -- a toothpick works very nicely. This will allow the culet to drop into the cup without touching the epoxy; however, there is always the exception.
FROM JONATHAN L. ROLFE SUBJECT: DOPPING, EPOXY Always ONLY use Five-Minute Epoxy. The formulations with longer cure times are highly cross linked and TOO hard and strong. Gentle warming, slowly, of the dop, softens the epoxy and the stone can be pulled off gently without too much discomfort to the fingers .. .it does NOT take much heat to soften these resins. SUBJECT: TRANSFERRING, DOPPING, EPOXY, WAX I have my own way. It will differ from everyone else's, so it
3 1
does not represent what's "normal," but perhaps there are elements which can be incorporated into other people's favorite methods. Or perhaps it could just furnish amusement or entertainment. I polish a finished table first, and dop to it. After faceting the girdle and pavilion, I demount the stone and inspect it. (Already I can hear the howls of outrage.) I make my own dops. The conical dops are made to exactly 42 degrees by means of a specially ground countersink, mounted in the tail stock of the lathe, centered to +/- 0.0005 TIR. The pavilion is then mounted in the conical dop; either wax or five-minute epoxy may be used. The conical dop is placed in a cylindrical holder on a surface ground dead flat plate. Naturally, the centration is perfect, �cause of �e. self-centering action of the conical geometnes. A prec1s1on gauge block is placed next to the �ertical d�p, and t!'1e height adjusted with glass microscope shdes as shims, until a glass slid contacting the table shows interference fringes (Newton's Rings). The glass is then weighted and the wax allowed to cool or the epoxy to harden. This guarantees that the table is dead perpendicular to the axis of the dop, achieving accuracy not possible with most transfer fixtures. It SOUNDS harder than it is, honest. I can transfer several stones in five minutes, and KNOW they are accurate. I have tried commercial transfer fixtures; I won't put them down, as thousands of people use them, but they are not for me. Using optical interferometry to detect a tilted stone (ASSUMING one has a dead flat table). Remember that one "wave" is less than a few hundred atoms of silicon. Let's see anybody beat that with a commercial fixture. I started using this method years ago, and it just made more sense to me than to trust someone else's machining .... We TRUST that commercial dops are straight (Or that we have not mangled them!). We TRUST that the angles are 90 degrees, and that the centering is perfect in the fixture. We also trust Detroit to build our cars, and I rest my case on the recall records. SUBJECT: DOPPING, V-DOPS I did a little thinking about this, and although one would think an emerald cut would require a V-dop, a cone dop will also center an emerald cut, assuming, as Jon Rolfe has pointed out, that the dop and the pavilion are both cut accurately.
Yes, if you think of the pyramidal comers of an emerald pavilion intersecting a cone, there is adequate reference to pick up the center. There is a complicating factor, however. The comers of the comer facets are at a compound intersection whose angle is not 42 degrees, or any other rational angle of any set of steps. However, if a fixture is used to insure that the table is perfectly perpendicular to the axis of the dop, then it works perfectly. One can rely on the geometry of the conic to establish perfect CENTERING, but not reliably for tilt. I have never figure this out . .intuitively it SHOULD work, but it doesn't all the time! That said, I have not used V-Dops in years. I can make them perfectly accurately, as I have a post grinder on the lathe, but I have seen
U.S.F.Ge Newsletter Vol. 9. No. 4 December, 1999
FACETERS FORUM
no advantage to using them over the proper use of a conical dop. And the V-dops do not insure centering on both axes .. the stone can slip and slide in the longitudinal axis.
FROM JACK ROWLAND
SUBJECT: DOPPING, ELMER'S GLUE
This is a total cold <lopping method. It takes a long time, but if it is really heat sensitive try it. Most of the time you can use wax if you use the shellac trick and make sure the stone is slowly heated to around 90 degrees before you transfer. But here goes . . . Use Elmer's Glue to dop the crown. Let it dry at least 24 hours, longer if it is humid. Once completely dry overcoat it with nail polish. Colored is better so you can see when it comes off. Cut the pavilion. Use nail polish remover to remove the nail polish, then use an exacto knife to be sure you are down to the Eimers. Now transfer to a cone dop with epoxy. Really mix the epoxy well. I think the shifting that is sometimes seen when using epoxy is due to improper mixing. The com starch can help with seeing if it is well mixed, but I suspect this could effect the bonding strength. Anyway, mix twice as long as you think it needs. Only use 5 minute epoxy. Don't use too much. Just enough so that it forms a small fillet around the meet between the stone and dop, not enough to go all over. Once the epoxy sets you can use water to melt the Eimers. Stand the dops up in a glass and add just enough water to get the Eimers wet. I don't immerse the whole thing. Superstition. Probably won't hurt, but why risk it? After a few hours I see if I can lightly tug it off. If not, repeat until it lets go. Cut the crown and then use acetone to soak the dop to remove the epoxy. Don't use attack as this has popped more that one cull et off my stones. Attack does not dissolve epoxy, it beaks it down. As it expands it can create pressure that can break the stone. Some folks drill a hole into the tip of the cone from the side of the dop to prevent this. Heat itself is rarely the problem. It is how fast the heat is applied. You can also debond epoxy by very slowly heating it in a water bath to boiling, then tug the stone off.
SUBJECT: TRANSFERRING
I got discouraged when faceting because I could not seem to keep a straight, even girdle on my stones. The girdle seemed to get thinner as I went around the stone. It started off fine but by the time it was finished the girdle was a knife edge. Any suggestions.
If you are using keyed dops your transfer jig or your transfer technique is probably to blame. You may also be using inconsistent pressure when cutting. What I do when I transfer is to use the little Graves T-bar to align the girdle. You should be able to feel the girdle facet seat on the flat part, then tighten down the retainer for the dop. When you cut the first girdle facet leave a lot of extra room. Also look to
32
see if the first girdle facet is of even width. If i t isn't use the cheater to fix it. If you cut the rest of the facets and find they are not the same width you have a problem with transfer or you may be using inconsistent pressure when cutting. For me it was caused by using epoxy. Going to wax fixed that for good.
USFG MEMBERS' WEBSITES
The primary purpose of the following list is one of communication; a communication that exists and is possible amongst us -- A. USFG members with websites; B. Members who have electronic mail potential but do not have websites; C. And members who have only regular (snail) mail potential. PLEASE NOTE: This LIST features only USFG members who have Websites; BUT in our March Newsletter there will be LIST of the USFG members who are legal dealers, but do not have websites, as well as those who have websites that are not listed in this piece.
We are a Guild composed of Professional and Hobbyist Gem Cutters; Inventors of Faceting Equipment, Laps, Faceting Machines etc.; Scientists, Engineers and Teachers. If our members have commodities for sale or free exchange, the USFG officers feel that this information is extremely important for all members of the USFG to have on hand. Lest you are concerned that this is commercialism, please be advised that the USFG does benefit financially one iota from this endeavor -- it is only communication of useful information.
TIDS IS ALSO A NOTICE to USFG members who are dealers that have only electronic mail and/or dealers who have only regular mail; please send the following information to Charles Moon (address in USFG Newsletter) and enclose the following instructions: 1. Name of business; 2. Email address, if you have one; 3 . Snail mail address and telephone; 4. Describe the essence of your business in 25 words or less.
PAUL T. AHLSTEDT: The Gemking Website Resources for Faceters: ORS System Clarity Graded Faceting Rough, Faceters Chat Room, Faceters Daily Discussion Digest, Faceting Information & Books, Rough Gemstone Miners and Importers. WEBSITE: <http://www.gemking.com> WEBSITE'S: E-MAIL: <mailto:[email protected]> PERSONAL E-MAIL: <[email protected]> P.T. AHSTEDT Mining and Mineral Exploration P.O. Box 474 Perris, California 92572-0474 ••••••••••••••••••••••••••••••••••••••••••••••••

U.S.F.G. Newsletter Vol. 9 No. 4 December, 1999
WEBSITES CLARK, DON: International Gem Society: The IGS is dedicated to supplying affordable education and information on Gemology, Lapidary and Metalsmithing. WEBSITE: <www.gemsociety.org> E-MAIL: < [email protected]> DON CLARK International Gem Society PO Box 491 808 Redding, CA 96049 •••••••••••••••••••••••••••••••••••••••••••••••• M. LUC GENOT: Gemline: Information website related to jewellery, gemmology, lapidary in Belgium (exposition, societies, stones infos . . . ). Luc is an authority on Blue Moonstones from Meethiyagoda, SriLanka WEBSITE: <http://www.gemline.org> E-MAIL: <[email protected]> M.Luc Genot, Gemline Ch. de Wavre, 850 B-1040 Bxl Belgium •••••••••••••••••••••••••••••••••••••••••••••••• GRAHAM, JEFF: Gram Faceting: Rough available: Tourmaline, Gamet, Sapphires, Quartz, Beryl, Peridot, Topaz .. . Gram Faceting books, "ask Jeff'' faceting related questions, cut stones, links. \VEBSITE: <http://v..r\vw.faceters.com>,.vww.faceters.com> E-MAIL: <mailto:[email protected]>[email protected]> JEFF GRAHAM Gram Faceting P.O. Box 1 8385 Tucson, AZ 85731 ************************************•*********** LANCE KANADY : GemData/The Spectrum Network: Colored Gemstone and Diamond Information, home of the interactive Gem, Mineral and Jewelry Show Calendar, Faceting info, USFG membership form, SoLux Daylighting info, Gem Sales and links to gem cutting sites and organization. WEBSITE: <http://www.gemdata.com> E-MAIL: <[email protected]> LANCE KANABY Mine Design 9135 Sheridan Drive Clarence, NY 14031 716-634-9400, Fax 716-633-3984 ************************************************ KELLER,BOB: Bob's Rock Shop/Rock&Gem Magazine OnHne: The Internet's first "zine11 for mineral collectors, lapidary hobbyists and rockhounds features online articles, show and club lists, free classified ads, Rock Net and more. WEBSITE: http://www.rockhounds.com E-MAIL: <[email protected] BOB KELLER 227 West Rillito Street
33
Tucson, AZ 85705 ************************************************ ANDY KILIKAUSKAS: Mojave Gems: The purpose of my site is to display my faceted & cabbed gems, and to give people some background information about gemcutting. WEBSITE: <http://ndti.net/andyk/wkpage.htm> E-MAIL: <[email protected]> ************************************************ MARR, JEAN: MystiCrystals, Gifts from the Heart of the Earth: Our searchable web site features information about our show schedule, gemstone jewelry, faceted gemstones, custom faceting, gem trees, gem tree supplies, facet rough, and contains articles by Jean on gemology and faceting. WEBSITE: <www.MystiCrystals.com> E-MAIL: <[email protected]> JEAN MARR PO BOX 1 815 Kernersville, NC 121 85 336-595-3870 ********************************************* GLEN & VENETTA PROBST: English Language Cyber Center at Brigham Young U. Reveals: A photo story about making a gemstone for learners of English as a second language. It is part of my website for the English Language Cyber Center at Brigham Young University. (Recommended: Excellent article, "Malting a Gemstone.") WEBSITE: <http://humanities.byu.edu/elc/student/adventures/gemstones/gemstone.html> E-MAIL: <[email protected]> GLEN W. PROBST 380 N. 1200 E. Orem, Utah 84097 ****************************************** ****** DIXIE THOMAS REALE: Kounting House: The web site is primarily designed for sales of rock. It has a catalog page with rock descriptions and pictures, as well as a one of a kind page with cabs and jewelry and some of my son's art works. There is also a rock of the month page with information on how the rocks are formed, and instruction on working the stones. There are a couple of field trips with maps and instructions to digging areas in the Northwestern U.S.A. WEBSITE: <http://www.dopplerfx.com/kounting> E-MAIL: <[email protected]> DIXIE THOMAS REALE 503 West 8th, Jerome, Idaho 83338 ************************************************ JONATHAN L. ROLFE: Jon Rolfe, Gearloose.com: Online articles illustrate how to build your own laps, faceting machines, digital angle readouts for existing production machines. Some examples of Jon's gemcutting appear & information, re his Batt Lap. There are links to other gemcutting sites and organizations. WEBSITE: <http://www.gearloose.com> E-MAIL: <[email protected]>

U.S.F.G. Newsletter Vol. 9 No. _4 December, 1999
(Continued.from page 33) JONATHAN L. ROLFE PO Box 533 North Easton, MA 02356 •••••••••••••••••••••••••••••••••••••••••••••••• BARBARA SMIGEL: Artistic Colored Stones Essence: Faceted gems, featuring exotic and collector material as well as cabs and carvings specifically chosen to appeal to jewelry designers. WEBSITE: <http://www.allweb.com/acs/> E-MAIL: <[email protected]> BARBARA W. SMIGEL 850 S. Rancho Dr. #2387 Las Vegas, Nevada 89106 702-382-0694 •••••••••••••••••••••••••••••••••••••••••••••••• SUMNER OLSEN: Olsen's Omelet and Faceted Stones: Olsen's Omelet Website contains pictures of fifteen gemstone eggs, which I have faceted. Faceted Stones Website contains pictures of seventy-four faceted stones. WEBSITE: Olsen's Omelet: http://members.aol.com. sumnenno/gemstone.html WEBSITE: Faceted Stones: http://members.aol.com/mildredoo/facets.htm (Olsen's Omelet Website is linked to the Faceted Stones Website) E-MAIL: <[email protected]> SUMNER M. OLSEN P.O.Box 880LL Steilacoom, Wa. 98388
INFORMATION NEEDED
Charlie Moon is in the process of preparing an article on CORIAN LAPS which is scheduled for publication in the March issue of this newsletter. Charlie requests that anyone who has used or is using the CORIAN LAP please send him comments on the lap, whether good, bad, or indifferent. Charlies e-mail address is: [email protected] His snail-mail address is: 1 55 Myrtle Court, Arcata, CA, 95521-6511 Let's hear what your experiences have been with the lap.
34
&i����������� � UF£TIME MEMBERSHIP AWARD �
�T IS WITH GREAT PLEASURE THAT THE � M USFG IS AWARDING ITS FIRST LIFE TIME � �MEMBERSHIP TO FRED VAN SANT! One � � could easily say that FRED is "MR. USFG." As �t �tor of the USFG Newsletter, he very quickly es- � � tablished it as one of the finest faceting newsletters � � be published in the USA. And for the first 6 � mi vears of the USFG -- a period before instant com- M �unication, the national faceting digests and other � � sources from which material could be easily ac- � �cessed -- almost every article in the Newsletter was �
� oduced by Fred. SO ONCE MORE, THE USFG OST HAPPILY AND SINCERELY AW ARDS � FRED VAN SANT, ONE OF THE USFG'S � FOUNDERS AND DEFINITELY ONE OF THE �j: � WORLD'S FINEST DESIGNER OF GEM- � � _STONES, A LIFE TIME MEMBERSHIP TO THE � �USFG! WE SINCERELY THANK YOU, FRED, � � �OR ALL THAT YOU HA VE ACCOMPLISHED � �-oR THE USFG! . � ������������
DUES CHANGES Due to the increased cost of producing, printing, and mailing the newsletter, for the first time since our organization some 10 years ago, the USFG Board of Directors was faced with the option of seriously reducing the size of the newsletter (by more than half from its current page count) OR increasing the annual membership dues. The Board has decided that the size of the newsletter should not be reduced. Thus, as of this notification, membership dues are increased in our three U. S. Postal Service mailing categories (domestic, Canadian, and overseas) as listed below: Domestic membership dues will increase $3.00 from $15.00 to $18.00. This additional $3.00 primarily covers increased production (paper, ink, envelopes, etc.) and commercial printing costs. (Domestic mailing costs are about $00.24 per issue). Canadian membership dues will increase $5.00, from $16.00 to $21 .00. This additional $5.00 covers increased production and commercial printing costs., but primarily increased mailing costs. Canadian mailing costs are $1.50 per issue, or $1.26 per issue higher than domestic costs ( about six times higher than domestic mailing costs). Thus, for $1.00 over and above the $1 5.00 domestic dues, Canadian members have been receiving 4 issues of the Newsletter at a USFG borne cost of about $4.00. Overseas membership dues will be increased $4.00 (from $19.00 to $23.00). This additional $4.00 covers increased production and commercial printing costs, but primarily increased mailing costs. Overseas mailing costs average about $2.40 per issue (about 10 times higher than ·domestic mailing costs).

U.S.F.G. Newsletter Vol. 9 No.A December, 1999
FACET-CUTTING SEQUENCES: A VEXING PROBLEM
By Jack E. Gross And Charles L. Moon Not so many years ago, the design and publication of stonecutting diagrams was limited to just a few pioneers who had the design capability and reproduction facilities to develop and distribute hard copies of the diagrams. With the advent of personal computers (with their computer-aided-design capabilities), electronic mail, and widespread organization of faceting guilds, the traffic of stone designs and transfer has increased dramatically. In general, it would be difficult to argue that these developments have not been a positive step in the growth of our hobby. However, this proliferation of stone-design traffic has resulted in occasional designs that contain errors of one sort or another. One of the most frustrating errors is a facet-cutting sequence that follows an order in which a "new facet to be cut" has no "previously cut facet" on which to be positioned ( discounting designs with purposely defined "floating facets"). Since the importance of cutting sequence does not seem to have received its deserved attention, this article seems appropriate to illustrate one example of the problem. Figs. I through 6 display the crown of a "square emerald" design that in one version of cutting instructions suggests a cutting order of, 1 , 2, 3, 4, 5, 6 and 7. The Figs. a..'"e intended to: ( I ) illustrate the consequences of following the suggested cutting sequence; and (2) illustrate an alternative cutting sequence that avoids the problem. Fig. I illustrates the positioning of the first three ranks of facets (labeled I , 2 and 3) which would have been cut in the suggested sequence (it is assumed the the pavilion cutting had been completed which would have formed the girdle). Fig. 2 illustrates the cut of the facet (labeled facet 4) suggested as the fourth step in the cutting sequence. Although facet 4 in the Fig. is located in the correct position (thanks to GemCad's drawing capabilities), in the process of actually cutting the stone there is no previously cut facet with points to which facet 4 can meet. In essence, the fourth suggested step in the cutting sequence creates a "floating facet" which must be positioned by eye. For those faceters who have not developed a "calibrated eye-ball" or other techniques for positioning such facets, floating facets are an invitation for the destruction of much rough. If the facets are not positioned correctly, then all facets which use the floating facets as meetpoints will also be mis-positioned. FIG. 3 illustrates an alternative cutting sequence in which cutting step 5 (facet 5) is cut before facet 4. The meets of facets 1 and 2 (indicated in the circle) provide the meetpoint for facet 5 .
35
48 54 Q
fl8 30
72 24
78 18
90 118
FIG. I . Illustration of the first three steps in the cutting se-quence.
54 48
42
FIG. 2. Illustration of cutting step 4 which creates a "floating facet."
FIG. 3. Illustration of step 5 facet positioning on facets I and 2 meetpoints.
30
24
18
FIG. 4. Illustration of step 4 facet positioning on facets 5 and 3 meetpoints.
FIG. 5. Illustration of step 6 facet positioning on facets 4 and 5 meetpoints.
30
24
18
FIG. 6. Illustration of step 7 facet positioning on facets l , 2 3 and 4 meetpoints.
FIG. 4 illustrates how facet 5 provides a meetpoint for positioning facet 4. FIGS. 5 and 6 illustrate a continued sequence of cutting steps, with each rank of facets providing the meetpoints for locating the next rank of facets. This illustration of facet-cutting sequence errors enforces the advice often offered to carefully analyze a design's cutting sequence before initiating cutting on a design for the first time. If a faceter is reasonably adept at operating GemCad whereby cutting sequences may be easily reviewed by redrawing the design facet by facet, the cutting sequence of any design, whether in Data V ue2 or not, can be easily analyzed for proper sequence.

U.S.F.G. Newsletter
UNITED STATES FACETERS GUILD Application for Membership
December, 1999
The USFG is open to faceters everywhere. Our primary goal is to improve the art and science of faceting through our newsletter and correspondence. Our secondary goal is to improve competitions and competition rules, both in the U.S. and internationally. Officers are elected every two years for 2 year terms; 1998 begins with new officers. Issues are voted on by mail Members receive our Quarterly Newsletter, usually containing about 20 pages each, and the right to participate in the USFG activities. New members receive a copy of our Constitution upon request.
Name: Mr. Mrs. Ms.
Street Address __________________ Telephone ----------
City, State, Zip _________________ �----------------------�-----�--...:.
I am a faceter I am interested in becoming a faceter _.
How long have you been faceting? _.
I compete or have competed at the following levels:
Junior Novice Intermediate Advanced Master _
I do not wish to compete _.
I have a display case _ 12 stones lo+ stones Educational Other _____ ____
Which machine do you cut with? _________________________ ...:
Ar� yo:: a gemstene de�!er? Yes _ ]\fo --
Do you need help with, or information about, your type of machine? Yes _ No _
Have you judged in competitions? Yes _ No _ Interested in judging? Yes _ No
Have you given talks or written articles on faceting? Yes _ No _.
E-mail address if applicable ___________________________ __:.
Are you a member of the Faceters Digest? Yes _ No _
Do you belong to other faceting guilds? Yes _ No If Yes, please list below:
Are you interested in serving as a USFG officer? _. If so, please list below:
Special talents or interests to share? Please list below:
Enc lo s: OID
1 for 1 year membership in USFG �as)
---------·
MAKE CHECKS PAYABLE TO: DON DUNN MAIL TIDS FORM PLUS CHECK TO: Don Dunn, 993 Renown Rd.
Dayton, OH 45430-1112 Telephone: (937) 426-5112
Rev. 8-98
36
![Caning of Senator Sumner, Part Three - Furman …facweb.furman.edu/~bensonlloyd/sumner/SumnerPart3ver1b.doc · Web view[The Caning of Senator Sumner] [Part Three] [H1]Part Three:](https://img.pdfslide.net/doc/110x75/5aa7a2597f8b9a6d5a8c9eae/caning-of-senator-sumner-part-three-furman-bensonlloydsumnersumnerpart3ver1bdocweb.jpg)