Embed Size (px)
Citation preview
Empowering Occupational Therapy, (c)1999 Charla Holst & Debra Vogt, www.TheraPower.Com, 1-877-BooksOT
FM-a .
Learn Origami - The Art Of Folding Paper Learn a new skill and increase the fine motor coordination in your hands.
Preparation Begin with the Hand Exercises found on page V.
Position Sit at a table.
Directions1. Start with clean hands and gather all supplies. 2. A valley fold is created when the paper folds up, towards you.
Try a valley fold. This is the
symbol used for a valley fold - - - - .
3. A mountain fold is created when you fold the paper down, awayfrom you.
Try a mountain fold. This isthe symbol used for a mountainfold - •• - •• - •• -.
4. The reverse fold uses the valley fold. This fold is often used to
make animal legs, necks, and tails. Fold an index card in half toform a long narrow strip.
5. Use a valley fold to bring one of
the short ends of the card up atan angle so that the short endmeets the long edge of the card.
1
Supplies• 3”x5” index cards
Empowering Occupational Therapy, (c)1999 Charla Holst & Debra Vogt, www.TheraPower.Com, 1-877-BooksOTEmpowering Occupational Therapy, © 1999 Charla Holst & Debra Vogt, www.TheraPower.com, 1-877-BooksOT
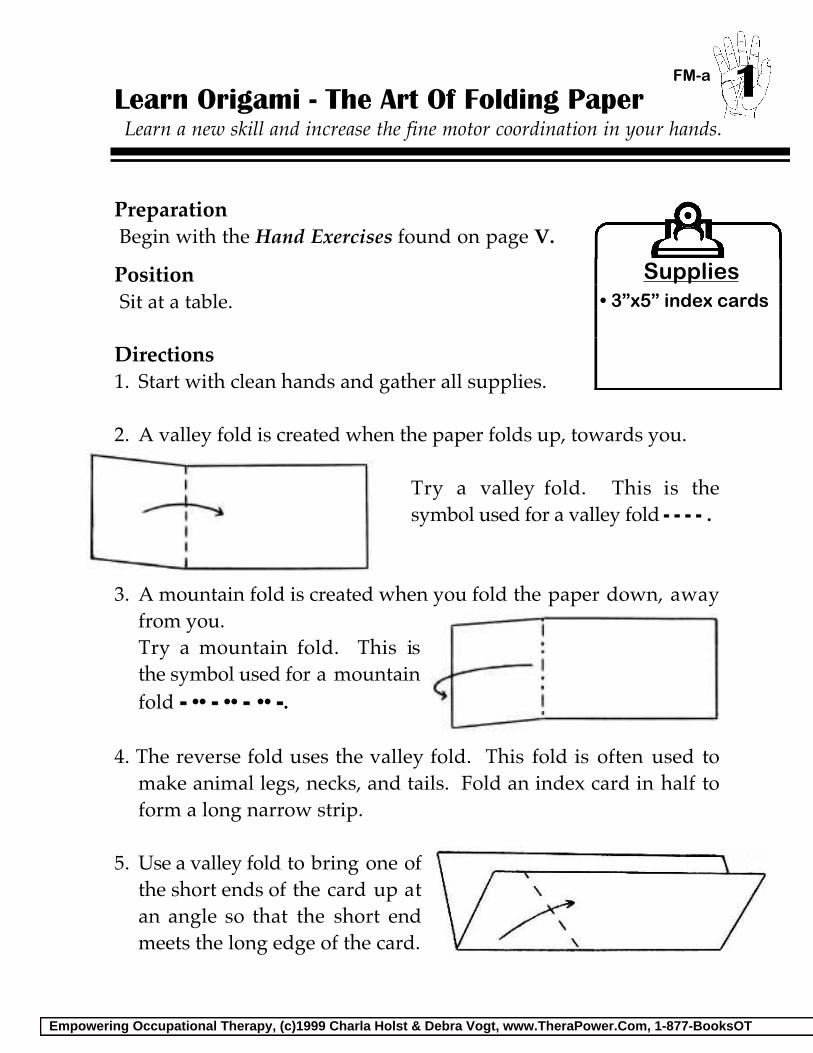
6. Unfold the valley fold and open the card slightly.
7. Push the middle fold into thecenter of the card to reversethe fold.
8. Crease the folds by running your finger over them. This is what
a reverse fold should look like.
Follow Up Accomplishments•Practice these folds untilyou can do them withoutlooking at the directions.•Learn to make a jumpingorigami frog. See activityFM-b3 for directions.
•learn a new skill•improve coordination of hands•increase range of motion of hands•increase endurance of hands•improve body awareness•improve attention•increase visual spatial awareness
Empowering Occupational Therapy, (c)1999 Charla Holst & Debra Vogt, www.TheraPower.Com, 1-877-BooksOT
FM-a .
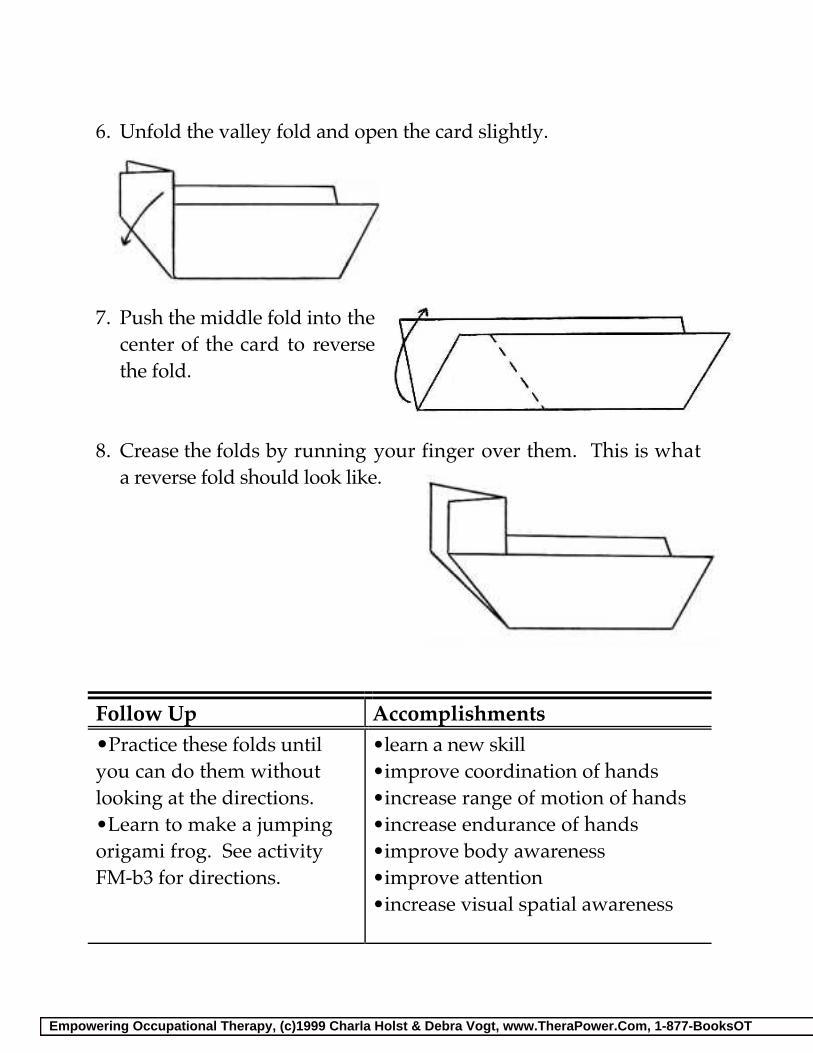
Sign Your Name In American Sign Language Increase the range of motion and fine motor coordination in your hands.
Preparation Begin with the Hand Exercises found on page V.
CAUTION: Avoid overuse and fatigue ofyour fingers and hands.
Directions1. Find the sign for the first letter of your name in the chart above.2. Position your hand exactly as the picture demonstrates for the
first letter of your name.3. Check to make sure your hand looks the same as the picture.
Some signs are similar in appearance. A mirror may help.4. Practice forming the sign until you are comfortable with it.
Continue the steps above for each letter of your name.
2
Supplies• picture below• mirror (optional)
American Manual Alphabet
Empowering Occupational Therapy, (c)1999 Charla Holst & Debra Vogt, www.TheraPower.Com, 1-877-BooksOTEmpowering Occupational Therapy, © 1999 Charla Holst & Debra Vogt, www.TheraPower.com, 1-877-BooksOT
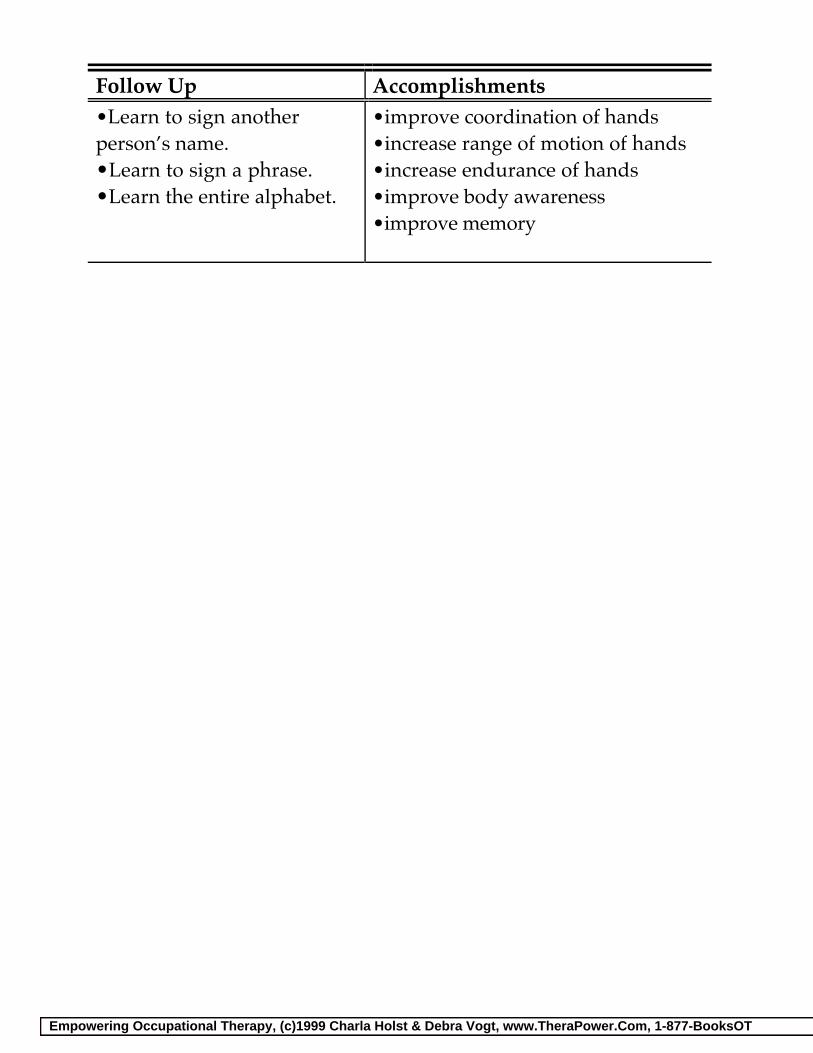
Follow Up Accomplishments•Learn to sign anotherperson’s name.•Learn to sign a phrase.•Learn the entire alphabet.
•improve coordination of hands•increase range of motion of hands•increase endurance of hands•improve body awareness•improve memory
Empowering Occupational Therapy, (c)1999 Charla Holst & Debra Vogt, www.TheraPower.Com, 1-877-BooksOT
FM-a .
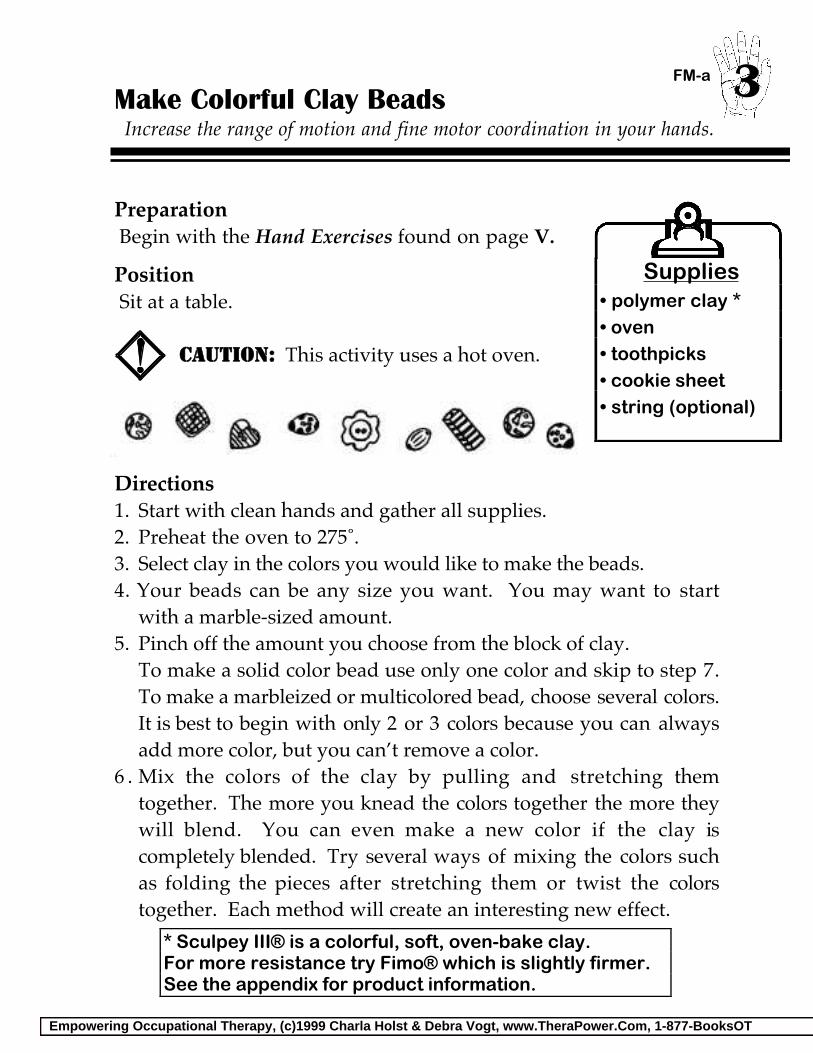
Make Colorful Clay Beads Increase the range of motion and fine motor coordination in your hands.
Preparation Begin with the Hand Exercises found on page V.
Position Sit at a table.
CAUTION: This activity uses a hot oven.
Directions 1. Start with clean hands and gather all supplies.2. Preheat the oven to 275˚.3. Select clay in the colors you would like to make the beads.4. Your beads can be any size you want. You may want to start
with a marble-sized amount.5. Pinch off the amount you choose from the block of clay. To make a solid color bead use only one color and skip to step 7.
To make a marbleized or multicolored bead, choose several colors.It is best to begin with only 2 or 3 colors because you can alwaysadd more color, but you can’t remove a color.
6 . Mix the colors of the clay by pulling and stretching themtogether. The more you knead the colors together the more theywill blend. You can even make a new color if the clay iscompletely blended. Try several ways of mixing the colors suchas folding the pieces after stretching them or twist the colorstogether. Each method will create an interesting new effect.
3
Supplies• polymer clay *• oven• toothpicks• cookie sheet• string (optional)
* Sculpey III® is a colorful, soft, oven-bake clay.For more resistance try Fimo® which is slightly firmer.See the appendix for product information.
Empowering Occupational Therapy, (c)1999 Charla Holst & Debra Vogt, www.TheraPower.Com, 1-877-BooksOTEmpowering Occupational Therapy, © 1999 Charla Holst & Debra Vogt, www.TheraPower.com, 1-877-BooksOT
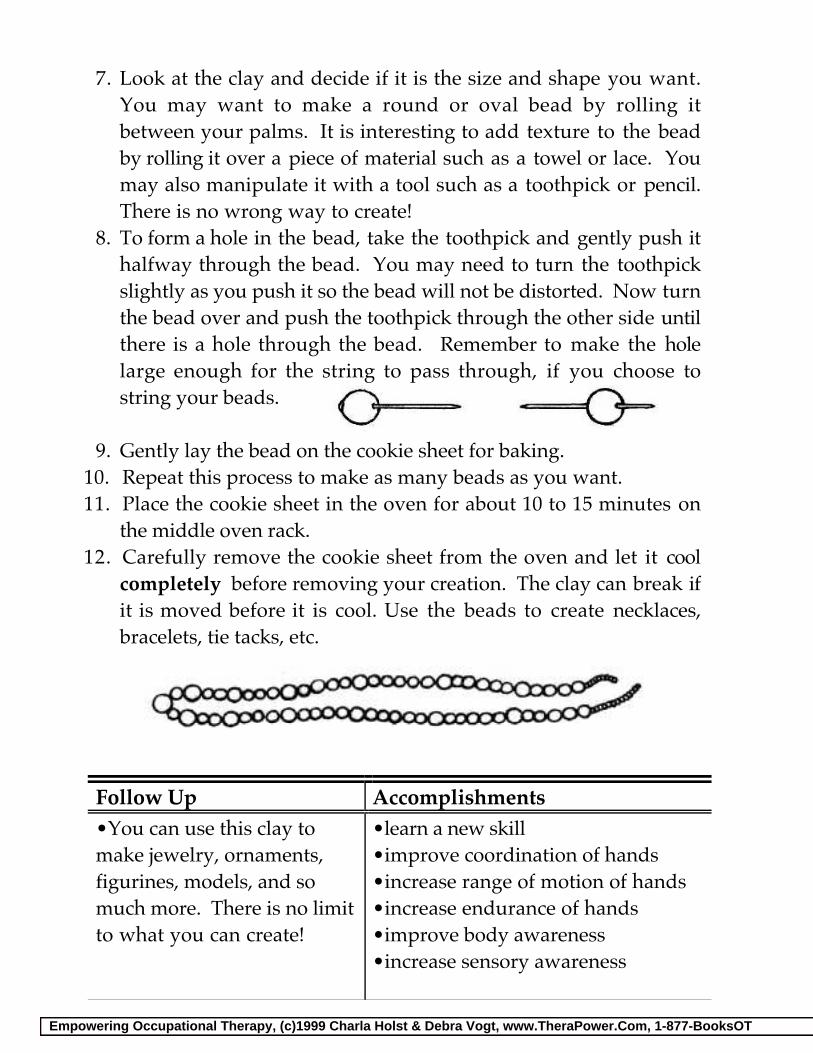
7. Look at the clay and decide if it is the size and shape you want.You may want to make a round or oval bead by rolling itbetween your palms. It is interesting to add texture to the beadby rolling it over a piece of material such as a towel or lace. Youmay also manipulate it with a tool such as a toothpick or pencil.There is no wrong way to create!
8. To form a hole in the bead, take the toothpick and gently push ithalfway through the bead. You may need to turn the toothpickslightly as you push it so the bead will not be distorted. Now turnthe bead over and push the toothpick through the other side untilthere is a hole through the bead. Remember to make the holelarge enough for the string to pass through, if you choose tostring your beads.
9. Gently lay the bead on the cookie sheet for baking.
10. Repeat this process to make as many beads as you want.11. Place the cookie sheet in the oven for about 10 to 15 minutes on
the middle oven rack.12. Carefully remove the cookie sheet from the oven and let it cool
completely before removing your creation. The clay can break ifit is moved before it is cool. Use the beads to create necklaces,bracelets, tie tacks, etc.
Follow Up Accomplishments•You can use this clay tomake jewelry, ornaments,figurines, models, and somuch more. There is no limitto what you can create!
•learn a new skill•improve coordination of hands•increase range of motion of hands•increase endurance of hands•improve body awareness•increase sensory awareness
Empowering Occupational Therapy, (c)1999 Charla Holst & Debra Vogt, www.TheraPower.Com, 1-877-BooksOT
FM-a .
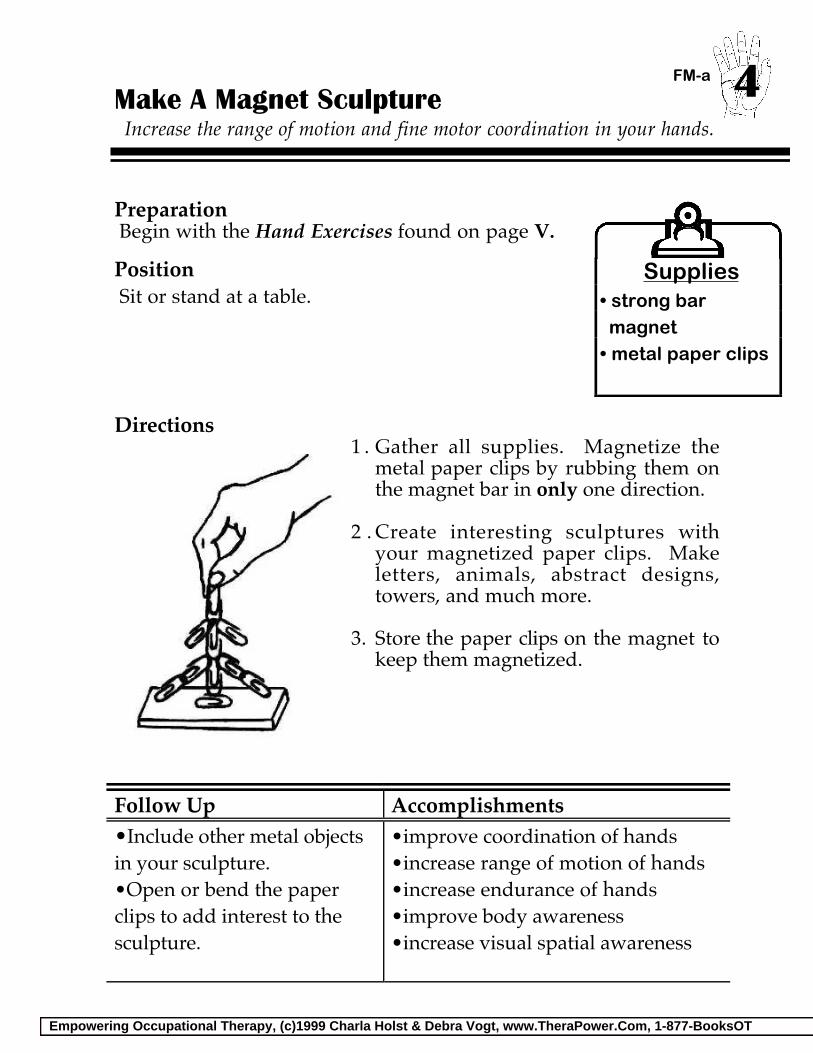
Make A Magnet Sculpture Increase the range of motion and fine motor coordination in your hands.
Preparation Begin with the Hand Exercises found on page V.
Position Sit or stand at a table.
Directions1 . Gather all supplies. Magnetize the
metal paper clips by rubbing them onthe magnet bar in only one direction.
2 . Create interesting sculptures with
your magnetized paper clips. Makeletters, animals, abstract designs,towers, and much more.
3. Store the paper clips on the magnet to
keep them magnetized.
Follow Up Accomplishments•Include other metal objectsin your sculpture.•Open or bend the paperclips to add interest to thesculpture.
•improve coordination of hands•increase range of motion of hands•increase endurance of hands•improve body awareness•increase visual spatial awareness
4
Supplies• strong bar magnet• metal paper clips

Empowering Occupational Therapy, (c)1999 Charla Holst & Debra Vogt, www.TheraPower.Com, 1-877-BooksOTEmpowering Occupational Therapy, © 1999 Charla Holst & Debra Vogt, www.TheraPower.com, 1-877-BooksOT
Empowering Occupational Therapy, (c)1999 Charla Holst & Debra Vogt, www.TheraPower.Com, 1-877-BooksOT
FM-a .
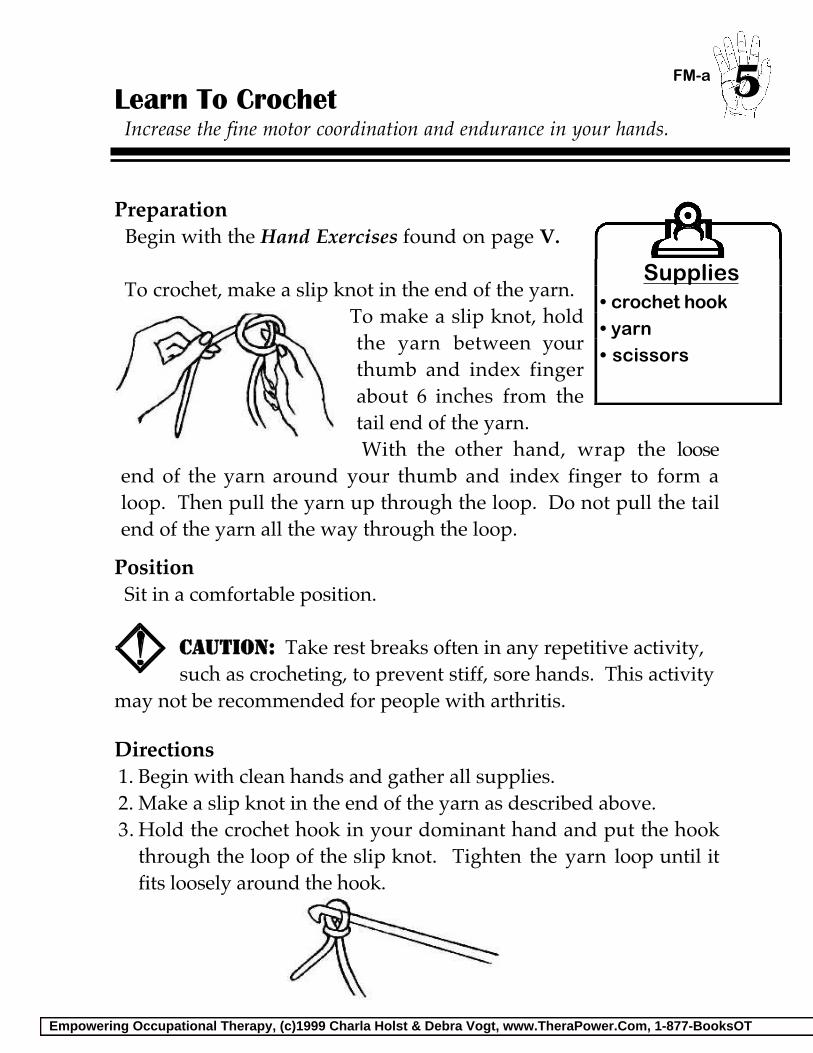
Learn To Crochet Increase the fine motor coordination and endurance in your hands.
Preparation Begin with the Hand Exercises found on page V.
To crochet, make a slip knot in the end of the yarn.To make a slip knot, holdthe yarn between yourthumb and index fingerabout 6 inches from thetail end of the yarn. With the other hand, wrap the loose
end of the yarn around your thumb and index finger to form aloop. Then pull the yarn up through the loop. Do not pull the tailend of the yarn all the way through the loop.
Position Sit in a comfortable position.
CAUTION: Take rest breaks often in any repetitive activity,such as crocheting, to prevent stiff, sore hands. This activity
may not be recommended for people with arthritis.
Directions 1. Begin with clean hands and gather all supplies. 2. Make a slip knot in the end of the yarn as described above. 3. Hold the crochet hook in your dominant hand and put the hook
through the loop of the slip knot. Tighten the yarn loop until itfits loosely around the hook.
5
Supplies• crochet hook• yarn• scissors
Empowering Occupational Therapy, (c)1999 Charla Holst & Debra Vogt, www.TheraPower.Com, 1-877-BooksOTEmpowering Occupational Therapy, © 1999 Charla Holst & Debra Vogt, www.TheraPower.com, 1-877-BooksOT
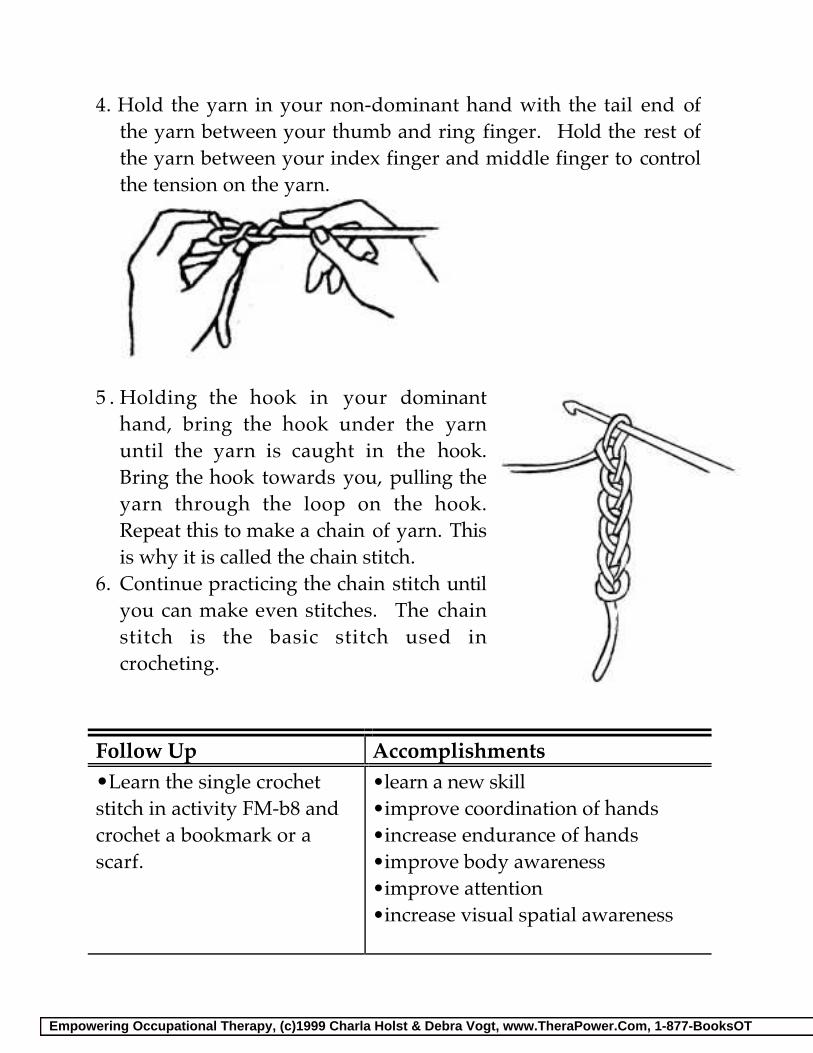
4. Hold the yarn in your non-dominant hand with the tail end of
the yarn between your thumb and ring finger. Hold the rest ofthe yarn between your index finger and middle finger to controlthe tension on the yarn.
5 . Holding the hook in your dominanthand, bring the hook under the yarnuntil the yarn is caught in the hook.Bring the hook towards you, pulling theyarn through the loop on the hook.Repeat this to make a chain of yarn. Thisis why it is called the chain stitch.
6. Continue practicing the chain stitch untilyou can make even stitches. The chainstitch is the basic stitch used incrocheting.
Follow Up Accomplishments•Learn the single crochetstitch in activity FM-b8 andcrochet a bookmark or ascarf.
•learn a new skill•improve coordination of hands•increase endurance of hands•improve body awareness•improve attention•increase visual spatial awareness
Empowering Occupational Therapy, (c)1999 Charla Holst & Debra Vogt, www.TheraPower.Com, 1-877-BooksOT
FM-a .
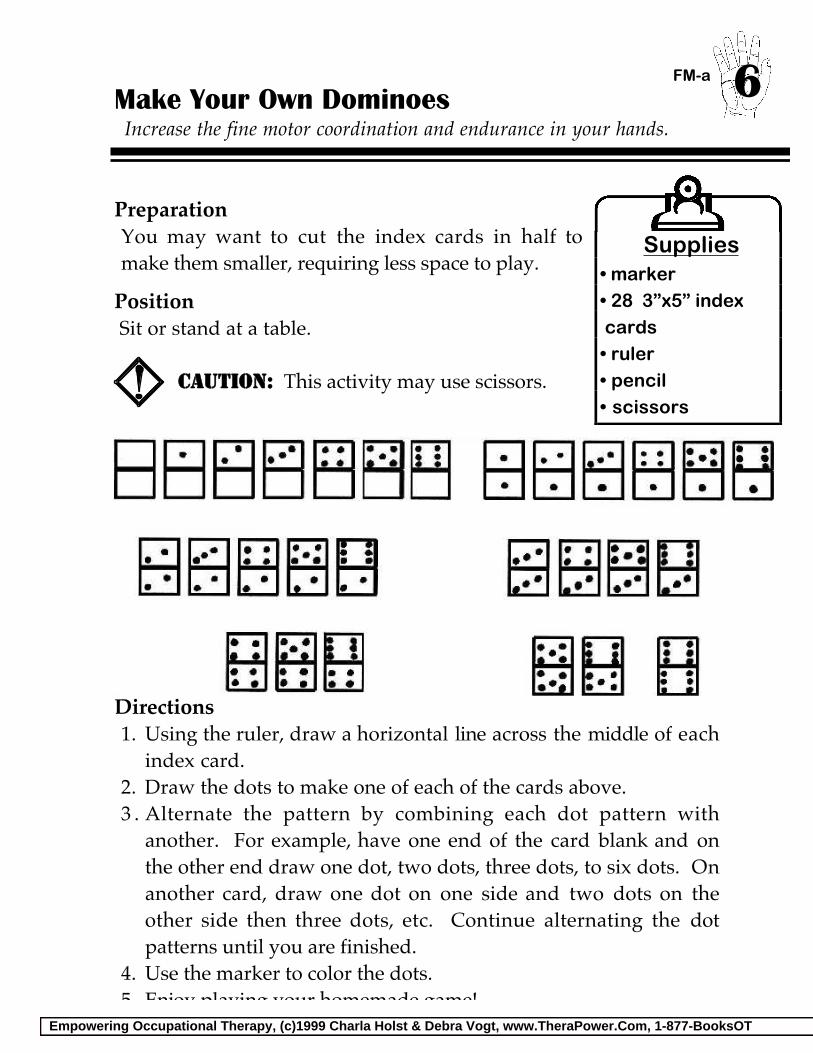
Make Your Own Dominoes Increase the fine motor coordination and endurance in your hands.
PreparationYou may want to cut the index cards in half tomake them smaller, requiring less space to play.
Position Sit or stand at a table.
CAUTION: This activity may use scissors.
Directions1. Using the ruler, draw a horizontal line across the middle of each
index card.2. Draw the dots to make one of each of the cards above.3 . Alternate the pattern by combining each dot pattern with
another. For example, have one end of the card blank and onthe other end draw one dot, two dots, three dots, to six dots. Onanother card, draw one dot on one side and two dots on theother side then three dots, etc. Continue alternating the dotpatterns until you are finished.
4. Use the marker to color the dots.5. Enjoy playing your homemade game!
6
Supplies• marker• 28 3”x5” index cards• ruler• pencil• scissors
Empowering Occupational Therapy, (c)1999 Charla Holst & Debra Vogt, www.TheraPower.Com, 1-877-BooksOTEmpowering Occupational Therapy, © 1999 Charla Holst & Debra Vogt, www.TheraPower.com, 1-877-BooksOT
Follow Up Accomplishments•Turn to activity COG-a6 fordirections to play dominoes.•For a challenge, make a setof dominoes with nine dots.You will need 55 index cards.
•improve coordination of hands•increase endurance of hands•improve attention•increase visual spatial awareness
Empowering Occupational Therapy, (c)1999 Charla Holst & Debra Vogt, www.TheraPower.Com, 1-877-BooksOT
FM-a .
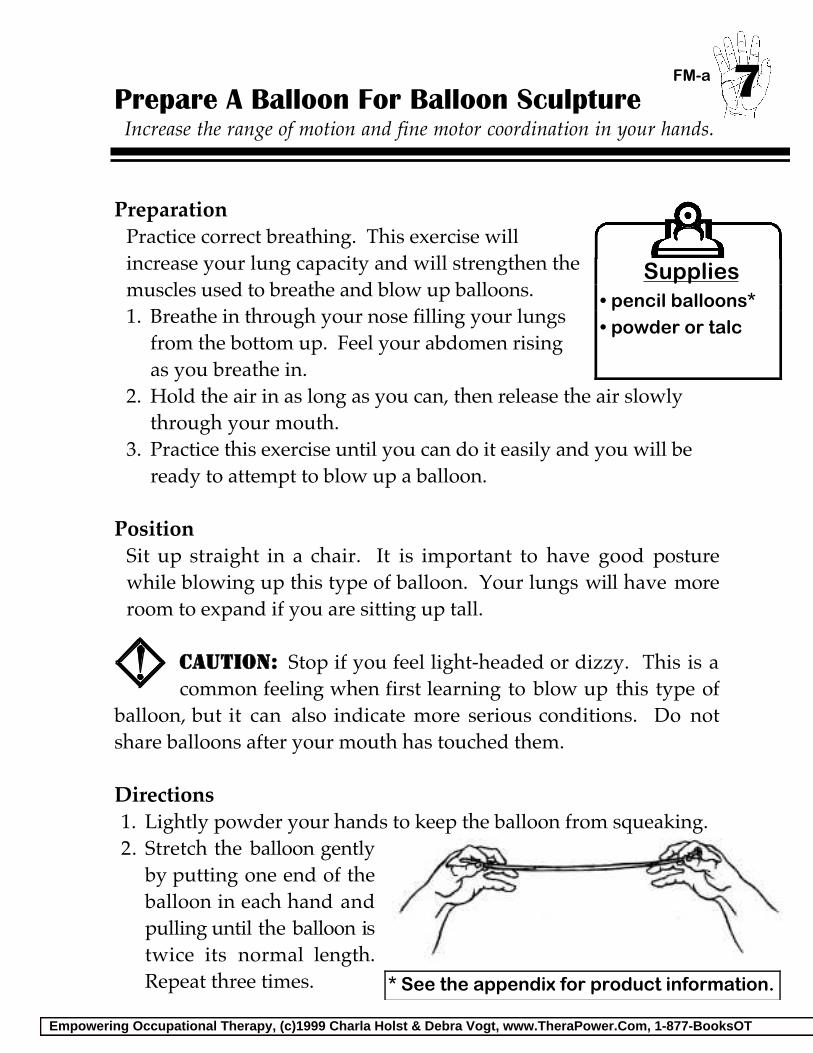
Prepare A Balloon For Balloon Sculpture Increase the range of motion and fine motor coordination in your hands.
PreparationPractice correct breathing. This exercise willincrease your lung capacity and will strengthen themuscles used to breathe and blow up balloons.1. Breathe in through your nose filling your lungs
from the bottom up. Feel your abdomen risingas you breathe in.
2. Hold the air in as long as you can, then release the air slowlythrough your mouth.
3. Practice this exercise until you can do it easily and you will beready to attempt to blow up a balloon.
PositionSit up straight in a chair. It is important to have good posturewhile blowing up this type of balloon. Your lungs will have moreroom to expand if you are sitting up tall.
CAUTION: Stop if you feel light-headed or dizzy. This is acommon feeling when first learning to blow up this type of
balloon, but it can also indicate more serious conditions. Do notshare balloons after your mouth has touched them.
Directions1. Lightly powder your hands to keep the balloon from squeaking.2. Stretch the balloon gently
by putting one end of theballoon in each hand andpulling until the balloon istwice its normal length.Repeat three times.
7
Supplies• pencil balloons*• powder or talc
* See the appendix for product information.
Empowering Occupational Therapy, (c)1999 Charla Holst & Debra Vogt, www.TheraPower.Com, 1-877-BooksOTEmpowering Occupational Therapy, © 1999 Charla Holst & Debra Vogt, www.TheraPower.com, 1-877-BooksOT
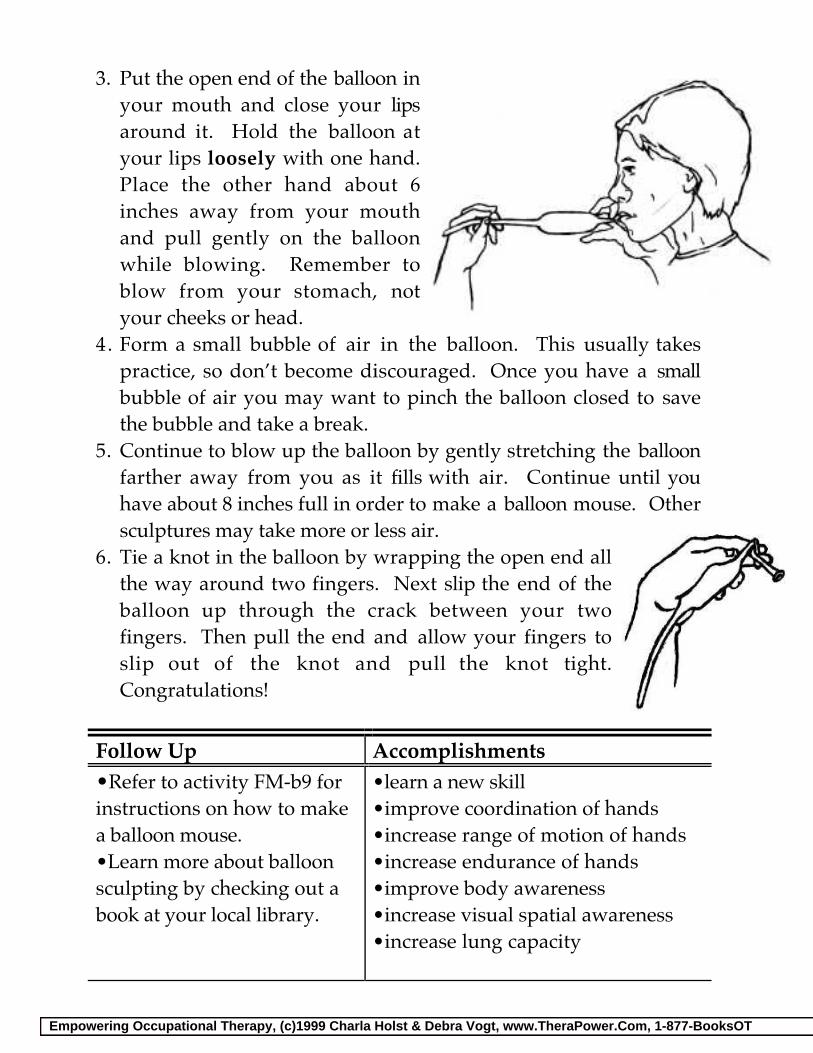
3. Put the open end of the balloon inyour mouth and close your lipsaround it. Hold the balloon atyour lips loosely with one hand.Place the other hand about 6inches away from your mouthand pull gently on the balloonwhile blowing. Remember toblow from your stomach, notyour cheeks or head.
4. Form a small bubble of air in the balloon. This usually takespractice, so don’t become discouraged. Once you have a smallbubble of air you may want to pinch the balloon closed to savethe bubble and take a break.
5. Continue to blow up the balloon by gently stretching the balloonfarther away from you as it fills with air. Continue until youhave about 8 inches full in order to make a balloon mouse. Othersculptures may take more or less air.
6. Tie a knot in the balloon by wrapping the open end allthe way around two fingers. Next slip the end of theballoon up through the crack between your twofingers. Then pull the end and allow your fingers toslip out of the knot and pull the knot tight.Congratulations!
Follow Up Accomplishments•Refer to activity FM-b9 forinstructions on how to makea balloon mouse.•Learn more about balloonsculpting by checking out abook at your local library.
•learn a new skill•improve coordination of hands•increase range of motion of hands•increase endurance of hands•improve body awareness•increase visual spatial awareness•increase lung capacity
Empowering Occupational Therapy, (c)1999 Charla Holst & Debra Vogt, www.TheraPower.Com, 1-877-BooksOT
FM-a .
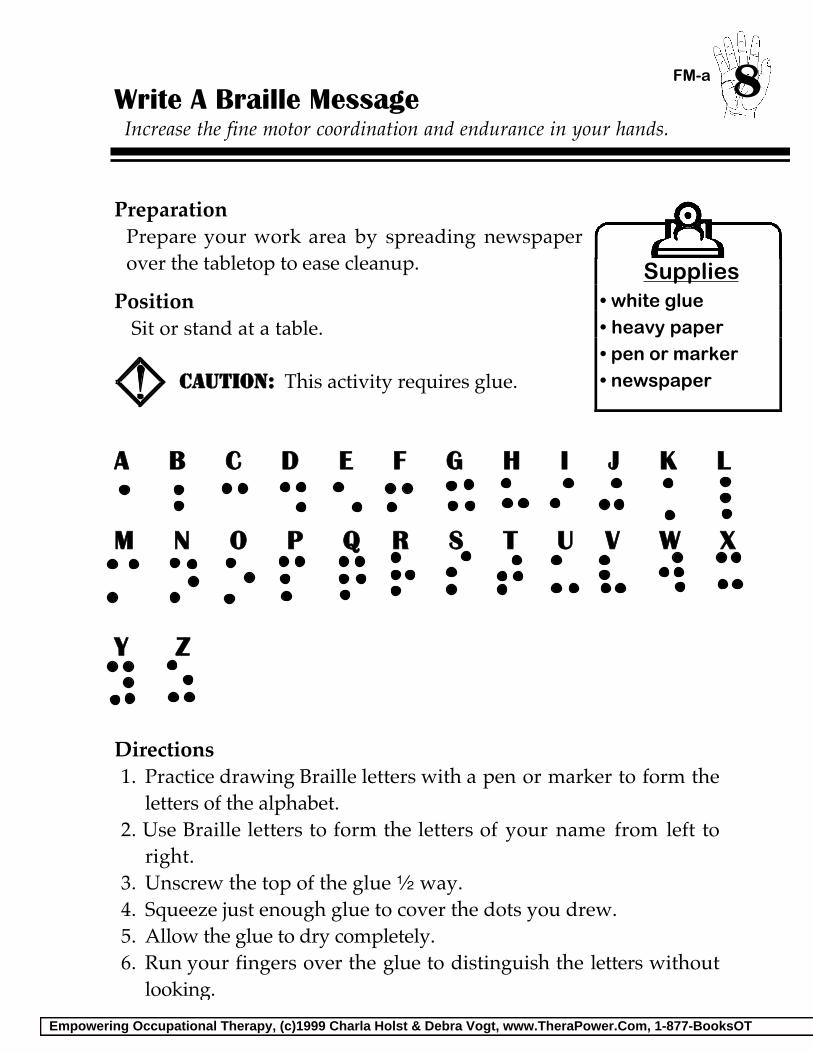
Write A Braille Message Increase the fine motor coordination and endurance in your hands.
PreparationPrepare your work area by spreading newspaperover the tabletop to ease cleanup.
Position Sit or stand at a table.
CAUTION: This activity requires glue.
A B C D E F G H I J K L
M N O P Q R S T U V W X
Y Z
Directions1. Practice drawing Braille letters with a pen or marker to form the
letters of the alphabet.2. Use Braille letters to form the letters of your name from left to
right.3. Unscrew the top of the glue 2 way.4. Squeeze just enough glue to cover the dots you drew.5. Allow the glue to dry completely. 6. Run your fingers over the glue to distinguish the letters without
looking.
8
Supplies• white glue• heavy paper• pen or marker• newspaper
Empowering Occupational Therapy, (c)1999 Charla Holst & Debra Vogt, www.TheraPower.Com, 1-877-BooksOTEmpowering Occupational Therapy, © 1999 Charla Holst & Debra Vogt, www.TheraPower.com, 1-877-BooksOT
Follow Up Accomplishments•Write a Braille letter tosomeone who has visualdeficits.•Help teach this skill tosomeone who has visualdeficits.
•learn a new skill•improve coordination of hands•increase endurance of hands•improve body awareness•improve attention•increase visual spatial awareness•increase sensory awareness
Empowering Occupational Therapy, (c)1999 Charla Holst & Debra Vogt, www.TheraPower.Com, 1-877-BooksOT
FM-a .
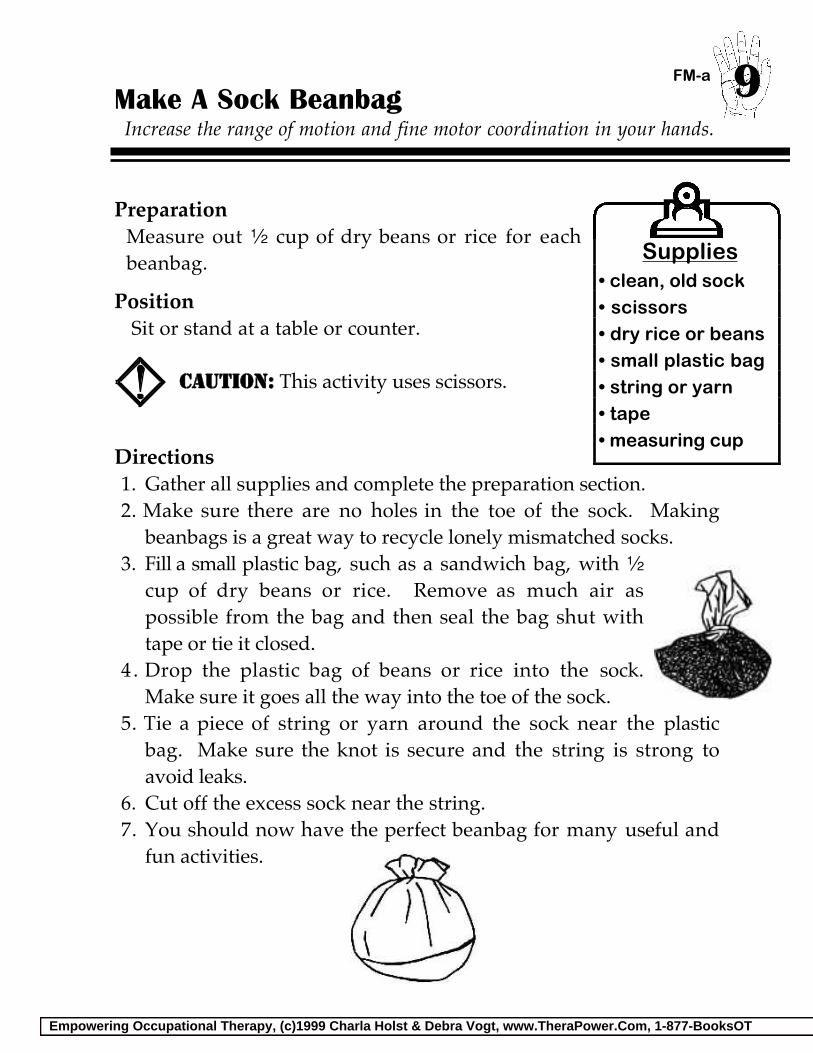
Make A Sock Beanbag Increase the range of motion and fine motor coordination in your hands.
PreparationMeasure out 2 cup of dry beans or rice for eachbeanbag.
Position Sit or stand at a table or counter.
CAUTION: This activity uses scissors.
Directions1. Gather all supplies and complete the preparation section.2. Make sure there are no holes in the toe of the sock. Making
beanbags is a great way to recycle lonely mismatched socks.3. Fill a small plastic bag, such as a sandwich bag, with 2
cup of dry beans or rice. Remove as much air aspossible from the bag and then seal the bag shut withtape or tie it closed.
4 . Drop the plastic bag of beans or rice into the sock.Make sure it goes all the way into the toe of the sock.
5. Tie a piece of string or yarn around the sock near the plasticbag. Make sure the knot is secure and the string is strong toavoid leaks.
6. Cut off the excess sock near the string. 7. You should now have the perfect beanbag for many useful and
fun activities.
9
Supplies• clean, old sock• scissors• dry rice or beans• small plastic bag• string or yarn• tape• measuring cup
Empowering Occupational Therapy, (c)1999 Charla Holst & Debra Vogt, www.TheraPower.Com, 1-877-BooksOTEmpowering Occupational Therapy, © 1999 Charla Holst & Debra Vogt, www.TheraPower.com, 1-877-BooksOT
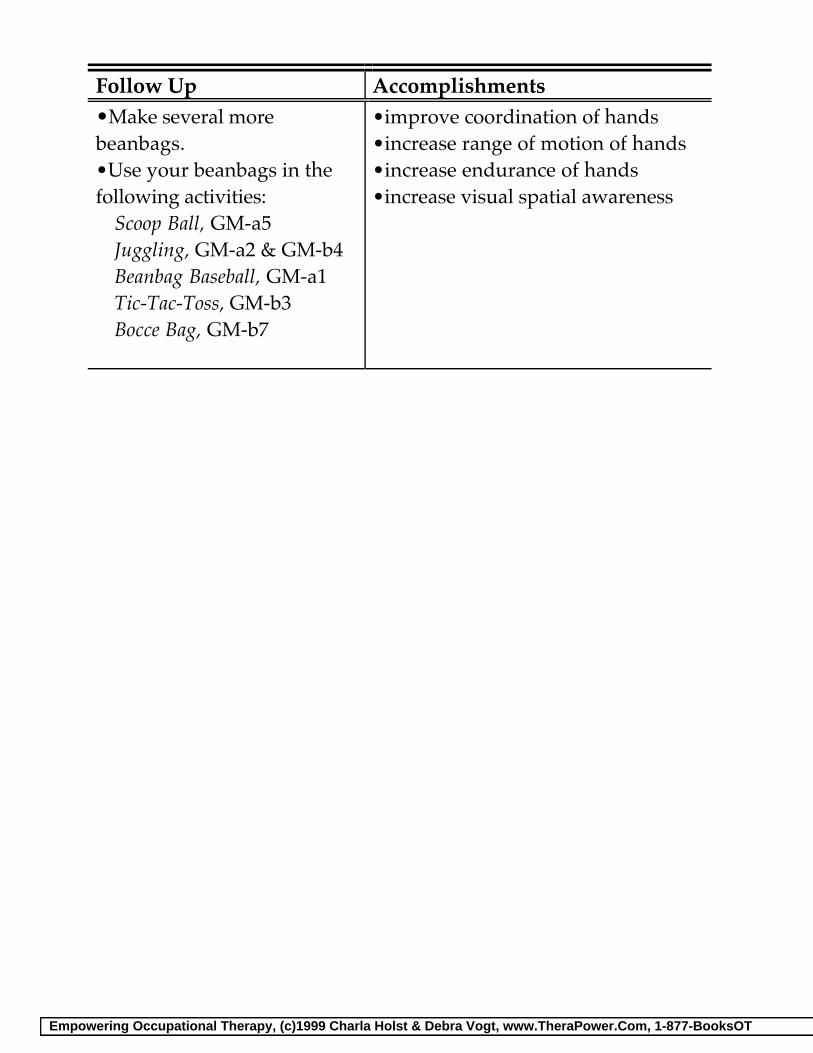
Follow Up Accomplishments•Make several morebeanbags.•Use your beanbags in thefollowing activities:
Scoop Ball, GM-a5Juggling, GM-a2 & GM-b4Beanbag Baseball, GM-a1Tic-Tac-Toss, GM-b3Bocce Bag, GM-b7
•improve coordination of hands•increase range of motion of hands•increase endurance of hands•increase visual spatial awareness
Empowering Occupational Therapy, (c)1999 Charla Holst & Debra Vogt, www.TheraPower.Com, 1-877-BooksOT
FM-a .
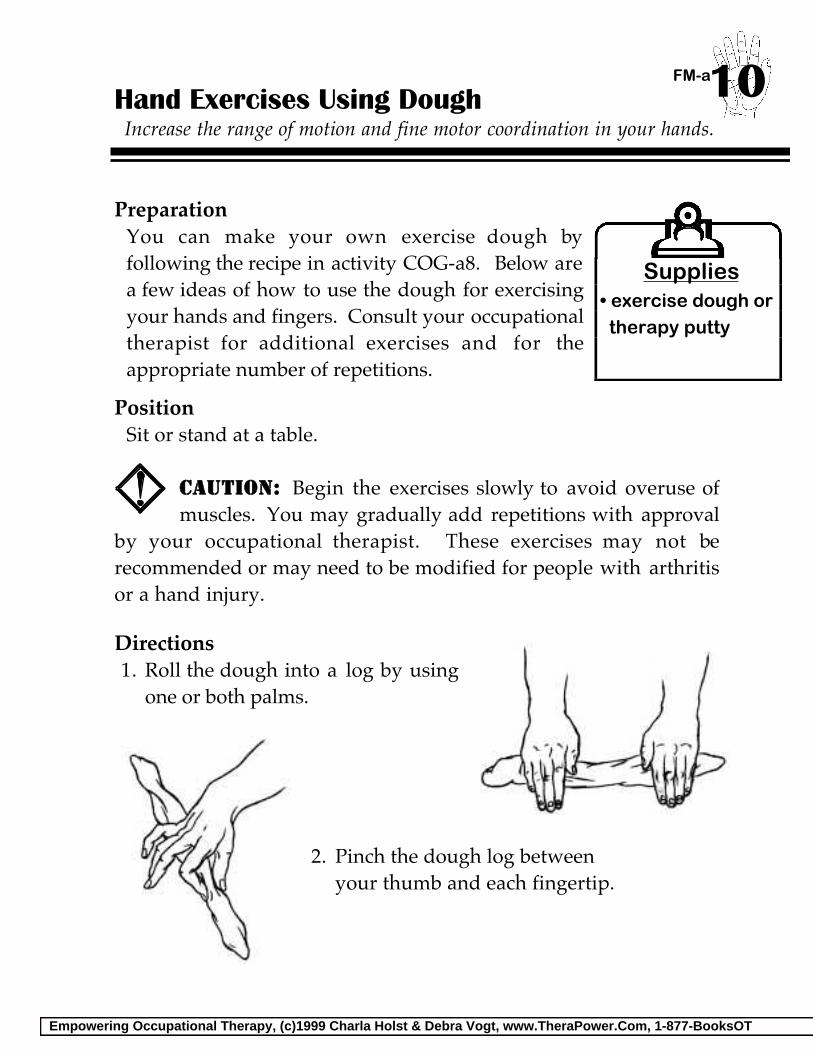
Hand Exercises Using Dough Increase the range of motion and fine motor coordination in your hands.
PreparationYou can make your own exercise dough byfollowing the recipe in activity COG-a8. Below area few ideas of how to use the dough for exercisingyour hands and fingers. Consult your occupationaltherapist for additional exercises and for theappropriate number of repetitions.
PositionSit or stand at a table.
CAUTION: Begin the exercises slowly to avoid overuse ofmuscles. You may gradually add repetitions with approval
by your occupational therapist. These exercises may not berecommended or may need to be modified for people with arthritisor a hand injury.
Directions1. Roll the dough into a log by using
one or both palms.
2. Pinch the dough log between your thumb and each fingertip.
10
Supplies• exercise dough ortherapy putty
Empowering Occupational Therapy, (c)1999 Charla Holst & Debra Vogt, www.TheraPower.Com, 1-877-BooksOTEmpowering Occupational Therapy, © 1999 Charla Holst & Debra Vogt, www.TheraPower.com, 1-877-BooksOT
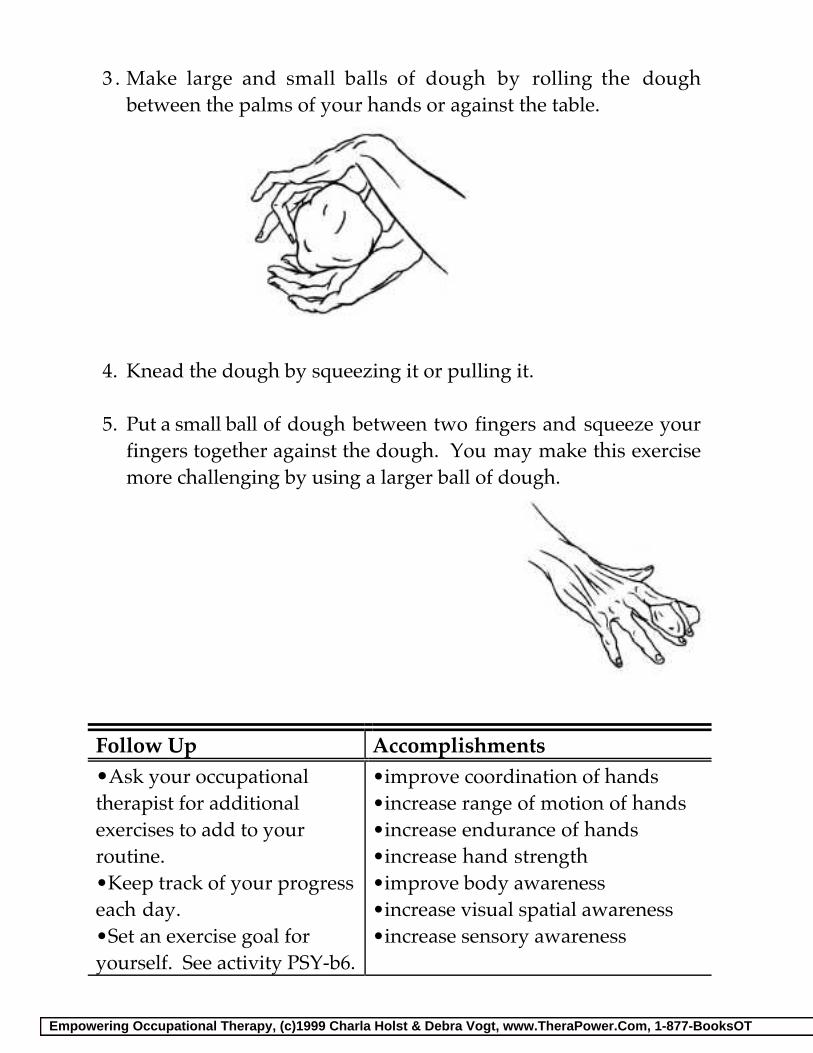
3 . Make large and small balls of dough by rolling the doughbetween the palms of your hands or against the table.
4. Knead the dough by squeezing it or pulling it. 5. Put a small ball of dough between two fingers and squeeze your
fingers together against the dough. You may make this exercisemore challenging by using a larger ball of dough.
Follow Up Accomplishments•Ask your occupationaltherapist for additionalexercises to add to yourroutine.•Keep track of your progresseach day.•Set an exercise goal foryourself. See activity PSY-b6.
•improve coordination of hands•increase range of motion of hands•increase endurance of hands•increase hand strength•improve body awareness•increase visual spatial awareness•increase sensory awareness