Embed Size (px)
Citation preview

A better way to use Windows 8
• Learn the Key Features of RetroUI Pro
• Learning to Use the Start Menu
• Using TabletView™
• Take Charge with Enforce™
• Configure RetroUI
• Configuring and using SuperSize™

Learn the Key Features of RetroUI Pro
A better way to use Windows 8

• Return to the classic desktop at login
• Add the Start Button and Start Menu back to the classic desktop
• Makes Windows 8 Easier:
• Press the Windows key or just click the taskbar to easily return to the
classic desktop
• Start menu has integrated Metro features
• Hotkeys allow you to easily control Windows 8
• Easily Pin Favorites to the Start Menu and TabletView
• Use TabletView™ to organize and open your favorite things
• Enforce™ - Make Metro play nice, within the bounds of the classic
desktop. Scale, Size & Position Metro Apps on the classic desktop
RetroUI™ - A better way to use Windows 8

RetroUI is designed to make Windows 8 easier and more fun to use.
• RetroUI allows you to skip over the Windows 8 Start Screen whenever you login.
• RetroUI brings back the Start Button and Start Menu, and adds powerful features that allow you to use the Metro features of Windows 8 easier, launch Metro Apps and easily pin your favorite websites too.
• You can also use the Windows Key on the keyboard [] to open and close the RetroUI Start Menu and to return to the classic desktop.
• RetroUI also allows you to take charge of Windows 8 and force the Metro Start Screen and Metro Apps to run in resizable windows on the Windows desktop.
• RetroUI features patent-pending technology we call Enforce™. With it, Windows 8 Store Apps are automatically resized. You can now move them around on your screen, and by pressing [F12] on the keyboard you can switch them back and forth from full-screen to windowed Apps with a single click on the keyboard.
Key Features of RetroUI – Overview

In Windows 8, the Metro Start Screen takes over your entire screen. • This can cause users to be confused, because Hotcorners and the Charms bar are hidden.
Key Features of RetroUI – Skip the Start Screen

RetroUI, returns you to the classic Windows desktop after you login. • After Login you should see the classic Windows desktop.
Key Features of RetroUI – Skip the Start Screen

RetroUI, returns the Start Button as a toolbar. • If the Start Button isn’t on your screen, you can right click the Taskbar at the bottom
of the screen, select Toolbars, then select RetroUI Start Button. Your Start Button is
Back!
Key Features of RetroUI – Bring Back the Start Button

You now see the Start Button and the RetroUI TabletView icons in your Toolbar • Click the RetroUI logo in the lower left to open the Start Menu
• Advanced Tip – This icon can be customized with the RetroUI settings application.
Key Features of RetroUI – Start Button and TabletView

Key Features of the Start Menu
A better way to use Windows 8

Key Features of the Start Menu
Clicking the Start Button you see the RetroUI Start Menu • The Start Menu is easy to use, and has lots of great features that make Windows 8 easier.

Using the Windows Key on the keyboard. • The Windows Key on the keyboard can be used to open/close the RetroUI Pro Start Menu.
• By simply pressing this key on the keyboard you will be returned to the classic desktop from the
Start screen or when a Windows 8 Store (Metro) App is running.
Key Features of the Start Menu

Two simple ways to return to the Windows 8 (Metro) Start Screen: • Click the return to Start Screen (Metro) icon in the RetroUI Start Menu
• Or you can also press Ctrl+Esc on your keyboard (press the control key and while holding it
press the Escape key).
• Or you can use the lower-left corner of the screen with mouse to open it via the Hotcorner.
Key Features of the Start Menu

Key Features of the Start Menu
Now, click ‘All Programs’. You can right-click any item and select “Pin to Start Menu” • Once items are pinned, they are visible as favorites, and also in TabletView.

Key Features of the Start Menu
.
Now, click ‘Pinned Favorites’. Right-click any icon and select “Enable Edit Mode”. Now you
can drag & drop to arrange your favorites the way you want them. You can also click the
un-pin icon to un-pin. Un-pinning removes the icon from favorites AND TabletView.

Key Features of the Start Menu
You can also pin your favorite websites. From the Start menu, click ‘All Programs’, then scroll
down to ‘Web Favorites’. And then right click a website you like. Then click Pin to Start Menu. After these are pinned, they appear at the top of favorites and in TabletView – remember right click to organize them.

Key Features of the Start Menu
You can also pin Windows 8 Store Apps (Metro Apps). Click ‘All Programs’, and you will see all
of your installed Windows Store Apps. Take special notice of the icon for ‘All Metro Apps’. • As before, simply right-click and select “Pin to Start Menu”

Key Features of the Start Menu
Power users can pin any feature of the Win-X menu to do things such as open an Admin
Command Prompt, open Control Panel, and many other powerful features • Select; Programs, Thinix, Win-X Menu, and Pin your favorite Win-X tools.

Key Features of the Start Menu
Metro Features are integrated into the Start Menu • Click to Open Start Screen, Open Task Switcher, Open Charms bar, or Search

Key Features of the Start Menu
Access any running Windows or Metro App with Task Switcher • The Task Switcher icon in the Start Menu allows quick access to any classic or Metro App!

Key Features of the Start Menu
Shutdown is now simple, with Shutdown options in the RetroUI Start Menu • Advanced Note: These items respect the Windows registry settings, i.e. if sleep was disabled it
wouldn’t be shown, and adapt in Terminal Services connections.

Understanding TabletView
A better way to use Windows 8

RetroUI TabletView™ - Launch anything with a single click
• Once you pin your favorite things using the Start menu, you can use
TabletView to organize your favorite things:
• My Computer, Documents, Music, Videos, etc.
• Classic Windows applications
• Metro Applications
• Your favorite Websites
• These powerful features allow you to be far more efficient and not need to
bounce back-and-forth between the classic desktop and the Windows 8
Start Screen. Saving time and making Windows 8 far easier and more
efficient.
Understanding TabletView

Understanding TabletView
Get started with TabletView by clicking the TabletView icon in the taskbar • If you don’t see a TabletView icon in your taskbar, it hasn’t been enabled – see the next slide.

Understanding TabletView
When you first open TabletView you see your favorite things but they may be disorganized • You can right click anywhere in TabletView to start organizing.

Understanding TabletView
After you right click, you are in edit-mode. Start by hitting the ‘Add Blank’ icon at the bottom
of the screen, add a dozen or so blanks to get started • Hint, you need to chase the Add-blank button around while adding blanks.
Understanding TabletView
After you have added some blanks to your layout. You can drag and drop your pinned
Favorites the way you like them • Hint, you may want to organize your favorites into groups of icons that do similar things.

Understanding TabletView
Try dragging some blanks in between groups of related items to get started • It takes a few minutes to get things right, but have some patience, it takes a bit of practice.
Understanding TabletView
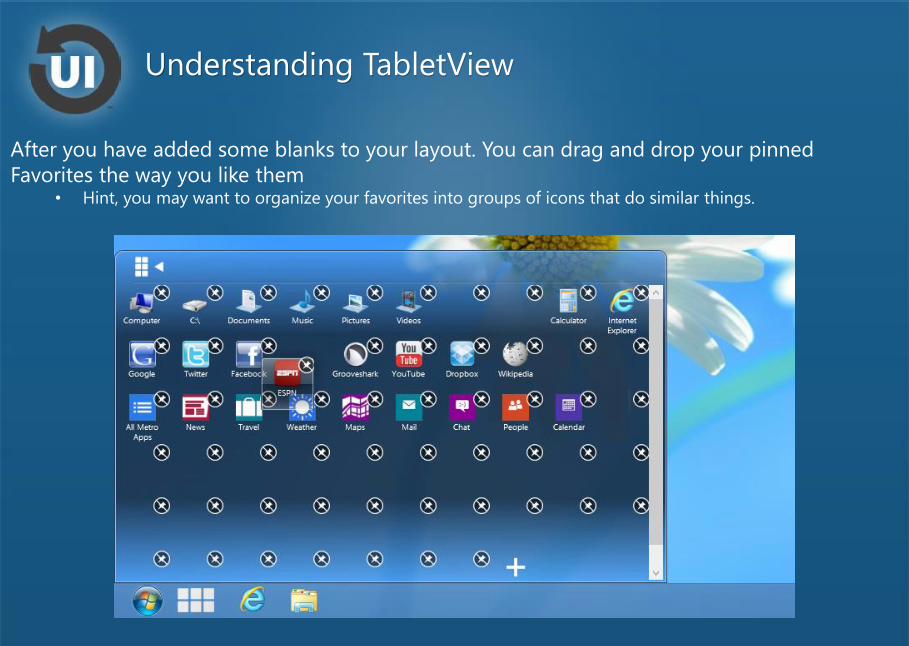
If you see any duplicates or other items you do not need in your layout, simply un-pin them • Advanced Users: duplicates can result from inheritance during the initial setup

Understanding TabletView
To see how the final view looks, you can right click again to turn off edit mode • Hint –this sort-order is independent of the sort order of your favorites in the Start Menu –
allowing you to arrange each view separately.

Take Charge with Enforce™
A better way to use Windows 8

Take Charge with Enforce
RetroUI Enforce™ - Make Windows 8 Play Nice
• With Enforce running, the Windows 8 Start Screen is resized to run within
the classic Windows desktop. It brings back the Taskbar and the Start
Button - this makes using Windows 8 far easier, and more efficient.
• Enforce makes the Taskbar and Start button visible while you are in Metro,
so you can simply click the Taskbar to return to the classic desktop.
• Windows 8 Store Apps (Metro Apps) are resized and run within resizable
windows on the classic desktop.
• Because of the way that Windows 8 works, you cannot multitask or switch
between a windowed Metro App and a classic Windows program, but
there is still a lot of efficiency gained by allowing Metro Apps to be resized
– particularly on high-resolution desktop monitors.
• There are several Hotkeys built-in to Enforce that make using Windows 8
easier.

RetroUI Pro has powerful features to control Apps:
• With an App open on your monitor, you can press F12 on the keyboard to
toggle the app between windowed/resizable and full-screen. More on this
later.
• You can simply drag Apps to the edge of the screen to snap them, similar
to the way Aero-Snap works for normal programs in Windows 7. Click the
top border of an App and drag it to the top of the screen to snap full-
screen, or any other edge of the screen to snap the window ½ screen, or
drag to the corner of the screen to snap ¼ screen.
• You can also snap windows by pressing the Windows key + ArrowKey, such
as WindowsKey+LeftArrow, or WindowsKey+RightArrow
• You can close Metro Apps by pressing Windowskey+DownArrow
Key Features of RetroUI – Overview

Take Charge with Enforce
The Windows 8 Start Screen without Enforce running • Users who have used Windows for years, are confused because of the hidden hotcorners and charms bar.

Take Charge with Enforce
Introducing Enforce – The game has just changed! • With Enforce running the Taskbar, and StartMenu™ icons are revealed.
• You no longer need to understand or use Hotcorners to return to the classic desktop.

Take Charge with Enforce
Enforce, is flexible and dynamic! • With Enforce – you can have your Taskbar on any side of the display and the Windows 8 Start Screen is
sized accordingly. Here we see the taskbar moved to the right side of the screen.

Take Charge with Enforce
Open your favorite Windows 8 Store (Metro) App • Enforce will resize it, and give you an icon to suspend the App in the upper right corner of the window

Take Charge with Enforce
You can now resize and reposition your Metro Apps on the classic desktop • Advanced users: Not all Metro Apps can be resized. Enforce includes technology to detect and exclude
non-resizable Metro apps, from being resized whenever they are launched

Apps are resized when launched
Pressing [F12] allows you to switch
a Metro App back to full-screen
Pressing [F12] again switches the Metro App
to a borderless window with the Taskbar
available.
Press -[F12]
Press -[F12]
Take Charge with Enforce
Taking control of Metro Apps – [F12] • Open a Metro App, then press the [F12] key on your keyboard to toggle the size and style of the Metro App

Take Charge with Enforce
You can now drag App windows to snap them similar to Aero-Snap • Open any Windows 8 Store App, drag it by the titlebar to the edge or any corner of the screen.
• Dragging to left, right or bottom edge will snap ½ screen, dragging to the top will snap full-screen, and
dragging to any corner of the screen will snap ¼ screen.
Take Charge with Enforce
Enforce and Windows Store (Metro) apps that don’t tolerate resizing
• Things to know about Enforce™:
• Not all Metro Apps can be resized or tolerate resizing
• Enforce, includes technology to automatically exclude apps that crash upon
resizing. So, if you open an application that cannot be resized, it is added
to exclusions automatically. Apps that cannot be resized are opened in full-
screen. For these applications the [F12] key allows you to close the app
• To clear the Apps which are excluded from resizing, you may:
• Press Control+Shift+Alt+C
Or select “Reset/Clear stored settings” from the RetroUI Tray application.
• Advanced Users: RetroUI includes advanced features that allow network
administrators to control these features. See the Enterprise deployment guide for
more information

Take Charge with Enforce
Function Keys to make using Windows 8 easier
• [F3] Opens the Search panel within Metro
• [F4] Closes Metro Apps
• F4 has special behavior within the Metro version of IE where it opens the Frequents & Favorites toolbar at the bottom of the screen.
• F4 has no effect on classic Windows applications.
• [F7] Pressing F7 on your keyboard opens Task Switcher allowing you to switch to any running classic windows app or Metro App.
• [F8] Enable / Disable Auto Window Resizing
• [F9] Pressing the F9 key on your keyboard opens/closes the Charms Bar.
• [F10] Lock your desktop.
• [F12] Resize Metro Apps, Full-Screen, Full-View with Taskbar, Windowed with close icon. Note: The close icon suspends Metro Apps.
• Advanced: Any or all of these features can be individually enabled/disabled in the settings application, and these keys can be re-assigned to different keys if desired.

Configure RetroUI
A better way to use Windows 8

RetroUI allows you to re-assign the Windows
key so that it opens / closes the RetroUI Start
Menu and also returns you to the classic
desktop. This is an important feature in
making Windows 8 easier to use.
You can also choose to bypass the Windows 8
Start screen whenever you login. Select ‘Bypass
the Windows 8 Start Screen’ if you want to
have your PC return to the classic desktop after
login.
Select ‘Bypass Windows 8 Start Screen from
Lock Screen’ if you want to return to the classic
desktop from a lock screen.
Select ‘Hide Hot Corners’ if you wish to disable
the corner UI tips for the Start screen, Charms
bar, and Metro Task Switcher. Note that this will
leave those features accessible via secondary
commands, but will simply remove the hot
corners.
Configure RetroUI

Start Menu Settings.
Show Metro Apps in Start menu:
This option allows you to enable or disable the
display of Metro Apps within the all programs
view of the Start menu. This option can be
disabled by unchecking the checkbox.
After Apps are pinned to favorites, they can be
launched even if this option is unchecked.
This allows you to pin the Apps you need and
still launch them from the pinned favorites, but
saves time each time the Start menu is opened
or updated because the Metro Apps don’t
need to be scanned and updated.
Configure RetroUI

Start Menu Settings.
RetroUI Pro now offers two different
layouts (styles) for the Start menu.
Select a Windows 7 Style Start menu:
This option is designed to be used with a
mouse and designed to match the style of
Windows 7. It features advanced options and
right-click context menus. This is the more full-
featured choice.
Select the Modern UI Style Start Menu:
This option is designed to be used with a
mouse or with touch. Since it is designed for
touch, the buttons are larger, and the operation
is simpler.
Configure RetroUI

Windows 7 Style Menu Options:
Number of pinned items to display:
This option allows you to set a minimum
number of pinned favorites to be displayed in
the start menu. Increasing this value will make
the Start menu taller, and decreasing this value
will cause the start menu to be shorter in
height.
The actual minimum number of items shown
may be more than the selected value, because
of the minimum height required to show the
menu items displayed in the Start menu such
as: Run, Documents, Downloads, Control Panel,
etc.
These settings work hand-in-hand to
determine the minimum and maximum height
of the Start menu.
Also note that the minimum number of items
will not be shown if it exceeds the monitor
resolution.
Configure RetroUI

Windows 7 Style Menu Options:
Start Menu Settings:
This option allows you to easily turn on/off the
features you wish to see in your start menu.
Make special note of the fact that you need
to scroll up/down in this section to see all
available options.
Configure RetroUI

Windows 7 Style Menu Options:
Start Menu Settings:
This option allows you to set the default choice
for the shutdown button in the Start menu.
Make special note of the fact that you need
to scroll up/down in this section to see all
available options.
Configure RetroUI

TabletView Settings.
Select ‘Small’ for most desktop or
laptop computers.
Or for users of tablet computers you can
select ‘Full Screen’ to allow TabletView
to run full-screen.
The TabletView icon size only affects
TabletView if in Full Screen mode. This
setting adjusts the size of the icons
displayed to the user in Full Screen
TabletView.
Configure RetroUI

Configure RetroUI
TabletView can be used with touch on a tablet PC or with a mouse/keyboard. Shown here is
TabletView configured for Full Screen. This is best for Tablets or convertible Laptops • There are four sizes of icons for TabletView, so you can select the best size for your PC

Configure RetroUI
Users can use TabletView on Desktops and Laptops • This is an example of TabletView configured in the ‘small’ mode. In this size, TabletView integrates into the
Start Menu. This mode provides a touch-friendly view on convertible tablets or convertible laptops

Configure RetroUI
Start Button: • If you install RetroUI Pro, and don’t see the Start Button in your Taskbar. Right click the Taskbar, select
Toolbars, then select RetroUI Start Button, to enable the Start Button.

Taskbar Settings.
Here, you can customize the icon that is
displayed for the Start Button in the
taskbar, and you can also enable or
disable the icon for TabletView in the
Taskbar.
Note that if the icon for TabletView is
disabled in the Taskbar, that TabletView
is still available from within the Start
Menu in the ModernUI style Start menu
but will be unavailable in the Windows 7
style start menu.
Configure RetroUI

Configure RetroUI
The Start Button shown with a Windows 8 Logo Look

Enforce™ Settings.
“Bring back the Windows 7 User experience
(Ux) in Windows 8”
Here, you can Enable & Disable Enforce. Note
that whenever you disable and then re-enable
Enforce, it clears the list of Metro Apps which
are excluded from automatic resizing.
When Enforce is enabled, all of the various
function keys which Enforce supports can be
individually enabled or disabled from this
screen.
It is recommended to use the default settings,
but these keys can be disabled or re-assigned to
different keys if these function keys conflict with
other applications.
There are many options here, refer to the
RetroUI user guide for more information.
Configure RetroUI
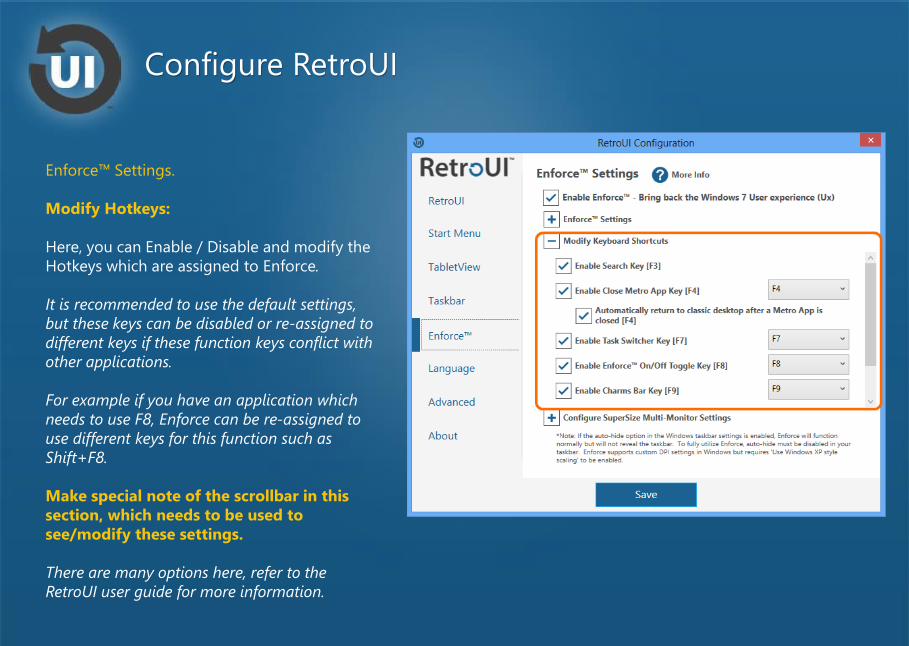
Enforce™ Settings.
Modify Hotkeys:
Here, you can Enable / Disable and modify the
Hotkeys which are assigned to Enforce.
It is recommended to use the default settings,
but these keys can be disabled or re-assigned to
different keys if these function keys conflict with
other applications.
For example if you have an application which
needs to use F8, Enforce can be re-assigned to
use different keys for this function such as
Shift+F8.
Make special note of the scrollbar in this
section, which needs to be used to
see/modify these settings.
There are many options here, refer to the
RetroUI user guide for more information.
Configure RetroUI

Enforce™ Settings:
Special note about using custom DPI
settings in Windows 8.
If you use custom DPI settings in
Windows 8 you must check the
checkbox that is entitled: “Use Windows
XP style scaling’.
Not selecting that option will cause
Enforce to incorrectly size the Windows
8 Start Screen and Windows 8 (Metro)
Apps.
For more information, consult the
RetroUI Pro user manual or knowledge
base.
Configure RetroUI
This is an example of what the screen looks like
if custom DPI settings are used without the
Windows option for ‘Use Windows XP style scaling’

Enforce™ Settings.
Select your desired language.
Note that dialog boxes within Enforce are
not multi-language and will appear in
English.
Configure RetroUI

Configure RetroUI
The Windows 7 style Start Menu colors will automatically match your Windows 8 colors • Colors are selectable only for the Modern UI Style Start Menu.
RetroUI AdaptiveColor™ technology
Automatically adjusts to your Windows 8 color pallet

Enforce™ Settings.
Advanced: This allows you to export the StartMenu.xml file
which contains a list of pinned favorites for the
user. This can be useful if you upgrade to a new
version of RetroUI, or if you want to create a
default configuration for distribution to a large
number of users.
“Advanced Settings”: This is a very aggressive
setting for advanced users and applications only.
Close and Disable the Windows 8 UI after Login.
Disable Charms Bar, Hot Corners, and Start
Screen for the user session. These features are
unavailable from keyboard, touch and mouse
input. This setting should not be used in
production environments without proper
testing.
See the Enterprise deployment guide for more
information.
Configure RetroUI

Enforce™ Settings.
About: This allows you enable or disable the automatic
check for updates and manually check for
updates.
It is recommended to automatic check for
updates enabled.
Configure RetroUI

Configuring and using SuperSize™
A better way to use Windows 8

Using SuperSize™ with multiple monitors • Without SuperSize™ the Windows 8 Start screen and Windows 8 Apps
are limited to only use one monitor. SuperSize combines the area of
multiple monitors into a large virtual display that allows users to
toggle the StartScreen and Windows 8 Apps to span-across multiple
monitors.
Key Features of RetroUI – Configuring and using SuperSize™

Core concepts of SuperSize™ • SuperSize requires multiple monitors and allows you to expand the Windows 8 Start
screen and Windows 8 Apps across multiple monitors.
• To use SuperSize, a wizard runs the first time you use the software asking you to assign
monitors to the SuperSize group. If you have only two monitors, you can simply answer
‘Yes’ to the first question and SuperSize will assign all available monitors to SuperSize.
• To fully understand and configure SuperSize, see the technical document “Technical
Overview – RetroUI Pro™ & SuperSize™
Windows 8 without SuperSize™ – Apps can use only one display, even if you have multiple monitors.
Key Features of RetroUI – Configuring and using SuperSize™

General Recommendations for SuperSize: • SuperSize requires at least TWO monitors!
• Use monitors with the same resolution if possible, but this is not required.
• Align the monitors to a common axis, and place the taskbars on all monitors along that
axis. In our example this means we align the bottom of the monitors using Windows
Display Manager, and we place our taskbars on both monitors on the bottom of both
monitors, and we make the taskbars the same height on both monitors.
• It is not required that taskbars exist on all monitors, and it is not required that the
monitors are aligned to the bottom.
• You cannot position the taskbar on an edge of any monitor which is adjacent to another
monitor. More detailed description of this follows.
• Generally monitors which are side-by-side, are preferred to monitor groups stacked on-
top of eachother. This is due to the way Windows 8 is designed and is not a limitation of
SuperSize.
• There are thousands of possible combinations which will work with SuperSize.
Key Features of RetroUI – Configuring and using SuperSize™

Taskbar placement: • One thing to make note of is that the taskbar(s) on both monitors must not be adjacent to
the other monitor. In this example, this means the taskbar on Monitor-a, cannot be on its
left side, and the taskbar on Monitor-b cannot be on its right side.
Key Features of RetroUI – Configuring and using SuperSize™

Resulting SuperSize display: • SuperSize creates a virtual display which is the maximum size based on the monitors
assigned to SuperSize.
• This is not limited to dual monitors, and does not require specialized hardware or drivers.
Key Features of RetroUI – Configuring and using SuperSize™
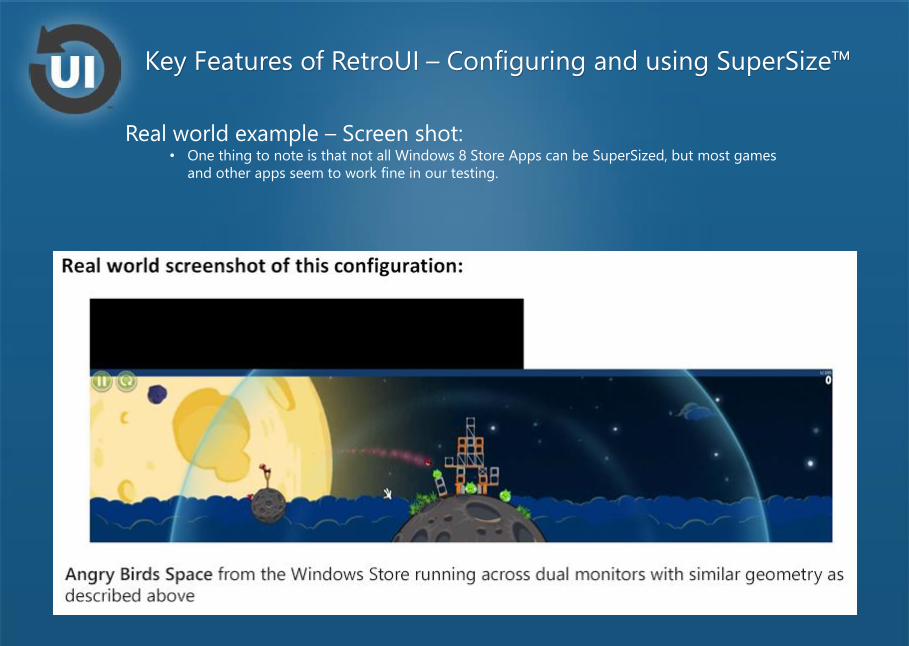
Real world example – Screen shot: • One thing to note is that not all Windows 8 Store Apps can be SuperSized, but most games
and other apps seem to work fine in our testing.
Key Features of RetroUI – Configuring and using SuperSize™

SuperSize Setup Wizard: • To run the Setup Wizard, press:
Control+Alt+F5 on your keyboard or select ‘Enable SuperSize’, from the RetroUI Tray
application.
Select Yes to this question, or select no if you have three or more monitors and wish to
customize SuperSize.
Key Features of RetroUI – Configuring and using SuperSize™
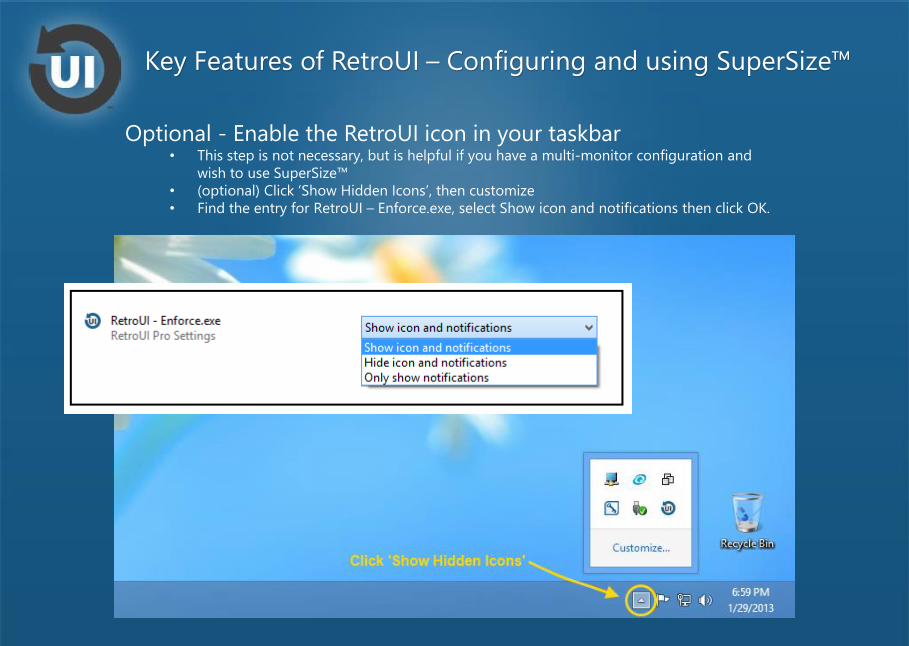
Optional - Enable the RetroUI icon in your taskbar • This step is not necessary, but is helpful if you have a multi-monitor configuration and
wish to use SuperSize™
• (optional) Click ‘Show Hidden Icons’, then customize
• Find the entry for RetroUI – Enforce.exe, select Show icon and notifications then click OK.
Key Features of RetroUI – Configuring and using SuperSize™

The RetroUI Tray icon can be used to control RetroUI • Click to change various settings or enable / disable SuperSize
• Reset / Clear stored settings removes learned settings for Enforce,
resetting it back to the factory configuration.
Key Features of RetroUI – Configuring and using SuperSize™

SuperSize™ – Allows the Start Screen to utilize the full resolution of multiple displays without a need for specialized
video cards.
Using SuperSize™ • After the setup wizard has run, you can press:
Control+Alt+F5 to turn SuperSize on/off
• This will cause the Windows 8 Start Screen and Windows 8 Apps to span-across multiple
monitors.
• You may then use F12 to toggle these Apps between resizable windows and full-screen
borderless Windows.
• To fully understand and configure SuperSize, see the technical document “Technical
Overview – RetroUI Pro™ & SuperSize™
Key Features of RetroUI – Configuring and using SuperSize™

SuperSize™ – Allows Apps to utilize the full resolution of multiple displays without a need for specialized video cards.
Using SuperSize™ • After the setup wizard has run, you can press:
Control+Alt+F5 to turn SuperSize on/off
• This will cause the Windows 8 Start Screen and Windows 8 Apps to span-across multiple
monitors.
• You may then use F12 to toggle these Apps between resizable windows and full-screen
borderless Windows.
• To fully understand and configure SuperSize, see the technical document “Technical
Overview – RetroUI Pro™ & SuperSize™
Key Features of RetroUI – Configuring and using SuperSize™

SuperSize™ – Allows normal Windows applications to span-across multiple displays. This is PhotoSynth.net running
within Internet Explorer across dual-displays.
Using SuperSize™ • SuperSize is capable of also SuperSizing normal Windows applications. In the screenshot
below the website PhotoSynth.net is running in a normal Internet Explorer window, and
allows the user to view borderless 360 degree virtual images in high resolution.
• To do this:
• Open Internet Explorer
• Press Control+Alt+F5 to enable SuperSize
• Press F11 to make Internet Explorer full-screen
• Press F12 to SuperSize the Internet Explorer
Window
• Getting back to normal, Press F11, then F12.
Key Features of RetroUI – Configuring and using SuperSize™

SuperSize™ – Allows monitors to be arranged one on top of the other, but this is not a preferred
arrangement for Windows 8.
Using SuperSize with
Stacked displays • SuperSize is capable of using
monitors which are stacked on top of
each other. However Windows 8 and
Windows 8 Apps generally assume a
landscape monitor. So this is
generally not preferred, but is
completely possible using Supersize.
• Note that in this arrangement of
monitors on top of each other that
the taskbar must not be at the
bottom of the upper monitor or at
the top of the lower monitor or it will
block the formation of the SuperSize
group. In this situation place the
taskbars on both monitors on the left
edges, or right edges or place the
upper monitor taskbar at the Top and
lower monitor taskbar at the bottom.
Key Features of RetroUI – Configuring and using SuperSize™
Download a fully functional 7-day trial of RetroUI Pro.
RetroUI.com
A better way to use Windows 8
![MUSÉE DAPPER Dossier de presse 15 octobre 2009 11 juillet 2010 · 2009. 11. 8. · 5 cérémoniels, costumes de guerre ou de chasse [8],circonscrivent le monde masculin. Ils se retrou-vent,](https://img.pdfslide.net/doc/110x75/5ff0fa6ee3b38c5ff06c62c7/muse-dapper-dossier-de-presse-15-octobre-2009-11-juillet-2010-2009-11-8-5.jpg)