Embed Size (px)
Citation preview
AutoCAD® Civil 3D®: Workflow for Visualization Using Civil View and Autodesk® 3ds Max® Design Class ID CI3530
John Sayre – Applied Technology Group
Class ID CI3530
Learning ObjectivesAt the end of this class, you will be able to:
Quickly generate rendered still shots for presentation pieces
List the steps required to transfer data between Civil 3D and 3ds Max Design
Apply object styles, such as cars, street lights, etc., to the model in 3ds Max Design
Create camera views traveling down the roadway
About the SpeakerJohn is an application engineer with 19 years experience in civil engineering. John specializes in Civil 3D, 3D Studio Max, Autodesk Map, and NavisWorks training and support. In his years as a civil designer, John has had in-depth experience in residential subdivision design, commercial design, and he specializes in storm water management and design. Over the years, he has provided training for civil engineering firms in Missouri, Oklahoma, Kansas, Arkansas, Louisiana, and Georgia.

AutoCAD® Civil 3D®: Workflow for Visualization Using Civil View and Autodesk® 3ds Max® Design
Introduction
The workflow for bringing data from Civil 3D to 3DS Max Design for a Roadway Project or a Proposed Subdivision is much the same. My original concept for this class was to use a Large Roadway Project to show you this workflow. As I started to build my dataset, I decided to use a different dataset, to show that Civil View was not just for Roads. The data that we will use for this class is a part of a subdivision that a client of ours came to me and said, “Can we do what you just showed me in a subdivision?”. The answer is yes. We will bring in the same data for the roads in the subdivision, we will bring in data for proposed surfaces inside the lots, and we will bring in a simple house that was generated in Revit Architecture. I believe that after you see that the workflow for this type project is much the same as a roadway project it will open up other ideas of how you can use Civil View to create your 3D Presentation.
Step 1 – Exporting Data from Civil 3D to 3D Studio Max Design using Civil View:
In the dataset that I have posted, you will see a dwg file that has a proposed subdivision. The design data that I have provided includes an alignment, profile, assembly, and a corridor. The data that we will initially export is going to be the alignment, corridor, and any feature lines that we would like to utilize for attaching objects or striping. To export the data from Civil 3D you need to:
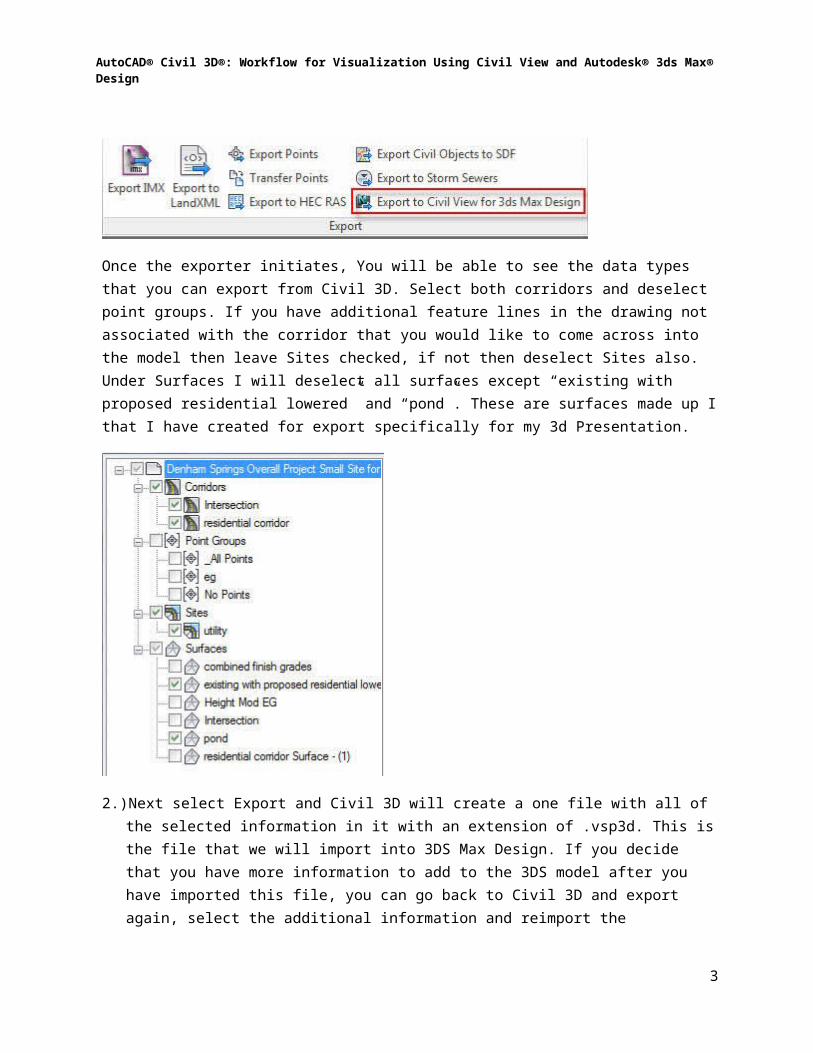
1.) Go to the Output tab in the ribbon. In the Export Panel you will see Export to Civil View for 3ds Max Design.
Once the exporter initiates, You will be able to see the data types that you can export from Civil 3D. Select both corridors and deselect point groups. If you have additional feature lines in the drawing not associated with the corridor that you would like to come across into the model then leave Sites checked, if not then deselect Sites also. Under Surfaces I will deselect all surfaces except “existing with proposed residential lowered” and “pond”. These are surfaces made up I that I have created for export specifically for my 3d Presentation.
2
AutoCAD® Civil 3D®: Workflow for Visualization Using Civil View and Autodesk® 3ds Max® Design
2.) Next select Export and Civil 3D will create a one file with all of the selected information in it with an extension of .vsp3d. This is the file that we will import into 3DS Max Design. If you decide that you have more information to add to the 3DS model after you have imported this file, you can go back to Civil 3D and export again, select the additional information and reimport the additional data from the same file and it will process into 3DS Max Design.
Step 2 – Importing Data from Civil 3D to 3D Studio Max Design using Civil View:
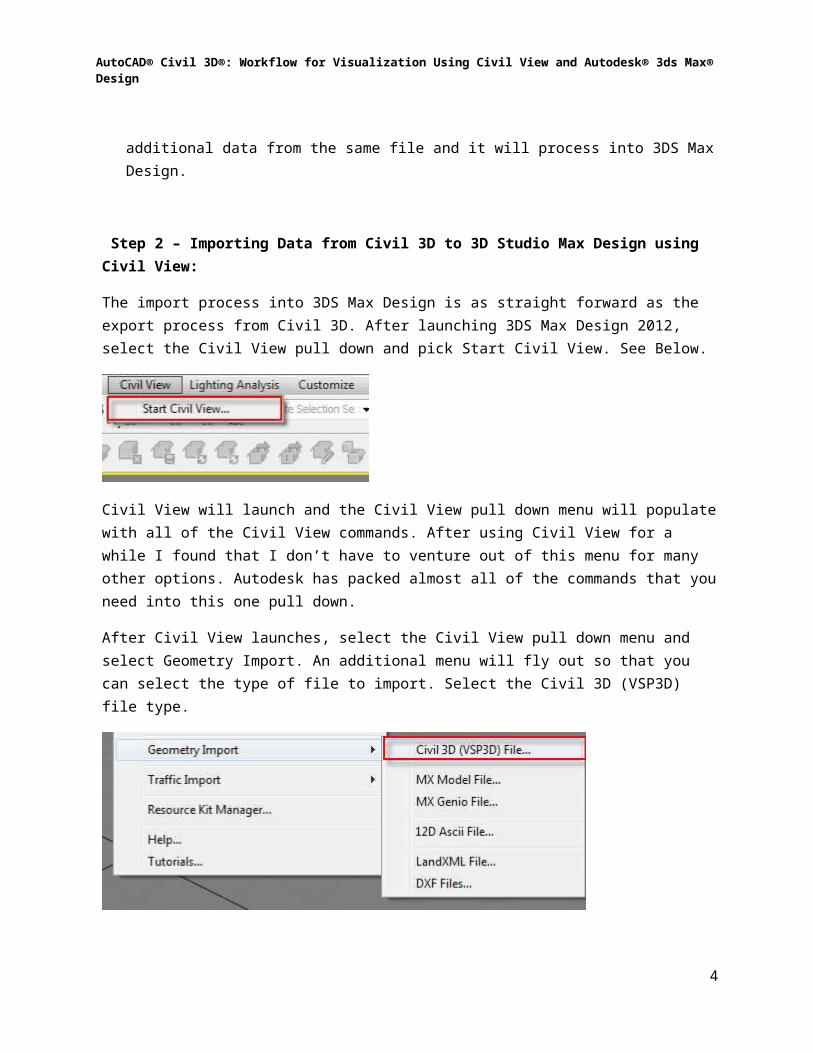
The import process into 3DS Max Design is as straight forward as the export process from Civil 3D. After launching 3DS Max Design 2012, select the Civil View pull down and pick Start Civil View. See Below.
Civil View will launch and the Civil View pull down menu will populate with all of the Civil View commands. After using Civil View for a while I found that I don’t have to venture out of this menu for many other options. Autodesk has packed almost all of the commands that you need into this one pull down.
3
AutoCAD® Civil 3D®: Workflow for Visualization Using Civil View and Autodesk® 3ds Max® Design
After Civil View launches, select the Civil View pull down menu and select Geometry Import. An additional menu will fly out so that you can select the type of file to import. Select the Civil 3D (VSP3D) file type.
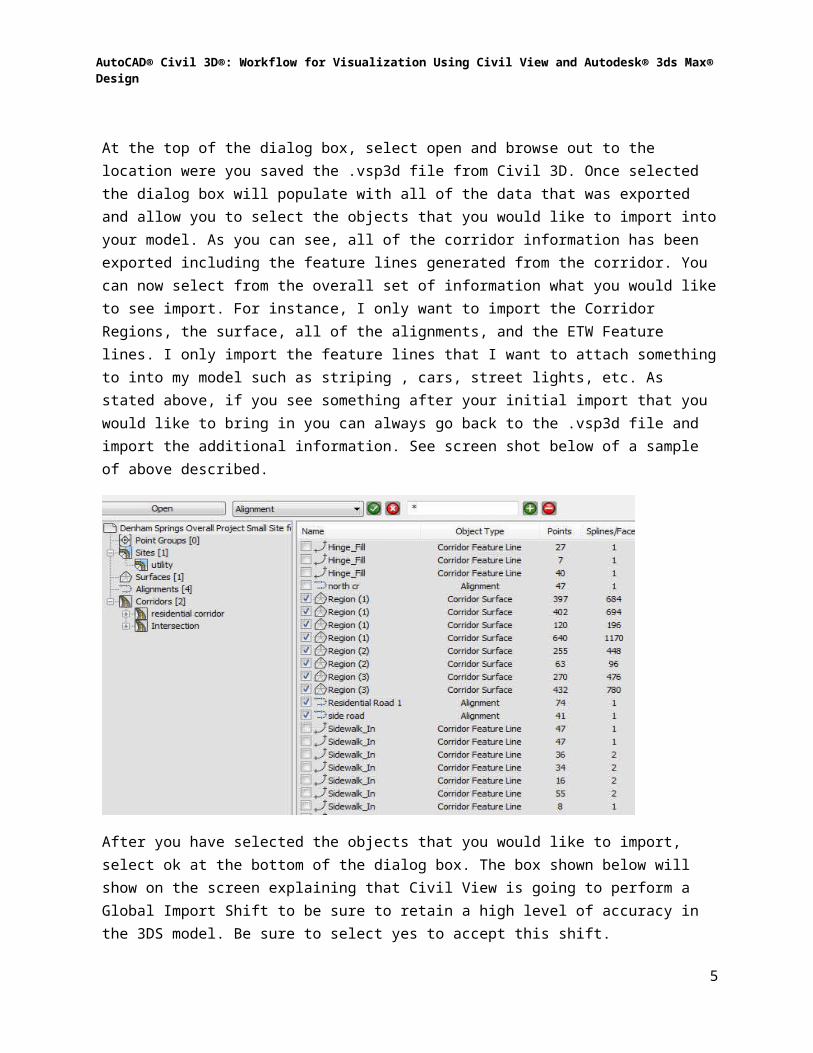
At the top of the dialog box, select open and browse out to the location were you saved the .vsp3d file from Civil 3D. Once selected the dialog box will populate with all of the data that was exported and allow you to select the objects that you would like to import into your model. As you can see, all of the corridor information has been exported including the feature lines generated from the corridor. You can now select from the overall set of information what you would like to see import. For instance, I only want to import the Corridor Regions, the surface, all of the alignments, and the ETW Feature lines. I only import the feature lines that I want to attach something to into my model such as striping , cars, street lights, etc. As stated above, if you see something after your initial import that you would like to bring in you can always go back to the .vsp3d file and import the additional information. See screen shot below of a sample of above described.
4
AutoCAD® Civil 3D®: Workflow for Visualization Using Civil View and Autodesk® 3ds Max® Design
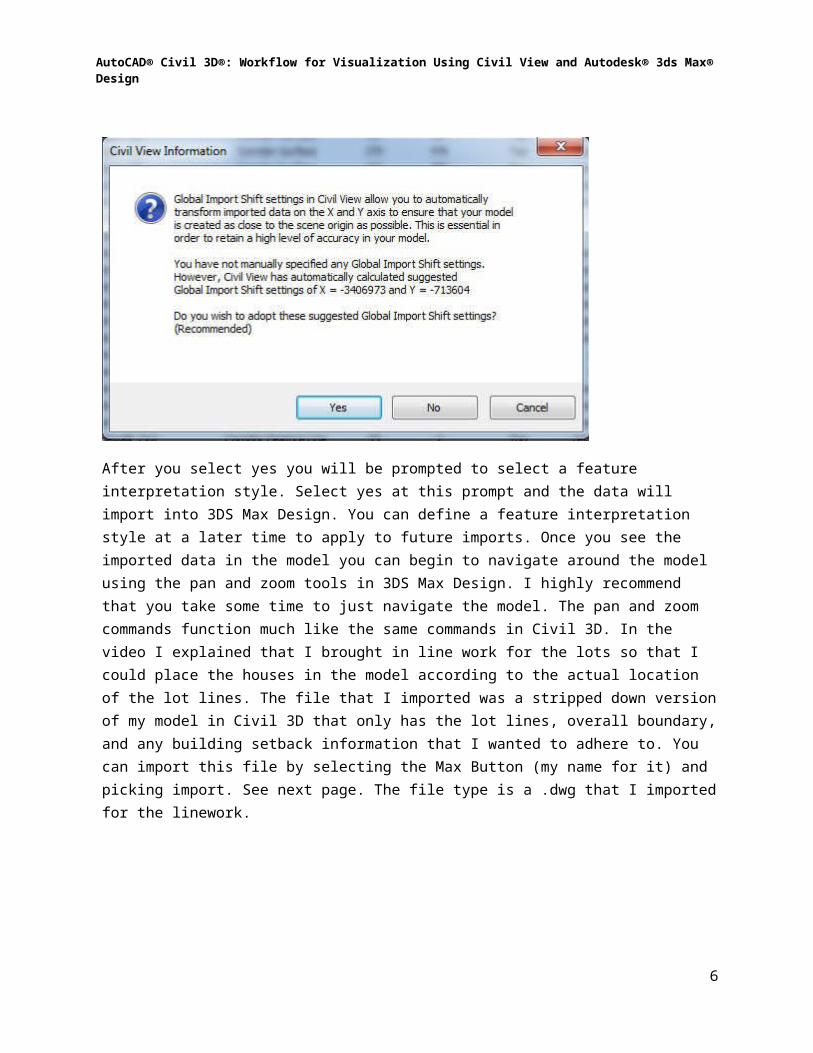
After you have selected the objects that you would like to import, select ok at the bottom of the dialog box. The box shown below will show on the screen explaining that Civil View is going to perform a Global Import Shift to be sure to retain a high level of accuracy in the 3DS model. Be sure to select yes to accept this shift.
After you select yes you will be prompted to select a feature interpretation style. Select yes at this prompt and the data will import into 3DS Max Design. You can define a feature interpretation style at a later time to apply to future imports. Once you see the imported data in the model you can begin to navigate around the model using the pan and zoom tools in 3DS Max Design. I highly recommend that you take some time to just navigate the model. The pan and zoom commands function much like the same commands in Civil 3D. In the video I explained that I brought in line work for the lots so that I could place the houses in the model according to the actual location of the lot lines. The file that I imported was a stripped down version of my model in Civil 3D that only has the lot lines, overall boundary, and any building setback information that I wanted to adhere to. You can import this file by selecting the Max Button (my name for it) and picking import. See next page. The file type is a .dwg that I imported for the linework.
5
AutoCAD® Civil 3D®: Workflow for Visualization Using Civil View and Autodesk® 3ds Max® Design
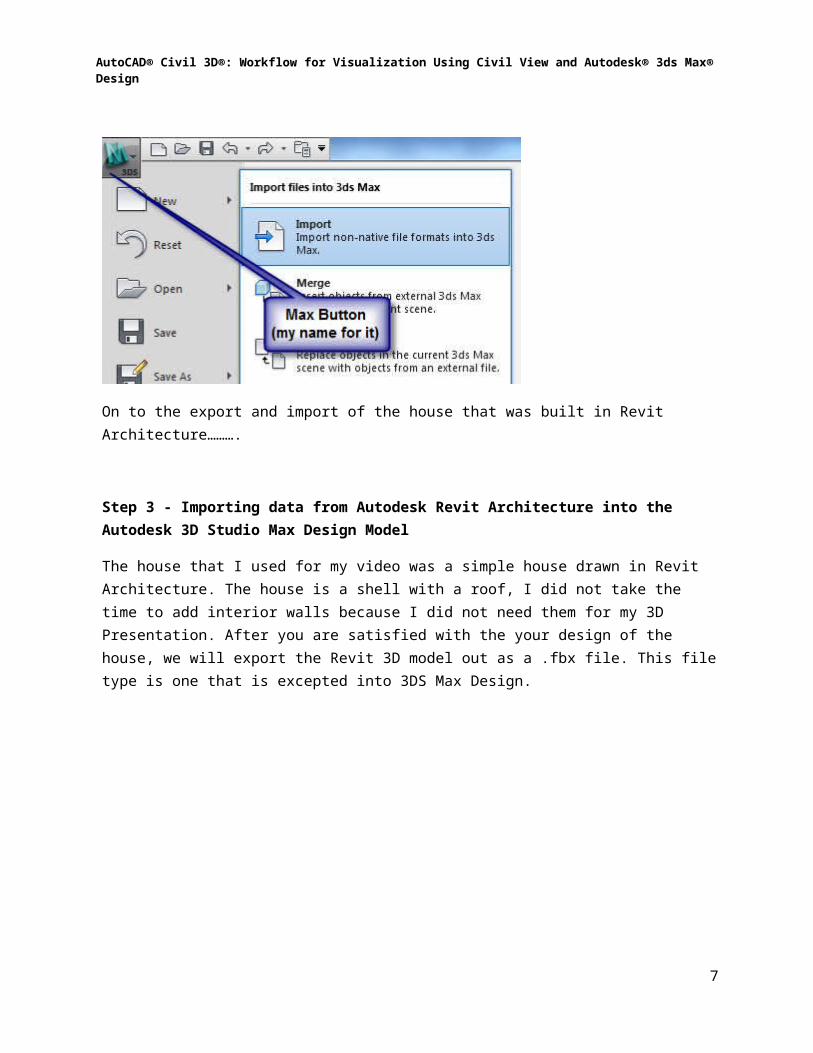
On to the export and import of the house that was built in Revit Architecture……….
Step 3 - Importing data from Autodesk Revit Architecture into the Autodesk 3D Studio Max Design Model
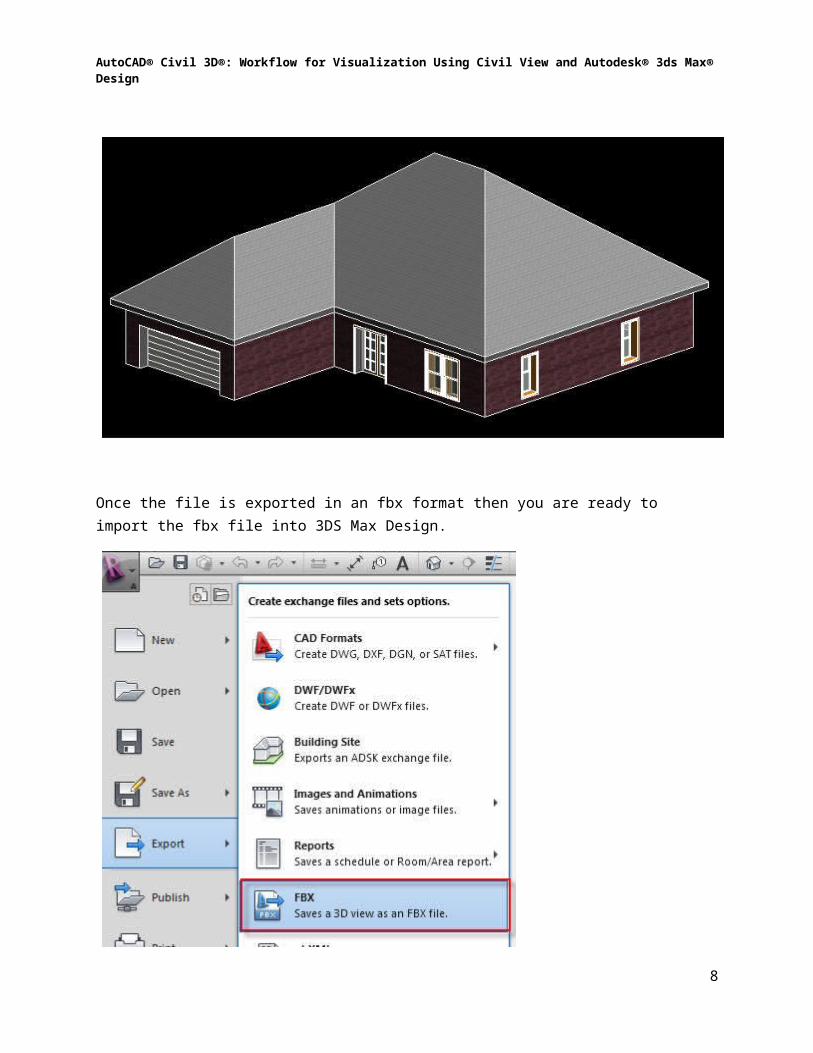
The house that I used for my video was a simple house drawn in Revit Architecture. The house is a shell with a roof, I did not take the time to add interior walls because I did not need them for my 3D Presentation. After you are satisfied with the your design of the house, we will export the Revit 3D model out as a .fbx file. This file type is one that is excepted into 3DS Max Design.
6
AutoCAD® Civil 3D®: Workflow for Visualization Using Civil View and Autodesk® 3ds Max® Design
Once the file is exported in an fbx format then you are ready to import the fbx file into 3DS Max Design.
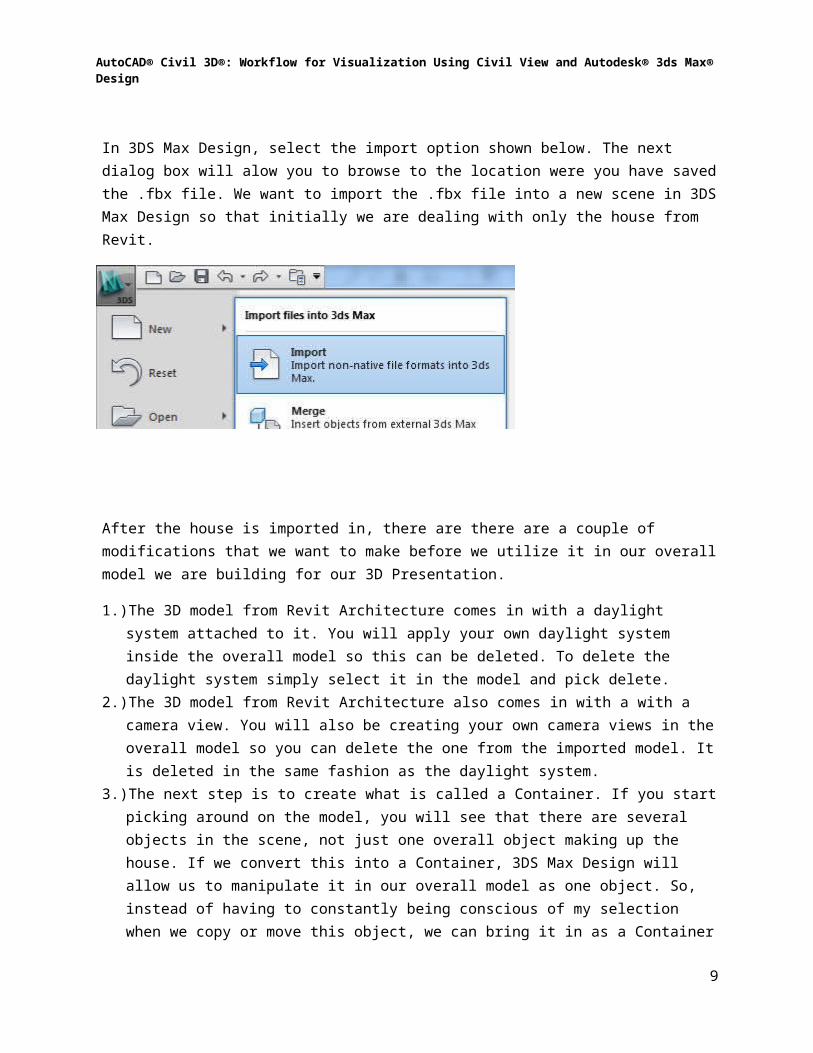
In 3DS Max Design, select the import option shown below. The next dialog box will alow you to browse to the location were you have saved the .fbx file. We want to import the .fbx file into a new scene in 3DS Max Design so that initially we are dealing with only the house from Revit.
After the house is imported in, there are there are a couple of modifications that we want to make before we utilize it in our overall model we are building for our 3D Presentation.
7
AutoCAD® Civil 3D®: Workflow for Visualization Using Civil View and Autodesk® 3ds Max® Design
1.) The 3D model from Revit Architecture comes in with a daylight system attached to it. You will apply your own daylight system inside the overall model so this can be deleted. To delete the daylight system simply select it in the model and pick delete.
2.) The 3D model from Revit Architecture also comes in with a with a camera view. You will also be creating your own camera views in the overall model so you can delete the one from the imported model. It is deleted in the same fashion as the daylight system.
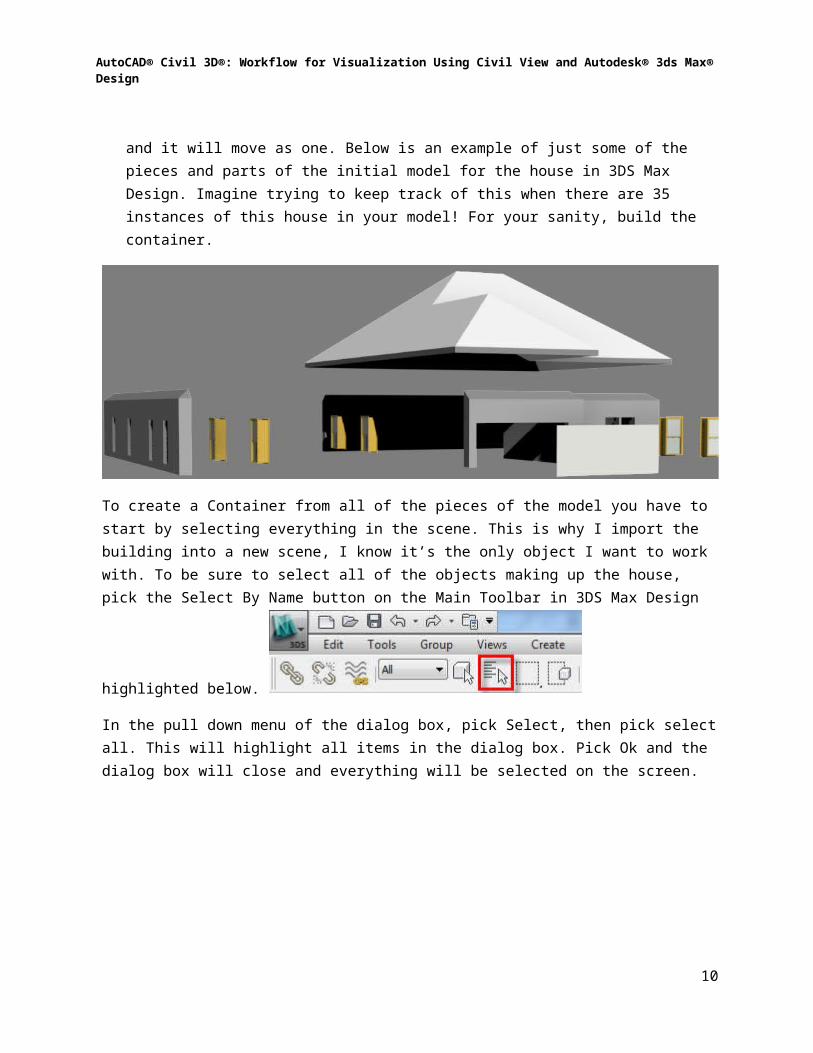
3.) The next step is to create what is called a Container. If you start picking around on the model, you will see that there are several objects in the scene, not just one overall object making up the house. If we convert this into a Container, 3DS Max Design will allow us to manipulate it in our overall model as one object. So, instead of having to constantly being conscious of my selection when we copy or move this object, we can bring it in as a Container and it will move as one. Below is an example of just some of the pieces and parts of the initial model for the house in 3DS Max Design. Imagine trying to keep track of this when there are 35 instances of this house in your model! For your sanity, build the container.
To create a Container from all of the pieces of the model you have to start by selecting everything in the scene. This is why I import the building into a new scene, I know it’s the only object I want to work with. To be sure to select all of the objects making up the house, pick the Select By Name button on the Main Toolbar in 3DS Max Design highlighted below.
In the pull down menu of the dialog box, pick Select, then pick select all. This will highlight all items in the dialog box. Pick Ok and the dialog box will close and everything will be selected on the screen.
8
AutoCAD® Civil 3D®: Workflow for Visualization Using Civil View and Autodesk® 3ds Max® Design
You can now go to your Containers toolbar and pick the Create Container from Selection command.
9
AutoCAD® Civil 3D®: Workflow for Visualization Using Civil View and Autodesk® 3ds Max® Design
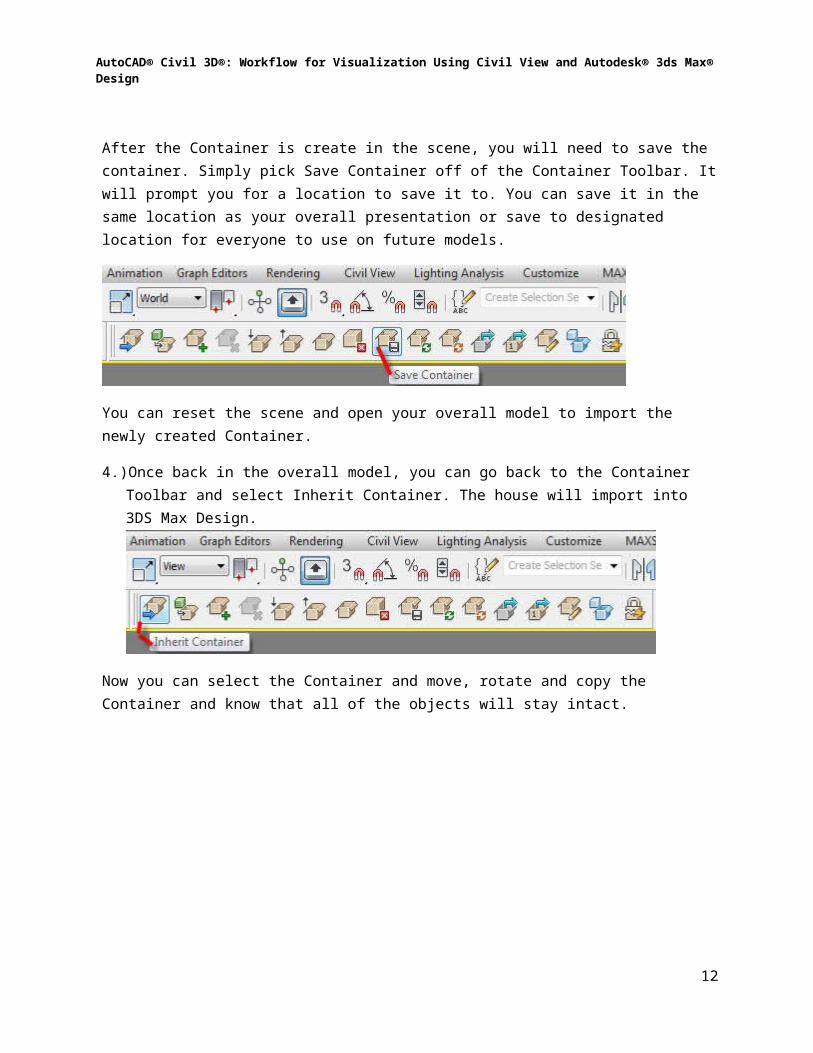
After the Container is create in the scene, you will need to save the container. Simply pick Save Container off of the Container Toolbar. It will prompt you for a location to save it to. You can save it in the same location as your overall presentation or save to designated location for everyone to use on future models.
You can reset the scene and open your overall model to import the newly created Container.
4.) Once back in the overall model, you can go back to the Container Toolbar and select Inherit Container. The house will import into 3DS Max Design.
Now you can select the Container and move, rotate and copy the Container and know that all of the objects will stay intact.
10

AutoCAD® Civil 3D®: Workflow for Visualization Using Civil View and Autodesk® 3ds Max® Design
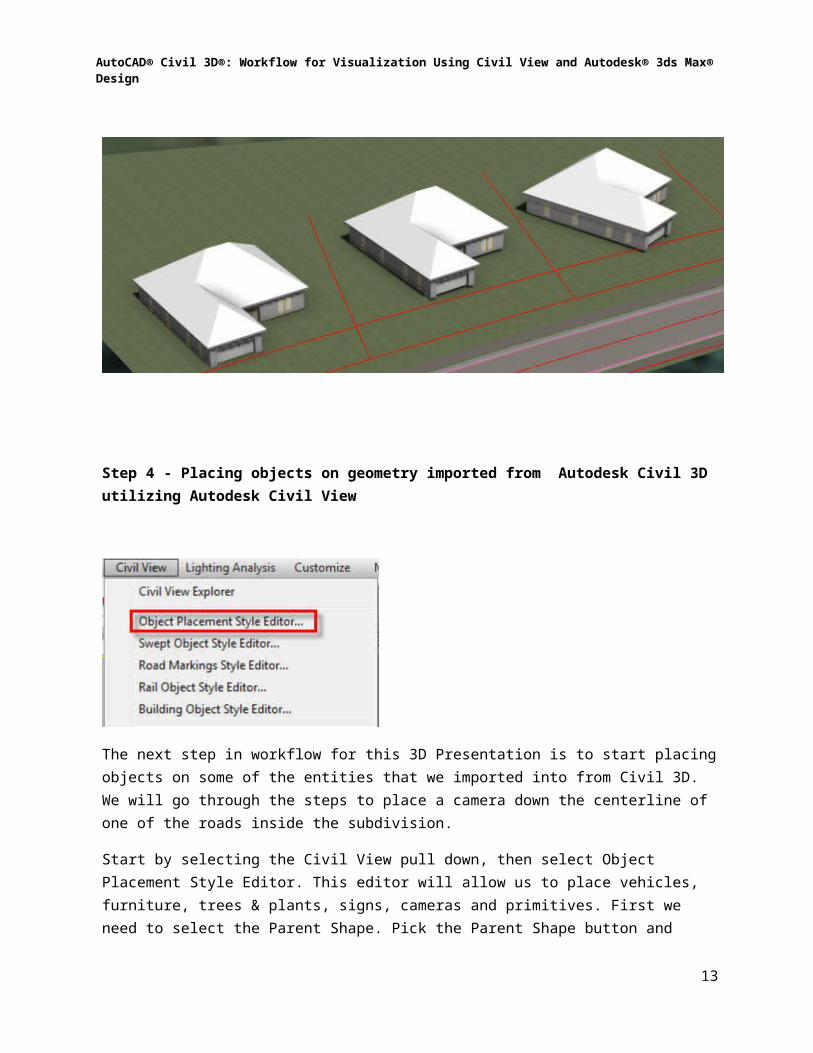
Step 4 - Placing objects on geometry imported from Autodesk Civil 3D utilizing Autodesk Civil View
The next step in workflow for this 3D Presentation is to start placing objects on some of the entities that we imported into from Civil 3D. We will go through the steps to place a camera down the centerline of one of the roads inside the subdivision.
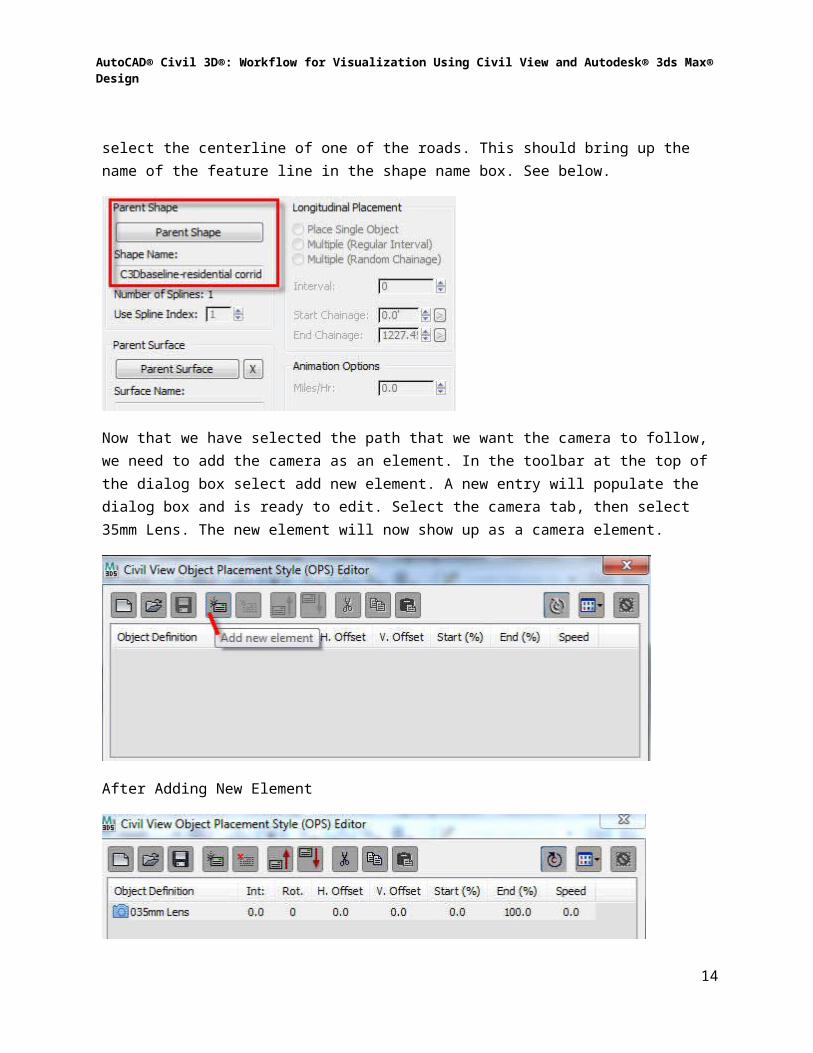
Start by selecting the Civil View pull down, then select Object Placement Style Editor. This editor will allow us to place vehicles, furniture, trees & plants, signs, cameras and primitives. First we need to select the Parent Shape. Pick the Parent Shape button and select the centerline of one of the roads. This should bring up the name of the feature line in the shape name box. See below.
Now that we have selected the path that we want the camera to follow, we need to add the camera as an element. In the toolbar at the top of the dialog box select add new element. A new entry will populate the dialog box and is ready to edit. Select the camera tab, then select 35mm Lens. The new element will now show up as a camera element.
11
AutoCAD® Civil 3D®: Workflow for Visualization Using Civil View and Autodesk® 3ds Max® Design
After Adding New Element
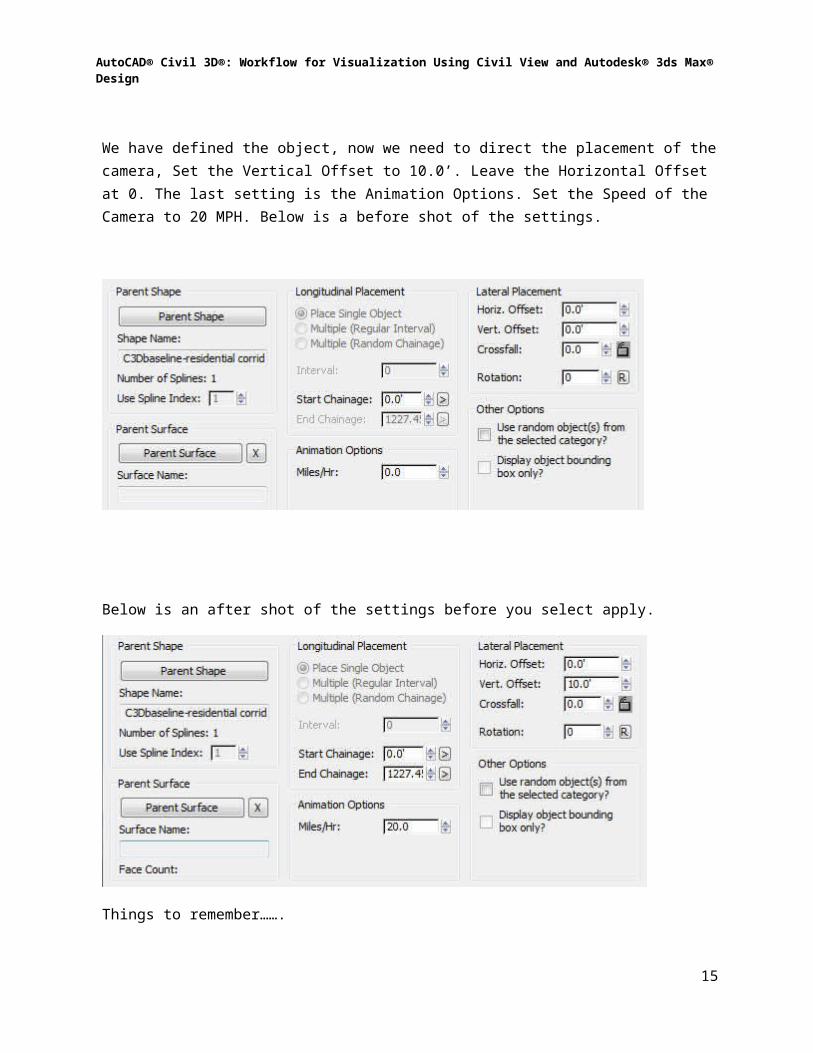
We have defined the object, now we need to direct the placement of the camera, Set the Vertical Offset to 10.0’. Leave the Horizontal Offset at 0. The last setting is the Animation Options. Set the Speed of the Camera to 20 MPH. Below is a before shot of the settings.
12
AutoCAD® Civil 3D®: Workflow for Visualization Using Civil View and Autodesk® 3ds Max® Design
Below is an after shot of the settings before you select apply.
Things to remember…….
Placing objects to the right of the centerline require a positive number and objects to the left require a negative number.
Also, when placing cars to the left of the centerline remember to not only set the Horizontal Offset to a negative number but also the speed that the camera will be traveling. For instance, we set out camera speed at 20 MPH, the camera moves forward. If we set it to -20 MPH the camera would travel backwards along the centerline of the road. This is applicable throughout the settings in Civil View.
13
AutoCAD® Civil 3D®: Workflow for Visualization Using Civil View and Autodesk® 3ds Max® Design
Change your view to the new camera view and select the play button in the lower right hand corner and you are driving the road!
You will place additional objects into the Model using the same steps as you did placing the camera. In the video that I provided I demonstrate how placing additional objects can be done.
After you have everything placed in the scene to your liking, you are now ready to start generating rendered still shots and animation videos. I speak also in the video about those settings briefly. I also show a sample of the finished product. There are too many settings to explain in this document and that is why I went into some detail in the video. You can shoot me an email at the address below and we can discuss this in further detail. My goal for this 45minute class was to show you another workflow for using the 3d Visualization Tools provided in the Infrastructure Design Suite Premium. It’s not only for Large Roadway Projects!!
14
AutoCAD® Civil 3D®: Workflow for Visualization Using Civil View and Autodesk® 3ds Max® Design
If you have questions or comments about this class, please feel free to drop me an email at [email protected] or contact me through the AU Website and we can discuss your project or go deeper into workflow details. I look forward to hearing from you all and hope that you enjoyed the Virtual Class. Also online will be my dataset that was used and Power Point Slides.
15