Embed Size (px)
Citation preview
Loading it Up with Autodesk® AutoloaderTim Sealschott – Advanced Solutions, Inc.
DM3460 This class will cover the techniques for using Autoloader to load legacy data into Autodesk Vault. We will cover techniques for migrating data using programs such as DWG TrueConvert™ (included in Autodesk DWG TrueView™) and Autodesk Inventor® Task Scheduler, organizing data and folder structure strategies before uploading, tips for resolving issues during the scan process, advanced troubleshooting for issues after scanning, and recommendations for setting up a job processor for creating visualization files during the upload process.
Learning ObjectivesAt the end of this class, you will be able to:
Organize files and folders in a structure that will make them “Vault ready”.
Determine whether to load one project at a time or to collect all projects into a single project before loading into Vault.
Use a data cleanup and loading process strategy on legacy files that you wish to load into Vault.
Migrate Autodesk Inventor® and Autodesk AutoCad® files to correct version using batch processes.
Fixing Autodesk Inventor® and Autodesk AutoCad® resolution errors
Create Mappings to Workspace and Library locations in Vault.
Setup a Job Processor that will automatically create visualizations files while you continue to load files into Vault.
About the Speaker
Tim Sealschott is a Technical Engineer and has been with Advanced Solutions since 2001. Tim has also
worked for other resellers in the Cincinnati area since 1999. Tim received the “Application Engineer of the
Year” award for the year of 2005, 2006 and 2007. He is an Inventor Certified Expert and a Manufacturing
Certified Implementation Expert. He spent fifteen years in the manufacturing field where his duties
included Cad Manager, Lead designer, and Systems AdministratorTim has also been a featured instructor
at the annual AUGI CAD Camp and is often a guest speaker at MAUGI user groups meetings.

Loading it Up with Autodesk® Autoloader
Organize files and folders in a structure that will make them “Vault Ready”
There are recommended best practices that will help you organize your data and get it ready to load into your Vault. You should upload either all your data on a “per project” basis or as a “collective project” basis. A “per project” basis usually requires a unique project that was created originally for intended data for that project. An example would be that you created a project for a specific design project and you only activate that project when opening those files in Inventor. Sometimes when creating data in Inventor little or no attention is paid to setting up specific project files or any project file at all before designs are creating therefore making it difficult to determine what project should be active before loading that data into the Vault.
Step 1:Copy all of your data to the machine that you are going to run Autoloader from. Copy them to a master folder with a name that is easily identifiable while in Autoloader you can find it quickly. Having this data on the local machine will ensure that you are not manipulating “live” data and help result in the best performance when uploading the data. Try to gather all Content Center data from individual user’s machines if strict adherence to a project file structure was not followed. If your are creating a “collective project” copy the content into a folder called “Content Center Files” and place this folder at the first level under the folder that you are copying all of the other project data into. In the “collective project” project file set this path as the content center path.
Step 2:After the files and folders that you wish to load have been copied locally to machine that will Autoload them you will want to search for any unnecessary or unwanted files that have been transferred during the copying process. Use Windows Explorer of some other file management utility and search for any unwanted files or folders such as .BAK, .TMP, .LOG and “OldVersion” data.
Step 3:Once you have deleted all of the unwanted files and folders our next step will be to create a “collective project” project file that we can use during the Autoloading process. In Inventor create a Single User Project file type and save it in the top level folder that we created and copied all of the data that we are going to load into the Vault. The Workspace path should be mapped to the same folder that you copied the ipj to and add any paths that you will wish to
2
Loading it Up with Autodesk® Autoloader
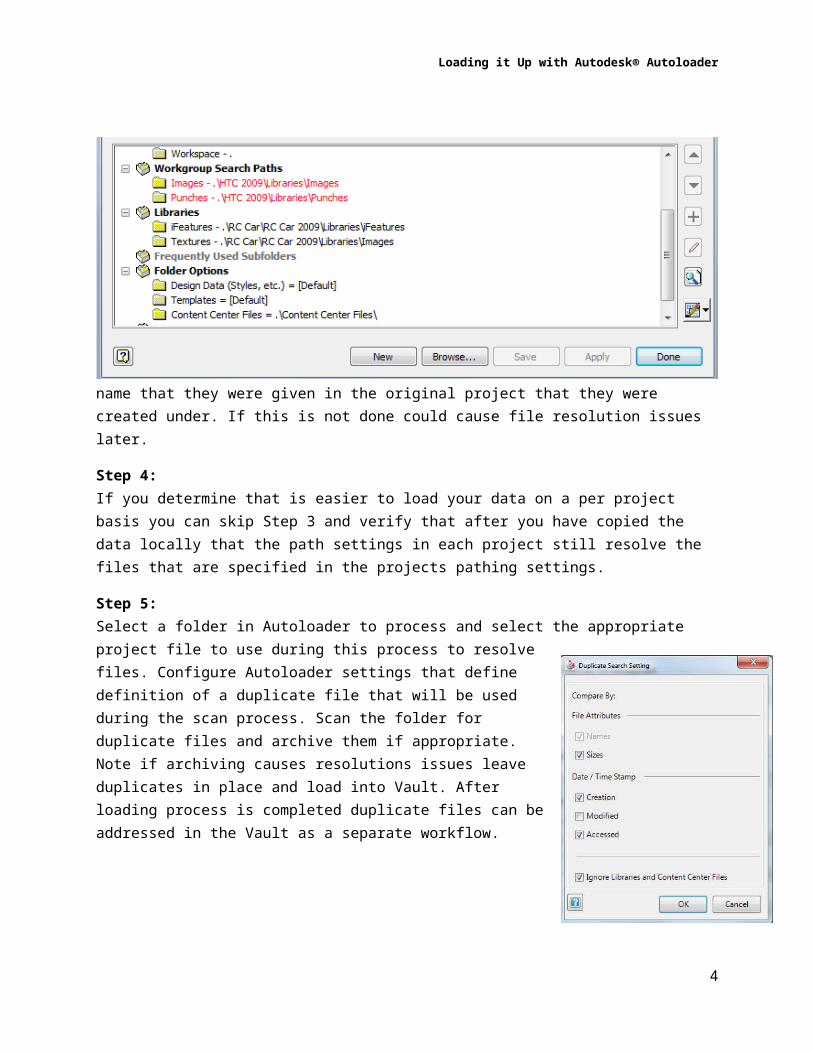
Vault as library folders as Workgroup or Library paths in the project file. Make sure the names of the paths you are creating as Workgroup or Library paths match the
name that they were given in the original project that they were created under. If this is not done could cause file resolution issues later.
Step 4:If you determine that is easier to load your data on a per project basis you can skip Step 3 and verify that after you have copied the data locally that the path settings in each project still resolve the files that are specified in the projects pathing settings.
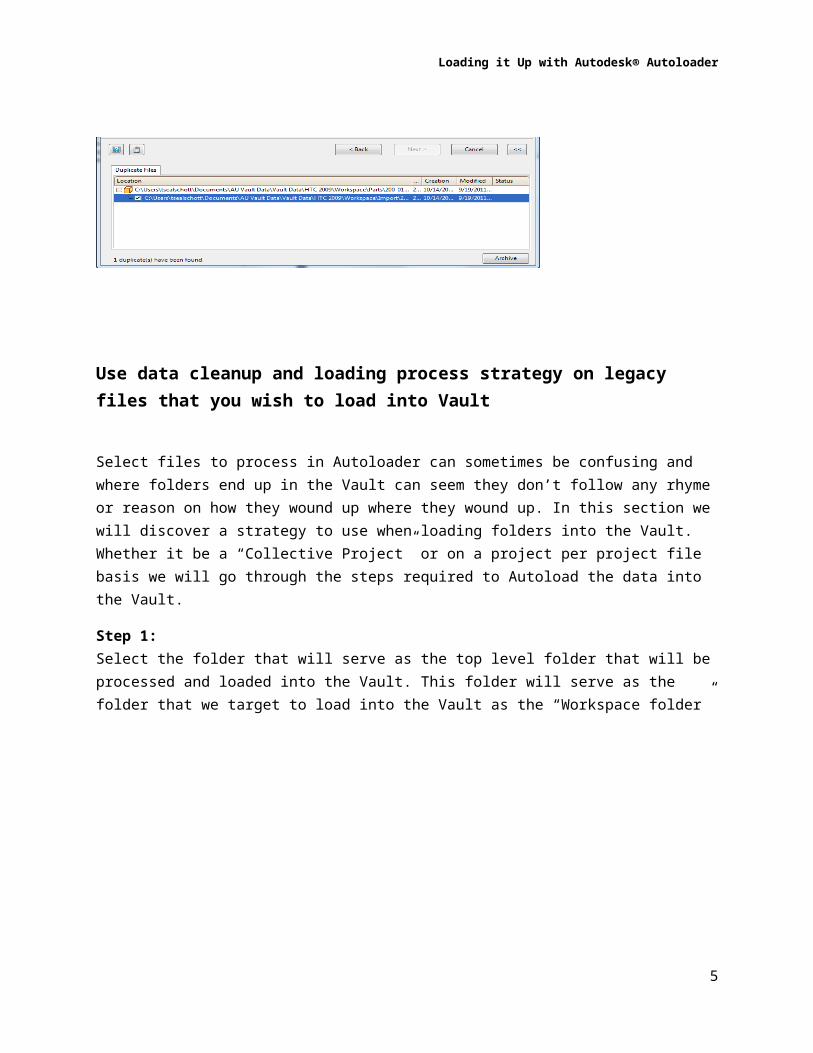
Step 5:Select a folder in Autoloader to process and select the appropriate project file to use during this process to resolve files. Configure Autoloader settings that define definition of a duplicate file that will be used during the scan process. Scan the folder for duplicate files and archive them if appropriate. Note if archiving causes resolutions issues leave duplicates in place and load into Vault. After loading process is completed duplicate files can be addressed in the Vault as a separate workflow.
3
Loading it Up with Autodesk® Autoloader
Use data cleanup and loading process strategy on legacy files that you wish to load into Vault
Select files to process in Autoloader can sometimes be confusing and where folders end up in the Vault can seem they don’t follow any rhyme or reason on how they wound up where they wound up. In this section we will discover a strategy to use when loading folders into the Vault. Whether it be a “Collective Project” or on a project per project file basis we will go through the steps required to Autoload the data into the Vault.
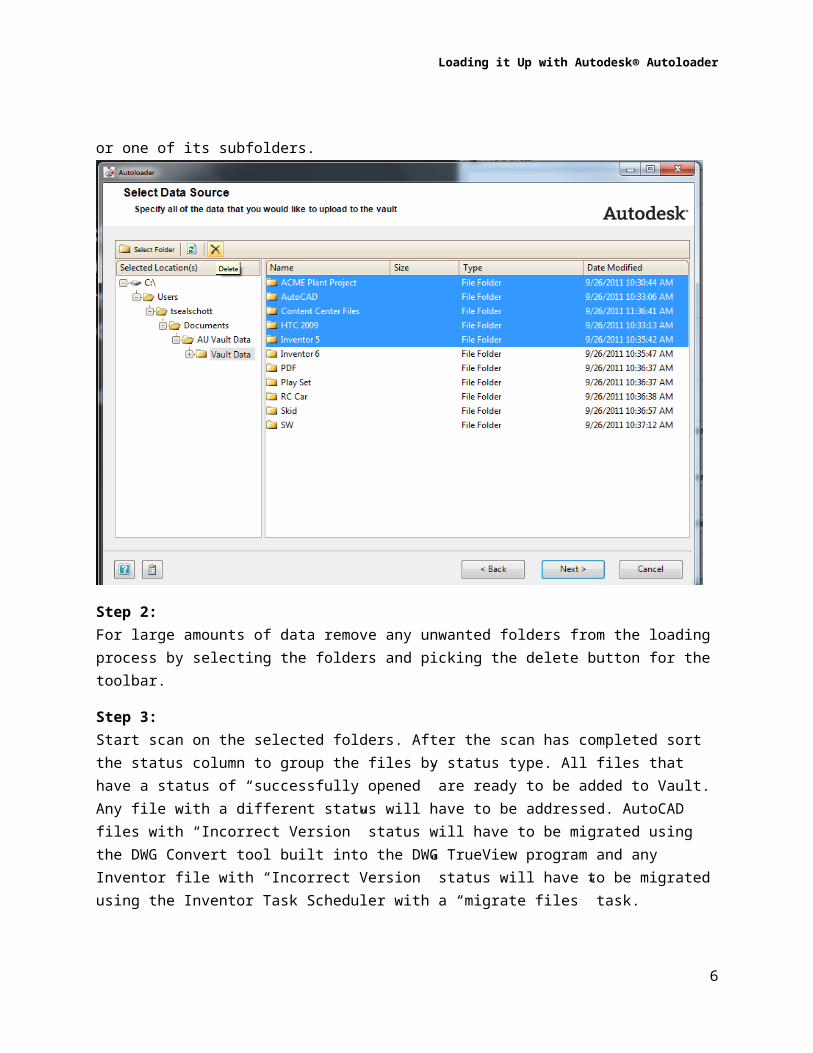
Step 1:Select the folder that will serve as the top level folder that will be processed and loaded into the Vault. This folder will serve as the folder that we target to load into the Vault as the “Workspace folder” or one of its subfolders.
4
Loading it Up with Autodesk® Autoloader
Step 2:For large amounts of data remove any unwanted folders from the loading process by selecting the folders and picking the delete button for the toolbar.
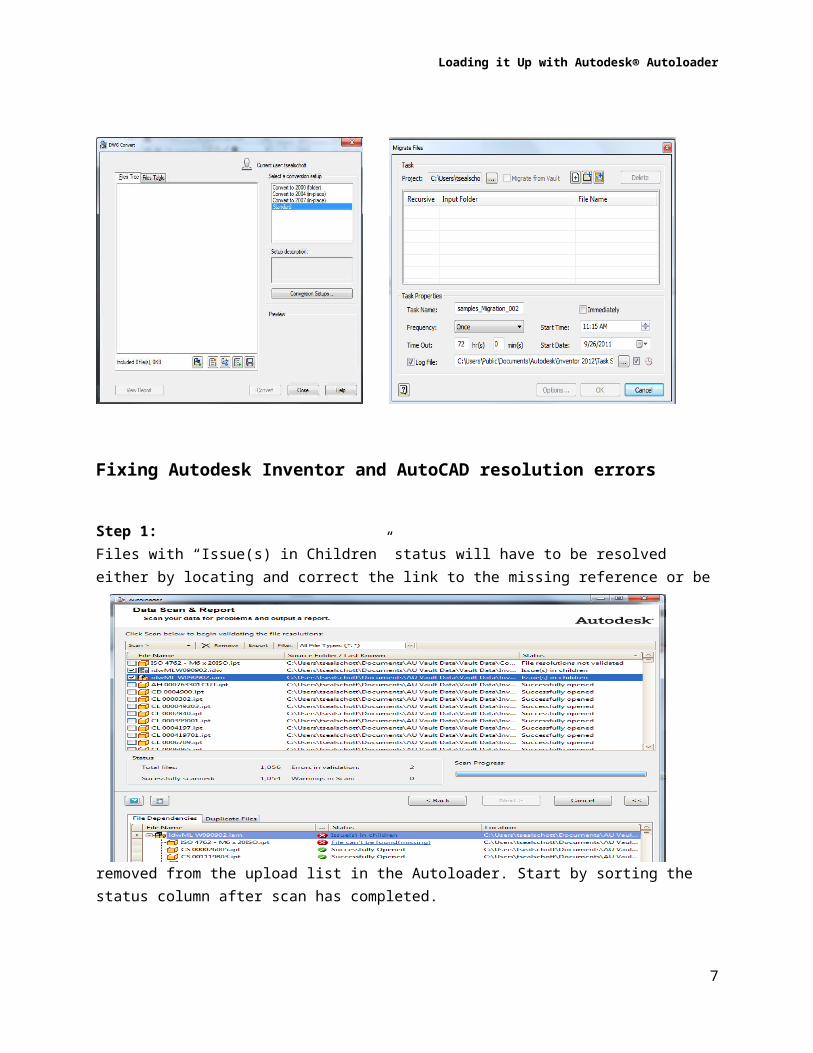
Step 3:Start scan on the selected folders. After the scan has completed sort the status column to group the files by status type. All files that have a status of “successfully opened” are ready to be added to Vault. Any file with a different status will have to be addressed. AutoCAD files with “Incorrect Version” status will have to be migrated using the DWG Convert tool built into the DWG TrueView program and any Inventor file with “Incorrect Version” status will have to be migrated using the Inventor Task Scheduler with a “migrate files” task.
Fixing Autodesk Inventor and AutoCAD resolution errors
Step 1:
5
Loading it Up with Autodesk® Autoloader
Files with “Issue(s) in Children” status will have to be resolved either by locating and correct the link to the missing reference or be removed from the upload list in the Autoloader. Start by
sorting the status column after scan has completed.
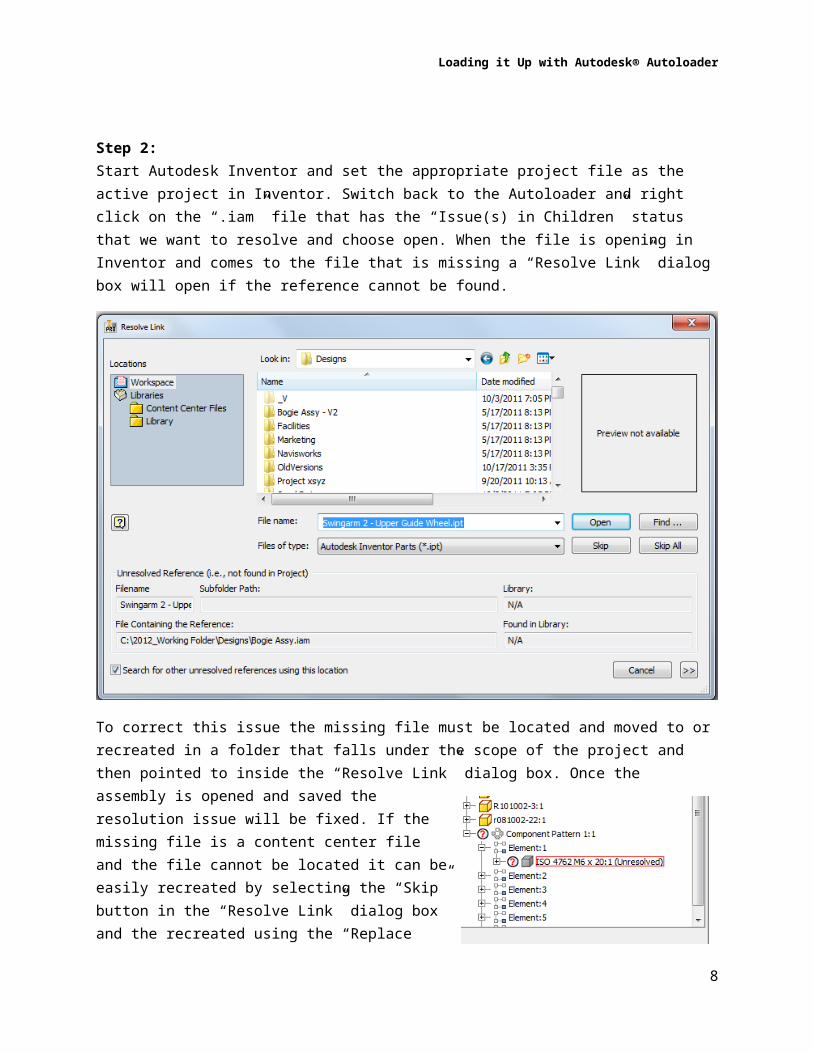
Step 2:Start Autodesk Inventor and set the appropriate project file as the active project in Inventor. Switch back to the Autoloader and right click on the “.iam” file that has the “Issue(s) in Children” status that we want to resolve and choose open. When the file is opening in Inventor and comes to the file that is missing a “Resolve Link” dialog box will open if the reference cannot be found.
6
Loading it Up with Autodesk® Autoloader
To correct this issue the missing file must be located and moved to or recreated in a folder that falls under the scope of the project and then pointed to inside the “Resolve Link” dialog box. Once the assembly is opened and saved the resolution issue will be fixed. If the missing file is a content center file and the file cannot be located it can be easily recreated by selecting the “Skip” button in the “Resolve Link” dialog box and the recreated using the “Replace from Content Center” command in Inventor. If any file cannot be recreated or moved you can remove the link in the file by choosing “Skip” and then deleting the link from the assembly browser to the missing file.
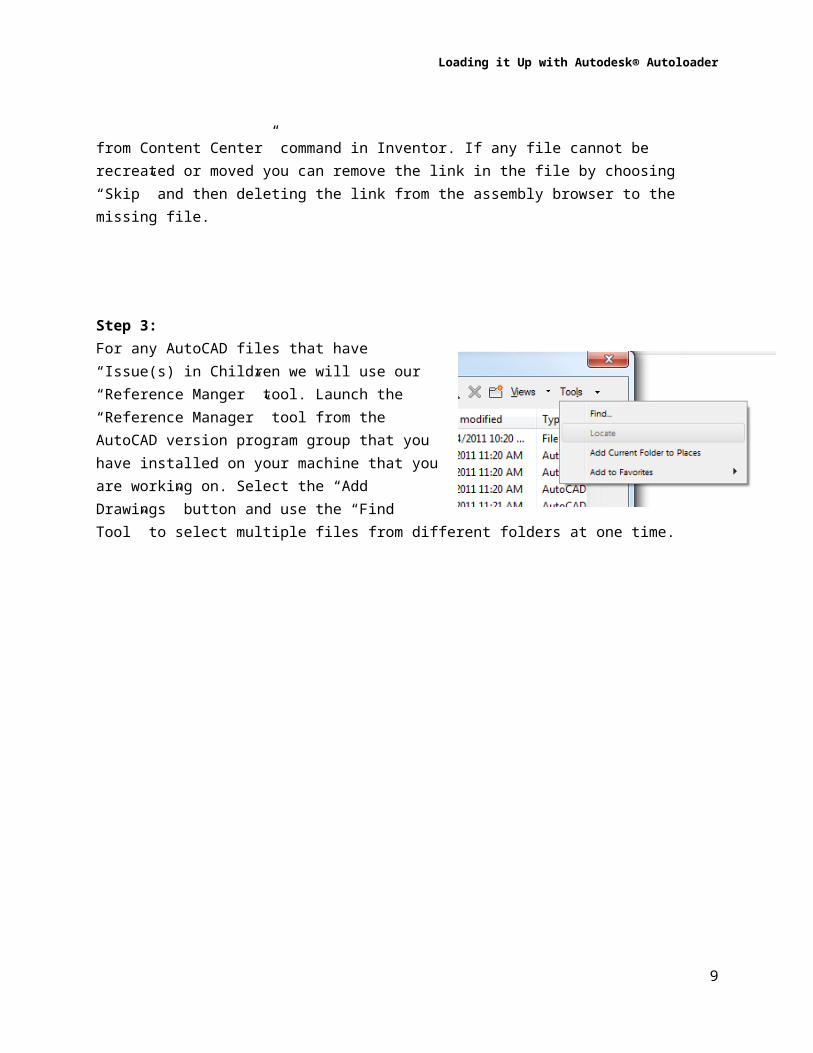
Step 3:For any AutoCAD files that have “Issue(s) in Children we will use our “Reference Manger” tool. Launch the “Reference Manager” tool from the AutoCAD version program group that you have installed on your machine that you are working on. Select the “Add
7
Loading it Up with Autodesk® Autoloader
Drawings” button and use the “Find Tool” to select multiple files from different folders at one time.
Find any Images or missing references and modify the saved path to the correct location for the missing references by selecting the files that you wish to change the path of. Any reference that cannot be resolved must be edited directly from the file in AutoCAD’s external reference manager deleting the link. The option is to remove the file from the scan list inside of the Autoloader so that the file will not be uploaded into Vault.
Create Mappings to Workspace and Library locations in Vault
Step 1:Our next step after our data has be cleaned and scanned is to tell the Vault which folder should the data be uploaded to. First thing to do is to login to Vault when prompted in Autoloader using the “Administrator” account. An account with an administrator role will not work. It must be the
8
Loading it Up with Autodesk® Autoloader
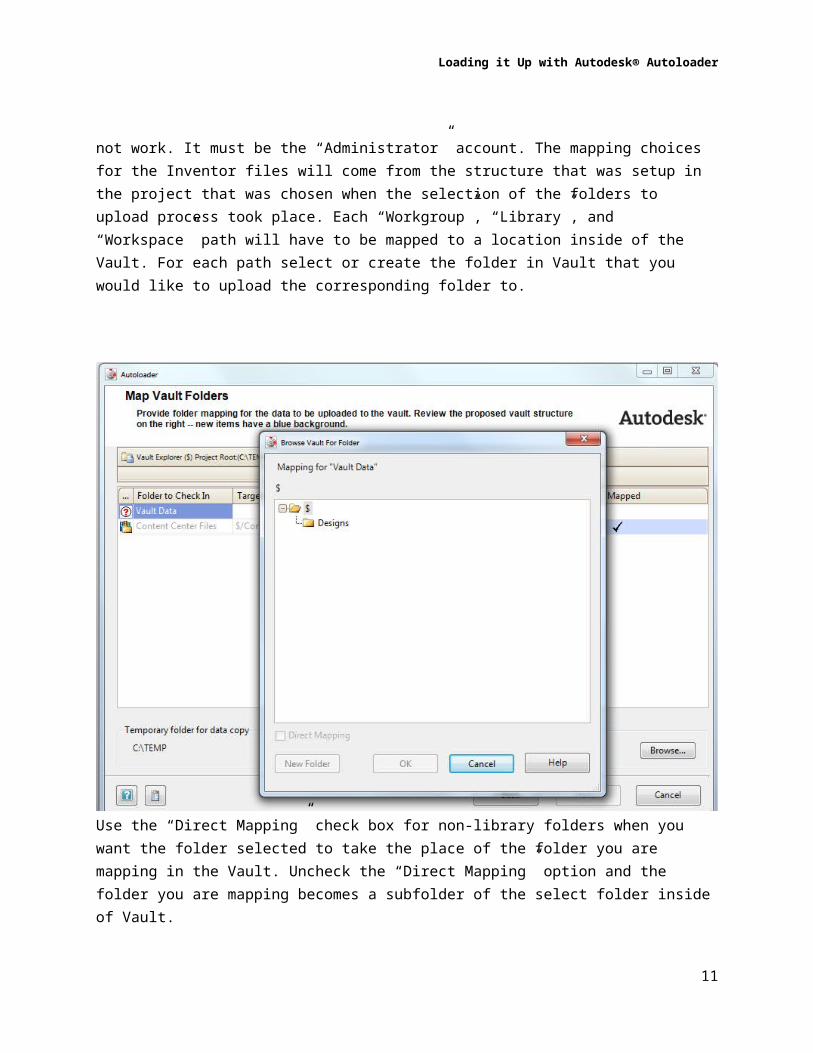
“Administrator” account. The mapping choices for the Inventor files will come from the structure that was setup in the project that was chosen when the selection of the folders to upload process took place. Each “Workgroup”, “Library”, and “Workspace” path will have to be mapped to a location inside of the Vault. For each path select or create the folder in Vault that you would like to upload the corresponding folder to.
Use the “Direct Mapping” check box for non-library folders when you want the folder selected to take the place of the folder you are mapping in the Vault. Uncheck the “Direct Mapping” option and the folder you are mapping becomes a subfolder of the select folder inside of Vault.
Step 2:After mappings are complete, set the temporary folder for the data to be copied to for validation and redirecting processes. The temporary folder should be on the machine that the Autoloader process is taking place and should consist of minimal characters.
9

Loading it Up with Autodesk® Autoloader
Setup a Job Processor that will automatically create visualization files while you continue to load files into Vault
Step 1:To setup a Job server(s), which is available only in the Vault Workgroup, Collaboration, and Professional products, login to the client using an account with an administrator assigned role and go to the “Tools” menu, Administration, Global settings command and select the Integrations tab and check the “Enable Job Server” box.
Step 2:Starting the job processor service is our next step. Go to a machine that you wish to use as a Job processor and make sure that the Vault Workgroup, Collaboration, or Professional client has been installed as well as any CAD software that will be required to publish the visualization file. This machine will consume a license of Vault or whatever CAD applications that will process the visualization file. It is also recommended that this be a dedicated machine. Once installed start the Job Processor application and logon to the Job Processor using a specific account that has been setup with a “consumer” role. Have the Job Processor start automatically by enabling the “Start at Windows logon” option.
Step 3:Configure the “Job Types” that you wish to perform on this Job Processor machine. You can configure multiple Job Processor machines if large amounts of data to be processed.
10
Loading it Up with Autodesk® Autoloader
Step 4:Next go back to Autoloader and configure Autoloader to use the Job Server to create visualization files. Check the “Create Visualization Attachment” box and “Using the Job Server” option.
Step 5:Once the uploading process starts publish jobs will be submitted to the machines that are setup as Job Servers. To Manage the Job Queue at each Job Server go to the “Tools”, “Job Queue” command in the Vault explorer client. Any task that the Job Server is process or is scheduled to process will show up in the Job Queue. To remove a task select it and click the remove button from the toolbar. To resubmit a task select any task that has failed and select the resubmit button.
Step 6:Once upload has been completed review the results of the Autoloading procedure by clicking the small button in the upper left hand corner. Things you should look for are any failed file status. This means that the file was not uploaded into the Vault, most likely because a newer version already exists. You will have to manually examine each file and resolve as needed.
11