Embed Size (px)
Citation preview

www.elearning.uq.edu.au
LEARN.UQ GRADE
CENTRE Trainer: eLearning Systems and Support team

Page 2 of 80

Page 3 of 80
Table of Contents
Overview .................................................................................................................... 7
Automatically created columns .............................................................................. 7
Additional columns ................................................................................................. 7
Grade Centre limitations ........................................................................................ 7
Rubric ......................................................................................................................... 8
What is a rubric? .................................................................................................... 8
Setup a rubric ............................................................................................................. 9
Create a category ..................................................................................................... 11
Create a Tutorial category .................................................................................... 12
Setting the category of a column .......................................................................... 13
Using categories .................................................................................................. 13
Create a Grade Schema (1 – 7 grades) ................................................................... 11
Grade Schema – 1 to 7 grades ............................................................................ 13
Copy a schema ................................................................................................ 13
Schema Information ......................................................................................... 14
Schema Mapping ............................................................................................. 14
Using a Grade Schema ........................................................................................ 15
Create a column ....................................................................................................... 16
Using a blank column to enter marks and feedback ............................................ 16
Create a blank column ......................................................................................... 16
Column Information .............................................................................................. 17
Dates .................................................................................................................... 18
Options ................................................................................................................. 19
Submit .................................................................................................................. 19
Enter marks only ...................................................................................................... 20
Quick Comments ...................................................................................................... 21
Enter marks, feedback and attach documents ......................................................... 23
Enter marks and feedback ...................................... Error! Bookmark not defined.
Attach documents ................................................... Error! Bookmark not defined.
Grading Notes ......................................................... Error! Bookmark not defined.
Navigate to next student ......................................... Error! Bookmark not defined.
Edit marks and Mark history ..................................................................................... 23
Changing marks and feedback ............................................................................ 27

Page 4 of 80
Grade History ....................................................................................................... 28
Enter marks using a rubric ....................................................................................... 29
Rubric ................................................................................................................... 30
Overall feedback .................................................................................................. 31
Total ................................................................................................................. 31
Current Grade Value ............................................................................................ 31
Grading Notes ...................................................................................................... 32
Navigate to next student ...................................................................................... 32
Upload marks using a spreadsheet .......................................................................... 32
Create a blank column ......................................................................................... 32
Download the spreadsheet .................................................................................. 33
Data ................................................................................................................. 33
Options ............................................................................................................ 34
Save Location ..................................................... Error! Bookmark not defined.
Download Grades ............................................................................................ 34
Enter / calculate marks ......................................................................................... 35
Remove formulas / Save ...................................................................................... 35
Upload the Spreadsheet ...................................................................................... 36
Download submitted assignments ............................................................................ 38
Grade Centre ....................................................................................................... 38
Select Users ......................................................................................................... 39
Download file ....................................................................................................... 39
File names ........................................................................................................... 40
Text file ............................................................................................................ 41
Uploading marked assignments ............................................................................... 41
Total column ............................................................................................................. 42
Create a calculated column .................................................................................. 42
Column Information .............................................................................................. 42
Dates .................................................................................................................... 43
Select Columns: ................................................................................................... 43
Options ................................................................................................................. 45
Submit .................................................................................................................. 45
X of Y Total column .................................................................................................. 46
Create a calculated column .................................................................................. 46
Column Information .............................................................................................. 46
Page 5 of 80
Dates .................................................................................................................... 47
Select Columns: ................................................................................................... 47
Options ................................................................................................................. 49
Submit .................................................................................................................. 49
Average column ....................................................................................................... 46
Create a calculated column .................................................................................. 49
Column Information .............................................................................................. 51
Dates .................................................................................................................... 52
Select Columns: ................................................................................................... 52
Options ................................................................................................................. 53
Submit .................................................................................................................. 53
Minimum / Maximum column .................................................................................... 54
Create a calculated column .................................................................................. 54
Column Information .............................................................................................. 54
Dates .................................................................................................................... 55
Select Columns: ................................................................................................... 55
Options ................................................................................................................. 56
Submit .................................................................................................................. 57
Weighted column (final marks) ................................................................................. 58
Create a calculated column .................................................................................. 58
Column Information .............................................................................................. 58
Dates .................................................................................................................... 59
Select Columns: ................................................................................................... 59
Options ................................................................................................................. 60
Submit .................................................................................................................. 61
Change the order of columns ................................................................................... 61
Hiding marks from students ...................................................................................... 62
Show marks to users............................................................................................ 62
Mark distribution and statistics ................................................................................. 63
Smart Views for SI-net Tutorial / Practical groups .................................................... 64
Access Smart Views in Grade Centre .................................................................. 64
To return to Full Grade Centre view ................................................................. 65
Set up Smart View favourites ............................................................................... 65
Grading Colour Codes .............................................................................................. 67
Page 6 of 80
Uploading grades to SI-net ....................................................................................... 70
Steps .................................................................................................................... 70
How to download your course list from SI-net ...................................................... 70
How to use the Blackboard SI-net Merge tool ...................................................... 71
Calculate final student marks and grades ............................................................ 72
Upload your grades spreadsheet to SI-net ........................................................... 73
Using the Become Student tool ................................................................................ 74
Making your course available ............................................................................... 74
Set Availablity .................................................................................................. 74
Adding dummy students ....................................................................................... 75
Using the Become student tool ............................................................................ 76
Viewing the course as a student ...................................................................... 76
Return to instructor view .................................................................................. 77
My Grades ................................................................................................................ 78
Further Resources.................................................................................................... 79
Technical Support ................................................................................................ 79
eLearning Solutions Service ................................................................................ 79
ITaLI Teach Assist ............................................................................................... 79
Faculty Educational Designers ............................................................................. 79
eLearning Resources ........................................................................................... 79
eLearning Newsletter ........................................................................................... 79
UQ eLearning Twitter ........................................................................................... 80
Pedagogical Resources ....................................................................................... 80
Student Resources .............................................................................................. 80
eLearning Workshops .......................................................................................... 80
ITaLI Workshops .................................................................................................. 80
Custom Workshops .............................................................................................. 80
Page 7 of 80
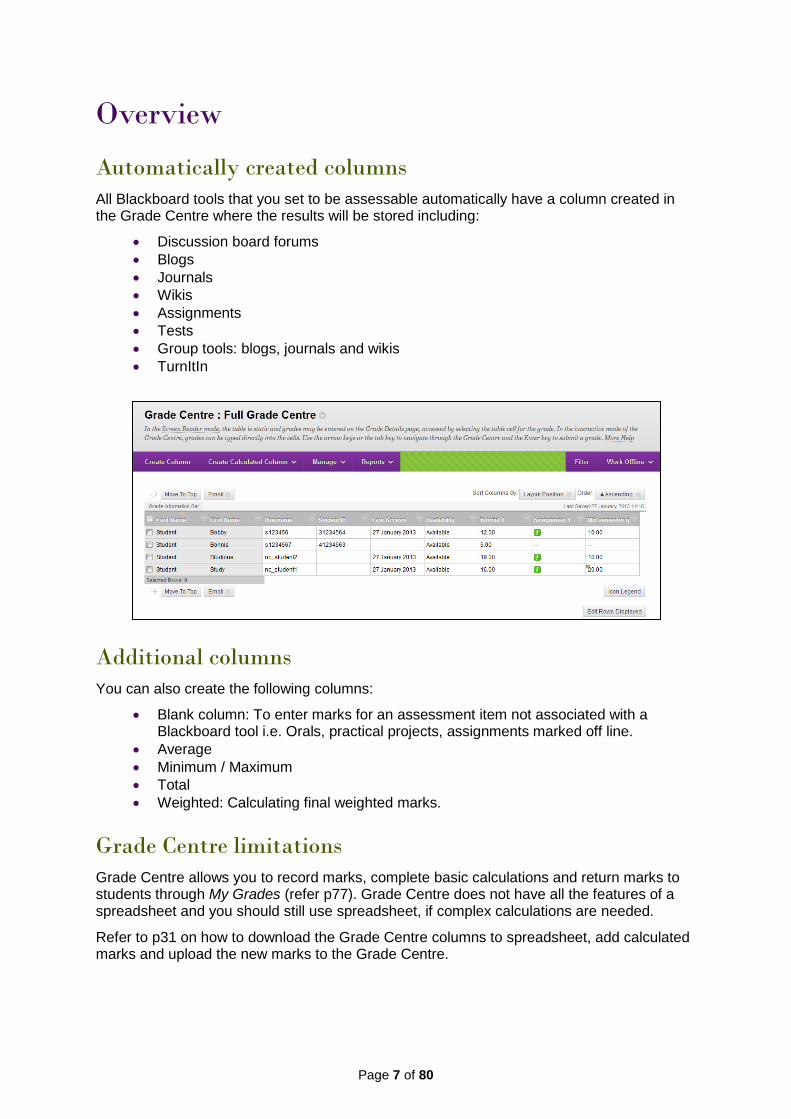
Overview
Automatically created columns
All Blackboard tools that you set to be assessable automatically have a column created in the Grade Centre where the results will be stored including:
Discussion board forums
Blogs
Journals
Wikis
Assignments
Tests
Group tools: blogs, journals and wikis
TurnItIn
Additional columns
You can also create the following columns:
Blank column: To enter marks for an assessment item not associated with a Blackboard tool i.e. Orals, practical projects, assignments marked off line.
Average
Minimum / Maximum
Total
Weighted: Calculating final weighted marks.
Grade Centre limitations
Grade Centre allows you to record marks, complete basic calculations and return marks to students through My Grades (refer p77). Grade Centre does not have all the features of a spreadsheet and you should still use spreadsheet, if complex calculations are needed.
Refer to p31 on how to download the Grade Centre columns to spreadsheet, add calculated marks and upload the new marks to the Grade Centre.
Page 8 of 80
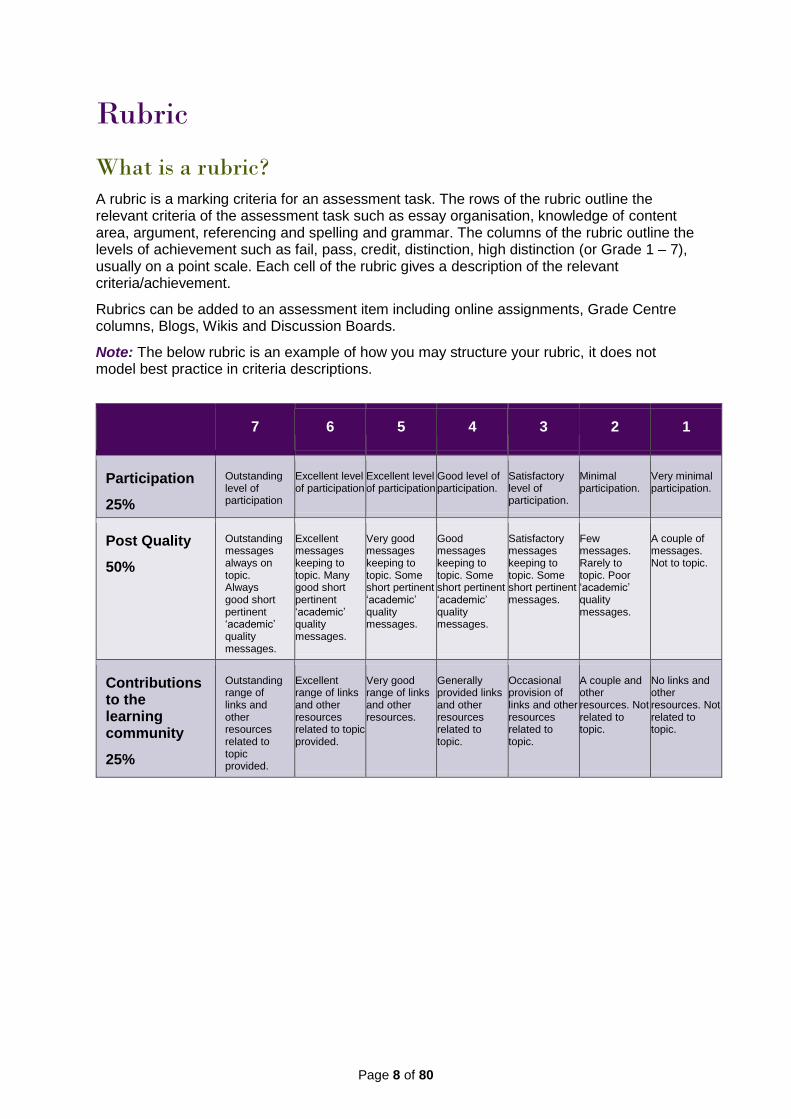
Rubric
What is a rubric?
A rubric is a marking criteria for an assessment task. The rows of the rubric outline the relevant criteria of the assessment task such as essay organisation, knowledge of content area, argument, referencing and spelling and grammar. The columns of the rubric outline the levels of achievement such as fail, pass, credit, distinction, high distinction (or Grade 1 – 7), usually on a point scale. Each cell of the rubric gives a description of the relevant criteria/achievement.
Rubrics can be added to an assessment item including online assignments, Grade Centre columns, Blogs, Wikis and Discussion Boards.
Note: The below rubric is an example of how you may structure your rubric, it does not model best practice in criteria descriptions.
7 6 5 4 3 2 1
Participation
25%
Outstanding level of participation
Excellent level of participation
Excellent level of participation
Good level of participation.
Satisfactory level of participation.
Minimal participation.
Very minimal participation.
Post Quality
50%
Outstanding messages always on topic. Always good short pertinent ‘academic’ quality messages.
Excellent messages keeping to topic. Many good short pertinent ‘academic’ quality messages.
Very good messages keeping to topic. Some short pertinent ‘academic’ quality messages.
Good messages keeping to topic. Some short pertinent ‘academic’ quality messages.
Satisfactory messages keeping to topic. Some short pertinent messages.
Few messages. Rarely to topic. Poor ‘academic’ quality messages.
A couple of messages. Not to topic.
Contributions to the learning community
25%
Outstanding range of links and other resources related to topic provided.
Excellent range of links and other resources related to topic provided.
Very good range of links and other resources.
Generally provided links and other resources related to topic.
Occasional provision of links and other resources related to topic.
A couple and other resources. Not related to topic.
No links and other resources. Not related to topic.
Page 9 of 80
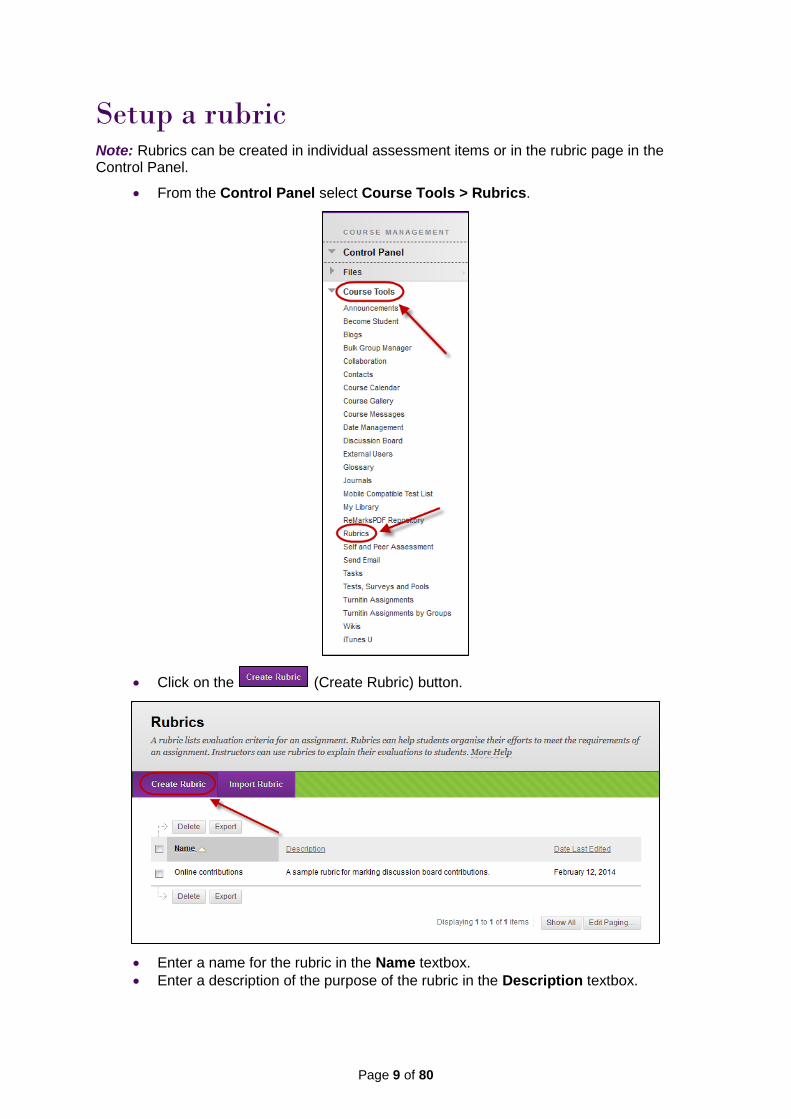
Setup a rubric Note: Rubrics can be created in individual assessment items or in the rubric page in the Control Panel.
From the Control Panel select Course Tools > Rubrics.
Click on the (Create Rubric) button.
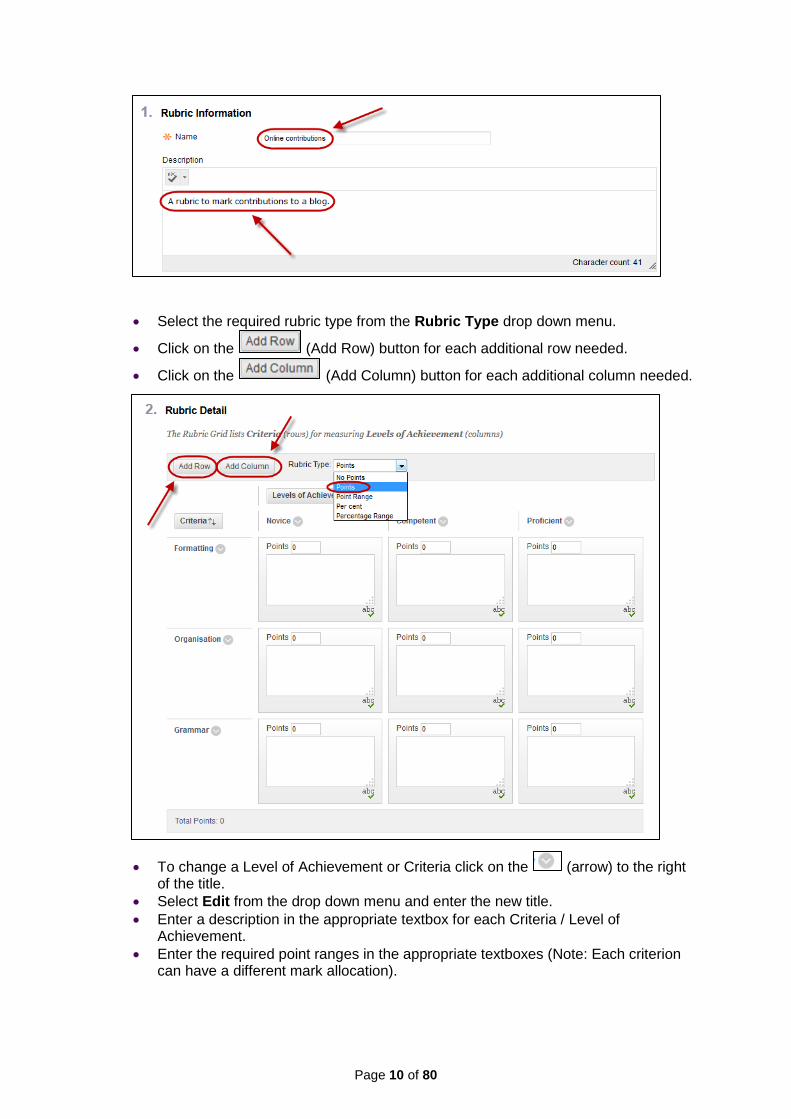
Enter a name for the rubric in the Name textbox.
Enter a description of the purpose of the rubric in the Description textbox.
Page 10 of 80
Select the required rubric type from the Rubric Type drop down menu.
Click on the (Add Row) button for each additional row needed.
Click on the (Add Column) button for each additional column needed.
To change a Level of Achievement or Criteria click on the (arrow) to the right of the title.
Select Edit from the drop down menu and enter the new title.
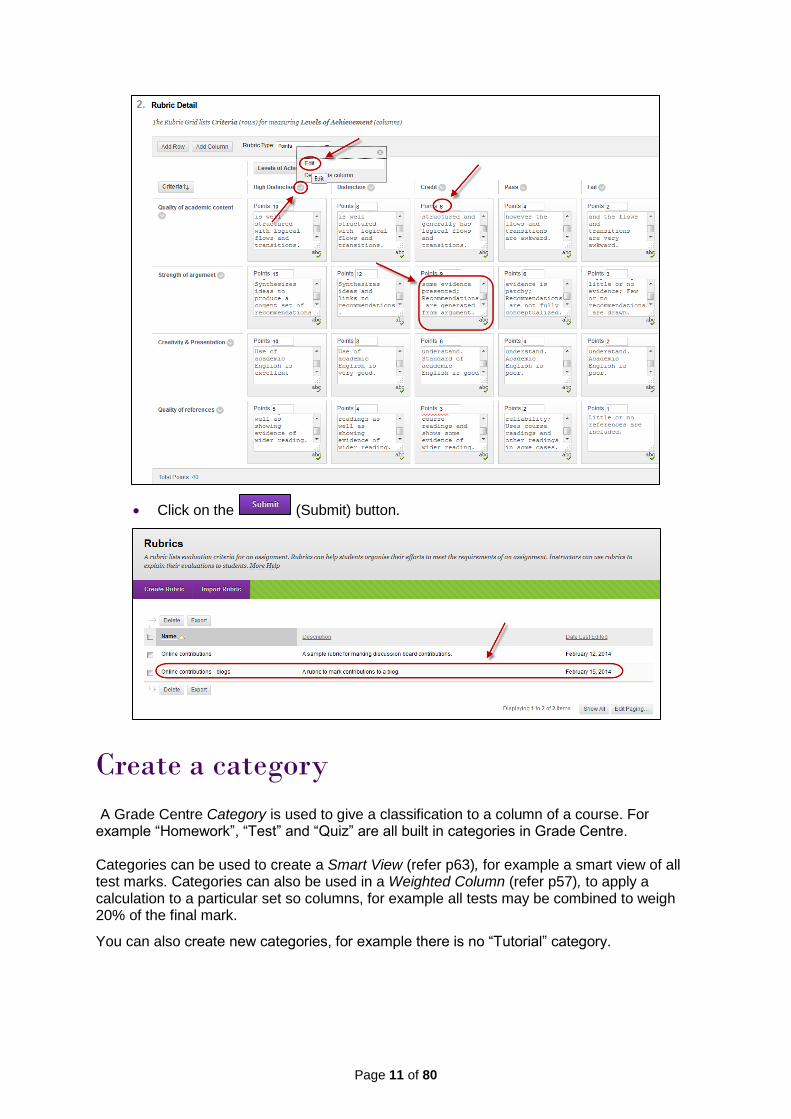
Enter a description in the appropriate textbox for each Criteria / Level of Achievement.
Enter the required point ranges in the appropriate textboxes (Note: Each criterion can have a different mark allocation).
Page 11 of 80
Click on the (Submit) button.
Create a category A Grade Centre Category is used to give a classification to a column of a course. For example “Homework”, “Test” and “Quiz” are all built in categories in Grade Centre. Categories can be used to create a Smart View (refer p63), for example a smart view of all test marks. Categories can also be used in a Weighted Column (refer p57), to apply a calculation to a particular set so columns, for example all tests may be combined to weigh 20% of the final mark.
You can also create new categories, for example there is no “Tutorial” category.
Page 12 of 80
Create a Tutorial category
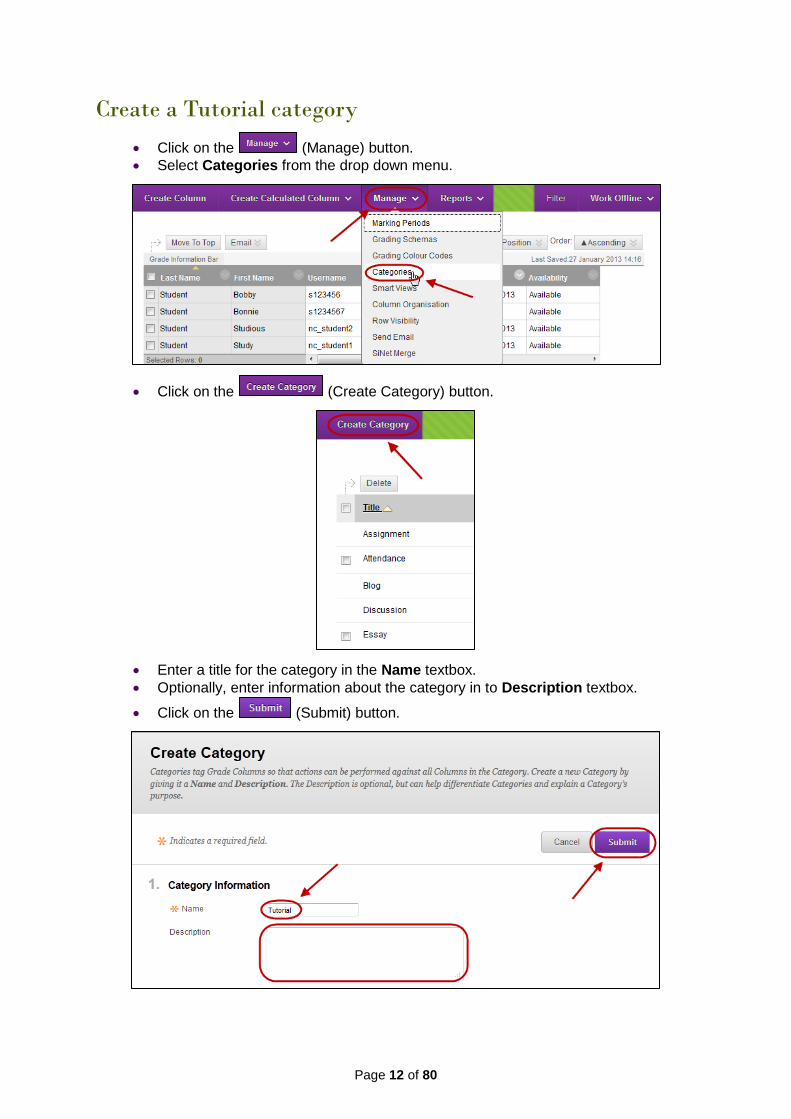
Click on the (Manage) button.
Select Categories from the drop down menu.
Click on the (Create Category) button.
Enter a title for the category in the Name textbox.
Optionally, enter information about the category in to Description textbox.
Click on the (Submit) button.
Page 13 of 80
Setting the category of a column
The when creating a column in Grade Centre any Category you have created will be options Category list (refer p18).
Using categories
Refer to Create a Smart View based on a category (refer p63), Create a weighted column (refer p57) and Total X of Y marks (refer p44) for further information.
Create a Grade Schema (1 – 7 grades) A Grading Schema displays a grade (1 – 7; F, P, C, D, HD; A – E) based on percentage ranges. i.e. If the student scores 88% in a particular schema an A would be displayed.
The results of the grade schema are displayed as well as the score in the grade centre column, this secondary display is not visible to students.
Blackboard already includes the Grade Scheme A+ to E-
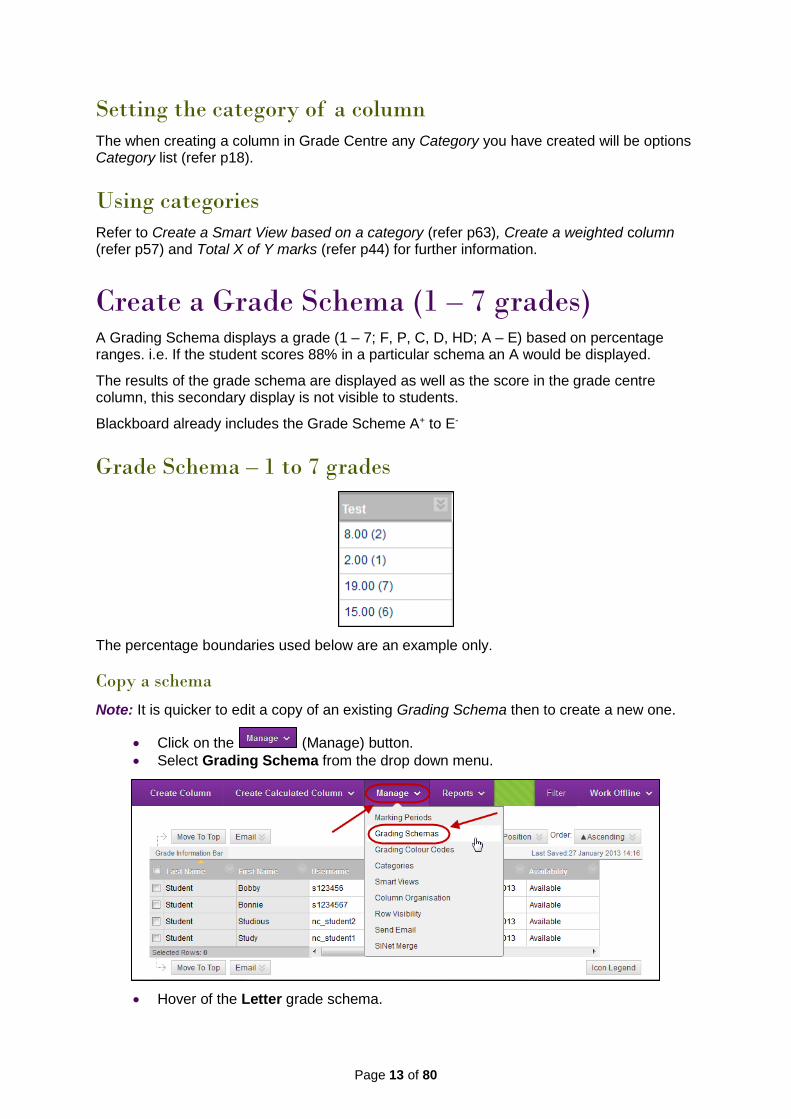
Grade Schema – 1 to 7 grades
The percentage boundaries used below are an example only.
Copy a schema
Note: It is quicker to edit a copy of an existing Grading Schema then to create a new one.
Click on the (Manage) button.
Select Grading Schema from the drop down menu.
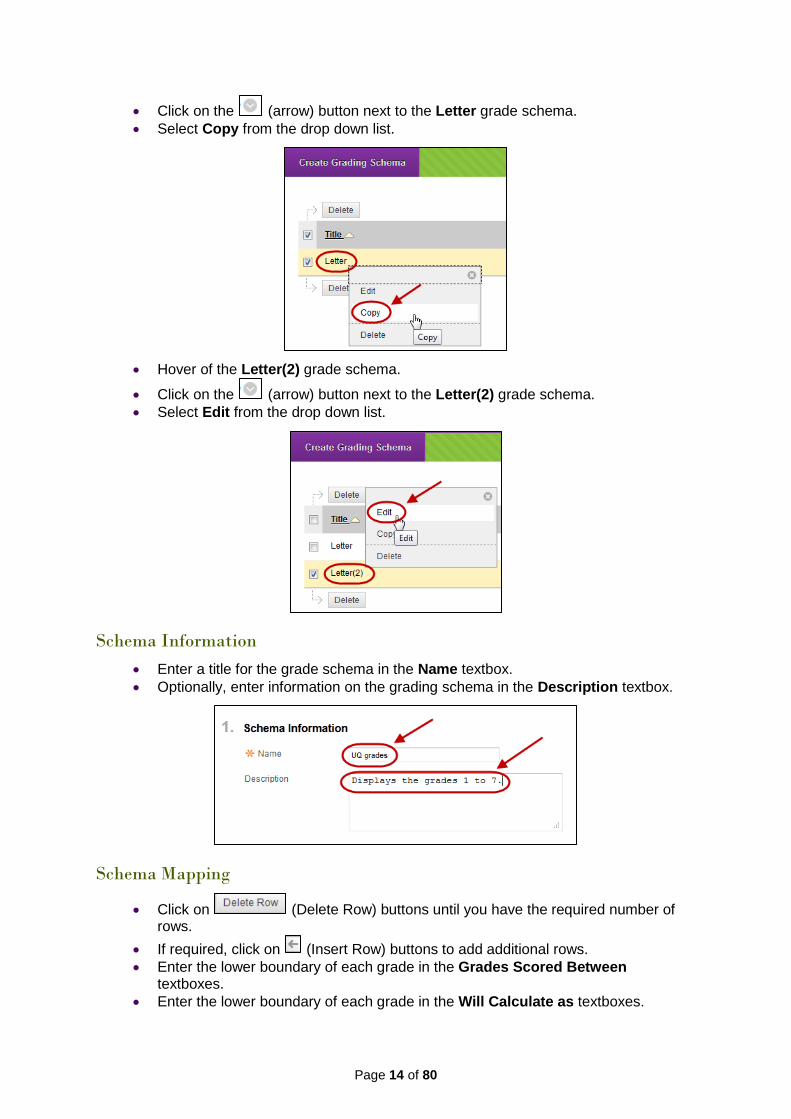
Hover of the Letter grade schema.
Page 14 of 80
Click on the (arrow) button next to the Letter grade schema.
Select Copy from the drop down list.
Hover of the Letter(2) grade schema.
Click on the (arrow) button next to the Letter(2) grade schema.
Select Edit from the drop down list.
Schema Information
Enter a title for the grade schema in the Name textbox.
Optionally, enter information on the grading schema in the Description textbox.
Schema Mapping
Click on (Delete Row) buttons until you have the required number of rows.
If required, click on (Insert Row) buttons to add additional rows.
Enter the lower boundary of each grade in the Grades Scored Between textboxes.
Enter the lower boundary of each grade in the Will Calculate as textboxes.
Page 15 of 80
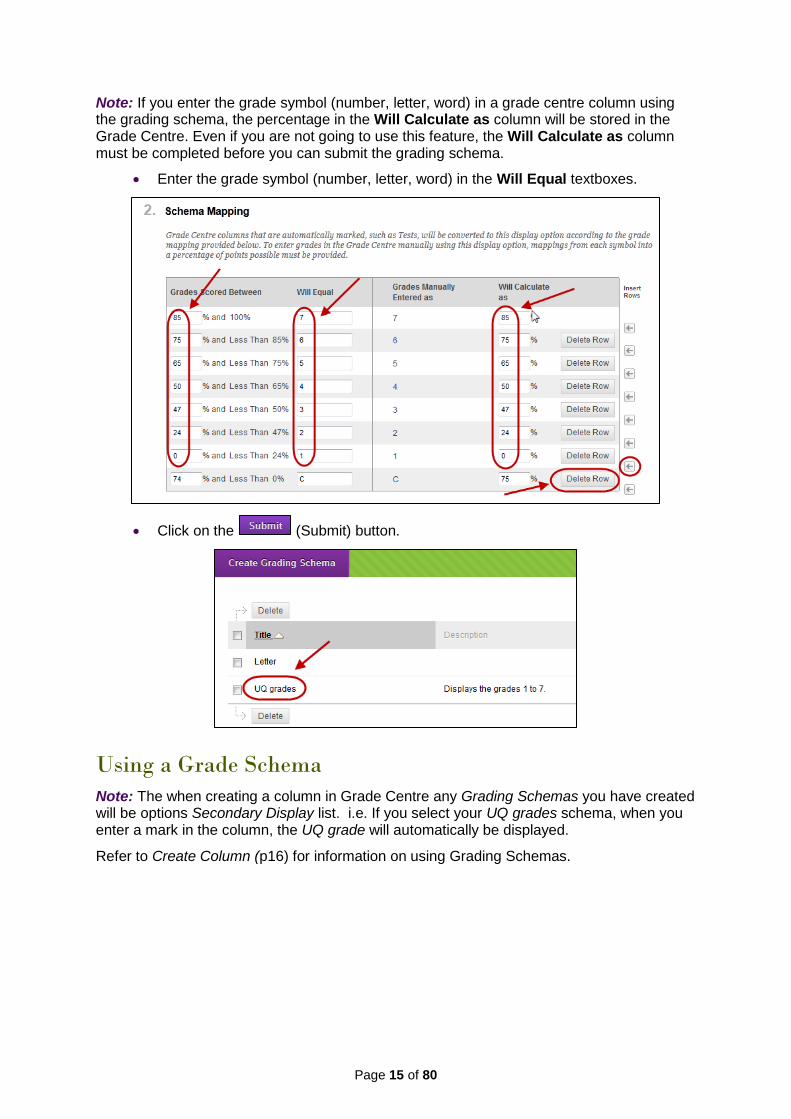
Note: If you enter the grade symbol (number, letter, word) in a grade centre column using the grading schema, the percentage in the Will Calculate as column will be stored in the Grade Centre. Even if you are not going to use this feature, the Will Calculate as column must be completed before you can submit the grading schema.
Enter the grade symbol (number, letter, word) in the Will Equal textboxes.
Click on the (Submit) button.
Using a Grade Schema
Note: The when creating a column in Grade Centre any Grading Schemas you have created will be options Secondary Display list. i.e. If you select your UQ grades schema, when you enter a mark in the column, the UQ grade will automatically be displayed.
Refer to Create Column (p16) for information on using Grading Schemas.
Page 16 of 80
Create a column
Using a blank column to enter marks and feedback
In the following exercise we will look at four ways marks and feedback can be entered into the Grade Centre using a blank column.
1. Entering marks into Grade Centre cells and add feedback using Quick comments.
2. Entering marks and feedback using View Grade Details. 3. Entering mark and feedback using a rubric. 4. Entering marks by downloading and uploading the Grade Centre spreadsheet.
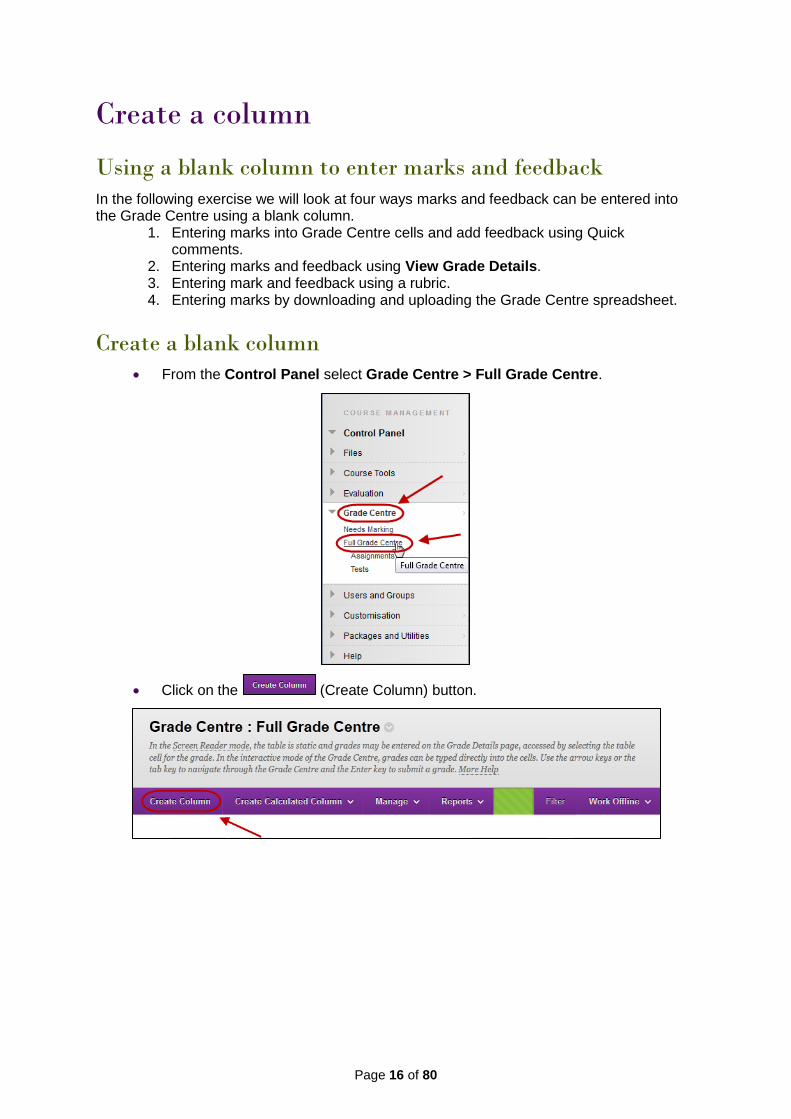
Create a blank column
From the Control Panel select Grade Centre > Full Grade Centre.
Click on the (Create Column) button.

Page 17 of 80
Column Information
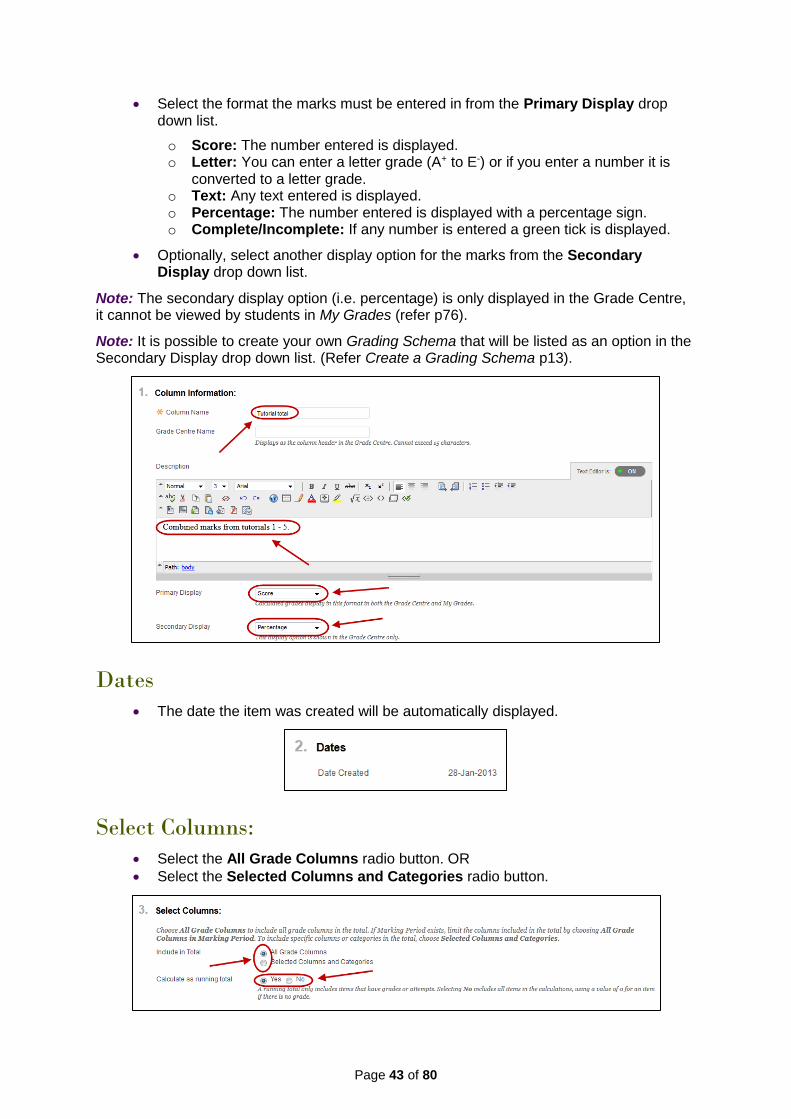
Enter a title for the column in the Column Name textbox.
Optionally, enter an abbreviated title for the column in the Grade Centre Name textbox.
Note: The Grade Centre Name is only displayed in the Grade Centre, the Column Name will be displayed in My Grades (refer p76) to the students.
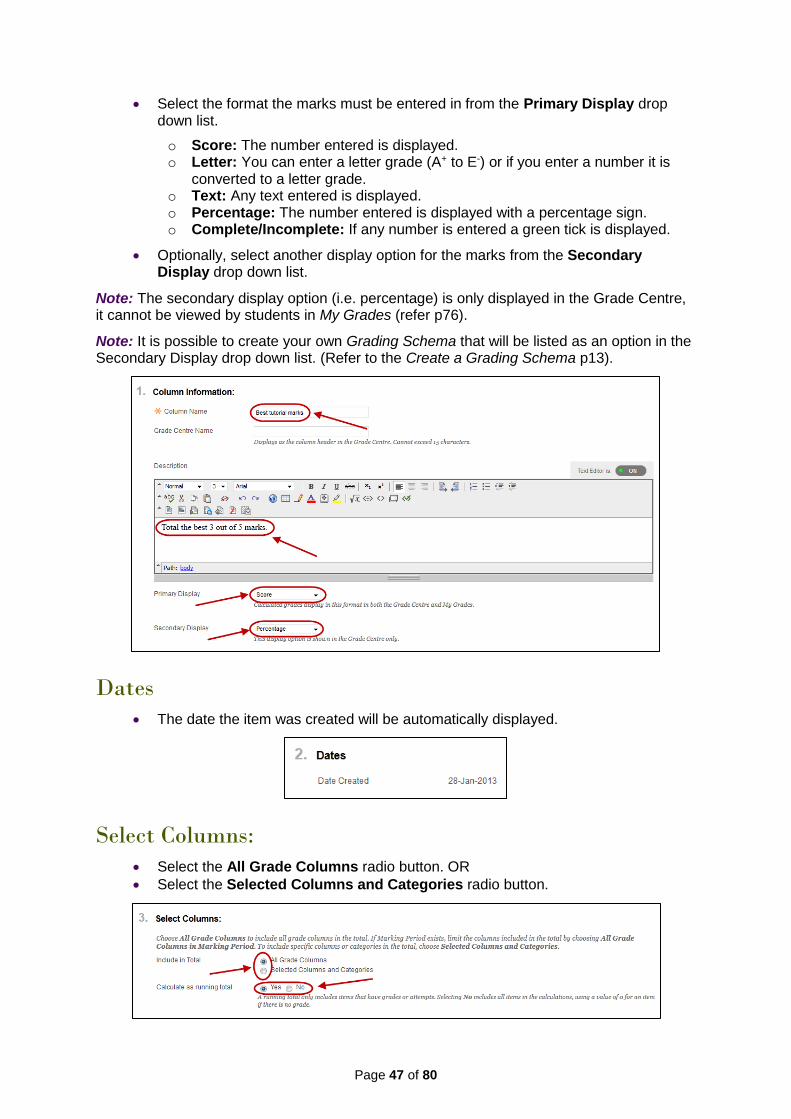
Select the format the marks must be entered in from the Primary Display drop down list.
o Score: The number entered is displayed. o Letter: You can enter a letter grade (A+ to E-) or if you enter a number it is
converted to a letter grade. o Text: Any text entered is displayed. o Percentage: The number entered is displayed with a percentage sign. o Complete/Incomplete: If any number is entered a green tick is displayed.
Optionally, select another display option for the marks from the Secondary Display drop down list.
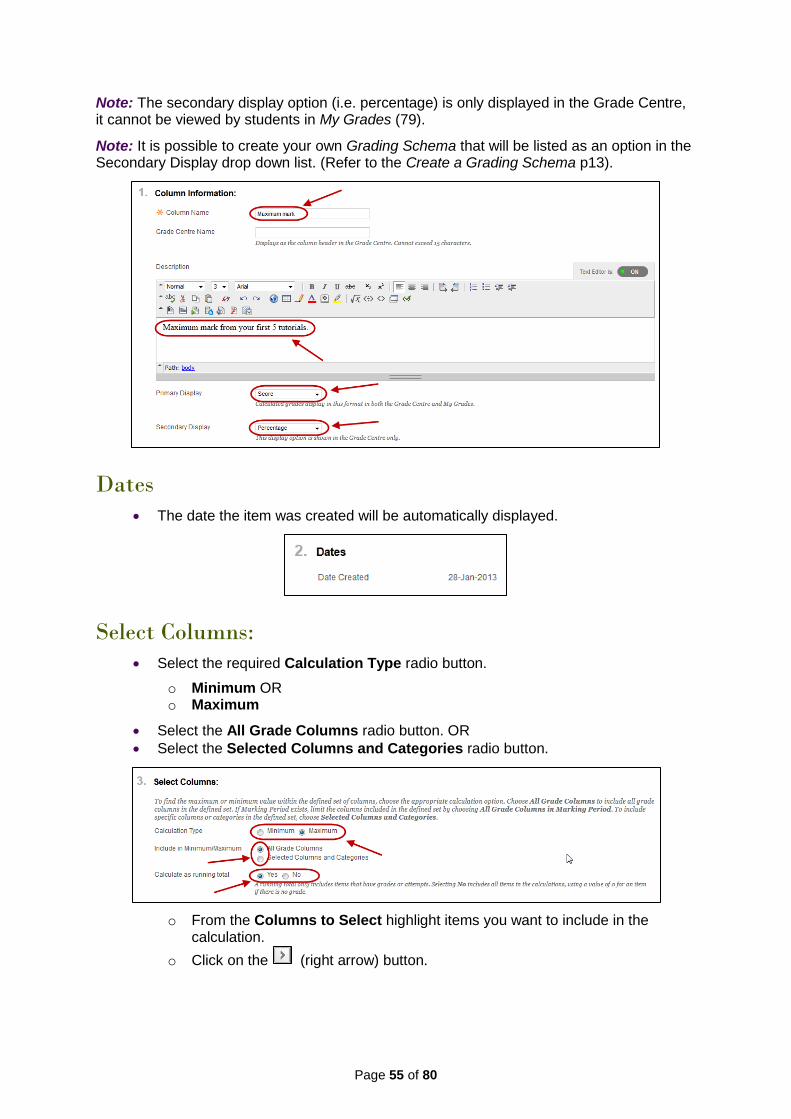
Note: The secondary display option (i.e. percentage) is only displayed in the Grade Centre, it cannot be viewed by students in My Grades.
Note: It is possible to create your own Grading Schema that will be listed as an option in the Secondary Display drop down list. (Refer to the Create a Grading Schema guide).
Optionally, specify the classification of mark to be stored in the column from the Category drop down list.
Note: Categories can be used to create a Smart View, for example a smart view of all test marks. Categories can also be used in a Weighted Column to apply a calculation to a particular set so columns, for example all tests may be combined to weigh 20% of the final mark.
Note: It is possible to create your own Category (refer p11) that will be listed as an option in the Category drop down list.
Page 18 of 80
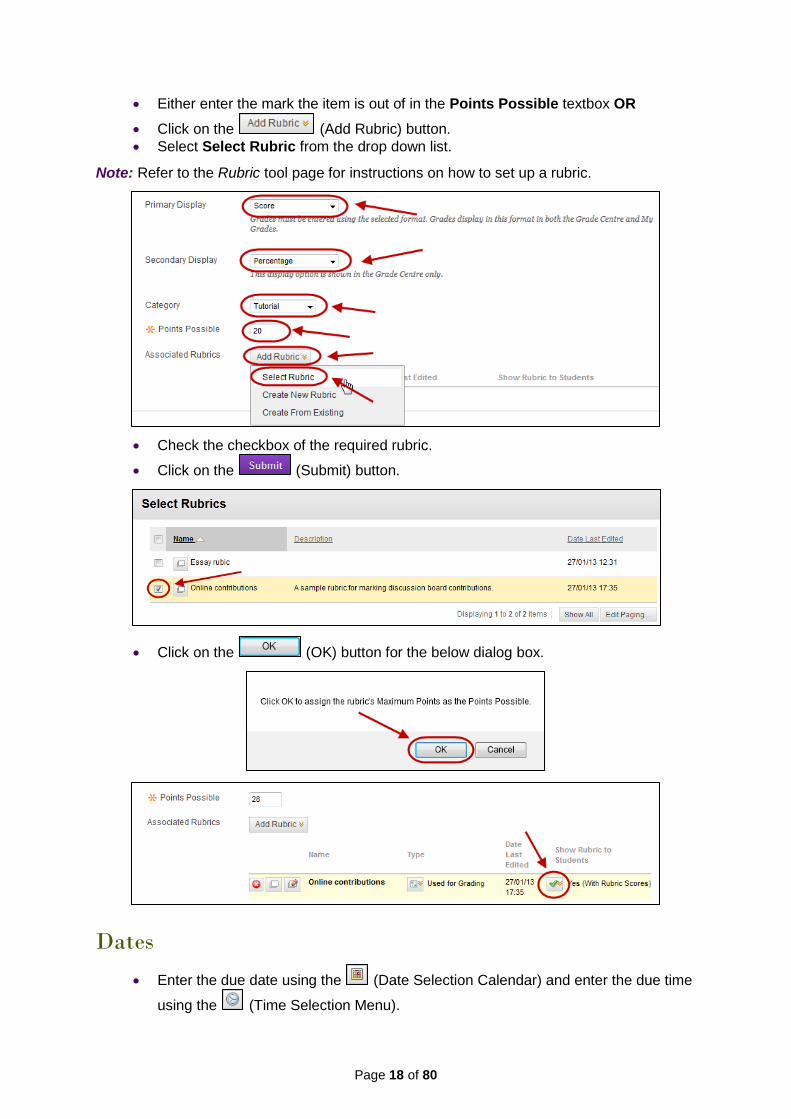
Either enter the mark the item is out of in the Points Possible textbox OR
Click on the (Add Rubric) button.
Select Select Rubric from the drop down list.
Note: Refer to the Rubric tool page for instructions on how to set up a rubric.
Check the checkbox of the required rubric.
Click on the (Submit) button.
Click on the (OK) button for the below dialog box.
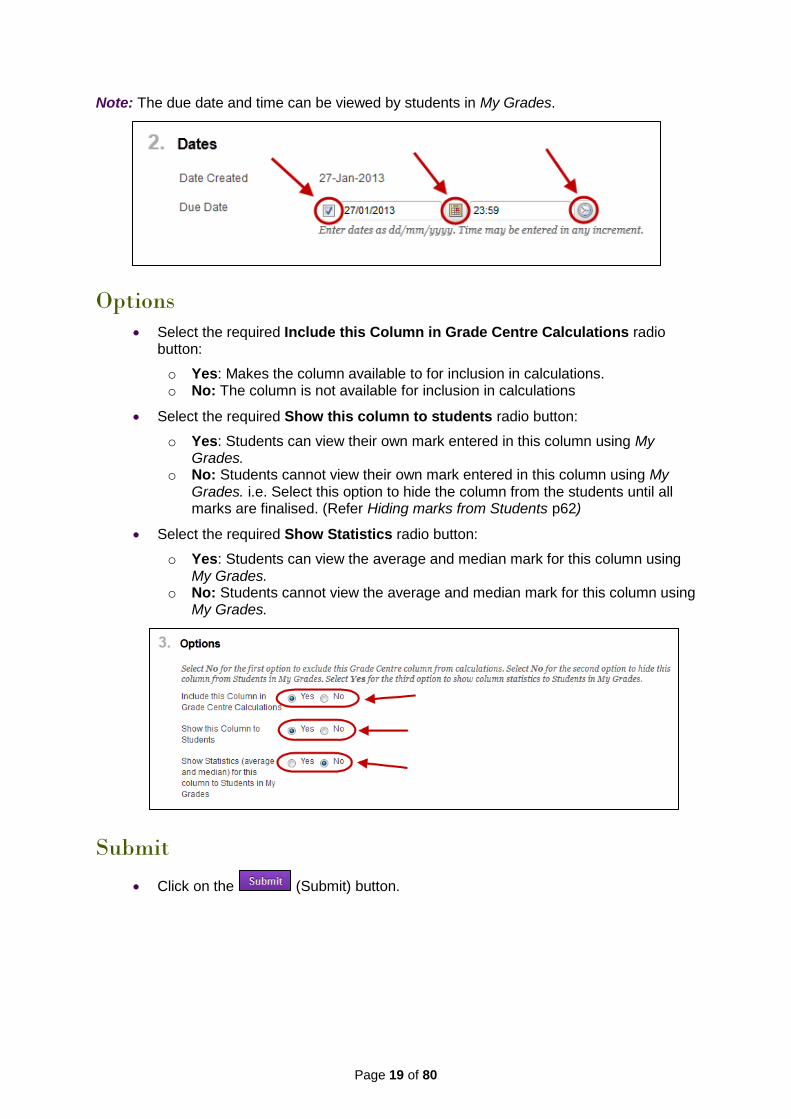
Dates
Enter the due date using the (Date Selection Calendar) and enter the due time
using the (Time Selection Menu).
Page 19 of 80
Note: The due date and time can be viewed by students in My Grades.
Options
Select the required Include this Column in Grade Centre Calculations radio button:
o Yes: Makes the column available to for inclusion in calculations. o No: The column is not available for inclusion in calculations
Select the required Show this column to students radio button:
o Yes: Students can view their own mark entered in this column using My Grades.
o No: Students cannot view their own mark entered in this column using My Grades. i.e. Select this option to hide the column from the students until all marks are finalised. (Refer Hiding marks from Students p62)
Select the required Show Statistics radio button:
o Yes: Students can view the average and median mark for this column using My Grades.
o No: Students cannot view the average and median mark for this column using My Grades.
Submit
Click on the (Submit) button.
Page 20 of 80
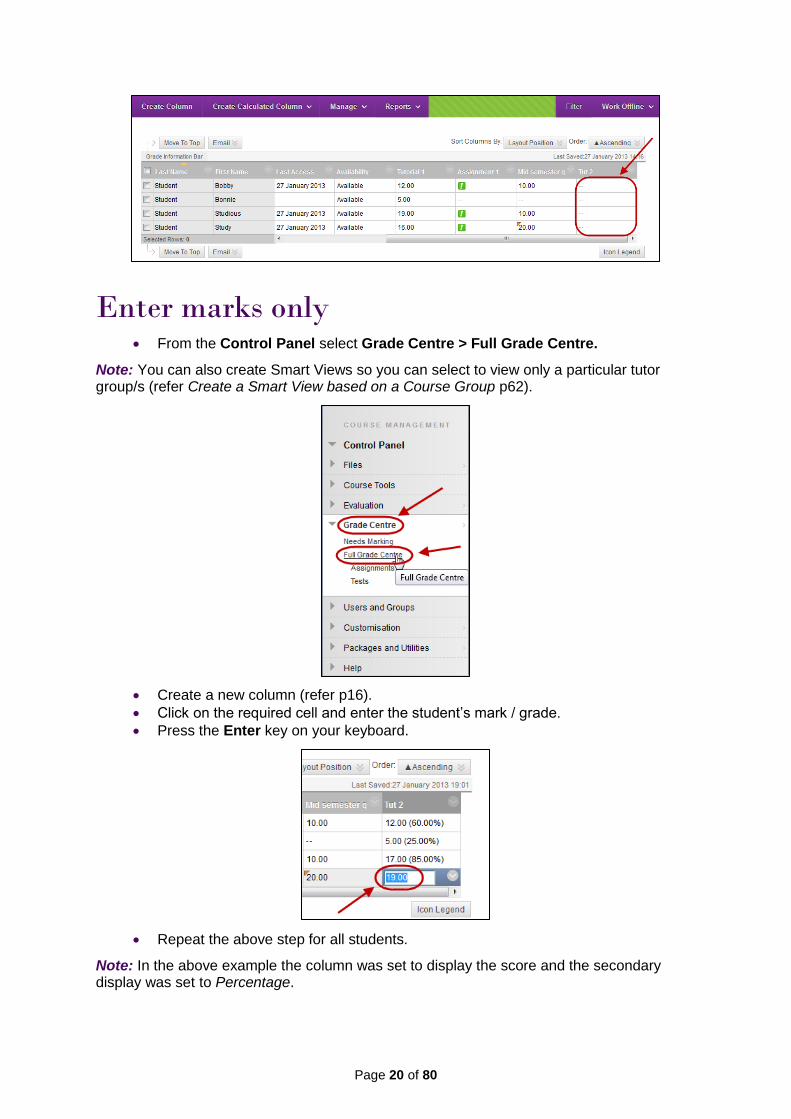
Enter marks only From the Control Panel select Grade Centre > Full Grade Centre.
Note: You can also create Smart Views so you can select to view only a particular tutor group/s (refer Create a Smart View based on a Course Group p62).
Create a new column (refer p16).
Click on the required cell and enter the student’s mark / grade.
Press the Enter key on your keyboard.
Repeat the above step for all students.
Note: In the above example the column was set to display the score and the secondary display was set to Percentage.
Page 21 of 80
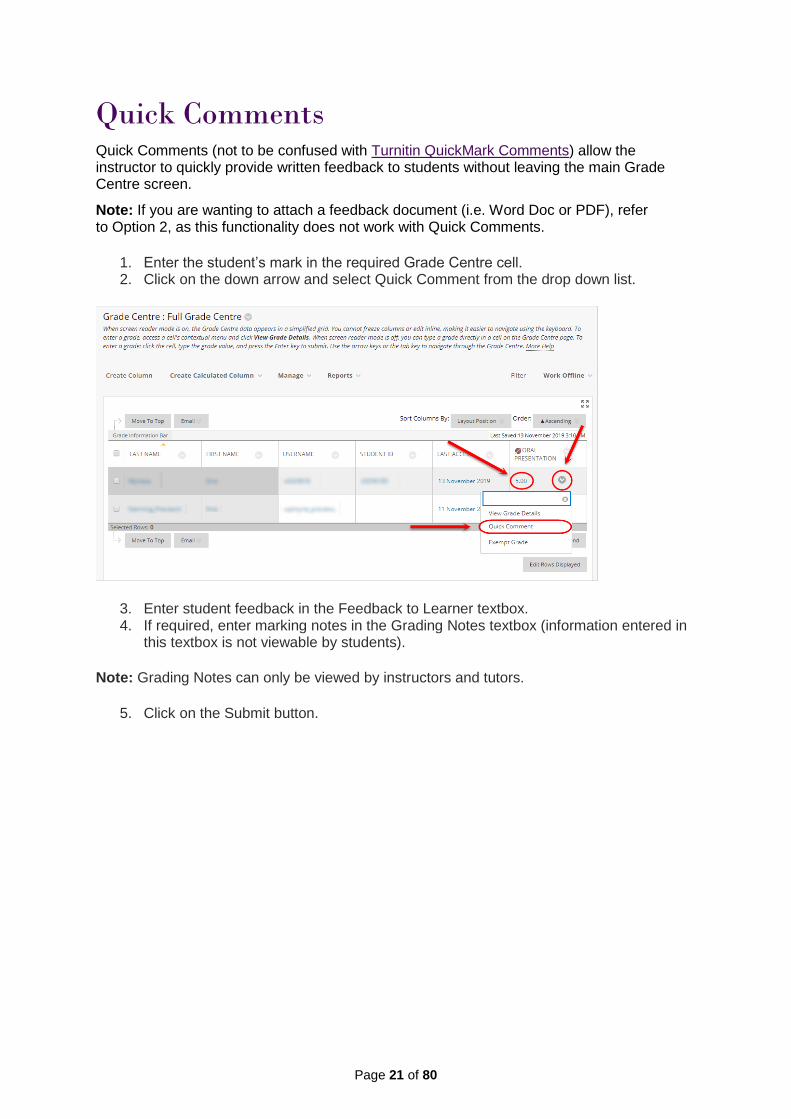
Quick Comments Quick Comments (not to be confused with Turnitin QuickMark Comments) allow the instructor to quickly provide written feedback to students without leaving the main Grade Centre screen.
Note: If you are wanting to attach a feedback document (i.e. Word Doc or PDF), refer to Option 2, as this functionality does not work with Quick Comments.
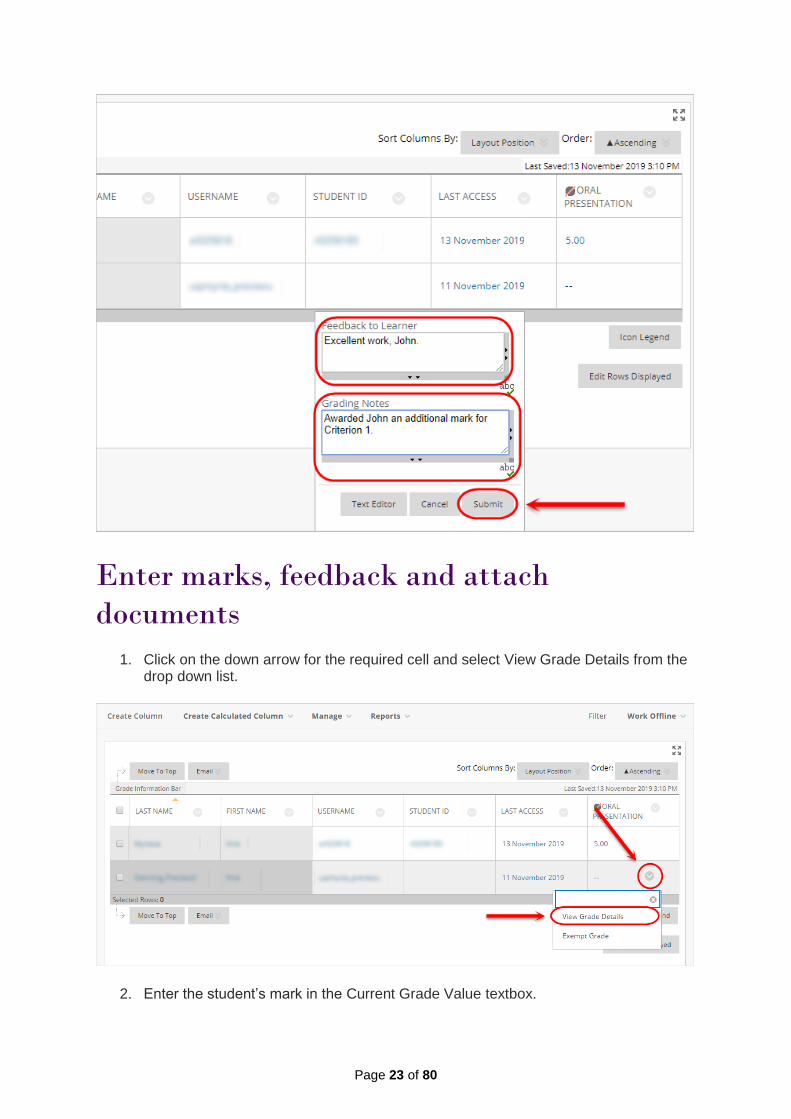
1. Enter the student’s mark in the required Grade Centre cell. 2. Click on the down arrow and select Quick Comment from the drop down list.
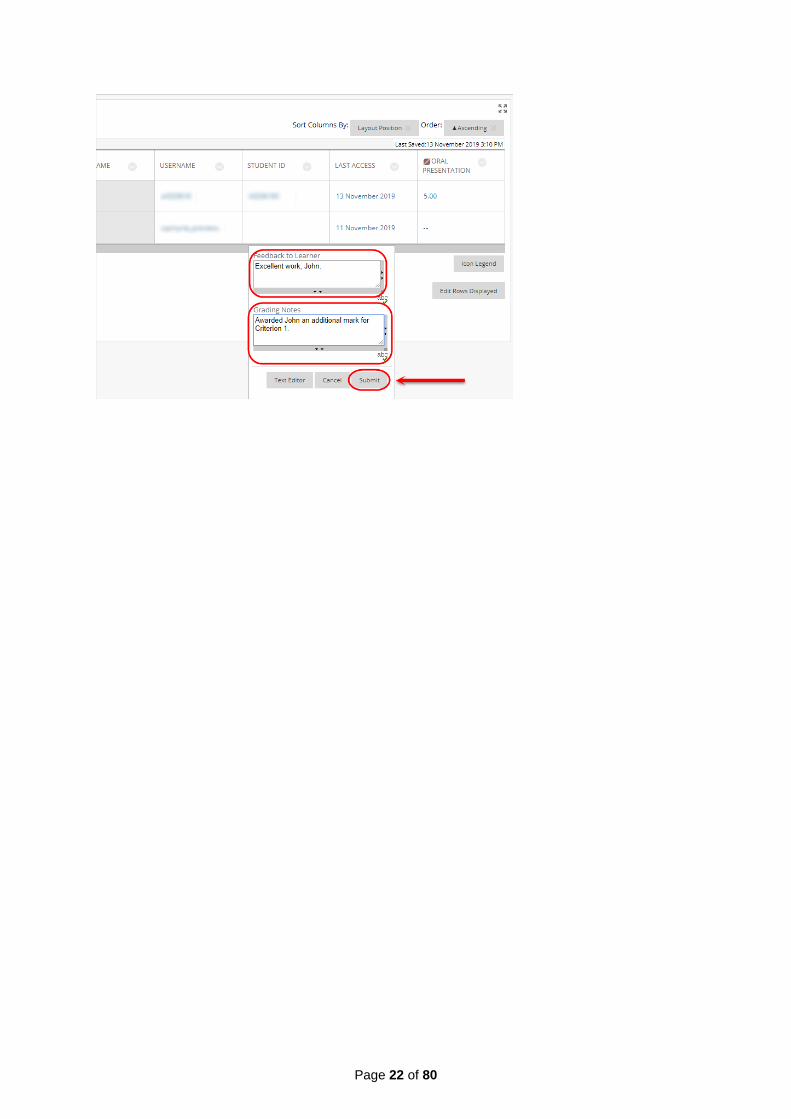
3. Enter student feedback in the Feedback to Learner textbox. 4. If required, enter marking notes in the Grading Notes textbox (information entered in
this textbox is not viewable by students).
Note: Grading Notes can only be viewed by instructors and tutors.
5. Click on the Submit button.
Page 22 of 80
Page 23 of 80
Enter marks, feedback and attach
documents
1. Click on the down arrow for the required cell and select View Grade Details from the drop down list.
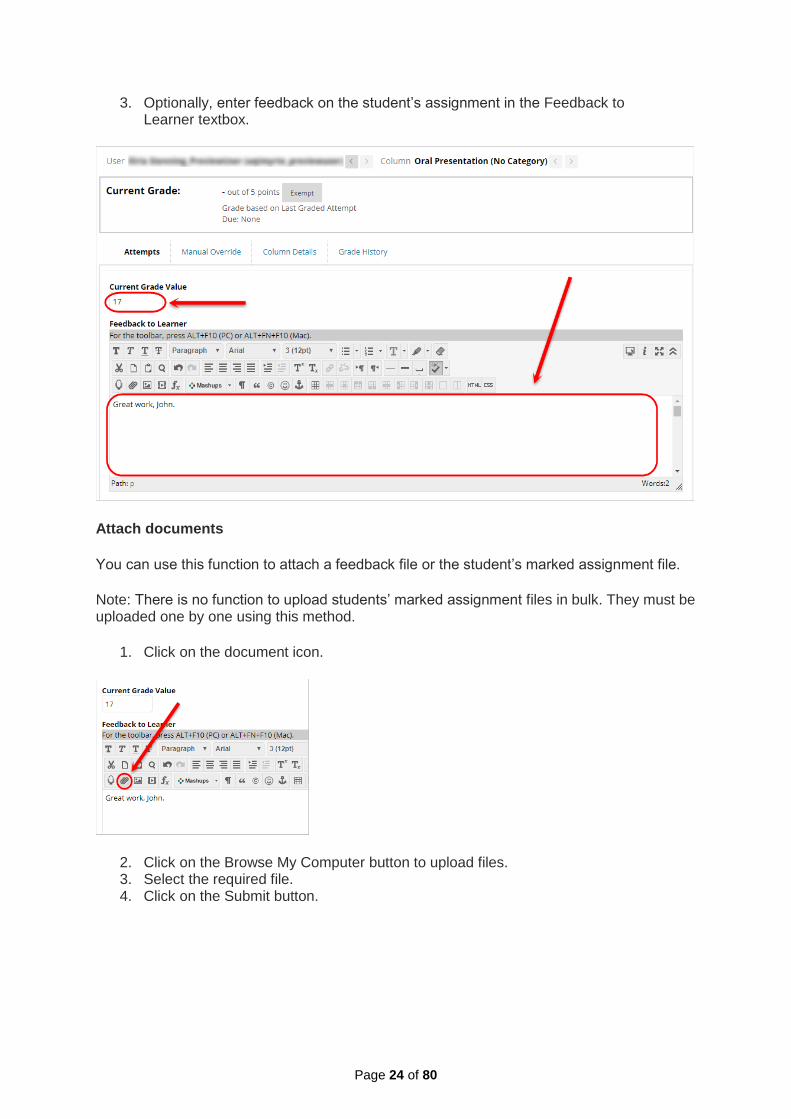
2. Enter the student’s mark in the Current Grade Value textbox.
Page 24 of 80
3. Optionally, enter feedback on the student’s assignment in the Feedback to Learner textbox.
Attach documents
You can use this function to attach a feedback file or the student’s marked assignment file.
Note: There is no function to upload students’ marked assignment files in bulk. They must be uploaded one by one using this method.
1. Click on the document icon.
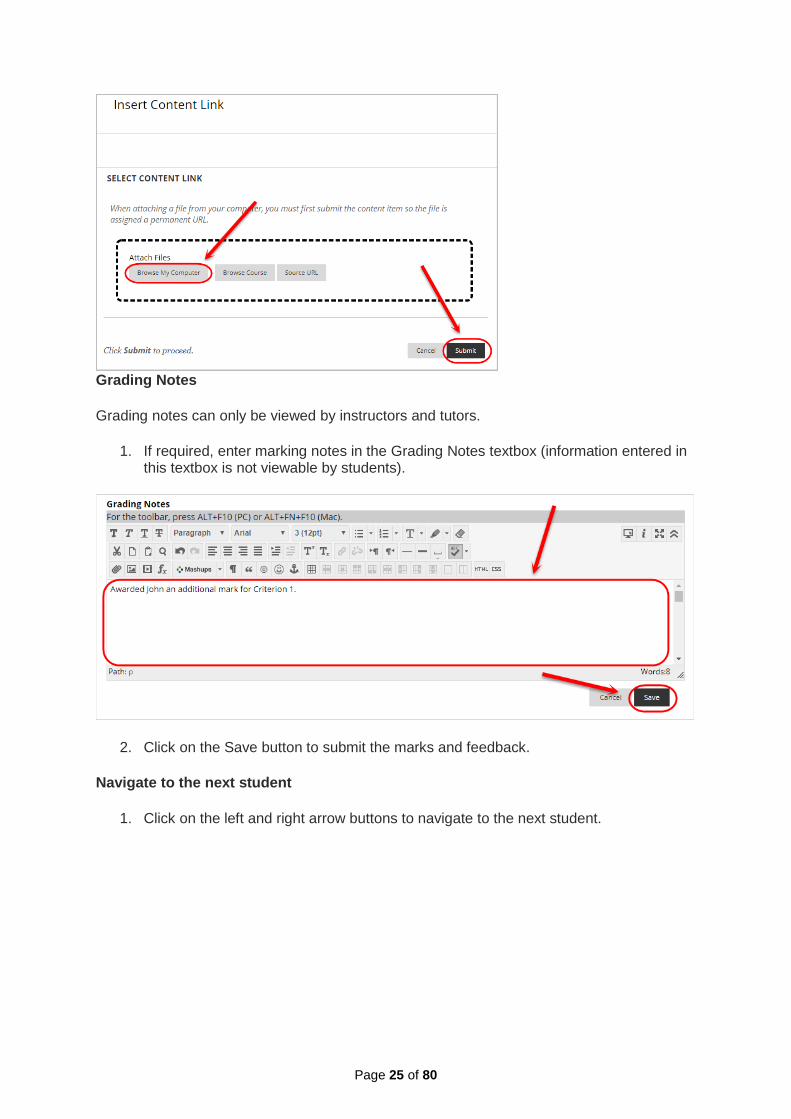
2. Click on the Browse My Computer button to upload files. 3. Select the required file. 4. Click on the Submit button.
Page 25 of 80
Grading Notes
Grading notes can only be viewed by instructors and tutors.
1. If required, enter marking notes in the Grading Notes textbox (information entered in this textbox is not viewable by students).
2. Click on the Save button to submit the marks and feedback.
Navigate to the next student
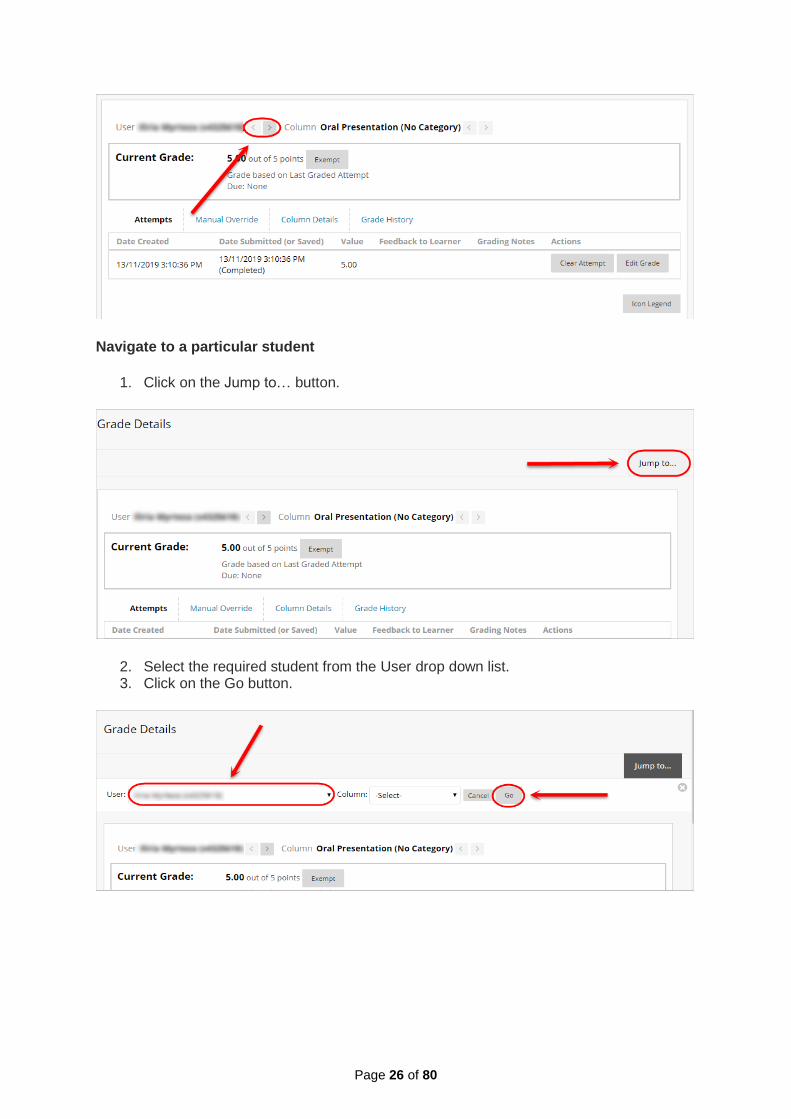
1. Click on the left and right arrow buttons to navigate to the next student.
Page 26 of 80
Navigate to a particular student
1. Click on the Jump to… button.
2. Select the required student from the User drop down list. 3. Click on the Go button.
Page 27 of 80
Edit marks and Mark history
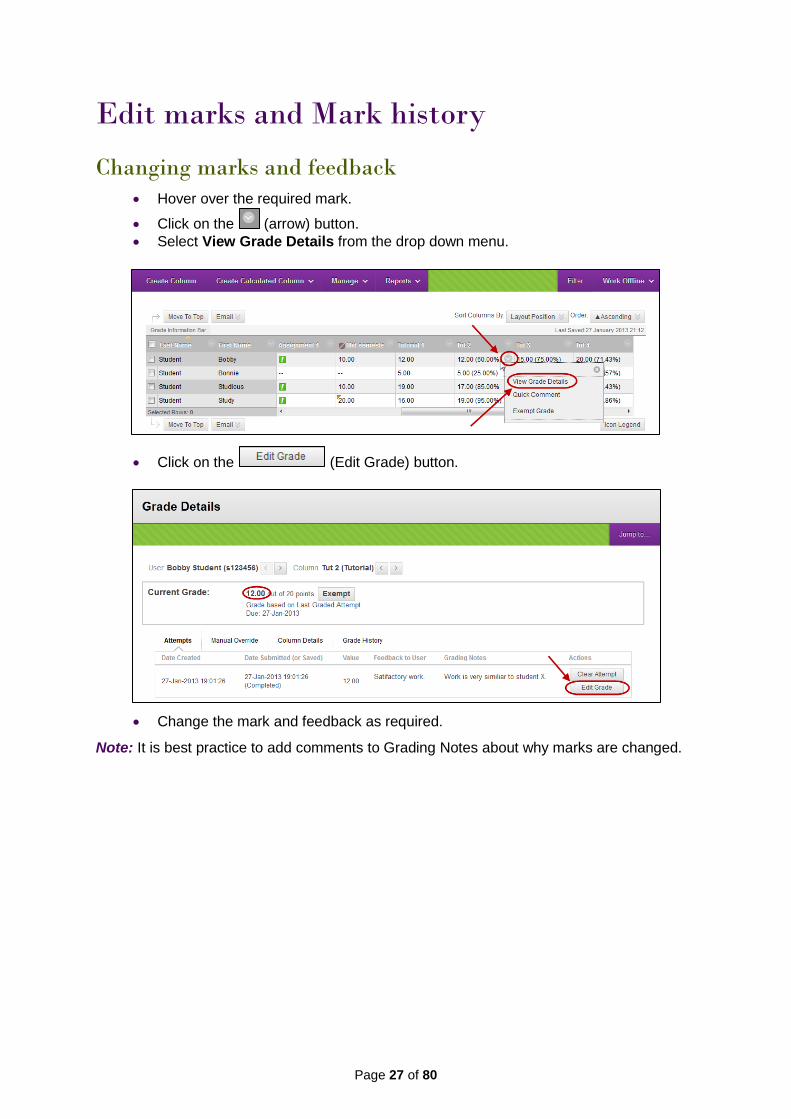
Changing marks and feedback
Hover over the required mark.
Click on the (arrow) button.
Select View Grade Details from the drop down menu.
Click on the (Edit Grade) button.
Change the mark and feedback as required.
Note: It is best practice to add comments to Grading Notes about why marks are changed.
Page 28 of 80
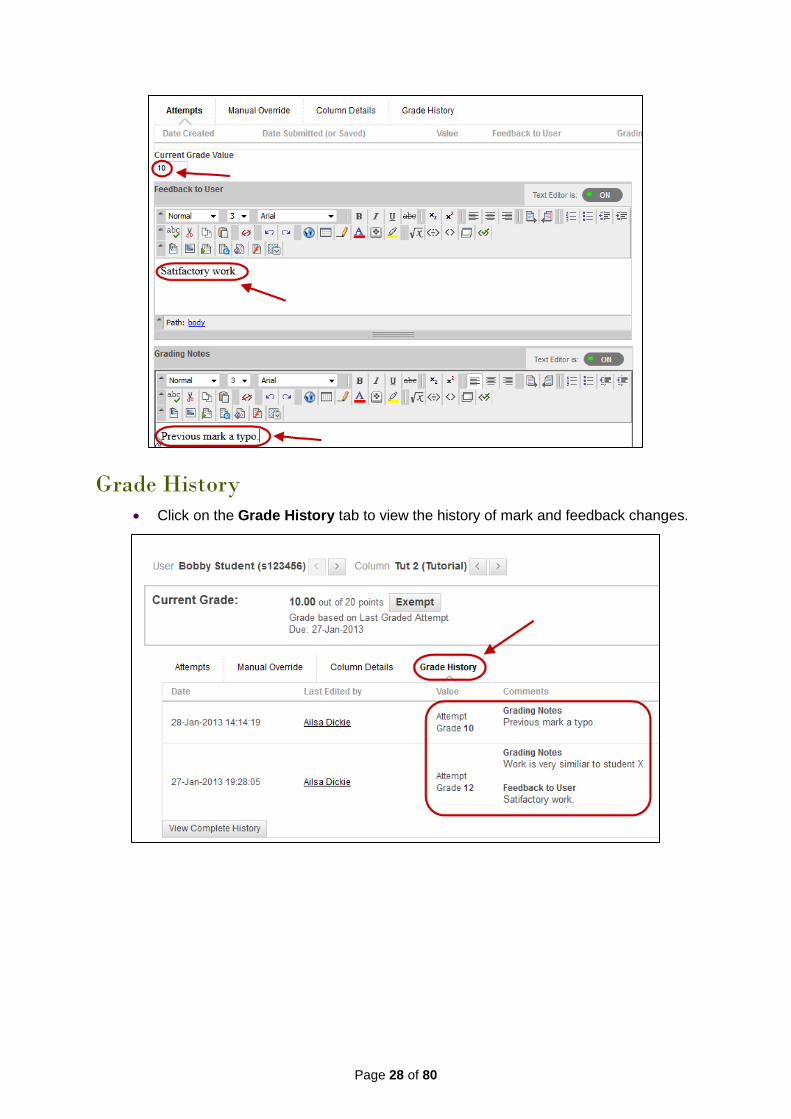
Grade History
Click on the Grade History tab to view the history of mark and feedback changes.
Page 29 of 80
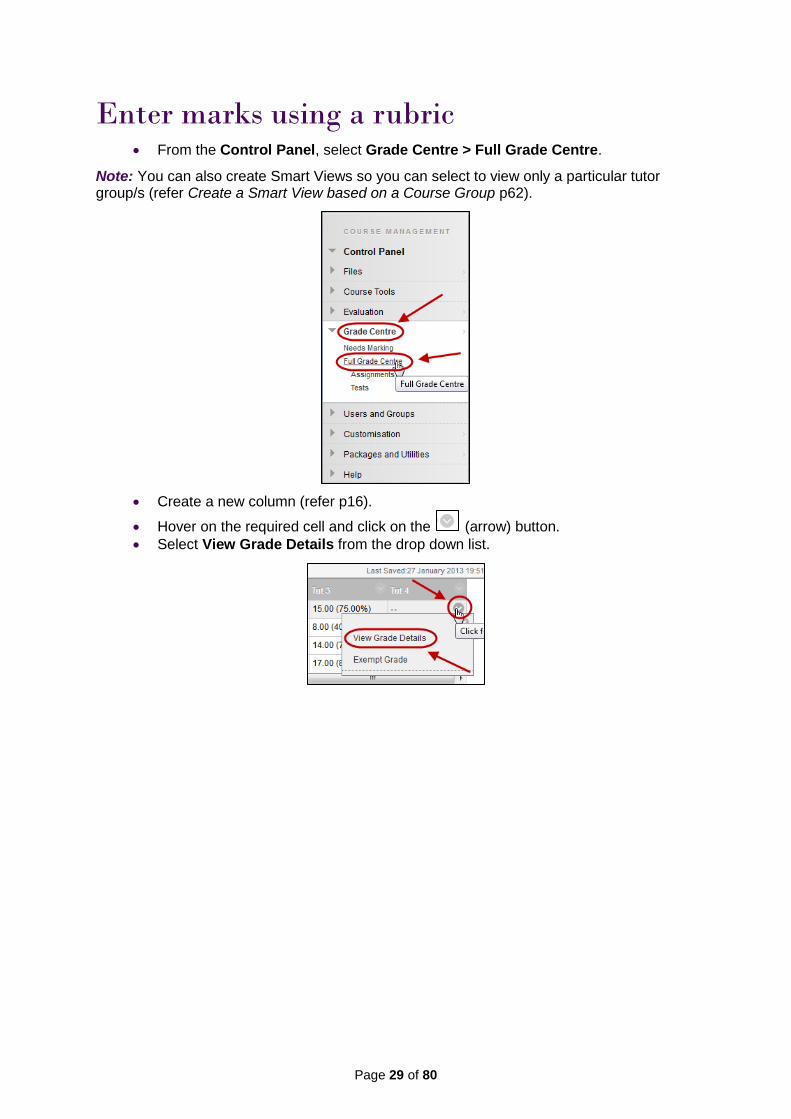
Enter marks using a rubric From the Control Panel, select Grade Centre > Full Grade Centre.
Note: You can also create Smart Views so you can select to view only a particular tutor group/s (refer Create a Smart View based on a Course Group p62).
Create a new column (refer p16).
Hover on the required cell and click on the (arrow) button.
Select View Grade Details from the drop down list.
Page 30 of 80
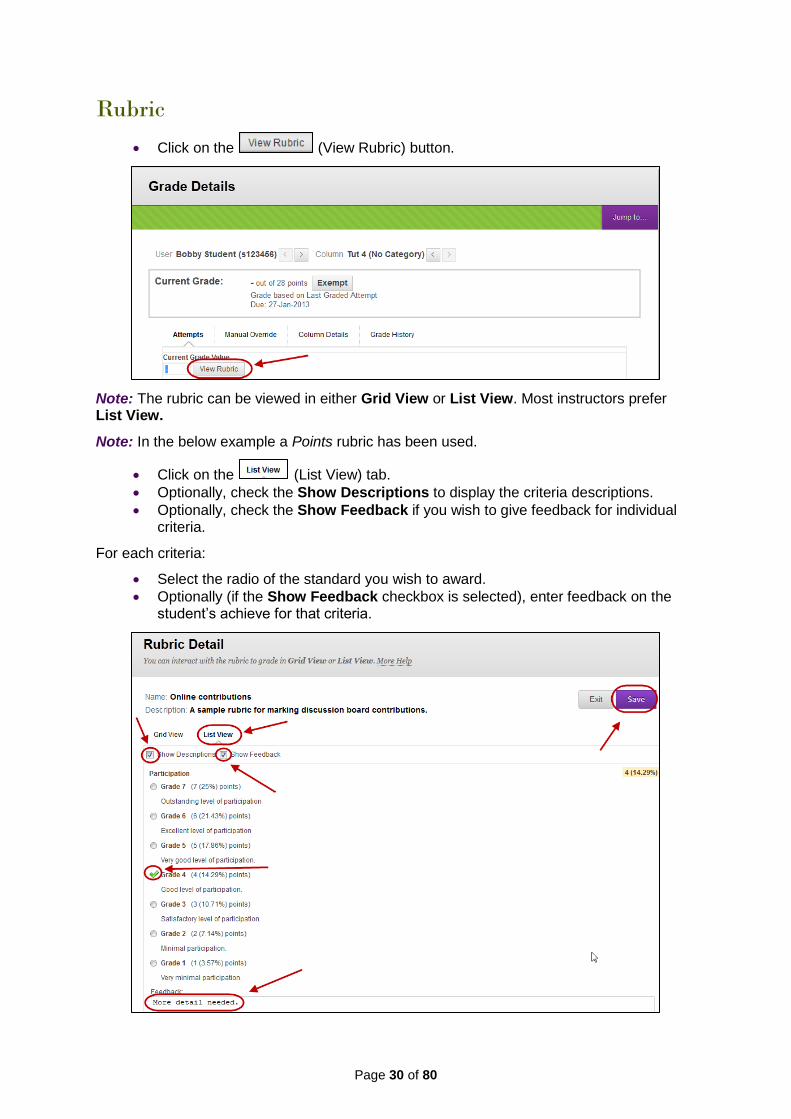
Rubric
Click on the (View Rubric) button.
Note: The rubric can be viewed in either Grid View or List View. Most instructors prefer List View.
Note: In the below example a Points rubric has been used.
Click on the (List View) tab.
Optionally, check the Show Descriptions to display the criteria descriptions.
Optionally, check the Show Feedback if you wish to give feedback for individual criteria.
For each criteria:
Select the radio of the standard you wish to award.
Optionally (if the Show Feedback checkbox is selected), enter feedback on the student’s achieve for that criteria.
Page 31 of 80
Overall feedback
Total
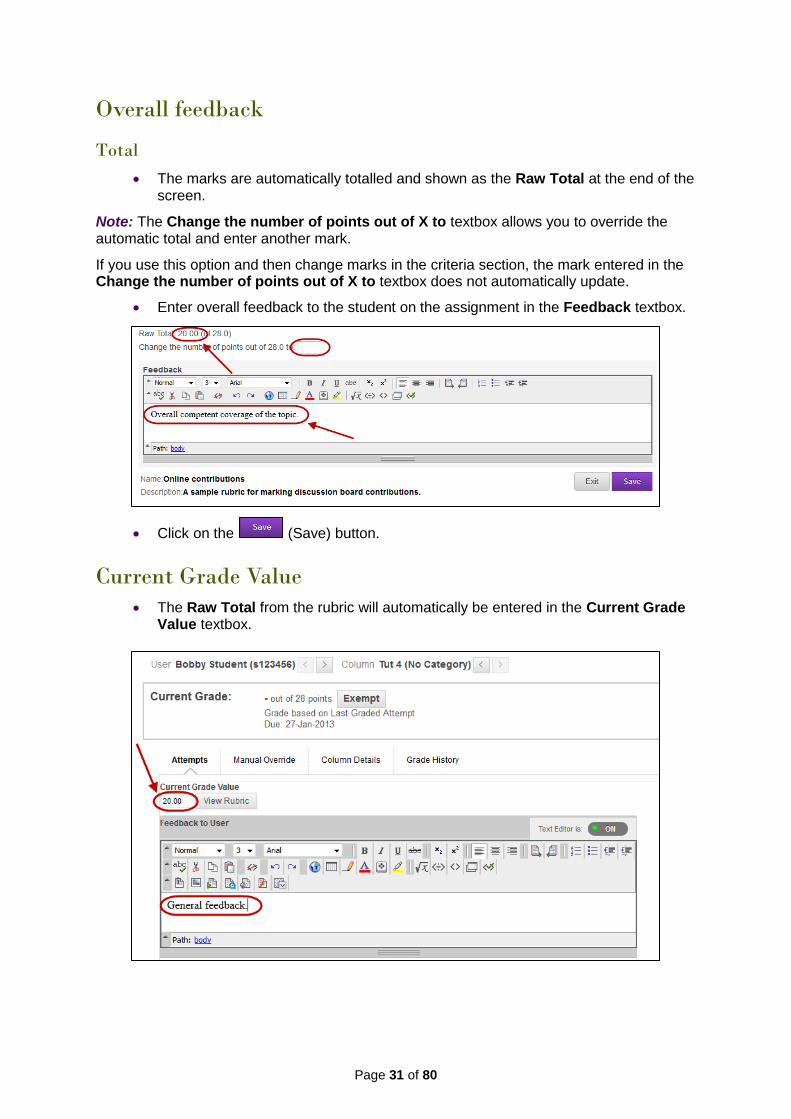
The marks are automatically totalled and shown as the Raw Total at the end of the screen.
Note: The Change the number of points out of X to textbox allows you to override the automatic total and enter another mark.
If you use this option and then change marks in the criteria section, the mark entered in the Change the number of points out of X to textbox does not automatically update.
Enter overall feedback to the student on the assignment in the Feedback textbox.
Click on the (Save) button.
Current Grade Value
The Raw Total from the rubric will automatically be entered in the Current Grade Value textbox.
Page 32 of 80
Grading Notes
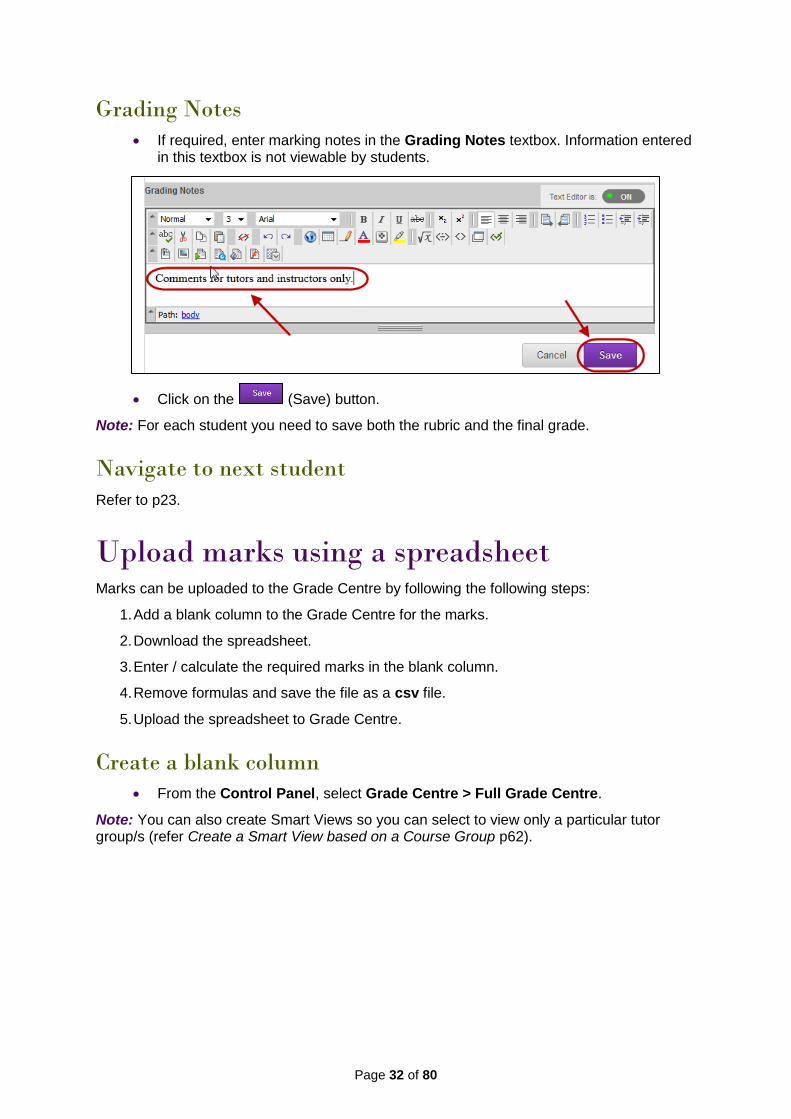
If required, enter marking notes in the Grading Notes textbox. Information entered in this textbox is not viewable by students.
Click on the (Save) button.
Note: For each student you need to save both the rubric and the final grade.
Navigate to next student
Refer to p23.
Upload marks using a spreadsheet Marks can be uploaded to the Grade Centre by following the following steps:
1. Add a blank column to the Grade Centre for the marks.
2. Download the spreadsheet.
3. Enter / calculate the required marks in the blank column.
4. Remove formulas and save the file as a csv file.
5. Upload the spreadsheet to Grade Centre.
Create a blank column
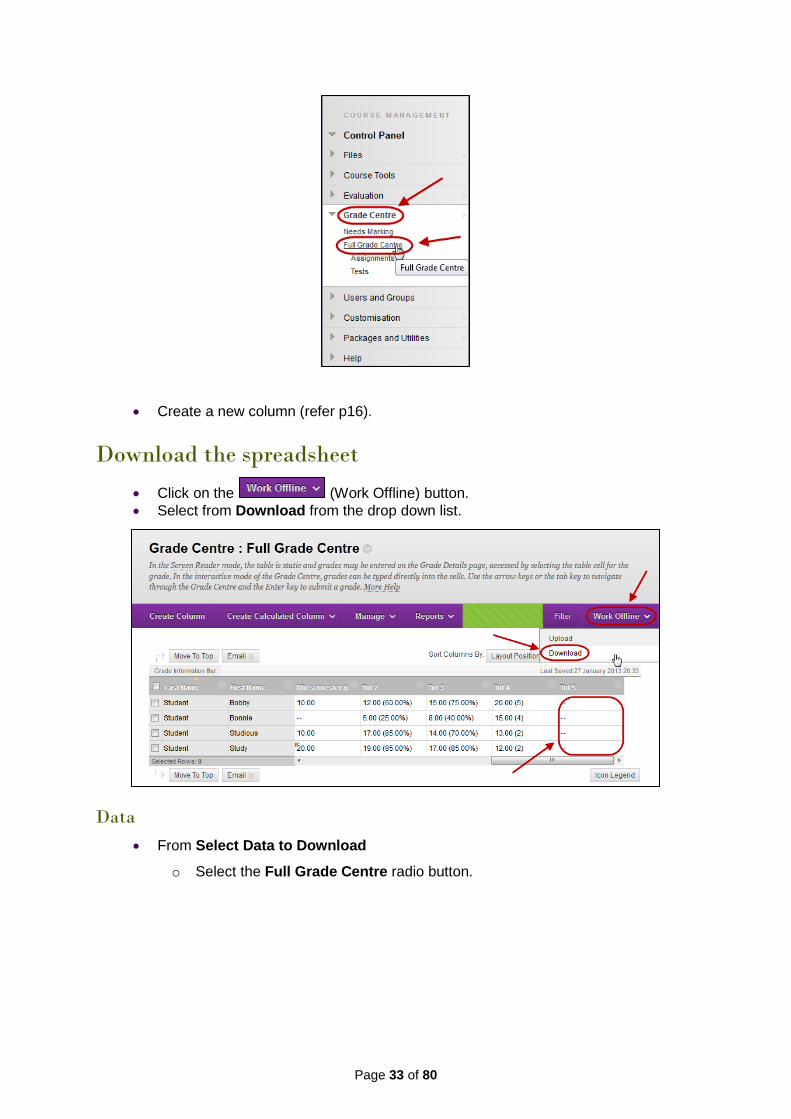
From the Control Panel, select Grade Centre > Full Grade Centre.
Note: You can also create Smart Views so you can select to view only a particular tutor group/s (refer Create a Smart View based on a Course Group p62).
Page 33 of 80
Create a new column (refer p16).
Download the spreadsheet
Click on the (Work Offline) button.
Select from Download from the drop down list.
Data
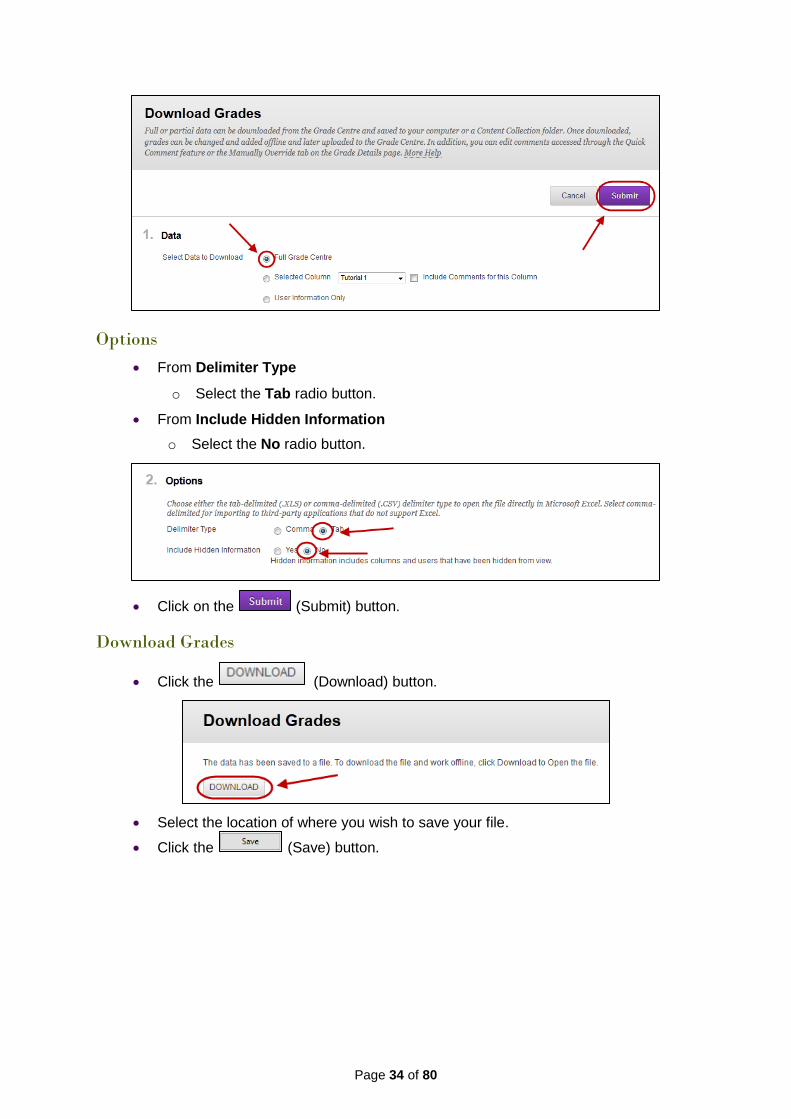
From Select Data to Download
o Select the Full Grade Centre radio button.
Page 34 of 80
Options
From Delimiter Type
o Select the Tab radio button.
From Include Hidden Information
o Select the No radio button.
Click on the (Submit) button.
Download Grades
Click the (Download) button.
Select the location of where you wish to save your file.
Click the (Save) button.
Page 35 of 80
Enter / calculate marks
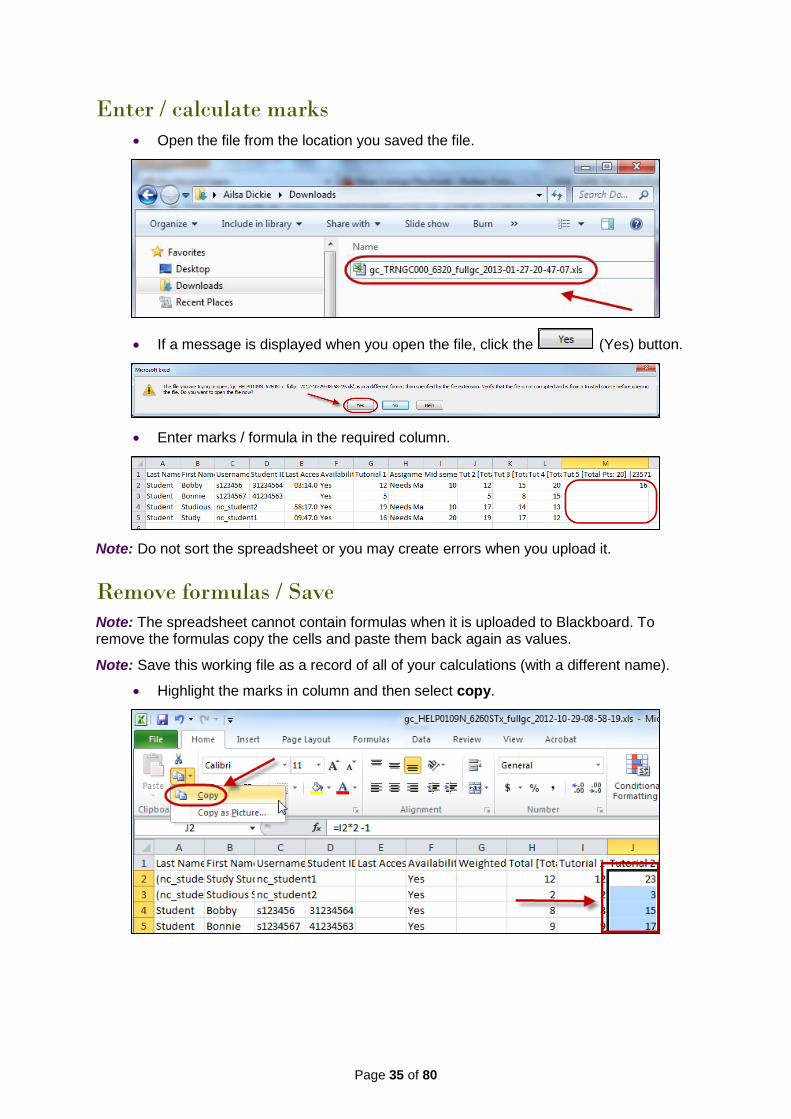
Open the file from the location you saved the file.
If a message is displayed when you open the file, click the (Yes) button.
Enter marks / formula in the required column.
Note: Do not sort the spreadsheet or you may create errors when you upload it.
Remove formulas / Save
Note: The spreadsheet cannot contain formulas when it is uploaded to Blackboard. To remove the formulas copy the cells and paste them back again as values.
Note: Save this working file as a record of all of your calculations (with a different name).
Highlight the marks in column and then select copy.
Page 36 of 80
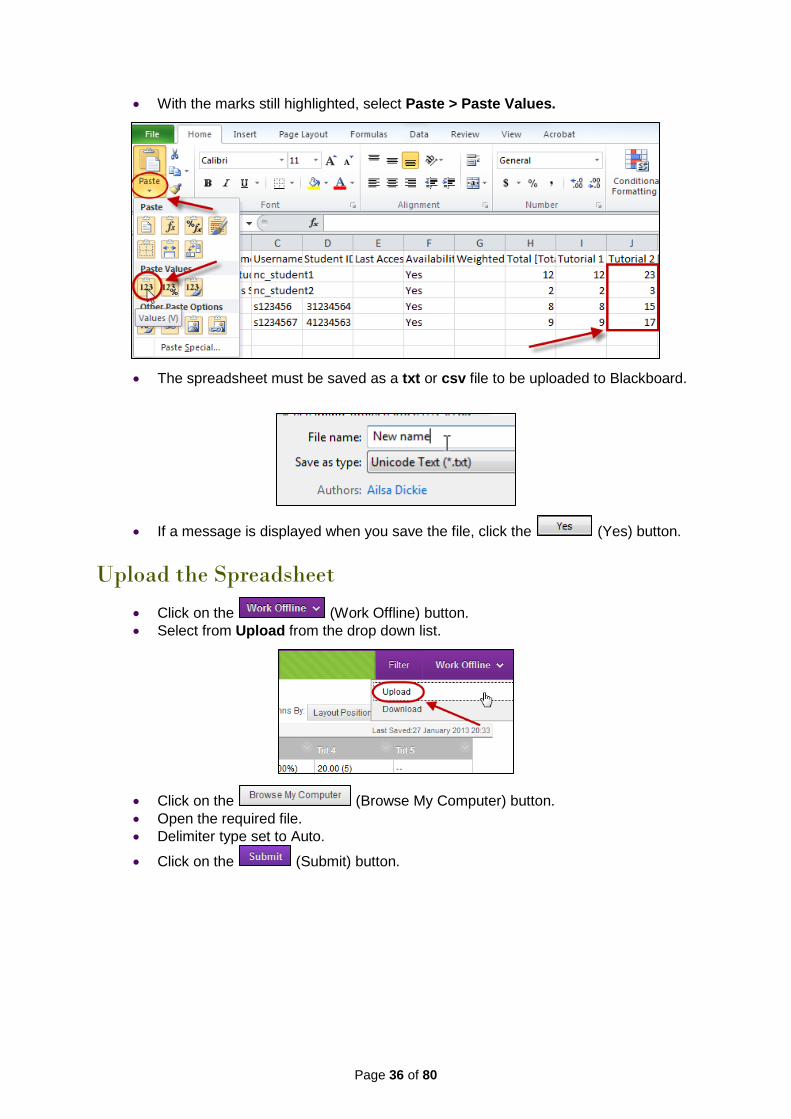
With the marks still highlighted, select Paste > Paste Values.
The spreadsheet must be saved as a txt or csv file to be uploaded to Blackboard.
If a message is displayed when you save the file, click the (Yes) button.
Upload the Spreadsheet
Click on the (Work Offline) button.
Select from Upload from the drop down list.
Click on the (Browse My Computer) button.
Open the required file.
Delimiter type set to Auto.
Click on the (Submit) button.
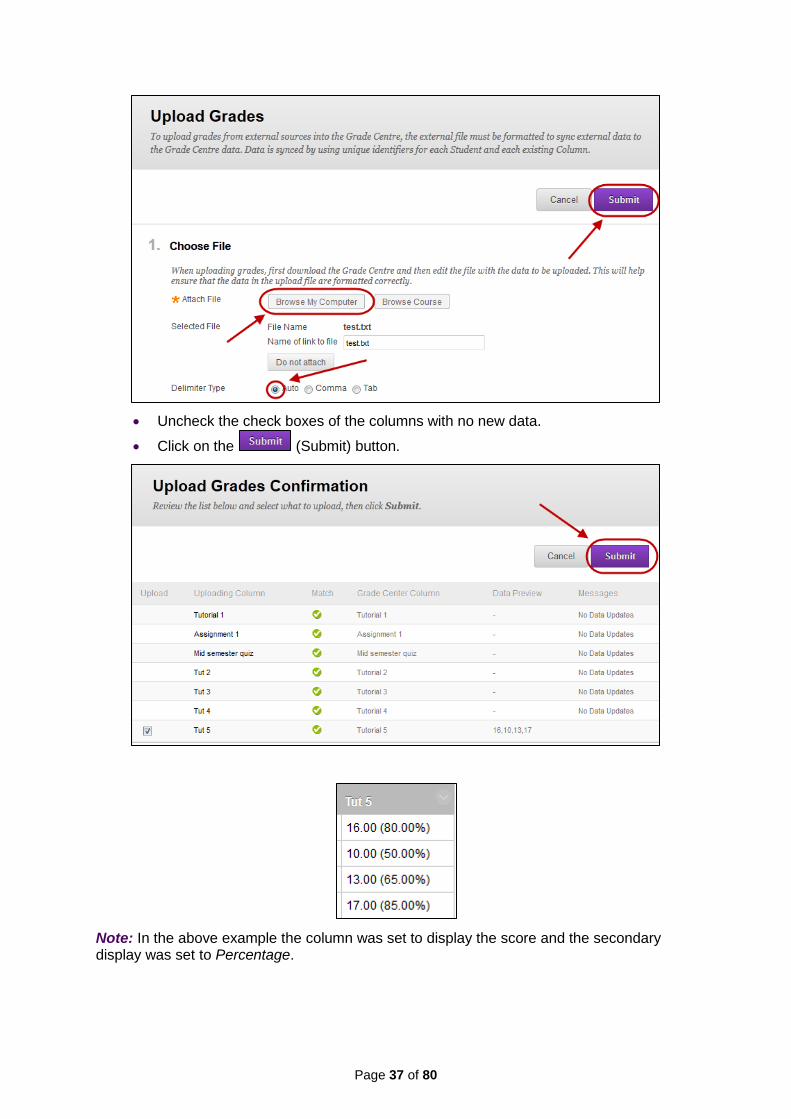
Page 37 of 80
Uncheck the check boxes of the columns with no new data.
Click on the (Submit) button.
Note: In the above example the column was set to display the score and the secondary display was set to Percentage.
Page 38 of 80
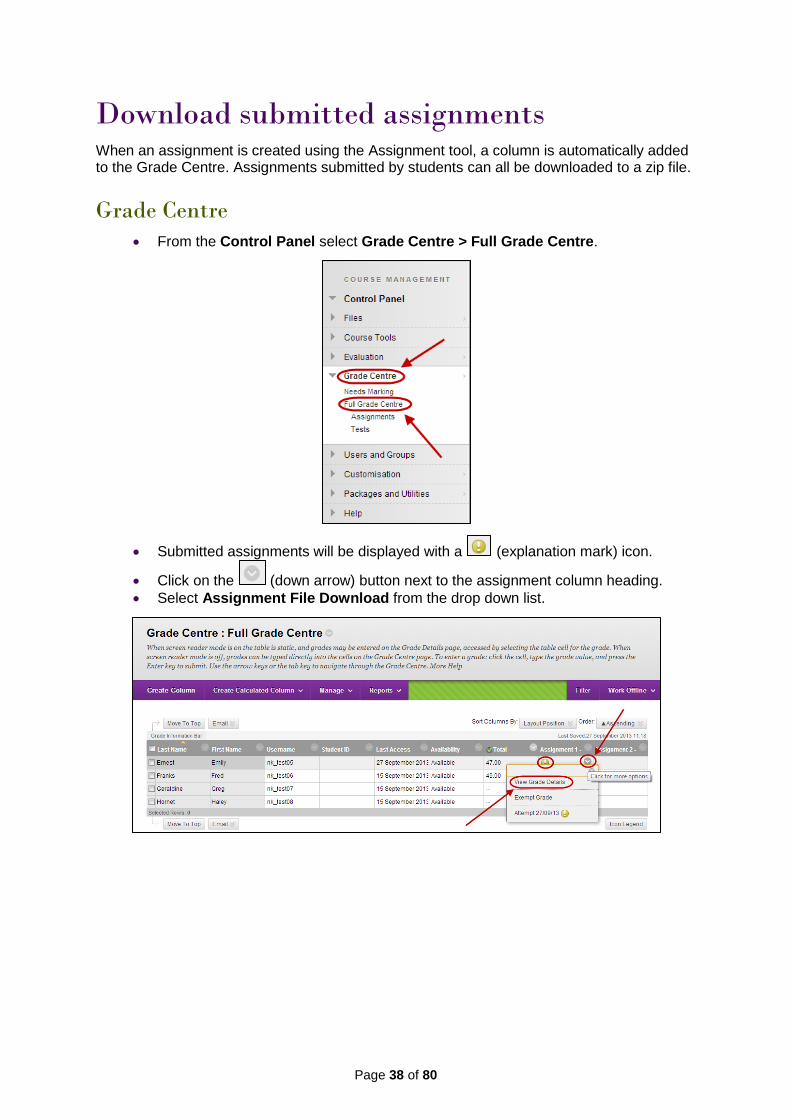
Download submitted assignments When an assignment is created using the Assignment tool, a column is automatically added to the Grade Centre. Assignments submitted by students can all be downloaded to a zip file.
Grade Centre
From the Control Panel select Grade Centre > Full Grade Centre.
Submitted assignments will be displayed with a (explanation mark) icon.
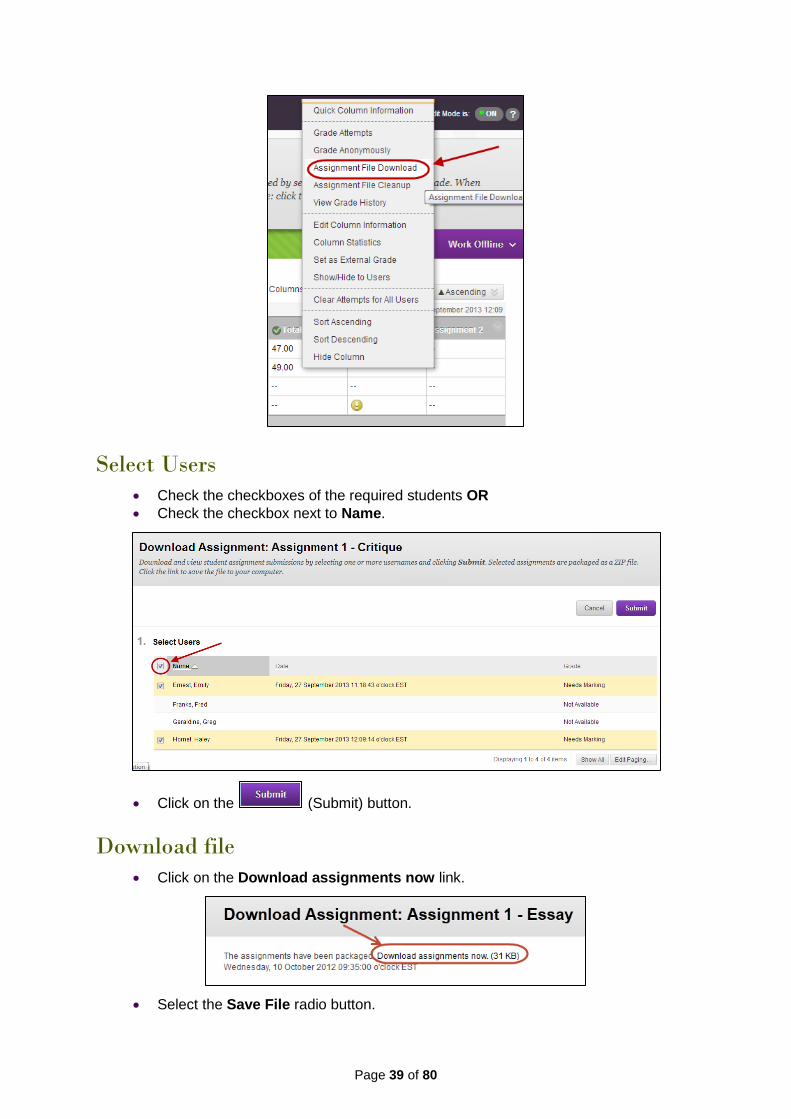
Click on the (down arrow) button next to the assignment column heading.
Select Assignment File Download from the drop down list.
Page 39 of 80
Select Users
Check the checkboxes of the required students OR
Check the checkbox next to Name.
Click on the (Submit) button.
Download file
Click on the Download assignments now link.
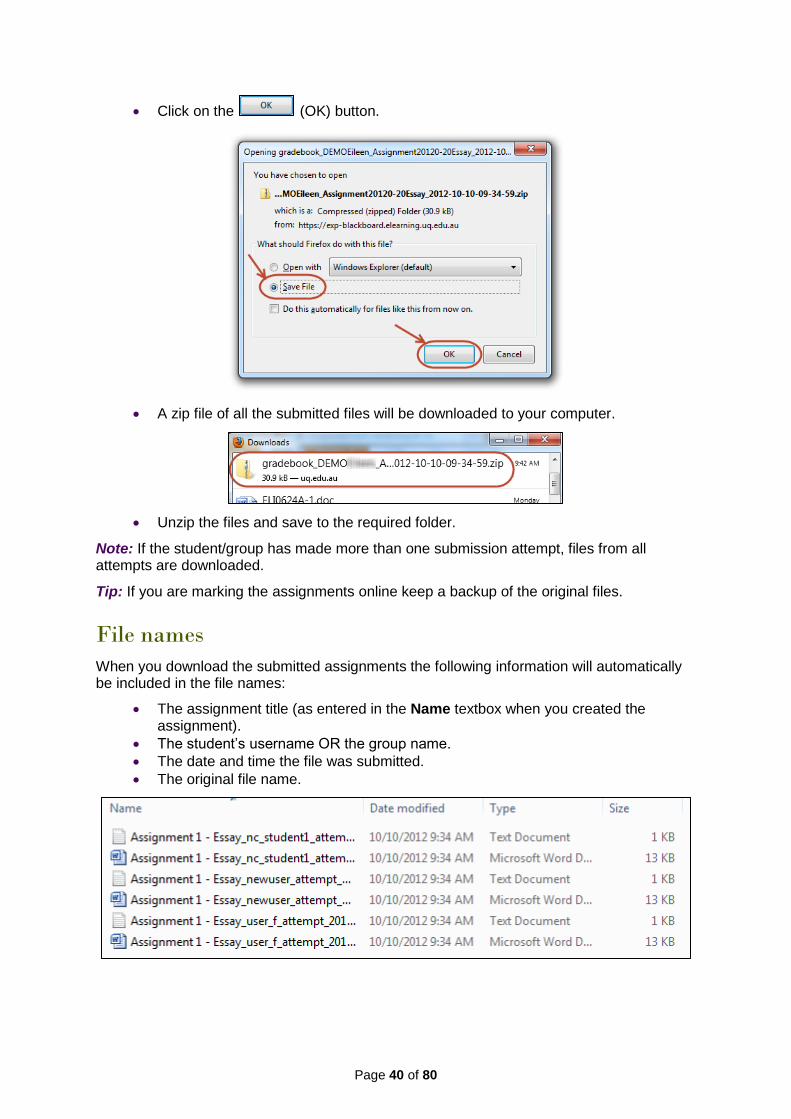
Select the Save File radio button.
Page 40 of 80
Click on the (OK) button.
A zip file of all the submitted files will be downloaded to your computer.
Unzip the files and save to the required folder.
Note: If the student/group has made more than one submission attempt, files from all attempts are downloaded.
Tip: If you are marking the assignments online keep a backup of the original files.
File names
When you download the submitted assignments the following information will automatically be included in the file names:
The assignment title (as entered in the Name textbox when you created the assignment).
The student’s username OR the group name.
The date and time the file was submitted.
The original file name.
Page 41 of 80
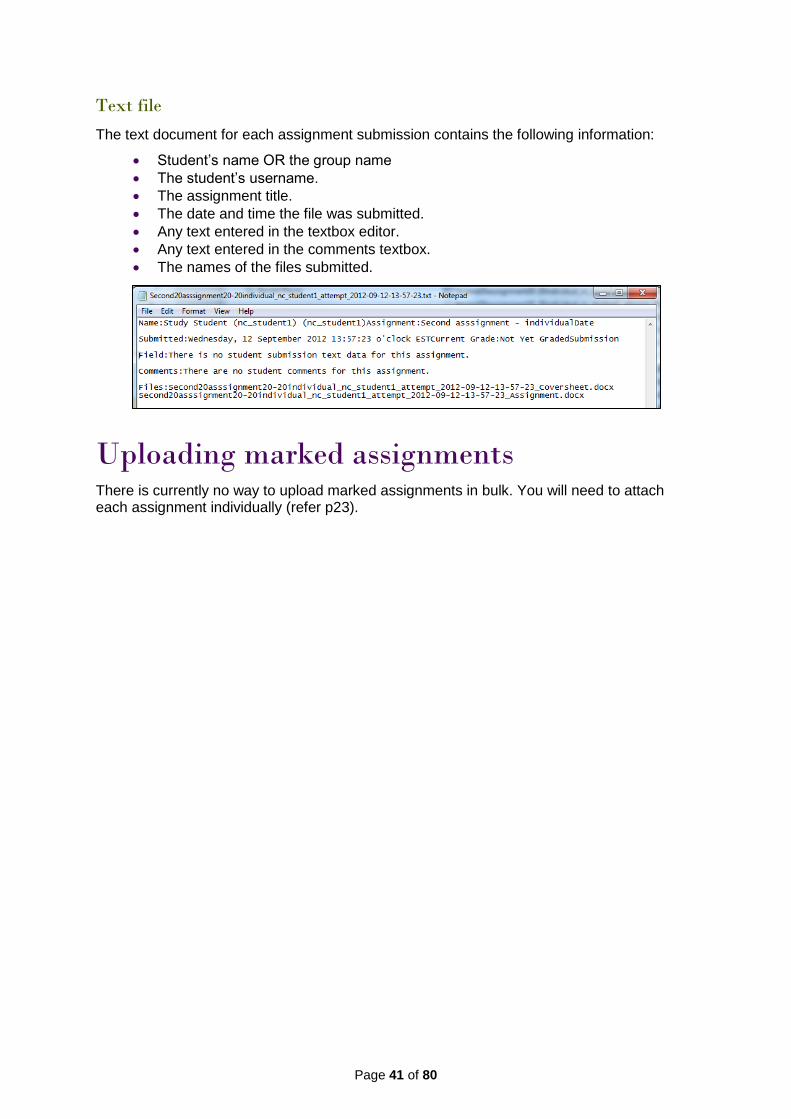
Text file
The text document for each assignment submission contains the following information:
Student’s name OR the group name
The student’s username.
The assignment title.
The date and time the file was submitted.
Any text entered in the textbox editor.
Any text entered in the comments textbox.
The names of the files submitted.
Uploading marked assignments There is currently no way to upload marked assignments in bulk. You will need to attach each assignment individually (refer p23).
Page 42 of 80
Total column
Create a calculated column
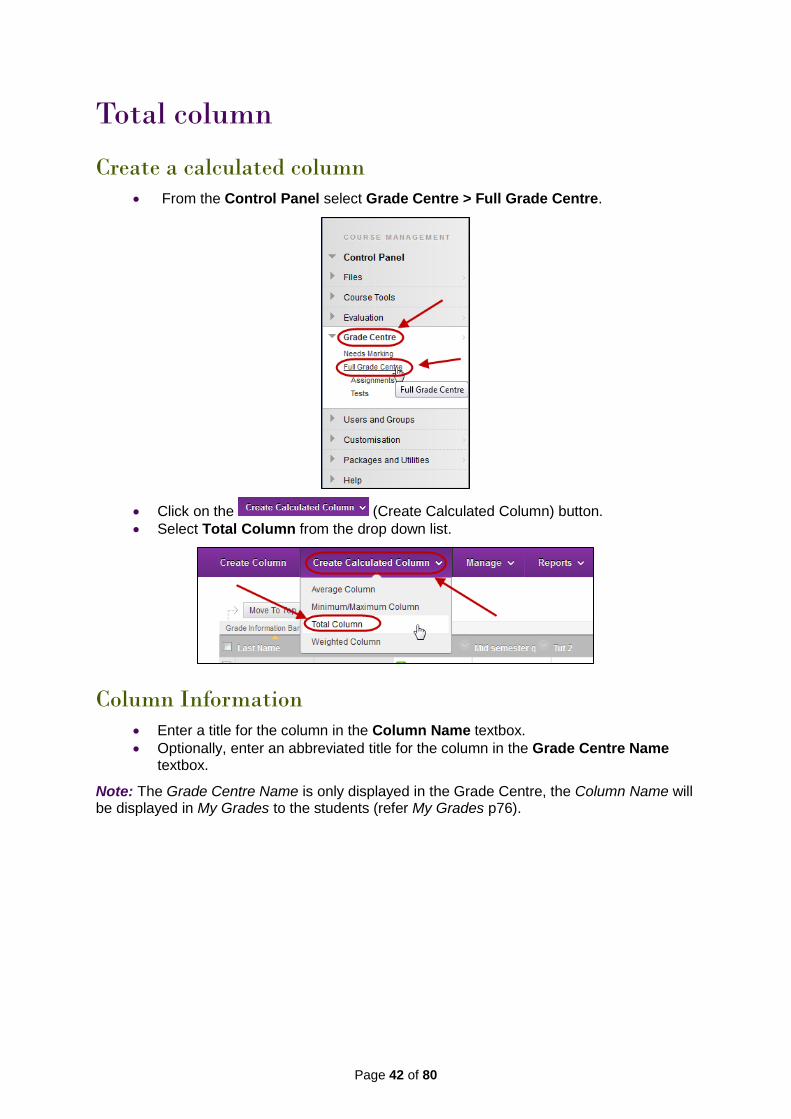
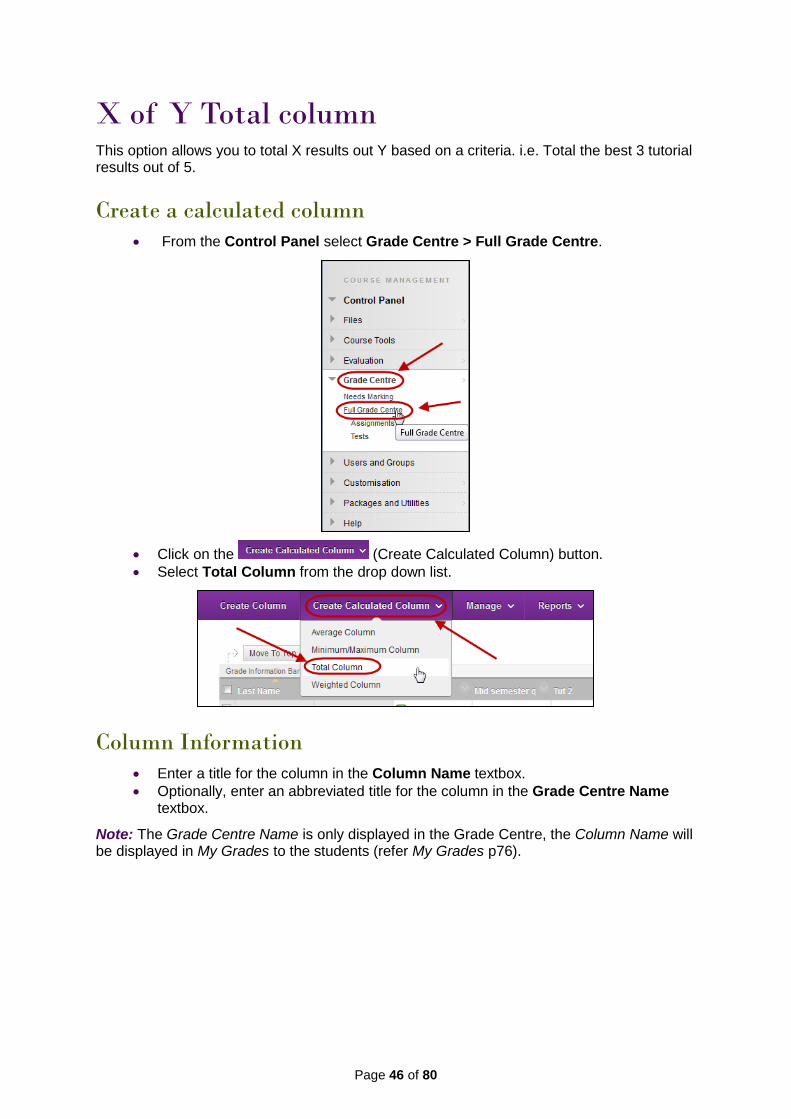
From the Control Panel select Grade Centre > Full Grade Centre.
Click on the (Create Calculated Column) button.
Select Total Column from the drop down list.
Column Information
Enter a title for the column in the Column Name textbox.
Optionally, enter an abbreviated title for the column in the Grade Centre Name textbox.
Note: The Grade Centre Name is only displayed in the Grade Centre, the Column Name will be displayed in My Grades to the students (refer My Grades p76).
Page 43 of 80
Select the format the marks must be entered in from the Primary Display drop down list.
o Score: The number entered is displayed. o Letter: You can enter a letter grade (A+ to E-) or if you enter a number it is
converted to a letter grade. o Text: Any text entered is displayed. o Percentage: The number entered is displayed with a percentage sign. o Complete/Incomplete: If any number is entered a green tick is displayed.
Optionally, select another display option for the marks from the Secondary Display drop down list.
Note: The secondary display option (i.e. percentage) is only displayed in the Grade Centre, it cannot be viewed by students in My Grades (refer p76).
Note: It is possible to create your own Grading Schema that will be listed as an option in the Secondary Display drop down list. (Refer Create a Grading Schema p13).
Dates
The date the item was created will be automatically displayed.
Select Columns:
Select the All Grade Columns radio button. OR
Select the Selected Columns and Categories radio button.
Page 44 of 80
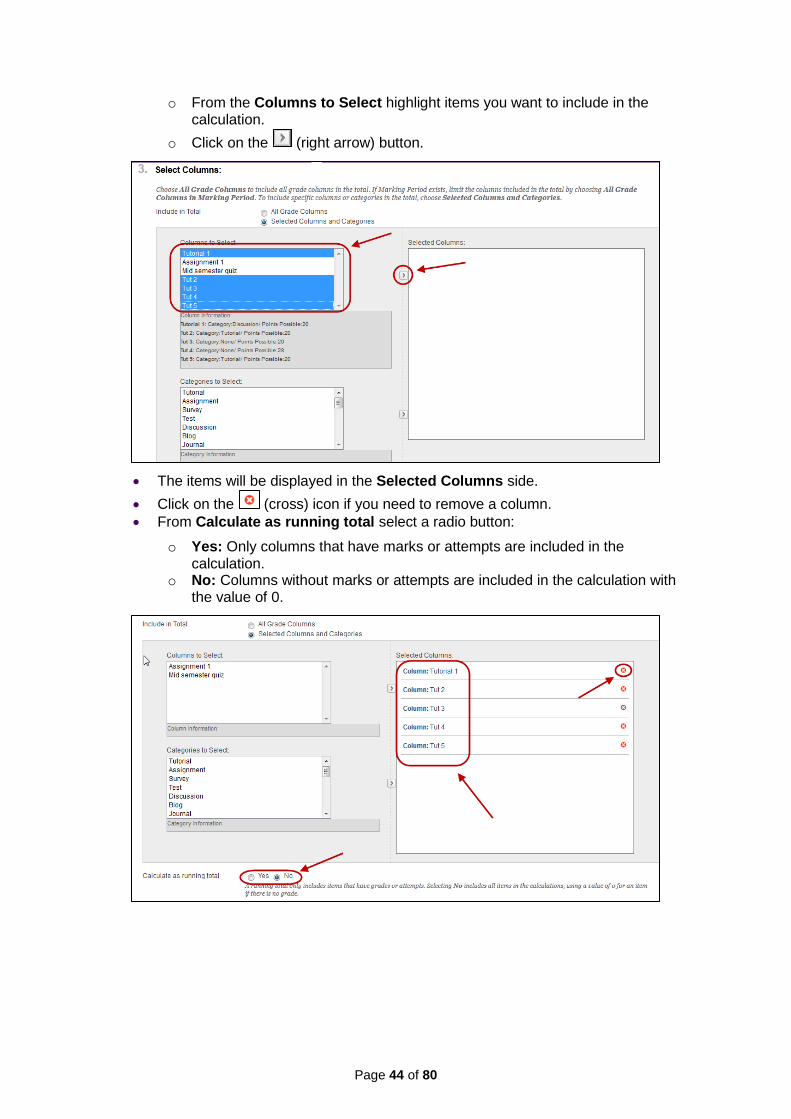
o From the Columns to Select highlight items you want to include in the calculation.
o Click on the (right arrow) button.
The items will be displayed in the Selected Columns side.
Click on the (cross) icon if you need to remove a column.
From Calculate as running total select a radio button:
o Yes: Only columns that have marks or attempts are included in the calculation.
o No: Columns without marks or attempts are included in the calculation with the value of 0.
Page 45 of 80
Options
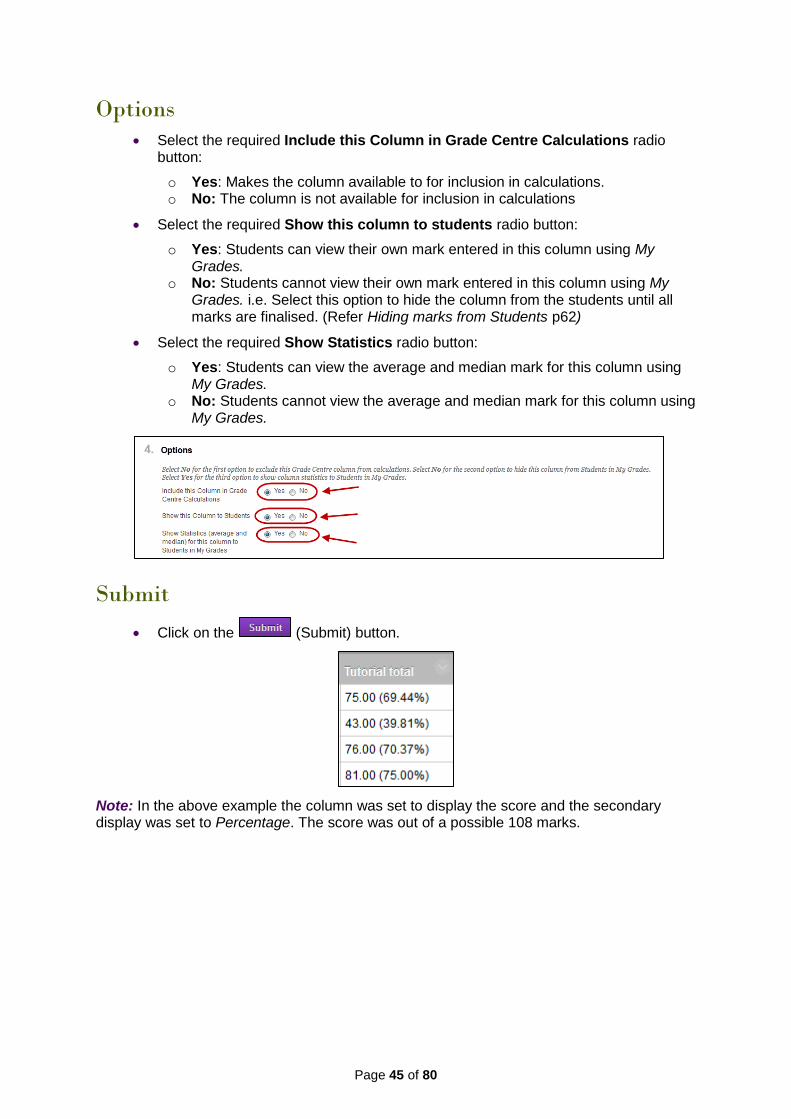
Select the required Include this Column in Grade Centre Calculations radio button:
o Yes: Makes the column available to for inclusion in calculations. o No: The column is not available for inclusion in calculations
Select the required Show this column to students radio button:
o Yes: Students can view their own mark entered in this column using My Grades.
o No: Students cannot view their own mark entered in this column using My Grades. i.e. Select this option to hide the column from the students until all marks are finalised. (Refer Hiding marks from Students p62)
Select the required Show Statistics radio button:
o Yes: Students can view the average and median mark for this column using My Grades.
o No: Students cannot view the average and median mark for this column using My Grades.
Submit
Click on the (Submit) button.
Note: In the above example the column was set to display the score and the secondary display was set to Percentage. The score was out of a possible 108 marks.
Page 46 of 80
X of Y Total column This option allows you to total X results out Y based on a criteria. i.e. Total the best 3 tutorial results out of 5.
Create a calculated column
From the Control Panel select Grade Centre > Full Grade Centre.
Click on the (Create Calculated Column) button.
Select Total Column from the drop down list.
Column Information
Enter a title for the column in the Column Name textbox.
Optionally, enter an abbreviated title for the column in the Grade Centre Name textbox.
Note: The Grade Centre Name is only displayed in the Grade Centre, the Column Name will be displayed in My Grades to the students (refer My Grades p76).
Page 47 of 80
Select the format the marks must be entered in from the Primary Display drop down list.
o Score: The number entered is displayed. o Letter: You can enter a letter grade (A+ to E-) or if you enter a number it is
converted to a letter grade. o Text: Any text entered is displayed. o Percentage: The number entered is displayed with a percentage sign. o Complete/Incomplete: If any number is entered a green tick is displayed.
Optionally, select another display option for the marks from the Secondary Display drop down list.
Note: The secondary display option (i.e. percentage) is only displayed in the Grade Centre, it cannot be viewed by students in My Grades (refer p76).
Note: It is possible to create your own Grading Schema that will be listed as an option in the Secondary Display drop down list. (Refer to the Create a Grading Schema p13).
Dates
The date the item was created will be automatically displayed.
Select Columns:
Select the All Grade Columns radio button. OR
Select the Selected Columns and Categories radio button.
Page 48 of 80
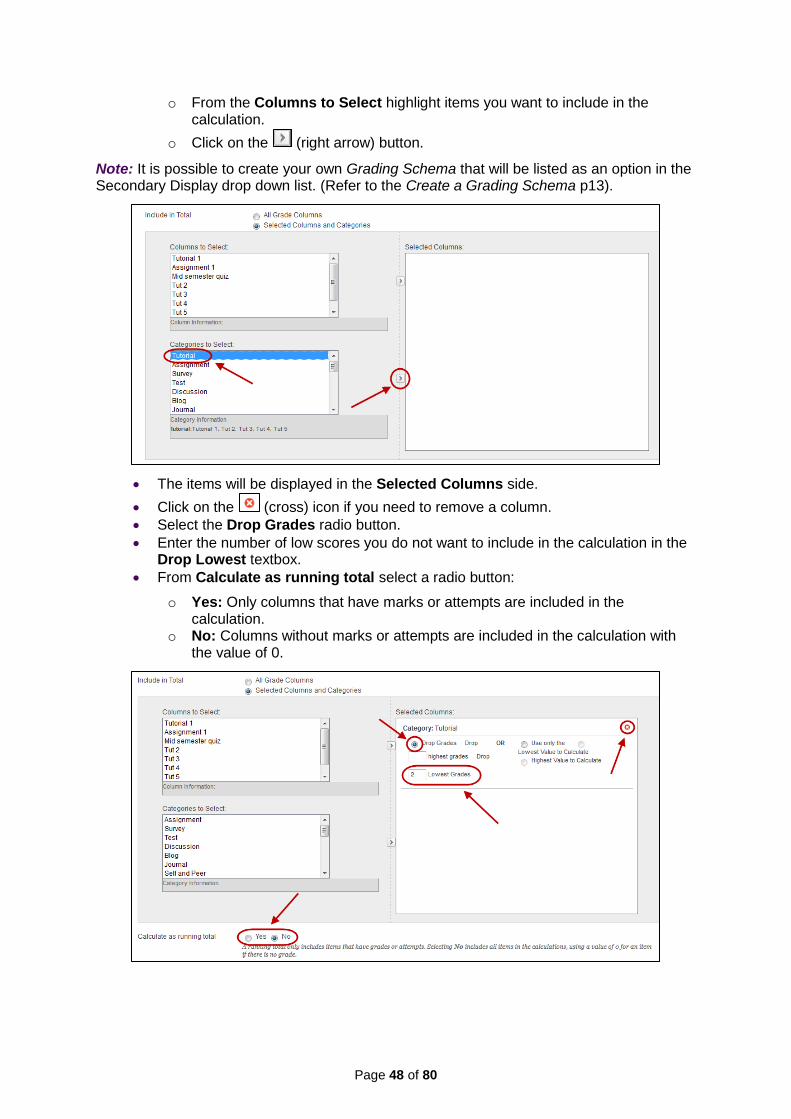
o From the Columns to Select highlight items you want to include in the calculation.
o Click on the (right arrow) button.
Note: It is possible to create your own Grading Schema that will be listed as an option in the Secondary Display drop down list. (Refer to the Create a Grading Schema p13).
The items will be displayed in the Selected Columns side.
Click on the (cross) icon if you need to remove a column.
Select the Drop Grades radio button.
Enter the number of low scores you do not want to include in the calculation in the Drop Lowest textbox.
From Calculate as running total select a radio button:
o Yes: Only columns that have marks or attempts are included in the calculation.
o No: Columns without marks or attempts are included in the calculation with the value of 0.
Page 49 of 80
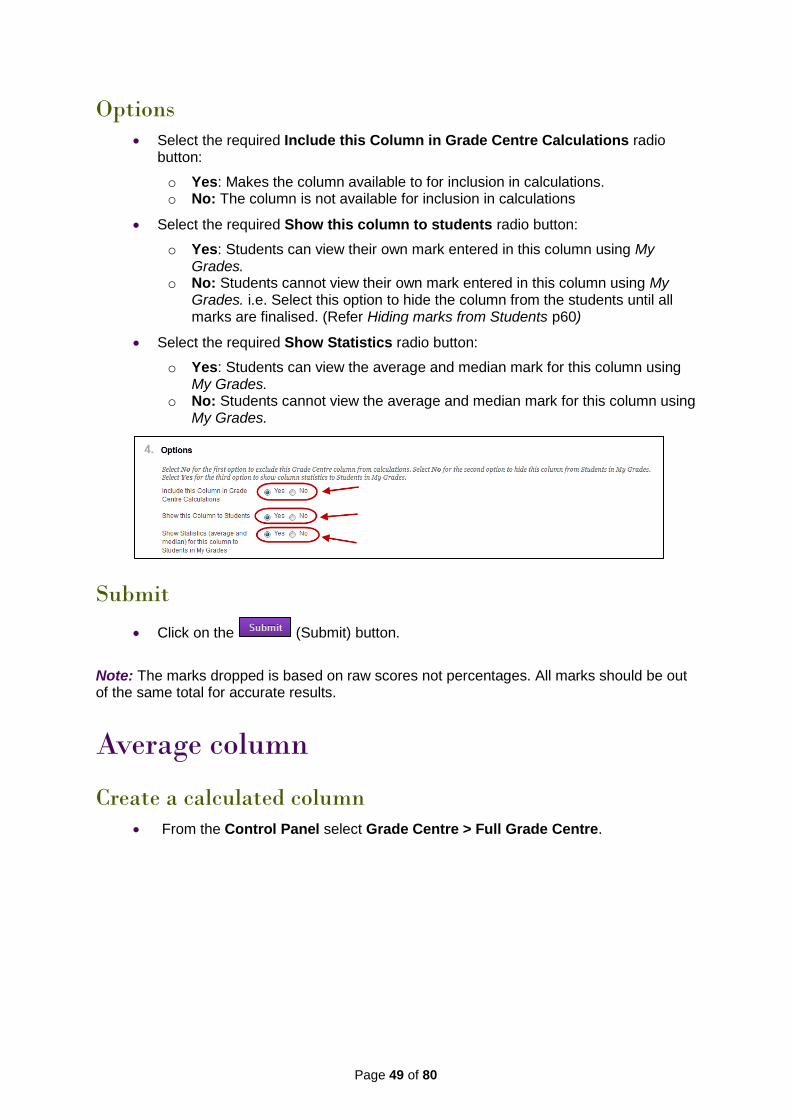
Options
Select the required Include this Column in Grade Centre Calculations radio button:
o Yes: Makes the column available to for inclusion in calculations. o No: The column is not available for inclusion in calculations
Select the required Show this column to students radio button:
o Yes: Students can view their own mark entered in this column using My Grades.
o No: Students cannot view their own mark entered in this column using My Grades. i.e. Select this option to hide the column from the students until all marks are finalised. (Refer Hiding marks from Students p60)
Select the required Show Statistics radio button:
o Yes: Students can view the average and median mark for this column using My Grades.
o No: Students cannot view the average and median mark for this column using My Grades.
Submit
Click on the (Submit) button.
Note: The marks dropped is based on raw scores not percentages. All marks should be out of the same total for accurate results.
Average column
Create a calculated column
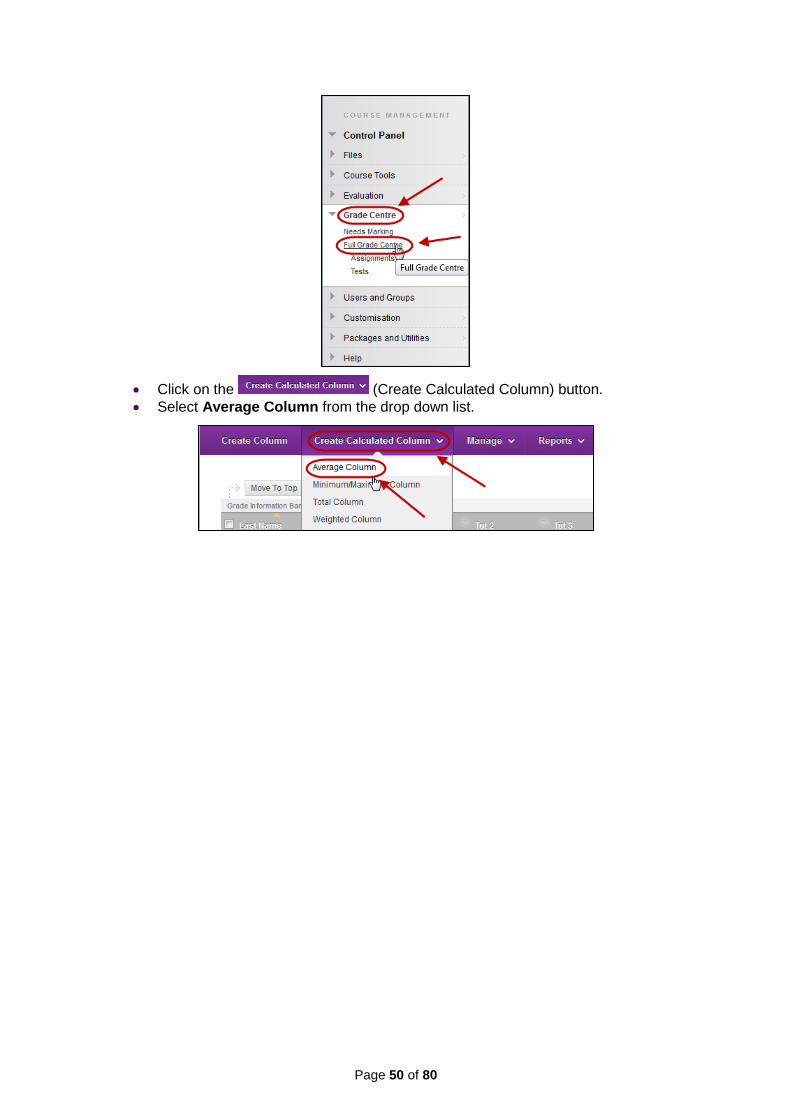
From the Control Panel select Grade Centre > Full Grade Centre.
Page 50 of 80
Click on the (Create Calculated Column) button.
Select Average Column from the drop down list.
Page 51 of 80
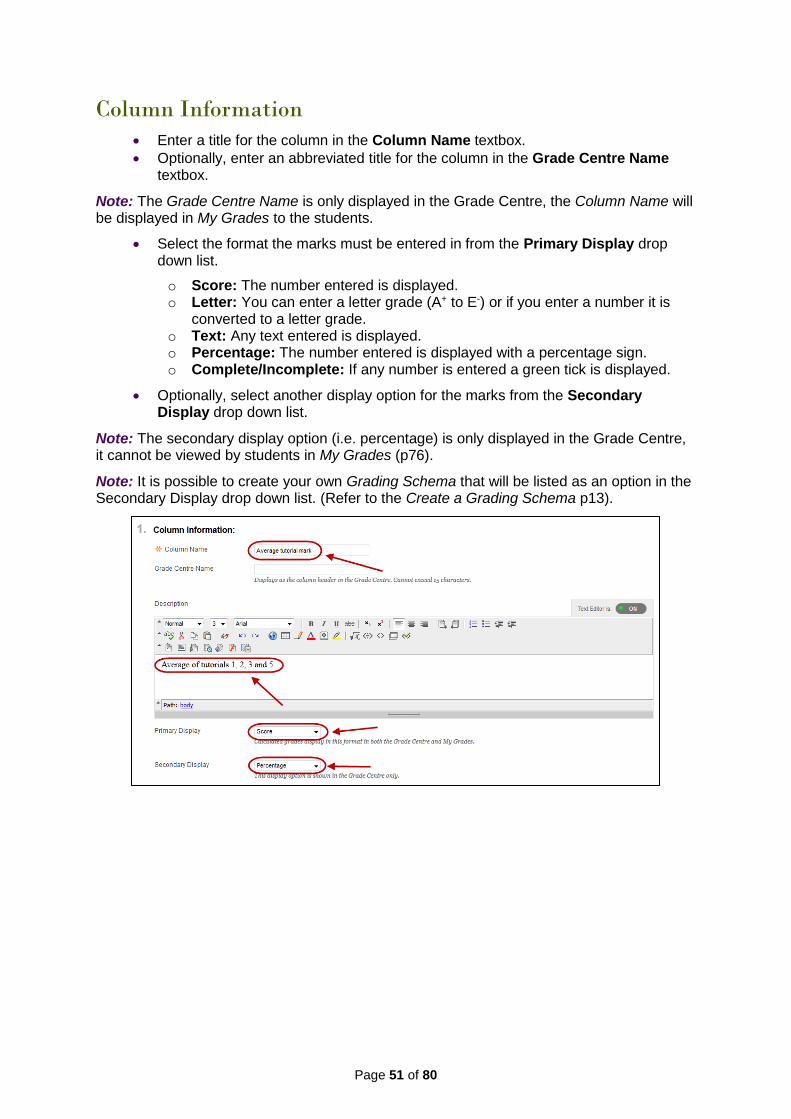
Column Information
Enter a title for the column in the Column Name textbox.
Optionally, enter an abbreviated title for the column in the Grade Centre Name textbox.
Note: The Grade Centre Name is only displayed in the Grade Centre, the Column Name will be displayed in My Grades to the students.
Select the format the marks must be entered in from the Primary Display drop down list.
o Score: The number entered is displayed. o Letter: You can enter a letter grade (A+ to E-) or if you enter a number it is
converted to a letter grade. o Text: Any text entered is displayed. o Percentage: The number entered is displayed with a percentage sign. o Complete/Incomplete: If any number is entered a green tick is displayed.
Optionally, select another display option for the marks from the Secondary Display drop down list.
Note: The secondary display option (i.e. percentage) is only displayed in the Grade Centre, it cannot be viewed by students in My Grades (p76).
Note: It is possible to create your own Grading Schema that will be listed as an option in the Secondary Display drop down list. (Refer to the Create a Grading Schema p13).
Page 52 of 80
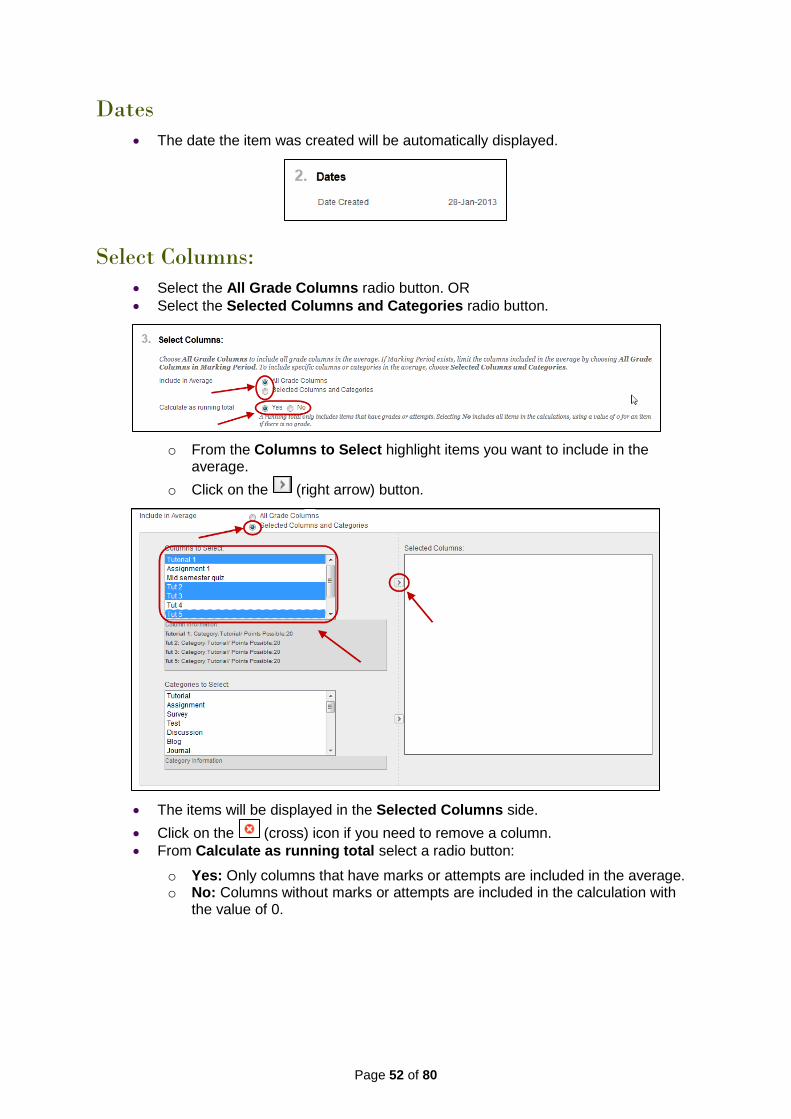
Dates
The date the item was created will be automatically displayed.
Select Columns:
Select the All Grade Columns radio button. OR
Select the Selected Columns and Categories radio button.
o From the Columns to Select highlight items you want to include in the average.
o Click on the (right arrow) button.
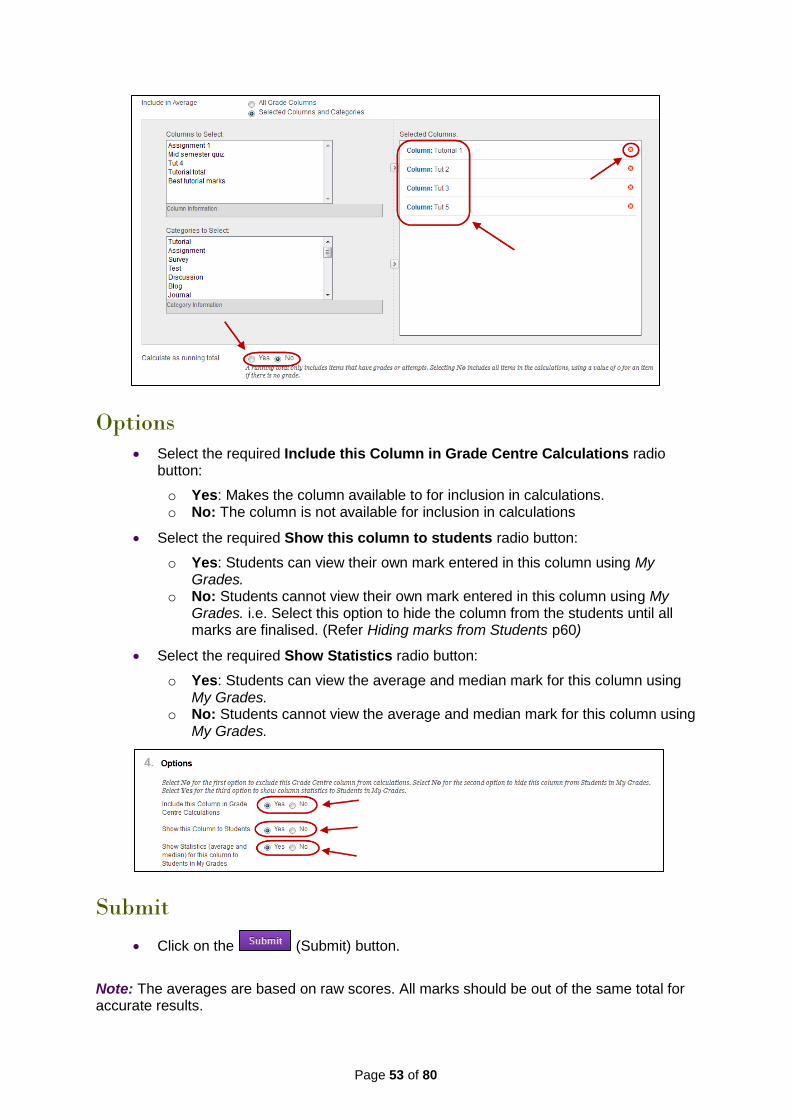
The items will be displayed in the Selected Columns side.
Click on the (cross) icon if you need to remove a column.
From Calculate as running total select a radio button:
o Yes: Only columns that have marks or attempts are included in the average. o No: Columns without marks or attempts are included in the calculation with
the value of 0.
Page 53 of 80
Options
Select the required Include this Column in Grade Centre Calculations radio button:
o Yes: Makes the column available to for inclusion in calculations. o No: The column is not available for inclusion in calculations
Select the required Show this column to students radio button:
o Yes: Students can view their own mark entered in this column using My Grades.
o No: Students cannot view their own mark entered in this column using My Grades. i.e. Select this option to hide the column from the students until all marks are finalised. (Refer Hiding marks from Students p60)
Select the required Show Statistics radio button:
o Yes: Students can view the average and median mark for this column using My Grades.
o No: Students cannot view the average and median mark for this column using My Grades.
Submit
Click on the (Submit) button.
Note: The averages are based on raw scores. All marks should be out of the same total for accurate results.
Page 54 of 80
Minimum / Maximum column
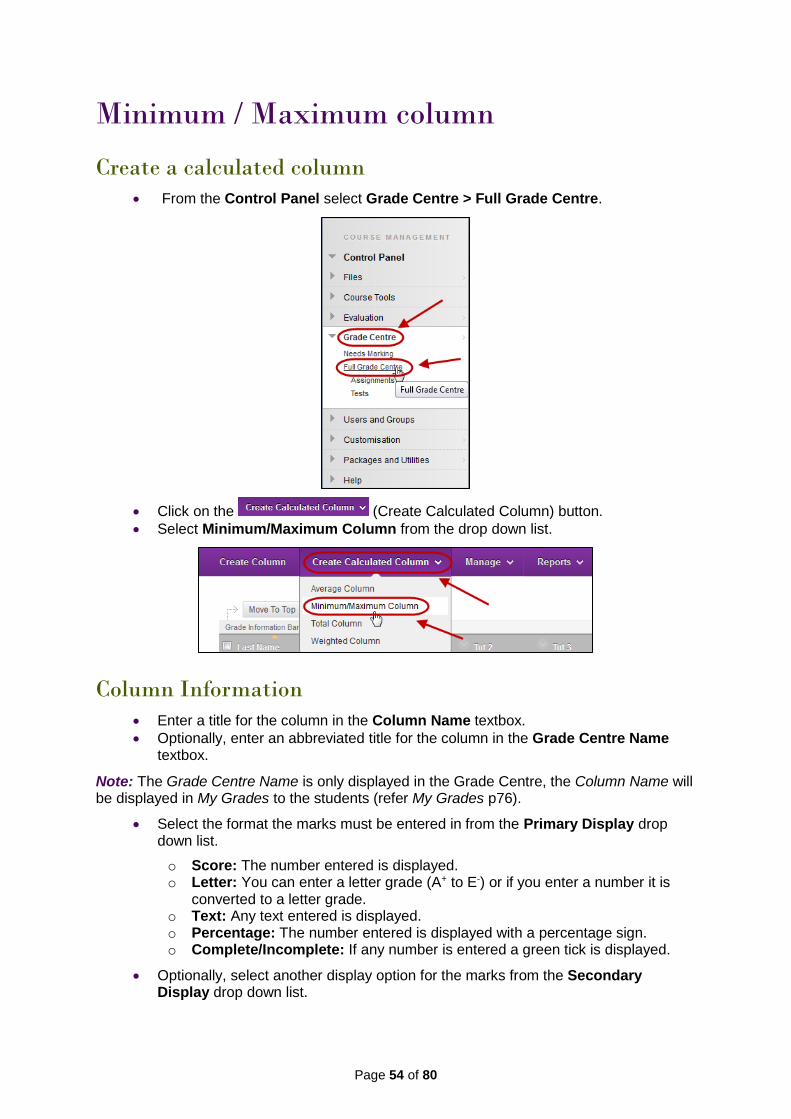
Create a calculated column
From the Control Panel select Grade Centre > Full Grade Centre.
Click on the (Create Calculated Column) button.
Select Minimum/Maximum Column from the drop down list.
Column Information
Enter a title for the column in the Column Name textbox.
Optionally, enter an abbreviated title for the column in the Grade Centre Name textbox.
Note: The Grade Centre Name is only displayed in the Grade Centre, the Column Name will be displayed in My Grades to the students (refer My Grades p76).
Select the format the marks must be entered in from the Primary Display drop down list.
o Score: The number entered is displayed. o Letter: You can enter a letter grade (A+ to E-) or if you enter a number it is
converted to a letter grade. o Text: Any text entered is displayed. o Percentage: The number entered is displayed with a percentage sign. o Complete/Incomplete: If any number is entered a green tick is displayed.
Optionally, select another display option for the marks from the Secondary Display drop down list.
Page 55 of 80
Note: The secondary display option (i.e. percentage) is only displayed in the Grade Centre, it cannot be viewed by students in My Grades (79).
Note: It is possible to create your own Grading Schema that will be listed as an option in the Secondary Display drop down list. (Refer to the Create a Grading Schema p13).
Dates
The date the item was created will be automatically displayed.
Select Columns:
Select the required Calculation Type radio button.
o Minimum OR o Maximum
Select the All Grade Columns radio button. OR
Select the Selected Columns and Categories radio button.
o From the Columns to Select highlight items you want to include in the calculation.
o Click on the (right arrow) button.
Page 56 of 80
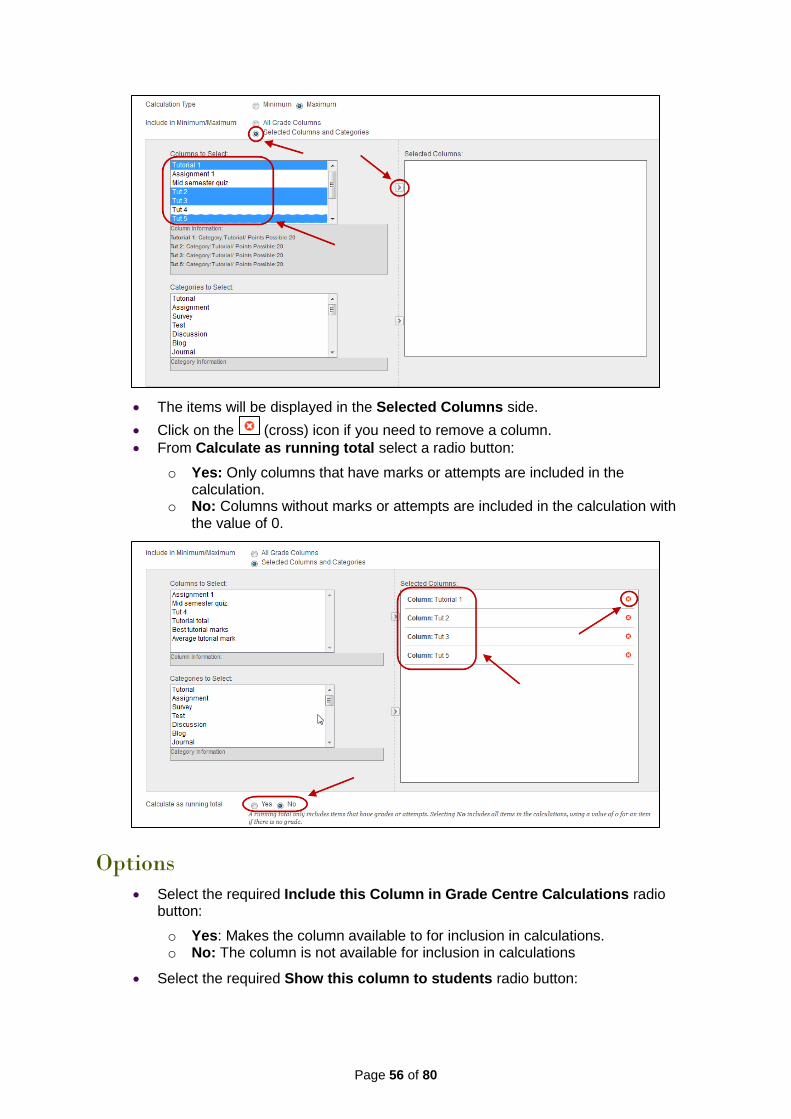
The items will be displayed in the Selected Columns side.
Click on the (cross) icon if you need to remove a column.
From Calculate as running total select a radio button:
o Yes: Only columns that have marks or attempts are included in the calculation.
o No: Columns without marks or attempts are included in the calculation with the value of 0.
Options
Select the required Include this Column in Grade Centre Calculations radio button:
o Yes: Makes the column available to for inclusion in calculations. o No: The column is not available for inclusion in calculations
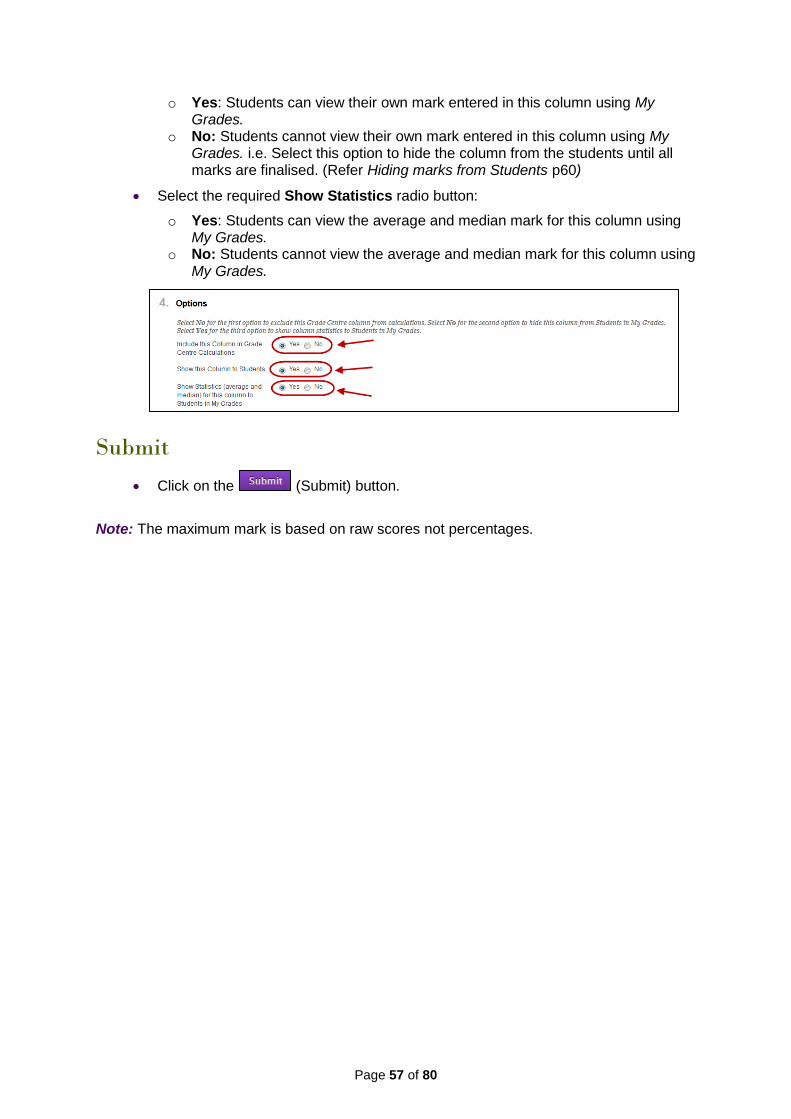
Select the required Show this column to students radio button:
Page 57 of 80
o Yes: Students can view their own mark entered in this column using My Grades.
o No: Students cannot view their own mark entered in this column using My Grades. i.e. Select this option to hide the column from the students until all marks are finalised. (Refer Hiding marks from Students p60)
Select the required Show Statistics radio button:
o Yes: Students can view the average and median mark for this column using My Grades.
o No: Students cannot view the average and median mark for this column using My Grades.
Submit
Click on the (Submit) button.
Note: The maximum mark is based on raw scores not percentages.
Page 58 of 80
Weighted column (final marks)
Create a calculated column
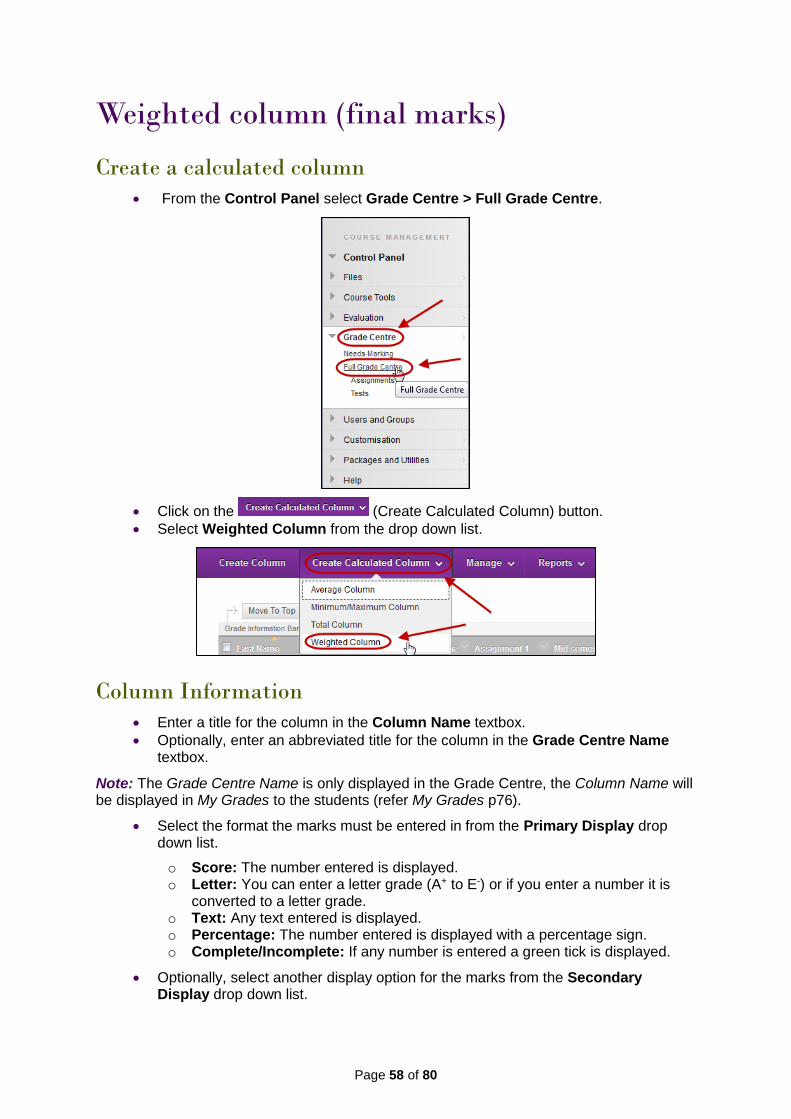
From the Control Panel select Grade Centre > Full Grade Centre.
Click on the (Create Calculated Column) button.
Select Weighted Column from the drop down list.
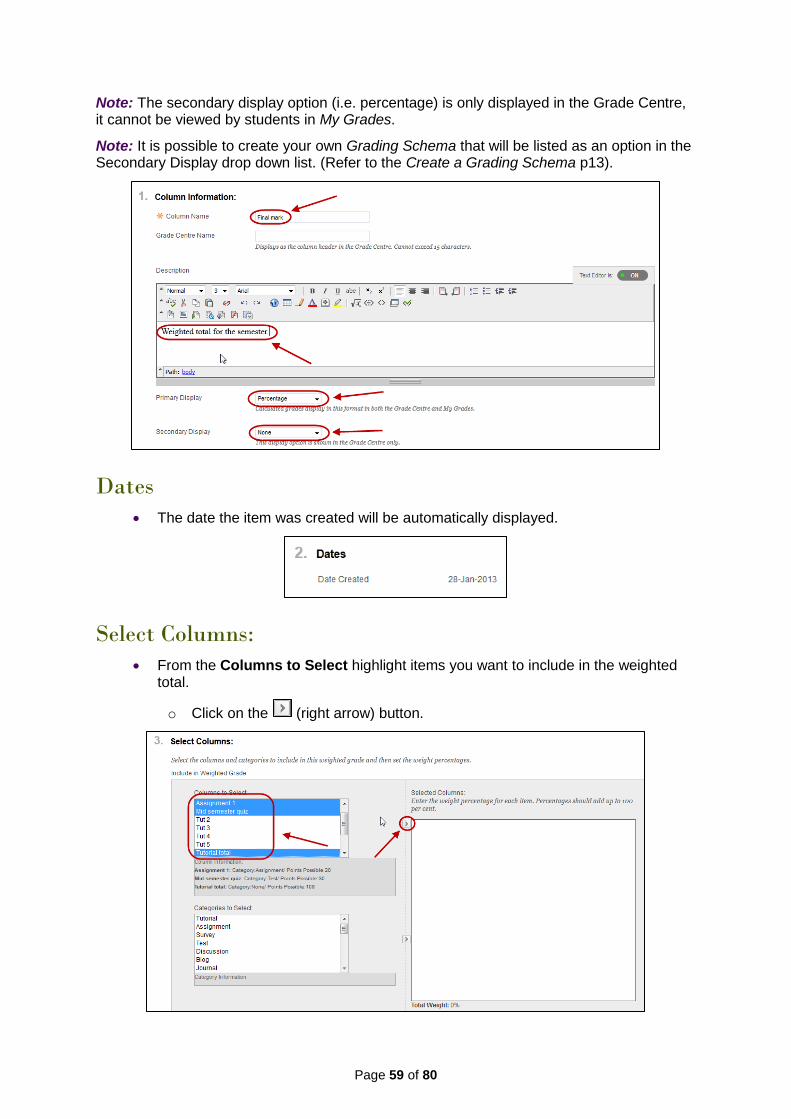
Column Information
Enter a title for the column in the Column Name textbox.
Optionally, enter an abbreviated title for the column in the Grade Centre Name textbox.
Note: The Grade Centre Name is only displayed in the Grade Centre, the Column Name will be displayed in My Grades to the students (refer My Grades p76).
Select the format the marks must be entered in from the Primary Display drop down list.
o Score: The number entered is displayed. o Letter: You can enter a letter grade (A+ to E-) or if you enter a number it is
converted to a letter grade. o Text: Any text entered is displayed. o Percentage: The number entered is displayed with a percentage sign. o Complete/Incomplete: If any number is entered a green tick is displayed.
Optionally, select another display option for the marks from the Secondary Display drop down list.
Page 59 of 80
Note: The secondary display option (i.e. percentage) is only displayed in the Grade Centre, it cannot be viewed by students in My Grades.
Note: It is possible to create your own Grading Schema that will be listed as an option in the Secondary Display drop down list. (Refer to the Create a Grading Schema p13).
Dates
The date the item was created will be automatically displayed.
Select Columns:
From the Columns to Select highlight items you want to include in the weighted total.
o Click on the (right arrow) button.
Page 60 of 80
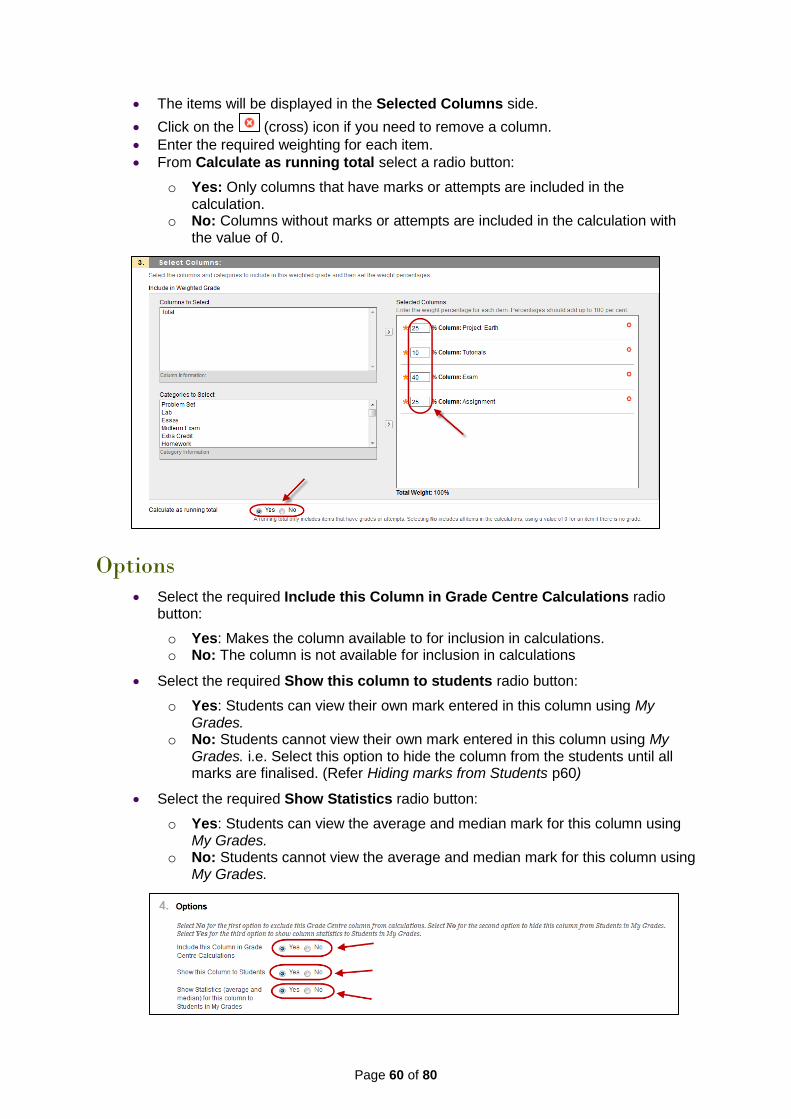
The items will be displayed in the Selected Columns side.
Click on the (cross) icon if you need to remove a column.
Enter the required weighting for each item.
From Calculate as running total select a radio button:
o Yes: Only columns that have marks or attempts are included in the calculation.
o No: Columns without marks or attempts are included in the calculation with the value of 0.
Options
Select the required Include this Column in Grade Centre Calculations radio button:
o Yes: Makes the column available to for inclusion in calculations. o No: The column is not available for inclusion in calculations
Select the required Show this column to students radio button:
o Yes: Students can view their own mark entered in this column using My Grades.
o No: Students cannot view their own mark entered in this column using My Grades. i.e. Select this option to hide the column from the students until all marks are finalised. (Refer Hiding marks from Students p60)
Select the required Show Statistics radio button:
o Yes: Students can view the average and median mark for this column using My Grades.
o No: Students cannot view the average and median mark for this column using My Grades.
Page 61 of 80
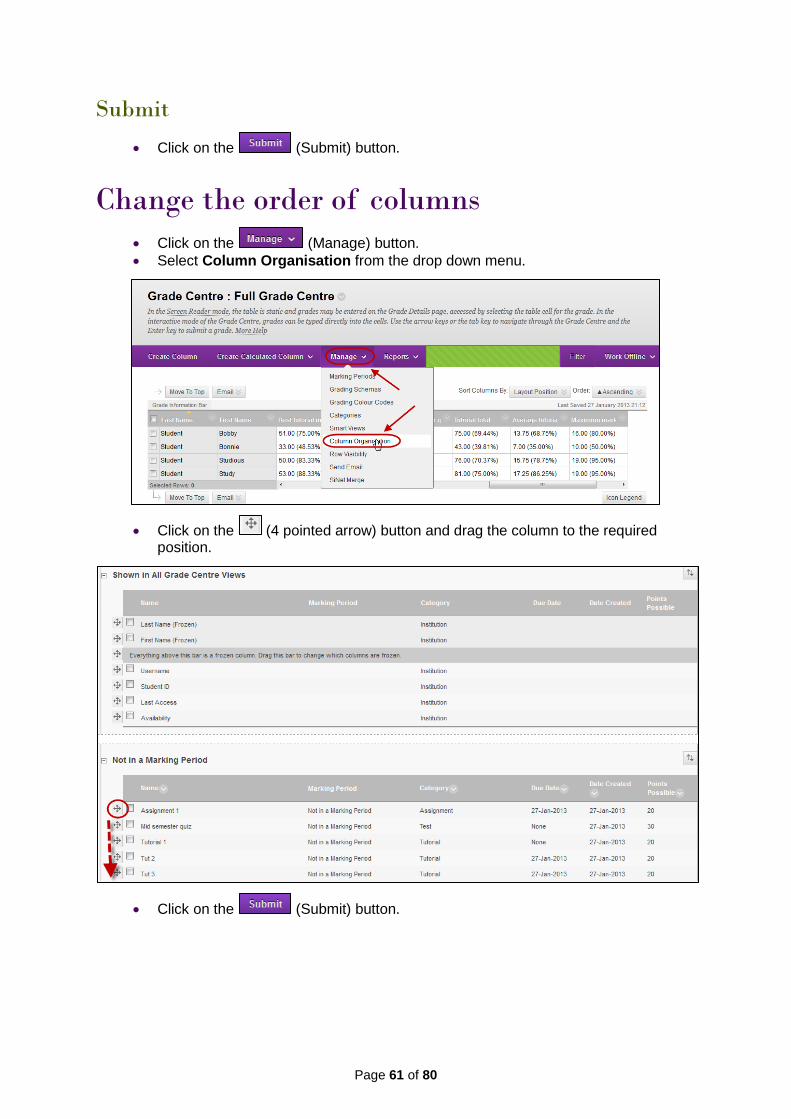
Submit
Click on the (Submit) button.
Change the order of columns
Click on the (Manage) button.
Select Column Organisation from the drop down menu.
Click on the (4 pointed arrow) button and drag the column to the required position.
Click on the (Submit) button.
Page 62 of 80
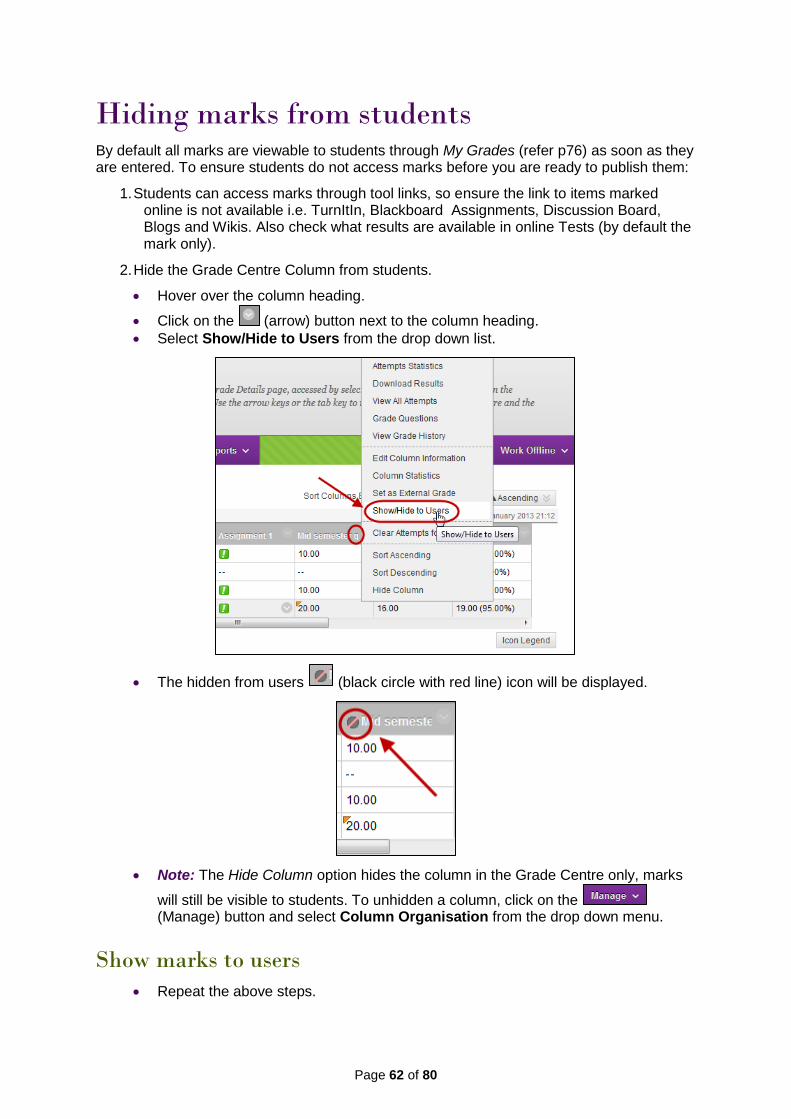
Hiding marks from students By default all marks are viewable to students through My Grades (refer p76) as soon as they are entered. To ensure students do not access marks before you are ready to publish them:
1. Students can access marks through tool links, so ensure the link to items marked online is not available i.e. TurnItIn, Blackboard Assignments, Discussion Board, Blogs and Wikis. Also check what results are available in online Tests (by default the mark only).
2. Hide the Grade Centre Column from students.
Hover over the column heading.
Click on the (arrow) button next to the column heading.
Select Show/Hide to Users from the drop down list.
The hidden from users (black circle with red line) icon will be displayed.
Note: The Hide Column option hides the column in the Grade Centre only, marks
will still be visible to students. To unhidden a column, click on the (Manage) button and select Column Organisation from the drop down menu.
Show marks to users
Repeat the above steps.
Page 63 of 80
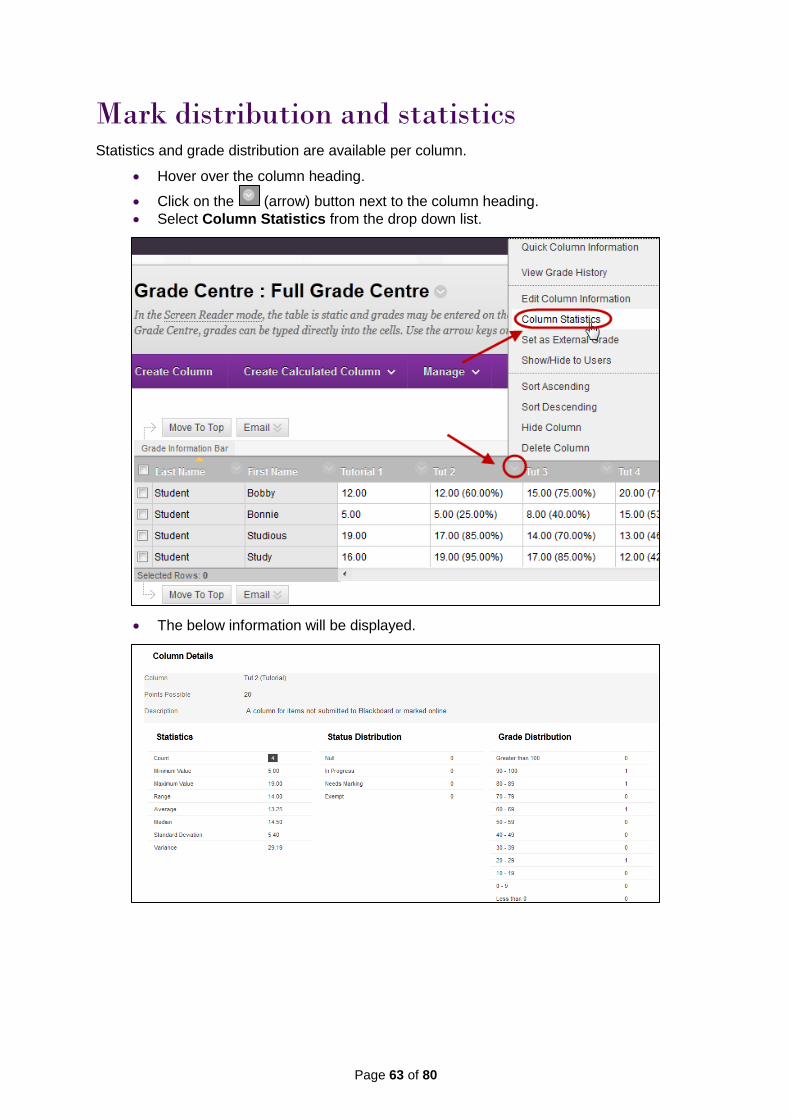
Mark distribution and statistics Statistics and grade distribution are available per column.
Hover over the column heading.
Click on the (arrow) button next to the column heading.
Select Column Statistics from the drop down list.
The below information will be displayed.
Page 64 of 80
Smart Views for SI-net Tutorial / Practical
groups If you have Tutorial or Practical groups setup in SI-net, these groups will be automatically transferred into your Learn.UQ course when the groups are “released”, usually during the first week of semester.
Note: There are other groups available in SI-net, only the Tutorial and Practical groups flow through to Blackboard.
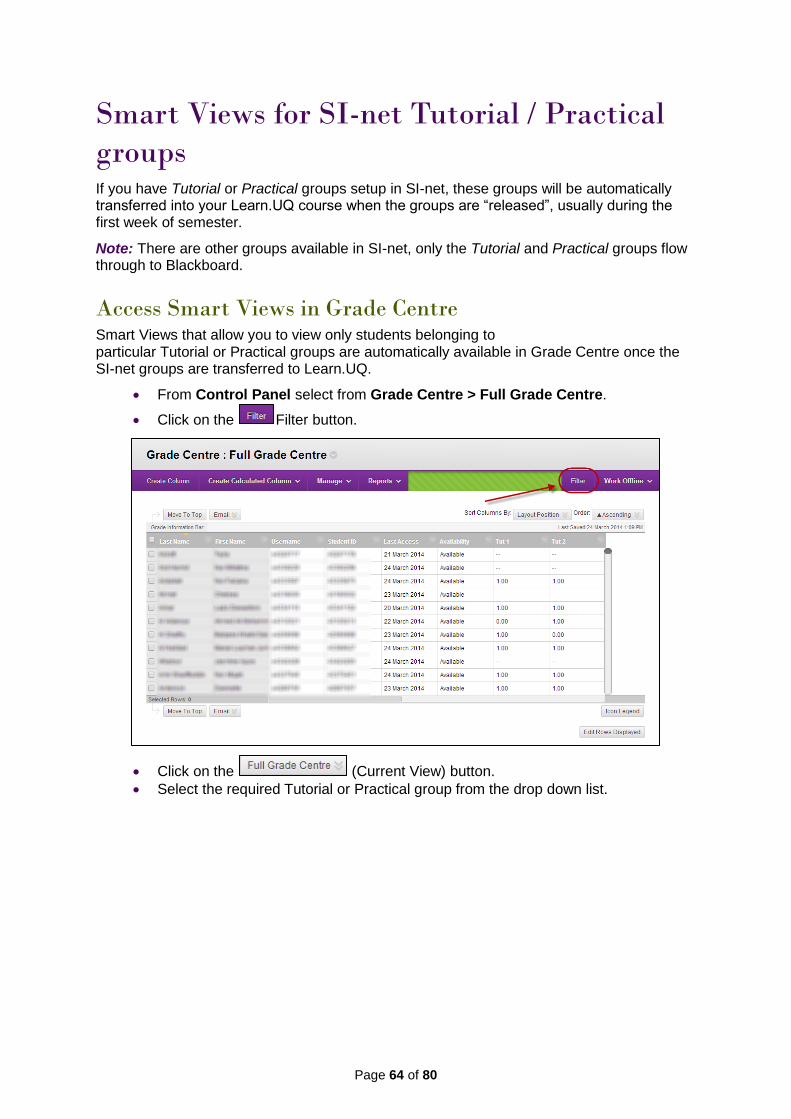
Access Smart Views in Grade Centre Smart Views that allow you to view only students belonging to particular Tutorial or Practical groups are automatically available in Grade Centre once the SI-net groups are transferred to Learn.UQ.
From Control Panel select from Grade Centre > Full Grade Centre.
Click on the Filter button.
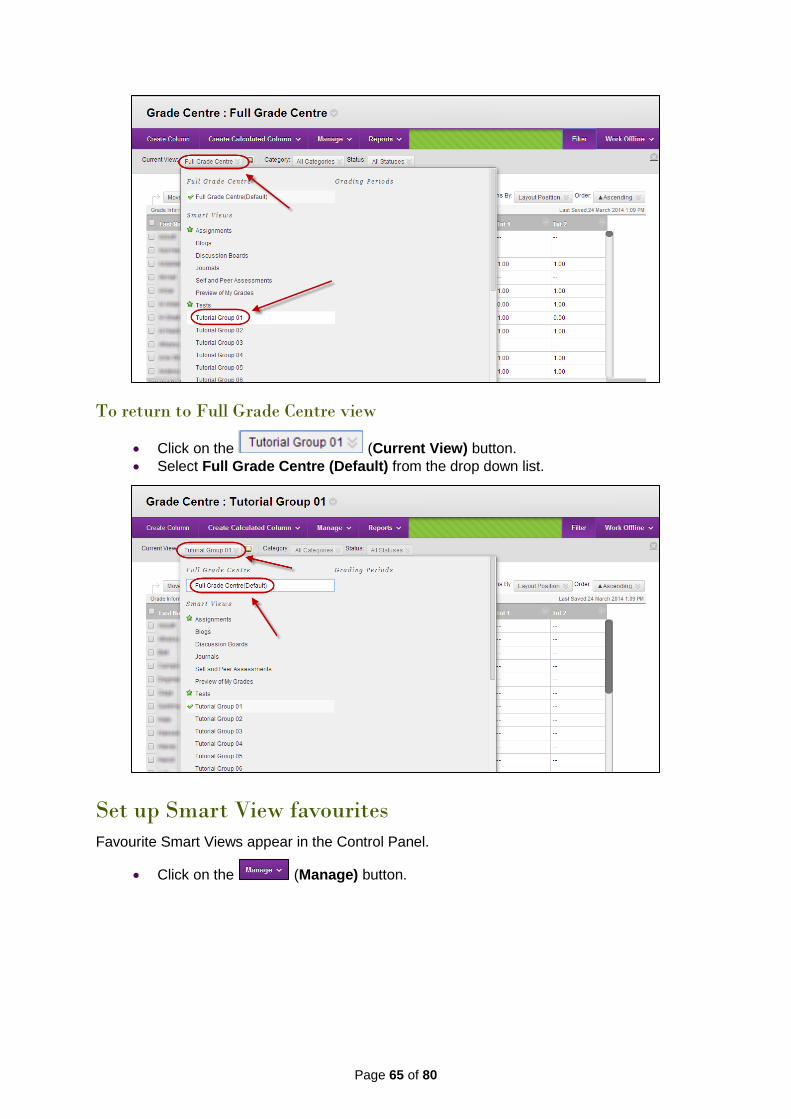
Click on the (Current View) button.
Select the required Tutorial or Practical group from the drop down list.
Page 65 of 80
To return to Full Grade Centre view
Click on the (Current View) button.
Select Full Grade Centre (Default) from the drop down list.
Set up Smart View favourites
Favourite Smart Views appear in the Control Panel.
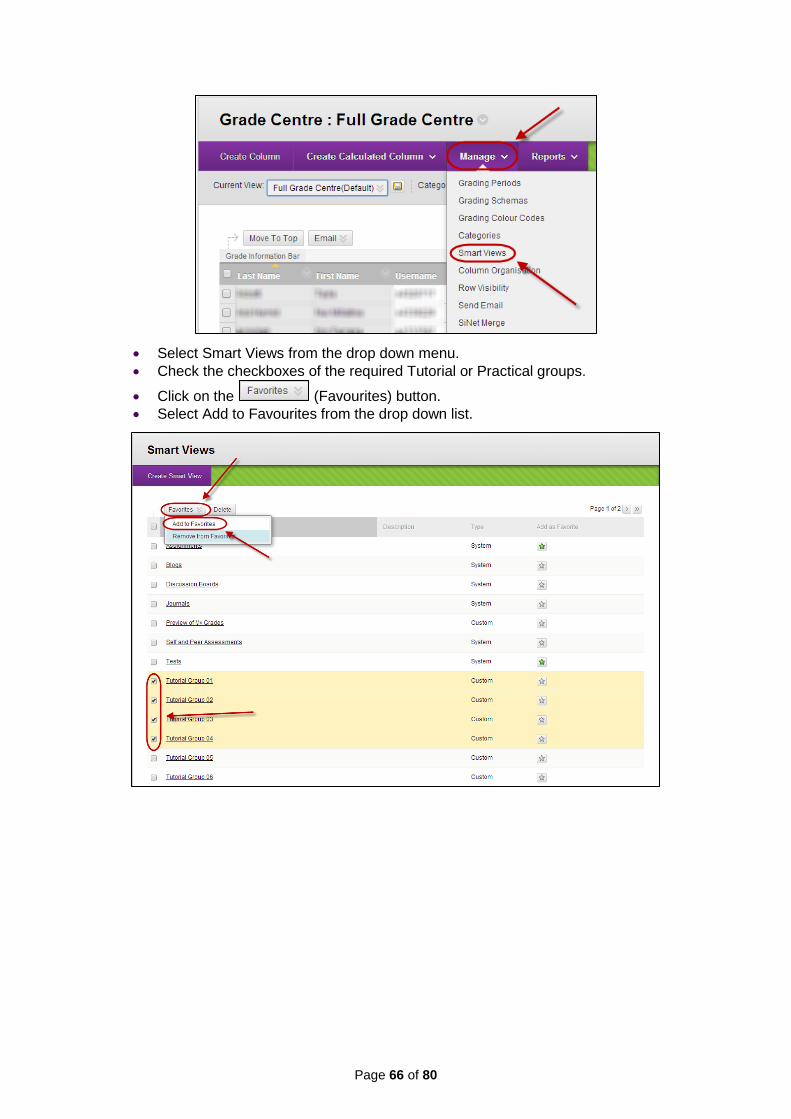
Click on the (Manage) button.
Page 66 of 80
Select Smart Views from the drop down menu.
Check the checkboxes of the required Tutorial or Practical groups.
Click on the (Favourites) button.
Select Add to Favourites from the drop down list.
Page 67 of 80
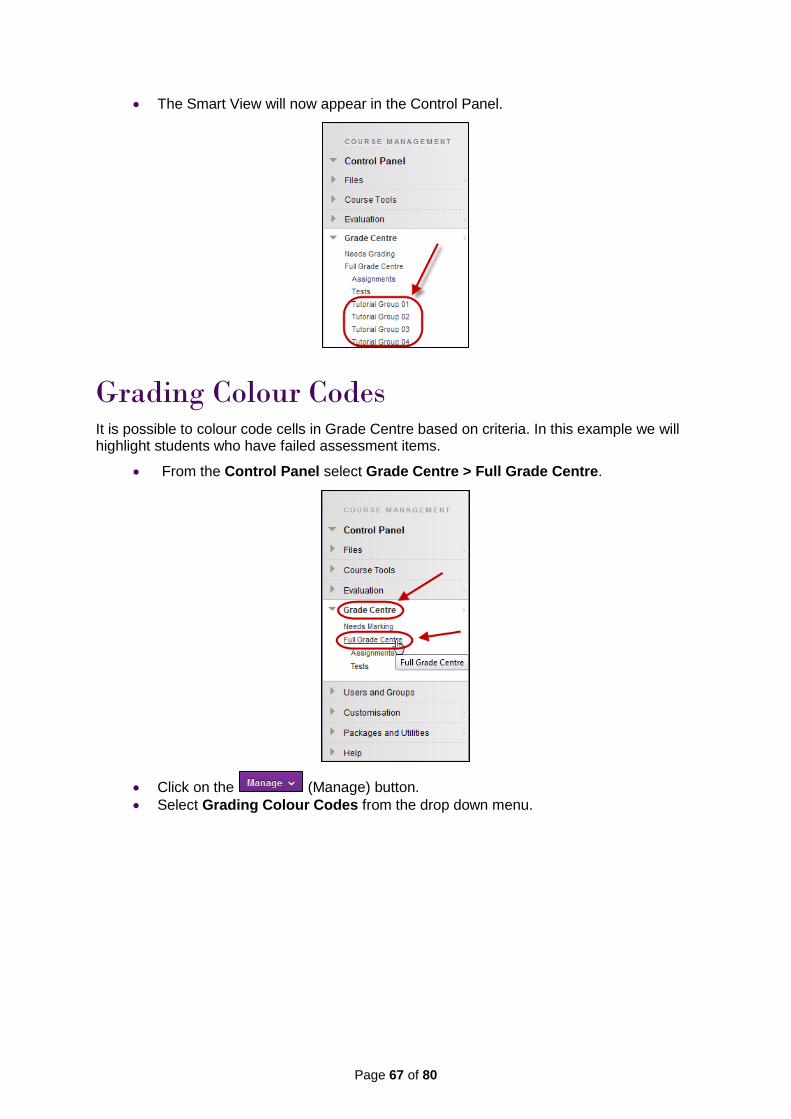
The Smart View will now appear in the Control Panel.
Grading Colour Codes It is possible to colour code cells in Grade Centre based on criteria. In this example we will highlight students who have failed assessment items.
From the Control Panel select Grade Centre > Full Grade Centre.
Click on the (Manage) button.
Select Grading Colour Codes from the drop down menu.

Page 68 of 80
Check the Enable Grading Colour Codes so the highlighting of cells will be displayed.
Click on the (Add Criteria) button.
Select the required Criteria from the drop down list.
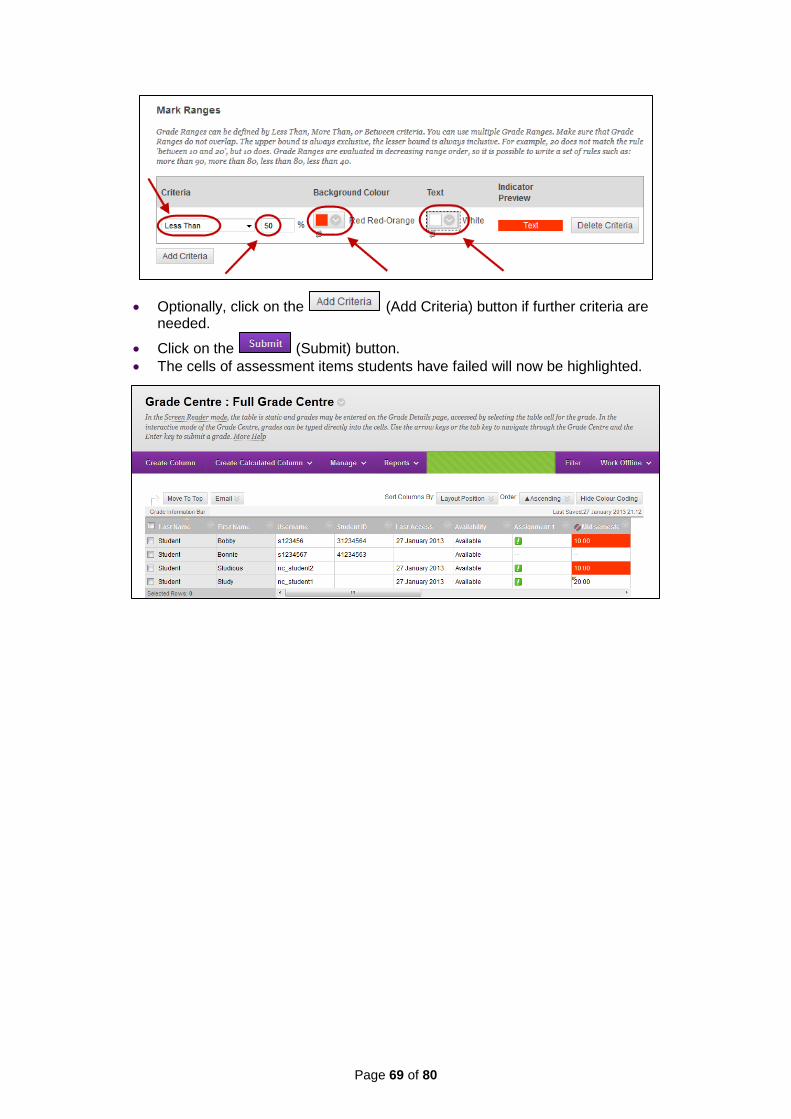
Enter the required percentage boundaries.
Select a Background Colour from the Colour picker.
Select a Text colour from the Colour picker.
Page 69 of 80
Optionally, click on the (Add Criteria) button if further criteria are needed.
Click on the (Submit) button.
The cells of assessment items students have failed will now be highlighted.
Page 70 of 80
Uploading grades to SI-net The marks spreadsheet you can download from the Grade Centre cannot be directly uploaded to SI-net as it is not in the required format. Furthermore, marks from the Grade Centre spreadsheet cannot be copied and pasted into a SI-net course list, as students are listed in a slightly different order.
To convert your Grade Centre file into the required SI-net format you need to use the SiNet Merge tool.
Steps
To upload grades to SI-net from the Blackboard Grade Centre you need to:
1. Download your course list from SI-net.
2. Use the Blackboard SiNet Merge tool to create a SI-net version of your grade centre content.
3. Calculate final student marks and grades inside the SI-net version.
4. Keep a copy of this working file, then reduce it down to a grades spreadsheet containing only the two columns required by SI-net.
5. Upload your grades spreadsheet to SI-net.
How to download your course list from SI-net
To obtain a file into which to enter students’ grades follow the steps in the mySI-net Guide for Staff 2012,
Grade Upload, p15
Download a Class List, p5
Page 71 of 80
How to use the Blackboard SI-net Merge tool
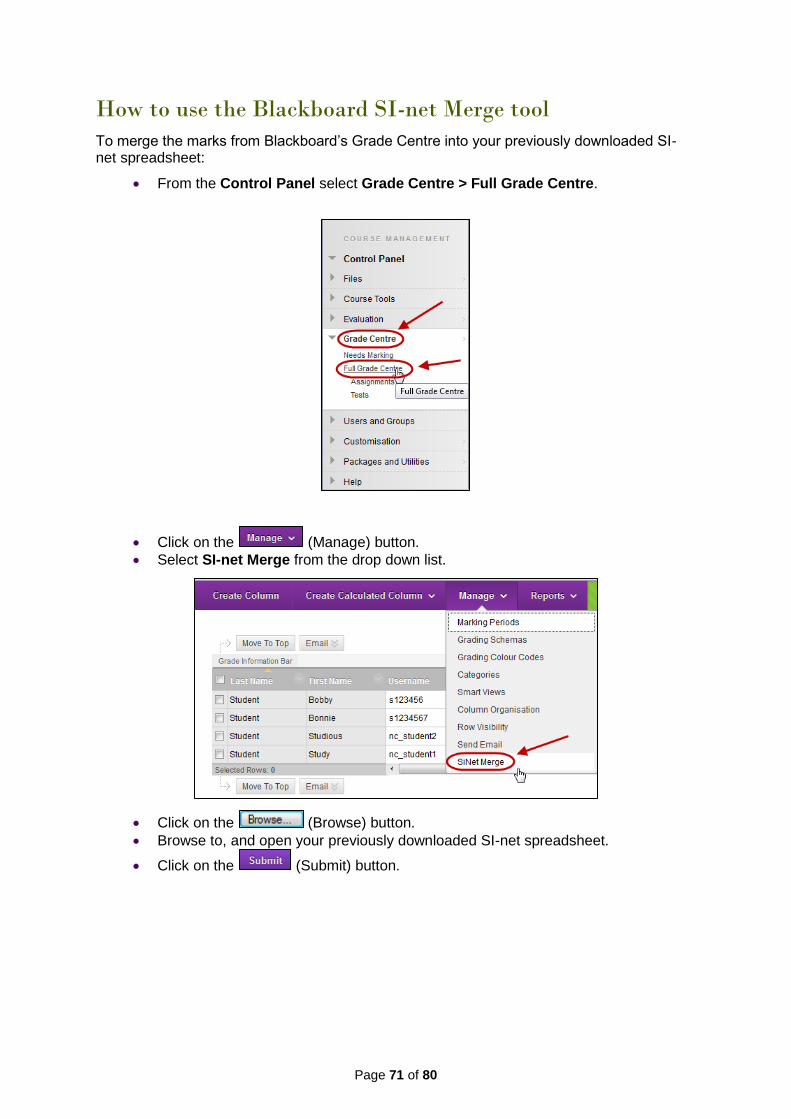
To merge the marks from Blackboard’s Grade Centre into your previously downloaded SI-net spreadsheet:
From the Control Panel select Grade Centre > Full Grade Centre.
Click on the (Manage) button.
Select SI-net Merge from the drop down list.
Click on the (Browse) button.
Browse to, and open your previously downloaded SI-net spreadsheet.
Click on the (Submit) button.
Page 72 of 80
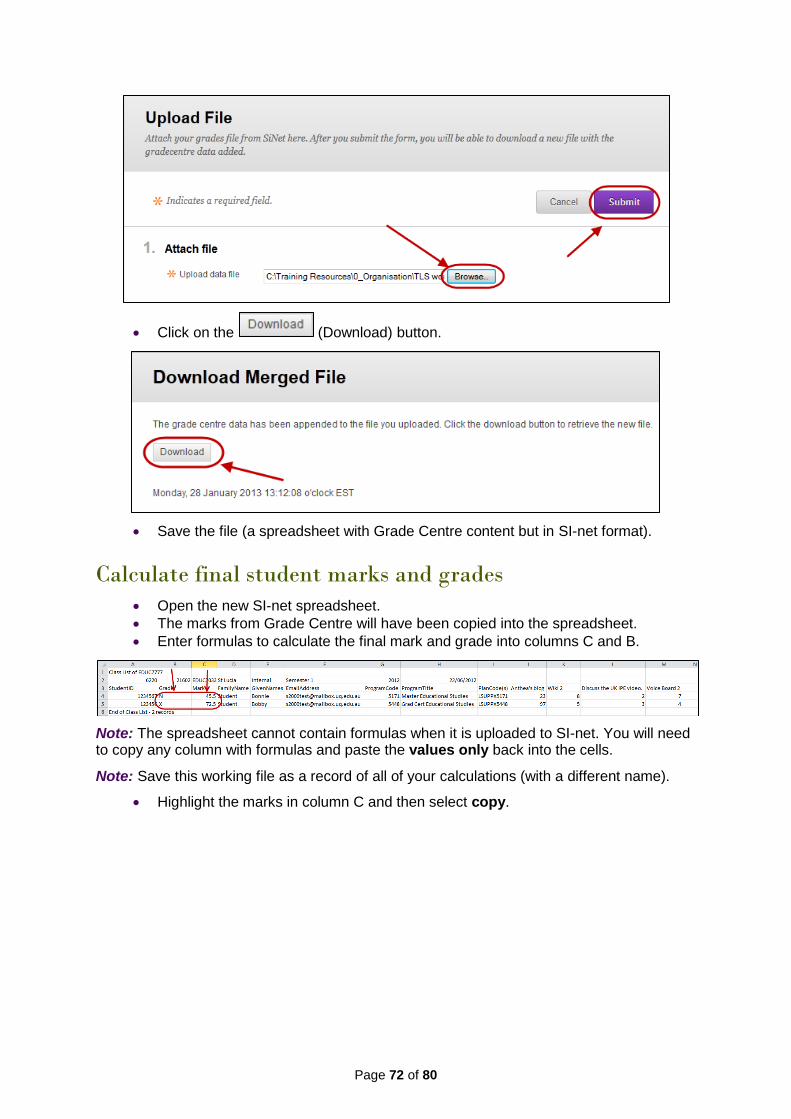
Click on the (Download) button.
Save the file (a spreadsheet with Grade Centre content but in SI-net format).
Calculate final student marks and grades
Open the new SI-net spreadsheet.
The marks from Grade Centre will have been copied into the spreadsheet.
Enter formulas to calculate the final mark and grade into columns C and B.
Note: The spreadsheet cannot contain formulas when it is uploaded to SI-net. You will need to copy any column with formulas and paste the values only back into the cells.
Note: Save this working file as a record of all of your calculations (with a different name).
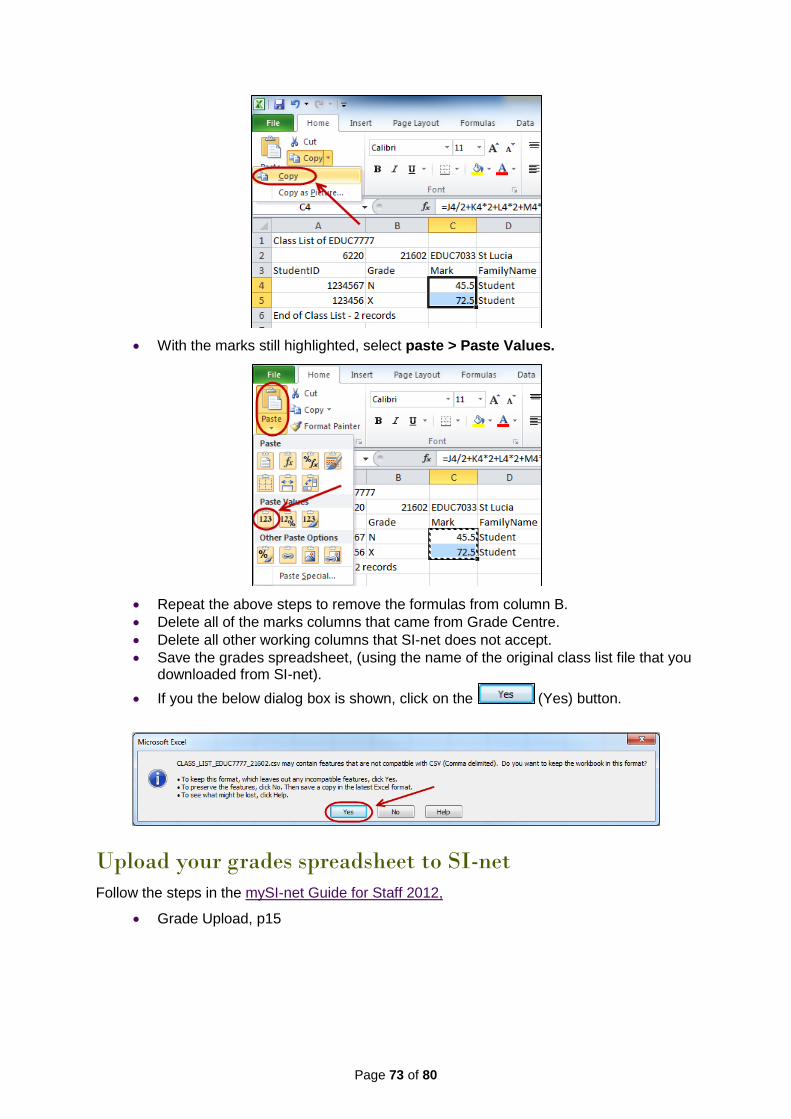
Highlight the marks in column C and then select copy.
Page 73 of 80
With the marks still highlighted, select paste > Paste Values.
Repeat the above steps to remove the formulas from column B.
Delete all of the marks columns that came from Grade Centre.
Delete all other working columns that SI-net does not accept.
Save the grades spreadsheet, (using the name of the original class list file that you downloaded from SI-net).
If you the below dialog box is shown, click on the (Yes) button.
Upload your grades spreadsheet to SI-net
Follow the steps in the mySI-net Guide for Staff 2012,
Grade Upload, p15
Page 74 of 80
Using the Become Student tool This tool allows you to view your course as a student. The tool can be used to test interactive tools such as tests and to check what your students are able to see in My Grades.
You need to complete the following three steps to use the tool.
1. Make the course available. 2. Add Dummy students. 3. Use Become student tool.
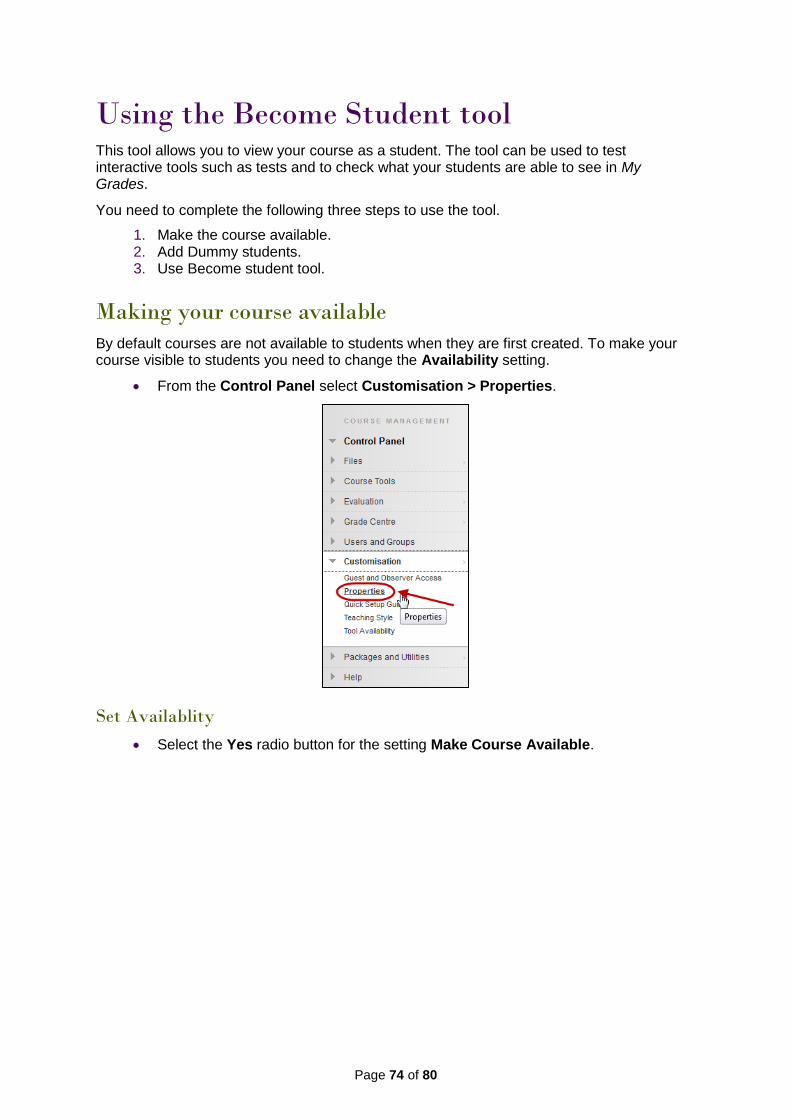
Making your course available
By default courses are not available to students when they are first created. To make your course visible to students you need to change the Availability setting.
From the Control Panel select Customisation > Properties.
Set Availablity
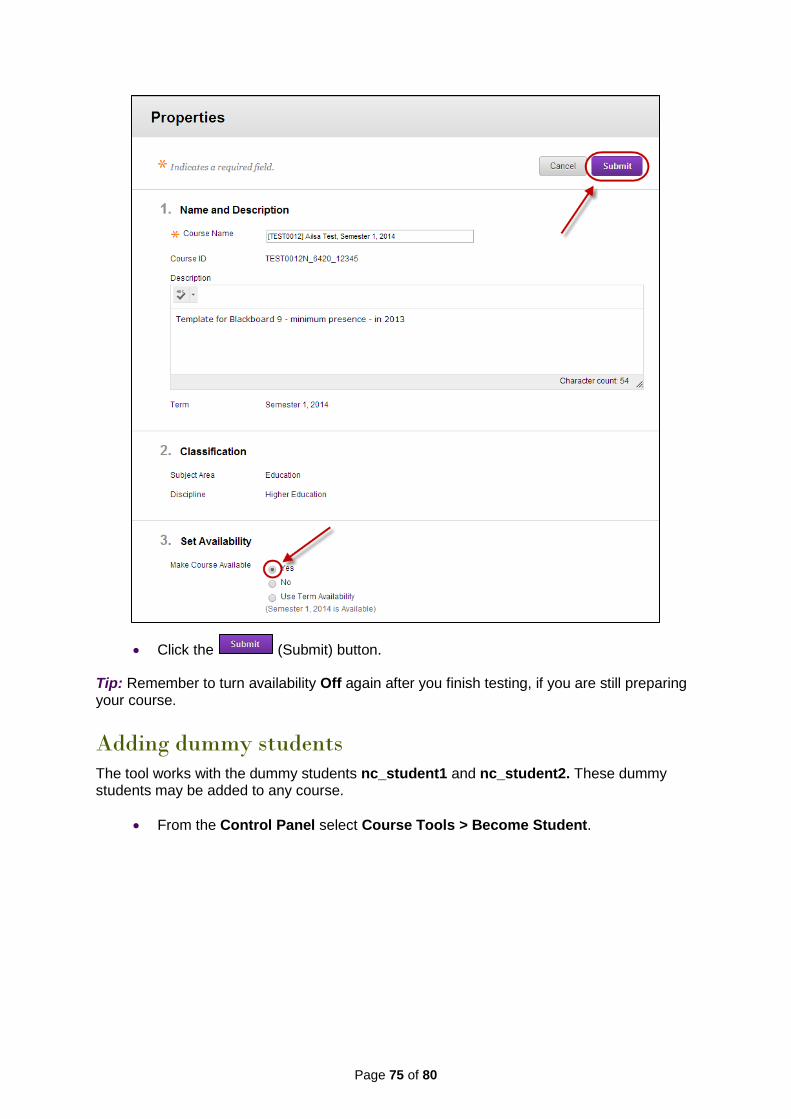
Select the Yes radio button for the setting Make Course Available.
Page 75 of 80
Click the (Submit) button.
Tip: Remember to turn availability Off again after you finish testing, if you are still preparing your course.
Adding dummy students
The tool works with the dummy students nc_student1 and nc_student2. These dummy students may be added to any course.
From the Control Panel select Course Tools > Become Student.

Page 76 of 80
By default both dummy students nc_student1 and nc_student2 are selected to be enrolled.
Note: The groups the dummy students belong to are highlighted.
Click on the (Submit) button.
Using the Become student tool
Viewing the course as a student
Click on the (Select student) button.
Select the required student from the drop down list.
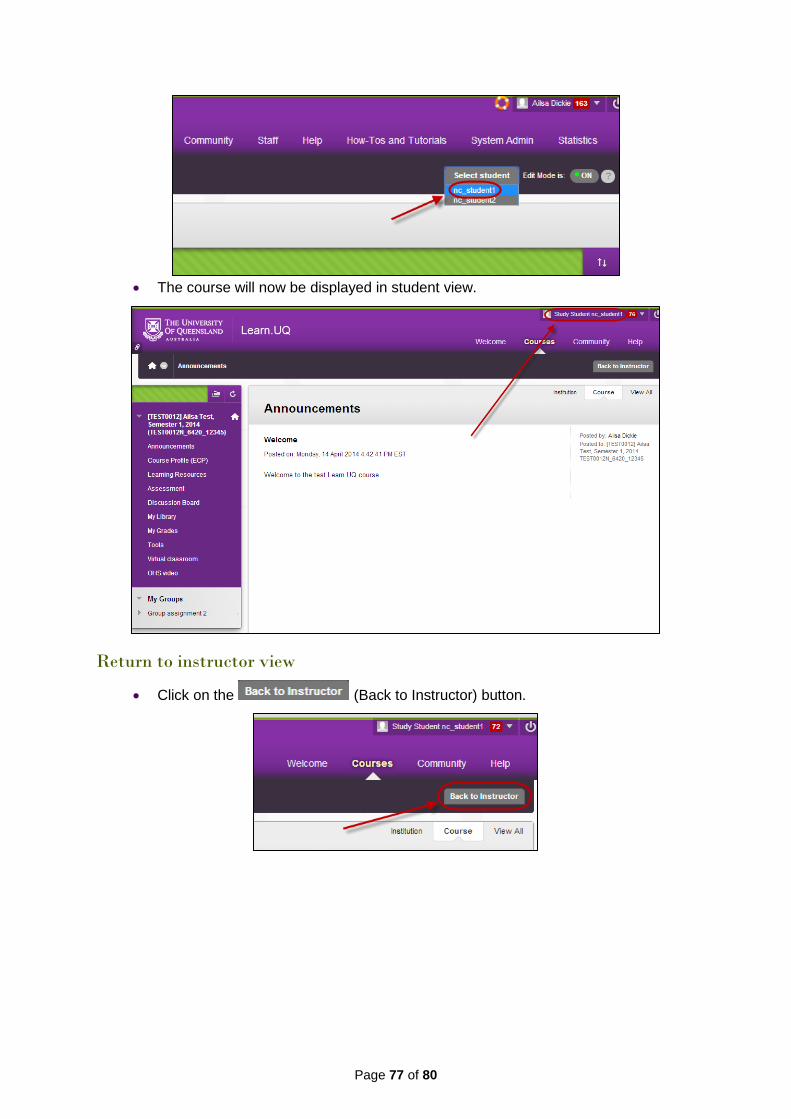
Page 77 of 80
The course will now be displayed in student view.
Return to instructor view
Click on the (Back to Instructor) button.
Page 78 of 80
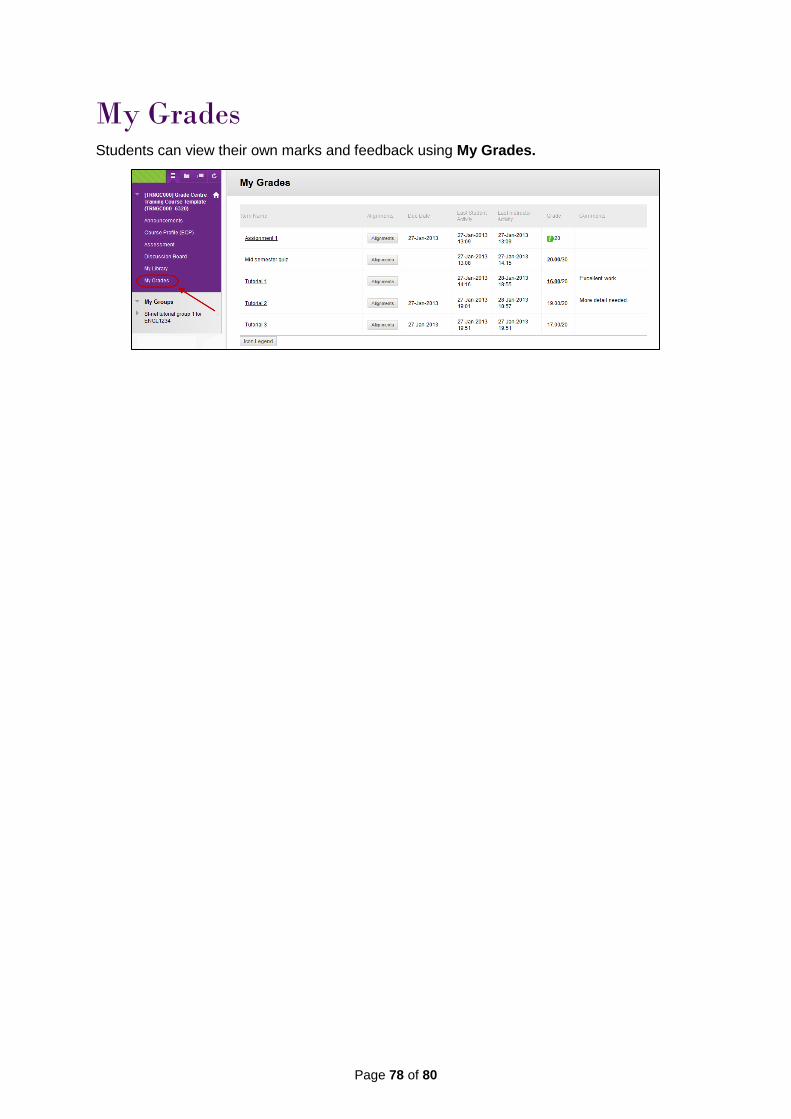
My Grades Students can view their own marks and feedback using My Grades.
Page 79 of 80
Further Resources
Technical Support
Helpdesk staff – Gary Smith, Paul Dutton and Daniel Lui. [email protected] or Ph 336 56000
eLearning Solutions Service
The eLearning Systems and Support team provide an eLearning Solutions Service to help staff implement eLearning solutions for the most common teaching and learning problems, using centrally supported eLearning tools.
ITaLI Teach Assist
TeachAssist is provided by ITaLI for the UQ community to offer support for their teaching and learning. If you are considering changing your curriculum, its delivery or assessment, evaluating your teaching or perhaps even educational research then get in contact through the ITaLI TeachAssist website.
Faculty Educational Designers Faculty Educational Designer Email Phone
BEL Christy Patton
(Business)
[email protected] 334 66978
EAIT Esther Fink [email protected] 336 57390
HABS Jessica Tsai [email protected] 336 56641
HASS Chris Frost
Inge Matt
334 61632
336 51333
MABS Kym Ward (Medicine)
Michael O’Brien (Public Health)
334 64620
336 55037
Science Pablo Riveros [email protected] 336 58869
eLearning Resources
A range of resources are available on our eLearning website, including self-help text based guides, self-help videos, teaching and learning quick-guides and information on known technical issues. Additionally, updates are also available on the progress of eLearning projects such as the implementation of new tools and upgrades to current systems.
eLearning Newsletter
The eLearning newsletter is published fortnightly and includes articles on eLearning tips for the start and end of semester, promotion of new tools, tool functionality and how tools could be used to improve teaching and learning. Other relevant communications on policy updates, tool upgrades and outages are also included in the newsletter.

Page 80 of 80
UQ eLearning Twitter
https://twitter.com/elearningUQ
Pedagogical Resources The Institute for Teaching and Learning Innovation (ITaLI) provides leadership, engagement and advocacy in educational innovation, teaching excellence and learning analytics.
Student Resources
Library Services provides AskUS a help and information service for students. They also offer face-to-face help, provide online Learn.UQ student guides and run workshops for students.
eLearning Workshops
A range of technical eLearning workshops are offered throughout the year. For descriptions of the workshops, dates and to enrol, visit the Teaching and Learning Technologies series on the Staff Development website.
ITaLI Workshops A range of pedagogical eLearning workshops are offered throughout the year. For descriptions of the workshops, dates and to enrol, visit the Teaching, Learning and assessment series on the Staff Development website.
Custom Workshops
Custom workshops for schools can be provided by the eLearning Systems and Support team and ITaLI.
eLearning technical workshops: [email protected]
eLearning pedagogical workshops: [email protected]
combined technical and pedagogical workshops: [email protected] or [email protected]
Prepared by: [Ailsa Dickie] Last modified: [13 November 2019] Version: Blackboard 9.1SP13