Embed Size (px)
Citation preview

LeaveLog User Guide
LeaveLog User Guide 2013
2
Contents
Introduction ................................................................................................................................................... 4
About LeaveLog ....................................................................................................................................... 4
LeaveLog Highlights ................................................................................................................................ 4
Registering In LeaveLog ............................................................................................................................... 4
Manage My Own Leave ............................................................................................................................ 5
Manage Leave for Others .......................................................................................................................... 5
Supervisor ................................................................................................................................................. 5
Approval Authority ................................................................................................................................... 5
Convalescent Leave Approver .................................................................................................................. 5
Administrator ............................................................................................................................................ 5
Requesting Permissions to a New State/Site and/or a New Leave Group ................................................ 6
Account Management ................................................................................................................................... 8
Managing Your Account ........................................................................................................................... 8
Account Settings ................................................................................................................................... 9
Permissions ........................................................................................................................................... 9
Leave History ........................................................................................................................................ 9
Entering Leave ............................................................................................................................................ 10
Entering Your Own Leave Request ........................................................................................................ 10
Entering a Leave Request for Other Users .............................................................................................. 12
Editing/Cancel an Existing Leave Request ............................................................................................. 13
Viewing a Leave Form in PDF format .................................................................................................... 17
Supervising and Approving Leave .............................................................................................................. 17
Recommending a Leave Request for Approval ...................................................................................... 17
Approving a Leave Request .................................................................................................................... 20
Signing a User Out/In for Leave ............................................................................................................. 21
Adding an Extension for a User .............................................................................................................. 22
Reviewing an Extension Request ............................................................................................................ 24
Adding/Removing a User from Your Leave Group ................................................................................ 26
Administration ............................................................................................................................................ 30
The Leave Group Hierarchy ................................................................................................................... 30
LeaveLog User Guide 2013
3
Managing Leave Groups ......................................................................................................................... 31
View DFAS Transactions ....................................................................................................................... 34
Approving/Removing Permissions Requests .......................................................................................... 35
Viewing Leave Reports ............................................................................................................................... 36
Late Leave ............................................................................................................................................... 37
Leave Balances ....................................................................................................................................... 37
Leave Control Number Report (Leave Log) ........................................................................................... 38
Leave Gantt Chart ................................................................................................................................... 38
Organization Roster ................................................................................................................................ 38
Users Who Haven’t Taken Leave ........................................................................................................... 38
Appendix ..................................................................................................................................................... 38
System Interfaces .................................................................................................................................... 38
Feedback ................................................................................................................................................. 38
Terms and Definitions ............................................................................................................................. 40
LeaveLog User Guide 2013
4
Introduction
About LeaveLog
LeaveLog is a system that automates the process of requesting, approving, charging, and tracking leave.
It’s currently used to track leave for Army National Guard AGR and ADOS in almost every state and the
Title 10 force. It’s also used to track the leave of some Active Army personnel.
LeaveLog Highlights
Accessible to anyone with a CAC and an AKO account
Customizable unit hierarchy
Daily updates of leave balances from DJMS-AC and DJMS-RC
Daily processing of leave to both DJMS-AC and DJMS-RC
Optional digitally signed leave forms
Email notifications
Comprehensive reporting
Registering In LeaveLog In order to use LeaveLog, you must have an AKO account and active Common Access Card (CAC). To
begin tracking your leave do the following:
1. From a computer with a CAC reader, navigate to LeaveLog:
https://ftsmcs.ngb.army.mil/protected/LeaveLog/
2. If you have not previously been registered, the system will read the SSN on your CAC and find
your record in HRM’s AGR pay extracts or TAPDB-G. If you are not in either of these
databases, enter the rest of your information.
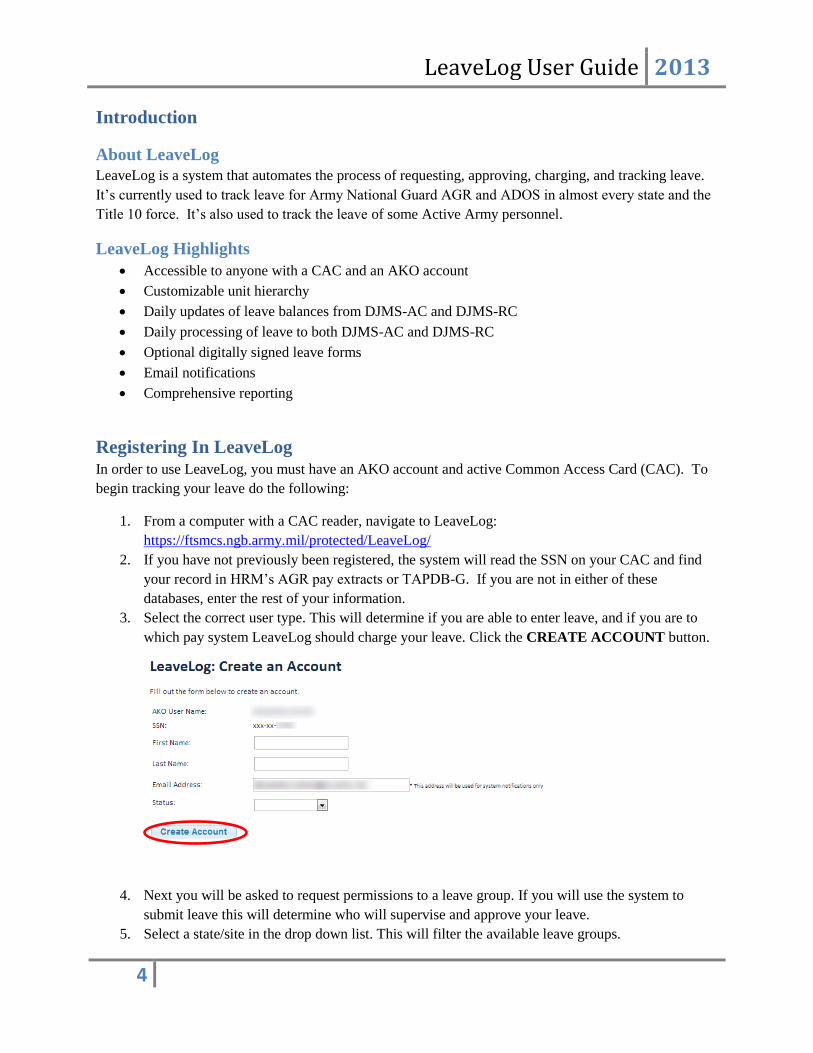
3. Select the correct user type. This will determine if you are able to enter leave, and if you are to
which pay system LeaveLog should charge your leave. Click the CREATE ACCOUNT button.
4. Next you will be asked to request permissions to a leave group. If you will use the system to
submit leave this will determine who will supervise and approve your leave.
5. Select a state/site in the drop down list. This will filter the available leave groups.

LeaveLog User Guide 2013
5
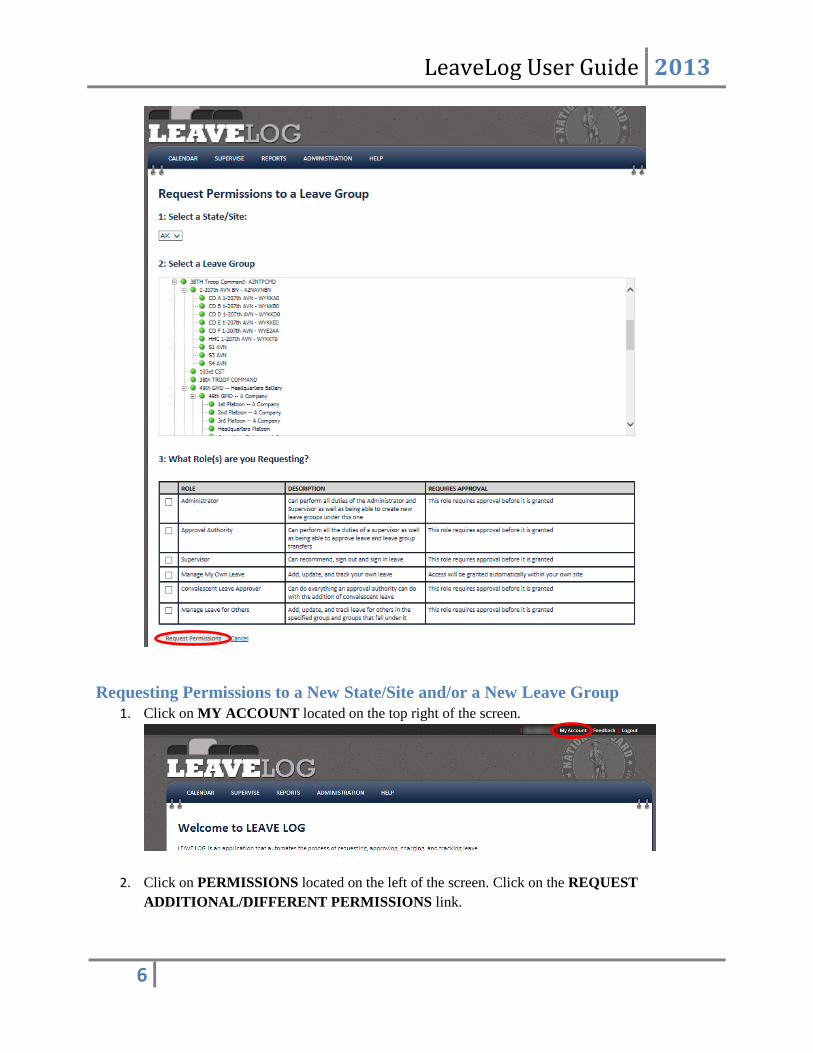
6. Select a leave group by clicking on the name of the group.
7. Select which role(s) you are requesting (Manage My Own Leave, Manage Leave For Others,
Supervisor, Approval Authority, and/or Administrator) by checking the checkbox next to each
that apply. The role descriptions are as follows:
Manage My Own Leave
This role allows the user to enter a leave request, edit an existing request, request a leave
extension, view a specific leave form in PDF format, and view remaining leave balance. Manage
My Own Leave users can only manage their own personal leave information. This role does not
require approval and will automatically take effect.
Manage Leave for Others
This role allows the user to add, update, and track leave for others in their specified group, and all
groups that fall under that group.
Supervisor
This role allows the user all the same permissions as a Manage My Own Leave user. In addition,
they can recommend, sign out/in, and edit leave for other users. LeaveLog also allows them to
enter leave requests and view reports for other users that they supervise. Supervisors can
add/remove Manage My Own Leave users and/or new Supervisors to a leave group. This role
requires approval from an Administrator before taking effect.
Approval Authority
This role is basically the same as a Supervisor. However, a Supervisor must be marked as an
Approval Authority to actually Approve/Deny leave for users in their leave group.
This role requires approval from an Administrator before taking effect.
Convalescent Leave Approver
This role allows the same permissions as an Approval Authority. In addition, this user can
approve convalescent leave.
Administrator
This role allows the user all the same permissions as an Approval Authority. In addition, they can
make changes to the leave group they administer. They can also create new leave groups and
move groups around in the hierarchy under the group they administer.
This role requires approval from an existing Administrator before taking effect.
8. Click the REQUEST PERMISSIONS button. An email will be sent to the supervisor(s) of the
groups you selected, to notify them of a pending request.
LeaveLog User Guide 2013
6
Requesting Permissions to a New State/Site and/or a New Leave Group
1. Click on MY ACCOUNT located on the top right of the screen.
2. Click on PERMISSIONS located on the left of the screen. Click on the REQUEST
ADDITIONAL/DIFFERENT PERMISSIONS link.

LeaveLog User Guide 2013
7
3. Your current state/site will be selected by default. If you are requesting permissions in a different
state (ISTs for example) select a different state/site.
4. Select the leave group to which you’d like to request permissions.
5. Select which role(s) you are requesting by checking the checkbox next to each that apply.
6. Click the REQUEST PERMISSIONS button. An email will be sent to the supervisor(s) of the
groups you selected to notify them of a pending request.
(Some roles may not require a request. If that is the case, your request will be automatically
approved and take effect immediately.)

LeaveLog User Guide 2013
8
Account Management
Managing Your Account
To manage your account:
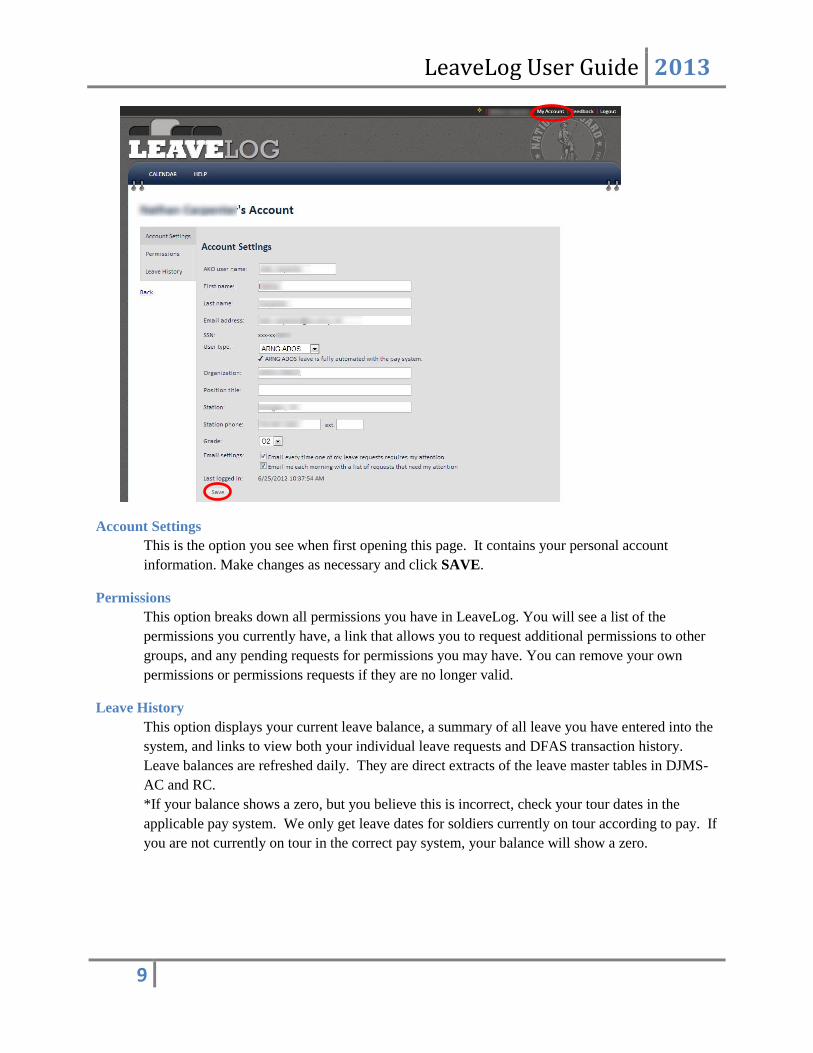
1. From the LeaveLog homepage, click on MY ACCOUNT located in the top right corner of the
screen. Three links will appear on the left side of the page.
LeaveLog User Guide 2013
9
Account Settings
This is the option you see when first opening this page. It contains your personal account
information. Make changes as necessary and click SAVE.
Permissions
This option breaks down all permissions you have in LeaveLog. You will see a list of the
permissions you currently have, a link that allows you to request additional permissions to other
groups, and any pending requests for permissions you may have. You can remove your own
permissions or permissions requests if they are no longer valid.
Leave History
This option displays your current leave balance, a summary of all leave you have entered into the
system, and links to view both your individual leave requests and DFAS transaction history.
Leave balances are refreshed daily. They are direct extracts of the leave master tables in DJMS-
AC and RC.
*If your balance shows a zero, but you believe this is incorrect, check your tour dates in the
applicable pay system. We only get leave dates for soldiers currently on tour according to pay. If
you are not currently on tour in the correct pay system, your balance will show a zero.
LeaveLog User Guide 2013
10
Entering Leave
Entering Your Own Leave Request
To enter a leave request into the system:
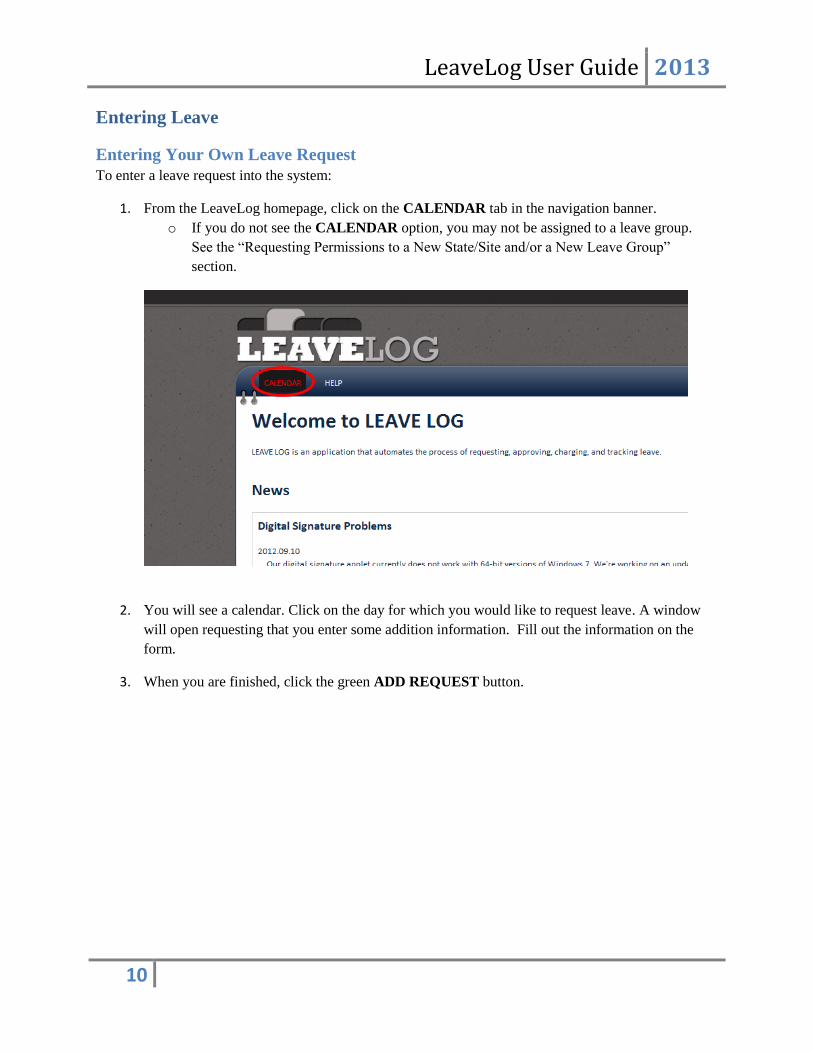
1. From the LeaveLog homepage, click on the CALENDAR tab in the navigation banner.
o If you do not see the CALENDAR option, you may not be assigned to a leave group.
See the “Requesting Permissions to a New State/Site and/or a New Leave Group”
section.
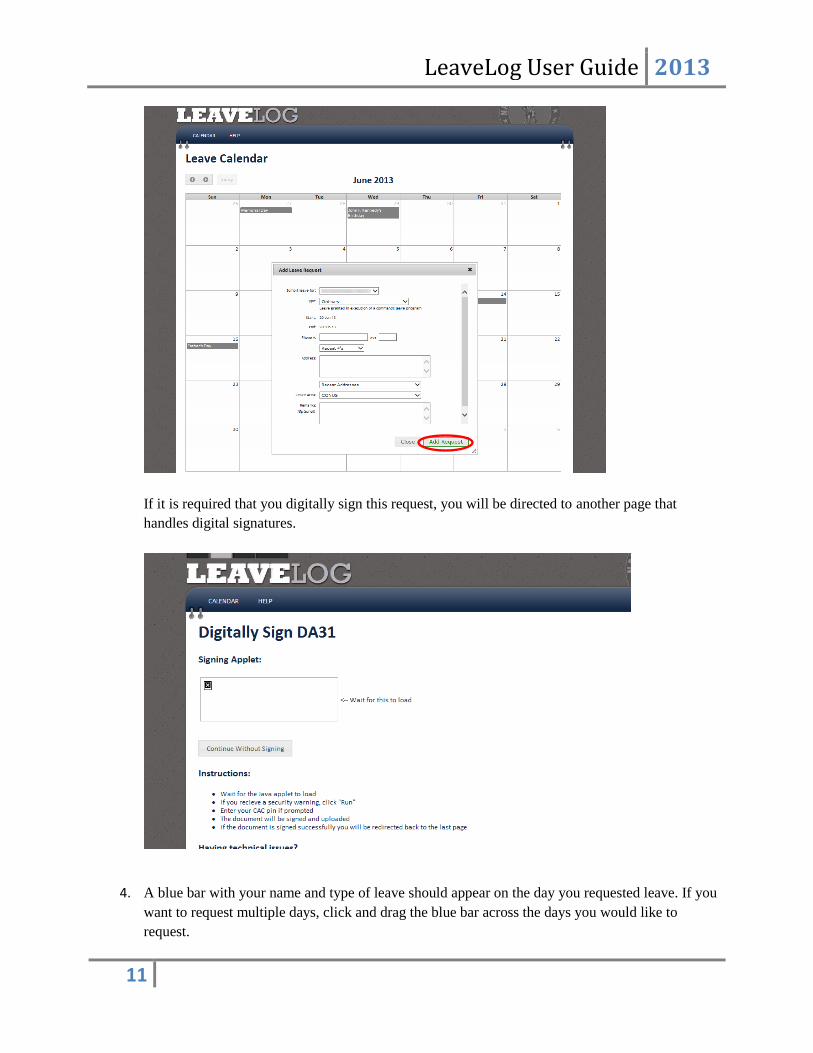
2. You will see a calendar. Click on the day for which you would like to request leave. A window
will open requesting that you enter some addition information. Fill out the information on the
form.
3. When you are finished, click the green ADD REQUEST button.
LeaveLog User Guide 2013
11
If it is required that you digitally sign this request, you will be directed to another page that
handles digital signatures.
4. A blue bar with your name and type of leave should appear on the day you requested leave. If you
want to request multiple days, click and drag the blue bar across the days you would like to
request.
LeaveLog User Guide 2013
12
5. An email notification will be sent to the supervisors in your leave group to notify them of a
pending request. A copy of this email will be sent to you. You will receive notification once it has
been approved or denied. The blue bar will turn green once it has been approved.
Entering a Leave Request for Other Users
Manage Leave for Others users, Supervisors, Convalescent Leave Approvers and Approval Authorities
may enter leave for the users they supervise. This should only be done if the user going on leave is
unavailable or unable to enter leave themselves.
To enter leave for someone else:
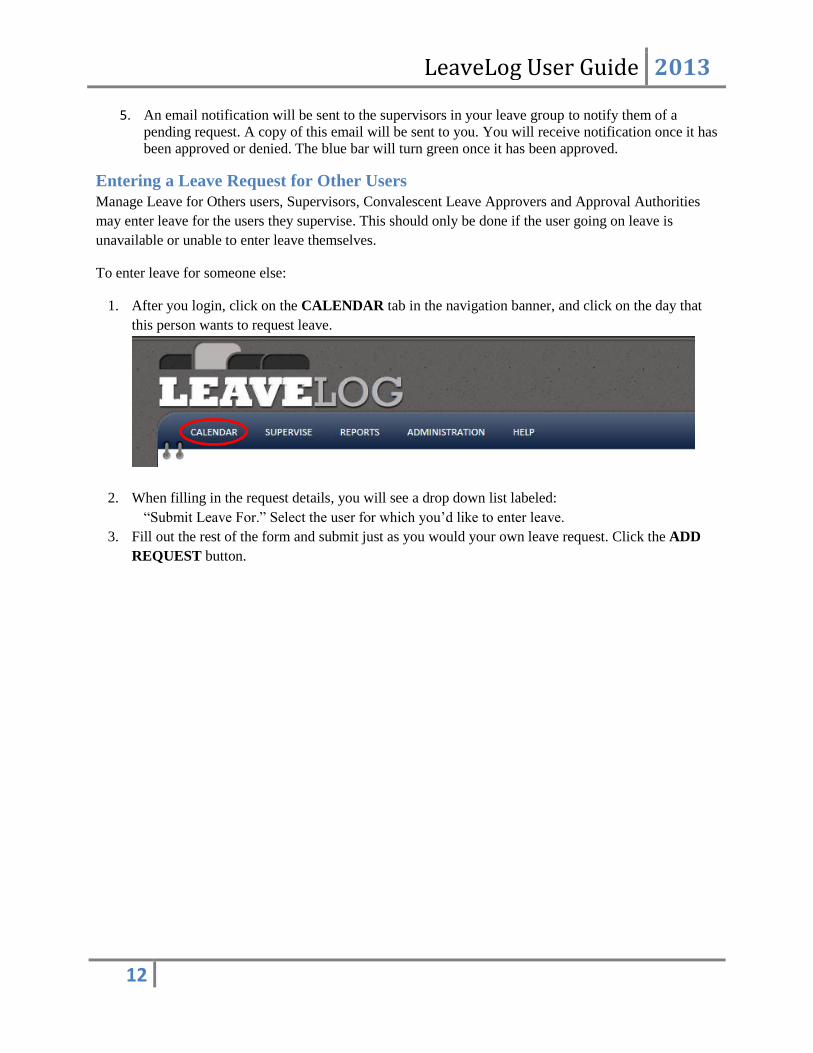
1. After you login, click on the CALENDAR tab in the navigation banner, and click on the day that
this person wants to request leave.
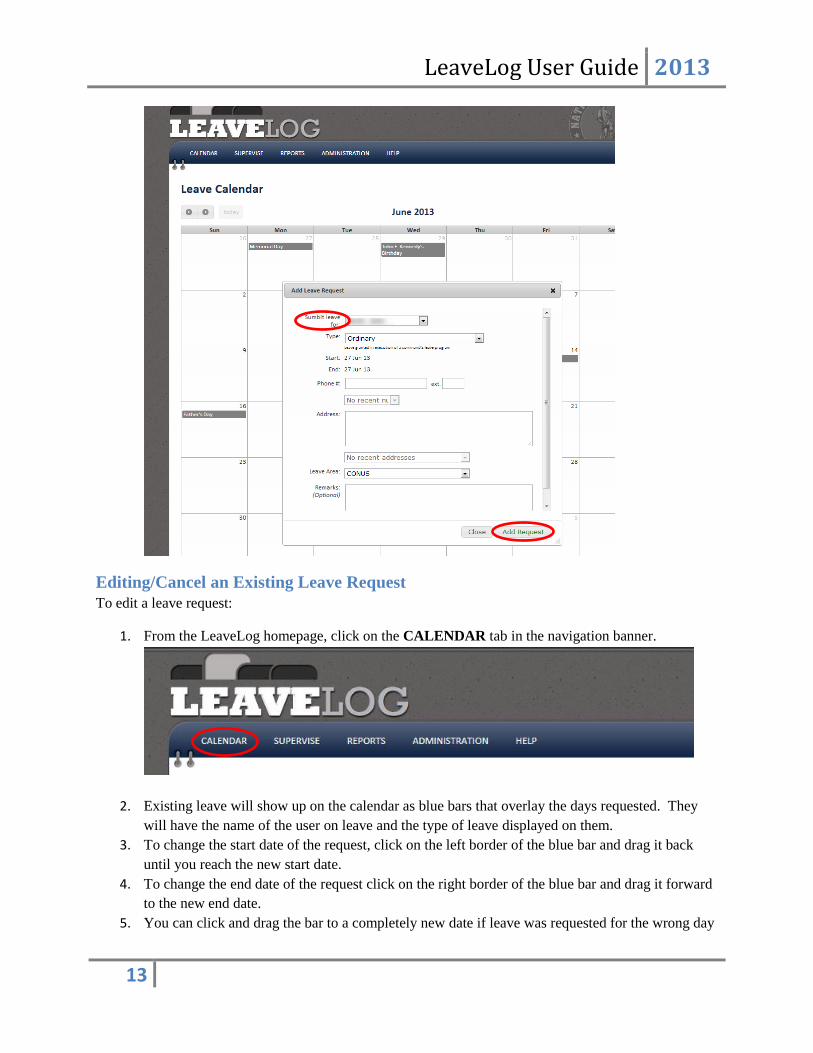
2. When filling in the request details, you will see a drop down list labeled:
“Submit Leave For.” Select the user for which you’d like to enter leave.
3. Fill out the rest of the form and submit just as you would your own leave request. Click the ADD
REQUEST button.
LeaveLog User Guide 2013
13
Editing/Cancel an Existing Leave Request
To edit a leave request:
1. From the LeaveLog homepage, click on the CALENDAR tab in the navigation banner.
2. Existing leave will show up on the calendar as blue bars that overlay the days requested. They
will have the name of the user on leave and the type of leave displayed on them.
3. To change the start date of the request, click on the left border of the blue bar and drag it back
until you reach the new start date.
4. To change the end date of the request click on the right border of the blue bar and drag it forward
to the new end date.
5. You can click and drag the bar to a completely new date if leave was requested for the wrong day
LeaveLog User Guide 2013
14
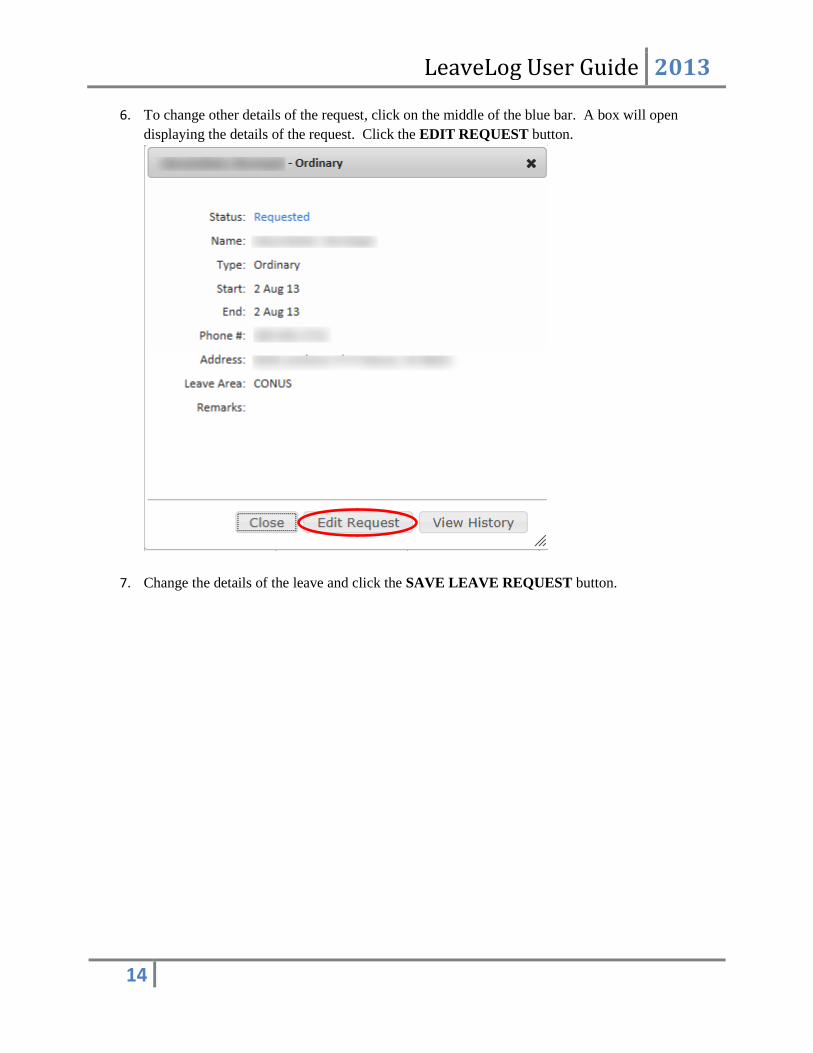
6. To change other details of the request, click on the middle of the blue bar. A box will open
displaying the details of the request. Click the EDIT REQUEST button.
7. Change the details of the leave and click the SAVE LEAVE REQUEST button.

LeaveLog User Guide 2013
15
To cancel a leave request:
1. Click on the middle of the blue bar of the leave you wish you cancel. A box will open displaying
the details of the request. Click the VIEW HISTORY button.

LeaveLog User Guide 2013
16
2. Under “Action History” on the right side of the screen, there is a text box where you can select
the next action. Under the drop down menu, select CANCEL. Click the SUBMIT button. The
leave request should no longer appear on the calendar.
a. If the request has already been charged in the pay system another transaction will be sent
to recover the days of leave.

LeaveLog User Guide 2013
17
Viewing a Leave Form in PDF format
LeaveLog automatically generates a leave form in PDF format for every requested leave. To view the
leave form, do the following:
1. Click on MY ACCOUNT in the top right corner of the page.
2. Click on LEAVE HISTORY.
3. Click the VIEW LEAVE REQUEST link.
4. Under the last column, labeled “Print,” click on the paper icon next to the leave form you would
like to view. The version of the leave form in PDF format should automatically begin to
download.
Supervising and Approving Leave
Recommending a Leave Request for Approval
To recommend/deny a pending leave request:
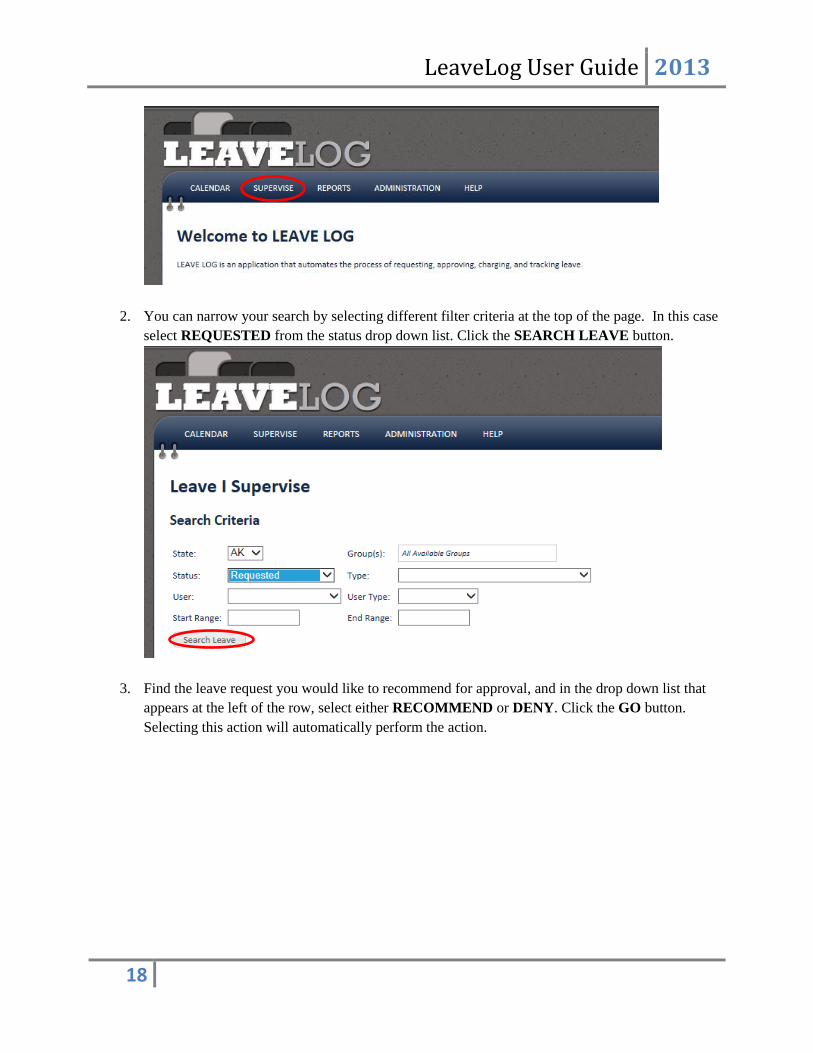
1. From the LeaveLog homepage, click the SUPERVISE tab in the navigation banner.
LeaveLog User Guide 2013
18
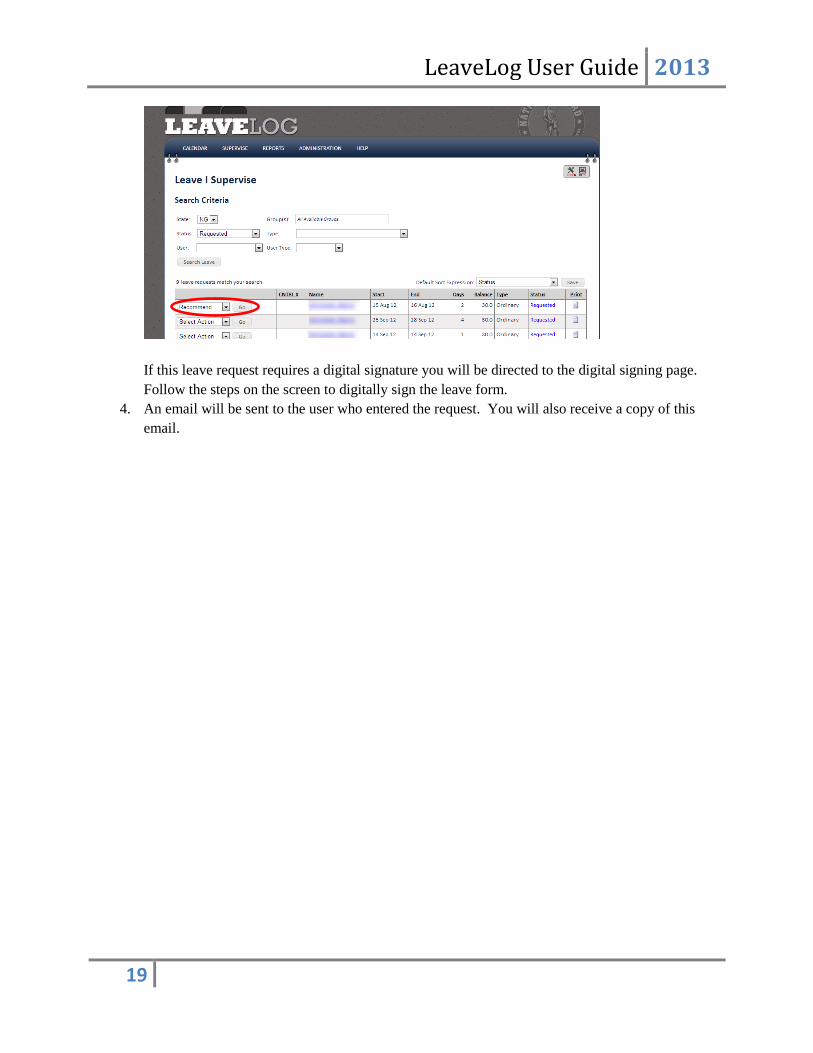
2. You can narrow your search by selecting different filter criteria at the top of the page. In this case
select REQUESTED from the status drop down list. Click the SEARCH LEAVE button.
3. Find the leave request you would like to recommend for approval, and in the drop down list that
appears at the left of the row, select either RECOMMEND or DENY. Click the GO button.
Selecting this action will automatically perform the action.
LeaveLog User Guide 2013
19
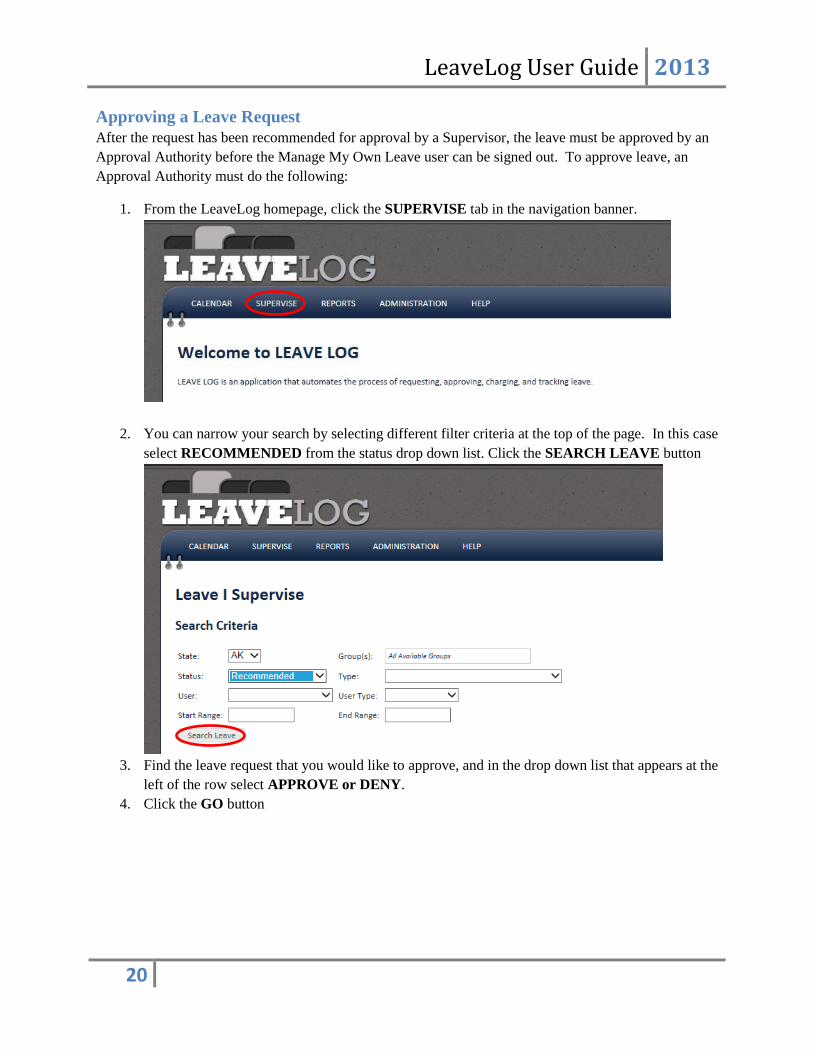
If this leave request requires a digital signature you will be directed to the digital signing page.
Follow the steps on the screen to digitally sign the leave form.
4. An email will be sent to the user who entered the request. You will also receive a copy of this
email.
LeaveLog User Guide 2013
20
Approving a Leave Request
After the request has been recommended for approval by a Supervisor, the leave must be approved by an
Approval Authority before the Manage My Own Leave user can be signed out. To approve leave, an
Approval Authority must do the following:
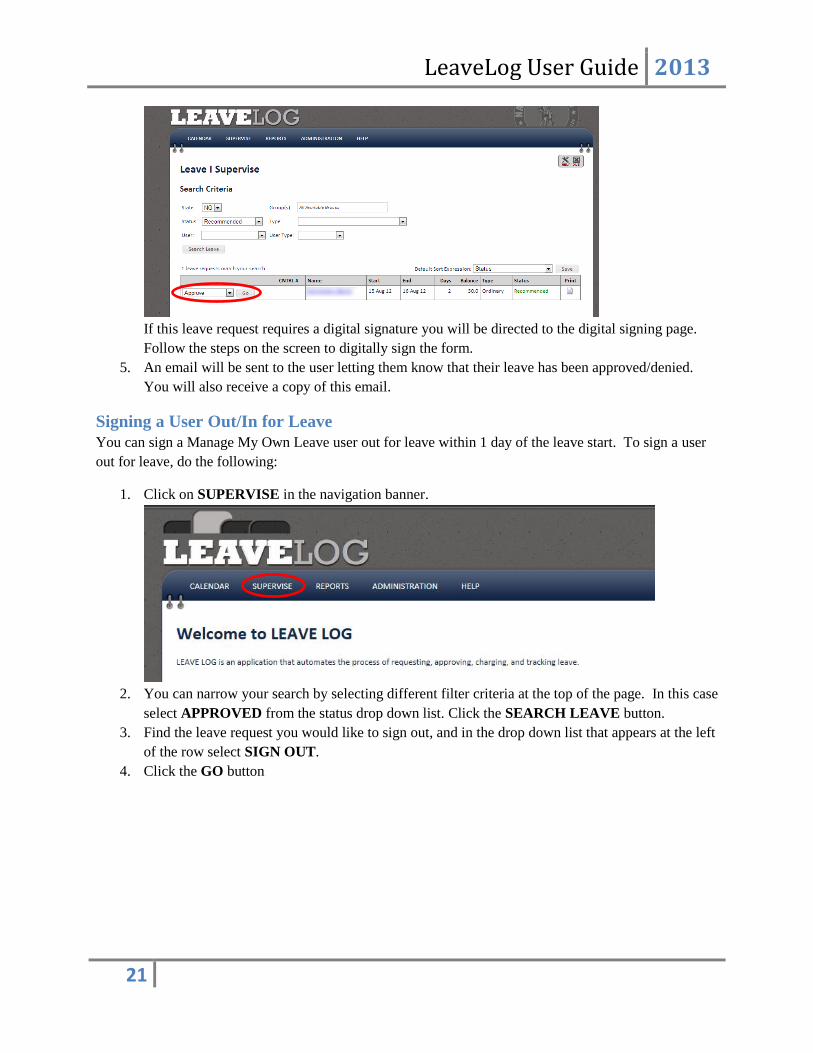
1. From the LeaveLog homepage, click the SUPERVISE tab in the navigation banner.
2. You can narrow your search by selecting different filter criteria at the top of the page. In this case
select RECOMMENDED from the status drop down list. Click the SEARCH LEAVE button
3. Find the leave request that you would like to approve, and in the drop down list that appears at the
left of the row select APPROVE or DENY.
4. Click the GO button
LeaveLog User Guide 2013
21
If this leave request requires a digital signature you will be directed to the digital signing page.
Follow the steps on the screen to digitally sign the form.
5. An email will be sent to the user letting them know that their leave has been approved/denied.
You will also receive a copy of this email.
Signing a User Out/In for Leave
You can sign a Manage My Own Leave user out for leave within 1 day of the leave start. To sign a user
out for leave, do the following:
1. Click on SUPERVISE in the navigation banner.
2. You can narrow your search by selecting different filter criteria at the top of the page. In this case
select APPROVED from the status drop down list. Click the SEARCH LEAVE button.
3. Find the leave request you would like to sign out, and in the drop down list that appears at the left
of the row select SIGN OUT.
4. Click the GO button

LeaveLog User Guide 2013
22
If this leave request requires a digital signature you will be directed to the digital signing page.
Follow the steps on the screen to digitally sign the leave form.
5. An email will be sent to the user to notify them that they have been signed out. You will receive
a copy of this email.
To sign a user in from leave:
1. Follow the same procedure, except select SIGN IN in the drop down list at the left of the row.
If this leave request requires a digital signature you will be directed to the digital signing page.
Follow the steps on the screen to digitally sign the leave form.
*Please note that if you sign a user in early (before the end date marked on the request) the
end date of the request will be changed to the date you signed the soldier in. If this is
chargeable leave the number of days charged will change.
2. An email will be sent to the user to notify them that they have been signed in. You will receive a
copy of this email.
Adding an Extension for a User
If a Manage Your Own Leave user is on leave and needs an extension to their leave, but is unable to
access the Leave Log system, you have the ability to add in an extension for that user. To add an
extension for a user, do the following:
1. Click on SUPERVISE in the navigation tab.
LeaveLog User Guide 2013
23
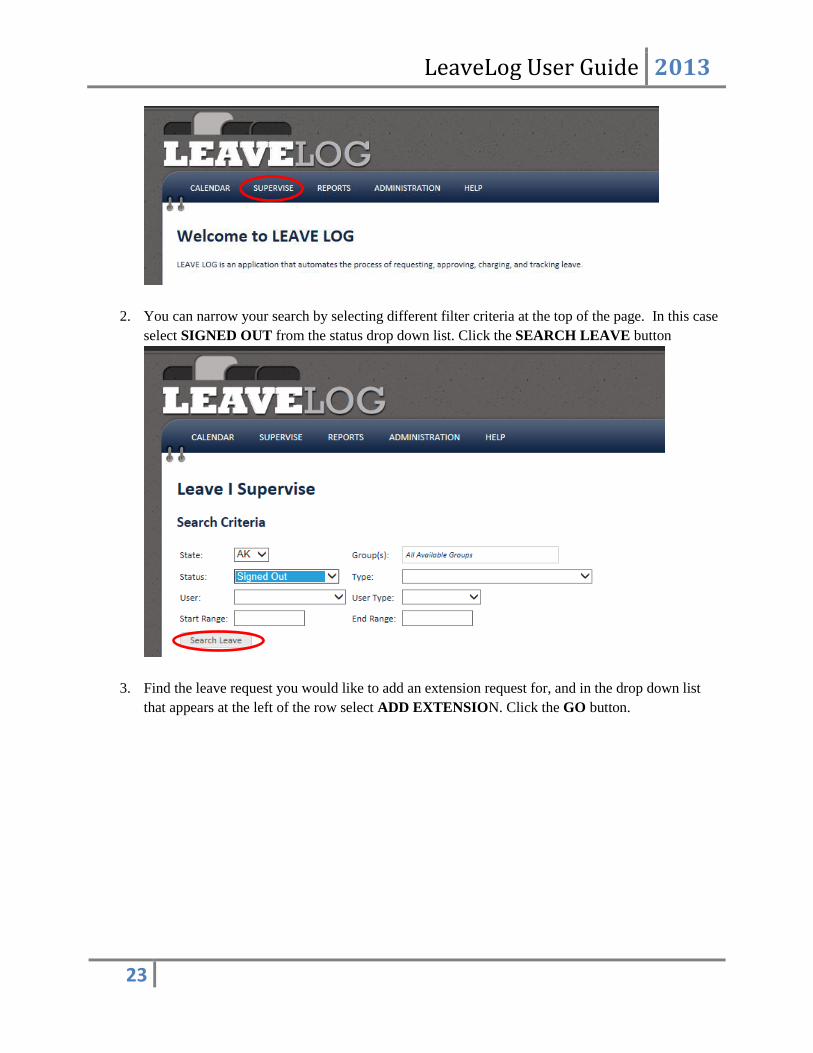
2. You can narrow your search by selecting different filter criteria at the top of the page. In this case
select SIGNED OUT from the status drop down list. Click the SEARCH LEAVE button
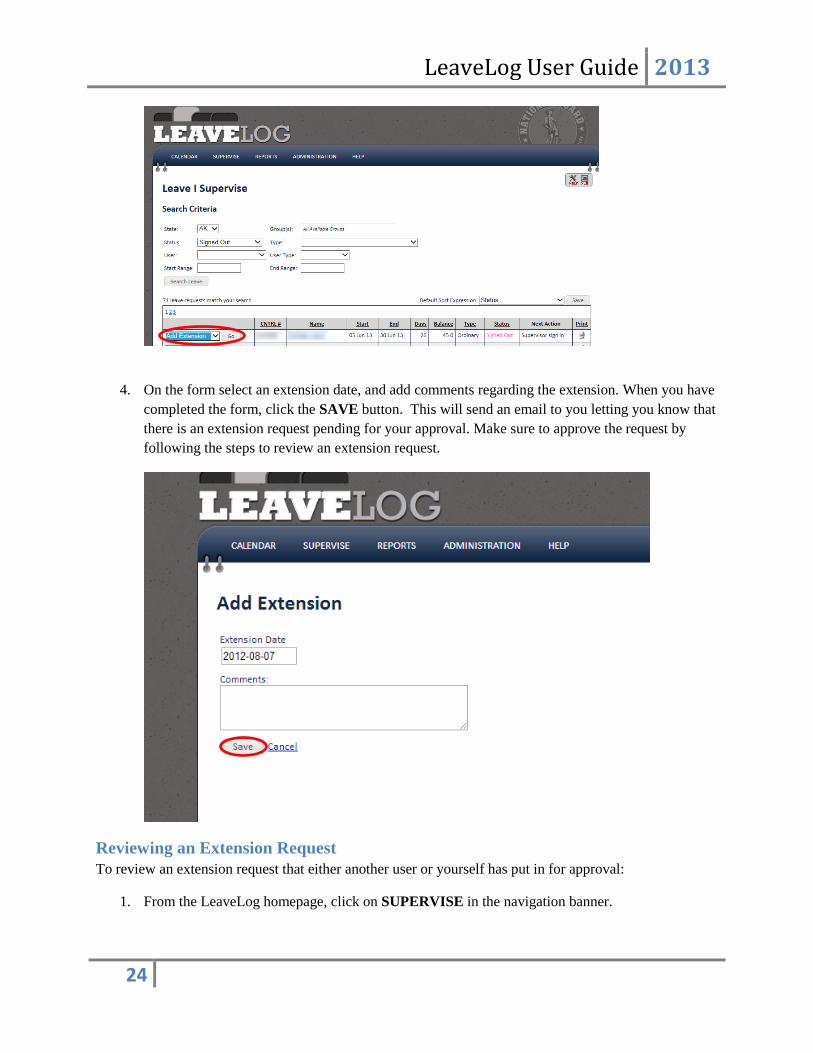
3. Find the leave request you would like to add an extension request for, and in the drop down list
that appears at the left of the row select ADD EXTENSION. Click the GO button.
LeaveLog User Guide 2013
24
4. On the form select an extension date, and add comments regarding the extension. When you have
completed the form, click the SAVE button. This will send an email to you letting you know that
there is an extension request pending for your approval. Make sure to approve the request by
following the steps to review an extension request.
Reviewing an Extension Request
To review an extension request that either another user or yourself has put in for approval:
1. From the LeaveLog homepage, click on SUPERVISE in the navigation banner.
LeaveLog User Guide 2013
25
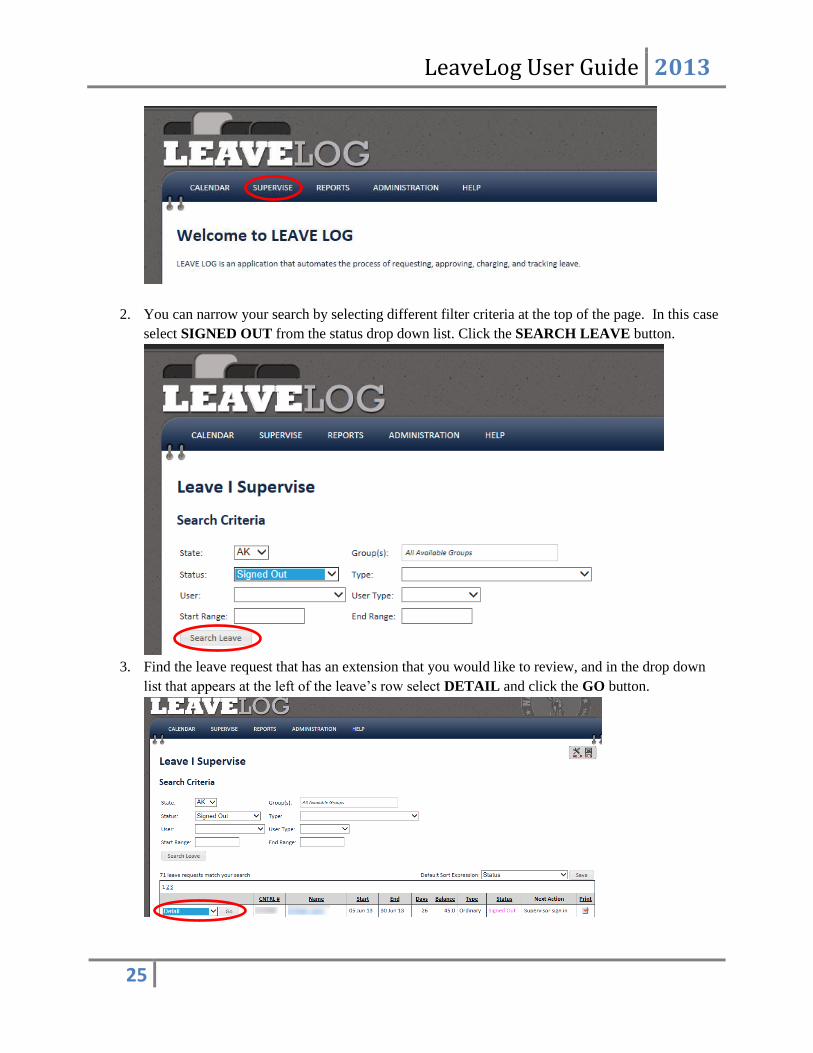
2. You can narrow your search by selecting different filter criteria at the top of the page. In this case
select SIGNED OUT from the status drop down list. Click the SEARCH LEAVE button.
3. Find the leave request that has an extension that you would like to review, and in the drop down
list that appears at the left of the leave’s row select DETAIL and click the GO button.
LeaveLog User Guide 2013
26
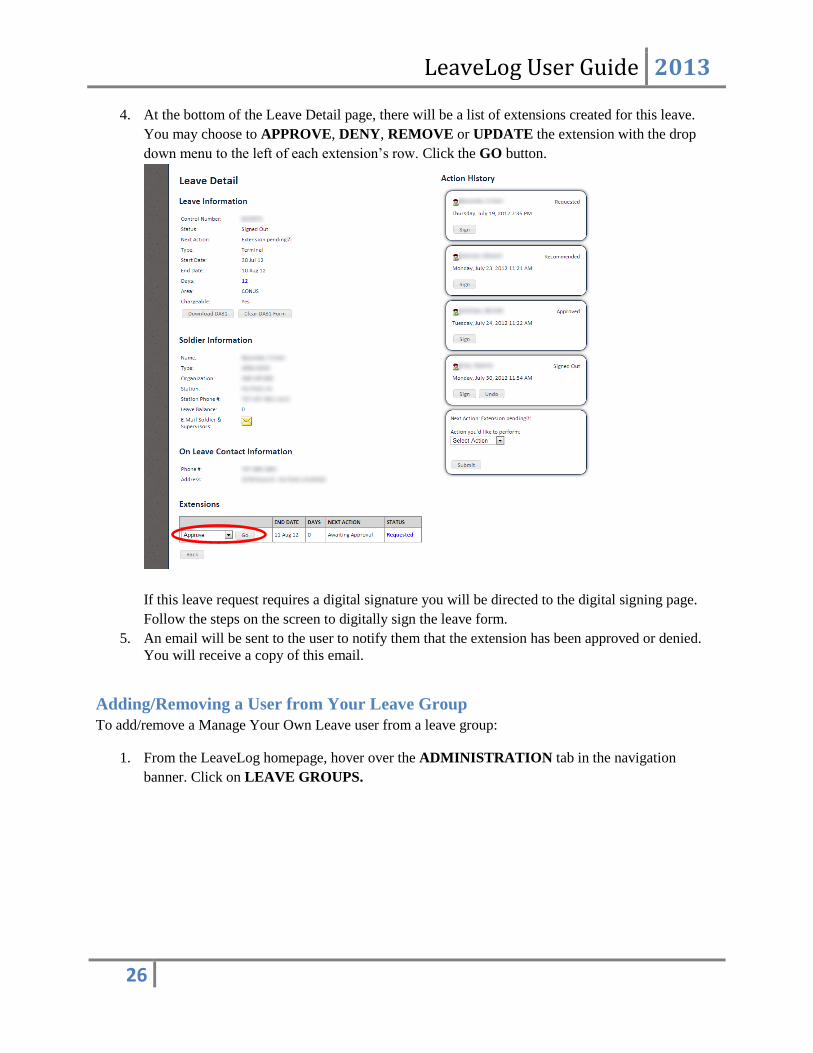
4. At the bottom of the Leave Detail page, there will be a list of extensions created for this leave.
You may choose to APPROVE, DENY, REMOVE or UPDATE the extension with the drop
down menu to the left of each extension’s row. Click the GO button.
If this leave request requires a digital signature you will be directed to the digital signing page.
Follow the steps on the screen to digitally sign the leave form.
5. An email will be sent to the user to notify them that the extension has been approved or denied.
You will receive a copy of this email.
Adding/Removing a User from Your Leave Group
To add/remove a Manage Your Own Leave user from a leave group:
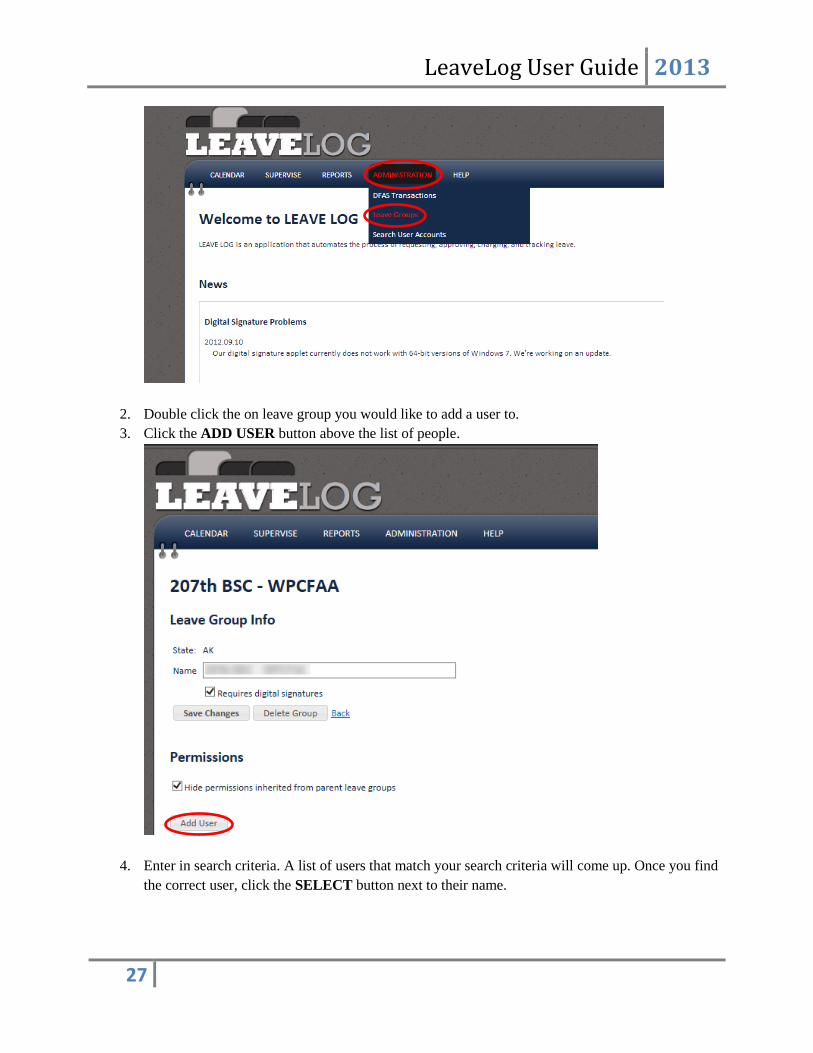
1. From the LeaveLog homepage, hover over the ADMINISTRATION tab in the navigation
banner. Click on LEAVE GROUPS.
LeaveLog User Guide 2013
27
2. Double click the on leave group you would like to add a user to.
3. Click the ADD USER button above the list of people.
4. Enter in search criteria. A list of users that match your search criteria will come up. Once you find
the correct user, click the SELECT button next to their name.

LeaveLog User Guide 2013
28
5. A list of the four permission roles will appear. Select the check box next to the appropriate role
for the user. Click SAVE ROLES.
To remove a user:
LeaveLog User Guide 2013
29
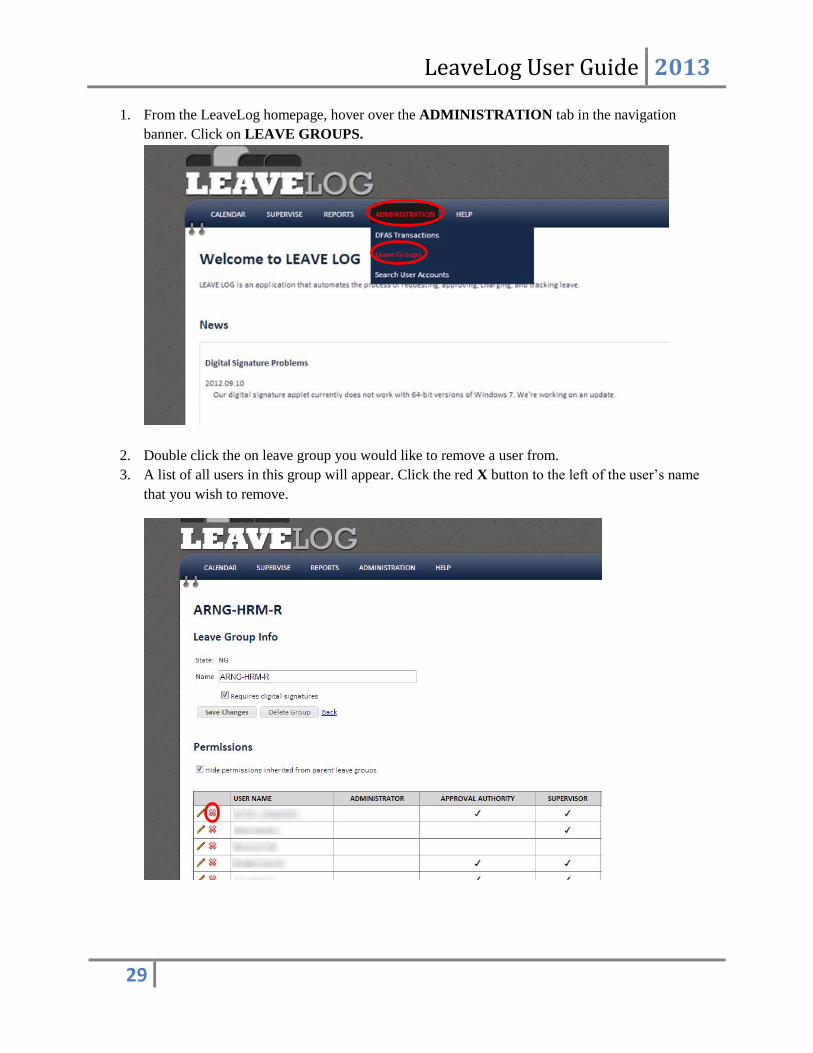
1. From the LeaveLog homepage, hover over the ADMINISTRATION tab in the navigation
banner. Click on LEAVE GROUPS.
2. Double click the on leave group you would like to remove a user from.
3. A list of all users in this group will appear. Click the red X button to the left of the user’s name
that you wish to remove.
LeaveLog User Guide 2013
30
Administration
The Leave Group Hierarchy
The leave group hierarchy is an organizational structure. Leave groups can be nested under each other to
create a tree. Permissions for Users who are Administrators, Approval Authorities and or Supervisors
cascade down to “child” groups. This means that if GroupA is the “parent” of GroupB, and I am a
Supervisor in GroupA, I can also supervise Users in GroupB. Users who are Administrators for a leave
group can create and move child leave groups.
To move a group in the hierarchy:
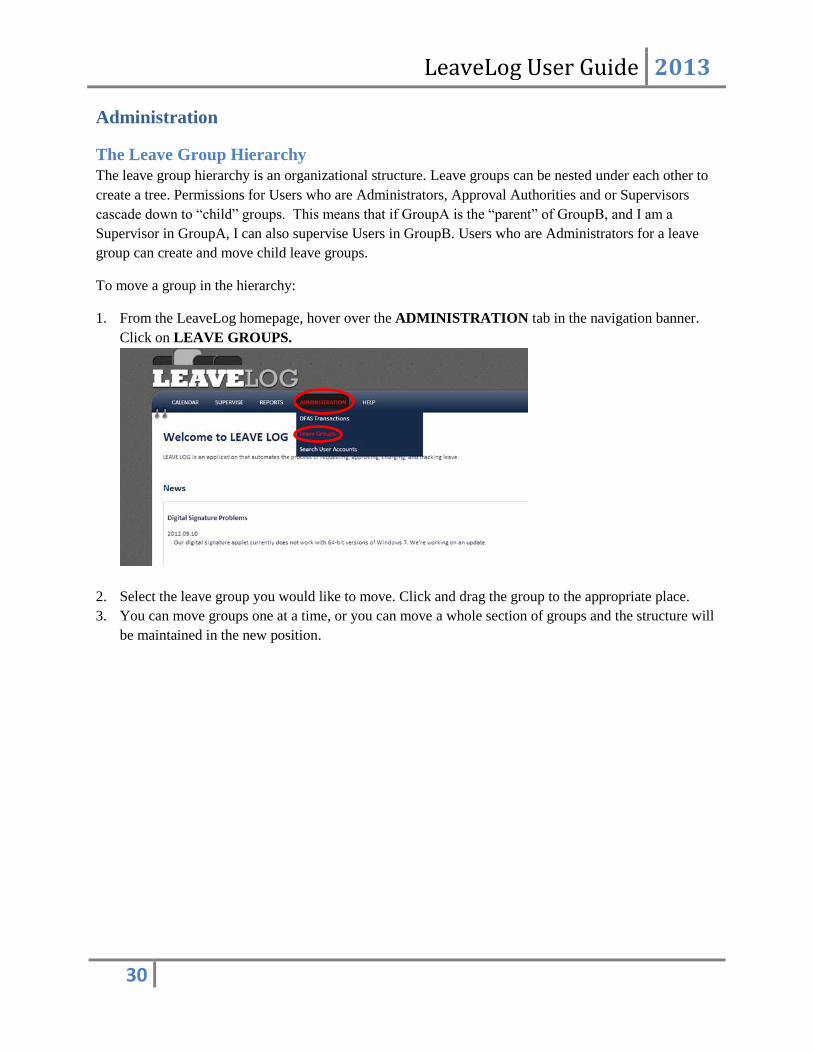
1. From the LeaveLog homepage, hover over the ADMINISTRATION tab in the navigation banner.
Click on LEAVE GROUPS.
2. Select the leave group you would like to move. Click and drag the group to the appropriate place.
3. You can move groups one at a time, or you can move a whole section of groups and the structure will
be maintained in the new position.

LeaveLog User Guide 2013
31
Email notifications are only sent to direct members of the leave group in which the leave was entered. If
a user enters leave in a child group, the supervisors in the parent group do not get notified.
Managing Leave Groups
A leave group is a grouping of users. A user is assigned to a leave group in conjunction with a
permissions role. Example: John Smith is a Supervisor for the 135th BCT leave group.
To edit a leave group:
1. From the LeaveLog homepage, hover over the ADMINISTRATION tab in the navigation banner.
Click on LEAVE GROUPS.
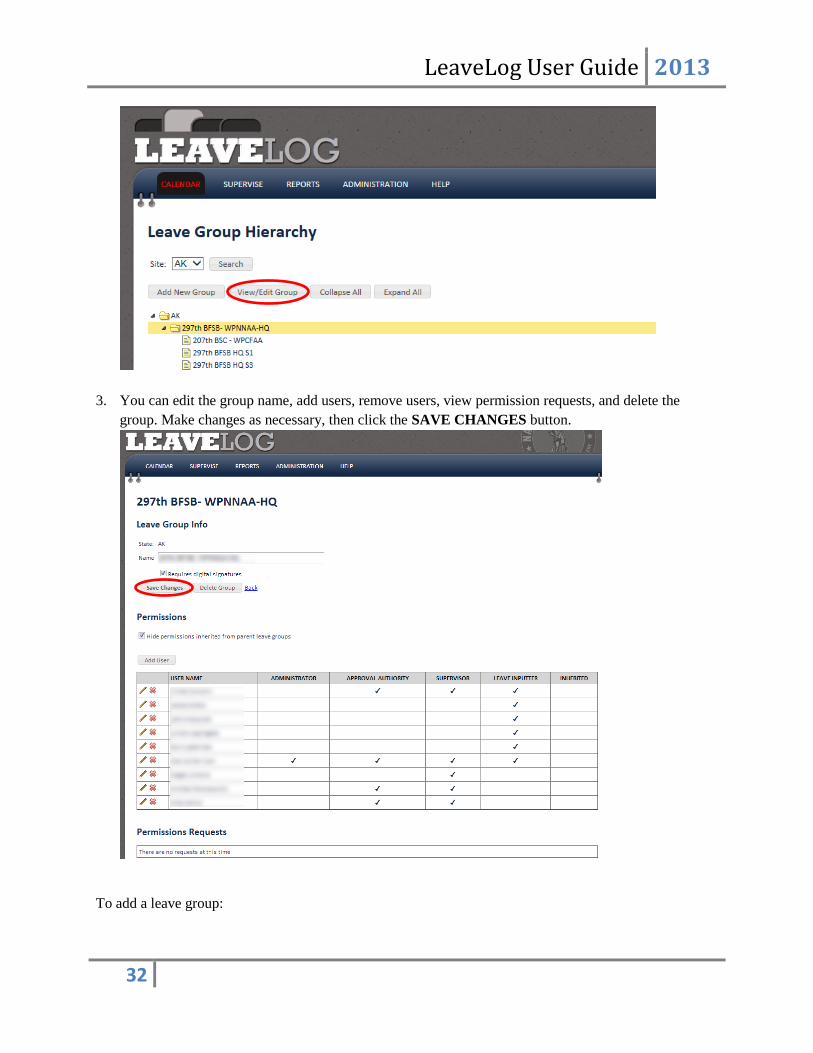
2. Select the group you wish to edit. Click the VIEW/EDIT GROUP button. (This button will not
become active if you do not have the appropriate permissions.)
LeaveLog User Guide 2013
32
3. You can edit the group name, add users, remove users, view permission requests, and delete the
group. Make changes as necessary, then click the SAVE CHANGES button.
To add a leave group:
LeaveLog User Guide 2013
33
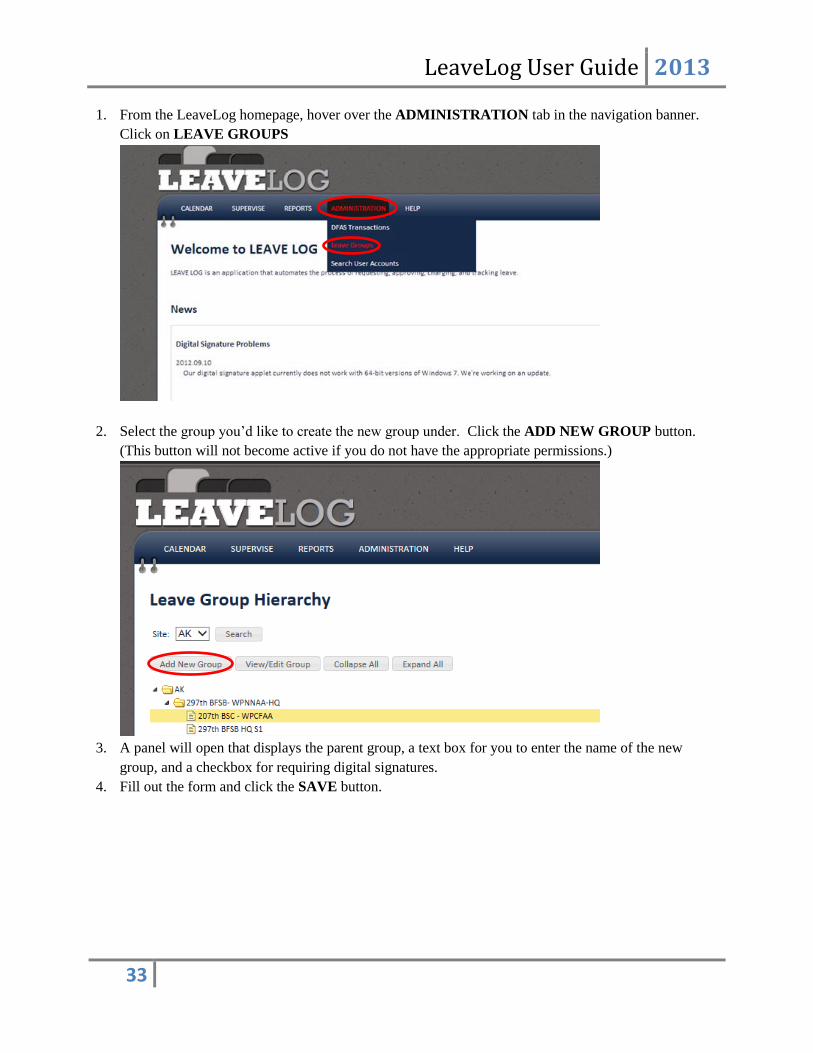
1. From the LeaveLog homepage, hover over the ADMINISTRATION tab in the navigation banner.
Click on LEAVE GROUPS
2. Select the group you’d like to create the new group under. Click the ADD NEW GROUP button.
(This button will not become active if you do not have the appropriate permissions.)
3. A panel will open that displays the parent group, a text box for you to enter the name of the new
group, and a checkbox for requiring digital signatures.
4. Fill out the form and click the SAVE button.

LeaveLog User Guide 2013
34
View DFAS Transactions
A DFAS transaction is generated when a user is signed in from leave.
Transaction types:
o Record leave: This is the type of transaction that is generated when a user is first charged
leave. It lets the pay system know who took leave and for what dates.
o Update leave: If a leave request is changed after it has already been processed by the pay
system LeaveLog will generate an update transaction to fix the record in the pay system.
o Remove leave: If a leave is cancelled after it has been processed, LeaveLog will generate
a cancellation transaction to recover the days of leave that were originally processed.
DJMS-AC:
o Transactions are added to a batch and sent to ARNG-RMC-F on a daily basis. ARNG-
RMC-F typically processes them every three days.
o ARNG-RMC-F sends LeaveLog a report after a batch has been processed that details
which transactions processed successfully, which were recycled, and which rejected.
LeaveLog processes this report and marks the requests “Processed” or “Rejected”.
Recycled transactions are ignored; they will show up on the next report. Rejected
transactions come with an error description which is placed in the comments of the
request.
DJMS-RC:
Transactions are sent to ARNG-RMC-F and uploaded into DJMS-RC on a daily basis.
ARNG-RMC-F sends LeaveLog a list of rejections from the previous day. Transactions
that are rejected are marked “Rejected” in LeaveLog and the rejection code is added to
the comments of the leave request.
ARNG-RMC-F only sends LeaveLog DJMS-RC rejections. They do not send a list of
which transactions processed successfully. Because of this, LeaveLog cannot
automatically mark leave for soldiers in DJMS-RC as “Processed”. Leave for soldiers in
DJMS-RC must be manually marked “Processed” by an administrator in the state.
LeaveLog cannot assume that if a request does not show up on the rejection list that it has
processed successfully. Transactions can be recycled by the pay system to be processed
at a later time. There have also been cases where files were not uploaded into DJMS-RC
by ARNG-RMC-F in a timely manner. If a file is never uploaded, it will not create
LeaveLog User Guide 2013
35
rejections. LeaveLog would see no rejections and mark the requests as processed when
in fact the entire file had not been uploaded.
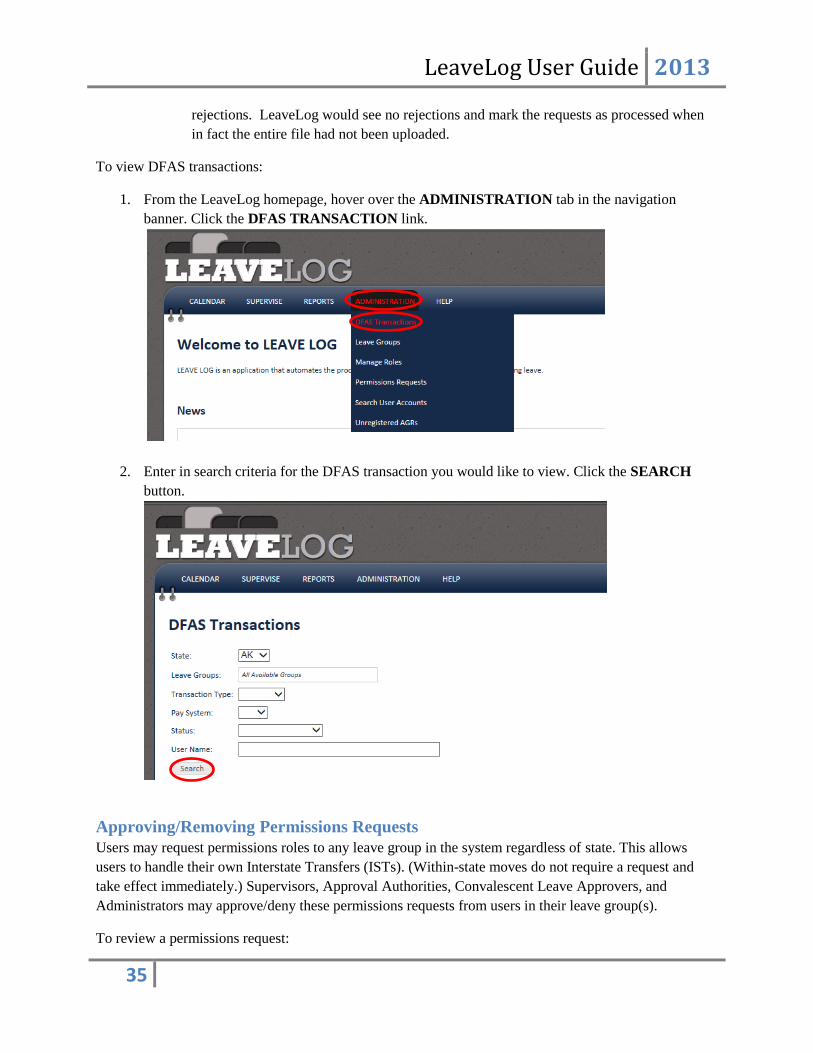
To view DFAS transactions:
1. From the LeaveLog homepage, hover over the ADMINISTRATION tab in the navigation
banner. Click the DFAS TRANSACTION link.
2. Enter in search criteria for the DFAS transaction you would like to view. Click the SEARCH
button.
Approving/Removing Permissions Requests
Users may request permissions roles to any leave group in the system regardless of state. This allows
users to handle their own Interstate Transfers (ISTs). (Within-state moves do not require a request and
take effect immediately.) Supervisors, Approval Authorities, Convalescent Leave Approvers, and
Administrators may approve/deny these permissions requests from users in their leave group(s).
To review a permissions request:

LeaveLog User Guide 2013
36
1. From the LeaveLog homepage, hover over the ADMINISTRATION tab in the navigation banner.
Click on PERMISSIONS REQUESTS.
2. Check the checkbox next to the request(s) you’d like to approve or remove.
3. Click the APPROVE SELECTED or REMOVE SELECTED button above the list
Viewing Leave Reports For Supervisors, Approval Authorities, Convalescent Leave Approvers, and Administrators, there are a
few prepackaged reports in LeaveLog to help you report leave.
To locate these reports:
1. From the LeaveLog homepage, hover over the REPORTS tab in the navigation banner. Select the
report you want to view.

LeaveLog User Guide 2013
37
Late Leave
This report shows all Users that are still actively signed out, when they are supposed to have
already signed back in. There is a moveable gray bar labeled “Days Late” that allows you to
select the number of days late you wish to view. Example- show all leave that is signed out, but
should have been signed in 20 days ago.
Leave Balances
The leave balance report displays leave balances for individual users. You can filter the report by
state, leave group(s), pay system the user is paid from, and the number of days left in a balance.
The leave balances are imported daily from DJMS-AC and DJMS-RC. LeaveLog does not
change the balances at any point. Changes to the leave balances must be made via transactions on
their respective pay systems. This report is refreshed every hour, so leave group moves or
changed in the number of leave days in the queue this FY or awaiting export to DFAS may
not show up immediately.
Columns:
o Name
o Leave Group – the leave group the user is currently assigned to
o Pay System – AC/RC
o BASD – Basic Active Service Date. This date is pulled from ARNG-HRM’s latest
copy of TAPDB-G
o Tour End – Only for users in DJMS-RC. Downloaded daily with the balances
o Balance
o In Queue This FY – Leave that is in LeaveLog, but has not been taken. Planned
leave.
o Awaiting DFAS Export – Leave that has been completed in LeaveLog but has not
been sent for processing yet.
LeaveLog User Guide 2013
38
Leave Control Number Report (Leave Log)
This report shows every leave request that has been assigned a leave control number in your state,
ordered numerically. This report is intended to be a replacement for the DA form 4179 (Leave
Control Log).
Leave Gantt Chart
This report shows a graphical representation of all active leave during a given time. It shows time
horizontally and displays a colored bar during the period of time the Manage Your Own Leave
user is on leave. Any leave that is in the approved, signed out, returned, signed in, or DFAS
processed status will show on this report.
Organization Roster
This report displays all users in your state. It shows who the Administrators are, what groups
have been set up, and Supervisors and Manage Your Own Leave users in each group.
Users Who Haven’t Taken Leave
This report allows you to enter a date and see who has not taken leave since that date.
Appendix
System Interfaces
DJMS-AC
o Automated leave processing for any user paid from DJMS-AC (Active Army, Active
Army Guard, etc)
o Leave balances are downloaded from the leave master tables in DJMS-AC daily and
displayed in LeaveLog
o Leave transactions are batched and sent to ARNG-RMC-F daily. ARNG-RMC-F
uploads the transactions into DJMS-AC daily as well
DJMS-RC
o Automated leave processing for any soldier paid from DJM-RC (MDAY, ADOS, etc)
o Leave balances are downloaded from the leave master tables in DJMS-RC daily and
displayed in LeaveLog
o Leave transactions are batched and sent to ARNG-RMC-F daily. ARNG-RMC-F
uploads the transactions into DJMS-RC daily as well
HRMS
o Title 10 users who are on leave are sent to the Human Resource Management System
(HRMS) daily.
Feedback
All users have the option to provide feedback for the LeaveLog site. All feedback comments are emailed
directly to the development team.

LeaveLog User Guide 2013
39
To leave feedback:
1. Click on FEEDBACK located in the top right corner of the screen.
Click the ADD FEEDBACK button.
Type your feedback in the “Comments” section. Click the SAVE button.

LeaveLog User Guide 2013
40
Terms and Definitions
Leave Status:
o Request – Leave is awaiting recommendation or approval
o Recommended – Leave has been recommended by a Supervisor and is awaiting approval
from an Approval Authority
o Approved – Leave has been approved by an Approval Authority and can be signed out up
to 3 days prior to the start date.
o Signed Out – A Supervisor or Approval Authority has signed the user out on leave.
o Signed In – A Supervisor or Approval Authority has signed the user in from leave.
LeaveLog will now generate a pay transaction is applicable
o Denied – Leave can be denied by a supervisor or approval authority. Denied leave
cannot have actions performed on it
o Cancelled – Leave has been cancelled by the person who requested it. Cancelled leave
cannot have actions performed on it.
o Awaiting Processing – Leave transaction has been sent to ARNG-RMC-F for upload into
DJMS-AC/RC.
o Processed –
DJMS-AC: Leave Log has confirmed that the leave transaction has been
processed successfully into the pay system
DJMS-RC: An Administrator has manually marked the leave as processed
o Rejected – A leave transaction was uploaded into the pay system but was not successfully
processed. See leave action history for rejection description
o Recycled – A leave transaction was uploaded into the pay system but was not
successfully processed. The pay system will try to process the leave again at a later time.
DJMS-AC – Defense Joint Military Pay System – Active Component
DJMS-RC – Defense Joint Military Pay System – Reserve Component
DFAS – Defense Finance and Accounting Services
FTSMCS – Full Time Support Management Control System
CAC – Common Access Card. Needed along with a CAC reader and an AKO account to access
LeaveLog