Embed Size (px)
Citation preview

What's New
About
Rides
Mailing List
Members
Photos
Projects
Library/Misc.
MARS Gear
Links
Click HERE to go back to the top Vacuum Foamshell pageClick HERE to go back to the main Projects pageClick HERE to go back to John Tetz's ProjectsClick HERE to go back to the Foamshell Links Page
Left hand drive freewheel
Left hand drive freewheel on hubSeveral years ago I took notes while modifying the freewheels I built for my front wheel drive bikes, but I lost that write-up, so I modified another freewheel – it was a rainy weekend. This took about five hours, including taking notes, dimensions, and photos. For a source of freewheels I went to a bike shop which had some old 6-speed hubs with freewheels. To start:
a) Remove the axle and main ball bearings, saving the balls in a small plastic bag.
b) Pry out the dust cap (not used) with a large screwdriver.
c) Clamp the hub in a vise. You might need to use a wood spacer if the hub diameter varies.
d) Remove the main bearing race using a drift and a hammer (unless you have the correct spanner). There are two slots, so place the drift at a low angle and hit it quite hard. Alternate one slot at a time. This bearing is a LEFT hand thread, clockwise if the assembly is facing up. Loosen the bearing, but do not remove it.
e) Remove the entire freewheel assembly from the hub using a 10 mm Allen key wrench. There is a large diameter hex bolt in the center of the hub, which is usually quite tight.
Page 1 of 6MARS projects - VFS - Left hand drive freewheel
03/03/2009http://www.recumbents.com/mars/pages/proj/tetz/VFS/projtetzVFS02lefthanddrive.ht...

f) Unscrew the main bearing over a sheet of paper. You will see many tiny bearings ready to run out all over the floor. Caution: there is a set of similar bearings on the bottom, so hold the freewheel by the bottom as you remove the upper bearings. Then slide the freewheel assembly out of the main body and store the bearings in a plastic bag. There are spacer washers between the main bearing and the freewheel which set the preload on those tiny bearings (very important).
Machining the freewheel: mentally picture shifting the now empty freewheel body from its normal right side position to the left side of a hub, maintaining the same orientation. This then keeps the internal ratchet teeth in the correct direction.
Heat the main body with a propane torch to remove the hardness. Let it cool slowly. Then machine off the lip. This drawing shows only a small section of the body. Removing the lip allows a cog to slide on the grooves from a new direction onto the body.
Temporarily reassemble the freewheel center inside the main body in order to measure how much metal must be removed from the main body.
Only the small freewheel bearings on the right side of the drawing are needed. Use grease to hold the bearings. Then measure the distance from the main body to the engagement side of the freewheel center. This is the 0.515" dimension using a 6-speed freewheel. Remove this dimension from the main body, plus about 0.008". The engagement side of the freewheel must project beyond the edge of the main body but not too far, otherwise dirt and water will get in.
Page 2 of 6MARS projects - VFS - Left hand drive freewheel
03/03/2009http://www.recumbents.com/mars/pages/proj/tetz/VFS/projtetzVFS02lefthanddrive.ht...

Cone cap bodyUse large snap rings to hold the cogs; I have two cogs to extend gear range. Determine the spacers to be used and machine the grooves in the main body. The snap rings need to be up against the cogs to keep them from rattling. Round snap rings work better and reduce machining tolerance requirements.
An aluminum dust cap must be made to protect the main bearings. The 1.125" dimension is a light press fit to the outer diameter of the main bearing race. A normal cone with rubber seal is used for the rotating seal.
Page 3 of 6MARS projects - VFS - Left hand drive freewheel
03/03/2009http://www.recumbents.com/mars/pages/proj/tetz/VFS/projtetzVFS02lefthanddrive.ht...

A sealed bearing can be used. Heat the main bearing to remove the hardness, and then machine to ~1.02" inner diameter. A sealed bearing would slightly reduce the width of the freewheel.
Grind slotsThe pawls need to be reversed to engage the ratchets properly. Before removing the pawls, note carefully how they lie in their machined cutouts. Note when compressing them they are flush with the outside surface of the freewheel body. They should not jut out because they could drag or even jam against the ratchet teeth. Don’t lose the tiny spring. Using a 0.2" diameter x 0.4" long grinding stone, grind the opposite (left) side of the present cutouts. Push to the left and down while grinding, as shown above. Try to leave a lip on the right side of the grinding to hold the pawls in place. Note how deep the original shape is and try to duplicate this. Grinding should only take a half an hour. Suggestion: the small diameter grinding wheel gets very hot and will wear quickly, so use it in spurts to allow cooling.
Page 4 of 6MARS projects - VFS - Left hand drive freewheel
03/03/2009http://www.recumbents.com/mars/pages/proj/tetz/VFS/projtetzVFS02lefthanddrive.ht...

Pawls end viewTemporarily assemble the freewheel to check if both pawls catch at the same time. If not, additional grinding may be necessary to lower the one that is late. Both pawls need to click together. You might want to assemble it using some upper bearings to check for proper operation. Then clean, re-lube, and assemble the freewheel, first the bottom freewheel bearings, using lightweight bike grease to hold them, then the spacer washers on the top side, then the upper freewheel bearings, and finally the main bearing race. Caution: on assembly do not get any grease on the threads of the main bearing race to freewheel joint (difficult). This joint is rotating in the wrong direction and will come unwound, resulting in excessive pressure on the main bearings, most likely destroying them, so use an ample amount of permanent Loctite. Finally, tighten the main bearing by placing the freewheel on an old hub that is clamped tightly in a vise and use the drift. You might temporarily hold the freewheel on the hub with the large diameter hex bolt.
Body drive sideHere is the assembled freewheel (without the snap ring groves), 1" long without the dust cover. This gives an overall dimension between fork legs of about 4.58".
Page 5 of 6MARS projects - VFS - Left hand drive freewheel
03/03/2009http://www.recumbents.com/mars/pages/proj/tetz/VFS/projtetzVFS02lefthanddrive.ht...

Body bearing sideAnother view of the assembled freewheel.
Next section: LFWD carbon mesh seat construction
Page 6 of 6MARS projects - VFS - Left hand drive freewheel
03/03/2009http://www.recumbents.com/mars/pages/proj/tetz/VFS/projtetzVFS02lefthanddrive.ht...
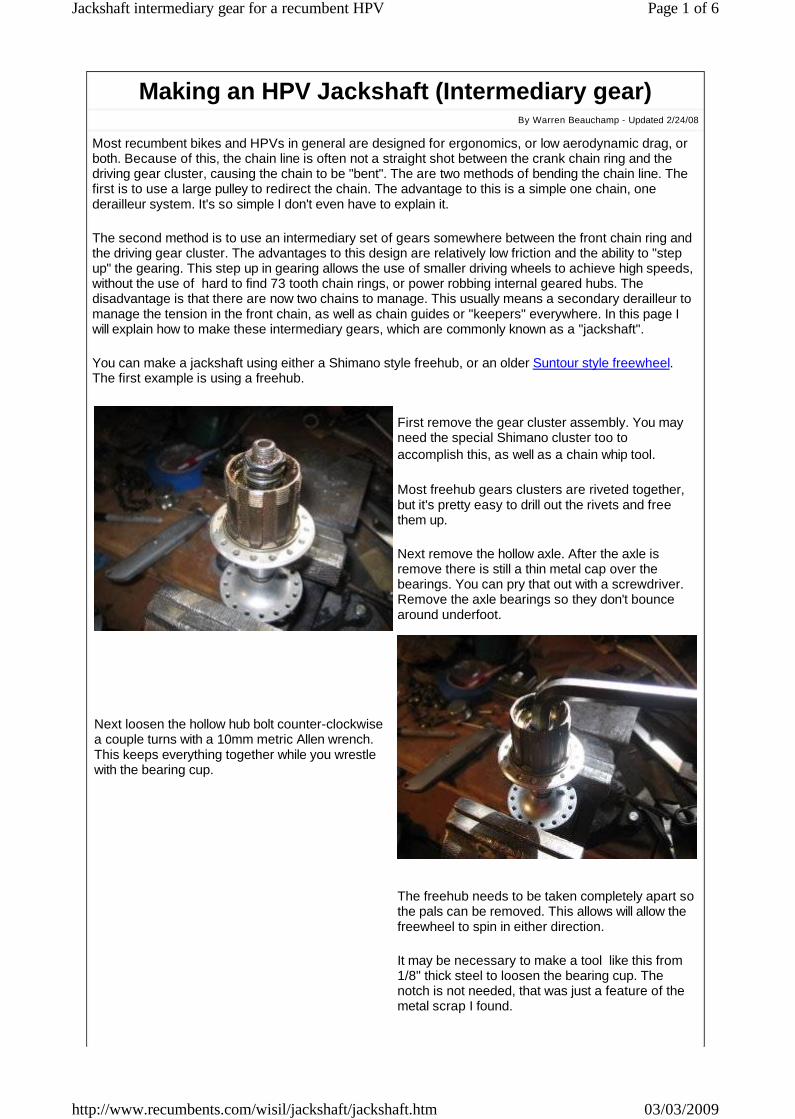
Making an HPV Jackshaft (Intermediary gear)By Warren Beauchamp - Updated 2/24/08
Most recumbent bikes and HPVs in general are designed for ergonomics, or low aerodynamic drag, or both. Because of this, the chain line is often not a straight shot between the crank chain ring and the driving gear cluster, causing the chain to be "bent". The are two methods of bending the chain line. The first is to use a large pulley to redirect the chain. The advantage to this is a simple one chain, one derailleur system. It's so simple I don't even have to explain it.
The second method is to use an intermediary set of gears somewhere between the front chain ring and the driving gear cluster. The advantages to this design are relatively low friction and the ability to "step up" the gearing. This step up in gearing allows the use of smaller driving wheels to achieve high speeds, without the use of hard to find 73 tooth chain rings, or power robbing internal geared hubs. The disadvantage is that there are now two chains to manage. This usually means a secondary derailleur to manage the tension in the front chain, as well as chain guides or "keepers" everywhere. In this page I will explain how to make these intermediary gears, which are commonly known as a "jackshaft".
You can make a jackshaft using either a Shimano style freehub, or an older Suntour style freewheel. The first example is using a freehub.
First remove the gear cluster assembly. You may need the special Shimano cluster too to accomplish this, as well as a chain whip tool.
Most freehub gears clusters are riveted together, but it's pretty easy to drill out the rivets and free them up.
Next remove the hollow axle. After the axle is remove there is still a thin metal cap over the bearings. You can pry that out with a screwdriver. Remove the axle bearings so they don't bounce around underfoot.
Next loosen the hollow hub bolt counter-clockwise a couple turns with a 10mm metric Allen wrench. This keeps everything together while you wrestle with the bearing cup.
The freehub needs to be taken completely apart so the pals can be removed. This allows will allow the freewheel to spin in either direction.
It may be necessary to make a tool like this from 1/8" thick steel to loosen the bearing cup. The notch is not needed, that was just a feature of the metal scrap I found.
Page 1 of 6Jackshaft intermediary gear for a recumbent HPV
03/03/2009http://www.recumbents.com/wisil/jackshaft/jackshaft.htm

Insert your tool into the notches in the bearing cup, and twist clockwise.
Here's the hub with the hollow bolt, and the bearing cup removed.
The inner guts of the freehub can then be removed. Make sure to take this all apart on something clean, as some of the bearing are going to fall out.
Remove the palls (the things that go clicky clicky), and the wire keeper that holds them in. Chase down the bearings and put them back into place, and reassemble the freehub.
Cut the threaded section off of the hollow bolt. It will be used as a spacer. You will need to use a cut off
Page 2 of 6Jackshaft intermediary gear for a recumbent HPV
03/03/2009http://www.recumbents.com/wisil/jackshaft/jackshaft.htm

tool or dremel rather than a hacksaw, as the hollow nut is made of hardened steel. Make a thick washer, which will go on the bottom of the freehub.
This mid-drive will be used as part of a human powered boat drive, so it looks a bit different that a bike mid drive, but the same concepts apply.
Build up the new mid-drive. The parts pictured left to right on this axle are an axle bolt, a spacer made from a chunk of tubing, and axle spacer, the thick washer, the freehub, another spacer made from tubing and the right side nut.
I wrapped some electrical tape around the axle to space it out to the inside diameter of the hollow nut. This ensures that the freehub is properly centered on the axle when it's all tightened down.
Here is the completed intermediary jackshaft. I used a couple of spacers between the two gears to ensure they were far enough apart that the chains would not rub. I made a big lightweight spacer for the remaining space on the hub with some handy aluminum tubing.
Here's how to attach the freehub to a bottom bracket cup, without having a machine shop at your disposal.
First you need a steel bottom bracket cup from a cheesy bike with a non-sealed-bearing-BB (item 1). Then you need to rip apart a perfectly good rear cluster, remove the pals so it turns both directions, and put it back together (item 2). Hack the threads off the hollow star nut that held the carrier to the hub so you can use it as a sleeve (item4). Use an old solid bike axle (item 3), plus a bunch of axle spacers and washer to complement...
Page 3 of 6Jackshaft intermediary gear for a recumbent HPV
03/03/2009http://www.recumbents.com/wisil/jackshaft/jackshaft.htm

Slide the axle with the "item 4" sleeve into the carrier. An axle nut and a spacer and another nut are to the right of the sleeve. The additional spacer and sleeve will be used to mount the derailleur later.
Add another spacer to the back of the carrier, to keep the axle centered in the hole back there, and to space it out a bit from the BB cup.
Add the big washer, and another spacer. This fills in that huge hole in the BB cup, and centers the axle in there.
Note that there is a certain amount of slop between axle and the sleeve, and between the spacers and the BB cup hole. You can wrap the axle with electrical tape to make the sleeve fit snugly, and when it's all tightened down it will be plenty strong.
Add the BB cup, a couple more washers, and a nut. Tighten to a torque of one grunt.
Uh. That last nut sitting there forlornly is left over.
Move along now...
Suntour Freewheel Jackshaft
You can make also make a jackshaft using a freewheel, which is an older type of gear cluster, commonly made by Suntour. You'll need a chain whip to remove the gears.
Even if the wheel is a throwaway, leave the spokes attached to the wheel until after you are done removing the freewheel. It's much easier if you have something to hold onto while you are grunting away, removing gears that have been gunked in
Page 4 of 6Jackshaft intermediary gear for a recumbent HPV
03/03/2009http://www.recumbents.com/wisil/jackshaft/jackshaft.htm

place for the past 20 years. As you can see in the picture below, I cut the spokes before removing the freewheel body, making it much harder to remove.
You'll need to completely disassemble the freewheel, to remove the palls. This will allow the freewheel to spin smoothly in either direction. Depending on how tight it is, you may need some special tools to disassemble the freewheel itself. If you don't have the special tools, you can just mount the freewheel body in a vise and use a punch in one of the two holes in the bearing keeper to tap the keeper loose. Note that loose is clockwise. Be careful when you get it loose, there are approximately 1 million ball bearings inside. Clean everything well. Use some grease to stick the ball bearings in place when you are reassembling it. Wash the grease out with a lightweight oil. Grease is too heavy a lubricant for those little balls.
The threads that held the freewheel onto the hub are the same as in a bottom bracket. The picture below shows the back of the freewheel and a bottom bracket retainer.
After you screwed the bottom bracket retainer into the freewheel, you can just screw that into a bottom bracket.
Page 5 of 6Jackshaft intermediary gear for a recumbent HPV
03/03/2009http://www.recumbents.com/wisil/jackshaft/jackshaft.htm

Return to HPV projects page
If your project happens to have a bottom bracket in the right place, you are lucky. If you are not so lucky, you can buy plain bottom bracket shells, hack them up, and braise them right to the frame. If you are unsure of the jackshaft placement, you can mount the remnants of the bottom bracket to an adjustable clamp. Note that by using larger gears you will attain higher power transfer efficiency. The smaller gear in the photo below is just there to retain the larger gears.
You will need a secondary derailleur to keep the front chain from popping off. I recommend mounting it as close to the intermediary gears as possible.
Page 6 of 6Jackshaft intermediary gear for a recumbent HPV
03/03/2009http://www.recumbents.com/wisil/jackshaft/jackshaft.htm