Embed Size (px)
Citation preview

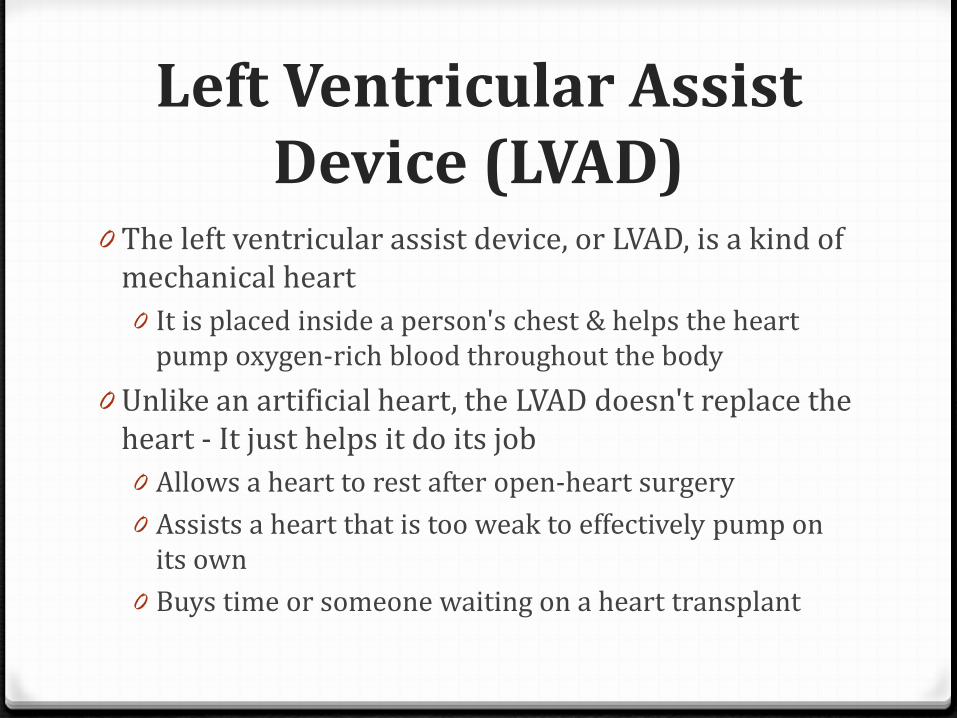
Left Ventricular Assist Device (LVAD)
0 The left ventricular assist device, or LVAD, is a kind of mechanical heart 0 It is placed inside a person's chest & helps the heart
pump oxygen-rich blood throughout the body 0 Unlike an artificial heart, the LVAD doesn't replace the
heart - It just helps it do its job 0 Allows a heart to rest after open-heart surgery 0 Assists a heart that is too weak to effectively pump on
its own 0 Buys time or someone waiting on a heart transplant
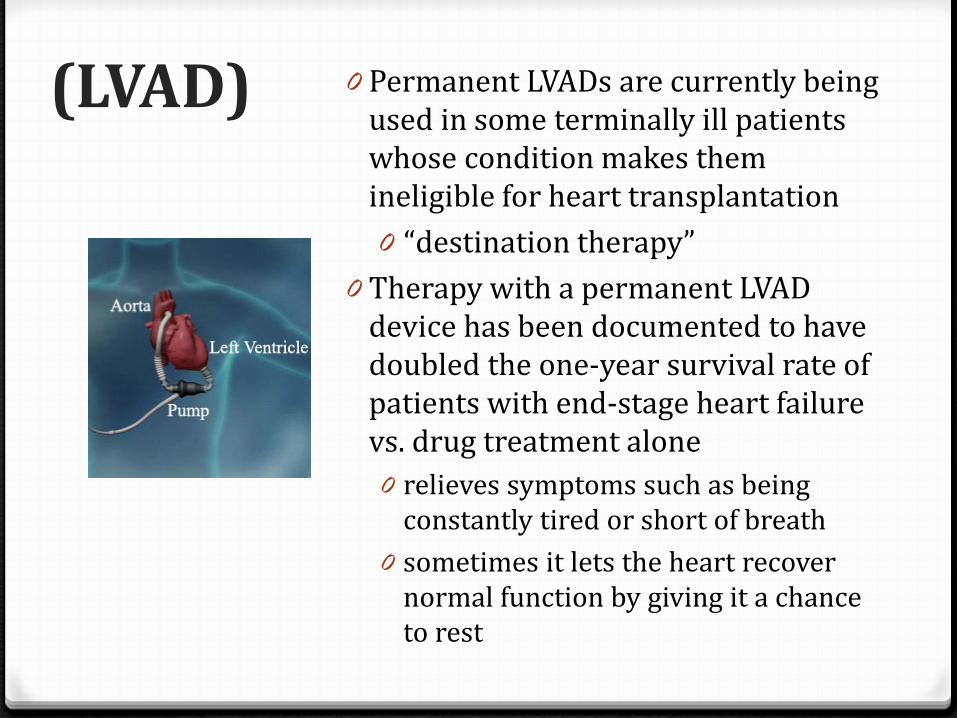
(LVAD) 0 Permanent LVADs are currently being used in some terminally ill patients whose condition makes them ineligible for heart transplantation 0 “destination therapy”
0 Therapy with a permanent LVAD device has been documented to have doubled the one-year survival rate of patients with end-stage heart failure vs. drug treatment alone 0 relieves symptoms such as being
constantly tired or short of breath 0 sometimes it lets the heart recover
normal function by giving it a chance to rest
How Does an LVAD Work?
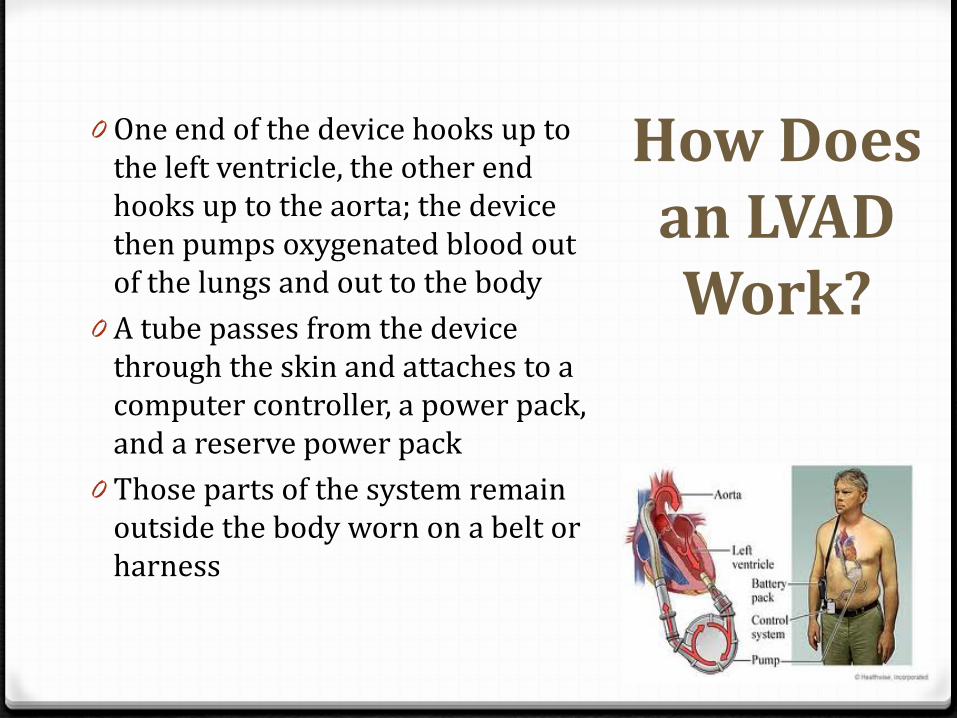
0 One end of the device hooks up to the left ventricle, the other end hooks up to the aorta; the device then pumps oxygenated blood out of the lungs and out to the body
0 A tube passes from the device through the skin and attaches to a computer controller, a power pack, and a reserve power pack
0 Those parts of the system remain outside the body worn on a belt or harness
Cardiopulmonary bypass (CPB) 0 Cardiopulmonary bypass is commonly used because of
the difficulty of operating on the beating heart 0 Operations requiring the opening of the chambers of the
heart require the use of CPB to support circulation during that period
0 The machine nourishes the blood cells and allows them to continue cellular respiration even through surgery
0 CPB mechanically circulates and oxygenates blood for the body while bypassing the heart and lungs
0 Often called a “heart–lung machine”, it maintains perfusion to other body organs and tissues while the surgeon works in a bloodless surgical field
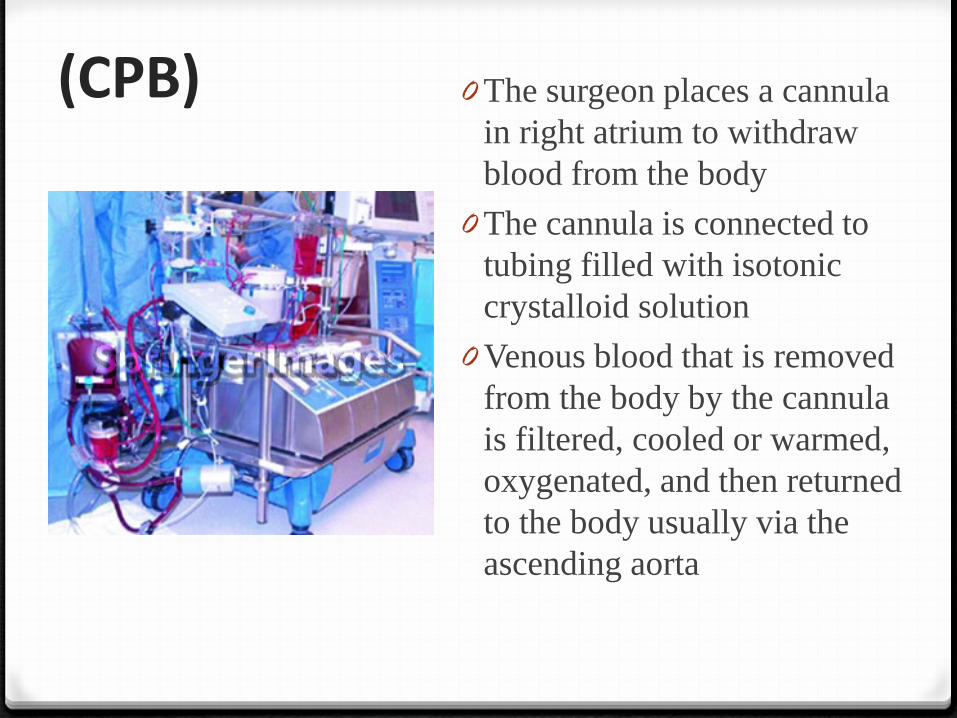
(CPB) 0 The surgeon places a cannula in right atrium to withdraw blood from the body
0 The cannula is connected to tubing filled with isotonic crystalloid solution
0 Venous blood that is removed from the body by the cannula is filtered, cooled or warmed, oxygenated, and then returned to the body usually via the ascending aorta

(CPB) 0 The patient is administered heparin to prevent clotting
0 During the procedure, hypothermia is maintained; body temperature is usually kept at 28ºC to 32ºC (82.4–89.6ºF).
0 The blood is cooled during CPB and returned to the body. The cooled blood slows the body’s basal metabolic rate, decreasing its demand for oxygen
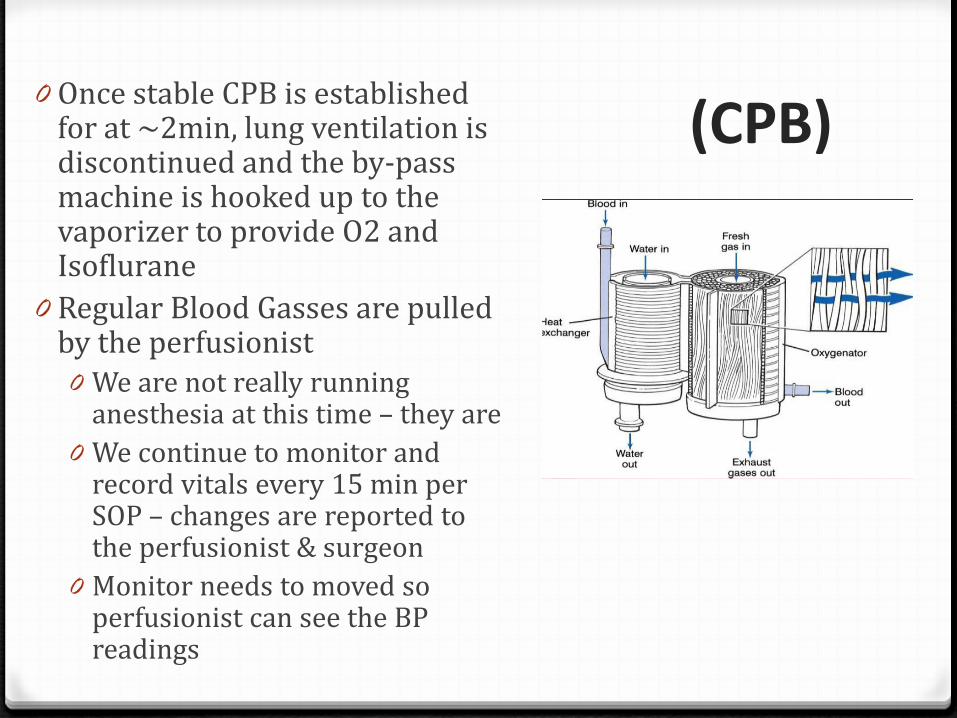
(CPB) 0 Once stable CPB is established for at ~2min, lung ventilation is discontinued and the by-pass machine is hooked up to the vaporizer to provide O2 and Isoflurane
0 Regular Blood Gasses are pulled by the perfusionist 0 We are not really running
anesthesia at this time – they are 0 We continue to monitor and
record vitals every 15 min per SOP – changes are reported to the perfusionist & surgeon
0 Monitor needs to moved so perfusionist can see the BP readings
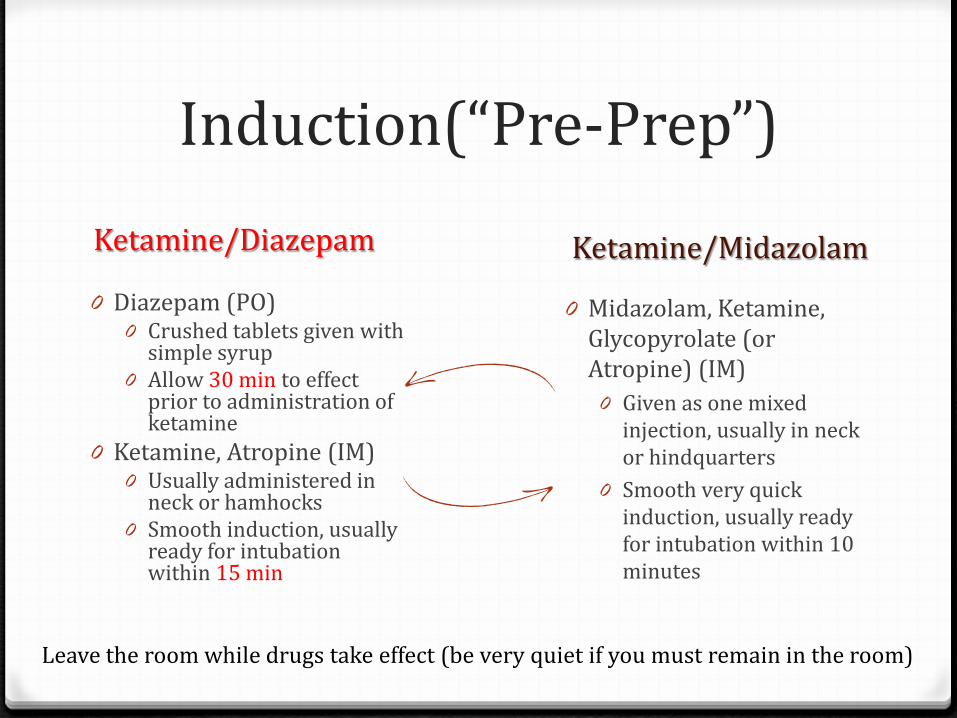
Induction(“Pre-Prep”) Ketamine/Diazepam Ketamine/Midazolam 0 Diazepam (PO)
0 Crushed tablets given with simple syrup
0 Allow 30 min to effect prior to administration of ketamine
0 Ketamine, Atropine (IM) 0 Usually administered in
neck or hamhocks 0 Smooth induction, usually
ready for intubation within 15 min
0 Midazolam, Ketamine, Glycopyrolate (or Atropine) (IM) 0 Given as one mixed
injection, usually in neck or hindquarters
0 Smooth very quick induction, usually ready for intubation within 10 minutes
Leave the room while drugs take effect (be very quiet if you must remain in the room)
Keep The Animal Calm 0 Unhandled pigs can stress easily
0 Introduce them to Red Restraint Boards on arrival! 0 Train them to take Simple Syrup to improve their reception to the
restraint boards and oral pre-meds
0 Stress receptors compete for binding sites with some drugs and can cause an opposite reaction (excitement) and or prolonged induction
0 A quiet undisturbed room after administration allows for a smoother induction – ALLOW TIME FOR DRUGS TO WORK before moving the animal! 0 Allow ~30min after oral Diazepam … … … 0 Then give the Ketamine and allow 10min for both to work prior to
shaving/hosing and then transporting from the room
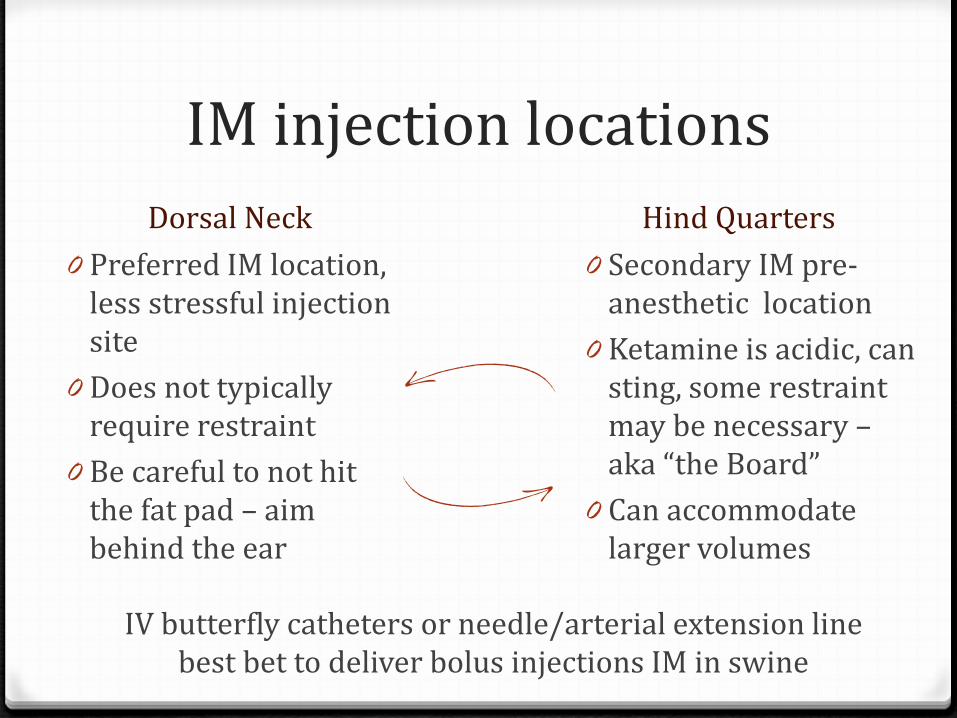
IM injection locations Dorsal Neck Hind Quarters
0 Preferred IM location, less stressful injection site
0 Does not typically require restraint
0 Be careful to not hit the fat pad – aim behind the ear
0 Secondary IM pre-anesthetic location
0 Ketamine is acidic, can sting, some restraint may be necessary – aka “the Board”
0 Can accommodate larger volumes
IV butterfly catheters or needle/arterial extension line best bet to deliver bolus injections IM in swine
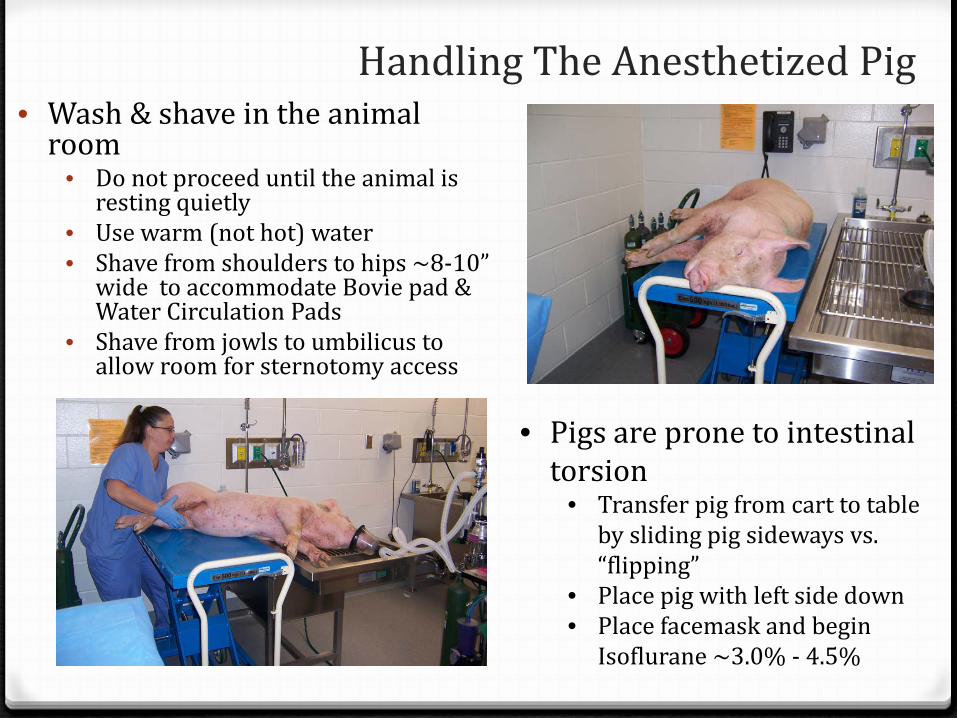
Handling The Anesthetized Pig • Wash & shave in the animal
room • Do not proceed until the animal is
resting quietly • Use warm (not hot) water • Shave from shoulders to hips ~8-10”
wide to accommodate Bovie pad & Water Circulation Pads
• Shave from jowls to umbilicus to allow room for sternotomy access
• Pigs are prone to intestinal
torsion • Transfer pig from cart to table
by sliding pig sideways vs. “flipping”
• Place pig with left side down • Place facemask and begin
Isoflurane ~3.0% - 4.5%
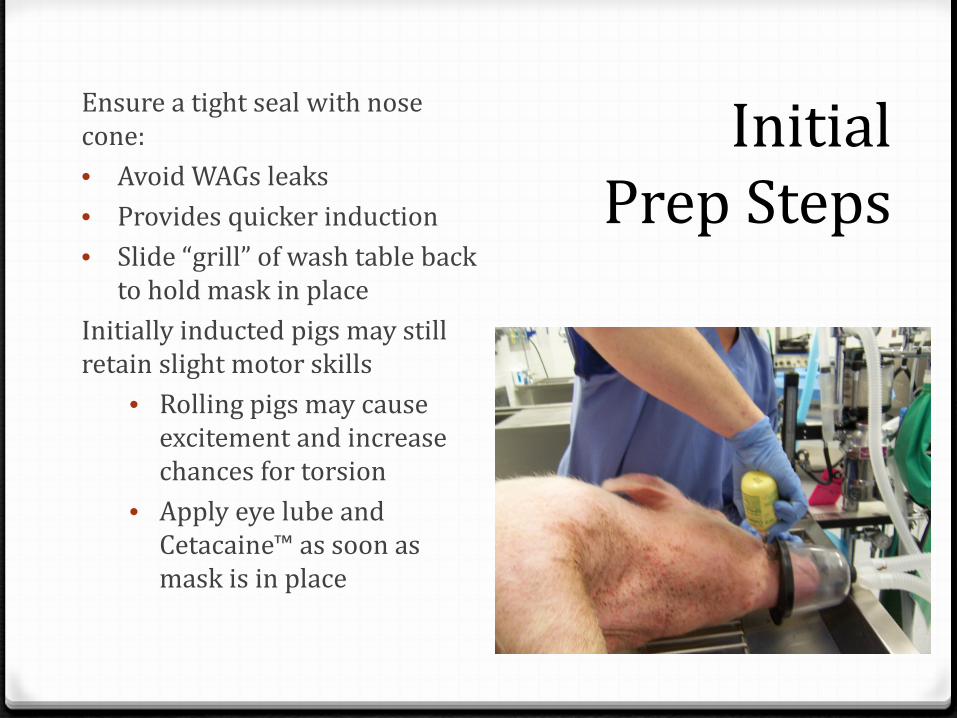
Ensure a tight seal with nose cone: • Avoid WAGs leaks • Provides quicker induction • Slide “grill” of wash table back
to hold mask in place Initially inducted pigs may still retain slight motor skills
• Rolling pigs may cause excitement and increase chances for torsion
• Apply eye lube and Cetacaine™ as soon as mask is in place
Initial Prep Steps
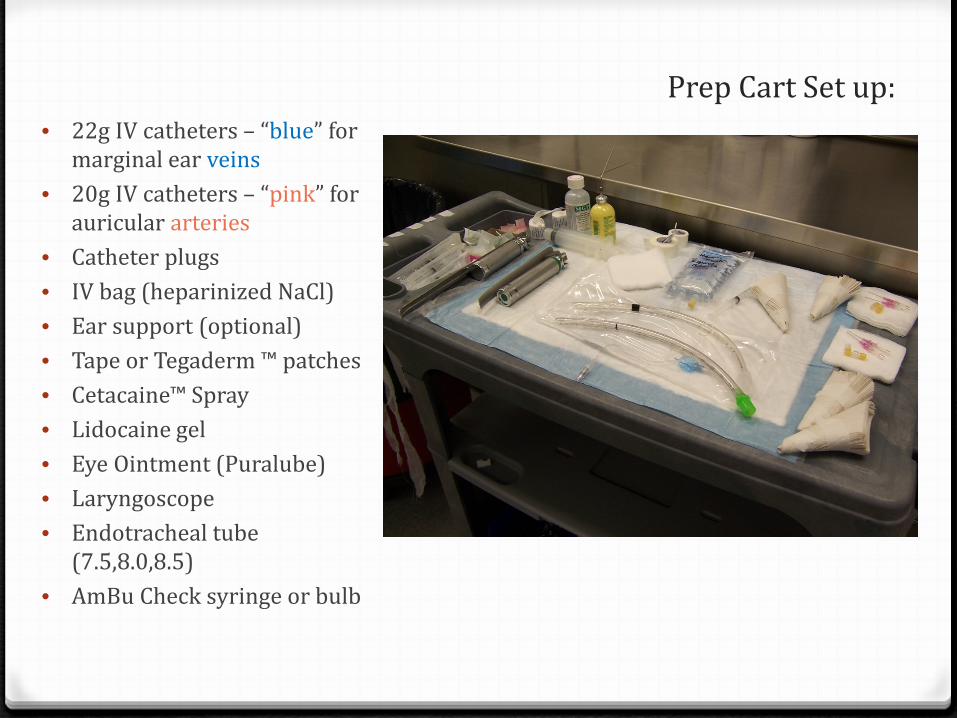
Prep Cart Set up: • 22g IV catheters – “blue” for
marginal ear veins • 20g IV catheters – “pink” for
auricular arteries • Catheter plugs • IV bag (heparinized NaCl) • Ear support (optional) • Tape or Tegaderm ™ patches • Cetacaine™ Spray • Lidocaine gel • Eye Ointment (Puralube) • Laryngoscope • Endotracheal tube
(7.5,8.0,8.5) • AmBu Check syringe or bulb
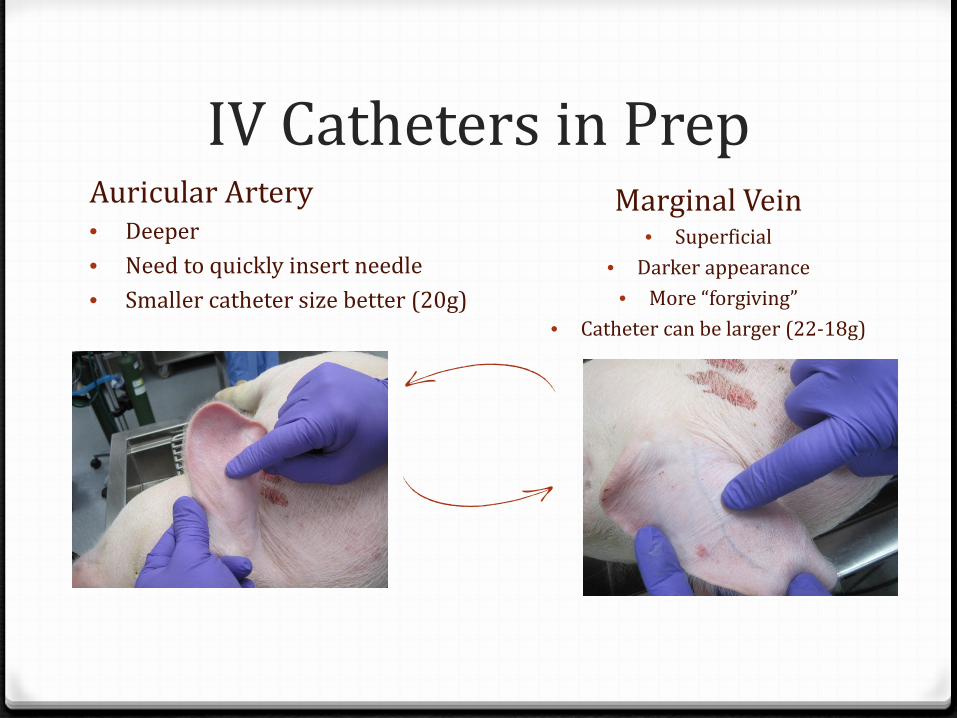
IV Catheters in Prep Auricular Artery • Deeper • Need to quickly insert needle • Smaller catheter size better (20g)
Marginal Vein • Superficial
• Darker appearance • More “forgiving”
• Catheter can be larger (22-18g)

IV Catheters in Prep
0 22g IV Catheter placed in each Marginal Ear Vein
= 2 per pig (one per ear) 0 Flush at initial placement
and again when secured
IV Catheters in Prep
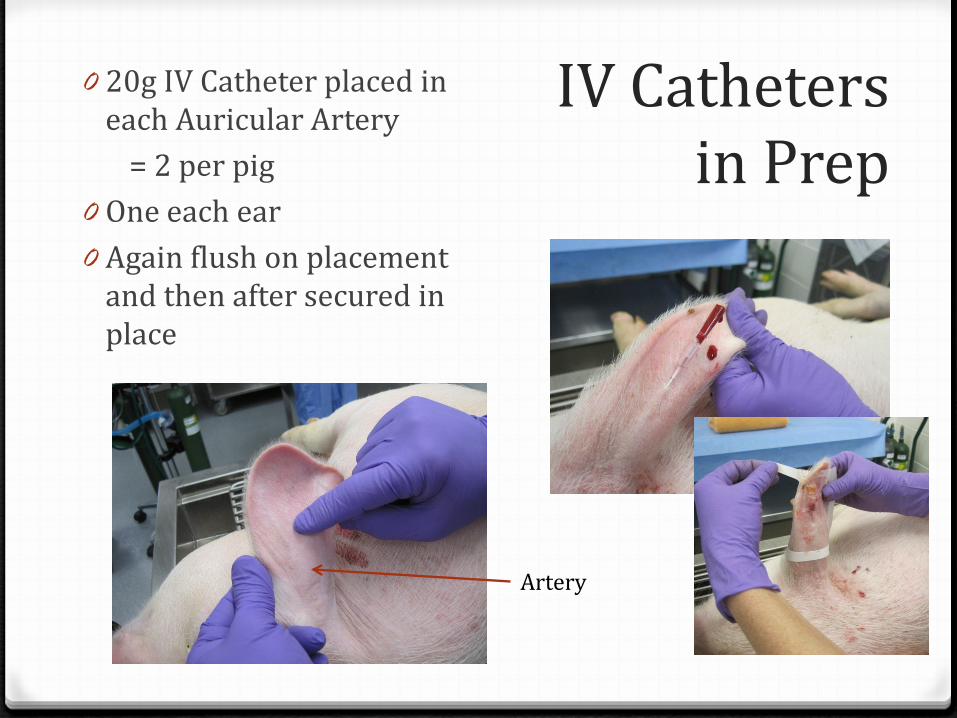
0 20g IV Catheter placed in each Auricular Artery
= 2 per pig 0 One each ear 0 Again flush on placement
and then after secured in place
Artery
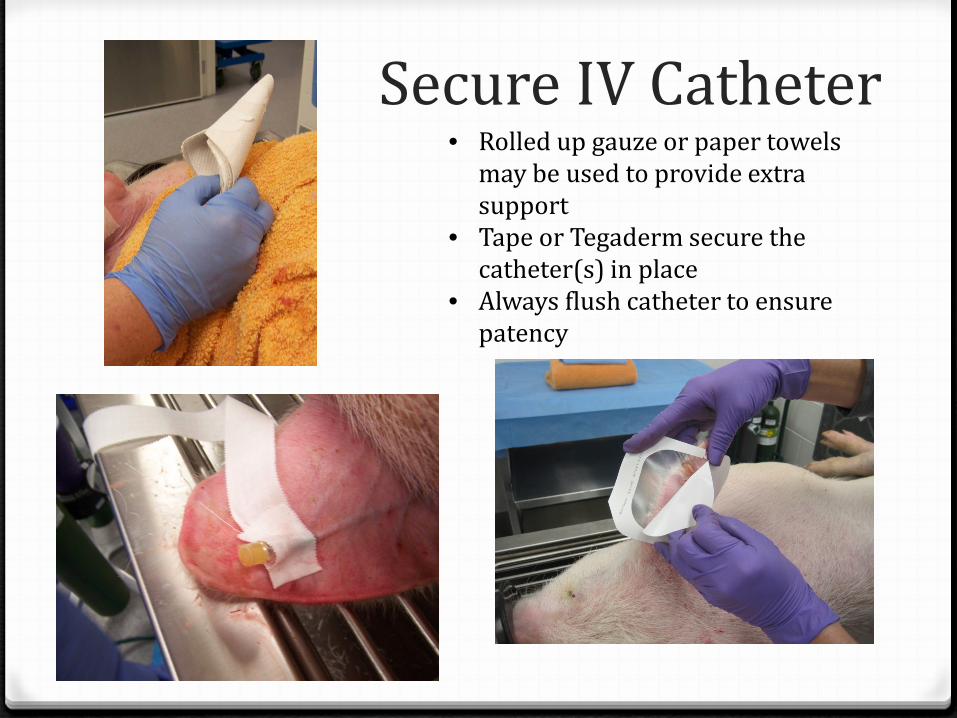
Secure IV Catheter • Rolled up gauze or paper towels
may be used to provide extra support
• Tape or Tegaderm secure the catheter(s) in place
• Always flush catheter to ensure patency
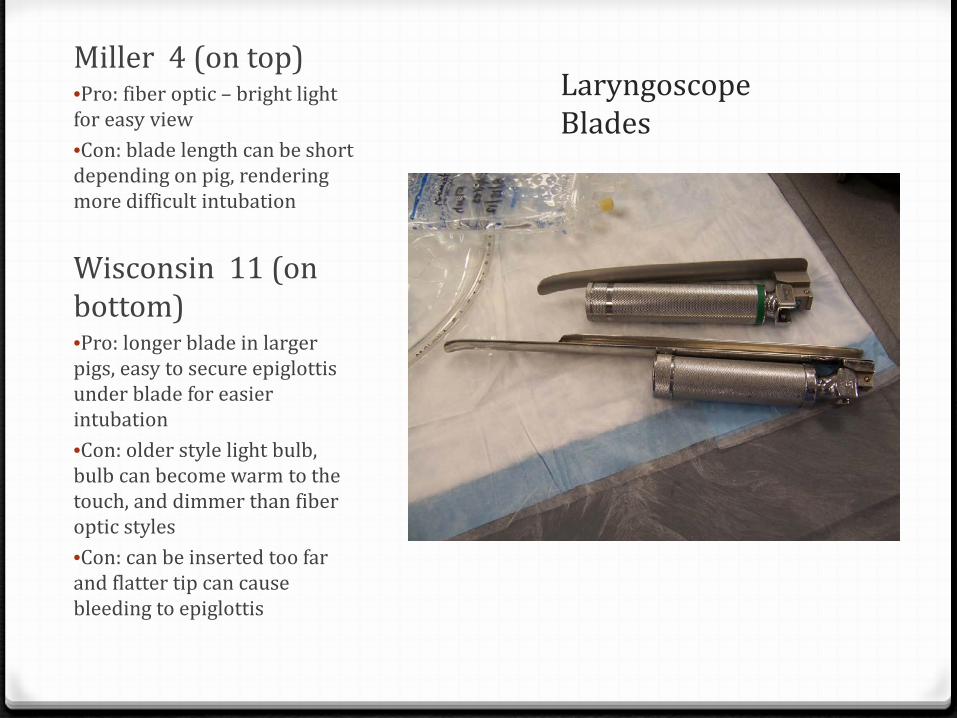
Laryngoscope Blades
Miller 4 (on top) •Pro: fiber optic – bright light for easy view •Con: blade length can be short depending on pig, rendering more difficult intubation
Wisconsin 11 (on bottom) •Pro: longer blade in larger pigs, easy to secure epiglottis under blade for easier intubation •Con: older style light bulb, bulb can become warm to the touch, and dimmer than fiber optic styles •Con: can be inserted too far and flatter tip can cause bleeding to epiglottis
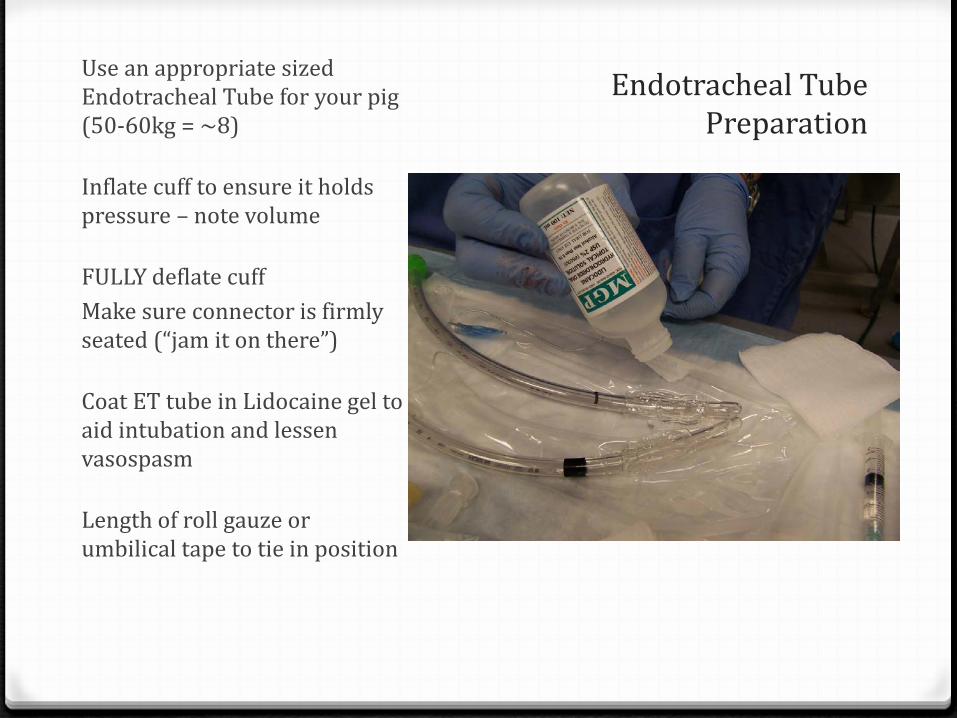
Endotracheal Tube Preparation
Use an appropriate sized Endotracheal Tube for your pig (50-60kg = ~8)
Inflate cuff to ensure it holds pressure – note volume
FULLY deflate cuff Make sure connector is firmly seated (“jam it on there”)
Coat ET tube in Lidocaine gel to aid intubation and lessen vasospasm
Length of roll gauze or umbilical tape to tie in position
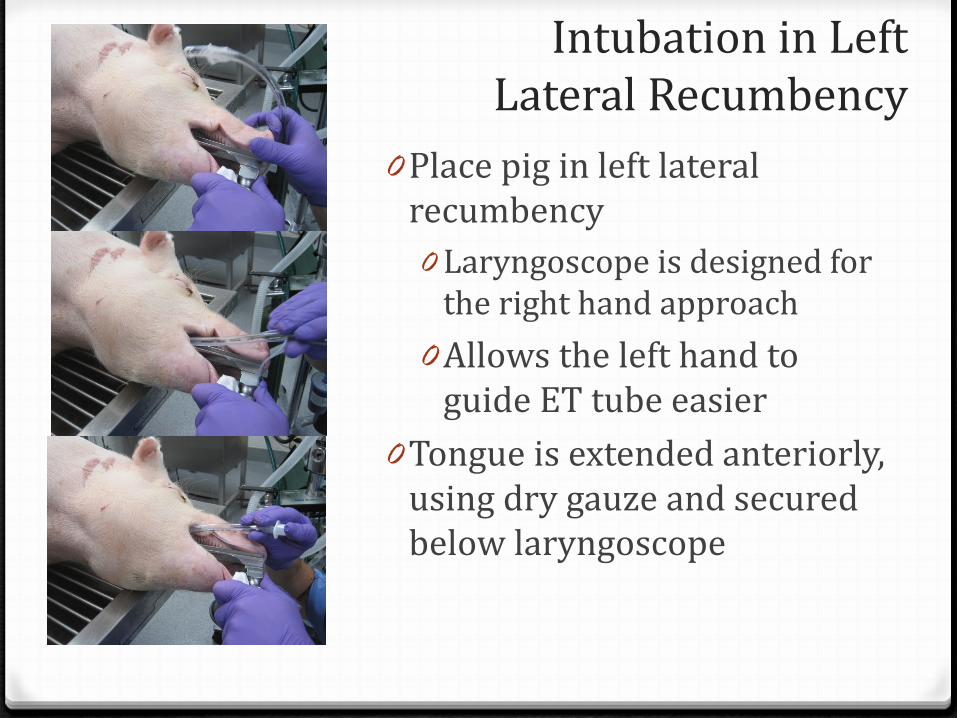
Intubation in Left Lateral Recumbency
0 Place pig in left lateral recumbency 0 Laryngoscope is designed for
the right hand approach 0 Allows the left hand to
guide ET tube easier 0 Tongue is extended anteriorly,
using dry gauze and secured below laryngoscope
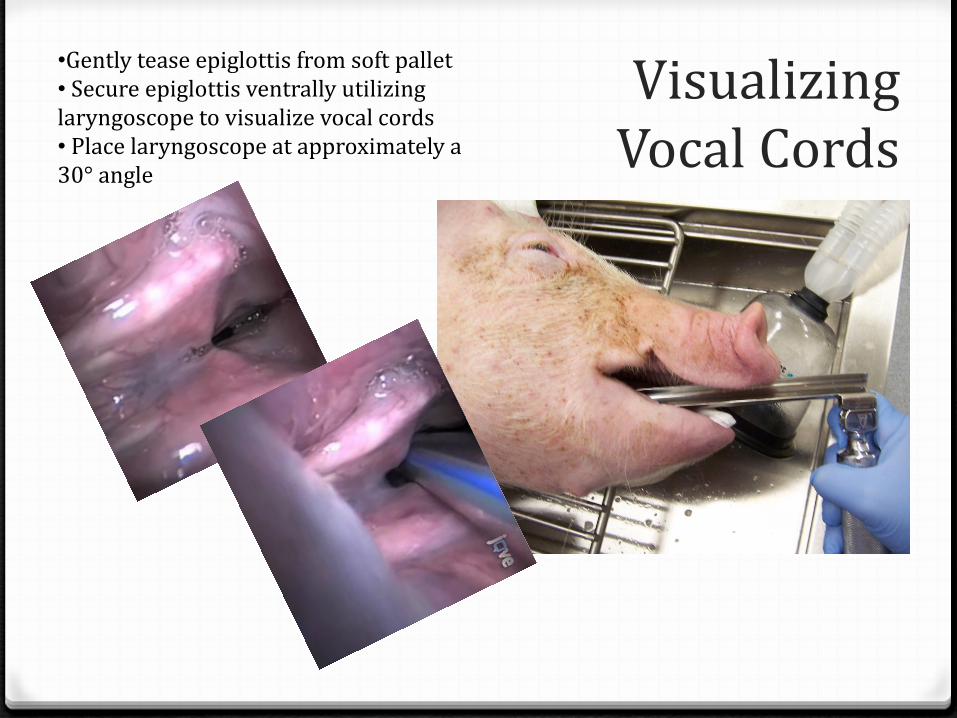
Visualizing Vocal Cords
•Gently tease epiglottis from soft pallet • Secure epiglottis ventrally utilizing laryngoscope to visualize vocal cords • Place laryngoscope at approximately a 30° angle
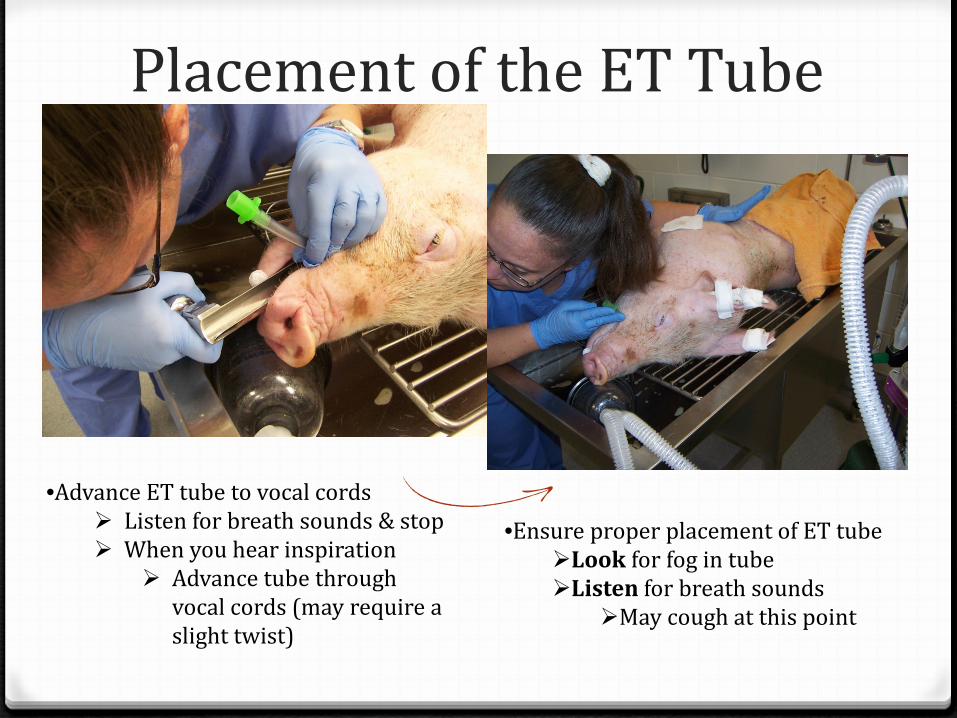
Placement of the ET Tube
•Advance ET tube to vocal cords Listen for breath sounds & stop When you hear inspiration
Advance tube through vocal cords (may require a slight twist)
•Ensure proper placement of ET tube Look for fog in tube Listen for breath sounds
May cough at this point
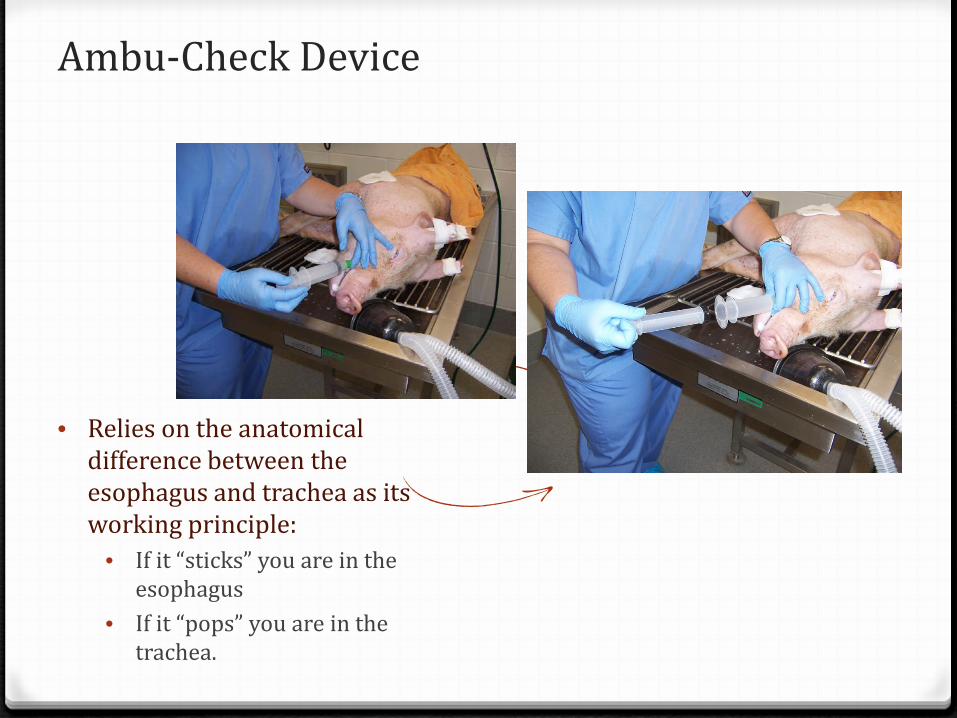
Ambu-Check Device
• Relies on the anatomical difference between the esophagus and trachea as its working principle:
• If it “sticks” you are in the esophagus
• If it “pops” you are in the trachea.
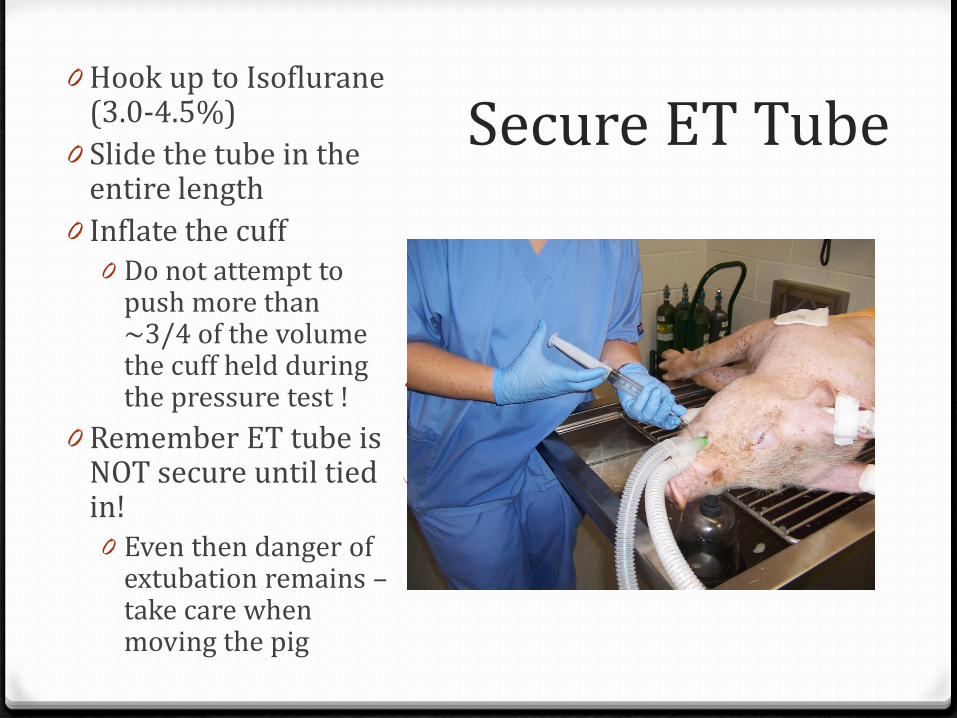
Secure ET Tube 0 Hook up to Isoflurane
(3.0-4.5%) 0 Slide the tube in the
entire length 0 Inflate the cuff
0 Do not attempt to push more than ~3/4 of the volume the cuff held during the pressure test !
0 Remember ET tube is NOT secure until tied in! 0 Even then danger of
extubation remains – take care when moving the pig
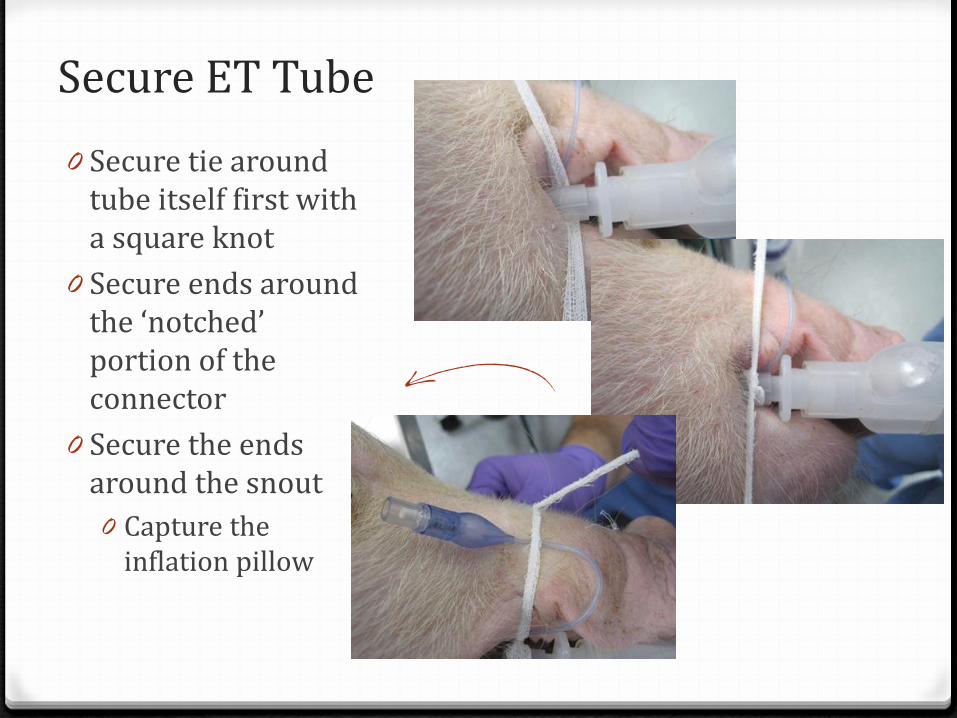
Secure ET Tube 0 Secure tie around
tube itself first with a square knot
0 Secure ends around the ‘notched’ portion of the connector
0 Secure the ends around the snout 0 Capture the
inflation pillow
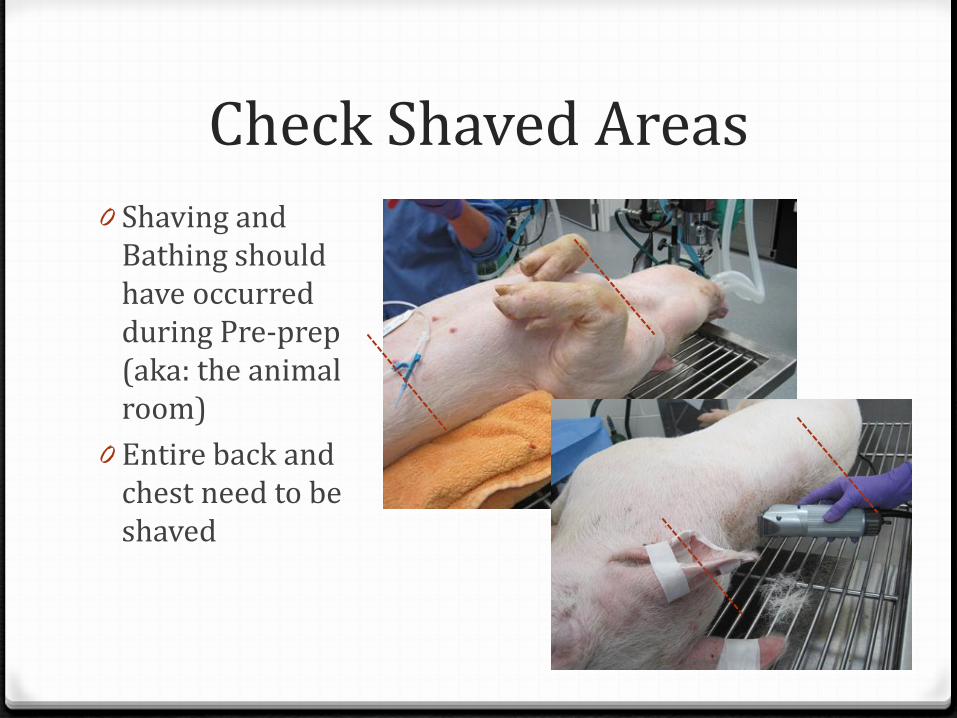
Check Shaved Areas 0 Shaving and
Bathing should have occurred during Pre-prep (aka: the animal room)
0 Entire back and chest need to be shaved
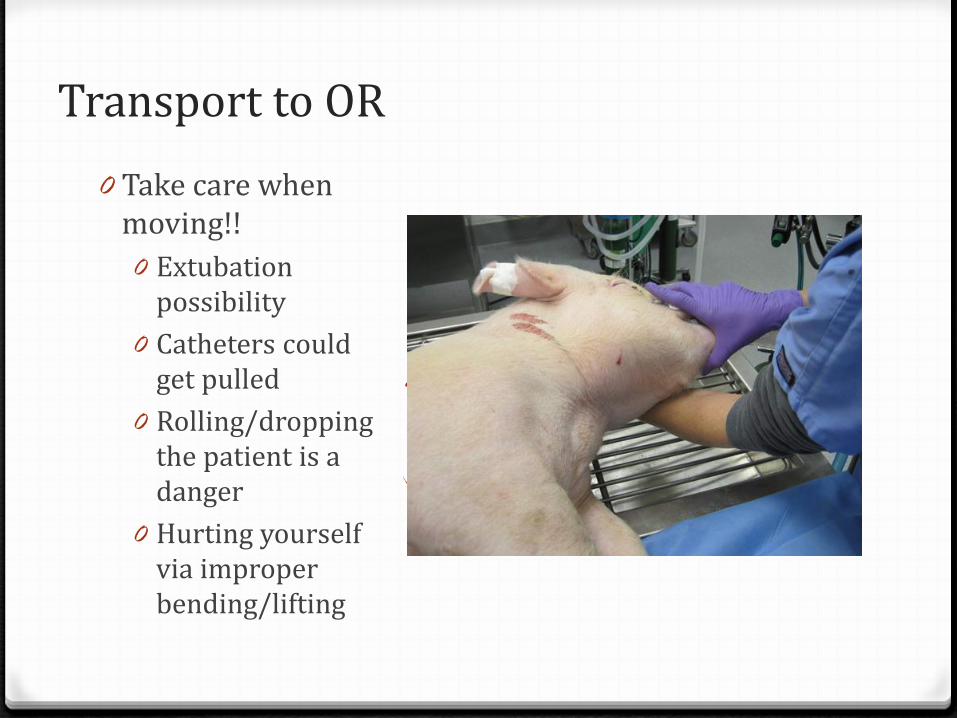
Transport to OR 0 Take care when
moving!! 0 Extubation
possibility 0 Catheters could
get pulled 0 Rolling/dropping
the patient is a danger
0 Hurting yourself via improper bending/lifting
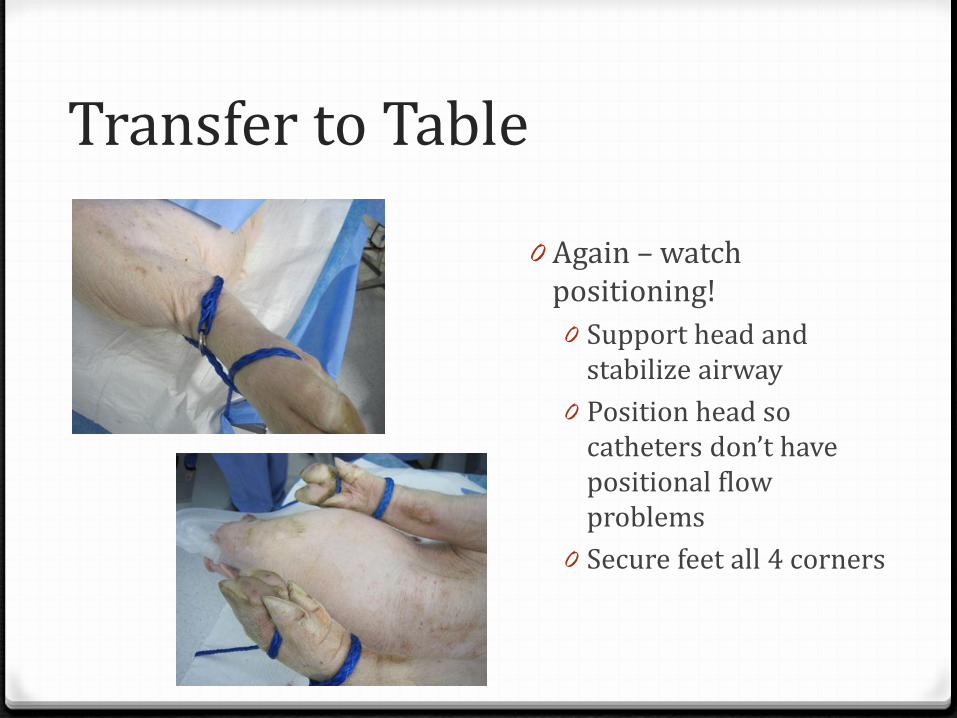
Transfer to Table
0 Again – watch positioning! 0 Support head and
stabilize airway 0 Position head so
catheters don’t have positional flow problems
0 Secure feet all 4 corners
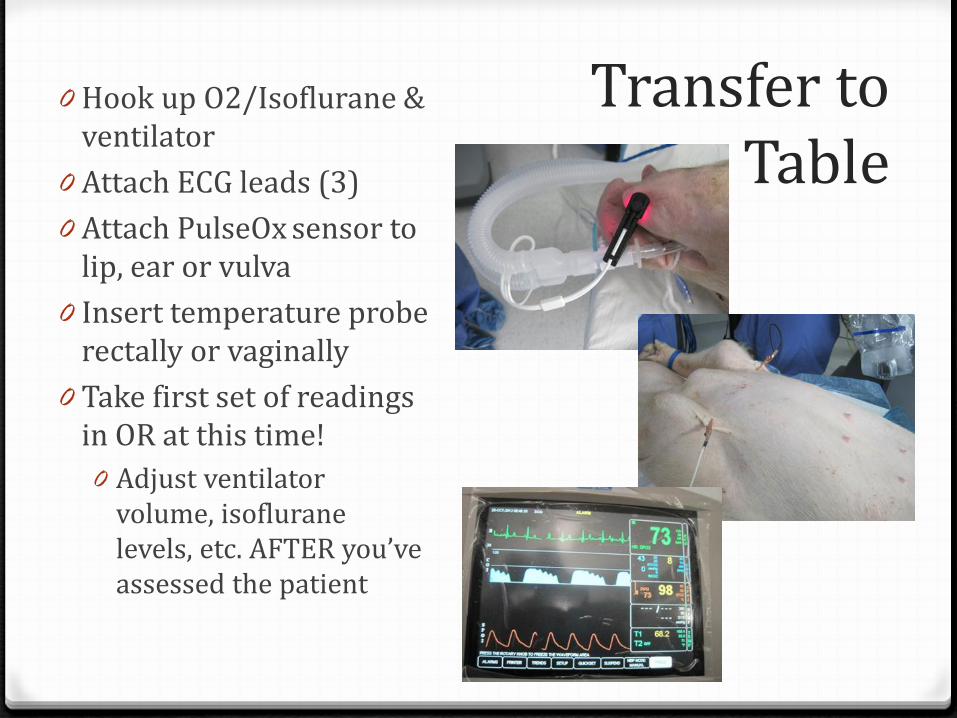
Transfer to Table
0 Hook up O2/Isoflurane & ventilator
0 Attach ECG leads (3) 0 Attach PulseOx sensor to
lip, ear or vulva 0 Insert temperature probe
rectally or vaginally 0 Take first set of readings
in OR at this time! 0 Adjust ventilator
volume, isoflurane levels, etc. AFTER you’ve assessed the patient
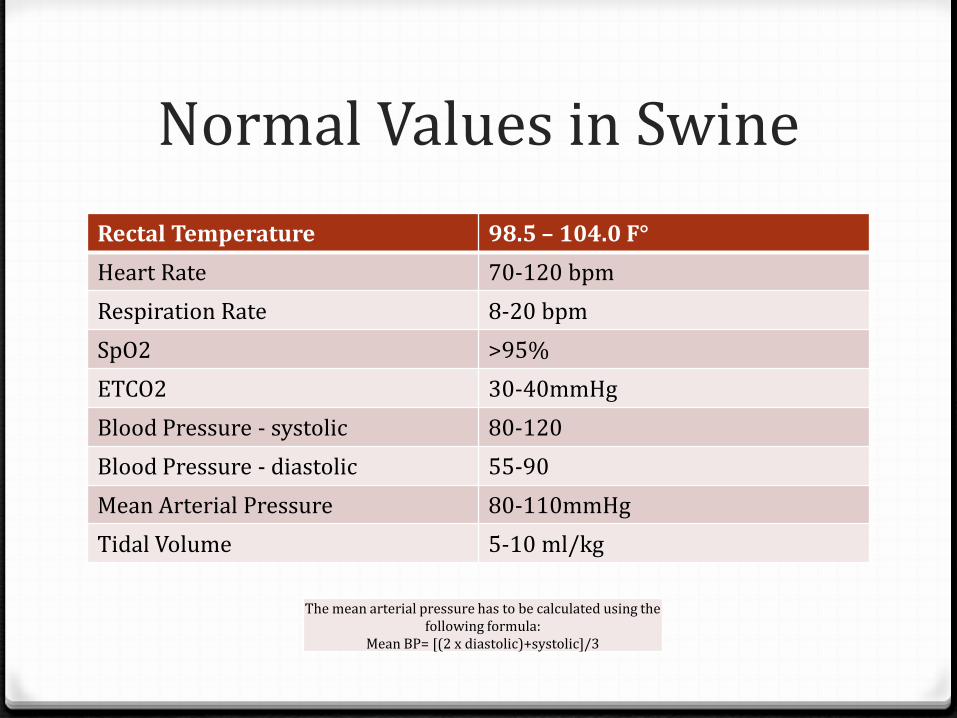
Normal Values in Swine Rectal Temperature 98.5 – 104.0 F° Heart Rate 70-120 bpm Respiration Rate 8-20 bpm SpO2 >95% ETCO2 30-40mmHg Blood Pressure - systolic 80-120 Blood Pressure - diastolic 55-90 Mean Arterial Pressure 80-110mmHg Tidal Volume 5-10 ml/kg
The mean arterial pressure has to be calculated using the following formula:
Mean BP= [(2 x diastolic)+systolic]/3
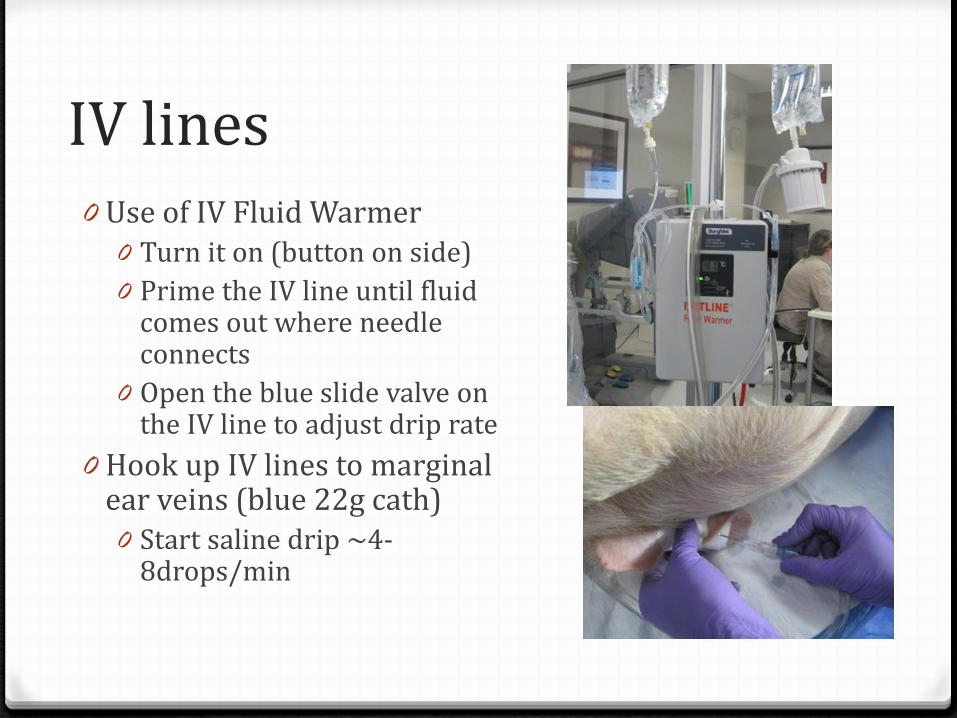
IV lines 0 Use of IV Fluid Warmer
0 Turn it on (button on side) 0 Prime the IV line until fluid
comes out where needle connects
0 Open the blue slide valve on the IV line to adjust drip rate
0 Hook up IV lines to marginal ear veins (blue 22g cath) 0 Start saline drip ~4-
8drops/min
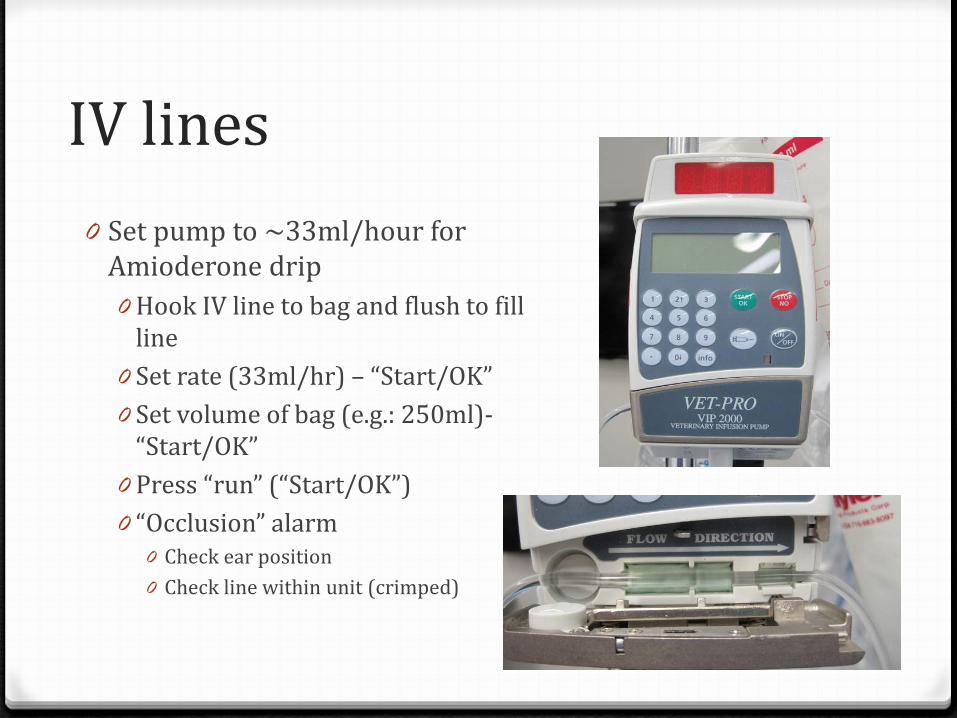
IV lines 0 Set pump to ~33ml/hour for
Amioderone drip 0 Hook IV line to bag and flush to fill
line 0 Set rate (33ml/hr) – “Start/OK” 0 Set volume of bag (e.g.: 250ml)-
“Start/OK” 0 Press “run” (“Start/OK”) 0 “Occlusion” alarm
0 Check ear position 0 Check line within unit (crimped)
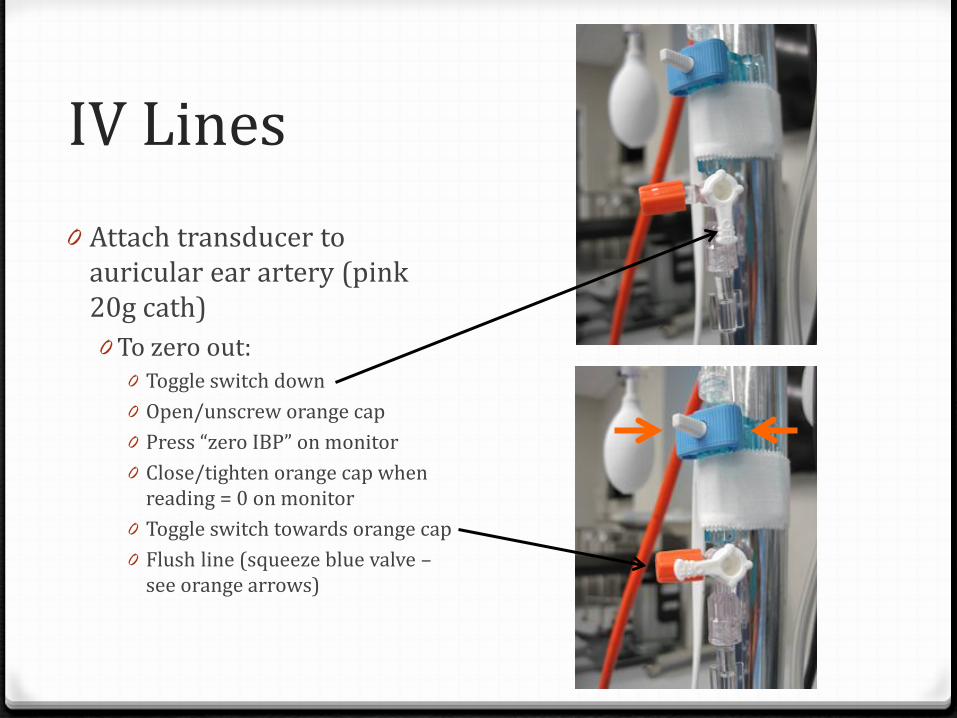
IV Lines 0 Attach transducer to
auricular ear artery (pink 20g cath) 0 To zero out:
0 Toggle switch down 0 Open/unscrew orange cap 0 Press “zero IBP” on monitor 0 Close/tighten orange cap when
reading = 0 on monitor 0 Toggle switch towards orange cap 0 Flush line (squeeze blue valve –
see orange arrows)
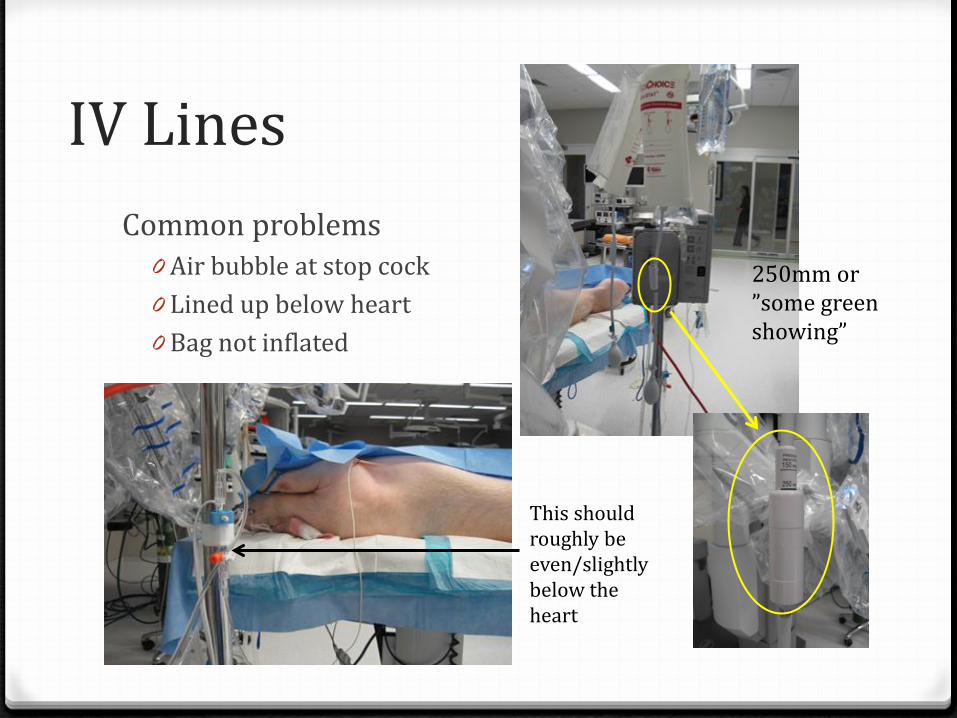
IV Lines Common problems
0 Air bubble at stop cock 0 Lined up below heart 0 Bag not inflated
250mm or ”some green showing”
This should roughly be even/slightly below the heart

Femoral Caths Placed 0 We use a 5F catheter and
Seldinger technique to percutaneously place the femoral artery catheters 0 Do NOT “pick up” by the legs when
ANY femoral line is in place! 0 Invasive blood pressure
monitoring for during the by-pass and cross- clamping portion of the surgery
0 Will provide numeric readings during by-pass 0 monitor will “flat line”, watch
trends/changes in systolic/dystolic pressure
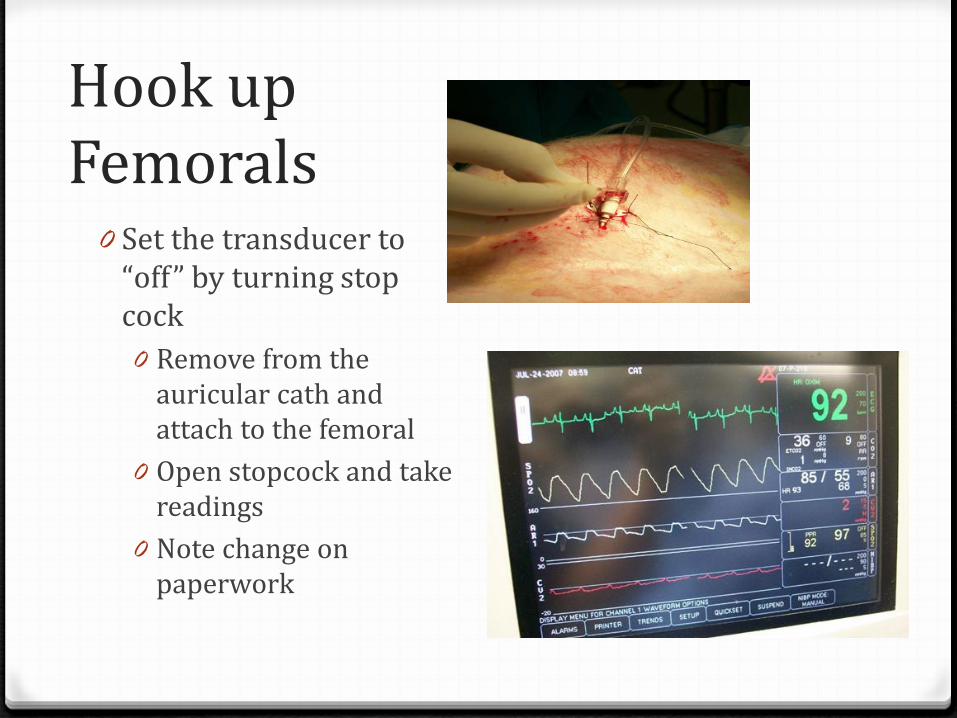
Hook up Femorals
0 Set the transducer to “off” by turning stop cock 0 Remove from the
auricular cath and attach to the femoral
0 Open stopcock and take readings
0 Note change on paperwork
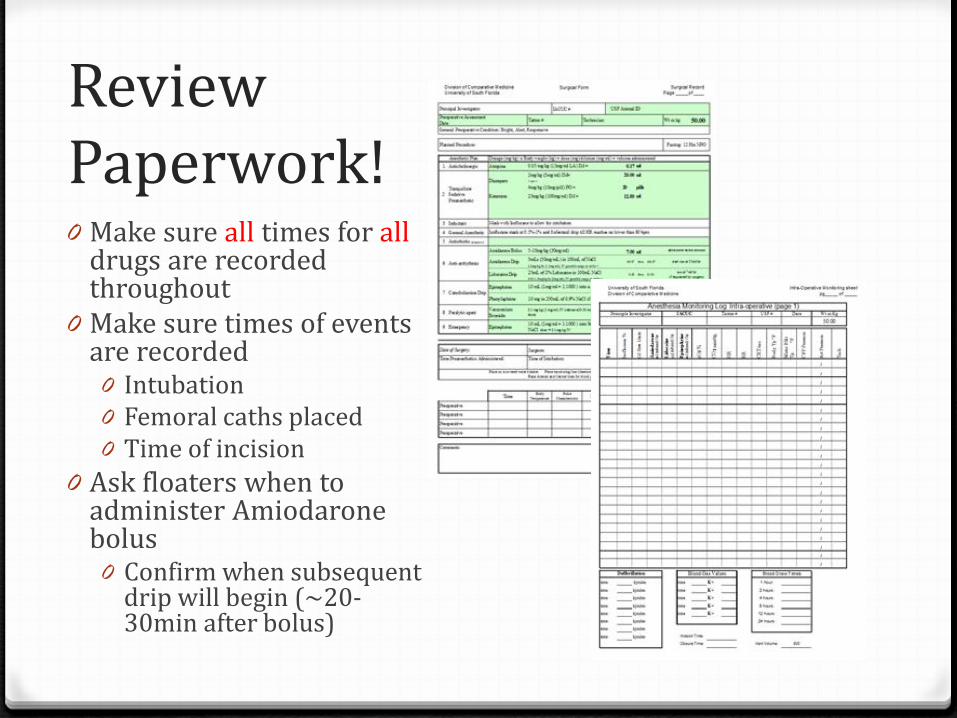
Review Paperwork! 0 Make sure all times for all
drugs are recorded throughout
0 Make sure times of events are recorded 0 Intubation 0 Femoral caths placed 0 Time of incision
0 Ask floaters when to administer Amiodarone bolus 0 Confirm when subsequent
drip will begin (~20-30min after bolus)

Monitoring the ECG - Normal waveform
P
R
Q S
T
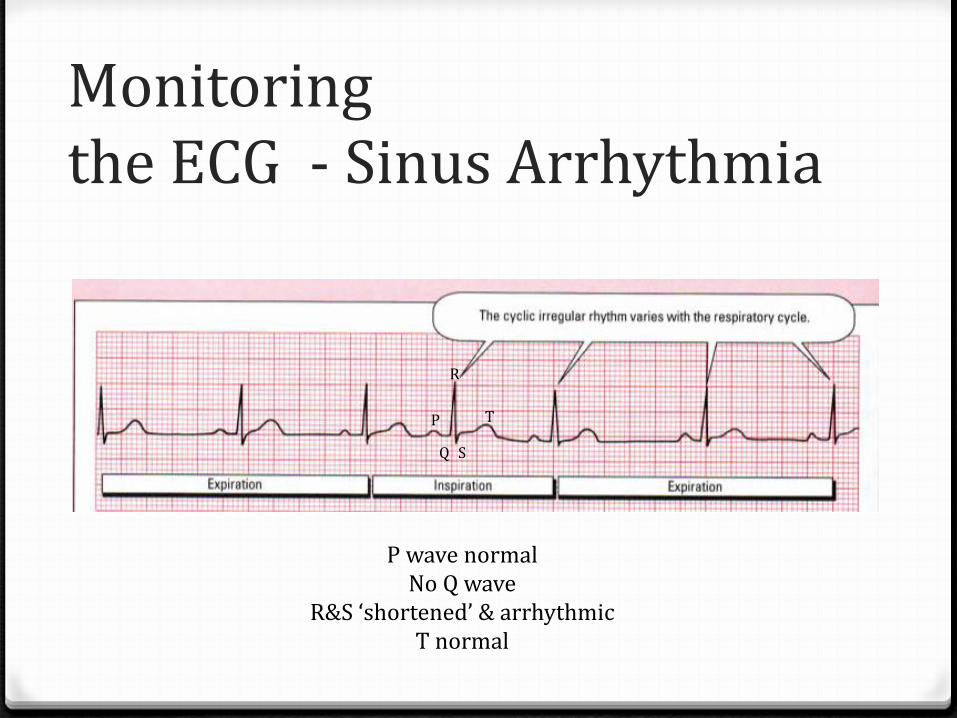
Monitoring the ECG - Sinus Arrhythmia
P
Q
R
S
T
P wave normal No Q wave
R&S ‘shortened’ & arrhythmic T normal
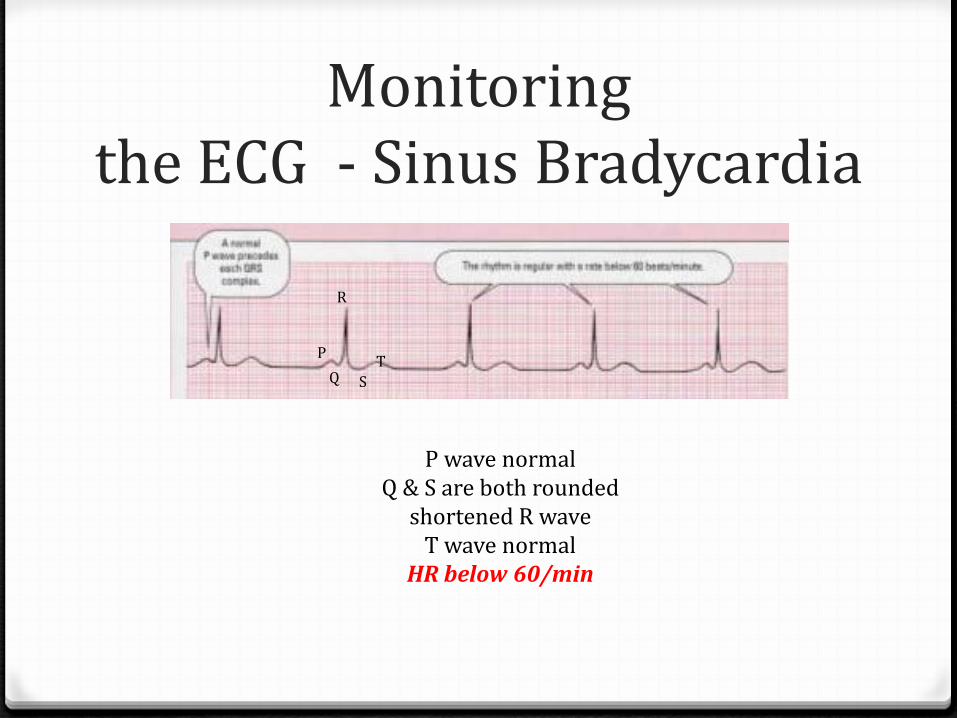
Monitoring the ECG - Sinus Bradycardia
P wave normal Q & S are both rounded
shortened R wave T wave normal
HR below 60/min
P
R
Q S T
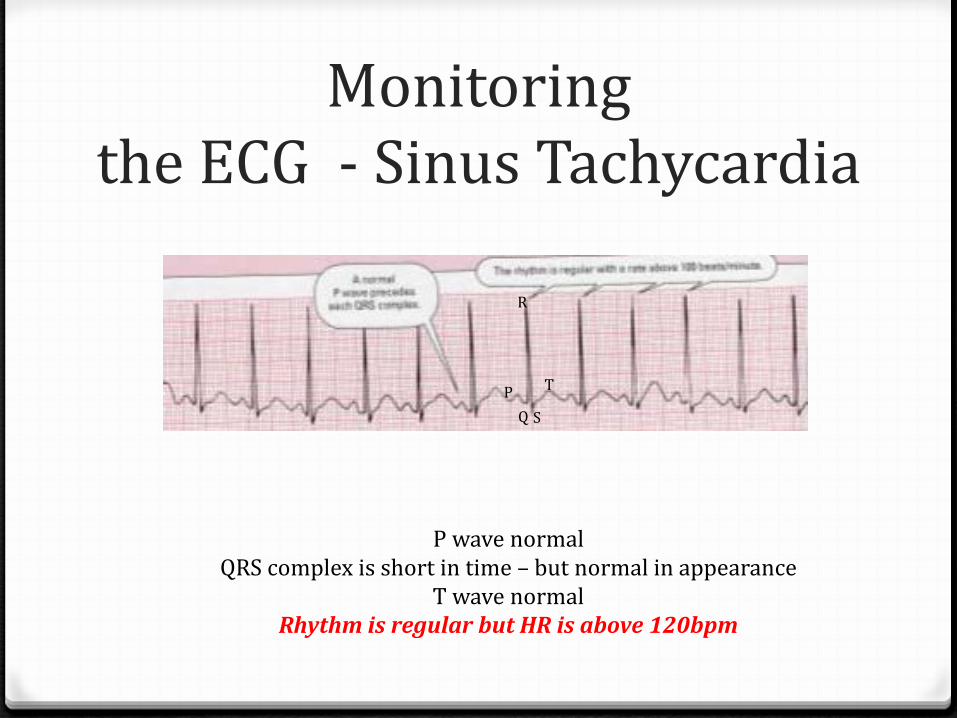
Monitoring the ECG - Sinus Tachycardia
P wave normal QRS complex is short in time – but normal in appearance
T wave normal Rhythm is regular but HR is above 120bpm
S
T
R
Q P

Most Common E-Drugs
Working with the Ventilator
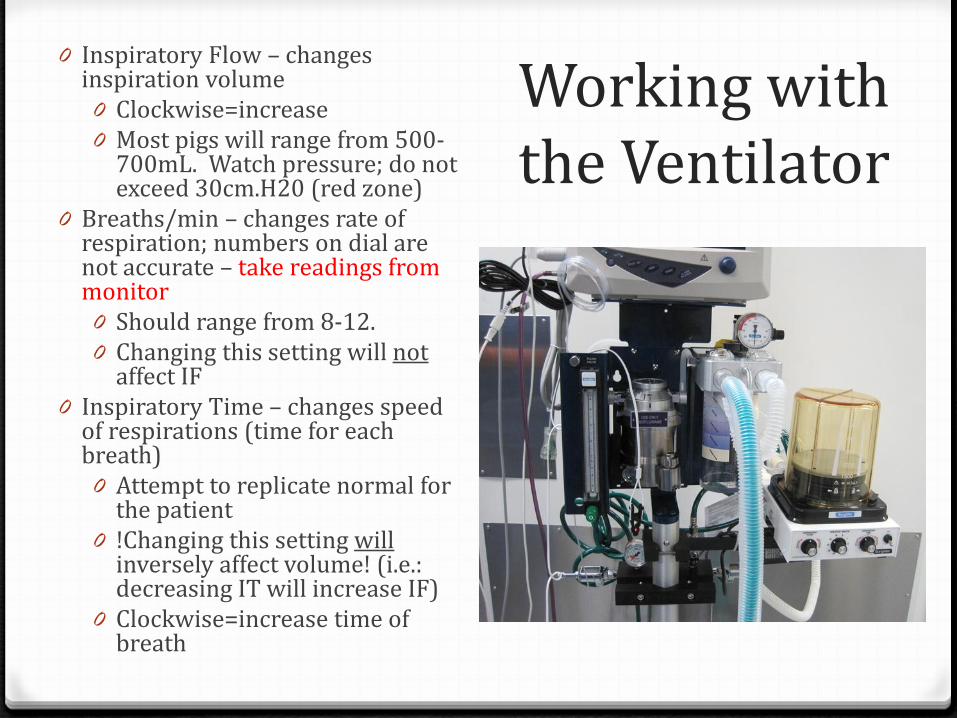
0 Inspiratory Flow – changes inspiration volume 0 Clockwise=increase 0 Most pigs will range from 500-
700mL. Watch pressure; do not exceed 30cm.H20 (red zone)
0 Breaths/min – changes rate of respiration; numbers on dial are not accurate – take readings from monitor 0 Should range from 8-12. 0 Changing this setting will not
affect IF 0 Inspiratory Time – changes speed
of respirations (time for each breath) 0 Attempt to replicate normal for
the patient 0 !Changing this setting will
inversely affect volume! (i.e.: decreasing IT will increase IF)
0 Clockwise=increase time of breath
Working with the Ventilator
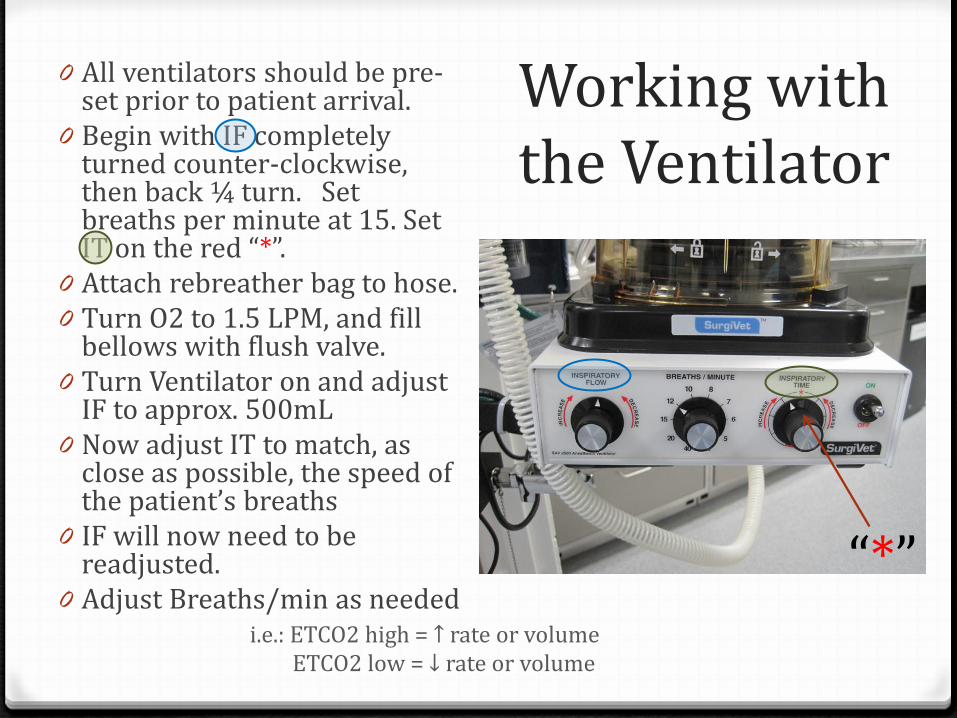
0 All ventilators should be pre-set prior to patient arrival.
0 Begin with IF completely turned counter-clockwise, then back ¼ turn. Set breaths per minute at 15. Set IT on the red “*”.
0 Attach rebreather bag to hose. 0 Turn O2 to 1.5 LPM, and fill
bellows with flush valve. 0 Turn Ventilator on and adjust
IF to approx. 500mL 0 Now adjust IT to match, as
close as possible, the speed of the patient’s breaths
0 IF will now need to be readjusted.
0 Adjust Breaths/min as needed “*”
i.e.: ETCO2 high = ↑ rate or volume ETCO2 low = ↓ rate or volume
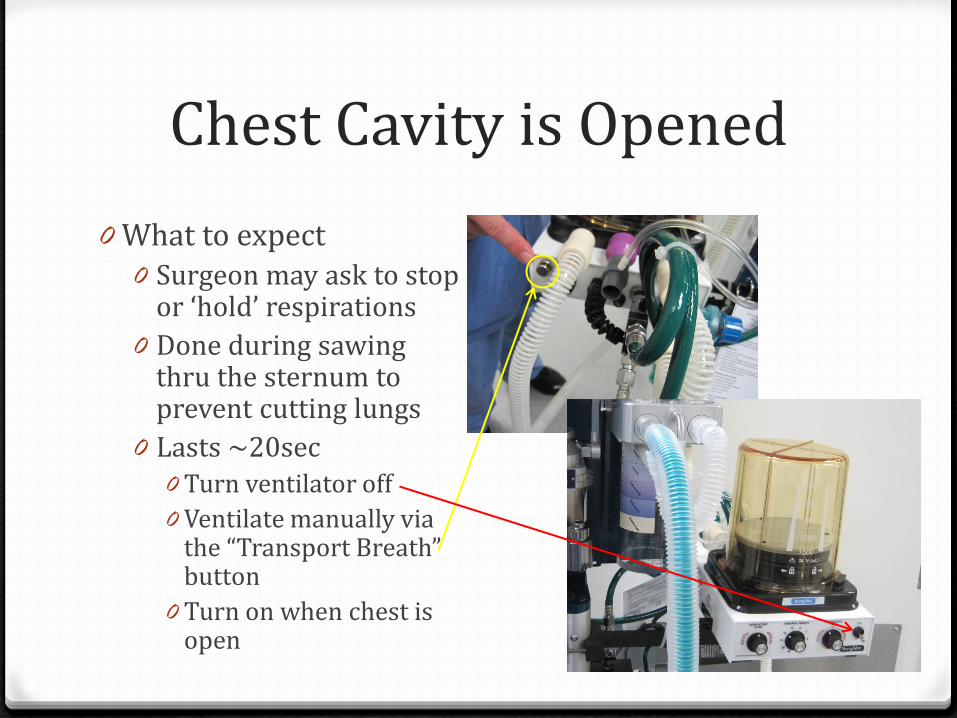
Chest Cavity is Opened 0 What to expect
0 Surgeon may ask to stop or ‘hold’ respirations
0 Done during sawing thru the sternum to prevent cutting lungs
0 Lasts ~20sec 0 Turn ventilator off 0 Ventilate manually via
the “Transport Breath” button
0 Turn on when chest is open
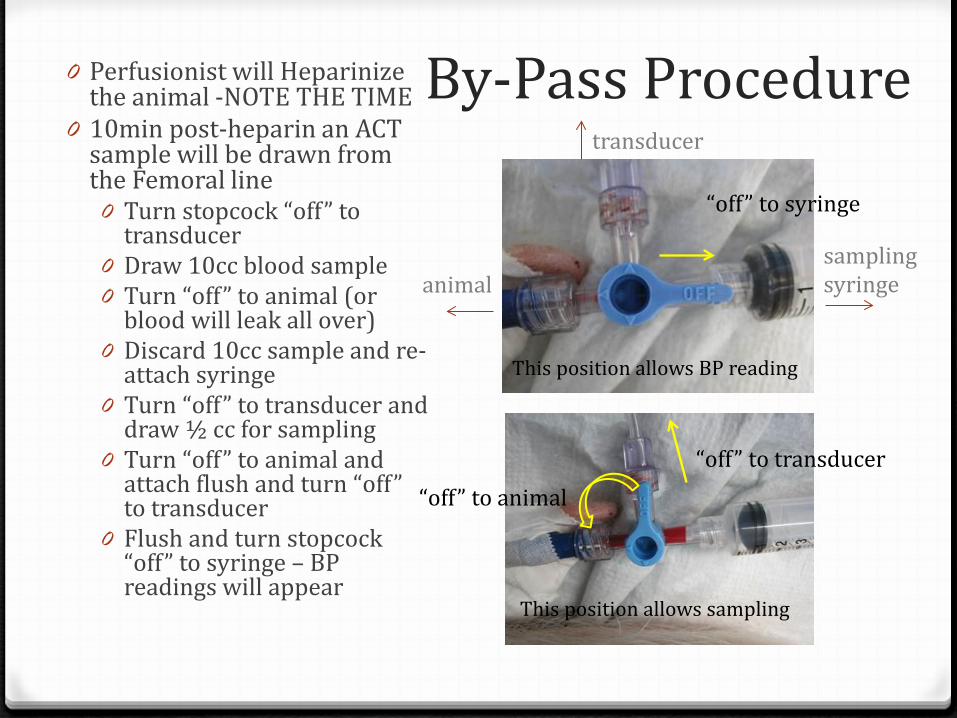
By-Pass Procedure 0 Perfusionist will Heparinize the animal -NOTE THE TIME
0 10min post-heparin an ACT sample will be drawn from the Femoral line 0 Turn stopcock “off” to
transducer 0 Draw 10cc blood sample 0 Turn “off” to animal (or
blood will leak all over) 0 Discard 10cc sample and re-
attach syringe 0 Turn “off” to transducer and
draw ½ cc for sampling 0 Turn “off” to animal and
attach flush and turn “off” to transducer
0 Flush and turn stopcock “off” to syringe – BP readings will appear
sampling syringe
transducer
animal
This position allows BP reading
This position allows sampling
“off” to transducer “off” to animal
“off” to syringe
By-Pass Procedure
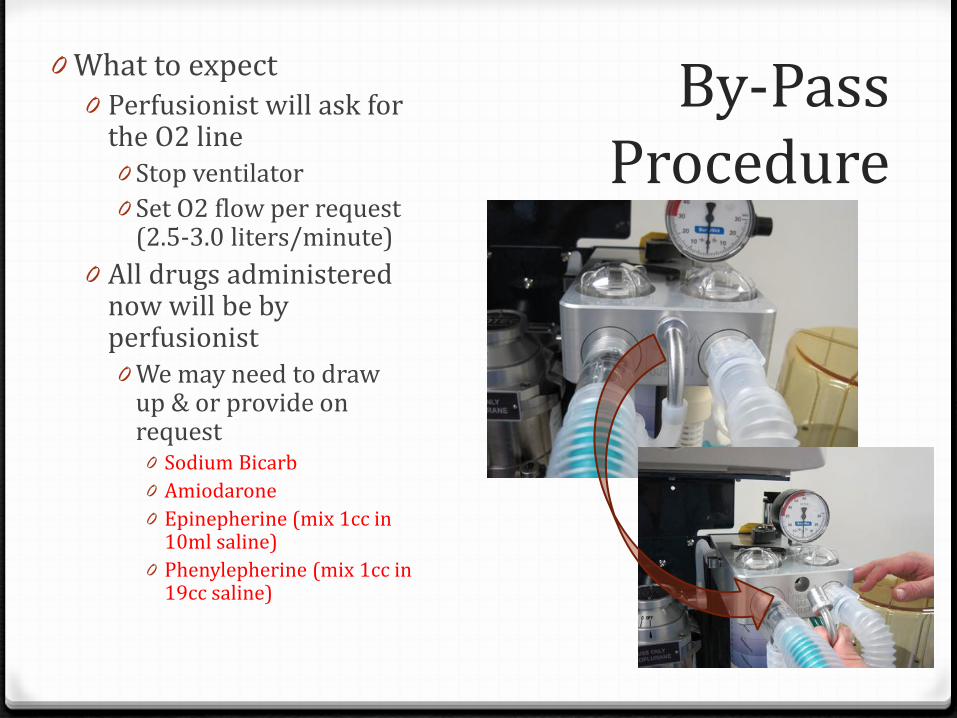
0 What to expect 0 Perfusionist will ask for
the O2 line 0 Stop ventilator 0 Set O2 flow per request
(2.5-3.0 liters/minute) 0 All drugs administered
now will be by perfusionist 0 We may need to draw
up & or provide on request 0 Sodium Bicarb 0 Amiodarone 0 Epinepherine (mix 1cc in
10ml saline) 0 Phenylepherine (mix 1cc in
19cc saline)
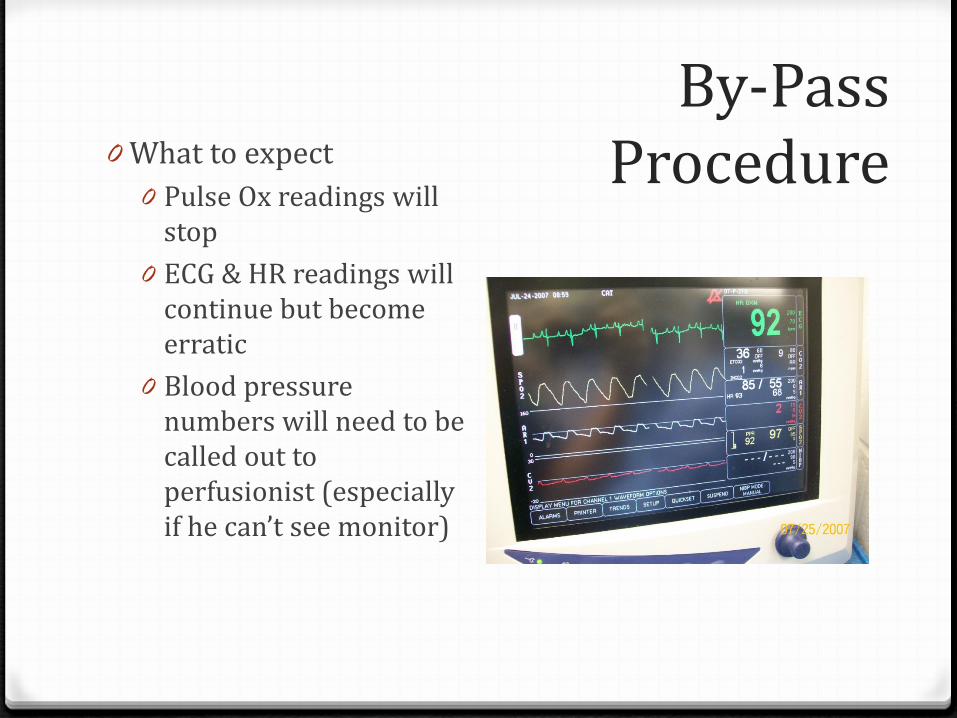
By-Pass Procedure 0 What to expect
0 Pulse Ox readings will stop
0 ECG & HR readings will continue but become erratic
0 Blood pressure numbers will need to be called out to perfusionist (especially if he can’t see monitor)
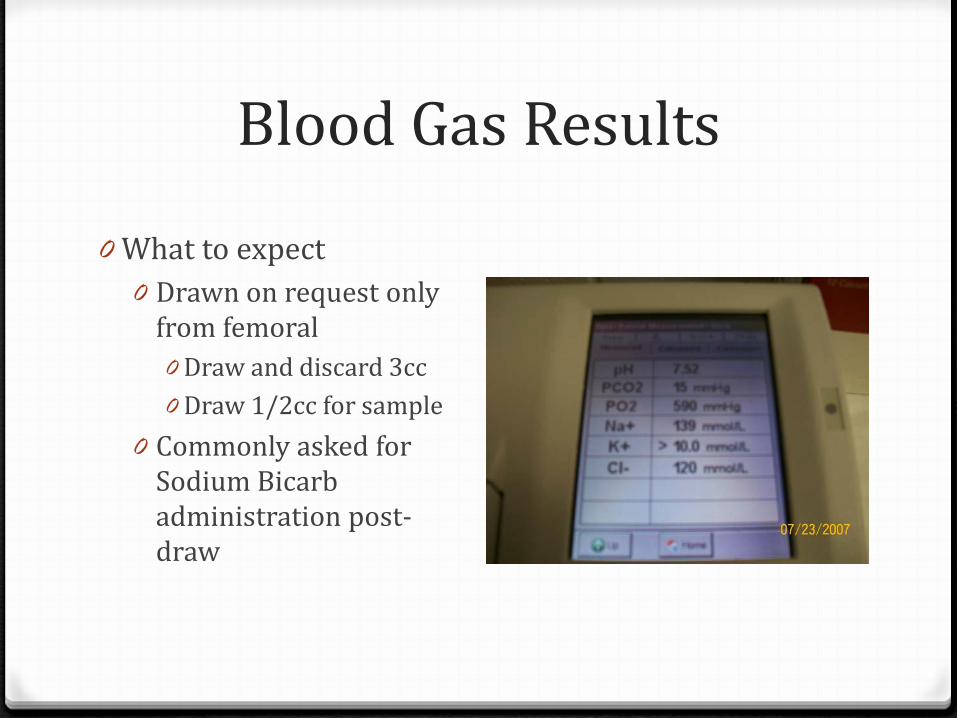
Blood Gas Results
0 What to expect 0 Drawn on request only
from femoral 0 Draw and discard 3cc 0 Draw 1/2cc for sample
0 Commonly asked for Sodium Bicarb administration post-draw
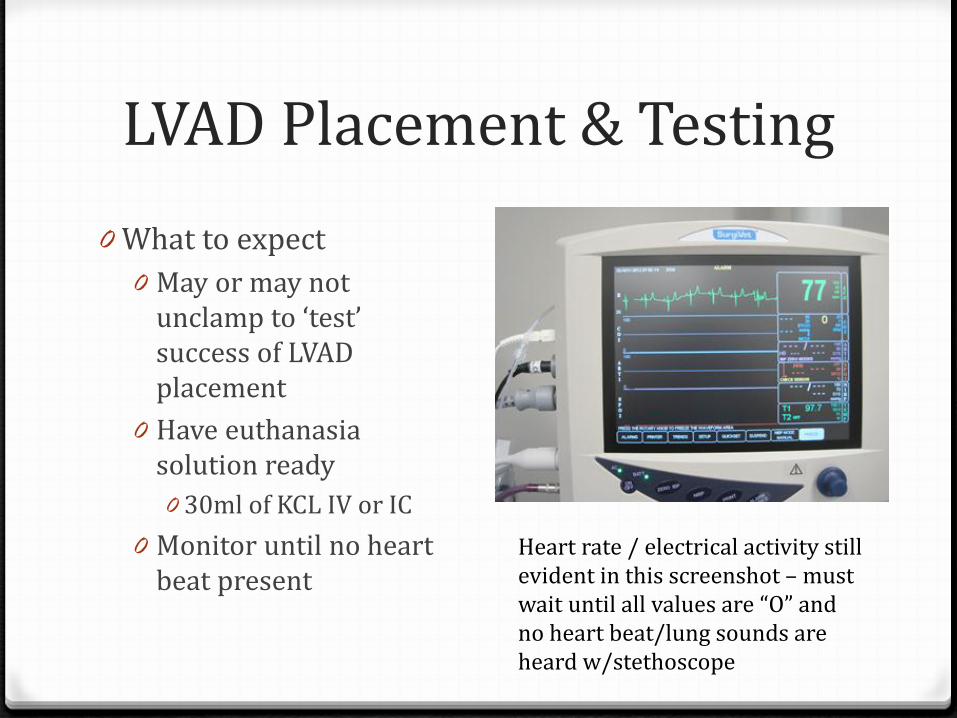
LVAD Placement & Testing 0 What to expect
0 May or may not unclamp to ‘test’ success of LVAD placement
0 Have euthanasia solution ready 0 30ml of KCL IV or IC
0 Monitor until no heart beat present
Heart rate / electrical activity still evident in this screenshot – must wait until all values are “O” and no heart beat/lung sounds are heard w/stethoscope