Embed Size (px)
Citation preview
NCTech Ltd. 20-22 Braid Road, Edinburgh EH10 6AD UK T: +44 131 202 6258 E: [email protected] www.nctechimaging.com
Leica P40 scan colourisation
with iSTAR HDR images
[Application note – Glasgow University, Glasgow]
Date: 06 October 2015
Author: Araceli Perez Ramos, Application Assistant.
Organisations involved: NCTech, Leica Geosystems, Glasgow University.
Products used: Leica Cyclone 9.1 with NCTech iSTAR image integration.
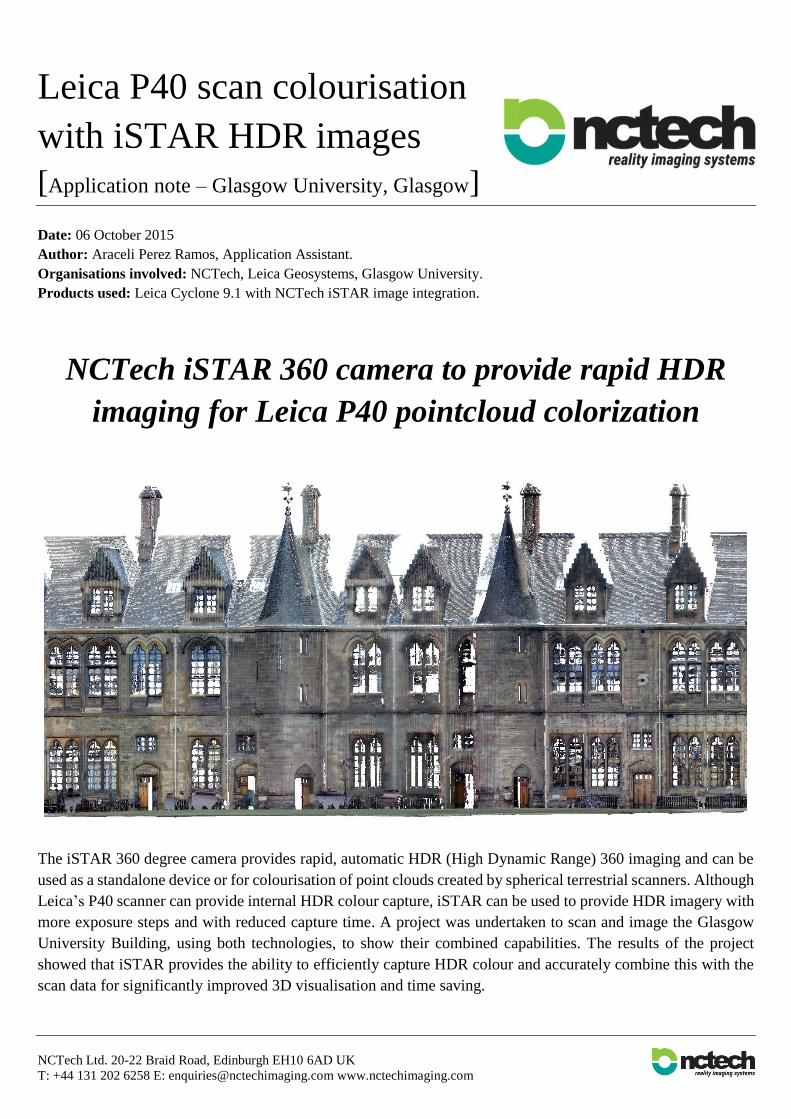
NCTech iSTAR 360 camera to provide rapid HDR
imaging for Leica P40 pointcloud colorization
The iSTAR 360 degree camera provides rapid, automatic HDR (High Dynamic Range) 360 imaging and can be
used as a standalone device or for colourisation of point clouds created by spherical terrestrial scanners. Although
Leica’s P40 scanner can provide internal HDR colour capture, iSTAR can be used to provide HDR imagery with
more exposure steps and with reduced capture time. A project was undertaken to scan and image the Glasgow
University Building, using both technologies, to show their combined capabilities. The results of the project
showed that iSTAR provides the ability to efficiently capture HDR colour and accurately combine this with the
scan data for significantly improved 3D visualisation and time saving.
NCTech Ltd. 20-22 Braid Road, Edinburgh EH10 6AD UK T: +44 131 202 6258 E: [email protected] www.nctechimaging.com
00.Content. The aim if this report is to show the workflow used to achieve quality
coloured pointcloud using NCTech iSTAR imaging integrated into
Leica Cyclone 9.1 and its advantages.
01. Software installation.
02. Fieldworks.
03. Office-work.
04. Results.
05. Colorization using iSTAR data against laser scanner internal camera.
06. Conclusion.
07. Acknowledgements.
01. Software installation. Installing Leica Cyclone: http://hds.leica-geosystems.com/en/Support-
Downloads-Cyclone-Downloads_27054.htm
02. Fieldworks. Working with NCTech solutions is the easiest, most accurate and
highest speed method of colouring point clouds with iSTAR images:
02.01. PLANNING SCAN STATIONS no change to standard
process for scanning with or without colour.
02.02. CAPTURING POINT CLOUDS with the Leica P40, select
the Laser Scanner resolution you consider most suitable for the job as
in normal use. NCTech solutions work irrespective of scan resolution
Img. 02.01 and Img. 02.02. LaserScanner and iSTAR station.
1 NCTech recommend using its adaptor poles to accurately locate the camera in
the correct position, different adaptors are used for other laser scanning systems (Leica, Faro,Trimble, Topcon, Surphaser, Z+F, etc).
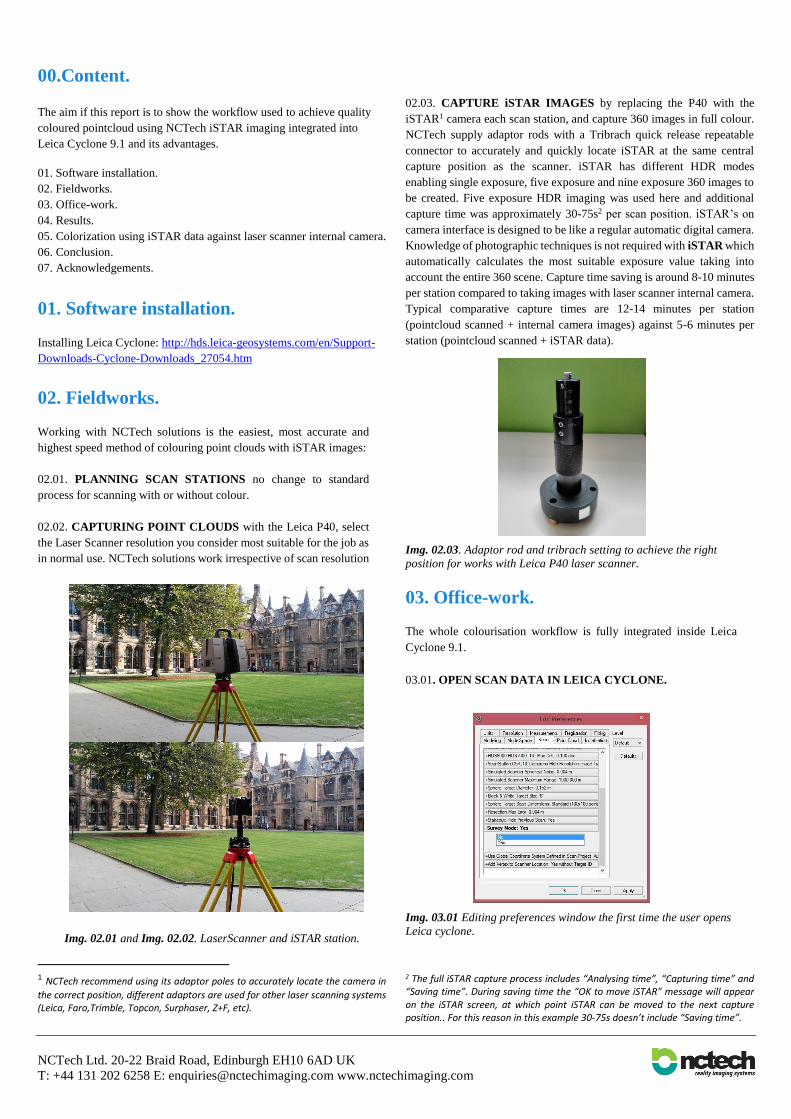
02.03. CAPTURE iSTAR IMAGES by replacing the P40 with the
iSTAR1 camera each scan station, and capture 360 images in full colour.
NCTech supply adaptor rods with a Tribrach quick release repeatable
connector to accurately and quickly locate iSTAR at the same central
capture position as the scanner. iSTAR has different HDR modes
enabling single exposure, five exposure and nine exposure 360 images to
be created. Five exposure HDR imaging was used here and additional
capture time was approximately 30-75s2 per scan position. iSTAR’s on
camera interface is designed to be like a regular automatic digital camera.
Knowledge of photographic techniques is not required with iSTAR which
automatically calculates the most suitable exposure value taking into
account the entire 360 scene. Capture time saving is around 8-10 minutes
per station compared to taking images with laser scanner internal camera.
Typical comparative capture times are 12-14 minutes per station
(pointcloud scanned + internal camera images) against 5-6 minutes per
station (pointcloud scanned + iSTAR data).
Img. 02.03. Adaptor rod and tribrach setting to achieve the right
position for works with Leica P40 laser scanner.
03. Office-work. The whole colourisation workflow is fully integrated inside Leica
Cyclone 9.1.
03.01. OPEN SCAN DATA IN LEICA CYCLONE.
Img. 03.01 Editing preferences window the first time the user opens
Leica cyclone.
2 The full iSTAR capture process includes “Analysing time”, “Capturing time” and “Saving time”. During saving time the “OK to move iSTAR" message will appear on the iSTAR screen, at which point iSTAR can be moved to the next capture position.. For this reason in this example 30-75s doesn’t include “Saving time”.

NCTech Ltd. 20-22 Braid Road, Edinburgh EH10 6AD UK T: +44 131 202 6258 E: [email protected] www.nctechimaging.com
The first time you run Leica Cyclone, you should turn off Survey
mode since it displays the individuals scans in their own folders.
Edit>Preferences>Scan>Survey Mode: No. Check that level is set to
default.
To import raw files from a scanner, you need to first create a Cyclone
database. Configure> database>add. Add any filename that you
choose. Leave Database Filename field empty (no Cyclone database
has been created yet).
Img. 03.02. Data base creation in Leica Cyclone 9.1.
Now, you can import the scan data to the new database which has been
created before. File>Import>Import ScanStation Data> Import
ScanStation Project to import scan station data for a new project.
Img. 03.03. Import StationProject in Leica Cyclone 9.1.
When importing scan data into cyclone ensure you have selected
“remove mixed pixels” during data import. This will reduce the
amount of noise.
Img. 03.04. Import StationProject parameters in Leica Cyclone 9.1.

NCTech Ltd. 20-22 Braid Road, Edinburgh EH10 6AD UK T: +44 131 202 6258 E: [email protected] www.nctechimaging.com
03.02. REGISTRATION INTO LEICA CYCLONE.
Select your project folder under your data base and click
“Create>Registration” Double click on registration icon to open it.
Img. 03.05. Registration creation in Leica Cyclone 9.1.
Img. 03.06. Registration window in Leica Cyclone 9.1.
Once registration has been created you can add your scans clicking
ScanWorld>Add and selecting all scans you want to register in the
emergent window.
Img. 03.07. Adding scans to the registration in Leica Cyclone 9.1.
If targets have not been used, as in this case of study, you must manually
identify common points or areas between two scans. You can
do this using the “Cloud Constraint Wizard” by selecting those
pointclouds which have common areas (Cloud Constraint> Cloud
Constraint Wizard) or you can do it using “Visual Registration” (Visual
registration>Visual alignment).
Img. 03.08. Cloud Constraint Wizard in Leica Cyclone 9.1.
Img. 03.09. Visual alignment in Leica Cyclone 9.1.
To calculate the errors, click Registration>Register. You can check the
error results at “Constraint list” tab. Once the error values were ok for
you, click Registration> Create Scanworld/Freeze Registration.
Img. 03.10. “Constraint list” tab in Leica Cyclone 9.1.

NCTech Ltd. 20-22 Braid Road, Edinburgh EH10 6AD UK T: +44 131 202 6258 E: [email protected] www.nctechimaging.com
To view the data Registration>Create and Open ModelSpace.
Img. 03.10. Registered Pointcloud in Leica Cyclone 9.1.
03.02. COLOURIZATION INTO LEICA CYCLONE USING
iSTAR DATA.
After registering the pointclouds you can then colour them using iSTAR
data directly within Leica Cyclone in *.nctri raw format. This process
does not require any pre-processing of images or exporting of pointclouds
in *.e57 format. The whole process of colorization is done within Leica
cyclone 9.1 and is totally integrated.
Before starting the colorization process, ensure registration is correct with
no duplicates or alignment error. Otherwise, mismatching between
iSTAR data images and pointclouds may occur.
Img. 03.11. Example of partial mismatching between pointcloud and
colorization data in Leica Cyclone 9.1.
Img. 03.12. Example of partial mismatching between pointcloud and
colorization data in Leica Cyclone 9.1.
Img. 03.13. Example of general mismatching between pointcloud and
colorization data in Leica Cyclone 9.1.
To colourize your pointcloud you only need to import the iSTAR raw data
file into cyclone as is usual with any other kind of image, then apply the
image to the pointcloud.
Firstly, import the *nctri file corresponding to each pointcloud by clicking
right button mouse>Import and select *.nctri file from iSTAR data folder.
Img. 03.14. Import *.nctri raw file from iSTAR in Leica Cyclone 9.1.
Secondly, apply each image to the corresponding pointcloud by clicking
right mouse button and selecting “Apply MultiImage”.

NCTech Ltd. 20-22 Braid Road, Edinburgh EH10 6AD UK T: +44 131 202 6258 E: [email protected] www.nctechimaging.com
The import and pointcloud colouring process time is depending on
computer specification, but the process is fully automatically.
Img. 03.15. Apply *.nctri raw file from iSTAR to colorize pointclouds in
Leica Cyclone 9.1.
04. Results. Coloured point clouds are obtained following described workflow. 18
Scan and iSTAR stations were used to obtain a merged coloured point
cloud of Glasgow University Building. Results are showed in Leica
cyclone 9.1. and also 3rd party software.
Img. 04.01. and Img. 04.02. Visualization of Coloured PointClouds in
ModelSpace of Leica Cyclone 9.1.
Img. 04.03. Visualization of Coloured PointClouds in TrueView of
Leica Cyclone 9.1.
Img. 04.04. Visualization of Coloured PointClouds in 3rd party
software.
05. Colourisation using iSTAR data
compared to using internal laser scanner
camera. As it is shown in the previous section, it can be observed (Img. 04.03 and
Img. 04. 04) that the representation of the colour in Leica Cyclone is
different compared to visualisation using a 3rd party software. In this
section the difference of colorization using iSTAR data and internal laser
scanner camera is analysed in both Leica Cyclone and 3rd party software.
Img. 05.01. Visualization of Coloured PointClouds with iSTAR data in
TrueView from Leica Cyclone 9.1.

NCTech Ltd. 20-22 Braid Road, Edinburgh EH10 6AD UK T: +44 131 202 6258 E: [email protected] www.nctechimaging.com
Img. 05.01. Visualization of Coloured PointClouds in TrueView of
Leica Cyclone 9.1.
Img. 05.02. Visualization of Coloured PointClouds with laser scanner
internal camera data in TrueView from Leica Cyclone 9.1.
Looking at Img. 05.01 and Img. 05.02 it can be observed that iSTAR
data coloured pointclouds give improved visual resolution for any
occluded area through the interpolate and fill occluded areas function.
This functionality is automatic within cyclone during colorisation, and
corresponds to one of the several options that can be selected in
NCTech ColourCloud.
Img. 05.03. Panorama corresponding to the raw data applied to the
comparison station.
As we can see looking at the Img. 05.03. the representation of colour
corresponding to iSTAR data inside Leica Cyclone looks different to
the processed panorama belonging to the same raw data. Thus, results
obtained following different workflow for the same station are also
compared in 3rd party software. As it is shown at Img 05.04 and Img.
05.05 the representation of colour in this 3rd party software matches
with the corresponding panorama (Img. 05.03). This allows us to
compare the quality provided by each image source under the same
conditions.
Img. 05.04. Visualization of PointClouds with iSTAR data using
NCTech ColourCloud in 3rd party software.
Img. 05.05. Visualisation of PointClouds with iSTAR data using Leica
cyclone to colourisation in 3rd party software.
Img. 05.06. Visualization of PointClouds with laser scanner internal
camera data using Leica cyclone to colorization in 3rd part software.
To conclude the comparison, observing the images Img. 05.04. Img.
05.05 and Img. 05.06 corresponding to the same station and
visualizing in the same 3rd party software it can be noted that the
results obtained from iSTAR data processed in NCTech ColorCloud
or Leica Cyclone 9.1 have little discernible difference, however the
using laser scanner internal camera gives lower visual quality.
06. Conclusion.
Coloured point clouds can be obtained through using iSTAR for
image capture, then following the scan data colourisation method as
described here.
In the case described in this Application Note, the visualisation of
coloured data in Cyclone could be improved compared to 3rd party
software. Despite this, working with NCTech solutions combined
with the Leica P40 Laser Scanner for point cloud colourisation is
considered advantageous to alternative techniques for a number of
reasons:

NCTech Ltd. 20-22 Braid Road, Edinburgh EH10 6AD UK T: +44 131 202 6258 E: [email protected] www.nctechimaging.com
Only one iSTAR shot is needed to colour the entire scene at each
view instead of multiple shots and images per position. This means
less time on site and also eliminates patchy colourisation experienced
where individual images are optimised for their omnidirectional view,
then combined. Knowledge of photography techniques is not needed since iSTAR
analyses the whole scene and work out the most suitable camera
settings for the full 360 view. Simple use, minimal training. iSTAR and NCTech software are
designed to be highly automated and user friendly, with minimal
training required. Automatic overlay of iSTAR images to point clouds, avoiding
having to manually define common points, eliminating user error and
enabling batch processing for efficient operation. High performance output in difficult lighting conditions. iSTAR
can provide high visual quality images in a wide range of lighting
environments as a result of the automatic HDR settings and EV range
of 27 f-stops. Reduced fieldwork data capture time. iSTAR can provide high
visual quality images (HDR ON: 5 exposures, HDR PRO: 9
exposures) in less time than LaserScanner internal camera (HDR
images with 3 exposures). Taking a HDR image with iSTAR takes
from 1.50’corresponding to light conditions (4s Analysing + 7s
Capturing + 1.39’ Saving = 1.50’ Total to 4.50’ corresponding to dark
conditions (1.40’ Analysing + 1.20’ Capturing + 1.90’ Saving = 4.50’
Total) depending on lighting conditions but it usually takes around
2.00’ on average in normal light conditions. Nevertheless, taking
photos with internal laser scanner camera increases the capturing time
with laser scanner in 10 minutes on average.
Reduced office time for data processing. iSTAR data from each
station is converted into 6 different images for Cyclone import
whereas the internal laser scanner camera provides 259 images per
station resulting in a longer import time and colorization process.
Quality of coloured pointclouds is improved. iSTAR data produce
improved visual quality compared to the laser scanner internal
camera. Further improvements are gained through additional features
such as “interpolate and fill occluded areas”, automatically applied
when colorization is processed in Leica Cyclone 9.1 and other options
in NCTech ColourCloud.
07. Acknowledgements. NCTech greatly thanks Leica Geosystems http://www.leica-
geosystems.co.uk , especially Gary Kelly and Mark Benjamin for their
collaboration and technical support in this Application Note.
For further information about iSTAR or NCTech software visit NCTech
website https://www.nctechimaging.com or contact us