Embed Size (px)
Citation preview
Lesson 17: Formatting the Contents of Cells

2
Learning Objectives
After studying this lesson, you will be able to:
Format worksheets using a variety of methods and
apply workbook themes
Control text to align and fit within cells
Format cells with borders, fill colors, and cell styles
Work with date functions and create custom number
formats
Apply conditional formatting to flag positive and
negative trends

3
Formatting Methods
Font group on the Home tab
of the RibbonThe Mini Toolbar appears
when text is selected

4
Live Preview
Place the mouse pointer over
a formatting option to see a
live preview of how the
selected cells will be affected
if the formatting command
is issued
Notice the actual size of
the text displayed in the
font size box

5
Aligning Cell Entries
By Default:
Text entries are left aligned
Number entries are right aligned
Notice how the text is lined up along the left side of the
cells and the numbers are lined up along the right side

6
Indenting the Contents of Cells
Offset text and numbers from the left and right edges
of cells
The types of income are
indented below the Income title
7
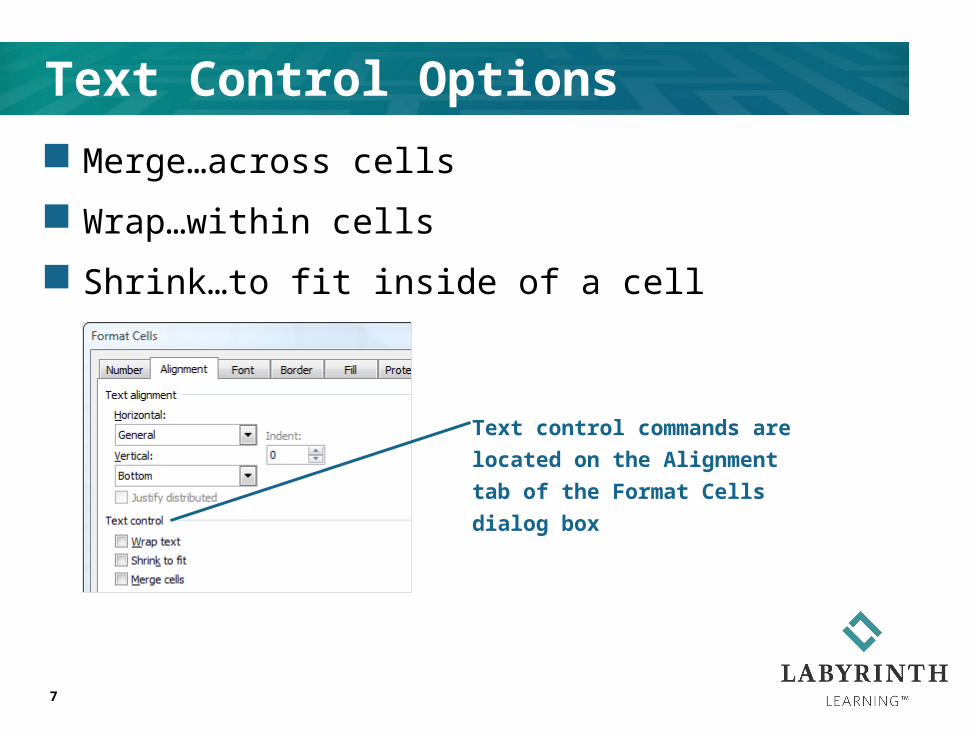
Text Control Options
Merge…across cells
Wrap…within cells
Shrink…to fit inside of a cell
Text control commands are
located on the Alignment tab of
the Format Cells dialog box

8
The Merge and Center Command
Merges selected cells and changes alignment of new
“single” merged cell to center
Green Clean is contained in cell A1 (see the Name box), but is
now merged over cells A1:E1 and centered in the new cell

9
Number Formatting
Formatting becomes the “property” of a cell
If you replace the contents of a cell, the formatting will
apply to the new contents as well

10
The Format Cells Dialog Box
Six tabs that allow you to format different aspects of
your worksheet:
1. Number
2. Border
3. Alignment
4. Fill
5. Font
6. Protection

11
Borders
Add borders to the edges of cells
Clicking the Borders button will display this
menu, which allows you to apply the
indicated border to the selected cells

12
Fill Color
“Fill” the cells of your worksheet with colors or
patterns!
Choose a color to
apply to the selected
cells
Apply a pattern by choosing the Fill
tab of the Format Cells dialog box

13
Format Painter
Copy text and number formats from one cell to
another
Does not copy cell contents; only formatting
Tip! Double-click the Format Painter button to
apply the selected formatting to multiple locations!

14
Using Themes in Excel
Easily apply formatting to
your entire worksheet
Choose matching fonts and
styles if you are design-
challenged!

15
Formatting Dates
Excel performs the following steps when you enter a
date in a cell: Recognizes the entry as a date if you enter it using a standard date
format (12/25/07, December 25, 2007, 25-Dec-07)
Converts the date to a serial number between 1 and 2,958,525
Formats the serial number entry with the same date format you
used when you entered the date
Dates can be used: To display dates in cells using various formats
In formulas

16
Date Functions
Insert a date function rather than type the date
Date functions produce the current date and,
depending on the function, can update
automatically
Use the Insert Function dialog box or type the
function in the result cell
Date functions are not case-sensitive, so type the
formula in lowercase

Conditional Formatting
Applies formatting to cells that meet criteria you set
17
The New Formatting Rule dialog box
allows you to create your own conditional
formatting rule

Lesson 17: Formatting the Contents of Cells