Embed Size (px)
Citation preview
Lesson 4:
Creating Pages, Posts, and Menus
Chapter 1: Introduction Welcome to Lesson 4! You now have the framework of a shiny, new website sitting on your server, but
it's not much more than an empty shell. Today, you'll learn how to fill the void with the most important
element of your site: content. This can be any type of information, like text, images, and video. We'll
focus on written content in this lesson, and we'll look at visual media in the next lesson.
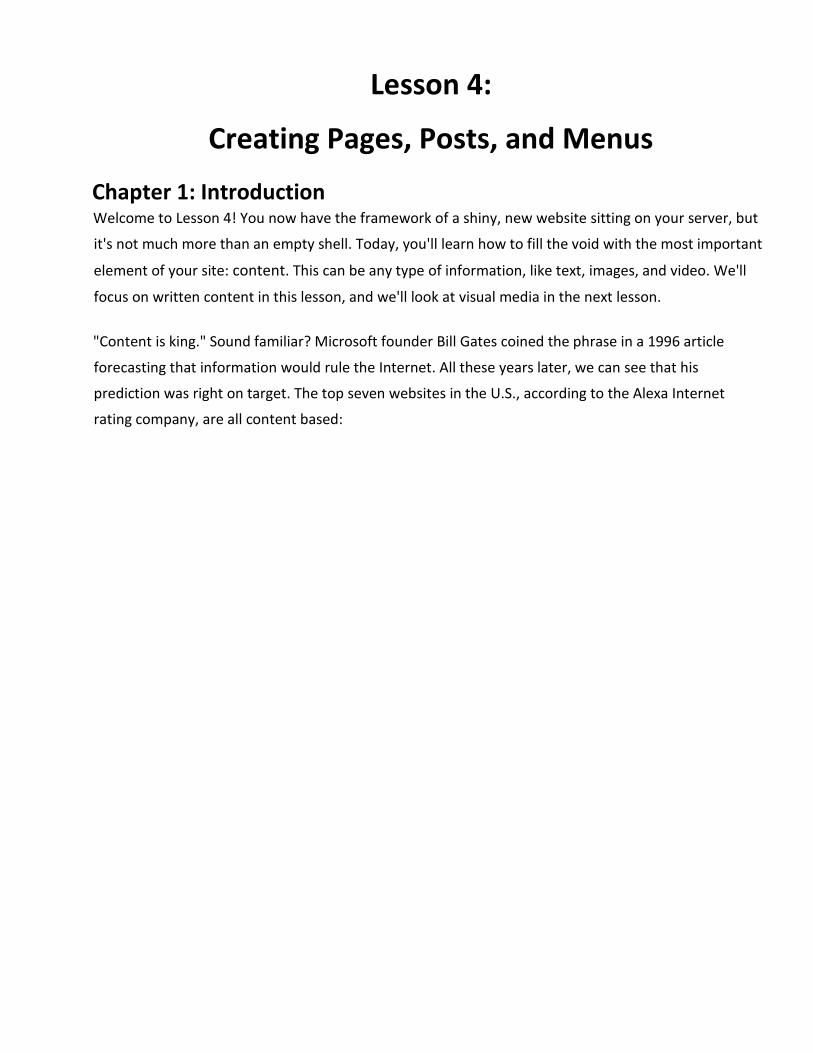
"Content is king." Sound familiar? Microsoft founder Bill Gates coined the phrase in a 1996 article
forecasting that information would rule the Internet. All these years later, we can see that his
prediction was right on target. The top seven websites in the U.S., according to the Alexa Internet
rating company, are all content based:
Alexa's most popular U.S. websites
In this lesson, you're going to learn how to enter and organize written content as pages and posts.
You'll also find out how to create links and how to design a user-friendly navigation system using the
WP custom menu.
I've written some content for the site that you can insert. The link below contains a folder of the two
files you'll need for this lesson. Paste the link in your browser to download the zip folder, and then
open the folder by double-clicking it or clicking the popup link that says Extract all files. If you don't see
that, use a Zip utility on your computer. If you don't have a Zip utility, download one listed in this
lesson's Supplementary Material section.
Using the Safari browser? Go to Preferences, and at the bottom of the window, check the option for
Safari to open safe files after downloading.
https://ed2go-cbl.difference-engine.com/api/v2/authoring/nodes/74595042/serve
Make a note of where you saved the folder on your computer's hard drive so that you can find it later.
Many people find it easiest to download the package to their Desktop or to a flash drive.
Okay, ready to get started? See you in Chapter 2!
Chapter 2: Adding Pages WordPress can display your written content in either a post or a page.
Because you're building a content management website, most of your content will appear on static
pages, which display information that doesn't change very often.
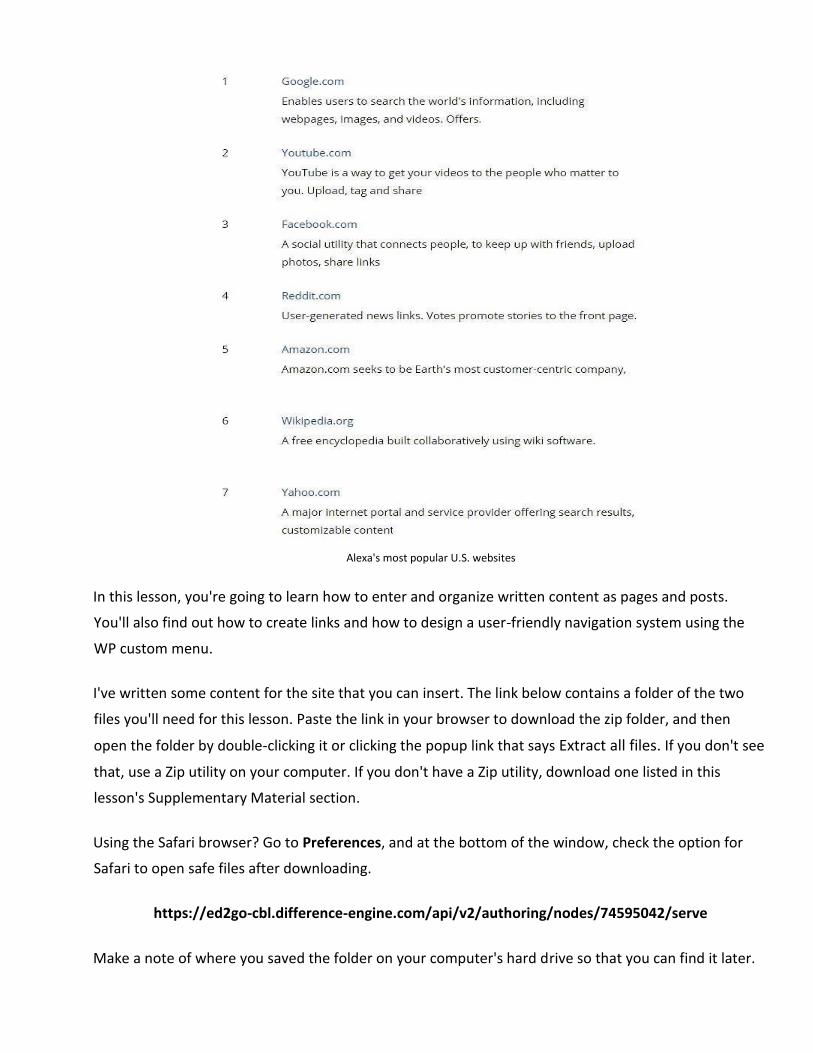
First, we'll remove the default page installed with WordPress. Let's give it a try:
1. Open your Dashboard, and click the Pages submenu in the left column. The Pages screen
will open, listing all your static pages.
2. Put your cursor over the A homepage section title, and click the Trash link that appears
underneath. (If you see no A homepage section, that means WordPress has removed this
sample page, so either delete a page you don’t want, or just proceed with Step 3.)
Deleting a page
That's all there is to removing a page. If you decide you want to restore a trashed page, you
have 30 days before WordPress permanently deletes it.
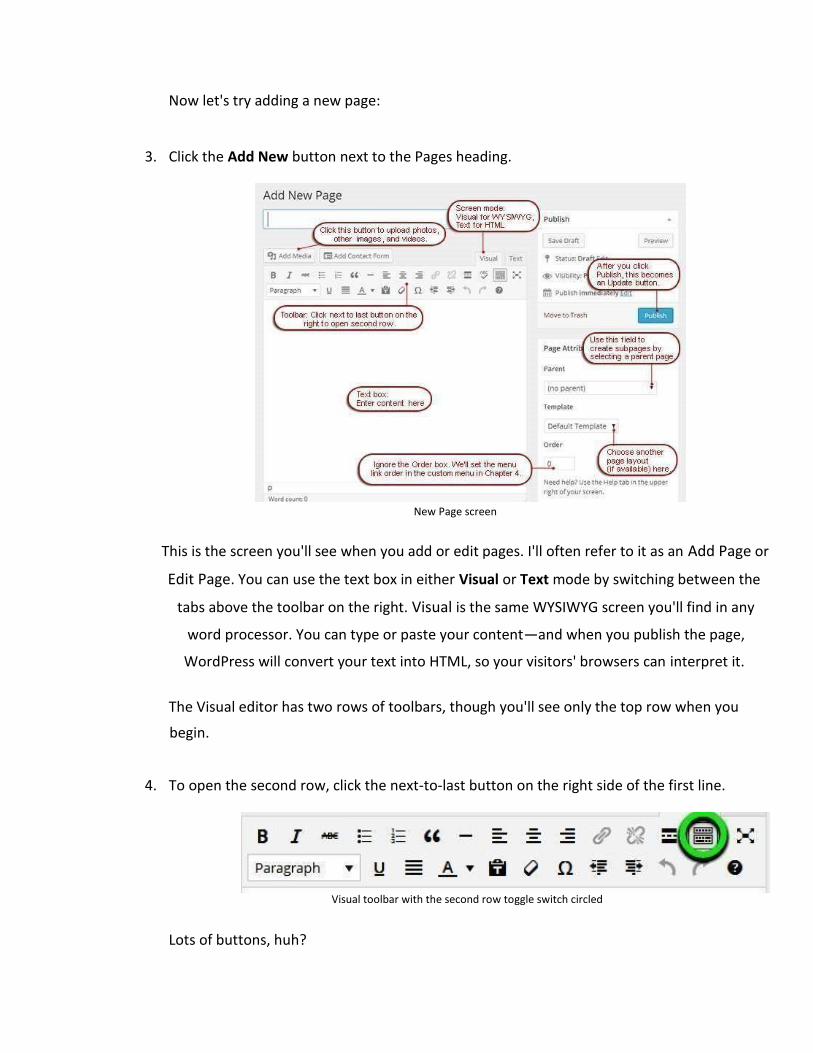
Now let's try adding a new page:
3. Click the Add New button next to the Pages heading.
New Page screen
This is the screen you'll see when you add or edit pages. I'll often refer to it as an Add Page or
Edit Page. You can use the text box in either Visual or Text mode by switching between the
tabs above the toolbar on the right. Visual is the same WYSIWYG screen you'll find in any
word processor. You can type or paste your content—and when you publish the page,
WordPress will convert your text into HTML, so your visitors' browsers can interpret it.
The Visual editor has two rows of toolbars, though you'll see only the top row when you
begin.
4. To open the second row, click the next-to-last button on the right side of the first line.
Visual toolbar with the second row toggle switch circled
Lots of buttons, huh?
You’ll find an excellent and thorough guide to all these tools here:
https://make.wordpress.org/support/user-manual/content/editors/visual-editor/
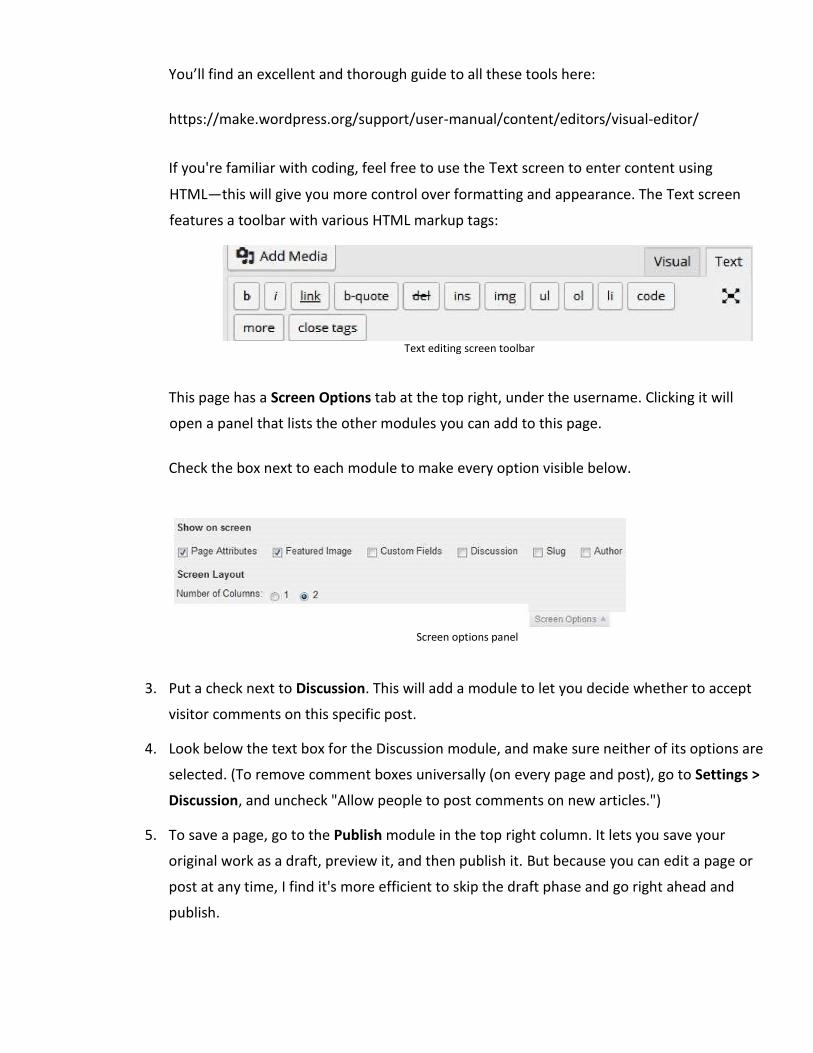
If you're familiar with coding, feel free to use the Text screen to enter content using
HTML—this will give you more control over formatting and appearance. The Text screen
features a toolbar with various HTML markup tags:
Text editing screen toolbar
This page has a Screen Options tab at the top right, under the username. Clicking it will
open a panel that lists the other modules you can add to this page.
Check the box next to each module to make every option visible below.
Screen options panel
3. Put a check next to Discussion. This will add a module to let you decide whether to accept
visitor comments on this specific post.
4. Look below the text box for the Discussion module, and make sure neither of its options are
selected. (To remove comment boxes universally (on every page and post), go to Settings >
Discussion, and uncheck "Allow people to post comments on new articles.")
5. To save a page, go to the Publish module in the top right column. It lets you save your
original work as a draft, preview it, and then publish it. But because you can edit a page or
post at any time, I find it's more efficient to skip the draft phase and go right ahead and
publish.
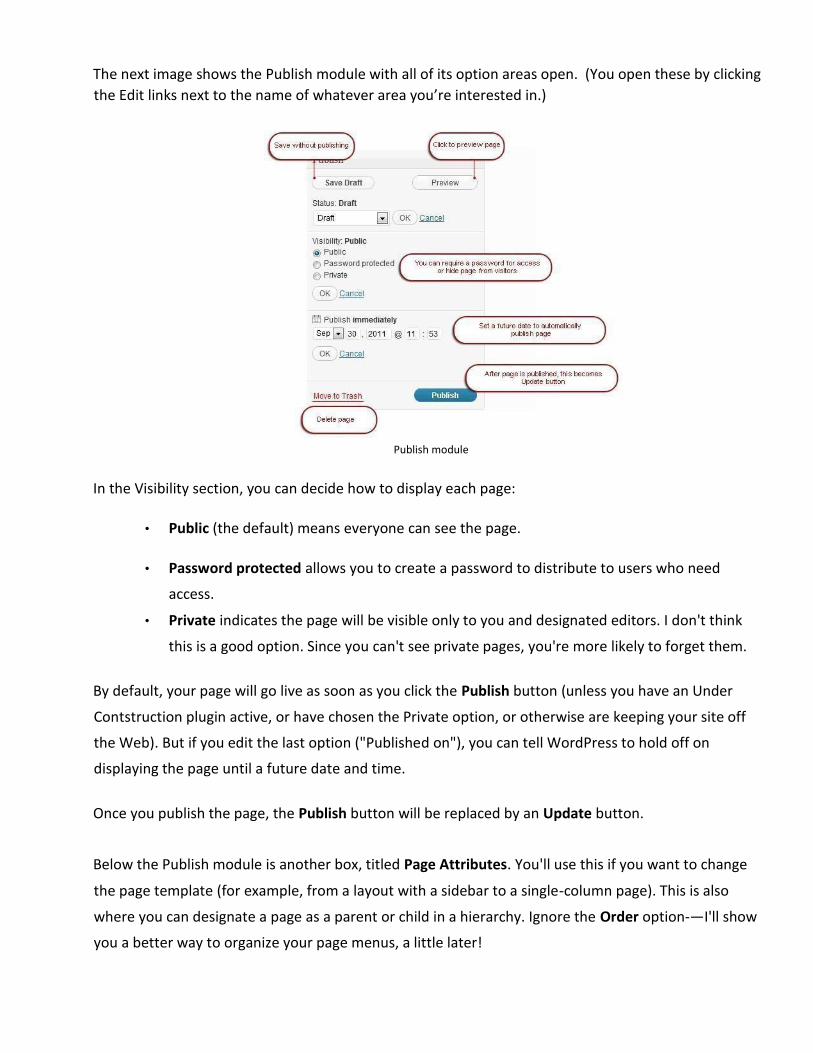
The next image shows the Publish module with all of its option areas open. (You open these by clicking
the Edit links next to the name of whatever area you’re interested in.)
Publish module
In the Visibility section, you can decide how to display each page:
• Public (the default) means everyone can see the page.
• Password protected allows you to create a password to distribute to users who need
access.
• Private indicates the page will be visible only to you and designated editors. I don't think
this is a good option. Since you can't see private pages, you're more likely to forget them.
By default, your page will go live as soon as you click the Publish button (unless you have an Under
Contstruction plugin active, or have chosen the Private option, or otherwise are keeping your site off
the Web). But if you edit the last option ("Published on"), you can tell WordPress to hold off on
displaying the page until a future date and time.
Once you publish the page, the Publish button will be replaced by an Update button.
Below the Publish module is another box, titled Page Attributes. You'll use this if you want to change
the page template (for example, from a layout with a sidebar to a single-column page). This is also
where you can designate a page as a parent or child in a hierarchy. Ignore the Order option-—I'll show
you a better way to organize your page menus, a little later!
Creating the Home Page
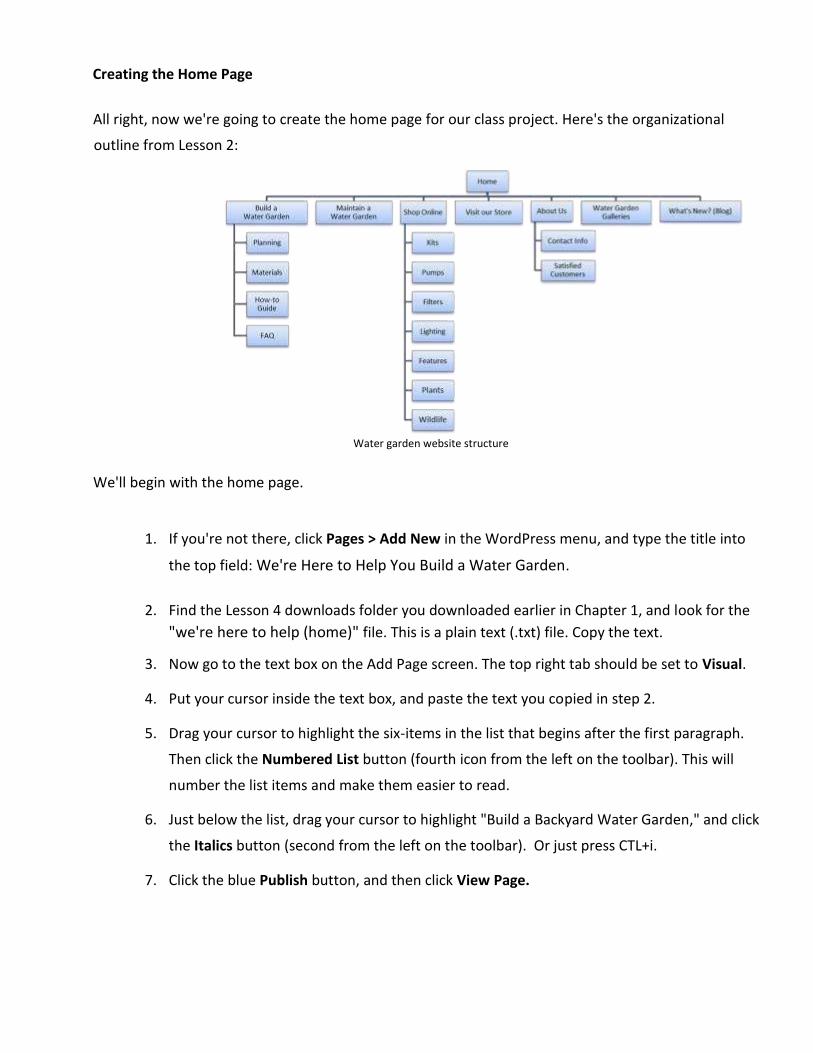
All right, now we're going to create the home page for our class project. Here's the organizational
outline from Lesson 2:
Water garden website structure
We'll begin with the home page.
1. If you're not there, click Pages > Add New in the WordPress menu, and type the title into
the top field: We're Here to Help You Build a Water Garden.
2. Find the Lesson 4 downloads folder you downloaded earlier in Chapter 1, and look for the
"we're here to help (home)" file. This is a plain text (.txt) file. Copy the text.
3. Now go to the text box on the Add Page screen. The top right tab should be set to Visual.
4. Put your cursor inside the text box, and paste the text you copied in step 2.
5. Drag your cursor to highlight the six-items in the list that begins after the first paragraph.
Then click the Numbered List button (fourth icon from the left on the toolbar). This will
number the list items and make them easier to read.
6. Just below the list, drag your cursor to highlight "Build a Backyard Water Garden," and click
the Italics button (second from the left on the toolbar). Or just press CTL+i.
7. Click the blue Publish button, and then click View Page.
How does your home page look? Next, we'll add the first parent page.
Creating a Parent Page
This page is titled "Build a Water Garden." It will anchor the step-by-step instructions for building the
water feature.
1. Once again, in the WordPress menu, click Pages > Add New.
2. From the Lesson 4 downloads, copy the article titled "build water garden."
3. Type Build a Water Garden in the Title field.
4. After making sure the screen tab is set to Visual, paste the article into the text box.
5. This article includes a series of questions and answers. Highlight each of the six questions, and
click the Bold button. That will make the questions easier to read. (Or CTL+b)
6. Click the Publish button, and view the page. Make any necessary changes to the spacing or
punctuation. I added a line break (SHIFT + ENTER) between paragraphs and questions to give the
page a cleaner look.
7. Click the Update button (which replaced the Publish button) in the Publish module.
Adding a Child Page
Remember back in Lesson 2 when I discussed about how hierarchies can keep your website better
organized? We're going to create a hierarchy now by adding a child page to the top level (parent) page
you just created.
In the website outline, you'll see that Build a Water Garden has a subpage titled "Materials List."
Here's how we'll put it in:
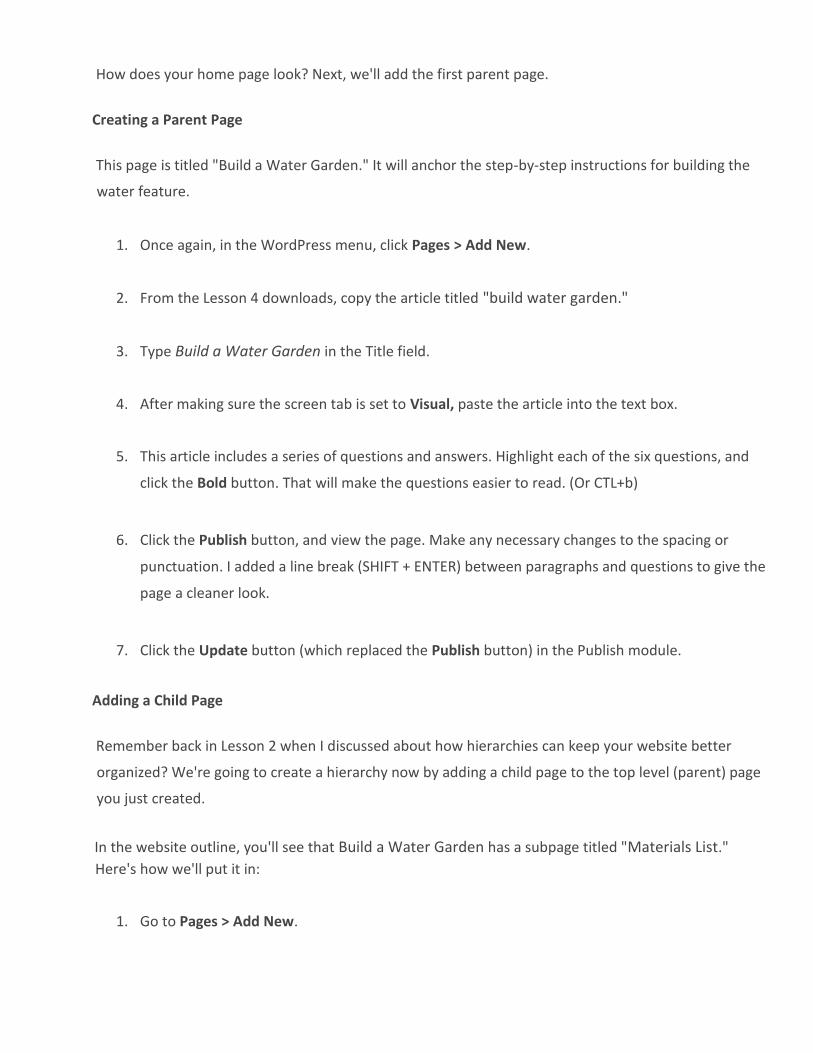
1. Go to Pages > Add New.
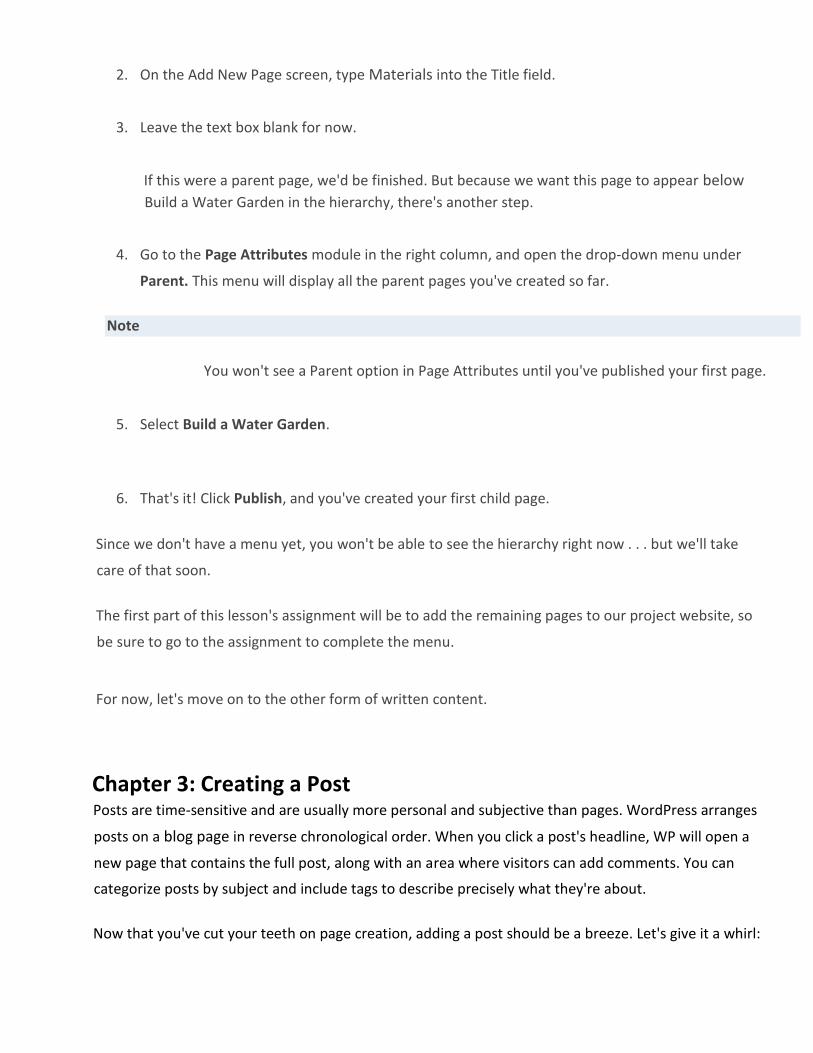
2. On the Add New Page screen, type Materials into the Title field.
3. Leave the text box blank for now.
If this were a parent page, we'd be finished. But because we want this page to appear below
Build a Water Garden in the hierarchy, there's another step.
4. Go to the Page Attributes module in the right column, and open the drop-down menu under
Parent. This menu will display all the parent pages you've created so far.
Note
You won't see a Parent option in Page Attributes until you've published your first page.
5. Select Build a Water Garden.
6. That's it! Click Publish, and you've created your first child page.
Since we don't have a menu yet, you won't be able to see the hierarchy right now . . . but we'll take
care of that soon.
The first part of this lesson's assignment will be to add the remaining pages to our project website, so
be sure to go to the assignment to complete the menu.
For now, let's move on to the other form of written content.
Chapter 3: Creating a Post Posts are time-sensitive and are usually more personal and subjective than pages. WordPress arranges
posts on a blog page in reverse chronological order. When you click a post's headline, WP will open a
new page that contains the full post, along with an area where visitors can add comments. You can
categorize posts by subject and include tags to describe precisely what they're about.
Now that you've cut your teeth on page creation, adding a post should be a breeze. Let's give it a whirl:
1. In the WordPress menu, click Posts to open a list of existing posts. Again, we're going to remove
the sample included in the installation.
2. Put your cursor over the title, WordPress Resources…, and click the Trash link.
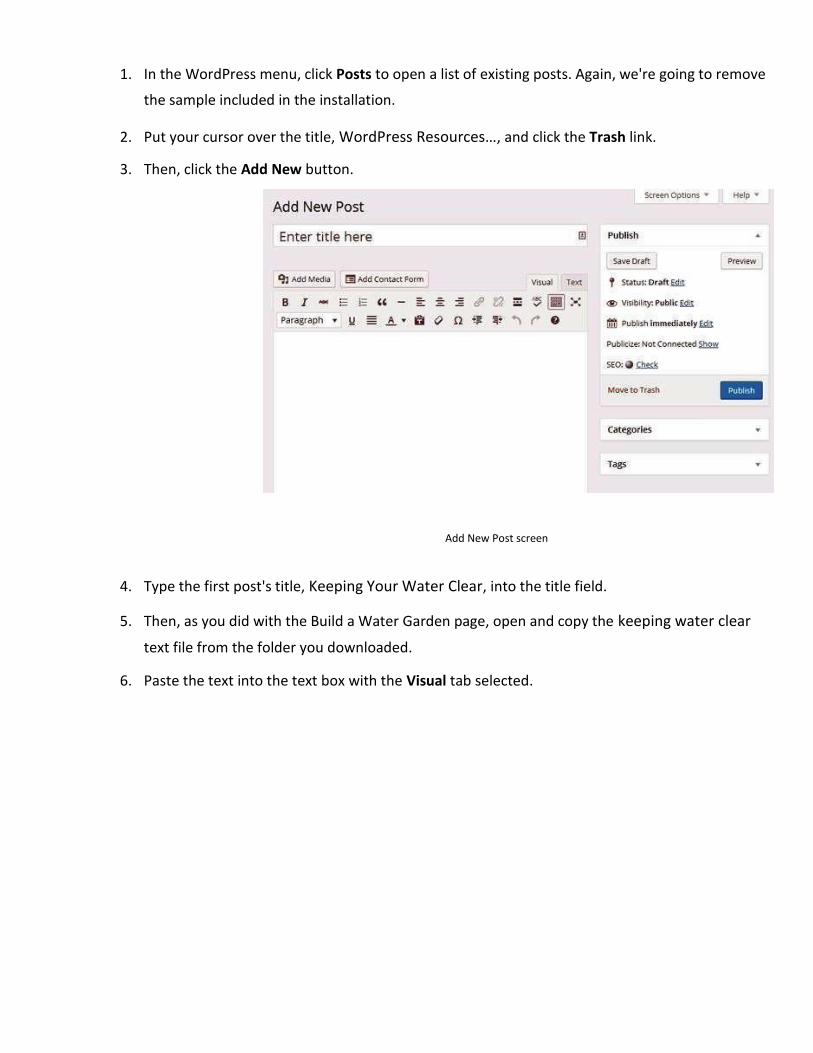
3. Then, click the Add New button.
Add New Post screen
4. Type the first post's title, Keeping Your Water Clear, into the title field.
5. Then, as you did with the Build a Water Garden page, open and copy the keeping water clear
text file from the folder you downloaded.
6. Paste the text into the text box with the Visual tab selected.
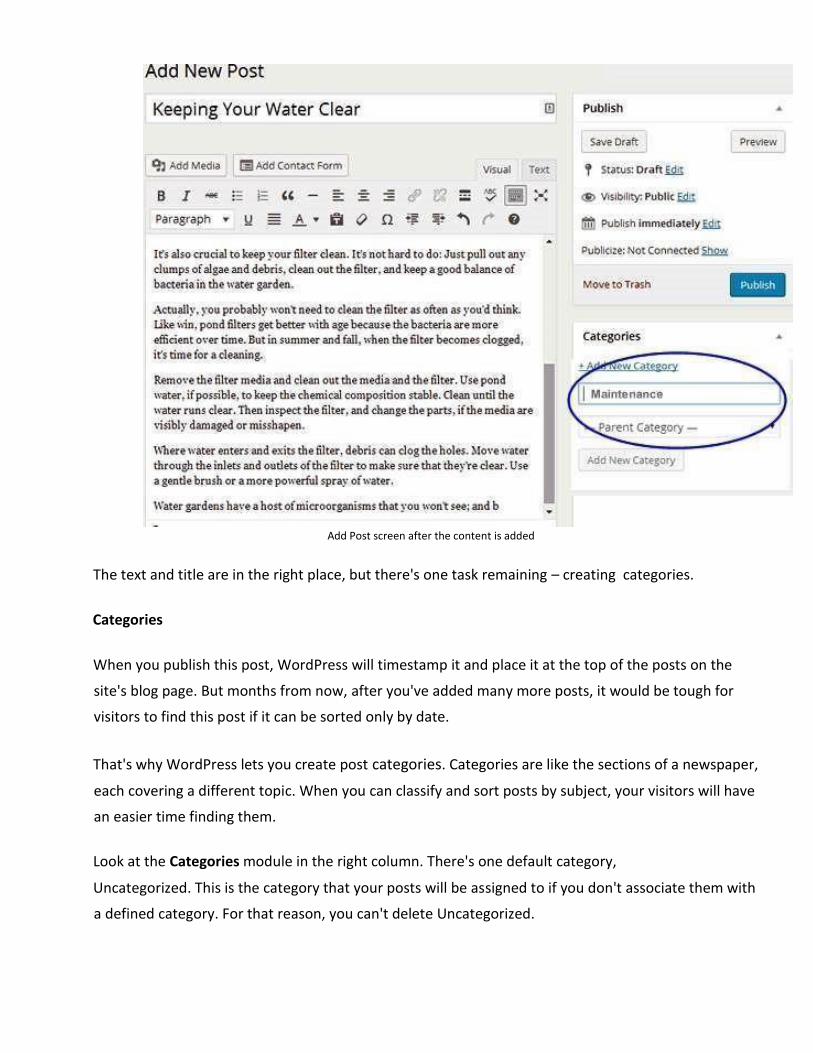
Add Post screen after the content is added
The text and title are in the right place, but there's one task remaining – creating categories.
Categories
When you publish this post, WordPress will timestamp it and place it at the top of the posts on the
site's blog page. But months from now, after you've added many more posts, it would be tough for
visitors to find this post if it can be sorted only by date.
That's why WordPress lets you create post categories. Categories are like the sections of a newspaper,
each covering a different topic. When you can classify and sort posts by subject, your visitors will have
an easier time finding them.
Look at the Categories module in the right column. There's one default category,
Uncategorized. This is the category that your posts will be assigned to if you don't associate them with
a defined category. For that reason, you can't delete Uncategorized.

1. Click the +Add New Category link near the bottom of the box, and then enter the name of
the new category, Maintenance, in the field.
2. Click the Add New Category button (the button, not the +Add New Category link) and then
click the Publish button to save the post. In addition to the category options on the Add
Post and Edit Post pages, WordPress has another location where you can work with
categories.
3. Click Posts > Categories.
Categories screen
4. In the Name field (under Add New Category), type in Water.
5. To make this a subcategory, go down to the Parent area, and open the drop-down menu.
Select Maintenance as the parent category, and click the Add New Category button. You'll
see that you've added Water as a subcategory of Maintenance.
Now let's go back to the post to link it to the new subcategory.
6. Click Posts > All Posts, and put your cursor over the title Keeping Your Water Clear.
7. This time, select the Quick Edit link. This expands the panel so that you can make changes
without having to open an Edit Post screen.
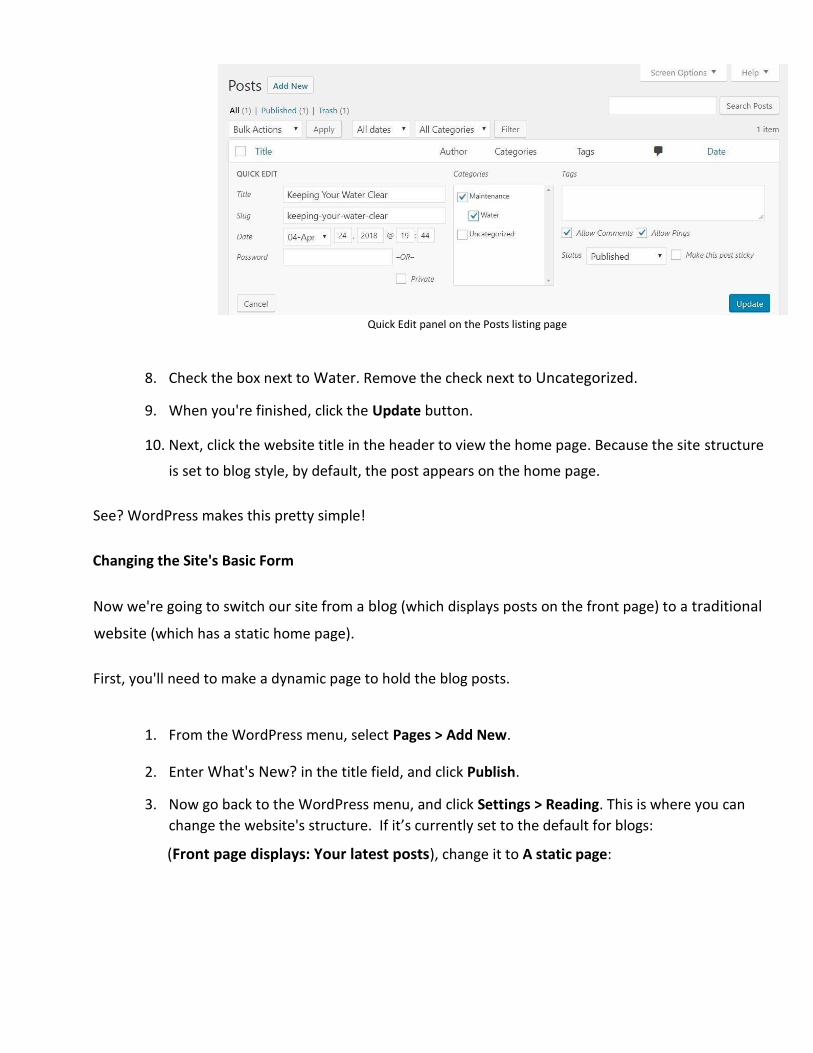
Quick Edit panel on the Posts listing page
8. Check the box next to Water. Remove the check next to Uncategorized.
9. When you're finished, click the Update button.
10. Next, click the website title in the header to view the home page. Because the site structure
is set to blog style, by default, the post appears on the home page.
See? WordPress makes this pretty simple!
Changing the Site's Basic Form
Now we're going to switch our site from a blog (which displays posts on the front page) to a traditional
website (which has a static home page).
First, you'll need to make a dynamic page to hold the blog posts.
1. From the WordPress menu, select Pages > Add New.
2. Enter What's New? in the title field, and click Publish.
3. Now go back to the WordPress menu, and click Settings > Reading. This is where you can
change the website's structure. If it’s currently set to the default for blogs:
(Front page displays: Your latest posts), change it to A static page:
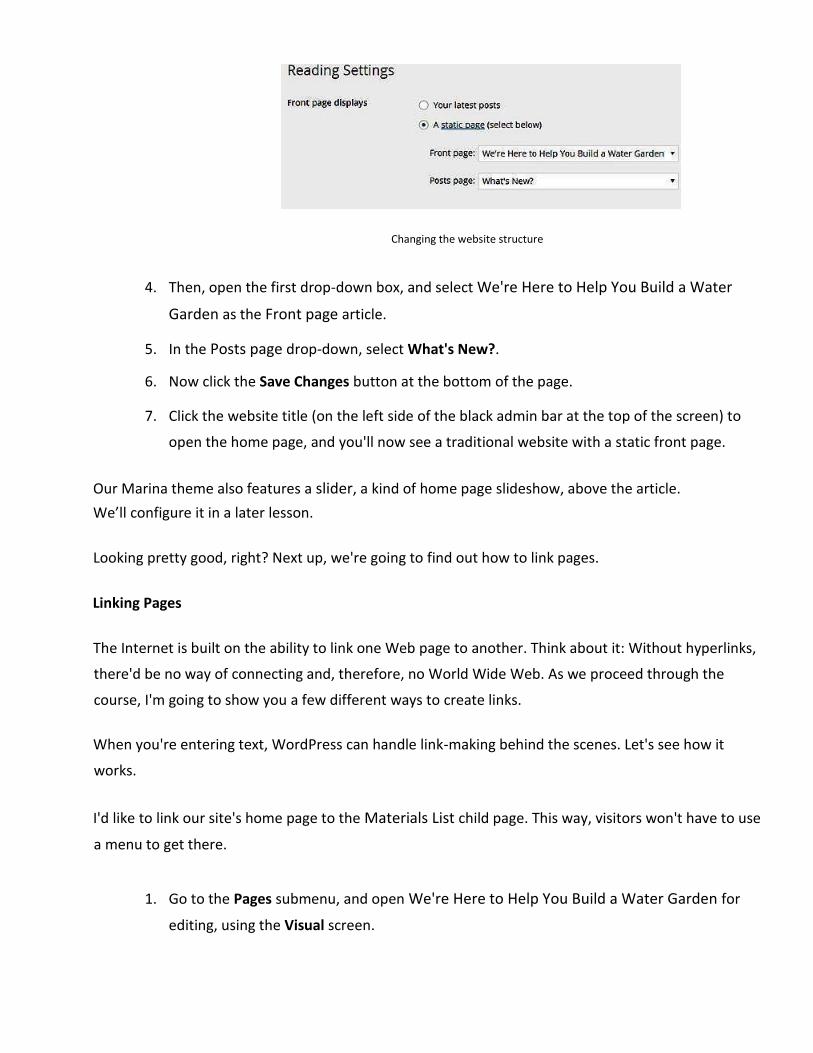
Changing the website structure
4. Then, open the first drop-down box, and select We're Here to Help You Build a Water
Garden as the Front page article.
5. In the Posts page drop-down, select What's New?.
6. Now click the Save Changes button at the bottom of the page.
7. Click the website title (on the left side of the black admin bar at the top of the screen) to
open the home page, and you'll now see a traditional website with a static front page.
Our Marina theme also features a slider, a kind of home page slideshow, above the article.
We’ll configure it in a later lesson.
Looking pretty good, right? Next up, we're going to find out how to link pages.
Linking Pages
The Internet is built on the ability to link one Web page to another. Think about it: Without hyperlinks,
there'd be no way of connecting and, therefore, no World Wide Web. As we proceed through the
course, I'm going to show you a few different ways to create links.
When you're entering text, WordPress can handle link-making behind the scenes. Let's see how it
works.
I'd like to link our site's home page to the Materials List child page. This way, visitors won't have to use
a menu to get there.
1. Go to the Pages submenu, and open We're Here to Help You Build a Water Garden for
editing, using the Visual screen.
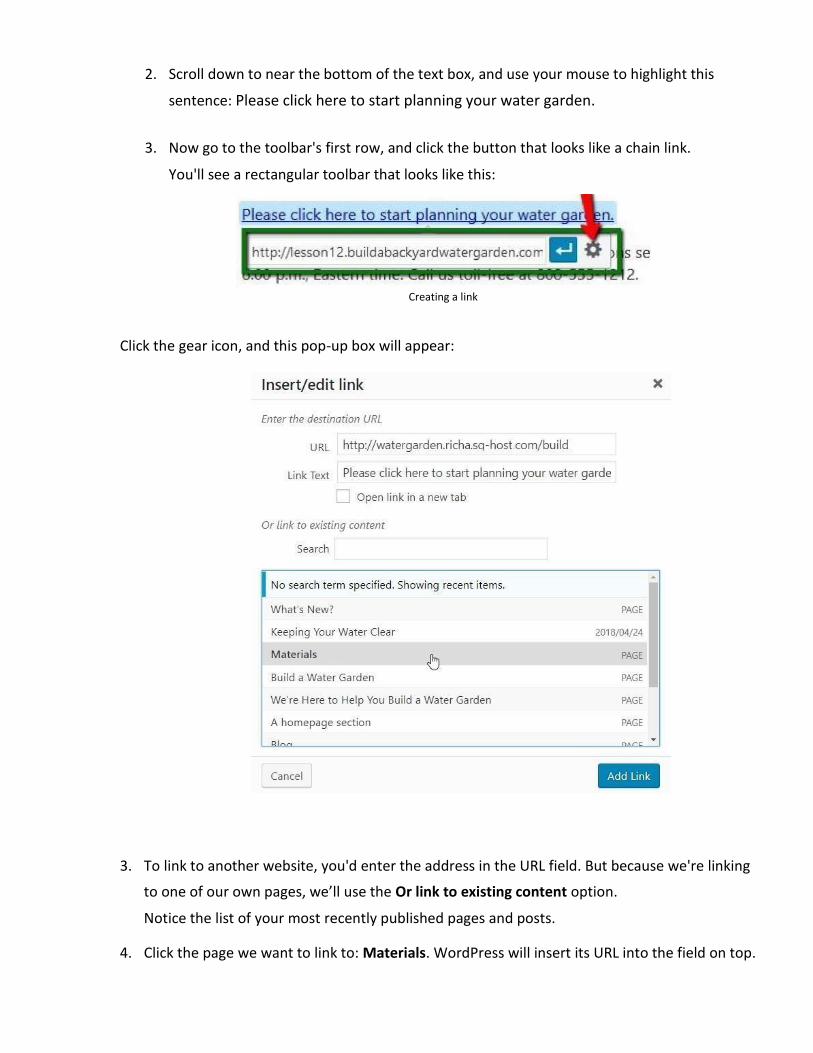
2. Scroll down to near the bottom of the text box, and use your mouse to highlight this
sentence: Please click here to start planning your water garden.
3. Now go to the toolbar's first row, and click the button that looks like a chain link.
You'll see a rectangular toolbar that looks like this:
Creating a link
Click the gear icon, and this pop-up box will appear:
3. To link to another website, you'd enter the address in the URL field. But because we're linking
to one of our own pages, we’ll use the Or link to existing content option.
Notice the list of your most recently published pages and posts.
4. Click the page we want to link to: Materials. WordPress will insert its URL into the field on top.
5. Click the Add Link button at the bottom of the screen. Then, click Update.
6. In the WYSIWYG (Visual) screen, you'll see that the phrase is now underlined like a traditional
hyperlink.
7. Test the link by clicking View Page, and then click the underlined words. This will open the
Materials page.
We can also create links using HTML code. But let's not worry about that now (I promise, we'll get to
that a little later in the course).
How did you do? In the next chapter, you'll learn how to direct people to the content they're looking
for. See you in Chapter 4!
Chapter 4: Menus A website menu is the tool that guides visitors to the information they're seeking. You'll often see a
horizontal main menu (sometimes known as a navigation bar) just above or below the page header.
Menus can also appear in vertical form in sidebars.
WordPress comes with a menu maker that's powerful and easy to use. Let's check it out!
1. From the WordPress menu, click Appearance > Menus.
2. Click the Create a New Menu link.
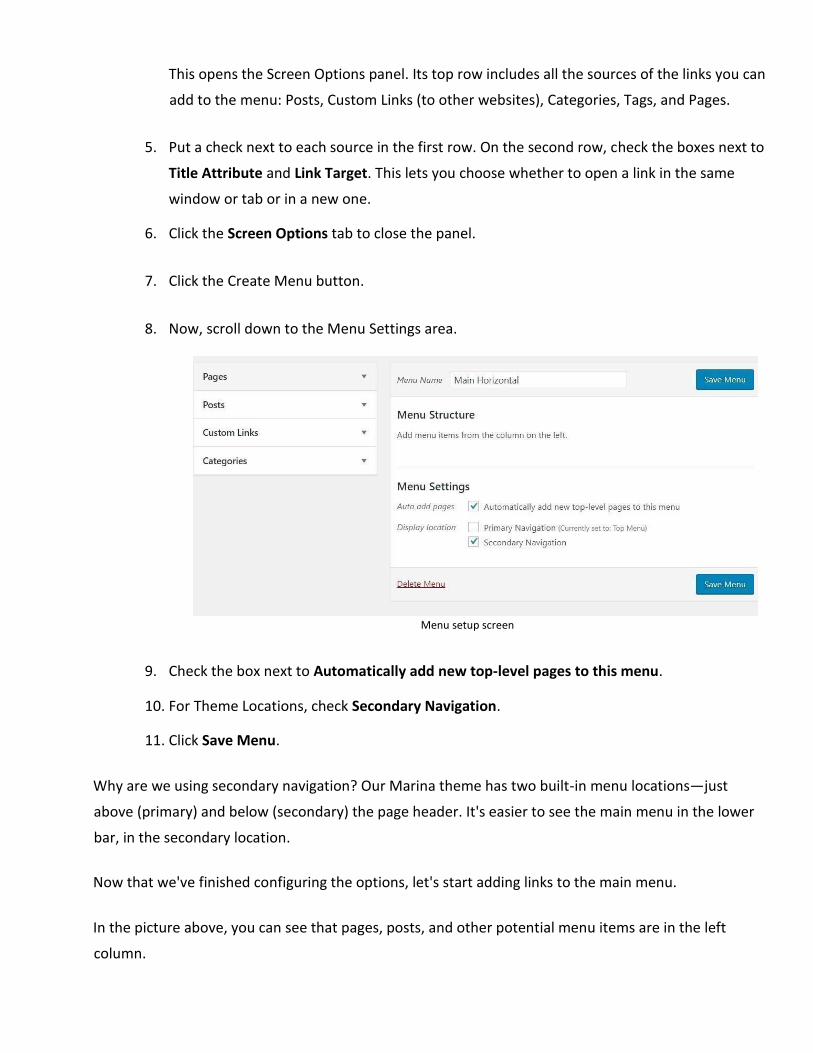
3. We'll need to give our menu a name. In the Menu Name field, enter Main Horizontal.
Now let's set up the page so that it displays all the features we want to use.
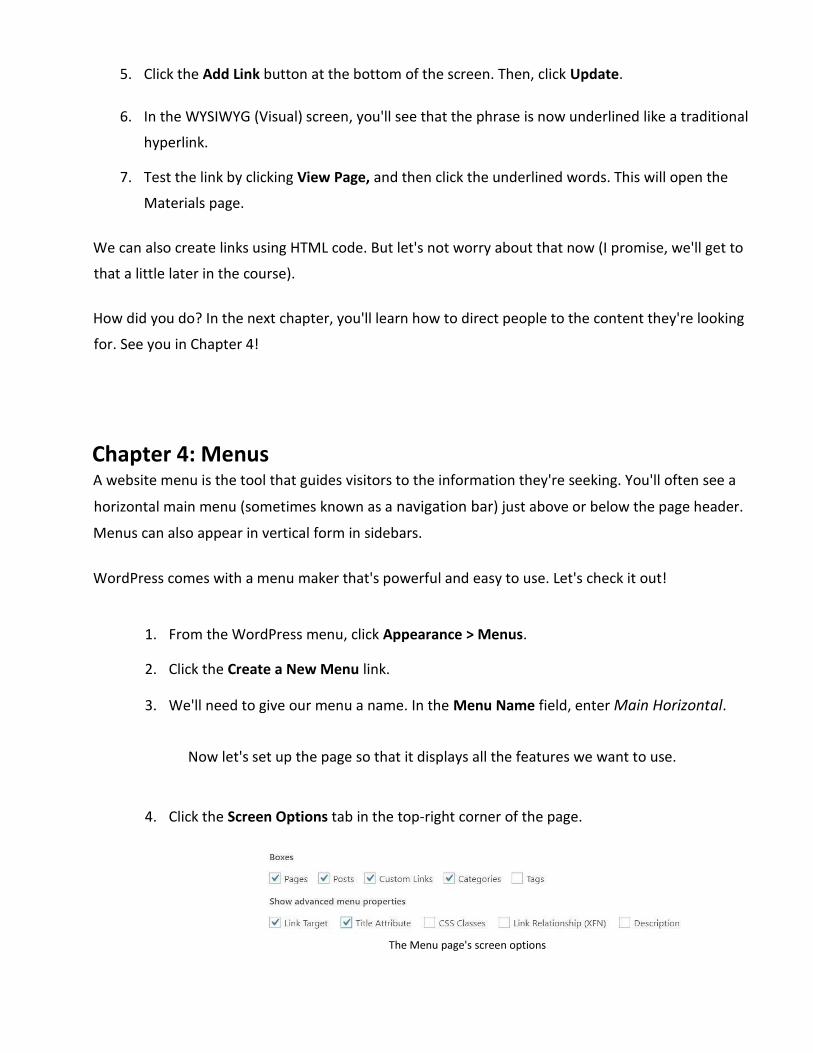
4. Click the Screen Options tab in the top-right corner of the page.
The Menu page's screen options
This opens the Screen Options panel. Its top row includes all the sources of the links you can
add to the menu: Posts, Custom Links (to other websites), Categories, Tags, and Pages.
5. Put a check next to each source in the first row. On the second row, check the boxes next to
Title Attribute and Link Target. This lets you choose whether to open a link in the same
window or tab or in a new one.
6. Click the Screen Options tab to close the panel.
7. Click the Create Menu button.
8. Now, scroll down to the Menu Settings area.
Menu setup screen
9. Check the box next to Automatically add new top-level pages to this menu.
10. For Theme Locations, check Secondary Navigation.
11. Click Save Menu.
Why are we using secondary navigation? Our Marina theme has two built-in menu locations—just
above (primary) and below (secondary) the page header. It's easier to see the main menu in the lower
bar, in the secondary location.
Now that we've finished configuring the options, let's start adding links to the main menu.
In the picture above, you can see that pages, posts, and other potential menu items are in the left
column.
1. Click the arrow on the right of Pages to open the Pages module. Then, click the View All tab
to display the title of each page you've published.
2. Click Select All in the bottom left corner.
3. Click Add to Menu.
The menu items are now represented in the right column's Menu Structure area, each in
what I'll call a link box.
Important: The Menu Structure column will control the order and hierarchy of the links on your
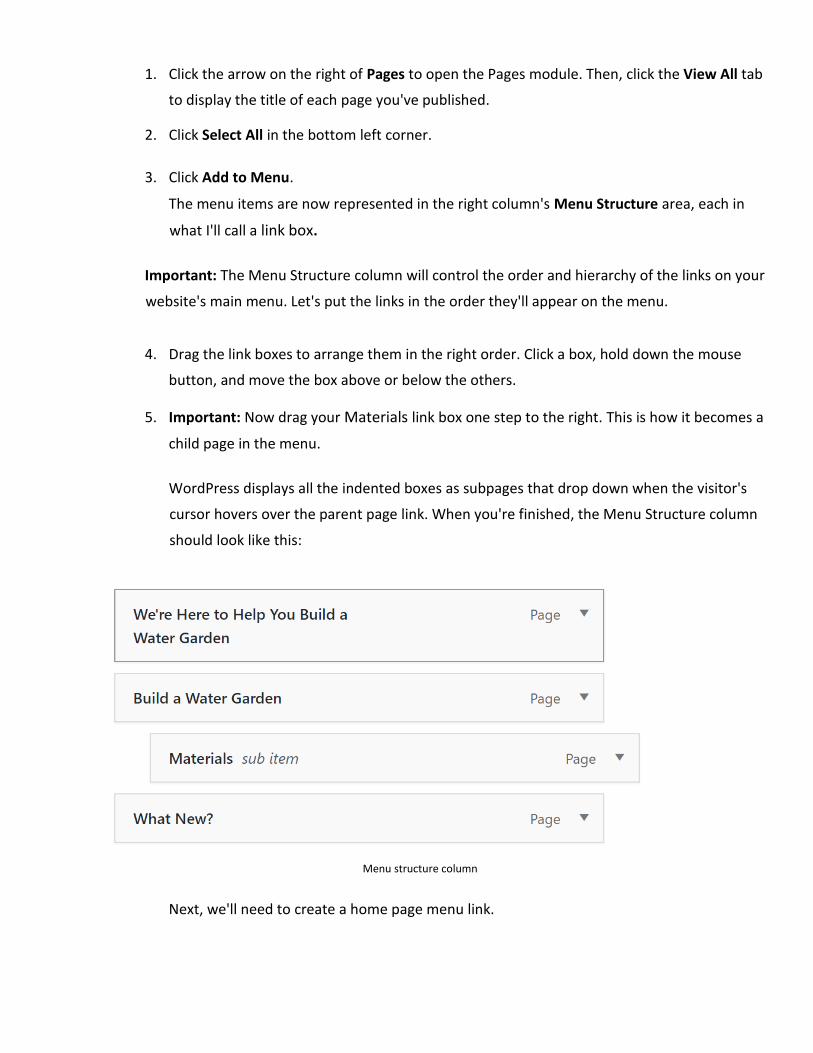
website's main menu. Let's put the links in the order they'll appear on the menu.
4. Drag the link boxes to arrange them in the right order. Click a box, hold down the mouse
button, and move the box above or below the others.
5. Important: Now drag your Materials link box one step to the right. This is how it becomes a
child page in the menu.
WordPress displays all the indented boxes as subpages that drop down when the visitor's
cursor hovers over the parent page link. When you're finished, the Menu Structure column
should look like this:
Menu structure column
Next, we'll need to create a home page menu link.
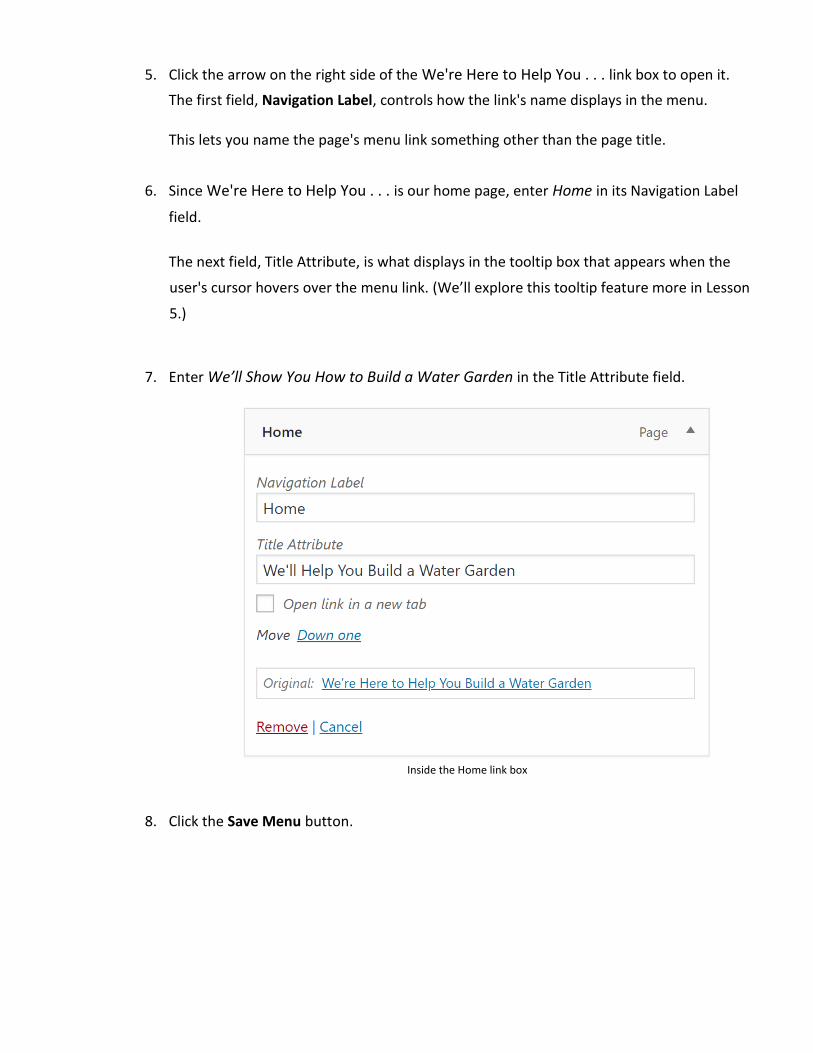
5. Click the arrow on the right side of the We're Here to Help You . . . link box to open it.
The first field, Navigation Label, controls how the link's name displays in the menu.
This lets you name the page's menu link something other than the page title.
6. Since We're Here to Help You . . . is our home page, enter Home in its Navigation Label
field.
The next field, Title Attribute, is what displays in the tooltip box that appears when the
user's cursor hovers over the menu link. (We’ll explore this tooltip feature more in Lesson
5.)
7. Enter We’ll Show You How to Build a Water Garden in the Title Attribute field.
Inside the Home link box
8. Click the Save Menu button.
Naming the Home Page
This is an appropriate time to advise you against naming your website's home
page Home in the title attribute field, when you create the home page. Here
are a couple of reasons:
• Naming it Home wastes a good way to help optimize your site for
search engines. Your site will appear higher up in search engine
page results when the home page title attribute contains words or
phrases that describe what it's about.
• If you ever decide to change the home page, it'll cause confusion.
You can have WordPress specify which page is the home page on
the Settings > Reading screen. And as we just did, you can change
the menu link name to Home in its link box on the Menus screen.
Some Points to Remember
It's important to note that this custom menu maker works independently of the other WordPress
publishing functions. The menu won't automatically delete page links, add subpage links, or change the
links' order.
This means you'll often have to make a special trip to the Appearance > Menus page when you want to
change things on the menu.
Earlier, we instructed WordPress to automatically add a new top-level (parent) page to the menu each
time you publish one. But the new page will appear as the last item in the menu unless you open the
Menus screen and drag the link box to a different, presumably better, location in the Menu Structure.
You'll also have to go back to the Menus page to manually specify any child pages that you
subsequently publish. WordPress won't do this for you.
Also, if you see duplicate menu items on the menu bar (linking to the same page), this happened
because you had the automatic-add top-level pages option in effect, and you also manually added a
page later. No problem, just go to the Appearance > Menus screen. In the Menu Structure area, click
the small black arrow to open the details about one of your duplicate items, then click Remove to
delete it.
While these extra tasks can be a bit annoying, they're a small price to pay in return for the menu's
many advantages!
The default system, which we'd been using up to now, put every published page's title on the menu. It
won't let you change the wording, hide any pages, or add categories and tags as links. It also won't add
a link to another website.
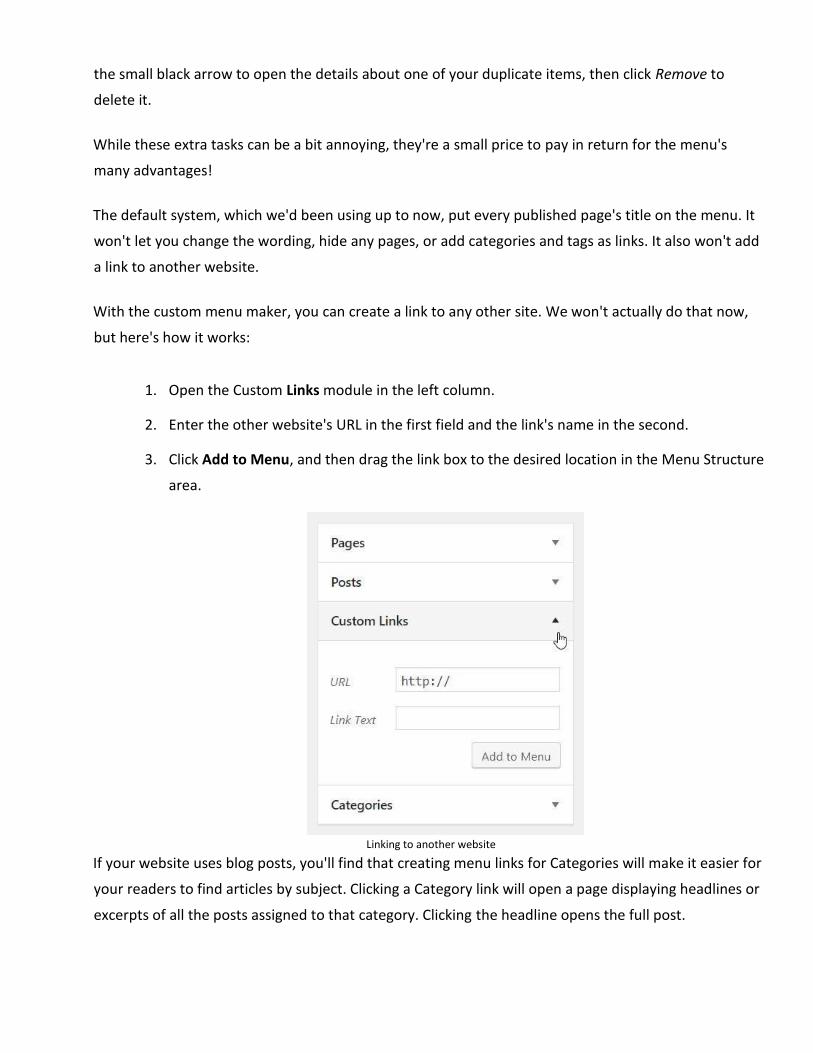
With the custom menu maker, you can create a link to any other site. We won't actually do that now,
but here's how it works:
1. Open the Custom Links module in the left column.
2. Enter the other website's URL in the first field and the link's name in the second.
3. Click Add to Menu, and then drag the link box to the desired location in the Menu Structure
area.
Linking to another website
If your website uses blog posts, you'll find that creating menu links for Categories will make it easier for
your readers to find articles by subject. Clicking a Category link will open a page displaying headlines or
excerpts of all the posts assigned to that category. Clicking the headline opens the full post.
We're almost done working on the main menu for the water garden site. But now comes the most
important step of all . . .
Click the blue Save Menu button once more before you leave the page, or risk losing all the changes
you've made! I keep mentioning this because it has to become part of your WordPress workflow. Don’t
ask me how often I used to navigate somewhere else within WordPress, and loose work, while I was
learning WordPress’s ways. Fortunately, WordPress now usually displays warnings with a Leave Site? input
box, if you try to go elsewhere in WordPress before publishing or updating your edits. Usually, not always!
There are times when you’ll click the Update button, then try to leave that page, and the warning message
“all will be lost!” pops up anyway. Just click the button a second time.
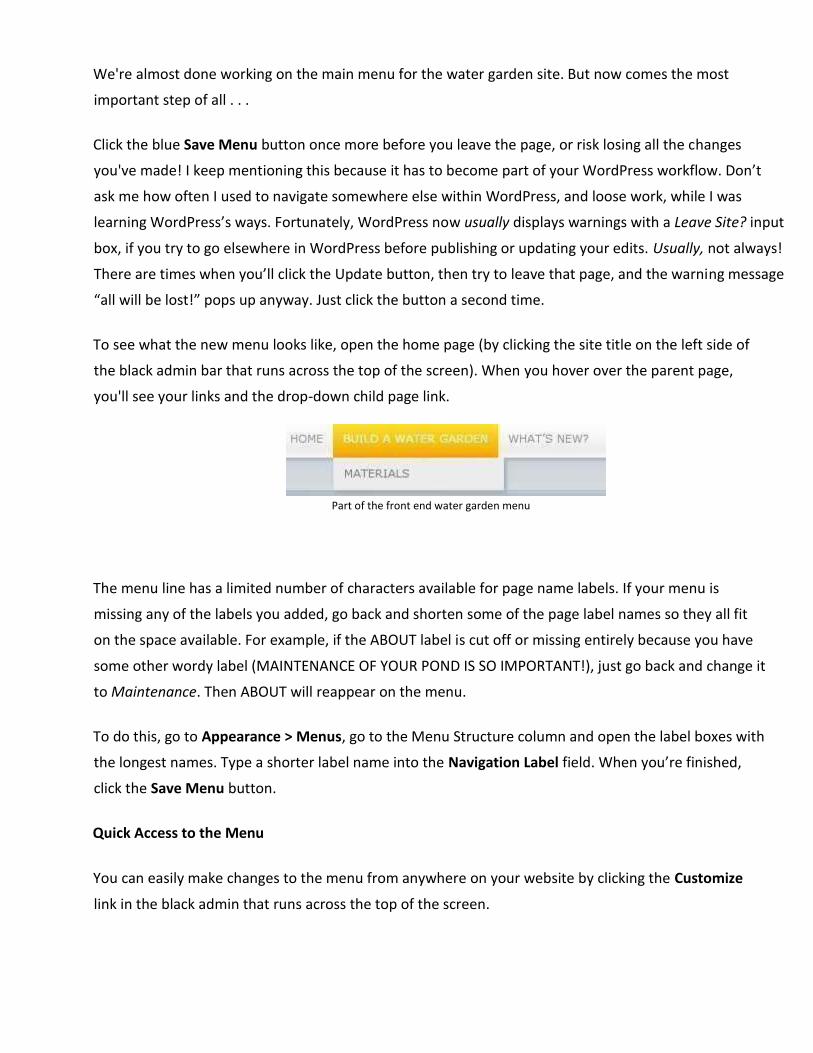
To see what the new menu looks like, open the home page (by clicking the site title on the left side of
the black admin bar that runs across the top of the screen). When you hover over the parent page,
you'll see your links and the drop-down child page link.
Part of the front end water garden menu
The menu line has a limited number of characters available for page name labels. If your menu is
missing any of the labels you added, go back and shorten some of the page label names so they all fit
on the space available. For example, if the ABOUT label is cut off or missing entirely because you have
some other wordy label (MAINTENANCE OF YOUR POND IS SO IMPORTANT!), just go back and change it
to Maintenance. Then ABOUT will reappear on the menu.
To do this, go to Appearance > Menus, go to the Menu Structure column and open the label boxes with
the longest names. Type a shorter label name into the Navigation Label field. When you’re finished,
click the Save Menu button.
Quick Access to the Menu
You can easily make changes to the menu from anywhere on your website by clicking the Customize
link in the black admin that runs across the top of the screen.
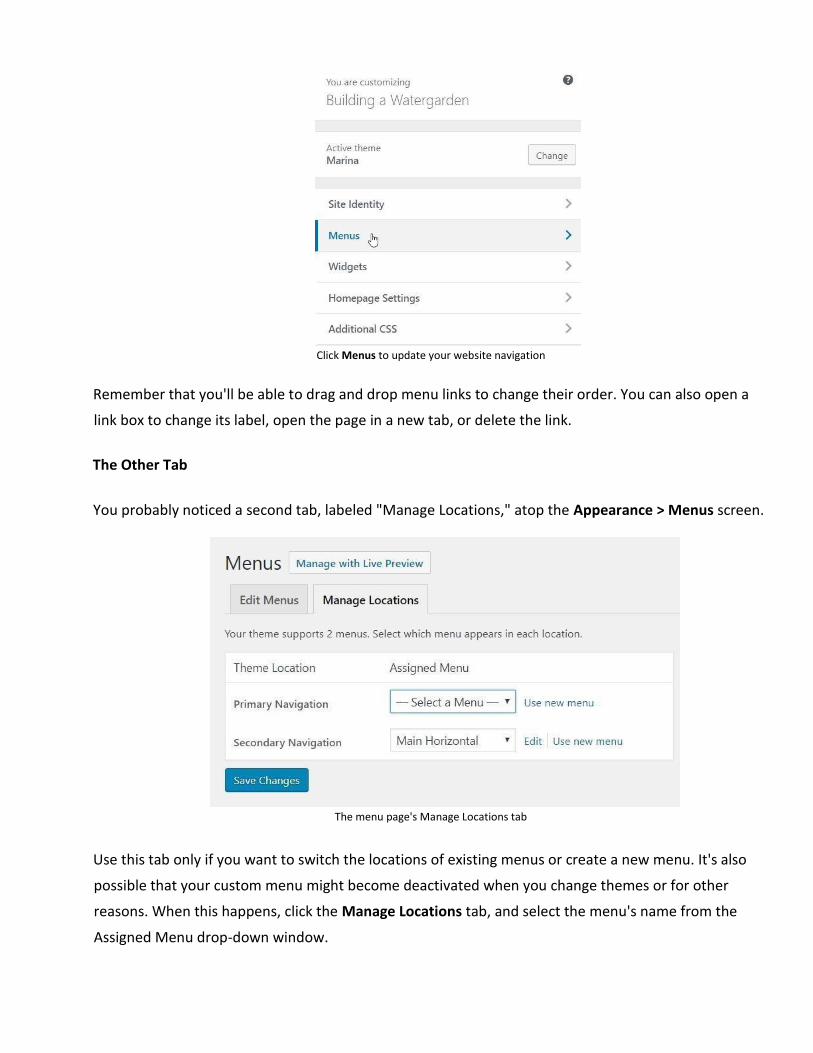
Click Menus to update your website navigation
Remember that you'll be able to drag and drop menu links to change their order. You can also open a
link box to change its label, open the page in a new tab, or delete the link.
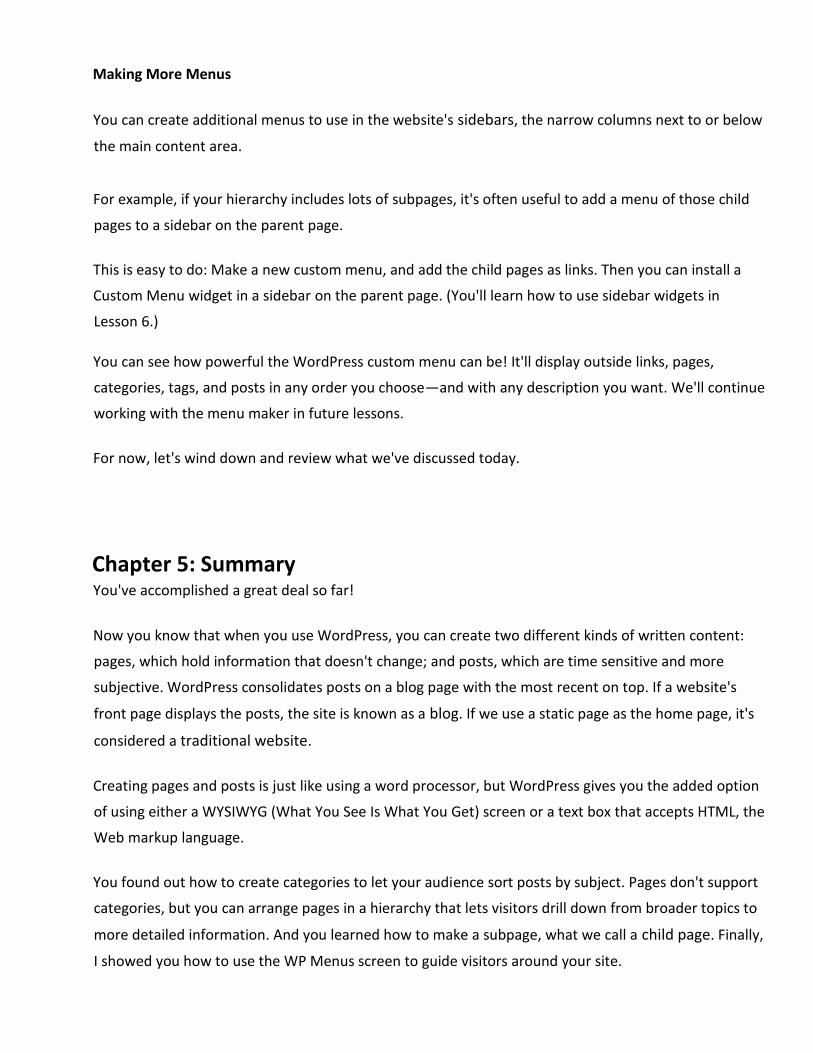
The Other Tab
You probably noticed a second tab, labeled "Manage Locations," atop the Appearance > Menus screen.
The menu page's Manage Locations tab
Use this tab only if you want to switch the locations of existing menus or create a new menu. It's also
possible that your custom menu might become deactivated when you change themes or for other
reasons. When this happens, click the Manage Locations tab, and select the menu's name from the
Assigned Menu drop-down window.
Making More Menus
You can create additional menus to use in the website's sidebars, the narrow columns next to or below
the main content area.
For example, if your hierarchy includes lots of subpages, it's often useful to add a menu of those child
pages to a sidebar on the parent page.
This is easy to do: Make a new custom menu, and add the child pages as links. Then you can install a
Custom Menu widget in a sidebar on the parent page. (You'll learn how to use sidebar widgets in
Lesson 6.)
You can see how powerful the WordPress custom menu can be! It'll display outside links, pages,
categories, tags, and posts in any order you choose—and with any description you want. We'll continue
working with the menu maker in future lessons.
For now, let's wind down and review what we've discussed today.
Chapter 5: Summary You've accomplished a great deal so far!
Now you know that when you use WordPress, you can create two different kinds of written content:
pages, which hold information that doesn't change; and posts, which are time sensitive and more
subjective. WordPress consolidates posts on a blog page with the most recent on top. If a website's
front page displays the posts, the site is known as a blog. If we use a static page as the home page, it's
considered a traditional website.
Creating pages and posts is just like using a word processor, but WordPress gives you the added option
of using either a WYSIWYG (What You See Is What You Get) screen or a text box that accepts HTML, the
Web markup language.
You found out how to create categories to let your audience sort posts by subject. Pages don't support
categories, but you can arrange pages in a hierarchy that lets visitors drill down from broader topics to
more detailed information. And you learned how to make a subpage, what we call a child page. Finally,
I showed you how to use the WP Menus screen to guide visitors around your site.

In the next lesson, we'll work on adding the other forms of content: images, videos, and documents.
But first, take a few minutes to check out the Supplementary Material section for this lesson, as well as
the FAQs and assignment. And don't forget to take the quiz!