Embed Size (px)
Citation preview
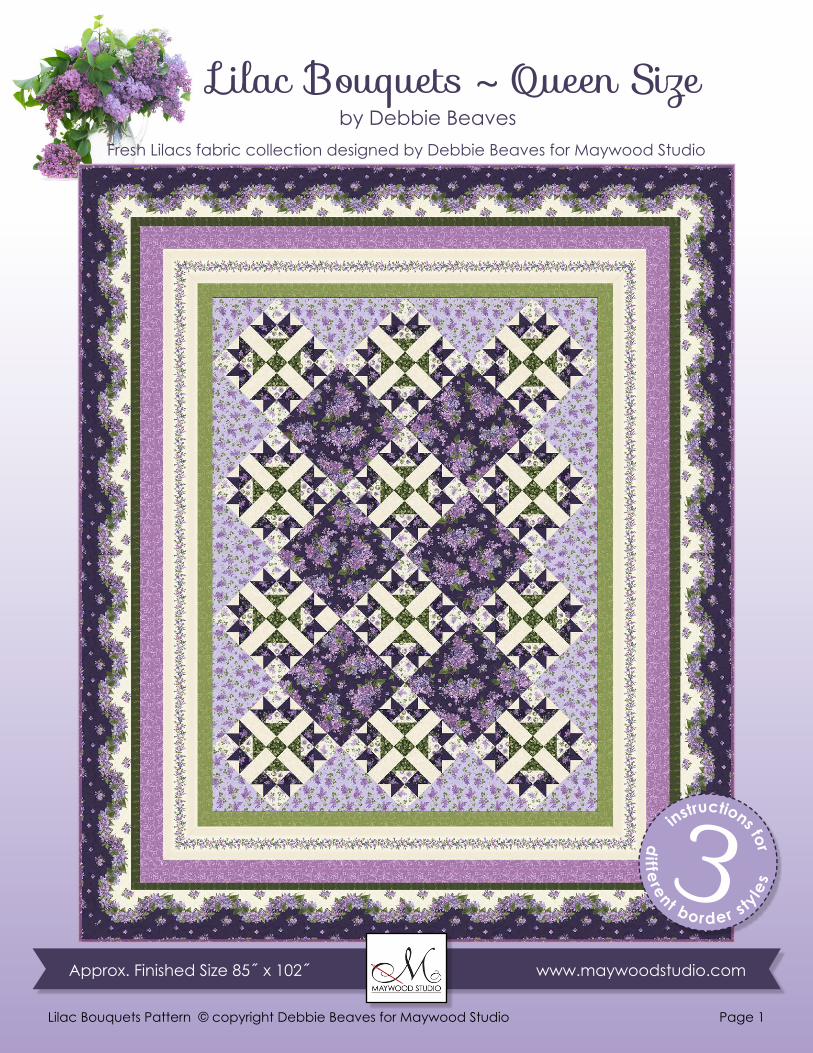
Lilac Bouquets ~ Queen Sizeby Debbie Beaves
Lilac Bouquets Pattern © copyright Debbie Beaves for Maywood Studio Page 1
Fresh Lilacs fabric collection designed by Debbie Beaves for Maywood Studio
3diffe rent border sty
les
instructions for
Approx. Finished Size 56˝ x 72˝ www.maywoodstudio.comApprox. Finished Size 85˝ x 102˝ www.maywoodstudio.com

Fabric & Yardage CuttingMAS8602-E1/2 yard
Fabric 1A (48) 3˝ squares
MAS8606-E1-1/4 yard
Fabric 2B (1) 18˝ x 25-1/2˝ E (24) 2-1/2˝ x 5-1/2˝ G (2) 5-1/2˝ x 36˝
MAS8602-V5/8 yard
Fabric 3C (48) 3-3/8˝ squares, cut once diagonally
MAS8608-V5/8 yard
Fabric 4B (1) 18˝ x 25-1/2˝
MAS8609-EZ5/8 yard
Fabric 5D (1) 19˝ x 27˝
MAS8605-G3/4 yard
Fabric 6D (1) 19˝ x 27˝ F (1) 2-1/2˝ x 36˝
MAS8606-P1 yard
Fabric 7Border 3 (8) 3-1/2˝ x WOF. Sew end to end, trim into two 67-1/2˝ and two 78-1/2˝ strips (for basic square corner borders)
MAS8602-VP1-1/4 yards
Fabric 8SST (3) 18-1/4˝ squares, cut twice diagonally (2 not used)CST (2) 9-3/8˝ squares, cut once diagonally
MAS8606-G5/8 yard
Fabric 9 Border 1 (7) 2-1/2˝ x WOF. Sew end to end, trim into two 55-1/2˝ and two 68-1/2˝ strips (for basic square corner borders)
MAS8603-E2-5/8 yards
Fabric 10 Border 2 (2) 3-1/2˝ x unfinished width of quilt, and (2) 3-1/2˝ x unfinished length of quilt - strips cut parallel to the selvage. (For Basic Mitered 45° Corners, see cutting note on step 22, page 4.)
MAS8607-G1/2 yard
Fabric 11 Border 4 (5) 2˝ x WOF. Sew end to end, Measure your quilt. Trim the strip into two long and two short strips (for basic square corner borders)
MAS8601-V3-1/2 yards
Fabric 12 Border 5 Cut four 6˝ width x length of fabric. See Cutting Sugges-tion on page 5 for instructions. Strips cut parallel to the selvage.
MAS8600-V7/8 yardDark Version
Fabric 13 dark version onlySetting Squares (6) 12-1/2˝ squares
MAS8600-E7/8 yardLight Version
Fabric 13 light version onlySetting Squares (6) 12-1/2˝ squares
MAS8607-P1 yard
Fabric 14 Binding At least 386˝ of continuous 2-1/2˝ wide bias
Lilac Bouquets Pattern © copyright Debbie Beaves for Maywood Studio Page 2(adjust lengths on each border if necessary to fit your quilt)SST = Side Setting Triangles CST = Corner Setting Triangles WOF = width of fabric
BACKING _______ your choice

Directions
1. Using a water soluble pencil or pen, mark a 4 x 6 grid of 3-3/4˝ squares on the wrong side of B (lighter of the two B fabrics). Mark a diagonal line in both directions through the squares.
2. Place the B pieces right sides together.
3. Sew 1/4˝ away from the diagonal lines exactly as shown in the diagram.
4. Cut along all marked lines. Trim corners from QST (quarter square triangle) units. Press in the direction indicated by the arrows.
5. Using a water soluble pencil or pen, mark a 4 x 6 grid of 3-3/8˝ squares on the wrong side of a D (lighter of the two D fabrics).
6. Mark diagonal lines as shown.
7. Place the D pieces right sides together. Sew 1/4˝ away from each diagonal line. Cut apart along all marked lines. Press.
8. Sew the B/B QST units from step 4 to the C triangles. Press.
9. Sew the A, B. C and D pieces into blocks following the diagrams. Press.
10. Sew the F and G strips together. Press.
11. Cut the G/F/G strip set into 2-1/2˝ wide units.
12. Sew the units from steps 9 and 11 along with the E strips into blocks. Press.
13. Sew the blocks and setting triangles into rows. Press toward the setting triangles. Sew row to row. Press to one side. SST = Side Setting Triangles CST = Corner Setting Triangles
E E+ + =
Make 24 Make 1212-1/2˝ square
Rotate 12
G
G
F
Cut 12
DD
Make 48(3" square)
C CB BB B
Make 48 Make 48(3" square)
A
Make 48(5-1/2" square)
Make 48 Make 48B B B B
Lilac Bouquets Pattern © copyright Debbie Beaves for Maywood Studio Page 3
Setting Squares
SST CST

Trim
Crease
21
19
Lilac Bouquets Pattern © copyright Debbie Beaves for Maywood Studio Page 4
7
Pieced quilt top WSU.
20
17. Place a short border 2 strip wrong side up (WSU) on to a short side of the quilt top. Match the pin markings to center the border with the quilt. Re-pin.
18. Press the ends of each short border strip at a 45º angle. Sew the short border strips to the top and bottom of the quilt. Start and stop the stitches 1/4˝ away from the edges of the pieced top.
19. Bring the short ends of the border strips together.
20. Sew along the pressed creases. Press open. Trim excess fabric.
21. Repeat the process for the remaining corners.
22. Add borders 3 and 4 using the corner technique you choose. (Cutting note: For mitered borders, add extra length to the border strips - at least twice the strip’s unfinished width.)
14. Basic Straight (90°) Borders: Center & sew one long border 1 strip to each long side of the quilt. Press toward the border strip. Center & sew a short border 1 strip to each short side of the quilt. Press toward the border strips. Alternately you can choose to miter each border. See Basic Mitered (45°) Borders below.
15. Basic Mitered (45°) Borders: Fold the quilt top in half lengthwise. Place a straight pin at each fold to mark the center. Fold the quilt top in half widthwise and pin at each fold. Fold each border strip in half and pin at the folds.
16. Center the long border strips on opposite long sides of the quilt. Sew to the pieced quilt top starting and stopping 1/4˝ away from the corners of the top. Press away from the border 2 strips.
Press
CreaseCrease
1817
(Image note: borders enlarged to to show detail)
Lilac Bouquets Pattern © copyright Debbie Beaves for Maywood Studio Page 5
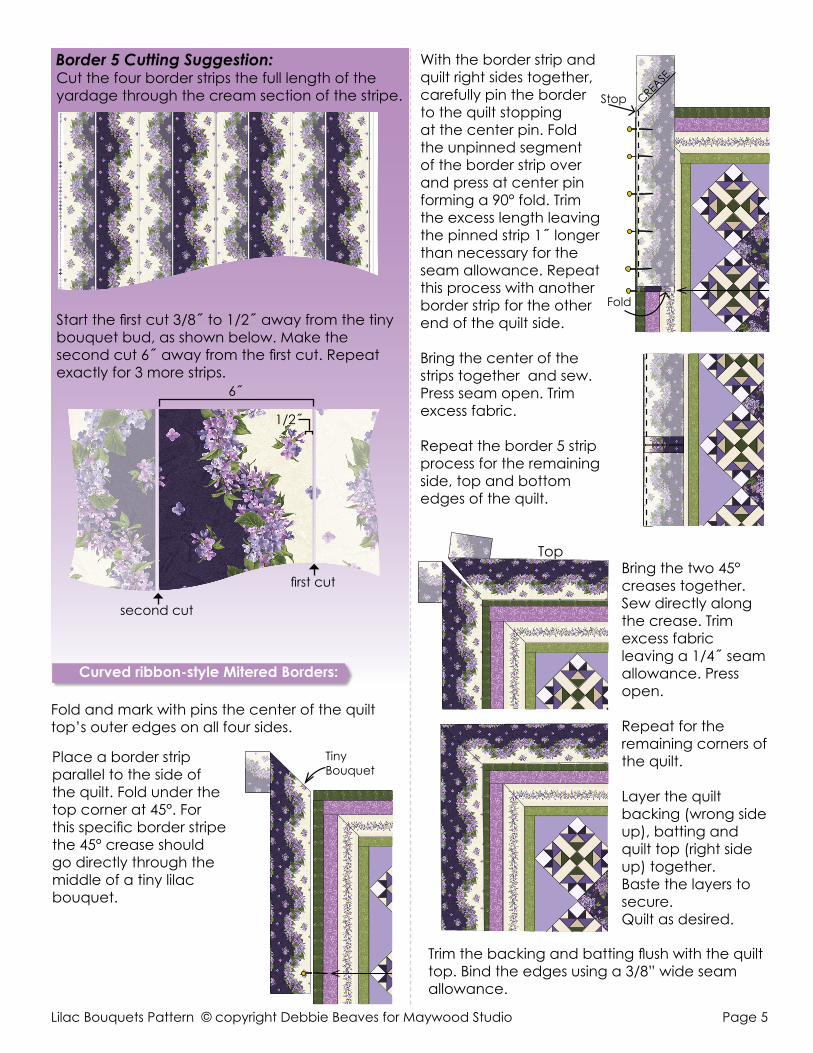
Fold and mark with pins the center of the quilt top’s outer edges on all four sides.
Cut the four border strips the full length of the yardage through the cream section of the stripe.
Start the first cut 3/8˝ to 1/2˝ away from the tiny bouquet bud, as shown below. Make the second cut 6˝ away from the first cut. Repeat exactly for 3 more strips.
1/2˝
6˝
first cut
second cut
Place a border strip parallel to the side of the quilt. Fold under the top corner at 45°. For this specific border stripe the 45° crease should go directly through the middle of a tiny lilac bouquet.
With the border strip and quilt right sides together, carefully pin the border to the quilt stopping at the center pin. Fold the unpinned segment of the border strip over and press at center pin forming a 90° fold. Trim the excess length leaving the pinned strip 1˝ longer than necessary for the seam allowance. Repeat this process with another border strip for the other end of the quilt side.
Bring the center of the strips together and sew. Press seam open. Trim excess fabric.
Repeat the border 5 strip process for the remaining side, top and bottom edges of the quilt.
Bring the two 45° creases together. Sew directly along the crease. Trim excess fabric leaving a 1/4˝ seam allowance. Press open.
Repeat for the remaining corners of the quilt.
Layer the quilt backing (wrong side up), batting and quilt top (right side up) together.Baste the layers to secure.Quilt as desired.
Trim the backing and batting flush with the quilt top. Bind the edges using a 3/8” wide seam allowance.
Top
CREASE
Fold
Stop
TinyBouquet