Embed Size (px)
Citation preview

Page | 1 v0.1.0.58
LineRender 9000
Introduction Hello, and thanks for your well-informed and wise decision to purchase LineRender9000!
I hope you’ll find this toolset to be very useful in your 3d art endeavors. But enough chit-
chat, let’s get to it!
Product overview LineRender 9000 is a toolset entirely inside DAZ Studio designed to support non-
photorealistic art styles. It adds the capability to generate line art from 3d scenes in a
highly automated way.
Since it is based on custom cameras (camera shaders), LineRender's line art can be
generated without changing object surfaces (materials), leaving your existing scenes
intact.
The built-in compositing allows for quickly combining your own rendering settings (using
3Delight, Nvidia Iray, or any built-in renderer of your choice) with the line art output from
LineRender 9000. It's compatible with any textures, such as Visual Style Shaders and
PwToon.
Includes:
LINERENDER 9000 SCRIPTED 3DELIGHT RENDER SCRIPT which generates line art based on
differences in color
Several custom shader cameras that render the scene in drastically different
ways (to provide different options for line art generation).
LR9K AUTORENDER DAZ Script which automates rendering multiple times and
compositing the results with one click.
LR9K COMPOSITE CAM which composites images on top of each other.
All of the components can be used independently or in conjunction with each other
and will greatly expand your non photorealistic rendering capabilities.
Installation Theoretically DAZ Connect™ or the provided installer from DAZ 3d should have installed
the content for you correctly. Here’s where the resulting files should have landed:
1. Several 3Delight Scripted Renderer Script files should be in:
a. <DAZ Studio installation
directory>\scripts\support\djigneo\ScriptedRenderer\LineRender9000
b. <DAZ Studio installation
directory>\resources\ScriptedRenderer\LineRender9000
2. Several presets should be located in the DAZ Studio Content Library
a. My Library\Camera presets\LineRender9000\

Page | 2 v0.1.0.58
b. My Library\Scripts\LineRender9000\
If installed correctly, the LINERENDER 9000 SCRIPTED 3DELIGHT RENDER SCRIPT should display
from within DAZ Studio:
Render settings pane > Engine > Scripted 3Delight
Render script > LineRender 9000
Quick start guide 1. Open or create a scene.
2. Load one of the LR9k Settings presets from My
Library\Scripts\LineRender9000\Settings presets.
3. Select a camera of your choice in the Viewport and orient the camera so it’s
pointing at your scene.
4. Launch LR9K AUTORENDER render script from My
Library\Scripts\LineRender9000\LR9k AutoRender.
a. Select ‘Destination’ (where you would like to save your images)
b. Enter ‘File prefix’ (what you would like to name this particular scene)
5. Click 'Render!"
6. Pat yourself on the back for making wise product purchasing decisions!
Product details
LineRender 9000 render script The LINERENDER 9000 SCRIPTED 3DELIGHT RENDER SCRIPT is a custom render script that draws
lines based on the differences in color in the output image.
This image for example:

Page | 3 v0.1.0.58
Generates line art that looks like this:
And here are the two images overlaid:

Page | 4 v0.1.0.58
This might not look like much, but when several line art images based on different scene
representations are composited together, it starts to work.
The line image is automatically generated as a separate image from the main render
and dropped into a directory of your choosing (based on Render Settings > Renderer
Files > Outline image output directory).
Note: While JPEG is a supported image format, it’s not recommended for use. The
reason is that the JPEG file format doesn’t support opacity. If an image is generated
with an alpha (opacity) channel and saved as a JPEG, 3Delight will output the
background alpha channel as black. LineRender 9000’s line output files are best when
using alpha channels, because it makes it easy to overlay the line images on top of
other images because essentially only the lines get added to the resulting image. If
JPEG is used however, that utility is gone. If one were to configure Line Color to be
black, then the line image output would be completely black (because the Line color is
black and the background is black also). So, if you insist on using JPEG, make sure the
Line Color is set to something non-black. For example, pink! Or better yet, just use PNG
(which honors alpha).
Properties
If you've never seen the Render Settings pane before, here's what it looks like.

Page | 5 v0.1.0.58
Except for the LineRender9000 properties, which you probably haven't seen until now.
Ok, fine, here's the explanation...
Property name Description
Line Color Controls the color of the output lines. Black is overrated. Maybe
try something fun like pink for your next rendering adventure!
Line Edge
Threshold
Determines how "different" adjacent colors need to be in order
for 3Delight to decide to draw a line where the colors meet.
Higher values mean that 3Delight is less likely to draw a line,
whereas lower values mean that 3Delight will be more likely to
draw lines.
For typical use, settings between 0.20 and 0.75 are
recommended.
Line Width Controls how thick the output line will be once 3Delight has
decided to draw a line.
For typical use, settings between 0.75 and 1.25 are
recommended.

Page | 6 v0.1.0.58
Note that Line Width will need adjustment based on output
image size. Larger images will likely need larger Line Width values.
Use ColorId
materials
If set to 'Yes', at render time the materials in the scene get
overridden to be a basic texture that simply displays an ambient
color (without shadows). The color of that texture is based on an
"LR9k ColorID" property which gets automatically added to the
Surfaces editor. The point of this feature is to be able to "group"
surfaces together as a single entity for line-drawing purposes.
Generally speaking, this is used to get solid outlines around figures
and objects, though the possibilities are certainly very flexible. For
more info on this subject, read more of this manual!
Use raytracing If set to 'Yes' instructs 3Delight to use the raytracing feature. This
can produce clearer-looking renders at the expense of longer
render times (sometimes). Raytracing tends to handle
intersecting objects better.
(This tells 3Delight to use the raytrace hider instead of REYES. If
you don't know what that means, then you clearly haven't read
the 3Delight documentation nearly as much as I have.)
Render lights If set to 'No', lights are automatically disabled at render time. This
is only useful when using surface materials that don't require
lights, or when using a Camera that doesn't rely on lights (but
rather surface geometry) to have something to draw.
Render shadows If set to 'No', shadows do not get rendered.
Outline image
output directory
The directory where the line image file will be saved during the
render. This file gets automatically generated, even if the "main"
render is not saved.
Outline image
name
The filename of the line art file (without extension).
Image type Specifies the type of image file (PNG, JPEG, TIFF, etc).
Use ColorId surfaces
The Use ColorId surfaces feature warrants an extended explanation.
“ColorId surfaces” serve as a way to combine or separate different materials in your
scene for line generating purposes.
Take for example this render of the Persian Beauty Outfit top:

Page | 7 v0.1.0.58
If line art is generated from this full-color render, it ends up being rather noisy, because
there are a lot of different colors going on:
Interesting output, but this isn’t always the desired effect. In cartoon style art, it would
be a little strange to have so many thick lines like this. You may also note there are parts

Page | 8 v0.1.0.58
of the top that aren’t getting outlines at all! (If you’re curious, it’s because the edges of
the top are in shadow and don’t cause much of a color difference between the black
background 3Delight sees but you don’t due to opacity.)
Leveraging the Use ColorId materials feature, a solid outline around the entirety of the
top is easily achieved, because the “main” render ends up looking like this:
So the line output looks like this:

Page | 9 v0.1.0.58
Once again, the way this feature works is that when the scene is about to render, all
surfaces get replaced (just for the duration of the render) with an ambient surface set
to the color defined in the LR9k ColorID property. In the above example, all surfaces of
the top had LR9k ColorID set to a shade of blue.
When the LineRender9000 Scripted 3Delight script is selected via Render Settings >
Engine = Scripted 3Delight, Render Script = LineRender9000, all material shaders
automatically get a new property added to them, LR9k ColorID:
This property can be found in Surfaces pane > Editor.
Setting LR9k ColorID to identical colors convinces 3Delight to draw outlines as if the
materials were one object.
Setting LR9k ColorID to contrasting colors convinces 3Delight to draw outlines as if the
materials were separate objects.
Got it? Same color, same object. Different colors, different objects. Easy. Ok, fine, here’s
an example.
So, let’s say we’d like the Persian Beauty Top’s sleeves to be separate from the torso
area of the top. This effect can be achieved by choosing a single LR9k ColorID value for
the torso areas, and a different LR9k ColorID value for the sleeves.

Page | 10 v0.1.0.58
In the Surfaces pane, select all surfaces of the PersianFullTop figure and set the LR9k
ColorID value to something (this example demonstrates using a delightful shade of
blue…ish).
Now select only the sleeve surfaces. If you’re having trouble finding them, look for ones
that say ‘Sleeve’ in the name. Or just copy this screenshot:

Page | 11 v0.1.0.58
Set the LR9k ColorID property to a different color, such as bright green. If the LR9k
ColorID property is missing, verify Render settings is set so that Engine = Scripted 3Delight
and Render Script = LineRender 9000.
A render of the scene with Use ColorId materials set to ‘Yes’ generates this “main”
render (note how the torso is blue and the sleeves are green):

Page | 12 v0.1.0.58
And this line render (note the extra lines separating the sleeves from the torso):
In summary, the Use ColorId materials feature is one of the best way to get consistent
outlines around surfaces in your scene. It can also be used as a way to generate layer
masks, if you’re into that sort of layered-image-editing thing.

Page | 13 v0.1.0.58
It is recommended to use a “regular” (non-shader) camera in conjunction with the Use
ColorId materials feature. Many of the cameras included with this product completely
ignore the surfaces in the scene, so it usually doesn’t make sense to use ColorId with
them, but feel free to experiment!
Shader cameras
Why shader cameras?
Using shader cameras is relatively clean way to get different output from the same
scene without having to modify scene properties, such as material settings. The point of
having a variety of cameras is to render the scene in different ways to get different
basis for lines to be drawn. Most of the shader cameras included simplify the output
colors so 3Delight’s outliner is less confused by all the crazy colors found in your scenes.
The descriptions of the cameras below have renders of this image:
…except they’re rendered using the described cameras, followed by the line output
from that image. Some of the cameras give better results when compositing the main
render, others when compositing lines. What you do with the images is your business!
Edge blend
No one knows how Edge blend came to be. One day there was nothing, and the next
Edge blend! Edge blend will ignore the surfaces in the scene and draw a geometric
representation of the scene in white with some shading. This camera is commonly used
as a way to get “detail” lines.

Page | 14 v0.1.0.58
Fresnel reflected v
Ignores surface materials and renders the scene geometry using a Fresnel algorithm,
outputting the reflected vector as color information, converted to greyscale. That’s a
long-winded way of saying “the camera you should use for normal-like detail lines that
looks better than a straight output of normals would”.
Toon camera
Dynamically treats object surfaces as if they have DAZ Toon shader applied. Play with
the Clamps property to configure the color segmentation, and Clamp blend to control
how much the colors bleed together. This camera is mostly used for the “main color” of
a scene, although it can certainly be used to add some additional line detail.

Page | 15 v0.1.0.58
Toon 2-tone camera
After applying “toon” effect to the scene (similar to TOON CAMERA), checks the surface
color and if darker than Color threshold, sets the surface color to the Dark color
property, otherwise to the Light color property.
Shadow opacity cam
Checks the surface to see if it’s in shadow (based on scene lighting). If the shadow
color is darker than Shadow color threshold, the surface color is changed to the
Shadow color, otherwise to alpha. This camera serves as a way to gain higher control
the shadows in the scene independently of surfaces (so for example, ambient surfaces
can be used for the main scene color and shadows can be added using output from
this camera).

Page | 16 v0.1.0.58
LR9k Composite cam While technically the LR9K COMPOSITE CAM is a shader camera, this one deserves a
section of its own!
Essentially, this camera layers 4 images on top of each other, ignoring what’s in the
scene and where the camera is pointed. It also has options to control layer opacity, but
I’m getting ahead of myself.
The LR9k Composite cam is a special camera mainly to be used as a convenience
feature to see how images look when composited on top of each other (and be able
to save the composite as a single image without the usage of image-editing software,
such as Photoshop). Generally, it's recommended to load the camera in the scene and
let LR9K AUTORENDER control the camera completely by using the "Composite features"
of LR9K AUTORENDER, rather than attempting to use this camera directly.
The important thing to note is that the camera ignores what's in the viewport (what it's
pointing at) and only draws the images specified in its Image properties. Renders using
this camera should typically be "regular" 3Delight (not LineRender9000).
When using this camera, Render Settings pane > Pixel size (output image size) should be
set to the same aspect ratio as the input images, otherwise the images will stretch.
Artistic results are not guaranteed if this warning is not heeded.
Properties The Properties pane for LR9K COMPOSITE CAM should look something like this:

Page | 17 v0.1.0.58
Here's what the many, many properties do:
Property Description
Layer <number> Specifies the image to draw in the render. Layer 1 is the
"bottom"-most layer, and the other layers are composited
on top.
Layer <number> opacity Specifies how transparent the layer should appear in the
composited image. If a Layer <number> image is not
specified, set the corresponding Layer <number> opacity
to 0.0 so a plain white image doesn't cover up the lower
layer images. Or don't, if you prefer to see pure white
images come out. Your choice.
LR9k AutoRender script This script automates several renders in sequence. It has the feature of copying camera
parameters, so there's no need to manually keep the many cameras used with this
product "in sync" (that is, pointing the same direction and having the same focal length
settings, etc) with one another. The script will align all cameras with the camera
selected when the script is launched.
Note: All cameras used will need to be parented to the same thing. Parenting cameras
to different points of origin (nodes in the scene) will cause unexpected behavior,
because even though the camera parameters are identical, they could be pointing
different directions if they have different points of origin. You could get very "artistic"
results if you do this, but no guarantees...

Page | 18 v0.1.0.58
Terminology
Think of a Render pass as a collection of settings that get applied to the scene before
Render Settings > Render is pressed. Every Render pass that is “enabled” will cause
another render to occur when the Render! button is pressed.
A Composite pass is a way to configure what images are combined together to make
an output image. It is possible to configure multiple Composite passes to try multiple
image combinations based on the same series of renders.
General properties
Destination is where the image files get dropped.
File Prefix is how the files get named: <File Prefix>_<Render pass
number>_<Camera>[_<frame number>][_lines].<File extension>
Render pass buttons
Add adds a new Render pass to the Render passes list. A Render pass represents
pressing the ‘Render’ button manually, except in this case LR9k AutoRender does it for
you.
Remove removes the selected (highlighted) Render pass from the list (permanently). If
there aren’t Render passes in the list or they’re not highlighted don’t expect this button
to do anything.
Move up will change the Order of the selected Render pass to be a lower number, and
thus get rendered earlier. It mostly doesn’t make a big difference which renders are
done first, but maybe have the quicker renders first.
Move down will change the Order of the selected Render pass to be a higher number.
If this button is pressed when the last-most Render pass is selected, nothing will happen.
Render pass properties
Enabled means the row will trigger a render pass. Setting Enabled to 'No' means "keep
this setting, but don't render it right now".
Camera allows you to select a camera in your scene. If there’s nothing in this combo
box, make sure there are cameras in your scene. Primarily, this property means the
camera shader that will take effect during the render pass. The active camera is
indeed switched for each render pass, but the script will automatically align the
cameras to match the Viewport camera, so the orientation of the Camera specified in
the property is completely disregarded. (And we want that, because keeping all the
cameras pointing the same direction and having the same focus is rather tedious. Trust
me, I’ve tried it.)
Renderer is what Rendering engine to use. This is populated with all available Rendering
engines based on what DAZ Studio has available for selection in Render settings >
Engine. In addition, all Scripted 3Delight render scripts get their own option (the most
important being LineRender9000, of course).

Page | 19 v0.1.0.58
LineRender9000 render properties section contains properties which specifically get
passed to the LineRender9000 script. These are only visible when Renderer is set to
'Scripted 3Delight > LineRender9000'
Composite pass buttons
Add will add another Composite pass to the list.
Remove will remove the selected Composite pass from the list. Note that the ‘header’
of the Composite pass (the one that has Order set to a number) must be selected for
this button to function.
Composite pass properties
Enabled controls if the Composite pass will trigger a render when ‘Render!’ is pressed.
Setting Enabled to No is a way to keep the settings without taking the time to render the
composite image.
Camera is which LR9k Composite cam to use for the Composite pass. Largely doesn’t
matter unless you’re doing fancy stuff with pre-existing images.
Composite pass layer properties
Image source allows the selection of Render pass, Image file, Keep existing image, and
None.
Render pass means the output of one of the configured render passes will be the
image used for this layer.
Image file allows specification of a pre-existing image to use as one of the
Composite pass layers. Could be used, for example to specify a background, or
a render you’ve already completed.
Keep existing image will leave the LR9k Composite cam’s Image <number>
property intact, which is really just another way to specify a pre-existing image.
None will cause the layer to be unused and the Opacity to be 0% (completely
invisible).
Render pass allows selection of one of the Render passes configured in the Render
passes section of the dialog. The number corresponds to the Order of the Render pass.
Output type allows selection of Main render and Lines. This only applies to Render
passes which use Scripted 3Delight > LineRender9000 as the Renderer. To have the Line
output be used, set this to Lines.
Image file allows selection of a pre-existing image to use. Only applies when Image
source is set to Image file.
Image tint allows adding a tint to the Image file (similar to an Image map property such
as ‘Diffuse color’ on the Surfaces pane). Only applies when Image source is set to
Image file.

Page | 20 v0.1.0.58
Layer Opacity specifies how transparent the image layer is when composited. A value
of 1.0 is completely visible, whereas a value of 0.0 is completely invisible.
The buttons!
Render! button triggers a series of renders which all get saved directly to file in the
directory specified in Destination, using the Render settings specified in Render pass
settings. This changes your workflow to: “schedule” several render passes (by setting
Enabled to ‘Yes’), click Render! once, then walk away and make a sandwich.
Saving settings
When Render! or Save settings is pressed, a null node is created in the scene titled LR9K
AUTORENDER SETTINGS. A hidden property coincidentally titled Settings stores the settings
used by LR9K AUTORENDER. Deleting this node will delete the saved settings.
Settings may be saved and loaded by saving this node as a scene subset (DAZ Studio
menu > File > Save as > Scene subset, select only the LR9K AUTORENDER SETTINGS node)
and loading into other scenes (by loading the DUF file created via Save as > Scene
subset). The Tutorials > Creating your own LR9k presets section in this document has a
step-by-step explanation of this process.
Another thing to note is that the Render pass settings are saved based on the Camera
labels (the user-friendly name that you can change), so if a camera is renamed, the
settings for passes using that Camera will be deleted after the next time LR9k
AutoRender is executed.
If multiple settings nodes are in the scene, LR9K AUTORENDER will honor the primary
selected node (the one highlighted in the Scene tab) when the script is launched. If a
node is not selected, an arbitrary settings node will be used.
If a settings node is not present when LR9K AUTORENDER is launched, one will be created
for you.
If you're curious, technical, or just like to break things, you may view the saved settings
using the following steps:
1. Select the LR9K AUTORENDER SETTINGS node
2. Navigate to the Properties pane
3. Enable the display of hidden properties via Property pane menu > Show hidden
properties
4. Locate Settings property, click the '...' button to screw with only look at the saved
settings information.
Interaction with Render Settings
Generally, the settings in the Render Settings pane are honored, with a few exceptions:
Render Settings pane > General > Render Target is treated as ‘Direct to file’
regardless of how it’s set.

Page | 21 v0.1.0.58
Render Settings pane > Pixel Samples X and Pixel Samples Y for LineRender9000
are based on the Render pass settings in LR9K AUTORENDER.
Render Settings pane > General > Image name, including file type (extension), is
controlled by the LR9K AUTORENDER general settings. If using LineRender9000, the
line image property settings are also subject to the dominance of the cruel
master, LR9K AUTORENDER.
Configuring Image series renders
An Image series render will take effect when Render Settings pane > General > Render
Type is set to 'Image series'. Other settings are treated as ‘Still Image (Current Frame)’.
Tips
Getting better line output Generally speaking, getting great results from LineRender9000 comes about from the
composition of several different LineRender9000 renders composited on top of each
other.
Mostly, a single line output image isn't fantastic in and of itself. Rather, the combination
of several "incomplete"-looking line images on top of each other start to create a
convincing line work for an image. Theoretically, it would be possible to emulate a
rather detailed line-art style by compositing a large number of line output images on
top of each other with varying shader parameters and opacities.
That being said, here are some tips to get better line output from individual renders:
1. Use a shader camera instead of a full-color camera. The shader cameras simplify
the output colors so there's less "noise" in the output line image. This is why the
cameras that come with this product are generally black and white. It reduces
the “noise” multiple colors cause.
2. Play with the 'Pixel samples' render properties. Try turning them up to 8-24 when
Use raytracing is set to ‘No’. Use raytracing will give higher quality results at lower
Pixel samples, and a range of 6-10 is recommended for that setting.
3. Use the ‘Visible’ property on nodes to isolate objects / groups of objects in the
scene to get outlines only on them.
4. Learn to use the ‘Use ColorId materials’ feature. It’s good, for reals. It’s the best
way to get consistent, clean outlines around objects.
Developing a convincing cartoon style 1. Generally, I’ve achieved better-looking results by using solid colors. Consider
changing the surfaces in the scene to have less detail.
2. Consider using geometry shells with opacity maps to act as layers. This technique
allows modifying the surface colors from within DAZ Studio™ (instead of creating
a custom texture that has the desired colors. Doing it that way means every
color tweak is an image edit rather than a property edit).

Page | 22 v0.1.0.58
Tutorials
Creating your own LR9k presets If you’ve stumbled upon some LR9k settings that you like, you can create your own
preset for easy loading into future scenes.
1. File > Save as > Scene subset
2. Choose a filename and location for the preset
3. Select the LR9k settings node as well as the cameras used for the Render passes.
Then you can load the preset into different scenes! It’s actually pretty cool.
Creating custom actions for scripts If LR9K AUTORENDER becomes a commonplace part of your workflow, consider creating
a custom action for the script so it's more readily accessible without having to navigate
through your Content Library.
Navigate to the LRAutoRender script in your Content Library. Right-click > Create
Custom Action
This creates a menu item in the 'Scripts' menu of DAZ Studio.
To relabel the menu item:
Window menu > Workspace > Customize
In the 'Actions' pane > Custom, find LRAutoRender

Page | 23 v0.1.0.58
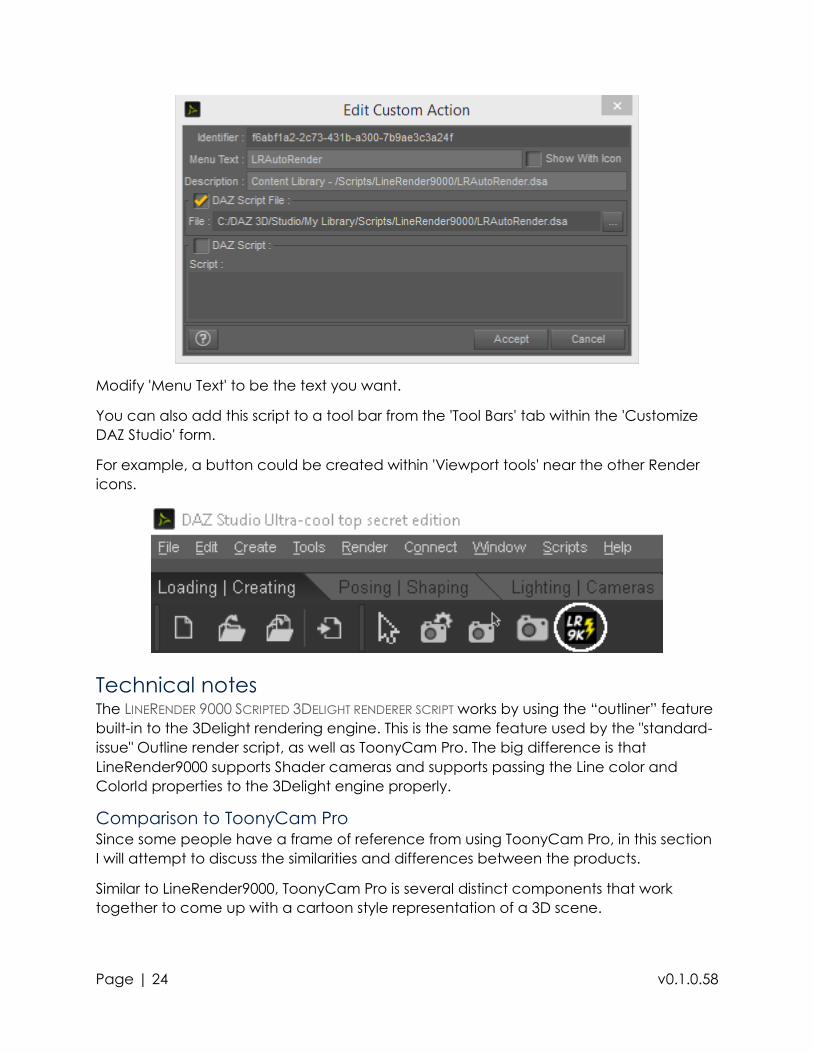
Right click > Edit Custom Action...
Page | 24 v0.1.0.58
Modify 'Menu Text' to be the text you want.
You can also add this script to a tool bar from the 'Tool Bars' tab within the 'Customize
DAZ Studio' form.
For example, a button could be created within 'Viewport tools' near the other Render
icons.
Technical notes The LINERENDER 9000 SCRIPTED 3DELIGHT RENDERER SCRIPT works by using the “outliner” feature
built-in to the 3Delight rendering engine. This is the same feature used by the "standard-
issue" Outline render script, as well as ToonyCam Pro. The big difference is that
LineRender9000 supports Shader cameras and supports passing the Line color and
ColorId properties to the 3Delight engine properly.
Comparison to ToonyCam Pro
Since some people have a frame of reference from using ToonyCam Pro, in this section
I will attempt to discuss the similarities and differences between the products.
Similar to LineRender9000, ToonyCam Pro is several distinct components that work
together to come up with a cartoon style representation of a 3D scene.

Page | 25 v0.1.0.58
ToonyCam Pro
Outline Compositor Scripted 3Delight render script
ToonyCam Pro composite camera
ToonyCam Pro's Scripted renderer script does two things of note:
Automates two renders back to back
Feeds the line outputs of the first render to the Composite camera
ToonyCam Pro's Composite camera does two things of note:
Renders the image with baked-in toon shading
Composites 3 images on top of the toon-shaded image: ColorId, Normal, and
Depth outline images.
ToonyCam Pro is able to achieve "1-click" results because of the way the Line output
was configured and generated. Similar to the Outline example script, ToonyCam's
render script asks 3Delight to generate lines based on 3 different render-time variables:
Color, Normals, and Depth. This style of composition and line generation is non-
configurable, other than specifying Line Thickness and Threshold.
LineRender9000
Scripted 3Delight render script
LR9K Composite camera
Various other shader cameras
LR9k AutoRender script
LineRender900's 3Delight render script enables line output similar to ToonyCam Pro and
the Standard Outline render script. The difference is that LineRender9000 generates only
one line-output file: Color. The usage of ColorId materials was parameterized as a
Render option, and support for Shader cameras had to be added in order to use the
shader cameras that transform scene variables into colors.
Instead of using one render pass with a pre-configured ColorId, Normals, Depth
approach, LineRender9000 is based on several render passes using different shader
cameras so that the line output is more configurable. The approach of using multiple
cameras has several advantages and disadvantages. The advantages are that line
output is predictable and flexible. These are important advantages, because when
rendering with the other line-generating scripts, it is very difficult to predict where lines
will be drawn, since there is no visual representation of the Normals or Depth variables.
Similarly, the ColorId surface override happens at render time so it's difficult to ensure
that it is configured correctly. Having all line output based on color means that for every
line image, there's a corresponding "main render" image that points to where the
differences in color are, and thus why lines were drawn where they were. The decision
to have Line output to be solely based on color allows for a great deal of flexibility,
since any number of Camera shaders and Material shaders can be used to generate

Page | 26 v0.1.0.58
such variances of color. To a large degree, the line output one can get from
LineRender9000 is limited only by one's creativity with using and creating shaders.
The disadvantages of using multiple cameras is that in order to have the outputs of all
cameras line up so that a composition looks good, the cameras need to have the
same properties. (e.g. they need to point the same way and have the same focal
length.) It also means that a render needs to be triggered per camera. These concerns
were largely addressed by the creation of the LR9K AUTORENDER script.
The LR9K AUTORENDER script does primarily 3 things:
Automates a series of renders, allowing specification of Camera and some
Render properties.
Copies camera properties to match with the camera used when the script is
launched.
Optionally allows for configuring how the results of the renders get composited.
Comparing to ToonyCam Pro again, ToonyCam Pro requires that the main render is
always 3Delight using a Toon camera and always generates ColorId, Normal, and
Depth lines. In contrast, LineRender9000 allows for specifying any 4 output image files of
the user's choice (using any renderer) to be used for any of the 4 layers of the
composite image. LineRender9000 has to render 4 times to get the same number of
layers ToonyCam Pro does in 2 render passes, but the results are a lot more
configurable.
To get similar results to a ToonyCam Pro image, one might configure LR9K AUTORENDER as
follows:
1. Toon camera : 3Delight
2. Regular camera : LineRender9000 using ColorId materials
3. Normal camera: LineRender9000
4. Depth camera: LineRender9000
All composited on top of each other using 100% opacity.
(Normal and Depth cameras were not included as stock LineRender9000 cameras,
since I didn't like their output style. If you’re into blocky-looking geometric renders,
maybe a Normal camera is for you. Seriously though, I suggest using Fresnel reflected v
in place of Normals, and literally anything in place of Depth.)
Raytracing in 3Delight Raytracing is the default Render mode of the latest versions of 3Delight. In general, it
tends to produce “sharper” shading output (as well as handle object collisions better)
and has been noted to have a positive effect on the outliner (which is used to draw the
line output for LineRender9000).
For additional information on the subject, please reference the 3Delight wiki.