Embed Size (px)
Citation preview
Linux From Scratch HOWTO
Table of Contents
Linux From Scratch HOWTO...........................................................................................................................1Gerard Beekmans ....................................................................................................................................11.Introduction...........................................................................................................................................12.Software packages you need to download............................................................................................13.Preparing the new system.....................................................................................................................14.Installing Sysvinit.................................................................................................................................25.Installing a kernel..................................................................................................................................26.Installing the GNU C and C++ Libraries..............................................................................................27.Installing the GNU C and C++ compilers............................................................................................28.Installing login utilities.........................................................................................................................29.Installing Vim.......................................................................................................................................310.Creating initial boot scripts.................................................................................................................311.Reinstalling statically linked software................................................................................................312.Installing the rest of the basic system software..................................................................................413.Setting up basic networking................................................................................................................414.Setting up Email sub system...............................................................................................................415.Installing Internet Servers...................................................................................................................416.Installing X Window System..............................................................................................................517.Installing Window Maker...................................................................................................................518.Configuring system for Internet..........................................................................................................519.Migrations from old to new setups.....................................................................................................520.Copyright & Licensing Information...................................................................................................61. Introduction..........................................................................................................................................61.1 What's this all about?.........................................................................................................................61.2 New versions......................................................................................................................................61.3 Version history...................................................................................................................................61.4 Current Projects.................................................................................................................................81.5 TODO................................................................................................................................................81.6 Mailinglists........................................................................................................................................8
Subscribing ................................................................................................................................8Unsubscribing ............................................................................................................................9
1.7 Contact info........................................................................................................................................910. Creating initial boot scripts................................................................................................................910.1 Preparing the directories and master files........................................................................................910.2 Creating the reboot script...............................................................................................................1010.3 Creating the halt script...................................................................................................................1010.4 Creating the mountfs script............................................................................................................1010.5 Creating the umountfs script..........................................................................................................1110.6 Creating the sendsignals script.......................................................................................................1110.7 Set file permissions and create symlinks.......................................................................................1210.8 Creating the /etc/fstab file..............................................................................................................1210.9 Testing the system.........................................................................................................................1211. Reinstalling statically linked software.............................................................................................1311.1 Reinstaling GCC−2.7.2.3...............................................................................................................1311.2 Installing the Termcap library........................................................................................................1311.3 Installing the Readline library........................................................................................................1411.4 Reinstalling Bash...........................................................................................................................14
Linux From Scratch HOWTO
i
Table of Contents
11.5 Reinstalling Sysvinit......................................................................................................................1411.6 Reinstalling Make..........................................................................................................................1411.7 Reinstalling Sed.............................................................................................................................1511.8 Reinstalling Shell Utils..................................................................................................................1511.9 Reinstalling File Utils....................................................................................................................1511.10 Reinstalling + Installing Util Linux.............................................................................................1511.11 Reinstalling Text Utils.................................................................................................................1611.12 Reinstalling Tar............................................................................................................................1611.13 Reinstalling Gzip.........................................................................................................................1711.14 Reinstalling Bison........................................................................................................................1711.15 Installing Flex..............................................................................................................................1711.16 Reinstalling Binutils....................................................................................................................1711.17 Reinstalling Grep.........................................................................................................................1711.18 Reinstalling Mawk.......................................................................................................................1811.19 Reinstalling Find Utils.................................................................................................................1811.20 Reinstalling Diff Utils..................................................................................................................1811.21 Installing Less..............................................................................................................................1811.22 Reinstalling Perl...........................................................................................................................1811.23 Reinstalling M4............................................................................................................................1911.24 Reinstalling Texinfo....................................................................................................................1912. Installing the rest of the basic system software...............................................................................1912.1 Installing E2fsprogs.......................................................................................................................19
Installing E2fsprogs .................................................................................................................19Creating the checkroot bootscript ............................................................................................20Updating /etc/init.d/umountfs ..................................................................................................21Creating proper permissions and creating symlink ..................................................................21
12.2 Installing File.................................................................................................................................2112.3 Installing Libtool............................................................................................................................2112.4 Installing Modutils.........................................................................................................................2112.5 Installing Linux86..........................................................................................................................2212.6 Installing Lilo.................................................................................................................................22
Installing Lilo ...........................................................................................................................22Configuring Lilo ......................................................................................................................22Copying kernel image files ......................................................................................................22
12.7 Installing DPKG............................................................................................................................2212.8 Installing Sysklogd........................................................................................................................23
Installing Sysklogd ..................................................................................................................23Configuring Sysklogd ..............................................................................................................23Creating the Sysklogd bootscript .............................................................................................23Setting up symlinks and permissions .......................................................................................25
12.9 Installing Groff...............................................................................................................................2512.10 Installing Man−db........................................................................................................................2512.11 Installing Procps..........................................................................................................................2512.12 Installing Procinfo........................................................................................................................2512.13 Installing Procmisc......................................................................................................................2612.14 Installing Shadow Password........................................................................................................2613. Setting up basic networking.............................................................................................................26
Linux From Scratch HOWTO
ii
Table of Contents
13.1 Installing Netkit−base....................................................................................................................2713.2 Installing Net−tools........................................................................................................................27
Creating the /etc/init.d/localnet bootscript ...............................................................................27Setting up permissions and symlink ........................................................................................27Creating the /etc/hostname file ................................................................................................28Creating the /etc/hosts file .......................................................................................................28Creating the /etc/init.d/ethnet file ............................................................................................29Setting up permissions and symlink for /etc/init.d/ethnet ........................................................29Testing the network setup ........................................................................................................29
14. Setting up Email sub system............................................................................................................3014.1 Preparing system for Email sub system.........................................................................................30
Creating extra groups and user ................................................................................................30Creating directories ..................................................................................................................30
14.2 Installing Procmail.........................................................................................................................3014.3 Installing Sendmail........................................................................................................................30
Installing Sendmail ..................................................................................................................31Configuring Sendmail ..............................................................................................................31
14.4 Installing Mailx..............................................................................................................................3114.5 Creating /etc/init.d/sendmail bootscript.........................................................................................3214.6 Setting up permissions and symlinks.............................................................................................3314.7 Installing Mutt................................................................................................................................3314.8 Installing Fetchmail.......................................................................................................................3314.9 Testing the Email sub system........................................................................................................3315. Installing Internet Servers................................................................................................................3415.1 Installing telnet daemon + client....................................................................................................3415.2 Installing Proftpd...........................................................................................................................3415.3 Installing Netkit−ftp.......................................................................................................................3415.4 Installing Apache...........................................................................................................................3515.5 Installing Slang Library.................................................................................................................3515.6 Installing Zlib.................................................................................................................................3515.7 Installing Lynx...............................................................................................................................3515.8 Configuring the daemons...............................................................................................................3615.9 Configuring telnetd........................................................................................................................36
Creating the /etc/inetd.conf configuration file .........................................................................36Creating the /etc/init.d/inetd bootscript ...................................................................................36Setting up permissions and symlinks .......................................................................................37
15.10 Configuring proftpd.....................................................................................................................37Creating necessary groups and users .......................................................................................37Creating the /etc/init.d/proftpd bootscript ................................................................................38Setting up permissions and symlinks .......................................................................................39
15.11 Configuring apache......................................................................................................................39Editing apache configuration file .............................................................................................39Creating /etc/init.d/apache bootscript ......................................................................................39Setting up permissions and symlinks .......................................................................................40
15.12 Testing the daemons....................................................................................................................4016. Installing X Window System...........................................................................................................4116.1 Installing X....................................................................................................................................41
Linux From Scratch HOWTO
iii
Table of Contents
16.2 Creating /etc/ld.so.conf..................................................................................................................4116.3 Modifying /etc/man_db.config......................................................................................................4116.4 Creating the /usr/include/X11 symlink..........................................................................................4216.5 Creating the /usr/X11 symlink.......................................................................................................4216.6 Adding /usr/X11/bin to the $PATH environment variable............................................................4216.7 Configuring X................................................................................................................................4216.8 Testing X........................................................................................................................................4217. Installing Window Maker................................................................................................................4317.1 Preparing the system for the Window Maker installation.............................................................43
Installing libPropList ...............................................................................................................43Installing libXpm .....................................................................................................................43Installing libpng .......................................................................................................................44Installing libtiff ........................................................................................................................44Installing libjpeg ......................................................................................................................44Installing libungif .....................................................................................................................44Installing WindowMaker .........................................................................................................44
17.2 Updating dynamic loader cache.....................................................................................................4417.3 Configuring WindowMaker...........................................................................................................4517.4 Testing WindowMaker..................................................................................................................4518. Configuring system for Internet.......................................................................................................4518.1 Configuring Kernel........................................................................................................................4518.2 Creating groups and directories.....................................................................................................4518.3 Installing PPP.................................................................................................................................4518.4 Creating /etc/resolv.conf................................................................................................................4618.5 Creating the connect and disconnect scripts..................................................................................4618.6 Creating /etc/ppp/peers/provider....................................................................................................4718.7 Creating /etc/chatscripts/provider..................................................................................................4718.8 Note on password authentication...................................................................................................4718.9 Other resources..............................................................................................................................4819. Migrations from old to new setups..................................................................................................4819.1 Migrating from old C++ Library setup to the new setup...............................................................4819.2 Migrating from old compiler setup to the new setup.....................................................................482. Software packages you need to download.........................................................................................492.1 Mandatory software.........................................................................................................................492.2 Optional software.............................................................................................................................5120. Copyright & Licensing Information................................................................................................523. Preparing the new system..................................................................................................................523.1 How we are going to do things........................................................................................................523.2 Creating a new partition...................................................................................................................533.3 Creating an ext2 file system on the new partition............................................................................533.4 Adding an entry to LILO.................................................................................................................533.5 Creating directories..........................................................................................................................533.6 Copying the /dev directory...............................................................................................................544. Installing Sysvinit..............................................................................................................................544.1 Preparing Sysvinit............................................................................................................................544.2 Configuring Sysvinit........................................................................................................................554.3 Copying passwd & group files.........................................................................................................55
Linux From Scratch HOWTO
iv
Table of Contents
4.4 Installing a root shell........................................................................................................................564.5 Testing the system...........................................................................................................................565. Installing a kernel...............................................................................................................................575.1 Note on ftp.kernel.org......................................................................................................................575.2 Configuring the kernel.....................................................................................................................575.3 Updating LILO.................................................................................................................................575.4 Testing the system...........................................................................................................................576. Installing the GNU C and C++ Libraries...........................................................................................586.1 Preparing the system for the GNU C Library installation...............................................................58
Installing Make ........................................................................................................................58Installing Sed ...........................................................................................................................58Installing Shell Utils ................................................................................................................58Installing File Utils ..................................................................................................................59Installing Util Linux .................................................................................................................59Installing Text Utils .................................................................................................................59Installing Tar ............................................................................................................................59Installing Gzip ..........................................................................................................................60Installing Binutils .....................................................................................................................60Installing Grep .........................................................................................................................60Installing Bison ........................................................................................................................61Installing Mawk .......................................................................................................................61Installing Find Utils .................................................................................................................61Installing Diff Utils ..................................................................................................................61Installing Ld.so ........................................................................................................................61Installing Perl ...........................................................................................................................62Installing M4 ............................................................................................................................62Installing Texinfo .....................................................................................................................62Installing Automake .................................................................................................................63Installing Autoconf ..................................................................................................................63
6.2 Installing the GNU C Library..........................................................................................................636.3 Installing the GNU C++ Library......................................................................................................65
Installing the libstdc++2.9_2.91.66−0slink2.deb package ......................................................65Installing the libstdc++2.9−dev_2.91.66−0slink2.deb package ..............................................65
7. Installing the GNU C and C++ compilers.........................................................................................667.1 Making two small test programs......................................................................................................667.2 Installing GCC 2.7.2.3.....................................................................................................................677.3 Installing the g++_2.91.66−0slink2.deb package............................................................................677.4 Creating necessary symlinks............................................................................................................677.5 Testing the compilers.......................................................................................................................688. Installing login utilities......................................................................................................................688.1 Installing agetty + login...................................................................................................................688.2 Modifying $LFS/etc/inittab.............................................................................................................688.3 Creating the UTMP record file........................................................................................................698.4 Testing the system...........................................................................................................................699. Installing Vim....................................................................................................................................699.1 Preparing the system for the Vim installation..................................................................................69
Installing Ncurses ....................................................................................................................69
Linux From Scratch HOWTO
v

Table of Contents
9.2 Installing Vim..................................................................................................................................70
Linux From Scratch HOWTO
vi
Linux From Scratch HOWTO
Gerard Beekmans
Version 1.3, February 2000
This document describes the process of creating your own Linux system from scratch from an alreadyinstalled Linux distribution, using nothing but the source code of software that we need
1.Introduction
• 1.1 What's this all about?• 1.2 New versions• 1.3 Version history• 1.4 Current Projects• 1.5 TODO• 1.6 Mailinglists• 1.7 Contact info
2.Software packages you need to download
• 2.1 Mandatory software• 2.2 Optional software
3.Preparing the new system
• 3.1 How we are going to do things• 3.2 Creating a new partition• 3.3 Creating an ext2 file system on the new partition• 3.4 Adding an entry to LILO• 3.5 Creating directories• 3.6 Copying the /dev directory
Linux From Scratch HOWTO 1
4.Installing Sysvinit
• 4.1 Preparing Sysvinit• 4.2 Configuring Sysvinit• 4.3 Copying passwd & group files• 4.4 Installing a root shell• 4.5 Testing the system
5.Installing a kernel
• 5.1 Note on ftp.kernel.org• 5.2 Configuring the kernel• 5.3 Updating LILO• 5.4 Testing the system
6.Installing the GNU C and C++ Libraries
• 6.1 Preparing the system for the GNU C Library installation• 6.2 Installing the GNU C Library• 6.3 Installing the GNU C++ Library
7.Installing the GNU C and C++ compilers
• 7.1 Making two small test programs• 7.2 Installing GCC 2.7.2.3• 7.3 Installing the g++_2.91.66−0slink2.deb package• 7.4 Creating necessary symlinks• 7.5 Testing the compilers
8.Installing login utilities
• 8.1 Installing agetty + login• 8.2 Modifying $LFS/etc/inittab• 8.3 Creating the UTMP record file• 8.4 Testing the system
Linux From Scratch HOWTO
4.Installing Sysvinit 2
9.Installing Vim
• 9.1 Preparing the system for the Vim installation• 9.2 Installing Vim
10.Creating initial boot scripts
• 10.1 Preparing the directories and master files• 10.2 Creating the reboot script• 10.3 Creating the halt script• 10.4 Creating the mountfs script• 10.5 Creating the umountfs script• 10.6 Creating the sendsignals script• 10.7 Set file permissions and create symlinks• 10.8 Creating the /etc/fstab file• 10.9 Testing the system
11.Reinstalling statically linked software
• 11.1 Reinstaling GCC−2.7.2.3• 11.2 Installing the Termcap library• 11.3 Installing the Readline library• 11.4 Reinstalling Bash• 11.5 Reinstalling Sysvinit• 11.6 Reinstalling Make• 11.7 Reinstalling Sed• 11.8 Reinstalling Shell Utils• 11.9 Reinstalling File Utils• 11.10 Reinstalling + Installing Util Linux• 11.11 Reinstalling Text Utils• 11.12 Reinstalling Tar• 11.13 Reinstalling Gzip• 11.14 Reinstalling Bison• 11.15 Installing Flex• 11.16 Reinstalling Binutils• 11.17 Reinstalling Grep• 11.18 Reinstalling Mawk• 11.19 Reinstalling Find Utils• 11.20 Reinstalling Diff Utils• 11.21 Installing Less• 11.22 Reinstalling Perl• 11.23 Reinstalling M4• 11.24 Reinstalling Texinfo
Linux From Scratch HOWTO
9.Installing Vim 3
12.Installing the rest of the basic system software
• 12.1 Installing E2fsprogs• 12.2 Installing File• 12.3 Installing Libtool• 12.4 Installing Modutils• 12.5 Installing Linux86• 12.6 Installing Lilo• 12.7 Installing DPKG• 12.8 Installing Sysklogd• 12.9 Installing Groff• 12.10 Installing Man−db• 12.11 Installing Procps• 12.12 Installing Procinfo• 12.13 Installing Procmisc• 12.14 Installing Shadow Password
13.Setting up basic networking
• 13.1 Installing Netkit−base• 13.2 Installing Net−tools
14.Setting up Email sub system
• 14.1 Preparing system for Email sub system• 14.2 Installing Procmail• 14.3 Installing Sendmail• 14.4 Installing Mailx• 14.5 Creating /etc/init.d/sendmail bootscript• 14.6 Setting up permissions and symlinks• 14.7 Installing Mutt• 14.8 Installing Fetchmail• 14.9 Testing the Email sub system
15.Installing Internet Servers
• 15.1 Installing telnet daemon + client• 15.2 Installing Proftpd• 15.3 Installing Netkit−ftp• 15.4 Installing Apache• 15.5 Installing Slang Library• 15.6 Installing Zlib• 15.7 Installing Lynx• 15.8 Configuring the daemons
Linux From Scratch HOWTO
12.Installing the rest of the basic system software 4
• 15.9 Configuring telnetd• 15.10 Configuring proftpd• 15.11 Configuring apache• 15.12 Testing the daemons
16.Installing X Window System
• 16.1 Installing X• 16.2 Creating /etc/ld.so.conf• 16.3 Modifying /etc/man_db.config• 16.4 Creating the /usr/include/X11 symlink• 16.5 Creating the /usr/X11 symlink• 16.6 Adding /usr/X11/bin to the $PATH environment variable• 16.7 Configuring X• 16.8 Testing X
17.Installing Window Maker
• 17.1 Preparing the system for the Window Maker installation• 17.2 Updating dynamic loader cache• 17.3 Configuring WindowMaker• 17.4 Testing WindowMaker
18.Configuring system for Internet
• 18.1 Configuring Kernel• 18.2 Creating groups and directories• 18.3 Installing PPP• 18.4 Creating /etc/resolv.conf• 18.5 Creating the connect and disconnect scripts• 18.6 Creating /etc/ppp/peers/provider• 18.7 Creating /etc/chatscripts/provider• 18.8 Note on password authentication• 18.9 Other resources
19.Migrations from old to new setups
• 19.1 Migrating from old C++ Library setup to the new setup• 19.2 Migrating from old compiler setup to the new setup
Linux From Scratch HOWTO
16.Installing X Window System 5
20.Copyright & Licensing Information
Next Previous Contents Next Previous Contents
1. Introduction
1.1 What's this all about?
I started this document around May 1999. I tried a few Linux distributions and came to the conclusion thatthere's wasn't a distribution I totally liked. Every distribution has it's own advantages and disadvantages, but Iwas never satisfied with what I had (although Debian comes very close to what I want), so I decided toexplore the possibility of building my own Linux distribution using nothing but source code of programs. AsI found out there's quite a bit of work involved, but it's also a lot of fun and you really learn a lot by doing it,since you need to configure every single aspect of the system. This forces you to read a lot of manuals onhow to configure various software. It also gives you total control over your system (well, that's the idea). Youknow exactly what software is installed, how it is configured and where all the configuration files reside.
I started writing a series of articles for a Dutch/Belgium E−zine on this subject. Not soon after I got stuckgetting a compiler to work. I decided to give this project a rest at that point, since a lot of things at that timeneeded my attention (I was about to move from The Netherlands to Canada to get married. There were a lotof things to arrange regarding the move abroad and a lot of immigration stuff to sort out).
A few months after my arrival in Canada and getting married, I decided to continue my work on this project.Pretty much starting all over again from scratch and following a different approach, I got things to work outfinally. The end result is what you are reading right now.
1.2 New versions
The latest version of the document can always be found at http://huizen.dds.nl/~glb/
1.3 Version history
1.3 − February 11th, 2000
• Two mailinglists are available. Read section 1.6 for more details• Changed the compiler setup. Gcc−2.95.2 no longer is being used. In stead gcc−2.7.2.3 is the new C
compiler and egcs−2.91.60 is the C++ compiler.• Updated sections that contained compile instructions by running make CC=/usr/gcc2723/bin/gcc. A
simple 'make' suffices now since gcc−2.7.2.3 is our default C compiler now.• Changed the 'abstract' line to be more accurate.• Fixed typos that were left behind in the previous versions
Linux From Scratch HOWTO
20.Copyright & Licensing Information 6
• Moved section 1.4 (TODO) to section 1.5.• Section 2: Added the version numbers of the software that are known to work with this document.• Section 2: Mawk link was broken (thanks to David McCauley (and various other people) for
informing me about this).• Section 2: Sysklogd link was broken (thanks to David McCauley for informing me about this).• Section 2: divided the list into mandatory and optional software (the separation is software for section
13 and above)• Inserted new section 1.4: Current projects.• Inserted new section 3.1: How we are going to do things. In this section I briefly explain that you
need to already have Linux installed to use this HOWTO and also explained there is no need for anykind of boot disk.
• Section 3.3: Clarified the currently used kernel image is to be used (thanks to Andrew Blais forpointing this out).
• Section 3.4: Added the usr/share directory to the list of directories that need to be created.• Section 5: Clarified that the kernel source tree must be copied to the LFS partition• Section 6.1.2: Pointed out availability of fixed package in case compilation fails• Section 6.1.4: Rather than renaming ginstall to install we create a symlink install• Section 6.1.8: Pointed out availability of fixed package in case compilation fails• Section 6.1.10: Pointed out availability of fixed package in case compilation fails• Section 6.1.13: Pointed out availability of fixed package in case compilation fails• Section 6.1.14: Pointed out availability of fixed package in case compilation fails• Section 6.1.17: Pointed out availability of fixed package in case compilation fails• Section 6.1.18: Pointed out availability of fixed package in case compilation fails• Section 7.2: The gcc−2.7.2.3 compiler needs to be linked statically at first (to avoid possible Library
conflicts between the normal and LFS system).• Inserted section 11.1: Reinstalling GCC 2.7.2.3• Section 11.13: Pointed out availability of fixed package in case compilation fails• Section 11.19: Pointed out availability of fixed package in case compilation fails• Section 14.4: Failed to mention that the package needs to be configured prior to compilation.• Section 15.2: Failed to mention that the package needs to be configured prior to compilation.• Inserted a new section 19 (old section 19 has become section 20) that contains migrating information,
in case you need to do some re−modeling to change a setup (like migrating to the new compiler setupin this version).
1.2 − January 9th, 2000
• Section 2: Owen Cook pointed out that the link for the sysvinit package was wrong. It said cistron.nl.It should be ftp.cistron.nl
• Section 3.4: Added the usr/include directory to the list of directories that need to be created• Section 4.3: Made a notion of the possibility that somebody's system might be using shadowed
passwords.• Section 6.1.3: The majority of the files that need to be copied was missing (the files that need to be
copied to $LFS/usr/bin).• Section 6.1.4: Forgot to mention that the mv program needs to be copied as well• Section 6.1.14: Forgot to mention that the cmp program needs to be copied as well• Section 7: Just to make sure nobody runs into problems, I added the comment that all file systems
must be unmounted and the root file system must be mounted read−only before the computer isrebooted
• Section 7.2: Added the −−local−prefix=/usr/gcc2723 switch to the configure command line• Section 11.7: Fixed a typo in one of the programs: patchchk should be pathchk
Linux From Scratch HOWTO
20.Copyright & Licensing Information 7
• Section 11.9: Added compilation and copying of the mkswap program
1.1 − December 20th, 1999
• Fixed a few typos• Modified section 18 (Configuring system for Internet) from just a reference to the
ISP−Hookup−HOWTO to a basic explanation on how to setup Internet• Fixed error in /etc/syslog.conf (in section 12.8.2)
1.0 − December 16th, 1999
• Initial release
1.4 Current Projects
Projects related to this HOWTO that are currently underway.
• The HOWTO is under the process of being translated into Spanish
1.5 TODO
Things that need to be done for future releases. If you feel you want to help out on one of these items, let meknow first (in case you end up doing something somebody else is doing already or is already finished).
• Translate the HOWTO into Dutch. Although I'm Dutch myself, I can't seem to find time to do thework myself.
1.6 Mailinglists
There are two mailinglists you can subscribe to. The lfs−discuss and the lfs−announce list. The former is anopen non−moderated list discussing anything that has got anything to do with this HOWTO (askingquestions, inform about mistakes in this HOWTO and so on). The latter is an open moderated list. Anybodycan subscribe to it, but you cannot post messages to it (only the moderator(s) can). This list is primarily usedfor announcements of new versions of the HOWTO.
If you're subscribed to the lfs−discuss list you don't need to be subscribed to the lfs−announce list as well.Everything that is sent over the lfs−announce list is also sent over the lfs−discuss list.
Subscribing
To subscribe to a list, send an email to [email protected] and type in the body either subscribelfs−discuss or subscribe lfs−announce
Linux From Scratch HOWTO
1.4 Current Projects 8
Majordomo will send you a confirmation−request email. This email will contain an authentication code. Onceyou send this email back to Majordomo (instructions are provided in that email) you will be subscribed.
Unsubscribing
To unsubscribe from a list, send an email to [email protected] and type in the the body either unsubscribelfs−discuss or unsubscribe lfs−announce
1.7 Contact info
You can reach me, Gerard Beekmans, at tts−[email protected]
Next Previous ContentsNextPreviousContents
10. Creating initial boot scripts
10.1 Preparing the directories and master files
You need the Sysvinit package again for this section.
Create the necessary directories by issuing these commands:
cd /etc mkdir rc0.d rc1.d rc2.d rc3.d rc4.d rc5.d rc6.d init.d rcS.d
• Go to the unpacked Sysvinit source directory• Copy the debian/etc/init.d/rc file to: /etc/init.d• Go to the /etc/init.d directory• Create a new file rcS containing the following:
#!/bin/sh # Begin /etc/init.d/rcS runlevel=S prevlevel=N umask 022 export runlevel prevlevel trap ":" INT QUIT TSTP for i in /etc/rcS.d/S??* do
Linux From Scratch HOWTO
Unsubscribing 9
if [ ! −f "$i" ] && continue $i start done # End /etc/init.d/rcS
10.2 Creating the reboot script
• Create a new file reboot containing the following:
#!/bin/sh # Begin /etc/init.d/reboot echo −n "System reboot in progress..." /sbin/reboot −d −f −i # End /etc/init.d/reboot
10.3 Creating the halt script
• Create a new file halt containing the following:
#!/bin/sh # Begin /etc/init.d/halt /sbin/halt −d −f −i −p # End /etc/init.d/halt
10.4 Creating the mountfs script
• Create a new file mountfs containing the following:
#!/bin/sh# Begin /etc/init.d/mountfs check_status(){ if [ $? = 0 ] then echo "OK" else echo "FAILED" fi
Linux From Scratch HOWTO
10.2 Creating the reboot script 10
} echo −n "Remounting root file system in read−write mode..."/sbin/mount −n −o remount,rw /check_status > /etc/mtab/sbin/mount −f −o remount,rw / echo −n "Mounting proc file system..."/sbin/mount proccheck_status # End /etc/init.d/mountfs
10.5 Creating the umountfs script
• Create a new file umountfs containing the following:
#!/bin/sh# Begin /etc/init.d/umountfs check_status(){ if [ $? = 0 ] then echo "OK" else echo "FAILED" fi} echo −n "Unmounting file systems..."/sbin/umount −a −r check_status echo −n "Remounting root file system in read−only mode..."/sbin/mount −o remount,ro /check_status # End /etc/init.d/umountfs
10.6 Creating the sendsignals script
• Create a new file sendsignals containing the following:
#!/bin/sh# Begin /etc/init.d/sendsignals check_status(){ if [ $? = 0 ]
Linux From Scratch HOWTO
10.5 Creating the umountfs script 11
then echo "OK" else echo "FAILED" fi}echo −n "Sending all processes the TERM signal..."/sbin/killall5 −15check_status echo −n "Sending all processes the KILL signal..."/sbin/killall5 −9check_status
10.7 Set file permissions and create symlinks
• Set the proper file permissions by running chmod 755 reboot halt mountfs umountfssendsignals
• Create the necessary symlinks by running:
cd ../rc6.d; ln −s ../init.d/umountfs S90umountfs ln −s ../init.d/reboot S99reboot ln −s ../init.d/sendsignals S80sendsignals cd ../rc0.d; ln −s ../init.d/umountfs S90umountfs ln −s ../init.d/halt S99halt ln −s ../init.d/sendsignals S80sendsignals cd ../rcS.d; ln −s ../init.d/mountfs S10mountfs
10.8 Creating the /etc/fstab file
• Create a file /etc/fstab containing the following:
/dev/<LFS−partition device> / ext2 defaults 0 1 /dev/<swap−partition device> none swap sw 0 0 proc /proc proc defaults 0 0
10.9 Testing the system
You can test the system by restarting your computer and boot into LFS again. Any errors should be gone nowand your root partition should be mounted in read−write mode automatically.
You can now finally restart your computer with a command like shutdown −r now
NextPreviousContentsNextPreviousContents
Linux From Scratch HOWTO
10.7 Set file permissions and create symlinks 12
11. Reinstalling statically linked software
In this section we're going to reinstall all software that has been linked statically before dynamically. It'spretty straightforward like it was when we prepared our system for the Glibc installation.
It's important that you take a close look at this section. If you decide you can't be bothered reinstalling all thepreviously installed software, at least look at the new libraries and programs in this section. A few programsthat are already installed depend on certain libraries when dynamically linked. But these libraries aren't onlyused by the already installed programs; other software might require it as well, so you want to install those.Also, a few programs recommend other programs to be installed. We didn't require those programs for theGlibc and GCC installation, but we might as well install them now to avoid problems later.
Make sure you remove the old source tree first for best result (to make sure all programs are linkeddynamically).
11.1 Reinstaling GCC−2.7.2.3
• Unpack the GCC archive• Configure the package by running configure• Compile the package by running
make LANGUAGES=cmake stage1make "CC=stage1/xgcc −Bstage1/" "CFLAGS="−g −O2" LANGUAGES=cmake stage2make "CC=stage2/xgcc −Bstage2/" "CFLAGS="−g −O2" LANGUAGES=cmake compare
• Install the package by running make CC="stage2/xgcc −Bstage2/" "CFLAGS="−g−O2" LANGUAGES=c install
11.2 Installing the Termcap library
• Unpack the Termcap archive• Configure the package by running configure• Compile the package by running make• Install the package by running make install
Linux From Scratch HOWTO
11. Reinstalling statically linked software 13
11.3 Installing the Readline library
• Unpack the Readline archive• Configure the package by running configure• Compile the package by running make shared• Install the package by running make install• Install the shared libraries by running make install−shared
11.4 Reinstalling Bash
• Unpack the Bash archive• Configure the package by running configure −−with−installed−readline• Compile the package by running make• Edit the Makefile file and find the variable: bindir• Replace the current value with: /bin• Install the package by running make install
The just installed Bash version is compiled with the −g compiler flag, which means it's compiled withdebugging information. This means that when you ever need to run bash through a debugger, the output ishuman readable, whereas a binary compiled without debugger information is very hard to debug. Thedownside is that the Bash executable is now about 1MB in size. If you remove the debug information, you'llhave an executable of around 340KB in size. This is quite a difference and worth it if you don't debugprograms at all.
You can edit the Makefile files whenever you compile a program so you can remove the −g compiler flags(often found in a CFLAGS variable), or you can run the strip program with one or more executables as theparameter(s). All debugging information will be deleted (this won't affect the program itself in any waywhatsoever). The choice is yours.
11.5 Reinstalling Sysvinit
• Unpack the Sysvinit package• Go to the src directory• Compile the package by running make• Install the package by running make install
11.6 Reinstalling Make
• Unpack the Make archive• Configure the package by running configure• Compile the package by running make• Install the package by running make install
Linux From Scratch HOWTO
11.3 Installing the Readline library 14
11.7 Reinstalling Sed
• Unpack the Sed archive• Configure the package by running configure• Compile the package by running make• Install the package by running make install
11.8 Reinstalling Shell Utils
• Unpack the Shell Utils archive• Configure the package by running configure• Compile the package by running make• Copy the following binaries from the src directory to /bin: date echo false pwd sleep
stty su true uname• Copy the following binary from the src directory to /sbin: chroot• Copy the following binaries from the src directory to /usr/bin: basename dirname env expr
factor groups id logname nice nohup pathchk printenv printf seq teetest tty uptime users who whoami yes
11.9 Reinstalling File Utils
• Unpack the File Utils archive• Configure the package by running configure• Compile the package by running make• Edit the Makefile file• Find the following variables: bindir sbindir sysconfdir localstatedir• Remove the $(exec_prefix) and $(prefix) parts so you'll be left with the values: /bin /sbin /etc and /var• Install the package by running make install• Move the /bin/install file to the /usr/bin directory
11.10 Reinstalling + Installing Util Linux
• Unpack the Util Linux archive• Configure the package by running configure• Go to the lib directory• Compile the files there by running make• Go to the disk−util directory• Compile mkswap by running make mkswap• Copy the following binary to /sbin: mkswap• Go to the fdisk directory• Compile fdisk by running make fdisk• Compile cfdisk by running make cfdisk• Copy the following binaries to /sbin: cfdisk fdisk
Linux From Scratch HOWTO
11.7 Reinstalling Sed 15
• Copy the following files to /usr/man/man8: cfdisk.8 fdisk.8• Go to the login−utils directory• Compile agetty by running make agetty• Compile login by running make login• Copy the following file to /usr/man/man1: login.1• Copy the following file to /usr/man/man8: agetty.8• Go to the mount directory• Compile the utilities by running make• Copy the following binaries to /sbin: mount umount swapon losetup• Copy the following files to /usr/man/man8: All *.8 files• Remove the /sbin/swapoff symlink and recreate the symlink that links /sbin/swapoff to
/sbin/swapon• Go to the sys−utils directory• Compile dmesg by running make dmesg• Compile rdev by running make rdev• Copy the following binary to /bin: dmesg• Copy the following binary to /sbin: rdev• Copy the following files to /usr/man/man8: dmesg.8 rdev.8 swapdev.8 ramsize.8
vidmode.8 rootflags.8• Create the symlinks that link /sbin/rdev, /sbin/swapdev, /sbin/ramsize,
/sbin/vidmode and /sbin/rootflags to /sbin/rdev• Go to the text−utils directory• Compile more by running make more MOREHELPDIR=/usr/share/more• Copy the following binary to /usr/bin: more• Copy the following file to /usr/man/man1: more.1• Create the /usr/share/more directory• Copy the following file to /usr/share/more: more.help
11.11 Reinstalling Text Utils
• Unpack the Text Utils archive• Configure the package by running configure• Compile the package by running make• Edit the src/Makefile file and find the variable: bindir• Replace the current value with: /usr/bin• Install the package by running make install• Move the /usr/bin/cat file to /bin/cat
11.12 Reinstalling Tar
• Unpack the Tar archive• Configure the package by running configure• Compile the package by running make• Edit the src/Makefile file and find the variables: bindir and libexecdir• Give bindir the value: /bin• Give libexecdir the value: /usr/bin• Install the package by running make install
Linux From Scratch HOWTO
11.11 Reinstalling Text Utils 16
• If you don't need the ReMote Tapeserver program, you can delete the /usr/bin/rmt program
11.13 Reinstalling Gzip
• Unpack the Gzip archive• Configure the package by running configure• Compile the package by running make• Edit the Makefile file and find the variable: bindir• Replace the current value with: /bin• Install the package by running make install
There is a possibility you will experience compilation problems. If this is the case, you can download a fixedversion of this package from the following URL:http://tts.ookhoi.dds.nl/download/lfs−howto/gzip−1.2.4−lfs.tar.gz
11.14 Reinstalling Bison
• Unpack the Bison archive• Configure the package by running configure• Compile the package by running make• Install the package by running make install
11.15 Installing Flex
• Unpack the Flex archive• Configure the package by running configure• Compile the package by running make• Install the package by running make install
11.16 Reinstalling Binutils
• Unpack the Binutils archive• Configure the package by running configure• Compile the package by running make• Install the package by running make install
11.17 Reinstalling Grep
• Unpack the Grep archive• Configure the package by running configure
Linux From Scratch HOWTO
11.13 Reinstalling Gzip 17

• Compile the package by running make• Install the package by running make install
11.18 Reinstalling Mawk
• Unpack the Mawk archive• Configure the package by running configure• Compile the package by running make• Install the package by running make install
11.19 Reinstalling Find Utils
• Unpack the Find Utils archive• Configure the package by running configure• Compile the package by running make• Install the package by running make install
There is a possibility you will experience compilation problems. If this is the case, you can download a fixedversion of this package from the following URL:http://tts.ookhoi.dds.nl/download/lfs−howto/findutils−4.1−lfs.tar.gz
11.20 Reinstalling Diff Utils
• Unpack the Diff Utils archive• Configure the package by running configure• Compile the package by running make• Install the package by running make install
11.21 Installing Less
• Unpack the Less archive• Configure the package by running configure• Compile the package by running make• Install the package by running make install
11.22 Reinstalling Perl
• Unpack the Perl archive• Configure the package by running Configure
Linux From Scratch HOWTO
11.18 Reinstalling Mawk 18
If you agree on all default values, you might want to configure the package by running Configure −d .This way you don't have to press enter all the time to accept the default values.
• Compile the package by running make• Test the package by running make test• Install the package by running make install
11.23 Reinstalling M4
• Unpack the M4 archive• Configure the package by running configure• Compile the package by running make• Install the package by running make install
11.24 Reinstalling Texinfo
• Unpack the Texinfo archive• Configure the package by running configure• Compile the package by running make• Install the package by running make install
NextPreviousContentsNextPreviousContents
12. Installing the rest of the basic system software
The rest of the software that's part of our basic system will be installed in this section. You don't need all thesoftware, but it's recommended to have it.
12.1 Installing E2fsprogs
Installing E2fsprogs
• Unpack the E2fsprogs archive• Configure the package by running configure• Compile the package by running make
When compiling I'm getting this error: mke2fs.c:142:SCSI_DISK_MAJOR not defined. I solved it thefollowing way:
Linux From Scratch HOWTO
11.23 Reinstalling M4 19
• Edit the misc/mke2fs.c file and find the first occurrence of SCSI_DISK_MAJOR• Change this to: SCSI_DISK0_MAJOR
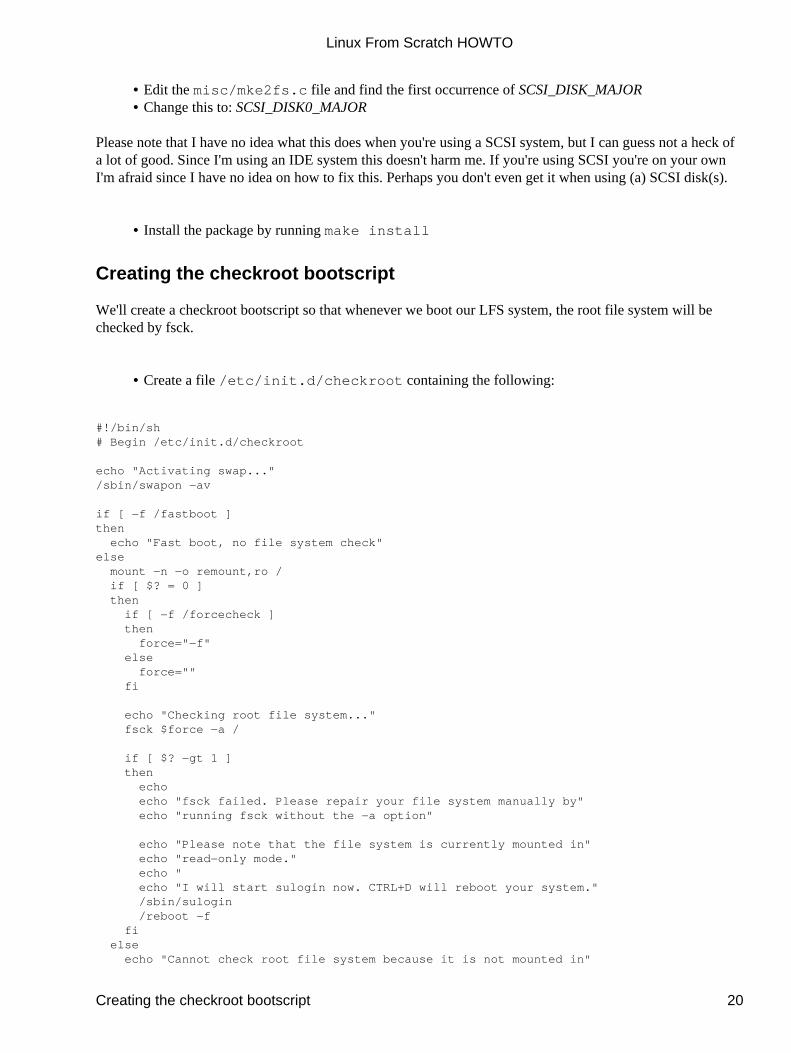
Please note that I have no idea what this does when you're using a SCSI system, but I can guess not a heck ofa lot of good. Since I'm using an IDE system this doesn't harm me. If you're using SCSI you're on your ownI'm afraid since I have no idea on how to fix this. Perhaps you don't even get it when using (a) SCSI disk(s).
• Install the package by running make install
Creating the checkroot bootscript
We'll create a checkroot bootscript so that whenever we boot our LFS system, the root file system will bechecked by fsck.
• Create a file /etc/init.d/checkroot containing the following:
#!/bin/sh# Begin /etc/init.d/checkroot echo "Activating swap..."/sbin/swapon −av if [ −f /fastboot ]then echo "Fast boot, no file system check"else mount −n −o remount,ro / if [ $? = 0 ] then if [ −f /forcecheck ] then force="−f" else force="" fi echo "Checking root file system..." fsck $force −a / if [ $? −gt 1 ] then echo echo "fsck failed. Please repair your file system manually by" echo "running fsck without the −a option" echo "Please note that the file system is currently mounted in" echo "read−only mode." echo " echo "I will start sulogin now. CTRL+D will reboot your system." /sbin/sulogin /reboot −f fi else echo "Cannot check root file system because it is not mounted in"
Linux From Scratch HOWTO
Creating the checkroot bootscript 20

echo "read−only mode." fifi # End /etc/init.d/checkroot
Updating /etc/init.d/umountfs
• Edit the /etc/init.d/umounts file and put these lines as the first commands (under the "#Begin /etc/init.d/umountfs" line)
echo "Deactivating swap..."/sbin/swapoff −av
Creating proper permissions and creating symlink
• Set the proper permissions on the checkroot file by running chmod 755/etc/init.d/checkroot
• Create the proper symlink by running cd /etc/rcS.d; ln −s ../init.d/checkrootS05checkroot
12.2 Installing File
• Unpack the File archive• Configure the package by running configure• Compile the package by running make• Install the package by running make install
12.3 Installing Libtool
• Unpack the Libtool archive• Configure the package by running configure• Compile the package by running make• Install the package by running make install
12.4 Installing Modutils
• Unpack the Modutils archive• Configure the package by running configure• Compile the package by running make
Linux From Scratch HOWTO
Updating /etc/init.d/umountfs 21
• Install the package by running make install
12.5 Installing Linux86
• Unpack the Linux86 archive• Go to the as directory and compile the programs there by running make• Copy the following binary to /usr/bin: as86• Go to the ld directory and compile the programs there by running make• Copy the following binary to /usr/bin: ld86
12.6 Installing Lilo
Installing Lilo
• Unpack the Lilo archive• Compile the package by running make• Install the package by running make install
Configuring Lilo
• Copy the /etc/lilo.conf file from your normal Linux system to the /etc directory on the LFSsystem
Copying kernel image files
• Copy the kernel images from the /boot directory from your normal Linux system to /boot on theLFS system
12.7 Installing DPKG
We don't install the Debian Package manger itself, but a small program that is shipped with this package; thestart−stop−daemon program. This program is very useful in boot scripts so we're going to use it.
• Unpack the DPKG archive• Go to the scripts directory• Compile the start−stop−daemon program by running make start−stop−daemon• Copy the following binary /sbin: start−stop−daemon• Copy the following file to /usr/man/man8: start−stop−daemon.8
Linux From Scratch HOWTO
12.5 Installing Linux86 22
12.8 Installing Sysklogd
Installing Sysklogd
• Unpack the Sysklogd archive• Compile the package by running make• Install the package by running make INSTALL=/bin/install install
Configuring Sysklogd
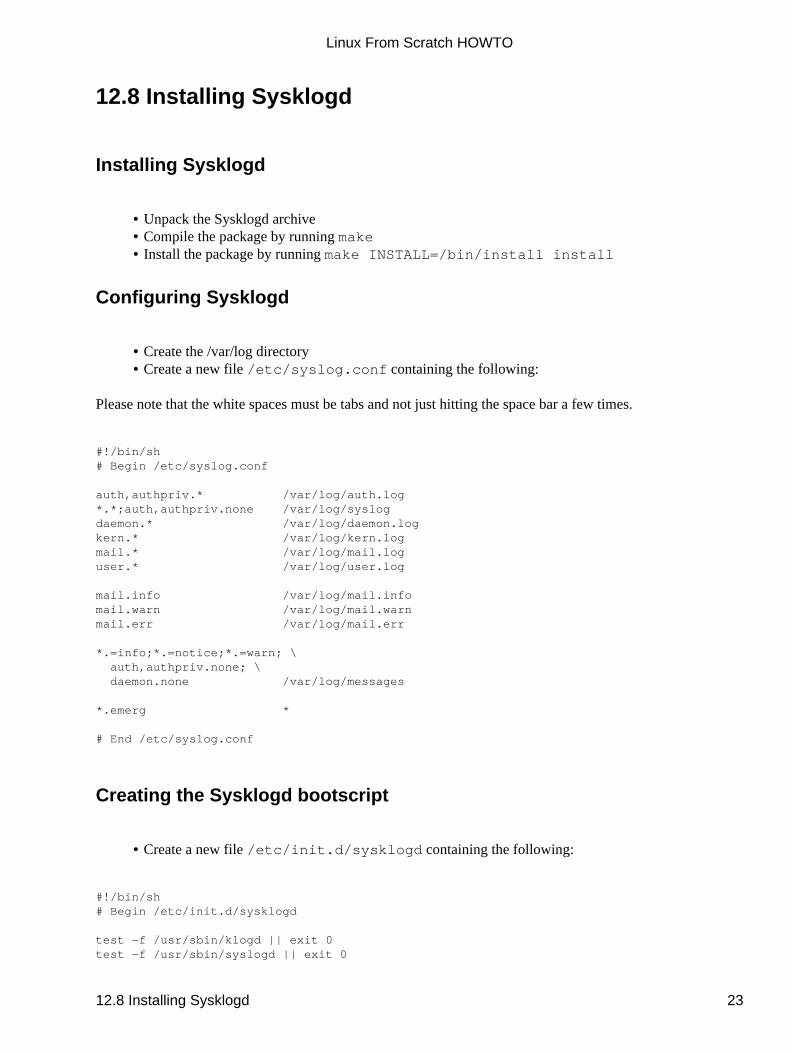
• Create the /var/log directory• Create a new file /etc/syslog.conf containing the following:
Please note that the white spaces must be tabs and not just hitting the space bar a few times.
#!/bin/sh# Begin /etc/syslog.conf auth,authpriv.* /var/log/auth.log*.*;auth,authpriv.none /var/log/syslogdaemon.* /var/log/daemon.logkern.* /var/log/kern.logmail.* /var/log/mail.loguser.* /var/log/user.log mail.info /var/log/mail.infomail.warn /var/log/mail.warnmail.err /var/log/mail.err *.=info;*.=notice;*.=warn; \ auth,authpriv.none; \ daemon.none /var/log/messages *.emerg * # End /etc/syslog.conf
Creating the Sysklogd bootscript
• Create a new file /etc/init.d/sysklogd containing the following:
#!/bin/sh# Begin /etc/init.d/sysklogd test −f /usr/sbin/klogd || exit 0test −f /usr/sbin/syslogd || exit 0
Linux From Scratch HOWTO
12.8 Installing Sysklogd 23
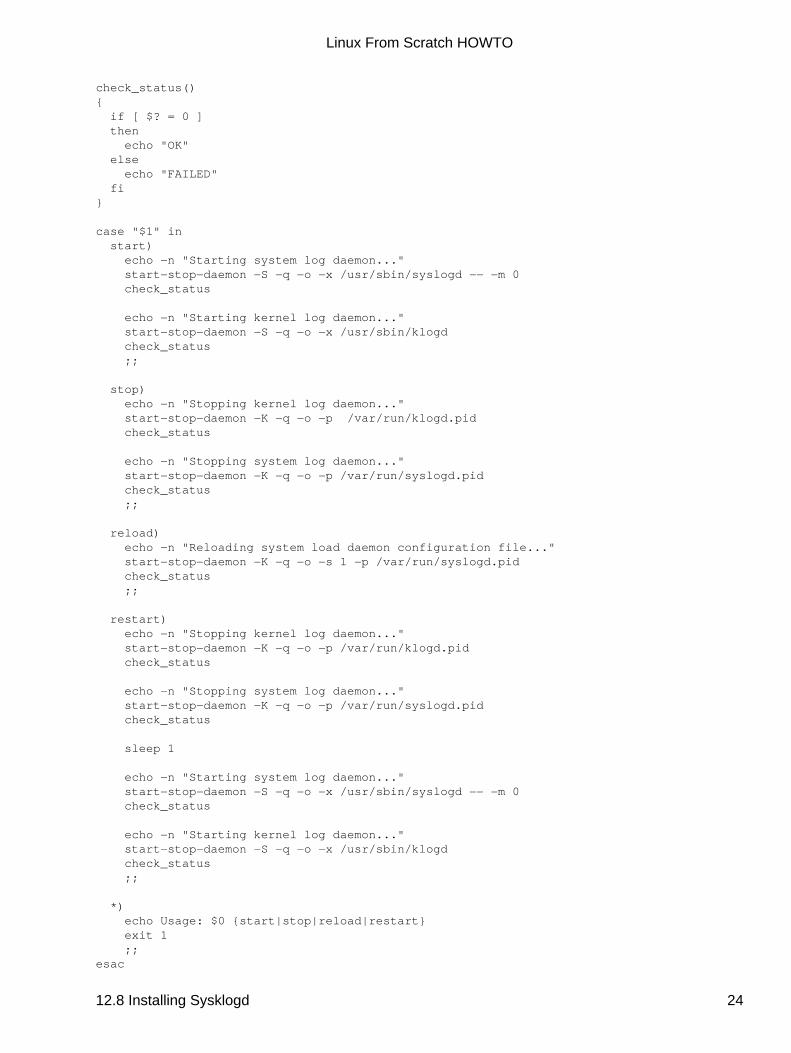
check_status(){ if [ $? = 0 ] then echo "OK" else echo "FAILED" fi} case "$1" in start) echo −n "Starting system log daemon..." start−stop−daemon −S −q −o −x /usr/sbin/syslogd −− −m 0 check_status echo −n "Starting kernel log daemon..." start−stop−daemon −S −q −o −x /usr/sbin/klogd check_status ;; stop) echo −n "Stopping kernel log daemon..." start−stop−daemon −K −q −o −p /var/run/klogd.pid check_status echo −n "Stopping system log daemon..." start−stop−daemon −K −q −o −p /var/run/syslogd.pid check_status ;; reload) echo −n "Reloading system load daemon configuration file..." start−stop−daemon −K −q −o −s 1 −p /var/run/syslogd.pid check_status ;; restart) echo −n "Stopping kernel log daemon..." start−stop−daemon −K −q −o −p /var/run/klogd.pid check_status echo −n "Stopping system log daemon..." start−stop−daemon −K −q −o −p /var/run/syslogd.pid check_status sleep 1 echo −n "Starting system log daemon..." start−stop−daemon −S −q −o −x /usr/sbin/syslogd −− −m 0 check_status echo −n "Starting kernel log daemon..." start−stop−daemon −S −q −o −x /usr/sbin/klogd check_status ;; *) echo Usage: $0 {start|stop|reload|restart} exit 1 ;;esac
Linux From Scratch HOWTO
12.8 Installing Sysklogd 24
# End /etc/init.d/sysklogd
Setting up symlinks and permissions
• Set the proper permissions by running chmod 755 /etc/init.d/sysklogd• Create the proper symlinks by running the following commands:
cd /etc/rc2.d; ln −s ../init.d/sysklogd S03sysklogdcd ../rc6.d; ln −s ../init.d/sysklogd K90sysklogdcd ../rc0.d; ln −s ../init.d/sysklogd K90sysklogd
12.9 Installing Groff
• Unpack the Groff archive• Configure the package by running configure• Compile the package by running make• Install the package by running make install
12.10 Installing Man−db
• Unpack the Man−db archive• Configure the package by running configure• Compile the package by running make• Install the package by running make install
12.11 Installing Procps
• Compile the package by running make• Edit the Makefile file and comment out the variable: XSCPT• Install the package by running make install
12.12 Installing Procinfo
• Compile the package by running make• Install the package by running make install
Linux From Scratch HOWTO
Setting up symlinks and permissions 25
12.13 Installing Procmisc
• Compile the package by running make• Install the package by running make install
12.14 Installing Shadow Password
This package contains the utilities to modify user's passwords, add new users/groups, delete users/groups andmore. I'm not going to explain to you what 'password shadowing' means. You can read all about that in thedoc/HOWTO file. There's one thing you should keep in mind, if you decide to use shadow support, thatprograms that need to verify passwords (examples are xdm, ftp daemons, pop3d, etc) need to be'shadow−compliant', eg. they need to be able to work with shadowed passwords.
If you decide you don't want to use shadowed passwords (after you're read the doc/HOWTO document), youstill use this archive since the utilities in this archive are also used on system which have shadowedpasswords disabled. You can read all about this in the HOWTO. Also note that you can switch betweenshadow and non−shadow at any point you want.
• Configure the package by running configure• Compile the package by running make• Install the package by running make install• Copy the following files from the etc directory to /etc: limits login.access
login.defs.linux shells suauth• Rename the /etc/login.defs.linux to /etc/login.defs
Now is a very good moment to read section #5 of the doc/HOWTO file. You can read how you can test ifshadowing works and if not, how to disable it. If it doesn't work and you haven't tested it, you'll end up withan unusable system after you logout of all your consoles, since you won't be able to login anymore. You caneasily fix this by passing the init=/sbin/sulogin parameter to the kernel, unpack the util−linux archive, go tothe login−utils directory, build the login program and replace the /bin/login by the one in the util−linuxpackage. Things are never hopelessly messed up, but you can avoid a hassle by testing properly and readingmanuals ;)
NextPreviousContentsNextPreviousContents
13. Setting up basic networking
Linux From Scratch HOWTO
12.13 Installing Procmisc 26
13.1 Installing Netkit−base
• Unpack the Netkit−base archive• Configure the package by running configure• Compile the package by running make• Install the package by running make install• Copy the following files from the etc.sample directory to the /etc/ directory: services
protocols
13.2 Installing Net−tools
• Unpack the Net−tools archive• Compile the package by running make• Install the package by running make install
Creating the /etc/init.d/localnet bootscript
• Create a new file /etc/init.d/localnet containing the following:
#!/bin/sh# Begin /etc/init.d/localnet check_status(){ if [ $? = 0 ] then echo "OK" else echo "FAILED" fi} echo −n "Setting up loopback device..."/sbin/ifconfig lo 127.0.0.1check_status echo −n "Setting up hostname..."/bin/hostname −−file /etc/hostnamecheck_status # End /etc/init.d/localnet
Setting up permissions and symlink
• Set the proper permissions by running chmod 755 /etc/init.d/localnet• Create the proper symlinks by running cd /etc/rcS.d; ln −s ../init.d/network
Linux From Scratch HOWTO
13.1 Installing Netkit−base 27
S03localnet
Creating the /etc/hostname file
Create a new file /etc/hostname and put the hostname in it. This is not the FQDN (Fully QualifiedDomain Name). This is the name you wish to call your computer in a network.
Creating the /etc/hosts file
If you want to configure a network card, you have to decide on the IP−address, FQDN and possible aliasesfor use in the /etc/hosts file. An example is:
<myip> myhost.mydomain.org somealiases
Make sure the IP−address is in the private network IP−address range. Valid ranges are:
Class NetworksA 10.0.0.0B 172.16.0.0 through 172.31.0.0C 192.168.0.0 through 192.168.255.0
A valid IP address could be 192.168.1.1. A valid FQDN for this IP could be me.lfs.org
If you're not going to use a network card, you still need to come up with a FQDN. This is necessary forprograms like Sendmail to operate correctly (in fact; Sendmail won't run when it can't determine the FQDN).
Here's the /etc/hosts file if you don't configure a network card:
# Begin /etc/hosts (no network card version)127.0.0.1 me.lfs.org <contents of /etc/hostname> localhost# End /etc/hosts (no network card version)
Here's the /etc/hosts file if you do configure a network card:
# Begin /etc/hosts (network card version)127.0.0.1 localhost192.168.1.1 me.lfs.org <contents of /etc/hostname># End /etc/hosts (network card version)
Of course, change the 192.168.1.1 and me.lfs.org to your own liking (or requirements if you are assigned anIP−address by a network/system administrator and you plan on connecting this machine to that network).
Linux From Scratch HOWTO
Creating the /etc/hostname file 28
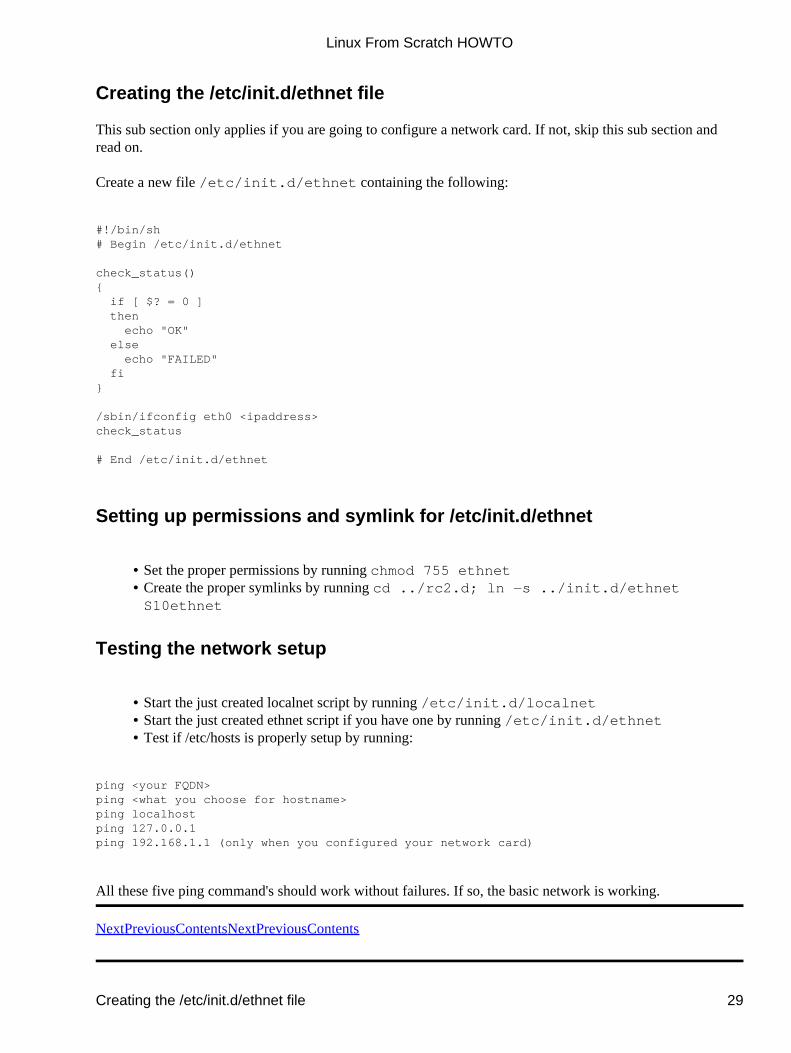
Creating the /etc/init.d/ethnet file
This sub section only applies if you are going to configure a network card. If not, skip this sub section andread on.
Create a new file /etc/init.d/ethnet containing the following:
#!/bin/sh# Begin /etc/init.d/ethnet check_status(){ if [ $? = 0 ] then echo "OK" else echo "FAILED" fi} /sbin/ifconfig eth0 <ipaddress>check_status # End /etc/init.d/ethnet
Setting up permissions and symlink for /etc/init.d/ethnet
• Set the proper permissions by running chmod 755 ethnet• Create the proper symlinks by running cd ../rc2.d; ln −s ../init.d/ethnet
S10ethnet
Testing the network setup
• Start the just created localnet script by running /etc/init.d/localnet• Start the just created ethnet script if you have one by running /etc/init.d/ethnet• Test if /etc/hosts is properly setup by running:
ping <your FQDN>ping <what you choose for hostname>ping localhostping 127.0.0.1ping 192.168.1.1 (only when you configured your network card)
All these five ping command's should work without failures. If so, the basic network is working.
NextPreviousContentsNextPreviousContents
Linux From Scratch HOWTO
Creating the /etc/init.d/ethnet file 29
14. Setting up Email sub system
14.1 Preparing system for Email sub system
Creating extra groups and user
We need to add a few groups and a user which will be used by the email utilities.
• Create the bin group by running groupadd −g 1 bin• Create the kmem group by running groupadd −g 2 kmem• Create the mail group by running groupadd −g 3 mail• Create the bin user by running useradd −u 1 −g bin −d /bin −s /bin/sh bin
Creating directories
There are two directories used by the email sub system, thus we need to create them and give them the properpermissions.
• Create the /var/spool directory• Create the /var/spool/mqueue directory• Create the /var/spool/mail directory• Set permissions on /tmp by running chmod 777 /tmp• Set permissions on /var/spool/mqueue by running chmod 700 /var/spool/mqueue• Set permissions on /var/spool/mail by running chmod 775 /var/spool/mail• Put /var/spool/mail in the mail group by running chgrp mail /var/spool/mail
14.2 Installing Procmail
• Unpack the Procmail archive• Compile the package by running make• Install the package by running make install• Set the proper permissions on the Procmail utilities by running make install−suid
14.3 Installing Sendmail
Linux From Scratch HOWTO
14. Setting up Email sub system 30
Installing Sendmail
• Unpack the Sendmail archive• Go to the src directory• Compile the package by running Build• Install the package by running Build install
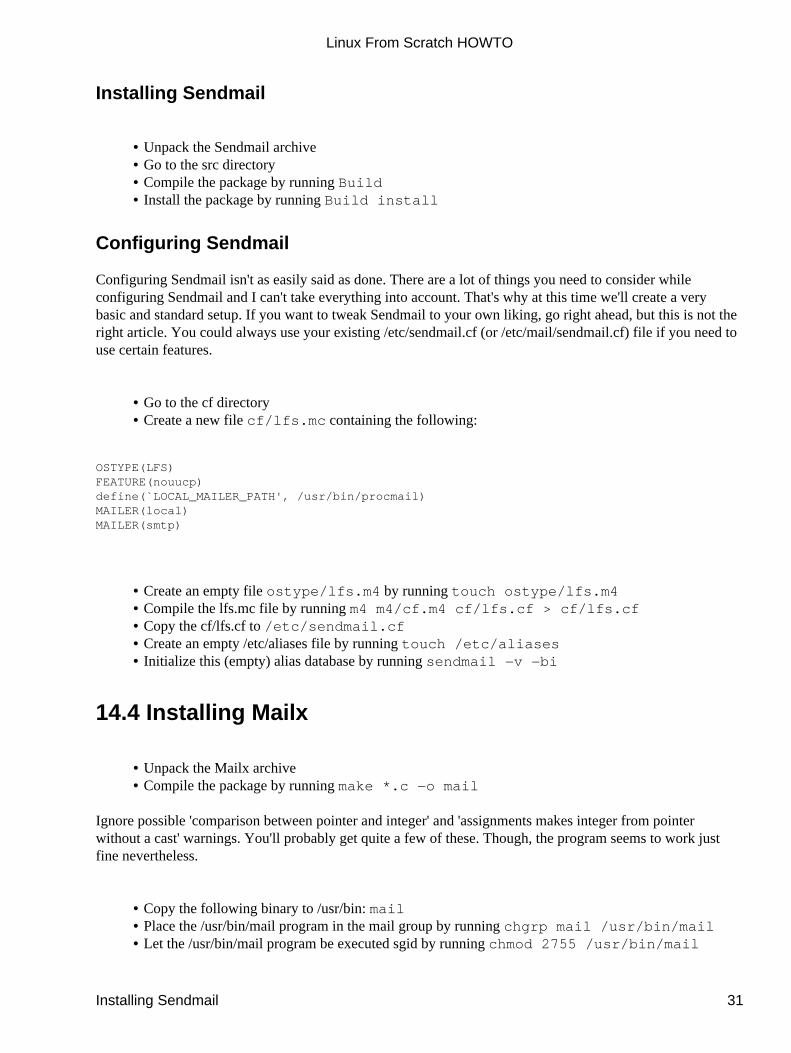
Configuring Sendmail
Configuring Sendmail isn't as easily said as done. There are a lot of things you need to consider whileconfiguring Sendmail and I can't take everything into account. That's why at this time we'll create a verybasic and standard setup. If you want to tweak Sendmail to your own liking, go right ahead, but this is not theright article. You could always use your existing /etc/sendmail.cf (or /etc/mail/sendmail.cf) file if you need touse certain features.
• Go to the cf directory• Create a new file cf/lfs.mc containing the following:
OSTYPE(LFS)FEATURE(nouucp)define(`LOCAL_MAILER_PATH', /usr/bin/procmail)MAILER(local)MAILER(smtp)
• Create an empty file ostype/lfs.m4 by running touch ostype/lfs.m4• Compile the lfs.mc file by running m4 m4/cf.m4 cf/lfs.cf > cf/lfs.cf• Copy the cf/lfs.cf to /etc/sendmail.cf• Create an empty /etc/aliases file by running touch /etc/aliases• Initialize this (empty) alias database by running sendmail −v −bi
14.4 Installing Mailx
• Unpack the Mailx archive• Compile the package by running make *.c −o mail
Ignore possible 'comparison between pointer and integer' and 'assignments makes integer from pointerwithout a cast' warnings. You'll probably get quite a few of these. Though, the program seems to work justfine nevertheless.
• Copy the following binary to /usr/bin: mail• Place the /usr/bin/mail program in the mail group by running chgrp mail /usr/bin/mail• Let the /usr/bin/mail program be executed sgid by running chmod 2755 /usr/bin/mail
Linux From Scratch HOWTO
Installing Sendmail 31
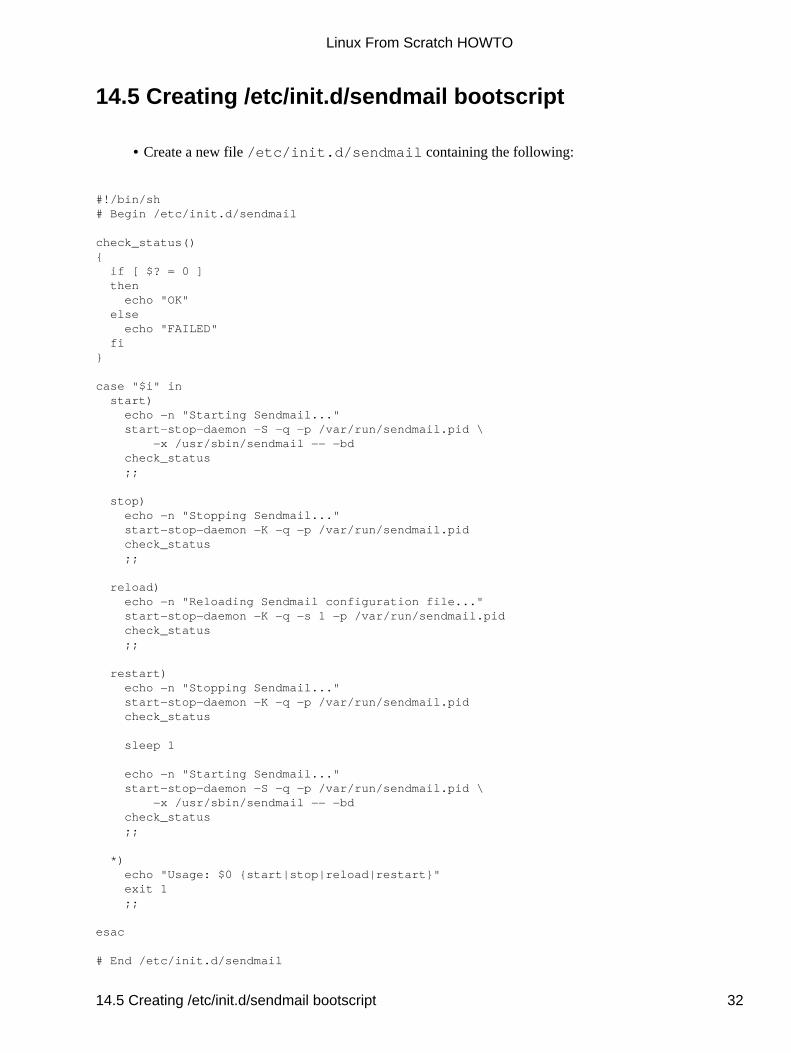
14.5 Creating /etc/init.d/sendmail bootscript
• Create a new file /etc/init.d/sendmail containing the following:
#!/bin/sh# Begin /etc/init.d/sendmail check_status(){ if [ $? = 0 ] then echo "OK" else echo "FAILED" fi} case "$i" in start) echo −n "Starting Sendmail..." start−stop−daemon −S −q −p /var/run/sendmail.pid \ −x /usr/sbin/sendmail −− −bd check_status ;; stop) echo −n "Stopping Sendmail..." start−stop−daemon −K −q −p /var/run/sendmail.pid check_status ;; reload) echo −n "Reloading Sendmail configuration file..." start−stop−daemon −K −q −s 1 −p /var/run/sendmail.pid check_status ;; restart) echo −n "Stopping Sendmail..." start−stop−daemon −K −q −p /var/run/sendmail.pid check_status sleep 1 echo −n "Starting Sendmail..." start−stop−daemon −S −q −p /var/run/sendmail.pid \ −x /usr/sbin/sendmail −− −bd check_status ;; *) echo "Usage: $0 {start|stop|reload|restart}" exit 1 ;; esac # End /etc/init.d/sendmail
Linux From Scratch HOWTO
14.5 Creating /etc/init.d/sendmail bootscript 32
14.6 Setting up permissions and symlinks
• Set the proper permissions by running chmod 755 /etc/init.d/sendmail• Create the proper symlinks by running:
cd /etc/init.d/rc2.d; ln −s ../init.d/sendmail S20sendmailcd ../rc0.d; ln −s ../init.d/sendmail K20sendmailcd ../rc6.d; ln −s ../init.d/sendmail K20sendmail
14.7 Installing Mutt
My favorite email client is Mutt, so that's why we're installing this one. Feel free to skip the installation ofMutt and install your own favorite client. After all, this is going to be your system. Not mine.
If your favorite client is an X Window client (such as Netscape Mail) then you'll have to sit tight a little whiletill we've installed X.
• Unpack the Mutt archive• Configure the package by running configure• Compile the package by running make• Install the package by running make install
14.8 Installing Fetchmail
• Unpack the Fetchmail archive• Configure the package by running configure• Compile the package by running make• Install the package by running make install
14.9 Testing the Email sub system
It's time to test the email system now.
• Start Sendmail by running /usr/sbin/sendmail −bd (you need to start sendmail using the fullpath. If you don't, you can't let sendmail reload the sendmail.cf by with kill −1 <sendmail pid>).
• Send yourself an email by running echo "this is an email test" | mail −s testroot
• Start the mail program and you should see your email there.• Create a new user by running useradd −m testuser
Linux From Scratch HOWTO
14.6 Setting up permissions and symlinks 33

• Send an email to testuser by running echo "test mail to testuser" | mail −stest testuser
• Login as testuser, try to obtain that email (using the mail program) and send an email to root in thesame way as you send an email to testuser.
If this all worked just fine, you have a working email system for local email. It's not necessarily ready forInternet yet. You can remove the testuser by running userdel −r testuser
NextPreviousContentsNextPreviousContents
15. Installing Internet Servers
In this section we're going to install three of the most used Internet servers, together with the necessaryclients. These are going to be installed:
telnetd with the standard telnet client
proftpd with the standard ftp client
apache with lynx as client
15.1 Installing telnet daemon + client
• Unpack the Netkit−telnet archive• Configure the package by running configure• Compile the package by running make• Install the package by running make install
15.2 Installing Proftpd
• Unpack the Proftpd archive• Configure the package by running configure• Compile the package by running make• Install the package by running make install
15.3 Installing Netkit−ftp
• Unpack the Netkit−ftp archive• Configure the package by running configure• Compile the package by running make• Install the package by running make install
Linux From Scratch HOWTO
15. Installing Internet Servers 34
15.4 Installing Apache
Apache isn't that easily configured. Like with Sendmail, a lot depends on your own preference and systemsetup. Therefore, once I again I stick with a very basic installation. If this doesn't work well enough for you,read the documentation and modify whatever you need to.
• Unpack the Apache archive• Configure the package by running configure• Compile the package by running make• Install the package by running make install
15.5 Installing Slang Library
The Slang library is an alternative to the Ncurses library. We're going to use this library to link Lynx against.Though Lynx works fine with the Ncurses library, people recommend using the Slang library. I myself can'tfind a difference between a Lynx linked against the Slang library or against the Ncurses library. However, I'lljust follow that advise and use Slang.
• Unpack the Slang archive• Configure the package by running configure• Compile the package by running make elf• Install the package by running make install−elf• Create extra symlinks for the library by running make install−links
15.6 Installing Zlib
Zlib is a compression library, used by programs like PKware's zip and unzip utilities. Lynx can use thislibrary to compress certain files.
• Unpack the Zlib archive• Configure the package by running configure• Compile the package by running make• Install the package by running make install
15.7 Installing Lynx
• Unpack the Lynx archive• Configure the package by running configure −−libdir=/etc −−with−zlib
−−with−screen=slang• Compile the package by running make• Install the package by running make install• Install the helpfile by running make install−help• Install other documentation by running make install−doc
Linux From Scratch HOWTO
15.4 Installing Apache 35
15.8 Configuring the daemons
It's possible to run the daemons in either stand−alone mode or via the Internet Server daemon (inetd). Wherepossible, I choose to run the daemons in stand−alone mode. This makes it easier to start and stop individualprocesses without modifying the /etc/inetd.conf file constantly.
However, in the telnetd case it's better to run it via inetd, since telnetd doesn't seem to respawn itself when thelast user logs out. This would mean as soon as the last person logs out from the telnet session, the telnetdaemon stops as well. This isn't desirable, so we let telnetd run using inetd to spawn a telnet processwhenever somebody logs on.
15.9 Configuring telnetd
Creating the /etc/inetd.conf configuration file
• Create a new file /etc/inetd.conf containing the following:
# Begin /etc/inetd.conf telnet stream tcp nowait root /usr/sbin/in.telnetd # End /etc/inetd.conf
Creating the /etc/init.d/inetd bootscript
• Create a new file /etc/init.d/inetd containing the following:
#!/bin/sh# Begin /etc/init.d/inetd check_status(){ if [ $? = 0 ] then echo "OK" else echo "FAILED" fi} case "$1" in start) echo −n "Starting Internet Server daemon..." start−stop−daemon −S −q −p /var/run/inetd.pid \ −x /usr/sbin/inetd check_status ;;
Linux From Scratch HOWTO
15.8 Configuring the daemons 36
stop) echo −n "Stopping Internet Server daemon..." start−stop−daemon −K −q −p /var/run/inetd.pid check_status ;; reload) echo −n "Reloading Internet Server configuration file..." start−stop−daemon −K −q −s 1 −p /var/run/inetd.pid check_status ;; restart) echo −n "Stopping Internet Server daemon..." start−stop−daemon −K −q −p /var/run/inetd.pid check_status sleep 1 echo −n "Starting Internet Server daemon..." start−stop−daemon −S −q −p /var/run/inetd.pid \ −x /usr/sbin/inetd check_status ;; *) echo "Usage: $0 {start|stop|reload|restart}" ;; esac # End /etc/init.d/inetd
Setting up permissions and symlinks
• Set the proper permissions by running chmod 755 /etc/init.d/inetd• Create the necessary symlinks by running
cd /etc/rc2.d; ln −s ../init.d/inetd S30inetdcd ../rc0.d; ln −s ../init.d/inetd K30inetdcd ../rc6.d; ln −s ../init.d/inetd K30 inetd
15.10 Configuring proftpd
Creating necessary groups and users
• Create the necessary groups by running:
Linux From Scratch HOWTO
Setting up permissions and symlinks 37
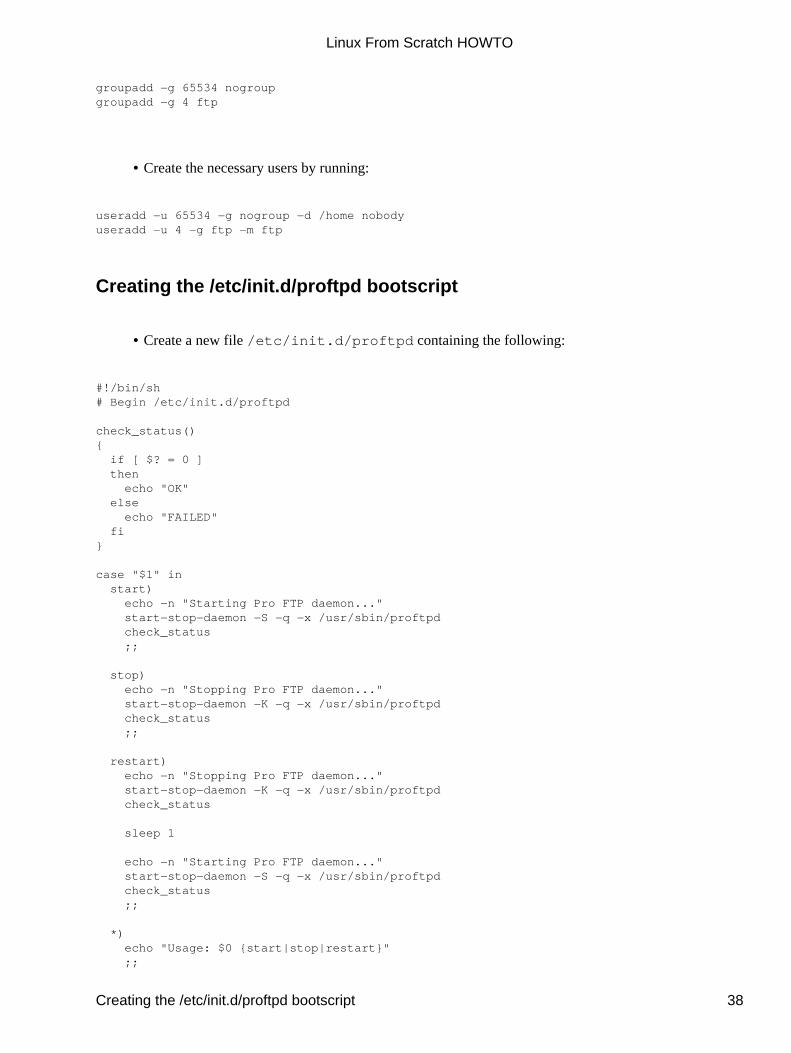
groupadd −g 65534 nogroupgroupadd −g 4 ftp
• Create the necessary users by running:
useradd −u 65534 −g nogroup −d /home nobodyuseradd −u 4 −g ftp −m ftp
Creating the /etc/init.d/proftpd bootscript
• Create a new file /etc/init.d/proftpd containing the following:
#!/bin/sh# Begin /etc/init.d/proftpd check_status(){ if [ $? = 0 ] then echo "OK" else echo "FAILED" fi} case "$1" in start) echo −n "Starting Pro FTP daemon..." start−stop−daemon −S −q −x /usr/sbin/proftpd check_status ;; stop) echo −n "Stopping Pro FTP daemon..." start−stop−daemon −K −q −x /usr/sbin/proftpd check_status ;; restart) echo −n "Stopping Pro FTP daemon..." start−stop−daemon −K −q −x /usr/sbin/proftpd check_status sleep 1 echo −n "Starting Pro FTP daemon..." start−stop−daemon −S −q −x /usr/sbin/proftpd check_status ;; *) echo "Usage: $0 {start|stop|restart}" ;;
Linux From Scratch HOWTO
Creating the /etc/init.d/proftpd bootscript 38

esac # End /etc/init.d/proftpd
Setting up permissions and symlinks
• Set the proper permissions by running chmod 755 /etc/init.d/proftpd• Create the necessary symlinks by running:
cd /etc/rc2.d; ln −s ../init.d/proftpd S40proftpdcd ../rc0.d; ln −s ../init.d/proftpd K40proftpdcd ../rc6.d; ln −s ../init.d/proftpd K40proftpd
15.11 Configuring apache
Editing apache configuration file
Edit the files in the /usr/apache/etc directory and modify them according to your own needs.
• Edit the httpd.conf file and find the variable: Group• Replace the current value (if any) with: nogroup
Creating /etc/init.d/apache bootscript
• Create a new file /etc/init.d/apache containing the following:
#!/bin/sh# Begin /etc/init.d/apache case "$1" in start) echo −n "Starting Apache HTTP daemon..." /usr/apache/sbin/apachectl start ;; stop) echo −n "Stopping Apache HTTP daemon..." /usr/apache/sbin/apachectl stop ;; restart) echo −n "Restarting Apache HTTP daemon..." /usr/apache/sbin/apachectl restart ;;
Linux From Scratch HOWTO
Setting up permissions and symlinks 39
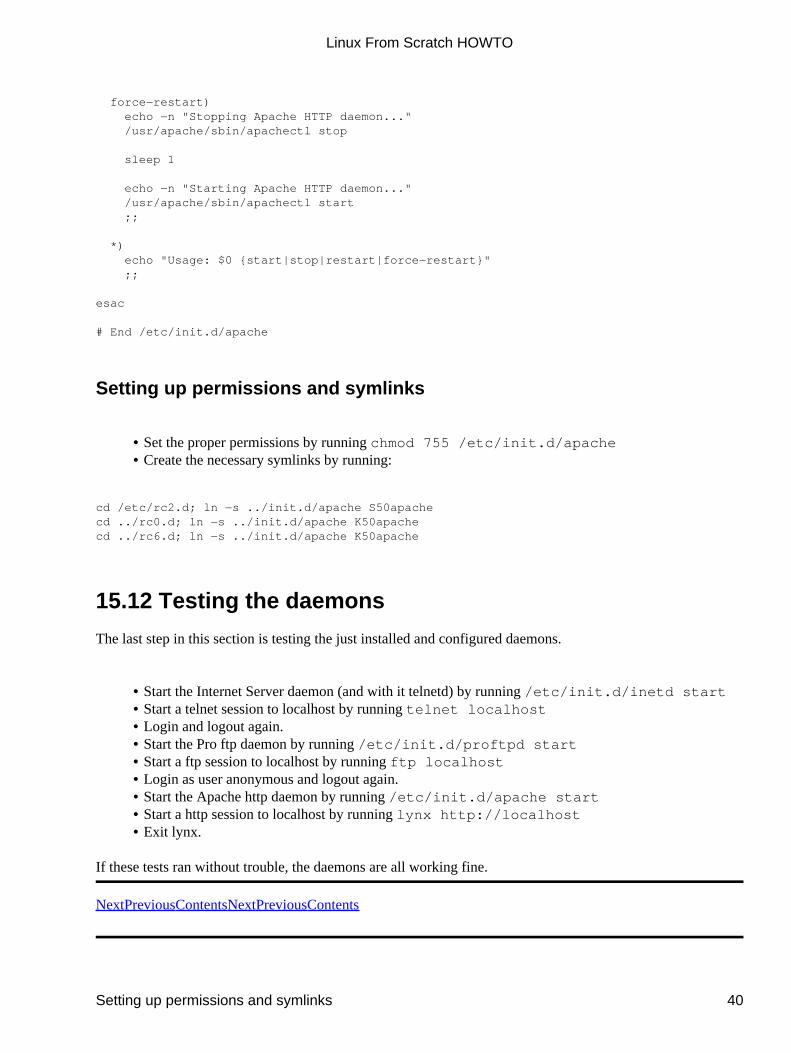
force−restart) echo −n "Stopping Apache HTTP daemon..." /usr/apache/sbin/apachectl stop sleep 1 echo −n "Starting Apache HTTP daemon..." /usr/apache/sbin/apachectl start ;; *) echo "Usage: $0 {start|stop|restart|force−restart}" ;; esac # End /etc/init.d/apache
Setting up permissions and symlinks
• Set the proper permissions by running chmod 755 /etc/init.d/apache• Create the necessary symlinks by running:
cd /etc/rc2.d; ln −s ../init.d/apache S50apachecd ../rc0.d; ln −s ../init.d/apache K50apachecd ../rc6.d; ln −s ../init.d/apache K50apache
15.12 Testing the daemons
The last step in this section is testing the just installed and configured daemons.
• Start the Internet Server daemon (and with it telnetd) by running /etc/init.d/inetd start• Start a telnet session to localhost by running telnet localhost• Login and logout again.• Start the Pro ftp daemon by running /etc/init.d/proftpd start• Start a ftp session to localhost by running ftp localhost• Login as user anonymous and logout again.• Start the Apache http daemon by running /etc/init.d/apache start• Start a http session to localhost by running lynx http://localhost• Exit lynx.
If these tests ran without trouble, the daemons are all working fine.
NextPreviousContentsNextPreviousContents
Linux From Scratch HOWTO
Setting up permissions and symlinks 40
16. Installing X Window System
16.1 Installing X
• Unpack the X archive• Compile the package by running make World
During the compilation process you will encounter a few errors about the "makedepend" script not being ableto find the stddef.h stdarg.h and float.h header files. The script just isn't as smart as the compiler isapparently, since the compilation itself does work fine without compilation errors. Though, creating a fewtemporary symlinks won't solve the problem; they only will cause more problems for some reason.
So you just ignore the many makedepend errors you most likely will be getting. Also errors similar to"pointer targets in passing arg x of somefunction differ in signedness". You can rewrite those files if you feellike it. I won't.
• Install the package by running make install• Install the man pages by running make install.man
16.2 Creating /etc/ld.so.conf
Create a new file /etc/ld.so.conf containing the following:
# Begin /etc/ld.so.conf /lib/usr/lib/usr/X11R6/lib # End /etc/ld.so.conf
• Update the dynamic loader cache by running ldconfig
16.3 Modifying /etc/man_db.config
• Edit the /etc/man_db.config file and look for this line: MANDATORY_MANPATH /usr/man• Under that line put the following one: MANDATORY_MANPATH /usr/X11R6/man
Linux From Scratch HOWTO
16. Installing X Window System 41
16.4 Creating the /usr/include/X11 symlink
• In order for the pre−processor to find the X11/*.h files (which you encounter in #include statementsin source code) create the following symlink: ln −s /usr/X11R6/include/X11/usr/include/X11
16.5 Creating the /usr/X11 symlink
Often software copies files to /usr/X11 so it doesn't have to know which release of X you are using. Thissymlink hasn't been created by the X installation, so we have to create it by ourselves.
• Create the /usr/X11 symlink by running ln −s /usr/X11R6 /usr/X11
16.6 Adding /usr/X11/bin to the $PATH environment variable
There are a few ways to add the /usr/X11/bin path to the $PATH environment variable. One way of doing sois the following:
• Create a new file /root/.bashrc with it's contents as follows: exportPATH=$PATH:/usr/X11/bin
You need to login again for this change to become effective. Or you can update the path by runningexport PATH=$PATH:/usr/X11/bin manually
16.7 Configuring X
• Configure the X server by running xf86config
If the XF86Config file created by xf86config doesn't suffice, then you better copy the already existingXF86Config from your normal Linux system to /etc. Cases wherein you need to make special changes to thefile which aren't supported by the xf86config program force you to do this. You can always modify thecreated XF86Config file by hand. This can be very time consuming, especially if you don't quite rememberwhat needs to be changed.
16.8 Testing X
Now that X is properly configured it's time for our first test run.
• Start the X server by running startx
The X server should start and display 3 xterm's on your screen. If this is true in your case, X is running fine.
Linux From Scratch HOWTO
16.4 Creating the /usr/include/X11 symlink 42
NextPreviousContentsNextPreviousContents
17. Installing Window Maker
I choose to install Window Maker as the Window Manager. This is because I've used WindowMaker forquite a while now and I'm very satisfied with it. As usual, you don't have to do what I'm doing; installwhatever you want. As you might know, you can install several Window Managers simultaneously andchoose which one to start by specifying it in the $HOME/.xinitrc (or $HOME/.xsession in case you decide touse xdm) file.
17.1 Preparing the system for the Window Maker installation
Installing libPropList
• Unpack the libPropList archive• Configure the package by running configure• Compile the package by running make• Install the package by running make install
Installing libXpm
• Unpack the libXpm archive• Prepare the compilation by running xmkmf; make Makefiles; make includes; make
depend
Ignore the warning about not being able to find the X11/xpm.h file from make depend.
• Compile the package by running make
The compilation process will abort because the X11/xpm.h file cannot be found. So we install this file nowand then recompile.
• Go to the lib directory• Install the libraries and header files by running make install• Go to the top level directory and recompile the package by running make• Install the rest of the package by running make install
Linux From Scratch HOWTO
17. Installing Window Maker 43
Installing libpng
• Unpack the libpng archive• Compile the package by running make −f scripts/makefile.lnx• Install the package by running make −f scripts/makefile.lnx install
Installing libtiff
• Unpack the libtiff archive• Configure the package by running configure• Compile the package by running make• Install the package by running make install
Installing libjpeg
• Unpack the libjpeg archive• Configure the package by running configure −−enable−shared −−enable−static• Compile the library by running make libjpg.la• Compile the tools and install the package by running make install
Installing libungif
• Unpack the libungif archive• Configure the package by running configure• Compile the package by running make• Install the package by running make install
Installing WindowMaker
• Unpack the WindowMaker archive• Configure the package by running configure• Compile the package by running make• Install the package by running make install
17.2 Updating dynamic loader cache
• Update the dynamic loader cache by running ldconfig
Linux From Scratch HOWTO
Installing libpng 44
17.3 Configuring WindowMaker
Every user who wishes to use WindowMaker has to run the wmaker.inst script before he or she can use it.This script will copy the necessary files into the user's home directory and modify the $HOME/.xinitrc file(or create it if it's not there yet).
• Setup WindowMaker for yourself by running wmaker.inst
17.4 Testing WindowMaker
• Start the X server and see if the WindowMaker Window Manager starts properly by running startx
NextPreviousContentsNextPreviousContents
18. Configuring system for Internet
18.1 Configuring Kernel
Before you can logon to the Internet, the kernel must be ppp−aware. You can accomplish this by compilingppp−support directly into the kernel, or compiling the ppp drivers are modules which you load when youneed them. Whatever you prefer, do it now by re−configuring the kernel if necessary. If your LFS kernel isalready ppp−aware than you don't have to re−configure the kernel.
18.2 Creating groups and directories
• Create the daemon group by running groupadd −g 5 daemon• Create the /var/lock directory by running mkdir /var/lock
18.3 Installing PPP
• Unpack the PPP archive• Configure the package by running configure• Compile the package by running make• Install the package by running make install
Linux From Scratch HOWTO
17.3 Configuring WindowMaker 45

18.4 Creating /etc/resolv.conf
• Create a new file /etc/resolv.conf containing the following:
# Begin /etc/resolv.conf nameserver <IP address of your ISP's primairy DNS server>nameserver <IP address of your ISP's secundairy DNS server> # End /etc/resolv.conf
18.5 Creating the connect and disconnect scripts
• Create a new file /usr/bin/pon file containing the following:
#!/bin/sh# Begin /usr/bin/pon /usr/sbin/pppd call provider # End /usr/bin/pon
• Create a new file /usr/bin/poff file containing the following:
#!/bin/sh# Begin /usr/bin/poff set −− `cat /var/run/ppp*.pid` case $# in 0) kill −15 `ps axw|grep "pppd call [[allnum:]]+"|grep −v grep|awk '{print $1}'` exit 0 ;; 1) kill −15 $1 exit 0 ;;esac # End /usr/bin/poff
Linux From Scratch HOWTO
18.4 Creating /etc/resolv.conf 46
18.6 Creating /etc/ppp/peers/provider
• Create the /etc/ppp/peers directory• Create a new file /etc/ppp/peers/provider containing the following:
# Begin /etc/ppp/peers/provider noauthconnect "/usr/sbin/chat −v −f /etc/chatscripts/provider"/dev/ttyS1115200defaultroutenoipdefault # End /etc/ppp/peers/provider
18.7 Creating /etc/chatscripts/provider
• Create the /etc/chatscripts directory• Create a new file /etc/chatscripts/provider containing the following:
# Begin /etc/chatscripts/provider ABORT BUSYABORT "NO CARRIER"ABORT VOICEABORT "NO DIALTONE"ABORT "NO ANSWER""" ATZOK ATDT <ISP's phonenumber>TIMEOUT 35CONNECT ''TIMEOUT 10ogin: \q<username>TIMEOUT 10assword: \q<mysecretpassword> # End /etc/chatscripts/provider
18.8 Note on password authentication
As you see from the sample scripts (these are the actual scripts I'm using myself) above I logon to my ISPusing this chatscripts in stead of authenticating via pap or chap. Though my ISP supports pap, I choose to doit this slightly different way which has it's disadvantages and advantages. In my case the advantages outweighthe disadvantages. This way I have more control over my logon procedure and I can see closer what ishappening when.
For example most times when I connect I have a window running tail −f /var/log/syslog so I can
Linux From Scratch HOWTO
18.6 Creating /etc/ppp/peers/provider 47
keep an eye on when things like the username and password are sent.
18.9 Other resources
For a far more detailed guide on how to set up Internet, I refer to Egil Kvaleberg'sISP−Hookup−HOWTO which is available from the LDP site at http://www.linuxdoc.org/
NextPreviousContentsNextPreviousContents
19. Migrations from old to new setups
This section is only to be used by people who have installed a LFS system using previous versions of thisHOWTO. If a major change in an installation approach has taken place, you first need to take some actionssuch as removing existing files from a package before you can re−install that package. This section is used toassist people who obtained an old, obsolete version of this HOWTO and after installing the LFS systemnoticed that there's a new HOWTO (like this one) fixing things that went wrong in the older versions.
19.1 Migrating from old C++ Library setup to the new setup
This section only applies to people who have previously installed the C++ Library using LFS−HOWTOversion 1.0, 1.1 or 1.2.
• Remove the following directory and symlinks: /usr/include/g++*
19.2 Migrating from old compiler setup to the new setup
This section only applies to people who have previously installed compilers using LFS−HOWTO 1.0, 1.1 or1.2.
• Remove the following files from the $LFS/usr/bin directory: cc cpp c++ gcc gcj gcjh g77 g++protoize unprotoize
• Remove the following directories: $LFS/usr/lib/gcc−lib $LFS/usr/gcc2723
NextPreviousContentsNextPreviousContents
Linux From Scratch HOWTO
18.9 Other resources 48
2. Software packages you need to download
Below is a list of all the software that you need to download for use in this document. I display the sites anddirectories where you can download the software, but it is up to you to make sure you download the sourcearchive and the latest version. The version numbers correspondent to versions of the software that is knownto work.
2.1 Mandatory software
Sysvinit (2.78) : ftp://ftp.cistron.nl/pub/people/miquels/sysvinit/
Bash (2.03) : ftp://ftp.gnu.org/gnu/bash/
Linux Kernel (2.2.14) : ftp://ftp.kernel.org/
Make (3.77) : ftp://ftp.gnu.org/gnu/make/
Sed (3.02) : ftp://ftp.gnu.org/gnu/sed/
Shell Utils (2.0) : ftp://ftp.gnu.org/gnu/sh−utils/
File Utils (4.0) : ftp://ftp.gnu.org/gnu/fileutils/
Util Linux (2.9z) : ftp://ftp.win.tue.nl/pub/linux/utils/util−linux/
Text Utils (1.22) : ftp://ftp.gnu.org/gnu/textutils/
Tar (1.12) : ftp://ftp.gnu.org/gnu/tar/
Gzip (1.2.4) : ftp://ftp.gnu.org/gnu/gzip/
Binutils (2.9.1.0) : ftp://ftp.gnu.org/gnu/binutils/
Grep (2.2) : ftp://ftp.gnu.org/gnu/grep/
Bison (1.25) : ftp://ftp.gnu.org/gnu/bison/
Mawk (1.3.3) : ftp://ftp.whidbey.net/pub/brennan/
Find Utils (4.1) : ftp://ftp.gnu.org/gnu/findutils/
Diff Utils (2.7) : ftp://ftp.gnu.org/gnu/diffutils/
Ld.so (1.9.10) : ftp://tsx−11.mit.edu/pub/linux/packages/GCC/
Perl (5.005_03) : ftp://ftp.gnu.org/gnu/perl/
M4 (1.4) : ftp://ftp.gnu.org/gnu/m4/
Linux From Scratch HOWTO
2. Software packages you need to download 49
Texinfo (4.0) : ftp://ftp.gnu.org/gnu/texinfo/
Automake (1.3) : ftp://ftp.gnu.org/gnu/automake/
Autoconf (2.13) : ftp://ftp.gnu.org/gnu/autoconf/
Glibc (2.0.7pre6) : ftp://ftp.gwdg.de/pub/linux/glibc/2.0.7pre6/
Glibc−crypt (2.0.pre6) : ftp://ftp.gwdg.de/pub/linux/glibc/2.0.7pre6/
Glibc−linuxthreads (2.0.7pre6) : ftp://ftp.gwdg.de/pub/linux/glibc/2.0.7pre6/
Libstdc++−2.91.60 : ftp://ftp.debian.org/debian/dists/slink/main/binary−i386/base/
Libstdc++−2.91.660−dev : ftp://ftp.debian.org/debian/dists/slink/main/binary−i386/devel/
GCC (2.7.2.3) : ftp://ftp.gnu.org/gnu/gcc/
G++−2.91.60 : ftp://ftp.debian.org/debian/dists/slink/main/binary−i386/devel/
Ncurses (4.2) : ftp://ftp.gnu.org/gnu/ncurses/
Vim (5.5) : ftp://ftp.vim.org/pub/vim/
Readline Library (4.0) : ftp://ftp.gnu.org/gnu/readline/
Termcap Library (1.3) : ftp://ftp.gnu.org/gnu/termcap/
Flex (2.5.4a) : ftp://ftp.gnu.org/gnu/flex/
Less (332) : ftp://ftp.gnu.org/gnu/less/
E2fsprogs (1.12) : ftp://tsx−11.mit.edu/pub/linux/packages/ext2fs/
File (3.26) : ftp://ftp.debian.org/debian/dists/slink/main/source/utils/
Libtool (1.2) : ftp://ftp.gnu.org/gnu/libtool/
Modutils (2.3.7) : ftp://ftp.ocs.com.au/pub/modutils/v2.3/
Linux86 (0.14.3) : ftp://ftp.debian.org/debian/dists/slink/main/source/devel
Lilo (21) : ftp://sunsite.unc.edu/pub/Linux/system/boot/lilo/
DPKG (1.4.0.35) : ftp://ftp.debian.org/debian/dists/slink/main/source/base/
Sysklogd (1.3.31) : ftp://sunsite.unc.edu/pub/Linux/system/daemons/
Groff (1.11.1) : ftp://ftp.gnu.org/gnu/groff/
Man−db (2.3.10) : ftp://ftp.debian.org/debian/dists/slink/main/source/doc/
Linux From Scratch HOWTO
2. Software packages you need to download 50
Procps (2.0.6) : ftp://tsx−11.mit.edu/pub/linux/sources/usr.bin/
Procinfo (17) : ftp://ftp.cistron.nl/pub/people/svm/
Procmisc (19) : ftp://lrcftp.epfl.ch/pub/linux/local/psmisc/
Shadow Password Suite (19990827) : ftp://piast.t19.ds.pwr.wroc.pl/pub/linux/shadow/
2.2 Optional software
All software below is used in sections 13 and above and are not strictly necessary. You have to determine foryourself if you want to install certain packages. If, for example, you don't intend to go online with the LFSsystem, you might not want to install the email, telnet, ftp, www, etc. utilities. You can omit those. I suggestyou read the sections 13 and above first to determine which software packages you want and which softwarepackages you don't want to install.
Netkit−base : ftp://ftp.uk.linux.org/pub/linux/Networking/netkit−devel/
Net−tools (1.53) : http://www.tazenda.demon.co.uk/phil/net−tools/
Procmail (3.13.1) : ftp://ftp.procmail.org/pub/procmail/
Sendmail (8.9.3) : ftp://ftp.sendmail.org/pub/sendmail/
Mailx (8.1.1) : ftp://ftp.debian.org/debian/dists/slink/main/source/mail/
Mutt (1.0i) : ftp://ftp.mutt.org/pub/mutt/
Fetchmail (5.2.0) : http://www.tuxedo.org/~esr/fetchmail/
Netkit−telnet : ftp://ftp.uk.linux.org/pub/linux/Networking/netkit−devel/
Proftpd (1.2.0pre9) : ftp://ftp.tos.net/pub/proftpd/
Netkit−ftp : ftp://ftp.uk.linux.org/pub/linux/Networking/netkit−devel/
Apache (1.3.3) : http://www.apache.org/dist/
Slang Library (1.3.10) : ftp://space.mit.edu/pub/davis/slang/
Zlib Library (1.1.3) : http://www.cdrom.com/pub/infozip/zlib/
Lynx (2.8.1) : http://www.slcc.edu/lynx/release/
Xfree86 (3.3.2.3) : ftp://ftp.xfree86.org/pub/XFree86/
libPropList (0.9.1) : ftp://ftp.windowmaker.org/pub/libs/
libXpm (4.7) : ftp://sunsite.unc.edu/pub/Linux/libs/X/
Linux From Scratch HOWTO
2.2 Optional software 51
libpng (1.0.3) : http://www.cdrom.com/pub/png/
libtiff (3.4) : ftp://ftp.sgi.com/graphics/tiff/
libjpeg (6b) : http://www.ijg.org/
libungif (4.1.0) : ftp://prtr−13.ucsc.edu/pub/libungif/
WindowMaker (0.61.1) : ftp://ftp.windowmaker.org/pub/release/
PPP (2.3.10) : ftp://cs.anu.edu.au/pub/software/ppp/
NextPreviousContents Next PreviousContents
20. Copyright & Licensing Information
Copyright (C) 1999 by Gerard Beekmans. This document may be distributed only subject to the terms andconditions set forth in the LDP License at http://www.linuxdoc.org/COPYRIGHT.html.
It is not necessary to display the license notice, as described in the LDP License, when only a small part ofthis document (the HOWTO) is quoted for informational or similar purposes. However, I do require you todisplay with the quotation(s) a line similar to the following line: "Quoted from the LFS−HOWTO athttp://huizen.dds.nl/~glb/
Next PreviousContentsNextPreviousContents
3. Preparing the new system
3.1 How we are going to do things
We are going to build the LFS system using an already installed Linux distribution such as Debian, SuSe,Slackware, Mandrake, RedHat, etc. You don't need to have any kind of bootdisk. We will use an existingLinux system as the base (since we need a compiler, linker, text editor and other tools).
If you don't have Linux installed yet, you won't be able to put this HOWTO to use right away. I suggest youfirst install a Linux distribution. It really doesn't matter which one you install. It also doesn't need to be thelatest version (though it shouldn't be a too old one. If it is about a year old or newer it'll do just fine).
Linux From Scratch HOWTO
20. Copyright & Licensing Information 52
3.2 Creating a new partition
Before we can build our new Linux system, we need to have an empty Linux partition on which we can buildour new system. If you already have a Linux Native partition available, you can skip this subsection.
Start the fdisk program (or cfdisk if you prefer that program) with the appropriate hard disk as theoption (like /dev/hda if you want to create a new partition on the primary master IDE disk). Create a LinuxNative partition, write the partition table and exit the (c)fdisk program. If you get the message that you needto reboot your system to ensure that that partition table is updated, then please reboot your system now beforecontinuing.
3.3 Creating an ext2 file system on the new partition
Once the partition is created, we have to create a new ext2 file system on that partition. From now on I'll referto this newly created partition as $LFS. $LFS should be substituted with the partition you have created. If youcreated your partition on /dev/hda4, you mounted it on /mnt/hda4 and this document tells you to copy a file to$LFS/usr/bin then you need to copy that file to /mnt/hda4/usr/bin.
To create a new ext2 file system we use the mke2fs command. Give $LFS as the only option and the filesystem will be created.
3.4 Adding an entry to LILO
In order to be able to boot from this partition later on, we need to update our /etc/lilo.conf file. Addthe following lines to lilo.conf:
image=<currently used image> label=<label> root=$LFS read−only
Replace <currently used image> by the kernel image file that you are using to boot your normal Linuxsystem. <label> can be anything you want it to be. I named the label "lfs" What you enter as <label> is whatyou enter at the LILO−prompt when you choose with system to boot.
Now run the lilo program to update the boot loader.
3.5 Creating directories
Let's create a minimal directory tree on the $LFS partition. issuing the following commands will create thenecessary directories. Make sure you first mount the $LFS partition before you attempt to create thedirectories.
cd $LFSmkdir boot etc home lib mnt proc root tmp var usrmkdir bin sbin usr/bin usr/sbin usr/src
Linux From Scratch HOWTO
3.2 Creating a new partition 53
mkdir usr/man usr/include usr/sharecd usr/manmkdir man1 man2 man3 man4 man5 man6 man7 man8cd ..ln −s . localln −s /etc etcln −s /var varln −s /usr/man share/man
I am aware that a number of directories you have created above are in total violation with the FHS (FileHierarchy Standard − http://www.pathname.com/fhs/). The reason why I do this is just a preference. I want tokeep certain files all together. For example the old standard was that man pages go in /usr/man and/usr/local/man. The most recent standard dictates that man pages should go in /usr/share/man (and possibly/usr/local/share/man). I just want them all to be in /usr/man so I know exactly in what directory a certain manpage is and I don't have to start looking in various directories to find out where it is (although I can simplyfind a file with the 'locate' command I still prefer the way I do things).
If you want to create a file system that it completely according the FHS, then I urge you to take a look atwww.pathname.com/fhs and create your directories accordingly.
3.6 Copying the /dev directory
We can create every single file that we need to be in the $LFS/dev directory using the mknod command, butthat just takes up a lot of time. I choose to just simply copy the current /dev directory to the $LFS partition.Use this command to copy the entire directory while preserving original rights, symlinks and owner ships:
cp −av /dev $LFS
Feel free to strip down the $LFS/dev directory, only leaving the devices you really need.
NextPreviousContentsNextPreviousContents
4. Installing Sysvinit
4.1 Preparing Sysvinit
Under normal circumstances, after the kernel's done loading and initializing various system components, itattempts to load a program called init which will finalize the system boot process. The program found onmost Linux systems is called Sysvinit and that's the program we're going to install on our LFS system.
• Unpack the Sysvinit archive• Go to the src directory• Edit the Makefile file
Linux From Scratch HOWTO
3.6 Copying the /dev directory 54
• Somewhere in this file, but before the rule all: putt his variable: ROOT = $LFS• Precede every /dev on the last four lines in this file by $(ROOT)
After applying the $(ROOT) parts to the last four lines, they should look like this:
@if [! −p $(ROOT)/dev/initctl ]; then \ echo "Creating $(ROOT)/dev/initctl" \ rm −f $(ROOT)/dev/initctl; \ mknod −m 600 $(ROOT)/dev/initctl p; fi
• Compile the package by running make LDFLAGS=−static• Install the package by running make install
4.2 Configuring Sysvinit
In order for Sysvinit to work, we need to create it's configuration file. Create the $LFS/etc/inittab filecontaining the following:
# Begin /etc/inittab id:2:initdefault: si::sysinit:/etc/init.d/rcS ~~:S:wait:/sbin/sulogin l0:0:wait:/etc/init.d/rc 0l1:1:wait:/etc/init.d/rc 1l2:2:wait:/etc/init.d/rc 2l3:3:wait:/etc/init.d/rc 3l4:4:wait:/etc/init.d/rc 4l5:5:wait:/etc/init.d/rc 5l6:6:wait:/etc/init.d/rc 6z6:6:wait:/sbin/sulogin ca:12345:ctrlaltdel:/sbin/shutdown −t1 −a −r now 1:2345:respawn:/sbin/sulogin # End /etc/inittab
4.3 Copying passwd & group files
As you can see from the inittab file, when we boot the system, init will start the sulogin program and suloginwill ask you for root's password. This means we need to have at least a passwd file present on the LFSsystem. We'll use the passwd and group files from the current running Linux system. Since the passwords areencoded it's just easier to copy the already present file and use that, instead of retyping the encoded password.Mistakes are easily made and this way we can avoid extra hassle afterwards.
Linux From Scratch HOWTO
4.2 Configuring Sysvinit 55
• Copy the /etc/passwd and /etc/group files to $LFS/etc/• Edit the $LFS/etc/passwd file and remove every line, except the line for the user root• Edit the $LFS/etc/group file and remove every line, except the line for the group root
It might be the case that your system uses shadowed passwords. In that case the /etc/passwd files will notcontain the root password, but the /etc/shadow file does (this file is only accessible by user root and programswho run as root). The password field of /etc/passwd contains a x usually (the first field after the username).Remove that x and replace it with the encoded password you have in /etc/shadow. The encoded password isthe second field in the /etc/shadow file (so the first field after the username, without the colons). Make sureyou copy it exactly as it is. Remember: it is case sensitive.
4.4 Installing a root shell
When sulogin asks you for the root password and you've entered the password, a shell needs to be started.Usually this is the bash shell. Since there are no libraries installed yet, we need to link bash statically, justlike we did with Sysvinit.
• Unpack the Bash archive• Configure the package by running configure −−enable−static−link• Compile the package by running make• Copy the binary bash to $LFS/bin• Create a symlink that links $LFS/bin/sh to $LFS/bin/bash
4.5 Testing the system
After you've completed this section, we can test the system and see if we can log on to it. Please note that youwill get errors regarding the init program not being able to start the rcS and rc scripts. Ignore those error s fornow. It is normal. We will install these scripts in a later stage.
Also note that you won't be able to shutdown the system with a program like shutdown. Although theprogram is present, it will give you the following error: "You don't exist. Go away." when you try to use theprogram. The meaning of this error is that the system isn't able to locate the password file. Although theshutdown program is statically linked against the libraries it needs, it still depends on the nss library (NameServer Switch) which is part of the GNU C Library, which also will be installed in a later stage. This NSSlibrary passes on information where (in this case) the passwd file can be found.
For now you can reboot the system using the reboot −f command. This will bypass shutting down thesystem using the shutdown program and reboot immediately. Since the file system is mounted read−only thiswill not harm our system in any way (though you might get a warning next time you try to mount the systemthat it wasn't unmounted cleanly the last time and that you should run e2fsck to make sure the file system isOK).
NextPreviousContentsNextPreviousContents
Linux From Scratch HOWTO
4.4 Installing a root shell 56
5. Installing a kernel
5.1 Note on ftp.kernel.org
In section 2 above I mentioned you can download a new kernel from ftp://ftp.kernel.org/ However, this site isoften too busy to get through and the maintainers of this site encourage you to download the kernel from alocation near you. You can access a mirror site by going to ftp://ftp.<country code>.kernel.org/ (likeftp.ca.kernel.org).
5.2 Configuring the kernel
• Unpack the Kernel archive in the /usr/src/ directory• Choose a method to configure the kernel (see the README file for more details on configuration
methods) and make sure you don't configure anything as modules at this point. This is because wewon't have the necessary software available to load kernel modules for a while.
• After you're done with your kernel configuration, run make dep• Compile the kernel by running make bzImage• Copy the arch/<cpu>/boot/bzImage file to the /boot directory (or some place else if your
Linux system uses a different convention where kernel images and the like are stored)• Optionally you can rename the /boot/bzImage file to something like /boot/lfskernel• Copy the entire kernel source tree from to the LFS partition by running: cp −av
/usr/src/linux $LFS/usr/src• Create the $LFS/usr/include/linux symlink by running ln −s $LFS/usr/include/linux
/usr/src/linux/include/linux• Create the $LFS/usr/include/asm symlink by running ln −s $LFS/usr/include/asm
/usr/src/linux/include/asm
5.3 Updating LILO
• Edit the /etc/lilo.conf file and go to the LFS section• Change the image name to lfskernel (or whatever you've named the originally called bzImage
file)• Run lilo to update the boot loader.
5.4 Testing the system
Reboot your system and start your LFS system. Verify that the newly installed kernel doesn't performout−of−the−ordinary actions (like crashing).
NextPreviousContentsNextPreviousContents
Linux From Scratch HOWTO
5. Installing a kernel 57
6. Installing the GNU C and C++ Libraries
6.1 Preparing the system for the GNU C Library installation
In this section we're going to install Glibc. But before we'll be able to install these libraries, we need to have abunch of other software installed on the LFS system. Therefore all these programs need to be linkedstatically. This means quite a bit of extra work, because after Glibc and the GNU CC compilers are installed,we're going to re−install all these programs so they'll be linked dynamically. If somebody knows of a betterway to accomplish this, without first building all the software statically and then rebuild them dynamically,please let me know.
I know of one other way and that's by installing Glibc using pre−compiled binaries. But that would bedirectly against what we're doing here. So that's not an option.
All software that is being installed in this section will be compiled on our normal working Linux system andthen copied to the LFS system.
You'll notice that the installation of this software is very straightforward is most cases. I also won't explainwhat this software does, since it's all trivial software and if you don't know what some program does, you canalways read the README file and other documentation.
Installing Make
• Unpack the Make archive• Configure the package by running configure• Compile the package by running make LDFLAGS=−static• Copy the make binary to $LFS/usr/bin
Installing Sed
• Unpack the Sed archive• Configure the package by running configure• Compile the package by running make LDFLAGS=−static• Copy the sed/sed binary to $LFS/usr/bin
There is a possibility you will experience compilation problems. If this is teh case, you can download a fixedversion of this package from the following URL:http://tts.ookhoi.dds.nl/download/lfs−howto/sed−3.02−lfs.tar.gz
Installing Shell Utils
• Unpack the Shell Utils archive• Configure the package by running configure
Linux From Scratch HOWTO
6. Installing the GNU C and C++ Libraries 58
• Compile the package by running make LDFLAGS=−static• Copy the following binaries from the src directory to $LFS/bin: date echo false pwd
sleep stty su true uname• Copy the following binary from the src directory to $LFS/sbin: chroot• Copy the following binaries from the src directory to $LFS/usr/bin: basename dirname env
expr factor groups id logname nice nohup pathchk printenv printfseq tee test tty uptime users who whoami yes
Installing File Utils
• Unpack the File Utils archive• Configure the package by running configure• Compile the package by running make LDFLAGS=−static• Copy the following binaries from the src directory to $LFS/bin: chgrp chmod chown cp dd
df dir dircolors du ln ls mkdir mkfifo mknod mv rm rmdir sync touchvdir
• Copy the following binary from the src directory to $LFS/usr/bin: ginstall• Create the $LFS/usr/bin/install symlink by running: cd $LFS/usr/bin; ln −s ginstall
install
Installing Util Linux
• Unpack the Util Linux archive• Configure the package by running configure• Go to the lib directory and compile the files there by running make• Go to the mount directory and compile the programs there by running make LDFLAGS=−static• Copy the following binaries to $LFS/sbin: losetup mount swapon umount• Create the symlink that links $LFS/sbin/swapoff to $LFS/sbin/swapon
Installing Text Utils
• Unpack the Text Utils archive• Configure the package by running configure• Compile the package by running make LDFLAGS=−static• Copy the following binary from the src directory to $LFS/bin: cat• Copy the following binaries from the src directory to $LFS/usr/bin: cksum comm csplit cut
expand fmt fold head join md5sum nl od paste pr sort split sum tactail tr unexpand uniq wc
Installing Tar
• Unpack the Tar archive• Configure the package by running configure• Compile the package by running make LDFLAGS=−static
Linux From Scratch HOWTO
Installing File Utils 59
After compiling the programs in the src directory you will have two programs: tar and rmt. Tar is obvious.Rmt stands for ReMote Tapeserver. If you don't need this program (ie; you don't have a tapestreamer in yournetwork or on your machine) then you don't need to copy this program.
• Copy the src/tar binary to $LFS/bin• Copy the src/rmt binary to $LFS/bin (if you need it)
Installing Gzip
• Unpack the Gzip archive• Configure the package by running configure• Compile the package by running make LDFLAGS=−static• Remove from the following files the .in extension: gzexe.in zdiff.in zforce.in
zgrep.in zmore.in znew.in• Copy the following files to $LFS/bin: gunzip gzexe gzip zcat zdiff zforce zgrep
zmore znew
There is a possibility you will experience compilation problems. If this is the case, you can download a fixedversion of this package from the following URL:http://tts.ookhoi.dds.nl/download/lfs−howto/gzip−1.2.4−lfs.tar.gz
Installing Binutils
• Unpack the Binutils archive• Configure the package by running configure• Compile the package by running make LDFLAGS=−all−static• Copy the following binaries from the gas directory to $LFS/usr/bin: as−new gasp−new• Rename those files to $LFS/usr/bin/as and $LFS/usr/bin/gasp• Copy the following binaries from the ld directory to $LFS/usr/bin:ld−new• Rename that file to $LFS/usr/bin/ld• Copy the following binaries from the binutils directory to $LFS/usr/bin: addr2line ar
c++filt nm−new objcopy objdump ranlib size strings strip−new• Rename $LFS/usr/bin/nm−new to $LFS/usr/bin/nm• Rename $LFS/usr/bin/strip−new to $LFS/usr/bin/strip
Installing Grep
• Unpack the Grep archive• Configure the package by running configure• Compile the package by running make LDFLAGS=−static• Copy the following binaries from the src directory to $LFS/usr/bin: egrep fgrep grep
There is a possibility you will experience compilation problems. If this is the case, you can download a fixedversion of this package from the following URL: http://tts.ookhoi.dds.nl/download/grep−2.2−lfs.tar.gz
Linux From Scratch HOWTO
Installing Gzip 60
Installing Bison
• Unpack the Bison archive• Configure the package by running configure• Compile the package by running make LDFLAGS=−static• Copy the following binary to $LFS/usr/bin: bison• Copy the following files to $LFS/usr/share: bison.hairy bison.simple
Installing Mawk
• Unpack the Mawk archive• Configure the package by running configure• Compile the package by running make CFLAGS="−O −static"• Copy the following binary to $LFS/usr/bin: mawk• Create the symlinks that links $LFS/usr/bin/awk to $LFS/usr/bin/mawk
Installing Find Utils
• Unpack the Find Utils archive• Configure the package by running configure• Compile the package by running make LDFLAGS=−static• Copy the following binary from the find directory to $LFS/usr/bin: find
There is a possibility you will experience compilation problems. If this is the case, you can download a fixedversion of this package from the following URL:http://tts.ookhoi.dds.nl/download/lfs−howto/findutils−4.1−lfs.tar.gz
Installing Diff Utils
• Unpack the Diff Utils archive• Configure the package by running configure• Compile the package by running make LDFLAGS=−static• Copy the following binaries to $LFS/usr/bin: cmp diff diff3 sdiff
There is a possibility you will experience compilation problems. If this is the case, you can download a fixedversion of this package from the following URL:http://tts.ookhoi.dds.nl/download/lfs−howto/diffutils−2.7−lfs.tar.gz
Installing Ld.so
• Unpack the Ld.so archive• Go to the util directory• Compile ldd by running make ldd
Linux From Scratch HOWTO
Installing Bison 61
• Compile ldconfig by running make ldconfig• Copy the following binary to $LFS/bin:ldd• Copy the following binary to $LFS/sbin: ldconfig
Installing Perl
• Unpack the Perl archive• Configure the package by running Configure
You can stick to all the default questions, except to the following.
When asked What is the file extension used for shared libraries? [so]
Answer with: none
When asked Any additional ld flags (NOT including libraries)? [−L/usr/local/lib]
Answer with: −L/usr/local/lib −static
When asked Do you wish to use dynamic loading? [y]
Answer with: n
• Compile the package by running make• Copy the following binary to $LFS/usr/bin: perl
Installing M4
• Unpack the M4 archive• Configure the package by running configure• Compile the package by running make LDFLAGS=−static• Copy the following binary from the src directory to $LFS/usr/bin: m4
There is a possibility you will experience compilation problems. If this is the case, you can download a fixedversion of this package from the following URL:http://tts.ookhoi.dds.nl/download/lfs−howto/m4−1.4−lfs.tar.gz
Installing Texinfo
• Unpack the Texinfo archive• Configure the package by running configure −−disable−nls
Linux From Scratch HOWTO
Installing Perl 62
• Compile the package by running make LDFLAGS=−static• Copy the following binary from the makeinfo directory to $LFS/usr/bin: makeinfo
Installing Automake
• Unpack the automake archive• Configure the package by running configure• Copy the following scripts to $LFS/usr/bin: automake aclocal• Create the following directory: $LFS/usr/share/automake• Copy the following files to $LFS/usr/share/automake: config.guess config.sub
install−sh mdate−sh missing mkinstalldirs elisp−comp ylwrapacinstall
• Copy the following files to $LFS/usr/share/automake: All *.am files• Create the following directory: $LFS/usr/share/aclocal• Copy the following files from the m4 directory to $LFS/usr/share/aclocal: all *.m4 files
Installing Autoconf
• Unpack the Autoconf archive• Configure the package by running configure• Compile the package by running make• Copy the following files to $LFS/usr/bin: autoconf autoheader autoreconf autoscan
autoupdate ifnames• Create the following directory: $LFS/usr/share/autoconf• Copy the following files to $LFS/usr/share/autoconf: All *.m4* files (in effect this means all *m4
and all *.m4f files)• Also copy these following files to $LFS/usr/share/autoconf: acconfig.h acfunctions
acheaders acidentifiers acprograms acmakevars
6.2 Installing the GNU C Library
We're not going to installed the latest Glibc version, 2.1.2, but version 2.0.7pre6. The reason is that glibc2.1.2 requires at least gcc 2.8 (or egcs 1.1). My system has gcc 2.7.2.3 thus I can't compile the glibc2.1.2library. And I also don't want to upgrade my working Linux system to gcc 2.95.2 (which is the latest versionat the time of writing this document). Upgrading a compiler isn't as easy as it sounds and I don't want to breakthings on this working system.
So therefore I have to install glibc 2.0.7pre6. However, we are going to install the gcc 2.95.2 compiler. Wealso need to install the gcc 2.7.2.3 compiler because certain software can't be compiled with gcc 2.95.2 (dueto bugs in the programs that aren't really bugs but the gcc 2.95.2 compiler defines them as bugs. This is not abug in the compiler, but changes in the C standard (if I understood it correctly)).
A note on the glibc−crypt package. The following is quoted from the glibc−crypt−README file onftp://ftp.gnu.org/gnu/glibc:
−*−*−*−*−*−
Linux From Scratch HOWTO
Installing Automake 63
The add−on is not included in the main distribution of the GNU C library because some governments, mostly notable those of France, Russia and the US, have very restrictive rules governing the distribution and use of encryption software. Please read the node "Legal Problems" in the manual for more details. In particular, the US does not allow export of this software without a license, including via the Internet. So please do not download it from the main FSF FTP site at ftp.gnu.org if you are outside of the US. This software was completely developed outside the US.−*−*−*−*−*−
"This software" refers to the glibc−crypt package at ftp://ftp.gwdg.de/pub/linux/glibc/2.0.7pre6/. This lawonly affects people who don't live in the US. It's not prohibited to import DES software, so if you live in theUS you can import it from that German site.
• Unpack the Glibc archive• Move the glibc−crypt and glibc−linuxthreads archives into the unpacked glibc directory• Unpack the glibc−crypt and glibc−linuxthreads there• Configure the package by running (from the glibc top level directory) configure
−−with−gnu−binutils −−enable−shared−−enable−add−ons=linuxthreads,crypt
• Create a new file configparms containing the following:
# Begin configparmsprefix=/usrslibdir=/libsysconfdir=/etc# End configparms
• Compile the package by running make• Reboot the computer into the LFS system• Remount the LFS partition in read−write mode• Mount the partition where the Glibc source files reside• If this partition is different from the partition where your /usr directory is usually mounted on, also
mount that partition• Create a symlink that links /usr/lib/gcc−lib to the usr/lib/gcc−lib directory on the
normal Linux system.• Go to the Glibc source directory• Install the package by running make install• Remove the /usr/lib/gcc−lib symlink
You can check if the GNU C Library seems to be working by running a dynamically linked program that usesthis library (like almost every program). A simple test is running the ls program that resides in the bindirectory on your normal Linux partition. If you can run this program without any errors, then the GNU CLibrary seems to be installed correctly.
Please not that if your normal Linux system uses a differnet library version that the one you just installed on
Linux From Scratch HOWTO
Installing Automake 64
your LFS system, that program will most likely crash and reported a 'Segmentation Fault' or somethingsimilar. If so, just continue with the installation of the C++ Library and the compilers. After the compilers aredone you will compile a small test program and execute it for the sake of testing the compiler. If those twolittle programs execute without crashing, it means that 1) the compiler works 2) the C Library works too. Sodon't worry too much right now if programs from your normal Linux system don't work due to C Libraryincompatibilities.
6.3 Installing the GNU C++ Library
If you have used a previous version of this HOWTO to install a LFS system and you wish to update your LFSsystem conforming the changes made in this version of the HOWTO, you first need to remove the existingfiles regarding the previously installed C++ library before continuing with this section.
• If you have used LFS−HOWTO versions 1.0, 1.1 or 1.2 please read section 19.1 now beforecontinuing.
This HOWTO used to install the C++ library from sources, but that has been changed and is an exception.The C++ library is installed from pre−compiled binaries. The reason is that I have not been able to find thesources for the C++ library version that I prefer to use. So until then we'll use pre−compiled binaries.
Installing the libstdc++2.9_2.91.66−0slink2.deb package
• Extract the archive files by running ar x libstdc++2.9_2.91.66−0slink2.deb• Extract the package itself by running tar xvfz data.tar.gz• Copy the package by running cp −av usr /• Remove the following files and directory: usr data.tar.gz control.tar.gz
debian−binary
Installing the libstdc++2.9−dev_2.91.66−0slink2.deb package
• Extract the archive files by running ar x libstdc++2.9−dev_2.91.66−0slink2.deb• Extract the package itself by running tar xvfz data.tar.gz• Copy the package by running cp −av usr /• Remove the following files and directory: usr data.tar.gz control.tar.gz
debian−binary
NextPreviousContentsNextPreviousContents
Linux From Scratch HOWTO
6.3 Installing the GNU C++ Library 65
7. Installing the GNU C and C++ compilers
You need to restart your system back into the normal Linux system to compile the gcc compiler. Before youreboot, unmount the partitions you mounted (that contained the glibc sources) and mount the LFS rootpartition read only by running mount −o remount,ro / /
If you have used a previous version of this HOWTO to install a LFS system and you wish to update your LFSsystem conforming the changes made in this version, you first need to remove the existing files regarding thepreviously installed compilers before continuing with this section.
• If you have used LFS−HOWTO versions 1.0, 1.1 or 1.2 please read section 19.2 now beforecontinuing
This HOWTO used to install the C++ compiler from source, but that has been changed and is an exception.The C++ compiler is installed using pre−compiled binaries. The reason is that I have not been able to find thesources for the C++ compiler version that I prefer to use. So until then we'll use pre−compiled binaries.
We also will link the C compiler statically. Although Glibc is installed on our LFS system, we still arecompiling the compiler on our normal Linux system. The normal Linux system may contain a differentversion of Glibc and the compiler will be linked against that version. Therefore we will link the compilerstatically and later on when all statically linked software is being re−installed we also will re−install thecompiler. This procedure is not necessary if both your normal Linux system and the LFS system use the sameLibrary version, but since I don't know that we will do it this way. This ensures this document is usable onevery Linux system, no matter what version of libraries they use.
7.1 Making two small test programs
We'll create a little C and a little C++ program which we will use after the installations to determine if thecompilers can find the necessary files in order to successfully compile a program.
• Create a new file $LFS/root/test1.c containing the following:
// Begin test.c#include <stdio.h>int main() {printf("Hello World!\n");return 0;}// End test.c
• Create a new file $LFS/root/test2.cpp containing the following:
// Begin test2.cpp#include <iostream.h>int main() {cout << "Hello World!" << endl;
Linux From Scratch HOWTO
7. Installing the GNU C and C++ compilers 66
return 0;}// End test2.cpp
7.2 Installing GCC 2.7.2.3
• Unpack the gcc−2.7.2.3 archive• Configure the package by running configure• Build the compiler by executing these commands in sequence:
make LANGUAGES=cmake stage1 make CC="stage1/xgcc −Bstage1/" CFLAGS="−g −O2 −static" LANGUAGES=cmake stage2make CC="stage2/xgcc −Bstage2/" CFLAGS="−g −O2 −−static" LANGUAGES=cmake compare
• If make compare doesn't report any differences, the compiler is build successfully.• Reboot your computer in the LFS system.• Mount the partition that contains the gcc−2.7.2.3 source files.• Install the package by running make CC="stage2/xgcc −Bstage2/" CFLAGS="−g
−O2" LANGUAGES=c install
7.3 Installing the g++_2.91.66−0slink2.deb package
• Extract the archive files by running ar x g++_2.91.66−0slink2.deb• Extract the package itself by running tar xvfz data.tar.gz• Copy the files by running cp −av usr /• Remove the following files and directory: usr data.tar.gz control.tar.gz
debian−binary
Note that this g++ compiler is already pre−compiled and linked against glibc 2.0.7. Therefore there is no needto re−install this package in a later stage.
7.4 Creating necessary symlinks
• Create the /lib/cpp symlink by running ln −s /usr/lib/gcc−lib/<host>/2.7.2.3/cpp/lib/cpp
• Create the /usr/bin/cpp symlink by running ln −s/usr/lib/gcc−lib/<host>/2.7.2.3/cpp /usr/bin/cpp
• Create the /usr/bin/cc symlink by running ln −s /usr/bin/gcc /usr/bin/cc
Replace <host> with the directory where the gcc−2.7.2.3 files were installed (i686−unknown−linux in my
Linux From Scratch HOWTO
7.2 Installing GCC 2.7.2.3 67
case).
7.5 Testing the compilers
We will compile two small programs which we will use to test if the compilers compile. Note that this is byno means an exhaustive test. It's just a little test to see if the compiler can find the necessary files in order tocompile a basic program.
• Go to the /root directory• Compile test1.c by running gcc test1.c −o test1• Compile test2.cpp by running g++ test2.cpp −o test2• Execute the test1 and test2 programs to make sure the programs run ok without dumping the core or
perform other out−of−the−ordinary actions.
NextPreviousContentsNextPreviousContents
8. Installing login utilities
8.1 Installing agetty + login
You need the Util Linux package again for this section. If you haven't deleted the Util Linux source directory,you can skip the first two steps.
• Unpack the Util Linux archive (if you have deleted it since last time we've used it)• Configure the package by running configure• Go to the login−utils directory• Compile agetty and login by running make agetty login• Copy the following binary to /sbin: agetty• Copy the following binary to /bin: login
8.2 Modifying $LFS/etc/inittab
You have to reboot back into your normal Linux system for this step because we need a text editor which isn'tinstalled yet.
The next step is modifying the $LFS/etc/inittab file so that agetty is started on a virtual console every time westart the system. This is how it works on most if not every Linux system.
• Edit the $LFS/etc/inittab file
Linux From Scratch HOWTO
7.5 Testing the compilers 68
• Find this line and remove it: 1:2345:respawn:/sbin/sulogin• Where the previous line was, put the following lines:
1:2345:respawn:/sbin/agetty /dev/tty1 9600 2:2345:respawn:/sbin/agetty /dev/tty2 9600 3:2345:respawn:/sbin/agetty /dev/tty3 9600 4:2345:respawn:/sbin/agetty /dev/tty4 9600 5:2345:respawn:/sbin/agetty /dev/tty5 9600 6:2345:respawn:/sbin/agetty /dev/tty6 9600
8.3 Creating the UTMP record file
Every time you log onto a Linux system, the /var/run/utmp file is modified. When this file isn't present, a lotof programs will start complaining, including agetty and login. So we just create an empty$LFS/var/run/utmp file and those programs won't complain anymore.
• Create the $LFS/var/run directory• Create an empty file by running touch $LFS/var/run/utmp
8.4 Testing the system
If you want you can test the system now. Restart the system and boot into the LFS system. After the kerneland sysvinit are done loading, agetty should start and prompt you with a username. Since the only user wecurrently have is 'root', you login as root.
NextPreviousContentsNextPreviousContents
9. Installing Vim
Restart your system in the LFS system. From now on you don't need to start your normal Linux systemanymore. The reason we had to do this is because the LFS system was lacking a text editor.
9.1 Preparing the system for the Vim installation
Installing Ncurses
In order to install Vim we need to have the ncurses libraries installed.
• Unpack the Ncurses archive• Configure the package by running configure −−with−shared
Linux From Scratch HOWTO
8.3 Creating the UTMP record file 69
• Compile the package by running make• Install the terminfo files by running make install.data• Go to the test directory and run a few of the programs to verify that the libraries are working• Install the libraries by running make install
9.2 Installing Vim
Vim comes in two separate parts: A 'src' package and a 'rt' (run−time) package. You need both in order toinstall Vim. If you put both archives in the same directory, the unpacked files of both archives will appear inthe same directory that will be created when you unpack the first (it doesn't matter which one you unpackfirst).
• Unpack the Vim−src and the Vim−rt archives• Configure the package by running configure• Compile the package by running make• Install the package by running make install
NextPreviousContents
Linux From Scratch HOWTO
9.2 Installing Vim 70