Embed Size (px)
Citation preview
1
Linux Red Hat GS-4 Installation Guide
Revised 06/06/2008
A GS-4 installation follows the same steps for each flavor of Linux. In areas of the specific Linux OS installation and print services such as CUPS and LPRng, we attempt to make helpful notes while assuming the installer has the necessary skills to before these tasks.
Required Applications
Red Hat and, Fedora,Supported: All versions of Red Hat
GCC Development Tools: are required to successfully install LPRng. During a CD-based installation, select Custom installation and select Development Tools.
PostgreSQLGoPrint recommends installing PostgreSQL version 8.1 which is included in a default PostgreSQL installation of Red Hat
Sun Java SDK (J2SE 1.6.2) A successful GoPrint installation requires Sun Java Developers Kit J2SE version 1.6.2
Option #1 – LPRng Printing ManagementLPRng printing solution version 3.8.22 (GS-4 does NOT support versions higher than 3.8.22) Refer to the steps on page 10 for downloading and installing LPRng.
Alert** Under RH the backend scripts run as the user “nobody” this user needs to have write permissions to the /usr/local/gs4/logs directory. Do this by adding lp and goprint to the nobody group. usermod -a -G nobody goprint repeat for the lp user.
Red Hat and Fedobra Required Packages
GoPrint recommends installing the minimum number of packages required to successfully implement a X Window, database server installation
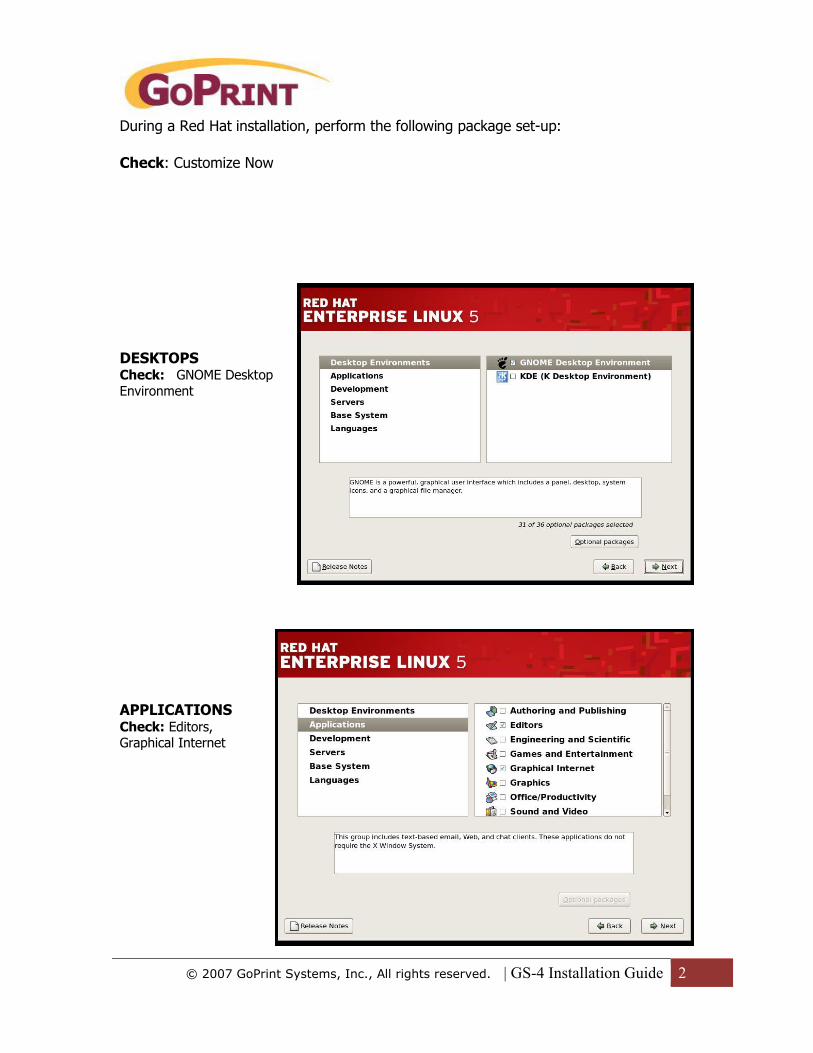
SELinux Disabled
For now, SELinux must be disabled. Go to System / Administration / Security Level and Firewall, click on the SELinux tab, set it to Disabled, and click OK.
© 2007 GoPrint Systems, Inc., All rights reserved. | GS-4 Installation Guide 2
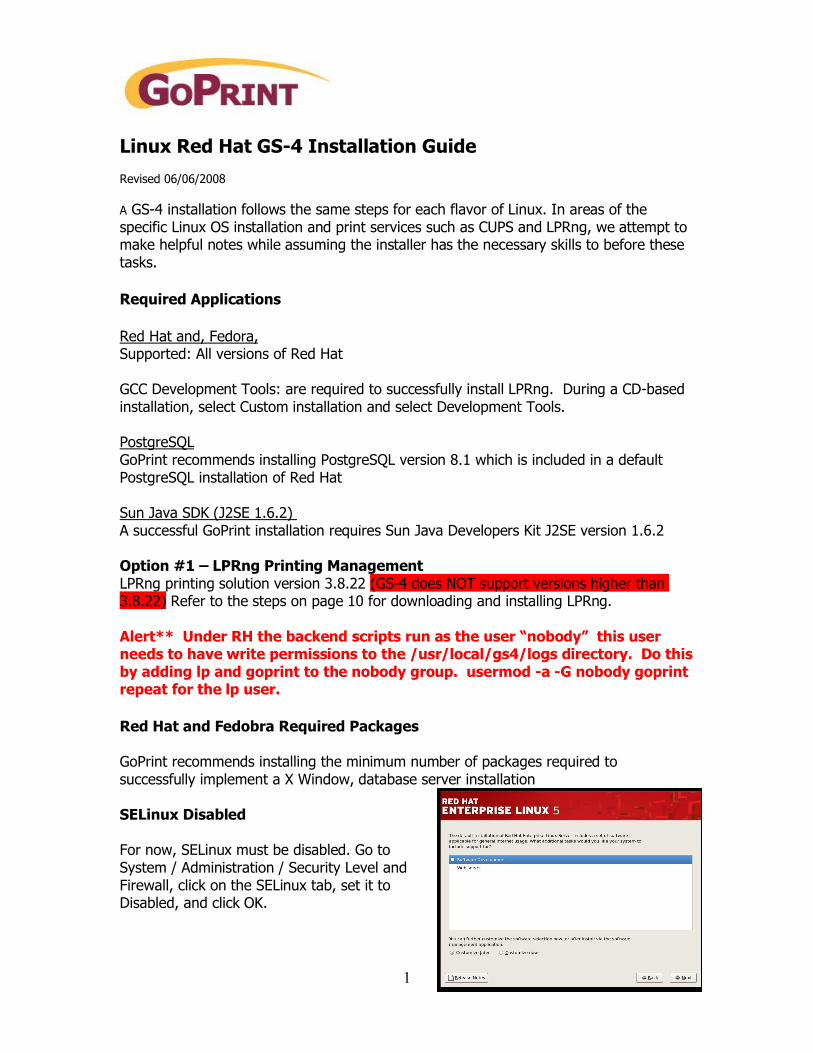
During a Red Hat installation, perform the following package set-up:
Check: Customize Now
DESKTOPSCheck: GNOME Desktop Environment
APPLICATIONSCheck: Editors, Graphical Internet

© 2007 GoPrint Systems, Inc., All rights reserved. | GS-4 Installation Guide 3
DEVELOPMENTCheck:
Development Tools (GCC Development Tools are required)
SERVERSDeselect: Web Server, Windows File Server. Printing Support
Check: PostgreSQLDatabase (Installs version 8.1), Server Configuration Tools
UNCHECKl CUPS Check PRINTING SUPPORT (Important)
TO support LPRng deselect PRINTING SUPPORT

© 2007 GoPrint Systems, Inc., All rights reserved. | GS-4 Installation Guide 4
To ensure a stable LPRng implementation, CUPS, and its dependencies must not be installed. To disable CUPS support, during a CD-base installation choose Custom options and deselect Printing Support from the listing of installable applications then disable the CUPS daemon after installation.
Click the Details link and check ALL optional PostgreSQL packages
Base System
Check: X Windows System,Administration Tools, System Tools
Languages – Leave default
© 2007 GoPrint Systems, Inc., All rights reserved. | GS-4 Installation Guide 5
Check: Enable Kdump
Select:No Firewall radio Button
Select:Disabled SELinux from
the drop down menu

© 2007 GoPrint Systems, Inc., All rights reserved. | GS-4 Installation Guide 6
GOPrint GS-4 Overview
The GoPrint solution offers multiple set-up methods based on the size and budget of your organization. The sole foundation requires the configuration of three scripts, the goprintgtx (GTX -transaction service) goprintagent (Agent - pauses print queues), and the station-loader (Station – payment kiosk).
Configuration Environments Offered
1. Combo server- installation where the GTX, AGENT and STATION software all reside on the same box.
2. GTX, AGENT and STATION on individual machines. With this scenario, the GTX resides on a database server, the AGENT installed on one of more print servers, and STATION on one or multiple kiosk machines.Note: With this scenario, if your environment requires multiple print servers, the AGENT service must be configured on each individual server.
3. GTX, AGENT on one machine STATION on a kiosk machine. The most common scenario involves installing the GTX and AGENT services on the print server and the STATION software on the one or more kiosk machines.
PostgreSQL Installation
GoPrint currently provides support for PostgreSQL versions, 7.3, 7.4 and 8.0, 8.1,8.2 requiring the GCC and development tools.
During a Red Hat 5, select Custom installation and when prompted select the following additional programs:
a. Post installation tasks Customize installation of packages Deselect Printing Support – Prevents CUPS installation Select Development tools - gcc Select PostgreSQL Server, client libs, PostgreSQL jdbc and the
rest of the PostgreSQL modules. Follow and accept the default prompts
Selecting PostgreSQL Server installs PostgreSQL version 8.1 - accept the defaults

© 2007 GoPrint Systems, Inc., All rights reserved. | GS-4 Installation Guide 7
PostgreSQL Configuration
A default PostgreSQL installation is installed under /var/lib/pgsql/data/
Before you can begin using PostrgreSQL, you must manually start the postgresql service
$ /etc/init.d/postgresql start
Once the service is running, it creates the required files and subdirectories under pgsql/data, two of which are the pg_hba.conf and postgresql.conf files. By default, PostgreSQL only accepts UNIX Socket and Localhost connections. For security purposes, this is the preferred setting if the database resides on the same server running the GTX service. If the GTX service is running on a remote machine, then your configuration files must reflect the hostname and network settings of the remote server. See the postgreSQL documentation or contact GoPrint Support for help with these settings.
Configuring the pg_hba.conf and postgresql.conf for localhost connections. Change to Root and edit the following:
A. pg_hba.conf
$ cd /var/lib/pgsql/data
# TYPE DATABASE USER IP-ADDRESS IP-MASK METHODFirst line is required when making local Unix connections to PostgreSQL when running psql scripts from a command line.
# Database administrative login by UNIX socketslocal all all trust
# All IPv4 connections host all all 127.0.0.1/32 trust B. Edit the postgresql.conf
Enable TCP/IP Connections (applies to versions 7+) Hint: The settings are commented out by default, make sure to uncomment them!
tcpip_socket = ‘localhost’
Increase the number of max_connections to 250 (or higher, depending upon the size of the server's database pool):
max_connections = 250

© 2007 GoPrint Systems, Inc., All rights reserved. | GS-4 Installation Guide 8
Increase the shared memory size so that there are at least 2000 shared_buffers and 1000 max_fsm_relations. Additionally, set aside 100,000 max_fsm_pages for each 1 GB of database storage:
shared_buffers = 2000max_fsm_relations = 1000max_fsm_pages = 100000 # 100k for every 1 GB of db storage
If the server has to sort large amounts of data when querying, consider increasing the sort_mem size.
Caution - Setting this value too high can cause the database to run out of memory
Edit the sysctl.conf file
$ cd /etc/sysctl.conf
Add the line: fs.file-max = 32768
Restart the PostgreSQL postmaster service for the changes to effect
$ /etc/init.d/postgresql restart
Test to ensure the postgres user can connect to the PostgreSQL server
$ psql –U postgres –d template1 (Unix Sockets test)$ \q
$ psql – U postgres – H servername -d template1 (TCPIP test) $ \q
LPRng InstallationGoPrint requires LPRng 3.8.22. A copy has been provided
along with your installation guide or you may download the source code from www.lprng.com
IMPORTANT GS-4 ONLY SUPPPORT LPRng 3.8.22
Required Packages
NOTE: To ensure a stable LPRng implementation, CUPS, and its dependencies must not be installed. To disable CUPS support, during a CD-base installation choose Custom options and deselect Printing Support from the listing of installable applications then disable the CUPS daemon after installation.

© 2007 GoPrint Systems, Inc., All rights reserved. | GS-4 Installation Guide 9
GCC development tools prior to an LPRng installation attempt
Download the LPRng tar file into /opt and untar the file
$ tar -xvzf<the_full_downloaded_file_name>
Once unpacked, navigate to the newly created LPRng <version> directory and run configure
$ cd /opt/LRng-3.8.22$ ./configure --prefix=/usr --libexecdir=/usr/sbin --sysconfdir=/etc
Once completed, issue a two sed commands then a make and then finally a make install sed -i "s/^SHELL=/#&/" Makefile sed -i "s;-Werror ; ;g" src/Makefile
$ make >make install
LPRng ConfigurationOnce the installation of LPRng is complete, it is necessary to configure the Lpd.conf and Lpd.perms system files and then configure your printer information in the printcap file. Change to Root to make the following changes:
Edit lpd.confA default installation of LPRng creates a /etc/lpd directory. Change to the Lpd directory to edit lpd.conf
The /etc/lpd.conf file can be used to override the set of default values for the print spooler or other printing applications.
$ cd /etc/lpd $ nano –w lpd.conf Add the following entries to the end of the file
logger_destination=localhost%7771 #Forces logging on localhost longnumber #Creates a 6 digit job number - required fifo@ #First in first out – what comes in first is handled first spool_dir_perms=000770 #permissions set for spool directory spool_file_perms=000660 #Permission set for Spool files
Edit the Lpd.perms
The /etc/lpd.perms file is used by lpd to determine who is allowed to perform various operations.
© 2007 GoPrint Systems, Inc., All rights reserved. | GS-4 Installation Guide 10
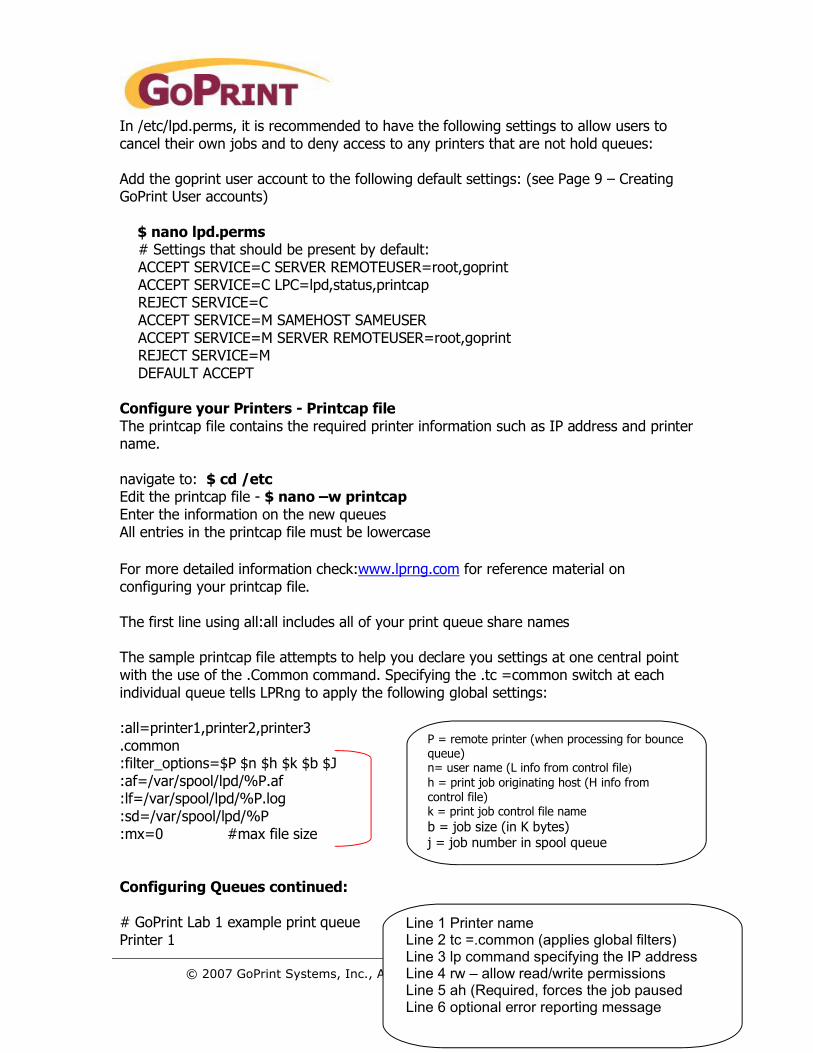
In /etc/lpd.perms, it is recommended to have the following settings to allow users to cancel their own jobs and to deny access to any printers that are not hold queues:
Add the goprint user account to the following default settings: (see Page 9 – Creating GoPrint User accounts)
$ nano lpd.perms # Settings that should be present by default: ACCEPT SERVICE=C SERVER REMOTEUSER=root,goprint ACCEPT SERVICE=C LPC=lpd,status,printcap REJECT SERVICE=C ACCEPT SERVICE=M SAMEHOST SAMEUSER ACCEPT SERVICE=M SERVER REMOTEUSER=root,goprint REJECT SERVICE=M DEFAULT ACCEPT
Configure your Printers - Printcap fileThe printcap file contains the required printer information such as IP address and printer name.
navigate to: $ cd /etcEdit the printcap file - $ nano –w printcapEnter the information on the new queues All entries in the printcap file must be lowercase
For more detailed information check:www.lprng.com for reference material on configuring your printcap file.
The first line using all:all includes all of your print queue share names
The sample printcap file attempts to help you declare you settings at one central point with the use of the .Common command. Specifying the .tc =common switch at each individual queue tells LPRng to apply the following global settings:
:all=printer1,printer2,printer3.common:filter_options=$P $n $h $k $b $J:af=/var/spool/lpd/%P.af:lf=/var/spool/lpd/%P.log:sd=/var/spool/lpd/%P:mx=0 #max file size
Configuring Queues continued:
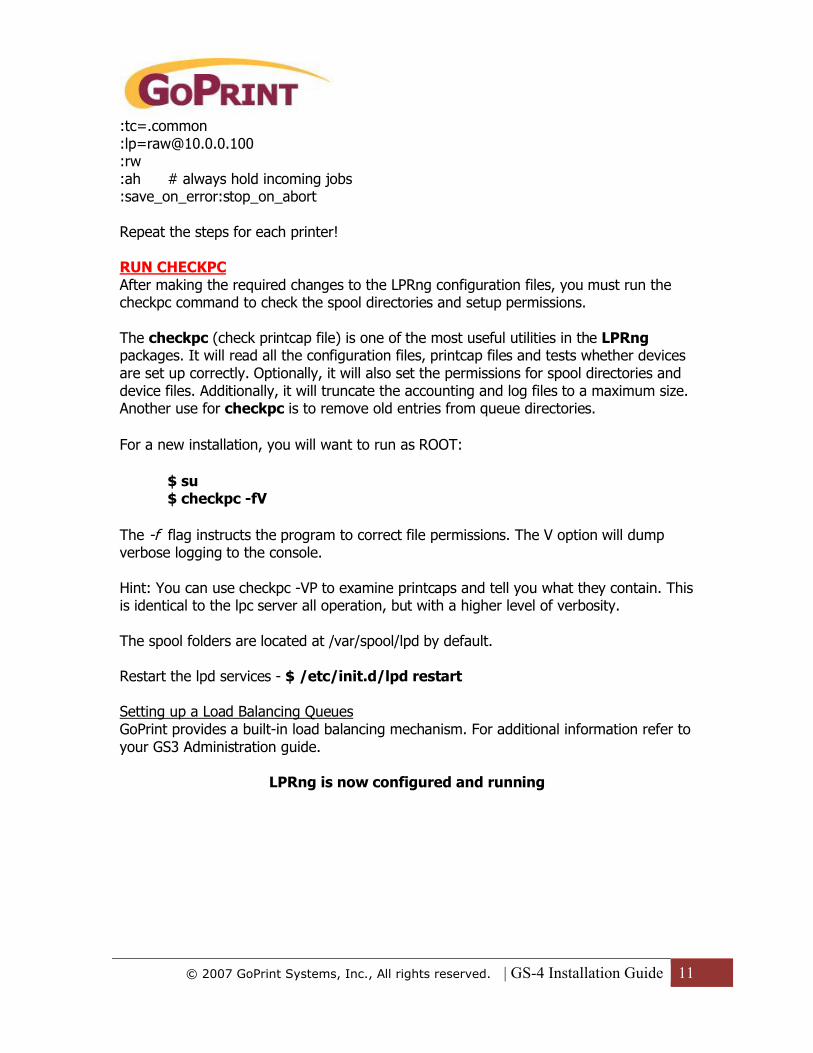
# GoPrint Lab 1 example print queue Printer 1
P = remote printer (when processing for bounce queue)n= user name (L info from control file)h = print job originating host (H info from control file)k = print job control file nameb = job size (in K bytes)j = job number in spool queue
Line 1 Printer name Line 2 tc =.common (applies global filters)Line 3 lp command specifying the IP addressLine 4 rw – allow read/write permissionsLine 5 ah (Required, forces the job pausedLine 6 optional error reporting message
© 2007 GoPrint Systems, Inc., All rights reserved. | GS-4 Installation Guide 11
:tc=.common:[email protected]:rw:ah # always hold incoming jobs:save_on_error:stop_on_abort
Repeat the steps for each printer!
RUN CHECKPCAfter making the required changes to the LPRng configuration files, you must run the checkpc command to check the spool directories and setup permissions.
The checkpc (check printcap file) is one of the most useful utilities in the LPRngpackages. It will read all the configuration files, printcap files and tests whether devices are set up correctly. Optionally, it will also set the permissions for spool directories and device files. Additionally, it will truncate the accounting and log files to a maximum size. Another use for checkpc is to remove old entries from queue directories.
For a new installation, you will want to run as ROOT:
$ su $ checkpc -fV
The -f flag instructs the program to correct file permissions. The V option will dump verbose logging to the console.
Hint: You can use checkpc -VP to examine printcaps and tell you what they contain. This is identical to the lpc server all operation, but with a higher level of verbosity.
The spool folders are located at /var/spool/lpd by default.
Restart the lpd services - $ /etc/init.d/lpd restart
Setting up a Load Balancing QueuesGoPrint provides a built-in load balancing mechanism. For additional information refer to your GS3 Administration guide.
LPRng is now configured and running

© 2007 GoPrint Systems, Inc., All rights reserved. | GS-4 Installation Guide 12
GOPRINT GS-4 INSTALLATION
GoPrint GS-4 Server - OverviewThe GoPrint server installation involves the configuration of the PostgreSQL database, the print server, and its corresponding startup scripts. If the GTX scripts (database) and Agent scripts (print queues) are running on the same machine, then both start-up scripts must be configured to auto-start at system boot. If the GTX and Agent are located on different machines, then the GTX start-up script and the Agent start-up scripts MUST be configured separately on their respected servers.
Important: When the Agent (print server) is installed on a separate machine from the GTX, the /usr/local/gs4/goprint.cfg script must be configured to point to the hostname or FQDN of the GTX server.
Step 1 - Create The GoPrint User Account Create a user called goprint for remote access. This user will also be used to ogin locally and then switch to “su” to the root user.
$ useradd goprint –m -p goprint –s /bin/bash
And add the user to the lp group:
$ usermod –G lp goprint
Grant the goprint group permissions to Java SDK security directory
A default installation of Sun SDK grants only the root user account and group permissions to the self-signed SSL cert (cacerts) file. When selecting GS4 to run under goprint user account , the goprint group must have RWX permissions access to the cacerts file created under the security directory.

© 2007 GoPrint Systems, Inc., All rights reserved. | GS-4 Installation Guide 13
Step 2 – Creating the gs4 directory
Manually create the gs4 directory in /usr/local by issuing the command mkdir gs4untar the gs4 Linux tar file and set the proper permissions
$ cd /usr/local $ mkdir gs4$ tar –xvzf <GS4 tar file name>
$ chmod +x /usr/local/gs4/bin/*.sh
Change ownership of the GS4 directory to the goprint user and group – this setting enables the GTX and Agent to run as the goprint user instead of root.
$ chown –R goprint:goprint /usr/local/gs4/$ chmod –R 770 /usr/local/gs4/
Finally, modify existing lines in /etc/lprng/lpd.perms to grant access to the goprint user to the print queues for C and M (if not completed during the LPRng configuration)service functions.
ACCEPT SERVICE=C SERVER REMOTEUSER=root,goprintACCEPT SERVICE=M SERVER REMOTEUSER=root,goprint
Step 2 - Prerequisites to creating the PostgreSQL Database
Java Dependency on LibXp-1.0.0-8
You will need to install the libXp-1.0.0-8.i386.rpm to resolve a dependency issue with xorg that java links to. The library can be found on one of the RH5 installation CD's.
Starting the GoPrint-GTX service.
init.d: You need to create a symbolic link GoPrint-GTX (CASE SENSITIVE)to the GoPrint-Service.sh file in /usr/local/gs4/bin. This service
cannot be started anymore from the console. Then in /etc/rc2.d and/etc/rc3.d create links called "S20<service name>" back to the same namefile in init.d. Again to keep this standard we should make note of thestartup order so that the goprint services start after the databaseservice for systems where where both are installed. For stopping theservices in /etc/rc0.d and /etc/rc1.d create a link called "K10<servicename>" to the /etc/init.d/<service name>.
JAVA:
© 2007 GoPrint Systems, Inc., All rights reserved. | GS-4 Installation Guide 14
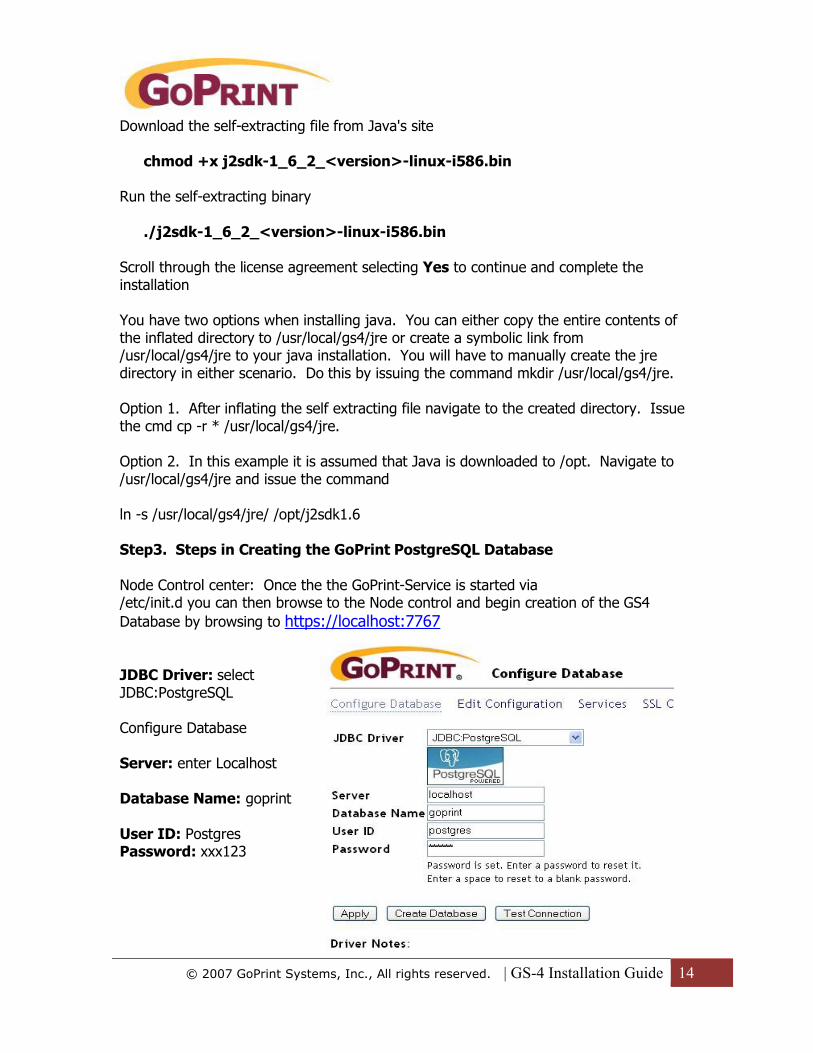
Download the self-extracting file from Java's site
chmod +x j2sdk-1_6_2_<version>-linux-i586.bin
Run the self-extracting binary
./j2sdk-1_6_2_<version>-linux-i586.bin Scroll through the license agreement selecting Yes to continue and complete the installation
You have two options when installing java. You can either copy the entire contents of the inflated directory to /usr/local/gs4/jre or create a symbolic link from /usr/local/gs4/jre to your java installation. You will have to manually create the jre directory in either scenario. Do this by issuing the command mkdir /usr/local/gs4/jre.
Option 1. After inflating the self extracting file navigate to the created directory. Issue the cmd cp -r * /usr/local/gs4/jre.
Option 2. In this example it is assumed that Java is downloaded to /opt. Navigate to /usr/local/gs4/jre and issue the command
ln -s /usr/local/gs4/jre/ /opt/j2sdk1.6
Step3. Steps in Creating the GoPrint PostgreSQL Database
Node Control center: Once the the GoPrint-Service is started via/etc/init.d you can then browse to the Node control and begin creation of the GS4 Database by browsing to https://localhost:7767
JDBC Driver: select JDBC:PostgreSQL
Configure Database
Server: enter Localhost
Database Name: goprint
User ID: PostgresPassword: xxx123

© 2007 GoPrint Systems, Inc., All rights reserved. | GS-4 Installation Guide 15
Click: Create Database
Starting the GS4 Services
Once the database has successfully been created you will need to start the GoPrint GTX service.
To Start the GTX service clickServices
Offline Services - GTXClick the Start button
Note: Once the GTX serviceIs displayed as running,
A link to access the Control Center appears. You may click on the link to access Control Center Congratulations you have successfully installed the GS4 Server-based solution.
The next step is to login into Control Center and enter your license key and serial number
Important: before your print release stations, print queues, additional print servers, client popup, and 3rd party transaction systems can be brought online, the corresponding license key and serial No must be entered.
GS4 Control Center - License Key and Serial No

© 2007 GoPrint Systems, Inc., All rights reserved. | GS-4 Installation Guide 16
Use your web browser to visit the GS4 Control Center by entering: http://servername:7768
or via a secure porthttps://servername:7770
The default user name:
Username: adminPassword: admin
Step 1 - From Display Options, click LPRng and press Configure

© 2007 GoPrint Systems, Inc., All rights reserved. | GS-4 Installation Guide 17
GS-4 Red Hat Linux PayStation Installation Guide
Setting up a Linux GoPrint Station
Install Linux with the Gnome 2 desktop and Metacity Window Manager (Optional) Download Java J2SE 1.6.2
Sun Java SDK (J2SE 1.6.2) InstallationGoPrint currently supports SJDK 1.6.2
IMPORTANT: The specific J2SE version and installation path MUST be referenced in the /usr/local/gs4/config.sh during the GS4 configuration to ensure Java is recognized. By default GS4 installation assumes J2SE
is installed in the /opt directory. If a different directory is chosen, you will need to adjust the path in the /usr/local/gs4/config.sh file
Dwnload the latest version of the SDK Software Developers Kit:http://java.sun.com/j2se/download.jsp
Select the J2SE 1.6.2 Linux self-extracting file and into /opt
Download the self-extracting file from Java's site
chmod +x j2sdk-1_6_2_<version>-linux-i586.bin
Run the self-extracting binary
./j2sdk-1_6_2_<version>-linux-i586.bin
Scroll through the license agreement selecting Yes to continue - Java is now installed
User accounts and Permissions
Add a goprint user for remote access and system management, a goprint group for permissions, and a kiosk user that will be used to auto-start the station interface. The /usr/local/gs3/logs directory will be written to by the kiosk user, so it needs special permissions.
The goprint user account and goprint group MUST have RWX permissions to the gs3/logs and the Kiosk user must be added to the goprint group to secure
the proper permissions to this directory.
$ useradd goprint –m -p goprint –s /bin/bash$ useradd kiosk -m –p kiosk -G goprint –s /bin/bash
Card Reader and Coin Opt Serial Port Permissions

© 2007 GoPrint Systems, Inc., All rights reserved. | GS-4 Installation Guide 18
A non-root user account must have the proper permissions in order to open specific serial ports required for vending hardware.
Add the goprint and Kiosk user accounts to the UUCP group
$ usermod –G uucp goprint$ usermod –G uucp kiosk
The following error will occur in the /usr/local/gs4/logs/station.log if the correct permissions are not applied. Additionally, the vending device will not be recognized when a transaction is attempted.
2006-06-18 08:20:47,471 ERROR [com.goprint.card.CardReaderTransport:main] Could not open serial port java.io.IOException: /dev/ttyS1: SerOpenPort failed: : 13
Hint: when connecting a vending unit to a payment station, you must change the Port field to reflect A LINUX environment - Control Center – Station – Card Reader settings
Install the GS-4 filesChange into /usr/local/ and create a gs3 directory, unpack the GS4 tar file and make the scripts executable.
$ cd /usr/local $ mkdir gs4$ mkdir /usr/local/gs4/logs$ tar –xvzf <GS4 tar file name> $ chmod +x /usr/local/gs4/bin/*.sh
Make a logs directory under the GS4 home directory
$ mkdir /usr/local/gs4/logs
Change ownership of the GS4 directory to the goprint user. This enables the station service to run as the goprint user account instead of root.
$ chown –R goprint:goprint /usr/local/gs4$ chmod -R 770 /usr/local/gs4
Creating the kiosk user for auto-login the station service for auto-start

© 2007 GoPrint Systems, Inc., All rights reserved. | GS-4 Installation Guide 19
Copy the session-manual file to a .gnome2 subdirectory under the kiosk home directory to have the station startup at login. This directory won't exist until the user has logged into the desktop once, but you can make it manually as long as you set the permissions properly. Also copy the station.desktop file so the goprint and kiosk user's Gnome desktops will have a GoPrint Station icon.
$ mkdir ~kiosk/.gnome2$ cp /usr/local/gs4/bin/gnome/station.desktop ~kiosk/.gnome2/$ chown -R kiosk:users ~kiosk/.gnome2$ mkdir ~kiosk/Desktop$ cp /usr/local/gs4/bin/gnome/station.desktop ~kiosk/Desktop$ chown -R kiosk:users ~kiosk/Desktop$ mkdir ~goprint/Desktop$ cp /usr/local/gs4/bin/gnome/station.desktop ~goprint/Desktop$ chown goprint:users ~goprint/Desktop
The GoPrint station uses SSL (Port 7770) to communicate across the network to the GoPrint database server. A default installation of Sun SDK grants only
the root user account and group permissions to the self-signed SSL cert (cacerts) file. When selecting GS4 station to run under goprint and kiosk user accounts, the goprint group must have RWX permissions access to the cacerts file created under the security directory and the kiosk user added to the goprint group.
$ chgrp –R goprint /opt/j2sdk1.6.2_<version>/jre/lib/security$ chmod –R 770 /opt/j2sdk1.6.2_<version>/jre/lib/security
The following error message appears in the /gs4/logs/station.log file if the goprint (goprint group) and Kiosk users do not have write permissions to the cacerts file:
2006-06-18 08:13:13,577 ERROR [com.goprint.station.StationClient:main] Error retrieving SSL certificate java.io.FileNotFoundException: /opt/j2sdk1.6.2_12/jre/lib/security/cacerts (Permission denied)
Note: Modify the /etc/hosts file to have the IP address and host name of the GTX server if the site does not have DNS setup
Configure the Kiosk user for Auto-Login
Creating auto login for kiosk user.

© 2007 GoPrint Systems, Inc., All rights reserved. | GS-4 Installation Guide 20
Select the Users tab first and select the “show all from /etc/passwd” check box.
Next on the Security tab you can now select Enable Timed Login and choose the user.

© 2007 GoPrint Systems, Inc., All rights reserved. | GS-4 Installation Guide 21
You will need to login to the Gnome desktop as the kiosk user once and set the screen saver to Flag with text set to "Touch the screen to begin", or something along those lines. The default screen saver cycles through all the savers and is quite annoying.
Additional information on configuring a Kiosk environment with Red Hat http://www.redhat.com/docs/manuals/enterprise/RHEL-5-Manual/desktop-guide/s1-ddg-lockdown-other-kiosk-configs.html
X Configuration Touch screen addendum - Optional for Touchscreens
There are two solutions for the installation of the touch screens in the case of either a combo server or standalone paystation.
The first is a hardware solution, if this is the case the touchscreen will work out of the box. This is a special order screen that integrates out of the box with Linux.
The second solution involves a software/hardware solution. First you will have to open the screen itself. Do this by unscrewing the four mounting screws located on each corner. Gently pry the case open with a flat end screw driver. Once the cae is open locate the cable that traces back from the VGA port. The controller cable has a small black end on it 4 pin connection. Pull this from its connection and turn it 180 degrees. Re-attach the controller. Re-assemble the screen.
Next you will have to edit the XF86conf file or Xorg file This is located in /etc/X11/
Add the following line to the "ServerLayout" Section:
Inputdevice "Touchscreen1" "SendCoreEvents"
Add the following section to the "Inputdevice" section: Create a new section of desired)
Enter the following text into the file and choose Save

© 2007 GoPrint Systems, Inc., All rights reserved. | GS-4 Installation Guide 22
Section "InputDevice"Identifier "TouchScreen1"Driver "elographics"Option "Device" "/dev/ttyS1"Option "AlwaysCore"Option "ScreenNumber" "0"
Option "screenno" "0" Option "MinX" "553" Option "MaxX" "3440" Option "MinY" "657" Option "MaxY" "3441" Option "UntouchDelay" "3" Option "ReportDelay" "1"
EndSection
IMPORTANT NOTE: The Min/Max coordinates above are valid for a 15" flat panel. If you are using a different size monitor, or are using a CRT monitor, then you will have to run a calibration utility for your touchscreen hardware in order to get the right settings.
If you are using an ELO device see the following URL for instructions: http://www.elotouch.com/support/linux.asp
If you are using a USB mouse recommended for both mouse and touchscreen to be active at the same time) then find your mouse section in the XF86Config file and use these settings.
Option "Protocol" "IMPS/2"Option "Device" "/dev/input/mice"Option "ZAxisMapping" "4 5"# Mouse-speed setting for PS/2 mouse.Option "Resolution" "1600"
Find the ServerLayout section and make sure it looks like this. If you are using a PS/2 mouse instead of a USB mouse then you'll have to use the touchscreen as your CorePointer and comment out the mouse line
InputDevice "Mouse1" "CorePointer"InputDevice "Keyboard1" "CoreKeyboard"# add this line if you are using a touchscreenInputDevice "Touchscreen1" "SendCoreEvents"
Calibrating an ELO touchscreen requires a DOS boot disk with utilities from elotouch.com. Visit http://www.bootdisk.com/ if you need a quick DOS boot disk to put the ELO utilities on. The drivers are in a file named linux.zip available at http://www.elotouch.com/support/dnld.asp#linux.
The touchscreen is now configured you are now ready to Start the Station process

© 2007 GoPrint Systems, Inc., All rights reserved. | GS-4 Installation Guide 23
10. Start the station process/usr/local/gs4/bin/ ./station.sh &or to force a connection to the server# /usr/ocal/gs4/bin/ ./station-loader.sh &
Configure The GoPrint System
The final step to get your system up and running is to configure your print queues, prices sheets, stations, and other available features to your specifications. Please see the appropriate sections in the ADMIN GUIDE pertaining to this information.
GOPRINT DEFAULT USER ACCOUNTS The following information pertains to built-in and default login and password configuration settings implemented by the GoPrint support staff on hardware purchased directly from GoPrint. You may implement the required naming convention for your institution.
PAYSTATIONS
PayStation Payment Window
Root account1 • Login: root 2 • Password: go123srv
PayStation OS local user (kiosk user) account 1 • Login: goprint 2 • Password: go123
Default user account with minimal permissions configured for automatic login
Website Control Center URL 1 • HTTP://SERVERNAME:7768
GS3 Control Center 1 • Login: admin 2 • Password: admin
Default web-base system administrator login
1 • Login: go123pay2 • goprn03
A built-in system PayStation local login account. Use to close down the PayStation window when communication to the GoPrint server is down. In most cases the normal system ADMIN account or an user account with account rights (ACL) are sufficient to shutdown the GoPrint PayStation window.

© 2007 GoPrint Systems, Inc., All rights reserved. | GS-4 Installation Guide 24
PostgresSQL Database Logins• Login: postgres• Password: XXX123
PostgreSQL built-in database owner(DBO) account • Login: Goprint • Password: Goprint
PostgreSQL account created during the database installation
Recommended Tools and ServicesRecommended Cosmetic packages: xscreensaver gdm-themes metacity-themesUtility packages: vim, traceroute, whois, bind-tools, telnet-bsd, ncftp, sysstat, iproute2, xinetd, Security packages: shorewall netcat
# Pgdmin3 PostgreSQL Admin Tool - http://www.pgadmin.org# The LPRng Printing Cookbook -http://www.lprng.com/PrintingCookbook/index.html# PostgresSQL Documentation - http://www.postgresql.org/docs/# Sun Java Installation for Linux - http://java.sun.com/j2se/1.4.2/install-linux.html
CUPS REMOVAL – Optional if using LPRng only!
LPRNG and CUPS cannot co-exist. So CUPS must be disabled first and then removed. Do This by entering a console and typing:
1. Service CUPS stop$ rpm --erase cups
Which will produce the following output:
error: Failed dependencies: /usr/bin/lp is needed by (installed) redhat-lsb-3.0-8.EL.i386 /usr/bin/lpr is needed by (installed) redhat-lsb-3.0-8.EL.i386 cups is needed by (installed) hal-cups-utils-0.5.2-8.i386 cups is needed by (installed) libgnomecups-0.1.12-5.i386 cups is needed by (installed) desktop-printing-0.17-3.EL.1.i386 cups >= 1.1.17-4 is needed by (installed) system-config-printer-0.6.116.4-1.i386
(the list of packages depending on cups may be even longer).
Once you know what depends on cups, remove those packages
rpm --erase hal-cups-utils libgnomecups rpm --erase desktop-printing system-config-printer
© 2007 GoPrint Systems, Inc., All rights reserved. | GS-4 Installation Guide 25
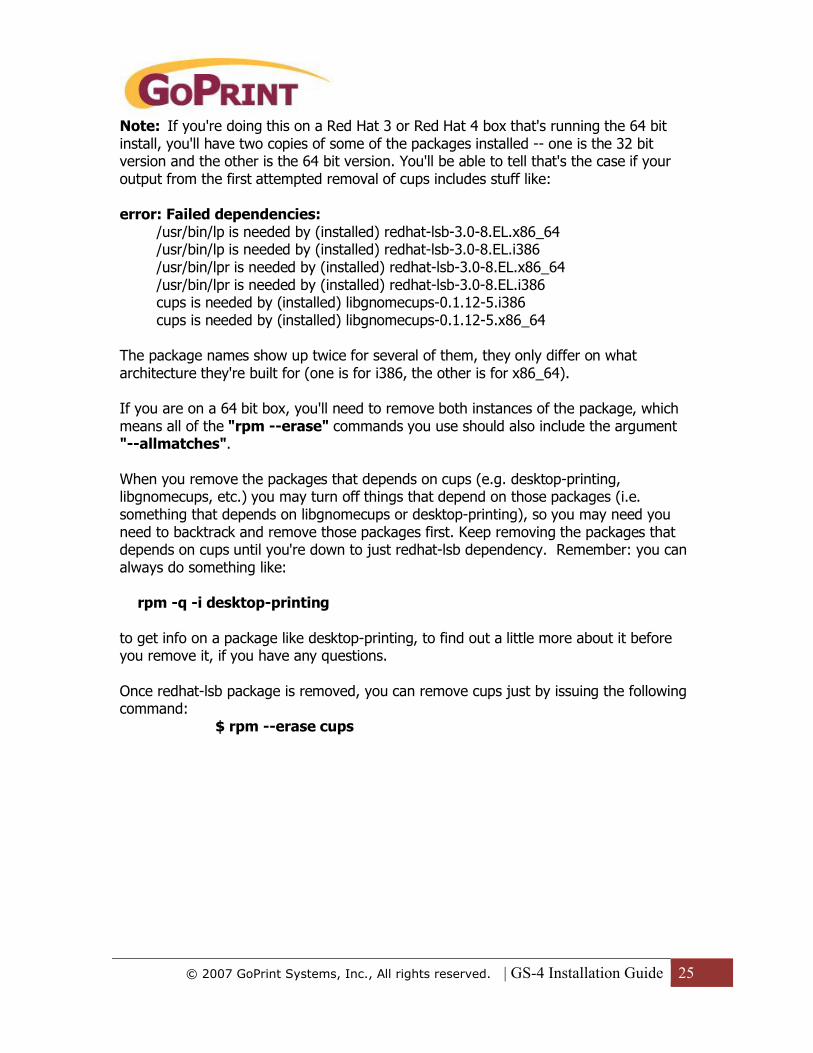
Note: If you're doing this on a Red Hat 3 or Red Hat 4 box that's running the 64 bit install, you'll have two copies of some of the packages installed -- one is the 32 bit version and the other is the 64 bit version. You'll be able to tell that's the case if your output from the first attempted removal of cups includes stuff like:
error: Failed dependencies: /usr/bin/lp is needed by (installed) redhat-lsb-3.0-8.EL.x86_64 /usr/bin/lp is needed by (installed) redhat-lsb-3.0-8.EL.i386 /usr/bin/lpr is needed by (installed) redhat-lsb-3.0-8.EL.x86_64 /usr/bin/lpr is needed by (installed) redhat-lsb-3.0-8.EL.i386 cups is needed by (installed) libgnomecups-0.1.12-5.i386 cups is needed by (installed) libgnomecups-0.1.12-5.x86_64
The package names show up twice for several of them, they only differ on what architecture they're built for (one is for i386, the other is for x86_64).
If you are on a 64 bit box, you'll need to remove both instances of the package, which means all of the "rpm --erase" commands you use should also include the argument "--allmatches".
When you remove the packages that depends on cups (e.g. desktop-printing, libgnomecups, etc.) you may turn off things that depend on those packages (i.e. something that depends on libgnomecups or desktop-printing), so you may need you need to backtrack and remove those packages first. Keep removing the packages that depends on cups until you're down to just redhat-lsb dependency. Remember: you can always do something like:
rpm -q -i desktop-printing
to get info on a package like desktop-printing, to find out a little more about it before you remove it, if you have any questions.
Once redhat-lsb package is removed, you can remove cups just by issuing the following command:
$ rpm --erase cups

© 2007 GoPrint Systems, Inc., All rights reserved. | GS-4 Installation Guide 26
Troubleshooting Tips
PostgreSQL Errors
If this message appears, there are two possible reasons for this: either the server isn't running at all. Simply start it.
The other non-trivial cause for this message is that the server isn't configured to accept TCP/IP requests on the address shown.
For security reasons, a PostgreSQL server "out of the box" doesn't listen on TCP/IP ports. Instead, it has to be enabled to listen for TCP/IP requests. This can be done by adding tcpip = true to the postgresql.conf file for Versions 7.3.x and 7.4.x, or listen_addresses='*' for Version 8.0.x and above; this will make the server accept connections on any IP interface.
The TCP/IP setting is commented out by default, a command error is to enable the TCP/IP settings and not uncomment its corresponding line.
Additionally, after editing the postgresql.conf or the pg_hba.conf files the postmaster has to be restarted in order for the changes to take effect./etc/init.d/postgresql restart
This error occurs if the pga_hba.conf file contains mis-configured information.
Along with the IP address the subnet mask is also required when using localhost and TCP/IP connections.
Make sure the subnet mask exists and is correct format

© 2007 GoPrint Systems, Inc., All rights reserved. | GS-4 Installation Guide 27
Secondly, make sure your settings are in the correct search format:
UNIX Socket connectionsLocalhost TCP/IP connections
This error occurs if a TCP/IP entry does not exist for the specified host IP address and/or the postgres user account for the specified database
Postgresql Service FAILS to start
The postgresql service can fail to start if another process is running on the same port. This may happen during a new installation when the server is configured to obtain a DHCP address and later changed to a static address.
Navigate to /var/lib/pgsql/data/ and delete the postgresql.pid file and restart the postmaster service. A new postgresql.pid will be created after a successful restart.
Creating a Password for the Postgres user account
su to the postgres user account and issue the ALTER USER psql commandpostgres@printserver:/home/goprint$ psql -c "ALTER USE postgres WITH PASSWORD 'XXX123'" -d template1
LPRng Errors
Illegal Option –s when attempting to start LPDError executing command 'lpq -a -s'lpq: illegal option -- s
usage: lpq [-a] [-l] [-Pprinter] [user ...] [job ...]
lpq(8) from the base system is being run, and that doesn't understandthe '-s' option used by lpq(8) from lprNG. Either you need to specifythe full path to the correct version of lpq (which will be/usr/local/bin/lpq if you've installed lprNG from packages), or youhave to futz with the $PATH and put /usr/local/bin before /usr/bin.

© 2007 GoPrint Systems, Inc., All rights reserved. | GS-4 Installation Guide 28
Station Errors
Permission denied
/opt/j2sdk1.4.2_12/jre/lib/i386/libawt.so: cannot restore segment prot after reloc: Permission denied
Solution
Disabled Selinux using the security tool or by editing its config file /etc/selinux/config
Card Reader does not respond when swiping debit card?
Solution1 Make sure all cables are secure and the card reader is attached and referenced to the correct serial port in Control Center.
Secondly, Check the /user/local/gs4/logs/station.log and look for the following error
2006-06-18 08:13:14,770 ERROR [com.goprint.card.CardReaderTransport:main] Could not open serial port java.io.IOException: /dev/ttyS1: SerOpenPort failed: : 13
Solution2The GoPrint and Kiosk users must have the proper permissions to access devices from a serial port. To do so, add the kiosk and goprint user accounts to the UDDP group and refresh your payment station.
Unable to obtain SSL Errors
The Station communicates to the GTX services through a secured port. The goprint group must have write permissions to the cacerts file to successfully obtain the SSL.
2006-06-18 08:20:46,405 ERROR [com.goprint.station.StationClient:main] Error retrieving SSL certificate java.io.FileNotFoundException: /opt/j2sdk1.4.2_12/jre/lib/security/cacerts (Permission denied) at java.io.FileOutputStream.open(Native Method)
GTX and Agent Errors
GoPrint GTX Service will not start?
If the GTX service displays the following error ‘Stop Event’ in /user/local/gs4/logs/gtx.log this is an indication that the root and/or the goprint group do not have RWX permissions to /opt/j2sdk1.4.2_12/jre/lib/security

© 2007 GoPrint Systems, Inc., All rights reserved. | GS-4 Installation Guide 29
Stdin: is not a tty
Error occurs when attempting to start the /etc/init.d/goprintgtx script.
If the export GS3USER user name is not the same in the config.sh and gtx.ini files it will cause this error. In this case, the export user is specified as the goprint user created during installation to run the GS3 scripts and needs to be specified in the following line in the goprintgtx script. The default setting is root.
if [ -z "$GS3USER" ]; then
export GS3USER=goprint
Address already in use
The following error will occur if more than one Agent, GTX, or Station process has been started. Issue a stop command for the troubled service and restart.
2006-07-08 15:03:39,510 ERROR [com.goprint.lpr.LprQueueMonitor:Thread-3] Error opening Server Socketjava.net.BindException: Address already in use