Embed Size (px)
Citation preview

Privileged and Confidential
LMIS – Constituency of Assessor
and Moderator Usr Manual v4.3
2017
For External Use
SERVICES SETA
LMIS User Manual – Assessor and Moderator
1 | P a g e Copy Rights Disclaimer: Please note that no contents of this document should be replicated without prior consent of relevant parties. 2017
Table of Contents 1. Introduction .................................................................................................................................... 2
2. Register an Assessor ....................................................................................................................... 4
2.1 User Registration..................................................................................................................... 4
2.2 Register a User ........................................................................................................................ 4
2.3 User Account Activation ......................................................................................................... 5
2.3.1 User Login ....................................................................................................................... 5
3. Application for Registration ............................................................................................................ 6
3.1 Apply For Registration ............................................................................................................. 6
3.2 Step 1 – Learning Units ........................................................................................................... 8
3.3 Step 2 – Documents .............................................................................................................. 14
3.4 Step 3 – Professional Experience .......................................................................................... 18
3.5 Step 4 – Educational Details .................................................................................................. 20
3.6 Step 5 – Verify and Submit .................................................................................................... 24
4. Apply For Extension of Scope ........................................................................................................ 28
4.1 “Apply for Extension of Scope” button ................................................................................. 28
5. Review Assessor and Moderator Applications ............................................................................. 34
5.1 Allocate Evaluator for the application .................................................................................. 34
5.2 Evaluate Assessor Application .............................................................................................. 37
5.3 Send Feedback Email ............................................................................................................ 43
6. Award or Not Award Accreditation............................................................................................... 45
LMIS User Manual – Assessor and Moderator
2 | P a g e Copy Rights Disclaimer: Please note that no contents of this document should be replicated without prior consent of relevant parties. 2017
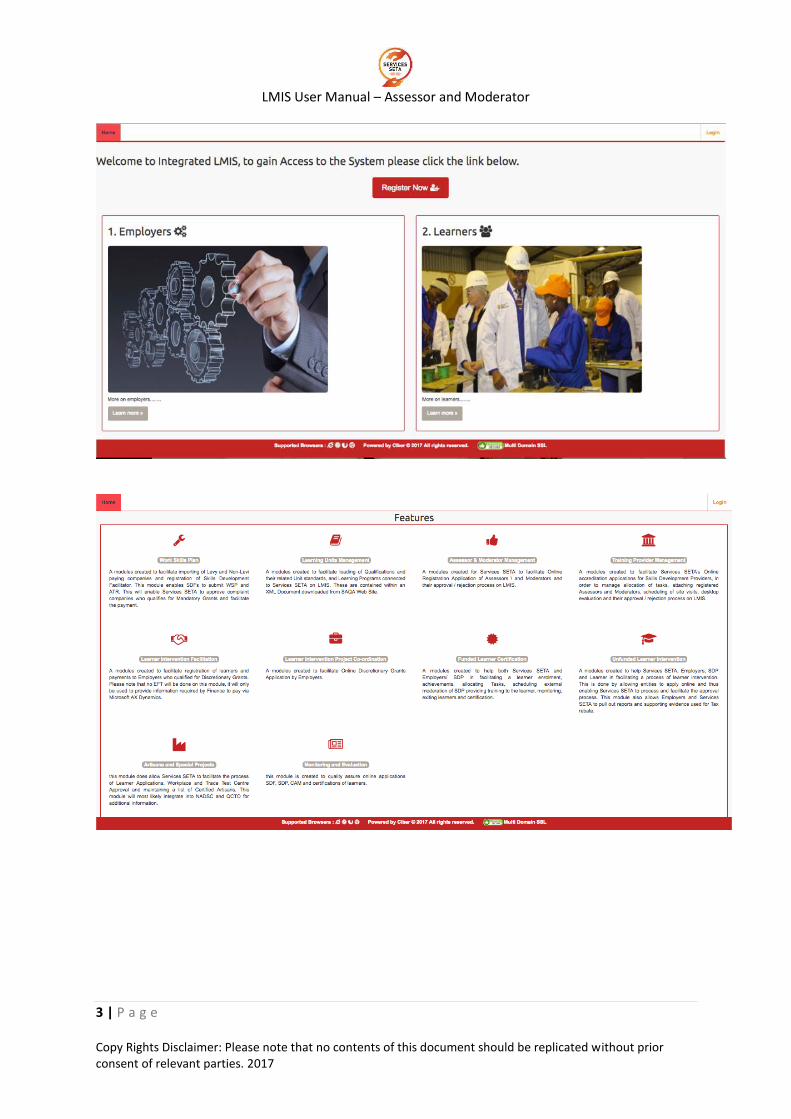
1. Introduction
Integrated Learner Management Information System was developed to help Services SETA
facilitate the following:
I. Registration of Assessors and Moderators on LMIS.
II. Application for Registration for Constituent Assessors and Moderators.
III. Approval of applications by SSETA.
IV. Planning to address skills shortage by being proactive, this is through an
accurate research and reporting.
V. View single Truth of the information about the Assessors and Moderators
registered with the Services SETA.
This user manual only covers CAM functionality.
LMIS User Manual – Assessor and Moderator
3 | P a g e Copy Rights Disclaimer: Please note that no contents of this document should be replicated without prior consent of relevant parties. 2017
LMIS User Manual – Assessor and Moderator
4 | P a g e Copy Rights Disclaimer: Please note that no contents of this document should be replicated without prior consent of relevant parties. 2017
2. Register an Assessor
This section demonstrates and explains how an Assessor can gain access to LMIS and start applying
for Registration at the Services SETA.
2.1 User Registration
A user needs to Register on the system as an Assessor before gaining access to the following key
features:
i. Capturing learning units that they are accredited for.
ii. Uploading Supporting Documentation.
iii. Capturing their Professional Experience.
iv. Adding the Educational background and submitting the application for registration.
Note: Moderators who wish to be Registered with the Services SETA need to be first registered as
Assessor. Users who wish to apply for both roles need to ensure that they select the “Assessor and
Moderator” option on the “User Type” Dropdown.
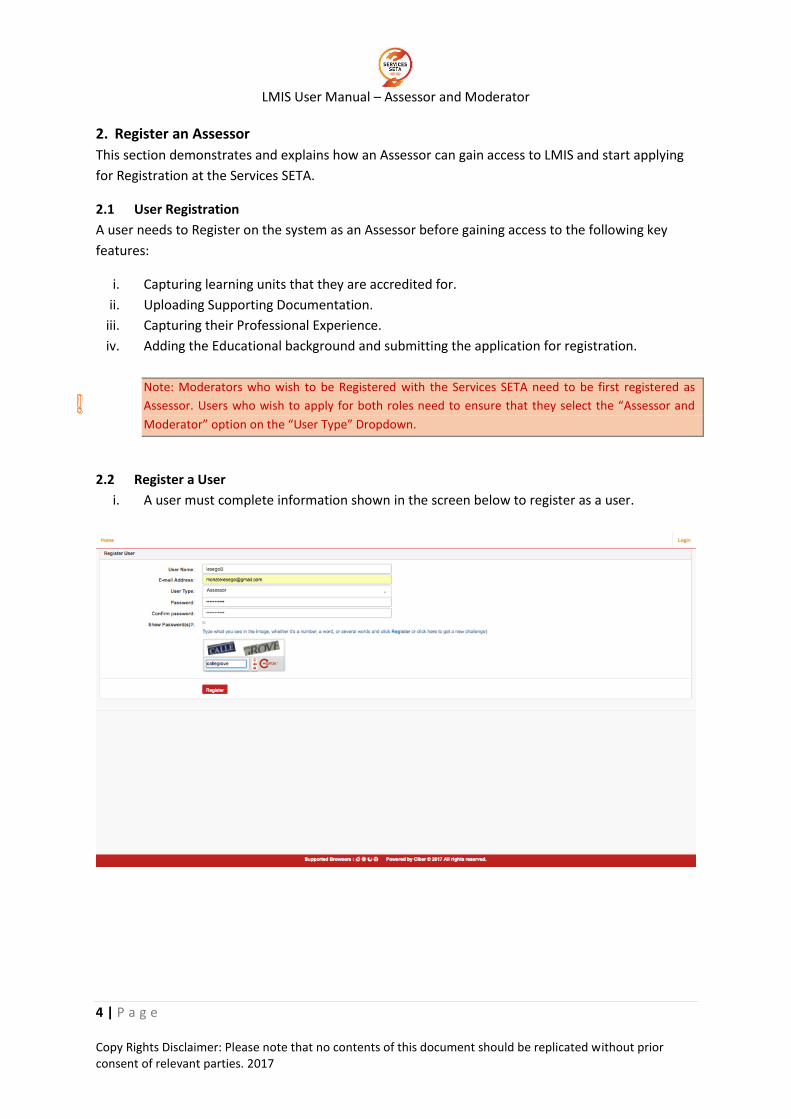
2.2 Register a User
i. A user must complete information shown in the screen below to register as a user.
LMIS User Manual – Assessor and Moderator
5 | P a g e Copy Rights Disclaimer: Please note that no contents of this document should be replicated without prior consent of relevant parties. 2017
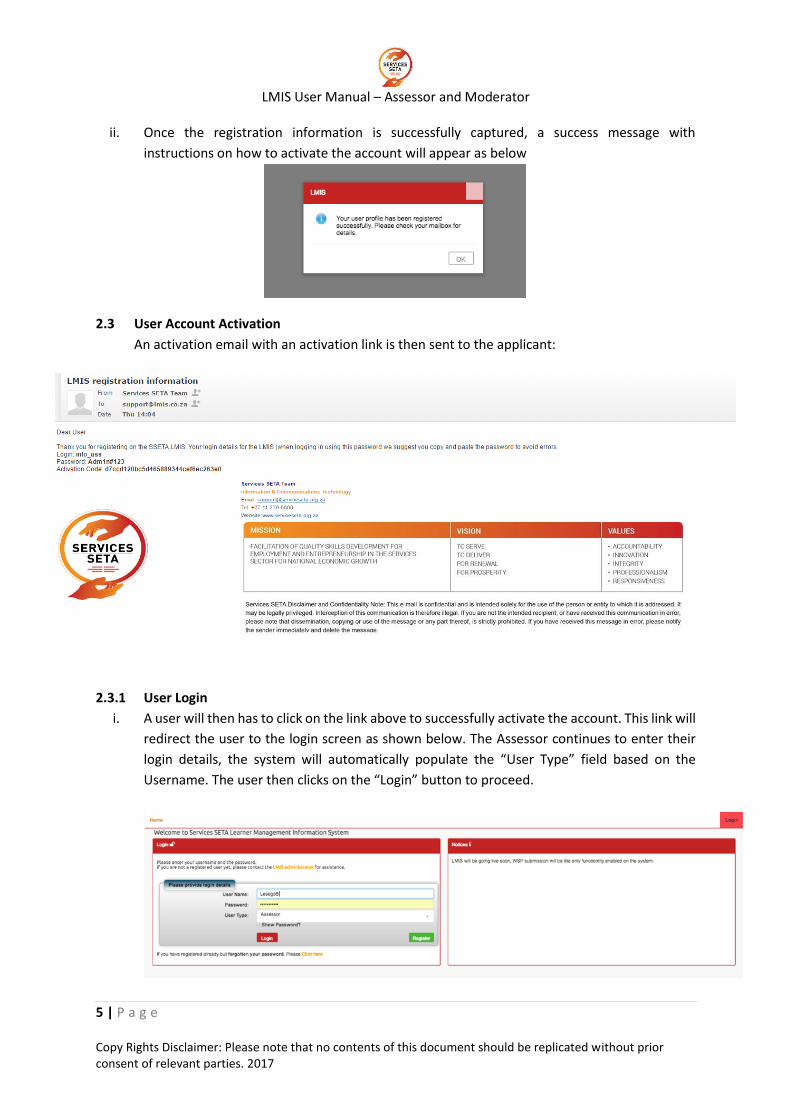
ii. Once the registration information is successfully captured, a success message with
instructions on how to activate the account will appear as below
2.3 User Account Activation
An activation email with an activation link is then sent to the applicant:
2.3.1 User Login
i. A user will then has to click on the link above to successfully activate the account. This link will
redirect the user to the login screen as shown below. The Assessor continues to enter their
login details, the system will automatically populate the “User Type” field based on the
Username. The user then clicks on the “Login” button to proceed.
LMIS User Manual – Assessor and Moderator
6 | P a g e Copy Rights Disclaimer: Please note that no contents of this document should be replicated without prior consent of relevant parties. 2017
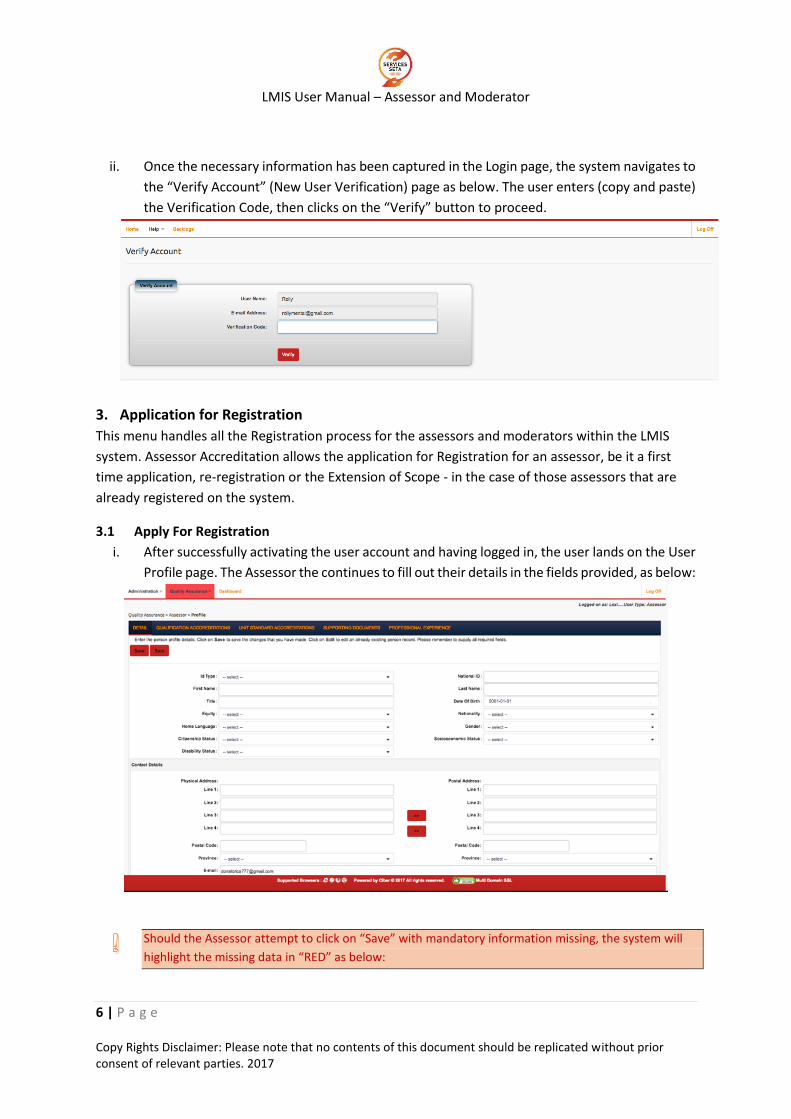
ii. Once the necessary information has been captured in the Login page, the system navigates to
the “Verify Account” (New User Verification) page as below. The user enters (copy and paste)
the Verification Code, then clicks on the “Verify” button to proceed.
3. Application for Registration
This menu handles all the Registration process for the assessors and moderators within the LMIS
system. Assessor Accreditation allows the application for Registration for an assessor, be it a first
time application, re-registration or the Extension of Scope - in the case of those assessors that are
already registered on the system.
3.1 Apply For Registration
i. After successfully activating the user account and having logged in, the user lands on the User
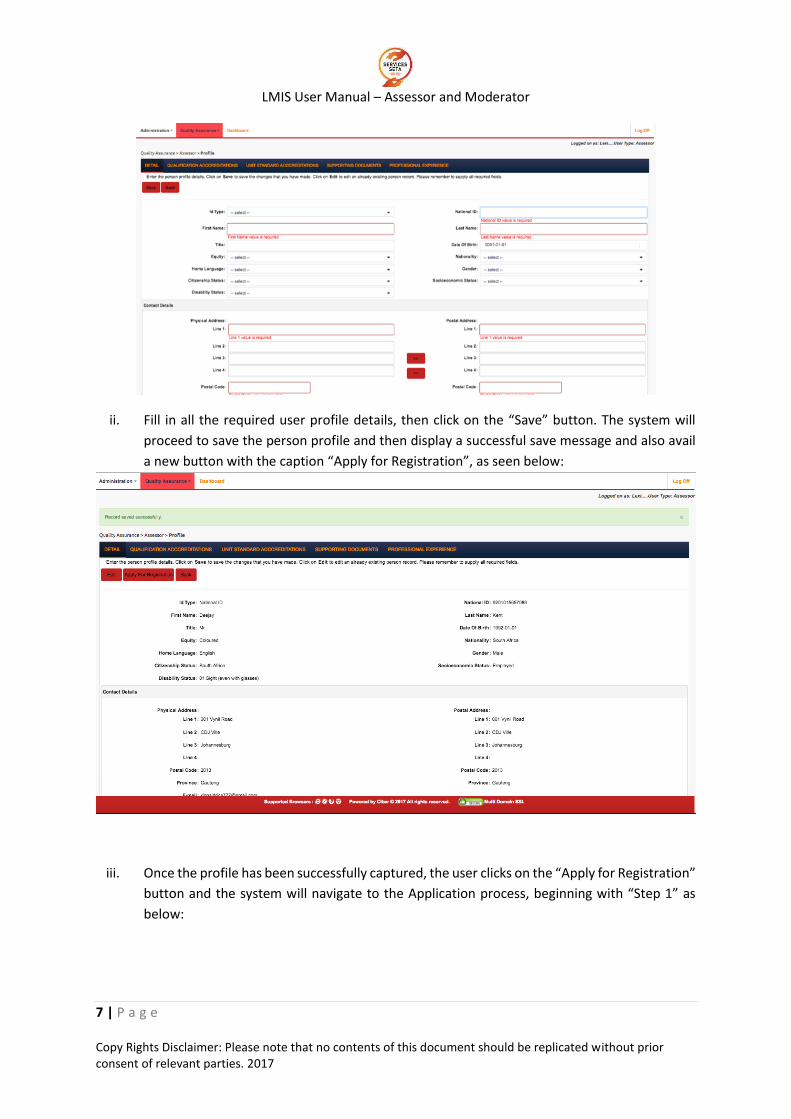
Profile page. The Assessor the continues to fill out their details in the fields provided, as below:
Should the Assessor attempt to click on “Save” with mandatory information missing, the system will
highlight the missing data in “RED” as below:
LMIS User Manual – Assessor and Moderator
7 | P a g e Copy Rights Disclaimer: Please note that no contents of this document should be replicated without prior consent of relevant parties. 2017
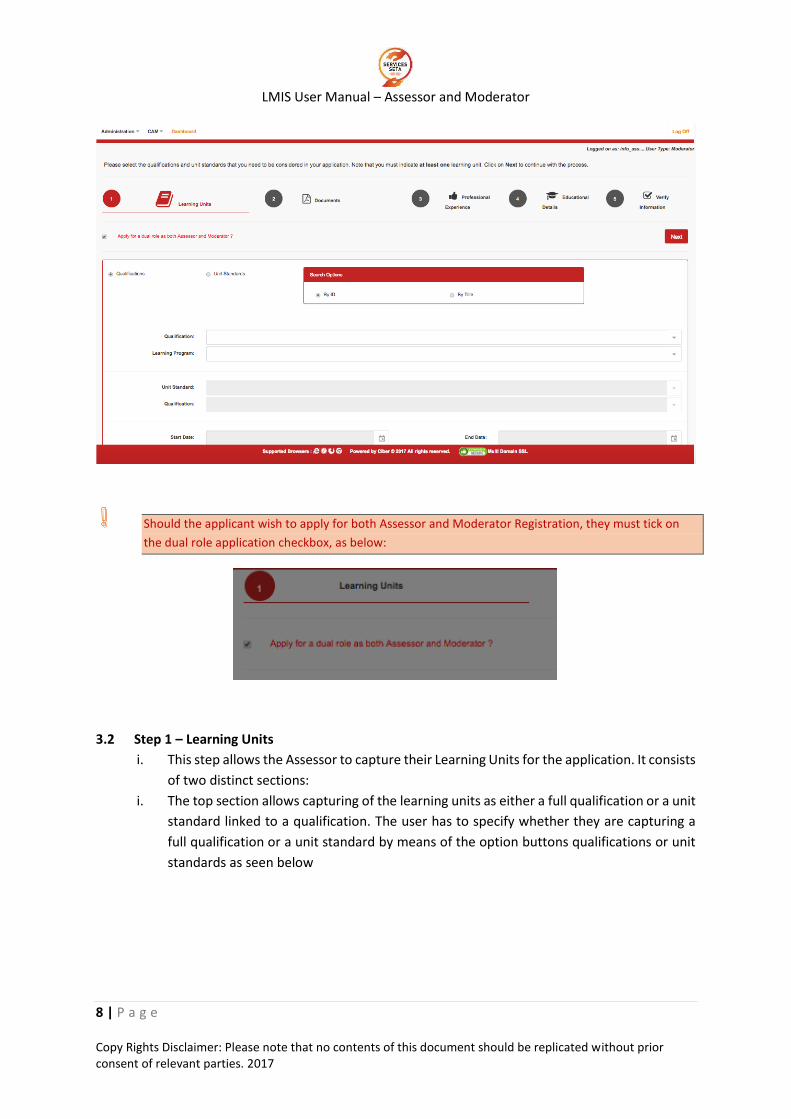
ii. Fill in all the required user profile details, then click on the “Save” button. The system will
proceed to save the person profile and then display a successful save message and also avail
a new button with the caption “Apply for Registration”, as seen below:
iii. Once the profile has been successfully captured, the user clicks on the “Apply for Registration”
button and the system will navigate to the Application process, beginning with “Step 1” as
below:
LMIS User Manual – Assessor and Moderator
8 | P a g e Copy Rights Disclaimer: Please note that no contents of this document should be replicated without prior consent of relevant parties. 2017
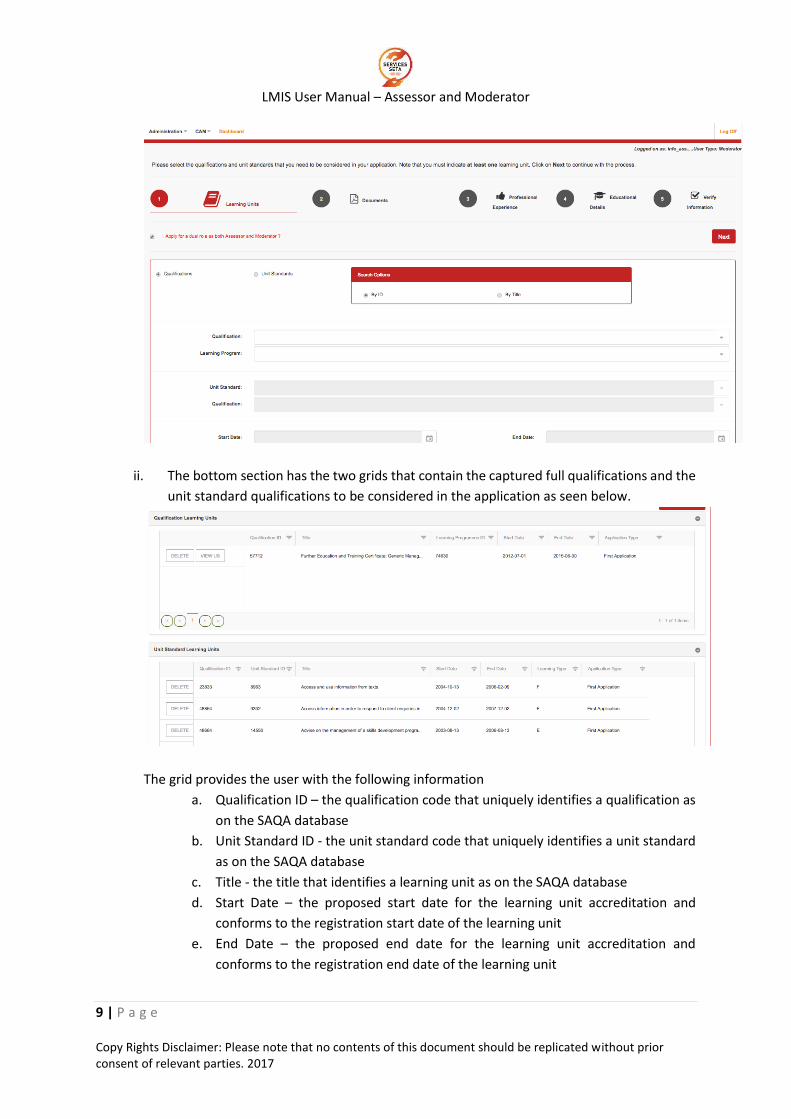
Should the applicant wish to apply for both Assessor and Moderator Registration, they must tick on
the dual role application checkbox, as below:
3.2 Step 1 – Learning Units
i. This step allows the Assessor to capture their Learning Units for the application. It consists
of two distinct sections:
i. The top section allows capturing of the learning units as either a full qualification or a unit
standard linked to a qualification. The user has to specify whether they are capturing a
full qualification or a unit standard by means of the option buttons qualifications or unit
standards as seen below
LMIS User Manual – Assessor and Moderator
9 | P a g e Copy Rights Disclaimer: Please note that no contents of this document should be replicated without prior consent of relevant parties. 2017
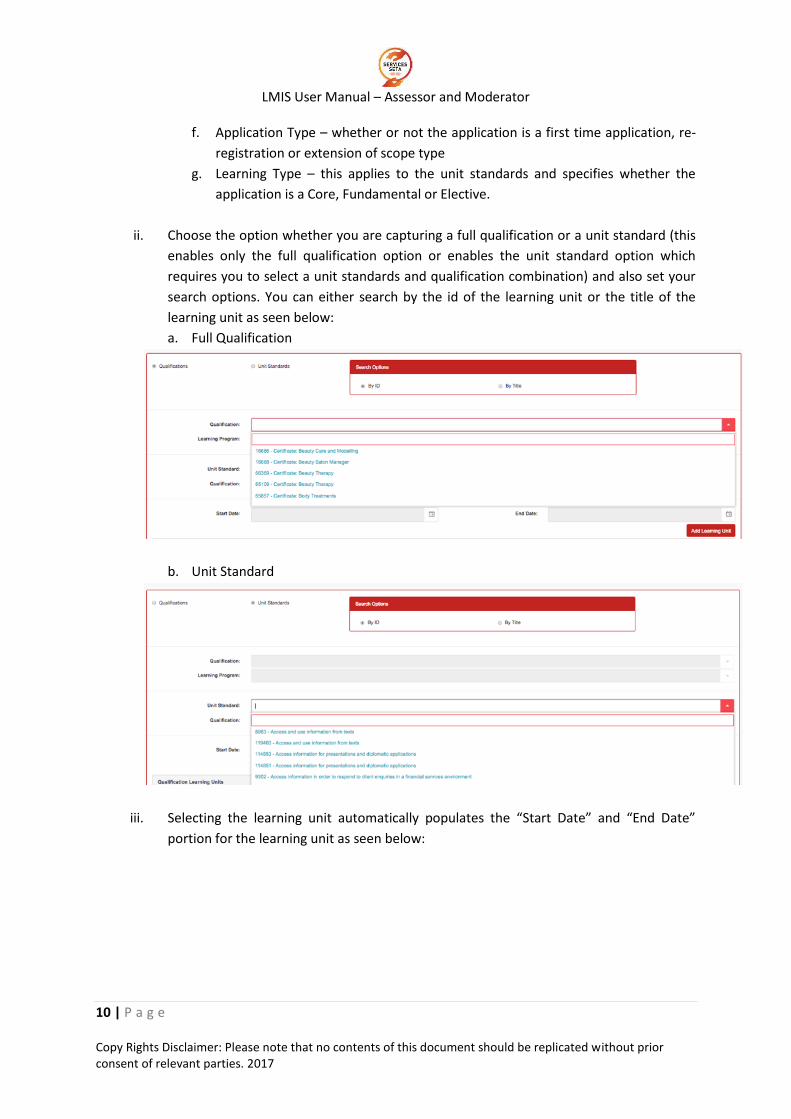
ii. The bottom section has the two grids that contain the captured full qualifications and the
unit standard qualifications to be considered in the application as seen below.
The grid provides the user with the following information
a. Qualification ID – the qualification code that uniquely identifies a qualification as
on the SAQA database
b. Unit Standard ID - the unit standard code that uniquely identifies a unit standard
as on the SAQA database
c. Title - the title that identifies a learning unit as on the SAQA database
d. Start Date – the proposed start date for the learning unit accreditation and
conforms to the registration start date of the learning unit
e. End Date – the proposed end date for the learning unit accreditation and
conforms to the registration end date of the learning unit
LMIS User Manual – Assessor and Moderator
10 | P a g e Copy Rights Disclaimer: Please note that no contents of this document should be replicated without prior consent of relevant parties. 2017
f. Application Type – whether or not the application is a first time application, re-
registration or extension of scope type
g. Learning Type – this applies to the unit standards and specifies whether the
application is a Core, Fundamental or Elective.
ii. Choose the option whether you are capturing a full qualification or a unit standard (this
enables only the full qualification option or enables the unit standard option which
requires you to select a unit standards and qualification combination) and also set your
search options. You can either search by the id of the learning unit or the title of the
learning unit as seen below:
a. Full Qualification
b. Unit Standard
iii. Selecting the learning unit automatically populates the “Start Date” and “End Date”
portion for the learning unit as seen below:
LMIS User Manual – Assessor and Moderator
11 | P a g e Copy Rights Disclaimer: Please note that no contents of this document should be replicated without prior consent of relevant parties. 2017
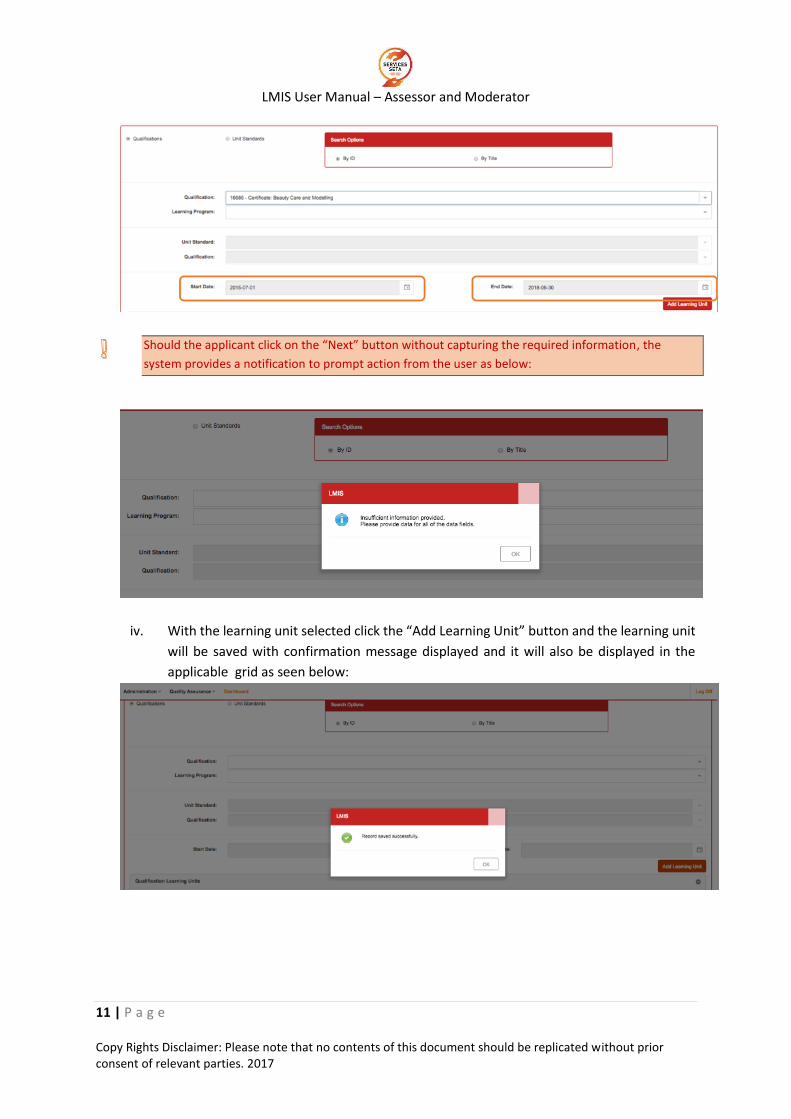
Should the applicant click on the “Next” button without capturing the required information, the
system provides a notification to prompt action from the user as below:
iv. With the learning unit selected click the “Add Learning Unit” button and the learning unit
will be saved with confirmation message displayed and it will also be displayed in the
applicable grid as seen below:

LMIS User Manual – Assessor and Moderator
12 | P a g e Copy Rights Disclaimer: Please note that no contents of this document should be replicated without prior consent of relevant parties. 2017
v. There is an option to remove learning units captured in error or not to be considered in
the application any longer by clicking the “Delete” button related to the learning unit
concerned on the grid.
vi. Select a learning unit to delete and then click the “Delete” button. The system will prompt
the user if they really want to proceed with the deletion process and if not they can click
“Cancel” to abort the process or click “Yes” to proceed with the deletion as seen below:
LMIS User Manual – Assessor and Moderator
13 | P a g e Copy Rights Disclaimer: Please note that no contents of this document should be replicated without prior consent of relevant parties. 2017
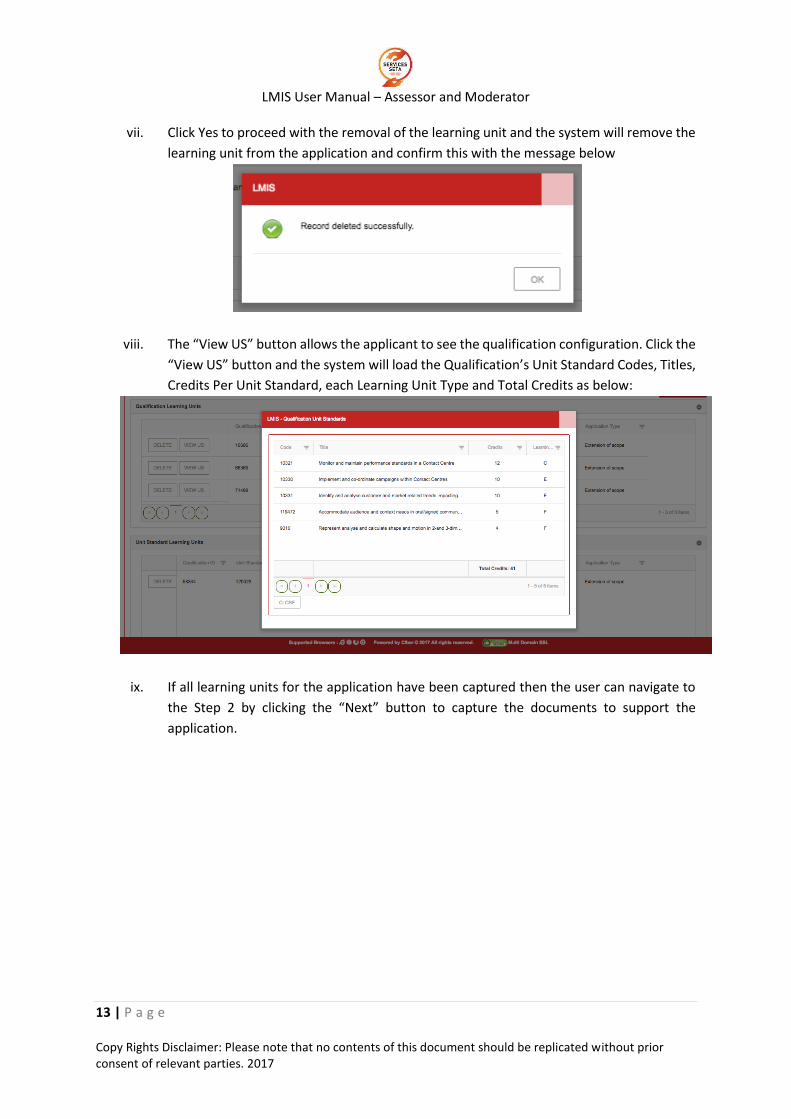
vii. Click Yes to proceed with the removal of the learning unit and the system will remove the
learning unit from the application and confirm this with the message below
viii. The “View US” button allows the applicant to see the qualification configuration. Click the
“View US” button and the system will load the Qualification’s Unit Standard Codes, Titles,
Credits Per Unit Standard, each Learning Unit Type and Total Credits as below:
ix. If all learning units for the application have been captured then the user can navigate to
the Step 2 by clicking the “Next” button to capture the documents to support the
application.
LMIS User Manual – Assessor and Moderator
14 | P a g e Copy Rights Disclaimer: Please note that no contents of this document should be replicated without prior consent of relevant parties. 2017
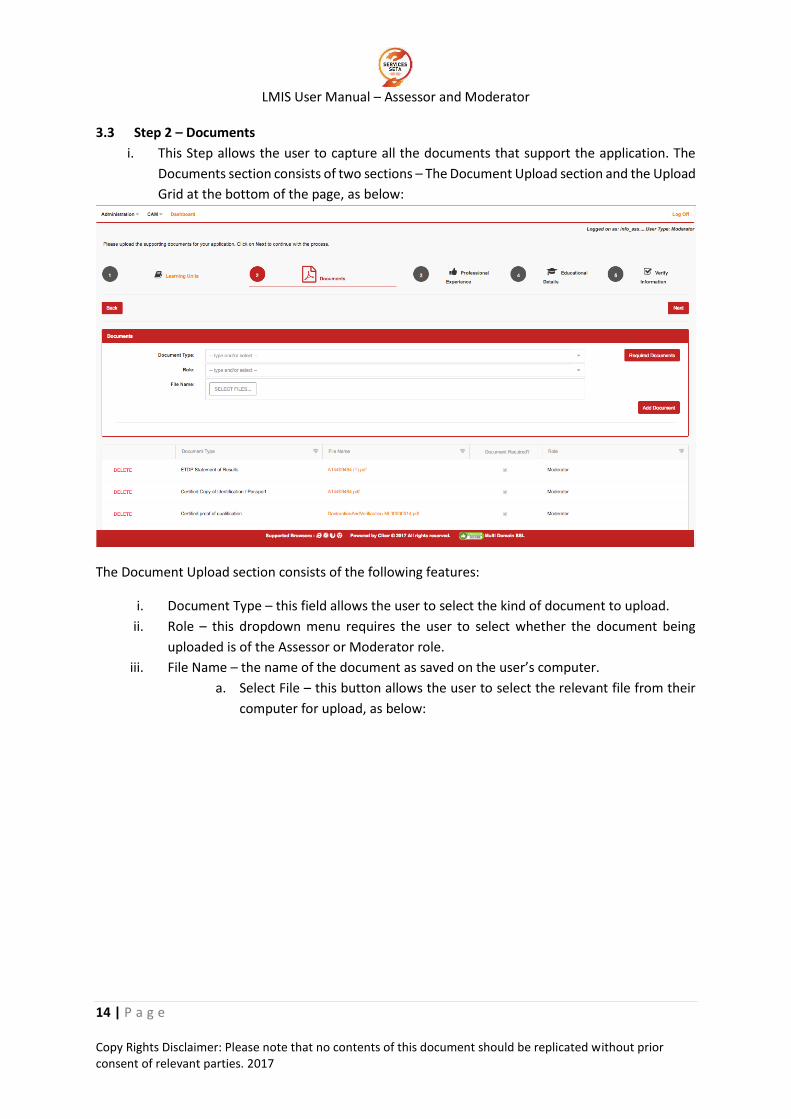
3.3 Step 2 – Documents
i. This Step allows the user to capture all the documents that support the application. The
Documents section consists of two sections – The Document Upload section and the Upload
Grid at the bottom of the page, as below:
The Document Upload section consists of the following features:
i. Document Type – this field allows the user to select the kind of document to upload.
ii. Role – this dropdown menu requires the user to select whether the document being
uploaded is of the Assessor or Moderator role.
iii. File Name – the name of the document as saved on the user’s computer.
a. Select File – this button allows the user to select the relevant file from their
computer for upload, as below:
LMIS User Manual – Assessor and Moderator
15 | P a g e Copy Rights Disclaimer: Please note that no contents of this document should be replicated without prior consent of relevant parties. 2017
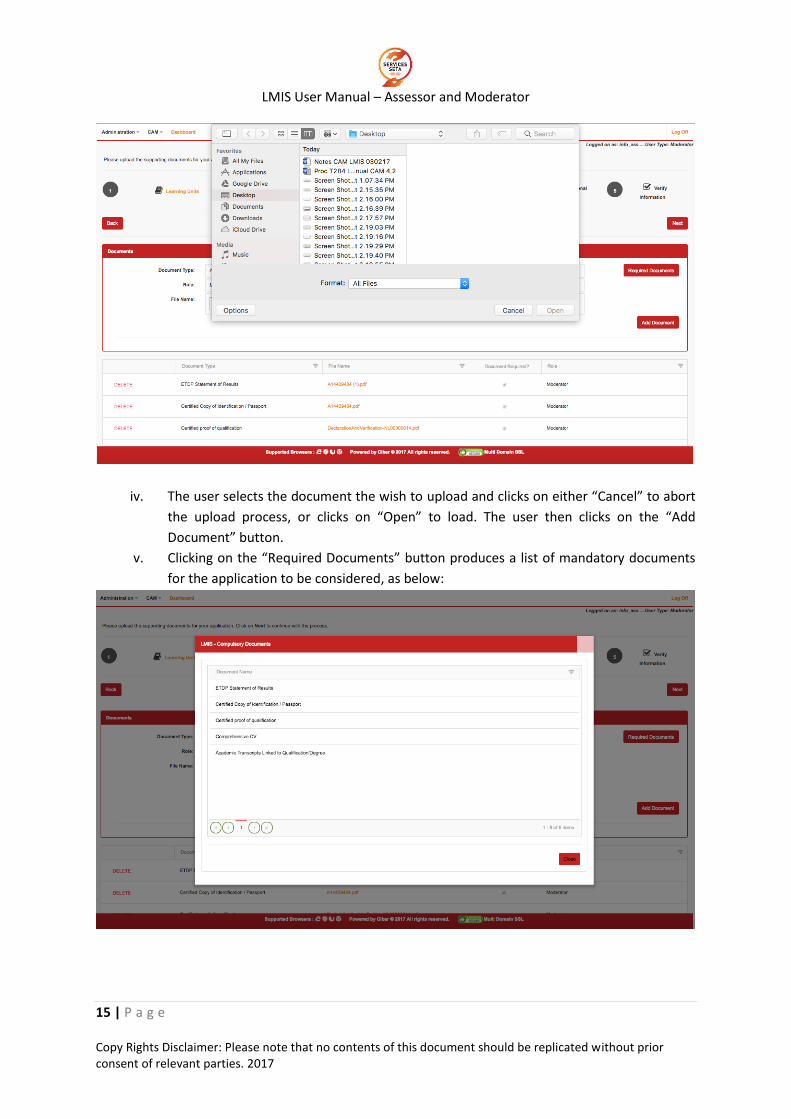
iv. The user selects the document the wish to upload and clicks on either “Cancel” to abort
the upload process, or clicks on “Open” to load. The user then clicks on the “Add
Document” button.
v. Clicking on the “Required Documents” button produces a list of mandatory documents
for the application to be considered, as below:
LMIS User Manual – Assessor and Moderator
16 | P a g e Copy Rights Disclaimer: Please note that no contents of this document should be replicated without prior consent of relevant parties. 2017
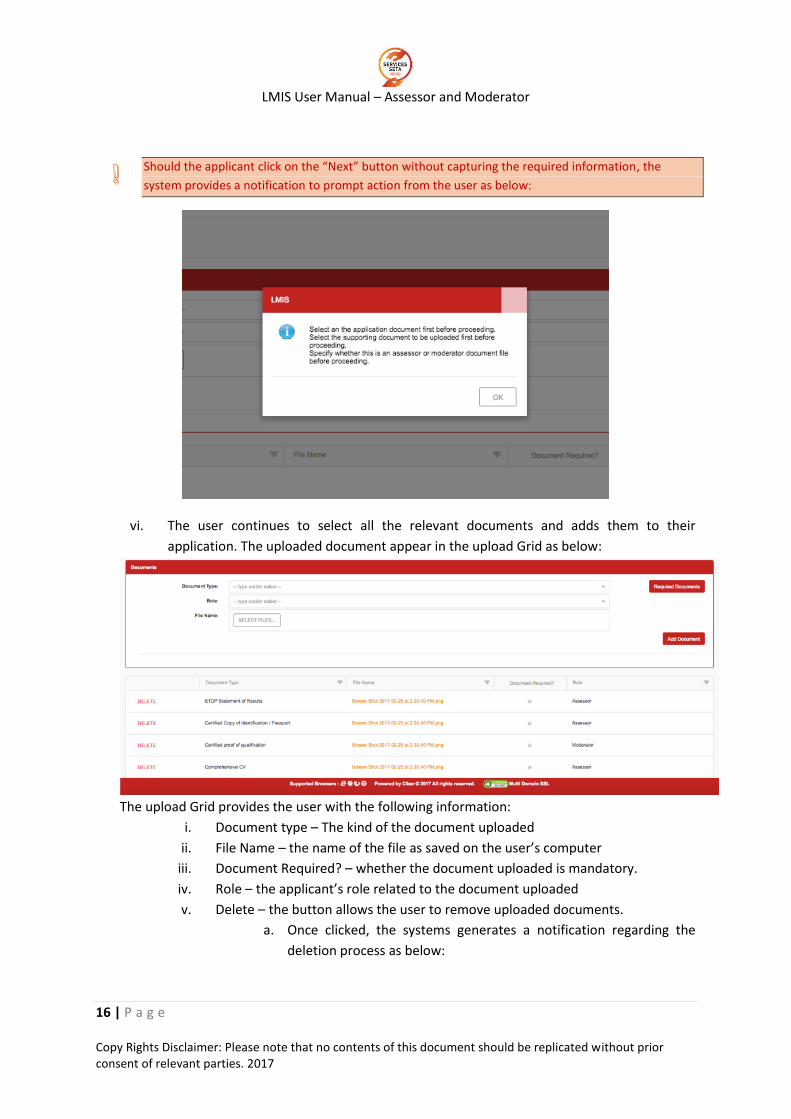
Should the applicant click on the “Next” button without capturing the required information, the
system provides a notification to prompt action from the user as below:
vi. The user continues to select all the relevant documents and adds them to their
application. The uploaded document appear in the upload Grid as below:
The upload Grid provides the user with the following information:
i. Document type – The kind of the document uploaded
ii. File Name – the name of the file as saved on the user’s computer
iii. Document Required? – whether the document uploaded is mandatory.
iv. Role – the applicant’s role related to the document uploaded
v. Delete – the button allows the user to remove uploaded documents.
a. Once clicked, the systems generates a notification regarding the
deletion process as below:
LMIS User Manual – Assessor and Moderator
17 | P a g e Copy Rights Disclaimer: Please note that no contents of this document should be replicated without prior consent of relevant parties. 2017
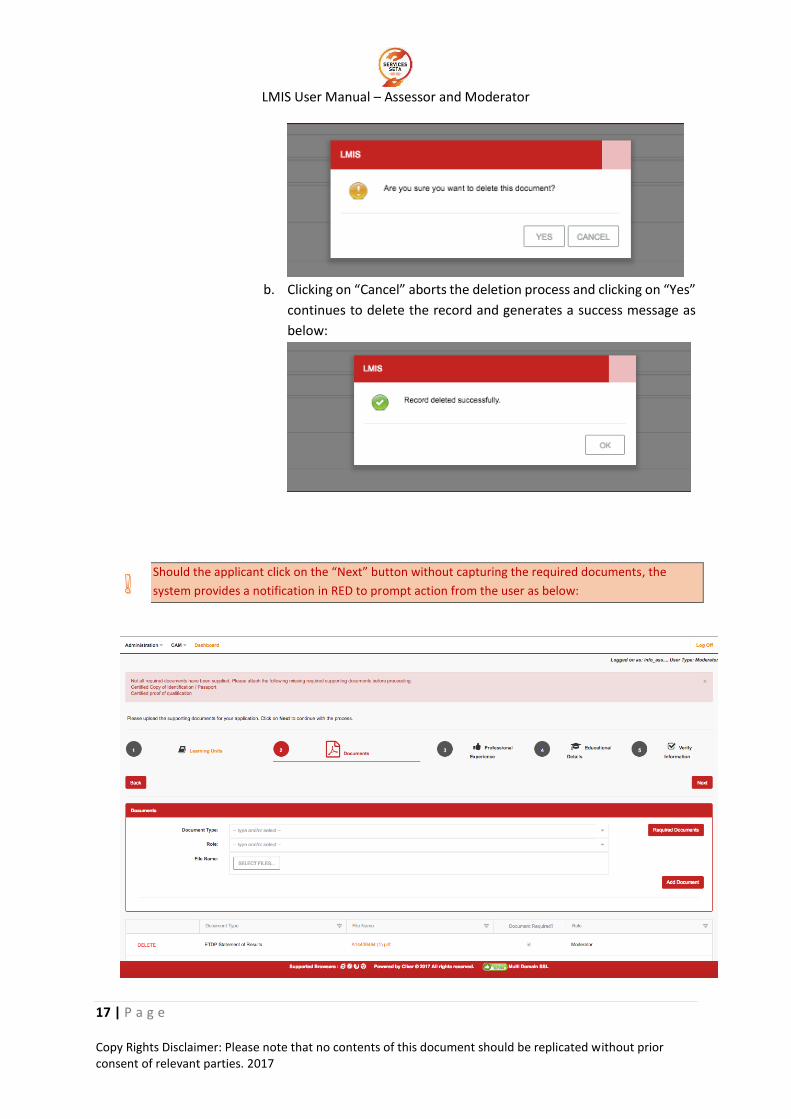
b. Clicking on “Cancel” aborts the deletion process and clicking on “Yes”
continues to delete the record and generates a success message as
below:
Should the applicant click on the “Next” button without capturing the required documents, the
system provides a notification in RED to prompt action from the user as below:
LMIS User Manual – Assessor and Moderator
18 | P a g e Copy Rights Disclaimer: Please note that no contents of this document should be replicated without prior consent of relevant parties. 2017
vi. If all documents are supplied the user then clicks on the “Next” button to go the
Next step which is the Professional Experience.
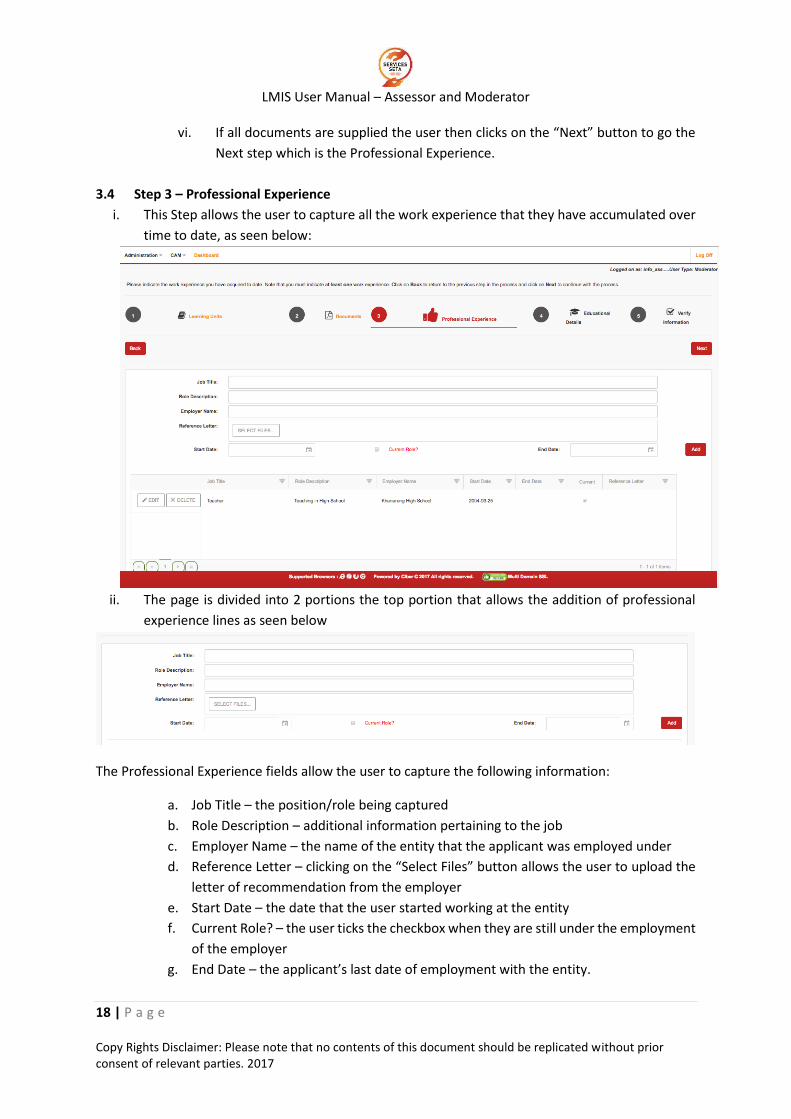
3.4 Step 3 – Professional Experience
i. This Step allows the user to capture all the work experience that they have accumulated over
time to date, as seen below:
ii. The page is divided into 2 portions the top portion that allows the addition of professional
experience lines as seen below
The Professional Experience fields allow the user to capture the following information:
a. Job Title – the position/role being captured
b. Role Description – additional information pertaining to the job
c. Employer Name – the name of the entity that the applicant was employed under
d. Reference Letter – clicking on the “Select Files” button allows the user to upload the
letter of recommendation from the employer
e. Start Date – the date that the user started working at the entity
f. Current Role? – the user ticks the checkbox when they are still under the employment
of the employer
g. End Date – the applicant’s last date of employment with the entity.
LMIS User Manual – Assessor and Moderator
19 | P a g e Copy Rights Disclaimer: Please note that no contents of this document should be replicated without prior consent of relevant parties. 2017
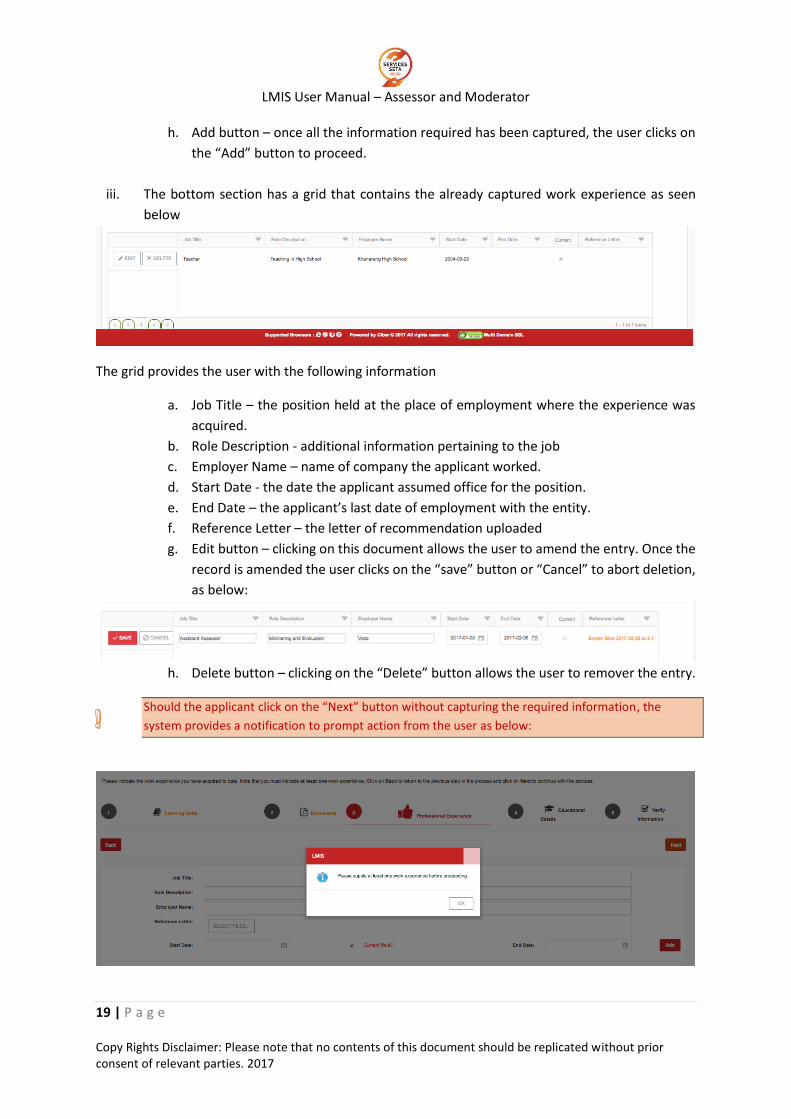
h. Add button – once all the information required has been captured, the user clicks on
the “Add” button to proceed.
iii. The bottom section has a grid that contains the already captured work experience as seen
below
The grid provides the user with the following information
a. Job Title – the position held at the place of employment where the experience was
acquired.
b. Role Description - additional information pertaining to the job
c. Employer Name – name of company the applicant worked.
d. Start Date - the date the applicant assumed office for the position.
e. End Date – the applicant’s last date of employment with the entity.
f. Reference Letter – the letter of recommendation uploaded
g. Edit button – clicking on this document allows the user to amend the entry. Once the
record is amended the user clicks on the “save” button or “Cancel” to abort deletion,
as below:
h. Delete button – clicking on the “Delete” button allows the user to remover the entry.
Should the applicant click on the “Next” button without capturing the required information, the
system provides a notification to prompt action from the user as below:
LMIS User Manual – Assessor and Moderator
20 | P a g e Copy Rights Disclaimer: Please note that no contents of this document should be replicated without prior consent of relevant parties. 2017
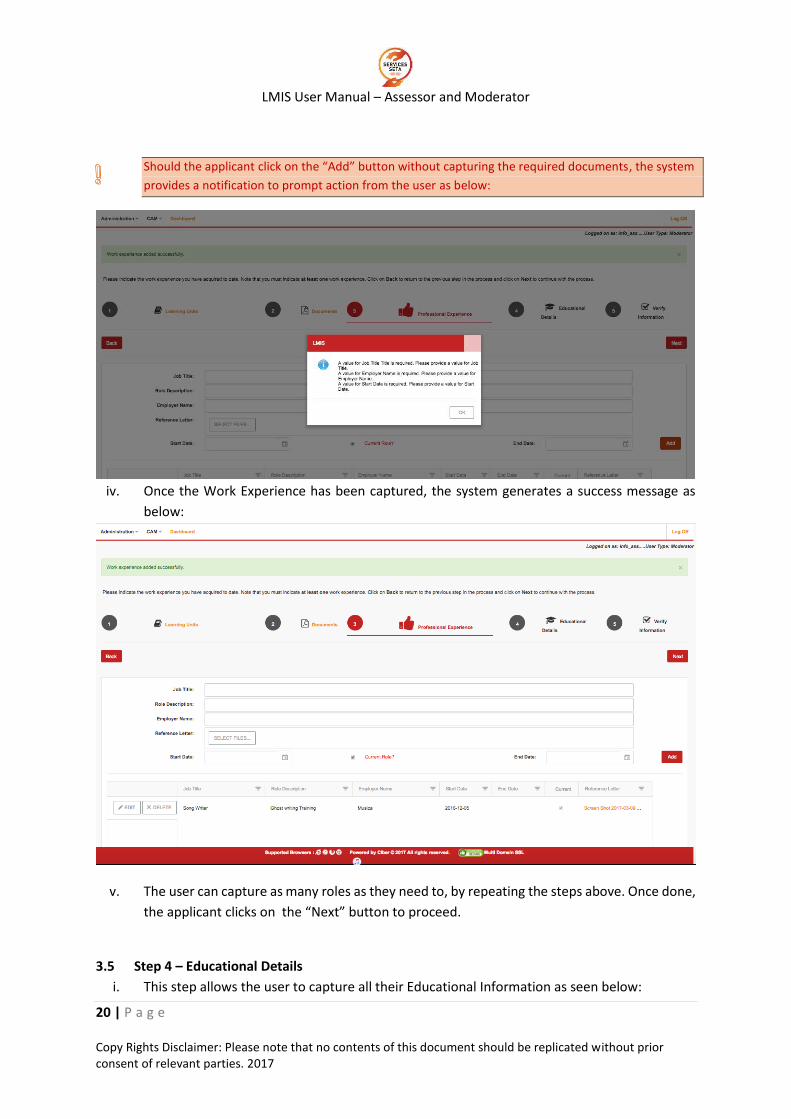
Should the applicant click on the “Add” button without capturing the required documents, the system
provides a notification to prompt action from the user as below:
iv. Once the Work Experience has been captured, the system generates a success message as
below:
v. The user can capture as many roles as they need to, by repeating the steps above. Once done,
the applicant clicks on the “Next” button to proceed.
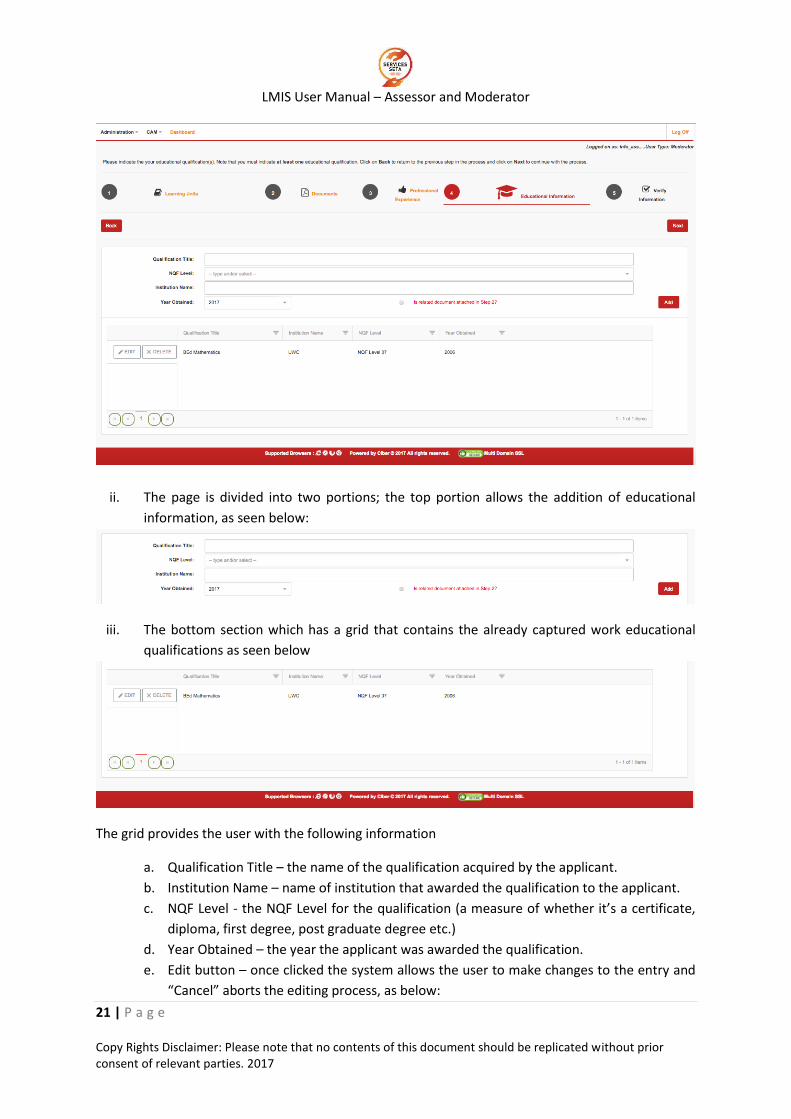
3.5 Step 4 – Educational Details
i. This step allows the user to capture all their Educational Information as seen below:
LMIS User Manual – Assessor and Moderator
21 | P a g e Copy Rights Disclaimer: Please note that no contents of this document should be replicated without prior consent of relevant parties. 2017
ii. The page is divided into two portions; the top portion allows the addition of educational
information, as seen below:
iii. The bottom section which has a grid that contains the already captured work educational
qualifications as seen below
The grid provides the user with the following information
a. Qualification Title – the name of the qualification acquired by the applicant.
b. Institution Name – name of institution that awarded the qualification to the applicant.
c. NQF Level - the NQF Level for the qualification (a measure of whether it’s a certificate,
diploma, first degree, post graduate degree etc.)
d. Year Obtained – the year the applicant was awarded the qualification.
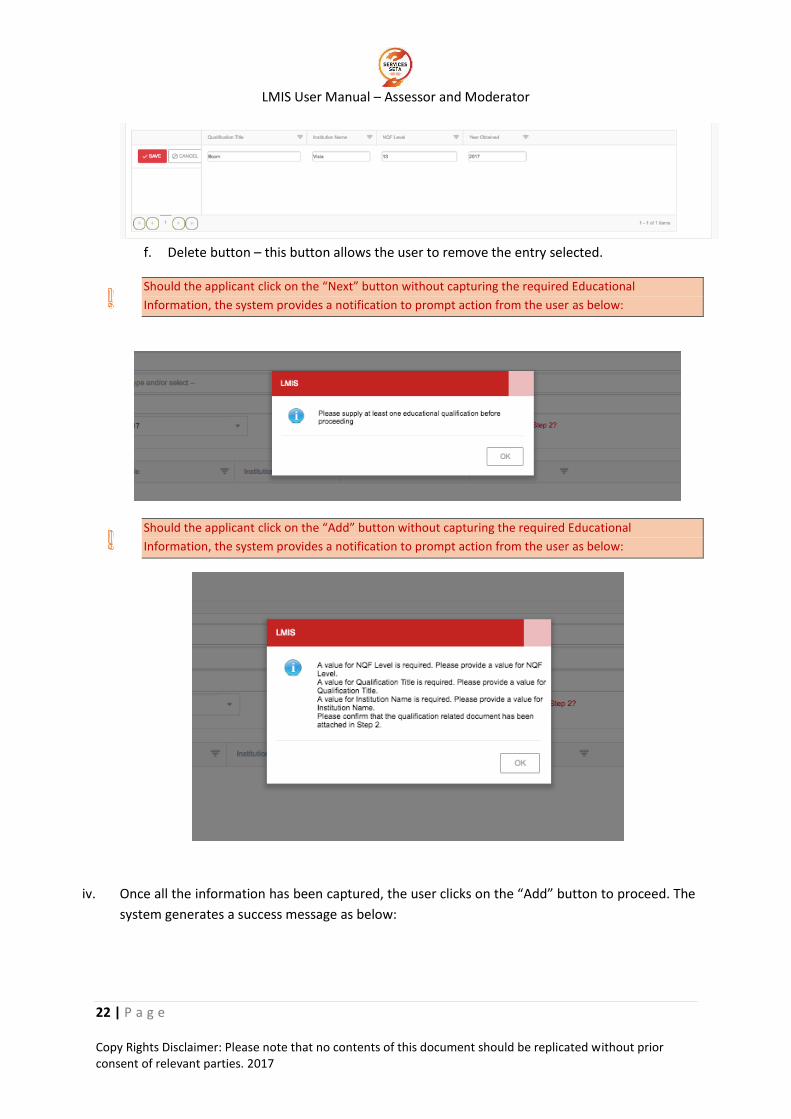
e. Edit button – once clicked the system allows the user to make changes to the entry and
“Cancel” aborts the editing process, as below:
LMIS User Manual – Assessor and Moderator
22 | P a g e Copy Rights Disclaimer: Please note that no contents of this document should be replicated without prior consent of relevant parties. 2017
f. Delete button – this button allows the user to remove the entry selected.
Should the applicant click on the “Next” button without capturing the required Educational
Information, the system provides a notification to prompt action from the user as below:
Should the applicant click on the “Add” button without capturing the required Educational
Information, the system provides a notification to prompt action from the user as below:
iv. Once all the information has been captured, the user clicks on the “Add” button to proceed. The
system generates a success message as below:
LMIS User Manual – Assessor and Moderator
23 | P a g e Copy Rights Disclaimer: Please note that no contents of this document should be replicated without prior consent of relevant parties. 2017
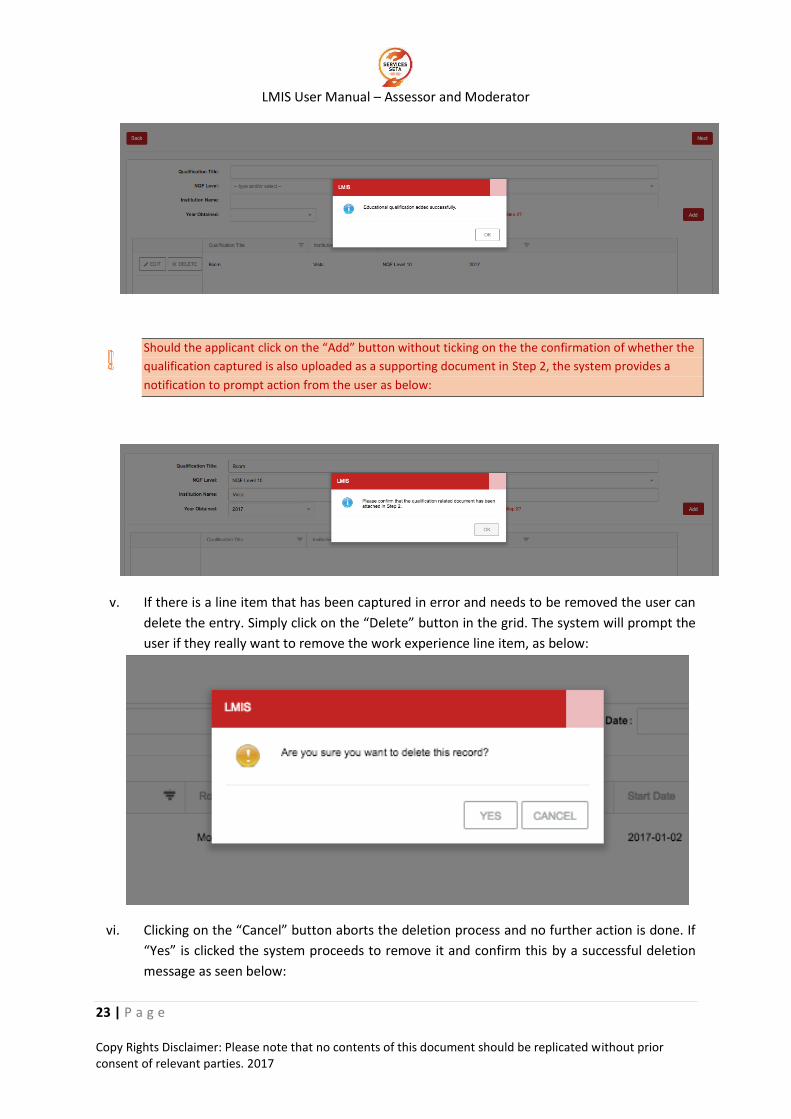
Should the applicant click on the “Add” button without ticking on the the confirmation of whether the
qualification captured is also uploaded as a supporting document in Step 2, the system provides a
notification to prompt action from the user as below:
v. If there is a line item that has been captured in error and needs to be removed the user can
delete the entry. Simply click on the “Delete” button in the grid. The system will prompt the
user if they really want to remove the work experience line item, as below:
vi. Clicking on the “Cancel” button aborts the deletion process and no further action is done. If
“Yes” is clicked the system proceeds to remove it and confirm this by a successful deletion
message as seen below:
LMIS User Manual – Assessor and Moderator
24 | P a g e Copy Rights Disclaimer: Please note that no contents of this document should be replicated without prior consent of relevant parties. 2017
vii. Should the applicant decide to update an already captured record, they can click on the “Edit”
button in the grid – this action opens up the entry for editing. The user makes necessary
changes and then clicks on “Save”, as below:
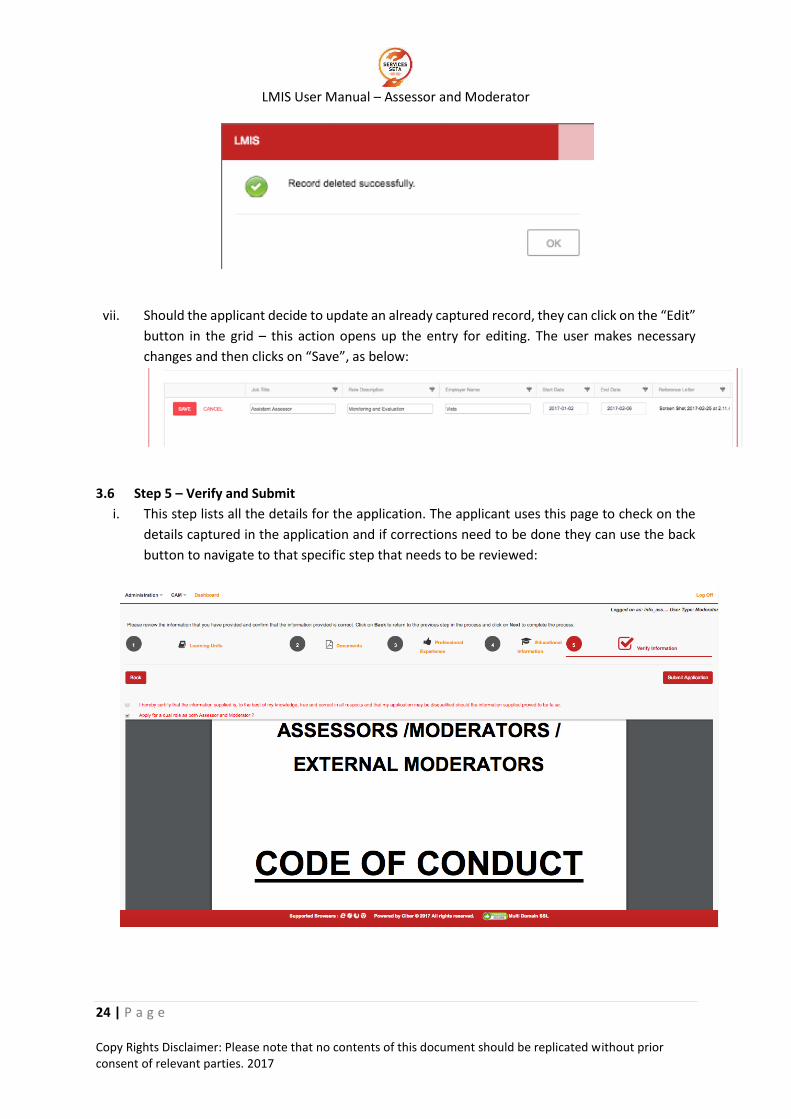
3.6 Step 5 – Verify and Submit
i. This step lists all the details for the application. The applicant uses this page to check on the
details captured in the application and if corrections need to be done they can use the back
button to navigate to that specific step that needs to be reviewed:
LMIS User Manual – Assessor and Moderator
25 | P a g e Copy Rights Disclaimer: Please note that no contents of this document should be replicated without prior consent of relevant parties. 2017
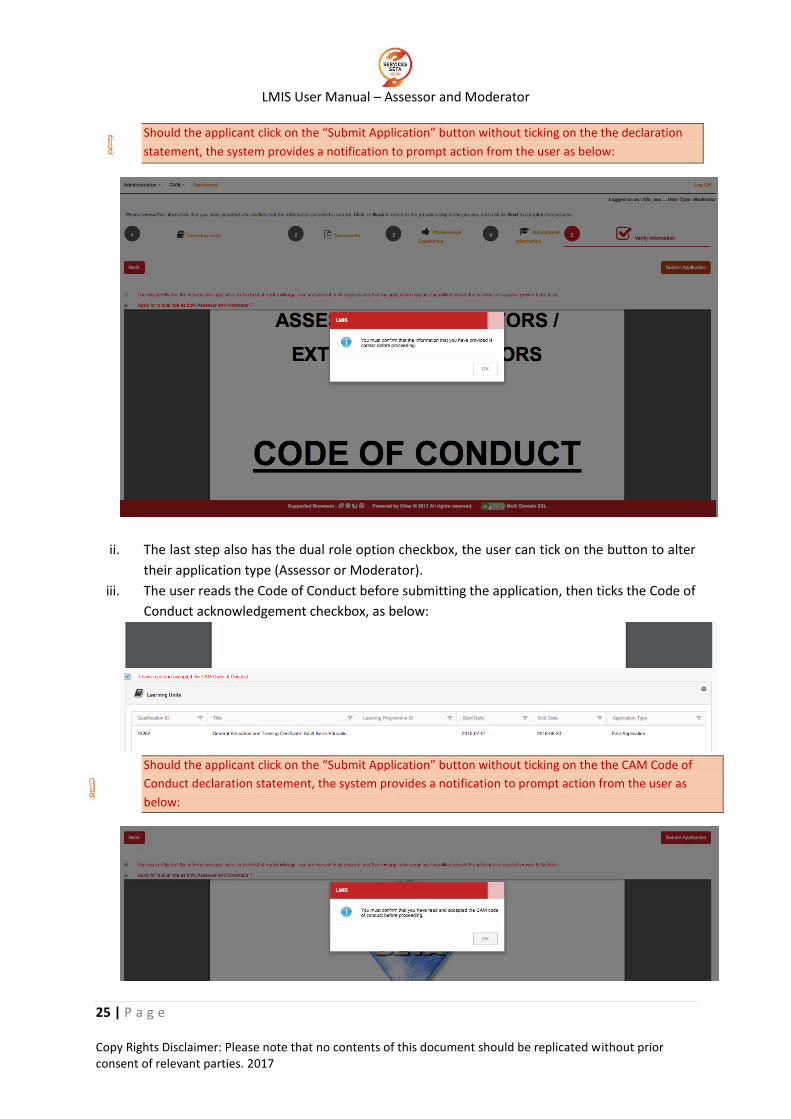
Should the applicant click on the “Submit Application” button without ticking on the the declaration
statement, the system provides a notification to prompt action from the user as below:
ii. The last step also has the dual role option checkbox, the user can tick on the button to alter
their application type (Assessor or Moderator).
iii. The user reads the Code of Conduct before submitting the application, then ticks the Code of
Conduct acknowledgement checkbox, as below:
Should the applicant click on the “Submit Application” button without ticking on the the CAM Code of
Conduct declaration statement, the system provides a notification to prompt action from the user as
below:
LMIS User Manual – Assessor and Moderator
26 | P a g e Copy Rights Disclaimer: Please note that no contents of this document should be replicated without prior consent of relevant parties. 2017
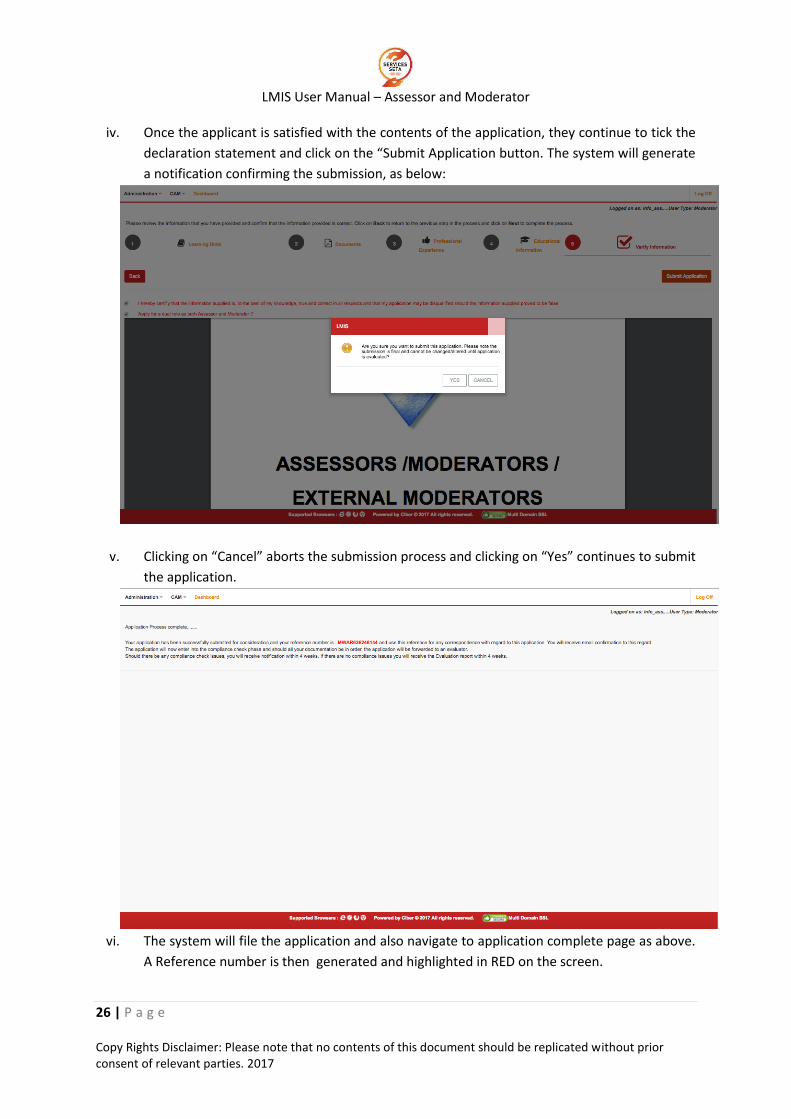
iv. Once the applicant is satisfied with the contents of the application, they continue to tick the
declaration statement and click on the “Submit Application button. The system will generate
a notification confirming the submission, as below:
v. Clicking on “Cancel” aborts the submission process and clicking on “Yes” continues to submit
the application.
vi. The system will file the application and also navigate to application complete page as above.
A Reference number is then generated and highlighted in RED on the screen.
LMIS User Manual – Assessor and Moderator
27 | P a g e Copy Rights Disclaimer: Please note that no contents of this document should be replicated without prior consent of relevant parties. 2017
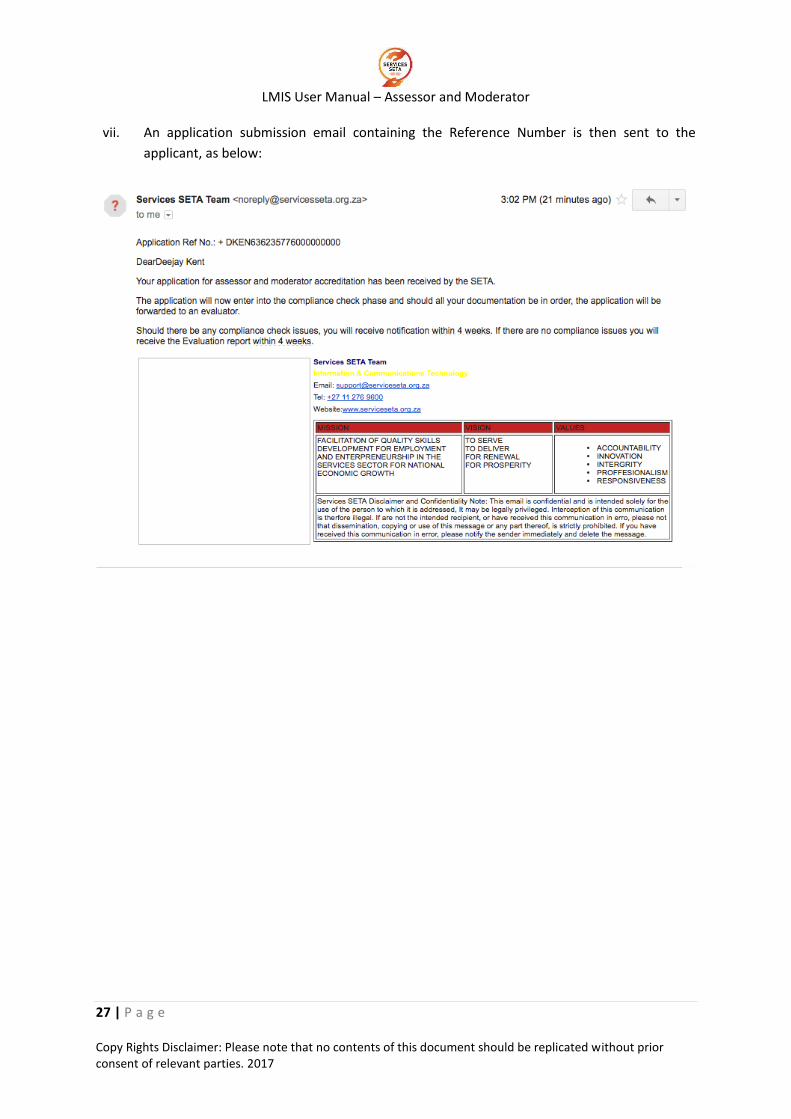
vii. An application submission email containing the Reference Number is then sent to the
applicant, as below:
LMIS User Manual – Assessor and Moderator
28 | P a g e Copy Rights Disclaimer: Please note that no contents of this document should be replicated without prior consent of relevant parties. 2017
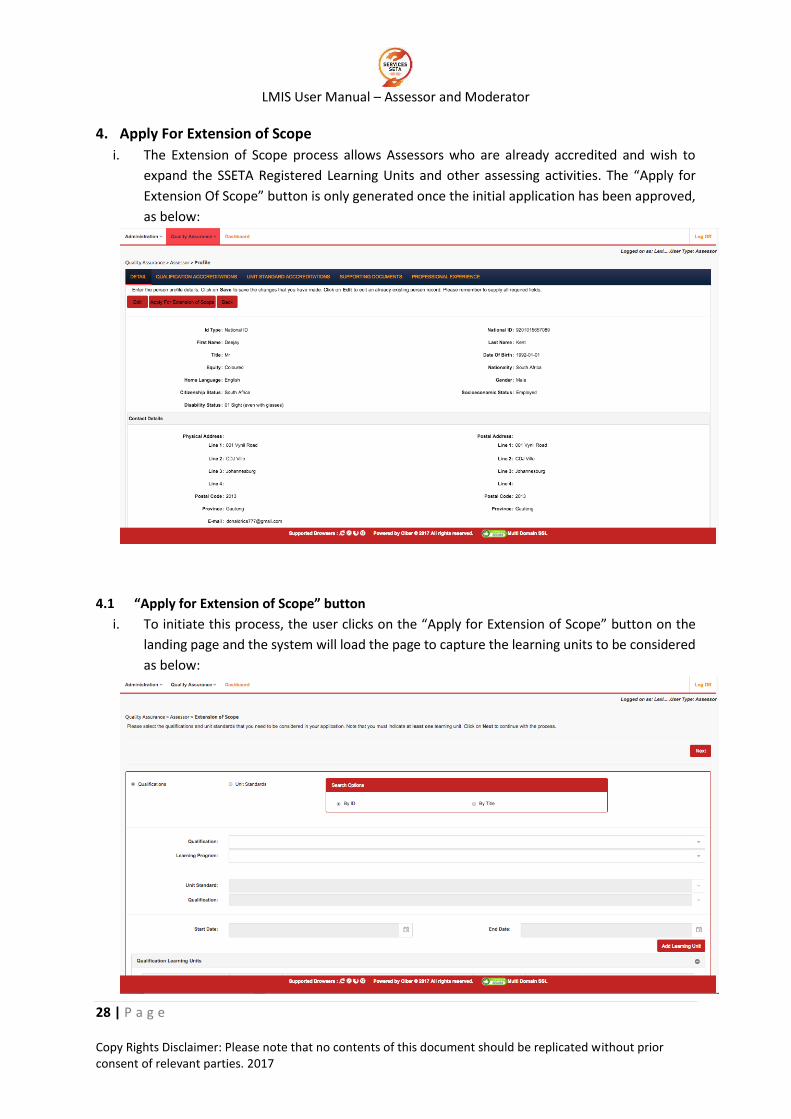
4. Apply For Extension of Scope
i. The Extension of Scope process allows Assessors who are already accredited and wish to
expand the SSETA Registered Learning Units and other assessing activities. The “Apply for
Extension Of Scope” button is only generated once the initial application has been approved,
as below:
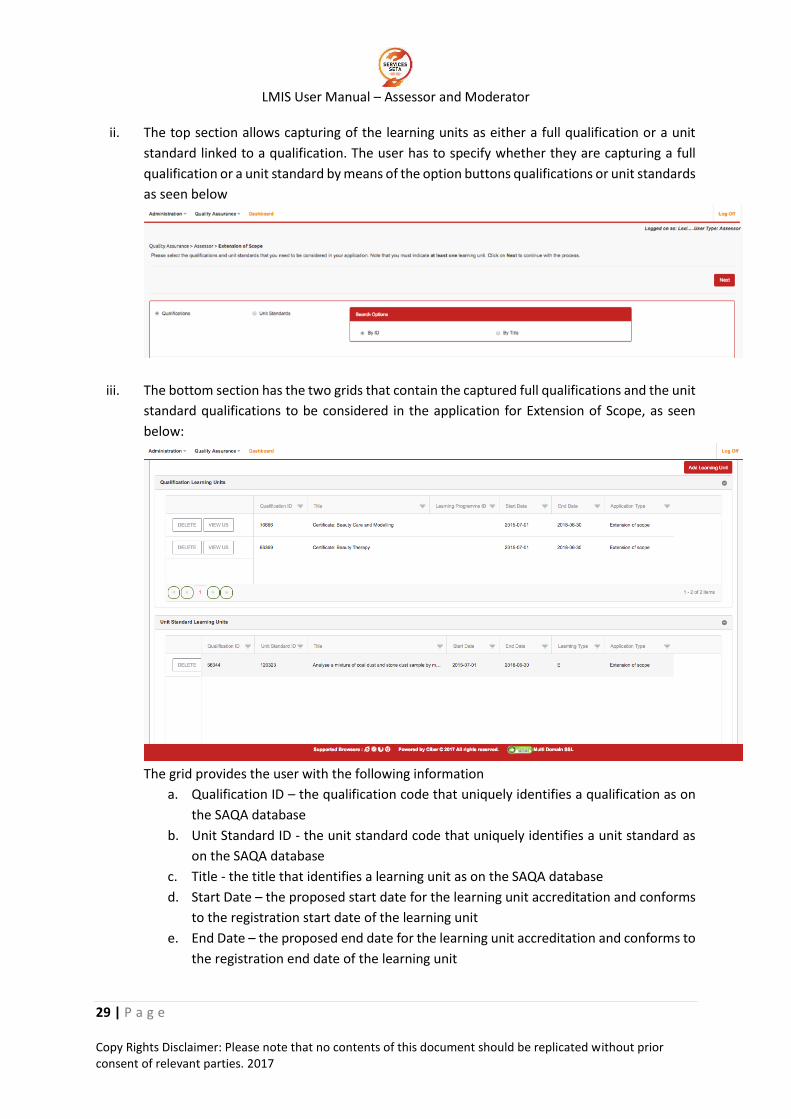
4.1 “Apply for Extension of Scope” button
i. To initiate this process, the user clicks on the “Apply for Extension of Scope” button on the
landing page and the system will load the page to capture the learning units to be considered
as below:
LMIS User Manual – Assessor and Moderator
29 | P a g e Copy Rights Disclaimer: Please note that no contents of this document should be replicated without prior consent of relevant parties. 2017
ii. The top section allows capturing of the learning units as either a full qualification or a unit
standard linked to a qualification. The user has to specify whether they are capturing a full
qualification or a unit standard by means of the option buttons qualifications or unit standards
as seen below
iii. The bottom section has the two grids that contain the captured full qualifications and the unit
standard qualifications to be considered in the application for Extension of Scope, as seen
below:
The grid provides the user with the following information
a. Qualification ID – the qualification code that uniquely identifies a qualification as on
the SAQA database
b. Unit Standard ID - the unit standard code that uniquely identifies a unit standard as
on the SAQA database
c. Title - the title that identifies a learning unit as on the SAQA database
d. Start Date – the proposed start date for the learning unit accreditation and conforms
to the registration start date of the learning unit
e. End Date – the proposed end date for the learning unit accreditation and conforms to
the registration end date of the learning unit
LMIS User Manual – Assessor and Moderator
30 | P a g e Copy Rights Disclaimer: Please note that no contents of this document should be replicated without prior consent of relevant parties. 2017
f. Learning Type – this applies to the unit standards and specifies whether the
application is a Core, Fundamental or Elective.
g. Application Type – whether or not the application is a first application or extension of
scope
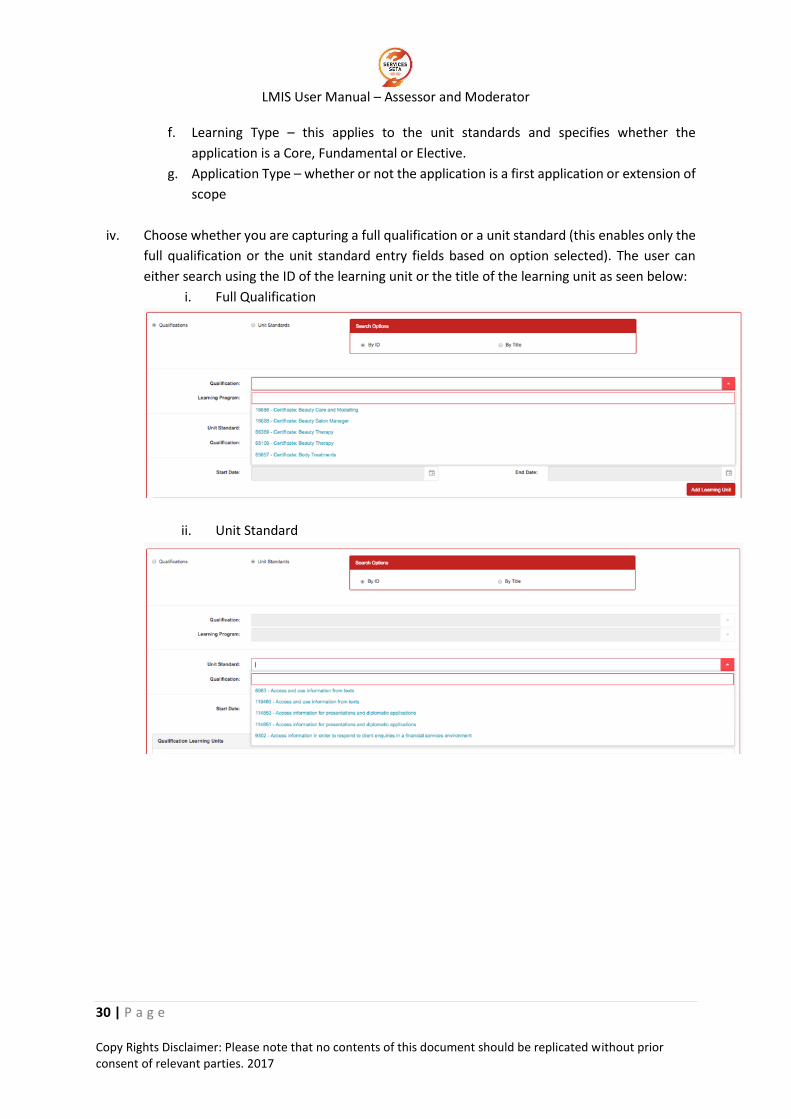
iv. Choose whether you are capturing a full qualification or a unit standard (this enables only the
full qualification or the unit standard entry fields based on option selected). The user can
either search using the ID of the learning unit or the title of the learning unit as seen below:
i. Full Qualification
ii. Unit Standard
LMIS User Manual – Assessor and Moderator
31 | P a g e Copy Rights Disclaimer: Please note that no contents of this document should be replicated without prior consent of relevant parties. 2017
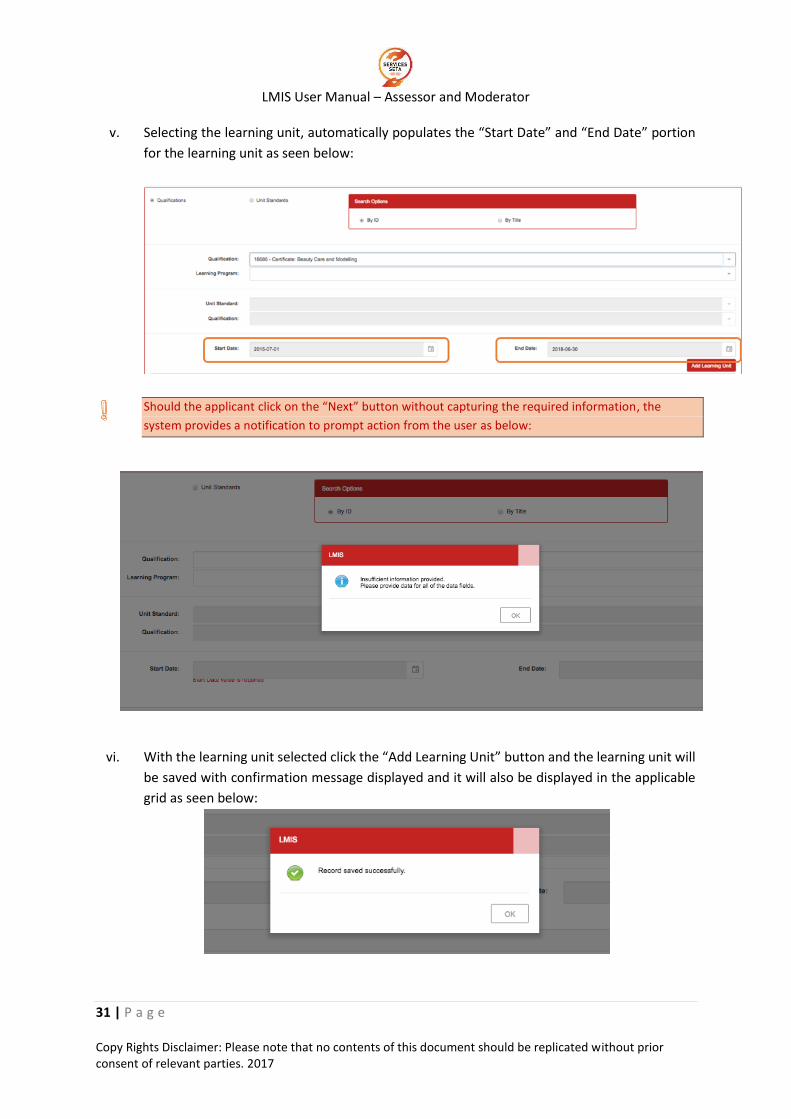
v. Selecting the learning unit, automatically populates the “Start Date” and “End Date” portion
for the learning unit as seen below:
Should the applicant click on the “Next” button without capturing the required information, the
system provides a notification to prompt action from the user as below:
vi. With the learning unit selected click the “Add Learning Unit” button and the learning unit will
be saved with confirmation message displayed and it will also be displayed in the applicable
grid as seen below:

LMIS User Manual – Assessor and Moderator
32 | P a g e Copy Rights Disclaimer: Please note that no contents of this document should be replicated without prior consent of relevant parties. 2017
vii. There is an option to remove learning units captured in error or not to be considered in the
application any longer by clicking the “Delete” button related to the learning unit concerned
on the grid.
viii. Select a learning unit to delete and then click the “Delete” button. The system will prompt the
user if they really want to proceed with the deletion process and if not they can click “Cancel”
to abort the process or click “Yes” to proceed with the deletion as seen below:
ix. Click Yes to proceed with the removal of the learning unit and the system will remove the
learning unit from the application and confirm this with the message below
LMIS User Manual – Assessor and Moderator
33 | P a g e Copy Rights Disclaimer: Please note that no contents of this document should be replicated without prior consent of relevant parties. 2017
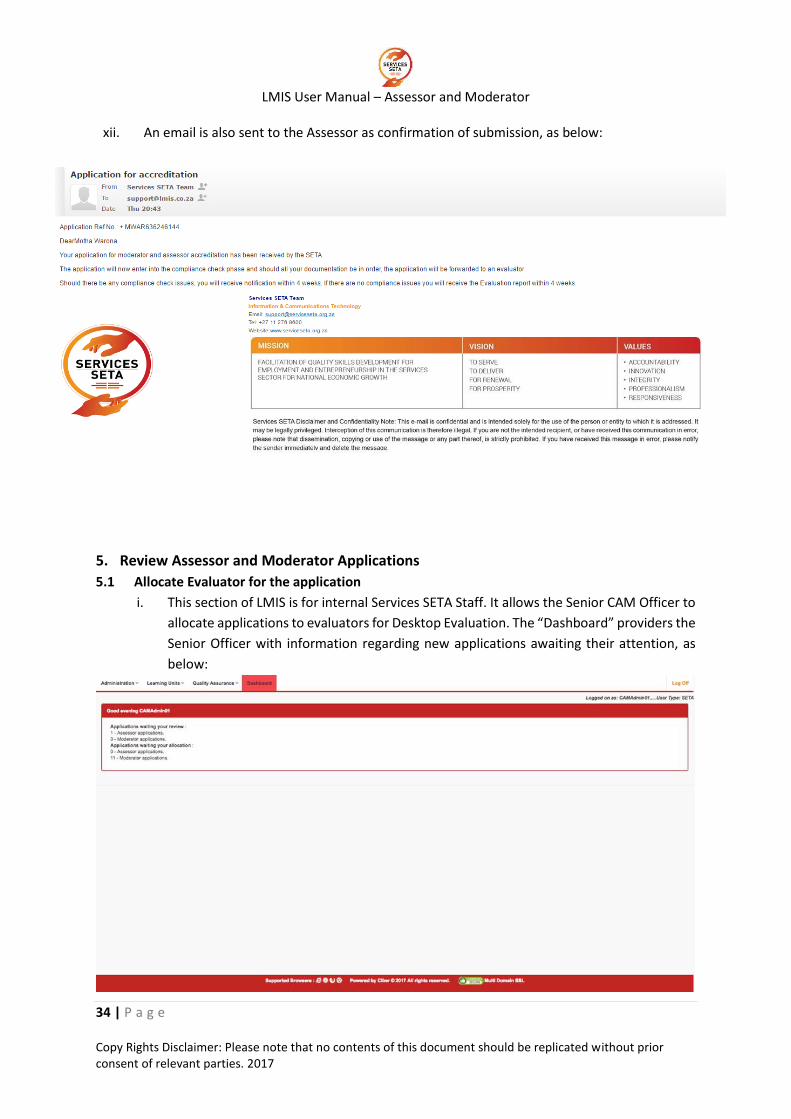
x. The “View US” button allows the applicant to see the qualification configuration. Click the
“View US” button and the system will load the Qualification’s Unit Standard Codes, Titles,
Credits Per Unit Standard, each Learning Unit Type and Total Credits as below:
xi. Once all the Learning Units have been captured, the user clicks on “Next” to complete the
process. The system then navigates to the process completion screen, which contains the
Reference number highlighted in RED, as below:
LMIS User Manual – Assessor and Moderator
34 | P a g e Copy Rights Disclaimer: Please note that no contents of this document should be replicated without prior consent of relevant parties. 2017
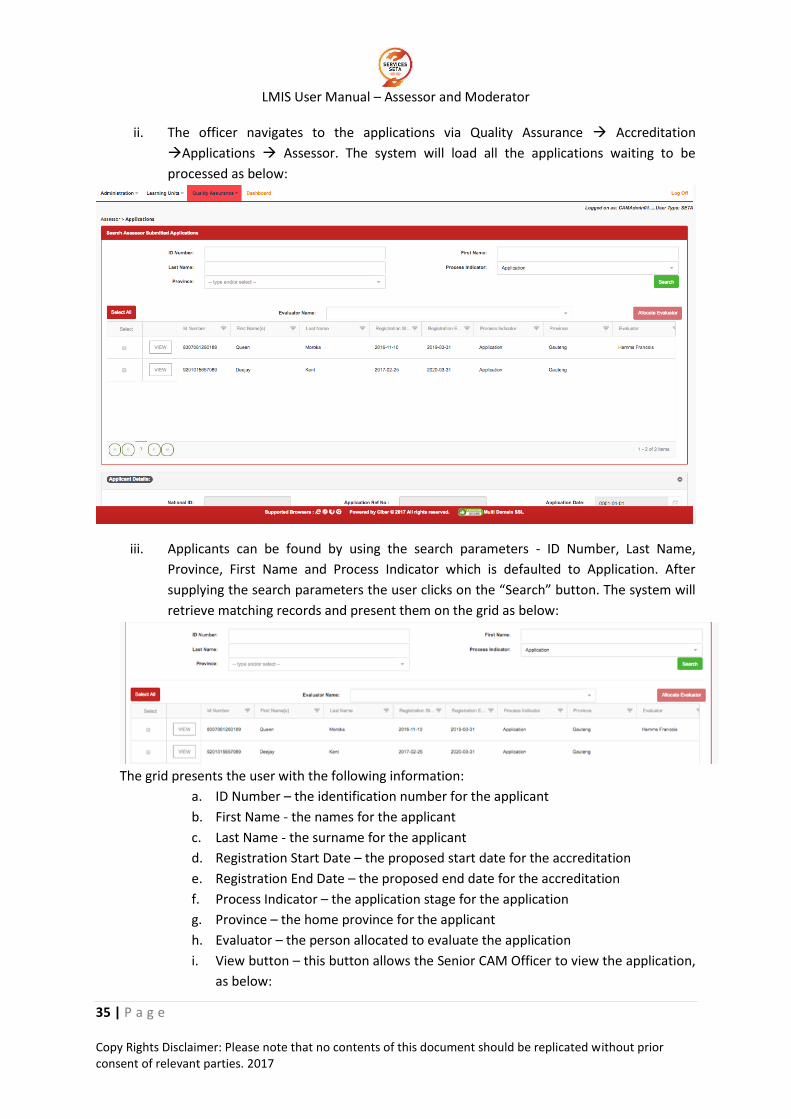
xii. An email is also sent to the Assessor as confirmation of submission, as below:
5. Review Assessor and Moderator Applications
5.1 Allocate Evaluator for the application
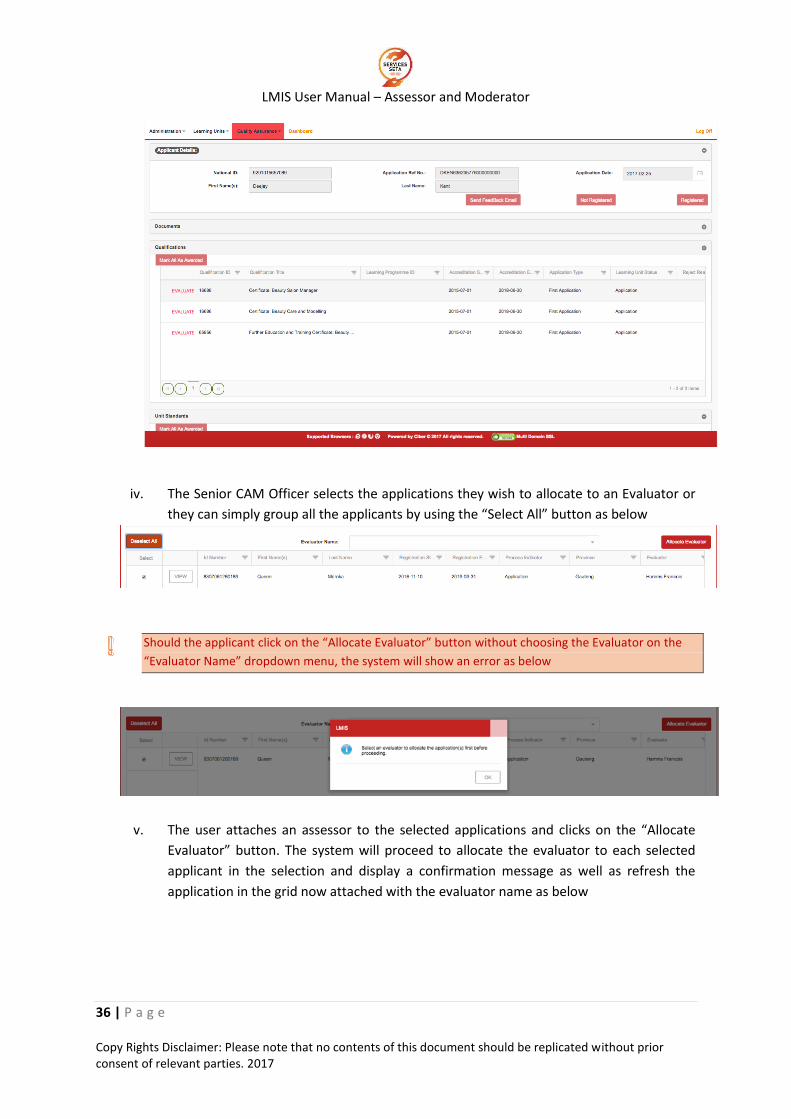
i. This section of LMIS is for internal Services SETA Staff. It allows the Senior CAM Officer to
allocate applications to evaluators for Desktop Evaluation. The “Dashboard” providers the
Senior Officer with information regarding new applications awaiting their attention, as
below:
LMIS User Manual – Assessor and Moderator
35 | P a g e Copy Rights Disclaimer: Please note that no contents of this document should be replicated without prior consent of relevant parties. 2017
ii. The officer navigates to the applications via Quality Assurance Accreditation
Applications Assessor. The system will load all the applications waiting to be
processed as below:
iii. Applicants can be found by using the search parameters - ID Number, Last Name,
Province, First Name and Process Indicator which is defaulted to Application. After
supplying the search parameters the user clicks on the “Search” button. The system will
retrieve matching records and present them on the grid as below:
The grid presents the user with the following information:
a. ID Number – the identification number for the applicant
b. First Name - the names for the applicant
c. Last Name - the surname for the applicant
d. Registration Start Date – the proposed start date for the accreditation
e. Registration End Date – the proposed end date for the accreditation
f. Process Indicator – the application stage for the application
g. Province – the home province for the applicant
h. Evaluator – the person allocated to evaluate the application
i. View button – this button allows the Senior CAM Officer to view the application,
as below:
LMIS User Manual – Assessor and Moderator
36 | P a g e Copy Rights Disclaimer: Please note that no contents of this document should be replicated without prior consent of relevant parties. 2017
iv. The Senior CAM Officer selects the applications they wish to allocate to an Evaluator or
they can simply group all the applicants by using the “Select All” button as below
Should the applicant click on the “Allocate Evaluator” button without choosing the Evaluator on the
“Evaluator Name” dropdown menu, the system will show an error as below
v. The user attaches an assessor to the selected applications and clicks on the “Allocate
Evaluator” button. The system will proceed to allocate the evaluator to each selected
applicant in the selection and display a confirmation message as well as refresh the
application in the grid now attached with the evaluator name as below
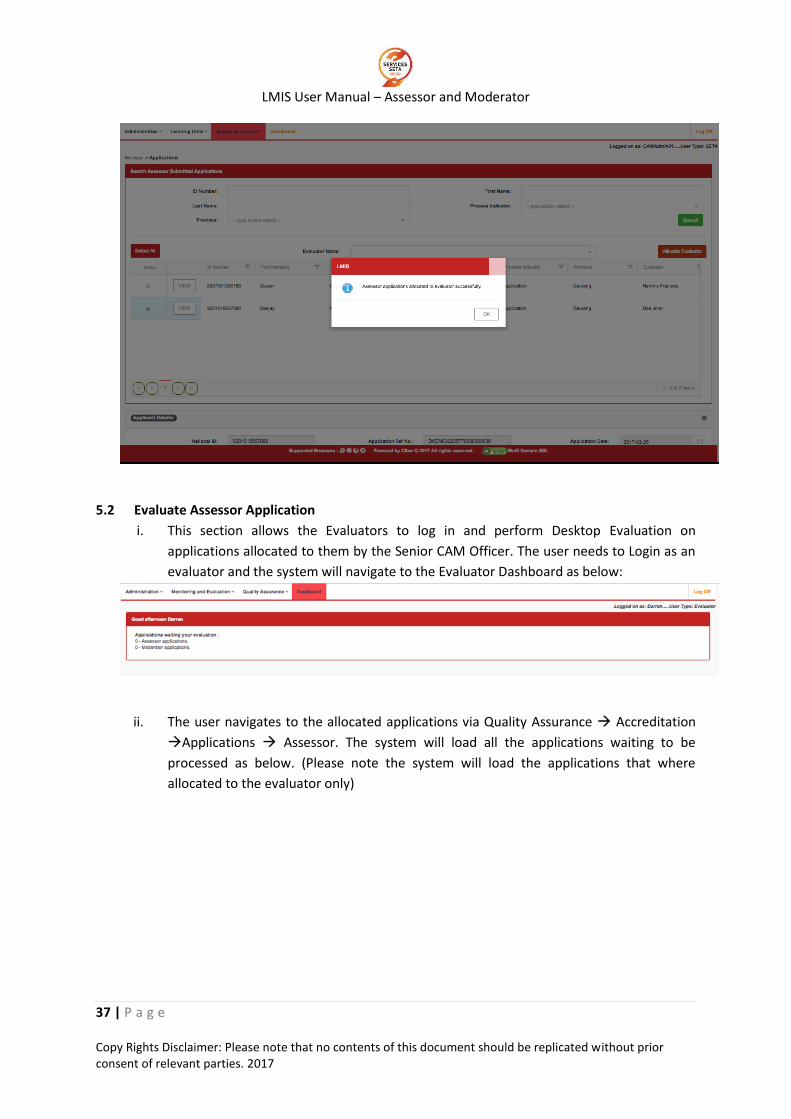
LMIS User Manual – Assessor and Moderator
37 | P a g e Copy Rights Disclaimer: Please note that no contents of this document should be replicated without prior consent of relevant parties. 2017
5.2 Evaluate Assessor Application
i. This section allows the Evaluators to log in and perform Desktop Evaluation on
applications allocated to them by the Senior CAM Officer. The user needs to Login as an
evaluator and the system will navigate to the Evaluator Dashboard as below:
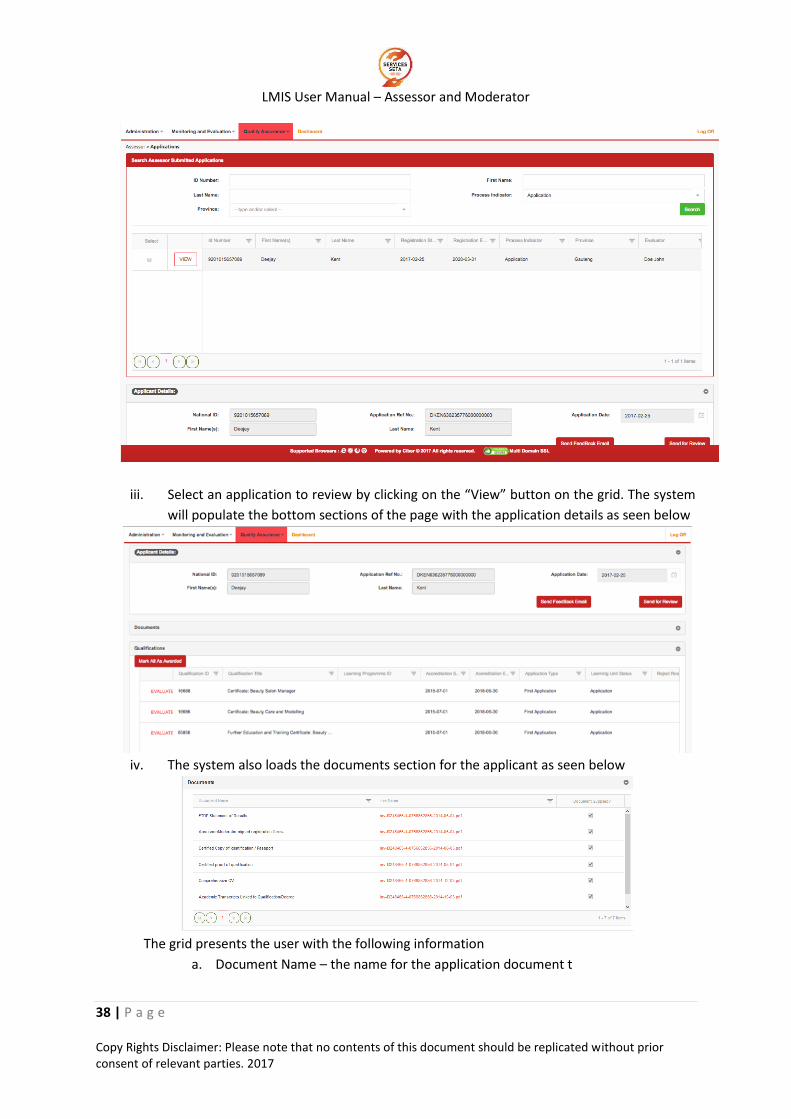
ii. The user navigates to the allocated applications via Quality Assurance Accreditation
Applications Assessor. The system will load all the applications waiting to be
processed as below. (Please note the system will load the applications that where
allocated to the evaluator only)
LMIS User Manual – Assessor and Moderator
38 | P a g e Copy Rights Disclaimer: Please note that no contents of this document should be replicated without prior consent of relevant parties. 2017
iii. Select an application to review by clicking on the “View” button on the grid. The system
will populate the bottom sections of the page with the application details as seen below
iv. The system also loads the documents section for the applicant as seen below
The grid presents the user with the following information
a. Document Name – the name for the application document t
LMIS User Manual – Assessor and Moderator
39 | P a g e Copy Rights Disclaimer: Please note that no contents of this document should be replicated without prior consent of relevant parties. 2017
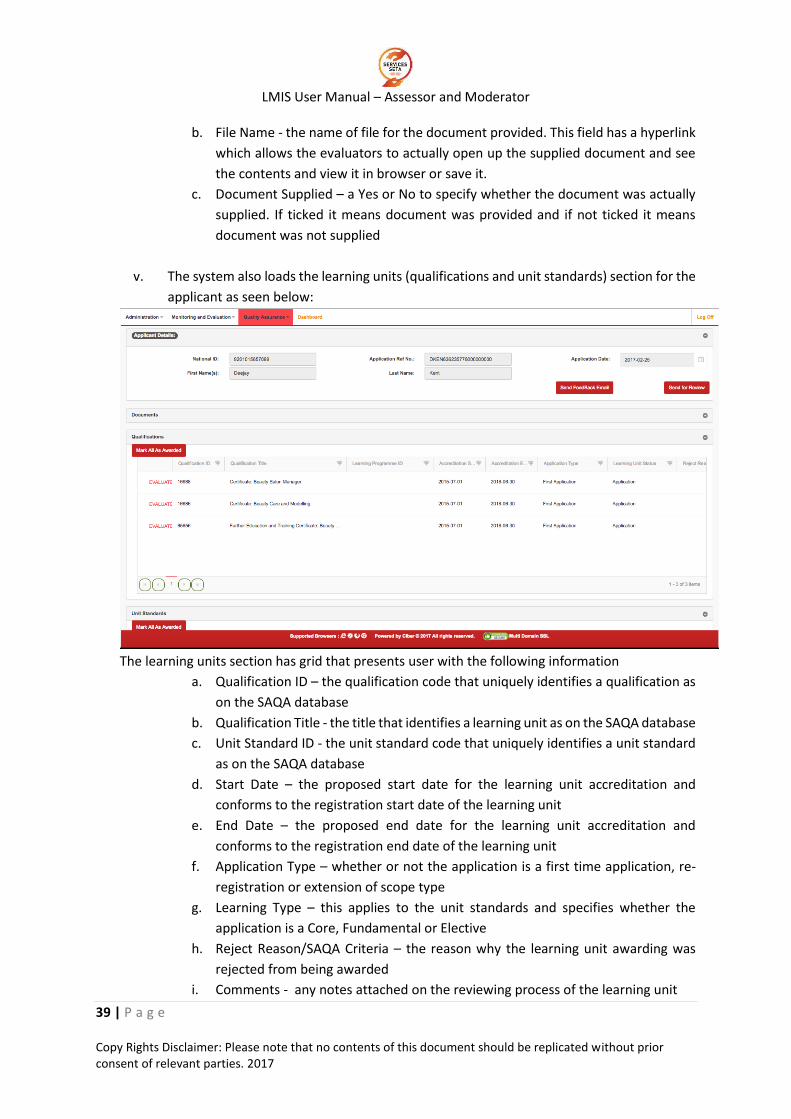
b. File Name - the name of file for the document provided. This field has a hyperlink
which allows the evaluators to actually open up the supplied document and see
the contents and view it in browser or save it.
c. Document Supplied – a Yes or No to specify whether the document was actually
supplied. If ticked it means document was provided and if not ticked it means
document was not supplied
v. The system also loads the learning units (qualifications and unit standards) section for the
applicant as seen below:
The learning units section has grid that presents user with the following information
a. Qualification ID – the qualification code that uniquely identifies a qualification as
on the SAQA database
b. Qualification Title - the title that identifies a learning unit as on the SAQA database
c. Unit Standard ID - the unit standard code that uniquely identifies a unit standard
as on the SAQA database
d. Start Date – the proposed start date for the learning unit accreditation and
conforms to the registration start date of the learning unit
e. End Date – the proposed end date for the learning unit accreditation and
conforms to the registration end date of the learning unit
f. Application Type – whether or not the application is a first time application, re-
registration or extension of scope type
g. Learning Type – this applies to the unit standards and specifies whether the
application is a Core, Fundamental or Elective
h. Reject Reason/SAQA Criteria – the reason why the learning unit awarding was
rejected from being awarded
i. Comments - any notes attached on the reviewing process of the learning unit
LMIS User Manual – Assessor and Moderator
40 | P a g e Copy Rights Disclaimer: Please note that no contents of this document should be replicated without prior consent of relevant parties. 2017
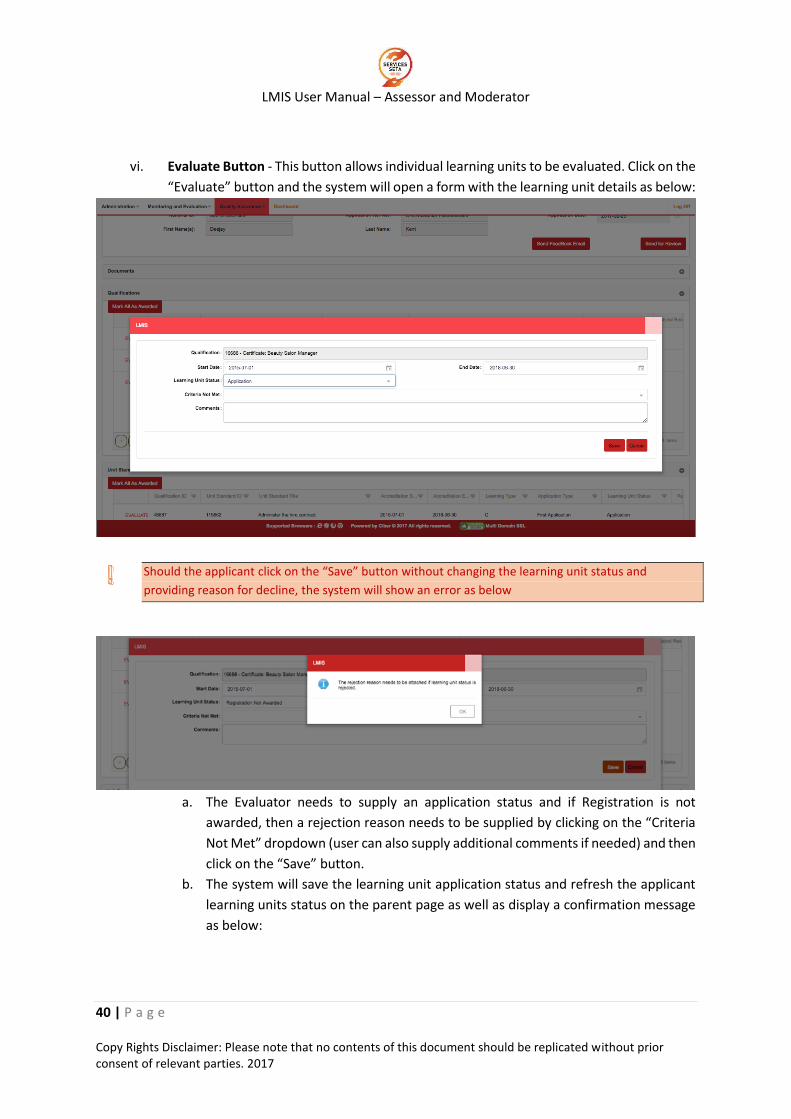
vi. Evaluate Button - This button allows individual learning units to be evaluated. Click on the
“Evaluate” button and the system will open a form with the learning unit details as below:
Should the applicant click on the “Save” button without changing the learning unit status and
providing reason for decline, the system will show an error as below
a. The Evaluator needs to supply an application status and if Registration is not
awarded, then a rejection reason needs to be supplied by clicking on the “Criteria
Not Met” dropdown (user can also supply additional comments if needed) and then
click on the “Save” button.
b. The system will save the learning unit application status and refresh the applicant
learning units status on the parent page as well as display a confirmation message
as below:
LMIS User Manual – Assessor and Moderator
41 | P a g e Copy Rights Disclaimer: Please note that no contents of this document should be replicated without prior consent of relevant parties. 2017
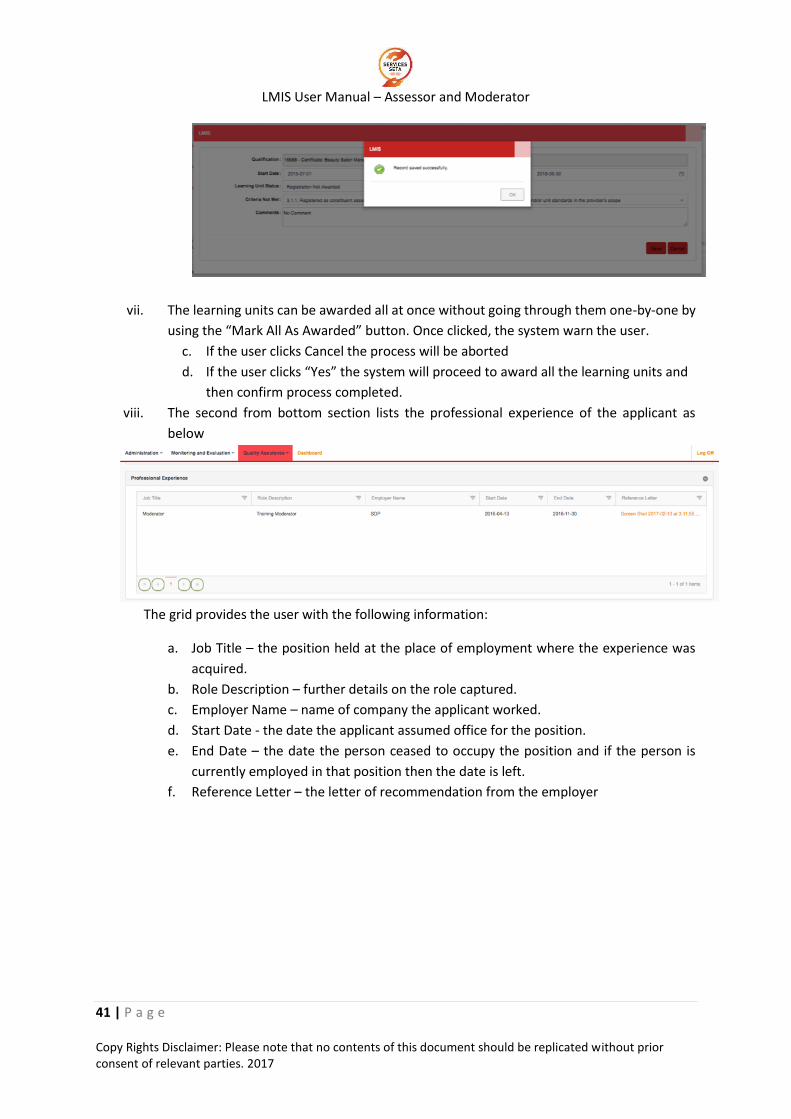
vii. The learning units can be awarded all at once without going through them one-by-one by
using the “Mark All As Awarded” button. Once clicked, the system warn the user.
c. If the user clicks Cancel the process will be aborted
d. If the user clicks “Yes” the system will proceed to award all the learning units and
then confirm process completed.
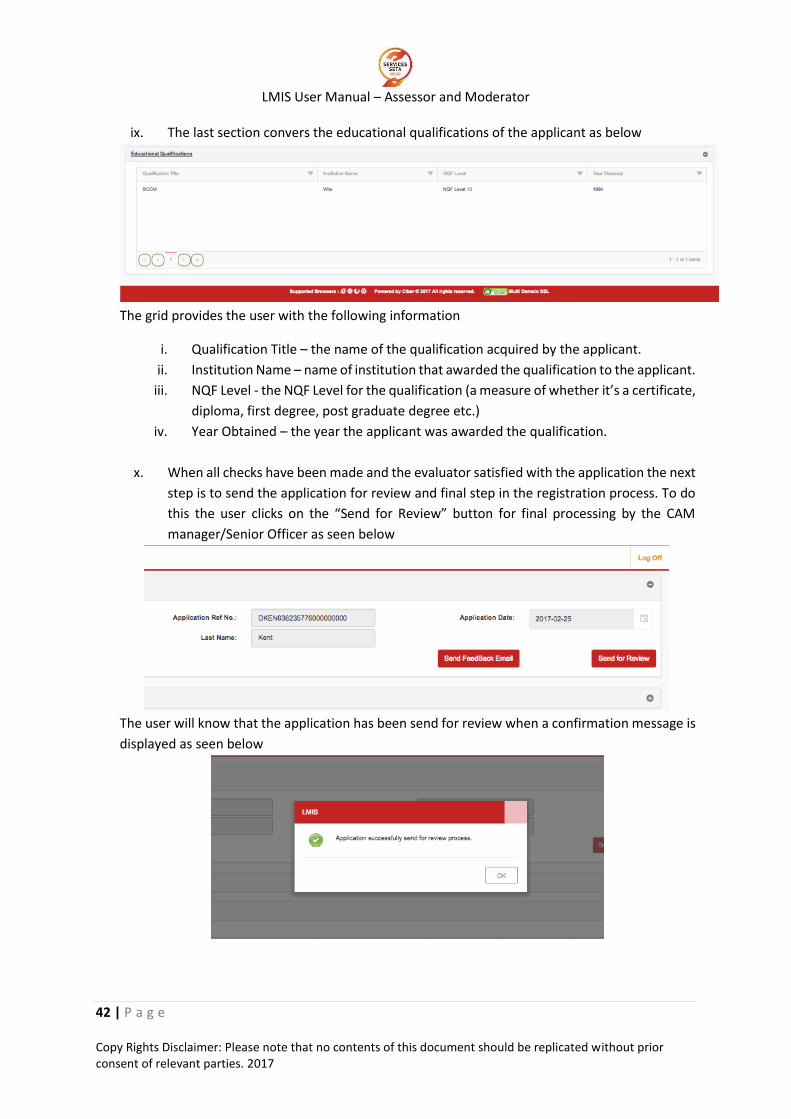
viii. The second from bottom section lists the professional experience of the applicant as
below
The grid provides the user with the following information:
a. Job Title – the position held at the place of employment where the experience was
acquired.
b. Role Description – further details on the role captured.
c. Employer Name – name of company the applicant worked.
d. Start Date - the date the applicant assumed office for the position.
e. End Date – the date the person ceased to occupy the position and if the person is
currently employed in that position then the date is left.
f. Reference Letter – the letter of recommendation from the employer
LMIS User Manual – Assessor and Moderator
42 | P a g e Copy Rights Disclaimer: Please note that no contents of this document should be replicated without prior consent of relevant parties. 2017
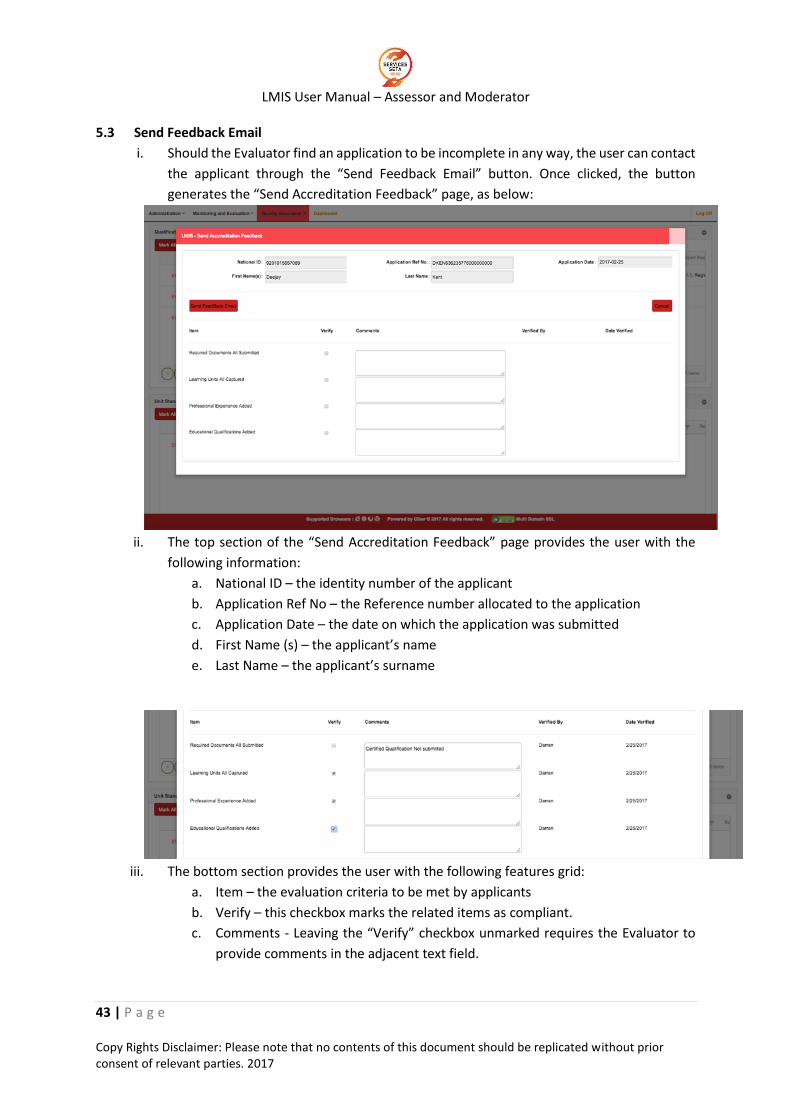
ix. The last section convers the educational qualifications of the applicant as below
The grid provides the user with the following information
i. Qualification Title – the name of the qualification acquired by the applicant.
ii. Institution Name – name of institution that awarded the qualification to the applicant.
iii. NQF Level - the NQF Level for the qualification (a measure of whether it’s a certificate,
diploma, first degree, post graduate degree etc.)
iv. Year Obtained – the year the applicant was awarded the qualification.
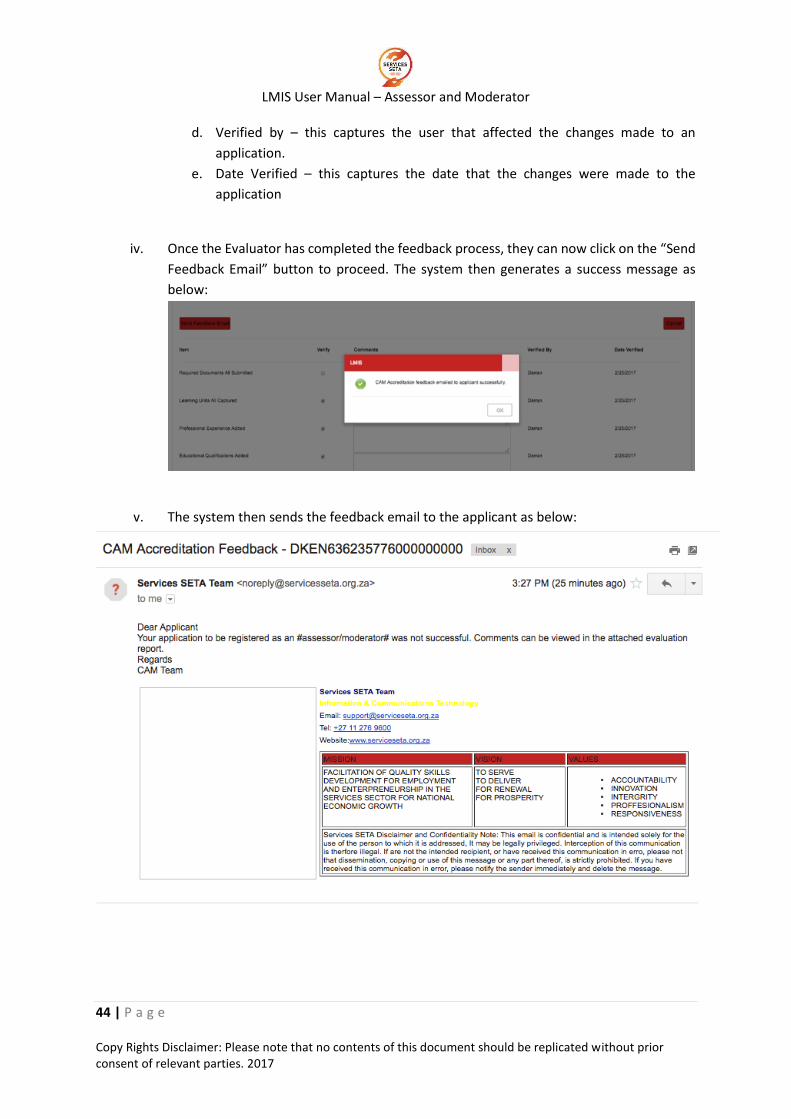
x. When all checks have been made and the evaluator satisfied with the application the next
step is to send the application for review and final step in the registration process. To do
this the user clicks on the “Send for Review” button for final processing by the CAM
manager/Senior Officer as seen below
The user will know that the application has been send for review when a confirmation message is
displayed as seen below
LMIS User Manual – Assessor and Moderator
43 | P a g e Copy Rights Disclaimer: Please note that no contents of this document should be replicated without prior consent of relevant parties. 2017
5.3 Send Feedback Email
i. Should the Evaluator find an application to be incomplete in any way, the user can contact
the applicant through the “Send Feedback Email” button. Once clicked, the button
generates the “Send Accreditation Feedback” page, as below:
ii. The top section of the “Send Accreditation Feedback” page provides the user with the
following information:
a. National ID – the identity number of the applicant
b. Application Ref No – the Reference number allocated to the application
c. Application Date – the date on which the application was submitted
d. First Name (s) – the applicant’s name
e. Last Name – the applicant’s surname
iii. The bottom section provides the user with the following features grid:
a. Item – the evaluation criteria to be met by applicants
b. Verify – this checkbox marks the related items as compliant.
c. Comments - Leaving the “Verify” checkbox unmarked requires the Evaluator to
provide comments in the adjacent text field.
LMIS User Manual – Assessor and Moderator
44 | P a g e Copy Rights Disclaimer: Please note that no contents of this document should be replicated without prior consent of relevant parties. 2017
d. Verified by – this captures the user that affected the changes made to an
application.
e. Date Verified – this captures the date that the changes were made to the
application
iv. Once the Evaluator has completed the feedback process, they can now click on the “Send
Feedback Email” button to proceed. The system then generates a success message as
below:
v. The system then sends the feedback email to the applicant as below:
LMIS User Manual – Assessor and Moderator
45 | P a g e Copy Rights Disclaimer: Please note that no contents of this document should be replicated without prior consent of relevant parties. 2017
6. Award or Not Award Accreditation
i. This process marks the end of the Assessor and Moderator application process. With the
applicant evaluated, the CAM Manager logs in to process the assessor applications which
can be found in the “Under review” on the “Process Indicator” dropdown menu. To do
this, the user needs to navigate to Quality Assurance Accreditation Applications
Assessor.
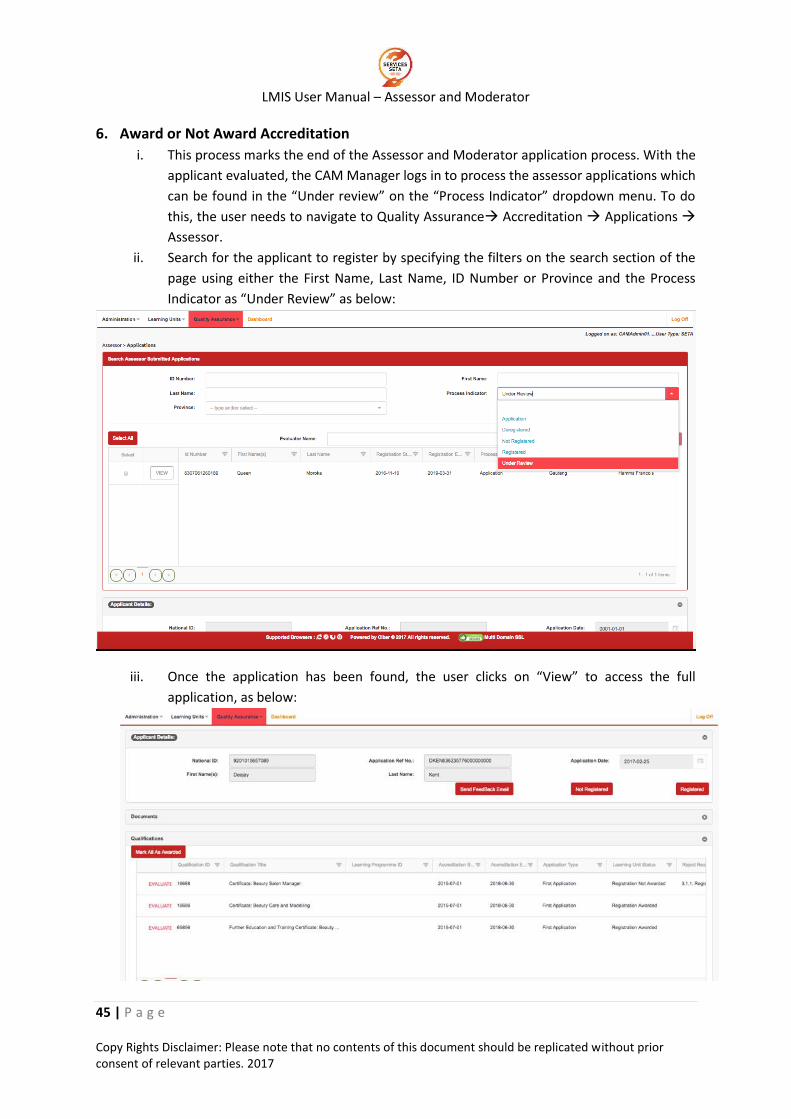
ii. Search for the applicant to register by specifying the filters on the search section of the
page using either the First Name, Last Name, ID Number or Province and the Process
Indicator as “Under Review” as below:
iii. Once the application has been found, the user clicks on “View” to access the full
application, as below:
LMIS User Manual – Assessor and Moderator
46 | P a g e Copy Rights Disclaimer: Please note that no contents of this document should be replicated without prior consent of relevant parties. 2017
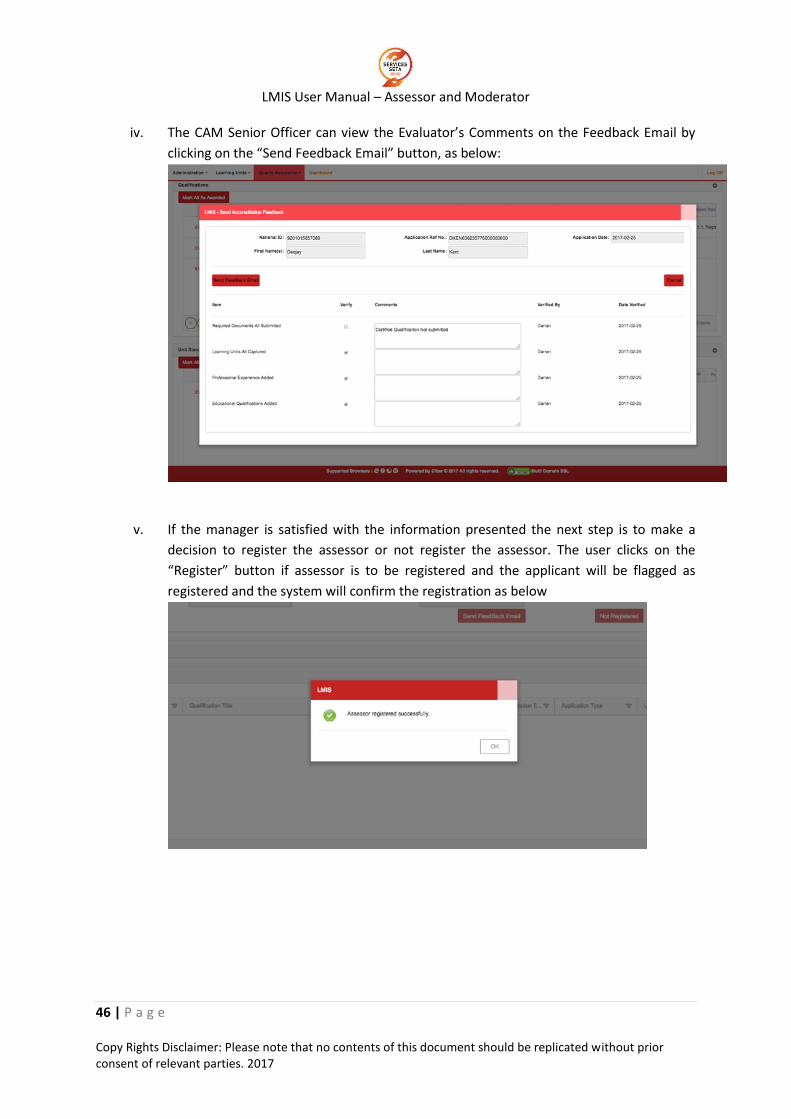
iv. The CAM Senior Officer can view the Evaluator’s Comments on the Feedback Email by
clicking on the “Send Feedback Email” button, as below:
v. If the manager is satisfied with the information presented the next step is to make a
decision to register the assessor or not register the assessor. The user clicks on the
“Register” button if assessor is to be registered and the applicant will be flagged as
registered and the system will confirm the registration as below
LMIS User Manual – Assessor and Moderator
47 | P a g e Copy Rights Disclaimer: Please note that no contents of this document should be replicated without prior consent of relevant parties. 2017
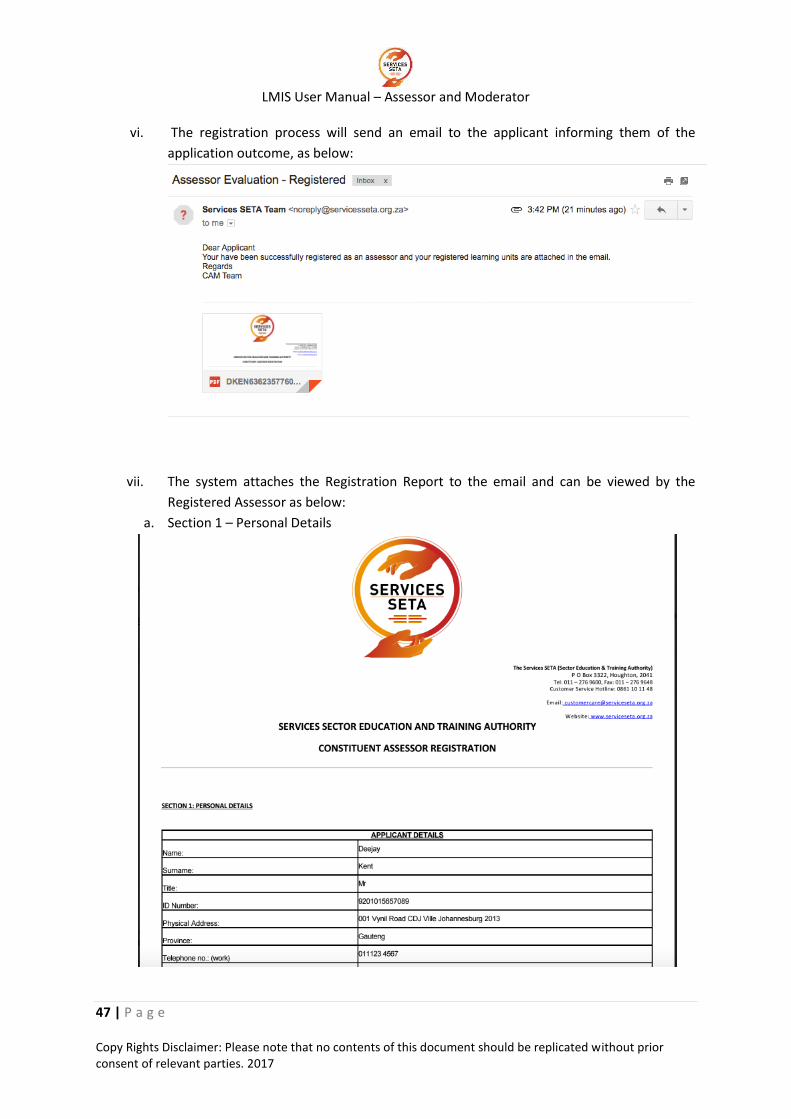
vi. The registration process will send an email to the applicant informing them of the
application outcome, as below:
vii. The system attaches the Registration Report to the email and can be viewed by the
Registered Assessor as below:
a. Section 1 – Personal Details
LMIS User Manual – Assessor and Moderator
48 | P a g e Copy Rights Disclaimer: Please note that no contents of this document should be replicated without prior consent of relevant parties. 2017
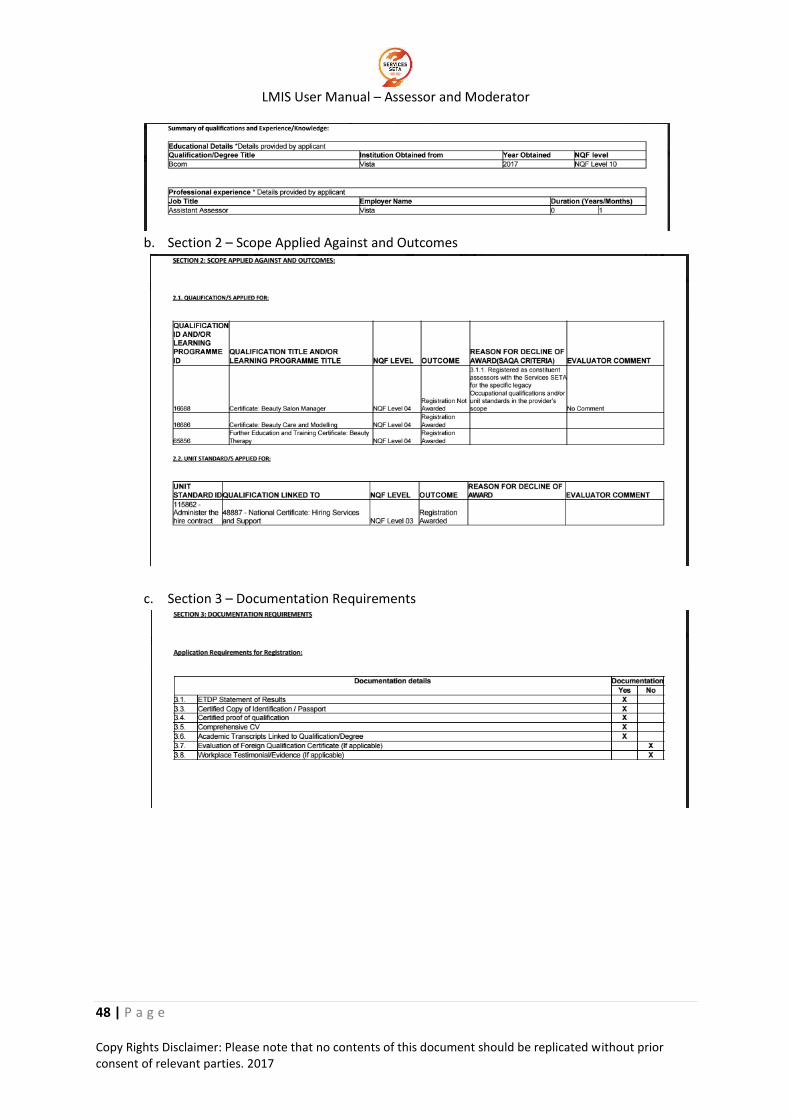
b. Section 2 – Scope Applied Against and Outcomes
c. Section 3 – Documentation Requirements
LMIS User Manual – Assessor and Moderator
49 | P a g e Copy Rights Disclaimer: Please note that no contents of this document should be replicated without prior consent of relevant parties. 2017
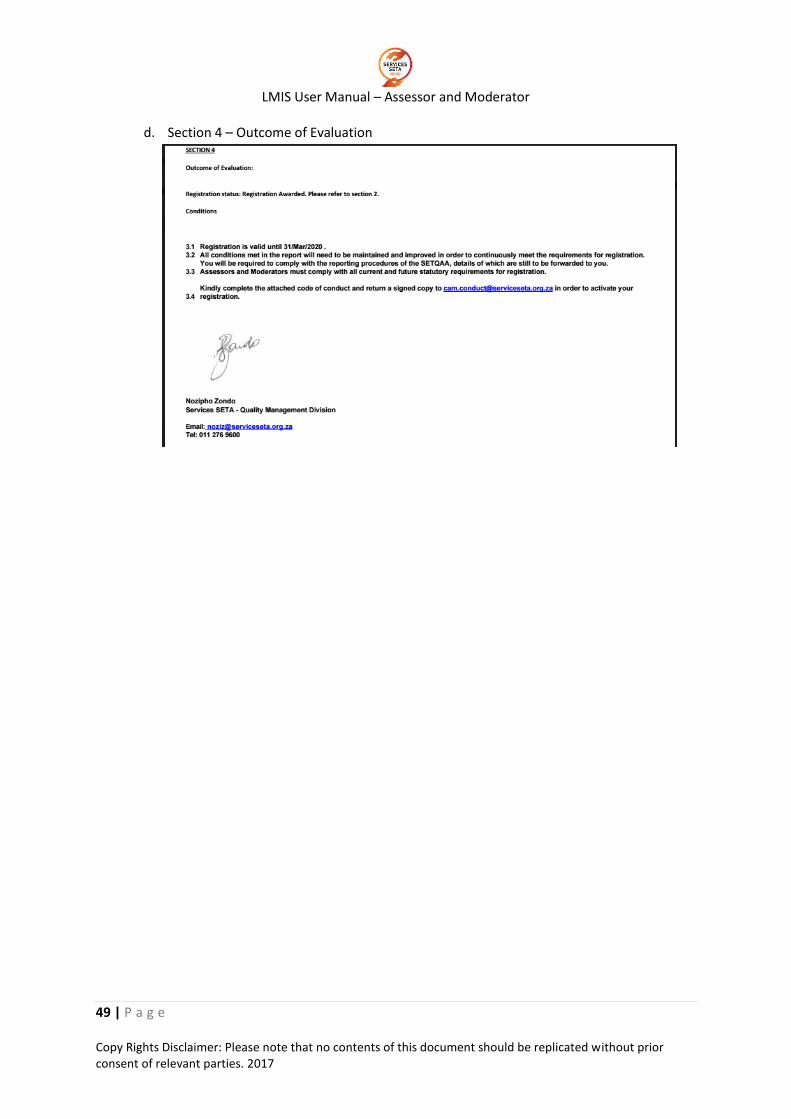
d. Section 4 – Outcome of Evaluation