Embed Size (px)
Citation preview

1
LoadPass Permits Electronic Permit System
User Guide
ndenergy.org 701-566-5576
2
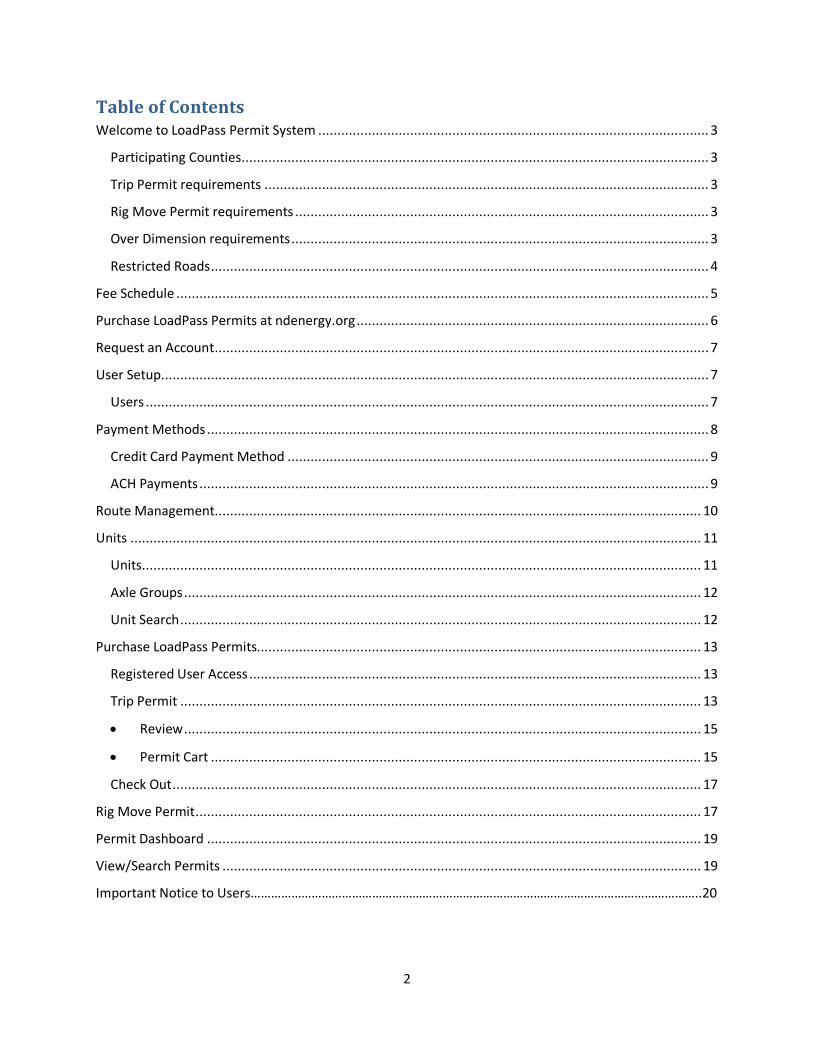
Table of Contents Welcome to LoadPass Permit System ...................................................................................................... 3
Participating Counties .......................................................................................................................... 3
Trip Permit requirements .................................................................................................................... 3
Rig Move Permit requirements ............................................................................................................ 3
Over Dimension requirements ............................................................................................................. 3
Restricted Roads .................................................................................................................................. 4
Fee Schedule ........................................................................................................................................... 5
Purchase LoadPass Permits at ndenergy.org ............................................................................................ 6
Request an Account................................................................................................................................. 7
User Setup............................................................................................................................................... 7
Users ................................................................................................................................................... 7
Payment Methods ................................................................................................................................... 8
Credit Card Payment Method .............................................................................................................. 9
ACH Payments ..................................................................................................................................... 9
Route Management............................................................................................................................... 10
Units ..................................................................................................................................................... 11
Units .................................................................................................................................................. 11
Axle Groups ....................................................................................................................................... 12
Unit Search ........................................................................................................................................ 12
Purchase LoadPass Permits.................................................................................................................... 13
Registered User Access ...................................................................................................................... 13
Trip Permit ........................................................................................................................................ 13
Review ....................................................................................................................................... 15
Permit Cart ................................................................................................................................ 15
Check Out .......................................................................................................................................... 17
Rig Move Permit .................................................................................................................................... 17
Permit Dashboard ................................................................................................................................. 19
View/Search Permits ............................................................................................................................. 19
Important Notice to Users……………………………………………………………………………………………………………………..20
3
Welcome to the LoadPass Permit System
LoadPass Permit System is a program that is governed by the Executive Board and Truck Permit Committee of the Western Dakota Energy Association (formerly ND Association of Oil & Gas Producing Counties). ePermits (trip permits) and Rig Move permits are available for purchase at www.ndenergy.org – Select Order Truck Permits.
Participating Counties
The 19 counties/cities presently using this program are:
Adams County Divide County McKenzie County Stark County Billings County Dunn County McLean County Ward County Bottineau County Emmons County Mountrail County Williams County Bowman County Golden Valley
County Renville County
Burke County Hettinger County Slope County City of Dickinson
Trip Permit requirements - Trip Permits are required by the participating counties for overweight or over-dimension non-divisible loads traveling on county roads. All cranes, workover rigs and roaded earth moving equipment must have a county permit to travel on county roads. Some permits will require county approval and some permits will be automatically approved, depending on the load, road conditions, and route taken. Permits are considered valid for a single trip (from point A to point B). For round trip travel, the reverse trip requires a second permit. Although permits are single trip movement forms, the electronic trip permit purchased on our website allows for a three-day window in which to take the trip. This gives the user a couple of days to obtain permits before the trip is to be taken, and allows for unforeseen delays. The exception to that rule is the Rig Move Permit, which is valid for movement on all three days, if appropriate.
Rig Move Permit requirements: A Rig Move Permit is required for permission to move a drilling rig from one site to another, using participating county roads. A county approved Rig Move Permit only gives the permission to move the rig and the units associated with it. Each overweight or over-dimension unit within the rig move group, must have a valid trip permit for the move as well, if applicable. The cost of the Rig Move Permit is $500 per county in and $500 per county out of the site, and requires county approval. The counties have two days to act on the permit request.
Over Dimension requirements - A LoadPass Permit is required on any load that is over-dimension. The participating counties follow the state guidelines for over-dimension loads. In addition, any load that exceeds 14’6” in width is required to be signed and flagged. And, any load exceeding 16’ wide is additionally required to have an escort vehicle with flashers in front and back of the load while traveling on participating county roads. Multiple wide load vehicles

4
may be grouped together with one escort vehicle in front and back of group. Any load 16’ or wider may not exceed a speed of 25 mph.
Permit Fees: See the fee schedule listed in this user guide for fee information.
Restricted Roads: The user is responsible for determining whether or not a county road they plan to travel on is weight restricted. We can offer some assistance by providing a Restricted Road Map, which includes the participating counties. This map can be found at http://umap.awtylogistics.com/ A link to this map is available on the electronic trip permit form, in the Route area. Text version of county road restrictions is available on our website at http://ndenergy.org/rcr/Restrictions.aspx.
Restricted Road Notification System – Anyone interested in being notified by the counties, when a new restriction is placed on their roads, may sign up to receive emails or text messages on the Restriction page at http://ndenergy.org/rcr/Restrictions.aspx.
Please Note - The LoadPass Permit System provides the restriction information, notifications and restriction map as a courtesy to the counties and the industry. The information is kept as up to date as possible, and the notification system has a history of being quite reliable, but we can’t guarantee accuracy. There is a lot of data to collect and maintain when working with eighteen counties, and communication systems sometimes fail. So there is always a chance that the information we provide is not correct. So please do not rely on this information alone. It is the driver’s responsibility to drive legally on the county roads, so please use whatever resources you need to make sure you are driving legally on the county roadways. A listing of the participating county road superintendents and sheriff offices is available for download on the ndenergy.org website. Please call the county before driving to clarify any questions you have about county roadways or routing.

5

6
Feel
Purchase LoadPass Permits at ndenergy.org
To obtain a permit to drive overweight or over-dimension on participating county roads, please go to ndenergy.org, and click on ‘Order Truck Permits.’ A permit may be ordered through a registered user login.
LoadPass Permits may be purchased online at:
ndenergy.org Select ‘Order Truck Permits’
For assistance please call the county permit office at 701-566-5576 or email [email protected]

7
Request an Account Register as a User - To register as a new user, select ‘Request an Account’ and complete the
REQUEST AN ACCOUNT, enter requested information into each field and click Submit. Your request will be reviewed and if approved a username and password will be emailed to the email address entered. Once you receive your username and password, enter that information into the Login Screen, select Remember my login if appropriate, and click Login. Registered User - To order a permit as a registered user enter your User Name and Password and select Login. You may then go into your company account and set up your company Information.
User Setup
Users - To set up additional users for the account, from the drop down menu, select Account, Users, click Add User, and complete the fields. The User Role options give you the ability to assign the appropriate user rights to each of your company’s users. You may choose one or more roles for each of your users. The Administrator role gives the user the ability to see and work in all areas of your company’s account.

8
Role Descriptions:
Account - can create & edit users, assign roles
Administrator - covers all other roles
Manage Payments - can create / edit / delete payment methods
Manage Routes - can create / edit / delete routes (Everything under Routes on the navigation bar)
Manage Units - can create / edit / delete units. (Everything under Units on the navigation bar)
Request Permit All – Can create / request permit, and manage all permits
Request Permit Mine – Can create / request permits, and manage those permits Users may be created and edited by users with Account or Administrator roles by clicking on the pencil icon to the left of the User, and users may be deleted by users with Account or Administrator roles by clicking the trash can to the right of the User. Users may be searched using the User search fields to the right of the user list.
Payment Methods –
Credit Card Payments
ACH Payments

9
Credit Card Payment Method
Payment methods may be stored to be used to purchase permits if appropriate. From the drop down menu, select Account, Payment Methods. Add Credit Card. Complete the fields and select Create. The ‘Payment Name’ can be any user-selected label that will help your users identify the payment source. The ‘Bill To’ fields must contain the billing information for the card being used. The ‘Card Code’ is the code on the back of the credit card. Payment Methods may be edited by using the pencil icon to the left of the Payment Method on the Payment Methods screen. Payment Methods may be deleted by selecting the edit icon next to the Payment Method and selecting Delete at the bottom of the screen. Credit Card Payment methods may be stored when payments are entered during the permit purchase process as well.
ACH Payments
To Request ACH as a Payment Method -
1. Select Account 2. Click on Payment Method 3. Click on Request ACH Option
1. Click on Account 2. Select Payment Method 3. Select Add Bank Account
1. Complete the ACH Form 2. Click Create

10
Within 2 – 4 days, there will be two micro deposits sent to your bank
account to verify the account information. When you see those deposits
made to your bank account, please return to this screen and enter the two
amounts. When you have completed this step, your ACH bank account will
be verified, and your bank account will be set up as a Payment Method to
be used to purchase Uniform County ePermits.
Route Management
To enter a route, on the Route Management screen, select ‘Add Route.’
Name - The route name should be a user-defined label identifying the route.
Load From / Load To - The ‘Load From’ and ‘Load To’ fields should contain descriptive information identifying the starting and ending points of the route.
After completing the Route description information, select ‘Create.’ Add Road to Route - The ‘Add Road to Route’ fields will be displayed.
Road Type - Enter the ‘Road Type.’ From the dropdown, select ‘State/Federal’ for State or Federal highways, select ‘County’ for county roads, select ‘Township’ for Township roads, and Select Lease/Private for Lease roads or private roads. If you are unsure what type of road you will be traveling on, select the blue ‘View Restricted Road Map’ button toward the bottom of the screen to refer to the map. See ‘Restricted Road Map’ section for more information on using the map or check with the County Road Department in the county in which you will be traveling.
City Street - If you selected City Street road type – select the city you are traveling in.
County - If you selected County or Township road type, select the county you are traveling in for this road. If you are traveling in more than one county, road segments for each county should be listed as separate roads.

11
Township Approved By - If you selected a road type of Township, enter Township official approval name into the ‘Township Approved By’ field. Select the optional ‘View Township Contacts’ to obtain contact information for Township officials.
Road – The road field should be completed with a description of the road you are traveling on, using the road name, as well as the nearest intersection and other descriptive information to allow the county official reviewing your request to understand where you will be traveling.
Restriction – You must know if the road you are traveling has a weight restriction on it. If you don’t know, please click the ‘View Restricted Road Map’ button to review the restrictions in the county or counties you are traveling in. If there is no weight restriction on the road you are entering into the system, select ‘By Legal Weight’ from the Restriction field dropdown menu. If there is a weight restriction on the road on which you are traveling, select the appropriate weight restriction from the dropdown menu.
Miles – Enter the number of miles you are traveling on this road or road segment. Any ton/mile fees being assessed will use this number of miles in the fee formula.
When the fields have been completed for this road or road segment, click the ‘Add a Road’ button at the bottom of the screen to save. Repeat the ‘Add a Road’ procedure for each road you want to add to the route. *Note: If you are traveling on a road that is shared by two counties, enter the road segment under the county in which side of the road you are traveling. For the reverse trip, you would list the other county. The order of the roads may be modified by using the up and down arrows to the left of the road list. The roads may be edited by selecting the pencil icon to the left of the road. The road may be deleted by selecting the trash can icon to the right of the road. When you have added all the roads to the route, you may click the white Cancel/Return button under the Route information, and you will be taken back to the Route Management screen.
Units
Units - You may pre-enter your company units into the system. From the dropdown menu, select ‘Units’ and select ‘Add Unit.’ Enter Unit name or number, and License Weight (no comma in the number), then click create. You may edit or delete your saved units by using the pencil icon to the left or the trash can to the right of the unit entry on the Unit Management screen.

12
Axle Groups – After entering a new unit, or when selecting the edit icon on an existing unit, you will be given the option to enter the Axle Groups for that unit. To add axle groups to be saved with the unit, on Axle Group entry screen, enter an identifying Axle group name or number in the first Axle Group field (i.e. steering, or 1, 2 etc.). Enter the number of axles in that group into the # of Axles field. Enter the axle weight in pounds for the group into the Weight field (no comma in the number). And click Add Axle Group. You may do this procedure for each axle group associated with that unit. Once entered, the axle group order may be changed by using the arrow up and down option to the left of each Axle group. These entries may be edited by clicking the pencil icon to the left of the Axle group entry, and they may be deleted by clicking the trash can icon to the right of the Axle group entry. When all Axle groups have been added, click Cancel/Return to return to the Unit Management screen. Unit Search – Units may be searched by using the Search/Filter Units fields on the right side of the Unit Management screen.
13
Purchase LoadPass Permits
Registered User Access - To login with a as a registered user, enter your User Name and Password on the Login Screen. (See ‘Request an Account’ section of the User Guide).
From the ‘Permits’ dropdown menu, select ‘Create Trip Permit’ (Trip Permit covers Trip, Xcess and Restricted Permits) or ‘Create Rig Move Permit.’
Trip Permit – Select ‘Create Trip Permit’ to request a Trip permit. The Trip permit covers what has been traditionally referred to as a Trip Permit, an Xcess permit (over 150,000 lbs. GVW), and a Restricted Road permit. These will all be covered by completing the Trip Permit form. The only permit type that isn’t accessed through the Trip Permit option is the Rig Move permit. The Rig Move permit may be accessed by selecting ‘Create Rig Move Permit.’
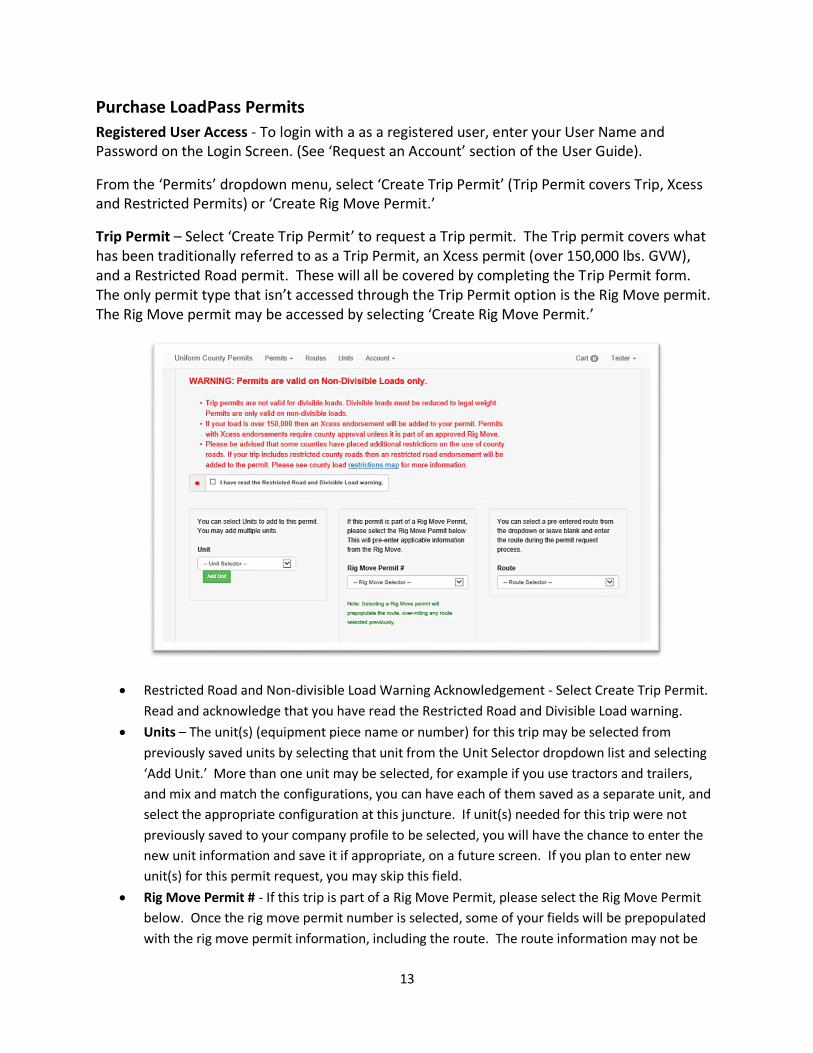
Restricted Road and Non-divisible Load Warning Acknowledgement - Select Create Trip Permit.
Read and acknowledge that you have read the Restricted Road and Divisible Load warning.
Units – The unit(s) (equipment piece name or number) for this trip may be selected from
previously saved units by selecting that unit from the Unit Selector dropdown list and selecting
‘Add Unit.’ More than one unit may be selected, for example if you use tractors and trailers,
and mix and match the configurations, you can have each of them saved as a separate unit, and
select the appropriate configuration at this juncture. If unit(s) needed for this trip were not
previously saved to your company profile to be selected, you will have the chance to enter the
new unit information and save it if appropriate, on a future screen. If you plan to enter new
unit(s) for this permit request, you may skip this field.
Rig Move Permit # - If this trip is part of a Rig Move Permit, please select the Rig Move Permit
below. Once the rig move permit number is selected, some of your fields will be prepopulated
with the rig move permit information, including the route. The route information may not be

14
changed from the route move information approved on the rig move permit. If the trip permit
you are requesting, is not tied to a Rig Move, no entry is made to this field.
Route – The route for this trip (if not tied to a Rig Move) may be selected from previously saved
routes by selecting that route from the Route Selector dropdown list, or if the route needed for
this trip was not previously saved to your company profile to be selected, you will have the
chance to enter the new route information and save it if appropriate, on a future screen. If you
plan to enter the new route information for this permit request, you may skip this field.
Company Information – If requesting the permit as a registered user, the company information
fields will be populated. You have the option of editing the Contact Name, Phone, and/or Email
if appropriate. You may also enter additional email addresses to receive this permit
information either by entering the Name and Email or by selecting the email using the Email
Selector. When information on this screen is complete, click ‘Next’ to move to the Load screen.
You may optionally navigate each screen by clicking on the Company, Load, Axles, Route, and
Review navigation buttons at the top of each screen. As each screen is completed, the white
buttons at the top of the form – Company, Load, Axles, Route, and Review will turn green. If a
button is white in color, there is something missing on that screen. Select the white button and
complete the required fields.
Load – Enter the driver’s name. Enter the trip starting date. Trip permits are valid for single
trips from Point A to Point B. The return trip requires a second permit. You are given a three-
day span in which to make the trip. Select the load type from the dropdown.
o Trucks and Trailers
o Roaded Earthmoving Equipment
o Workover Rigs and Cranes

15
Enter the load description – describe what the load is. Select width from categories – under
14’6”, Over 14’6”, and Over 16’. Enter the Width, Height and Length of the entire load. Click
the box if the load is over dimension. (The LoadPass Permit System follows the state guidelines
on over-dimension units.) Add any Comments you may want the county officials to receive
regarding this trip.
Axles –
o Enter the Unit number (Your company’s truck identification number)
o Enter the License Weight – The weight at which your truck is licensed
o Gross Weight – The Gross Weight will complete as you enter the Axle Weights
o Axles
Leave ‘Group 1’ as the title of the first Axle Group, or you may enter your own
description, i.e. ‘Steering Group,’ etc.
Enter the Number of Axles in Group 1
Enter the Weight of the Group 1 Axle Grouping
Click Add Axle Group
o Repeat with Axle ‘Group 2,’ ‘Group 3,’ etc., until all axle groups are entered.
o The total Gross Weight will be automatically updated from the total Weight entered for
all groups.
Route – Registered users may have selected a route at the beginning of the permit entry
process, on the Company page. If so, the route fields will be populated. Review the information
to be sure it is correct, and make changes if necessary. If a route was not initially selected, the
route information may be entered on the Route screen. (See the Route section of this User
Guide) When the route information has been entered click Next.
Review – Review your permit information and fees for accuracy, and to continue click ‘Add to
Cart.’
Permit Cart – After the permit has been added to the Cart, ‘Proceed to Checkout’ may be
selected to complete the payment process, or select the ‘Add Trip Permit’ or ‘Add Rig Move
Permit’ button to purchase an additional permit, and pay for multiple permits simultaneously.

16

17
Check Out – The Permit payment process may be completed by selecting a saved payment method,
or by entering Billing Information and Card Information on the Check Out page. The click ‘Create.’
Rig Move Permit
To order a Rig Move permit, from the dropdown menu select Permits and Create Rig Move Permit.
Restricted Road and Non-divisible Load Warning Acknowledgement - Select Create Trip Permit. Read and acknowledge that you have read the Restricted Road and Divisible Load warning.
Select a saved route if appropriate
Company Information - If requesting the permit as a registered user, the company
information fields will be populated. You have the option of editing the Contact Name,
Phone, and/or Email if appropriate. An optional Reference # field is available if needed
for tracking within your company. You may also enter additional email addresses to

18
receive this permit information either by entering the Name and Email or by selecting
the email using the Email Selector. When information on this screen is complete, click
‘Next’ to move to the Rig Move permit information screen. You may optionally navigate
each screen by clicking on the buttons at the top. As each screen is completed, the
white buttons at the top of the form will turn green. If a button is white in color, there
is some information missing on that screen. Select the white button and complete the
required fields.
Rig Move Permit Information – Complete the Start Trip Date – Rig Move Permits are
valid for three days of travel. Enter the Rig Company, Rig #, Operating Company, and
add any Comments you feel you would like the county to review. Optionally, you may
upload a map or other documents to assist the county to understand what your plan is.
Additional information is very helpful in expediting the approval process on Rig Move
permit requests. When the fields are complete, click Next, or select the Route button at
the top of the form.
Route – If your Route was selected from a saved Route, the route fields will be
prepopulated. If not, enter From and To locations. These should be general
explanations of where you are starting and where you are ending. Be as descriptive as
possible.
Now add the Roads to the Route one at a time. Enter the ‘Road Type.’ From the dropdown, select ‘State/Federal’ for State or Federal highways, select ‘County’ for county roads, select ‘Township’ for Township roads, and Select Lease/Private for Lease roads or private roads. If you are unsure what type of road you will be traveling on, select the blue ‘View Restricted Road Map’ button toward the bottom of the screen to refer to the map. See ‘Restricted Road Map’ section for more information on using the map or check with the County Road Department in the county in which you will be traveling.
City Street - If you selected City Street road type – select the city you are traveling in.
County - If you selected County or Township road type, select the county you are traveling in for this road. If you are traveling in more than one county, road segments for each county should be listed as separate roads.
Township Approved By - If you selected a road type of Township, enter Township official approval name into the ‘Township Approved By’ field. Select the optional ‘View Township Contacts’ to obtain contact information for Township officials.
Road – The road field should be completed with a description of the road you are traveling on, using the road name, as well as the nearest intersection and other descriptive information to allow the county official reviewing your request to understand where you will be traveling.
Restriction – You must know if the road you are traveling has a weight restriction on it. If you don’t know, please click the ‘View Restricted Road Map’ button to review the restrictions in the county or counties you are traveling in. If there is no weight restriction on the road you are entering into the system, select ‘By Legal Weight’ from
19
the Restriction field dropdown menu. If there is a weight restriction on the road on which you are traveling, select the appropriate weight restriction from the dropdown menu.
Miles – Enter the number of miles you are traveling on this road or road segment. Any ton/mile fees being assessed will use this number of miles in the fee formula.
When the fields have been completed for this road or road segment, click the ‘Add a Road’ button to save. Repeat the ‘Add a Road’ procedure for each road you want to add to the route. *Note: If you are traveling on a ‘shared’ county road, that involves two counties, list the road segment under the county whose side of the road you are traveling. The order of the roads may be modified by using the up and down arrows to the left of the road list. The roads may be edited by selecting the pencil icon to the left of the road. The road may be deleted by selecting the trash can icon to the right of the road. When you have added all the roads to the route, you may click the Next button to continue or select the Review button at the top of the screen to review your permit request. Please see the Review, Permit Cart, and Check Out sections of the User Guide to complete the purchase of your Rig Move Permit
Permit Dashboard
A permit dashboard is available to registered users given the appropriate rights, for the management of current permits. To view the permit dashboard, from the dropdown menu, select Permits and Permit Dashboard. Permits may be viewed by the following categories by selecting each tab:
Drafts – The permit is under construction, and the purchase process has not been finalized. Drafts can be modified and completed at any time.
Pending – A permit has been paid for and submitted to the county or counties for approval, but the approval has not been finalized by one or more counties. The status of each county is displayed on the Pending permit listing.
Active – The permit has been approved or does not require county review, and can be used as a valid permit.
Select ‘View’ beside the permits you wish to open and view. Select the trash can icon to delete a permit.
View/Search Permits

20
To search for a permit using the following criteria, from the Permits dropdown menu, select
View/Search Permits
IMPORTANT NOTICE TO USER:
WARNING: Permits are valid on Non-divisible Loads only, and Weight Restrictions may be in place on some or all county/township roads.
PERMISSION FOR THIS MOVEMENT IS HEREBY GRANTED subject to compliance with provisions of laws put forth by individual cities & county members of the LoadPass Permit System. THIS PERMIT MUST BE IN POSSESSION PRIOR TO STARTING ANY MOVEMENT THIS PERMIT IS FOR SINGLE TRIP MOVEMENT ONLY THIS PERMIT IS ONLY VALID IN PARTICIPATING COUNTIES/CITIES and is NOT valid on State Highways THIS PERMIT IS VALID FOR NON-DIVISABLE LOADS ONLY. DIVISIBLE LOADS MUST BE REDUCED TO LEGAL WEIGHT Be advised that some counties/cities and townships have placed additional restrictions on the use of county/city and township roads. This permit does NOT give blanket authority to use roads that are otherwise restricted. If you will be traveling on weight restricted county or participating township roads you will need to include the road restriction in your permit route, and ton/mile fees will be applied. You may view the Restricted Road map on the ndenergy.org website for more information. Please note: The LoadPass Permit System provides the road restriction information, notifications and road restriction map as a courtesy to the counties and the industry. The information provided is from multiple data sources from the participating Counties. The information is believed to be accurate but LoadPass cannot guarantee the accuracy of the information within the system. It is the permit holder's responsibility to follow all applicable road restrictions. A listing of the participating county road superintendents and sheriff offices is available for download on the ndenergy.org website. Please call the county before driving to clarify any questions you have about county roadways or routing. REQUIREMENTS:
1. Overweight permits are not valid for movement on bituminous pavements when the atmospheric temperature is 85°F or above or when otherwise deemed necessary by county official(s). 2. No travel when inclement weather prevails, if visibility is poor or roadways are slippery. 3. No travel in hours of darkness. Movement must occur within ½ hour prior to Sunrise through ½ hour after sunset. 4. All vertical clearances are the responsibility of the permittee. Communication lines may be as low as 15'6", signal lights 16' and flashing lights 17'. 5. Require 18" x18" red flags, front & rear and traffic side of road 6. Require 12" x12" red flag at rearmost part of load when rear overhang is more than 4ft. 7. Must display a 12" x 60" 'OVERSIZE LOAD' sign front and rear. 8. Speed not to exceed 40 MPH on all roadways when the GVW exceeds 120,000 lbs or an axle group is more than 5,000 lbs over legal weight. 9. OVERDIMENSION RESTRICTIONS ARE THE SAME AS NORTH DAKOTA STATE LAW:
Liability of applicant: 1) The applicant or permittee, as a condition for obtaining and oversize or overweight permit, or both, permit, shall assume all responsibility for accidents, damage, or injury to any persons or damage to public or private property caused by the movement of any oversize or overweight, or both, vehicle or load covered by the permit while upon participating county, city or township roads of the LoadPass Permit System. 2) the applicant or permittee agrees to indemnify and hold harmless the counties, cities and townships participating in the LoadPass Permit System, their officers, and employees, and the LoadPass Permit System itself, from any and all claims resulting directly or indirectly from the movement of an oversize or overweight, or both, vehicle or load on any county, city or township roadways within the counties and or cities that are members of the LoadPass Permit System, governed by WDEA

21