Embed Size (px)
Citation preview

LogBook User’s Manual, Version 2.0
Partners/Sponsors: Alabama Law Enforcement Agency
Alabama Department of Economic and Community Affairs
Center for Advanced Public Safety Computer Science Department
The University of Alabama http://caps.ua.edu
Date revised: March 5, 2015
1

Table of Contents Getting Started ................................................................................................................................ 3
Launching Move .............................................................................................................................. 3
Introduction to LogBook ................................................................................................................. 4
Settings ........................................................................................................................................ 5
Navigating the Calendar .............................................................................................................. 8
Shift Info ...................................................................................................................................... 9
Importing Data .......................................................................................................................... 10
Add Activity Record ................................................................................................................... 11
Validating Your Data ................................................................................................................. 14
Finalizing Your Data .................................................................................................................. 15
Editing your Data ...................................................................................................................... 16
Printing ...................................................................................................................................... 16
Saving Your Data ....................................................................................................................... 19
Transferring Data ...................................................................................................................... 19
Search ........................................................................................................................................ 20
Reset Button ............................................................................................................................. 22
Help Icon ................................................................................................................................... 22
Technical Support ......................................................................................................................... 23
2
Getting Started In order to use LogBook you must first have MOVE (Mobile Officer’s Virtual Environment) installed on your system. This helps to automate your data entry requirements and integrates the various searches and entries you may wish to make. However, to use LogBook you must be logged into the MOVE.
Launching Move
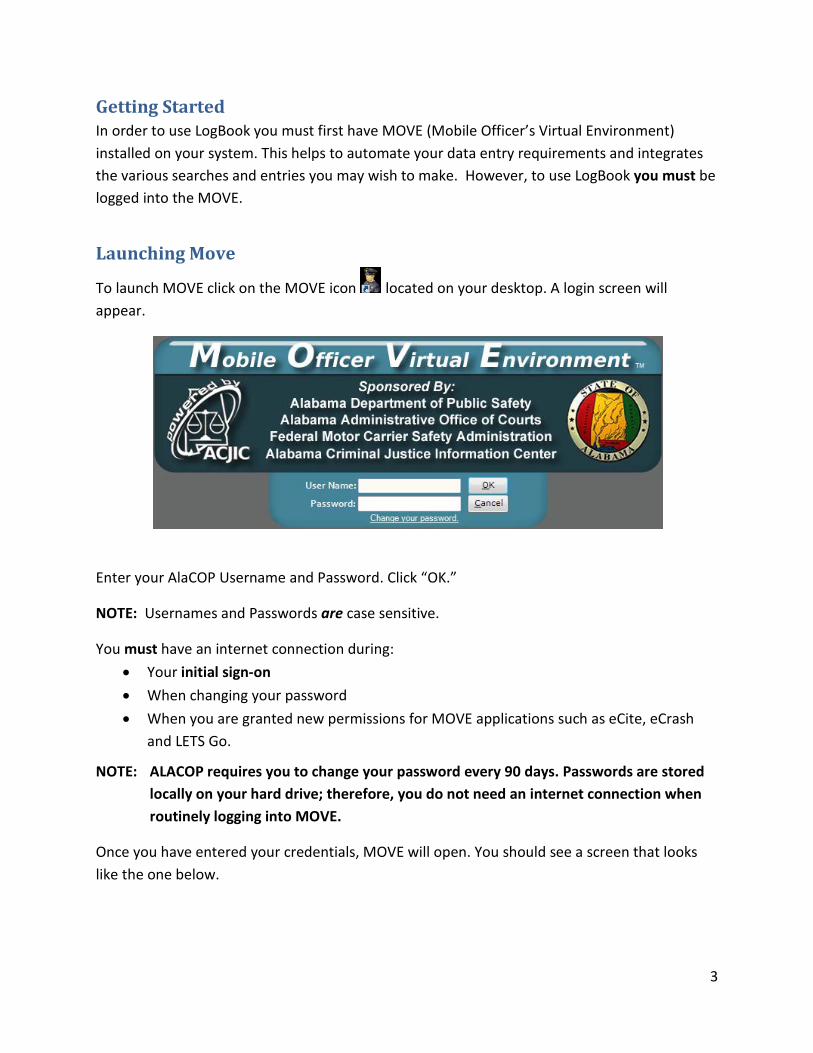
To launch MOVE click on the MOVE icon located on your desktop. A login screen will appear.
Enter your AlaCOP Username and Password. Click “OK.”
NOTE: Usernames and Passwords are case sensitive.
You must have an internet connection during: • Your initial sign-on • When changing your password • When you are granted new permissions for MOVE applications such as eCite, eCrash
and LETS Go.
NOTE: ALACOP requires you to change your password every 90 days. Passwords are stored locally on your hard drive; therefore, you do not need an internet connection when routinely logging into MOVE.
Once you have entered your credentials, MOVE will open. You should see a screen that looks like the one below.
3
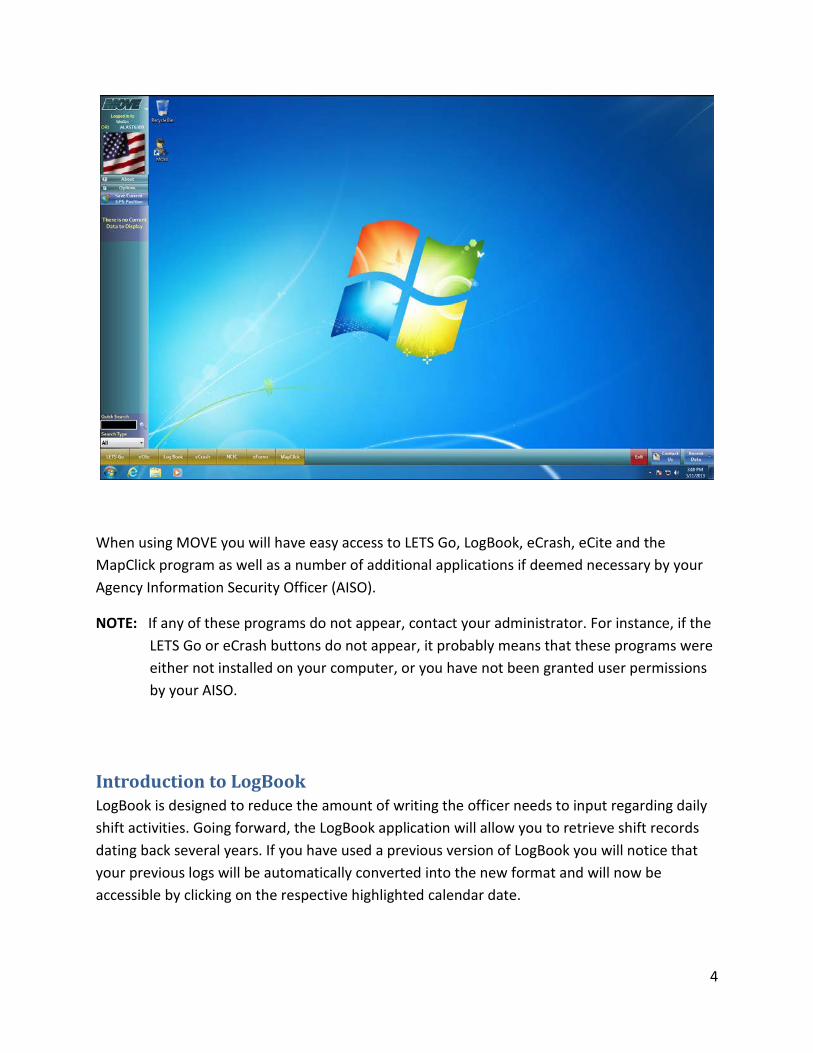
When using MOVE you will have easy access to LETS Go, LogBook, eCrash, eCite and the MapClick program as well as a number of additional applications if deemed necessary by your Agency Information Security Officer (AISO).
NOTE: If any of these programs do not appear, contact your administrator. For instance, if the LETS Go or eCrash buttons do not appear, it probably means that these programs were either not installed on your computer, or you have not been granted user permissions by your AISO.
Introduction to LogBook LogBook is designed to reduce the amount of writing the officer needs to input regarding daily shift activities. Going forward, the LogBook application will allow you to retrieve shift records dating back several years. If you have used a previous version of LogBook you will notice that your previous logs will be automatically converted into the new format and will now be accessible by clicking on the respective highlighted calendar date.
4
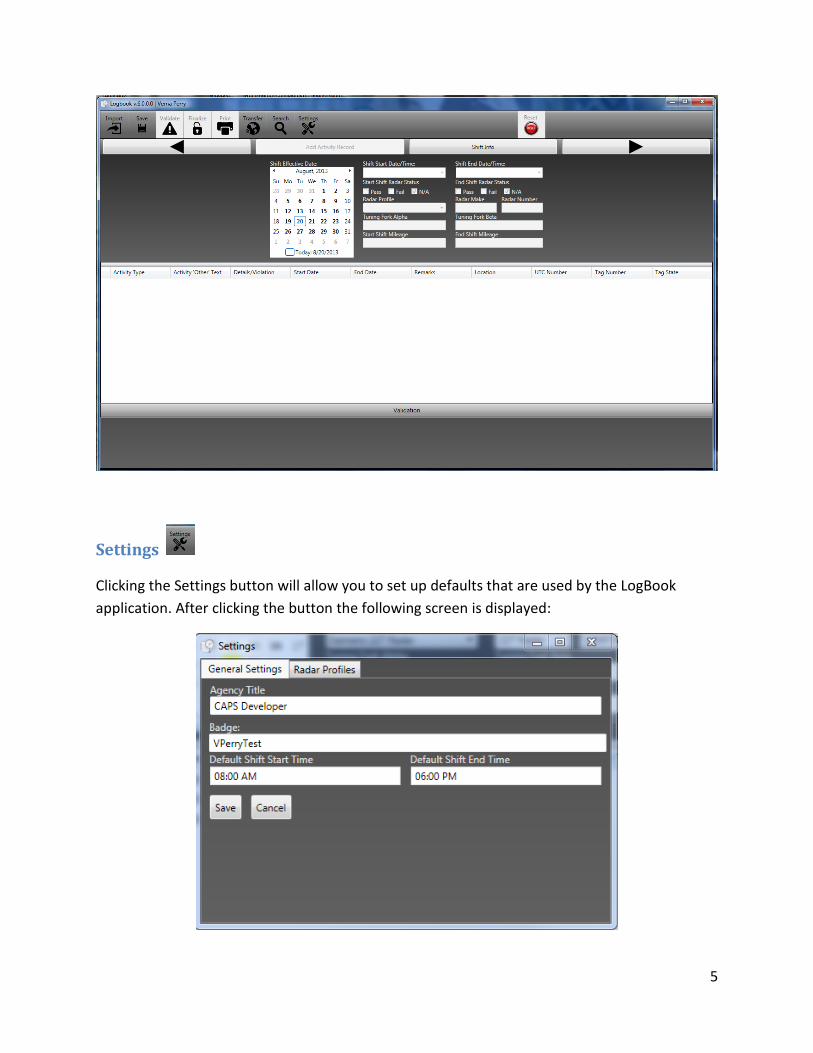
Settings
Clicking the Settings button will allow you to set up defaults that are used by the LogBook application. After clicking the button the following screen is displayed:
5

The Settings Menu is divided into two tabs. The first tab “General Settings” allows you to set the default settings for:
• Your Job Title with your Agency • Your Badge Number/Name • Your Default Shift Start Time • Your Default Shift End Time
By setting these items in the General Tab, you will not need to enter it every time you create a new logbook page. Currently, you must enter your shift time based upon a “12:00 hour clock.” Make certain to validate whether your shift is AM or PM. After making sure that all of the information is correct, press the Save button at the bottom left of the screen. Pressing the Cancel button will dismiss the screen and delete all information you have typed in.
The Second tab under the Settings menu is the Radar Profiles tab. It allows the user to create various Radar Profiles. If you are accustomed to working in a variety of police cars or using a variety of radar equipment during your shift, each car or type of radar equipment may have a different Radar setup.
Using the Radar Profiles tab displayed below, you can customize a different radar profile for every type of radar you use.
To begin creating your radar profile, first click the New Profile button in the lower left. Create a profile name of your own choosing for the first radar profile under the Profile Name text field in the top right. Next, you will need to enter the Radar Make/ Manufacturer’s name for the
6
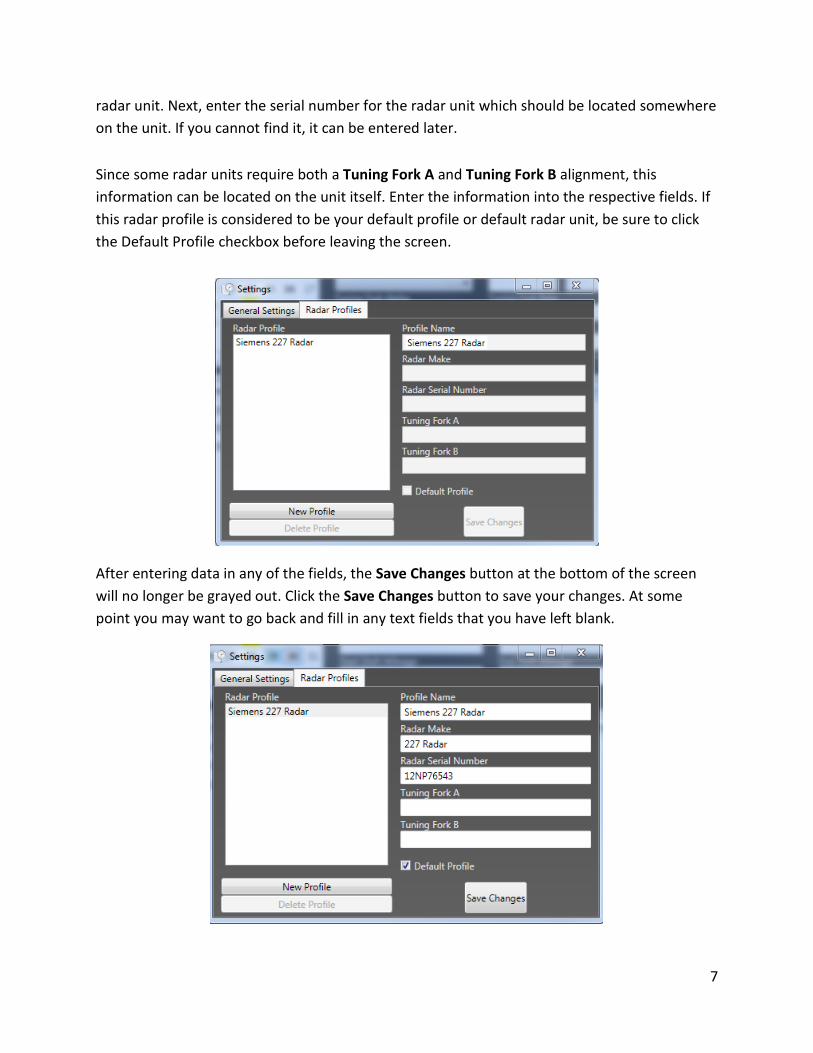
radar unit. Next, enter the serial number for the radar unit which should be located somewhere on the unit. If you cannot find it, it can be entered later.
Since some radar units require both a Tuning Fork A and Tuning Fork B alignment, this information can be located on the unit itself. Enter the information into the respective fields. If this radar profile is considered to be your default profile or default radar unit, be sure to click the Default Profile checkbox before leaving the screen.
After entering data in any of the fields, the Save Changes button at the bottom of the screen will no longer be grayed out. Click the Save Changes button to save your changes. At some point you may want to go back and fill in any text fields that you have left blank.
7

Navigating the Calendar When you open Logbook you will notice the Shift Effective Date calendar under the Shift Info Tab. This calendar will allow you to view past logs as well as check the status of the data entered.
As you create logs for various days, you will notice that some dates on the Shift Effective Date Calendar will be highlighted in various colors:
• Yellow highlight = the shift record is still open and has not been Finalized for the respective log date.
• Blue highlight = the shift log has been Finalized (however, if you need to, you can still perform additional edits).
• Green highlight = the shift log has been Transferred to the Agency’s server.
If you have not created a LogBook entry, no dates will be highlighted.
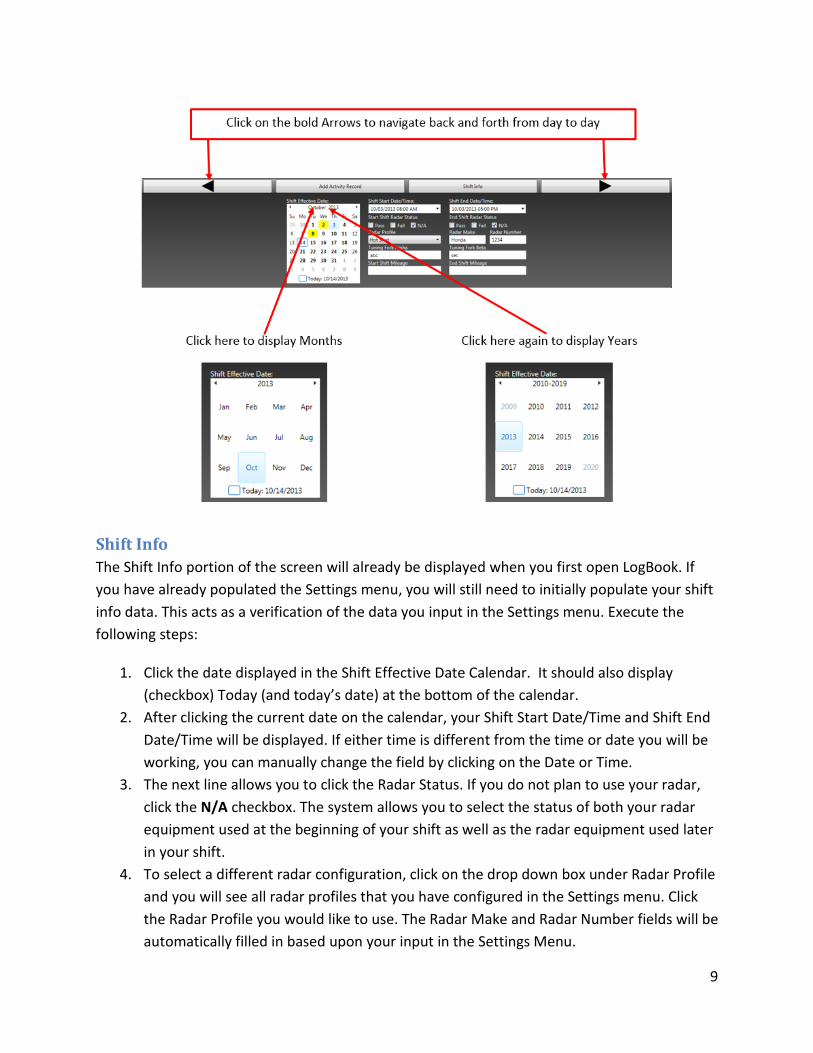
To maneuver to different days in the calendar you can simply click on the day you are interested in and view that day’s activity. To shift from day to day you can use the Bold Arrows at the top of the screen to go back and forth one day at a time.
If you need to see a previous month or year you can use the calendar navigation tool. Simply click on the month and year shown in then existing calendar. This will display a window that shows a table of months. You can then either choose the month desired or if you need to search further you can click on the year shown to display a table of years. Choose the year, then month, then day as needed.
8
Shift Info The Shift Info portion of the screen will already be displayed when you first open LogBook. If you have already populated the Settings menu, you will still need to initially populate your shift info data. This acts as a verification of the data you input in the Settings menu. Execute the following steps:
1. Click the date displayed in the Shift Effective Date Calendar. It should also display (checkbox) Today (and today’s date) at the bottom of the calendar.
2. After clicking the current date on the calendar, your Shift Start Date/Time and Shift End Date/Time will be displayed. If either time is different from the time or date you will be working, you can manually change the field by clicking on the Date or Time.
3. The next line allows you to click the Radar Status. If you do not plan to use your radar, click the N/A checkbox. The system allows you to select the status of both your radar equipment used at the beginning of your shift as well as the radar equipment used later in your shift.
4. To select a different radar configuration, click on the drop down box under Radar Profile and you will see all radar profiles that you have configured in the Settings menu. Click the Radar Profile you would like to use. The Radar Make and Radar Number fields will be automatically filled in based upon your input in the Settings Menu.
9
5. If you want to use a radar profile that you have not configured, click on the Radar Profile dropdown menu and click in the blank area in the dropdown field. This will blank out the adjacent fields. Type in the radar make and number in the adjacent fields.
6. The next fields “Tuning Fork Alpha” and “Tuning Fork Beta” will be filled in automatically if you are using a profile input in the Settings menu. (Note: You must have input this information in the Settings menu.)
7. Next, input your Start Shift Mileage. At the end of your shift you will need to input your End Shift Mileage. Or, when you try to Finalize or Validate your log, you will get an error message reminding you to input your End Shift Mileage.
Importing Data
The Import button is used to bring in reports and information from other applications such as eCite, eCrash, eForms, and ASPEN Inspections. The following conditions apply:
• eCite citations meeting the respective date criteria will be imported • eCrash reports that are completed and transferred to the server • eForms that are completed and Finalized • ASPEN Inspections that are completed.
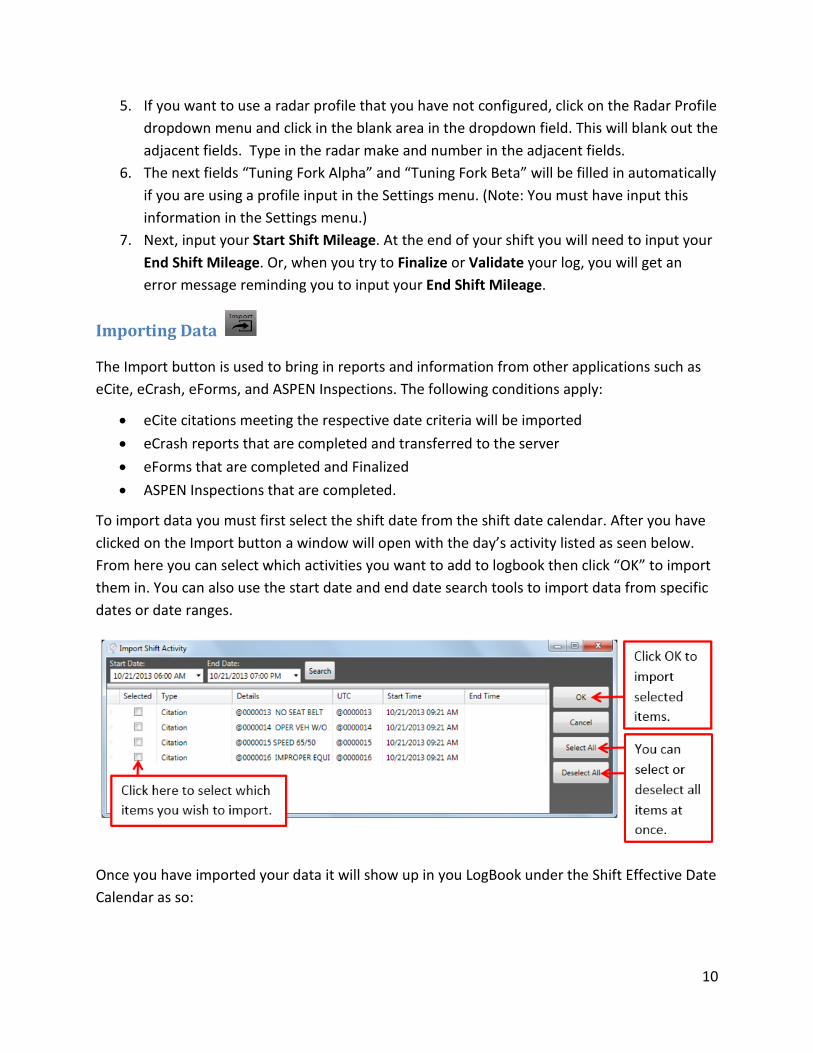
To import data you must first select the shift date from the shift date calendar. After you have clicked on the Import button a window will open with the day’s activity listed as seen below. From here you can select which activities you want to add to logbook then click “OK” to import them in. You can also use the start date and end date search tools to import data from specific dates or date ranges.
Once you have imported your data it will show up in you LogBook under the Shift Effective Date Calendar as so:
10
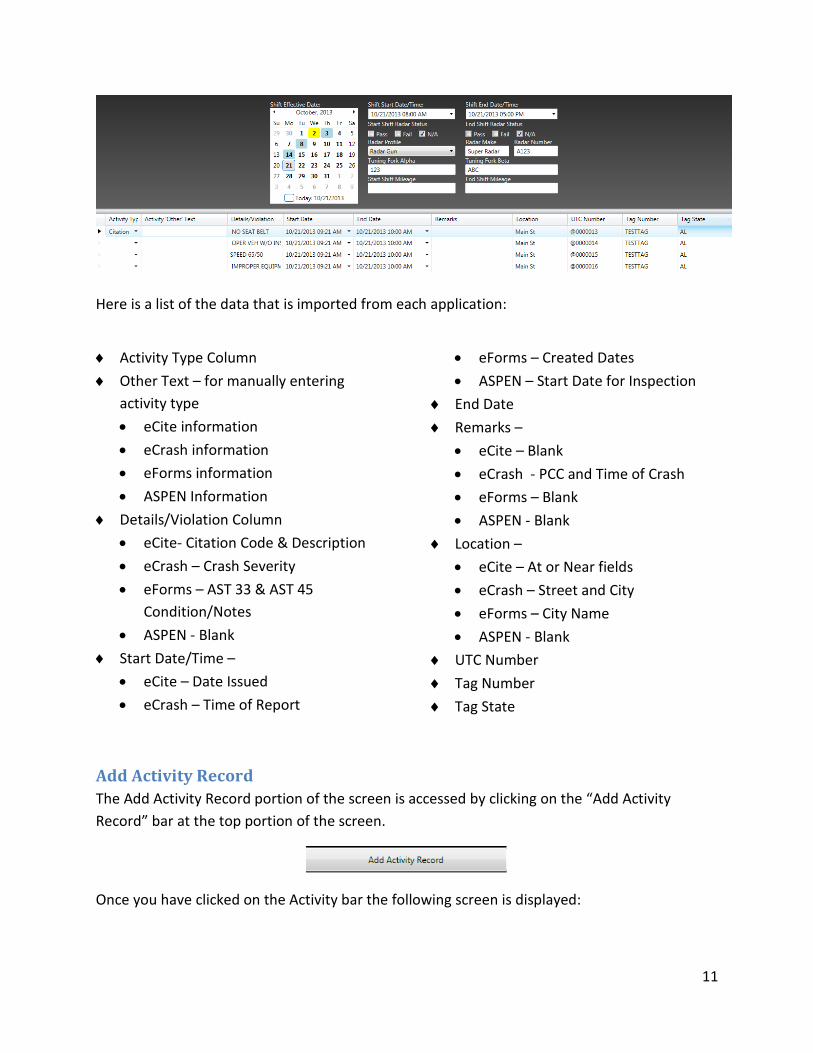
Here is a list of the data that is imported from each application:
♦ Activity Type Column ♦ Other Text – for manually entering
activity type • eCite information • eCrash information • eForms information • ASPEN Information
♦ Details/Violation Column • eCite- Citation Code & Description • eCrash – Crash Severity • eForms – AST 33 & AST 45
Condition/Notes • ASPEN - Blank
♦ Start Date/Time – • eCite – Date Issued • eCrash – Time of Report
• eForms – Created Dates • ASPEN – Start Date for Inspection
♦ End Date ♦ Remarks –
• eCite – Blank • eCrash - PCC and Time of Crash • eForms – Blank • ASPEN - Blank
♦ Location – • eCite – At or Near fields • eCrash – Street and City • eForms – City Name • ASPEN - Blank
♦ UTC Number ♦ Tag Number ♦ Tag State
Add Activity Record The Add Activity Record portion of the screen is accessed by clicking on the “Add Activity Record” bar at the top portion of the screen.
Once you have clicked on the Activity bar the following screen is displayed:
11
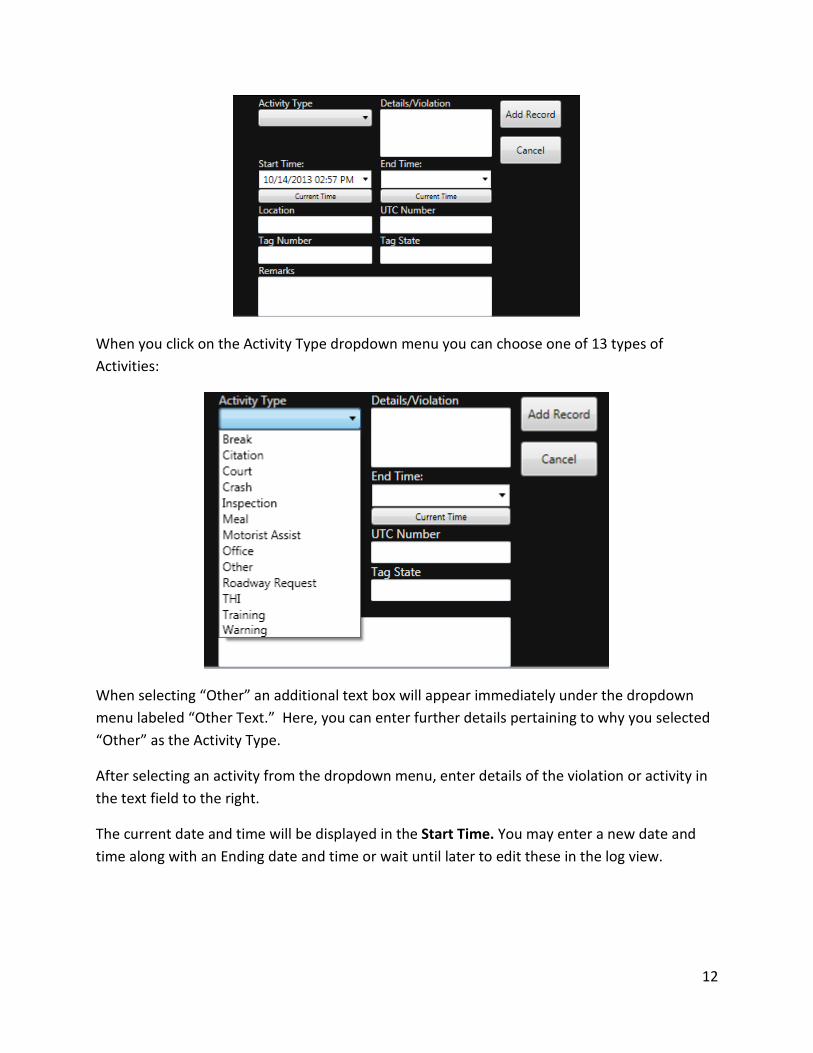
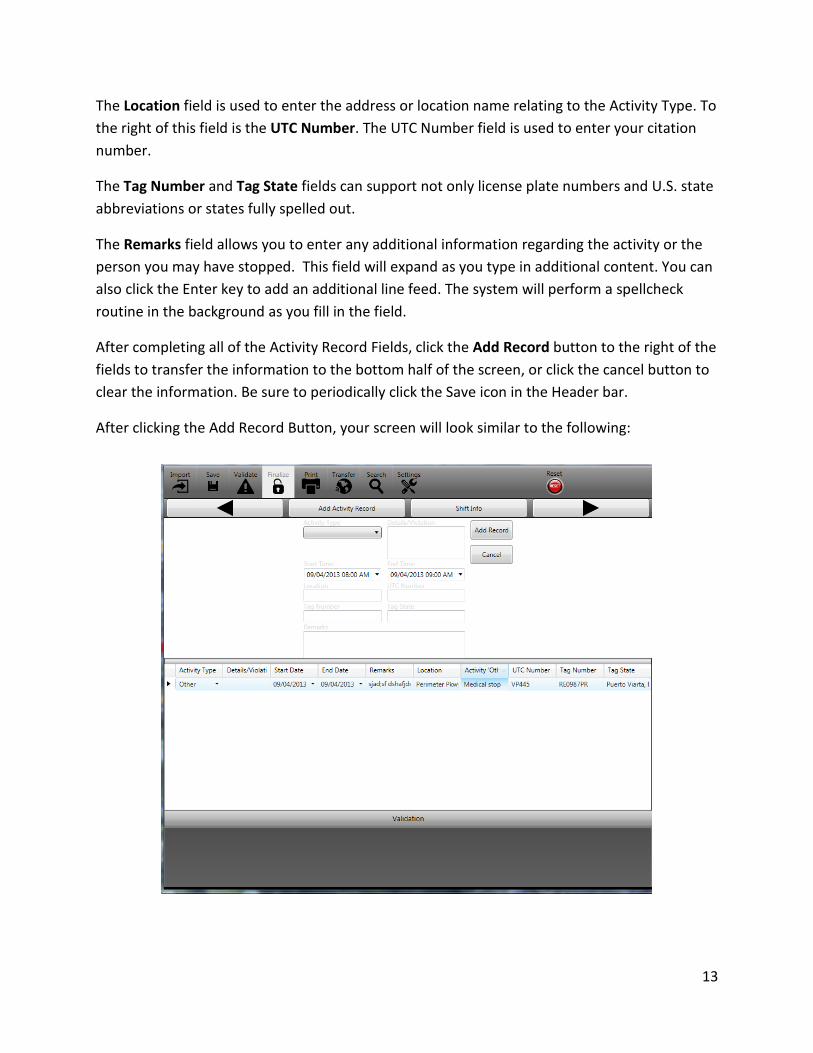
When you click on the Activity Type dropdown menu you can choose one of 13 types of Activities:
When selecting “Other” an additional text box will appear immediately under the dropdown menu labeled “Other Text.” Here, you can enter further details pertaining to why you selected “Other” as the Activity Type.
After selecting an activity from the dropdown menu, enter details of the violation or activity in the text field to the right.
The current date and time will be displayed in the Start Time. You may enter a new date and time along with an Ending date and time or wait until later to edit these in the log view.
12
The Location field is used to enter the address or location name relating to the Activity Type. To the right of this field is the UTC Number. The UTC Number field is used to enter your citation number.
The Tag Number and Tag State fields can support not only license plate numbers and U.S. state abbreviations or states fully spelled out.
The Remarks field allows you to enter any additional information regarding the activity or the person you may have stopped. This field will expand as you type in additional content. You can also click the Enter key to add an additional line feed. The system will perform a spellcheck routine in the background as you fill in the field.
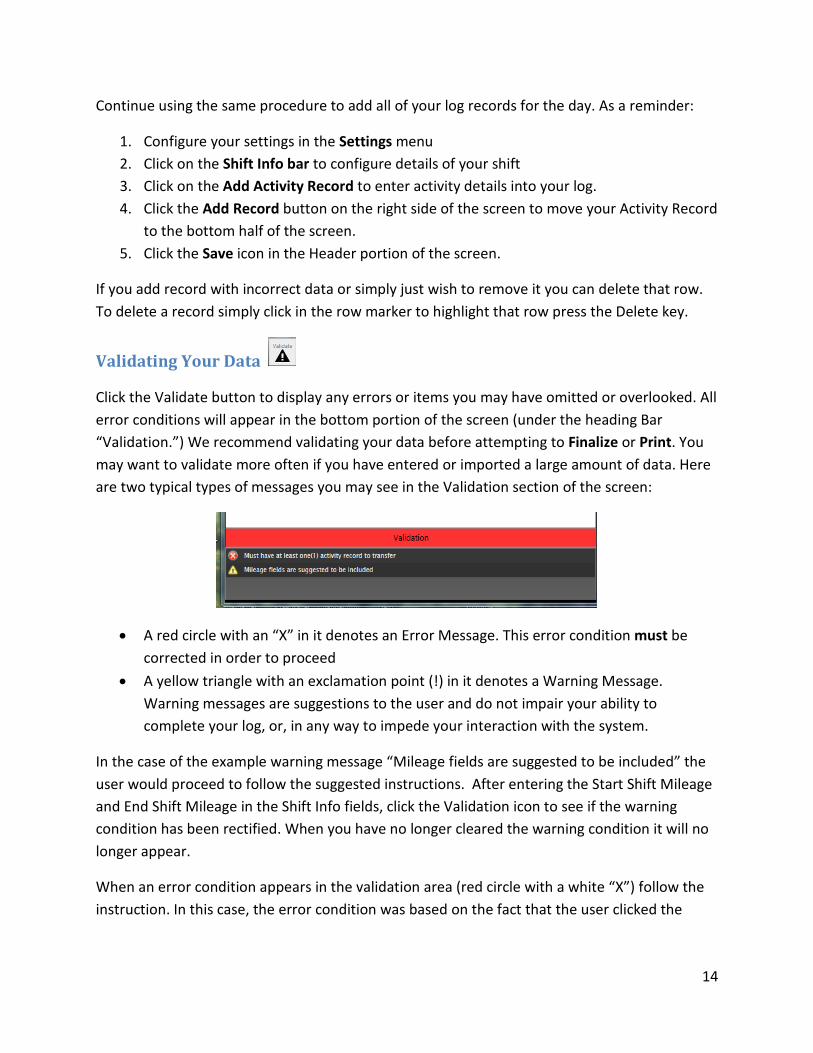
After completing all of the Activity Record Fields, click the Add Record button to the right of the fields to transfer the information to the bottom half of the screen, or click the cancel button to clear the information. Be sure to periodically click the Save icon in the Header bar.
After clicking the Add Record Button, your screen will look similar to the following:
13
Continue using the same procedure to add all of your log records for the day. As a reminder:
1. Configure your settings in the Settings menu 2. Click on the Shift Info bar to configure details of your shift 3. Click on the Add Activity Record to enter activity details into your log. 4. Click the Add Record button on the right side of the screen to move your Activity Record
to the bottom half of the screen. 5. Click the Save icon in the Header portion of the screen.
If you add record with incorrect data or simply just wish to remove it you can delete that row. To delete a record simply click in the row marker to highlight that row press the Delete key.
Validating Your Data
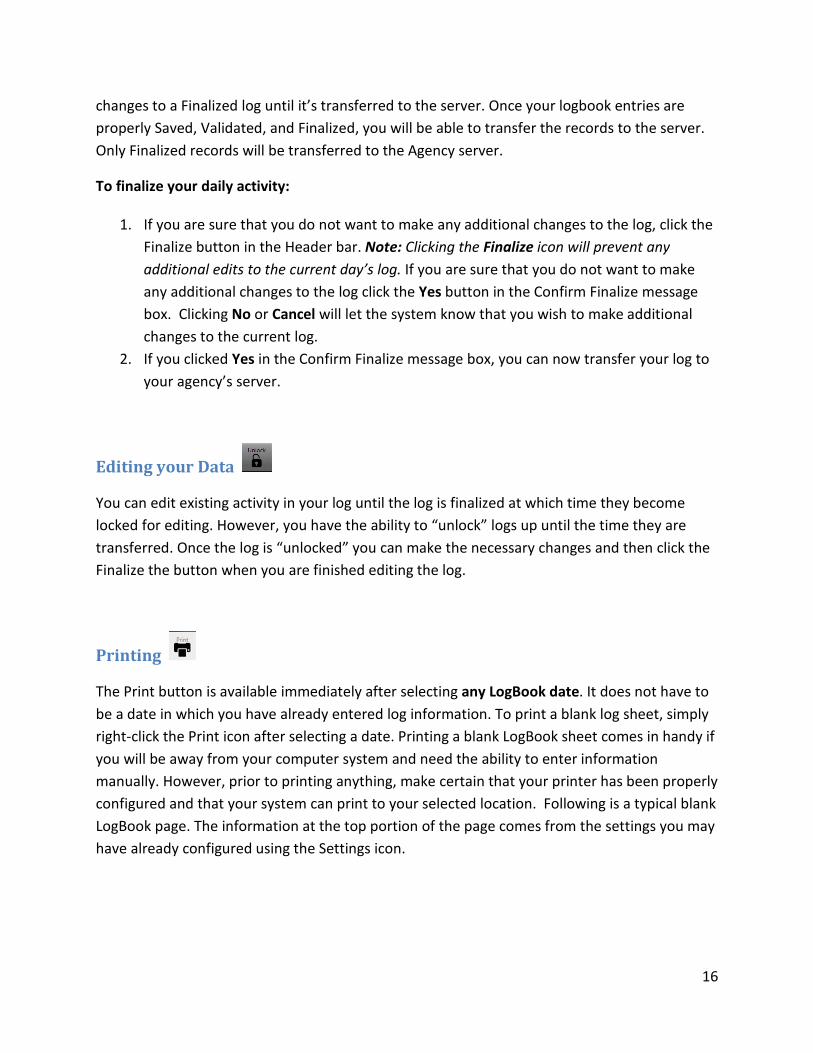
Click the Validate button to display any errors or items you may have omitted or overlooked. All error conditions will appear in the bottom portion of the screen (under the heading Bar “Validation.”) We recommend validating your data before attempting to Finalize or Print. You may want to validate more often if you have entered or imported a large amount of data. Here are two typical types of messages you may see in the Validation section of the screen:
• A red circle with an “X” in it denotes an Error Message. This error condition must be corrected in order to proceed
• A yellow triangle with an exclamation point (!) in it denotes a Warning Message. Warning messages are suggestions to the user and do not impair your ability to complete your log, or, in any way to impede your interaction with the system.
In the case of the example warning message “Mileage fields are suggested to be included” the user would proceed to follow the suggested instructions. After entering the Start Shift Mileage and End Shift Mileage in the Shift Info fields, click the Validation icon to see if the warning condition has been rectified. When you have no longer cleared the warning condition it will no longer appear.
When an error condition appears in the validation area (red circle with a white “X”) follow the instruction. In this case, the error condition was based on the fact that the user clicked the
14

Validate icon prior to inputting an activity record; therefore, the error condition will be resolved by adding at least one activity record before clicking Validate.
Once all error messages and warning messages are cleared and you click the Validation icon once again, the Validation bar near the bottom of the screen will turn a bright green.
To resolve errors and warnings:
1. Click the Validate icon on the header bar. The Validation bar in the bottom portion of the screen will turn a bright green. This means that the system has found no major errors in your log data. However, if the system finds fields that you omitted, the Validation bar will turn red indicating that the system has found an error or an omission in your log.
2. The reason for the error will be displayed in the bottom portion of the screen. You will need to rectify the error before the system will allow you to close out the day’s log. To rectify any errors appearing in the Validation area:
o Clearing Error Messages: Upon seeing an Error Message in the Validation Area, go to the
respective area of the form referred to in the message and follow the recommended action. In this case, the system is telling the user that there needs to be at least one record in the Activity Area of the form.
o Clearing Warning Messages: The Validation bar will turn yellow if you have any Warning messages yet
to be cleared. Again, the system will continue to process your log despite a Warning message being displayed. To rectify Warning messages Click the validation with the triangle and go to the respective area of the form and follow the recommended action.
Finalizing Your Data
After validating your records and correcting any omissions or errors, you are now ready to finalize your data. Click the Finalize icon. LogBook now allows users to reopen and/or make
15
changes to a Finalized log until it’s transferred to the server. Once your logbook entries are properly Saved, Validated, and Finalized, you will be able to transfer the records to the server. Only Finalized records will be transferred to the Agency server.
To finalize your daily activity:
1. If you are sure that you do not want to make any additional changes to the log, click the Finalize button in the Header bar. Note: Clicking the Finalize icon will prevent any additional edits to the current day’s log. If you are sure that you do not want to make any additional changes to the log click the Yes button in the Confirm Finalize message box. Clicking No or Cancel will let the system know that you wish to make additional changes to the current log.
2. If you clicked Yes in the Confirm Finalize message box, you can now transfer your log to your agency’s server.
Editing your Data
You can edit existing activity in your log until the log is finalized at which time they become locked for editing. However, you have the ability to “unlock” logs up until the time they are transferred. Once the log is “unlocked” you can make the necessary changes and then click the Finalize the button when you are finished editing the log.
Printing
The Print button is available immediately after selecting any LogBook date. It does not have to be a date in which you have already entered log information. To print a blank log sheet, simply right-click the Print icon after selecting a date. Printing a blank LogBook sheet comes in handy if you will be away from your computer system and need the ability to enter information manually. However, prior to printing anything, make certain that your printer has been properly configured and that your system can print to your selected location. Following is a typical blank LogBook page. The information at the top portion of the page comes from the settings you may have already configured using the Settings icon.
16

After the Printer page is displayed, you will notice the heading “ACTIVITY/RADAR LOG” is prominently displayed on the first line. To the user’s right is the page number or number of pages. If you are merely printing a blank page, it will default to Page 1 of 1. As you add more Activity Information to LogBook for a specific date, the data may overflow onto a second page or more when printing.
The top left-hand block of the LogBook printout contains the Officer’s Name, followed by the Badge Number, Radar Make, Radar Number and the Tuning Fork A and B channel numbers. If you did not enter any of this data when you were configuring your application using the Settings icon, this data block will be blank on the printout and will be blank on your Activity Record screen.
17

The center block of information below the ACTIVITY/RADAR LOG heading contains your Radar Start and End Status. If you selected the N/A checkbox on the Shift Information screen it will reflect this on the printer log as well. If you selected the N/A checkbox in the Settings configuration area, it will likewise have the checkbox selected on the printout. Having the N/A checkbox selected will in no way hinder your use of the LogBook product. It only means that the system will not check for radar-related information.
The right-hand block of the printout contains the Shift Date, Start Time, and End Time. The total mileage calculated (by the system) for that date will appear in the Shift Mileage field.
The very bottom of the printer Log deals with the actual output of the page. From left to right you can click the printer queue down arrow to display the complete list of printers your system has been configured to print to. After clicking the print queue down arrow, merely scroll through the list of available printers and select the appropriate one.
The next button at the bottom of the printer log is the Print button. Clicking the Print button will automatically print a hardcopy of all pages displayed in the printer log. When all pages have been spooled to the printer, the print interface will automatically close. If you decide to not print after viewing the pages of your report in the print log, click the Cancel button.
By clicking on the Export to PDF button you can export the report to a PDF file copy on your computer’s hard drive or thumb drive.
18

Saving Your Data
The Save Icon is used to save all log records for the current date. It is a good habit to periodically click the Save button to save large amounts of data that you may have input. In addition, when you log off each day the system will also prompt you to save your data.
Transferring Data
The Transfer button is used to upload or transfer your log data to the agency’s server.
Note: While in the Training mode, you will not be able to transfer data to the agency’s server. Exit the training mode and then try again to upload your file.
To Transfer your data:
3. Click the Transfer button on the Header bar. The Transfer LogBook records screen will be displayed. All of your Logbook records created since your last upload will be displayed.
4. Place a check next to the records you would like to transfer to your agency’s server. 5. On the far right hand side of the screen, click on either of the following buttons:
a. OK b. Cancel c. Select All d. Deselect All
If you clicked OK, a status message will appear in the Result column, reflecting that the record has been successfully transferred to the agency server. However, if when you selected the OK
19
button and the word None appears in the Result column, this means that no records were transferred to the agency server.
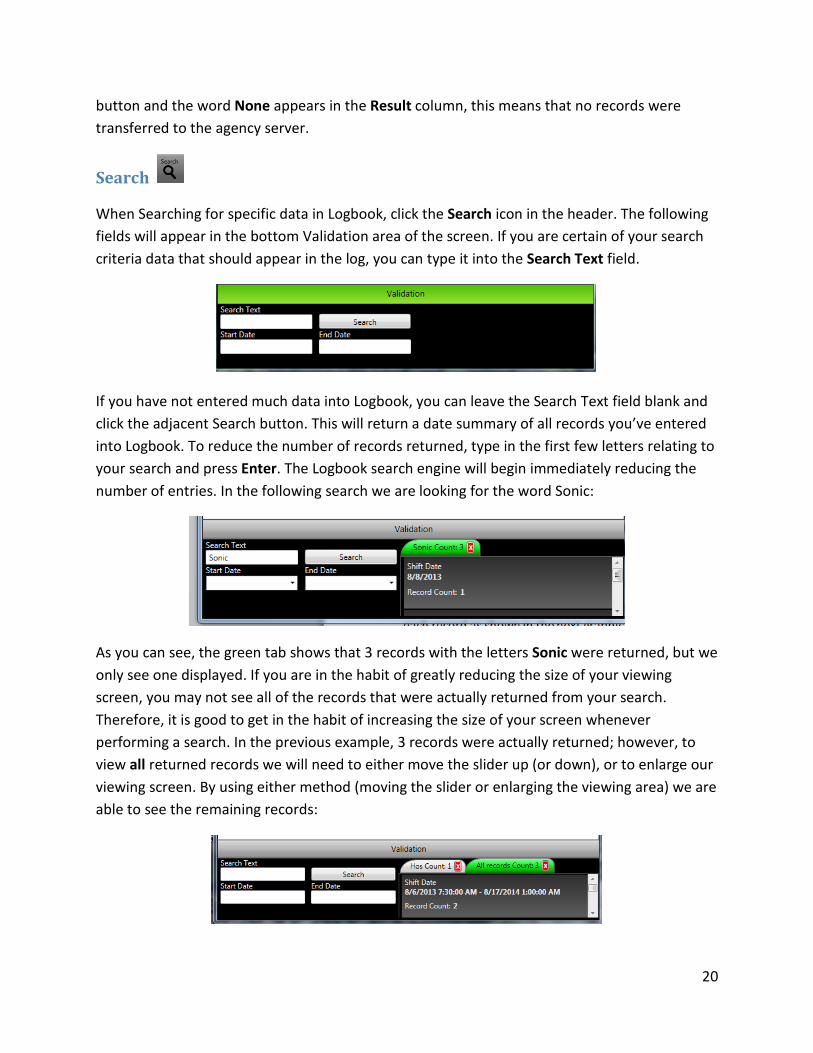
Search
When Searching for specific data in Logbook, click the Search icon in the header. The following fields will appear in the bottom Validation area of the screen. If you are certain of your search criteria data that should appear in the log, you can type it into the Search Text field.
If you have not entered much data into Logbook, you can leave the Search Text field blank and click the adjacent Search button. This will return a date summary of all records you’ve entered into Logbook. To reduce the number of records returned, type in the first few letters relating to your search and press Enter. The Logbook search engine will begin immediately reducing the number of entries. In the following search we are looking for the word Sonic:
As you can see, the green tab shows that 3 records with the letters Sonic were returned, but we only see one displayed. If you are in the habit of greatly reducing the size of your viewing screen, you may not see all of the records that were actually returned from your search. Therefore, it is good to get in the habit of increasing the size of your screen whenever performing a search. In the previous example, 3 records were actually returned; however, to view all returned records we will need to either move the slider up (or down), or to enlarge our viewing screen. By using either method (moving the slider or enlarging the viewing area) we are able to see the remaining records:
20
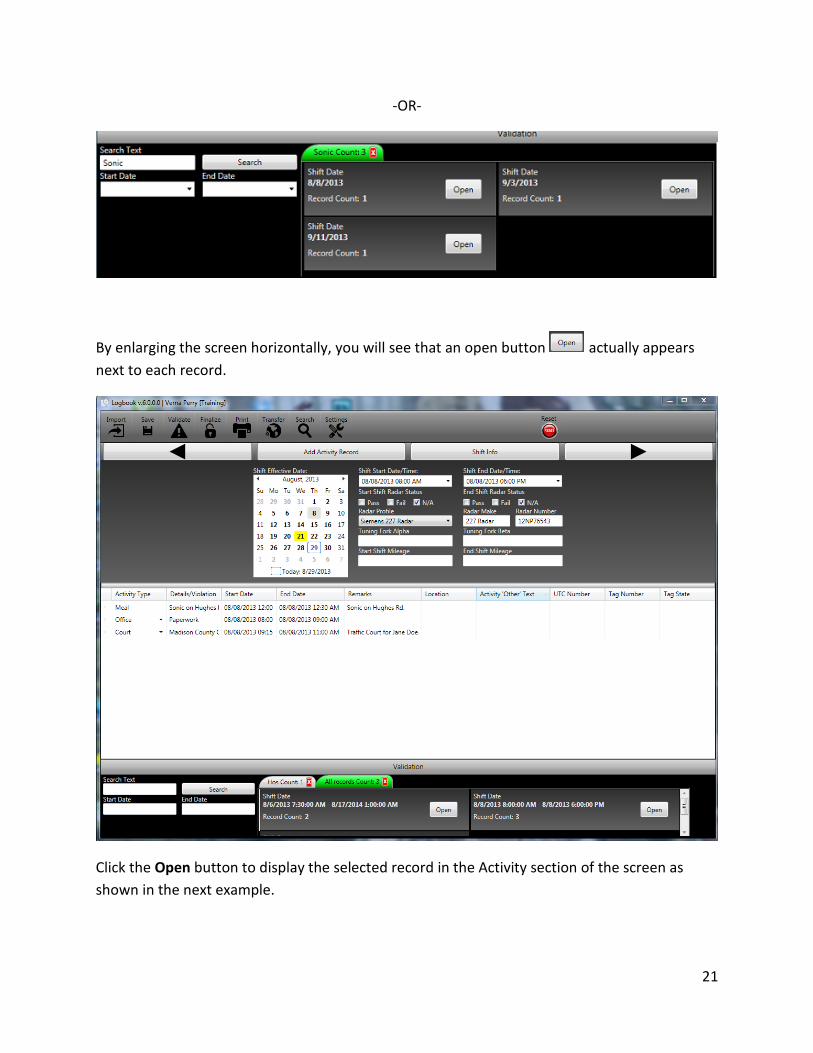
-OR-
By enlarging the screen horizontally, you will see that an open button actually appears next to each record.
Click the Open button to display the selected record in the Activity section of the screen as shown in the next example.
21
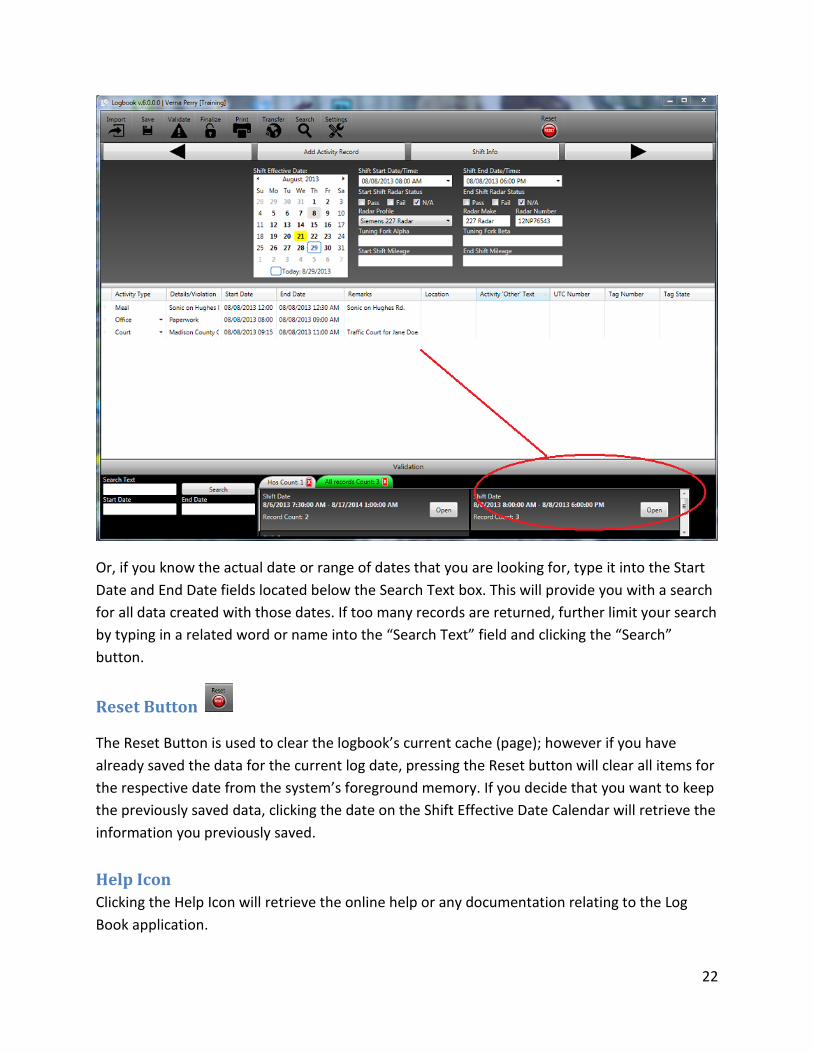
Or, if you know the actual date or range of dates that you are looking for, type it into the Start Date and End Date fields located below the Search Text box. This will provide you with a search for all data created with those dates. If too many records are returned, further limit your search by typing in a related word or name into the “Search Text” field and clicking the “Search” button.
Reset Button
The Reset Button is used to clear the logbook’s current cache (page); however if you have already saved the data for the current log date, pressing the Reset button will clear all items for the respective date from the system’s foreground memory. If you decide that you want to keep the previously saved data, clicking the date on the Shift Effective Date Calendar will retrieve the information you previously saved.
Help Icon Clicking the Help Icon will retrieve the online help or any documentation relating to the Log Book application.
22
Technical Support As you begin to use the LogBook application you may have questions or problems that are not covered in this training manual. We have several options available to assist you should you encounter difficulties.
We welcome your feedback on the LogBook application. Please feel free to offer suggestions and recommendations. Or, notify us of any problems you may encounter, or tell us how much you like the program. This is how we make necessary changes geared to improving the product for you.
For technical support or to offer feedback please call 800-392-8025. Or, you can email questions, comments, and /or suggestions to [email protected].
23