Embed Size (px)
Citation preview
© 2017 by Bird Home Automation GmbH. Stand June 27th 2017
Diese Anleitung wurde erstellt und bereitgestellt durch Bird Home
Automation Group.
Loxone Integration mit DoorBird IP Video Türstation
(PLEASE SCROLL DOWN FOR THE ENGLISH VERSION)
1. Konfiguration der DoorBird IP Video Türstation
1.1. SIP Einstellungen
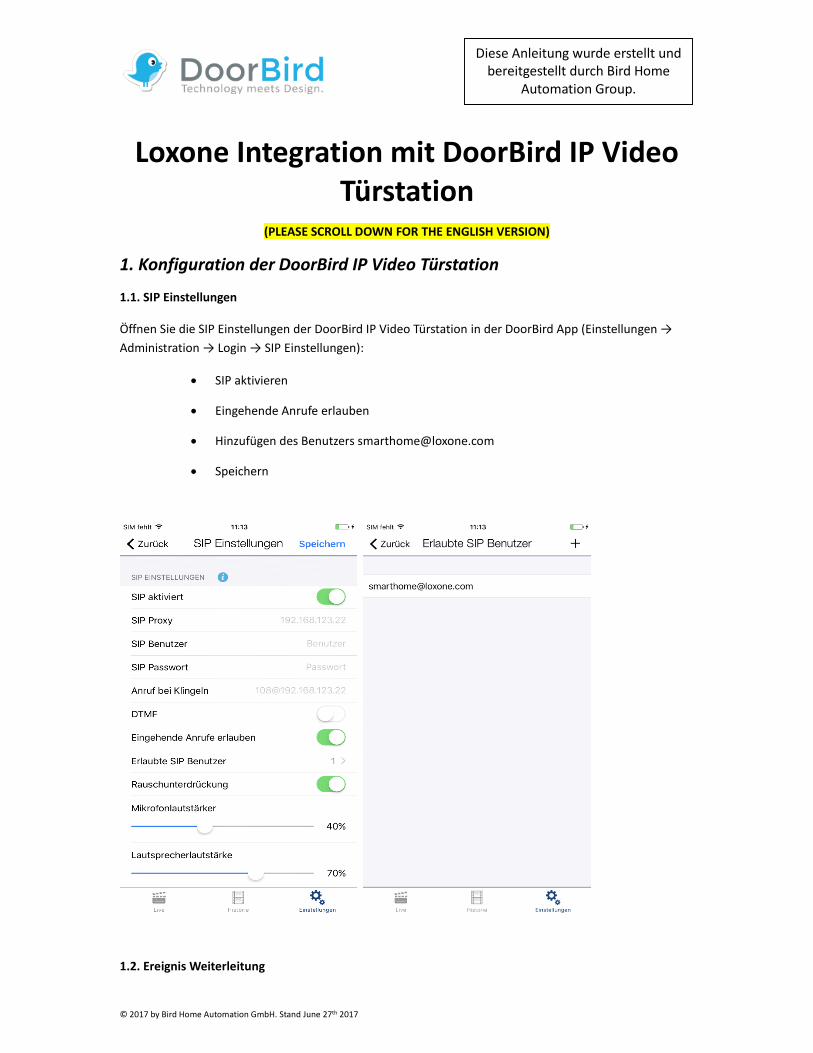
Öffnen Sie die SIP Einstellungen der DoorBird IP Video Türstation in der DoorBird App (Einstellungen →
Administration → Login → SIP Einstellungen):
SIP aktivieren
Eingehende Anrufe erlauben
Hinzufügen des Benutzers [email protected]
Speichern
1.2. Ereignis Weiterleitung
© 2017 by Bird Home Automation GmbH. Stand June 27th 2017
Diese Anleitung wurde erstellt und bereitgestellt durch Bird Home
Automation Group.
Die Ereignisse (Klingeln, Bewegungssensor) der DoorBird IP Video Türstation müssen an den Loxone Miniserver weitergeleitet werden. Um diese Experten-Funktion in der DoorBird IP Video Türstation zu aktivieren, müssen Sie einmalig zwei URLs per Webbrowser über einen PC aufrufen. Der PC muss im selben LAN wie der Loxone Miniserver und die DoorBird IP Videotürstation sein. Wir empfehlen die Verwendung von Firefox.
Der URL besteht aus folgenden Daten:
DoorBird App Benutzername und Passwort der DoorBird IP Video Türstation (wichtig: kein Administrator), siehe z.B. das Dokument „Digital Passport“ der DoorBird IP Video Türstation
IP Adresse der DoorBird IP Video Türstation
Loxone Miniserver IP Adresse und Port
Virtueller Eingang auf den geschaltet wird
Loxone Miniserver Benutzername und Passwort
Klingel Event URL
http://<doorbird-username>:<doorbird-password>@<doorbird-ip-address>/bha-api/notification.cgi?url=http://<loxone-miniserver-ip-address>:<loxone-miniserver-port>/dev/sps/io/vixx/pulse?doorbell&user=<loxone-miniserver-username>&password=<loxone-miniserver-password>&event=doorbell&subscribe=1
Stellen Sie sicher, dass Sie die Platzhalter <> durch die passenden Informationen ersetzen. Geben Sie dann die URL in Ihrem Webbrowser ein und bestätigen Sie mit ENTER.
Bewegungssensor Event URL
http://<doorbird-username>:<doorbird-password>@<doorbird-ip-adress>/bha-api/notification.cgi?url=http://<loxone-miniserver-ip-address:<loxone-miniserver-port>/dev/sps/io/vixx/pulse?motionsensor&user=<loxone-miniserver-username>&password=<loxone-miniserver-password>&event=motionsensor&subscribe=1
Stellen Sie sicher, dass Sie die Platzhalter <> durch die passenden Informationen ersetzen. Geben Sie dann die URL in Ihrem Webbrowser ein und bestätigen Sie mit ENTER.
© 2017 by Bird Home Automation GmbH. Stand June 27th 2017
Diese Anleitung wurde erstellt und bereitgestellt durch Bird Home
Automation Group.
2. Konfiguration des Loxone Miniserver
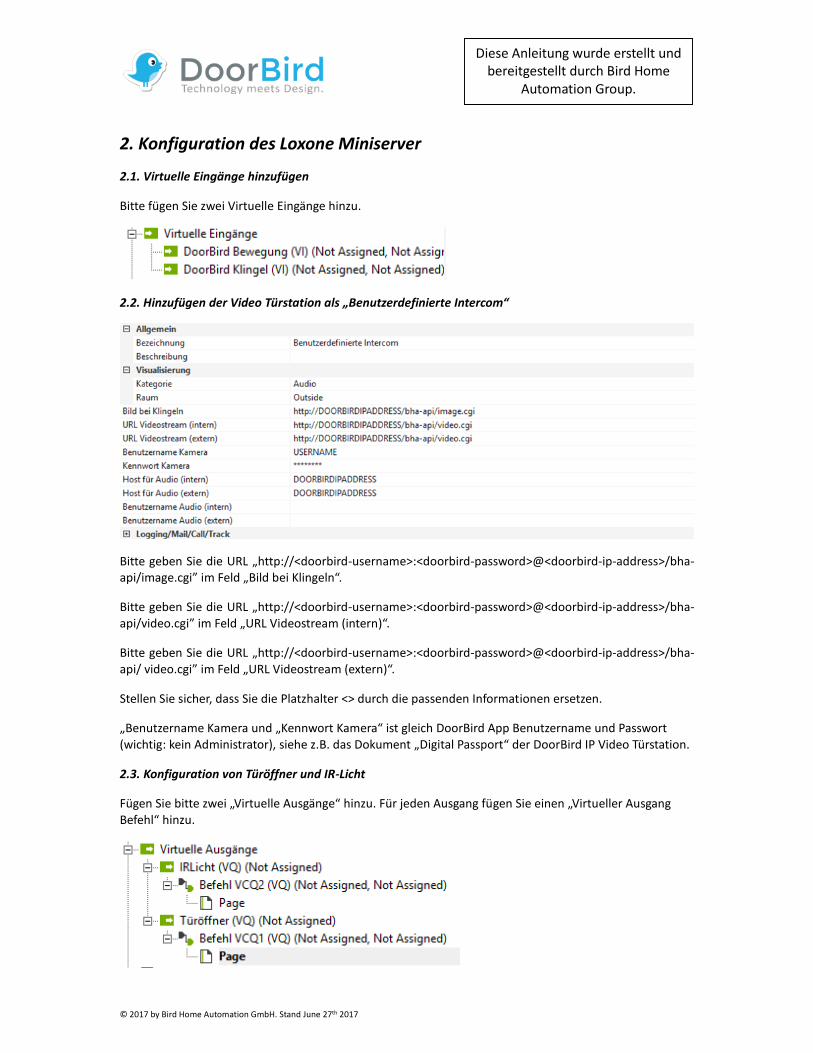
2.1. Virtuelle Eingänge hinzufügen
Bitte fügen Sie zwei Virtuelle Eingänge hinzu.
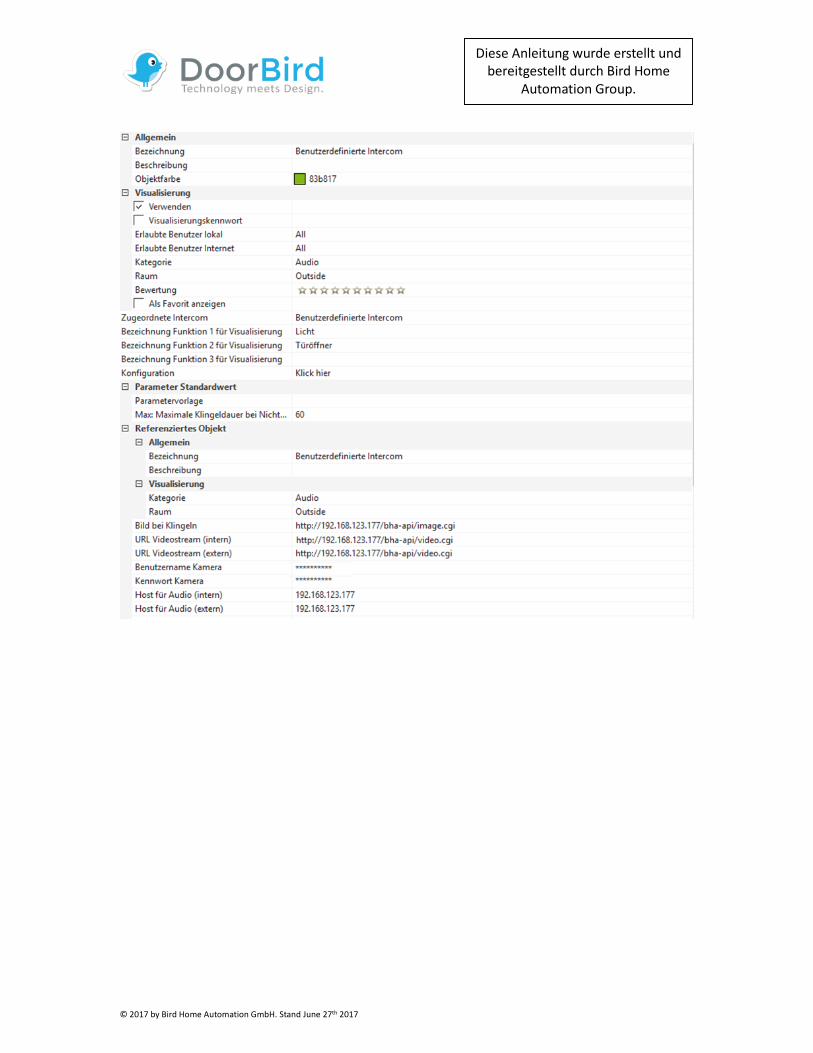
2.2. Hinzufügen der Video Türstation als „Benutzerdefinierte Intercom“
Bitte geben Sie die URL „http://<doorbird-username>:<doorbird-password>@<doorbird-ip-address>/bha-api/image.cgi” im Feld „Bild bei Klingeln“.
Bitte geben Sie die URL „http://<doorbird-username>:<doorbird-password>@<doorbird-ip-address>/bha-api/video.cgi” im Feld „URL Videostream (intern)“.
Bitte geben Sie die URL „http://<doorbird-username>:<doorbird-password>@<doorbird-ip-address>/bha-api/ video.cgi” im Feld „URL Videostream (extern)“.
Stellen Sie sicher, dass Sie die Platzhalter <> durch die passenden Informationen ersetzen.
„Benutzername Kamera und „Kennwort Kamera“ ist gleich DoorBird App Benutzername und Passwort (wichtig: kein Administrator), siehe z.B. das Dokument „Digital Passport“ der DoorBird IP Video Türstation.
2.3. Konfiguration von Türöffner und IR-Licht
Fügen Sie bitte zwei „Virtuelle Ausgänge“ hinzu. Für jeden Ausgang fügen Sie einen „Virtueller Ausgang Befehl“ hinzu.
© 2017 by Bird Home Automation GmbH. Stand June 27th 2017
Diese Anleitung wurde erstellt und bereitgestellt durch Bird Home
Automation Group.
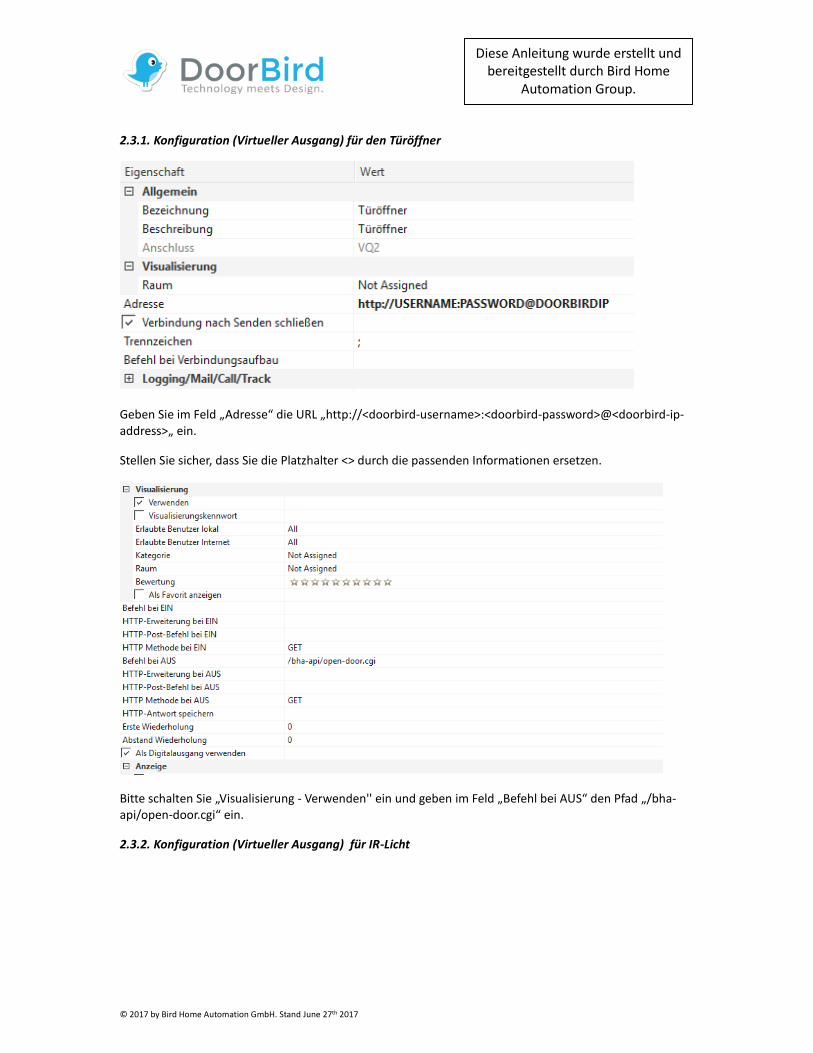
2.3.1. Konfiguration (Virtueller Ausgang) für den Türöffner
Geben Sie im Feld „Adresse“ die URL „http://<doorbird-username>:<doorbird-password>@<doorbird-ip-address>„ ein.
Stellen Sie sicher, dass Sie die Platzhalter <> durch die passenden Informationen ersetzen.
Bitte schalten Sie „Visualisierung - Verwenden'' ein und geben im Feld „Befehl bei AUS“ den Pfad „/bha-api/open-door.cgi“ ein.
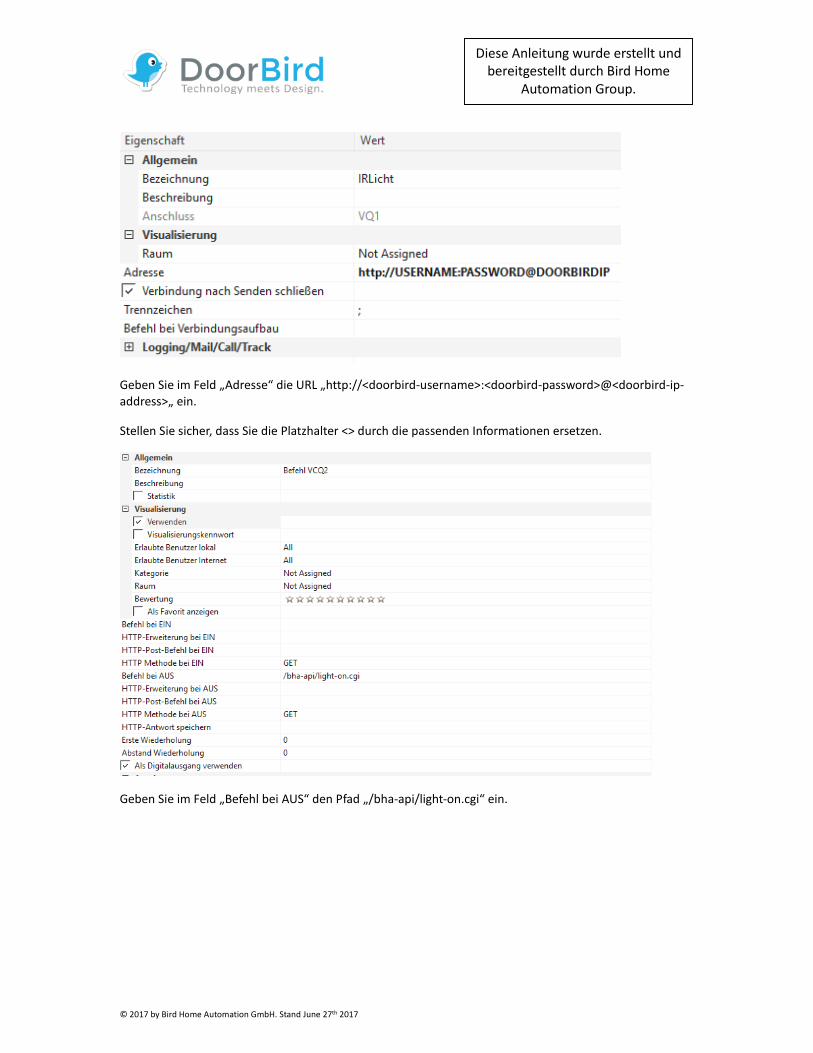
2.3.2. Konfiguration (Virtueller Ausgang) für IR-Licht
© 2017 by Bird Home Automation GmbH. Stand June 27th 2017
Diese Anleitung wurde erstellt und bereitgestellt durch Bird Home
Automation Group.
Geben Sie im Feld „Adresse“ die URL „http://<doorbird-username>:<doorbird-password>@<doorbird-ip-address>„ ein.
Stellen Sie sicher, dass Sie die Platzhalter <> durch die passenden Informationen ersetzen.
Geben Sie im Feld „Befehl bei AUS“ den Pfad „/bha-api/light-on.cgi“ ein.
© 2017 by Bird Home Automation GmbH. Stand June 27th 2017
Diese Anleitung wurde erstellt und bereitgestellt durch Bird Home
Automation Group.
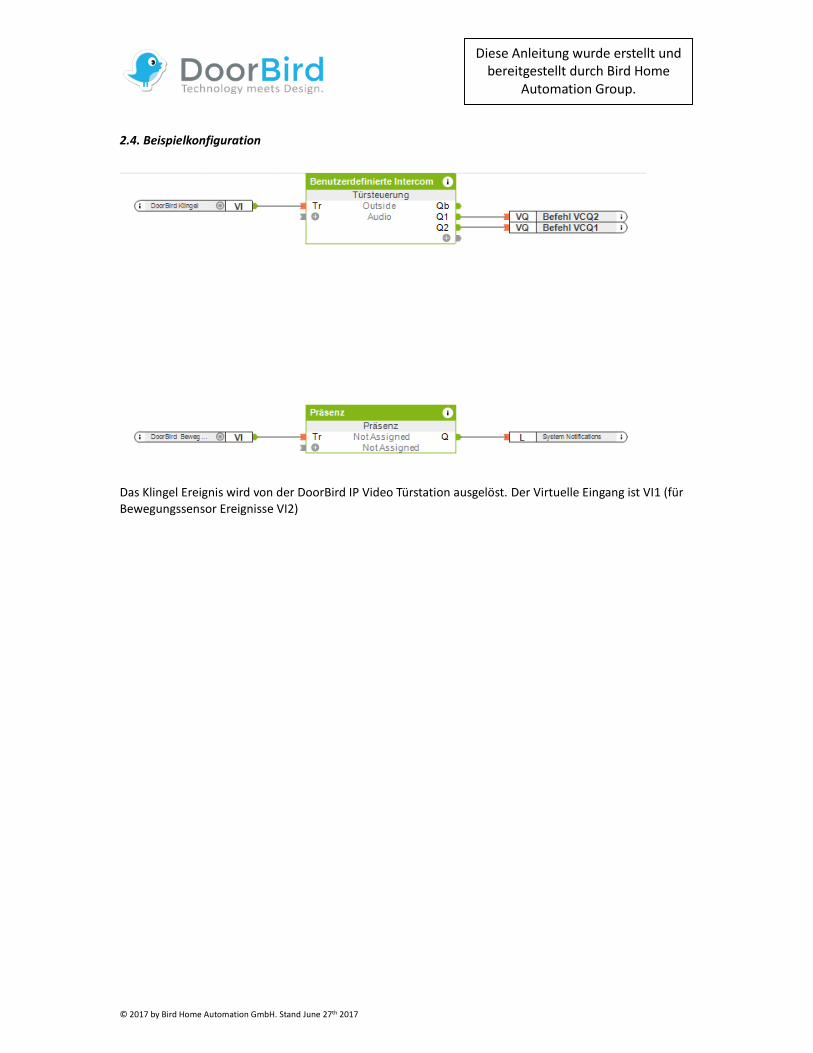
2.4. Beispielkonfiguration
Das Klingel Ereignis wird von der DoorBird IP Video Türstation ausgelöst. Der Virtuelle Eingang ist VI1 (für Bewegungssensor Ereignisse VI2)
© 2017 by Bird Home Automation GmbH. Stand June 27th 2017
Diese Anleitung wurde erstellt und bereitgestellt durch Bird Home
Automation Group.

© 2017 by Bird Home Automation GmbH. Stand June 27th 2017
Diese Anleitung wurde erstellt und bereitgestellt durch Bird Home
Automation Group.
Vorschau von Layout der Loxone App
© 2017 by Bird Home Automation GmbH. Stand June 27th 2017
Diese Anleitung wurde erstellt und bereitgestellt durch Bird Home
Automation Group.
Loxone integration with DoorBird IP Video
Door Station
1. Configuration of the DoorBird IP Video Door Station
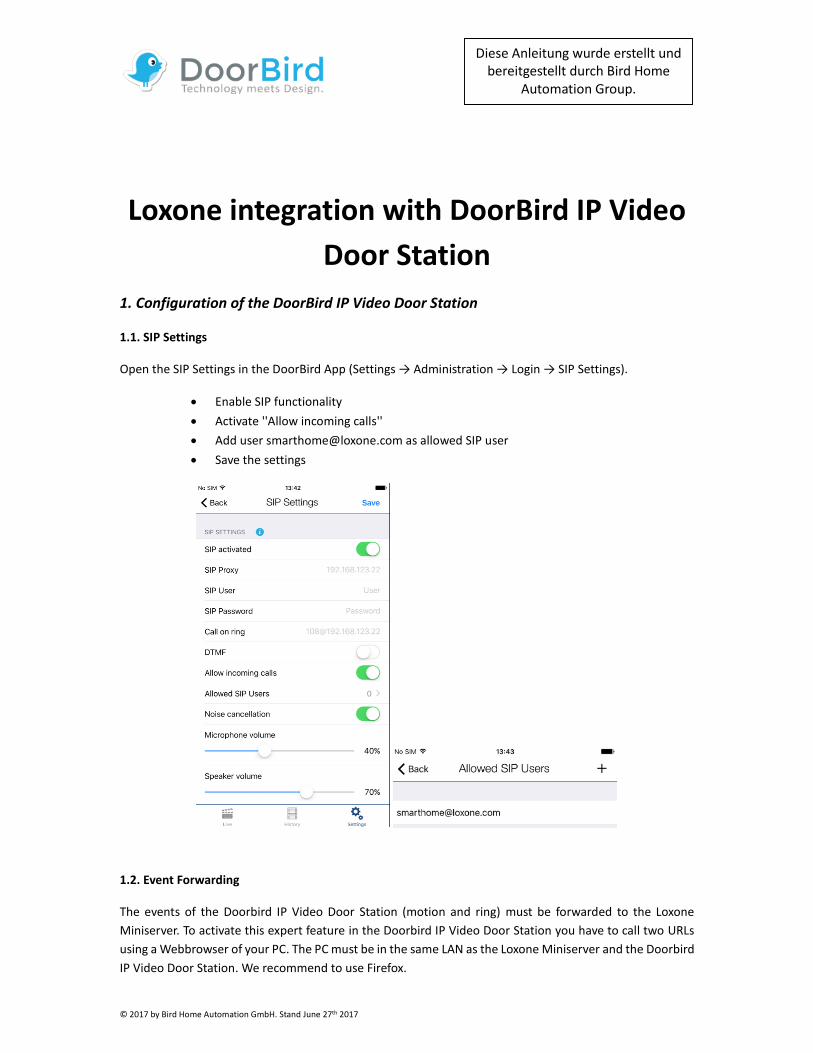
1.1. SIP Settings
Open the SIP Settings in the DoorBird App (Settings → Administration → Login → SIP Settings).
Enable SIP functionality
Activate ''Allow incoming calls''
Add user [email protected] as allowed SIP user
Save the settings
1.2. Event Forwarding
The events of the Doorbird IP Video Door Station (motion and ring) must be forwarded to the Loxone
Miniserver. To activate this expert feature in the Doorbird IP Video Door Station you have to call two URLs
using a Webbrowser of your PC. The PC must be in the same LAN as the Loxone Miniserver and the Doorbird
IP Video Door Station. We recommend to use Firefox.
© 2017 by Bird Home Automation GmbH. Stand June 27th 2017
Diese Anleitung wurde erstellt und bereitgestellt durch Bird Home
Automation Group.
The URL is composed of the following data:
DoorBird App Username and Password of the DoorBird IP Video Door Station
(important: not the Administrator), see e.g. the document „Digital Passport” of the
DoorBird IP Video Door Station
DoorBird IP Video Door Station IP address
Loxone Miniserver IP address and port
Switched Virtual input
Loxone Miniserver username and password
Ring notifications URL
http://<doorbird-username>:<doorbird-password>@<doorbird-ip-address>/bha-api/notification.cgi?url=http://<loxone-miniserver-ip-address>:<loxone-miniserver-port>/dev/sps/io/vixx/pulse?doorbell&user=<loxone-miniserver-username>&password=<loxone-miniserver-password>&event=doorbell&subscribe=1
Make sure to replace the placeholder <> with the appropriate information. Then enter the URL in the Webbrowser of your PC and hit ENTER.
Motion sensor notifications URL
http://<doorbird-username>:<doorbird-password>@<doorbird-ip-adress>/bha-api/notification.cgi?url=http://<loxone-miniserver-ip-address:<loxone-miniserver-port>/dev/sps/io/vixx/pulse?motionsensor&user=<loxone-miniserver-username>&password=<loxone-miniserver-password>&event=motionsensor&subscribe=1
Make sure to replace the placeholder <> with the appropriate information. Then enter the URL in the Webbrowser of your PC and hit ENTER.
2. Configuration of the Loxone Miniserver
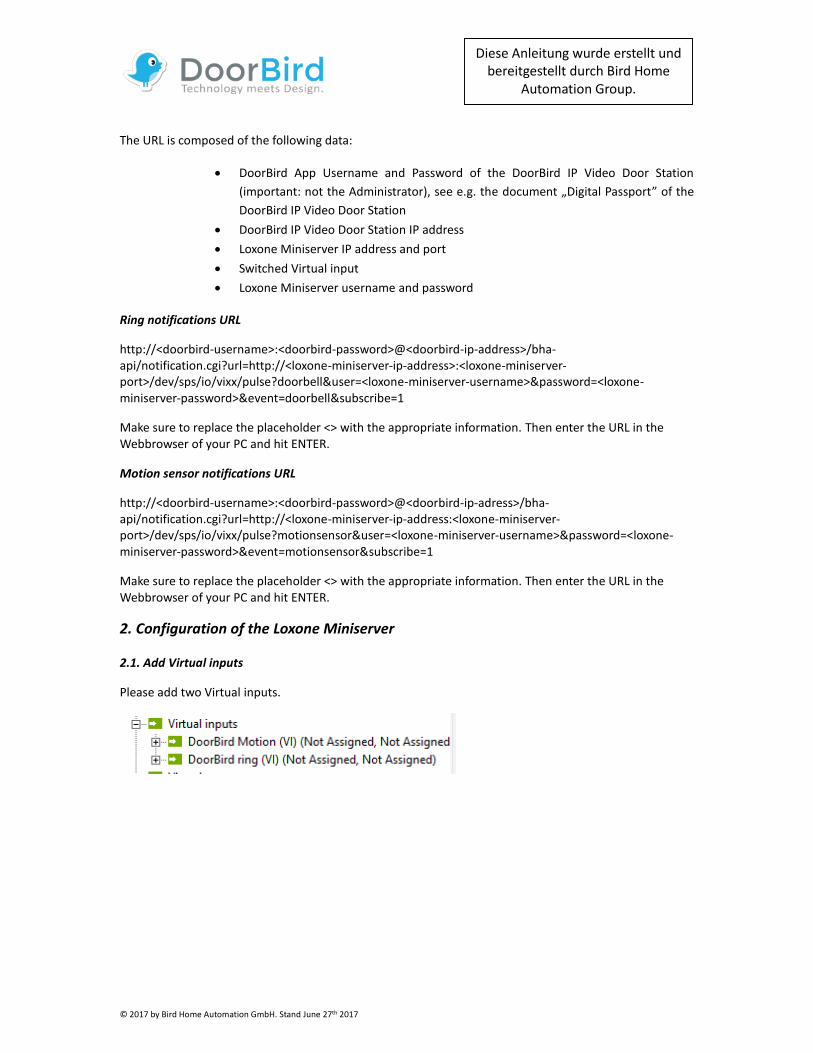
2.1. Add Virtual inputs
Please add two Virtual inputs.
© 2017 by Bird Home Automation GmbH. Stand June 27th 2017
Diese Anleitung wurde erstellt und bereitgestellt durch Bird Home
Automation Group.
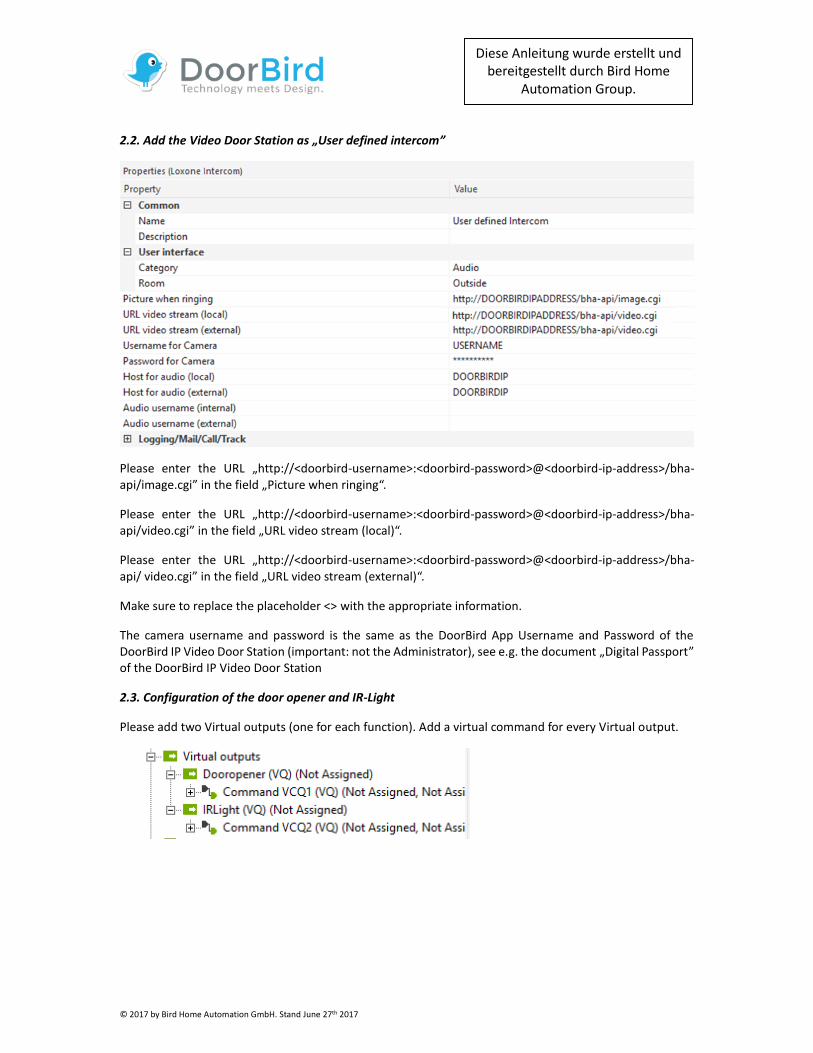
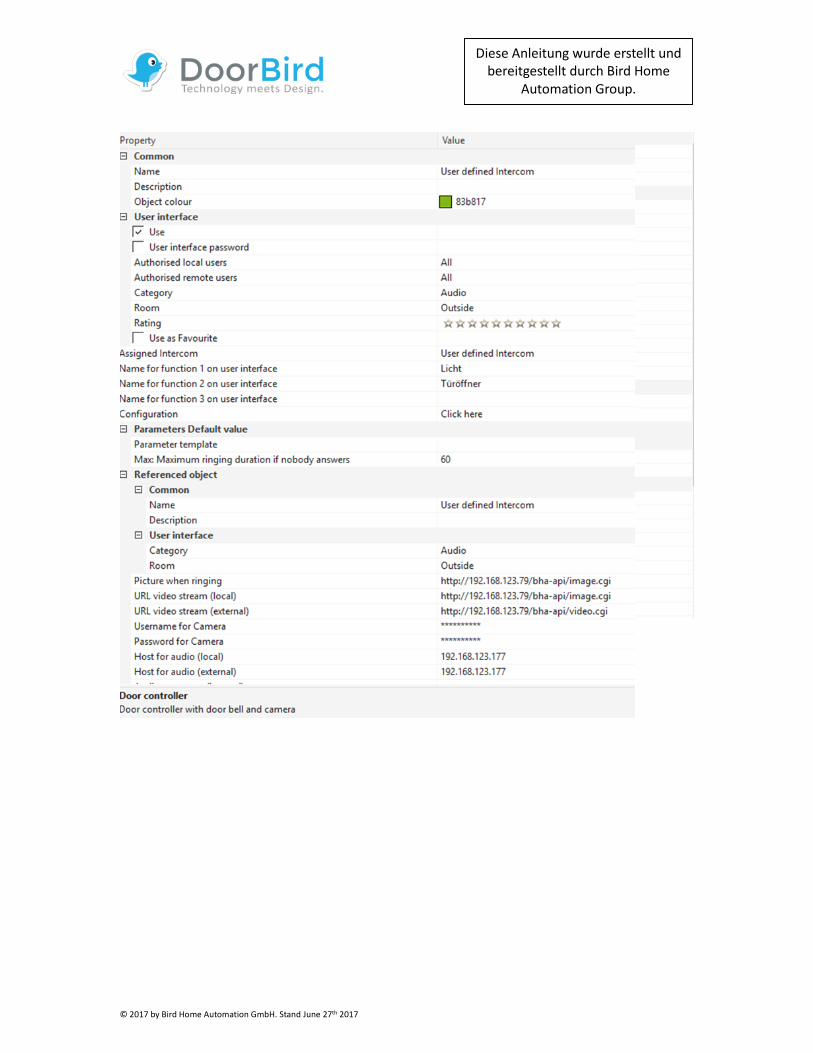
2.2. Add the Video Door Station as „User defined intercom”
Please enter the URL „http://<doorbird-username>:<doorbird-password>@<doorbird-ip-address>/bha-api/image.cgi” in the field „Picture when ringing“.
Please enter the URL „http://<doorbird-username>:<doorbird-password>@<doorbird-ip-address>/bha-api/video.cgi” in the field „URL video stream (local)“.
Please enter the URL „http://<doorbird-username>:<doorbird-password>@<doorbird-ip-address>/bha-api/ video.cgi” in the field „URL video stream (external)“.
Make sure to replace the placeholder <> with the appropriate information.
The camera username and password is the same as the DoorBird App Username and Password of the DoorBird IP Video Door Station (important: not the Administrator), see e.g. the document „Digital Passport” of the DoorBird IP Video Door Station
2.3. Configuration of the door opener and IR-Light
Please add two Virtual outputs (one for each function). Add a virtual command for every Virtual output.

© 2017 by Bird Home Automation GmbH. Stand June 27th 2017
Diese Anleitung wurde erstellt und bereitgestellt durch Bird Home
Automation Group.
2.3.1. Command's configuration for the door opener
Please enter the URL „http://<doorbird-username>:<doorbird-password>@<doorbird-ip-address>” in the field „Address“. Make sure to replace the placeholder <> with the appropriate information.
Please enter the path „/bha-api/open-door.cgi“ in the field „Command for OFF“.
© 2017 by Bird Home Automation GmbH. Stand June 27th 2017
Diese Anleitung wurde erstellt und bereitgestellt durch Bird Home
Automation Group.
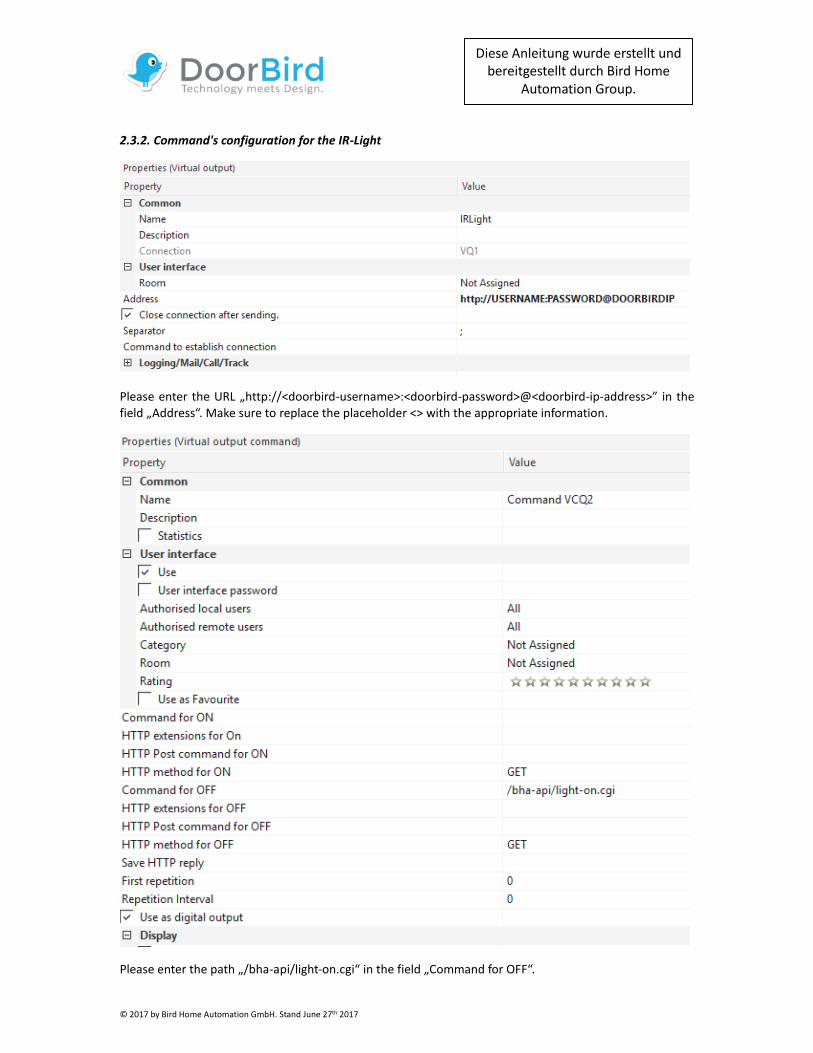
2.3.2. Command's configuration for the IR-Light
Please enter the URL „http://<doorbird-username>:<doorbird-password>@<doorbird-ip-address>” in the field „Address“. Make sure to replace the placeholder <> with the appropriate information.
Please enter the path „/bha-api/light-on.cgi“ in the field „Command for OFF“.
© 2017 by Bird Home Automation GmbH. Stand June 27th 2017
Diese Anleitung wurde erstellt und bereitgestellt durch Bird Home
Automation Group.
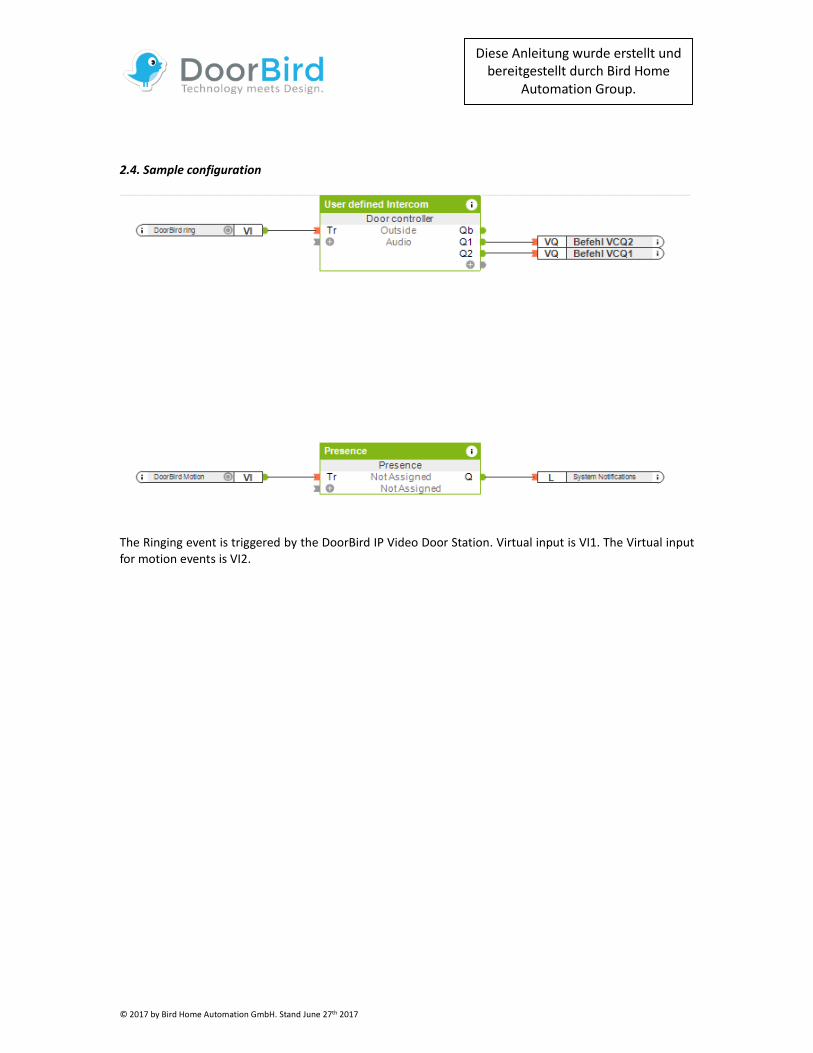
2.4. Sample configuration
The Ringing event is triggered by the DoorBird IP Video Door Station. Virtual input is VI1. The Virtual input for motion events is VI2.
© 2017 by Bird Home Automation GmbH. Stand June 27th 2017
Diese Anleitung wurde erstellt und bereitgestellt durch Bird Home
Automation Group.
© 2017 by Bird Home Automation GmbH. Stand June 27th 2017
Diese Anleitung wurde erstellt und bereitgestellt durch Bird Home
Automation Group.
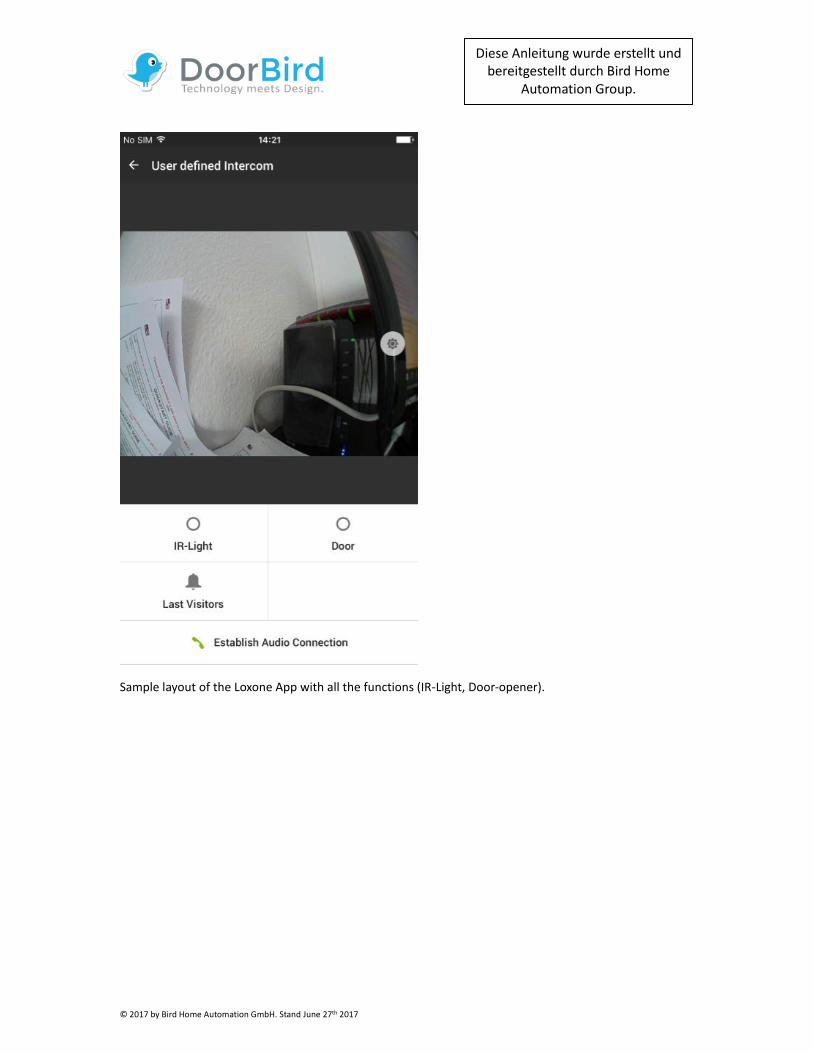
Sample layout of the Loxone App with all the functions (IR-Light, Door-opener).