Embed Size (px)
Citation preview

L P A R - To o l 1 . 4 . 2 . x �1 © b y P o w e r C a m p u s 0 1
P o w e r C a m p u s 0 1
L P A R - To o l 1 . 4 . 2 . xU s e r G u i d e
Version: 1.4.2.0

Copyright © 2018-2020 by PowerCampus01
This manual is the intellectual property of PowerCampus01. It may be copied as a whole or in excerpts and also printed out, as long as no parts are changed. All information contained in this manual has been created with great care. Nevertheless, incorrect information can not be completely ruled out. PowerCampus01 is not liable for any errors and their consequences. The content may be changed at any time without notice.
Software and hardware names in this manual are in many cases registered trademarks and are the copyright of the respective copyright holder.
https://www.powercampus.de
https://www.powercampus01.com
L P A R - To o l 1 . 4 . 2 . x �2 © b y P o w e r C a m p u s 0 1
Foreword 6 ........................................................................................................
Introduction 6 ..............................................................................................................
Additional Information 6 ..............................................................................................
Help with Problems 6 ...................................................................................................
1. Introduction 7 ...............................................................................................
1. Prerequisites 7 ........................................................................................................
2. Installation 7 ..........................................................................................................
3. Installation on AIX 7 ...............................................................................................
4. Installation on Linux 9 .............................................................................................
5. Installation on MacOS 9 .........................................................................................
6. Installation tar-File 9 ................................................................................................
7. Configuration of the LPAR tool 10 ............................................................................
8. Installation of the License 11 ....................................................................................
2. Using the LPAR tool 13 .................................................................................
1. Configuration of OpenSSH 13 .................................................................................
2. Registring an HMC 13 .............................................................................................
3. Overview of the Commands 15 ...............................................................................
4. Using the keyword help 17 ......................................................................................
5. Selection of the HMC, managed system or LPAR 18 ..................................................
6. Selection of HMCs 20 .............................................................................................
7. Selection of Managed Systems 21 ...........................................................................
8. Selection of LPARs 22 .............................................................................................
9. Selection of the Output Format 22 ...........................................................................
10.Selection of the Data Records 23 .............................................................................
11. Selection of the Data Fields 26 ................................................................................
3. Administration of LPARs 27 ..........................................................................
1. Status of an LPAR 27 ...............................................................................................
2. Attributes of an LPAR 28 .........................................................................................
3. Activating an LPAR 29 .............................................................................................
4. Shutting down an LPAR 31 .......................................................................................
5. Initiating a System Dump 33 ....................................................................................
6. Console for an LPAR 33 ..........................................................................................
L P A R - To o l 1 . 4 . 2 . x �3 © b y P o w e r C a m p u s 0 1
7. Live Partition Mobility (LPM) 35 ...............................................................................
4. Creation of LPARs 39 ....................................................................................
1. Creation of a new LPAR 39 .....................................................................................
2. Deleting an LPAR 45 ...............................................................................................
5. DLPAR-Operations 47 ...................................................................................
1. Changing the memory of an LPAR 47 .......................................................................
2. Changing main Memory Limits in the Profile 48 ........................................................
3. Changing the Number of Processors and Processor Units 49 .....................................
4. Changing Processor Limits in the Profile 50 ...............................................................
5. Configuring Physical Slots 51 ...................................................................................
6. Virtual Ethernet Slots 53 ..........................................................................................
7. Virtual SCSI Adapters 54 ........................................................................................
8. Virtual FC Adapters 58 ...........................................................................................
9. SR-IOV 60 ..............................................................................................................
6. Virtual I/O Server 67 ....................................................................................
1. Virtual Media Repository 67 ....................................................................................
2. Administration of VSCSI 69 .....................................................................................
3. Administration of VFC (NPIV) 70 .............................................................................
7. Administration of Managed Systems 72 .......................................................
1. Multiple Shared Processor Pools 72 .........................................................................
2. Administering Virtual Ethernet Switches 73 ...............................................................
3. Managing Partition Data 74 ....................................................................................
8. HMC 77 .........................................................................................................
1. User Accounts 77 ...................................................................................................
2. Administration of Authorized Keys 78 ......................................................................
3. Resource Roles 79 ..................................................................................................
4. Task Roles 81 .........................................................................................................
5. Users logged into the HMC 83 ................................................................................
9. Advanced Virtualization 85 ..........................................................................
1. Configuration of SR-IOV 85 .....................................................................................
2. Configuration of vNIC 90 ........................................................................................
L P A R - To o l 1 . 4 . 2 . x �4 © b y P o w e r C a m p u s 0 1
10.Troubleshooting 91 .......................................................................................
1. Incorrect Usage of Commands 91 ............................................................................
2. HMC returns Error Message 91 ...............................................................................
3. Errors of the LPAR tool 92 .......................................................................................
A. Configurationparameters 94........................................................................
L P A R - To o l 1 . 4 . 2 . x �5 © b y P o w e r C a m p u s 0 1

F o r e w o r dI n t r o d u c t i o n
This user guide is intended for administrators and users who use the LPAR tool to administer and configure POWER virtualization. The manual presupposes the following:
• basic knowledge of working on the command line of a UNIX system
• basic understanding of virtualization concepts and features of POWER virtualization
The user manual can be downloaded from the download area on the PowerCampus01 website:
• https://www.powercampus.de or https://www.powercampus01.com
A d d i t i o n a l I n f o r m a t i o n
More information about the LPAR tool is available in the Tools section of the PowerCampus01 website:
• https://www.powercampus.de or https://www.powercampus01.com
H e l p w i t h P r o b l e m s
If the LPAR tool malfunctions, PowerCampus01 technical support can be contacted. The following URL will open a software call for the LPAR tool:
• https://www.powercampus.de/tools/lpar-tool/software-call
Support can be reached via the following e-mail address:
• E-mail: [email protected]
Software updates of the LPAR tool can be downloaded from the download area on the PowerCampus01 website:
• https://www.powercampus.de or https://www.powercampus01.com
L P A R - To o l 1 . 4 . 2 . x �6 © b y P o w e r C a m p u s 0 1
1. I n t r o d u c t i o nThe LPAR tool essentially consists of the 4 programs hmc, ms, lpar and vios. These programs can be used from the command line to administer a POWER virtualization environment. Most tasks that are otherwise performed via the HMC GUI can be performed conveniently and efficiently from the command line with these commands.
1. P r e r e q u i s i t e s
The LPAR tool is available in versions for AIX, Linux and MacOS (in preparation).
Necessary prerequisite for the functionality of the LPAR tool is an SSH connection to the HMC(s). By default, the LPAR tool uses the account of the logged-in user as the HMC user. If the HMC user is another user, this can be specified.
The SSH login to the HMC should be possible without entering a password or passphrase, which can be achieved by using the ssh-agent. The user's public key must be previously stored on the HMC. If no ssh-agent is used, the LPAR tool can still be used, but a password or passphrase prompt will be requested each time the tool is called.
A valid license is required to use the LPAR tool.
2. I n s t a l l a t i o n
There are two different ways to install the LPAR tool for each supported operating system: installing a package or installing a tar file.
Recommended is the installation of the package for the appropriate operating system. This requires administration rights on the system where the LPAR tool is to be installed. The LPAR tool is therefore available to all users on the system. Of course, a user still needs a login on the HMCs.
The possibility of using a tar file for the installation is intended in the case that the user does not have administration rights. The tar file can then be unpacked by the user in his home directory. The LPAR tool is then only available to this user. Of course, other users on the same system can also install and use the LPAR tool via tar in their home directory.
3. I n s t a l l a t i o n o n A I X
A package is available for installation on AIX: pwrcmps.lpar.1.X.X.X.bff. This contains the fileset pwrcmps.lpar.rte. The package can be downloaded from the website https://powercampus.de/download.
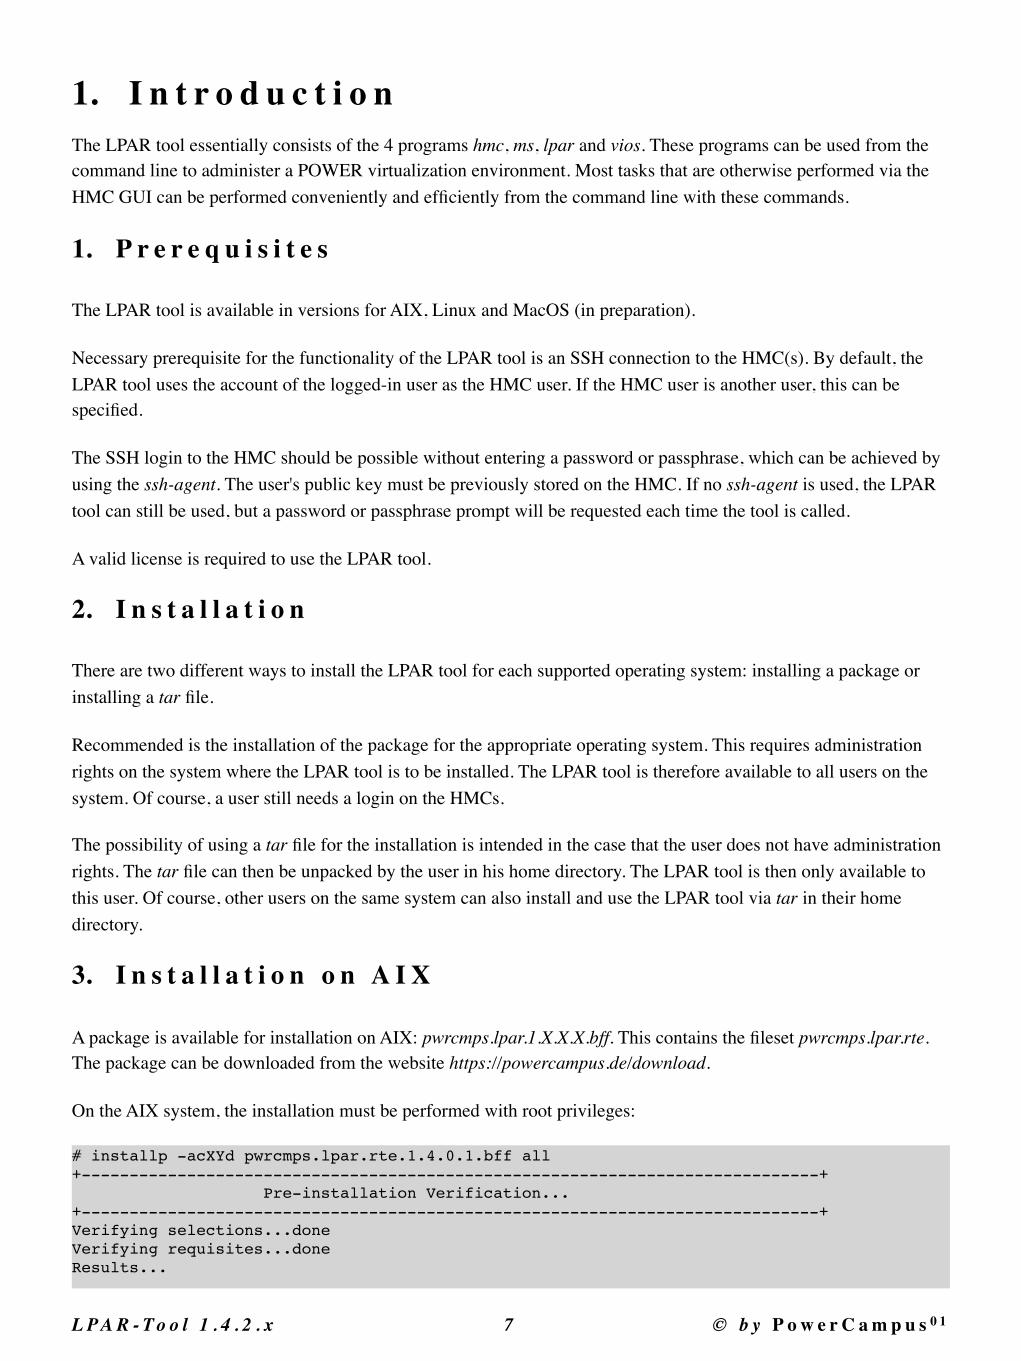
On the AIX system, the installation must be performed with root privileges:
# installp -acXYd pwrcmps.lpar.rte.1.4.0.1.bff all+-----------------------------------------------------------------------------+ Pre-installation Verification...+-----------------------------------------------------------------------------+Verifying selections...doneVerifying requisites...doneResults...
L P A R - To o l 1 . 4 . 2 . x �7 © b y P o w e r C a m p u s 0 1
SUCCESSES--------- Filesets listed in this section passed pre-installation verification and will be installed. Selected Filesets ----------------- pwrcmps.lpar.rte 1.4.0.1 # LPAR tool << End of Success Section >> +-----------------------------------------------------------------------------+ BUILDDATE Verification ...+-----------------------------------------------------------------------------+Verifying build dates...doneFILESET STATISTICS ------------------ 1 Selected to be installed, of which: 1 Passed pre-installation verification ---- 1 Total to be installed +-----------------------------------------------------------------------------+ Installing Software...+-----------------------------------------------------------------------------+ installp: APPLYING software for: pwrcmps.lpar.rte 1.4.0.1 Finished processing all filesets. (Total time: 3 secs). +-----------------------------------------------------------------------------+ Summaries:+-----------------------------------------------------------------------------+ Installation Summary--------------------Name Level Part Event Result-------------------------------------------------------------------------------pwrcmps.lpar.rte 1.4.0.1 USR APPLY SUCCESS #
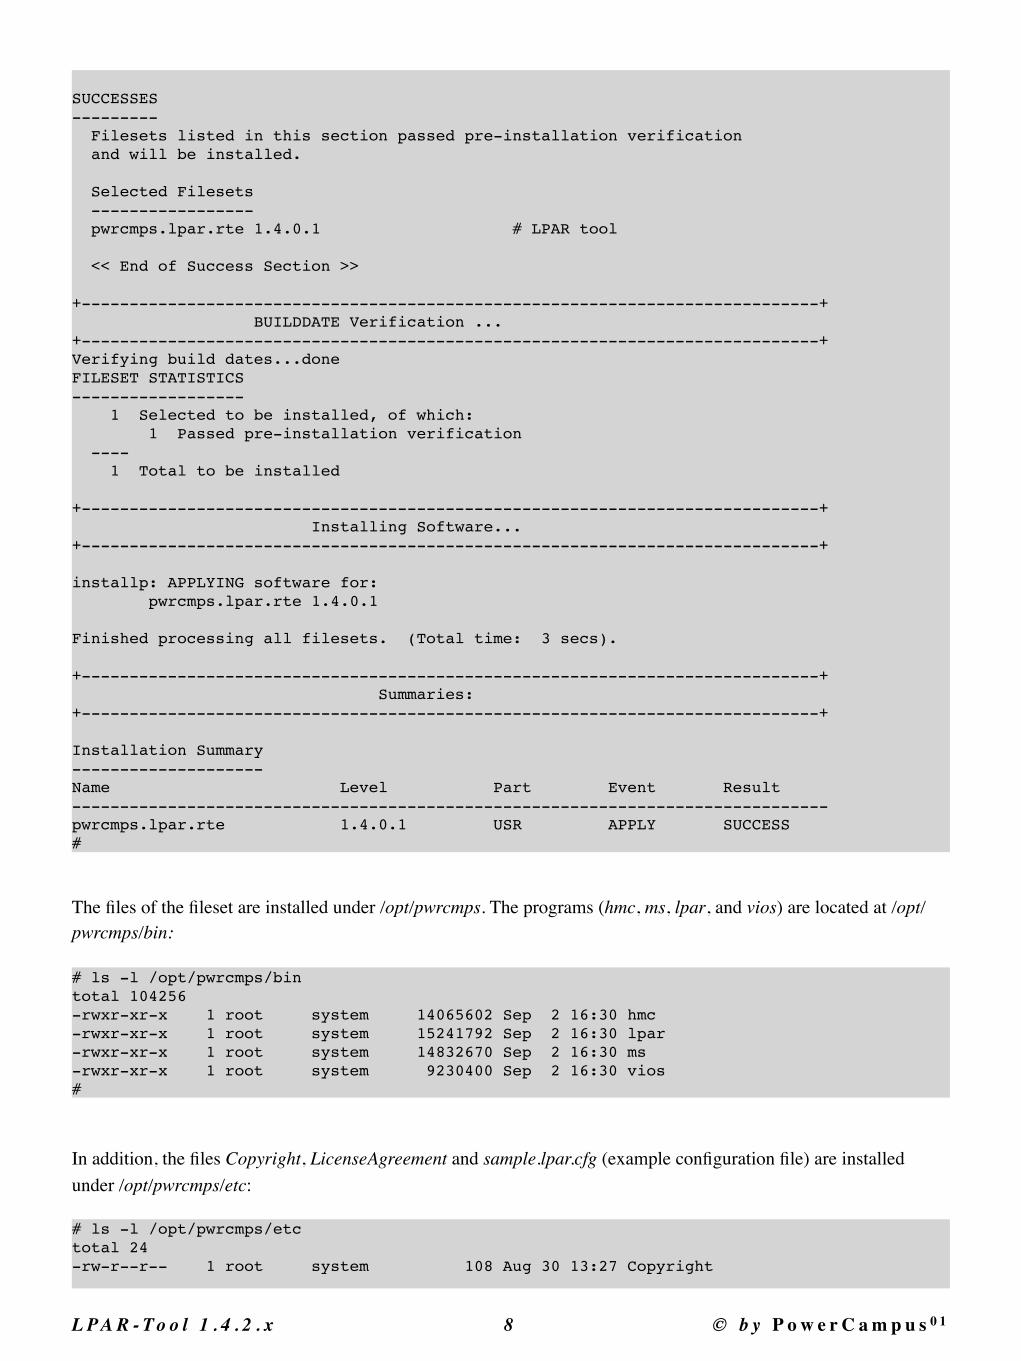
The files of the fileset are installed under /opt/pwrcmps. The programs (hmc, ms, lpar, and vios) are located at /opt/pwrcmps/bin:
# ls -l /opt/pwrcmps/bintotal 104256-rwxr-xr-x 1 root system 14065602 Sep 2 16:30 hmc-rwxr-xr-x 1 root system 15241792 Sep 2 16:30 lpar-rwxr-xr-x 1 root system 14832670 Sep 2 16:30 ms-rwxr-xr-x 1 root system 9230400 Sep 2 16:30 vios#
In addition, the files Copyright, LicenseAgreement and sample.lpar.cfg (example configuration file) are installed under /opt/pwrcmps/etc:
# ls -l /opt/pwrcmps/etctotal 24-rw-r--r-- 1 root system 108 Aug 30 13:27 Copyright
L P A R - To o l 1 . 4 . 2 . x �8 © b y P o w e r C a m p u s 0 1
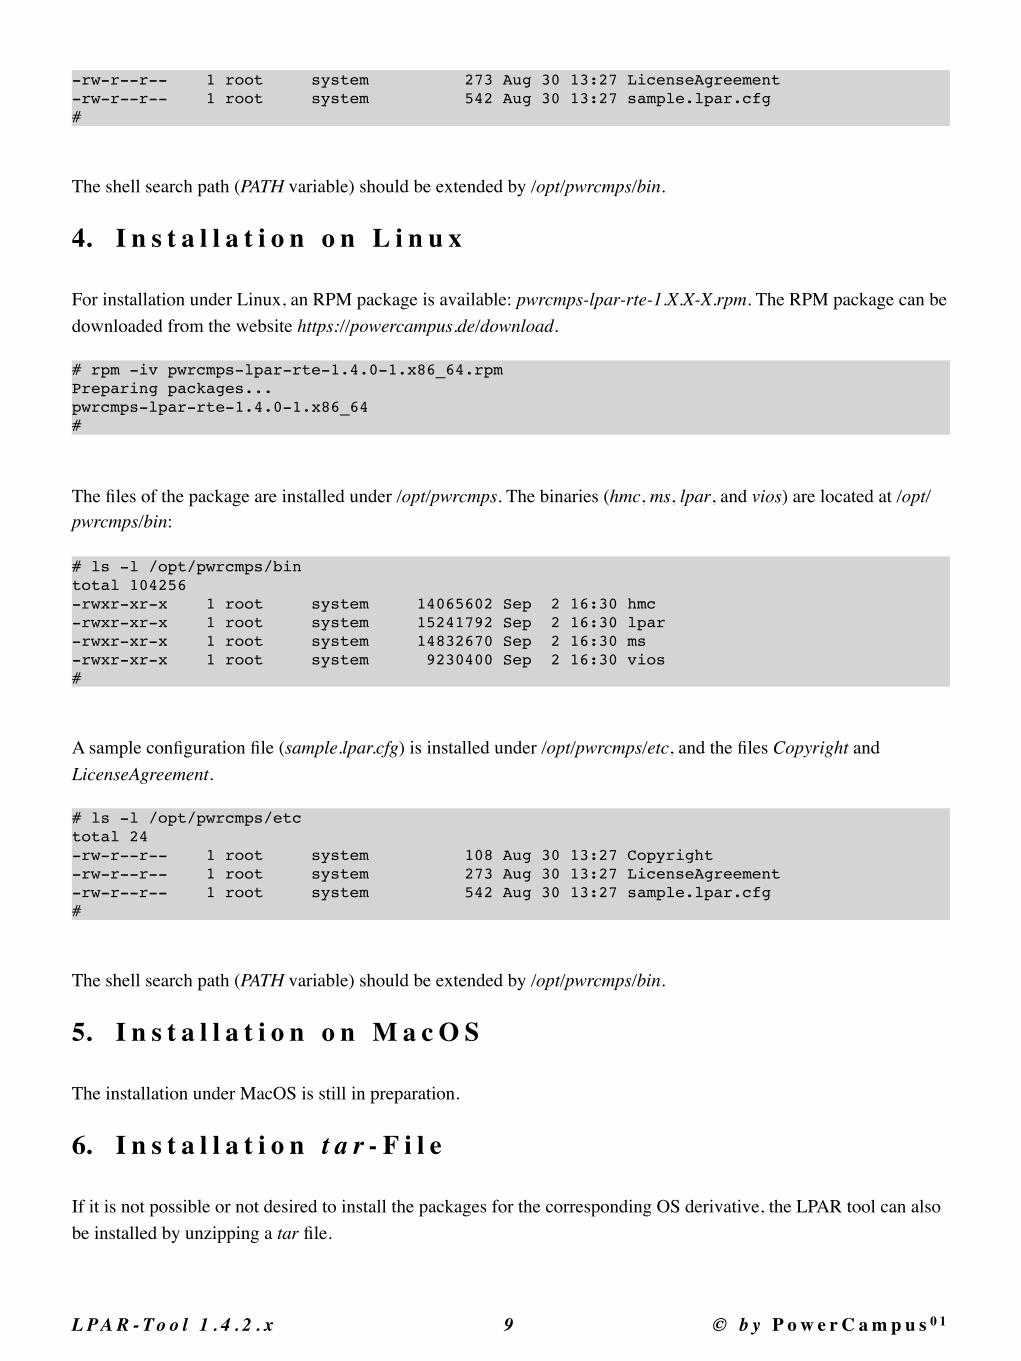
-rw-r--r-- 1 root system 273 Aug 30 13:27 LicenseAgreement-rw-r--r-- 1 root system 542 Aug 30 13:27 sample.lpar.cfg#
The shell search path (PATH variable) should be extended by /opt/pwrcmps/bin.
4. I n s t a l l a t i o n o n L i n u x
For installation under Linux, an RPM package is available: pwrcmps-lpar-rte-1.X.X-X.rpm. The RPM package can be downloaded from the website https://powercampus.de/download.
# rpm -iv pwrcmps-lpar-rte-1.4.0-1.x86_64.rpmPreparing packages...pwrcmps-lpar-rte-1.4.0-1.x86_64#
The files of the package are installed under /opt/pwrcmps. The binaries (hmc, ms, lpar, and vios) are located at /opt/pwrcmps/bin:
# ls -l /opt/pwrcmps/bintotal 104256-rwxr-xr-x 1 root system 14065602 Sep 2 16:30 hmc-rwxr-xr-x 1 root system 15241792 Sep 2 16:30 lpar-rwxr-xr-x 1 root system 14832670 Sep 2 16:30 ms-rwxr-xr-x 1 root system 9230400 Sep 2 16:30 vios#
A sample configuration file (sample.lpar.cfg) is installed under /opt/pwrcmps/etc, and the files Copyright and LicenseAgreement.
# ls -l /opt/pwrcmps/etctotal 24-rw-r--r-- 1 root system 108 Aug 30 13:27 Copyright-rw-r--r-- 1 root system 273 Aug 30 13:27 LicenseAgreement-rw-r--r-- 1 root system 542 Aug 30 13:27 sample.lpar.cfg#
The shell search path (PATH variable) should be extended by /opt/pwrcmps/bin.
5. I n s t a l l a t i o n o n M a c O S
The installation under MacOS is still in preparation.
6. I n s t a l l a t i o n t a r - F i l e
If it is not possible or not desired to install the packages for the corresponding OS derivative, the LPAR tool can also be installed by unzipping a tar file.
L P A R - To o l 1 . 4 . 2 . x �9 © b y P o w e r C a m p u s 0 1
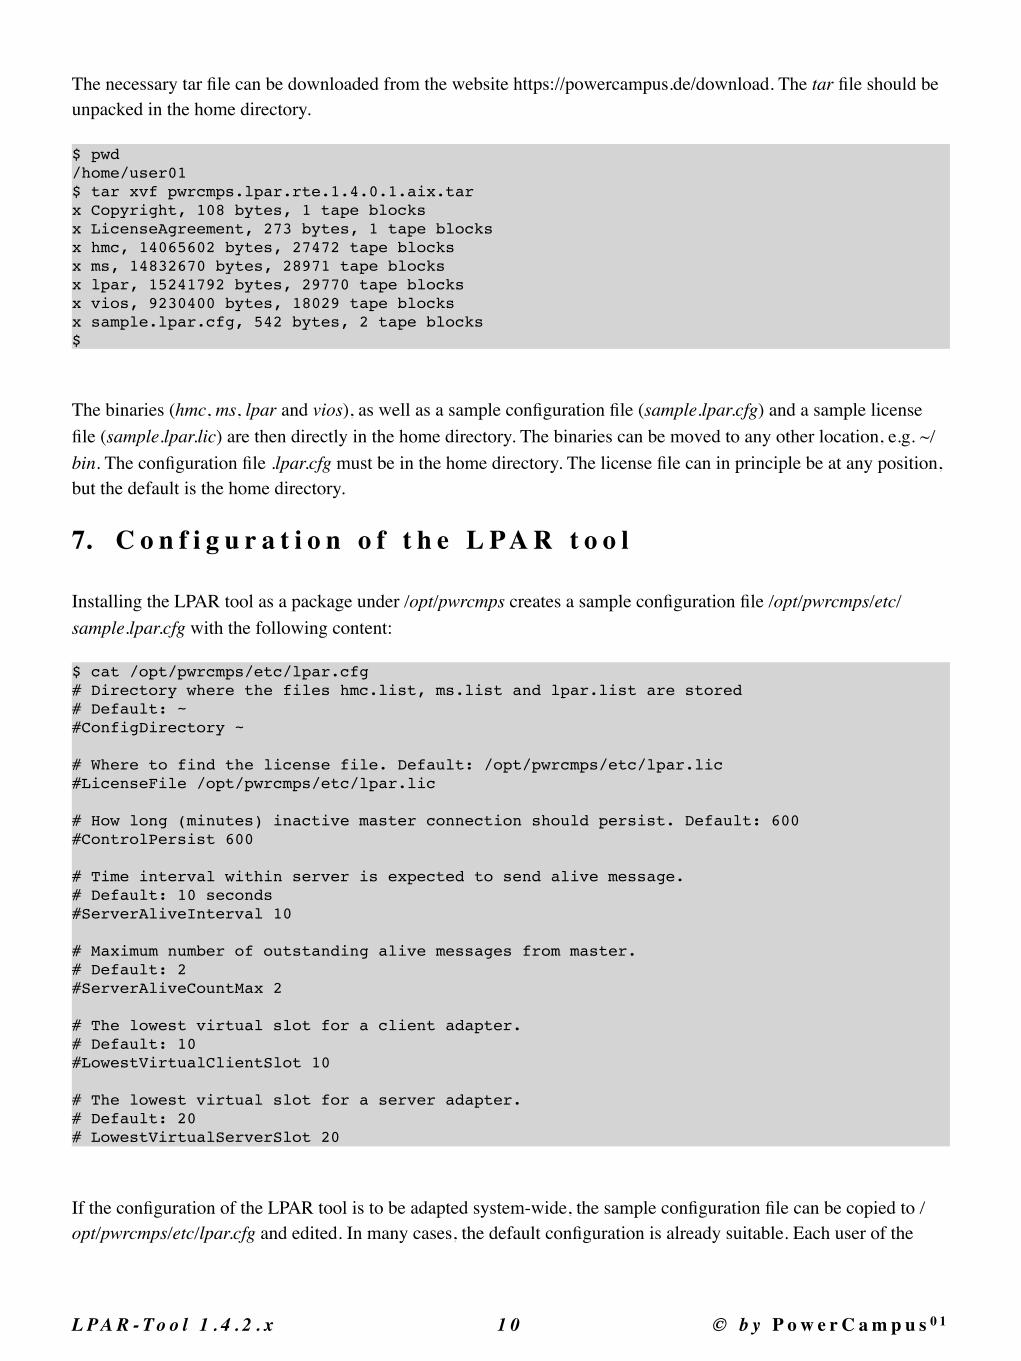
The necessary tar file can be downloaded from the website https://powercampus.de/download. The tar file should be unpacked in the home directory.
$ pwd/home/user01$ tar xvf pwrcmps.lpar.rte.1.4.0.1.aix.tar x Copyright, 108 bytes, 1 tape blocksx LicenseAgreement, 273 bytes, 1 tape blocksx hmc, 14065602 bytes, 27472 tape blocksx ms, 14832670 bytes, 28971 tape blocksx lpar, 15241792 bytes, 29770 tape blocksx vios, 9230400 bytes, 18029 tape blocksx sample.lpar.cfg, 542 bytes, 2 tape blocks$
The binaries (hmc, ms, lpar and vios), as well as a sample configuration file (sample.lpar.cfg) and a sample license file (sample.lpar.lic) are then directly in the home directory. The binaries can be moved to any other location, e.g. ~/bin. The configuration file .lpar.cfg must be in the home directory. The license file can in principle be at any position, but the default is the home directory.
7. C o n f i g u r a t i o n o f t h e L P A R t o o l
Installing the LPAR tool as a package under /opt/pwrcmps creates a sample configuration file /opt/pwrcmps/etc/sample.lpar.cfg with the following content:
$ cat /opt/pwrcmps/etc/lpar.cfg# Directory where the files hmc.list, ms.list and lpar.list are stored# Default: ~#ConfigDirectory ~
# Where to find the license file. Default: /opt/pwrcmps/etc/lpar.lic#LicenseFile /opt/pwrcmps/etc/lpar.lic
# How long (minutes) inactive master connection should persist. Default: 600#ControlPersist 600
# Time interval within server is expected to send alive message.# Default: 10 seconds#ServerAliveInterval 10
# Maximum number of outstanding alive messages from master.# Default: 2#ServerAliveCountMax 2
# The lowest virtual slot for a client adapter.# Default: 10#LowestVirtualClientSlot 10
# The lowest virtual slot for a server adapter.# Default: 20# LowestVirtualServerSlot 20
If the configuration of the LPAR tool is to be adapted system-wide, the sample configuration file can be copied to /opt/pwrcmps/etc/lpar.cfg and edited. In many cases, the default configuration is already suitable. Each user of the
L P A R - To o l 1 . 4 . 2 . x �1 0 © b y P o w e r C a m p u s 0 1
LPAR tool can have a different configuration via the file .lpar.cfg in his home directory. The user-specific configuration file overwrites the settings from the system-wide configuration file.
The LPAR tool stores the registered HMCs, managed systems and LPARs in the 3 files hmc.list, ms.list and lpar.list. The ConfigDirectory parameter can be used to configure where these files should be stored. The default setting is "~", the respective home directory.
The LPAR tool requires a valid license key. The parameter LicenseFile can be used to specify in which file the license is entered. The default is /opt/pwrcmps/etc/lpar.lic or ~/.lpar.lic (home directory of the user) and should not be overwritten.
The LPAR tool uses SSH-Master-Connections, with the parameter ControlPersist you can specify how long this connection should last (in seconds). The default value is 5 minutes.
8. I n s t a l l a t i o n o f t h e L i c e n s e
A license is required to use the LPAR tool. A 30-day trial license is available via [email protected].
If the LPAR tool was installed from a package, the license should be entered in the file /opt/pwrcmps/etc/lpar.lic.
If the LPAR tool was installed from a tar file, the license can in principle be installed at any point, but the path must then be configured in the user's home directory via the configuration file .lpar.cfg.
Generating a license requires the serial numbers of the HMCs used. The serial number can be obtained by logging into the HMC using ssh and the command "lshmc -v":
$ ssh hmc01hmc01> lshmc -v…*SE 123ABCD…hmc01> exit$(The serial number is in the line beginning with "* SE".)
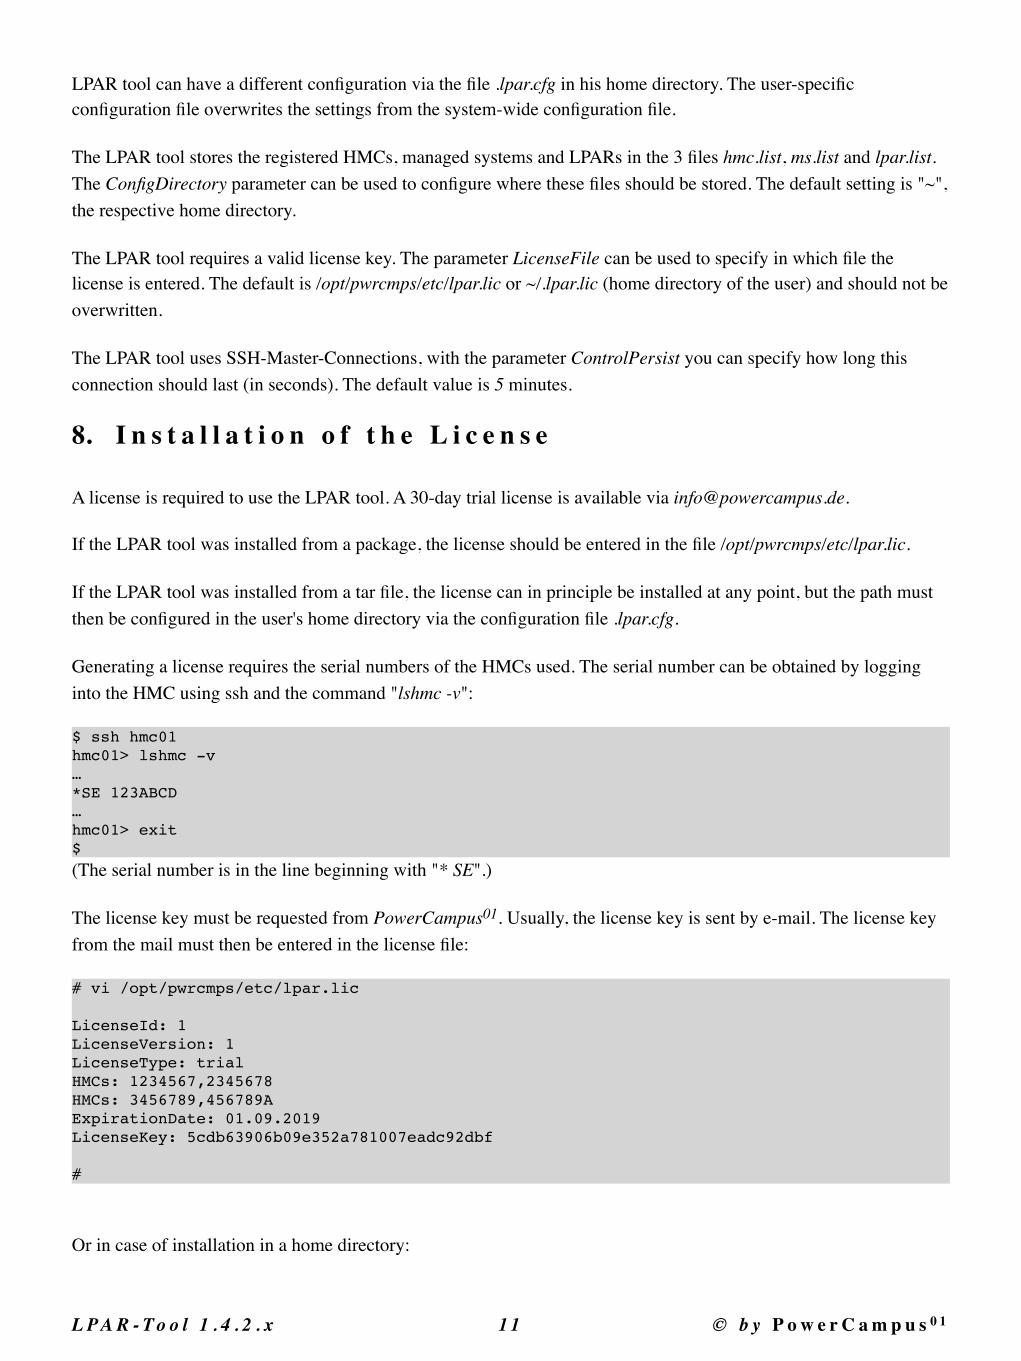
The license key must be requested from PowerCampus01. Usually, the license key is sent by e-mail. The license key from the mail must then be entered in the license file:
# vi /opt/pwrcmps/etc/lpar.lic
LicenseId: 1LicenseVersion: 1LicenseType: trialHMCs: 1234567,2345678HMCs: 3456789,456789AExpirationDate: 01.09.2019LicenseKey: 5cdb63906b09e352a781007eadc92dbf
#
Or in case of installation in a home directory:
L P A R - To o l 1 . 4 . 2 . x �1 1 © b y P o w e r C a m p u s 0 1
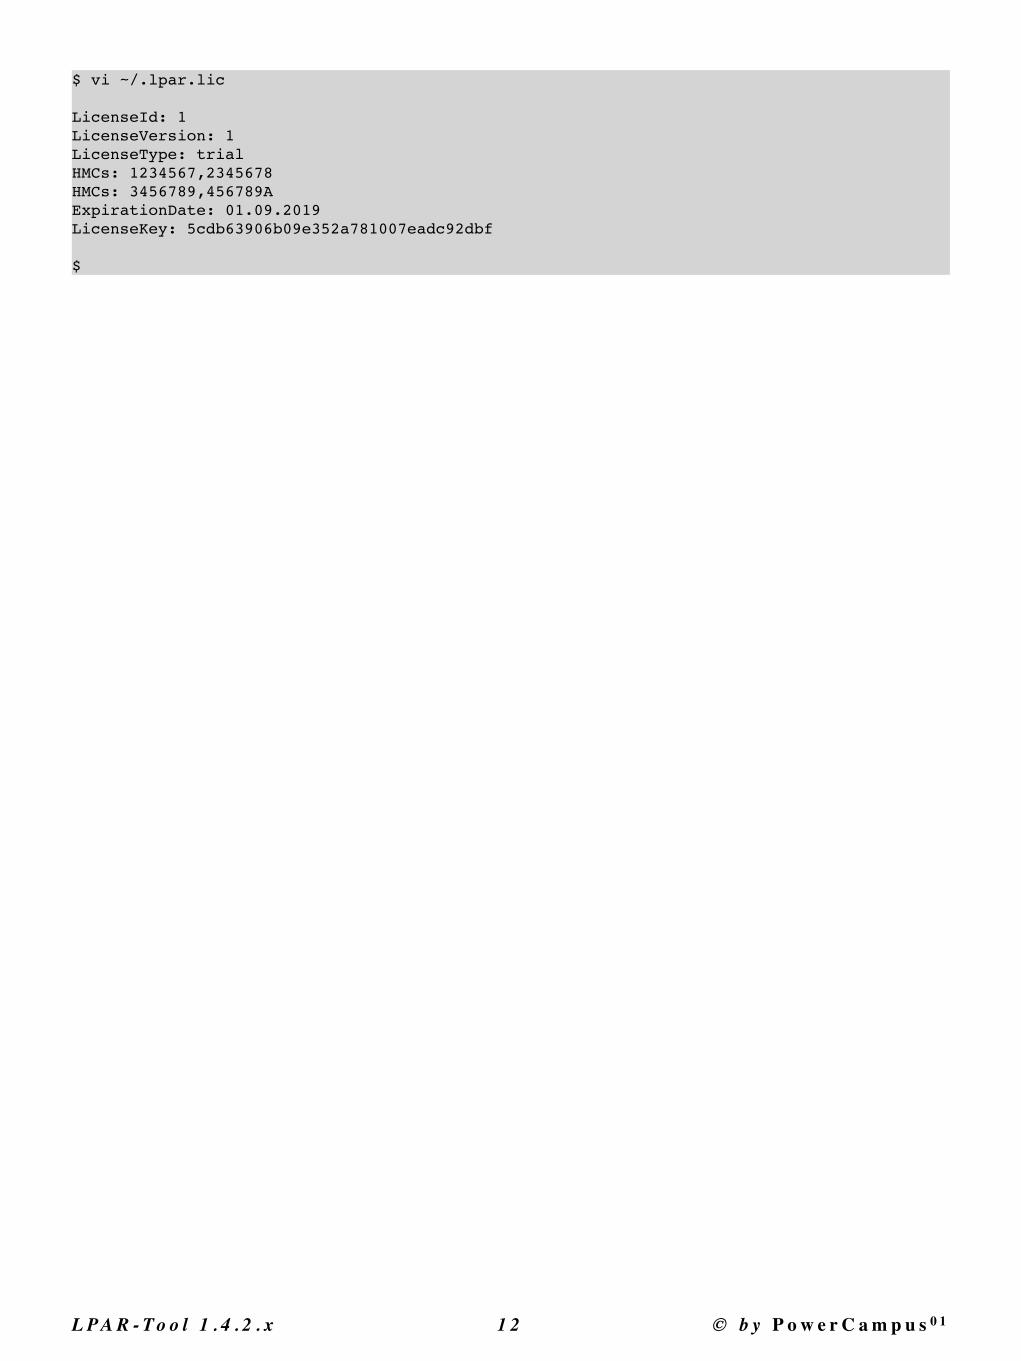
$ vi ~/.lpar.lic
LicenseId: 1LicenseVersion: 1LicenseType: trialHMCs: 1234567,2345678HMCs: 3456789,456789AExpirationDate: 01.09.2019LicenseKey: 5cdb63906b09e352a781007eadc92dbf
$
L P A R - To o l 1 . 4 . 2 . x �1 2 © b y P o w e r C a m p u s 0 1
2. U s i n g t h e L P A R t o o l
1. C o n f i g u r a t i o n o f O p e n S S H
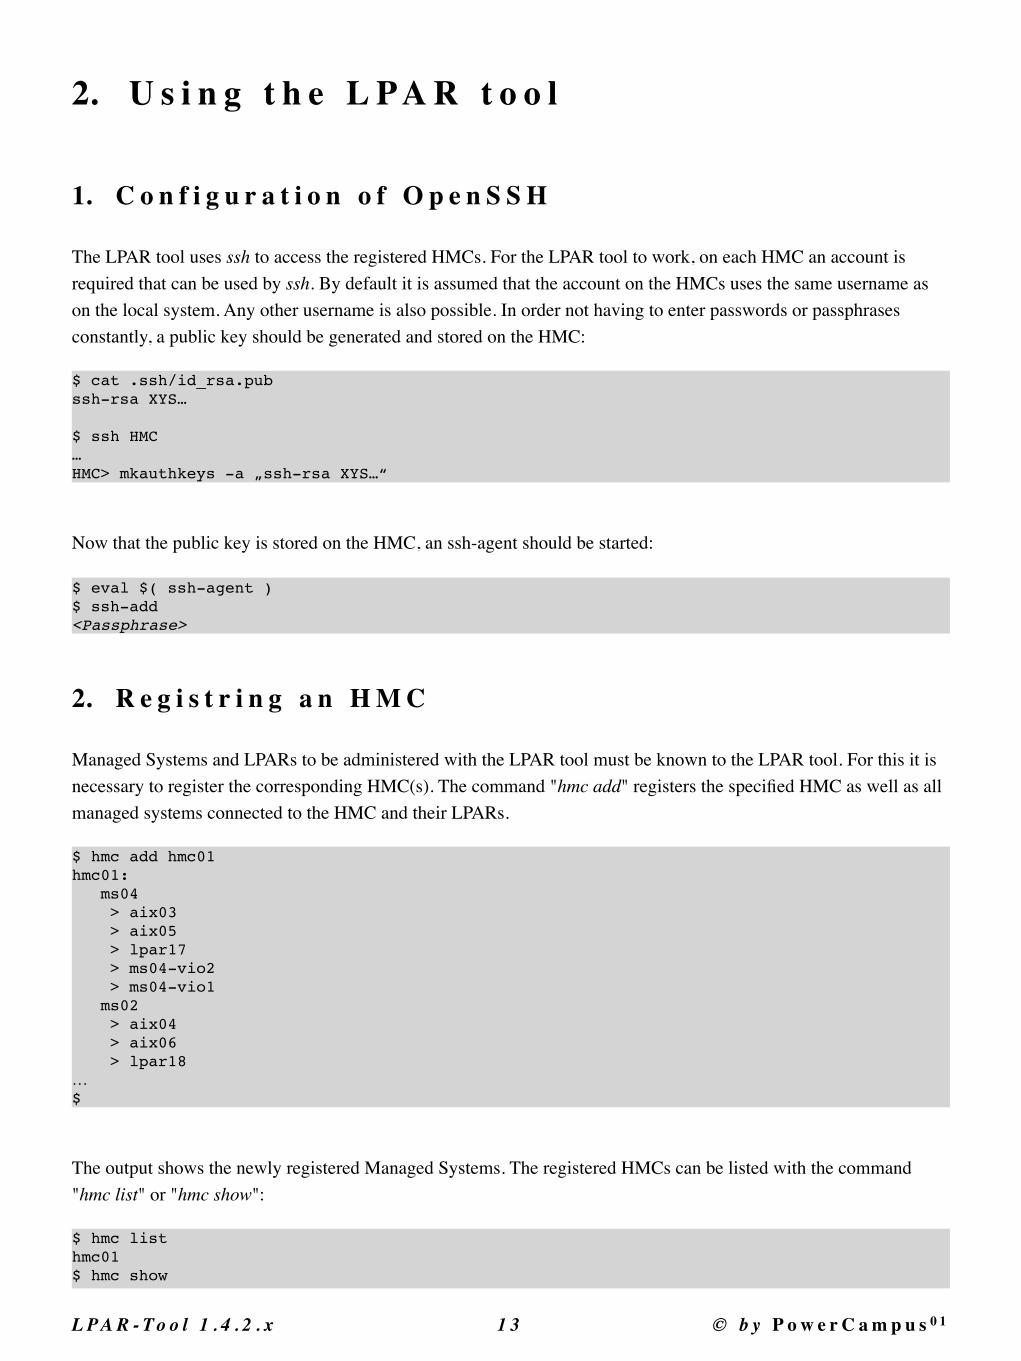
The LPAR tool uses ssh to access the registered HMCs. For the LPAR tool to work, on each HMC an account is required that can be used by ssh. By default it is assumed that the account on the HMCs uses the same username as on the local system. Any other username is also possible. In order not having to enter passwords or passphrases constantly, a public key should be generated and stored on the HMC:
$ cat .ssh/id_rsa.pubssh-rsa XYS…
$ ssh HMC…HMC> mkauthkeys -a „ssh-rsa XYS…“
Now that the public key is stored on the HMC, an ssh-agent should be started:
$ eval $( ssh-agent )$ ssh-add<Passphrase>
2. R e g i s t r i n g a n H M C
Managed Systems and LPARs to be administered with the LPAR tool must be known to the LPAR tool. For this it is necessary to register the corresponding HMC(s). The command "hmc add" registers the specified HMC as well as all managed systems connected to the HMC and their LPARs.
$ hmc add hmc01hmc01: ms04 > aix03 > aix05 > lpar17 > ms04-vio2 > ms04-vio1 ms02 > aix04 > aix06 > lpar18…$
The output shows the newly registered Managed Systems. The registered HMCs can be listed with the command "hmc list" or "hmc show":
$ hmc listhmc01$ hmc show
L P A R - To o l 1 . 4 . 2 . x �1 3 © b y P o w e r C a m p u s 0 1
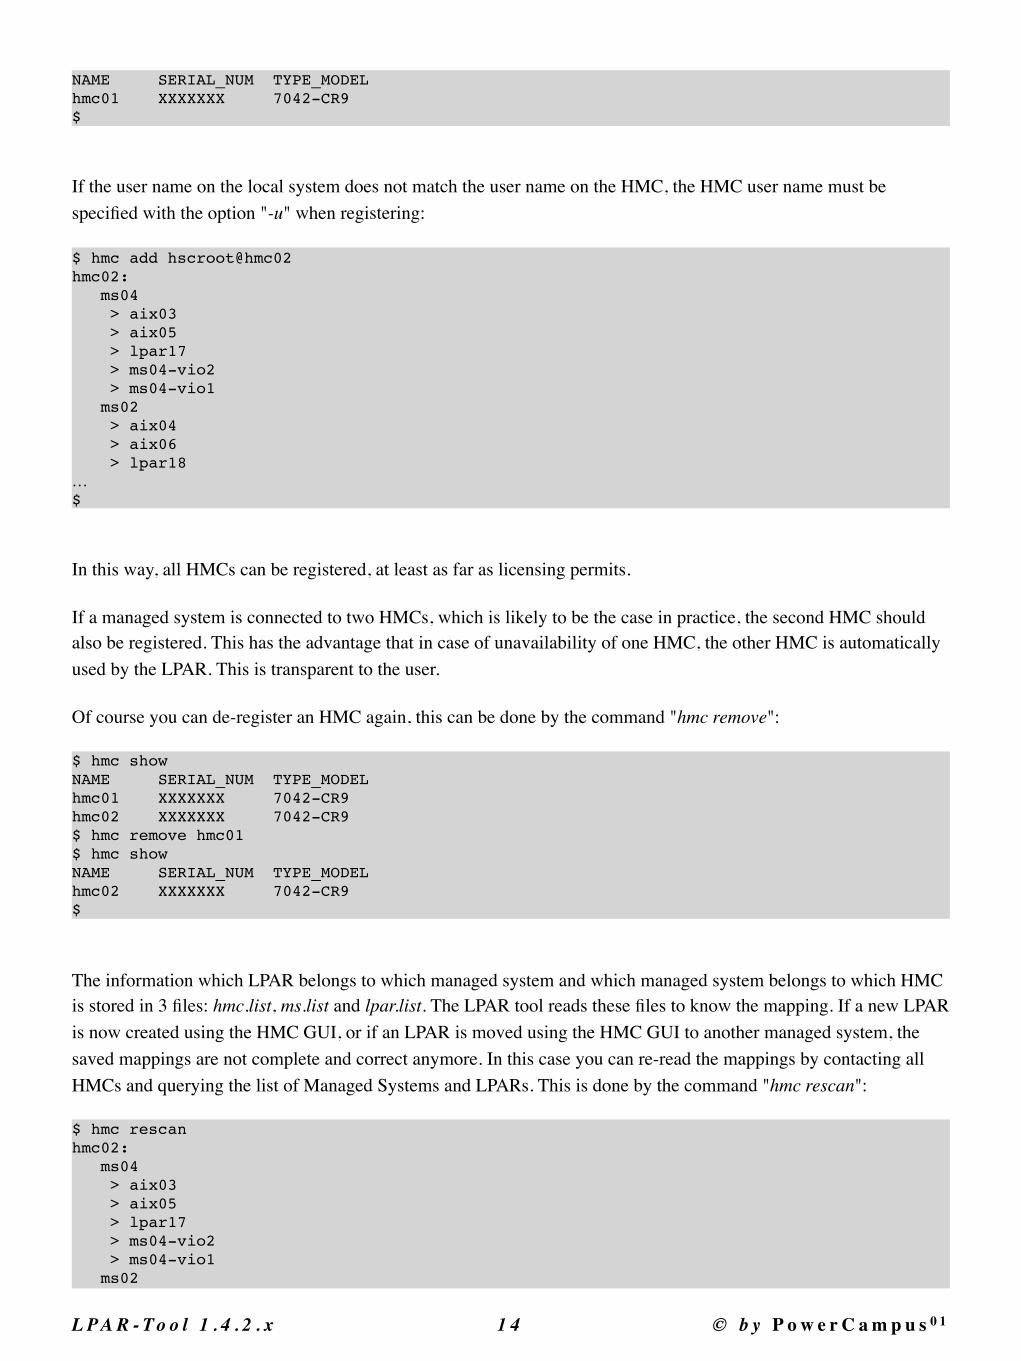
NAME SERIAL_NUM TYPE_MODELhmc01 XXXXXXX 7042-CR9$
If the user name on the local system does not match the user name on the HMC, the HMC user name must be specified with the option "-u" when registering:
$ hmc add hscroot@hmc02hmc02: ms04 > aix03 > aix05 > lpar17 > ms04-vio2 > ms04-vio1 ms02 > aix04 > aix06 > lpar18…$
In this way, all HMCs can be registered, at least as far as licensing permits.
If a managed system is connected to two HMCs, which is likely to be the case in practice, the second HMC should also be registered. This has the advantage that in case of unavailability of one HMC, the other HMC is automatically used by the LPAR. This is transparent to the user.
Of course you can de-register an HMC again, this can be done by the command "hmc remove":
$ hmc showNAME SERIAL_NUM TYPE_MODELhmc01 XXXXXXX 7042-CR9hmc02 XXXXXXX 7042-CR9$ hmc remove hmc01$ hmc showNAME SERIAL_NUM TYPE_MODELhmc02 XXXXXXX 7042-CR9$
The information which LPAR belongs to which managed system and which managed system belongs to which HMC is stored in 3 files: hmc.list, ms.list and lpar.list. The LPAR tool reads these files to know the mapping. If a new LPAR is now created using the HMC GUI, or if an LPAR is moved using the HMC GUI to another managed system, the saved mappings are not complete and correct anymore. In this case you can re-read the mappings by contacting all HMCs and querying the list of Managed Systems and LPARs. This is done by the command "hmc rescan":
$ hmc rescanhmc02: ms04 > aix03 > aix05 > lpar17 > ms04-vio2 > ms04-vio1 ms02
L P A R - To o l 1 . 4 . 2 . x �1 4 © b y P o w e r C a m p u s 0 1
> aix04 > aix06 > lpar18…$
After a run of "hmc rescan" the mappings are correct again.
3. O v e r v i e w o f t h e C o m m a n d s
All 4 commands of the LPAR tool work in a similar way. Each of the commands expects the specification of a keyword. The keyword determines the functionality to perform. Before and after the keyword, supported options can be specified. The remaining arguments are used by the function to be performed:
command [options] keyword [options] arguments
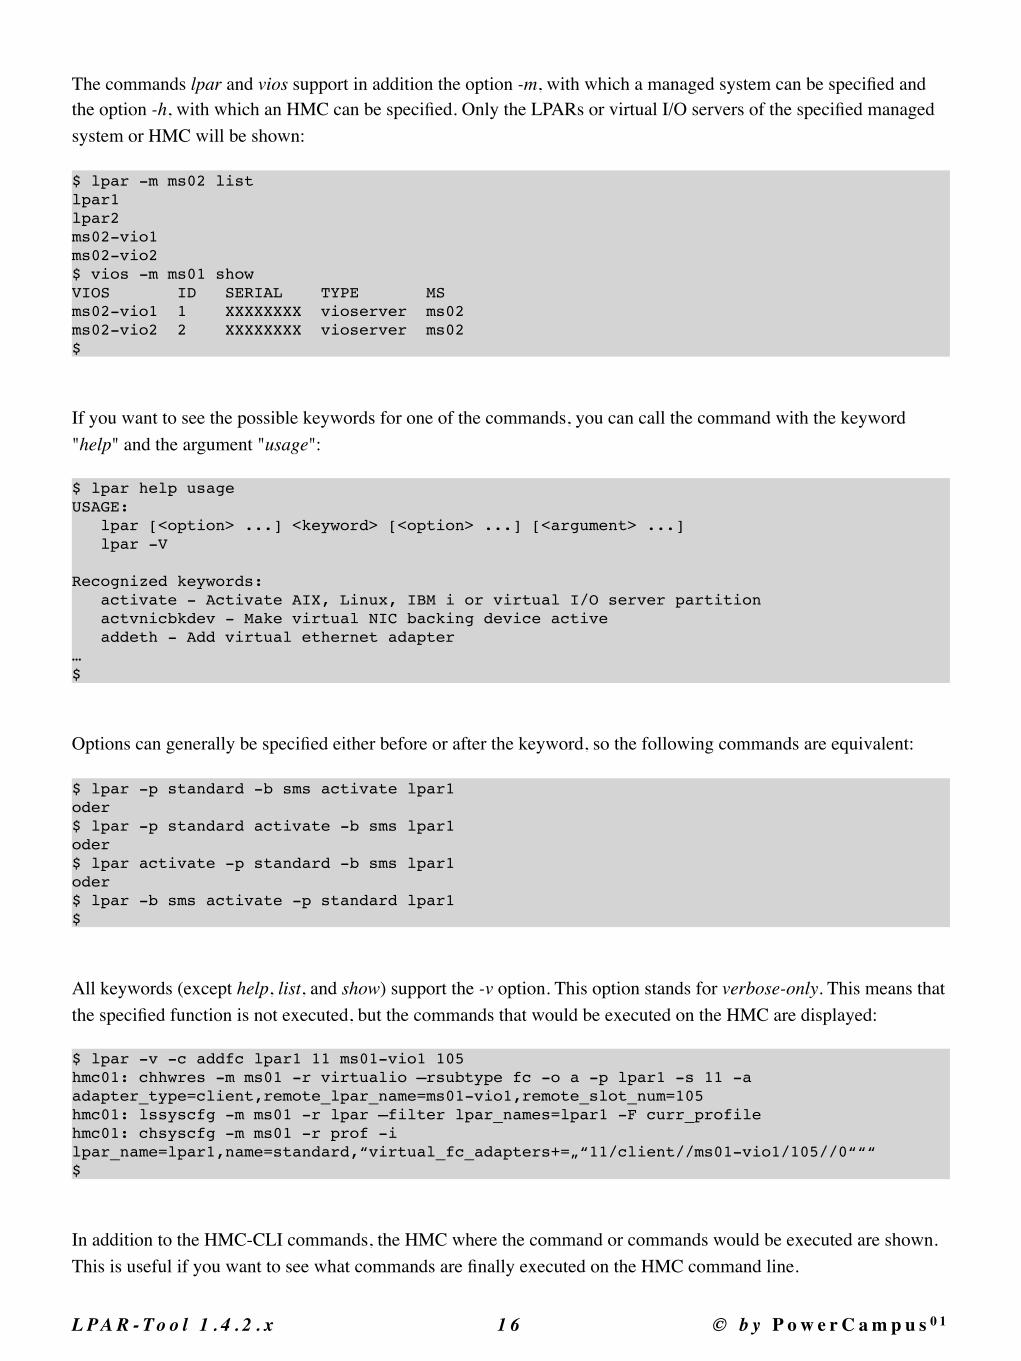
Each of the 4 commands supports the keywords "list" and "show". These two keywords only access the internal map files, so there is no SSH access to the HMCs. The keyword „list" lists only the names of registered HMCs, Managed Systems, LPARs, or Virtual I/O Servers. The keyword "show" returns some additional information. Here are some examples:
$ hmc listhmc01hmc02$ ms showNAME SERIAL_NUM TYPE_MODEL HMCSms02 XXXXXXX 9009-22A hmc01,hmc02ms04 XXXXXXX 9009-22A hmc01,hmc02…$ lpar listlpar1lpar2lpar3…$ vios showVIOS ID SERIAL TYPE MSms02-vio1 1 XXXXXXXX vioserver ms02ms02-vio2 2 XXXXXXXX vioserver ms02ms04-vio1 1 XXXXXXXX vioserver ms04…$
In all cases you can limit the output by using arguments:
$ hmc list hmc01 hmc02hmc01hmc02$ hmc show hmc02NAME SERIAL_NUM TYPE_MODELhmc02 XXXXXXX 7042-CR9 $
L P A R - To o l 1 . 4 . 2 . x �1 5 © b y P o w e r C a m p u s 0 1
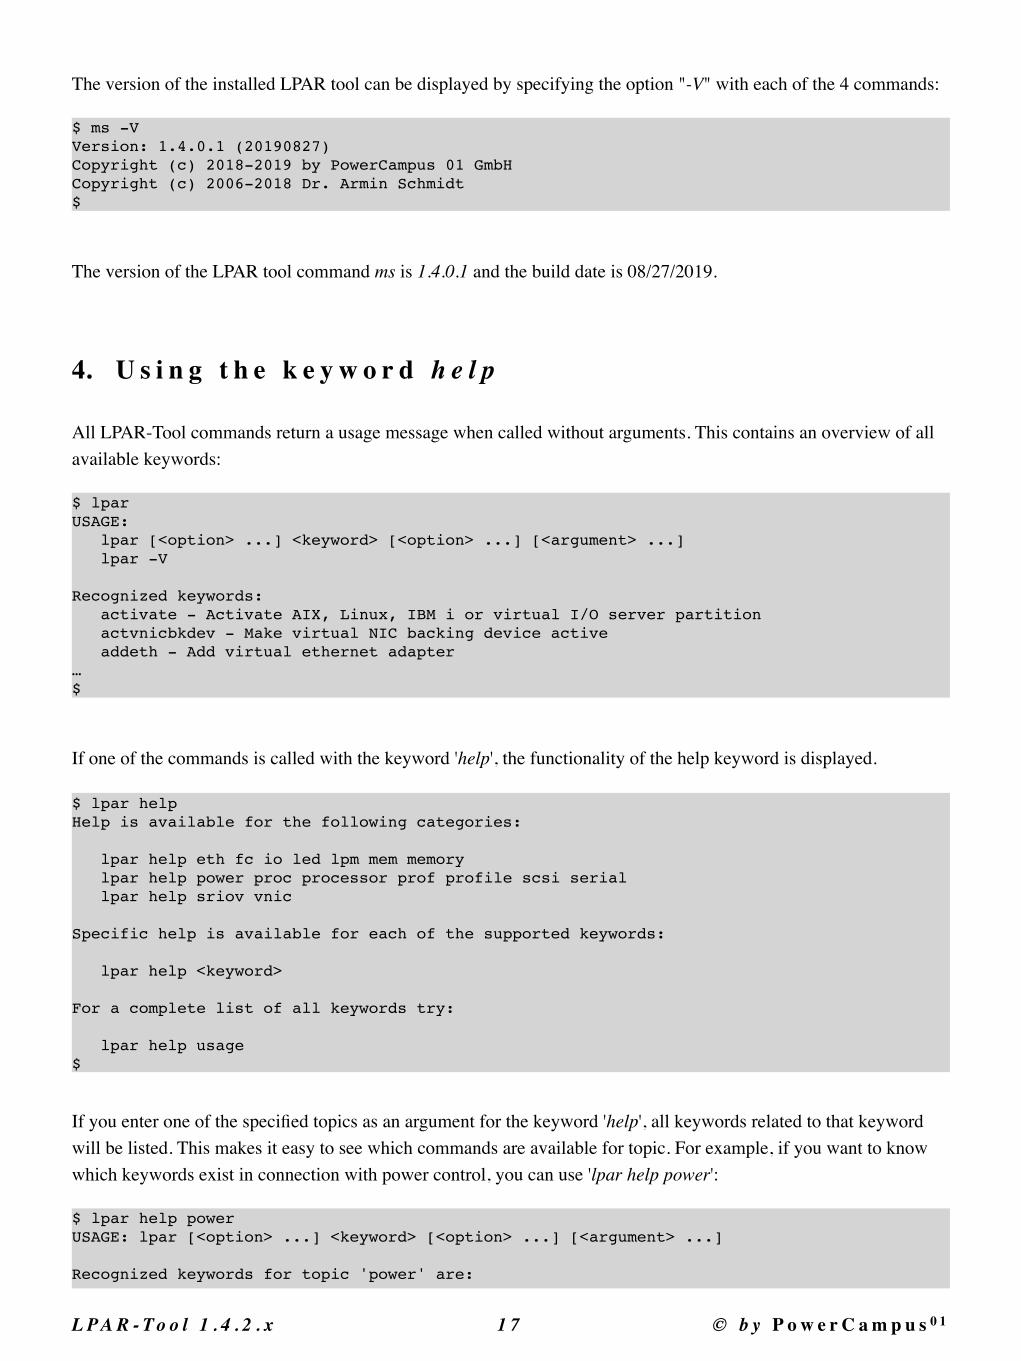
The commands lpar and vios support in addition the option -m, with which a managed system can be specified and the option -h, with which an HMC can be specified. Only the LPARs or virtual I/O servers of the specified managed system or HMC will be shown:
$ lpar -m ms02 listlpar1lpar2ms02-vio1ms02-vio2$ vios -m ms01 showVIOS ID SERIAL TYPE MSms02-vio1 1 XXXXXXXX vioserver ms02ms02-vio2 2 XXXXXXXX vioserver ms02$
If you want to see the possible keywords for one of the commands, you can call the command with the keyword "help" and the argument "usage":
$ lpar help usageUSAGE: lpar [<option> ...] <keyword> [<option> ...] [<argument> ...] lpar -V Recognized keywords: activate - Activate AIX, Linux, IBM i or virtual I/O server partition actvnicbkdev - Make virtual NIC backing device active addeth - Add virtual ethernet adapter…$
Options can generally be specified either before or after the keyword, so the following commands are equivalent:
$ lpar -p standard -b sms activate lpar1oder$ lpar -p standard activate -b sms lpar1oder$ lpar activate -p standard -b sms lpar1oder$ lpar -b sms activate -p standard lpar1$
All keywords (except help, list, and show) support the -v option. This option stands for verbose-only. This means that the specified function is not executed, but the commands that would be executed on the HMC are displayed:
$ lpar -v -c addfc lpar1 11 ms01-vio1 105hmc01: chhwres -m ms01 -r virtualio —rsubtype fc -o a -p lpar1 -s 11 -a adapter_type=client,remote_lpar_name=ms01-vio1,remote_slot_num=105hmc01: lssyscfg -m ms01 -r lpar —filter lpar_names=lpar1 -F curr_profilehmc01: chsyscfg -m ms01 -r prof -i lpar_name=lpar1,name=standard,“virtual_fc_adapters+=„“11/client//ms01-vio1/105//0“““$
In addition to the HMC-CLI commands, the HMC where the command or commands would be executed are shown. This is useful if you want to see what commands are finally executed on the HMC command line.
L P A R - To o l 1 . 4 . 2 . x �1 6 © b y P o w e r C a m p u s 0 1
The version of the installed LPAR tool can be displayed by specifying the option "-V" with each of the 4 commands:
$ ms -VVersion: 1.4.0.1 (20190827)Copyright (c) 2018-2019 by PowerCampus 01 GmbHCopyright (c) 2006-2018 Dr. Armin Schmidt$
The version of the LPAR tool command ms is 1.4.0.1 and the build date is 08/27/2019.
4. U s i n g t h e k e y w o r d h e l p
All LPAR-Tool commands return a usage message when called without arguments. This contains an overview of all available keywords:
$ lparUSAGE: lpar [<option> ...] <keyword> [<option> ...] [<argument> ...] lpar -V Recognized keywords: activate - Activate AIX, Linux, IBM i or virtual I/O server partition actvnicbkdev - Make virtual NIC backing device active addeth - Add virtual ethernet adapter…$
If one of the commands is called with the keyword 'help', the functionality of the help keyword is displayed.
$ lpar helpHelp is available for the following categories: lpar help eth fc io led lpm mem memory lpar help power proc processor prof profile scsi serial lpar help sriov vnic Specific help is available for each of the supported keywords: lpar help <keyword> For a complete list of all keywords try: lpar help usage$
If you enter one of the specified topics as an argument for the keyword 'help', all keywords related to that keyword will be listed. This makes it easy to see which commands are available for topic. For example, if you want to know which keywords exist in connection with power control, you can use 'lpar help power':
$ lpar help powerUSAGE: lpar [<option> ...] <keyword> [<option> ...] [<argument> ...] Recognized keywords for topic 'power' are:
L P A R - To o l 1 . 4 . 2 . x �1 7 © b y P o w e r C a m p u s 0 1
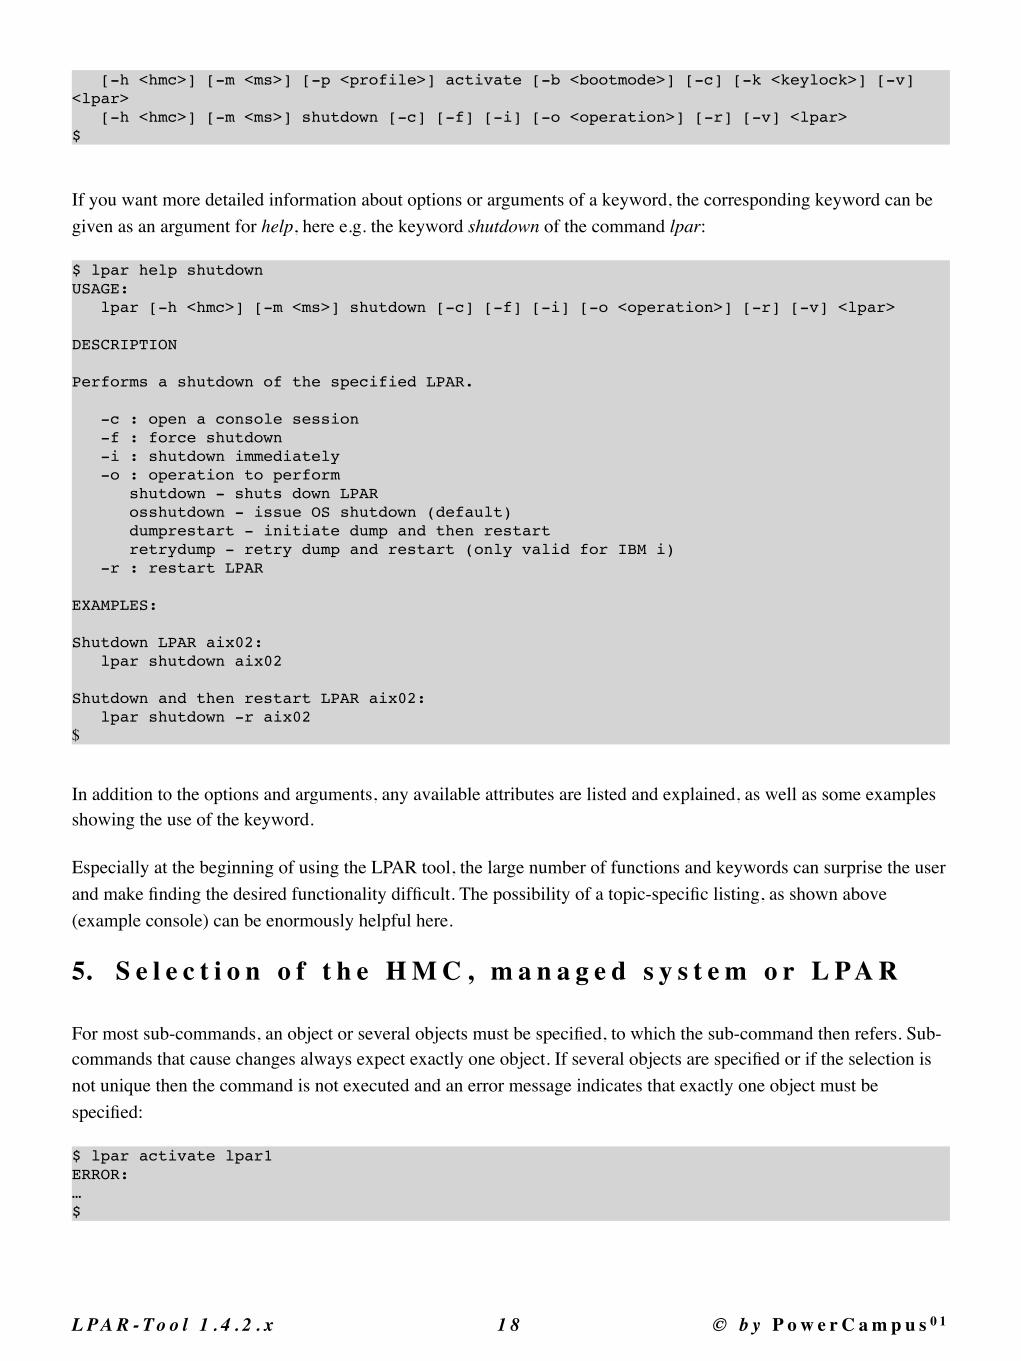
[-h <hmc>] [-m <ms>] [-p <profile>] activate [-b <bootmode>] [-c] [-k <keylock>] [-v] <lpar> [-h <hmc>] [-m <ms>] shutdown [-c] [-f] [-i] [-o <operation>] [-r] [-v] <lpar>$
If you want more detailed information about options or arguments of a keyword, the corresponding keyword can be given as an argument for help, here e.g. the keyword shutdown of the command lpar:
$ lpar help shutdownUSAGE: lpar [-h <hmc>] [-m <ms>] shutdown [-c] [-f] [-i] [-o <operation>] [-r] [-v] <lpar> DESCRIPTION Performs a shutdown of the specified LPAR. -c : open a console session -f : force shutdown -i : shutdown immediately -o : operation to perform shutdown - shuts down LPAR osshutdown - issue OS shutdown (default) dumprestart - initiate dump and then restart retrydump - retry dump and restart (only valid for IBM i) -r : restart LPAR EXAMPLES: Shutdown LPAR aix02: lpar shutdown aix02 Shutdown and then restart LPAR aix02: lpar shutdown -r aix02$
In addition to the options and arguments, any available attributes are listed and explained, as well as some examples showing the use of the keyword.
Especially at the beginning of using the LPAR tool, the large number of functions and keywords can surprise the user and make finding the desired functionality difficult. The possibility of a topic-specific listing, as shown above (example console) can be enormously helpful here.
5. S e l e c t i o n o f t h e H M C , m a n a g e d s y s t e m o r L P A R
For most sub-commands, an object or several objects must be specified, to which the sub-command then refers. Sub-commands that cause changes always expect exactly one object. If several objects are specified or if the selection is not unique then the command is not executed and an error message indicates that exactly one object must be specified:
$ lpar activate lpar1ERROR:…$
L P A R - To o l 1 . 4 . 2 . x �1 8 © b y P o w e r C a m p u s 0 1
In such a case, the -h and/or -m options must be used to uniquely identify the object. If there is only one LPAR named lpar1 which can be reached via the HMC hmc01, uniqueness can be achieved with the option ,-h hmc01':
$ lpar -h hmc01 activate lpar1$
Alternatively, you can also specify the managed system of the LPAR:
$ lpar -m ms01 activate lpar1$
If more than one managed system is named ms01 (rather unlikely), then both the HMC and the managed system must be specified:
$ lpar -h hmc01 -m ms01 activate lpar1$
If the names of all LPARs, managed systems and HMCs are unique (ie only assigned once), then the options -h and -m are not necessary. This saves a lot of tip work!
For commands that accept one or more objects, uniqueness is not necessary. For example, if there are 2 LPARs with the same name on different Managed Systems, then the command simply refers to both LPARs:
$ lpar show lpar1…
The LPAR tool allows wildcards when specifying objects. For example, this allows to quickly list all LPARs that start with "aix" in the LPAR name:
$ lpar show aix*NAME ID SERIAL LPAR_ENV MS HMCSaix04 3 XXXXXXX aixlinux ms06 hmc01,hmc02aix05 4 XXXXXXX aixlinux ms03 hmc01,hmc02…$
However, since the shell first interprets and evaluates wildcards, this can lead to unexpected arguments, shown here for the example *db*. In this case, the wildcard matches files in the current directory and the shell therefore substitutes the wildcard with the list of matching files. The LPAR tool is then called with this list:
$ lpar show *db*ERROR: no matching LPAR 'audit_db2.tar' foundUSAGE: lpar [-h <hmc>] [-m <ms>] show [{-o <format>|-f|-j|-y}] [-F <fields>] [-s <selections>] [<lpar> …]$
This can be avoided by either quoting the argument in quotes or apostrophes, or prefixing a backslash:
L P A R - To o l 1 . 4 . 2 . x �1 9 © b y P o w e r C a m p u s 0 1
$ lpar show „*db*“…$ lpar show ‚*db*‘…$
6. S e l e c t i o n o f H M C s
An HMC can be specified either by name or serial number:
$ hmc show hmc01NAME SERIAL_NUM TYPE_MODELhmc01 1234567 7042-CR9$ hmc show 1234567NAME SERIAL_NUM TYPE_MODELhmc01 1234567 7042-CR9$
In both cases wildcards are allowed:
$ hmc show hmc*NAME SERIAL_NUM TYPE_MODELhmc01 1234567 7042-CR9hmc02 1238351 7042-CR9…$ hmc show 123*NAME SERIAL_NUM TYPE_MODELhmc01 1234567 7042-CR9hmc01 1238351 7042-CR9$
In addition, HMCs can also be selected by type and by model, e.g. all HMCs of type 7042-CR9:
$ hmc show 7042-CR9NAME SERIAL_NUM TYPE_MODELhmc01 1234567 7042-CR9hmc02 1238351 7042-CR9…$
Again, wildcards are allowed:
$ hmc show 7042*NAME SERIAL_NUM TYPE_MODELhmc01 1234567 7042-CR9hmc02 1238351 7042-CR9…$ hmc show *CR8NAME SERIAL_NUM TYPE_MODELhmc05 XXXXXXX 7042-CR8hmc06 XXXXXXX 7042-CR8$
L P A R - To o l 1 . 4 . 2 . x �2 0 © b y P o w e r C a m p u s 0 1
7. S e l e c t i o n o f M a n a g e d S y s t e m s
A managed system can be specified either by name or serial number:
$ ms show ms05NAME SERIAL_NUM TYPE_MODEL HMCSms05 0123456 8205-E6B hmc01,hmc02$ ms show 0123456NAME SERIAL_NUM TYPE_MODEL HMCSms05 0123456 8205-E6B hmc01,hmc02$
In both cases, wildcards can also be used:
$ ms show ms0*NAME SERIAL_NUM TYPE_MODEL HMCSms01 XXXXXXX 8205-E6B hmc01,hmc02ms02 XXXXXXX 8205-E6B hmc01,hmc02…$ ms show 0123*NAME SERIAL_NUM TYPE_MODEL HMCSms05 XXXXXXX 8205-E6B hmc01,hmc02ms06 XXXXXXX 8205-E6B hmc01,hmc02$
In addition, managed systems can also be selected by type and model or only the type:
$ ms show 8205-E6DNAME SERIAL_NUM TYPE_MODEL HMCSms01 XXXXXXX 8205-E6B hmc01,hmc02ms02 XXXXXXX 8205-E6B hmc01,hmc02…$ ms show 8205NAME SERIAL_NUM TYPE_MODEL HMCSms01 XXXXXXX 8205-E6B hmc01,hmc02ms02 XXXXXXX 8205-E6B hmc01,hmc02…$
Again, wildcards are allowed:
$ ms show 820*…$ ms show 8205-E*…$
All of the above examples select from all managed systems known to the LPAR tool. If the option, -h 'specifies an HMC, then the selection is limited to managed systems connected to this HMC. This makes it easy to list, for example, all managed systems of type 8205 at the HMC hmc01:
$ ms -h hmc03 show 8205NAME SERIAL_NUM TYPE_MODEL HMCSms08 XXXXXXX 8205-E6B hmc03,hmc04
L P A R - To o l 1 . 4 . 2 . x �2 1 © b y P o w e r C a m p u s 0 1
ms09 XXXXXXX 8205-E6B hmc03,hmc04$
With the option itself, no wildcards can be used, the HMC must be specified either in the form of the name or the serial number!
8. S e l e c t i o n o f L P A R s
LPARs can also be selected by name or serial number:
$ lpar show aix01NAME ID SERIAL LPAR_ENV MS HMCSaix01 3 01234567 aixlinux ms05 hmc01,hmc02$ lpar show 01234567NAME ID SERIAL LPAR_ENV MS HMCSaix01 3 01234567 aixlinux ms05 hmc01,hmc02$
Again, wildcards are allowed in both cases:
$ lpar show aix*…$ lpar show 0123*…$
The selection is made from all the LPARs known to the LPAR tool. With the -h option, this can be restricted to LPARs connected via a specific HMC. The -m option can be used to restrict this to LPARs running on a particular managed system. For example, all LPARs with "tsm" in the name running on the managed system ms03:
$ lpar -m ms03 show *tsm*NAME ID SERIAL LPAR_ENV MS HMCSaixtsm01 3 XXXXXXX3 aixlinux ms03 hmc01,hmc02aixtsm02 8 XXXXXXX8 aixlinux ms03 hmc01,hmc02$
9. S e l e c t i o n o f t h e O u t p u t F o r m a t
For all commands which print information, an attempt was made to display the information as clearly as possible. As a rule, some information is not printed in order to keep the amount of output readable. The format of this standard output may change from one version to the next version of the LPAR tool. If the output of the LPAR tool is to be further processed by a program, the LPAR tool offers the possibility to produce output in JSON format, stanza format or YAML format. These formats are easier for programs to parse. In addition, when using these formats, all informations are shown by default. Currently the commands hmc, ms and lpar offer the possibility to generate these output formats. For the command vios this will be realized in the next version (1.5.X).
L P A R - To o l 1 . 4 . 2 . x �2 2 © b y P o w e r C a m p u s 0 1
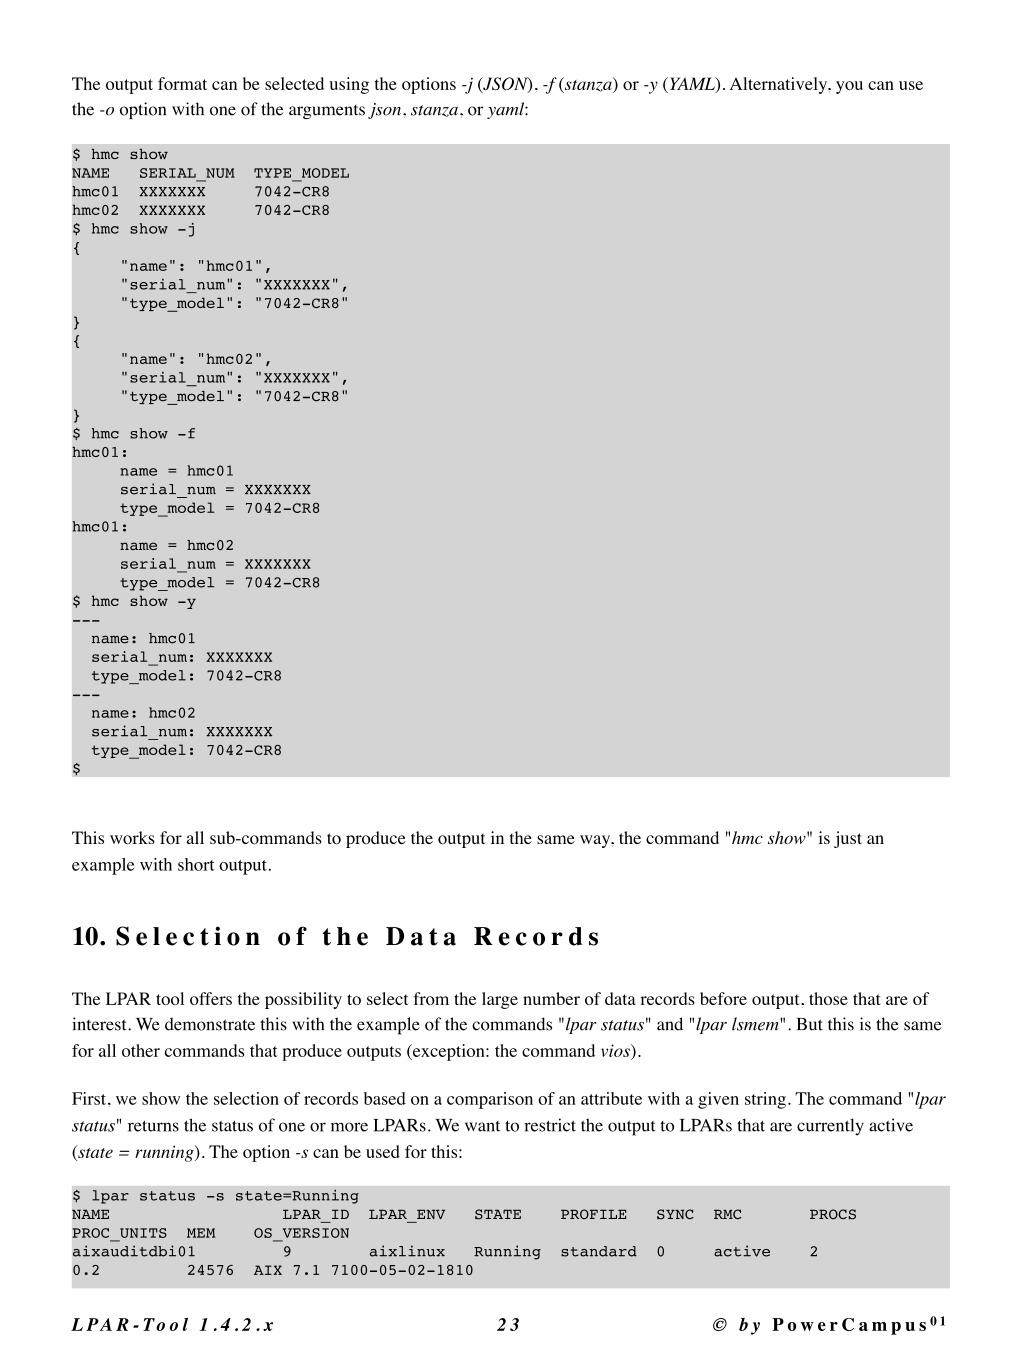
The output format can be selected using the options -j (JSON), -f (stanza) or -y (YAML). Alternatively, you can use the -o option with one of the arguments json, stanza, or yaml:
$ hmc showNAME SERIAL_NUM TYPE_MODELhmc01 XXXXXXX 7042-CR8 hmc02 XXXXXXX 7042-CR8$ hmc show -j{
"name": "hmc01","serial_num": "XXXXXXX","type_model": "7042-CR8"
}{
"name": "hmc02","serial_num": "XXXXXXX","type_model": "7042-CR8"
}$ hmc show -fhmc01:
name = hmc01serial_num = XXXXXXXtype_model = 7042-CR8
hmc01:name = hmc02serial_num = XXXXXXXtype_model = 7042-CR8
$ hmc show -y--- name: hmc01 serial_num: XXXXXXX type_model: 7042-CR8--- name: hmc02 serial_num: XXXXXXX type_model: 7042-CR8$
This works for all sub-commands to produce the output in the same way, the command "hmc show" is just an example with short output.
10. S e l e c t i o n o f t h e D a t a R e c o r d s
The LPAR tool offers the possibility to select from the large number of data records before output, those that are of interest. We demonstrate this with the example of the commands "lpar status" and "lpar lsmem". But this is the same for all other commands that produce outputs (exception: the command vios).
First, we show the selection of records based on a comparison of an attribute with a given string. The command "lpar status" returns the status of one or more LPARs. We want to restrict the output to LPARs that are currently active (state = running). The option -s can be used for this:
$ lpar status -s state=RunningNAME LPAR_ID LPAR_ENV STATE PROFILE SYNC RMC PROCS PROC_UNITS MEM OS_VERSIONaixauditdbi01 9 aixlinux Running standard 0 active 2 0.2 24576 AIX 7.1 7100-05-02-1810
L P A R - To o l 1 . 4 . 2 . x �2 3 © b y P o w e r C a m p u s 0 1
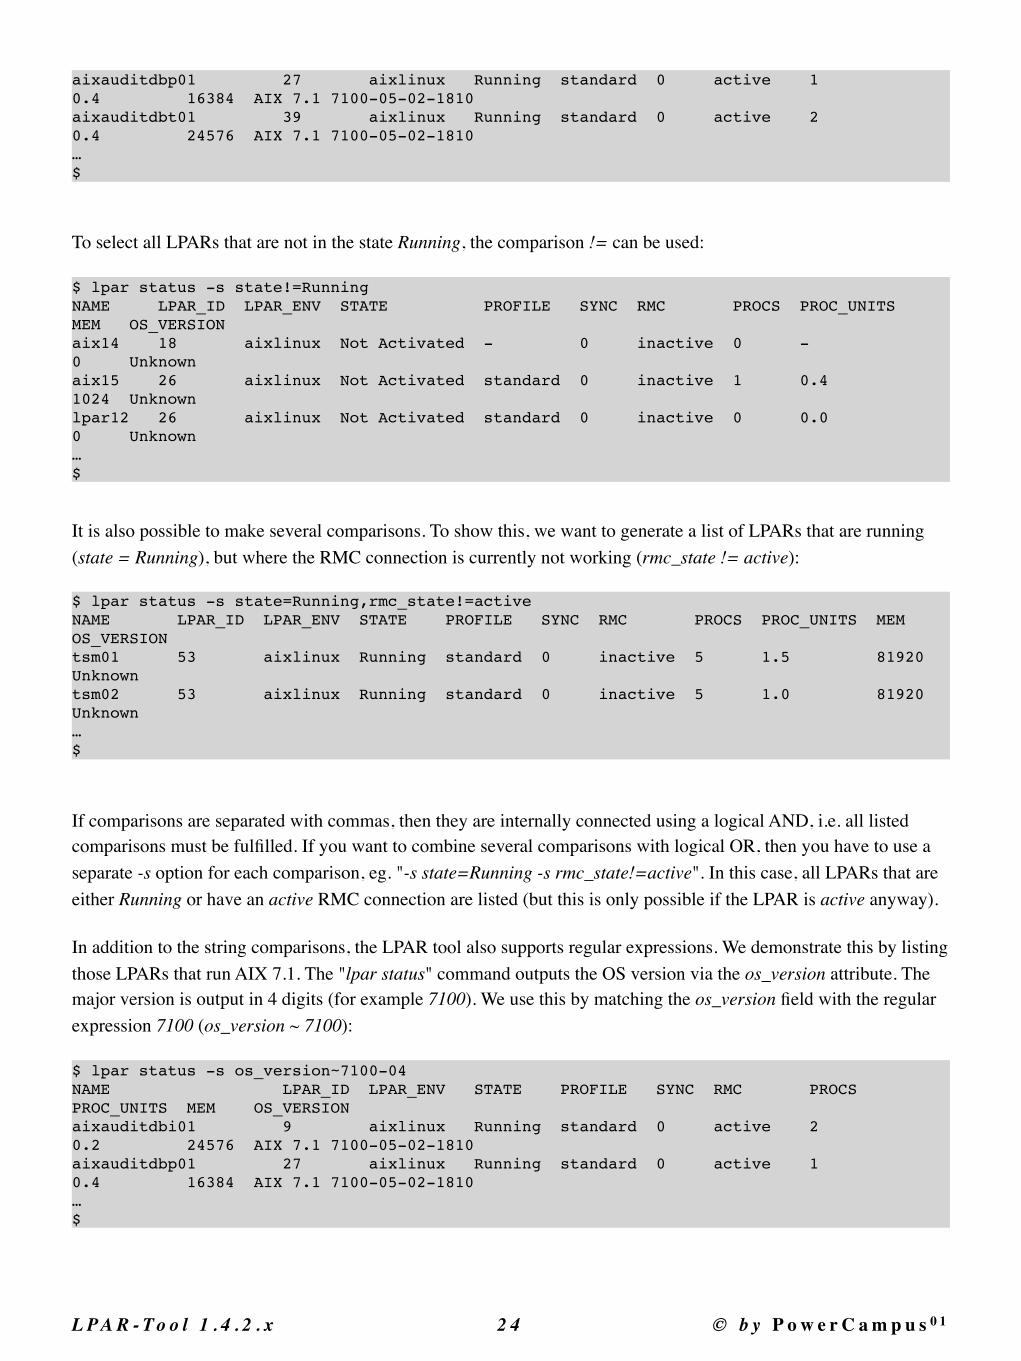
aixauditdbp01 27 aixlinux Running standard 0 active 1 0.4 16384 AIX 7.1 7100-05-02-1810aixauditdbt01 39 aixlinux Running standard 0 active 2 0.4 24576 AIX 7.1 7100-05-02-1810…$
To select all LPARs that are not in the state Running, the comparison != can be used:
$ lpar status -s state!=RunningNAME LPAR_ID LPAR_ENV STATE PROFILE SYNC RMC PROCS PROC_UNITS MEM OS_VERSIONaix14 18 aixlinux Not Activated - 0 inactive 0 - 0 Unknownaix15 26 aixlinux Not Activated standard 0 inactive 1 0.4 1024 Unknownlpar12 26 aixlinux Not Activated standard 0 inactive 0 0.0 0 Unknown…$
It is also possible to make several comparisons. To show this, we want to generate a list of LPARs that are running (state = Running), but where the RMC connection is currently not working (rmc_state != active):
$ lpar status -s state=Running,rmc_state!=activeNAME LPAR_ID LPAR_ENV STATE PROFILE SYNC RMC PROCS PROC_UNITS MEM OS_VERSIONtsm01 53 aixlinux Running standard 0 inactive 5 1.5 81920 Unknowntsm02 53 aixlinux Running standard 0 inactive 5 1.0 81920 Unknown…$
If comparisons are separated with commas, then they are internally connected using a logical AND, i.e. all listed comparisons must be fulfilled. If you want to combine several comparisons with logical OR, then you have to use a separate -s option for each comparison, eg. "-s state=Running -s rmc_state!=active". In this case, all LPARs that are either Running or have an active RMC connection are listed (but this is only possible if the LPAR is active anyway).
In addition to the string comparisons, the LPAR tool also supports regular expressions. We demonstrate this by listing those LPARs that run AIX 7.1. The "lpar status" command outputs the OS version via the os_version attribute. The major version is output in 4 digits (for example 7100). We use this by matching the os_version field with the regular expression 7100 (os_version ~ 7100):
$ lpar status -s os_version~7100-04NAME LPAR_ID LPAR_ENV STATE PROFILE SYNC RMC PROCS PROC_UNITS MEM OS_VERSIONaixauditdbi01 9 aixlinux Running standard 0 active 2 0.2 24576 AIX 7.1 7100-05-02-1810aixauditdbp01 27 aixlinux Running standard 0 active 1 0.4 16384 AIX 7.1 7100-05-02-1810…$
L P A R - To o l 1 . 4 . 2 . x �2 4 © b y P o w e r C a m p u s 0 1
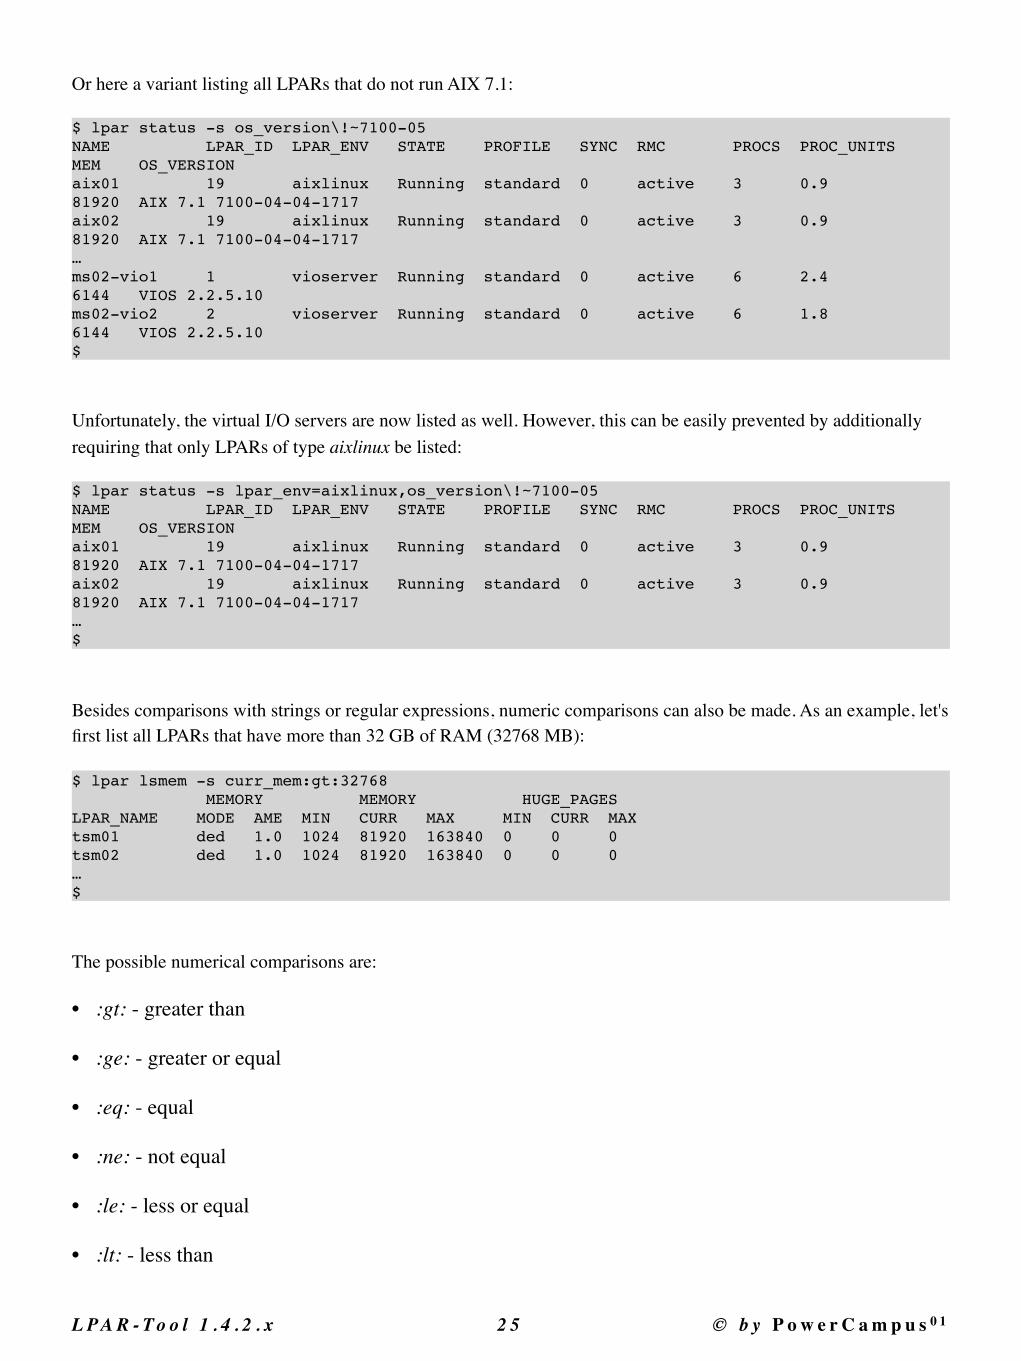
Or here a variant listing all LPARs that do not run AIX 7.1:
$ lpar status -s os_version\!~7100-05NAME LPAR_ID LPAR_ENV STATE PROFILE SYNC RMC PROCS PROC_UNITS MEM OS_VERSIONaix01 19 aixlinux Running standard 0 active 3 0.9 81920 AIX 7.1 7100-04-04-1717aix02 19 aixlinux Running standard 0 active 3 0.9 81920 AIX 7.1 7100-04-04-1717…ms02-vio1 1 vioserver Running standard 0 active 6 2.4 6144 VIOS 2.2.5.10ms02-vio2 2 vioserver Running standard 0 active 6 1.8 6144 VIOS 2.2.5.10$
Unfortunately, the virtual I/O servers are now listed as well. However, this can be easily prevented by additionally requiring that only LPARs of type aixlinux be listed:
$ lpar status -s lpar_env=aixlinux,os_version\!~7100-05NAME LPAR_ID LPAR_ENV STATE PROFILE SYNC RMC PROCS PROC_UNITS MEM OS_VERSIONaix01 19 aixlinux Running standard 0 active 3 0.9 81920 AIX 7.1 7100-04-04-1717aix02 19 aixlinux Running standard 0 active 3 0.9 81920 AIX 7.1 7100-04-04-1717…$
Besides comparisons with strings or regular expressions, numeric comparisons can also be made. As an example, let's first list all LPARs that have more than 32 GB of RAM (32768 MB):
$ lpar lsmem -s curr_mem:gt:32768 MEMORY MEMORY HUGE_PAGES LPAR_NAME MODE AME MIN CURR MAX MIN CURR MAXtsm01 ded 1.0 1024 81920 163840 0 0 0tsm02 ded 1.0 1024 81920 163840 0 0 0…$
The possible numerical comparisons are:
• :gt: - greater than
• :ge: - greater or equal
• :eq: - equal
• :ne: - not equal
• :le: - less or equal
• :lt: - less than
L P A R - To o l 1 . 4 . 2 . x �2 5 © b y P o w e r C a m p u s 0 1
Of course all comparisons can be combined!
11. S e l e c t i o n o f t h e D a t a F i e l d s
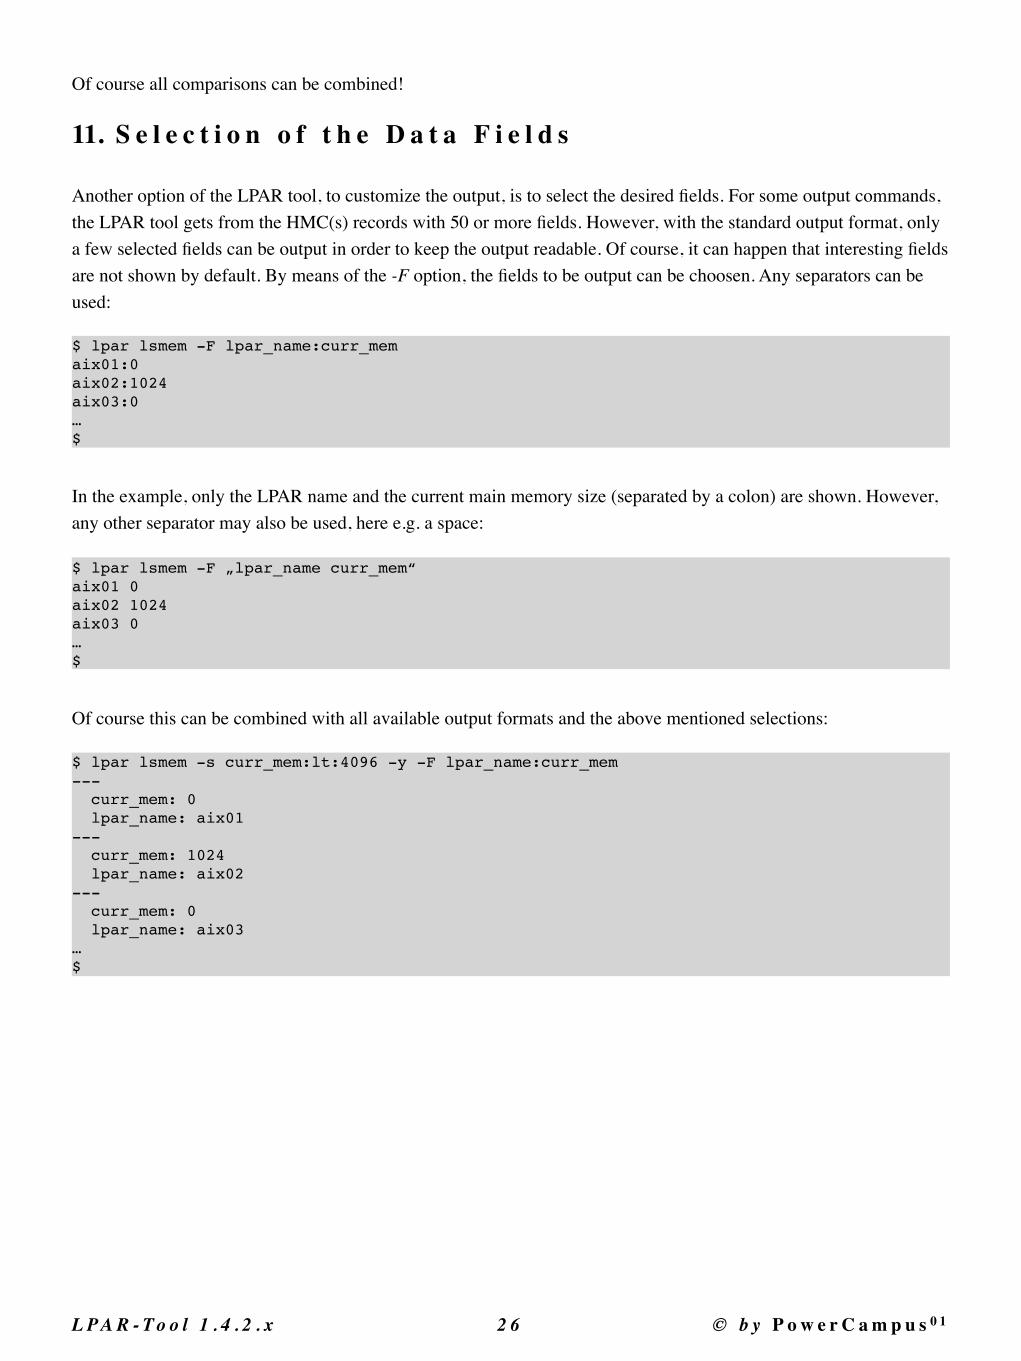
Another option of the LPAR tool, to customize the output, is to select the desired fields. For some output commands, the LPAR tool gets from the HMC(s) records with 50 or more fields. However, with the standard output format, only a few selected fields can be output in order to keep the output readable. Of course, it can happen that interesting fields are not shown by default. By means of the -F option, the fields to be output can be choosen. Any separators can be used:
$ lpar lsmem -F lpar_name:curr_memaix01:0aix02:1024aix03:0…$
In the example, only the LPAR name and the current main memory size (separated by a colon) are shown. However, any other separator may also be used, here e.g. a space:
$ lpar lsmem -F „lpar_name curr_mem“aix01 0aix02 1024aix03 0…$
Of course this can be combined with all available output formats and the above mentioned selections:
$ lpar lsmem -s curr_mem:lt:4096 -y -F lpar_name:curr_mem--- curr_mem: 0 lpar_name: aix01--- curr_mem: 1024 lpar_name: aix02--- curr_mem: 0 lpar_name: aix03…$
L P A R - To o l 1 . 4 . 2 . x �2 6 © b y P o w e r C a m p u s 0 1
3. A d m i n i s t r a t i o n o f L P A R sFirst, we'll show some simpler, but more common, operations on LPARs using the LPAR tool:
• Status of an LPAR
• Configuration of an LPAR
• Activating an LPAR
• Shutting down an LPAR
• Opening the console for an LPAR
1. S t a t u s o f a n L P A R
To display the status of an LPAR there is the command "lpar status". This command can also list the status of several or even all LPARs with one command.
List the status of an LPAR:
$ lpar status lpar1NAME LPAR_ID LPAR_ENV STATE PROFILE SYNC RMC PROCS PROC_UNITS MEM OS_VERSIONlpar1 3 aixlinux Running standard 0 active 4 0.4 33792 AIX 7.1 7100-04-05-1720$
List status of multiple LPARs:
$ lpar status lpar1 lpar2 lpar3NAME LPAR_ID LPAR_ENV STATE PROFILE SYNC RMC PROCS PROC_UNITS MEM OS_VERSIONlpar1 3 aixlinux Running standard 0 active 4 0.4 33792 AIX 7.1 7100-04-05-1720lpar2 16 aixlinux Running standard 0 active 1 0.2 16384 AIX 7.1 7100-04-05-1720lpar3 13 aixlinux Running standard 0 active 2 0.3 32768 AIX 7.1 7100-04-05-1720$
List status of all LPARs of a managed system:
$ lpar -m ms01 statusNAME LPAR_ID LPAR_ENV STATE PROFILE SYNC RMC PROCS PROC_UNITS MEM OS_VERSIONlpar1 3 aixlinux Running standard 0 active 4 0.4 33792 AIX 7.1 7100-04-05-1720lpar4 7 aixlinux Not Activated standard 0 inactive 4 0.4 33792 AIX 7.1 7100-04-05-1720…$
L P A R - To o l 1 . 4 . 2 . x �2 7 © b y P o w e r C a m p u s 0 1
List status of all LPARs:
$ lpar statusNAME LPAR_ID LPAR_ENV STATE PROFILE SYNC RMC PROCS PROC_UNITS MEM OS_VERSIONlpar1 3 aixlinux Running standard 0 active 4 0.4 33792 AIX 7.1 7100-04-05-1720lpar2 16 aixlinux Running standard 0 active 1 0.2 16384 AIX 7.1 7100-04-05-1720lpar3 13 aixlinux Running standard 0 active 2 0.3 32768 AIX 7.1 7100-04-05-1720lpar4 7 aixlinux Not Activated standard 0 inactive 4 0.4 33792 AIX 7.1 7100-04-05-1720 …$
In addition to the status of the LPAR, the status of the RMC connection and other information is also displayed.
2. A t t r i b u t e s o f a n L P A R
The current attributes of an LPAR can be most easily displayed with the command "lpar lsattr":
$ lpar lsattr lpar1NAME DEFAULT_PROFILE ALLOW_PERF_COLLECTION TIME_REF SUSPEND_CAPABLE REMOTE_RESTART_CAPABLE SIMPLIFIED_REMOTE_RESTART_CAPABLElpar1 standard 0 0 0 0 -$
Some attributes are not set by the profile but apply to an LPAR regardless of the profile used. Examples of such attributes are the LPAR name, the default profile name, or the remote_restart_capable property. The attributes can be changed by using the command "lpar chattr", shown here by the example of the property new_name:
$ lpar chattr lpar1 new_name=lpar100$
The above command renames the LPAR. However, the name change does not occur in the local map files, so the LPAR is still known under the old name, but can not be addressed by the old name:
$ lpar lsmem lpar1 MEMORY MEMORY HUGE_PAGES LPAR_NAME MODE AME MIN CURR MAX MIN CURR MAX$
An "hmc rescan" updates the mapping files again and then the renamed LPAR can now be addressed by its new name.
However, to rename an LPAR, a simpler way is to use the "lpar rename" command, which also updates the mapping files:
L P A R - To o l 1 . 4 . 2 . x �2 8 © b y P o w e r C a m p u s 0 1
$ lpar rename lpar100 lpar1$
As another example, we'll show the change of the sync_curr_profile attribute, which indicates whether the current configuration of an LPAR should automatically be synchronized with the current active profile. If this is activated, changes to the LPAR are automatically made in the profile as well. Current configuration and profile are then always synchronous.
$ lpar chattr lpar1 sync_curr_profile=1$
Valid values for the sync_curr_profile attribute are:
0 - deactivate synchronization1 - activate synchronization2 - temporarily deactivate synchronization (suspend), until the profile is activated or applied
If synchronization is activated, the currently active profile can no longer be changed:
$ lpar -p standard chmem lpar1 mem_expansion=1.4hmc01: chsyscfg -r prof -m ms09 -i 'lpar_name=lpar1,name=standard,mem_expansion=1.4'ERROR: remote HMC command returned an error (1)StdErr: An error occurred while changing the partition profile named standard.StdErr: This profile is synchronized with the partition's current configuration. To update this profile, you can specify the force option on this command, or you can turn off current profile synchronization for the partition. If you specify the force option on this command, this profile will be updated and synchronization of this profile will be suspended until the next time this profile is activated or applied.$
3. A c t i v a t i n g a n L P A R
If an LPAR is in the "Not Activated" state, it can be reactivated with the "lpar activate" command. In the simplest case this works as follows:
$ lpar activate lpar1$
The LPAR is activated using the last current configuration. Depending on the configuration of the profile, the LPAR is automatically booted. Which of the profiles is the current profile can be determined with the help of "lpar status":
$ lpar status lpar1NAME LPAR_ID LPAR_ENV STATE PROFILE SYNC RMC PROCS PROC_UNITS MEM OS_VERSIONlpar1 4 aixlinux Not Activated standard 1 inactive 1 - 2048 Unknown$
L P A R - To o l 1 . 4 . 2 . x �2 9 © b y P o w e r C a m p u s 0 1
When activating an LPAR for the first time, a profile must be specified, the LPAR does not yet have a last current profile:
$ lpar -m ms09 create. > lpar6 $ lpar status lpar6NAME LPAR_ID LPAR_ENV STATE PROFILE SYNC RMC PROCS PROC_UNITS MEM OS_VERSIONlpar6 7 aixlinux Not Activated - 1 inactive 1 - 2048 Unknown$
If you attempt to start the LPAR without specifying a profile, you will get the following error message:
$ lpar activate lpar6ERROR: lparActivate(): remote HMC command returned an error (1)CMD on hmc01: chsysstate -m ms09 -r lpar -o on -n lpar6StdErr: HSCL3680 Partition lpar6 cannot be activated due to insufficient resources in its current configuration. Please activate the partition with a profile.$
The available profiles of an LPAR can be displayed with the command "lpar lsprof":
$ lpar lsprof lpar6NAME PROFILESlpar6 standard$
We are now activating the above LPAR with the profile 'standard':
$ lpar activate -p standard lpar6$
Now also a current profile for the LPAR is shown :
$ lpar status lpar6NAME LPAR_ID LPAR_ENV STATE PROFILE SYNC RMC PROCS PROC_UNITS MEM OS_VERSIONlpar6 7 aixlinux Running standard 1 inactive 1 - 2048 Unknown$
If the LPAR is not to be booted automatically, the desired boot mode can also be specified:
$ lpar activate -b sms lpar1$
The LPAR is activated and boots into the SMS menu. Alternatively, you can specify "norm" for normal bootmode or "of" for OpenFirmware.
L P A R - To o l 1 . 4 . 2 . x �3 0 © b y P o w e r C a m p u s 0 1
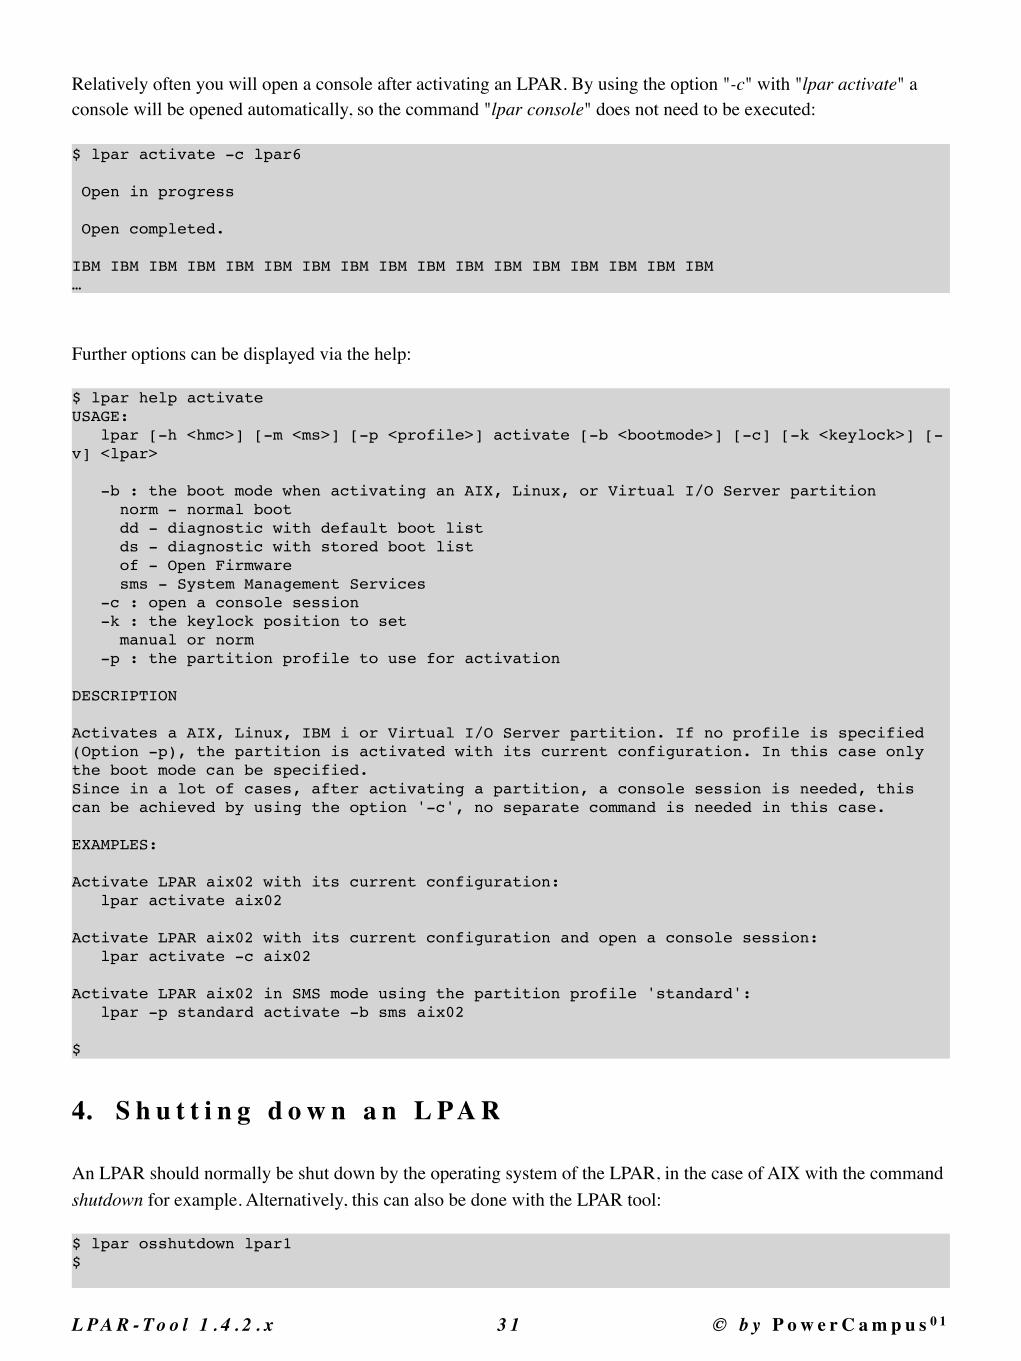
Relatively often you will open a console after activating an LPAR. By using the option "-c" with "lpar activate" a console will be opened automatically, so the command "lpar console" does not need to be executed:
$ lpar activate -c lpar6
Open in progress
Open completed.
IBM IBM IBM IBM IBM IBM IBM IBM IBM IBM IBM IBM IBM IBM IBM IBM IBM…
Further options can be displayed via the help:
$ lpar help activateUSAGE: lpar [-h <hmc>] [-m <ms>] [-p <profile>] activate [-b <bootmode>] [-c] [-k <keylock>] [-v] <lpar> -b : the boot mode when activating an AIX, Linux, or Virtual I/O Server partition norm - normal boot dd - diagnostic with default boot list ds - diagnostic with stored boot list of - Open Firmware sms - System Management Services -c : open a console session -k : the keylock position to set manual or norm -p : the partition profile to use for activation DESCRIPTION Activates a AIX, Linux, IBM i or Virtual I/O Server partition. If no profile is specified(Option -p), the partition is activated with its current configuration. In this case onlythe boot mode can be specified.Since in a lot of cases, after activating a partition, a console session is needed, thiscan be achieved by using the option '-c', no separate command is needed in this case. EXAMPLES: Activate LPAR aix02 with its current configuration: lpar activate aix02 Activate LPAR aix02 with its current configuration and open a console session: lpar activate -c aix02 Activate LPAR aix02 in SMS mode using the partition profile 'standard': lpar -p standard activate -b sms aix02 $
4. S h u t t i n g d o w n a n L P A R
An LPAR should normally be shut down by the operating system of the LPAR, in the case of AIX with the command shutdown for example. Alternatively, this can also be done with the LPAR tool:
$ lpar osshutdown lpar1$
L P A R - To o l 1 . 4 . 2 . x �3 1 © b y P o w e r C a m p u s 0 1

A working RMC connection is a prerequisite for the "lpar osshutdown" command. The command initiates a regular shutdown of the operating system. The command supports, among other options, the two options "-i" and "-r", which have an influence on the operating system shutdown.
In case of an AIX-LPAR, the following commands are executed:
In case of a Linux LPAR, the following commands are executed:
The following commands are executed for a virtual I/O server:
If the LPAR or the operating system hangs, the "lpar osshutdown" command is usually unsuccessful. You can then try to use the "-f" (force) option to force a shutdown, but in many cases this is unsuccessful.
In such a case, or if the operating system is not active at all (e.g. SMS mode), the "lpar shutdown" command can be used. No RMC connection is necessary here. A so-called delayed shutdown is then carried out, i.e. the LPAR is signaled a shutdown via the hypervisor (in the case of AIX a SIGPWR signal is sent, whereupon AIX performs a shutdown), the LPAR then gets time to complete outstanding I/Os and is then finally turned off.
The "-i" and "-r" options are also supported here and have the following meaning:
-i (immediate) -r (restart) Ausgeführtes OS Kommando
nein nein shutdown
nein ja shutdown -r
ja nein shutdown -F
ja ja shutdown -F -r
-i (immediate) -r (restart) Ausgeführtes OS Kommando
nein nein shutdown -h +1
nein ja shutdown -r +1
ja nein shutdown -h now
ja ja shutdown -r now
-i (immediate) -r (restart) Ausgeführtes OS Kommando
nein nein shutdown
nein ja shutdown -restart
ja nein shutdown -force
ja ja shutdown -force -restart
-i (immediate) -r (restart) Bedeutung
nein nein A delayed shutdown is carried out.
nein ja A system dump with restart is initiated (operator panel function 22). The equivalent is "lpar dumprestart".
ja nein An immediate shutdown is triggered (operator panel function 8).
ja ja An immediate restart is carried out (operator panel function 3).
L P A R - To o l 1 . 4 . 2 . x �3 2 © b y P o w e r C a m p u s 0 1
If possible, a regular shutdown should always be carried out when the operating system is running ("lpar osshutdown" or directly via the operating system).
5. I n i t i a t i n g a S y s t e m D u m p
In some situations, a regular shutdown of the operating system is no longer possible, e.g. because the operating system hangs due to an error and no longer responds or does not respond correctly. If you want to make a call to IBM for such a system, it is advisable not to simply switch off the hanging system, but to create a system dump. The system dump can then be made available to IBM and can help determine the cause of the malfunction or hang. Without such a dump, it is extremely difficult for IBM Support to determine the cause of the error!
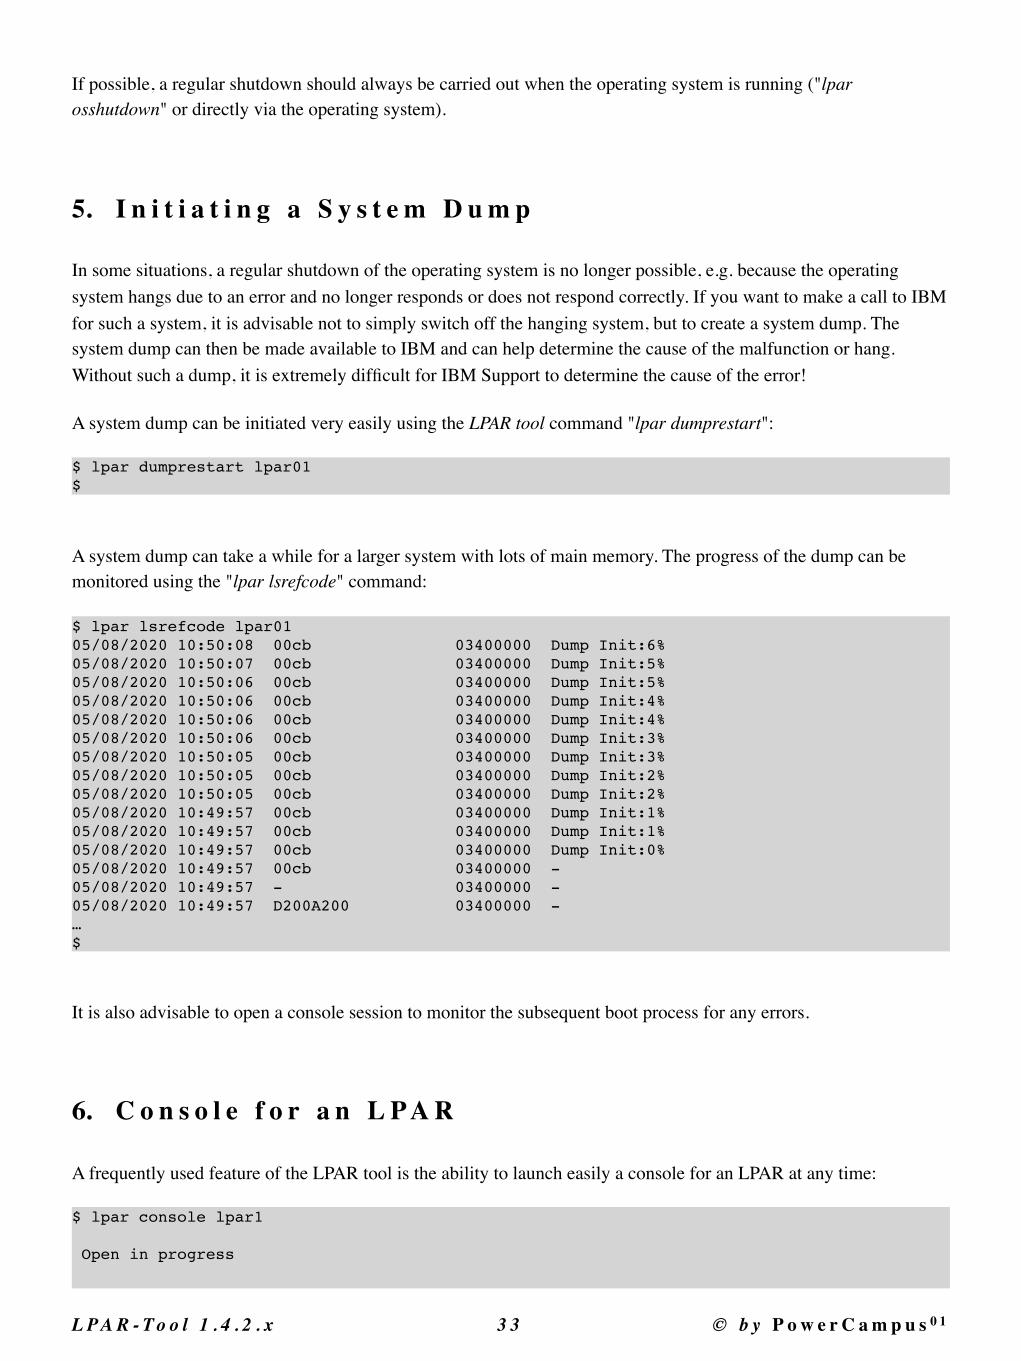
A system dump can be initiated very easily using the LPAR tool command "lpar dumprestart":
$ lpar dumprestart lpar01$
A system dump can take a while for a larger system with lots of main memory. The progress of the dump can be monitored using the "lpar lsrefcode" command:
$ lpar lsrefcode lpar0105/08/2020 10:50:08 00cb 03400000 Dump Init:6%05/08/2020 10:50:07 00cb 03400000 Dump Init:5%05/08/2020 10:50:06 00cb 03400000 Dump Init:5%05/08/2020 10:50:06 00cb 03400000 Dump Init:4%05/08/2020 10:50:06 00cb 03400000 Dump Init:4%05/08/2020 10:50:06 00cb 03400000 Dump Init:3%05/08/2020 10:50:05 00cb 03400000 Dump Init:3%05/08/2020 10:50:05 00cb 03400000 Dump Init:2%05/08/2020 10:50:05 00cb 03400000 Dump Init:2%05/08/2020 10:49:57 00cb 03400000 Dump Init:1%05/08/2020 10:49:57 00cb 03400000 Dump Init:1%05/08/2020 10:49:57 00cb 03400000 Dump Init:0%05/08/2020 10:49:57 00cb 03400000 -05/08/2020 10:49:57 - 03400000 -05/08/2020 10:49:57 D200A200 03400000 -…$
It is also advisable to open a console session to monitor the subsequent boot process for any errors.
6. C o n s o l e f o r a n L P A R
A frequently used feature of the LPAR tool is the ability to launch easily a console for an LPAR at any time:
$ lpar console lpar1
Open in progress
L P A R - To o l 1 . 4 . 2 . x �3 3 © b y P o w e r C a m p u s 0 1
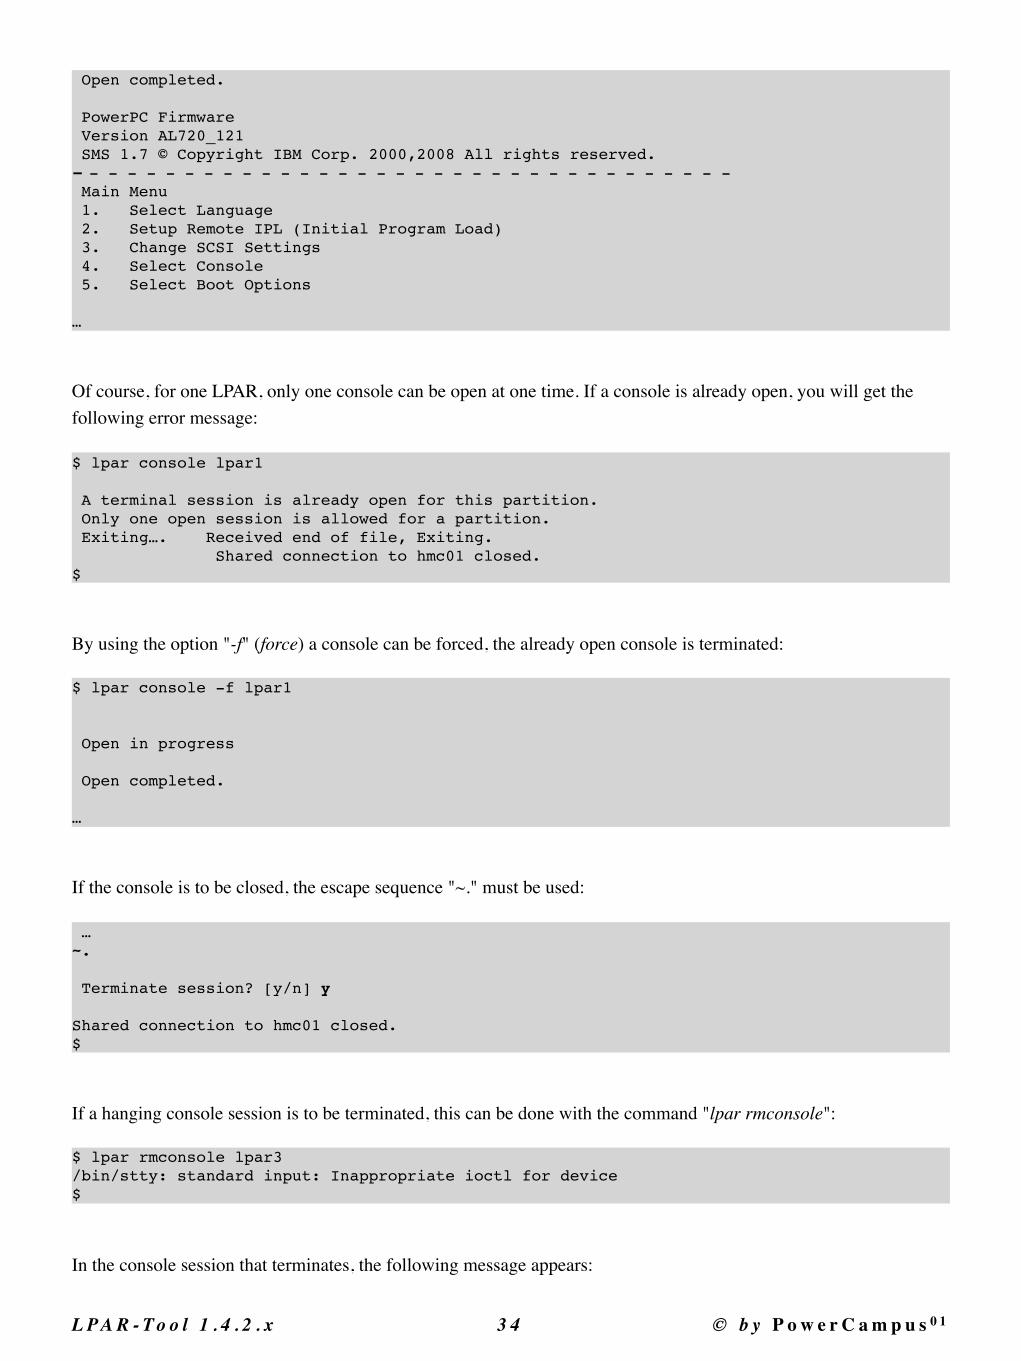
Open completed.
PowerPC Firmware Version AL720_121 SMS 1.7 © Copyright IBM Corp. 2000,2008 All rights reserved.- - - - - - - - - - - - - - - - - - - - - - - - - - - - - - - - - - - Main Menu 1. Select Language 2. Setup Remote IPL (Initial Program Load) 3. Change SCSI Settings 4. Select Console 5. Select Boot Options
…
Of course, for one LPAR, only one console can be open at one time. If a console is already open, you will get the following error message:
$ lpar console lpar1
A terminal session is already open for this partition. Only one open session is allowed for a partition. Exiting…. Received end of file, Exiting. Shared connection to hmc01 closed.$
By using the option "-f" (force) a console can be forced, the already open console is terminated:
$ lpar console -f lpar1
Open in progress
Open completed.
…
If the console is to be closed, the escape sequence "~." must be used:
…~.
Terminate session? [y/n] y
Shared connection to hmc01 closed.$
If a hanging console session is to be terminated, this can be done with the command "lpar rmconsole":
$ lpar rmconsole lpar3/bin/stty: standard input: Inappropriate ioctl for device$
In the console session that terminates, the following message appears:
L P A R - To o l 1 . 4 . 2 . x �3 4 © b y P o w e r C a m p u s 0 1
Connection has closed This session is no longer connected. Please close this window.
Whether there are open consoles, can be checked indirectly. For this you can use the command "hmc lslogon" on the connected HMCs to list the running sessions:
$ hmc lslogon hmc01USER_NAME TTY_ID LOGON_TIME ACCESS_LOCATION TASK_NAME TTY_ID START_TIME USER_NAME PID- - - - - - - - -$$ hmc lslogon hmc02USER_NAME TTY_ID LOGON_TIME ACCESS_LOCATION TASK_NAME TTY_ID START_TIME USER_NAME PIDuser01 pts/1 2018-10-10 09:38 172.20.132.167 mkvterm pts/1 Oct 10 09:38:18 2018 root 24583$
A console session can be recognized by the task name mkvterm.
7. L i v e P a r t i t i o n M o b i l i t y ( L P M )
Here we show, how to perform LPM with the help of the LPAR tool.
First we check the status of the LPAR lpar2 and the status of the RMC connection. The easiest way is the command "lpar status":
$ lpar status lpar2NAME LPAR_ID LPAR_ENV STATE PROFILE SYNC RMC PROCS PROC_UNITS MEM OS_VERSIONlpar2 39 aixlinux Running standard 0 active 1 0.1 4096 AIX 7.2 7200-03-02-1846$
The LPAR is in the status „Running“ and the RMC connection is active. The LPAR is active with one processor core and 0.1 processor units, and it has 4 GB of main memory.
Next we check the processor compatibility mode, for this we need to list all attributes of the LPAR:
$ lpar lsattr -f lpar2lpar2: affinity_group_id = none allow_perf_collection = 0 auto_start = 0 boot_mode = norm curr_lpar_proc_compat_mode = POWER7…$
L P A R - To o l 1 . 4 . 2 . x �3 5 © b y P o w e r C a m p u s 0 1
The LPAR is currently running in POWER7 mode, i. the target platform must support at least POWER7. Finally, we check the VLAN and VSwitch used by the LPAR:
$ lpar lsvslot lpar2SLOT REQ ADAPTER_TYPE STATE DATA0 Yes serial/server 1 remote: (any)/any connect_status=unavailable hmc=11 Yes serial/server 1 remote: (any)/any connect_status=unavailable hmc=15 No eth 1 PVID=1234 VLANS= ETHERNET0 XXXXXXXXXXXX10 No fc/client 1 remote: ms01-vio1(1)/103 c050760XXXXX0052,c050760XXXXX005320 No fc/client 1 remote: ms01-vio2(2)/203 c050760XXXXX0056,c050760XXXXX0057$
The LPAR is using VLAN 1234 on VSwitch ETHERNET0.
Now we check the target-managed system ms03. It is an S824, a POWER8 system. The available processor units can be displayed with "ms lsproc":
$ ms lsproc ms03NAME INSTALLED CONFIGURABLE AVAIL MAX_SHARED_PROC_POOLSms03 20.0 20.0 6.5 64$
The available RAM can be displayed using "ms lsmem":
$ ms lsmem ms03NAME INSTALLED FIRMWARE CONFIGURABLE AVAIL MEM_REGION_SIZEms03 1048576 17920 1048576 647680 256$
So there are enough resources available.
The VLAN 1234 on VSwitch ETHERNET0 is also available, as the following command shows:
$ ms lsvswitch ms03MS VSWITCH SWITCH_MODE VLAN_IDSms03 ETHBLB VEB 10,12,14ms03 ETHERNET0(Default) VEB 20,21,22,1234$
Moving the LPAR to managed system ms03 should be possible.
The manual checks we made above are also done when moving the LPAR from the HMC. It is also possible to carry out a so-called validation of the LPAR, during which it is checked whether all conditions for migration are met without actually moving the LPAR.
We now perform such a validation using the LPAR tool:
$ lpar validate lpar2 ms03 … Warnings:
L P A R - To o l 1 . 4 . 2 . x �3 6 © b y P o w e r C a m p u s 0 1
HSCLA4CD The management console cannot maintain the source Virtual I/O Server (VIOS) slot number 203 for virtual fibre channel adapter 20 on the destination VIOS partition 1*MMMM-TTT*SSSSSSS.Shared connection to hmc01 closed.$
The exit status of the validation is 0 despite all the messages:
$ echo $?0$
This means that the LPAR can be moved. We now perform the migration:
$ lpar migrate lpar2 ms03
… Warnings:HSCLA4CD The management console cannot maintain the source Virtual I/O Server (VIOS) slot number 203 for virtual fibre channel adapter 20 on the destination VIOS partition 1*MMMM-TTT*SSSSSSS.Shared connection to hmc01 closed.$
Only warnings were shown, which means the migration was successful. We'll take a quick look at where the LPAR is now:
$ lpar show lpar2NAME ID SERIAL LPAR_ENV MS HMCSlpar2 40 XXXXXXXXX aixlinux ms03 hmc01,hmc02$
This confirms that the migration was successful.
You can also move an inactive LPAR to another managed system. We will try this for the LPAR lpar3 now:
$ lpar status lpar3NAME LPAR_ID LPAR_ENV STATE PROFILE SYNC RMC PROCS PROC_UNITS MEM OS_VERSIONlpar3 7 aixlinux Not Activated standard 0 inactive 1 - 2048 Unknown$
The LPAR also uses the VLAN 1234. This time we don’t do a validation, instead we perform the migration immediately:
$ lpar migrate lpar3 ms05 … Warnings:
L P A R - To o l 1 . 4 . 2 . x �3 7 © b y P o w e r C a m p u s 0 1
HSCLA295 As part of the migration process, the management console will create a new migration profile containing the partition's current state. The default is to use the current profile, which will replace the existing definition of this profile. While this works for most scenarios, other options are possible. You may specify a different existing profile, which would be replaced with the current partition definition, or you may specify a new profile to save the current partition state.HSCLB505 The partition cannot use hardware-accelerated encryption on the destination managed system because the destination managed system does not support hardware-accelerated encryption.HSCLB504 The migrating partition cannot use hardware-accelerated Active Memory Expansion on the destination managed system because the destination managed system does not support hardware-accelerated Active Memory Expansion.HSCLA4CD The management console cannot maintain the source Virtual I/O Server (VIOS) slot number 44 for virtual fibre channel adapter 10 on the destination VIOS partition 1*MMMM-TTT*SSSSSSS.Shared connection to hmc01 closed.$
The LPAR has been moved to ms05:
$ lpar show lpar3NAME ID SERIAL LPAR_ENV MS HMCSlpar3 39 XXXXXXXXX aixlinux ms05 hmc01,hmc02$
L P A R - To o l 1 . 4 . 2 . x �3 8 © b y P o w e r C a m p u s 0 1
4. C r e a t i o n o f L P A R sThe LPAR tool makes it easy to create new LPARs. By using blueprint files even complex LPARs can be created with just one command.
1. C r e a t i o n o f a n e w L P A R
A new LPAR can be created with the command "lpar create". The managed system must be specified on which the LPAR is to be created:
$ lpar -m ms01 create. > lpar1$
The LPAR is created without physical and virtual adapters. Since no profile name was specified, the default "standard" is used. The name of the LPAR is lparN, where N is counted up from 1. Of course, the profile name and/or name of the LPAR can also be specified:
$ lpar -m ms01 -p myprofile create mylpar01. > mylpar01$
The status of the newly created LPAR can be displayed with the command "lpar status":
$ lpar status lpar1NAME LPAR_ID LPAR_ENV STATE PROFILE SYNC RMC PROCS PROC_UNITS MEM OS_VERSIONlpar1 4 aixlinux Not Activated - 0 inactive 0 - 0 Unknown$
The new LPAR has the type aixlinux and is not activated. Detailed information about an LPAR can be displayed with the command "lpar display".
$ lpar display lpar1NAME : lpar1LPAR_ID : 4LPAR_ENV : aixlinuxSERIAL : XXXXXXXXXMS : ms01HMCS : hmc01,hmc02STATE : Not ActivatedRESOURCE_CONFIG : 0OS_VERSION : UnknownPROC_COMPAT_MODE : desired=default,curr=POWER7PROC_MODE : curr=ded,pend=dedSHARED_PROC_POOL : curr=-,pend=-SHARING_MODE : curr=share_idle_procs,pend=share_idle_procsUNCAP_WEIGHT : curr=-,pend=-PROCS : min=0,desired=0,max=0PROC_UNITS : min=-,desired=-,max=-
L P A R - To o l 1 . 4 . 2 . x �3 9 © b y P o w e r C a m p u s 0 1
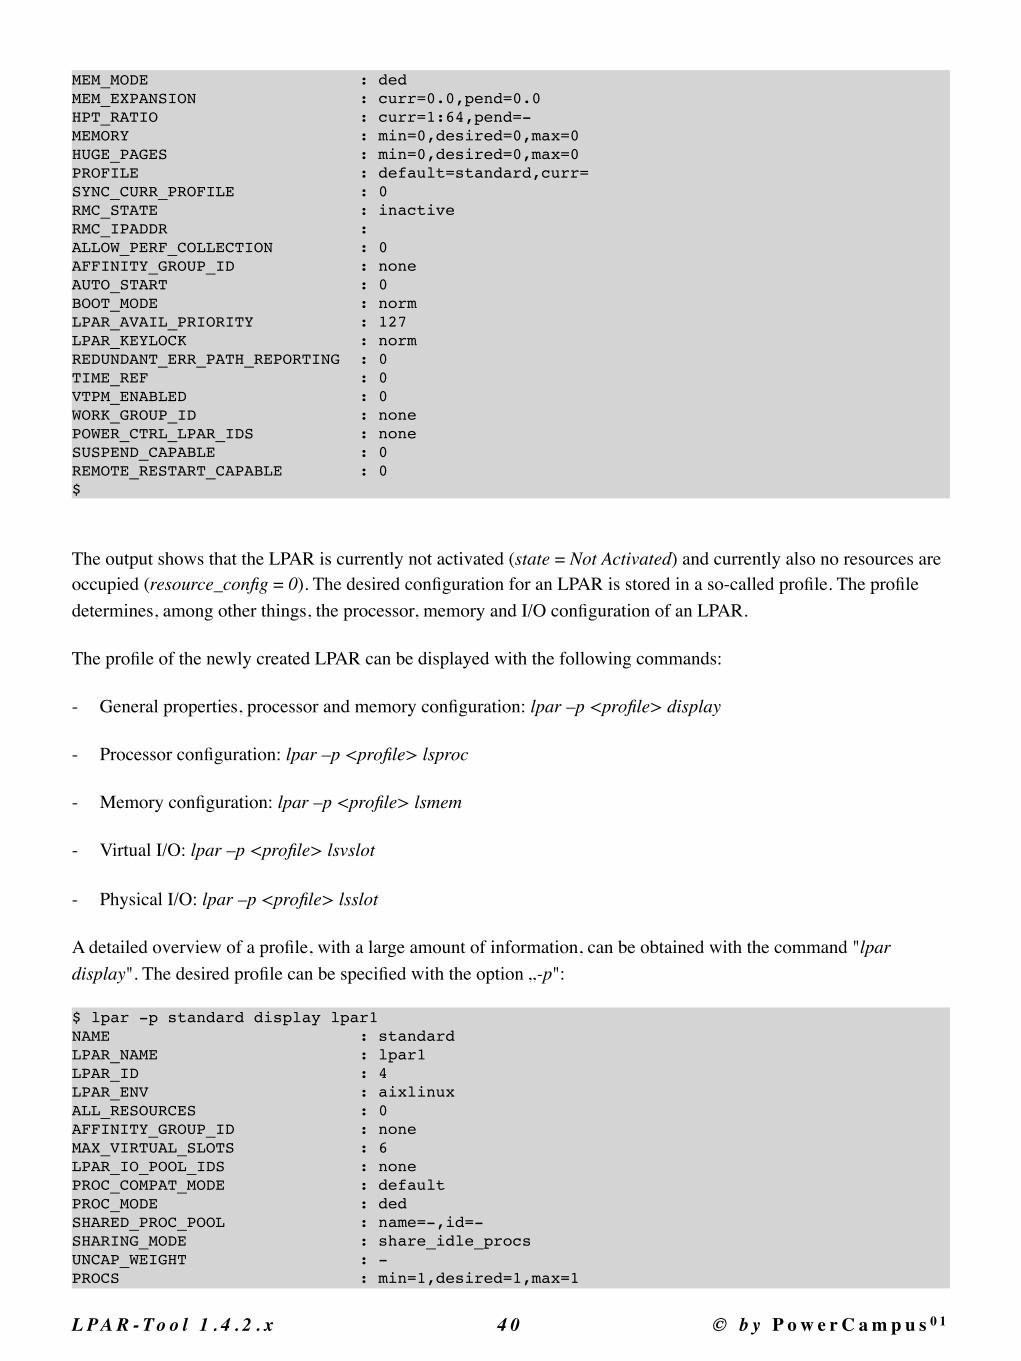
MEM_MODE : dedMEM_EXPANSION : curr=0.0,pend=0.0HPT_RATIO : curr=1:64,pend=-MEMORY : min=0,desired=0,max=0HUGE_PAGES : min=0,desired=0,max=0PROFILE : default=standard,curr=SYNC_CURR_PROFILE : 0RMC_STATE : inactiveRMC_IPADDR : ALLOW_PERF_COLLECTION : 0AFFINITY_GROUP_ID : noneAUTO_START : 0BOOT_MODE : normLPAR_AVAIL_PRIORITY : 127LPAR_KEYLOCK : normREDUNDANT_ERR_PATH_REPORTING : 0TIME_REF : 0VTPM_ENABLED : 0WORK_GROUP_ID : nonePOWER_CTRL_LPAR_IDS : noneSUSPEND_CAPABLE : 0REMOTE_RESTART_CAPABLE : 0$
The output shows that the LPAR is currently not activated (state = Not Activated) and currently also no resources are occupied (resource_config = 0). The desired configuration for an LPAR is stored in a so-called profile. The profile determines, among other things, the processor, memory and I/O configuration of an LPAR.
The profile of the newly created LPAR can be displayed with the following commands:
- General properties, processor and memory configuration: lpar –p <profile> display
- Processor configuration: lpar –p <profile> lsproc
- Memory configuration: lpar –p <profile> lsmem
- Virtual I/O: lpar –p <profile> lsvslot
- Physical I/O: lpar –p <profile> lsslot
A detailed overview of a profile, with a large amount of information, can be obtained with the command "lpar display". The desired profile can be specified with the option „-p":
$ lpar -p standard display lpar1NAME : standardLPAR_NAME : lpar1LPAR_ID : 4LPAR_ENV : aixlinuxALL_RESOURCES : 0AFFINITY_GROUP_ID : noneMAX_VIRTUAL_SLOTS : 6LPAR_IO_POOL_IDS : nonePROC_COMPAT_MODE : defaultPROC_MODE : dedSHARED_PROC_POOL : name=-,id=-SHARING_MODE : share_idle_procsUNCAP_WEIGHT : -PROCS : min=1,desired=1,max=1
L P A R - To o l 1 . 4 . 2 . x �4 0 © b y P o w e r C a m p u s 0 1
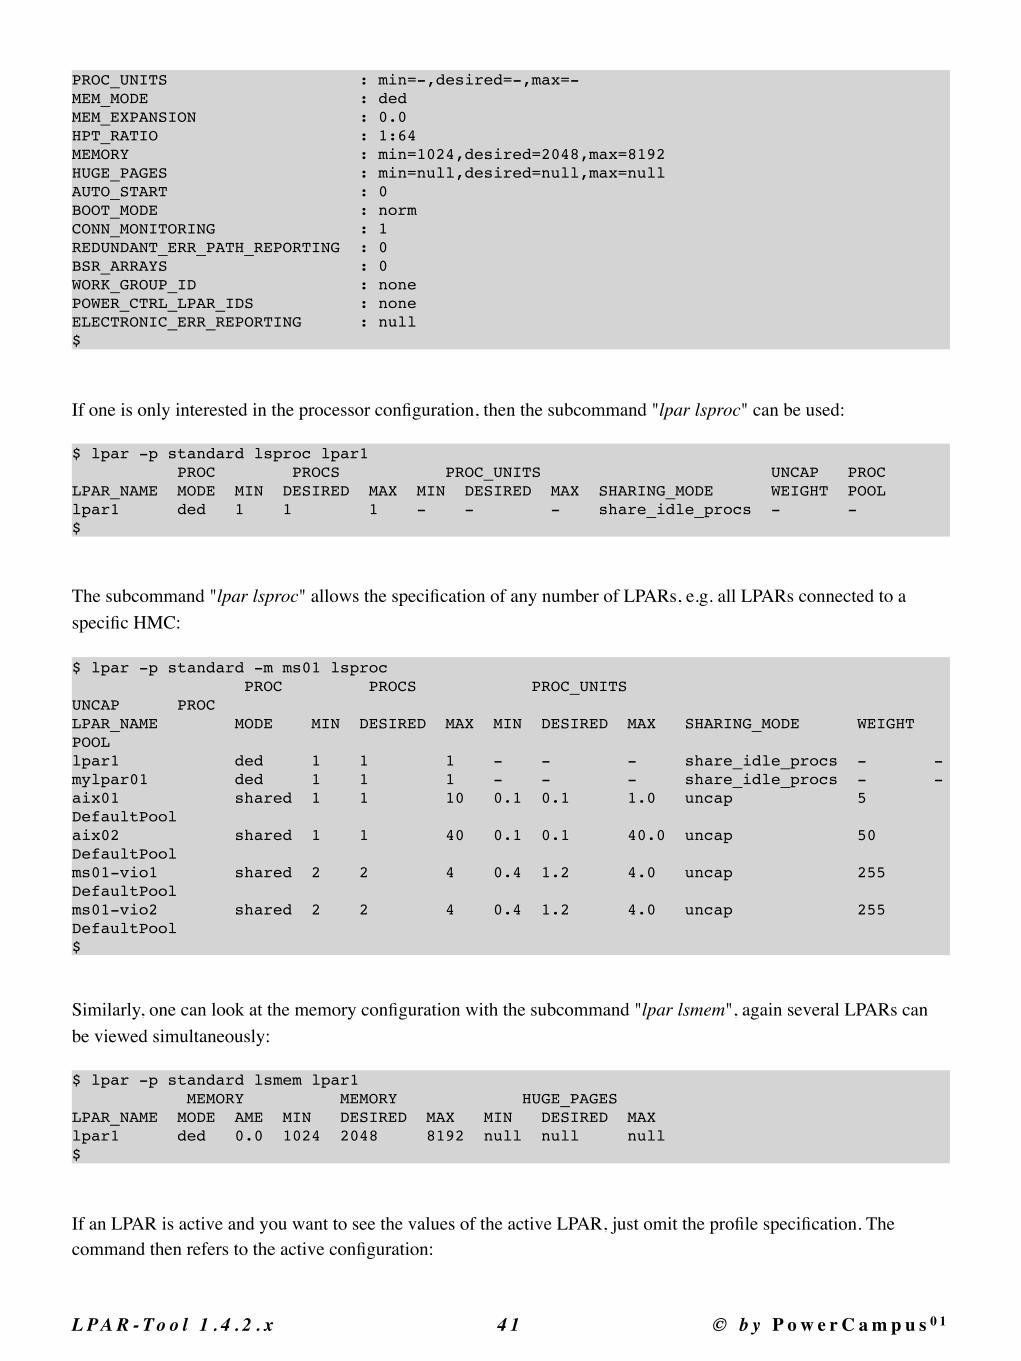
PROC_UNITS : min=-,desired=-,max=-MEM_MODE : dedMEM_EXPANSION : 0.0HPT_RATIO : 1:64MEMORY : min=1024,desired=2048,max=8192HUGE_PAGES : min=null,desired=null,max=nullAUTO_START : 0BOOT_MODE : normCONN_MONITORING : 1REDUNDANT_ERR_PATH_REPORTING : 0BSR_ARRAYS : 0WORK_GROUP_ID : nonePOWER_CTRL_LPAR_IDS : noneELECTRONIC_ERR_REPORTING : null$
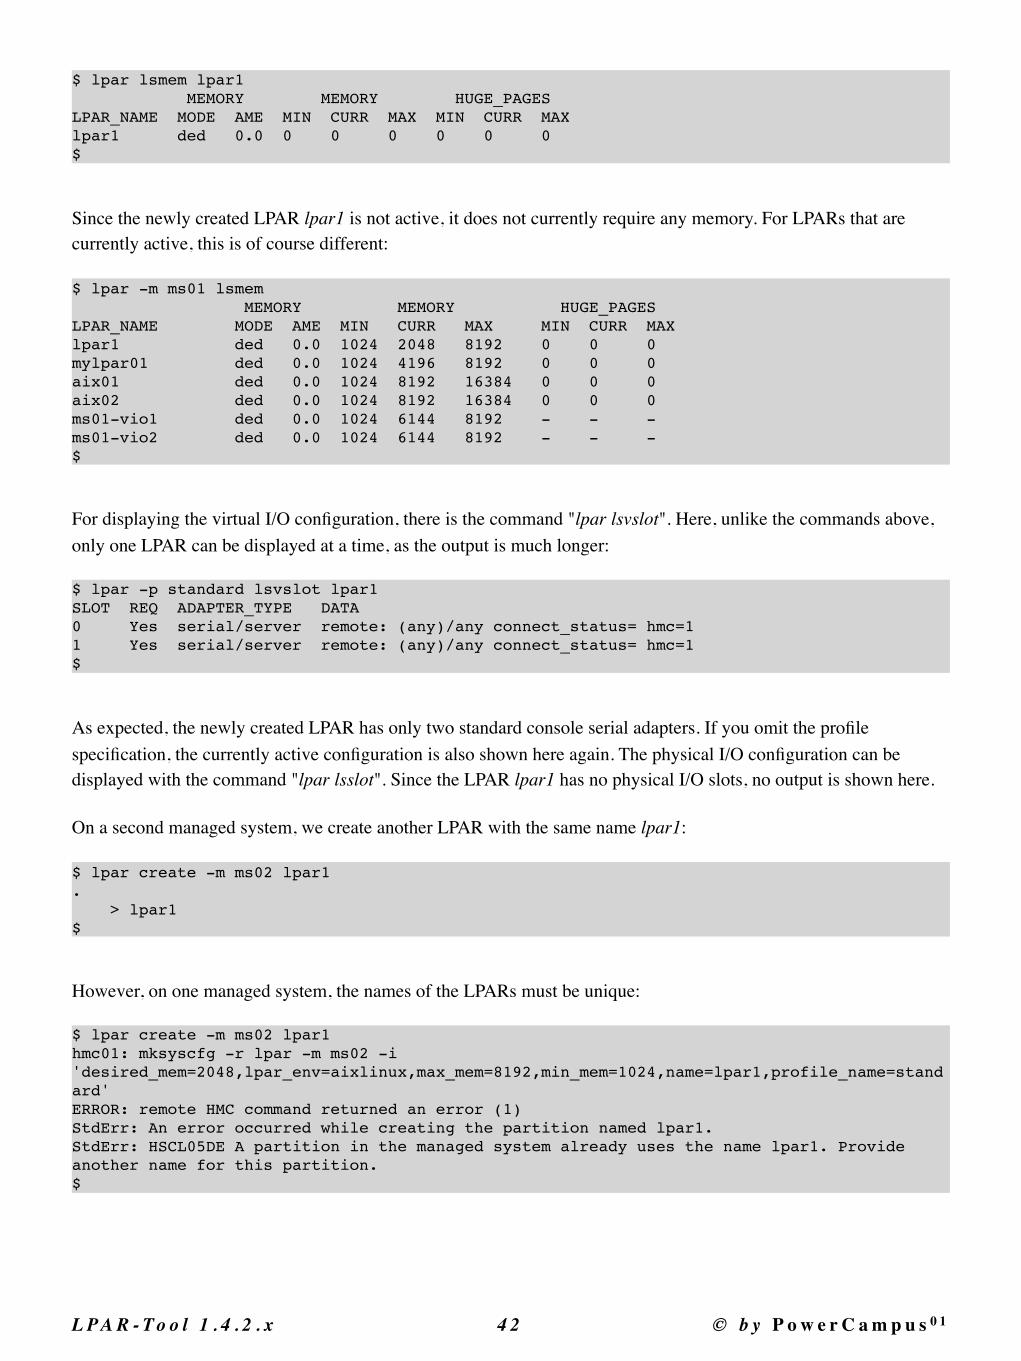
If one is only interested in the processor configuration, then the subcommand "lpar lsproc" can be used:
$ lpar -p standard lsproc lpar1 PROC PROCS PROC_UNITS UNCAP PROCLPAR_NAME MODE MIN DESIRED MAX MIN DESIRED MAX SHARING_MODE WEIGHT POOLlpar1 ded 1 1 1 - - - share_idle_procs - -$
The subcommand "lpar lsproc" allows the specification of any number of LPARs, e.g. all LPARs connected to a specific HMC:
$ lpar -p standard -m ms01 lsproc PROC PROCS PROC_UNITS UNCAP PROC LPAR_NAME MODE MIN DESIRED MAX MIN DESIRED MAX SHARING_MODE WEIGHT POOLlpar1 ded 1 1 1 - - - share_idle_procs - -mylpar01 ded 1 1 1 - - - share_idle_procs - -aix01 shared 1 1 10 0.1 0.1 1.0 uncap 5 DefaultPoolaix02 shared 1 1 40 0.1 0.1 40.0 uncap 50 DefaultPoolms01-vio1 shared 2 2 4 0.4 1.2 4.0 uncap 255 DefaultPoolms01-vio2 shared 2 2 4 0.4 1.2 4.0 uncap 255 DefaultPool$
Similarly, one can look at the memory configuration with the subcommand "lpar lsmem", again several LPARs can be viewed simultaneously:
$ lpar -p standard lsmem lpar1 MEMORY MEMORY HUGE_PAGES LPAR_NAME MODE AME MIN DESIRED MAX MIN DESIRED MAXlpar1 ded 0.0 1024 2048 8192 null null null$
If an LPAR is active and you want to see the values of the active LPAR, just omit the profile specification. The command then refers to the active configuration:
L P A R - To o l 1 . 4 . 2 . x �4 1 © b y P o w e r C a m p u s 0 1
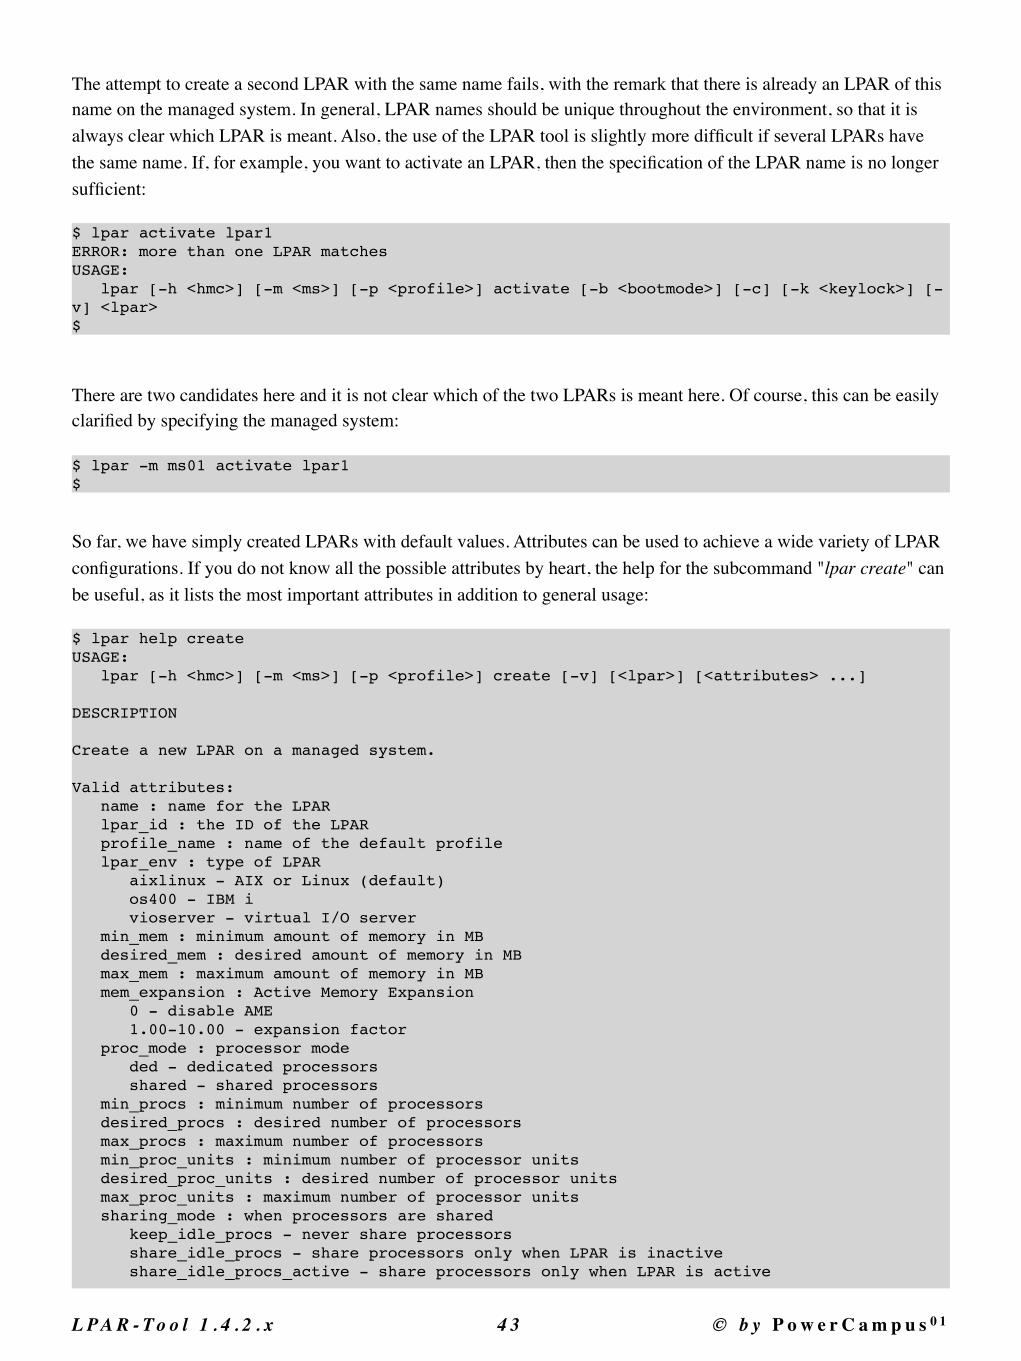
$ lpar lsmem lpar1 MEMORY MEMORY HUGE_PAGES LPAR_NAME MODE AME MIN CURR MAX MIN CURR MAXlpar1 ded 0.0 0 0 0 0 0 0$
Since the newly created LPAR lpar1 is not active, it does not currently require any memory. For LPARs that are currently active, this is of course different:
$ lpar -m ms01 lsmem MEMORY MEMORY HUGE_PAGES LPAR_NAME MODE AME MIN CURR MAX MIN CURR MAXlpar1 ded 0.0 1024 2048 8192 0 0 0mylpar01 ded 0.0 1024 4196 8192 0 0 0aix01 ded 0.0 1024 8192 16384 0 0 0aix02 ded 0.0 1024 8192 16384 0 0 0ms01-vio1 ded 0.0 1024 6144 8192 - - -ms01-vio2 ded 0.0 1024 6144 8192 - - -$
For displaying the virtual I/O configuration, there is the command "lpar lsvslot". Here, unlike the commands above, only one LPAR can be displayed at a time, as the output is much longer:
$ lpar -p standard lsvslot lpar1SLOT REQ ADAPTER_TYPE DATA0 Yes serial/server remote: (any)/any connect_status= hmc=11 Yes serial/server remote: (any)/any connect_status= hmc=1$
As expected, the newly created LPAR has only two standard console serial adapters. If you omit the profile specification, the currently active configuration is also shown here again. The physical I/O configuration can be displayed with the command "lpar lsslot". Since the LPAR lpar1 has no physical I/O slots, no output is shown here.
On a second managed system, we create another LPAR with the same name lpar1:
$ lpar create -m ms02 lpar1. > lpar1$
However, on one managed system, the names of the LPARs must be unique:
$ lpar create -m ms02 lpar1hmc01: mksyscfg -r lpar -m ms02 -i 'desired_mem=2048,lpar_env=aixlinux,max_mem=8192,min_mem=1024,name=lpar1,profile_name=standard'ERROR: remote HMC command returned an error (1)StdErr: An error occurred while creating the partition named lpar1.StdErr: HSCL05DE A partition in the managed system already uses the name lpar1. Provide another name for this partition.$
L P A R - To o l 1 . 4 . 2 . x �4 2 © b y P o w e r C a m p u s 0 1
The attempt to create a second LPAR with the same name fails, with the remark that there is already an LPAR of this name on the managed system. In general, LPAR names should be unique throughout the environment, so that it is always clear which LPAR is meant. Also, the use of the LPAR tool is slightly more difficult if several LPARs have the same name. If, for example, you want to activate an LPAR, then the specification of the LPAR name is no longer sufficient:
$ lpar activate lpar1ERROR: more than one LPAR matchesUSAGE: lpar [-h <hmc>] [-m <ms>] [-p <profile>] activate [-b <bootmode>] [-c] [-k <keylock>] [-v] <lpar>$
There are two candidates here and it is not clear which of the two LPARs is meant here. Of course, this can be easily clarified by specifying the managed system:
$ lpar -m ms01 activate lpar1$
So far, we have simply created LPARs with default values. Attributes can be used to achieve a wide variety of LPAR configurations. If you do not know all the possible attributes by heart, the help for the subcommand "lpar create" can be useful, as it lists the most important attributes in addition to general usage:
$ lpar help createUSAGE: lpar [-h <hmc>] [-m <ms>] [-p <profile>] create [-v] [<lpar>] [<attributes> ...] DESCRIPTION Create a new LPAR on a managed system. Valid attributes: name : name for the LPAR lpar_id : the ID of the LPAR profile_name : name of the default profile lpar_env : type of LPAR aixlinux - AIX or Linux (default) os400 - IBM i vioserver - virtual I/O server min_mem : minimum amount of memory in MB desired_mem : desired amount of memory in MB max_mem : maximum amount of memory in MB mem_expansion : Active Memory Expansion 0 - disable AME 1.00-10.00 - expansion factor proc_mode : processor mode ded - dedicated processors shared - shared processors min_procs : minimum number of processors desired_procs : desired number of processors max_procs : maximum number of processors min_proc_units : minimum number of processor units desired_proc_units : desired number of processor units max_proc_units : maximum number of processor units sharing_mode : when processors are shared keep_idle_procs - never share processors share_idle_procs - share processors only when LPAR is inactive share_idle_procs_active - share processors only when LPAR is active
L P A R - To o l 1 . 4 . 2 . x �4 3 © b y P o w e r C a m p u s 0 1
share_idle_procs_always - share processors always cap - cap processing units uncap - uncap processing units uncap_weight : weight priority when competting for processors shared_proc_pool_name : shared processor pool shared_proc_pool_id : shared processor pool ID max_virtual_slots : maximum number of virtual slots (for additional attributes see the IBM documentation) EXAMPLES Create a new LPAR on managed system ms01 with default attributes: lpar -m ms01 create Create IBM i LPAR with name testlpar on managed system ms01: lpar -m ms01 create testlpar lpar_env=os400 # or lpar -m ms01 create name=testlpar lpar_env=os400 Create dedicated processor AIX LPAR with 2 dedicated processors (min=1, max=4): lpar -m ms01 create proc_mode=ded min_procs=1 desired_procs=2 max_procs=4$
The type of LPAR can be specified using the lpar_env attribute. If you want to create an IBM i partition, this can be done by specifying the type os400:
$ lpar -m ms01 create sys1 lpar_env=os400hmc01: mksyscfg -r lpar -m ms01 -i 'desired_mem=2048,lpar_env=os400,max_mem=8192,min_mem=1024,name=sys1,profile_name=standard'ERROR: remote HMC command returned an error (1)StdErr: An error occurred while creating the partition named sys1.StdErr: One or more required attributes are missing. The missing attributes are console_slot. Please correct the configuration data and retry the command.$
The command fails; to create an IBM i partition, the console_slot attribute must be specified. We'll try again and specify hmc as console_slot:
$ lpar -m ms01 create sys1 lpar_env=os400 console_slot=hmc. > sys1$
All previously created LPARs were dedicated processor LPARs (proc_mode = ded):
$ lpar lsproc sys1 lpar1 PROC PROCS PROC_UNITS UNCAP PROCLPAR_NAME MODE MIN DESIRED MAX MIN DESIRED MAX CURR_SHARING_MODE WEIGHT POOLlpar1 ded 0 0 0 - - - share_idle_procs - -sys1 ded 0 0 0 - - - share_idle_procs - -$
Of course, you can also create shared processor LPARs, you only have to use the attribute proc_mode with the value shared:
$ lpar -m ms01 create proc_mode=shared. > lpar2
L P A R - To o l 1 . 4 . 2 . x �4 4 © b y P o w e r C a m p u s 0 1
$
Since no further attributes have been specified, default values are used for the processor and memory configuration:
$ lpar lsproc -p standard lpar2 PROC PROCS PROC_UNITS UNCAP PROC LPAR_NAME MODE MIN DESIRED MAX MIN DESIRED MAX SHARING_MODE WEIGHT POOLlpar2 shared 1 2 4 0.1 0.2 0.4 uncap 64 DefaultPool$
Finally, we show an example in which processor and memory configuration are explicitly specified:
$ lpar -m ms01 create proc_mode=shared min_procs=1 desired_procs=3 max_procs=5 min_proc_units=0.1 desired_proc_units=0.7 max_proc_units=1.5 uncap_weight=20. > lpar3$
2. D e l e t i n g a n L P A R
Deleting an LPAR is also easy with the LPAR tool. To delete an LPAR, there is the subcommand "lpar delete":
$ lpar -m ms01 delete mylpar01Deleting LPAR mylpar01ERROR: lparDelete(): remote HMC command returned an error (1)CMD on hmc01: rmsyscfg -m ms01 -r lpar -n mylpar01StdErr: An error occurred while deleting the partition named mylpar01.StdErr: HSCL05E6 Partition mylpar01 delete failed. Cannot delete a partition when its state is not in the Not Activated state. Perform a shutdown operation then delete the partition.$
Of course, the LPAR to be deleted must not be active. This can be checked with "lpar status" before deletion:
$ lpar status mylpar01NAME LPAR_ID LPAR_ENV STATE PROFILE SYNC RMC PROCS PROC_UNITS MEM OS_VERSIONmylpar01 3 aixlinux Running myprofile 0 active2 1 0.2 4096 Unknown$
The LPAR can be shut down and powered off via the OS, or with the subcommand "lpar shutdown". The command "lpar shutdown" triggers an orderly shutdown of the OS of an LPAR via the HMC:
$ lpar shutdown -m ms01 mylpar01$
If the status "Not Activated" is displayed, the LPAR can be deleted:
$ lpar status mylpar01NAME LPAR_ID LPAR_ENV STATE PROFILE SYNC RMC PROCS PROC_UNITS MEM OS_VERSION
L P A R - To o l 1 . 4 . 2 . x �4 5 © b y P o w e r C a m p u s 0 1

mylpar01 3 aixlinux Not Activated myprofile 0 inactive 2 0.2 4096 Unknown
$
Now deleting the LPAR should be successful:
$ lpar delete mylpar01$
L P A R - To o l 1 . 4 . 2 . x �4 6 © b y P o w e r C a m p u s 0 1

5. D L P A R - O p e r a t i o n sPhysical and virtual resources can be dynamically added or removed during runtime of an LPAR while AIX or Linux are running. The only prerequisite for this is a working RMC connection to the HMC. The LPAR tool makes it easy to perform DLPAR operations. For all DLPAR operations with the LPAR tool, the current profile is also adjusted by default. On the GUI, this has to be done manually and will frequently be forgotten, which leads to problems after a new activation. Optionally, you can perform a DLPAR operation only at runtime, without adjusting the current profile. The option "-d" is used for this purpose. It is also possible to make the change only in a profile if e.g. the LPAR is disabled, in the SMS menu, or there is no active RMC connection between LPAR and HMC.
The following subsections each show how DLPAR operations can be performed on different resources.
1. C h a n g i n g t h e m e m o r y o f a n L P A R
A common task in the management of LPARs is the expansion of main memory. The profile of an LPAR indicates within which limits the main memory can be dynamically enlarged and reduced. These limits can be viewed in different ways:
$ lpar lsmem lpar1 MEMORY MEMORY HUGE_PAGES LPAR_NAME MODE AME MIN CURR MAX MIN CURR MAXlpar1 ded 0.0 1024 4096 8192 0 0 0$
The current configuration of the LPAR is displayed. If you want to display the configuration resulting from a profile, then the option "-p <profile>" must be used:
$ lpar -p standard mem lpar1 MEMORY MEMORY HUGE_PAGES LPAR_NAME MODE AME MIN DESIRED MAX MIN DESIRED MAXlpar1 ded 0.0 1024 4096 8192 0 0 0$
For our example LPAR lpar1, the memory limits are configured to be at least 1024 MB and at most 8192 MB. The current memory size is 4096 MB. The profile also has 4096 MB configured as the desired value.
To dynamically change the memory, an active RMC connection is needed. This can be easily found out with the command "lpar status":
$ lpar status lpar1NAME LPAR_ID LPAR_ENV STATE PROFILE SYNC RMC PROCS PROC_UNITS MEM OS_VERSIONlpar1 39 aixlinux Running standard 0 active 1 0.1 4096 AIX 7.2 7200-03-02-1846$
L P A R - To o l 1 . 4 . 2 . x �4 7 © b y P o w e r C a m p u s 0 1
The main memory of the LPAR lpar1 should be extended by 1024 MB, both dynamically and in the current profile. We quickly check if 1024 MB RAM is available on the managed system. For this we need the associated managed system:
$ lpar show lpar1NAME ID SERIAL LPAR_ENV MS HMCSlpar1 39 XXXXXXXXX aixlinux ms01 hmc01,hmc02$
The LPAR lpar1 is located on the managed system ms01.
The managed system ms01 still has sufficient free RAM capacity:
$ ms lsmem ms01NAME INSTALLED FIRMWARE CONFIGURABLE AVAIL MEM_REGION_SIZEms01 1048576 17920 1048576 647680 256$
We now perform the RAM extension of lpar1:
$ lpar addmem lpar1 1024$
The additional memory is immediately available to the LPAR. The profile of the LPAR will automatically be changed accordingly, so that the next time it is activated with the current profile, the same main memory size will be used.
If the memory size is only temporarily increased, the option "-d" (dynamic only) can be used. The old value is retained in the profile and the extension is only carried out dynamically:
$ lpar -d addmem lpar1 1024$
If the LPAR is turned off and is activated later again, then it will start up with 2048 MB of RAM.
If you only want to change the memory size in the profile, the option "-p <profile>" is used instead of the option "-d":
$ lpar -p standard addmem lpar1 1024$
If you want to reduce the memory of an LPAR, then there is the similar command "lpar rmmem" with the same options as "lpar addmem".
2. C h a n g i n g m a i n M e m o r y L i m i t s i n t h e P r o f i l e
The minimum and maximum RAM size of an LPAR can only be changed in the profile. For the change to take effect, the LPAR must be stopped and then restarted using the changed profile.
L P A R - To o l 1 . 4 . 2 . x �4 8 © b y P o w e r C a m p u s 0 1

If you want to increase lpar1's memory to 16384 MB, this is not possible at runtime due to the maximum memory limit of 8192 MB. To change this, the profile must be adjusted, and this limit must be increased to a value of at least 16384 MB. Only then can the desired memory size of 16384 MB be configured. A change of the memory limits in the profile can be carried out with the command "lpar chmem":
$ lpar -p standard chmem lpar1 min_mem=1024 desired_mem=16384 max_mem=32768$
In the example, the minimum value was left at 1024 MB, the desired memory size set to 16384 MB and the maximum value at 32768 MB. This leaves buffers for later increases, which can then be dynamically performed up to a size of 32768 MB.
The LPAR must be reactivated with the changed profile after shutting down and powering off:
$ lpar -p standard activate lpar1$
3. C h a n g i n g t h e N u m b e r o f P r o c e s s o r s a n d P r o c e s s o r U n i t s
For performance bottlenecks, the number of processor cores and the number of processor units can be changed. The profile of an LPAR indicates within which limits these can be dynamically enlarged and reduced. These limits can be viewed in different ways:
$ lpar lsproc lpar1 PROC PROCS PROC_UNITS UNCAP PROC LPAR_NAME MODE MIN DESIRED MAX MIN DESIRED MAX CURR_SHARING_MODE WEIGHT POOLlpar1 shared 1 1 2 0.1 0.1 0.4 uncap 10 DefaultPool$
The current configuration of the LPAR is displayed. If you want to look at the configuration resulting from a profile, then the option "-p <profile>" must be used:
$ lpar -p standard lsproc lpar1 PROC PROCS PROC_UNITS UNCAP PROC LPAR_NAME MODE MIN DESIRED MAX MIN DESIRED MAX SHARING_MODE WEIGHT POOLlpar1 shared 1 1 2 0.1 0.1 0.4 uncap 10 DefaultPool$
For our example LPAR lpar1, the limits for the number of processor cores are at least 1 and at most 2. The current number of processor cores is 1. In the profile, 1 processor core is also configured as the desired value. The limits for the processor units are at least 0.1 and at most 0.4. The current value for the current processor units is 0.1. This is also configured in the profile as the desired value.
To dynamically change the memory, an active RMC connection is needed. This can be easily found out with the command "lpar status".
L P A R - To o l 1 . 4 . 2 . x �4 9 © b y P o w e r C a m p u s 0 1
The number of processor cores should be increased by 1, the number of processor units by 0.1, dynamically as well as in the current profile. We quickly check if processor units are still available on the managed system. For this we need the associated managed system:
$ lpar show lpar1NAME ID SERIAL LPAR_ENV MS HMCSlpar1 39 XXXXXXXXX aixlinux ms01 hmc01,hmc02$
The LPAR lpar1 is located on the managed system ms01.
The managed system ms01 still has enough unassigned processor units:
$ ms lsproc ms01NAME INSTALLED CONFIGURABLE AVAIL MAX_SHARED_PROC_POOLSms01 20.0 20.0 6.5 64$
We now increase the processor configuration of lpar1:
$ lpar addprocs lpar1 1$ lpar addprocunits lpar1 0.1$
The additional core and additional processor units are immediately available to the LPAR. The profile of the LPAR will automatically be changed accordingly, so that the same configuration will be used at the next activation with the current profile.
If the processor cores and processor units are only to be temporarily increased, the option "-d" (dynamic only) can be used. The old value is retained in the profile and the extension is only carried out dynamically:
$ lpar -d addprocs lpar1 1$ lpar -d addprocunits lpar1 0.1$
If the LPAR is switched off and reactivated later, it will start again with 2 cores and 0.2 processor units.
If you only want to change the processor cores in the profile, the option "-p <profile>" is used instead of the option "-d":
$ lpar -p standard addprocs lpar1 1$ lpar -p standard addprocunits lpar 0.1$
If processor cores and/or processor units are to be reduced, then the same applies to the command "lpar rmprocs" or "lpar rmprocunits" with the same options as "lpar addprocs" and "lpar addprocunits".
4. C h a n g i n g P r o c e s s o r L i m i t s i n t h e P r o f i l e
L P A R - To o l 1 . 4 . 2 . x �5 0 © b y P o w e r C a m p u s 0 1
The minimum and maximum number of cores and processor units of an LPAR can only be changed in the profile. For the change to take effect, the LPAR must be stopped and then restarted using the changed profile.
If the number of cores of lpar1 is to be increased to 5, this is not possible at runtime due to the limit of the maximum number of cores of 4. In order to achieve the increase, the profile must be adjusted, and the limit increased to a value of at least 5. Only then can the desired number of cores of 5 be configured. A change of the processor limits in the profile can be carried out with the command "lpar chproc" for cores or "lpar chprocunits" for processor units:
$ lpar -p standard chproc lpar1 min_procs=1 desired_procs=5 max_procs=8$ lpar -p standard chproc lpar1 min_proc_units=0.1 desired_proc_units=0.5 max_proc_units=2.0$
In the example, the minimum value of the cores was left at 1, the desired number of cores was set to 5 and the maximum value was set to 8. For the processor units, the minimum value was 0.1, the maximum value 2.0 and the desired value 0.5. This leaves room for further increases later, which can then be performed dynamically up to a size of 8 cores and 2.0 processor units.
The LPAR must be reactivated with the changed profile after shutting down and powering off:
$ lpar -p standard activate lpar1$
5. C o n f i g u r i n g P h y s i c a l S l o t s
Even physical slots can be configured in and out of an LPAR using DLPAR operations on a running LPAR.
Which physical slots are currently assigned to an LPAR can be displayed with the command "lpar lsslot":
$ lpar lsslot ms01-vio1DRC_NAME DRC_INDEX IOPOOL DESCRIPTIONU78C0.001.XXXXXXX-P2-C3 21010203 none Quad 8 Gigabit Fibre Channel AdapterU78C0.001.XXXXXXX-P2-C2 21010204 none UnknownU78C0.001.XXXXXXX-P2-C1 21010205 none 10 Gigabit Ethernet-SFP+ SR PCI-E adapterU78C0.001.XXXXXXX-P2-C9-T1 21010208 none PCI-E SAS ControllerU78C0.001.XXXXXXX-P2-C9-T2 21010209 none PCI-E SAS ControllerU78C0.001.XXXXXXX-P2-C2 21010244 none Quad 8 Gigabit Fibre Channel AdapterU78C0.001.XXXXXXX-P2-C1 21010245 none 10 Gigabit Ethernet-SFP+ SR PCI-E adapterU78C0.001.XXXXXXX-P2-C5 2101024D none 4-Port 10/100/1000 Base-TX PCI Express Adapter$
Of course, the configuration in the profile may differ, but it can also be easily viewed with the option "-p <profile>":
$ lpar -p standard lsslot ms01-vio1DRC_NAME DRC_INDEX REQ IOPOOL DESCRIPTIONU78C0.001.XXXXXXX-P2-C2 21010204 No none UnknownU78C0.001.XXXXXXX-P2-C1 21010205 No none 10 Gigabit Ethernet-SFP+ SR PCI-E adapterU78C0.001.XXXXXXX-P2-C9-T1 21010208 No none PCI-E SAS ControllerU78C0.001.XXXXXXX-P2-C9-T2 21010209 No none PCI-E SAS ControllerU78C0.001.XXXXXXX-P2-C2 21010244 No none Quad 8 Gigabit Fibre Channel Adapter
L P A R - To o l 1 . 4 . 2 . x �5 1 © b y P o w e r C a m p u s 0 1
U78C0.001.XXXXXXX-P2-C1 21010245 No none 10 Gigabit Ethernet-SFP+ SR PCI-E adapterU78C0.001.XXXXXXX-P2-C5 2101024D No none 4-Port 10/100/1000 Base-TX PCI Express Adapter$
If an additional slot is to be configured into the LPAR, it is recommended to first list the available physical slots of the managed system:
$ ms lsslot ms01DRC_NAME DRC_INDEX IOPOOL LPAR_NAME DESCRIPTIONU78C0.001.XXXXXXX-P2-T3 21010200 none - RAID ControllerU78C0.001.XXXXXXX-P2-C8-T7 21010201 none - Generic XT-Compatible Serial ControllerU78C0.001.XXXXXXX-P2-C4 21010202 none - Empty slotU78C0.001.XXXXXXX-P2-C3 21010203 none ms01-vio1 Quad 8 Gigabit Fibre Channel AdapterU78C0.001.XXXXXXX-P2-C2 21010204 none ms01-vio1 UnknownU78C0.001.XXXXXXX-P2-C1 21010205 none ms01-vio1 10 Gigabit Ethernet-SFP+ SR PCI-E adapterU78C0.001.XXXXXXX-P2-C9-T1 21010208 none ms01-vio1 PCI-E SAS ControllerU78C0.001.XXXXXXX-P2-C9-T2 21010209 none ms01-vio1 PCI-E SAS ControllerU78C0.001.XXXXXXX-P2-C8-T5 2101020A none - Universal…$
The output shows all physical slots of the managed system, as well as the current assignment to LPARs. To assign one of these slots, it must not currently be assigned to any other LPAR. Technically, when adding, the DRC index of the slot must be specified, which is shown in the output of the command "ms slots" above in a separate column. The assignment can be made using the DRC index and the command "lpar addslot":
$ lpar addslot lpar1 2101000A$
The change is again carried out dynamically and in the current profile. The new hardware must then be configured into the operating system, which can be done by starting the cfgmgr under AIX as root:
lpar1 # cfgmgrlpar1 #
If the slot is to be added dynamically only, the option "-d" can be used again:
$ lpar -d addslot lpar1 2101000A$
Changing only the profile can be achieved with the option "-p <profile>":
$ lpar -p standard addslot lpar1 2101000A$
L P A R - To o l 1 . 4 . 2 . x �5 2 © b y P o w e r C a m p u s 0 1
The removal of physical slots works analogously with the command "lpar rmslot". It should be noted here, however, that all devices of the slot in the operating system must be removed (rmdev), before trying to remove the slot!
6. V i r t u a l E t h e r n e t S l o t s
Virtual Ethernet slots can be added to regular LPARs or virtual I/O servers. At first, we only consider normal LPARs, for which no so-called trunking adapters can be created.
To create a virtual Ethernet adapter you first need information about the available VSwitches and VLANs on the system. This information can be obtained with the command "ms lsvswitch":
$ ms lsvswitch ms01MS VSWITCH SWITCH_MODE VLAN_IDSms01 ETHPROD VEB 720,735,437ms01 ETHERNET0(Default) VEB 100,102,105,107ms01 ETHMGMT VEB 1400,1600$
First, we create a virtual Ethernet adapter for the VLAN 100 (default switch ETHERNET0). As a slot number on the LPAR we choose the slot 5 (this must not be used yet):
$ lpar addeth lpar1 5 100$
Of course, this works only if there is already an Ethernet adapter in the LPAR with active RMC connection. Otherwise, the only option is to change the profile and reactivate the LPAR.
We create another virtual Ethernet adapter, this time in the VLAN 720 (VSwitch ETHPROD). Since the adapter does not belong to the default VSwitch this time, the VSwitch must be specified explicitly:
$ lpar addeth -s ETHPROD lpar1 6 720$
Both adapters were dynamically configured (DLPAR operation) and the adapters were added to the current profile. The VLAN ID specified after the slot number is a so-called PVID (Port VLAN ID), which means that untagged Ethernet packets are tagged with the specified PVID. If you want to use more VLANs on the same adapter, then this is also possible. For this the option "-i" (IEEE) must be used, then up to 20 further VLANs are possible on the adapter:
$ lpar addeth -i lpar1 7 102 105,107$
The additional VLANs are specified as a comma-separated list.
The result can be displayed again with the command "lpar vslots“. Once for the active configuration:
$ lpar lsvslot lpar1
L P A R - To o l 1 . 4 . 2 . x �5 3 © b y P o w e r C a m p u s 0 1
SLOT REQ ADAPTER_TYPE STATE DATA…2 No eth 1 PVID=1400 VLANS= ETHMGMT XXXXXXXXXXXX5 No eth 1 PVID=100 VLANS= ETHERNET0 XXXXXXXXXXXX…$
and for the current profile:
$ lpar -p standard lsslot lpar1SLOT REQ ADAPTER_TYPE DATA…2 No eth PVID=1400 VLANS= ETHMGMT 5 No eth PVID=100 VLANS= ETHERNET0 …$
As before, with the option "-d" adapters can be configured dynamically only, and with the option "-p <profile>" into the profile only!
If you want to remove virtual Ethernet adapters again, there is the command "lpar rmeth":
$ lpar rmeth lpar1 7$
In addition to the LPAR, only the slot number must be specified.
7. V i r t u a l S C S I A d a p t e r s
For virtual SCSI adapters, a virtual SCSI client adapter must be created in the client LPAR. In addition, a virtual SCSI server adapter must be created for this adapter on a virtual I/O server of the managed system. By default, the LPAR tool creates both the client and server adapters. I/Os in the client LPAR are then forwarded by the virtual SCSI client adapter, with the help of the hypervisor, to the virtual SCSI server adapter of a virtual I/O server, which then acts as a kind of storage system.
A virtual SCSI client adapter can be created with the command "lpar addscsi":
$ lpar addscsi lpar1 11 ms01-vio1 56lpar1: slot 11 -> ms01-vio1/56 added by DLPAR operationlpar1: slot 11 -> ms01-vio1/56 added to current profile (standard)ms01-vio1: slot 56 -> lpar1/11 added by DLPAR operation$
Where 11 is the slot number for the VSCSI client adapter on the client LPAR lpar1 and 56 is the slot number to use for the VSCSI server adapter on the virtual I/O server ms01-vio1. The command "lpar addscsi" creates both the client adapter and the server adapter. In addition, client and server adapters are also entered in the respective profiles.
Let's take a quick look at the virtual adapters of the LPAR lpar1:
$ lpar lsvslot lpar1
L P A R - To o l 1 . 4 . 2 . x �5 4 © b y P o w e r C a m p u s 0 1
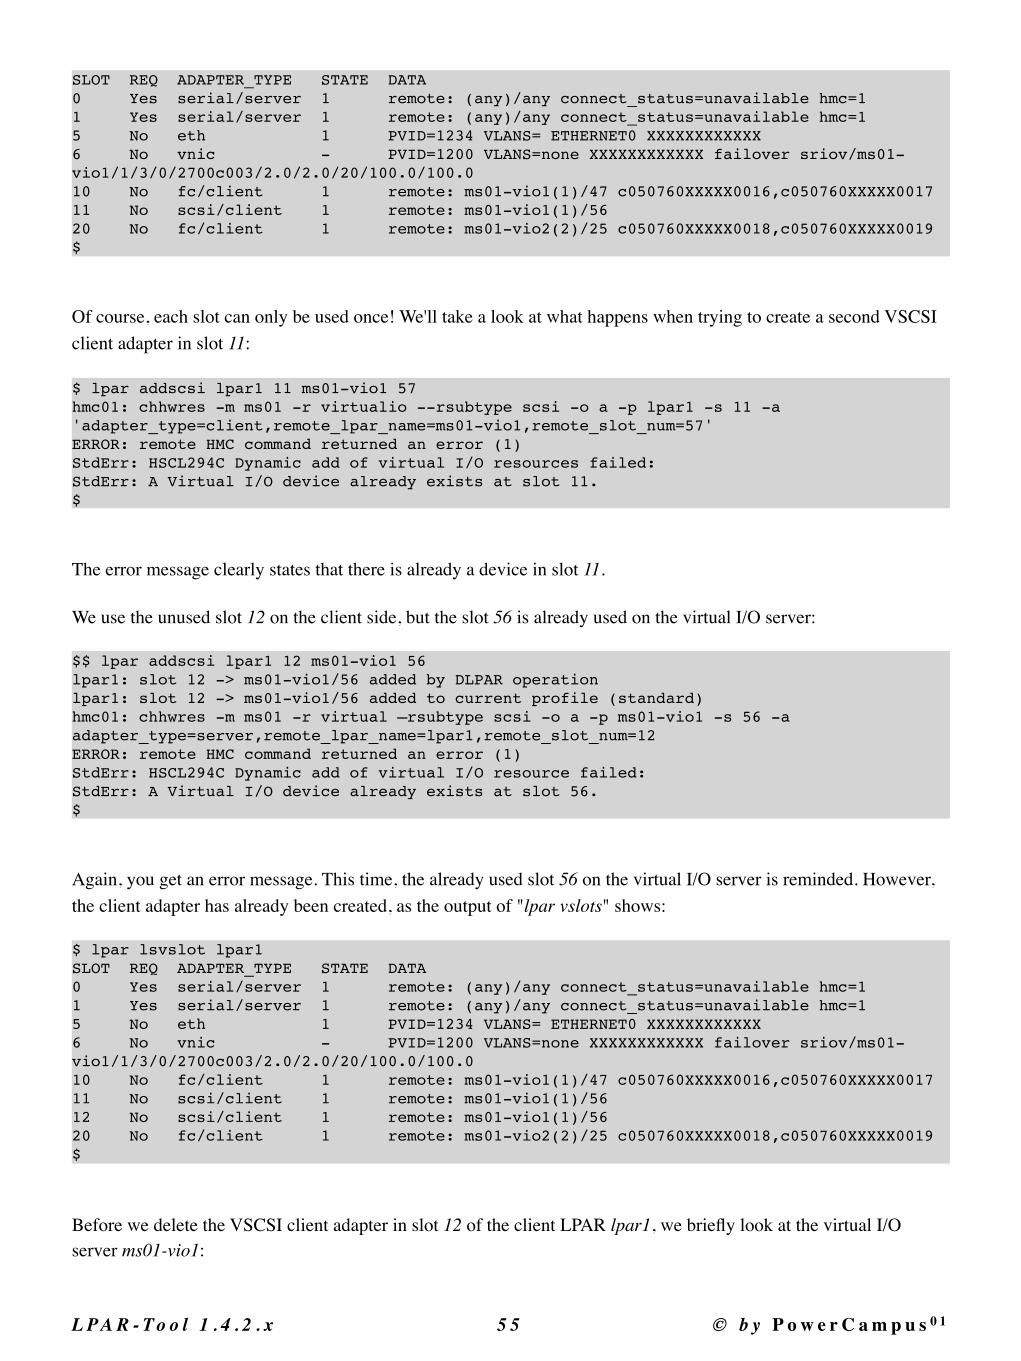
SLOT REQ ADAPTER_TYPE STATE DATA0 Yes serial/server 1 remote: (any)/any connect_status=unavailable hmc=11 Yes serial/server 1 remote: (any)/any connect_status=unavailable hmc=15 No eth 1 PVID=1234 VLANS= ETHERNET0 XXXXXXXXXXXX6 No vnic - PVID=1200 VLANS=none XXXXXXXXXXXX failover sriov/ms01-vio1/1/3/0/2700c003/2.0/2.0/20/100.0/100.010 No fc/client 1 remote: ms01-vio1(1)/47 c050760XXXXX0016,c050760XXXXX001711 No scsi/client 1 remote: ms01-vio1(1)/5620 No fc/client 1 remote: ms01-vio2(2)/25 c050760XXXXX0018,c050760XXXXX0019$
Of course, each slot can only be used once! We'll take a look at what happens when trying to create a second VSCSI client adapter in slot 11:
$ lpar addscsi lpar1 11 ms01-vio1 57hmc01: chhwres -m ms01 -r virtualio --rsubtype scsi -o a -p lpar1 -s 11 -a 'adapter_type=client,remote_lpar_name=ms01-vio1,remote_slot_num=57'ERROR: remote HMC command returned an error (1)StdErr: HSCL294C Dynamic add of virtual I/O resources failed: StdErr: A Virtual I/O device already exists at slot 11.$
The error message clearly states that there is already a device in slot 11.
We use the unused slot 12 on the client side, but the slot 56 is already used on the virtual I/O server:
$$ lpar addscsi lpar1 12 ms01-vio1 56lpar1: slot 12 -> ms01-vio1/56 added by DLPAR operationlpar1: slot 12 -> ms01-vio1/56 added to current profile (standard)hmc01: chhwres -m ms01 -r virtual —rsubtype scsi -o a -p ms01-vio1 -s 56 -a adapter_type=server,remote_lpar_name=lpar1,remote_slot_num=12ERROR: remote HMC command returned an error (1)StdErr: HSCL294C Dynamic add of virtual I/O resource failed:StdErr: A Virtual I/O device already exists at slot 56.$
Again, you get an error message. This time, the already used slot 56 on the virtual I/O server is reminded. However, the client adapter has already been created, as the output of "lpar vslots" shows:
$ lpar lsvslot lpar1SLOT REQ ADAPTER_TYPE STATE DATA0 Yes serial/server 1 remote: (any)/any connect_status=unavailable hmc=11 Yes serial/server 1 remote: (any)/any connect_status=unavailable hmc=15 No eth 1 PVID=1234 VLANS= ETHERNET0 XXXXXXXXXXXX6 No vnic - PVID=1200 VLANS=none XXXXXXXXXXXX failover sriov/ms01-vio1/1/3/0/2700c003/2.0/2.0/20/100.0/100.010 No fc/client 1 remote: ms01-vio1(1)/47 c050760XXXXX0016,c050760XXXXX001711 No scsi/client 1 remote: ms01-vio1(1)/5612 No scsi/client 1 remote: ms01-vio1(1)/5620 No fc/client 1 remote: ms01-vio2(2)/25 c050760XXXXX0018,c050760XXXXX0019$
Before we delete the VSCSI client adapter in slot 12 of the client LPAR lpar1, we briefly look at the virtual I/O server ms01-vio1:
L P A R - To o l 1 . 4 . 2 . x �5 5 © b y P o w e r C a m p u s 0 1
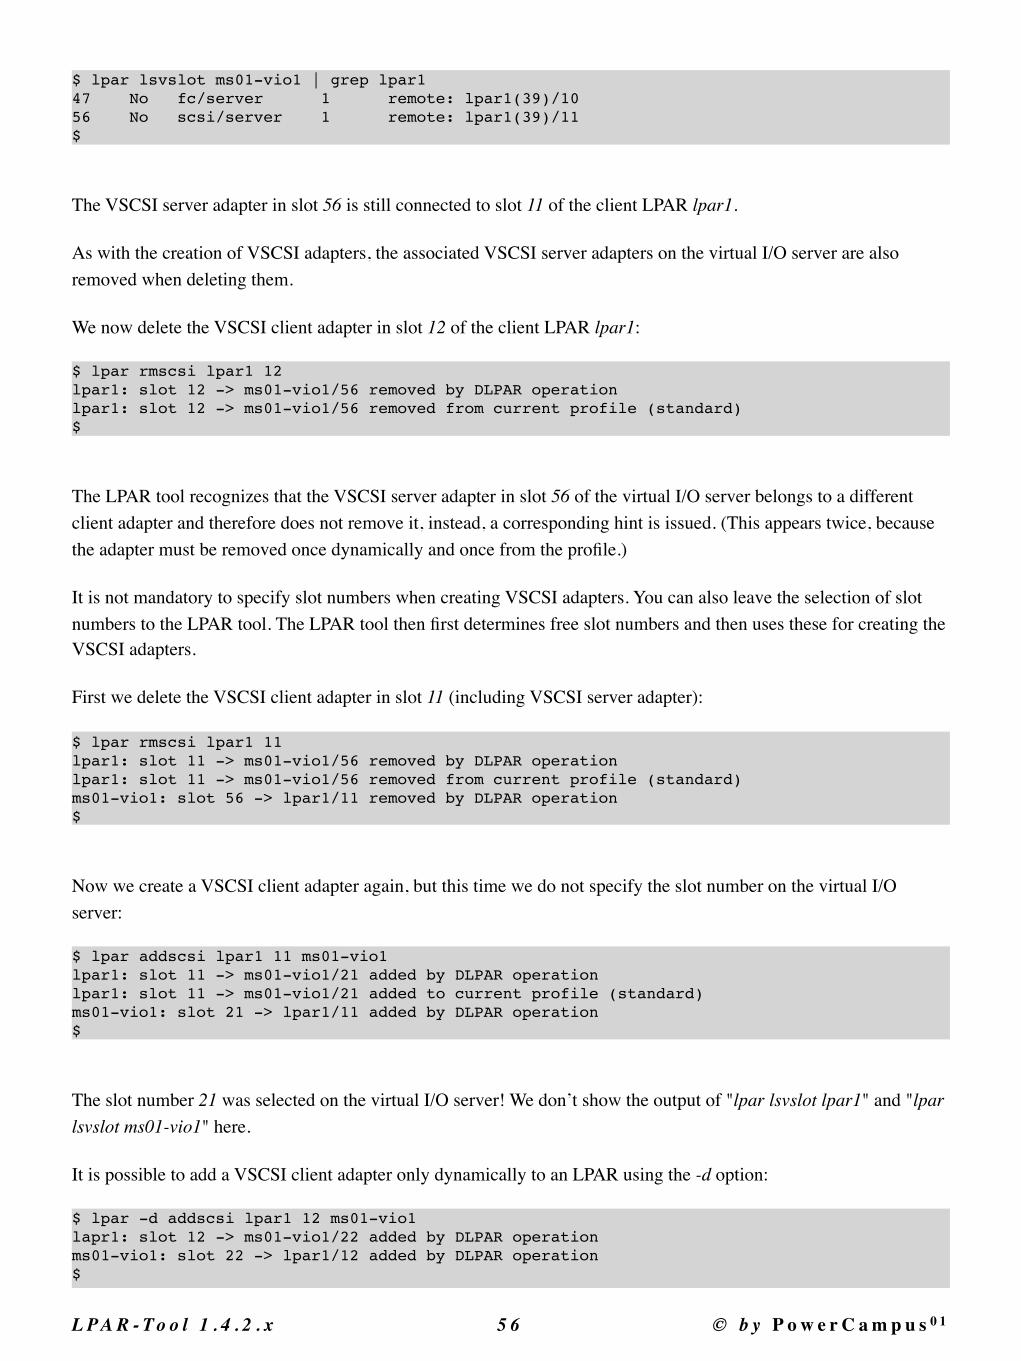
$ lpar lsvslot ms01-vio1 | grep lpar147 No fc/server 1 remote: lpar1(39)/10 56 No scsi/server 1 remote: lpar1(39)/11$
The VSCSI server adapter in slot 56 is still connected to slot 11 of the client LPAR lpar1.
As with the creation of VSCSI adapters, the associated VSCSI server adapters on the virtual I/O server are also removed when deleting them.
We now delete the VSCSI client adapter in slot 12 of the client LPAR lpar1:
$ lpar rmscsi lpar1 12lpar1: slot 12 -> ms01-vio1/56 removed by DLPAR operationlpar1: slot 12 -> ms01-vio1/56 removed from current profile (standard)$
The LPAR tool recognizes that the VSCSI server adapter in slot 56 of the virtual I/O server belongs to a different client adapter and therefore does not remove it, instead, a corresponding hint is issued. (This appears twice, because the adapter must be removed once dynamically and once from the profile.)
It is not mandatory to specify slot numbers when creating VSCSI adapters. You can also leave the selection of slot numbers to the LPAR tool. The LPAR tool then first determines free slot numbers and then uses these for creating the VSCSI adapters.
First we delete the VSCSI client adapter in slot 11 (including VSCSI server adapter):
$ lpar rmscsi lpar1 11lpar1: slot 11 -> ms01-vio1/56 removed by DLPAR operationlpar1: slot 11 -> ms01-vio1/56 removed from current profile (standard)ms01-vio1: slot 56 -> lpar1/11 removed by DLPAR operation$
Now we create a VSCSI client adapter again, but this time we do not specify the slot number on the virtual I/O server:
$ lpar addscsi lpar1 11 ms01-vio1lpar1: slot 11 -> ms01-vio1/21 added by DLPAR operationlpar1: slot 11 -> ms01-vio1/21 added to current profile (standard)ms01-vio1: slot 21 -> lpar1/11 added by DLPAR operation$
The slot number 21 was selected on the virtual I/O server! We don’t show the output of "lpar lsvslot lpar1" and "lpar lsvslot ms01-vio1" here.
It is possible to add a VSCSI client adapter only dynamically to an LPAR using the -d option:
$ lpar -d addscsi lpar1 12 ms01-vio1lapr1: slot 12 -> ms01-vio1/22 added by DLPAR operationms01-vio1: slot 22 -> lpar1/12 added by DLPAR operation$
L P A R - To o l 1 . 4 . 2 . x �5 6 © b y P o w e r C a m p u s 0 1
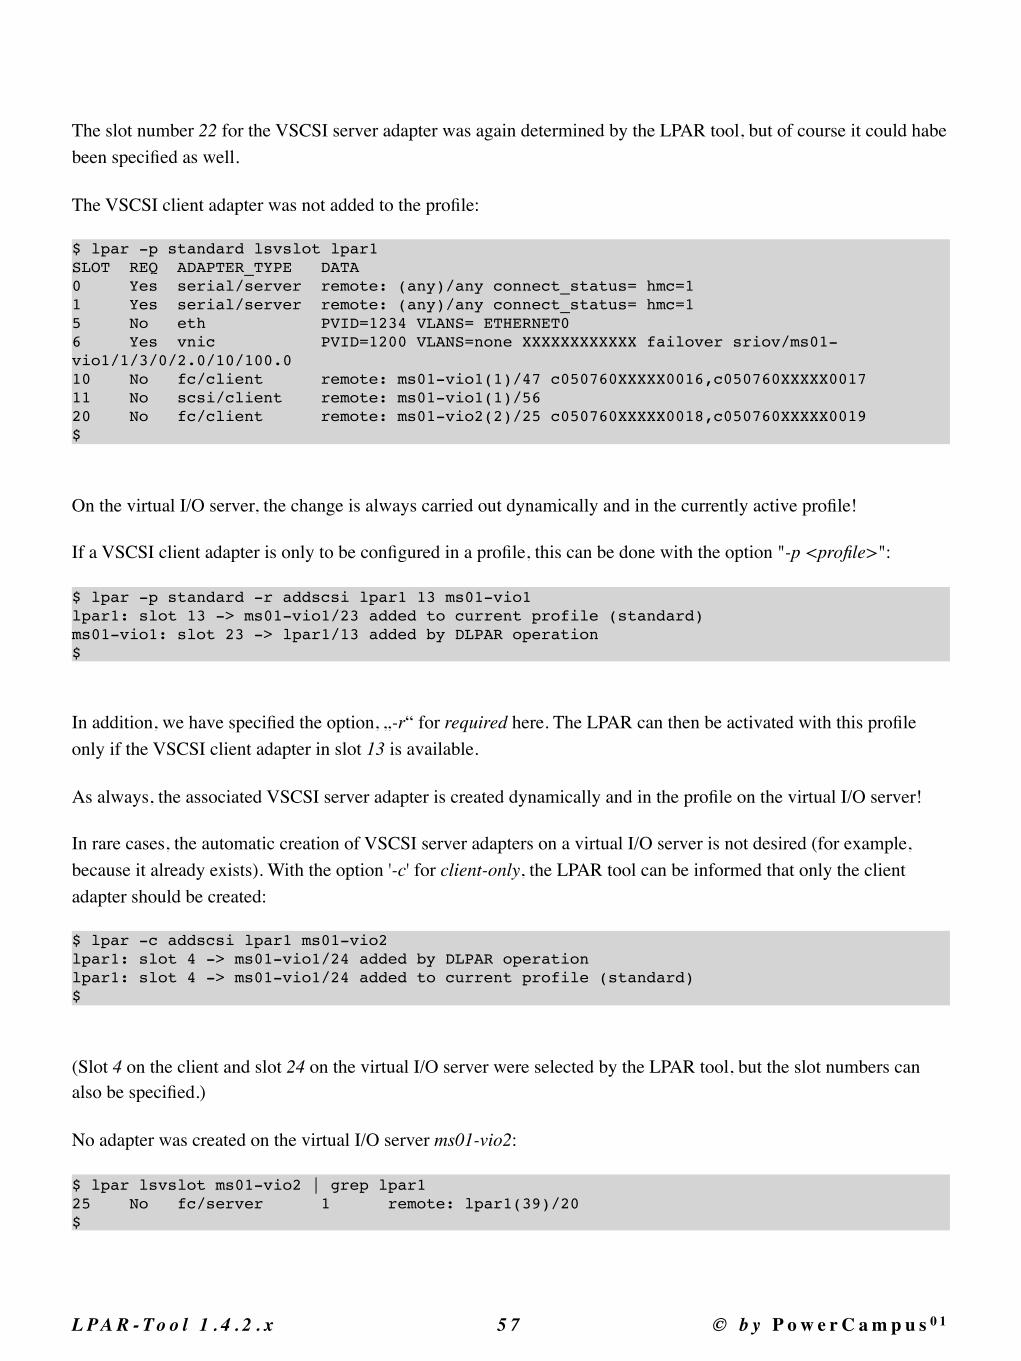
The slot number 22 for the VSCSI server adapter was again determined by the LPAR tool, but of course it could habe been specified as well.
The VSCSI client adapter was not added to the profile:
$ lpar -p standard lsvslot lpar1SLOT REQ ADAPTER_TYPE DATA0 Yes serial/server remote: (any)/any connect_status= hmc=11 Yes serial/server remote: (any)/any connect_status= hmc=15 No eth PVID=1234 VLANS= ETHERNET0 6 Yes vnic PVID=1200 VLANS=none XXXXXXXXXXXX failover sriov/ms01-vio1/1/3/0/2.0/10/100.010 No fc/client remote: ms01-vio1(1)/47 c050760XXXXX0016,c050760XXXXX001711 No scsi/client remote: ms01-vio1(1)/5620 No fc/client remote: ms01-vio2(2)/25 c050760XXXXX0018,c050760XXXXX0019$
On the virtual I/O server, the change is always carried out dynamically and in the currently active profile!
If a VSCSI client adapter is only to be configured in a profile, this can be done with the option "-p <profile>":
$ lpar -p standard -r addscsi lpar1 13 ms01-vio1lpar1: slot 13 -> ms01-vio1/23 added to current profile (standard)ms01-vio1: slot 23 -> lpar1/13 added by DLPAR operation$
In addition, we have specified the option, „-r“ for required here. The LPAR can then be activated with this profile only if the VSCSI client adapter in slot 13 is available.
As always, the associated VSCSI server adapter is created dynamically and in the profile on the virtual I/O server!
In rare cases, the automatic creation of VSCSI server adapters on a virtual I/O server is not desired (for example, because it already exists). With the option '-c' for client-only, the LPAR tool can be informed that only the client adapter should be created:
$ lpar -c addscsi lpar1 ms01-vio2lpar1: slot 4 -> ms01-vio1/24 added by DLPAR operationlpar1: slot 4 -> ms01-vio1/24 added to current profile (standard)$
(Slot 4 on the client and slot 24 on the virtual I/O server were selected by the LPAR tool, but the slot numbers can also be specified.)
No adapter was created on the virtual I/O server ms01-vio2:
$ lpar lsvslot ms01-vio2 | grep lpar125 No fc/server 1 remote: lpar1(39)/20 $
L P A R - To o l 1 . 4 . 2 . x �5 7 © b y P o w e r C a m p u s 0 1
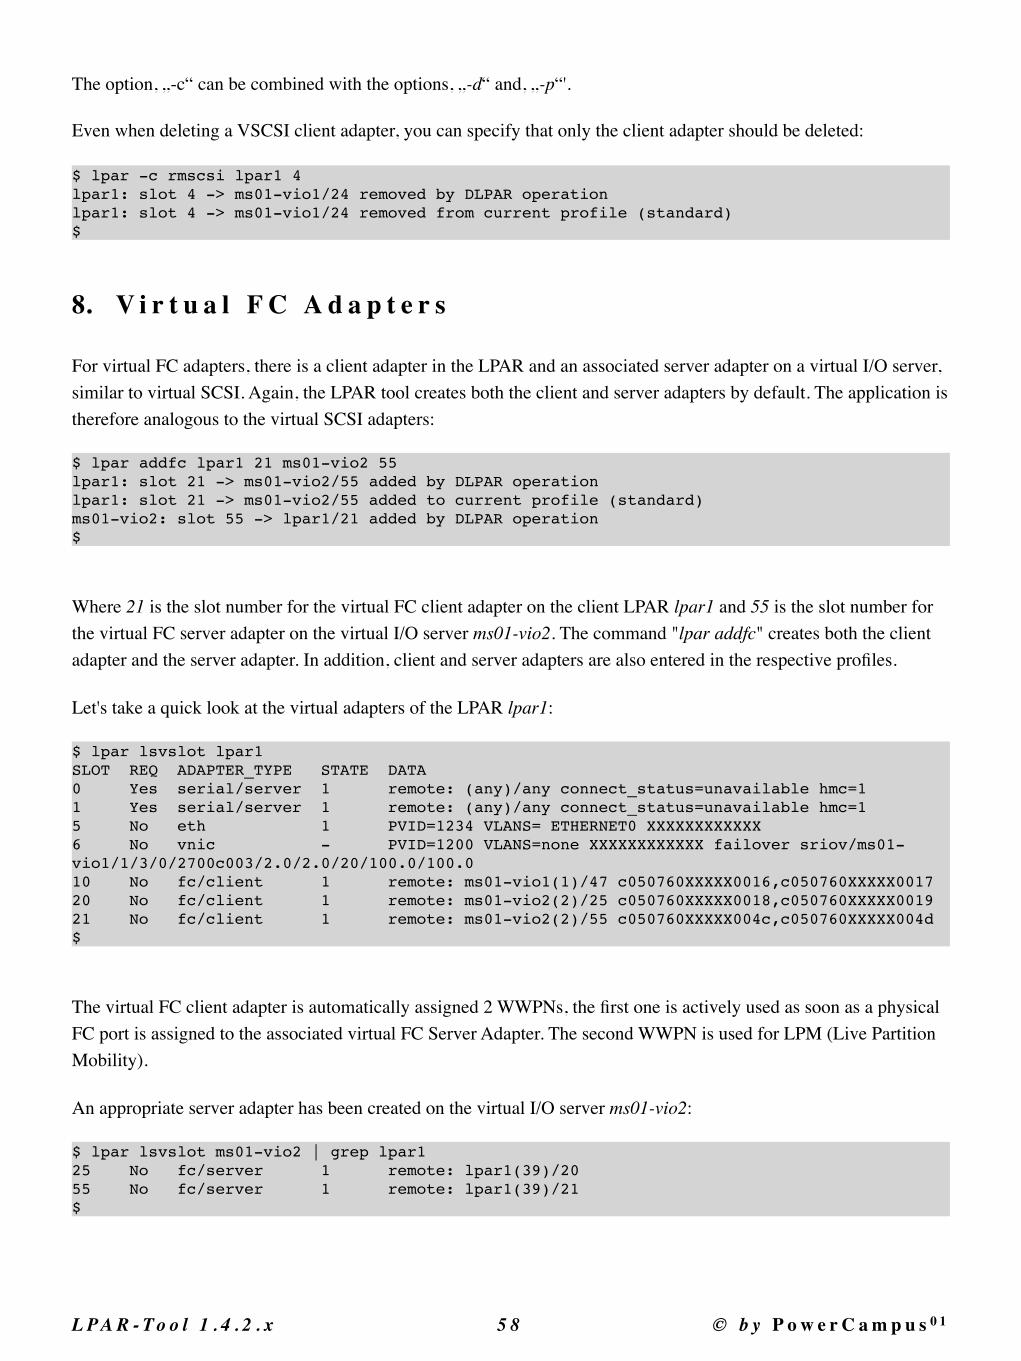
The option, „-c“ can be combined with the options, „-d“ and, „-p“'.
Even when deleting a VSCSI client adapter, you can specify that only the client adapter should be deleted:
$ lpar -c rmscsi lpar1 4lpar1: slot 4 -> ms01-vio1/24 removed by DLPAR operationlpar1: slot 4 -> ms01-vio1/24 removed from current profile (standard)$
8. V i r t u a l F C A d a p t e r s
For virtual FC adapters, there is a client adapter in the LPAR and an associated server adapter on a virtual I/O server, similar to virtual SCSI. Again, the LPAR tool creates both the client and server adapters by default. The application is therefore analogous to the virtual SCSI adapters:
$ lpar addfc lpar1 21 ms01-vio2 55lpar1: slot 21 -> ms01-vio2/55 added by DLPAR operationlpar1: slot 21 -> ms01-vio2/55 added to current profile (standard)ms01-vio2: slot 55 -> lpar1/21 added by DLPAR operation$
Where 21 is the slot number for the virtual FC client adapter on the client LPAR lpar1 and 55 is the slot number for the virtual FC server adapter on the virtual I/O server ms01-vio2. The command "lpar addfc" creates both the client adapter and the server adapter. In addition, client and server adapters are also entered in the respective profiles.
Let's take a quick look at the virtual adapters of the LPAR lpar1:
$ lpar lsvslot lpar1SLOT REQ ADAPTER_TYPE STATE DATA0 Yes serial/server 1 remote: (any)/any connect_status=unavailable hmc=11 Yes serial/server 1 remote: (any)/any connect_status=unavailable hmc=15 No eth 1 PVID=1234 VLANS= ETHERNET0 XXXXXXXXXXXX6 No vnic - PVID=1200 VLANS=none XXXXXXXXXXXX failover sriov/ms01-vio1/1/3/0/2700c003/2.0/2.0/20/100.0/100.010 No fc/client 1 remote: ms01-vio1(1)/47 c050760XXXXX0016,c050760XXXXX001720 No fc/client 1 remote: ms01-vio2(2)/25 c050760XXXXX0018,c050760XXXXX001921 No fc/client 1 remote: ms01-vio2(2)/55 c050760XXXXX004c,c050760XXXXX004d$
The virtual FC client adapter is automatically assigned 2 WWPNs, the first one is actively used as soon as a physical FC port is assigned to the associated virtual FC Server Adapter. The second WWPN is used for LPM (Live Partition Mobility).
An appropriate server adapter has been created on the virtual I/O server ms01-vio2:
$ lpar lsvslot ms01-vio2 | grep lpar125 No fc/server 1 remote: lpar1(39)/20 55 No fc/server 1 remote: lpar1(39)/21$
L P A R - To o l 1 . 4 . 2 . x �5 8 © b y P o w e r C a m p u s 0 1
As with the VSCSI adapters, slot numbers do not have to be specified, but can be selected by the LPAR tool. We create another virtual FC client adapter and let the LPAR tool determine the slot number on the virtual I/O server:
$ lpar addfc lpar1 22 ms01-vio2lpar1: slot 22 -> ms01-vio2/20 added by DLPAR operationlpar1: slot 22 -> ms01-vio2/20 added to current profile (standard)ms01-vio2: slot 20 -> lpar1/22 added by DLPAR operation$$ lpar lsvslot lpar1SLOT REQ ADAPTER_TYPE STATE DATA0 Yes serial/server 1 remote: (any)/any connect_status=unavailable hmc=11 Yes serial/server 1 remote: (any)/any connect_status=unavailable hmc=15 No eth 1 PVID=1234 VLANS= ETHERNET0 XXXXXXXXXXXX6 No vnic - PVID=1200 VLANS=none XXXXXXXXXXXX failover sriov/ms01-vio1/1/3/0/2700c003/2.0/2.0/20/100.0/100.010 No fc/client 1 remote: ms01-vio1(1)/47 c050760XXXXX0016,c050760XXXXX001720 No fc/client 1 remote: ms01-vio2(2)/25 c050760XXXXX0018,c050760XXXXX001921 No fc/client 1 remote: ms01-vio2(2)/55 c050760XXXXX004c,c050760XXXXX004d22 No fc/client 1 remote: ms01-vio2(2)/20 c050760XXXXX004e,c050760XXXXX004f$
Here slot number 20 on the virtual I/O server ms01-vio2 was selected by the LPAR tool.
All other options work the same way for virtual FC adapters as described for VSCSI adapters and will not be described here again.
The removal of a virtual FC adapter can be carried out with the command "lpar rmfc" analogous to the command "lpar rmscsi". We show here the removal of the adapter in slot 21:
$ lpar rmfc lpar1 22lpar1: slot 22 -> ms01-vio2/20 removed by DLPAR operationlpar1: slot 22 -> ms01-vio2/20 removed from current profile (standard)ms01-vio2: slot 20 -> lpar1/22 removed by DLPAR operation$
In addition to the client adapter, the server adapters on the virtual I / O server are also removed here.
If you accidentally deleted a client adapter, but you still need it, you can not just create a new adapter. The new adapter gets two new (not yet used) WWPNs. LUNs mapped to the old WWPNs will not be accessible with the new WWPNs (unless the storage configuration and SAN zoning are modified accordingly). However, it is possible to create a client adapter and specify the desired WWPNs. In the example we use the WWPNs c050760XXXXX004e and c050760XXXXX004f which were used by the adapter in slot 22 above:
$ lpar addfc lpar1 22 ms01-vio2 20 c050760XXXXX004e,c050760XXXXX004flpar1: slot 22 -> ms01-vio2/20 added by DLPAR operationlpar1: slot 22 -> ms01-vio2/20 added to current profile (standard)ms01-vio2: slot 20 -> lpar1/22 added by DLPAR operation$
The virtual FC adapter in slot 22 of the client LPAR lpar1 has the specified WWPNs:
$ lpar lsvslot lpar1SLOT REQ ADAPTER_TYPE STATE DATA
L P A R - To o l 1 . 4 . 2 . x �5 9 © b y P o w e r C a m p u s 0 1
0 Yes serial/server 1 remote: (any)/any connect_status=unavailable hmc=11 Yes serial/server 1 remote: (any)/any connect_status=unavailable hmc=15 No eth 1 PVID=1234 VLANS= ETHERNET0 XXXXXXXXXXXX6 No vnic - PVID=1200 VLANS=none XXXXXXXXXXXX failover sriov/ms01-vio1/1/3/0/2700c003/2.0/2.0/20/100.0/100.010 No fc/client 1 remote: ms01-vio1(1)/47 c050760XXXXX0016,c050760XXXXX001720 No fc/client 1 remote: ms01-vio2(2)/25 c050760XXXXX0018,c050760XXXXX001921 No fc/client 1 remote: ms01-vio2(2)/55 c050760XXXXX004c,c050760XXXXX004d22 No fc/client 1 remote: ms01-vio2(2)/20 c050760XXXXX004e,c050760XXXXX004f$
This allows the old LUNs to be accessed again.
9. S R - I O V
In order to use SR-IOV, you need a managed system that supports SR-IOV, as well as an SR-IOV capable PCI adapter. Whether a managed system supports SR-IOV and has SR-IOV-capable adapters is relatively easy to determine with the command "ms lssriov". Here is an example of a non-SR-IOV enabled managed system:
$ ms lssriov ms05hmc01: lshwres -r sriov --rsubtype adapter -m ms05ERROR: remote HMC command returned an error (1)StdErr: HSCL1237 The managed system does not support SR-IOV.$
An example of an SR-IOV capable system without SR-IOV capable adapters shows the following output:
$ ms lssriov ms15PHYS_LOC SLOT_ID CONFIG_STATE SRIOV_STATUS ADAPTER_ID PHYS_PORTS LOGICAL_PORTS$
Interestingly, of course, a system that has SR-IOV enabled adapter:
$ ms lssriov ms22PHYS_LOC SLOT_ID CONFIG_STATE SRIOV_STATUS ADAPTER_ID PHYS_PORTS LOGICAL_PORTSU78D3.001.XXXXXXX-P1-C6 2102001b sriov running 1 4 48 U78D3.001.XXXXXXX-P1-C4 21010020 dedicated null null null null U78D3.001.XXXXXXX-P1-C9 21010010 dedicated null null null null U78D3.001.XXXXXXX-P1-C11 21020013 sriov running 2 4 48 $
The output shows 4 SR-IOV capable adapters. The adapters in slots P1-C9 and P1-C4 have the config_state dedicated. This means that these adapters are currently used classically without SR-IOV functionality. The adapters can only be assigned to one LPAR and only used directly by them. The adapters in slots P1-C11 and P1-C6 have a config_state of sriov. This means that these adapters can be used by several LPARs at the same time. The adapters
L P A R - To o l 1 . 4 . 2 . x �6 0 © b y P o w e r C a m p u s 0 1
themselves are not assigned to LPARs in this case, but so-called logical ports are generated, which can be assigned to different LPARs. The adapters can be used directly by several LPARs together. For this purpose, so-called virtual functions are used, which are assigned in the form of logical ports to the LPARs.
To be able to use an adapter for SR-IOV, it must first be switched from the classic dedicated mode to the so-called SR-IOV mode. This can be done with the command "ms chsriov":
$ ms chsriov ms22 21010010 shared$
If the adapter is currently assigned to an LPAR, the mode can not be switched, as the following example shows:
$ ms chsriov ms22 21010010 sharedhmc01: chhwres -r sriov --rsubtype adapter -m ms22 -o a -a 'slot_id=21010010'ERROR: remote HMC command returned an error (1)StdErr: HSCL1232 The command failed because the adapter is in use by partitions ms22-vio2. Remove the adapter's resources from the specified partitions and try the operation again.$
The output of "ms lssriov" shows that the adapter now has the config_state sriov. It also displays the adapter ID, the number of physical ports, and the maximum number of logical ports:
$ ms lssriov ms22PHYS_LOC SLOT_ID CONFIG_STATE SRIOV_STATUS ADAPTER_ID PHYS_PORTS LOGICAL_PORTSU78D3.001.XXXXXXX-P1-C6 2102001b sriov running 1 4 48 U78D3.001.XXXXXXX-P1-C4 21010020 dedicated null null null null U78D3.001.XXXXXXX-P1-C9 21010010 sriov running 15 4 48 U78D3.001.XXXXXXX-P1-C11 21020013 sriov running 2 4 48 $
The SR-IOV adapter has got the adapter ID 15, has 4 physical ports and a maximum of 48 logical ports can be configured. If a specific adapter ID is to be used, this can be specified during reconfiguration. How, shows us the help to the command:
$ ms help chsriovUSAGE:… Attributes when switching an adapter to shared mode: adapter_id - 1-32, default: assign next available adapter ID Note: An SR-IOV adapter can only be changed to shared mode, if it is not assignedto an LPAR! EXAMPLES: … Switch adapter 21010010 of managed system ms02 to shared mode usingadapter ID 3:
L P A R - To o l 1 . 4 . 2 . x �6 1 © b y P o w e r C a m p u s 0 1
ms chsriov ms01 21010010 shared adapter_id=3$
We try this out and assign an adapter ID of 3 for the adapter above:
$ ms chsriov ms22 21010010 dedicated$ ms chsriov ms22 21010010 shared adapter_id=3$
Of course, if the adapter ID is already in use, an error will be shown:
$ ms chsriov ms22 21010010 shared adapter_id=2hmc01: chhwres -r sriov --rsubtype adapter -m ms22 -o a -a adapter_id=2,slot_id=21010010ERROR: remote HMC command returned an error (1)StdErr: HSCL1299 The operation to switch the adapter in slot 21010010 to shared mode failed with the following errors:StdErr: StdErr: HSCL1301 Valid adapter IDs are from 1 to 32 and must be unique on the managed system. The adapter ID cannot be changed while the adapter is in SR-IOV mode.$
The physical ports of the adapters can be viewed using the option ‚-p‘ (physical port):
$ ms lssriov -p ms22PHYS_PORT_LOC LABEL TYPE ADAPTER PPORT USED MAX CONN_SPEED MTU U78D3.001.XXXXXXX-P1-C6-T3 - eth 1 2 0 4 0 9000U78D3.001.XXXXXXX-P1-C6-T4 - eth 1 3 0 4 0 9000U78D3.001.XXXXXXX-P1-C4-T3 - eth 2 2 1 4 1000 9000U78D3.001.XXXXXXX-P1-C4-T4 - eth 2 3 0 4 0 9000U78D3.001.XXXXXXX-P1-C9-T3 - eth 4 2 1 4 1000 9000U78D3.001.XXXXXXX-P1-C9-T4 - eth 4 3 0 4 0 9000U78D3.001.XXXXXXX-P1-C11-T3 - eth 3 2 0 4 0 9000U78D3.001.XXXXXXX-P1-C11-T4 - eth 3 3 0 4 0 9000U78D3.001.XXXXXXX-P1-C6-T1 - ethc 1 0 1 20 10000 9000U78D3.001.XXXXXXX-P1-C6-T2 - ethc 1 1 1 20 0 9000U78D3.001.XXXXXXX-P1-C4-T1 - ethc 2 0 1 20 10000 9000U78D3.001.XXXXXXX-P1-C4-T2 - ethc 2 1 1 20 10000 9000U78D3.001.XXXXXXX-P1-C9-T1 - ethc 4 0 1 20 10000 9000U78D3.001.XXXXXXX-P1-C9-T2 - ethc 4 1 2 20 10000 9000U78D3.001.XXXXXXX-P1-C11-T1 - ethc 3 0 1 20 10000 9000U78D3.001.XXXXXXX-P1-C11-T2 - ethc 3 1 1 20 0 9000$
The column USED indicates how many logical ports are currently configured, the column MAX indicates how many can be configured at maximum.
Some attributes of a physical port can be changed with the command "ms chsriov". The help for the command lists most of the changeable attributes:
$ ms help chsriovUSAGE: ms [-h <hmc>] chsriov [-v] <ms> {<slot_id> {dedicated|shared} | <adapter_id> <phys_port_id> <attributes>} [<attributes> ...] DESCRIPTION:
L P A R - To o l 1 . 4 . 2 . x �6 2 © b y P o w e r C a m p u s 0 1
Switches an SR-IOV adapter in a managed system either to dedicated or shared mode,or sets attributes for an SR-IOV physical port. Attributes when switching an adapter to shared mode: adapter_id - 1-32, default: assign next available adapter ID Attributes for an SR-IOV physical port: conn_speed - ethernet speed auto : autonegotation 10 : 10 Mbps 100 : 100 Mbps 1000 : 1 Gbps 10000 : 10 Gbps 40000 : 40 Gbps 100000 : 100 Gbps max_recv_packet_size - MTU 1500 - 1500 byts 9000 - 9000 bytes (jumbo frames) phys_port_label - label for the physical port 1-16 characters none - to clear the label phys_port_sub_label - sublabel for the physical port 1-8 characters none - to clear the sublabel recv_flow_control 0 - disable 1 - enable trans_flow_control 0 - disable 1 - enable veb_mode 0 - disable virtual ethernet bridge mode 1 - enable virtual ethernet bridge mode vepa_mode 0 - disable virtual ethernet port aggregator mode 1 - enable virtual ethernet port aggregator mode (see the IBM documentation for additional attributes)…$
We configure jumbo frames and assign a name for the port 0 of the adapter 3:
$ ms chsriov ms22 3 0 phys_port_label=myport max_recv_packet_size=9000$ ms lssriov -p -s adapter_id=3,phys_port_id=0 ms22PHYS_PORT_LOC LABEL TYPE ADAPTER PPORT USED MAX CONN_SPEED MTU U78D3.001.XXXXXXX-P1-C11-T1 myport ethc 3 0 1 20 10000 9000$
Not all properties of a physical port are displayed by default. If you really want to see all the properties, or if you want to use the output in scripts, then output in JSON, stanza or YAML format is recommended:
$ ms lssriov -p -s adapter_id=3,phys_port_id=0 -y ms22--- adapter_id: 3 capabilities: [pvid_priority_capable,port_vlan_id_capable,mac_vlan_consistency_capable,clear_phys_port_stat_capable,clear_logical_port_stat_capable,disable_enable_logical_ports_capable] config_conn_speed: auto config_logical_ports: 1
L P A R - To o l 1 . 4 . 2 . x �6 3 © b y P o w e r C a m p u s 0 1

config_max_recv_packet_size: 9000 config_recv_flow_control: 0 config_trans_flow_control: 0 conn_speed: 10000 curr_eth_logical_ports: 1 max_diag_ports: 1 max_eth_logical_ports: 20 max_promisc_ports: 1 max_recv_packet_size: 9000 phys_port_id: 0 phys_port_label: myport phys_port_loc: U78D3.001.XXXXXXX-P1-C11-T1 phys_port_max_logical_ports: 20 phys_port_sub_label: null phys_port_type: ethc priority_flow_control_active: 0 recv_flow_control: 0 state: 1 supported_max_eth_logical_ports: 20 trans_flow_control: 0 veb_mode: 1 vepa_mode: 0$
Now that the adapter is in SR-IOV mode and the physical ports have been configured, logical ports for LPARs can now be created. We start with an LPAR running under AIX 7.2 that does not have any logical SR-IOV ports:
$ lpar status aix02NAME LPAR_ID LPAR_ENV STATE PROFILE RMC PROCS PROC_UNITS MEMORY OS_VERSION aix02 39 aixlinux Running standard active 1 0.7 4096 AIX 7.2 7200-03-02-1846$$ lpar lssriov aix02LPORT REQ ADAPTER PPORT CONFIG_ID CAPACITY MAX_CAPACITY PVID VLANS CURR_MAC_ADDR$$ lpar lssriov -p standard aix02LPORT ADAPTER PPORT CONFIG_ID CAPACITY MAX_CAPACITY PVID VLANS MAC_ADDR ALLOWED_OS_MAC_ADDRS$
We create a logical port on adapter 3 physical port 0 for this LPAR. The logical port should have the PVID 1200:
$ lpar addsriov aix02 3 0 port_vlan_id=1200$
The command adds the port via DLPAR operation and updates the current profile to make sure the logical SR-IOV port is available when the LPAR is re-activated. The logical ports can be listed by means of "lpar lssriov":
$ lpar lssriov aix02LPORT REQ ADAPTER PPORT CONFIG_ID CAPACITY MAX_CAPACITY PVID VLANS CURR_MAC_ADDR2700c004 1 3 0 0 2.0 100.0 1200 all xxxxxx945f00 $$ lpar lssriov -p standard aix02LPORT ADAPTER PPORT CONFIG_ID CAPACITY MAX_CAPACITY PVID VLANS MAC_ADDR ALLOWED_OS_MAC_ADDRS
L P A R - To o l 1 . 4 . 2 . x �6 4 © b y P o w e r C a m p u s 0 1
2700c004 3 0 0 2.0 100.0 1200 all - all $
The output shows that the logical port was created by default with a guaranteed capacity of 2% (column CAPACITY) and a maximum capacity of 100%. Different values can of course be specified when creating the logical port, (attributes capacity and max_capacity). The logical SR-IOV port is visible under AIX in the Defined state and can be used after a cfgmgr run!
aix02:/root> lscfg -l ent* ent0 U9009.22A.YYYYYYY-V39-C5-T1 Virtual I/O Ethernet Adapter (l-lan) ent1 U78D3.001.XXXXXXX-P1-C11-T1-S5 PCIe3 10GbE SFP+ SR 4-port Converged Network Adapter VF (df1028e214100f04)aix02:/root>
That this is a logical SR-IOV port can be seen from the description of the adapter type in the output of lscfg. There is among other things "... Network Adapter VF ...". The term VF for Virtual Function is an indication for SR-IOV. Common access to the hardware of the same PCI card is realized with SR-IOV via Virtual Functions, whereby each accessing system (LPAR) is assigned such a virtual function.
The configuration of the resulting Ethernet adapter on AIX works as usual. That this is a logical SR-IOV port, is not apparent from the device name ent1.
The attributes of a logical SR-IOV port can be changed with the command "lpar chsriov". Possible attributes can be found in the online help:
$ lpar help chsriovUSAGE: lpar [-h <hmc>] [-m <ms>] [-p <profile>] chsriov [-d] [-f] [-l <detail_level>] [-w <wait_time>] [-v] <lpar> <config_id>|<logical_port_id> <attributes> ... DESCRIPTION: Changes attributes of an SR-IOV logical port. allowed_os_mac_addrs - allowed MAC addresses allowed_priorities - allowed QoS priorities none : no priorities allowed (default) 0-7: comma-separated list of integers all : all priorities are allowed allowed_vlan_ids - allowed VLANs none : no VLAN IDs allowed VLAN_IDs: comma-separated list of VLAN IDs all : all VLAN IDs are allowed (default) diag_mode - diagnostics mode 0 : disable (default) 1 : enable port_vlan_id - VLAN-ID for untagged packets or 0 to disable VLAN tagging pvid_priority - priority of the PVID EXAMPLES: Set the PVID of logical port with config_id 1 of LPAR aix01 to 1200: lpar chsriov aix01 1 port_vlan_id=1200 Set the PVID and PVID priority of logical port 2700c006 of LPAR aix01 dynamically only:
L P A R - To o l 1 . 4 . 2 . x �6 5 © b y P o w e r C a m p u s 0 1
lpar chsriov -d aix01 2700c006 port_vlan_id=1200 pvid_priority=0 Set the PVID priority of logical port with config_id 1 in the profile 'standard'of LPAR aix01 to 2: lpar -p standard chsriov aix01 1 pvid_priority=2 $
Here we show how to change the attributes port_vlan_id and pvid_priority:
$ lpar chsriov aix02 0 port_vlan_id=1200 pvid_priority=2$
Instead of the config_id (here 0), the logical_port_id (here 2700c004) can also be specified as an argument to select the logical SR-IOV port.
Finally, it will be shown how to remove a logical SR-IOV port if needed. Prerequisite is that the port is no longer in use by the OS and was removed with rmdev!
$ lpar rmsriov aix02 2700c004$
The set of logical SR-IOV ports of a managed system can be listed as "ms lssriov -l":
$ ms lssriov -l ms22LOCATION_CODE ADAPTER_ID PHYS_PORT_ID LOGICAL_PORT_ID LPAR_NAME CAPACITY CURR_MAC_ADDRU78D3.001.XXXXXXX-P1-C6-T1-S1 1 0 27004001 ms22-vio2 50.0 xxxxxxf72200 U78D3.001.XXXXXXX-P1-C6-T2-S2 1 1 27004002 ms22-vio2 50.0 xxxxxxf72201 U78D3.001.XXXXXXX-P1-C4-T1-S1 2 0 27008001 ms22-vio2 50.0 xxxxxxf72202 U78D3.001.XXXXXXX-P1-C4-T2-S2 2 1 27008002 ms22-vio2 10.0 xxxxxxf72203 U78D3.001.XXXXXXX-P1-C4-T3-S3 2 2 27008003 ms22-vio2 50.0 xxxxxxc01a04 U78D3.001.XXXXXXX-P1-C9-T1-S1 4 0 27010001 ms22-vio1 50.0 xxxxxx58de02 U78D3.001.XXXXXXX-P1-C9-T2-S2 4 1 27010002 ms22-vio1 50.0 xxxxxx58de03 U78D3.001.XXXXXXX-P1-C9-T3-S3 4 2 27010003 ms22-vio1 50.0 xxxxxx37e504 U78D3.001.XXXXXXX-P1-C9-T2-S4 4 1 27010004 aix01 10.0 xxxxxxdff700 U78D3.001.XXXXXXX-P1-C11-T1-S1 3 0 2700c001 ms22-vio1 50.0 xxxxxx07fe00 U78D3.001.XXXXXXX-P1-C11-T2-S2 3 1 2700c002 ms22-vio1 50.0 xxxxxx58de01 U78D3.001.XXXXXXX-P1-C11-T1-S5 3 0 2700c004 aix02 4.0 xxxxxx945f09 $
L P A R - To o l 1 . 4 . 2 . x �6 6 © b y P o w e r C a m p u s 0 1
6. V i r t u a l I / O S e r v e rA large number of operations on a virtual I/O server can be conveniently performed via the LPAR tool, without having to log in directly to the virtual I/O server.
1. V i r t u a l M e d i a R e p o s i t o r y
Here we show the administration of a virtual media repository on a virtual I/O server using the LPAR tool.
First, we create a repository with a size of 20 GB:
$ vios mkrep ms04-vio2 20gVirtual Media Repository CreatedRepository created within "VMLibrary" logical volume$
Details about the repository can be viewed with the command "vios lsrep":
$ vios lsrep ms04-vio2Size(mb) Free(mb) Parent Pool Parent Size Parent Free 20396 20396 rootvg 279552 172544$
To use the Virtual Optical Library, an LPAR requires a virtual CD drive. A virtual CD drive is a virtual SCSI device, this means the LPAR requires a virtual SCSI adapter. Our example LPAR already has such an adapter:
$ lpar lsvslot lpar6SLOT REQ ADAPTER_TYPE STATE DATA0 Yes serial/server 1 remote: (any)/any connect_status=unavailable hmc=11 Yes serial/server 1 remote: (any)/any connect_status=unavailable hmc=15 No eth 1 PVID=1234 VLANS= ETHERNET0 XXXXXXXXXXXX10 No fc/client 1 remote: ms04-vio1(1)/47 c050760XXXXX0016,c050760XXXXX001720 No fc/client 1 remote: ms04-vio2(2)/25 c050760XXXXX0018,c050760XXXXX001921 No scsi/client 1 remote: ms04-vio2(1)/21$
To create a virtual CD drive (file backed optical), we need to know the vhost adapter on the virtual I/O server for the VSCSI client adapter:
$ vios vscsi ms04-vio2VIOS SLOT NAME CLIENT LUNSms04-vio2 C19 vhost0 0x00000006 0ms04-vio2 C21 vhost1 0x00000001 0$
The correct adapter is vhost1 (slot C21). Now we can create the virtual CD drive:
$ vios mkfbo ms04-vio2 vhost1vtopt0 Available$
L P A R - To o l 1 . 4 . 2 . x �6 7 © b y P o w e r C a m p u s 0 1
If desired, the virtual optical device can also be given a descriptive name:
$ vios mkfbo ms04-vio2 vhost1 lpar6_cdlpar6_cd Available$
The devices can be displayed with the command "vios lsvopt":
$ vios lsvopt ms04-vio2VTD Media Size(mb)lpar6_cd No Media n/avtopt0 No Media n/a$
We have created some media in the virtual media repository (not yet supported by the LPAR tool):
$ vios lsrep ms04-vio2Size(mb) Free(mb) Parent Pool Parent Size Parent Free 51703 45887 rootvg 571392 286720 Name File Size Optical Access aix610702-mksysb 1752 None ro aix710103-mksysb 1643 None ro aix710104-mksysb 1653 None ro blank 768 None rw$
A virtual optical medium can be inserted into a virtual CD drive with the command "vios loadopt":
$ vios loadopt ms04-vio2 lpar6_cd blank$
Which medium is currently inserted in a virtual drive can be seen as follows:
$ vios lsrep ms04-vio2Size(mb) Free(mb) Parent Pool Parent Size Parent Free 1015 915 rootvg 139776 99072 Name File Size Optical Access blank 100 lpar6_cd rw
The virtual medium is now available in the client LPAR.
To "eject" a medium again, "vios unloadopt" can be used:
$ vios unloadopt ms04-vio2 lpar6_cd$
If the capacity of the repository is exhausted, it can be easily extended:
L P A R - To o l 1 . 4 . 2 . x �6 8 © b y P o w e r C a m p u s 0 1
$ vios chrep ms04-vio2 10g$
Of course, this is only possible while there is still room in the rootvg.
If the virtual media repository is to be deleted, this is also possible with the LPAR tool:
$ vios rmrep ms04-vio2ERROR: viosRmrep(): remote HMC command returned an error (1)CMD on hmc01: viosvrcmd -m ms04 -p ms04-vio2 -c "rmrep"StdErr: HSCL2970 The IOServer command has failed because of the following reason: StdErr: DVD repository contains file backed DVD media. Use -f to removeStdErr: StdErr: rc=4$
However, the media must be deleted beforehand. Alternatively, you can also use the option "-f" to force deletion of all media when deleting the virtual media repository:
$ vios rmrep -f ms04-vio2$
2. A d m i n i s t r a t i o n o f V S C S I
On the virtual I/O server a vhost device must be created for each virtual SCSI server adapter:
$ vios vscsi ms01-vio1VIOS SLOT NAME CLIENT LUNSms01-vio1 C35 vhost0 0x04 18ms01-vio1 C80 vhost1 0x05 7ms01-vio1 C48 vhost2 0x03 0$
Slot 48 belongs to the device vhost2. There are no virtual target devices assigned to this vhost device.
Suppose that the disk hdisk15 is not yet in use on the virtual I/O server and should be assigned to LPAR lpar1, e.g. as a disk for the rootvg, then you can perform the assignment with the following command:
$ vios map ms01-vio1 vhost2 hdisk15$
A quick check shows that a LUN is now associated with the vhost2 device:
$ vios vscsi ms01-vio1VIOS SLOT NAME CLIENT LUNSms01-vio1 C35 vhost0 0x04 18ms01-vio1 C80 vhost1 0x05 7ms01-vio1 C48 vhost2 0x03 1$
L P A R - To o l 1 . 4 . 2 . x �6 9 © b y P o w e r C a m p u s 0 1
More detailed information can be obtained by specifying the vhost device as an additional argument:
$ vios vscsi ms01-vio1 vhost2VIOS VHOST DISK VTDms01-vio1 vhost2 hdisk15 vtscsi2$
The name vtscsi2 is a bit uninformative, you can not see what it is used for. Many administrators give descriptive names indicating the purpose of the device in the client LPAR, e.g. lpar1_hd0 to indicate that this device is used in the LPAR lpar1 as hdisk0. Of course you can also specify any name for the virtual target device when mapping with the LPAR tool:
$ vios map ms01-vio1 vhost2 hdisk16 lpar1_hd1$
Such a name is very helpful, especially if a lot of disks are used with VSCSI:
$ vios vscsi ms01-vio1 vhost2VIOS VHOST DISK VTDms01-vio1 vhost2 hdisk15 vtscsi2ms01-vio1 vhost2 hdisk16 lpar1_hd1$
Of course, such a mapping can also be removed again. For this, the corresponding hdisk in the client LPAR should first be unconfigured from the operating system. To delete the mapping on the virtual I/O server, use the command "vios unmap":
$ vios unmap ms01-vio1 vhost2 lpar1_hd1$
3. A d m i n i s t r a t i o n o f V F C ( N P I V )
On the virtual I/O server, a vfchost device is created for every virtual FC server adapter. We can list these devices using the command "vios npiv":
$ vios npiv ms01-vio2VIOS ADAPT NAME CLIENT OS ADAPT STATUS PORTSms01-vio2 fcs3 vfchost1 lpar2 AIX fcs1 LOGGED_IN 7ms01-vio2 fcs1 vfchost2 lpar3 AIX fcs1 LOGGED_IN 5ms01-vio2 vfchost3 lpar1 AIX fcs1 NOT_LOGGED_IN 0$
The vfchost device for spar 1 is vfchost3. The vfchost3 device is not yet assigned to a physical adapter (column 2 ADAPT). Therefore, the status is NOT_LOGGED_IN (not logged into the fabric) and the number of ports is 0.
There is no assignment to a physical port. This can easily be done with the command "vios vfcmap":
$ vios vfcmap ms01-vio2 vfchost3 fcs3$
L P A R - To o l 1 . 4 . 2 . x �7 0 © b y P o w e r C a m p u s 0 1
The status and assignment of the adapter should have changed:
$ vios npiv ms01-vio2VIOS ADAPT NAME CLIENT OS ADAPT STATUS PORTSms01-vio2 fcs3 vfchost1 lpar2 AIX fcs1 LOGGED_IN 7ms01-vio2 fcs1 vfchost2 lpar3 AIX fcs1 LOGGED_IN 5ms01-vio2 fcs3 vfchost3 lpar1 AIX fcs1 LOGGED_IN 1$
The adapter is now in status LOGGED_IN and a port is displayed. The first WWPN of the virtual FC Client Adapter is now additionally mapped to the physical port fcs3 via NPIV. This WWPN is logged into the fabric and is currently the only port in its zone.
Storage can now be zoned directly to the WWPN of the client LPAR. The disks no longer have to be laboriously mapped on the virtual I/O servers as in VSCSI.
In order to remove the mapping of the vfchost device to a physical port, the "vios vfcmap" command is executed without specifying a physical port:
$ vios vfcmap ms01-vio2 vfchost3$
L P A R - To o l 1 . 4 . 2 . x �7 1 © b y P o w e r C a m p u s 0 1
7. A d m i n i s t r a t i o n o f M a n a g e d S y s t e m s1. M u l t i p l e S h a r e d P r o c e s s o r P o o l s
Since the introduction of POWER6 servers there is the possibility to configure several shared processor pools. Thus, LPARs can be organized into shared processor pools, e.g. to have better control over the performance or to restrict software licenses to LPARs in a shared processor pool.
Which shared processor pools are available on a managed system can be listed with the command "ms lsprocpool":
$ ms lsprocpool ms09 MS PROCPOOL MAX RESERVEDms09 DefaultPool(0) - -ms09 pool1(1) 4.0 0.0ms09 pool2(2) 1.0 0.0$
(Note: several managed systems can be specified)
The ID of a processor pool is displayed in parentheses after the custom pool name. The processor pool DefaultPool with ID 0 always exists and is always active. The MAX column lists the maximum pool capacity, which is always an integer and indicates the maximum number of procuncits in the processor pool. The LPARs in a shared processor pool can not exceed this maximum capacity. The column RESERVED indicates how many procunits are reserved for LPARs in the shared processor pool (in addition to the entitled capacity of the LPARs).
The output can be defined by means of the options "-f" and/or "-F":
$ ms lsprocpool -f ms09ms09: name=DefaultPool shared_proc_pool_id=0 \"lpar_names=lpar2,lpar1,ms09-vio2,ms09-vio1,lpar3\" \"lpar_ids=4,3,2,1,7\" ms09: name=pool1 shared_proc_pool_id=1 max_pool_proc_units=4.0 curr_reserved_pool_proc_units=0.0 pend_reserved_pool_proc_units=0.0 lpar_ids=none ms09: name=pool2 shared_proc_pool_id=2 max_pool_proc_units=1.0 curr_reserved_pool_proc_units=0.0 pend_reserved_pool_proc_units=0.0 lpar_ids=none $
$ ms lsprocpool -F name:max_pool_proc_units ms09name:max_pool_proc_units
L P A R - To o l 1 . 4 . 2 . x �7 2 © b y P o w e r C a m p u s 0 1
DefaultPool:-pool1:4.0pool2:1.0$
In addition to the DefaultPool, there are 63 more shared processor pools. By default these are named SharedPoolN, where N is the ID of the pool (N = 1..63). Additional pools can not be created, the existing pools can only be reconfigured. As long as a pool does not have processor resources assigned, it will not be displayed by the LPAR tool.
We assign one processor core to the pool SharedPool6 and rename it to mypool at the same time:
$ ms chprocpool ms09 SharedPool06 new_name=mypool max_pool_proc_units=1$
Jetzt wird der Pool bei „ms lsprocpool“ auch angezeigt:
$ ms lsprocpool ms09MS PROCPOOL MAX RESERVEDms09 DefaultPool(0) - -ms09 pool1(1) 4.0 0.0ms09 pool2(2) 1.0 0.0ms09 mypool(6) 1.0 0.0$
2. A d m i n i s t e r i n g V i r t u a l E t h e r n e t S w i t c h e s
By default, every managed system always has the virtual ethernet switch ETHERNET0. Typically, LPARs are then created using virtual ethernet adapters attached to this VSwitch. The network traffic is then forwarded to a so-called trunking port on a virtual I/O server, which is part of a shared ethernet adapter (SEA). Each SEA has at least one physical Ethernet adapter by which the network traffic is then forwarded to a physical LAN.
If another shared ethernet adapter is now configured with a physically separate LAN, the separation of the networks should also be retained in the managed system. However, if one uses the default VSwitch ETHERNET0, which is already used for the previous SEA, then the externally separated networks are connected internally by the VSwitch ETHERNET0. This is not only for security-related aspects of concern, but can also lead to surprises when the same VLAN IDs are used in the physically separate networks.
The existing virtual ethernet switches on a managed system can be listed using "ms lsvswitch":
$ ms lsvswitch ms01MS VSWITCH SWITCH_MODE VLAN_IDSms01 ETHERNET0(Default) VEB 100,200,300$
For each VSwitch, the available (configured) VLANs are also listed.
L P A R - To o l 1 . 4 . 2 . x �7 3 © b y P o w e r C a m p u s 0 1
To create a new VSwitch, the command "ms addvswitch" is used, as an argument the name of the managed system and the name of the new VSwitch have to be specified:
$ ms addvswitch ms01 ETHNAS$
The new VSwitch is called ETHNAS and will of course be listed from now on:
$ ms lsvswitch ms01MS VSWITCH SWITCH_MODE VLAN_IDSms01 ETHERNET0(Default) VEB 100,200,300ms01 ETHNAS VEB none$
By default, a new VSwitch is created in VEB (Virtual Ethernet Bridge) mode. The VSwitch then works like an Ethernet bridge, LPARs in the same managed system can communicate directly via the VSwitch, without the network packets going through an SEA into the external physical network. This means that network traffic between LPARs in the same managed system using the same VSwitch and the same VLAN are not inspected by a firewall!
In the VEPA (Virtual Ethernet Port Aggregator) mode, all network traffic is forwarded to the external network. If the destination is in the same managed system as the sender, the network packets are routed back to the managed system. LPARs in the same managed system can no longer exchange network packets directly via the hypervisor. Of course, the performance is worse than in the VEB mode.
When creating virtual ethernet adapters, the option '-s' can be used to specify the desired VSwitch.
If a VSwitch is no longer needed, it can be removed again using "ms rmvswitch":
$ ms rmvswitch ms01 ETHNAS$
However, the VSwitch may not be in use, otherwise you will get the following error message:
$ ms rmvswitch ms01 ETHNASERROR: msVswitch(): remote HMC command returned an error (1)CMD on hmc01: chhwres -m ms01 -r virtualio —rsubtype vswitch -o r —vswitch ETHNASStdErr: HSCL3689 This virtual switch cannot be deleted since the following virtual networks are using this virtual switch: VLAN100-ETHNAS,. All virtual networks using a virtual switch must be deleted before the virtual switch can be deleted.$
3. M a n a g i n g P a r t i t i o n D a t a
The partition profile data can be saved on the HMC. If an LPAR has been deleted or the configuration of an LPAR has been changed, the LPAR can be restored by means of a backup.
To save the profile data of all LPARs of a managed system on an HMC, use the command "ms bkprofdata":
$ ms bkprofdata ms01 backup01
L P A R - To o l 1 . 4 . 2 . x �7 4 © b y P o w e r C a m p u s 0 1

$
As arguments, the managed system and a file name for the backup must be specified. If a relative path is specified, the backup is stored on the HMC under /var/hsc/profiles/<serial-number>, where <serial-number> is the serial number of the managed system.
Caution: The profile data of all LPARs are always backed up, the backup can not be restricted to individual LPARs!
Which backups of profile data are already available in the named default directory can be listed with "ms lsprofdata":
$ ms lsprofdata ms01backupbackup01$
On the managed system ms01 there are currently the following LPARs, which are all included in the above backup:
$ lpar -m ms01 showLPAR ID SERIAL LPAR_ENV MS HMCslpar2 4 XXXXXXX4 aixlinux ms01 hmc01,hmc02lpar3 5 XXXXXXX5 aixlinux ms01 hmc01,hmc02ms01-vio1 2 XXXXXXX2 vioserver ms01 hmc01,hmc02ms01-vio2 3 XXXXXXX3 vioserver ms01 hmc01,hmc02$
The LPAR lpar3 is not needed and is currently not active. We delete these to demonstrate a restore of the profile data:
$ lpar delete lpar3$ lpar -m ms01 showLPAR ID SERIAL LPAR_ENV MS HMCslpar2 4 XXXXXXX4 aixlinux ms01 hmc01,hmc02ms01-vio1 2 XXXXXXX2 vioserver ms01 hmc01,hmc02ms01-vio2 3 XXXXXXX3 vioserver ms01 hmc01,hmc02$
Now the created backup will be used to restore the LPAR lpar3:
$ ms rstprofdata ms01 3 backup01$
There are the following 4 restore types:
1 — full restore
2 — Merging the current configuration with the backup, in case of differences the backup will be used
3 — Merging the current configuration with the backup, in case of differences the current configuration is maintained
4 — Initialization, all partitions, partition profiles and system profiles are deleted.
L P A R - To o l 1 . 4 . 2 . x �7 5 © b y P o w e r C a m p u s 0 1

The LPAR lpar3 has been restored. In order that it will be included again in the mapping files, once the command "hmc rescan" has to be started:
$ hmc rescanms01ms02ms03ms04…$
The LPAR lpar3 has been recreated:
$ lpar -m ms01 showLPAR ID SERIAL LPAR_ENV MS HMCslpar2 4 XXXXXXX4 aixlinux ms01 hmc01,hmc02lpar3 5 XXXXXXX5 aixlinux ms01 hmc01,hmc02ms01-vio1 2 XXXXXXX2 vioserver ms01 hmc01,hmc02ms01-vio2 3 XXXXXXX3 vioserver ms01 hmc01,hmc02$
If a backup is no longer needed, it can be deleted again using "ms rmprofdata":
$ ms rmprofdata ms01 backup01$
Caution: A restore may affect all LPARs, although not shown in the example above. A backup usually always contains the profile data of several LPARs.
L P A R - To o l 1 . 4 . 2 . x �7 6 © b y P o w e r C a m p u s 0 1
8. H M CAll HMC user accounts can be managed using the LPAR tool. Each HMC user has assigned a resource role and a task role. The resource role determines which managed systems and LPARs the user can manage. Managed systems and LPARs that are not assigned to their resource role are not visible to them. This is true for the command line (and thus the LPAR tool) as well as for the GUI. The task role determines which operations the user is allowed to perform on managed systems, LPARs and HMCs.
1. U s e r A c c o u n t s
First, we'll show how to use the LPAR tool to list, create, delete, and modify user accounts.
A list of currently created users on an HMC can be obtained with the command "hmc lshmcusr":
$ hmc lshmcusr hmc01NAME DESCRIPTION TASKROLE RESOURCEROLEhscroot HMC Super User hmcsuperadmin ALL:lpar2rrd technical user hmcviewer ALL:operator Operators firstlevel ALL:kmeier Klaus Meier hmcsuperadmin ALL:…$
The resource role "ALL:" includes all managed systems and LPARs.
A new user can be created with the command "hmc mkhmcusr":
$ hmc mkhmcusr hmc01 testuserEnter the new password: XXXXXXXXRetype the new password: XXXXXXXX$ hmc lshmcusr hmc01NAME DESCRIPTION TASKROLE RESOURCEROLEhscroot HMC Super User hmcsuperadmin ALL:lpar2rrd technical user hmcviewer ALL:operator Operators firstlevel ALL:kmeier Klaus Meier hmcsuperadmin ALL:…testuser hmcviewer ALL:$
The new user is assigned the task role "hmcviewer" and the resource role "ALL:".
Of course, the attributes of a user, such as assigned task role or resource role, can also be changed easily with the LPAR tool. For this there is the command "hmc chhmcusr":
$ hmc chhmcusr hmc01 testuser taskrole=hmcsuperadmin$ hmc lshmcusr hmc01NAME DESCRIPTION TASKROLE RESOURCEROLEhscroot HMC Super User hmcsuperadmin ALL:lpar2rrd technical user hmcviewer ALL:operator Operators firstlevel ALL:kmeier Klaus Meier hmcsuperadmin ALL:…testuser hmcsuperadmin ALL:
L P A R - To o l 1 . 4 . 2 . x �7 7 © b y P o w e r C a m p u s 0 1
$
It is just as easy to change the resource role of a user:
$ hmc chhmcusr hmc01 testuser resourcerole=testonly$ hmc lshmcusr hmc01NAME DESCRIPTION TASKROLE RESOURCEROLEhscroot HMC Super User hmcsuperadmin ALL:lpar2rrd technical user hmcviewer ALL:operator Operators firstlevel ALL:kmeier Klaus Meier hmcsuperadmin ALL:…testuser hmcsuperadmin testonly$
Of course, the resource role "testonly" must exist!
If a user account is no longer needed, it can be deleted:
$ hmc rmhmcusr hmc01 testuser$
2. A d m i n i s t r a t i o n o f A u t h o r i z e d K e y s
Starting with version 1.4.2.0, authorized keys of HMC users, can be easily managed with the LPAR tool.
With the command "hmc lsauthkeys" all public keys from the file ~/.ssh/authorized_keys2 can be displayed. If no user name is specified, the own authorized_keys2 is shown:
$ hmc lsauthkeys hmc01LINEssh-rsa AAAAB3…Jvtw== user01 $
There is currently only one RSA key in the displayed authorized_keys2. The key itself is not shown completely here. The key has the comment "user01". If another key is to be added, the command "hmc addauthkeys" can be used. The key to be added must be enclosed in quotation marks because it contains spaces:
$ hmc addauthkeys hmc01 "ssh-rsa AAAAkasjkjaksjf testuser"
$
Another RSA key with the comment “testuser” has been added. A short check with "hmc lsauthkeys" shows that the key has really been entered:
$ hmc lsauthkeys hmc01LINEssh-rsa AAAAB3…Jvtw== user01ssh-rsa AAAAkasjkjaksjf testuser $
L P A R - To o l 1 . 4 . 2 . x �7 8 © b y P o w e r C a m p u s 0 1
A key can be removed just as easily! To do this, either enter the complete key (whole line) and of course again in quotation marks with the command "hmc rmauthkeys" or, alternatively, the comment of the key can also be specified:
$ hmc rmauthkeys hmc01 "ssh-rsa AAAAkasjkjaksjf testuser“$oder$ hmc rmauthkeys hmc01 testuser$
A check shows that the key is no longer present:
$ hmc lsauthkeys hmc01LINEssh-rsa AAAAB3…Jvtw== user01 $
If your own account has sufficient privileges (see task roles), the authorized_keys2 of other users can also be accessed. The user name is simply given as an additional argument after the HMC, here the user user15 has been used:
$ hmc lsauthkeys hmc01 user15LINE $
The user user15 has obviously not yet entered a public key. We add a public key:
$ hmc addauthkeys hmc01 user15 „ssh-rsa XXXXXXXXXXXXXX user15“$
The new key appears in the authorized_keys2 of user user15:
$ hmc lsauthkeys hmc01 user15LINEssh-rsa XXXXXXXXXXXXXX user15 $
However, a user can only remove a key himself! The command "hmc rmauthkeys" currently does not offer the option of specifying a user name. (This is finally because this is not supported on the HMC CLI.)
3. R e s o u r c e R o l e s
Resource roles can be used to restrict the managed systems and LPARs a user is allowed to administer. Managed systems and LPARs that are not part of the user's resource role are not visible to the user. These are displayed neither in the GUI nor on the command line.
L P A R - To o l 1 . 4 . 2 . x �7 9 © b y P o w e r C a m p u s 0 1
By default, only the built-in and unchangeable resource role "ALL:" exists. This can be used, but is not visible to many commands. Additional resource roles can be created, configured and assigned to users as desired.
A list of existing resource roles on an HMC can be obtained with the command "hmc lsresourceroles":
$ hmc lsresourceroles hmc01NAMErole01role02ms01onlytestonly$
The built-in resource role "ALL:" is not indicated as already indicated above. Only resource roles that can be changed are displayed.
If you want to see the resources inside a resource role, use the command "hmc lsresourcerole". The resource role to be displayed is simply given as an argument after the HMC name:
$ hmc lsresourcerole hmc01 testonlyRESOURCEROLE: testonlycec:ms01lpar:all:ms01lpar:testdb01lpar:testdb02$
To add a new resource role, the command "hmc mkresourcerole" can be used:
$ hmc mkresourcerole hmc01 myrole$
The resource role is empty after creation:
$ hmc lsresourcerole hmc01 myroleRESOURCEROLE: myrole$
Changing an existing resource role can be done with the command "hmc chresourcerole". There are a number of different options.
Adding a managed system:
$ hmc chresourcerole hmc01 myrole +cec:ms02$
If the name of the managed system is unique, i.e. is not at the same time also the name of an LPAR, then the short form:
L P A R - To o l 1 . 4 . 2 . x �8 0 © b y P o w e r C a m p u s 0 1
$ hmc chresourcerole hmc01 myrole +ms02$
can be used.
Adding an LPAR works similarly:
$ hmc chresourcerole hmc01 myrole +lpar:lpar1$ oder kürzer$ hmc chresourcerole hmc01 myrole +lpar1$
If all LPARs of a managed system are addressed, this is done with:
$ hmc chresourcerole hmc01 myrole +lpar:all:ms02$
Of course, by prefixing a minus sign, you can remove LPARs or managed systems from a resource role:
$ hmc chresourcerole hmc01 testrole -ms04$ hmc chresourcerole hmc01 testrole -cec:ms04$ hmc chresourcerole hmc01 testrole -lpar:lpar3$ hmc chresourcerole hmc01 testrole -lpar3$ hmc chresourcerole hmc01 testrole -lpar:all:ms03
Resource roles that are no longer needed can be easily deleted using "hmc rmresourcerole":
$ hmc rmresourcerole hmc01 testrole$
4. Ta s k R o l e s
Task roles allow you to configure which operations a user may perform on managed systems, LPARs or HMCs.
By default, some task roles are already predefined on each HMC. Additional task roles can be created. The currently existing Task Roles can be listed with the command "hmc lstaskroles":
$ hmc lstaskroles hmc01NAME PARENThmcdev Predefinedhmcsuperadmin Predefinedhmcviewer Predefined$
Each task role can be listed in detail:
$ hmc lstaskrole hmc01 hmcviewertaskrole: hmcviewerparent: Predefinedresources:
L P A R - To o l 1 . 4 . 2 . x �8 1 © b y P o w e r C a m p u s 0 1
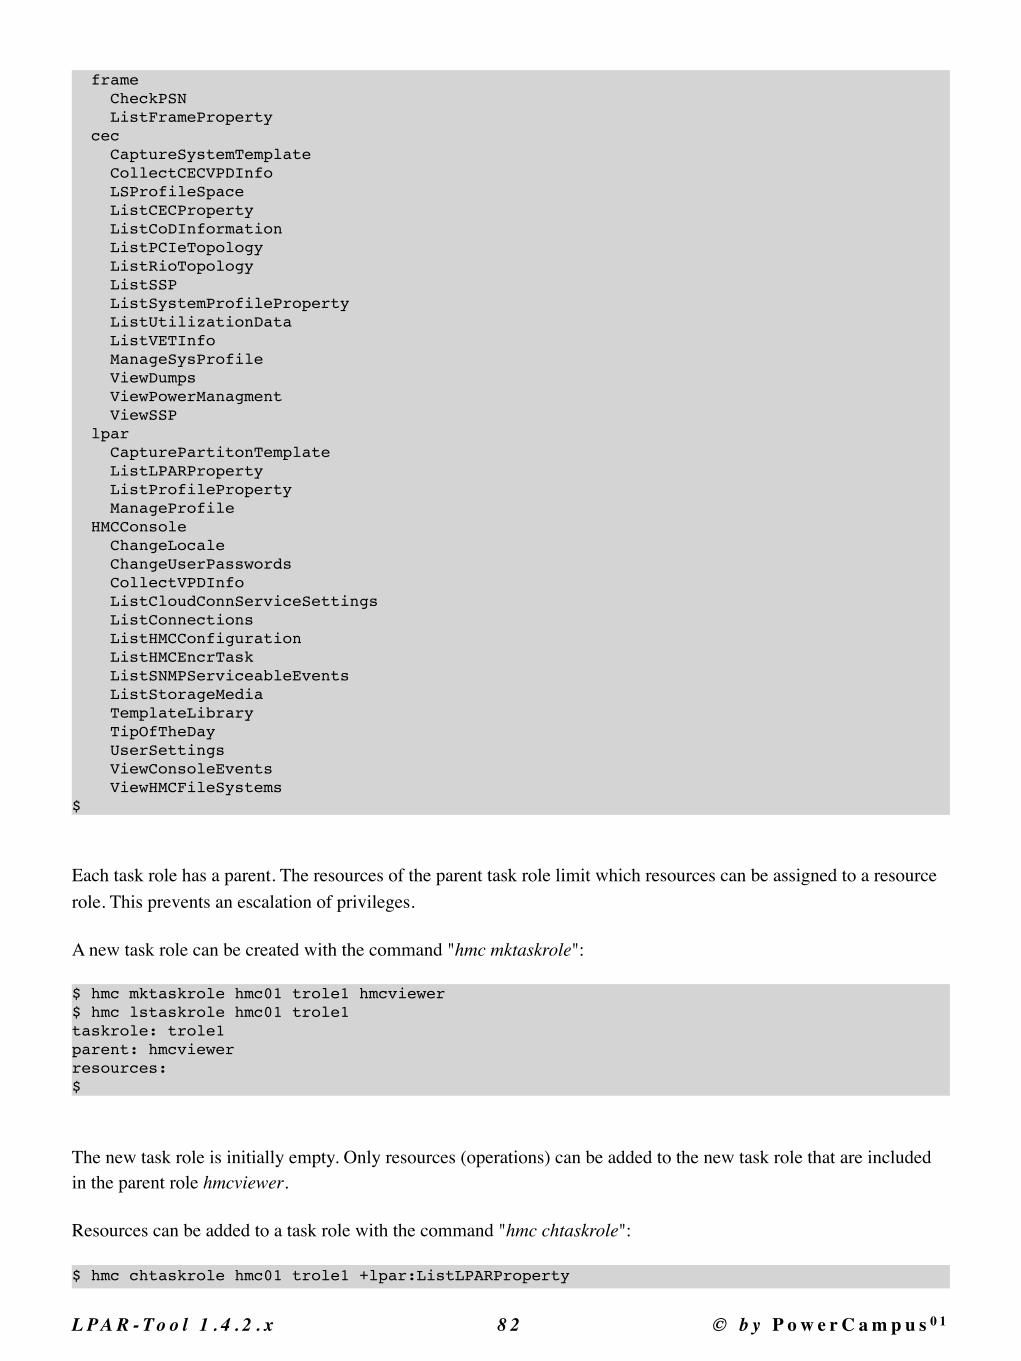
frame CheckPSN ListFrameProperty cec CaptureSystemTemplate CollectCECVPDInfo LSProfileSpace ListCECProperty ListCoDInformation ListPCIeTopology ListRioTopology ListSSP ListSystemProfileProperty ListUtilizationData ListVETInfo ManageSysProfile ViewDumps ViewPowerManagment ViewSSP lpar CapturePartitonTemplate ListLPARProperty ListProfileProperty ManageProfile HMCConsole ChangeLocale ChangeUserPasswords CollectVPDInfo ListCloudConnServiceSettings ListConnections ListHMCConfiguration ListHMCEncrTask ListSNMPServiceableEvents ListStorageMedia TemplateLibrary TipOfTheDay UserSettings ViewConsoleEvents ViewHMCFileSystems$
Each task role has a parent. The resources of the parent task role limit which resources can be assigned to a resource role. This prevents an escalation of privileges.
A new task role can be created with the command "hmc mktaskrole":
$ hmc mktaskrole hmc01 trole1 hmcviewer$ hmc lstaskrole hmc01 trole1taskrole: trole1parent: hmcviewerresources:$
The new task role is initially empty. Only resources (operations) can be added to the new task role that are included in the parent role hmcviewer.
Resources can be added to a task role with the command "hmc chtaskrole":
$ hmc chtaskrole hmc01 trole1 +lpar:ListLPARProperty
L P A R - To o l 1 . 4 . 2 . x �8 2 © b y P o w e r C a m p u s 0 1
$ hmc chtaskrole hmc01 trole1 +cec:ListCECProperty$ hmc lstaskrole hmc01 trole1taskrole: trole1parent: hmcviewerresources: cec ListCECProperty lpar ListLPARProperty$
Of course you can also remove resources from a task role:
$ hmc chtaskrole hmc01 trole1 -cec:ListCECProperty$ hmc chtaskrole hmc01 trole1 -lpar:ListLPARProperty$
Unnecessary task roles can be deleted with the help of the command "hmc rmtaskrole":
$ hmc rmtaskrole hmc01 trole1$
5. U s e r s l o g g e d i n t o t h e H M C
Users can either work on the HMC using the GUI or the CLI. Actions taken by logged in users may occasionally hang. This sometimes happens especially when working with the GUI.
Users logged in via CLI can be displayed with the command "hmc lslogon", including the so-called tasks that started them:
$ hmc lslogon hmc01USER_NAME TTY_ID LOGON_TIME ACCESS_LOCATION TASK_NAME TTY_ID START_TIME USER_NAME PIDkmeier pts/1 2018-05-29 16:17 10.11.12.13 bash pts/1 May 29 16:17:25 2018 root 20513$
Should a process hang or the logged-in user is unavailable for a longer time, the process can be terminated:
$ hmc termtask hmc01 20513$
The specified argument is the PID of the process to be stopped.
The users logged in on the GUI can also be listed with "hmc lslogon", the option "-r webui" must be specified in that case:
$ hmc lslogon -r webbi hmc01USER_NAME SESSION_ID LOGON_TIME LOGON_MODE TASK_ID TASK_NAME SESSION_ID START_TIME USER_NAME
L P A R - To o l 1 . 4 . 2 . x �8 3 © b y P o w e r C a m p u s 0 1

kmeier 3 04/26/2018 12:54:28 Enhanced+ 156 ms01 3 04/26/2018 12:59:13 kmeier$
The default for the -r option, if not specified, is "-r ssh".
You can also terminate a task on the GUI with the "hmc termtask" command. To do this, the displayed task ID must be specified as an argument:
$ hmc termtask -r webui hmc01 156$
L P A R - To o l 1 . 4 . 2 . x �8 4 © b y P o w e r C a m p u s 0 1
9. A d v a n c e d V i r t u a l i z a t i o nThis chapter describes some advanced topics in POWER virtualization, such as SR-IOV and vNICs.
1. C o n f i g u r a t i o n o f S R - I O V
This section shows how to configure SR-IOV with the LPAR tool.
In classic POWER virtualization, virtualization takes place through the interaction of the POWER hypervisor and the virtual I/O server. I/O and network accesses are forwarded to the virtual I/O server by the POWER hypervisor. The virtual I/O servers owns all the necessary hardware resources and forwards the access to the physical hardware. This concept is very flexible and has proven itself over many years. Some disadvantages of this concept are obvious:
- Every access uses a virtual I/O server, which costs resources (CPU and RAM). Network traffic in particular is very CPU-intensive, so that some quite some CPU resources are consumed by the virtual I/O server.
- The forwarding of requests to a virtual I/O server introduces additional delay, so that the latency of requests inevitably increases.
When using SR-IOV (Single Root I/O Virtualization), the virtualization takes place directly on the PCI card. A virtual I/O server is then no longer required, which saves CPU and RAM resources. In addition, the latency of requests is reduced, since the request is not forwarded to a virtual I/O server.
In the following, we show the configuration of SR-IOV using a concrete example. Our managed system ms24 is equipped with SR-IOV cards. The SR-IOV cards of a system can be displayed with the command "ms lssriov":
$ ms lssriov ms24PHYS_LOC SLOT_ID CONFIG_STATE SRIOV_STATUS ADAPTER_ID PHYS_PORTS LOGICAL_PORTSU78D3.001.XXXXXXX-P1-C4 21010020 dedicated null null null nullU78D3.001.XXXXXXX-P1-C6 2102001b dedicated null null null nullU78D3.001.XXXXXXX-P1-C11 21020013 dedicated null null null nullU78D3.001.XXXXXXX-P1-C9 21010010 dedicated null null null null$
Our system is equipped with 4 SR-IOV cards, as the above output shows. The cards are located in slots P1-C4, P1-C6, P1-C9 and P1-C11. All 4 cards are still in the configuration state (CONFIG_STATE) "dedicated". This means that the cards can be assigned to exactly one LPAR, but cannot be used for SR-IOV.
The cards must first be put into the so-called “shared mode”, which enables the use of hardware virtualization in the first place. This is done with the command "ms chsriov":
$ ms chsriov ms24 21020013 shared$ ms chsriov ms24 2102001b shared$
L P A R - To o l 1 . 4 . 2 . x �8 5 © b y P o w e r C a m p u s 0 1
The slot ID (SLOT_ID) and the argument “shared” or “dedicated” must be given as an argument. Each SR-IOV adapter is assigned a unique adapter ID (ADAPTER_ID). If you want to use a specific adapter ID for a specific adapter, the desired adapter ID can be specified as an additional argument:
$ ms chsriov ms24 21010020 shared adapter_id=4$ ms chsriov ms24 21010010 shared adapter_id=8$
We take a brief look at the state of the cards:
$ ms lssriov ms24PHYS_LOC SLOT_ID CONFIG_STATE SRIOV_STATUS ADAPTER_ID PHYS_PORTS LOGICAL_PORTSU78D3.001.XXXXXXX-P1-C4 21010020 sriov initializing unavailable unavailable unavailableU78D3.001.XXXXXXX-P1-C6 2102001b sriov running 2 4 48U78D3.001.XXXXXXX-P1-C11 21020013 sriov initializing unavailable unavailable unavailableU78D3.001.XXXXXXX-P1-C9 21010010 sriov missing unavailable unavailable unavailable$
The output shows that the initialization can take some time. After all cards have been initialized, the following output results:
$ ms lssriov ms24PHYS_LOC SLOT_ID CONFIG_STATE SRIOV_STATUS ADAPTER_ID PHYS_PORTS LOGICAL_PORTSU78D3.001.XXXXXXX-P1-C11 21020013 sriov running 1 4 48U78D3.001.XXXXXXX-P1-C6 2102001b sriov running 2 4 48U78D3.001.XXXXXXX-P1-C4 21010020 sriov running 4 2 120U78D3.001.XXXXXXX-P1-C9 21010010 sriov running 8 2 120$
The CONFIG_STATE is now "sriov" with SRIOV_STATUS "running" on all 4 cards. The adapters with ID 1 and 2 each have 4 physical ports, which support a total of 48 logical ports. Each logical port can be assigned to exactly one LPAR. The adapters with IDs 4 and 8 only have 2 physical ports, but support 120 logical ports. How many logical ports are supported, ultimately depends on the SR-IOV adapter card used.
Next, let's take a closer look at the physical ports. The "ms lssriov" command can also be used here again, this time with the "-p" option for physical ports:
$ ms lssriov -p ms24PHYS_PORT_LOC STATE LABEL TYPE ADAPTER PPORT USED MAX CONN_SPEED MTUU78D3.001.XXXXXXX-P1-C11-T1 1 - ethc 1 0 0 20 10000 9000U78D3.001.XXXXXXX-P1-C11-T2 0 - ethc 1 1 0 20 0 9000U78D3.001.XXXXXXX-P1-C11-T3 0 - eth 1 2 0 4 0 9000U78D3.001.XXXXXXX-P1-C11-T4 0 - eth 1 3 0 4 0 9000U78D3.001.XXXXXXX-P1-C6-T1 1 - ethc 2 0 0 20 10000 9000
L P A R - To o l 1 . 4 . 2 . x �8 6 © b y P o w e r C a m p u s 0 1
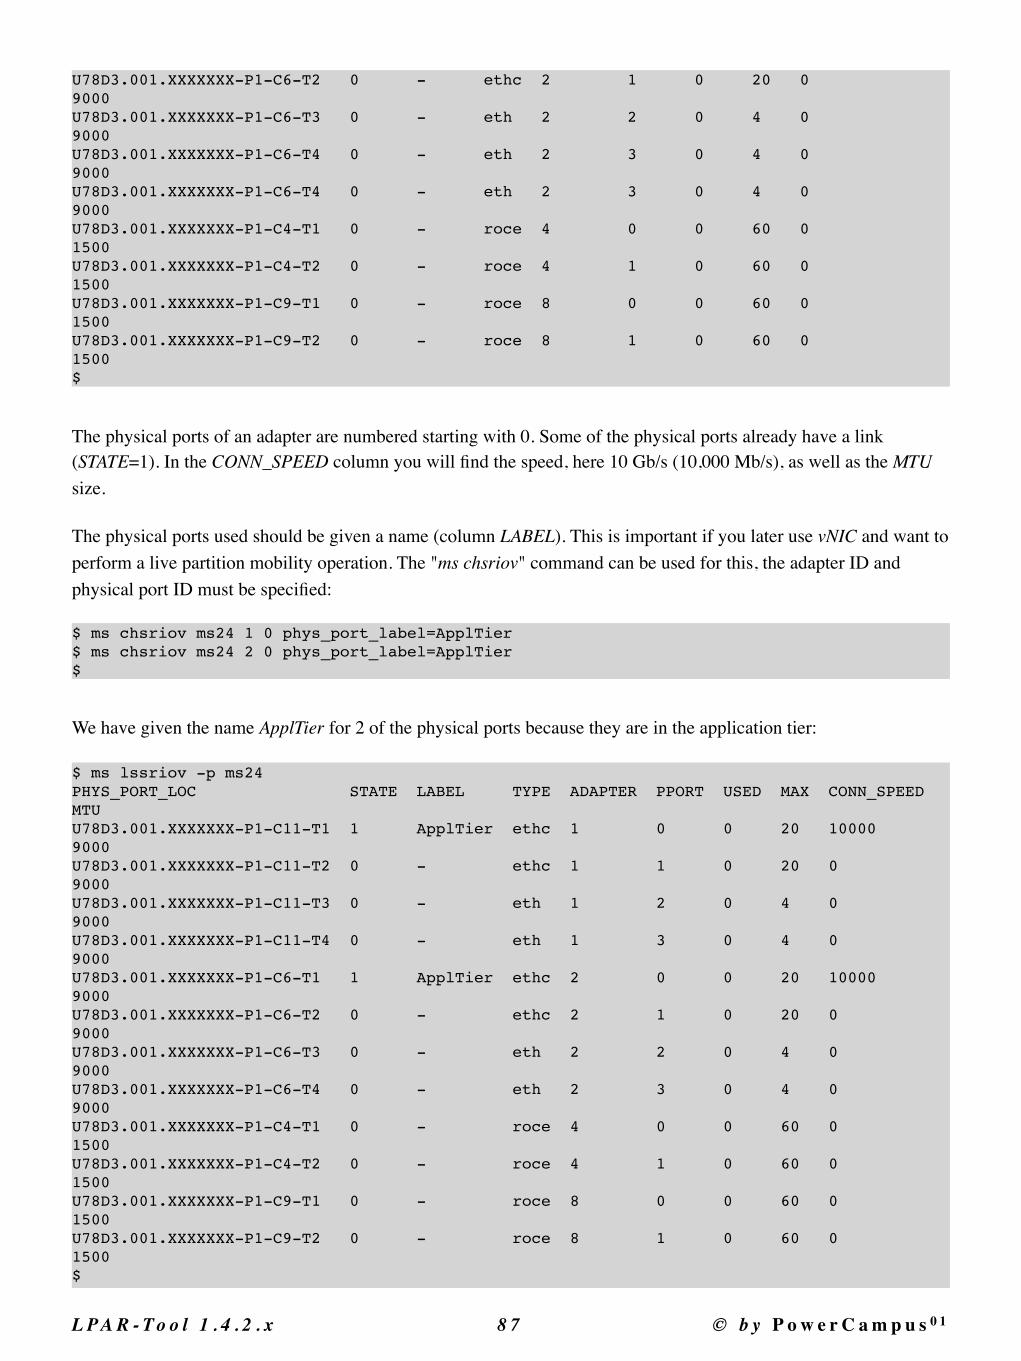
U78D3.001.XXXXXXX-P1-C6-T2 0 - ethc 2 1 0 20 0 9000U78D3.001.XXXXXXX-P1-C6-T3 0 - eth 2 2 0 4 0 9000U78D3.001.XXXXXXX-P1-C6-T4 0 - eth 2 3 0 4 0 9000U78D3.001.XXXXXXX-P1-C6-T4 0 - eth 2 3 0 4 0 9000U78D3.001.XXXXXXX-P1-C4-T1 0 - roce 4 0 0 60 0 1500U78D3.001.XXXXXXX-P1-C4-T2 0 - roce 4 1 0 60 0 1500U78D3.001.XXXXXXX-P1-C9-T1 0 - roce 8 0 0 60 0 1500U78D3.001.XXXXXXX-P1-C9-T2 0 - roce 8 1 0 60 0 1500$
The physical ports of an adapter are numbered starting with 0. Some of the physical ports already have a link (STATE=1). In the CONN_SPEED column you will find the speed, here 10 Gb/s (10,000 Mb/s), as well as the MTU size.
The physical ports used should be given a name (column LABEL). This is important if you later use vNIC and want to perform a live partition mobility operation. The "ms chsriov" command can be used for this, the adapter ID and physical port ID must be specified:
$ ms chsriov ms24 1 0 phys_port_label=ApplTier$ ms chsriov ms24 2 0 phys_port_label=ApplTier$
We have given the name ApplTier for 2 of the physical ports because they are in the application tier:
$ ms lssriov -p ms24PHYS_PORT_LOC STATE LABEL TYPE ADAPTER PPORT USED MAX CONN_SPEED MTUU78D3.001.XXXXXXX-P1-C11-T1 1 ApplTier ethc 1 0 0 20 10000 9000U78D3.001.XXXXXXX-P1-C11-T2 0 - ethc 1 1 0 20 0 9000U78D3.001.XXXXXXX-P1-C11-T3 0 - eth 1 2 0 4 0 9000U78D3.001.XXXXXXX-P1-C11-T4 0 - eth 1 3 0 4 0 9000U78D3.001.XXXXXXX-P1-C6-T1 1 ApplTier ethc 2 0 0 20 10000 9000U78D3.001.XXXXXXX-P1-C6-T2 0 - ethc 2 1 0 20 0 9000U78D3.001.XXXXXXX-P1-C6-T3 0 - eth 2 2 0 4 0 9000U78D3.001.XXXXXXX-P1-C6-T4 0 - eth 2 3 0 4 0 9000U78D3.001.XXXXXXX-P1-C4-T1 0 - roce 4 0 0 60 0 1500U78D3.001.XXXXXXX-P1-C4-T2 0 - roce 4 1 0 60 0 1500U78D3.001.XXXXXXX-P1-C9-T1 0 - roce 8 0 0 60 0 1500U78D3.001.XXXXXXX-P1-C9-T2 0 - roce 8 1 0 60 0 1500$
L P A R - To o l 1 . 4 . 2 . x �8 7 © b y P o w e r C a m p u s 0 1
There are a number of other attributes that can be changed using "ms chsriov". These can be found either in the IBM documentation or in the command's online help:
$ ms help chsriovUSAGE: ms [-h <hmc>] chsriov [-v] <ms> {<slot_id> {dedicated|shared} | <adapter_id> <phys_port_id> <attributes>} [<attributes> ...] DESCRIPTION: Switches an SR-IOV adapter in a managed system either to dedicated or shared mode,or sets attributes for an SR-IOV physical port. Attributes when switching an adapter to shared mode: adapter_id - 1-32, default: assign next available adapter ID Attributes for an SR-IOV physical port: conn_speed - ethernet speed auto : autonegotation 10 : 10 Mbps 100 : 100 Mbps 1000 : 1 Gbps 10000 : 10 Gbps 40000 : 40 Gbps 100000 : 100 Gbps max_recv_packet_size - MTU 1500 - 1500 byts 9000 - 9000 bytes (jumbo frames) phys_port_label - label for the physical port 1-16 characters none - to clear the label phys_port_sub_label - sublabel for the physical port 1-8 characters none - to clear the sublabel recv_flow_control 0 - disable 1 - enable trans_flow_control 0 - disable 1 - enable veb_mode 0 - disable virtual ethernet bridge mode 1 - enable virtual ethernet bridge mode vepa_mode 0 - disable virtual ethernet port aggregator mode 1 - enable virtual ethernet port aggregator mode (see the IBM documentation for additional attributes) Note: An SR-IOV adapter can only be changed to shared mode, if it is not assignedto an LPAR! EXAMPLES: Switch adapter 21010010 of managed system ms01 to shared mode: ms chsriov ms01 21010010 shared Switch adapter 21010010 of managed system ms01 back to dedicated mode: ms chsriov ms01 21010010 dedicated Switch adapter 21010010 of managed system ms01 to shared mode usingadapter ID 3: ms chsriov ms01 21010010 shared adapter_id=3
L P A R - To o l 1 . 4 . 2 . x �8 8 © b y P o w e r C a m p u s 0 1
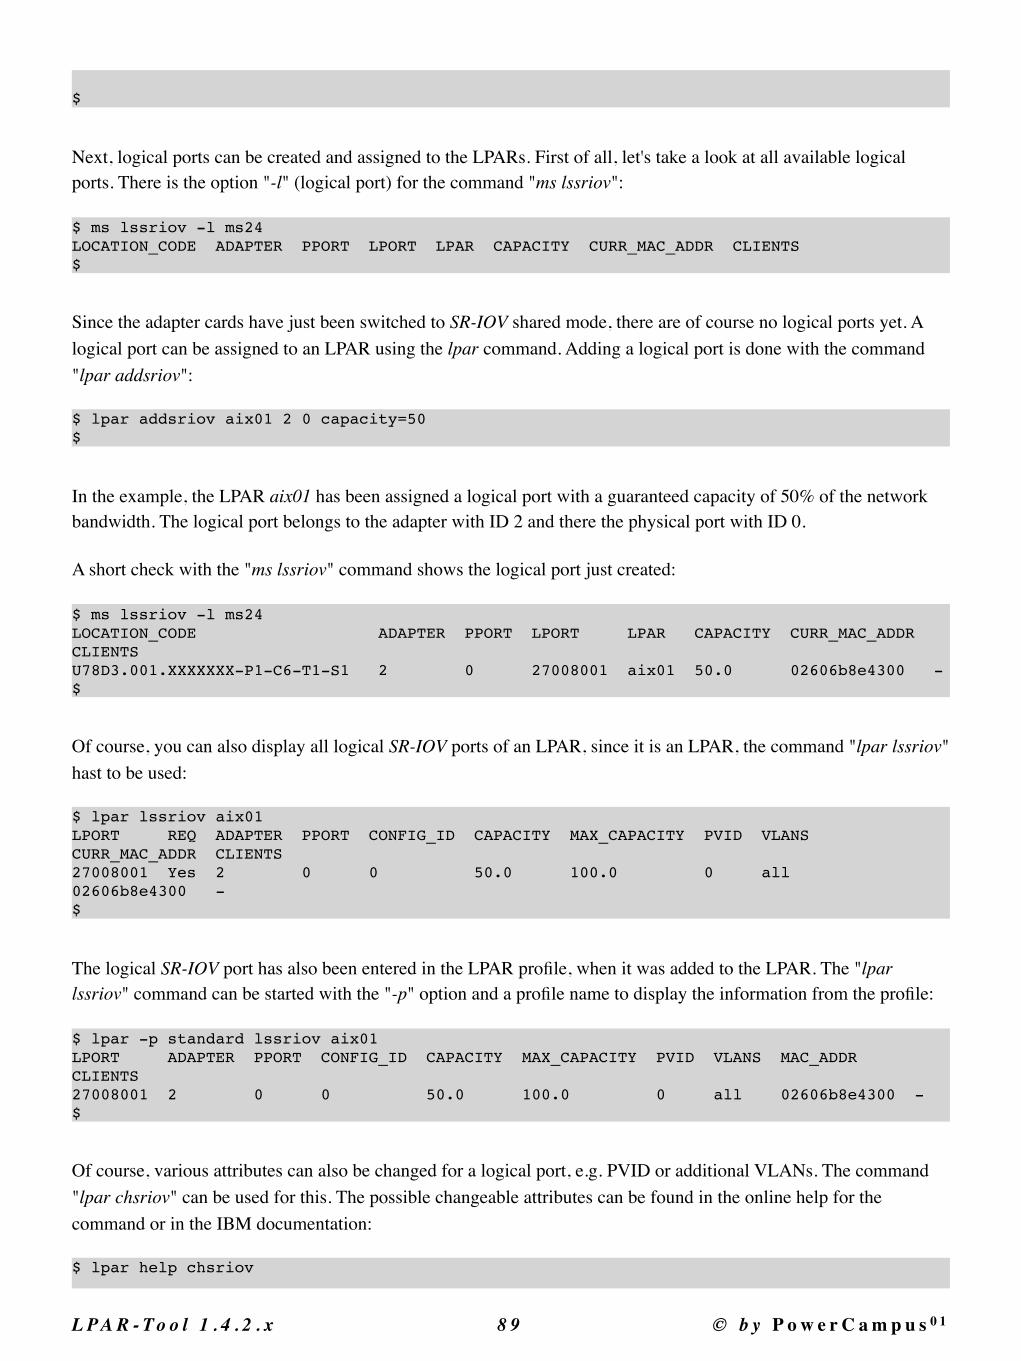
$
Next, logical ports can be created and assigned to the LPARs. First of all, let's take a look at all available logical ports. There is the option "-l" (logical port) for the command "ms lssriov":
$ ms lssriov -l ms24LOCATION_CODE ADAPTER PPORT LPORT LPAR CAPACITY CURR_MAC_ADDR CLIENTS$
Since the adapter cards have just been switched to SR-IOV shared mode, there are of course no logical ports yet. A logical port can be assigned to an LPAR using the lpar command. Adding a logical port is done with the command "lpar addsriov":
$ lpar addsriov aix01 2 0 capacity=50$
In the example, the LPAR aix01 has been assigned a logical port with a guaranteed capacity of 50% of the network bandwidth. The logical port belongs to the adapter with ID 2 and there the physical port with ID 0.
A short check with the "ms lssriov" command shows the logical port just created:
$ ms lssriov -l ms24LOCATION_CODE ADAPTER PPORT LPORT LPAR CAPACITY CURR_MAC_ADDR CLIENTSU78D3.001.XXXXXXX-P1-C6-T1-S1 2 0 27008001 aix01 50.0 02606b8e4300 -$
Of course, you can also display all logical SR-IOV ports of an LPAR, since it is an LPAR, the command "lpar lssriov" hast to be used:
$ lpar lssriov aix01LPORT REQ ADAPTER PPORT CONFIG_ID CAPACITY MAX_CAPACITY PVID VLANS CURR_MAC_ADDR CLIENTS27008001 Yes 2 0 0 50.0 100.0 0 all 02606b8e4300 -$
The logical SR-IOV port has also been entered in the LPAR profile, when it was added to the LPAR. The "lpar lssriov" command can be started with the "-p" option and a profile name to display the information from the profile:
$ lpar -p standard lssriov aix01LPORT ADAPTER PPORT CONFIG_ID CAPACITY MAX_CAPACITY PVID VLANS MAC_ADDR CLIENTS27008001 2 0 0 50.0 100.0 0 all 02606b8e4300 -$
Of course, various attributes can also be changed for a logical port, e.g. PVID or additional VLANs. The command "lpar chsriov" can be used for this. The possible changeable attributes can be found in the online help for the command or in the IBM documentation:
$ lpar help chsriov
L P A R - To o l 1 . 4 . 2 . x �8 9 © b y P o w e r C a m p u s 0 1
USAGE: lpar [-h <hmc>] [-m <ms>] [-p <profile>] chsriov [-d] [-f] [-l <detail_level>] [-w <wait_time>] [-v] <lpar> <config_id>|<logical_port_id> <attributes> ... DESCRIPTION: Changes attributes of an SR-IOV logical port. allowed_os_mac_addrs - allowed MAC addresses allowed_priorities - allowed QoS priorities none : no priorities allowed (default) 0-7: comma-separated list of integers all : all priorities are allowed allowed_vlan_ids - allowed VLANs none : no VLAN IDs allowed VLAN_IDs: comma-separated list of VLAN IDs all : all VLAN IDs are allowed (default) diag_mode - diagnostics mode 0 : disable (default) 1 : enable port_vlan_id - VLAN-ID for untagged packets or 0 to disable VLAN tagging pvid_priority - priority of the PVID EXAMPLES: Set the PVID of logical port with config_id 1 of LPAR aix01 to 1200: lpar chsriov aix01 1 port_vlan_id=1200 Set the PVID and PVID priority of logical port 2700c006 of LPAR aix01 dynamically only: lpar chsriov -d aix01 2700c006 port_vlan_id=1200 pvid_priority=0 Set the PVID priority of logical port with config_id 1 in the profile 'standard'of LPAR aix01 to 2: lpar -p standard chsriov aix01 1 pvid_priority=2 $
2. C o n f i g u r a t i o n o f v N I C
to be done.
L P A R - To o l 1 . 4 . 2 . x �9 0 © b y P o w e r C a m p u s 0 1
10. T r o u b l e s h o o t i n gIf error messages occur while using the LPAR tool, then of course the question arises as to the cause of the error. In general, errors can be assigned to one of the following classes:
A command was not used correctly: e.g. wrong spelling, wrong syntax, wrong option, missing arguments or similar. In this case, an error message should be output. The command should be corrected and then restarted.
A command was used correctly, but the executing HMC returns an error.
The LPAR tool does not work properly and returns an error message.
All calls to the LPAR tool are logged in the file ~/lpar.log, in case of errors also the error message is recorded in the log file.
1. I n c o r r e c t U s a g e o f C o m m a n d s
If a command is not used correctly, the LPAR tool issues an error message together with a usage message.
$ lpar lsvslotERROR: argument missing Usage: lpar [option …] keyword [arg …] lpar -V…$
The LPAR tool issues an error message:
„ERROR: argument missing“.
Often an LPAR name or managed system name is misspelled:
$ lpar addprocs testlpar7 1ERROR: LPAR ‚testlpar‘ not found$
2. H M C r e t u r n s E r r o r M e s s a g e
Even if commands are used correctly, errors can occur.
$ ms lssriov ms03ERROR: remote HMC command returned an error (1)CMD on hmc01: lshwres -m ms03 -r sriov —rsubtype adapterStdErr: HSCL1237 The managed system does not support SR-IOV.$
The ms command was used correctly, but the specified managed system ms03 does not support SRIOV. The LPAR tool gives the error message
L P A R - To o l 1 . 4 . 2 . x �9 1 © b y P o w e r C a m p u s 0 1
„ERROR: remote HMC command returned an error (1)“
On the associated HMC (hmc01) the command
lshwres -m ms03 -r sriov —rsubtype adapter
was executed with the correct syntax. The LPAR tool outputs the error message of the HMC command:
„StdErr: HSCL1237 The managed system does not support SR-IOV.“
There is no error in the LPAR tool, the specified managed system does not support SRIOV.
Here is an example of an error in the LPAR tool (this is however already fixed in the current version):
$ lpar lsvslot lpar7ERROR: remote HMC command returned an error(1)CMD on hmc02: lshwres -m ms11 -r virtualio —rsubtype vnic —level lpar —filter lpar_names=lpar7StdErr: The command entered is either missing a required parameter or a parameter value is invalid. The parameters that are missing or have an invalid value are —rsubtype. Please check your entry and retry the command.$
Again, the command was used correctly (command lpar). However, in this case the remote command on the HMC is faulty and thus the virtual slots of the LPAR lpar7 can not be displayed. The problem in this case is an older HMC version that does not support vNICs and therefore does not know the value "vnic" for the option "-rsubtype". The problem was resolved by installing a check.
So if the LPAR tool generates an HMC command that is not correct (invalid option or argument), then there is probably an error in the program code of the LPAR tool. The problem can then be reported to [email protected]. The used HMC version as well as the output of the command including the error message should then be sent.
3. E r r o r s o f t h e L P A R t o o l
No software is perfect and error-free. We have subjected the LPAR tool to intensive testing, but it can not be ruled out that there are errors in the LPAR tool. Here is a constructed error to demonstrate how such an unknown error could show up:
$ lpar lsrefcode lpar5ERROR: tableGetRow(): index out of range$
To avoid crashes of the LPAR-Tool commands, most of the functions used check the arguments with which they were called. If a faulty argument is detected, the command aborts with an error message and an indication of the function that detected the error:
„ERROR: tableGetRow(): index out of range“
L P A R - To o l 1 . 4 . 2 . x �9 2 © b y P o w e r C a m p u s 0 1

Here, a function called tableGetRow() was called, when checking its arguments, it found the given index was out of range. Error messages that include a function name usually indicate an error in one of the commands of the LPAR tool. Also in this case, the error should be reported to [email protected] along with the screen output.
L P A R - To o l 1 . 4 . 2 . x �9 3 © b y P o w e r C a m p u s 0 1
A. C o n f i g u r a t i o n p a r a m e t e r sThe /opt/pwrcmps/etc/lpar.cfg and ~/.lpar.cfg files can be used to configure the LPAR tool. The system-wide configuration file (if available) is read in first. The user-specific configuration file (if available) is read in afterwards. If a parameter is set in both files, the last user-specific configuration applies.
ConfigDirectory:
This parameter determines where the hmc.list, ms.list, and lpar.list files are created.
Default: the user's home directory.
LicenseFile:
The parameter determines where the license file is located.
Default: /opt/pwrcmps/etc/lpar.lic and ~/.lpar.lic.
ControlPersist:
Specifies how long an inactive SSH master connection is kept open.
Default: 5 minutes.
ServerAliveInterval:
Time interval within which an alive message is expected from the server.
Default: 10 seconds.
ServerAliveCountMax:
Maximum number of outstanding alive messages from the server.
Default: 2.
L P A R - To o l 1 . 4 . 2 . x �9 4 © b y P o w e r C a m p u s 0 1