Embed Size (px)
Citation preview
en
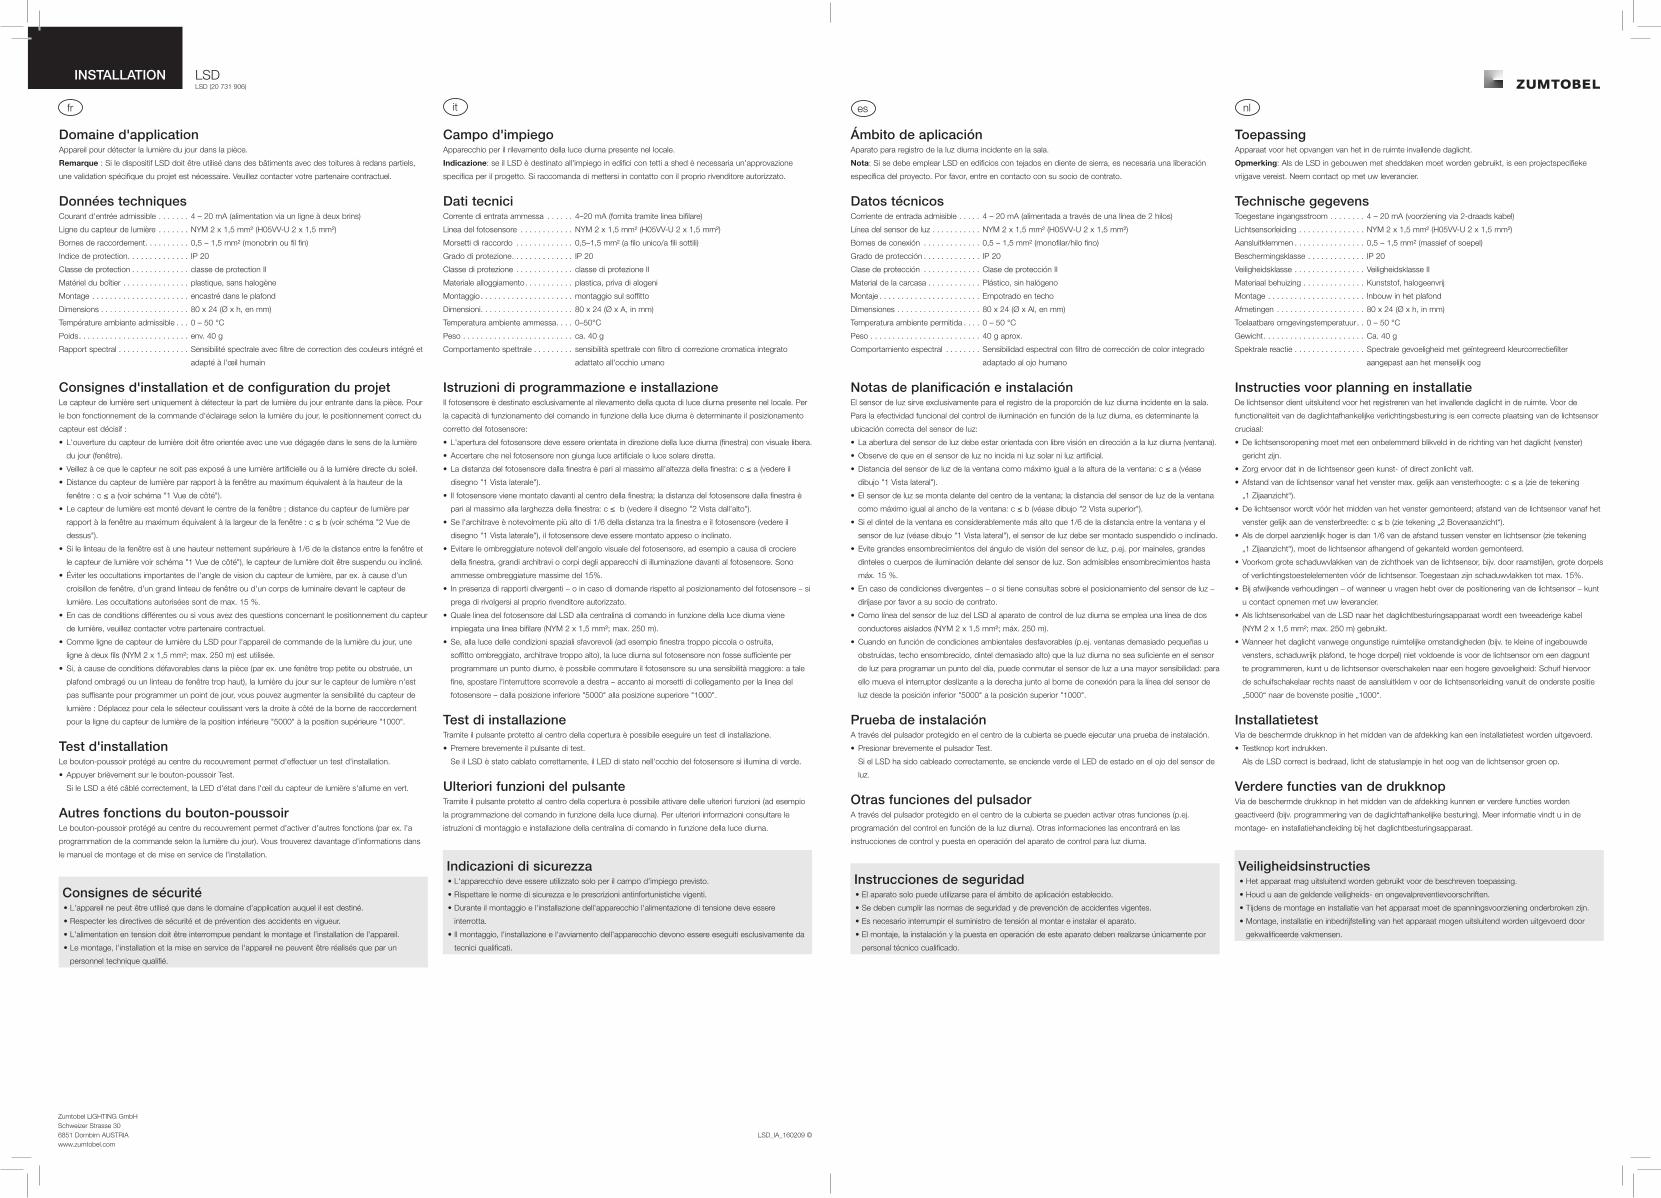
Application areaDevice for measuring the occurring daylight in the room.
Note: If the LSD should be used in buildings with saw-tooth roofs, a project-specific approval is required.
Please contact your sales partner.
Technical dataPermissible input current . . . . . . . . . . 4 – 20 mA (supplied via 2-wire line)
Light sensor line . . . . . . . . . . . . . . . . NYM 2 x 1.5 mm² (H05VV-U 2 x 1.5 mm²)
Terminals . . . . . . . . . . . . . . . . . . . . . . 0.5 – 1.5 mm² (solid or fine-stranded)
Degree of protection . . . . . . . . . . . . . IP20
Protection class. . . . . . . . . . . . . . . . . protection class II
Housing material . . . . . . . . . . . . . . . . plastic, halogen-free
Installation . . . . . . . . . . . . . . . . . . . . . Ceiling recess
Dimensions . . . . . . . . . . . . . . . . . . . . 80 x 24 (Ø x H, in mm)
Permissible ambient temperature . . . 0 – 50°C
Weight. . . . . . . . . . . . . . . . . . . . . . . . approx. 40 g
Spectral behaviour. . . . . . . . . . . . . . . spectral sensitivity adapted to the human eye with integrated colour
correction filter
System design and installation notesThe light sensor has been exclusively designed to measure the occurring daylight in the room. It is
essential that the light sensor is correctly positioned in order for daylight linking to function properly:
• The light sensor opening must face the source of daylight (window).
• Ensure that no artificial light or direct sunlight reaches the light sensor.
• Ensure the distance between light sensor and window does not exceed the window height: c ≤ a (see
drawing "1 Side view").
• Install the light sensor in front of the centre of the window; ensure the distance between light sensor and
window does not exceed the window width: c ≤ b (see drawing "2 View from above").
• If the window lintel height clearly exceeds 1/6 of the distance between window and light sensor (see
drawing "1 Side view"), the light sensor must be installed suspended or inclined.
• Avoid large-scale shading of the light sensor's angle of view, e.g. by window cross bars, high window
lintels or luminaire housings located in front of the light sensor. The maximum permissible shading is
15%.
• For special situations and dimensions, or if you have questions about positioning the light sensor, please
contact your sales partner.
• A two-core line (NYM 2 x 1.5 mm²; max. 250 m) is used as light sensor line from the LSD to the daylight
control device.
• If the daylight reaching the light sensor is insufficient for programming a day point due to unfavourable
conditions in the room (e.g. windows that are too small or obstructed, shadowed ceiling, window lintel
that is too high, etc.), the light sensor can be switched to a higher level of sensitivity if necessary: to do
this, move the sliding switch, located on the right next to the terminal for the light sensor line, from the
bottom position "5000" to the top position "1000".
Installation testAn installation test can be performed using the protected push button in the middle of the cover.
• Briefly press the test key.
If the LSD has been wired correctly, the status LED in light sensor's eye lights green.
Other functions of the push buttonOther functions (e.g. programming the daylight linking) can be initiated using the protected push button in
the middle of the cover. Further information can be found in the assembly and installation instructions of
the daylight control device.
Safety instructions• The device may only be used for the application area specified.
• Relevant health and safety regulations must be observed.
• When assembling and installing the device, the voltage supply must be disconnected.
• Only qualified personnel may assemble, install and commission the device.
INSTALLATION LSDLSD (20 731 906)
Zumtobel LIGHTING GmbHSchweizer Strasse 306851 Dornbirn AUSTRIAwww.zumtobel.com
LSD_IA_160209 ©
EinsatzbereichGerät zur Erfassung des in den Raum einfallenden Tageslichts.
Hinweis: Soll der LSD in Gebäuden mit Sheddächern verwendet werden, ist eine projektspezifische
Freigabe erforderlich. Setzen Sie sich bitte mit Ihrem Vertragspartner in Verbindung.
Technische DatenZulässiger Eingangsstrom . . . . . . . . . 4 – 20 mA (über 2-Draht-Leitung versorgt)
Lichtsensorleitung . . . . . . . . . . . . . . . NYM 2 x 1,5 mm² (H05VV-U 2 x 1,5 mm²)
Anschlussklemmen . . . . . . . . . . . . . . 0,5 – 1,5 mm² (eindrähtig/feindrähtig)
Schutzart. . . . . . . . . . . . . . . . . . . . . . IP 20
Schutzklasse . . . . . . . . . . . . . . . . . . . Schutzklasse II
Gehäusematerial . . . . . . . . . . . . . . . . Kunststoff, halogenfrei
Montage . . . . . . . . . . . . . . . . . . . . . . Deckeneinbau
Abmessungen . . . . . . . . . . . . . . . . . . 80 x 24 (Ø x H, in mm)
Zulässige Umgebungstemperatur . . . 0 – 50 °C
Gewicht. . . . . . . . . . . . . . . . . . . . . . . ca. 40 g
Spektralverhalten. . . . . . . . . . . . . . . . spektrale Empfindlichkeit mit integriertem Farbkorrekturfilter dem
menschlichen Auge angepasst
Planungs- und InstallationshinweiseDer Lichtsensor dient ausschließlich der Erfassung des einfallenden Tageslichtanteils im Raum. Für die
Funktionstüchtigkeit der tageslichtabhängigen Beleuchtungssteuerung ist die korrekte Platzierung des
Lichtsensors maßgeblich:
• Die Lichtsensor-Öffnung muss mit freiem Blick in Richtung Tageslicht (Fenster) ausgerichtet sein.
• Achten Sie darauf, dass in den Lichtsensor weder Kunst- noch direktes Sonnenlicht einfällt.
• Abstand des Lichtsensors vom Fenster höchstens gleich Fensterhöhe: c ≤ a (siehe Zeichnung
„1 Seitenansicht“).
• Der Lichtsensor wird vor der Fenstermitte montiert; Abstand des Lichtsensors vom Fenster höchstens
gleich Fensterbreite: c ≤ b (siehe Zeichnung „2 Ansicht von oben“).
• Ist der Fenstersturz wesentlich höher als 1/6 des Abstands zwischen Fenster und Lichtsensor (siehe
Zeichnung „1 Seitenansicht“), muss der Lichtsensor abgehängt oder geneigt montiert werden.
• Vermeiden Sie größere Abschattungen des Lichtsensor-Blickwinkels, z. B. durch Fensterkreuze, große
Fensterstürze oder Leuchtenkörper vor dem Lichtsensor. Zulässig sind Abschattungen bis max. 15 %.
• Bei abweichenden Verhältnissen – oder wenn Sie Fragen zur Positionierung des Lichtsensors haben –
wenden Sie sich bitte an Ihren Vertragspartner.
• Als Lichtsensor-Leitung vom LSD zum Tageslicht-Steuergerät wird eine zweiadrige Leitung
(NYM 2 x 1,5 mm²; max. 250 m) verwendet.
• Wenn aufgrund ungünstiger Raumverhältnisse (z. B. zu kleine oder verbaute Fenster, verschattete
Decke, zu hohe Fensterstürze) das Tageslicht am Lichtsensor nicht ausreicht, um einen Tag-
Systempunkt zu programmieren, können Sie den Lichtsensor auf eine höhere Empfindlichkeit
umschalten: Verschieben Sie dazu den Schiebeschalter rechts neben der Anschlussklemme für die
Lichtsensor-Leitung von der unteren Position „5000“ in die obere Stellung „1000“.
InstallationstestÜber den geschützten Drucktaster in der Mitte der Abdeckung kann ein Installationstest durchgeführt
werden.
• Testtaster kurz drücken.
Wurde der LSD korrekt verdrahtet, leuchtet die Status-LED im Lichtsensor-Auge grün.
Weitere Funktionen des DrucktastersÜber den geschützten Drucktaster in der Mitte der Abdeckung können weitere Funktionen ausgelöst
werden (z. B. Programmierung der tageslichtabhängige Steuerung). Weitere Informationen finden Sie in der
Montage- und Installationsanleitung des Tageslicht-Steuergeräts.
Sicherheitshinweise• Das Gerät darf nur für den festgelegten Einsatzbereich verwendet werden.
• Die geltenden Sicherheits- und Unfallverhütungsvorschriften sind zu beachten.
• Bei Montage und Installation des Geräts muss die Spannungsversorgung unterbrochen sein.
• Montage, Installation und Inbetriebnahme des Geräts darf nur durch qualifiziertes Fachpersonal
erfolgen.
de
0,5 – 1,5 mm2
5 – 6 mm
eindrähtig/feindrähtig solid/�ne-strandedmonobrin/�l �na �lo unico/a �li sottilimono�lar/hilo �nomassief/soepel
S1 S2
S1
S2Sensor in
Controldevice
24
80
30°
a
≤ 1/6 c
40°
10°c
60°
b
cc ≤ a
c ≤ b
a = Fensterhöhe/Window height/Hauteur de la fenêtre/
Altezza finestra/Altura de ventana/Vensterhoogte
b = Fensterbreite/Window width/Largeur de la fenêtre/
Larghezza finestra/Ancho de ventana/Vensterbreedte
c = Abstand zwischen Fenster und Lichtsensor/Distance
between window and light sensor/Distance entre la
fenêtre et le capteur de lumière/Distanza tra finestra e
fotosensore/ Distancia entre ventana y sensor de luz/
Afstand tussen venster en lichtsensor
1 Seitenansicht/Side view/Vue de côté/Vista
laterale/Vista lateral/Zijaanzicht
2 Ansicht von oben/View from above/Vue de dessus/
Vista dall‘alto/Vista superior/ Bovenaanzicht
nl
ToepassingApparaat voor het opvangen van het in de ruimte invallende daglicht.
Opmerking: Als de LSD in gebouwen met sheddaken moet worden gebruikt, is een projectspecifieke
vrijgave vereist. Neem contact op met uw leverancier.
Technische gegevensToegestane ingangsstroom . . . . . . . . 4 – 20 mA (voorziening via 2-draads kabel)
Lichtsensorleiding . . . . . . . . . . . . . . . NYM 2 x 1,5 mm² (H05VV-U 2 x 1,5 mm²)
Aansluitklemmen . . . . . . . . . . . . . . . . 0,5 – 1,5 mm² (massief of soepel)
Beschermingsklasse . . . . . . . . . . . . . IP 20
Veiligheidsklasse . . . . . . . . . . . . . . . . Veiligheidsklasse II
Materiaal behuizing . . . . . . . . . . . . . . Kunststof, halogeenvrij
Montage . . . . . . . . . . . . . . . . . . . . . . Inbouw in het plafond
Afmetingen . . . . . . . . . . . . . . . . . . . . 80 x 24 (Ø x h, in mm)
Toelaatbare omgevingstemperatuur. . 0 – 50 °C
Gewicht. . . . . . . . . . . . . . . . . . . . . . . Ca. 40 g
Spektrale reactie . . . . . . . . . . . . . . . . Spectrale gevoeligheid met geïntegreerd kleurcorrectiefilter
aangepast aan het menselijk oog
Instructies voor planning en installatieDe lichtsensor dient uitsluitend voor het registreren van het invallende daglicht in de ruimte. Voor de
functionaliteit van de daglichtafhankelijke verlichtingsbesturing is een correcte plaatsing van de lichtsensor
cruciaal:
• De lichtsensoropening moet met een onbelemmerd blikveld in de richting van het daglicht (venster)
gericht zijn.
• Zorg ervoor dat in de lichtsensor geen kunst- of direct zonlicht valt.
• Afstand van de lichtsensor vanaf het venster max. gelijk aan vensterhoogte: c ≤ a (zie de tekening
„1 Zijaanzicht“).
• De lichtsensor wordt vóór het midden van het venster gemonteerd; afstand van de lichtsensor vanaf het
venster gelijk aan de vensterbreedte: c ≤ b (zie tekening „2 Bovenaanzicht“).
• Als de dorpel aanzienlijk hoger is dan 1/6 van de afstand tussen venster en lichtsensor (zie tekening
„1 Zijaanzicht“), moet de lichtsensor afhangend of gekanteld worden gemonteerd.
• Voorkom grote schaduwvlakken van de zichthoek van de lichtsensor, bijv. door raamstijlen, grote dorpels
of verlichtingstoestelelementen vóór de lichtsensor. Toegestaan zijn schaduwvlakken tot max. 15%.
• Bij afwijkende verhoudingen – of wanneer u vragen hebt over de positionering van de lichtsensor – kunt
u contact opnemen met uw leverancier.
• Als lichtsensorkabel van de LSD naar het daglichtbesturingsapparaat wordt een tweeaderige kabel
(NYM 2 x 1,5 mm²; max. 250 m) gebruikt.
• Wanneer het daglicht vanwege ongunstige ruimtelijke omstandigheden (bijv. te kleine of ingebouwde
vensters, schaduwrijk plafond, te hoge dorpel) niet voldoende is voor de lichtsensor om een dagpunt
te programmeren, kunt u de lichtsensor overschakelen naar een hogere gevoeligheid: Schuif hiervoor
de schuifschakelaar rechts naast de aansluitklem v oor de lichtsensorleiding vanuit de onderste positie
„5000“ naar de bovenste positie „1000“.
InstallatietestVia de beschermde drukknop in het midden van de afdekking kan een installatietest worden uitgevoerd.
• Testknop kort indrukken.
Als de LSD correct is bedraad, licht de statuslampje in het oog van de lichtsensor groen op.
Verdere functies van de drukknopVia de beschermde drukknop in het midden van de afdekking kunnen er verdere functies worden
geactiveerd (bijv. programmering van de daglichtafhankelijke besturing). Meer informatie vindt u in de
montage- en installatiehandleiding bij het daglichtbesturingsapparaat.
Veiligheidsinstructies• Het apparaat mag uitsluitend worden gebruikt voor de beschreven toepassing.
• Houd u aan de geldende veiligheids- en ongevalpreventievoorschriften.
• Tijdens de montage en installatie van het apparaat moet de spanningsvoorziening onderbroken zijn.
• Montage, installatie en inbedrijfstelling van het apparaat mogen uitsluitend worden uitgevoerd door
gekwalificeerde vakmensen.
es
Ámbito de aplicaciónAparato para registro de la luz diurna incidente en la sala.
Nota: Si se debe emplear LSD en edificios con tejados en diente de sierra, es necesaria una liberación
específica del proyecto. Por favor, entre en contacto con su socio de contrato.
Datos técnicosCorriente de entrada admisible . . . . . 4 – 20 mA (alimentada a través de una línea de 2 hilos)
Línea del sensor de luz . . . . . . . . . . . NYM 2 x 1,5 mm² (H05VV-U 2 x 1,5 mm²)
Bornes de conexión . . . . . . . . . . . . . 0,5 – 1,5 mm² (monofilar/hilo fino)
Grado de protección . . . . . . . . . . . . . IP 20
Clase de protección . . . . . . . . . . . . . Clase de protección II
Material de la carcasa . . . . . . . . . . . . Plástico, sin halógeno
Montaje . . . . . . . . . . . . . . . . . . . . . . . Empotrado en techo
Dimensiones . . . . . . . . . . . . . . . . . . . 80 x 24 (Ø x Al, en mm)
Temperatura ambiente permitida . . . . 0 – 50 °C
Peso . . . . . . . . . . . . . . . . . . . . . . . . . 40 g aprox.
Comportamiento espectral . . . . . . . . Sensibilidad espectral con filtro de corrección de color integrado
adaptado al ojo humano
Notas de planificación e instalaciónEl sensor de luz sirve exclusivamente para el registro de la proporción de luz diurna incidente en la sala.
Para la efectividad funcional del control de iluminación en función de la luz diurna, es determinante la
ubicación correcta del sensor de luz:
• La abertura del sensor de luz debe estar orientada con libre visión en dirección a la luz diurna (ventana).
• Observe de que en el sensor de luz no incida ni luz solar ni luz artificial.
• Distancia del sensor de luz de la ventana como máximo igual a la altura de la ventana: c ≤ a (véase
dibujo "1 Vista lateral").
• El sensor de luz se monta delante del centro de la ventana; la distancia del sensor de luz de la ventana
como máximo igual al ancho de la ventana: c ≤ b (véase dibujo "2 Vista superior").
• Si el dintel de la ventana es considerablemente más alto que 1/6 de la distancia entre la ventana y el
sensor de luz (véase dibujo "1 Vista lateral"), el sensor de luz debe ser montado suspendido o inclinado.
• Evite grandes ensombrecimientos del ángulo de visión del sensor de luz, p.ej. por maineles, grandes
dinteles o cuerpos de iluminación delante del sensor de luz. Son admisibles ensombrecimientos hasta
máx. 15 %.
• En caso de condiciones divergentes – o si tiene consultas sobre el posicionamiento del sensor de luz –
diríjase por favor a su socio de contrato.
• Como línea del sensor de luz del LSD al aparato de control de luz diurna se emplea una línea de dos
conductores aislados (NYM 2 x 1,5 mm²; máx. 250 m).
• Cuando en función de condiciones ambientales desfavorables (p.ej. ventanas demasiado pequeñas u
obstruidas, techo ensombrecido, dintel demasiado alto) que la luz diurna no sea suficiente en el sensor
de luz para programar un punto del día, puede conmutar el sensor de luz a una mayor sensibilidad: para
ello mueva el interruptor deslizante a la derecha junto al borne de conexión para la línea del sensor de
luz desde la posición inferior "5000" a la posición superior "1000".
Prueba de instalaciónA través del pulsador protegido en el centro de la cubierta se puede ejecutar una prueba de instalación.
• Presionar brevemente el pulsador Test.
Si el LSD ha sido cableado correctamente, se enciende verde el LED de estado en el ojo del sensor de
luz.
Otras funciones del pulsadorA través del pulsador protegido en el centro de la cubierta se pueden activar otras funciones (p.ej.
programación del control en función de la luz diurna). Otras informaciones las encontrará en las
instrucciones de control y puesta en operación del aparato de control para luz diurna.
Instrucciones de seguridad• El aparato solo puede utilizarse para el ámbito de aplicación establecido.
• Se deben cumplir las normas de seguridad y de prevención de accidentes vigentes.
• Es necesario interrumpir el suministro de tensión al montar e instalar el aparato.
• El montaje, la instalación y la puesta en operación de este aparato deben realizarse únicamente por
personal técnico cualificado.
it
Campo d'impiegoApparecchio per il rilevamento della luce diurna presente nel locale.
Indicazione: se il LSD è destinato all'impiego in edifici con tetti a shed è necessaria un'approvazione
specifica per il progetto. Si raccomanda di mettersi in contatto con il proprio rivenditore autorizzato.
Dati tecniciCorrente di entrata ammessa . . . . . . 4–20 mA (fornita tramite linea bifilare)
Linea del fotosensore . . . . . . . . . . . . NYM 2 x 1,5 mm² (H05VV-U 2 x 1,5 mm²)
Morsetti di raccordo . . . . . . . . . . . . . 0,5–1,5 mm² (a filo unico/a fili sottili)
Grado di protezione. . . . . . . . . . . . . . IP 20
Classe di protezione . . . . . . . . . . . . . classe di protezione II
Materiale alloggiamento. . . . . . . . . . . plastica, priva di alogeni
Montaggio . . . . . . . . . . . . . . . . . . . . . montaggio sul soffitto
Dimensioni. . . . . . . . . . . . . . . . . . . . . 80 x 24 (Ø x A, in mm)
Temperatura ambiente ammessa. . . . 0–50°C
Peso . . . . . . . . . . . . . . . . . . . . . . . . . ca. 40 g
Comportamento spettrale . . . . . . . . . sensibilità spettrale con filtro di correzione cromatica integrato
adattato all'occhio umano
Istruzioni di programmazione e installazioneIl fotosensore è destinato esclusivamente al rilevamento della quota di luce diurna presente nel locale. Per
la capacità di funzionamento del comando in funzione della luce diurna è determinante il posizionamento
corretto del fotosensore:
• L'apertura del fotosensore deve essere orientata in direzione della luce diurna (finestra) con visuale libera.
• Accertare che nel fotosensore non giunga luce artificiale o luce solare diretta.
• La distanza del fotosensore dalla finestra è pari al massimo all'altezza della finestra: c ≤ a (vedere il
disegno "1 Vista laterale").
• Il fotosensore viene montato davanti al centro della finestra; la distanza del fotosensore dalla finestra è
pari al massimo alla larghezza della finestra: c ≤ b (vedere il disegno "2 Vista dall'alto").
• Se l'architrave è notevolmente più alto di 1/6 della distanza tra la finestra e il fotosensore (vedere il
disegno "1 Vista laterale"), il fotosensore deve essere montato appeso o inclinato.
• Evitare le ombreggiature notevoli dell'angolo visuale del fotosensore, ad esempio a causa di crociere
della finestra, grandi architravi o corpi degli apparecchi di illuminazione davanti al fotosensore. Sono
ammesse ombreggiature massime del 15%.
• In presenza di rapporti divergenti – o in caso di domande rispetto al posizionamento del fotosensore – si
prega di rivolgersi al proprio rivenditore autorizzato.
• Quale linea del fotosensore dal LSD alla centralina di comando in funzione della luce diurna viene
impiegata una linea bifilare (NYM 2 x 1,5 mm²; max. 250 m).
• Se, alla luce delle condizioni spaziali sfavorevoli (ad esempio finestra troppo piccola o ostruita,
soffitto ombreggiato, architrave troppo alto), la luce diurna sul fotosensore non fosse sufficiente per
programmare un punto diurno, è possibile commutare il fotosensore su una sensibilità maggiore: a tale
fine, spostare l'interruttore scorrevole a destra – accanto ai morsetti di collegamento per la linea del
fotosensore – dalla posizione inferiore "5000" alla posizione superiore "1000".
Test di installazioneTramite il pulsante protetto al centro della copertura è possibile eseguire un test di installazione.
• Premere brevemente il pulsante di test.
Se il LSD è stato cablato correttamente, il LED di stato nell'occhio del fotosensore si illumina di verde.
Ulteriori funzioni del pulsanteTramite il pulsante protetto al centro della copertura è possibile attivare delle ulteriori funzioni (ad esempio
la programmazione del comando in funzione della luce diurna). Per ulteriori informazioni consultare le
istruzioni di montaggio e installazione della centralina di comando in funzione della luce diurna.
Indicazioni di sicurezza• L'apparecchio deve essere utilizzato solo per il campo d'impiego previsto.
• Rispettare le norme di sicurezza e le prescrizioni antinfortunistiche vigenti.
• Durante il montaggio e l'installazione dell'apparecchio l'alimentazione di tensione deve essere
interrotta.
• Il montaggio, l'installazione e l'avviamento dell'apparecchio devono essere eseguiti esclusivamente da
tecnici qualificati.
fr
Domaine d'applicationAppareil pour détecter la lumière du jour dans la pièce.
Remarque : Si le dispositif LSD doit être utilisé dans des bâtiments avec des toitures à redans partiels,
une validation spécifique du projet est nécessaire. Veuillez contacter votre partenaire contractuel.
Données techniquesCourant d'entrée admissible . . . . . . . 4 – 20 mA (alimentation via un ligne à deux brins)
Ligne du capteur de lumière . . . . . . . NYM 2 x 1,5 mm² (H05VV-U 2 x 1,5 mm²)
Bornes de raccordement. . . . . . . . . . 0,5 – 1,5 mm² (monobrin ou fil fin)
Indice de protection. . . . . . . . . . . . . . IP 20
Classe de protection . . . . . . . . . . . . . classe de protection II
Matériel du boîtier . . . . . . . . . . . . . . . plastique, sans halogène
Montage . . . . . . . . . . . . . . . . . . . . . . encastré dans le plafond
Dimensions . . . . . . . . . . . . . . . . . . . . 80 x 24 (Ø x h, en mm)
Température ambiante admissible . . . 0 – 50 °C
Poids. . . . . . . . . . . . . . . . . . . . . . . . . env. 40 g
Rapport spectral . . . . . . . . . . . . . . . . Sensibilité spectrale avec filtre de correction des couleurs intégré et
adapté à l'œil humain
Consignes d'installation et de configuration du projetLe capteur de lumière sert uniquement à détecteur la part de lumière du jour entrante dans la pièce. Pour
le bon fonctionnement de la commande d'éclairage selon la lumière du jour, le positionnement correct du
capteur est décisif :
• L'ouverture du capteur de lumière doit être orientée avec une vue dégagée dans le sens de la lumière
du jour (fenêtre).
• Veillez à ce que le capteur ne soit pas exposé à une lumière artificielle ou à la lumière directe du soleil.
• Distance du capteur de lumière par rapport à la fenêtre au maximum équivalent à la hauteur de la
fenêtre : c ≤ a (voir schéma "1 Vue de côté").
• Le capteur de lumière est monté devant le centre de la fenêtre ; distance du capteur de lumière par
rapport à la fenêtre au maximum équivalent à la largeur de la fenêtre : c ≤ b (voir schéma "2 Vue de
dessus").
• Si le linteau de la fenêtre est à une hauteur nettement supérieure à 1/6 de la distance entre la fenêtre et
le capteur de lumière voir schéma "1 Vue de côté"), le capteur de lumière doit être suspendu ou incliné.
• Éviter les occultations importantes de l'angle de vision du capteur de lumière, par ex. à cause d'un
croisillon de fenêtre, d'un grand linteau de fenêtre ou d'un corps de luminaire devant le capteur de
lumière. Les occultations autorisées sont de max. 15 %.
• En cas de conditions différentes ou si vous avez des questions concernant le positionnement du capteur
de lumière, veuillez contacter votre partenaire contractuel.
• Comme ligne de capteur de lumière du LSD pour l'appareil de commande de la lumière du jour, une
ligne à deux fils (NYM 2 x 1,5 mm²; max. 250 m) est utilisée.
• Si, à cause de conditions défavorables dans la pièce (par ex. une fenêtre trop petite ou obstruée, un
plafond ombragé ou un linteau de fenêtre trop haut), la lumière du jour sur le capteur de lumière n'est
pas suffisante pour programmer un point de jour, vous pouvez augmenter la sensibilité du capteur de
lumière : Déplacez pour cela le sélecteur coulissant vers la droite à côté de la borne de raccordement
pour la ligne du capteur de lumière de la position inférieure "5000" à la position supérieure "1000".
Test d'installationLe bouton-poussoir protégé au centre du recouvrement permet d'effectuer un test d'installation.
• Appuyer brièvement sur le bouton-poussoir Test.
Si le LSD a été câblé correctement, la LED d'état dans l'œil du capteur de lumière s'allume en vert.
Autres fonctions du bouton-poussoirLe bouton-poussoir protégé au centre du recouvrement permet d'activer d'autres fonctions (par ex. l'a
programmation de la commande selon la lumière du jour). Vous trouverez davantage d'informations dans
le manuel de montage et de mise en service de l'installation.
Consignes de sécurité• L'appareil ne peut être utilisé que dans le domaine d'application auquel il est destiné.
• Respecter les directives de sécurité et de prévention des accidents en vigueur.
• L'alimentation en tension doit être interrompue pendant le montage et l'installation de l'appareil.
• Le montage, l'installation et la mise en service de l'appareil ne peuvent être réalisés que par un
personnel technique qualifié.
INSTALLATION LSDLSD (20 731 906)
Zumtobel LIGHTING GmbHSchweizer Strasse 306851 Dornbirn AUSTRIAwww.zumtobel.com
LSD_IA_160209 ©


![[LSD]LSD - Complete FBI Blotter Microgram Analysis Manual (1987)](https://img.pdfslide.net/doc/110x75/55cf98fa550346d0339acf6a/lsdlsd-complete-fbi-blotter-microgram-analysis-manual-1987.jpg)