Embed Size (px)
Citation preview
il
LT500 SERIES | GETTING STARTED GUIDE
GNSS HANDHELD RECEIVER
Copyright
Copyright 2014-2015 CHC | Shanghai HuaCe Navigation Technology Ltd. All rights reserved. The CHC are trademark of Shanghai Huace Navigation Technology Limited. All other trademarks are the property of their respective owners.
Trademarks
All product and brand names mentioned in this publication are trademarks of their respective holders.
Safety Warnings
The Global Positioning System (GPS) is operated by the U.S. Government, which is solely responsible for the accuracy and maintenance of the GPS network. Accuracy can also be affected by poor satellite geometry and obstructions, like buildings and heavy canopy.
FCC interference statement
This equipment has been designed to comply with the limits for a class B digital device, pursuant to part 15 of the FCC Rules in the Portable Mode. These limits are designed to provide reasonable protection against harmful interference in a residential installation.
Operation is subject to the following two conditions: (1) this device may not cause harmful interference and (2) this device must accept any interference received, including interference that may cause undesired operation.
LT500 Series Getting Started Guide --- Revision 1.0 April 2015
CONTENTS
1. Introduction ............................................................................................................................................. 1
1.1. Technical Assistance ............................................................................................................... 1
1.2. Your Comments ...................................................................................................................... 1
1.3. Safety Information .................................................................................................................. 1
1.4. Warning and Cautions ............................................................................................................ 1
1.5. Use and Care ........................................................................................................................... 2
2. Overview .................................................................................................................................................. 3
2.1. Features .................................................................................................................................. 3
2.2. Specifications .......................................................................................................................... 3
3. Description .............................................................................................................................................. 5
3.1. Front View .............................................................................................................................. 5
3.2. Rear View ............................................................................................................................... 8
3.3. Bottom View ........................................................................................................................... 9
4. First-Time Operation ............................................................................................................................. 10
4.1. Insert the SIM Card, Storage Card and Battery ..................................................................... 10
4.2. Turn On/Off or Standby ........................................................................................................ 10
4.3. Align Screen .......................................................................................................................... 10
4.4. Set Time/Date ...................................................................................................................... 10
4.5. Use Camera ........................................................................................................................... 10
4.6. Establish Wireless Connection (GPRS/ Wi-Fi/ Bluetooth) .................................................... 11
4.7. Connect to Office Computer ................................................................................................. 12
4.8. Install Software ..................................................................................................................... 12
4.9. Charge the Battery ................................................................................................................ 13
5. Getting Started With SurvCE 4 .............................................................................................................. 14
5.1. Configure Internal GPS ......................................................................................................... 14
5.2. Start SurvCE .......................................................................................................................... 15
6. Getting Started With DigiTerra Explorer 7 ............................................................................................. 16
7. Output NMEA 0183 Data ....................................................................................................................... 18
8. Common Settings .................................................................................................................................. 19
Page 1
1. INTRODUCTION
Thank you for choosing CHC LT500 Series GNSS Handheld Receiver.
This Getting Started Guide will provide useful information about your
receiver. It will also guide you through your first steps of using LT500 Series
in the field.
1.1. TECHNICAL ASSISTANCE
If you have a problem and cannot find the information you need in the
product documentation, contact your local dealer from which you purchased
the LT500 Series. Alternatively, please request technical support using the
CHC Website (www.chcnav.com) or CHC technical support email
1.2. YOUR COMMENTS
Your feedback about this Getting Started Guide will help us to improve it in
future revision. Please e-mail your comments to [email protected].
1.3. SAFETY INFORMATION
This manual describes CHC LT500 Series GNSS Handheld Receiver. Before
using the LT500 Series, please make sure that you have read and understood
this Getting Started Guide, as well as the safety requirements.
1.4. WARNING AND CAUTIONS
An absence of specific alerts does not mean that there are no safety risks
involved.
A Warning or Caution information is intended to minimize the risk of
personal injury and/or damage to the equipment.
WARNING - A Warning alerts you to a potential misused or
wrong setting of the equipment.
CAUTION - A Caution alerts you to a possible risk of serious
injury to your person and/or damage to the equipment.

Page 2
1.5. USE AND CARE
The LT500 Series is designed to withstand the rough environment that
typically occurs in the field. However, the LT500 Series is high-precision
electronic equipment and should be treated with reasonable care.
Page 3
2. OVERVIEW
2.1. FEATURES
The CHC LT500 Series offers 3 different options to meet requirements of
various applications with adoption of Windows® Embedded Handheld 6.5
operating system. Featuring with outstanding specifications and cutting-edge
technologies integrating with gyro, laser plummet and accelerometer, the
LT500 series makes your work more efficient. And the LT500 Series is
optimized to run with Carlson SurvCE® 4 field survey software and/or
DigiTerra Explorer 7 GIS data collection software.
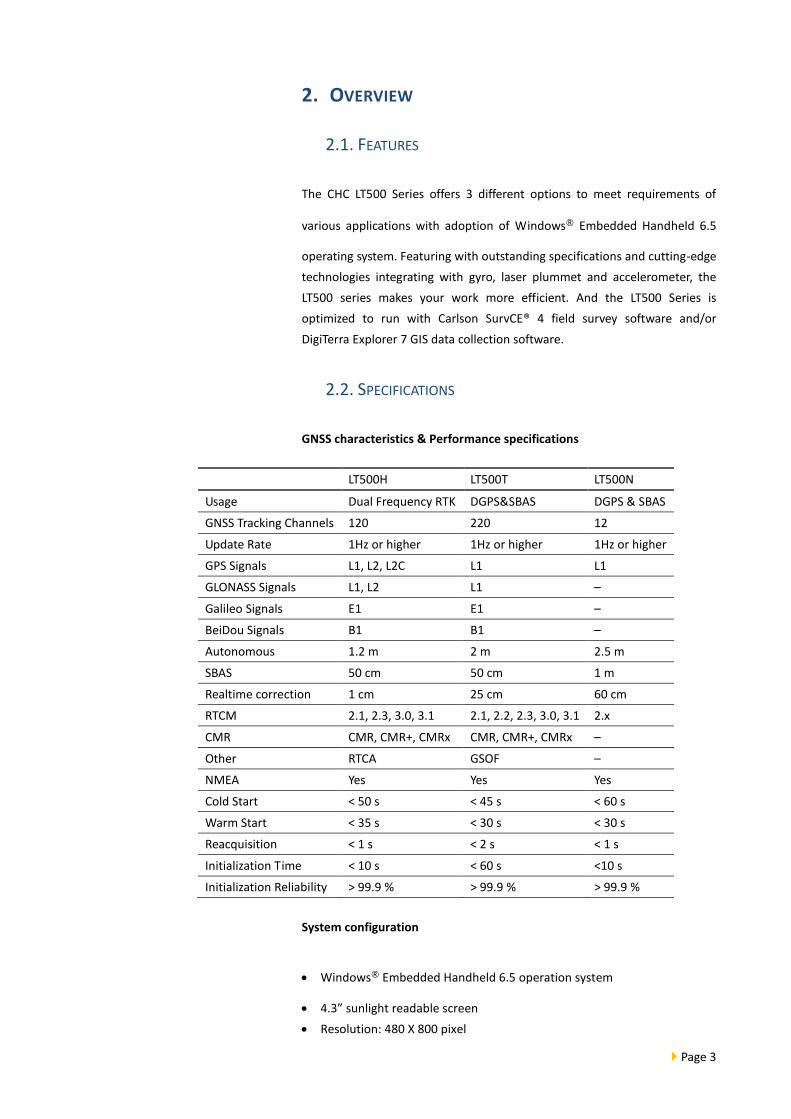
2.2. SPECIFICATIONS
GNSS characteristics & Performance specifications
LT500H LT500T LT500N
Usage Dual Frequency RTK DGPS&SBAS DGPS & SBAS
GNSS Tracking Channels 120 220 12
Update Rate 1Hz or higher 1Hz or higher 1Hz or higher
GPS Signals L1, L2, L2C L1 L1
GLONASS Signals L1, L2 L1 –
Galileo Signals E1 E1 –
BeiDou Signals B1 B1 –
Autonomous 1.2 m 2 m 2.5 m
SBAS 50 cm 50 cm 1 m
Realtime correction 1 cm 25 cm 60 cm
RTCM 2.1, 2.3, 3.0, 3.1 2.1, 2.2, 2.3, 3.0, 3.1 2.x
CMR CMR, CMR+, CMRx CMR, CMR+, CMRx –
Other RTCA GSOF –
NMEA Yes Yes Yes
Cold Start < 50 s < 45 s < 60 s
Warm Start < 35 s < 30 s < 30 s
Reacquisition < 1 s < 2 s < 1 s
Initialization Time < 10 s < 60 s <10 s
Initialization Reliability > 99.9 % > 99.9 % > 99.9 %
System configuration
Windows® Embedded Handheld 6.5 operation system
4.3” sunlight readable screen
Resolution: 480 X 800 pixel
Page 4
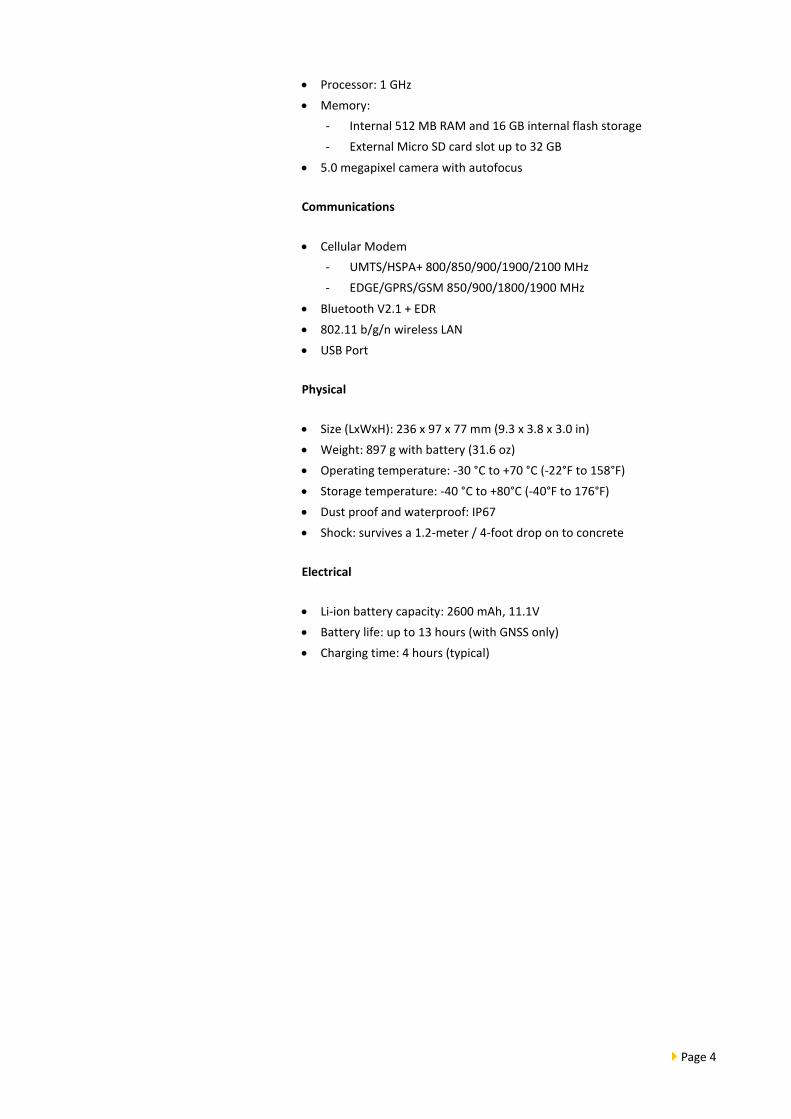
Processor: 1 GHz
Memory:
- Internal 512 MB RAM and 16 GB internal flash storage
- External Micro SD card slot up to 32 GB
5.0 megapixel camera with autofocus
Communications
Cellular Modem
- UMTS/HSPA+ 800/850/900/1900/2100 MHz
- EDGE/GPRS/GSM 850/900/1800/1900 MHz
Bluetooth V2.1 + EDR
802.11 b/g/n wireless LAN
USB Port
Physical
Size (LxWxH): 236 x 97 x 77 mm (9.3 x 3.8 x 3.0 in)
Weight: 897 g with battery (31.6 oz)
Operating temperature: -30 °C to +70 °C (-22°F to 158°F)
Storage temperature: -40 °C to +80°C (-40°F to 176°F)
Dust proof and waterproof: IP67
Shock: survives a 1.2-meter / 4-foot drop on to concrete
Electrical
Li-ion battery capacity: 2600 mAh, 11.1V
Battery life: up to 13 hours (with GNSS only)
Charging time: 4 hours (typical)

Page 5
3. DESCRIPTION
3.1. FRONT VIEW
Page 6
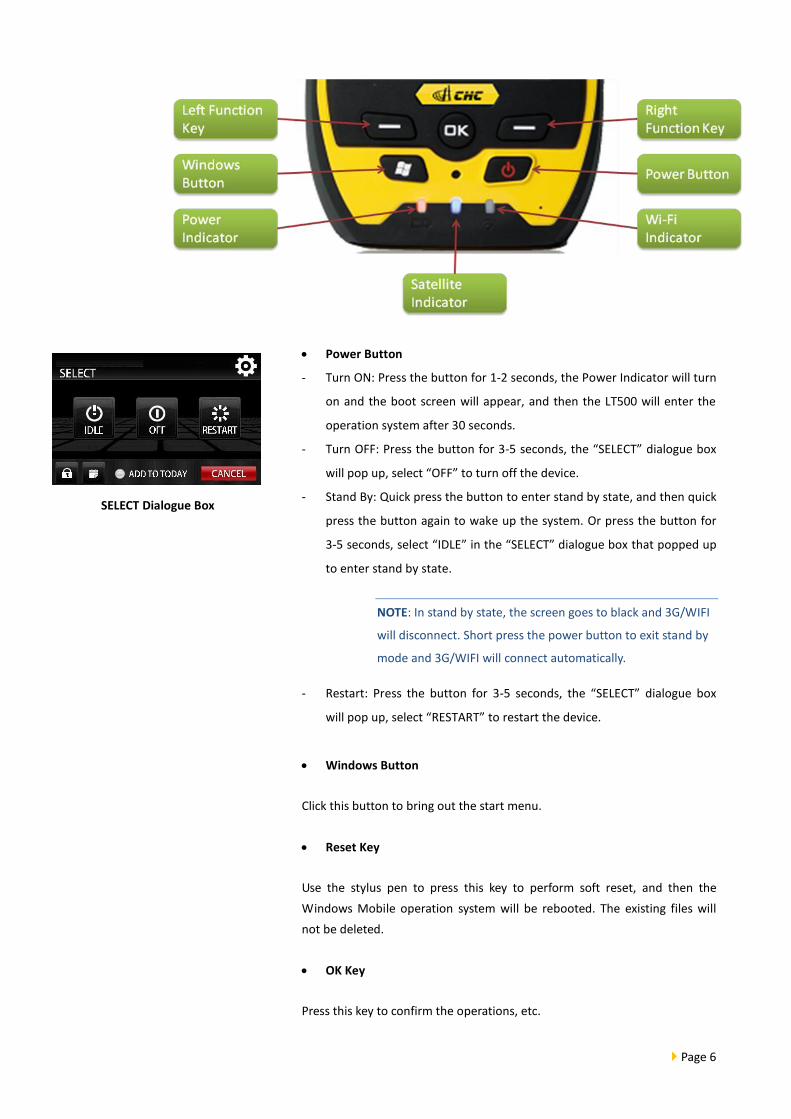
Power Button
- Turn ON: Press the button for 1-2 seconds, the Power Indicator will turn
on and the boot screen will appear, and then the LT500 will enter the
operation system after 30 seconds.
- Turn OFF: Press the button for 3-5 seconds, the “SELECT” dialogue box
will pop up, select “OFF” to turn off the device.
- Stand By: Quick press the button to enter stand by state, and then quick
press the button again to wake up the system. Or press the button for
3-5 seconds, select “IDLE” in the “SELECT” dialogue box that popped up
to enter stand by state.
NOTE: In stand by state, the screen goes to black and 3G/WIFI
will disconnect. Short press the power button to exit stand by
mode and 3G/WIFI will connect automatically.
- Restart: Press the button for 3-5 seconds, the “SELECT” dialogue box
will pop up, select “RESTART” to restart the device.
Windows Button
Click this button to bring out the start menu.
Reset Key
Use the stylus pen to press this key to perform soft reset, and then the
Windows Mobile operation system will be rebooted. The existing files will
not be deleted.
OK Key
Press this key to confirm the operations, etc.
SELECT Dialogue Box
Page 7
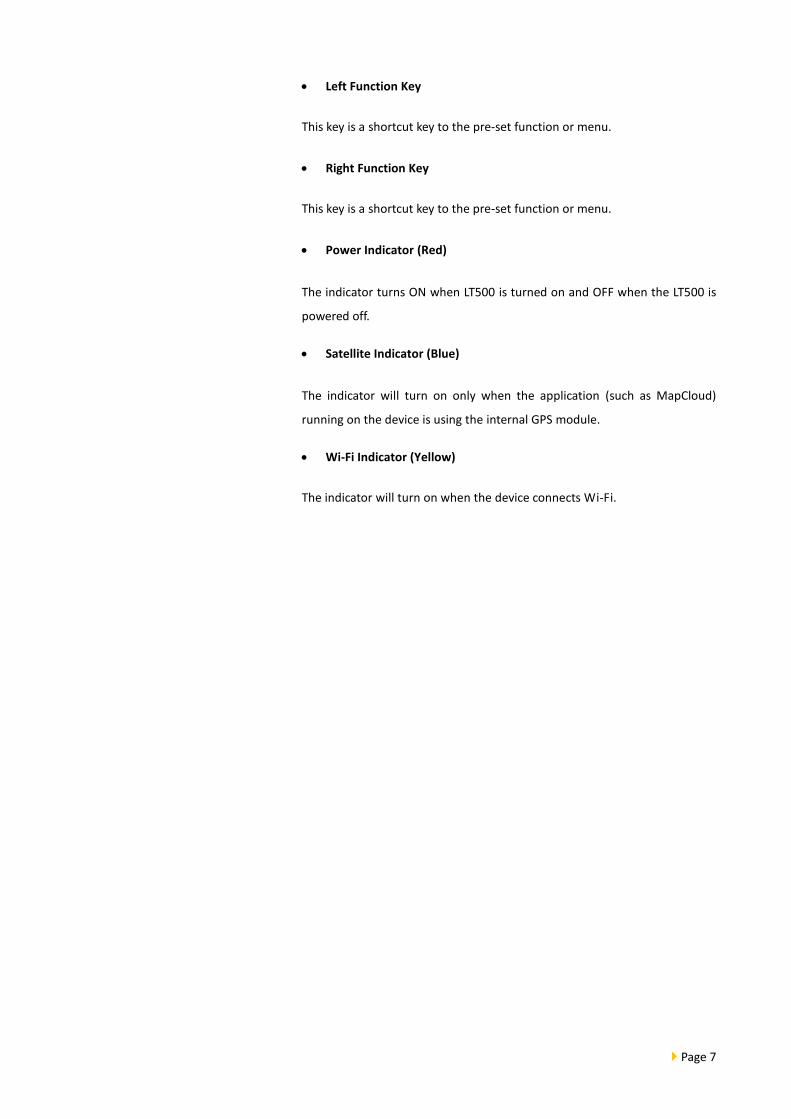
Left Function Key
This key is a shortcut key to the pre-set function or menu.
Right Function Key
This key is a shortcut key to the pre-set function or menu.
Power Indicator (Red)
The indicator turns ON when LT500 is turned on and OFF when the LT500 is
powered off.
Satellite Indicator (Blue)
The indicator will turn on only when the application (such as MapCloud)
running on the device is using the internal GPS module.
Wi-Fi Indicator (Yellow)
The indicator will turn on when the device connects Wi-Fi.
Page 8
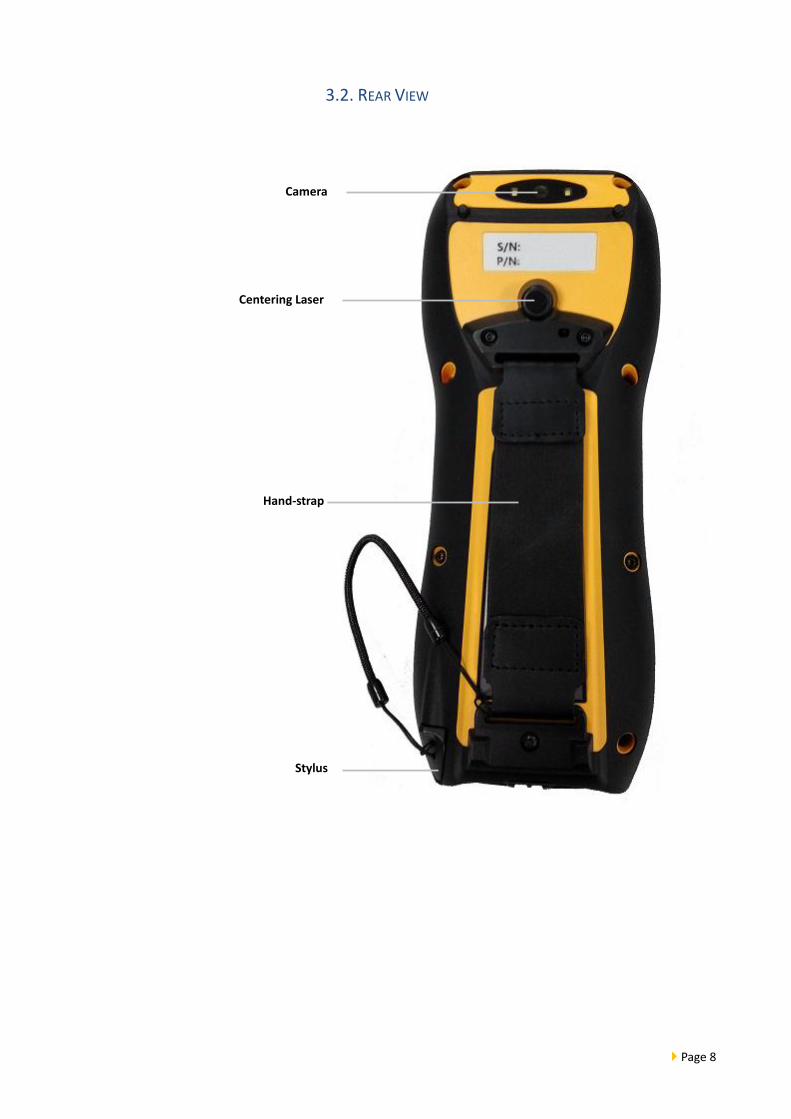
3.2. REAR VIEW
Hand-strap
a
Camera
Centering Laser
Stylus

Page 9
3.3. BOTTOM VIEW
USB Port
TF Card Slot
SIM Card Slot
Battery
Battery Slot
Latch Catch
of Battery
Power Port
of Battery
Page 10
4. FIRST-TIME OPERATION
4.1. INSERT THE SIM CARD, STORAGE CARD AND BATTERY
Refer 3.3 Bottom View to find the SIM card and storage card slot,
and then insert the cards into slots correctly.
Insert the battery into the battery slot until the latch catch of the
battery fix the battery to the device.
4.2. TURN ON/OFF OR STANDBY
Make sure that the battery is charged and installed in the receiver.
Refer the instruction of “Power Button” in 3.1 Front View for the
operation of turn ON, turn OFF and Standby.
4.3. ALIGN SCREEN
Press the Windows Button or tap the windows icon → [Settings] →
[System] → [Screen] → <General> tab → [Align Screen], and then using the
stylus to tap the target firmly and accurately at each location on the
screen until the screen has been aligned.
4.4. SET TIME/DATE
Press the Windows Button or tap the windows icon → [Settings] →
[System] → [Clock & Alarms] → <Time> tab, and then set the Time Zone,
Data and Time.
4.5. USE CAMERA
Press the Windows Button or tap the windows icon → [Pictures &
Videos] → [Camera] to open the camera → press OK Key to take a picture,
and then tap [OK] icon on the bottom right corner of screen to exit picture
taking mode.

Page 11
4.6. ESTABLISH WIRELESS CONNECTION (GPRS/ WI-FI/
BLUETOOTH)
First of all, Press the Windows Button or tap the windows icon →
[Settings] → [Connections] → [Wireless Manager] to turn on
Bluetooth/Phone/Wi-Fi function.
NOTE: The function of Wi-Fi may not available when the
device is being connected with PC which is connected to the
Internet by USB data cable.
Using GPRS
Press the Windows Button or tap the windows icon → [Settings] →
[Connections] → [Connections] → [Tasks] tab → [Manage existing
connections] → [Modem] tab → tap and hold an existing connection and
then click [Connect] in the popup menu to establish the connection.
NOTE: Also, you can add a new modem connection. In the
[Tasks] tab → [Add a new modem connection] → enter a name
for the connection → [Select a modem: Cellular Line (GPRS)]
→ [Next] → enter the Access point name of the SIM card
provider → [Next] → [Finish].
Using Wi-Fi
Press the Windows Button or tap the windows icon → [Settings] →
[Connections] → [Wi-Fi] → [Wireless] tab → tap one available network →
configure the wireless network by following the process to finish the settings
as prompt by the configuration software
NOTE: You can hold the connected wireless network, and then
tap [Remove Settings] in the popup menu to disconnect this
wireless network.
Page 12
Using Bluetooth
Press the Windows Button or tap the windows icon → [Settings] →
[Bluetooth] → [Devices] tab → [Add new device…] → system will search for
Bluetooth Devices → select the device to connect with → [Next] → enter the
passcode → [Next], and then the Bluetooth connection has been
established.
Note: The password used for pairing Bluetooth devices can be
freely defined (e.g., 1234). Just make sure the same PIN code
is entered for two devices to be paired.
WARNING: When deleting an existing bluetooth connection,
please make sure to delete COM port first.
4.7. CONNECT TO OFFICE COMPUTER
To install software or access to LT500 Series receiver, you can use
your office computer and a Microsoft ActiveSync connection to
transfer the installation files from the computer to the LT500.
It means Microsoft Windows Mobile Device Center or ActiveSync
should first be installed on your computer.
NOTE: You can choose the suitable version for your computer
and download this software for free from the Microsoft
website.
Connect the LT500 with your computer by USB data cable.
Turn on LT500, and wait the computer to establish synchronous
connection automatically through the installed synchronization
software.
The synchronization software interface will appear on your
computer screen. You can follow the menus on the software
interface to browse the contents of LT500 and exchange data
between LT500 and your computer.
4.8. INSTALL SOFTWARE
Make sure the LT500 is connected and synchronized with your
computer.
Select and click on the installation file to install, or if the installation
file runs only on LT500, please copy the file to LT500 and click it to
install. You can also copy files to LT500’s relevant location to save
it.
Page 13
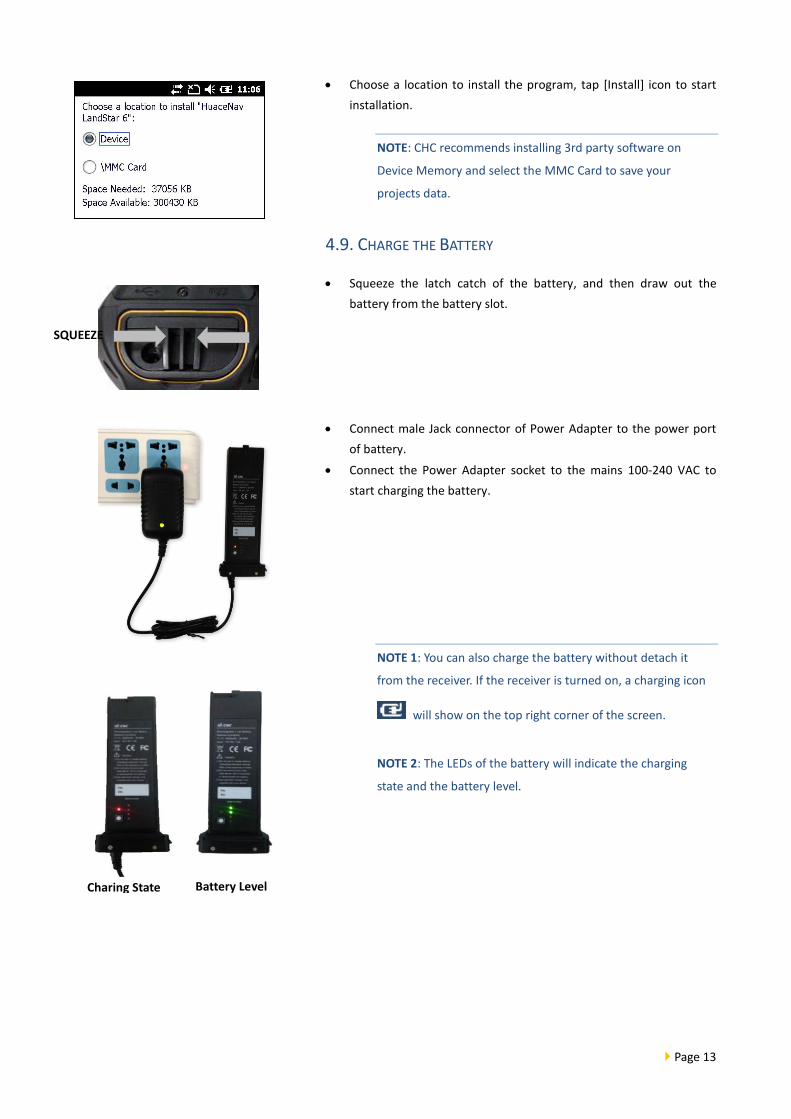
Choose a location to install the program, tap [Install] icon to start
installation.
NOTE: CHC recommends installing 3rd party software on
Device Memory and select the MMC Card to save your
projects data.
4.9. CHARGE THE BATTERY
Squeeze the latch catch of the battery, and then draw out the
battery from the battery slot.
Connect male Jack connector of Power Adapter to the power port
of battery.
Connect the Power Adapter socket to the mains 100-240 VAC to
start charging the battery.
NOTE 1: You can also charge the battery without detach it
from the receiver. If the receiver is turned on, a charging icon
will show on the top right corner of the screen.
NOTE 2: The LEDs of the battery will indicate the charging
state and the battery level.
Battery Level Charing State
SQUEEZE
Page 14
5. GETTING STARTED WITH SURVCE 4
5.1. CONFIGURE INTERNAL GPS
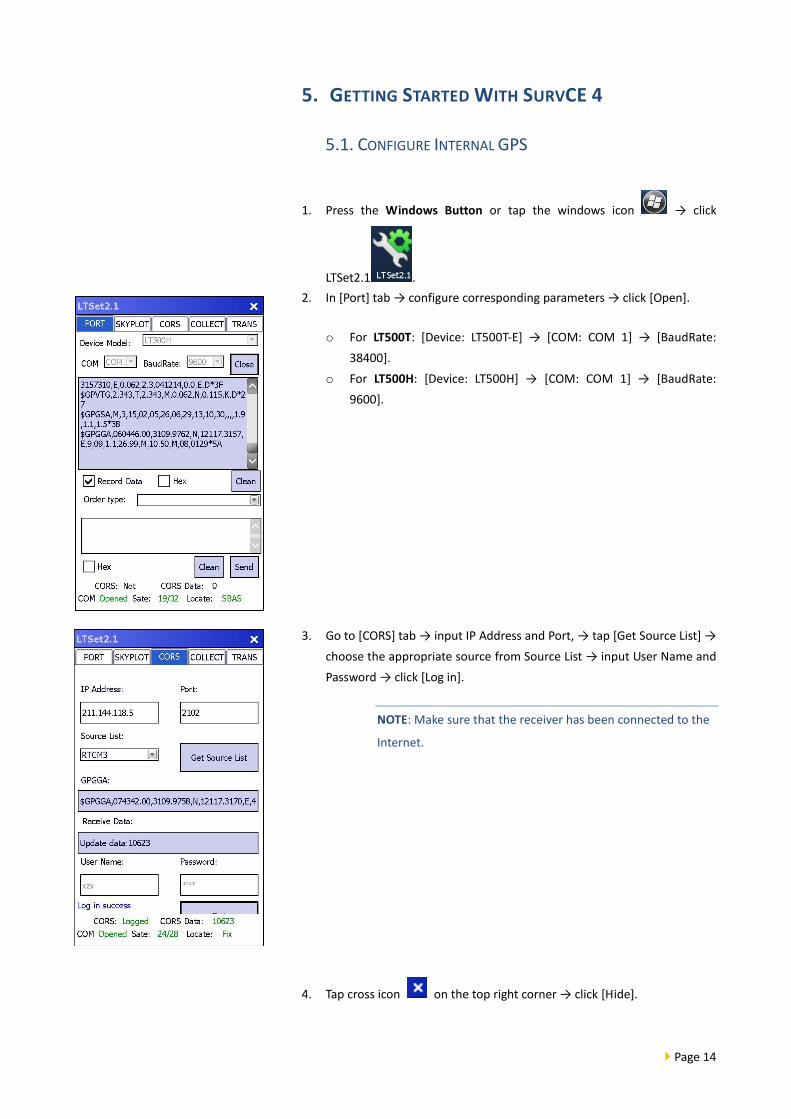
1. Press the Windows Button or tap the windows icon → click
LTSet2.1 .
2. In [Port] tab → configure corresponding parameters → click [Open].
o For LT500T: [Device: LT500T-E] → [COM: COM 1] → [BaudRate:
38400].
o For LT500H: [Device: LT500H] → [COM: COM 1] → [BaudRate:
9600].
3. Go to [CORS] tab → input IP Address and Port, → tap [Get Source List] →
choose the appropriate source from Source List → input User Name and
Password → click [Log in].
NOTE: Make sure that the receiver has been connected to the
Internet.
4. Tap cross icon on the top right corner → click [Hide].
Page 15
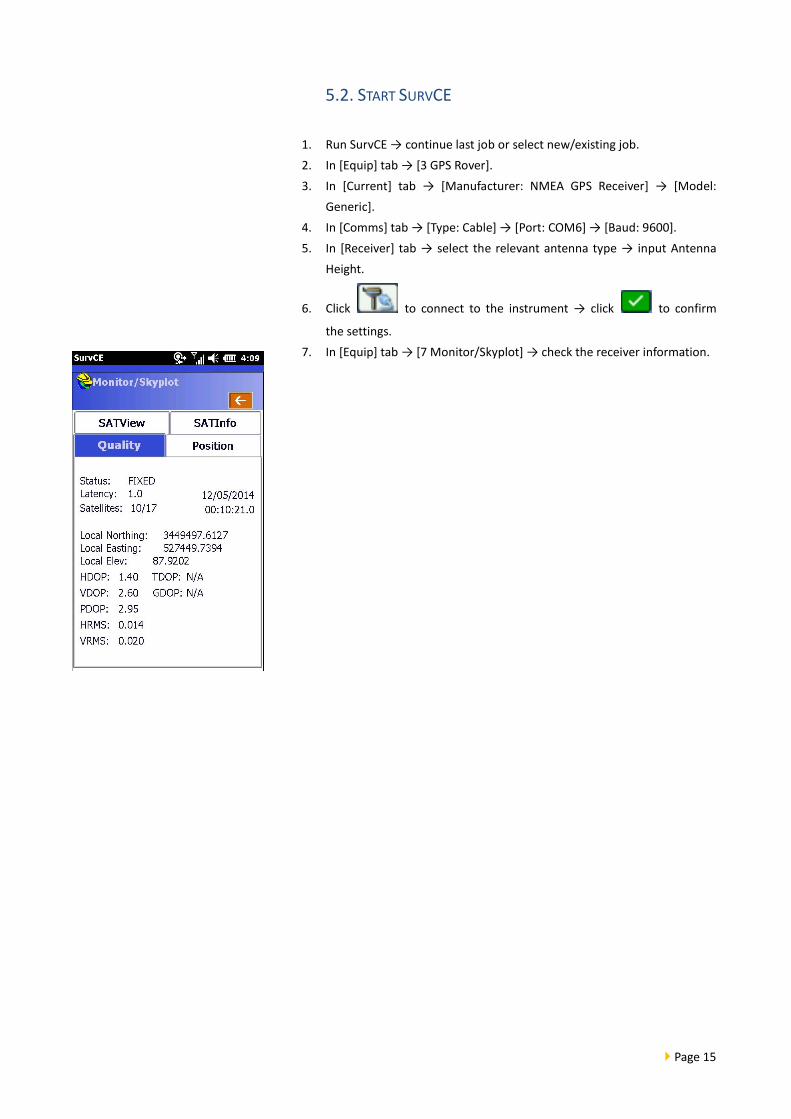
5.2. START SURVCE
1. Run SurvCE → continue last job or select new/existing job.
2. In [Equip] tab → [3 GPS Rover].
3. In [Current] tab → [Manufacturer: NMEA GPS Receiver] → [Model:
Generic].
4. In [Comms] tab → [Type: Cable] → [Port: COM6] → [Baud: 9600].
5. In [Receiver] tab → select the relevant antenna type → input Antenna
Height.
6. Click to connect to the instrument → click to confirm
the settings.
7. In [Equip] tab → [7 Monitor/Skyplot] → check the receiver information.
Page 16
6. GETTING STARTED WITH DIGITERRA EXPLORER 7
1. Run DigiTerra Explorer v7 → create a new map or open a exist map.
2. Tap icon → [Status].
3. Tap [Set] → [GNSS] tab → configure corresponding [Port] and
[BaudRate].
o For LT500N: [COM: COM 1] → [BaudRate: 9600].
o For LT500T: [COM: COM 1] → [BaudRate: 38400].
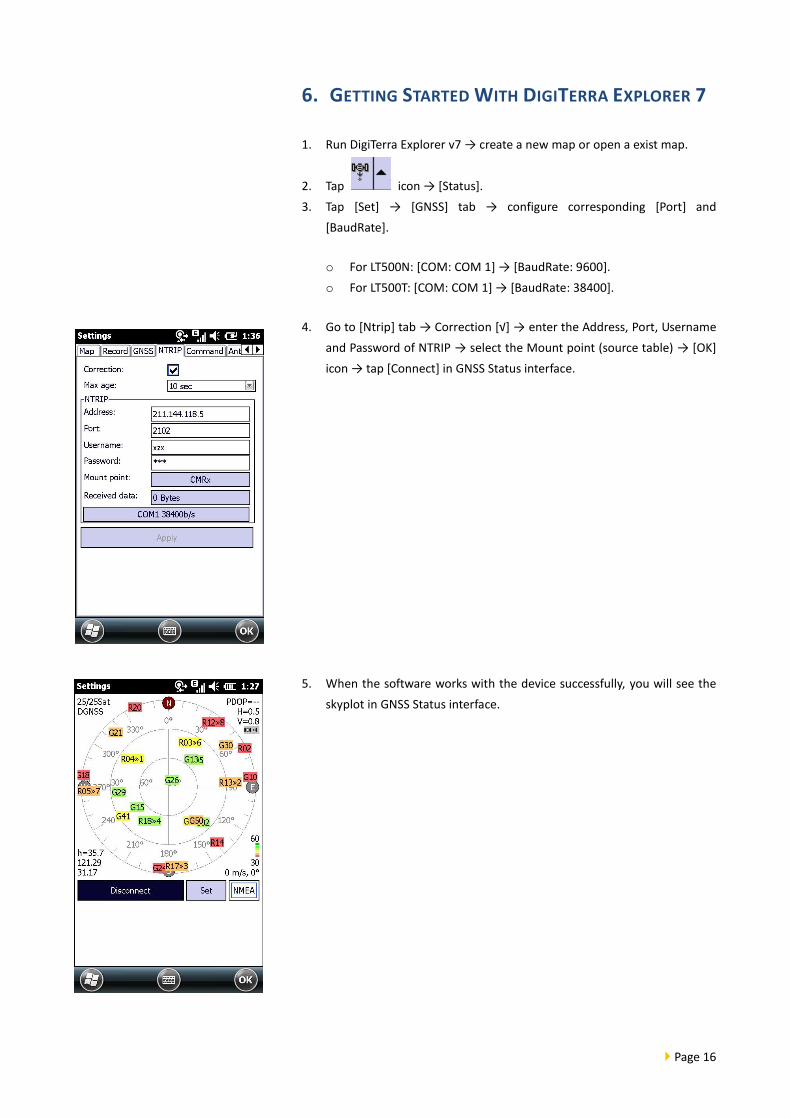
4. Go to [Ntrip] tab → Correction [√] → enter the Address, Port, Username
and Password of NTRIP → select the Mount point (source table) → [OK]
icon → tap [Connect] in GNSS Status interface.
5. When the software works with the device successfully, you will see the
skyplot in GNSS Status interface.
Page 17
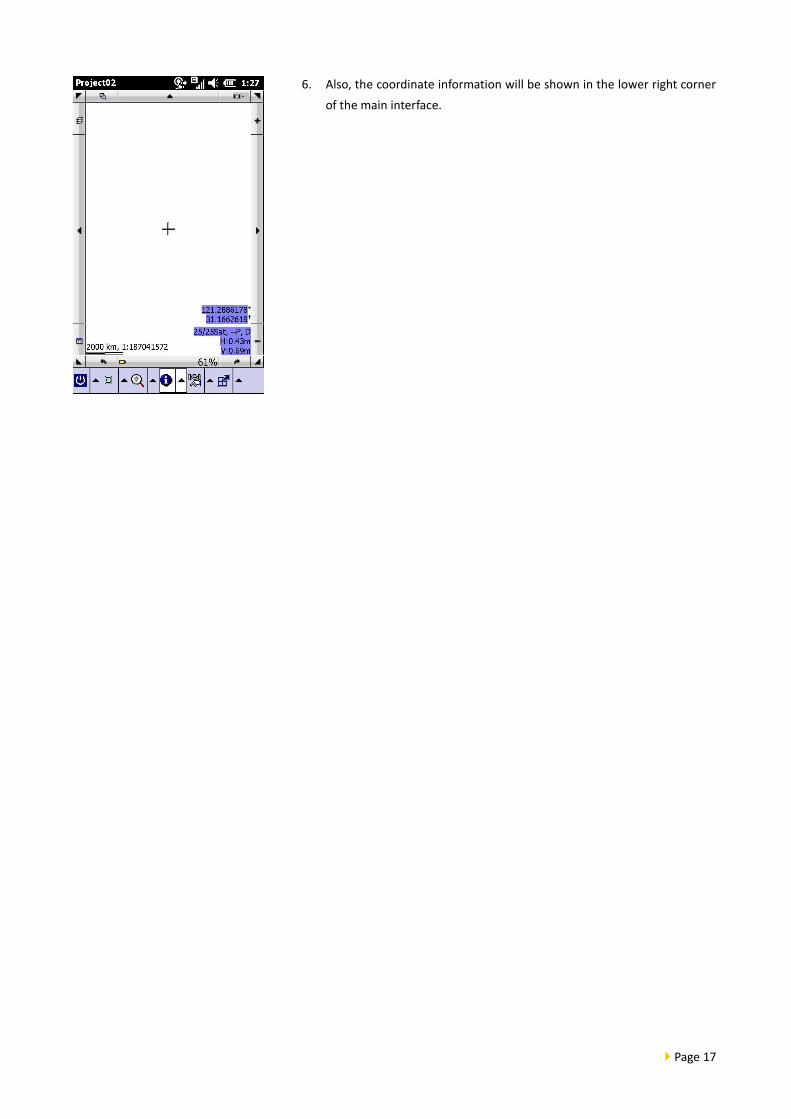
6. Also, the coordinate information will be shown in the lower right corner
of the main interface.
Page 18
7. OUTPUT NMEA 0183 DATA
1. Refer 4.6. Establish Wireless Connection (GPRS/ Wi-Fi/ Bluetooth) to
establish Bluetooth connection with computer or other devices.
2. Go to [Settings] → [Bluetooth] → [COM Ports] tab → [New Outgoing
Port] → select the device connected with your LT500 through Bluetooth
→ [Next] → select the available COM for [Port] → un-tick [Secure
Connection] → [Finish].
3. Press the Windows Button or tap the windows icon → click
LTSet2.1 .
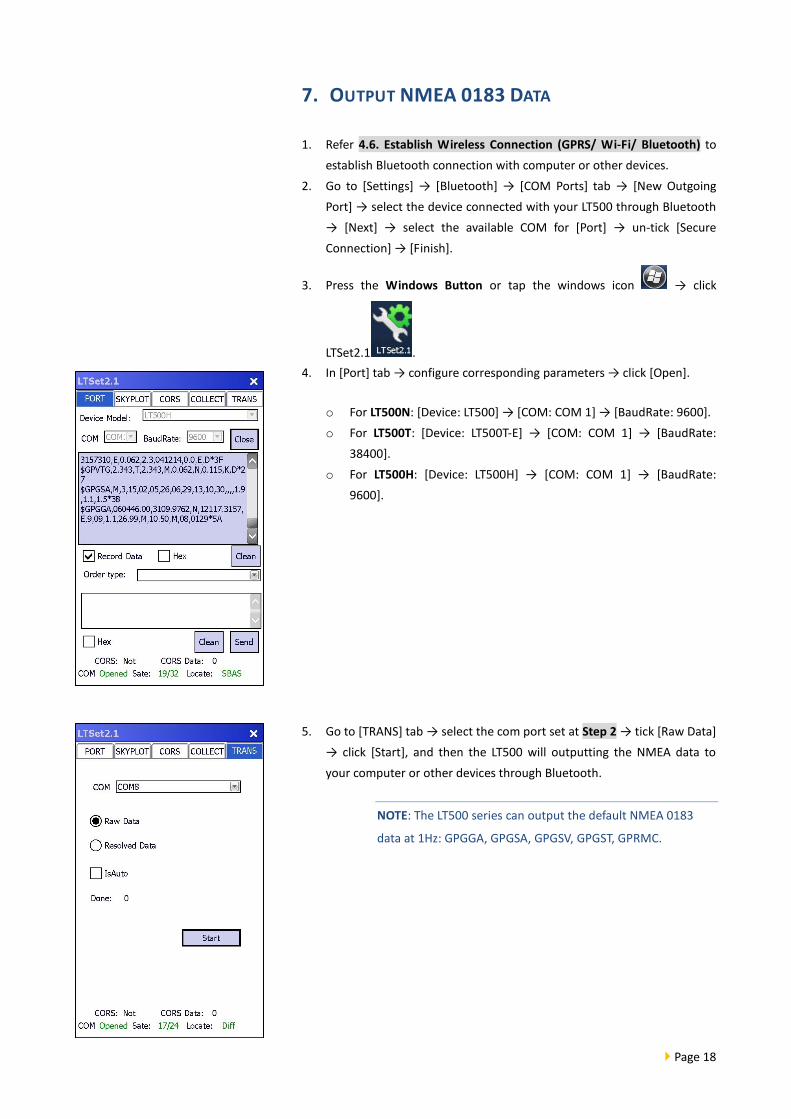
4. In [Port] tab → configure corresponding parameters → click [Open].
o For LT500N: [Device: LT500] → [COM: COM 1] → [BaudRate: 9600].
o For LT500T: [Device: LT500T-E] → [COM: COM 1] → [BaudRate:
38400].
o For LT500H: [Device: LT500H] → [COM: COM 1] → [BaudRate:
9600].
5. Go to [TRANS] tab → select the com port set at Step 2 → tick [Raw Data]
→ click [Start], and then the LT500 will outputting the NMEA data to
your computer or other devices through Bluetooth.
NOTE: The LT500 series can output the default NMEA 0183
data at 1Hz: GPGGA, GPGSA, GPGSV, GPGST, GPRMC.
Page 19
8. COMMON SETTINGS
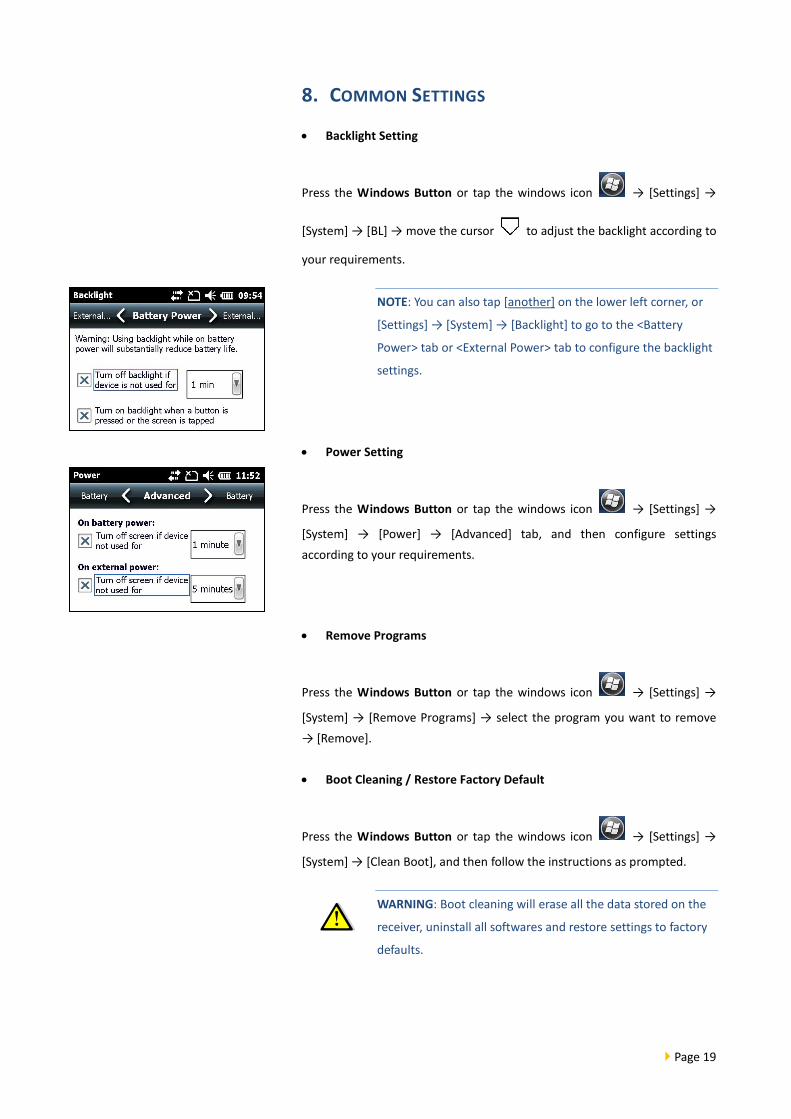
Backlight Setting
Press the Windows Button or tap the windows icon → [Settings] →
[System] → [BL] → move the cursor to adjust the backlight according to
your requirements.
NOTE: You can also tap [another] on the lower left corner, or
[Settings] → [System] → [Backlight] to go to the <Battery
Power> tab or <External Power> tab to configure the backlight
settings.
Power Setting
Press the Windows Button or tap the windows icon → [Settings] →
[System] → [Power] → [Advanced] tab, and then configure settings
according to your requirements.
Remove Programs
Press the Windows Button or tap the windows icon → [Settings] →
[System] → [Remove Programs] → select the program you want to remove
→ [Remove].
Boot Cleaning / Restore Factory Default
Press the Windows Button or tap the windows icon → [Settings] →
[System] → [Clean Boot], and then follow the instructions as prompted.
WARNING: Boot cleaning will erase all the data stored on the
receiver, uninstall all softwares and restore settings to factory
defaults.

Page 20
CHC - Shanghai HuaCe Navigation Technology Ltd.
Building C, NO. 599 Gaojing Road,
Qingpu District, 201702 Shanghai, China
Tel: +86 21 542 60 273
Fax: +86 21 649 50 963
Email: [email protected] | [email protected]
Website: www.chcnav.com