Embed Size (px)
Citation preview

Rev. 1/26/17 DR www.elitescreens.com 1
Lunette Series
Home Theater Curved Fixed Frame Projection Screen User’s Guide
Important Safety and Warning Precautions
Please follow these instructions carefully to ensure proper maintenance and safety with your Lunette Series Fixed Frame Curved Screen
1. When hanging the screen up, please make sure that no other objects – such as power switches, outlets, furniture, ladders, windows, etc., occupy the space designated for your Fixed-Frame screen.
2. Regardless if the screen is hung on or installed into the wall; make sure that the proper mounting anchorsareusedandthattheweightissupportedappropriatelybyastrongandstructurallysound surface just as any large and heavy picture frame should. (Please consult a home improvement specialist for the best advice on installation.)
3. Frame parts are made of high quality velour-surfaced aluminum and should be handled with care.
4. When not in use, cover over the screen with a furniture sheet to protect it from dirt, grime, paint, or any other impurities.
5. When cleaning, use a soft cloth moistened with warm water to remove any marks on the frame or screen surface.
6. Never attempt to use any solutions, chemicals, or abrasive cleaners on the screen surface.
7. In order to avoid damaging the screen, avoid touching it directly with your fingers, writing stationary, tools, or any other sharp or abrasive objects.
8. Spare parts should be placed out of reach of small children in accordance with house hold safety guidelines.
CAUTION: The projection screen frame is made of high-quality aluminum alloy and should be handled with care. Use a soft cloth with warm water to remove any spots on the screen material surface.
To avoid damaging the screen material, never attempt to use any solutions, chemicals, or abrasive cleaners on the screen itself, and never attempt to touch screen with your fingers or sharps/abrasive objects.

Rev. 1/26/17 DR www.elitescreens.com 2
Hardware and Parts List A. Dry-wall anchor
x 12 pcs
B. 1.77” L –Bracket x 2-4 pcs C. 3.54” L-Bracket x 0-2 pcs
D. Lower Bracket x 2pcs
E. M5screws x 8 pcs
F. Wood screws x 12 pcs
G. Fix Plate x 1 bag
H. Butterfly screws x 4 pcs
I. Elbow joint x 4pcs
J. Wall bracket x 1 pcs
K. Center Support Bar x 1-2 pcs
Notes 1. Center support bar may be packed with the screen material. 2. Models 165” and above includes 2 pcs
L. Screen Material x 1pcs
M. Horizontal Rods x 2 N. Vertical Rods x 2
O. Vertical Upright Frame x 2 pcs
P. Horizontal Curved Frame x 2 pcs
125” models and above = 2 pcs Under 125” = 0 pcs
125” models and above = 2pcs Under 125” = 4 pcs

Rev. 1/26/17 DR www.elitescreens.com 3
Frame Assembly and Screen Material Installation 1. Insert both Elbow Joints (I) into each Horizontal Curved Frame (P) and join all four frame parts
together as shown below.
2. After making sure that all four corners join at right angles (forming a perfect rectangle), fasten the four
angles together by using M5 screws (E).
3. Layout the Screen Material and Tension Rods on a clean and dry surface. Then, gently roll out the
screen material over the back of the fixed frame.
4. Insert the screen Tension Rods through the sleeves according to their corresponding lengths on each edge of the screen as seen below.
Vertical Upright Fame
Horizontal Curved Frame
Back of the screen material
Minimal gap is normal here
Rev. 1/26/17 DR www.elitescreens.com 4
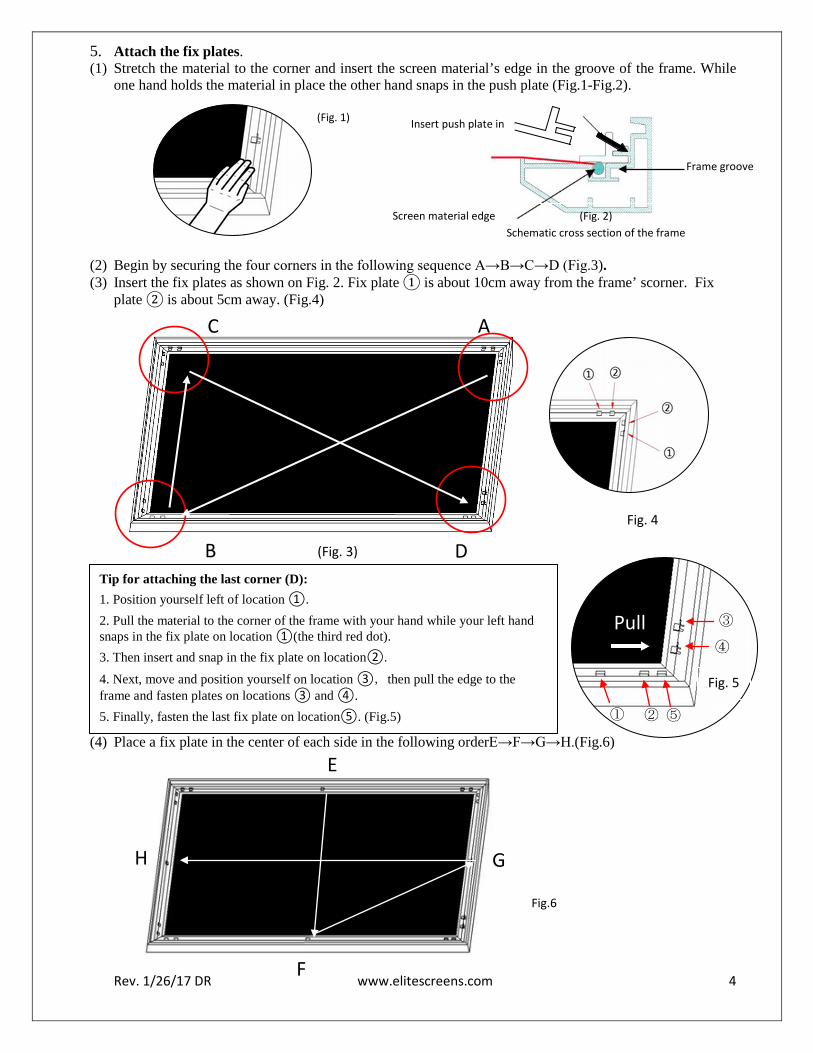
5. Attach the fix plates. (1) Stretch the material to the corner and insert the screen material’s edge in the groove of the frame. While
one hand holds the material in place the other hand snaps in the push plate (Fig.1-Fig.2).
(2) Begin by securing the four corners in the following sequence A→B→C→D (Fig.3). (3) Insert the fix plates as shown on Fig. 2. Fix plate ① is about 10cm away from the frame’ scorner. Fix
plate ② is about 5cm away. (Fig.4)
(4) Place a fix plate in the center of each side in the following orderE→F→G→H.(Fig.6)
(Fig. 1) Insert push plate in
Screen material edge (Fig. 2) Schematic cross section of the frame
Frame groove
A C
Fig. 4
B D (Fig. 3)
Tip for attaching the last corner (D): 1. Position yourself left of location ①. 2. Pull the material to the corner of the frame with your hand while your left hand snaps in the fix plate on location ①(the third red dot). 3. Then insert and snap in the fix plate on location②.
4. Next, move and position yourself on location ③,then pull the edge to the frame and fasten plates on locations ③ and ④. 5. Finally, fasten the last fix plate on location⑤. (Fig.5) ① ②
③
⑤
④
Pull
Fig. 5
Fig.6
E
G
H
F

Rev. 1/26/17 DR www.elitescreens.com 5
(5) Next, fasten a fix plate on the center of each frame side in the following order I→J→K→L→M→N→O→P as shown in Fig.7.
(6) Fasten the remainder of the fix plates in the empty locations in the red markings to complete attaching the screen material. (Fig.8)
Black backing attachment procedure for AcousticPro materials The purpose of the black backing material is to block out any light penetration that may reflect off of anything mounted behind the screen, which can cause distortion to the projected image.
Fig.7
Fig.8
Interval markings reveal the best points for inserting the fix plates (Fig. 9) The prongs on the fix plates insert to the lip on the back of the frame creating a friction hold that will firmly keep the material and black backing in place (Fig. 10-11).After the material has been installed, the backing will lay over the back of the white (Acoustic) material and then be held in place by the Velcro on the fix plates (Fig 12).
The black backing is held in place by the Velcro that is on the fix plates. Black backing Fix plates secure the Acoustic material and the black backing behind it.
I
J
K
L M
N
O
P
(Fig. 9) (Fig. 11) (Fig. 10) (Fig. 12)

Rev. 1/26/17 DR www.elitescreens.com 6
Center Support Bar
1. Center Support Bar may be packed in a plastic tube with the screen material.
Center support bar
2. Insert the Center Support Bar into the upper top groove on the back of the frame (note: this not the same groove where the fix plate inserts) with the bottom end near the center point of the frame, and place it in at an angle so that both ends of the bar are aligned with the groove.
3. Slide the top end of the bar into the top center point location (as shown below) to complete the center support bar installation. This will provide added stability to the frame and added tension to the material.
For 165” and above models

Rev. 1/26/17 DR www.elitescreens.com 7
Installation 1. Use butterfly screws to install the upper bracket as shown in following diagrams
2. Locate the height where you want the screen installed, and draw an upper base line. Install the wall bracket (J) in the middle area of the upper base line as shown below. Confirm the distance between the two brackets on the level direction following the data E of P10 diagram. Mark the hole location on the wall by following the base line and the upper bracket’s screw hole site, and then drill the hole. Insert the wall anchor and tighten the upper bracket using the provided screw. Note: The upper base line must align with the upper bracket’s top edge
3. Draw a lower base line according to the data F of P10 diagram and the upper base line, and then make a hole on the wall according to the screw hole location for the lower bracket, then insert the anchor and tighten the lower bracket with the provided screw.
Use two 1.77” brackets to assemble an upper bracket for models below 125”
Use one 1.77” bracket and one 3.54” bracket to assemble an upper bracket for models 125” and above.
Wall
Upper bracket
Lower bracket
Wood screw Hollow wall anchor
P10
Midpoint
Center bracket
Upper bracket Center bracket

Note: Two (2) or more people must install the frame for added safety. 4. Mount the frame on the wall mount in the center. Then, slide the upper brackets over to the frame grooves and gently pull the frame down onto the bracket. The lower bracket will also slide into the groove of the lower frame.
Rev. 1/26/17 DR www.elitescreens.com 8
Upper base line
Lower base line
Top Bracket
Frame
Bottom Bracket
H= Overall height F=H-115mm (5.9”)
For H Measurement, please view the dimensions table at: http://www.elitescreens.com/dimensions

For a local Elite Screens contact or Technical Support, please visit www.elitescreens.com
Rev. 1/26/17 DR www.elitescreens.com 9
Base line
Swing the bottom bracket to the left or right to fit it in the groove of the lower frame.
Installation diagram of frame and bracket
Midpoint