Embed Size (px)
Citation preview
LVM HOWTO
AJ Lewis
<alewis(at)rackable.com>
Copyright © 2002−2003 Sistina Software, Inc
Copyright © 2004−2005 Red Hat, Inc
Copyright © 2005−2006 Terrascale Technologies, Inc
Copyright © 2006 Rackable Systems, Inc
Revision HistoryRevision 0.19 2006−11−27 Revised by: ajlClarified full snapshot conditions in Section 3.8 and Section 13.4.1 and added a note about resizing the originof a snapshot; Fixed Rackable copyright; Fixed e−mail addressRevision 0.18 2006−11−27 Revised by: ajlClarify whole disk usage in Section 11.1; Updated copyright; Updated e−mail addressRevision 0.17 2005−10−03 Revised by: ajlAdded FAQ entry for max size of LVs in LVM2; Did some cleanup of "Recover physical volume metadata"section; Updated e−mail addressRevision 0.16 2005−07−15 Revised by: ajlAdded lvm2 boot−time scripts info; Added "Recover physical volume metadata" section − thanks toMaximilian Attems for the patchRevision 0.15 2005−06−09 Revised by: ajlRemoved references to xfs_freeze − it is no longer needed; Updated snapshots subsection in Anatomy ofLVM section; Added a couple entries to the LVM2 FAQ; Fixed a couple typosRevision 0.14 2004−10−06 Revised by: ajlAdded reference to lvm2_createinitrd in source tree; Adjusted lvcreate example slightly; Added 'vgchange−ay' in 'Moving a volume group to another system' recipeRevision 0.13 2004−08−16 Revised by: ajlClarify symlink farm description; Fix dm control device major number; Remove /boot from vg in small lvmsetup example; Add notes about /boot and / on LVM; Remove outdated link;Revision 0.12 2004−06−07 Revised by: ajlUpdated LVM2 FAQ entriesRevision 0.11 2004−05−03 Revised by: ajlUpdated LVM2 FAQ entries
Revision 0.10 2004−04−22 Revised by: ajlremoved −print0 from find command after receiving reports that it doesn't workRevision 0.9 2004−04−16 Revised by: ajlAdded −print0 to find command before piping it to cpio; Changed vgimport command line for LVM 2;Added ext3 to the ext2 resize section; Updated FAQ; Updated Links sectionRevision 0.8 2004−02−25 Revised by: ajlUpdated CVS locations and FTP links; Added section on extending a JFS filesystem; Fixed typos − Ranaspell against documentRevision 0.7 2004−02−16 Revised by: ajlUpdated to include LVM 2 and device mapper information; Updated email addresses; Updated copyright;Added FAQ section; Added document license; Updated to docbook 4.2Revision 0.6 2003−12−09 Revised by: ajlUpdated for LVM 1.0.8; fixed broken link; Clarified redhat init script section;Revision 0.5 2003−02−10 Revised by: ajlUpdated Redhat initscript information for 7.0 and above; Added information on removing a partition tablefrom a disk if pvcreate fails; Default PE size is 32MB now; Updated method for snapshotting under XFS.Revision 0.4 2002−12−16 Revised by: ajlUpdated for LVM 1.0.6Revision 0.3 2002−09−16 Revised by: ajlremoved example pvmove from Command Operations section − we now just point to the more detailedrecipe on pvmove that contains various warnings and suchRevision 0.2 2002−09−11 Revised by: ajlUpdated for LVM 1.0.5 and converted to DocBook XML 4.1.2.Revision 0.1 2002−04−28 Revised by: gfInitial conversion from Sistina's LaTeX source and import to tLDP in LinuxDoc format.
This document describes how to build, install, and configure LVM for Linux. A basic description of LVM isalso included. This version of the HowTo is for LVM 2 with device−mapper, as well as LVM 1.0.8.
Permission is granted to copy, distribute and/or modify this document under the terms of the GNU FreeDocumentation License, Version 1.2 published by the Free Software Foundation; with no Invariant Sections,no Front−Cover Texts and no Back−Cover Texts. A copy of the license is included in the section entitled"GNU Free Documentation License".
This document is distributed in the hope that it will be useful, but WITHOUT ANY WARRANTY, eitherexpressed or implied. While every effort has been taken to ensure the accuracy of the information documentedherein, the author(s)/editor(s)/maintainer(s)/contributor(s) assumes NO RESPONSIBILITY for any errors, orfor any damages, direct or consequential, as a result of the use of the information documented herein.
Table of Contents Introduction........................................................................................................................................................1
1. Latest Version......................................................................................................................................12. Disclaimer............................................................................................................................................13. Contributors.........................................................................................................................................1
Chapter 1. What is LVM?..................................................................................................................................2
Chapter 2. What is Logical Volume Management?.........................................................................................32.1. Why would I want it?........................................................................................................................32.2. Benefits of Logical Volume Management on a Small System.........................................................32.3. Benefits of Logical Volume Management on a Large System.........................................................4
Chapter 3. Anatomy of LVM.............................................................................................................................63.1. volume group (VG)...........................................................................................................................63.2. physical volume (PV).......................................................................................................................63.3. logical volume (LV)..........................................................................................................................63.4. physical extent (PE)..........................................................................................................................73.5. logical extent (LE)............................................................................................................................73.6. Tying it all together...........................................................................................................................73.7. mapping modes (linear/striped)........................................................................................................73.8. Snapshots..........................................................................................................................................8
Chapter 4. Frequently Asked Questions...........................................................................................................94.1. LVM 2 FAQ......................................................................................................................................94.2. LVM 1 FAQ....................................................................................................................................12
Chapter 5. Acquiring LVM..............................................................................................................................135.1. Download the source.......................................................................................................................135.2. Download the development source via CVS..................................................................................135.3. Before You Begin...........................................................................................................................135.4. Initial Setup.....................................................................................................................................135.5. Checking Out Source Code.............................................................................................................145.6. Code Updates..................................................................................................................................155.7. Starting a Project.............................................................................................................................155.8. Hacking the Code............................................................................................................................155.9. Conflicts..........................................................................................................................................16
Chapter 6. Building the kernel modules.........................................................................................................176.1. Building the device−mapper module..............................................................................................176.2. Build the LVM 1 kernel module.....................................................................................................17
6.2.1. Building a patch for your kernel............................................................................................176.2.2. Building the LVM module for Linux 2.2.17+.......................................................................186.2.3. Building the LVM modules for Linux 2.4............................................................................186.2.4. Checking the proc file system...............................................................................................18
Chapter 7. LVM 1 Boot time scripts...............................................................................................................197.1. Caldera............................................................................................................................................197.2. Debian.............................................................................................................................................19
LVM HOWTO
i
Table of ContentsChapter 7. LVM 1 Boot time scripts
7.3. Mandrake........................................................................................................................................207.4. Redhat.............................................................................................................................................207.5. Slackware........................................................................................................................................207.6. SuSE................................................................................................................................................22
Chapter 8. LVM 2 Boot Time Scripts.............................................................................................................23
Chapter 9. Building LVM from the Source....................................................................................................249.1. Make LVM library and tools..........................................................................................................249.2. Install LVM library and tools.........................................................................................................249.3. Removing LVM library and tools...................................................................................................24
Chapter 10. Transitioning from previous versions of LVM to LVM 1.0.8..................................................2510.1. Upgrading to LVM 1.0.8 with a non−LVM root partition...........................................................2510.2. Upgrading to LVM 1.0.8 with an LVM root partition and initrd.................................................25
Chapter 11. Common Tasks.............................................................................................................................2811.1. Initializing disks or disk partitions................................................................................................2811.2. Creating a volume group...............................................................................................................2811.3. Activating a volume group............................................................................................................2911.4. Removing a volume group............................................................................................................2911.5. Adding physical volumes to a volume group...............................................................................2911.6. Removing physical volumes from a volume group......................................................................2911.7. Creating a logical volume.............................................................................................................3011.8. Removing a logical volume..........................................................................................................3011.9. Extending a logical volume..........................................................................................................3111.10. Reducing a logical volume..........................................................................................................3211.11. Migrating data off of a physical volume.....................................................................................33
Chapter 12. Disk partitioning..........................................................................................................................3412.1. Multiple partitions on the same disk.............................................................................................3412.2. Sun disk labels..............................................................................................................................34
Chapter 13. Recipes..........................................................................................................................................3613.1. Setting up LVM on three SCSI disks............................................................................................36
13.1.1. Preparing the disks..............................................................................................................3613.1.2. Setup a Volume Group........................................................................................................3613.1.3. Creating the Logical Volume..............................................................................................3713.1.4. Create the File System.........................................................................................................3713.1.5. Test the File System............................................................................................................37
13.2. Setting up LVM on three SCSI disks with striping......................................................................3813.2.1. Preparing the disk partitions................................................................................................3813.2.2. Setup a Volume Group........................................................................................................3813.2.3. Creating the Logical Volume..............................................................................................3913.2.4. Create the File System.........................................................................................................3913.2.5. Test the File System............................................................................................................39
13.3. Add a new disk to a multi−disk SCSI system...............................................................................40
LVM HOWTO
ii
Table of ContentsChapter 13. Recipes
13.3.1. Current situation..................................................................................................................4013.3.2. Prepare the disk partitions...................................................................................................4013.3.3. Add the new disks to the volume groups............................................................................4113.3.4. Extend the file systems........................................................................................................4213.3.5. Remount the extended volumes..........................................................................................43
13.4. Taking a Backup Using Snapshots...............................................................................................4313.4.1. Create the snapshot volume.................................................................................................4313.4.2. Mount the snapshot volume................................................................................................4413.4.3. Do the backup......................................................................................................................4413.4.4. Remove the snapshot...........................................................................................................44
13.5. Removing an Old Disk.................................................................................................................4413.5.1. Distributing Old Extents to Existing Disks in Volume Group............................................4413.5.2. Distributing Old Extents to a New Replacement Disk........................................................45
13.6. Moving a volume group to another system...................................................................................4613.6.1. Unmount the file system......................................................................................................4613.6.2. Mark the volume group inactive.........................................................................................4613.6.3. Export the volume group.....................................................................................................4613.6.4. Import the volume group.....................................................................................................4713.6.5. Activate the volume group..................................................................................................4713.6.6. Mount the file system..........................................................................................................47
13.7. Splitting a volume group...............................................................................................................4713.7.1. Determine free space...........................................................................................................4713.7.2. Move data off the disks to be used......................................................................................4813.7.3. Create the new volume group..............................................................................................4813.7.4. Remove remaining volume.................................................................................................4813.7.5. Create new logical volume..................................................................................................4913.7.6. Make a file system on the volume.......................................................................................4913.7.7. Mount the new volume........................................................................................................49
13.8. Converting a root filesystem to LVM 1........................................................................................4913.8.1. Boot single user...................................................................................................................5013.8.2. Run Parted...........................................................................................................................5013.8.3. Reboot.................................................................................................................................5113.8.4. Verify kernel config options................................................................................................5113.8.5. Adjust partition type............................................................................................................5113.8.6. Set up LVM 1 for the new scheme......................................................................................5113.8.7. Create the Filesystem..........................................................................................................5213.8.8. Update /etc/fstab..................................................................................................................5213.8.9. Create an LVM 1 initial RAM disk.....................................................................................5213.8.10. Update /etc/lilo.conf..........................................................................................................5213.8.11. Run LILO to write the new boot sector.............................................................................5313.8.12. Reboot to lvm....................................................................................................................5313.8.13. Add remainder of disk.......................................................................................................53
13.9. Recover physical volume metadata..............................................................................................53
Appendix A. Dangerous Operations...............................................................................................................55A.1. Restoring the VG UUIDs using uuid_fixer....................................................................................55A.2. Sharing LVM volumes...................................................................................................................56
LVM HOWTO
iii
Table of ContentsAppendix B. Reporting Errors and Bugs.......................................................................................................57
Appendix C. Contact and Links......................................................................................................................58C.1. Mail lists.........................................................................................................................................58C.2. Links...............................................................................................................................................59
Appendix D. GNU Free Documentation License...........................................................................................60D.1. PREAMBLE..................................................................................................................................60D.2. APPLICABILITY AND DEFINITIONS......................................................................................60D.3. VERBATIM COPYING................................................................................................................61D.4. COPYING IN QUANTITY...........................................................................................................62D.5. MODIFICATIONS........................................................................................................................62D.6. COMBINING DOCUMENTS.......................................................................................................63D.7. COLLECTIONS OF DOCUMENTS............................................................................................64D.8. AGGREGATION WITH INDEPENDENT WORKS...................................................................64D.9. TRANSLATION............................................................................................................................64D.10. TERMINATION..........................................................................................................................65D.11. FUTURE REVISIONS OF THIS LICENSE...............................................................................65D.12. ADDENDUM: How to use this License for your documents.....................................................65
LVM HOWTO
iv
IntroductionThis is an attempt to collect everything needed to know to get LVM up and running. The entire process ofgetting, compiling, installing, and setting up LVM will be covered. Pointers to LVM configurations that havebeen tested with will also be included. This version of the HowTo is for LVM 2 with device−mapper andLVM 1.0.8.
All previous versions of LVM are considered obsolete and are only kept for historical reasons. This documentmakes no attempt to explain or describe the workings or use of those versions.
1. Latest Version
We will keep the latest version of this HowTo in the CVS with the other LDP Howtos. You can get it bychecking out ``LDP/howto/docbook/LVM−HOWTO.xml'' from the tLDP CVS server. You should always beable to get a human readable version of this HowTo from the http://www.tldp.org/HOWTO/LVM−HOWTO.html
2. Disclaimer
This document is distributed in the hope that it will be useful, but WITHOUT ANY WARRANTY, eitherexpressed or implied. While every effort has been taken to ensure the accuracy of the information documentedherein, the author(s)/editor(s)/maintainer(s)/contributor(s) assumes NO RESPONSIBILITY for any errors, orfor any damages, direct or consequential, as a result of the use of the information documented herein.
3. Contributors
List of everyone who has put words into this file.
AJ Lewis• Joe Thornber• Patrick Caulfield• Alasdair Kergon• Jochen Radmacher − JFS extend information•
Please notify the HowTo maintainer if you believe you should be listed above.
Introduction 1
Chapter 1. What is LVM?LVM is a Logical Volume Manager for the Linux operating system. There are now two version of LVM forLinux:
LVM 2 − The latest and greatest version of LVM for Linux.
LVM 2 is almost completely backward compatible with volumes created with LVM 1. The exceptionto this is snapshots (You must remove snapshot volumes before upgrading to LVM 2)
LVM 2 uses the device mapper kernel driver. Device mapper support is in the 2.6 kernel tree andthere are patches available for current 2.4 kernels.
•
LVM 1 − The version that is in the 2.4 series kernel,
LVM 1 is a mature product that has been considered stable for a couple of years. The kernel driver forLVM 1 is included in the 2.4 series kernels, but this does not mean that your 2.4.x kernel is up to datewith the latest version of LVM. Look at the README for the latest information about which kernelshave the current code in them.
•
Chapter 1. What is LVM? 2
Chapter 2. What is Logical Volume Management?Logical volume management provides a higher−level view of the disk storage on a computer system than thetraditional view of disks and partitions. This gives the system administrator much more flexibility inallocating storage to applications and users.
Storage volumes created under the control of the logical volume manager can be resized and moved aroundalmost at will, although this may need some upgrading of file system tools.
The logical volume manager also allows management of storage volumes in user−defined groups, allowingthe system administrator to deal with sensibly named volume groups such as "development" and "sales" ratherthan physical disk names such as "sda" and "sdb".
2.1. Why would I want it?
Logical volume management is traditionally associated with large installations containing many disks but it isequally suited to small systems with a single disk or maybe two.
2.2. Benefits of Logical Volume Management on a SmallSystem
One of the difficult decisions facing a new user installing Linux for the first time is how to partition the diskdrive. The need to estimate just how much space is likely to be needed for system files and user files makesthe installation more complex than is necessary and some users simply opt to put all their data into one largepartition in an attempt to avoid the issue.
Once the user has guessed how much space is needed for /home /usr / (or has let the installation program doit) then is quite common for one of these partitions to fill up even if there is plenty of disk space in one of theother partitions.
With logical volume management, the whole disk would be allocated to a single volume group and logicalvolumes created to hold the / /usr and /home file systems. If, for example the /home logical volume later filledup but there was still space available on /usr then it would be possible to shrink /usr by a few megabytes andreallocate that space to /home.
Another alternative would be to allocate minimal amounts of space for each logical volume and leave some ofthe disk unallocated. Then, when the partitions start to fill up, they can be expanded as necessary.
As an example: Joe buys a PC with an 8.4 Gigabyte disk on it and installs Linux using the followingpartitioning system:
/boot /dev/hda1 10 Megabytesswap /dev/hda2 256 Megabytes/ /dev/hda3 2 Gigabytes/home /dev/hda4 6 Gigabytes
This, he thinks, will maximize the amount of space available for all his MP3 files.
Chapter 2. What is Logical Volume Management? 3
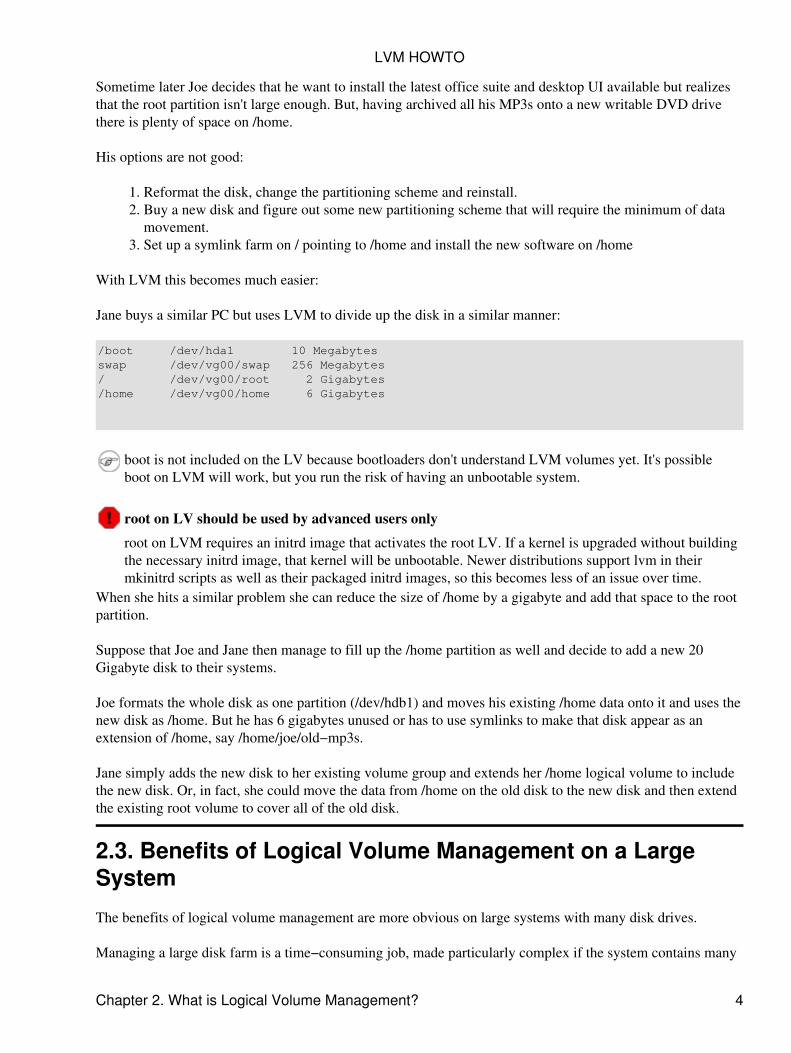
Sometime later Joe decides that he want to install the latest office suite and desktop UI available but realizesthat the root partition isn't large enough. But, having archived all his MP3s onto a new writable DVD drivethere is plenty of space on /home.
His options are not good:
Reformat the disk, change the partitioning scheme and reinstall.1. Buy a new disk and figure out some new partitioning scheme that will require the minimum of datamovement.
2.
Set up a symlink farm on / pointing to /home and install the new software on /home3.
With LVM this becomes much easier:
Jane buys a similar PC but uses LVM to divide up the disk in a similar manner:
/boot /dev/hda1 10 Megabytesswap /dev/vg00/swap 256 Megabytes/ /dev/vg00/root 2 Gigabytes/home /dev/vg00/home 6 Gigabytes
boot is not included on the LV because bootloaders don't understand LVM volumes yet. It's possibleboot on LVM will work, but you run the risk of having an unbootable system.
root on LV should be used by advanced users only
root on LVM requires an initrd image that activates the root LV. If a kernel is upgraded without buildingthe necessary initrd image, that kernel will be unbootable. Newer distributions support lvm in theirmkinitrd scripts as well as their packaged initrd images, so this becomes less of an issue over time.
When she hits a similar problem she can reduce the size of /home by a gigabyte and add that space to the rootpartition.
Suppose that Joe and Jane then manage to fill up the /home partition as well and decide to add a new 20Gigabyte disk to their systems.
Joe formats the whole disk as one partition (/dev/hdb1) and moves his existing /home data onto it and uses thenew disk as /home. But he has 6 gigabytes unused or has to use symlinks to make that disk appear as anextension of /home, say /home/joe/old−mp3s.
Jane simply adds the new disk to her existing volume group and extends her /home logical volume to includethe new disk. Or, in fact, she could move the data from /home on the old disk to the new disk and then extendthe existing root volume to cover all of the old disk.
2.3. Benefits of Logical Volume Management on a LargeSystem
The benefits of logical volume management are more obvious on large systems with many disk drives.
Managing a large disk farm is a time−consuming job, made particularly complex if the system contains many
LVM HOWTO
Chapter 2. What is Logical Volume Management? 4
disks of different sizes. Balancing the (often conflicting) storage requirements of various users can be anightmare.
User groups can be allocated to volume groups and logical volumes and these can be grown as required. It ispossible for the system administrator to "hold back" disk storage until it is required. It can then be added tothe volume(user) group that has the most pressing need.
When new drives are added to the system, it is no longer necessary to move users files around to make thebest use of the new storage; simply add the new disk into an existing volume group or groups and extend thelogical volumes as necessary.
It is also easy to take old drives out of service by moving the data from them onto newer drives − this can bedone online, without disrupting user service.
LVM HOWTO
Chapter 2. What is Logical Volume Management? 5
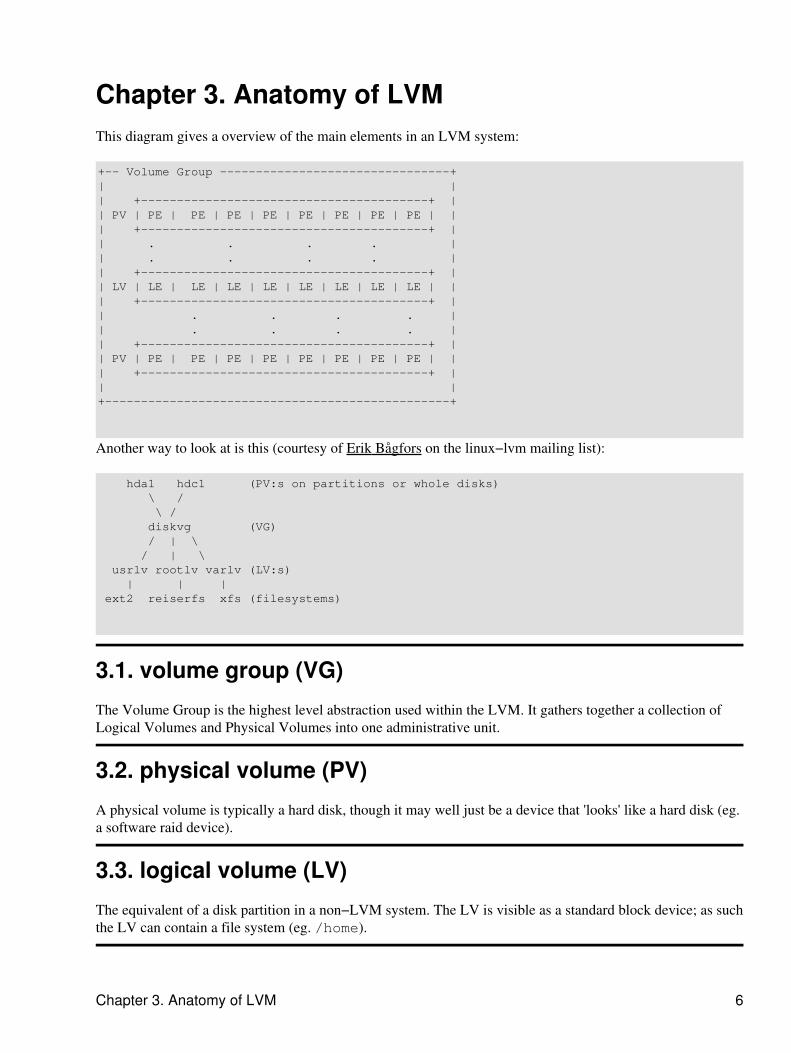
Chapter 3. Anatomy of LVMThis diagram gives a overview of the main elements in an LVM system:
+−− Volume Group −−−−−−−−−−−−−−−−−−−−−−−−−−−−−−−−+| || +−−−−−−−−−−−−−−−−−−−−−−−−−−−−−−−−−−−−−−−−+ || PV | PE | PE | PE | PE | PE | PE | PE | PE | || +−−−−−−−−−−−−−−−−−−−−−−−−−−−−−−−−−−−−−−−−+ || . . . . || . . . . || +−−−−−−−−−−−−−−−−−−−−−−−−−−−−−−−−−−−−−−−−+ || LV | LE | LE | LE | LE | LE | LE | LE | LE | || +−−−−−−−−−−−−−−−−−−−−−−−−−−−−−−−−−−−−−−−−+ || . . . . || . . . . || +−−−−−−−−−−−−−−−−−−−−−−−−−−−−−−−−−−−−−−−−+ || PV | PE | PE | PE | PE | PE | PE | PE | PE | || +−−−−−−−−−−−−−−−−−−−−−−−−−−−−−−−−−−−−−−−−+ || |+−−−−−−−−−−−−−−−−−−−−−−−−−−−−−−−−−−−−−−−−−−−−−−−−+
Another way to look at is this (courtesy of Erik Bågfors on the linux−lvm mailing list):
hda1 hdc1 (PV:s on partitions or whole disks) \ / \ / diskvg (VG) / | \ / | \ usrlv rootlv varlv (LV:s) | | | ext2 reiserfs xfs (filesystems)
3.1. volume group (VG)
The Volume Group is the highest level abstraction used within the LVM. It gathers together a collection ofLogical Volumes and Physical Volumes into one administrative unit.
3.2. physical volume (PV)
A physical volume is typically a hard disk, though it may well just be a device that 'looks' like a hard disk (eg.a software raid device).
3.3. logical volume (LV)
The equivalent of a disk partition in a non−LVM system. The LV is visible as a standard block device; as suchthe LV can contain a file system (eg. /home).
Chapter 3. Anatomy of LVM 6
3.4. physical extent (PE)
Each physical volume is divided chunks of data, known as physical extents, these extents have the same sizeas the logical extents for the volume group.
3.5. logical extent (LE)
Each logical volume is split into chunks of data, known as logical extents. The extent size is the same for alllogical volumes in the volume group.
3.6. Tying it all together
A concrete example will help:
Lets suppose we have a volume group called VG1, this volume group has a physical extent size of 4MB. Intothis volume group we introduce 2 hard disk partitions, /dev/hda1 and /dev/hdb1. These partitions will becomephysical volumes PV1 and PV2 (more meaningful names can be given at the administrators discretion). ThePV's are divided up into 4MB chunks, since this is the extent size for the volume group. The disks aredifferent sizes and we get 99 extents in PV1 and 248 extents in PV2. We now can create ourselves a logicalvolume, this can be any size between 1 and 347 (248 + 99) extents. When the logical volume is created amapping is defined between logical extents and physical extents, eg. logical extent 1 could map onto physicalextent 51 of PV1, data written to the first 4 MB of the logical volume in fact be written to the 51st extent ofPV1.
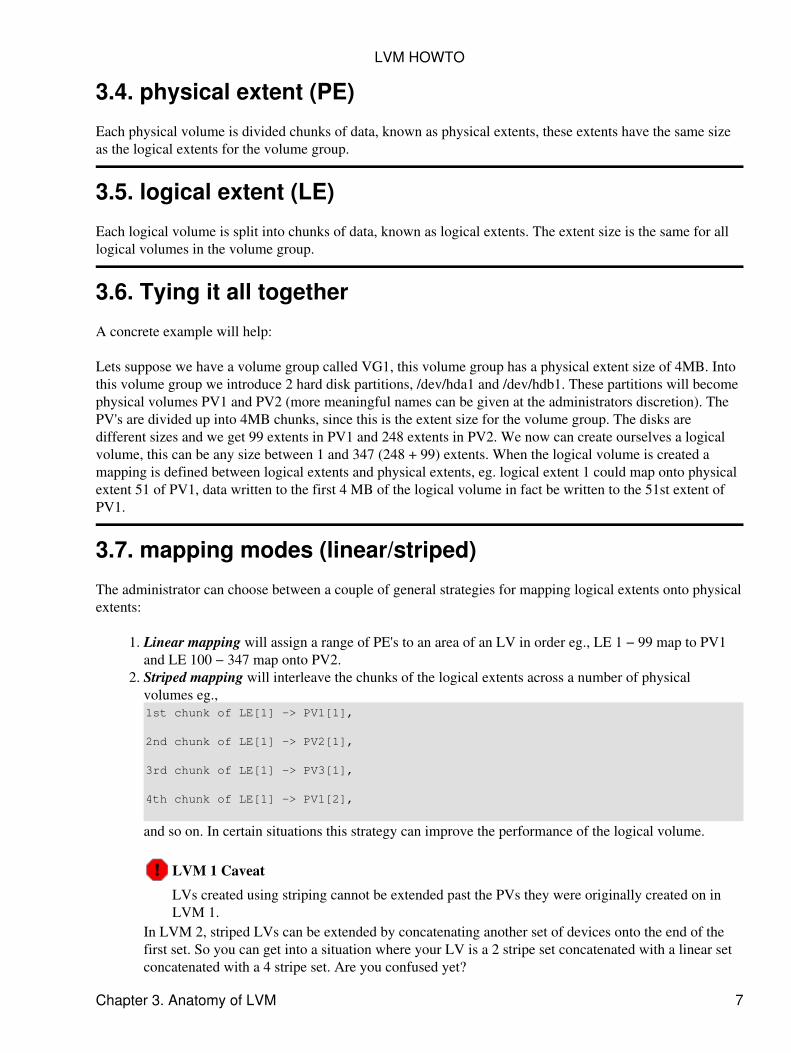
3.7. mapping modes (linear/striped)
The administrator can choose between a couple of general strategies for mapping logical extents onto physicalextents:
Linear mapping will assign a range of PE's to an area of an LV in order eg., LE 1 − 99 map to PV1and LE 100 − 347 map onto PV2.
1.
Striped mapping will interleave the chunks of the logical extents across a number of physicalvolumes eg.,1st chunk of LE[1] −> PV1[1],
2nd chunk of LE[1] −> PV2[1],
3rd chunk of LE[1] −> PV3[1],
4th chunk of LE[1] −> PV1[2],
and so on. In certain situations this strategy can improve the performance of the logical volume.
LVM 1 Caveat
LVs created using striping cannot be extended past the PVs they were originally created on inLVM 1.
In LVM 2, striped LVs can be extended by concatenating another set of devices onto the end of thefirst set. So you can get into a situation where your LV is a 2 stripe set concatenated with a linear setconcatenated with a 4 stripe set. Are you confused yet?
2.
LVM HOWTO
Chapter 3. Anatomy of LVM 7
3.8. Snapshots
A wonderful facility provided by LVM is 'snapshots'. This allows the administrator to create a new blockdevice which presents an exact copy of a logical volume, frozen at some point in time. Typically this wouldbe used when some batch processing, a backup for instance, needs to be performed on the logical volume, butyou don't want to halt a live system that is changing the data. When the snapshot device has been finishedwith the system administrator can just remove the device. This facility does require that the snapshot be madeat a time when the data on the logical volume is in a consistent state − the VFS−lock patch for LVM1 makessure that some filesystems do this automatically when a snapshot is created, and many of the filesystems inthe 2.6 kernel do this automatically when a snapshot is created without patching.
Full snapshot are automatically disabled
If the snapshot logical volume becomes full it will be dropped (become unusable) so it is vitallyimportant to allocate enough space. The amount of space necessary is dependent on the usage ofthe snapshot, so there is no set recipe to follow for this. If the snapshot size equals the origin size,it will never overflow.
LVM1 has read−only snapshots. Read−only snapshots work by creating an exception table, which is used tokeep track of which blocks have been changed. If a block is to be changed on the origin, it is first copied tothe snapshot, marked as copied in the exception table, and then the new data is written to the original volume.
In LVM2, snapshots are read/write by default. Read/write snapshots work like read−only snapshots, with theadditional feature that if data is written to the snapshot, that block is marked in the exception table as used,and never gets copied from the original volume. This opens up many new possibilities that were not possiblewith LVM1's read−only snapshots. One example is to snapshot a volume, mount the snapshot, and try anexperimental program that change files on that volume. If you don't like what it did, you can unmount thesnapshot, remove it, and mount the original filesystem in its place. It is also useful for creating volumes foruse with Xen. You can create a disk image, then snapshot it and modify the snapshot for a particular domUinstance. You can then create another snapshot of the original volume, and modify that one for a differentdomU instance. Since the only storage used by a snapshot is blocks that were changed on the origin or thesnapshot, the majority of the volume is shared by the domU's.
With the current LVM2/device−mapper code, the origin can be grown, but not shrunk. With LVM1, youcannot resize the origin.
LVM 1 −> LVM 2 Upgrade Info
Make sure to remove snapshot LVs before upgrading from LVM 1 to LVM 2. (See Section 4.1)
LVM HOWTO
Chapter 3. Anatomy of LVM 8
Chapter 4. Frequently Asked Questions
4.1. LVM 2 FAQ
4.1.1. I have LVM 1 installed and running on my system. How do I start using LVM 2?4.1.2. Do I need a special lvm2 kernel module?4.1.3. I get errors about /dev/mapper/control when I try to use the LVM 2 tools. What's going on?4.1.4. Which commands and types of logical volumes are currently supported in LVM 2?4.1.5. Does LVM 2 use a different format from LVM 1 for it's ondisk representation of Volume Groups andLogical Volumes?4.1.6. Does LVM 2 support VGs and LVs created with LVM 1?4.1.7. Can I upgrade my LVM 1 based VGs and LVs to LVM 2 native format?4.1.8. I've upgraded to LVM 2, but the tools keep failing with out of memory errors. What gives?4.1.9. I have my root partition on an LV in LVM 1. How do I upgrade to LVM 2? And what happened tolvmcreate_initrd?4.1.10. How resilient is LVM to a sudden renumbering of physical hard disks?4.1.11. I'm trying to fill my vg, and vgdisplay/vgs says that I have 1.87 GB free, but when I do an lvcreate vg−L1.87G it says "insufficient free extends". What's going on?4.1.12. How are snapshots in LVM2 different from LVM1?4.1.13. What is the maximum size of a single LV?
4.1.1. I have LVM 1 installed and running on my system. How do I start using LVM 2?
Here's the Quick Start instructions :)
Start by removing any snapshot LVs on the system. These are not handled by LVM 2 and will preventthe origin from being activated when LVM 2 comes up.
1.
Make sure you have some way of booting the system other than from your standard boot partition.Have the LVM 1 tools, standard system tools (mount) and an LVM 1 compatible kernel on it in caseyou need to get back and fix some things.
2.
Grab the LVM 2 tools source and the device mapper source and compile them. You need to install thedevice mapper library using "make install" before compiling the LVM 2 tools. Also copy thedm/scripts/devmap_mknod.sh script into /sbin. I recommend only installing the 'lvm' binary for nowso you have access to the LVM 1 tools if you need them. If you have access to packages for LVM 2and device−mapper, you can install those instead, but beware of them overwriting your LVM 1 toolset.
3.
Get a device mapper compatible kernel, either built in or as a kernel module.4. Figure out where LVM 1 was activated in your startup scripts. Make sure the device−mapper moduleis loaded by that point (if you are using device mapper as a module) and add'/sbin/devmap_mknod.sh; lvm vgscan; lvm vgchange −ay' afterward.
5.
Install the kernel with device mapper support in it. Reboot. If all goes well, you should be runningwith lvm2.
6.
4.1.2. Do I need a special lvm2 kernel module?
No. You need device−mapper. The lvm2 tools use device−mapper to interface with the kernel and do all theirdevice mapping (hence the name device−mapper). As long as you have device−mapper, you should be able touse LVM2.
Chapter 4. Frequently Asked Questions 9
4.1.3. I get errors about /dev/mapper/control when I try to use the LVM 2 tools. What's going on?
The primary cause of this is not having run the "dmsetup mknodes" after rebooting into a dm capable kernel.This script generates the control node for device mapper.
If you don't have the "dmsetup mknodes", don't despair! (Though you should probably upgrade to the latestversion of device−mapper.) It's pretty easy to create the /dev/mapper/control file on your own:
Make sure you have the device−mapper module loaded (if you didn't build it into your kernel).1. Run# cat /proc/misc | grep device−mapper | awk '{print $1}'
and note the number printed. (If you don't get any output, refer to step 1.)
2.
Run# mkdir /dev/mapper
− if you get an error saying /dev/mapper already exists, make sure it's a directory and move on.
3.
Run# mknod /dev/mapper/control c 10 $number
where $number is the number printed in step 2.
4.
You should be all set now!
4.1.4. Which commands and types of logical volumes are currently supported in LVM 2?
If you are using the stable 2.4 device mapper patch from the lvm2 tarball, all the major functionality you'dexpect using lvm1 is supported with the lvm2 tools. (You still need to remove snapshots before upgradingfrom lvm1 to lvm2)
If you are using the version of device mapper in the 2.6 kernel.org kernel series the following commands andLV types are not supported:
pvmove• snapshots•
The beginnings of support for these features are in the unstable device mapper patches maintained by JoeThornber.
4.1.5. Does LVM 2 use a different format from LVM 1 for it's ondisk representation of Volume Groups andLogical Volumes?
Yes. LVM 2 uses lvm 2 format metadata. This format is much more flexible than the LVM 1 format metadata,removing or reducing most of the limitations LVM 1 had.
4.1.6. Does LVM 2 support VGs and LVs created with LVM 1?
Yes. LVM 2 will activate and operate on VG and LVs created with LVM 1. The exception to this is snapshotscreated with LVM 1 − these should be removed before upgrading. Snapshots that remain after upgrading willhave to be removed before their origins can be activated by LVM 2.
4.1.7. Can I upgrade my LVM 1 based VGs and LVs to LVM 2 native format?
LVM HOWTO
Chapter 4. Frequently Asked Questions 10
Yes. Use vgconvert to convert your VG and all LVs contained within it to the new lvm 2 format metadata. Bewarned that it's not always possible to revert back to lvm 1 format metadata.
4.1.8. I've upgraded to LVM 2, but the tools keep failing with out of memory errors. What gives?
One possible cause of this is that some versions of LVM 1 (The user that reported this bug originally wasusing Mandrake 9.2, but it is not necessarily limited to that distribution) did not put a UUID into the PV andVG structures as they were supposed to. The most current versions of the LVM 2 tools automatically fillUUIDs in for the structures if they see they are missing, so you should grab a more current version and yourproblem should be solved. If not, post to the linux−lvm mailing list
4.1.9. I have my root partition on an LV in LVM 1. How do I upgrade to LVM 2? And what happened tolvmcreate_initrd?
Upgrading to LVM 2 is a bit trickier with root on LVM, but it's not impossible. You need to queue up a kernelwith device−mapper support and install the lvm2 tools (you might want to make a backup of the lvm 1 tools,or find a rescue disk with the lvm tools built in, in case you need them before you're done). Then find amkinitrd script that has support for your distro and lvm 2.
Currently, this is the list of mkinitrd scripts that I know support lvm2, sorted by distro:
mkinitrd scripts with lvm 2 support
fedoraThe latest fedora core 2 mkinitrd handles lvm2, but it relies on a statically built lvm binary from thelatest lvm 2 tarball.
Redhat 9 users may be able to use this as wellDebian
There is an unofficial version hereGeneric
There is a version in the lvm2 source tree under scripts/lvm2_createinitrd/. See thedocumentation in that directory for more details.
4.1.10. How resilient is LVM to a sudden renumbering of physical hard disks?
It's fine − LVM identifies PVs by UUID, not by device name.
Each disk (PV) is labeled with a UUID, which uniquely identifies it to the system. 'vgscan' identifies this aftera new disk is added that changes your drive numbering. Most distros run vgscan in the lvm startup scripts tocope with this on reboot after a hardware addition. If you're doing a hot−add, you'll have to run this by hand Ithink. On the other hand, if your vg is activated and being used, the renumbering should not affect it at all. It'sonly the activation that needs the identifier, and the worst case scenario is that the activation will fail without avgscan with a complaint about a missing PV.
The failure or removal of a drive that LVM is currently using will cause problems with current use andfuture activations of the VG that was using it.
4.1.11. I'm trying to fill my vg, and vgdisplay/vgs says that I have 1.87 GB free, but when I do an lvcreate vg−L1.87G it says "insufficient free extends". What's going on?
LVM HOWTO
Chapter 4. Frequently Asked Questions 11
The 1.87 GB figure is rounded to 2 decimal places, so it's probably 1.866 GB or something. This is ahuman−readable output to give you a general idea of how big the VG is. If you want to specify an exact size,you must use extents instead of some multiple of bytes.
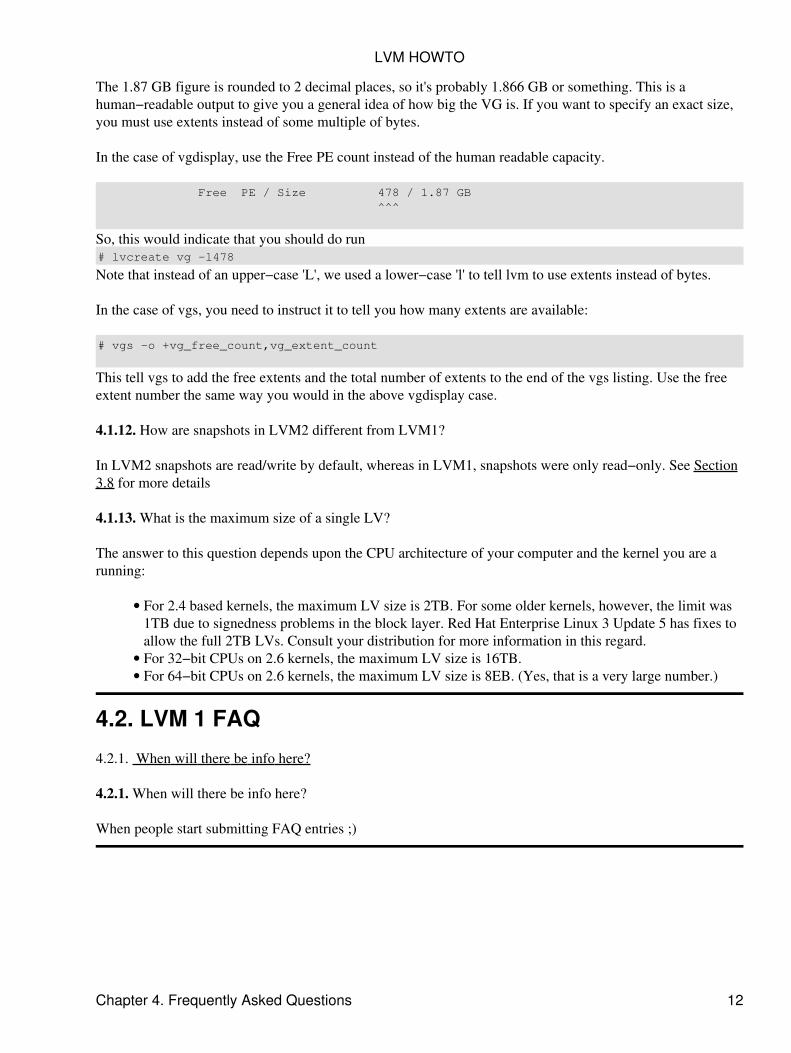
In the case of vgdisplay, use the Free PE count instead of the human readable capacity.
Free PE / Size 478 / 1.87 GB ^^^
So, this would indicate that you should do run# lvcreate vg −l478
Note that instead of an upper−case 'L', we used a lower−case 'l' to tell lvm to use extents instead of bytes.
In the case of vgs, you need to instruct it to tell you how many extents are available:
# vgs −o +vg_free_count,vg_extent_count
This tell vgs to add the free extents and the total number of extents to the end of the vgs listing. Use the freeextent number the same way you would in the above vgdisplay case.
4.1.12. How are snapshots in LVM2 different from LVM1?
In LVM2 snapshots are read/write by default, whereas in LVM1, snapshots were only read−only. See Section3.8 for more details
4.1.13. What is the maximum size of a single LV?
The answer to this question depends upon the CPU architecture of your computer and the kernel you are arunning:
For 2.4 based kernels, the maximum LV size is 2TB. For some older kernels, however, the limit was1TB due to signedness problems in the block layer. Red Hat Enterprise Linux 3 Update 5 has fixes toallow the full 2TB LVs. Consult your distribution for more information in this regard.
•
For 32−bit CPUs on 2.6 kernels, the maximum LV size is 16TB.• For 64−bit CPUs on 2.6 kernels, the maximum LV size is 8EB. (Yes, that is a very large number.)•
4.2. LVM 1 FAQ
4.2.1. When will there be info here?
4.2.1. When will there be info here?
When people start submitting FAQ entries ;)
LVM HOWTO
Chapter 4. Frequently Asked Questions 12
Chapter 5. Acquiring LVMThe first thing you need to do is get a copy of LVM.
Download via FTP a tarball of LVM.• Download the source that is under active development via CVS•
5.1. Download the source
Device Mapper• LVM 2
Make sure you also grab the device mapper source
•
LVM 1•
The LVM 1 kernel patch must be generated using the LVM 1 source. More information regarding thiscan be found in Section 6.2
5.2. Download the development source via CVS
Note: the state of code in the CVS repository fluctuates wildly. It will contain bugs. Maybe ones that willcrash LVM or the kernel. It may not even compile. Consider it alpha−quality code. You could lose data. Youhave been warned.
5.3. Before You Begin
To follow the development progress of LVM, subscribe to the LVM mailing lists, linux−lvm and theappropriate commit list (see Section C.1).
To build LVM from the CVS sources, you must have several GNU tools:
the CVS client version 1.9 or better• GCC 2.95.2• GNU make 3.79• autoconf, version 2.13 or better•
5.4. Initial Setup
To make life easier in the future with regards to updating the CVS tree create the file $HOME/.cvsrc andinsert the following lines. This configures useful defaults for the three most commonly used CVS commands.Do this now before proceeding any further.
diff −u −b −Bcheckout −Pupdate −d −P
Chapter 5. Acquiring LVM 13
Also, if you are on a slow net link (like a dialup), you will want to add a line containing cvs −z5 in this file.This turns on a useful compression level for all CVS commands.
5.5. Checking Out Source Code
Device Mapper library and tools
The device mapper library is required to build LVM 2.
The first time you download from cvs, you must login
# cvs −d :pserver:[email protected]:/cvs/dm login cvs
The password is `cvs'. The command outputs nothing if successful and an error message if it fails.Only an initial login is required. All subsequent CVS commands read the password stored in the file$HOME/.cvspass for authentication.
Use the following to check out a copy of the code
# cvs −d :pserver:[email protected]:/cvs/dm checkout device−mapper
This will create a new directory device−mapper in your current directory containing the latest,up−to−the−minute device mapper code.
•
LVM 2
The first time you download from cvs, you must login
# cvs −d :pserver:[email protected]:/cvs/lvm2 login cvs
The password is `cvs'. The command outputs nothing if successful and an error message if it fails.Only an initial login is required. All subsequent CVS commands read the password stored in the file$HOME/.cvspass for authentication.
Use the following to check out a copy of the code
# cvs −d :pserver:[email protected]:/cvs/lvm2 checkout LVM2
This will create a new directory LVM2 in your current directory containing the latest,up−to−the−minute LVM 2 code.
•
LVM 1
The first time you download from cvs, you must login
# cvs −d :pserver:[email protected]:/cvs/lvm login cvs
The password is `cvs'. The command outputs nothing if successful and an error message if it fails.Only an initial login is required. All subsequent CVS commands read the password stored in the file
•
LVM HOWTO
Chapter 5. Acquiring LVM 14
$HOME/.cvspass for authentication.
Use the following to check out a copy of the code
# cvs −d :pserver:[email protected]:/cvs/lvm checkout LVM
This will create a new directory LVM in your current directory containing the latest,up−to−the−minute LVM 1 code.
CVS commands work from anywhere inside the source tree, and recurse downward. So if you happen to issuean update from inside the `tools' subdirectory it will work fine, but only update the tools directory and it'ssubdirectories. In the following command examples it is assumed that you are at the top of the source tree.
5.6. Code Updates
Code changes are made fairly frequently in the CVS repository. Announcements of this are automatically sentto the lvm−commit list.
You can update your copy of the sources to match the master repository with the update command. It is notnecessary to check out a new copy. Using update is significantly faster and simpler, as it will download onlypatches instead of entire files and update only those files that have changed since your last update. It willautomatically merge any changes in the CVS repository with any local changes you have made as well. Justcd to the directory you'd like to update and then type the following.
# cvs update
If you did not specify a tag when you checked out the source, this will update your sources to the latestversion on the main branch. If you specified a branch tag, it will update to the latest version on that branch. Ifyou specified a version tag, it will not do anything.
5.7. Starting a Project
Discuss your ideas on the developers list before you start. Someone may be working on the same thing youhave in mind or they may have some good ideas about how to go about it.
5.8. Hacking the Code
So, have you found a bug you want to fix? Want to implement a feature from the TODO list? Got a newfeature to implement? Hacking the code couldn't be easier. Just edit your copy of the sources. No need to copyfiles to .orig or anything. CVS has copies of the originals.
When you have your code in a working state and have tested as best you can with the hardware you have,generate a patch against the current sources in the CVS repository.
# cvs update # cvs diff > patchfile
Mail the patch to the linux−lvm or dm−devel list (Section C.1) with a description of what changes or additions
LVM HOWTO
Chapter 5. Acquiring LVM 15
you implemented.
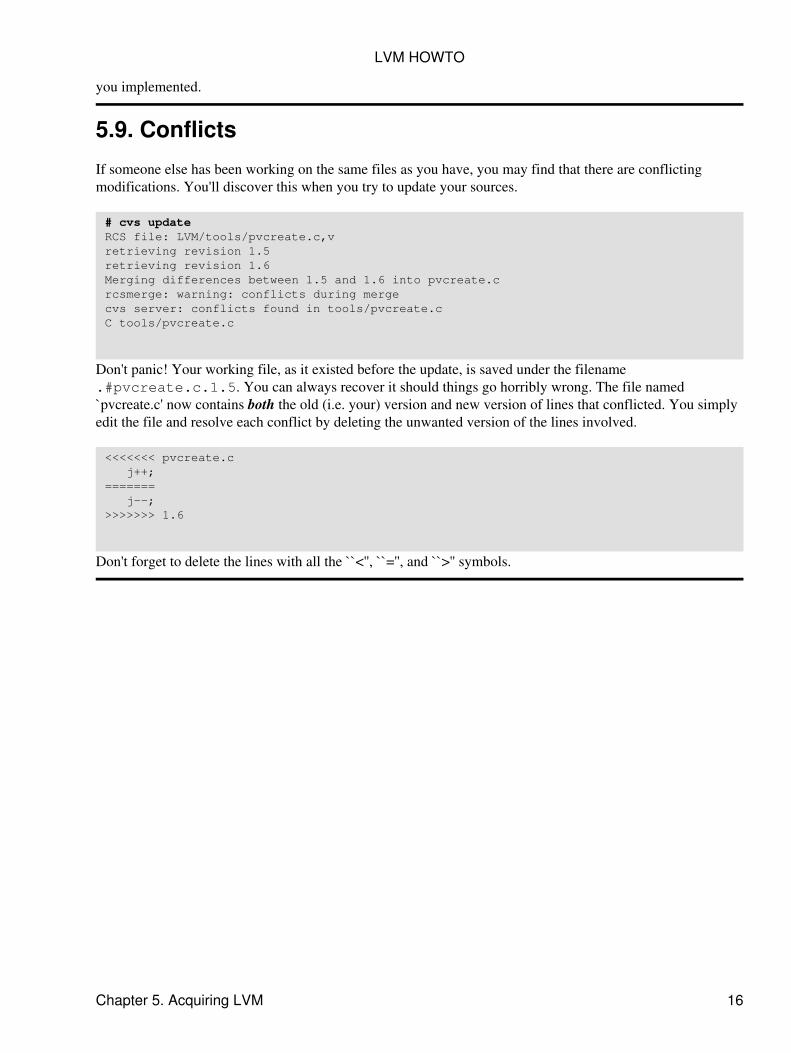
5.9. Conflicts
If someone else has been working on the same files as you have, you may find that there are conflictingmodifications. You'll discover this when you try to update your sources.
# cvs update RCS file: LVM/tools/pvcreate.c,v
retrieving revision 1.5 retrieving revision 1.6 Merging differences between 1.5 and 1.6 into pvcreate.c rcsmerge: warning: conflicts during merge cvs server: conflicts found in tools/pvcreate.c C tools/pvcreate.c
Don't panic! Your working file, as it existed before the update, is saved under the filename.#pvcreate.c.1.5. You can always recover it should things go horribly wrong. The file named`pvcreate.c' now contains both the old (i.e. your) version and new version of lines that conflicted. You simplyedit the file and resolve each conflict by deleting the unwanted version of the lines involved.
<<<<<<< pvcreate.c j++; ======= j−−; >>>>>>> 1.6
Don't forget to delete the lines with all the ``<'', ``='', and ``>'' symbols.
LVM HOWTO
Chapter 5. Acquiring LVM 16
Chapter 6. Building the kernel modules
6.1. Building the device−mapper module
Device mapper is in 2.6.9 and later, so you just need to make sure it is enabled either as a module or builtin tothe kernel. Look for /sys/class/misc/device−mapper or look in /proc/devices for a device−mapper entry to seeif it is enabled. If neither are there, try modprobe dm_mod, then check again. For versions previous to 2.6.9,either you or your distro must patch the kernel to support it. Check the device mapper web page for moreinformation.
6.2. Build the LVM 1 kernel module
To use LVM 1 you will have to build the LVM 1 kernel module (recommended), or if you prefer rebuild thekernel with the LVM 1 code statically linked into it.
Your Linux system is probably based on one of the popular distributions (eg., Red Hat, SuSE, Debian) inwhich case it is possible that you already have the LVM 1 module. Check the version of the tools you have onyour system. You can do this by running any of the LVM command line tools with the '−h' flag. Use pvscan−h if you don't know any of the commands. If the version number listed at the top of the help listing is LVM1.0.8, use your current setup and avoid the rest of this section.
6.2.1. Building a patch for your kernel
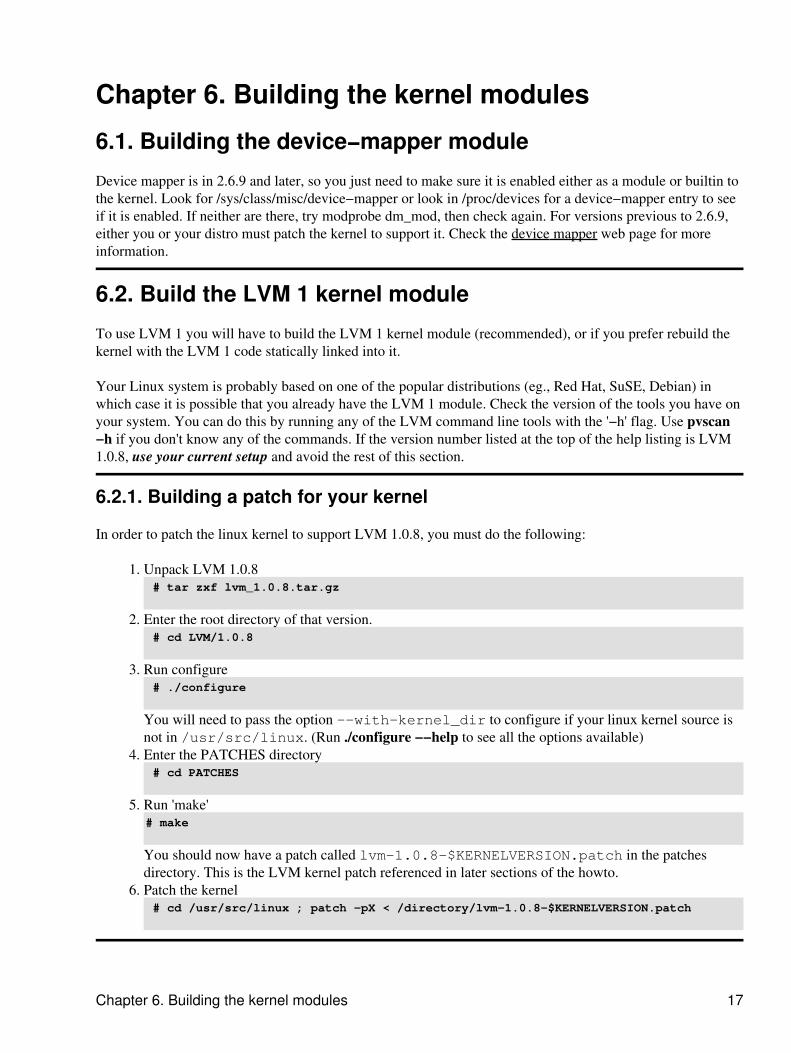
In order to patch the linux kernel to support LVM 1.0.8, you must do the following:
Unpack LVM 1.0.8 # tar zxf lvm_1.0.8.tar.gz
1.
Enter the root directory of that version. # cd LVM/1.0.8
2.
Run configure # ./configure
You will need to pass the option −−with−kernel_dir to configure if your linux kernel source isnot in /usr/src/linux. (Run ./configure −−help to see all the options available)
3.
Enter the PATCHES directory # cd PATCHES
4.
Run 'make'# make
You should now have a patch called lvm−1.0.8−$KERNELVERSION.patch in the patchesdirectory. This is the LVM kernel patch referenced in later sections of the howto.
5.
Patch the kernel # cd /usr/src/linux ; patch −pX < /directory/lvm−1.0.8−$KERNELVERSION.patch
6.
Chapter 6. Building the kernel modules 17
6.2.2. Building the LVM module for Linux 2.2.17+
The 2.2 series kernel needs to be patched before you can start building, look elsewhere for instructions on howto patch your kernel.
Patches:
rawio patch
Stephen Tweedie's raw_io patch which can be found athttp://www.kernel.org/pub/linux/kernel/people/sct/raw−io
1.
lvm patch
The relevant LVM 1 patch which should be built out of the PATCHES sub−directory of the LVMdistribution. More information can be found in Section 6.2.1, Building a patch for your kernel.
2.
Once the patches have been correctly applied, you need to make sure that the module is actually built, LVM 1lives under the block devices section of the kernel config, you should probably request that the LVM /procinformation is compiled as well.
Build the kernel modules as usual.
6.2.3. Building the LVM modules for Linux 2.4
The 2.4 kernel comes with LVM 1 already included although you should check at the Sistina web site forupdates, (eg. v2.4.9 kernels and earlier must have the latest LVM 1 patch applied ). When configuring yourkernel look for LVM 1 under Multi−device support (RAID and LVM). LVM 1 can be compiled into thekernel or as a module. Build your kernel and modules and install then in the usual way. If you chose to buildLVM as a module it will be called lvm−mod.o
If you want to use snapshots with ReiserFS, make sure you apply the linux−2.4.x−VFS−lock patch(there are copies of this in the LVM/1.0.8/PATCHES directory.)
6.2.4. Checking the proc file system
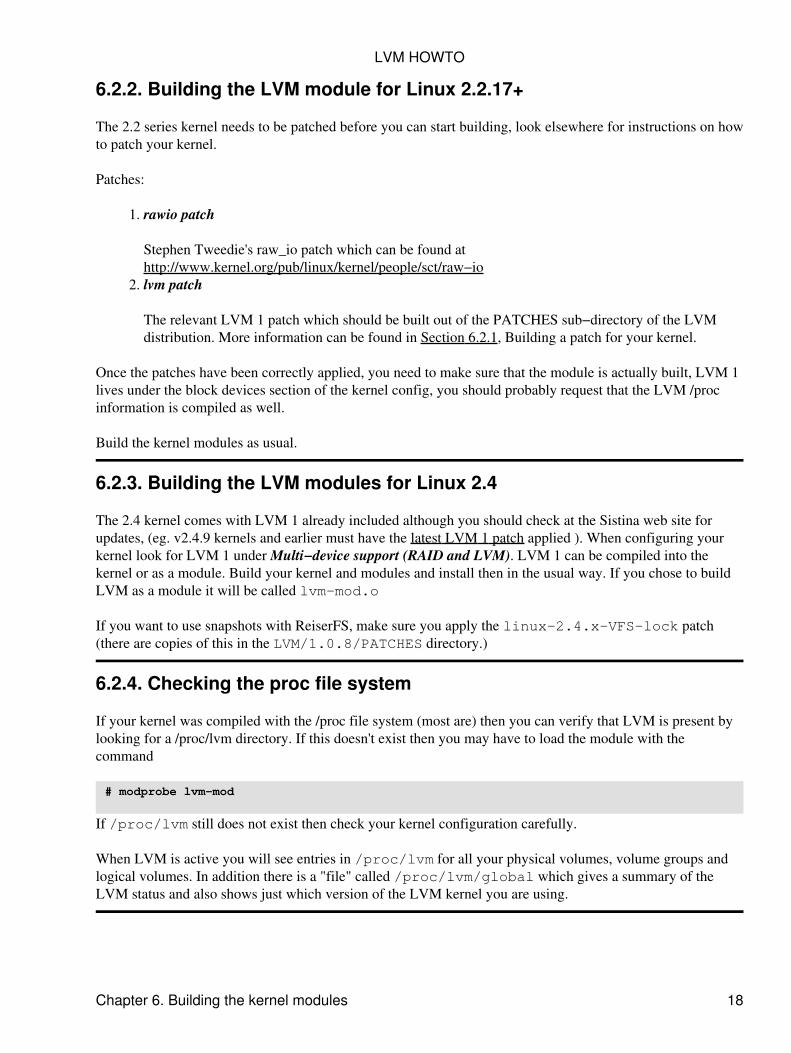
If your kernel was compiled with the /proc file system (most are) then you can verify that LVM is present bylooking for a /proc/lvm directory. If this doesn't exist then you may have to load the module with thecommand
# modprobe lvm−mod
If /proc/lvm still does not exist then check your kernel configuration carefully.
When LVM is active you will see entries in /proc/lvm for all your physical volumes, volume groups andlogical volumes. In addition there is a "file" called /proc/lvm/global which gives a summary of theLVM status and also shows just which version of the LVM kernel you are using.
LVM HOWTO
Chapter 6. Building the kernel modules 18
Chapter 7. LVM 1 Boot time scriptsBoot−time scripts are not provided as part of the LVM distribution, however these are quite simple to do foryourself.
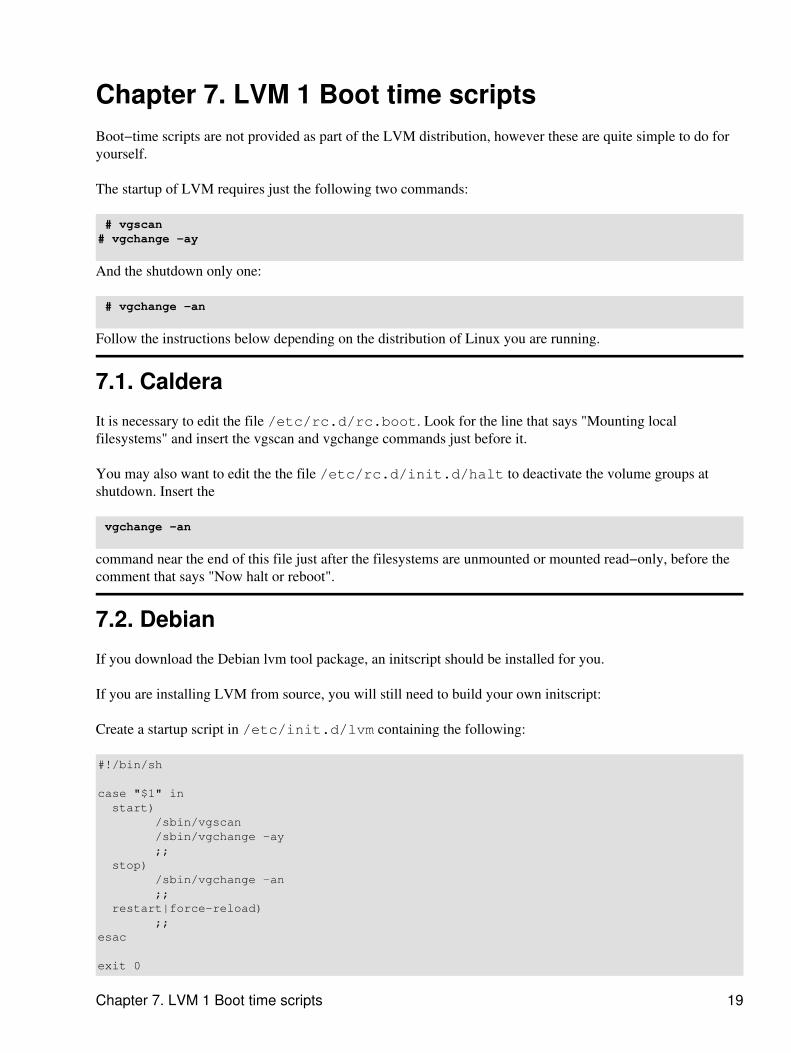
The startup of LVM requires just the following two commands:
# vgscan# vgchange −ay
And the shutdown only one:
# vgchange −an
Follow the instructions below depending on the distribution of Linux you are running.
7.1. Caldera
It is necessary to edit the file /etc/rc.d/rc.boot. Look for the line that says "Mounting localfilesystems" and insert the vgscan and vgchange commands just before it.
You may also want to edit the the file /etc/rc.d/init.d/halt to deactivate the volume groups atshutdown. Insert the
vgchange −an
command near the end of this file just after the filesystems are unmounted or mounted read−only, before thecomment that says "Now halt or reboot".
7.2. Debian
If you download the Debian lvm tool package, an initscript should be installed for you.
If you are installing LVM from source, you will still need to build your own initscript:
Create a startup script in /etc/init.d/lvm containing the following:
#!/bin/sh
case "$1" in start) /sbin/vgscan /sbin/vgchange −ay ;; stop) /sbin/vgchange −an ;; restart|force−reload) ;;esac
exit 0
Chapter 7. LVM 1 Boot time scripts 19
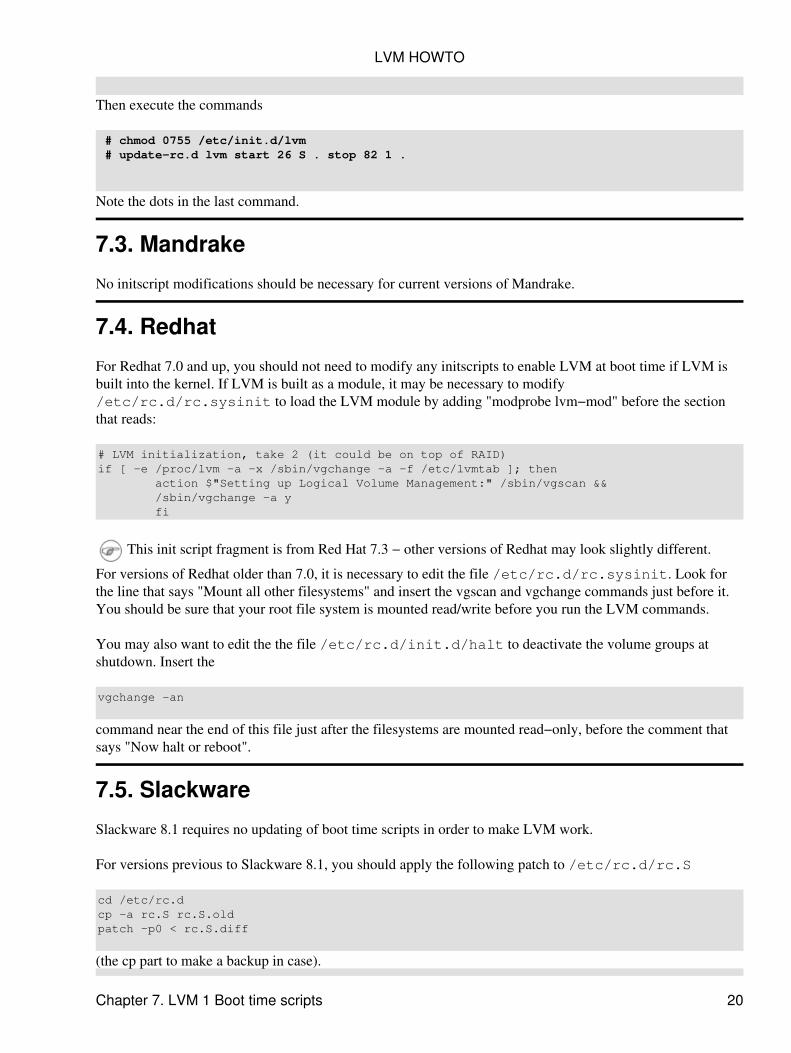
Then execute the commands
# chmod 0755 /etc/init.d/lvm # update−rc.d lvm start 26 S . stop 82 1 .
Note the dots in the last command.
7.3. Mandrake
No initscript modifications should be necessary for current versions of Mandrake.
7.4. Redhat
For Redhat 7.0 and up, you should not need to modify any initscripts to enable LVM at boot time if LVM isbuilt into the kernel. If LVM is built as a module, it may be necessary to modify/etc/rc.d/rc.sysinit to load the LVM module by adding "modprobe lvm−mod" before the sectionthat reads:
# LVM initialization, take 2 (it could be on top of RAID)if [ −e /proc/lvm −a −x /sbin/vgchange −a −f /etc/lvmtab ]; then action $"Setting up Logical Volume Management:" /sbin/vgscan && /sbin/vgchange −a y fi
This init script fragment is from Red Hat 7.3 − other versions of Redhat may look slightly different.
For versions of Redhat older than 7.0, it is necessary to edit the file /etc/rc.d/rc.sysinit. Look forthe line that says "Mount all other filesystems" and insert the vgscan and vgchange commands just before it.You should be sure that your root file system is mounted read/write before you run the LVM commands.
You may also want to edit the the file /etc/rc.d/init.d/halt to deactivate the volume groups atshutdown. Insert the
vgchange −an
command near the end of this file just after the filesystems are mounted read−only, before the comment thatsays "Now halt or reboot".
7.5. Slackware
Slackware 8.1 requires no updating of boot time scripts in order to make LVM work.
For versions previous to Slackware 8.1, you should apply the following patch to /etc/rc.d/rc.S
cd /etc/rc.dcp −a rc.S rc.S.oldpatch −p0 < rc.S.diff
(the cp part to make a backup in case).
LVM HOWTO
Chapter 7. LVM 1 Boot time scripts 20

−−−−− snip snip file: rc.S.diff−−−−−−−−−−−−−−−−−− rc.S.or Tue Jul 17 18:11:20 2001+++ rc.S Tue Jul 17 17:57:36 2001@@ −4,6 +4,7 @@ # # Mostly written by: Patrick J. Volkerding, <[email protected]> #+# Added LVM support <[email protected]>
PATH=/sbin:/usr/sbin:/bin:/usr/bin
@@ −28,19 +29,21 @@ READWRITE=yes fi
+ # Check the integrity of all filesystems if [ ! READWRITE = yes ]; then− /sbin/fsck −A −a+ /sbin/fsck −a /+ # Check only the root fs first, but no others # If there was a failure, drop into single−user mode. if [ ? −gt 1 ] ; then echo echo− echo "*******************************************************"− echo "*** An error occurred during the file system check. ***"− echo "*** You will now be given a chance to log into the ***"− echo "*** system in single−user mode to fix the problem. ***"− echo "*** Running 'e2fsck −v −y <partition>' might help. ***"− echo "*******************************************************"+ echo "************************************************************"+ echo "*** An error occurred during the root file system check. ***"+ echo "*** You will now be given a chance to log into the ***"+ echo "*** system in single−user mode to fix the problem. ***"+ echo "*** Running 'e2fsck −v −y <partition>' might help. ***"+ echo "************************************************************" echo echo "Once you exit the single−user shell, the system will reboot." echo@@ −82,6 +85,44 @@ echo −n "get into your machine and start looking for the problem. " read junk; fi+ # okay / fs is clean, and mounted as rw+ # This was an addition, limits vgscan to /proc thus+ # speeding up the scan immensely.+ /sbin/mount /proc++ # Initialize Logical Volume Manager+ /sbin/vgscan+ /sbin/vgchange −ay++ /sbin/fsck −A −a −R+ #Check all the other filesystem, including the LVM's, excluding /++ # If there was a failure, drop into single−user mode.+ if [ ? −gt 1 ] ; then+ echo+ echo+ echo "*******************************************************"+ echo "*** An error occurred during the file system check. ***"
LVM HOWTO
Chapter 7. LVM 1 Boot time scripts 21
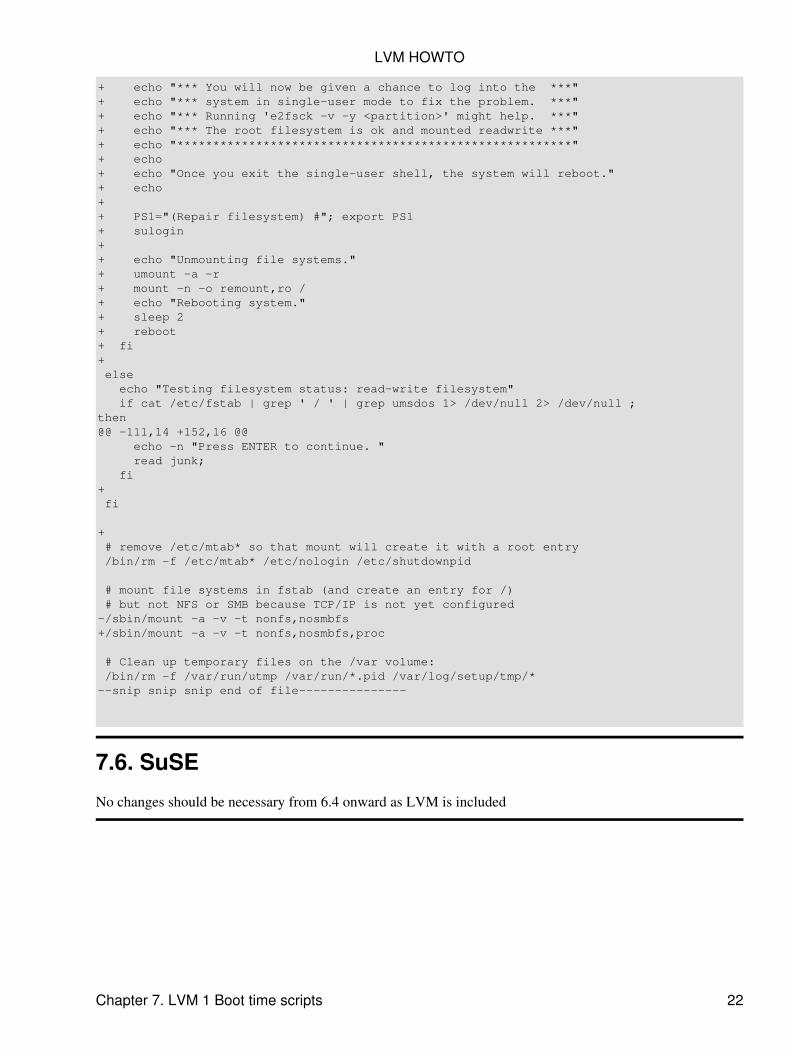
+ echo "*** You will now be given a chance to log into the ***"+ echo "*** system in single−user mode to fix the problem. ***"+ echo "*** Running 'e2fsck −v −y <partition>' might help. ***"+ echo "*** The root filesystem is ok and mounted readwrite ***"+ echo "*******************************************************"+ echo+ echo "Once you exit the single−user shell, the system will reboot."+ echo++ PS1="(Repair filesystem) #"; export PS1+ sulogin++ echo "Unmounting file systems."+ umount −a −r+ mount −n −o remount,ro /+ echo "Rebooting system."+ sleep 2+ reboot+ fi+ else echo "Testing filesystem status: read−write filesystem" if cat /etc/fstab | grep ' / ' | grep umsdos 1> /dev/null 2> /dev/null ;then@@ −111,14 +152,16 @@ echo −n "Press ENTER to continue. " read junk; fi+ fi
+ # remove /etc/mtab* so that mount will create it with a root entry /bin/rm −f /etc/mtab* /etc/nologin /etc/shutdownpid
# mount file systems in fstab (and create an entry for /) # but not NFS or SMB because TCP/IP is not yet configured−/sbin/mount −a −v −t nonfs,nosmbfs+/sbin/mount −a −v −t nonfs,nosmbfs,proc
# Clean up temporary files on the /var volume: /bin/rm −f /var/run/utmp /var/run/*.pid /var/log/setup/tmp/*−−snip snip snip end of file−−−−−−−−−−−−−−−
7.6. SuSE
No changes should be necessary from 6.4 onward as LVM is included
LVM HOWTO
Chapter 7. LVM 1 Boot time scripts 22
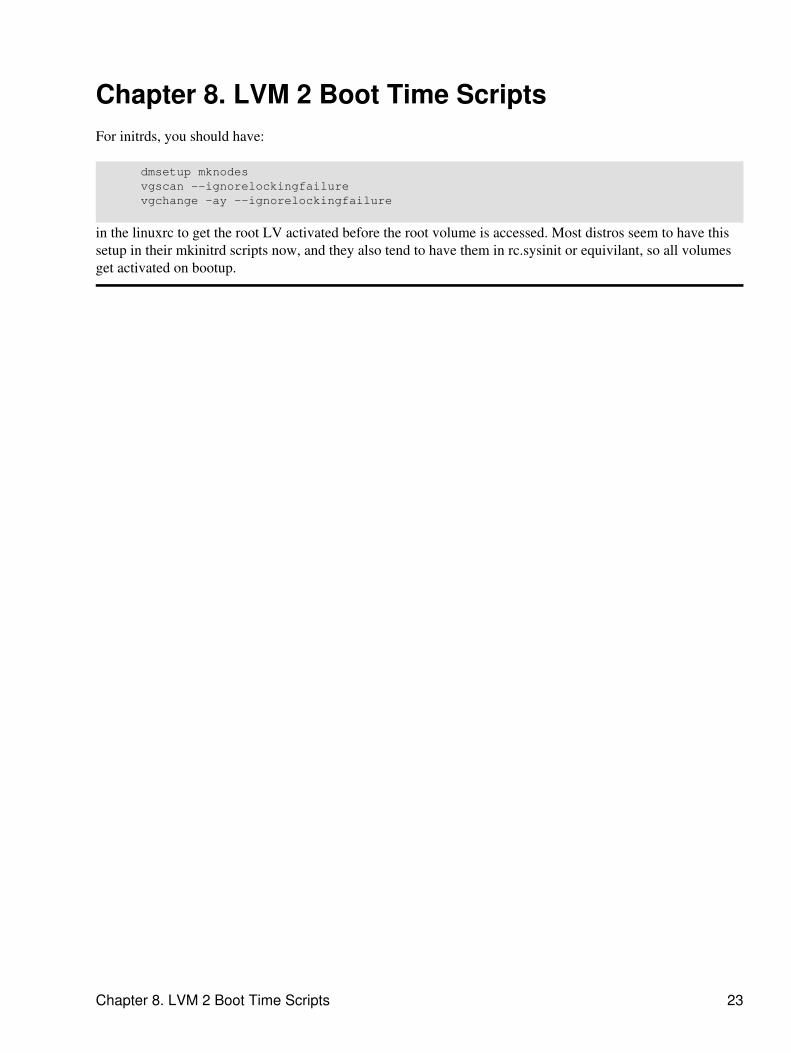
Chapter 8. LVM 2 Boot Time ScriptsFor initrds, you should have:
dmsetup mknodes vgscan −−ignorelockingfailure vgchange −ay −−ignorelockingfailure
in the linuxrc to get the root LV activated before the root volume is accessed. Most distros seem to have thissetup in their mkinitrd scripts now, and they also tend to have them in rc.sysinit or equivilant, so all volumesget activated on bootup.
Chapter 8. LVM 2 Boot Time Scripts 23
Chapter 9. Building LVM from the Source
9.1. Make LVM library and tools
Change into the LVM directory and do a ./configure followed by make. This will make all of the librariesand programs.
If the need arises you can change some options with the configure script. Do a ./configure −−help todetermine which options are supported. Most of the time this will not be necessary.
There should be no errors from the build process. If there are, see Reporting Errors and Bugs on how to reportthis.
You are welcome to fix them and send us the patches too. Patches are generally sent to the linux−lvm list.
9.2. Install LVM library and tools
After the LVM source compiles properly, simply run make install to install the LVM library and tools ontoyour system.
9.3. Removing LVM library and tools
To remove the library and tools you just installed, run make remove. You must have the original source treeyou used to install LVM to use this feature.
Chapter 9. Building LVM from the Source 24
Chapter 10. Transitioning from previous versionsof LVM to LVM 1.0.8Transitioning from previous versions of LVM to LVM 1.0.8 should be fairly painless. We have come up witha method to read in PV version 1 metadata (LVM 0.9.1 Beta7 and earlier) as well as PV version 2 metadata(LVM 0.9.1 Beta8 and LVM 1.0).
Warning: New PVs initialized with LVM 1.0.8 are created with the PV version 1 on−disk structure. Thismeans that LVM 0.9.1 Beta8 and LVM 1.0 cannot read or use PVs created with 1.0.8.
10.1. Upgrading to LVM 1.0.8 with a non−LVM root partition
There are just a few simple steps to transition this setup, but it is still recommended that you backup your databefore you try it. You have been warned.
Build LVM kernel and modules
Follow the steps outlined in Chapter 5 − Section 6.2 for instructions on how to get and build thenecessary kernel components of LVM.
1.
Build the LVM user tools
Follow the steps in Chapter 9 to build and install the user tools for LVM.
2.
Setup your init scripts
Make sure you have the proper init scripts setup as per Chapter 7.
3.
Boot into the new kernel
Make sure your boot−loader is setup to load the new LVM−enhanced kernel and, if you are usingLVM modules, put an insmod lvm−mod into your startup script OR extend /etc/modules.conf(formerly /etc/conf.modules) by adding
alias block−major−58 lvm−mod alias char−major−109 lvm−mod
to enable modprobe to load the LVM module (don't forget to enable kmod).
Reboot and enjoy.
4.
10.2. Upgrading to LVM 1.0.8 with an LVM root partition andinitrd
This is relatively straightforward if you follow the steps carefully. It is recommended you have a good backupand a suitable rescue disk handy just in case.
The "normal" way of running an LVM root file system is to have a single non−LVM partition called /bootwhich contains the kernel and initial RAM disk needed to start the system. The system I upgraded was asfollows:
Chapter 10. Transitioning from previous versions of LVM to LVM 1.0.8 25
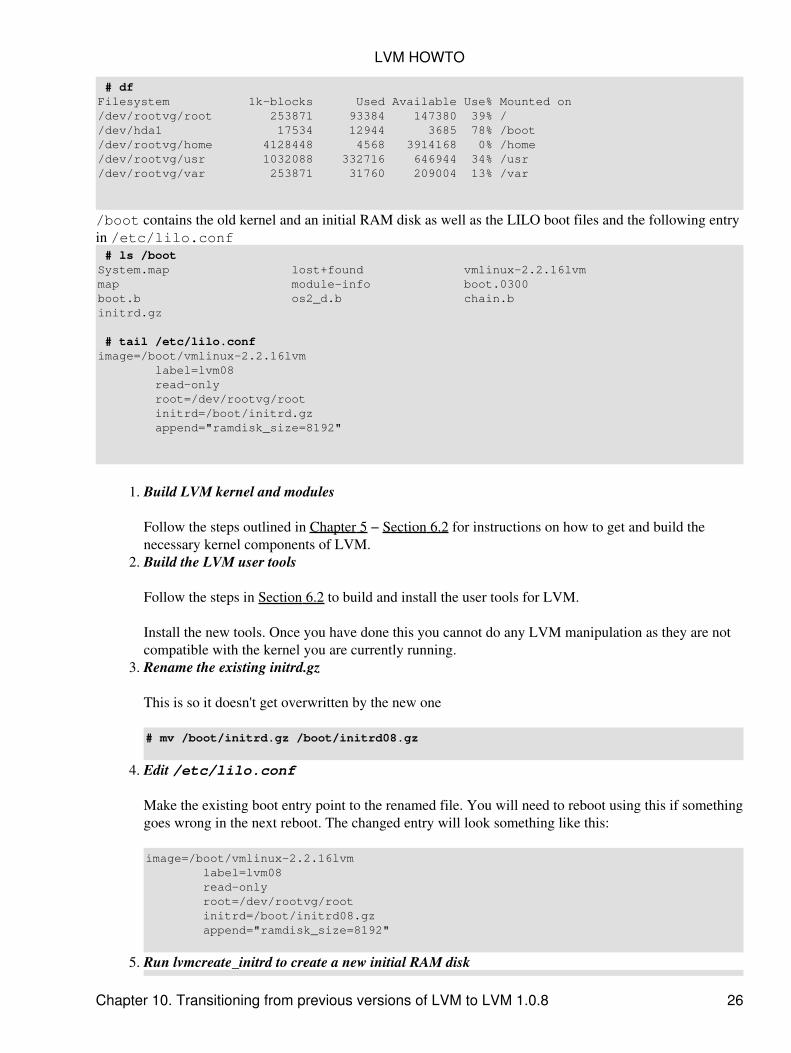
# dfFilesystem 1k−blocks Used Available Use% Mounted on/dev/rootvg/root 253871 93384 147380 39% //dev/hda1 17534 12944 3685 78% /boot/dev/rootvg/home 4128448 4568 3914168 0% /home/dev/rootvg/usr 1032088 332716 646944 34% /usr/dev/rootvg/var 253871 31760 209004 13% /var
/boot contains the old kernel and an initial RAM disk as well as the LILO boot files and the following entryin /etc/lilo.conf # ls /bootSystem.map lost+found vmlinux−2.2.16lvmmap module−info boot.0300 boot.b os2_d.b chain.binitrd.gz
# tail /etc/lilo.confimage=/boot/vmlinux−2.2.16lvm label=lvm08 read−only root=/dev/rootvg/root initrd=/boot/initrd.gz append="ramdisk_size=8192"
Build LVM kernel and modules
Follow the steps outlined in Chapter 5 − Section 6.2 for instructions on how to get and build thenecessary kernel components of LVM.
1.
Build the LVM user tools
Follow the steps in Section 6.2 to build and install the user tools for LVM.
Install the new tools. Once you have done this you cannot do any LVM manipulation as they are notcompatible with the kernel you are currently running.
2.
Rename the existing initrd.gz
This is so it doesn't get overwritten by the new one
# mv /boot/initrd.gz /boot/initrd08.gz
3.
Edit /etc/lilo.conf
Make the existing boot entry point to the renamed file. You will need to reboot using this if somethinggoes wrong in the next reboot. The changed entry will look something like this:
image=/boot/vmlinux−2.2.16lvm label=lvm08 read−only root=/dev/rootvg/root initrd=/boot/initrd08.gz append="ramdisk_size=8192"
4.
Run lvmcreate_initrd to create a new initial RAM disk5.
LVM HOWTO
Chapter 10. Transitioning from previous versions of LVM to LVM 1.0.8 26
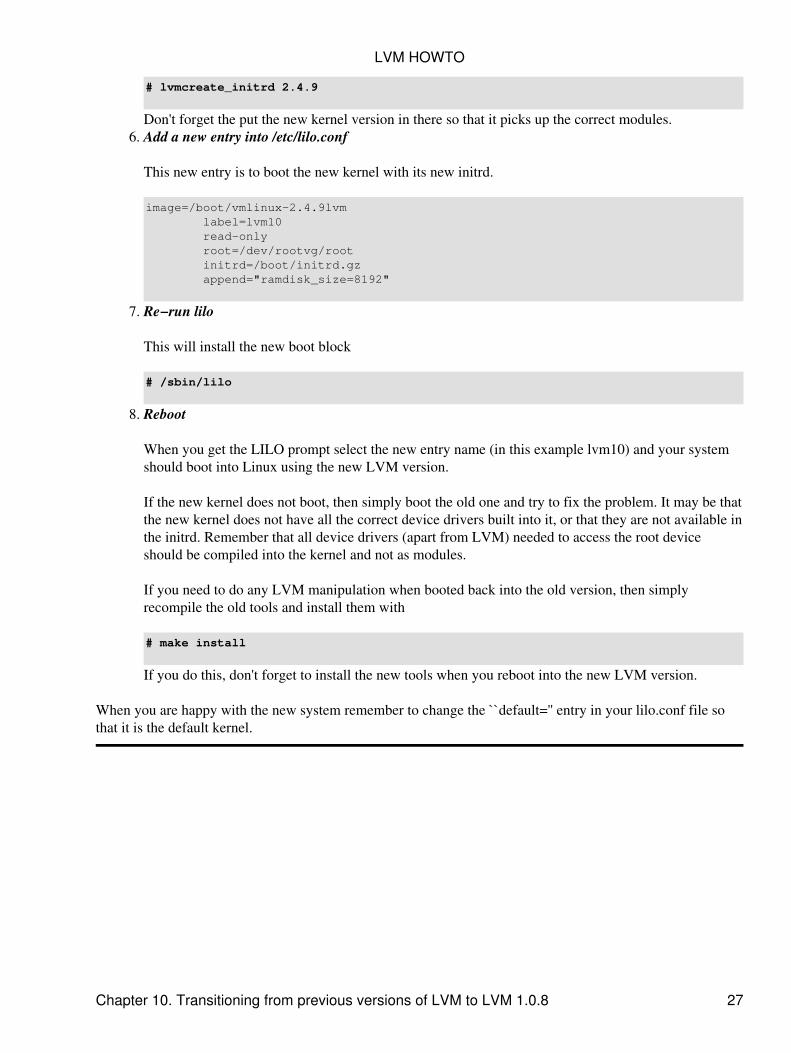
# lvmcreate_initrd 2.4.9
Don't forget the put the new kernel version in there so that it picks up the correct modules.Add a new entry into /etc/lilo.conf
This new entry is to boot the new kernel with its new initrd.
image=/boot/vmlinux−2.4.9lvm label=lvm10 read−only root=/dev/rootvg/root initrd=/boot/initrd.gz append="ramdisk_size=8192"
6.
Re−run lilo
This will install the new boot block
# /sbin/lilo
7.
Reboot
When you get the LILO prompt select the new entry name (in this example lvm10) and your systemshould boot into Linux using the new LVM version.
If the new kernel does not boot, then simply boot the old one and try to fix the problem. It may be thatthe new kernel does not have all the correct device drivers built into it, or that they are not available inthe initrd. Remember that all device drivers (apart from LVM) needed to access the root deviceshould be compiled into the kernel and not as modules.
If you need to do any LVM manipulation when booted back into the old version, then simplyrecompile the old tools and install them with
# make install
If you do this, don't forget to install the new tools when you reboot into the new LVM version.
8.
When you are happy with the new system remember to change the ``default='' entry in your lilo.conf file sothat it is the default kernel.
LVM HOWTO
Chapter 10. Transitioning from previous versions of LVM to LVM 1.0.8 27
Chapter 11. Common TasksThe following sections outline some common administrative tasks for an LVM system. This is no substitutefor reading the man pages.
11.1. Initializing disks or disk partitions
Before you can use a disk or disk partition as a physical volume you will have to initialize it:
For entire disks:
Run pvcreate on the disk:# pvcreate /dev/hdb
This creates a volume group descriptor at the start of disk.
Not Recommended
Using the whole disk as a PV (as opposed to a partition spanning the whole disk) is notrecommended because of the management issues it can create. Any other OS that looks at thedisk will not recognize the LVM metadata and display the disk as being free, so it is likely it willbe overwritten. LVM itself will work fine with whole disk PVs.
•
If you get an error that LVM can't initialize a disk with a partition table on it, first make sure that thedisk you are operating on is the correct one. If you are very sure that it is, run the following:
DANGEROUS
The following commands will destroy the partition table on the disk being operated on. Be verysure it is the correct disk.
# dd if=/dev/zero of=/dev/diskname bs=1k count=1# blockdev −−rereadpt /dev/diskname
•
For partitions:
When using LVM 1 on PCs with DOS partitions, set the partition type to 0x8e using fdisk or someother similar program. This step is unnecessary on PPC systems or when using LVM 2.
•
Run pvcreate on the partition:# pvcreate /dev/hdb1
This creates a volume group descriptor at the start of the /dev/hdb1 partition.
•
11.2. Creating a volume group
Use the 'vgcreate' program:
# vgcreate my_volume_group /dev/hda1 /dev/hdb1
NOTE: If you are using LVM 1 with devfs it is essential to use the full devfs name of the device rather thanthe symlinked name in /dev. So the above would be:
Chapter 11. Common Tasks 28
# vgcreate my_volume_group /dev/ide/host0/bus0/target0/lun0/part1 \ /dev/ide/host0/bus0/target1/lun0/part1
LVM 2 does not have this restriction.
You can also specify the extent size with this command if the default of 32MB is not suitable for you with the'−s' switch. In addition you can put some limits on the number of physical or logical volumes the volume canhave.
11.3. Activating a volume group
After rebooting the system or running vgchange −an, you will not be able to access your VGs and LVs. Toreactivate the volume group, run:
# vgchange −a y my_volume_group
11.4. Removing a volume group
Make sure that no logical volumes are present in the volume group, see later section for how to do this.
Deactivate the volume group:
# vgchange −a n my_volume_group
Now you actually remove the volume group:
# vgremove my_volume_group
11.5. Adding physical volumes to a volume group
Use 'vgextend' to add an initialized physical volume to an existing volume group.
# vgextend my_volume_group /dev/hdc1 ^^^^^^^^^ new physical volume
11.6. Removing physical volumes from a volume group
Make sure that the physical volume isn't used by any logical volumes by using then 'pvdisplay' command:
# pvdisplay /dev/hda1−−− Physical volume −−−PV Name /dev/hda1VG Name myvgPV Size 1.95 GB / NOT usable 4 MB [LVM: 122 KB]PV# 1PV Status availableAllocatable yes (but full)Cur LV 1
LVM HOWTO
Chapter 11. Common Tasks 29
PE Size (KByte) 4096Total PE 499Free PE 0Allocated PE 499PV UUID Sd44tK−9IRw−SrMC−MOkn−76iP−iftz−OVSen7
If the physical volume is still used you will have to migrate the data to another physical volume usingpvmove.
Then use 'vgreduce' to remove the physical volume:
# vgreduce my_volume_group /dev/hda1
11.7. Creating a logical volume
To create a 1500MB linear LV named 'testlv' and its block device special '/dev/testvg/testlv':
# lvcreate −L1500 −ntestlv testvg
To create a 100 LE large logical volume with 2 stripes and stripe size 4 KB.
# lvcreate −i2 −I4 −l100 −nanothertestlv testvg
If you want to create an LV that uses the entire VG, use vgdisplay to find the "Total PE" size, then use thatwhen running lvcreate.
# vgdisplay testvg | grep "Total PE"Total PE 10230# lvcreate −l 10230 testvg −n mylv
This will create an LV called mylv filling the testvg VG.
If you want the logical volume to be allocated from a specific physical volume in the volume group, specifythe PV or PVs at the end of the lvcreate command line.
# lvcreate −L 1500 −ntestlv testvg /dev/sdg
11.8. Removing a logical volume
A logical volume must be closed before it can be removed:
# umount /dev/myvg/homevol# lvremove /dev/myvg/homevollvremove −− do you really want to remove "/dev/myvg/homevol"? [y/n]: ylvremove −− doing automatic backup of volume group "myvg"lvremove −− logical volume "/dev/myvg/homevol" successfully removed
LVM HOWTO
Chapter 11. Common Tasks 30
11.9. Extending a logical volume
To extend a logical volume you simply tell the lvextend command how much you want to increase the size.You can specify how much to grow the volume, or how large you want it to grow to:
# lvextend −L12G /dev/myvg/homevollvextend −− extending logical volume "/dev/myvg/homevol" to 12 GBlvextend −− doing automatic backup of volume group "myvg"lvextend −− logical volume "/dev/myvg/homevol" successfully extended
will extend /dev/myvg/homevol to 12 Gigabytes.
# lvextend −L+1G /dev/myvg/homevollvextend −− extending logical volume "/dev/myvg/homevol" to 13 GBlvextend −− doing automatic backup of volume group "myvg"lvextend −− logical volume "/dev/myvg/homevol" successfully extended
will add another gigabyte to /dev/myvg/homevol.
After you have extended the logical volume it is necessary to increase the file system size to match. how youdo this depends on the file system you are using.
By default, most file system resizing tools will increase the size of the file system to be the size of theunderlying logical volume so you don't need to worry about specifying the same size for each of the twocommands.
ext2/ext3
Unless you have patched your kernel with the ext2online patch it is necessary to unmount the filesystem before resizing it. (It seems that the online resizing patch is rather dangerous, so use at yourown risk)
# umount /dev/myvg/homevol/dev/myvg/homevol # resize2fs /dev/myvg/homevol # mount /dev/myvg/homevol /home
If you don't have e2fsprogs 1.19 or later, you can download the ext2resize command fromext2resize.sourceforge.net and use that:
# umount /dev/myvg/homevol/dev/myvg/homevol # ext2resize /dev/myvg/homevol # mount /dev/myvg/homevol /home
For ext2 there is an easier way. LVM 1 ships with a utility called e2fsadm which does the lvextendand resize2fs for you (it can also do file system shrinking, see the next section).
LVM 2 Caveat
There is currently no e2fsadm equivalent for LVM 2 and the e2fsadm that ships with LVM 1does not work with LVM 2.
so the single command# e2fsadm −L+1G /dev/myvg/homevol
1.
LVM HOWTO
Chapter 11. Common Tasks 31
is equivalent to the two commands:# lvextend −L+1G /dev/myvg/homevol # resize2fs /dev/myvg/homevol
Note
You will still need to unmount the file system before running e2fsadm.reiserfs
Reiserfs file systems can be resized when mounted or unmounted as you prefer:
Online:# resize_reiserfs −f /dev/myvg/homevol
♦
Offline:# umount /dev/myvg/homevol # resize_reiserfs /dev/myvg/homevol # mount −treiserfs /dev/myvg/homevol /home
♦
2.
xfs
XFS file systems must be mounted to be resized and the mount−point is specified rather than thedevice name.
# xfs_growfs /home
3.
jfs
Just like XFS the JFS file system must be mounted to be resized and the mount−point is specifiedrather than the device name. You need at least Version 1.0.21 of the jfs−utils to do this.
# mount −o remount,resize /home
Known Kernel Bug
Some kernel versions have problems with this syntax (2.6.0 is known to have this problem). Inthis case you have to explicitly specify the new size of the filesystem in blocks. This isextremely error prone as you must know the blocksize of your filesystem and calculate the newsize based on those units.
Example: If you were to resize a JFS file system to 4 gigabytes that has 4k blocks, you wouldwrite:
# mount −o remount,resize=1048576 /home
4.
11.10. Reducing a logical volume
Logical volumes can be reduced in size as well as increased. However, it is very important to remember toreduce the size of the file system or whatever is residing in the volume before shrinking the volume itself,
LVM HOWTO
Chapter 11. Common Tasks 32
otherwise you risk losing data.
ext2
If you are using LVM 1 with ext2 as the file system then you can use the e2fsadm commandmentioned earlier to take care of both the file system and volume resizing as follows:
# umount /home# e2fsadm −L−1G /dev/myvg/homevol# mount /home
LVM 2 Caveat
There is currently no e2fsadm equivalent for LVM 2 and the e2fsadm that ships with LVM 1does not work with LVM 2.
If you prefer to do this manually you must know the new size of the volume in blocks and use thefollowing commands:
# umount /home# resize2fs /dev/myvg/homevol 524288# lvreduce −L−1G /dev/myvg/homevol# mount /home
1.
reiserfs
Reiserfs seems to prefer to be unmounted when shrinking
# umount /home# resize_reiserfs −s−1G /dev/myvg/homevol# lvreduce −L−1G /dev/myvg/homevol# mount −treiserfs /dev/myvg/homevol /home
2.
xfs
There is no way to shrink XFS file systems.
3.
jfs
There is no way to shrink JFS file systems.
4.
11.11. Migrating data off of a physical volume
To take a disk out of service it must first have all of its active physical extents moved to one or more of theremaining disks in the volume group. There must be enough free physical extents in the remaining PVs tohold the extents to be copied from the old disk. For further detail see Section 13.5.
LVM HOWTO
Chapter 11. Common Tasks 33
Chapter 12. Disk partitioning
12.1. Multiple partitions on the same disk
LVM allows you to create PVs (physical volumes) out of almost any block device so, for example, thefollowing are all valid commands and will work quite happily in an LVM environment:
# pvcreate /dev/sda1# pvcreate /dev/sdf# pvcreate /dev/hda8# pvcreate /dev/hda6# pvcreate /dev/md1
In a "normal" production system it is recommended that only one PV exists on a single real disk, for thefollowing reasons:
Administrative convenience
It's easier to keep track of the hardware in a system if each real disk only appears once. This becomesparticularly true if a disk fails.
•
To avoid striping performance problems
LVM can't tell that two PVs are on the same physical disk, so if you create a striped LV then thestripes could be on different partitions on the same disk resulting in a decrease in performance ratherthan an increase.
•
However it may be desirable to do this for some reasons:
Migration of existing system to LVM
On a system with few disks it may be necessary to move data around partitions to do the conversion(see Section 13.8)
•
Splitting one big disk between Volume Groups
If you have a very large disk and want to have more than one volume group for administrativepurposes then it is necessary to partition the drive into more than one area.
•
If you do have a disk with more than one partition and both of those partitions are in the same volume group,take care to specify which partitions are to be included in a logical volume when creating striped volumes.
The recommended method of partitioning a disk is to create a single partition that covers the whole disk. Thisavoids any nasty accidents with whole disk drive device nodes and prevents the kernel warning aboutunknown partition types at boot−up.
12.2. Sun disk labels
You need to be especially careful on SPARC systems where the disks have Sun disk labels on them.
The normal layout for a Sun disk label is for the first partition to start at block zero of the disk, thus the firstpartition also covers the area containing the disk label itself. This works fine for ext2 filesystems (and is
Chapter 12. Disk partitioning 34
essential for booting using SILO) but such partitions should not be used for LVM. This is because LVM startswriting at the very start of the device and will overwrite the disk label.
If you want to use a disk with a Sun disk label with LVM, make sure that the partition you are going to usestarts at cylinder 1 or higher.
LVM HOWTO
Chapter 12. Disk partitioning 35
Chapter 13. RecipesThis section details several different "recipes" for setting up lvm. The hope is that the reader will adapt theserecipes to their own system and needs.
13.1. Setting up LVM on three SCSI disks
For this recipe, the setup has three SCSI disks that will be put into a logical volume using LVM. The disks areat /dev/sda, /dev/sdb, and /dev/sdc.
13.1.1. Preparing the disks
Before you can use a disk in a volume group you will have to prepare it:
Warning!
The following will destroy any data on /dev/sda, /dev/sdb, and /dev/sdcRun pvcreate on the disks
# pvcreate /dev/sda# pvcreate /dev/sdb# pvcreate /dev/sdc
This creates a volume group descriptor area (VGDA) at the start of the disks.
13.1.2. Setup a Volume Group
Create a volume group# vgcreate my_volume_group /dev/sda /dev/sdb /dev/sdc/
1.
Run vgdisplay to verify volume group# vgdisplay# vgdisplay−−− Volume Group −−−VG Name my_volume_groupVG Access read/writeVG Status available/resizableVG # 1MAX LV 256Cur LV 0Open LV 0MAX LV Size 255.99 GBMax PV 256Cur PV 3Act PV 3VG Size 1.45 GBPE Size 4 MBTotal PE 372Alloc PE / Size 0 / 0Free PE / Size 372/ 1.45 GBVG UUID nP2PY5−5TOS−hLx0−FDu0−2a6N−f37x−0BME0Y
2.
Chapter 13. Recipes 36
The most important things to verify are that the first three items are correct and that the VG Size itemis the proper size for the amount of space in all four of your disks.
13.1.3. Creating the Logical Volume
If the volume group looks correct, it is time to create a logical volume on top of the volume group.
You can make the logical volume any size you like. (It is similar to a partition on a non LVM setup.) For thisexample we will create just a single logical volume of size 1GB on the volume group. We will not use stripingbecause it is not currently possible to add a disk to a stripe set after the logical volume is created.
# lvcreate −L1G −nmy_logical_volume my_volume_grouplvcreate −− doing automatic backup of "my_volume_group"lvcreate −− logical volume "/dev/my_volume_group/my_logical_volume" successfully created
13.1.4. Create the File System
Create an ext2 file system on the logical volume
# mke2fs /dev/my_volume_group/my_logical_volumemke2fs 1.19, 13−Jul−2000 for EXT2 FS 0.5b, 95/08/09Filesystem label=OS type: LinuxBlock size=4096 (log=2)Fragment size=4096 (log=2)131072 inodes, 262144 blocks13107 blocks (5.00%) reserved for the super userFirst data block=09 block groups32768 blocks per group, 32768 fragments per group16384 inodes per groupSuperblock backups stored on blocks: 32768, 98304, 163840, 229376
Writing inode tables: doneWriting superblocks and filesystem accounting information: done
13.1.5. Test the File System
Mount the logical volume and check to make sure everything looks correct
# mount /dev/my_volume_group/my_logical_volume /mnt# dfFilesystem 1k−blocks Used Available Use% Mounted on/dev/hda1 1311552 628824 616104 51% //dev/my_volume_group/my_logical_volume 1040132 20 987276 0% /mnt
If everything worked properly, you should now have a logical volume with and ext2 file system mounted at/mnt.
LVM HOWTO
Chapter 13. Recipes 37
13.2. Setting up LVM on three SCSI disks with striping
For this recipe, the setup has three SCSI disks that will be put into a logical volume using LVM. The disks areat /dev/sda, /dev/sdb, and /dev/sdc.
Note
It is not currently possible to add a disk to a striped logical volume in LVM 1. Use LVM 2 with the lvm2 format metadata if you wish to be able to do so able to do so.
13.2.1. Preparing the disk partitions
Before you can use a disk in a volume group you will have to prepare it:
Warning!
The following will destroy any data on /dev/sda, /dev/sdb, and /dev/sdcRun pvcreate on the disks:
# pvcreate /dev/sda# pvcreate /dev/sdb# pvcreate /dev/sdc
This creates a volume group descriptor area (VGDA) at the start of the disks.
13.2.2. Setup a Volume Group
Create a volume group# vgcreate my_volume_group /dev/sda /dev/sdb /dev/sdc
1.
Run vgdisplay to verify volume group# vgdisplay−−− Volume Group −−−VG Name my_volume_groupVG Access read/writeVG Status available/resizableVG # 1MAX LV 256Cur LV 0Open LV 0MAX LV Size 255.99 GBMax PV 256Cur PV 3Act PV 3VG Size 1.45 GBPE Size 4 MBTotal PE 372Alloc PE / Size 0 / 0Free PE / Size 372/ 1.45 GBVG UUID nP2PY5−5TOS−hLx0−FDu0−2a6N−f37x−0BME0Y
The most important things to verify are that the first three items are correct and that the VG Size itemis the proper size for the amount of space in all four of your disks.
2.
LVM HOWTO
Chapter 13. Recipes 38
13.2.3. Creating the Logical Volume
If the volume group looks correct, it is time to create a logical volume on top of the volume group.
You can make the logical volume any size you like (up to the size of the VG you are creating it on; it issimilar to a partition on a non LVM setup). For this example we will create just a single logical volume of size1GB on the volume group. The logical volume will be a striped set using for the 4k stripe size. This shouldincrease the performance of the logical volume.
# lvcreate −i3 −I4 −L1G −nmy_logical_volume my_volume_grouplvcreate −− rounding 1048576 KB to stripe boundary size 1056768 KB / 258 PElvcreate −− doing automatic backup of "my_volume_group"lvcreate −− logical volume "/dev/my_volume_group/my_logical_volume" successfully created
Note
If you create the logical volume with a '−i2' you will only use two of the disks in your volume group.This is useful if you want to create two logical volumes out of the same physical volume, but we will nottouch that in this recipe.
13.2.4. Create the File System
Create an ext2 file system on the logical volume
# mke2fs /dev/my_volume_group/my_logical_volumemke2fs 1.19, 13−Jul−2000 for EXT2 FS 0.5b, 95/08/09Filesystem label=OS type: LinuxBlock size=4096 (log=2)Fragment size=4096 (log=2)132192 inodes, 264192 blocks13209 blocks (5.00%) reserved for the super userFirst data block=09 block groups32768 blocks per group, 32768 fragments per group14688 inodes per groupSuperblock backups stored on blocks: 32768, 98304, 163840, 229376
Writing inode tables: doneWriting superblocks and filesystem accounting information: done
13.2.5. Test the File System
Mount the file system on the logical volume
# mount /dev/my_volume_group/my_logical_volume /mnt
and check to make sure everything looks correct# dfFilesystem 1k−blocks Used Available Use% Mounted on/dev/hda1 1311552 628824 616104 51% /
LVM HOWTO
Chapter 13. Recipes 39
/dev/my_volume_group/my_logical_volume 1040132 20 987276 0% /mnt
If everything worked properly, you should now have a logical volume mounted at /mnt.
13.3. Add a new disk to a multi−disk SCSI system
13.3.1. Current situation
A data centre machine has 6 disks attached as follows:
# pvscanpvscan −− ACTIVE PV "/dev/sda" of VG "dev" [1.95 GB / 0 free]pvscan −− ACTIVE PV "/dev/sdb" of VG "sales" [1.95 GB / 0 free]pvscan −− ACTIVE PV "/dev/sdc" of VG "ops" [1.95 GB / 44 MB free]pvscan −− ACTIVE PV "/dev/sdd" of VG "dev" [1.95 GB / 0 free]pvscan −− ACTIVE PV "/dev/sde1" of VG "ops" [996 MB / 52 MB free]pvscan −− ACTIVE PV "/dev/sde2" of VG "sales" [996 MB / 944 MB free]pvscan −− ACTIVE PV "/dev/sdf1" of VG "ops" [996 MB / 0 free]pvscan −− ACTIVE PV "/dev/sdf2" of VG "dev" [996 MB / 72 MB free]pvscan −− total: 8 [11.72 GB] / in use: 8 [11.72 GB] / in no VG: 0 [0]
# dfFilesystem 1k−blocks Used Available Use% Mounted on/dev/dev/cvs 1342492 516468 757828 41% /mnt/dev/cvs/dev/dev/users 2064208 2060036 4172 100% /mnt/dev/users/dev/dev/build 1548144 1023041 525103 66% /mnt/dev/build/dev/ops/databases 2890692 2302417 588275 79% /mnt/ops/databases/dev/sales/users 2064208 871214 1192994 42% /mnt/sales/users/dev/ops/batch 1032088 897122 134966 86% /mnt/ops/batch
As you can see the "dev" and "ops" groups are getting full so a new disk is purchased and added to the system.It becomes /dev/sdg.
13.3.2. Prepare the disk partitions
The new disk is to be shared equally between ops and dev so it is partitioned into two physical volumes/dev/sdg1 and /dev/sdg2 :
# fdisk /dev/sdgDevice contains neither a valid DOS partition table, nor Sun or SGIdisklabel Building a new DOS disklabel. Changes will remain in memoryonly, until you decide to write them. After that, of course, theprevious content won't be recoverable.
Command (m for help): nCommand action e extended p primary partition (1−4)pPartition number (1−4): 1First cylinder (1−1000, default 1):Using default value 1Last cylinder or +size or +sizeM or +sizeK (1−1000, default 1000): 500
Command (m for help): n
LVM HOWTO
Chapter 13. Recipes 40
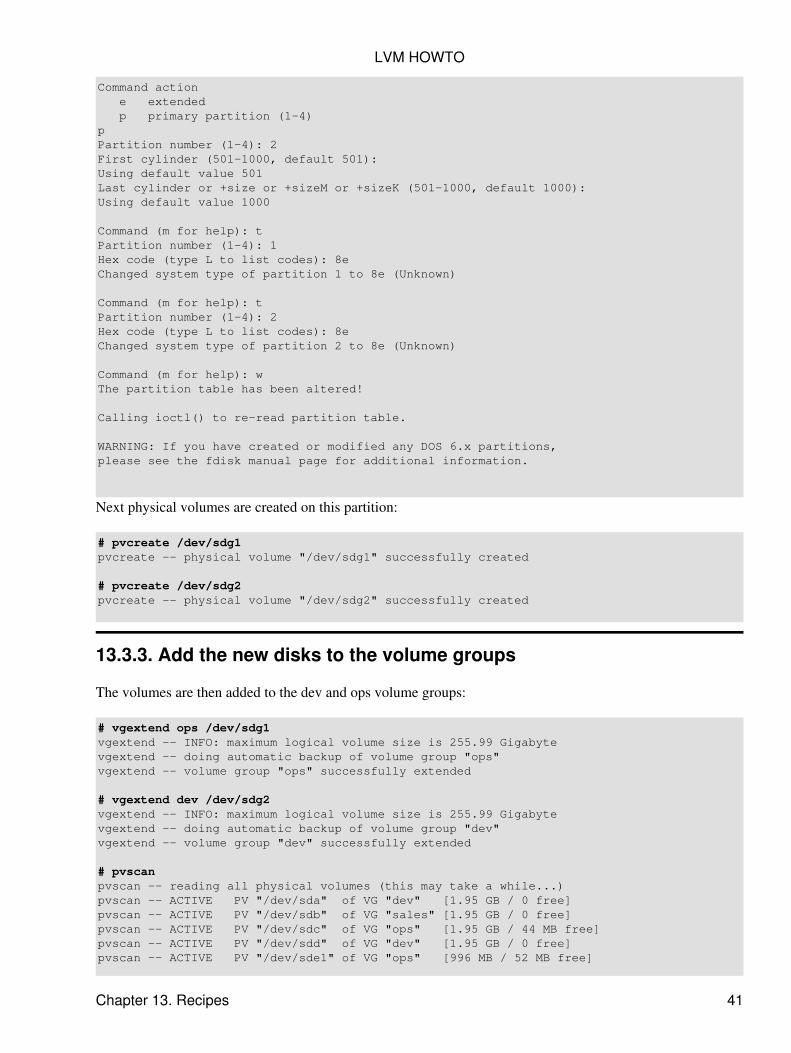
Command action e extended p primary partition (1−4)pPartition number (1−4): 2First cylinder (501−1000, default 501):Using default value 501Last cylinder or +size or +sizeM or +sizeK (501−1000, default 1000):Using default value 1000
Command (m for help): tPartition number (1−4): 1Hex code (type L to list codes): 8eChanged system type of partition 1 to 8e (Unknown)
Command (m for help): tPartition number (1−4): 2Hex code (type L to list codes): 8eChanged system type of partition 2 to 8e (Unknown)
Command (m for help): wThe partition table has been altered!
Calling ioctl() to re−read partition table.
WARNING: If you have created or modified any DOS 6.x partitions,please see the fdisk manual page for additional information.
Next physical volumes are created on this partition:
# pvcreate /dev/sdg1pvcreate −− physical volume "/dev/sdg1" successfully created
# pvcreate /dev/sdg2pvcreate −− physical volume "/dev/sdg2" successfully created
13.3.3. Add the new disks to the volume groups
The volumes are then added to the dev and ops volume groups:
# vgextend ops /dev/sdg1vgextend −− INFO: maximum logical volume size is 255.99 Gigabytevgextend −− doing automatic backup of volume group "ops"vgextend −− volume group "ops" successfully extended
# vgextend dev /dev/sdg2vgextend −− INFO: maximum logical volume size is 255.99 Gigabytevgextend −− doing automatic backup of volume group "dev"vgextend −− volume group "dev" successfully extended
# pvscanpvscan −− reading all physical volumes (this may take a while...)pvscan −− ACTIVE PV "/dev/sda" of VG "dev" [1.95 GB / 0 free]pvscan −− ACTIVE PV "/dev/sdb" of VG "sales" [1.95 GB / 0 free]pvscan −− ACTIVE PV "/dev/sdc" of VG "ops" [1.95 GB / 44 MB free]pvscan −− ACTIVE PV "/dev/sdd" of VG "dev" [1.95 GB / 0 free]pvscan −− ACTIVE PV "/dev/sde1" of VG "ops" [996 MB / 52 MB free]
LVM HOWTO
Chapter 13. Recipes 41
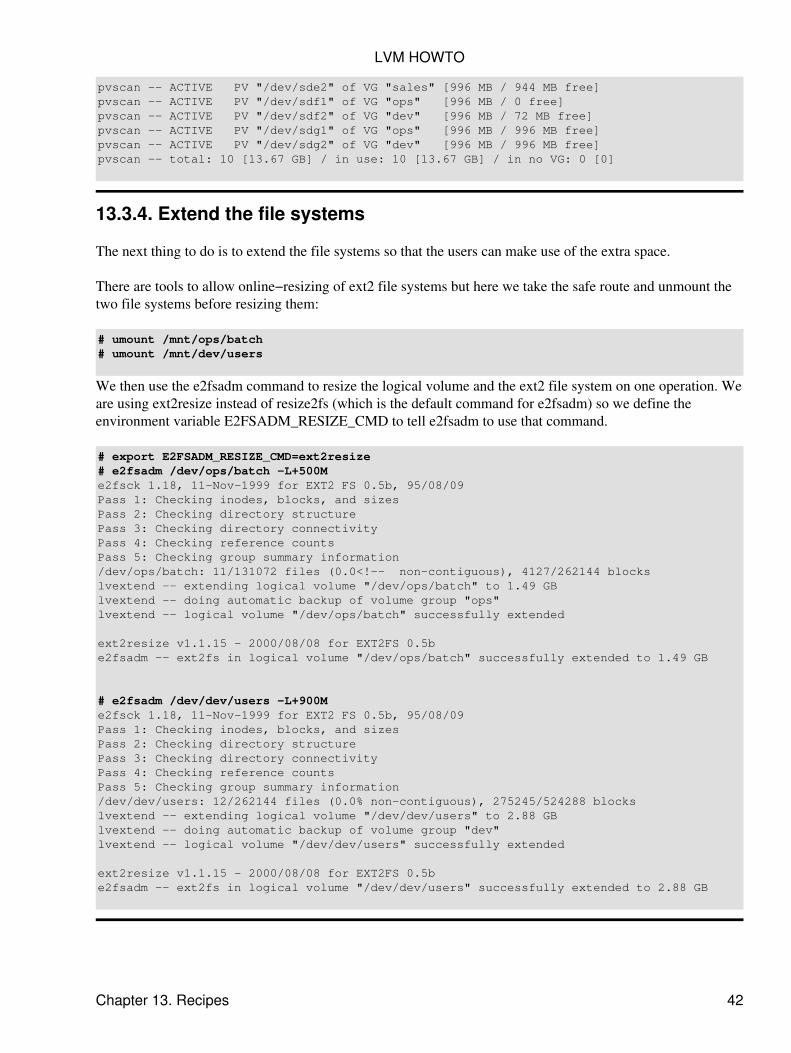
pvscan −− ACTIVE PV "/dev/sde2" of VG "sales" [996 MB / 944 MB free]pvscan −− ACTIVE PV "/dev/sdf1" of VG "ops" [996 MB / 0 free]pvscan −− ACTIVE PV "/dev/sdf2" of VG "dev" [996 MB / 72 MB free]pvscan −− ACTIVE PV "/dev/sdg1" of VG "ops" [996 MB / 996 MB free]pvscan −− ACTIVE PV "/dev/sdg2" of VG "dev" [996 MB / 996 MB free]pvscan −− total: 10 [13.67 GB] / in use: 10 [13.67 GB] / in no VG: 0 [0]
13.3.4. Extend the file systems
The next thing to do is to extend the file systems so that the users can make use of the extra space.
There are tools to allow online−resizing of ext2 file systems but here we take the safe route and unmount thetwo file systems before resizing them:
# umount /mnt/ops/batch# umount /mnt/dev/users
We then use the e2fsadm command to resize the logical volume and the ext2 file system on one operation. Weare using ext2resize instead of resize2fs (which is the default command for e2fsadm) so we define theenvironment variable E2FSADM_RESIZE_CMD to tell e2fsadm to use that command.
# export E2FSADM_RESIZE_CMD=ext2resize# e2fsadm /dev/ops/batch −L+500Me2fsck 1.18, 11−Nov−1999 for EXT2 FS 0.5b, 95/08/09Pass 1: Checking inodes, blocks, and sizesPass 2: Checking directory structurePass 3: Checking directory connectivityPass 4: Checking reference countsPass 5: Checking group summary information/dev/ops/batch: 11/131072 files (0.0<!−− non−contiguous), 4127/262144 blockslvextend −− extending logical volume "/dev/ops/batch" to 1.49 GBlvextend −− doing automatic backup of volume group "ops"lvextend −− logical volume "/dev/ops/batch" successfully extended
ext2resize v1.1.15 − 2000/08/08 for EXT2FS 0.5be2fsadm −− ext2fs in logical volume "/dev/ops/batch" successfully extended to 1.49 GB
# e2fsadm /dev/dev/users −L+900Me2fsck 1.18, 11−Nov−1999 for EXT2 FS 0.5b, 95/08/09Pass 1: Checking inodes, blocks, and sizesPass 2: Checking directory structurePass 3: Checking directory connectivityPass 4: Checking reference countsPass 5: Checking group summary information/dev/dev/users: 12/262144 files (0.0% non−contiguous), 275245/524288 blockslvextend −− extending logical volume "/dev/dev/users" to 2.88 GBlvextend −− doing automatic backup of volume group "dev"lvextend −− logical volume "/dev/dev/users" successfully extended
ext2resize v1.1.15 − 2000/08/08 for EXT2FS 0.5be2fsadm −− ext2fs in logical volume "/dev/dev/users" successfully extended to 2.88 GB
LVM HOWTO
Chapter 13. Recipes 42
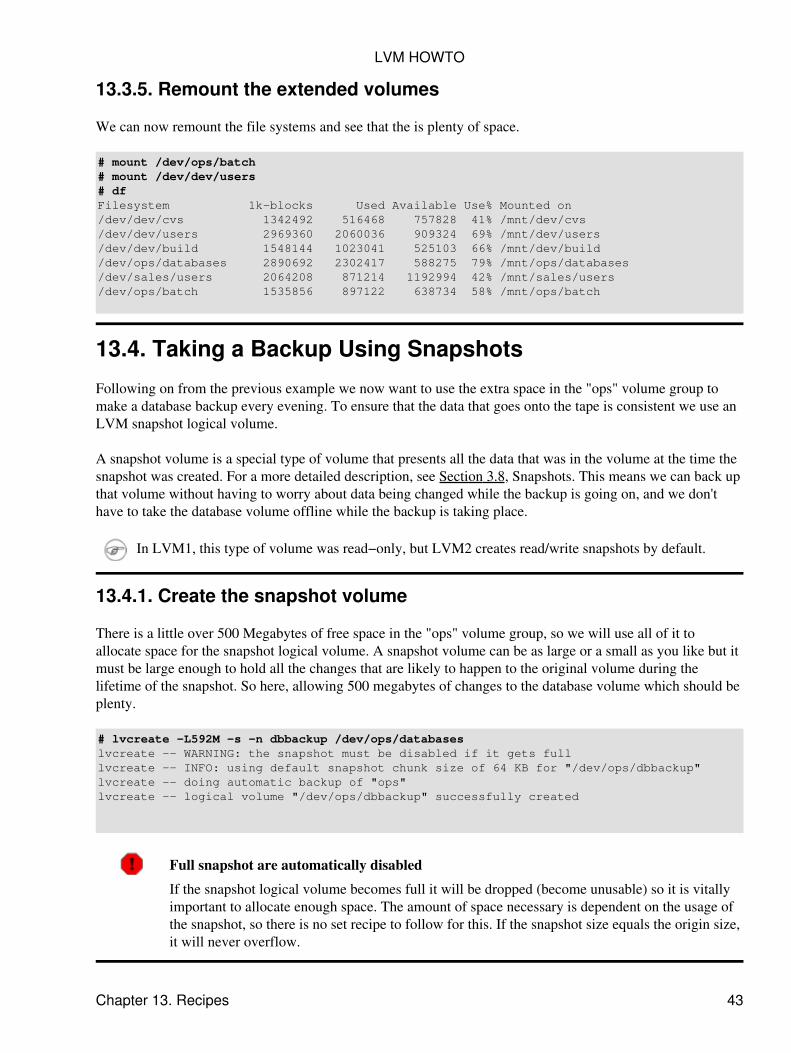
13.3.5. Remount the extended volumes
We can now remount the file systems and see that the is plenty of space.
# mount /dev/ops/batch# mount /dev/dev/users# dfFilesystem 1k−blocks Used Available Use% Mounted on/dev/dev/cvs 1342492 516468 757828 41% /mnt/dev/cvs/dev/dev/users 2969360 2060036 909324 69% /mnt/dev/users/dev/dev/build 1548144 1023041 525103 66% /mnt/dev/build/dev/ops/databases 2890692 2302417 588275 79% /mnt/ops/databases/dev/sales/users 2064208 871214 1192994 42% /mnt/sales/users/dev/ops/batch 1535856 897122 638734 58% /mnt/ops/batch
13.4. Taking a Backup Using Snapshots
Following on from the previous example we now want to use the extra space in the "ops" volume group tomake a database backup every evening. To ensure that the data that goes onto the tape is consistent we use anLVM snapshot logical volume.
A snapshot volume is a special type of volume that presents all the data that was in the volume at the time thesnapshot was created. For a more detailed description, see Section 3.8, Snapshots. This means we can back upthat volume without having to worry about data being changed while the backup is going on, and we don'thave to take the database volume offline while the backup is taking place.
In LVM1, this type of volume was read−only, but LVM2 creates read/write snapshots by default.
13.4.1. Create the snapshot volume
There is a little over 500 Megabytes of free space in the "ops" volume group, so we will use all of it toallocate space for the snapshot logical volume. A snapshot volume can be as large or a small as you like but itmust be large enough to hold all the changes that are likely to happen to the original volume during thelifetime of the snapshot. So here, allowing 500 megabytes of changes to the database volume which should beplenty.
# lvcreate −L592M −s −n dbbackup /dev/ops/databases lvcreate −− WARNING: the snapshot must be disabled if it gets fulllvcreate −− INFO: using default snapshot chunk size of 64 KB for "/dev/ops/dbbackup"lvcreate −− doing automatic backup of "ops"lvcreate −− logical volume "/dev/ops/dbbackup" successfully created
Full snapshot are automatically disabled
If the snapshot logical volume becomes full it will be dropped (become unusable) so it is vitallyimportant to allocate enough space. The amount of space necessary is dependent on the usage ofthe snapshot, so there is no set recipe to follow for this. If the snapshot size equals the origin size,it will never overflow.
LVM HOWTO
Chapter 13. Recipes 43
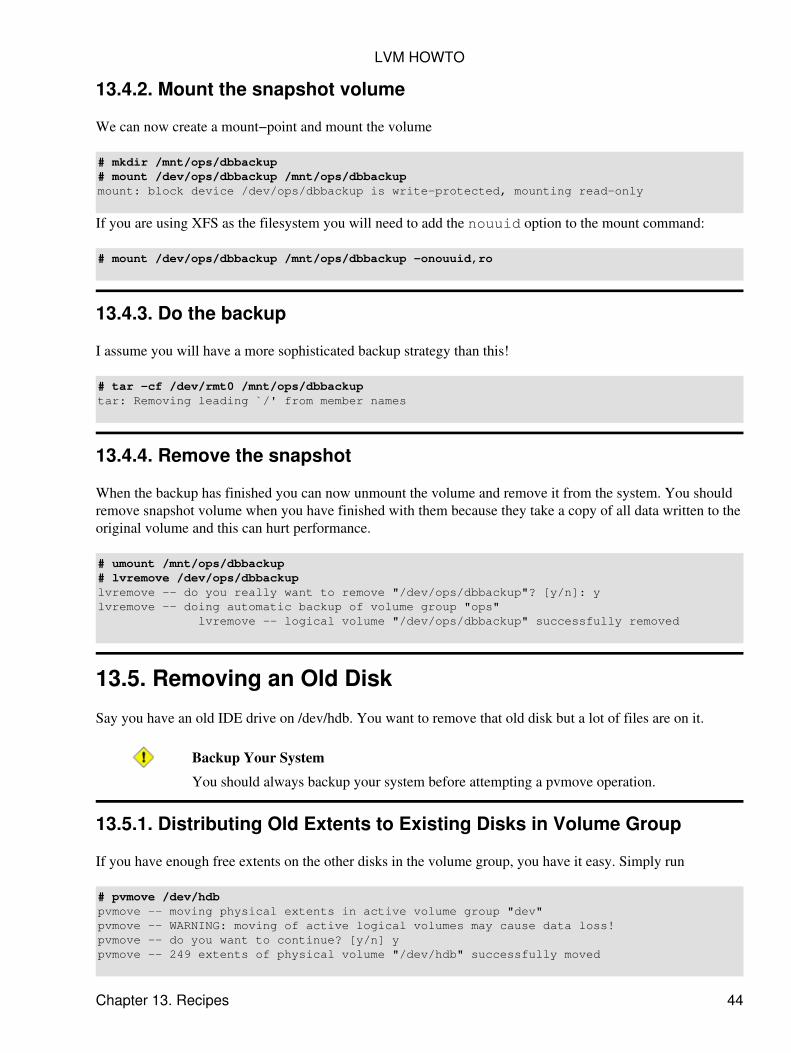
13.4.2. Mount the snapshot volume
We can now create a mount−point and mount the volume
# mkdir /mnt/ops/dbbackup# mount /dev/ops/dbbackup /mnt/ops/dbbackupmount: block device /dev/ops/dbbackup is write−protected, mounting read−only
If you are using XFS as the filesystem you will need to add the nouuid option to the mount command:
# mount /dev/ops/dbbackup /mnt/ops/dbbackup −onouuid,ro
13.4.3. Do the backup
I assume you will have a more sophisticated backup strategy than this!
# tar −cf /dev/rmt0 /mnt/ops/dbbackuptar: Removing leading `/' from member names
13.4.4. Remove the snapshot
When the backup has finished you can now unmount the volume and remove it from the system. You shouldremove snapshot volume when you have finished with them because they take a copy of all data written to theoriginal volume and this can hurt performance.
# umount /mnt/ops/dbbackup# lvremove /dev/ops/dbbackup lvremove −− do you really want to remove "/dev/ops/dbbackup"? [y/n]: ylvremove −− doing automatic backup of volume group "ops" lvremove −− logical volume "/dev/ops/dbbackup" successfully removed
13.5. Removing an Old Disk
Say you have an old IDE drive on /dev/hdb. You want to remove that old disk but a lot of files are on it.
Backup Your System
You should always backup your system before attempting a pvmove operation.
13.5.1. Distributing Old Extents to Existing Disks in Volume Group
If you have enough free extents on the other disks in the volume group, you have it easy. Simply run
# pvmove /dev/hdbpvmove −− moving physical extents in active volume group "dev"pvmove −− WARNING: moving of active logical volumes may cause data loss!pvmove −− do you want to continue? [y/n] ypvmove −− 249 extents of physical volume "/dev/hdb" successfully moved
LVM HOWTO
Chapter 13. Recipes 44
This will move the allocated physical extents from /dev/hdb onto the rest of the disks in the volume group.
pvmove is Slow
Be aware that pvmove is quite slow as it has to copy the contents of a disk block by block to one or moredisks. If you want more steady status reports from pvmove, use the −v flag.
13.5.1.1. Remove the unused disk
We can now remove the old IDE disk from the volume group.
# vgreduce dev /dev/hdbvgreduce −− doing automatic backup of volume group "dev"vgreduce −− volume group "dev" successfully reduced by physical volume:vgreduce −− /dev/hdb
The drive can now be either physically removed when the machine is next powered down or reallocated toother users.
13.5.2. Distributing Old Extents to a New Replacement Disk
If you do not have enough free physical extents to distribute the old physical extents to, you will have to add adisk to the volume group and move the extents to it.
13.5.2.1. Prepare the disk
First, you need to pvcreate the new disk to make it available to LVM. In this recipe we show that you don'tneed to partition a disk to be able to use it.
# pvcreate /dev/sdfpvcreate −− physical volume "/dev/sdf" successfully created
13.5.2.2. Add it to the volume group
As developers use a lot of disk space this is a good volume group to add it into.
# vgextend dev /dev/sdfvgextend −− INFO: maximum logical volume size is 255.99 Gigabytevgextend −− doing automatic backup of volume group "dev"vgextend −− volume group "dev" successfully extended
13.5.2.3. Move the data
Next we move the data from the old disk onto the new one. Note that it is not necessary to unmount the filesystem before doing this. Although it is *highly* recommended that you do a full backup before attemptingthis operation in case of a power outage or some other problem that may interrupt it. The pvmove commandcan take a considerable amount of time to complete and it also exacts a performance hit on the two volumesso, although it isn't necessary, it is advisable to do this when the volumes are not too busy.
LVM HOWTO
Chapter 13. Recipes 45
# pvmove /dev/hdb /dev/sdfpvmove −− moving physical extents in active volume group "dev"pvmove −− WARNING: moving of active logical volumes may cause data loss!pvmove −− do you want to continue? [y/n] ypvmove −− 249 extents of physical volume "/dev/hdb" successfully moved
13.5.2.4. Remove the unused disk
We can now remove the old IDE disk from the volume group.
# vgreduce dev /dev/hdbvgreduce −− doing automatic backup of volume group "dev"vgreduce −− volume group "dev" successfully reduced by physical volume:vgreduce −− /dev/hdb
The drive can now be either physically removed when the machine is next powered down or reallocated tosome other users.
13.6. Moving a volume group to another system
It is quite easy to move a whole volume group to another system if, for example, a user department acquires anew server. To do this we use the vgexport and vgimport commands.
vgexport/vgimport is not necessary to move drives from one system to another. It is an administrativepolicy tool to prevent access to volumes in the time it takes to move them.
13.6.1. Unmount the file system
First, make sure that no users are accessing files on the active volume, then unmount it
# unmount /mnt/design/users
13.6.2. Mark the volume group inactive
Marking the volume group inactive removes it from the kernel and prevents any further activity on it.
# vgchange −an designvgchange −− volume group "design" successfully deactivated
13.6.3. Export the volume group
It is now necessary to export the volume group. This prevents it from being accessed on the ``old'' host systemand prepares it to be removed.
# vgexport designvgexport −− volume group "design" successfully exported
When the machine is next shut down, the disk can be unplugged and then connected to it's new machine
LVM HOWTO
Chapter 13. Recipes 46
13.6.4. Import the volume group
When plugged into the new system it becomes /dev/sdb so an initial pvscan shows:
# pvscanpvscan −− reading all physical volumes (this may take a while...)pvscan −− inactive PV "/dev/sdb1" is in EXPORTED VG "design" [996 MB / 996 MB free]pvscan −− inactive PV "/dev/sdb2" is in EXPORTED VG "design" [996 MB / 244 MB free]pvscan −− total: 2 [1.95 GB] / in use: 2 [1.95 GB] / in no VG: 0 [0]
We can now import the volume group (which also activates it) and mount the file system.
If you are importing on an LVM 2 system, run:
# vgimport design Volume group "vg" successfully imported
If you are importing on an LVM 1 system, add the PVs that need to be imported:
# vgimport design /dev/sdb1 /dev/sdb2vgimport −− doing automatic backup of volume group "design"vgimport −− volume group "design" successfully imported and activated
13.6.5. Activate the volume group
You must activate the volume group before you can access it.
# vgchange −ay design
13.6.6. Mount the file system
# mkdir −p /mnt/design/users# mount /dev/design/users /mnt/design/users
The file system is now available for use.
13.7. Splitting a volume group
There is a new group of users "design" to add to the system. One way of dealing with this is to create a newvolume group to hold their data. There are no new disks but there is plenty of free space on the existing disksthat can be reallocated.
13.7.1. Determine free space
# pvscan pvscan −− reading all physical volumes (this may take a while...)pvscan −− ACTIVE PV "/dev/sda" of VG "dev" [1.95 GB / 0 free]pvscan −− ACTIVE PV "/dev/sdb" of VG "sales" [1.95 GB / 1.27 GB free]
LVM HOWTO
Chapter 13. Recipes 47
pvscan −− ACTIVE PV "/dev/sdc" of VG "ops" [1.95 GB / 564 MB free]pvscan −− ACTIVE PV "/dev/sdd" of VG "dev" [1.95 GB / 0 free]pvscan −− ACTIVE PV "/dev/sde" of VG "ops" [1.95 GB / 1.9 GB free]pvscan −− ACTIVE PV "/dev/sdf" of VG "dev" [1.95 GB / 1.33 GB free]pvscan −− ACTIVE PV "/dev/sdg1" of VG "ops" [996 MB / 432 MB free]pvscan −− ACTIVE PV "/dev/sdg2" of VG "dev" [996 MB / 632 MB free]pvscan −− total: 8 [13.67 GB] / in use: 8 [13.67 GB] / in no VG: 0 [0]
We decide to reallocate /dev/sdg1 and /dev/sdg2 to design so first we have to move the physical extents intothe free areas of the other volumes (in this case /dev/sdf for volume group dev and /dev/sde for volume groupops).
13.7.2. Move data off the disks to be used
Some space is still used on the chosen volumes so it is necessary to move that used space off onto someothers.
Move all the used physical extents from /dev/sdg1 to /dev/sde and from /dev/sdg2 to /dev/sdf
# pvmove /dev/sdg1 /dev/sdepvmove −− moving physical extents in active volume group "ops"pvmove −− WARNING: moving of active logical volumes may cause data loss!pvmove −− do you want to continue? [y/n] ypvmove −− doing automatic backup of volume group "ops"pvmove −− 141 extents of physical volume "/dev/sdg1" successfully moved
# pvmove /dev/sdg2 /dev/sdfpvmove −− moving physical extents in active volume group "dev"pvmove −− WARNING: moving of active logical volumes may cause data loss!pvmove −− do you want to continue? [y/n] ypvmove −− doing automatic backup of volume group "dev"pvmove −− 91 extents of physical volume "/dev/sdg2" successfully moved
13.7.3. Create the new volume group
Now, split /dev/sdg2 from dev and add it into a new group called "design". it is possible to do this usingvgreduce and vgcreate but the vgsplit command combines the two.
# vgsplit dev design /dev/sdg2vgsplit −− doing automatic backup of volume group "dev"vgsplit −− doing automatic backup of volume group "design"vgsplit −− volume group "dev" successfully split into "dev" and "design"
13.7.4. Remove remaining volume
Next, remove /dev/sdg1 from ops and add it into design.
# vgreduce ops /dev/sdg1vgreduce −− doing automatic backup of volume group "ops"vgreduce −− volume group "ops" successfully reduced by physical volume:vgreduce −− /dev/sdg1
# vgextend design /dev/sdg1
LVM HOWTO
Chapter 13. Recipes 48
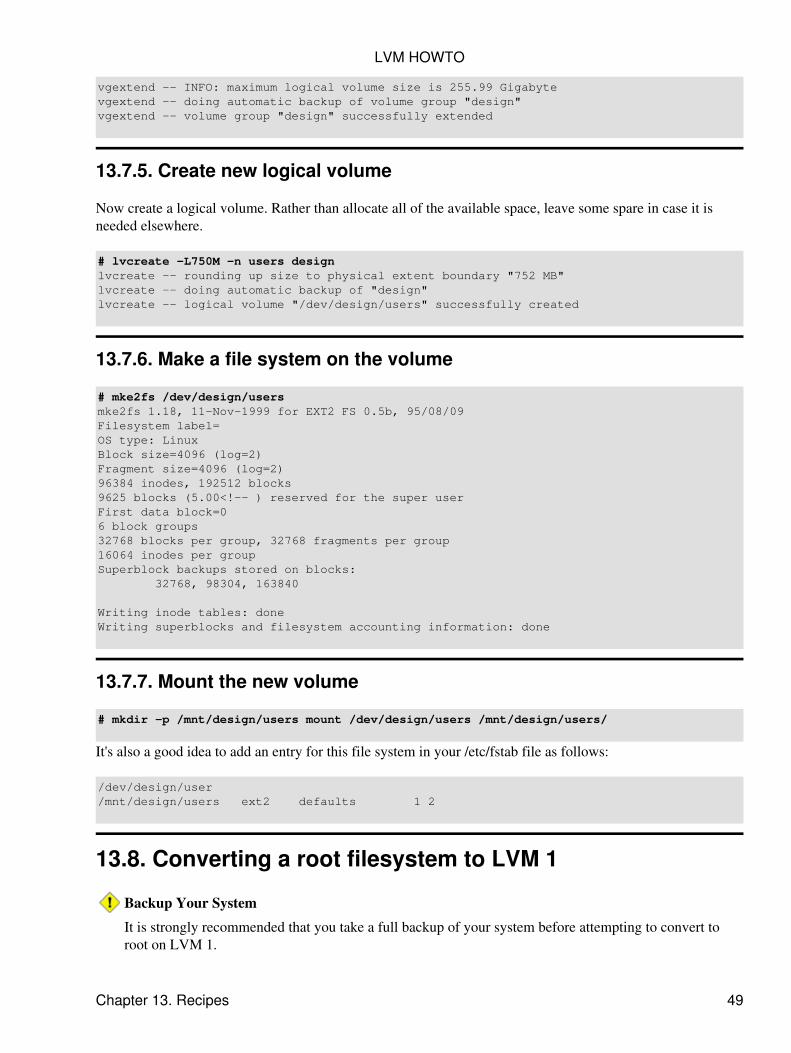
vgextend −− INFO: maximum logical volume size is 255.99 Gigabytevgextend −− doing automatic backup of volume group "design"vgextend −− volume group "design" successfully extended
13.7.5. Create new logical volume
Now create a logical volume. Rather than allocate all of the available space, leave some spare in case it isneeded elsewhere.
# lvcreate −L750M −n users designlvcreate −− rounding up size to physical extent boundary "752 MB"lvcreate −− doing automatic backup of "design"lvcreate −− logical volume "/dev/design/users" successfully created
13.7.6. Make a file system on the volume
# mke2fs /dev/design/usersmke2fs 1.18, 11−Nov−1999 for EXT2 FS 0.5b, 95/08/09Filesystem label=OS type: LinuxBlock size=4096 (log=2)Fragment size=4096 (log=2)96384 inodes, 192512 blocks9625 blocks (5.00<!−− ) reserved for the super userFirst data block=06 block groups32768 blocks per group, 32768 fragments per group16064 inodes per groupSuperblock backups stored on blocks: 32768, 98304, 163840
Writing inode tables: done Writing superblocks and filesystem accounting information: done
13.7.7. Mount the new volume
# mkdir −p /mnt/design/users mount /dev/design/users /mnt/design/users/
It's also a good idea to add an entry for this file system in your /etc/fstab file as follows:
/dev/design/user/mnt/design/users ext2 defaults 1 2
13.8. Converting a root filesystem to LVM 1
Backup Your System
It is strongly recommended that you take a full backup of your system before attempting to convert toroot on LVM 1.
LVM HOWTO
Chapter 13. Recipes 49
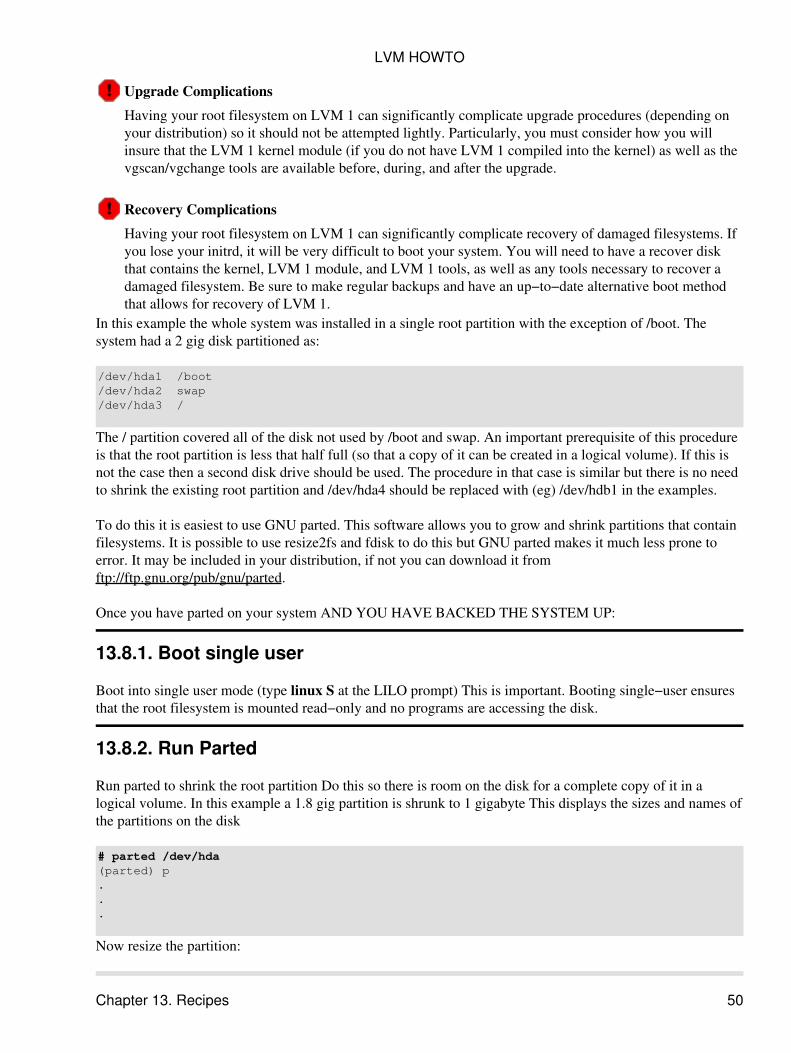
Upgrade Complications
Having your root filesystem on LVM 1 can significantly complicate upgrade procedures (depending onyour distribution) so it should not be attempted lightly. Particularly, you must consider how you willinsure that the LVM 1 kernel module (if you do not have LVM 1 compiled into the kernel) as well as thevgscan/vgchange tools are available before, during, and after the upgrade.
Recovery Complications
Having your root filesystem on LVM 1 can significantly complicate recovery of damaged filesystems. Ifyou lose your initrd, it will be very difficult to boot your system. You will need to have a recover diskthat contains the kernel, LVM 1 module, and LVM 1 tools, as well as any tools necessary to recover adamaged filesystem. Be sure to make regular backups and have an up−to−date alternative boot methodthat allows for recovery of LVM 1.
In this example the whole system was installed in a single root partition with the exception of /boot. Thesystem had a 2 gig disk partitioned as:
/dev/hda1 /boot /dev/hda2 swap/dev/hda3 /
The / partition covered all of the disk not used by /boot and swap. An important prerequisite of this procedureis that the root partition is less that half full (so that a copy of it can be created in a logical volume). If this isnot the case then a second disk drive should be used. The procedure in that case is similar but there is no needto shrink the existing root partition and /dev/hda4 should be replaced with (eg) /dev/hdb1 in the examples.
To do this it is easiest to use GNU parted. This software allows you to grow and shrink partitions that containfilesystems. It is possible to use resize2fs and fdisk to do this but GNU parted makes it much less prone toerror. It may be included in your distribution, if not you can download it fromftp://ftp.gnu.org/pub/gnu/parted.
Once you have parted on your system AND YOU HAVE BACKED THE SYSTEM UP:
13.8.1. Boot single user
Boot into single user mode (type linux S at the LILO prompt) This is important. Booting single−user ensuresthat the root filesystem is mounted read−only and no programs are accessing the disk.
13.8.2. Run Parted
Run parted to shrink the root partition Do this so there is room on the disk for a complete copy of it in alogical volume. In this example a 1.8 gig partition is shrunk to 1 gigabyte This displays the sizes and names ofthe partitions on the disk
# parted /dev/hda(parted) p...
Now resize the partition:
LVM HOWTO
Chapter 13. Recipes 50
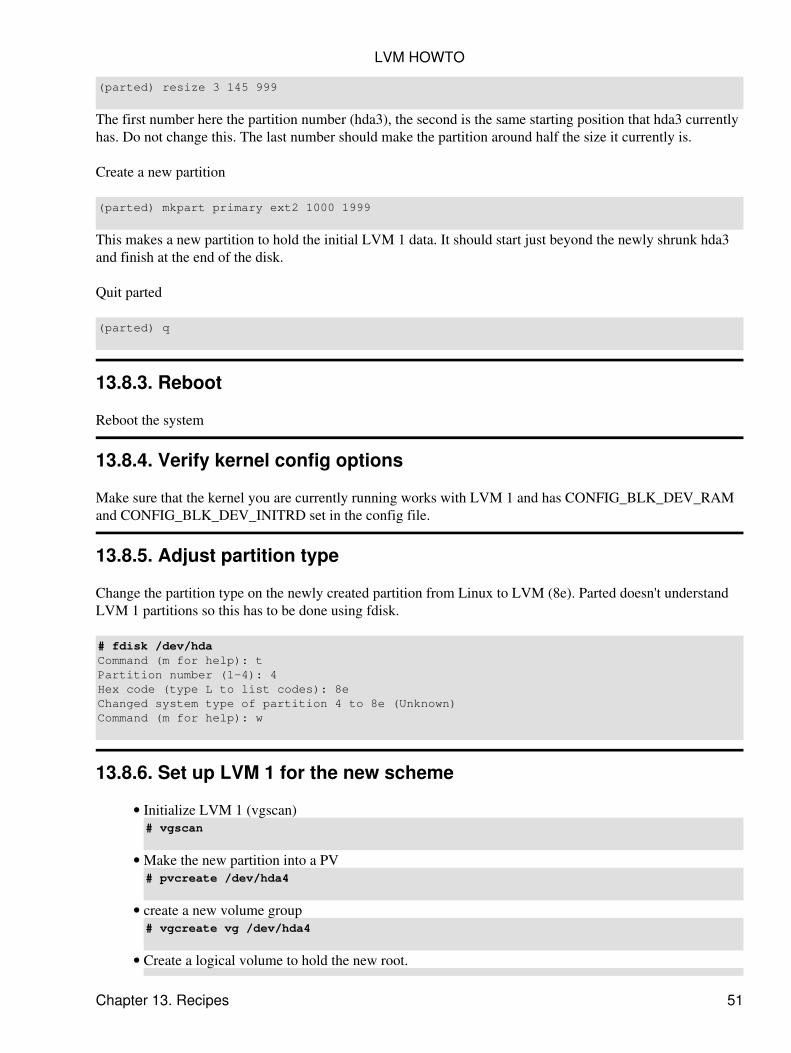
(parted) resize 3 145 999
The first number here the partition number (hda3), the second is the same starting position that hda3 currentlyhas. Do not change this. The last number should make the partition around half the size it currently is.
Create a new partition
(parted) mkpart primary ext2 1000 1999
This makes a new partition to hold the initial LVM 1 data. It should start just beyond the newly shrunk hda3and finish at the end of the disk.
Quit parted
(parted) q
13.8.3. Reboot
Reboot the system
13.8.4. Verify kernel config options
Make sure that the kernel you are currently running works with LVM 1 and has CONFIG_BLK_DEV_RAMand CONFIG_BLK_DEV_INITRD set in the config file.
13.8.5. Adjust partition type
Change the partition type on the newly created partition from Linux to LVM (8e). Parted doesn't understandLVM 1 partitions so this has to be done using fdisk.
# fdisk /dev/hdaCommand (m for help): tPartition number (1−4): 4Hex code (type L to list codes): 8eChanged system type of partition 4 to 8e (Unknown)Command (m for help): w
13.8.6. Set up LVM 1 for the new scheme
Initialize LVM 1 (vgscan)# vgscan
•
Make the new partition into a PV# pvcreate /dev/hda4
•
create a new volume group# vgcreate vg /dev/hda4
•
Create a logical volume to hold the new root.•
LVM HOWTO
Chapter 13. Recipes 51

# lvcreate −L250M −n root vg
13.8.7. Create the Filesystem
Make a filesystem in the logical volume and copy the root files onto it.
# mke2fs /dev/vg/root# mount /dev/vg/root /mnt/# find / −xdev | cpio −pvmd /mnt
13.8.8. Update /etc/fstab
Edit /mnt/etc/fstab on the new root so that / is mounted on /dev/vg/root. For example:
/dev/hda3 / ext2 defaults 1 1
becomes: /dev/vg/root / ext2 defaults 1 1
13.8.9. Create an LVM 1 initial RAM disk
# lvmcreate_initrd
Make sure you note the name that lvmcreate_initrd calls the initrd image. It should be in /boot.
13.8.10. Update /etc/lilo.conf
Add an entry in /etc/lilo.conf for LVM 1. This should look similar to the following:
image = /boot/KERNEL_IMAGE_NAME label = lvm root = /dev/vg/root initrd = /boot/INITRD_IMAGE_NAME ramdisk = 8192
Where KERNEL_IMAGE_NAME is the name of your LVM 1 enabled kernel, and INITRD_IMAGE_NAMEis the name of the initrd image created by lvmcreate_initrd. The ramdisk line may need to be increased if youhave a large LVM 1 configuration, but 8192 should suffice for most users. The default ramdisk size is 4096. Ifin doubt check the output from the lvmcreate_initrd command, the line that says:lvmcreate_initrd −− making loopback file (6189 kB)
and make the ramdisk the size given in brackets.
You should copy this new lilo.conf onto /etc in the new root fs as well.
# cp /etc/lilo.conf /mnt/etc/
LVM HOWTO
Chapter 13. Recipes 52
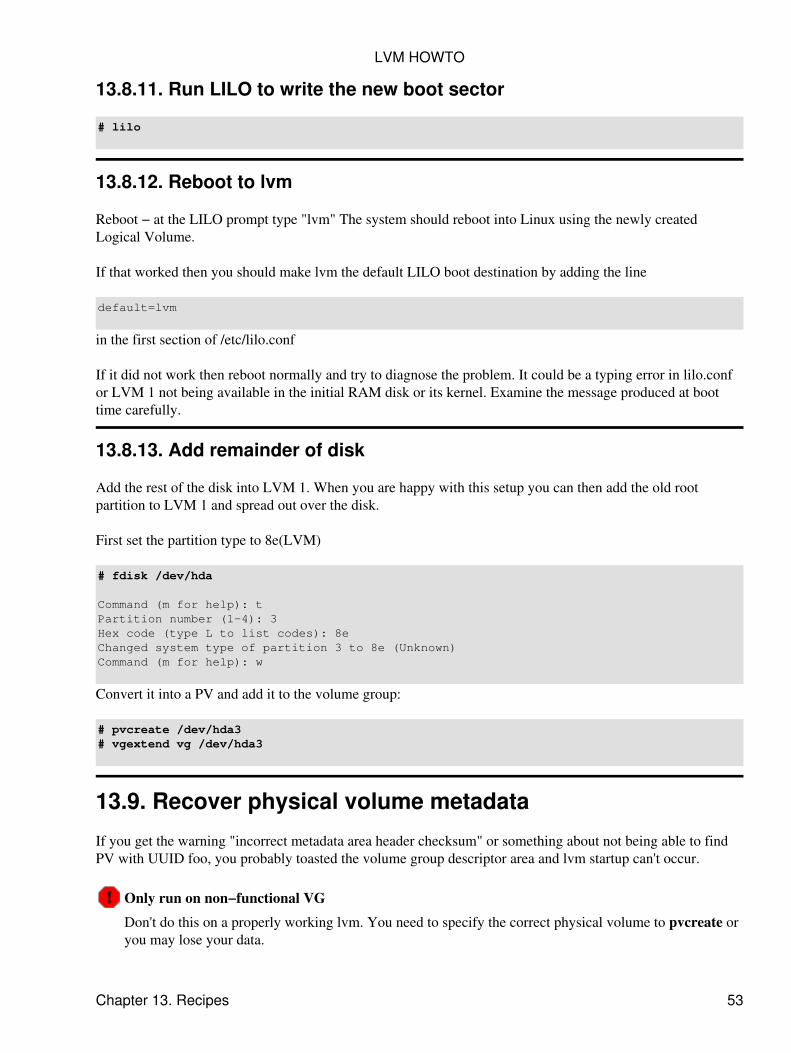
13.8.11. Run LILO to write the new boot sector
# lilo
13.8.12. Reboot to lvm
Reboot − at the LILO prompt type "lvm" The system should reboot into Linux using the newly createdLogical Volume.
If that worked then you should make lvm the default LILO boot destination by adding the line
default=lvm
in the first section of /etc/lilo.conf
If it did not work then reboot normally and try to diagnose the problem. It could be a typing error in lilo.confor LVM 1 not being available in the initial RAM disk or its kernel. Examine the message produced at boottime carefully.
13.8.13. Add remainder of disk
Add the rest of the disk into LVM 1. When you are happy with this setup you can then add the old rootpartition to LVM 1 and spread out over the disk.
First set the partition type to 8e(LVM)
# fdisk /dev/hda
Command (m for help): tPartition number (1−4): 3Hex code (type L to list codes): 8eChanged system type of partition 3 to 8e (Unknown)Command (m for help): w
Convert it into a PV and add it to the volume group:
# pvcreate /dev/hda3# vgextend vg /dev/hda3
13.9. Recover physical volume metadata
If you get the warning "incorrect metadata area header checksum" or something about not being able to findPV with UUID foo, you probably toasted the volume group descriptor area and lvm startup can't occur.
Only run on non−functional VG
Don't do this on a properly working lvm. You need to specify the correct physical volume to pvcreate oryou may lose your data.
LVM HOWTO
Chapter 13. Recipes 53
Extract the exact uuid for the PV that was overwritten from the file/etc/lvm/archive/VolumeGroupName_XXXXX.vg. (Where XXXXX represents the number of thelast known good archived lvm metadata).
Use pvcreate to restore the metadata: pvcreate −−uuid "<some_long_string>" −−restorefile/etc/lvm/archive/VolumeGroupName_XXXXX.vg <PhysicalVolume>
If you are lucky you'll find that the on−disk lvm metadata takes at least so much space as what it wasoverwritten with. The above command has been know to recover a PV overwritten with mkswap. If whateveroverwrote the VGDA writes past that area, LVs may be affected. In this case, fsck might be able to fix thefilesystem on the LV, or you may need more drastic measures to pull data off of it. Contact your local friendlyfilesystem expert for help in that case.
pvcreate only overwrites the lvm metadata areas on disk and doesn't touch the data areas (the logicalvolumes).
LVM HOWTO
Chapter 13. Recipes 54
Appendix A. Dangerous Operations
Warning
Don't do this unless you're really sure of what you're doing. You'll probably lose all your data.
A.1. Restoring the VG UUIDs using uuid_fixer
If you've upgraded LVM from previous versions to early 0.9 and 0.9.1 versions of LVM and vgscan saysvgscan −− no volume groups found, this is one way to fix it.
Download the UUID fixer program from the contributor directory at Sistina.
It is located at ftp://ftp.sistina.com/pub/LVM/contrib/uuid_fixer−0.3−IOP10.tar.gz"
•
Extract uuid_fixer−0.3−IOP10.tar.gz# tar zxf uuid_fixer−0.3−IOP10.tar.gz
•
cd to uuid_fixer# cd uuid_fixer
You have one of two options at this point:
Use the prebuild binary (it is build for i386 architecture).
Make sure you list all the PVs in the VG you are restoring, and follow the prompts
# ./uuid_fixer <LIST OF ALL PVS IN VG TO BE RESTORED>
1.
Build the uuid_builder program from source
Edit the Makefile with your favorite editor, and make sure LVMDIR points to your LVMsource.
Then run make.
# make
Now run uuid_fixer. Make sure you list all the PVs in the VG you are restoring, and followthe prompts.
# ./uuid_fixer <LIST OF ALL PVS IN VG TO BE RESTORED>
2.
•
Deactivate any active Volume Groups (optional)# vgchange −an
•
Run vgscan# vgscan
•
Reactivate Volume Groups# vgchange −ay
•
Appendix A. Dangerous Operations 55
A.2. Sharing LVM volumes
LVM is not cluster aware
Be very careful doing this, LVM is not currently cluster−aware and it is very easy to lose all your data.If you have a fibre−channel or shared−SCSI environment where more than one machine has physical accessto a set of disks then you can use LVM to divide these disks up into logical volumes. If you want to share datayou should really be looking at GFS or other cluster filesystems.
The key thing to remember when sharing volumes is that all the LVM administration must be done on onenode only and that all other nodes must have LVM shut down before changing anything on the admin node.Then, when the changes have been made, it is necessary to run vgscan on the other nodes before reloading thevolume groups. Also, unless you are running a cluster−aware filesystem (such as GFS) or application on thevolume, only one node can mount each filesystem. It is up to you, as system administrator to enforce this,LVM will not stop you corrupting your data.
The startup sequence of each node is the same as for a single−node setup with
vgscanvgchange −ay
in the startup scripts.
If you need to do any changes to the LVM metadata (regardless of whether it affects volumes mounted onother nodes) you must go through the following sequence. In the steps below ``admin node'' is any arbitrarilychosen node in the cluster.
Admin node Other nodes−−−−−−−−−− −−−−−−−−−−− Close all Logical volumes (umount) vgchange −an<make changes, eg lvextend> vgscan vgchange −ay
VGs should be active on the admin node
You do not need to, nor should you, unload the VGs on the admin node, so this can be the node with thehighest uptime requirement.
I'll say it again: Be very careful doing this
LVM HOWTO
Appendix A. Dangerous Operations 56
Appendix B. Reporting Errors and BugsJust telling us that LVM did not work does not provide us with enough information to help you. We need toknow about your setup and the various components of your configuration. The first thing you should do ischeck the linux−lvm mailing list archives to see if someone else has already reported the same bug. If you donot find a bug report for a problem similar to yours you should collect as much of the following informationas possible. The list is grouped into three categories of errors.
For compilation errors:
Detail the specific version of LVM you have. If you extracted LVM from a tarball give thename of the tar file and list any patches you applied. If you acquired LVM from the PublicCVS server, give the date and time you checked it out.
1.
Provide the exact error message. Copy the lines of output before the actual error message aswell as the lines after. These lines occasionally give hints as to why the error occurred.
2.
List the steps, in order, that produced the error. Is the error reproducible? If you start from aclean state does the same sequence of steps reproduce the error?
3.
•
For LVM errors:
Include all of the information requested in the compilation section.1. Attach a short description of your hardware: types of machines and disks, disks interface(SCSI, FC, NBD). Any other tidbits about your hardware you feel is important.
2.
The command lines used with LVM to produce the error.3. A log file produced when running the offending commands. Make sure you have thefollowing in your /etc/lvm/lvm.conf file:log { file="/tmp/lvm2.log" level=7 activation=1}
4.
•
When LVM trips a panic trap:
Include all of the information requested in two sections above.1. Provide the debug dump for the machine. This is best accomplished if you are watching theconsole output of the computer over a serial link, since you can't very well copy and pastefrom a panic'd machine, and it is very easy to mistype something if you try to copy the outputby hand.
2.
•
This can be a lot of information. If you end up with more than a couple of files, tar and gzip them into a singlearchive. Submit a link to where this file can be found to the appropriate mailing list (see Section C.1) alongwith a short description of the error. If you do not have a public web or ftp site that you can post theinformation to, you can try to submit the file to the list.
Appendix B. Reporting Errors and Bugs 57
Appendix C. Contact and Links
C.1. Mail lists
Before you post to any of our lists please read the all of this document and check the archives to see if yourquestion has already been answered. Please post in text only to our lists, fancy formated messages are nearimpossible to read if someone else is not running a mail client that understands it. Standard mailing listetiquette applies. Incomplete questions or configuration data make it very hard for us to answer yourquestions.
LVM Discussion Mailing Lists
linux−lvmThis list is aimed at user−related questions and comments. You may be able to get the answers youneed from other people who have the same issues. Open discussion is encouraged. Bug reports shouldbe sent to this list.
Subscribe using the web interface.
Look at the archivesdm−devel
This list is not specifically for lvm, but since device mapper is used by LVM 2, it is mentioned here.
Subscribe using the web interface.
Look at the archives
LVM−Related Commit Lists
lvm2−commitThis list gets messages automatically whenever someone commits to the lvm2 cvs tree. Its mainpurpose is to keep up with the cvs tree.
Look at the archiveslvm−commit
This list gets messages automatically whenever someone commits to the lvm cvs tree. Its mainpurpose is to keep up with the cvs tree.
Look at the archivesdm−commit
This list gets messages automatically whenever someone commits to the dm cvs tree. Its main purposeis to keep up with the cvs tree.
Look at the archives
Discontinued Lists
lvm−develThis list has been discontinued; please use linux−lvm for lvm development discussion.
Appendix C. Contact and Links 58
lvm−bugsThis list has been discontinued; Bug reports should be sent to the linux−lvm list.
C.2. Links
LVM Links:
The Logical Volume Manager home page.• The LVM 1 home page.• The Device Mapper home page.• The LVM 2 ftp site.• The LVM 1 ftp site.• The Device Mapper ftp site.•
LVM HOWTO
Appendix C. Contact and Links 59
Appendix D. GNU Free Documentation LicenseVersion 1.2, November 2002
Copyright (C) 2000,2001,2002 Free Software Foundation, Inc. 59 Temple Place, Suite 330,Boston, MA 02111−1307 USA Everyone is permitted to copy and distribute verbatim copiesof this license document, but changing it is not allowed.
D.1. PREAMBLE
The purpose of this License is to make a manual, textbook, or other functional and useful document "free" inthe sense of freedom: to assure everyone the effective freedom to copy and redistribute it, with or withoutmodifying it, either commercially or noncommercially. Secondarily, this License preserves for the author andpublisher a way to get credit for their work, while not being considered responsible for modifications made byothers.
This License is a kind of "copyleft", which means that derivative works of the document must themselves befree in the same sense. It complements the GNU General Public License, which is a copyleft license designedfor free software.
We have designed this License in order to use it for manuals for free software, because free software needsfree documentation: a free program should come with manuals providing the same freedoms that the softwaredoes. But this License is not limited to software manuals; it can be used for any textual work, regardless ofsubject matter or whether it is published as a printed book. We recommend this License principally for workswhose purpose is instruction or reference.
D.2. APPLICABILITY AND DEFINITIONS
This License applies to any manual or other work, in any medium, that contains a notice placed by thecopyright holder saying it can be distributed under the terms of this License. Such a notice grants aworld−wide, royalty−free license, unlimited in duration, to use that work under the conditions stated herein.The "Document", below, refers to any such manual or work. Any member of the public is a licensee, and isaddressed as "you". You accept the license if you copy, modify or distribute the work in a way requiringpermission under copyright law.
A "Modified Version" of the Document means any work containing the Document or a portion of it, eithercopied verbatim, or with modifications and/or translated into another language.
A "Secondary Section" is a named appendix or a front−matter section of the Document that deals exclusivelywith the relationship of the publishers or authors of the Document to the Document's overall subject (or torelated matters) and contains nothing that could fall directly within that overall subject. (Thus, if theDocument is in part a textbook of mathematics, a Secondary Section may not explain any mathematics.) Therelationship could be a matter of historical connection with the subject or with related matters, or of legal,commercial, philosophical, ethical or political position regarding them.
The "Invariant Sections" are certain Secondary Sections whose titles are designated, as being those ofInvariant Sections, in the notice that says that the Document is released under this License. If a section doesnot fit the above definition of Secondary then it is not allowed to be designated as Invariant. The Document
Appendix D. GNU Free Documentation License 60

may contain zero Invariant Sections. If the Document does not identify any Invariant Sections then there arenone.
The "Cover Texts" are certain short passages of text that are listed, as Front−Cover Texts or Back−CoverTexts, in the notice that says that the Document is released under this License. A Front−Cover Text may be atmost 5 words, and a Back−Cover Text may be at most 25 words.
A "Transparent" copy of the Document means a machine−readable copy, represented in a format whosespecification is available to the general public, that is suitable for revising the document straightforwardlywith generic text editors or (for images composed of pixels) generic paint programs or (for drawings) somewidely available drawing editor, and that is suitable for input to text formatters or for automatic translation toa variety of formats suitable for input to text formatters. A copy made in an otherwise Transparent file formatwhose markup, or absence of markup, has been arranged to thwart or discourage subsequent modification byreaders is not Transparent. An image format is not Transparent if used for any substantial amount of text. Acopy that is not "Transparent" is called "Opaque".
Examples of suitable formats for Transparent copies include plain ASCII without markup, Texinfo inputformat, LaTeX input format, SGML or XML using a publicly available DTD, and standard−conformingsimple HTML, PostScript or PDF designed for human modification. Examples of transparent image formatsinclude PNG, XCF and JPG. Opaque formats include proprietary formats that can be read and edited only byproprietary word processors, SGML or XML for which the DTD and/or processing tools are not generallyavailable, and the machine−generated HTML, PostScript or PDF produced by some word processors foroutput purposes only.
The "Title Page" means, for a printed book, the title page itself, plus such following pages as are needed tohold, legibly, the material this License requires to appear in the title page. For works in formats which do nothave any title page as such, "Title Page" means the text near the most prominent appearance of the work'stitle, preceding the beginning of the body of the text.
A section "Entitled XYZ" means a named subunit of the Document whose title either is precisely XYZ orcontains XYZ in parentheses following text that translates XYZ in another language. (Here XYZ stands for aspecific section name mentioned below, such as "Acknowledgements", "Dedications", "Endorsements", or"History".) To "Preserve the Title" of such a section when you modify the Document means that it remains asection "Entitled XYZ" according to this definition.
The Document may include Warranty Disclaimers next to the notice which states that this License applies tothe Document. These Warranty Disclaimers are considered to be included by reference in this License, butonly as regards disclaiming warranties: any other implication that these Warranty Disclaimers may have isvoid and has no effect on the meaning of this License.
D.3. VERBATIM COPYING
You may copy and distribute the Document in any medium, either commercially or noncommercially,provided that this License, the copyright notices, and the license notice saying this License applies to theDocument are reproduced in all copies, and that you add no other conditions whatsoever to those of thisLicense. You may not use technical measures to obstruct or control the reading or further copying of thecopies you make or distribute. However, you may accept compensation in exchange for copies. If youdistribute a large enough number of copies you must also follow the conditions in section 3.
You may also lend copies, under the same conditions stated above, and you may publicly display copies.
LVM HOWTO
Appendix D. GNU Free Documentation License 61

D.4. COPYING IN QUANTITY
If you publish printed copies (or copies in media that commonly have printed covers) of the Document,numbering more than 100, and the Document's license notice requires Cover Texts, you must enclose thecopies in covers that carry, clearly and legibly, all these Cover Texts: Front−Cover Texts on the front cover,and Back−Cover Texts on the back cover. Both covers must also clearly and legibly identify you as thepublisher of these copies. The front cover must present the full title with all words of the title equallyprominent and visible. You may add other material on the covers in addition. Copying with changes limited tothe covers, as long as they preserve the title of the Document and satisfy these conditions, can be treated asverbatim copying in other respects.
If the required texts for either cover are too voluminous to fit legibly, you should put the first ones listed (asmany as fit reasonably) on the actual cover, and continue the rest onto adjacent pages.
If you publish or distribute Opaque copies of the Document numbering more than 100, you must eitherinclude a machine−readable Transparent copy along with each Opaque copy, or state in or with each Opaquecopy a computer−network location from which the general network−using public has access to downloadusing public−standard network protocols a complete Transparent copy of the Document, free of addedmaterial. If you use the latter option, you must take reasonably prudent steps, when you begin distribution ofOpaque copies in quantity, to ensure that this Transparent copy will remain thus accessible at the statedlocation until at least one year after the last time you distribute an Opaque copy (directly or through youragents or retailers) of that edition to the public.
It is requested, but not required, that you contact the authors of the Document well before redistributing anylarge number of copies, to give them a chance to provide you with an updated version of the Document.
D.5. MODIFICATIONS
You may copy and distribute a Modified Version of the Document under the conditions of sections 2 and 3above, provided that you release the Modified Version under precisely this License, with the ModifiedVersion filling the role of the Document, thus licensing distribution and modification of the Modified Versionto whoever possesses a copy of it. In addition, you must do these things in the Modified Version:
Use in the Title Page (and on the covers, if any) a title distinct from that of the Document, and fromthose of previous versions (which should, if there were any, be listed in the History section of theDocument). You may use the same title as a previous version if the original publisher of that versiongives permission.
A.
List on the Title Page, as authors, one or more persons or entities responsible for authorship of themodifications in the Modified Version, together with at least five of the principal authors of theDocument (all of its principal authors, if it has fewer than five), unless they release you from thisrequirement.
B.
State on the Title page the name of the publisher of the Modified Version, as the publisher.C. Preserve all the copyright notices of the Document.D. Add an appropriate copyright notice for your modifications adjacent to the other copyright notices.E. Include, immediately after the copyright notices, a license notice giving the public permission to usethe Modified Version under the terms of this License, in the form shown in the Addendum below.
F.
Preserve in that license notice the full lists of Invariant Sections and required Cover Texts given in theDocument's license notice.
G.
LVM HOWTO
Appendix D. GNU Free Documentation License 62
Include an unaltered copy of this License.H. Preserve the section Entitled "History", Preserve its Title, and add to it an item stating at least the title,year, new authors, and publisher of the Modified Version as given on the Title Page. If there is nosection Entitled "History" in the Document, create one stating the title, year, authors, and publisher ofthe Document as given on its Title Page, then add an item describing the Modified Version as statedin the previous sentence.
I.
Preserve the network location, if any, given in the Document for public access to a Transparent copyof the Document, and likewise the network locations given in the Document for previous versions itwas based on. These may be placed in the "History" section. You may omit a network location for awork that was published at least four years before the Document itself, or if the original publisher ofthe version it refers to gives permission.
J.
For any section Entitled "Acknowledgements" or "Dedications", Preserve the Title of the section, andpreserve in the section all the substance and tone of each of the contributor acknowledgements and/ordedications given therein.
K.
Preserve all the Invariant Sections of the Document, unaltered in their text and in their titles. Sectionnumbers or the equivalent are not considered part of the section titles.
L.
Delete any section Entitled "Endorsements". Such a section may not be included in the ModifiedVersion.
M.
Do not retitle any existing section to be Entitled "Endorsements" or to conflict in title with anyInvariant Section.
N.
Preserve any Warranty Disclaimers.O.
If the Modified Version includes new front−matter sections or appendices that qualify as Secondary Sectionsand contain no material copied from the Document, you may at your option designate some or all of thesesections as invariant. To do this, add their titles to the list of Invariant Sections in the Modified Version'slicense notice. These titles must be distinct from any other section titles.
You may add a section Entitled "Endorsements", provided it contains nothing but endorsements of yourModified Version by various parties−−for example, statements of peer review or that the text has beenapproved by an organization as the authoritative definition of a standard.
You may add a passage of up to five words as a Front−Cover Text, and a passage of up to 25 words as aBack−Cover Text, to the end of the list of Cover Texts in the Modified Version. Only one passage ofFront−Cover Text and one of Back−Cover Text may be added by (or through arrangements made by) any oneentity. If the Document already includes a cover text for the same cover, previously added by you or byarrangement made by the same entity you are acting on behalf of, you may not add another; but you mayreplace the old one, on explicit permission from the previous publisher that added the old one.
The author(s) and publisher(s) of the Document do not by this License give permission to use their names forpublicity for or to assert or imply endorsement of any Modified Version.
D.6. COMBINING DOCUMENTS
You may combine the Document with other documents released under this License, under the terms definedin section 4 above for modified versions, provided that you include in the combination all of the InvariantSections of all of the original documents, unmodified, and list them all as Invariant Sections of your combinedwork in its license notice, and that you preserve all their Warranty Disclaimers.
The combined work need only contain one copy of this License, and multiple identical Invariant Sections maybe replaced with a single copy. If there are multiple Invariant Sections with the same name but different
LVM HOWTO
Appendix D. GNU Free Documentation License 63
contents, make the title of each such section unique by adding at the end of it, in parentheses, the name of theoriginal author or publisher of that section if known, or else a unique number. Make the same adjustment tothe section titles in the list of Invariant Sections in the license notice of the combined work.
In the combination, you must combine any sections Entitled "History" in the various original documents,forming one section Entitled "History"; likewise combine any sections Entitled "Acknowledgements", and anysections Entitled "Dedications". You must delete all sections Entitled "Endorsements".
D.7. COLLECTIONS OF DOCUMENTS
You may make a collection consisting of the Document and other documents released under this License, andreplace the individual copies of this License in the various documents with a single copy that is included inthe collection, provided that you follow the rules of this License for verbatim copying of each of thedocuments in all other respects.
You may extract a single document from such a collection, and distribute it individually under this License,provided you insert a copy of this License into the extracted document, and follow this License in all otherrespects regarding verbatim copying of that document.
D.8. AGGREGATION WITH INDEPENDENT WORKS
A compilation of the Document or its derivatives with other separate and independent documents or works, inor on a volume of a storage or distribution medium, is called an "aggregate" if the copyright resulting from thecompilation is not used to limit the legal rights of the compilation's users beyond what the individual workspermit. When the Document is included in an aggregate, this License does not apply to the other works in theaggregate which are not themselves derivative works of the Document.
If the Cover Text requirement of section 3 is applicable to these copies of the Document, then if the Documentis less than one half of the entire aggregate, the Document's Cover Texts may be placed on covers that bracketthe Document within the aggregate, or the electronic equivalent of covers if the Document is in electronicform. Otherwise they must appear on printed covers that bracket the whole aggregate.
D.9. TRANSLATION
Translation is considered a kind of modification, so you may distribute translations of the Document under theterms of section 4. Replacing Invariant Sections with translations requires special permission from theircopyright holders, but you may include translations of some or all Invariant Sections in addition to theoriginal versions of these Invariant Sections. You may include a translation of this License, and all the licensenotices in the Document, and any Warranty Disclaimers, provided that you also include the original Englishversion of this License and the original versions of those notices and disclaimers. In case of a disagreementbetween the translation and the original version of this License or a notice or disclaimer, the original versionwill prevail.
If a section in the Document is Entitled "Acknowledgements", "Dedications", or "History", the requirement(section 4) to Preserve its Title (section 1) will typically require changing the actual title.
LVM HOWTO
Appendix D. GNU Free Documentation License 64
D.10. TERMINATION
You may not copy, modify, sublicense, or distribute the Document except as expressly provided for under thisLicense. Any other attempt to copy, modify, sublicense or distribute the Document is void, and willautomatically terminate your rights under this License. However, parties who have received copies, or rights,from you under this License will not have their licenses terminated so long as such parties remain in fullcompliance.
D.11. FUTURE REVISIONS OF THIS LICENSE
The Free Software Foundation may publish new, revised versions of the GNU Free Documentation Licensefrom time to time. Such new versions will be similar in spirit to the present version, but may differ in detail toaddress new problems or concerns. See http://www.gnu.org/copyleft/.
Each version of the License is given a distinguishing version number. If the Document specifies that aparticular numbered version of this License "or any later version" applies to it, you have the option offollowing the terms and conditions either of that specified version or of any later version that has beenpublished (not as a draft) by the Free Software Foundation. If the Document does not specify a versionnumber of this License, you may choose any version ever published (not as a draft) by the Free SoftwareFoundation.
D.12. ADDENDUM: How to use this License for yourdocuments
To use this License in a document you have written, include a copy of the License in the document and put thefollowing copyright and license notices just after the title page:
Copyright (c) YEAR YOUR NAME. Permission is granted to copy, distribute and/or modifythis document under the terms of the GNU Free Documentation License, Version 1.2 or anylater version published by the Free Software Foundation; with no Invariant Sections, noFront−Cover Texts, and no Back−Cover Texts. A copy of the license is included in thesection entitled "GNU Free Documentation License".
If you have Invariant Sections, Front−Cover Texts and Back−Cover Texts, replace the "with...Texts." linewith this:
with the Invariant Sections being LIST THEIR TITLES, with the Front−Cover Texts beingLIST, and with the Back−Cover Texts being LIST.
If you have Invariant Sections without Cover Texts, or some other combination of the three, merge those twoalternatives to suit the situation.
If your document contains nontrivial examples of program code, we recommend releasing these examples inparallel under your choice of free software license, such as the GNU General Public License, to permit theiruse in free software.
LVM HOWTO
Appendix D. GNU Free Documentation License 65