Embed Size (px)
Citation preview
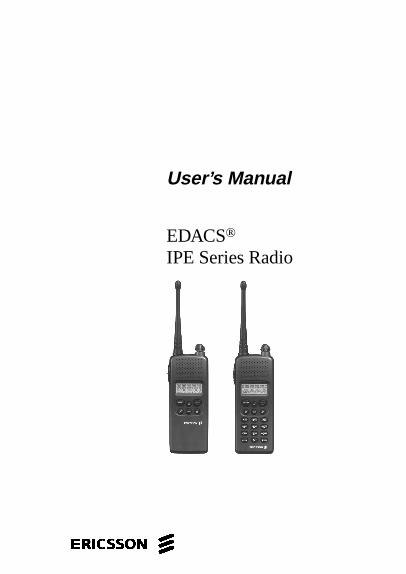
User’s Manual
EDACS®
IPE Series Radio
ericssonz
NOTICE!This manual covers Ericsson and General Electricproducts manufactured and sold by Ericsson Inc.
NOTE!
Repairs to this equipment should be made only by anauthorized service technician or facility designated by thesupplier. Any repairs, alterations or substitution of rec-ommended parts made by the user to this equipment notapproved by the manufacturer could void the user’sauthority to operate the equipment in addition to themanufacturer’s warranty.
This manual is published by Ericsson Inc. , without any warranty.Improvements and changes to this manual necessitated by typo-graphical errors, inaccuracies of current information, or improvementsto programs and/or equipment, may be made by Ericsson Inc. , at anytime and without notice. Such changes will be incorporated into neweditions of this manual. No part of this manual may be reproduced ortransmitted in any form or by any means, electronic or mechanical,including photocopying and recording, for any purpose, without theexpress written permission of Ericsson Inc .
The software contained in this device is copy-righted by Ericsson Inc. Unpublished rights arereserved under the copyright laws of the UnitedStates.
NOTE
Copyright© May 1996, Ericsson Inc.
2
TABLE OF CONTENTSINTRODUCTION . . . . . . . . . . . . . . . . . . 5BASIC OPERATION . . . . . . . . . . . . . . . . 7
TURNING THE RADIO ON . . . . . . . . . . . . 7PLACING AN INDIVIDUAL CALL . . . . . . . . . 8PLACING A GROUP CALL . . . . . . . . . . . . 9PLACING AN EMERGENCY CALL . . . . . . . 9ANSWERING AN INDIVIDUAL CALL . . . . . . 10PLACING AN INTERCONNECT CALL . . . . . . 10
Nobody Answers or You Hear a Busy orFast Busy Tone . . . . . . . . . . . . . . . . 12Last Number Re-Dial . . . . . . . . . . . . . 12A Call is Unsuccessful or a Call in Progress is Interrupted . . . . . . . . . . . . . . . . 12
ANSWERING AN INTERCONNECT CALL . . . 12Unanswered Call Counter . . . . . . . . . . 13
SYSTEM SELECTION . . . . . . . . . . . . . . . 13GROUP SELECTION . . . . . . . . . . . . . . . . 14GROUP SCAN . . . . . . . . . . . . . . . . . . . 14
VOLUME CONTROL KNOB . . . . . . . . . . . 15HANDSFREE Volume Control . . . . . . . . 15
MUTE KEY . . . . . . . . . . . . . . . . . . . . 15AIR TIME METER . . . . . . . . . . . . . . . . . 15TURNING THE UNIT OFF . . . . . . . . . . . . 16
DISPLAY, KEYPAD, AND AUDIBLE SIGNALS . . . 16DISPLAY . . . . . . . . . . . . . . . . . . . . . 16
Alphanumeric Field . . . . . . . . . . . . . 16Numeric Field . . . . . . . . . . . . . . . . 17Status Indicators . . . . . . . . . . . . . . . 17
BUTTON . . . . . . . . . . . . . . . . . . . . . 18KEYPAD . . . . . . . . . . . . . . . . . . . . . . 18
MENU . . . . . . . . . . . . . . . . . . . . . . . . 19Illumination . . . . . . . . . . . . . . . . . . 22
ALERT TONES . . . . . . . . . . . . . . . . . . . 22AUDIBLE SIGNALS . . . . . . . . . . . . . . . . 24
Ringing Signal . . . . . . . . . . . . . . . . 24Error Signal . . . . . . . . . . . . . . . . . 25Malfunction Alarm Signal . . . . . . . . . . 25
ELECTRONIC LOCK AND CALL RESTRICTIONS 25SETUP LOCK CODE . . . . . . . . . . . . . . . 26
3
TABLE OF CONTENTS (CONT’D)STORING NUMBERS . . . . . . . . . . . . . . . 27
STORING A NUMBER (AND NAME) . . . . . . 27MEMORY PROTECTION . . . . . . . . . . . . 29MEMORY FULL . . . . . . . . . . . . . . . . . 30
RECALLING NUMBERS . . . . . . . . . . . . . . 31Displaying Extended Digits . . . . . . . . . 31Alpha Recall . . . . . . . . . . . . . . . . . 31Recalling a Number by Entering the Memory Location . . . . . . . . . . . . . . 33Appending Digits to a Recalled Number . . 33Changing a Recalled Number . . . . . . . . 34
SPEED CALLING . . . . . . . . . . . . . . . . 34ERASING A STORED NUMBER . . . . . . . . 34RECALLING A NUMBER DURING A CALL . . . 35
DTMF SIGNALING . . . . . . . . . . . . . . . . . 35DTMF SIGNALING USING THE KEYPAD . . . . 35
ACCESSING USER MENU FUNCTIONS . . . . . 36MENU FUNCTION DEFINITIONS . . . . . . . . 37
BATTERIES AND RECHARGING . . . . . . . . . 42BATTERIES . . . . . . . . . . . . . . . . . . . 42
Battery Level Indicator . . . . . . . . . . . 42Low Battery Alert . . . . . . . . . . . . . . 43Care and Maintenance . . . . . . . . . . . 43Rechargeable Battery Pack Disposal . . . . 44Inserting and Removing a Battery . . . . . 45
RECHARGING . . . . . . . . . . . . . . . . . . 46Using a Desk-Top Charger . . . . . . . . . 47Restoring Battery Capacity . . . . . . . . . 48
INTRINSICALLY SAFE USAGE . . . . . . . . . . 49BATTERY PACKS . . . . . . . . . . . . . . . . 49ACCESSORIES . . . . . . . . . . . . . . . . . 50
APPENDIX 1 . . . . . . . . . . . . . . . . . . . . 51FAULT TRACING . . . . . . . . . . . . . . . . 51
No Power to the Radio . . . . . . . . . . . 51SERV Indicator Does Not Come On . . . . 51Received Signal is Weak . . . . . . . . . . 51A Call Cannot be Placed . . . . . . . . . . 52"LOCKED" Is Displayed . . . . . . . . . . . 52
WARRANTY . . . . . . . . . . . . . . . . . . . . 54
4
INTRODUCTION
This manual describes how to use the IPE SeriesPortable Radios. The IPE (Infinity) is a synthesized,microprocessor-based, duplex portable FM radio provid-ing reliable two-way communications in Enhanced DigitalAccess Communications System (EDACS) trunking en-vironments.
Duplex is provided in EDACS systems while operat-ing in the Telephone Interconnect Mode. At other times,the radio provides simplex communications; i.e., whenplacing group calls in the EDACS environment. In anEDACS trunked environment the user selects a commu-nications system. In this mode, channel selection istransparent to the user and is controlled via digital com-munication with the system controller. This provides ad-vanced programmable features and fast access to com-munication channels.
The exact operation of the radio depends on the radiomode, the operating mode, the radio’s programming, andthe particular radio system. Most features described inthis manual may be enabled or disabled through pro-gramming. Consult the system administrator for the re-quired features to be programmed into the radio.
5
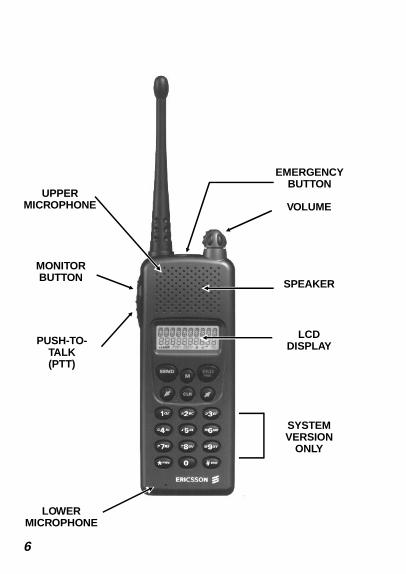
EMERGENCYBUTTON
VOLUME
SPEAKER
LCDDISPLAY
UPPERMICROPHONE
MONITORBUTTON
PUSH-TO-TALK(PTT)
LOWERMICROPHONE
SYSTEMVERSION
ONLY
6
BASIC OPERATION
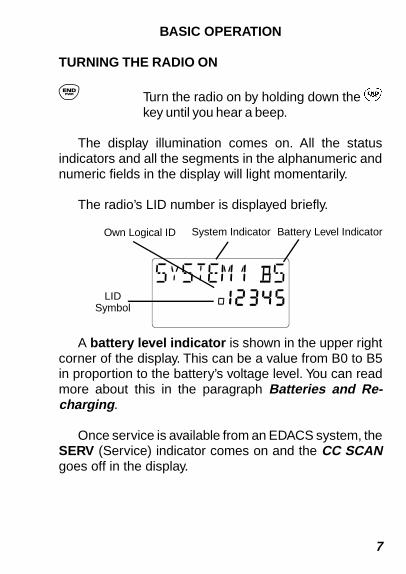
TURNING THE RADIO ON
E Turn the radio on by holding down the Ekey until you hear a beep.
The display illumination comes on. All the statusindicators and all the segments in the alphanumeric andnumeric fields in the display will light momentarily.
The radio’s LID number is displayed briefly.
A battery level indicator is shown in the upper rightcorner of the display. This can be a value from B0 to B5in proportion to the battery’s voltage level. You can readmore about this in the paragraph Batteries and Re-charging .
Once service is available from an EDACS system, theSERV (Service) indicator comes on and the CC SCANgoes off in the display.
Own Logical ID Battery Level IndicatorSystem Indicator
LIDSymbol
7
Note the following points:
• If the SERV indicator does not come on, you havelost contact with the EDACS system and cannot,therefore, place or receive any calls. Refer toAppendix 1 for further information.
PLACING AN INDIVIDUAL CALL
1. Press the # key followed by the LID of the unityou wish to call. These digits are shown in thesecond line of the display.
If you enter a wrong digit or a wrong LID:
Erase a wrong digit by pressing the C key mo-mentarily. You may delete all wrong digits indi-vidually like this, or eliminate all entered digits byholding the C key for approximately 1 second. Ifyou are not in a call, pressing the E key will alsodelete all entered digits.
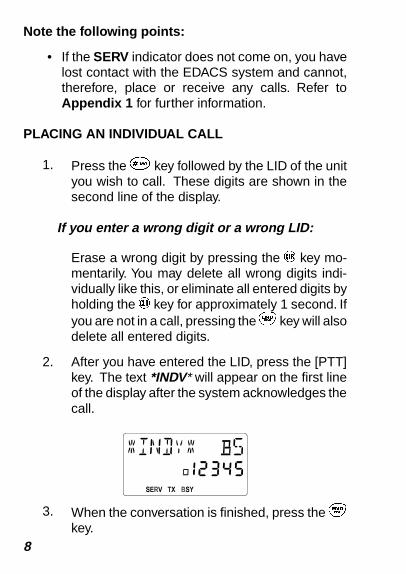
2. After you have entered the LID, press the [PTT]key. The text *INDV* will appear on the first lineof the display after the system acknowledges thecall.
3. When the conversation is finished, press the Ekey.
8
PLACING A GROUP CALL
To place an EDACS Group Call on the desired Group(refer to GROUP SELECTION for further information)simply press the [PTT] key and speak into the micro-phone.
PLACING AN EMERGENCY CALL
Press and hold the Emergency button for approxi-mately 2 seconds. The EMG icon will begin to flash andthe word *EMERG* will appear in the display.
To clear an EMERGENCY(supervisory function only):
Select the Group where the Emergency is active.Press and release the Emergency button and then pressand release the C key. The radio will send the ClearEmergency message.
This feature can be disabled in the radio’s person-ality.
NOTE
9
ANSWERING AN INDIVIDUAL CALL
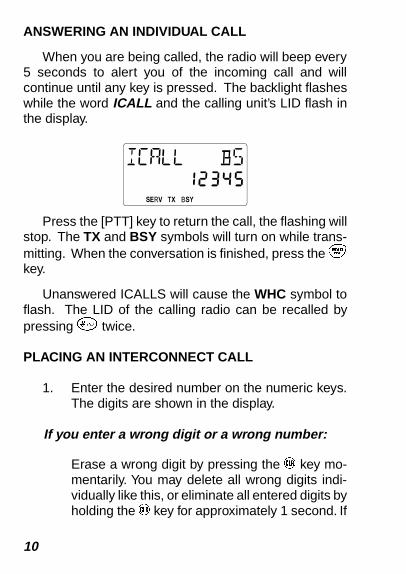
When you are being called, the radio will beep every5 seconds to alert you of the incoming call and willcontinue until any key is pressed. The backlight flasheswhile the word ICALL and the calling unit’s LID flash inthe display.
Press the [PTT] key to return the call, the flashing willstop. The TX and BSY symbols will turn on while trans-mitting. When the conversation is finished, press the Ekey.
Unanswered ICALLS will cause the WHC symbol toflash. The LID of the calling radio can be recalled bypressing # twice.
PLACING AN INTERCONNECT CALL
1. Enter the desired number on the numeric keys.The digits are shown in the display.
If you enter a wrong digit or a wrong number:
Erase a wrong digit by pressing the C key mo-mentarily. You may delete all wrong digits indi-vidually like this, or eliminate all entered digits byholding the C key for approximately 1 second. If
10
you are not in a call, pressing the E key will alsodelete all entered digits.
2. When you have entered the number, press S.
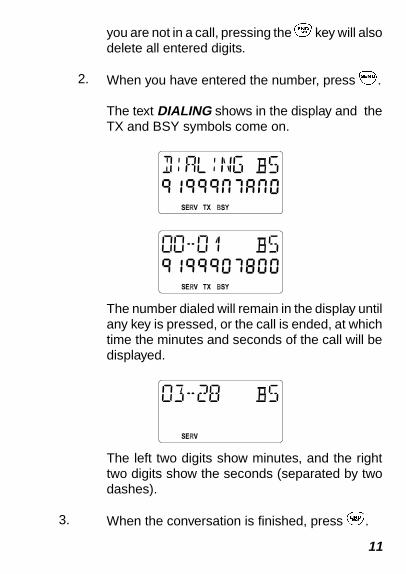
The text DIALING shows in the display and theTX and BSY symbols come on.
The number dialed will remain in the display untilany key is pressed, or the call is ended, at whichtime the minutes and seconds of the call will bedisplayed.
The left two digits show minutes, and the righttwo digits show the seconds (separated by twodashes).
3. When the conversation is finished, press E.
11
Nobody Answers or You Hear a Busy or Fast BusyTone
Press E. The telephone number will be re-tained in the memory and you can easily repeatthe call.
Last Number Re-Dial
M Press M, then > to scroll to the RECALLfunction. Then press M, the word LASTDIAL will appear and the last dialed num-ber will be displayed. Press S to place thecall.
The last number called will remain in thememory even if the radio is turned off.
A Call is Unsuccessful or a Call in Progress isInterrupted
An error signal (a short beep) is heard. Refer toAppendix 1 for further information.
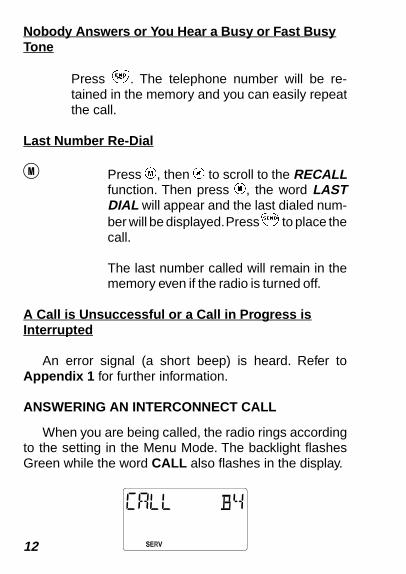
ANSWERING AN INTERCONNECT CALL
When you are being called, the radio rings accordingto the setting in the Menu Mode. The backlight flashesGreen while the word CALL also flashes in the display.
12
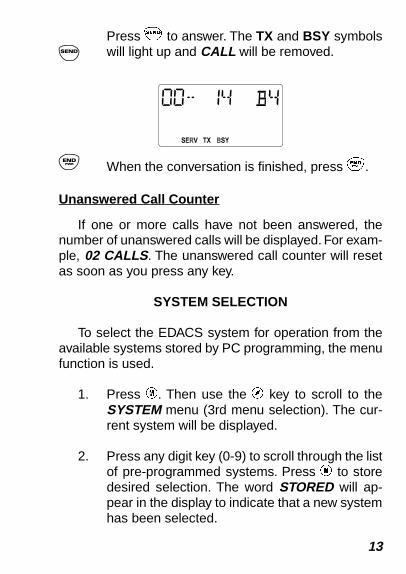
S
Press S to answer. The TX and BSY symbolswill light up and CALL will be removed.
E When the conversation is finished, press E.
Unanswered Call Counter
If one or more calls have not been answered, thenumber of unanswered calls will be displayed. For exam-ple, 02 CALLS . The unanswered call counter will resetas soon as you press any key.
SYSTEM SELECTION
To select the EDACS system for operation from theavailable systems stored by PC programming, the menufunction is used.
1. Press M. Then use the > key to scroll to theSYSTEM menu (3rd menu selection). The cur-rent system will be displayed.
2. Press any digit key (0-9) to scroll through the listof pre-programmed systems. Press M to storedesired selection. The word STORED will ap-pear in the display to indicate that a new systemhas been selected.
13
3. Press E to exit from the menu function.
GROUP SELECTION
EDACS group selections are also made through theuser menu.
1. Press M. Then use the > key to scroll to theGROUP menu (4th menu selection). The cur-rent Group will be displayed.
2. Press any digit key (0-9) to scroll through theGroup Set for the currently selected System.Another press of the M key will store the newselected group.
3. While scrolling, the * key is used to add theGroup to the Group Scan List, the SCN symbolwill indicate the Group has successfully beenadded. The # key is used to delete the Groupfrom the Group Scan List.
4. Press the E key to exit from the user menu.
GROUP SCAN
To enable Group Scan press C key. The flashingSCN symbol will indicate that the scan function is turnedon. All groups previously entered into the Group ScanList will be monitored.
14
VOLUME CONTROL KNOB
Keypad volume and earpiece volume is adjust-able from the knob on top of the radio.
HANDSFREE Volume Control
<
>
During handsfree operation you can adjust thevolume with these keys.
MUTE KEY
M During a phone conversation, the microphonecan be deactivated by holding down the M key.Release the M key to resume the conversation.The display will show MUTE while muted.
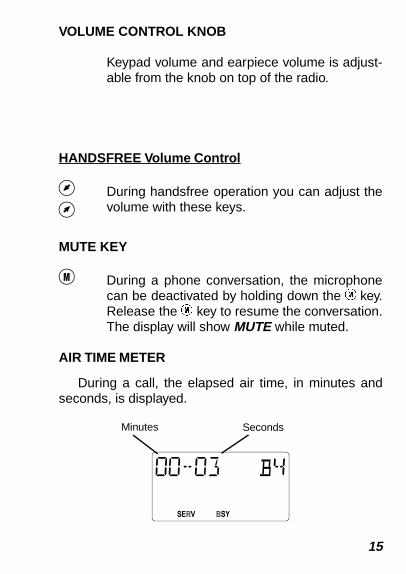
AIR TIME METER
During a call, the elapsed air time, in minutes andseconds, is displayed.
Minutes Seconds
15
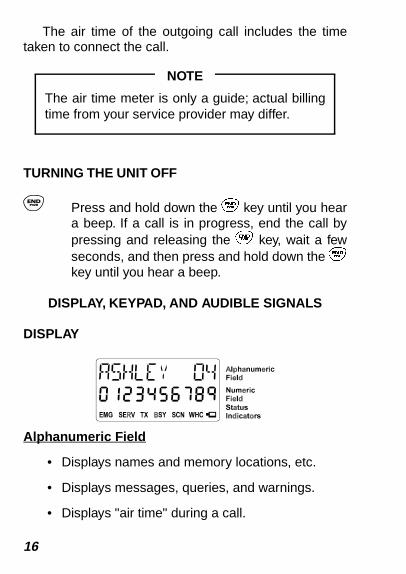
The air time of the outgoing call includes the timetaken to connect the call.
TURNING THE UNIT OFF
E Press and hold down the E key until you heara beep. If a call is in progress, end the call bypressing and releasing the E key, wait a fewseconds, and then press and hold down the Ekey until you hear a beep.
DISPLAY, KEYPAD, AND AUDIBLE SIGNALS
DISPLAY
Alphanumeric Field
• Displays names and memory locations, etc.
• Displays messages, queries, and warnings.
• Displays "air time" during a call.
The air time meter is only a guide; actual billingtime from your service provider may differ.
NOTE
16

• Displays battery level indicator.
Numeric Field
Displays the telephone number entered on the key-pad, or recalled from memory.
Status Indicators
EMG Emergency . Indicates that an emergencyis declared on the current group.
SERV Service . Indicates control channel.
TX Transmit . Indicates unit is transmitting.
SCN Scan . During Group selection it indicatesGroup has been added to the Group ScanList. Flashing indicates scan function isturned on.
BSY Busy . Unit is active in some type of call.Shown during a call and also while an out-going call is being connected. Flasheswhile the radio is queued.
WHC Who Has Called . Flashes to indicate thatyou received an Individual Call.
Battery . Flashes when battery reacheslevel B0.
17
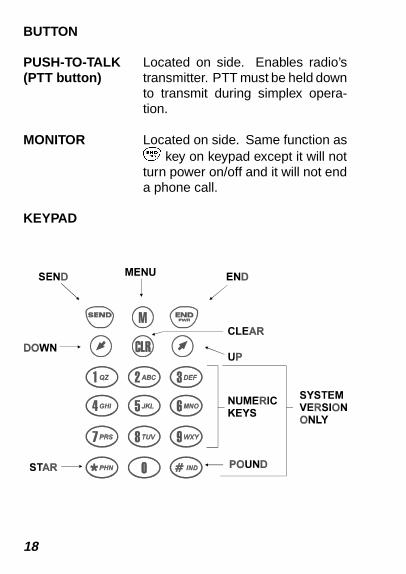
BUTTON
PUSH-TO-TALK(PTT button)
Located on side. Enables radio’stransmitter. PTT must be held downto transmit during simplex opera-tion.
MONITOR Located on side. Same function asE key on keypad except it will notturn power on/off and it will not enda phone call.
KEYPAD
18
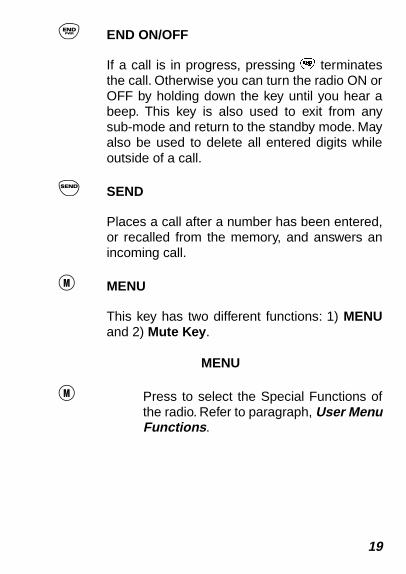
E END ON/OFF
If a call is in progress, pressing E terminatesthe call. Otherwise you can turn the radio ON orOFF by holding down the key until you hear abeep. This key is also used to exit from anysub-mode and return to the standby mode. Mayalso be used to delete all entered digits whileoutside of a call.
S SEND
Places a call after a number has been entered,or recalled from the memory, and answers anincoming call.
M MENU
This key has two different functions: 1) MENUand 2) Mute Key .
MENU
M Press to select the Special Functions ofthe radio. Refer to paragraph, User MenuFunctions .
19
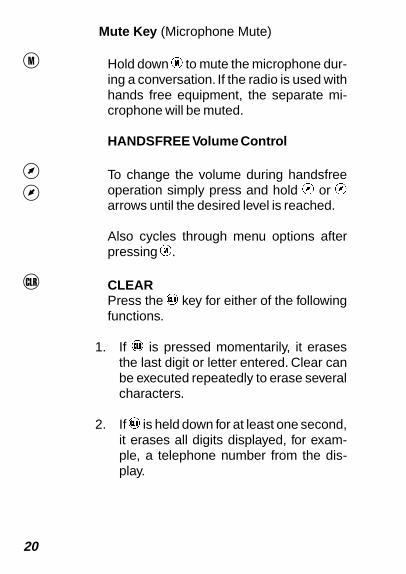
Mute Key (Microphone Mute)
M Hold down M to mute the microphone dur-ing a conversation. If the radio is used withhands free equipment, the separate mi-crophone will be muted.
HANDSFREE Volume Control
>
<
To change the volume during handsfreeoperation simply press and hold > or <arrows until the desired level is reached.
Also cycles through menu options afterpressing M.
C CLEARPress the C key for either of the followingfunctions.
1. If C is pressed momentarily, it erasesthe last digit or letter entered. Clear canbe executed repeatedly to erase severalcharacters.
2. If C is held down for at least one second,it erases all digits displayed, for exam-ple, a telephone number from the dis-play.
20
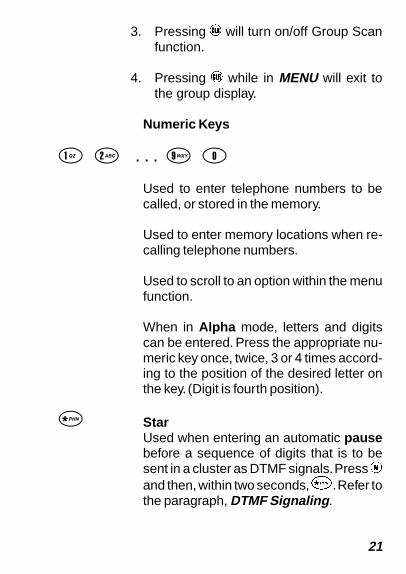
3. Pressing C will turn on/off Group Scanfunction.
4. Pressing C while in MENU will exit tothe group display.
Numeric Keys
1 2 . . . 9 0
Used to enter telephone numbers to becalled, or stored in the memory.
Used to enter memory locations when re-calling telephone numbers.
Used to scroll to an option within the menufunction.
When in Alpha mode, letters and digitscan be entered. Press the appropriate nu-meric key once, twice, 3 or 4 times accord-ing to the position of the desired letter onthe key. (Digit is fourth position).
* StarUsed when entering an automatic pausebefore a sequence of digits that is to besent in a cluster as DTMF signals. Press Mand then, within two seconds, *. Refer tothe paragraph, DTMF Signaling .
21
Used in Alpha mode to enter a space or astar.
# PoundUsed when entering a manual pause be-fore a sequence of digits that is to be sentin a cluster as DTMF signals. Press M andthen, within two seconds #. Refer to theparagraph, DTMF Signaling.
Used when placing an Individual Call. Re-fer to paragraph PLACING AN INDIVID-UAL CALL .
Illumination
The display and keys are illuminated.
The light will be on if the phone is being dialed, or if akey has been pressed. After 10 seconds of inactivity thelight will automatically turn off. See the paragraph onUser Menu Functions for further information on thisoption.
ALERT TONES
The IPE Series radios generate a set of unique alerttones to indicate operating status. The following sectionidentifies and describes the alert tones used in theDuplex radio for EDACS applications.
22
CALL ORIGINATE ALERTIf programmed, a short tone is sounded whenever theS key or PTT button is pressed and the radio hasacquired a channel. This tone indicates the user maybegin communications.
CALL QUEUEDIf no tone is heard after the transmitter is keyed andthe BSY icon flashes, this indicates that the systemhas placed the request in a queue. If the S key orPTT button is pressed while in queue, the radioautokeys (automatically keys) when a channel be-comes available (see AUTOKEY).
AUTOKEYWhen the S key or PTT button is pressed to placea call on the system, but is released before thechannel is assigned (e.g., a queued call), the radioautomatically keys on the channel when it gets theassignment. The radio generates a long beep andholds the transmitter keyed for two seconds. Pressingthe PTT button keeps the channel and sends themessage before this two second time-out has ex-pired.
SYSTEM BUSYIf after pressing S key or PTT button a short tone isheard and the words SYS BUSY appear on thedisplay, this indicates that your calling party is eitheralready on the system or the system queue is full. Youmust rekey later to access the system.
23
CALL DENIEDIf after pressing S key or PTT button a short tone isheard and the word DENIED appears on the display,this indicates that the system has denied your re-quest. This happens when either the caller or calleeunit LIDs are not valid on the system.
OUT OF RANGE/SYSTEM INOPERATIVEIf the radio is searching for a channel when PTT orS is pressed, a single tone sounds immediately afterthe S key or PTT button is pressed indicating theradio is out of range of the repeater. Otherwise theradio tries to place the call for a short period (3seconds) after the initial attempt. If it cannot thenreliably communicate with the system, the radio gen-erates a low pitched tone and displays NO ACCESSwhen it gives up trying to place the call. The systemis off the air or the radio needs servicing when theradio is within calling range, and these tones areheard. Observe the SERV icon and the CC SCANdisplay to determine when the system is in rangeand/or operational again.
AUDIBLE SIGNALS
Ringing Signal
The ringing signal sounds when a call is received. Itwill be repeated until the call is answered or is terminatedby the system.
There is a special function to allow you to set thevolume of the ringing signal. The ringing volume can be24
set to one of several different signals. See the paragraphUser Menu Functions .
Error Signal
A short beep tells you have done something incor-rectly. For example, if you try to store a telephone numberin a memory location that is already in use, or if you tryto place a call when the SERV indicator is not present inthe display.
Malfunction Alarm Signal
A long beep will be heard if:
• The attached battery is becoming exhausted. Thewarning LOW BATT will also flash in the display.Refer to the paragraph Batteries and Recharg-ing .
ELECTRONIC LOCK AND CALL RESTRICTIONS
In this function the radio may be locked completely,blocks out going calls but can still receive calls. The 4-digitpersonal Code may also be changed from this function.
The radio is factory programmed with a lock codeof 0000. To improve security, enter a personalizedfour digit code by using the ALTER CODE option.
IMPORTANT
25
An option is set by entering the menu, toggling to theright alternative and pressing M. The telephone thenprompts for the personal code. If the right code is entered,the option is set. (To change the personal code,the codemust be entered, then the new code must be entered andverified).
When the radio is completely locked, the option LOCKAUTO is set and the text LOCKED is shown in the display.If the right 4-digit code is entered, the text UNLOCKEDwill be displayed for 5 seconds and the lock is temporarilyremoved. When the phone is powered off, the lock be-comes active again.
The only way to permanently remove the lock is toenter this menu and select another option. If the optionLOCK OFF is set, no restriction is active.
If an incorrect personal code is entered, WRONGCODE appears in the display and the display returns tomanual standby mode.
SETUP LOCK CODE
1. Press M.
2. Press > key to scroll to LOCK .
3. Press any digit key (1-9) to scroll to ALTERCODE.
4. Press M.
26
5. Enter OLD code.
6. Enter NEW code.
7. Enter NEW code (to verify new code).
8. Press M to store new code.
9. Press E to exit from menu function.
STORING NUMBERS
You can store often used telephone numbers in theradio’s memory, both when the radio is in standby modeand during a conversation. Numbers can be stored with,or without, an accompanying name.
A number to be stored may contain up to 26 digits,and a name up to 8 letters, including spaces. Up to 25numbers may be stored depending on the number ofsystems and groups already configured.
STORING A NUMBER (AND NAME)
1. Enter the telephone number you wish to store. Ifyou make a mistake, you can erase a wrong digitby pressing the C key.
27
2. Press M. Then press > to scroll to STORE --.Press M and the word STORE is displayed,followed by the first free memory location, forexample 22.
3. To store the number in this memory location, goto step 5.
4. To store the number in a different memory loca-tion, enter the number of the memory location,for example 11.
5. Press M again. The question NAME? appears.This indicates that you can now enter an accom-panying name if you wish to do so.
6. Enter the first letter of the name. Pressing adifferent key or waiting for one second will move
M >
1 1
28
the cursor to the next position. You can enter upto eight letters.
- To enter a letter, press the appropriate nu-meric key once, twice, or three times, depend-ing on the position of the letter on the key.
- To enter a number, press the appropriate nu-meric key four times.
- If you make a mistake, correct it by pressingthe C key.
7. When you have entered the entire name, pressM. The number and name are stored.
If you do not press M, the number (and name) will bestored automatically after about 20 seconds.
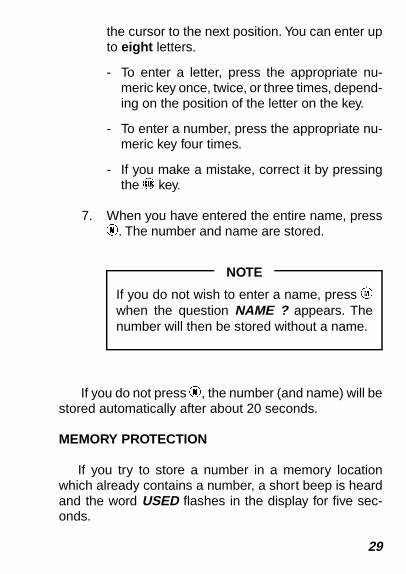
MEMORY PROTECTION
If you try to store a number in a memory locationwhich already contains a number, a short beep is heardand the word USED flashes in the display for five sec-onds.
If you do not wish to enter a name, press Mwhen the question NAME ? appears. Thenumber will then be stored without a name.
NOTE
29
You can choose either to:
a. Store the number in a different memory location.Enter the number of the memory location andpress M.
b. Store the number under the selected memorylocation, thus erasing the old number (andname). Just press M.
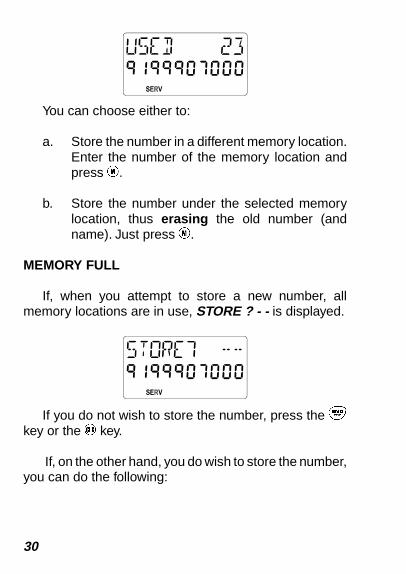
MEMORY FULL
If, when you attempt to store a new number, allmemory locations are in use, STORE ? - - is displayed.
If you do not wish to store the number, press the Ekey or the C key.
If, on the other hand, you do wish to store the number,you can do the following:
30
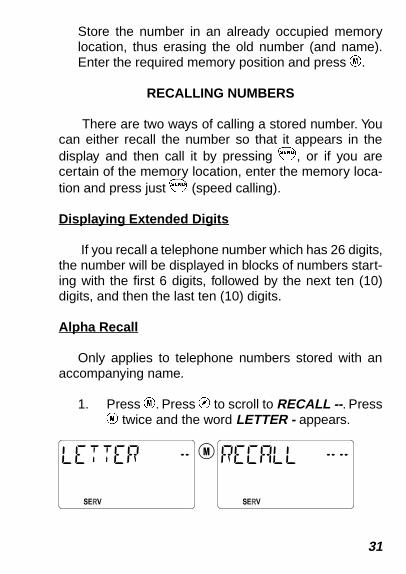
Store the number in an already occupied memorylocation, thus erasing the old number (and name).Enter the required memory position and press M.
RECALLING NUMBERS
There are two ways of calling a stored number. Youcan either recall the number so that it appears in thedisplay and then call it by pressing S, or if you arecertain of the memory location, enter the memory loca-tion and press just S (speed calling).
Displaying Extended Digits
If you recall a telephone number which has 26 digits,the number will be displayed in blocks of numbers start-ing with the first 6 digits, followed by the next ten (10)digits, and then the last ten (10) digits.
Alpha Recall
Only applies to telephone numbers stored with anaccompanying name.
1. Press M. Press > to scroll to RECALL -- . PressM twice and the word LETTER - appears.
M
31
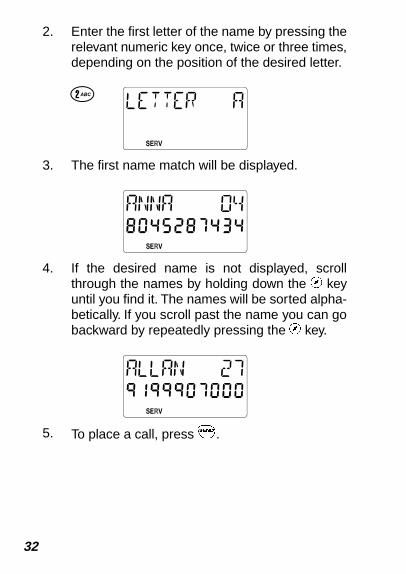
2. Enter the first letter of the name by pressing therelevant numeric key once, twice or three times,depending on the position of the desired letter.
3. The first name match will be displayed.
4. If the desired name is not displayed, scrollthrough the names by holding down the > keyuntil you find it. The names will be sorted alpha-betically. If you scroll past the name you can gobackward by repeatedly pressing the < key.
5. To place a call, press S.
2
32
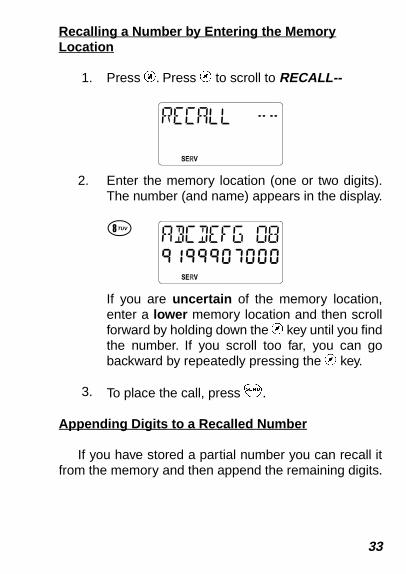
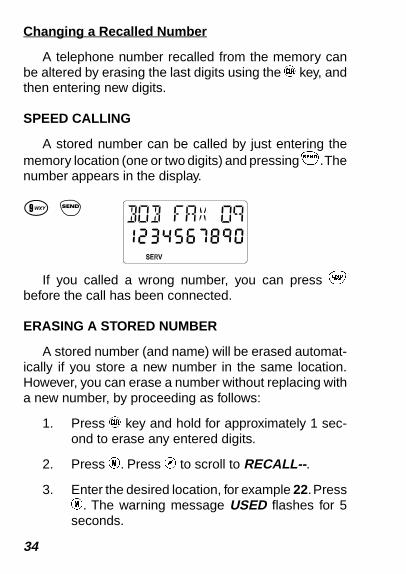
Recalling a Number by Entering the MemoryLocation
1. Press M. Press > to scroll to RECALL--
2. Enter the memory location (one or two digits).The number (and name) appears in the display.
If you are uncertain of the memory location,enter a lower memory location and then scrollforward by holding down the > key until you findthe number. If you scroll too far, you can gobackward by repeatedly pressing the < key.
3. To place the call, press S.
Appending Digits to a Recalled Number
If you have stored a partial number you can recall itfrom the memory and then append the remaining digits.
8
33
Changing a Recalled Number
A telephone number recalled from the memory canbe altered by erasing the last digits using the C key, andthen entering new digits.
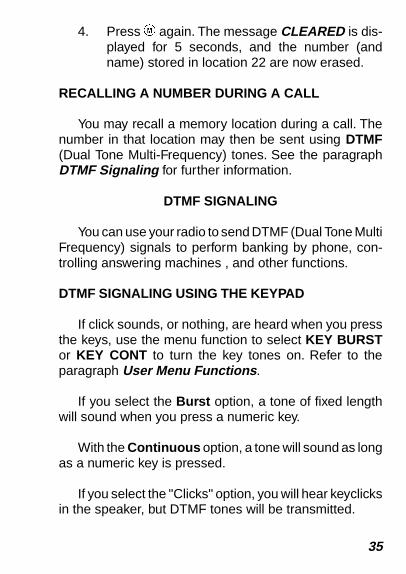
SPEED CALLING
A stored number can be called by just entering thememory location (one or two digits) and pressing S. Thenumber appears in the display.
If you called a wrong number, you can press Ebefore the call has been connected.
ERASING A STORED NUMBER
A stored number (and name) will be erased automat-ically if you store a new number in the same location.However, you can erase a number without replacing witha new number, by proceeding as follows:
1. Press C key and hold for approximately 1 sec-ond to erase any entered digits.
2. Press M. Press > to scroll to RECALL-- .
3. Enter the desired location, for example 22. PressM. The warning message USED flashes for 5seconds.
9 S
34
4. Press M again. The message CLEARED is dis-played for 5 seconds, and the number (andname) stored in location 22 are now erased.
RECALLING A NUMBER DURING A CALL
You may recall a memory location during a call. Thenumber in that location may then be sent using DTMF(Dual Tone Multi-Frequency) tones. See the paragraphDTMF Signaling for further information.
DTMF SIGNALING
You can use your radio to send DTMF (Dual Tone MultiFrequency) signals to perform banking by phone, con-trolling answering machines , and other functions.
DTMF SIGNALING USING THE KEYPAD
If click sounds, or nothing, are heard when you pressthe keys, use the menu function to select KEY BURSTor KEY CONT to turn the key tones on. Refer to theparagraph User Menu Functions .
If you select the Burst option, a tone of fixed lengthwill sound when you press a numeric key.
With the Continuous option, a tone will sound as longas a numeric key is pressed.
If you select the "Clicks" option, you will hear keyclicksin the speaker, but DTMF tones will be transmitted.
35
To send DTMF signals:
1. Call the desired number.
2. When the call has been connected, pressingkeys 0 - 9, *, and # will cause the correspondingDTMF signals to be sent.
ACCESSING USER MENU FUNCTIONS
To access the user menu functions:
1. Press M.
2. Press > to scroll forward or < to scroll backwardto select desired function.
3. Press any digit key (0-9) to select an optionwithin a function.
4. Press M to store desired option.
5. Press > or < to continue to scroll through menufunction or press E or C to exit menu.
36
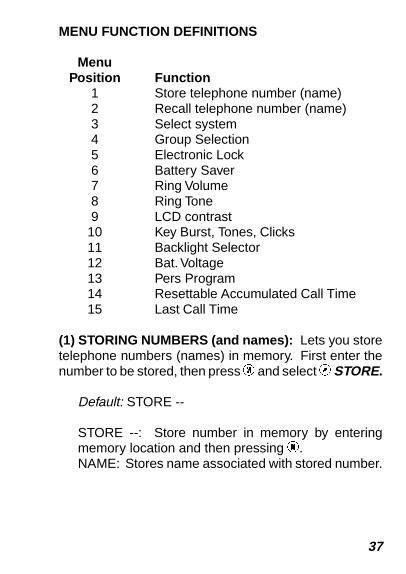
MENU FUNCTION DEFINITIONS
MenuPosition Function
1 Store telephone number (name)2 Recall telephone number (name)3 Select system4 Group Selection5 Electronic Lock6 Battery Saver7 Ring Volume8 Ring Tone9 LCD contrast10 Key Burst, Tones, Clicks11 Backlight Selector12 Bat. Voltage13 Pers Program14 Resettable Accumulated Call Time15 Last Call Time
(1) STORING NUMBERS (and names): Lets you storetelephone numbers (names) in memory. First enter thenumber to be stored, then press M and select > STORE.
Default: STORE --
STORE --: Store number in memory by enteringmemory location and then pressing M.NAME: Stores name associated with stored number.
37
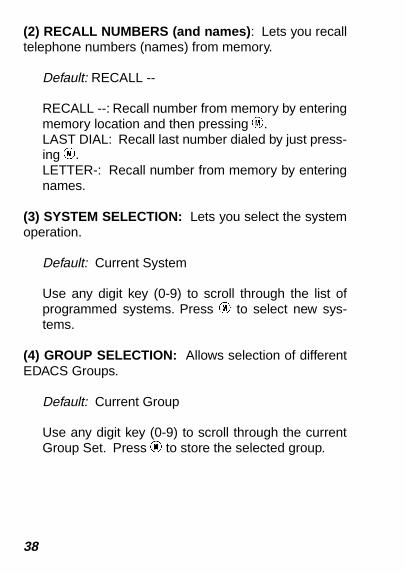
(2) RECALL NUMBERS (and names) : Lets you recalltelephone numbers (names) from memory.
Default: RECALL --
RECALL --: Recall number from memory by enteringmemory location and then pressing M.LAST DIAL: Recall last number dialed by just press-ing M.LETTER-: Recall number from memory by enteringnames.
(3) SYSTEM SELECTION: Lets you select the systemoperation.
Default: Current System
Use any digit key (0-9) to scroll through the list ofprogrammed systems. Press M to select new sys-tems.
(4) GROUP SELECTION: Allows selection of differentEDACS Groups.
Default: Current Group
Use any digit key (0-9) to scroll through the currentGroup Set. Press M to store the selected group.
38
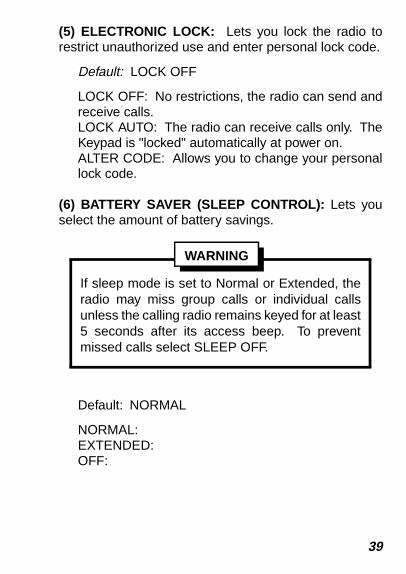
(5) ELECTRONIC LOCK: Lets you lock the radio torestrict unauthorized use and enter personal lock code.
Default: LOCK OFF
LOCK OFF: No restrictions, the radio can send andreceive calls.LOCK AUTO: The radio can receive calls only. TheKeypad is "locked" automatically at power on.ALTER CODE: Allows you to change your personallock code.
(6) BATTERY SAVER (SLEEP CONTROL): Lets youselect the amount of battery savings.
Default: NORMAL
NORMAL: EXTENDED:OFF:
If sleep mode is set to Normal or Extended, theradio may miss group calls or individual callsunless the calling radio remains keyed for at least5 seconds after its access beep. To preventmissed calls select SLEEP OFF.
WARNING
39
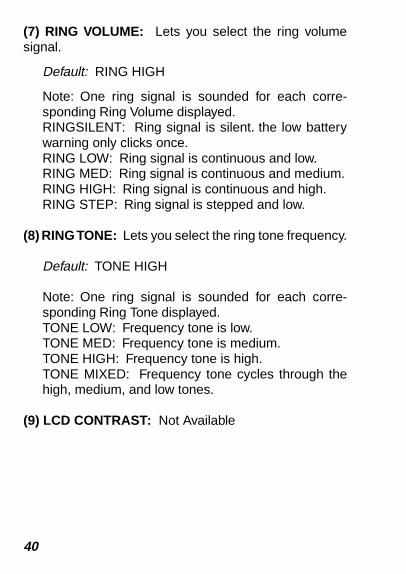
(7) RING VOLUME: Lets you select the ring volumesignal.
Default: RING HIGH
Note: One ring signal is sounded for each corre-sponding Ring Volume displayed.RINGSILENT: Ring signal is silent. the low batterywarning only clicks once.RING LOW: Ring signal is continuous and low.RING MED: Ring signal is continuous and medium.RING HIGH: Ring signal is continuous and high.RING STEP: Ring signal is stepped and low.
(8) RING TONE: Lets you select the ring tone frequency.
Default: TONE HIGH
Note: One ring signal is sounded for each corre-sponding Ring Tone displayed.TONE LOW: Frequency tone is low.TONE MED: Frequency tone is medium.TONE HIGH: Frequency tone is high.TONE MIXED: Frequency tone cycles through thehigh, medium, and low tones.
(9) LCD CONTRAST: Not Available
40
(10) KEY BURST, TONES, OR CLICKS: Lets youselect whether keypad numeric keys (0-9, #, *) pro-duce DTMF tones or key clicks.
Default: KEY CONT.
KEY BURST: Burst mode avoids double-digiting er-ror. The radio signal may drop out very briefly whenyou make a call in motion. This drop out can causeequipment to interpret two or more digits when youonly press one. Select this mode if you experience adouble digit error often.KEY CONT: Some answering machines require con-tinuous mode. Select this mode if you are havingdifficulty controlling answering machines.KEY CLICK: Click mode sends the digits as a DTMFtone, but the user hears a click.
(11) BACKLIGHT SELECTOR: Keypad or display illu-mination to be automatic or switched off.
Default: LIGHT AUTO.
LIGHT AUTO: The illumination comes on for tenseconds after any key is pressed. The illuminationstays on continuously if the radio is mounted in a carkit and turned on.LIGHT OFF: The illumination is off at all times.
(12) BATTERY VOLTAGE: Shows the input battery volt-age to the radio (for example, 6-3 = 6.3 volts).
(13) PERS PROG: PC personality programming mode.
41
(14) RESETTABLE ACCUMULATED CALL TIME: Dis-plays accumulated call time, in hours and minutes, sincelast reset.
ACCUM TIME: Displays the accumulated time.RESET?--RCL: Resets to zero by pressing key.
(15) LAST CALL TIME: Displays "air time" of last call inminutes and seconds.
BATTERIES AND RECHARGING
BATTERIES
The IPE Series is designed for use with high qualityEricsson batteries provided in the package. Use of otherbatteries should be avoided as it may be hazardous andmay result in voiding your radio’s warranty.
Battery Level Indicator
A number from B0 to B5, based on the battery levelis shown on the right of the display. A fully charged batterywill show B5. A battery which is almost discharged willindicate B1 or B0.
42
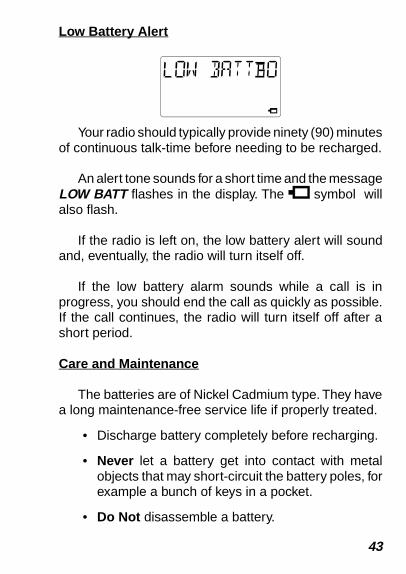
Low Battery Alert
Your radio should typically provide ninety (90) minutesof continuous talk-time before needing to be recharged.
An alert tone sounds for a short time and the messageLOW BATT flashes in the display. The symbol willalso flash.
If the radio is left on, the low battery alert will soundand, eventually, the radio will turn itself off.
If the low battery alarm sounds while a call is inprogress, you should end the call as quickly as possible.If the call continues, the radio will turn itself off after ashort period.
Care and Maintenance
The batteries are of Nickel Cadmium type. They havea long maintenance-free service life if properly treated.
• Discharge battery completely before recharging.
• Never let a battery get into contact with metalobjects that may short-circuit the battery poles, forexample a bunch of keys in a pocket.
• Do Not disassemble a battery.
43
• A battery may explode if disposed of in a fire.
• Use only Ericsson specified batteries and charg-ers.
Rechargeable Battery Pack Disposal
The product that you have purchasedcontains a rechargeable, recyclablebattery. At the end of its useful life,under various state and local laws, itmay be illegal to dispose of this bat-tery into the municipal waste stream.Check with your local solid waste offi-
cials for details in your area for recycling options or properdisposal. Call Toll Free 1-800-8-BATTERY for informationand/or procedures for returning rechargeable batteries inyour state.
44
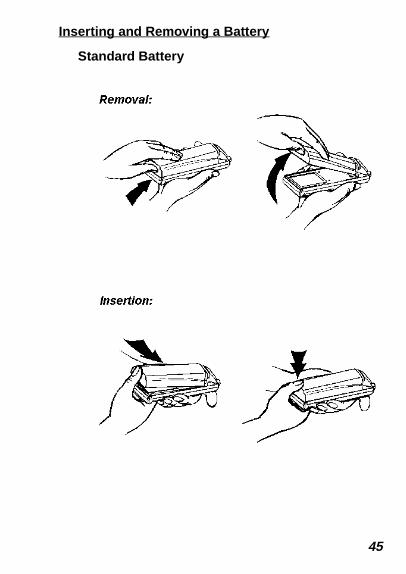
Inserting and Removing a Battery
Standard Battery
45
RECHARGING
Your charger is intended for indoor use only. Keepcharger and AC adaptor dry. Do not use in or near water.
Avoid recharging a battery before the low battery alertis displayed.
Never recharge a battery when the ambient tempera-ture is below 5°C or 40°F, or above 40°C or 105°F.
The LED on the charger will indicate that charging isin progress. Remove the battery when the LED turnsgreen. Do not leave the battery in the charger for morethan 48 hours. Over-charging may reduce battery life.
46
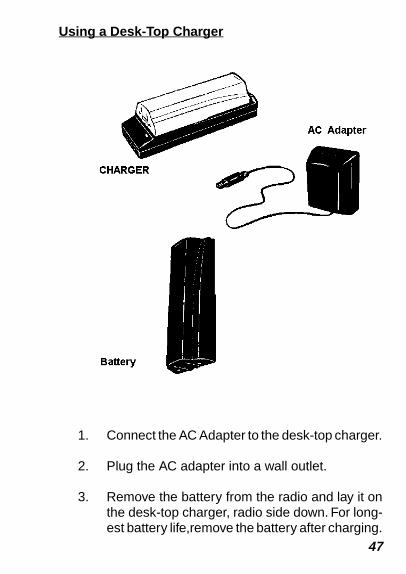
Using a Desk-Top Charger
1. Connect the AC Adapter to the desk-top charger.
2. Plug the AC adapter into a wall outlet.
3. Remove the battery from the radio and lay it onthe desk-top charger, radio side down. For long-est battery life,remove the battery after charging.
47
Restoring Battery Capacity
If you often recharge a battery before the low batteryalarm has been issued, the battery’s ability to acceptcharge may be impaired. This will result in less and lesstime between recharges. To restore the battery, performthe following:
1. Use the radio as you normally would, until thelow battery alarm has been issued.
2. Allow the radio to remain on until it turns itselfoff.
3. Charge the battery using the desk-top charger.
After discharging and recharging the battery this way,it can be used for a longer period before the next rechargeis required. To get the longest period between charges,repeat this procedure 3 or 4 times.
Also if a battery has not been used for several months,it may require 3 or 4 charge-discharge cycles to return tofull capacity.
48
INTRINSICALLY SAFE USAGE
Selected portable radios with appropriate factory in-stalled F4 Options are certified as Intrinsically Safe bythe Factory Mutual Research Corporation. IntrinsicallySafe approval includes Class l, II, Ill, Division 1 hazard-ous locations in the presence of Groups C, D, E, F andG atmospheres. Non-Incendive approval includesClassI, Division 2 hazardous locations in the presence ofGroups A, B, C and D atmospheres.
Hazardous locations are defined in the National Elec-trical Code. Useful standards NFPA 437A and NFPA437M for the classifications of hazardous areas can beordered from the National Fire Protection Association,Batterymarch Park, Quincy, MA 02269.
BATTERY PACKS
Only battery packs identified with a green latch shallbe used with a portable radio that is rated and labeled asFactory Mutual Intrinsically Safe. Use of non-specifiedbattery packs voids Factory Mutual approval. The follow-ing battery pack options are approved for use in intrinsi-cally safe radios:
TBD
49

ACCESSORIES
The accessories that follow are approved for use withintrinsically safe radios. Use of accessories other thanthose listed voids Factory Mutual approval.
TBD
50
APPENDIX 1
FAULT TRACING
No Power to the Radio
• If the radio does not come on when you hold downthe E key, recharge or replace the battery. Referto paragraph Batteries and Recharging .
SERV Indicator Does Not Come On
You have lost contact with the EDACS system andyou cannot place any calls. The reason for this is either:
• The received signal is too weak. See the nextsection, Received Signal is Weak
• You are in an area which is not covered by theEDACS system selected.
Received Signal is Weak
If the radio displays CC SCAN often, move the radioto obtain a stronger signal.
• Large obstacles such as buildings, hills and moun-tains can drastically affect the signal strength andyou may have to move to obtain a sufficientlystrong signal.
• Indoors, it is usually best to use the radio near awindow.
51
A Call Cannot be Placed
The reason for this is either:
• The phone number displayed may be incorrect.
• The radio may not be in service or the signal isweak. See the prior sections.
• The EDACS system you are using requires ordoes not allow the phone number to be precededby a "1" or the area code. Try various combinationsor contact the operator for more information.
• You are roaming and the EDACS system you areusing doesn’t have a roaming agreement with yourhome system.
"LOCKED" Is Displayed
The radio is locked to prevent unauthorized use.
To unlock:
1. If anything is shown on the numeric field of thedisplay, erase it with the C key.
2. Enter the 4-digit code lock code . UNLOCKEDwill be displayed briefly.
52
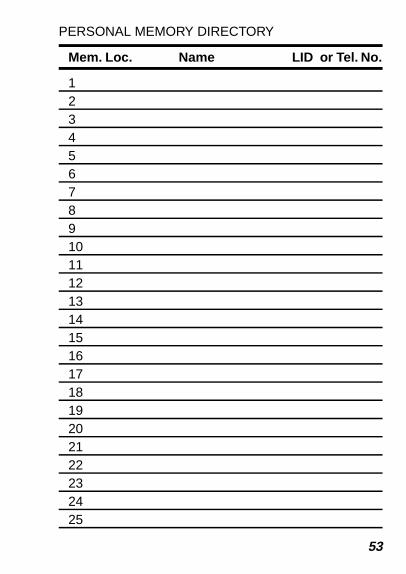
PERSONAL MEMORY DIRECTORY
Mem. Loc. Name LID or Tel. No.
12345678910111213141516171819202122232425
53
WARRANTYA. Ericsson Inc. (hereinafter "Seller") warrants to the original purchaser for use (hereinafter
"Buyer") that Equipment manufactured by Seller shall be free from defects in material,workmanship and title, and shall conform to its published specifications. With respect toany Equipment not manufactured by Seller (except for integral parts of Seller’s Equipmentto which the warranties set forth above shall apply). Seller gives no warranty, and only thewarranty, if any, given by the manufacturer shall apply. Batteries are excluded from thiswarranty.
B. Seller’s obligations set forth in Paragraph C below shall apply only to failures to meet theabove warranties (except as to title) occurring within the following periods of time from dateof sale to the Buyer and are conditioned on Buyer’s giving written notice to Seller withinthirty (30) days of such occurrence:
1. for fuses, incandescent lamps, vacuum tubes and non-rechargeable batteries,operable on arrival only.
2. for parts and accessories (except as noted in B.1) sold by Seller’s Service PartsOperation, ninety (90) days.
3. for all other Equipment of Seller’s manufacture, one (1) year.
C. If any Equipment fails to meet the foregoing warranties, Seller shall correct the failure at itsoption (i) by repairing any defective or damaged part or parts thereof, or (ii) by makingavailable at Seller’s factory any necessary repaired or replacement parts. Any repaired orreplacement part furnished thereunder shall be warranted for the remainder of the warrantyperiod of the Equipment in which it is installed. Where such failure cannot be corrected bySeller’s reasonable efforts, the parties will negotiate an equitable adjustment in price. Laborto perform warranty service will be provided at no change only for the Equipment coveredunder Paragraph B.3, and only during the first three (3) months following the date of saleto the Buyer. Thereafter, labor will be charged at prevailing rates. To be eligible for no-chargelabor, service must be performed by an Authorized Service Center or other Servicesapproved for these purposes either at its place of business during normal business hours,for mobile or personal equipment, or at the Buyer’s location, for fixed location equipment.Service on fixed location equipment more than thirty (30) miles from the Service Center orother approved Service’s place of business will include a charge for transportation.Equipment located off-shore is not eligible for no-charge labor.
D. Seller’s obligations under Paragraph C shall not apply to any Equipment, or part thereof,which (i) has been modified or otherwise altered other than pursuant to Seller’s writteninstructions or written approval or, (ii) is normally consumed in operation or, (iii) has anormal life inherently shorter than the warranty periods specified in Paragraph B, or (iv) isnot properly stored, installed, used, maintained or repaired, or, (v) has been subjected toany other kind of misuse or detrimental exposure, or has been involved in an accident.
E. The preceding paragraphs set forth the exclusive remedies for claims (except as to title)based upon defects in or nonconformity of the Equipment, whether the claim is in contract,warranty, tort (including negligence), strict liability or otherwise, and however instituted.Upon the expiration of the warranty period, all such liability shall terminate. The foregoingwarranties are exclusive and in lieu of all other warranties, whether oral, written, expressed,implied or statutory. NO IMPLIED OR STATUTORY WARRANTIES OF MERCHANTABIL-ITY OR FITNESS FOR PARTICULAR PURPOSE SHALL APPLY. IN NO EVENT SHALLTHE SELLER BE LIABLE FOR ANY INCIDENTAL, CONSEQUENTIAL, SPECIAL, INDI-RECT OR EXEMPLARY DAMAGES.
This warranty applies only within the United States. 1-800-528-7711 (outside U.S.A., 804-528-7711)
54

NOTES
55
Emergency Numbers
Police
State Police
Fire
Poison Control
AmbulanceLife Saving & Rescue Squad
Ericsson Inc.Private Radio SystemsMountain View RoadLynchburg,Virginia 24502 AE/LZT 123 1907 R1C1-800-528-7711 (Outside USA, 804-528-7711) Printed in U.S.A.