Embed Size (px)
DESCRIPTION
Â
Citation preview
1
DIGITAL DESIGN + FABRICATION SM1, 2015 M2 JOURNAL- PANEL AND FOLD
naomi ng & sam coleman699616 & 586363Michelle James
2
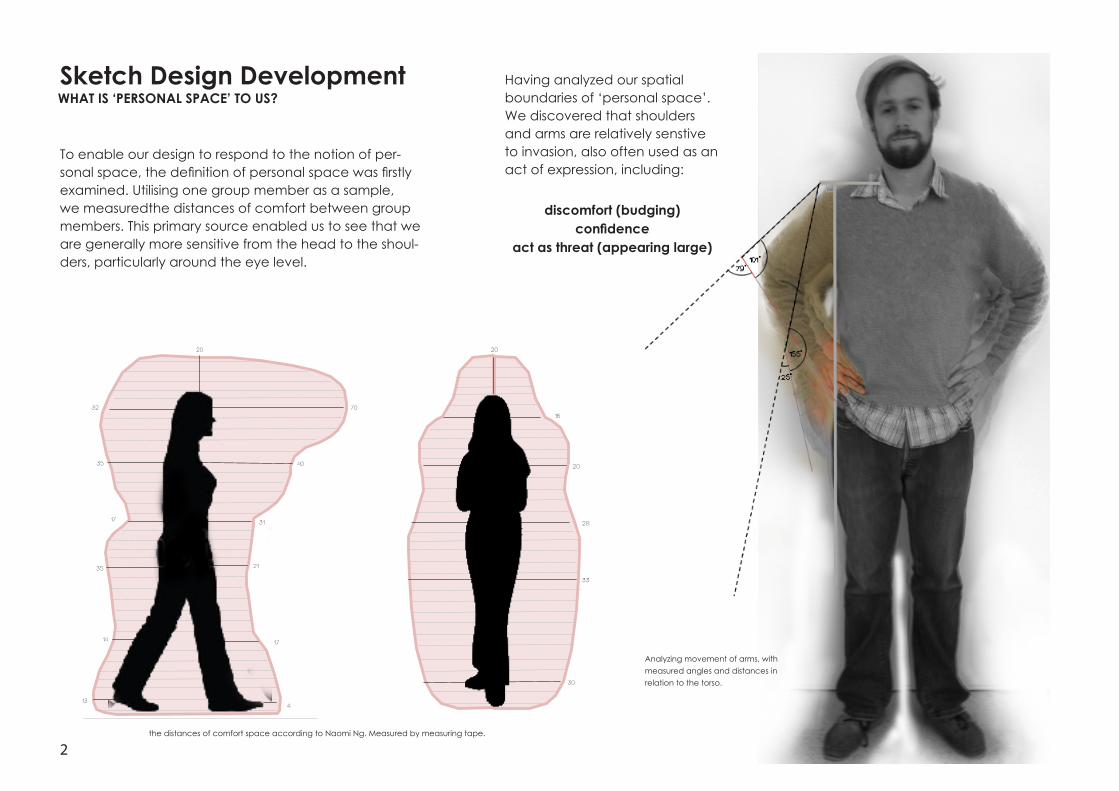
Sketch Design Development
20
70
40
31
21
4
17
13
14
35
17
35
32
16
20
28
33
30
20
WHAT IS ‘PERSONAL SPACE’ TO US?
To enable our design to respond to the notion of per-sonal space, the definition of personal space was firstly examined. Utilising one group member as a sample, we measuredthe distances of comfort between group members. This primary source enabled us to see that we are generally more sensitive from the head to the shoul-ders, particularly around the eye level.
the distances of comfort space according to Naomi Ng. Measured by measuring tape.
Having analyzed our spatial boundaries of ‘personal space’. We discovered that shoulders and arms are relatively senstive to invasion, also often used as an act of expression, including:
discomfort (budging)confidence
act as threat (appearing large)
Analyzing movement of arms, with measured angles and distances in relation to the torso.
3
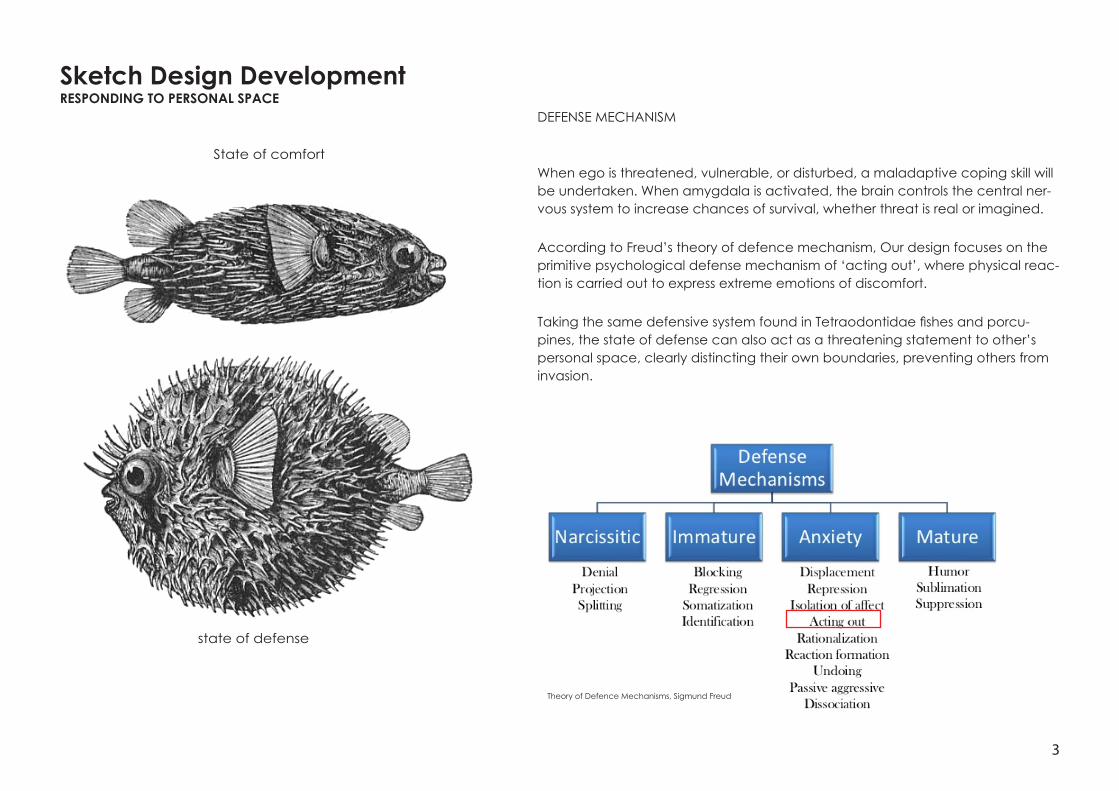
Sketch Design DevelopmentRESPONDING TO PERSONAL SPACE
DEFENSE MECHANISM
When ego is threatened, vulnerable, or disturbed, a maladaptive coping skill will be undertaken. When amygdala is activated, the brain controls the central ner-vous system to increase chances of survival, whether threat is real or imagined.
According to Freud’s theory of defence mechanism, Our design focuses on the primitive psychological defense mechanism of ‘acting out’, where physical reac-tion is carried out to express extreme emotions of discomfort.
Taking the same defensive system found in Tetraodontidae fishes and porcu-pines, the state of defense can also act as a threatening statement to other’s personal space, clearly distincting their own boundaries, preventing others from invasion.
State of comfort
state of defense
Theory of Defence Mechanisms, Sigmund Freud
4
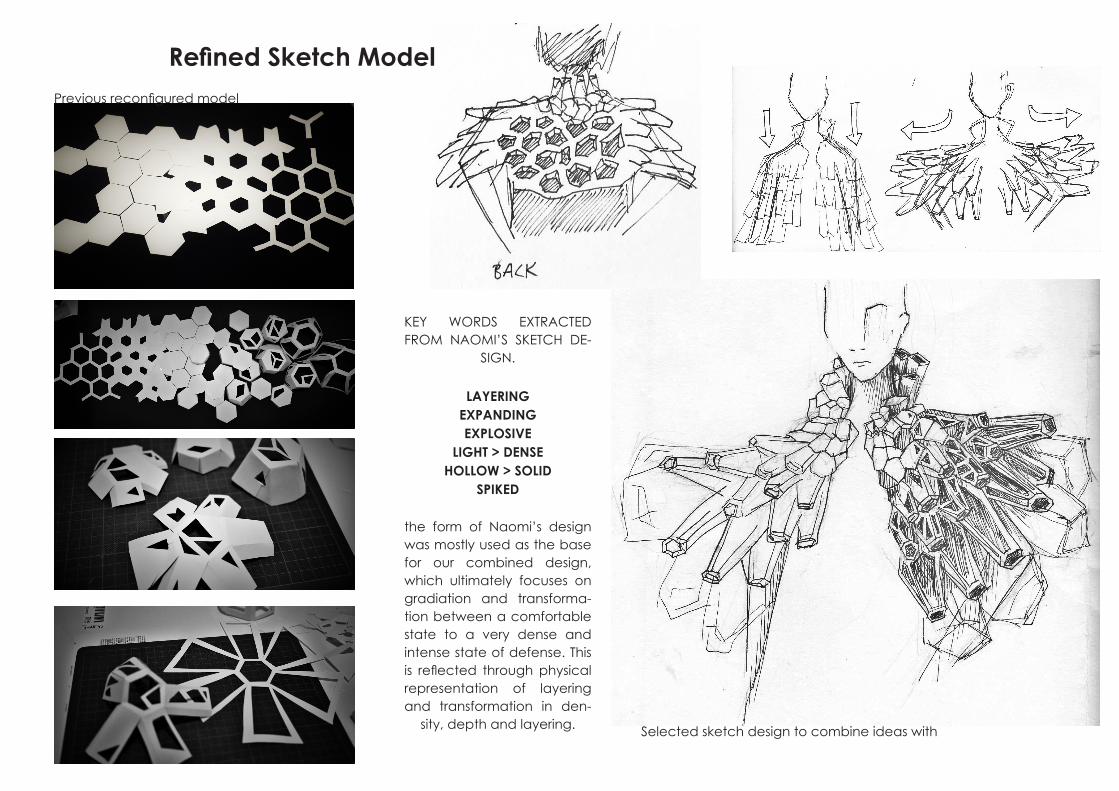
Previous reconfigured model
KEY WORDS EXTRACTED FROM NAOMI’S SKETCH DE-
SIGN.
LAYERINGEXPANDINGEXPLOSIVE
LIGHT > DENSEHOLLOW > SOLID
SPIKED
the form of Naomi’s design was mostly used as the base for our combined design, which ultimately focuses on gradiation and transforma-tion between a comfortable state to a very dense and intense state of defense. This is reflected through physical representation of layering and transformation in den-
sity, depth and layering. Selected sketch design to combine ideas with
Refined Sketch Model
5
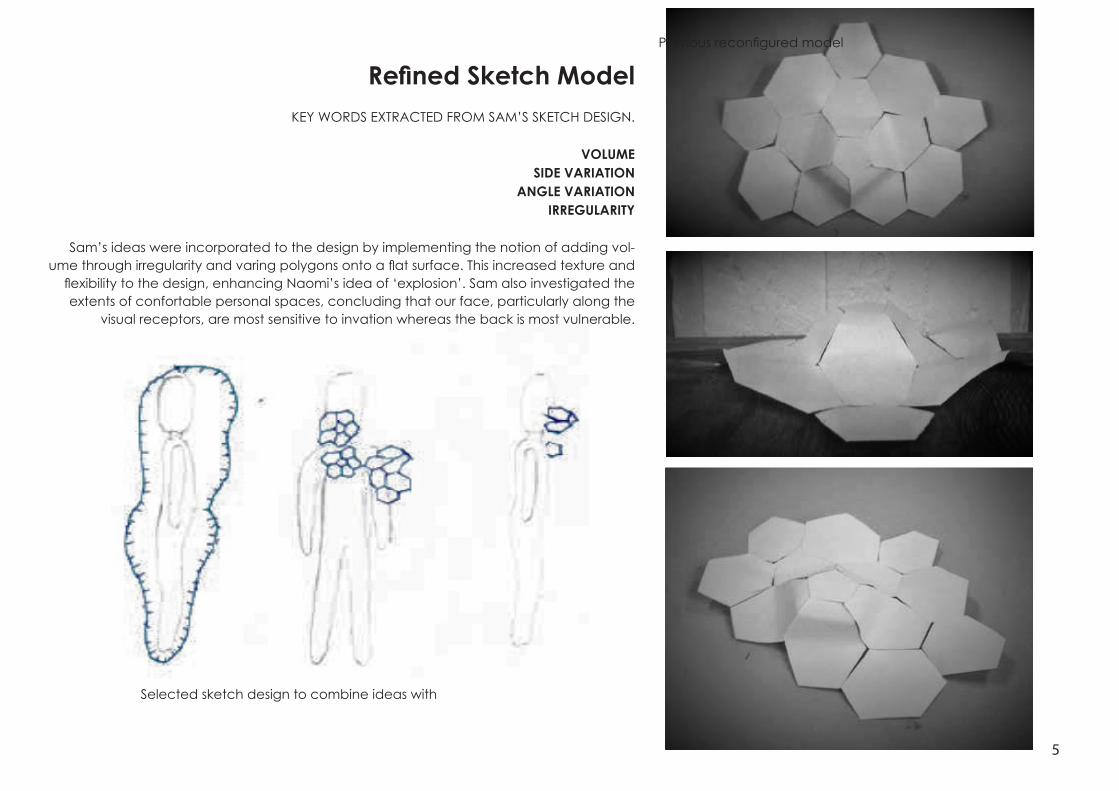
Refined Sketch ModelKEY WORDS EXTRACTED FROM SAM’S SKETCH DESIGN.
VOLUMESIDE VARIATION
ANGLE VARIATIONIRREGULARITY
Sam’s ideas were incorporated to the design by implementing the notion of adding vol-ume through irregularity and varing polygons onto a flat surface. This increased texture and
flexibility to the design, enhancing Naomi’s idea of ‘explosion’. Sam also investigated the extents of confortable personal spaces, concluding that our face, particularly along the
visual receptors, are most sensitive to invation whereas the back is most vulnerable.
Previous reconfigured model
Selected sketch design to combine ideas with
6
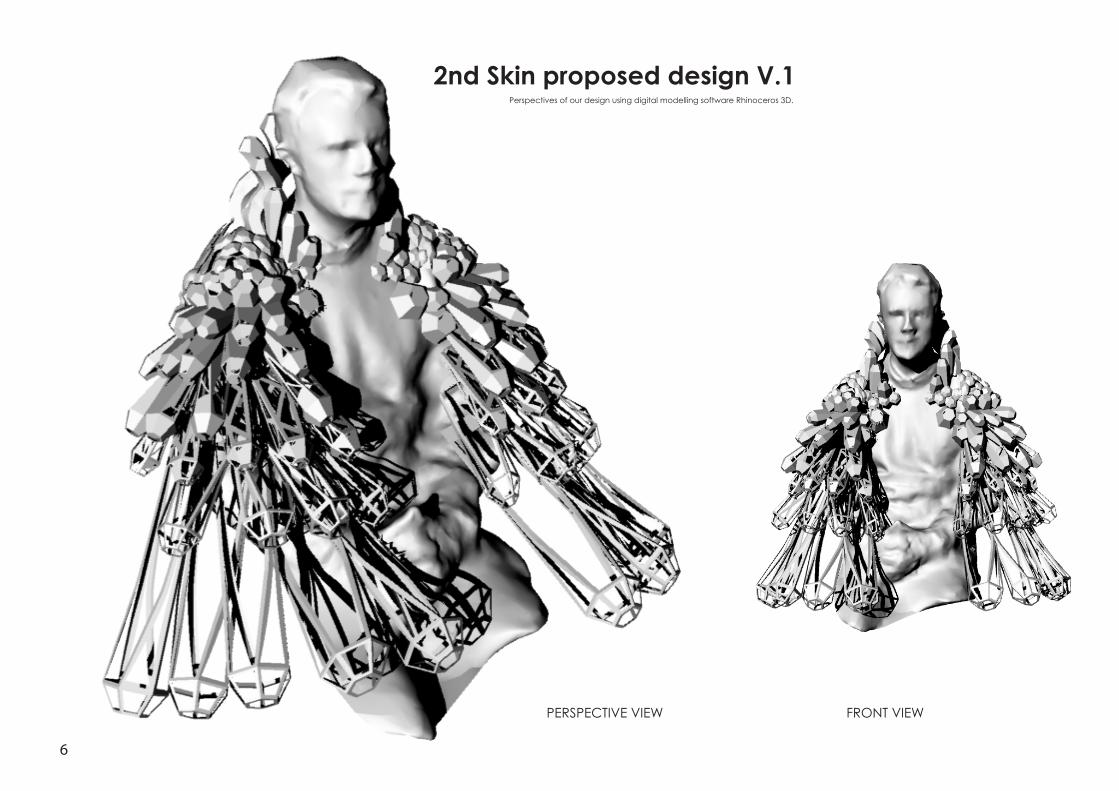
2nd Skin proposed design V.1
PERSPECTIVE VIEW FRONT VIEW
Perspectives of our design using digital modelling software Rhinoceros 3D.
7
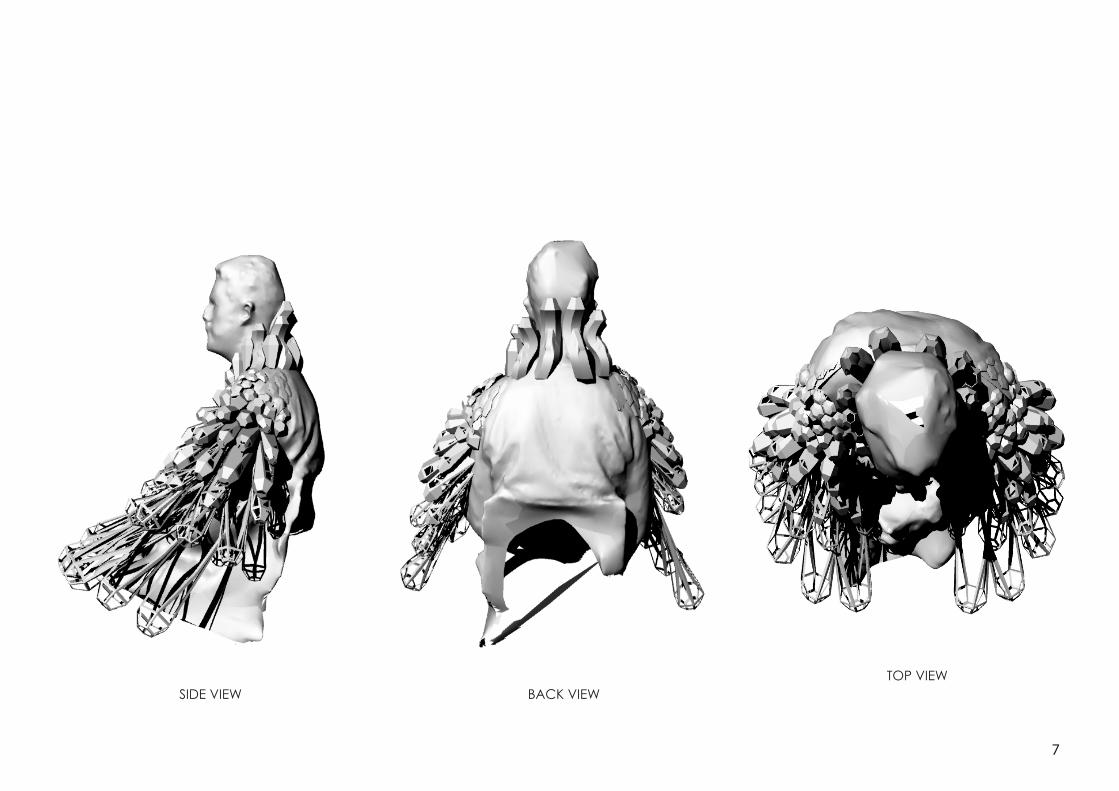
SIDE VIEW BACK VIEWTOP VIEW
8
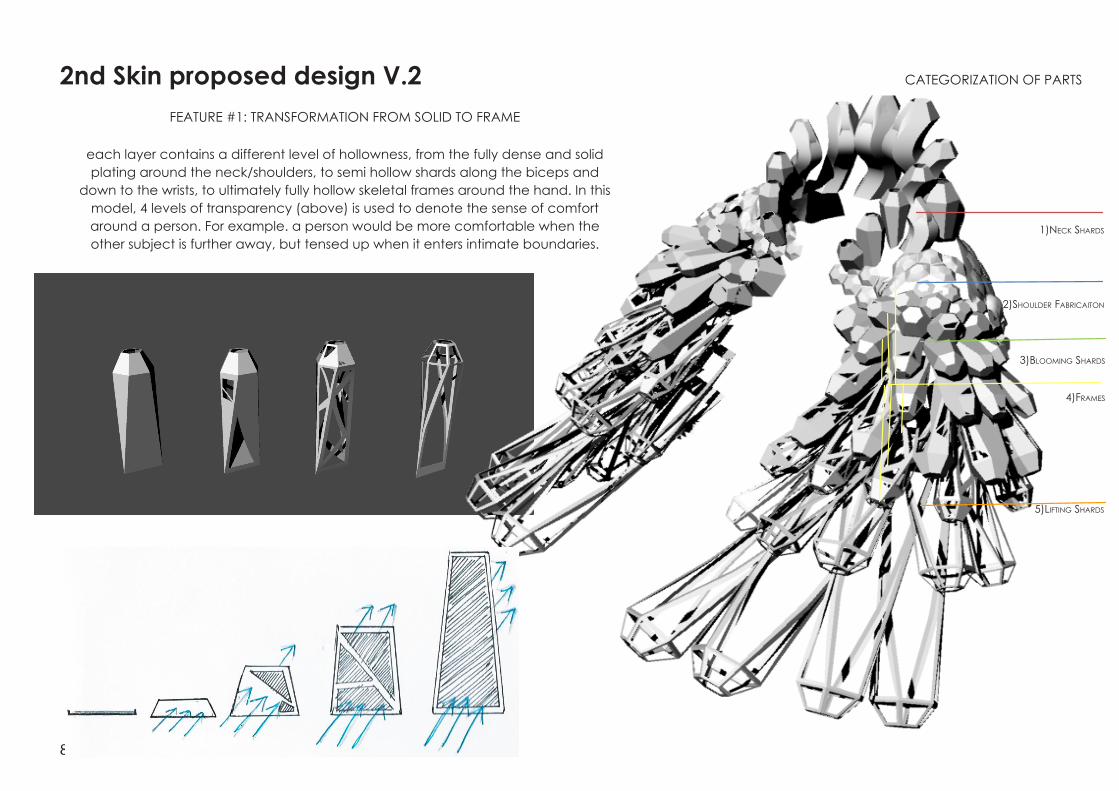
2nd Skin proposed design V.2FEATURE #1: TRANSFORMATION FROM SOLID TO FRAME
each layer contains a different level of hollowness, from the fully dense and solid plating around the neck/shoulders, to semi hollow shards along the biceps and
down to the wrists, to ultimately fully hollow skeletal frames around the hand. In this model, 4 levels of transparency (above) is used to denote the sense of comfort around a person. For example. a person would be more comfortable when the other subject is further away, but tensed up when it enters intimate boundaries.
1)Neck ShardS
2)Shoulder FabricaitoN
3)bloomiNg ShardS
4)FrameS
5)liFtiNg ShardS
CATEGORIZATION OF PARTS
9
CATEGORIZATION OF PARTS
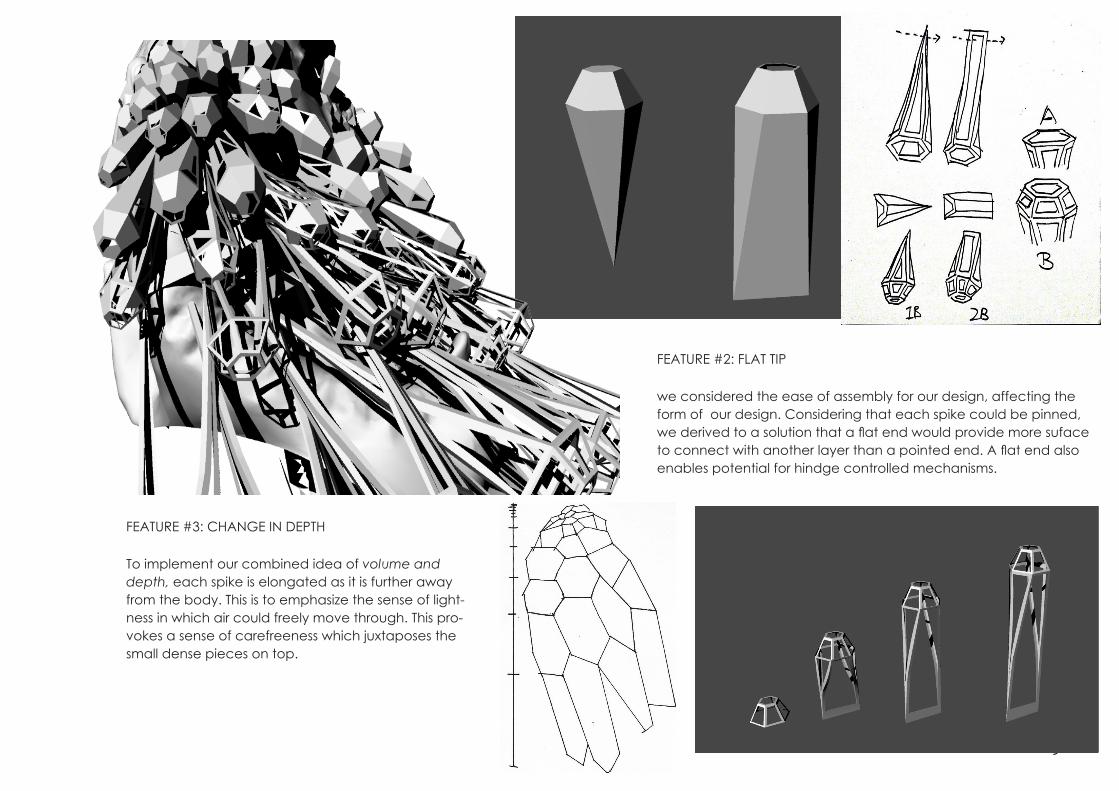
FEATURE #2: FLAT TIP
we considered the ease of assembly for our design, affecting the form of our design. Considering that each spike could be pinned, we derived to a solution that a flat end would provide more suface to connect with another layer than a pointed end. A flat end also enables potential for hindge controlled mechanisms.
FEATURE #3: CHANGE IN DEPTH
To implement our combined idea of volume and depth, each spike is elongated as it is further away from the body. This is to emphasize the sense of light-ness in which air could freely move through. This pro-vokes a sense of carefreeness which juxtaposes the small dense pieces on top.
10
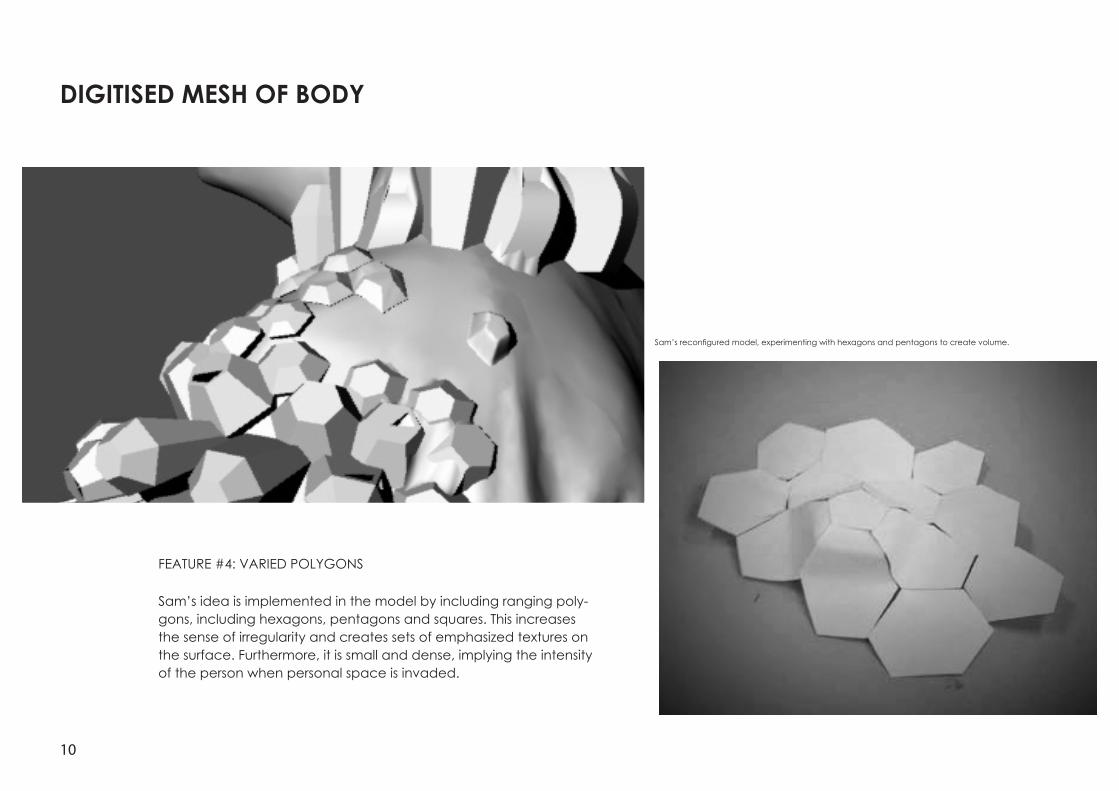
DIGITISED MESH OF BODY
FEATURE #4: VARIED POLYGONS
Sam’s idea is implemented in the model by including ranging poly-gons, including hexagons, pentagons and squares. This increases the sense of irregularity and creates sets of emphasized textures on the surface. Furthermore, it is small and dense, implying the intensity of the person when personal space is invaded.
Sam’s reconfigured model, experimenting with hexagons and pentagons to create volume.
11
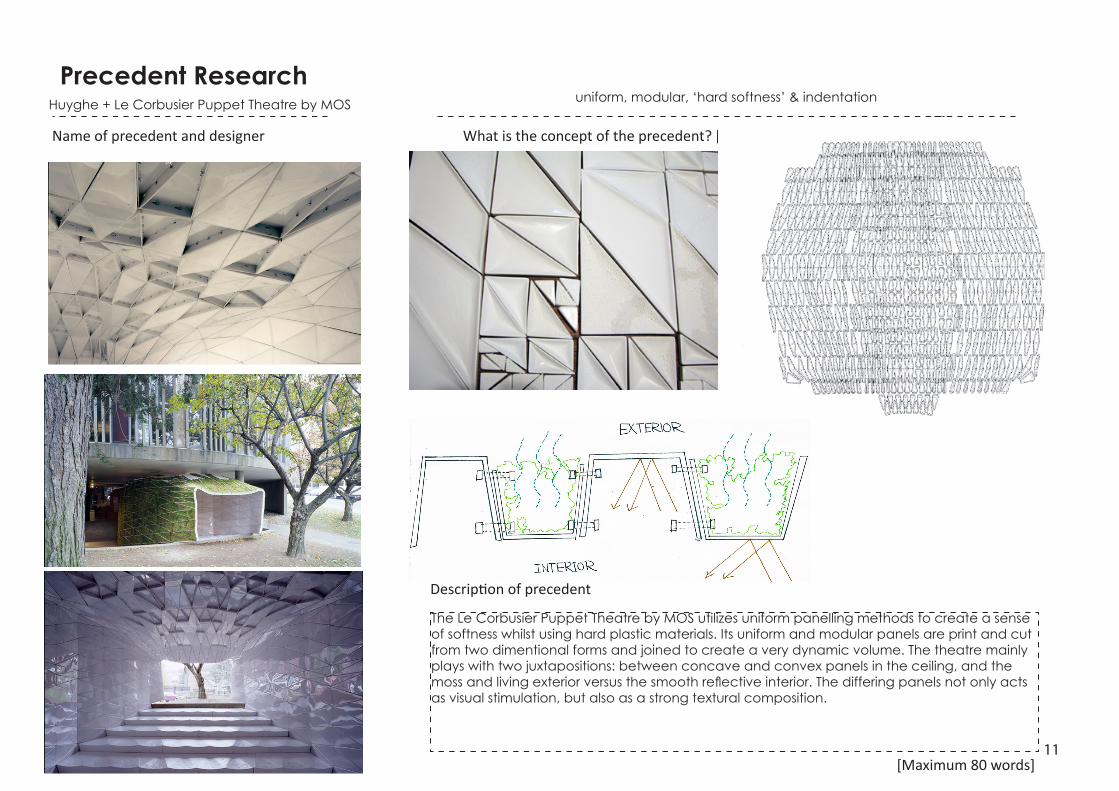
Precedent Research
[Maximum 80 words]
What is the concept of the precedent? [Maximum 5 key words]
CHOOSE A PRECEDENT FROM THE LMS INCLUDE IMAGES OF THE PRECEDENT IN
THIS SPACE
DIAGRAM THE PRECEDENT CONCEPT IN THIS SPACE
The Le Corbusier Puppet Theatre by MOS utilizes uniform panelling methods to create a sense of softness whilst using hard plastic materials. Its uniform and modular panels are print and cut from two dimentional forms and joined to create a very dynamic volume. The theatre mainly plays with two juxtapositions: between concave and convex panels in the ceiling, and the moss and living exterior versus the smooth reflective interior. The differing panels not only acts as visual stimulation, but also as a strong textural composition.
Name of precedent and designer
Description of precedent
Huyghe + Le Corbusier Puppet Theatre by MOS uniform, modular, ‘hard softness’ & indentation
12
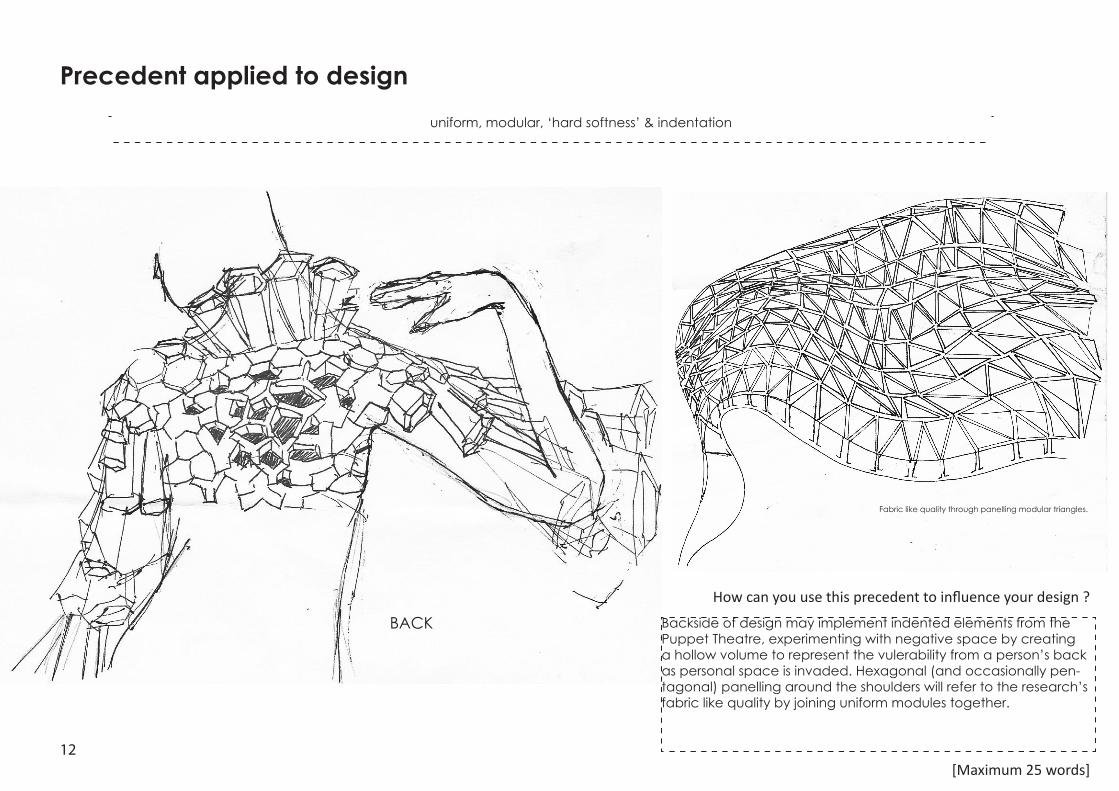
Precedent applied to design
[Maximum 25 words]
Backside of design may implement indented elements from the Puppet Theatre, experimenting with negative space by creating a hollow volume to represent the vulerability from a person’s back as personal space is invaded. Hexagonal (and occasionally pen-tagonal) panelling around the shoulders will refer to the research’s fabric like quality by joining uniform modules together.
How can you use this precedent to influence your design ?
uniform, modular, ‘hard softness’ & indentation
BACK
Fabric like quality through panelling modular triangles.
TO KEEP*mechanism and the way shards are lifted
*rigidity of timber frame- to sustain pulley force*lightness and flexibility of shards
TO IMPROVE *timber frame- needs to be lighter and adapts to arm
*strings- thinner and smoother to reduce friction*paper matieral- needs to be more rigid
13
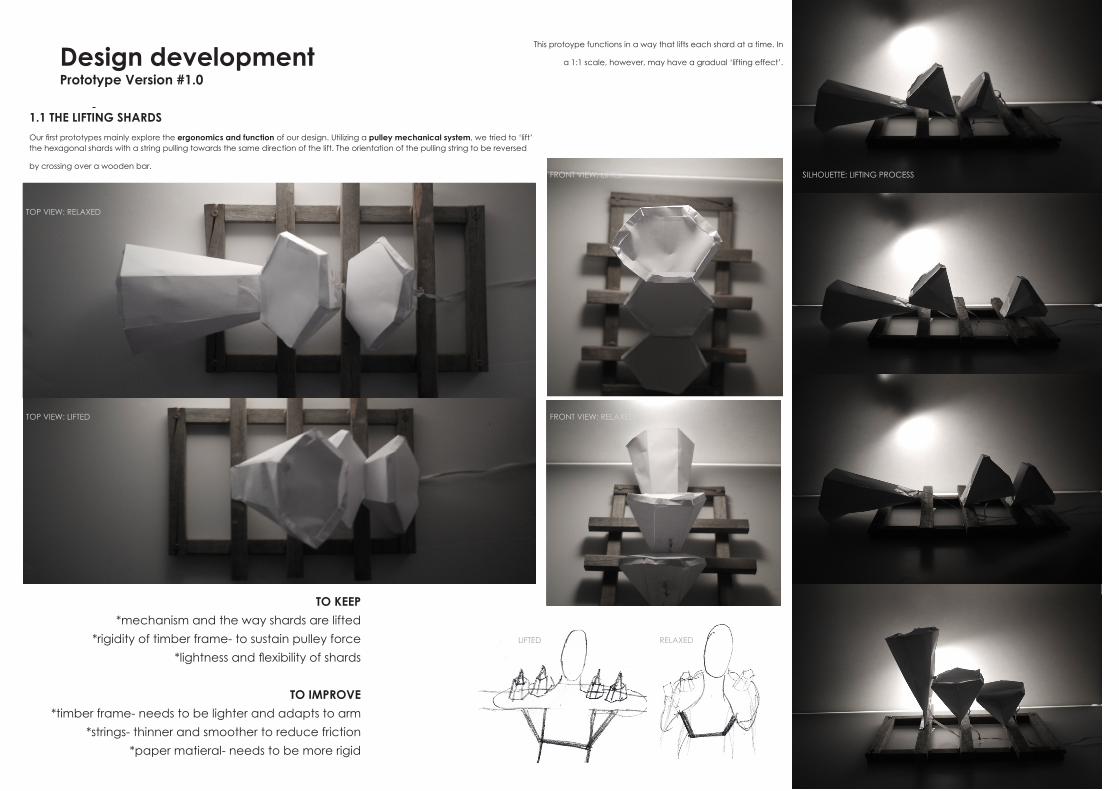
Design developmentPrototype Version #1.0
1.1 THE LIFTING SHARDSOur first prototypes mainly explore the ergonomics and function of our design. Utilizing a pulley mechanical system, we tried to ‘lift’ the hexagonal shards with a string pulling towards the same direction of the lift. The orientation of the pulling string to be reversed
by crossing over a wooden bar.
This protoype functions in a way that lifts each shard at a time. In
a 1:1 scale, however, may have a gradual ‘lifting effect’.
TO KEEP*mechanism and the way shards are lifted
*rigidity of timber frame- to sustain pulley force*lightness and flexibility of shards
TO IMPROVE *timber frame- needs to be lighter and adapts to arm
*strings- thinner and smoother to reduce friction*paper matieral- needs to be more rigid
TOP VIEW: RELAXED
TOP VIEW: LIFTED
SILHOUETTE: LIFTING PROCESS
FRONT VIEW: RELAXED
FRONT VIEW: LIFTED
LIFTED RELAXED
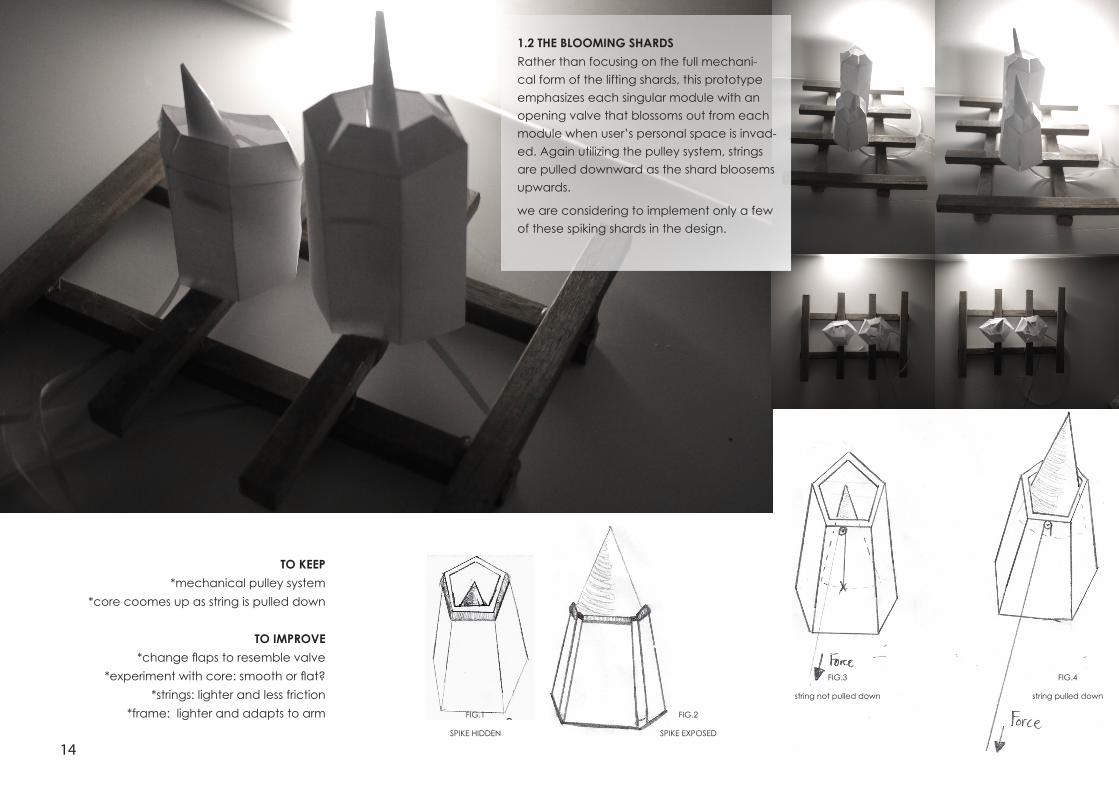
14
TO KEEP*mechanical pulley system
*core coomes up as string is pulled down
TO IMPROVE*change flaps to resemble valve
*experiment with core: smooth or flat?*strings: lighter and less friction
*frame: lighter and adapts to arm
FIG.3
string not pulled down
FIG.4
string pulled down
FIG.1
SPIKE HIDDEN
FIG.2
SPIKE EXPOSED
1.2 THE BLOOMING SHARDSRather than focusing on the full mechani-cal form of the lifting shards, this prototype emphasizes each singular module with an opening valve that blossoms out from each module when user’s personal space is invad-ed. Again utilizing the pulley system, strings are pulled downward as the shard bloosems upwards.
we are considering to implement only a few of these spiking shards in the design.
15
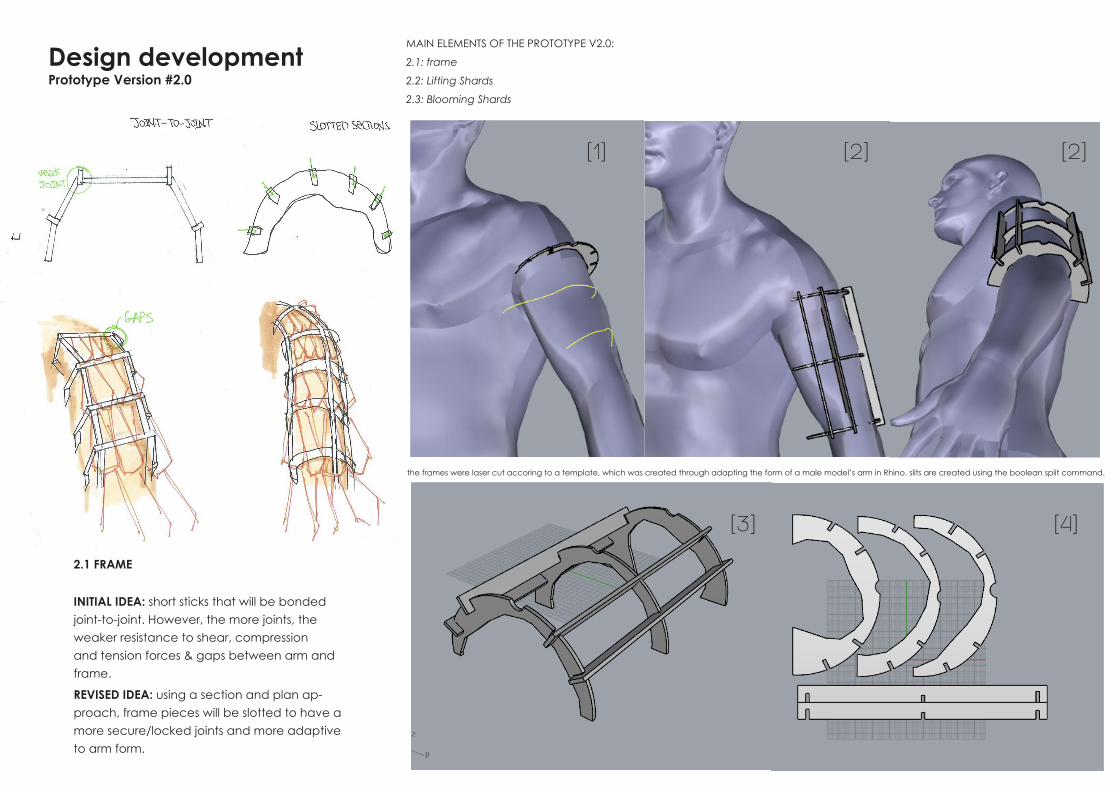
the frames were laser cut accoring to a template, which was created through adapting the form of a male model’s arm in Rhino. slits are created using the boolean split command.
Design developmentPrototype Version #2.0
[1]
[3]
[2] [2]
[4]
2.1 FRAME
INITIAL IDEA: short sticks that will be bonded joint-to-joint. However, the more joints, the weaker resistance to shear, compression and tension forces & gaps between arm and frame.
REVISED IDEA: using a section and plan ap-proach, frame pieces will be slotted to have a more secure/locked joints and more adaptive to arm form.
MAIN ELEMENTS OF THE PROTOTYPE V2.0:
2.1: frame
2.2: Lifting Shards
2.3: Blooming Shards
16
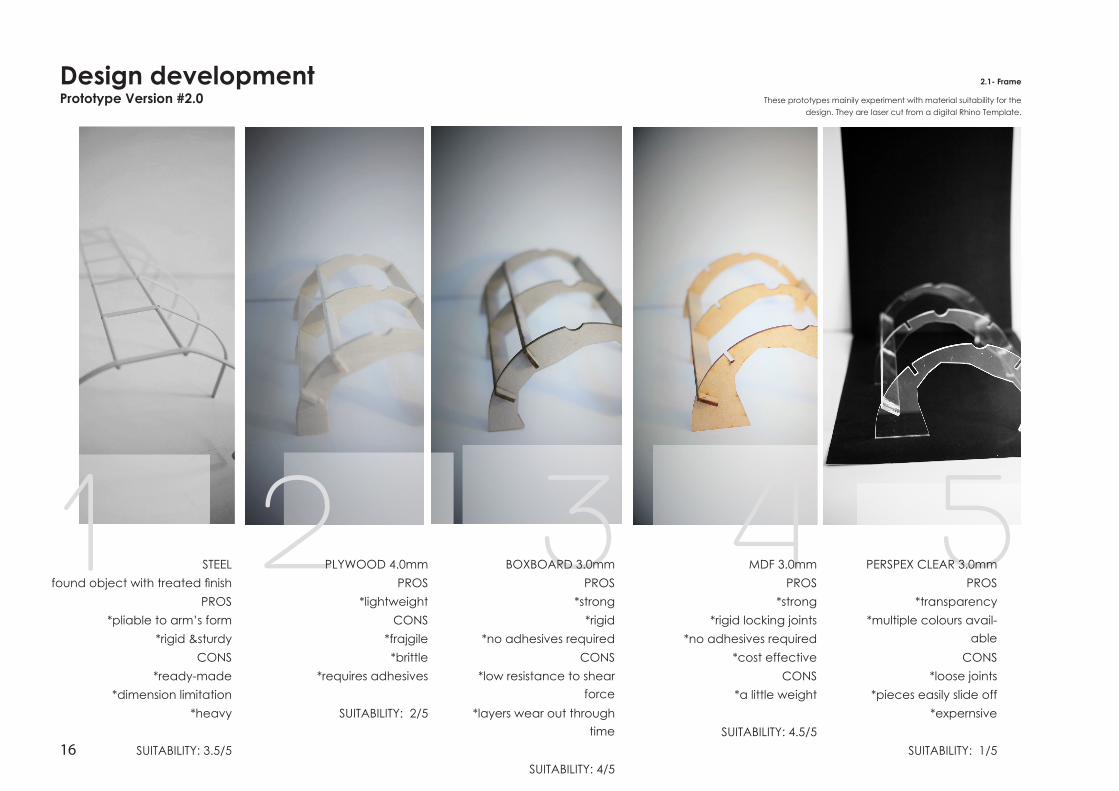
Design developmentPrototype Version #2.0
2.1- Frame
These prototypes mainily experiment with material suitability for the design. They are laser cut from a digital Rhino Template.
1 2 3 54STEELfound object with treated finish
PROS*pliable to arm’s form
*rigid &sturdyCONS
*ready-made*dimension limitation
*heavy
SUITABILITY: 3.5/5
PLYWOOD 4.0mmPROS
*lightweightCONS
*frajgile*brittle
*requires adhesives
SUITABILITY: 2/5
BOXBOARD 3.0mmPROS
*strong*rigid
*no adhesives requiredCONS
*low resistance to shear force
*layers wear out through time
SUITABILITY: 4/5
MDF 3.0mmPROS
*strong*rigid locking joints
*no adhesives required*cost effective
CONS*a little weight
SUITABILITY: 4.5/5
PERSPEX CLEAR 3.0mmPROS
*transparency*multiple colours avail-
ableCONS
*loose joints*pieces easily slide off
*expernsive
SUITABILITY: 1/5
17
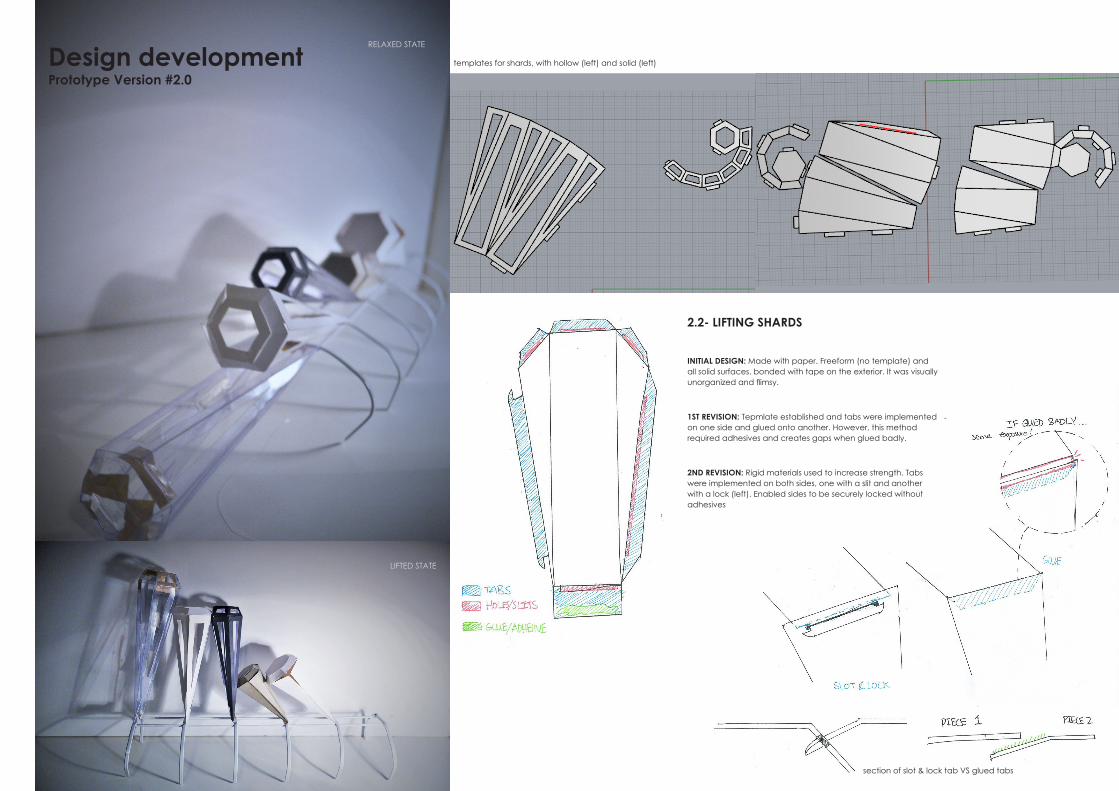
2.2- LIFTING SHARDS
INITIAL DESIGN: Made with paper. Freeform (no template) and all solid surfaces. bonded with tape on the exterior. It was visually unorganized and flimsy.
1ST REVISION: Tepmlate established and tabs were implemented on one side and glued onto another. However, this method required adhesives and creates gaps when glued badly.
2ND REVISION: Rigid materials used to increase strength. Tabs were implemented on both sides, one with a slit and another with a lock (left). Enabled sides to be securely locked without adhesives
RELAXED STATE
LIFTED STATE
Design developmentPrototype Version #2.0
templates for shards, with hollow (left) and solid (left)
section of slot & lock tab VS glued tabs
18
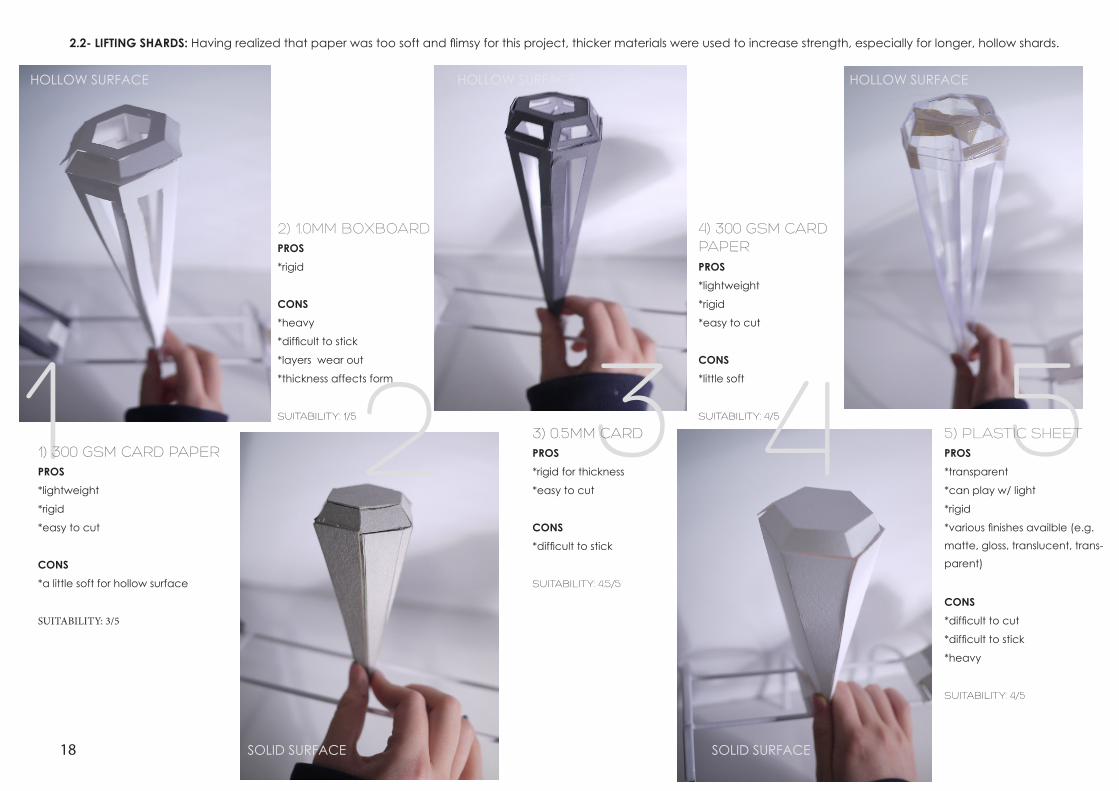
HOLLOW SURFACE
SOLID SURFACE
HOLLOW SURFACEHOLLOW SURFACE
SOLID SURFACE
2.2- LIFTING SHARDS: Having realized that paper was too soft and flimsy for this project, thicker materials were used to increase strength, especially for longer, hollow shards.
11) 300 GSM CARD PAPERPROS*lightweight
*rigid
*easy to cut
CONS*a little soft for hollow surface
SUITABILITY: 3/5
2 3 54
2) 1.0MM BOXBOARDPROS*rigid
CONS*heavy
*difficult to stick
*layers wear out
*thickness affects form
SUITABILITY: 1/5
3) 0.5MM CARD PROS*rigid for thickness
*easy to cut
CONS*difficult to stick
SUITABILITY: 4.5/5
4) 300 GSM CARD PAPERPROS*lightweight
*rigid
*easy to cut
CONS*little soft
SUITABILITY: 4/5
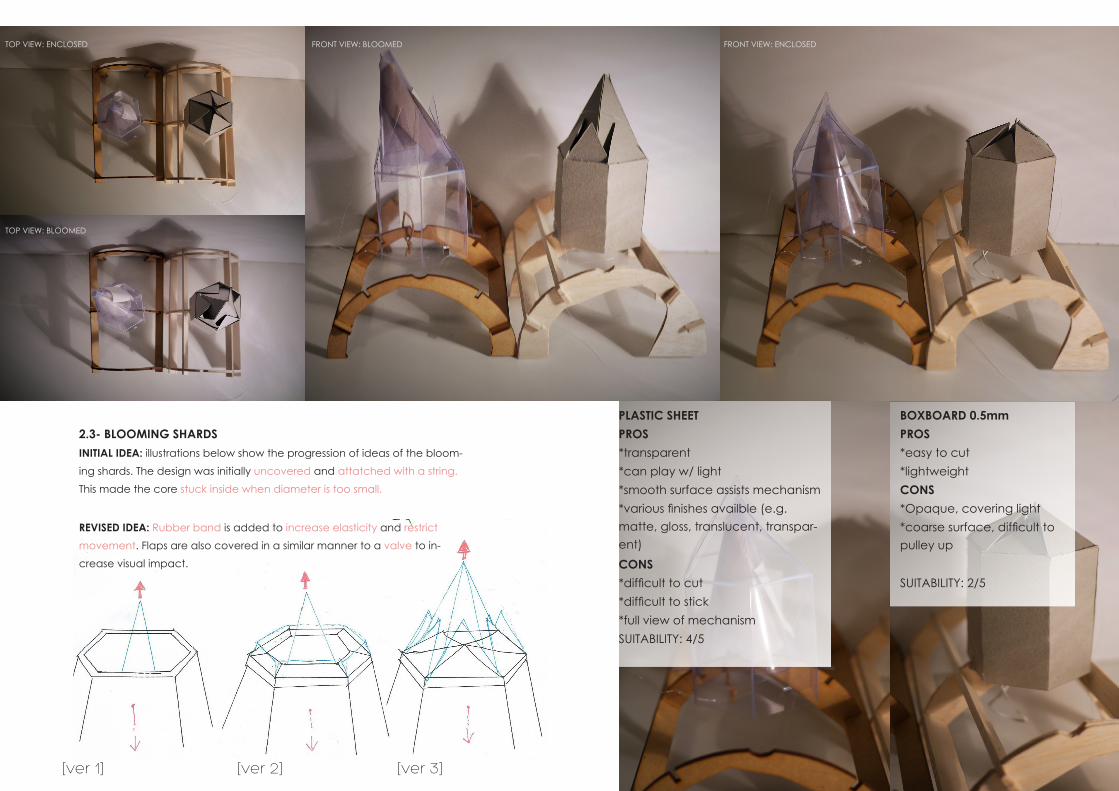
5) PLASTIC SHEETPROS*transparent
*can play w/ light
*rigid
*various finishes availble (e.g. matte, gloss, translucent, trans-parent)
CONS*difficult to cut
*difficult to stick
*heavy
SUITABILITY: 4/5
19
BOXBOARD 0.5mmPROS*easy to cut*lightweightCONS*Opaque, covering light*coarse surface, difficult to pulley up
SUITABILITY: 2/5
2.3- BLOOMING SHARDS INITIAL IDEA: illustrations below show the progression of ideas of the bloom-ing shards. The design was initially uncovered and attatched with a string. This made the core stuck inside when diameter is too small.
REVISED IDEA: Rubber band is added to increase elasticity and restrict movement. Flaps are also covered in a similar manner to a valve to in-crease visual impact.
PLASTIC SHEETPROS*transparent*can play w/ light*smooth surface assists mechanism*various finishes availble (e.g. matte, gloss, translucent, transpar-ent)CONS*difficult to cut*difficult to stick*full view of mechanismSUITABILITY: 4/5
[ver 1] [ver 3][ver 2]
TOP VIEW: ENCLOSED
TOP VIEW: BLOOMED
FRONT VIEW: BLOOMED FRONT VIEW: ENCLOSED
20
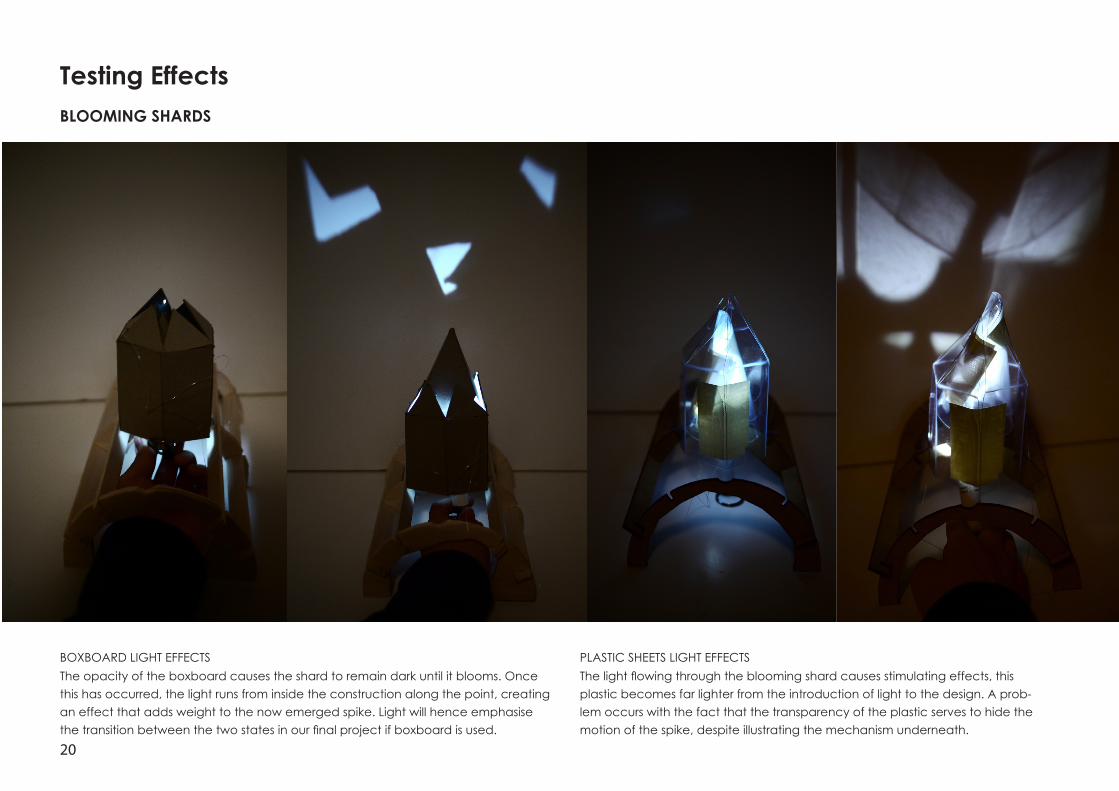
Testing EffectsBLOOMING SHARDS
BOXBOARD LIGHT EFFECTSThe opacity of the boxboard causes the shard to remain dark until it blooms. Once this has occurred, the light runs from inside the construction along the point, creating an effect that adds weight to the now emerged spike. Light will hence emphasise the transition between the two states in our final project if boxboard is used.
PLASTIC SHEETS LIGHT EFFECTSThe light flowing through the blooming shard causes stimulating effects, this plastic becomes far lighter from the introduction of light to the design. A prob-lem occurs with the fact that the transparency of the plastic serves to hide the motion of the spike, despite illustrating the mechanism underneath.
21
12
3
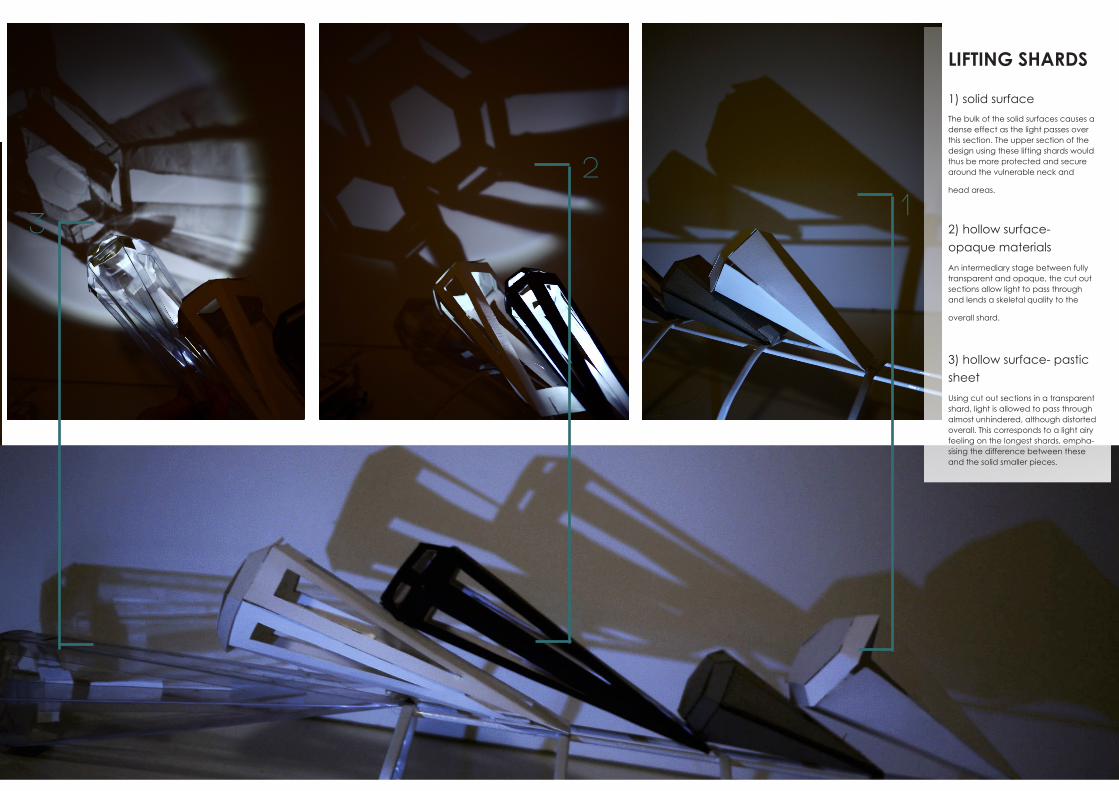
LIFTING SHARDS
1) solid surfaceThe bulk of the solid surfaces causes a dense effect as the light passes over this section. The upper section of the design using these lifting shards would thus be more protected and secure around the vulnerable neck and
head areas.
2) hollow surface- opaque materialsAn intermediary stage between fully transparent and opaque, the cut out sections allow light to pass through and lends a skeletal quality to the
overall shard.
3) hollow surface- pastic sheetUsing cut out sections in a transparent shard, light is allowed to pass through almost unhindered, although distorted overall. This corresponds to a light airy feeling on the longest shards, empha-sising the difference between these and the solid smaller pieces.
22


![Issue Date 2018-01okinawa-repo.lib.u-ryukyu.ac.jp/bitstream/20.500.12001/...A e8;]!&m2_!9I ± z ¥E û ·1 ª /cE Á l ï19!! * Í+ × t8 F Ý : 5 ! 7 Ï F!;]!&m2_!9 Ï)ü s ± zl](https://img.pdfslide.net/doc/110x75/5fc559036caa4b77720ac56e/issue-date-2018-01okinawa-repolibu-a-e8m29i-z-e-1-ce.jpg)