Embed Size (px)
Citation preview

Magento 2 Google Tag Manager Pro Tracking -
Installation/Set-up Guide
1. Upload Package: Upload the content of the module to your root folder. This will not overwrite the existing Magento folder or files, only the new contents will be added.
2. Install extension: After the successful upload of the package you have to run the commands on Magento2 root directory via SSH
“php bin/magento setup:upgrade”
“php bin/magento setup:static-content:deploy”
3. Clear Caches: This can be done from the admin console by navigating to the cache management page (System->Cache Management), selecting all caches, clicking ‘refresh’ from the drop-down menu, and submitting the change. Logout and login back in Admin.
4. Configuration settings for Google Tag Manager Pro: Go to Admin->Stores->Configuration->Scommerce Configuration->Google Tag Manager Pro->General
a. Enable: Set yes to enable the module.
b. License Key: Enter the License key provided by Scommerce Mage.
c. Account Id: Enter your Google Tag Manager Account Id.
d. Enhanced Ecommerce: Set yes to enable the enhanced ecommerce.
e. Brand Attribute : Select brand attribute to send brand information to Google Analytics
f. Brand text box: If you don’t have brand attribute and you want to send default brand name to Google Analytics then you can enter here.

g. Base: Set 'Yes' if you want to send base order data and 'No' to send store order data to Google
h. Enable dynamic remarketing tags: Set 'Yes' if you want to enable google dynamic remarketing tags to used for GTM.
i. Product ID Attribute: Select the attribute which you have submitted in your Google base feed. For e.g. SKU
5. Set up Google Tag Manager for Enhanced Ecommerce
Create the following variable
Google Analytic ID
Create the following triggers
o Product Click

o Add To Cart
o Remove From Cart
o Checkout for measuring steps
Create the following tags o Universal Analytics – All Pages


o Product Click

o Add To Cart

o Remove From Cart

o Checkout for measuring steps
6. Set up Enhanced Ecommerce in Google Analytics
To turn on Enhanced E-commerce for a view, and label your checkout steps:
1. Click Admin at the top of any Analytics page. 2. Select the view for which you want to enable Enhanced E-
commerce reporting. 3. In the View column, click E-commerce Settings. 4. Under Step 1, Enable E-commerce, set the status to ON. 5. Click Next step. 6. Under Step 2, Enhanced E-commerce Settings, set the status to
ON. When you turn this option on: o You can then see the Enhanced E-commerce reports in the
Conversions section o The other, older category of E-commerce reports is no longer visible
You can turn this option off to restore the older category of E-commerce reports.

7. Optionally, enter labels for the checkout steps that you have defined in your
Magento steps configuration. Please see screenshot below for reference
8. Click Submit.
7. Set up Google Tag Manager for Facebook Dynamic
Remarketing
Create the following variables
Facebook Pixel ID

Total (data layer variable - google_tag_params.ecomm_totalvalue)
currencyCode

Product ID (s) (data layer variable - google_tag_params.ecomm_prodid)
Product Price (s) (data layer variable - google_tag_params.ecomm_pvalue)

Checkout Steps (data layer variable - ecommerce.checkout.actionField.step)

Create the following triggers
o Checkout Initiate
o Initiate Payment

o Search Page
o Remarketing Tag Product

o Remarketing Tag Purchase
o Add to Cart (same as Enhanced Ecommerce please check
above section)

Create the following tags
o Facebook Audience Pixel – All Pages
<!-- Facebook Pixel Code --> <script> !function(f,b,e,v,n,t,s){if(f.fbq)return;n=f.fbq=function(){n.callMethod? n.callMethod.apply(n,arguments):n.queue.push(arguments)};if(!f._fbq)f._fbq=n; n.push=n;n.loaded=!0;n.version='2.0';n.queue=[];t=b.createElement(e);t.async=!0; t.src=v;s=b.getElementsByTagName(e)[0];s.parentNode.insertBefore(t,s)}(window, document,'script','//connect.facebook.net/en_US/fbevents.js'); fbq('init', '{{facebookPixelID}}'); fbq('track', 'PageView'); </script> <noscript><img height="1" width="1" style="display:none" src="https://www.facebook.com/tr?id={{facebookPixelID}}&ev=PageView&noscript=1" /></noscript> <!-- End Facebook Pixel Code -->

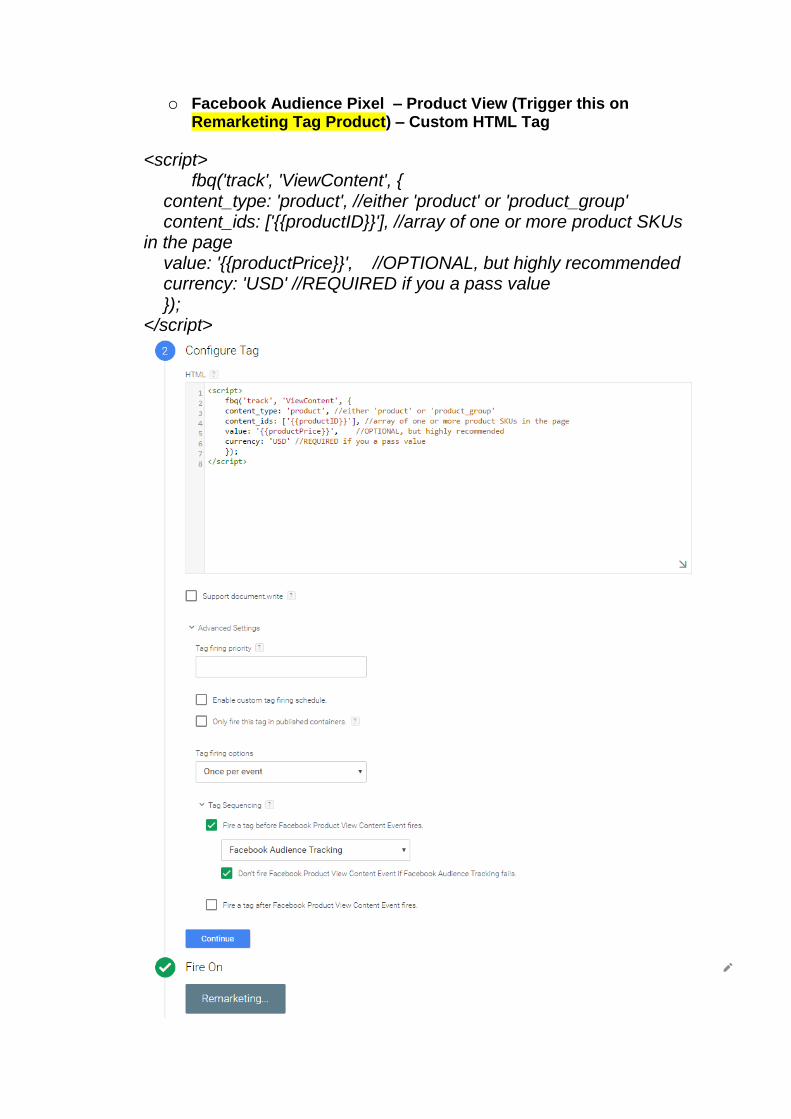
o Facebook Audience Pixel – Product View (Trigger this on Remarketing Tag Product) – Custom HTML Tag
<script> fbq('track', 'ViewContent', { content_type: 'product', //either 'product' or 'product_group' content_ids: ['{{productID}}'], //array of one or more product SKUs in the page value: '{{productPrice}}', //OPTIONAL, but highly recommended currency: 'USD' //REQUIRED if you a pass value }); </script>
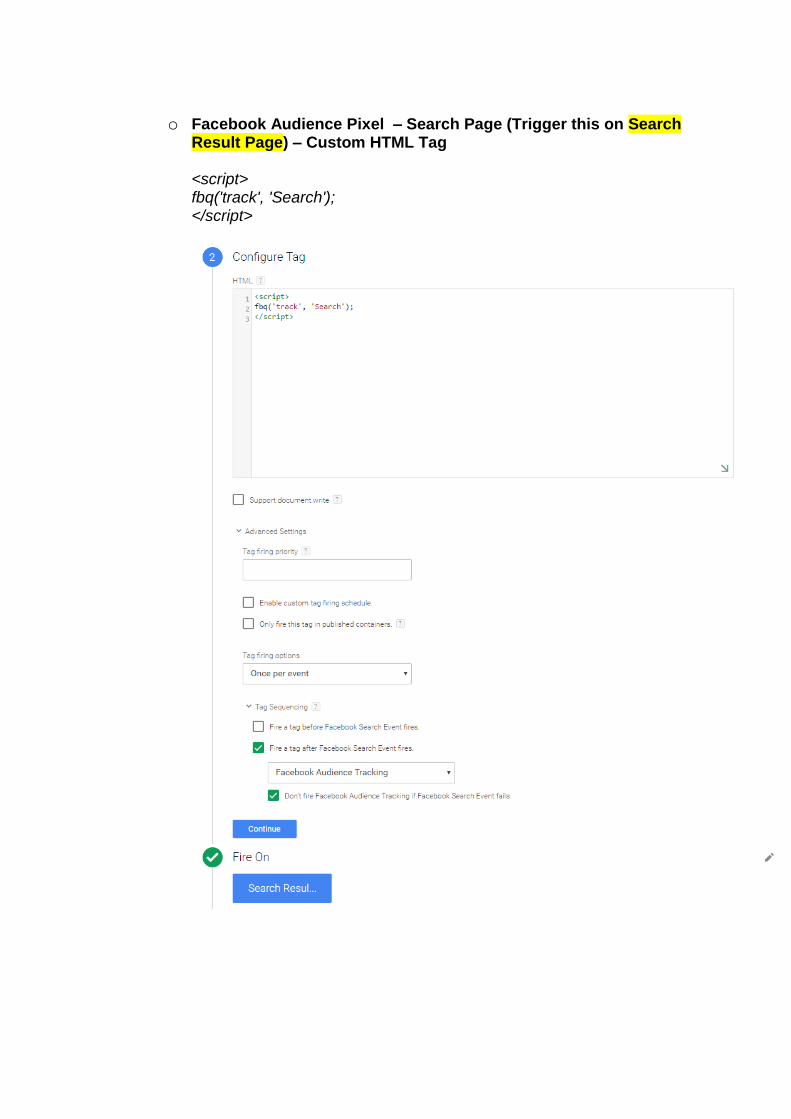
o Facebook Audience Pixel – Search Page (Trigger this on Search
Result Page) – Custom HTML Tag <script> fbq('track', 'Search'); </script>

o Facebook Audience Pixel – Add To Cart (Trigger this on Add To
Cart) – Custom HTML Tag
<script> var productIDs = '{{productID}}'; var results = productIDs.split(","); fbq('track', 'AddToCart', { content_ids: results, //array of one or more product SKUs in the page`z content_type: 'product', value: '{{total}}', //OPTIONAL, but highly recommended currency: 'USD' //REQUIRED if you pass a value }); </script>


o Facebook Audience Pixel – Initiate Checkout (Trigger this on Initiate Checkout) – Custom HTML Tag <script> fbq('track', 'InitiateCheckout'); </script>

o Facebook Audience Pixel – Initiate Payment (Trigger this on Initiate Payment) – Custom HTML Tag
<script>
fbq('track', 'AddPaymentInfo');
</script>

o Facebook Audience Pixel – Purchase(Trigger this on Remarketing Tag Purchase) – Custom HTML Tag <script> var productIDs = '{{productID}}'; var results = productIDs.split(","); console.log(results); fbq('track', 'Purchase', { content_type: 'product', //either 'product' or 'product_group' content_ids: results, //array of one or more product SKUs in the page value: '{{total}}', //REQUIRED currency: '{{currencyCode}}' //REQUIRED }); </script>


8. Set up Google Tag Manager for Google Dynamic Remarketing
Create the following variables
Google Tag Params
Conversion ID

Create the following triggers
o Remarketing Tag Home
o Remarketing Tag Category

o Remarketing Tag Cart
o Remarketing Tag Product (same as Facebook Dynamic Remarketing please check above section)
o Remarketing Tag Purchase (same as Facebook Dynamic Remarketing please check above section)

Create the following tags
o Adwords Dynamic Remarketing Home (Trigger this on Remarketing Tag Home)

o Adwords Dynamic Remarketing Category (Trigger this on
Remarketing Tag Category)

o Adwords Dynamic Remarketing Product (Trigger this on Remarketing Tag Product)

o Adwords Dynamic Remarketing Cart (Trigger this on Remarketing Tag Cart)

Adwords Dynamic Remarketing Purchase (Trigger this on
Remarketing Tag Purchase)

Ajax Add To Basket or Remove From Basket
Add the following two functions in your ajax add to basket js file and call
gaAddToCart on success of Ajax add to basket and gaRemoveFromCart on
success of Ajax remove from basket function.
Ajax Add To Basket
function gaAddToCart(){jQuery.cookie.json = true;var productToBasket =
jQuery.cookie("productToBasket");var productlist =
jQuery.cookie("productlist");if (productToBasket !=
undefined){manipulationOfCart(productToBasket,'add',productlist);jQuery.remo
veCookie("productToBasket", { path: '/', domain: '.' + document.domain});}}
Ajax Remove From Basket
function gaRemoveFromCart(){jQuery.cookie.json = true;var productOutBasket
= jQuery.cookie("productOutBasket");if (productOutBasket !=
undefined){manipulationOfCart(productOutBasket, 'remove',
'');jQuery.removeCookie("productOutBasket", { path: '/', domain: '.' +
document.domain });}}
Please contact [email protected] for any queries.