Embed Size (px)
Citation preview
DAVE ™
One Integrated System for All Your Vital Record Business Needs
LexisNexis VitalChek Network, Inc. 6 Creekside Crossing
Six Cadillac Drive Brentwood, TN 37027
Maine Death Module
Medical Facility User Training Exercises
All Material Copyrighted LexisNexis VitalChek Network, Inc.
January 2010 (Updated May, 2017 – 16.3 Test)
Page 2 of 95
Table of Contents
Section 1: General DAVE™ Navigation ............................................................................... 4
Exercise 1.1 – Logging Into DAVE™ .................................................................................... 4
Exercise 1.2 – Messages ......................................................................................................... 5
Exercise 1.3 – Current Activities .......................................................................................... 11
Exercise 1.4 – Change/Forgot Password .............................................................................. 12
Exercise 1.5 – Logging out of DAVE™ ............................................................................... 15
Section 2: Page Controls and Features..................................................................................... 17
Exercise 2.1 – Dropdown Lists ............................................................................................. 17
Exercise 2.2 – Standard Date Format ................................................................................... 18
Exercise 2.3 – Using Calendars ............................................................................................ 18
Exercise 2.4 – Lookup Controls............................................................................................ 19
Exercise 2.5 – Clear Data Controls ....................................................................................... 22
Exercise 2.6 – Place Lookup ................................................................................................. 22
Exercise 2.7 – Tooltip ........................................................................................................... 24
Exercise 2.8 – Predictive Text .............................................................................................. 25
Section 3: Record Validation ................................................................................................... 25
Exercise 3.1 – Status Bar ...................................................................................................... 25
Exercise 3.2 – Record Validation and Error Correction ....................................................... 26
Exercise 3.3 – Duplicate Record Resolution ........................................................................ 33
Section 4: Start/Edit New Case ................................................................................................ 37
Exercise 4.1 – Required Fields ............................................................................................. 37
Exercise 4.2 – Decedent ........................................................................................................ 40
Exercise 4.3 – Pronouncement .............................................................................................. 40
Exercise 4.4 – Place of Death ............................................................................................... 42
Exercise 4.5 – Cause of Death .............................................................................................. 45
Exercise 4.6 – Other Factors ................................................................................................. 49
Exercise 4.7 – Certifier ......................................................................................................... 51
Exercise 4.8 – Certify ........................................................................................................... 55
Exercise 4.9 – Locate Case ................................................................................................... 57
Exercise 4.10 – Preview Case ............................................................................................... 58
Section 5: Other Links/Registrar ............................................................................................. 60
Exercise 5.1 – Amendment Lists .......................................................................................... 60
Exercise 5.2 – Amendments (Corrections) ........................................................................... 61
Exercise 5.3 – Comments ..................................................................................................... 69
Exercise 5.4 – Attachments (Registration) ........................................................................... 73
Exercise 5.5 – Print Forms - Working Copy......................................................................... 75
Exercise 5.6 – Print Forms - Drop to Paper - Medical.......................................................... 77
Exercise 5.7 – Refer To Medical Examiner .......................................................................... 79
Exercise 5.8 – Relinquish Case ............................................................................................. 82
Exercise 5.9 – Request Non Affiliated Certification ............................................................ 83
Section 6: Work Queues .......................................................................................................... 89
Exercise 6.1 – Work Queue Summary .................................................................................. 89
Section 7: Resources ................................................................................................................ 91
Appendices ................................................................................................................................ 91
Page 3 of 95
Appendix 1 – Glossary of Icons and Controls ...................................................................... 91
Appendix 2 – Usage and Common Conventions .................................................................. 94
Page 4 of 95
Section 1: General DAVE™ Navigation
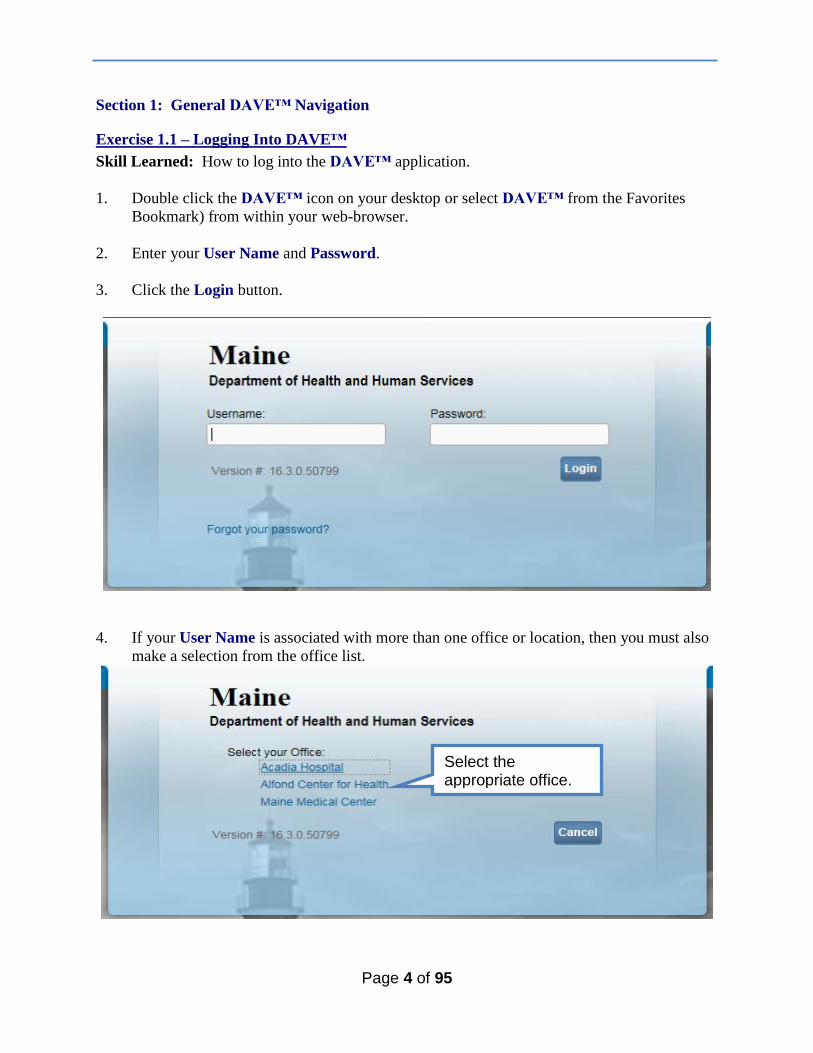
Exercise 1.1 – Logging Into DAVE™
Skill Learned: How to log into the DAVE™ application.
1. Double click the DAVE™ icon on your desktop or select DAVE™ from the Favorites
Bookmark) from within your web-browser.
2. Enter your User Name and Password.
3. Click the Login button.
4. If your User Name is associated with more than one office or location, then you must also
make a selection from the office list.
Select the appropriate office.
Page 5 of 95
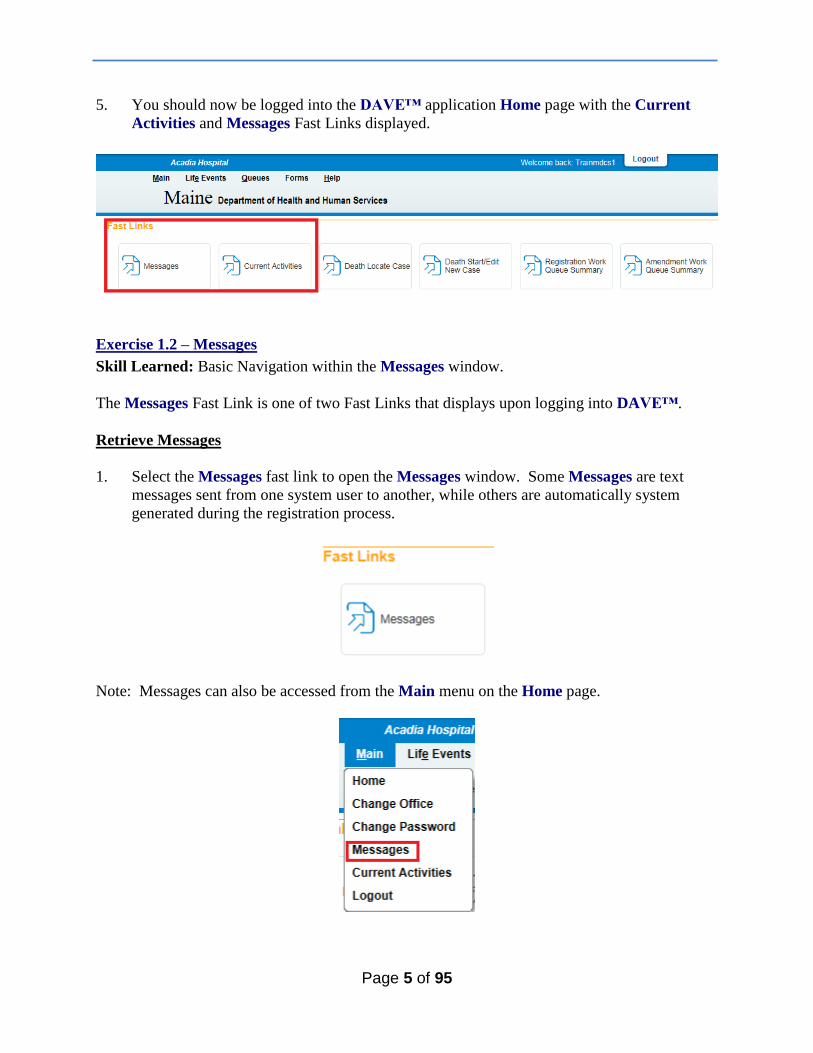
5. You should now be logged into the DAVE™ application Home page with the Current
Activities and Messages Fast Links displayed.
Exercise 1.2 – Messages
Skill Learned: Basic Navigation within the Messages window.
The Messages Fast Link is one of two Fast Links that displays upon logging into DAVE™.
Retrieve Messages
1. Select the Messages fast link to open the Messages window. Some Messages are text
messages sent from one system user to another, while others are automatically system
generated during the registration process.
Note: Messages can also be accessed from the Main menu on the Home page.

Page 6 of 95
The Messages window is a grid that displays all of the messages that have been sent to the user
or current office (the office selected at login.) To read a message, click the blue hyperlink in the
From column. The Message Text column displays all or a portion of the message that was sent,
depending on message length. Date Sent displays the date and time the message was sent.
Notice that the Remove from List button is initially grayed out or disabled.
2. Click any of the blue hyperlinks in the From column of the Messages window to read that
particular message.
3. The Message window is a popup that appears on top of the DAVE™ page. After reading
the message, click the Close button.
4. Place a checkmark in the checkbox next to the Date Sent column header.
Page 7 of 95
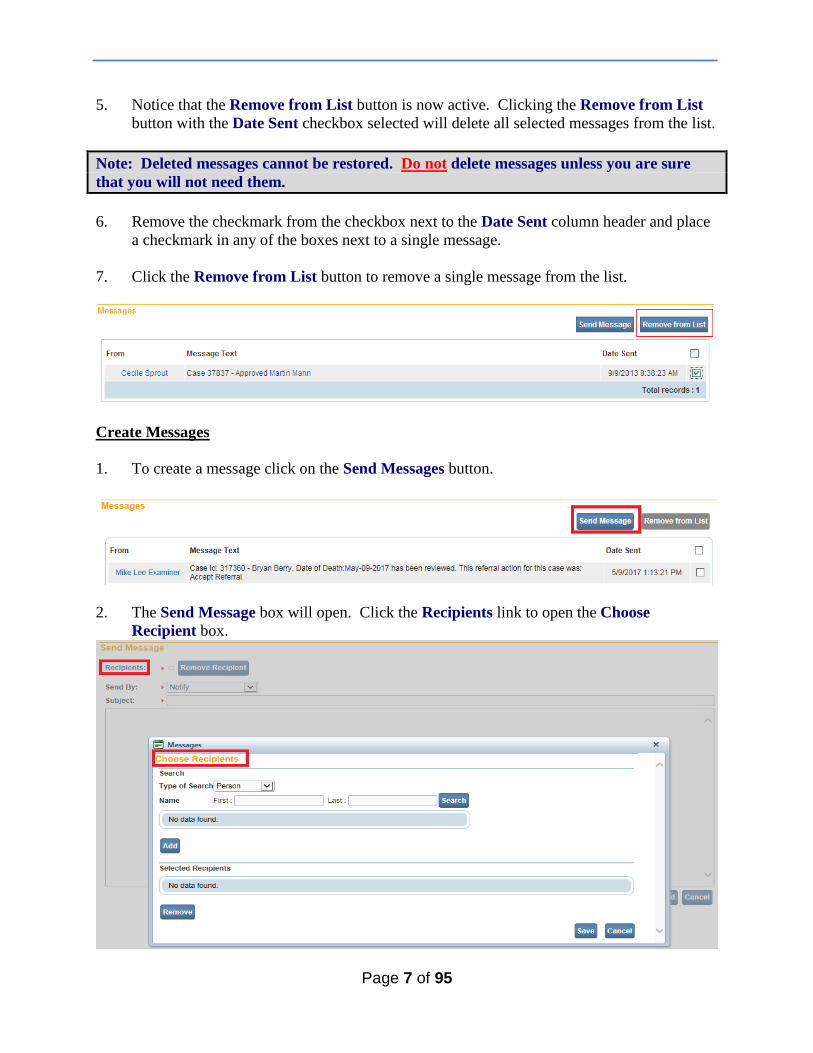
5. Notice that the Remove from List button is now active. Clicking the Remove from List
button with the Date Sent checkbox selected will delete all selected messages from the list.
Note: Deleted messages cannot be restored. Do not delete messages unless you are sure
that you will not need them.
6. Remove the checkmark from the checkbox next to the Date Sent column header and place
a checkmark in any of the boxes next to a single message.
7. Click the Remove from List button to remove a single message from the list.
Create Messages
1. To create a message click on the Send Messages button.
2. The Send Message box will open. Click the Recipients link to open the Choose
Recipient box.

Page 8 of 95
3. In the Choose Recipients box, the Type of Search defaults to ‘Person’. A search can also
be made on an ‘Organization’.
4. Type in the first and last name of the person you wish to send a message to. Select the
Search button.
5. Place a checkmark in the checkbox next to the name of the person you wish to send a
message to.
Page 9 of 95
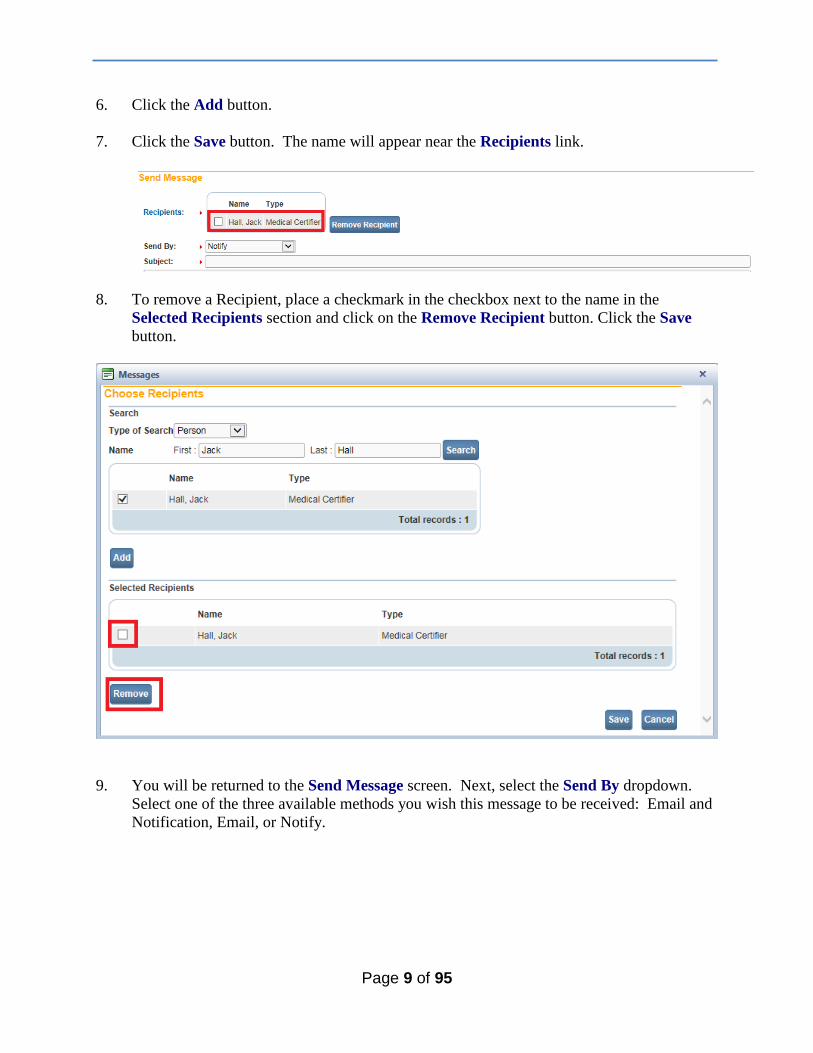
6. Click the Add button.
7. Click the Save button. The name will appear near the Recipients link.
8. To remove a Recipient, place a checkmark in the checkbox next to the name in the
Selected Recipients section and click on the Remove Recipient button. Click the Save
button.
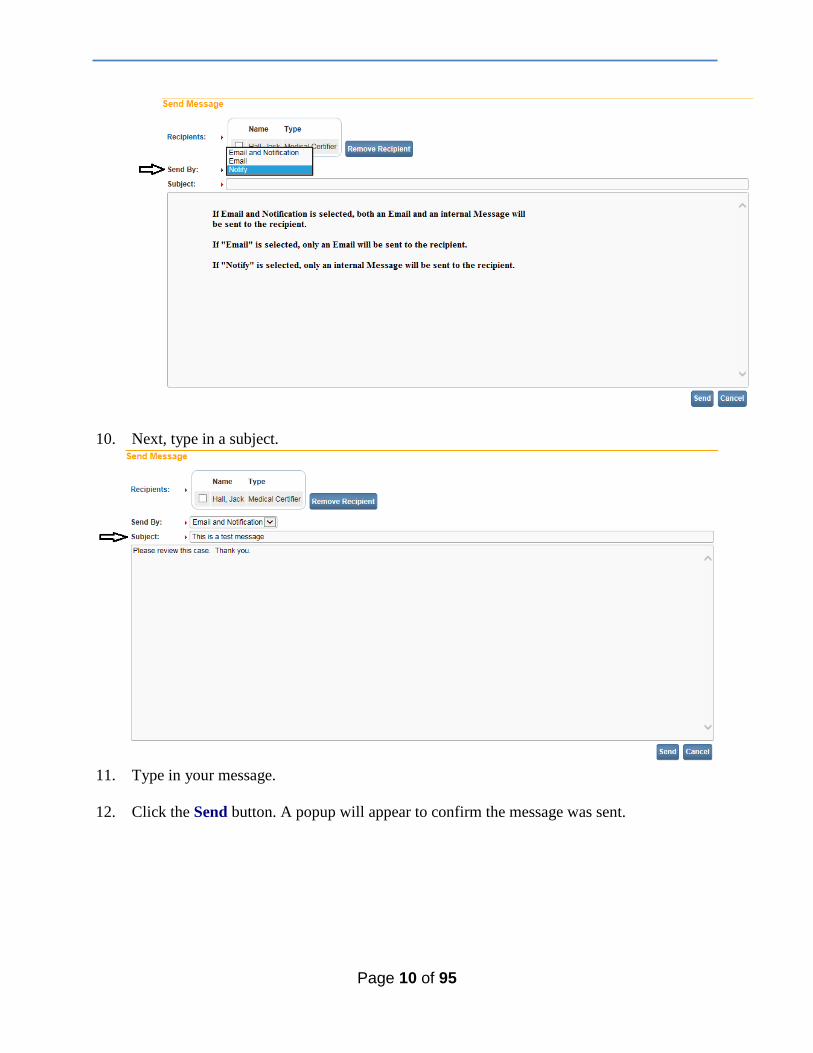
9. You will be returned to the Send Message screen. Next, select the Send By dropdown.
Select one of the three available methods you wish this message to be received: Email and
Notification, Email, or Notify.
Page 10 of 95
10. Next, type in a subject.
11. Type in your message.
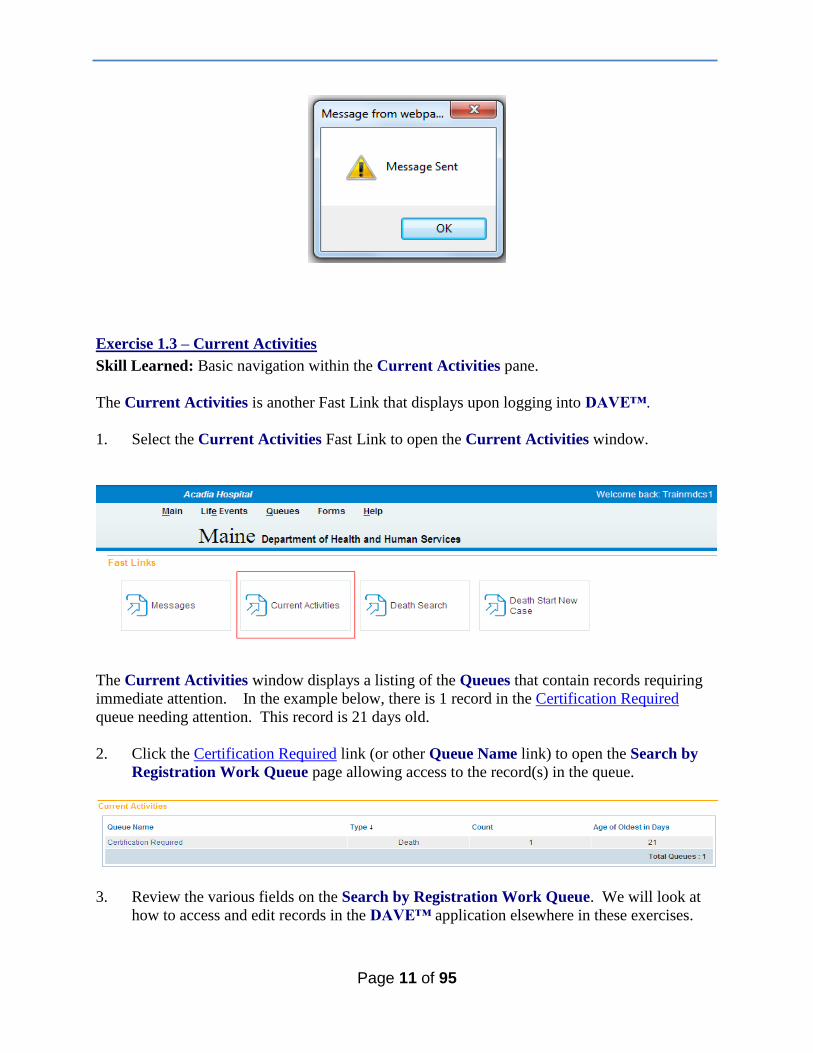
12. Click the Send button. A popup will appear to confirm the message was sent.
Page 11 of 95
Exercise 1.3 – Current Activities
Skill Learned: Basic navigation within the Current Activities pane.
The Current Activities is another Fast Link that displays upon logging into DAVE™.
1. Select the Current Activities Fast Link to open the Current Activities window.
The Current Activities window displays a listing of the Queues that contain records requiring
immediate attention. In the example below, there is 1 record in the Certification Required
queue needing attention. This record is 21 days old.
2. Click the Certification Required link (or other Queue Name link) to open the Search by
Registration Work Queue page allowing access to the record(s) in the queue.
3. Review the various fields on the Search by Registration Work Queue. We will look at
how to access and edit records in the DAVE™ application elsewhere in these exercises.
Page 12 of 95
4. Click the Return button to close this page and return to the Home page.
Exercise 1.4 – Change/Forgot Password
Skill Learned: How to change your DAVE™ system password.
The Application Support Specialist will provide new enrollees with a password that will enable
the user to log into DAVE™. This is a temporary password that must be changed when logging
in for the first time.
Change your password:
1. From the Home page, select Main -> Change Password.
2. Enter your old or temporary password into the Old Password text entry box.
3. Enter your new password into the New Password text entry box. Passwords must be at
least 8 characters in length and should be a combination of letters, numbers, uppercase and
lowercase characters.
Page 13 of 95
4. Re-enter the new password in the Confirm Password text entry box. Note: you must enter
the exact same password both times.
5. Answer the Security Question and Security Answer.
6. Click the Save button.
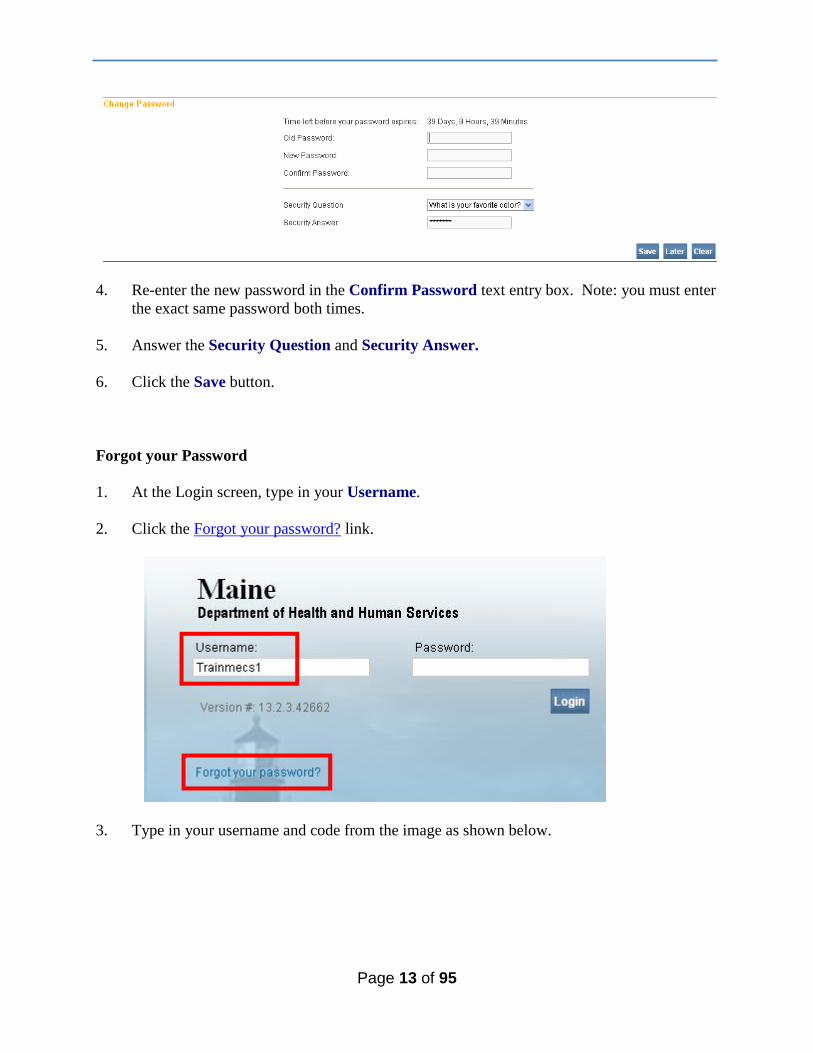
Forgot your Password
1. At the Login screen, type in your Username.
2. Click the Forgot your password? link.
3. Type in your username and code from the image as shown below.
Page 14 of 95
4. Select the Next button.
5. At “Please answer your security question below”, type in the answer to the security
question you completed earlier in Step 5 above of the “Change Your Password” section.
6. Select the Next button.
7. A message will appear stating a temporary password has been sent to your email address.
8. Select Continue.
9. The Login screen will appear.
10. Retrieve the automated email message with the temporary password.
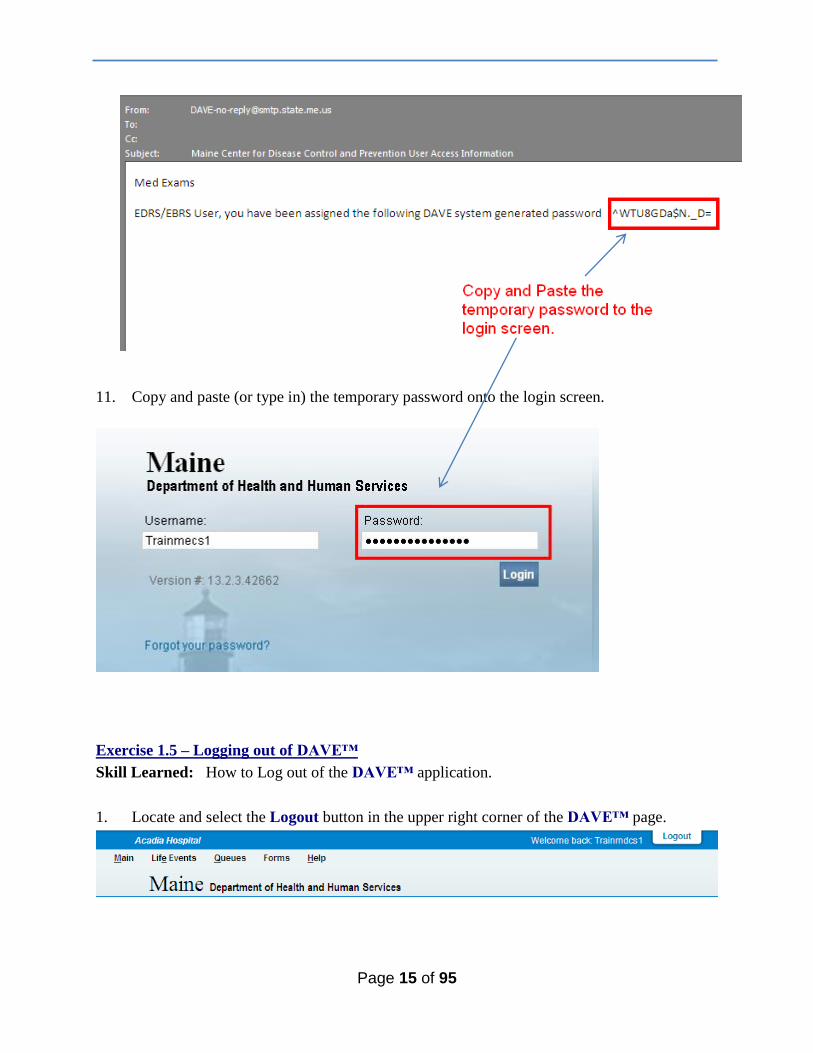
Page 15 of 95
11. Copy and paste (or type in) the temporary password onto the login screen.
Exercise 1.5 – Logging out of DAVE™
Skill Learned: How to Log out of the DAVE™ application.
1. Locate and select the Logout button in the upper right corner of the DAVE™ page.
Page 16 of 95
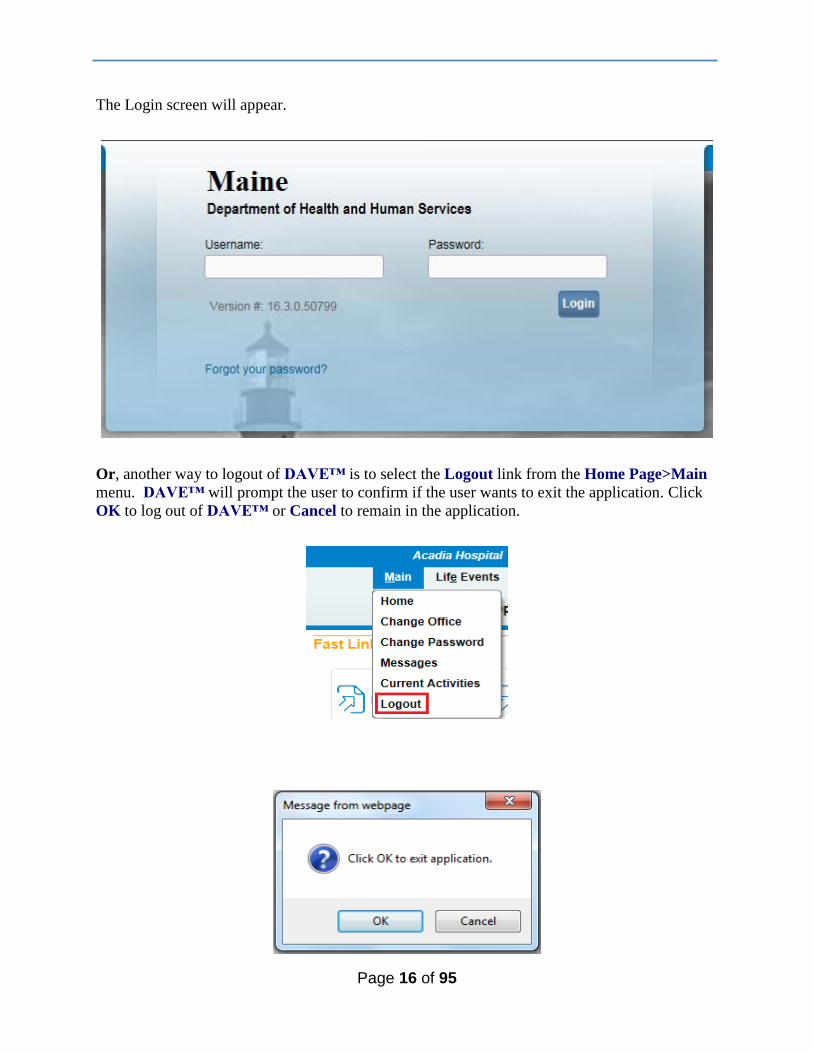
The Login screen will appear.
Or, another way to logout of DAVE™ is to select the Logout link from the Home Page>Main
menu. DAVE™ will prompt the user to confirm if the user wants to exit the application. Click
OK to log out of DAVE™ or Cancel to remain in the application.
Page 17 of 95
Section 2: Page Controls and Features
Exercise 2.1 – Dropdown Lists
Skill Learned: How to navigate through DAVE™ using the various fields and icons.
Dropdown lists provide you with a pre-defined list of choices. This eliminates the need to
manually type in data, prevents inappropriate data from being entered, and prevents spelling
errors.
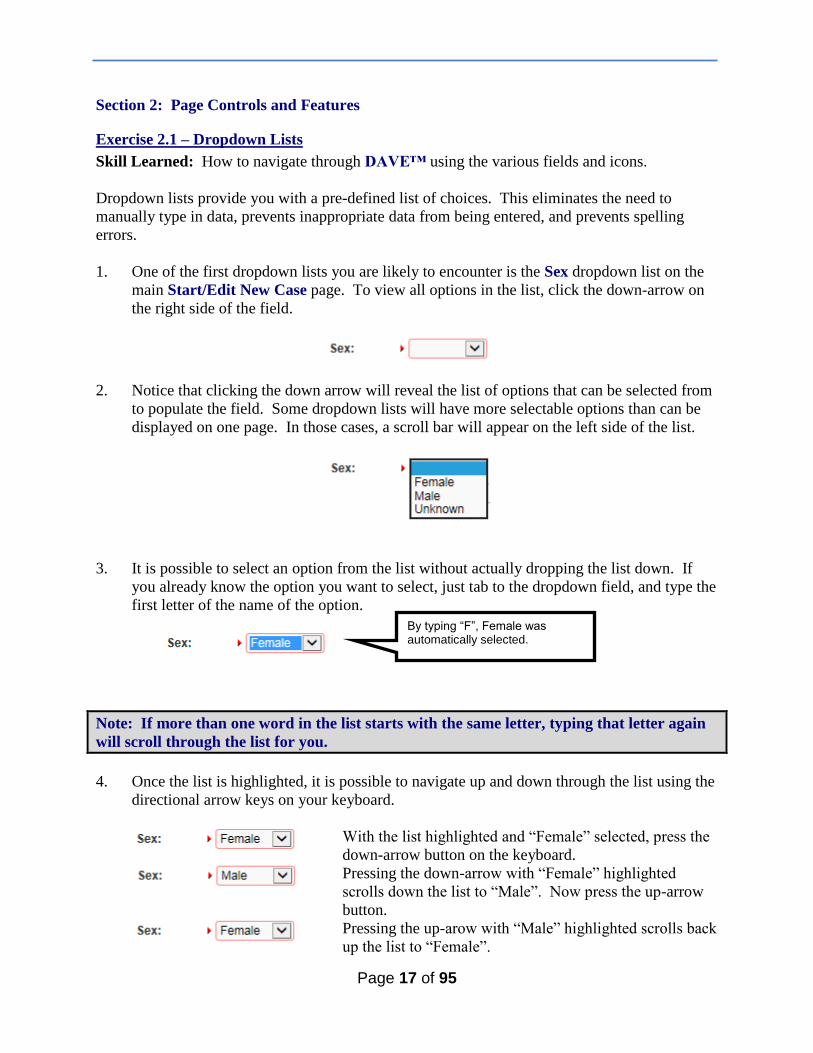
1. One of the first dropdown lists you are likely to encounter is the Sex dropdown list on the
main Start/Edit New Case page. To view all options in the list, click the down-arrow on
the right side of the field.
2. Notice that clicking the down arrow will reveal the list of options that can be selected from
to populate the field. Some dropdown lists will have more selectable options than can be
displayed on one page. In those cases, a scroll bar will appear on the left side of the list.
3. It is possible to select an option from the list without actually dropping the list down. If
you already know the option you want to select, just tab to the dropdown field, and type the
first letter of the name of the option.
Note: If more than one word in the list starts with the same letter, typing that letter again
will scroll through the list for you.
4. Once the list is highlighted, it is possible to navigate up and down through the list using the
directional arrow keys on your keyboard.
With the list highlighted and “Female” selected, press the
down-arrow button on the keyboard.
Pressing the down-arrow with “Female” highlighted
scrolls down the list to “Male”. Now press the up-arrow
button.
Pressing the up-arow with “Male” highlighted scrolls back
up the list to “Female”.
By typing “F”, Female was automatically selected.
Page 18 of 95
Exercise 2.2 – Standard Date Format
Skill Learned: How to properly enter dates into the DAVE™ system. While processing death
registrations, you will frequently be inputting dates. DAVE™ allows you much flexibility in
using several different date formats.
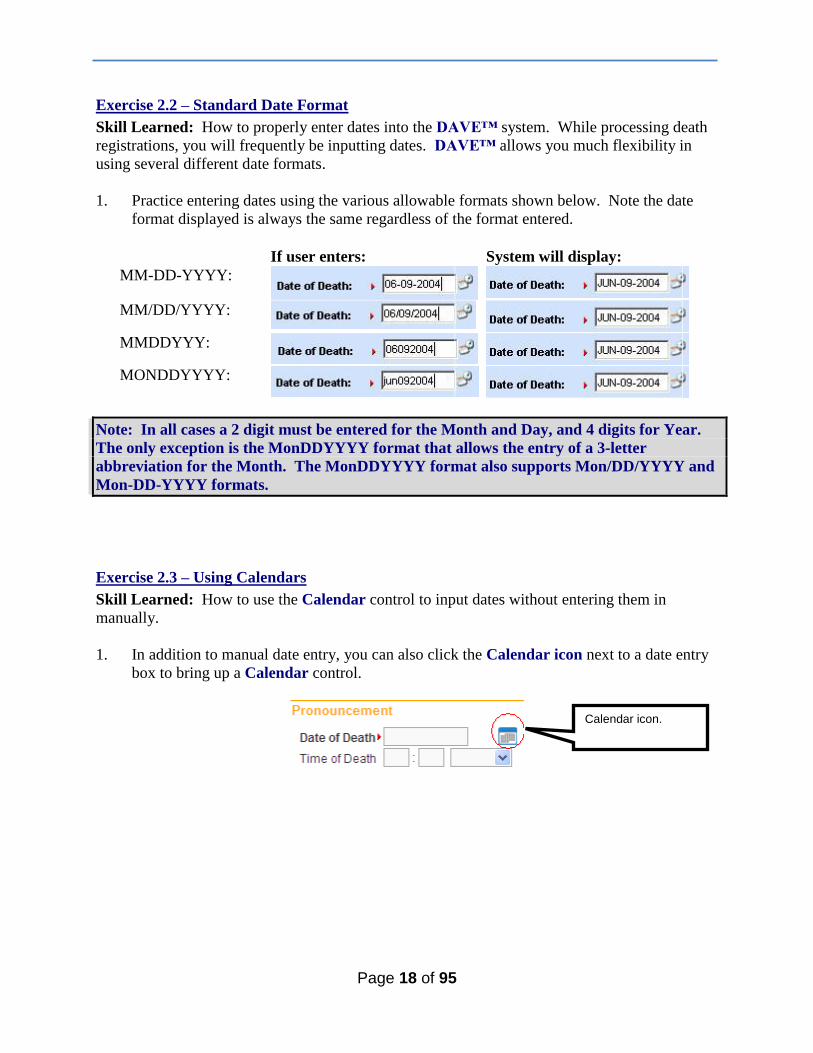
1. Practice entering dates using the various allowable formats shown below. Note the date
format displayed is always the same regardless of the format entered.
If user enters: System will display:
MM-DD-YYYY:
MM/DD/YYYY:
MMDDYYY:
MONDDYYYY:
Note: In all cases a 2 digit must be entered for the Month and Day, and 4 digits for Year.
The only exception is the MonDDYYYY format that allows the entry of a 3-letter
abbreviation for the Month. The MonDDYYYY format also supports Mon/DD/YYYY and
Mon-DD-YYYY formats.
Exercise 2.3 – Using Calendars
Skill Learned: How to use the Calendar control to input dates without entering them in
manually.
1. In addition to manual date entry, you can also click the Calendar icon next to a date entry
box to bring up a Calendar control.
Calendar icon.
Page 19 of 95
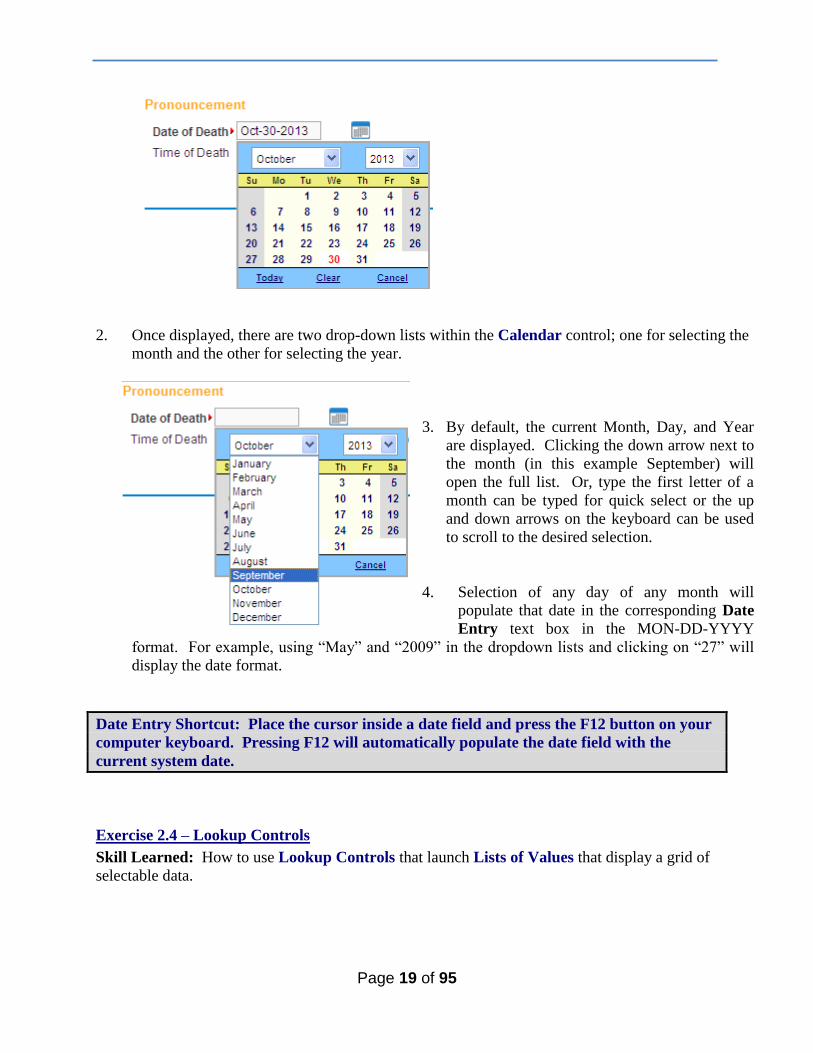
2. Once displayed, there are two drop-down lists within the Calendar control; one for selecting the
month and the other for selecting the year.
3. By default, the current Month, Day, and Year
are displayed. Clicking the down arrow next to
the month (in this example September) will
open the full list. Or, type the first letter of a
month can be typed for quick select or the up
and down arrows on the keyboard can be used
to scroll to the desired selection.
4. Selection of any day of any month will
populate that date in the corresponding Date
Entry text box in the MON-DD-YYYY
format. For example, using “May” and “2009” in the dropdown lists and clicking on “27” will
display the date format.
Date Entry Shortcut: Place the cursor inside a date field and press the F12 button on your
computer keyboard. Pressing F12 will automatically populate the date field with the
current system date.
Exercise 2.4 – Lookup Controls
Skill Learned: How to use Lookup Controls that launch Lists of Values that display a grid of
selectable data.
Page 20 of 95
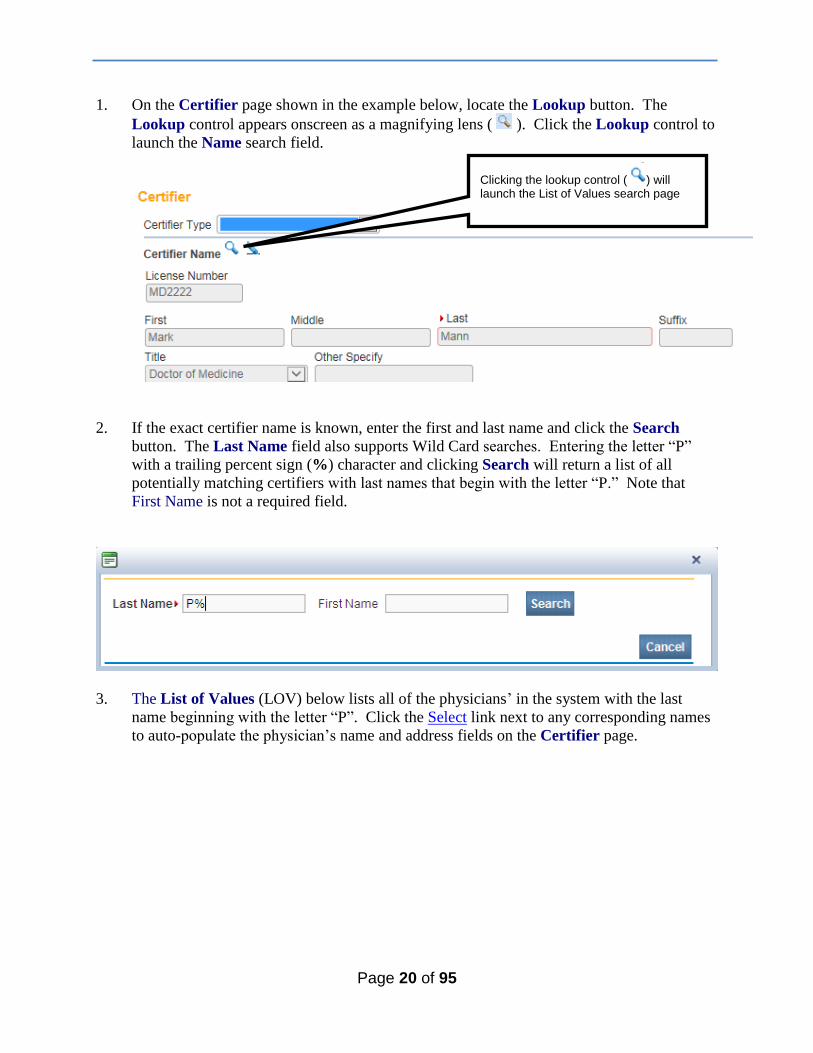
1. On the Certifier page shown in the example below, locate the Lookup button. The
Lookup control appears onscreen as a magnifying lens ( ). Click the Lookup control to
launch the Name search field.
2. If the exact certifier name is known, enter the first and last name and click the Search
button. The Last Name field also supports Wild Card searches. Entering the letter “P”
with a trailing percent sign (%) character and clicking Search will return a list of all
potentially matching certifiers with last names that begin with the letter “P.” Note that
First Name is not a required field.
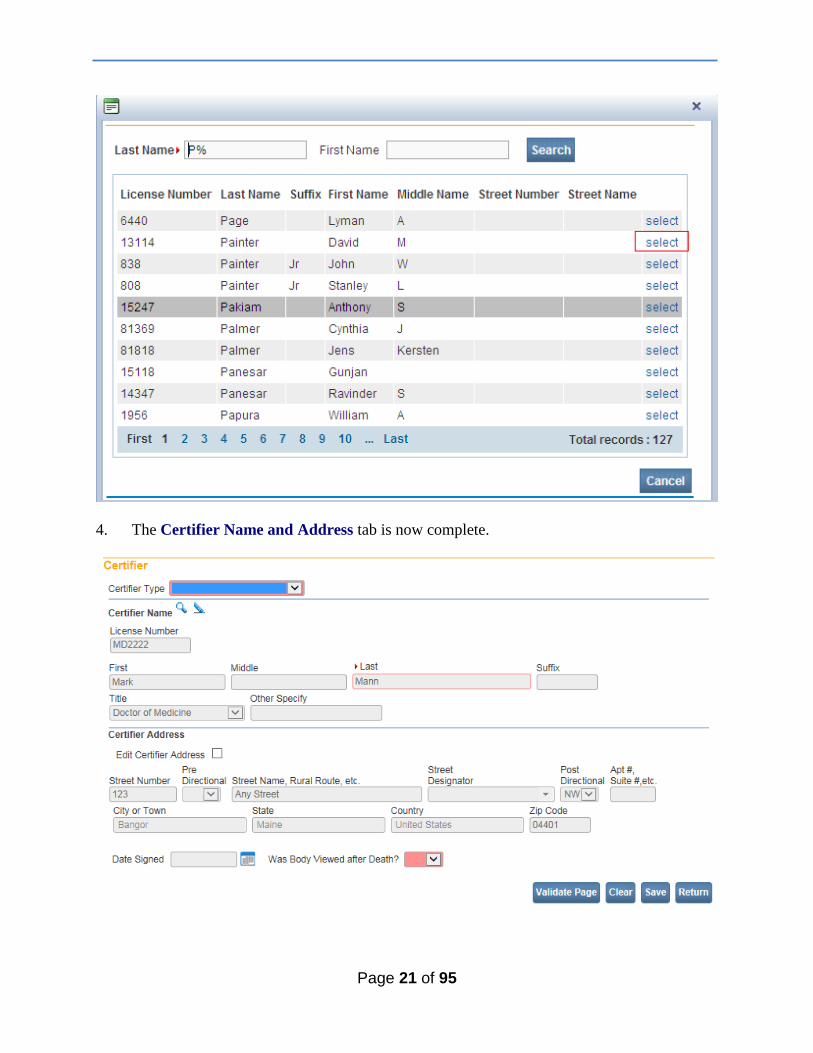
3. The List of Values (LOV) below lists all of the physicians’ in the system with the last
name beginning with the letter “P”. Click the Select link next to any corresponding names
to auto-populate the physician’s name and address fields on the Certifier page.
Clicking the lookup control ( ) will launch the List of Values search page
Page 21 of 95
4. The Certifier Name and Address tab is now complete.
Page 22 of 95
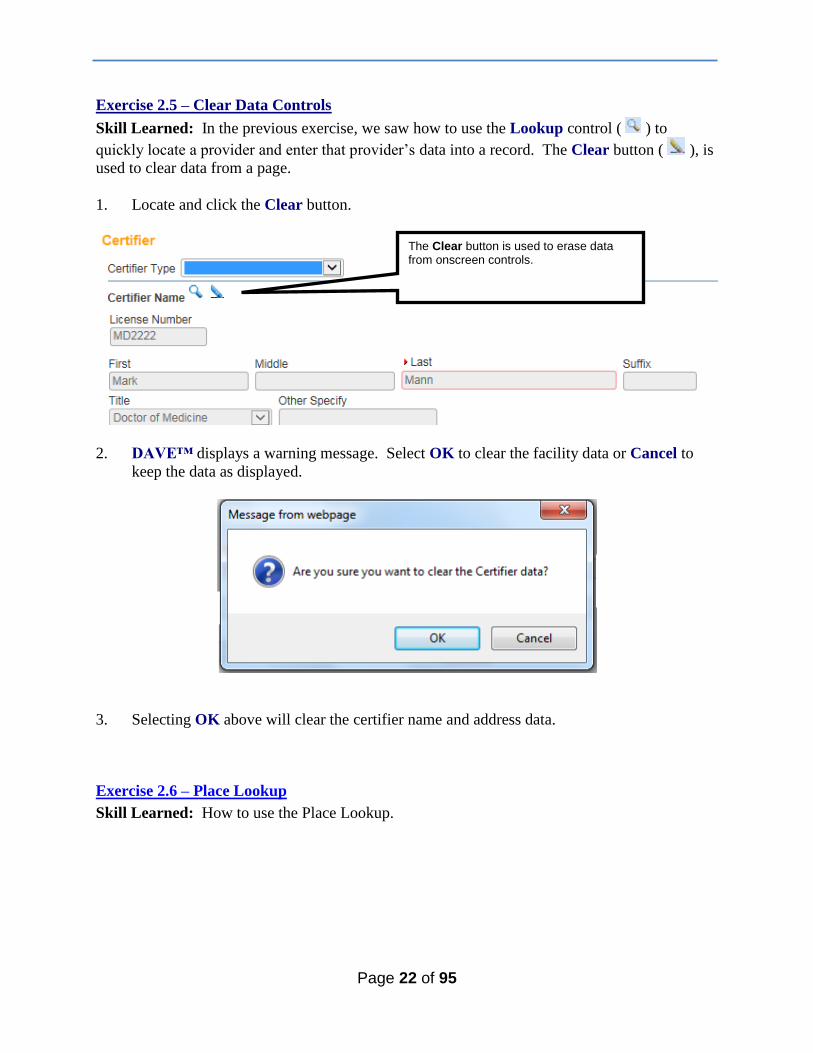
Exercise 2.5 – Clear Data Controls
Skill Learned: In the previous exercise, we saw how to use the Lookup control ( ) to
quickly locate a provider and enter that provider’s data into a record. The Clear button ( ), is
used to clear data from a page.
1. Locate and click the Clear button.
2. DAVE™ displays a warning message. Select OK to clear the facility data or Cancel to
keep the data as displayed.
3. Selecting OK above will clear the certifier name and address data.
Exercise 2.6 – Place Lookup
Skill Learned: How to use the Place Lookup.
The Clear button is used to erase data from onscreen controls.
Page 23 of 95
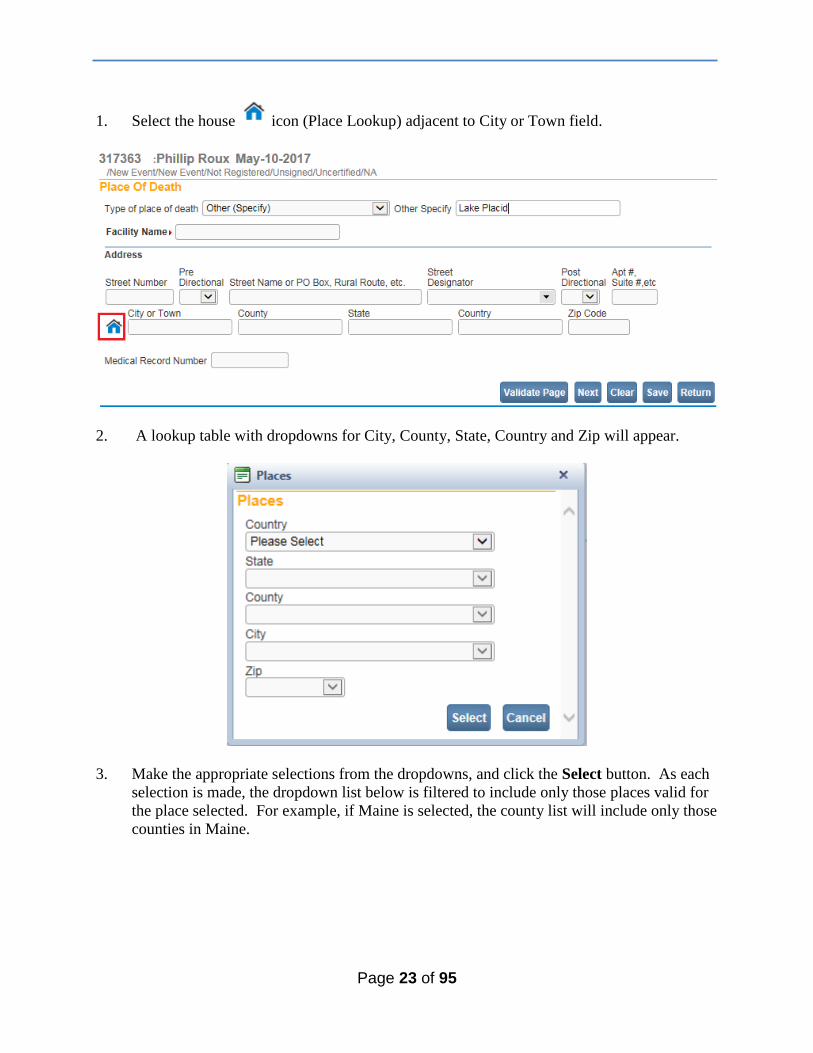
1. Select the house icon (Place Lookup) adjacent to City or Town field.
2. A lookup table with dropdowns for City, County, State, Country and Zip will appear.
3. Make the appropriate selections from the dropdowns, and click the Select button. As each
selection is made, the dropdown list below is filtered to include only those places valid for
the place selected. For example, if Maine is selected, the county list will include only those
counties in Maine.

Page 24 of 95
Exercise 2.7 – Tooltip
Skill Learned: How to use Tooltips.
When Tooltips is turned on, this permits the user to view what is required in a specific field by
hovering over the field.
Tooltips can be turned on or off by the user. To turn Tooltips on go to the Home page and
select the Help menu and place a checkmark in the Show Tooltips checkbox as shown below.
To turn Tooltips off, remove the checkmark from the checkbox.
Page 25 of 95
Exercise 2.8 – Predictive Text
Skill Learned: What is Predictive Text?
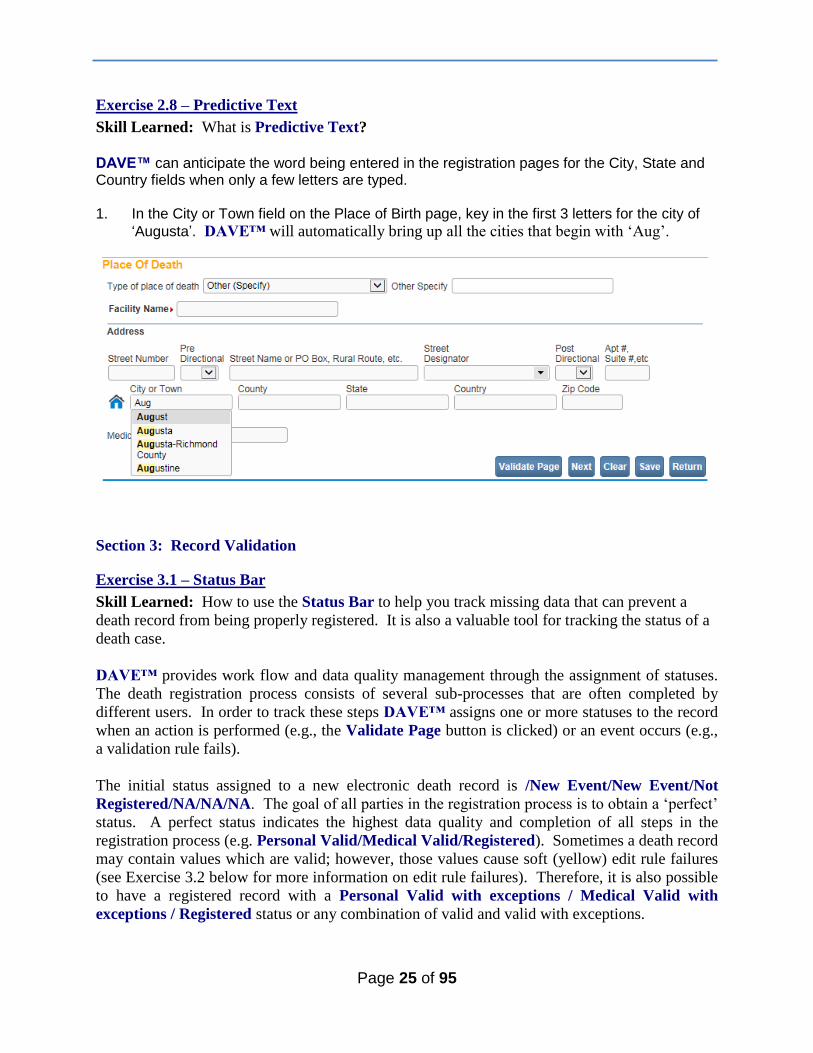
DAVE™ can anticipate the word being entered in the registration pages for the City, State and Country fields when only a few letters are typed. 1. In the City or Town field on the Place of Birth page, key in the first 3 letters for the city of
‘Augusta’. DAVE™ will automatically bring up all the cities that begin with ‘Aug’.
Section 3: Record Validation
Exercise 3.1 – Status Bar
Skill Learned: How to use the Status Bar to help you track missing data that can prevent a
death record from being properly registered. It is also a valuable tool for tracking the status of a
death case.
DAVE™ provides work flow and data quality management through the assignment of statuses.
The death registration process consists of several sub-processes that are often completed by
different users. In order to track these steps DAVE™ assigns one or more statuses to the record
when an action is performed (e.g., the Validate Page button is clicked) or an event occurs (e.g.,
a validation rule fails).
The initial status assigned to a new electronic death record is /New Event/New Event/Not
Registered/NA/NA/NA. The goal of all parties in the registration process is to obtain a ‘perfect’
status. A perfect status indicates the highest data quality and completion of all steps in the
registration process (e.g. Personal Valid/Medical Valid/Registered). Sometimes a death record
may contain values which are valid; however, those values cause soft (yellow) edit rule failures
(see Exercise 3.2 below for more information on edit rule failures). Therefore, it is also possible
to have a registered record with a Personal Valid with exceptions / Medical Valid with
exceptions / Registered status or any combination of valid and valid with exceptions.
Page 26 of 95
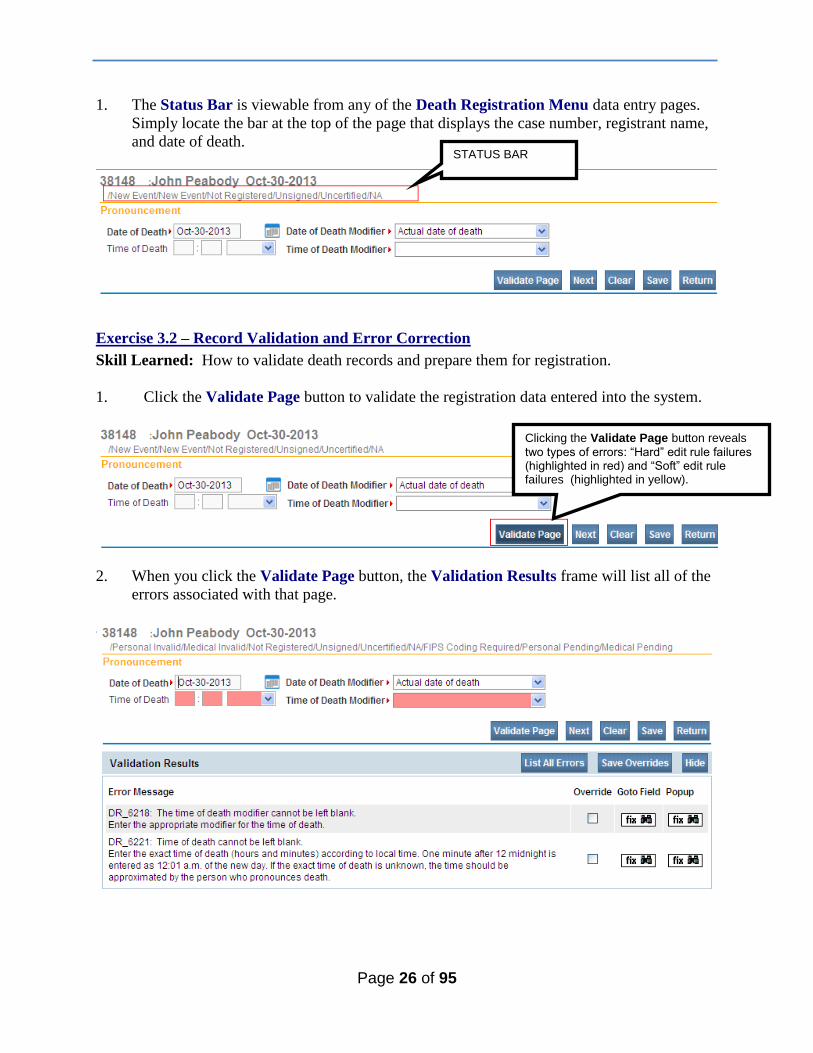
1. The Status Bar is viewable from any of the Death Registration Menu data entry pages.
Simply locate the bar at the top of the page that displays the case number, registrant name,
and date of death.
Exercise 3.2 – Record Validation and Error Correction
Skill Learned: How to validate death records and prepare them for registration.
1. Click the Validate Page button to validate the registration data entered into the system.
2. When you click the Validate Page button, the Validation Results frame will list all of the
errors associated with that page.
STATUS BAR
Clicking the Validate Page button reveals
two types of errors: “Hard” edit rule failures (highlighted in red) and “Soft” edit rule failures (highlighted in yellow).

Page 27 of 95
3. Initially, the Validation Results frame will only display those errors associated with the
current registration page. All of the errors in the example below are related to the
Pronouncement page. However, if you then click the List All Errors button,
the Validation Result frame will refresh and display all of the errors associated with the
current registration.
Clicking “List All Errors” will reveal the errors on all pages of the registration.
List All Errors button will change back to List Page Errors button.
Page 28 of 95
4. Notice also that the List All Errors button has now become the List Page Errors button.
Clicking this button again will remove any errors not associated with the current
registration page.
5. Click the Hide button to close the Validation Results frame. Re-validate any registration
page to view the Validation Results frame again.
Error Correction Using the Goto Field Button
6. To correct an error, click the button in the Goto Field column of the Validation
Results page. This will place the cursor or “focus” in the field that needs to be corrected.
Use this option if you are on a single registration page with many errors to correct.
Click the Hide button to temporarily remove the Validation Results frame. Re-validate any page to view the results frame again.
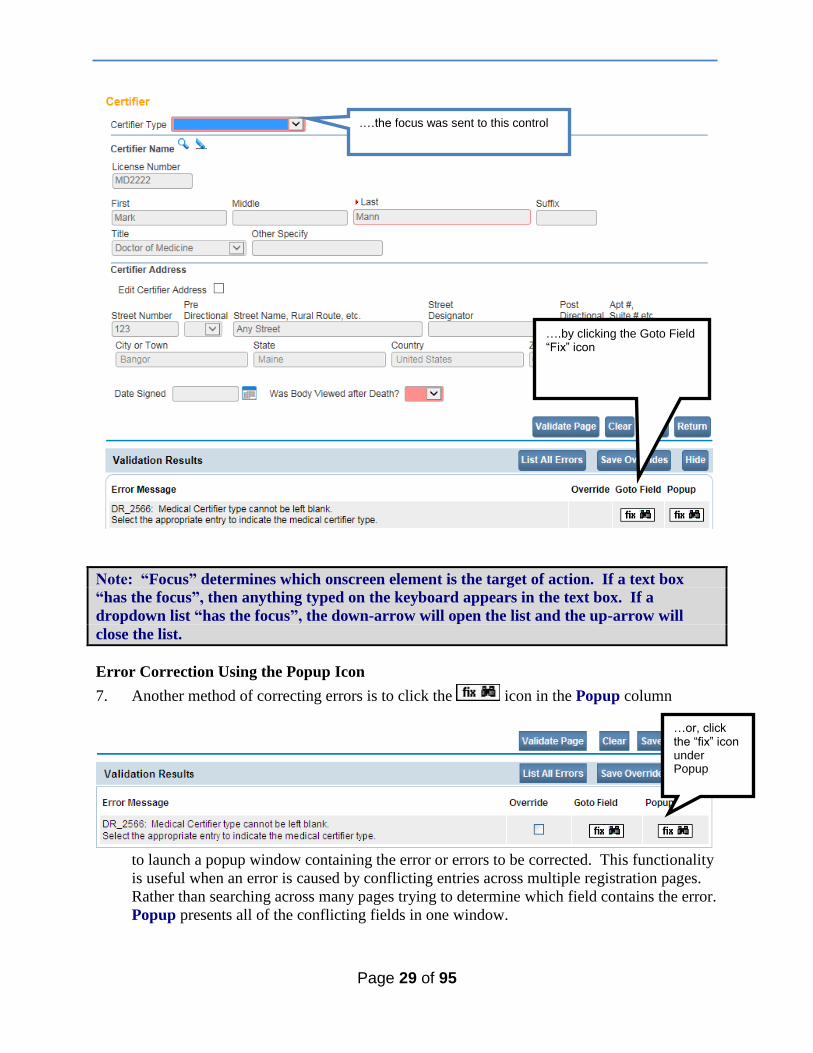
Page 29 of 95
Note: “Focus” determines which onscreen element is the target of action. If a text box
“has the focus”, then anything typed on the keyboard appears in the text box. If a
dropdown list “has the focus”, the down-arrow will open the list and the up-arrow will
close the list.
Error Correction Using the Popup Icon
7. Another method of correcting errors is to click the icon in the Popup column
to launch a popup window containing the error or errors to be corrected. This functionality
is useful when an error is caused by conflicting entries across multiple registration pages.
Rather than searching across many pages trying to determine which field contains the error.
Popup presents all of the conflicting fields in one window.
….by clicking the Goto Field “Fix” icon
…or, click the “fix” icon under Popup
.…the focus was sent to this control
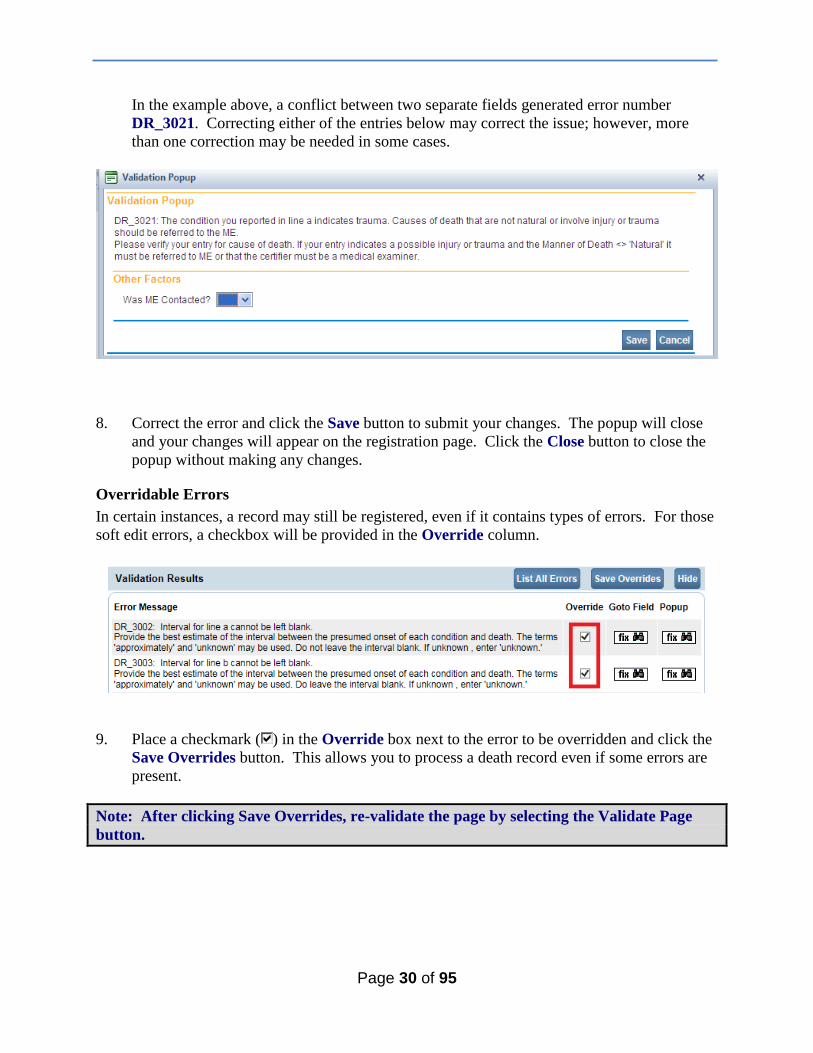
Page 30 of 95
In the example above, a conflict between two separate fields generated error number
DR_3021. Correcting either of the entries below may correct the issue; however, more
than one correction may be needed in some cases.
8. Correct the error and click the Save button to submit your changes. The popup will close
and your changes will appear on the registration page. Click the Close button to close the
popup without making any changes.
Overridable Errors
In certain instances, a record may still be registered, even if it contains types of errors. For those
soft edit errors, a checkbox will be provided in the Override column.
9. Place a checkmark ( ) in the Override box next to the error to be overridden and click the
Save Overrides button. This allows you to process a death record even if some errors are
present.
Note: After clicking Save Overrides, re-validate the page by selecting the Validate Page
button.
Page 31 of 95
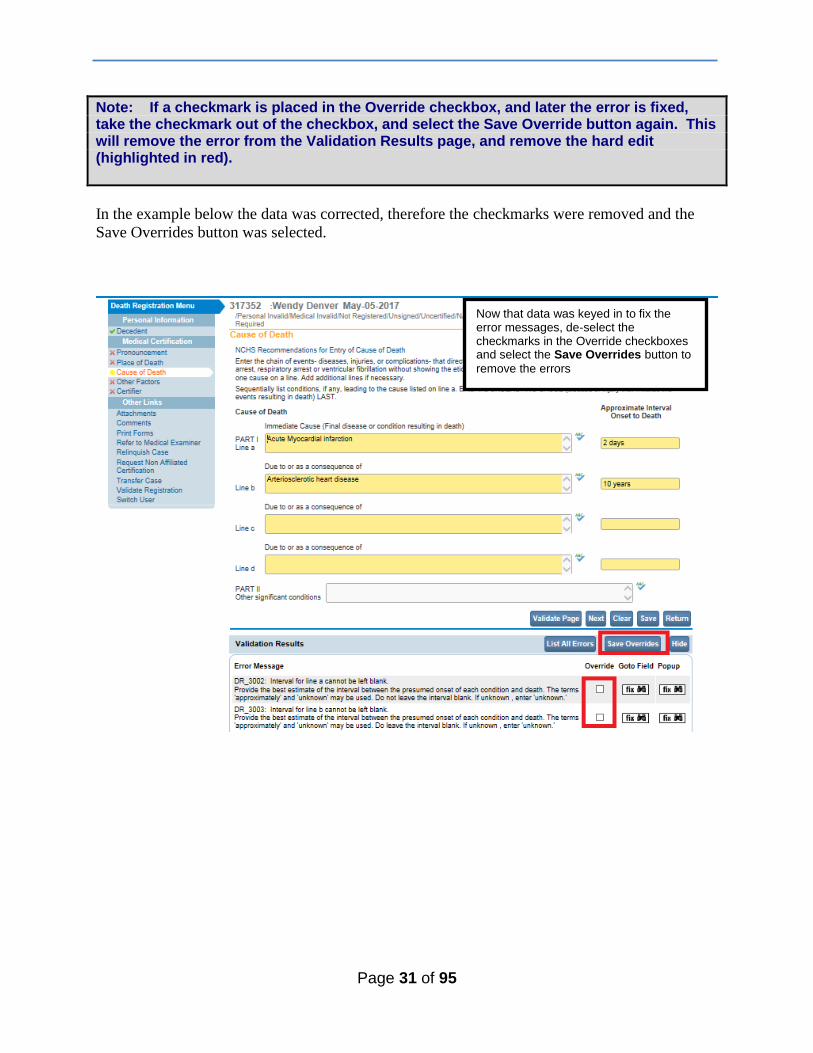
Note: If a checkmark is placed in the Override checkbox, and later the error is fixed, take the checkmark out of the checkbox, and select the Save Override button again. This will remove the error from the Validation Results page, and remove the hard edit (highlighted in red).
In the example below the data was corrected, therefore the checkmarks were removed and the
Save Overrides button was selected.
Now that data was keyed in to fix the error messages, de-select the checkmarks in the Override checkboxes and select the Save Overrides button to
remove the errors
Page 32 of 95
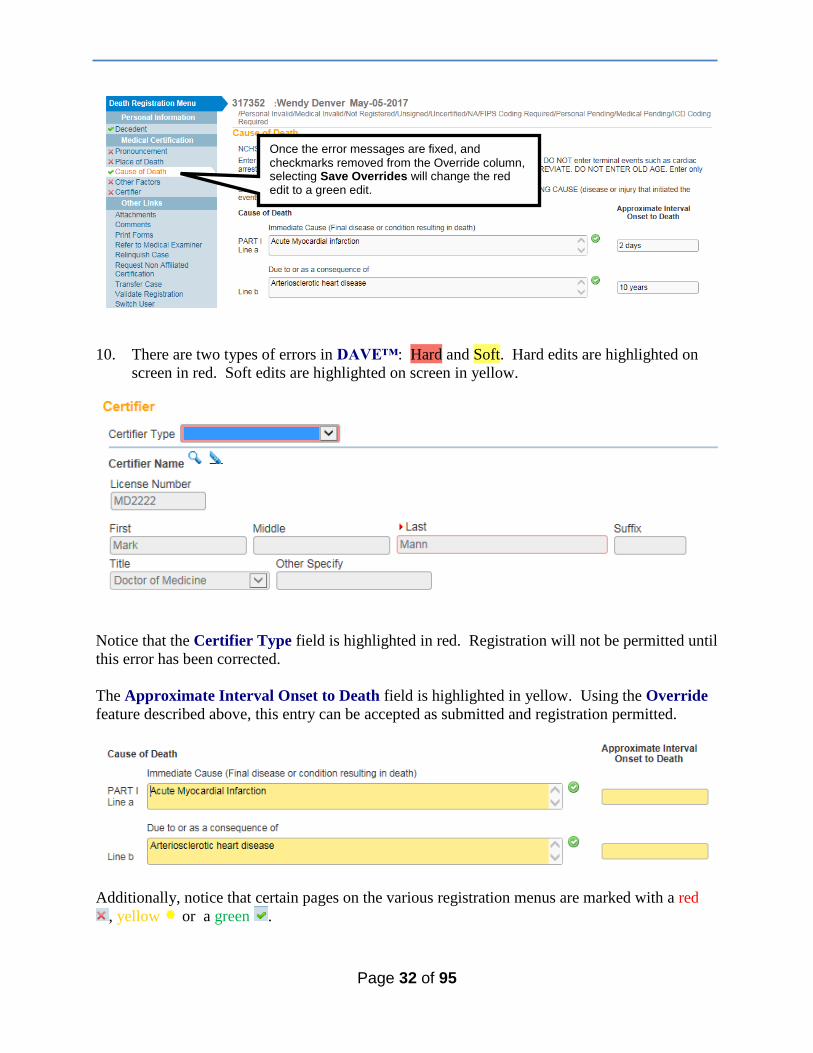
10. There are two types of errors in DAVE™: Hard and Soft. Hard edits are highlighted on
screen in red. Soft edits are highlighted on screen in yellow.
Notice that the Certifier Type field is highlighted in red. Registration will not be permitted until
this error has been corrected.
The Approximate Interval Onset to Death field is highlighted in yellow. Using the Override
feature described above, this entry can be accepted as submitted and registration permitted.
Additionally, notice that certain pages on the various registration menus are marked with a red
, yellow or a green .
Once the error messages are fixed, and checkmarks removed from the Override column, selecting Save Overrides will change the red edit to a green edit.
Page 33 of 95
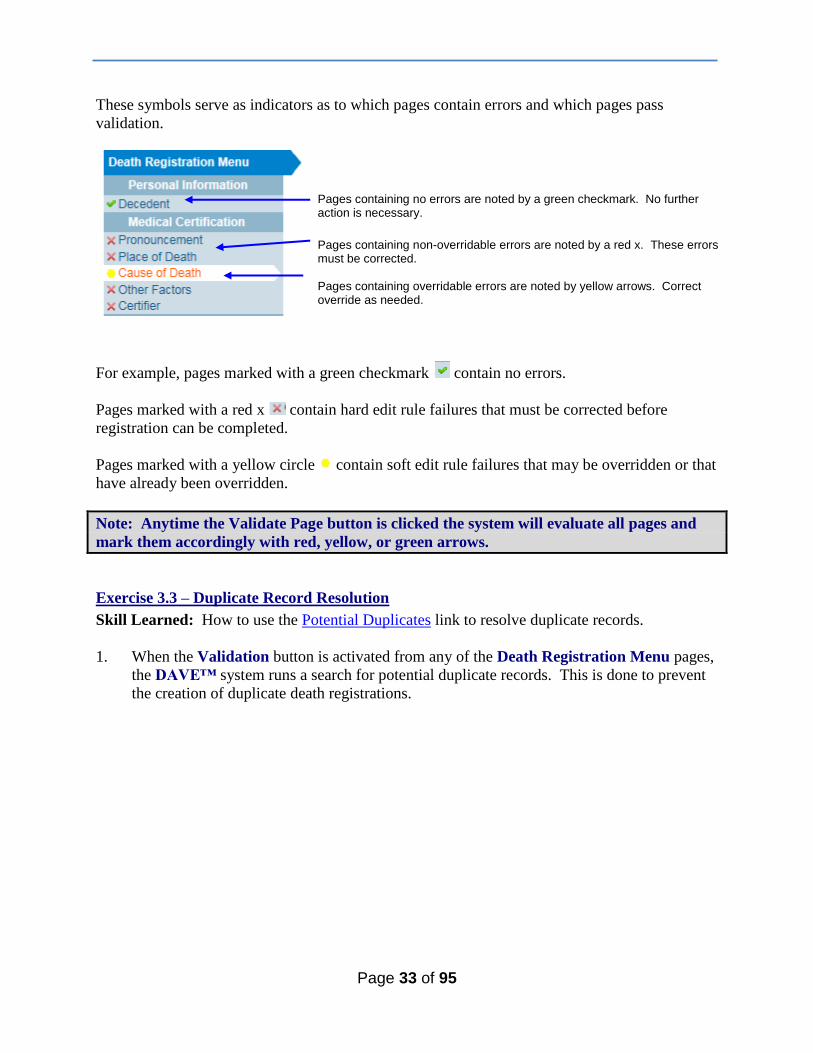
These symbols serve as indicators as to which pages contain errors and which pages pass
validation.
Pages containing no errors are noted by a green checkmark. No further action is necessary.
Pages containing non-overridable errors are noted by a red x. These errors must be corrected. Pages containing overridable errors are noted by yellow arrows. Correct override as needed.
For example, pages marked with a green checkmark contain no errors.
Pages marked with a red x contain hard edit rule failures that must be corrected before
registration can be completed.
Pages marked with a yellow circle contain soft edit rule failures that may be overridden or that
have already been overridden.
Note: Anytime the Validate Page button is clicked the system will evaluate all pages and
mark them accordingly with red, yellow, or green arrows.
Exercise 3.3 – Duplicate Record Resolution
Skill Learned: How to use the Potential Duplicates link to resolve duplicate records.
1. When the Validation button is activated from any of the Death Registration Menu pages,
the DAVE™ system runs a search for potential duplicate records. This is done to prevent
the creation of duplicate death registrations.
Page 34 of 95
2. If DAVE™ finds potential duplicates, an error message will appear in the Validation
Frame containing the following message and link:
3. Click the Potential Duplicates link to open the Duplicate Resolution page. This page lists
all of the records in the DAVE™ database that have been identified as potential duplicates.
Please note that all records may not be accessible. Access to the records displayed is based
on the user’s security profile. If one of the duplicate cases is not owned by the current
office, it will be disabled.
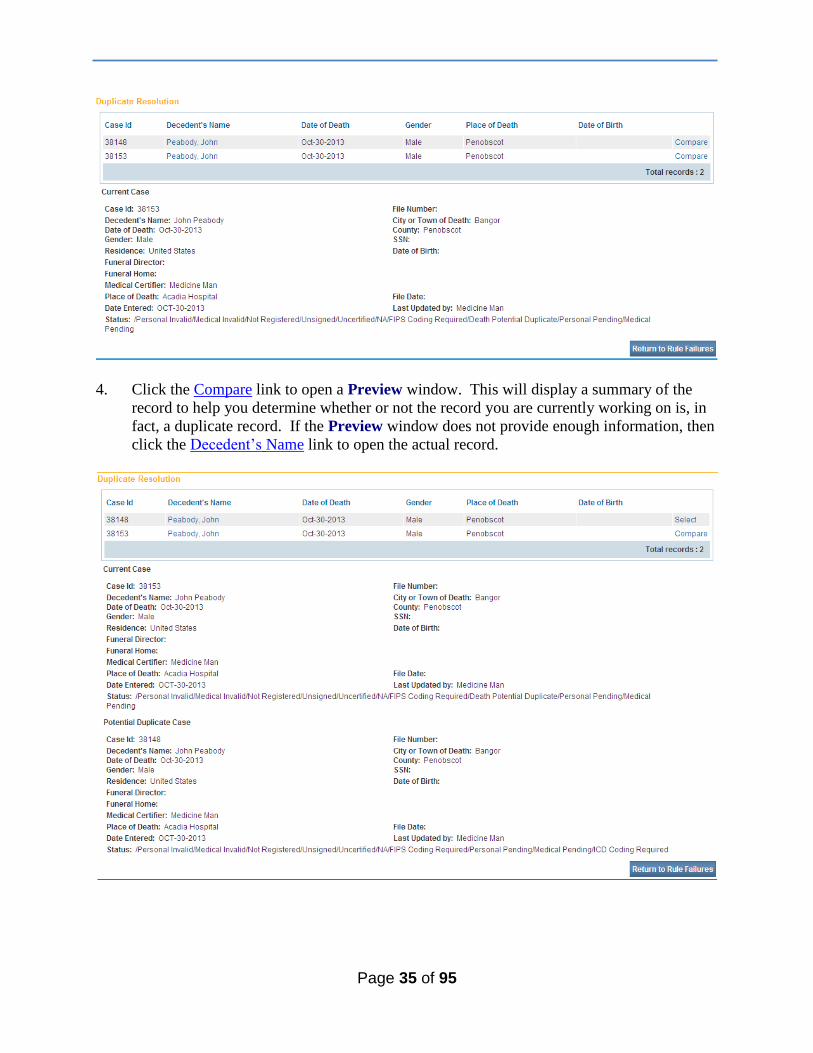
Page 35 of 95
4. Click the Compare link to open a Preview window. This will display a summary of the
record to help you determine whether or not the record you are currently working on is, in
fact, a duplicate record. If the Preview window does not provide enough information, then
click the Decedent’s Name link to open the actual record.

Page 36 of 95
5. When you have finished looking over the opened record, click the Return button at the
bottom of the page to return to the Duplicate Resolution window.
6. If you are certain the record you are working on is not a duplicate, then click the Return to
Rule Failures button to return to the new record.
If a duplicate record has been created in error, contact the Vital Records’ EDRS Help Line
to have one of the duplicate cases abandoned.
Page 37 of 95
7. Place a checkmark in the checkbox located in the Override column and click the Save
Overrides button.
Section 4: Start/Edit New Case
In the exercises that follow, you will learn how to use the Medical Certification pages of the
DAVE™ application to process and certify a death record.
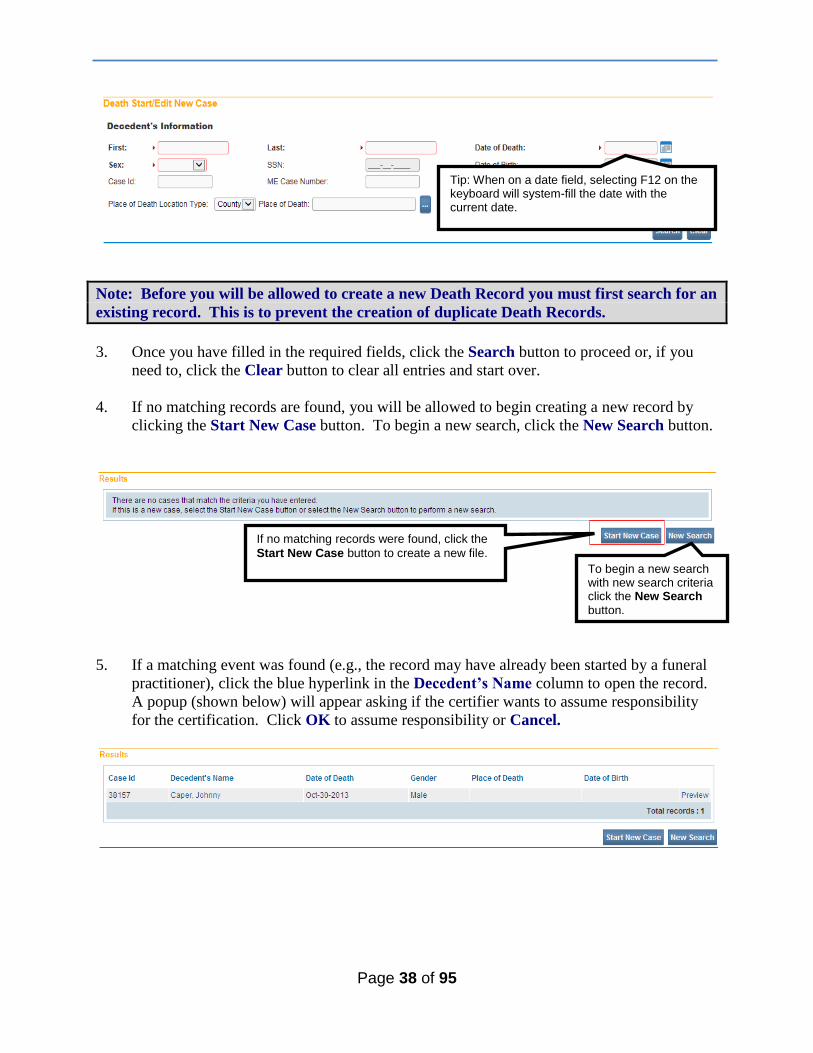
Exercise 4.1 – Required Fields
Skill Learned: How to complete and execute the Start/Edit New Case page.
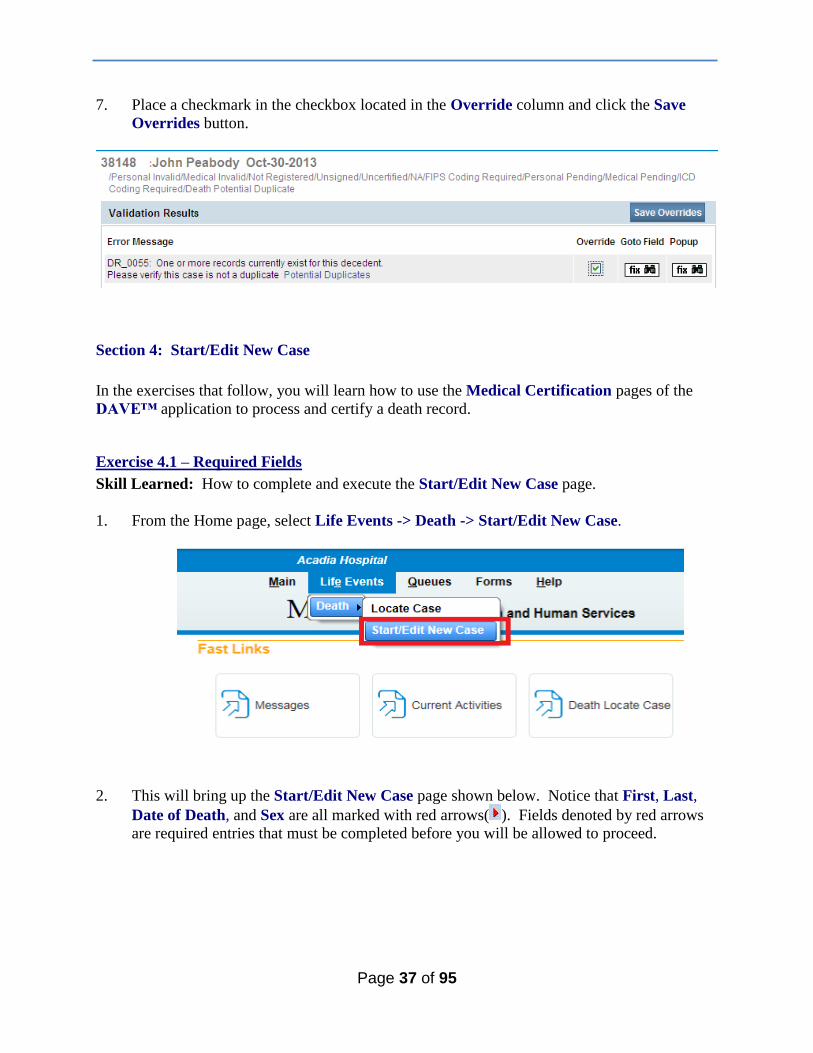
1. From the Home page, select Life Events -> Death -> Start/Edit New Case.
2. This will bring up the Start/Edit New Case page shown below. Notice that First, Last,
Date of Death, and Sex are all marked with red arrows( ). Fields denoted by red arrows
are required entries that must be completed before you will be allowed to proceed.
Page 38 of 95
Note: Before you will be allowed to create a new Death Record you must first search for an
existing record. This is to prevent the creation of duplicate Death Records.
3. Once you have filled in the required fields, click the Search button to proceed or, if you
need to, click the Clear button to clear all entries and start over.
4. If no matching records are found, you will be allowed to begin creating a new record by
clicking the Start New Case button. To begin a new search, click the New Search button.
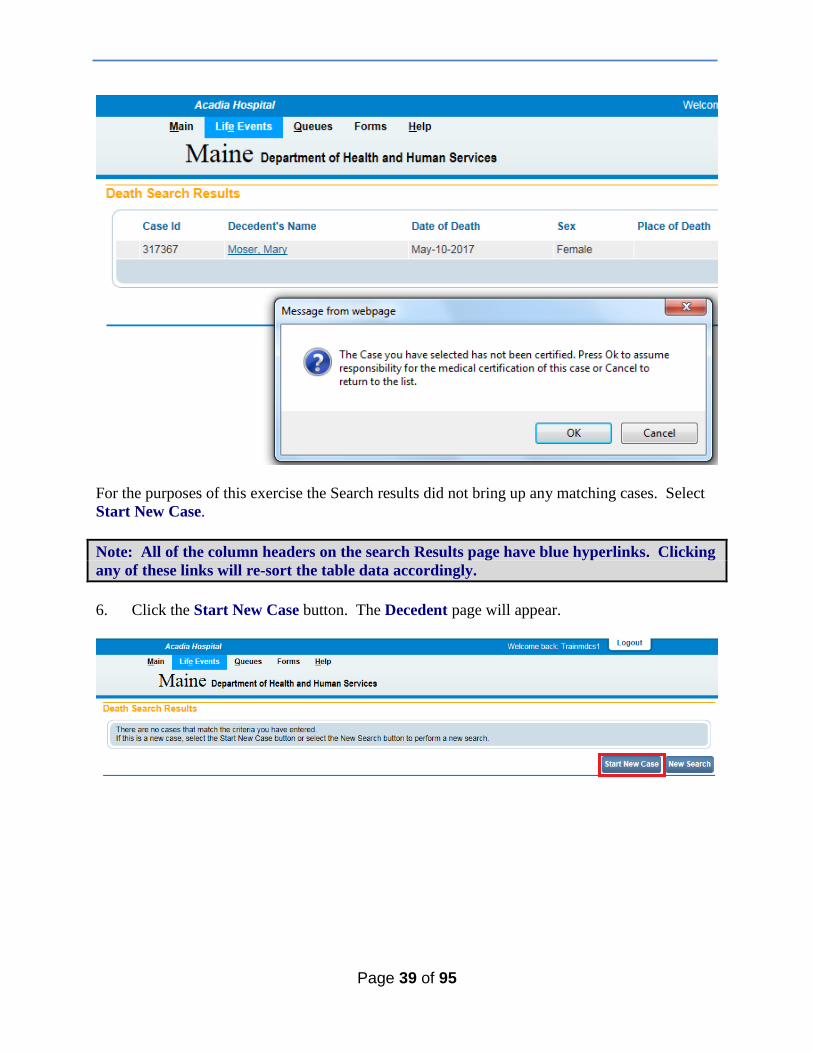
5. If a matching event was found (e.g., the record may have already been started by a funeral
practitioner), click the blue hyperlink in the Decedent’s Name column to open the record.
A popup (shown below) will appear asking if the certifier wants to assume responsibility
for the certification. Click OK to assume responsibility or Cancel.
If no matching records were found, click the
Start New Case button to create a new file.
To begin a new search with new search criteria click the New Search
button.
Tip: When on a date field, selecting F12 on the keyboard will system-fill the date with the current date.
Page 39 of 95
For the purposes of this exercise the Search results did not bring up any matching cases. Select
Start New Case.
Note: All of the column headers on the search Results page have blue hyperlinks. Clicking
any of these links will re-sort the table data accordingly.
6. Click the Start New Case button. The Decedent page will appear.
Page 40 of 95
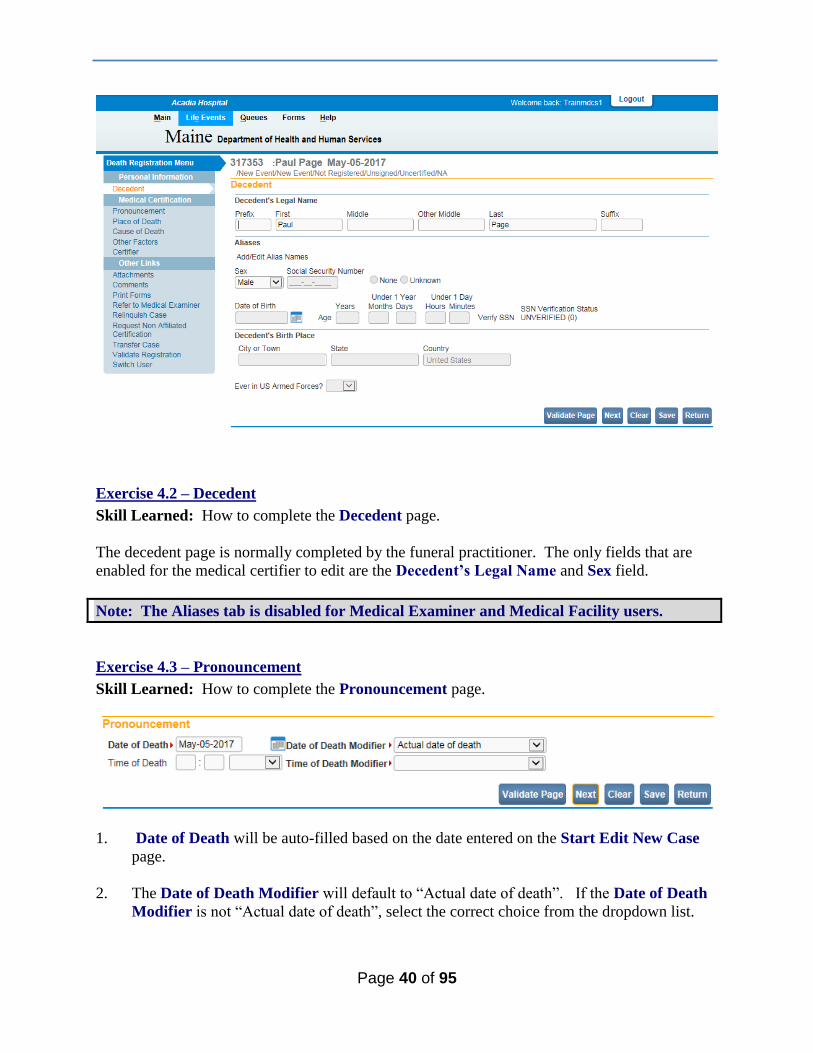
Exercise 4.2 – Decedent
Skill Learned: How to complete the Decedent page.
The decedent page is normally completed by the funeral practitioner. The only fields that are
enabled for the medical certifier to edit are the Decedent’s Legal Name and Sex field.
Note: The Aliases tab is disabled for Medical Examiner and Medical Facility users.
Exercise 4.3 – Pronouncement
Skill Learned: How to complete the Pronouncement page.
1. Date of Death will be auto-filled based on the date entered on the Start Edit New Case
page.
2. The Date of Death Modifier will default to “Actual date of death”. If the Date of Death
Modifier is not “Actual date of death”, select the correct choice from the dropdown list.
Page 41 of 95
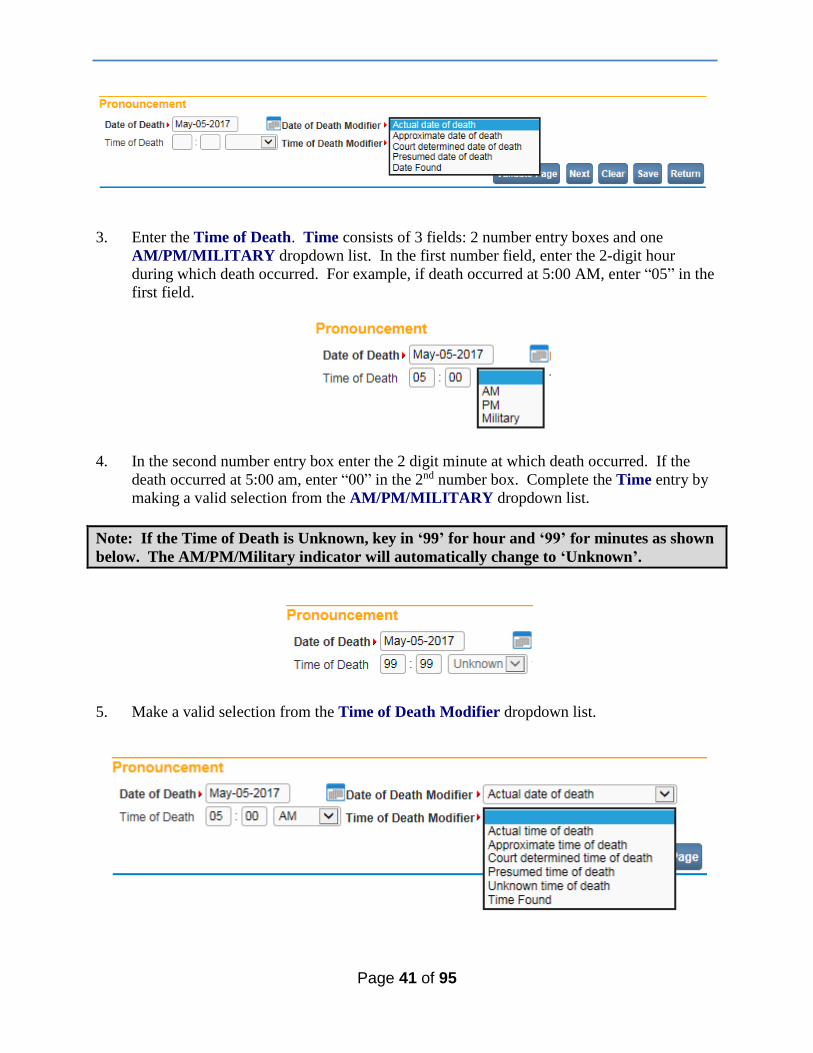
3. Enter the Time of Death. Time consists of 3 fields: 2 number entry boxes and one
AM/PM/MILITARY dropdown list. In the first number field, enter the 2-digit hour
during which death occurred. For example, if death occurred at 5:00 AM, enter “05” in the
first field.
4. In the second number entry box enter the 2 digit minute at which death occurred. If the
death occurred at 5:00 am, enter “00” in the 2nd number box. Complete the Time entry by
making a valid selection from the AM/PM/MILITARY dropdown list.
Note: If the Time of Death is Unknown, key in ‘99’ for hour and ‘99’ for minutes as shown
below. The AM/PM/Military indicator will automatically change to ‘Unknown’.
5. Make a valid selection from the Time of Death Modifier dropdown list.
Page 42 of 95
6. Click the Validate Page button to check this page for errors, the Next button to proceed to
the Place of Death page, the Clear button to clear all entries, the Save button to save
changes without leaving this page, or the Return button to return to the Home page.
Exercise 4.4 – Place of Death
Skill Learned: How to complete the Place of Death page. For medical facility users, the fields
on this page will be auto-filled based on the facility with which the user is associated. If the user
is associated with more than one facility, then the fields on this page will be auto-filled based on
the office selected at login.
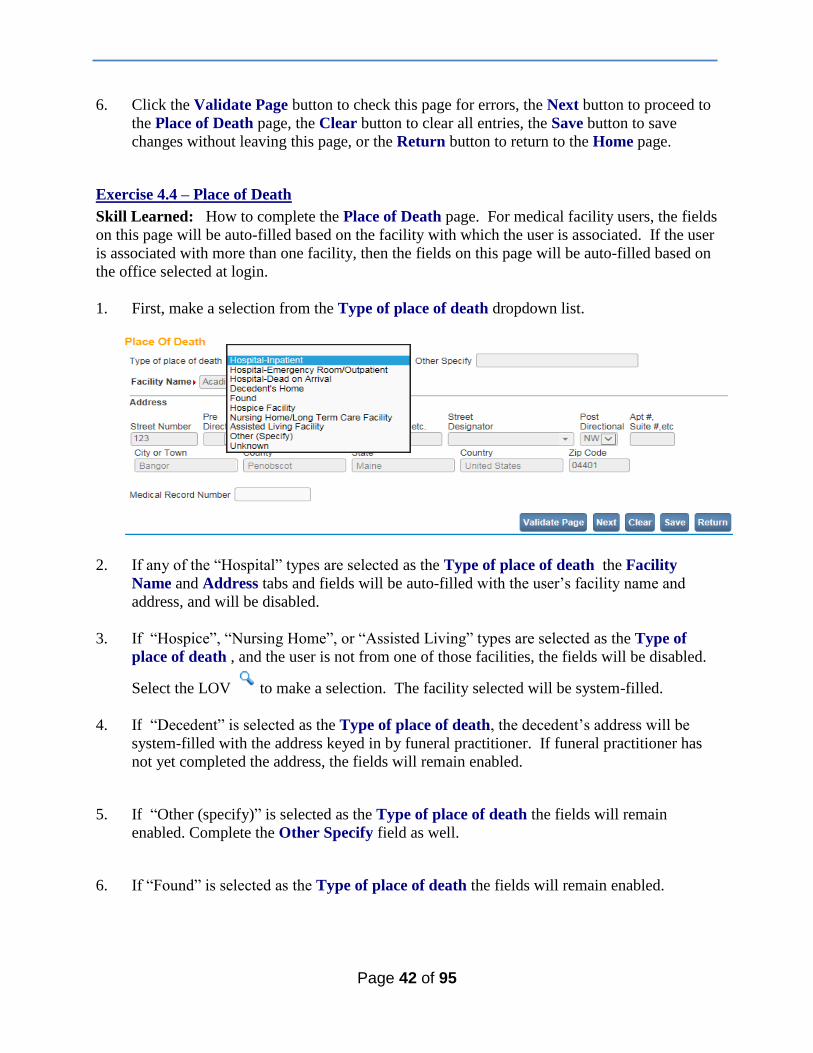
1. First, make a selection from the Type of place of death dropdown list.
2. If any of the “Hospital” types are selected as the Type of place of death the Facility
Name and Address tabs and fields will be auto-filled with the user’s facility name and
address, and will be disabled.
3. If “Hospice”, “Nursing Home”, or “Assisted Living” types are selected as the Type of
place of death , and the user is not from one of those facilities, the fields will be disabled.
Select the LOV to make a selection. The facility selected will be system-filled.
4. If “Decedent” is selected as the Type of place of death, the decedent’s address will be
system-filled with the address keyed in by funeral practitioner. If funeral practitioner has
not yet completed the address, the fields will remain enabled.
5. If “Other (specify)” is selected as the Type of place of death the fields will remain
enabled. Complete the Other Specify field as well.
6. If “Found” is selected as the Type of place of death the fields will remain enabled.
Page 43 of 95
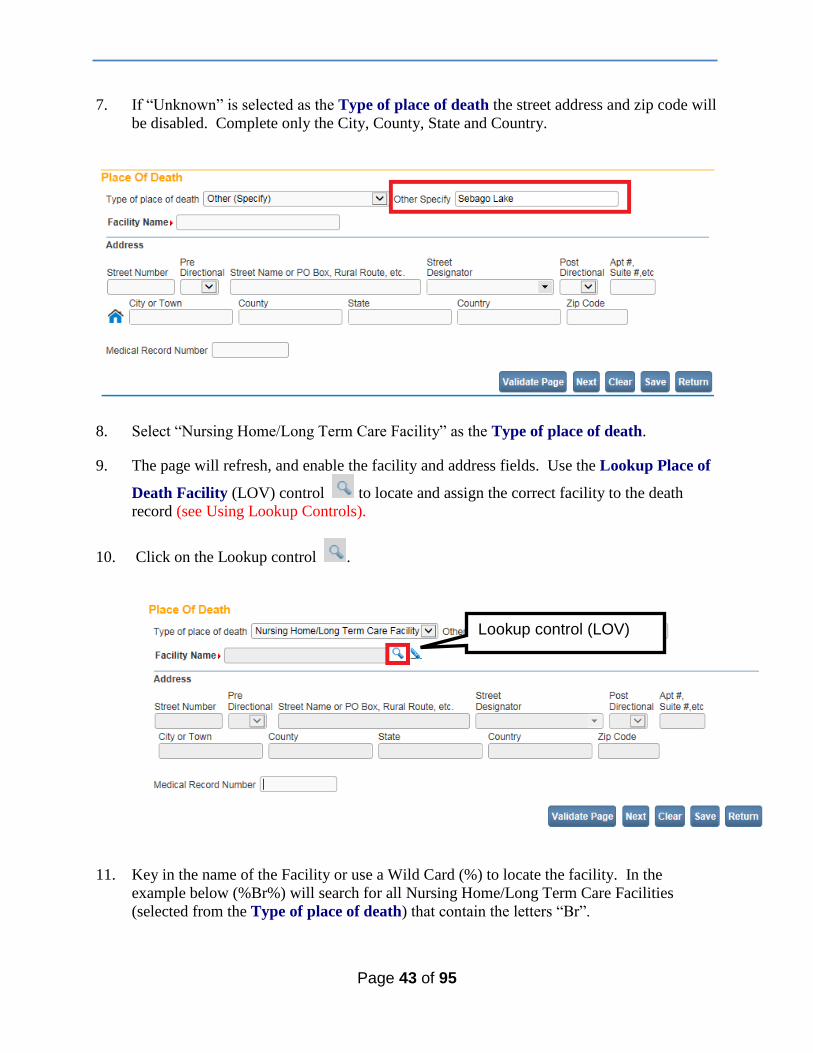
7. If “Unknown” is selected as the Type of place of death the street address and zip code will
be disabled. Complete only the City, County, State and Country.
8. Select “Nursing Home/Long Term Care Facility” as the Type of place of death.
9. The page will refresh, and enable the facility and address fields. Use the Lookup Place of
Death Facility (LOV) control to locate and assign the correct facility to the death
record (see Using Lookup Controls).
10. Click on the Lookup control .
11. Key in the name of the Facility or use a Wild Card (%) to locate the facility. In the
example below (%Br%) will search for all Nursing Home/Long Term Care Facilities
(selected from the Type of place of death) that contain the letters “Br”.
Lookup control (LOV)

Page 44 of 95
12. Click the Search button.
13. The Search Results will return all facilities that contain the letters “Br”.
When a wild card (%) is used before and after the letters (Br), DAVE™ will search for all facilities that contain those letters.
When a wild card (%) is used only after the letters (Br), DAVE™ will search for all facilities that “begin” with the letters (Br).
Page 45 of 95
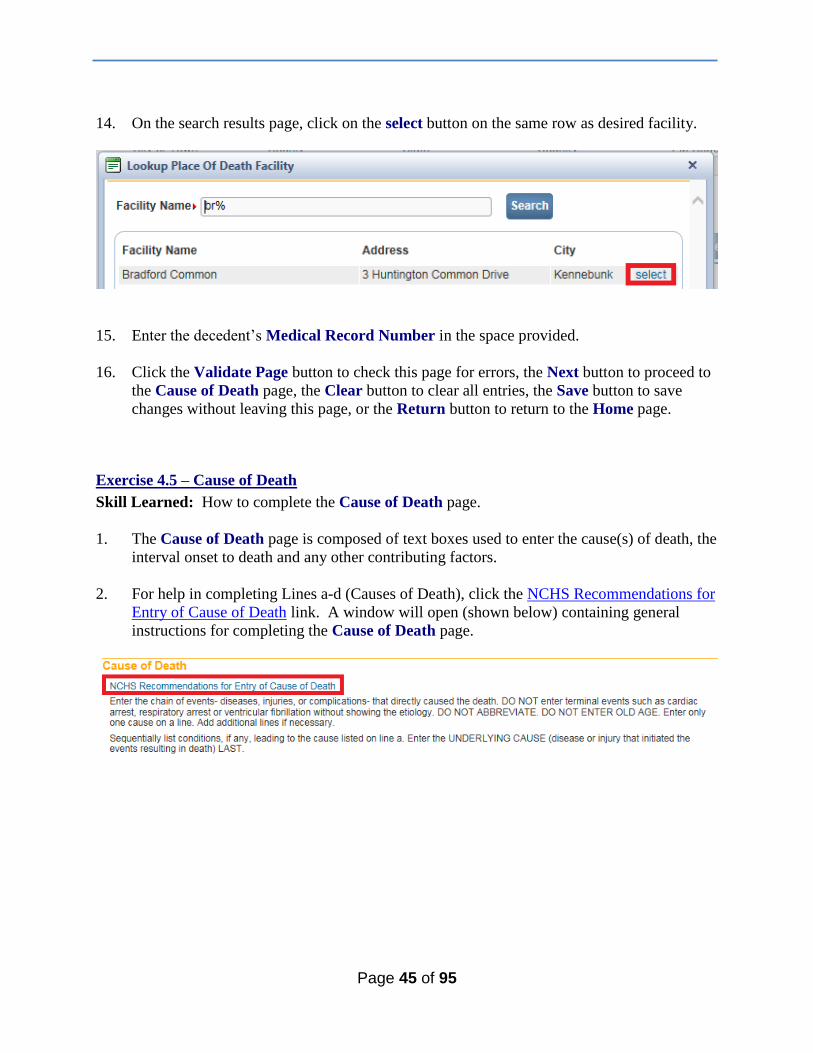
14. On the search results page, click on the select button on the same row as desired facility.
15. Enter the decedent’s Medical Record Number in the space provided.
16. Click the Validate Page button to check this page for errors, the Next button to proceed to
the Cause of Death page, the Clear button to clear all entries, the Save button to save
changes without leaving this page, or the Return button to return to the Home page.
Exercise 4.5 – Cause of Death
Skill Learned: How to complete the Cause of Death page.
1. The Cause of Death page is composed of text boxes used to enter the cause(s) of death, the
interval onset to death and any other contributing factors.
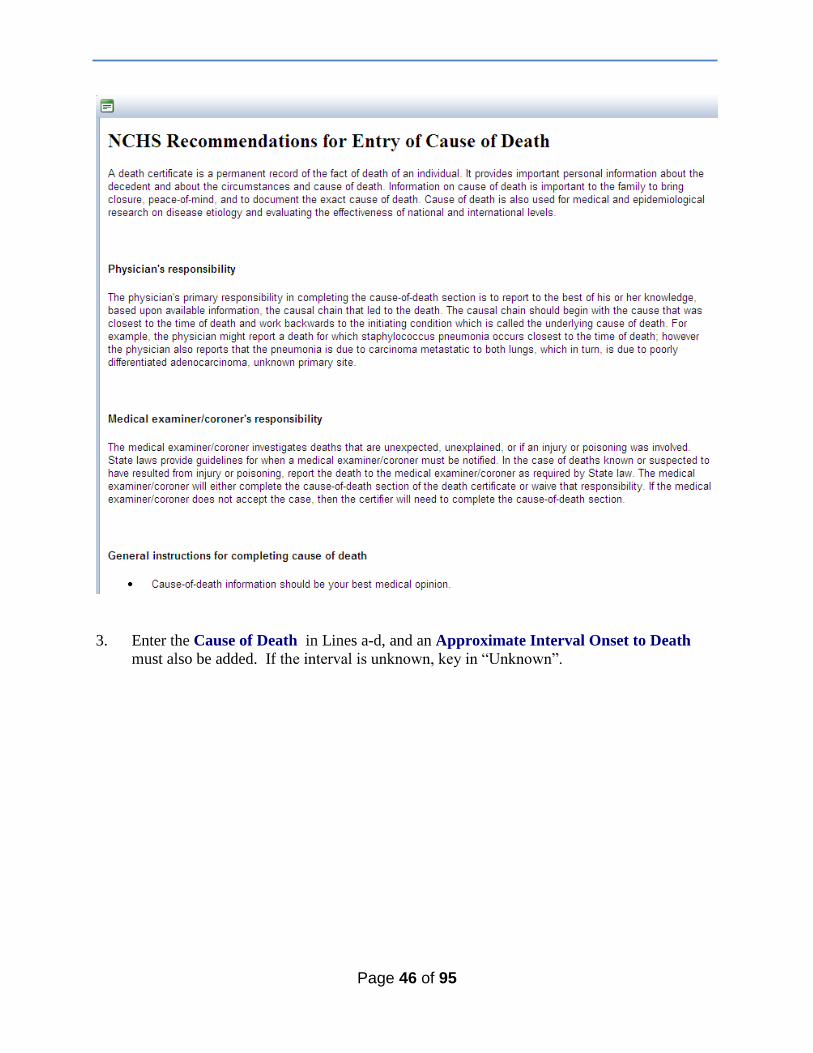
2. For help in completing Lines a-d (Causes of Death), click the NCHS Recommendations for
Entry of Cause of Death link. A window will open (shown below) containing general
instructions for completing the Cause of Death page.
Page 46 of 95
3. Enter the Cause of Death in Lines a-d, and an Approximate Interval Onset to Death
must also be added. If the interval is unknown, key in “Unknown”.
Page 47 of 95
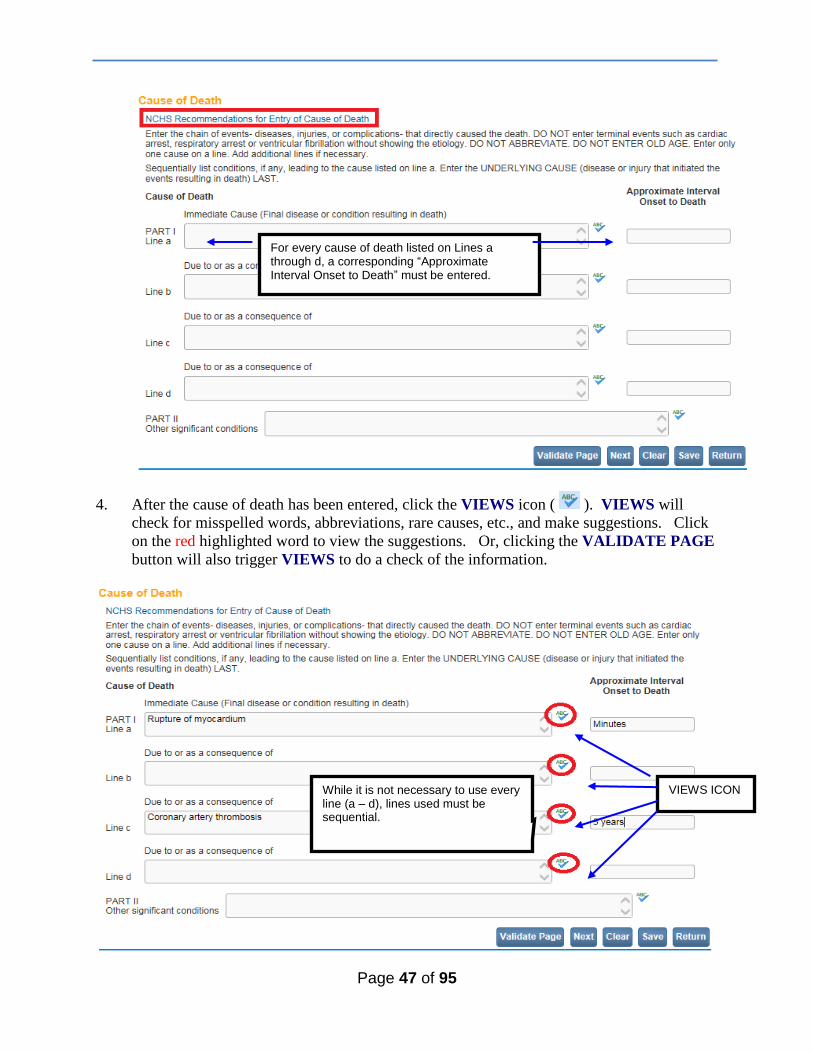
4. After the cause of death has been entered, click the VIEWS icon ( ). VIEWS will
check for misspelled words, abbreviations, rare causes, etc., and make suggestions. Click
on the red highlighted word to view the suggestions. Or, clicking the VALIDATE PAGE
button will also trigger VIEWS to do a check of the information.
While it is not necessary to use every line (a – d), lines used must be sequential.
For every cause of death listed on Lines a through d, a corresponding “Approximate Interval Onset to Death” must be entered.
VIEWS ICON
Page 48 of 95
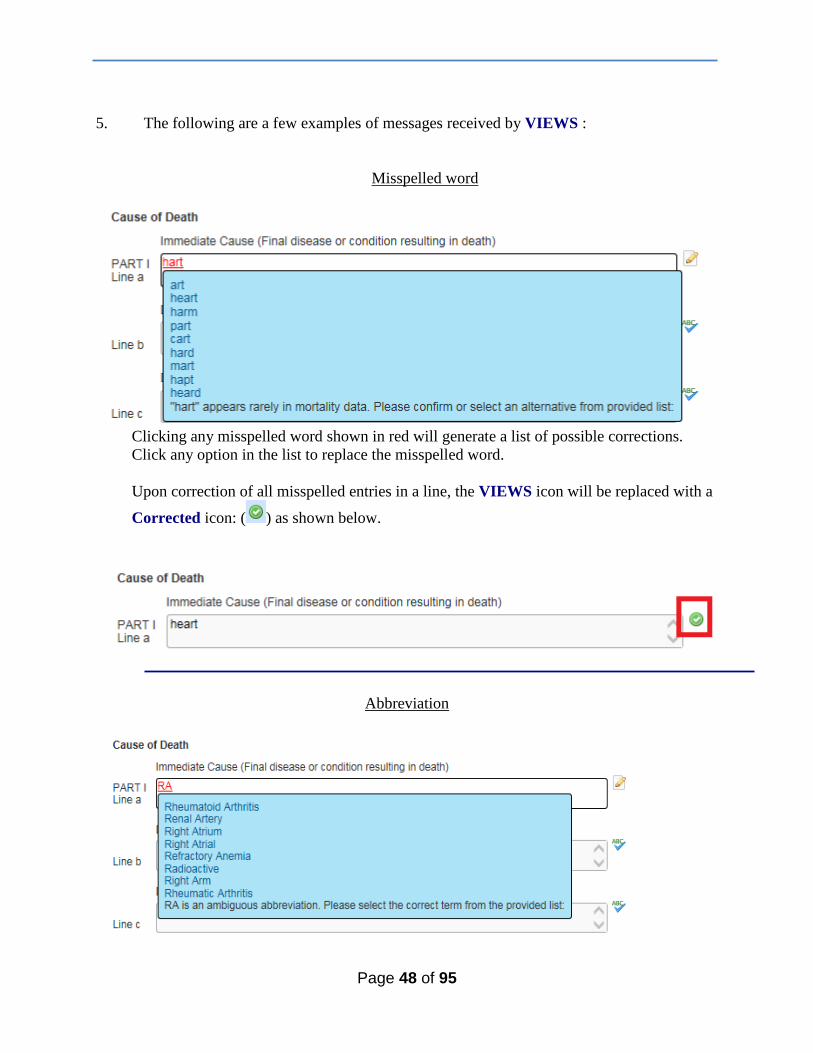
5. The following are a few examples of messages received by VIEWS :
Misspelled word
Clicking any misspelled word shown in red will generate a list of possible corrections.
Click any option in the list to replace the misspelled word.
Upon correction of all misspelled entries in a line, the VIEWS icon will be replaced with a
Corrected icon: ( ) as shown below.
Abbreviation
Page 49 of 95
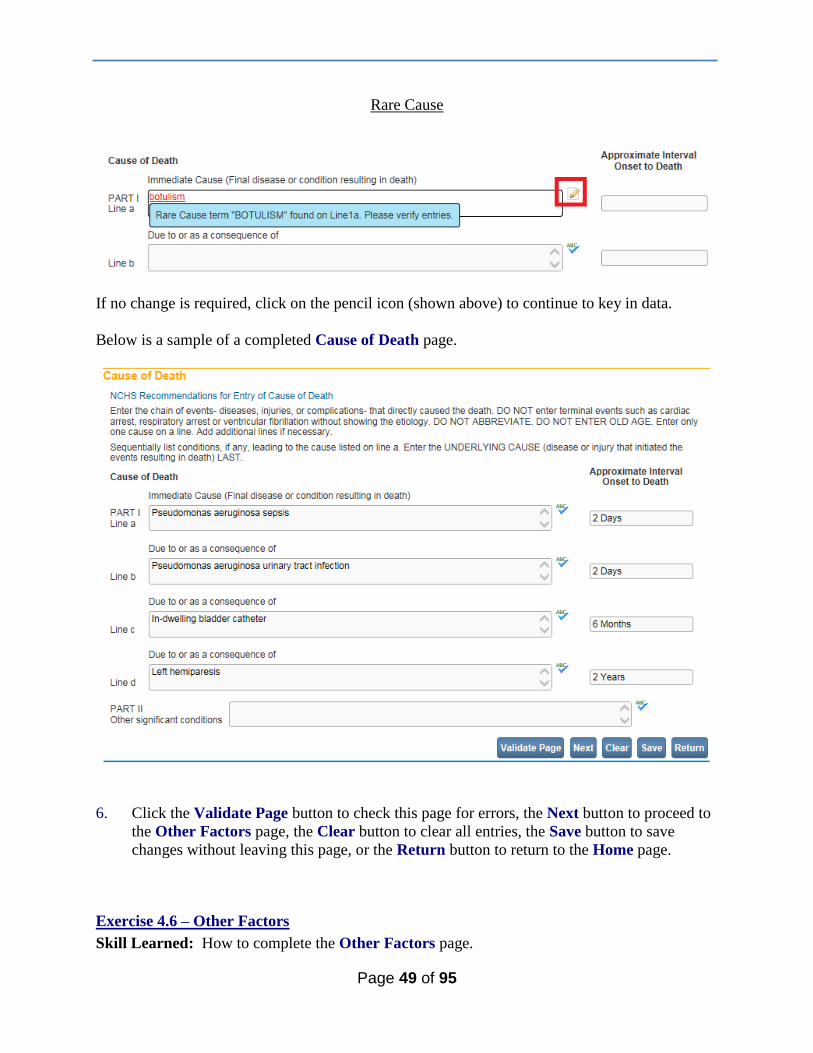
Rare Cause
If no change is required, click on the pencil icon (shown above) to continue to key in data.
Below is a sample of a completed Cause of Death page.
6. Click the Validate Page button to check this page for errors, the Next button to proceed to
the Other Factors page, the Clear button to clear all entries, the Save button to save
changes without leaving this page, or the Return button to return to the Home page.
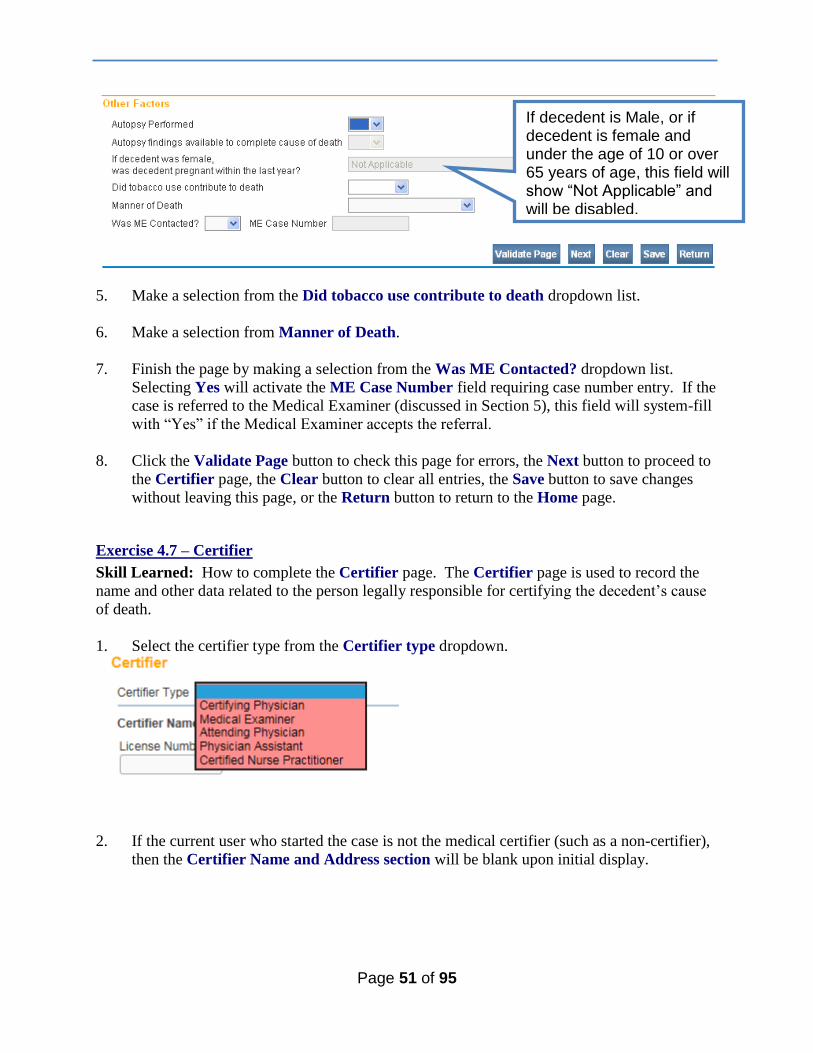
Exercise 4.6 – Other Factors
Skill Learned: How to complete the Other Factors page.
Page 50 of 95
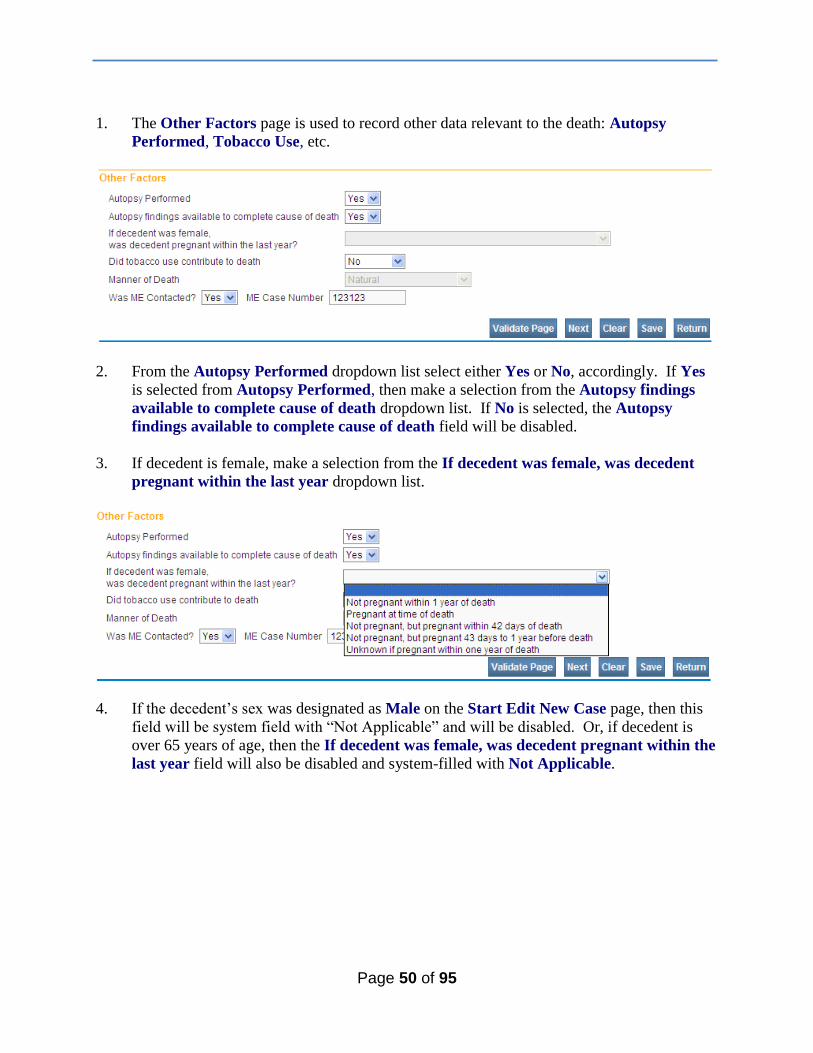
1. The Other Factors page is used to record other data relevant to the death: Autopsy
Performed, Tobacco Use, etc.
2. From the Autopsy Performed dropdown list select either Yes or No, accordingly. If Yes
is selected from Autopsy Performed, then make a selection from the Autopsy findings
available to complete cause of death dropdown list. If No is selected, the Autopsy
findings available to complete cause of death field will be disabled.
3. If decedent is female, make a selection from the If decedent was female, was decedent
pregnant within the last year dropdown list.
4. If the decedent’s sex was designated as Male on the Start Edit New Case page, then this
field will be system field with “Not Applicable” and will be disabled. Or, if decedent is
over 65 years of age, then the If decedent was female, was decedent pregnant within the
last year field will also be disabled and system-filled with Not Applicable.
Page 51 of 95
5. Make a selection from the Did tobacco use contribute to death dropdown list.
6. Make a selection from Manner of Death.
7. Finish the page by making a selection from the Was ME Contacted? dropdown list.
Selecting Yes will activate the ME Case Number field requiring case number entry. If the
case is referred to the Medical Examiner (discussed in Section 5), this field will system-fill
with “Yes” if the Medical Examiner accepts the referral.
8. Click the Validate Page button to check this page for errors, the Next button to proceed to
the Certifier page, the Clear button to clear all entries, the Save button to save changes
without leaving this page, or the Return button to return to the Home page.
Exercise 4.7 – Certifier
Skill Learned: How to complete the Certifier page. The Certifier page is used to record the
name and other data related to the person legally responsible for certifying the decedent’s cause
of death.
1. Select the certifier type from the Certifier type dropdown.
2. If the current user who started the case is not the medical certifier (such as a non-certifier),
then the Certifier Name and Address section will be blank upon initial display.
If decedent is Male, or if decedent is female and under the age of 10 or over 65 years of age, this field will show “Not Applicable” and will be disabled.
Page 52 of 95
3. To complete the Certifier Name and Address section click on the LookUp control
The Lookup Certifier box will appear. Key in the last name of the desired Certifier and
select the Search button. Or, a search can be done using a wild card (%) as explained
earlier.
Lookup control
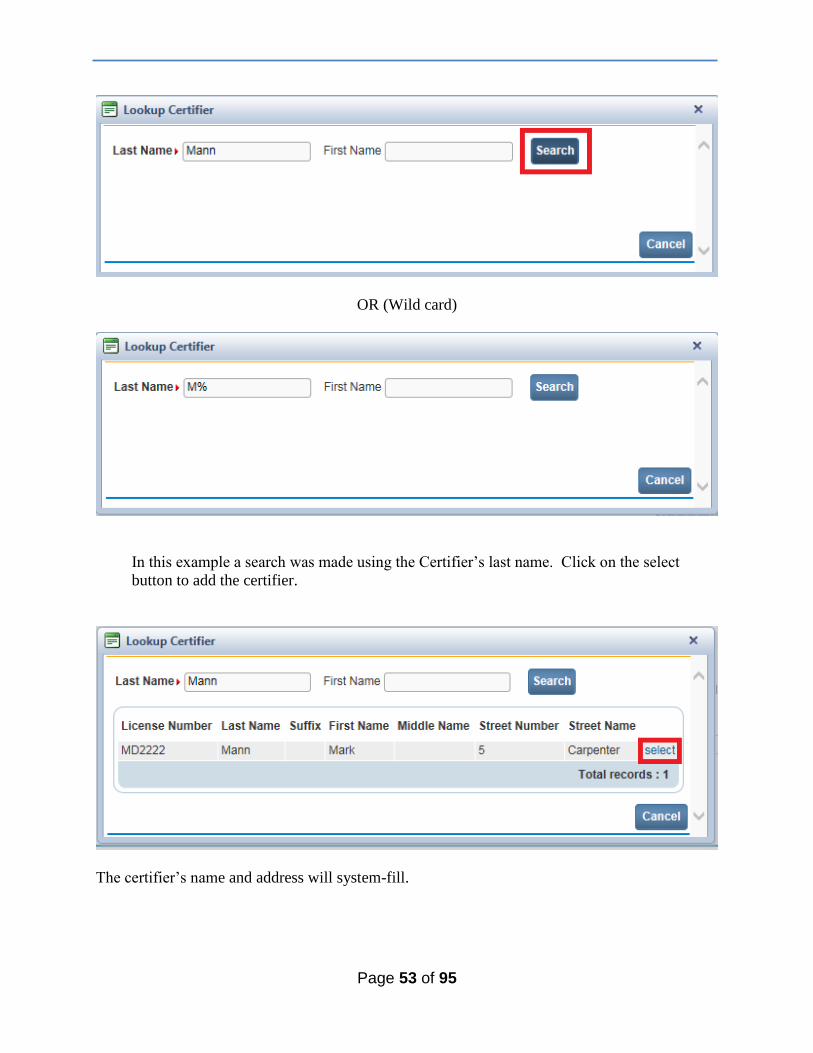
Page 53 of 95
OR (Wild card)
In this example a search was made using the Certifier’s last name. Click on the select
button to add the certifier.
The certifier’s name and address will system-fill.
Page 54 of 95
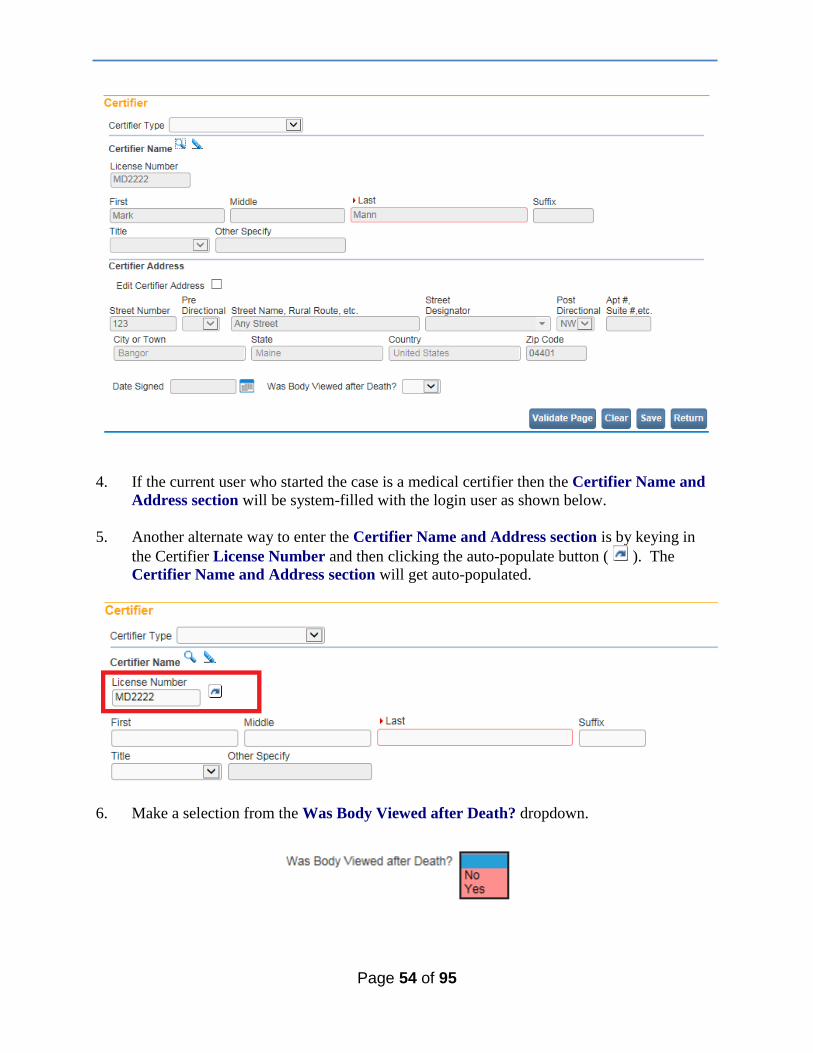
4. If the current user who started the case is a medical certifier then the Certifier Name and
Address section will be system-filled with the login user as shown below.
5. Another alternate way to enter the Certifier Name and Address section is by keying in
the Certifier License Number and then clicking the auto-populate button ( ). The
Certifier Name and Address section will get auto-populated.
6. Make a selection from the Was Body Viewed after Death? dropdown.
Page 55 of 95
7. The Date Signed field is disabled. The date will be auto-filled upon certification
/affirmation by the certifier.
8. Click the Validate Page button to check this page for errors, the Clear button to clear all
entries, the Save button to save changes without leaving this page, or the Return button to
return to the Home page.
Exercise 4.8 – Certify
Skill Learned: How to complete the Affirmations page. An affirmation is used to record the
fact that the medical certifier is accepting legal responsibility for the accuracy of the medical
information provided.
Certify defined: affirming that the decedent died of the causes specified in the registration.
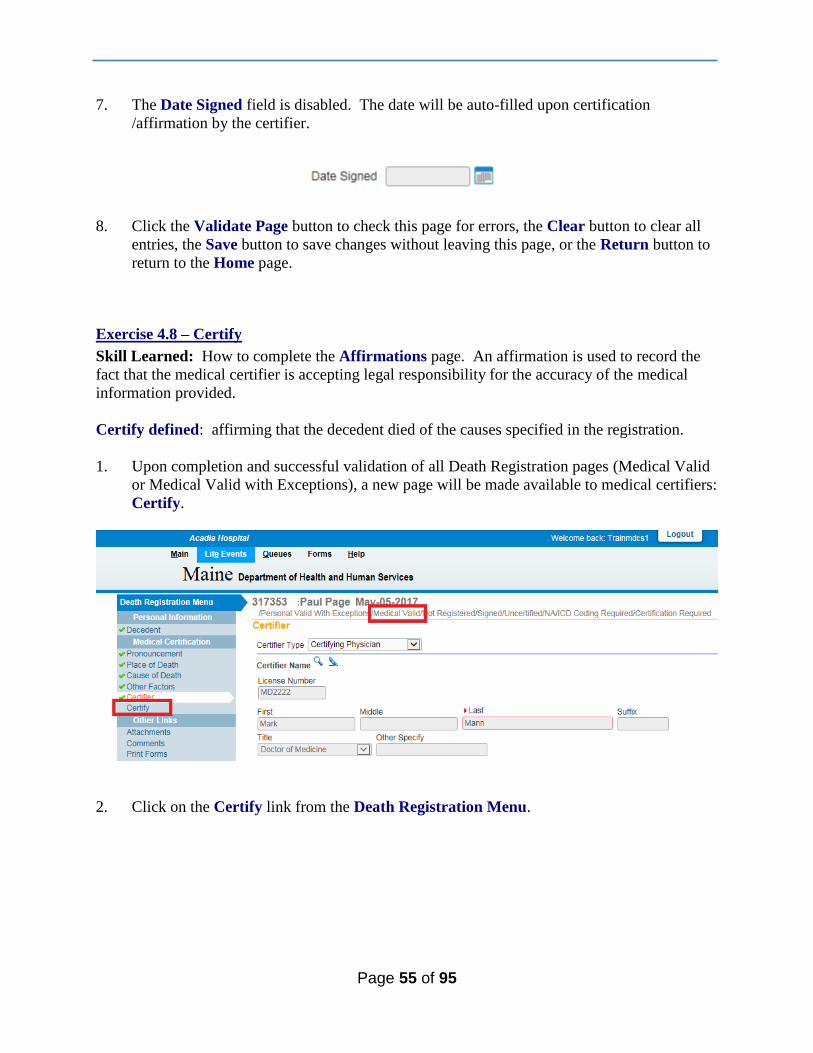
1. Upon completion and successful validation of all Death Registration pages (Medical Valid
or Medical Valid with Exceptions), a new page will be made available to medical certifiers:
Certify.
2. Click on the Certify link from the Death Registration Menu.

Page 56 of 95
3. To certify/affirm the record and achieve a status of “Certified”, place a checkmark in the
Affirm the following checkbox and click the Affirm button.
4. The record will be officially certified/affirmed and an Authentication Successful message
displayed:
5. Should the case need to be un-certified, click the Certify link, and click the Uncertify
button shown below. NOTE: The case cannot be uncertified once the case is registered.
The certifier can “uncertify” a case as long as the case is not yet registered.
Page 57 of 95
Exercise 4.9 – Locate Case
Skill Learned: In Exercise 4.1 above, we learned how to start a new case. In this exercise, you
will learn how to complete the Locate Case page which is used by data providers such as funeral
practitioners, physicians and medical examiners to locate pre-existing cases “owned” by the
office to which the current user is associated.
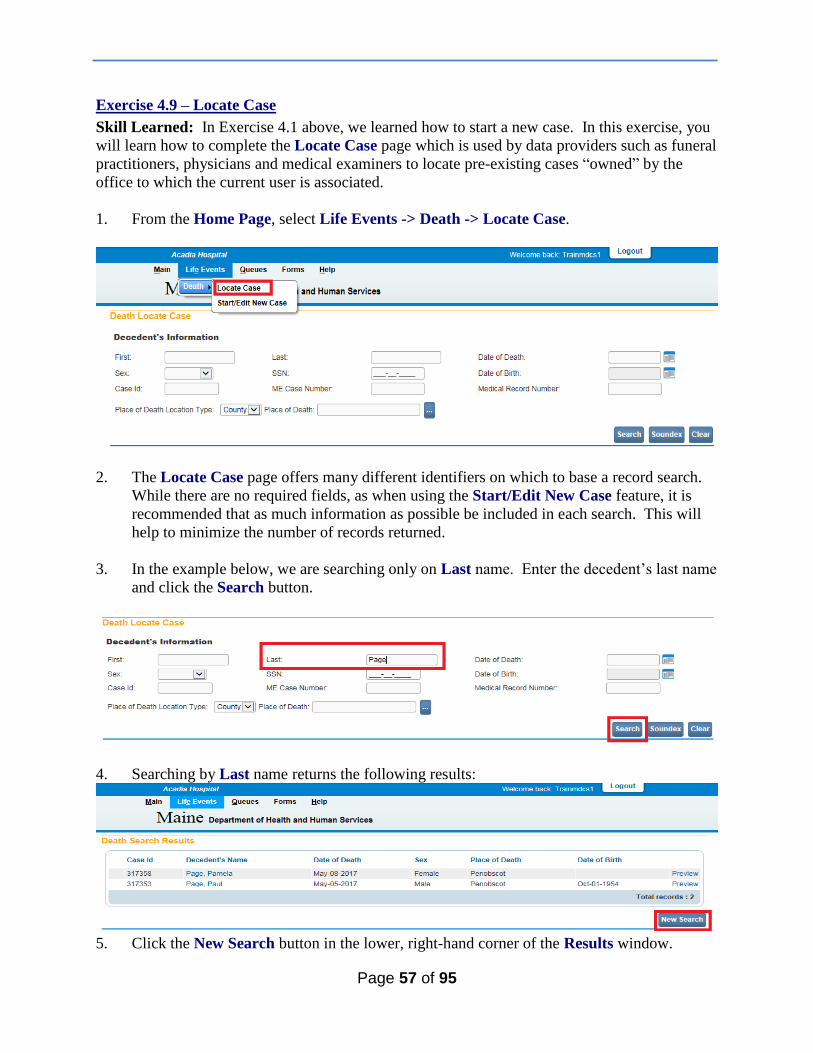
1. From the Home Page, select Life Events -> Death -> Locate Case.
2. The Locate Case page offers many different identifiers on which to base a record search.
While there are no required fields, as when using the Start/Edit New Case feature, it is
recommended that as much information as possible be included in each search. This will
help to minimize the number of records returned.
3. In the example below, we are searching only on Last name. Enter the decedent’s last name
and click the Search button.
4. Searching by Last name returns the following results:
5. Click the New Search button in the lower, right-hand corner of the Results window.
Page 58 of 95
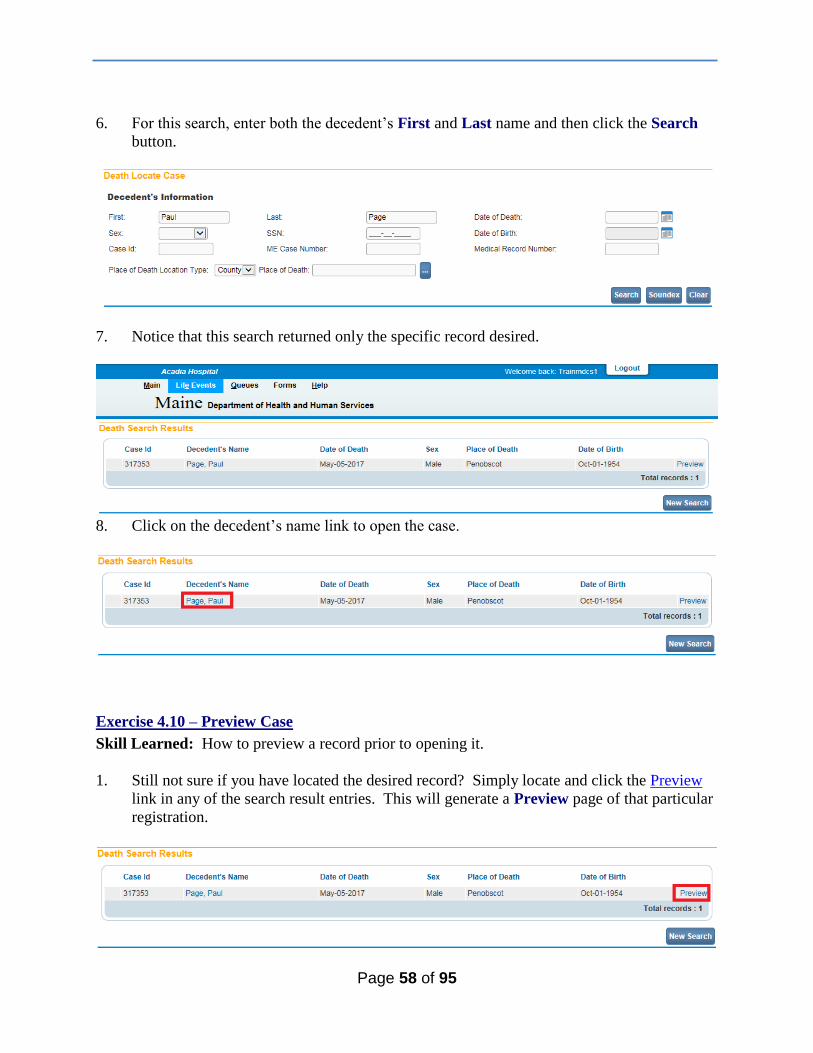
6. For this search, enter both the decedent’s First and Last name and then click the Search
button.
7. Notice that this search returned only the specific record desired.
8. Click on the decedent’s name link to open the case.
Exercise 4.10 – Preview Case
Skill Learned: How to preview a record prior to opening it.
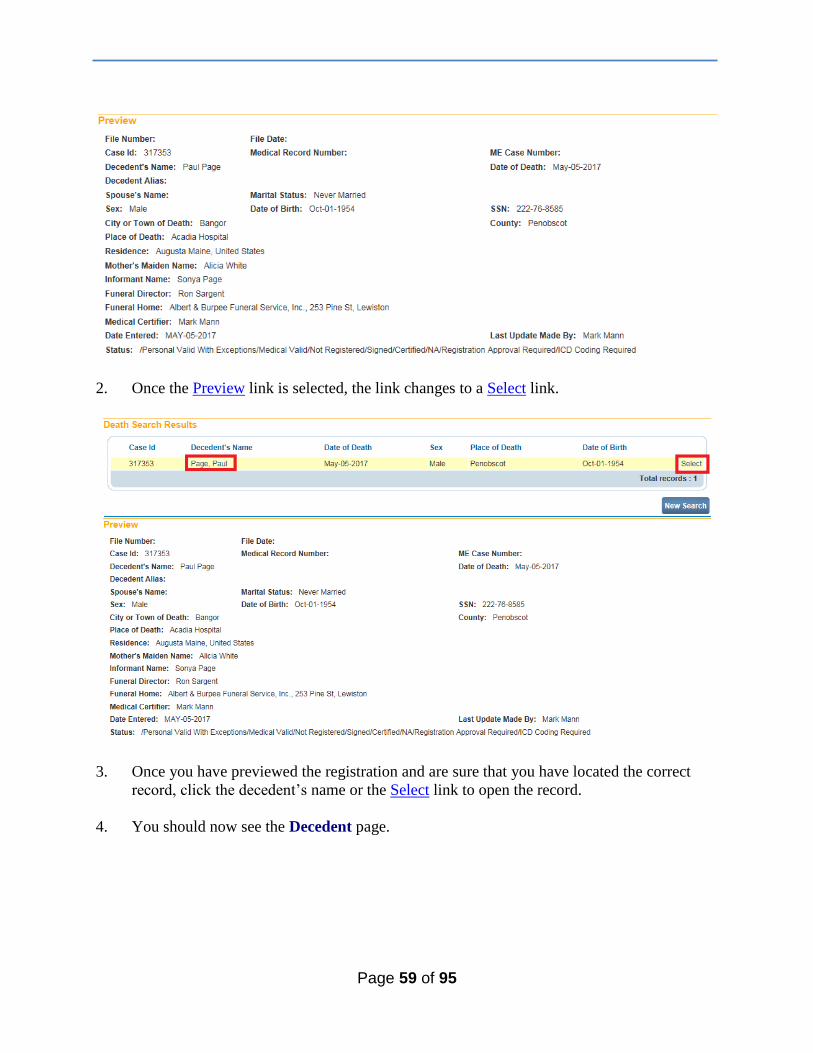
1. Still not sure if you have located the desired record? Simply locate and click the Preview
link in any of the search result entries. This will generate a Preview page of that particular
registration.
Page 59 of 95
2. Once the Preview link is selected, the link changes to a Select link.
3. Once you have previewed the registration and are sure that you have located the correct
record, click the decedent’s name or the Select link to open the record.
4. You should now see the Decedent page.
Page 60 of 95
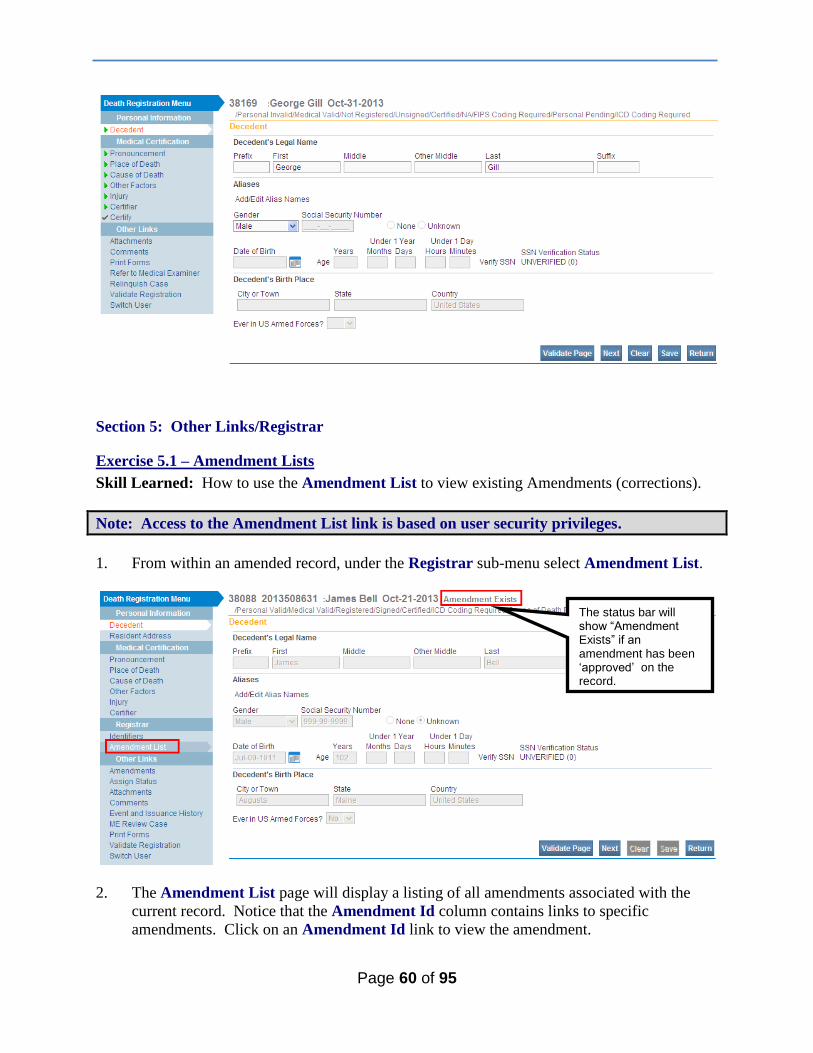
Section 5: Other Links/Registrar
Exercise 5.1 – Amendment Lists
Skill Learned: How to use the Amendment List to view existing Amendments (corrections).
Note: Access to the Amendment List link is based on user security privileges.
1. From within an amended record, under the Registrar sub-menu select Amendment List.
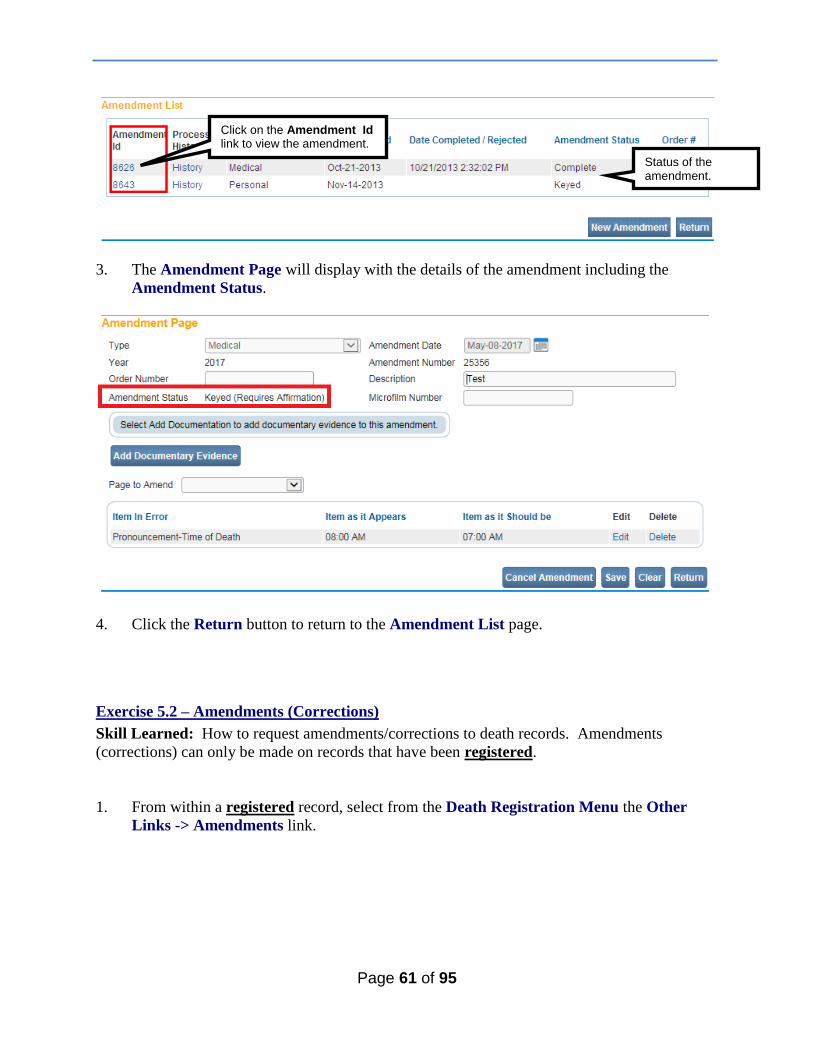
2. The Amendment List page will display a listing of all amendments associated with the
current record. Notice that the Amendment Id column contains links to specific
amendments. Click on an Amendment Id link to view the amendment.
The status bar will show “Amendment Exists” if an amendment has been ‘approved’ on the record.
Page 61 of 95
3. The Amendment Page will display with the details of the amendment including the
Amendment Status.
4. Click the Return button to return to the Amendment List page.
Exercise 5.2 – Amendments (Corrections)
Skill Learned: How to request amendments/corrections to death records. Amendments
(corrections) can only be made on records that have been registered.
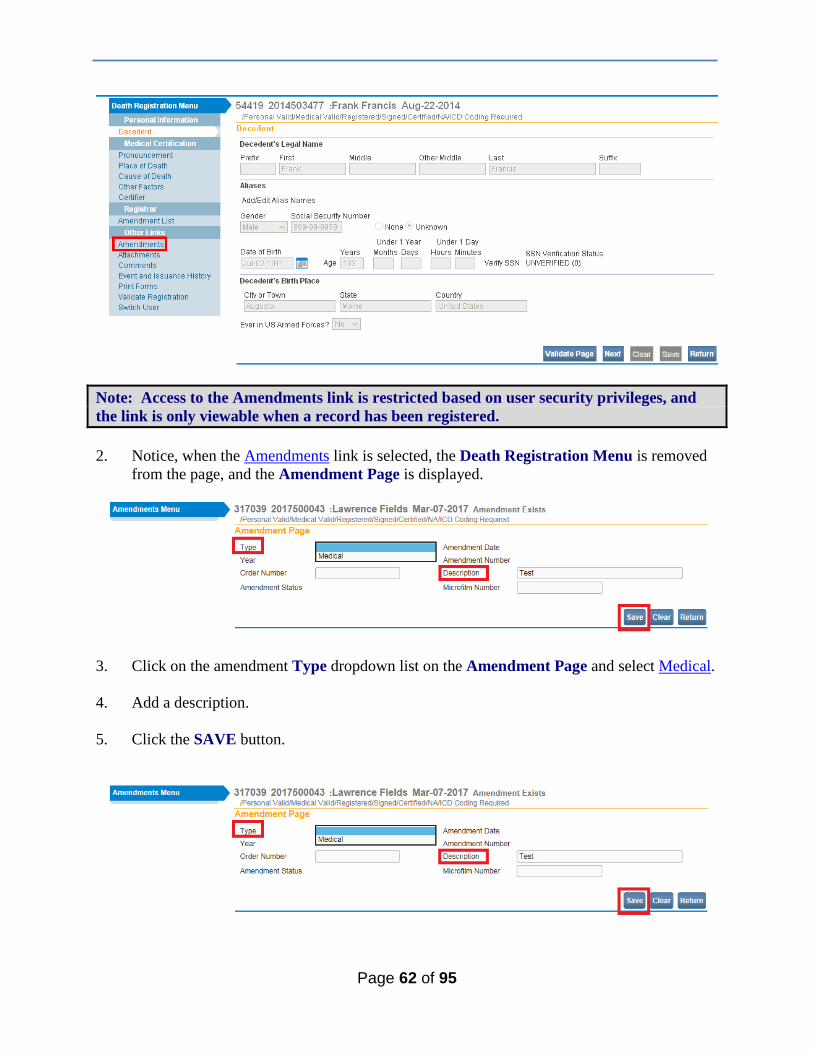
1. From within a registered record, select from the Death Registration Menu the Other
Links -> Amendments link.
Click on the Amendment Id link to view the amendment.
Status of the amendment.
Page 62 of 95
Note: Access to the Amendments link is restricted based on user security privileges, and
the link is only viewable when a record has been registered.
2. Notice, when the Amendments link is selected, the Death Registration Menu is removed
from the page, and the Amendment Page is displayed.
3. Click on the amendment Type dropdown list on the Amendment Page and select Medical.
4. Add a description.
5. Click the SAVE button.
Page 63 of 95
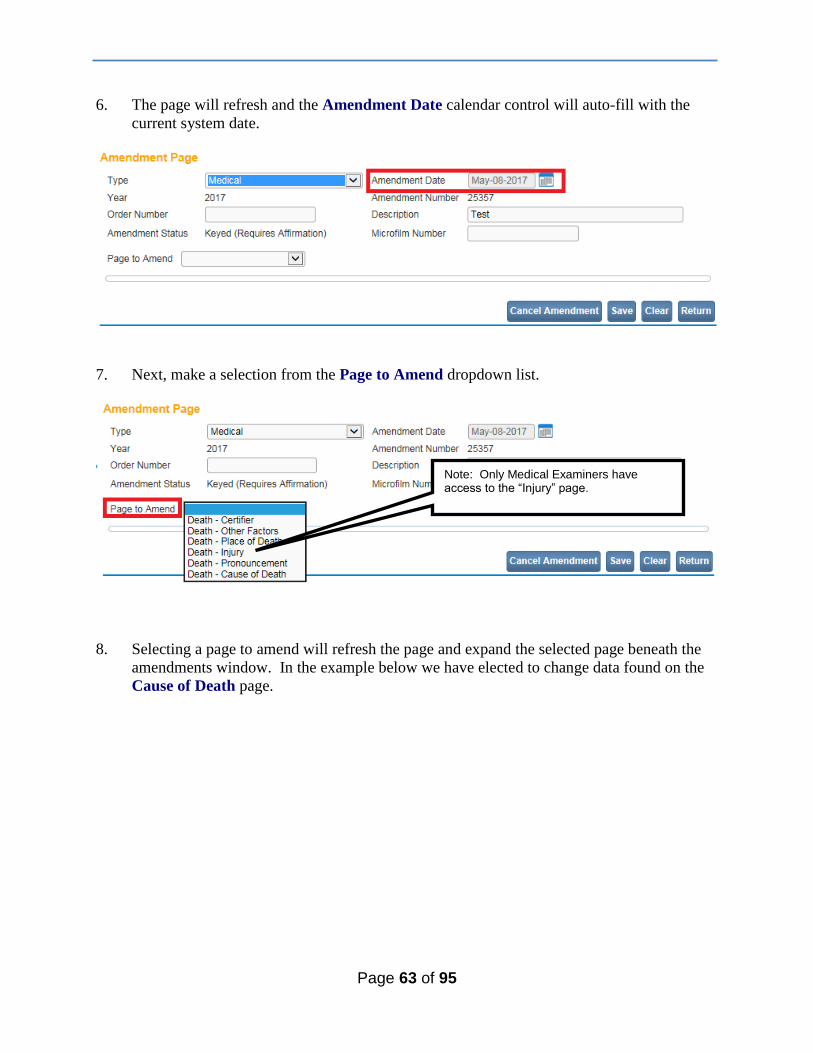
6. The page will refresh and the Amendment Date calendar control will auto-fill with the
current system date.
7. Next, make a selection from the Page to Amend dropdown list.
8. Selecting a page to amend will refresh the page and expand the selected page beneath the
amendments window. In the example below we have elected to change data found on the
Cause of Death page.
Note: Only Medical Examiners have access to the “Injury” page.

Page 64 of 95
9. Make the necessary changes to the Cause of Death page. In this example we are amending
the cause of death from “Heart Attack” to “Acute Myocardial Infarction”.
10. Click the SAVE button.
Page 65 of 95
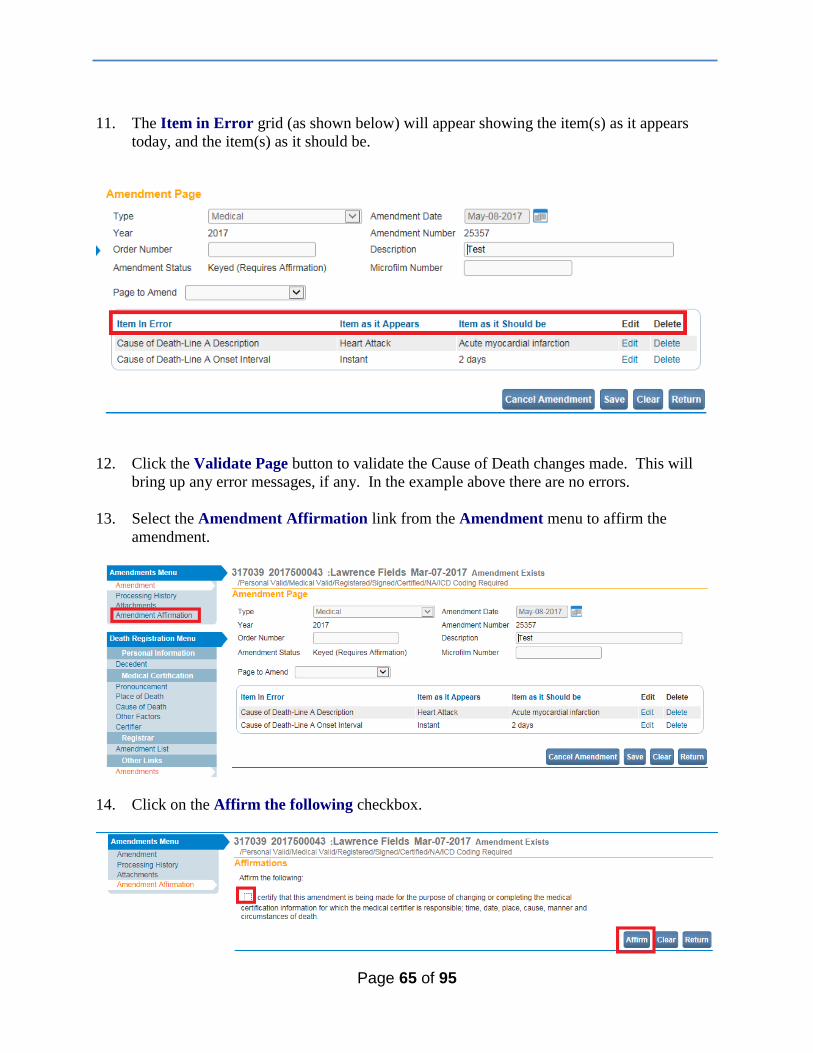
11. The Item in Error grid (as shown below) will appear showing the item(s) as it appears
today, and the item(s) as it should be.
12. Click the Validate Page button to validate the Cause of Death changes made. This will
bring up any error messages, if any. In the example above there are no errors.
13. Select the Amendment Affirmation link from the Amendment menu to affirm the
amendment.
14. Click on the Affirm the following checkbox.
Page 66 of 95
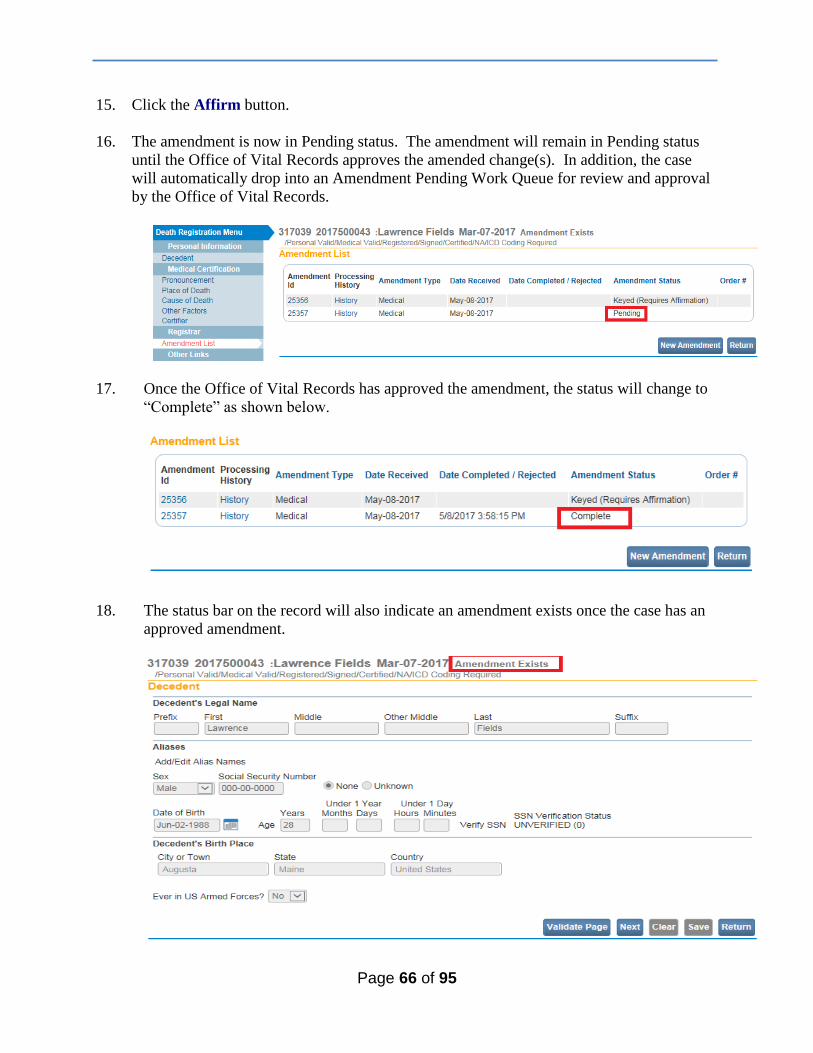
15. Click the Affirm button.
16. The amendment is now in Pending status. The amendment will remain in Pending status
until the Office of Vital Records approves the amended change(s). In addition, the case
will automatically drop into an Amendment Pending Work Queue for review and approval
by the Office of Vital Records.
17. Once the Office of Vital Records has approved the amendment, the status will change to
“Complete” as shown below.
18. The status bar on the record will also indicate an amendment exists once the case has an
approved amendment.
Page 67 of 95
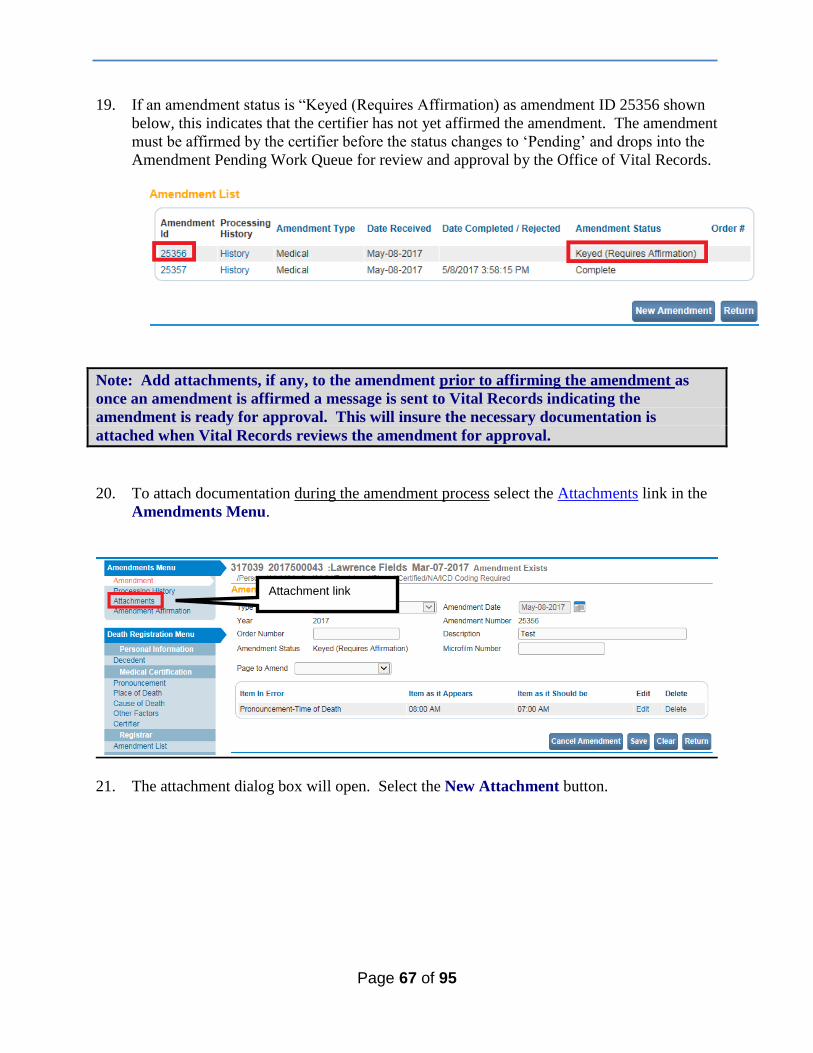
19. If an amendment status is “Keyed (Requires Affirmation) as amendment ID 25356 shown
below, this indicates that the certifier has not yet affirmed the amendment. The amendment
must be affirmed by the certifier before the status changes to ‘Pending’ and drops into the
Amendment Pending Work Queue for review and approval by the Office of Vital Records.
Note: Add attachments, if any, to the amendment prior to affirming the amendment as
once an amendment is affirmed a message is sent to Vital Records indicating the
amendment is ready for approval. This will insure the necessary documentation is
attached when Vital Records reviews the amendment for approval.
20. To attach documentation during the amendment process select the Attachments link in the
Amendments Menu.
21. The attachment dialog box will open. Select the New Attachment button.
Attachment link
Page 68 of 95
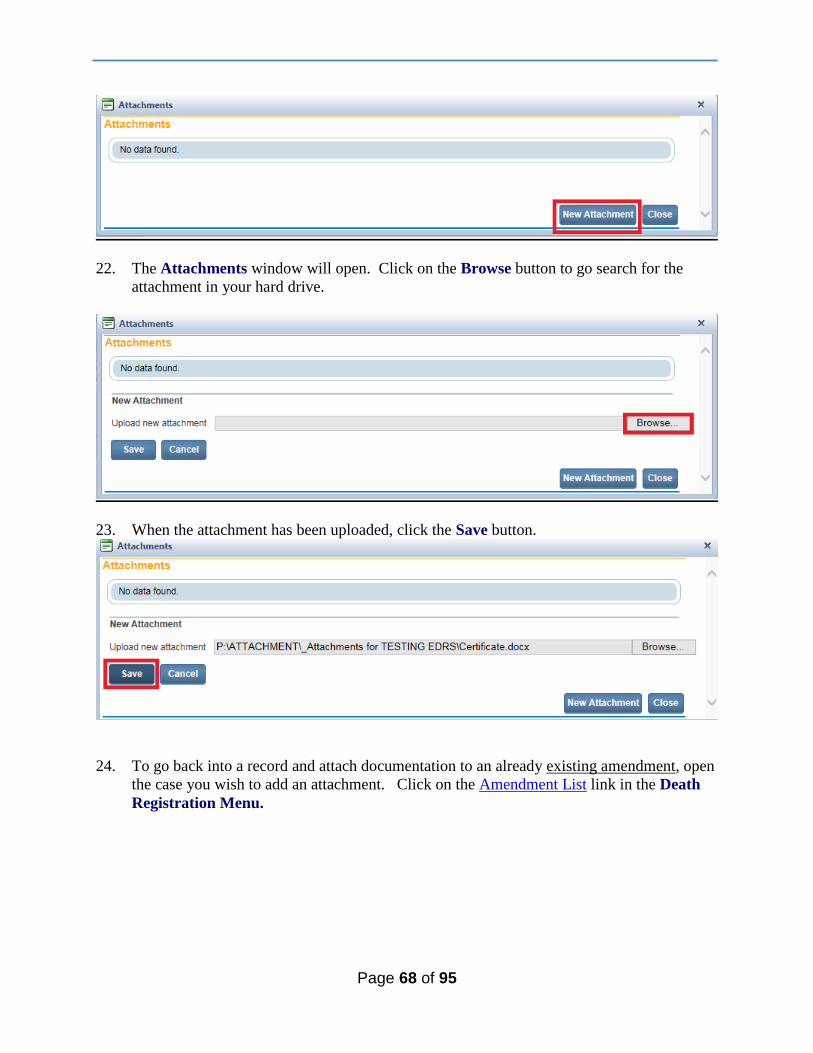
22. The Attachments window will open. Click on the Browse button to go search for the
attachment in your hard drive.
23. When the attachment has been uploaded, click the Save button.
24. To go back into a record and attach documentation to an already existing amendment, open
the case you wish to add an attachment. Click on the Amendment List link in the Death
Registration Menu.

Page 69 of 95
25. The Amendment List page will open.
26. Click on the Amendment ID number to open the Amendment menu.
27. Select the Attachment link. The attachment dialog box will open.
28. Select the New Attachment button. The Attachments window will open.
29. Click on the Browse button to go search for the attachment in your hard drive. When the
attachment has been uploaded, click the Save button.
Exercise 5.3 – Comments
Skill Learned: How to view and enter comments. During the process of entering and
registering death records, it is sometimes necessary to store comments or remarks about a case.
These comments can serve as reminders or as instructions to others who will work on the case.
The case must be opened to add comments.
1. From the Death Registration Menu select Other Links -> Comments.
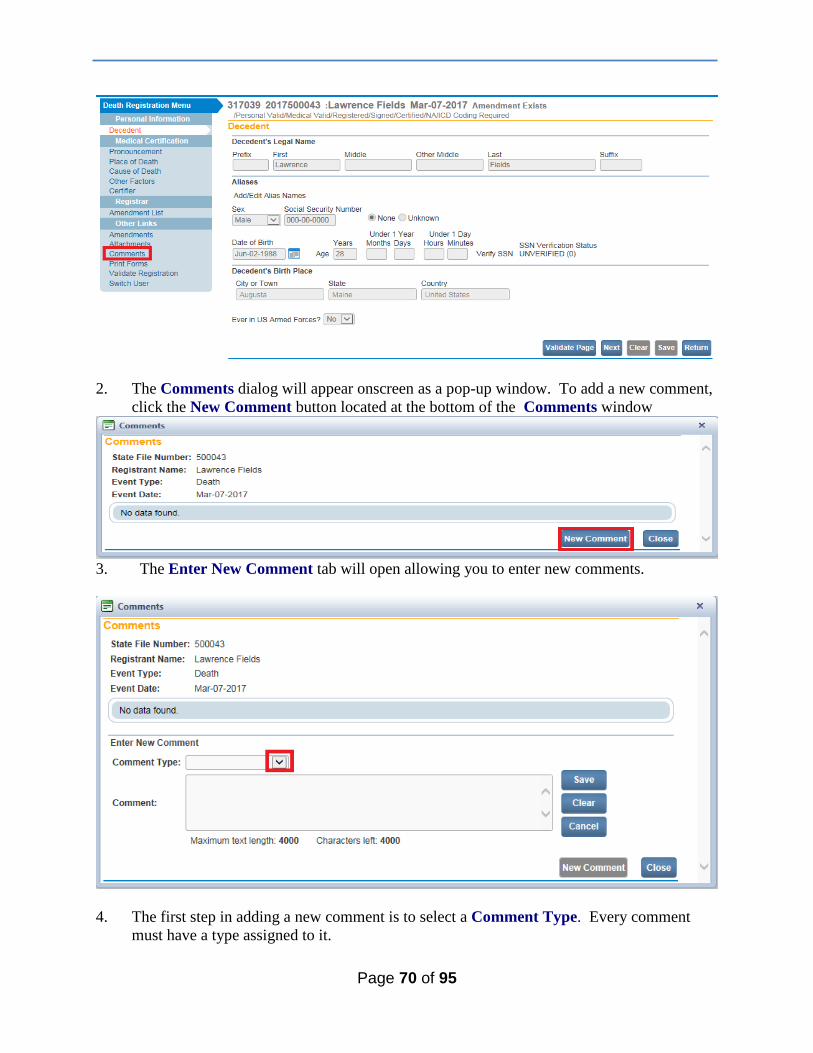
Page 70 of 95
2. The Comments dialog will appear onscreen as a pop-up window. To add a new comment,
click the New Comment button located at the bottom of the Comments window
3. The Enter New Comment tab will open allowing you to enter new comments.
4. The first step in adding a new comment is to select a Comment Type. Every comment
must have a type assigned to it.
Page 71 of 95
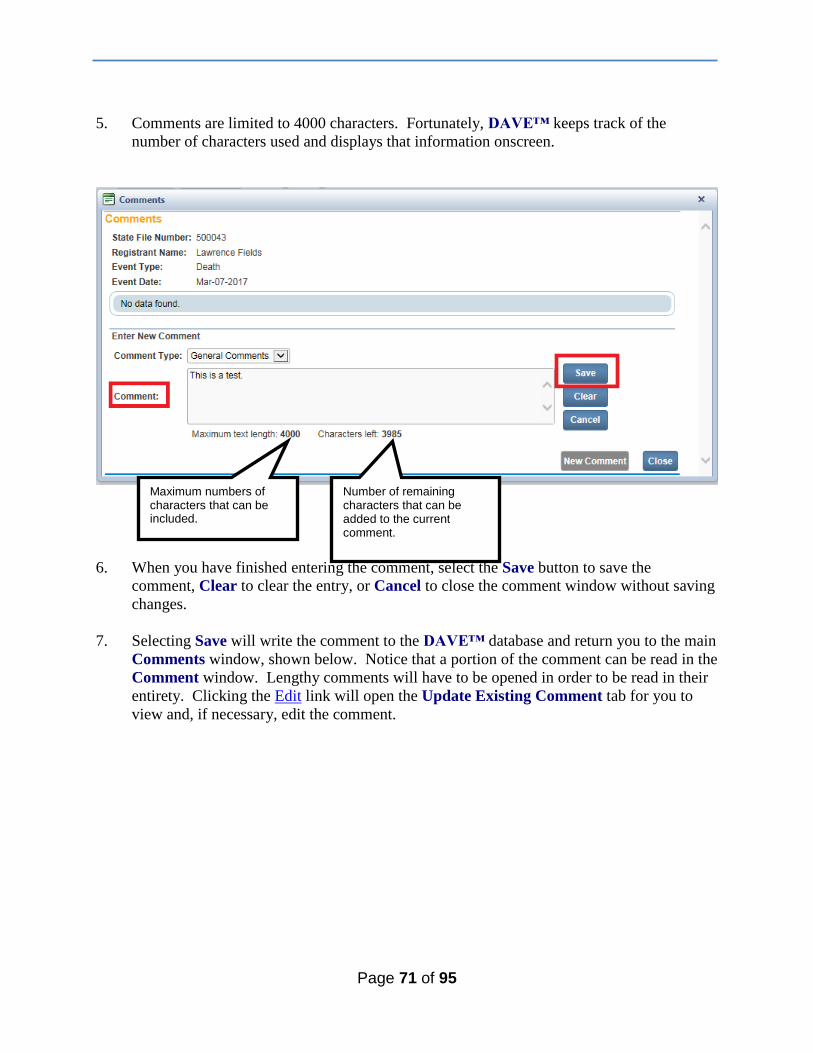
5. Comments are limited to 4000 characters. Fortunately, DAVE™ keeps track of the
number of characters used and displays that information onscreen.
6. When you have finished entering the comment, select the Save button to save the
comment, Clear to clear the entry, or Cancel to close the comment window without saving
changes.
7. Selecting Save will write the comment to the DAVE™ database and return you to the main
Comments window, shown below. Notice that a portion of the comment can be read in the
Comment window. Lengthy comments will have to be opened in order to be read in their
entirety. Clicking the Edit link will open the Update Existing Comment tab for you to
view and, if necessary, edit the comment.
Maximum numbers of characters that can be included.
Number of remaining characters that can be added to the current comment.
Page 72 of 95
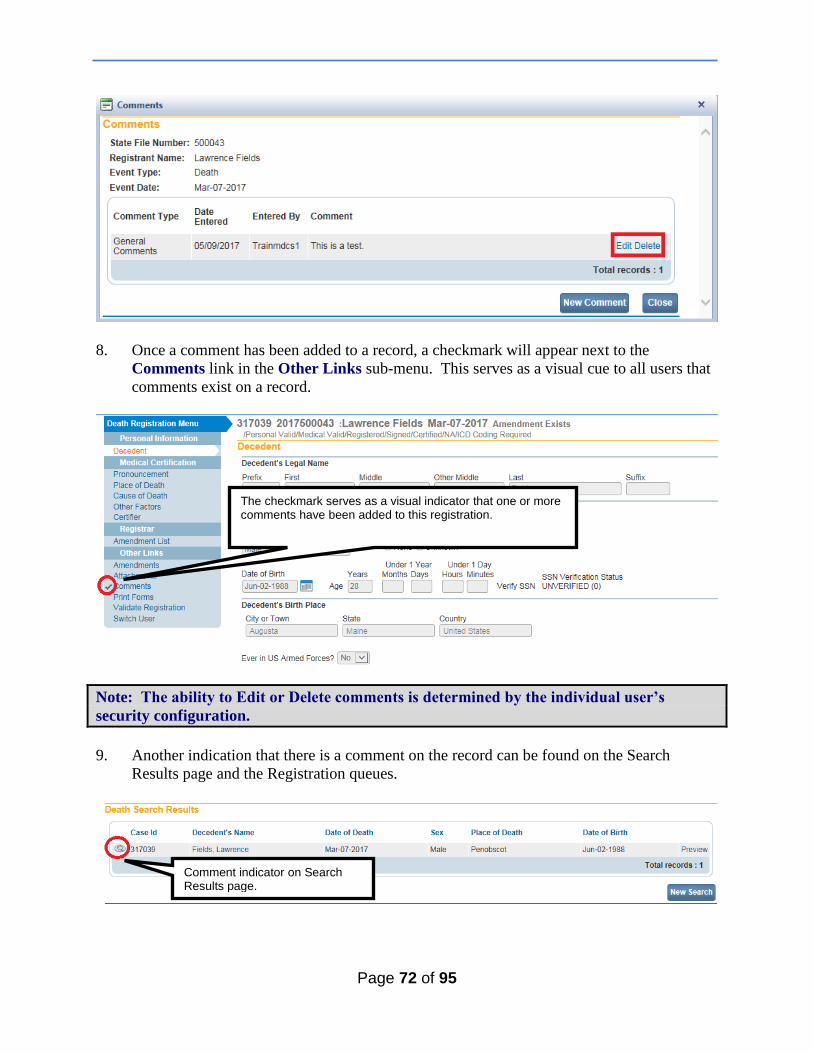
8. Once a comment has been added to a record, a checkmark will appear next to the
Comments link in the Other Links sub-menu. This serves as a visual cue to all users that
comments exist on a record.
Note: The ability to Edit or Delete comments is determined by the individual user’s
security configuration.
9. Another indication that there is a comment on the record can be found on the Search
Results page and the Registration queues.
The checkmark serves as a visual indicator that one or more comments have been added to this registration.
Comment indicator on Search Results page.

Page 73 of 95
Exercise 5.4 – Attachments (Registration)
Skill Learned: How to add attachments. It is sometimes necessary to add attachments to a case.
Adding attachments to the registration is very similar to adding attachments within an
amendment.
Note: There is a 4M size limitation on attachments. If the attachment is too large, reduce
and scan the attachment prior to attaching the document to the record.
1. Open the record applicable to the attachment.
2. From the Death Registration Menu select Other Links ->Attachments
3. The Attachments dialog box will open.
4. Select the New Attachment button.
Comment indicator in registration queues.
Page 74 of 95
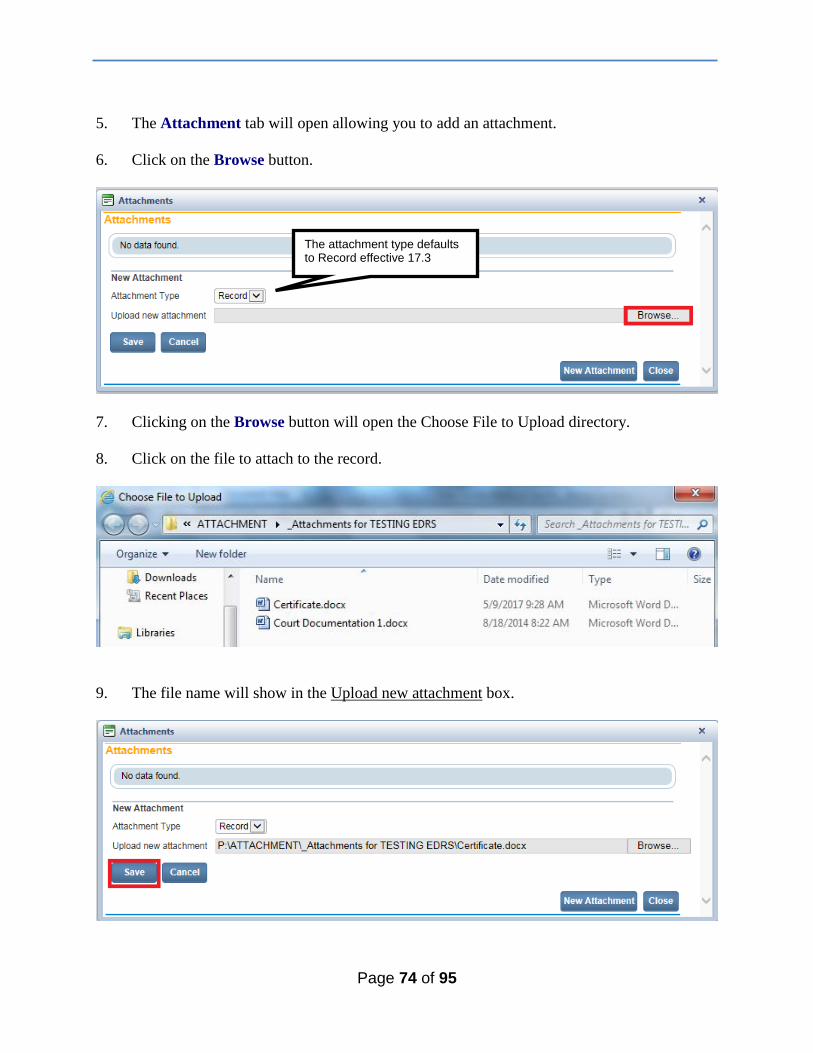
5. The Attachment tab will open allowing you to add an attachment.
6. Click on the Browse button.
7. Clicking on the Browse button will open the Choose File to Upload directory.
8. Click on the file to attach to the record.
9. The file name will show in the Upload new attachment box.
The attachment type defaults to Record effective 17.3
Page 75 of 95
10. Select Save.
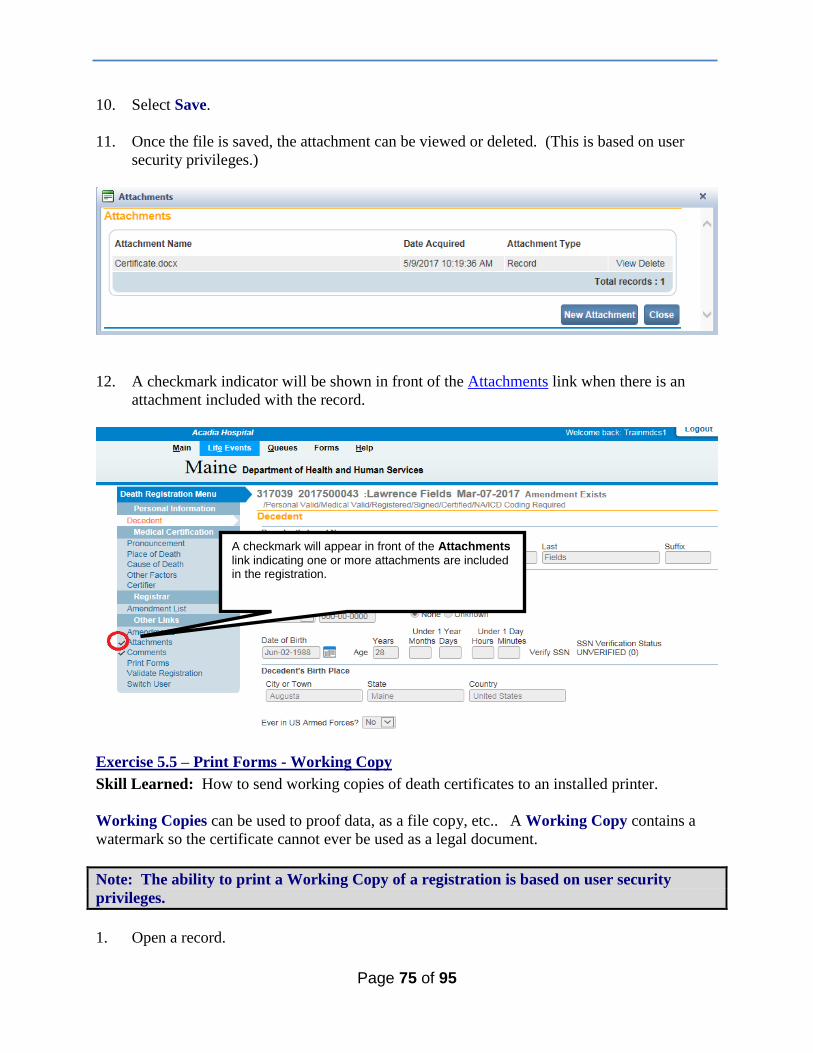
11. Once the file is saved, the attachment can be viewed or deleted. (This is based on user
security privileges.)
12. A checkmark indicator will be shown in front of the Attachments link when there is an
attachment included with the record.
Exercise 5.5 – Print Forms - Working Copy
Skill Learned: How to send working copies of death certificates to an installed printer.
Working Copies can be used to proof data, as a file copy, etc.. A Working Copy contains a
watermark so the certificate cannot ever be used as a legal document.
Note: The ability to print a Working Copy of a registration is based on user security
privileges.
1. Open a record.
A checkmark will appear in front of the Attachments
link indicating one or more attachments are included in the registration.
Page 76 of 95
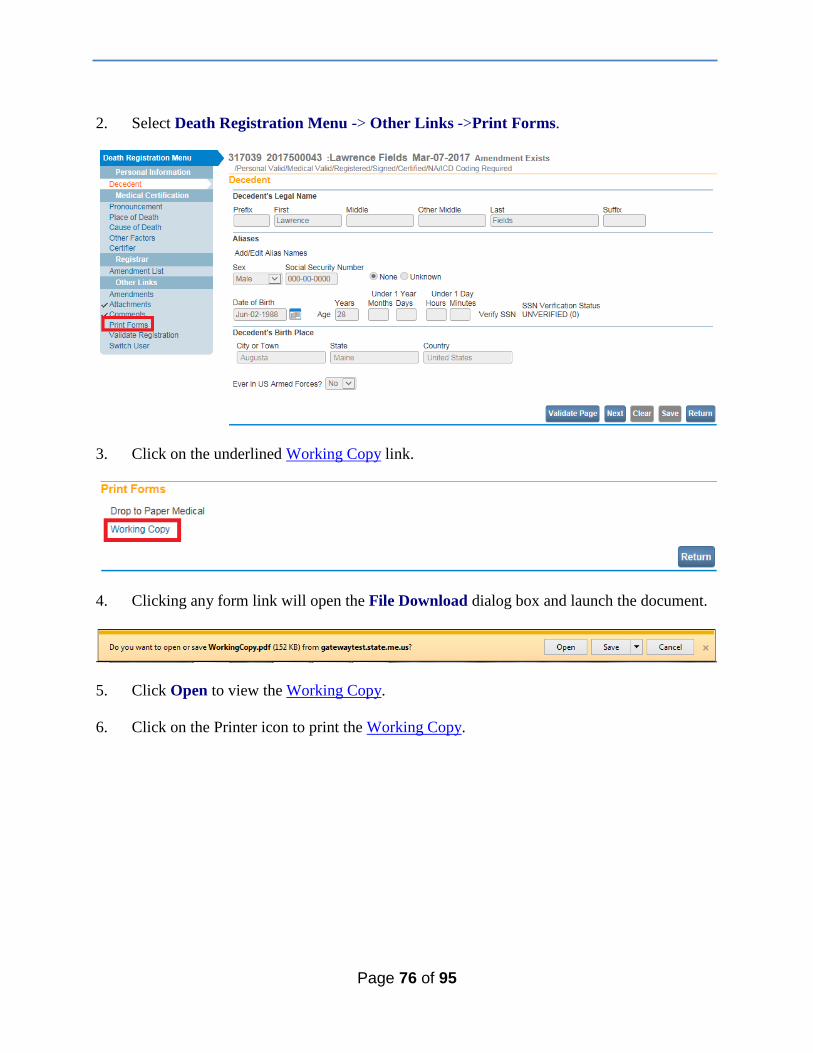
2. Select Death Registration Menu -> Other Links ->Print Forms.
3. Click on the underlined Working Copy link.
4. Clicking any form link will open the File Download dialog box and launch the document.
5. Click Open to view the Working Copy.
6. Click on the Printer icon to print the Working Copy.
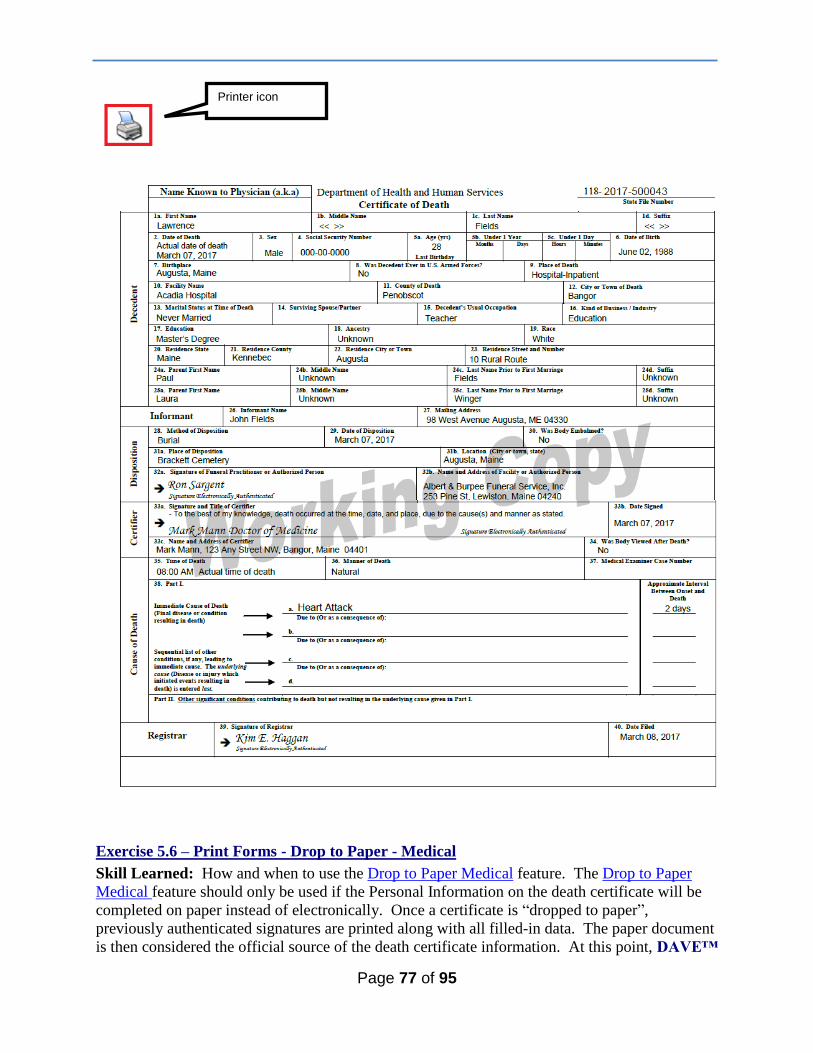
Page 77 of 95
Exercise 5.6 – Print Forms - Drop to Paper - Medical
Skill Learned: How and when to use the Drop to Paper Medical feature. The Drop to Paper
Medical feature should only be used if the Personal Information on the death certificate will be
completed on paper instead of electronically. Once a certificate is “dropped to paper”,
previously authenticated signatures are printed along with all filled-in data. The paper document
is then considered the official source of the death certificate information. At this point, DAVE™
Printer icon
Page 78 of 95
locks all “authenticated” information from further update in order to ensure the paper document
matches the electronic record. Authorized users, such as state users still have the ability to
update “locked” fields once the paper document is filed.
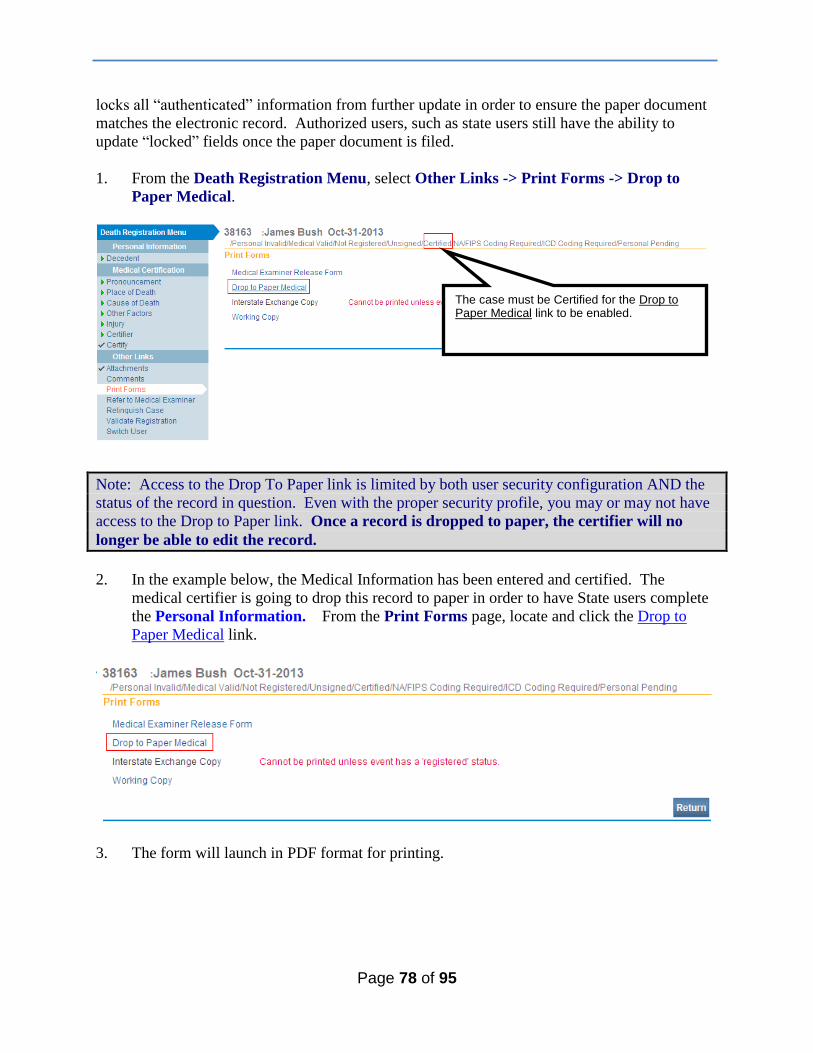
1. From the Death Registration Menu, select Other Links -> Print Forms -> Drop to
Paper Medical.
Note: Access to the Drop To Paper link is limited by both user security configuration AND the
status of the record in question. Even with the proper security profile, you may or may not have
access to the Drop to Paper link. Once a record is dropped to paper, the certifier will no
longer be able to edit the record.
2. In the example below, the Medical Information has been entered and certified. The
medical certifier is going to drop this record to paper in order to have State users complete
the Personal Information. From the Print Forms page, locate and click the Drop to
Paper Medical link.
3. The form will launch in PDF format for printing.
The case must be Certified for the Drop to Paper Medical link to be enabled.
Page 79 of 95
The status bar will indicate when a record has been Drop to Paper Medical.
The record will automatically drop into a Drop to Paper Medical Work Queue assigned to the
Office of Vital Records for completion of the Personal Information.
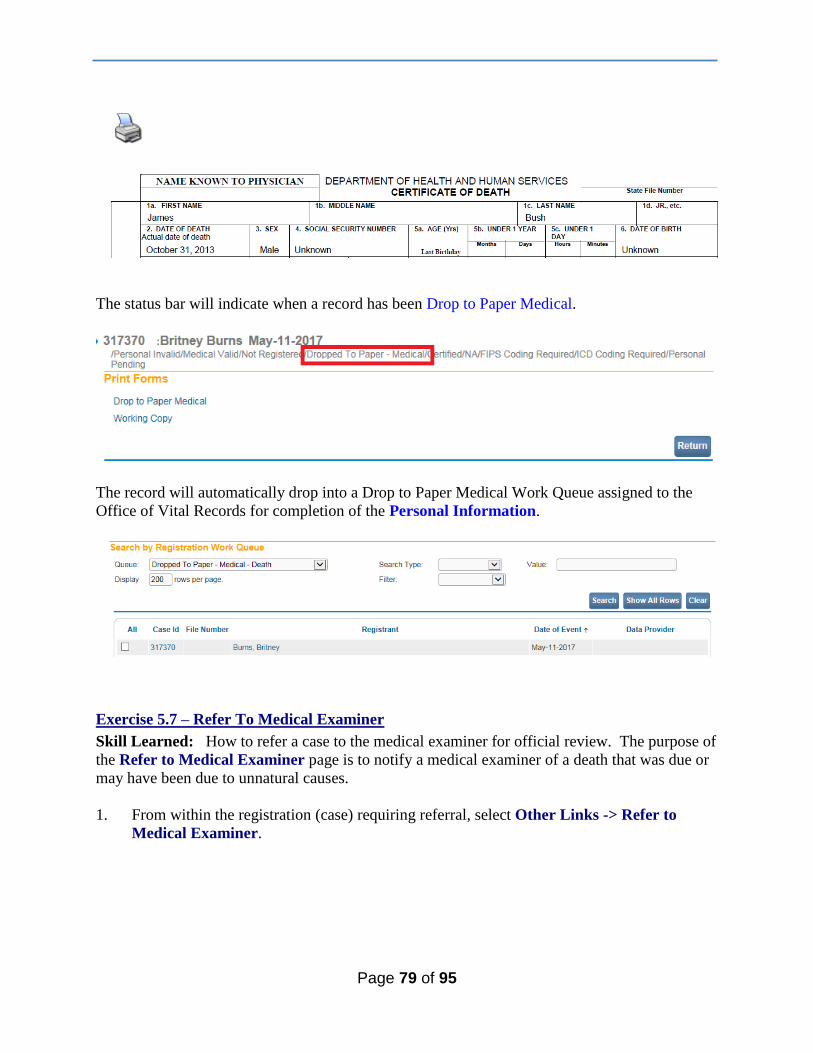
Exercise 5.7 – Refer To Medical Examiner
Skill Learned: How to refer a case to the medical examiner for official review. The purpose of
the Refer to Medical Examiner page is to notify a medical examiner of a death that was due or
may have been due to unnatural causes.
1. From within the registration (case) requiring referral, select Other Links -> Refer to
Medical Examiner.

Page 80 of 95
2. This will launch the Refer to Medical Examiner page as shown below. Notice, that the
Message field is auto-filled with a pre-formatted message. This message can be sent as is,
edited, or deleted and replaced entirely.
3. Click Save to complete the referral process. The next time the medical examiner logs in,
this case will appear in his/her work queue and also in Messages.
4. Once the message is saved, the information on the page and the SAVE button is disabled.
The status bar will show ME Review Required as shown below.
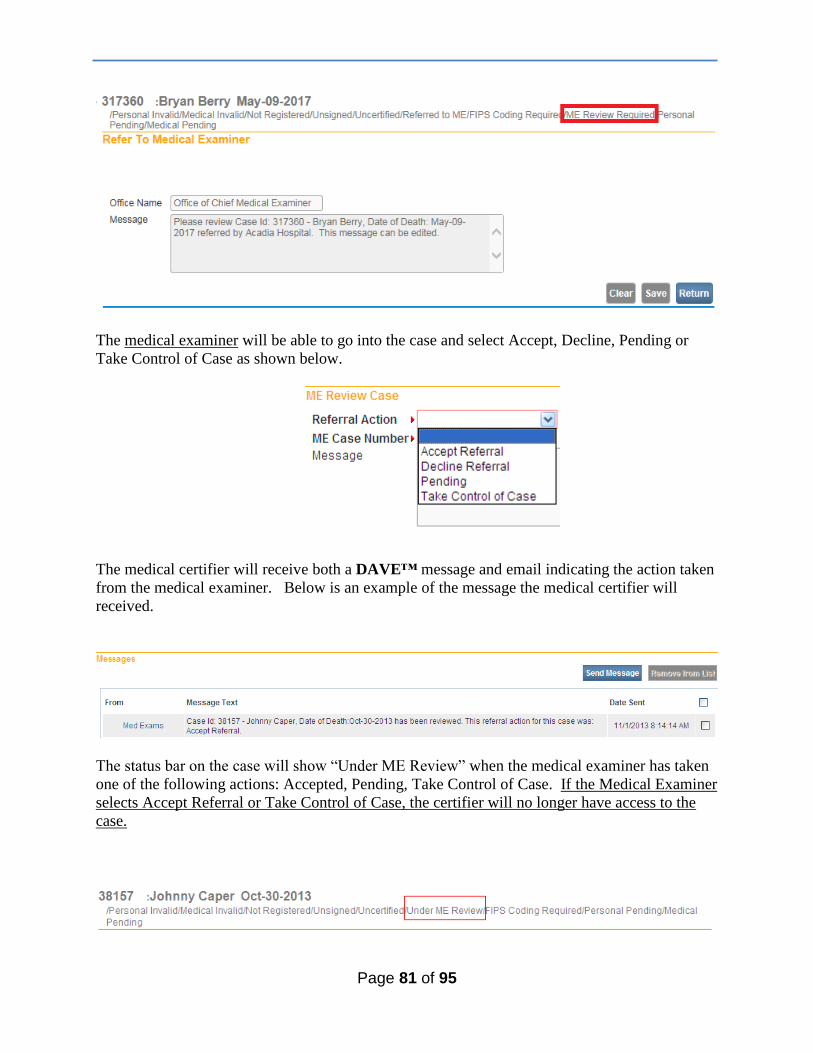
Page 81 of 95
The medical examiner will be able to go into the case and select Accept, Decline, Pending or
Take Control of Case as shown below.
The medical certifier will receive both a DAVE™ message and email indicating the action taken
from the medical examiner. Below is an example of the message the medical certifier will
received.
The status bar on the case will show “Under ME Review” when the medical examiner has taken
one of the following actions: Accepted, Pending, Take Control of Case. If the Medical Examiner
selects Accept Referral or Take Control of Case, the certifier will no longer have access to the
case.
Page 82 of 95
If the case has been “declined” by the medical examiner the status bar will indicate “Referral
Declined” and an automated email and message will be sent to the medical certifier. The
medical certifier will continue to have access rights to the case.
Exercise 5.8 – Relinquish Case
Skill Learned: How to surrender ownership of an unregistered record. Once a certifier has
certified a record, no other user has “write access” to that portion of the record. That is, only that
certifier that “owns” the information is allowed to edit the information.
The Relinquish Case link allows a user to relinquish control of their portion of a record so that a
different user can login and take ownership. If the case is “certified” it will become “un-
certified” once the owner relinquishes the case giving another user access to the case. A case,
however, does not need to be certified to be relinguished.
NOTE: Once the record is relinquished, the person who relinquished the record will no longer
have access to the record once the new user has taken ownership. If the new user has not yet
taken ownership, the person who relinquished the case can regain access of the record by going
to Life Events>Death>Start/Edit New Case.
1. From the Death Registration Menu select Other Links -> Relinquish Case
2. The Relinquish Case window will open. Select OK to relinquish control of the record or
Cancel to retain ownership of the record.
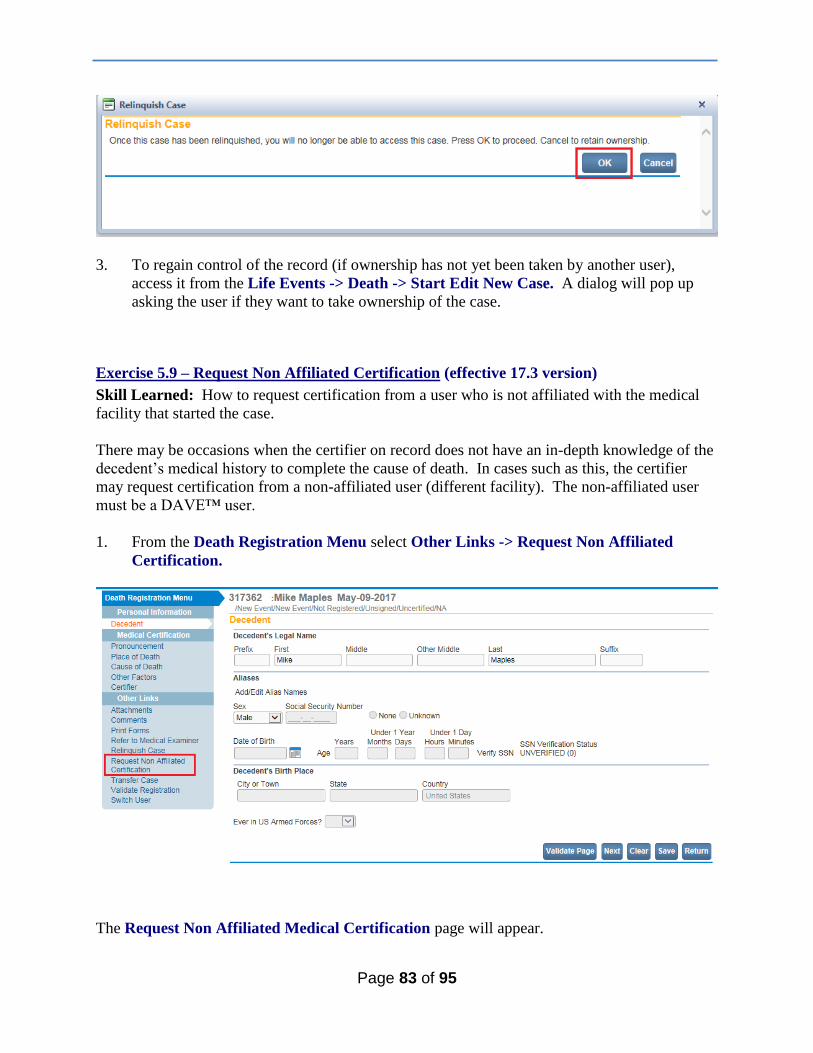
Page 83 of 95
3. To regain control of the record (if ownership has not yet been taken by another user),
access it from the Life Events -> Death -> Start Edit New Case. A dialog will pop up
asking the user if they want to take ownership of the case.
Exercise 5.9 – Request Non Affiliated Certification (effective 17.3 version)
Skill Learned: How to request certification from a user who is not affiliated with the medical
facility that started the case.
There may be occasions when the certifier on record does not have an in-depth knowledge of the
decedent’s medical history to complete the cause of death. In cases such as this, the certifier
may request certification from a non-affiliated user (different facility). The non-affiliated user
must be a DAVE™ user.
1. From the Death Registration Menu select Other Links -> Request Non Affiliated
Certification.
The Request Non Affiliated Medical Certification page will appear.
Page 84 of 95
2. Click on the Certifier Name LOV. The Lookup Certifier page will popup.
3. Key in the Last Name of the certifier for whom non-affiliated medical certification is
requested.
4. Click the Search button.
LOV
Page 85 of 95
5. Click the Select button on the same row as the desired certifier.
The certifier’s name is system-filled on the Request Non Affiliated Medical Certification
page.
6. Next, click on the Facility LOV.
Page 86 of 95
The Facilities popup will appear.
7. Key in the name of the facility. Type in either the entire facility name, or use a wild card
(%) as done in the example below.
8. Click the Search button.
9. Click the Select button on the same row of the desired facility.
Page 87 of 95
The office name is system-filled with the selected facility.
10. Click the Save button.
Both an external email and an internal message will be sent to the requested certifier as shown
below.
Page 88 of 95
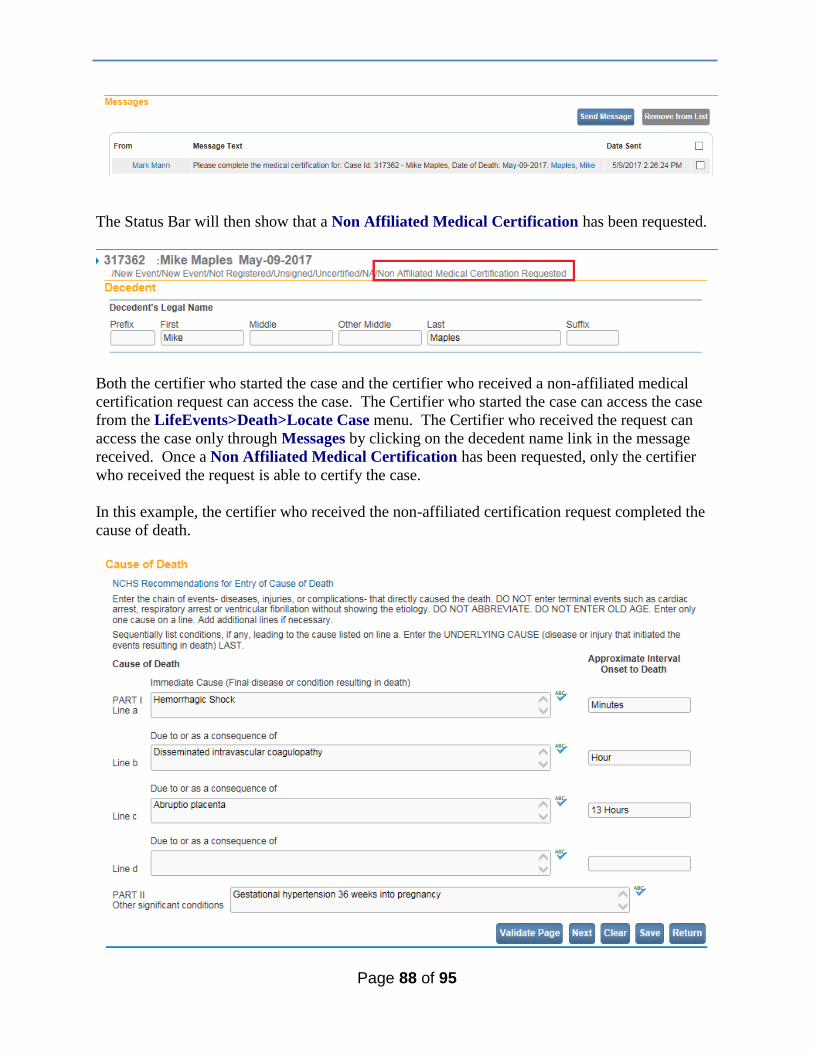
The Status Bar will then show that a Non Affiliated Medical Certification has been requested.
Both the certifier who started the case and the certifier who received a non-affiliated medical
certification request can access the case. The Certifier who started the case can access the case
from the LifeEvents>Death>Locate Case menu. The Certifier who received the request can
access the case only through Messages by clicking on the decedent name link in the message
received. Once a Non Affiliated Medical Certification has been requested, only the certifier
who received the request is able to certify the case.
In this example, the certifier who received the non-affiliated certification request completed the
cause of death.
Page 89 of 95
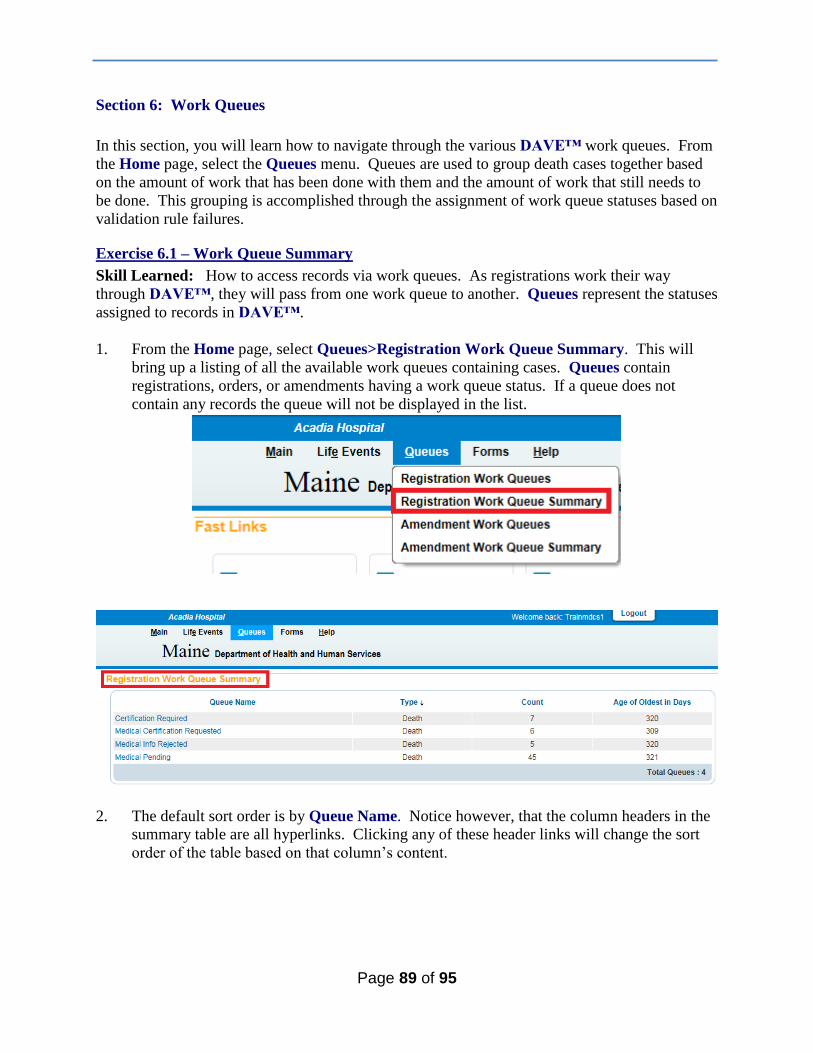
Section 6: Work Queues
In this section, you will learn how to navigate through the various DAVE™ work queues. From
the Home page, select the Queues menu. Queues are used to group death cases together based
on the amount of work that has been done with them and the amount of work that still needs to
be done. This grouping is accomplished through the assignment of work queue statuses based on
validation rule failures.
Exercise 6.1 – Work Queue Summary
Skill Learned: How to access records via work queues. As registrations work their way
through DAVE™, they will pass from one work queue to another. Queues represent the statuses
assigned to records in DAVE™.
1. From the Home page, select Queues>Registration Work Queue Summary. This will
bring up a listing of all the available work queues containing cases. Queues contain
registrations, orders, or amendments having a work queue status. If a queue does not
contain any records the queue will not be displayed in the list.
2. The default sort order is by Queue Name. Notice however, that the column headers in the
summary table are all hyperlinks. Clicking any of these header links will change the sort
order of the table based on that column’s content.
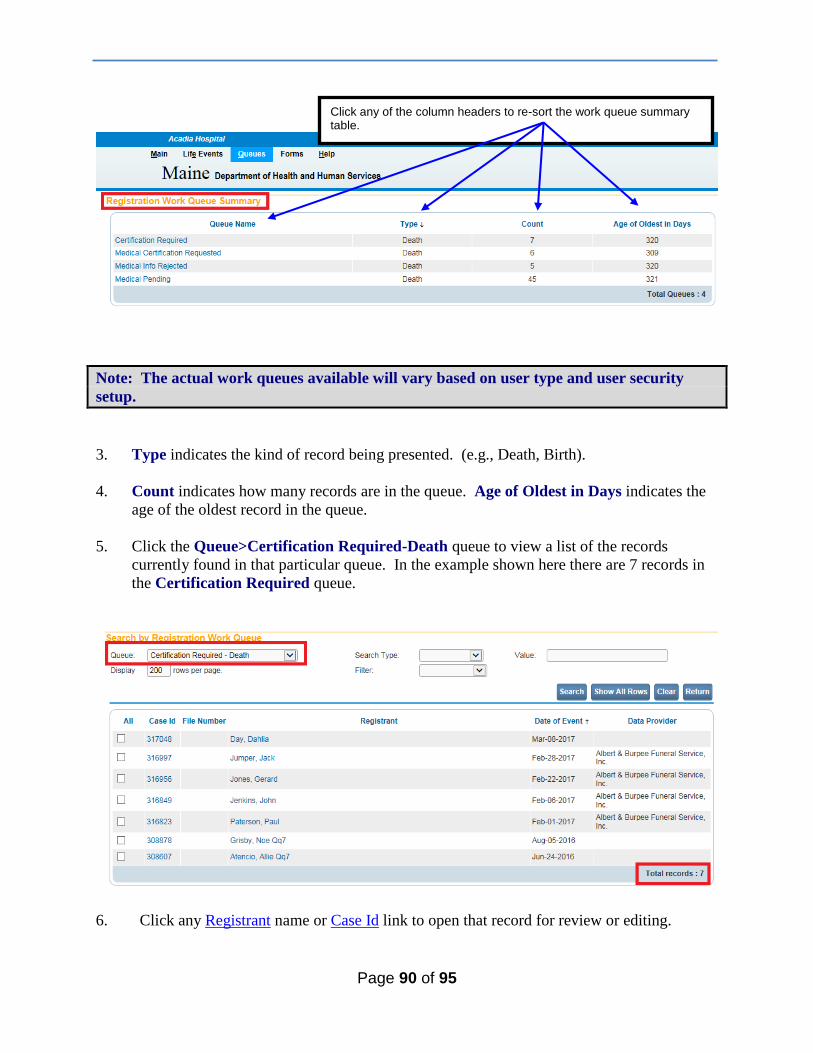
Page 90 of 95
Note: The actual work queues available will vary based on user type and user security
setup.
3. Type indicates the kind of record being presented. (e.g., Death, Birth).
4. Count indicates how many records are in the queue. Age of Oldest in Days indicates the
age of the oldest record in the queue.
5. Click the Queue>Certification Required-Death queue to view a list of the records
currently found in that particular queue. In the example shown here there are 7 records in
the Certification Required queue.
6. Click any Registrant name or Case Id link to open that record for review or editing.
Click any of the column headers to re-sort the work queue summary table.
Page 91 of 95
Section 7: Resources
The National Center for Health Statistics (NCHS) has prepared the following handbook which
contain instructions for completing death certificates:
- Physicians’ Handbook on Medical Certification of Death
You can obtain this handbook at the following link:
https://www.cdc.gov/nchs/data/misc/hb_cod.pdf
Appendices
Appendix 1 – Glossary of Icons and Controls
There are several different types of icons and controls used in DAVE™. Many of these are
industry-standard or universal controls that you may already be familiar with from using other
programs and/or websites. Others, are DAVE™ specific controls that you will not find
anywhere else.
- Auto-populate Button – this control can be clicked on using your mouse’s left click
button. This control is used in conjunction with a dropdown list to auto-fill information
relevant to the entity selected within the dropdown list. Clicking the auto-populate button
below will auto-fill the Age.
- Auto-populate Tool Tip: this is an onscreen tool-tip that appears whenever the
cursor is allowed to ‘hover’ over an Auto-populate button. This is simply a visual indicator that
the auto-populate feature can be used.
Calendar Icon: this is an onscreen control that can be clicked on using your mouse’s left
click button. This icon is used in conjunction with Date Entry text boxes. Clicking this icon will
bring up the Calendar control that can be used to select a specific date.
Page 92 of 95
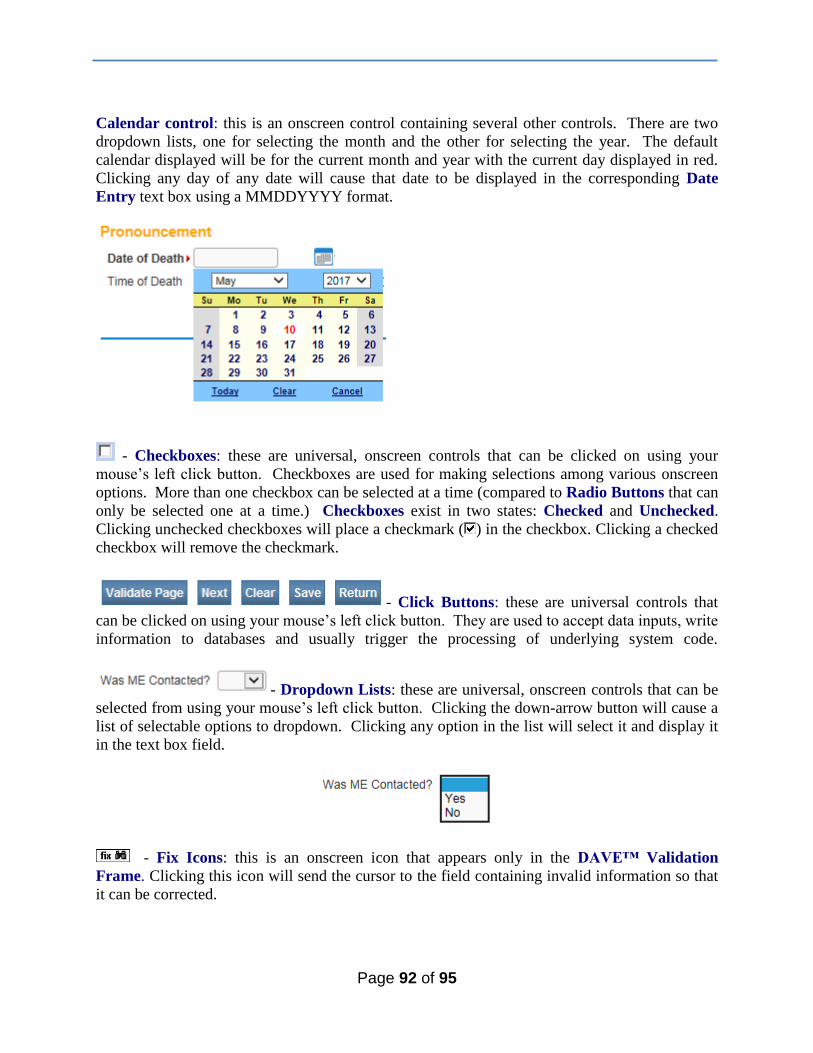
Calendar control: this is an onscreen control containing several other controls. There are two
dropdown lists, one for selecting the month and the other for selecting the year. The default
calendar displayed will be for the current month and year with the current day displayed in red.
Clicking any day of any date will cause that date to be displayed in the corresponding Date
Entry text box using a MMDDYYYY format.
- Checkboxes: these are universal, onscreen controls that can be clicked on using your
mouse’s left click button. Checkboxes are used for making selections among various onscreen
options. More than one checkbox can be selected at a time (compared to Radio Buttons that can
only be selected one at a time.) Checkboxes exist in two states: Checked and Unchecked.
Clicking unchecked checkboxes will place a checkmark ( ) in the checkbox. Clicking a checked
checkbox will remove the checkmark.
- Click Buttons: these are universal controls that
can be clicked on using your mouse’s left click button. They are used to accept data inputs, write
information to databases and usually trigger the processing of underlying system code.
- Dropdown Lists: these are universal, onscreen controls that can be
selected from using your mouse’s left click button. Clicking the down-arrow button will cause a
list of selectable options to dropdown. Clicking any option in the list will select it and display it
in the text box field.
- Fix Icons: this is an onscreen icon that appears only in the DAVE™ Validation
Frame. Clicking this icon will send the cursor to the field containing invalid information so that
it can be corrected.

Page 93 of 95
Labels –are universal controls or fields. Actually, most
fields have labels. A Label tells you what type of information is displayed in a field or what
type of information to place in a field. In our example here, the field has a label containing the
word First. That tells you to place the Decedent’s first name in this text box field.
- Radio Buttons: these are universal controls that can be selected using your mouse’s left
click button. Clicking a radio button will fill in (●) the circle. Unlike Checkboxes, which allow
for multiple selections, only one Radio Button per group of buttons may be selected at one time.
For example, you might use a radio button to select a brand of car to purchase, but use
checkboxes to add all the features you want.
- Text Entry Boxes: these are universal controls used to
record information. Text Entry Boxes can be formatted to accept only text, a combination of
text and numbers, numbers only or dates. In this example, the Text Box is being used to record
someone’s First name. In this case, the text entry box is formatted to prevent the entry of any
numbers or special characters. Some Text-Entry Boxes are display only.
- Validation – Green Checkmark: this is a display only icon. Clicking it has
no effect. This icon is used in the Death Registration Menu and indicates that a DAVE™
information page contains valid information.
- Validation – Red X: this is a display only icon. Clicking it has no effect. This
icon is used in the Death Registration Menu and indicates that a DAVE™ information page
contains invalid information that must be corrected before certification will be allowed.
- Validation –Yellow Circle: this is a display only icon. Clicking it has no
effect. This icon is used in the Death Registration Menu and indicates that a DAVE™
information page contains information that may be invalid and must be corrected or overridden
before certification will be allowed.
Page 94 of 95
Appendix 2 – Usage and Common Conventions
This appendix consists of useful tips and tricks to help you become a more efficient user of the
DAVE™ application. These hints will actually help you with almost any Windows based
application.
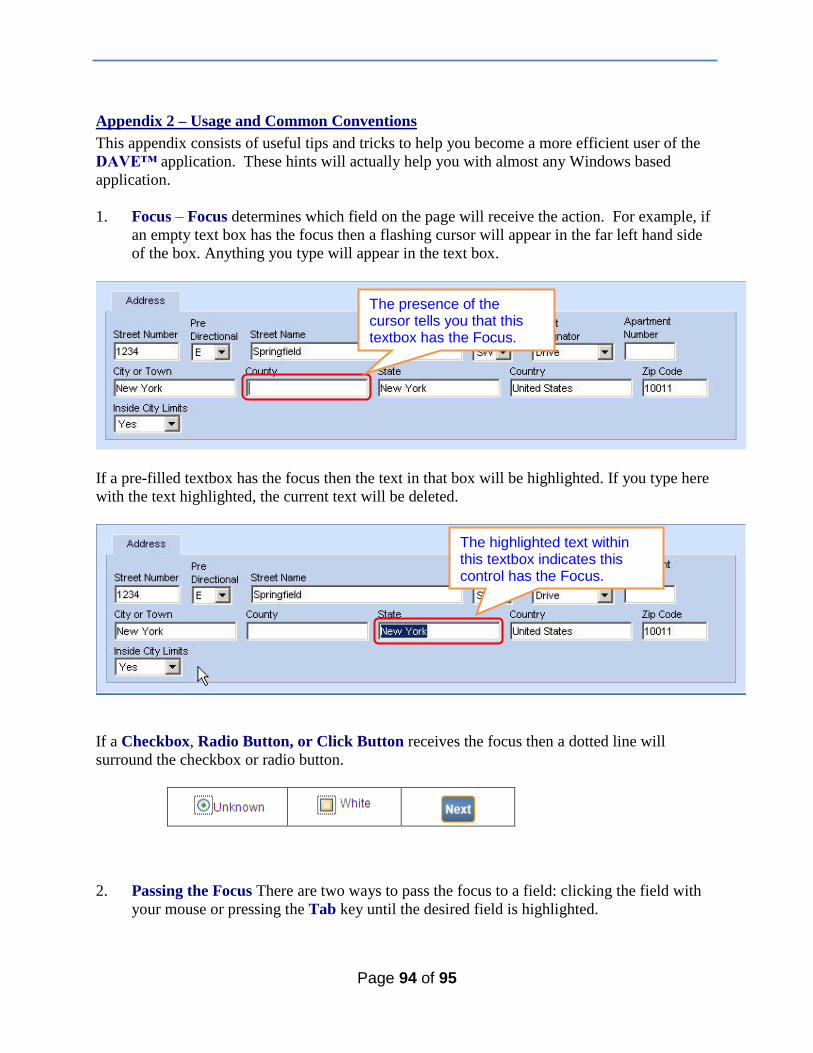
1. Focus – Focus determines which field on the page will receive the action. For example, if
an empty text box has the focus then a flashing cursor will appear in the far left hand side
of the box. Anything you type will appear in the text box.
If a pre-filled textbox has the focus then the text in that box will be highlighted. If you type here
with the text highlighted, the current text will be deleted.
If a Checkbox, Radio Button, or Click Button receives the focus then a dotted line will
surround the checkbox or radio button.
2. Passing the Focus There are two ways to pass the focus to a field: clicking the field with
your mouse or pressing the Tab key until the desired field is highlighted.
The highlighted text within this textbox indicates this control has the Focus.
The presence of the cursor tells you that this textbox has the Focus.
Page 95 of 95
The most common way of placing the focus on a field is by clicking the field with your
mouse. This is also the slowest and least efficient way of passing the focus from one field
to the next.
Instead, learn to use Tab and Shift-Tab to pass the focus back and forth among the fields.
Using Tab will advance the focus forwards. Shift-Tab, which is triggered by holding
down the Shift key while pressing the Tab key, will pass the focus back to the previous
field.
Every page is structured a little differently. Exactly where Tab and Shift-Tab sends the
Focus will vary, but it should always advance you logically from one field to the next.
3. Keyboard Shortcuts – Now that you understand what Focus is and how to pass it from
one field to the next, let’s see how you can use it to become a more efficient DAVE™ user.
If a Text Entry Box has the Focus, then just start typing to fill in the box. Note: If the text
entry box already contains text, then when it receives the focus that text will be highlighted.
Anything typed while the text is highlighted will replace the old text.
If a Checkbox has the Focus, then pressing the spacebar will check or uncheck the control.
If a Dropdown List receives the Focus then you have several options:
• Use the mouse to click the down-arrow to reveal the list of selectable options.
However, try to avoid using the mouse.
• If you know the first letter of the option you want to select, type just that letter. The
focus will then shift down to the first option in the list beginning with that letter.
• If there are multiple selections beginning with that letter, then keep typing it until
your desired option shows up. Then, Tab off of the list to save that selection.
• Use the Up and Down Arrows on your keyboard to scroll through the list of
options. When the correct option is highlighted, use the Tab key to save that
selection and move to the next field.
• Hold down the Alt key and press the Down-Arrow button on your keyboard to
reveal the list. Then, using either your mouse or the Up and Down Arrows, make
your selection and Tab off to the next field or hit the Enter button.
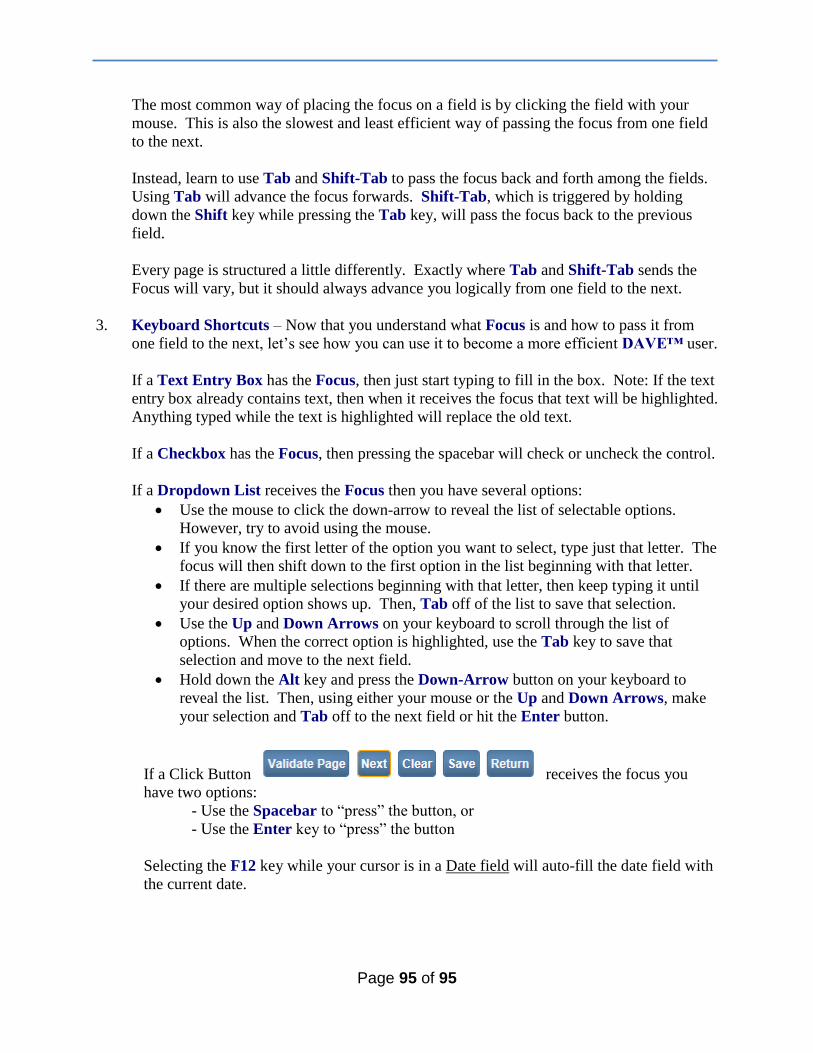
If a Click Button receives the focus you
have two options:
- Use the Spacebar to “press” the button, or
- Use the Enter key to “press” the button
Selecting the F12 key while your cursor is in a Date field will auto-fill the date field with
the current date.