Embed Size (px)
Citation preview

WITS
FEi Systems
3/3/2015
MAINE-WITS Clinical User GuideClinical User Guide

IntroductionWITS is a web based application specifically designed for the State of Maine to effectively manage substance abuse treatment data collection and clinical functions. WITS comes with core clinical features essential to managing substance abuse recovery services and treatment case management.
This provider user guide has been prepared for those working within SAMHS in a clinical nature.
| P a g e
WITS is compatible with up-to-date versions of most modern browsers such as, Internet Explorer version 10+, Firefox, Google Chrome, and Safari.
All browsers require Silverlight plug-in for WITS Scheduler.
Note: System Requirements

ContentsIntroduction..........................................................................................................................................i
Section 1. Screenings/Assessments......................................................................................................1
Screenings...............................................................................................................................................1
Assessments............................................................................................................................................2
Section 2. Treatment Plan....................................................................................................................3
Section 3. Consent/Referral................................................................................................................12
Consents................................................................................................................................................12
Linked Consents.................................................................................................................................16
Referrals................................................................................................................................................16
Creating Referrals Out.......................................................................................................................16
Accepting Referrals In (viewing consented records)..........................................................................18
Section 5. Scheduler...........................................................................................................................20
Viewing/Searching Your Calendar.........................................................................................................20
Adding a New Appointment..................................................................................................................21
Updating/Editing Appointments............................................................................................................22
Section 6. Group Notes.......................................................................................................................22
Group Type............................................................................................................................................23
Group List:.............................................................................................................................................24
Session List............................................................................................................................................27
Section 7. Clinical Dashboard..............................................................................................................35
Section 8. Creating an Announcement................................................................................................39
Section 9. Alerts.................................................................................................................................40
| P a g e

Section 1. Screenings/Assessments Where: Client List > Activity List > Screening/Assessments
Screenings and Assessments are typically done after Intake and prior to Admission/Program enrollment or on a periodic basis. Screenings and Assessments are located on the left hand navigation menu under the client’s Activity List. Several Assessments/Screenings are available, but currently there are no required screenings or assessments that must be completed within Maine-WITS.
Screenings1. From the left hand menu click on Screening.
2. There are several screenings to choose from:
3. Click on the Screening link that you would like to complete and navigate through the screening as you would navigate through other parts of WITS.
4. Once you have completed all sections of the Screening and clicked Finish, the completed screener will show up in the client’s Activity List.
| P a g e

Assessments1. From the left hand menu click on Assessments.
2. There are several Assessments to choose from:
3. Click on the Assessment link that you would like to complete and navigate through the Assessment as you would navigate through other parts of WITS.
4. Once you have completed all sections of the Assessment and clicked Finish, the completed Assessment will show up in the client’s Activity List.
| P a g e
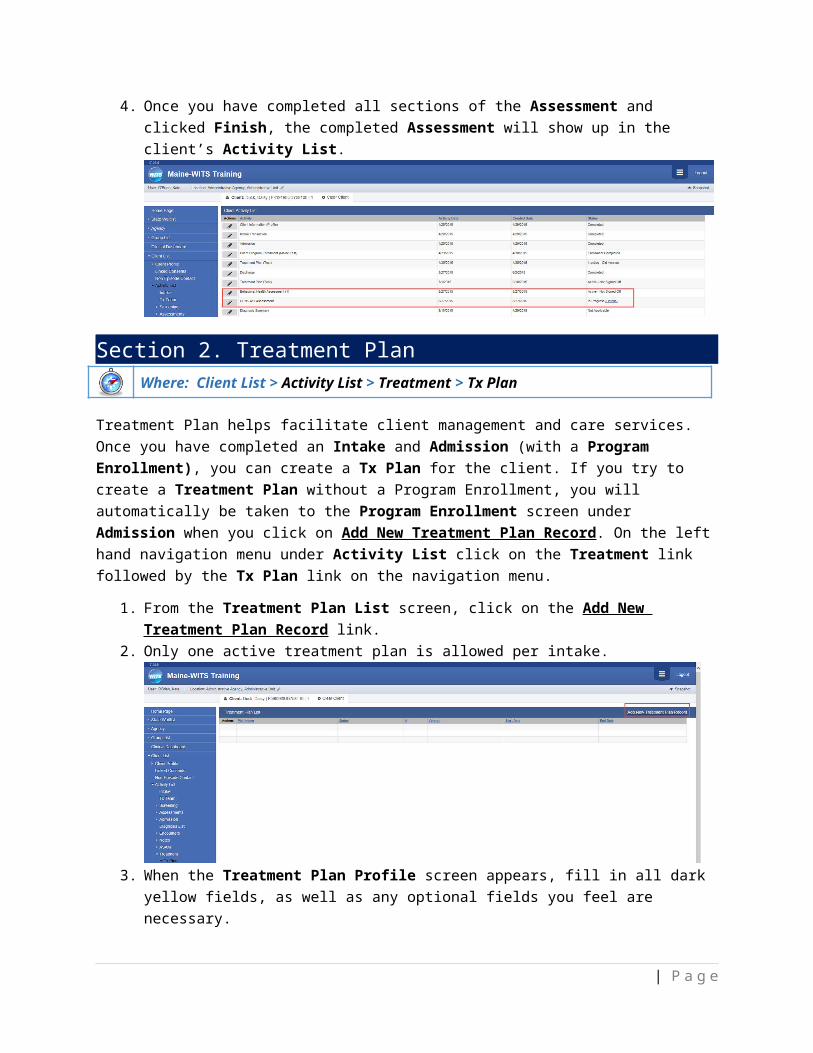
Section 2. Treatment Plan Where: Client List > Activity List > Treatment > Tx Plan
Treatment Plan helps facilitate client management and care services. Once you have completed an Intake and Admission (with a Program Enrollment), you can create a Tx Plan for the client. If you try to create a Treatment Plan without a Program Enrollment, you will automatically be taken to the Program Enrollment screen under Admission when you click on Add New Treatment Plan Record. On the left hand navigation menu under Activity List click on the Treatment link followed by the Tx Plan link on the navigation menu.
1. From the Treatment Plan List screen, click on the Add New Treatment Plan Record link. 2. Only one active treatment plan is allowed per intake.
3. When the Treatment Plan Profile screen appears, fill in all dark yellow fields, as well as any optional fields you feel are necessary.
4. From this screen you can also add treatment team members by clicking on the Add Team Member link.
| P a g e

5. The Treatment Team screen is located under Admission, but you can view it and update it from the Treatment Plan by clicking the Add Team Member link.
6. Fill in all dark yellow fields as well as any optional fields you feel are necessary. You will need to choose a treatment team member (either staff or non-staff) before you can save the record.
7. Collateral Contacts can also be updated from this screen as well as assigning groups to the treatment team.
| P a g e

8. When complete, click Finish to complete and save. You will then be taken back to the Treatment Plan Profile screen. The treatment team members can be seen at the bottom of the Treatment Plan Profile screen.
a. Note that you can have different versions of a treatment plan:
9. Continue through the Tx Plan by clicking on the blue arrow buttons. 10. The screen following the profile screen is the Overview screen. This screen is optional and is
comprised of text boxes for the user to enter information in their own words.11. The text fields expand to see all information entered, by clicking and dragging the lower right
corner. 12. Once you have finised entereing in all information click Save and continue through the Tx Plan
using the blue arrow buttons.
13. Once you click on the blue arrow button, you will be taken to the Client Diagnosis screen. In order to enter a diganosis click the Edit Diagnosis link. From this screen you can also Review Prior Diagnosis by clicking on the link at the bottom of the screen.
| P a g e

14. Click on Edit Diagnosis link to update the client diagnosis. When you are finished click Save and Finish, which will return you to the Client Diagnosis screen.
15. You must click Save on the uneditable Client Diagnosis screen as well in order to proceed through the remaining Tx Plan screens.
16. Once you have clicked Save, you will be able to proceed to the Problems/Goals screen (Treatment Plan Problem screen).
17. This screen will allow you to see the date of the BHA (assessment) as well as the problem summary that was reported on the BHA (assessment) if a BHA (assessment) was completed for this client.
| P a g e
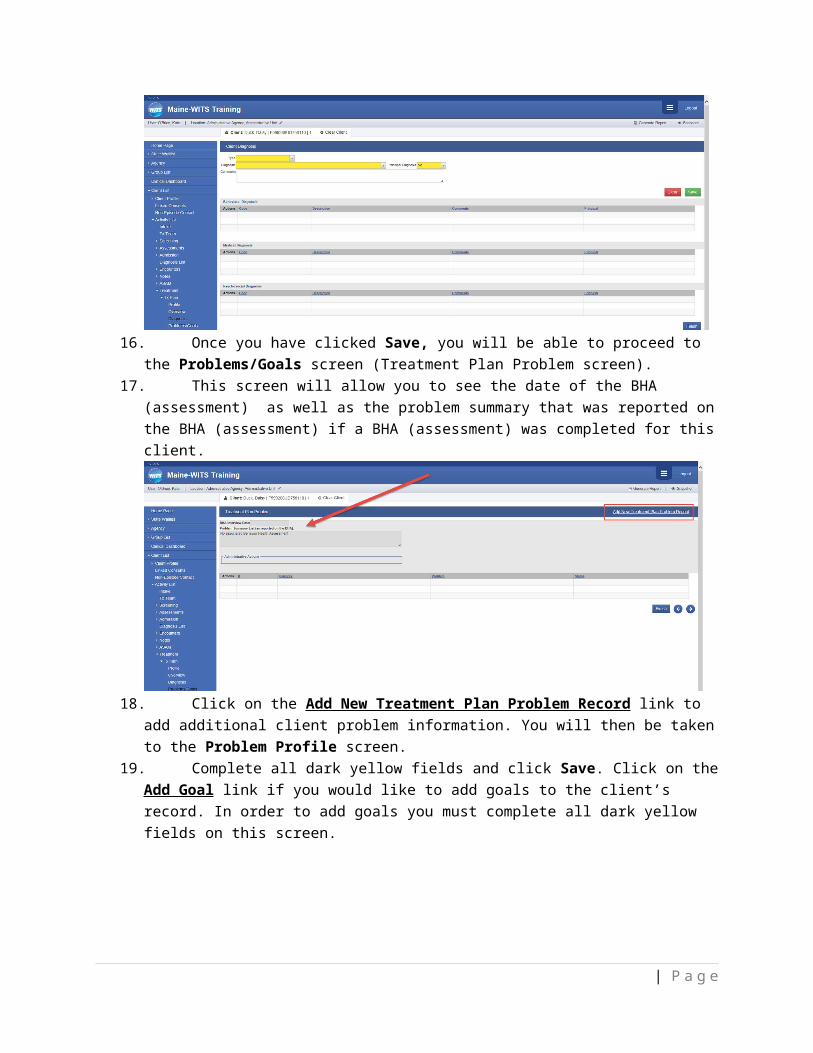
18. Click on the Add New Treatment Plan Problem Record link to add additional client problem information. You will then be taken to the Problem Profile screen.
19. Complete all dark yellow fields and click Save. Click on the Add Goal link if you would like to add goals to the client’s record. In order to add goals you must complete all dark yellow fields on this screen.
20. In order to add Goals you must associate it with a Problem, which we already entered on the previous screen.
21. Complete all dark yellow fields and click Save. Once you have entered a Goal and clicked Save, you will be able to add an Objective to the problem/goal. You are unable to enter an Objective without having first entered a Problem and a Goal.
| P a g e

22. Once you have completed all dark yellow fields and entered an Objective, click Save. Now that you have entered an Objective, you are able to add an Intervention to the Tx Plan.
23. Complete all dark yellow fields on the Intervention screen and click Finish.
24. Once you click Finish, you will be taken back to the Objective screen. Click Finish and you will be taken back to the Goal screen. Click Finish and you will be taken back to the Problem Profile screen. Once you click Finish you will be taken back to the Treatment Plan Problem screen.
| P a g e

25. When you click Finish on the Treatment Plan Problem screen you will be taken to the Treatment Plan List screen. This screen will show all treatment plans associated with this client and the status, version, start date, and end date of each plan.
26. Now that you have entered the client’s problems, goals, objectives, and intervention, you can add planned services from the left hand navigation menu under Tx Plan. Click on Planned Services under Tx Plan.
| P a g e

27. Click on the Add New Planned Services Record link to add planned services.
28. You can view the entire treatment plan by clicking on Plan Outline on the left-hand navigation menu.
29. Treatment Reviews are available as well by clicking on the left-hand menu item Tx Review.
| P a g e

30. Medications and Vital Signs can be added to the client’s record as well, by clicking on Medications from the left-hand menu
| P a g e
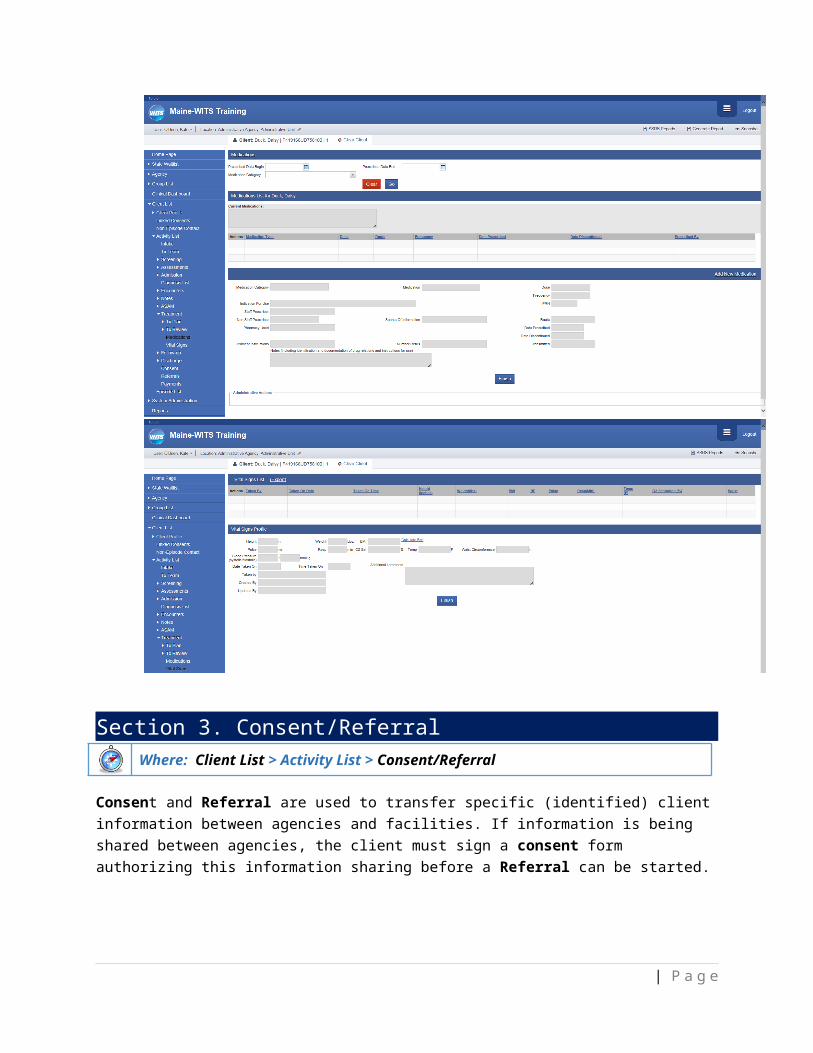
Section 3. Consent/Referral Where: Client List > Activity List > Consent/Referral
Consent and Referral are used to transfer specific (identified) client information between agencies and facilities. If information is being shared between agencies, the client must sign a consent form authorizing this information sharing before a Referral can be started.
Consents1. To create/view a Client Consent, click on the Consent link on the left navigation while in the
context of the client Activity.2. When you click on the Consent link, the Client Consent List screen will appear. You can either
review any consent or click on the Add New Client Consent Record link to add a new consent.
1. When you click on the Add New Client Consent Record link, you will be prompted with a question ‘Is this related to a waitlist record?’. If the consent is related to a waitlist record, you will click yes.
| P a g e

2. After choosing Yes, you will be asked to choose from the accepted waitlist records.
3. If the consent is not related to a waitlist record and you choose no, you will be taken to the Client Disclosure Agreement screen. Complete all dark yellow fields and any white optional fields as necessary.
4. Once the client has signed off on the Consent, the Consent record will be greyed out upon Review and no longer editable. You must choose Yes as the dropdown value for the question “Has the client signed the paper agreement form”. Choosing Yes will automatically populate today’s date in the ‘Date client signed consent’ field. You can change this date if needed for back data entry.
5. In the “Client Information Options” section, choose all items that should be shared with another entity in a read-only fashion. Note that each option you choose must have an expiration date, such as “Upon discharge plus xx days”.
6. NOTE: If you are required to obtain a new formal written consent from the client, select “NO” for “Has the client signed the paper agreement form, until you do obtain the client’s signature.
| P a g e

7. Once the client’s signature is obtained, the consent is read-only
8. When you click Save, the Client Disclosure Agreement will appear greyed out (read only) on screen. You can choose Finish, which will take you back to the Client Consent List screen where you will see the Active Client Disclosure Agreement.
| P a g e

9. Or you can choose Revoke which will prohibit further information sharing and you will be taken back to the Client Activity List screen after answering Yes to the revoke question. You will then also see on the Client Consent List that the status of that consent is revoked.
10. A completed consent can be revoked by clicking the Revoke button on Consent completion or by navigating back to Consents on client Activity List and clicking revoke on the completed Consent.
11. A revoked consent stops any further information sharing of newly created records. It does not stop the receiving agency from viewing records shared during the consented period. In this way, the electronic consent operates just like paper consented records.
| P a g e

Linked ConsentsLinked consent functionality is available to Clinical Supervisors and WITS Administrators. Linked consent feature was developed in order to allow better management of client records across agencies, and to be able to integrate consented records into client records rather than having them accessible only through the Client Search screen. This feature will allow users to manually create a link between two client records in order to indicate they are the same person, and will also allow for the ‘filing’ of consented activities into the client record.
Please see the Linked Consents User Document for more instructions.
ReferralsCreating Referrals Out
1. To create or view a client referral click on Referrals on the left hand navigation menu. You will be taken to the Client Referral List screen.
2. To add a new referral record click on the Add New Client Referral Record link in the right hand corner of the screen.
a. Note that a referral may also be created by clicking on the Create Referral based on this Consent link which appears at the right top side of a signed consent profile.
b. If a client has not signed the form and the ‘Has the client signed the paper agreement form’ field is set to ‘no’, the Create Referral Using this Disclosure Agreement link will not show on the screen.
| P a g e

3. Complete all dark yellow required fields as well as any necessary optional fields in the Referred By section of the screen.
a. Programb. Reason c. Is Consent Verification Required? d. Is Consent Verified?e. Continue This Episode of Care?
i. This should be “Yes” only if you intend to transfer records. f. Referral Status
i. Should be “Pending”4. If you intend to transfer the record to another facility, you will need to complete all dark yellow
required fields as well as any necessary optional fields in the Referred To area of the screen.a. Signed Consentsb. Facilityc. Program
| P a g e

Accepting Referrals In (viewing consented records)1. For a user in the Accepting Agency to accept referrals from the referring agency, the user must
have the View Consented Clients role. 2. Click “Client List” from left menu 3. Click “Go” to do a full search or search for a client4. Scroll down to “Clients with Consents from Outside Agencies” List
5. Look for the client referred to this Agency.6. Click “Activity List” from Referred client view a list of all the activities transferred.
a. The list contains ONLY the list of activities for which consent was given. b. The activities on this list are read only and may not be re-consented to another agency.
| P a g e

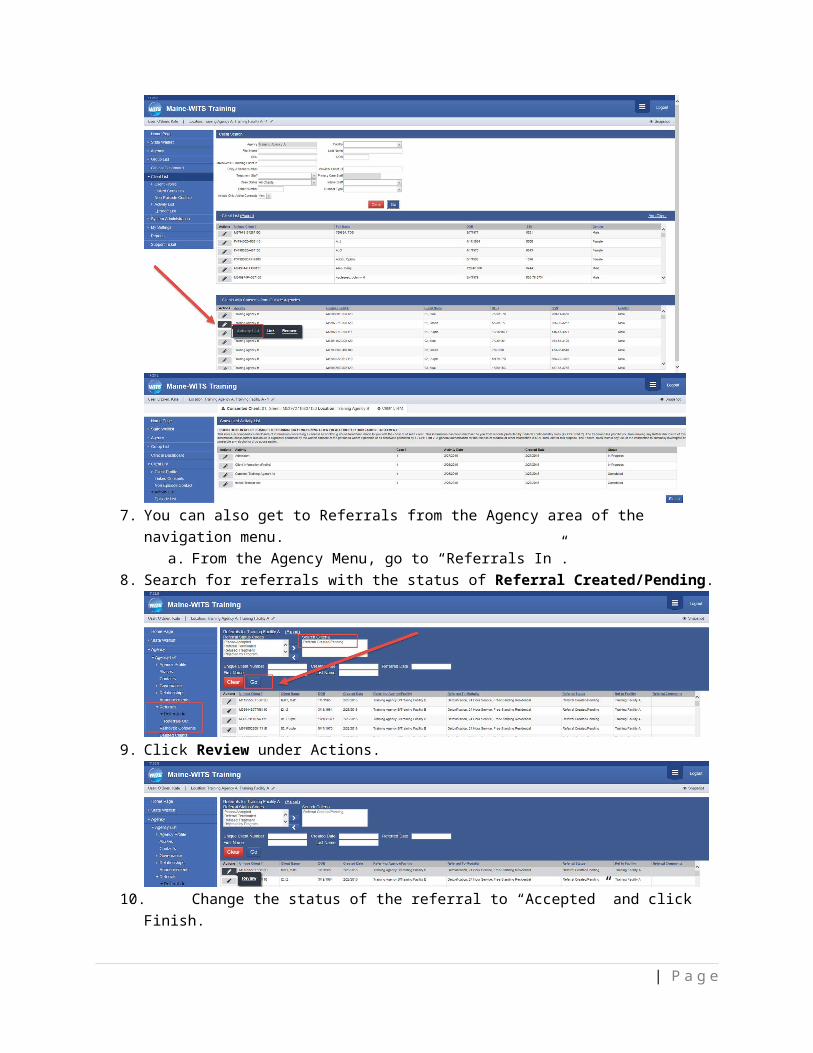
7. You can also get to Referrals from the Agency area of the navigation menu.a. From the Agency Menu, go to “Referrals In”.
8. Search for referrals with the status of Referral Created/Pending.
9. Click Review under Actions.
10. Change the status of the referral to “Accepted” and click Finish.
| P a g e

11. If you are not transferring the client record, the client profile will be copied to your agency.12. If you are transferring the client record, clicking Finish transfers the client.
Section 5. Scheduler Where: Homepage > Scheduler
The Scheduler provides a central scheduling tool for the system that allows an individual to view and modify their own or other schedules, depending on their role. The Scheduler also allows you to Create an Encounter for a client service based appointment.
1. To access the Scheduler you will do so from your Homepage.
Viewing/Searching Your Calendar2. To see your schedule for the day or another date range, use the start and end date boxes to
choose your parameters and click Refresh.
3. To view your appointment, click Review or to view your calendar click Edit/Add Schedule.
| P a g e
4. Click on the “page” icon on the appointment to view it, or on the “x” to delete the appointment.
5. Search Calendar allows the user to view a list of all appointments in a date range. Appointments may be confirmed from this screen.
• By clicking on the calendar day, you can view a different day.• You can set the calendar interval to different times.• If you have the role Manage Staff Schedules, you can use the mover box to view more
schedules side by side.
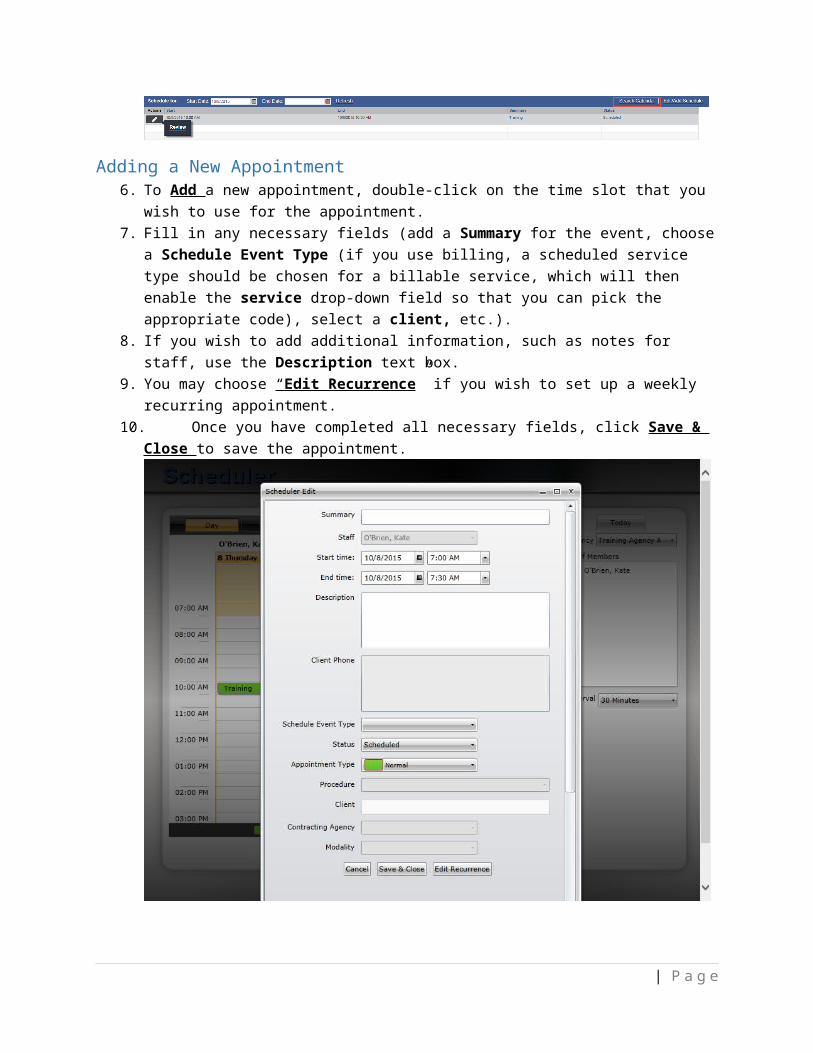
Adding a New Appointment6. To Add a new appointment, double-click on the time slot that you wish to use for the
appointment.7. Fill in any necessary fields (add a Summary for the event, choose a Schedule Event Type (if you
use billing, a scheduled service type should be chosen for a billable service, which will then enable the service drop-down field so that you can pick the appropriate code), select a client, etc.).
8. If you wish to add additional information, such as notes for staff, use the Description text box.
| P a g e

9. You may choose “ Edit Recurrence ” if you wish to set up a weekly recurring appointment.10. Once you have completed all necessary fields, click Save & Close to save the appointment.
Updating/Editing Appointments1. If necessary, the time of the appointment can be adjusted, or the appointment can be
rescheduled. 2. Appointments can be dragged to another date/time on your own calendar, or to another user’s
calendar if you have access to those calendars.3. The status should be updated if the client does not show up for the appointment, as well.4. Once the appointment is complete, you can create an encounter directly from the list screen.
Section 6. Group Notes Where: Group List
Group Notes gives the ability to facilitate the creation and management of support groups within an agency/facility. Group Notes allows users to create and manage support groups with features such as creating and editing groups, clients, sessions, and notes.
1. Group List allows the user to create new groups and build a roster of clients that will attend meetings.
| P a g e

2. Session List allows you to create a session for a group that includes a schedule, client attendees, and meeting notes. A session is different from a group profile in that it represents the actual meeting or event
3. Notes is linked to the Session List and allows you to create detailed individual patient notes, which are then carried forward to the Encounter.
4. Encounters allow you to collect notes created for an individual as well as general group notes. It then creates an encounter with its own set of notes that can be signed and sent to billing
Group Notes Workflow
Create Session Notes
Create Group Type
Create Group Profile
Add Session
Attendees
Create Group Roster
Create Group
Session
Manage Session
Attendees
Group Type1. Once your agency/facility context is selected, the first thing you must do is set up Group Types
for this facility. 2. To start, go to the Group Type screen on the left-hand navigation menu (under Group List).3. The Group Types screen allows you to categorize your groups for this facility (i.e. Alcohol,
Domestic Violence etc.). If you do not have the need to categorize your groups, you still need to create at least one Group Type before you can create a Group Profile.
4. To add a new group type you would click on the Add Group Type link. You can also Edit or Remove group types by using the action icon next to the description.
5. Once you have created your Group Types for the facility (complete the dark yellow description text box field and any other necessary optional fields), you should click Save or Finish which will bring you back to the Group List Profile/Search screen.
| P a g e
Group List:6. The Group List screen allows a user to manage all of the groups that are currently set up at each
facility.7. Click on the Group List from the left-hand navigation menu. The Group Profile List/Search
screen will appear.8. From here you can add a new group profile as well as review a group profile, delete a group
profile (once you have added sessions to a group profile it cannot be deleted), review the session list of a group, and review the group roster by clicking on the actions icon to the left of the group name.
9. To add a new group profile, click on the Add link.
| P a g e

10. You will then be taken to the Group Profile screen. Complete all dark yellow fields as well as any necessary optional fields. Once you are finished click Save.
a. Group Name: This is the name that will appear on the Group List Screen; Choose a name that is meaningful to you.
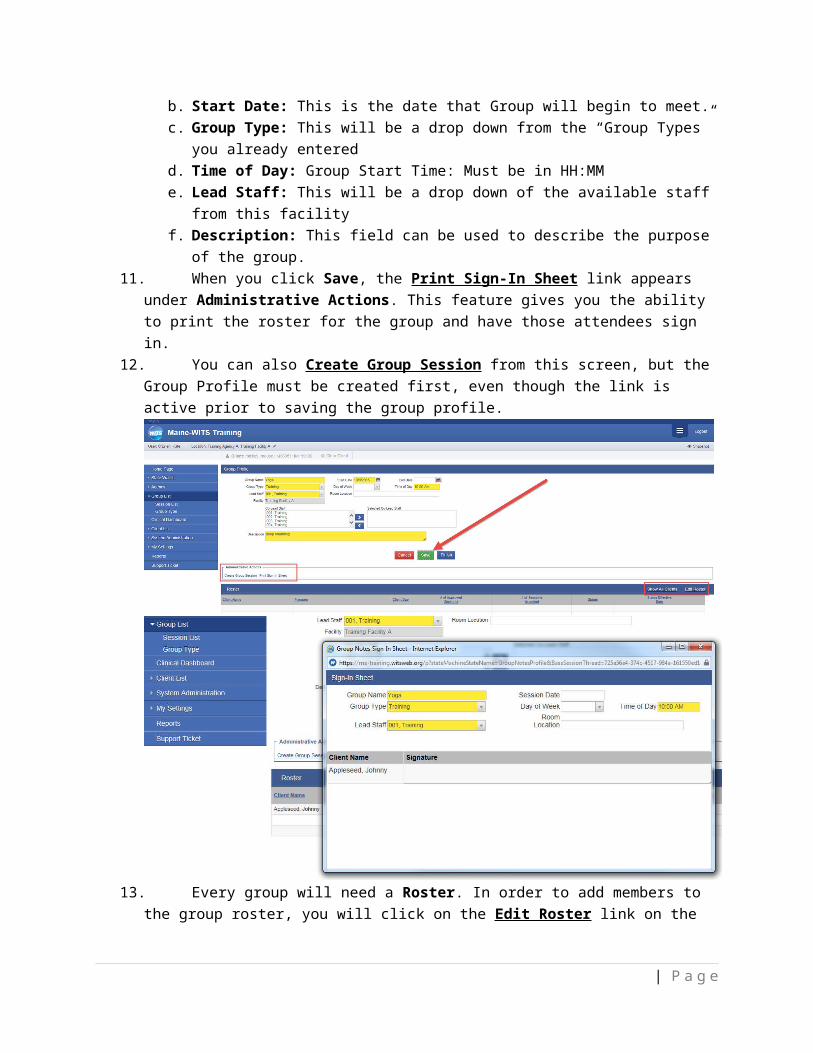
b. Start Date: This is the date that Group will begin to meet.c. Group Type: This will be a drop down from the “Group Types” you already enteredd. Time of Day: Group Start Time: Must be in HH:MMe. Lead Staff: This will be a drop down of the available staff from this facilityf. Description: This field can be used to describe the purpose of the group.
11. When you click Save, the Print Sign-In Sheet link appears under Administrative Actions. This feature gives you the ability to print the roster for the group and have those attendees sign in.
12. You can also Create Group Session from this screen, but the Group Profile must be created first, even though the link is active prior to saving the group profile.
| P a g e

13. Every group will need a Roster. In order to add members to the group roster, you will click on the Edit Roster link on the Group Profile screen. Please note, that in order to add a client to a group roster, they must be enrolled in Program.
a. Client Name: This will be a drop down with all client with open program enrollments.b. Program: If a client has more than one program enrollment, you will have to select
which program to associate with the group roster.c. Status/Status Effective Date:
i. Active: The member is currently participating in the groupii. Inactive: The member status can be changed to inactive and Reason field will be
become requirediii. Completed: A member has completed the necessary requirements for the group
and will not be included in any new sessions thereafteriv. Waiting: Use this status when a client is waiting to join a group
14. Clicking the Edit Roster link will take you to the Roster screen. To edit the roster, click on the Add Member link.
15. Complete any dark yellow fields as well as any necessary optional fields and click Save. You will then see the client at the top of the screen on the Roster screen.
| P a g e

16. Click Finish to return to the Group Profile screen. From here, click Finish to return to the Group Profile List/Search screen.
Session List17. Once you have created your Group Profile and added members to your Group Roster, you will
need to create a session each time the group plans to meet. A session is different from a Group Profile in that it represents the actual meeting or event.
18. From the Group Profile List screen, you must choose a group by selecting the Review link. Once clicked, you will now see the Group Profile screen.
19. Click on the Create Group Session link located above the Roster title bar in the Administrative Actions area. The Group Session Notes screen will appear.
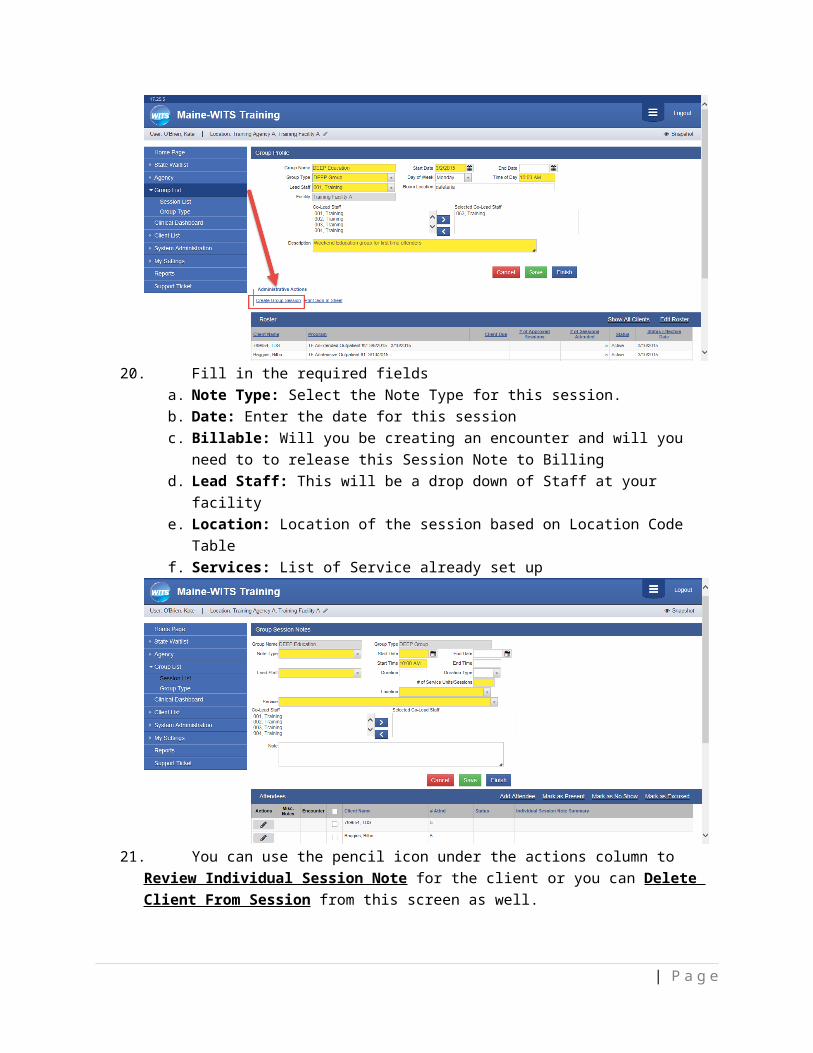
20. Fill in the required fieldsa. Note Type: Select the Note Type for this session. b. Date: Enter the date for this sessionc. Billable: Will you be creating an encounter and will you need to to release this Session
Note to Billingd. Lead Staff: This will be a drop down of Staff at your facilitye. Location: Location of the session based on Location Code Tablef. Services: List of Service already set up
| P a g e
21. You can use the pencil icon under the actions column to Review Individual Session Note for the client or you can Delete Client From Session from this screen as well.
22. You can also add an attendee to the session, but before you can add an attendee to an existing session you must first make sure that they have been added to the Group Roster. If they are not in the Group Roster, the client will not be available in to be added as an attendee.
23. From the Group Session Notes Screen, click on the Add Attendee link. Notice that you are on the “Individual Notes” screen. From the Client Name dropdown, select your client.
| P a g e

24. Next enter in a brief note about the client. You can always edit the note later, but you will need to enter in some information in order to proceed with adding the client to the attendees list. Click Finish once you are done.
25. The ability to manage an attendee can be done from the Group Session Notes screen. 26. Once an attendee has been added to a session, they will appear in the Attendees list on the
Group Session Notes screen. 27. Select the clients from the Attendees list by clicking on the selection box located to the left of
the client’s name. 28. You can mark several clients as Present, Absent, or Excused from the group and Click SAVE.
Note that the # Attended and Status will change.
29. There are four types of notes that can be created within a session:a. General Session Note
| P a g e

b. Individual Note - specific to a clientc. Miscellaneous Note - specific to a client, not billabled. Encounter Note - specific to a client and required for billing.
30. Notes can be signed by authorized individuals, making them permanent records that are carried forward to Misc. Notes and Encounter Notes (for billing).
31. General Session Note:a. In the “Group Session Notes” screen you will notice a large text field called Note.
Continue and type directly into the note field entering only information you believe is pertinent to the group session.
b. After you have completed entering your information, click SAVE.
32. Individual Note:a. On the “Group Session Notes” screen select a client and click on the Review Link
located under the Actions column. b. The new screen on your desktop should be titled “Individual Notes.” Enter your
information and click FINISH. c. In the “Group Session Notes” screen, under the Attendees section, there is now a brief
description of the note just created that appears in the Individual Note Summary column.
| P a g e
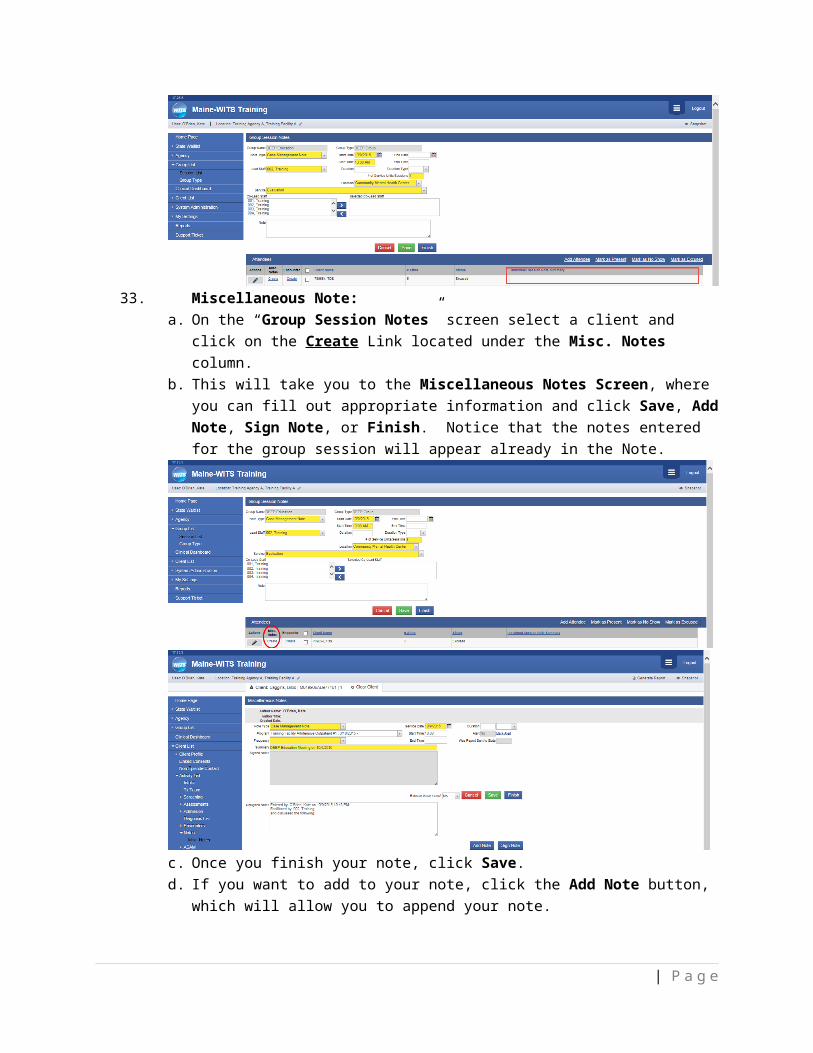
33. Miscellaneous Note:a. On the “Group Session Notes” screen select a client and click on the Create Link located
under the Misc. Notes column.b. This will take you to the Miscellaneous Notes Screen, where you can fill out appropriate
information and click Save, Add Note, Sign Note, or Finish. Notice that the notes entered for the group session will appear already in the Note.
c. Once you finish your note, click Save.
| P a g e

d. If you want to add to your note, click the Add Note button, which will allow you to append your note.
e. Enter text into the Append Notes text box and click Finish, which will take you back to the Miscellaneous Notes screen. You can see where the Appended Note was added.
| P a g e

f. Once you have finished entering in your notes, click the Sign Note button. You will now see the Unsigned Notes text has populated into the Signed Notes text box and is read only. You can continue to add more notes if needed.
g. When you are done, click Finish, and you will be returned to the Group Session Notes screen. Note that link under the Misc. Notes column has now changed to View instead of Create. Use this action to view the notes previously created.
34. Encounter Note
| P a g e

a. On the Group Session Notes screen select a client and click on the Create link located under the Encounter column.
b. This will take you to the Encounter screen. Complete all of the dark yellow required fields and any necessary optional fields. Note that the notes entered for the group session will populate in the Encounter.
c. Note that the Encounter Note must have a Duration and Duration Type (this can be added on the Encounter screen or on the Group Session Note screen which populates into the Encounter screen) in order to Finish the Encounter note.
d. Click Save and continue through the Encounter screens using the blue arrow navigation
button. Complete the Encounter Notes screen and click Save or Finish. e. You can append/add to the note by clicking the Add Note button. You can sign the note
by clicking the Sign Note button. Once you sign the note the unsigned notes will populate into the signed notes text box and appear as read only.
| P a g e
f. When you click Finish you will be taken back to the Group Session Notes screen. You will see that the Encounter link has changed from Create to View.
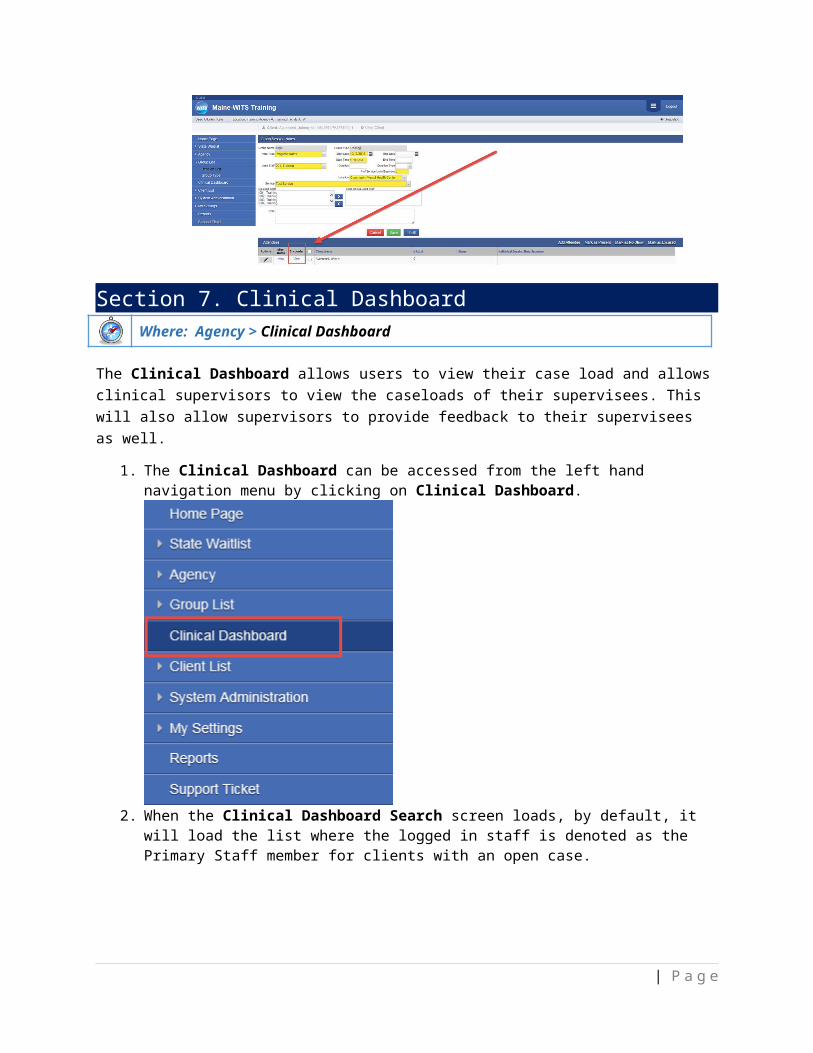
Section 7. Clinical Dashboard Where: Agency > Clinical Dashboard
The Clinical Dashboard allows users to view their case load and allows clinical supervisors to view the caseloads of their supervisees. This will also allow supervisors to provide feedback to their supervisees as well.
1. The Clinical Dashboard can be accessed from the left hand navigation menu by clicking on Clinical Dashboard.
| P a g e

2. When the Clinical Dashboard Search screen loads, by default, it will load the list where the logged in staff is denoted as the Primary Staff member for clients with an open case.
3. The top of the screen can be used to filter the list displayed. 4. If the logged in staff is a clinical supervisor, the primary staff list will display all the staff that
have the current staff person as their clinical supervisor (in the staff set up), as well as the context staff person.
5. Any text that is underlined is a link, and when clicked, it will take the user to the corresponding part of the client’s record.
6. Hovering over the pencil action icon will reveal the Notes link where staff can access and print notes, and supervisors can create new Misc. or Encounter Notes.
| P a g e

7. Notes is a place for supervisors to provide input/feedback or notes about a case, specifically to a staff member. Client cases that have unread notes will be highlighted in Red.
8. When Supervisors, click on the Notes link, they will be taken to the Notes Search/List screen which is also under the Activity List > Notes on the left hand navigation menu.
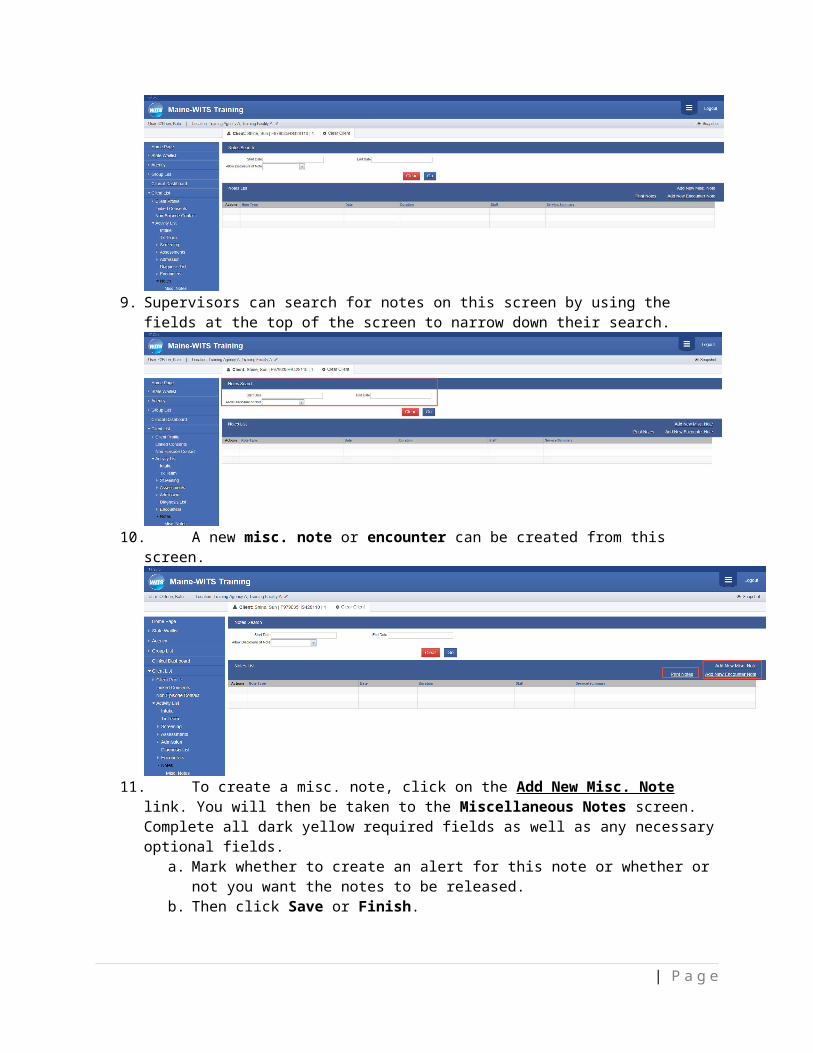
9. Supervisors can search for notes on this screen by using the fields at the top of the screen to narrow down their search.
| P a g e

10. A new misc. note or encounter can be created from this screen.
11. To create a misc. note, click on the Add New Misc. Note link. You will then be taken to the Miscellaneous Notes screen. Complete all dark yellow required fields as well as any necessary optional fields.
a. Mark whether to create an alert for this note or whether or not you want the notes to be released.
b. Then click Save or Finish.
12. If you choose to sign the note by clicking the Sign Note button, it will then be read only. You can also append the note, by clicking the Add Note button.
13. Supervisors can also print notes from here.
| P a g e

14. Clicking the View Feedback Summary link on the Clinical Dashboard Search screen under Administrative Actions will bring up the search screen where the results can be filtered.
15. Results may be viewed by a supervisor for one or more staff, or by the staff person.16. A staff person viewing the feedback may change the “Status” flag to “Read” to indicate that the
feedback has been reviewed.17. Feedback remains attached to the staff person’s record, even if the client is no longer their
responsibility
Section 8. Creating an Announcement Where: Homepage > Announcements
Announcements are managed by a WITS Administrator (can send announcements to all users, or to all users at a specific agency type or specific domain at the agency level) or by the Agency Administrator for
| P a g e
his/her own agency. Announcements are typically used for things such as scheduled trainings, system maintenance or other mass communications to WITS users.
1. To view Announcements that pertain to your agency, go to the Home Page of WITS.
2. Next, to view the Announcement in more detail click on the pencil action icon, then click review.
3. You will now see the Announcement screen appear. Here you can view the Announcement details.
4. When finished click Cancel to take you back to the Home Page.
Section 9. Alerts Where: Homepage > Alerts
| P a g e

Alerts were designed as an easy way to track clients and activities that are required. They are a great way to keep track of important events such as treatment plan reviews, expiring consents with important contacts etc. Alerts appear on the homepage for each user, based on the configuration setup for each alert in the agency and the user’s relationship with the client. There are many types of alerts. Alerts can be managed by the WITS Administrator (can configure alerts for the context agency or for all agencies of a particular type), Agency Administrators (can configure alerts for their agency only), and Clinical Supervisor (can review Supervisee alerts, as well as reassign those alerts to another staff).
1. Alerts can be viewed from your Home Page under the Alerts section of that screen. On your home page, you will see a list of alerts for specific clients in that section.
2. Alerts that appear in red are overdue. The checkbox column is available for information record keeping, to mark those alerts that have been reviewed. Using this checkbox to mark alerts will not stop them from displaying.
3. Agency Administrators will also have the Search in Agency link which allows them to:a. View all alerts in the agency to see if particular staff may not be completing work on
time.b. Delete alerts if they are no longer relevant (if a client leaves treatment)c. Reassign alerts to staff.
i. NOTE: If a staff member is on vacation or leave, but you do not wish to reassign their cases, you should use this function to reassign their workload temporarily to another person on staff (by name). Make sure you reassign the alert to someone working in the same facility, program and/or Unit.
ii. If a staff member’s cases need to be reassigned, go to the intake, Admission or Treatment Team page and change the staff member there. This WILL NOT
| P a g e
change current alerts, but it will ensure that future alerts are sent to the correct person.
4. Clinical Supervisors will have the Search Supervisee Alerts link, which allows them to see all of the alerts for the staff they supervise, with the same capabilities that the Agency Administrator has.
5. You can click on the pencil action icon to review the alert or to search alerts, click on the link (Search in Agency or Search Supervisee Alerts), enter the search criteria at the top of the screen and click Go.
6. You may use the ‘Assigned to’ field to search for alerts that were generated for a specific staff person.
7. Choose the action you wish to take on the alert by clicking on the pencil icon in the actions column.
8. If you wish to re-assign the alert to a different staff person, you will be asked to enter a new staff person’s name, and then click ‘Save’ or ‘Finish’.
| P a g e