Embed Size (px)
Citation preview
Find more ideas & inspiration: redheart.com
Please Note: Print this pattern using Landscape Orientation.
©2015 Coats & Clark
RedHeart.comPage 1 of 3
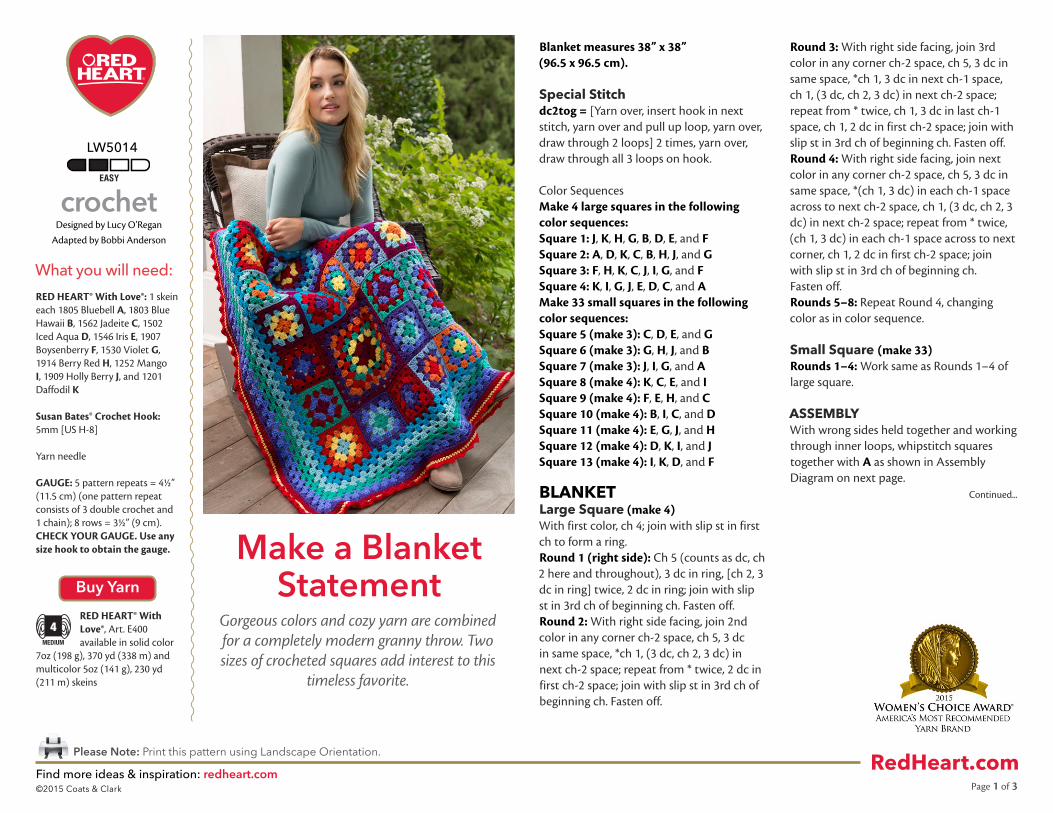
Make a Blanket Statement
RED HEART® With Love®: 1 skein each 1805 Bluebell A, 1803 Blue Hawaii B, 1562 Jadeite C, 1502 Iced Aqua D, 1546 Iris E, 1907 Boysenberry F, 1530 Violet G, 1914 Berry Red H, 1252 Mango I, 1909 Holly Berry J, and 1201 Daffodil K
Susan Bates® Crochet Hook:5mm [US H-8]
Yarn needle
GAUGE: 5 pattern repeats = 4½” (11.5 cm) (one pattern repeat consists of 3 double crochet and 1 chain); 8 rows = 3½” (9 cm). CHECK YOUR GAUGE. Use any size hook to obtain the gauge.
RED HEART® With Love®, Art. E400 available in solid color
7oz (198 g), 370 yd (338 m) and multicolor 5oz (141 g), 230 yd (211 m) skeins
LW5014
crochetDesigned by Lucy O’Regan
Adapted by Bobbi Anderson
What you will need:
Buy Yarn
Continued...
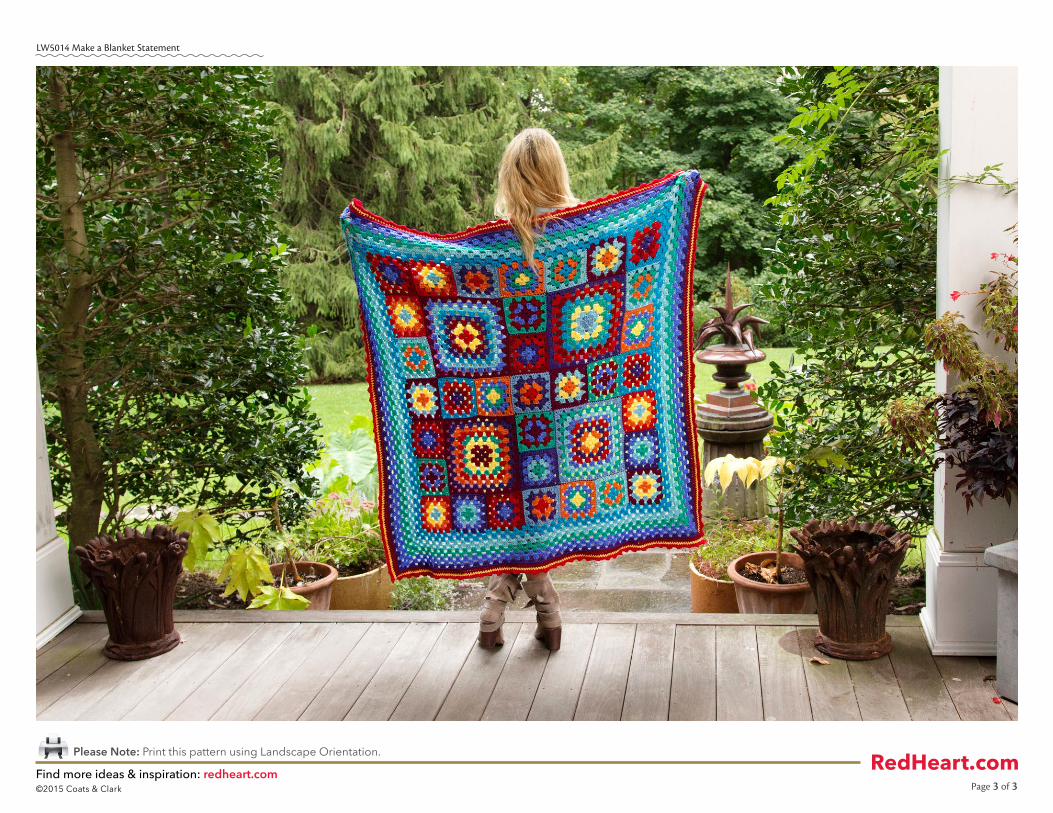
Gorgeous colors and cozy yarn are combined for a completely modern granny throw. Two sizes of crocheted squares add interest to this
timeless favorite.
Blanket measures 38” x 38” (96.5 x 96.5 cm).
Special Stitchdc2tog = [Yarn over, insert hook in next stitch, yarn over and pull up loop, yarn over, draw through 2 loops] 2 times, yarn over, draw through all 3 loops on hook.
Color SequencesMake 4 large squares in the following color sequences:Square 1: J, K, H, G, B, D, E, and FSquare 2: A, D, K, C, B, H, J, and GSquare 3: F, H, K, C, J, I, G, and FSquare 4: K, I, G, J, E, D, C, and AMake 33 small squares in the following color sequences:Square 5 (make 3): C, D, E, and GSquare 6 (make 3): G, H, J, and BSquare 7 (make 3): J, I, G, and ASquare 8 (make 4): K, C, E, and ISquare 9 (make 4): F, E, H, and CSquare 10 (make 4): B, I, C, and DSquare 11 (make 4): E, G, J, and HSquare 12 (make 4): D, K, I, and JSquare 13 (make 4): I, K, D, and F
BLANKETLarge Square (make 4)With first color, ch 4; join with slip st in first ch to form a ring. Round 1 (right side): Ch 5 (counts as dc, ch 2 here and throughout), 3 dc in ring, [ch 2, 3 dc in ring] twice, 2 dc in ring; join with slip st in 3rd ch of beginning ch. Fasten off.Round 2: With right side facing, join 2nd color in any corner ch-2 space, ch 5, 3 dc in same space, *ch 1, (3 dc, ch 2, 3 dc) in next ch-2 space; repeat from * twice, 2 dc in first ch-2 space; join with slip st in 3rd ch of beginning ch. Fasten off.
Round 3: With right side facing, join 3rd color in any corner ch-2 space, ch 5, 3 dc in same space, *ch 1, 3 dc in next ch-1 space, ch 1, (3 dc, ch 2, 3 dc) in next ch-2 space; repeat from * twice, ch 1, 3 dc in last ch-1 space, ch 1, 2 dc in first ch-2 space; join with slip st in 3rd ch of beginning ch. Fasten off.Round 4: With right side facing, join next color in any corner ch-2 space, ch 5, 3 dc in same space, *(ch 1, 3 dc) in each ch-1 space across to next ch-2 space, ch 1, (3 dc, ch 2, 3 dc) in next ch-2 space; repeat from * twice, (ch 1, 3 dc) in each ch-1 space across to next corner, ch 1, 2 dc in first ch-2 space; join with slip st in 3rd ch of beginning ch. Fasten off.Rounds 5–8: Repeat Round 4, changing color as in color sequence.
Small Square (make 33)Rounds 1–4: Work same as Rounds 1–4 of large square.
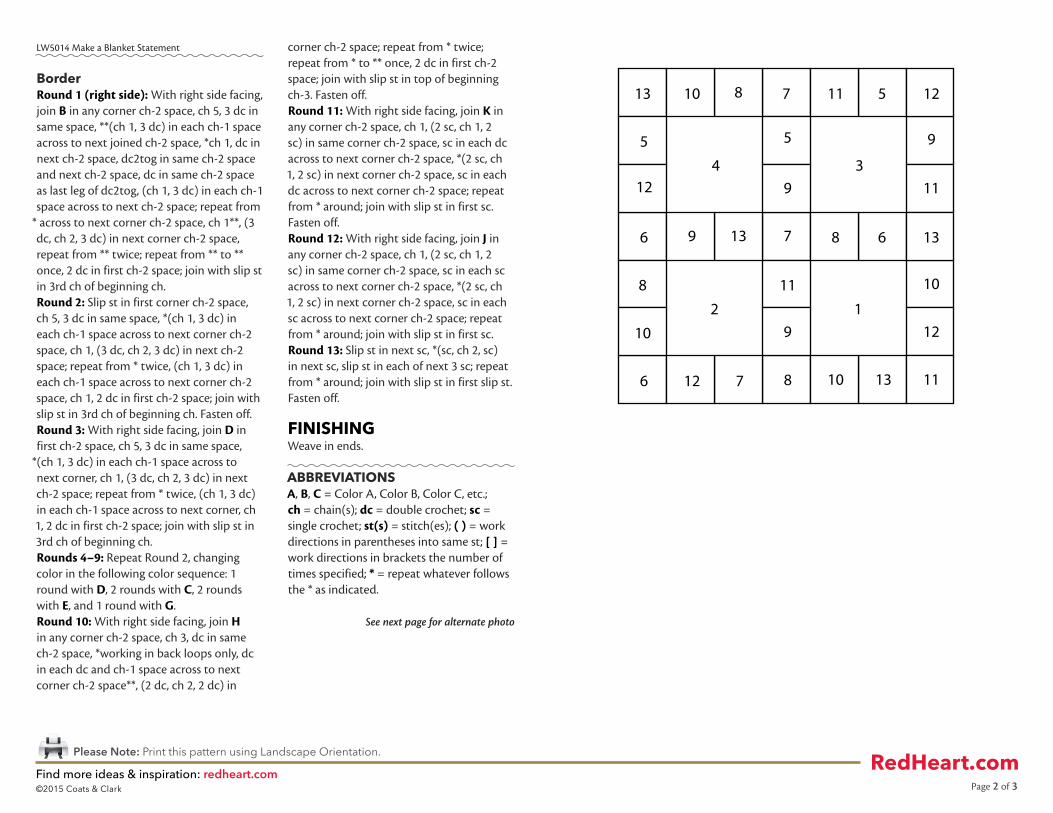
ASSEMBLYWith wrong sides held together and working through inner loops, whipstitch squares together with A as shown in Assembly Diagram on next page.
Find more ideas & inspiration: redheart.com
Please Note: Print this pattern using Landscape Orientation.
©2015 Coats & Clark
RedHeart.comPage 2 of 3
See next page for alternate photo
LW5014 Make a Blanket Statement
BorderRound 1 (right side): With right side facing, join B in any corner ch-2 space, ch 5, 3 dc in same space, **(ch 1, 3 dc) in each ch-1 space across to next joined ch-2 space, *ch 1, dc in next ch-2 space, dc2tog in same ch-2 space and next ch-2 space, dc in same ch-2 space as last leg of dc2tog, (ch 1, 3 dc) in each ch-1 space across to next ch-2 space; repeat from
* across to next corner ch-2 space, ch 1**, (3 dc, ch 2, 3 dc) in next corner ch-2 space, repeat from ** twice; repeat from ** to ** once, 2 dc in first ch-2 space; join with slip st in 3rd ch of beginning ch.Round 2: Slip st in first corner ch-2 space, ch 5, 3 dc in same space, *(ch 1, 3 dc) in each ch-1 space across to next corner ch-2 space, ch 1, (3 dc, ch 2, 3 dc) in next ch-2 space; repeat from * twice, (ch 1, 3 dc) in each ch-1 space across to next corner ch-2 space, ch 1, 2 dc in first ch-2 space; join with slip st in 3rd ch of beginning ch. Fasten off.Round 3: With right side facing, join D in first ch-2 space, ch 5, 3 dc in same space,
*(ch 1, 3 dc) in each ch-1 space across to next corner, ch 1, (3 dc, ch 2, 3 dc) in next ch-2 space; repeat from * twice, (ch 1, 3 dc) in each ch-1 space across to next corner, ch 1, 2 dc in first ch-2 space; join with slip st in 3rd ch of beginning ch.Rounds 4–9: Repeat Round 2, changing color in the following color sequence: 1 round with D, 2 rounds with C, 2 rounds with E, and 1 round with G.Round 10: With right side facing, join H in any corner ch-2 space, ch 3, dc in same ch-2 space, *working in back loops only, dc in each dc and ch-1 space across to next corner ch-2 space**, (2 dc, ch 2, 2 dc) in
corner ch-2 space; repeat from * twice; repeat from * to ** once, 2 dc in first ch-2 space; join with slip st in top of beginning ch-3. Fasten off.Round 11: With right side facing, join K in any corner ch-2 space, ch 1, (2 sc, ch 1, 2 sc) in same corner ch-2 space, sc in each dc across to next corner ch-2 space, *(2 sc, ch 1, 2 sc) in next corner ch-2 space, sc in each dc across to next corner ch-2 space; repeat from * around; join with slip st in first sc. Fasten off.Round 12: With right side facing, join J in any corner ch-2 space, ch 1, (2 sc, ch 1, 2 sc) in same corner ch-2 space, sc in each sc across to next corner ch-2 space, *(2 sc, ch 1, 2 sc) in next corner ch-2 space, sc in each sc across to next corner ch-2 space; repeat from * around; join with slip st in first sc. Round 13: Slip st in next sc, *(sc, ch 2, sc) in next sc, slip st in each of next 3 sc; repeat from * around; join with slip st in first slip st. Fasten off.
FINISHINGWeave in ends.
ABBREVIATIONSA, B, C = Color A, Color B, Color C, etc.; ch = chain(s); dc = double crochet; sc = single crochet; st(s) = stitch(es); ( ) = work directions in parentheses into same st; [ ] = work directions in brackets the number of times specified; * = repeat whatever follows the * as indicated.
12
4 3
13 10 8 7 11 5 12
5
12
8
10
5
9
9
11
6 9 13 7 8 6 13
11
9
10
12
6 12 7 8 10 13 11
LW5014 BLANKET STATEMENT ASSEMBLY DIAGRAM
Find more ideas & inspiration: redheart.com
Please Note: Print this pattern using Landscape Orientation.
©2015 Coats & Clark
RedHeart.comPage 3 of 3
LW5014 Make a Blanket Statement