Embed Size (px)
Citation preview

Manage My Profile
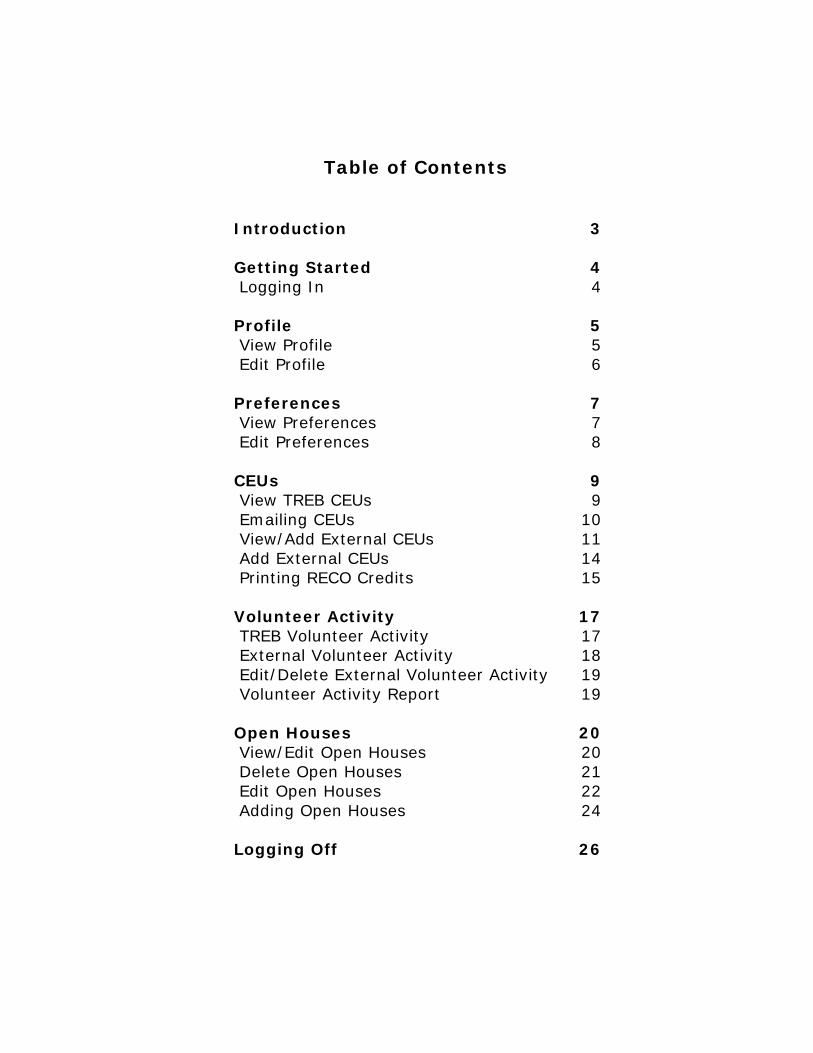
Table of Contents
Introduction 3 Getting Started 4 Logging In 4 Profile 5 View Profile 5 Edit Profile 6 Preferences 7 View Preferences 7 Edit Preferences 8 CEUs 9 View TREB CEUs 9 Emailing CEUs 10 View/Add External CEUs 11 Add External CEUs 14 Printing RECO Credits 15 Volunteer Activity
17
TREB Volunteer Activity 17 External Volunteer Activity 18 Edit/Delete External Volunteer Activity 19 Volunteer Activity Report 19 Open Houses 20 View/Edit Open Houses 20 Delete Open Houses 21 Edit Open Houses 22 Adding Open Houses 24 Logging Off 26

Introduction
Manage My Profile was created to enable the Members to access their personal information as well as the information which the Members may want to control. This includes access to their profile information stored in TREB's Membership system, preference information including settings for email and security, CEU credit information, and access to a new Open House Application which will allow them to store public open house information to display on the Toronto Real Estate Board's public website.
From Profile, Members will have access to view the Membership profile TREB maintains, as well as have access to edit/update some fields. From Preferences, Members will have access to view and edit some email, security, and miscellaneous fields. From CEUs, Members will be able to add external CEUs, view the number of CEU credits they currently carry, and print the RECO Declaration of Continuing Education Report. And finally, Open Houses, provides access for Members to the new Open House module for public open houses. Members will have access to view their public open houses, add new public open houses, edit their public open houses that are already stored, as well as remove them.
This document will take the user through the Manage My Profile system module by module. It will outline basic functionality as well as provide step by step instructions for specific parts of the system.
Should you require any additional information please call the Help Desk at 416-443-8111.

Getting Started
Logging In
From TorontoMLS click the Manage My Profile link.
If you are entering via your browser directly you will have to login completely, from TorontoMLS start from step 2:
1. In the User ID field type your TorontoMLS username 2. In the Password field type your TorontoMLS password from before the Authenticators
(it is not your 4 digit pin). 3. Click Sign On.
Once you log in you will be brought to the Home screen. If you entered via TorontoMLS you will go directly to this screen.
At any time you can return to this screen by clicking Home on the menu bar.

Profile The Profile module of Manage My Profile provides Members access to view the Membership profile TREB maintains on them. Each Member only has access to view their own profile information as well as have access to edit/update some fields from that profile. View Profile Click on the Profile Tab at the top of the Manage My Profile screen.
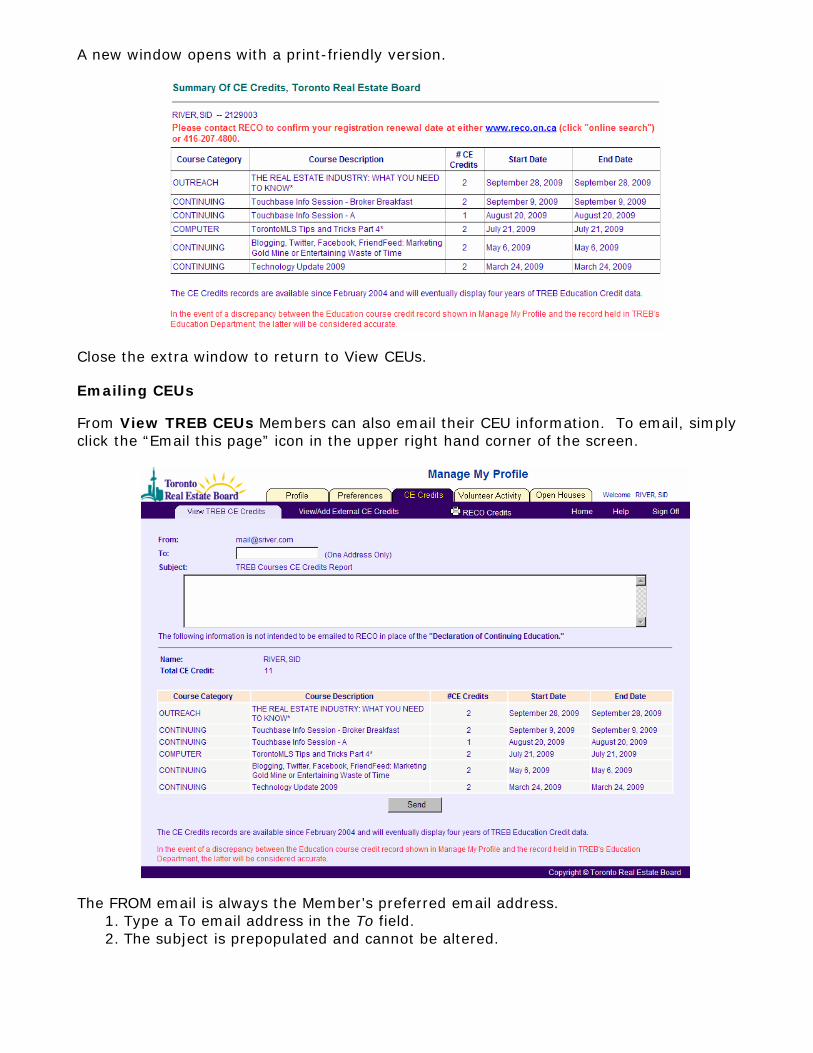
To print, simply click the “Print this page” icon in the upper right hand corner of the screen. A new window opens with a print-friendly version.
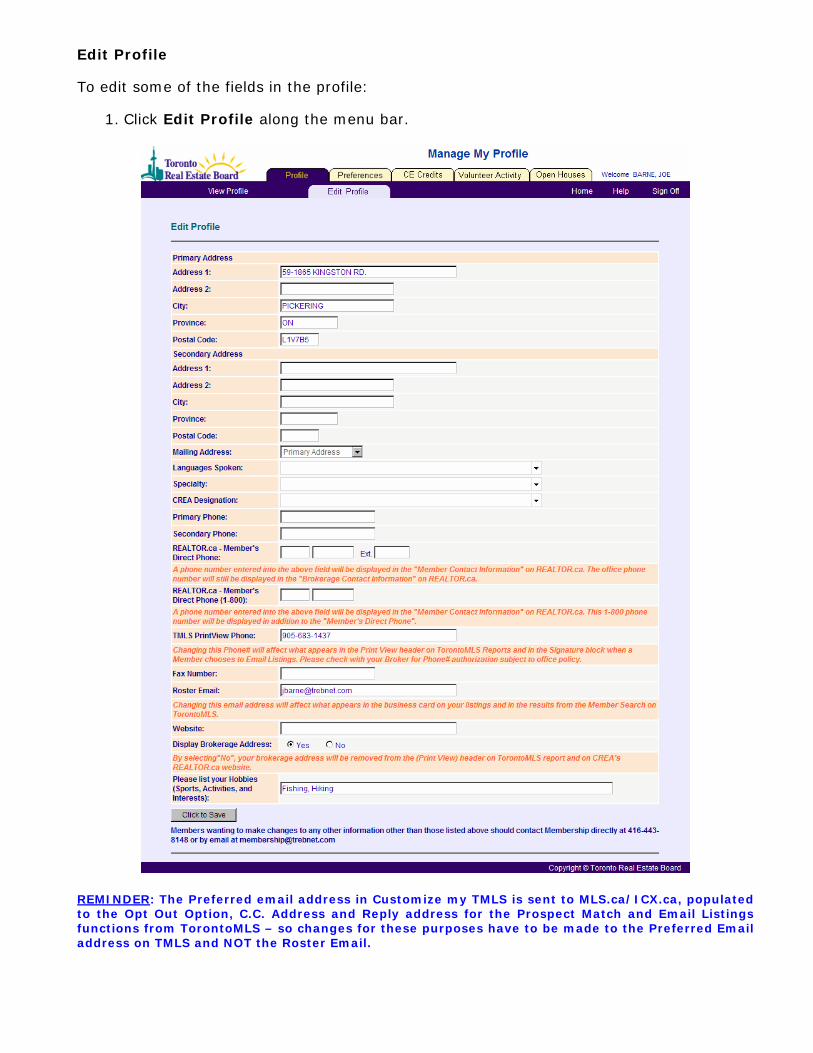
Edit Profile To edit some of the fields in the profile:
1. Click Edit Profile along the menu bar.
REMINDER: The Preferred email address in Customize my TMLS is sent to MLS.ca/ICX.ca, populated to the Opt Out Option, C.C. Address and Reply address for the Prospect Match and Email Listings functions from TorontoMLS – so changes for these purposes have to be made to the Preferred Email address on TMLS and NOT the Roster Email.

REMINDER: When a phone number is added in the TMLS PrintView Ph# field it will appear the following day on TorontoMLS in the header of the printed reports as well as in the signature block when a Member clicks Email Listings.
2. Highlight any information in the field that you wish to change and type in new
information. 3. Tab to move from field to field. 4. Once all your changes have been made, click the Click to Save button. 5. The View screen appears again with the confirmation of the changes made.
NOTE: Members wanting to make changes to any other information other than those listed on the Edit screen should contact Membership directly at 416-443-8111
Preferences The Preferences module of Manage My Profile provides Members access to view and edit some email, security, and miscellaneous fields. View Preferences Click on the Preferences Tab at the top of the Manage My Profile screen.
To print, simply click the “Print this page” icon in the upper right hand corner of the screen. A new window opens with a print-friendly version.

Edit Preferences
1. Click Edit Preferences along the menu bar.
2. To alter the questions or Invoicing Options simple select the new entry from the drop down.
3. Highlight any information in the field that you wish to change and type in new information.
4. Tab to move from field to field. 5. Once all your changes have been made, click the Submit button. To reset to undo
any current changes click the Reset button.
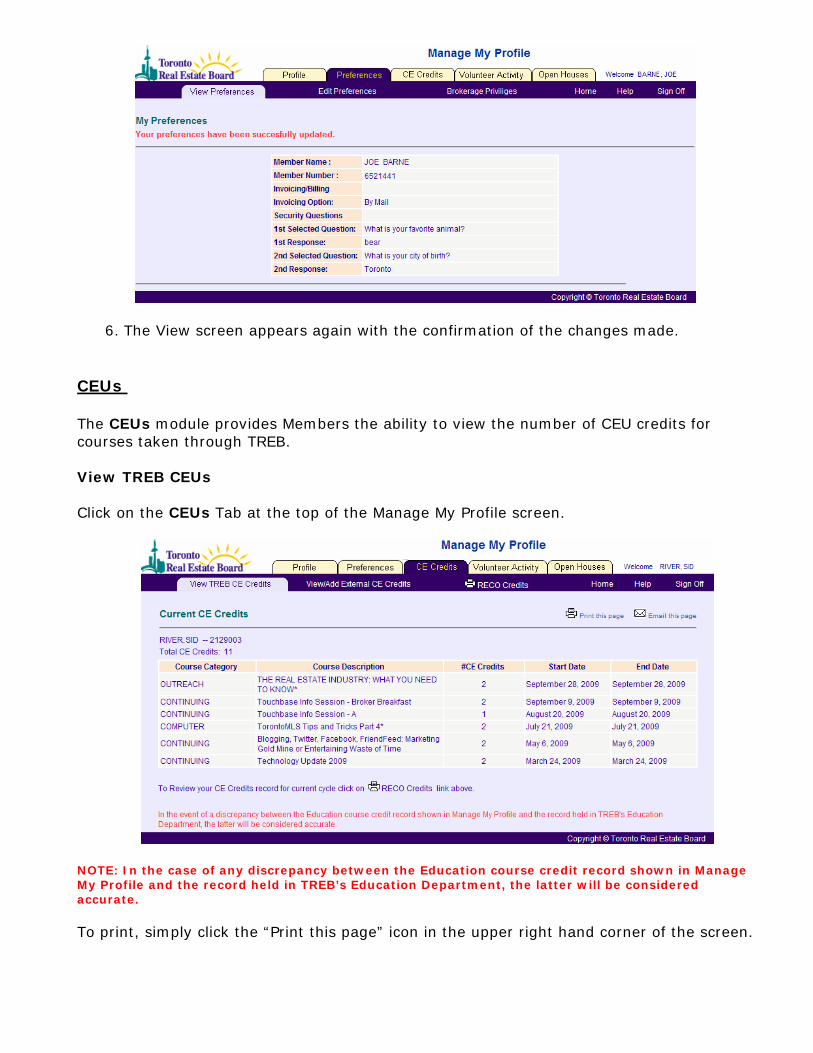
6. The View screen appears again with the confirmation of the changes made.
CEUs The CEUs module provides Members the ability to view the number of CEU credits for courses taken through TREB. View TREB CEUs
Click on the CEUs Tab at the top of the Manage My Profile screen.
NOTE: In the case of any discrepancy between the Education course credit record shown in Manage My Profile and the record held in TREB’s Education Department, the latter will be considered accurate. To print, simply click the “Print this page” icon in the upper right hand corner of the screen.
A new window opens with a print-friendly version.
Close the extra window to return to View CEUs. Emailing CEUs From View TREB CEUs Members can also email their CEU information. To email, simply click the “Email this page” icon in the upper right hand corner of the screen.
The FROM email is always the Member’s preferred email address.
1. Type a To email address in the To field. 2. The subject is prepopulated and cannot be altered.

3. Type your main message in the Message box below the Subject field. 4. When your email is complete click the Send button.
View/Add External CEUs Click on the CEUs Tab at the top of the Manage My Profile screen.
From within View/Add External CEUs Members have the ability to add and track CEU credits obtained from sources outside of TREB. To update the completion timing of the RECO Real Estate Update:
1. Click the Add hyperlink on the far right of that line 2. Using the drop downs, select the date:
• Month • Day • Year
3. Click Add to Database.
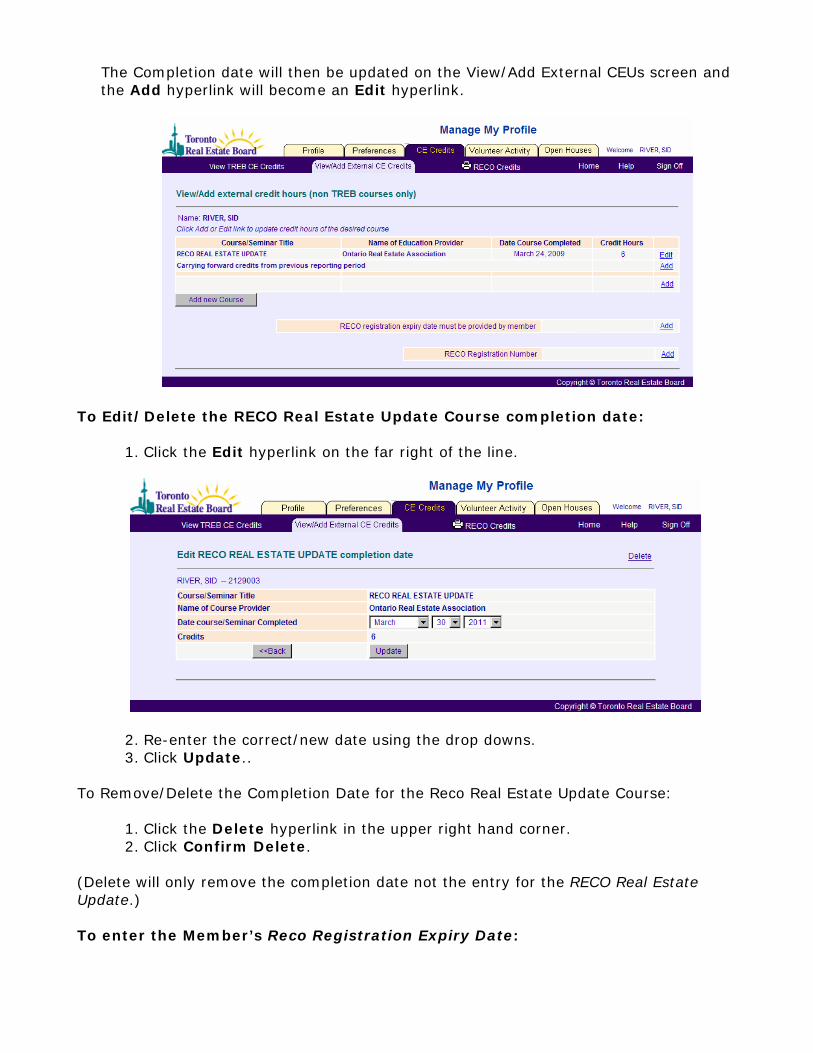
The Completion date will then be updated on the View/Add External CEUs screen and the Add hyperlink will become an Edit hyperlink.
To Edit/Delete the RECO Real Estate Update Course completion date:
1. Click the Edit hyperlink on the far right of the line.
2. Re-enter the correct/new date using the drop downs. 3. Click Update..
To Remove/Delete the Completion Date for the Reco Real Estate Update Course:
1. Click the Delete hyperlink in the upper right hand corner. 2. Click Confirm Delete.
(Delete will only remove the completion date not the entry for the RECO Real Estate Update.) To enter the Member’s Reco Registration Expiry Date:
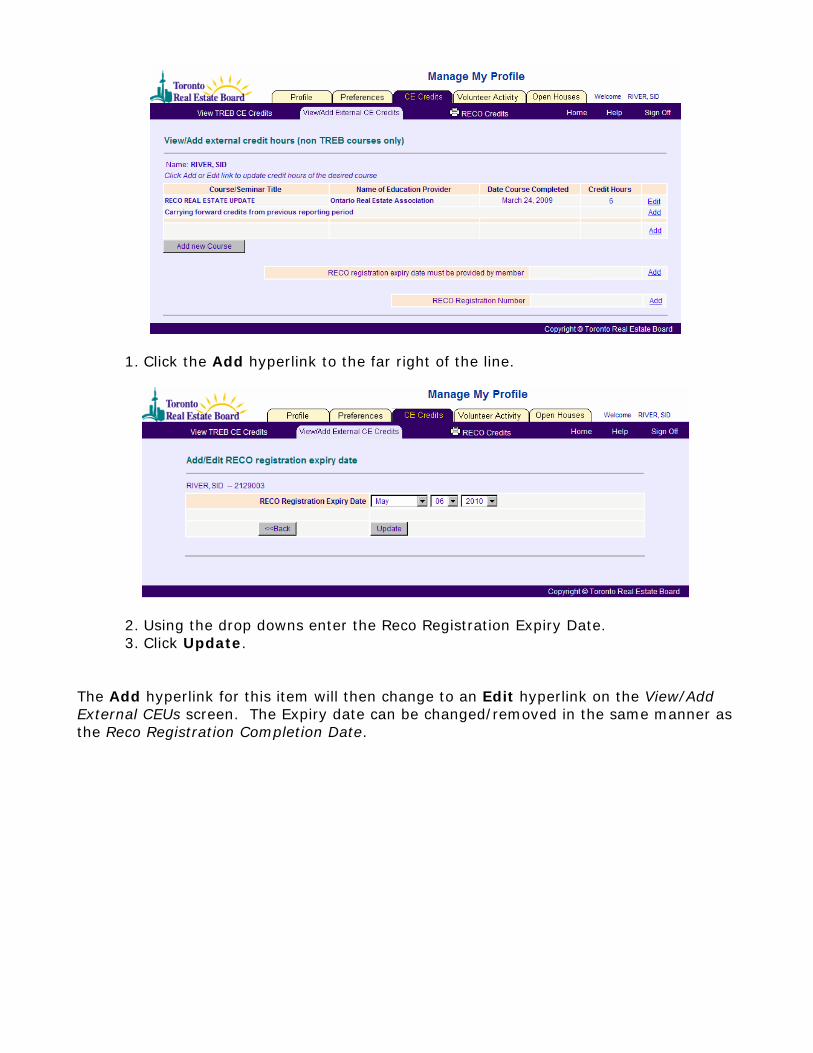
1. Click the Add hyperlink to the far right of the line.
2. Using the drop downs enter the Reco Registration Expiry Date. 3. Click Update.
The Add hyperlink for this item will then change to an Edit hyperlink on the View/Add External CEUs screen. The Expiry date can be changed/removed in the same manner as the Reco Registration Completion Date.
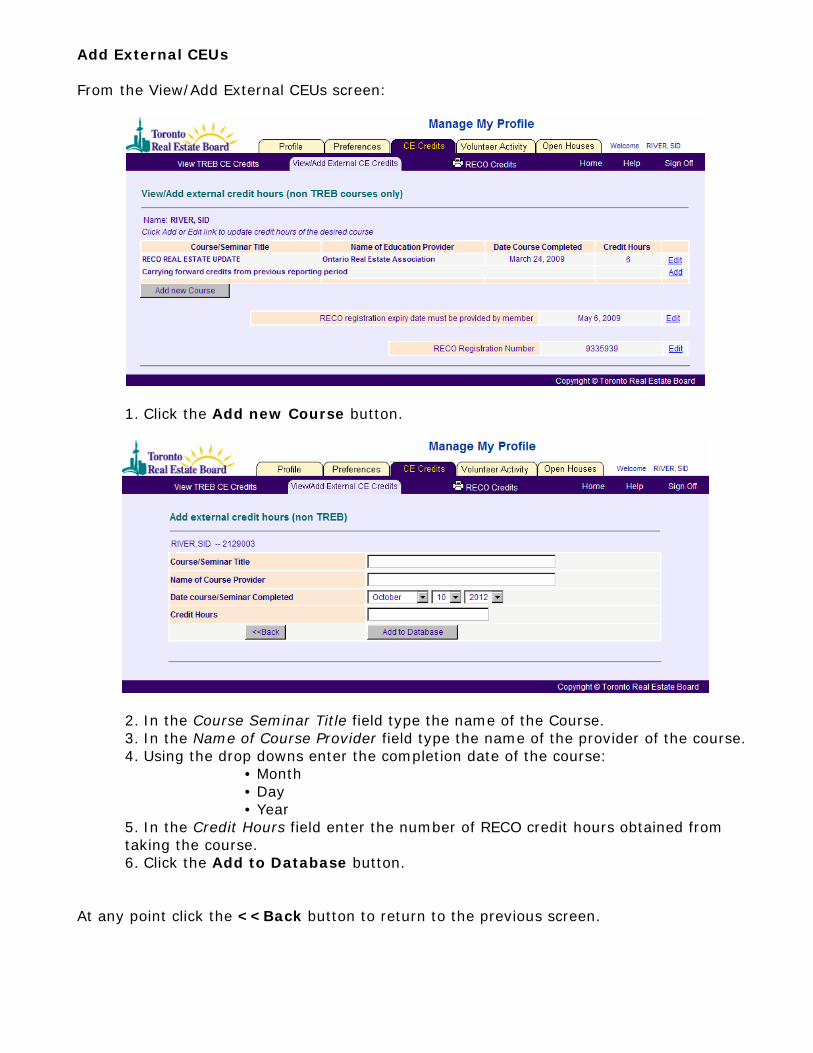
Add External CEUs From the View/Add External CEUs screen:
1. Click the Add new Course button.
2. In the Course Seminar Title field type the name of the Course. 3. In the Name of Course Provider field type the name of the provider of the course. 4. Using the drop downs enter the completion date of the course:
• Month • Day • Year
5. In the Credit Hours field enter the number of RECO credit hours obtained from taking the course.
6. Click the Add to Database button.
At any point click the <<Back button to return to the previous screen.

The course will then appear in a new section below the Reco Real Estate Update Course on the View/Add External CEUs screen. An Edit hyperlink will appear to the far right of the line for that course, this course can now be edited/deleted in the same manner as the Reco Real Estate Update Course. Printing RECO Credits/ RECO Declaration of Continuing Education From the View/Add External CEUs or View TREB CEUs screens:
1. Click the Printer icon labeled RECO Credits on the dark menu bar.


Volunteer Activity The Volunteer Activity module provides Members access to view their TREB Volunteer Activity, add and view external volunteer activity, edit or remove any external volunteer activity they have already added, as well as print a volunteer activity report. TREB Volunteer Activity Click the Volunteer Activity Tab at the top of the Manage My Profile screen. Click the TREB Volunteer Activity item on the menu line.
From here Members can view their TREB Volunteer Activity (Committee history) from 2004 onwards. To view more details on a specific volunteer activity click the hyperlinked view to the left of the activity.
From this screen, click <<Back to return to the list of TREB Volunteer Activities.
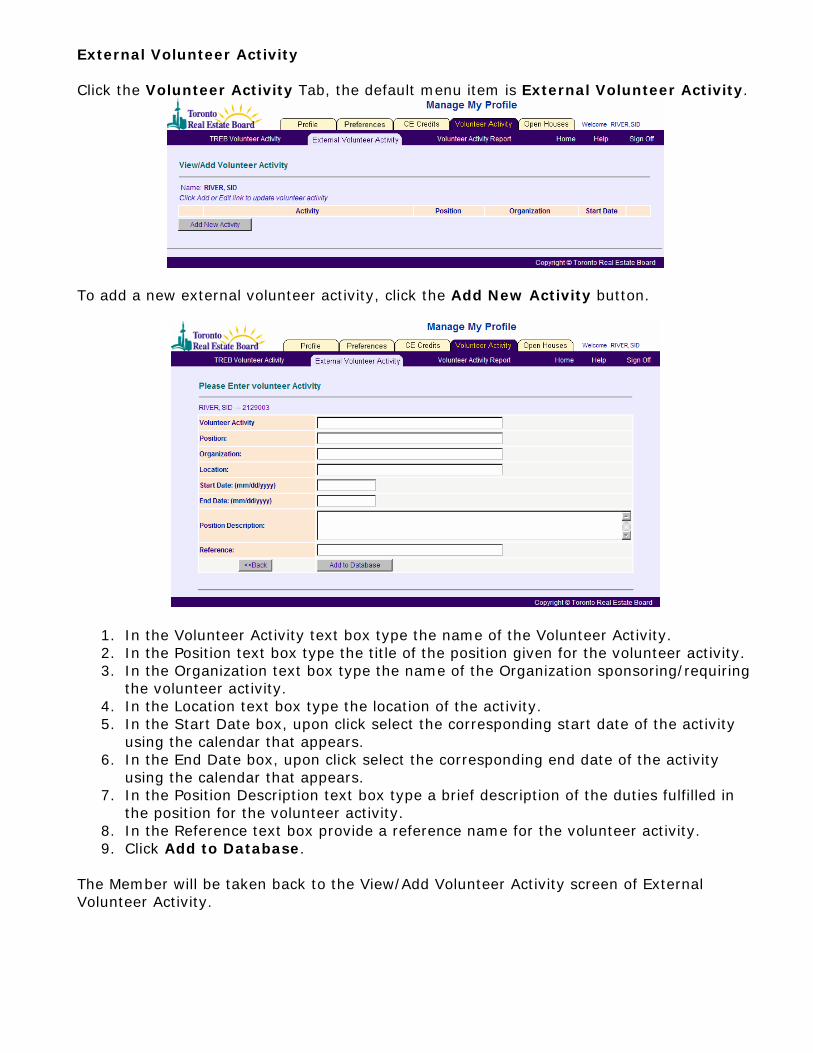
External Volunteer Activity Click the Volunteer Activity Tab, the default menu item is External Volunteer Activity.
To add a new external volunteer activity, click the Add New Activity button.
1. In the Volunteer Activity text box type the name of the Volunteer Activity. 2. In the Position text box type the title of the position given for the volunteer activity. 3. In the Organization text box type the name of the Organization sponsoring/requiring
the volunteer activity. 4. In the Location text box type the location of the activity. 5. In the Start Date box, upon click select the corresponding start date of the activity
using the calendar that appears. 6. In the End Date box, upon click select the corresponding end date of the activity
using the calendar that appears. 7. In the Position Description text box type a brief description of the duties fulfilled in
the position for the volunteer activity. 8. In the Reference text box provide a reference name for the volunteer activity. 9. Click Add to Database.
The Member will be taken back to the View/Add Volunteer Activity screen of External Volunteer Activity.
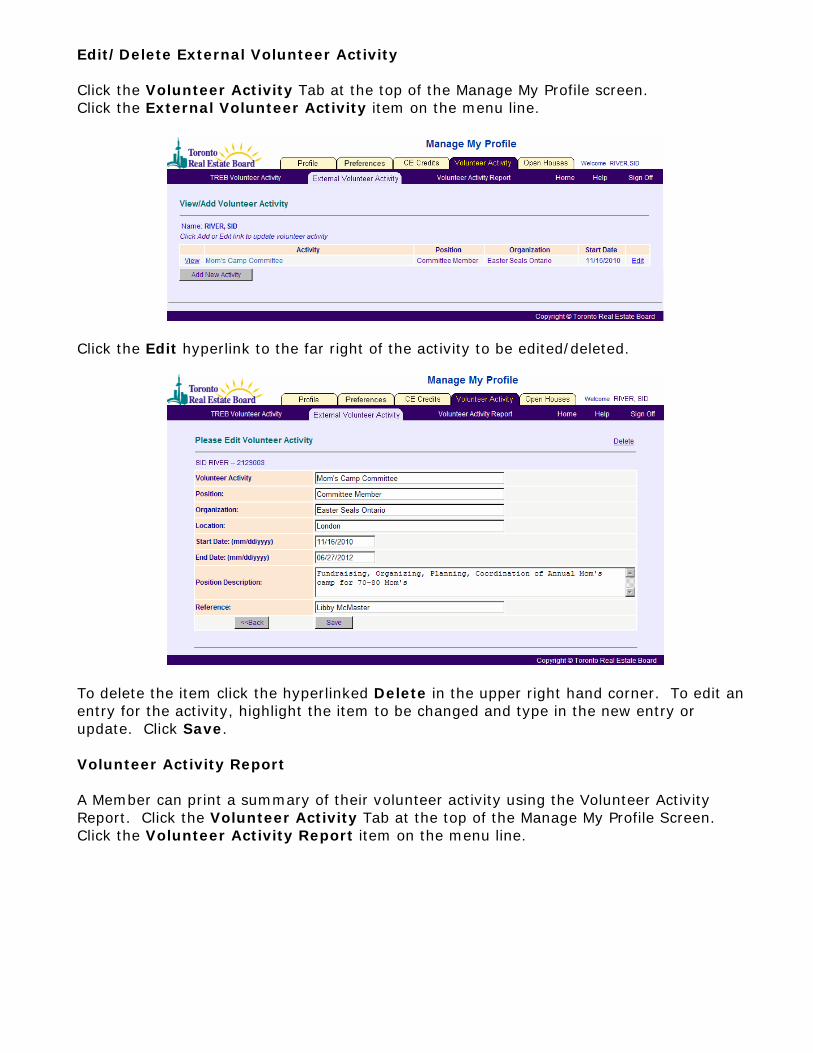
Edit/Delete External Volunteer Activity Click the Volunteer Activity Tab at the top of the Manage My Profile screen. Click the External Volunteer Activity item on the menu line.
Click the Edit hyperlink to the far right of the activity to be edited/deleted.
To delete the item click the hyperlinked Delete in the upper right hand corner. To edit an entry for the activity, highlight the item to be changed and type in the new entry or update. Click Save. Volunteer Activity Report A Member can print a summary of their volunteer activity using the Volunteer Activity Report. Click the Volunteer Activity Tab at the top of the Manage My Profile Screen. Click the Volunteer Activity Report item on the menu line.
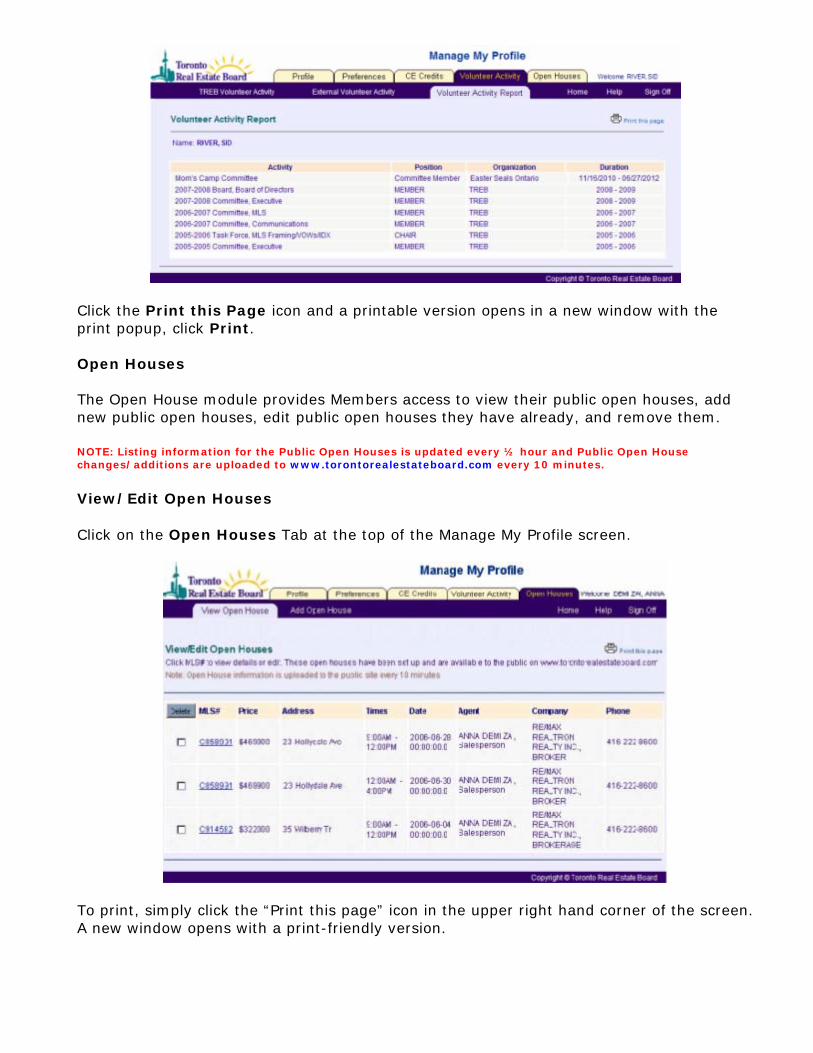
Click the Print this Page icon and a printable version opens in a new window with the print popup, click Print. Open Houses The Open House module provides Members access to view their public open houses, add new public open houses, edit public open houses they have already, and remove them. NOTE: Listing information for the Public Open Houses is updated every ½ hour and Public Open House changes/additions are uploaded to www.torontorealestateboard.com every 10 minutes.
View/Edit Open Houses Click on the Open Houses Tab at the top of the Manage My Profile screen.
To print, simply click the “Print this page” icon in the upper right hand corner of the screen. A new window opens with a print-friendly version.

Deleting Open Houses From the View/Edit Open Houses screen:
1. Click in the box next to the Open House record you wish removed. You can click in one or you can click multiple.
2. Click the Delete button.
3. Once you’ve reviewed to make sure you have the correct records selected, click OK on the confirmation popup.

4. The View/Edit screen appears again with a confirmation message. Editing Open Houses From the View/Edit Open Houses screen:
1. Click the hyperlinked MLS# of the listing for which you wish to alter the Open House.
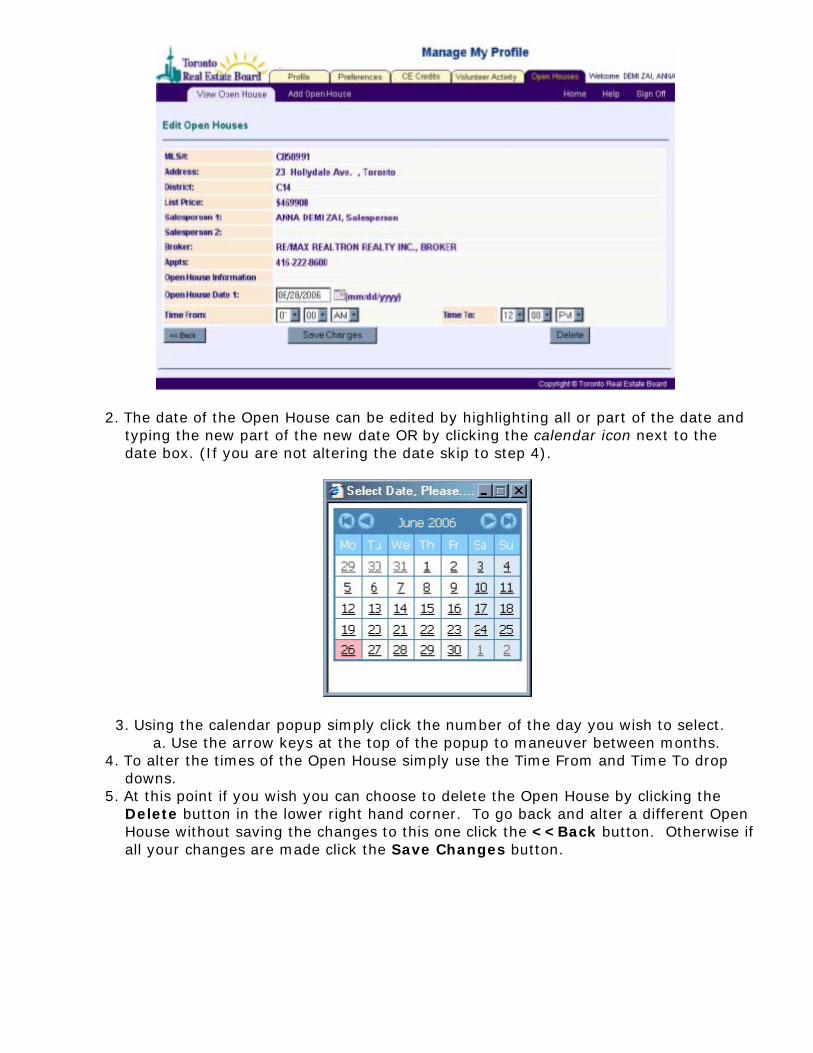
2. The date of the Open House can be edited by highlighting all or part of the date and typing the new part of the new date OR by clicking the calendar icon next to the date box. (If you are not altering the date skip to step 4).
3. Using the calendar popup simply click the number of the day you wish to select. a. Use the arrow keys at the top of the popup to maneuver between months.
4. To alter the times of the Open House simply use the Time From and Time To drop downs.
5. At this point if you wish you can choose to delete the Open House by clicking the Delete button in the lower right hand corner. To go back and alter a different Open House without saving the changes to this one click the <<Back button. Otherwise if all your changes are made click the Save Changes button.
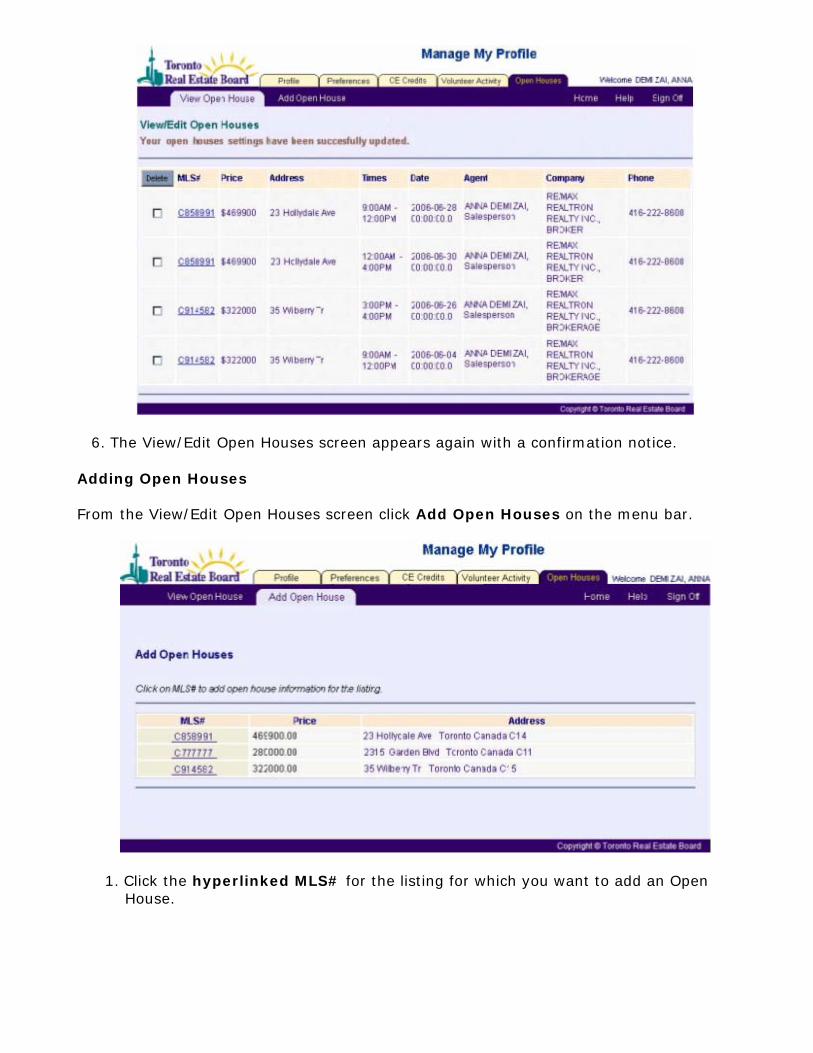
6. The View/Edit Open Houses screen appears again with a confirmation notice. Adding Open Houses From the View/Edit Open Houses screen click Add Open Houses on the menu bar.
1. Click the hyperlinked MLS# for the listing for which you want to add an Open House.

2. Using the Date dropdowns select the day you wish to schedule an open house. 3. Using the From Time dropdowns select the time you wish the open house to start. 4. Using the To Time dropdowns select the time you wish the open house to end. 5. To add another click the Add Another Open House button and repeat steps 2-4, if
you only wanted to add one Open House for this listing skip to step 10.
6. Using the Date dropdowns select the day you wish to schedule another open house. 7. Using the From Time dropdowns select the time you wish the other open house to
start. 8. Using the To Time dropdowns select the time you wish the other open house to end. 9. To add more Open Houses for this listing repeat steps 5-8

10. To save the Open Houses click the Submit button.
11. The successful screen appears, from here click the Go To MLS Listing button to return to your list of listings.
Logging Off To log off from the system at any time click the Sign Off on any screen. On the confirmation popup click OK.