Embed Size (px)
Citation preview
Manage Your Code with Git and
Iceberg
Guillermo Polito and Stéphane Ducasse with Allex Oliveira
May 12, 2020
Copyright 2017 by Guillermo Polito and Stéphane Ducasse with Allex Oliveira.
The contents of this book are protected under the Creative Commons Attribution-ShareAlike 3.0 Unported license.
You are free:
• to Share: to copy, distribute and transmit the work,
• to Remix: to adapt the work,
Under the following conditions:
Attribution. You must attribute the work in the manner specified by the author orlicensor (but not in any way that suggests that they endorse you or your use ofthe work).
Share Alike. If you alter, transform, or build upon this work, you may distribute theresulting work only under the same, similar or a compatible license.
For any reuse or distribution, you must make clear to others the license terms of thiswork. The best way to do this is with a link to this web page:http://creativecommons.org/licenses/by-sa/3.0/
Any of the above conditions can be waived if you get permission from the copyrightholder. Nothing in this license impairs or restricts the author’s moral rights.
Your fair dealing and other rights are in no way affected by the above. This is a human-readable summary of the Legal Code (the full license):http://creativecommons.org/licenses/by-sa/3.0/legalcode
Layout and typography based on the sbabook LATEX class by Damien Pollet.
Contents
Illustrations iv
1 Preamble 1
2 Getting Started with Git 3
2.1 Creating a Repository . . . . . . . . . . . . . . . . . . . . . . . . . . . . . 4
2.2 git clone . . . . . . . . . . . . . . . . . . . . . . . . . . . . . . . . . . 5
2.3 Making Changes: How does git track my Changes? . . . . . . . . . . . . . 6
2.4 Commiting your Changes . . . . . . . . . . . . . . . . . . . . . . . . . . . 9
2.5 Synchronizing with your Remote Repository . . . . . . . . . . . . . . . . . 11
2.6 Overview . . . . . . . . . . . . . . . . . . . . . . . . . . . . . . . . . . . . 15
2.7 Exercises . . . . . . . . . . . . . . . . . . . . . . . . . . . . . . . . . . . . 15
3 Understanding Git 17
3.1 Some git Internals . . . . . . . . . . . . . . . . . . . . . . . . . . . . . . 17
3.2 Understanding Detached HEAD . . . . . . . . . . . . . . . . . . . . . . . . 21
3.3 Merging history lines . . . . . . . . . . . . . . . . . . . . . . . . . . . . . 22
3.4 Commit in workflow . . . . . . . . . . . . . . . . . . . . . . . . . . . . . . 25
3.5 Creating new history lines with branches . . . . . . . . . . . . . . . . . . . 26
3.6 Interacting with Remote Repositories . . . . . . . . . . . . . . . . . . . . . 29
3.7 Exercises . . . . . . . . . . . . . . . . . . . . . . . . . . . . . . . . . . . . 34
4 Practical Git Scenarios 37
4.1 Before commit little helpers . . . . . . . . . . . . . . . . . . . . . . . . . . 37
4.2 Exploring the History . . . . . . . . . . . . . . . . . . . . . . . . . . . . . 38
4.3 Discarding your Local Committed Changes . . . . . . . . . . . . . . . . . . 40
4.4 Ignoring Files . . . . . . . . . . . . . . . . . . . . . . . . . . . . . . . . . 40
4.5 Commiting a File Filtered out by the .gitignore . . . . . . . . . . . . . . . . 41
4.6 Getting out of Detached HEAD . . . . . . . . . . . . . . . . . . . . . . . . 42
4.7 Accessing your Repository through SSH . . . . . . . . . . . . . . . . . . . . 42
4.8 Rewriting the History . . . . . . . . . . . . . . . . . . . . . . . . . . . . . 43
4.9 How to Overwrite/Modify Commits . . . . . . . . . . . . . . . . . . . . . . 44
4.10 Conclusion . . . . . . . . . . . . . . . . . . . . . . . . . . . . . . . . . . . 46
i
Contents
5 Publishing your first Pharo project with Iceberg 47
5.1 For the impatient . . . . . . . . . . . . . . . . . . . . . . . . . . . . . . . 47
5.2 Basic Architecture . . . . . . . . . . . . . . . . . . . . . . . . . . . . . . . 48
5.3 Create a new project on Github . . . . . . . . . . . . . . . . . . . . . . . . 48
5.4 [Optional] SSH setup: Tell Iceberg to use your keys . . . . . . . . . . . . . . 48
5.5 Iceberg Repositories browser . . . . . . . . . . . . . . . . . . . . . . . . . 50
5.6 Add a new project to Iceberg . . . . . . . . . . . . . . . . . . . . . . . . . 50
5.7 Repair to the rescue . . . . . . . . . . . . . . . . . . . . . . . . . . . . . . 52
5.8 Create project metadata . . . . . . . . . . . . . . . . . . . . . . . . . . . . 53
5.9 Add and commit your package using the Working copy browser . . . . . . . 54
5.10 Conclusion . . . . . . . . . . . . . . . . . . . . . . . . . . . . . . . . . . . 57
6 Configure your project nicely 59
6.1 What if I did not create a remote repository . . . . . . . . . . . . . . . . . . 60
6.2 Defining a BaselineOf . . . . . . . . . . . . . . . . . . . . . . . . . . . . 62
6.3 Loading from an existing repository . . . . . . . . . . . . . . . . . . . . . . 63
6.4 [Optional] Add a nice .gitignore file . . . . . . . . . . . . . . . . . . . . . . 63
6.5 Going further: Understanding the architecture . . . . . . . . . . . . . . . . 64
6.6 Conclusion . . . . . . . . . . . . . . . . . . . . . . . . . . . . . . . . . . . 64
7 Empowering your projects 67
7.1 Adding Travis integration . . . . . . . . . . . . . . . . . . . . . . . . . . . 67
7.2 On windows . . . . . . . . . . . . . . . . . . . . . . . . . . . . . . . . . . 68
7.3 Adding badges . . . . . . . . . . . . . . . . . . . . . . . . . . . . . . . . . 69
7.4 Conclusion . . . . . . . . . . . . . . . . . . . . . . . . . . . . . . . . . . . 69
8 Contributing to Pharo 71
8.1 In a nutshell . . . . . . . . . . . . . . . . . . . . . . . . . . . . . . . . . . 71
8.2 Step 0: Setting up the development environment . . . . . . . . . . . . . . . 71
8.3 Fork the Pharo repository . . . . . . . . . . . . . . . . . . . . . . . . . . . 72
8.4 Setup Iceberg . . . . . . . . . . . . . . . . . . . . . . . . . . . . . . . . . 72
8.5 Step 1. Setting up your repository . . . . . . . . . . . . . . . . . . . . . . . 73
8.6 Step 2: Work on your image and push your change . . . . . . . . . . . . . . 75
8.7 Step 3: Follow your pull request . . . . . . . . . . . . . . . . . . . . . . . . 76
8.8 Step 4: Once your pull request is integrated . . . . . . . . . . . . . . . . . 76
8.9 Why you do not need to resync your fork with the pharo repo? . . . . . . . 77
8.10 Update your Pharo fork using the command line . . . . . . . . . . . . . . . 77
8.11 Conclusion . . . . . . . . . . . . . . . . . . . . . . . . . . . . . . . . . . . 77
9 Tips and Tricks 79
9.1 How to use SSH keys . . . . . . . . . . . . . . . . . . . . . . . . . . . . . 79
9.2 How to contribute back to a project . . . . . . . . . . . . . . . . . . . . . . 80
9.3 How to distribute your changes in different branches . . . . . . . . . . . . 80
10 Iceberg Glossary 83
10.1 Git . . . . . . . . . . . . . . . . . . . . . . . . . . . . . . . . . . . . . . . 83
10.2 Iceberg . . . . . . . . . . . . . . . . . . . . . . . . . . . . . . . . . . . . . 85
ii

Contents
Bibliography 87
iii
Illustrations
2-1 A Repository as a timeline of changes. . . . . . . . . . . . . . . . . . . . . 3
2-2 Creating a New Repository on Github. . . . . . . . . . . . . . . . . . . . . 4
2-3 A Repository Page for a project called test in GitHub. . . . . . . . . . . . . . 5
2-4 Basic git architecture: You change the files in your working copy, commit
changes to local repository and synchronize your local repository with
remote ones. . . . . . . . . . . . . . . . . . . . . . . . . . . . . . . . . . 5
2-5 Getting the HTTPS url of your repository from GitHub. . . . . . . . . . . . . 6
2-6 Push is an operation that sends commits from your local repository to a
remote repository. . . . . . . . . . . . . . . . . . . . . . . . . . . . . . . . 13
2-7 Overview of git basic operations: add, commit, pull and push (+ extra
fetch and merge). . . . . . . . . . . . . . . . . . . . . . . . . . . . . . . 15
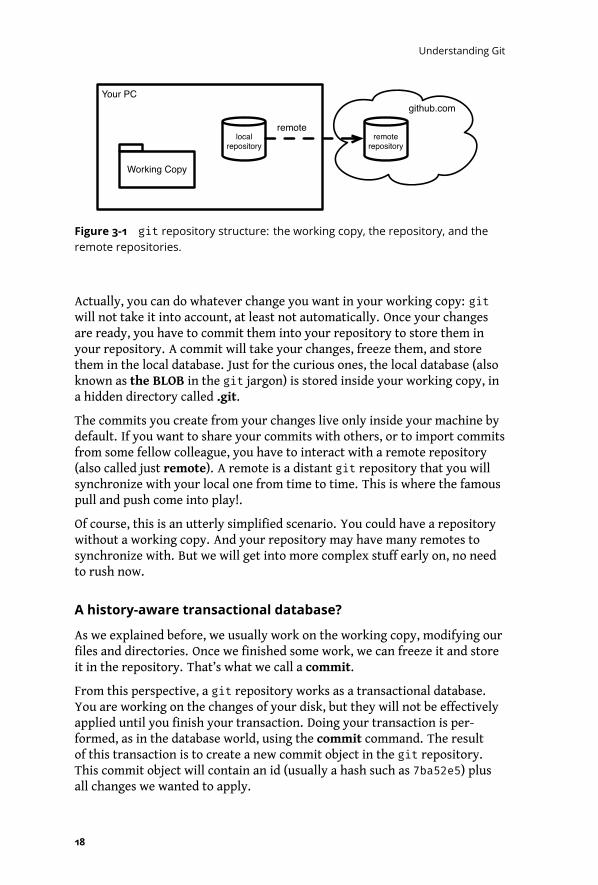
3-1 git repository structure: the working copy, the repository, and the
remote repositories. . . . . . . . . . . . . . . . . . . . . . . . . . . . . . . 18
3-2 Graph of commits. . . . . . . . . . . . . . . . . . . . . . . . . . . . . . . . 19
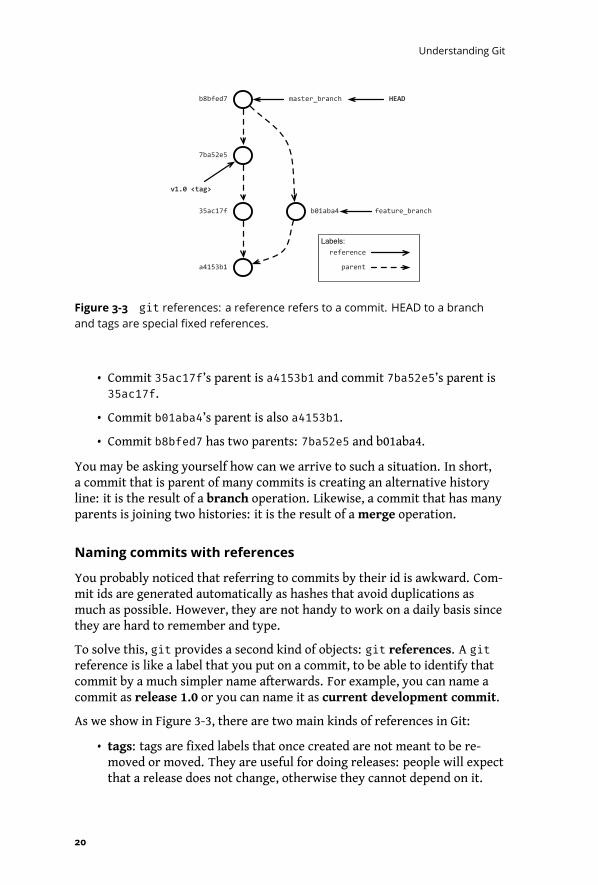
3-3 git references: a reference refers to a commit. HEAD to a branch and
tags are special fixed references. . . . . . . . . . . . . . . . . . . . . . . . 20
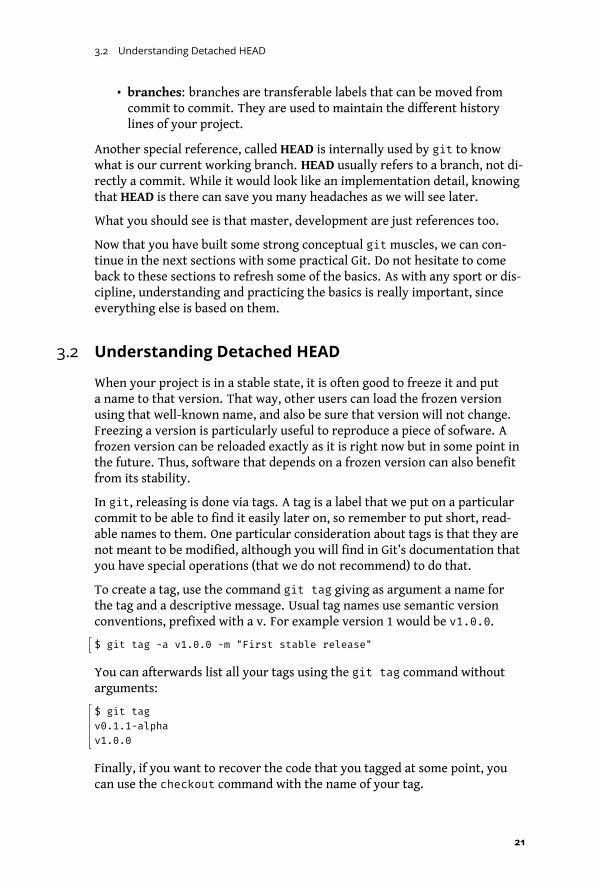
3-4 Detached HEAD after checking out a tag: HEAD refers to a commit and
not a branch anymore. . . . . . . . . . . . . . . . . . . . . . . . . . . . . 22
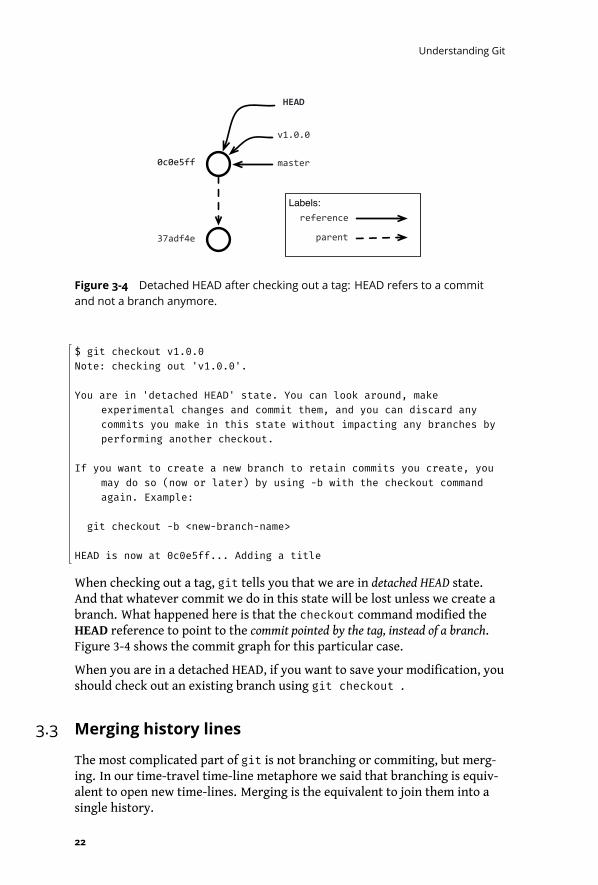
3-5 Merging the history with a merge commit. . . . . . . . . . . . . . . . . . . 23
3-6 Commit is an operation that stores things from your working copy into
your local repository. . . . . . . . . . . . . . . . . . . . . . . . . . . . . . 25
3-7 History graph after our first commit. . . . . . . . . . . . . . . . . . . . . . 26
3-8 History graph after our second commit . . . . . . . . . . . . . . . . . . . . 26
3-9 History lines can be branched from a commit. . . . . . . . . . . . . . . . . 27
3-10 A new branch points by default to the same commit as the current branch. . 27
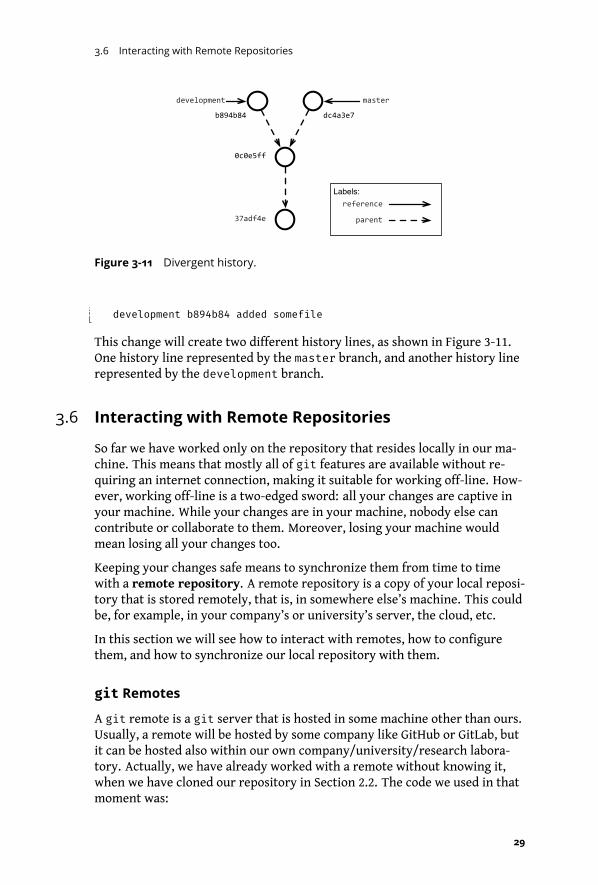
3-11 Divergent history. . . . . . . . . . . . . . . . . . . . . . . . . . . . . . . . 29
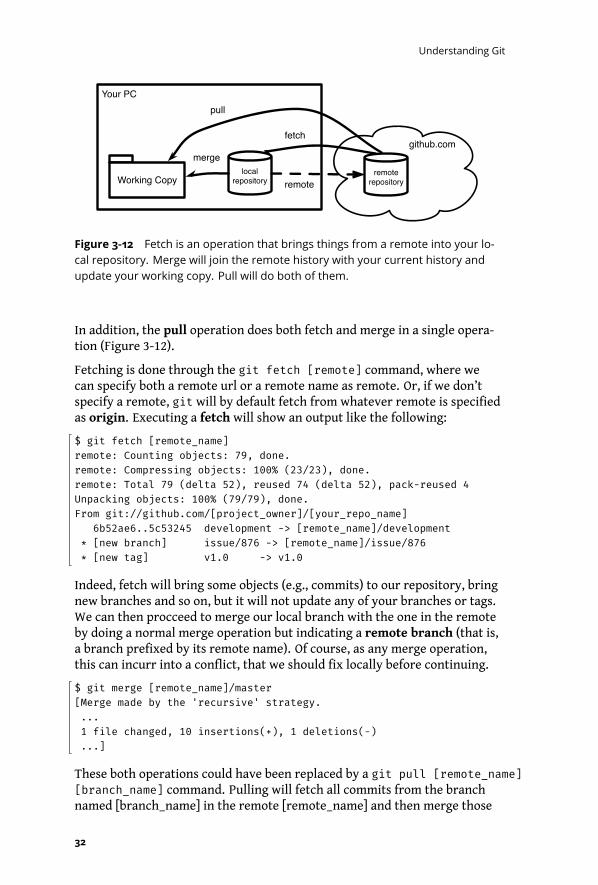
3-12 Fetch is an operation that brings things from a remote into your local
repository. Merge will join the remote history with your current history
and update your working copy. Pull will do both of them. . . . . . . . . . . 32
3-13 Push is an operation that sends commits from your local repository to a
remote repository. . . . . . . . . . . . . . . . . . . . . . . . . . . . . . . . 33
4-1 Example of SourceTree’s commit graph view. . . . . . . . . . . . . . . . . . 39
4-2 Example of Github’s commit graph view. . . . . . . . . . . . . . . . . . . . 40
iv
Illustrations
5-1 A distributed versioning system. . . . . . . . . . . . . . . . . . . . . . . . 48
5-2 Create a new project on Github. . . . . . . . . . . . . . . . . . . . . . . . . 49
5-3 Use Custom SSH keys settings. . . . . . . . . . . . . . . . . . . . . . . . . 49
5-4 Iceberg Repositories browser on a fresh image indicates that if you want
to version modifications to Pharo itself you will have to tell Iceberg where
the Pharo clone is located. But you do not care. . . . . . . . . . . . . . . . 50
5-5 Cloning a project hosted on Github via SSH. . . . . . . . . . . . . . . . . . 51
5-6 Cloning a project hosted on Github via HTTPS. . . . . . . . . . . . . . . . . 51
5-7 Just after cloning an empty project, Iceberg reports that the project is
missing information. . . . . . . . . . . . . . . . . . . . . . . . . . . . . . . 52
5-8 Adding a project with some contents shows that the project is not loaded
- not that it is not found. . . . . . . . . . . . . . . . . . . . . . . . . . . . . 52
5-9 Create project metadata action and explanation. . . . . . . . . . . . . . . . 53
5-10 Showing where the metadata will be saved and the format encodings. . . . 53
5-11 Adding a src repository for code storage. . . . . . . . . . . . . . . . . . . . 54
5-12 Resulting situation with a src folder. . . . . . . . . . . . . . . . . . . . . . . 54
5-13 Details of metadata commit. . . . . . . . . . . . . . . . . . . . . . . . . . 55
5-14 Adding a package to your project using the Working copy browser. . . . . . . 55
5-15 Iceberg indicates that your package has unsaved changes – indeed you
just added your package. . . . . . . . . . . . . . . . . . . . . . . . . . . . 56
5-16 When you commit changes, Iceberg shows you the code about to be
committed and you can chose the code entities that will effectively be saved. 56
5-17 Once changes committed, Iceberg reflects that your project is in sync
with the code in your local repository. . . . . . . . . . . . . . . . . . . . . 56
5-18 Publishing your committed changes. . . . . . . . . . . . . . . . . . . . . . 57
6-1 Creating a local repository without pre-existing remote repository. . . . . . 59
6-2 Opening the repository browser let you add and browse branches as well
as remote repositories. . . . . . . . . . . . . . . . . . . . . . . . . . . . . 60
6-3 Adding a remote using the Repository browser of your project (SSH version). 61
6-4 Adding a remote using the Repository browser of your project (HTTP version). 61
6-5 Once you pushed you changes to the remote repository. . . . . . . . . . . . 61
6-6 Added the baseline package to your project using the Working copy browser. 62
6-7 Architecture. . . . . . . . . . . . . . . . . . . . . . . . . . . . . . . . . . . 65
8-1 A fresh Pharo image by default indicates that it does not find the clone of
Pharo. . . . . . . . . . . . . . . . . . . . . . . . . . . . . . . . . . . . . . 74
8-2 Repairing the Pharo project. . . . . . . . . . . . . . . . . . . . . . . . . . . 74
8-3 Solving the detached working copy situation. . . . . . . . . . . . . . . . . . 75
8-4 Checking your pull request. . . . . . . . . . . . . . . . . . . . . . . . . . . 76
8-5 Command Line. . . . . . . . . . . . . . . . . . . . . . . . . . . . . . . . . 78
9-1 Checkout choices. . . . . . . . . . . . . . . . . . . . . . . . . . . . . . . . 81
v

CHA P T E R 1Preamble
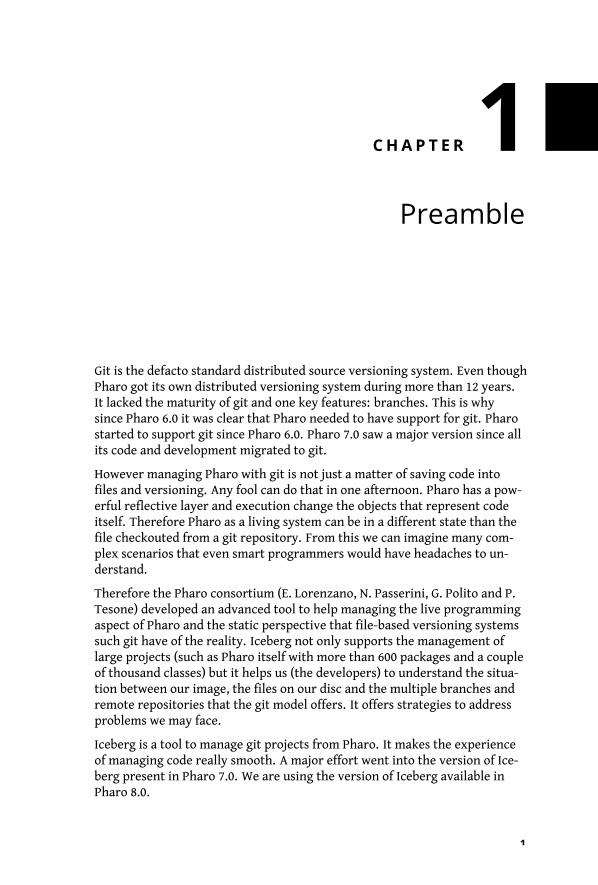
Git is the defacto standard distributed source versioning system. Even thoughPharo got its own distributed versioning system during more than 12 years.It lacked the maturity of git and one key features: branches. This is whysince Pharo 6.0 it was clear that Pharo needed to have support for git. Pharostarted to support git since Pharo 6.0. Pharo 7.0 saw a major version since allits code and development migrated to git.
However managing Pharo with git is not just a matter of saving code intofiles and versioning. Any fool can do that in one afternoon. Pharo has a pow-erful reflective layer and execution change the objects that represent codeitself. Therefore Pharo as a living system can be in a different state than thefile checkouted from a git repository. From this we can imagine many com-plex scenarios that even smart programmers would have headaches to un-derstand.
Therefore the Pharo consortium (E. Lorenzano, N. Passerini, G. Polito and P.Tesone) developed an advanced tool to help managing the live programmingaspect of Pharo and the static perspective that file-based versioning systemssuch git have of the reality. Iceberg not only supports the management oflarge projects (such as Pharo itself with more than 600 packages and a coupleof thousand classes) but it helps us (the developers) to understand the situa-tion between our image, the files on our disc and the multiple branches andremote repositories that the git model offers. It offers strategies to addressproblems we may face.
Iceberg is a tool to manage git projects from Pharo. It makes the experienceof managing code really smooth. A major effort went into the version of Ice-berg present in Pharo 7.0. We are using the version of Iceberg available inPharo 8.0.
1

Preamble
This document is under writing but we decided to release before its comple-tion because managing code can be a large topic when we start to discussworkflow and process.
The book is structured for now in two main parts
1. Understanding from the command-line
2. Managing Pharo code with Iceberg.
The authors want to thank Sean de Nigris, Quentin Ducasse and Stefan Egger-mont for the reviews and copy-edit of the early version. We also thank PeterUhnak for his first blog on publishing Pharo code on Github. We thank IonaThomas for the enhancements of Iceberg.
2
CHA P T E R 2Getting Started with Git
In this chapter we introduce the basics of git and VCSs through guided ex-amples. We first start by setting up a repository in a remote server and thenload it in our own machine. We then show how we can inspect the state ofour repository and save our files into it. Once our changes are saved, weshow how we can push our changes to our remote repository in a distantserver.
This chapter will assume you have git already installed in your machine,and that you’re using a *nix operating system.
Moreover, you will see that we will approach git with the command-line.Don’t be affraid if you’ve never used it before, it is not as difficult as it mayseem and you will get used to it. There is always a first time! Also, we promiseyou that everything you learn in here can be applied to, and will actuallyhelp you better understand, non command-line tools.
t1 t2 t3 t4 t5
first version
added a file
new directory
modified file...
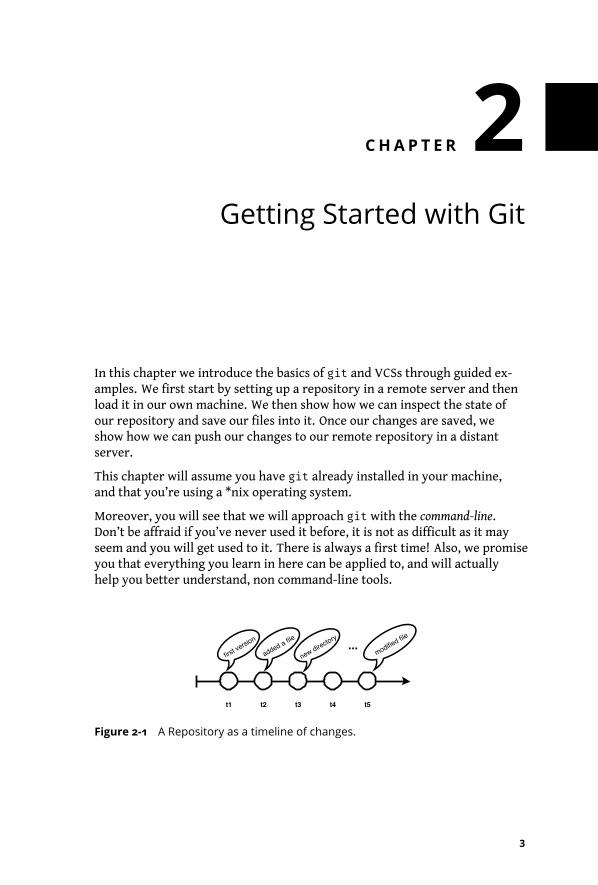
Figure 2-1 A Repository as a timeline of changes.
3
Getting Started with Git
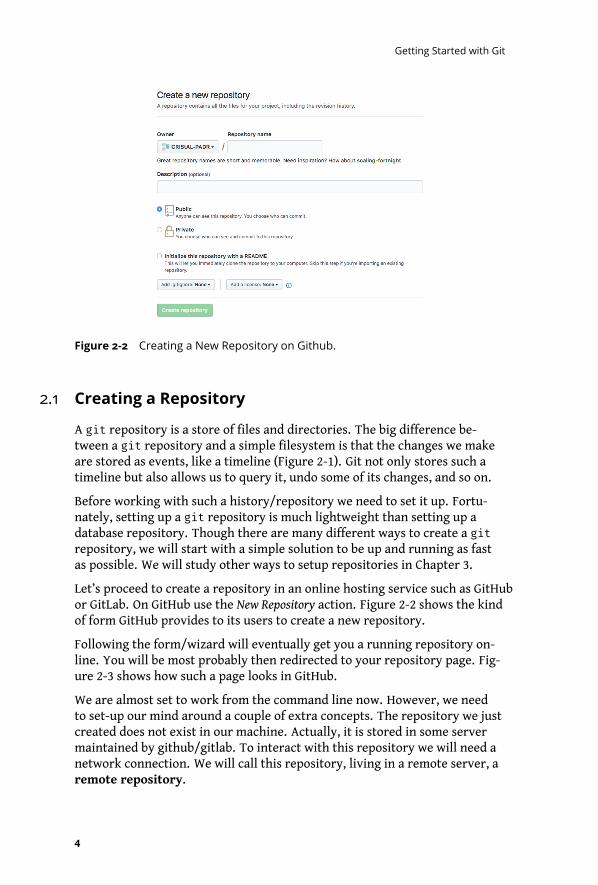
Figure 2-2 Creating a New Repository on Github.
2.1 Creating a Repository
A git repository is a store of files and directories. The big difference be-tween a git repository and a simple filesystem is that the changes we makeare stored as events, like a timeline (Figure 2-1). Git not only stores such atimeline but also allows us to query it, undo some of its changes, and so on.
Before working with such a history/repository we need to set it up. Fortu-nately, setting up a git repository is much lightweight than setting up adatabase repository. Though there are many different ways to create a gitrepository, we will start with a simple solution to be up and running as fastas possible. We will study other ways to setup repositories in Chapter 3.
Let’s proceed to create a repository in an online hosting service such as GitHubor GitLab. On GitHub use the New Repository action. Figure 2-2 shows the kindof form GitHub provides to its users to create a new repository.
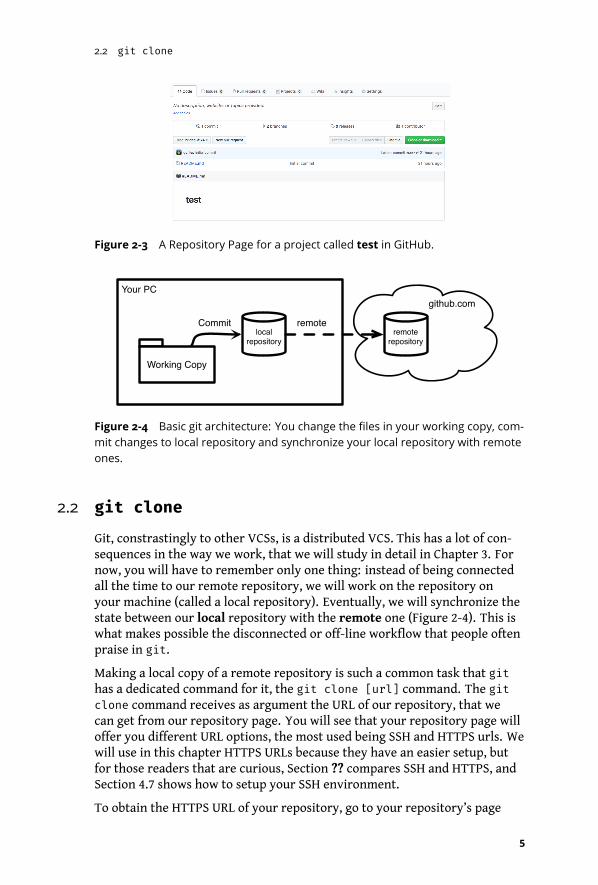
Following the form/wizard will eventually get you a running repository on-line. You will be most probably then redirected to your repository page. Fig-ure 2-3 shows how such a page looks in GitHub.
We are almost set to work from the command line now. However, we needto set-up our mind around a couple of extra concepts. The repository we justcreated does not exist in our machine. Actually, it is stored in some servermaintained by github/gitlab. To interact with this repository we will need anetwork connection. We will call this repository, living in a remote server, aremote repository.
4
2.2 git clone
Figure 2-3 A Repository Page for a project called test in GitHub.
github.comYour PC
local repository
remote repository
Working Copy
remoteCommit
Figure 2-4 Basic git architecture: You change the files in your working copy, com-
mit changes to local repository and synchronize your local repository with remote
ones.
2.2 git clone
Git, constrastingly to other VCSs, is a distributed VCS. This has a lot of con-sequences in the way we work, that we will study in detail in Chapter 3. Fornow, you will have to remember only one thing: instead of being connectedall the time to our remote repository, we will work on the repository onyour machine (called a local repository). Eventually, we will synchronize thestate between our local repository with the remote one (Figure 2-4). This iswhat makes possible the disconnected or off-line workflow that people oftenpraise in git.
Making a local copy of a remote repository is such a common task that githas a dedicated command for it, the git clone [url] command. The gitclone command receives as argument the URL of our repository, that wecan get from our repository page. You will see that your repository page willoffer you different URL options, the most used being SSH and HTTPS urls. Wewill use in this chapter HTTPS URLs because they have an easier setup, butfor those readers that are curious, Section ?? compares SSH and HTTPS, andSection 4.7 shows how to setup your SSH environment.
To obtain the HTTPS URL of your repository, go to your repository’s page
5
Getting Started with Git
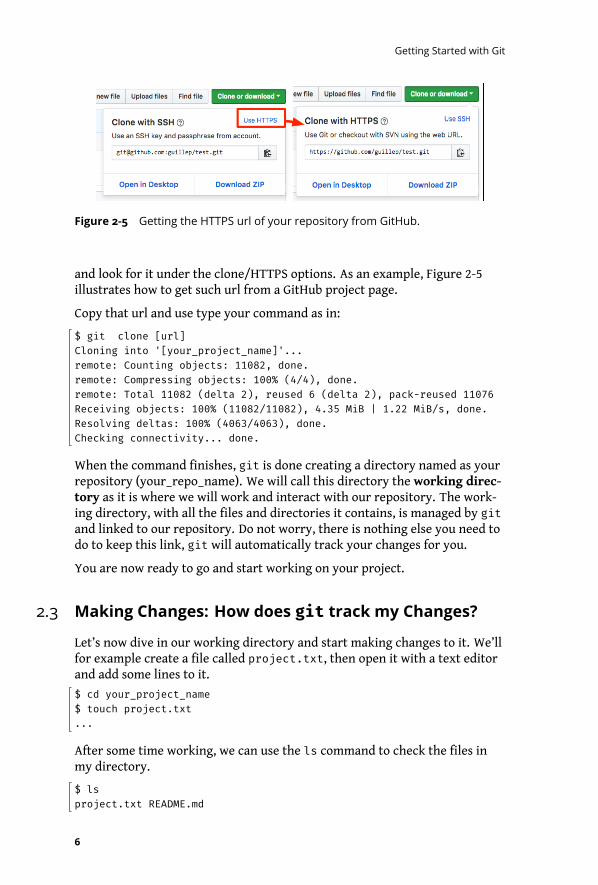
Figure 2-5 Getting the HTTPS url of your repository from GitHub.
and look for it under the clone/HTTPS options. As an example, Figure 2-5illustrates how to get such url from a GitHub project page.
Copy that url and use type your command as in:
$ git clone [url]Cloning into '[your_project_name]'...remote: Counting objects: 11082, done.remote: Compressing objects: 100% (4/4), done.remote: Total 11082 (delta 2), reused 6 (delta 2), pack-reused 11076Receiving objects: 100% (11082/11082), 4.35 MiB | 1.22 MiB/s, done.Resolving deltas: 100% (4063/4063), done.Checking connectivity... done.
When the command finishes, git is done creating a directory named as yourrepository (your_repo_name). We will call this directory the working direc-tory as it is where we will work and interact with our repository. The work-ing directory, with all the files and directories it contains, is managed by gitand linked to our repository. Do not worry, there is nothing else you need todo to keep this link, git will automatically track your changes for you.
You are now ready to go and start working on your project.
2.3 Making Changes: How does git track my Changes?
Let’s now dive in our working directory and start making changes to it. We’llfor example create a file called project.txt, then open it with a text editorand add some lines to it.
$ cd your_project_name$ touch project.txt...
After some time working, we can use the ls command to check the files inmy directory.
$ lsproject.txt README.md
6
2.3 Making Changes: How does git track my Changes?
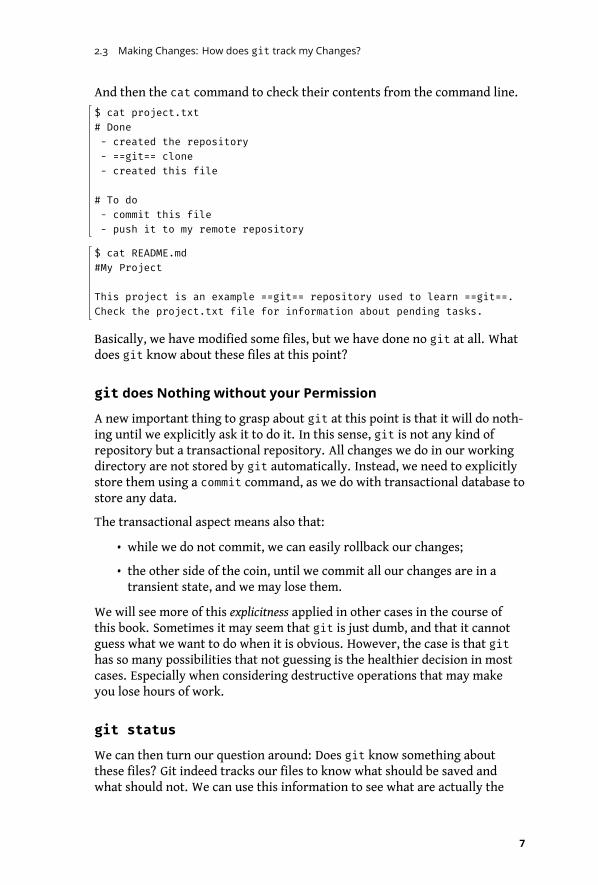
And then the cat command to check their contents from the command line.
$ cat project.txt# Done- created the repository- ==git== clone- created this file
# To do- commit this file- push it to my remote repository
$ cat README.md#My Project
This project is an example ==git== repository used to learn ==git==.Check the project.txt file for information about pending tasks.
Basically, we have modified some files, but we have done no git at all. Whatdoes git know about these files at this point?
git does Nothing without your Permission
A new important thing to grasp about git at this point is that it will do noth-ing until we explicitly ask it to do it. In this sense, git is not any kind ofrepository but a transactional repository. All changes we do in our workingdirectory are not stored by git automatically. Instead, we need to explicitlystore them using a commit command, as we do with transactional database tostore any data.
The transactional aspect means also that:
• while we do not commit, we can easily rollback our changes;
• the other side of the coin, until we commit all our changes are in atransient state, and we may lose them.
We will see more of this explicitness applied in other cases in the course ofthis book. Sometimes it may seem that git is just dumb, and that it cannotguess what we want to do when it is obvious. However, the case is that githas so many possibilities that not guessing is the healthier decision in mostcases. Especially when considering destructive operations that may makeyou lose hours of work.
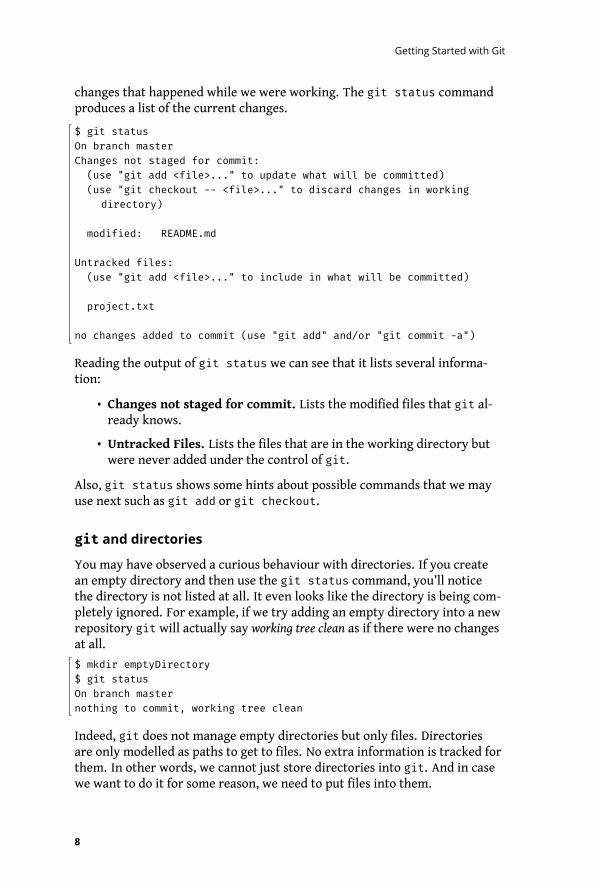
git status
We can then turn our question around: Does git know something aboutthese files? Git indeed tracks our files to know what should be saved andwhat should not. We can use this information to see what are actually the
7
Getting Started with Git
changes that happened while we were working. The git status commandproduces a list of the current changes.
$ git statusOn branch masterChanges not staged for commit:(use "git add <file>..." to update what will be committed)(use "git checkout -- <file>..." to discard changes in working
directory)
modified: README.md
Untracked files:(use "git add <file>..." to include in what will be committed)
project.txt
no changes added to commit (use "git add" and/or "git commit -a")
Reading the output of git status we can see that it lists several informa-tion:
• Changes not staged for commit. Lists the modified files that git al-ready knows.
• Untracked Files. Lists the files that are in the working directory butwere never added under the control of git.
Also, git status shows some hints about possible commands that we mayuse next such as git add or git checkout.
git and directories
You may have observed a curious behaviour with directories. If you createan empty directory and then use the git status command, you’ll noticethe directory is not listed at all. It even looks like the directory is being com-pletely ignored. For example, if we try adding an empty directory into a newrepository git will actually say working tree clean as if there were no changesat all.
$ mkdir emptyDirectory$ git statusOn branch masternothing to commit, working tree clean
Indeed, git does not manage empty directories but only files. Directoriesare only modelled as paths to get to files. No extra information is tracked forthem. In other words, we cannot just store directories into git. And in casewe want to do it for some reason, we need to put files into them.
8
2.4 Commiting your Changes
2.4 Commiting your Changes
We would like now to save our changes in our git repository. This way, ifanything happens, we can always recover our work up to this point. We havesaid before that the operation of saving our work in the repository is called acommit. If we try the git commit command we will see this is not as directas expected.
$git commitOn branch master
Initial commit
Untracked files:README.mdproject.txt
nothing added to commit but untracked files present
If we read Git’s message, we will notice that though it has correctly identifiedthat we have new files, git is asking us to add them before it can committhem.
The Groceries Metaphore
To make it simple, you can see this whole tracking story as going to the su-permarket. Imagine you make your grocery list and go to the supermarket.To get our groceries and take them home, we need first to go look for them,put them in our shopping cart, and then go and pay for them. An extra ser-vice may propose to take your grocery list and do the groceries for you. Butsuch an extra service requires that you make a list up-front.
Same apply with git, the default behavior of git is not to commit all thechanges. Partly because Git’s philosophy is to ask the user explicitly what todo, which in this case is translated to asking what to commit. Instead, gitrequires us to add the files we want to commit to a list of added files, alsocalled in git terminology the staging area, and equivalent to your shoppinglist. Once our staging area is full with the changes we want to commit, wecan commit such changes using the git commit command.
A First Commit
Adding changes to your staging area is done through the git add [file]command. Let’s proceed to add our changes and see what is the status of ourrepository afterwards.
9
Getting Started with Git
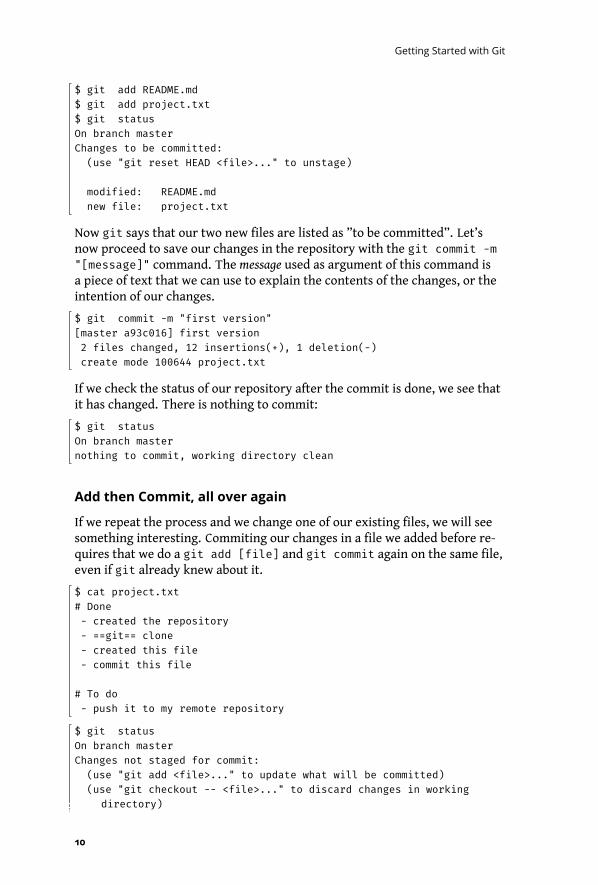
$ git add README.md$ git add project.txt$ git statusOn branch masterChanges to be committed:(use "git reset HEAD <file>..." to unstage)
modified: README.mdnew file: project.txt
Now git says that our two new files are listed as ”to be committed”. Let’snow proceed to save our changes in the repository with the git commit -m"[message]" command. The message used as argument of this command isa piece of text that we can use to explain the contents of the changes, or theintention of our changes.
$ git commit -m "first version"[master a93c016] first version2 files changed, 12 insertions(+), 1 deletion(-)create mode 100644 project.txt
If we check the status of our repository after the commit is done, we see thatit has changed. There is nothing to commit:
$ git statusOn branch masternothing to commit, working directory clean
Add then Commit, all over again
If we repeat the process and we change one of our existing files, we will seesomething interesting. Commiting our changes in a file we added before re-quires that we do a git add [file] and git commit again on the same file,even if git already knew about it.
$ cat project.txt# Done- created the repository- ==git== clone- created this file- commit this file
# To do- push it to my remote repository
$ git statusOn branch masterChanges not staged for commit:(use "git add <file>..." to update what will be committed)(use "git checkout -- <file>..." to discard changes in working
directory)
10
2.5 Synchronizing with your Remote Repository
modified: project.txt
no changes added to commit (use "git add" and/or "git commit -a")
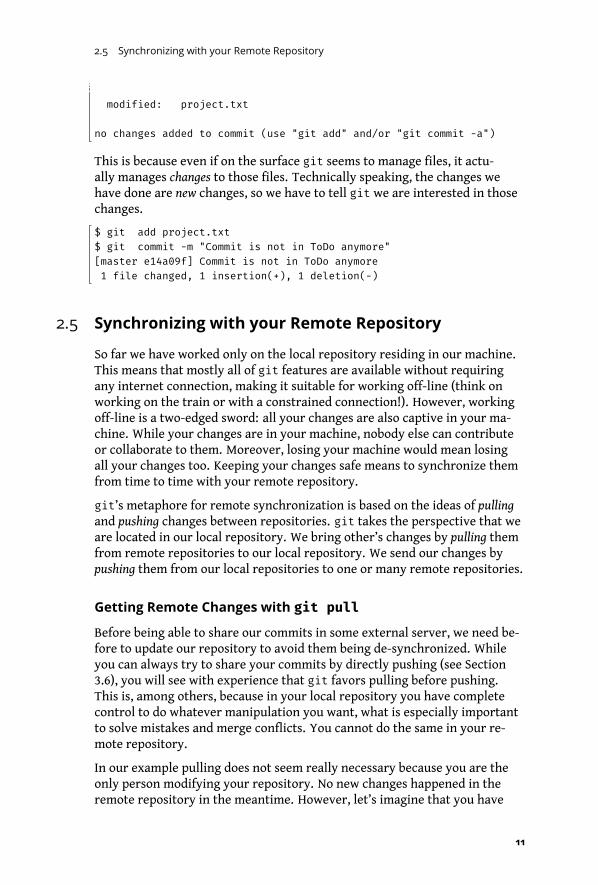
This is because even if on the surface git seems to manage files, it actu-ally manages changes to those files. Technically speaking, the changes wehave done are new changes, so we have to tell git we are interested in thosechanges.
$ git add project.txt$ git commit -m "Commit is not in ToDo anymore"[master e14a09f] Commit is not in ToDo anymore1 file changed, 1 insertion(+), 1 deletion(-)
2.5 Synchronizing with your Remote Repository
So far we have worked only on the local repository residing in our machine.This means that mostly all of git features are available without requiringany internet connection, making it suitable for working off-line (think onworking on the train or with a constrained connection!). However, workingoff-line is a two-edged sword: all your changes are also captive in your ma-chine. While your changes are in your machine, nobody else can contributeor collaborate to them. Moreover, losing your machine would mean losingall your changes too. Keeping your changes safe means to synchronize themfrom time to time with your remote repository.
git’s metaphore for remote synchronization is based on the ideas of pullingand pushing changes between repositories. git takes the perspective that weare located in our local repository. We bring other’s changes by pulling themfrom remote repositories to our local repository. We send our changes bypushing them from our local repositories to one or many remote repositories.
Getting Remote Changes with git pull
Before being able to share our commits in some external server, we need be-fore to update our repository to avoid them being de-synchronized. Whileyou can always try to share your commits by directly pushing (see Section3.6), you will see with experience that git favors pulling before pushing.This is, among others, because in your local repository you have completecontrol to do whatever manipulation you want, what is especially importantto solve mistakes and merge conflicts. You cannot do the same in your re-mote repository.
In our example pulling does not seem really necessary because you are theonly person modifying your repository. No new changes happened in theremote repository in the meantime. However, let’s imagine that you have
11
Getting Started with Git
done a modification in this same repository from another machine or evena different clone in the same machine (which are totally feasible scenarii).In that case, you would like to update your local repository with those newchanges.
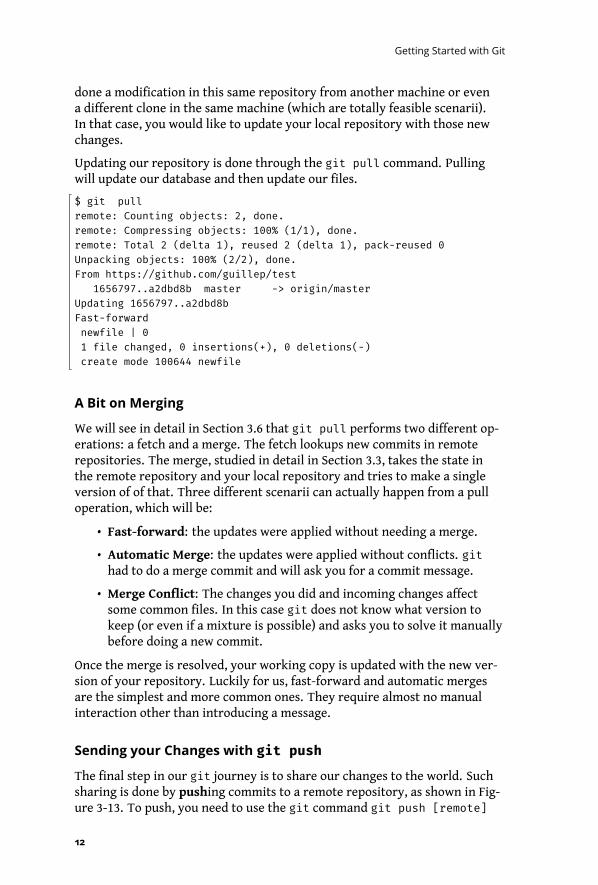
Updating our repository is done through the git pull command. Pullingwill update our database and then update our files.
$ git pullremote: Counting objects: 2, done.remote: Compressing objects: 100% (1/1), done.remote: Total 2 (delta 1), reused 2 (delta 1), pack-reused 0Unpacking objects: 100% (2/2), done.From https://github.com/guillep/test
1656797..a2dbd8b master -> origin/masterUpdating 1656797..a2dbd8bFast-forwardnewfile | 01 file changed, 0 insertions(+), 0 deletions(-)create mode 100644 newfile
A Bit on Merging
We will see in detail in Section 3.6 that git pull performs two different op-erations: a fetch and a merge. The fetch lookups new commits in remoterepositories. The merge, studied in detail in Section 3.3, takes the state inthe remote repository and your local repository and tries to make a singleversion of of that. Three different scenarii can actually happen from a pulloperation, which will be:
• Fast-forward: the updates were applied without needing a merge.
• Automatic Merge: the updates were applied without conflicts. githad to do a merge commit and will ask you for a commit message.
• Merge Conflict: The changes you did and incoming changes affectsome common files. In this case git does not know what version tokeep (or even if a mixture is possible) and asks you to solve it manuallybefore doing a new commit.
Once the merge is resolved, your working copy is updated with the new ver-sion of your repository. Luckily for us, fast-forward and automatic mergesare the simplest and more common ones. They require almost no manualinteraction other than introducing a message.
Sending your Changes with git push
The final step in our git journey is to share our changes to the world. Suchsharing is done by pushing commits to a remote repository, as shown in Fig-ure 3-13. To push, you need to use the git command git push [remote]
12

2.5 Synchronizing with your Remote Repository
github.com
Your PC
local repository
remote repositoryWorking Copy remote
push
commit
Figure 2-6 Push is an operation that sends commits from your local repository to
a remote repository.
[remote_branch]. This command will send the commits pointed from youryour current branch to the remote [remote] in the branch [remote_branch].
$ git push origin masterCounting objects: 3, done.Delta compression using up to 4 threads.Compressing objects: 100% (2/2), done.Writing objects: 100% (3/3), 271 bytes | 0 bytes/s, done.Total 3 (delta 0), reused 0 (delta 0)To [email protected]:[your_username]/[your_repo_name].git
b6dcc3f..f269295 master -> temp
A Branch’s Upstream
We can omit the destination branch and remote from the command, relyingon git default values. By default a git push operation will push to the socalled branch’s upstream. A branch’s upstream is a configuration specifyinga pair (remote, branch) where we should push by default that branch. Whenwe clone a repository, the default branch comes with an already configuredupstream. We can interrogate git for the branch’s upstream with the superverbose flag in the branch command, i.e., git branch -vv, where we can seefor example that ourmaster branch’s upstream is origin/master, while ourdevelopment branch has no upstream.
$ git branch -vv # doubly verbose!development 1656797 This commit adds a new featuremaster f269295 [origin/master] First commit
When a branch has no upstream, a push operation will by default fail with agit error. Git will ask us to set an upstream, or otherwise specify explicitly apair remote/branch for each push.
13
Getting Started with Git
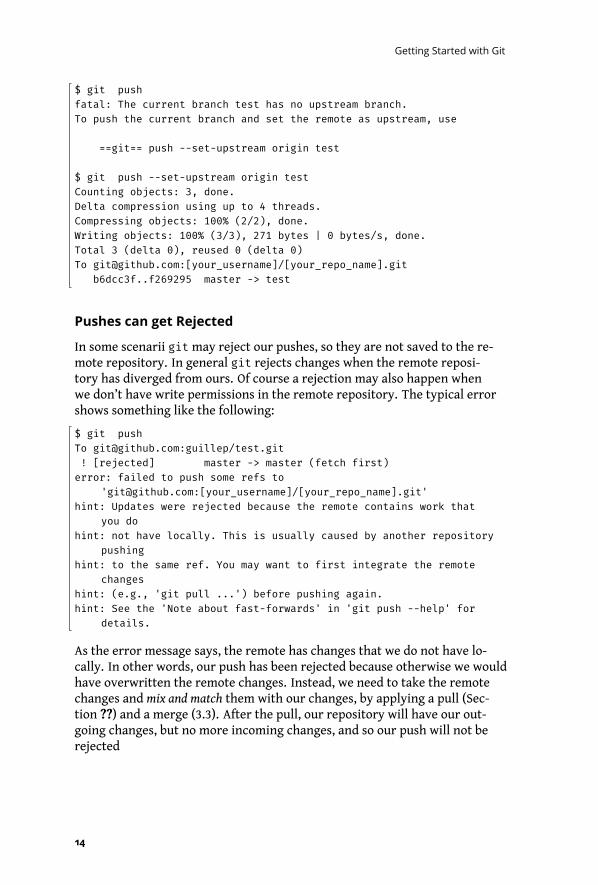
$ git pushfatal: The current branch test has no upstream branch.To push the current branch and set the remote as upstream, use
==git== push --set-upstream origin test
$ git push --set-upstream origin testCounting objects: 3, done.Delta compression using up to 4 threads.Compressing objects: 100% (2/2), done.Writing objects: 100% (3/3), 271 bytes | 0 bytes/s, done.Total 3 (delta 0), reused 0 (delta 0)To [email protected]:[your_username]/[your_repo_name].git
b6dcc3f..f269295 master -> test
Pushes can get Rejected
In some scenarii gitmay reject our pushes, so they are not saved to the re-mote repository. In general git rejects changes when the remote reposi-tory has diverged from ours. Of course a rejection may also happen whenwe don’t have write permissions in the remote repository. The typical errorshows something like the following:
$ git pushTo [email protected]:guillep/test.git! [rejected] master -> master (fetch first)error: failed to push some refs to
'[email protected]:[your_username]/[your_repo_name].git'hint: Updates were rejected because the remote contains work that
you dohint: not have locally. This is usually caused by another repository
pushinghint: to the same ref. You may want to first integrate the remote
changeshint: (e.g., 'git pull ...') before pushing again.hint: See the 'Note about fast-forwards' in 'git push --help' for
details.
As the error message says, the remote has changes that we do not have lo-cally. In other words, our push has been rejected because otherwise we wouldhave overwritten the remote changes. Instead, we need to take the remotechanges and mix and match them with our changes, by applying a pull (Sec-tion ??) and a merge (3.3). After the pull, our repository will have our out-going changes, but no more incoming changes, and so our push will not berejected
14
2.6 Overview
github.comYour PC
localrepository
remote repository
Working Copy
fetchmerge
pull
pushadd+
commit
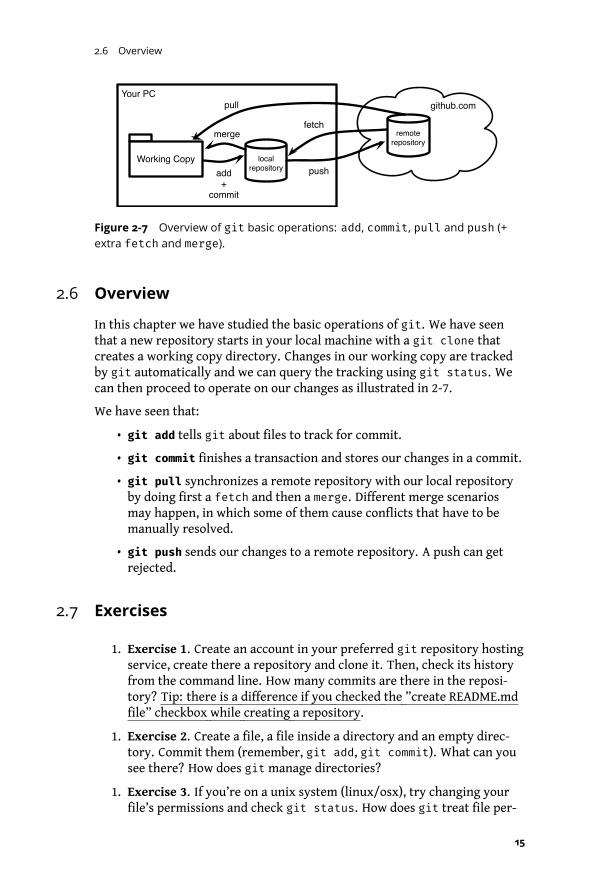
Figure 2-7 Overview of git basic operations: add, commit, pull and push (+
extra fetch and merge).
2.6 Overview
In this chapter we have studied the basic operations of git. We have seenthat a new repository starts in your local machine with a git clone thatcreates a working copy directory. Changes in our working copy are trackedby git automatically and we can query the tracking using git status. Wecan then proceed to operate on our changes as illustrated in 2-7.
We have seen that:
• git add tells git about files to track for commit.
• git commit finishes a transaction and stores our changes in a commit.
• git pull synchronizes a remote repository with our local repositoryby doing first a fetch and then a merge. Different merge scenariosmay happen, in which some of them cause conflicts that have to bemanually resolved.
• git push sends our changes to a remote repository. A push can getrejected.
2.7 Exercises
1. Exercise 1. Create an account in your preferred git repository hostingservice, create there a repository and clone it. Then, check its historyfrom the command line. How many commits are there in the reposi-tory? Tip: there is a difference if you checked the ”create README.mdfile” checkbox while creating a repository.
1. Exercise 2. Create a file, a file inside a directory and an empty direc-tory. Commit them (remember, git add, git commit). What can yousee there? How does gitmanage directories?
1. Exercise 3. If you’re on a unix system (linux/osx), try changing yourfile’s permissions and check git status. How does git treat file per-
15
Getting Started with Git
missions? Commit your changes and check the log. What can you ob-serve?
1. Exercise 4. Push now your changes to your remote repository. Then,clone your repository again in another directory. Tip: try checking thehelp of the clone command git clone -h. Did git save all your files,directories and even permissions?
1. Exercise 5. Go back to your first repository, add a new file, commit itand push it. Then go back to the second repository and pull. Inspectthe history in both repositories: Is it the same?
1. Exercise 6. Check your online repository on your hosting service. Canyou see the same state as in your local repositories? Go over the dif-ferent tools offered by the hosting, they usually give some idea of theactivity of the project, try to understand what they are for.
16
CHA P T E R 3Understanding Git
Before going on with the reproducibility concerns that brought you here toread this chapter and even before continuing with practical git commands,we will dive a bit into git concepts.
3.1 Some git Internals
Understanding a bit how git works is useful when doing some more compli-cated stuff such as merging and branching. If you already know what is a gitcommit, a git reference and how the graph of git objects is managed, youcan skip this section.
Dissecting a git Repository
Before starting explaining what is a commit, what is a branch, and so on,let’s start easy by understanding the parts that compose our git repository.When you create a git repository as we did in the last section, or you clonean old repository that already has some files in it, you will find that thereis more than meets the eye. A git repository has usually three core collab-orating components: the working copy, the repository, and the remoterepositories. You can see an schematics on Figure 3-1.
What you usually see in your disk when you clone is not actually the gitrepository but the working copy. The working copy is the directory whereyour files are, where you work and apply modifications. It is called a workingcopy because what you see is actually a copy of what is in the repository. Theworking copy is a write-able copy: you can freely modify it, break it, add newthings or remove them.
17
Understanding Git
github.comYour PC
local repository
remote repository
Working Copy
remote
Figure 3-1 git repository structure: the working copy, the repository, and the
remote repositories.
Actually, you can do whatever change you want in your working copy: gitwill not take it into account, at least not automatically. Once your changesare ready, you have to commit them into your repository to store them inyour repository. A commit will take your changes, freeze them, and storethem in the local database. Just for the curious ones, the local database (alsoknown as the BLOB in the git jargon) is stored inside your working copy, ina hidden directory called .git.
The commits you create from your changes live only inside your machine bydefault. If you want to share your commits with others, or to import commitsfrom some fellow colleague, you have to interact with a remote repository(also called just remote). A remote is a distant git repository that you willsynchronize with your local one from time to time. This is where the famouspull and push come into play!.
Of course, this is an utterly simplified scenario. You could have a repositorywithout a working copy. And your repository may have many remotes tosynchronize with. But we will get into more complex stuff early on, no needto rush now.
A history-aware transactional database?
As we explained before, we usually work on the working copy, modifying ourfiles and directories. Once we finished some work, we can freeze it and storeit in the repository. That’s what we call a commit.
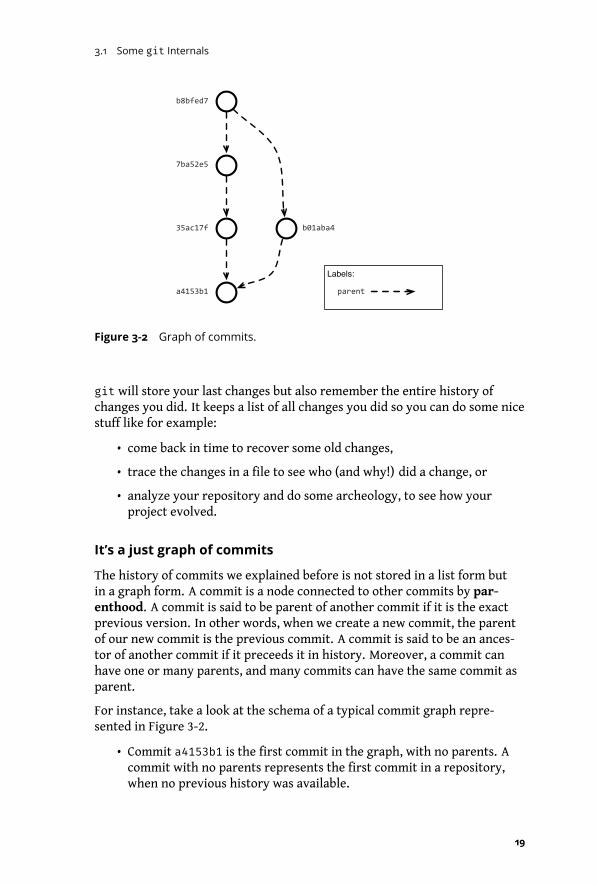
From this perspective, a git repository works as a transactional database.You are working on the changes of your disk, but they will not be effectivelyapplied until you finish your transaction. Doing your transaction is per-formed, as in the database world, using the commit command. The resultof this transaction is to create a new commit object in the git repository.This commit object will contain an id (usually a hash such as 7ba52e5) plusall changes we wanted to apply.
18
3.1 Some git Internals
Labels:
b8bfed7
7ba52e5
35ac17f
a4153b1
b01aba4
parent
Figure 3-2 Graph of commits.
git will store your last changes but also remember the entire history ofchanges you did. It keeps a list of all changes you did so you can do some nicestuff like for example:
• come back in time to recover some old changes,
• trace the changes in a file to see who (and why!) did a change, or
• analyze your repository and do some archeology, to see how yourproject evolved.
It’s a just graph of commits
The history of commits we explained before is not stored in a list form butin a graph form. A commit is a node connected to other commits by par-enthood. A commit is said to be parent of another commit if it is the exactprevious version. In other words, when we create a new commit, the parentof our new commit is the previous commit. A commit is said to be an ances-tor of another commit if it preceeds it in history. Moreover, a commit canhave one or many parents, and many commits can have the same commit asparent.
For instance, take a look at the schema of a typical commit graph repre-sented in Figure 3-2.
• Commit a4153b1 is the first commit in the graph, with no parents. Acommit with no parents represents the first commit in a repository,when no previous history was available.
19
Understanding Git
b8bfed7
7ba52e5
35ac17f
a4153b1
b01aba4 feature_branch
master_branch
v1.0<tag>
HEAD
parent
referenceLabels:
Figure 3-3 git references: a reference refers to a commit. HEAD to a branch
and tags are special fixed references.
• Commit 35ac17f’s parent is a4153b1 and commit 7ba52e5’s parent is35ac17f.
• Commit b01aba4’s parent is also a4153b1.
• Commit b8bfed7 has two parents: 7ba52e5 and b01aba4.
You may be asking yourself how can we arrive to such a situation. In short,a commit that is parent of many commits is creating an alternative historyline: it is the result of a branch operation. Likewise, a commit that has manyparents is joining two histories: it is the result of amerge operation.
Naming commits with references
You probably noticed that referring to commits by their id is awkward. Com-mit ids are generated automatically as hashes that avoid duplications asmuch as possible. However, they are not handy to work on a daily basis sincethey are hard to remember and type.
To solve this, git provides a second kind of objects: git references. A gitreference is like a label that you put on a commit, to be able to identify thatcommit by a much simpler name afterwards. For example, you can name acommit as release 1.0 or you can name it as current development commit.
As we show in Figure 3-3, there are two main kinds of references in Git:
• tags: tags are fixed labels that once created are not meant to be re-moved or moved. They are useful for doing releases: people will expectthat a release does not change, otherwise they cannot depend on it.
20
3.2 Understanding Detached HEAD
• branches: branches are transferable labels that can be moved fromcommit to commit. They are used to maintain the different historylines of your project.
Another special reference, called HEAD is internally used by git to knowwhat is our current working branch. HEAD usually refers to a branch, not di-rectly a commit. While it would look like an implementation detail, knowingthat HEAD is there can save you many headaches as we will see later.
What you should see is that master, development are just references too.
Now that you have built some strong conceptual gitmuscles, we can con-tinue in the next sections with some practical Git. Do not hesitate to comeback to these sections to refresh some of the basics. As with any sport or dis-cipline, understanding and practicing the basics is really important, sinceeverything else is based on them.
3.2 Understanding Detached HEAD
When your project is in a stable state, it is often good to freeze it and puta name to that version. That way, other users can load the frozen versionusing that well-known name, and also be sure that version will not change.Freezing a version is particularly useful to reproduce a piece of sofware. Afrozen version can be reloaded exactly as it is right now but in some point inthe future. Thus, software that depends on a frozen version can also benefitfrom its stability.
In git, releasing is done via tags. A tag is a label that we put on a particularcommit to be able to find it easily later on, so remember to put short, read-able names to them. One particular consideration about tags is that they arenot meant to be modified, although you will find in Git’s documentation thatyou have special operations (that we do not recommend) to do that.
To create a tag, use the command git tag giving as argument a name forthe tag and a descriptive message. Usual tag names use semantic versionconventions, prefixed with a v. For example version 1 would be v1.0.0.
$ git tag -a v1.0.0 -m "First stable release"
You can afterwards list all your tags using the git tag command withoutarguments:
$ git tagv0.1.1-alphav1.0.0
Finally, if you want to recover the code that you tagged at some point, youcan use the checkout command with the name of your tag.
21
Understanding Git
37adf4e
master
HEAD
0c0e5ff
v1.0.0
parent
referenceLabels:
Figure 3-4 Detached HEAD after checking out a tag: HEAD refers to a commit
and not a branch anymore.
$ git checkout v1.0.0Note: checking out 'v1.0.0'.
You are in 'detached HEAD' state. You can look around, makeexperimental changes and commit them, and you can discard anycommits you make in this state without impacting any branches byperforming another checkout.
If you want to create a new branch to retain commits you create, youmay do so (now or later) by using -b with the checkout commandagain. Example:
git checkout -b <new-branch-name>
HEAD is now at 0c0e5ff... Adding a title
When checking out a tag, git tells you that we are in detached HEAD state.And that whatever commit we do in this state will be lost unless we create abranch. What happened here is that the checkout command modified theHEAD reference to point to the commit pointed by the tag, instead of a branch.Figure 3-4 shows the commit graph for this particular case.
When you are in a detached HEAD, if you want to save your modification, youshould check out an existing branch using git checkout .
3.3 Merging history lines
The most complicated part of git is not branching or commiting, but merg-ing. In our time-travel time-line metaphore we said that branching is equiv-alent to open new time-lines. Merging is the equivalent to join them into asingle history.
22
3.3 Merging history lines
37adf4e
master
0c0e5ff
development
b894b84 dc4a3e7
parent
referenceLabels:
2dae910
Figure 3-5 Merging the history with a merge commit.
The concept behind merging is not difficult. Using the same idea of graph ofcommits that we used before, a merge can be represented as a commit thathas several parents, thus joining several histories. Figure 3-5 illustrates sucha merge commit.
However, as you see also in the picture, a merge commit will be referencedby one of the branches but not both. In other words, a merge operation meansthat a first branch will be merged into a second one. Thus the first one will re-main intact. To perform a merge we need to checkout the branch that willhost the changes, and then use the merge command with a branch name asargument. The following example shows how we can merge the developmentbranch into the master branch.
$ git checkout master...$ git merge development[Merge made by the 'recursive' strategy....1 file changed, 0 insertions(+), 0 deletions(-)...]
Managing Conflicts
When merging different history lines, things can go wrong if both historylines modified the same file or ressource. Such a problem is also called a con-flict.
To understand the issue, let’s generate a conflict on purpose. We can createtwo branches called future-1 and future-2 adding each the same file butwith different contents:
23
Understanding Git
$ git checkout -b future-1$ echo "I'm in future-1" > conflicting.txt$ git add conflicting.txt$ git commit -m "Maybe will cause a conflict"
# Let's go back to master and redo the same in another branch$ git checkout master
$ git checkout -b future-2$ echo "I'm in future-2" > conflicting.txt$ git add conflicting.txt$ git commit -m "I'm sure it will cause a conflict!"
And then trigger a conflict when trying to merge:
# We are in future-2 so we will try to merge future-1$ git merge future-1Auto-merging conflicting.txtCONFLICT (add/add): Merge conflict in conflicting.txtAutomatic merge failed; fix conflicts and then commit the result.
We see that as soon as we merge, git tries to automatically merge the fileconflicting.txt. It detects however a merge conflict that does not allow itto continue. If we check Git’s status, you will now see:
$ git statusOn branch future-2You have unmerged paths.(fix conflicts and run "git commit")
Unmerged paths:(use "git add <file>..." to mark resolution)
both added: conflicting.txt
no changes added to commit (use "git add" and/or "git commit -a")
git tells us that conflicting.txt is not merged and that we should fix it.To continue working, we should resolve such a conflict, telling git what ver-sion we want to keep. Several solutions work: either we keep the version wehad in future-2, we keep the version incoming from future-1, or we keep acan manually resolve the conflict and keep whatever version we want.
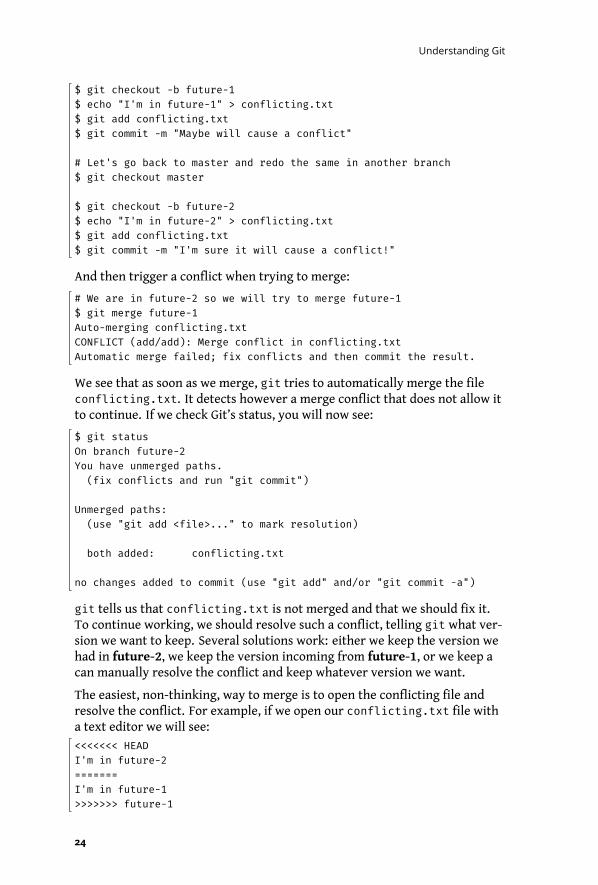
The easiest, non-thinking, way to merge is to open the conflicting file andresolve the conflict. For example, if we open our conflicting.txt file witha text editor we will see:
<<<<<<< HEADI'm in future-2=======I'm in future-1>>>>>>> future-1
24
3.4 Commit in workflow
github.comYour PC
local repository
remote repository
Working Copy
remoteCommit
Figure 3-6 Commit is an operation that stores things from your working copy
into your local repository.
gitmodified our file adding some <<<<<<<, >>>>>>> and =======markersin our file. What this markers delimit is the conflicts git found. As the firstline says, the first region (what is between the <<<<<<< and the =======)corresponds at the version that was in HEAD (i.e., future-2). As the last linesays, the last region (what is between the ======= and the >>>>>>>) corre-sponds to the version that was in future-1.
To resolve the conflict, you should:
• remove all the special markers
• keep only the version you want (or edit it to be different)
• add and commit the conflicting file
For example, let’s say we wanted to keep the version in future-2, we can editthe file leaving only
I'm in future-2
and then commit the resolved conflict:
$ git add conflicting.txt$ git commit -m "Resolve conflict"
3.4 Commit in workflow
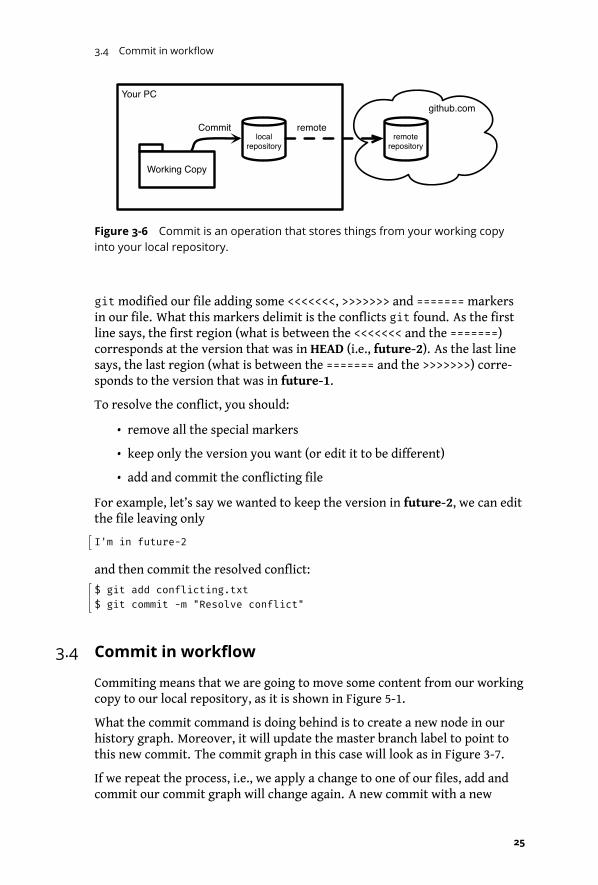
Commiting means that we are going to move some content from our workingcopy to our local repository, as it is shown in Figure 5-1.
What the commit command is doing behind is to create a new node in ourhistory graph. Moreover, it will update the master branch label to point tothis new commit. The commit graph in this case will look as in Figure 3-7.
If we repeat the process, i.e., we apply a change to one of our files, add andcommit our commit graph will change again. A new commit with a new
25
Understanding Git
37adf4e master HEAD
referenceLabels:
Figure 3-7 History graph after our first commit.
37adf4e
master HEAD0c0e5ff
parent
referenceLabels:
Figure 3-8 History graph after our second commit
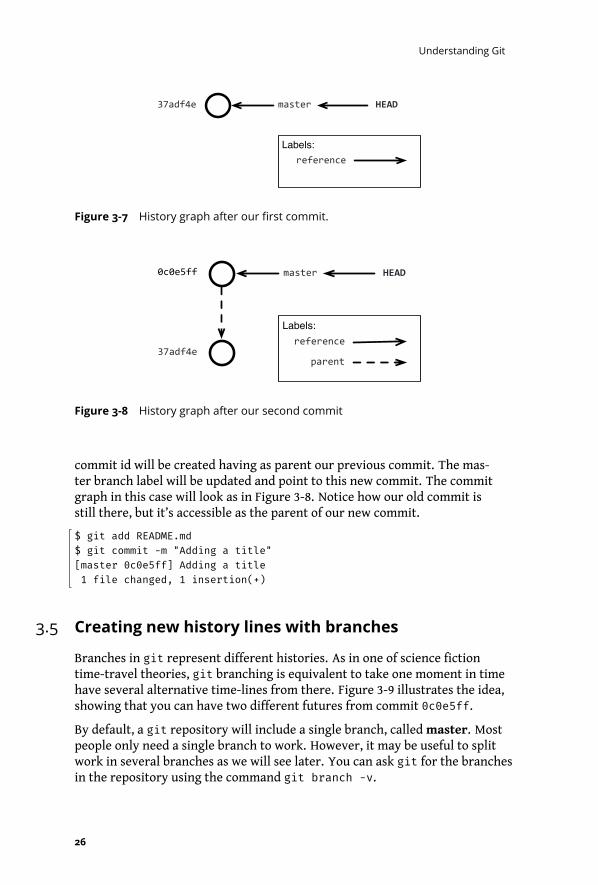
commit id will be created having as parent our previous commit. The mas-ter branch label will be updated and point to this new commit. The commitgraph in this case will look as in Figure 3-8. Notice how our old commit isstill there, but it’s accessible as the parent of our new commit.
$ git add README.md$ git commit -m "Adding a title"[master 0c0e5ff] Adding a title1 file changed, 1 insertion(+)
3.5 Creating new history lines with branches
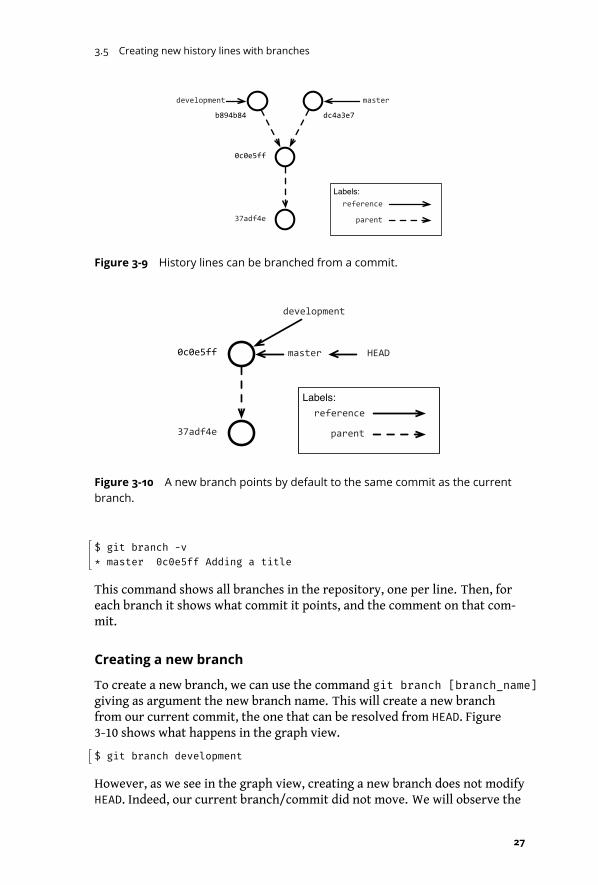
Branches in git represent different histories. As in one of science fictiontime-travel theories, git branching is equivalent to take one moment in timehave several alternative time-lines from there. Figure 3-9 illustrates the idea,showing that you can have two different futures from commit 0c0e5ff.
By default, a git repository will include a single branch, calledmaster. Mostpeople only need a single branch to work. However, it may be useful to splitwork in several branches as we will see later. You can ask git for the branchesin the repository using the command git branch -v.
26
3.5 Creating new history lines with branches
37adf4e
master
0c0e5ff
development
b894b84 dc4a3e7
parent
referenceLabels:
Figure 3-9 History lines can be branched from a commit.
37adf4e
master0c0e5ff
development
HEAD
parent
referenceLabels:
Figure 3-10 A new branch points by default to the same commit as the current
branch.
$ git branch -v* master 0c0e5ff Adding a title
This command shows all branches in the repository, one per line. Then, foreach branch it shows what commit it points, and the comment on that com-mit.
Creating a new branch
To create a new branch, we can use the command git branch [branch_name]giving as argument the new branch name. This will create a new branchfrom our current commit, the one that can be resolved from HEAD. Figure3-10 shows what happens in the graph view.
$ git branch development
However, as we see in the graph view, creating a new branch does not modifyHEAD. Indeed, our current branch/commit did not move. We will observe the
27
Understanding Git
same in the command line, if we ask the list of branches. The branch masteris marked with a star, indicating it is the actual branch. And both branchespoint to the same commit.
$ git branch -v* master 0c0e5ff Adding a titledevelopment 0c0e5ff Adding a title
To start working on our new branch, we just need to use the same checkoutcommand we used for tags.
$ git checkout developmentSwitched to branch 'development'
Or alternatively, we could have created our branch using the checkout -bcommand, which performs a git branch and a git checkout one after theother. Useful since these operations are usually done together most of thetime.
# Instead of branch and then checkout$ git checkout -b developmentSwitched to branch 'development'
Then, doing some work and creating a commit will only modify our currentbranch and leave master as it was before.
$ touch somefile$ git add somefile$ git commit -m "added somefile"[development b894b84] added somefile1 file changed, 0 insertions(+), 0 deletions(-)create mode 100644 somefile$ git branch -v
master 0c0e5ff Adding a title* development b894b84 added somefile
Diverging history
Now that we have done some work in a branch, we can make our branchesdiverge. We only need to checkout another branch, existing or new, andstart working from there.
$ git checkout masterSwitched to branch 'master'$ touch someotherfile$ git add someotherfile$ git commit -m "added someotherfile"[master dc4a3e7] added someotherfile1 file changed, 0 insertions(+), 0 deletions(-)create mode 100644 someotherfile$ git branch -v* master dc4a3e7 added someotherfile
28
3.6 Interacting with Remote Repositories
37adf4e
master
0c0e5ff
development
b894b84 dc4a3e7
parent
referenceLabels:
Figure 3-11 Divergent history.
development b894b84 added somefile
This change will create two different history lines, as shown in Figure 3-11.One history line represented by the master branch, and another history linerepresented by the development branch.
3.6 Interacting with Remote Repositories
So far we have worked only on the repository that resides locally in our ma-chine. This means that mostly all of git features are available without re-quiring an internet connection, making it suitable for working off-line. How-ever, working off-line is a two-edged sword: all your changes are captive inyour machine. While your changes are in your machine, nobody else cancontribute or collaborate to them. Moreover, losing your machine wouldmean losing all your changes too.
Keeping your changes safe means to synchronize them from time to timewith a remote repository. A remote repository is a copy of your local reposi-tory that is stored remotely, that is, in somewhere else’s machine. This couldbe, for example, in your company’s or university’s server, the cloud, etc.
In this section we will see how to interact with remotes, how to configurethem, and how to synchronize our local repository with them.
git Remotes
A git remote is a git server that is hosted in some machine other than ours.Usually, a remote will be hosted by some company like GitHub or GitLab, butit can be hosted also within our own company/university/research labora-tory. Actually, we have already worked with a remote without knowing it,when we have cloned our repository in Section 2.2. The code we used in thatmoment was:
29
Understanding Git
$ git clone [email protected]:[your_username]/[your_repo_name].git
Which can be generalized as:
$ git clone [remote]
Once created, we can interrogate our repository for its remotes using thecommand git remote -v. We will then observe that git created automati-cally a remote named origin pointing to the location that we just cloned.
$ git remote -vorigin [email protected]:[your_username]/[your_repo_name].git (fetch)origin [email protected]:[your_username]/[your_repo_name].git (push)
This first means that git allows us to assign a name to avoid using urls allthe way. In addition, we can see that git differentiates remotes used forfetching from those used for pushing. Those differences are important formore advanced git configuration, that we will not cover in this chapter.
Adding and Removing Remotes
For advanced scenarios, when we need more than the default origin remote,we will need to use different remotes. All git commands interacting with aremote repository will have a variant accepting a remote repository as argu-ment, as we will see later. In those cases, we can specify the remote’s url oneach of those commands to interact with the desired remote.
However, to avoid copy-pasting different remote urls all the time, git pro-vides us with the possibility of configuring new named remotes such as ori-gin. The drawback of such an approach is that our list of remotes will needto be maintained from time to time, for example, if urls become invalid orour repository moves. In such cases, we will want to modify or remove oldremotes to keep avoid errors or mistakes.
To create a new named remote we can execute the command git remoteadd [remote_name] [url].
$ git remote add someRemote [url]$ git remote -vorigin [email protected]:[your_username]/[your_repo_name].git (fetch)origin [email protected]:[your_username]/[your_repo_name].git (push)someRemote [url] (fetch)someRemote [url] (push)
Existing remotes can then be renamed using the git remote rename [old_name][new_name]. And in case the remote name you wanted to rename does notexist, git will answer you with a falta error.
$ git remote rename someRemote company_remote$ git remote rename non_existent newnamefatal: No such remote: non_existent
30
3.6 Interacting with Remote Repositories
Existing remotes can then be renamed using the git remote rename [old_name][new_name]. And in case the remote name you wanted to rename does notexist, git will answer you with a falta error.
$ git remote rename someRemote company_remote$ git remote rename non_existent newnamefatal: No such remote: non_existent
Finally, to remove an existing named remote you can use the git remoteremove [remote_name]. And in case the remote name you wanted to re-name does not exist, git will answer you with a falta error.
$ git remote remove company_remote$ git remote remove non_existentfatal: No such remote: non_existent
Update your repository: Fetching and Pulling
Before being able to share our commits in some external server, we need be-fore to update our repository to avoid them being out of synchronization.While you can always try to share your commits by pushing (see Section 3.6),you will see with experience that git favors pulling before pushing. This is,among others, because in your local repository you can do whatever manip-ulation you want to solve mistakes and merge conflicts, while you cannot dothe same in your remote repository.
Concretely, when using git you have to have a state of mind where:
1. . you update your repository
2. . you fix locally whatever existing conflict between your work and theremote work
3. . you then publish your changes.
Note Actually, our recommended workflow has one more step beforeupdating: commit. If you try to update when your working copy is dirty,updating can destroy your changes. Instead, if you commit before doingan update, your changes will be safely stored in the database. You’ll beable to do any expert manipulation with your changes once they are inthe repository.
As we said before, a git repository is no other than a database. It is a databasethat stores commits and references to those commits. And to update thisdatabase, we require two basic operations:
• fetch. Bring the commits and references from a remote repository toyour local repository without affecting your own.
• merge. Merge the remote references with your own references, thesame operation explained in Section 3.3.
31
Understanding Git
github.com
Your PC
local repository
remote repositoryWorking Copy remote
fetch
merge
pull
Figure 3-12 Fetch is an operation that brings things from a remote into your lo-
cal repository. Merge will join the remote history with your current history and
update your working copy. Pull will do both of them.
In addition, the pull operation does both fetch and merge in a single opera-tion (Figure 3-12).
Fetching is done through the git fetch [remote] command, where wecan specify both a remote url or a remote name as remote. Or, if we don’tspecify a remote, git will by default fetch from whatever remote is specifiedas origin. Executing a fetch will show an output like the following:
$ git fetch [remote_name]remote: Counting objects: 79, done.remote: Compressing objects: 100% (23/23), done.remote: Total 79 (delta 52), reused 74 (delta 52), pack-reused 4Unpacking objects: 100% (79/79), done.From git://github.com/[project_owner]/[your_repo_name]
6b52ae6..5c53245 development -> [remote_name]/development* [new branch] issue/876 -> [remote_name]/issue/876* [new tag] v1.0 -> v1.0
Indeed, fetch will bring some objects (e.g., commits) to our repository, bringnew branches and so on, but it will not update any of your branches or tags.We can then procceed to merge our local branch with the one in the remoteby doing a normal merge operation but indicating a remote branch (that is,a branch prefixed by its remote name). Of course, as any merge operation,this can incurr into a conflict, that we should fix locally before continuing.
$ git merge [remote_name]/master[Merge made by the 'recursive' strategy....1 file changed, 10 insertions(+), 1 deletions(-)...]
These both operations could have been replaced by a git pull [remote_name][branch_name] command. Pulling will fetch all commits from the branchnamed [branch_name] in the remote [remote_name] and then merge those
32
3.6 Interacting with Remote Repositories
github.com
Your PC
local repository
remote repositoryWorking Copy remote
push
commit
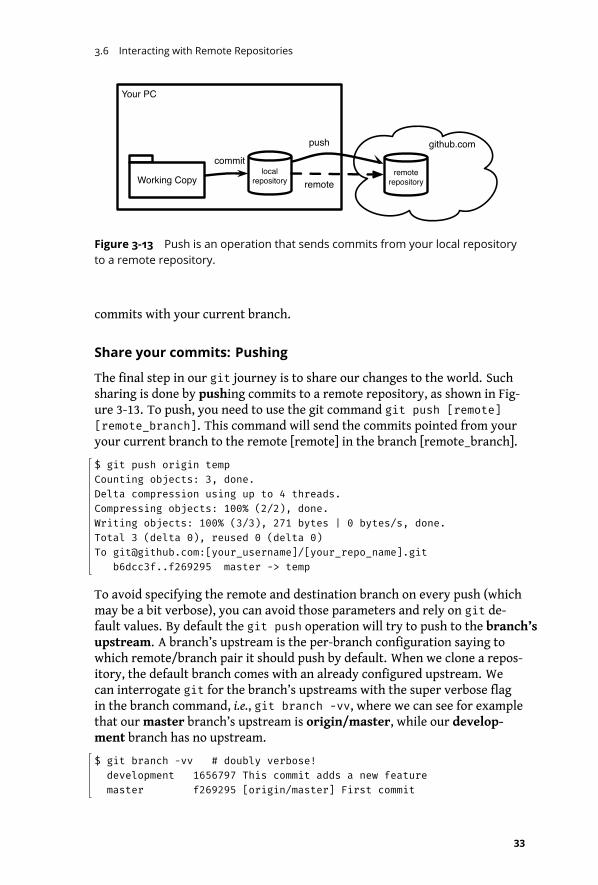
Figure 3-13 Push is an operation that sends commits from your local repository
to a remote repository.
commits with your current branch.
Share your commits: Pushing
The final step in our git journey is to share our changes to the world. Suchsharing is done by pushing commits to a remote repository, as shown in Fig-ure 3-13. To push, you need to use the git command git push [remote][remote_branch]. This command will send the commits pointed from youryour current branch to the remote [remote] in the branch [remote_branch].
$ git push origin tempCounting objects: 3, done.Delta compression using up to 4 threads.Compressing objects: 100% (2/2), done.Writing objects: 100% (3/3), 271 bytes | 0 bytes/s, done.Total 3 (delta 0), reused 0 (delta 0)To [email protected]:[your_username]/[your_repo_name].git
b6dcc3f..f269295 master -> temp
To avoid specifying the remote and destination branch on every push (whichmay be a bit verbose), you can avoid those parameters and rely on git de-fault values. By default the git push operation will try to push to the branch’supstream. A branch’s upstream is the per-branch configuration saying towhich remote/branch pair it should push by default. When we clone a repos-itory, the default branch comes with an already configured upstream. Wecan interrogate git for the branch’s upstreams with the super verbose flagin the branch command, i.e., git branch -vv, where we can see for examplethat ourmaster branch’s upstream is origin/master, while our develop-ment branch has no upstream.
$ git branch -vv # doubly verbose!development 1656797 This commit adds a new featuremaster f269295 [origin/master] First commit
33
Understanding Git
On the other side, when a branch has no upstream, a push operation will bydefault fail with a git error. git will ask us to set an upstream, or otherwisespecify a pair remote/branch for each push.
$ git pushfatal: The current branch test has no upstream branch.To push the current branch and set the remote as upstream, use
git push --set-upstream origin test
$ git push --set-upstream origin testCounting objects: 3, done.Delta compression using up to 4 threads.Compressing objects: 100% (2/2), done.Writing objects: 100% (3/3), 271 bytes | 0 bytes/s, done.Total 3 (delta 0), reused 0 (delta 0)To [email protected]:[your_username]/[your_repo_name].git
b6dcc3f..f269295 master -> test
Finally, another thing may happen while pushing: gitmay reject our changes.
$ git pushTo [email protected]:guillep/test.git! [rejected] master -> master (fetch first)error: failed to push some refs to
'[email protected]:[your_username]/[your_repo_name].git'hint: Updates were rejected because the remote contains work that
you dohint: not have locally. This is usually caused by another repository
pushinghint: to the same ref. You may want to first integrate the remote
changeshint: (e.g., 'git pull ...') before pushing again.hint: See the 'Note about fast-forwards' in 'git push --help' for
details.
As the error message says, the remote has changes that we do not have lo-cally, so we need to update our repository first. This can be solved with a pulland a merge.
3.7 Exercises
1. Exercise 1. Get a repository with many commits and checkout the par-ent of the current commit. This will put you in ”Detached HEAD” state.Solve it using a new branch.
1. Exercise 2. Try to merge your previous branch into your new branch.What kind of merge is it?
34
3.7 Exercises
1. Exercise 3. Repeat the scenario of the first exercise, apply a changeto your one of your files and commit it. Try to merge your previousbranch into your new branch. What kind of merge is it?
1. Exercise 4. Create a new online repository and push your changes intoit.
1. Exercise 5. What is the smaller set of steps you could imagine to createa conflict?
35

CHA P T E R 4Practical Git Scenarios
In this chapter we will show some git features that can help you in yourdaily use of git.
4.1 Before commit little helpers
You may add too fast a file to your staging area or index. Or you may want todiscard the changes you did to your working copy to get back in the situationwhere no changes were made. The two problems can be handled as follows.
Remove Files from the Staging Area
It may happen that you went too fast and added a file to your staging area(remember the groceries’ list) and that you changed your mind and do notwant to add it anymore. Your file is not committed so a simple reset will dothe job. You can either remove single files or everything.
$ git reset HEAD file# Or everything$ git reset HEAD .
Getting back your file as in your local repository
Another common scenario is that you modified a file of your working copyand your realize that it would be better to drop the changes and get back thefile that is versioned in your local repository. Simply checkouting again willfix your problem
$ git checkout file
37
Practical Git Scenarios
4.2 Exploring the History
The git log Command
The commit graphs we have shown so far are not evident at all while whenwe use the git status command. There is however a way to ask git aboutthem using the git log command.
$ git logcommit 0c0e5ff55b56fe8eabc1661a1da64b41f9d74472Author: Guille Polito <[email protected]>Date: Wed Mar 21 15:37:32 2018 +0100
Adding a title
commit 37adf4eaa945cbd7460991f88bff5aa902db06ceAuthor: Guille Polito <[email protected]>Date: Wed Mar 21 14:02:43 2018 +0100
first version
git log prints the list of commits in order of parenthood. The one on thetop is the most recent commit, our last commit. The one below is its par-ent, and so on. As you can see, each commit has an id, the author name, thetimestamp and its message.
To display a more compact version (commit ids + message) of the log use
git log --oneline
We can also ask git what are the changes introduced in a particular commitusing the command git show.
$ git show 0c0e5ff55b56fe8eabc1661a1da64b41f9d74472commit 0c0e5ff55b56fe8eabc1661a1da64b41f9d74472Author: Guille Polito <[email protected]>Date: Wed Mar 21 15:37:32 2018 +0100
Adding a title
diff --==git== a/README.md b/README.mdindex e69de29..cad05f1 100644--- a/README.md+++ b/README.md@@ -0,0 +1 @@+! a title\ No newline at end of file
That will give us the commit description as in git log plus a (not so read-able) diff of the modified files showing the inserted, modified and deleted
38
4.2 Exploring the History
Figure 4-1 Example of SourceTree’s commit graph view.
lines. More advanced graphical tools are able to read this description andshow a more user-friendly diff.
Accessing the History Graph
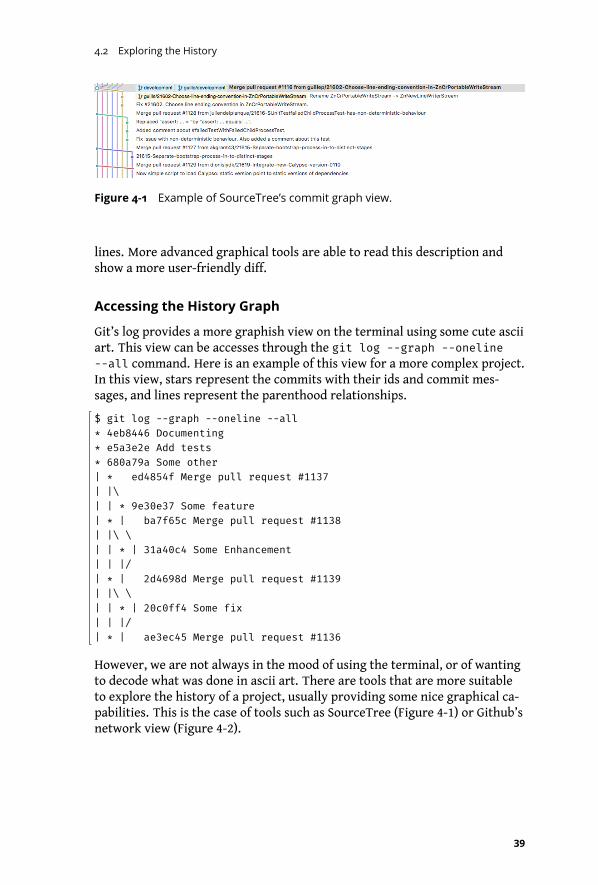
Git’s log provides a more graphish view on the terminal using some cute asciiart. This view can be accesses through the git log --graph --oneline--all command. Here is an example of this view for a more complex project.In this view, stars represent the commits with their ids and commit mes-sages, and lines represent the parenthood relationships.
$ git log --graph --oneline --all* 4eb8446 Documenting* e5a3e2e Add tests* 680a79a Some other| * ed4854f Merge pull request #1137| |\| | * 9e30e37 Some feature| * | ba7f65c Merge pull request #1138| |\ \| | * | 31a40c4 Some Enhancement| | |/| * | 2d4698d Merge pull request #1139| |\ \| | * | 20c0ff4 Some fix| | |/| * | ae3ec45 Merge pull request #1136
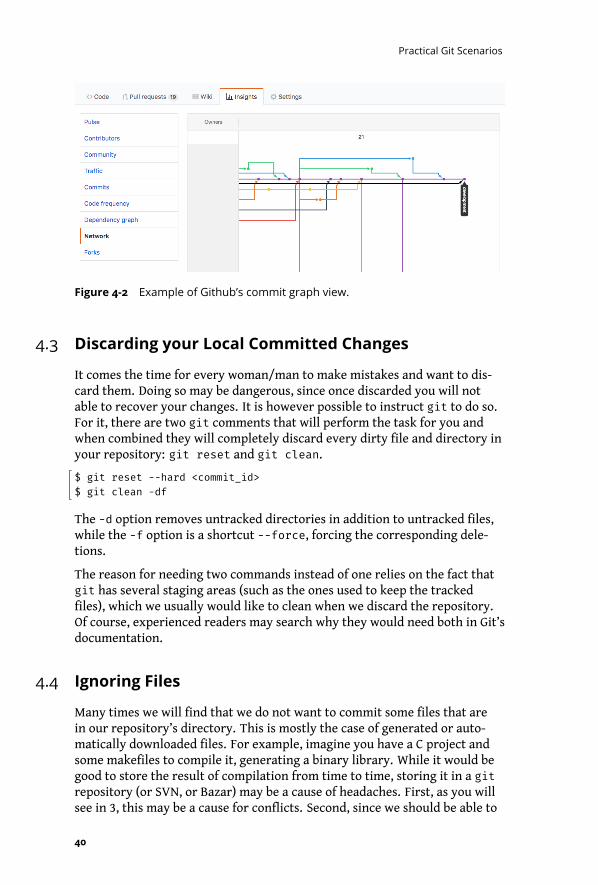
However, we are not always in the mood of using the terminal, or of wantingto decode what was done in ascii art. There are tools that are more suitableto explore the history of a project, usually providing some nice graphical ca-pabilities. This is the case of tools such as SourceTree (Figure 4-1) or Github’snetwork view (Figure 4-2).
39
Practical Git Scenarios
Figure 4-2 Example of Github’s commit graph view.
4.3 Discarding your Local Committed Changes
It comes the time for every woman/man to make mistakes and want to dis-card them. Doing so may be dangerous, since once discarded you will notable to recover your changes. It is however possible to instruct git to do so.For it, there are two git comments that will perform the task for you andwhen combined they will completely discard every dirty file and directory inyour repository: git reset and git clean.
$ git reset --hard <commit_id>$ git clean -df
The -d option removes untracked directories in addition to untracked files,while the -f option is a shortcut --force, forcing the corresponding dele-tions.
The reason for needing two commands instead of one relies on the fact thatgit has several staging areas (such as the ones used to keep the trackedfiles), which we usually would like to clean when we discard the repository.Of course, experienced readers may search why they would need both in Git’sdocumentation.
4.4 Ignoring Files
Many times we will find that we do not want to commit some files that arein our repository’s directory. This is mostly the case of generated or auto-matically downloaded files. For example, imagine you have a C project andsome makefiles to compile it, generating a binary library. While it would begood to store the result of compilation from time to time, storing it in a gitrepository (or SVN, or Bazar) may be a cause of headaches. First, as you willsee in 3, this may be a cause for conflicts. Second, since we should be able to
40
4.5 Commiting a File Filtered out by the .gitignore
generated such binary library from the sources, having the already compiledresult in the repository does not add so much value.
This same ideas can be used to ignore any kind of generated file. For exam-ple, pdfs generated by document generation tools, meta-data files generatedby IDEs and tools (e.g., Eclipse), compiled libraries (e.g., dll, so, or dylib files).
In such cases, we can tell git to ignore cetain files using the .gitignore file.The .gitignore file is an optional text file that we can write in the root ofour repository with a list of file paths to ignore.
# Example of .gitignore file
# Lines starting with hashtags are comments
# A file name will ignore that filesomeignoredfile.txt
# A file name will ignore that filesomeignoredfile.txt
# A file pattern will ignore all pdf files*.pdf
Once your file is ready, you have to add it and commit it to git to make ittake effect.
$ git add .gitignore$ git commit -m "Added gitignore"
From this moment on, all listed files will be ignored by git add and gitstatus. And you will be able to perform further commands to add ”all butignored files”:
$ git add .
Note If a file or a file type is tracked but you want git to ignore itschanges afterward, adding it to .gitignore file will not make the job i.e.git will continue to track it.
To avoid keeping track of it in the future, but secure it locally in your work-ing directory, it must be removed from the tracking list using ==git rm –cached<file> (.<file_type>)==. Nevertheless, be aware that the file is still present inthe past history!
4.5 Commiting a File Filtered out by the .gitignore
For certain workflow, it is better to filter out certain files such as generatedpdf but from time to time you may want to version a file that would not be
41
Practical Git Scenarios
because its extension or folder is listed in the .gitignore file. You can stillcommit such a such without having to touch the .gitignore file. You canuse the --force option of the add command.
$ git add -f that.pdf$ git commit -m "that file is still important"
4.6 Getting out of Detached HEAD
Detached head means no other than ”HEAD is not pointing to a branch”. Be-ing in a detached HEAD state is not bad in itself, but it may provoke loss ofchanges. As a matter of fact, any commit that is not properly referenced byanother commit or by another git reference (tag, branch) may be garbagecollected.
git will not forbid you to commit in this state, but any new commit you cre-ate will only reachable if you remember the commit hash. To get out of det-tached HEAD, the easiest solution is to checkout a branch, as we will see inthe next section. Checking out a branch will set HEAD to point to a branchinstead of a commit, saving you some HEADaches.
4.7 Accessing your Repository through SSH
To be able to access your repository from your local machine, you need tosetup your credentials. Think it this way: you need to tell the server who youare on every interaction you have with it. Otherwise, Github will reject anyoperation against your repository. Such a setup requires the creation anduploading of SSH keys.
An SSH key works as a lock: a key is actually a pair of a public and a privatekey. The private key is meant to reside in your machine and not be publishedat all. A public key is meant to be shared with others to prove your identity.Whenever you want to prove your identity, SSH will exchange messages en-crypted with your public key, and see if you are able to decrypt it using yourprivate key.
To create an SSH key, in *nix systems you can simply type in your terminal
$ ssh-keygen -t rsa -b 4096 -C "your_email@some_domain.com"
Follow the instructions in your terminal such as setting the location for yourkey pair (usually it is $HOME/.ssh) and the passphrase (a kind of password).Finally, you’ll end up with your public/private pair on the selected location.It is now time to upload it to Github.
Connect yourself to your Github settings (usually https://github.com/set-tings/profile) and go to the ”SSH and GPG keys” menu. Import there the con-tents of your public key file. You should be now able to use your repository.
42
4.8 Rewriting the History
4.8 Rewriting the History
Many times it happens that we accidentally commit something wrong. Maybewe wanted to commit more or less things, maybe a completely different con-tent, or we did a mistake in the commit’s message. In these cases, we canrewrite Git’s history, e.g, undo our current commit and go back to the previ-ous commit, or rewrite the current commit with some new properties.
Be careful! Rewriting the history can have severe consequences. Imaginethat the commit you want to undo was already pushed. This means thatsomebody else could have pulled this commit into her/his repository. If weundo this already published commit, we are making everybody else’s repos-itories obsolete! This can be indeed problematic depending on the numberof users the project has, and their knowledge on git to be able to solve thisissue.
Undo a commit using git reset --hard
To undo the last commit, it is as easy as:
$ git reset --hard HEAD~1
git reset --hard [commitish]makes your current branch point to [com-mitish]. HEAD is your current head, and you can read ~1 as ”minus one”. Inother words, HEAD~1 is head minus one, which boils down to the parent ofhead, our previous commit.
You can use this same trick to rewrite the history in any other way, sinceyou can use any commitish expression to reset. For example, HEAD~17means17 versions before head, or someBranch~4means four commits before thebranch someBranch.
Update a Commit’s Message using git commit --amend
To change our current commit’s message you can use the following com-mand:
$ git commit --amend -m "New commit message"
Or, if you don’t use the -m option, a text editor will be prompt so you can edita commit message.
$ git commit --amend
You can use the same trick not only to modify a commit’s message but tomodify your entire commit. Actually, just adding new things with git addbefore an --amend will replace the current commit with a new commit merg-ing the previous commit changes with what you just added.
43
Practical Git Scenarios
4.9 How to Overwrite/Modify Commits
WARNING: It is highly not recommended to rewrite the history of a repo es-pecially when part of it has already been pushed to a remote. Modifying thehistory will most likely break the history shared by the different collabora-tors and you may deal with an inextricable merge conflict.
Change the last Commit
Imagine you have just committed your changes and have not pushed themyet, but
1. you are not satified with the commit message
$ git log --oneline$ git commit --amend -m "Updated commit message"$ git log --oneline
2. you forgot to save some modification or to add some files before commit-ting. Then make your changes and use
$ git commit -a --amend --no-edit
Merge two commits
First, it is worth repeating that you must think twice before modifying thehistory of the repo. Now, assume that you have not pushed the correspond-ing commits. Merging two consecutive commits is a way to work with a cleanertree. Consider you want to merge commits ”Intermediate” and ”Old”
$ git log --oneline
eae7846 New71c0c64 Intermediatef039832 Oldcca92f1 Even older
Then, you can interactively -i focus on the last three HEAD~3 commit.
$ git rebase -i HEAD~3
pick f039832 Oldpick 71c0c64 Intermidiatepick eae7846 New
Note Observe that the commits are displayed in the reversed order.
Now you can squash the commit ”Intermediate” into its parent commit ”Old”
44
4.9 How to Overwrite/Modify Commits
pick f039832 Oldsquash 71c0c64 Intermidiatepick eae7846 New
And set the message e.g. ”Merge intermediate + old” attached to the single.
# This is a combination of 2 commits.# This is the 1st commit message:
Old
# This is the commit message #2:
Intermediate
# Please enter the commit message for your changes. Lines starting# with '#' will be ignored, and an empty message aborts the commit.
$ git log --oneline
eae7846 New651375a Merge intermediate + oldcca92f1 Even older
Note that the commit id has changed
Pushing Rewritten History
As soon as the history we have rewritten was never pushed before, we cancontinue working normally and pushing our changes then without prob-lems. However, if we have already pushed the commit we want to undo, thismeans that we are potentially impacting all users of our repository. Becauseof the problems it can pose to other people, pushing a rewritten history isnot a completely favoured by git. Better said, it is not allowed by defaultand you’ll be warned about it:
$ git pushTo [email protected]:REPOSITORY_OWNER/YOUR_REPOSITORY.git! [rejected] YOUR_BRANCH -> YOUR_BRANCH (non-fast-forward)error: failed to push some refs to
'[email protected]:REPOSITORY_OWNER/YOUR_REPOSITORY.git'hint: Updates were rejected because the tip of your current branch
is behindhint: its remote counterpart. Integrate the remote changes (e.g.hint: '==git== pull ...') before pushing again.hint: See the 'Note about fast-forwards' in '==git== push --help'
for details.
With this message gitmeans that you should not blindly overwrite the his-tory. Also, it suggests to pull changes from the remote repository. How-ever, doing that will bring back to our repository the history we wanted to
45
Practical Git Scenarios
undo! What we want to do is to impose our current (undone) state in the re-mote repository. To do that, we need to force the push using the git push--force or the git push -f option.
$==git== push -fTotal 0 (delta 0), reused 0 (delta 0)To [email protected]:REPOSITORY_OWNER/YOUR_REPOSITORY.git+ a1713f3...6e0c7bf YOUR_BRANCH -> YOUR_BRANCH (forced update)
4.10 Conclusion
This chapter presented some operations that may help you. As a generalprinciple avoid rewriting history because you may lose changes and get intounrecovable state.
46
CHA P T E R 5Publishing your first Pharo
project with Iceberg
In this chapter we explain how you can publish your project on Github usingIceberg. We do not explain basic concepts like commit, push/pull, merging,or cloning.
A strong precondition before reading this chapter is that you must be ableto publish from the command line to the git hosting service that you wantto use. If you cannot do not expect Iceberg to fix it magically for you. Now ifyou have some problems with SSH configuration (which is the default withGithub) you can either use HTTPS or have a look in Chapter 9 the section ex-plaining how to generate SSH keys. Let us get started.
5.1 For the impatient
If you do not want to read everything, here is the executive summary.
• Create a project on Github or any git-based platform.
• [Optional] Configure Iceberg to use custom ssh keys.
• Add a project in Iceberg.
– Optionally but strongly recommanded, in the cloned repository,create a directory named src on your file system. This is a goodconvention.
• In Iceberg, open your project and add your packages.
• Commit your project.
47
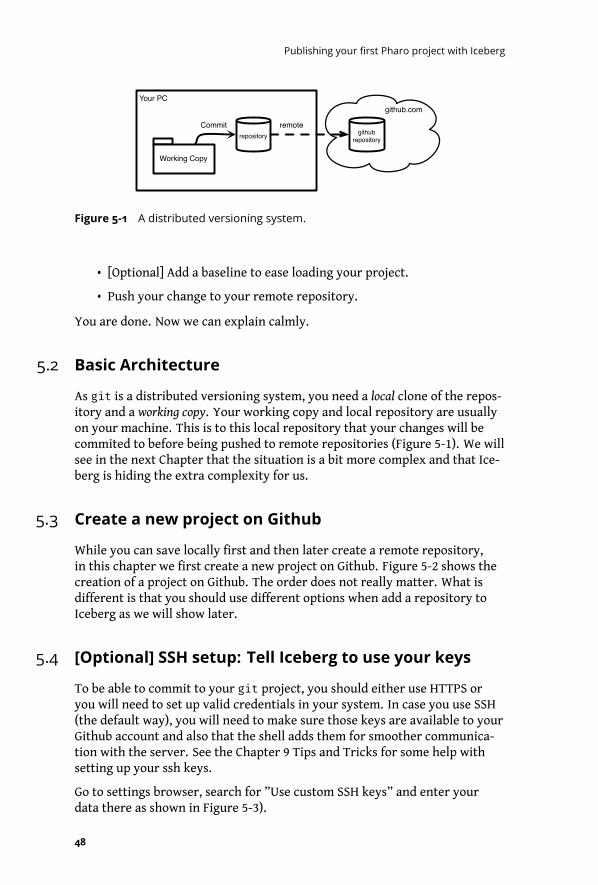
Publishing your first Pharo project with Iceberg
github.comYour PC
repository github repository
Working Copy
remoteCommit
Figure 5-1 A distributed versioning system.
• [Optional] Add a baseline to ease loading your project.
• Push your change to your remote repository.
You are done. Now we can explain calmly.
5.2 Basic Architecture
As git is a distributed versioning system, you need a local clone of the repos-itory and a working copy. Your working copy and local repository are usuallyon your machine. This is to this local repository that your changes will becommited to before being pushed to remote repositories (Figure 5-1). We willsee in the next Chapter that the situation is a bit more complex and that Ice-berg is hiding the extra complexity for us.
5.3 Create a new project on Github
While you can save locally first and then later create a remote repository,in this chapter we first create a new project on Github. Figure 5-2 shows thecreation of a project on Github. The order does not really matter. What isdifferent is that you should use different options when add a repository toIceberg as we will show later.
5.4 [Optional] SSH setup: Tell Iceberg to use your keys
To be able to commit to your git project, you should either use HTTPS oryou will need to set up valid credentials in your system. In case you use SSH(the default way), you will need to make sure those keys are available to yourGithub account and also that the shell adds them for smoother communica-tion with the server. See the Chapter 9 Tips and Tricks for some help withsetting up your ssh keys.
Go to settings browser, search for ”Use custom SSH keys” and enter yourdata there as shown in Figure 5-3).
48
5.4 [Optional] SSH setup: Tell Iceberg to use your keys
Figure 5-2 Create a new project on Github.
Figure 5-3 Use Custom SSH keys settings.
Alternatively, you can execute the following expressions in your image play-ground or add them to your Pharo system preference file (See Menu Systemitem startup):
IceCredentialsProvider useCustomSsh: true.IceCredentialsProvider sshCredentials
publicKey: 'path\to\ssh\id_rsa.pub';privateKey: 'path\to\ssh\id_rsa'
Note Pro Tip: this can be used too in case you have a non-default keyfile. You just need to replace id_rsa with your file name.
49

Publishing your first Pharo project with Iceberg
Figure 5-4 Iceberg Repositories browser on a fresh image indicates that if you
want to version modifications to Pharo itself you will have to tell Iceberg where
the Pharo clone is located. But you do not care.
5.5 Iceberg Repositories browser
Figure 5-4 shows the top level Iceberg pane. It shows that for now you do nothave defined nor loaded any project. It shows the Pharo project and indi-cates that it could not find its local repository by displaying ’Local repositorymissing’.
First you do not have to worry about the Pharo project or repository if youdo not want to contribute to Pharo. So just go ahead. Now if you want to un-derstand what is happening here is the explanation. The Pharo system doesnot have any idea where it should look for the git repository correspondingto the source of the classes it contains. Indeed, the image you are executingmay have been built somewhere, patched or not many times. Now Pharo isfully operational without having a local repository. You can browse systemclasses and methods because Pharo has its own internal source management.This warning just indicates that if you want to version Pharo system code us-ing git then you should indicate to the system where the clone and workingcopy are located on your local machine. So if you do not plan to modify andversion the Pharo system code, you do not have to worry.
5.6 Add a new project to Iceberg
The first step is then to add a project to Iceberg:
• Press the ’+’ button to the right of the Iceberg main window.
• Select the source of your project. In our example, since you did notclone your project yet, choose the Github option.
Notice that you can either use SSH (Figure 5-5) or HTTPS (Figure 5-6).
Figure 5-5 and 5-6) instruct Iceberg to clone the repository we just created onGithub. We specify the owner, project, and physical location where the local
50
5.6 Add a new project to Iceberg
Figure 5-5 Cloning a project hosted on Github via SSH.
Figure 5-6 Cloning a project hosted on Github via HTTPS.
clone and git working copy will be on your disk.
Iceberg has now added your project to its list of managed projects and clonedan empty repository to your disk. You will see the status of your project, asin Figure 5-7. Here is a breakdown of what you are seeing:
• MyCoolProjectWithPharo has a star and is green. This usually meansthat you have changes which haven’t been committed yet, but may alsohappen in unrelated edge cases like this one. Don’t worry about thisfor now.
• The Status of the project is ’No Project Found’ and this is more impor-tant. This is normal since the project is empty. Iceberg cannot find itsmetadata. We will fix this soon.
Later on, when you will have commited changes to your project and youwant to load it in another image, when you will clone again, you will see that
51
Publishing your first Pharo project with Iceberg
Figure 5-7 Just after cloning an empty project, Iceberg reports that the project is
missing information.
Figure 5-8 Adding a project with some contents shows that the project is not
loaded - not that it is not found.
Iceberg will just report that the project is not loaded as shown in Figure 5-8.
5.7 Repair to the rescue
Iceberg is a smart tool that tries to help you fix the problems you may en-counter while working with git. As a general principle, each time you geta status with red text (such as ”No Project Found” or ”Detached WorkingCopy”), you should ask Iceberg to fix it using the Repair command.
Iceberg cannot solve all situations automatically, but it will propose and ex-plain possible repair actions. The actions are ranked from most to least likelyto be right one. Each action has a displayed explanation on the situation andthe consequences of the using it. It is always a good idea to read them. Set-ting your repository the right way makes it extremely hard to lose any pieceof code with Iceberg and Pharo is general since Pharo contains its own copyof the code.
52
5.8 Create project metadata
Figure 5-9 Create project metadata action and explanation.
Figure 5-10 Showing where the metadata will be saved and the format encod-
ings.
5.8 Create project metadata
Iceberg reported that it could not find the project because some meta datawere missing such as the format of the code encodings and the example lo-cation inside the repository. When we activate the repair command we getFigure 5-9. It shows the ”Create project metadata” action and its explana-tion.
When you choose to create the project metadata, Iceberg shows you thefilesystem of your project as well as the repository format as shown in Figure5-10. Tonel is the preferred format for Pharo projects. It has been designedto be Windows and file system friendly. Change it only if you know what youare doing!
Before accepting the changes, it is a good idea to add a source (src) folder
53
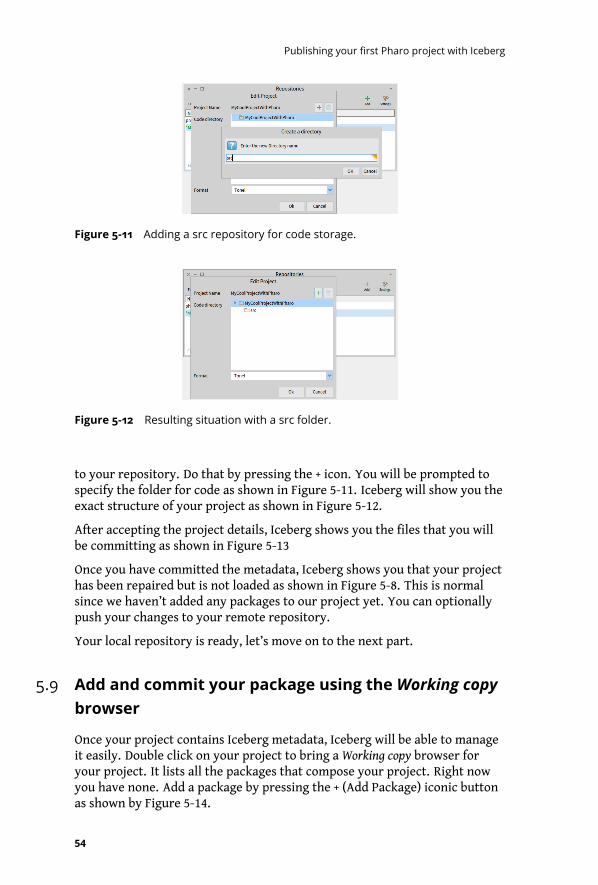
Publishing your first Pharo project with Iceberg
Figure 5-11 Adding a src repository for code storage.
Figure 5-12 Resulting situation with a src folder.
to your repository. Do that by pressing the + icon. You will be prompted tospecify the folder for code as shown in Figure 5-11. Iceberg will show you theexact structure of your project as shown in Figure 5-12.
After accepting the project details, Iceberg shows you the files that you willbe committing as shown in Figure 5-13
Once you have committed the metadata, Iceberg shows you that your projecthas been repaired but is not loaded as shown in Figure 5-8. This is normalsince we haven’t added any packages to our project yet. You can optionallypush your changes to your remote repository.
Your local repository is ready, let’s move on to the next part.
5.9 Add and commit your package using theWorking copy
browser
Once your project contains Iceberg metadata, Iceberg will be able to manageit easily. Double click on your project to bring a Working copy browser foryour project. It lists all the packages that compose your project. Right nowyou have none. Add a package by pressing the + (Add Package) iconic buttonas shown by Figure 5-14.
54
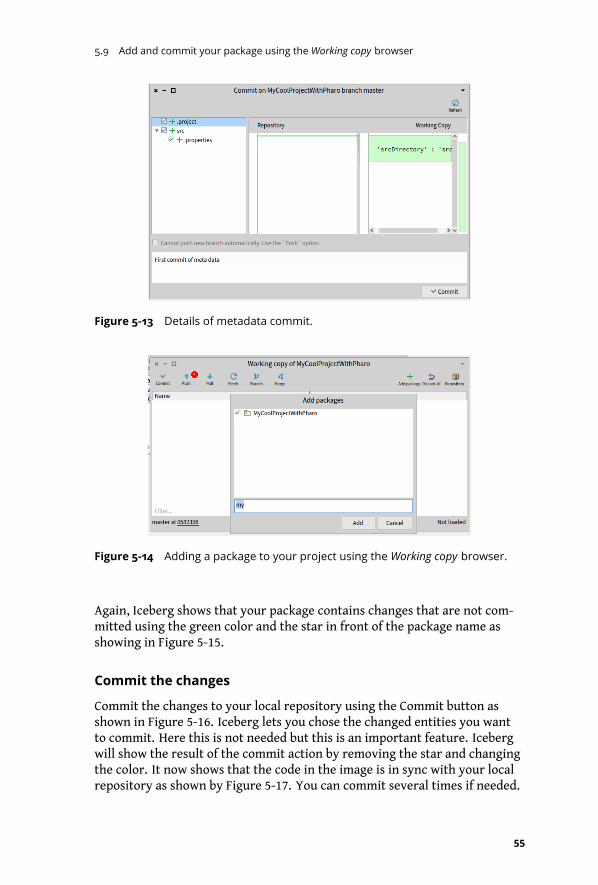
5.9 Add and commit your package using the Working copy browser
Figure 5-13 Details of metadata commit.
Figure 5-14 Adding a package to your project using the Working copy browser.
Again, Iceberg shows that your package contains changes that are not com-mitted using the green color and the star in front of the package name asshowing in Figure 5-15.
Commit the changes
Commit the changes to your local repository using the Commit button asshown in Figure 5-16. Iceberg lets you chose the changed entities you wantto commit. Here this is not needed but this is an important feature. Icebergwill show the result of the commit action by removing the star and changingthe color. It now shows that the code in the image is in sync with your localrepository as shown by Figure 5-17. You can commit several times if needed.
55
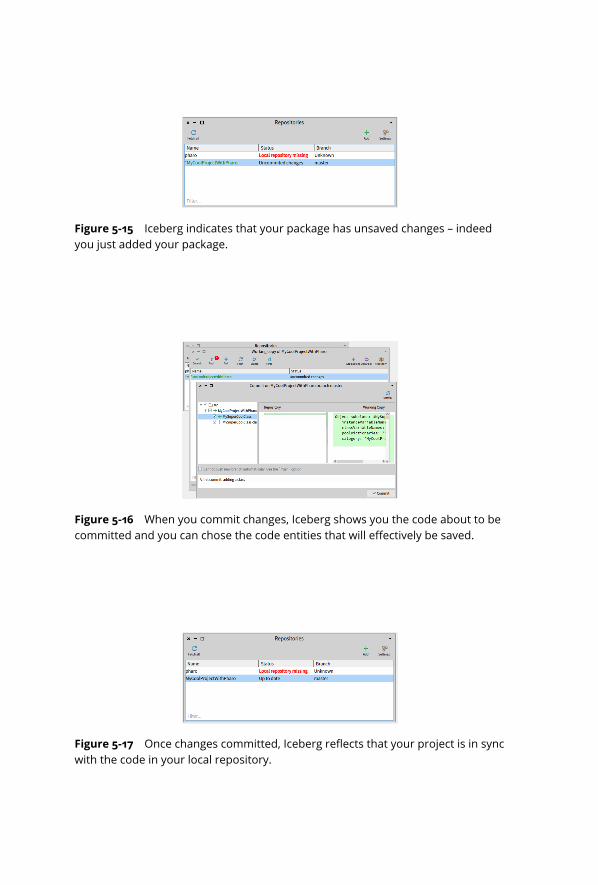
Figure 5-15 Iceberg indicates that your package has unsaved changes – indeed
you just added your package.
Figure 5-16 When you commit changes, Iceberg shows you the code about to be
committed and you can chose the code entities that will effectively be saved.
Figure 5-17 Once changes committed, Iceberg reflects that your project is in sync
with the code in your local repository.
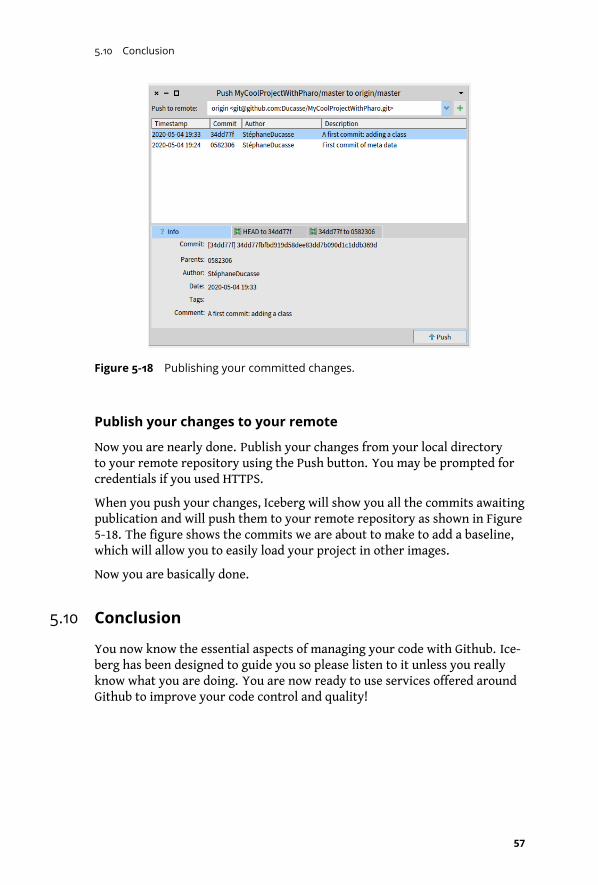
5.10 Conclusion
Figure 5-18 Publishing your committed changes.
Publish your changes to your remote
Now you are nearly done. Publish your changes from your local directoryto your remote repository using the Push button. You may be prompted forcredentials if you used HTTPS.
When you push your changes, Iceberg will show you all the commits awaitingpublication and will push them to your remote repository as shown in Figure5-18. The figure shows the commits we are about to make to add a baseline,which will allow you to easily load your project in other images.
Now you are basically done.
5.10 Conclusion
You now know the essential aspects of managing your code with Github. Ice-berg has been designed to guide you so please listen to it unless you reallyknow what you are doing. You are now ready to use services offered aroundGithub to improve your code control and quality!
57

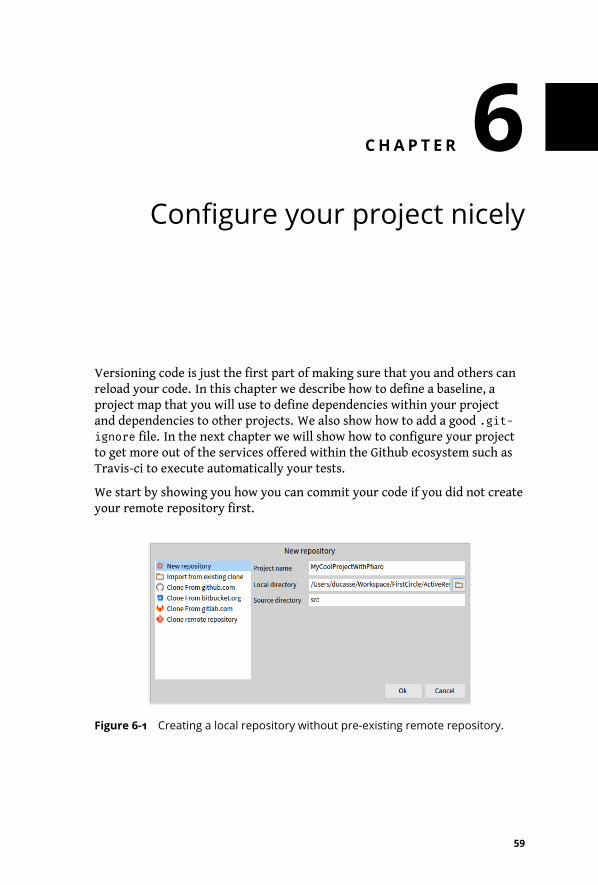
CHA P T E R 6Configure your project nicely
Versioning code is just the first part of making sure that you and others canreload your code. In this chapter we describe how to define a baseline, aproject map that you will use to define dependencies within your projectand dependencies to other projects. We also show how to add a good .git-ignore file. In the next chapter we will show how to configure your projectto get more out of the services offered within the Github ecosystem such asTravis-ci to execute automatically your tests.
We start by showing you how you can commit your code if you did not createyour remote repository first.
Figure 6-1 Creating a local repository without pre-existing remote repository.
59
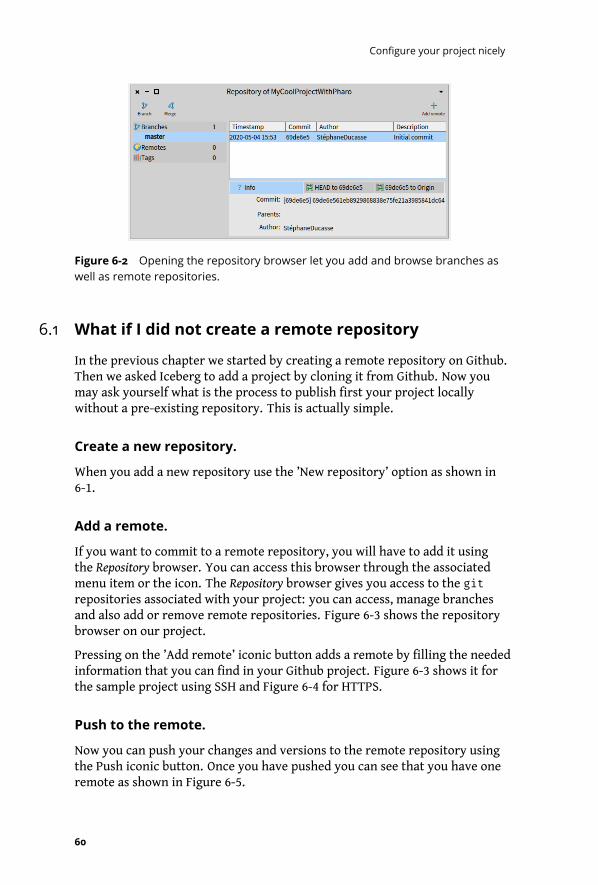
Configure your project nicely
Figure 6-2 Opening the repository browser let you add and browse branches as
well as remote repositories.
6.1 What if I did not create a remote repository
In the previous chapter we started by creating a remote repository on Github.Then we asked Iceberg to add a project by cloning it from Github. Now youmay ask yourself what is the process to publish first your project locallywithout a pre-existing repository. This is actually simple.
Create a new repository.
When you add a new repository use the ’New repository’ option as shown in6-1.
Add a remote.
If you want to commit to a remote repository, you will have to add it usingthe Repository browser. You can access this browser through the associatedmenu item or the icon. The Repository browser gives you access to the gitrepositories associated with your project: you can access, manage branchesand also add or remove remote repositories. Figure 6-3 shows the repositorybrowser on our project.
Pressing on the ’Add remote’ iconic button adds a remote by filling the neededinformation that you can find in your Github project. Figure 6-3 shows it forthe sample project using SSH and Figure 6-4 for HTTPS.
Push to the remote.
Now you can push your changes and versions to the remote repository usingthe Push iconic button. Once you have pushed you can see that you have oneremote as shown in Figure 6-5.
60
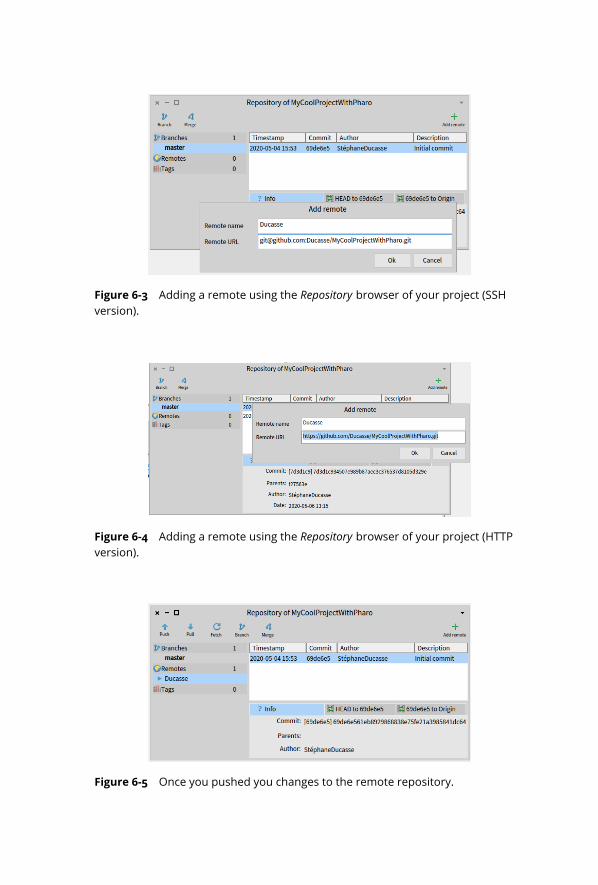
Figure 6-3 Adding a remote using the Repository browser of your project (SSH
version).
Figure 6-4 Adding a remote using the Repository browser of your project (HTTP
version).
Figure 6-5 Once you pushed you changes to the remote repository.
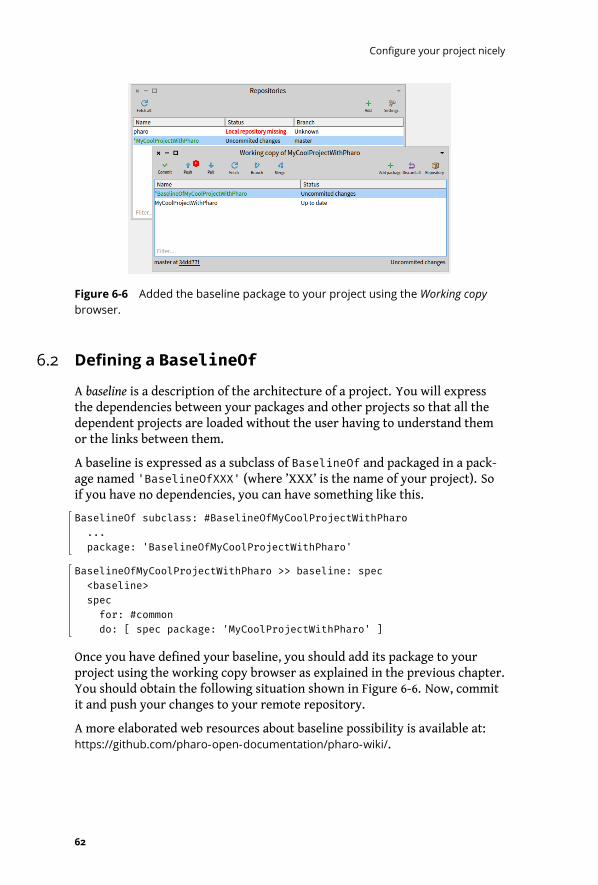
Configure your project nicely
Figure 6-6 Added the baseline package to your project using the Working copy
browser.
6.2 Defining a BaselineOf
A baseline is a description of the architecture of a project. You will expressthe dependencies between your packages and other projects so that all thedependent projects are loaded without the user having to understand themor the links between them.
A baseline is expressed as a subclass of BaselineOf and packaged in a pack-age named 'BaselineOfXXX' (where ’XXX’ is the name of your project). Soif you have no dependencies, you can have something like this.
BaselineOf subclass: #BaselineOfMyCoolProjectWithPharo...package: 'BaselineOfMyCoolProjectWithPharo'
BaselineOfMyCoolProjectWithPharo >> baseline: spec<baseline>specfor: #commondo: [ spec package: 'MyCoolProjectWithPharo' ]
Once you have defined your baseline, you should add its package to yourproject using the working copy browser as explained in the previous chapter.You should obtain the following situation shown in Figure 6-6. Now, commitit and push your changes to your remote repository.
A more elaborated web resources about baseline possibility is available at:https://github.com/pharo-open-documentation/pharo-wiki/.
62
6.3 Loading from an existing repository
6.3 Loading from an existing repository
Once you have a repository you committed code to and would like to load itinto a new Pharo image, there are two ways to work this out.
Manual load.
• Add the project as explained in the first chapter
• Open the working copy browser by double clicking on the project linein the repositories browser.
• Select a package and manually load it.
Scripting the load.
The second way is to make use of Metacello. However, this will only work ifyou have already created a BaselineOf. In this case, you can just executethe following snippet:
Metacello newbaseline: 'MyCoolProjectWithPharo';repository: 'github://Ducasse/MyCoolProjectWithPharo/src';load
For projects with metadata, like the one we just created, that’s it. Notice thatwe not only mention the Github pass but also added the code folder (heresrc).
6.4 [Optional] Add a nice .gitignore file
Iceberg automatically manages files such as .gitignore.
# For Pharo 70 and up# http://www.pharo.org# Since Pharo 70 all the community is moving to git.
# image, changes and sources*.changes*.sources*.image
# Pharo Debug log file and launcher metadataPharoDebug.logpharo.versionmeta-inf.ston
# Since Pharo 70, all local cache files for Monticello packagecache, playground, epicea... are under the pharo-local
63
Configure your project nicely
/pharo-local
# Metacello-github cache/github-cachegithub-*.zip
6.5 Going further: Understanding the architecture
As git is a distributed versioning system, you need a local clone of yourrepository. In general you edit your working copy located on your hard-drive and you commit to your local clone, and from there you push to remoterepositories like Github. We explain here the specificity of managing Pharowith git.
When coding in Pharo, you should understand that you are not directly edit-ing your local working copy, you are modifying objects that represent classesand methods that are living in the Pharo environment. Therefore it is likeyou have a double working copy: Pharo itself and the git working copy.
When you use git command lines, you have to understand that there is thecode in the image and the code in the working copy (and your local clone).Toupdate your image, you first have to update your git working copy and thenload code from the working copy to the image. To save your code you have tosave the code to files, add them to your git working copy and commit themto your clone.
Now the interesting part is that Iceberg manages all this for you transpar-ently. All the synchronization between these two working copies is done be-hind the scene.
Figure 6-7 shows the architecture of the system.
• You have your code in the Pharo image.
• Pharo is acting as a working copy (it contains the contents of the localgit repository).
• Iceberg manages the publication of your code to the git working copyand the git local repository.
• Iceberg manages the publication of your code to remote repositories.
• Iceberg manages the re-synchronization of your image with the gitlocal repository, git remote repositories and the git working copy.
6.6 Conclusion
We show how to package your code correclty. It will help you to reload it anduse the services that we will present in the next chapter.
64
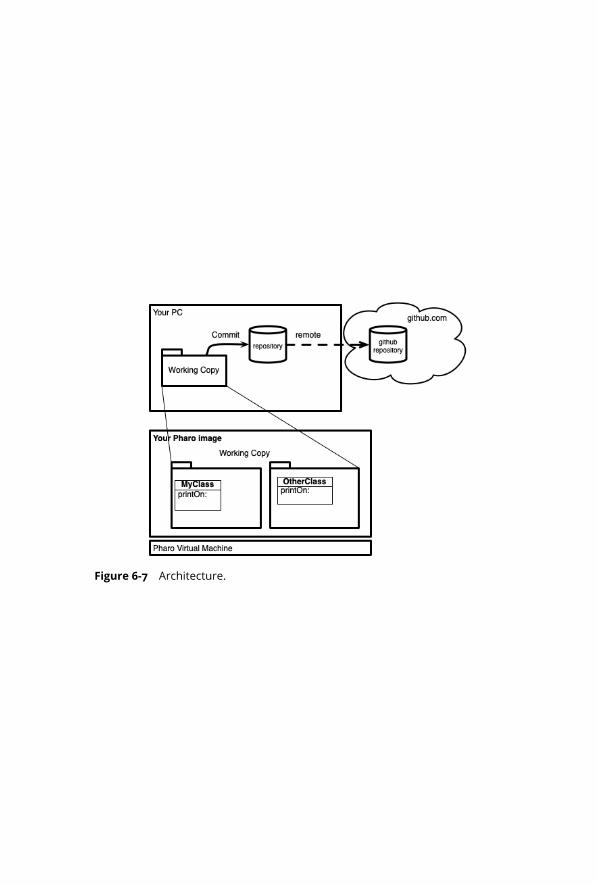
Figure 6-7 Architecture.

CHA P T E R 7Empowering your projects
Now that you can save your code on Github in a breeze, you can take ad-vantage of services to automate actions. For example, to execute tests usingTravis1) or AppVeyor2 for Windows.
7.1 Adding Travis integration
By adding two simple files, you can have the tests of your project automat-ically run after each commit with Travis. You need to enable Travis in yourGithub repository. Since Travis is changing its policy and work tightly in re-lation with Github you might have a better time checking on their respectivewebsites.
You should also add the two following files: .travis.yml and .smalltalk.stonin the top level of your repository.
.travis.yml
language: smalltalksudo: falseos:
- linuxsmalltalk:
- Pharo-7.0
.smalltalk.ston
1http://www.travis-ci.com2https://www.appveyor.com
67
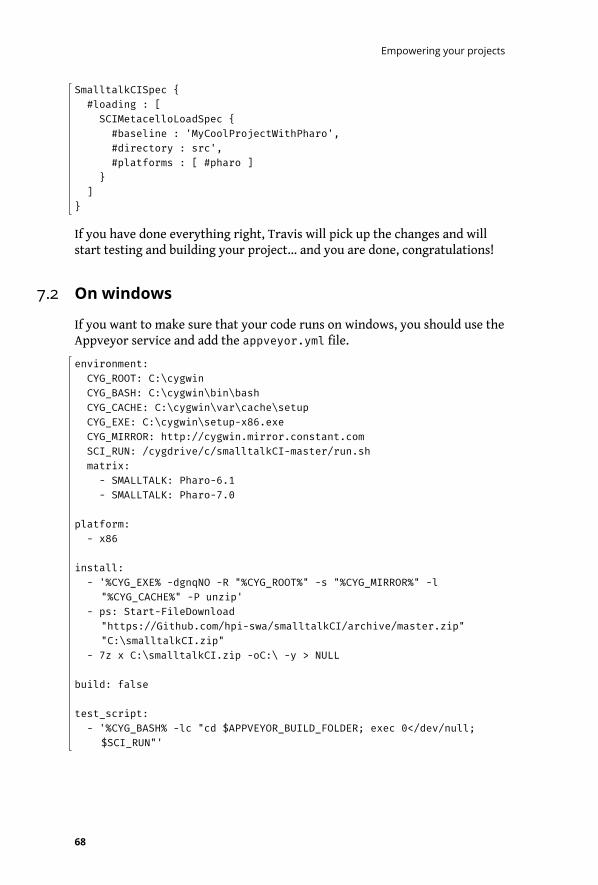
Empowering your projects
SmalltalkCISpec {#loading : [SCIMetacelloLoadSpec {
#baseline : 'MyCoolProjectWithPharo',#directory : src',#platforms : [ #pharo ]
}]
}
If you have done everything right, Travis will pick up the changes and willstart testing and building your project… and you are done, congratulations!
7.2 On windows
If you want to make sure that your code runs on windows, you should use theAppveyor service and add the appveyor.yml file.
environment:CYG_ROOT: C:\cygwinCYG_BASH: C:\cygwin\bin\bashCYG_CACHE: C:\cygwin\var\cache\setupCYG_EXE: C:\cygwin\setup-x86.exeCYG_MIRROR: http://cygwin.mirror.constant.comSCI_RUN: /cygdrive/c/smalltalkCI-master/run.shmatrix:- SMALLTALK: Pharo-6.1- SMALLTALK: Pharo-7.0
platform:- x86
install:- '%CYG_EXE% -dgnqNO -R "%CYG_ROOT%" -s "%CYG_MIRROR%" -l
"%CYG_CACHE%" -P unzip'- ps: Start-FileDownload
"https://Github.com/hpi-swa/smalltalkCI/archive/master.zip""C:\smalltalkCI.zip"
- 7z x C:\smalltalkCI.zip -oC:\ -y > NULL
build: false
test_script:- '%CYG_BASH% -lc "cd $APPVEYOR_BUILD_FOLDER; exec 0</dev/null;
$SCI_RUN"'
68

7.3 Adding badges
7.3 Adding badges
With CI happily running, you can add a badge to your README that will showthe current status of your project. Here is the badge of the Containers-Stackproject where we also enabled the coveralls.io test coverage service.
# Containers-StackA dead stupid stack implementation, but one fully working :)
[]
(https://travis-ci.com/Ducasse/Containers-Stack)[](https://coveralls.io/Github//Ducasse/Containers-Stack?branch=master)[]()[](https://pharo.org/download)[](https://pharo.org/download)
## InstallationThe following script installs Containers-Stack in Pharo.
```smalltalkMetacello new
baseline: 'ContainersStack';repository: 'Github://Ducasse/Containers-Stack/src';load.
```
To obtain the necessary link, click on the badge in your Travis project overviewand select one of the options. You can insert the markdown code directlyinto your README.md.
7.4 Conclusion
With a continuous integration setup, you make sure that you can run yoursoftware on different platforms. In addition you make sure that you will beable to smoothly load your code and that any addition or modifications youjust did is not disrupting the whole project. Other services such as coverallsare available for Pharo.
69

CHA P T E R 8Contributing to Pharo
Pharo itself is hosted on GitHub under http://www.github.com/pharo-project/.All the development of the core system is done via this code repository. Youcan contribute to Pharo itself fixing some issues. The official and unique wayof submitting code is by doing a Pull Request from your fork to the officialrepository. You can see the issues on the Pharo Github repository: http://www.github.com/pharo-project/pharo/issues.
8.1 In a nutshell
The general process is summarised by the following steps:
1. Download the latest version (this is important since I will make surethat you do not have to resync your fork).
2. Use repair (it will fetch some commits and make sure that your localrepository is in sync the remotes).
3. Use repair (and create a branch let us called Bottom-123 that will pointto the commits of your image).
4. Create a new branch for the issue you want to work on.
5. Code, then commit, then push to YOUR fork
6. Issue a PullRequest from your fork to Pharo
7. Check out your Bottom-123 branch and you can restart step 5
8.2 Step 0: Setting up the development environment
Download and launch latest Pharo version:
71
Contributing to Pharo
The recommended way to download Pharo is to use the Pharo launcher,which you can get from Pharo download’s page. Otherwise, if you have a nicecommand line environment (wget, readline, bash), download latest develop-ment pharo using zeroconf.
Note Pro tip: If you’re on windows and you want a nice command lineenvironment, install msys
wget -O- get.pharo.org/64/90+vm | bash./pharo-ui Pharo.image
If you don’t have a command line environment, you can download both im-age and vm manually from the following links for windows for example:
• Image: http://files.pharo.org/get-files/90/pharo.zip
• VM: http://files.pharo.org/get-files/90/pharo-win-stable.zip
Or you can browse the file server and find the files suiting your environment.
8.3 Fork the Pharo repository
All changes you’ll do will be versionned in your own fork of the Pharo repos-itory. Then, from your fork you’ll be able to issue pull requests to Pharo,where they will be reviewed, and luckily, integrated.
Go to Pharo github’s repository and click on the fork button on the top right.Yes, this means that you’ll need a github account to contribute to Pharo, yes.
8.4 Setup Iceberg
To be able to contribute to Pharo, you need a Pharo git repository.
You will need to set a valid set of credentials in your system to be able towork with Pharo. In case you use SSH (the default way), you will need tomake sure those keys are available but you can start by using HTTPS sincethis is easier. In case they are not (and you will notice as soon as you try toclone a project or commit a change into one), you can add them followingthis steps:
Linux setting credentials
Execute in your shell:
ssh-add ~/.ssh/id_rsa
72
8.5 Step 1. Setting up your repository
OSX setting credentials
Execute in your shell:
ssh-add -K ~/.ssh/id_rsa
Both for OSX and linux you can add such lines in your .bash_profile (orthe one corresponding to your shell installation) so they are automaticallyexecuted on each new shell session.
Windows setting credentials
in windows is more complicated, you may need to generate a pair of keys(that needs to be uploaded to your account on github). You can follow in-structions on how to generate your keys http://guides.beanstalkapp.com/
version-control/git-on-windows.html#installing-ssh-keys.
Pharo side settings
Then you need to go to settings browser, search for ”Use custom SSH keys”and complete your data there.
Alternatively, you can execute in your image playground:
IceCredentialsProvider useCustomSsh: true.IceCredentialsProvider sshCredentials
publicKey: 'path\to\ssh\id_rsa.pub';privateKey: 'path\to\ssh\id_rsa'
Note Pro Tip: this can be used too in case you have a non default keyfile, you just need to replace ”id_rsa” with your file name.
8.5 Step 1. Setting up your repository
A fresh Pharo image comes with a pre-configured Pharo repository. Nowthis repository is in state ”Local Repository Missing”. You can develop withthe image without problem now if you want to send some enhancements toPharo you will not be able to do it. Indeed the message Local RepositoryMissingmeans that the image does not find a Pharo clone in your disk.
Repairing local repository missing.
To solve this situation, you need to rebind your repository with a clone onyour disk. Indeed even if you can browse the system class code, the imagedoes not know where its repository is. The repair menu item/button willpropose you some solutions.
73
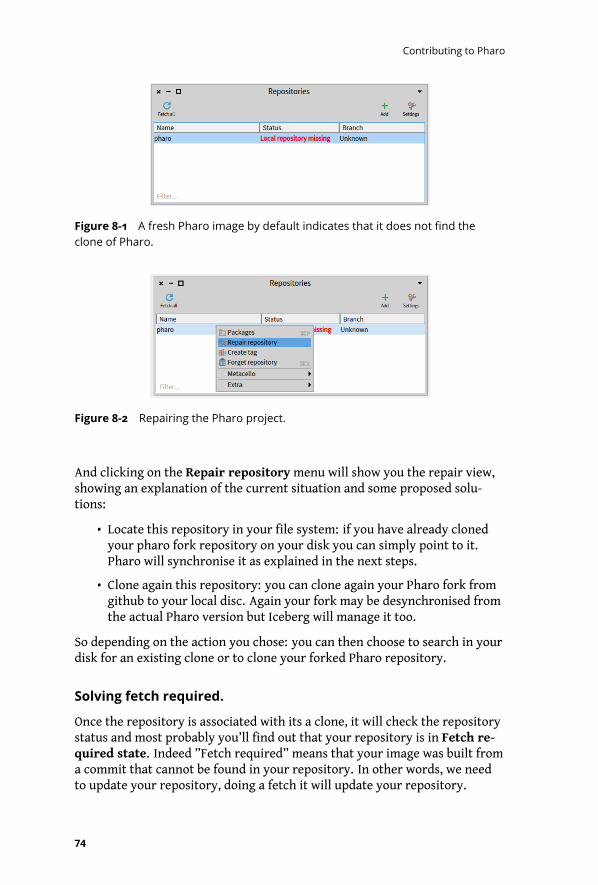
Contributing to Pharo
Figure 8-1 A fresh Pharo image by default indicates that it does not find the
clone of Pharo.
Figure 8-2 Repairing the Pharo project.
And clicking on the Repair repositorymenu will show you the repair view,showing an explanation of the current situation and some proposed solu-tions:
• Locate this repository in your file system: if you have already clonedyour pharo fork repository on your disk you can simply point to it.Pharo will synchronise it as explained in the next steps.
• Clone again this repository: you can clone again your Pharo fork fromgithub to your local disc. Again your fork may be desynchronised fromthe actual Pharo version but Iceberg will manage it too.
So depending on the action you chose: you can then choose to search in yourdisk for an existing clone or to clone your forked Pharo repository.
Solving fetch required.
Once the repository is associated with its a clone, it will check the repositorystatus and most probably you’ll find out that your repository is in Fetch re-quired state. Indeed ”Fetch required” means that your image was built froma commit that cannot be found in your repository. In other words, we needto update your repository, doing a fetch it will update your repository.
74
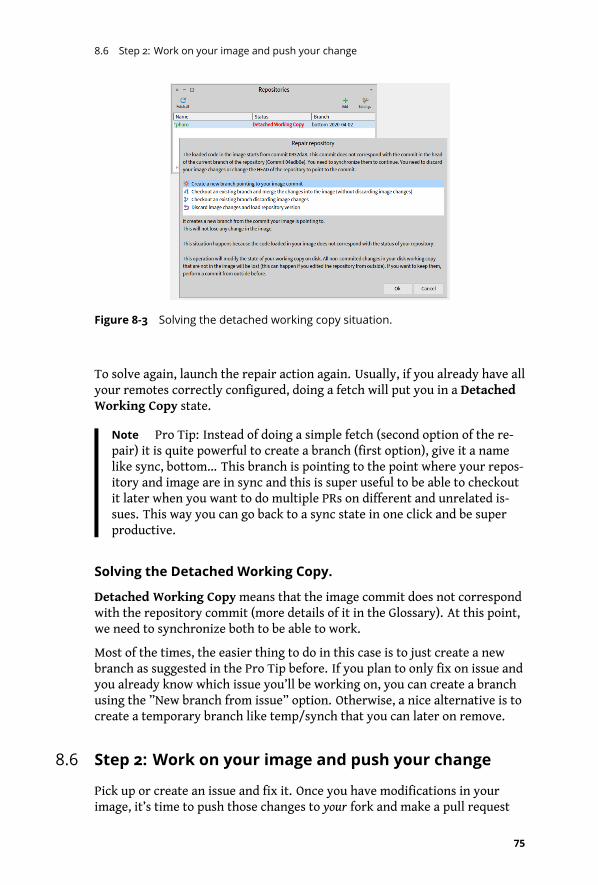
8.6 Step 2: Work on your image and push your change
Figure 8-3 Solving the detached working copy situation.
To solve again, launch the repair action again. Usually, if you already have allyour remotes correctly configured, doing a fetch will put you in a DetachedWorking Copy state.
Note Pro Tip: Instead of doing a simple fetch (second option of the re-pair) it is quite powerful to create a branch (first option), give it a namelike sync, bottom... This branch is pointing to the point where your repos-itory and image are in sync and this is super useful to be able to checkoutit later when you want to do multiple PRs on different and unrelated is-sues. This way you can go back to a sync state in one click and be superproductive.
Solving the Detached Working Copy.
Detached Working Copymeans that the image commit does not correspondwith the repository commit (more details of it in the Glossary). At this point,we need to synchronize both to be able to work.
Most of the times, the easier thing to do in this case is to just create a newbranch as suggested in the Pro Tip before. If you plan to only fix on issue andyou already know which issue you’ll be working on, you can create a branchusing the ”New branch from issue” option. Otherwise, a nice alternative is tocreate a temporary branch like temp/synch that you can later on remove.
8.6 Step 2: Work on your image and push your change
Pick up or create an issue and fix it. Once you have modifications in yourimage, it’s time to push those changes to your fork and make a pull request
75

Contributing to Pharo
Figure 8-4 Checking your pull request.
from your fork to the main Pharo repository. To do that, we enforce the fol-lowing process:
• you create a local branch for the issue,
• you issue a pull request of that issue to the main pharo developmentbranch.
Once you have done and commited all your work, you need to push it andcreate a pull request. Right click on the repository and go to the Github plu-gin menu item.
Select the option Create pull request and select as target branch pharo’sdevelopment branch.
And issue the pull request!
Note Pro Tip: If your PR fixes the issue, you can put a keyword ”fixes#IssueNumber” in the description to automatically close the issue onmerge. https://help.github.com/en/articles/closing-issues-using-keywords
8.7 Step 3: Follow your pull request
If you go to github, you’ll see your pull request open and that some checksare running. Note that if your PR fails because of test failing or you want tointegrate feedback provided by reviewed, it is super simple: just continueto commit in your branch. Your Pull Request will be updated with your newchanges. This is always a cool feeling, so enjoy it.
8.8 Step 4: Once your pull request is integrated
Some cleanups are required:
• remove your branch from your fork
• close the issue (this is done automatically if your PR contained ”fixes#numberOfIssue”)
76
8.9 Why you do not need to resync your fork with the pharo repo?
8.9 Why you do not need to resync your fork with the pharo
repo?
No, you do not need to explicitly resync your fork. Why? Because when youpush your commits, you push also the Pharo commits. But let us look at it indetails:
• When you download an image (imagine that this image contains thecode of commit3 and that Pharo’ repository is at commit5), the repairaction will fetch all the commits (up to 5) and put them in your localrepository.
• When you create your bottom branch (the branch that points to thesituation of your image when you downloaded) and later a child branchcontaining your fixes (call it myfix), it implies that when you commityour myfix branch, all the commits from myfixes and then from com-mit3 down to the common ancestor between your fork and your localrepository will be pushed back to your fork.
So if you downloaded the latest image (imagine for commit6 and that thepharo repository is at commit6 - yes this is the latest image!) when you pushyour branch (which here is child of commit6), automatically all the commits(6 down to the common ancestors between your local repo to your fork) willbe pushed to your fork. So your fork will be in sync with Pharo’s one.
So each time you work and push to your fork from the latest image, your forkgets updated!
8.10 Update your Pharo fork using the command line
You can also update your Pharo fork using the command line in 6 commands.You need to have a git command line interface installed:
$ git clone https://github.com/YOUR-USER-NAME/pharo.git$ cd Pharo$ git remote add pharo https://github.com/pharo-project/pharo.git$ git fetch pharo$ git pull pharo Pharo8.0$ git push origin Pharo8.0
You can see the results in Figure 8-5.
8.11 Conclusion
Now you know how to update a branch from your repository and can happilycontinue to improve Pharo.
77

Figure 8-5 Command Line.
CHA P T E R 9Tips and Tricks
This chapter contains some simple recipe-oriented frequently asked ques-tions. If you have some more please send them to us or even better, present aPull Request.
9.1 How to use SSH keys
In case SSH is not set up (and you will notice as soon as you try to clone aproject or commit a change to one), there are some simple basic points to beable to use SSH with github.
You can add SSH keys by following these steps (on Windows, if you want anice command line environment, install http://mingw.org/wiki/msys):
Generate a key pair
To do this, execute the command:
ssh-keygen -t rsa
It will generate a private and a public key (on a unix-based installation inthe directory .ssh). You should copy your id_rsa.pub key to your githubaccount. Keep the keys in a safe place.
On Windows, you can follow instructions on how to generate your keys athttp://guides.beanstalkapp.com/version-control/git-on-windows.html#installing-ssh-keys.
Add the key to your ssh agent
In linux, execute in your shell:
79
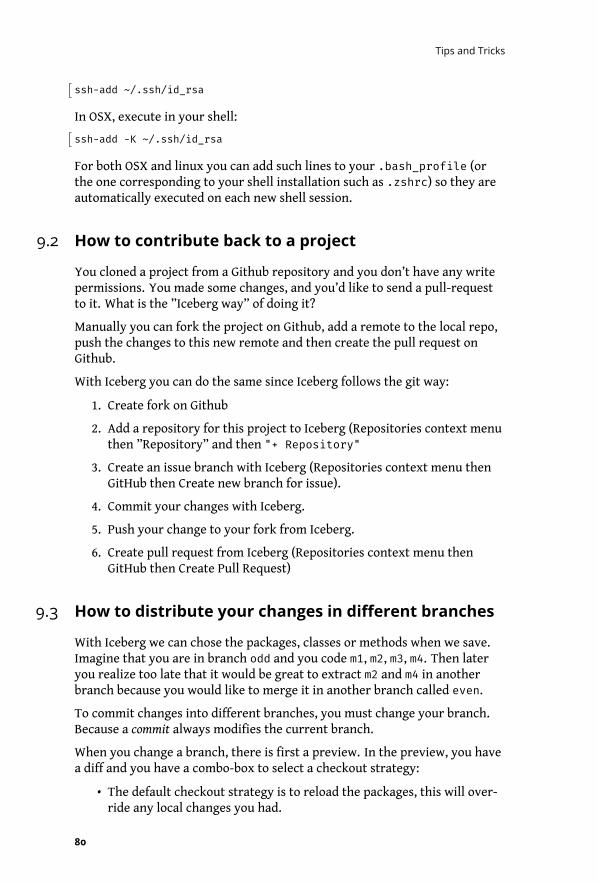
Tips and Tricks
ssh-add ~/.ssh/id_rsa
In OSX, execute in your shell:
ssh-add -K ~/.ssh/id_rsa
For both OSX and linux you can add such lines to your .bash_profile (orthe one corresponding to your shell installation such as .zshrc) so they areautomatically executed on each new shell session.
9.2 How to contribute back to a project
You cloned a project from a Github repository and you don’t have any writepermissions. You made some changes, and you’d like to send a pull-requestto it. What is the ”Iceberg way” of doing it?
Manually you can fork the project on Github, add a remote to the local repo,push the changes to this new remote and then create the pull request onGithub.
With Iceberg you can do the same since Iceberg follows the git way:
1. Create fork on Github
2. Add a repository for this project to Iceberg (Repositories context menuthen ”Repository” and then "+ Repository"
3. Create an issue branch with Iceberg (Repositories context menu thenGitHub then Create new branch for issue).
4. Commit your changes with Iceberg.
5. Push your change to your fork from Iceberg.
6. Create pull request from Iceberg (Repositories context menu thenGitHub then Create Pull Request)
9.3 How to distribute your changes in different branches
With Iceberg we can chose the packages, classes or methods when we save.Imagine that you are in branch odd and you code m1, m2, m3, m4. Then lateryou realize too late that it would be great to extract m2 and m4 in anotherbranch because you would like to merge it in another branch called even.
To commit changes into different branches, you must change your branch.Because a commit always modifies the current branch.
When you change a branch, there is first a preview. In the preview, you havea diff and you have a combo-box to select a checkout strategy:
• The default checkout strategy is to reload the packages, this will over-ride any local changes you had.
80
9.3 How to distribute your changes in different branches
Figure 9-1 Checkout choices.
• The last one is to not load any packages: in other words, change thebranch but do not touch my image.
So one way to do save your changes in separate branch is to:
1. Commit in branch odd by selecting a subset of changes
2. Change to branch even using the ”Do not checkout” strategy
3. Commit in branch even a subset of changes
81

CHA P T E R 10Iceberg Glossary
Git is complicated. Git with (Pharo) images is even more complicated. Thispage introduces the vocabulary used by Iceberg. Part of this vocabulary isGit vocabulary, part of it is Github’s vocabulary, part of it is introduced byIceberg.
10.1 Git
Disk Working Copy (Git)
It is important not to confuse the code on your disk with the one of the repos-itory itself. The repository (a kind of database) has a lot more information,such as known branches, history of commits, remote repositories, the git in-dex and much more. Normally this information is kept in a directory named.git. The files that you see on your disk and that you edit are just a workingcopy of the contents in the repository.
The git index (Git)
The index is an intermediate structure which is used to select the contentsthat are going to be committed.
So, to commit changes to your local repository, two actions are needed:
1. git add someFileOrDirectory will add someFileOrDirectory tothe index.
2. git commit will create a new commit out of the contents of the index,which will be added to your local repository and to the current branch.
83
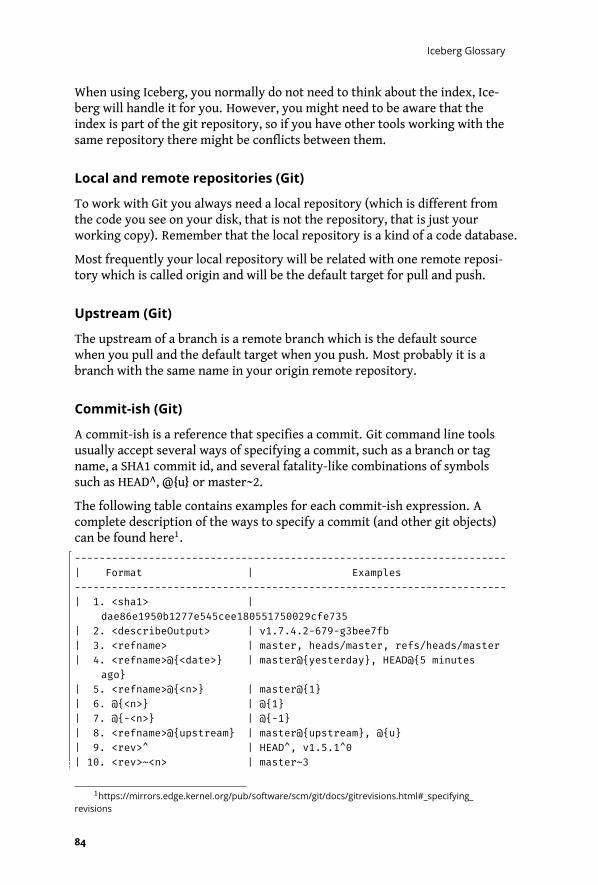
Iceberg Glossary
When using Iceberg, you normally do not need to think about the index, Ice-berg will handle it for you. However, you might need to be aware that theindex is part of the git repository, so if you have other tools working with thesame repository there might be conflicts between them.
Local and remote repositories (Git)
To work with Git you always need a local repository (which is different fromthe code you see on your disk, that is not the repository, that is just yourworking copy). Remember that the local repository is a kind of a code database.
Most frequently your local repository will be related with one remote reposi-tory which is called origin and will be the default target for pull and push.
Upstream (Git)
The upstream of a branch is a remote branch which is the default sourcewhen you pull and the default target when you push. Most probably it is abranch with the same name in your origin remote repository.
Commit-ish (Git)
A commit-ish is a reference that specifies a commit. Git command line toolsusually accept several ways of specifying a commit, such as a branch or tagname, a SHA1 commit id, and several fatality-like combinations of symbolssuch as HEAD^, @{u} or master~2.
The following table contains examples for each commit-ish expression. Acomplete description of the ways to specify a commit (and other git objects)can be found here1.
----------------------------------------------------------------------| Format | Examples----------------------------------------------------------------------| 1. <sha1> |
dae86e1950b1277e545cee180551750029cfe735| 2. <describeOutput> | v1.7.4.2-679-g3bee7fb| 3. <refname> | master, heads/master, refs/heads/master| 4. <refname>@{<date>} | master@{yesterday}, HEAD@{5 minutes
ago}| 5. <refname>@{<n>} | master@{1}| 6. @{<n>} | @{1}| 7. @{-<n>} | @{-1}| 8. <refname>@{upstream} | master@{upstream}, @{u}| 9. <rev>^ | HEAD^, v1.5.1^0| 10. <rev>~<n> | master~3
1https://mirrors.edge.kernel.org/pub/software/scm/git/docs/gitrevisions.html#_specifying_
revisions
84
10.2 Iceberg
| 11. <rev>^{<type>} | v0.99.8^{commit}| 12. <rev>^{} | v0.99.8^{}| 13. <rev>^{/<text>} | HEAD^{/fix nasty bug}| 14. :/<text> | :/fix nasty bug----------------------------------------------------------------------
10.2 Iceberg
Iceberg Working Copy (Iceberg)
Iceberg also includes an object called the working copy that is not quite thesame as Git’s working copy. Iceberg’s working copy represents the codeloaded in the Pharo image, with the loaded commit and the packages.
Local Repository Missing (Iceberg)
The Local Repository Missing status is shown by iceberg when a project inthe image does not find its repository on disk. This happens most probablybecause you have downloaded an image that somebody else created, or youdeleted/moved a git repository in your disk. Most of the times this status isnot shown because iceberg automatically manages disk repositories.
To recover from this status, you need to update your repository by cloning anew git repository or by configuring an existing repository on disk.
Fetch required. Unknown ... (Iceberg)
The Fetch required status is shown by Iceberg when a project in the imagewas loaded from a commit that cannot be found in its local repository. Thishappens most probably because you’ve downloaded an image that somebodyelse created, and/or your repository on disk is not up to date.
To recover from this status, you need to fetch from remotes to try to findthe missing commit. It may happen that the missing commit is not in one ofyour configured remotes (even that nobody ever pushed it). In that case, theeasiest solution is to discard your image changes and checkout an existingbranch/commit.
Detached Working Copy (Iceberg)
The Detached working Copy status is shown by Iceberg when a project inthe image was loaded from a commit does not correspond with the currentcommit on disk. This happens most probably because you’ve modified yourrepository from the command line.
To recover from this status, you need to align your repository with yourworking copy. Either you can
85
Iceberg Glossary
1. discard your image changes and load the repository commit,
2. checkout a new branch pointing to your working copy commit or
3. merge what is in the image into the current branch.
Detached HEAD (Git)
The Detached HEAD status means that the current repository on disk is notworking on a branch but on a commit. From a git stand-point you can com-mit and continue working but your changes may get lost as the commit is notpointed to by any branch. From an Iceberg stand-point, we forbid commit inthis state to avoid difficult to understand and repair situations. To recoverfrom this status, you need to checkout a (new or existing) branch.
86

Bibliography
87