Embed Size (px)
Citation preview

Page 103
ACH
Managing ACH Templates
To begin creating a new ACH batch template or to edit a pre-existing template, you can either click on the "ACH" menu item within the menu on the left side of the screen, or by clicking on the ACH batches section of the Overview on the landing page.

Page 104
ACH
Page 105
ACH
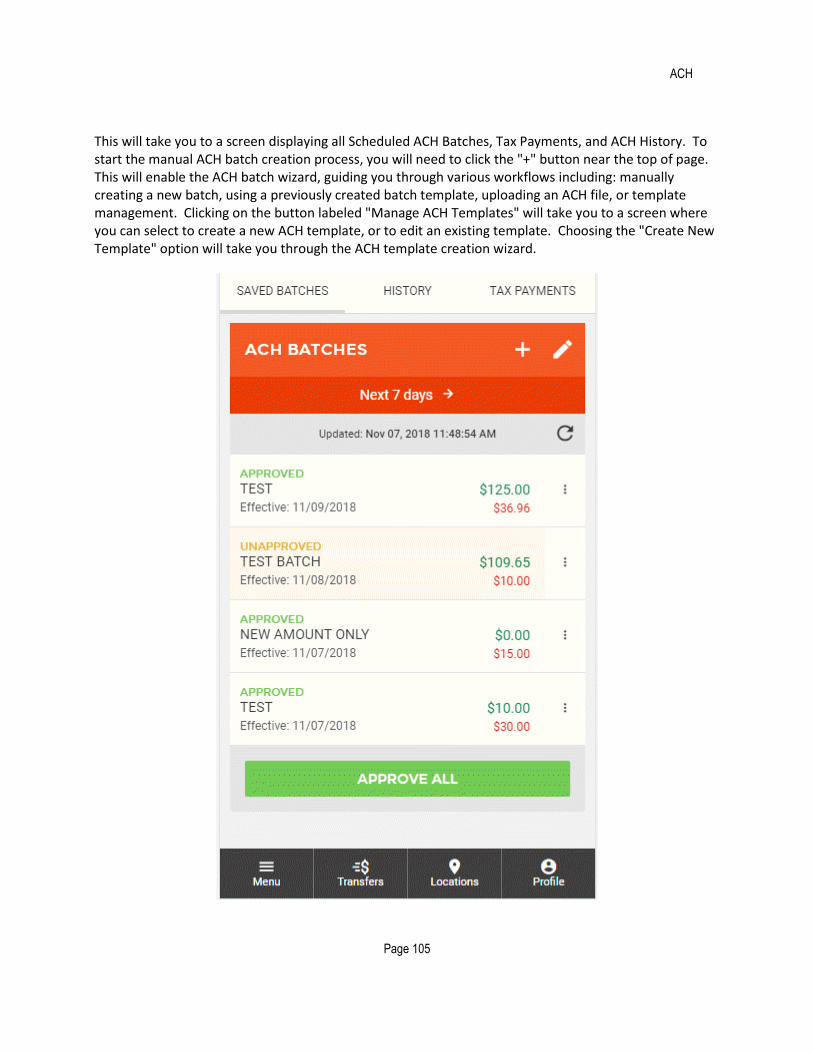
This will take you to a screen displaying all Scheduled ACH Batches, Tax Payments, and ACH History. To start the manual ACH batch creation process, you will need to click the "+" button near the top of page. This will enable the ACH batch wizard, guiding you through various workflows including: manually creating a new batch, using a previously created batch template, uploading an ACH file, or template management. Clicking on the button labeled "Manage ACH Templates" will take you to a screen where you can select to create a new ACH template, or to edit an existing template. Choosing the "Create New Template" option will take you through the ACH template creation wizard.

Page 106
ACH

Page 107
ACH

Page 108
ACH
The first step in the process is naming your template. Once a name has been determined, clicking "Next" at the bottom of the screen will take you to
The second step in creating a new ACH batch template is entering the necessary header information, including:
1 Batch Name
2 Company

Page 109
ACH
3 Offsetting Account
4 Entry Description
5 Discretionary Data
6 Entry Class

Page 110
ACH
Once all required fields have been filled out and reviewed, you can click "Add Recipients" at the bottom of the screen to proceed to the next step.
The next step in creating a new ACH batch template is adding recipients (also known as detail records) to the batch. Any detail records added here will be saved in your template in the state you leave them (thus adding detail records without entering amounts will ensure that all future uses of the template will not have amounts automatically filled out). You can add additional detail records to the batch via two

Page 111
ACH
different methods. The first includes the "+ Add Detail Record(s)" option, which allows the manual addition of new participants. The second includes the "+ Add Participant(s)" option, which allows you to select from a list of participants that have been built under a company.
Selecting the "+ Add Detail Record(s)" option will take you to a screen where individual recipients (also known as detail records) can be added to the batch. Here you will enter all the recipient’s information, including:

Page 112
ACH
1 Full Name
2 Identification Number
3 Amount
4 Transaction Type – Credit or Debit
5 Prenote (if a prenote is needed)
6 Routing Number
7 Account Number
8 Account Type
9 Payment Related Information (Addenda Information)

Page 113
ACH
10 Notify Via Email (Allows notifications to be sent via email to the recipient upon ACH processing)

Page 114
ACH

Page 115
ACH
Once these fields have been filled out for the detail record, you can click the "Save & Add Another" option, near the bottom of the screen, if you would like to manually add more detail records. If you are finished adding detail records you can click the "Save" option at the bottom of the screen. Once this is done, you will be taken back to the "Add Recipients" page of the ACH batch wizard. If you are ready to review the ACH batch template, you can click "Review Template" at the bottom of the screen, taking you to the review screen.

Page 116
ACH
Selecting the "+ Add Participant(s)" option will take you to a screen where all participants built under this company are listed and can be selected for addition to the batch. All details associated with the participant will automatically be moved into the batch upon selection.

Page 117
ACH
If you do not see the participant you are looking for, you can also create new participants from this screen and include them in the current batch. To accomplish this, click the "+ Create New Participant & Add to Batch" button.
Selecting the "+ Create New Participant & Add to Batch" option will take you to the Add New Participant screen. Here you will enter all the participant’s information, including:
1 Full Name
2 Identification Number
3 Email Address
4 Notify Via Email (Allows notifications to be sent via email to the participant upon ACH processing) When this field is enabled, an email address is required.

Page 118
ACH
5 Universal Participant (Allows the participant to be used by all companies)
A participant account must be added to save the participant. You can click the "+ Add Accounts" button to add an account.
Selecting the "+ Add Accounts" button will take you to the Add Participant Account screen. Here you will enter all the account information, including:

Page 119
ACH
1 Account Name
2 Account Type (Checking, Savings, GL, or Loan)
3 Account Number
4 Routing Number

Page 120
ACH
Once these fields have been filled out for the participant account, you can click the "Save Account" option near the bottom of the screen. Once this is done, you will be taken back to the "Add New Participants" page. If you are ready to save the participant, click "Save Participant" at the bottom of the screen.

Page 121
ACH
You will be directed back to the "Select Participants" screen where the participant you just created is marked for selection. You can create additional participants by clicking the "+Create New Participant & Add to Batch" button and going through the participant setup again.
Once all desired participants have been selected, click the "Add Selected Participants" option at the bottom of the screen to add them to the batch.

Page 122
ACH
You will be directed back to the Add Recipients screen where the selected participants will be displayed.
You will need to add an amount and designate the type of transaction for each participant on the Add Recipients screen.

Page 123
ACH
Once all detail records have been added to the ACH batch and you are ready to review the template, you can click the "Review Template" option at the bottom of the screen. This will take you to the next screen where you can review the ACH batch template.
On the review screen, you will be able to see all details of the current ACH batch template. This includes:
1 Header Information (Batch Name, Company Name, etc.)

Page 124
ACH
2 Recipients (Detail Records)
3 Totals (Credits and Debits)
If all information contained within the review screen looks accurate, you can select to "Save ACH Template".

Page 125
ACH
Upon finishing the process, you will see a success message, letting you know that the ACH batch template was created properly.

Page 126
ACH
Note: Choosing to edit an existing template follows the same steps as are listed above for created a new template, except instead of choosing the "Create New Template" option in the initial step, you will select "Edit Existing Template".