Embed Size (px)
Citation preview
Managing Devices
VMware Workspace ONE UEM

You can find the most up-to-date technical documentation on the VMware website at:
https://docs.vmware.com/
If you have comments about this documentation, submit your feedback to
VMware, Inc.3401 Hillview Ave.Palo Alto, CA 94304www.vmware.com
Copyright © 2020 VMware, Inc. All rights reserved. Copyright and trademark information.
Managing Devices
VMware, Inc. 2
Contents
1 Managing Devices with Workspace ONE UEM 7Device Dashboard 7
Device List View 8
Hover-Over Pop-Up Window in Device List View 11
Filtering Devices in List View 11
Add a Device from List View 13
Unenrolled Devices 15
Bulk Actions in Device List View 15
Selecting Devices in Device List View 16
Deleting Devices 17
Device Details 18
Device Details Menu Tabs 19
Device Actions by Platform 21
Device Action Descriptions 24
Enrollment Status 28
Enrollment Status Details View 30
Wipe Protection 31
Configure Wipe Protection Settings for Managed Devices 31
View Wipe Logs 32
Shared Devices 32
Define the Shared Device Hierarchy 34
Configure Shared Devices 35
Log In and Log Out of Shared Android Devices 36
Log In and Log Out of Shared iOS Devices 37
Log In and log out of Shared macOS Devices 38
Check In a Shared Device From the UEM Console 38
Enabling Directory Service-Based Enrollment 38
Lookup Values 39
2 Device Enrollment 41Enroll a Device With Workspace ONE Intelligent Hub 41
Additional Enrollment Workflows 42
Workspace ONE Direct Enrollment 44
Workspace ONE Direct Enrollment Supported Options 44
Enable Direct Enrollment for Workspace ONE 45
Enroll Your Device with Workspace ONE Direct Enrollment 46
Basic vs. Directory Services Enrollment 47
Directory Service Integration and Enrollment Restrictions 48
VMware, Inc. 3
Enrollment Considerations, Basic Versus Directory 49
Enabling Basic Enrollment 49
Bring Your Own Device (BYOD) Enrollment 50
Enrollment Considerations, BYOD 50
Identify Corporate Devices and Specify Default Device Ownership 51
Prompt Users to Identify Ownership Type 52
Self-Enrollment Versus Device Staging 52
Enrollment Considerations, Self-Enrollment 53
Self-Enrollment Process 53
Enrollment Considerations, Device Staging 54
Supervised Mode 56
Stage a Single-User Device 57
Stage a Multi-User Device 59
Device Registration 60
Enrollment Considerations, Registration 60
Register an Individual Device 62
Missing Device Identifiers During Registration 64
Register Multiple Devices 64
End-User Device Registration 65
Direct Users to Self-Register 65
Tracking Device Enrollment Status 66
Enable Registration Tokens and Create a Default Message 66
Generate a Token with the UEM Console 67
Generate a Token with the Self-Service Portal (SSP) 68
Enroll with a Registration Token 68
Configure Enrollment Options 69
Configure Enrollment Options on Terms of Use 70
Configure Enrollment Options on Grouping Tab 70
Configure Enrollment Options on Optional Prompt Tab 72
Configure Enrollment Options on Customization Tab 75
Blacklisting and Whitelisting Device Registration 76
Add a Blacklisted or Whitelisted Device 76
Additional Enrollment Restrictions 77
Enrollment Considerations, Additional Restrictions 77
Configure Enrollment Restriction Settings 78
Enrolled Device Limit Per Organization Group 78
Create an Enrollment Restriction Policy 79
Reasons You Should Not Enroll Devices in Global 81
Autodiscovery Enrollment 81
Configure Autodiscovery Enrollment from a Parent Organization Group 81
Configure Autodiscovery Enrollment from a Child Organization Group 82
Managing Devices
VMware, Inc. 4
3 Device Assignments 83Enable Device Assignments 83
Define Device Assignment Rule or Network Range 85
4 Device Profiles 88Profile Processing 88
Installation / Performance Tuning 89
Add General Profile Settings 91
Device Profiles List View 93
Device Profile Hover-Over Pop-Up 95
Confirm Device Profile Installation 96
Device Profiles Read-Only View 97
Device Profile Editing 97
Edit General Device Profile Settings 97
Edit Payload Device Profile Settings 98
Compliance Profiles 98
Add a Compliance Profile 99
Geofence Areas 100
Geofencing Support on iOS Devices 100
Add Geofencing Area 101
Apply a Geofence to a Profile 101
iBeacons 102
Time Schedules 102
View Device Assignment 103
5 Resources 105Resources List View 105
Add an Exchange Resource 106
Configure Advanced Settings for iOS Exchange 108
Configure Advanced Settings for macOS Exchange 108
Configure Advanced Settings for Android Exchange 109
Configure Advanced Settings for Windows Desktop Exchange 110
Add a Wi-Fi Resource 110
Configure Advanced Settings for Wi-Fi Proxy 111
Configure Advanced Settings for Android Wi-Fi 112
Add a VPN Resource 112
Configure Advanced Settings for iOS VPN 113
Configure Advanced Settings for Android VPN 115
6 Compliance Policies 116Compliance Policies List View 117
Managing Devices
VMware, Inc. 5
View Devices Page 118
Compliance Policy Rules by Platform 119
Compliance Policy Rules Descriptions 120
Compliance Policies Actions by Platform 122
Add a Compliance Policy 123
View Device Assignment 126
Compromised Device Detection with Health Attestation 127
Configure the Health Attestation for Windows Desktop Compliance Policies 127
Configure Health Attestation for Windows Phone Compliance Policies 128
7 Privacy for BYOD Deployments 131Security and Privacy in Workspace ONE UEM 131
Configure Privacy Settings 133
Privacy Notices for BYOD End Users 134
Privacy Settings 135
Create a Privacy Notice for BYOD Users 135
Privacy Best Practices 136
User Data Collection from BYOD End Users 138
Terms of Use for BYOD End Users 140
Restrictions for BYOD Devices 141
Enterprise Wipe for BYOD Devices 141
8 Device Tags 143
9 Certificate Management 148Renew or Revoke Digital Certificates 148
Certificate Integration Resources 149
10 Custom Attributes 151Create Custom Attributes 151
Custom Attributes Importing 152
Assign Organization Groups Using Custom Attributes 153
Managing Devices
VMware, Inc. 6

Managing Devices with Workspace ONE UEM 1Manage devices in your fleet and perform functions on a particular set of devices with Workspace ONE UEM powered by AirWatch.
You can examine the data flow with the Monitor and take a closer look at your fleet with Device Dashboard. You can group devices together and create customized lists with the Device List View.
You can also generate Reports and use Tags to easily identify devices. You can even set up the Self-Service Portal (SSP) to enable end users to manage their own devices and reduce the strain on Help Desk personnel.
This chapter includes the following topics:
n Device Dashboard
n Device List View
n Device Details
n Device Actions by Platform
n Enrollment Status
n Wipe Protection
n Shared Devices
n Lookup Values
Device DashboardAs devices are enrolled, you can manage them from the Device Dashboard in Workspace ONE UEM powered by AirWatch.
The Device Dashboard provides a high-level view of your entire fleet and allows you to act on individual devices quickly.
You can view graphical representations of relevant device information for your fleet, such as device ownership type, compliance statistics, and platform and OS breakdowns. You can access each set of devices in the presented categories by selecting any of the available data views from the Device Dashboard.
VMware, Inc. 7
From the List View, you can take administrative action: send messages, lock devices, delete devices, and change groups associated with the device.
n Security – View the top causes of security issues in your device fleet. Selecting any of the doughnut charts displays a filtered Device List view comprised of devices affected by the selected security issue. If supported by the platform, you can configure a compliance policy to act on these devices.
n Compromised – The number and percentage of compromised devices (jailbroken or rooted) in your deployment.
n No Passcode – The number and percentage of devices without a passcode configured for security.
n Not Encrypted – The number and percentage of devices that are not encrypted for security. This reported figure excludes Android SD Card encryption. Only those Android devices lacking disc encryption are reported in the donut graph.
Ownership – View the total number of devices in each ownership category. Selecting any of the bar graph segments displays a filtered Device List view comprised of devices affected by the selected ownership type.
n Last Seen Overview/Breakdown – View the number and percentage of devices that have recently communicated with the Workspace ONE UEM MDM server. For example, if several devices have not been seen in over 30 days, select the corresponding bar graph to display only those devices. You can then select all these filtered devices and send out a query command so that the devices can check in.
n Platforms – View the total number of devices in each device platform category. Selecting any of the graphs displays a filtered Device List view comprised of devices under the selected platform.
n Enrollment – View the total number of devices in each enrollment category. Selecting any of the graphs displays a filtered Device List view comprised of devices with the selected enrollment status.
n Operating System Breakdown – View devices in your fleet based on operating system. There are separate charts for each supported OS. Selecting any of the graphs displays a filtered Device List view comprised of devices running the selected OS version.
Device List ViewUse the Device List View in Workspace ONE UEM powered by AirWatch to see a full listing of devices in the currently selected organization group.
For information about a specific device, see the Device Details.
Managing Devices
VMware, Inc. 8
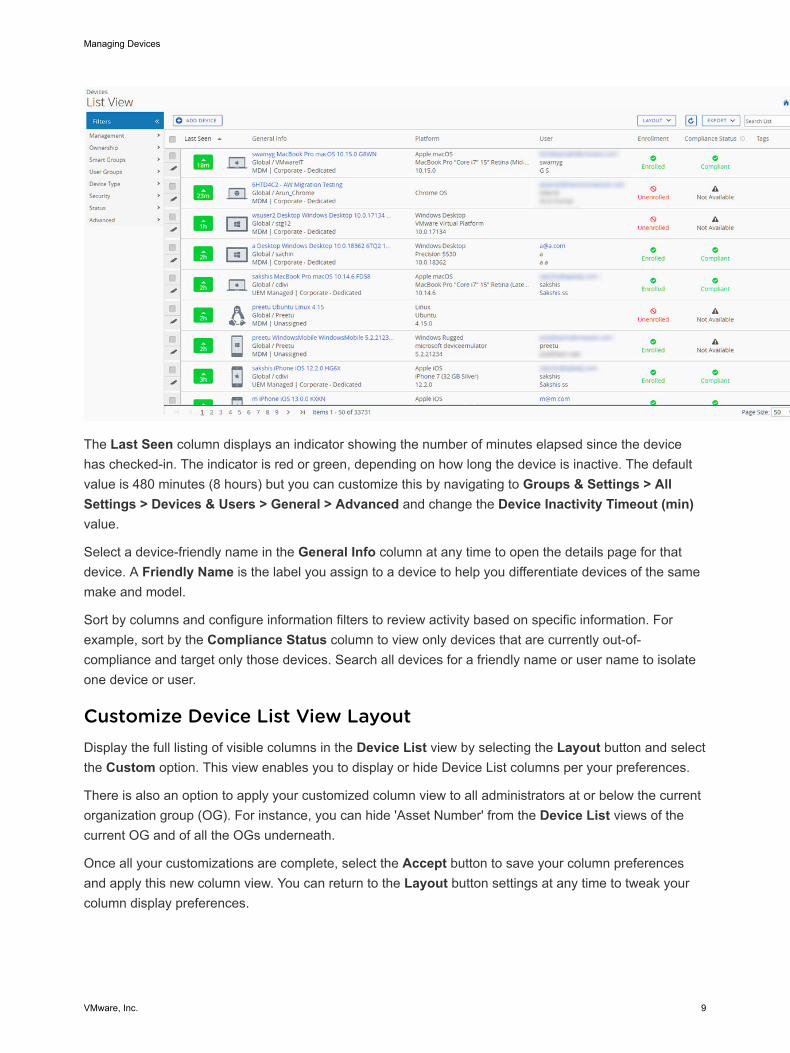
The Last Seen column displays an indicator showing the number of minutes elapsed since the device has checked-in. The indicator is red or green, depending on how long the device is inactive. The default value is 480 minutes (8 hours) but you can customize this by navigating to Groups & Settings > All Settings > Devices & Users > General > Advanced and change the Device Inactivity Timeout (min) value.
Select a device-friendly name in the General Info column at any time to open the details page for that device. A Friendly Name is the label you assign to a device to help you differentiate devices of the same make and model.
Sort by columns and configure information filters to review activity based on specific information. For example, sort by the Compliance Status column to view only devices that are currently out-of-compliance and target only those devices. Search all devices for a friendly name or user name to isolate one device or user.
Customize Device List View LayoutDisplay the full listing of visible columns in the Device List view by selecting the Layout button and select the Custom option. This view enables you to display or hide Device List columns per your preferences.
There is also an option to apply your customized column view to all administrators at or below the current organization group (OG). For instance, you can hide 'Asset Number' from the Device List views of the current OG and of all the OGs underneath.
Once all your customizations are complete, select the Accept button to save your column preferences and apply this new column view. You can return to the Layout button settings at any time to tweak your column display preferences.
Managing Devices
VMware, Inc. 9
Some notable device list view custom layout columns include the following.
n Android Management
n SSID (Service Set Identifier or Wi-Fi network name)
n Wi-Fi MAC Address
n Wi-Fi IP Address
n Public IP Address
Exporting List ViewSelect the Export button to save an XLSX or CSV (comma-separated values) file of the entire Device List View that can be viewed and analyzed with MS Excel. If you have a filter applied to the Device List View, the exported listing reflects the filtered results.
Search in Device List ViewYou can search for a single device for quick access to its information and take remote action on the device.
To run a search, navigate to Devices > List View, select the Search List bar and enter a user name, device-friendly name, or other device-identifying element. This action initiates a search across all devices, using your search parameter, within the current organization group and all child groups.
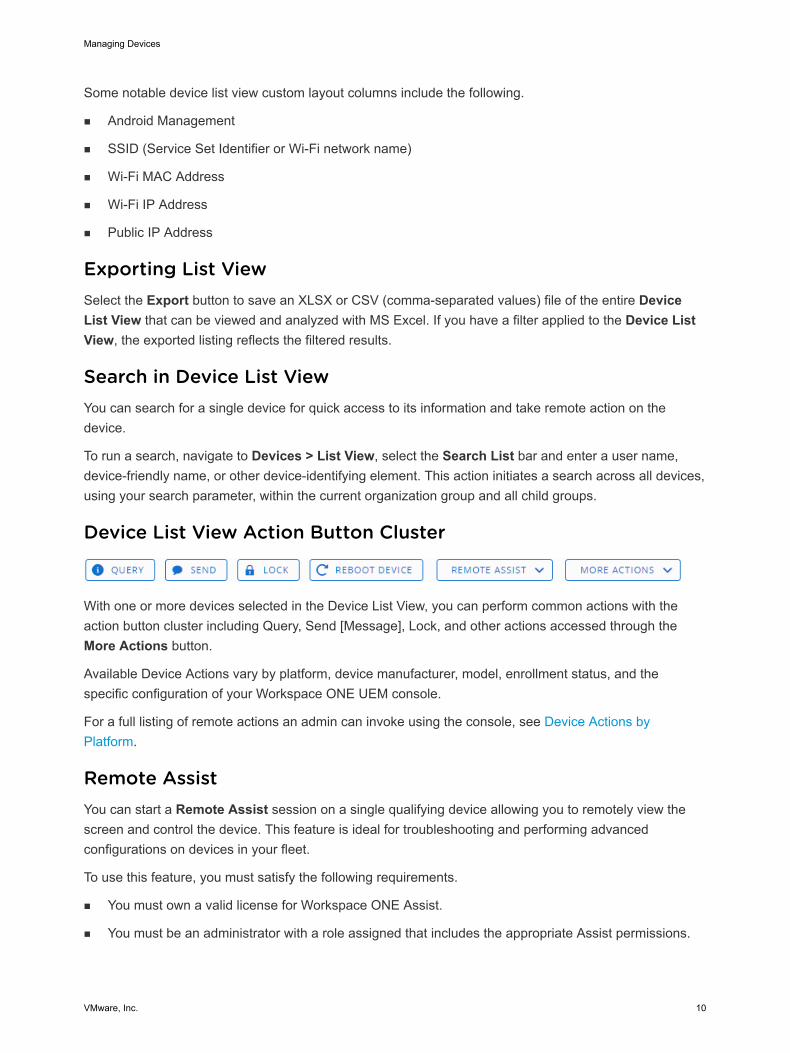
Device List View Action Button Cluster
With one or more devices selected in the Device List View, you can perform common actions with the action button cluster including Query, Send [Message], Lock, and other actions accessed through the More Actions button.
Available Device Actions vary by platform, device manufacturer, model, enrollment status, and the specific configuration of your Workspace ONE UEM console.
For a full listing of remote actions an admin can invoke using the console, see Device Actions by Platform.
Remote AssistYou can start a Remote Assist session on a single qualifying device allowing you to remotely view the screen and control the device. This feature is ideal for troubleshooting and performing advanced configurations on devices in your fleet.
To use this feature, you must satisfy the following requirements.
n You must own a valid license for Workspace ONE Assist.
n You must be an administrator with a role assigned that includes the appropriate Assist permissions.
Managing Devices
VMware, Inc. 10
n The Assist app must be installed on the device.
n Supported device platforms:
n Android
n iOS
n macOS
n Windows 10
n Windows Mobile
Select the check box to the left of a qualifying device in the Device List View and the Remote Assist button displays. Select this button to initiate a Remote Assist session.
For more information, see the Workspace ONE Assist guide, available on docs.vmware.com.
Hover-Over Pop-Up Window in Device List ViewEach device in the General Info column features a tool tip icon in the shape of a folder located in the upper-right corner next to the device friendly name. When this icon is tapped (mobile touch device) or hovered-over with a mouse pointer (PC or Mac), it displays a Hover-Over pop-up window. This pop-up window contains information such as Friendly Name, Organization Group, Group ID, Management, and Ownership.
Similar tool tip icons are found in the Enrollment and Compliance Status columns in the Device List view. These tool tip icons feature Hover-Over Pop-Up windows displaying Enrollment Date and Compliance Violations respectively.
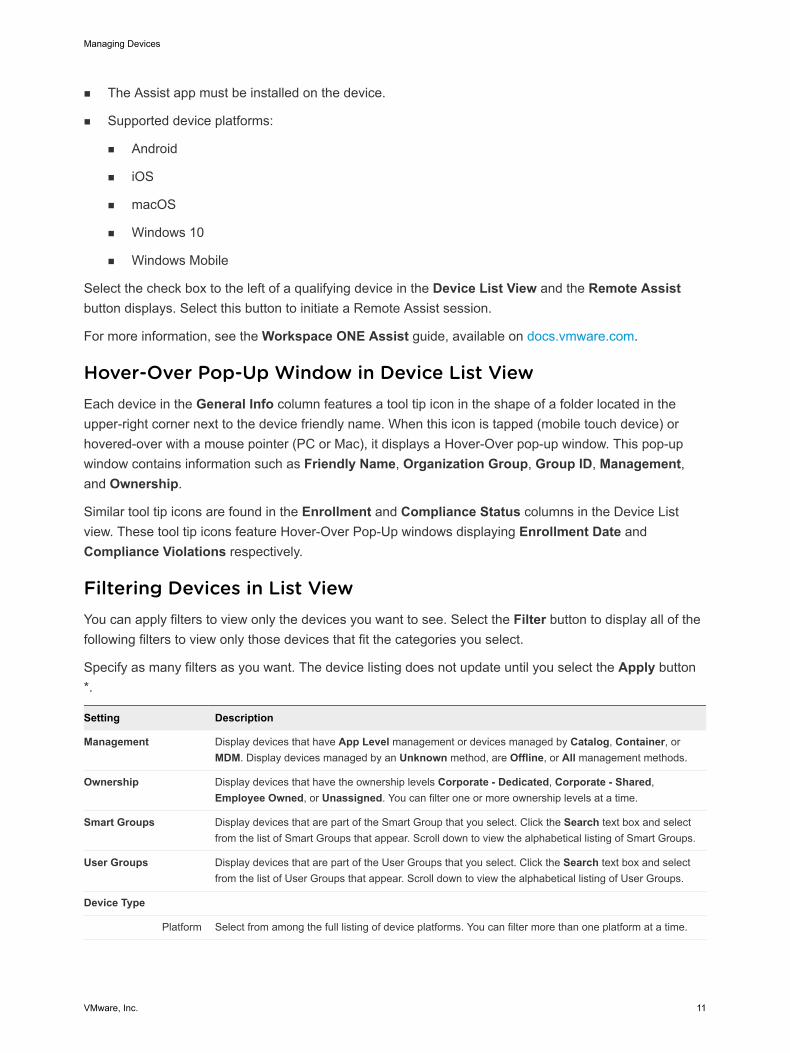
Filtering Devices in List ViewYou can apply filters to view only the devices you want to see. Select the Filter button to display all of the following filters to view only those devices that fit the categories you select.
Specify as many filters as you want. The device listing does not update until you select the Apply button *.
Setting Description
Management Display devices that have App Level management or devices managed by Catalog, Container, or MDM. Display devices managed by an Unknown method, are Offline, or All management methods.
Ownership Display devices that have the ownership levels Corporate - Dedicated, Corporate - Shared, Employee Owned, or Unassigned. You can filter one or more ownership levels at a time.
Smart Groups Display devices that are part of the Smart Group that you select. Click the Search text box and select from the list of Smart Groups that appear. Scroll down to view the alphabetical listing of Smart Groups.
User Groups Display devices that are part of the User Groups that you select. Click the Search text box and select from the list of User Groups that appear. Scroll down to view the alphabetical listing of User Groups.
Device Type
Platform Select from among the full listing of device platforms. You can filter more than one platform at a time.
Managing Devices
VMware, Inc. 11

Setting Description
Android Management * Available only when Android platform is selected.
You must select at least one platform and click the Apply button before you can select management types.
Filter among the device management types specific to the Android platform. You can also enable the Android Management column to appear by Customize Device List View Layout. This column also appears in Exporting List View.
Device Models * You must select at least one platform and click the Apply button before you can select device models.
OS Version * You must select at least one platform and click the Apply button before you can select OS versions. When you select multiple platforms, a list of OS versions displays grouped by each selected platform.
Security
Compromised Select from among Compromised, Not Compromised, Unknown, or All of the above.
A compromised device is a device that has been 'jailbroken' (for iOS devices) or 'rooted' (for Android devices).
Encryption Select from among Encrypted, Not Encrypted, Unknown, or All of the above.
Passcode Select from among Passcode, No Passcode, Unknown, or All passcode options.
Status
Enrollment Status Select from among Enrolled, Enterprise Wipe Pending, Device Wipe Pending, Unenrolled, or All of the above.
Last Seen Display devices based on how long ago they checked in. Use the minimum and maximum text boxes in the Last Seen (days) option to display devices last seen within a range of days. Entered numbers are inclusive: an entry of 1 displays all devices last seen more than 1 day but less than 2 days ago. An entry of 2 displays all devices last seen more than 2 days but less than 3 days ago, and so on. An entry of zero displays devices last seen more than 0 days but less than 1 day (24 hours) ago.
To display devices last seen more than (or equal to) the maximum entered number of days, leave the minimum text box blank.
To display devices last seen less than (or equal to) the minimum entered number of days, leave the maximum text box blank.
Compliance Select from among Compliant, Non-Compliant, Pending Compliance Check, Not Available, Unknown, or All of the above.
Enrollment History Select enrollment dates from among Past Day, Past Week, Past Month, or All enrollment dates.
Advanced
MAC Address Filter by the media access control address of a device.
IP Range Filter devices by their currently-assigned internet protocol address. Enter IP addresses in the IP Range Start and IP Range End text boxes to display devices that fall within that range.
The current IP address can be one of many associated IP addresses of a device, most of which can be found on the Network tab of Device Details.
Tags View devices by their assigned tags for which you can search and select from a drop-down menu.
Tunnel Select between showing all devices, showing devices connected to the tunnel, and devices not connected to the tunnel.
Content Compliance Select between showing all devices, showing only those devices missing required docs, and only those devices lacking the latest version of required content.
Lost Mode View all devices or only devices with Lost Mode enabled. Applicable to iOS devices only.
Managing Devices
VMware, Inc. 12
After applying multiple filters, you can glance at the circled number badge to the right of the Filters button to see exactly how many filters are applied to produce the listing.
You can clear all selected filters and return to the full device listing by selecting the 'X' next to the Filter button.
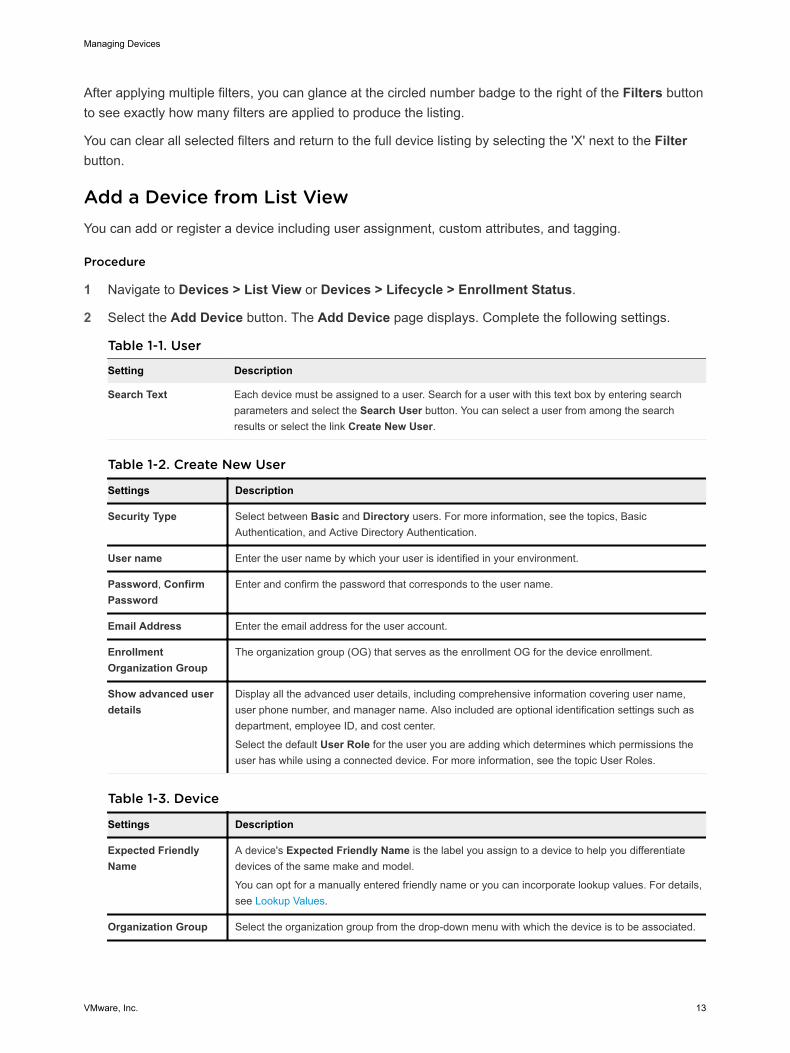
Add a Device from List ViewYou can add or register a device including user assignment, custom attributes, and tagging.
Procedure
1 Navigate to Devices > List View or Devices > Lifecycle > Enrollment Status.
2 Select the Add Device button. The Add Device page displays. Complete the following settings.
Table 1-1. User
Setting Description
Search Text Each device must be assigned to a user. Search for a user with this text box by entering search parameters and select the Search User button. You can select a user from among the search results or select the link Create New User.
Table 1-2. Create New User
Settings Description
Security Type Select between Basic and Directory users. For more information, see the topics, Basic Authentication, and Active Directory Authentication.
User name Enter the user name by which your user is identified in your environment.
Password, Confirm Password
Enter and confirm the password that corresponds to the user name.
Email Address Enter the email address for the user account.
Enrollment Organization Group
The organization group (OG) that serves as the enrollment OG for the device enrollment.
Show advanced user details
Display all the advanced user details, including comprehensive information covering user name, user phone number, and manager name. Also included are optional identification settings such as department, employee ID, and cost center.
Select the default User Role for the user you are adding which determines which permissions the user has while using a connected device. For more information, see the topic User Roles.
Table 1-3. Device
Settings Description
Expected Friendly Name
A device's Expected Friendly Name is the label you assign to a device to help you differentiate devices of the same make and model.
You can opt for a manually entered friendly name or you can incorporate lookup values. For details, see Lookup Values.
Organization Group Select the organization group from the drop-down menu with which the device is to be associated.
Managing Devices
VMware, Inc. 13
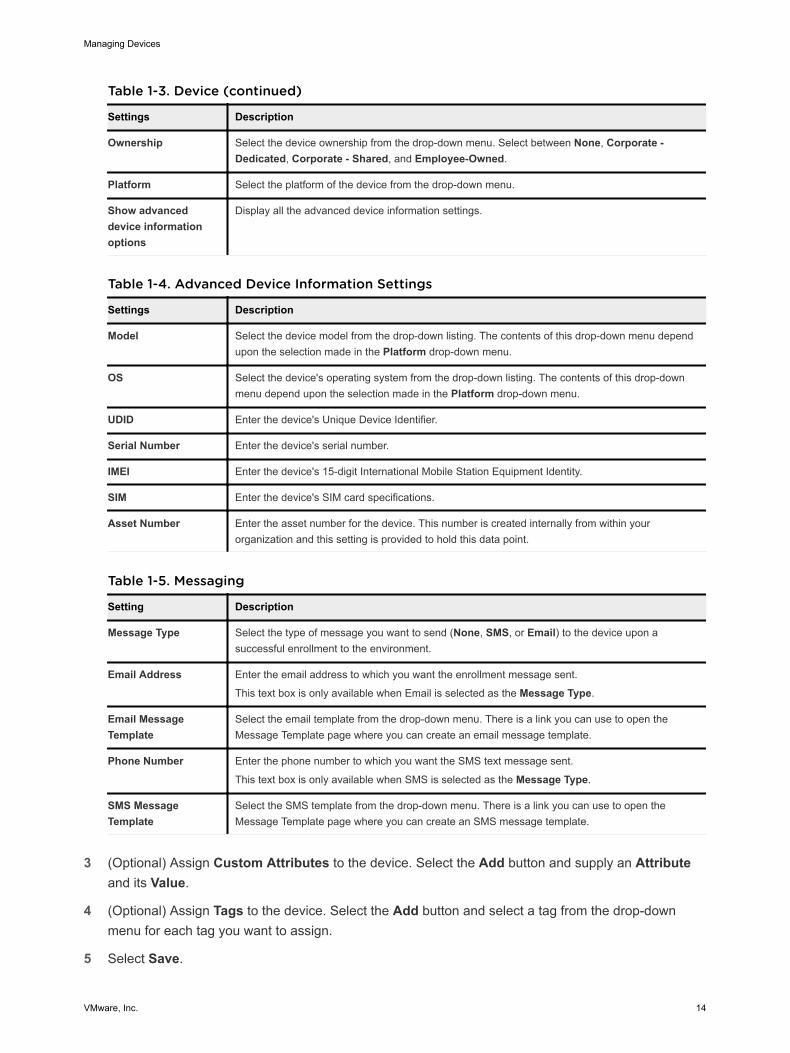
Table 1-3. Device (continued)
Settings Description
Ownership Select the device ownership from the drop-down menu. Select between None, Corporate - Dedicated, Corporate - Shared, and Employee-Owned.
Platform Select the platform of the device from the drop-down menu.
Show advanced device information options
Display all the advanced device information settings.
Table 1-4. Advanced Device Information Settings
Settings Description
Model Select the device model from the drop-down listing. The contents of this drop-down menu depend upon the selection made in the Platform drop-down menu.
OS Select the device's operating system from the drop-down listing. The contents of this drop-down menu depend upon the selection made in the Platform drop-down menu.
UDID Enter the device's Unique Device Identifier.
Serial Number Enter the device's serial number.
IMEI Enter the device's 15-digit International Mobile Station Equipment Identity.
SIM Enter the device's SIM card specifications.
Asset Number Enter the asset number for the device. This number is created internally from within your organization and this setting is provided to hold this data point.
Table 1-5. Messaging
Setting Description
Message Type Select the type of message you want to send (None, SMS, or Email) to the device upon a successful enrollment to the environment.
Email Address Enter the email address to which you want the enrollment message sent.
This text box is only available when Email is selected as the Message Type.
Email Message Template
Select the email template from the drop-down menu. There is a link you can use to open the Message Template page where you can create an email message template.
Phone Number Enter the phone number to which you want the SMS text message sent.
This text box is only available when SMS is selected as the Message Type.
SMS Message Template
Select the SMS template from the drop-down menu. There is a link you can use to open the Message Template page where you can create an SMS message template.
3 (Optional) Assign Custom Attributes to the device. Select the Add button and supply an Attribute and its Value.
4 (Optional) Assign Tags to the device. Select the Add button and select a tag from the drop-down menu for each tag you want to assign.
5 Select Save.
Managing Devices
VMware, Inc. 14
Unenrolled DevicesUnenrolled devices can be viewed in the Workspace ONE UEM console provided they were registered or held an enrolled status in the past. You can also get access to troubleshooting logs made before a device's unenrollment from the UEM console.
Unenrolled StatusAn unenrolled device is a device in one of three possible scenarios.
1 The device is new to Workspace ONE UEM and is not registered, not enrolled, and therefore not managed. A device in this scenario cannot be seen in the UEM console.
2 The new device has begun the Workspace ONE enrollment process and is registered with the UEM console but not yet fully enrolled. This scenario normally occurs during a wave of new enrollments where devices are registered as a way of restricting enrollment. The mechanism that allows registered devices to enroll is a device whitelist. A device in this state can be seen by the UEM console with the status 'unenrolled'. Given that a registered device is traditionally a part of the enrollment process, a device does not remain in this scenario for long.
3 A device can also become unenrolled if the device end user manually removes the MDM profile from the device.
For more information, see Deleting Devices.
Access Troubleshooting Logs Made Before UnenrollmentYou can access Troubleshooting/Commands logs made before the device was unenrolled. These logs can be useful to get a full picture of the device's history.
Procedure
1 Navigate to Devices > List View.
2 Select a device you know to have been unenrolled in the past.
You have the option to Filter the list view to show only devices with a Status of Unenrolled.
When you select a device, the Details View displays.
3 Select the More tab drop-down, then select Troubleshooting, followed by the Commands tab.
What to do next
If you do not intend to re-enroll a previously unenrolled device to the same customer organization group again, consider deleting the device record permanently so the device history is clear upon re-enrollment. Contact Workspace ONE Support to make this arrangement.
Bulk Actions in Device List ViewOnce you filter a subset of devices, you can perform bulk actions to multiple devices by selecting devices and then selecting from the action button cluster.
Managing Devices
VMware, Inc. 15
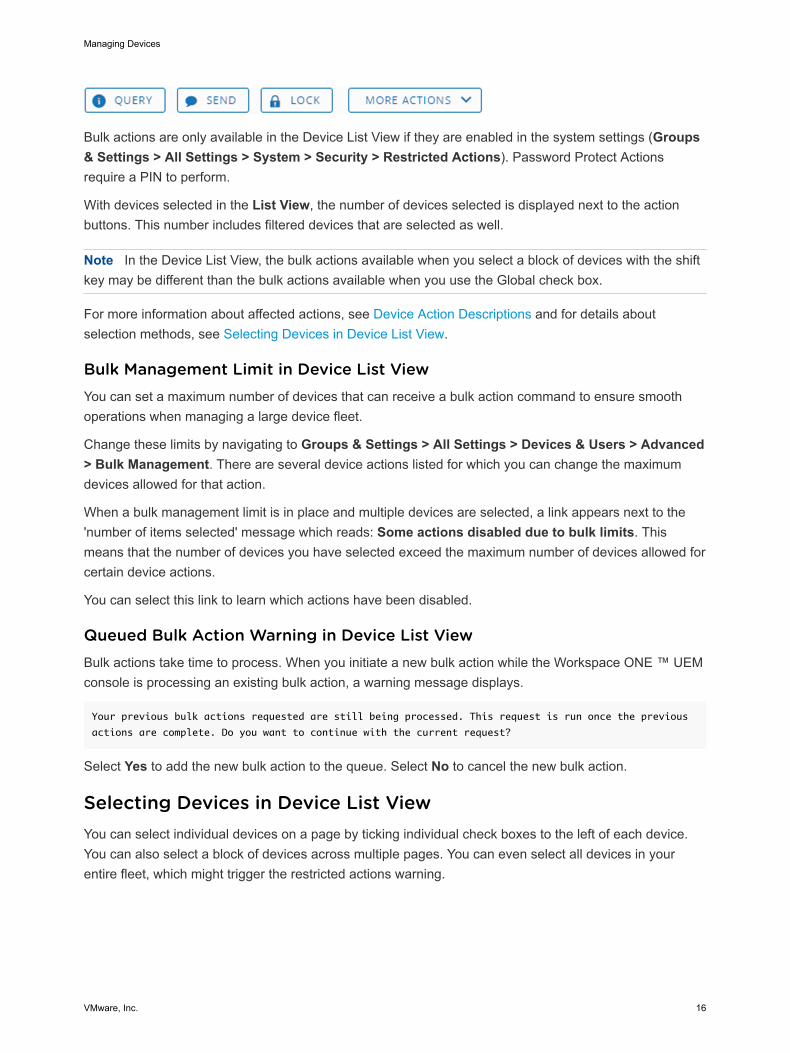
Bulk actions are only available in the Device List View if they are enabled in the system settings (Groups & Settings > All Settings > System > Security > Restricted Actions). Password Protect Actions require a PIN to perform.
With devices selected in the List View, the number of devices selected is displayed next to the action buttons. This number includes filtered devices that are selected as well.
Note In the Device List View, the bulk actions available when you select a block of devices with the shift key may be different than the bulk actions available when you use the Global check box.
For more information about affected actions, see Device Action Descriptions and for details about selection methods, see Selecting Devices in Device List View.
Bulk Management Limit in Device List ViewYou can set a maximum number of devices that can receive a bulk action command to ensure smooth operations when managing a large device fleet.
Change these limits by navigating to Groups & Settings > All Settings > Devices & Users > Advanced > Bulk Management. There are several device actions listed for which you can change the maximum devices allowed for that action.
When a bulk management limit is in place and multiple devices are selected, a link appears next to the 'number of items selected' message which reads: Some actions disabled due to bulk limits. This means that the number of devices you have selected exceed the maximum number of devices allowed for certain device actions.
You can select this link to learn which actions have been disabled.
Queued Bulk Action Warning in Device List ViewBulk actions take time to process. When you initiate a new bulk action while the Workspace ONE ™ UEM console is processing an existing bulk action, a warning message displays.
Your previous bulk actions requested are still being processed. This request is run once the previous
actions are complete. Do you want to continue with the current request?
Select Yes to add the new bulk action to the queue. Select No to cancel the new bulk action.
Selecting Devices in Device List ViewYou can select individual devices on a page by ticking individual check boxes to the left of each device. You can also select a block of devices across multiple pages. You can even select all devices in your entire fleet, which might trigger the restricted actions warning.
Managing Devices
VMware, Inc. 16
Selecting a Block of DevicesYou can select a contiguous block of devices, even across multiple pages, by selecting the device check box at the beginning of the block. Next, hold down the shift key, then select the device check box at the end of the block. This action is similar to the block-selection in the Windows and Mac environments and it allows you to apply bulk actions to those selected devices.
Selecting All DevicesThe Global check box, located to the left of the Last Seen column header, can be used to select or deselect all devices in the listing. If your List View contains a filtered listing of devices, the Global check box can be used to select or deselect all filtered devices.
When the Global check box features a green minus sign ( ), it means at least one but not all devices are selected. Select this icon again and it changes to a check mark sign ( ), indicating that all devices in the listing (either filtered or unfiltered) have been selected. Select it a third time and it changes again to an empty check box ( ), indicating that no devices in the listing are currently selected.
Note In the Device List View, the bulk actions available when you select a block of devices with the shift key may be different than the bulk actions available when you use the Global check box.
For more information about affected actions, see Device Action Descriptions.
Restricted Action Warning on All Devices SelectedWhen you initiate an action with all devices in your fleet selected, a warning message is displayed.
You are attempting to act on [number of selected] devices. This action may not apply to all devices. Certain limitations of this action include enrollment status, management type, device platform, model, or OS.
This warning is an acknowledgment of the diverse nature of a large device fleet featuring a multitude of different manufacturers, operating systems, and capabilities. It is unrelated to the Bulk Management Limit and any warnings it might generate. If you have a Bulk Management Limit in place, then this Restricted Action Warning message does not display.
Deleting DevicesYou can delete an enrolled device from the Workspace ONE UEM console.
Deleting a device removes the device from the Device List View, excluding it from all device management functions and features. However, a deleted device is still registered with the UEM console and gets added to the whitelist. This addition means the deleted device can be re-enrolled easily. A device can remain in this scenario indefinitely. You can retain up to approximately 150,000 devices on this whitelist. Contact support if your needs exceed this amount.
You can remove the registration record of any whitelisted device at any time, which makes the device unseen and unknown by the UEM console. A device in this scenario can be enrolled at a future date.
Alternately, you can remove the device from the whitelist and add the device to a blacklist, preventing future enrollment and effectively banning the device from your fleet.
Managing Devices
VMware, Inc. 17

For more information about Blacklisting and Whitelisting devices, see Blacklisting and Whitelisting Device Registration and Add a Blacklisted or Whitelisted Device.
You can delete a device from the Device List View or the Device Details View.
1 Navigate to Devices > List View and select the device you want to delete by clicking the check box to the left of the device listing.
a Some devices cannot be deleted from the list view. If you want to delete such a device, navigate to Devices > List View and instead, select the device Friendly Name in the General Info column. This action displays the Details View. The Friendly Name is the label you assign to a device to help you differentiate devices of the same make and model.
2 Locate the More Actions button and select it.
3 Select Delete Device and select OK at the confirmation prompt.
Results: the Device List View entry for the deleted device includes the "Deleting" indicator.
Device DetailsYou can see information for a single device and access user and device management actions quickly by viewing the Device Details page in Workspace ONE UEM powered by AirWatch.
Access Device Details by selecting a device friendly name from one of the available Dashboards, or by using the available search tools in the Workspace ONE UEM console. A Friendly Name is the label you assign to a device to help you differentiate it from devices of the same make and model.
The main page features several major sections.
n Notification Badges – Displays the Compromised State, Compliance Violations, Enrollment Date, time Last Seen for the selected device, and GPS/Location Service Availability (for Android devices only).
n Security – Displays security settings such as which management software was used for enrollment, passcode status, and data protections.
n If you enroll a device with the Browser Web app or Container app and later download and run the Workspace ONE Intelligent Hub app on the device, the 'Managed by Container' indicator changes to 'Hub Registered' to reflect the presence of the Workspace ONE Intelligent Hub.
n User Info – Displays basic user information including full name and email.
Managing Devices
VMware, Inc. 18

n Device Info – Displays device details such as organization group, location, smart groups, serial number, UDID, asset number, power status, storage capacity, physical memory, warranty information, and device tags in alphabetical order. Battery health applies to Zebra Android devices only.
n Profiles – Displays all profiles such as installed (active), assigned (inactive), and unmanaged (sideloaded).
n Apps – Displays all installed apps, both automatic apps and on-demand apps.
n Content – Displays content marked as 'Required' by the administrator in the Workspace ONE UEM Managed Repository and in the admin repository.
n Certifications – Displays all installed certificates, including certifications near their expiration date.
n Admin Applications – Displays the installed Workspace ONE Intelligent Hub information including version number.
n Zebra Battery Information (for Zebra Android devices only) – Displays detailed battery information including battery health, manufacture date, serial number, and part number.
Device Details DashboardThe dashboard displays basic device information such as the device friendly name. Other detailed information includes device type, device model, OS version number, ownership type, device action button cluster, and Recent List indicator.
Selecting the arrow buttons in the Recent List indicator changes the selected device based on its position in the filtered List View.
You can also initiate a Remote Assist session on qualifying devices. For details, see Remote Assist.
Device Details Menu TabsYou can use the Menu Tabs to access specific device information, which varies depending on the selected device platform.
Menu Tab Description
Summary View general statistics such as enrollment status, compliance, last seen, GPS availability, platform/model/OS, organization group, serial number, power status, storage capacity, physical memory, and virtual memory.
Compliance Display the status, policy name, date of the previous and forthcoming compliance check and the actions already taken on the device. The Compliance tab includes advanced troubleshooting and convenience features.
n Non-Compliant devices, and devices in pending compliance status, have troubleshooting functions available.
You can reevaluate compliance on a per-device basis ( ) or get detailed information about the compliance
status on the device ( ).
n Users with Read-Only privileges can view the specific compliance policy directly from the Compliance tab while Administrators can make edits to the compliance policy.
Managing Devices
VMware, Inc. 19

Menu Tab Description
Profiles View all profiles currently assigned, installed, and unmanaged on a device.
Apps View all apps currently assigned and installed on the device.
The App Compliance column identifies SDK-built applications that are non-compliant with SDK App Compliance settings. Find these settings in Groups & Settings > All Settings > Settings and Policies > SDK App Compliance.
Content View the status, type, name, version, priority, deployment, last update, date, time of views, and content on the device marked 'Required' by the administrator in the Workspace ONE UEM Managed Repository. This tab also provides a toolbar for administrative action (install or delete).
Location View current location or location history of a device. Select the Period or length of time you are looking back in Search of location data points. The Custom Period enables you to select a range of dates and times in 5-minute increments. You can also review latitude and longitude coordinates of these data points by moving the pointer over location markers on the map.
Enable the collection of location data by navigating to Groups & Settings > All Settings > Devices & Users and selecting the platform-specific Hub Settings page. For more information about location data as it relates to privacy, see GPS Coordinates for Privacy Best Practices.
Edit the number of location data points collected and the minimum distance between locations by navigating to Groups & Settings > All Settings > Installation > Maps.
User Access details about the user of a device and the status of the other devices enrolled to this user.
Managing Devices
VMware, Inc. 20
Menu Tab Description
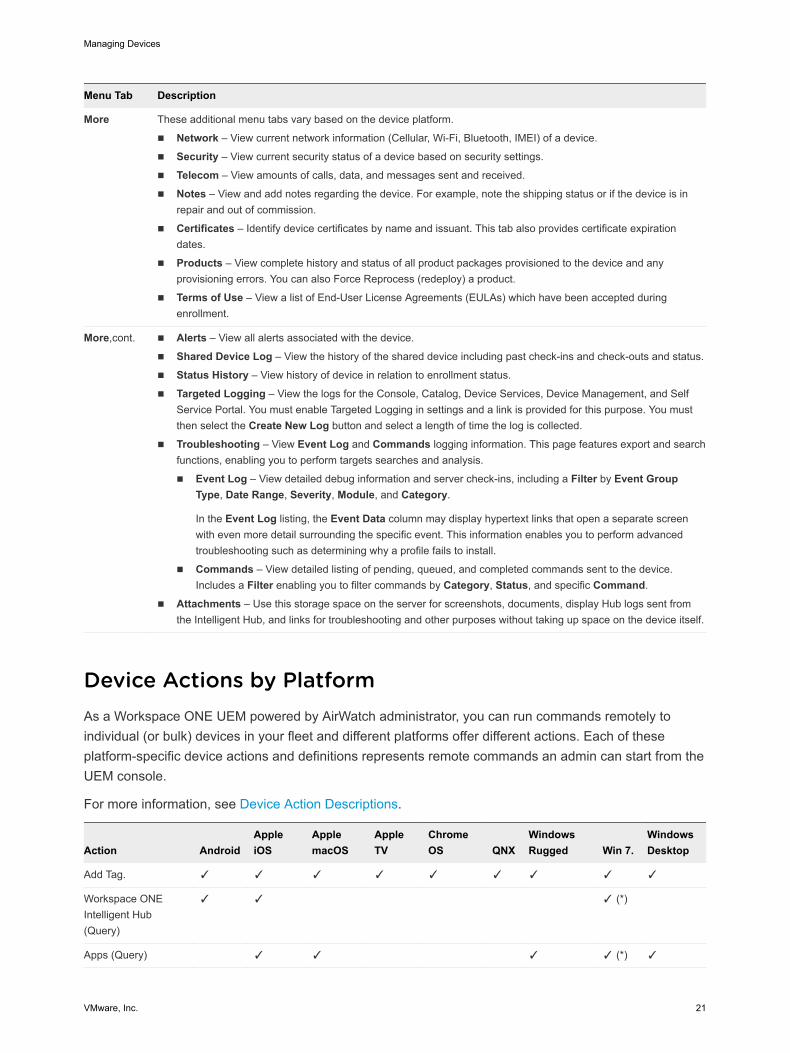
More These additional menu tabs vary based on the device platform.
n Network – View current network information (Cellular, Wi-Fi, Bluetooth, IMEI) of a device.
n Security – View current security status of a device based on security settings.
n Telecom – View amounts of calls, data, and messages sent and received.
n Notes – View and add notes regarding the device. For example, note the shipping status or if the device is in repair and out of commission.
n Certificates – Identify device certificates by name and issuant. This tab also provides certificate expiration dates.
n Products – View complete history and status of all product packages provisioned to the device and any provisioning errors. You can also Force Reprocess (redeploy) a product.
n Terms of Use – View a list of End-User License Agreements (EULAs) which have been accepted during enrollment.
More,cont. n Alerts – View all alerts associated with the device.
n Shared Device Log – View the history of the shared device including past check-ins and check-outs and status.
n Status History – View history of device in relation to enrollment status.
n Targeted Logging – View the logs for the Console, Catalog, Device Services, Device Management, and Self Service Portal. You must enable Targeted Logging in settings and a link is provided for this purpose. You must then select the Create New Log button and select a length of time the log is collected.
n Troubleshooting – View Event Log and Commands logging information. This page features export and search functions, enabling you to perform targets searches and analysis.
n Event Log – View detailed debug information and server check-ins, including a Filter by Event Group Type, Date Range, Severity, Module, and Category.
In the Event Log listing, the Event Data column may display hypertext links that open a separate screen with even more detail surrounding the specific event. This information enables you to perform advanced troubleshooting such as determining why a profile fails to install.
n Commands – View detailed listing of pending, queued, and completed commands sent to the device. Includes a Filter enabling you to filter commands by Category, Status, and specific Command.
n Attachments – Use this storage space on the server for screenshots, documents, display Hub logs sent from the Intelligent Hub, and links for troubleshooting and other purposes without taking up space on the device itself.
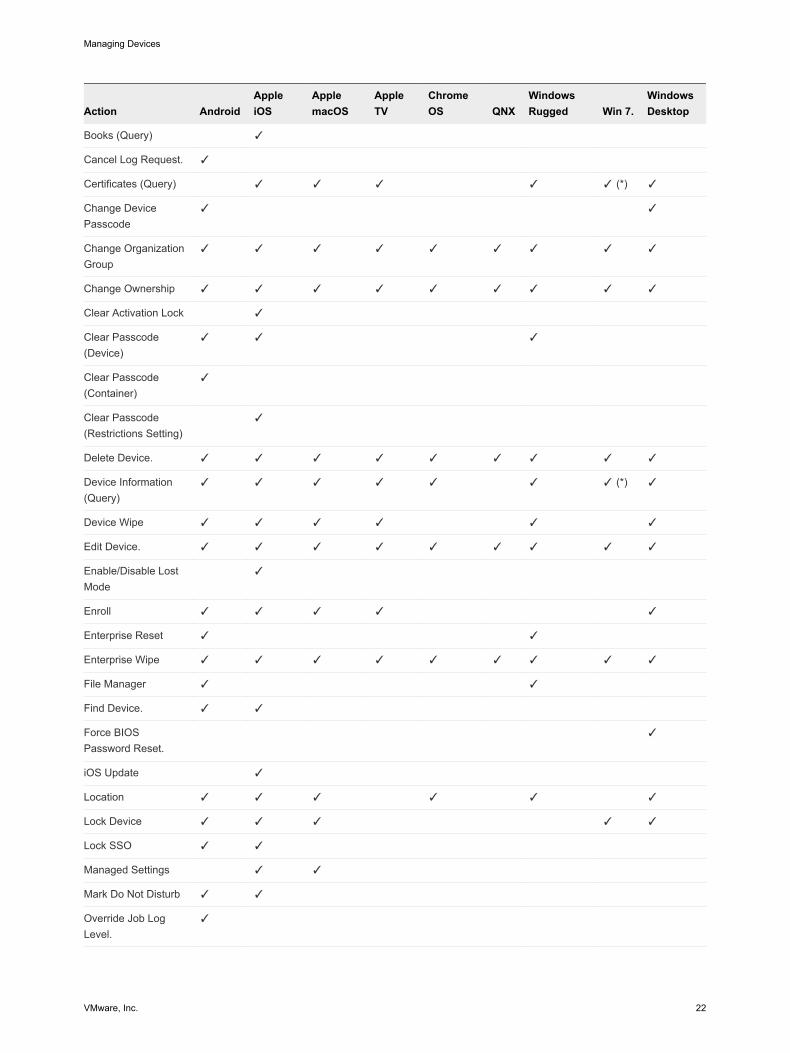
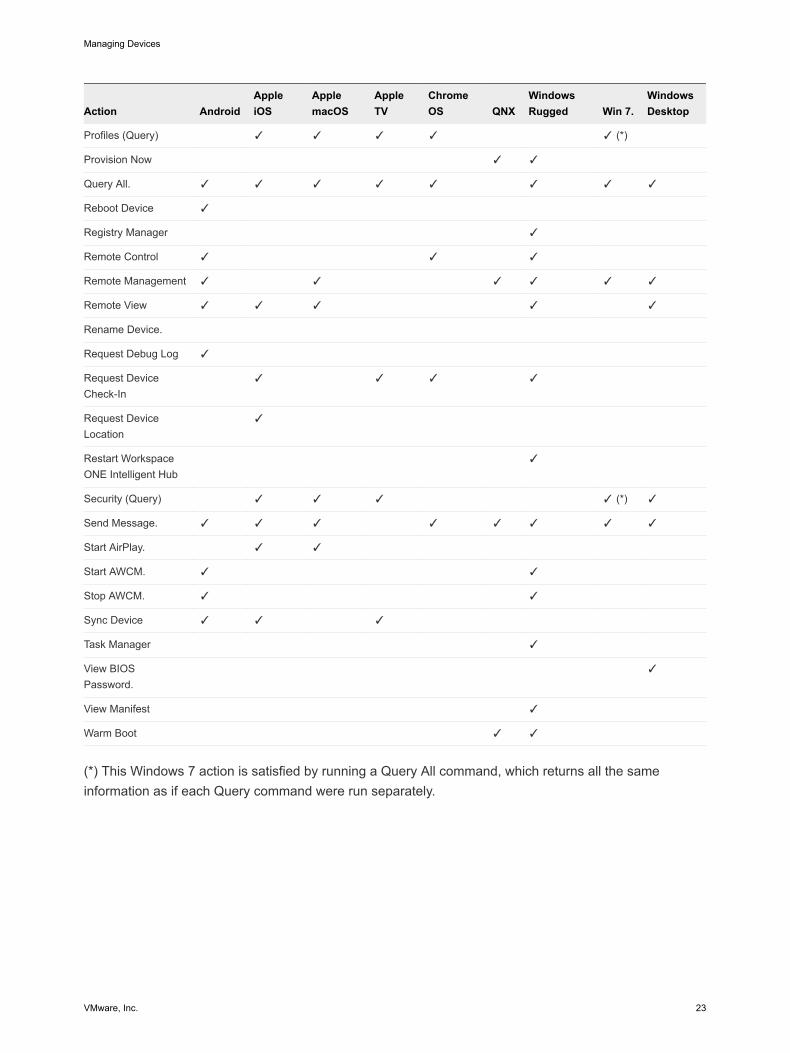
Device Actions by PlatformAs a Workspace ONE UEM powered by AirWatch administrator, you can run commands remotely to individual (or bulk) devices in your fleet and different platforms offer different actions. Each of these platform-specific device actions and definitions represents remote commands an admin can start from the UEM console.
For more information, see Device Action Descriptions.
Action AndroidApple iOS
Apple macOS
Apple TV
Chrome OS QNX
Windows Rugged Win 7.
Windows Desktop
Add Tag. ✓ ✓ ✓ ✓ ✓ ✓ ✓ ✓ ✓
Workspace ONE Intelligent Hub (Query)
✓ ✓ ✓ (*)
Apps (Query) ✓ ✓ ✓ ✓ (*) ✓
Managing Devices
VMware, Inc. 21
Action AndroidApple iOS
Apple macOS
Apple TV
Chrome OS QNX
Windows Rugged Win 7.
Windows Desktop
Books (Query) ✓
Cancel Log Request. ✓
Certificates (Query) ✓ ✓ ✓ ✓ ✓ (*) ✓
Change Device Passcode
✓ ✓
Change Organization Group
✓ ✓ ✓ ✓ ✓ ✓ ✓ ✓ ✓
Change Ownership ✓ ✓ ✓ ✓ ✓ ✓ ✓ ✓ ✓
Clear Activation Lock ✓
Clear Passcode (Device)
✓ ✓ ✓
Clear Passcode (Container)
✓
Clear Passcode (Restrictions Setting)
✓
Delete Device. ✓ ✓ ✓ ✓ ✓ ✓ ✓ ✓ ✓
Device Information (Query)
✓ ✓ ✓ ✓ ✓ ✓ ✓ (*) ✓
Device Wipe ✓ ✓ ✓ ✓ ✓ ✓
Edit Device. ✓ ✓ ✓ ✓ ✓ ✓ ✓ ✓ ✓
Enable/Disable Lost Mode
✓
Enroll ✓ ✓ ✓ ✓ ✓
Enterprise Reset ✓ ✓
Enterprise Wipe ✓ ✓ ✓ ✓ ✓ ✓ ✓ ✓ ✓
File Manager ✓ ✓
Find Device. ✓ ✓
Force BIOS Password Reset.
✓
iOS Update ✓
Location ✓ ✓ ✓ ✓ ✓ ✓
Lock Device ✓ ✓ ✓ ✓ ✓
Lock SSO ✓ ✓
Managed Settings ✓ ✓
Mark Do Not Disturb ✓ ✓
Override Job Log Level.
✓
Managing Devices
VMware, Inc. 22
Action AndroidApple iOS
Apple macOS
Apple TV
Chrome OS QNX
Windows Rugged Win 7.
Windows Desktop
Profiles (Query) ✓ ✓ ✓ ✓ ✓ (*)
Provision Now ✓ ✓
Query All. ✓ ✓ ✓ ✓ ✓ ✓ ✓ ✓
Reboot Device ✓
Registry Manager ✓
Remote Control ✓ ✓ ✓
Remote Management ✓ ✓ ✓ ✓ ✓ ✓
Remote View ✓ ✓ ✓ ✓ ✓
Rename Device.
Request Debug Log ✓
Request Device Check-In
✓ ✓ ✓ ✓
Request Device Location
✓
Restart Workspace ONE Intelligent Hub
✓
Security (Query) ✓ ✓ ✓ ✓ (*) ✓
Send Message. ✓ ✓ ✓ ✓ ✓ ✓ ✓ ✓
Start AirPlay. ✓ ✓
Start AWCM. ✓ ✓
Stop AWCM. ✓ ✓
Sync Device ✓ ✓ ✓
Task Manager ✓
View BIOS Password.
✓
View Manifest ✓
Warm Boot ✓ ✓
(*) This Windows 7 action is satisfied by running a Query All command, which returns all the same information as if each Query command were run separately.
Managing Devices
VMware, Inc. 23
Device Action DescriptionsView a detailed description of each action that can be run on a device, remotely from the Workspace ONE UEM console. This list is platform-agnostic.
n Add Tag – Assign a customizable tag to a device, which can be used to identify a special device in your fleet.
n Apps (Query) – Send an MDM query command to the device to return a list of installed applications.
n Books (Query) – Send a query command to the device to return a list of installed books.
n Certificates (Query) – Send an MDM query command to the device to return a list of installed certificates.
n Change Device Passcode – Replace any existing device passcode used to access the selected device with a new passcode.
n Change Organization Group – Change the device's home organization group to another existing OG. Includes an option to select a static or dynamic OG.
n If you want to change the organization group for multiple devices at a time, you must select devices for the bulk action using the Block selection method (using the shift-key) instead of the Global check box (next to the Last Seen column heading in the device list view).
n Change Ownership – Change the Ownership setting for a device, where applicable. Choices include Corporate-Dedicated, Corporate-Shared, Employee Owned and Undefined.
n Clear Activation Lock – Clear the Activation Lock on an iOS device. With the Activation Lock enabled, the user requires an Apple ID and password before taking the following actions: disabling Find My iPhone, factory wipe, and reactivate to use the device.
n Clear Passcode (Container) – Clear the container-specific passcode. To be used in situations where the user has forgotten their device's container passcode.
n Clear Passcode (Device) – Clear the device passcode. To be used in situations where the user has forgotten their device's passcode.
n Clear Passcode (Restrictions Setting) – Clear the passcode command clears the login passcode on the device. The device needs to be supervised.
n Delete Device – Delete and unenroll a device from the console. Sends the enterprise wipe command to the device that gets wiped on the next check-in and marks the device as Delete In Progress on the console. If the wipe protection is turned off on the device, the issued command immediately performs an enterprise wipe and removes the device representation in the console.
n Device Information (Query) – Send an MDM query command to the device to return information on the device such as friendly name, platform, model, organization group, operating system version, and ownership status.
n Device Wipe – Send an MDM command to wipe a device clear of all data and operating system. This action cannot be undone.
Managing Devices
VMware, Inc. 24
n Edit Device – Edit device information such as Friendly Name, Asset Number, Device Ownership, Device Group Device Category.
n Enable/Disable Lost Mode – Use this device action to lock a device and send a message, phone number, or text to the lock screen. The device end user cannot disable Lost Mode. When an admin disables Lost Mode, the device returns to normal functionality. Users receive a message that tells them that the location of the device was shared. (iOS 9.3 + Supervised)
n Request Device Location – Query a device when in Lost Mode and then use the Location tab to find the device. (iOS 9.3 + Supervised)
n Enroll – Send a message to the device user to enroll their device. You can optionally use a message template that can include enrollment information such as step-by-step instructions and helpful links. This action is only available on unenrolled devices.
n Enterprise Reset – Enterprise Reset a device to factory settings, keeping only the Workspace ONE UEM enrollment.
n Windows Desktop Only: Enterprise Reset restores a device to a Ready to Work state when a device is corrupted or has malfunctioning applications. It reinstalls the Windows OS while preserving user data, user accounts, and managed applications. The device will resync auto-deployed enterprise settings, policies, and applications after resync while remaining managed by Workspace ONE.
n Enterprise Wipe – Enterprise Wipe a device to unenroll and remove all managed enterprise resources including applications and profiles. This action cannot be undone and re-enrollment is required before Workspace ONE UEM can manage this device again. This device action includes options to prevent future re-enrollment and a Note Description text box for you to add information about the action.
n Enterprise Wipe is not supported for cloud domain-joined devices.
n File Manager – Start a File Manager within the UEM console that enables you to view remotely a device's content, add folders, conduct searches, and upload files.
n Find Device – Send a text message to the applicable Workspace ONE UEM application together with an audible sound designed to help the user locate a misplaced device. The audible sound options include playing the sound a configurable number of times and the length of the gap, in seconds, between sounds.
n Force BIOS Password Reset – Force the device to reset the BIOS password to a new auto-generated password.
n Workspace ONE Intelligent Hub Query – Send a query command to the Workspace ONE Intelligent Hub on the device to ensure it has been installed and is functioning normally.
n iOS Update – Push an operating system update to one or more iOS devices. Applicable only to supervised, DEP-enrolled devices with iOS version 9 or greater.
n Location – Reveal a device's location by showing it on a map using its GPS capability enabled on the macOS Workspace ONE Intelligent Hub. This device action requires user approval to enable the functionality in macOS System Preferences.
Managing Devices
VMware, Inc. 25
n If you want to display the location for multiple devices at a time, you must select devices for the bulk action using the Block selection method (using the shift-key) instead of the Global check box (next to the Last Seen column heading in the device list view).
n Lock Device – Send an MDM command to lock a selected device, rendering it unusable until it is unlocked.
n Lock SSO – Lock the device user out of Workspace ONE UEM Container and all participating applications.
n Managed Settings – Enable or disable voice roaming, data roaming, and personal hotspots.
n Manage Tags – View the currently assigned device tags and see a list of tags available to be assigned with the Manage Tags screen.
n If you want to Manage Tags for multiple devices at a time, you must select devices for the bulk action using the Block selection method (using the shift-key) instead of the Global check box (next to the Last Seen column heading in the device list view).
n Mark Do Not Disturb – Mark the device not to be disturbed, preventing it from receiving messages, emails, profiles, and any other type of incoming interaction. Only those devices that are actively Marked Do Not Disturb have the action Clear Do Not Disturb available, which removes the restrictions.
n Override Job Log Level – Override the currently specified level of job event logging on the selected device. This action sets the logging verbosity of Jobs pushed through Product Provisioning and overrides the current log level configured in Android Hub Settings. Job Log Level Override can be cleared by selecting the drop-down menu item Reset to Default on the action screen. You can also change the Job Log Level under the Product Provisioning category in Android Hub Settings.
n Profiles (Query) – Send an MDM query command to the device to return a list of installed device profiles.
n Provision Now – Provision products to a device. Provisioning is the ability to create an ordered installation of files, actions, profiles, and applications into a single product that can be pushed to devices.
n Query All – Send a query command to the device to return a list of installed applications (including Workspace ONE Intelligent Hub, where applicable), books, certificates, device information, profiles, and security measures.
n Reboot Device – Reboot a device remotely, reproducing the effect of powering it off and on again.
n Registry Manager – Start a Registry Manager within the UEM console that enables you to view remotely a device's OS registry, add keys, conduct searches and add properties.
n Remote Assist – Take control of a supported device remotely using this action, which offers platform-specific tools that allow you to perform support and troubleshooting on the device. Android devices require Remote Control Service to be installed on the device.
Managing Devices
VMware, Inc. 26
n Remote Management – Take control of a supported device remotely using this action, which starts a console application that enables you to perform support and troubleshoot on the device. Android devices require Remote Control Service to be installed on the device.
n Remote View – Enable an active stream of the device's output to a destination of your choice, allowing you to see what the user sees as they operate the device. The destination parameters include IP address, port, audio port, password, and scan time.
n Rename Device – Change the device's Friendly Name within the UEM console.
n Request Device Log – Request the debug log for the selected device, after which you can view the log by selecting the More tab and selecting Attachments > Documents. You cannot view the log within the Workspace ONE UEM console. The log is delivered as a ZIP file that can be used to troubleshoot and provide support.
When you request a log, you can select to receive the logs from the System or the Hub. System provides system-level logs. Hub provides logs from the multiple agents running on the device.
Managing Devices
VMware, Inc. 27
Android Only: you can retrieve detailed logs from corporate-owned Android devices and view them in the console to resolve issues on the device quickly.
n Request Device Check-In – Request that the selected device check itself in to the UEM console. This action updates the Last Seen column status.
n Restart Workspace ONE Intelligent Hub – Restart the Workspace ONE Intelligent Hub. This option is used during troubleshooting for when the enrollment process or submodule installation process is interrupted.
n Security (Query) – Send an MDM query command to the device to return the list of active security measures (device manager, encryption, passcode, certificates, and so on).
n Send Message – Send a message to the user of the selected device. Select between Email, Push Notification (through AirWatch Cloud Messaging), and SMS. Push notification requires Airwatch applications like Hub, Boxer etc which must have been launched at least once.
n Start AirPlay – Stream audiovisual content from the device to an AirPlay mirror destination. The MAC address (format "xx:xx:xx:xx:xx:xx" with no case-sensitive) of the destination is required. A passcode can also be specified if necessary. Scan Time defines the number of seconds (10-300) to spend searching for the destination. Requires macOS 10.10 or greater.
n Start/Stop AWCM – Start/Stop the Cloud Messaging service for the selected device. VMware AirWatch Cloud Messaging (AWCM) streamlines the delivery of messages and commands from the Admin Console. The AWCM eliminates the need for end users to access the public Internet or use consumer accounts such as Google IDs.
n Sync Device – Synchronize the selected device with the UEM console, aligning its Last Seen status.
n Task Manager – Run a Task Manager within the UEM console that enables you to view remotely a device's currently running tasks, including task Name, Process ID, and applicable Actions you can take.
n View BIOS Password – View the BIOS password for the device that was auto-generated by the Workspace ONE UEM console. You see the Last Password Applied and the Last Password Submitted.
n View Manifest – View the device's Package Manifest in XML format from the UEM console. The manifest on Windows Rugged devices lists metadata for widgets and applications.
n Warm Boot – Initiate a restart of the operating system without performing a power-on self-test (POST).
Enrollment StatusYou can assess enrollment status on a per-device basis in Workspace ONE UEM powered by AirWatch, import and register devices in bulk, whitelist/blacklist devices, and revoke/reset device tokens by reviewing the Enrollment Status.
Select Devices > Lifecycle > Enrollment Status to see a full list of all devices by enrollment status in the currently selected organization group.
Managing Devices
VMware, Inc. 28

Sort by columns and configure information filters to review device activity based on specific information. For example, sort by the Token Status column to view only devices whose registration is not applicable and act only on those specific devices. Search all devices for a friendly name or user name to isolate one device or user.
Setting Description
Filters You can filter out entire device categories by using filters which enable you to see only those devices that you are interested in.
n Enrollment Statusn Platformn Ownershipn Token Statusn Token Typen Sourcen First Seen
Add n Register Device – You can register or Add a single device to be enrolled.
n Whitelist or Blacklist Devices – You can allow only those devices to enroll that you have identified or whitelisted. Alternatively, you can restrict devices from an enrollment by blacklisting devices.
n Batch Import – Import multiple devices or multiple users with the Batch Import screen.
Resend Message Resend the original message sent to a user, including Self-Service Portal URL, Group ID, and login credentials.
More Actions
Change Organization Group
Move the selected device to the organization group of your choosing.
Change Ownership Change the type of ownership for the selected device.
Delete Permanently delete the registration information for selected devices. This action forces the user to re-register to enroll. Where applicable, you must first revoke the token before deleting a device registration.
Reset Token Reset the status of a token if it has been revoked or is expired.
Managing Devices
VMware, Inc. 29
Setting Description
Revoke Token Force the registration token status of selected devices to expire, essentially blocking access for unwanted users or devices.
For the Reset Token and Revoke Token actions, you can select to disable the Notify Users setting which prevents the default email notification from being sent.
Selecting Multiple Devices
Act on individual devices or multiple devices by selecting the check box next to each device and using the action buttons.
Once you have applied a filter to show a specific set of devices, you can perform bulk actions to multiple selected devices. Perform this action by selecting the devices and selecting an action from the Resend Message and More Actions buttons.
You can select individual check boxes. You can also select the entire set of filtered devices by selecting the global check box located atop the check box column.
When you select an action for one or more devices, a confirmation screen displays allowing you to Save or Cancel the action.
Layout Display the full listing of visible columns or choose to display or hide columns per your preferences by selecting the Custom option.
There is also an option to apply your customized column view to all administrators at or below the current organization group.
You can return to the Layout button settings at any time to modify your column display preferences.
Enrollment Status Details ViewSelect a device friendly name in the General Info column at any time to open the Details View for that device.
From the Details View, you can resend the enrollment message by selecting the Resend Message button. You can also edit a device registration info by selecting the Edit Registration button and completing the Advanced Device Information section.
The Details View displays a series of tabs, each containing relevant enrollment information about the device.
n Summary – View the registration date, time elapsed since the device was first seen, basic device and user info.
n User – View user details.
n Message – View the outgoing Device Activation email message including credential information and QR code. There is a resource available, called "User Registration Message," that allows the administrator to hide the Message tab after the device has successfully enrolled.
n Custom Attributes – View the Custom Attributes associated with the device..
n Tags – View the tags currently associated with the device.
n Offline Enrollment – If available, this tab allows you to enroll the device while it is offline. This feature is useful for when you want to use the device while offline (for example, while traveling).
Managing Devices
VMware, Inc. 30
Wipe ProtectionYou can protect yourself against excessive device wipes and enterprise wipes by setting a wipe threshold in Workspace ONE UEM powered by AirWatch.
Remotely wiping a device of privileged corporate content, called an Enterprise Wipe, is one of the steps considered when a device becomes lost or stolen. It is meant as a safeguard against the threat of corporate content coming into contact with competitors. A Device Wipe is potentially more destructive, removing all content until the device returns to its factory state.
However, there are circumstances when scheduled processes such as the Compliance Engine and other automated directives wipe multiple devices. In addition to the automated wipes, an accidental wipe initiated by an administrator can be problematic. As an administrator, you might want to be informed when such actions are initiated and be given the chance to intervene.
Configure wipe protection settings by defining a wipe threshold, which is a minimum number of devices wiped within a certain amount of time. For example, if more than 10 devices are wiped within 20 minutes, you can place future wipes on hold automatically until after you validate the wipe commands.
You can review wipe logs to see when devices were wiped and for what reason. After reviewing the information, you can accept or reject the on-hold wipe commands and unlock the system to reset the wipe threshold counter.
Configure Wipe Protection Settings for Managed DevicesSet a wipe threshold for managed devices and notify administrators through email when the threshold is met. You can only configure these settings at the Global or Customer level organization group.
Procedure
1 Navigate to Devices > Lifecycle > Settings > Managed Device Wipe Protection.
2 Configure the following settings.
Setting Description
Wiped Devices Enter the number of Wiped Devices that acts as your threshold for triggering wipe protection.
Within (minutes) Enter the value for Within (minutes) which is the amount of time the wipes must occur to trigger wipe protection.
Email Select a message template to email to administrators.
Create a message template for wipe protection by navigating to Groups & Settings > All Settings > Devices & Users > General > Message Templates and select Add, Next, select Device Lifecycle as the Category and Wipe Protection Notification as the Type. You can use the following lookup values as part of your message template.
n {EnterpriseWipeInterval} – The value of Within (minutes) on the settings page.
n {WipeLogConsolePage} – A link to the Wipe Log page.
To Enter the email addresses of administrators who must be notified. These administrators must have access to the Wipe Log page.
For details, see Lookup Values.
Managing Devices
VMware, Inc. 31
3 Select Save.
View Wipe LogsYou can view the Wipe Log page to see when devices were wiped and for what reason. After reviewing the information, you can accept or reject any on-hold wipe commands and unlock the system to reset the wipe threshold counter.
If the system is locked, then you see a banner at the top of the page indicating this status.
Procedure
1 Navigate to Devices > Lifecycle > Wipe Log.
The Report Device Wipe Log resource manages access to the Wipe Log page, and is available by default for system admins, SaaS admins, and Workspace ONE UEM admins. You can add this resource to any custom admin role using the Create Admin Role page.
2 Filter the Wipe Log by the following parameters.
n Date Range
n Wipe Type
n Status
n Source
n Ownership
3 View the list of devices and determine whether the presented devices are valid wipes.
Device pending actions have a status of "On Hold." Devices wiped before the threshold limit is reached display as "Processed".
a If they are valid wipes, then select each device and then select Approve wipes from the command list. The status changes to Approved.
b If they are not valid wipes, then select each device and then select Reject wipes from the command list. The status changes to Rejected.
4 Reset the device threshold counter and allow wipe commands to go through by selecting Unlock System.
What to do next
The system allows future automated wipe commands until the threshold limit is exceeded again.
You can only perform this action at a Global or Customer level organization group.
Shared DevicesShared Device/Multi-User Device functionality in Workspace ONE UEM powered by AirWatch ensures that security and authentication are in place for every unique end user. Shared devices can also allow only specific end users to access sensitive information.
Managing Devices
VMware, Inc. 32
Issuing a device to every employee in certain organizations can be expensive. Workspace ONE UEM powered by AirWatch lets you share a mobile device among end users in two ways: using a single fixed configuration for all end users, or using a unique configuration setting for individual end users.
When administering shared devices, you must first provision the devices with applicable settings and restrictions before deploying them to end users. Once deployed, Workspace ONE UEM uses a simple login or log-out process for shared devices in which end users simply enter their directory services or dedicated credentials to log in. The end-user role determines their level of access to corporate resources such as content, features, and applications. This role ensures the automatic configuration of features and resources that are available after the user logs in.
The login or log-out functions are self-contained within the Workspace ONE Intelligent Hub. Self-containment ensures that the enrollment status is never affected, and that the device is managed whether it is in use or not.
Shared Devices CapabilitiesThere are basic capabilities surrounding the functionality and security of devices that are shared across multiple users. These capabilities offer compelling reasons to consider shared devices as a cost-effective solution to making the most of enterprise mobility.
Functionalityn Personalize each end-user experience without losing corporate settings.
n Logging in a device configures it with corporate access and specific settings, applications, and content based on the end-user role and organization group (OG).
n Allow for a log in/log out process that is self-contained in the Workspace ONE Intelligent Hub or Workspace ONE Access.
n After the end user logs out of the device, the configuration settings of that session are wiped. The device is then ready for login by another end user.
Securityn Provision devices with the shared device settings before providing devices to end users.
n Log in and log out devices without affecting an enrollment in Workspace ONE UEM.
n Authenticate end users during a login with directory services or dedicated Workspace ONE UEM credentials.
n Authenticate end users using Workspace ONE Access.
n Manage devices even when a device is not logged in.
Platforms that Support Shared DevicesThe following devices support shared device/multi-user device functionality.
n Android 4.3 or later
Managing Devices
VMware, Inc. 33
n iOS devices with Workspace ONE Intelligent Hub 4.2 or later.
n For details about logging in and out of shared iOS devices, see the topic Log In and Log Out of Shared iOS Devices in the iOS Platform Guide, available on docs.vmware.com.
n MacOS devices with Workspace ONE Intelligent Hub 2.1 or later.
Define the Shared Device HierarchyWhile strictly optional, making an organization group (OG) specific to shared devices offers many benefits due to multi-tenancy and inherited device settings.
If you have a large number of shared devices in your fleet and you want to manage them apart from single user devices, you can make a shared device-specific OG. Making a shared device hierarchy in your OG structure is optional. Features like smart groups and user groups mean you do not have to rely strictly on OG hierarchy design to simplify device management.
However, having a shared device OG (or nested OGs) simplifies device management by enabling you to standardize device functionality through profiles, policies, and device inheritance without the processing overhead required by a smart group or a user group.
Procedure
1 Navigate to Groups & Settings > Groups > Organization Groups > Organization Group Details.
Here, you can see an OG representing your company.
2 Ensure the Organization Group Details displayed are accurate, and then use the available settings to make modifications, if necessary. If you make changes, select Save.
3 Select Add Child Organization Group.
4 Enter the following information for the first OG underneath the top-level OG.
Setting Description
Name Enter a name for the child organization group (OG) to be displayed. Use alphanumeric characters only. Do not use odd characters.
Group ID Enter an identifier for the OG for the end users to use during the device login. Group IDs are used during the enrollment of group devices to the appropriate OG.
Ensure that users sharing devices receive the Group ID as it might be required for the device to log in depending on your Shared Device configuration.
If you are not in an on-premises environment, the Group ID identifies your organization group across the entire shared SaaS environment. For this reason, all Group IDs must be uniquely named.
Type Select the preconfigured OG type that reflects the category for the child OG.
Country Select the country where the OG is based.
Locale Select the language classification for the selected country.
Customer Industry This setting is only available when Type is Customer. Select from the list of Customer Industries.
Time Zone Select the time zone for the OG's location.
5 Select Save.
Managing Devices
VMware, Inc. 34
Configure Shared DevicesSimilar to single-user device staging, multi-user staging (a "shared device") allows an IT administrator to provision devices to be used by more than one user.
Procedure
1 Navigate to Groups & Settings > All Settings > Devices & Users > General > Shared Device.
2 Select Override and complete the Grouping section.
Setting Description
Group Assignment Mode
Configure devices in one of three ways:
n Select Prompt User for Organization Group to have the end user enter a Group ID for an organization group upon login.
With this method, you have the flexibility to provide access to the settings, applications, and content of the organization group entered. Using this approach, an end user is not restricted to accessing only the settings, applications, and content for the organization group to which they are enrolled.
n Select Fixed Organization Group to limit your managed devices to settings and content applicable to a single organization group.
Each end user who logs in to a device has access to the same settings, applications, and content. This method can be beneficial in a retail use case where employees use shared devices for similar purposes such as checking inventory.
n Select User Group Organization Group to enable features based on both user groups and organization groups across your hierarchy.
When an end user logs in to a device, they have access to specific settings, applications, and content based on their assigned role within the hierarchy. For example, an end user is a member of the 'Sales' user group, and that user group is mapped to the 'Standard Access' organization group. When that end user logs in to the device, the device is configured with the settings, applications, and content available to the 'Standard Access' organization group.
You can map user groups to organization groups on the UEM console. Navigate to Groups & Settings > All Settings > Devices & Users > General > Enrollment. Select the Grouping tab and fill in the required details.
Always Prompt for Terms of Use
Prompts the end users to accept your Terms of Use agreement before they log in to a device.
3 Complete the Security section, as applicable.
Setting Description
Require Shared Device Passcode
(For iOS devices only)Require users to create a Shared Device passcode in the Self-Service Portal to check out devices. This passcode is different from a Single Sign On passcode or a device-level passcode.
Require Special Characters
Require special characters in the shared device passcode, which includes characters such as @, %, &, and so forth.
Shared Device Passcode Minimum Length
Set the minimum character length of the shared passcode.
Managing Devices
VMware, Inc. 35
Setting Description
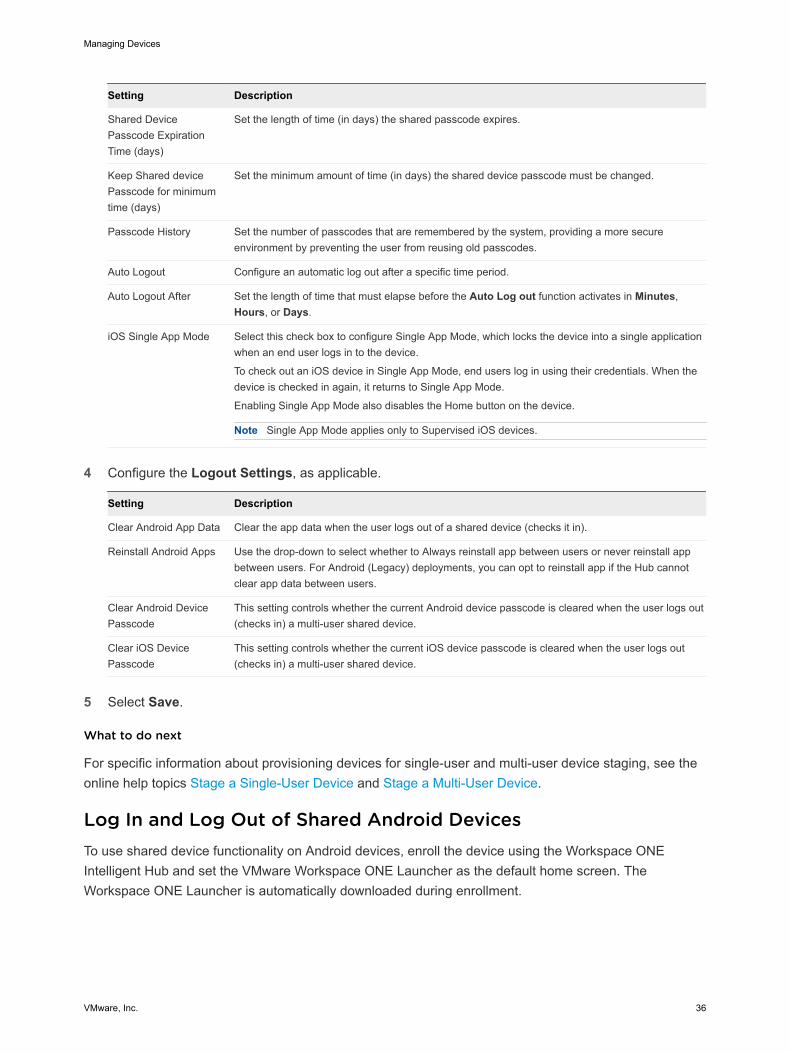
Shared Device Passcode Expiration Time (days)
Set the length of time (in days) the shared passcode expires.
Keep Shared device Passcode for minimum time (days)
Set the minimum amount of time (in days) the shared device passcode must be changed.
Passcode History Set the number of passcodes that are remembered by the system, providing a more secure environment by preventing the user from reusing old passcodes.
Auto Logout Configure an automatic log out after a specific time period.
Auto Logout After Set the length of time that must elapse before the Auto Log out function activates in Minutes, Hours, or Days.
iOS Single App Mode Select this check box to configure Single App Mode, which locks the device into a single application when an end user logs in to the device.
To check out an iOS device in Single App Mode, end users log in using their credentials. When the device is checked in again, it returns to Single App Mode.
Enabling Single App Mode also disables the Home button on the device.
Note Single App Mode applies only to Supervised iOS devices.
4 Configure the Logout Settings, as applicable.
Setting Description
Clear Android App Data Clear the app data when the user logs out of a shared device (checks it in).
Reinstall Android Apps Use the drop-down to select whether to Always reinstall app between users or never reinstall app between users. For Android (Legacy) deployments, you can opt to reinstall app if the Hub cannot clear app data between users.
Clear Android Device Passcode
This setting controls whether the current Android device passcode is cleared when the user logs out (checks in) a multi-user shared device.
Clear iOS Device Passcode
This setting controls whether the current iOS device passcode is cleared when the user logs out (checks in) a multi-user shared device.
5 Select Save.
What to do next
For specific information about provisioning devices for single-user and multi-user device staging, see the online help topics Stage a Single-User Device and Stage a Multi-User Device.
Log In and Log Out of Shared Android DevicesTo use shared device functionality on Android devices, enroll the device using the Workspace ONE Intelligent Hub and set the VMware Workspace ONE Launcher as the default home screen. The Workspace ONE Launcher is automatically downloaded during enrollment.
Managing Devices
VMware, Inc. 36
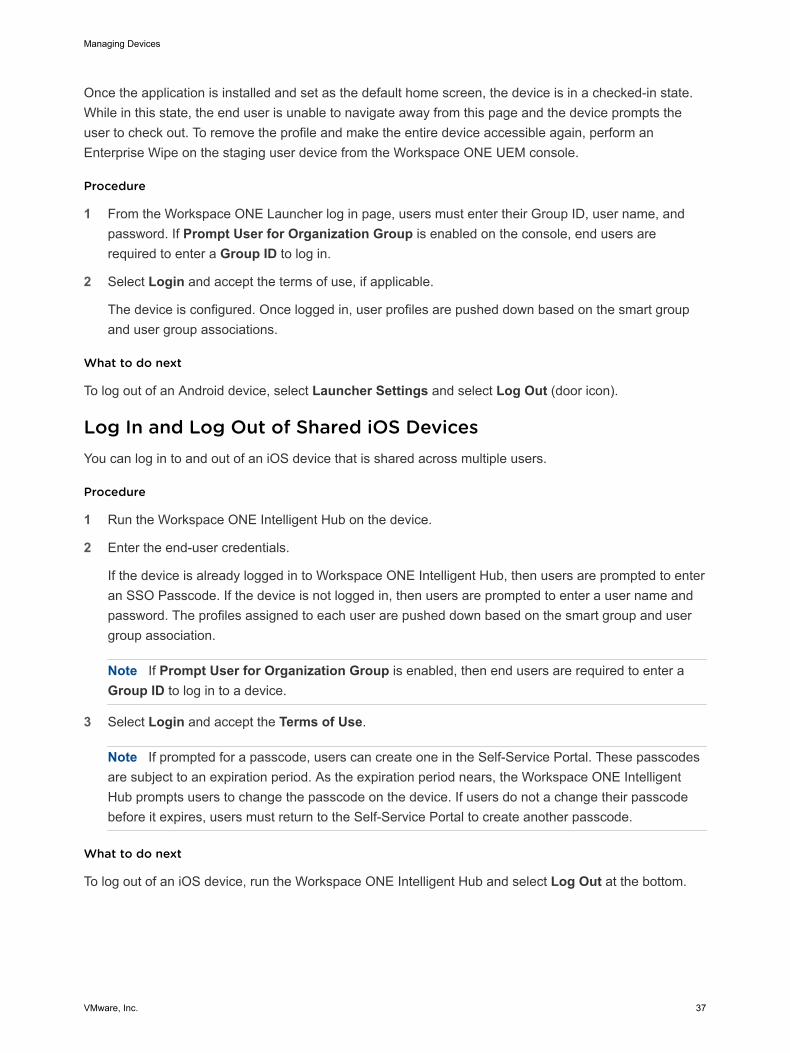
Once the application is installed and set as the default home screen, the device is in a checked-in state. While in this state, the end user is unable to navigate away from this page and the device prompts the user to check out. To remove the profile and make the entire device accessible again, perform an Enterprise Wipe on the staging user device from the Workspace ONE UEM console.
Procedure
1 From the Workspace ONE Launcher log in page, users must enter their Group ID, user name, and password. If Prompt User for Organization Group is enabled on the console, end users are required to enter a Group ID to log in.
2 Select Login and accept the terms of use, if applicable.
The device is configured. Once logged in, user profiles are pushed down based on the smart group and user group associations.
What to do next
To log out of an Android device, select Launcher Settings and select Log Out (door icon).
Log In and Log Out of Shared iOS DevicesYou can log in to and out of an iOS device that is shared across multiple users.
Procedure
1 Run the Workspace ONE Intelligent Hub on the device.
2 Enter the end-user credentials.
If the device is already logged in to Workspace ONE Intelligent Hub, then users are prompted to enter an SSO Passcode. If the device is not logged in, then users are prompted to enter a user name and password. The profiles assigned to each user are pushed down based on the smart group and user group association.
Note If Prompt User for Organization Group is enabled, then end users are required to enter a Group ID to log in to a device.
3 Select Login and accept the Terms of Use.
Note If prompted for a passcode, users can create one in the Self-Service Portal. These passcodes are subject to an expiration period. As the expiration period nears, the Workspace ONE Intelligent Hub prompts users to change the passcode on the device. If users do not a change their passcode before it expires, users must return to the Self-Service Portal to create another passcode.
What to do next
To log out of an iOS device, run the Workspace ONE Intelligent Hub and select Log Out at the bottom.
Managing Devices
VMware, Inc. 37
Log In and log out of Shared macOS DevicesMultiple users can log in to and out of a macOS shared device, activating the automatic push of device profiles.
Log In to a macOS Device - Using assigned Network credentials, log in to a macOS device that has been staged and you receive the profiles assigned to your account in Workspace ONE UEM.
Log out of a macOS Device - The standard macOS log-out procedure also logs the device out of your assigned Workspace ONE UEM user profile.
Check In a Shared Device From the UEM ConsoleYou can check in a device straight from the Workspace ONE UEM console, bypassing the need for the end user to check in the device using the installed Workspace ONE Intelligent Hub
When you check in a device using the UEM console, you effectively reset the enrollment to the multi staging user with the prescribed organization group, profiles, apps, and so on. On the device side, the Workspace ONE Intelligent Hub is restarted and the check-out screen displays.
This feature applies currently to iOS devices only. Devices that enrolled using a method other than the Workspace ONE Intelligent Hub (for example, Direct Enrollment, Workspace ONE, or Container) are not supported. Checking in devices in bulk from the console is not supported.
Procedure
1 Navigate to Devices > List View and locate the shared iOS device you want to check in.
2 Select the Friendly Name of the device to display Device Details.
3 Select the More Actions button in the upper-right corner of the screen.
4 Under the Management section, select Check In Device.
Enabling Directory Service-Based EnrollmentDirectory service enrollment refers to the process of integrating Workspace ONE UEM with your organization's directory service infrastructure. Integrating your directory service in this manner means you can import users automatically and, optionally, user groups such as security groups and distribution lists.
When integrating with a directory service such as Active Directory (AD), you have options for how you import users.
n Allow all directory users to enroll – You can allow all your directory service users to enroll. Also, you can set up your environment to auto discover users based on their email. Then create a Workspace ONE UEM user account for them when they perform an enrollment.
n Add users one by one – After integrating with a directory service, you can add users individually in the same manner as creating basic Workspace ONE UEM user accounts. The only difference is you must enter their user name and select Check User to auto populate remaining information from your directory service.
Managing Devices
VMware, Inc. 38
n Batch upload a CSV file – Using this option, you can import a list of directory services accounts in a CSV (comma-separated values) template file. This file has specific columns, some of which cannot be left blank.
n Integrate with user groups (Optional) – With this method, you can use your existing user group memberships to assign profiles, apps, compliance policies, and so on.
Note For information about how to integrate your Workspace ONE UEM environment with your directory service, refer to the VMware AirWatch Directory Services Guide. If you are considering integrating Workspace ONE UEM with a SAML provider, refer to the VMware AirWatch SAML Integration Guide, both available on docs.vmware.com.
Lookup ValuesA lookup value is a variable that represents a particular data element of a device, user, or admin account in Workspace ONE UEM powered by AirWatch and Workspace ONE Express. Lookup values can be invaluable in completing a process or a form.
In several different text boxes in the Workspace ONE UEM console and Workspace ONE Express, you can add lookup values in place of manually entered or static values. In most cases, lookup values function as a stand-in for a piece of information you do not know or do not have access to.
For example, the Add Device screen is used to add a device to your fleet. One of the text boxes on this screen that can be completed with lookup values is the Expected Friendly Name.
The friendly name represents the device on many different screens in the UEM console including the Device List View and the Details View. And while you can manually enter a static friendly name when you add a device, you can instead use lookup values to standardize the friendly name and make it a valuable identifier.
A common friendly name format can be constructed with the following lookup values.
{EnrollmentUser} {DeviceModel} {DeviceOperatingSystem} {DeviceSerialNumberLastFour}
If you enter this string in the Expected Friendly Name text box, it produces a friendly name that appears this way on the Device List View.
jsmith iPad iOS GHKD
This friendly name instantly provides you with at least three useful pieces of information. And with the last four digits of the device serial number at the end, the friendly name is almost sure to be unique.
Data OverheadWhen used, lookup values do not add to the device's memory with an extra load. Lookup values are a construct of the console itself, not something that is transferred to the device.
Managing Devices
VMware, Inc. 39
Static Strings Versus Lookup ValuesLookup values cannot be applied once a static string has been entered in a text box.
For example, assume that you have 100 devices to enroll. You add the first 50 devices using a manually entered static string for Expected Friendly Name. For the next 50 devices, you opt to use a lookup value for Expected Friendly Name instead. Those 100 devices, half with static friendly names and the other half with lookup values, can coexist perfectly well. There is no issue with mixing and matching static strings and lookup values.
However, you cannot return to the first 50 devices and replace the static string-friendly name with a lookup value.
Custom Lookup ValuesYou can use the Custom Attributes feature to make your own lookup values. You can then use these custom lookup values in the same manner as ordinary lookup values. For details, see Create Custom Attributes.
Managing Devices
VMware, Inc. 40
Device Enrollment 2Enrolling a device is required before the device can be managed by the Workspace ONE UEM powered by AirWatch. There are multiple enrollment paths, each path with options.
Enrolling Devices at GlobalThe Global organization group (OG) is designed to house Customer and other types of OGs. Given the way inheritance works, if you add devices to Global and configure Global with settings intended to affect those devices, you are also affecting all the Customer OGs underneath. This undermines the benefits of multitenancy and inheritance.
For more information, see Reasons You Should Not Enroll Devices in Global.
This chapter includes the following topics:
n Enroll a Device With Workspace ONE Intelligent Hub
n Additional Enrollment Workflows
n Workspace ONE Direct Enrollment
n Basic vs. Directory Services Enrollment
n Bring Your Own Device (BYOD) Enrollment
n Self-Enrollment Versus Device Staging
n Device Registration
n Configure Enrollment Options
n Blacklisting and Whitelisting Device Registration
n Additional Enrollment Restrictions
n Autodiscovery Enrollment
Enroll a Device With Workspace ONE Intelligent HubEnrolling a device with the Workspace ONE Intelligent Hub is the main option for Android, iOS, and Windows devices in Workspace ONE Express and Workspace ONE UEM powered by AirWatch.
VMware, Inc. 41
Procedure
1 Download and install the Workspace ONE Intelligent Hub from the Google Play Store (for Android devices) or from the App Store (for Apple devices).
Downloading the Workspace ONE Intelligent Hub from public application stores requires either an Apple ID or a Google Account.
Windows 10 devices must point the default browser on the device to https://getwsone.com to download the Hub.
2 Run the Workspace ONE Intelligent Hub upon the completion of the download or return to your browser session.
Important To ensure a successful installation and running of the Workspace ONE Intelligent Hub on your Android device, it must have a minimum of 60 MB of space available. CPU and Run Time Memory are allocated per app on the Android platform. If an app uses more resources than allocated, Android devices optimize themselves by killing such an app.
3 Enter your email address when prompted. The Workspace ONE console checks if your address has been previously added to the environment. In which case, you are already configured as an end user and your organization group is already assigned.
If the Workspace ONE console cannot identify you as an end user based on your email address, you are prompted to enter your Server, Group ID, and Credentials. If your environment URL and Group ID are needed, your Workspace ONE Administrator can provide it.
4 Finalize the enrollment by following all remaining prompts. You can use your email address in place of user name. If two users have the same email, the enrollment fails.
Results
The device is now enrolled with the Workspace ONE Intelligent Hub app. In the Summary tab of the Device Details View for this device, the security panel displays "Hub Registered" to reflect this enrollment method.
For more information, see Device Details.
Additional Enrollment WorkflowsIn some unique cases, the enrollment process into Workspace ONE UEM powered by AirWatch must be adjusted for specific organizations and deployments. For each of the additional enrollment options, end users need the credentials detailed in the Required Information section of this guide.
n Multi-Domain Environments – Enrollment login in single and multi-domain environments is supported provided they are made in the following format. domain\username.
n Kiosk Mode and Kiosk Designer – Windows desktop end users can configure their desktop devices in kiosk mode. Users can also use the kiosk designer in the Workspace ONE UEM console to create a multi-app kiosk.
Managing Devices
VMware, Inc. 42
n Notification-Prompt Enrollment – The end user receives a notification (email and SMS) with the Enrollment URL, and enters their Group ID and login credentials. When the end user accepts the Terms of Use (TOU), the device automatically enrolls and outfits with all MDM features and content. This acceptance includes selected apps and features from the Workspace ONE UEM server.
n Single-Click Enrollment – In this workflow, which applies to web-based enrollments, an administrator sends a Workspace ONE UEM-generated token to the user with an enrollment link URL. The user merely selects the provided link to authenticate and enroll the device, making it the easiest and fastest enrollment process for the end user. This method can also be secured by setting expiration times.
n Web Enrollment – There is an optional welcome screen that an administrator can invoke for Web enrollments by appending "/enroll/welcome" to the active environment. For example, by supplying the URL https://<custenvironment > /enroll/welcome to users participating in Web Enrollment, they see a Welcome to Workspace ONE UEM screen. This screen includes options to enroll with an Email Address or Group ID. The Web Enrollment option is applicable for Workspace ONE UEM version 8.0 and above.
n Dual-Factor Authentication – In this workflow, an administrator sends the same enrollment token generated by Workspace ONE UEM, but the user must also enter their login credentials. This method is just as easy to run as the Single-Click Enrollment but adds one additional level of security. The additional security measure is requiring the user to enter their unique credentials.
n End-User Registration – The user logs in to the Self-Service Portal (SSP) and registers their own device. Once registration is complete, the system sends an email to the end user that includes the enrollment URL and login credentials. This workflow assumes that administrators have not already performed device registration for a corporate device fleet. It also assumes that you require corporate devices to be registered so administrators can track enrollment status. Also, end-user registration means that corporate devices can be used together with user-purchased devices.
n Single-User Device Staging – The administrator enrolls devices on behalf of an end user. This method is useful for administrators who set up multiple devices for an entire team or single members of a team. Such a method saves the end users the time and effort of enrolling their own devices. The admin can also configure and enroll a device and mail it directly to a user who is off-site.
n Multi-User Device Staging – The administrator enrolls devices that are used by multiple users. Each device is enrolled and provisioned with a specific set of features that users access only after they log in with unique credentials.
For more information, see the following topics.
Enable Registration Tokens and Create a Default Message.
End-User Device Registration.
Device Registration.
Stage a Single-User Device.
Stage a Multi-User Device.
Managing Devices
VMware, Inc. 43
Workspace ONE Direct EnrollmentDirect Enrollment in Workspace ONE UEM powered by AirWatch allows you to enroll your devices into Workspace ONE UEM in the quickest manner possible.
Direct Enrollment represents the smoothest way to enroll devices that are corporate-owned and personally enabled (COPE). The COPE model offers businesses a way to strike a balance between the consumerization of devices and the security and control that IT needs.
As an administrator, you can configure Direct Enrollment with the options you want. These options include an optional prompt, restrict by device type, limit by user group, and defer the installation of apps to the user.
Workspace ONE Direct Enrollment Supported OptionsThe Workspace ONE Direct Enrollment feature works with many of the existing enrollment options and platforms available before the feature's development.
Direct enrollment with Workspace ONE ™ supports the following platforms and enrollment options.
Supported Platformsn iOS.
n Android Legacy.
n Android Enterprise.
Navigate to Groups & Settings > All Settings > Devices & Users > General > Enrollment, select each applicable tab, and make your selections based on compatibility with Workspace ONE Direct Enrollment.
AuthenticationThe following authentication options are compatible with Workspace ONE Direct Enrollment.
n Directory Users.
n SAML plus Active Directory Users are supported "on-the-fly". SAML without LDAP users is supported so long as the user record pre-exists in Workspace ONE UEM at the time of initial login.
Basic Users, Staging Users, SAML without Directory Users, and Authentication Proxy users are not currently supported.
n Open Enrollment.
n Workspace ONE does not audit the Require Workspace ONE Intelligent Hub for iOS or macOS settings, which are used to block web enrollment on their respective platforms.
Terms of UseAll terms of use options are compatible with Workspace ONE Direct Enrollment.
GroupingAll grouping options are compatible with Workspace ONE Direct Enrollment.
Managing Devices
VMware, Inc. 44
RestrictionsThe following restrictions options are compatible with Workspace ONE Direct Enrollment.
n Known Users and Configured Groups.
n Maximum Enrolled Device Limit.
n Policy settings are partially supported.
n Allowed Ownership Types – Workspace ONE only prompts for employee-owned and Corporate Dedicated. If you do not want either, disable optional prompt and use the default ownership type.
n Allowed Enrollment Types are not supported.
n Device Platform, Device Model, and OS Restrictions are supported.
n User Group Restrictions.
Optional PromptsThe following optional prompts options are compatible with Workspace ONE Direct Enrollment.
n Prompt for Device Ownership.
n Prompt for Asset Number (supported only when Prompt for Device Ownership is enabled).
n All other optional prompts are not supported.
CustomizationThe following customization options are compatible with Workspace ONE Direct Enrollment.
n Use specific Message Template for each Platform.
n Post-Enrollment Landing URL (iOS only).
n MDM Profile Message (iOS only).
n Use Custom MDM Applications.
n Enrollment Support Email and Enrollment Support Phone are not supported.
StagingDevice staging through Workspace ONE Direct Enrollment is not supported. If you must stage a device, whether for single or multiple users, you must enroll the device using Workspace ONE Intelligent Hub instead of Workspace ONE Direct Enrollment.
Enable Direct Enrollment for Workspace ONEYou can enable Workspace ONE ™ Direct Enrollment on the organization group (OG) of your preference. Once enabled, all qualified devices logging in for the first time to Workspace ONE UEM are directly enrolled. Unqualified devices that fall outside the criteria you define are enrolled in an unmanaged or container state.
Managing Devices
VMware, Inc. 45
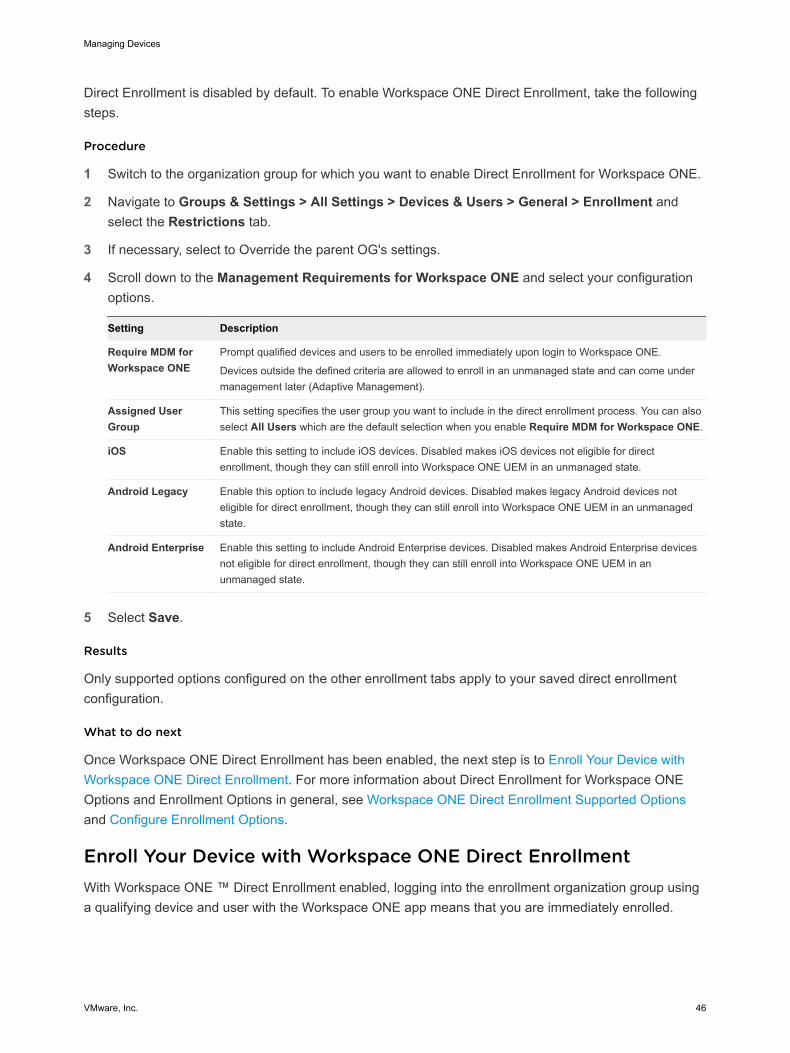
Direct Enrollment is disabled by default. To enable Workspace ONE Direct Enrollment, take the following steps.
Procedure
1 Switch to the organization group for which you want to enable Direct Enrollment for Workspace ONE.
2 Navigate to Groups & Settings > All Settings > Devices & Users > General > Enrollment and select the Restrictions tab.
3 If necessary, select to Override the parent OG's settings.
4 Scroll down to the Management Requirements for Workspace ONE and select your configuration options.
Setting Description
Require MDM for Workspace ONE
Prompt qualified devices and users to be enrolled immediately upon login to Workspace ONE.
Devices outside the defined criteria are allowed to enroll in an unmanaged state and can come under management later (Adaptive Management).
Assigned User Group
This setting specifies the user group you want to include in the direct enrollment process. You can also select All Users which are the default selection when you enable Require MDM for Workspace ONE.
iOS Enable this setting to include iOS devices. Disabled makes iOS devices not eligible for direct enrollment, though they can still enroll into Workspace ONE UEM in an unmanaged state.
Android Legacy Enable this option to include legacy Android devices. Disabled makes legacy Android devices not eligible for direct enrollment, though they can still enroll into Workspace ONE UEM in an unmanaged state.
Android Enterprise Enable this setting to include Android Enterprise devices. Disabled makes Android Enterprise devices not eligible for direct enrollment, though they can still enroll into Workspace ONE UEM in an unmanaged state.
5 Select Save.
Results
Only supported options configured on the other enrollment tabs apply to your saved direct enrollment configuration.
What to do next
Once Workspace ONE Direct Enrollment has been enabled, the next step is to Enroll Your Device with Workspace ONE Direct Enrollment. For more information about Direct Enrollment for Workspace ONE Options and Enrollment Options in general, see Workspace ONE Direct Enrollment Supported Options and Configure Enrollment Options.
Enroll Your Device with Workspace ONE Direct EnrollmentWith Workspace ONE ™ Direct Enrollment enabled, logging into the enrollment organization group using a qualifying device and user with the Workspace ONE app means that you are immediately enrolled.
Managing Devices
VMware, Inc. 46
Your users are also given the chance to install apps immediately which your company finds useful. Alternately, they can skip this step in favor of installing the app later. To enroll a device with Workspace ONE Direct Enrollment, the end user takes the following steps.
Procedure
1 Download, install, and run the Workspace ONE app from the platform-specific app store or repository.
2 Enter the server URL or email address.
3 Enter your directory services user name and password.
4 Install or enable Workspace Services by selecting affirmative steps specific to your platform.
a iOS – allow the server to open Settings, enter your device passcode, install an unsigned device profile, and open a screen in Workspace.
b Android Legacy – Install Workspace ONE Intelligent Hub, allow it to make and manage phone calls, select ownership for your device with an option to enter the device asset number, activate the device admin application, then sign into Workspace ONE.
c Android Enterprise – Accept (or decline) the terms of use agreement, set up the work profile, and create the Workspace ONE passcode.
5 When Workspace ONE finishes the install routine, you can Continue to install apps.
6 You can install individual apps selected from a list, Install all, or Skip this step entirely.
Basic vs. Directory Services EnrollmentYou can enroll existing users and groups of directory services like Active Directory (AD), Lotus Domino, and Novell e-Directory. If you do not have such an infrastructure or you choose not to integrate with it, you must perform Basic Enrollment in Workspace ONE UEM powered by AirWatch.
Basic enrollment means manually creating user accounts in the UEM console.
Note While Workspace ONE UEM supports a mix of both Basic and Directory-based users, you typically use one or the other for the initial enrollment of users and devices.
Managing Devices
VMware, Inc. 47
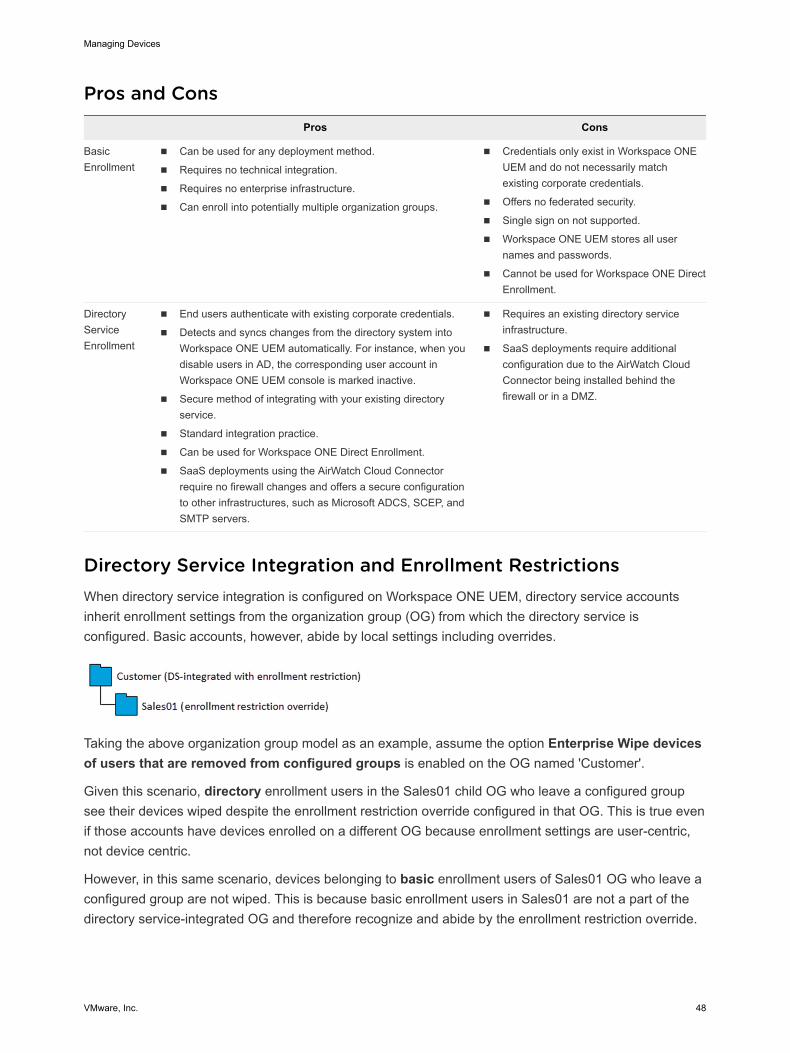
Pros and Cons
Pros Cons
Basic Enrollment
n Can be used for any deployment method.
n Requires no technical integration.
n Requires no enterprise infrastructure.
n Can enroll into potentially multiple organization groups.
n Credentials only exist in Workspace ONE UEM and do not necessarily match existing corporate credentials.
n Offers no federated security.
n Single sign on not supported.
n Workspace ONE UEM stores all user names and passwords.
n Cannot be used for Workspace ONE Direct Enrollment.
Directory Service Enrollment
n End users authenticate with existing corporate credentials.
n Detects and syncs changes from the directory system into Workspace ONE UEM automatically. For instance, when you disable users in AD, the corresponding user account in Workspace ONE UEM console is marked inactive.
n Secure method of integrating with your existing directory service.
n Standard integration practice.
n Can be used for Workspace ONE Direct Enrollment.
n SaaS deployments using the AirWatch Cloud Connector require no firewall changes and offers a secure configuration to other infrastructures, such as Microsoft ADCS, SCEP, and SMTP servers.
n Requires an existing directory service infrastructure.
n SaaS deployments require additional configuration due to the AirWatch Cloud Connector being installed behind the firewall or in a DMZ.
Directory Service Integration and Enrollment RestrictionsWhen directory service integration is configured on Workspace ONE UEM, directory service accounts inherit enrollment settings from the organization group (OG) from which the directory service is configured. Basic accounts, however, abide by local settings including overrides.
Taking the above organization group model as an example, assume the option Enterprise Wipe devices of users that are removed from configured groups is enabled on the OG named 'Customer'.
Given this scenario, directory enrollment users in the Sales01 child OG who leave a configured group see their devices wiped despite the enrollment restriction override configured in that OG. This is true even if those accounts have devices enrolled on a different OG because enrollment settings are user-centric, not device centric.
However, in this same scenario, devices belonging to basic enrollment users of Sales01 OG who leave a configured group are not wiped. This is because basic enrollment users in Sales01 are not a part of the directory service-integrated OG and therefore recognize and abide by the enrollment restriction override.
Managing Devices
VMware, Inc. 48
Enrollment Considerations, Basic Versus DirectoryWhen considering end-user enrollment, in addition to the existing pros and cons of Basic versus Directory users, there are other questions to consider.
For the pros & cons of basic users vs directory users, see Basic vs. Directory Services Enrollment.
Consideration #1: Who Can Enroll?In answering this question, consider the following.
n Is the intent of your MDM deployment to manage devices for all your organization's users at or below the base DN * you configured? If so, the easiest way to achieve this arrangement is to allow all users to enroll by ensuring the Restrict Enrollment check boxes are deselected.
You can allow all users to enroll during the initial deployment rollout and then afterward, restrict the enrollment to prevent unknown users from enrolling. As your organization adds new employees or members to existing user groups, these changes are synced and merged.
n Are there certain users or groups who are not to be included in MDM? If so, you must either add users one at a time or batch import a CSV (comma-separated value) file of only eligible users.
If you want to restrict certain users and groups, see Configure Enrollment Restriction Settings.
Consideration #2: Where Will Users Be Assigned?Another consideration to make when integrating your Workspace ONE UEM environment with directory services is how you assign directory users to organization groups during an enrollment. In answering this question, consider the following.
n Have you created an organization group structure that logically maps to your directory service groups? You must complete this task before you can edit user group assignments.
n If your users are enrolling their own devices, the option to select a Group ID from a list is simple. Human error is a factor in this simplicity and can lead to incorrect group assignments.
You can automatically select a Group ID based on a user group or allow users to select a Group ID from a list. These Group ID Assignment Mode options are available by navigating to Devices > Device Settings > Devices & Users > General > Enrollment and selecting the Grouping tab.
If you want to configure Group ID options, see Configure Enrollment Options on Grouping Tab.
* The base DN, or distinguished name, is the point from which a server searches for users. A distinguished name is a name that uniquely identifies an entry in the directory. Every entry in the directory has a DN.
Enabling Basic EnrollmentBasic Enrollment refers to the process of manually creating user accounts and user groups for each of your organization's users. If your organization is not integrating Workspace ONE UEM with a directory service, basic enrollment is how you create user accounts.
Managing Devices
VMware, Inc. 49
If you have a few basic accounts to create, then create them one at a time as described in the topic Create Basic User Accounts.
For basic enrollments involving larger end-user numbers, you can save time by filling out and uploading CSV (comma-separated values) template files. These files contain all user information through the batch import feature. For more information, see the topic Batch Import Users or Devices.
Bring Your Own Device (BYOD) EnrollmentA major challenge in managing users' personal devices in Workspace ONE UEM powered by AirWatch is recognizing and distinguishing between employee-owned and corporate-owned devices and then limiting enrollment to only approved devices.
Workspace ONE UEM enables you to configure many options that customize the end-user experience of enrolling a personal device. Before you begin, you must consider how you plan to identify employee-owned devices in your deployment and whether to enforce enrollment restrictions for employee-owned devices.
Enrollment Considerations, BYODAssuming you are allowing employees to enroll their personal devices in your Workspace ONE UEM environment, there are many considerations you must make before you proceed.
Consideration #1: Will BYOD Users Enroll with VMware Workspace ONE or the Workspace ONE Intelligent Hub?VMware Workspace ONE is a secure enterprise platform that delivers and manages any app on any device. It begins with self-service, single-sign on access to cloud, mobile, and Windows apps and includes powerfully integrated email, calendar, file, and collaboration tools.
With Workspace ONE, users do not need to enroll their personal devices to get access to services. The Workspace ONE app itself can be downloaded from the Apple App Store, Google Play, or Microsoft Store and installed. A user then logs in and gains access to applications based on the established policies. The Workspace ONE app configures an MDM management profile during its installation that enrolls the device automatically.
Consideration #2: Will You Apply Additional Enrollment Restrictions for Employee-Owned Devices?When answering this question, consider the following.
n Does your MDM deployment only support certain device platforms? If so, you can specify these platforms and only allow devices running on them to enroll.
n Are you limiting the number of personal devices an employee is allowed to enroll? If so, you can specify the maximum number of devices a user is allowed to enroll.
Managing Devices
VMware, Inc. 50
You can set up additional enrollment restrictions to further control who can enroll and which device types are allowed. For example, you can opt to support only those Android devices that feature built-in enterprise management functionality. After your organization evaluates and determines which kinds of employee-owned devices they want to use in your work environment, you can configure these settings.
For more information, see Additional Enrollment Restrictions.
Identify Corporate Devices and Specify Default Device OwnershipPreparing a list of devices can be useful if you have a mix of corporate-owned devices and employee-owned devices which employees enroll themselves. As enrollment commences, devices you identified as Corporate-Owned have their ownership type configured automatically based on what you selected. Then you can configure all employee-owned devices – which are not in the list – to enroll with an ownership type as Employee-Owned.
The following procedure explains how to import a list of pre-approved corporate devices. You can apply the Corporate-Owned ownership type after enrollment automatically, even if you have a restriction that automatically applies the Employee-Owned ownership type.
Restrictions for an open enrollment, by contrast, explicitly allow or block the enrollment for devices matching parameters you identify including platform, model, and operating system.
Procedure
1 Navigate to Devices > Lifecycle > Enrollment Status and select Add, then Batch Import which displays the Batch Import screen.
Alternatively, you can select Add then Whitelisted Devices to enter up to 30 whitelisted devices at a time by IMEI, UDID, or Serial Number. You can also select either Corporate Owned or Corporate Shared as the Ownership Type.
2 Enter a Batch Name and Batch Description, then select Add Whitelisted Device as the Batch Type.
3 Select the link entitled, "Download template with an example for whitelisted devices" and save this comma-separated values (CSV) template to a location you have access to. Edit this CSV file with Excel to add all the devices you want to whitelist, then save the file.
4 Select Choose File and select your saved CSV file.
5 Select Import to import this device information to your whitelist.
6 Set the Default Device Ownership type to Employee Owned for all open enrollment.
a Navigate to Devices > Devices Settings > Devices & Users > General > Enrollment and select the Grouping tab.
b Select Employee Owned as the Default Device Ownership.
c Select the Default Role assigned to the user, which determines the level of access the user has to the Self-Service Portal (SSP).
Managing Devices
VMware, Inc. 51
d Select the Default Action for Inactive Users, which determines what to do if the user is marked as inactive.
e Select Save.
Prompt Users to Identify Ownership TypeIf your deployment has organization groups with multiple ownership types, you can prompt users to identify their ownership type during enrollment. Careful consideration should be used before allowing users to choose their own ownership type.
You can always update the ownership type on individual devices later but it is safer and more secure to make a list of corporate devices. Then enroll the corporate-owned devices separately and later, set the default ownership type to Employee Owned.
Prerequisites
While simple, this approach assumes that every user correctly selects the appropriate ownership type applicable to their device. If a personal device user selects the Corporate-Owned type in error, their device is now subject to policies and profiles that normally do not apply to personal devices. This erroneous selection can have serious legal implications regarding user privacy.
Procedure
1 Navigate to Devices > Device Settings > Devices & Users > General > Enrollment and select the Optional Prompt tab.
2 Select Prompt for Device Ownership Type. During enrollment, users are prompted to select their ownership type.
3 Select Save.
Self-Enrollment Versus Device StagingWorkspace ONE UEM powered by AirWatch supports two methods for enrolling corporate devices. You can let users enroll their own devices or administrators can enroll devices on users' behalf in a process called device staging.
In device staging, an administrator enrolls devices before assigning them and distributing them to end users. This method is useful for administrators who must set up devices shared by multiple users across an organization.
Also, device staging works well for newly provisioned devices, since it happens before an employee receives the device. If your end users already have corporate devices, then allowing them to self-enroll makes the most sense. Letting users enroll their own devices is also beneficial when the total number of devices makes it impractical for administrators to perform device staging.
Device staging can be performed for Android, iOS, and macOS devices.
Managing Devices
VMware, Inc. 52
Device staging through Workspace ONE Direct Enrollment is not supported. If you must stage a device, whether for single or multiple users, you must enroll the device using Workspace ONE Intelligent Hub instead of Workspace ONE Direct Enrollment.
For more information, see Workspace ONE Direct Enrollment.
Enrollment Considerations, Self-EnrollmentIf you want to save time by allowing your end users to self enroll, consider the following questions.
Consideration #1: Device Ownershipn Do your end users already have assigned corporate devices? In this case, it may not be practical to
collect each device and have it staged and instead have users enroll themselves.
n Are your end users sharing devices or do they have their own dedicated devices? If end users are not sharing devices, then you can make it the responsibility of that device's single owner to enroll themselves.
Consideration #2: Auto DiscoveryAre you associating your organization's email domain with your Workspace ONE UEM environment? This process, known as an auto discovery, means that end users need only enter email address and credentials. The enrollment URL and Group ID are automatically entered.
See also Configure Autodiscovery Enrollment from a Child Organization Group and Configure Autodiscovery Enrollment from a Parent Organization Group.
Consideration #3: Workspace ONE Direct EnrollmentWorkspace ONE Direct Enrollment is a feature that fits well with self-enrollment. Once enabled, all qualified devices that log into the enrollment organization group are immediately enrolled. And once fully installed, the end user can agree to install apps selected by the company or to opt out of installing apps.
For more information, see Workspace ONE Direct Enrollment.
Self-Enrollment ProcessSelf-enrollment can require that end users know their appropriate Group ID and login credentials. If you have integrated with directory services, these credentials are the same as the user's directory service credentials.
You can also associate your organization's email domain with your Workspace ONE UEM environment in a process known as auto discovery. With auto discovery enabled, devices of supported platforms prompt end users to enter their email address. These devices automatically complete enrollment if their email domain (the text after @) matches – without the need to enter a Group ID or enrollment URL. For more information, see Autodiscovery Enrollment.
Managing Devices
VMware, Inc. 53
Procedure
1 End users navigate to AWAgent.com, which automatically detects whether the Workspace ONE Intelligent Hub is installed.
If Workspace ONE Intelligent Hub is not installed, the Website redirects to the appropriate mobile app store.
2 AirWatch Container users download the AirWatch Container app from the app store.
3 After launching the Workspace ONE Intelligent Hub or Container app, users enter their credentials – in addition to either an email address or URL/Group ID – and proceed with enrollment.
What to do next
Enrollment Considerations, Device StagingAdministrators can enroll devices on behalf of users in a process called device staging. Staging devices serves to streamline the process of registration and to enroll iOS devices shared by multiple users. You can also stage devices to provision an entire device fleet quickly with Apple Configurator.
Consideration #1: Use of Device StagingUnless you are using Apple Configurator, administrators must stage devices one-by-one. For large deployments, consider the time and staffing this effort requires.
Whereas administrators can stage new devices easily, employees already using corporate-owned devices must ship devices in or collect them on-site to have devices staged.
If you have thousands of devices to pre-enroll, device staging can take time. Therefore it works best when you have a new batch of devices being provisioned, since you can gain access to the devices before employees receive them.
Device staging can be performed for Android and iOS devices in following ways.
n Single User (Standard) – Used when you are staging a device which any user can enroll.
Note As indicated, this enrollment flow is intended for unattended devices. If you are using this flow for zero touch user enrollment, you are responsible for ensuring that staged devices are delivered to the intended user.
n Single User (Advanced) – Used when you are staging and enrolling a device for a particular user.
Note The staging user/administrator must ensure that the device is checked out to the registered user.
n Multi User – Used when you are staging a device to be shared among multiple users.
Managing Devices
VMware, Inc. 54
Consideration #2: Are You Participating in Apple's Device Enrollment Program?To maximize the benefits of Apple devices enrolled in Mobile Device Management (MDM), Apple has introduced the Device Enrollment Program (DEP). With DEP, you can perform the following.
n Install a non-removable MDM profile on a device, preventing end users from deleting it.
n Provision devices in Supervised mode (iOS only). Devices in Supervised mode can access additional security and configuration settings.
n Enforce an enrollment for all end users.
n Meet your organization's needs by customizing and streamline the enrollment process.
n Prevent iCloud back up by disabling users from signing in with their Apple ID when generating a DEP profile.
n Force OS updates for all end users.
Consideration #3: Use of Apple ConfiguratorApple Configurator enables IT administrators to deploy and manage Apple iOS devices effectively. Organizations such as retail stores, classrooms, and hospitals find it especially useful to pre-enroll devices for multiple end users to share.
Using Configurator to enroll pre-registered devices meant for a single user is supported by adding serial number/IMEI information to a user's registered device in the Console. A major benefit of Apple Configurator is that you can use a USB hub or iOS device cart to provision multiple devices in minutes.
Consideration #4: Use of Workspace ONE Direct EnrollmentDevice staging through Workspace ONE Direct Enrollment is not supported. If you must stage a device, whether for single or multiple users, you must enroll the device using Workspace ONE Intelligent Hub instead of Workspace ONE Direct Enrollment.
For more information, see Workspace ONE Direct Enrollment.
Consideration #5: Single User Staging or Registration?If you are considering staging devices for a single user, registration might be preferred. The difference between staging for a single user and registering a device is subtle but important.
Registration – When you register a device, you do so for an individual, named user. This procedure means that the device expects the first user who logs in to be the same user to whom it was registered. If another user attempts to log in to a registered device, security purposes dictate that the device is locked out and cannot be enrolled.
Single User Staging – When you stage a device, you do so for any user qualified to enroll in Workspace ONE UEM. In theory, you might hand a staged device to any qualified user, and that user might successfully log in to the device and enroll in Workspace ONE UEM.
Managing Devices
VMware, Inc. 55
The staging workflow allows you to prepare the device and then start the Workspace ONE Intelligent Hub, where any qualified enrollment user can log in. Workspace ONE UEM then performs a one-time reassignment to associate the device to that user.
Supervised ModeAdministrators have the option of enabling Supervised Mode for devices enrolled through Apple Configurator, which enables additional enhanced security features. However, this mode does introduce several limitations on the device.
BenefitsOnce a device is supervised and enrolled in Workspace ONE UEM, the administrator has the following enhanced features available for configuration when compared to normal devices.
n Elevated Restrictions over MDMn Prevent User from Removing Applications. Removing applications can also be restricted locally
on the device using restrictions under System Configuration.
n Prevent AirDrop.
n Prevent users from modifying iCloud and Mail account settings which prevents account modification.
n Disable iMessage.
n Set iBookstore Content rating restrictions.
n Disable Game Center and iBookstore.
n Enhanced Securityn Prevent end users from visiting websites with adult content in Safari.
n Restrict which devices can connect to specified AirPlay destinations, such as Apple TVs.
n Prevent the installation of certificates or unmanaged configuration profiles.
n Force all device network traffic through a global HTTP proxy.
n Kiosk Moden Lock down devices to one app with single app mode and disable the home button.
n Customize Wallpaper and Text on Device
n Enable or Clear Activation Lock
Limitationsn USB Access to supervised devices is restricted to the supervising Mac.
Managing Devices
VMware, Inc. 56
n Cannot copy data to and from the device using iTunes unless the Apple Configurator identity certificate is installed on the device.
n Media such as photos and videos cannot be copied from the device to a PC or Mac. To transfer this type of data, use the VMware Content Locker to sync the content with the user’s Personal Documents section. Alternatively, a file sharing application can be used to transfer the data over WLAN/WWAN to a server.
n Supervised mode prevents access to device-side logs using the iPhone Configuration Utility (IPCU).
n This mode makes it harder to troubleshoot any application or device issues. The reason for this difficulty is the logs from the device can only be obtained if the device is connected to the supervising Mac. To remediate some of the challenges, use the Workspace ONE SDK to send logs and logistics from the applications to the UEM console.
n Devices cannot be reset with factory settings easily.
n Once a device is factory reset, it must be brought back to the supervising Mac to restore it back to supervised mode. This procedure may be problematic if the Mac is not near the device.
In deciding whether or not to enable Supervised Mode, consider the following. While it enables additional features that enhance security on the device, the USB limitations must be considered.
The proximity of the device to the supervising Mac plays an important role in the decisions. Since the USB limitation prevents access to device-side logs, a device experiencing issues must be shipped back to a depot and restaged to restore functionality.
Deciding on supervision in advance is important because the process to supervise or “unsupervise” requires the shipping of the device to an IT location or depot.
Stage a Single-User DeviceSingle-User Device Staging on the Workspace ONE UEM console allows a single administrator to outfit devices for other users on their behalf, which can be useful for IT administrators provisioning a fleet of devices.
Managing Devices
VMware, Inc. 57
Device staging through Workspace ONE Direct Enrollment is not supported. If you must stage a device, whether for single or multiple users, you must enroll the device using Workspace ONE Intelligent Hub instead of Workspace ONE Direct Enrollment.
Important The ability to create staging users is an elevated admin privilege. Permission to create a staging user should be limited only to specific, trusted administrators. Also, treat staging user credentials as you would any other admin privilege and do not disclose the user credentials.
Currently, any administrator with the permission to create a user can also create a staging user. Limit this ability by editing the roles assigned to your administrators. Navigate to Accounts > Administrators >
Roles. Identify only those roles you want to limit and then Edit ( ) each of these roles in the category path All > Accounts > Users > Accounts by clearing the Edit check box from the "Add/Edit" permission.
Note LDAP binding is required when staging devices. To create this payload, see Binding a Device to the Directory Service in this guide.
Procedure
1 Navigate to Accounts > Users > List View and select Edit for the user account for which you want to enable device staging.
2 In the Add / Edit User page, select the Advanced tab.
a Scroll down to the Staging section.
b Select Enable Device Staging.
c Select the staging settings that apply to this staging user.
Single User Devices stages devices for a single user.
3 Toggle the type of single user device staging mode to either Standard or Advanced.
Standard staging requires an end user to enter login information after staging, while Advanced means that the staging user can enroll the device on behalf of another user.
4 Ensure that Multi User Devices is set to Disabled.
5 Enroll the device.
n Enroll using the Workspace ONE Intelligent Hub by entering a server URL and Group ID.
n Open the device's Internet browser, navigate to the enrollment URL, and enter the proper Group ID.
6 Enter your staging user's credentials during enrollment.
a If necessary, specify that you are staging for Single User Devices.
You will only have to do this if multi-user device staging is also enabled for the staging user.
Managing Devices
VMware, Inc. 58
7 Complete enrollment for either Advanced or Standard staging.
a If you are performing Advanced staging, you are prompted to enter the user name of the end-user device owner who is going to use the device. Proceed with enrollment by installing the Mobile Device Management (MDM) profile and accepting all prompts and messages.
b If you are performing Standard staging, then when the end user completes the enrollment, they are prompted to enter their own credentials in the login window.
Results
The device is now staged and ready for use by the new user. If an enrollment terms of use agreement is in place, the staging single-user will not see this TOU agreement prompt until they log into their SSP account.
Stage a Multi-User DeviceMulti-user device/shared device staging allows an IT administrator to provision devices intended to be used by more than one user. Multi-User staging allows the device to change its assigned user dynamically as the different network users log into that device.
Device staging through Workspace ONE Direct Enrollment is not supported. If you must stage a device, whether for single or multiple users, you must enroll the device using Workspace ONE Intelligent Hub instead of Workspace ONE Direct Enrollment.
Procedure
1 Navigate to Accounts > Users > List View and select Edit for the user account for which you want to enable device staging.
2 In the Add / Edit User page, select the Advanced tab.
a Scroll down to the Staging section.
b Select Enable Device Staging.
c Select the staging settings that apply to this staging user.
Single User Devices stages devices for a single user.
3 Toggle the type of single user device staging mode to either Standard or Advanced.
Standard staging requires an end user to enter login information after staging, while Advanced means that the staging user can enroll the device on behalf of another user.
4 Ensure that Multi User Devices is set to Enabled.
5 Enroll the device using one of the two following methods.
n Enroll using the Workspace ONE Intelligent Hub by entering a server URL and Group ID.
n Open the device's Internet browser, navigate to the enrollment URL, and enter the proper Group ID.
Managing Devices
VMware, Inc. 59
6 Enter your staging user's credentials during enrollment. If necessary, specify that you are staging for Single User Devices.
You only must do this if multi-user device staging is also enabled for the staging user.
Results
The device is now staged and ready for use by the new users.
Device RegistrationRegistering corporate devices is optional and the main benefit of this option is to restrict enrollment in Workspace ONE UEM powered by AirWatch to registered devices only.
Another benefit is tracking enrollment statuses, which let you know which of your users have enrolled and which have yet to enroll. You can then notify those users who have not yet enrolled.
Workspace ONE UEM can successfully register devices even when device identifiers are missing during the data entry phase, by users or administrators.
A third advantage to registering devices before enrollment is security. A registered device expects the user logging in for the first time to be the same individual it was registered to. If a different user attempts to log in to a registered device, the device is locked out and unable to enroll.
Enrollment Considerations, RegistrationIf you want to proceed with registering devices before enrollment, consider the following.
Who Will Register Devices?An important consideration when registering devices is deciding who performs the actual device registration.
n What is the total number of devices in your deployment? In large deployments of thousands of devices, you can add this information to a CSV (comma-separated values) file. You then upload this file before devices are provisioned. You can also pass on the act of device registration onto the end user.
n Do you support a BYOD program where employees can use their personal devices? If you opt to restrict enrollment to only registered devices, you must give employees instructions on how to register their devices.
End-User Device Registration Through the SSPYou can direct end users to register their own devices before enrolling into Workspace ONE UEM if you are supporting BYOD. You can also require users with corporate owned devices to register if you want to track enrollment or use registration tokens. In either case, you must notify your end users of the process they need to follow.
Managing Devices
VMware, Inc. 60
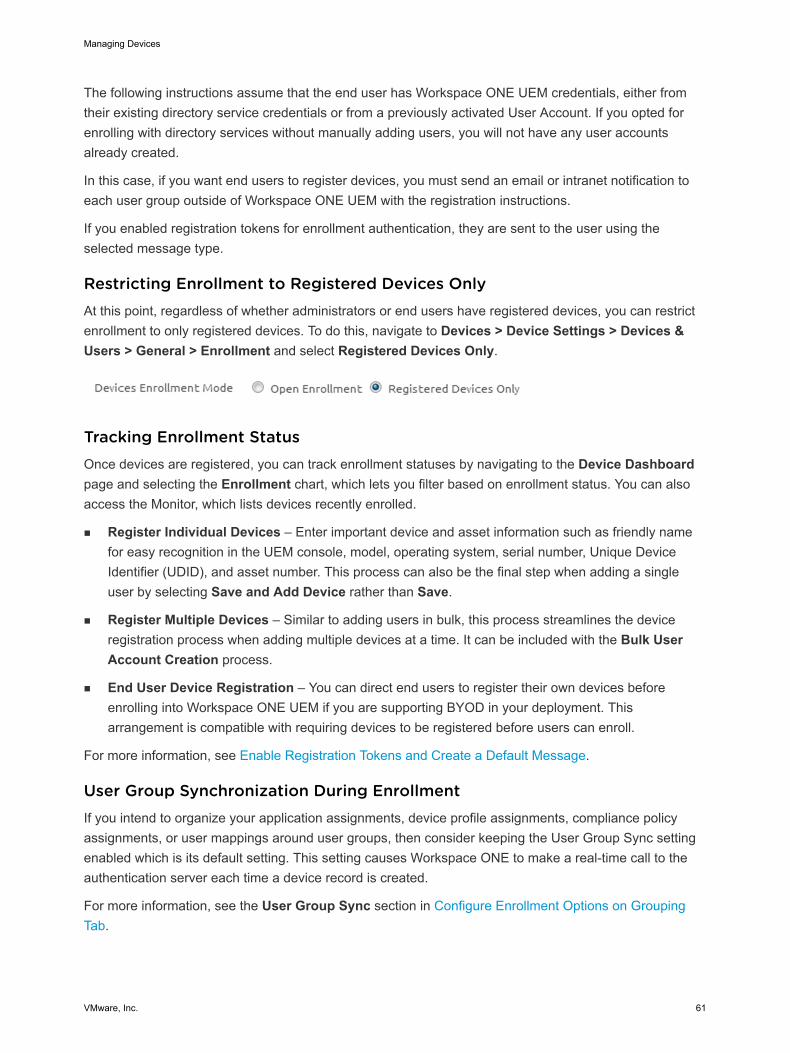
The following instructions assume that the end user has Workspace ONE UEM credentials, either from their existing directory service credentials or from a previously activated User Account. If you opted for enrolling with directory services without manually adding users, you will not have any user accounts already created.
In this case, if you want end users to register devices, you must send an email or intranet notification to each user group outside of Workspace ONE UEM with the registration instructions.
If you enabled registration tokens for enrollment authentication, they are sent to the user using the selected message type.
Restricting Enrollment to Registered Devices OnlyAt this point, regardless of whether administrators or end users have registered devices, you can restrict enrollment to only registered devices. To do this, navigate to Devices > Device Settings > Devices & Users > General > Enrollment and select Registered Devices Only.
Tracking Enrollment StatusOnce devices are registered, you can track enrollment statuses by navigating to the Device Dashboard page and selecting the Enrollment chart, which lets you filter based on enrollment status. You can also access the Monitor, which lists devices recently enrolled.
n Register Individual Devices – Enter important device and asset information such as friendly name for easy recognition in the UEM console, model, operating system, serial number, Unique Device Identifier (UDID), and asset number. This process can also be the final step when adding a single user by selecting Save and Add Device rather than Save.
n Register Multiple Devices – Similar to adding users in bulk, this process streamlines the device registration process when adding multiple devices at a time. It can be included with the Bulk User Account Creation process.
n End User Device Registration – You can direct end users to register their own devices before enrolling into Workspace ONE UEM if you are supporting BYOD in your deployment. This arrangement is compatible with requiring devices to be registered before users can enroll.
For more information, see Enable Registration Tokens and Create a Default Message.
User Group Synchronization During EnrollmentIf you intend to organize your application assignments, device profile assignments, compliance policy assignments, or user mappings around user groups, then consider keeping the User Group Sync setting enabled which is its default setting. This setting causes Workspace ONE to make a real-time call to the authentication server each time a device record is created.
For more information, see the User Group Sync section in Configure Enrollment Options on Grouping Tab.
Managing Devices
VMware, Inc. 61

Register an Individual DeviceWhile the Batch Import option makes registering hundreds or even dozens of devices convenient, when you have a small number of devices to register, you can register devices individually.
Procedure
1 Select the Add button, which can be found in the top-right quadrant of almost any screen in the Workspace ONE UEM console.
When selected, the button displays a drop-down menu with multiple options.
2 Select Device.
The Add Device page displays.
3 Complete the options according to your needs, starting with the User tab.
Setting Description
User Section
Search Text Search for the user by entering a search parameter and select the Search User button.
On a successful search, select the user account for whom you are registering the device. Several pre-populated text boxes display including Security Type, User Name, Password, and Email Address. You can edit these text boxes by displaying advanced user details.
Device Section
Expected Friendly Name
Enter the Friendly Name of the device. This text box accepts Lookup Values which you can insert by selecting the plus sign. For details, see Lookup Values.
Organization Group Select the Organization Group to which the device belongs.
Ownership Select the ownership level of the device.
Platform Select the platform of the device.
Show advanced device information options
Display advanced device information settings.
Model Select the device model. This drop-down menu option depends upon the Platform selection.
OS Select the device operating system. This drop-down menu option depends upon the Platform selection.
Managing Devices
VMware, Inc. 62
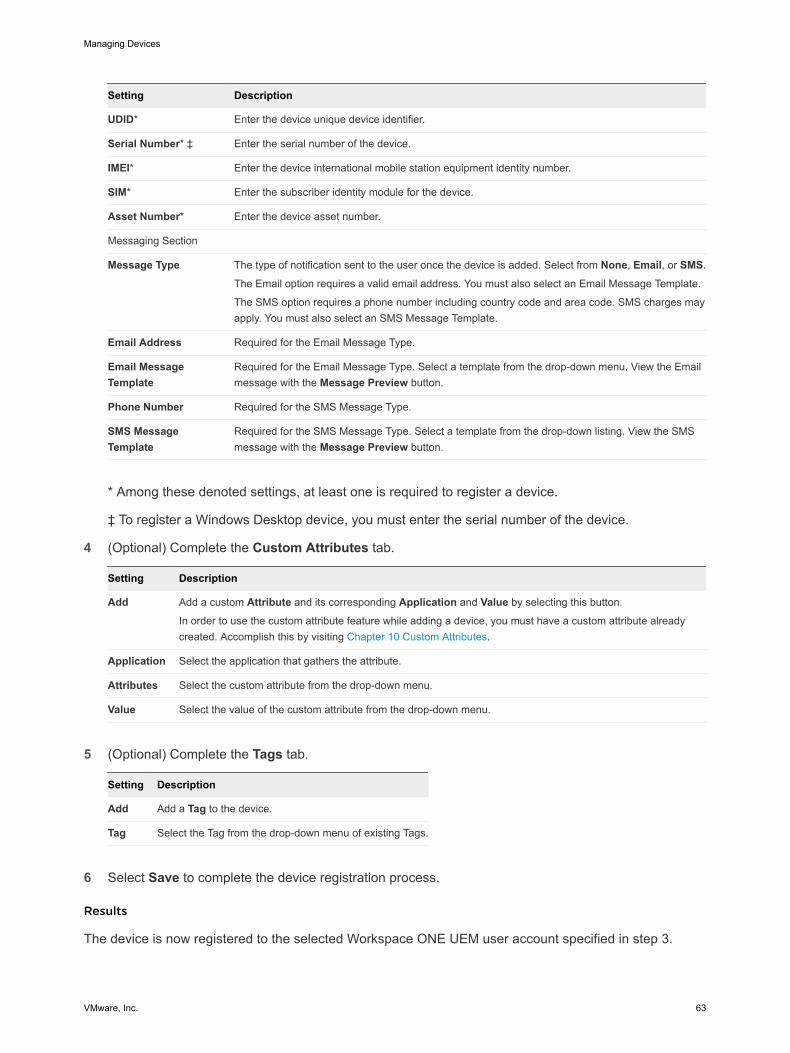
Setting Description
UDID* Enter the device unique device identifier.
Serial Number* ‡ Enter the serial number of the device.
IMEI* Enter the device international mobile station equipment identity number.
SIM* Enter the subscriber identity module for the device.
Asset Number* Enter the device asset number.
Messaging Section
Message Type The type of notification sent to the user once the device is added. Select from None, Email, or SMS.
The Email option requires a valid email address. You must also select an Email Message Template.
The SMS option requires a phone number including country code and area code. SMS charges may apply. You must also select an SMS Message Template.
Email Address Required for the Email Message Type.
Email Message Template
Required for the Email Message Type. Select a template from the drop-down menu. View the Email message with the Message Preview button.
Phone Number Required for the SMS Message Type.
SMS Message Template
Required for the SMS Message Type. Select a template from the drop-down listing. View the SMS message with the Message Preview button.
* Among these denoted settings, at least one is required to register a device.
‡ To register a Windows Desktop device, you must enter the serial number of the device.
4 (Optional) Complete the Custom Attributes tab.
Setting Description
Add Add a custom Attribute and its corresponding Application and Value by selecting this button.
In order to use the custom attribute feature while adding a device, you must have a custom attribute already created. Accomplish this by visiting Chapter 10 Custom Attributes.
Application Select the application that gathers the attribute.
Attributes Select the custom attribute from the drop-down menu.
Value Select the value of the custom attribute from the drop-down menu.
5 (Optional) Complete the Tags tab.
Setting Description
Add Add a Tag to the device.
Tag Select the Tag from the drop-down menu of existing Tags.
6 Select Save to complete the device registration process.
Results
The device is now registered to the selected Workspace ONE UEM user account specified in step 3.
Managing Devices
VMware, Inc. 63
What to do next
Deliver this device to this user so they can log in and complete the enrollment process. If another user attempts to log into this device before the registered user, the device is locked out and unable to enroll.
Missing Device Identifiers During RegistrationIf no device identifier is specified during registration (such as UDID, IMEI, and Serial Number), Workspace ONE UEM uses these attributes to match an enrolled device to its registration record automatically.
When inadequate registration information is provided, the following ranking allows Workspace ONE UEM to register devices successfully.
1 User to whom the device is registered.
2 Platform (if specified).
3 Model (if specified).
4 Ownership type (if specified).
5 Date of the oldest-matching registration record.
Register Multiple DevicesWhile Individual Device Registration works best when you have just a few devices you want to add, if you have hundreds or even dozens of devices to register, the Batch Import process is the way to go.
Procedure
1 Navigate to Accounts > Users > List View or Devices > Lifecycle > Enrollment Status.
a Select Add and then Batch Import to display the Batch Import screen.
2 Complete each of the required options: Batch Name, Batch Description, and Batch Type.
Within the Batch File (.csv) option is a list of task-based templates you can use to load users and their devices in bulk.
3 Select the appropriate download template and save the comma-separated values (CSV) file to somewhere accessible.
4 Locate the saved CSV file, open it with Excel, and enter all the relevant information for each of the devices that you want to import.
Each template is pre-populated with sample entries demonstrating the type of information (and its format) intended to be placed in each column. Fields in the CSV file denoted with an asterisk (*) are required.
5 Save the completed template as a CSV file. In the UEM console, select the Choose File button from the Batch Import screen, navigate to the path where you saved the completed CSV file and select it.
6 Select Save to complete registration for all listed users and corresponding devices.
Managing Devices
VMware, Inc. 64
End-User Device RegistrationDirecting end users to register their own devices might be preferable if you are unsure of the device details during setup. Alternately, if you have a bring-your-own-device (BYOD) deployment in effect, such a directive might be prudent.
If you are supporting BYOD in your deployment, then direct end users to register their own devices before enrolling into Workspace ONE UEM. You can take this step and still require devices to be registered before users enroll. If you want to track enrollment or use registration tokens, then require users with corporate owned devices to register. In either case, you must notify your end users of the process.
The following instructions assume that the end user has Workspace ONE UEM credentials, either from their existing directory service credentials or from a previously activated User Account. If you opted to enroll with directory services without manually adding users, you must not have any user accounts already created.
If you want end users to register devices, you must send an email or notification to each user group outside of Workspace ONE UEM with registration instructions.
If you enabled registration tokens for enrollment authentication, the token is sent to the user in the selected message.
n Send an email or intranet notification to users outside of Workspace ONE UEM with the registration instructions. Ensure that enrollment authentication is enabled for Active Directory or Authentication Proxy by navigating to Devices > Device Settings > Devices & Users > General > Enrollment > Authentication.
Verify that the setting Deny Unknown Users is deselected by navigating to Devices > Device Settings > Devices & Users > General > Enrollment > Restrictions.
n Create user accounts that allow all end users to register their devices, and then send user account activation messages to each user containing the registration instructions.
Both options require you to provide basic information to end users.
n Where to Register – End users can register by navigating to the Self-Service Portal URL. This URL follows the structure of https://<AirWatchEnvironment > /MyDevice where <AirWatchEnvironment > is the enrollment URL. For more information, see Direct Users to Self-Register.
n How to Authenticate into the Self-Service Portal – End users need the Group ID, user name, and password to log in to the Self-Service Portal (SSP).
Direct Users to Self-RegisterOnce the end user receives the registration message, they can register their own devices to save time.
Include these instructions in the registration message you send to end-users, and they are given what they require to register their own devices.
Managing Devices
VMware, Inc. 65
Procedure
1 Navigate to the Self-Service Portal (SSP) URL: https://<AirWatchEnvironment > /MyDevice, where <AirWatchEnvironment> is the enrollment URL for your environment.
2 Log in by entering the Group ID and credentials (either an email address or user name and password).
These credentials can match the directory service credentials for directory users.
3 Select Add Device to open the Register Device form.
4 Enter the device information by completing the required text boxes in the Register Device form.
5 Submit and register the device by selecting Save.
Tracking Device Enrollment StatusOccasionally, you might need to troubleshoot device registration, or track the stage of the overall enrollment process. End users might accidentally delete the message containing registration instructions, or they might not redeem an authentication within the allotted expiration time.
Manage enrollment status by accessing the Enrollment Status page at Devices > Lifecycle > Enrollment Status. Track the enrollment status of devices by sorting the Enrollment Status column in the listing or by filtering the list view by Enrollment Status.
Using the Enrollment Status page, you can produce a custom list of registered (but unenrolled) devices, select all devices in this custom list, and resend the enrollment instructions. If enough time elapses and a device fails to enroll, you can opt to reset (or even revoke) their registration token.
For more information, see Enrollment Status.
Enable Registration Tokens and Create a Default MessageIf you restrict an enrollment to registered devices only, you also have the option of requiring a registration token. This option increases security by confirming that a particular user is authorized to enroll.
You can also send an email or SMS message with the enrollment token attached to users with Workspace ONE ™ UEM accounts.
Procedure
1 Enable a token-based enrollment by selecting the appropriate organization group. Navigate to Devices > Device Settings > Devices & Users > General > Enrollment and ensure that the Authentication tab is selected.
2 Scroll down past the Getting Started section and select Registered Devices Only as the Devices Enrollment Mode.
A toggle labeled Require Registration Token appears. Enabling this option restricts enrollment to only token-registered devices.
Managing Devices
VMware, Inc. 66
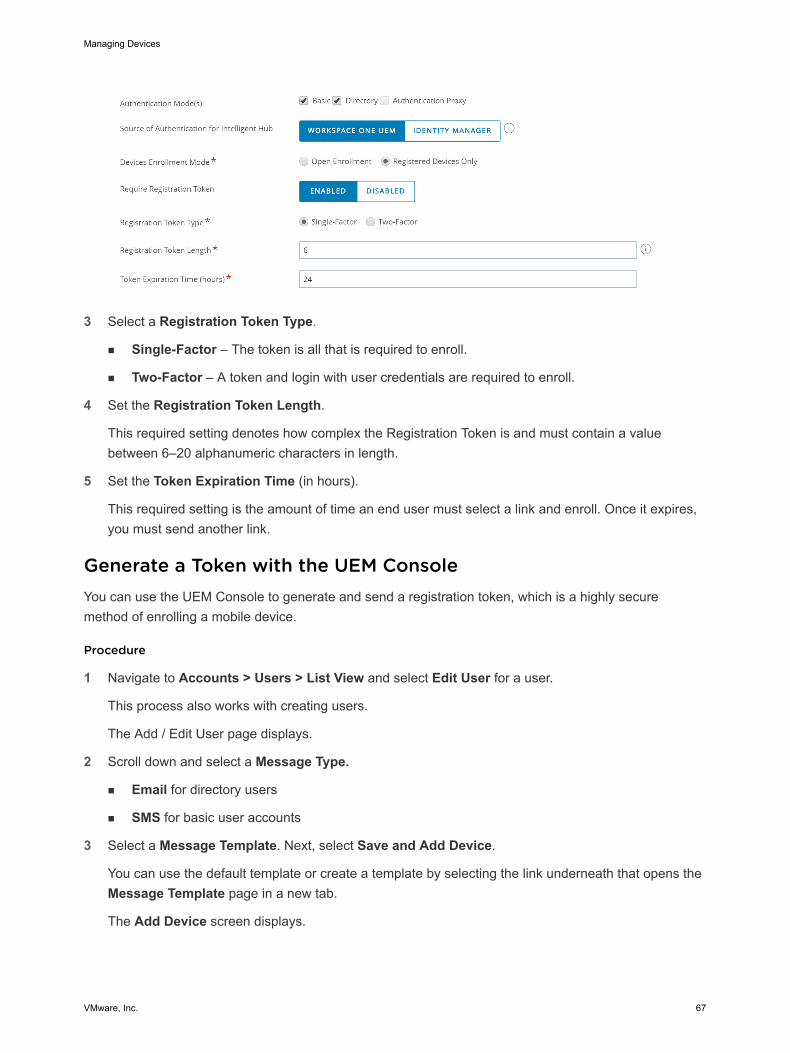
3 Select a Registration Token Type.
n Single-Factor – The token is all that is required to enroll.
n Two-Factor – A token and login with user credentials are required to enroll.
4 Set the Registration Token Length.
This required setting denotes how complex the Registration Token is and must contain a value between 6–20 alphanumeric characters in length.
5 Set the Token Expiration Time (in hours).
This required setting is the amount of time an end user must select a link and enroll. Once it expires, you must send another link.
Generate a Token with the UEM ConsoleYou can use the UEM Console to generate and send a registration token, which is a highly secure method of enrolling a mobile device.
Procedure
1 Navigate to Accounts > Users > List View and select Edit User for a user.
This process also works with creating users.
The Add / Edit User page displays.
2 Scroll down and select a Message Type.
n Email for directory users
n SMS for basic user accounts
3 Select a Message Template. Next, select Save and Add Device.
You can use the default template or create a template by selecting the link underneath that opens the Message Template page in a new tab.
The Add Device screen displays.
Managing Devices
VMware, Inc. 67
4 Review General information about the device and confirming information about the Message itself. Once finished, select Save to send the token to the user using the selected message type.
Results
Note The token is not accessible through the UEM console for security.
Generate a Token with the Self-Service Portal (SSP)You can use the Self Service Portal to generate and send a registration token, which can then be used to securely enroll a device.
Procedure
1 Log in to the Self-Service Portal.
If you are using single sign-on or smartcards for authentication, you can log in from a device or a computer. Directory users can log in using their directory service credentials.
2 Select Add Device.
3 Enter the device information (friendly name and platform) and any other details by completing the settings in the Register Device form. Ensure that the email address and phone number are present and accurate as they might not automatically populate.
4 Select Save to send the enrollment token to the user using the selected message type.
Results
Note The token is not shown on this page and only appears in the message that is sent.
As a security feature, the following changes have been made for accounts that have enrolled with a token.
n Email Address and Phone Number on both the Add Device screen and Account screen have been made read-only.
n The View Enrollment Message action has been removed.
Enroll with a Registration TokenYou can use a registration token to enroll a device which is a highly secure authentication method.
Procedure
1 Open the SMS or email message on the device and select the link that contains the enrollment token. If an enrollment page prompts for a Group ID or token, enter the token directly.
2 Enter a user name or password if two-factor authentication is used.
3 Continue with your enrollment as usual.
Once complete, the device is associated with the user for which the token was created.
Managing Devices
VMware, Inc. 68
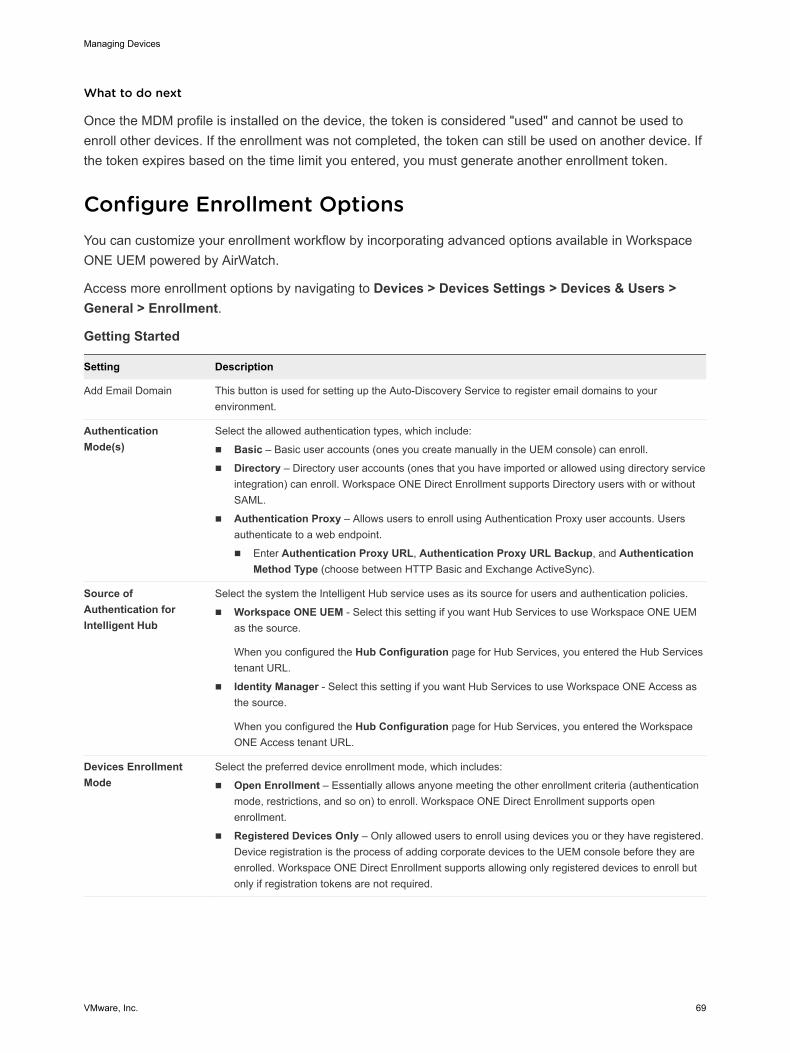
What to do next
Once the MDM profile is installed on the device, the token is considered "used" and cannot be used to enroll other devices. If the enrollment was not completed, the token can still be used on another device. If the token expires based on the time limit you entered, you must generate another enrollment token.
Configure Enrollment OptionsYou can customize your enrollment workflow by incorporating advanced options available in Workspace ONE UEM powered by AirWatch.
Access more enrollment options by navigating to Devices > Devices Settings > Devices & Users > General > Enrollment.
Getting Started
Setting Description
Add Email Domain This button is used for setting up the Auto-Discovery Service to register email domains to your environment.
Authentication Mode(s)
Select the allowed authentication types, which include:
n Basic – Basic user accounts (ones you create manually in the UEM console) can enroll.
n Directory – Directory user accounts (ones that you have imported or allowed using directory service integration) can enroll. Workspace ONE Direct Enrollment supports Directory users with or without SAML.
n Authentication Proxy – Allows users to enroll using Authentication Proxy user accounts. Users authenticate to a web endpoint.
n Enter Authentication Proxy URL, Authentication Proxy URL Backup, and Authentication Method Type (choose between HTTP Basic and Exchange ActiveSync).
Source of Authentication for Intelligent Hub
Select the system the Intelligent Hub service uses as its source for users and authentication policies.
n Workspace ONE UEM - Select this setting if you want Hub Services to use Workspace ONE UEM as the source.
When you configured the Hub Configuration page for Hub Services, you entered the Hub Services tenant URL.
n Identity Manager - Select this setting if you want Hub Services to use Workspace ONE Access as the source.
When you configured the Hub Configuration page for Hub Services, you entered the Workspace ONE Access tenant URL.
Devices Enrollment Mode
Select the preferred device enrollment mode, which includes:
n Open Enrollment – Essentially allows anyone meeting the other enrollment criteria (authentication mode, restrictions, and so on) to enroll. Workspace ONE Direct Enrollment supports open enrollment.
n Registered Devices Only – Only allowed users to enroll using devices you or they have registered. Device registration is the process of adding corporate devices to the UEM console before they are enrolled. Workspace ONE Direct Enrollment supports allowing only registered devices to enroll but only if registration tokens are not required.
Managing Devices
VMware, Inc. 69
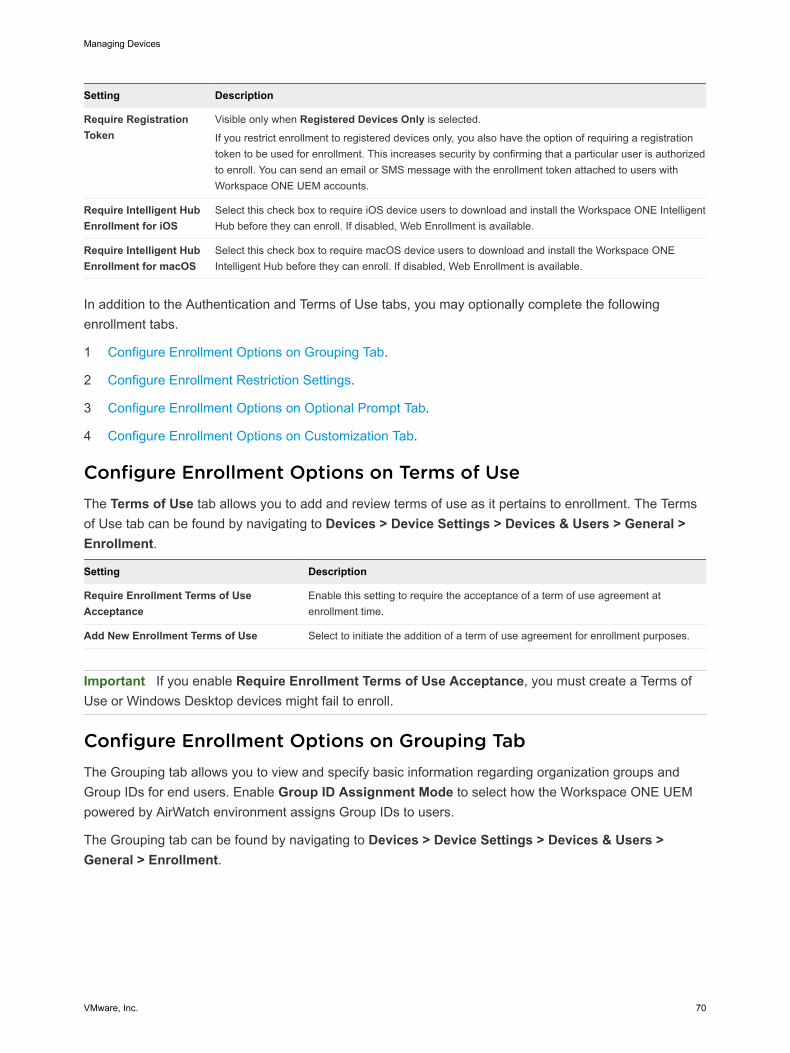
Setting Description
Require Registration Token
Visible only when Registered Devices Only is selected.
If you restrict enrollment to registered devices only, you also have the option of requiring a registration token to be used for enrollment. This increases security by confirming that a particular user is authorized to enroll. You can send an email or SMS message with the enrollment token attached to users with Workspace ONE UEM accounts.
Require Intelligent Hub Enrollment for iOS
Select this check box to require iOS device users to download and install the Workspace ONE Intelligent Hub before they can enroll. If disabled, Web Enrollment is available.
Require Intelligent Hub Enrollment for macOS
Select this check box to require macOS device users to download and install the Workspace ONE Intelligent Hub before they can enroll. If disabled, Web Enrollment is available.
In addition to the Authentication and Terms of Use tabs, you may optionally complete the following enrollment tabs.
1 Configure Enrollment Options on Grouping Tab.
2 Configure Enrollment Restriction Settings.
3 Configure Enrollment Options on Optional Prompt Tab.
4 Configure Enrollment Options on Customization Tab.
Configure Enrollment Options on Terms of UseThe Terms of Use tab allows you to add and review terms of use as it pertains to enrollment. The Terms of Use tab can be found by navigating to Devices > Device Settings > Devices & Users > General > Enrollment.
Setting Description
Require Enrollment Terms of Use Acceptance
Enable this setting to require the acceptance of a term of use agreement at enrollment time.
Add New Enrollment Terms of Use Select to initiate the addition of a term of use agreement for enrollment purposes.
Important If you enable Require Enrollment Terms of Use Acceptance, you must create a Terms of Use or Windows Desktop devices might fail to enroll.
Configure Enrollment Options on Grouping TabThe Grouping tab allows you to view and specify basic information regarding organization groups and Group IDs for end users. Enable Group ID Assignment Mode to select how the Workspace ONE UEM powered by AirWatch environment assigns Group IDs to users.
The Grouping tab can be found by navigating to Devices > Device Settings > Devices & Users > General > Enrollment.
Managing Devices
VMware, Inc. 70
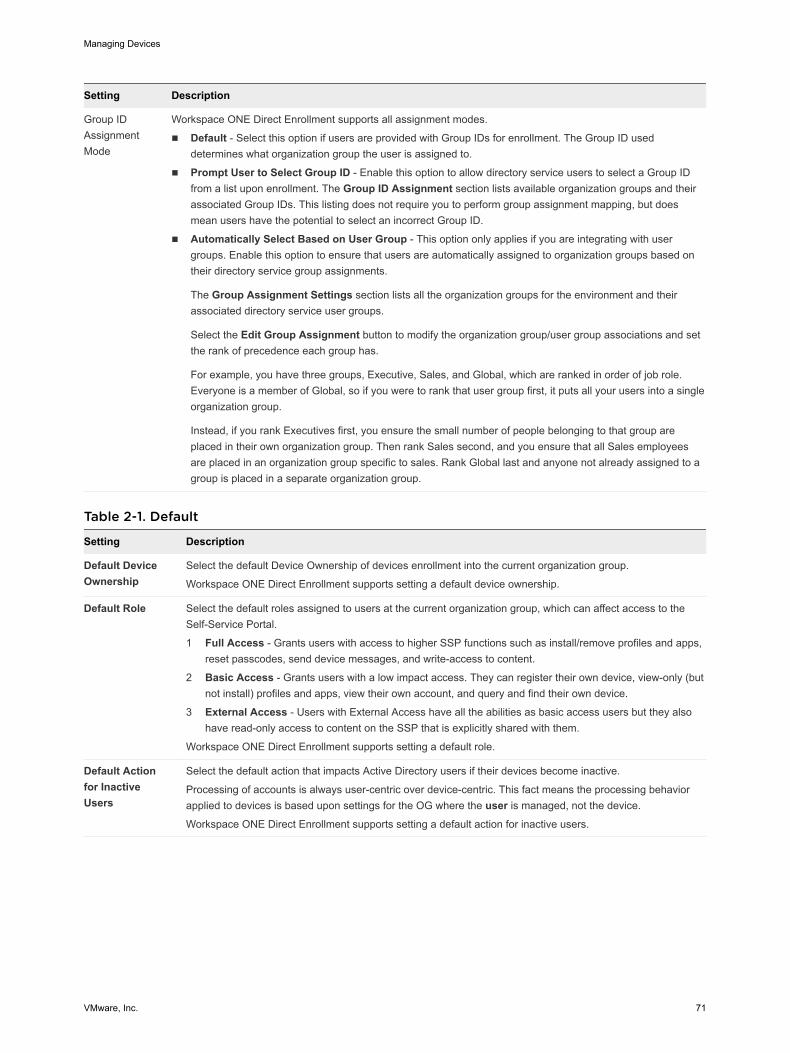
Setting Description
Group ID Assignment Mode
Workspace ONE Direct Enrollment supports all assignment modes.
n Default - Select this option if users are provided with Group IDs for enrollment. The Group ID used determines what organization group the user is assigned to.
n Prompt User to Select Group ID - Enable this option to allow directory service users to select a Group ID from a list upon enrollment. The Group ID Assignment section lists available organization groups and their associated Group IDs. This listing does not require you to perform group assignment mapping, but does mean users have the potential to select an incorrect Group ID.
n Automatically Select Based on User Group - This option only applies if you are integrating with user groups. Enable this option to ensure that users are automatically assigned to organization groups based on their directory service group assignments.
The Group Assignment Settings section lists all the organization groups for the environment and their associated directory service user groups.
Select the Edit Group Assignment button to modify the organization group/user group associations and set the rank of precedence each group has.
For example, you have three groups, Executive, Sales, and Global, which are ranked in order of job role. Everyone is a member of Global, so if you were to rank that user group first, it puts all your users into a single organization group.
Instead, if you rank Executives first, you ensure the small number of people belonging to that group are placed in their own organization group. Then rank Sales second, and you ensure that all Sales employees are placed in an organization group specific to sales. Rank Global last and anyone not already assigned to a group is placed in a separate organization group.
Table 2-1. Default
Setting Description
Default Device Ownership
Select the default Device Ownership of devices enrollment into the current organization group.
Workspace ONE Direct Enrollment supports setting a default device ownership.
Default Role Select the default roles assigned to users at the current organization group, which can affect access to the Self-Service Portal.
1 Full Access - Grants users with access to higher SSP functions such as install/remove profiles and apps, reset passcodes, send device messages, and write-access to content.
2 Basic Access - Grants users with a low impact access. They can register their own device, view-only (but not install) profiles and apps, view their own account, and query and find their own device.
3 External Access - Users with External Access have all the abilities as basic access users but they also have read-only access to content on the SSP that is explicitly shared with them.
Workspace ONE Direct Enrollment supports setting a default role.
Default Action for Inactive Users
Select the default action that impacts Active Directory users if their devices become inactive.
Processing of accounts is always user-centric over device-centric. This fact means the processing behavior applied to devices is based upon settings for the OG where the user is managed, not the device.
Workspace ONE Direct Enrollment supports setting a default action for inactive users.
Managing Devices
VMware, Inc. 71

Table 2-2. User Group Sync
Setting Description
Sync User Groups in Real Time for Workspace ONE
Workspace ONE can sync user groups for a given user as they register with the UEM console.
Enabled by default, this feature is most effective when user groups are being used with great frequency for app assignment, profile assignment, policy assignment, or user mapping.
This feature is CPU-intensive so unless your use case is similar to the above, disable this setting for improved performance and to prevent latency issues while launching the Workspace ONE application.
Table 2-3. User Role Mapping
Setting Description
Enable Directory Group-Based Mapping
Select this box to enable ranked assignments that link a directory user group to a specific Workspace ONE UEM role. Users belonging to a particular group are assigned the associated roles. If they belong to more than one group, they take the highest ranked pairing.
You can edit the order in which role-infused user groups are ranked by selecting the Edit assignment button.
Workspace ONE Direct Enrollment supports directory group-based mapping.
Configure Enrollment Options on Optional Prompt TabOn the Optional Prompt tab, you can decide to request extra device information, or present optional messages regarding enrollment and MDM information to the user.
The Optional Prompt tab can be found by navigating to Devices > Device Settings > Devices & Users > General > Enrollment.
Setting Description
Prompt for Device Ownership Type
You can prompt the end user to select their device ownership type. Otherwise, configure a default device ownership type for the current organization group.
Workspace ONE Direct Enrollment supports prompting for device ownership type.
Display Welcome Message
You can display a welcome message for your users early in the device enrollment process. You can configure both the header and the body of this welcome message by navigating to System > Localization > Localization Editor. Next, select the labels 'EnrollmentWelcomeMessageHeader' and 'EnrollmentWelcomeMessageBody' respectively.
Display MDM Installation Message
You can display a message for your users during the device enrollment process. You can configure both the header and the body of this MDM installation message by navigating to System > Localization > Localization Editor. Next, select the labels 'EnrollmentMdmInstallationMessageHeader' and 'EnrollmentMdmInstallationMessageBody' respectively.
If you opt to customize your own header and body messages using the Localization Editor, you must opt to 'Override' in the Current Setting option. Doing so ensures that your customizations are used instead of the default messages.
In addition to making one-off localization changes, you can also make localization changes in bulk by uploading an edited comma-separated values (CSV) file. Download this localization template CSV file by navigating to System > Localization > Localization Editor and select the Modify button. Edit the file per your preferences to affect bulk localization changes and upload it using the same screen.
Managing Devices
VMware, Inc. 72
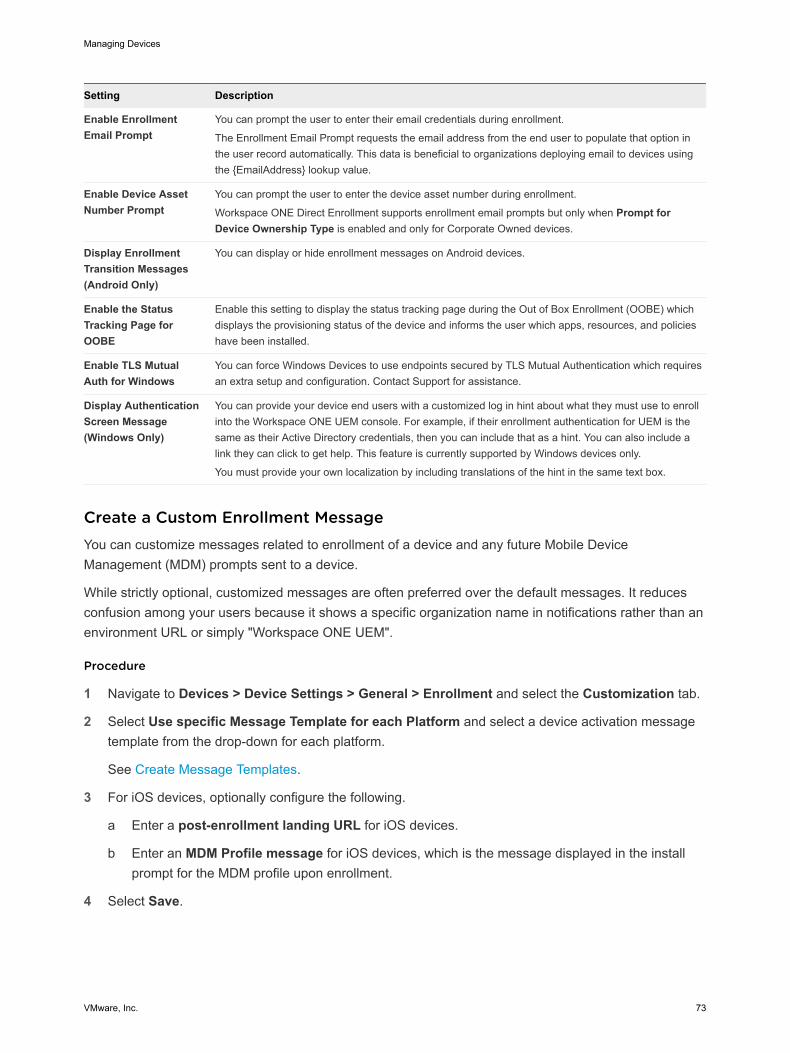
Setting Description
Enable Enrollment Email Prompt
You can prompt the user to enter their email credentials during enrollment.
The Enrollment Email Prompt requests the email address from the end user to populate that option in the user record automatically. This data is beneficial to organizations deploying email to devices using the {EmailAddress} lookup value.
Enable Device Asset Number Prompt
You can prompt the user to enter the device asset number during enrollment.
Workspace ONE Direct Enrollment supports enrollment email prompts but only when Prompt for Device Ownership Type is enabled and only for Corporate Owned devices.
Display Enrollment Transition Messages (Android Only)
You can display or hide enrollment messages on Android devices.
Enable the Status Tracking Page for OOBE
Enable this setting to display the status tracking page during the Out of Box Enrollment (OOBE) which displays the provisioning status of the device and informs the user which apps, resources, and policies have been installed.
Enable TLS Mutual Auth for Windows
You can force Windows Devices to use endpoints secured by TLS Mutual Authentication which requires an extra setup and configuration. Contact Support for assistance.
Display Authentication Screen Message (Windows Only)
You can provide your device end users with a customized log in hint about what they must use to enroll into the Workspace ONE UEM console. For example, if their enrollment authentication for UEM is the same as their Active Directory credentials, then you can include that as a hint. You can also include a link they can click to get help. This feature is currently supported by Windows devices only.
You must provide your own localization by including translations of the hint in the same text box.
Create a Custom Enrollment MessageYou can customize messages related to enrollment of a device and any future Mobile Device Management (MDM) prompts sent to a device.
While strictly optional, customized messages are often preferred over the default messages. It reduces confusion among your users because it shows a specific organization name in notifications rather than an environment URL or simply "Workspace ONE UEM".
Procedure
1 Navigate to Devices > Device Settings > General > Enrollment and select the Customization tab.
2 Select Use specific Message Template for each Platform and select a device activation message template from the drop-down for each platform.
See Create Message Templates.
3 For iOS devices, optionally configure the following.
a Enter a post-enrollment landing URL for iOS devices.
b Enter an MDM Profile message for iOS devices, which is the message displayed in the install prompt for the MDM profile upon enrollment.
4 Select Save.
Managing Devices
VMware, Inc. 73
Create Message TemplatesYou can create your own library of message templates customized by platform to cover the variety of scenarios you might encounter including enrollment.
Procedure
1 Navigate to Devices > Device Settings > General > Message Templates and select Add.
2 Set the Category drop-down menu to match the category of your template. Options include Administrator, Application, Compliance, Content, Device Lifecycle, Enrollment, and Terms of Use.
3 Set the Type that best corresponds to the subcategory.
The Type drop-down menu's options depend upon the Category setting.
4 Set the Select Language drop-down menu. Only languages based on the currently active locale are displayed. Select the Add button to add languages.
5 Select the Default check box if you want the template to be the default template for the selected Category.
6 Select the Message Type for the template.
The options are Email, SMS, and Push notification.
7 Compose your Email message by entering text to the Message Body text box.
n The Plain Text option features only a monospaced serif font (Courier) with no formatting options.
n The HTML option enables a Rich Text editing environment including fonts, formatting, heading levels, bullets, indentation, paragraph justification, subscript, superscript, image, and hyperlink capability. The HTML environment supports basic HTML coding using the Show Source button which you can use to toggle between the Rich Text and source views.
8 Save your template by selecting the Save button.
Configure Lifecycle NotificationsLifecycle Notifications enable you to deliver customized messages after specific events during the lifecycle of a device, including enrollment and unenrollment.
This optional setting can be configured by navigating to Devices > Lifecycle > Settings > Notifications and entering the following options for the following sections.
n Device Unenrolled - Send an email notification when a device unenrolls.
n Device Enrolled Successfully - Send an email notification when a device enrolls successfully.
n Device Blocked by Enrollment Restriction - Send an email notification if an enrollment restriction blocks a device. You can configure this behavior by navigating to Groups & Settings > All Settings > Devices & Users > General > Enrollment and selecting the Restrictions tab.
Managing Devices
VMware, Inc. 74
Setting Description
Send Email To.
n None - Send no confirmation email upon a successful device block, enrollment, or unenrollment.
n User - Send a confirmation email to the device user informing them of the successful device block, enrollment, or unenrollment.
n CC - Send the same confirmation email to a single email address or multiple, comma-separated email addresses.
n Message Template- Select the desired message template from the drop-down listing. You can add a new message template or edit an existing template by selecting the "Click here..." hyperlink that takes you to the Devices & Users > General > Message Templates settings page.
n Administrator - Send a confirmation email to the Workspace ONE UEM administrator informing them of the successful device block, enrollment, or unenrollment.
n To - Send the same confirmation email to a single email address or multiple, comma-separated email addresses.
Configure Enrollment Options on Customization TabYou can provide an extra level of end-user support, including email and phone number, by configuring the Customization tab. Such a support level is valuable when users are unable to enroll their device for any reason.
The Customization tab can be found by navigating to Devices > Device Settings > Devices & Users > General > Enrollment.
Setting Description
Use specific Message Template for each Platform
If enabled, you can select a unique message template for each platform.
The provided link displays the Message Template page, allowing you to begin creating templates immediately.
Workspace ONE ™ Direct Enrollment supports platform-specific message templates.
Enrollment Support Email
Enter the support email address.
Enrollment Support Phone
Enter the support phone number.
Post-Enrollment Landing URL (iOS only)
You can provide a post-enrollment landing URL that the end user is brought to upon a successful enrollment. This URL can be a company resource, such as a company website or login screen leading to more resources.
Workspace ONE Direct Enrollment supports post-enrollment landing URLs.
MDM Profile Message (iOS only)
For iOS devices only, this text box is for a message that appears during enrollment. You can specify a message with a maximum of 255 characters.
Workspace ONE Direct Enrollment supports iOS-only MDM profile messages.
Use Custom MDM Applications
Displays a link which opens the App Groups Listing page. This link is labeled Application Groups.
Workspace ONE Direct Enrollment supports custom MDM apps.
Managing Devices
VMware, Inc. 75
Blacklisting and Whitelisting Device RegistrationA blacklist is an explicit listing of devices or apps that are not allowed. A whitelist is a listing of devices or apps that are only allowed. Apply this concept to registration and you can control which devices are allowed to enroll in Workspace ONE UEM powered by AirWatch.
For example, in a deployment of only corporate-owned devices, you can create a whitelist of approved iOS devices. You can base this list of devices by International Mobile Equipment Identity (IMEI), Serial Number, or Unique Device Identifier (UDID). This way, enrollment is restricted to only those devices you have identified and enrollment by employee personal devices can be prohibited.
In addition, if a device is lost or stolen, you can add its IMEI, Serial Number, or UDID information to a list of blacklisted devices. Blacklisting a device unenrolls the device, removes all MDM profiles, and prevents enrollment until you remove the blacklist.
A user's registration record is updated with the device information after enrollment. When the device is unenrolled, any other user trying to enroll the same device is blocked from enrollment until the registration record for the previous user is deleted.
Add a Blacklisted or Whitelisted DeviceYou can add a blacklisted (device restricted from enrollment) or whitelisted (device cleared for enrollment) based on various device attributes.
Note Blacklisting devices that are registered in the Device Enrollment Program (DEP) restricts those devices from having a DEP profile assigned to them in the future.
Procedure
1 Navigate to Devices > Lifecycle > Enrollment Status and select Add.
2 Select Blacklisted Devices or Whitelisted Devices from the Add drop-down menu and complete the settings.
Setting Description
Blacklisted/Whitelisted Devices
Enter the list of whitelisted or blacklisted devices (by the Device Attribute selection), up to 30 at a time.
Device Attribute Select the corresponding device attribute type. Select IMEI, Serial Number, or UDID.
Organization Group Confirm to which Organization Group the devices are blacklisted or whitelisted.
Ownership You can allow devices only with the selected ownership type.
This option is only available while Whitelisting devices.
Additional Information
Allows you to select a platform to apply your whitelist or blacklist.
Platform You can blacklist or whitelist all devices belonging to an entire platform.
This option is only available when the Additional Information check box is enabled.
3 Select Save to confirm the settings.
Managing Devices
VMware, Inc. 76
Additional Enrollment RestrictionsYou can set up additional enrollment restrictions to control who can enroll in Workspace ONE UEM powered by AirWatch and which device types are allowed.
Applying additional enrollment restrictions is applicable to any deployment, regardless of directory services integration, BYOD support, device registration, or other configurations.
You can also determine the maximum number of enrolled devices per organization group. Once you configure enrollment restrictions, you can even save those restrictions as a policy.
Enrollment Considerations, Additional RestrictionsEnrollment restrictions let you fine-tune the enrollment parameters you want to apply to your deployment. When deciding which enrollment restrictions you might use, consider the following.
Consideration #1: Will You Restrict Specific Platforms, OS Versions, or Maximum Number of Allowed Devices?n Do you want to support only those devices that feature built-in enterprise management – such as
Samsung SAFE/Knox, HTC Sense, LG Enterprise, and Motorola devices? If so, you can require that Android devices have a supported enterprise version as an enrollment restriction.
n Do you want to limit the maximum devices that a user is allowed to enroll? If so, you can set this amount, including distinguishing between corporate owned and employee owned devices.
n Are there certain platforms you do not support in your deployment? If so, you can create a list of blocked device platforms that prevent them from enrolling.
Your organization must evaluate the number and kinds of devices your employees own. They must also determine which ones they want to use in your work environment. After this work is complete, you can save these enrollment restrictions as a policy.
Consideration #2: Will You Restrict Enrollment to a Set List of Corporate Devices?Additional registration options provide control of the devices that end users are allowed to enroll. Useful to accommodate BYOD deployments, you can prevent the enrollment of blacklisted devices or restrict the enrollment to only whitelisted devices. You can whitelist devices by type, platform, or specific device IDs and serial numbers. For more information, see Add a Blacklisted or Whitelisted Device.
Consideration #3: Will You Restrict the Number of Enrolled Devices Per Organization Group?You can apply a limit on the number of enrolled devices to an organization group (OG). Imposing such a limit helps you manage your deployment by preventing you from exceeding the number of valid enrollments. For more information, see Enrolled Device Limit Per Organization Group.
Managing Devices
VMware, Inc. 77
Configure Enrollment Restriction SettingsWhen integrating Workspace ONE UEM with directory services, you can determine which users can enroll devices into your corporate deployment.
You can restrict enrollment to only known users or to configured groups. Known users are users that exist in the UEM console. Configured groups are users associated to directory service groups if you opt to integrate with user groups. You can also limit the number of devices enrolled per organization group and save restrictions as a reusable policy.
These options are available by navigating to Groups & Settings > All Settings > Devices & Users > General > Enrollment and selecting the Restrictions tab. The Restrictions tab allows you to customize enrollment restriction policies by organization group and user group roles.
n Create and assign existing enrollment Restrictions policies using the Policy Settings.
n Assign the policy to a user group under the Group Assignment Settings area.
n Blacklist or whitelist devices by platform, operating system, UDID, IMEI, and so on.
Setting Description
User Access Control Workspace ONE Direct Enrollment supports all user access control options.
Restrict Enrollment to Known Users – Enable to restrict enrollment only to users that exist in the UEM console. This restriction applies to directory users you manually added to the UEM console one by one or through batch import. It can also be used to lock down enrollment after an initial deployment that allowed anyone to enroll. This option enables you to be selective about who can enroll.
You can allow all directory users who do not have accounts in the UEM console to enroll into Workspace ONE UEM by disabling this option. User accounts are automatically created during enrollment.
Restrict Enrollment to Configured Groups – Enable to restrict enrollment and only allow users belonging to All Groups or Selected Groups (if you have integrated with user groups) to enroll devices. Do not select this option if you have not integrated with your directory services user groups.
You can create Workspace ONE UEM user accounts during enrollment by disabling the option to allow all directory users to enroll. Select Enterprise Wipe devices of users that are removed from configured groups to automatically enterprise wipe devices. If All Groups is selected, devices not belonging to any user group are removed. If Selected Groups is selected, then devices not belonging to a particular user group are removed.
One option for integrating with user groups is to create an "MDM Approved" directory service group and import it to Workspace ONE UEM. After this import step, you can add existing directory service user groups to the "MDM Approved" group as they become eligible for Workspace ONE UEM.
Set limit for maximum enrolled devices at this OG and below
Enable and Enter Device Limit to limit the number of devices allowed to enroll in the current organization group (OG).
Workspace ONE Direct Enrollment supports this option.
Note Restrictions do not apply for iOS devices enrolled through Apple's Device Enrollment Program (DEP), because the required device information is only received after the device has been enrolled.
Enrolled Device Limit Per Organization GroupYou can apply a limit on the number of enrolled devices to an organization group (OG). Imposing such a limit helps you manage your deployment by preventing you from exceeding the number of valid enrollments.
Managing Devices
VMware, Inc. 78
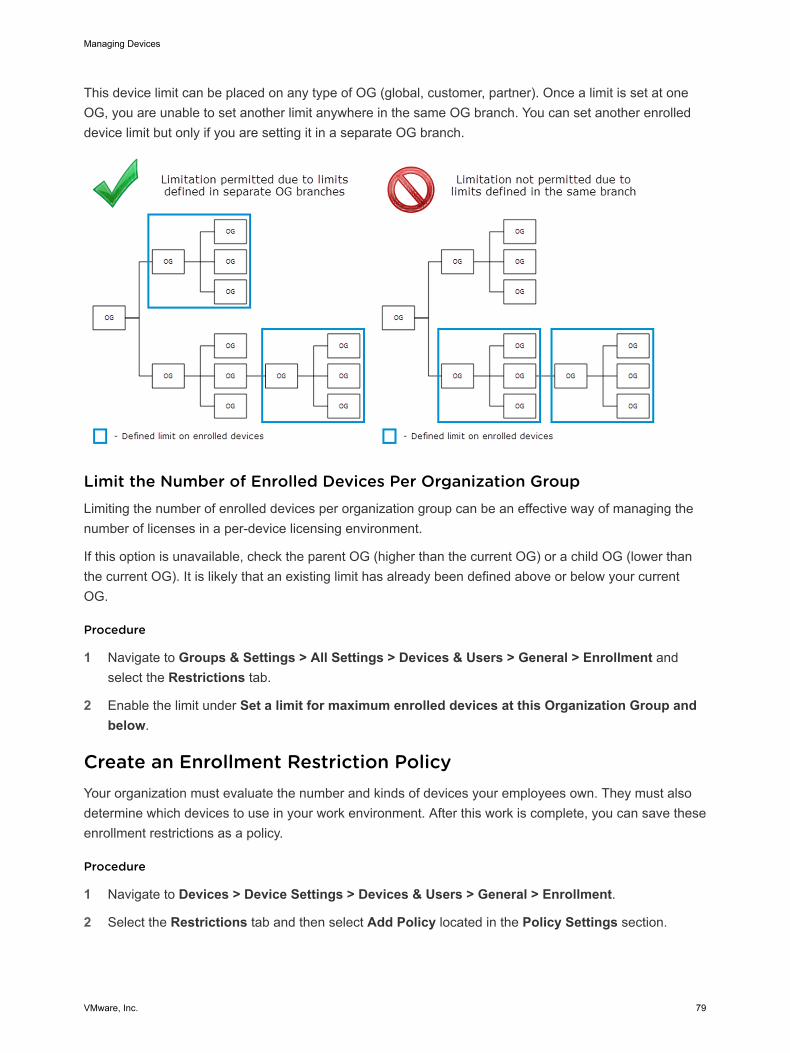
This device limit can be placed on any type of OG (global, customer, partner). Once a limit is set at one OG, you are unable to set another limit anywhere in the same OG branch. You can set another enrolled device limit but only if you are setting it in a separate OG branch.
Limit the Number of Enrolled Devices Per Organization GroupLimiting the number of enrolled devices per organization group can be an effective way of managing the number of licenses in a per-device licensing environment.
If this option is unavailable, check the parent OG (higher than the current OG) or a child OG (lower than the current OG). It is likely that an existing limit has already been defined above or below your current OG.
Procedure
1 Navigate to Groups & Settings > All Settings > Devices & Users > General > Enrollment and select the Restrictions tab.
2 Enable the limit under Set a limit for maximum enrolled devices at this Organization Group and below.
Create an Enrollment Restriction PolicyYour organization must evaluate the number and kinds of devices your employees own. They must also determine which devices to use in your work environment. After this work is complete, you can save these enrollment restrictions as a policy.
Procedure
1 Navigate to Devices > Device Settings > Devices & Users > General > Enrollment.
2 Select the Restrictions tab and then select Add Policy located in the Policy Settings section.
Managing Devices
VMware, Inc. 79
3 In the Add/Edit Enrollment Restriction Policy screen, add an enrollment restriction policy.
Setting Description
Enrollment Restriction Policy Name
Enter a name for your enrollment restriction policy.
OrganizationGroup Select an organization group from the drop-down menu. This is the OG to which your new enrollment restriction policy applies.
Policy Type Select the type of enrollment restriction policy, which can be either Organization Group Default to apply to the selected organization group, or User Group Policy for specific User Groups through Group Assignment Settings on the Restrictions tab.
AllowedOwnership Types
Select whether to permit or prevent Corporate - Dedicated, Corporate - Shared, and Employee Owned devices.
Workspace ONE Direct Enrollment only supports the ownership types Corporate Dedicated and Employee Owned.
AllowedEnrollment Types
Select whether to permit or prevent the enrollment of devices using MDM (Workspace ONE Intelligent Hub) and AirWatch Container (for iOS/Android) apps.
Device Limit per User Select Unlimited to allow users to enroll as many devices as they want. Workspace ONE Direct Enrollment supports setting a device limit per user.
Deselect this box to enter values for the Device Limit Per User section, to define the maximum number of devices per ownership type.
n Maximum Devices Per Usern Corporate Max Devicesn Shared Max Devicesn Employee Owned Max Devices
Allowed DeviceTypes Select the Limit enrollment to specific platforms, models or operating systems check box to add additional device-specific restrictions.
This option is supported by Workspace ONE Direct Enrollment.
Device Level Restrictions Mode
This option is only available if Limit enrollment to specific platforms, models or operating systems is selected in the Allowed Device Types option.
Determine the kind of device limitations you should have.
n Only allow listed device types (Whitelist) – Select this option to explicitly allow only devices matching the parameters you enter and to block everything else.
n Block listed device types (Blacklist) – Select this option to explicitly block devices matching the parameters you enter and to allow everything else.
For either device-level restrictions mode, select Add Device Restriction to choose a Platform, Model, Manufacturer (specific to Android devices), or Operating System. You may also add a Device Limit per defined device restriction. You may add multiple device restrictions.
You can also block specific devices based on their IMEI, Serial Number or UDID by navigating to Devices > Lifecycle > Enrollment Status and selecting Add. This is an effective way to block a single device and prevent it from re-enrolling without affecting other users' devices. Preventing re-enrollment is also available as an option when performing an Enterprise Wipe.
This option is supported by Workspace ONE Direct Enrollment.
4 Select Save to save your changes and navigate back to the Devices & Users / General / Enrollment screen.
Managing Devices
VMware, Inc. 80
Reasons You Should Not Enroll Devices in GlobalThere are several reasons enrolling devices directly to the top-level organization group (OG), commonly known as Global, is not a good idea. These reasons are multitenancy, inheritance, and functionality.
Multitenancy
You can make as many child organization groups as you need and you configure each one independently from the others. Settings you apply to a child OG do not impact other siblings.
Inheritance
Changes made to a parent level OG apply to the children. Conversely, changes made to a child level OG do not apply to the parent or siblings.
Functionality
There are settings and functionality that are only configurable to Customer type organization groups. These include wipe protection, telecom, and personal content. Devices added directly to the top-level Global OG are excluded from these settings and functionality.
The Global organization group (OG) is designed to house Customer and other types of OGs. Given the way inheritance works, if you add devices to Global and configure Global with settings intended to affect those devices, you are also affecting all the Customer OGs underneath. This undermines the benefits of multitenancy and inheritance.
Autodiscovery EnrollmentWorkspace ONE UEM powered by AirWatch makes the enrollment process simple, using an email-based autodiscovery system to enroll devices to environments and organization groups (OG). Autodiscovery can also be used to allow end users to authenticate into the Self-Service Portal (SSP).
Note To enable an autodiscovery for on-premises environments, ensure that your environment can communicate with the Workspace ONE UEM Autodiscovery servers.
Registration for Autodiscovery EnrollmentThe server checks for an email domain uniqueness, only allowing a domain to be registered at one organization group in one environment. Because of this server check, register your domain at your highest-level organization group.
Autodiscovery is configured automatically for new Software as a Service (SaaS) customers.
Configure Autodiscovery Enrollment from a Parent Organization GroupAutodiscovery Enrollment simplifies the enrollment process enrolling devices to intended environments and organization groups (OG) using end-user email addresses.
Configure an autodiscovery enrollment from a parent OG by taking the following steps.
Managing Devices
VMware, Inc. 81
Procedure
1 Navigate to Groups & Settings > All Settings > Admin > Cloud Services and enable the Auto Discovery setting. Enter your login email address in Auto Discovery AirWatch ID and select Set Identity.
a If necessary, navigate to https://my.workspaceone.com/set-discovery-password to set the password for Auto Discovery service. Once you have registered and selected Set Identity, the HMAC Token auto-populates. Click Test Connection to ensure that the connection is functional.
2 Enable the Auto Discovery Certificate Pinning option to upload your own certificate and pin it to the auto discovery function. You can review the validity dates and other information for existing certificates, and also can Replace and Clear these existing certificates.
3 Select Add a certificate and the settings Name and Certificate display. Enter the name of the certificate you want to upload, select the Upload button, and select the cert on your device.
4 Select Save to complete an autodiscovery setup.
What to do next
Instruct end users who enroll themselves to select the email address option for authentication, instead of entering an environment URL and Group ID. When users enroll devices with an email address, they enroll into the same group listed in the Enrollment Organization Group of the associated user account.
Configure Autodiscovery Enrollment from a Child Organization GroupYou can configure Autodiscovery Enrollment from a child organization group below the enrollment organization group. To enable an autodiscovery enrollment in this way, you must require users to select a Group ID during enrollment.
Force users to select a Group ID during enrollments.
Procedure
1 Navigate to Devices > Device Settings > General > Enrollment and select the Grouping tab.
2 Select Prompt User to Select Group ID.
3 Select Save.
Managing Devices
VMware, Inc. 82
Device Assignments 3Device Assignments enable you to move devices across organization groups (OG) and user names based on the network Internet protocol (IP) address range or custom attributes. It is an alternative to organizing content by user groups in Workspace ONE UEM powered by AirWatch.
Instead of admins manually moving devices between OGs, you can direct the console to move devices automatically when it connects to Wi-Fi that you define. You can also move devices based on custom attribute rules that you define.
A typical use case for device assignments is a user who regularly changes roles and requires specialized profiles and applications for each role.
You must choose between implementing User Groups and Device Assignments to move devices since Workspace ONE UEM powered by AirWatch does not support both functions on the same device.
This chapter includes the following topics:
n Enable Device Assignments
n Define Device Assignment Rule or Network Range
Enable Device AssignmentsBefore you can move devices across organization groups (OG) and user names based on an Internet protocol (IP) or custom attribute, you must enable device assignments in Workspace ONE UEM powered by AirWatch. Device assignments can only be configured at a child organization group.
VMware, Inc. 83
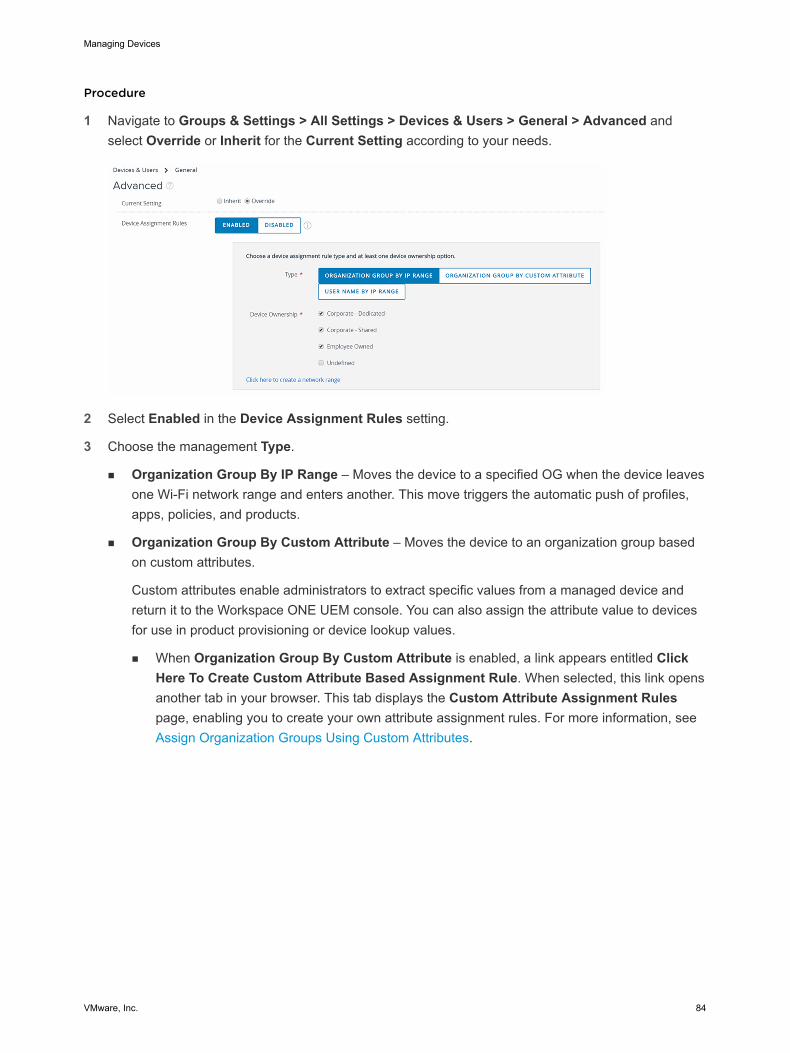
Procedure
1 Navigate to Groups & Settings > All Settings > Devices & Users > General > Advanced and select Override or Inherit for the Current Setting according to your needs.
2 Select Enabled in the Device Assignment Rules setting.
3 Choose the management Type.
n Organization Group By IP Range – Moves the device to a specified OG when the device leaves one Wi-Fi network range and enters another. This move triggers the automatic push of profiles, apps, policies, and products.
n Organization Group By Custom Attribute – Moves the device to an organization group based on custom attributes.
Custom attributes enable administrators to extract specific values from a managed device and return it to the Workspace ONE UEM console. You can also assign the attribute value to devices for use in product provisioning or device lookup values.
n When Organization Group By Custom Attribute is enabled, a link appears entitled Click Here To Create Custom Attribute Based Assignment Rule. When selected, this link opens another tab in your browser. This tab displays the Custom Attribute Assignment Rules page, enabling you to create your own attribute assignment rules. For more information, see Assign Organization Groups Using Custom Attributes.
Managing Devices
VMware, Inc. 84
n User name By IP Range – When a device exits one network and enters another, the device changes user names instead of moving to another OG. This user name change triggers the same push of profiles, apps, policies, and products as an OG change does. This option is for customers with a limited ability to create organization groups, providing an alternate way to take advantage of the device assignment feature.
Important If you want to change the assignment Type on an existing assignment configuration, you must delete all existing defined ranges. Remove IP Range assignments by navigating to Groups & Settings > Groups > Organization Groups > Network Ranges. Remove custom attribute assignments by navigating to Devices > Provisioning > Custom Attributes > Custom Attribute Assignment Rules.
4 Choose the Device Ownership options. Only devices with the selected ownership types are assigned.
n Corporate – Dedicated
n Corporate – Shared
n Employee Owned
n Undefined
5 You can add a network range by selecting the link, Click here to create a network range.
You can alternatively visit this page by navigating to Groups & Settings > Groups > Organization Groups > Network Ranges. The Network Ranges settings selection is only visible if Device Assignments has been enabled for the Organization Group you are in when you visit this location. For more information, see Define Device Assignment Rule or Network Range.
When selected, the Network Ranges page is displayed.
6 Select Save once all the options are set.
Define Device Assignment Rule or Network RangeWhen your device connects to Wi-Fi while managed by Workspace ONE UEM powered by AirWatch, the device authenticates and automatically installs profiles, apps, policies, and product provisions specific to the OG that you select.
You can also define rules based on custom attributes. When a device enrolls with an assigned attribute, the rule assigns the device to the configured organization group. The device can also be assigned in the case where the device receives a product provision containing a qualifying custom attribute.
Device assignments can only be configured at a child organization group.
Procedure
1 Navigate to Groups & Settings > Groups > Organization Groups > Network Ranges.
The Network Ranges option is not visible until you enable device assignments. So if you cannot find 'Network Ranges' in the Organization Groups navigation path, see Enable Device Assignments.
Managing Devices
VMware, Inc. 85

2 To add a single Internet protocol (IP) address range, select Add Network Range. In the Add/Edit Network Range page, complete the following settings and then select Save.
Table 3-1. Add Network Range
Setting Description
Start IP Address Enter the top end of the network range.
End IP Address Enter the bottom end of the network range.
Organization Group Name
Enter the OG name to which devices move when the network range is entered. This setting is only visible if the network assignment Type is 'Organization Group By IP Range.'
User name Enter the user name to whom devices register when the network range is entered. This setting is only visible if the network assignment Type is 'User name by IP Range.'
Description Optionally, add a helpful description of the network range.
Overlapping network ranges results in the message, "Save Failed, Network Range exists."
3 If you have several network ranges to add, you can optionally select Batch Import to save time.
a On the Batch Import page, select the Download template for this batch type link to view and download the bulk import template in CSV format.
b Open the CSV file. The CSV file features several columns corresponding to the options on the Add Network Range screen. Enter the organization Group ID in the "OrganisationGroup" column instead of organization group name.
Note You can identify the Group ID of any organization group by 1) moving to the OG you want to identify and 2) hovering your pointer over the OG label which displays a popup that contains the Group ID.
Note A CSV file (comma-separated values) is simply a text file whose extension has been changed from "TXT" to "CSV". It stores tabular data (text and numbers) in plain text. Each line or row of the file is a data record. Each record consists of one or more fields, separated by commas. It can be opened and edited with any text editor. It can also be opened and edited with Microsoft Excel.
c When you open the CSV template, notice that sample data has been added to each column in the template. The sample data is presented to inform you what kind of data is required and what format it must be in. Do not stray from the format presented by the sample data. Complete this template by filling in each of the required columns for each network range you want to add.
Managing Devices
VMware, Inc. 86
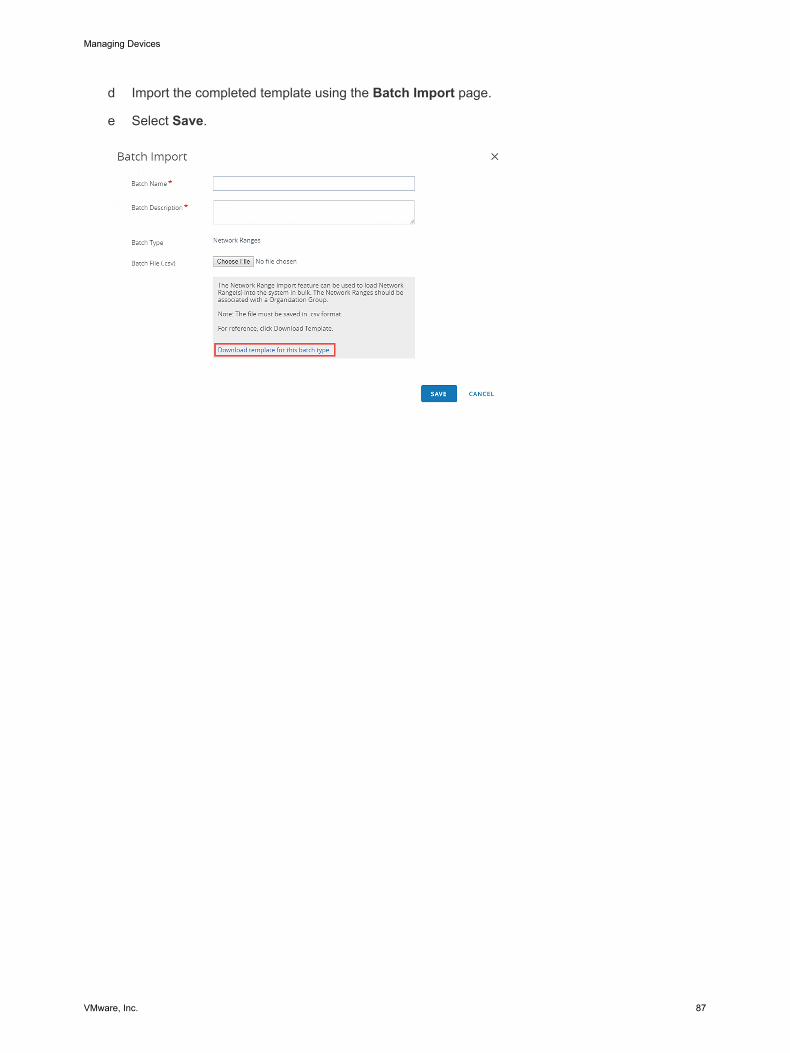
d Import the completed template using the Batch Import page.
e Select Save.
Managing Devices
VMware, Inc. 87
Device Profiles 4Device Profiles are the primary means by which you can manage devices in Workspace ONE UEM powered by AirWatch. They represent the settings that, when combined with compliance policies, help you enforce corporate rules and procedures.
Create profiles for each platform type then configure a payload, which consists of the individual settings you configure for each platform type.
The process for creating a profile consists of first specifying the General settings followed by the Payload settings.
n The General settings determine how the profile is deployed and who receives it.
n The Payload for the profile is the actual restriction itself and other settings as applied to the device when the profile is installed.
This chapter includes the following topics:
n Profile Processing
n Add General Profile Settings
n Device Profiles List View
n Device Profile Editing
n Compliance Profiles
n Geofence Areas
n Time Schedules
n View Device Assignment
Profile ProcessingDevice profiles provide a standardized foundation for device management under Workspace ONE UEM powered by AirWatch. The method used to process device profiles, including the retry logic when profile installations fail, is important to understand.
When a device profile gets assigned to devices, it undergoes the following process.
1 The profile is queued for installation.
VMware, Inc. 88
2 The device connects with Device Services in order to receive the profile for installation.
n If the connection succeeds, the profile installation status becomes 'Pending'.
n If the connection fails, the profile is again queued for installation (step 1) at the next device check-in.
3 The device installs the profile.
n If the installation succeeds, the profile installation status becomes 'Processed'.
n If the installation fails, the profile is again queued for installation (step 1) at the next device check in.
Performance TuningThe processing and publishing of device profiles, such as certificate-related profiles, represents a significant server strain and must be governed to relieve this strain. The Workspace ONE UEM console uses a batching logic for the most processor-intensive types of device profiles.
This batching logic can be adjusted by navigating to Groups & Settings > All Settings > Installation > Performance Tuning.
Installation / Performance TuningThe Performance Tuning settings page, found by navigating to Groups & Settings > All Settings > Installation > Performance Tuning, contains several options related to action frequencies and thresholds for various UEM console procedures.
Setting Description
Bulk Publish Commit Frequency
Profiles are pushed to the number of devices entered here per transaction. Minimum value is 1000. Maximum value is 50000. Default value is 40000.
Sample Scheduler Interval (minutes)
This setting determines how often the scheduler pulls a sample from the device, measured in minutes. Minimum value is 1. Maximum value is 1440 (24 hours). Default value is 5.
iOS Device Invites Per Second
This is the number of iOS devices per second that are invited to check into the Device Services through an APNs outbound message. Minimum value is 4. Default value is 30. Recommended maximum value is 120.
Certificate Profile Publish Frequency
This is the maximum number of certificate profile install commands that can be published at any point in time for your entire environment. Default value is 50.
Certificate Profile Manual Install Threshold
This is the maximum number of certificate profile install commands that can be queued from the dashboard per admin, per profile version. Default value is 100.
Maximum Apple API Calls Per Second (For Invitation of VPP Users)
Specifies the maximum number of calls per second that are made to the Apple VPP servers. Minimum value is 1. Maximum value is 1000. Default value is 30.
Run Real-Time Compliance
Managing Devices
VMware, Inc. 89
Setting Description
Number of Queue Commands (Max)
This is the maximum number of commands that the queue is allowed to have. Commands are published per the Certificate Profile Publish Frequency until they reach this limit. Once devices consume the commands, more commands are queued up.
The value you enter here is multiplied by the 'Certificate Profile Publish Frequency' to get that max number. This number can be increased to improve certificate batching, however, you should consider closely monitoring CA and DS server performance. Default value is 10.
Certificate Queue Throttling
If the commands added per the Certificate Profile Publish Frequency are not consumed by the devices, the next batch is queued in 30 minutes by default. This time interval can be lowered to improve certificate batching, however, you should consider closely monitoring CA and DS server performance. Default value is 15.
Allow minutes as minimum compliance interval
Enable to create compliance policies and set compliance escalation actions to take place at a minute based interval. Depending on the number of devices enrolled in this environment, the performance of your system might be affected. Please consider these factors before enabling this option.
Batch Size for Internal Application Deployment
This value specifies the number of devices that are included in the batch for internal application deployment. Minimum value is 1. Maximum value is 10000. Default value is 100.
MDM Application List Sample Interval (minutes)
Minimum value 1. Default value 480.
Windows app list sample base poll time (min)
Minimum value 1. Maximum value 1440. Default value 5.
Batch Size for VPP apps license sync
This setting specifies the number of apps included in each batch when they synchronize with the VPP cloud. Minimum value is 1. Maximum value is 250. Default value is 250.
Failed Application Install Retry Interval (Minutes)
This setting specifies how long to wait to attempt a reinstall of a failed application installation. Minimum value is 15. Maximum value is 10000. Default value is 60.
Max retry attempts for failed app install (Windows)
Specifies the maximum number of times to retry a failed installation. Minimum value is 0. Maximum value is 8. Default value is 5.
Device batch size for retrying failed installs
This setting specifies the maximum number of devices included in an attempt to reinstall a failed app installation attempt. Minimum value is 1. Maximum value is 15000. Default value is 10000.
Frequency for device-based VPP app auto updates (hours)
You have the ability to update device-based VPP applications automatically. This setting controls how often, measured in hours, these updates occur. Minimum value is 1. Maximum value is 24. Default value is 1.
App list size to check for app version updates
When the system checks for a new version of an app, this setting specifies the size of the list of apps that are checked. Minimum value is 20. Maximum value is 100. Default value is 20.
Install Certificate Profiles Without Batching on Enrollment
Determines whether or not certificate profile commands are sent in batches.
When enabled, batching logic on certificate profile install commands for new enrollments is skipped.
When disabled, batching logic on certificate profile install commands for new enrollments is applied.
Sync interval (hours) for VPP license counts at an organization group
This is the minimum amount of time, in hours, that the scheduler spends selecting an organization group to run the Sync License Count. Minimum value is 2. Maximum value is 24. Default value is 6.
Managing Devices
VMware, Inc. 90
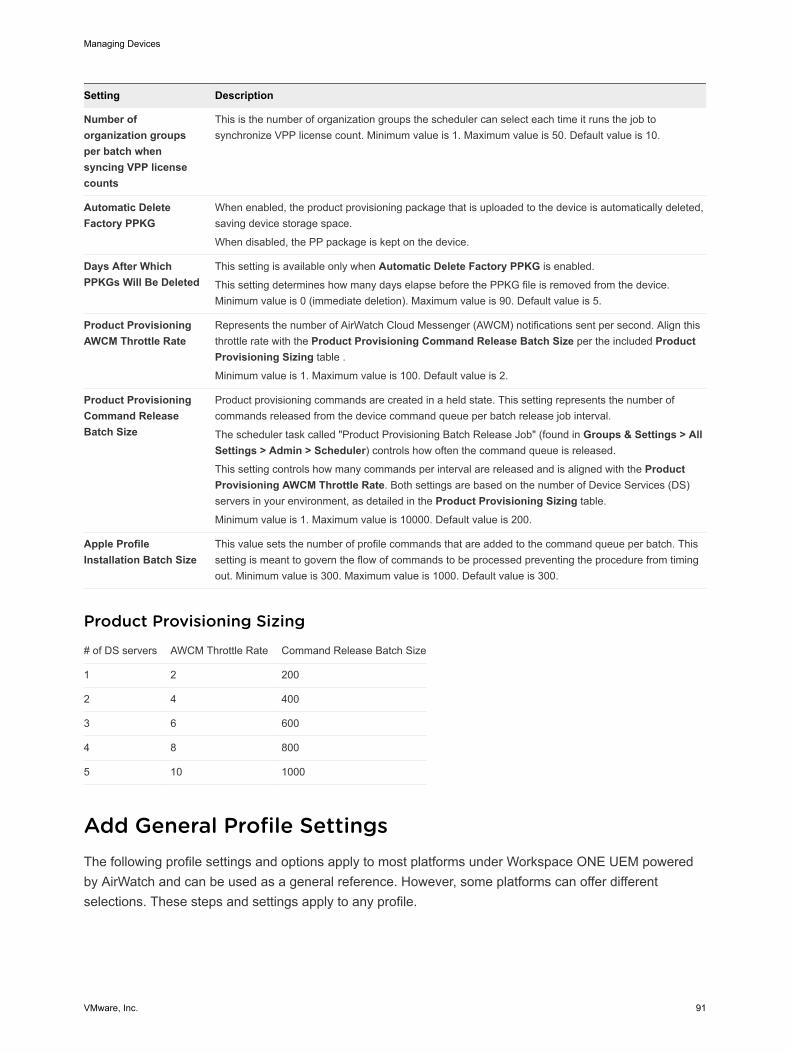
Setting Description
Number of organization groups per batch when syncing VPP license counts
This is the number of organization groups the scheduler can select each time it runs the job to synchronize VPP license count. Minimum value is 1. Maximum value is 50. Default value is 10.
Automatic Delete Factory PPKG
When enabled, the product provisioning package that is uploaded to the device is automatically deleted, saving device storage space.
When disabled, the PP package is kept on the device.
Days After Which PPKGs Will Be Deleted
This setting is available only when Automatic Delete Factory PPKG is enabled.
This setting determines how many days elapse before the PPKG file is removed from the device. Minimum value is 0 (immediate deletion). Maximum value is 90. Default value is 5.
Product Provisioning AWCM Throttle Rate
Represents the number of AirWatch Cloud Messenger (AWCM) notifications sent per second. Align this throttle rate with the Product Provisioning Command Release Batch Size per the included Product Provisioning Sizing table .
Minimum value is 1. Maximum value is 100. Default value is 2.
Product Provisioning Command Release Batch Size
Product provisioning commands are created in a held state. This setting represents the number of commands released from the device command queue per batch release job interval.
The scheduler task called "Product Provisioning Batch Release Job" (found in Groups & Settings > All Settings > Admin > Scheduler) controls how often the command queue is released.
This setting controls how many commands per interval are released and is aligned with the Product Provisioning AWCM Throttle Rate. Both settings are based on the number of Device Services (DS) servers in your environment, as detailed in the Product Provisioning Sizing table.
Minimum value is 1. Maximum value is 10000. Default value is 200.
Apple Profile Installation Batch Size
This value sets the number of profile commands that are added to the command queue per batch. This setting is meant to govern the flow of commands to be processed preventing the procedure from timing out. Minimum value is 300. Maximum value is 1000. Default value is 300.
Product Provisioning Sizing
# of DS servers AWCM Throttle Rate Command Release Batch Size
1 2 200
2 4 400
3 6 600
4 8 800
5 10 1000
Add General Profile SettingsThe following profile settings and options apply to most platforms under Workspace ONE UEM powered by AirWatch and can be used as a general reference. However, some platforms can offer different selections. These steps and settings apply to any profile.
Managing Devices
VMware, Inc. 91

Procedure
1 Navigate to Devices > Profiles & Resources > Profiles > ADD.
You can select from among the following options to add a profile.
n Add Profile – Perform a one-off addition of a new device profile.
n Upload Profile – Upload a signed profile on your device.
n Batch Import – Import new device profiles in bulk by using a comma-separated values (CSV) file. Enter a unique name and description to group and organize multiple profiles at a time.
2 Select Add Profile.
3 Select the appropriate platform for the profile you want to deploy.
Depending on the platform, the payload settings vary.
4 Complete the General tab by completing the following settings.
Setting Description
Name Name of the profile to be displayed in the Workspace ONE UEM console.
Version Read-only text box that reports the current version of the profile as determined by the Add Version.
Description A brief description of the profile that indicates its purpose.
Deployment Determines if the profile is automatically removed upon unenrollment (does not apply to Android profiles).
n Managed – The profile is removed.
n Manual – The profile remains installed until removed by the end user.
Assignment Type
Determines how the profile is deployed to devices.
n Auto – The profile is deployed to all devices.
n Optional – An end user can optionally install the profile from the Self-Service Portal (SSP), or it can be deployed to individual devices at the administrator's discretion.
End users can also install profiles representing Web applications, using a Web Clip or a Bookmark payload. And if you configure the payload to show in the App Catalog, then you can install it from the App Catalog.
n Interactive – (Does not apply to iOS or Android). This profile is of a unique type that end users install with the Self Service Portal. When installed, these special types of profiles interact with external systems to generate data meant to be sent to the device. This option is only available if enabled in Groups & Settings > All Settings > Devices & Users > Advanced > Profile Options.
n Compliance – The profile is applied to the device by the Compliance Engine when the user fails to take corrective action toward making their device compliant. For more information, see Compliance Profiles.
Allow Removal n Always – The end user can manually remove the profile at any time.
n With Authorization – The end user can remove the profile with the authorization of the administrator. Selecting this option adds an account Password text box.
n Never – The end user cannot remove the profile from the device.
Managed By The organization group with administrative access to the profile.
Managing Devices
VMware, Inc. 92
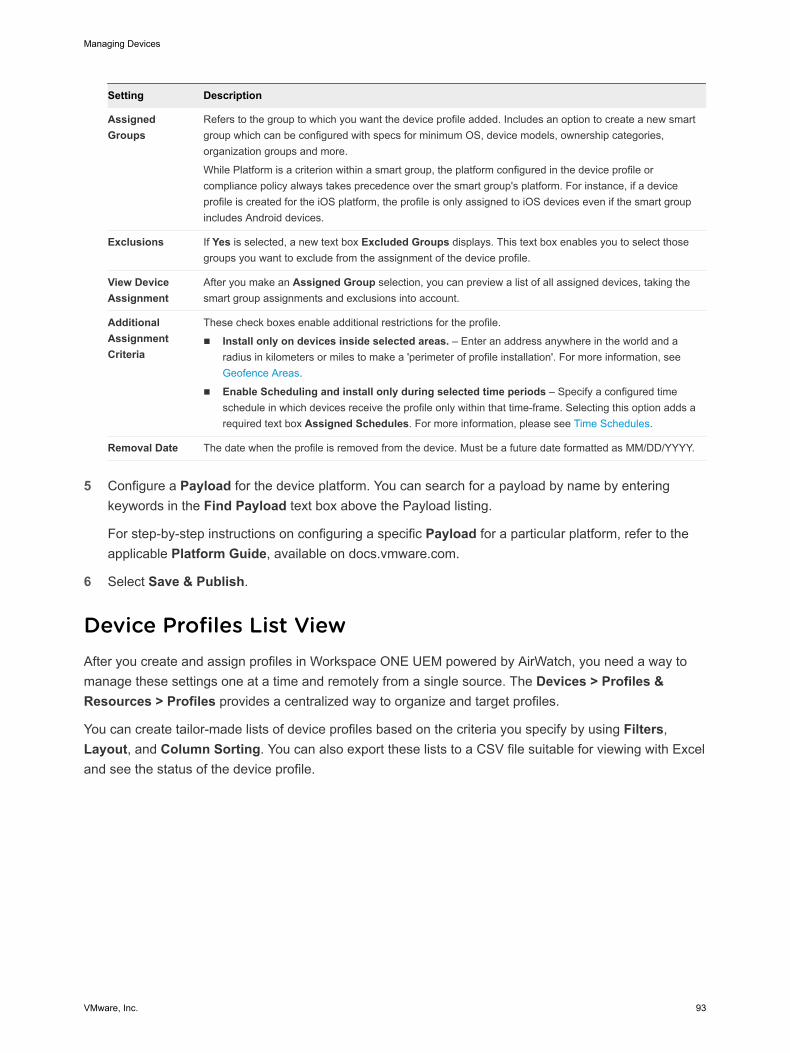
Setting Description
Assigned Groups
Refers to the group to which you want the device profile added. Includes an option to create a new smart group which can be configured with specs for minimum OS, device models, ownership categories, organization groups and more.
While Platform is a criterion within a smart group, the platform configured in the device profile or compliance policy always takes precedence over the smart group's platform. For instance, if a device profile is created for the iOS platform, the profile is only assigned to iOS devices even if the smart group includes Android devices.
Exclusions If Yes is selected, a new text box Excluded Groups displays. This text box enables you to select those groups you want to exclude from the assignment of the device profile.
View Device Assignment
After you make an Assigned Group selection, you can preview a list of all assigned devices, taking the smart group assignments and exclusions into account.
Additional Assignment Criteria
These check boxes enable additional restrictions for the profile.
n Install only on devices inside selected areas. – Enter an address anywhere in the world and a radius in kilometers or miles to make a 'perimeter of profile installation'. For more information, see Geofence Areas.
n Enable Scheduling and install only during selected time periods – Specify a configured time schedule in which devices receive the profile only within that time-frame. Selecting this option adds a required text box Assigned Schedules. For more information, please see Time Schedules.
Removal Date The date when the profile is removed from the device. Must be a future date formatted as MM/DD/YYYY.
5 Configure a Payload for the device platform. You can search for a payload by name by entering keywords in the Find Payload text box above the Payload listing.
For step-by-step instructions on configuring a specific Payload for a particular platform, refer to the applicable Platform Guide, available on docs.vmware.com.
6 Select Save & Publish.
Device Profiles List ViewAfter you create and assign profiles in Workspace ONE UEM powered by AirWatch, you need a way to manage these settings one at a time and remotely from a single source. The Devices > Profiles & Resources > Profiles provides a centralized way to organize and target profiles.
You can create tailor-made lists of device profiles based on the criteria you specify by using Filters, Layout, and Column Sorting. You can also export these lists to a CSV file suitable for viewing with Excel and see the status of the device profile.
Managing Devices
VMware, Inc. 93
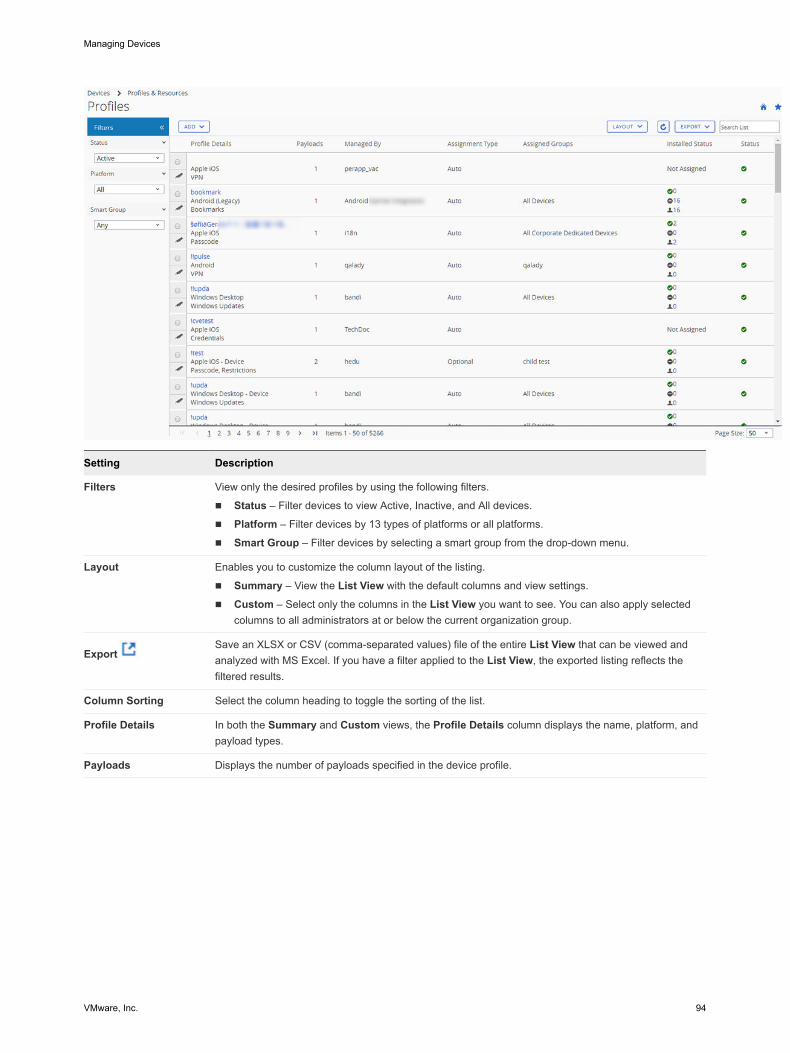
Setting Description
Filters View only the desired profiles by using the following filters.
n Status – Filter devices to view Active, Inactive, and All devices.
n Platform – Filter devices by 13 types of platforms or all platforms.
n Smart Group – Filter devices by selecting a smart group from the drop-down menu.
Layout Enables you to customize the column layout of the listing.
n Summary – View the List View with the default columns and view settings.
n Custom – Select only the columns in the List View you want to see. You can also apply selected columns to all administrators at or below the current organization group.
Export Save an XLSX or CSV (comma-separated values) file of the entire List View that can be viewed and analyzed with MS Excel. If you have a filter applied to the List View, the exported listing reflects the filtered results.
Column Sorting Select the column heading to toggle the sorting of the list.
Profile Details In both the Summary and Custom views, the Profile Details column displays the name, platform, and payload types.
Payloads Displays the number of payloads specified in the device profile.
Managing Devices
VMware, Inc. 94
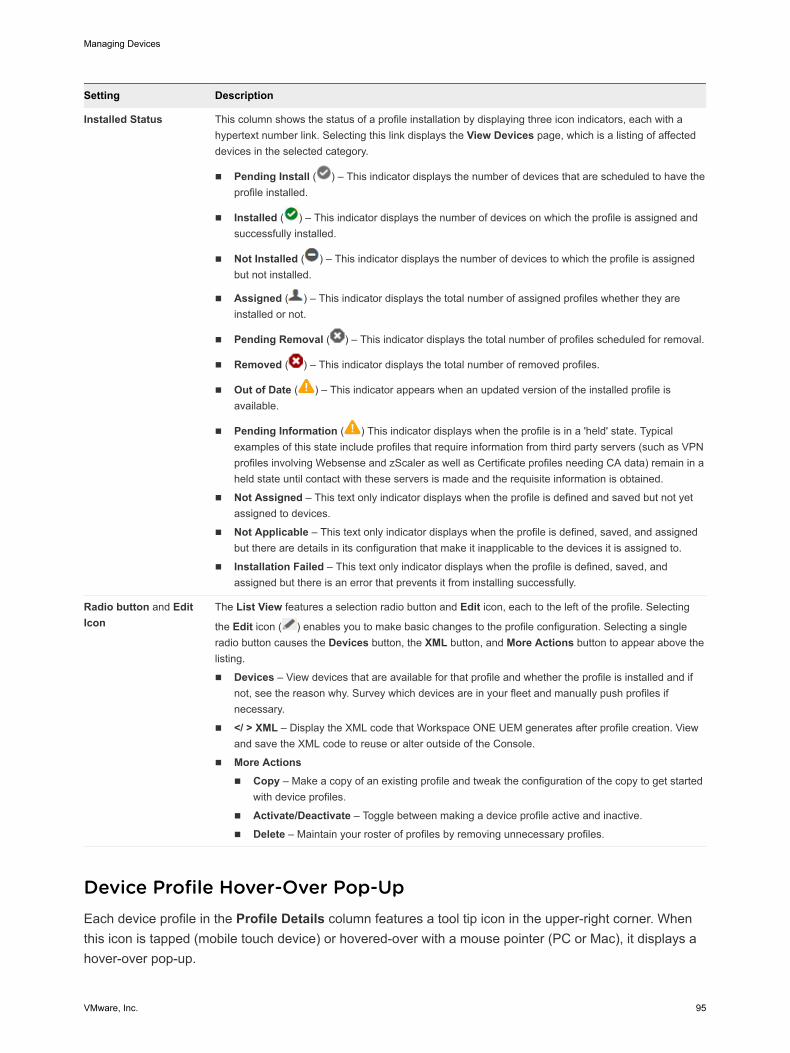
Setting Description
Installed Status This column shows the status of a profile installation by displaying three icon indicators, each with a hypertext number link. Selecting this link displays the View Devices page, which is a listing of affected devices in the selected category.
n Pending Install ( ) – This indicator displays the number of devices that are scheduled to have the profile installed.
n Installed ( ) – This indicator displays the number of devices on which the profile is assigned and successfully installed.
n Not Installed ( ) – This indicator displays the number of devices to which the profile is assigned but not installed.
n Assigned ( ) – This indicator displays the total number of assigned profiles whether they are installed or not.
n Pending Removal ( ) – This indicator displays the total number of profiles scheduled for removal.
n Removed ( ) – This indicator displays the total number of removed profiles.
n Out of Date ( ) – This indicator appears when an updated version of the installed profile is available.
n Pending Information ( ) This indicator displays when the profile is in a 'held' state. Typical examples of this state include profiles that require information from third party servers (such as VPN profiles involving Websense and zScaler as well as Certificate profiles needing CA data) remain in a held state until contact with these servers is made and the requisite information is obtained.
n Not Assigned – This text only indicator displays when the profile is defined and saved but not yet assigned to devices.
n Not Applicable – This text only indicator displays when the profile is defined, saved, and assigned but there are details in its configuration that make it inapplicable to the devices it is assigned to.
n Installation Failed – This text only indicator displays when the profile is defined, saved, and assigned but there is an error that prevents it from installing successfully.
Radio button and Edit Icon
The List View features a selection radio button and Edit icon, each to the left of the profile. Selecting
the Edit icon ( ) enables you to make basic changes to the profile configuration. Selecting a single radio button causes the Devices button, the XML button, and More Actions button to appear above the listing.
n Devices – View devices that are available for that profile and whether the profile is installed and if not, see the reason why. Survey which devices are in your fleet and manually push profiles if necessary.
n </ > XML – Display the XML code that Workspace ONE UEM generates after profile creation. View and save the XML code to reuse or alter outside of the Console.
n More Actionsn Copy – Make a copy of an existing profile and tweak the configuration of the copy to get started
with device profiles.
n Activate/Deactivate – Toggle between making a device profile active and inactive.
n Delete – Maintain your roster of profiles by removing unnecessary profiles.
Device Profile Hover-Over Pop-UpEach device profile in the Profile Details column features a tool tip icon in the upper-right corner. When this icon is tapped (mobile touch device) or hovered-over with a mouse pointer (PC or Mac), it displays a hover-over pop-up.
Managing Devices
VMware, Inc. 95
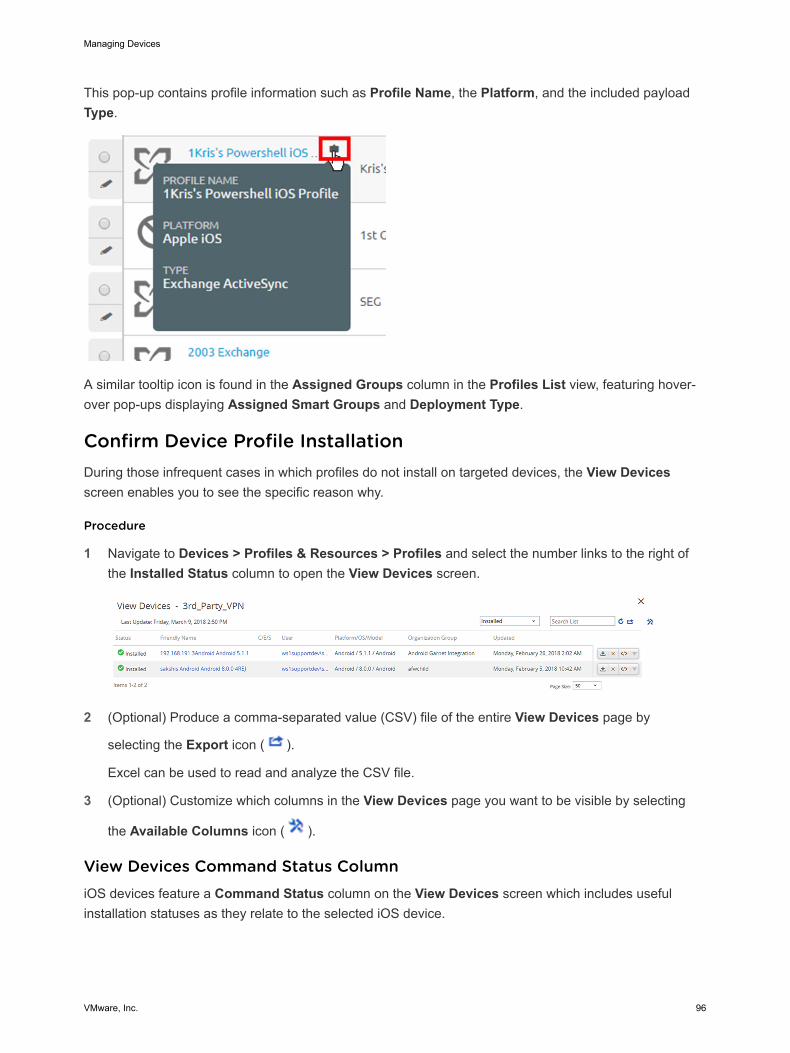
This pop-up contains profile information such as Profile Name, the Platform, and the included payload Type.
A similar tooltip icon is found in the Assigned Groups column in the Profiles List view, featuring hover-over pop-ups displaying Assigned Smart Groups and Deployment Type.
Confirm Device Profile InstallationDuring those infrequent cases in which profiles do not install on targeted devices, the View Devices screen enables you to see the specific reason why.
Procedure
1 Navigate to Devices > Profiles & Resources > Profiles and select the number links to the right of the Installed Status column to open the View Devices screen.
2 (Optional) Produce a comma-separated value (CSV) file of the entire View Devices page by
selecting the Export icon ( ).
Excel can be used to read and analyze the CSV file.
3 (Optional) Customize which columns in the View Devices page you want to be visible by selecting
the Available Columns icon ( ).
View Devices Command Status ColumniOS devices feature a Command Status column on the View Devices screen which includes useful installation statuses as they relate to the selected iOS device.
Managing Devices
VMware, Inc. 96
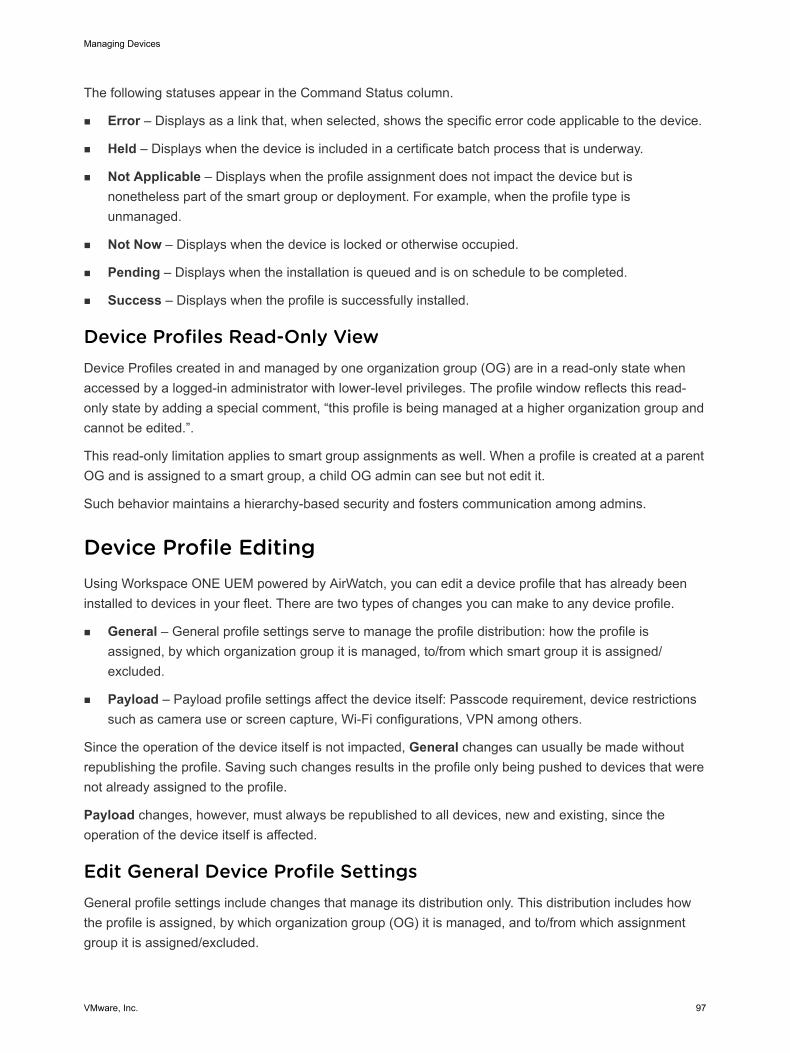
The following statuses appear in the Command Status column.
n Error – Displays as a link that, when selected, shows the specific error code applicable to the device.
n Held – Displays when the device is included in a certificate batch process that is underway.
n Not Applicable – Displays when the profile assignment does not impact the device but is nonetheless part of the smart group or deployment. For example, when the profile type is unmanaged.
n Not Now – Displays when the device is locked or otherwise occupied.
n Pending – Displays when the installation is queued and is on schedule to be completed.
n Success – Displays when the profile is successfully installed.
Device Profiles Read-Only ViewDevice Profiles created in and managed by one organization group (OG) are in a read-only state when accessed by a logged-in administrator with lower-level privileges. The profile window reflects this read-only state by adding a special comment, “this profile is being managed at a higher organization group and cannot be edited.”.
This read-only limitation applies to smart group assignments as well. When a profile is created at a parent OG and is assigned to a smart group, a child OG admin can see but not edit it.
Such behavior maintains a hierarchy-based security and fosters communication among admins.
Device Profile EditingUsing Workspace ONE UEM powered by AirWatch, you can edit a device profile that has already been installed to devices in your fleet. There are two types of changes you can make to any device profile.
n General – General profile settings serve to manage the profile distribution: how the profile is assigned, by which organization group it is managed, to/from which smart group it is assigned/excluded.
n Payload – Payload profile settings affect the device itself: Passcode requirement, device restrictions such as camera use or screen capture, Wi-Fi configurations, VPN among others.
Since the operation of the device itself is not impacted, General changes can usually be made without republishing the profile. Saving such changes results in the profile only being pushed to devices that were not already assigned to the profile.
Payload changes, however, must always be republished to all devices, new and existing, since the operation of the device itself is affected.
Edit General Device Profile SettingsGeneral profile settings include changes that manage its distribution only. This distribution includes how the profile is assigned, by which organization group (OG) it is managed, and to/from which assignment group it is assigned/excluded.
Managing Devices
VMware, Inc. 97

For more information, see Add General Profile Settings and View Device Assignment.
Procedure
1 Navigate to Devices > Profiles & Resources > Profiles and select the Edit icon ( ) from the actions menu of the profile you want to edit.
The only profiles that are editable are those profiles that an organization group (or a child organization group underneath) manages.
2 Make any changes you like in the General category.
3 After completing General changes, you can select Save & Publish to apply the profile to any new devices you might have added or removed.
Results
Devices already assigned with the profile do receive the republished profile again. The View Device Assignment screen appears, confirming the list of currently assigned devices.
Edit Payload Device Profile SettingsPayload profile settings include changes that affect the device itself: passcode requirement, device restrictions such as camera use or screen capture, Wi-Fi configurations, VPN among others.
The Add Version button enables you to create an increment version of the profile where settings in the Payload can be modified.
Procedure
1 Enable Payload editing that impacts the operation of the device by selecting the Add Version button.
Selecting the Add Version button and saving your changes means republishing the device profile to all devices to which it is assigned. This republishing includes devices that already have the profile.
For step-by-step instructions on configuring a specific Payload, refer to the applicable Platform Guide, available on docs.vmware.com.
2 After completing Payload changes, select Save & Publish to apply the profile to all assigned devices.
Results
The View Device Assignment screen appears, enabling you to confirm the list of currently assigned devices.
Compliance ProfilesTo understand Compliance Profiles in Workspace ONE UEM powered by AirWatch, you must have a full understanding of device profiles and compliance policies. Device profiles serve as the foundation for device management and security while compliance policies act as a security gate protecting corporate content.
Managing Devices
VMware, Inc. 98
Device profiles grant you control over a wide range of device settings. These settings include passcode complexity, Geofencing, time schedules, device hardware functionality, Wi-Fi, VPN, Email, Certificates, and many more.
The compliance engine monitors rules, enforces actions, and applies escalations (all of which you define). Compliance profiles, however, seek to provide the compliance engine with all the options and settings ordinarily available only to device profiles. For more information, see Chapter 6 Compliance Policies.
For example, you can make a special device profile that is identical to your normal device profile, only with more restrictive settings. You can then apply this special device profile in the Actions tab when you define your compliance policy. With such an arrangement, if the user fails to make their device compliant, you can apply the more restrictive compliance profile.
Add a Compliance ProfileYou can add a compliance profile, which is a hybrid of a compliance policy and a device profile, joining the best of these two features together. Adding a compliance profile is a two part process: 1) make a device profile and 2) assign it as an 'action' in a compliance policy.
Compliance profiles are created and saved in the same manner as Auto and Optional device profiles.
Procedure
1 Navigate to Devices > Profiles & Resources > Profiles, then select Add, then Add Profile, then select a platform.
2 Select a Name for your compliance profile that you can recognize later.
3 In the General profile tab, select 'Compliance' in the Assignment Type drop-down setting.
4 Complete the remaining General and Payload settings.
5 When finished, select Save & Publish.
6 Select this profile in your compliance policy.
7 Navigate to Devices > Compliance Policies > List View and select Add, then select a platform.
8 Define the Rules and select Next.
9 In the Actions tab, make the following selections.
a Set the first drop-down menu to 'Profile'.
b Set the second drop-down menu to 'Install Compliance Profile'.
c Set the third drop-down menu to the device profile you named.
10 Select Next and proceed configuring the remaining settings including Assignment and Summary tabs.
11 Save the compliance policy by selecting Finish or Finish and Activate.
What to do next
For step-by-step instructions on completing a device profile, see Add General Profile Settings.
For step-by-step instructions on completing a compliance policy, see Add a Compliance Policy.
Managing Devices
VMware, Inc. 99
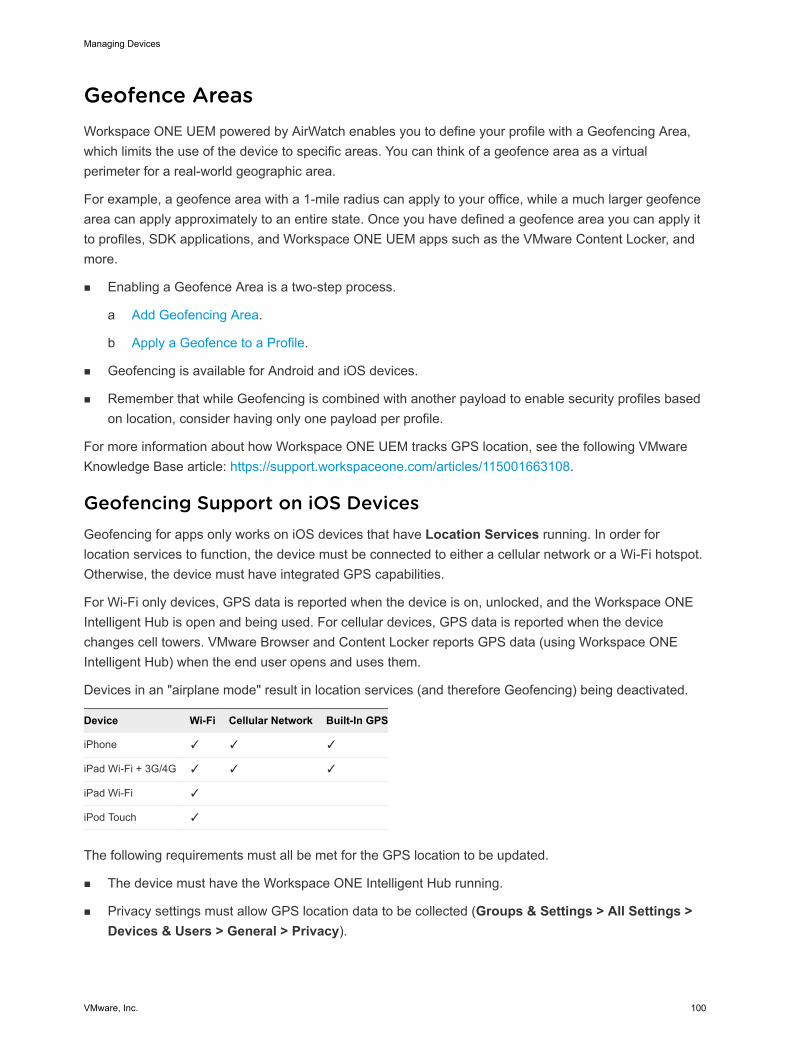
Geofence AreasWorkspace ONE UEM powered by AirWatch enables you to define your profile with a Geofencing Area, which limits the use of the device to specific areas. You can think of a geofence area as a virtual perimeter for a real-world geographic area.
For example, a geofence area with a 1-mile radius can apply to your office, while a much larger geofence area can apply approximately to an entire state. Once you have defined a geofence area you can apply it to profiles, SDK applications, and Workspace ONE UEM apps such as the VMware Content Locker, and more.
n Enabling a Geofence Area is a two-step process.
a Add Geofencing Area.
b Apply a Geofence to a Profile.
n Geofencing is available for Android and iOS devices.
n Remember that while Geofencing is combined with another payload to enable security profiles based on location, consider having only one payload per profile.
For more information about how Workspace ONE UEM tracks GPS location, see the following VMware Knowledge Base article: https://support.workspaceone.com/articles/115001663108.
Geofencing Support on iOS DevicesGeofencing for apps only works on iOS devices that have Location Services running. In order for location services to function, the device must be connected to either a cellular network or a Wi-Fi hotspot. Otherwise, the device must have integrated GPS capabilities.
For Wi-Fi only devices, GPS data is reported when the device is on, unlocked, and the Workspace ONE Intelligent Hub is open and being used. For cellular devices, GPS data is reported when the device changes cell towers. VMware Browser and Content Locker reports GPS data (using Workspace ONE Intelligent Hub) when the end user opens and uses them.
Devices in an "airplane mode" result in location services (and therefore Geofencing) being deactivated.
Device Wi-Fi Cellular Network Built-In GPS
iPhone ✓ ✓ ✓
iPad Wi-Fi + 3G/4G ✓ ✓ ✓
iPad Wi-Fi ✓
iPod Touch ✓
The following requirements must all be met for the GPS location to be updated.
n The device must have the Workspace ONE Intelligent Hub running.
n Privacy settings must allow GPS location data to be collected (Groups & Settings > All Settings > Devices & Users > General > Privacy).
Managing Devices
VMware, Inc. 100
n The settings for Workspace ONE Intelligent Hub for Apple iOS must enable “Collect Location Data” (Groups & Settings > All Settings > Devices & Users > Apple > Apple iOS > Hub Settings).
Set the Workspace ONE Intelligent Hub SDK settings to the Default SDK settings instead of "None".
Add Geofencing AreaYou must define a Geofencing area before you can apply one to a device.
Procedure
1 Access the Area settings page by navigating to Devices > Profiles & Resources > Profile Settings > Areas.
System Settings displays.
2 Select the Geofencing Area button.
3 Enter an Address and the Radius of the geofence in kilometers or miles.
You can double-click any area on the map to set the central location.
4 Select Click to Search to send the entered address as a search parameter to Bing maps. If the search is successful, the map view updates to display the entered location with the address as the epicenter of the geofence.
Note Integration with Bing maps requires that "insecure content" is loaded on this page. If a location search does not load as expected, you might need to allow "Show all Content" for your browser.
5 Enter the Area Name (how it appears in the Workspace ONE UEM console) and select Save.
What to do next
Next, you must apply a geofence to a profile. For more information, see Apply a Geofence to a Profile.
Apply a Geofence to a ProfileOnce you have added a Geofencing area, you can apply it to a profile and combine it with other payloads to create more robust profiles.
If a user manually disables location services on their iOS device, Workspace ONE UEM can no longer collect location updates. Workspace ONE UEM considers the device to be in the location where services were disabled.
Procedure
1 Navigate to Devices > Profiles & Resources > Profiles > ADD and select a platform.
2 Select Install only on devices inside selected areas on the General tab.
An Assigned Geofence Areas box displays. If no Geofence Area has been defined, the menu directs you back to the Geofence Area creation menu.
3 Enter one or multiple Geofencing areas to this profile.
Managing Devices
VMware, Inc. 101
4 Configure a payload such as Passcode, Restrictions, or Wi-Fi that you want to apply only while devices are inside the selected Geofencing areas.
5 Select Save & Publish.
Example
For example, you can define geofence areas around each of your offices. Then add a Restrictions payload that disallows access to the Game Center, multiplayer gaming, YouTube content, and other settings. Once activated, employees of the organization group to whom the profile is applied no longer have access to these functions while in the office.
iBeaconsiBeacon is a bluetooth-based proximity sensing protocol developed by Apple. As such, it is exclusive to certain Apple products.
iBeacon is specific to iOS and is used to manage location awareness. For more information, please see the Workspace ONE UEM iOS Device Management documentation, available on docs.vmware.com.
Time SchedulesWhile a profile under Workspace ONE UEM powered by AirWatch dictates how restrictive or permissive the device usability is, a time schedule puts the profile enforcement on a schedule. You can apply a time schedule to a new profile or an existing profile. You can also delete an unused time schedule.
Enabling a Time Schedule is a two-step process.
1 Define a Time Schedule.
2 Apply a Time Schedule to a new or existing Profile.
Define a Time Schedule1 Navigate to Devices > Profiles & Resources > Profiles Settings > Time Schedules.
2 Select Add Schedule above the Schedule Name column.
3 Select Add Schedule located under the Day of the Week column, then complete the following settings.
Setting Description
Schedule Name. Enter the name of the time schedule that appears in the listing.
Time Zone Select the time zone of the organization group under which the device is managed.
Day of the Week Apply a scheduled profile installation by selecting a day of the week.
All Day Make the profile install at midnight on the selected Day of the Week. Selecting this check box removes the Start Time and End Time columns.
Start Time. Select the time of day you want the profile to be installed.
Managing Devices
VMware, Inc. 102

Setting Description
End Time. Select the time of day you want the profile to be uninstalled.
Actions Remove the day's schedule by clicking the X.
4 Select Save.
Apply a Time Schedule to a Profile1 Navigate to Devices > Profiles & Resources > Profiles > ADD and select your platform.
2 Select Enable Scheduling and install only during selected time periods on the General tab.
3 In the Assigned Schedules box, enter one or more Time Schedules to this profile.
4 Configure a payload, such as Passcode, Restrictions, or Wi-Fi that you want to apply only while devices are inside the time frames.
5 Select Save & Publish.
Apply a Time Schedule to an Existing Profile1 Navigate to Devices > Profiles & Resources > Profiles and select the profile from the listing for
editing. Select the pencil icon ( ) or click the profile name.
2 In the General tab of the profile page, enable the setting Enable Scheduling and install only during selected time periods.
3 In the Assigned Schedule setting that appears, select from the drop-down menu the previously saved time schedule.
4 Select Save & Publish.
Delete a Time Schedule1 Navigate to Devices > Profiles & Resources > Profiles Settings > Time Schedules.
2 Select the radio button next to the time schedule you want to delete.
3 Select the Delete button.
View Device AssignmentSelecting the Save & Publish button upon configuring a device profile displays the View Device Assignment screen. This screen serves as a preview of affected (or unaffected) devices managed by Workspace ONE UEM powered by AirWatch.
Managing Devices
VMware, Inc. 103

Depending upon which kind of change you make to the device profile, the Assignment Status column reflects various states.
n Added – The profile is added and published to the device.
n Removed – The profile is removed from the device.
n Unchanged – Indicates that the profile is not scheduled to be republished to the device.
n Updated – Indicates that the profile is republished to a device that already has the profile assigned.
Select Publish to finalize the changes and, if necessary, republish any required profile.
Managing Devices
VMware, Inc. 104
Resources 5Resources simplify the provisioning of Wi-Fi, VPN, and Exchange payloads for Workspace ONE UEM powered by AirWatch deployments that support multiple device platforms, such as iOS, Android, and Windows.
Create a resource for any of these payloads and define the general settings each device platform receives. You can then optionally configure platform-specific settings that apply only to those devices.
Resources are defined, managed, and deployed separately from device profiles. Deploy resources alongside device profiles to provide deep and broad device management for all supported platforms in your deployment.
You do not have to use resources to deploy Wi-Fi, VPN, or Exchange settings. If you choose, you can still create separate device profiles for these payloads for each platform. Consider deploying resources when you expect the Wi-Fi, VPN, or Exchange settings to be identical or similar across platforms. Then, create additional device profiles as usual to manage functionality further for each platform.
This chapter includes the following topics:
n Resources List View
n Add an Exchange Resource
n Add a Wi-Fi Resource
n Add a VPN Resource
Resources List ViewUse the Resources List View in Workspace ONE UEM powered by AirWatch to add and manage your collection of device resources which includes viewing, deleting, and editing individual resource configurations.
Add a ResourceYou can add a resource to provision your multi-platform device fleet with the same Exchange, wi-fi, and VPN settings.
Navigate to Devices > Profiles & Resources > Resources and select Add Resource. You must select from the following options to add a resource.
n Exchange – Configure email settings so you can keep in touch with your Exchange email server.
VMware, Inc. 105
n Wi-Fi – Configure Wi-Fi connectivity settings so you can maintain network connectivity.
n VPN – Configure virtual private network settings so you can maintain a secure connection.
Each resource requires three distinct configuration steps. Create a device resource by specifying the Resource Details, the applicable Platforms, and the Assignment of the resource to devices.
n The Resource Details contain the resource name, description, server dependencies, and other critical settings that determine how the resource operates.
n The Platforms define on which devices the resource runs.
n The Assignment determines how the resource is deployed, including organization groups, user groups, and smart groups.
Manage ResourcesOnce you have amassed a collection of resources, you can manage them by navigating to Devices > Profiles & Resources > Resources and Filter, View, Edit, and Delete resources.
n Filter the Resource List View to show Active, Inactive, or All resources.
n View the different platforms which your resource includes by selecting the hyperlink numeral in the Platforms column.
n Open Advanced Settings for the resource by selecting the hyperlink platform name.
n Open the View Devices page by selecting the hyperlink numerals in the Installed/Assigned column of the Platforms page. This page displays the list of devices assigned to the resource.
n View and Export the XML code and upload a certificate by clicking the View hyperlink in the XML column of the Platforms page.
n Edit a resource by selecting the name link of the resource which displays the Resource Details section of the Edit Resource page.
n Edit the resource details by clicking the edit pencil ( ) to the left of the resource listing. You may proceed making edits to the other sections of the Edit Resource page by selecting the Next button.
n Edit the assignment of the resource by selecting the radio button to the left of the Resource listing and then clicking the Edit Assignment button.
n Delete a resource by selecting the radio button to the left of the resource listing and clicking the Delete button. Deleting a resource sets the resource to inactive until it is removed from all devices.
Add an Exchange ResourceYou can add a resource dedicated to providing devices with the means to send and receive secure email communications while managed under Workspace ONE UEM powered by AirWatch.
For an overview, see Chapter 5 Resources.
Managing Devices
VMware, Inc. 106
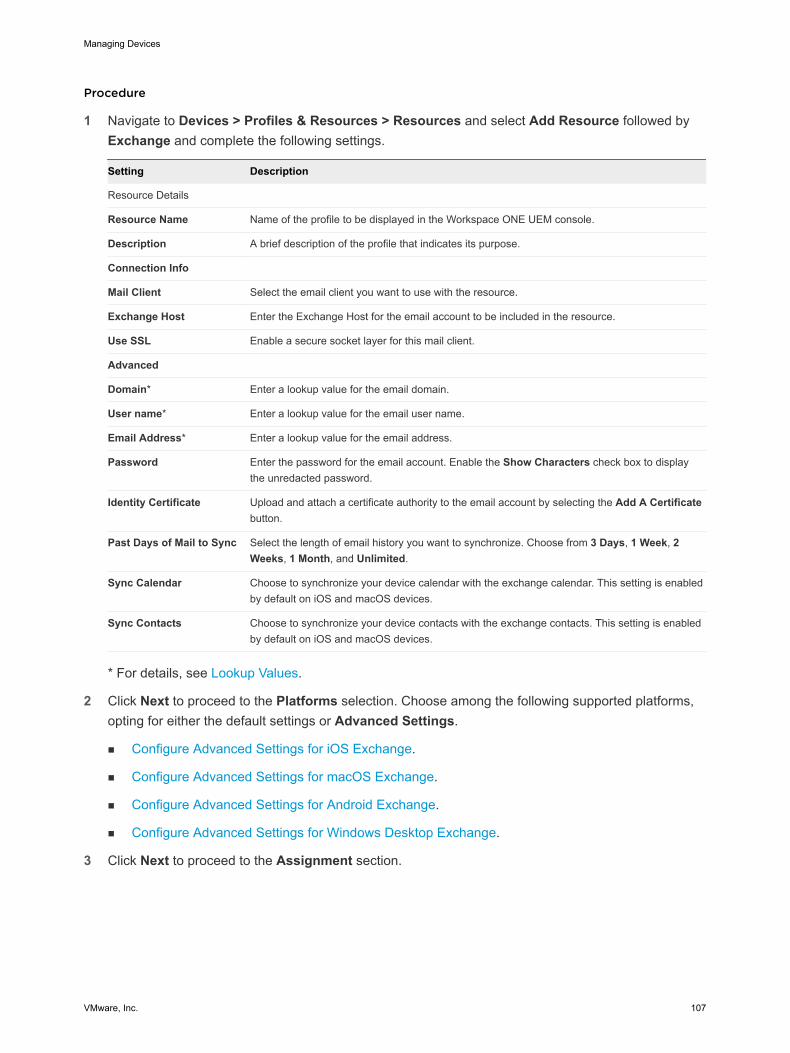
Procedure
1 Navigate to Devices > Profiles & Resources > Resources and select Add Resource followed by Exchange and complete the following settings.
Setting Description
Resource Details
Resource Name Name of the profile to be displayed in the Workspace ONE UEM console.
Description A brief description of the profile that indicates its purpose.
Connection Info
Mail Client Select the email client you want to use with the resource.
Exchange Host Enter the Exchange Host for the email account to be included in the resource.
Use SSL Enable a secure socket layer for this mail client.
Advanced
Domain* Enter a lookup value for the email domain.
User name* Enter a lookup value for the email user name.
Email Address* Enter a lookup value for the email address.
Password Enter the password for the email account. Enable the Show Characters check box to display the unredacted password.
Identity Certificate Upload and attach a certificate authority to the email account by selecting the Add A Certificate button.
Past Days of Mail to Sync Select the length of email history you want to synchronize. Choose from 3 Days, 1 Week, 2 Weeks, 1 Month, and Unlimited.
Sync Calendar Choose to synchronize your device calendar with the exchange calendar. This setting is enabled by default on iOS and macOS devices.
Sync Contacts Choose to synchronize your device contacts with the exchange contacts. This setting is enabled by default on iOS and macOS devices.
* For details, see Lookup Values.
2 Click Next to proceed to the Platforms selection. Choose among the following supported platforms, opting for either the default settings or Advanced Settings.
n Configure Advanced Settings for iOS Exchange.
n Configure Advanced Settings for macOS Exchange.
n Configure Advanced Settings for Android Exchange.
n Configure Advanced Settings for Windows Desktop Exchange.
3 Click Next to proceed to the Assignment section.
Managing Devices
VMware, Inc. 107
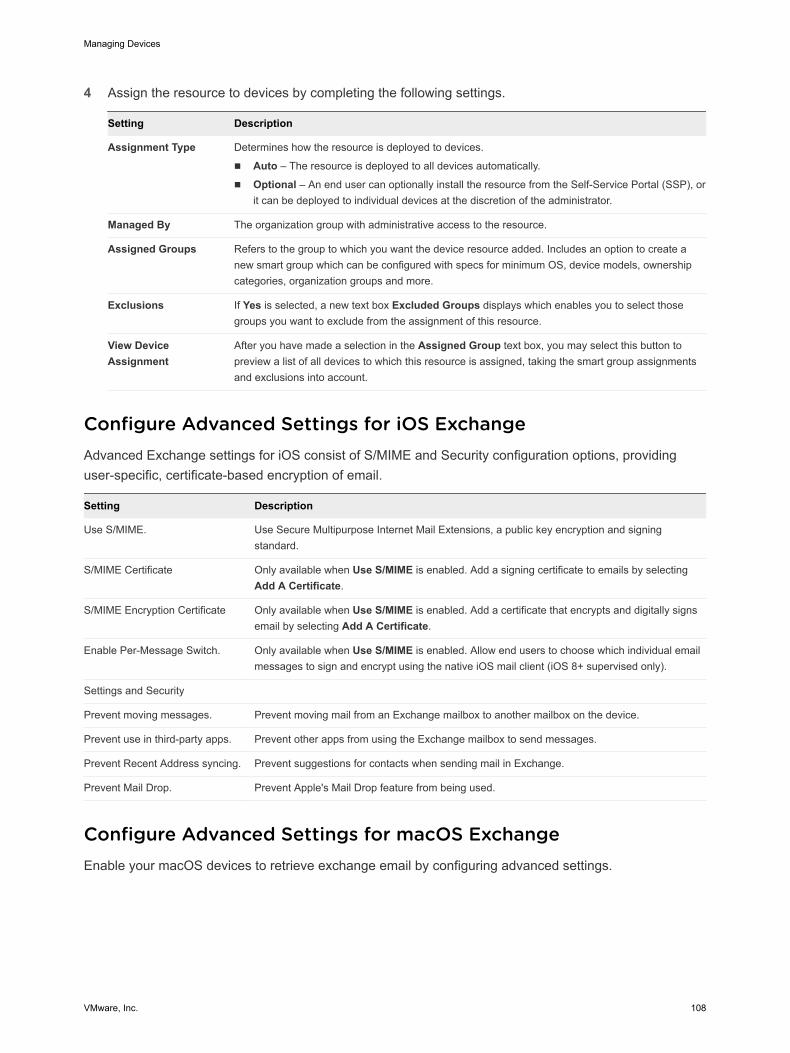
4 Assign the resource to devices by completing the following settings.
Setting Description
Assignment Type Determines how the resource is deployed to devices.
n Auto – The resource is deployed to all devices automatically.
n Optional – An end user can optionally install the resource from the Self-Service Portal (SSP), or it can be deployed to individual devices at the discretion of the administrator.
Managed By The organization group with administrative access to the resource.
Assigned Groups Refers to the group to which you want the device resource added. Includes an option to create a new smart group which can be configured with specs for minimum OS, device models, ownership categories, organization groups and more.
Exclusions If Yes is selected, a new text box Excluded Groups displays which enables you to select those groups you want to exclude from the assignment of this resource.
View Device Assignment
After you have made a selection in the Assigned Group text box, you may select this button to preview a list of all devices to which this resource is assigned, taking the smart group assignments and exclusions into account.
Configure Advanced Settings for iOS ExchangeAdvanced Exchange settings for iOS consist of S/MIME and Security configuration options, providing user-specific, certificate-based encryption of email.
Setting Description
Use S/MIME. Use Secure Multipurpose Internet Mail Extensions, a public key encryption and signing standard.
S/MIME Certificate Only available when Use S/MIME is enabled. Add a signing certificate to emails by selecting Add A Certificate.
S/MIME Encryption Certificate Only available when Use S/MIME is enabled. Add a certificate that encrypts and digitally signs email by selecting Add A Certificate.
Enable Per-Message Switch. Only available when Use S/MIME is enabled. Allow end users to choose which individual email messages to sign and encrypt using the native iOS mail client (iOS 8+ supervised only).
Settings and Security
Prevent moving messages. Prevent moving mail from an Exchange mailbox to another mailbox on the device.
Prevent use in third-party apps. Prevent other apps from using the Exchange mailbox to send messages.
Prevent Recent Address syncing. Prevent suggestions for contacts when sending mail in Exchange.
Prevent Mail Drop. Prevent Apple's Mail Drop feature from being used.
Configure Advanced Settings for macOS ExchangeEnable your macOS devices to retrieve exchange email by configuring advanced settings.
Managing Devices
VMware, Inc. 108
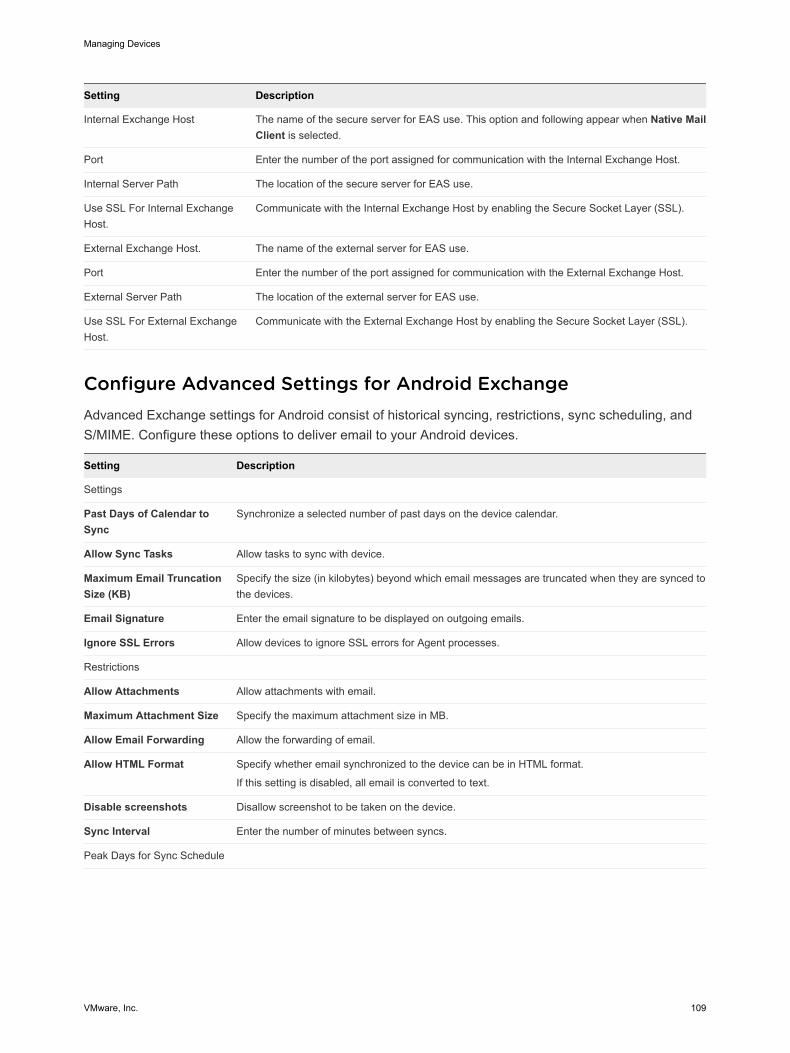
Setting Description
Internal Exchange Host The name of the secure server for EAS use. This option and following appear when Native Mail Client is selected.
Port Enter the number of the port assigned for communication with the Internal Exchange Host.
Internal Server Path The location of the secure server for EAS use.
Use SSL For Internal Exchange Host.
Communicate with the Internal Exchange Host by enabling the Secure Socket Layer (SSL).
External Exchange Host. The name of the external server for EAS use.
Port Enter the number of the port assigned for communication with the External Exchange Host.
External Server Path The location of the external server for EAS use.
Use SSL For External Exchange Host.
Communicate with the External Exchange Host by enabling the Secure Socket Layer (SSL).
Configure Advanced Settings for Android ExchangeAdvanced Exchange settings for Android consist of historical syncing, restrictions, sync scheduling, and S/MIME. Configure these options to deliver email to your Android devices.
Setting Description
Settings
Past Days of Calendar to Sync
Synchronize a selected number of past days on the device calendar.
Allow Sync Tasks Allow tasks to sync with device.
Maximum Email Truncation Size (KB)
Specify the size (in kilobytes) beyond which email messages are truncated when they are synced to the devices.
Email Signature Enter the email signature to be displayed on outgoing emails.
Ignore SSL Errors Allow devices to ignore SSL errors for Agent processes.
Restrictions
Allow Attachments Allow attachments with email.
Maximum Attachment Size Specify the maximum attachment size in MB.
Allow Email Forwarding Allow the forwarding of email.
Allow HTML Format Specify whether email synchronized to the device can be in HTML format.
If this setting is disabled, all email is converted to text.
Disable screenshots Disallow screenshot to be taken on the device.
Sync Interval Enter the number of minutes between syncs.
Peak Days for Sync Schedule
Managing Devices
VMware, Inc. 109
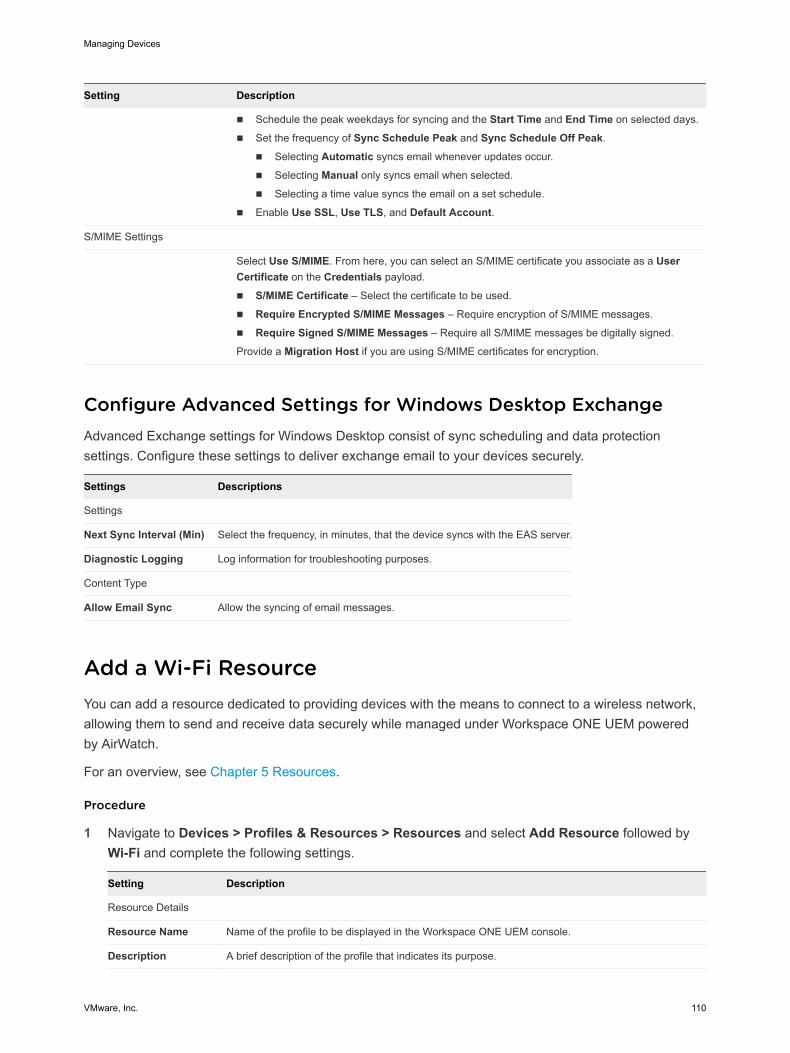
Setting Description
n Schedule the peak weekdays for syncing and the Start Time and End Time on selected days.
n Set the frequency of Sync Schedule Peak and Sync Schedule Off Peak.
n Selecting Automatic syncs email whenever updates occur.
n Selecting Manual only syncs email when selected.
n Selecting a time value syncs the email on a set schedule.
n Enable Use SSL, Use TLS, and Default Account.
S/MIME Settings
Select Use S/MIME. From here, you can select an S/MIME certificate you associate as a User Certificate on the Credentials payload.
n S/MIME Certificate – Select the certificate to be used.
n Require Encrypted S/MIME Messages – Require encryption of S/MIME messages.
n Require Signed S/MIME Messages – Require all S/MIME messages be digitally signed.
Provide a Migration Host if you are using S/MIME certificates for encryption.
Configure Advanced Settings for Windows Desktop ExchangeAdvanced Exchange settings for Windows Desktop consist of sync scheduling and data protection settings. Configure these settings to deliver exchange email to your devices securely.
Settings Descriptions
Settings
Next Sync Interval (Min) Select the frequency, in minutes, that the device syncs with the EAS server.
Diagnostic Logging Log information for troubleshooting purposes.
Content Type
Allow Email Sync Allow the syncing of email messages.
Add a Wi-Fi ResourceYou can add a resource dedicated to providing devices with the means to connect to a wireless network, allowing them to send and receive data securely while managed under Workspace ONE UEM powered by AirWatch.
For an overview, see Chapter 5 Resources.
Procedure
1 Navigate to Devices > Profiles & Resources > Resources and select Add Resource followed by Wi-Fi and complete the following settings.
Setting Description
Resource Details
Resource Name Name of the profile to be displayed in the Workspace ONE UEM console.
Description A brief description of the profile that indicates its purpose.
Managing Devices
VMware, Inc. 110
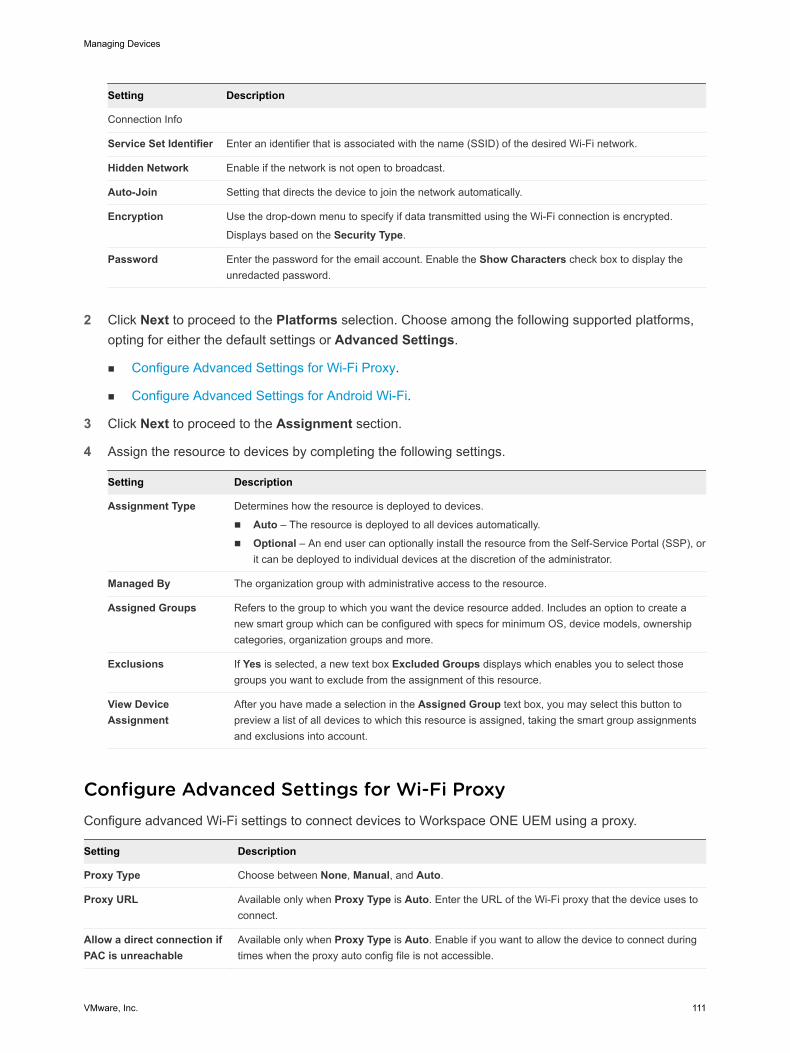
Setting Description
Connection Info
Service Set Identifier Enter an identifier that is associated with the name (SSID) of the desired Wi-Fi network.
Hidden Network Enable if the network is not open to broadcast.
Auto-Join Setting that directs the device to join the network automatically.
Encryption Use the drop-down menu to specify if data transmitted using the Wi-Fi connection is encrypted.
Displays based on the Security Type.
Password Enter the password for the email account. Enable the Show Characters check box to display the unredacted password.
2 Click Next to proceed to the Platforms selection. Choose among the following supported platforms, opting for either the default settings or Advanced Settings.
n Configure Advanced Settings for Wi-Fi Proxy.
n Configure Advanced Settings for Android Wi-Fi.
3 Click Next to proceed to the Assignment section.
4 Assign the resource to devices by completing the following settings.
Setting Description
Assignment Type Determines how the resource is deployed to devices.
n Auto – The resource is deployed to all devices automatically.
n Optional – An end user can optionally install the resource from the Self-Service Portal (SSP), or it can be deployed to individual devices at the discretion of the administrator.
Managed By The organization group with administrative access to the resource.
Assigned Groups Refers to the group to which you want the device resource added. Includes an option to create a new smart group which can be configured with specs for minimum OS, device models, ownership categories, organization groups and more.
Exclusions If Yes is selected, a new text box Excluded Groups displays which enables you to select those groups you want to exclude from the assignment of this resource.
View Device Assignment
After you have made a selection in the Assigned Group text box, you may select this button to preview a list of all devices to which this resource is assigned, taking the smart group assignments and exclusions into account.
Configure Advanced Settings for Wi-Fi ProxyConfigure advanced Wi-Fi settings to connect devices to Workspace ONE UEM using a proxy.
Setting Description
Proxy Type Choose between None, Manual, and Auto.
Proxy URL Available only when Proxy Type is Auto. Enter the URL of the Wi-Fi proxy that the device uses to connect.
Allow a direct connection if PAC is unreachable
Available only when Proxy Type is Auto. Enable if you want to allow the device to connect during times when the proxy auto config file is not accessible.
Managing Devices
VMware, Inc. 111
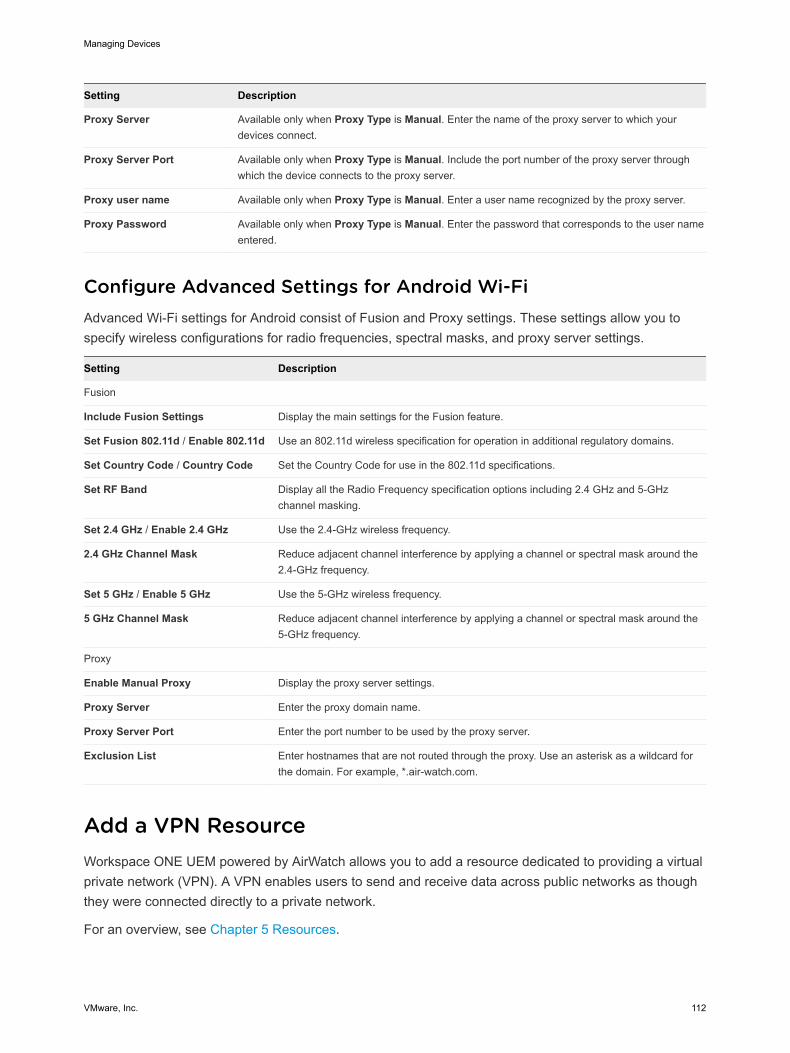
Setting Description
Proxy Server Available only when Proxy Type is Manual. Enter the name of the proxy server to which your devices connect.
Proxy Server Port Available only when Proxy Type is Manual. Include the port number of the proxy server through which the device connects to the proxy server.
Proxy user name Available only when Proxy Type is Manual. Enter a user name recognized by the proxy server.
Proxy Password Available only when Proxy Type is Manual. Enter the password that corresponds to the user name entered.
Configure Advanced Settings for Android Wi-FiAdvanced Wi-Fi settings for Android consist of Fusion and Proxy settings. These settings allow you to specify wireless configurations for radio frequencies, spectral masks, and proxy server settings.
Setting Description
Fusion
Include Fusion Settings Display the main settings for the Fusion feature.
Set Fusion 802.11d / Enable 802.11d Use an 802.11d wireless specification for operation in additional regulatory domains.
Set Country Code / Country Code Set the Country Code for use in the 802.11d specifications.
Set RF Band Display all the Radio Frequency specification options including 2.4 GHz and 5-GHz channel masking.
Set 2.4 GHz / Enable 2.4 GHz Use the 2.4-GHz wireless frequency.
2.4 GHz Channel Mask Reduce adjacent channel interference by applying a channel or spectral mask around the 2.4-GHz frequency.
Set 5 GHz / Enable 5 GHz Use the 5-GHz wireless frequency.
5 GHz Channel Mask Reduce adjacent channel interference by applying a channel or spectral mask around the 5-GHz frequency.
Proxy
Enable Manual Proxy Display the proxy server settings.
Proxy Server Enter the proxy domain name.
Proxy Server Port Enter the port number to be used by the proxy server.
Exclusion List Enter hostnames that are not routed through the proxy. Use an asterisk as a wildcard for the domain. For example, *.air-watch.com.
Add a VPN ResourceWorkspace ONE UEM powered by AirWatch allows you to add a resource dedicated to providing a virtual private network (VPN). A VPN enables users to send and receive data across public networks as though they were connected directly to a private network.
For an overview, see Chapter 5 Resources.
Managing Devices
VMware, Inc. 112
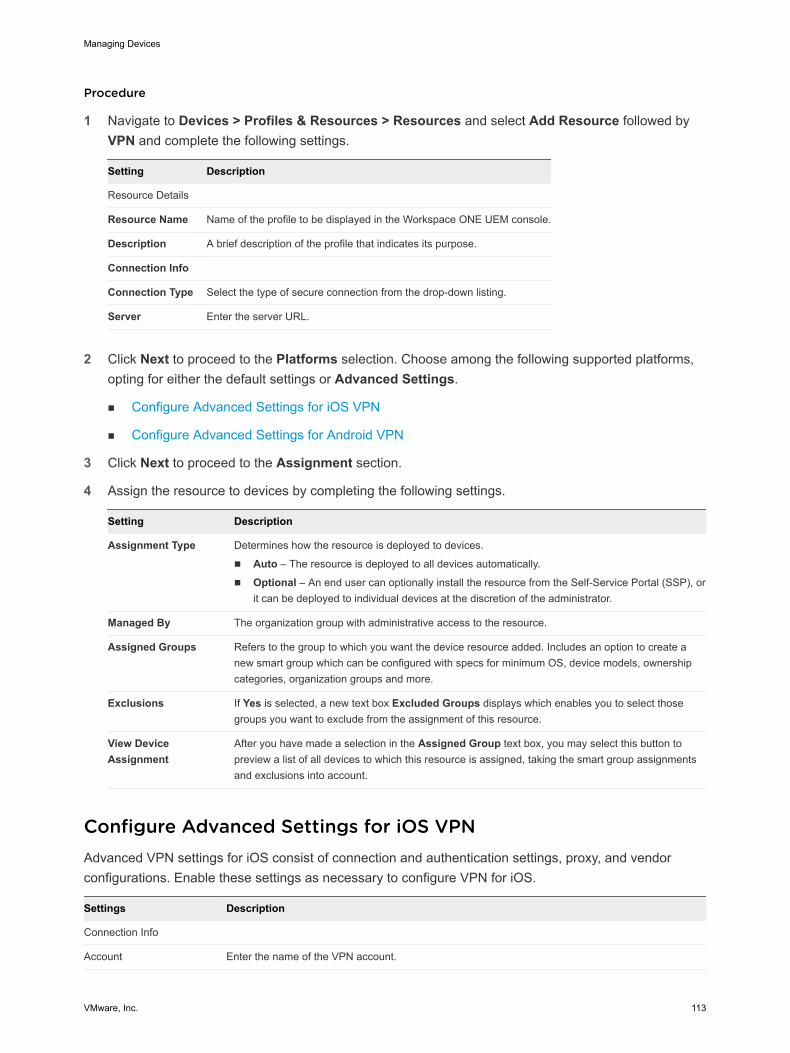
Procedure
1 Navigate to Devices > Profiles & Resources > Resources and select Add Resource followed by VPN and complete the following settings.
Setting Description
Resource Details
Resource Name Name of the profile to be displayed in the Workspace ONE UEM console.
Description A brief description of the profile that indicates its purpose.
Connection Info
Connection Type Select the type of secure connection from the drop-down listing.
Server Enter the server URL.
2 Click Next to proceed to the Platforms selection. Choose among the following supported platforms, opting for either the default settings or Advanced Settings.
n Configure Advanced Settings for iOS VPN
n Configure Advanced Settings for Android VPN
3 Click Next to proceed to the Assignment section.
4 Assign the resource to devices by completing the following settings.
Setting Description
Assignment Type Determines how the resource is deployed to devices.
n Auto – The resource is deployed to all devices automatically.
n Optional – An end user can optionally install the resource from the Self-Service Portal (SSP), or it can be deployed to individual devices at the discretion of the administrator.
Managed By The organization group with administrative access to the resource.
Assigned Groups Refers to the group to which you want the device resource added. Includes an option to create a new smart group which can be configured with specs for minimum OS, device models, ownership categories, organization groups and more.
Exclusions If Yes is selected, a new text box Excluded Groups displays which enables you to select those groups you want to exclude from the assignment of this resource.
View Device Assignment
After you have made a selection in the Assigned Group text box, you may select this button to preview a list of all devices to which this resource is assigned, taking the smart group assignments and exclusions into account.
Configure Advanced Settings for iOS VPNAdvanced VPN settings for iOS consist of connection and authentication settings, proxy, and vendor configurations. Enable these settings as necessary to configure VPN for iOS.
Settings Description
Connection Info
Account Enter the name of the VPN account.
Managing Devices
VMware, Inc. 113
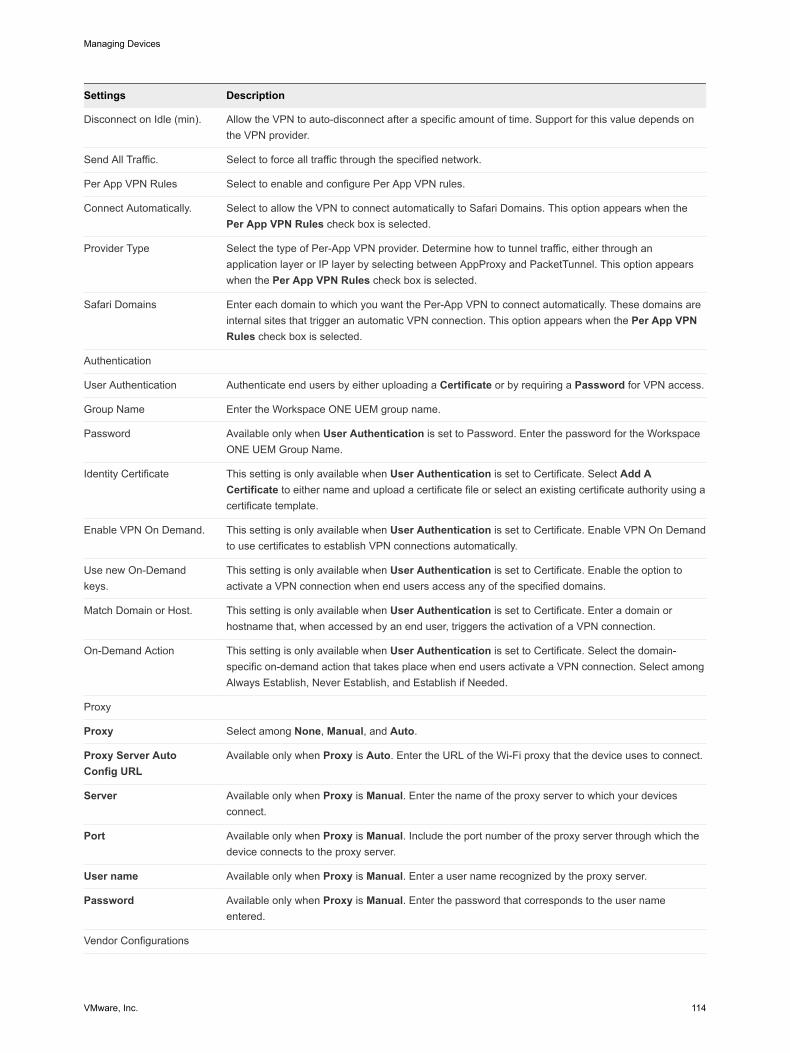
Settings Description
Disconnect on Idle (min). Allow the VPN to auto-disconnect after a specific amount of time. Support for this value depends on the VPN provider.
Send All Traffic. Select to force all traffic through the specified network.
Per App VPN Rules Select to enable and configure Per App VPN rules.
Connect Automatically. Select to allow the VPN to connect automatically to Safari Domains. This option appears when the Per App VPN Rules check box is selected.
Provider Type Select the type of Per-App VPN provider. Determine how to tunnel traffic, either through an application layer or IP layer by selecting between AppProxy and PacketTunnel. This option appears when the Per App VPN Rules check box is selected.
Safari Domains Enter each domain to which you want the Per-App VPN to connect automatically. These domains are internal sites that trigger an automatic VPN connection. This option appears when the Per App VPN Rules check box is selected.
Authentication
User Authentication Authenticate end users by either uploading a Certificate or by requiring a Password for VPN access.
Group Name Enter the Workspace ONE UEM group name.
Password Available only when User Authentication is set to Password. Enter the password for the Workspace ONE UEM Group Name.
Identity Certificate This setting is only available when User Authentication is set to Certificate. Select Add A Certificate to either name and upload a certificate file or select an existing certificate authority using a certificate template.
Enable VPN On Demand. This setting is only available when User Authentication is set to Certificate. Enable VPN On Demand to use certificates to establish VPN connections automatically.
Use new On-Demand keys.
This setting is only available when User Authentication is set to Certificate. Enable the option to activate a VPN connection when end users access any of the specified domains.
Match Domain or Host. This setting is only available when User Authentication is set to Certificate. Enter a domain or hostname that, when accessed by an end user, triggers the activation of a VPN connection.
On-Demand Action This setting is only available when User Authentication is set to Certificate. Select the domain-specific on-demand action that takes place when end users activate a VPN connection. Select among Always Establish, Never Establish, and Establish if Needed.
Proxy
Proxy Select among None, Manual, and Auto.
Proxy Server Auto Config URL
Available only when Proxy is Auto. Enter the URL of the Wi-Fi proxy that the device uses to connect.
Server Available only when Proxy is Manual. Enter the name of the proxy server to which your devices connect.
Port Available only when Proxy is Manual. Include the port number of the proxy server through which the device connects to the proxy server.
User name Available only when Proxy is Manual. Enter a user name recognized by the proxy server.
Password Available only when Proxy is Manual. Enter the password that corresponds to the user name entered.
Vendor Configurations
Managing Devices
VMware, Inc. 114
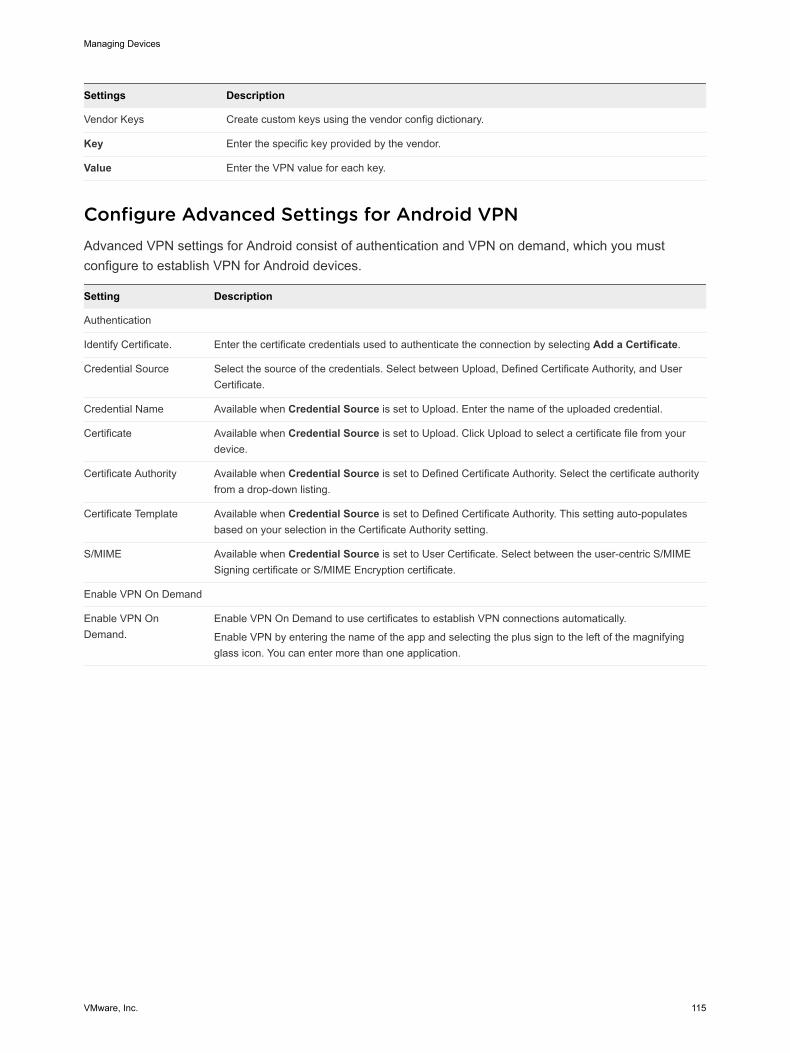
Settings Description
Vendor Keys Create custom keys using the vendor config dictionary.
Key Enter the specific key provided by the vendor.
Value Enter the VPN value for each key.
Configure Advanced Settings for Android VPNAdvanced VPN settings for Android consist of authentication and VPN on demand, which you must configure to establish VPN for Android devices.
Setting Description
Authentication
Identify Certificate. Enter the certificate credentials used to authenticate the connection by selecting Add a Certificate.
Credential Source Select the source of the credentials. Select between Upload, Defined Certificate Authority, and User Certificate.
Credential Name Available when Credential Source is set to Upload. Enter the name of the uploaded credential.
Certificate Available when Credential Source is set to Upload. Click Upload to select a certificate file from your device.
Certificate Authority Available when Credential Source is set to Defined Certificate Authority. Select the certificate authority from a drop-down listing.
Certificate Template Available when Credential Source is set to Defined Certificate Authority. This setting auto-populates based on your selection in the Certificate Authority setting.
S/MIME Available when Credential Source is set to User Certificate. Select between the user-centric S/MIME Signing certificate or S/MIME Encryption certificate.
Enable VPN On Demand
Enable VPN On Demand.
Enable VPN On Demand to use certificates to establish VPN connections automatically.
Enable VPN by entering the name of the app and selecting the plus sign to the left of the magnifying glass icon. You can enter more than one application.
Managing Devices
VMware, Inc. 115
Compliance Policies 6The compliance engine is an automated tool by Workspace ONE UEM powered by AirWatch that ensures all devices abide by policies that you define. These policies can include basic security settings such as requiring a passcode and enforcing certain precautions including passcode strength, blacklisting certain apps, and requiring device check-in intervals.
Once devices are determined to be out of compliance, the compliance engine warns users to address compliance errors to prevent disciplinary action on the device. For example, the compliance engine can trigger a message to notify the user that their device is out of compliance.
In addition, devices not in compliance cannot have device profiles assigned to it and cannot have apps installed on the device. If corrections are not made in the amount of time specified, the device loses access to certain content and functions that you define. The available compliance policies and actions vary by platform.
You can automate escalations when corrections are not made, for example, locking down the device and notifying the user to contact you to unlock the device. These escalation steps, disciplinary actions, grace periods, and messages are all customizable with the Unified Endpoint Management Console.
There are two methods by which compliance is measured.
n Real Time Compliance (RTC)
Unscheduled samples received from the device are used to determine whether or not the device is compliant. The samples are requested on demand by the admin.
n Engine Compliance
The compliance engine, a software algorithm that receives and measures scheduled samples, primarily determines the compliance of a device. The time intervals for the running of the scheduler are defined in the console by the admin.
Enforcing mobile security policies is represented by this general overview.
1 Choose your platform.
Determine on which platform you want to enforce compliance. After you select a platform, you are never shown an option that does not apply to that platform.
2 Build your policies.
Customize your policy to cover everything from an application list, compromised status, encryption, manufacturer, model and OS version, passcode and roaming.
VMware, Inc. 116
3 Define escalation.
Configure time-based actions in hours or days and take a tiered approach to those actions.
4 Specify actions.
Send SMS, email, or push notifications to the user device or send an email only to an Administrator. Request device check-in, remove or block specific profiles, install compliance profiles, remove, or block apps and perform an enterprise wipe.
5 Configure assignments.
Assign your compliance policy by organization group or smart group then confirm the assignment by device.
Confirm the Health of Windows DevicesWindows devices enable you to configure and scan the health of the device at startup to ensure that your corporate resources are secure. For more information, see the topic Compromised Device Detection with Health Attestation found in the Windows Desktop Device Management documentation on docs.vmware.com.
This chapter includes the following topics:
n Compliance Policies List View
n Compliance Policy Rules by Platform
n Add a Compliance Policy
n Compromised Device Detection with Health Attestation
Compliance Policies List ViewThe Compliance Policies List View in Workspace ONE UEM powered by AirWatch enables you to see all the active and inactive compliance policies and their configurations.
Devices are placed in a Pending compliance status during an initial enrollment. Creating, saving, and assigning a policy to an enrolled device causes the device compliance status to either be Compliant or NonCompliant.
Similarly, changes to Smart Group assignments only cause a device compliance policy to be Pending when the device is new to the smart group. Devices already assigned to the smart group cannot see their compliance status change simply because the smart group expands (or contracts) its assignment.
View the Compliance Policy List view by navigating to Devices > Compliance Policies > List View.
Managing Devices
VMware, Inc. 117
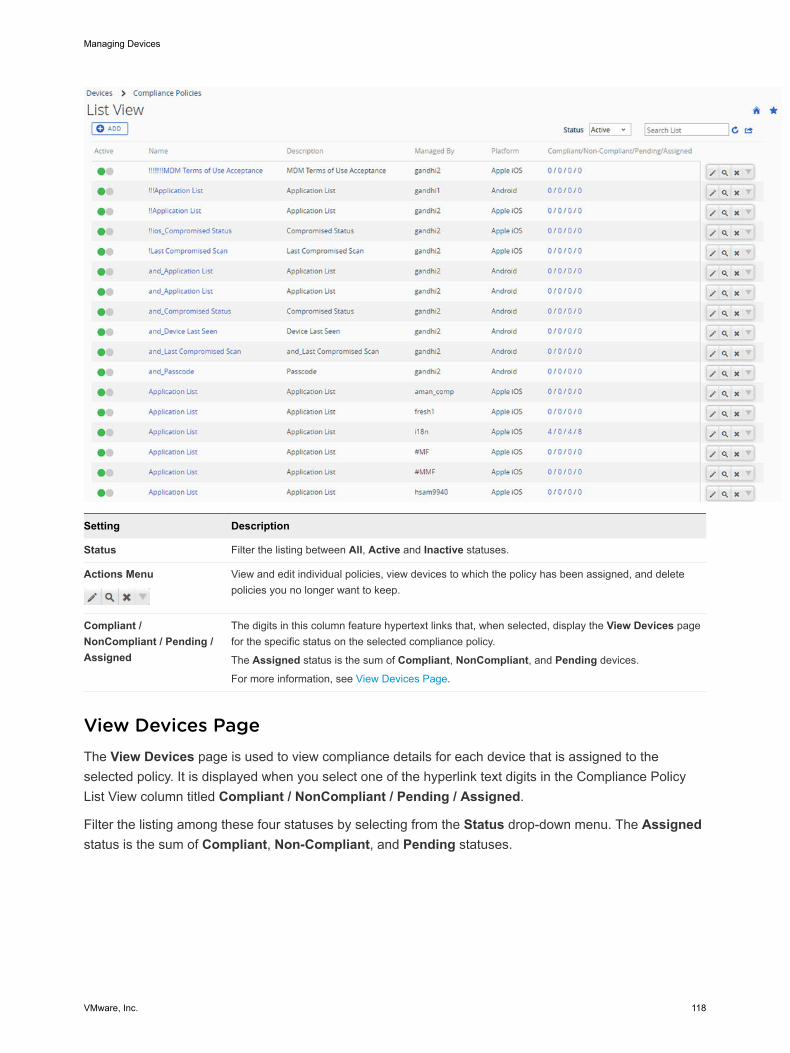
Setting Description
Status Filter the listing between All, Active and Inactive statuses.
Actions Menu View and edit individual policies, view devices to which the policy has been assigned, and delete policies you no longer want to keep.
Compliant / NonCompliant / Pending / Assigned
The digits in this column feature hypertext links that, when selected, display the View Devices page for the specific status on the selected compliance policy.
The Assigned status is the sum of Compliant, NonCompliant, and Pending devices.
For more information, see View Devices Page.
View Devices PageThe View Devices page is used to view compliance details for each device that is assigned to the selected policy. It is displayed when you select one of the hyperlink text digits in the Compliance Policy List View column titled Compliant / NonCompliant / Pending / Assigned.
Filter the listing among these four statuses by selecting from the Status drop-down menu. The Assigned status is the sum of Compliant, Non-Compliant, and Pending statuses.
Managing Devices
VMware, Inc. 118
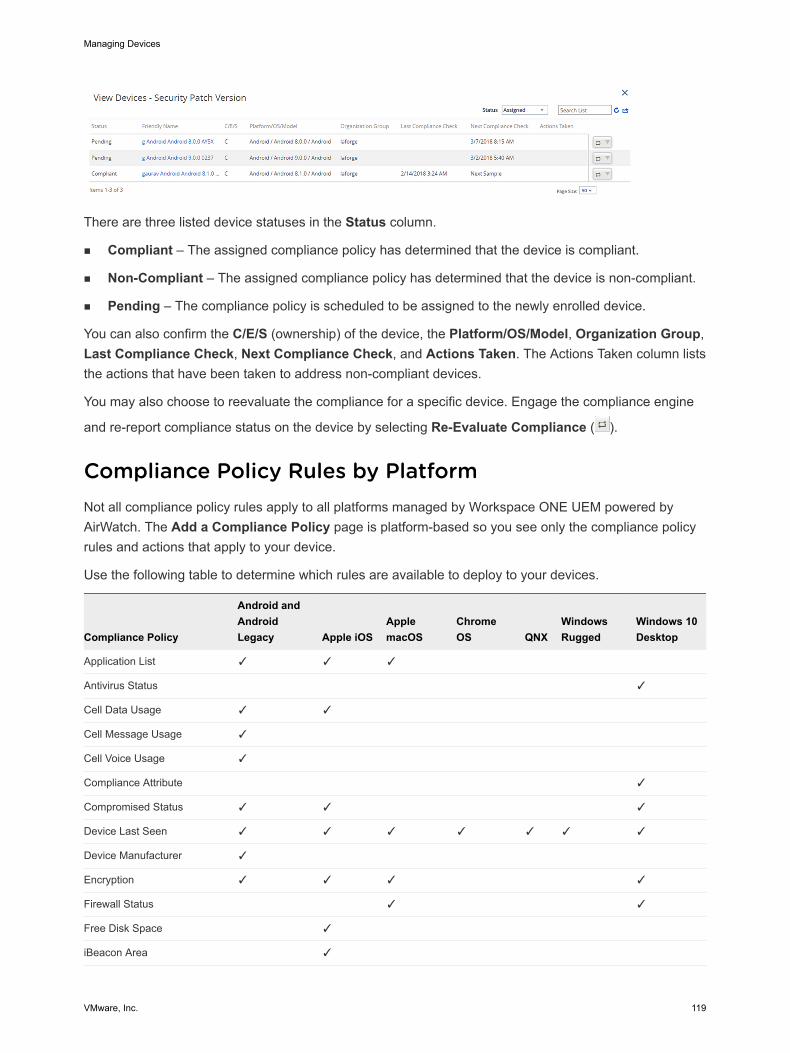
There are three listed device statuses in the Status column.
n Compliant – The assigned compliance policy has determined that the device is compliant.
n Non-Compliant – The assigned compliance policy has determined that the device is non-compliant.
n Pending – The compliance policy is scheduled to be assigned to the newly enrolled device.
You can also confirm the C/E/S (ownership) of the device, the Platform/OS/Model, Organization Group, Last Compliance Check, Next Compliance Check, and Actions Taken. The Actions Taken column lists the actions that have been taken to address non-compliant devices.
You may also choose to reevaluate the compliance for a specific device. Engage the compliance engine
and re-report compliance status on the device by selecting Re-Evaluate Compliance ( ).
Compliance Policy Rules by PlatformNot all compliance policy rules apply to all platforms managed by Workspace ONE UEM powered by AirWatch. The Add a Compliance Policy page is platform-based so you see only the compliance policy rules and actions that apply to your device.
Use the following table to determine which rules are available to deploy to your devices.
Compliance Policy
Android and Android Legacy Apple iOS
Apple macOS
Chrome OS QNX
Windows Rugged
Windows 10 Desktop
Application List ✓ ✓ ✓
Antivirus Status ✓
Cell Data Usage ✓ ✓
Cell Message Usage ✓
Cell Voice Usage ✓
Compliance Attribute ✓
Compromised Status ✓ ✓ ✓
Device Last Seen ✓ ✓ ✓ ✓ ✓ ✓ ✓
Device Manufacturer ✓
Encryption ✓ ✓ ✓ ✓
Firewall Status ✓ ✓
Free Disk Space ✓
iBeacon Area ✓
Managing Devices
VMware, Inc. 119
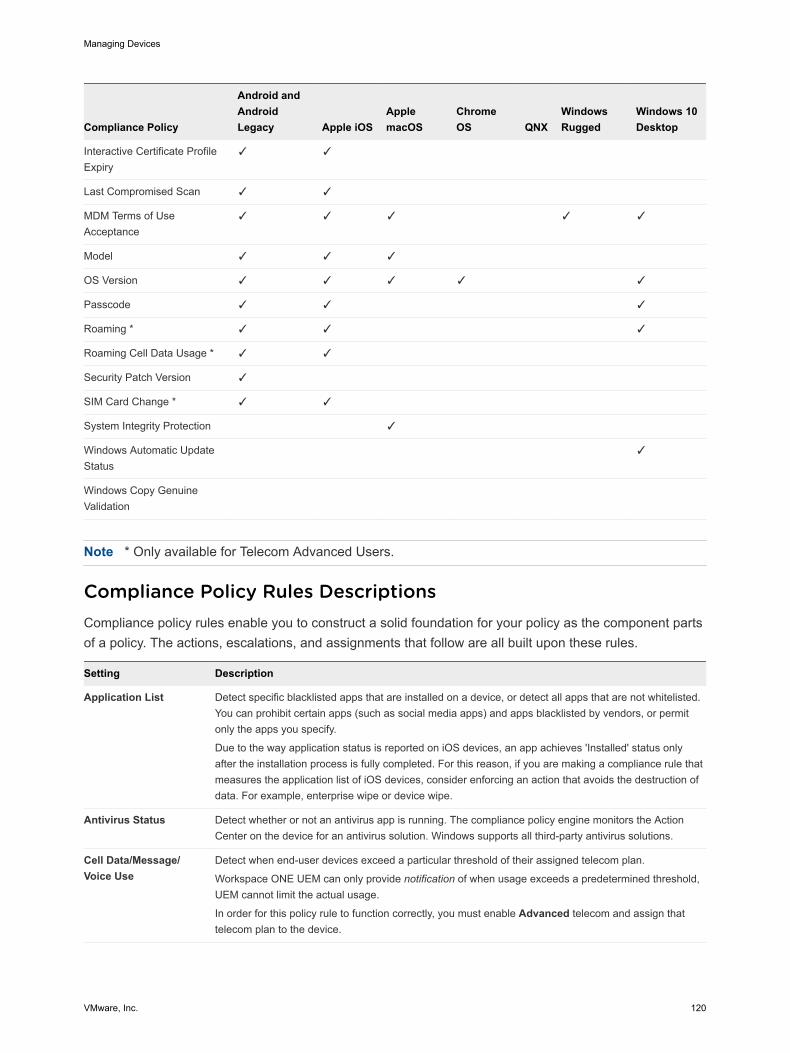
Compliance Policy
Android and Android Legacy Apple iOS
Apple macOS
Chrome OS QNX
Windows Rugged
Windows 10 Desktop
Interactive Certificate Profile Expiry
✓ ✓
Last Compromised Scan ✓ ✓
MDM Terms of Use Acceptance
✓ ✓ ✓ ✓ ✓
Model ✓ ✓ ✓
OS Version ✓ ✓ ✓ ✓ ✓
Passcode ✓ ✓ ✓
Roaming * ✓ ✓ ✓
Roaming Cell Data Usage * ✓ ✓
Security Patch Version ✓
SIM Card Change * ✓ ✓
System Integrity Protection ✓
Windows Automatic Update Status
✓
Windows Copy Genuine Validation
Note * Only available for Telecom Advanced Users.
Compliance Policy Rules DescriptionsCompliance policy rules enable you to construct a solid foundation for your policy as the component parts of a policy. The actions, escalations, and assignments that follow are all built upon these rules.
Setting Description
Application List Detect specific blacklisted apps that are installed on a device, or detect all apps that are not whitelisted. You can prohibit certain apps (such as social media apps) and apps blacklisted by vendors, or permit only the apps you specify.
Due to the way application status is reported on iOS devices, an app achieves 'Installed' status only after the installation process is fully completed. For this reason, if you are making a compliance rule that measures the application list of iOS devices, consider enforcing an action that avoids the destruction of data. For example, enterprise wipe or device wipe.
Antivirus Status Detect whether or not an antivirus app is running. The compliance policy engine monitors the Action Center on the device for an antivirus solution. Windows supports all third-party antivirus solutions.
Cell Data/Message/Voice Use
Detect when end-user devices exceed a particular threshold of their assigned telecom plan.
Workspace ONE UEM can only provide notification of when usage exceeds a predetermined threshold, UEM cannot limit the actual usage.
In order for this policy rule to function correctly, you must enable Advanced telecom and assign that telecom plan to the device.
Managing Devices
VMware, Inc. 120
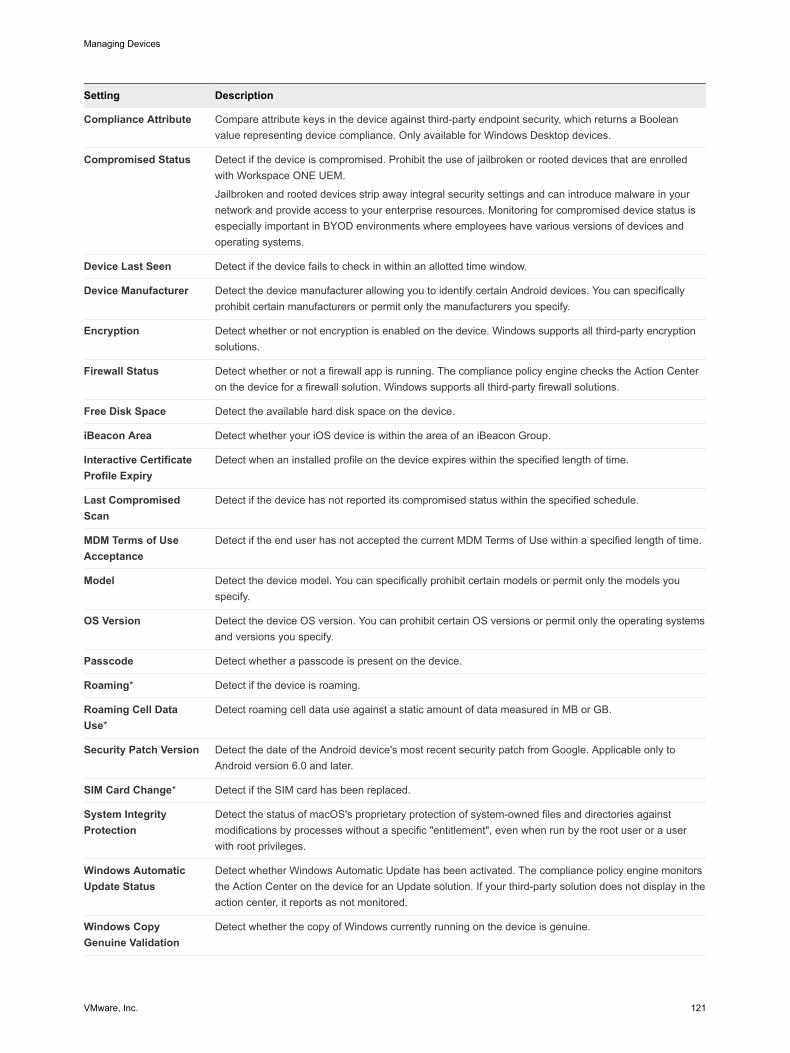
Setting Description
Compliance Attribute Compare attribute keys in the device against third-party endpoint security, which returns a Boolean value representing device compliance. Only available for Windows Desktop devices.
Compromised Status Detect if the device is compromised. Prohibit the use of jailbroken or rooted devices that are enrolled with Workspace ONE UEM.
Jailbroken and rooted devices strip away integral security settings and can introduce malware in your network and provide access to your enterprise resources. Monitoring for compromised device status is especially important in BYOD environments where employees have various versions of devices and operating systems.
Device Last Seen Detect if the device fails to check in within an allotted time window.
Device Manufacturer Detect the device manufacturer allowing you to identify certain Android devices. You can specifically prohibit certain manufacturers or permit only the manufacturers you specify.
Encryption Detect whether or not encryption is enabled on the device. Windows supports all third-party encryption solutions.
Firewall Status Detect whether or not a firewall app is running. The compliance policy engine checks the Action Center on the device for a firewall solution. Windows supports all third-party firewall solutions.
Free Disk Space Detect the available hard disk space on the device.
iBeacon Area Detect whether your iOS device is within the area of an iBeacon Group.
Interactive Certificate Profile Expiry
Detect when an installed profile on the device expires within the specified length of time.
Last Compromised Scan
Detect if the device has not reported its compromised status within the specified schedule.
MDM Terms of Use Acceptance
Detect if the end user has not accepted the current MDM Terms of Use within a specified length of time.
Model Detect the device model. You can specifically prohibit certain models or permit only the models you specify.
OS Version Detect the device OS version. You can prohibit certain OS versions or permit only the operating systems and versions you specify.
Passcode Detect whether a passcode is present on the device.
Roaming* Detect if the device is roaming.
Roaming Cell Data Use*
Detect roaming cell data use against a static amount of data measured in MB or GB.
Security Patch Version Detect the date of the Android device's most recent security patch from Google. Applicable only to Android version 6.0 and later.
SIM Card Change* Detect if the SIM card has been replaced.
System Integrity Protection
Detect the status of macOS's proprietary protection of system-owned files and directories against modifications by processes without a specific "entitlement", even when run by the root user or a user with root privileges.
Windows Automatic Update Status
Detect whether Windows Automatic Update has been activated. The compliance policy engine monitors the Action Center on the device for an Update solution. If your third-party solution does not display in the action center, it reports as not monitored.
Windows Copy Genuine Validation
Detect whether the copy of Windows currently running on the device is genuine.
Managing Devices
VMware, Inc. 121
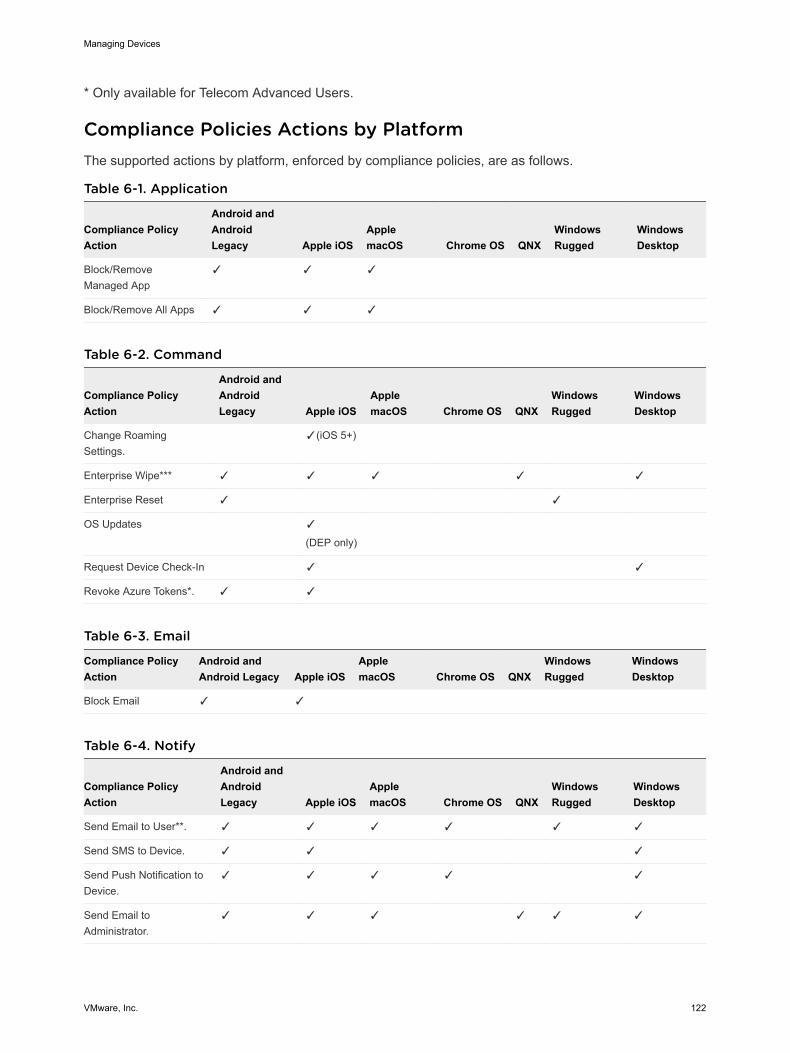
* Only available for Telecom Advanced Users.
Compliance Policies Actions by PlatformThe supported actions by platform, enforced by compliance policies, are as follows.
Table 6-1. Application
Compliance Policy Action
Android and Android Legacy Apple iOS
Apple macOS Chrome OS QNX
Windows Rugged
Windows Desktop
Block/Remove Managed App
✓ ✓ ✓
Block/Remove All Apps ✓ ✓ ✓
Table 6-2. Command
Compliance Policy Action
Android and Android Legacy Apple iOS
Apple macOS Chrome OS QNX
Windows Rugged
Windows Desktop
Change Roaming Settings.
✓(iOS 5+)
Enterprise Wipe*** ✓ ✓ ✓ ✓ ✓
Enterprise Reset ✓ ✓
OS Updates ✓
(DEP only)
Request Device Check-In ✓ ✓
Revoke Azure Tokens*. ✓ ✓
Table 6-3. Email
Compliance Policy Action
Android and Android Legacy Apple iOS
Apple macOS Chrome OS QNX
Windows Rugged
Windows Desktop
Block Email ✓ ✓
Table 6-4. Notify
Compliance Policy Action
Android and Android Legacy Apple iOS
Apple macOS Chrome OS QNX
Windows Rugged
Windows Desktop
Send Email to User**. ✓ ✓ ✓ ✓ ✓ ✓
Send SMS to Device. ✓ ✓ ✓
Send Push Notification to Device.
✓ ✓ ✓ ✓ ✓
Send Email to Administrator.
✓ ✓ ✓ ✓ ✓ ✓
Managing Devices
VMware, Inc. 122
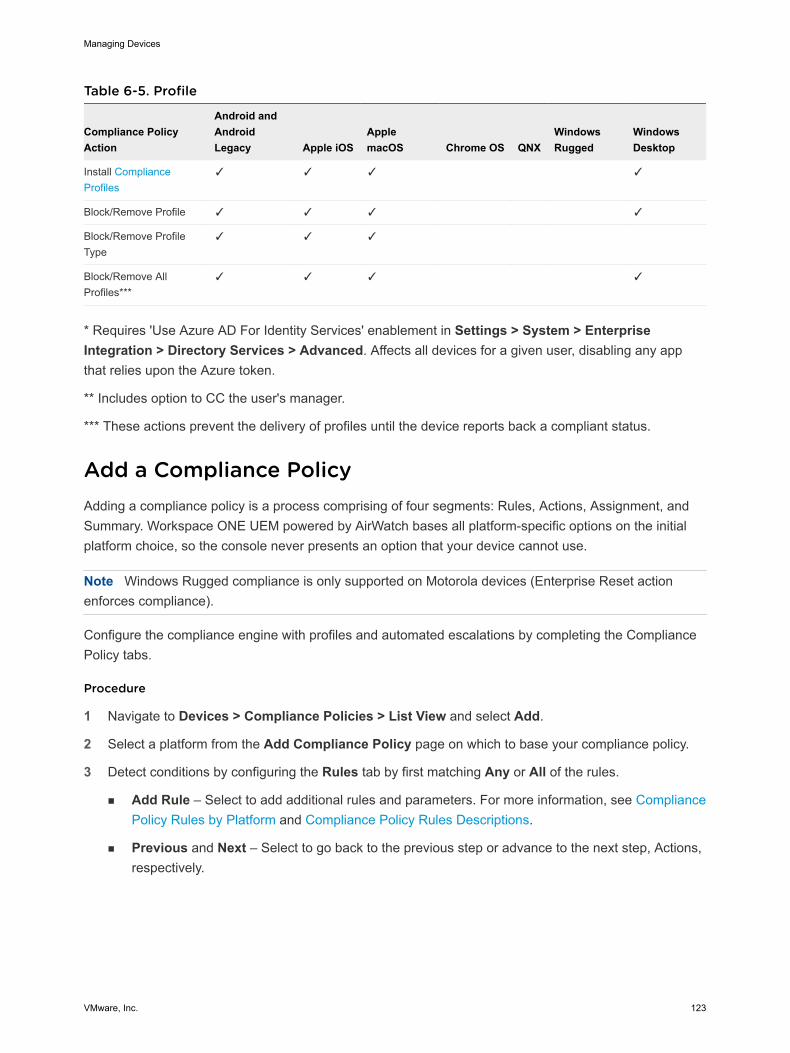
Table 6-5. Profile
Compliance Policy Action
Android and Android Legacy Apple iOS
Apple macOS Chrome OS QNX
Windows Rugged
Windows Desktop
Install Compliance Profiles
✓ ✓ ✓ ✓
Block/Remove Profile ✓ ✓ ✓ ✓
Block/Remove Profile Type
✓ ✓ ✓
Block/Remove All Profiles***
✓ ✓ ✓ ✓
* Requires 'Use Azure AD For Identity Services' enablement in Settings > System > Enterprise Integration > Directory Services > Advanced. Affects all devices for a given user, disabling any app that relies upon the Azure token.
** Includes option to CC the user's manager.
*** These actions prevent the delivery of profiles until the device reports back a compliant status.
Add a Compliance PolicyAdding a compliance policy is a process comprising of four segments: Rules, Actions, Assignment, and Summary. Workspace ONE UEM powered by AirWatch bases all platform-specific options on the initial platform choice, so the console never presents an option that your device cannot use.
Note Windows Rugged compliance is only supported on Motorola devices (Enterprise Reset action enforces compliance).
Configure the compliance engine with profiles and automated escalations by completing the Compliance Policy tabs.
Procedure
1 Navigate to Devices > Compliance Policies > List View and select Add.
2 Select a platform from the Add Compliance Policy page on which to base your compliance policy.
3 Detect conditions by configuring the Rules tab by first matching Any or All of the rules.
n Add Rule – Select to add additional rules and parameters. For more information, see Compliance Policy Rules by Platform and Compliance Policy Rules Descriptions.
n Previous and Next – Select to go back to the previous step or advance to the next step, Actions, respectively.
Managing Devices
VMware, Inc. 123
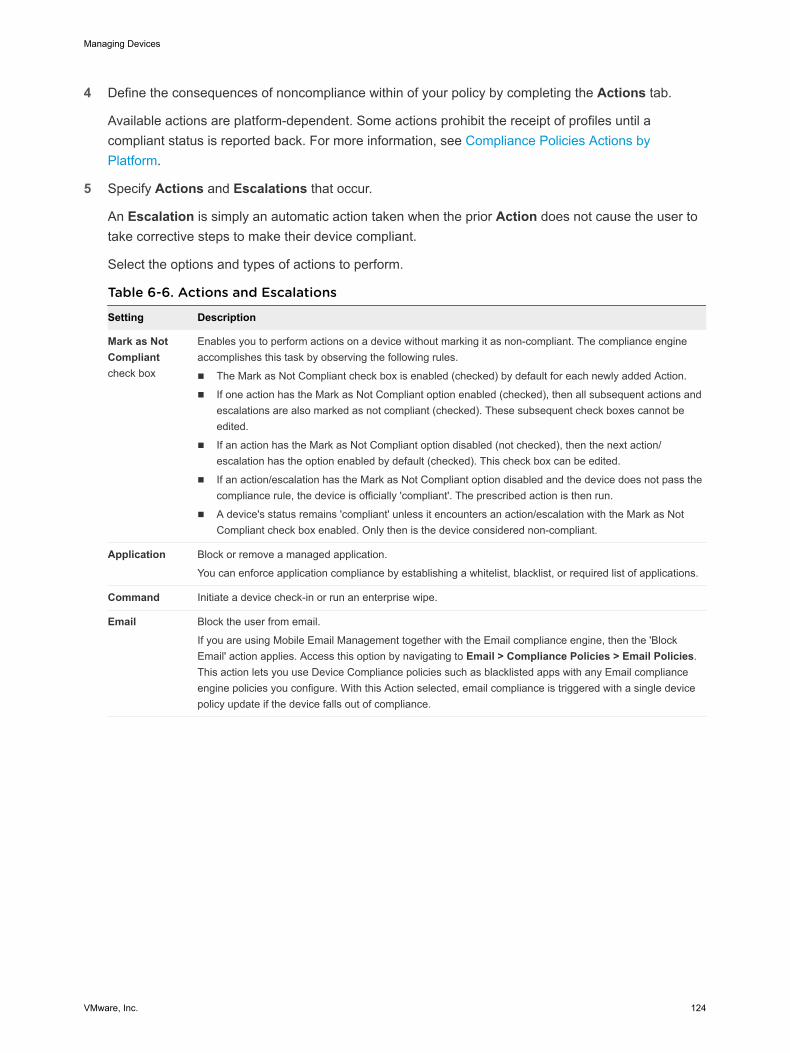
4 Define the consequences of noncompliance within of your policy by completing the Actions tab.
Available actions are platform-dependent. Some actions prohibit the receipt of profiles until a compliant status is reported back. For more information, see Compliance Policies Actions by Platform.
5 Specify Actions and Escalations that occur.
An Escalation is simply an automatic action taken when the prior Action does not cause the user to take corrective steps to make their device compliant.
Select the options and types of actions to perform.
Table 6-6. Actions and Escalations
Setting Description
Mark as Not Compliant check box
Enables you to perform actions on a device without marking it as non-compliant. The compliance engine accomplishes this task by observing the following rules.
n The Mark as Not Compliant check box is enabled (checked) by default for each newly added Action.
n If one action has the Mark as Not Compliant option enabled (checked), then all subsequent actions and escalations are also marked as not compliant (checked). These subsequent check boxes cannot be edited.
n If an action has the Mark as Not Compliant option disabled (not checked), then the next action/escalation has the option enabled by default (checked). This check box can be edited.
n If an action/escalation has the Mark as Not Compliant option disabled and the device does not pass the compliance rule, the device is officially 'compliant'. The prescribed action is then run.
n A device's status remains 'compliant' unless it encounters an action/escalation with the Mark as Not Compliant check box enabled. Only then is the device considered non-compliant.
Application Block or remove a managed application.
You can enforce application compliance by establishing a whitelist, blacklist, or required list of applications.
Command Initiate a device check-in or run an enterprise wipe.
Email Block the user from email.
If you are using Mobile Email Management together with the Email compliance engine, then the 'Block Email' action applies. Access this option by navigating to Email > Compliance Policies > Email Policies. This action lets you use Device Compliance policies such as blacklisted apps with any Email compliance engine policies you configure. With this Action selected, email compliance is triggered with a single device policy update if the device falls out of compliance.
Managing Devices
VMware, Inc. 124
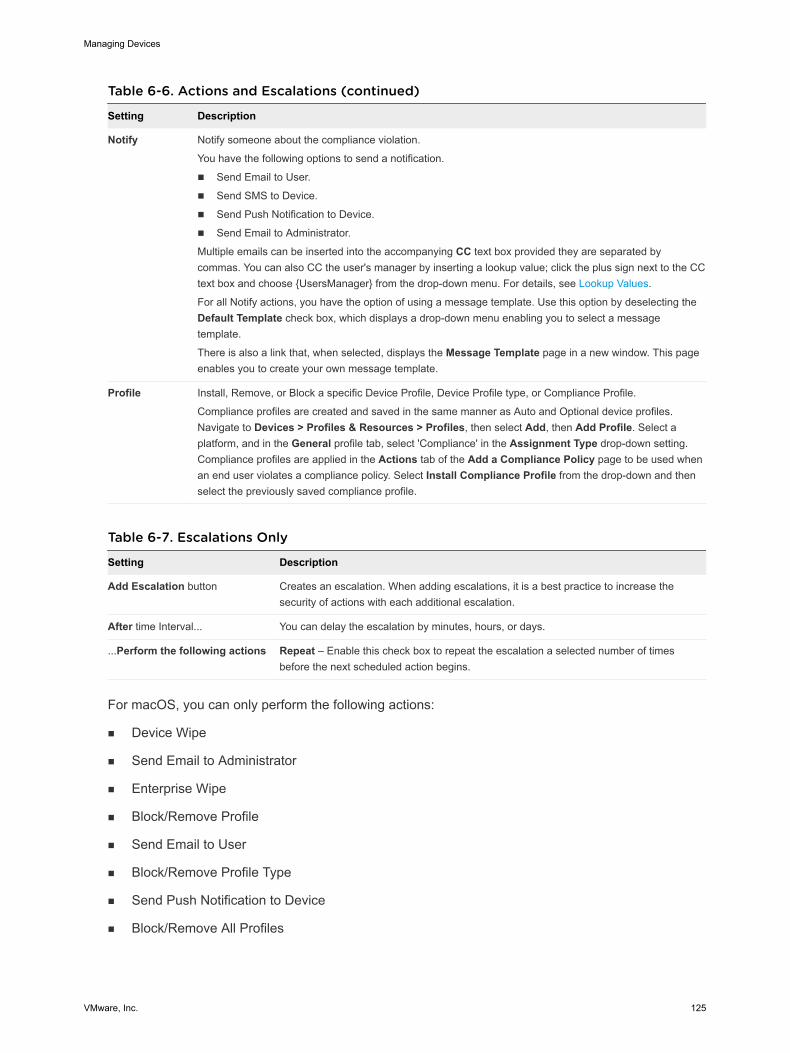
Table 6-6. Actions and Escalations (continued)
Setting Description
Notify Notify someone about the compliance violation.
You have the following options to send a notification.
n Send Email to User.
n Send SMS to Device.
n Send Push Notification to Device.
n Send Email to Administrator.
Multiple emails can be inserted into the accompanying CC text box provided they are separated by commas. You can also CC the user's manager by inserting a lookup value; click the plus sign next to the CC text box and choose {UsersManager} from the drop-down menu. For details, see Lookup Values.
For all Notify actions, you have the option of using a message template. Use this option by deselecting the Default Template check box, which displays a drop-down menu enabling you to select a message template.
There is also a link that, when selected, displays the Message Template page in a new window. This page enables you to create your own message template.
Profile Install, Remove, or Block a specific Device Profile, Device Profile type, or Compliance Profile.
Compliance profiles are created and saved in the same manner as Auto and Optional device profiles. Navigate to Devices > Profiles & Resources > Profiles, then select Add, then Add Profile. Select a platform, and in the General profile tab, select 'Compliance' in the Assignment Type drop-down setting. Compliance profiles are applied in the Actions tab of the Add a Compliance Policy page to be used when an end user violates a compliance policy. Select Install Compliance Profile from the drop-down and then select the previously saved compliance profile.
Table 6-7. Escalations Only
Setting Description
Add Escalation button Creates an escalation. When adding escalations, it is a best practice to increase the security of actions with each additional escalation.
After time Interval... You can delay the escalation by minutes, hours, or days.
...Perform the following actions Repeat – Enable this check box to repeat the escalation a selected number of times before the next scheduled action begins.
For macOS, you can only perform the following actions:
n Device Wipe
n Send Email to Administrator
n Enterprise Wipe
n Block/Remove Profile
n Send Email to User
n Block/Remove Profile Type
n Send Push Notification to Device
n Block/Remove All Profiles
Managing Devices
VMware, Inc. 125
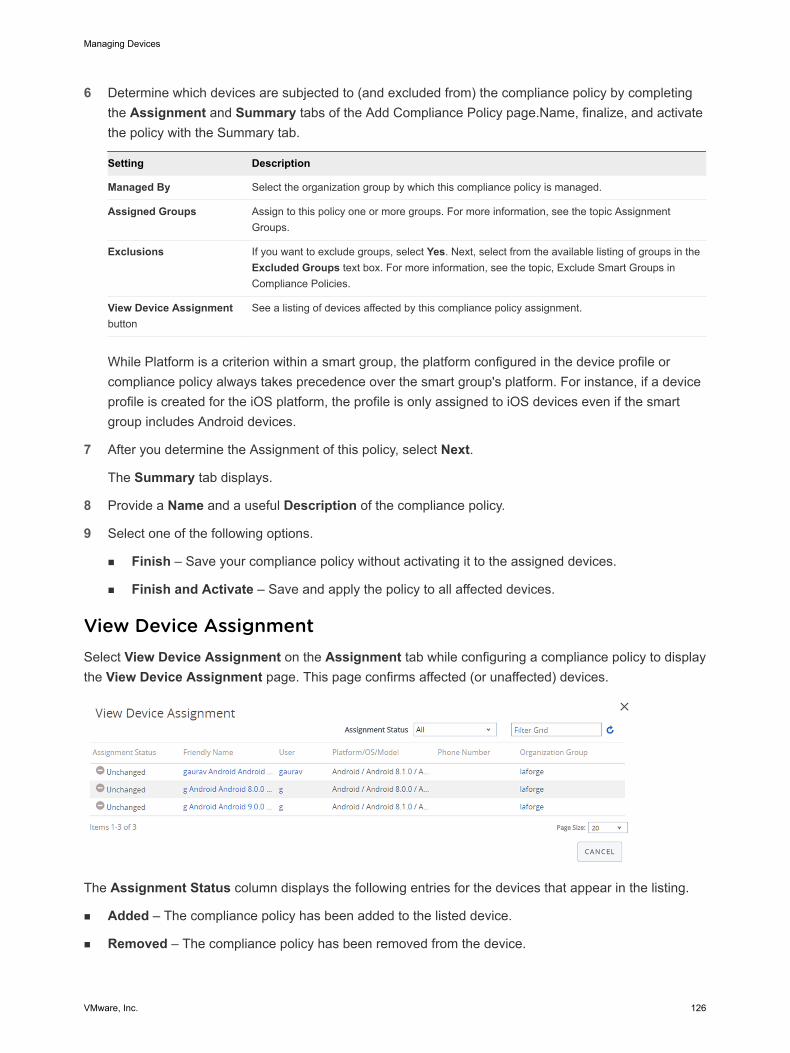
6 Determine which devices are subjected to (and excluded from) the compliance policy by completing the Assignment and Summary tabs of the Add Compliance Policy page.Name, finalize, and activate the policy with the Summary tab.
Setting Description
Managed By Select the organization group by which this compliance policy is managed.
Assigned Groups Assign to this policy one or more groups. For more information, see the topic Assignment Groups.
Exclusions If you want to exclude groups, select Yes. Next, select from the available listing of groups in the Excluded Groups text box. For more information, see the topic, Exclude Smart Groups in Compliance Policies.
View Device Assignment button
See a listing of devices affected by this compliance policy assignment.
While Platform is a criterion within a smart group, the platform configured in the device profile or compliance policy always takes precedence over the smart group's platform. For instance, if a device profile is created for the iOS platform, the profile is only assigned to iOS devices even if the smart group includes Android devices.
7 After you determine the Assignment of this policy, select Next.
The Summary tab displays.
8 Provide a Name and a useful Description of the compliance policy.
9 Select one of the following options.
n Finish – Save your compliance policy without activating it to the assigned devices.
n Finish and Activate – Save and apply the policy to all affected devices.
View Device AssignmentSelect View Device Assignment on the Assignment tab while configuring a compliance policy to display the View Device Assignment page. This page confirms affected (or unaffected) devices.
The Assignment Status column displays the following entries for the devices that appear in the listing.
n Added – The compliance policy has been added to the listed device.
n Removed – The compliance policy has been removed from the device.
Managing Devices
VMware, Inc. 126
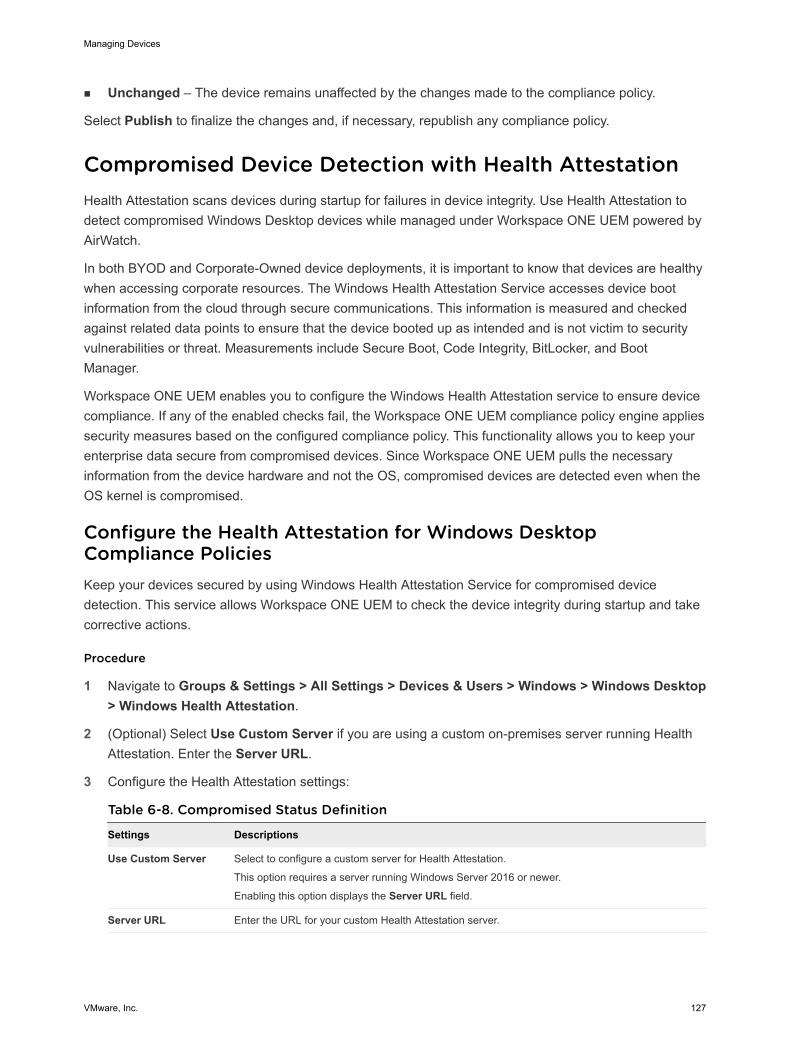
n Unchanged – The device remains unaffected by the changes made to the compliance policy.
Select Publish to finalize the changes and, if necessary, republish any compliance policy.
Compromised Device Detection with Health AttestationHealth Attestation scans devices during startup for failures in device integrity. Use Health Attestation to detect compromised Windows Desktop devices while managed under Workspace ONE UEM powered by AirWatch.
In both BYOD and Corporate-Owned device deployments, it is important to know that devices are healthy when accessing corporate resources. The Windows Health Attestation Service accesses device boot information from the cloud through secure communications. This information is measured and checked against related data points to ensure that the device booted up as intended and is not victim to security vulnerabilities or threat. Measurements include Secure Boot, Code Integrity, BitLocker, and Boot Manager.
Workspace ONE UEM enables you to configure the Windows Health Attestation service to ensure device compliance. If any of the enabled checks fail, the Workspace ONE UEM compliance policy engine applies security measures based on the configured compliance policy. This functionality allows you to keep your enterprise data secure from compromised devices. Since Workspace ONE UEM pulls the necessary information from the device hardware and not the OS, compromised devices are detected even when the OS kernel is compromised.
Configure the Health Attestation for Windows Desktop Compliance PoliciesKeep your devices secured by using Windows Health Attestation Service for compromised device detection. This service allows Workspace ONE UEM to check the device integrity during startup and take corrective actions.
Procedure
1 Navigate to Groups & Settings > All Settings > Devices & Users > Windows > Windows Desktop > Windows Health Attestation.
2 (Optional) Select Use Custom Server if you are using a custom on-premises server running Health Attestation. Enter the Server URL.
3 Configure the Health Attestation settings:
Table 6-8. Compromised Status Definition
Settings Descriptions
Use Custom Server Select to configure a custom server for Health Attestation.
This option requires a server running Windows Server 2016 or newer.
Enabling this option displays the Server URL field.
Server URL Enter the URL for your custom Health Attestation server.
Managing Devices
VMware, Inc. 127
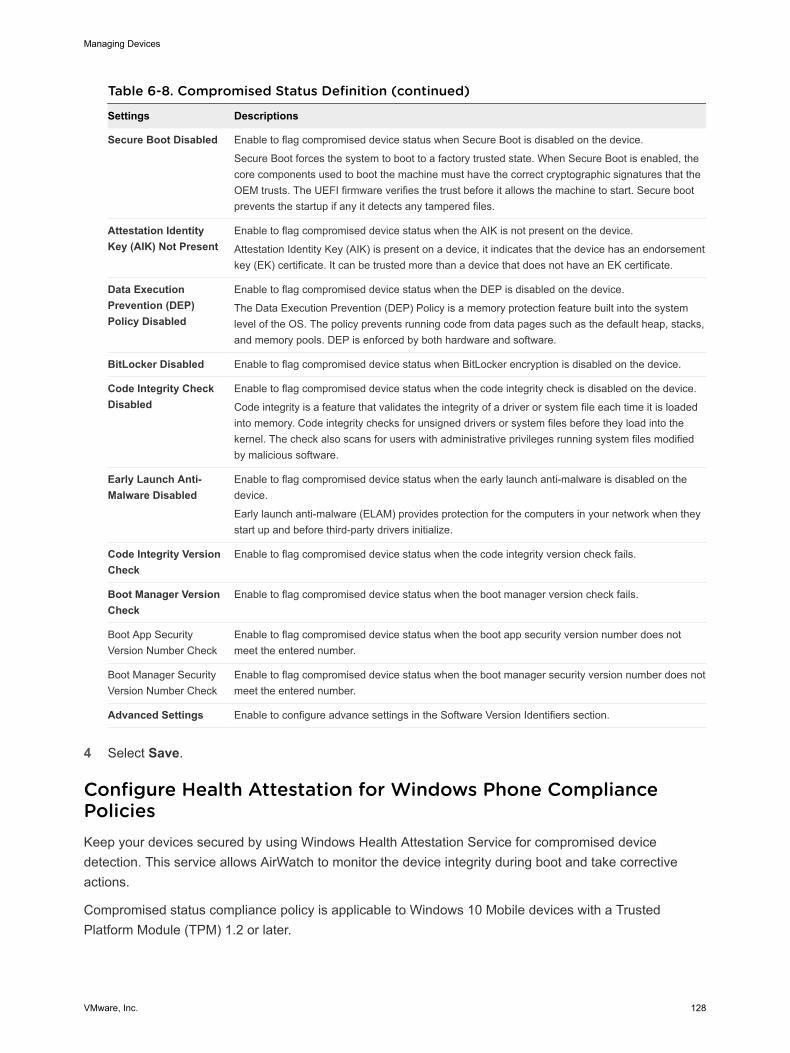
Table 6-8. Compromised Status Definition (continued)
Settings Descriptions
Secure Boot Disabled Enable to flag compromised device status when Secure Boot is disabled on the device.
Secure Boot forces the system to boot to a factory trusted state. When Secure Boot is enabled, the core components used to boot the machine must have the correct cryptographic signatures that the OEM trusts. The UEFI firmware verifies the trust before it allows the machine to start. Secure boot prevents the startup if any it detects any tampered files.
Attestation Identity Key (AIK) Not Present
Enable to flag compromised device status when the AIK is not present on the device.
Attestation Identity Key (AIK) is present on a device, it indicates that the device has an endorsement key (EK) certificate. It can be trusted more than a device that does not have an EK certificate.
Data Execution Prevention (DEP) Policy Disabled
Enable to flag compromised device status when the DEP is disabled on the device.
The Data Execution Prevention (DEP) Policy is a memory protection feature built into the system level of the OS. The policy prevents running code from data pages such as the default heap, stacks, and memory pools. DEP is enforced by both hardware and software.
BitLocker Disabled Enable to flag compromised device status when BitLocker encryption is disabled on the device.
Code Integrity Check Disabled
Enable to flag compromised device status when the code integrity check is disabled on the device.
Code integrity is a feature that validates the integrity of a driver or system file each time it is loaded into memory. Code integrity checks for unsigned drivers or system files before they load into the kernel. The check also scans for users with administrative privileges running system files modified by malicious software.
Early Launch Anti-Malware Disabled
Enable to flag compromised device status when the early launch anti-malware is disabled on the device.
Early launch anti-malware (ELAM) provides protection for the computers in your network when they start up and before third-party drivers initialize.
Code Integrity Version Check
Enable to flag compromised device status when the code integrity version check fails.
Boot Manager Version Check
Enable to flag compromised device status when the boot manager version check fails.
Boot App Security Version Number Check
Enable to flag compromised device status when the boot app security version number does not meet the entered number.
Boot Manager Security Version Number Check
Enable to flag compromised device status when the boot manager security version number does not meet the entered number.
Advanced Settings Enable to configure advance settings in the Software Version Identifiers section.
4 Select Save.
Configure Health Attestation for Windows Phone Compliance PoliciesKeep your devices secured by using Windows Health Attestation Service for compromised device detection. This service allows AirWatch to monitor the device integrity during boot and take corrective actions.
Compromised status compliance policy is applicable to Windows 10 Mobile devices with a Trusted Platform Module (TPM) 1.2 or later.
Managing Devices
VMware, Inc. 128
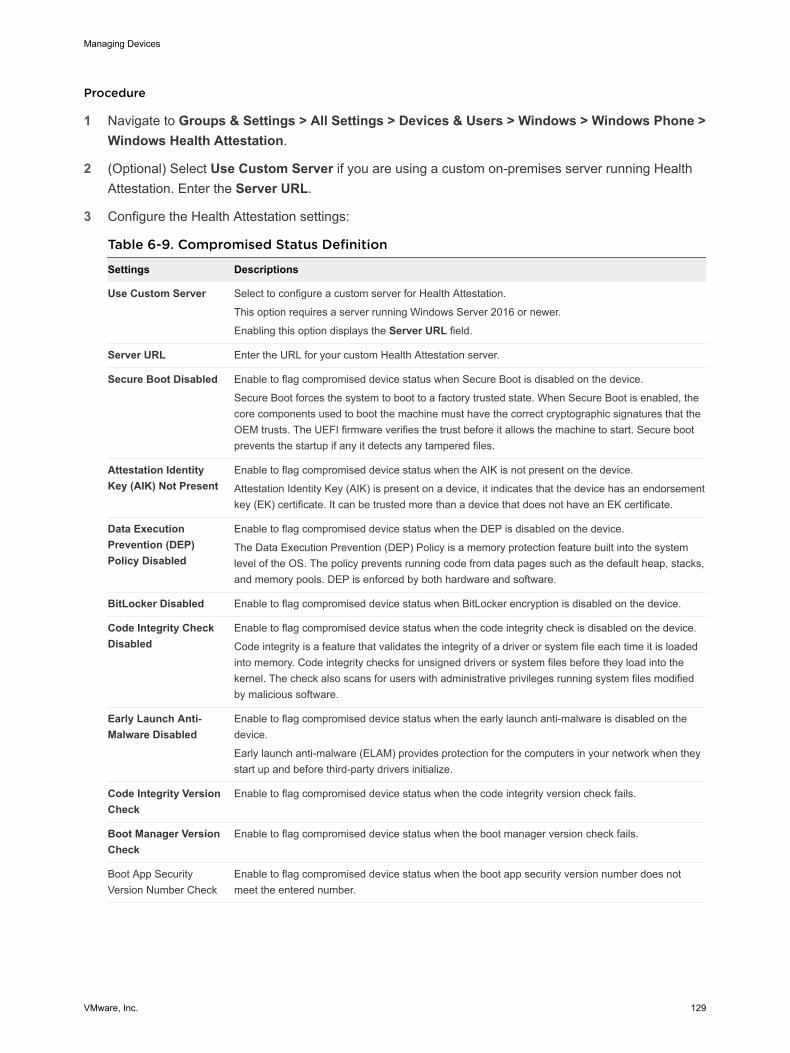
Procedure
1 Navigate to Groups & Settings > All Settings > Devices & Users > Windows > Windows Phone > Windows Health Attestation.
2 (Optional) Select Use Custom Server if you are using a custom on-premises server running Health Attestation. Enter the Server URL.
3 Configure the Health Attestation settings:
Table 6-9. Compromised Status Definition
Settings Descriptions
Use Custom Server Select to configure a custom server for Health Attestation.
This option requires a server running Windows Server 2016 or newer.
Enabling this option displays the Server URL field.
Server URL Enter the URL for your custom Health Attestation server.
Secure Boot Disabled Enable to flag compromised device status when Secure Boot is disabled on the device.
Secure Boot forces the system to boot to a factory trusted state. When Secure Boot is enabled, the core components used to boot the machine must have the correct cryptographic signatures that the OEM trusts. The UEFI firmware verifies the trust before it allows the machine to start. Secure boot prevents the startup if any it detects any tampered files.
Attestation Identity Key (AIK) Not Present
Enable to flag compromised device status when the AIK is not present on the device.
Attestation Identity Key (AIK) is present on a device, it indicates that the device has an endorsement key (EK) certificate. It can be trusted more than a device that does not have an EK certificate.
Data Execution Prevention (DEP) Policy Disabled
Enable to flag compromised device status when the DEP is disabled on the device.
The Data Execution Prevention (DEP) Policy is a memory protection feature built into the system level of the OS. The policy prevents running code from data pages such as the default heap, stacks, and memory pools. DEP is enforced by both hardware and software.
BitLocker Disabled Enable to flag compromised device status when BitLocker encryption is disabled on the device.
Code Integrity Check Disabled
Enable to flag compromised device status when the code integrity check is disabled on the device.
Code integrity is a feature that validates the integrity of a driver or system file each time it is loaded into memory. Code integrity checks for unsigned drivers or system files before they load into the kernel. The check also scans for users with administrative privileges running system files modified by malicious software.
Early Launch Anti-Malware Disabled
Enable to flag compromised device status when the early launch anti-malware is disabled on the device.
Early launch anti-malware (ELAM) provides protection for the computers in your network when they start up and before third-party drivers initialize.
Code Integrity Version Check
Enable to flag compromised device status when the code integrity version check fails.
Boot Manager Version Check
Enable to flag compromised device status when the boot manager version check fails.
Boot App Security Version Number Check
Enable to flag compromised device status when the boot app security version number does not meet the entered number.
Managing Devices
VMware, Inc. 129
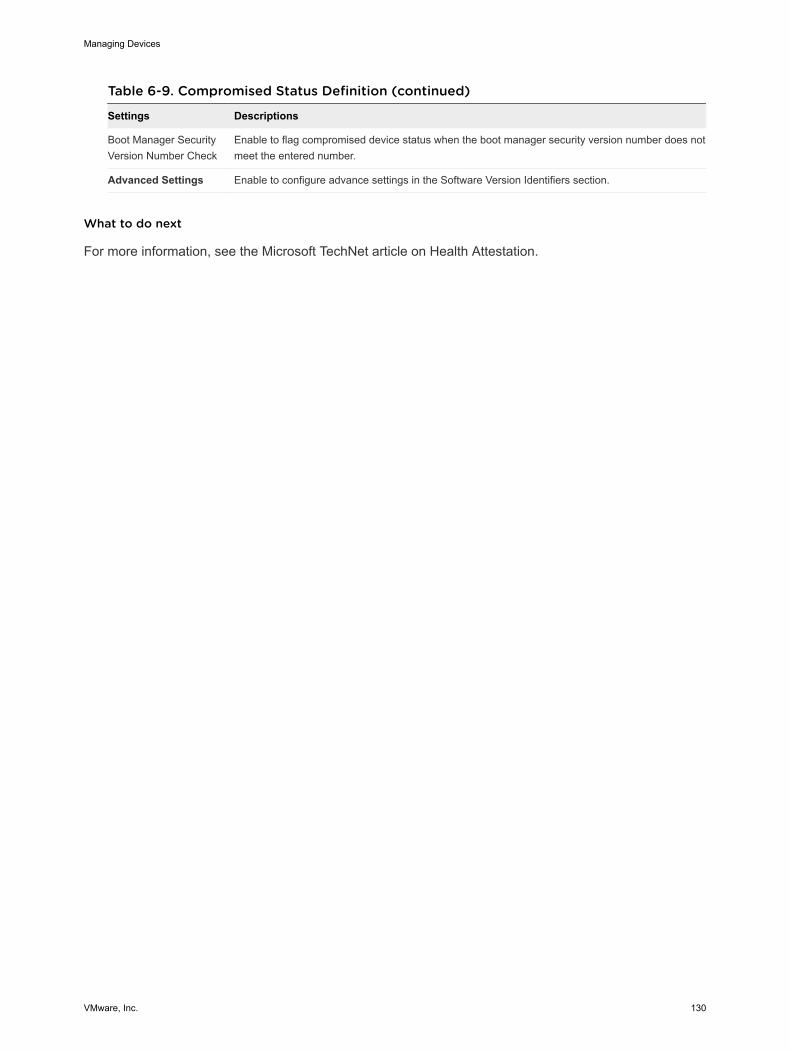
Table 6-9. Compromised Status Definition (continued)
Settings Descriptions
Boot Manager Security Version Number Check
Enable to flag compromised device status when the boot manager security version number does not meet the entered number.
Advanced Settings Enable to configure advance settings in the Software Version Identifiers section.
What to do next
For more information, see the Microsoft TechNet article on Health Attestation.
Managing Devices
VMware, Inc. 130
Privacy for BYOD Deployments 7One of the biggest concerns for BYOD end users is the privacy of the personal content on devices managed under Workspace ONE UEM powered by AirWatch. Your organization must assure employees that their personal data is not subject to corporate oversight.
With Workspace ONE UEM, you can ensure the privacy of personal data by creating customized privacy policies that do not collect personal data based on the device ownership type. In addition, you can define granular privacy settings to disable the collection of the personally identifiable information and disallow certain remote actions to employee-owned devices to ensure employee privacy.
You must inform your end users about how their data is collected and stored when they enroll into Workspace ONE UEM.
For more information about how VMware handles information collected through Workspace ONE UEM, such as analytics, see the VMware Privacy Policy at https://www.vmware.com/help/privacy.html.
Important Countries and jurisdictions have differing regulations governing the data that can be collected from end users. Your organization must thoroughly research the applicable laws before you configure your BYOD and privacy policies.
This chapter includes the following topics:
n Security and Privacy in Workspace ONE UEM
n Configure Privacy Settings
n Privacy Notices for BYOD End Users
n User Data Collection from BYOD End Users
n Terms of Use for BYOD End Users
n Restrictions for BYOD Devices
Security and Privacy in Workspace ONE UEMWorkspace ONE UEM powered by AirWatch provides customized levels of device and application management to help you balance corporate security and end-user privacy in a BYOD scenario.
Each management type provides a different balance of privacy and device management. Consult work with your legal team and IT teams to determine which balance is best for your BYOD users. Use the following comparison to help make the most practical choice.
VMware, Inc. 131
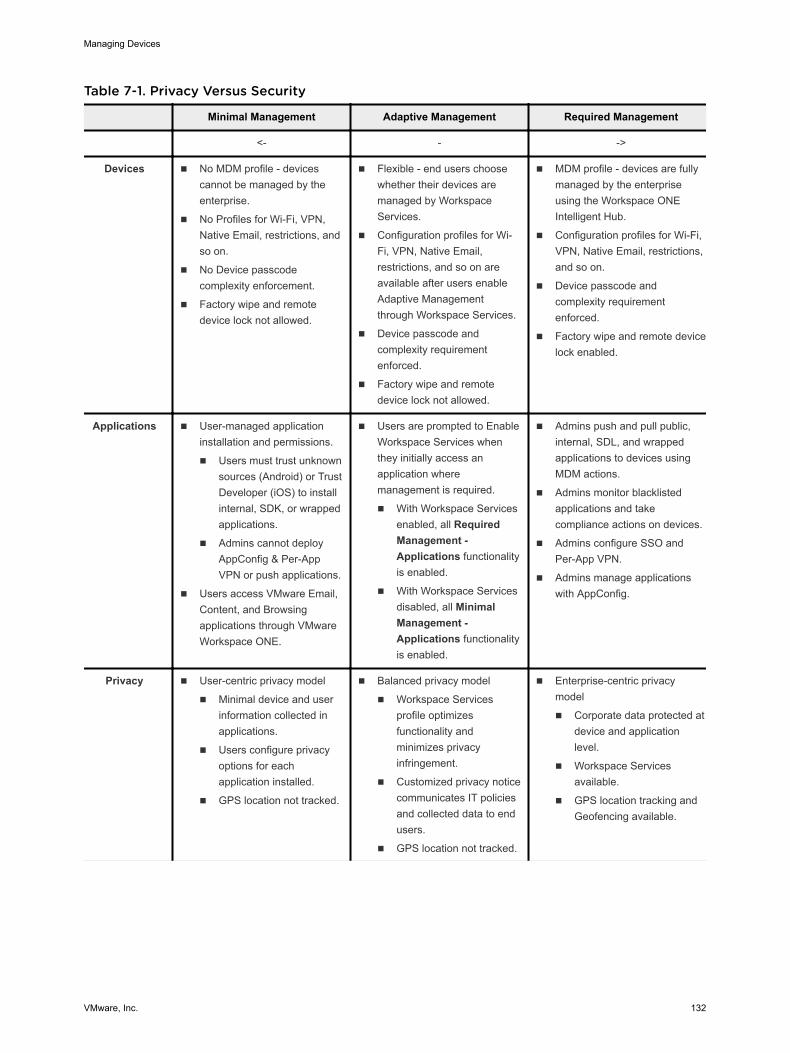
Table 7-1. Privacy Versus Security
Minimal Management Adaptive Management Required Management
<- - ->
Devices n No MDM profile - devices cannot be managed by the enterprise.
n No Profiles for Wi-Fi, VPN, Native Email, restrictions, and so on.
n No Device passcode complexity enforcement.
n Factory wipe and remote device lock not allowed.
n Flexible - end users choose whether their devices are managed by Workspace Services.
n Configuration profiles for Wi-Fi, VPN, Native Email, restrictions, and so on are available after users enable Adaptive Management through Workspace Services.
n Device passcode and complexity requirement enforced.
n Factory wipe and remote device lock not allowed.
n MDM profile - devices are fully managed by the enterprise using the Workspace ONE Intelligent Hub.
n Configuration profiles for Wi-Fi, VPN, Native Email, restrictions, and so on.
n Device passcode and complexity requirement enforced.
n Factory wipe and remote device lock enabled.
Applications n User-managed application installation and permissions.
n Users must trust unknown sources (Android) or Trust Developer (iOS) to install internal, SDK, or wrapped applications.
n Admins cannot deploy AppConfig & Per-App VPN or push applications.
n Users access VMware Email, Content, and Browsing applications through VMware Workspace ONE.
n Users are prompted to Enable Workspace Services when they initially access an application where management is required.
n With Workspace Services enabled, all Required Management - Applications functionality is enabled.
n With Workspace Services disabled, all Minimal Management - Applications functionality is enabled.
n Admins push and pull public, internal, SDL, and wrapped applications to devices using MDM actions.
n Admins monitor blacklisted applications and take compliance actions on devices.
n Admins configure SSO and Per-App VPN.
n Admins manage applications with AppConfig.
Privacy n User-centric privacy model
n Minimal device and user information collected in applications.
n Users configure privacy options for each application installed.
n GPS location not tracked.
n Balanced privacy model
n Workspace Services profile optimizes functionality and minimizes privacy infringement.
n Customized privacy notice communicates IT policies and collected data to end users.
n GPS location not tracked.
n Enterprise-centric privacy model
n Corporate data protected at device and application level.
n Workspace Services available.
n GPS location tracking and Geofencing available.
Managing Devices
VMware, Inc. 132
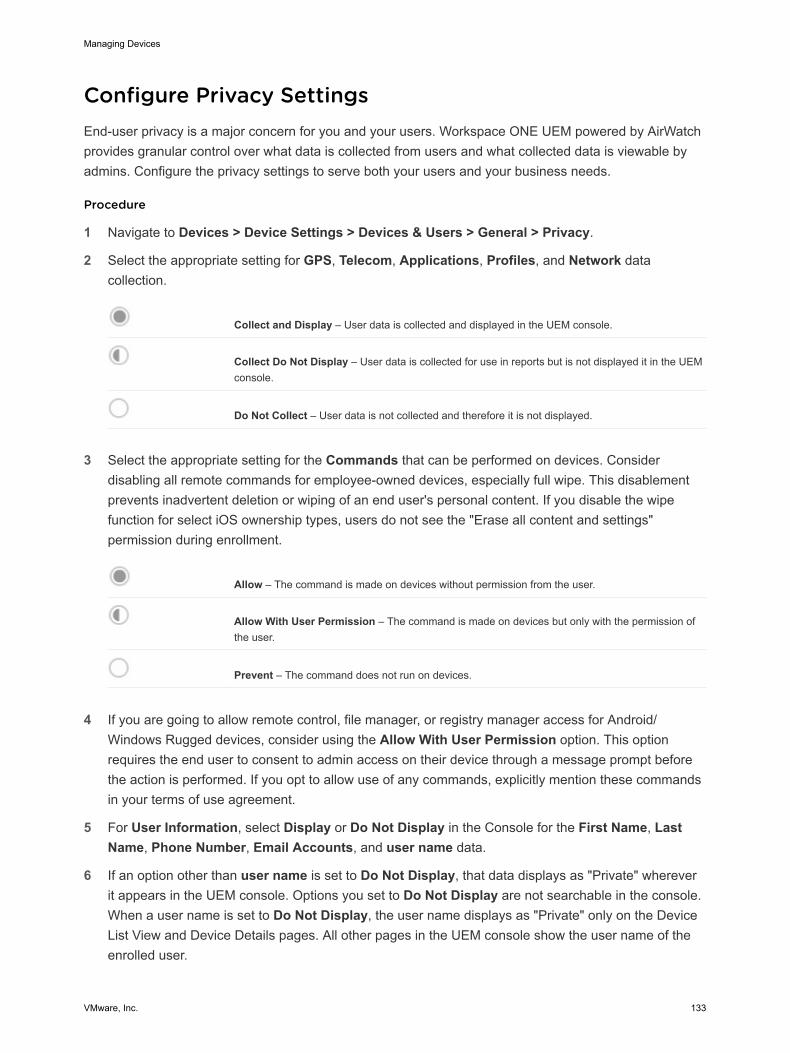
Configure Privacy SettingsEnd-user privacy is a major concern for you and your users. Workspace ONE UEM powered by AirWatch provides granular control over what data is collected from users and what collected data is viewable by admins. Configure the privacy settings to serve both your users and your business needs.
Procedure
1 Navigate to Devices > Device Settings > Devices & Users > General > Privacy.
2 Select the appropriate setting for GPS, Telecom, Applications, Profiles, and Network data collection.
Collect and Display – User data is collected and displayed in the UEM console.
Collect Do Not Display – User data is collected for use in reports but is not displayed it in the UEM console.
Do Not Collect – User data is not collected and therefore it is not displayed.
3 Select the appropriate setting for the Commands that can be performed on devices. Consider disabling all remote commands for employee-owned devices, especially full wipe. This disablement prevents inadvertent deletion or wiping of an end user's personal content. If you disable the wipe function for select iOS ownership types, users do not see the "Erase all content and settings" permission during enrollment.
Allow – The command is made on devices without permission from the user.
Allow With User Permission – The command is made on devices but only with the permission of the user.
Prevent – The command does not run on devices.
4 If you are going to allow remote control, file manager, or registry manager access for Android/Windows Rugged devices, consider using the Allow With User Permission option. This option requires the end user to consent to admin access on their device through a message prompt before the action is performed. If you opt to allow use of any commands, explicitly mention these commands in your terms of use agreement.
5 For User Information, select Display or Do Not Display in the Console for the First Name, Last Name, Phone Number, Email Accounts, and user name data.
6 If an option other than user name is set to Do Not Display, that data displays as "Private" wherever it appears in the UEM console. Options you set to Do Not Display are not searchable in the console. When a user name is set to Do Not Display, the user name displays as "Private" only on the Device List View and Device Details pages. All other pages in the UEM console show the user name of the enrolled user.
Managing Devices
VMware, Inc. 133
7 You can encrypt personally identifiable information, including first name, last name, email address, and telephone number. Navigate to Groups & Settings > All Settings > System > Security > Data Security from the Global or Customer-level organization group you want to configure encryption for. Enabling encryption, selecting which user data to encrypt, and selecting Save encrypts user data. Doing so limits some features in the UEM console, such as search, sort, and filter.
8 Select whether to Enable or Disable the Do Not Disturb Mode on the device. This setting lets user devices ignore MDM commands for a specified period. When Enabled, you can select a grace period or activation time in minutes, hours, or days, after which the Do Not Disturb Mode expires.
9 Select to Enable or Disable the User-Friendly Privacy Notice on the device.
10 When Enabled, you may choose Yes (display a privacy notice) or No (do not display a privacy notice) for each ownership level: Employee Owned, Corporate - Dedicated, Corporate - Shared, and Unknown.
11 Click Save. Privacy settings is a restricted action so you must enter your four digit console PIN to continue.
Privacy Notices for BYOD End UsersA privacy notice in Workspace ONE UEM powered by AirWatch informs your end users about what data you collect from their devices based on their device type, deployment type, and ownership type.
Privacy Notice ConfigurationPrivacy notices are automatically delivered based on the organization group and device ownership of the device connecting. You may choose to display a privacy notice for each ownership type: Employee Owned, Corporate - Dedicated, Corporate - Shared, and Unknown.
Privacy Notice DeploymentWhen you assign an ownership type to receive privacy notices, all users in the selected ownership type receive the privacy notification immediately as a Web clip. If you inserted the privacy notice lookup value PrivacyNotificationUrl in your message template, then the message includes a URL where the user can read the privacy notice.
Users receive the privacy notice automatically if:
n They enroll a new device and they are of an ownership type for which the privacy notice is enabled.
n They currently use an enrolled device and their ownership is changed post-enrollment to a type that is assigned the Web clip.
To learn how to deploy a privacy notice as part of a device activation, see Register an Individual Device.
Managing Devices
VMware, Inc. 134
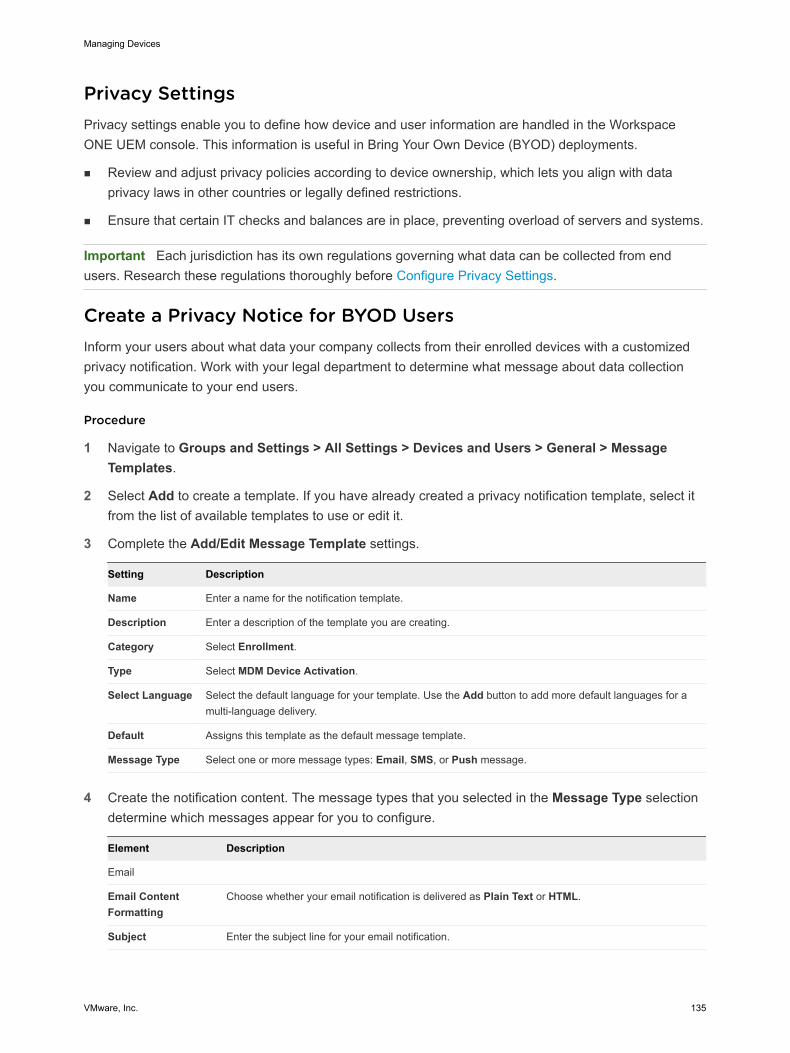
Privacy SettingsPrivacy settings enable you to define how device and user information are handled in the Workspace ONE UEM console. This information is useful in Bring Your Own Device (BYOD) deployments.
n Review and adjust privacy policies according to device ownership, which lets you align with data privacy laws in other countries or legally defined restrictions.
n Ensure that certain IT checks and balances are in place, preventing overload of servers and systems.
Important Each jurisdiction has its own regulations governing what data can be collected from end users. Research these regulations thoroughly before Configure Privacy Settings.
Create a Privacy Notice for BYOD UsersInform your users about what data your company collects from their enrolled devices with a customized privacy notification. Work with your legal department to determine what message about data collection you communicate to your end users.
Procedure
1 Navigate to Groups and Settings > All Settings > Devices and Users > General > Message Templates.
2 Select Add to create a template. If you have already created a privacy notification template, select it from the list of available templates to use or edit it.
3 Complete the Add/Edit Message Template settings.
Setting Description
Name Enter a name for the notification template.
Description Enter a description of the template you are creating.
Category Select Enrollment.
Type Select MDM Device Activation.
Select Language Select the default language for your template. Use the Add button to add more default languages for a multi-language delivery.
Default Assigns this template as the default message template.
Message Type Select one or more message types: Email, SMS, or Push message.
4 Create the notification content. The message types that you selected in the Message Type selection determine which messages appear for you to configure.
Element Description
Email Content Formatting
Choose whether your email notification is delivered as Plain Text or HTML.
Subject Enter the subject line for your email notification.
Managing Devices
VMware, Inc. 135
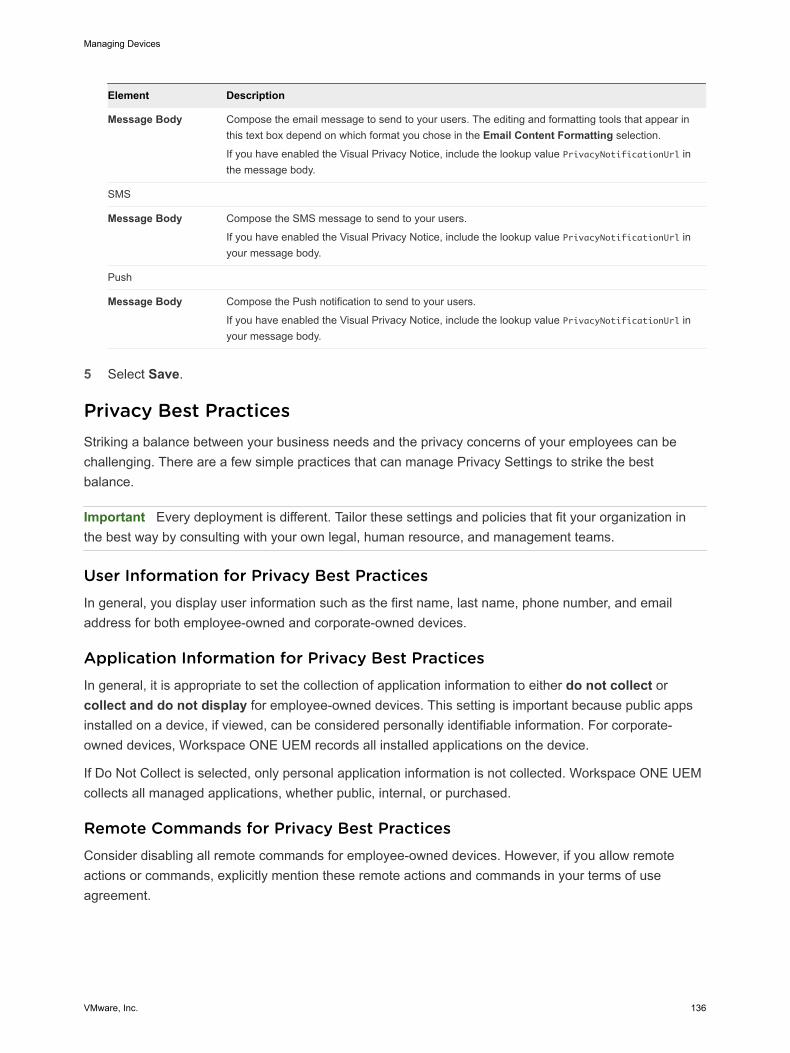
Element Description
Message Body Compose the email message to send to your users. The editing and formatting tools that appear in this text box depend on which format you chose in the Email Content Formatting selection.
If you have enabled the Visual Privacy Notice, include the lookup value PrivacyNotificationUrl in the message body.
SMS
Message Body Compose the SMS message to send to your users.
If you have enabled the Visual Privacy Notice, include the lookup value PrivacyNotificationUrl in your message body.
Push
Message Body Compose the Push notification to send to your users.
If you have enabled the Visual Privacy Notice, include the lookup value PrivacyNotificationUrl in your message body.
5 Select Save.
Privacy Best PracticesStriking a balance between your business needs and the privacy concerns of your employees can be challenging. There are a few simple practices that can manage Privacy Settings to strike the best balance.
Important Every deployment is different. Tailor these settings and policies that fit your organization in the best way by consulting with your own legal, human resource, and management teams.
User Information for Privacy Best PracticesIn general, you display user information such as the first name, last name, phone number, and email address for both employee-owned and corporate-owned devices.
Application Information for Privacy Best PracticesIn general, it is appropriate to set the collection of application information to either do not collect or collect and do not display for employee-owned devices. This setting is important because public apps installed on a device, if viewed, can be considered personally identifiable information. For corporate-owned devices, Workspace ONE UEM records all installed applications on the device.
If Do Not Collect is selected, only personal application information is not collected. Workspace ONE UEM collects all managed applications, whether public, internal, or purchased.
Remote Commands for Privacy Best PracticesConsider disabling all remote commands for employee-owned devices. However, if you allow remote actions or commands, explicitly mention these remote actions and commands in your terms of use agreement.
Managing Devices
VMware, Inc. 136
GPS Coordinates for Privacy Best PracticesThe collection of GPS coordinates relates to privacy concerns in a fundamental way. While it is not appropriate to collect GPS data for employee-owned devices, the following notes apply to all devices enrolled in Workspace ONE UEM.
n Only the Workspace ONE Intelligent Hub relays device GPS location data back to the UEM console.
n Other apps that use the Workspace ONE SDK such as VMware Browser, Content Locker, Boxer, and so forth, do not report GPS data back to the UEM console.
n GPS is typically used for lost or stolen devices. It is also used when knowing the location of a device is inherently part of the Workspace ONE UEM console function such as Geofencing.
n When GPS data is reported, Workspace ONE UEM defines a 1-kilometer region around this location. It then reports location information whenever the device moves outside the region or whenever the user opens a Workspace ONE UEM or internal application. No new GPS data is reported unless one of these actions occurs.
Telecom Data for Privacy Best PracticesIt is only appropriate to collect telecom data for employee-owned devices if they are a part of a stipend where cellphone expenses are subsidized. In this case, or for corporate-owned devices, consider the following about data you can collect.
n Carrier/Country Code – Carrier and Country Code are recorded and can be used for telecom tracking purposes. Telecom plans can be set up and devices can be assigned to the appropriate plan based on their carrier and country. This information can also be used to track devices by home carrier and home country or by current country and current carrier.
n Roaming Status – This status can be used to track which devices are in a 'Roaming' or 'Not Roaming' state. Compliance policies can be set up to disable voice and data use while the device is roaming or you can also apply other compliance actions. Also, if the device is assigned to a telecom plan, Workspace ONE UEM can track data use while roaming. Collecting and monitoring roaming status can be helpful in preventing large carrier charges due to roaming.
n Cellular Data Use – The data use in terms of total bytes sent and received. This data can be collected for each cellular device. If the device is assigned to a telecom plan, you can monitor data use based on a percentage of total data amount per billing cycle. This feature allows you to create compliance policies based on the percentage of data used and is helpful in preventing large carrier overage charges.
n Cell Use – The voice minutes that can be collected for each cellular device. Similar to data, if the device is assigned to a telecom plan, you can monitor use based on a percentage of minutes per billing cycle. This method allows you to create compliance policies based on the percentage of minutes used and can be helpful in preventing large carrier overage charges.
Managing Devices
VMware, Inc. 137
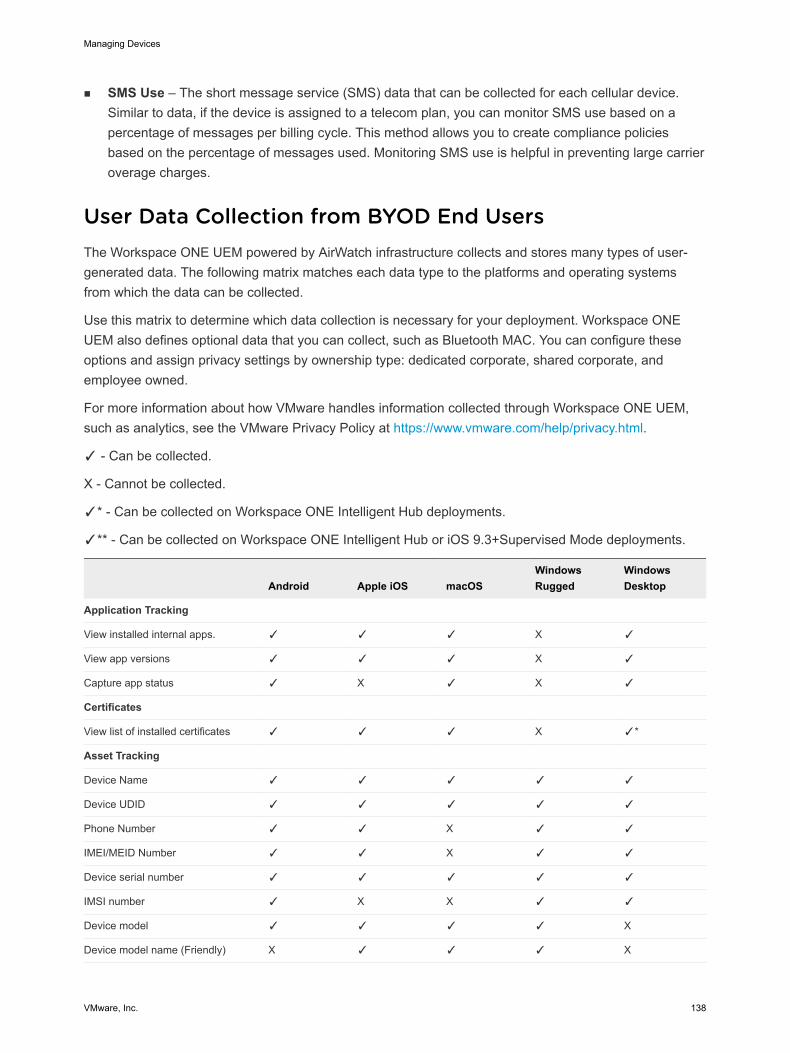
n SMS Use – The short message service (SMS) data that can be collected for each cellular device. Similar to data, if the device is assigned to a telecom plan, you can monitor SMS use based on a percentage of messages per billing cycle. This method allows you to create compliance policies based on the percentage of messages used. Monitoring SMS use is helpful in preventing large carrier overage charges.
User Data Collection from BYOD End UsersThe Workspace ONE UEM powered by AirWatch infrastructure collects and stores many types of user-generated data. The following matrix matches each data type to the platforms and operating systems from which the data can be collected.
Use this matrix to determine which data collection is necessary for your deployment. Workspace ONE UEM also defines optional data that you can collect, such as Bluetooth MAC. You can configure these options and assign privacy settings by ownership type: dedicated corporate, shared corporate, and employee owned.
For more information about how VMware handles information collected through Workspace ONE UEM, such as analytics, see the VMware Privacy Policy at https://www.vmware.com/help/privacy.html.
✓ - Can be collected.
X - Cannot be collected.
✓* - Can be collected on Workspace ONE Intelligent Hub deployments.
✓** - Can be collected on Workspace ONE Intelligent Hub or iOS 9.3+Supervised Mode deployments.
Android Apple iOS macOSWindows Rugged
Windows Desktop
Application Tracking
View installed internal apps. ✓ ✓ ✓ X ✓
View app versions ✓ ✓ ✓ X ✓
Capture app status ✓ X ✓ X ✓
Certificates
View list of installed certificates ✓ ✓ ✓ X ✓*
Asset Tracking
Device Name ✓ ✓ ✓ ✓ ✓
Device UDID ✓ ✓ ✓ ✓ ✓
Phone Number ✓ ✓ X ✓ ✓
IMEI/MEID Number ✓ ✓ X ✓ ✓
Device serial number ✓ ✓ ✓ ✓ ✓
IMSI number ✓ X X ✓ ✓
Device model ✓ ✓ ✓ ✓ X
Device model name (Friendly) X ✓ ✓ ✓ X
Managing Devices
VMware, Inc. 138
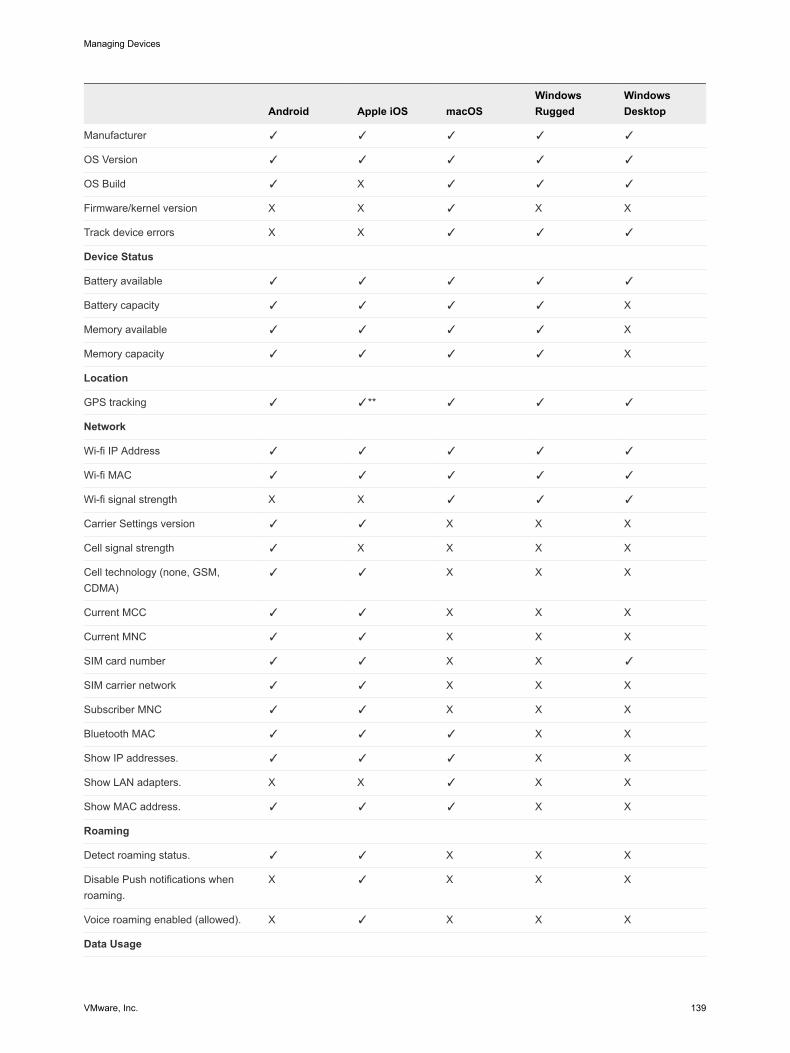
Android Apple iOS macOSWindows Rugged
Windows Desktop
Manufacturer ✓ ✓ ✓ ✓ ✓
OS Version ✓ ✓ ✓ ✓ ✓
OS Build ✓ X ✓ ✓ ✓
Firmware/kernel version X X ✓ X X
Track device errors X X ✓ ✓ ✓
Device Status
Battery available ✓ ✓ ✓ ✓ ✓
Battery capacity ✓ ✓ ✓ ✓ X
Memory available ✓ ✓ ✓ ✓ X
Memory capacity ✓ ✓ ✓ ✓ X
Location
GPS tracking ✓ ✓** ✓ ✓ ✓
Network
Wi-fi IP Address ✓ ✓ ✓ ✓ ✓
Wi-fi MAC ✓ ✓ ✓ ✓ ✓
Wi-fi signal strength X X ✓ ✓ ✓
Carrier Settings version ✓ ✓ X X X
Cell signal strength ✓ X X X X
Cell technology (none, GSM, CDMA)
✓ ✓ X X X
Current MCC ✓ ✓ X X X
Current MNC ✓ ✓ X X X
SIM card number ✓ ✓ X X ✓
SIM carrier network ✓ ✓ X X X
Subscriber MNC ✓ ✓ X X X
Bluetooth MAC ✓ ✓ ✓ X X
Show IP addresses. ✓ ✓ ✓ X X
Show LAN adapters. X X ✓ X X
Show MAC address. ✓ ✓ ✓ X X
Roaming
Detect roaming status. ✓ ✓ X X X
Disable Push notifications when roaming.
X ✓ X X X
Voice roaming enabled (allowed). X ✓ X X X
Data Usage
Managing Devices
VMware, Inc. 139
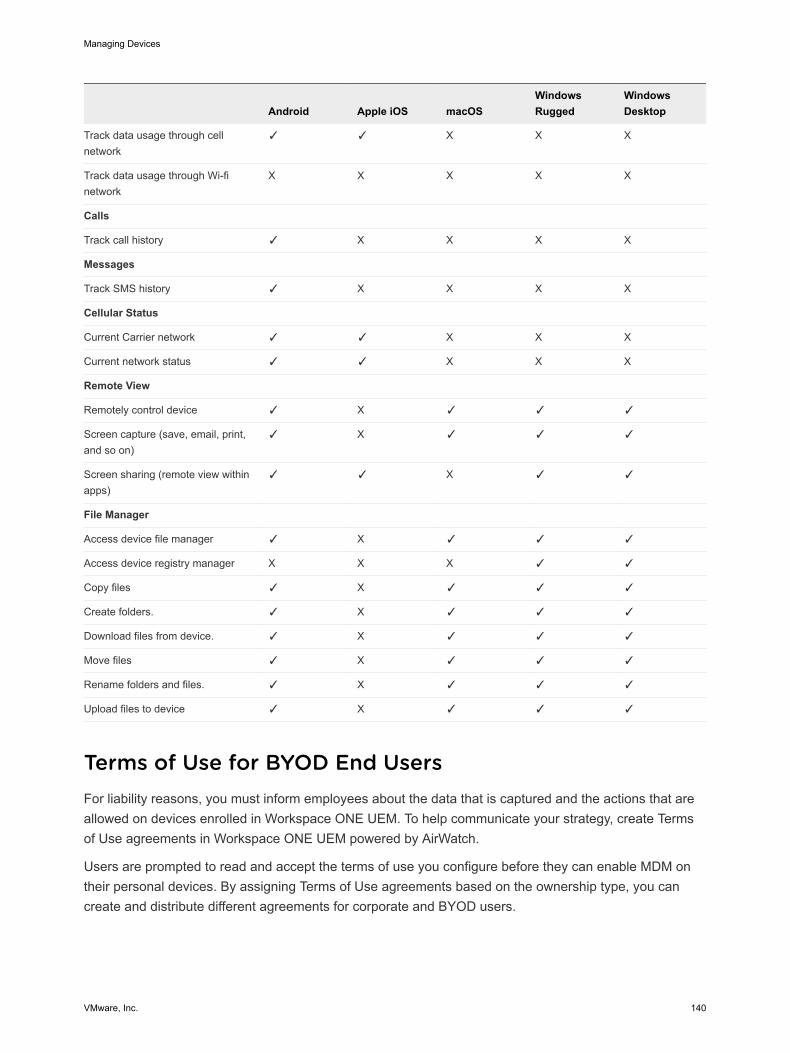
Android Apple iOS macOSWindows Rugged
Windows Desktop
Track data usage through cell network
✓ ✓ X X X
Track data usage through Wi-fi network
X X X X X
Calls
Track call history ✓ X X X X
Messages
Track SMS history ✓ X X X X
Cellular Status
Current Carrier network ✓ ✓ X X X
Current network status ✓ ✓ X X X
Remote View
Remotely control device ✓ X ✓ ✓ ✓
Screen capture (save, email, print, and so on)
✓ X ✓ ✓ ✓
Screen sharing (remote view within apps)
✓ ✓ X ✓ ✓
File Manager
Access device file manager ✓ X ✓ ✓ ✓
Access device registry manager X X X ✓ ✓
Copy files ✓ X ✓ ✓ ✓
Create folders. ✓ X ✓ ✓ ✓
Download files from device. ✓ X ✓ ✓ ✓
Move files ✓ X ✓ ✓ ✓
Rename folders and files. ✓ X ✓ ✓ ✓
Upload files to device ✓ X ✓ ✓ ✓
Terms of Use for BYOD End UsersFor liability reasons, you must inform employees about the data that is captured and the actions that are allowed on devices enrolled in Workspace ONE UEM. To help communicate your strategy, create Terms of Use agreements in Workspace ONE UEM powered by AirWatch.
Users are prompted to read and accept the terms of use you configure before they can enable MDM on their personal devices. By assigning Terms of Use agreements based on the ownership type, you can create and distribute different agreements for corporate and BYOD users.
Managing Devices
VMware, Inc. 140
After your organization has written its Terms of Use agreement, consider giving it to end users in a one to two-page white paper that omits unnecessary legal language. This white paper is not the official Terms of Use to which end users agree, but instead serves to communicate your corporate policies. Ideally, end users do not see the terms of use for employee-owned devices for the first time when they enroll their device. Be upfront about what end-user information you collect and how your BYOD policies affect them.
Restrictions for BYOD DevicesWorkspace ONE UEM powered by AirWatch permits you to deploy different security policies and restrictions to employee-owned and corporate-dedicated devices.
Using restriction profiles, you can set tight restrictions for corporate-dedicated devices, and looser restrictions for employee-owned devices. For example, restrictions to apps like YouTube or native App Stores are not typically deployed to employee-owned devices. Instead, you can create security profiles and restrictions that increase the level of device security without having a negative impact on functionality.
Device-Agnostic RestrictionsWorkspace ONE UEM makes the following restrictions available for every device and platform:
n Encrypted backups - Protect all backups with data encryption for BYOD devices with access to corporate content.
n Force fraud warning in supported browsers - Require users to acknowledge all warnings issued by the browser when it detects a suspicious site.
n Disable moving emails - Prohibit the exposure of sensitive corporate data by disabling the ability to forward a corporate email to a personal account, or open it in third-party applications.
Platform-Specific RestrictionsEach platform has its own set of enforceable restrictions. Evaluate these restrictions individually to determine their value to your deployment. Some, like iOS restrictions limited to supervised devices, do not apply, because employee-owned devices must not be enrolled with Apple Configurator.
n You can create security profiles and restrictions by navigating to Devices > Profiles > List View and selecting Add, then selecting the appropriate platform.
n If you create profiles specifically for employee-owned devices, only assign them to Smart Groups based on Ownership Type: Employee-Owned.
Enterprise Wipe for BYOD DevicesAn essential aspect of your BYOD deployment is removing corporate content when an employee leaves, or when a device is lost or stolen. Workspace ONE UEM allows you to perform an Enterprise Wipe on devices to remove all corporate content and access, but leave personal files and settings untouched.
Managing Devices
VMware, Inc. 141
Workspace ONE UEM lets you decide how an Enterprise Wipe applies to public and purchased VPP applications that sit in a gray area between corporate and employee-owned devices. An Enterprise Wipe also unenrolls the device from Workspace ONE UEM and strips it of all content enabled through MDM. This content includes email accounts, VPN settings, Wi-Fi profiles, secure content, and enterprise applications.
If you used Apple Volume Purchase Plan redemption codes for devices running iOS 6 and earlier, you cannot reclaim any redeemed licenses for that application. When installed, the application is associated to the user App Store account. This association cannot be undone. However, you can redeem license codes used for iOS 7 and later.
Perform an Enterprise Wipe for a BYOD DeviceAn enterprise wipe unenrolls the device from Workspace ONE UEM and strips it of all enterprise content, including email accounts, VPN settings, profiles, and applications.
Procedure
1 In the Admin Console, select the appropriate organization group.
2 Navigate to Devices > List View and select a device or multiple devices from the list.
3 The Device Details view displays a list of actions you can perform under the More drop-down in the top right. Select Enterprise Wipe.
4 In the confirmation dialog box, select Prevent Re-Enrollment to prevent this device from enrolling again.
5 Enter a Security PIN if applicable, and then select Enterprise Wipe to finish the action.
Disable Full Wipe for BYOD DevicesFor security and privacy reasons, you can disable the ability to perform a full wipe on a BYOD Device.
If you disable full wipe for select iOS ownership types, then users enrolling under that ownership type do not see "Erase all content and settings" permissions during profile installation.
Procedure
1 Navigate to Devices > Device Settings > Devices & Users > General > Privacy.
2 Scroll down to the Commands section and find the Employee Owned column.
3 Set the Full Wipe option to Prevent and select Save.
Managing Devices
VMware, Inc. 142
Device Tags 8Device tags in Workspace ONE UEM powered by AirWatch allow you to identify a specific device without requiring a device profile, smart group, or compliance policy without creating a note.
You can filter the device list view by tags, assign tags to a single or multiple devices, unassign tags, and delete unassigned tags.
For example, if a device has an aging battery or a broken screen, you can use tags to identify these devices in the console. Another use is to identify hardware variants in a more visible way rather than relying on the model number or description to tell devices apart.
For instance, two Windows Desktop devices can have the same model number, but their CPUs might be slightly different, or the amount of memory, or video card might be customized. Tagging enhanced hardware enables easy identification of these devices within the console.
Tags and Smart GroupsThe tag feature is integrated with smart groups. This integration means tags can be used to define a smart group.
For instance, if you have tagged all the devices in your fleet with cosmetic damage, then you can make a smart group out of these devices. You can then exclude this smart group from the pool of devices you temporarily assign to site visitors.
Another example is tagging low-performing devices. You can make a smart group of these tagged devices and exclude them from being used in mission-critical assignments.
Device Tags and Role PermissionsAll activities related to the device tag feature require permissions on the role you assign to your administrators. If you want your admins to own the responsibility of creating tags, you must add that permission (known as Resources in the console) to the role you assign to that administrator. The same is true of viewing tags, editing tags, deleting tags, assigning tags, even the ability to search for tags.
Filter Devices by Tag1 Navigate to Devices > List View, select Filters to display the Filters column s to the left of the
device list.
VMware, Inc. 143

2 Select Advanced from the list of Filter Categories and select Tags.
3 Click anywhere in the Search text box and select from the list of device tags that display.
Results: Devices with deselected tags are filtered out of the resulting list. The Device List View immediately refreshes itself when the first tag is selected.
Create a New Tag from System SettingsBefore you begin: You must have the correct permissions to create a tag. You can check on these permissions by viewing all the assigned resources (or permissions) of an admin role, modify the role with the 'Create Tag' permission and if not already assigned, then assign the modified role to your admin account. For details, see the topic View the Resources of an Admin Role.
1 Navigate to Groups & Settings > All Settings > Devices & Users > Advanced > Tags.
2 Select the Create Tag button. The Create Tag screen displays.
3 Enter the Name of the tag. The selection of the tag name is what makes the tag useful or not. Select a name that can be used to identify a device at a glance.
4 Select the Type of tag you want: Device, General, or Video.
5 Select Save.
The device tag is now available to be assigned to a device. Navigate to Devices > List View and select one or more devices to assign this tag to.
Assign Tags to a Single DeviceYou can assign tags to a device to identify it without using notes, profiles, policies, or giving the device a special friendly name. Are you looking for granting permissions as part of an admin role that includes (or excludes) the ability to assign a tag to a device? See the topic View the Resources of an Admin Role.
1 Navigate to Devices > List View and select the device you want to tag. Select the device you want to tag by choosing between these two selection methods.
a Display the Details View by selecting the device friendly name from the listing.
b Select the check box above the pencil icon, next to the device.
2 Select the More Actions button and then select Assign Tag. The Tag Assignment screen displays with a listing of tags available to apply to your selected device.
3 Select each of the tags you want to assign to the device. You can select more than one tag. If you selected Assign Tag from the device Details View, you also have a Manage Tags link which, when selected, opens the Tags System Settings page, enabling you to create a new tag.
Managing Devices
VMware, Inc. 144
Assign Tags to Multiple DevicesYou must have the correct permissions to assign a tag to multiple devices. You can check on these permissions by viewing all the assigned resources (or permissions) of an admin role, modify the role with the 'Device Bulk Management assign Tags' permission and if not already assigned, then assign the modified role to your admin account.
You can configure the maximum number of devices you are allowed to assign or unassign tags by navigating to Groups & Settings > All Settings > Devices & Users > Advanced > Bulk Management and scroll down to the Assign/Unassign Tag option.
1 Navigate to Devices > List View.
2 Select the check box of each device you want to assign a tag to.
3 Select More Actions and then select Manage Tags.
The Manage Tags page displays with multiple pieces of information. It confirms the number of devices selected from list view, it displays the currently assigned tags, and all the tags available to assign. You can also use the search text boxes in the upper-right corner of the Manage Tags page to enter search parameters for tag labels.
4 Select the tags you want to assign to all the selected devices. You can select more than one tag. You can also assign some tags while unassigning others in the same step.
5 Select Save.
Edit an Existing Device TagYou must have the correct permissions to edit a tag. You can check on these permissions by viewing all the assigned resources (or permissions) of an admin role, modify the role with the 'Edit Tag' permission and if not already assigned, then assign the modified role to your admin account.
1 Navigate to Groups & Settings > Devices & Users > Advanced > Tags.
2 Identify the tag you want to edit from the listing.
3 Select the pencil icon ( ) next to the tag you want to edit. The Edit Tag screen displays.
4 Edit the Name of the tag.
5 Select Save.
Results: The tag has been edited with a new name. Devices that were assigned with the previous tag have been updated with the edited tag.
Unassign Tags from Multiple DevicesYou must have the correct permissions to unassign tags from multiple devices. You can check on these permissions by viewing all the assigned resources (or permissions) of an admin role, modify the role with the 'Bulk Management unassign tags' permission and if not already assigned, then assign the modified role to your admin account. For details, see the topic View the Resources of an Admin Role.
Managing Devices
VMware, Inc. 145
You can configure the maximum number of devices you are allowed to assign or unassign tags by navigating to Groups & Settings > All Settings > Devices & Users > Advanced > Bulk Management and scroll down to the Assign/Unassign Tag option.
To unassign tags from multiple devices, take the following steps.
1 Navigate to Devices > List View and search for the tag you want to unassign. Alternately, you can filter devices based on one or more tags.
2 Select the check box to the left of each device in the Devices List View that has the tag you want to unassign.
3 Select the More Actions button above the listing.
4 Select Manage Tags.
The Manage Tags page displays with multiple pieces of information. It confirms the number of devices selected from list view, it displays the currently assigned tags, and all the tags available to assign. You can also use the search text boxes in the upper-right corner of the Manage Tags page to enter search parameters for tag labels.
5 Select the small 'x' next to each assigned tag you want to remove. You can unassign more than one tag. You can also assign some tags while unassigning others in the same step.
6 Select Save.
Results: The tag has been unassigned from all the devices you have selected. If that tag is assigned to any other device, the tag cannot be deleted.
Delete an Unassigned (Unused) Device TagSo long as a tag is unassigned and you have no plans to use it again, you can delete it.
You must have the correct permissions to delete a tag. You can check on these permissions by viewing all the assigned resources (or permissions) of an admin role, modify the role with the 'Delete Tag' permission and if not already assigned, then assign the modified role to your admin account. For details, see the topic View the Resources of an Admin Role.
Tags you want to delete must not be assigned to any device.
To unassign tags from devices, see the previous section above.
1 Once the tag is completely unassigned, navigate to Groups & Settings > Devices & Users > Advanced > Tags.
2 Identify the tag you want to delete from the listing.
3 Select the radio button next to the tag you want to delete. The Delete button displays above the listing.
4 Select Delete. A confirmation appears asking "Permanently delete tag?"
5 Select OK on the confirmation. If the tag is assigned to a device, you are not allowed to delete it. See the instructions above to unassign tags from devices.
Managing Devices
VMware, Inc. 146

If the tag is not assigned to any device when you delete it, it is now removed.
Managing Devices
VMware, Inc. 147
Certificate Management 9Consider implementing digital certificates for securing your corporate assets. Certificates offer a level of stability, security, and authentication with which passwords cannot compete. Workspace ONE UEM powered by AirWatch solves this problem of ensuring security throughout the lifecycle of a device by using digital certificates.
As the mobility of sensitive corporate content becomes the norm, the probability of unauthorized access and malicious threats increases. Even if you protect your corporate email, Wi-Fi, and virtual private network (VPN) using strong passwords, your infrastructure remains vulnerable to brute force attacks, dictionary attacks, and employee error.
Revoke and Renew Digital CertificatesYou can revoke and renew certificates individually or in bulk by using the Renew or Revoke Digital Certificates.
This chapter includes the following topics:
n Renew or Revoke Digital Certificates
n Certificate Integration Resources
Renew or Revoke Digital CertificatesOnce issued, Workspace ONE UEM powered by AirWatch enables you to manage deployed digital certificates using the Certificate List View. Administrators can view and sort certificates by device, authority, user, profile, issued date, and so on.
The Certificate List View provides a summary of deployed certificates and the ability to renew or revoke certificates individually or in bulk. Locate and revoke all digital certificates from a deactivated user/device or even renew/rotate all Wi-Fi authentication certs before a compliance driven expiration date.
Procedure
1 Initiate the process by navigating to Devices > Certificates > List View.
2 Identify and select the digital certificates you want to renew or revoke by inserting one or more check marks in the empty check boxes.
VMware, Inc. 148
3 Select the action button that you want to apply the action to the selected certificates.
n Renew
n Revoke
Certificate Integration ResourcesEach of the certificate documents accepted by Workspace ONE UEM powered by AirWatch can be located by name on docs.vmware.com.
n VMware AirWatch Certificate EOBO with ADCS via DCOM – Set up the Enrollment Agent Signing Certificate using ADCS over the DCOM protocol and take advantage of Microsoft’s Certificate Enroll On Behalf Of Others function.
n VMware AirWatch Certificate Authentication for Cisco AnyConnect – Set up your Cisco ASA Firewall with Workspace ONE UEM to deploy automatically and configure AnyConnect VPN with External CA Authentication.
n VMware AirWatch Certificate Authentication for Cisco IPSec VPN – Set up your Cisco ASA Firewall and Workspace ONE UEM to deploy automatically and configure IPSec VPN with External CA Authentication.
n VMware AirWatch Certificate Authentication for EAS with ADCS – Establish trust between your directory services, certificate authority, and an email server other than CAS.
n VMware AirWatch Certificate Authentication for EAS with NDES-MSCEP – Set up the Microsoft Exchange Client Access Server (CAS) and Workspace ONE UEM to allow a device to connect to Microsoft Exchange ActiveSync (EAS) using a certificate for authentication.
n VMware AirWatch Certificate Authentication for EAS with SEG – Set up Kerberos Delegation to enable EAS certificate authentication with the Secure Email Gateway.
n VMware Workspace ONE UEM Integration with Entrust IdentityGuard – Integrate with Entrust IdentityGuard service.
n VMware Workspace ONE UEM Integration with Global Sign Guide – Integrate with GlobalSign's services to issue certificates.
n VMware Workspace ONE UEM Integration with JCCH Guide – Integrate with JCCH's services to issue certificates.
n VMware Workspace ONE UEM Integration with Microsoft ADCS via DCOM – Set up the MS certificate authority for direct CA over the DCOM protocol. Take advantage of digital certificates by automating the issuing, renewal, and revocation process to mobile devices.
n VMware Workspace ONE UEM Integration with Microsoft NDES via SCEP – Set up the Microsoft certificate authority for direct CA integration with Workspace ONE UEM over the NDES/SCEP/MSECP protocol.
n VMware Workspace ONE UEM Integration with OpenTrust CMS Mobile 2 – Integrate with OpenTrust CMS Mobile services.
Managing Devices
VMware, Inc. 149
n VMware Workspace ONE UEM Integration with RSA PKI Guide – Integrate with RSA PKI to issue certificates.
n VMware Workspace ONE UEM Integration with SCEP – Use SCEP to apply certificates as part of your Workspace ONE UEM deployment.
n VMware Workspace ONE UEM Integration with SecureAuth PKI Guide – Integrate with SecureAuth PKI services to issue certificates.
n VMware Workspace ONE UEM Integration with Symantec MPKI Guide – Integrate with Symantec's MPKI services.
n VMware AirWatch Certificate Authentication for EAS with SEG and TMG – Discusses two configurations – TMG to EAS server and TMG to SEG to EAS server and defines the configurations required to set up certificate authentication.
n VMware Workspace ONE UEMSecuring Mobile Devices with Certificates – Learn more about why, in the mobile landscape, digital certificates do more than act as a security safeguard for content.
n VMware Workspace ONE UEM Selecting Microsoft CA Deployment Models Overview – Provides you with an overview of the different Microsoft CA Deployment Model and helps you in selecting the right deployment model for your enterprise.
Managing Devices
VMware, Inc. 150
Custom Attributes 10Custom attributes enable you to extract specific values from a managed device in Workspace ONE UEM powered by AirWatch and use it as assignment criteria for products. You can also set up rules that move devices to organization groups based on attribute values.
Note Custom attributes (and the rules generator) are only configurable and useable at Customer-level organization groups. For details about available options regarding device assignment rules based on custom attributes, see Enable Device Assignments from the Managing Devices Guide on docs.vmware.com.
Custom Attributes DatabaseCustom attributes are stored as XML files and in the Workspace ONE Intelligent Hub database, each stored on the device. When using the database, custom attributes are sent as samples to Workspace ONE UEM periodically for asset tracking of key/value pairs.
If a record in the device database is configured with 'Create Attribute' = TRUE, then the Workspace ONE Intelligent Hub automatically retrieves the Name and Value sent with the custom attributes sample. The key/value pair displays in the Device Details page for the device in the Custom Attributes tab.
Note Custom Attribute values cannot return the following special characters: / \ " * : ; < > ? |. If a script returns a value which contains these characters, the value is not reported on the console. Trim these characters from the script's output.
This chapter includes the following topics:
n Create Custom Attributes
n Custom Attributes Importing
n Assign Organization Groups Using Custom Attributes
Create Custom AttributesCreate a custom attribute and values to push to devices in Workspace ONE UEM powered by AirWatch. You can create assignment rules for products to provision based on these attributes and their values.
For details about available options regarding device assignment rules, see Enable Device Assignments from the Managing Devices Guide on docs.vmware.com.
VMware, Inc. 151

Procedure
1 Navigate to Devices > Provisioning > Custom Attributes > List View.
2 Select Add and then select Add Attribute.
3 Under the Settings tab, enter an Attribute Name.
4 Enter the optional Description of what the attribute identifies.
5 Enter the name of the Application that gathers the attribute. The application can be a third-party app or Workspace ONE Intelligent Hub.
6 Select Collect Value for Rule Generator to make the values of the attribute available in the drop-down menu of the rule generator.
7 Select Use in Rule Generator if you want to use the attribute in the rule generator.
8 Select Persist to prevent the removal of the custom attribute from the Workspace ONE UEM console unless an Admin or an API call explicitly removes it.
Otherwise, the attribute is removed as normal. If you delete a custom attribute reported from a device to the UEM console, a persisted custom attribute remains in the UEM console. Custom attribute persistence is only available to Android and Windows Rugged devices.
9 Select Use as Lookup Value to use the custom attribute as a lookup value anywhere in the UEM console.
You can use custom attributes as part of a device friendly name to simplify device naming.
10 Select the Values tab.
11 Select Add Value to add values to the custom attribute.
You do not need to enter all possible values of the attribute. The list of attributes entered here is not a requirement or constraint on what values the device can report. Instead, enter only expected values used to pre-define organization group assignment rules.
12 Select Save.
Custom Attributes ImportingThe custom attribute batch import feature in Workspace ONE UEM powered by AirWatch allows you to load custom attributes and corresponding values into the system in bulk. In the templates provided, each column corresponds to one custom attribute and each row corresponds to their different parameters.
With the templates, you can import custom attributes in different ways and with different information.
Caution The syntax of the first column of each template must be replicated exactly. Failure to use the proper syntax can cause database issues and result in loss of data.
Template Typesn Custom Attributes Template – Allows you to define a custom attribute and its settings.
Managing Devices
VMware, Inc. 152
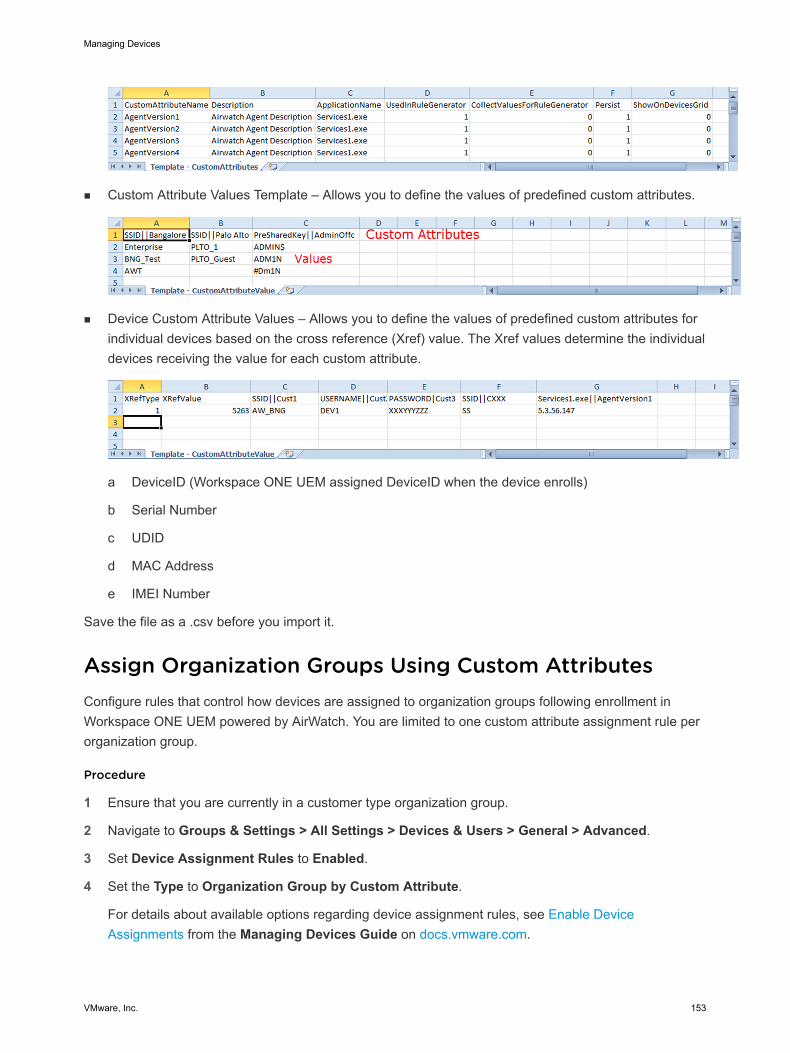
n Custom Attribute Values Template – Allows you to define the values of predefined custom attributes.
n Device Custom Attribute Values – Allows you to define the values of predefined custom attributes for individual devices based on the cross reference (Xref) value. The Xref values determine the individual devices receiving the value for each custom attribute.
a DeviceID (Workspace ONE UEM assigned DeviceID when the device enrolls)
b Serial Number
c UDID
d MAC Address
e IMEI Number
Save the file as a .csv before you import it.
Assign Organization Groups Using Custom AttributesConfigure rules that control how devices are assigned to organization groups following enrollment in Workspace ONE UEM powered by AirWatch. You are limited to one custom attribute assignment rule per organization group.
Procedure
1 Ensure that you are currently in a customer type organization group.
2 Navigate to Groups & Settings > All Settings > Devices & Users > General > Advanced.
3 Set Device Assignment Rules to Enabled.
4 Set the Type to Organization Group by Custom Attribute.
For details about available options regarding device assignment rules, see Enable Device Assignments from the Managing Devices Guide on docs.vmware.com.
Managing Devices
VMware, Inc. 153
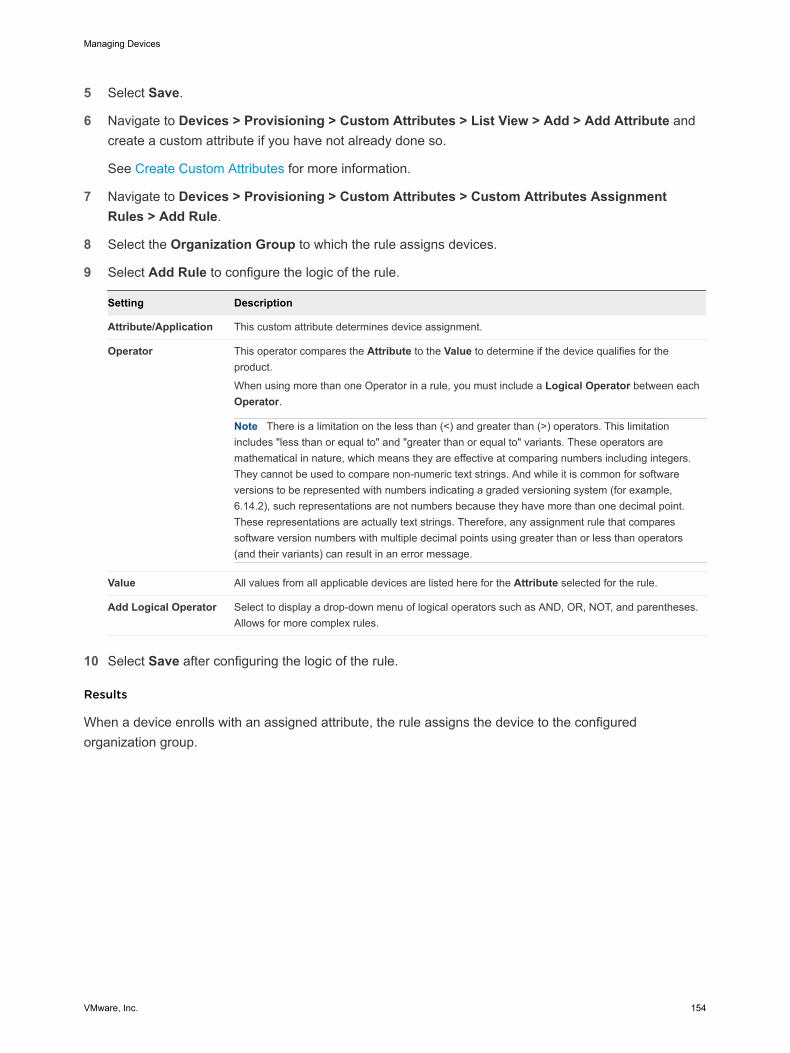
5 Select Save.
6 Navigate to Devices > Provisioning > Custom Attributes > List View > Add > Add Attribute and create a custom attribute if you have not already done so.
See Create Custom Attributes for more information.
7 Navigate to Devices > Provisioning > Custom Attributes > Custom Attributes Assignment Rules > Add Rule.
8 Select the Organization Group to which the rule assigns devices.
9 Select Add Rule to configure the logic of the rule.
Setting Description
Attribute/Application This custom attribute determines device assignment.
Operator This operator compares the Attribute to the Value to determine if the device qualifies for the product.
When using more than one Operator in a rule, you must include a Logical Operator between each Operator.
Note There is a limitation on the less than (<) and greater than (>) operators. This limitation includes "less than or equal to" and "greater than or equal to" variants. These operators are mathematical in nature, which means they are effective at comparing numbers including integers. They cannot be used to compare non-numeric text strings. And while it is common for software versions to be represented with numbers indicating a graded versioning system (for example, 6.14.2), such representations are not numbers because they have more than one decimal point. These representations are actually text strings. Therefore, any assignment rule that compares software version numbers with multiple decimal points using greater than or less than operators (and their variants) can result in an error message.
Value All values from all applicable devices are listed here for the Attribute selected for the rule.
Add Logical Operator Select to display a drop-down menu of logical operators such as AND, OR, NOT, and parentheses. Allows for more complex rules.
10 Select Save after configuring the logic of the rule.
Results
When a device enrolls with an assigned attribute, the rule assigns the device to the configured organization group.
Managing Devices
VMware, Inc. 154