Embed Size (px)
Citation preview
University of Alaska Statewide Financial Systems
User Documentation
MANAGING FINANCE REPORTS WITH
VISTA PLUS (Detail)
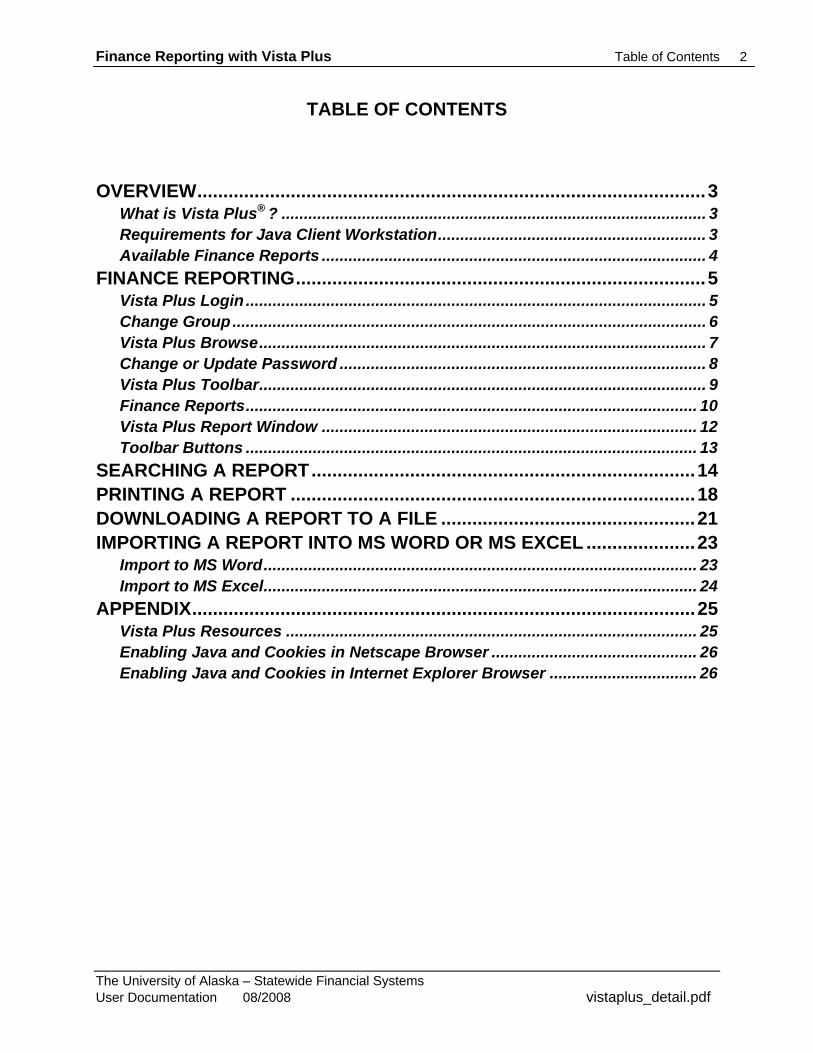
Finance Reporting with Vista Plus Table of Contents 2
TABLE OF CONTENTS
OVERVIEW..................................................................................................3 What is Vista Plus® ? ............................................................................................... 3 Requirements for Java Client Workstation............................................................ 3 Available Finance Reports ...................................................................................... 4
FINANCE REPORTING...............................................................................5 Vista Plus Login ....................................................................................................... 5 Change Group.......................................................................................................... 6 Vista Plus Browse.................................................................................................... 7 Change or Update Password .................................................................................. 8 Vista Plus Toolbar.................................................................................................... 9 Finance Reports..................................................................................................... 10 Vista Plus Report Window .................................................................................... 12 Toolbar Buttons ..................................................................................................... 13
SEARCHING A REPORT..........................................................................14 PRINTING A REPORT ..............................................................................18 DOWNLOADING A REPORT TO A FILE .................................................21 IMPORTING A REPORT INTO MS WORD OR MS EXCEL .....................23
Import to MS Word................................................................................................. 23 Import to MS Excel................................................................................................. 24
APPENDIX.................................................................................................25 Vista Plus Resources ............................................................................................ 25 Enabling Java and Cookies in Netscape Browser .............................................. 26 Enabling Java and Cookies in Internet Explorer Browser ................................. 26
The University of Alaska – Statewide Financial Systems User Documentation 08/2008 vistaplus_detail.pdf
Finance Reporting with Vista Plus Overview 3
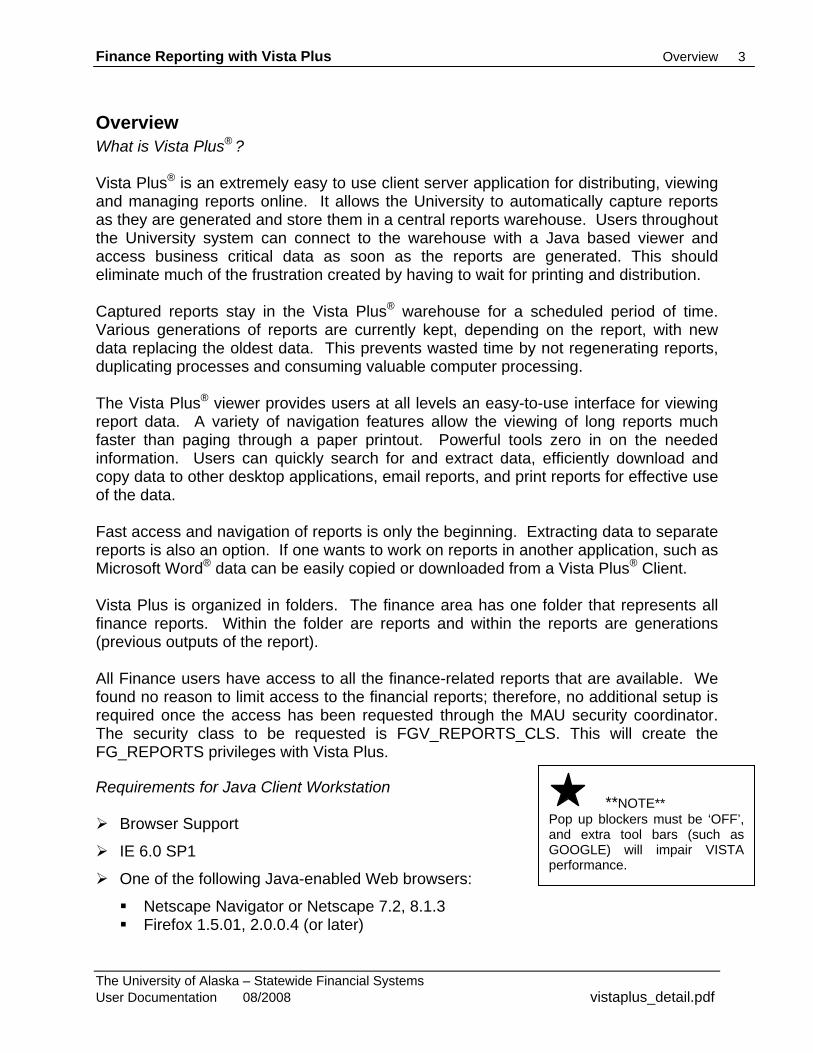
Overview What is Vista Plus® ? Vista Plus® is an extremely easy to use client server application for distributing, viewing and managing reports online. It allows the University to automatically capture reports as they are generated and store them in a central reports warehouse. Users throughout the University system can connect to the warehouse with a Java based viewer and access business critical data as soon as the reports are generated. This should eliminate much of the frustration created by having to wait for printing and distribution. Captured reports stay in the Vista Plus® warehouse for a scheduled period of time. Various generations of reports are currently kept, depending on the report, with new data replacing the oldest data. This prevents wasted time by not regenerating reports, duplicating processes and consuming valuable computer processing. The Vista Plus® viewer provides users at all levels an easy-to-use interface for viewing report data. A variety of navigation features allow the viewing of long reports much faster than paging through a paper printout. Powerful tools zero in on the needed information. Users can quickly search for and extract data, efficiently download and copy data to other desktop applications, email reports, and print reports for effective use of the data. Fast access and navigation of reports is only the beginning. Extracting data to separate reports is also an option. If one wants to work on reports in another application, such as Microsoft Word® data can be easily copied or downloaded from a Vista Plus® Client. Vista Plus is organized in folders. The finance area has one folder that represents all finance reports. Within the folder are reports and within the reports are generations (previous outputs of the report). All Finance users have access to all the finance-related reports that are available. We found no reason to limit access to the financial reports; therefore, no additional setup is required once the access has been requested through the MAU security coordinator. The security class to be requested is FGV_REPORTS_CLS. This will create the FG_REPORTS privileges with Vista Plus. Requirements for Java Client Workstation **NOTE**
Pop up blockers must be ‘OFF’, and extra tool bars (such as GOOGLE) will impair VISTA performance.
Browser Support
IE 6.0 SP1
One of the following Java-enabled Web browsers:
Netscape Navigator or Netscape 7.2, 8.1.3 Firefox 1.5.01, 2.0.0.4 (or later)
The University of Alaska – Statewide Financial Systems User Documentation 08/2008 vistaplus_detail.pdf

Finance Reporting with Vista Plus Overview 4
Available Finance Reports This document is meant for Finance and other users who access Finance reports. It is a Finance specific document, which describes how to login to the Vista Plus server via the web, then access, search, and import the reports into MS Word or MS Excel. Currently, the Finance reports accessible via Vista Plus and the number of generations saved are as follows:
Report Name Report Description # of Generations FGR2COE: Monthly Committed Open
Encumbrances 6
FGR2COE_WKLY: Weekly Committed Open Encumbrances
6
FGR2MRP UAA Organization Status by Sub-Account
6
FGR2UOE: Monthly Uncommitted Open Encumbrances
6
FGR2UOE_WKLY: Weekly Uncommitted Open Encumbrances
6
FGRACTH Account Hierarchy 12 FGRBDSC: Budget Status (Current
Year) 12
FGRFNDH Fund Hierarchy 12 FGRGLTA: General Ledger Detail
Transaction 12
FGRIDOC: Incomplete Document Listing 6 FGRODTA: Organization Detail Activity 12 FGRORGH Organization Hierarchy 12 FGRPRGH Program Hierarchy 12 FGRTRNR: Transaction Error Report 6 FRRGITD: Grant Inception to Date 6 TGPBILL A/R Purge 100 TGRAGES Aging Analysis 12
The University of Alaska – Statewide Financial Systems User Documentation 08/2008 vistaplus_detail.pdf
Finance Reporting with Vista Plus Log In 5
Finance Reporting
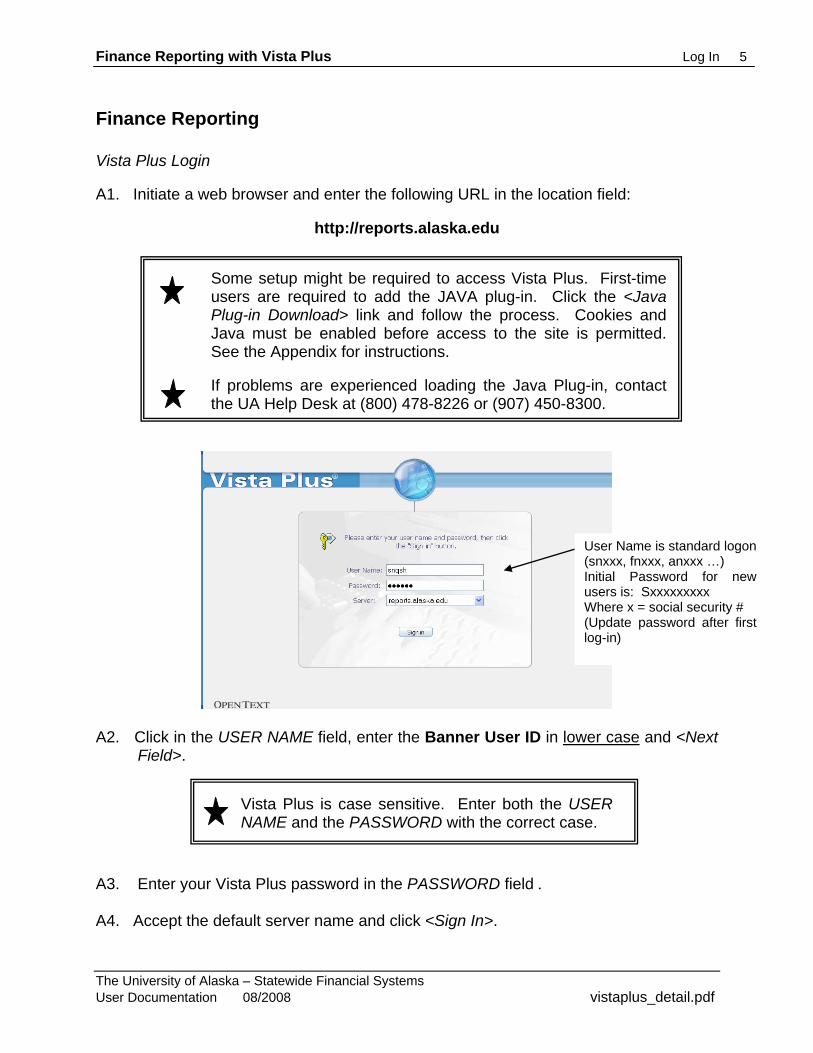
Vista Plus Login A1. Initiate a web browser and enter the following URL in the location field:
http://reports.alaska.edu
A2. Click in the USER NAME field, enter the Banner User ID in lower case and <Next
Field>.
Some setup might be required to access Vista Plus. First-time users are required to add the JAVA plug-in. Click the <Java Plug-in Download> link and follow the process. Cookies and Java must be enabled before access to the site is permitted. See the Appendix for instructions. If problems are experienced loading the Java Plug-in, contact the UA Help Desk at (800) 478-8226 or (907) 450-8300.
Vista Plus is case sensitive. Enter both the USER NAME and the PASSWORD with the correct case.
User Name is standard logon (snxxx, fnxxx, anxxx …) Initial Password for new users is: Sxxxxxxxxx Where x = social security # (Update password after first log-in)
A3. Enter your Vista Plus password in the PASSWORD field . A4. Accept the default server name and click <Sign In>.
The University of Alaska – Statewide Financial Systems User Documentation 08/2008 vistaplus_detail.pdf
Finance Reporting with Vista Plus Vista Plus Browse 6
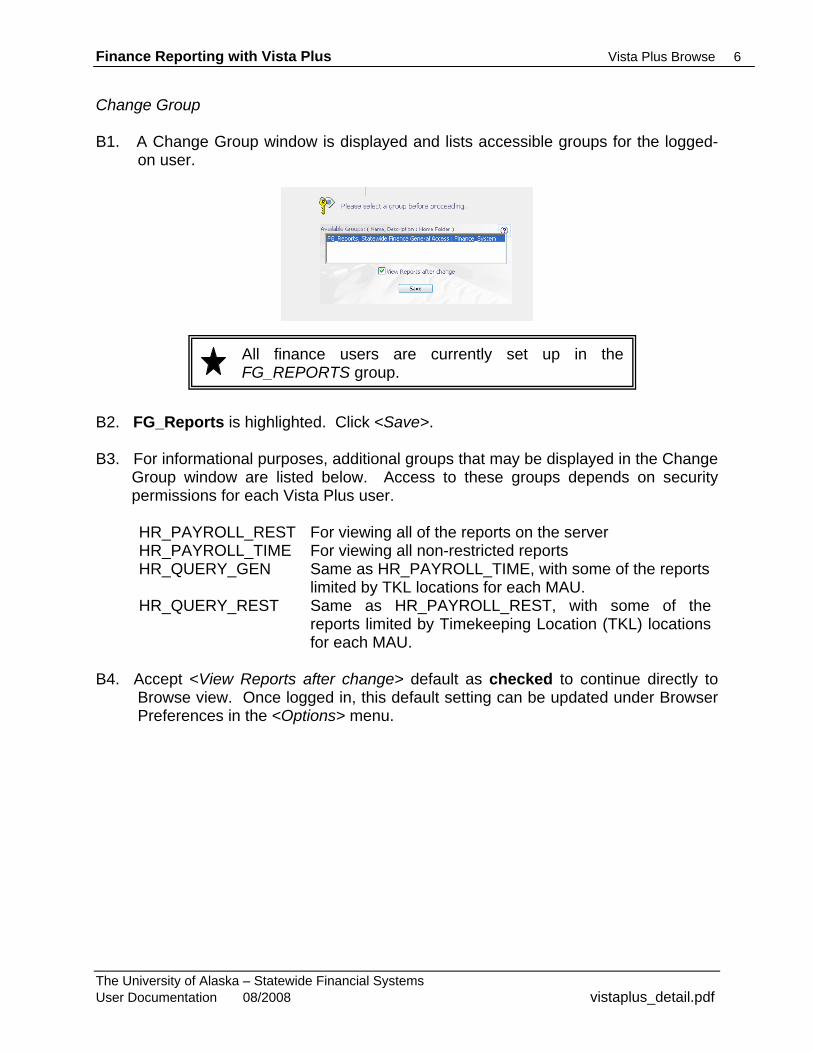
Change Group B1. A Change Group window is displayed and lists accessible groups for the logged-
on user.
All finance users are currently set up in the FG_REPORTS group.
B2. FG_Reports is highlighted. Click <Save>. B3. For informational purposes, additional groups that may be displayed in the Change
Group window are listed below. Access to these groups depends on security permissions for each Vista Plus user.
HR_PAYROLL_REST For viewing all of the reports on the server HR_PAYROLL_TIME For viewing all non-restricted reports HR_QUERY_GEN Same as HR_PAYROLL_TIME, with some of the reports
limited by TKL locations for each MAU. HR_QUERY_REST Same as HR_PAYROLL_REST, with some of the
reports limited by Timekeeping Location (TKL) locations for each MAU.
B4. Accept <View Reports after change> default as checked to continue directly to
Browse view. Once logged in, this default setting can be updated under Browser Preferences in the <Options> menu.
The University of Alaska – Statewide Financial Systems User Documentation 08/2008 vistaplus_detail.pdf
Finance Reporting with Vista Plus Vista Plus Browse 7
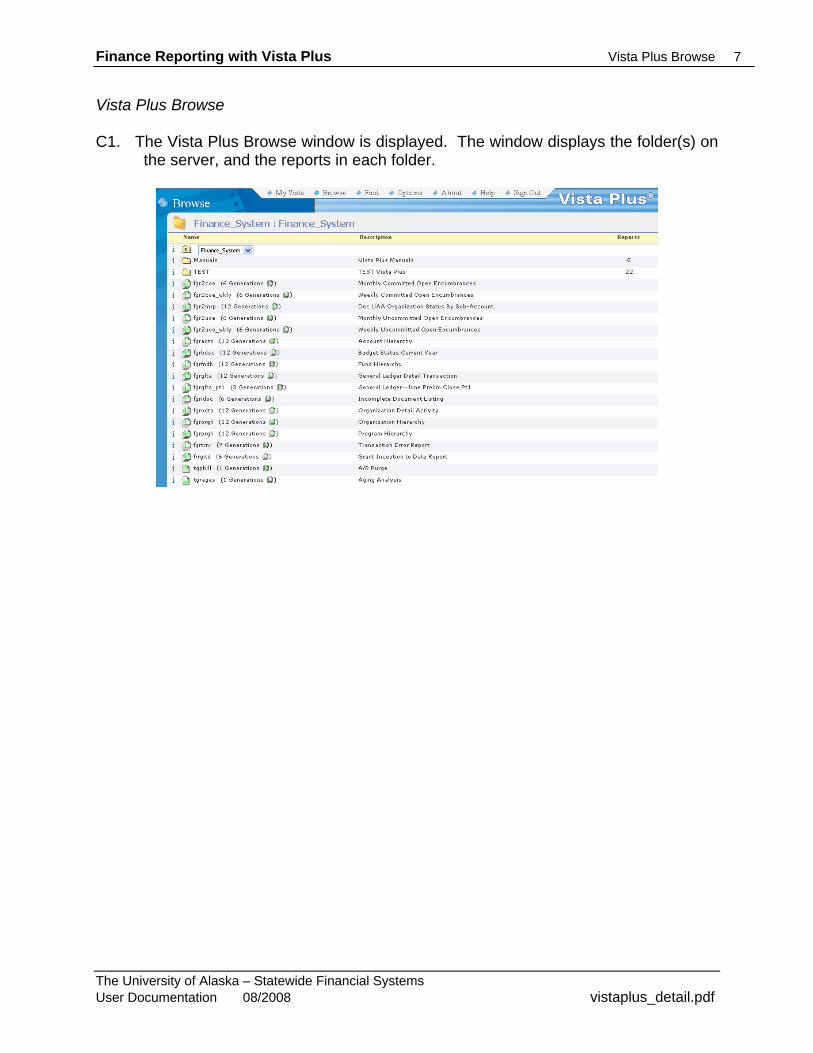
Vista Plus Browse
C1. The Vista Plus Browse window is displayed. The window displays the folder(s) on the server, and the reports in each folder.
The University of Alaska – Statewide Financial Systems User Documentation 08/2008 vistaplus_detail.pdf
Finance Reporting with Vista Plus Change Password 8
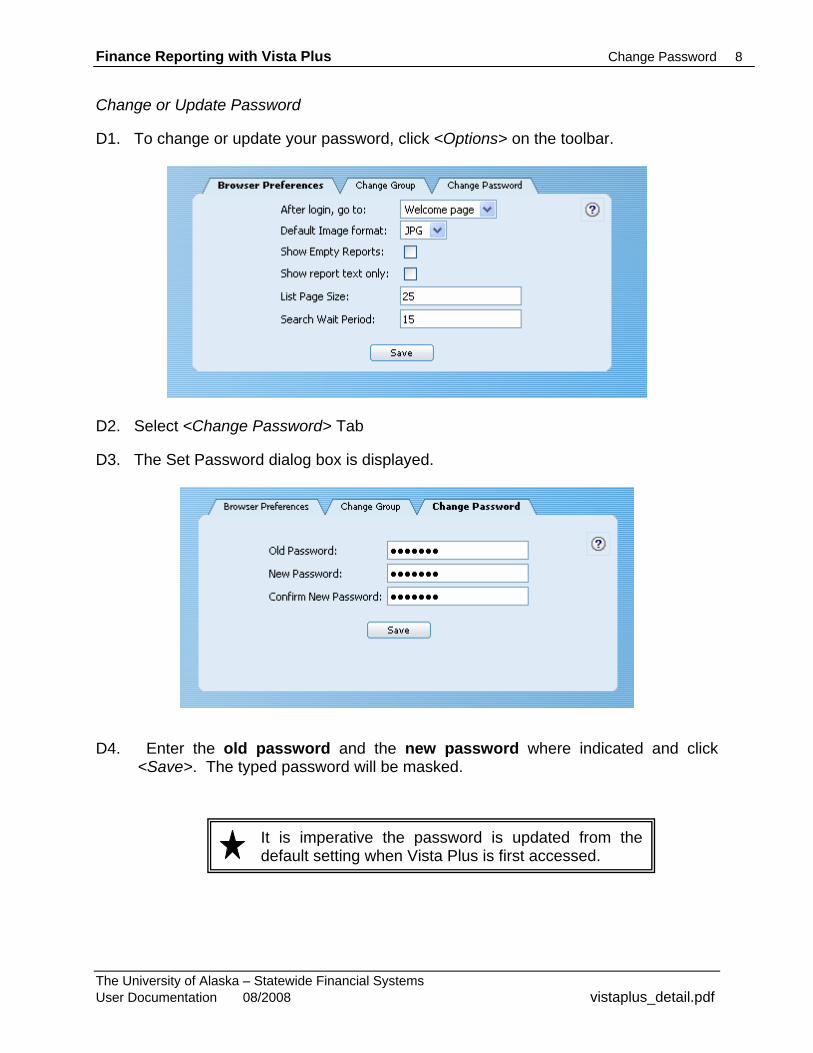
Change or Update Password D1. To change or update your password, click <Options> on the toolbar.
D2. Select <Change Password> Tab D3. The Set Password dialog box is displayed.
D4. Enter the old password and the new password where indicated and click <Save>. The typed password will be masked.
It is imperative the password is updated from the default setting when Vista Plus is first accessed.
The University of Alaska – Statewide Financial Systems User Documentation 08/2008 vistaplus_detail.pdf
Finance Reporting with Vista Plus Toolbar 9
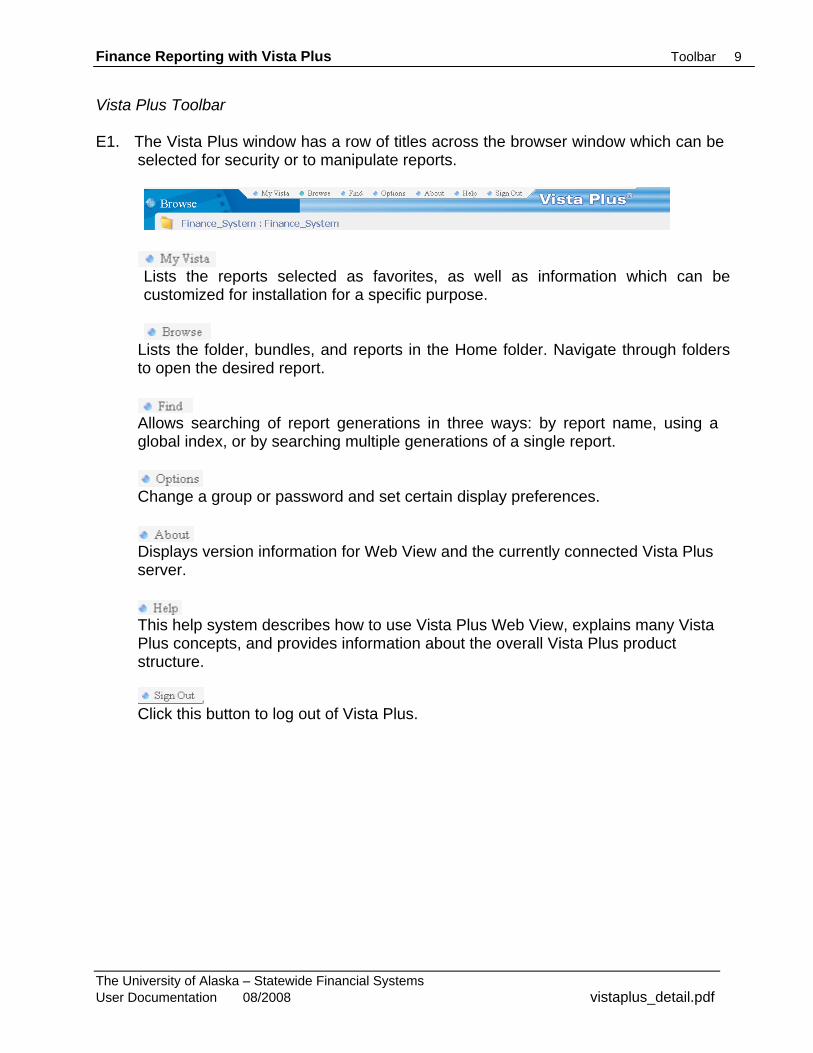
Vista Plus Toolbar E1. The Vista Plus window has a row of titles across the browser window which can be
selected for security or to manipulate reports.
Lists the reports selected as favorites, as well as information which can be
customized for installation for a specific purpose. Lists the folder, bundles, and reports in the Home folder. Navigate through folders
to open the desired report. Allows searching of report generations in three ways: by report name, using a
global index, or by searching multiple generations of a single report. Change a group or password and set certain display preferences. Displays version information for Web View and the currently connected Vista Plus
server. This help system describes how to use Vista Plus Web View, explains many Vista
Plus concepts, and provides information about the overall Vista Plus product structure.
Click this button to log out of Vista Plus.
The University of Alaska – Statewide Financial Systems User Documentation 08/2008 vistaplus_detail.pdf
Finance Reporting with Vista Plus Finance Reports 10
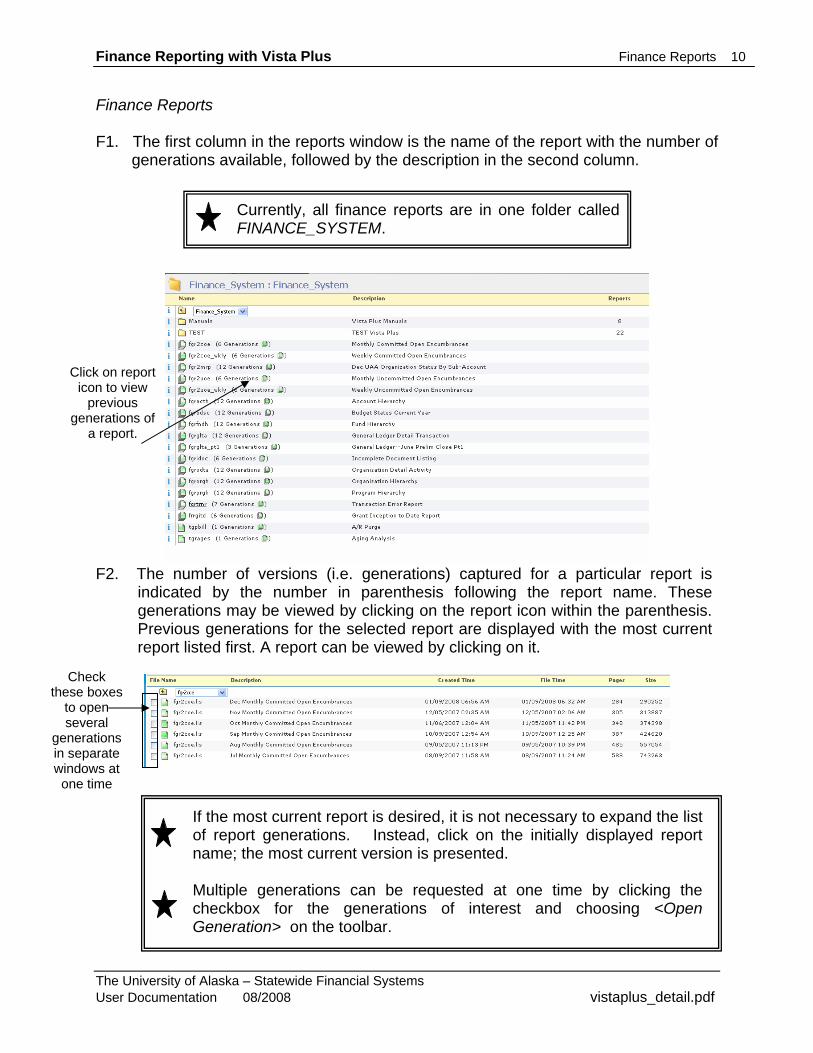
Finance Reports F1. The first column in the reports window is the name of the report with the number of
generations available, followed by the description in the second column.
Currently, all finance reports are in one folder called FINANCE_SYSTEM.
Click on report icon to view
previous generations of
a report.
F2. The number of versions (i.e. generations) captured for a particular report is indicated by the number in parenthesis following the report name. These generations may be viewed by clicking on the report icon within the parenthesis. Previous generations for the selected report are displayed with the most current report listed first. A report can be viewed by clicking on it.
If the most current report is desired, it is not necessary to expand the list of report generations. Instead, click on the initially displayed report name; the most current version is presented. Multiple generations can be requested at one time by clicking the checkbox for the generations of interest and choosing <Open Generation> on the toolbar.
Check these boxes
to open several
generations in separate windows at
one time
The University of Alaska – Statewide Financial Systems User Documentation 08/2008 vistaplus_detail.pdf
Finance Reporting with Vista Plus Finance Reports 11
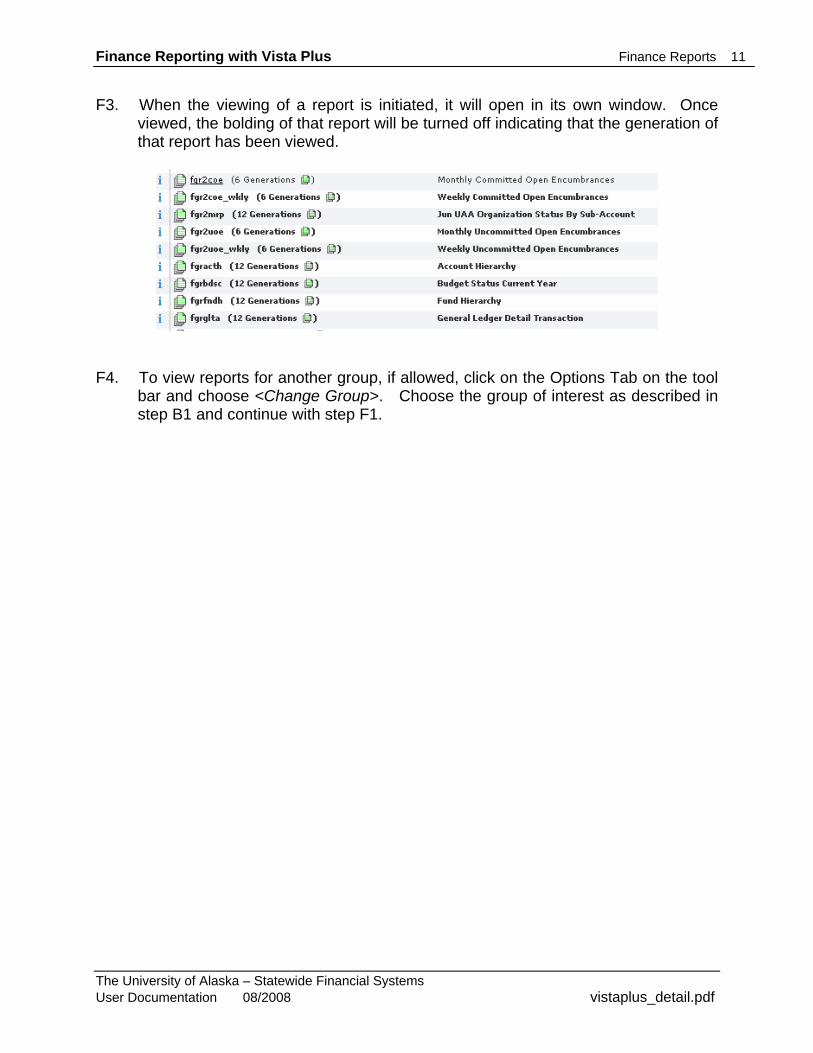
F3. When the viewing of a report is initiated, it will open in its own window. Once viewed, the bolding of that report will be turned off indicating that the generation of that report has been viewed.
F4. To view reports for another group, if allowed, click on the Options Tab on the tool
bar and choose <Change Group>. Choose the group of interest as described in step B1 and continue with step F1.
The University of Alaska – Statewide Financial Systems User Documentation 08/2008 vistaplus_detail.pdf
Finance Reporting with Vista Plus Report Window 12
Vista Plus Report Window
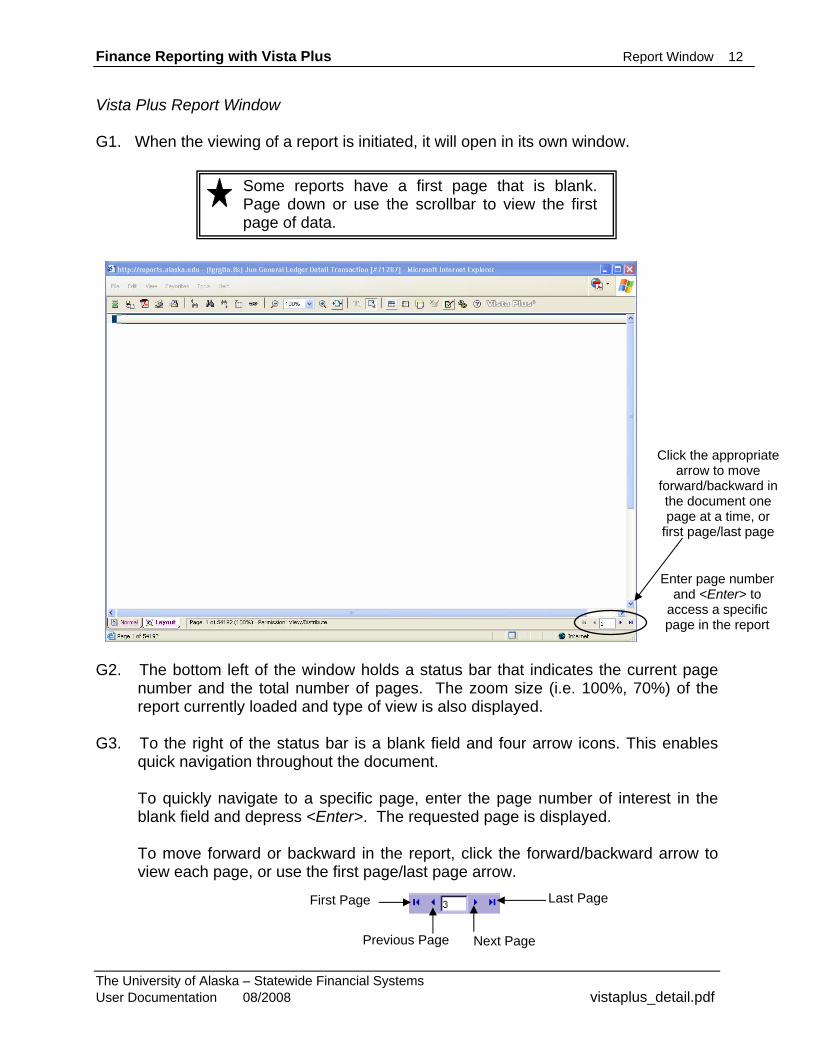
G1. When the viewing of a report is initiated, it will open in its own window. Some reports have a first page that is blank.
Page down or use the scrollbar to view the first page of data.
G2. The bottom left of the window holds a status bar that indicates the current page
number and the total number of pages. The zoom size (i.e. 100%, 70%) of the report currently loaded and type of view is also displayed.
G3. To the right of the status bar is a blank field and four arrow icons. This enables
quick navigation throughout the document.
To quickly navigate to a specific page, enter the page number of interest in the blank field and depress <Enter>. The requested page is displayed. To move forward or backward in the report, click the forward/backward arrow to view each page, or use the first page/last page arrow.
Enter page number and <Enter> to
access a specific page in the report
Click the appropriate arrow to move
forward/backward in the document one page at a time, or
first page/last page
First Page
Next Page
Last Page
Previous Page
The University of Alaska – Statewide Financial Systems User Documentation 08/2008 vistaplus_detail.pdf
Finance Reporting with Vista Plus Toolbar Buttons 13
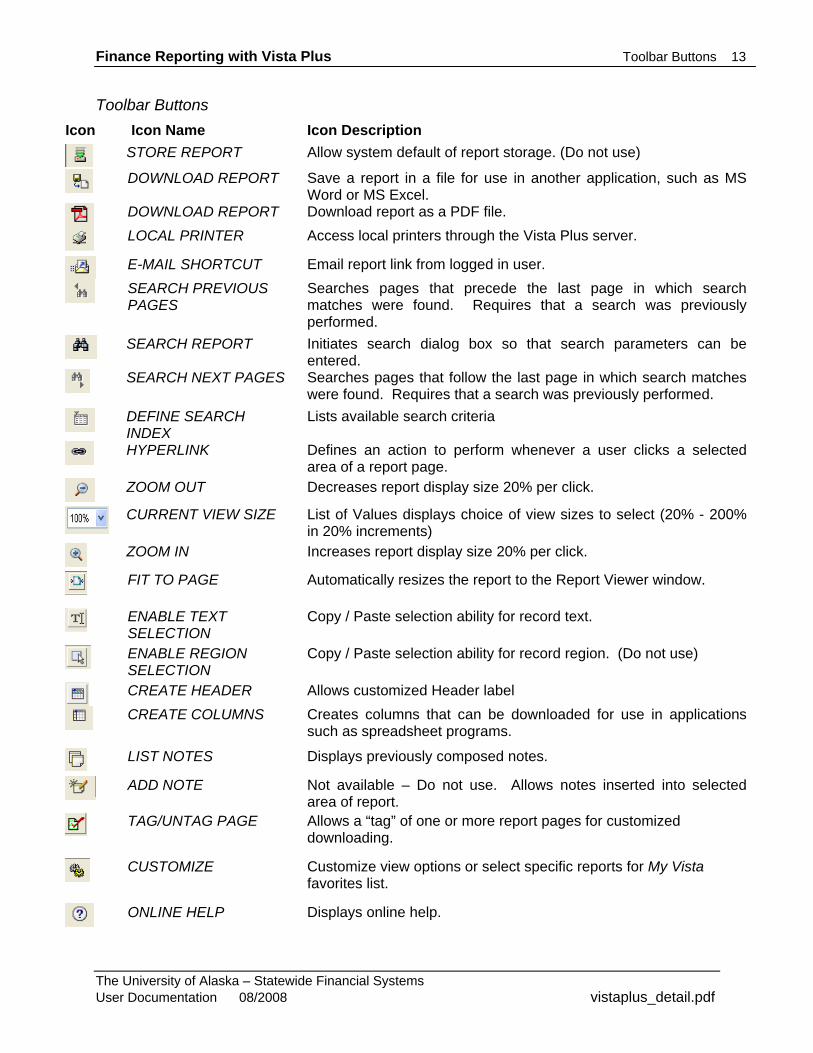
Toolbar Buttons Icon Icon Name Icon Description
Allow system default of report storage. (Do not use)
STORE REPORT
Save a report in a file for use in another application, such as MS Word or MS Excel.
DOWNLOAD REPORT
Download report as a PDF file.
DOWNLOAD REPORT Access local printers through the Vista Plus server.
LOCAL PRINTER
Email report link from logged in user.
E-MAIL SHORTCUT Searches pages that precede the last page in which search matches were found. Requires that a search was previously performed.
SEARCH PREVIOUS PAGES
Initiates search dialog box so that search parameters can be entered.
SEARCH REPORT
Searches pages that follow the last page in which search matches were found. Requires that a search was previously performed.
SEARCH NEXT PAGES
Lists available search criteria
DEFINE SEARCH INDEX
Defines an action to perform whenever a user clicks a selected area of a report page.
HYPERLINK
Decreases report display size 20% per click.
ZOOM OUT
List of Values displays choice of view sizes to select (20% - 200% in 20% increments)
CURRENT VIEW SIZE
Increases report display size 20% per click.
ZOOM IN
Automatically resizes the report to the Report Viewer window.
FIT TO PAGE
Copy / Paste selection ability for record text.
ENABLE TEXT SELECTION
Copy / Paste selection ability for record region. (Do not use)
ENABLE REGION SELECTION
Allows customized Header label
CREATE HEADER Creates columns that can be downloaded for use in applications such as spreadsheet programs.
CREATE COLUMNS
Displays previously composed notes.
LIST NOTES
Not available – Do not use. Allows notes inserted into selected area of report.
ADD NOTE
Allows a “tag” of one or more report pages for customized downloading.
TAG/UNTAG PAGE
Customize view options or select specific reports for My Vista favorites list.
CUSTOMIZE
Displays online help.
ONLINE HELP
The University of Alaska – Statewide Financial Systems User Documentation 08/2008 vistaplus_detail.pdf
Finance Reporting with Vista Plus Searching a Report 14
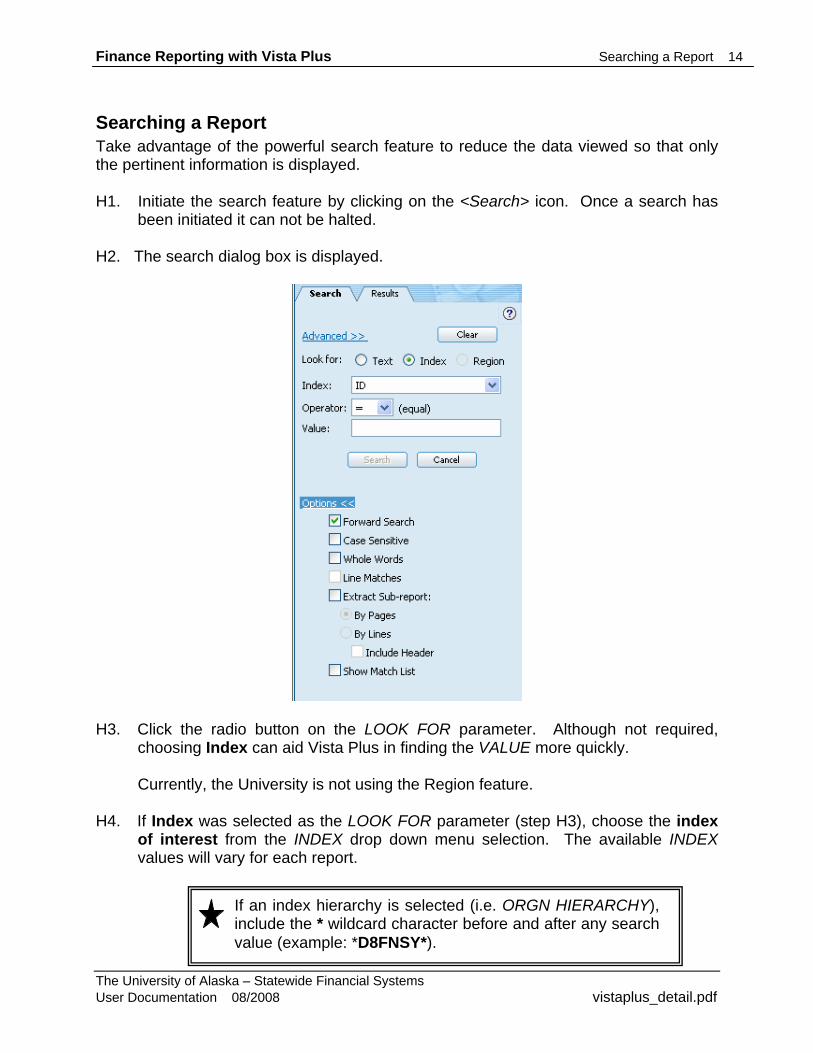
Searching a Report Take advantage of the powerful search feature to reduce the data viewed so that only the pertinent information is displayed. H1. Initiate the search feature by clicking on the <Search> icon. Once a search has
been initiated it can not be halted. H2. The search dialog box is displayed.
H3. Click the radio button on the LOOK FOR parameter. Although not required,
choosing Index can aid Vista Plus in finding the VALUE more quickly.
Currently, the University is not using the Region feature. H4. If Index was selected as the LOOK FOR parameter (step H3), choose the index
of interest from the INDEX drop down menu selection. The available INDEX values will vary for each report.
If an index hierarchy is selected (i.e. ORGN HIERARCHY), include the * wildcard character before and after any search value (example: *D8FNSY*).
The University of Alaska – Statewide Financial Systems User Documentation 08/2008 vistaplus_detail.pdf
Finance Reporting with Vista Plus Searching a Report 15
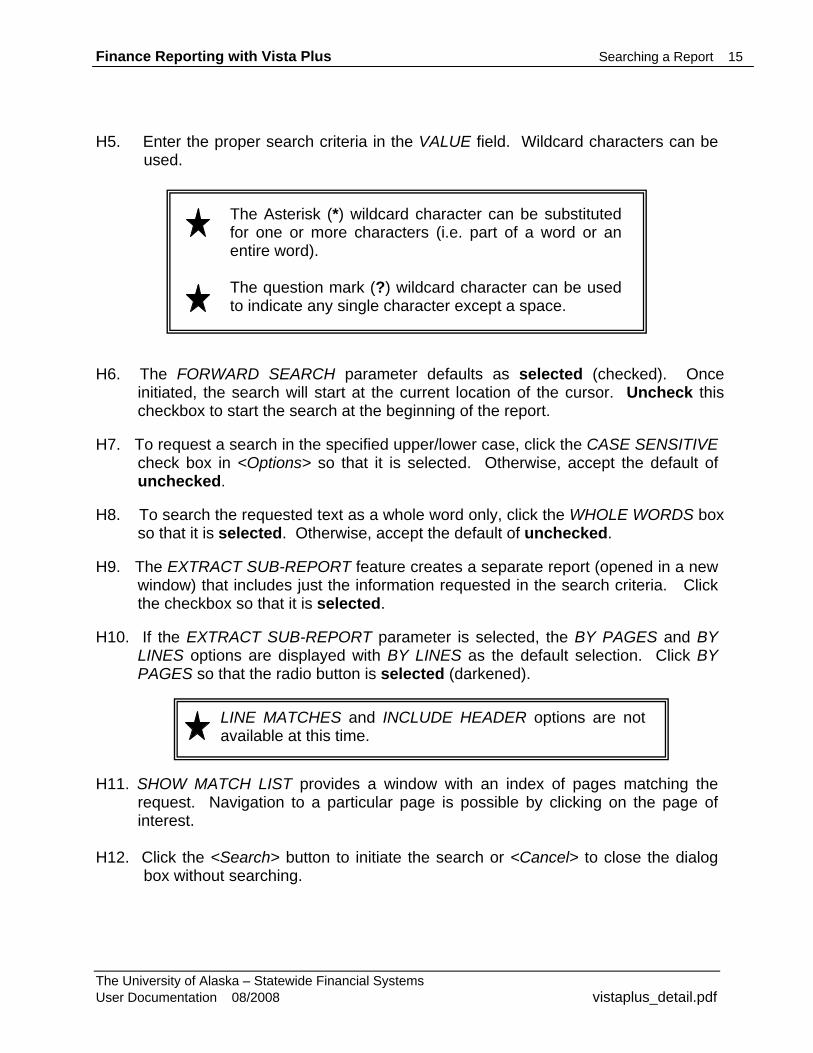
H5. Enter the proper search criteria in the VALUE field. Wildcard characters can be
used. H6. The FORWARD SEARCH parameter defaults as selected (checked). Once
initiated, the search will start at the current location of the cursor. Uncheck this checkbox to start the search at the beginning of the report.
H7. To request a search in the specified upper/lower case, click the CASE SENSITIVE
check box in <Options> so that it is selected. Otherwise, accept the default of unchecked.
H8. To search the requested text as a whole word only, click the WHOLE WORDS box
so that it is selected. Otherwise, accept the default of unchecked. H9. The EXTRACT SUB-REPORT feature creates a separate report (opened in a new
window) that includes just the information requested in the search criteria. Click the checkbox so that it is selected.
H10. If the EXTRACT SUB-REPORT parameter is selected, the BY PAGES and BY
LINES options are displayed with BY LINES as the default selection. Click BY PAGES so that the radio button is selected (darkened).
The Asterisk (*) wildcard character can be substituted for one or more characters (i.e. part of a word or an entire word). The question mark (?) wildcard character can be used to indicate any single character except a space.
LINE MATCHES and INCLUDE HEADER options are not available at this time.
H11. SHOW MATCH LIST provides a window with an index of pages matching the
request. Navigation to a particular page is possible by clicking on the page of interest.
H12. Click the <Search> button to initiate the search or <Cancel> to close the dialog
box without searching.
The University of Alaska – Statewide Financial Systems User Documentation 08/2008 vistaplus_detail.pdf
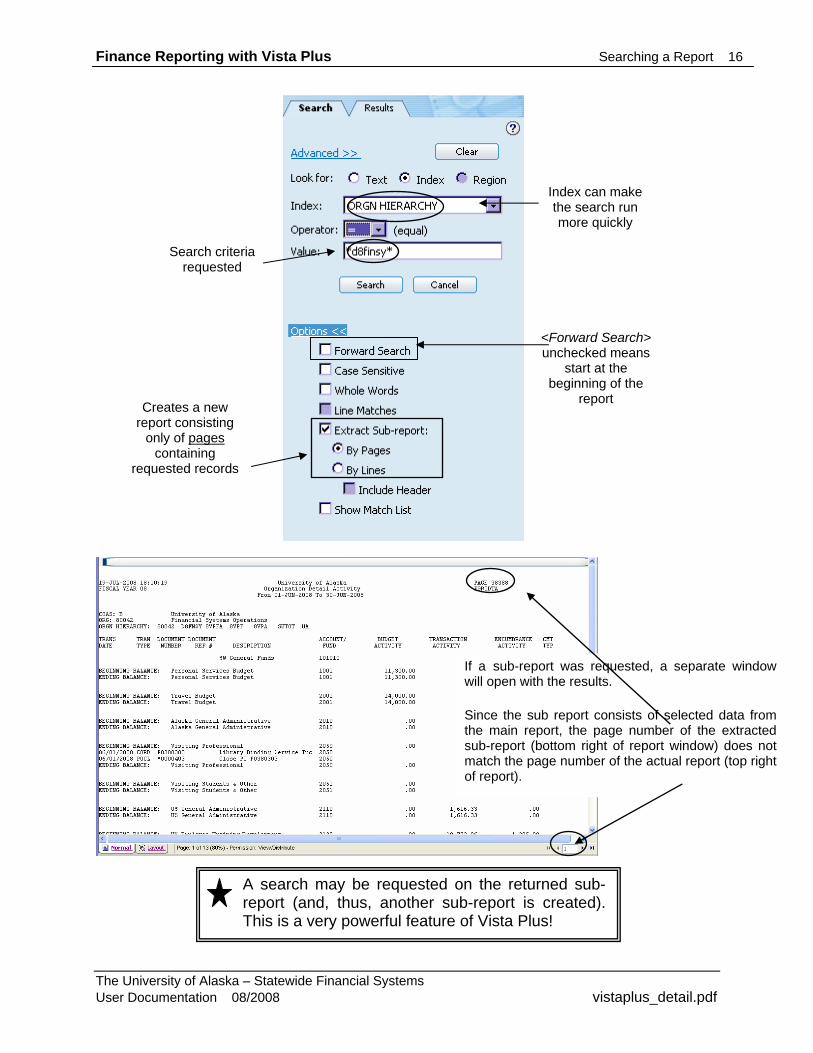
Finance Reporting with Vista Plus Searching a Report 16
Index can make the search run more quickly
Search criteria requested
<Forward Search> unchecked means
start at the beginning of the
report Creates a new report consisting
only of pages containing
requested records
If a sub-report was requested, a separate window will open with the results.
Since the sub report consists of selected data from the main report, the page number of the extracted sub-report (bottom right of report window) does not match the page number of the actual report (top right of report).
A search may be requested on the returned sub-report (and, thus, another sub-report is created). This is a very powerful feature of Vista Plus!
The University of Alaska – Statewide Financial Systems User Documentation 08/2008 vistaplus_detail.pdf
Finance Reporting with Vista Plus Searching a Report 17
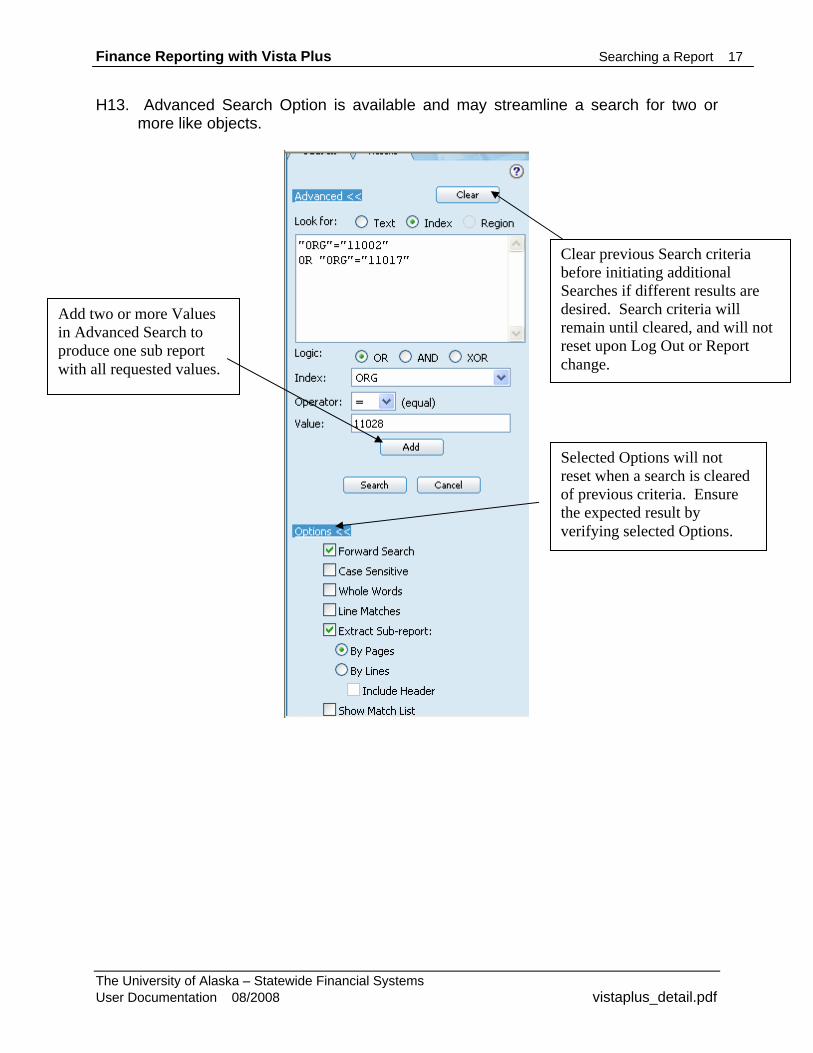
H13. Advanced Search Option is available and may streamline a search for two or more like objects.
Clear previous Search criteria before initiating additional Searches if different results are desired. Search criteria will remain until cleared, and will not reset upon Log Out or Report change.
Add two or more Values in Advanced Search to produce one sub report with all requested values.
Selected Options will not reset when a search is cleared of previous criteria. Ensure the expected result by verifying selected Options.
The University of Alaska – Statewide Financial Systems User Documentation 08/2008 vistaplus_detail.pdf
Finance Reporting with Vista Plus Searching a Report 18
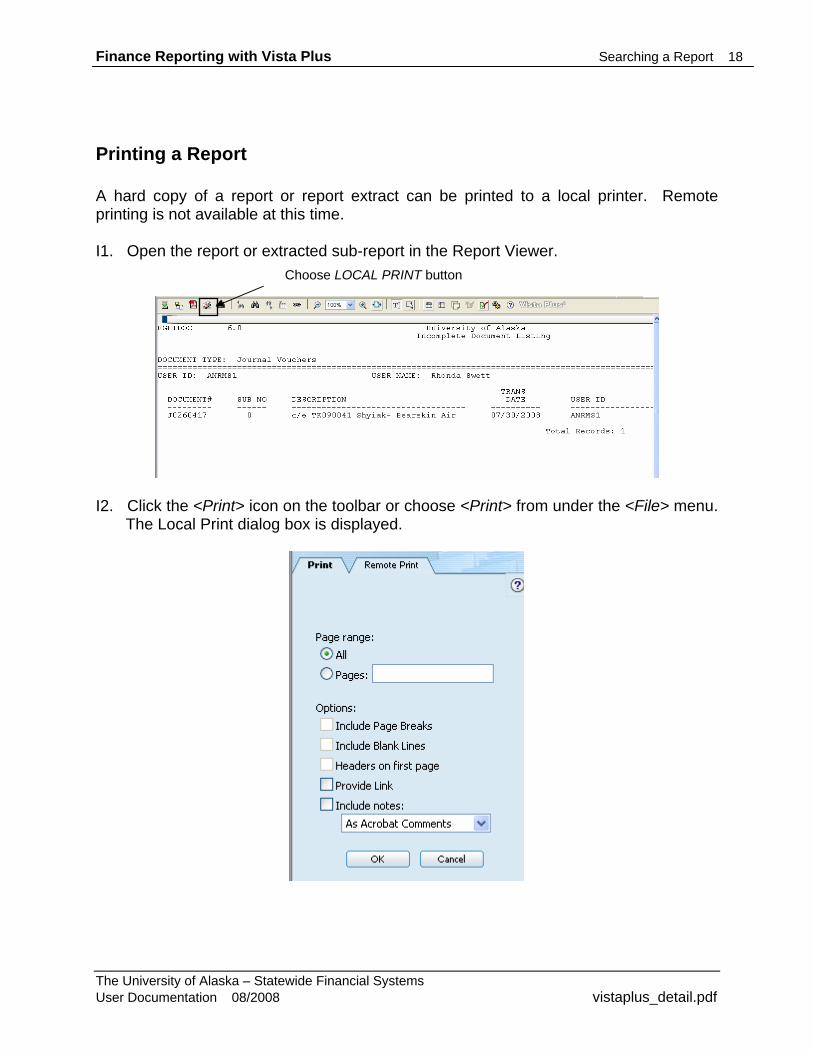
Printing a Report
A hard copy of a report or report extract can be printed to a local printer. Remote printing is not available at this time. I1. Open the report or extracted sub-report in the Report Viewer. Choose LOCAL PRINT button
I2. Click the <Print> icon on the toolbar or choose <Print> from under the <File> menu. The Local Print dialog box is displayed.
The University of Alaska – Statewide Financial Systems User Documentation 08/2008 vistaplus_detail.pdf
Finance Reporting with Vista Plus Searching a Report 19
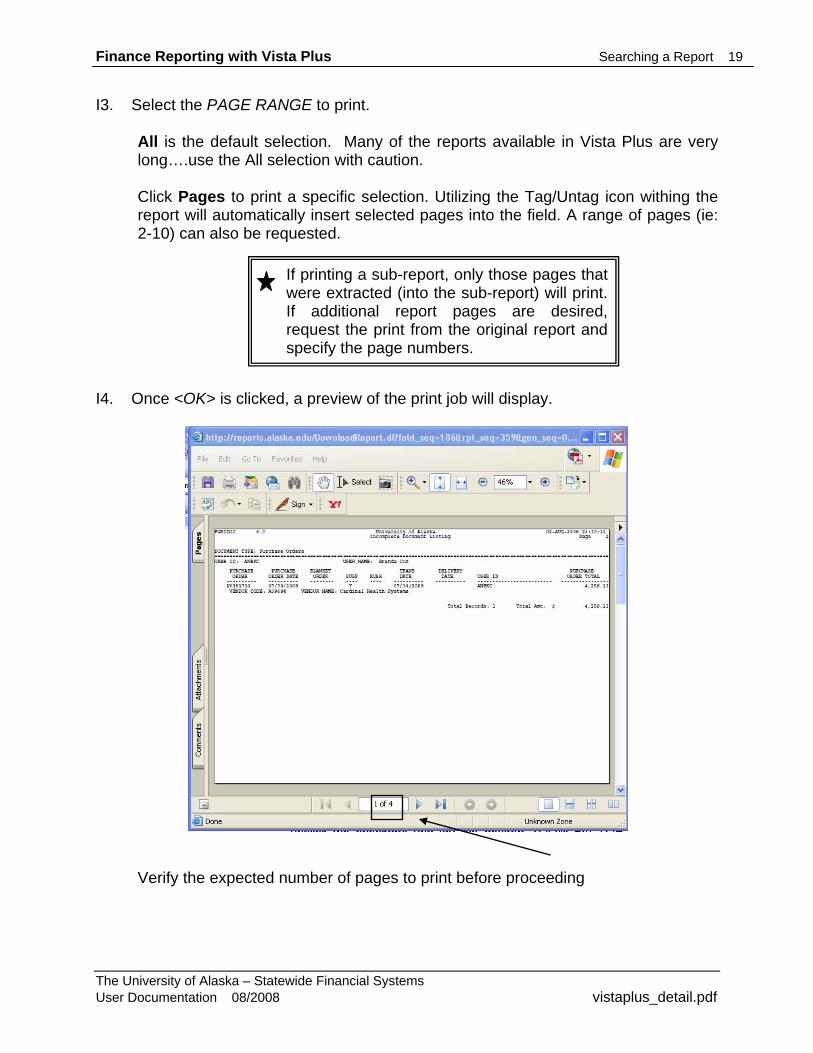
I3. Select the PAGE RANGE to print.
All is the default selection. Many of the reports available in Vista Plus are very long….use the All selection with caution. Click Pages to print a specific selection. Utilizing the Tag/Untag icon withing the report will automatically insert selected pages into the field. A range of pages (ie: 2-10) can also be requested.
If printing a sub-report, only those pages that were extracted (into the sub-report) will print. If additional report pages are desired, request the print from the original report and specify the page numbers.
I4. Once <OK> is clicked, a preview of the print job will display.
Verify the expected number of pages to print before proceeding
The University of Alaska – Statewide Financial Systems User Documentation 08/2008 vistaplus_detail.pdf
Finance Reporting with Vista Plus Searching a Report 20
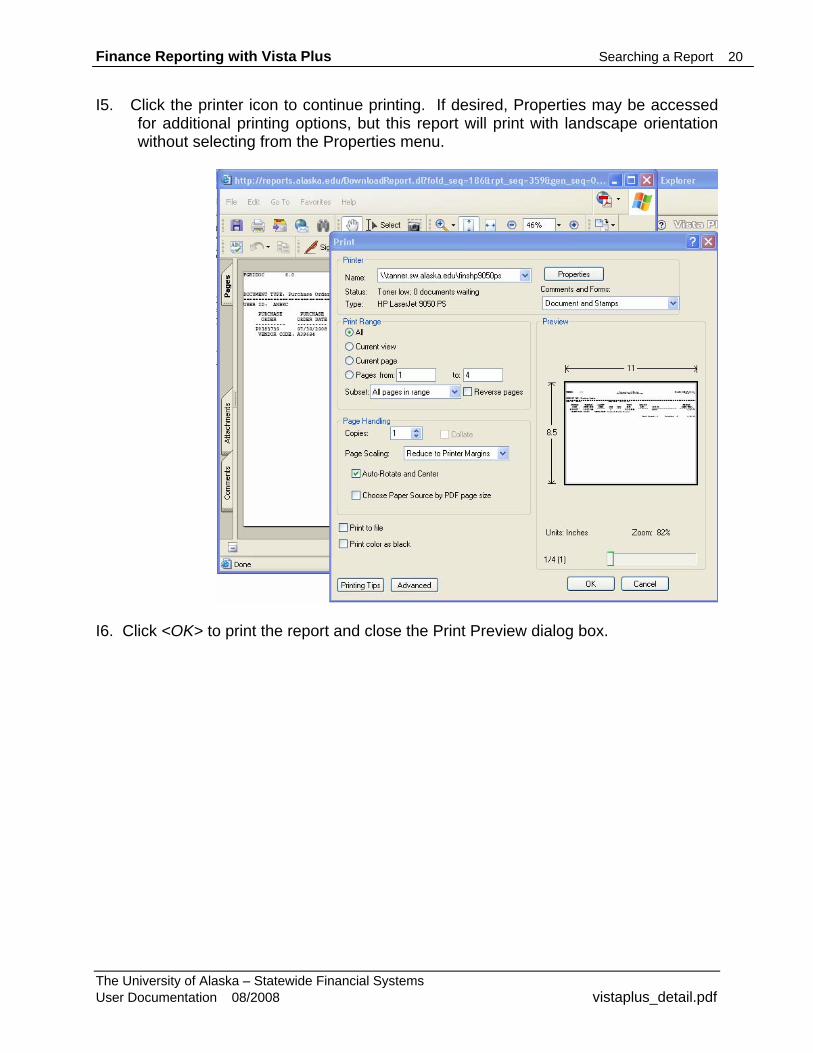
I5. Click the printer icon to continue printing. If desired, Properties may be accessed for additional printing options, but this report will print with landscape orientation without selecting from the Properties menu.
I6. Click <OK> to print the report and close the Print Preview dialog box.
The University of Alaska – Statewide Financial Systems User Documentation 08/2008 vistaplus_detail.pdf
Finance Reporting with Vista Plus Downloading a Report 21
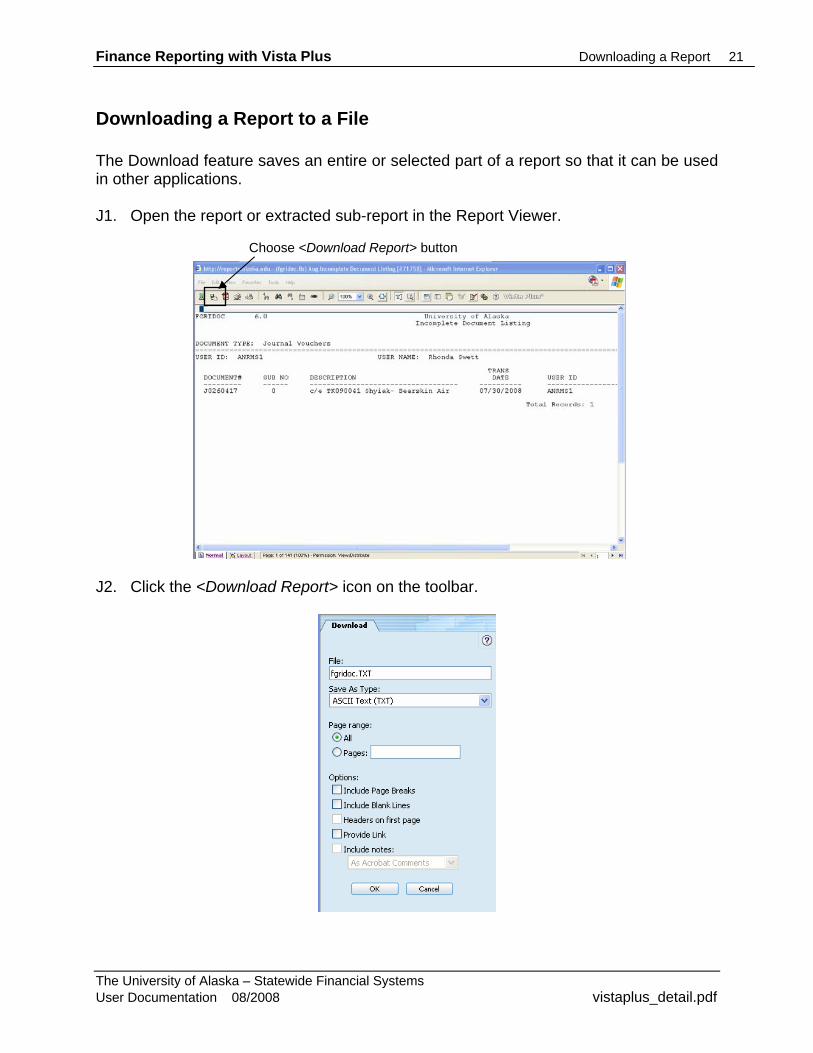
Downloading a Report to a File The Download feature saves an entire or selected part of a report so that it can be used in other applications. J1. Open the report or extracted sub-report in the Report Viewer.
Choose <Download Report> button
J2. Click the <Download Report> icon on the toolbar.
The University of Alaska – Statewide Financial Systems User Documentation 08/2008 vistaplus_detail.pdf
Finance Reporting with Vista Plus Downloading a Report 22
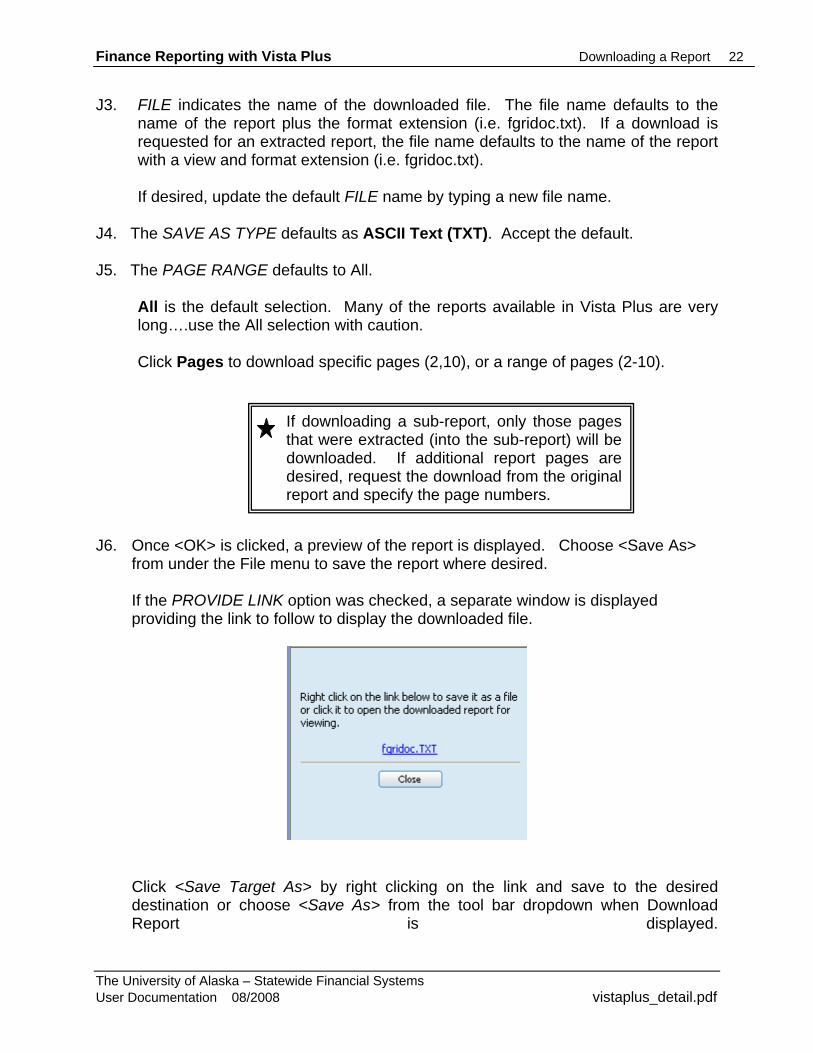
J3. FILE indicates the name of the downloaded file. The file name defaults to the name of the report plus the format extension (i.e. fgridoc.txt). If a download is requested for an extracted report, the file name defaults to the name of the report with a view and format extension (i.e. fgridoc.txt).
If desired, update the default FILE name by typing a new file name.
J4. The SAVE AS TYPE defaults as ASCII Text (TXT). Accept the default. J5. The PAGE RANGE defaults to All.
All is the default selection. Many of the reports available in Vista Plus are very long….use the All selection with caution. Click Pages to download specific pages (2,10), or a range of pages (2-10).
If downloading a sub-report, only those pages that were extracted (into the sub-report) will be downloaded. If additional report pages are desired, request the download from the original report and specify the page numbers.
J6. Once <OK> is clicked, a preview of the report is displayed. Choose <Save As>
from under the File menu to save the report where desired.
If the PROVIDE LINK option was checked, a separate window is displayed providing the link to follow to display the downloaded file.
Click <Save Target As> by right clicking on the link and save to the desired destination or choose <Save As> from the tool bar dropdown when Download Report is displayed.
The University of Alaska – Statewide Financial Systems User Documentation 08/2008 vistaplus_detail.pdf
Finance Reporting with Vista Plus Importing a Report 23
Importing a Report into MS Word or MS Excel
Working knowledge of Microsoft Word and Microsoft Excel are assumed.
Import to MS Word
Though importing to MS Word is possible, the practicality of doing so is questionable,
due to readability and formatting issues.
K1. Right click on downloaded report and select Open With - select MS Word – format
as desired
…OR…
K2. Initiate Microsoft Word.
K3. Open downloaded report.
K4. The downloaded data is displayed in the Word document. To make the file more easily readable, the following format changes are suggested:
Set page orientation to landscape Change all text size to 8 point font Change left and right margins to 0.3
K5. Save the file.
The University of Alaska – Statewide Financial Systems User Documentation 08/2008 vistaplus_detail.pdf
Finance Reporting with Vista Plus Importing a Report 24
Import to MS Excel L1. Right click on downloaded report and select Open With - select MS Excel – format
as desired.
…OR…
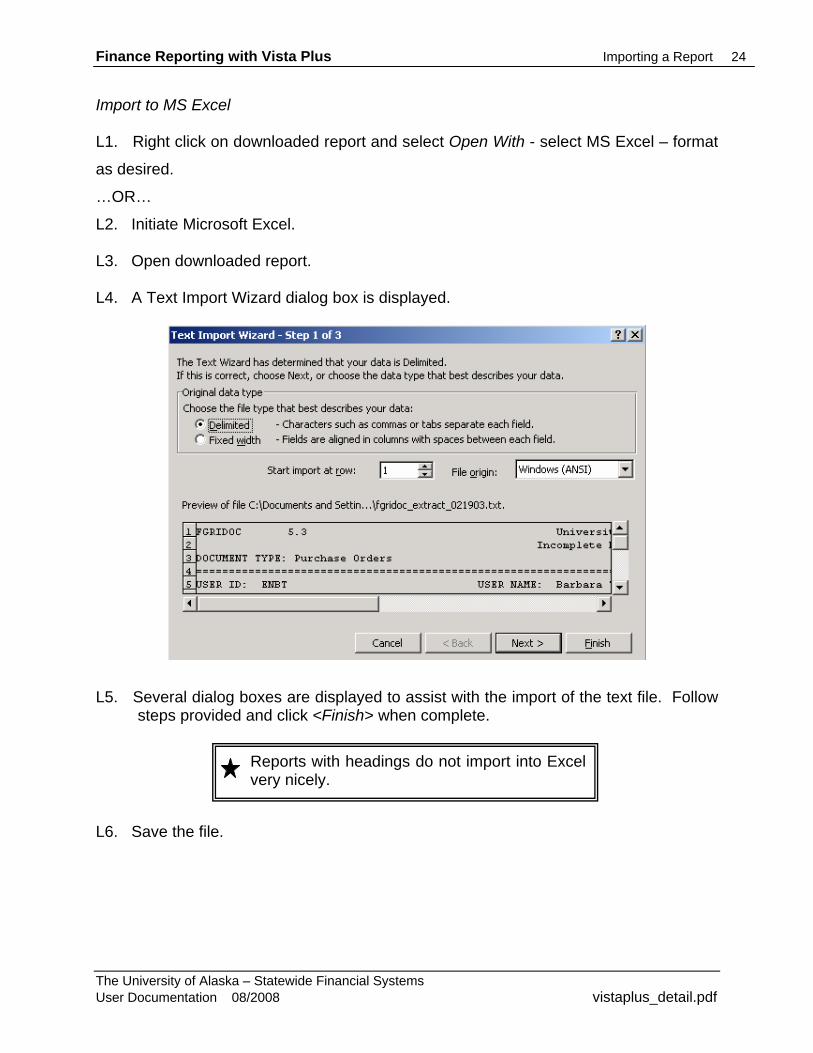
L2. Initiate Microsoft Excel. L3. Open downloaded report. L4. A Text Import Wizard dialog box is displayed.
L5. Several dialog boxes are displayed to assist with the import of the text file. Follow steps provided and click <Finish> when complete.
Reports with headings do not import into Excel
very nicely. L6. Save the file.
The University of Alaska – Statewide Financial Systems User Documentation 08/2008 vistaplus_detail.pdf
Finance Reporting with Vista Plus Appendix - Resources 25
Appendix
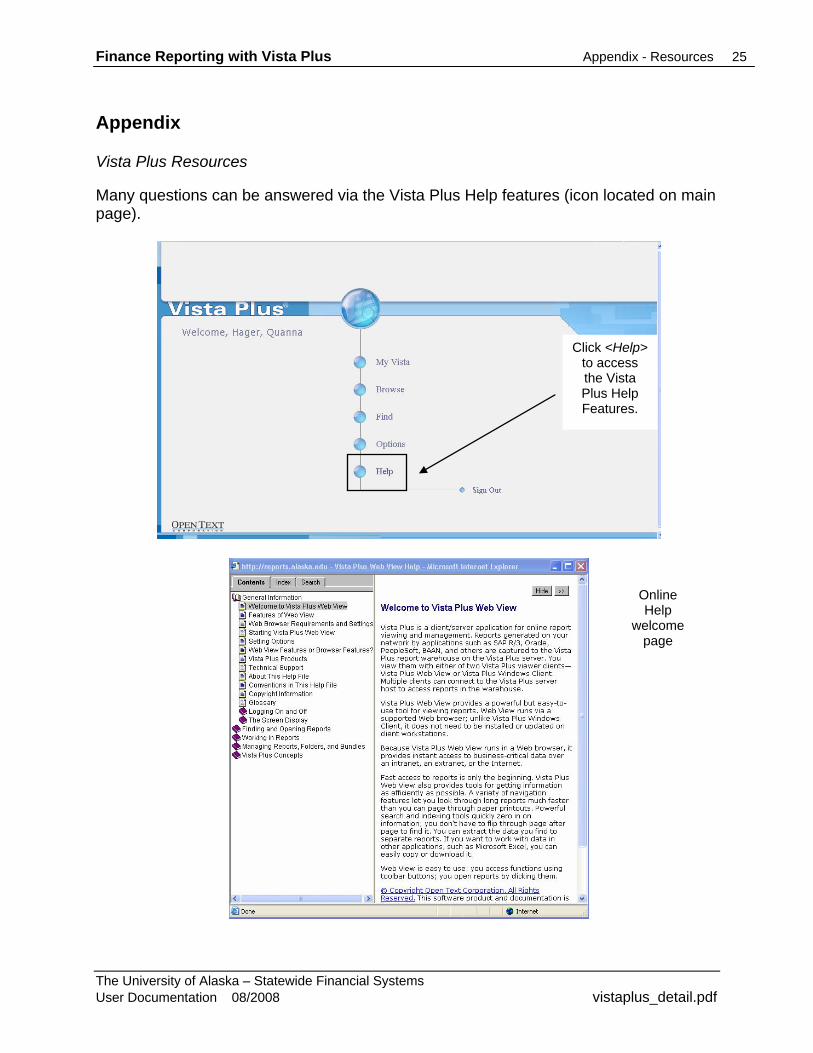
Vista Plus Resources Many questions can be answered via the Vista Plus Help features (icon located on main page).
Click <Help> to access the Vista Plus Help Features.
Online Help
welcome page
The University of Alaska – Statewide Financial Systems User Documentation 08/2008 vistaplus_detail.pdf
Finance Reporting with Vista Plus Appendix - Java 26
Enabling Java and Cookies in Netscape Browser
M1. Initiate Netscape Web Browser M2. Choose <Preferences> under the <Edit> menu M3. Click on <Advanced> M4. If not already selected, click on <Enable Java> and <Enable JavaScript> so that
they are checked. M5. Under Cookies, click on the radio button next to <Accept All Cookies> so that it is
selected (darkened). Enabling Java and Cookies in Internet Explorer Browser N1. Initiate Internet Explorer Web Browser N2. Choose <Internet Options> under the <Tools> menu N3. Click on <Advanced> N4. Scroll down. If not already selected, click on <Use Java 2 for applet> so that it is
checked. N5. Click on <Security> N6. Click on <Custom Level> N7. Scroll down. Under COOKIES, click on the <Enable> radio button next to <Allow
cookies that are stored on your computer> so that it is selected (darkened). Also, click on the <Enable> radio button next to <Allow per-session cookies (not stored)> so that it is selected (darkened).
The University of Alaska – Statewide Financial Systems User Documentation 08/2008 vistaplus_detail.pdf