Embed Size (px)
Citation preview
Managing Pepper Maggots with OMRI-Approved GF-120 Fruit Fly Bait T. Jude Boucher, University of Connecticut
24 Hyde Ave., Vernon, CT 06066 [email protected], 860-875-3331
The pepper maggot (PM), Zonosemata electa, is a Tephritid fruit fly native to horsenettle in North America, which first attacked peppers and eggplant in 1921. It has a patchy distribution throughout its range, which includes the eastern United States and Ontario, but also extends west to Kansas and south to Texas and Florida. In New England, it is quite common in the CT River Valley and along the shore in CT, MA and RI, and has been found as far north as Epping, NH. This pest has a single generation each year. The adult flies emerge from the soil in early to mid-July over a 10- to 14-day period. Males emerge up to 7 days before females. Each female can lay up to 50 eggs, beginning 6 to 7 days after mating. Eggs take 10 to 12 days to hatch. Mating is thought to occur exclusively on the host plant and fruit, where males will fight for territory to win a receptive female. However, the flies spend much of their time feeding in and inhabiting nearby trees, returning to the crop fields during daylight hours for mating and egg laying. Over 94% of egg laying occurs in the first 4 weeks after emergence. The flies may live through mid- to late August if not controlled. Fully grown maggots emerge from the fruit in late August or early September, and enter the soil to pass the winter as pupae. Adults have been known to migrate at least ½ mile to infest new pepper plantings. Up to 75% of the fruit have been lost in the second year of production on some farms, while other farms go years without experiencing pepper maggot problems. Fruit may be rendered unmarketable by the presence of maggots in the flesh or seed head (pacenta). In late August and early September, fruit may rot when soft rot bacteria enters exit holes left by emerging maggots. The insect survives the winter as a pupa about two inches below the soil surface. Females lay eggs by inserting their hollow, sword-like ovipositor though the fruit flesh and depositing an egg so that it sticks out into the void on the interior of the pepper pod. In doing so, the female leaves a small, white, round scar on the surface of the fruit, which can be used to monitor for the pest and to time initial insecticide applications. Only 5 to 50% of the egg-laying attempts (or scars) result in an egg being deposited in the fruit. These scars are particularly easy to detect on the glossy surface of cherry pepper pods: a favorite host. The insect will also attack other thick-fleshed, blocky fruit such as bell, cheese and apple pepper varieties and, less frequently, eggplant. Hot cherry peppers (i.e. ‘Cherry Bomb’) can be used as indicator plants to time insecticide applications, if planted every 50-75 feet in the outer row of peppers along the tree line or in the entire perimeter row of the crop. Another way to monitor for this pest is to bait a yellow, sticky AM Trap with a vial of 28% ammonium hydroxide solution (Fisher Scientific, Fair Lawn, NJ). We use a common 20 dram drug store vial, stuffed with cotton, with a ¼ -inch hole drilled in the top to dispense the ammonia. Using a paper clip, attach the vial to a hole made in the center of the AM trap. The trap works best 20 feet high in a maple tree beside the pepper field. Lower elevations and other types of trees have proved less reliable. Recent experience has demonstrated that you can
98
eventually trap all the flies out of one tree if that tree is used year after year for monitoring. Simply switching to a nearby tree will allow you to catch more flies. On IPM farms, pest control involves insecticide sprays with dimethoate or acephate (Orthene) applied within a week of catching the first PM fly or detecting the first stings on fruit. Two or three applications may be needed at 8- to 10-day intervals to cover the entire adult emergence and egg-laying period. Orthene will control both PM and European corn borer, but has a 7 day-to-harvest (dh) restriction. Dimethoate generally has a 0 or 1 dh restriction, but will not control borers. Pepper maggot can also be controlled using perimeter trap cropping. For example, when planting bell peppers, simply replace the outer perimeter row with a row or two of cherry pepper trap crop plants. You will need to plant a couple of cherry pepper plants at each end of the bell rows too, so that the trap crop completely encircles the cash crop. Within a week of detecting flies or stings, spray just the trap crop with an effective insecticide. For light populations, insecticide applications may not be necessary the first year to stop the flies from reaching the bell peppers. However, maggots that develop in the cherry pepper fruit the first year will produce so many flies the second year that the perimeter will be breached unless the trap crop is sprayed. Perimeter trap cropping has been successfully used to protect eggplant by planting two rows of hot cherry peppers in the perimeter and using a shielded spray to apply insecticide applications only to the trap crop. Until recently, the only effective management strategy for an organic farm was to cover host crops with a floating row cover throughout the entire flight period (5 to 8 weeks) or to market fruit with maggots inside. The use of row covers often proved impractical, especially during harvest. However, spinosad, which is ineffective when applied as a foliar spray (i.e., as SpinTor or Entrust), has recently been reformulated as a fruit fly bait: GF-120. The new bait formulation allows the fly to ingest more of the active ingredient to provide a higher kill. In research trials, this formulation has been shown to provide 67 to 98% efficacy for related pests, such as apple and blueberry maggots. The fact that GF-120 is not readily available makes using this product a challenge. Because it is not commonly stocked by local suppliers, GF-120 will have to be ordered prior to the planting season to insure that it arrives on time. For our trial, a representative from Dow AgriSciences provided the product for us to try. A second challenge is that label directions call for GF-120 to be applied with large orifice nozzles (droplet size 4-6 mm), but as an ultra low volume spray: approximately 1 gallon per acre of finished spray solution. It is also recommended that the material be applied to the underside of leaves “to reduce exposure to sun and rain.” Since large orifices are usually associated with high volumes of finished solution, this essentially meant that we had to travel at approximately 12 mph in an ATV, over rough terrain, while directing the spray up to the underside of the leaf canopy. We accomplished this on an organic farm in CT, both by using perimeter trap cropping to reduce the area requiring spray and by rolling the drive rows early in the season prior to spraying in order to allow high speed travel around a 1-acre block. A high rate of GF-120 was used: 20 fl oz/a in 140 fl oz of finished solution. Originally, based on recommendations from
99
Dow, we used a SJ3-02 TeeJet fertilizer nozzle with a 50 mesh screen at 20 psi to produce the correct flow rate and droplet size. However, the grower switched back to the nozzles which came with the sprayer for greater spray distance after the first application. The perimeter rows of cherry peppers were sprayed so that applications were directed to the top and underside of the plant canopy in two separate passes. An additional application was directed to the underside of the surrounding tree canopy per label directions. This process was repeated the first three weeks after flies were first detected in traps (starting July 12). The electric sprayer purchased for the ATV application then failed and required repair, which delayed the fourth application for 2.5 weeks or until Mid-August. Additional flies were captured during early August and new stings were detected on the fruit during that time period, which necessitated the final application. The unanticipated delay and heavy August rains may have reduced the efficacy of that final application. In 2010, pepper maggots were not controlled on this farm and approximately 75% of the fruit were infested and unmarketable. In 2011, using the interrupted GF-120 spray schedule (no spray in early Aug), 60 to 70% of the crop remained maggot-free at harvest. Providing an unsprayed control patch of peppers at the same site to measure the untreated damage level was considered impractical, due to the mobility of the adult fly. The grower was pleased with the results. This grower hedged his bet on the new fruit fly bait by covering a second block of peppers with floating row covers from the first week of July through August. The covered block remained maggot-free through harvest.
100
Meeting the Postharvest Needs of Vegetables from Field to Market Lee Stivers, Penn State Extension in Washington County
[email protected]; http://extension.psu.edu/washington Harvested vegetables are living systems that age with time. As a grower, your goal is to slow down the aging process. To do that, you need to understand, and manage, four natural processes: respiration, transpiration, ethylene production, and chilling injury. Proper cooling is the first step, followed by maintaining the optimum temperature and relative humidity (RH) for each vegetable. Produce a Clean, Mature Product: Quality cannot be improved after harvest; it can only be maintained. So it makes sense to start with the highest quality crop possible at harvest. This means selecting the right varieties, controlling pests during the growing season, managing water and nutrients, and harvesting at the optimal time.
Handle with Tender Loving Care: If produce is injured during harvest, grading or packaging, damage may not be seen until it reaches the retail or consumer levels. Postharvest rots are more prevalent in injured produce. Mechanically damaged fruits and vegetables also lose water more rapidly. Whether you are harvesting and handling cabbages or corn, berries or beans, “treat ‘em like eggs!” Remove the Field Heat: Postharvest cooling lowers the respiration rate of the product, slows water loss, inhibits the growth of molds and bacteria that can cause decay, and reduces the production of the ripening agent ethylene. Cooling methods include room-cooling, forced-air cooling, hydro-cooling and icing. Sanitize for Food Safety: Using chlorine or other sanitizing agents in wash water and hydro-cooling water helps protect against post-harvest diseases and also helps protect consumers from food-borne illnesses caused by pathogens. Package Properly: Any packaging should be designed to prevent physical damage to produce and be easy to handle. Packaging can aid in retaining water while still allowing gas exchange. Know Your Vegetables: Become familiar with the optimum storage temperatures and curing needs of each produce item. Below are specific recommendations for a few important fresh and storage crops grown in New England. Broccoli:
• Optimum temperature: 32oF reached ASAP after harvest • 95% RH • Very high respiration and transpiration rates • Low ethylene production; extremely sensitive to exposure
104
Summer Squash: • Maturity indicated by a variety of characteristics and market demand • Optimum temperature: 41-50oF • 95% RH • Transpiration rates high; water loss shrivels fruit • Very chilling sensitive when held below 40oF • Low rates of ethylene production; low to moderately sensitive to ethylene exposure
Winter Squash:
• Maturity indicated by rind hardness, color, and corking of the stem • Curing helps harden rinds, but not recommended for acorns (10 days, 80-85oF and 80-
85% RH) • Optimum temperature: 55-59oF for most, but 50-55oF for green rind types • 50-70% RH • Very chilling sensitive when held below 50oF • Most store 2-3 months, less for acorns, more for hubbards
Onions:
• Maturity indicated when 10-20% tops down in the field • Undercutting 1-2 inches accelerates dormancy • Curing in field when temperatures are over 75oF • Forced air curing can be rapid (12 hours at 86-105oF) or slower • Mature for storage when neck scale are completely dry; loss of 5-8% • Optimum temperature: 32oF but not below • 75-80% RH for best scale color • Can store up to 6-9 months; typically 3-6 months • Exposure to ethylene encourages sprouting
Carrots
• Maturity indicated by a variety of characteristics and market demand • More mature carrots will store longer than less mature ones • Optimum temperature: 32oF but not below • 98-100% RH but avoid free water which speeds decay • Can store 3-5 months under good conditions • Low ethylene production; exposure to ethylene results in bitter flavor
Potato• Maturity indicated when tuber skins are set, vines are dry • Optimal harvesting temperatures are 45-60oF • Prevent bruising and injury; treat gently • Cull and cure before storage. Cure by holding at 50-60oF and 95% RH for 10-14 days. • Optimum temperature: 38-40oF for tablestock • 95% RH • Can store up to 6-9 months; typically 3-6 months • Exposure to ethylene encourages sprouting
105
Crop Diversity in Winter Storage at Kilpatrick Family Farm Michael Kilpatrick
Kilpatrick Family Farm is a year-round mixed vegetable farm. Our main markets are year round Farmer’s Markets and CSA. Over the years, we have experimented with pushing the crops we go to see just what can be done. We run 5 distinct different environments for winter crops. This allows us to tailor the environment for the many different crops we grow. Root cellar (34 degrees, 95% humidity) This is the main storage facility on the farm. A 40’ X 8’ x9’ insulated overseas shipping container with stainless walls and aluminum slated floor, it holds up to 18,000 lbs of crop. We spent around $15,000 buying the container, installing it on a shale pad, and installing refrigeration and electric. To maintain organization in the cooler, we put all crops on pallets, and fill out a grid chart that is shared with all employees. The cooling system is a 3 HP Trenton compressor with 2 evaporation units. If we had know we would have employed a low velocity evaporation unit to reduce moisture loss. Right now our humidity system is “man with hose” but we would like to install a misting system at some time. Our warm storage area is an unused, insulated garage under our apartment. It has a cement floor that allows us to move stacks of bulk crates of squash and sweet potatoes around with a pallet jack. We regulate the humidity and temperature very unconventionally through opening and closing an inside door or outside window. Our goal is to maintain a temp of 55 in this area. We store our onions and garlic currently off-farm in a rented 8x14 cooler. It is managed as a low humidity cooler by draining all evaporator drainage into a closed container and limiting visits. We are currently building our own onion storage facility by walling off a section of another insulated shipping container and installing a coolbot. All of our prepped crops and second vegetable storage is in 2 coolers located in our washing shed. We will also store extra storage greens (greens cut in Nov/Dec and stored for up to 8 wks) in these coolers when we run out of space in our root cellar. We built our main cooler (8X11) out of used cooler panels and a used compressor. We added onto the backside of it 4 years ago for the second cooler (8X8) buying some “second” insulated structural panels from winter panel company out of Brattleburo, VT. They come in 4’ widths in varying lengths and at the time ran around $2 a square foot. We cut 2 12” by 6” holes in the shared wall between the coolers and consequently the new cooler runs around 10 degrees warmer than whatever we set the main cooler at. We use the second cooler in the summer for storing tomatoes, peppers, and cukes. The last area we use to store overwintered crop is directly in the ground. We have successfully over-wintered parsnips, carrots and Jerusalem artichokes this way. Carrots do best with at least 2 layers of rowcover, while JA’s and Parsnips are fine with no cover. All of these crops do best when they are on raised beds, out of any danger having saturated soil. Last year, we did have quite the problem with carrot rust fly in our over-wintered carrots and parsnips. We’re not sure if it was overwintering that did it, or just the season.
106

Storing greens was something that we almost discovered by accident. We had several beds of beautiful spinach in the field in December and cut it all to use for the next several markets. We ended up keeping some for 6 weeks. We have found a variety of factors contribute to greens that store well. A later, high quality planting. This allows for the crop to be in the prime of growth and to want to hunker down and go into hybernation for the winter. They then seem to fill their leaves with sugars, antifreeze, and carbohydrates and thus produce a very sweet, long lasting, durable leaf. Cutting at a low temperature and immediately getting it into good cold (34) storage. We do find that if spinach has some snow in it, it seems to keep better. We have successfully done this with spinach, lettuce, kale, brussel sprouts, Chinese cabbage, boc choi, hakuri turnips with greens, and mesclun. We will be trying this with mache, and working to improve our system with the other greens this year. This technique allows us to bunch our greenhouse greens up for the really cold months of January-March and allows us to sell high quality, sweet, relatively inexpensive to produce, greens for the high paced, busy, Holiday markets.
Without the storage facilities we have made the effort to perfect we wouldn’t have anywhere close to the diversity that we are able to display at our weekly markets. Please follow the below URL or scan the QR code to access the custom resource page which has much more information on varieties, dates of planting and harvesting, storage, the presentation slides and other relevant resources. www.kilpatrickfamilyfarm.com/NEVF
107
PREHARVEST DROP CONTROL WITH RETAIN AND NAA COMBINATIONS
Duane W. Greene, James Krupa, and Maureen Vezina Department of Plant, Soil, and Insect Sciences
University of Massachusetts Amherst, MA 01003
Retail sales continue to be an important component in the overall business model for growers in the Northeast. The pick-your-own component of this model is playing an increasingly important role in the overall business. Many varieties, including McIntosh and Macoun, are especially prone to drop. In previous business models, it was sufficient to control preharvest drop for a period of time sufficient for fruit to develop market maturity and to allow a timely harvest. This scenario has changed and we now ask available preharvest drop control compounds to be effective over a much longer period of time. The early weekends in October, especially the extremely busy Columbus Day weekend, are extremely important and growers are now attempting to keep fruit on the tree at least through this holiday weekend. ReTain and NAA are our primary drop control compounds and, by themselves and used as we have done in the past, they do not control drop for this extended period of time. The purpose of this project was to explore strategies using ReTain and NAA to extend the control of drop through the Columbus Day weekend without adversely affecting fruit quality. Both NAA and ReTain have the potential to influence fruit quality, ripening and storage potential. Materials and Methods A block of Gatzke McIntosh/M.9 was selected to do this drop control experiment. There were 9 treatments that included an untreated control, trees that received a full rate of ReTain either alone or with one or two applications of NAA at either 10 or 20 ppm and other trees received three half rates of ReTain applied at 2-week intervals that contained 10 or 20 ppm NAA or no NAA. All treatments were replicated 5 times with two trees treated per treatment per replication. One of the treated trees served as the drop tree and no fruit was harvested from this tree. A second tree was designated as the sample tree and all samples for evaluation and storage were harvested from this tree. There were 9 dates when samples for evaluation were taken starting on 26 August and ending on 14 October. Data generally taken on the sample dates included: fruit weight, flesh firmness, soluble solids, red color, internal ethylene and starch rating. A 20 kg sample was harvested on 13 September. Firmness on this sample was taken after 6 and 12 weeks in regular air storage and storage disorders were evaluated after 12 weeks on the remaining fruit in the box. All or a portion of the treatments were applied with a commercial airblast sprayer on 18 August and combination sprays were tank mixed. All fruit that dropped was picked up and discarded and then the number of fruit that subsequently dropped was picked up under each tree and discarded two times per week until 26 October. All remaining fruit were harvested from the drop trees on 26 October, counted and then the cumulative drop calculated over the whole drop period.
108
Results
Preharvest drop was followed over a 9-week period. Untreated control trees displayed the normal and severe preharvest drop problem associated with McIntosh. By 7 September 25% of the fruit were on the ground and one week later over 50% of the fruit had dropped. All other drop control treatments were effective but there were significant differences among treatments. A full rate of ReTain applied once on 18 August (the industry standard) was effective until the last week in September, when it started to loose its effectiveness. All drop control treatments were statistically better than the ReTain standard. This trend continued through the Columbus Day weekend. NAA when combined with ReTain improved the drop control of the ReTain standard. This was true whether one application of either 10 or 20 ppm NAA was applied with the initial ReTain application or whether two applications of NAA at 10 or 20 ppm were applied at 2 week intervals (one with the initial ReTain and then one alone 2 weeks later). In this experiment the treatment with 3 half rate applications of ReTain at 2 week intervals was superior to the one full rate of ReTain, However, there was no appropriate check (1 application using 1.5 pouches of ReTain) for this treatment so it is unresolved if it is the split application or the total amount of ReTain applied that is the important factor. The treatment involving application of 3 half rates of ReTain where each contained 20 ppm NAA was less effective. Starting as early as 10 September, the drop control of this treatment diminished more than any of the other drop control treatments. It should be noted that this is the only treatment that contains a low rate of ReTain and a high rate of NAA and this may be the major reason. Columbus Day weekend ended on 11 October. On that date the best drop control was achieved where a full rate of ReTain was applied on 18 August with 10 or 20 ppm NAA followed by another 10 or 20 ppm NAA treatment on 10 September. Equally good at this time were the 3 half rates of ReTain and the 3 half rates of ReTain with 10 ppm NAA. Fruit quality parameters were evaluated and statistically analyzed over the whole sampling period from 26 August to 14. Flesh firmness is an extremely important parameter, not only for fruit quality but also because NAA has the potential to reduce firmness, especially when applied alone. The flesh firmness results were quite unexciting in that there were no substantive differences among treatments. The inescapable conclusion is that ReTain is able to counteract any tendency for NAA to reduce flesh firmness, regardless of time of application. From a flesh firmness standpoint, ReTain makes NAA a much safer compound to use on apples during the harvest period. In general, fruit treated with ReTain had less red color and the addition of NAA with ReTain did not result in an increase in red color. ReTain-treated fruit had slightly lower starch rating and the addition of NAA to the ReTain did not result in any higher starch rating. On 4 October it was noted that the trees that received 3 applications of either 10 or 20 ppm NAA had more cracked fruit. When quantified, it averaged slightly more than 6%. Flesh firmness of fruit following regular air storage for 6 and 12 weeks. A difference among treatments or major trends is absent. The general lack of response seen following storage is similar to results documented at the various harvest dates. The influence of treatments on storage disorders is either nonsignificant or if significant, as with brown core, they are difficult to interpret.
109
Conclusions The results of this experiment clearly demonstrate that there is potential benefit of including NAA in a drop control program. The addition of NAA in the initial ReTain application or supplemental applications did enhance the drop control of ReTain. One of the major concerns associated with the use of NAA at harvest time is the potential that it can advance ripening thus adversely affect fruit quality at harvest and following a period of storage. This appears not to be the case. Flesh firmness of fruit held in cold storage for either 6 or 12 weeks showed no differences between ReTain-treated fruit and fruit that received combinations of ReTain and NAA. The multiple applications of 20 ppm NAA with half rates of ReTain raises the question that there may be a ratio between the amount of ReTain applied and the amount of NAA that ReTain is able to negate ripening effects. This must be established in another year, but until this is resolved it seems quite safe to say the one or two applications of NAA at 10 ppm with ReTain is treatment that is likely to enhance overall drop control without resulting in advanced ripening or the shortening of the storage period.
110
Brown Marmorated Stink Bug: Research and Control
Dr. Tracy Leskey Research Entomologist
USDA-ARS Appalachian Fruit Research Station
2217 Wiltshire Road Kearneysville WV, 25430-2771 USA
TEL: 304-725-3451 x329 EMAIL: [email protected]
The brown marmorated stink bug (BMSB), Halyomorpha halys (Stål) is an invasive
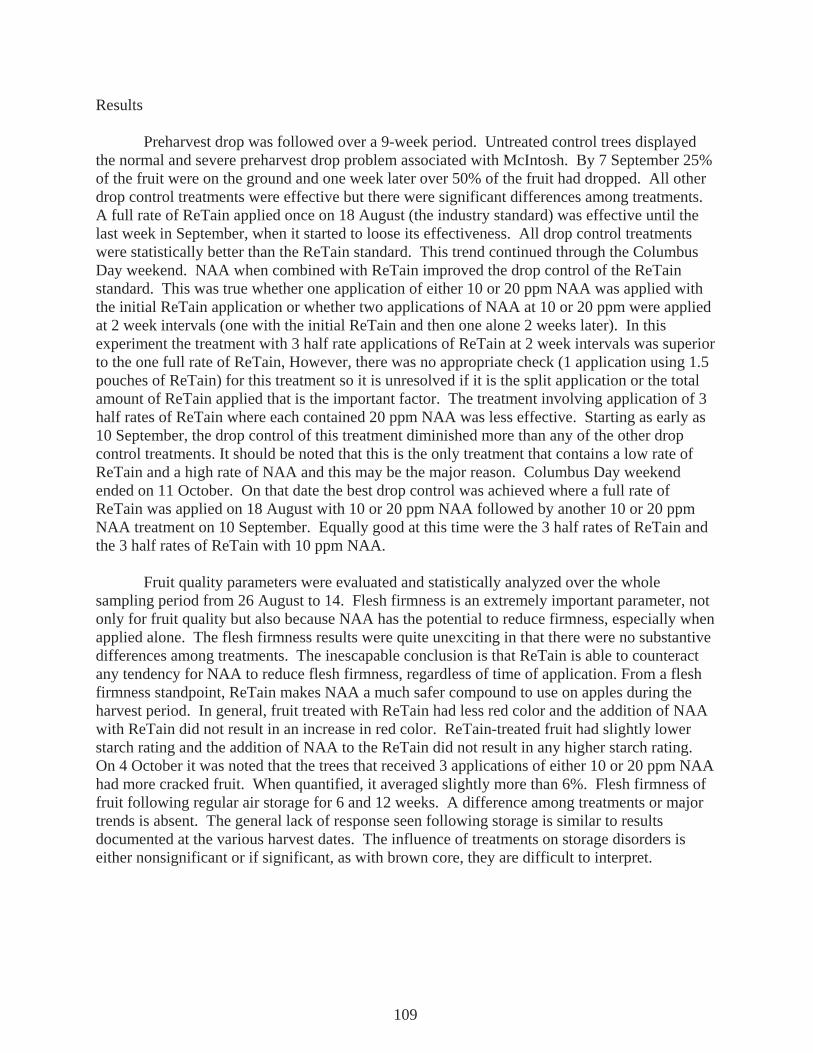
insect native to China, Taiwan, Korea, and Japan accidently introduced into the United States sometime in the mid- to late 1990s. Over the past several years, BMSB has emerged as a pest of increasing concern to agriculture in the United States. Currently, large populations are now established in PA, NJ, DE, MD, WV, and VA; all of these states have documented severe losses in a number of crops and tremendous nuisance problems for homeowners and businesses. Furthermore, established populations have been detected in CA, CT, IN, KY, NH, NY, OH, OR, and TN, though crop losses have been minimal at this early stage of infestation. Additional states where BMSB has been detected include AL, AZ, FL, GA, IA, IL, MA, ME, MI, MN, MS, NC, NE, RI, SC, TX VT, WA, and WI. In 2011, BMSB was confirmed in Ontario, Canada. Fig. 1 Adult BMSB on nectarine
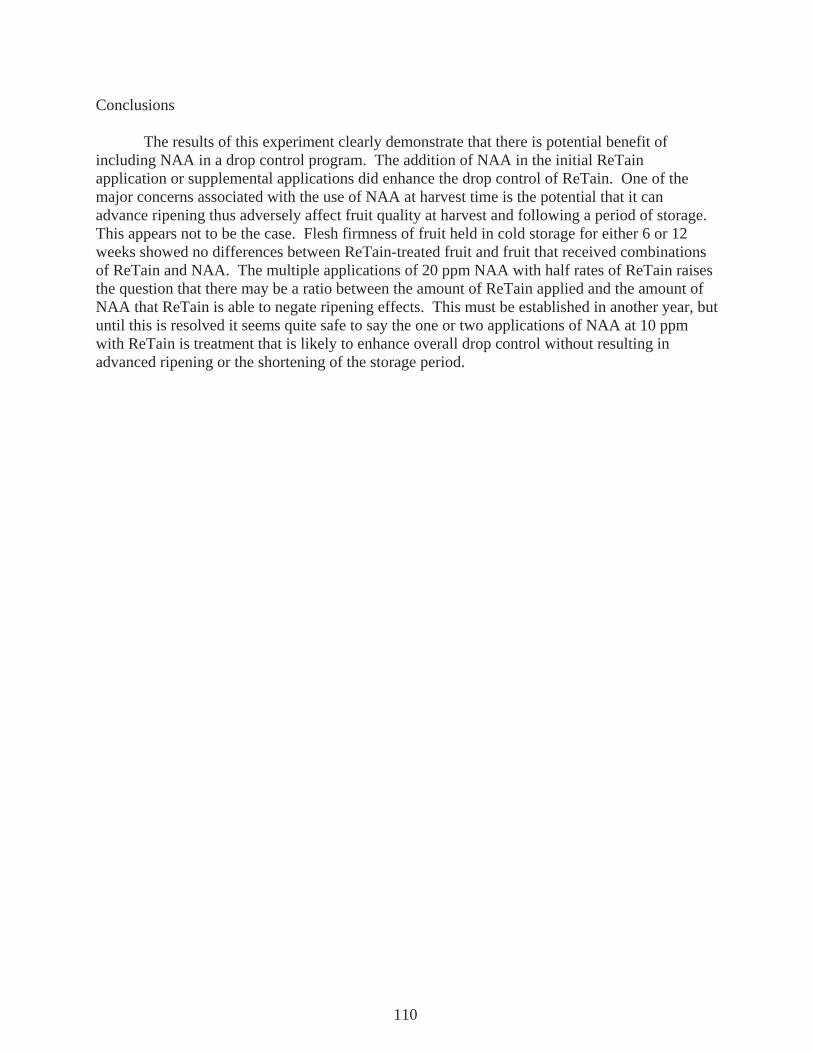
In 2010, BMSB populations increased dramatically and attacked many crops in the mid-Atlantic region. Damage in commercial orchard crops reached critical levels with some growers losing entire blocks of stone and pome fruit (Fig. 1, 2, and 3). Severe post-harvest losses from cold storage also were reported for apple throughout the region. In addition, extensive damage and crop losses were reported for peppers, tomatoes, corn, soybeans, and caneberries. Extensive
damage to woody and herbaceous ornamentals and to grapes also was reported. In 2011, overwintering survivorship of adults from human-made structures and from wild or natural overwintering sites was substantial. Large populations immigrated into stone fruit orchards in late May-early June to feed on immature fruit. Growers who treated with broad spectrum insecticides at frequent intervals during this primary period of risk had substantially less injury than those that did not. Subsequently, growers have radically altered their management practices to control BMSB, an insect that is now consider the
single most important concern in many cropping systems. Tree fruit growers are typically
Fig. 2 Early-season BMSB injury on peach
111

making 2-4x more insecticide applications than in previous years and generally with older, broad-spectrum materials, for example. Those who have maintained a vigilant and very aggressive spray schedule have been able to minimize damage whereas those who did not saw increases in injury. Similarly, chemical treatments have been added to other crops to minimize BMSB injury. A prime example is soybean; growers have made applications in the peripheral areas of soybean fields to combat BMSB. Though growers have been able to reduce injury, these radical departures from previous management regimes have resulted in increased costs (insecticides, fuel, equipment maintenance, and labor) and inputs making this approach unsustainable both economically and environmentally. An obvious casualty of BMSB in agriculture is the devastation to integrated pest management (IPM) programs put into place over the past several decades as well as the tremendous challenges this insect poses for the organic community.
Fig. 3 Late-season BMSB injury on apple
In order to develop effective long-term solutions for managing this invasive species, we
must (1) define the basic biology, phenology, and behavior of BMSB in agroecosystems, urban landscapes, and in native, unmanaged habitats; (2) establish the host range and preference of BMSB for both cultivated and wild hosts as well as susceptibility of cultivated hosts; (3) assess and survey BMSB populations to establish geographic distribution, population density and potential spread; (4) develop effective stimulus-based monitoring tools for BMSB to allow growers to make informed management decisions; (5) develop effective behaviorally-based attract-and-kill management strategy for BMSB to reduce insecticide inputs; and ultimately (6) Establish biological control efforts (whether parasitoid, predator, or pathogen) to reduce or eliminate this insect as a pest of agricultural and urban settings.
Adult AdultMale Female
2nd 3rd 4th 5th
Egg Mass 1st
Fig. 4 Life stages of BMSB
112
Understanding the Limitations of Newer Apple Fungicides
David A. Rosenberger, Cornell's Hudson Valley Lab P.O. Box 727, Highland, NY 12528
E-mail: [email protected]
DMI fungicides have provided apple growers with a golden era of disease control that is drawing to a close as the appearance of DMI-resistant apple scab gradually reduces the usefulness of this class of fungicides. The DMI fungicides include Rally (formerly sold as Nova), Vintage (formerly sold as Rubigan), Procure, Indar, Inspire Super, Tebuzol, and Topguard. Inspire Super is a package mix of a DMI (difenoconazole) and Vangard, which is in the anilinopyrimidine fungicide class.
The DMI fungicides had advantages that have not yet been duplicated with any other fungicide chemistry. They provided effective control of the three major fungal diseases of apple that occur in spring: apple scab, powdery mildew, and rust diseases. They also provided 96 hr of post-infection or "kick-back" activity, and they suppressed lesion expression and sporulation when applied any time before lesions appeared on leaves. When applied in combinations with captan or mancozeb, the DMIs provided effective disease control when applied at 9 to 12 day intervals as compared to the 7-day spray intervals required for most other fungicides during spring. Because none of the newer fungicides can duplicate the activity of the DMIs, growers will need to carefully consider the limitations of the available fungicides that they will be using to replace the DMIs.
Following is a summary of fungicide classes that are currently available for apple disease control, along with some of the advantages and weaknesses that are common to most of the fungicides within the respective classes.
Contact fungicides: Captan and the mancozeb fungicides (Manzate, Dithane, Penncozeb) were developed more than 50 years ago, but they are still essential for disease control on apples. They are multi-site inhibitors that arrest fungal growth by attacking multiple biochemical pathways simultaneously. As a result, fungi do not develop resistance to these fungicides. Their weakness is that they lack post-infection activity, so they must be applied before germinating spores penetrate leaves. Captan is intrinsically more active against apple scab than are the mancozeb fungicides, but captan does not control rust diseases and is not compatible with oil. Neither captan nor mancozeb control powdery mildew.
Dodine (now sold as Syllit) is an old fungicide that was largely abandoned due to resistance, but it is now regaining consideration as an early-season scab fungicide. Recent work by Kerik Cox and his group at the Geneva Experiment Station has shown that resistance to Syllit is less common than was previously thought. Dodine is an excellent scab fungicide with good retention, redistribution, and anti-sporulant properties. It also provides 48 hr of post-infection activity. However, dodine does not control rust or powdery mildew. Uncertainties about where dodine-resistant strains are lurking dictates that it must always be used in combination with a contact fungicide so as to avert disaster if some dodine-resistant strains are present. A dodine-mancozeb combination can be especially useful for working around early-season oil sprays and may provide better protection during the prebloom period than programs that depend exclusively on captan and mancozeb, especially if prebloom weather generates conditions where protective fungicide coverage may have lapsed between sprays due to heavy rains or weather that precluded
113
timely applications. However, the maximum label rate of Syllit must be used in combination with captan or mancozeb if the objective is to inactivate visible scab lesions. Using dodine to clean up scab after it appears on leaves will create selection pressure for rapid re-appearance of dodine-resistant scab.
Anilinopyrimidine fungicides include Vangard and Scala. These fungicides work best in cool weather, do not redistribute well, and will not control scab on fruit. Thus, they work best in prebloom sprays. They provide 48 to 72 hr of post-infection activity and can be useful if applied in combinations with captan or mancozeb in prebloom sprays where some post-infection activity is needed, especially if reliability of dodine is uncertain for the orchards in question.
DMI fungicides are still effective against apple scab in many orchards. However, their reliability against scab will always be questionable because the incidence of DMI-resistant scab is gradually increasing in most orchards. Disease control failures can therefore be expected if DMI fungicides are used to arrest established scab lesions (i.e., if they are used for post-infection control of scab) in orchards with high levels of DMI-resistant scab. Even where DMIs no longer control scab, however, they still provide excellent control of rust diseases, especially quince rust, due to their extended post-infection activity against rust diseases. They may also be the best option for controlling powdery mildew, especially if they are used in the petal fall and first cover sprays. Inspire Super is the strongest scab fungicide in this group, but Inspire Super and Indar are weaker than other DMIs against powdery mildew. Rally and Topguard are the best mildewcides. For a variety of reasons, all fungicides in this group should be applied in combination with captan or a mancozeb fungicide. In orchards known to have DMI-resistant scab, the rate of the contact fungicide must be high enough to control scab without assistance from the DMI and spray intervals must be shortened to those that are appropriate for a contact fungicide program.
Strobilurin or QoI fungicides include Flint, Sovran, and Pristine. (Pristine is actually package mix of the strobilurin pyraclostrobin with another product, boscalid, that is a member of the SDHI group). These fungicides should be viewed as "super protectants" in that they work best when applied ahead of rains even though they can provide up to 48 hr of post-infection activity against apple scab. They lack post-infection activity against rust diseases, so they appear weak on rust diseases when compared to DMI fungicides. They also lack the strong post-infection and antisporulant activity that the DMIs exhibit against mildew, so they must be applied before petal fall if they will be used as the primary mildewcide during spring. Apple scab that becomes resistant to this group will show the benomyl-type of resistance where even high doses will not control the pathogen. Such resistant isolates have already been found in many orchards in Michigan and in a few orchards in New York and elsewhere. Fungicides in this group can also be useful for controlling black rot, sooty blotch, and flyspeck during summer. However, all of the product labels restrict use of these fungicides to a total of only four applications per year for any combination of products within the group.
SDHI fungicides are a new class of fungicides, with several products approaching registration. Fontelis (penthiopyrad) is being developed by DuPont. Luna Sensation is a package mix of fluopyram with Flint that will be marketed by Bayer, and BASF will be marketing Merivon, a package mix of fluxapyroxad and pyraclostrobin (the latter being the strobilurin component in Pristine). Other products in the SDHI group are being evaluated by other companies but have not yet been named. In general, the SDHI group provides good control of scab and mildew, but only marginal control of rust diseases. There is some evidence that these products may provide 48 to 60 hr of post-infection activity against apple scab. Their activity
114
against rust diseases may be largely dependent on the protectant activity of the strobilurin or other combination product with which they are mixed. Fontelis may be sold as a stand-alone product, but it has performed best in my trials when mixed with mancozeb. Disappointment awaits anyone who is hoping that the SDHI fungicides will have all of the attributes that we came to associate with DMIs. The best seasonal timing for the SDHI fungicides remains to be determined, but overuse will almost certainly result in rapid development of SDHI-resistant apple scab. This will be especially problematic if Luna Sensation or Merivon, which are package mixes with a strobilurin, are applied in orchards that already contain strobilurin-resistant apple scab. Use of Luna Sensation and Merivon may also be limited by the 4-spray-per-season limitation on any combination of strobilurin sprays since both of these are formulated with a strobilurin fungicide.
Phosphite fungicides are sold under many different brand names such as ProPhyt, Fosphite, K-Phite, Phostrol, and Agri-Fos, as well as numerous others. We have been unable to show that the phosphites provide any advantage when added to captan or mancozeb in springtime sprays. However, when added to captan in summer sprays, that combination will control sooty blotch and flyspeck just as well as a combination of Captan plus Topsin M. Thus, a phosphite-captan combination can be used to fill gaps in summer spray programs where label restrictions on total numbers of sprays or on total lb/A/yr might limit full-summer applications of Topsin M or strobilurin fungicides. However, the phosphite fungicides do NOT enhance activity of captan against black rot and bitter rot fruit decays, so higher rates of captan are required where these pathogens are a concern than would be the case if captan were combined with Topsin M. Crops, diseases, rates, and application intervals vary with product labels, so read the labels carefully.
Fungicides for summer diseases: The combination of captan plus Topsin M has become the standard for controlling summer diseases. Topsin M is usually used at rates of 9 to 16 oz/A, with the higher end of this range required for situations where sooty blotch and flyspeck (SBFS) are especially prevalent. Rates of captan used with Topsin vary from 2 lb/A to 4 lb/A of Captan-80, with the higher rates required where bitter rot is a concern because Topsin M does not control bitter rot. Pristine applied alone is reasonably effective against bitter rot, and bitter rot control can be further enhanced by using a combination of Pristine plus 2 lb/A of Captan-80. Pristine provides the longest residual activity against SBFS and is therefore especially useful as the "last spray" of summer for late-season yellow cultivars such as Golden Delicious and Crispin. However, the residual activity of Pristine will be totally lost after 2.2 to 2.5 inches of rain, so a follow-up spray may be required in September to keep SBFS off of late-season cultivars in southern New England if heavy rains occur in early September and remove the residues of the planned "last spray" that was applied prior to the rains.
Flint initially provided excellent control of SBFS, but we have found in recent years that Flint is no longer controlling some species of sooty blotch when it is applied in late summer.
Inspire Super and Indar both provides good control of SBFS and fair control of fruit decays when applied during summer. However, using Inspire Super or Indar during summer will add selection pressure for DMI-resistant apple scab. Therefore, these fungicides should not be applied after second cover except where DMI activity against apple scab is already totally lost due to DMI-resistance.
115
Managing Fertility in Bramble Crops Laura McDermott
Cornell University Cooperative Extension Capital District Vegetable and Small Fruit Program
415 Lower Main Street Hudson Falls, NY 12839
518-746-2562 [email protected]
Basic Soil Fertility Concepts Managing plant and soil fertility in bramble crops is important for optimum production. Nutrient management is not an easy proposition as it varies from farm to farm, and even from site to site on the same farm. Soil variability, along with differences in management practices and weather make it impossible to have a menu driven protocol for farmers to follow. Farmers need to make changes according to specific situations and in order to do that they need to know the basics of nutrient management as it pertains to bramble crops. The nutrient availability of soils is less understood by farmers than the physical differences between soil types i.e. water and nutrient retention. Soil nutrient tests are used to measure the plant-available nutrients in the soil. They do not measure the total nutrients in the soil, which often is significantly higher than what is available. The type of soil influences how much nutrients are available. If soil particles are small (clay), soil nutrient availability is higher, but those same soils may contain high levels of certain nutrients that block availability of certain nutrients. Nutrients are available to plants as individual ions with either a positive charge (cation) or a negative charge (anion). The charge impacts how the ion behaves in the soil, for instance ammonium (NH4+) is retained by soil adsorption and nitrate (NO3-) is often leached despite the fact that both of these forms of N are available to plants. As the plant absorbs the ammonium cation, it excretes one H+ proton so that there is a neutral charge in the plant. As those positively charged protons accumulate in the soil, the soil pH (a measure of soil acidity) drops and thus alters the availability of other plant nutrients. This is when lime and sulfur come into use. Bramble crops need a soil pH of 6.0 – 6.5, forgiving really, but when even the type of fertilizer one uses could alter the ability of the plant to access nutrients it becomes clear that soil fertility management is a challenging endeavor. Diagnosing Nutrient Problems Visual diagnosis is the most common means of detection of fertility problems, but it is the least reliable. Plant symptoms like poor plant vigor, pale leaf color, and distorted fruit are also symptoms of some pest and cultural problems as well as the result of many different nutrient deficiencies or toxicities. Designing a nutrient program by visual symptoms alone will likely be ineffective. Instead, growers should become familiar and comfortable with laboratory analyses. Consistent use of soil tests and foliar analysis can reveal the information necessary for good nutrient management.
116
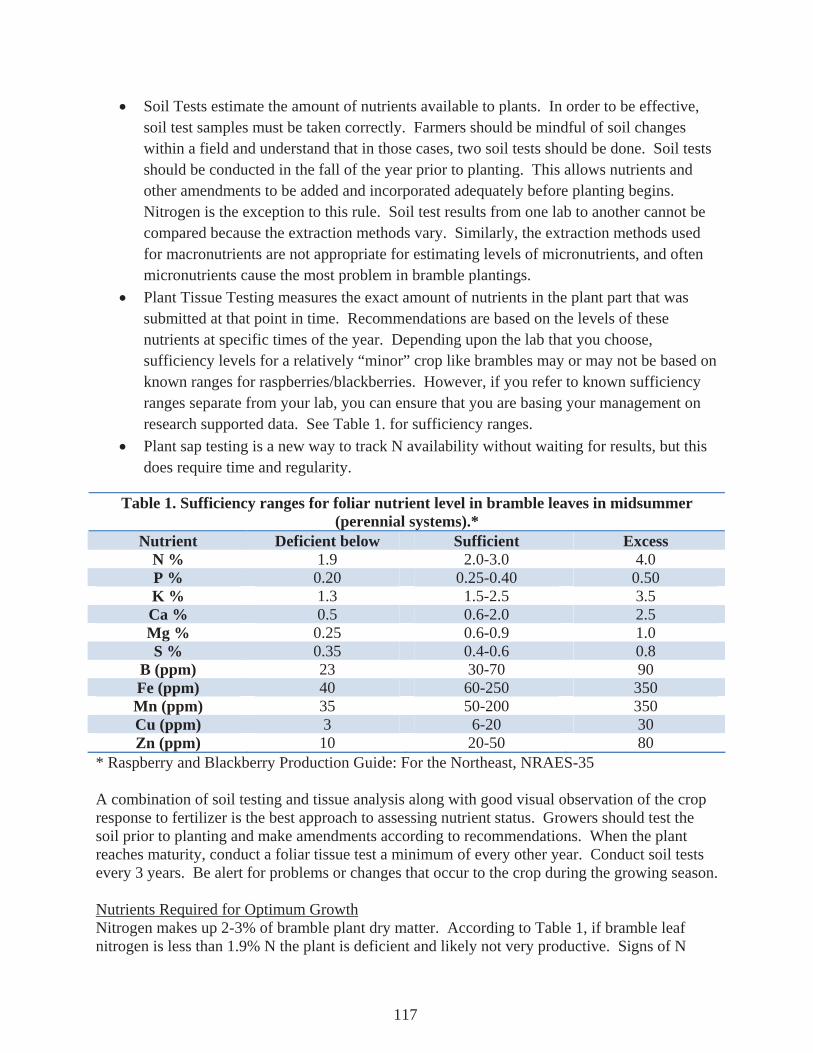
Soil Tests estimate the amount of nutrients available to plants. In order to be effective, soil test samples must be taken correctly. Farmers should be mindful of soil changes within a field and understand that in those cases, two soil tests should be done. Soil tests should be conducted in the fall of the year prior to planting. This allows nutrients and other amendments to be added and incorporated adequately before planting begins. Nitrogen is the exception to this rule. Soil test results from one lab to another cannot be compared because the extraction methods vary. Similarly, the extraction methods used for macronutrients are not appropriate for estimating levels of micronutrients, and often micronutrients cause the most problem in bramble plantings. Plant Tissue Testing measures the exact amount of nutrients in the plant part that was submitted at that point in time. Recommendations are based on the levels of these nutrients at specific times of the year. Depending upon the lab that you choose, sufficiency levels for a relatively “minor” crop like brambles may or may not be based on known ranges for raspberries/blackberries. However, if you refer to known sufficiency ranges separate from your lab, you can ensure that you are basing your management on research supported data. See Table 1. for sufficiency ranges. Plant sap testing is a new way to track N availability without waiting for results, but this does require time and regularity.
Table 1. Sufficiency ranges for foliar nutrient level in bramble leaves in midsummer (perennial systems).*
Nutrient Deficient below Sufficient ExcessN % 1.9 2.0-3.0 4.0 P % 0.20 0.25-0.40 0.50 K % 1.3 1.5-2.5 3.5 Ca % 0.5 0.6-2.0 2.5 Mg % 0.25 0.6-0.9 1.0 S % 0.35 0.4-0.6 0.8
B (ppm) 23 30-70 90 Fe (ppm) 40 60-250 350 Mn (ppm) 35 50-200 350 Cu (ppm) 3 6-20 30 Zn (ppm) 10 20-50 80
* Raspberry and Blackberry Production Guide: For the Northeast, NRAES-35 A combination of soil testing and tissue analysis along with good visual observation of the crop response to fertilizer is the best approach to assessing nutrient status. Growers should test the soil prior to planting and make amendments according to recommendations. When the plant reaches maturity, conduct a foliar tissue test a minimum of every other year. Conduct soil tests every 3 years. Be alert for problems or changes that occur to the crop during the growing season. Nutrients Required for Optimum Growth Nitrogen makes up 2-3% of bramble plant dry matter. According to Table 1, if bramble leaf nitrogen is less than 1.9% N the plant is deficient and likely not very productive. Signs of N
117
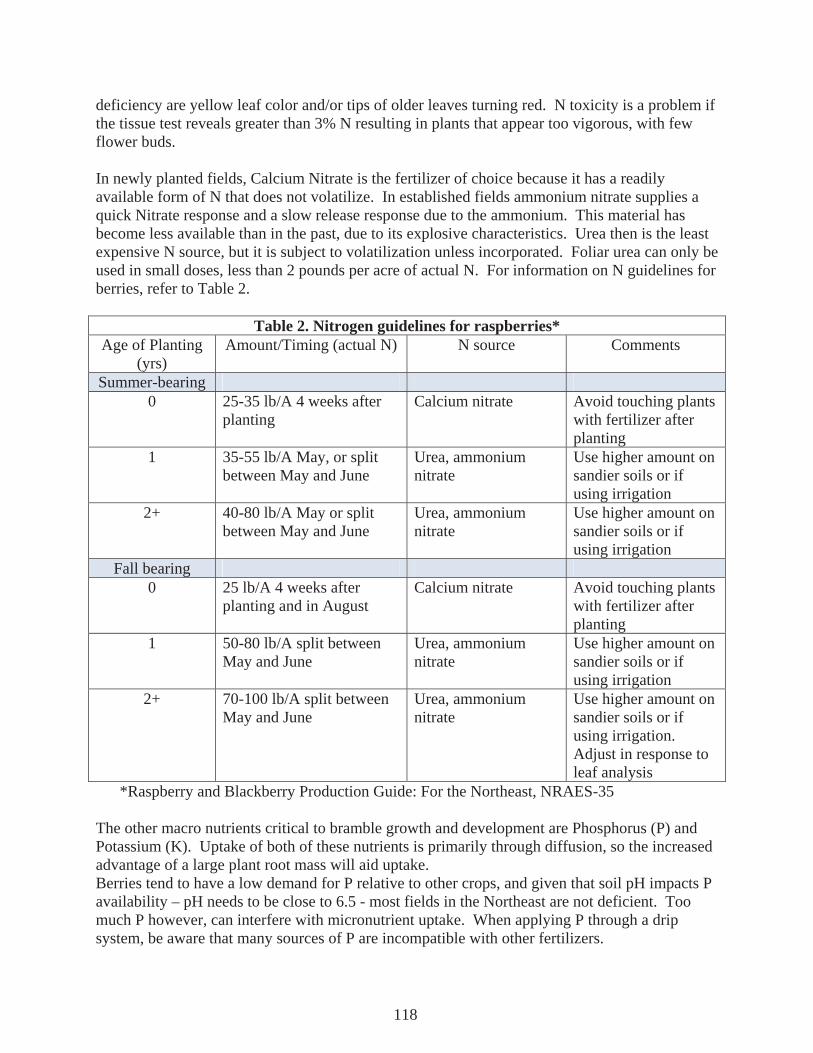
deficiency are yellow leaf color and/or tips of older leaves turning red. N toxicity is a problem if the tissue test reveals greater than 3% N resulting in plants that appear too vigorous, with few flower buds. In newly planted fields, Calcium Nitrate is the fertilizer of choice because it has a readily available form of N that does not volatilize. In established fields ammonium nitrate supplies a quick Nitrate response and a slow release response due to the ammonium. This material has become less available than in the past, due to its explosive characteristics. Urea then is the least expensive N source, but it is subject to volatilization unless incorporated. Foliar urea can only be used in small doses, less than 2 pounds per acre of actual N. For information on N guidelines for berries, refer to Table 2.
Table 2. Nitrogen guidelines for raspberries* Age of Planting
(yrs) Amount/Timing (actual N) N source Comments
Summer-bearing 0 25-35 lb/A 4 weeks after
planting Calcium nitrate Avoid touching plants
with fertilizer after planting
1 35-55 lb/A May, or split between May and June
Urea, ammonium nitrate
Use higher amount on sandier soils or if using irrigation
2+ 40-80 lb/A May or split between May and June
Urea, ammonium nitrate
Use higher amount on sandier soils or if using irrigation
Fall bearing 0 25 lb/A 4 weeks after
planting and in August Calcium nitrate Avoid touching plants
with fertilizer after planting
1 50-80 lb/A split between May and June
Urea, ammonium nitrate
Use higher amount on sandier soils or if using irrigation
2+ 70-100 lb/A split between May and June
Urea, ammonium nitrate
Use higher amount on sandier soils or if using irrigation. Adjust in response to leaf analysis
*Raspberry and Blackberry Production Guide: For the Northeast, NRAES-35
The other macro nutrients critical to bramble growth and development are Phosphorus (P) and Potassium (K). Uptake of both of these nutrients is primarily through diffusion, so the increased advantage of a large plant root mass will aid uptake. Berries tend to have a low demand for P relative to other crops, and given that soil pH impacts P availability – pH needs to be close to 6.5 - most fields in the Northeast are not deficient. Too much P however, can interfere with micronutrient uptake. When applying P through a drip system, be aware that many sources of P are incompatible with other fertilizers.
118
119
Brambles have a relatively high demand for K and the availability of the K in the soil is very dependent on soil chemistry. Increasing soil organic matter will help to increase the exchange capacity of the soil. Pre-plant incorporation of K is the most effective, while fertigation can be used to supply potassium during the season to established plantings. Potassium levels in leaves tend to fluctuate during the season dropping as crop load increases. Adding K during the season is sometimes necessary. Potassium sulfate or potassium magnesium sulfate are the best sources of potassium for brambles. Muriate of potash is inexpensive, but it has chloride in it that causes problems with brambles. More specific information about micro nutrients and soil management can be found in the Raspberry and Blackberry Production Guide – NRAES-35.
120
Cane Borers, Crown Borers, Thrips, Oh My! Douglas G. Pfeiffer, Dept. of Entomology
Virginia Tech, Blacksburg VA 24061 540-231-4183 [email protected]
Rednecked Cane Borer, Agrilus ruficollis (F.)
I. Introduction: This buprestid beetle infests wild and cultivated blackberries and raspberries in the eastern states from Canada to the Gulf of Mexico. Adults are about 6-7 mm (1/4 inch) long, with an iridescent coppery pronotum. On galled plants, there is less live vegetative growth and more dead wood. There is often reduced berry size and number, as well as vegetative growth with increasing number of galls per plant. Affected canes may not produce fruit. Canes weakened by galls are more subject to winter injury.
II. Biology: Adults are present from May to August, or late April to early June, depending on the region. Females lay white spherical eggs on the trunk, and produce a yellow viscous material from the ovipositor which is smoothed over into a covering, before fading to white or grey. Larvae exit the egg directly into the plant, never becoming exposed, and so are impervious to sprays. Young larvae are restricted to the cambium, circling the cane 3-4 times in a close spiral, girdling the primocane, and producing gall-like swellings. Larvae winter in the cane, and in March create a pupal chamber. The pupa is formed in late April. The pupal period lasts 20-40 days. When the adult leaves the pupal skin, it remains in the tunnel for about 10 days before chewing a D-shaped emergence hole. Adults feed on foliage for several days before beginning oviposition. They are most easily found on the plants on warm sunny days. There is one generation annually.
III. Control: Chemical control: After leaf fall or during winter pruning, note galls. If more than 10% of the primocanes are infested, or if the number of primocanes expected to be pruned off is exceeded, a spray in justified. Examine primocanes for adults twice weekly, beginning at the beginning of bloom. Damage is minimized when Malathion 8F (2 pt/A) or Brigade 10WSB (8-16 oz/A) is applied at intervals of 7-12 days from the time the first beetles appear (early to mid May) until early June (last emergence). Cultural control: Remove galled canes in dormant season or early spring. This is most effective if nearby wild hosts are eliminated, and also more effective in open settings (wild brambles in nearby woods provide a source of wild beetles). Summer pruning also may provide a substantial reduction in rednecked cane borer infestation, since by the time new shoots appear, they have escaped much of the oviposition period of rednecked cane borer.
Raspberry Cane Borer, Oberea bimaculata (Olivier) I. Introduction: This cerambycid beetle is about 12 mm (1/2 inch) long, and is black except for the pronotum which is bright orange with two black spots. The long antennae easily separate it from the rednecked cane borer. II. Biology: Raspberry cane borer is distributed from Kansas eastward, and has been reported as being very destructive in Quebec. It infests the young shoots of raspberry, blackberry and sometimes rose. Adults appear in June, and are present until late August. After ovipositing, the female girdles 6 mm above and 6 mm below the egg puncture. Shoot tips wilt in early summer. IV. Control: Chemical control: Just before blossoms open, either malathion 8F (2 pt/A) or M-Pede (2% solution) may be applied. Cultural control: Wilting canes or those with girdling should be destroyed. If pruning occurs within a few days of the onset of wilting, only a small amount of additional shoot need be removed.
Raspberry Crown Borer, Pennisetia marginata (Harris)
I. Introduction: The sesiid moth can be a severe pest to raspberry and blackberry plantings. Its cryptic nature may complicate diagnosis.
II. Biology: Eggs are laid on the undersides of new leaves, with 2-3 eggs per plant. Eggs incubate 3-10 weeks, beginning to hatch in late July (about the first week of September and continuing until early November in the northern
121
part of its range (Canada)). The young larva spins down to the crown, where it overwinters in a hibernaculum. In the spring it tunnels into the cambium. Cracks develop at this site, from which reddish brown frass is produced in April. During the first summer, the larva feeds at the base of new canes, girdling the plant and causing gall formation. Galls are most evident in October. Moths fly from early to mid July through late September (August through September in the north). Females begin to oviposit beginning on the first day after emergence; the female lives 3-11 days, averaging about 103 eggs.
III. Control: Chemical control: Bifenthrin (Brigade 10WSB), may be used as a drench treatment for raspberry crown borer. Apply at either post-harvest (fall) or pre-bloom (spring), as a drench application directed at the crown of plants in a minimum of 50 gal water/A. Do not make a prebloom foliar and prebloom drench application. The most effective time of application is between October and early April. Sevin or malathion may be used as foliar sprays. Cultural control: Remove all wilted canes in June and July.
Thrips
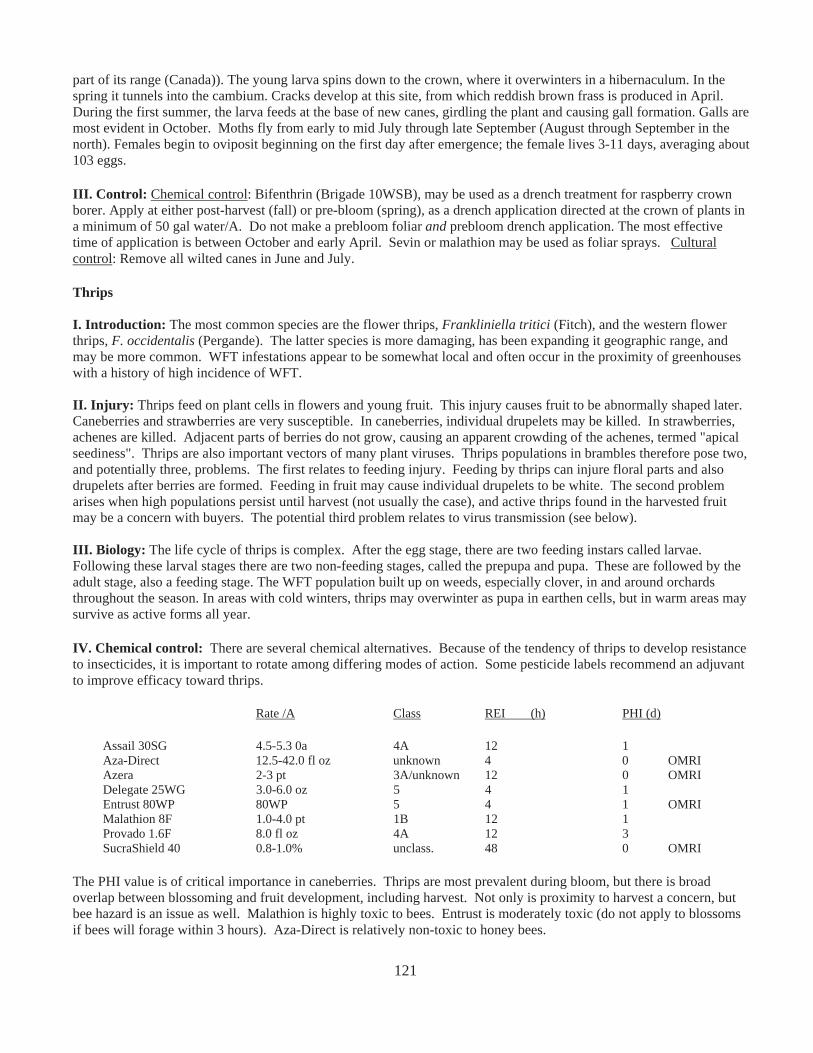
I. Introduction: The most common species are the flower thrips, Frankliniella tritici (Fitch), and the western flower thrips, F. occidentalis (Pergande). The latter species is more damaging, has been expanding it geographic range, and may be more common. WFT infestations appear to be somewhat local and often occur in the proximity of greenhouses with a history of high incidence of WFT. II. Injury: Thrips feed on plant cells in flowers and young fruit. This injury causes fruit to be abnormally shaped later. Caneberries and strawberries are very susceptible. In caneberries, individual drupelets may be killed. In strawberries, achenes are killed. Adjacent parts of berries do not grow, causing an apparent crowding of the achenes, termed "apical seediness". Thrips are also important vectors of many plant viruses. Thrips populations in brambles therefore pose two, and potentially three, problems. The first relates to feeding injury. Feeding by thrips can injure floral parts and also drupelets after berries are formed. Feeding in fruit may cause individual drupelets to be white. The second problem arises when high populations persist until harvest (not usually the case), and active thrips found in the harvested fruit may be a concern with buyers. The potential third problem relates to virus transmission (see below). III. Biology: The life cycle of thrips is complex. After the egg stage, there are two feeding instars called larvae. Following these larval stages there are two non-feeding stages, called the prepupa and pupa. These are followed by the adult stage, also a feeding stage. The WFT population built up on weeds, especially clover, in and around orchards throughout the season. In areas with cold winters, thrips may overwinter as pupa in earthen cells, but in warm areas may survive as active forms all year.
IV. Chemical control: There are several chemical alternatives. Because of the tendency of thrips to develop resistance to insecticides, it is important to rotate among differing modes of action. Some pesticide labels recommend an adjuvant to improve efficacy toward thrips.
Rate /A Class REI (h) PHI (d)
Assail 30SG 4.5-5.3 0a 4A 12 1 Aza-Direct 12.5-42.0 fl oz unknown 4 0 OMRI Azera 2-3 pt 3A/unknown 12 0 OMRI Delegate 25WG 3.0-6.0 oz 5 4 1 Entrust 80WP 80WP 5 4 1 OMRI Malathion 8F 1.0-4.0 pt 1B 12 1 Provado 1.6F 8.0 fl oz 4A 12 3 SucraShield 40 0.8-1.0% unclass. 48 0 OMRI
The PHI value is of critical importance in caneberries. Thrips are most prevalent during bloom, but there is broad overlap between blossoming and fruit development, including harvest. Not only is proximity to harvest a concern, but bee hazard is an issue as well. Malathion is highly toxic to bees. Entrust is moderately toxic (do not apply to blossoms if bees will forage within 3 hours). Aza-Direct is relatively non-toxic to honey bees.

122
Pruning Raspberries and Blackberries - Summer Pruning for increased plant health, Fall pruning to prevent winter damage.
Nate Nourse Nourse Farms 41 River Road
South Deerfield, Ma 01373 413-665-2658
For over five years, we have reduced winter damage in summer brambles by late fall pruning. Pruning the plant mass reduces the surface area of the plantings, decreasing winter damage due to plant desiccation. I have seen virtually no winter damage in our summer red and black raspberries. Most recommendations suggest it is better to wait until spring and prune off the winter damage in summer bearing brambles. I believe that decreasing the amount of cane the plant has to support, increases the chances it has to survive the winter. According to Kathy Demchak at Penn State University:
“In certain situations, such as when cane diseases are an issue, it may be more valuable to remove the floricane along with the disease inoculum on them, and improve air circulation. This is especially important for growers who are growing under low spray, no-spray, or organic systems where cultural controls to manage diseases take on critical value.”
At Nourse Farms, we have been very aggressive with our pruning strategy. As soon as summer berry harvest ends, we begin pruning out the old canes. I feel that plant health is the most important consideration, we try to remove all diseased canes. We select the best 6-8 canes per foot of row and attach them to the trellis with clips. We are experimenting with some varieties leaving only 4 canes per foot of row. I would recommend trying several different cane densities to see which is best for you. Once the raspberry plants have seen a few killing frosts, we begin our fall pruning. The summer red raspberries are topped to 6 inches above the trellis wire. Our top wire is 52-60 inches above the soil for all brambles, the standard used to be 36-40 inches. On black berries and black raspberries, we cut the laterals back to 12 inches. The result has been virtual elimination of winter damage, with temperatures as low as – 15 degrees. Improving plant health and growth contributed to increased yields and profits.

123
Weed Management in Brambles
Bradley A. Majek [email protected]
Department of Extension Specialists Rutgers Agricultural Research & Extension Center
121 Northville Road Bridgeton, NJ 08302
Weed control options available to grower include cultural, mechanical, and chemical weed control. Mechanical weed control methods include plowing, disking, and harrowing before planting and disking, mowing, and hand-weeding after planting. Many established perennials weeds can be controlled mechanically by starving the roots. The weed begins to send food to the roots 10 to 14 days after a shoot emerges from the soil. Repeated close mowing or shallow cultivation within 7 to 10 days after any new shoots appear can eventually kill the weed. Many repeated cultivations are usually needed. Three to six months of diligence may be needed to eliminate established perennials. A single late or missed cultivation can “save” the weed. In the short term, cultivation aerates the soil surface, which improves initial water penetration and releases nutrients from oxidized organic matter, but mechanical weed control has disadvantages. Close cultivation can injure the canes, and cultivating too deep prunes roots. Repeated cultivation destroys soil structure and reduces the organic matter content. This reduces the nutrient and water holding capacity of the soil and decreases water penetration. The long term result of constant cultivation is the lowering of the productivity of the land and is not generally recommended for that reason.
Recommended management includes eliminating perennial weeds before planting brambles, maintaining a vegetation free zone in the row, and establishment of a perennial grass sod between the rows. Integration of vegetation management with insect and disease control programs is essential. Maintain the vegetation free zone in the row to prevent competition with the crop. The width of the vegetation free zone should be about forty percent of the distance between the rows. The width may vary, however, depending on soil fertility, water holding capacity and exposure to erosion. Do NOT reduce the width of the vegetation free zone in new plantings. Maintain the full width of the vegetation free zone in new plantings to achieve maximum growth. Sod between the rows prevents soil erosion, provides traction for equipment, increases soil organic matter, improves soil structure and water permeability, and furnishes shelter for beneficial insects. The sod should not include plants that are an alternate host for insect pests, or diseases and nematodes that attack the crop. In addition, the sod should be easily maintained, tolerant to drought, require little or no fertilization, and compete minimally with the crop. Tall fescue or hard fescue perennial grass sods are recommended for row middles. Both types of fescue are tolerant to disease, drought, low pH and low fertility. They compete effectively with weeds, do not spread or creep into the row by rhizome or stolen growth, and are semi-dormant during the hot dry summer months. Tall fescue is more vigorous and is more easily established, but requires more frequent mowing. Newly developed “turf type” tall fescue varieties are vigorous, and have a lower mowing requirement than the traditional ‘Kentucky 31’ tall fescue. Hard fescue grows more slowly and close to the ground, and has a minimal mowing requirement, but is moderately slow and difficult to establish. The addition of clover or other legumes is not recommended. Although legumes do fix
124
nitrogen, release for plant use unpredictable, and often at the wrong time of year. Legumes may also be alternate hosts for pests, including insects, nematodes, and diseases. Preparation for sod establishment should begin the year before the crop is planted. Control perennial weeds and nematodes, and correct soil pH and nutrient deficiencies first. Complete primary tillage during the summer months. Consider building gently sloping raised ridges to improve drainage in the future rows before sowing grass. Fields planted flat have developed depressions in the row between the strips of sod due to the improving soil structure in the sod compared with the vegetation free strip. The success of a sod planting will depend on accurate seeding and timing. Sow tall or hard fescue in late summer into a well prepared seedbed. Use 50 to 75 pounds of seed per broadcast acre to establish tall fescue, or 25 to 50 pounds of seed per broadcast acre to establish hard fescue. Blend up to five pounds of perennial ryegrass per one hundred pounds of hard fescue seed to provide a fast thin cover while the hard fescue gets established. The perennial ryegrass will be eliminated from the stand by disease and drought in a few years. Use a seeder manufactured to sow grass and other similar sized seed that will ensure proper seed placement, a firm seedbed, and good seed and soil contact. Failure to use adequate equipment for seeding frequently results in poor establishment. Do not use a “spinner spreader” to distribute the seed. Fescue seed that lands in the crop rows will establish and may be difficult to control. Seeding should be completed by September first in the northern counties of New Jersey, and by September twentieth in the southern counties. Apply 50 pounds of nitrogen (N) per acre at seeding and repeat in late fall or early spring to encourage rapid establishment. Excellent results have been obtained by seeding perennial grass in the future crop row as well as between the rows. Use one hundred percent perennial ryegrass in the row rather than fescue. Rapid establishment and growth, and susceptibility to herbicides make perennial ryegrass a better choice. Kill the sod in the row when the crops to be planted and “no-till” the bramble into the dead sod. Use recommended herbicides to control weeds. The sod’s roots increase soil organic matter, and improve soil structure and water permeability before it is killed, and acts as a mulch to conserve water and prevent erosion during the establishment year. By fall the dead sod deteriorates and is not attractive to rodents. Establishment of a dense sod that is competitive with weeds will require fifteen to twenty months. Some additional effort during this period will ensure success. The year before the crop is planted, apply 2,4-D in late fall eight to ten weeks after seeding the grass. Use 0.25 to 0.5 pints of 2,4-D per acre to control seedling annual broadleaf weeds. Apply Gallery 75DF to the sod early the first spring to control large crabgrass and other weeds while the sod establishes. Use Gallery 75DF at 1.0 pound of active ingredient per acre. The Gallery 75DF rate is the same as the rate labeled for use in the row for newly planted nonbearing blackberries and raspberries. In row weed control the establishment year requires extra care not to injure crop. Surflan 4AS or Devrinol 50 DF plus Gallery is safe and effective after transplanting conventional plants. Planting tissue culture plants, and other planting systems that use plants that are smaller or less vigorous than conventional plants should not be treated with a herbicide until well established. Consider planting into black plastic mulch to aid establishment, and remove the plastic later, but do not use Surflan under plastic mulch.
125
After establishment, treat brambles with a combination of herbicides to provide residual grass and broadleaf weed control in late fall and/or in early spring, before buds break. Add a postemergence herbicide, if needed to control emerged weeds. Solicam 80DF, Surflan 4AS, or Devrinol 50DF are good residual annual grass herbicides. Solicam will also suppress certain perennial grasses and yellow nutsedge when used at the maximum recommended rate. Princep, Sinbar, and Casoron are residual annual broadleaf weed herbicides. Princep can be applied in late fall or spring. Sinbar leaches more readily, especially in sandy coarse textured soils low in organic matter, and should only be used in the spring before bud break. Casoron is a granular formulation that must be applied in late fall or winter when the crop is dormant, but Casoron controls perennial as well as annual broadleaf weeds. Gramoxone Extra is a non-selective postemergence herbicide that can be used to control emerged seedling weeds when the crop is dormant. Young growing bramble shoots will be killed or severely injured if sprayed. Poast, Fusilade DX, and Select are postemergence herbicides that control most grasses, but will not injure brambles, or control broadleaf weeds and yellow nutsedge. Select is only for use on non-bearing brambles, but will control tall and hard fescue. Poast and Fusilade DX are labeled for use on bearing brambles, but will not control or even significantly injure tall or hard fescue. Roundup formulations, Touchdown, and other labeled glyphosate formulations are translocated non-selective postemergence herbicides that should only be used with extreme care in brambles. Application of either of these herbicides to only a few leaves or a small section of green cane may result in death of the plant or severe injury that may persist for more than one year. Apply only as a spot treatment to control difficult perennial weeds.
126
Effectively Managing Cucurbit Mildews: What You Need to Know
Margaret Tuttle McGrath
Department of Plant Pathology and Plant-Microbe Biology, Cornell University Long Island Horticultural Research and Extension Center,
3059 Sound Avenue, Riverhead, NY 11901. 631-727-3595. [email protected]
Producing a high-quality cucurbit crop necessitates effectively managing powdery mildew and downy mildew. These two foliar, fungal diseases are common in the northeast because the pathogens produce spores easily dispersed by wind that enable them to spread widely. Crops often are affected by both. While neither pathogen affects fruit directly, they cause leaves to die prematurely which results in fewer fruit and/or fruit of low quality (poor flavor, sunscald, poor storability). Powdery mildew is managed with resistant varieties and fungicides. An integrated program with both management tools is needed to achieve effective control because the pathogen is adept at evolving new strains resistant to individual tools that thus are not controlled as well by the tool. It is more difficult for new pathogen strains to develop when an integrated program is used, and effective control is more likely. Resistant varieties have not provided as effective control in recent years as before. But they remain an important tool. There are now resistant varieties in most crop groups with new varieties released most years. Select cantaloupes with resistance to pathogen races 1 and 2. Select squash and pumpkins with resistance from both parents (homozygous resistance) when possible. This term is used in a few catalogues (for example Outstanding Seeds) whereas others use terms like ‘high resistance’ and ‘intermediate resistance’ to generally refer to homozygous and heterozygous resistance, respectively. Degree of disease suppression obtained with a variety also depends on modifying genes present. Plant breeders are actively searching for new sources of resistance to powdery mildew. The most effective fungicide program for powdery mildew is weekly applications of targeted, mobile fungicides tank mixed with a protectant fungicide beginning very early in powdery mildew development. Mobile fungicides are needed for control on the underside of leaves where the pathogen develops best. The action threshold for starting applications is one leaf with symptoms out of 50 older leaves examined. Powdery mildew usually begins to develop around the start of fruit production. Alternate among targeted fungicides and apply with protectant fungicide to manage resistance development and avoid control failure if resistance occurs, and also to comply with label use restrictions. Some fungicides are no longer recommended because resistant pathogen strains are sufficiently common to render them ineffective: Topsin M (FRAC code 1; MBC fungicide) and QoI fungicides (Code 11), which include Quadris, Cabrio and Flint. Other fungicide chemistry has remained adequately effective to include in a fungicide program although the pathogen has developed some resistance, in particular the DMI fungicides (Code 3), which include Procure, Rally, Tebuzol, Folicur, and Inspire Super. They remain effective partly because resistance to this group is quantitative, whereas to the Code 1 and 11 fungicides it is qualitative (pathogen is sensitive or resistant), and these DMI fungicides are inherently more active than the first DMI fungicide, Bayleton, which is no longer registered for this use because of control failures due to resistance. Highest label rate is recommended when resistance is quantitative or might be (generally assumed to be until known). Procure applied at its highest label rate provides a higher dose of active ingredient than the other Code 3 fungicides. This fungicide was effective in the yearly fungicide efficacy experiment conducted on Long Island in 2011. Quintec (FRAC Code 13) has been the most consistently effective fungicide in fungicide evaluations, therefore it is recommended as the main mobile fungicide to use on labeled crops (pumpkin, winter squash, gourd, melon) where the crop rotational restriction of 12 months is acceptable. Recent crop additions to the Quintec label have increased the options of what can be planted within 12 months of the last application. The Quintec label specifies no more than two consecutive applications plus a crop maximum of four applications. FRAC Code 7 is the third fungicide chemistry recommended for managing powdery mildew. Boscalid is the
127
only active ingredient in this fungicide group labeled currently for this use. It is in the product Pristine. While highly resistant pathogen strains have been detected, Pristine has continued to provide some control, including in the Long Island 2011 evaluation when it was as effective as Procure. Prospect looks good for improved control of powdery mildew in the future. There are new mobile fungicides on track for registration soon that are highly effective for powdery mildew. Similar to the targeted, mobile fungicides currently in use, they do have risk of resistance developing because they have single site mode of action. Therefore it will be critical to always use a resistance management program. Hopefully these fungicides will be registered before the pathogen has developed resistance to Quintec so that all can be used together in a fungicide resistance management program. Vivando, which is being developed by BASF, has the novel active ingredient metrafenone. It is a FRAC code U8 fungicide. ‘U’ designation means it is unknown more of action. It was registered in the US in 2011 with approval for use on grapes. Additional crops including cucurbits are anticipated to be labeled in 2013. Resistance risk is considered medium; elsewhere strains of the wheat powdery mildew pathogen have been detected with reduced sensitivity. Torino, being developed by Gowan, is another product with a unique active ingredient unlike other fungicides. It is cyflufenamid, a FRAC code U6 fungicide. US federal registration is pending and anticipated in spring 2012 for cucurbits, grapes, and strawberries. The cucurbit powdery mildew pathogen has developed resistance elsewhere in the world where already registered. Like Quintec, both of these fungicides are only effective for powdery mildew diseases. Three new fungicides in development have an active ingredient that belongs to the carboxamide class of fungicides (FRAC Code 7), which is the same as boscalid. However, these fungicides have been more effective than Pristine in fungicide evaluations documenting differences in activity. Fontelis (aka LEM17), developed by DuPont, contains penthiopyrad. Federal registration is expected before the end of 2011, thus it will be the first new carboxamide available. The carboxamide ingredient in Merivon is fluxapyroxad. This product also contains pyraclostrobin. It is being developed by BASF. EPA approval is anticipated for the first label with pome/stone fruit in early 2012 and for additional crops including cucurbits in 2013. Bayer Crop Science has the ingredient fluopyram in their Luna series fungicides. Luna Experience is anticipated to be registered before the 2012 growing season but only on watermelon; other cucurbit crops will be added subsequently. Pristine, Merivon, Fontelis, and/or Luna Experience should not be used in alternation because they all have an active ingredient in the same chemical group (Code 7). This chemistry is also effective for gummy stem blight/black rot. Downy mildew is primarily managed with fungicides. Resistance bred into cucumbers provides some suppression of the pathogen strains present recently, but substantially less that what was achieved against strains present before 2004. However, they are still considered a worthwhile component of an integrated program. Plant breeders are searching for new sources of resistance. As with powdery mildew, fungicide resistance is also a concern with the downy mildew pathogen and therefore the fungicide program recommended for downy mildew is also targeted, mobile fungicides applied in alternation on a weekly schedule and tank mixed with a protectant fungicide beginning very early in disease development. Resistance to mefenoxam and metalaxyl and to strobilurins is sufficiently common that fungicides with these active ingredients (e.g. Ridomil and Cabrio), which use to be highly effective, are no longer recommended. The full list of mobile fungicides with different modes of action recommended for managing downy mildew includes: Ranman (FRAC Code 21), Forum (40), Revus (40), Presidio (43), Curzate (27), Tanos (27), Gavel (22), and Previcur Flex (28). These have been registered for this use in the US for a few years. Concern about resistance developing to single site mode of action fungicides like these increases with use. Alternating among fungicides in different FRAC Groups (different codes) and tank-mixing them with a protectant fungicide (except for Gavel which contains mancozeb) is recommended for delaying resistance development, minimizing the impact of resistance when it occurs and it is often required to comply with the restrictions on most labels. Curzate and Tanos have some curative activity (up to 2 days under cool temperatures) but limited residual activity (about 3-5 days). Presidio has an advantage over Curzate and Previcur Flex of also being effective for Phytophthora blight. Both diseases are often of concern for most cucurbit growers. Presidio has a long rotational interval of 18
128
months for non-labeled crops, which can be a constraint on production. All cucurbits, fruiting vegetables, tuberous and corm vegetables (except potato), and leafy vegetables are now labeled; carrot, sugar beet, potato and rotational wheat will be labeled soon; and rotational field corn is expected in 2012. All of the mobile fungicides listed above have proven effective in university fungicide efficacy evaluations. Efficacy of Revus has varied among crop types with control being good on pumpkin but poor on cucumber. Based on results from an analysis of all published data from these evaluations, Presidio is the most effective fungicide, followed by Previcur Flex and then Ranman. All of the mobile fungicides are at risk for development of fungicide resistance because of their single site mode of action. And the downy mildew pathogen is considered prone to developing resistance. Resistance to the active ingredient in Tanos and Curzate has been detected in Europe. The analysis of fungicide efficacy data also revealed that combining mobile fungicides with a protectant fungicide improved control; thus there is an additional benefit to this standard practice for managing resistance. None of the downy mildew fungicides are effective for powdery mildew unfortunately. A new mobile fungicide developed by BASF, Zampro, is anticipated to be registered during the later part of 2012 for use on cucurbits as well as potatoes, grapes, brassicas and fruiting vegetables. It is effective for Phytophthora blight as well as downy mildew. Zampro contains new fungicide chemistry, ametoctradin (FRAC code 45), plus dimethomorph (40), the active ingredient in Forum. Once this fungicide is registered it will be recommended as a component of the fungicide program in place of the code 40 fungicide being used. Chlorothalonil and mancozeb are the main protectant fungicides for downy mildew. Copper is not as effective. Dithane now has a supplemental label that includes pumpkin, winter squash and gourd. An important tool for determining when fungicide application is warranted is the forecast web site for this disease at http://cdm.ipmpipe.org. Cucurbit plants are susceptible to downy mildew from emergence; however, this disease usually does not start to develop in the northeast until later in crop development when the pathogen is dispersed by wind into the region. The forecast program monitors where the disease occurs and predicts where the pathogen likely will be successfully spread. The pathogen needs living cucurbit crops to survive, thus it cannot survive where it is cold during winter. The risk of downy mildew occurring throughout the eastern US is forecast and posted three times a week. Forecasts enable timely fungicide applications. Growers can now subscribe to receive customizable alerts by e-mail or text message. Information is also maintained at the forecast web site of cucurbit crop types being affected by downy mildew. This is important because the pathogen exists as pathotypes that differ in their ability to infect the various crops. All pathotypes can infect cucumber; some also can infect melons and squashes are susceptible to others. Success of the forecast system depends on knowledge of where downy mildew is occurring; therefore prompt reporting of outbreaks by growers is critical. In conclusion, to manage the mildew diseases effectively in cucurbit crops: 1) select resistant varieties, 2) sign up to receive alerts about downy mildew occurrence and routinely check the forecast web site to know where the disease is occurring and what crops are affected, 3) inspect crops routinely for symptoms beginning at the start of crop development for downy mildew and fruit development for powdery mildew, 4) apply protectant fungicides when there is a risk of disease development, and 5) beginning when these diseases start to develop, apply targeted fungicides weekly and alternate amongst available chemistry based on FRAC code. Unfortunately there are no targeted fungicides effective for both mildew diseases because the causal pathogens are biologically very different. Add new fungicides to the program when they become available; substitute new for older product if they are in the same FRAC group. Please Note: The specific directions on fungicide labels must be adhered to -- they supersede these recommendations, if there is a conflict. Note that some products mentioned are not yet registered for use on cucurbits. Check labels for use restrictions. Any reference to commercial products, trade or brand names is for information only; no endorsement is intended.
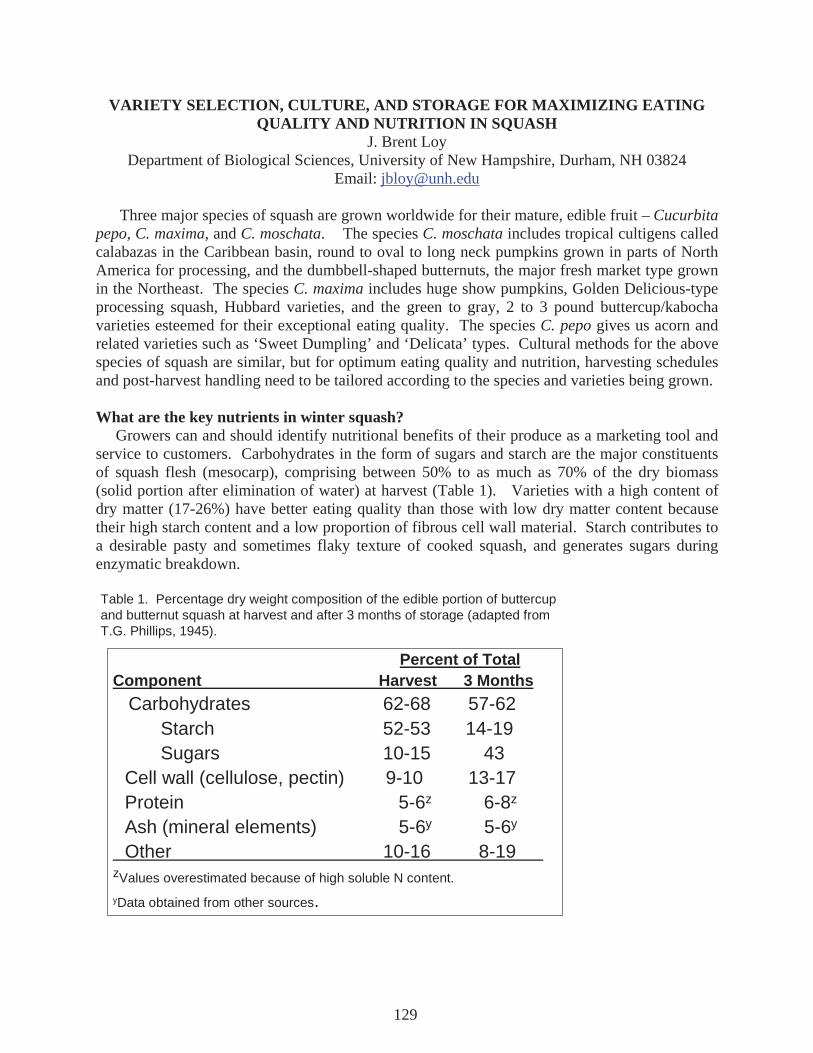
VARIETY SELECTION, CULTURE, AND STORAGE FOR MAXIMIZING EATING QUALITY AND NUTRITION IN SQUASH
J. Brent Loy Department of Biological Sciences, University of New Hampshire, Durham, NH 03824
Email: [email protected]
Three major species of squash are grown worldwide for their mature, edible fruit – Cucurbita pepo, C. maxima, and C. moschata. The species C. moschata includes tropical cultigens called calabazas in the Caribbean basin, round to oval to long neck pumpkins grown in parts of North America for processing, and the dumbbell-shaped butternuts, the major fresh market type grown in the Northeast. The species C. maxima includes huge show pumpkins, Golden Delicious-type processing squash, Hubbard varieties, and the green to gray, 2 to 3 pound buttercup/kabocha varieties esteemed for their exceptional eating quality. The species C. pepo gives us acorn and related varieties such as ‘Sweet Dumpling’ and ‘Delicata’ types. Cultural methods for the above species of squash are similar, but for optimum eating quality and nutrition, harvesting schedules and post-harvest handling need to be tailored according to the species and varieties being grown.
What are the key nutrients in winter squash? Growers can and should identify nutritional benefits of their produce as a marketing tool and service to customers. Carbohydrates in the form of sugars and starch are the major constituents of squash flesh (mesocarp), comprising between 50% to as much as 70% of the dry biomass (solid portion after elimination of water) at harvest (Table 1). Varieties with a high content of dry matter (17-26%) have better eating quality than those with low dry matter content because their high starch content and a low proportion of fibrous cell wall material. Starch contributes to a desirable pasty and sometimes flaky texture of cooked squash, and generates sugars during enzymatic breakdown.
Table 1. Percentage dry weight composition of the edible portion of buttercup and butternut squash at harvest and after 3 months of storage (adapted from T.G. Phillips, 1945).
Percent of TotalComponent Harvest 3 Months
Carbohydrates 62-68 57-62Starch 52-53 14-19Sugars 10-15 43
Cell wall (cellulose, pectin) 9-10 13-17Protein 5-6z 6-8z
Ash (mineral elements) 5-6y 5-6y
Other 10-16 8-19zValues overestimated because of high soluble N content.yData obtained from other sources.
129
In cooking tests, high sugar content is strongly associated with high ratings for eating quality. The sugar content at harvest can vary from over 20% in some acorn varieties to 10% or less in some kabocha and butternut varieties. The relative sugar content can be estimated using a hand-held refractometer, with values given in % soluble solids (SS). Acceptable eating quality is generally attained when SS values are 11% or higher. If starch levels are sufficiently high, sugar content will progressively increase during storage until most of the starch is consumed. In varieties with low starch content, starch is rapidly depleted in storage, and often sugar content of flesh does not reach acceptable levels. In such varieties, flesh texture deteriorates, becoming more watery and fibrous and less pasty. Other than providing carbohydrates and dietary fiber, the major nutritional benefit of squash is the high content of carotenoids, the yellow to orange, fat-soluble pigments. Beta-carotene, an abundant carotenoid in several varieties of squash, is an important precursor to vitamin A, an essential vitamin for normal development and eye function. Xanthophyll carotenoids, lutein and zeaxanthin, accumulate in the macular region (central portion of the retina) in the eye, and provide photo-protection. Jennifer Noseworthy, a doctoral student at UNH has been studying carotenoid content and carotenoid profiles in squash and sweet potato. She has found that the carotenoid content in the popular butternut variety ‘Waltham,’ is comprised of a relatively high proportion of lutein (27 to 37%) and -carotene (19 to 23%) at harvest. Carotenoid levels were appreciably higher in the kabocha/buttercup varieties analyzed than in butternuts, but over 50% of the carotenoids in kabocha varieties are considered non-beneficial to human health. There may be considerable variability in types of carotenoids in different varieties of squash. Squash maturity and harvest
The three popular classes of winter squash, kabocha/buttercup, butternut and acorn, differ in their nutritional and eating properties relative to recommended harvest and storage periods. All three classes attain maximum starch content between 30 and 35 days from fruit set (when female flowers open and pollination occurs). Seed development is not completed until about 55 days after fruit set, and so a continuous supply of sugars from leaf photosynthesis or from breakdown of starch in the flesh is needed for the process of seed fill. A general rule of thumb is to wait at least 50 to 60 days after fruit set for removing the fruit from the vine, as long as the vines are healthy.
Butternut varieties will turn tan color about two weeks before the fruit should be harvested. Butternut can be harvested when fruit first turn tan color, but they will have to be stored longer to attain sufficient sugar levels and the flesh quality (% dry matter) often show a more pronounced decrease than if squash were harvested at 55 to 60 days after fruit set. Butternut varieties grown in most regions of New England should be stored for about two months (50 to 60 oF) to attain sufficient sugar levels. The starch to sugar conversion can be accelerated by storing squash for one to two weeks at 80 to 85 oF, prior to storing at the recommended lower temperature for long-term storage.
Buttercup varieties harvested at 55 to 60 days after fruit set will sometimes have soluble solids levels of close to 11%; however, it is usually advisable to store the squash for an additional two weeks to acquire higher sugar levels. Moreover, many kabocha squash have excessive dry matter at harvest for good eating quality, and should be stored for a month of more to allow for some loss in dry matter through respiration and for additional sugar accumulation. Because most kabocha varieties have extremely high starch reserves, harvest at 40 days after fruit set is often recommended. The earlier harvest reduces the likelihood for sunburn damage,
130
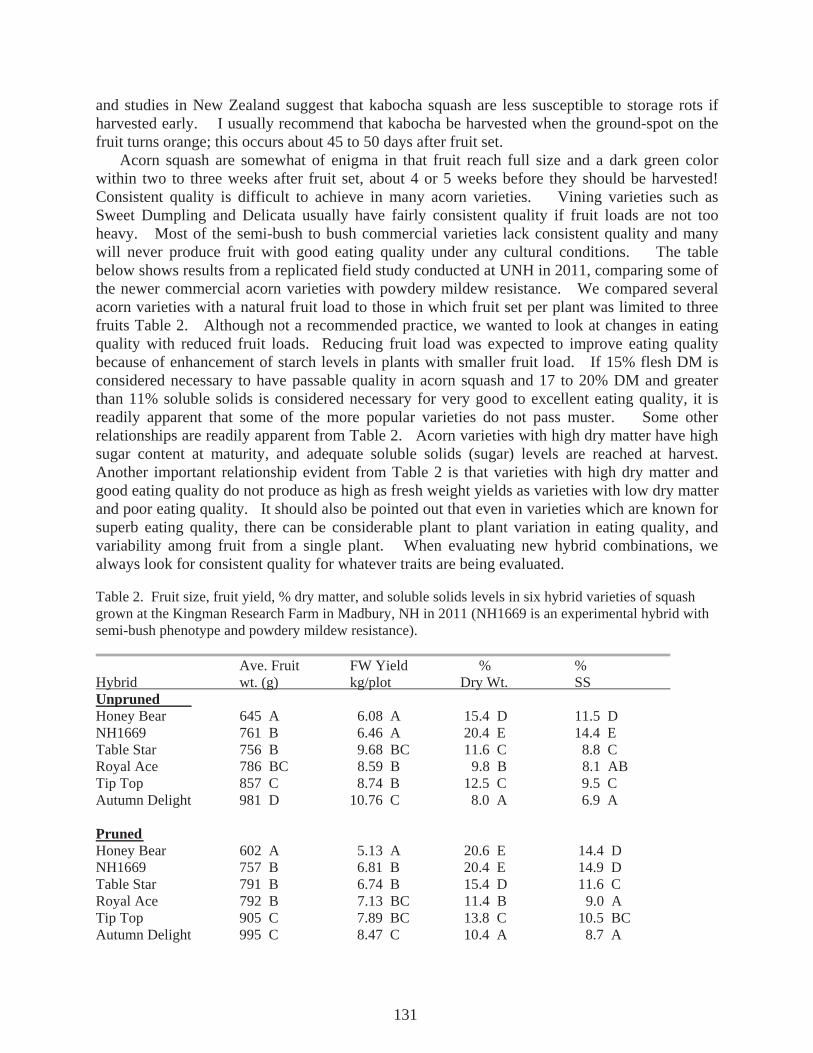
and studies in New Zealand suggest that kabocha squash are less susceptible to storage rots if harvested early. I usually recommend that kabocha be harvested when the ground-spot on the fruit turns orange; this occurs about 45 to 50 days after fruit set.
Acorn squash are somewhat of enigma in that fruit reach full size and a dark green color within two to three weeks after fruit set, about 4 or 5 weeks before they should be harvested! Consistent quality is difficult to achieve in many acorn varieties. Vining varieties such as Sweet Dumpling and Delicata usually have fairly consistent quality if fruit loads are not too heavy. Most of the semi-bush to bush commercial varieties lack consistent quality and many will never produce fruit with good eating quality under any cultural conditions. The table below shows results from a replicated field study conducted at UNH in 2011, comparing some of the newer commercial acorn varieties with powdery mildew resistance. We compared several acorn varieties with a natural fruit load to those in which fruit set per plant was limited to three fruits Table 2. Although not a recommended practice, we wanted to look at changes in eating quality with reduced fruit loads. Reducing fruit load was expected to improve eating quality because of enhancement of starch levels in plants with smaller fruit load. If 15% flesh DM is considered necessary to have passable quality in acorn squash and 17 to 20% DM and greater than 11% soluble solids is considered necessary for very good to excellent eating quality, it is readily apparent that some of the more popular varieties do not pass muster. Some other relationships are readily apparent from Table 2. Acorn varieties with high dry matter have high sugar content at maturity, and adequate soluble solids (sugar) levels are reached at harvest. Another important relationship evident from Table 2 is that varieties with high dry matter and good eating quality do not produce as high as fresh weight yields as varieties with low dry matter and poor eating quality. It should also be pointed out that even in varieties which are known for superb eating quality, there can be considerable plant to plant variation in eating quality, and variability among fruit from a single plant. When evaluating new hybrid combinations, we always look for consistent quality for whatever traits are being evaluated.
Table 2. Fruit size, fruit yield, % dry matter, and soluble solids levels in six hybrid varieties of squash grown at the Kingman Research Farm in Madbury, NH in 2011 (NH1669 is an experimental hybrid with semi-bush phenotype and powdery mildew resistance). Ave. Fruit FW Yield % % Hybrid wt. (g) kg/plot Dry Wt. SS Unpruned Honey Bear 645 A 6.08 A 15.4 D 11.5 D NH1669 761 B 6.46 A 20.4 E 14.4 E Table Star 756 B 9.68 BC 11.6 C 8.8 C Royal Ace 786 BC 8.59 B 9.8 B 8.1 AB Tip Top 857 C 8.74 B 12.5 C 9.5 C Autumn Delight 981 D 10.76 C 8.0 A 6.9 A Pruned Honey Bear 602 A 5.13 A 20.6 E 14.4 D NH1669 757 B 6.81 B 20.4 E 14.9 D Table Star 791 B 6.74 B 15.4 D 11.6 C Royal Ace 792 B 7.13 BC 11.4 B 9.0 A Tip Top 905 C 7.89 BC 13.8 C 10.5 BC Autumn Delight 995 C 8.47 C 10.4 A 8.7 A
131
Abbreviations: Ave. Fruit Wt. – average fruit fresh weight; FW Yield = fresh weight total yield per plot in kilograms (1 kg = 2.2 pounds); % Dry Wt. (dry weight); % SS (soluble solids). Values within a column with a different letter are significantly different at P = 0.05.. Pruned plants were pruned to a maximum of three fruits per plant.
ConclusionThe three major classes of winter squash - acorn, kabocha/buttercup, and butternut – have different attributes associated with maturation and post-harvest changes in eating quality and nutrition. It is important for growers to understand these differences in order to use proper harvesting and post-harvest methods, and also to provide information to customers that will guide them in purchasing and utilizing squash for optimum culinary and nutritional benefits. In addition to species differences in maturation, there are also considerable varietal differences with respect to eating quality and consistency in eating quality. It behooves growers to become more aware of those varieties which exhibit good eating quality so that their customers are satisfied with their purchases, and realize the benefits of purchasing produce at roadside retail markets. Growers should not view squash as just a fill-in vegetable to market in the fall, but as an item they can market as a culinary delight with excellent nutritional benefits.
132
GROWING SEEDLESS WATERMELONS Alan Schwartz – Tower Hill Farm
276 Ames Street, Lawrence, MA 01841 (978) 688-2878 [email protected]
Watermelons have come a long way since the discovery of their seedy fruits. Through the wonders of science, we now have seedless varieties. How are these seedless watermelon seeds produced? They are created by crossing a tetraploid (seedless) inbred line female parent with a diploid (seeded) inbred line male parent. The resulting varieties are available in various shapes, sizes and colors. Several factors differentiate seedless from seeded watermelons. First, a pollinator is required. These specially bred melons bloom early, produce large quantities of pollen, and are smaller than the desired melons. Ace and Companion are just two of the pollinators available. Seedless melons also lack the vigor of regular varieties. The seed is expensive and must be handled with great care. It has a greater chance or rotting if certain conditions are not met. A sterile soilless mixture is required. Because the seedlings don’t do well if their roots are disturbed, the seed must be planted directly into peat pots. Fill the pots with well moistened, but not wet, soilless starting mixture. Warm the pots to 90 degrees and hold them at that temperature for four days. It is now time to plant the seedlings. To keep track of the seedlings, make separated plantings of the seedless variety and the pollinator. To insure good fruit set, plant three seedless to one pollinator. Plant the narrow seed, tip down, ½ inch into the soil. Cover the containers with a thin layer of clean sand. This will help maintain soil temperature and moisture. As soon as the plants emerge, lower the temperature to 75 degrees. Gradually, harden off the seedlings. When the threat of frost is completely gone and the plants have their second set of leaves, plant the pots in raised beds fertilized with 15-15-15 or its organic equivalent at the rate of six pounds per 1,000 feet of row. Black plastic or paper mulch can be applied before planting. Row covers can also be used, but only after the plants have established themselves. Otherwise, the plants will cook. Space the pots with two feet between plants and six feet between rows. To prevent the peat pots from drying out, be sure to cover them with soil. Inter space the triploid with the pollinator. Apply a liquid starter fertilizer. When the vines begin to run, side dress the plants with nitrogen at the rate of forty pounds per acre. For the rest of the season, watermelons require limited care. They will tolerate drought, but lack the vigor to outgrow weed competition. Beds must be free of weeds. Careful cultivation is required to protect the plants’ shallow root system. The use of bees will make for earlier fruit set and increased yields. Two hives per acre are suggested.
133

If you have followed all these tips and have a bountiful crop, how do you tell when the melons are ripe? There are three signs. First, the bottom of the melon will turn yellow. Second, the tendril closest to the fruit will be brown. Third, when tapped, the melon will make a thumping sound. The implementation of the tips outlined in this presentation will help you to meet the increasing consumer demand for seedless watermelons.
134
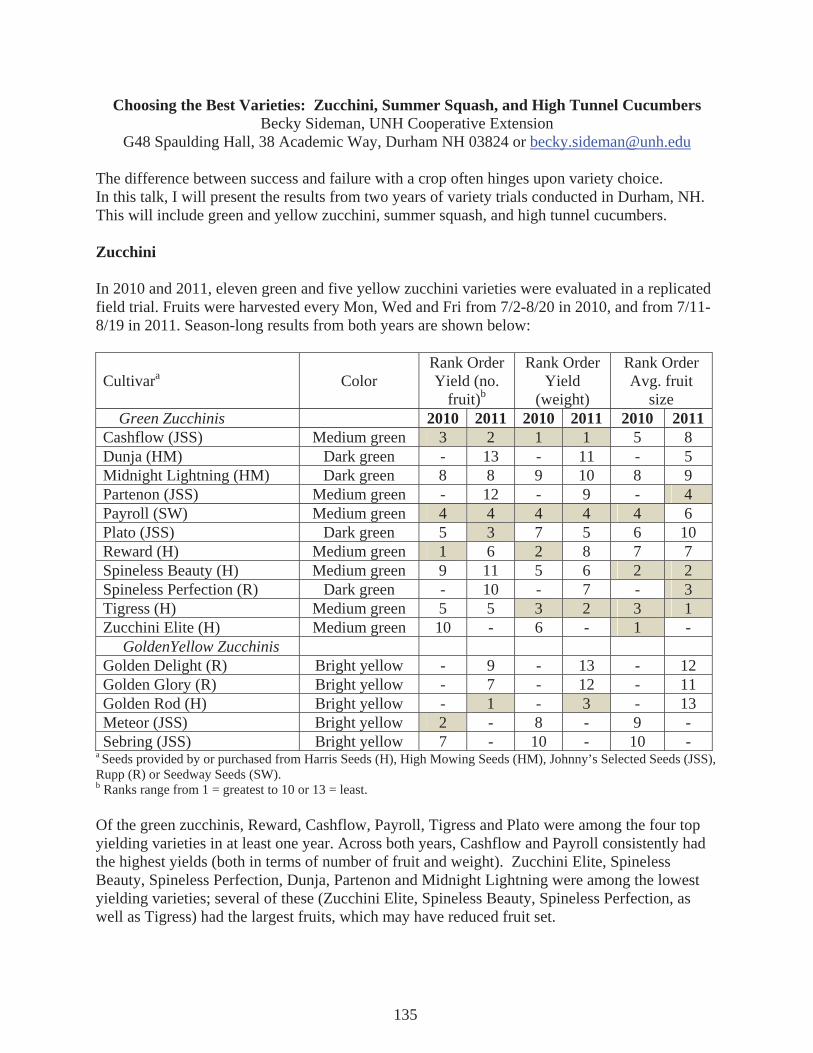
Choosing the Best Varieties: Zucchini, Summer Squash, and High Tunnel Cucumbers Becky Sideman, UNH Cooperative Extension
G48 Spaulding Hall, 38 Academic Way, Durham NH 03824 or [email protected]
The difference between success and failure with a crop often hinges upon variety choice. In this talk, I will present the results from two years of variety trials conducted in Durham, NH. This will include green and yellow zucchini, summer squash, and high tunnel cucumbers.
Zucchini
In 2010 and 2011, eleven green and five yellow zucchini varieties were evaluated in a replicated field trial. Fruits were harvested every Mon, Wed and Fri from 7/2-8/20 in 2010, and from 7/11-8/19 in 2011. Season-long results from both years are shown below: Cultivara
Color
Rank Order Yield (no.
fruit)b
Rank Order Yield
(weight)
Rank Order Avg. fruit
size Green Zucchinis 2010 2011 2010 2011 2010 2011Cashflow (JSS) Medium green 3 2 1 1 5 8 Dunja (HM) Dark green - 13 - 11 - 5 Midnight Lightning (HM) Dark green 8 8 9 10 8 9 Partenon (JSS) Medium green - 12 - 9 - 4 Payroll (SW) Medium green 4 4 4 4 4 6 Plato (JSS) Dark green 5 3 7 5 6 10 Reward (H) Medium green 1 6 2 8 7 7 Spineless Beauty (H) Medium green 9 11 5 6 2 2 Spineless Perfection (R) Dark green - 10 - 7 - 3 Tigress (H) Medium green 5 5 3 2 3 1 Zucchini Elite (H) Medium green 10 - 6 - 1 - GoldenYellow Zucchinis Golden Delight (R) Bright yellow - 9 - 13 - 12 Golden Glory (R) Bright yellow - 7 - 12 - 11 Golden Rod (H) Bright yellow - 1 - 3 - 13 Meteor (JSS) Bright yellow 2 - 8 - 9 - Sebring (JSS) Bright yellow 7 - 10 - 10 -
a Seeds provided by or purchased from Harris Seeds (H), High Mowing Seeds (HM), Johnny’s Selected Seeds (JSS), Rupp (R) or Seedway Seeds (SW). b Ranks range from 1 = greatest to 10 or 13 = least. Of the green zucchinis, Reward, Cashflow, Payroll, Tigress and Plato were among the four top yielding varieties in at least one year. Across both years, Cashflow and Payroll consistently had the highest yields (both in terms of number of fruit and weight). Zucchini Elite, Spineless Beauty, Spineless Perfection, Dunja, Partenon and Midnight Lightning were among the lowest yielding varieties; several of these (Zucchini Elite, Spineless Beauty, Spineless Perfection, as well as Tigress) had the largest fruits, which may have reduced fruit set.
135
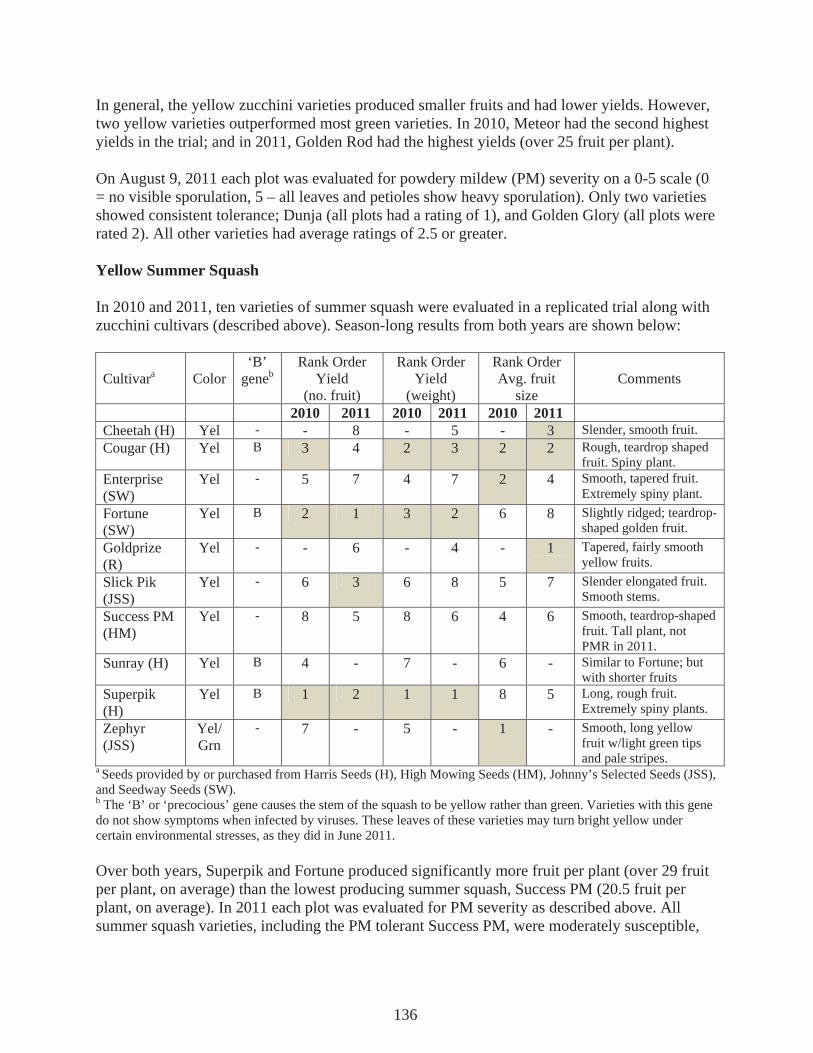
In general, the yellow zucchini varieties produced smaller fruits and had lower yields. However, two yellow varieties outperformed most green varieties. In 2010, Meteor had the second highest yields in the trial; and in 2011, Golden Rod had the highest yields (over 25 fruit per plant). On August 9, 2011 each plot was evaluated for powdery mildew (PM) severity on a 0-5 scale (0 = no visible sporulation, 5 – all leaves and petioles show heavy sporulation). Only two varieties showed consistent tolerance; Dunja (all plots had a rating of 1), and Golden Glory (all plots were rated 2). All other varieties had average ratings of 2.5 or greater. Yellow Summer Squash In 2010 and 2011, ten varieties of summer squash were evaluated in a replicated trial along with zucchini cultivars (described above). Season-long results from both years are shown below: Cultivara
Color
‘B’ geneb
Rank Order Yield
(no. fruit)
Rank Order Yield
(weight)
Rank Order Avg. fruit
size
Comments
2010 2011 2010 2011 2010 2011 Cheetah (H) Yel - - 8 - 5 - 3 Slender, smooth fruit. Cougar (H) Yel B 3 4 2 3 2 2 Rough, teardrop shaped
fruit. Spiny plant. Enterprise (SW)
Yel - 5 7 4 7 2 4 Smooth, tapered fruit. Extremely spiny plant.
Fortune (SW)
Yel B 2 1 3 2 6 8 Slightly ridged; teardrop-shaped golden fruit.
Goldprize (R)
Yel -
- 6 - 4 - 1 Tapered, fairly smooth yellow fruits.
Slick Pik (JSS)
Yel - 6 3 6 8 5 7 Slender elongated fruit. Smooth stems.
Success PM (HM)
Yel - 8 5 8 6 4 6 Smooth, teardrop-shaped fruit. Tall plant, not PMR in 2011.
Sunray (H) Yel B 4 - 7 - 6 - Similar to Fortune; but with shorter fruits
Superpik (H)
Yel B 1 2 1 1 8 5 Long, rough fruit. Extremely spiny plants.
Zephyr (JSS)
Yel/ Grn
- 7 - 5 - 1 - Smooth, long yellow fruit w/light green tips and pale stripes.
a Seeds provided by or purchased from Harris Seeds (H), High Mowing Seeds (HM), Johnny’s Selected Seeds (JSS), and Seedway Seeds (SW). b The ‘B’ or ‘precocious’ gene causes the stem of the squash to be yellow rather than green. Varieties with this gene do not show symptoms when infected by viruses. These leaves of these varieties may turn bright yellow under certain environmental stresses, as they did in June 2011.
Over both years, Superpik and Fortune produced significantly more fruit per plant (over 29 fruit per plant, on average) than the lowest producing summer squash, Success PM (20.5 fruit per plant, on average). In 2011 each plot was evaluated for PM severity as described above. All summer squash varieties, including the PM tolerant Success PM, were moderately susceptible,
136
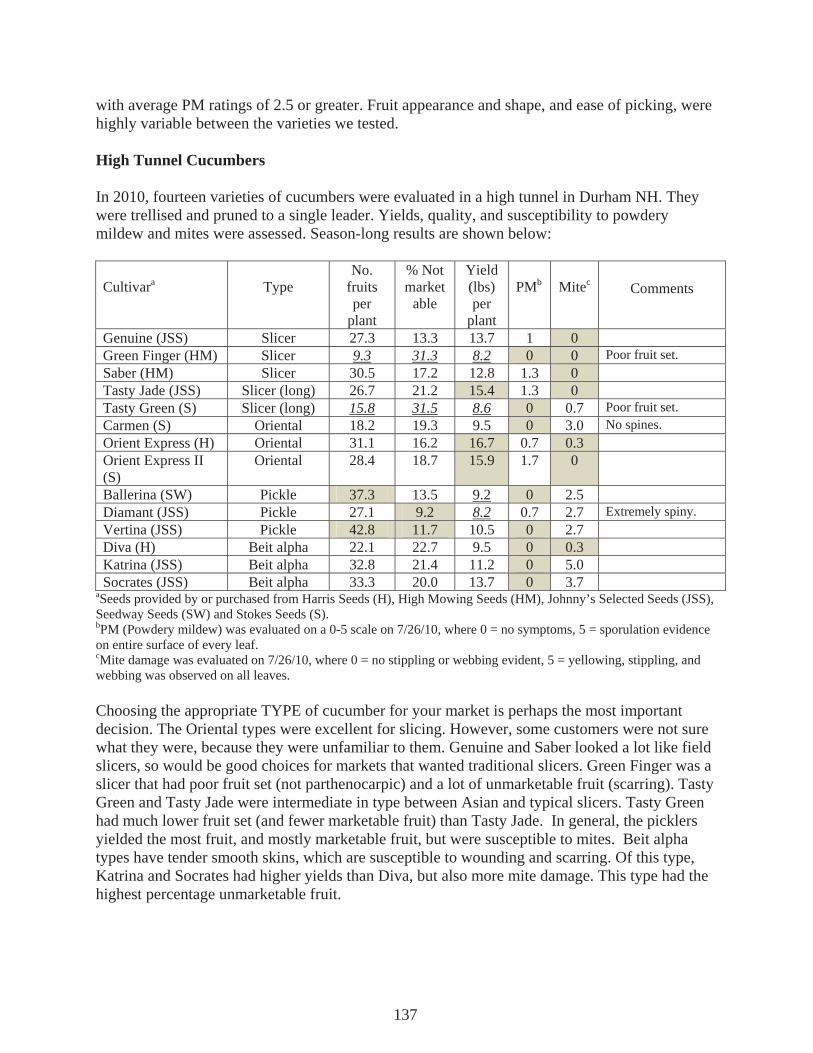
with average PM ratings of 2.5 or greater. Fruit appearance and shape, and ease of picking, were highly variable between the varieties we tested. High Tunnel Cucumbers
In 2010, fourteen varieties of cucumbers were evaluated in a high tunnel in Durham NH. They were trellised and pruned to a single leader. Yields, quality, and susceptibility to powdery mildew and mites were assessed. Season-long results are shown below:
Cultivara
Type
No. fruits per
plant
% Not market
able
Yield (lbs) per
plant
PMb
Mitec
Comments
Genuine (JSS) Slicer 27.3 13.3 13.7 1 0 Green Finger (HM) Slicer 9.3 31.3 8.2 0 0 Poor fruit set. Saber (HM) Slicer 30.5 17.2 12.8 1.3 0 Tasty Jade (JSS) Slicer (long) 26.7 21.2 15.4 1.3 0 Tasty Green (S) Slicer (long) 15.8 31.5 8.6 0 0.7 Poor fruit set. Carmen (S) Oriental 18.2 19.3 9.5 0 3.0 No spines. Orient Express (H) Oriental 31.1 16.2 16.7 0.7 0.3 Orient Express II (S)
Oriental 28.4 18.7 15.9 1.7 0
Ballerina (SW) Pickle 37.3 13.5 9.2 0 2.5 Diamant (JSS) Pickle 27.1 9.2 8.2 0.7 2.7 Extremely spiny. Vertina (JSS) Pickle 42.8 11.7 10.5 0 2.7 Diva (H) Beit alpha 22.1 22.7 9.5 0 0.3 Katrina (JSS) Beit alpha 32.8 21.4 11.2 0 5.0 Socrates (JSS) Beit alpha 33.3 20.0 13.7 0 3.7
aSeeds provided by or purchased from Harris Seeds (H), High Mowing Seeds (HM), Johnny’s Selected Seeds (JSS), Seedway Seeds (SW) and Stokes Seeds (S). bPM (Powdery mildew) was evaluated on a 0-5 scale on 7/26/10, where 0 = no symptoms, 5 = sporulation evidence on entire surface of every leaf. cMite damage was evaluated on 7/26/10, where 0 = no stippling or webbing evident, 5 = yellowing, stippling, and webbing was observed on all leaves. Choosing the appropriate TYPE of cucumber for your market is perhaps the most important decision. The Oriental types were excellent for slicing. However, some customers were not sure what they were, because they were unfamiliar to them. Genuine and Saber looked a lot like field slicers, so would be good choices for markets that wanted traditional slicers. Green Finger was a slicer that had poor fruit set (not parthenocarpic) and a lot of unmarketable fruit (scarring). Tasty Green and Tasty Jade were intermediate in type between Asian and typical slicers. Tasty Green had much lower fruit set (and fewer marketable fruit) than Tasty Jade. In general, the picklers yielded the most fruit, and mostly marketable fruit, but were susceptible to mites. Beit alpha types have tender smooth skins, which are susceptible to wounding and scarring. Of this type, Katrina and Socrates had higher yields than Diva, but also more mite damage. This type had the highest percentage unmarketable fruit.
137
Onion Management: Insects, Diseases, and New Research in Plasticulture
Christine Hoepting, Cornell Cooperative Extension Regional Vegetable Program,12690 Rte. 31, Albion, NY 14411, 585-798-4265 x 38; [email protected]
As a rule of thumb, healthy large onion foliage translants into large onion bulbs. Bulbing
is stimulated by the longest day of the year, June 21st. To achieve healthy large foliage, onions should be planted as early as possible in the spring, and anything that will help to push the onion plants along (e.g. optimum nutrients, warm soil, adequate soil moisture, no competition from weeds, etc.) at this early stage should be beneficial. During bulbing, a consistent supply of adequate moisture is best. Ideally, onion foliage should dry down naturally rather than from disease or insect damage or other plant stresses.
Insects:The most common and problematic insect pest of small-scale onion production is onion thrips (OT). OT feeding reduces the photosynthetic capacity of the onion plant, which can reduce yield and bulb size by 30% or more. Once OT populations exceed 50 OT per plant, they can be very challenging to control. OT generate very quickly and are favored by hot and dry conditions.
Scouting for onion thrips: Start scouting in early- to mid-June. Note that transplants imported from the south may be infested with OT and may need to be sprayed sooner. OT are tiny slender insects. Nymphs are yellow and 0.5 to 1.2 mm in length and adults are brown, up to 2 mm in length. Look deep into the leaf axils to find the first OT of the season. Count the total number of OT and divide by the total number of leaves per plant to get the number of OT per leaf. Insecticide sprays should be started at 1 to 3 OT per leaf, depending on the insecticide used.
Cultural control practices: The first line of defense against OT is insecticides. However, there are cultural practices that are complimentary to an insecticide spray program. In Cornell studies, silver and straw mulches have been shown to delay buildup of OT resulting in delayed onset of the first insecticide spray and increased time interval between sprays. Similarly, kaolin clay has provided only mediocre OT control and may have to be reapplied frequently as it is easily washed off by rain.
Use the best insecticides: Movento (available as a Section 18 in NY) and Radiant are the most highly effective insecticides labeled to control OT. Radiant has excellent residual activity lasting > 7 days. Movento is systemic and has residual activity of > 10 days, but it is not very effective against adult OT. For this reason, Movento is strategically placed during the first half of the season when adult populations are lower than they are late in the season. Agri-Mek (available as a Section 18 in NY) provides good control of OT and has residual activity of 5-7 days. Lannate provides mediocre control of OT, OPs like Penncap-M provide poor control and pyrethroids like Warrior have failed to control OT in Cornell trials. The Cornell recommendations for OT control provide a sequence and strategy that takes into consideration the strengths and weaknesses of the available insecticides and applies them in a responsible manner to avoid the development of resistance in order to provide an effective, sustainable and economical OT management plan.
138
2011 Cornell spray recommendations for OT: 1) 2 sprays of Movento 5 fl oz, each at 1 OT per leaf* 2) 2 sprays of Agri-Mek 0.15EC 14 fl oz, 7 days apart (note: 30 day PHI) 3) 2 sprays of Lannate 3 pts, 7 days apart 4) 2 sprays of Radiant 6-8 fl oz, each at 3 OT per leaf *If 3 weeks after the first spray of Movento, the OT population does not reach 1 OT per leaf, skip to Agri-Mek. If after using Movento or Agri-Mek, there are only 2-3 weeks remaining before onions are pulled, skip to Radiant.
For small-scale growers: OT populations may not be resistant to pyrethroids or OPs in these areas as they are in muck areas where large-scale onion production occurs. Start spraying these insecticides at 1 OT per leaf. If after 7 days, OT numbers are higher than 1 OT per leaf, switch to another chemical class.
For organic growers: Entrust is the most effective OMRI-approved insecticide and should be applied at 1 OT per leaf. It should not be applied more than twice before switching to another chemical class. Cultural practices may be incorporated.
Other important points: It is very common to not see a knockdown in OT until after the second consecutive spray of an insecticide. Use the highest rate of penetrating surfactant with Movento, Agri-Mek and Radiant. Diseases: The most important diseases of small-scale onion production are purple blotch, downy mildew and bacterial bulb decay.
Purple Blotch: PB usually develops and spreads during July and August as plants begin to mature. PB lesions can girdle onion leaves resulting in leaf dieback and in severe cases, onions can die standing up. When scouting, look for boat-shaped target-spot lesions about 0.5 to 1.0 inch in length on the outer 2-3 leaves of the plant. Lesions can be tan-ish or purplish, sometimes blackish in color, on green leaf tissue. Start spraying for PB in early July or at first sign of disease. In the most recent Cornell fungicide trials (2005-2007), half rate of Scala (9 oz) + half rate of Bravo (1.5 pt), Switch, Rovral and Endura were the top 4 best treatments for control of PB. All of these fungicides also control Botrytis leaf blight, another common leaf disease of onion. Other fungicides that can be used to manage PB include Quadris Top, Pristine, Cabrio and Inspire Super. Note that mancozeb and Bravo are weak against PB. Generally, fungicide sprays for PB need to be continued weekly for the rest of the season.
Downy mildew: DM is sporadic and generally only occurs in cool and wet years or very late in the season. It can be very destructive causing severe leaf dieback and onions often die standing up. Early detection of DM is very tricky. Middle-aged leaves first turn pale, then yellowish, and elongated patches may have grayish-violet fuzzy spores on green leaf tissue. Sporulation is most easily observed when dew is present. In older infections, the initial infection site becomes necrotic and is quickly invaded by PB and secondary pathogens with black spores. Infected leaves will die back very quickly. Once DM is detected, apply Ridomil Gold + mancozeb (Penncozeb, Manzate, Dithane) alternated with a high rate of Quadris Top + mancozeb. Other fungicides labeled for DM in onions include Reason, Revus, Presidio (new), Aliette, Acrobat, Forum, Phostrol/Prophyt. Know that once a plant is infected with DM that it will lose the affected leaves to dieback. The fungicide program is to prevent further spread from the infected
139
plants to healthy ones, so that the whole field is not destroyed. Expect original DM hot spots to worsen, despite fungicide sprays. To assess whether DM is being contained, look for lack of new infections, and lack of spores on old lesions.
Bacterial bulb decay: A complex of several bacterial organisms including from the Geneses Burkholderia, Pantoea and Enterobacter have been found to cause bacterial bulb decay of onion, which are commonly soil borne. Symptoms first appear as leaf blights on the youngest center leaves of the plant and result in yellowing or bleaching and wilting of these leaves. The infection progresses down the leaves and neck, and eventually into the bulb. Affected bulb scales become soft and water-soaked and are yellow-brown in appearance. Cooper bactericides and Oxidate provide mediocre to poor control of bacterial diseases in onion. New research in plasticulture has shown that some very simple and economical adjustments to cultural practices can go a long way towards reducing bacterial diseases of onions. New Research in Plasticulure: In small-scale production, onions are typically grown from transplants on 3 foot wide black plastic mulch beds with 2 to 4 rows per bed. Onions are harvested by hand starting in early July and throughout the summer and sold at roadside stands, farmer’s markets and produce auctions. Recent Cornell-led studies have demonstrated that narrow plant spacing and alternatives to black plastic mulch can significantly reduce bacterial bulb decay, increase marketable yield and increase profitability of small-scale intensively grown onions.
Narrow plant spacing: Cornell studies showed that when plant spacing was reduced from 6” or 8” to 4” with 3 or 4 rows per 3-foot plastic mulch bed (row spacing: 4 rows = 6”; 3 rows = 8”), this provided 53 to 64% control of bacterial bulb decay at harvest. Marketable yield also increased by 1.4 to 2.4 times, representing an increased net economic return of $43 to $258 per 100 feet of bed, due to increased weight of marketable jumbo-sized bulbs. Wide plant spacing produces big bushy plants with more leaves, thicker necks, delayed maturity and bigger bulbs, which are more prone to rotting. Narrowing plant spacing produces plants with fewer leaves and narrower necks that mature earlier and therefore are less conducive to bacterial bulb decay.
Alternatives to black plastic: Cornell studies showed that silver plastic, biodegradable black plastic and bare ground reduced bacterial bulb decay by 59%, 71% and 75%, respectively. Reflective silver plastic mulch, biodegradable black plastic and bare ground had significantly 1.8 to 2.8 times higher marketable yield than black plastic. Reflective silver and biodegradable black plastics had significantly 3.7 and 3.6 times, respectively, higher jumbo weight than black plastic, which resulted in an increased net return of $96 to $215 per 100 feet of bed compared to black plastic. Despite significantly reduced incidence of bacterial bulb decay, onions grown on bare ground did not yield higher than black plastic due to extreme competition from weeds; for bare ground to be effective, weeds must be adequately controlled. All of the alternatives to black plastic had significantly lower soil temperatures compared to the black plastic; we suspect that the higher temperatures of the black plastic are more favorable for development of bacterial diseases. For more information, visit http://blogs.cce.cornell.edu/cvp/, from the side menu, click on “crops,..” and then “onions”, or contact Christy Hoepting.
140
Detecting and Managing Bloat Nematode in Garlic Crystal Stewart, Capital District Vegetable and Small Fruit Program, Cornell University
Cooperative Extension. [email protected]. 518.775.0018
Over the last two years it has been determined that bloat nematode (GBN), Didylenchus dipsasci, is widespread on garlic in many parts of the Northeast. As the industry works to control the spread of this nematode to now nematode-free growers, we are simultaneously working to help growers who do have GBN work to eliminate it while preserving their existing crops, if possible. The following steps should be taken by anyone who is unsure if they have GBN. 1) Determine if you have bloat nematode. Dr. Abawi’s lab at the NYSAES can analyze samples of new infestation sites and those in field research trials—please contact Crystal Stewart for updated rates and protocols if you are interested. 2) Only plant clean seed. Bloat nematode is introduced and perpetuated by planting seed that is infested. Do not replant any of your garlic from an infested lot. Even if bulbs appear normal (symptomless), low levels of bloat nematodes can increase a thousand fold during one growing season. This means that garlic that showed no symptoms when it was planted could become heavily infested by the time it is harvested the next season. There is currently no NYS certification program for garlic seed, so you will have to work with suppliers to determine how they have ensured their seed is clean. If you or your supplier have not had seed tested, it cannot be guaranteed to be nematode free. Even if seed tests clean, it does not guarantee that bloat nematode does not occur, it just means that it is undetectable. It is recommended to have clean seed re-tested every at least 5 years. 3) Do not sell bloat nematode infested garlic for seed. Selling quality bulbs infested with bloat nematode for food is acceptable. Garlic festivals may have more detailed rules. 4) Plant garlic in a location that has not been cropped to garlic at least 4 years. Bloat nematodes can also live in the soil and on alternate hosts. To eliminate and/or to prevent build-up of the nematode populations in the field, rotate away from any Allium crops (garlic, onions, leek, chives), celery, parsley, or salsify, and areas with high populations of hairy nightshade weeds. Also, do not plant garlic and control nightshades for at least 4 years in the area where garlic was grown in 2010. Please note, this recommendation may change in the future—preliminary results indicate GBN may not be able to survive winters consistently in the Northeast. 5) Plant cover crops after harvesting garlic. Mustard, sorghum-sudangrass, and other cover crops have been shown to reduce nematode populations due to their bio-fumigant effect. Thus, they may effectively reduce bloat nematode populations. For information on seeding rates, fertility needs and seeds sources, visit the cover crop website at http://calshort-lamp.cit.cornell.edu/bjorkman/covercrops/fall-mustard.php or contact your vegetable specialist. 6) If possible, Keep fields moist: Bloat nematodes cannot survive for long periods in moist soils, but they do in dry soils.
141
7) Treat infested fields with a conventional fumigant-type nematicide. This is an option for conventional growers. Custom applications of Telone-C17 or Vapam are available for use in some states incluing New York as pre-plant treatments and are highly effective against the bloat and other plant-parasitic nematodes, where appropriate and cost-effective. 8) Vydate may also be labeled for control of GBN—please see your state’s pesticide guidelines to verify whether this is the case. Hot water treatments are being examined as a treatment option, but are not considered a reliable way to eliminate 100% of the GBN’s at this time.
142
Late blight 2011: biology, resistant varieties, disease forecasting and management. Bill Fry, Ian Small, Kevin Myers, Giovanna Danies, Laura Joseph. Department of Plant
Pathology and Plant-Microbe Biology. Cornell University, Ithaca NY, 14853. [email protected] Biology: As part of an AFRI grant involving more than 20 collaborators from throughout the USA, we received in 2011 more than 120 suspected late blight samples. All but a few were positive for late blight. We received samples from Connecticut, Delaware, Florida, Maine, Minnesota, New Hampshire, North Dakota, Oregon, Pennsylvania, Rhode Island, Virginia, Washington, and Wisconsin. Our major focus was to determine genotype (using microsatellite markers), and convey information as rapidly as possible to extension personnel who submitted the sample. Microsatellite analysis can be done on infected tissue or on sporangia from lesions, so data can be obtained without culturing the pathogen. In many cases, information was returned to the submitter within 24-48 hr of receipt of the sample. The data were uploaded to a national website that reported these various occurrences of late blight. Preliminary analyses to date (10 October, 2011) indicate that the vast majority of genotypes of Phytophthora infestans strains in these samples corresponded to those that had been detected in previous years. These lineages were: US8 (A2 mating type, resistant to mefenoxam, not aggressive on tomato, very pathogenic to potato, one sample) US11 (A1 mating type, resistant to mefenoxam, aggressive to tomato and potato, one sample) US22 (A2 mating type, sensitive to mefenoxam, aggressive on tomatoes, but also pathogenic on potato, > 15 samples (from NY and ME) US23 (A1 mating type, sensitive to mefenoxam, aggressive on both tomatoes and potatoes, > 50 samples, from many NE states) US24 (A1 mating type, sensitive to mefenoxam, aggressive mainly on potatoes, >14 samples, from WA, OR, ND, MN, ME, NY) There were at least ten samples containing genotypes that we had not previously seen. We are currently investigating their mating types, sensitivities to mefenoxam, host preference and relative aggressiveness. There appear to be both A1 and A2 mating types in this group and they also appear to have diverse sensitivities to mefenoxam. We are also investigating their relatedness to other strains. Phenotypic analyses were conducted in the lab on isolates from the US8, US22, US23 and US24 clonal lineages collected in 2010. Isolates from the US8 and US24 clonal lineages had been obtained almost exclusively from potatoes. We found that sporulation on tomatoes was typically only about 10% that of sporulation on potatoes for each of these two lineages. Thus, it seems that neither US8 nor US24 is likely to cause a sustained epidemic on tomatoes. US8 and US23 appeared to sporulate about equivalently on potato, and more abundantly than did US22 or US24, so US8 and US23 may be the most aggressive potato pathogens. In contrast, US22 and US23 were aggressive to both potato and tomato. Using lesion growth rate and sporulation as criteria, US23 appeared to be somewhat more aggressive on both potato and tomato than was US22.
143
144
Resistant varieties. We’ve investigated also the relative resistances diverse potato and tomato cultivars to late blight. Most of the popular cultivars are susceptible, but some recently available tomato cultivars are immune to the currently dominant strains of P. infestans. The relative resistances of many cultivars will be presented. The resistance of potato foliage to P. infestans is not necessarily related to the resistance of tubers. Therefore, we are separately obtaining data on the relative resistances of tubers of the most popular cultivars. Forecasting and Management: Host resistance, weather, pathogen characteristics, and fungicide can be integrated via a Decision Support System (DSS) to achieve efficient late blight suppression. The DSS is currently available on the web at http://blight.eas.cornell.edu/blight/. The system requires a password, but these are readily available. The DSS uses weather data observed at a site chosen by the user. Additionally, the DSS uses weather forecasts (for the next 7 days) that are very specific to the user’s location. This enables one to make predictions of late development specific to one’s location. The system contains two disease forecasts: Blitecast and Simcast. Simcast incorporates the effects of host resistance and fungicide as well as weather effects. Blitecast incorporates only the effects of weather. This past year, chlorothalonil was the only fungicide in the system, but experiments conducted during the last several years will provide data to include the effects of additional fungicides. In field trials, standard fungicides have been demonstrated to be quite effective to suppress late blight. Even copper is quite effective in suppressing foliar blight. Chlorothalonil was consistently among the most effective at suppressing foliar blight. Unfortunately, we could detect no disease suppressing effect of oxidate. Several fungicides provided significant protection to tubers. These included Gavel, Presidio and Ranman. The DSS was evaluated in field experiments in 2010 and 2011. Use of the DSS enabled much more efficient use of fungicide compared to standard grower practice –disease suppression equivalent to that of standard grower practice (weekly sprays), but with fewer fungicide applications. Unsprayed plots in the experiments were severely diseased. Sprayed plots were not significantly different from each other, each with a very low level of late blight. Research reported here was supported by the Agriculture and Food Research Initiative Competitive Grants Program 2011-68004-30104 from the USDA National Institute of Food and Agriculture, by the Cornell Agricultural Experiment Station and by USDA RIPM project: 2010-34103-21005.
Growing Small Acreage Potatoes for Profitability Andre Cantelmo
Heron Pond Farm, South Hampton NH [email protected] (603) 591-8720
Growing potatoes for profit may seem like a lost cause. The world uses potatoes as a filler and cheap calorie in many different ways. We have decided not to try to compete with a product that we can not beat. Instead, our potatoes are seen as a local food with unique taste. We grow varieties that you can't find in the store. Someone looking at our Nicolas at market for $1.50 a pound may say “I can get them for .50 cents a pound at the supermarket.” We like being able to say “no, you can't.” We create something that you truly can't get anywhere else. At the same time we have watched many a grower willing to take a major hit in yields per acre to grow spuds at a small scale. This is not necessary. The real money in local potatoes can be made by taking all the great knowledge used by the big boys and scaling down to the size you are. Giving the crop what it needs when it needs it is like printing money. If the same field can give you five times what you planted or twenty times what you planted, which would you take? Of course money can be made by chitting potatoes for early production. We do this, but getting potatoes mid June for early sales is a topic unto itself. The following is a primer that has helped us at least to know when and why we were loosing yield in our main potato crop. After the establishment of a market for your spuds, getting the most per acre is the fastest way to increase profitability. It is important to start off on the right foot. Good soil prep and the correct conditions will help avoid a lot of problems. Severity of common scab is significantly reduced in soils with pH levels of 5.2 and below, but losses can rapidly increase with small increases in pH above 5.2. Potatoes are commonly grown in soils with a pH of 5.0 to 5.2 for control of common scab. You will have to compensate for poor nutrient up take and the lack of effect of minor elements. Potatoes grow great in 6.5 soil, but it is hard to get around the scab. Legume cover crops should not be grown ahead of potatoes, since this can encourage scab, nor should sod crops, since they may increase wireworm populations. On the other hand, small grains—corn or sorghum-Sudangrass—may benefit a potato crop that follows. In Maine, some growers have used Japanese millet as a cover crop in the year prior to potatoes in an effort to reduce rhizoctonia. We use oats, wheat, or rye. Oats are great for the winter kill and allow the soil to be worked well early. We chisel plow all our fields, Perfecta harrow. We have very rocky ground, so it takes many passes to get up as many rocks as we can. This leads to a second ground preparation most of the time. We apply our amendments before we go through to fix the ground we compacted. Potatoes love calcium and so putting down gypsum is a good idea when trying not to raise pH. If an organic fertilizer is to be used some of it will need to be put down pre-planting and then incorporated. Our goal is to have 140lbs of nitrogen per acre. Most planters will not be set up to put that much organic material down at planting. Since potatoes should be side dressed only as a last resort, pre-plant incorporation allows for the fertilizer to be below the tubers. Picking out the best potato variety well ahead of time is key. A standard red, white and gold are important in any potato growing operation. Nevertheless, odd ball, off types, and fingerlings will help set you apart from the supermarket. We know we can't beat the market price so setting ourselves apart is key. We grow reba, chiefton, norland, superior, satina, nicola, Adirondack blue, Adirondack red, peter willcox, la ratt, french fingerling, and Russian banana. By November the year before we know where they are coming from. We get 90% of our potatoes from Bob Chapple, a grower in Vermont to whom we owe much. You need to trust your seed source. What is in their cellar will be in your cellar.
145
It would be tempting to get your seed, cut it up, and plant it all in the same day. We like to let the seed wake up first. The eyes swell a bit, but do not emerge. Potatoes will regrow their eyes three times, but each time they will be weaker. Best not to let them get to the point where they are damaged at planting. It takes a full day for us to cut our potatoes. We use a line cutter that does a good job of making the piece size. Anything under 1.5 oz is not good and each piece should have at least three eyes. “Blind seed” will cause gaps in the field that give weeds an opportunity and reduce per acre yield. For this reason we love to use “b's” as their size often lends them to being not cut at all. Another benefit of not cutting spuds is it reduces the opportunity for the seed to rot in the field. Seed that must be cut is given a day to heal over before planting out. There are many seed treatments on the market, but we have gotten away from using them as our cultural practice has reduced their need. Cleaning the cutter is important to keeping diseases in check. We use a John Deer 216 two-row potato planter. You can buy one of these used for about $2,500 and it will transform the way you plant potatoes. This alone may be the biggest increase of yield for some. Each variety has its own needs for fertility, but we have settled on 140 lbs of nitrogen per acre as a base. Potatoes are poor nitrogen scavengers, so all of it should go down at or pre-planting. Side dressing will be less effective. Potatoes need a 1-2-2 N-P-K. Use a good soil text and your agricultural extension to get you where you need to be. We have found that our fertilizer suppliers have been very helpful as well. Fertilizer applied at the time of planting should not be in direct contact with seed pieces. The recommended placement on very low testing soils is in two bands, each band 2 inches to the side and 2 inches below the seed pieces. For our round potatoes we use a spacing of 8.5 inches between seed pieces. Fingerling requires 10-12 inches apart depending on variety. It is important when using a trench planter to maintain the skids below the furrow openers. These skids define the bottom of the trench. Without a good “v” shape seed pieces can roll at panting. This will bunch seed, create gaps, and reduce per acre yields. We use trench application of pesticides and fungicides to aid in the growing of our spuds. The seed pieces are sprayed as they go down at planting. Admire, Quadis, and Ridomil Gold (see labels) are what we have used, but both organic and conventional growers will benefit from the use of Soil Serenade, designed to protect young plants against soil diseases like Pythium, Rhizoctonia, Fusarium, and Phytophthora. We may replace Ridomil Gold with Serenade because some growers have reported great root growth with the use of this product, in addition to its fungicide effects. Ground crack occurs just before the leaves and stems push their way out of the soil. Timing is everything at this stage. All the forms of weed control at this point can cause some crop damage, if too much of the crop is up. We have found that you are better off sucking up the crop damage now than letting the weeds get to you. Sencor (see label) can give you a 30-day window and burn down the weeds present at time of application. It can, and will, burn potatoes and will damage colored verities more then whites. Flaming will give you a good week to get to your next cultivation, which may be all you need. Above-ground parts of your spuds will be damaged, but it’s worth it. If you are good with the tool, your ground speed can help you get more weeds and less crop damage. Blind cultivation is a good compromise if you have waited too long. You will get less crop damage, but also control fewer weeds. The weeds controlled, or not controlled, at ground crack will tell you what kind of season you are going to have. Cultivation and hilling should begin as soon as there is enough plant material above ground that you are not going to bury them. Cross flaming can help with the weeds, but you need to know what you are doing in order not to take down your crop. A benefit of cross flaming is that you will get some bug as
146
you go. You will, however, do nothing to get air down into the root zone of the tubers. We love for our cultivating and hilling season to last about a month. So, week one cultivate, bring soil in between plants, and set up a secondary ridge four to six inches away from plant. This is the beginning of the first hill. Week two, potatoes may be small enough to get in with a second cultivation which is mainly to loosen soil for the first hill. The first hill is done as soon as we are off the field from second cultivation. The first hill cups the plants, it doesn’t bury them. After our first hill, our plants look like they are sitting in a trough. By week three, we can't bring in the cultivator without causing crop damage. The potatoes have leafed out and grown to the point that you can't see the cupped hills, but the second hilling takes that soil under the plants and pushes it on top of the lower stems. At the same time more soil is brought in around the plants. Sometimes, week four does not work out for us, mostly because of weather. This last hilling is right on the edge, flirting with damaging the vines. The potatoes are just about ready to close the canopy. This last hilling helps stop greening of spud, and acts as the last cultivation of weeds before the canopy is closed and weeds have a hard time getting started under the crop. A third hilling is so beneficial that we accept a 15% vine damage and still feel we have done the right thing. We use the front tines to lift the vines as we go if need be. It is important to understand the life cycle of the potato to make the most of the crop that you have in the ground. Life cycle is broken down into three important parts for us: tuber initiation, bulking, and maturation. Irrigation needs are really the only thing left on the table to look at during each of these stages. Assuming, of course, that we are on top of our disease control, lack of water is the only stress that we need to look out for. Planting as early as we can has already helped us with the best photoperiods. When the conditions are favorable for tuber initiation, the elongation of the stolon stops, and cells located in the pith and the cortex of the apical region of the stolon, first enlarge and, then, later divide longitudinally. The combination of these processes results in the swelling of the subapical part of the stolon. Induction of tuberization is favored by long nights (short photoperiods), cool temperatures, low rates of nitrogen fertilization, and more advanced “physiological age” of the seed tuber. Tuber initiation begins with the formation of 15-20 tubers. If the plant does not have enough water during this phase only a few tubers will form, decreasing the overall yield. During tuber bulking, the potatoes increase in size and weight. Between 5 and 10 of the initial tubers actually grow. The rest are either used for nutrition by the plant or absorbed by other potatoes. Moisture stress during this phase results in small potatoes. Stress followed by adequate moisture leads to cracked, misshapen potatoes. A constant rate of increase in tuber size and weight occurs during this stage, unless a growth-limiting factor is present. This stage can last from 60 to over 90 days, depending on the length of the growing season and presence of pathogens. This is critically important: tuber size and quality is closely related to moisture supply in this period. Research has shown that the total yield of potatoes is most sensitive to water stress during mid-bulking. Mid-bulking occurs three to six weeks after tuber initiation. However, water stress any time during this period will have an effect on the total yield. Tuber growth is retarded by moisture stress and does not resume uniformly when moisture again becomes available. New growth and enlargement will take place at the top end while the other portions of the tuber remain stunted. Consequently, especially in some long tuber varieties, constricted areas develop that are directly related to the stage of tuber growth at the time the moisture stress occurred. Other deficiencies in quality such as growth cracks and knobbiness are also related to moisture stress followed by periods of adequate or surplus moisture. During maturation, the canopy begins to die, water use decreases, and tuber growth slows. When the potatoes are nearly mature, producers typically spray the canopy to kill the plant in preparation for harvest. We have also simply mowed off, being careful of the top of the hills.
147

148
Lack of pest and fungal control in the field can take what was a great crop and make it nothing. Growing on long-time potato ground, we have a good population of all the pests you could imagine. Colorado potato beetle is a prime pest. We get 60 days of protection from the Admire, but then we have to be alert for potato beetle outbreaks. We want to use Entrust or Radiant to control late outbreaks. In order to do this, we must be on top of the life cycle of the pest. We get one shot with two sprays to get it. Our missing the correct life stage of the beetle to spray only helps them to become resistant to this powerful tool. As always, please be careful and read the label. No spinosad product controls potato leaf hopper. When you are spraying for CPB, you are not controlling hoppers. Potato leaf hopper will cause burn down before you get the most out of your crop. Be careful of mowing next to your potato field as you will drive the hoppers into the potatoes. Also, beware of adjacent hay fields being mowed and protect yourself. A combination of pyganic and neem extract seems to do the best job on them. We have used Warrior or some pyrenthins for control as well. Blight scares us all. Especially after the 2009 scares and crop loss we all had. Ag extension has done a great job of putting out alerts when the spores are present and when conditions are ripe for an outbreak. I highly recommend following their lead for spray timings. We use both copper and Brovo as protectants. If we are in the heat of an outbreak, or have some ourselves, we will start with tank mixes of copper or Brovo with Cruzate or Previcur Flex (see labels). These combinations are effective for both late and early blight, depending on target and rate of application. The Cruzate and copper tank mix can give you a two day reset on late blight and might save a crop. Many factors effect the timing of your harvest. The ideal harvest temperature is between 50 and 59°F (10° and 15°C). To avoid shatter bruises, do not harvest when the tuber pulp temperature is less than 41°F (5°C). Tubers warmer than 64-68°F (18-20°C) and under drought stress are susceptible to black-spot bruising. Harvesting when tuber pulp temperature exceeds 68°F (20°C) increases the risk of leak and pink rot diseases, which can result in extensive storage decay. You also don't want to leave potatoes in the ground too long because you will start to pick up scerth and rizoctonia. We are trying to time our harvest so we don't import too much heat into our root cellar while at the same time giving the potatoes the correct temperature for curing. We also must give the color potatoes time for their skin to set. We have damaged many a red spud by digging too early or too warm. We try for a minimum two-week wait after mowing, but not to leave them in more then three weeks. Post-harvest handling and storage can affect pack-out yield as much as anything you do during the growing season. The greatest amount of shrink occurs after harvest and before curing is complete. Harvested potatoes are skinned and there is no barrier to moisture loss until suberin is formed over the wounds. This initial storage period promotes wound healing (suberization) and skin set, and both are critical for long-term storage quality of potatoes. The temperature, relative humidity, and length of the curing period are determined by the condition of the harvested potatoes. High humidity (95%) during the curing period is necessary to prevent excessive shrinkage and to promote wound healing. Mature, healthy potatoes should be cured for about two weeks at 50-60°F (10-15°C) and 95% relative humidity. Good luck with this. We try our best, but come up short all the time. But, the closer you come to this, the better off you will be. We have found that every effort is rewarded at this stage, even if it is not perfect. Long-term storage should be 38 degrees for table stock. Colder temps lead to starch/sugar conversions. This will result in black spots in the cooked potatoes. Potatoes are stored dirty.
Storage and Fresh Market Carrot Production at River Berry Farm.
David Marchant
River Berry Farm, 191 Goose Pond Road, Fairfax, VT 05454 [email protected]
We have been growing carrots (certified organic) for fall and winter sales since 1994. We grow two to three acres of carrots that are marketed from October through March and sold primarily to local accounts in the Burlington, VT area. Production Methods Pre-Plant Preparation Carrot fields typically have a cover of winter rye and hairy vetch that is mowed and disked in late May to early June. If there is no cover crop the ground is spread with compost and oats planted in the spring. Oats are then disked in June, Beds are shaped with a pan bed shaper with chisel plows that are mounted in front of the press pan. The chisels are set where each row is planted so that the soil is friable to a depth of 10 to 12”. Varieties – we primarily plant Bolero (Nantes type carrot) and some Sugar Snax or Navajo (Imperator type). We also plant some specialty carrots (purple haze, solar yellow, rainbow). Bolero is the preferred carrot for flavor, and yields extremely well. Planting The beds are prepared one week before planting. The carrots are planted with a stanhay belt seeder and seeded with pelleted seed, 17 in. between rows. Belts are punched with three lines so plant density is approx. 30 seeds per ft. We start planting the last week of June, and plant until approx. July 20th. We plant ½ acre per week. This allows us to keep the hand weeding at a manageable level, as well as giving us time to replant if we have poor emergence. Plantings are overhead irrigated as needed Weed Control Approximately 6 days after planting the beds are flamed with a tractor mounted flamer. The carrots are cultivated 3 to 4 times with a budding basket weeder. Carrots are handweeded (on hands and knees) 3 weeks after planting. Depending on weed pressure, carrots will be walked (handweeding) a second time. Once carrots are too tall for basket weeders we use vegetable knives. Fertilizers – We sidedress with a 5-1-9 custom blended fertilizer from North Country Organics. Rate is 35#/ per 500ft. bed (equivalent of 500#/acre). Diseases and Pests- We practice good crop rotation with a minimum of three years between crops. Primary field disease is Alternaria on the tops. We have primarily gone with use of resistant
149
150
varieties. Carrot Rust Fly can be an issue but usually is not a major problem. We attribute this to our later season planting time. Harvest – We typically start harvesting early October and often will harvest into mid Nov. We want the carrots to be exposed to much cold temperature so as to increase the sugars. Customer demand for our carrots is primarily because of the sweet flavor. This is largely due to late fall harvesting. We harvest our carrots with an older FMC one –row carrot harvester. We have been using our machine for 17 years now. We rebuilt the conveyor system so it puts the carrots directly into a 20 bushel bulk bin. The most important aspect with using a harvester is growing varieties with strong tops. While the harvester does require a fair bit of maintenance, the time saved in harvesting is unbelievable. A 500ft. row can be harvested by two people in about 2 to 3 minutes Postharvest Storage – Carrots are stored in bulk bins unwashed. Wooden bins are wrapped with plastic shrink wrap, plastic bins are unwrapped. Tops of bins are covered with either cardboard or grain bags. Coolers are kept near 32 deg. Carrots are regularly misted to keep humidity up. We use greenhouse misters that are mounted on the ceiling of the cooler. Once the temperature of the carrots is brought down, the cooler is set so the evaporator fans only run when the compressor runs. This reduces the drying aspect of the fans. Packing and Marketing - Carrots are washed in a barrel washer and then packed into perforated polyethylene bags. We have found that they will store up to a month in the bags. We sell in bulk 50#, 25# and cellos of 5# and 1# bags. Juicers (broken carrots) are sold bulk and in 10# bags, at usually half the price. We use Tri Pack tip scales for weighing cellos. Carrots are primarily sold to our local Coops. We shoot for providing carrots through March and sometimes into April.
The Soil Food Web and Pest Management
Mary Barbercheck, Department of Entomology, 501 ASI Building, Penn State University, University Park, PA, 16802
Tel. (814)863-2982 [email protected] New England Vegetable and Fruit Conference, Manchester, NH December 13-15, 2011
Many agricultural production practices affect insect populations. Crop susceptibility to pest damage may be influenced by differences in plant health mediated by soil management. In general, soil management that replenishes and conserves organic matter and enhances the abundance and biodiversity of beneficial organisms creates an environment that promotes plant health. Crop rotation and preservation of beneficial insects through the reduction of insecticide use can reduce pest pressure. Increasingly, research has demonstrated that the ability of a crop plant to resist or tolerate pests is tied to the physical, chemical, and biological properties of soil (Phelan et al., 1995, 1996; Altieri and Nicholls, 2003; Zehnder et al., 2007). Soils with high organic matter and active soil biology generally have both good soil fertility and complex food webs. Soil organisms are involved in many beneficial processes, e.g., decomposition and nutrient cycling, carbon sequestration, maintenance of plant diversity, bioremediation, and biological control. In this paper, I will focus on how two key functions of the soil food web, decomposition/nutrient cycling and biological control, affect pest management in agricultural systems. The Soil Food Web All of life can be thought to operate in a food web based trophic groups. Trophic groups are defined by what an organism eats. Food webs are composed of many food chains - depicted as a linear sequence starting from a species that eats no other species, e.g., decomposers and producers (plants), and ends at a species that is eaten by no other species in the chain, e.g., predators. The “structure” of a food web is the composition and relative numbers of organisms in each trophic group. Food web complexity is a characteristic of both the number of species and the number of different species in the soil. The foundation of the soil food web is organic matter. The lower the level of trophic group, the more heavily it relies on its nutrition from soil organic matter. Management practices can alter the diversity and complexity for interactions in the soil through effects on organic matter. For example, crop type, tillage practices, residue management, pesticide use, and irrigation can alter the structure and complexity of the food web. Bottom-Up Control: Plant Quality from an Insect’s Point of View From the plant-feeding insect’s point of view – the insect is at the center of the food chain – below it are the food it feeds on - plants - and above it, animals that feed on the insect, – natural enemies. What regulates insect populations to determine whether a plant-feeding insect will reach damaging levels? Characteristics of an insect’s food are considered “bottom-up” factors. Characteristics that influence the natural enemies of insects are considered “top-down” factors because of the position of these factors in relation to the plant-feeding insect in the plant-insect-natural enemy food chain.
151
Many kinds of insects feed on plants, although not all plant-feeding insects are pests. Even when a known insect pest is present in the environment with a crop, there are many factors that influence whether or not an insect will choose to eat, and potentially damage a plant. Insects use chemical smell and taste cues to help them recognize host plants, and can differentiate plants based on their odors and tastes. The chemistry of the plant determines its appeal to an insect. Chemical cues from plants that insects use to determine the suitability of the plant as a resource fall into two broad categories: primary and secondary metabolites. Primary metabolites are compounds synthesized by plants for essential functions, such as growth and development. Examples of primary metabolites include carbohydrates, lipids, proteins, and nucleic acids. A key component of proteins and nucleic acids is nitrogen. Secondary metabolites are compounds produced in metabolic pathways other than those directly involved in growth and development and are not considered essential to the plant. Many thousands of secondary metabolites have been isolated from plants, and often contribute to their distinctive colors and flavors. Some secondary metabolites are toxins for insects, and are called plant defense compounds because they can interfere with an insect’s metabolism, often by blocking specific biochemical reactions. The higher the concentration of these chemicals in the insect’s diet, the less nutrition the insect can gain from eating plant tissues. These defensive chemicals are usually most effective against non-adapted specialists on other plant species and generalist insects that feed across plant types. Plant defensive chemicals include alkaloids, cyanogenic glycosides and glucosinolates, terpenoids, and phenolics. These defensive chemicals often render a particular plant species unsuitable as a food plant for particular insect species. However, in some cases, insect species have evolved mechanisms to overcome the defensive function of particular secondary metabolites and are be able to exploit them as a food resource. The Effects of Fertility Source on Plant Quality Soil organisms play a key role in decomposition and release of plant-available nutrients from soil organic matter, a process called mineralization. As organisms decompose complex materials, or consume other organisms, nutrients are converted from one form to another, and are made available to plants and to other soil organisms. The way that soil fertility is managed affects insect-plant interactions by altering plant quality as a resource for plant-feeding insects. Soil fertility in agricultural systems is mainly accomplished through applications of synthetic fertilizers, crop rotation, cover cropping, and the application of plant and animal materials. Healthy, vigorous plants that grow quickly are better able to withstand pest damage. However, over-fertilizing crops can increase pest problems through changes in nutrient and chemical composition of crop plants. Specifically, increasing soluble nitrogen levels in plants can decrease their resistance to pests, resulting in higher pest density and crop damage. For example, increased nitrogen fertilizer rates have been associated with increased soluble N in plant tissue and large increases in numbers of mites, aphids, thrips, and other plant feeding insects. Practices that promote an increase of soil organic matter and a gradual release of plant nutrients through decomposition and mineralization do not generally lead to excessive N levels in plant tissues. Therefore, in theory, do not promote increases in insect pest
152
populations. In general, organic fertilizers such as animal and green manures contain nitrogen sources that are released over a longer time scale than the pulsed and readily-available nitrogen in synthetic fertilizers. Bottom-Up Control of Insects: Soil fertility and Brassica pests Plants in the Brassica (cole crop) family are rich in sulfur containing compounds called glucosinolates. These compounds play a defensive role in Brassica – insect relationships and have a negative effect on generalist plant-feeding insects, although some insect species are able to tolerate or detoxify some glucosinolates. Staley et al. (2010) applied organic and synthetic fertilizer treatments at two nitrogen concentrations each to cabbage (Brassica oleracea var. capitata cv. Derby Day), and measured their effects on the abundance of plant-feeding insects and plant chemistry. The organic treatments included a green manure (white clover, Trifolium repens var. Milvus) for the low-nitrogen treatment (approx. 100 kg nitrogen per hectare), while the high- nitrogen treatment included both green and animal manures (organic chicken manure to provide approx. 200 kg nitrogen per hectare in total). The two synthetic fertilizer treatments included a conventional high fertilizer treatment (ammonium nitrate at 200 kg nitrogen per hectare) and a conventional low fertilizer treatment (ammonium nitrate at 100 kg nitro- gen per hectare). The most common plant-feeding insects found were the cabbage aphid, Brevicoryne brassicae (a cole crop specialist), the green peach aphid, Myzus persicae (a generalist plant-feeder), and the diamondback moth, Plutella xylostella (a cole crop specialist). The cabbage aphid was more abundant on organically fertilized plants, while the green peach aphid had higher populations on synthetically fertilized plants. The diamondback moth was more abundant on synthetically fertilized plants and preferred to oviposit on these plants. Nitrogen concentration was greater for conventionally fertilized than organically fertilized cabbage. Glucosinolate concentrations were up to three times greater on cabbage plants grown in the organic treatments, while foliar nitrogen was maximized on plants under the higher of the synthetic fertilizer treatments. The varying response of insect species to these strong differences in plant chemistry demonstrates that the response of plant-feeding insects to level and source of fertility is complex. Top-Down Control of Insects: The Soil Food Web and Biological Control Complex food webs foster populations of beneficial organisms that can help keep pest organisms in check. The exploitation of the predators and parasites, or natural enemies, to control pest insects is called biological control. Natural enemies include predators, such as birds, lady beetles and lacewings, that consume a large number of prey during their whole lifetime; parasitoids whose immature develops on or within a single insect host, ultimately killing it; and pathogens - disease-causing organisms including bacteria, fungi, and viruses that kill their insect host. Many natural enemies can be purchased, but it may be more economical to use a conservation approach – i.e., create conditions through management that attract and retain these beneficial organisms. Some common biological control organisms associated with the soil include ground and rove beetles, spiders and harvestmen, insect-parasitic fungi, and insect-parasitic nematodes. Biological control of pest insects may be enhanced by reducing disturbance, such as reducing tillage and pesticide use, by creating refuges from these disturbances, and
153
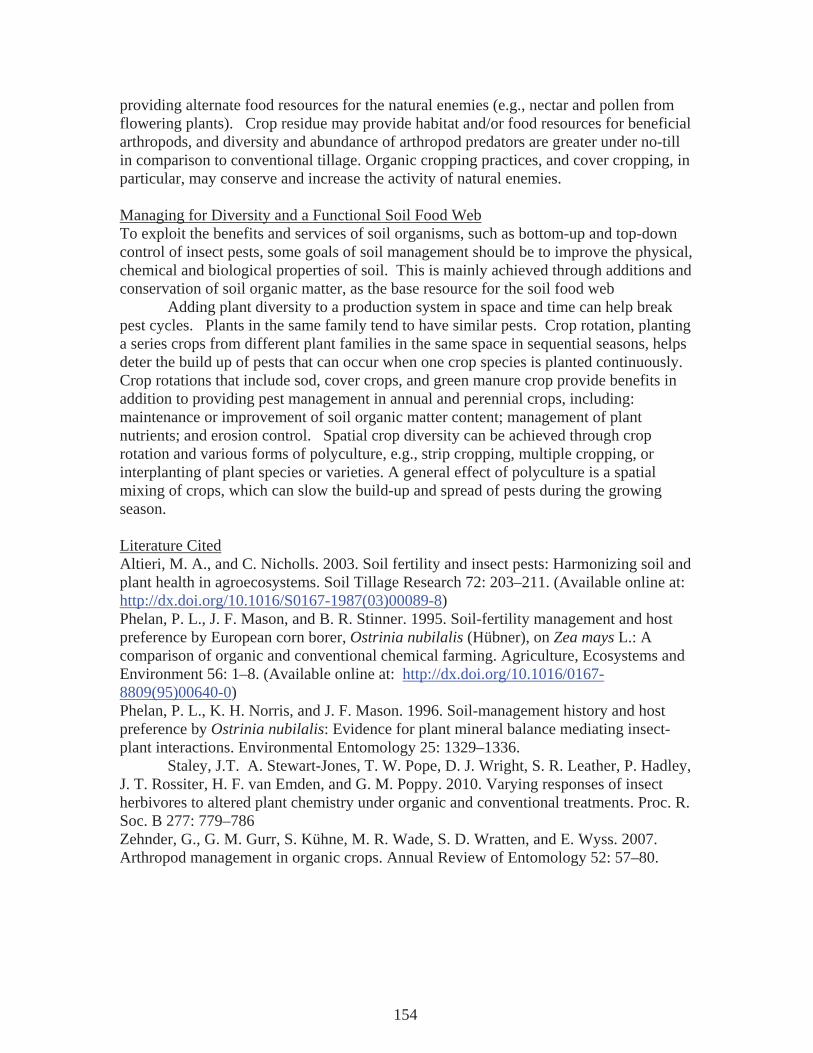
providing alternate food resources for the natural enemies (e.g., nectar and pollen from flowering plants). Crop residue may provide habitat and/or food resources for beneficial arthropods, and diversity and abundance of arthropod predators are greater under no-till in comparison to conventional tillage. Organic cropping practices, and cover cropping, in particular, may conserve and increase the activity of natural enemies. Managing for Diversity and a Functional Soil Food Web To exploit the benefits and services of soil organisms, such as bottom-up and top-down control of insect pests, some goals of soil management should be to improve the physical, chemical and biological properties of soil. This is mainly achieved through additions and conservation of soil organic matter, as the base resource for the soil food web Adding plant diversity to a production system in space and time can help break pest cycles. Plants in the same family tend to have similar pests. Crop rotation, planting a series crops from different plant families in the same space in sequential seasons, helps deter the build up of pests that can occur when one crop species is planted continuously. Crop rotations that include sod, cover crops, and green manure crop provide benefits in addition to providing pest management in annual and perennial crops, including: maintenance or improvement of soil organic matter content; management of plant nutrients; and erosion control. Spatial crop diversity can be achieved through crop rotation and various forms of polyculture, e.g., strip cropping, multiple cropping, or interplanting of plant species or varieties. A general effect of polyculture is a spatial mixing of crops, which can slow the build-up and spread of pests during the growing season. Literature Cited Altieri, M. A., and C. Nicholls. 2003. Soil fertility and insect pests: Harmonizing soil and plant health in agroecosystems. Soil Tillage Research 72: 203–211. (Available online at: http://dx.doi.org/10.1016/S0167-1987(03)00089-8) Phelan, P. L., J. F. Mason, and B. R. Stinner. 1995. Soil-fertility management and host preference by European corn borer, Ostrinia nubilalis (Hübner), on Zea mays L.: A comparison of organic and conventional chemical farming. Agriculture, Ecosystems and Environment 56: 1–8. (Available online at: http://dx.doi.org/10.1016/0167-8809(95)00640-0) Phelan, P. L., K. H. Norris, and J. F. Mason. 1996. Soil-management history and host preference by Ostrinia nubilalis: Evidence for plant mineral balance mediating insect-plant interactions. Environmental Entomology 25: 1329–1336. Staley, J.T. A. Stewart-Jones, T. W. Pope, D. J. Wright, S. R. Leather, P. Hadley, J. T. Rossiter, H. F. van Emden, and G. M. Poppy. 2010. Varying responses of insect herbivores to altered plant chemistry under organic and conventional treatments. Proc. R. Soc. B 277: 779–786 Zehnder, G., G. M. Gurr, S. Kühne, M. R. Wade, S. D. Wratten, and E. Wyss. 2007. Arthropod management in organic crops. Annual Review of Entomology 52: 57–80.
154
155
Additional ResourcesAltieri, M. A., C. I. Nicholls, and M. A. Fritz. 2005. Manage insects on your farm: A guide to ecological strategies. Sustainable Agriculture Network Handbook Series Book 7. National Agricultural Laboratory, Beltsville, MD. (Available online at: http://www.sare.org/Learning-Center/Books/Manage-Insects-on-Your-Farm) Magdoff, F., Van Es, H. 2009. Building Soils for Better Crops: Sustainable Soil Management. 3rd Edition. SARE Handbook Series Book 10. Multiple authors. Organic Agriculture. http://www.extension.org/organic_production
Using Compost to Feed the Soil Community and Meet the Nutrient Requirements of Sweet Corn, Is it Realistic?
Mark Hutchinson: Extension Professor, University of Maine [email protected]
Dr. David Handley: Small Fruit and Vegetable Specialist, Extension Professor, University of Maine
Dr. Will Brinton: Woods End Laboratory Tori Lee Jackson: Assistant Extension Professor, University of Maine
Vegetable growers have long been interested in the effect of compost amendments on sweet corn production and soil health. Compost provides a diversity of organic matter from living microbes to stable humus which feeds the soil biological community while building and maintaining high soil quality. The long term investment in soil quality improves the long term production capacity of the soil. This study evaluated two composts, leaf and yard waste (LY) and biosolids (BS) as soil amendments at three application rates on sweet corn production. The study conducted over two growing seasons. A partial listing of the composts characteristics are shown in Table1. Table 1: Compost Characteristics
CompostType
TotalNitrogen
%
BulkDensity(lbs/cuyd) pH C:N
Leaf andYardWaste 0.45 956 7.2 15.3
Biosolids 0.61 657 7.9 31.9 Biosolids compost was provided by the Lewiston Auburn Pollution Control Authority (LAPCA). The leaf and yard waste compost was made at the University of Maine Compost Research and Education Facility. The study was conducted on an Agawam fine sandy loam. Prior to planting in 2010, 80 lbs. of P2O5 was broadcasted as recommended by soil tests. No additional conventional or organic fertilizer was added in either year. In both 2010 and 2011, BC 0805 sweet corn (82 days), was planted on 34” rows with a plant population of approximately 28,000 plants per acre. Composts were hand applied at the rates of 0, 10, 20 and 40 tons per acre and incorporated with a Perfecta harrow in replicated plots. A cover crop of oats was planted in August of 2010 after harvest over the entire research area.
156
In 2011, each plot was split in half. One half received the same treatment as in 2010, 0, 10, 20 and 40 tons/acre. The second half did not receive any additional compost or fertilizer. Conventional herbicide weed control was implemented each year. In 2010, marketable yield (Figure 1) was greater than the control in all treatments. Biosolid compost (BS) application rates of 20 and 40 tons/acre produce acceptable yields, 1069 and 1263 dozen per acre, respectfully, in 2010 (Figure1). Leaf and yard waste compost (LY) yields were consistently lower then acceptable yield levels of 1000 dozen per acre in 2010. Preside-dress Soil Nitrate Test (PSNT), data not shown, indicated that soil nitrate levels were above the recommended 25 ppm for only the BS 40 treatment. PSNT values for LY was well below the recommended level which follows the yield. With a PSNT value of 25 ppm you can expect approximately 100 lbs. of N to be plant available during the growing season. A second year compost application increased yield in all treatments. Yields were significantly higher, 1386 to 1833 dozen per acre for all BS treatments. Leaf and yard waste compost yields were also at or above expected yields. A likely cause is the additional soil organic matter available to microbes for N mineralization. All PSNT values except for BS 40 were above the 25 ppm recommendation. However, the yield increase was greater than a single application which indicates there is an accumulative effect of compost in soils from previous applications. Plots with no additional compost applications had similar yields as 2010 (Figure1). This indicates that the effects of compost last for at least two years. Compost has a wide diversity of organic matter, from unstable to very stable, therefore mineralization happens over a longer period of time. Under proper soil conditions, stable organic material is mineralized, releasing plant available N. PSNT data (Figure 2) indicated that soil nitrate levels were below optimal levels without additional compost application but similar to 2010. This supports the idea that compost has a residual effect on the soil and crop productivity. Compost continued to feed the soil microbial population through year two. Conventional insecticides were not used in either year. There was no marketable yield loss from insect damage. In conclusion, both types of compost had a positive effect on the yield of sweet corn over a two year period. Compost did provide some plant available nitrogen in both application years. Yield data indicates there was both an accumulative and residual effect of compost applications.
157
Figure 1. Effect of two compost sources applied pre-planting at three rates on the growth and yield characteristics of sweet corn; Highmoor Farm, 2010 and 2011.
Figure 2. 2011 Preside-dress soil nitrate test from soil amended with compost.
158


![Omri Kenneth Webb IV, AIA · Reference: Omri Kenneth Webb IV AIA, LEED AP ACHA Examining Committee: I enthusiastically support Omri [Ken] Webb’s application for ACHA membership](https://img.pdfslide.net/doc/110x75/5ed507ce86b2b20c6b0fdb39/omri-kenneth-webb-iv-reference-omri-kenneth-webb-iv-aia-leed-ap-acha-examining.jpg)