Embed Size (px)
Citation preview
Managing TLS Certificate, KeyStore, andTrustStore Files
This chapter contains the following sections:
• About the TLS Certificate, KeyStore, and TrustStore Files, page 1
• Preparing to Generate the TLS Credentials, page 2
• Creating the TLS Private Key, Certificate, and Certification Authority, page 4
• Configuring the Cryptographic Keys on the Switch, page 5
• Enabling TLS for onePK and OpenFlow Switches, page 7
• Configuring the NX-API Certificate, page 8
• Creating the TLS KeyStore File, page 8
• Creating the TLS TrustStore File, page 9
• Starting the Application with TLS Enabled , page 9
• Providing the TLS KeyStore and TrustStore Passwords, page 10
About the TLS Certificate, KeyStore, and TrustStore Files
To support onePK devices, all connections to Cisco Nexus Data Broker that use onePK or OpenFlowagents require Transport Layer Security (TLS). For NX-API devices, TLS is optional.
Note
Enabling the TLS connections between Cisco Nexus Data Broker and the OpenFlow or onePK switchesrequires TLS KeyStore and TrustStore files. The TLS KeyStore and TLS TrustStore files are passwordprotected.
Cisco Nexus 3000, 3100, and 3500 Series switches require additional credentials, including Private Key,Certificate, and Certificate Authority (CA).
• The TLS KeyStore file contains the private key and certificate information used by Cisco Nexus DataBroker.
Cisco Nexus Data Broker Configuration Guide, Release 2.1 1

• The TLS TrustStore file contains the Certification Authority (CA) certificates used to sign the certificateson the connecting switches.
If TLS connections are required in your Cisco Nexus Data Broker implementation, all of the connections inthe network must be TLS encrypted, and you must run Cisco Nexus Data Broker with TLS enabled (seeStarting the Application with TLS Enabled , on page 9). After Cisco Nexus Data Broker is started withTLS, you must run the TLS KeyStore password configuration command (see Providing the TLS KeyStoreand TrustStore Passwords) to provide the passwords for Cisco Nexus Data Broker to unlock the KeyStorefiles.
Preparing to Generate the TLS CredentialsOpenFlow and Cisco onePK switches require cryptographic configuration to enable TLS.
The NX-API protocol plugin now supports TLS for secure communication to the devices. You can connectto the NX-API protocol plugin on the secure port 443. All configuration, discovery, and statisitcs collectionis done using secure communication. Cisco Nexus Data Broker should be configured with the requiredcertificates and it should be started in the secure mode. When Cisco Nexus Data Broker is started in TLSmode, all devices support the TLS connection. The normal unencrypted connection to the switches is notaccepted.
Self-signed certificates are appropriate only for testing in small deployments. For additional security andmore granular controls over individual certificate use and revocation, you should use certificates generatedby your organization's Certificate Authority. In addition, you should never use the keys and certificatesgenerated by this procedure in a production environment.
Caution
Before You Begin
Ensure that OpenSSL is installed on the Linux host where these steps will be performed.
Procedure
Step 1 Create a TLS directory, and then navigate to it:mkdir -p TLS
cd TLS
Step 2 Create three directories under mypersonalca and two prerequisite files:mkdir -p mypersonalca/certs
mkdir -p mypersonalca/private
mkdir -p mypersonalca/crl
echo "01" > mypersonalca/serial
touch mypersonalca/index.txt
Step 3 Create the CA configuration file (ca.cnf).The following is an example of the content of the Example.conf file:
[ req ]default_bits = 2048 # Size of keys
Cisco Nexus Data Broker Configuration Guide, Release 2.12
Managing TLS Certificate, KeyStore, and TrustStore FilesPreparing to Generate the TLS Credentials
default_keyfile = example.key # name of generated keysdefault_md = sha1 # message digest algorithmstring_mask = nombstr # permitted charactersdistinguished_name = req_distinguished_namereq_extensions = v3_reqx509_extensions = v3_req
[ req_distinguished_name ]# Variable name Prompt string#---------------------- ----------------------------------0.organizationName = Organization Name (company)organizationalUnitName = Organizational Unit Name (department, division)emailAddress = Email AddressemailAddress_max = 40localityName = Locality Name (city, district)stateOrProvinceName = State or Province Name (full name)countryName = Country Name (2 letter code)countryName_min = 2countryName_max = 2commonName = Common Name (hostname, IP, or your name)commonName_max = 64
# Default values for the above, for consistency and less typing.# Variable name Value#------------------------------ ------------------------------commonName_default = www.cisco.com0.organizationName_default = CiscolocalityName_default = San JosestateOrProvinceName_default = CAcountryName_default = USemailAddress_default = [email protected]
[ v3_ca ]basicConstraints = CA:TRUEsubjectKeyIdentifier = hashauthorityKeyIdentifier = keyid:always,issuer:always
[ v3_req ]# Extensions to add to a certificate requestbasicConstraints = CA:FALSEkeyUsage = nonRepudiation, digitalSignature, keyEncipherment
# Some CAs do not yet support subjectAltName in CSRs.# Instead the additional names are form entries on web# pages where one requests the certificate...subjectAltName = @alt_names
[alt_names]
Cisco Nexus Data Broker Configuration Guide, Release 2.1 3
Managing TLS Certificate, KeyStore, and TrustStore FilesPreparing to Generate the TLS Credentials
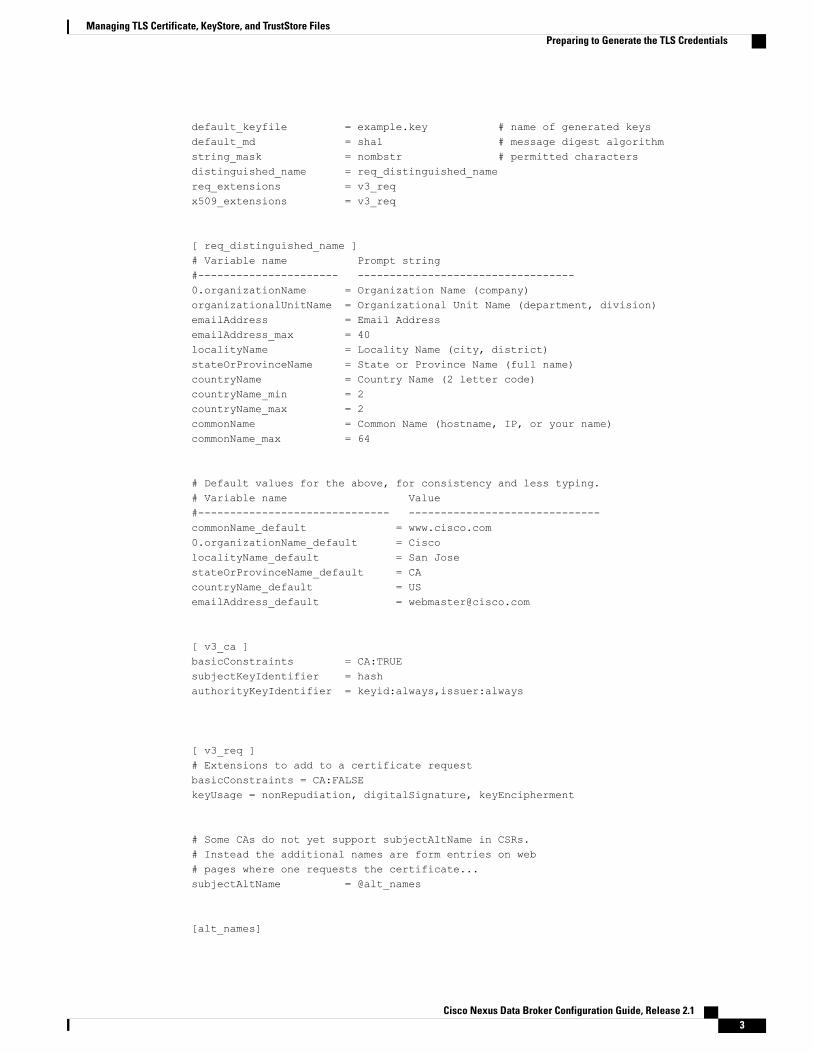
# NXAPI Device IPs to be supported/managed by NDBIP.1 = 1.1.1.1IP.2 = 2.2.2.2IP.3 = 3.3.3.3IP.4 = 4.4.4.4
[ server ]# Make a cert with nsCertType set to "server"basicConstraints=CA:FALSEnsCertType = servernsComment = "OpenSSL Generated Server Certificate"subjectKeyIdentifier=hashauthorityKeyIdentifier=keyid,issuer:always
[ client ]# Make a cert with nsCertType set to "client"basicConstraints=CA:FALSEnsCertType = clientnsComment = "OpenSSL Generated Client Certificate"subjectKeyIdentifier=hashauthorityKeyIdentifier=keyid,issuer:always
Step 4 Before saving the file, some changes need to be made that are specific to the devices. One critical change isto change the [alt_names] section to be relevant to the device IP address, because these IP addresses shouldbe specified in the configuration file. If you need more or fewer IP/DNS names, you can add or remove thelines.
This step is applicable to NX-APIonly.
Note
What to Do Next
Create the TLS certificate file.
Creating the TLS Private Key, Certificate, and CertificationAuthority
Before You Begin
Complete the steps in Preparing to Generate the TLS Credentials.
Procedure
Step 1 Generate the TLS private key and Certification Authority (CA) files by entering the openssl req -x509 -nodes-days 3650 -newkey rsa:2048 -out mypersonalca/certs/ca.pem -outform PEM -keyoutmypersonalca/private/ca.key command.This step generates the TLS private key in PEM format with a key length of 2048 bits, and the CA file.
Cisco Nexus Data Broker Configuration Guide, Release 2.14
Managing TLS Certificate, KeyStore, and TrustStore FilesCreating the TLS Private Key, Certificate, and Certification Authority
Step 2 Generate the certificate key and certificate request files by entering the openssl req -newkey rsa:2048 -keyoutcert.key -keyform PEM -out cert.req -outform PEM command.This step generates the controller key (cert.key) and certificate request (cert.req) files in PEM format.
You must specify a PEM pass phrase that is 4 to 1024 alphanumeric characters in length, forexample, cisco123.
You must also specify a common name in this step to complete Step 3. An example of a commonname is the hostname of the server where Cisco Nexus Data Broker is running.
Important
Step 3 Generate the certificate file by entering the openssl ca -batch -notext -in cert.req -out cert.pem -configca.cnf command.This step generates the certificate (cert.pem) file in PEM format using the certificate request (cert.req) andthe certificate configuration (ca.cnf) files as inputs, and creates the certificates file (cert.pem) as output.The following is an example of the console response:
Using configuration from ca.cnf
Check that the request matches the signature
Signature ok
The Subject's Distinguished Name is as follows
countryName :PRINTABLE:'AU'
stateOrProvinceName :ASN.1 12:'Some-State'
organizationName :ASN.1 12:'Internet Widgits Pty Ltd'commonName :ASN.1 12:'localhost'
What to Do Next
Generate and import the certificate files on your Cisco Nexus 3000, 3100, or 3500 Series switches.
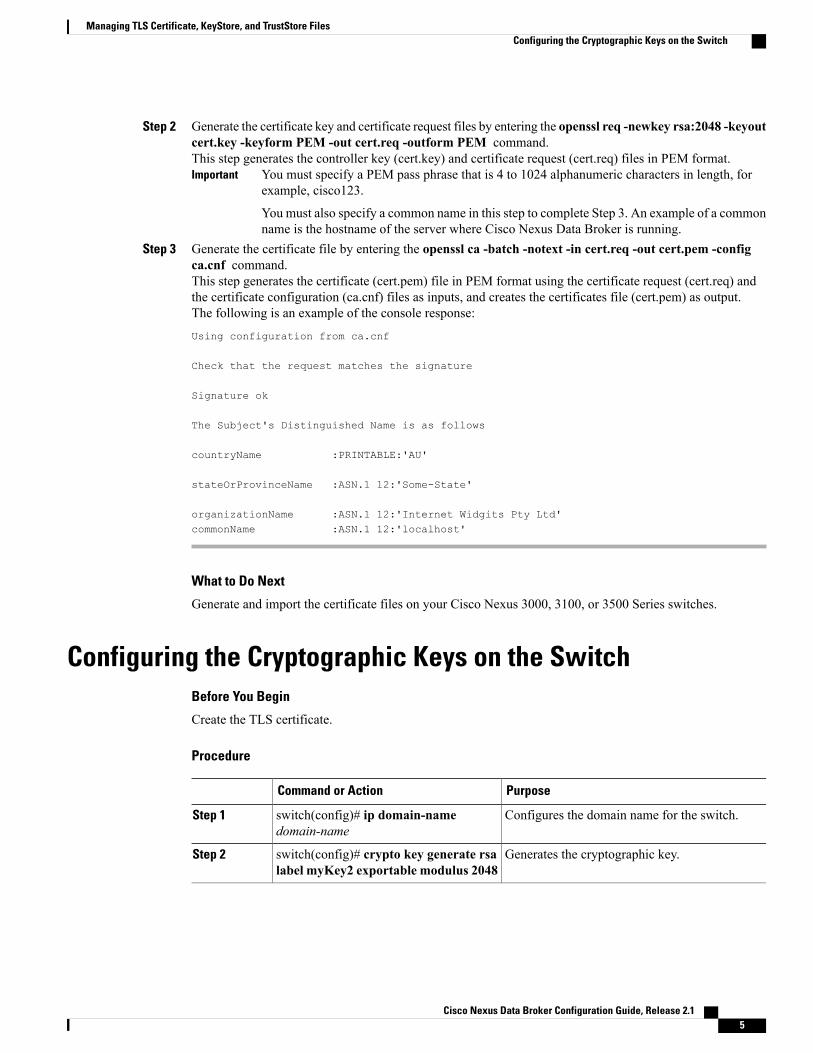
Configuring the Cryptographic Keys on the SwitchBefore You Begin
Create the TLS certificate.
Procedure
PurposeCommand or Action
Configures the domain name for the switch.switch(config)# ip domain-namedomain-name
Step 1
Generates the cryptographic key.switch(config)# crypto key generate rsalabel myKey2 exportable modulus 2048
Step 2
Cisco Nexus Data Broker Configuration Guide, Release 2.1 5
Managing TLS Certificate, KeyStore, and TrustStore FilesConfiguring the Cryptographic Keys on the Switch
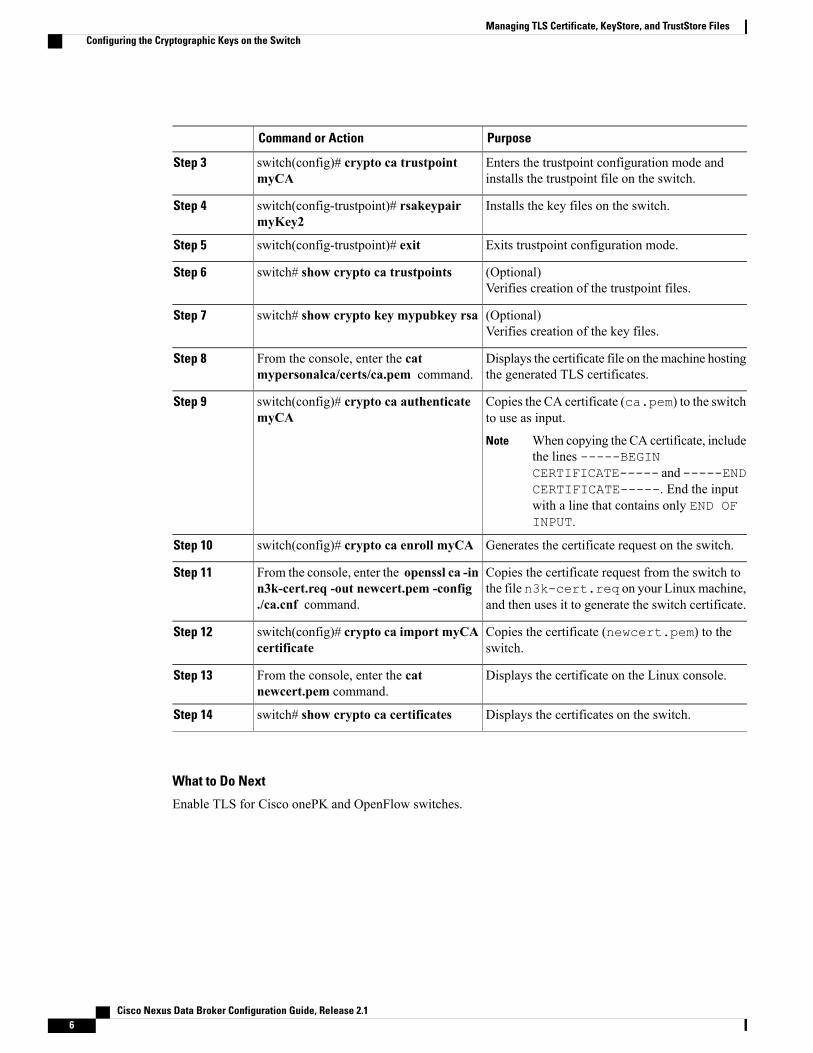
PurposeCommand or Action
Enters the trustpoint configuration mode andinstalls the trustpoint file on the switch.
switch(config)# crypto ca trustpointmyCA
Step 3
Installs the key files on the switch.switch(config-trustpoint)# rsakeypairmyKey2
Step 4
Exits trustpoint configuration mode.switch(config-trustpoint)# exitStep 5
(Optional)Verifies creation of the trustpoint files.
switch# show crypto ca trustpointsStep 6
(Optional)Verifies creation of the key files.
switch# show crypto key mypubkey rsaStep 7
Displays the certificate file on the machine hostingthe generated TLS certificates.
From the console, enter the catmypersonalca/certs/ca.pem command.
Step 8
Copies the CA certificate (ca.pem) to the switchto use as input.
switch(config)# crypto ca authenticatemyCA
Step 9
When copying the CA certificate, includethe lines -----BEGINCERTIFICATE----- and-----ENDCERTIFICATE-----. End the inputwith a line that contains only END OFINPUT.
Note
Generates the certificate request on the switch.switch(config)# crypto ca enroll myCAStep 10
Copies the certificate request from the switch tothe file n3k-cert.req on your Linuxmachine,and then uses it to generate the switch certificate.
From the console, enter the openssl ca -inn3k-cert.req -out newcert.pem -config./ca.cnf command.
Step 11
Copies the certificate (newcert.pem) to theswitch.
switch(config)# crypto ca import myCAcertificate
Step 12
Displays the certificate on the Linux console.From the console, enter the catnewcert.pem command.
Step 13
Displays the certificates on the switch.switch# show crypto ca certificatesStep 14
What to Do Next
Enable TLS for Cisco onePK and OpenFlow switches.
Cisco Nexus Data Broker Configuration Guide, Release 2.16
Managing TLS Certificate, KeyStore, and TrustStore FilesConfiguring the Cryptographic Keys on the Switch
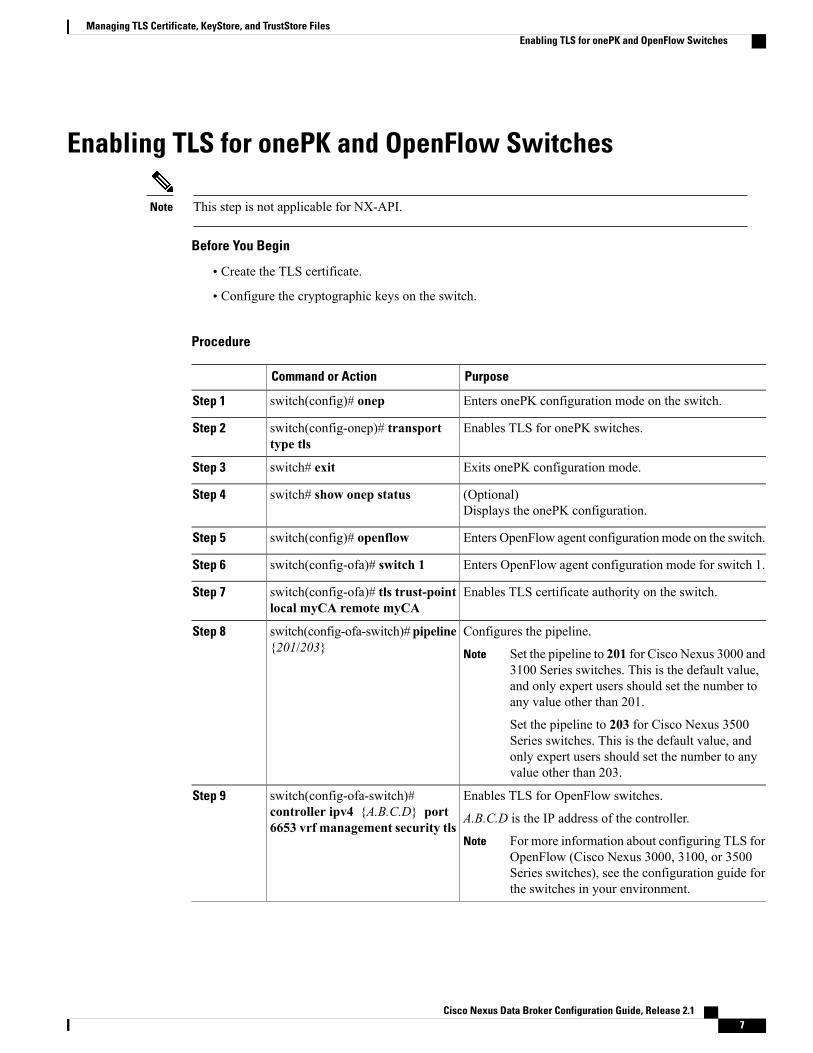
Enabling TLS for onePK and OpenFlow Switches
This step is not applicable for NX-API.Note
Before You Begin
• Create the TLS certificate.
• Configure the cryptographic keys on the switch.
Procedure
PurposeCommand or Action
Enters onePK configuration mode on the switch.switch(config)# onepStep 1
Enables TLS for onePK switches.switch(config-onep)# transporttype tls
Step 2
Exits onePK configuration mode.switch# exitStep 3
(Optional)Displays the onePK configuration.
switch# show onep statusStep 4
Enters OpenFlow agent configurationmode on the switch.switch(config)# openflowStep 5
Enters OpenFlow agent configuration mode for switch 1.switch(config-ofa)# switch 1Step 6
Enables TLS certificate authority on the switch.switch(config-ofa)# tls trust-pointlocal myCA remote myCA
Step 7
Configures the pipeline.switch(config-ofa-switch)#pipeline{201/203}
Step 8
Set the pipeline to 201 for Cisco Nexus 3000 and3100 Series switches. This is the default value,and only expert users should set the number toany value other than 201.
Set the pipeline to 203 for Cisco Nexus 3500Series switches. This is the default value, andonly expert users should set the number to anyvalue other than 203.
Note
Enables TLS for OpenFlow switches.switch(config-ofa-switch)#controller ipv4 {A.B.C.D} port6653 vrf management security tls
Step 9
A.B.C.D is the IP address of the controller.
For more information about configuring TLS forOpenFlow (Cisco Nexus 3000, 3100, or 3500Series switches), see the configuration guide forthe switches in your environment.
Note
Cisco Nexus Data Broker Configuration Guide, Release 2.1 7
Managing TLS Certificate, KeyStore, and TrustStore FilesEnabling TLS for onePK and OpenFlow Switches
What to Do Next
Create the TLS KeyStore file.
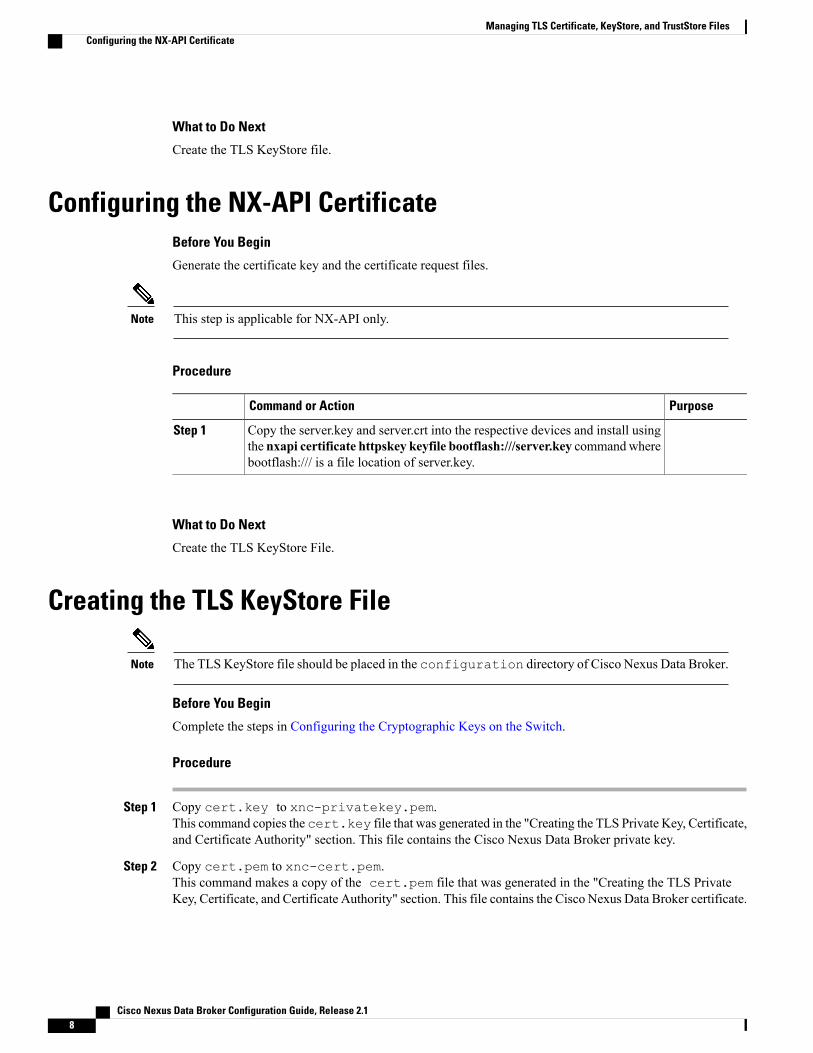
Configuring the NX-API CertificateBefore You Begin
Generate the certificate key and the certificate request files.
This step is applicable for NX-API only.Note
Procedure
PurposeCommand or Action
Copy the server.key and server.crt into the respective devices and install usingthe nxapi certificate httpskey keyfile bootflash:///server.key commandwherebootflash:/// is a file location of server.key.
Step 1
What to Do Next
Create the TLS KeyStore File.
Creating the TLS KeyStore File
The TLS KeyStore file should be placed in the configuration directory of Cisco Nexus Data Broker.Note
Before You Begin
Complete the steps in Configuring the Cryptographic Keys on the Switch.
Procedure
Step 1 Copy cert.key to xnc-privatekey.pem.This command copies the cert.key file that was generated in the "Creating the TLS Private Key, Certificate,and Certificate Authority" section. This file contains the Cisco Nexus Data Broker private key.
Step 2 Copy cert.pem to xnc-cert.pem.This command makes a copy of the cert.pem file that was generated in the "Creating the TLS PrivateKey, Certificate, and Certificate Authority" section. This file contains the Cisco Nexus Data Broker certificate.
Cisco Nexus Data Broker Configuration Guide, Release 2.18
Managing TLS Certificate, KeyStore, and TrustStore FilesConfiguring the NX-API Certificate
Step 3 Create the xnc.pem file, which contains the private key and certificate, by entering the catxnc-privatekey.pem xnc-cert.pem > xnc.pem command.
Step 4 Convert the PEM file xnc.pem file to the file xnc.p12 file by entering the openssl pkcs12 -export -outxnc.p12 -in xnc.pem command.
Step 5 Enter a password at the prompt.This is the Export password. Use the same password that you entered in Step 2 of "Creating the TLSPrivate Key, Certificate, and Certification Authority". The password must contain at least 6 characters,for example, cisco123. You must use the same password for this step and for Step 7.
Note
The xnc.pem file is converted to a password-protected .p12 file.
Step 6 Convert the xnc.p12 to a Java KeyStore (tlsKeyStore) file by entering the keytool -importkeystore-srckeystore xnc.p12 -srcstoretype pkcs12 -destkeystore tlsKeyStore -deststoretype jks command.This command converts the xnc.p12 file to a password-protected tlsKeyStore file
Step 7 Enter a password at the prompt.Use the same password that you entered in Step5.
Note
Creating the TLS TrustStore File
The TLS TrustStore file should be placed in the application configuration directory.Note
Procedure
Step 1 Copy the mypersonalca/certs/ca.pem file to sw-cacert.pem.Step 2 Convert the sw-cacert.pem file to a Java TrustStore (tlsTrustStore) file by entering the keytool -import
-alias swca1 -file sw-cacert.pem -keystore tlsTrustStore command.Step 3 Enter a password at the prompt.
The sw-cacert.pem file is converted into a password-protected Java TrustStore (tlsTrustStore) file.
The passwordmust be at least six characters long, for example, cisco123.Note
Step 4 If the switches in your network use more than one CA certificate, repeat Step 1 through Step 3 for each CAcertificate required.
Starting the Application with TLS EnabledBefore You Begin
• Generate and import certificate files on the switches.
Cisco Nexus Data Broker Configuration Guide, Release 2.1 9
Managing TLS Certificate, KeyStore, and TrustStore FilesCreating the TLS TrustStore File
• Enable TLS on the OpenFlow or onePK switches.
• Create and deploy TLS KeyStore and TLS TrustStore files for the Cisco Nexus Data Broker application.
• Make sure that the TLS KeyStore (tlsKeyStore) and TLS TrustStore (tlsTrustStore) files are located inthe ./configuration directory.
Procedure
Step 1 From the console, start Cisco Nexus Data Broker by entering the ./runxnc.sh -tls -tlskeystore./configuration/tlsKeyStore -tlstruststore ./configuration/tlsTrustStore command.
Youwill not see any network elements until you provide the TLSKeyStore and TrustStore passwordsas described in the next section.
Note
Step 2 Cisco Nexus Data Broker is started with TLS enabled.
Providing the TLS KeyStore and TrustStore PasswordsThe TLS KeyStore and TrustStore passwords are sent to the Cisco Nexus Data Broker so that it can read thepassword-protected TLS KeyStore and TrustStore files.
Procedure
Step 1 Open a command window where you installed Cisco Nexus Data Broker.Step 2 Navigate to the xnc/bin directory.Step 3 Provide the TLS KeyStore and TLS TrustStore passwords by entering the ./xnc config-keystore-passwords
[--user {user} --password {password} --url {url} --verbose --prompt --keystore-password{keystore_password} --truststore-password {truststore_password}] command.Enter the following information:
• The Cisco Nexus Data Broker username {user}—The user name.
• The Cisco Nexus Data Broker password {password}—The password for the user. For example, thedefault admin password is admin.
• The Cisco Nexus Data Broker web URL {url}—The web URL of the application. For example, thedefault URL is https://Nexus_Data_Broker_IP:8443.
Only HTTPS is enabled by default. If you want to use HTTP, enable it by editing the XMLfile.
Note
• The TLS KeyStore password {keystore_password}—The TLS KeyStore password.
• The TLS TrustStore password {truststore_password}—The TLS TrustStore password.
Cisco Nexus Data Broker Configuration Guide, Release 2.110
Managing TLS Certificate, KeyStore, and TrustStore FilesProviding the TLS KeyStore and TrustStore Passwords


![MSc System and Network Engineering - de Laata hardware-backed Keystore service to the Android OS [15]. The Keystore consists of multiple components, two of which are [16]: 1.Keymaster](https://img.pdfslide.net/doc/110x75/5f0668217e708231d417d691/msc-system-and-network-engineering-de-laat-a-hardware-backed-keystore-service.jpg)