Embed Size (px)
Citation preview
8/10/2019 Manual 1874 Sharps
http://slidepdf.com/reader/full/manual-1874-sharps 1/17
8/10/2019 Manual 1874 Sharps
http://slidepdf.com/reader/full/manual-1874-sharps 2/17
2
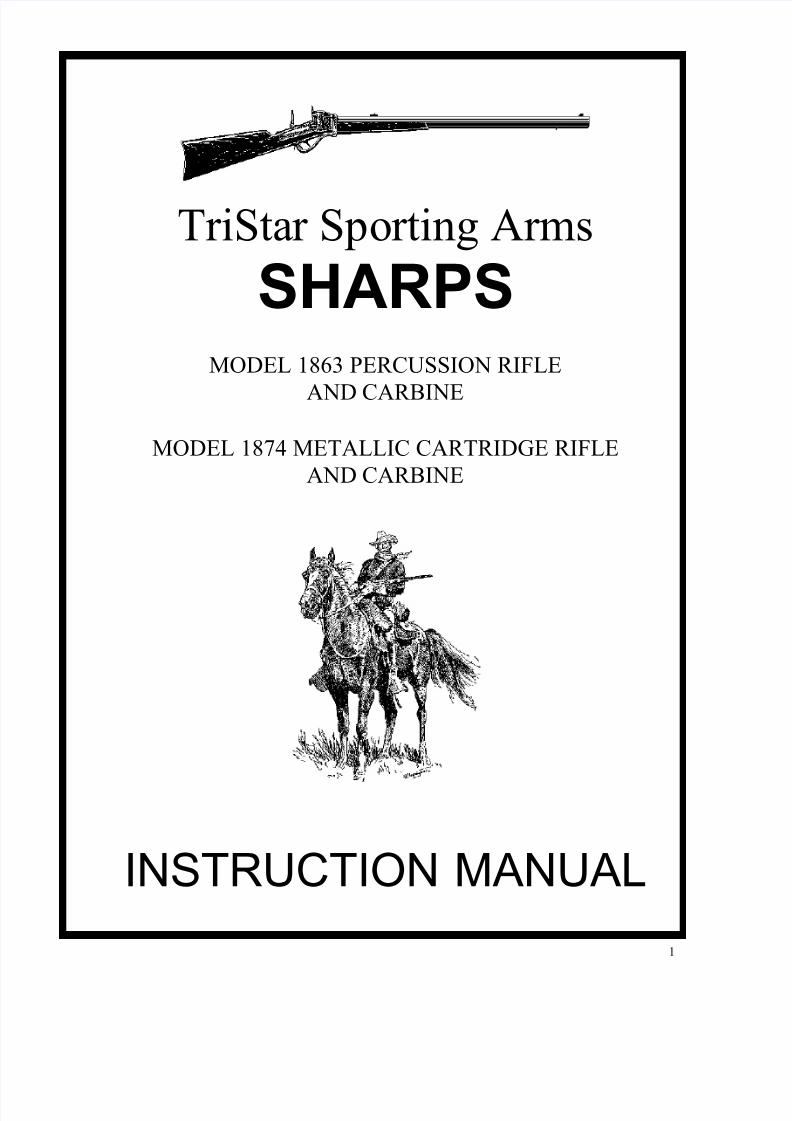
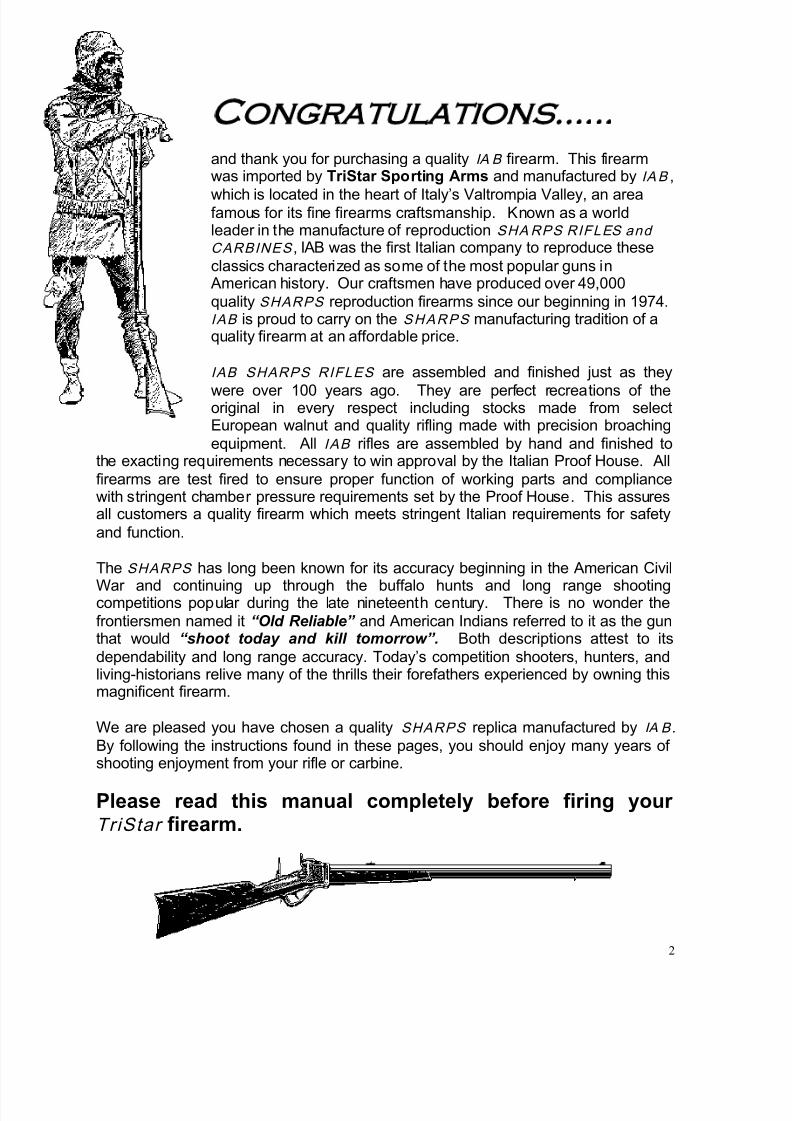
ongr tul tions…… and thank you for purchasing a quality IA B firearm. This firearmwas imported by TriStar Sporting Arms and manufactured by IAB ,
which is located in the heart of Italy’s Valtrompia Valley, an areafamous for its fine firearms craftsmanship. Known as a worldleader in the manufacture of reproduction SHARPS RIFLES and
CARBINES , IAB was the first Italian company to reproduce these
classics characterized as some of the most popular guns in American history. Our craftsmen have produced over 49,000
quality SHARPS reproduction firearms since our beginning in 1974.IAB is proud to carry on the SHARPS manufacturing tradition of aquality firearm at an affordable price.
IAB SHARPS RIFLES are assembled and finished just as they
were over 100 years ago. They are perfect recreations of theoriginal in every respect including stocks made from selectEuropean walnut and quality rifling made with precision broaching
equipment. All IAB rifles are assembled by hand and finished tothe exacting requirements necessary to win approval by the Italian Proof House. All
firearms are test fired to ensure proper function of working parts and compliancewith stringent chamber pressure requirements set by the Proof House. This assuresall customers a quality firearm which meets stringent Italian requirements for safety
and function.
The SHARPS has long been known for its accuracy beginning in the American Civil
War and continuing up through the buffalo hunts and long range shootingcompetitions popular during the late nineteenth century. There is no wonder the
frontiersmen named it “Old Reliable” and American Indians referred to it as the gunthat would “shoot today and kill tomorrow”. Both descriptions attest to its
dependability and long range accuracy. Today’s competition shooters, hunters, andliving-historians relive many of the thrills their forefathers experienced by owning thismagnificent firearm.
We are pleased you have chosen a quality SHARPS replica manufactured by IA B .
By following the instructions found in these pages, you should enjoy many years ofshooting enjoyment from your rifle or carbine.
Please read this manual completely before firing yourTriStar firearm.
8/10/2019 Manual 1874 Sharps
http://slidepdf.com/reader/full/manual-1874-sharps 3/17
3
Important Safety Rules
1. If you do not thoroughly understand the proper use and care of firearms, DO NOTATTEMPT TO SHOOT THIS GUN. Seek advice from someone you know to be
a competent authority in the care, use, and handling of firearms.
2. Keep this firearm pointed in a safe direction at all times.
3. REMEBER TO TREAT EVERY FIREARM AS IF IT IS LOADED!
4. Never operate this firearm without proper eye and hearing protection.
5 Keep your finger off the trigger until you are ready to shoot.
NEVER “set” the set type triggers until you are ready to fire the gun.
6. Check to be sure the barre l is clear of any obstruction before loading the
gun. Remember to repeat this procedure each time before reloading the gun.
7. NEVER place a loaded firearm in a vehicle or lean the gun against any object where
it might fall over and accidenta lly discharge. When this firearm is not in use, itshould be emptied of any charge or cartridge and placed in a case or suitable
protected location. NEVER store this gun loaded!
8. KEEP ALL GUNS OUT OF THE REACH OF CHILDREN! You should store
this gun and its ammunition separately.
9. Avoid the use of drugs or alcoholic beverages prior to or during the use of this or anyother firearm.
10. Always conduct yourself in a safe and responsible manner when using this or anyother firearm. Do not abuse your shooting and hunting privileges.
Please read this instruction manual carefully and thoroughly. Familiarize
yourself with the function of your firearm before loading and firing. If you
are unsure about any aspect of proper gun use and handling, seekknowledgeable instruction before attempting to use your gun.
8/10/2019 Manual 1874 Sharps
http://slidepdf.com/reader/full/manual-1874-sharps 4/17
4
This ma nual includes inst ru ct ion s for th e use and c are of bo th percussio n and meta l l ic
cartr idg e r if les and carbine s. Please refer to the p roper sect io n for y our r if le or carbin e .
Section I: Mo del 1863 Percus sion R ifle and Carbine
Step 1 - Initial Cleaning
Before firing your percussion Sharps for the first time, you should remove any excess factory
lubricants applied to protect the gun during shipping. This process will be great ly simplified by fieldstripping the gun. (Please refer to the “Disassembly and Cleaning” section for field strippinginstructions). Once this initial cleaning is completed, the gun should be re-lubricated with quality gun
oil. The initial cleaning process should include swabbing the bore with several dry cleaning patches toremove all excess oil. The barrel must be clean, dry, and free of obstructions prior to firing.
Step 2 – Loading
The f i rs t step in the loadin g pro cess is to make su re the mu zzle of th e gun ispointe d in a SAFE DIRECTION!
Your Sharps rifle or carbine can be fired using either paper cartridges or bullet and powder. Eachmethod is covered herein.
Before loading either a paper cartridge or powder and bullet, one or two percussion caps should befired to clear any obstructions or excess oil from the nipple and flame channel.
PAPER CARTRIDGE LOADING
Your Sharps rifle or carbine can be fired using paper cartridges. Instruct ions for making paper
cartridges can be found at the end of this section.
To load your gun with a paper cartridge, first place the hammer in the SAFE position by pulling it backinto the half-cock notch.
Next the trigger guard/lever should be extended fully downward which will lower the breech block andexpose the chamber.
Carefully insert the paper cartridge into the chamber until the bullet seats firmly against the rifling. Toinsure a complete charge, sufficient pressure should be applied to the cartridge to slightly compactthe powder charge in the chamber.
Return the trigger guard/lever to the closed position... When the breech block is returned to the
closed position, the back of the paper cartridge will be sheared off, exposing the powder to the flamechannel.
Once th e breech is clo sed, the gun sho uld be turned over , a l lowing any excess p owd er to fa l l
away from the act ion. This step i s very IMPORTANT to en su re safe operat ion of the gun.
Your Sharps rifle or carbine is now ready for firing.
POWDER AND BULLET LOADING
8/10/2019 Manual 1874 Sharps
http://slidepdf.com/reader/full/manual-1874-sharps 5/17
5
Your Sharps rifle or carbine can be fired using powder and a bullet of the proper caliber.
To load your gun with powder and bullet, first place the hammer in the SAFE position by pulling itback into the half-cock notch.
Carefully insert a bullet of the proper caliber into the chamber, making sure it is firmly seated againstthe rifling at the front of the chamber.
Next, fill the remaining chamber space with FFg black powder, Pyrodex, or an approved black powdersubstitute. To ensure a full charge, you should slightly overfill the chamber. The chamber of a .45
caliber rifle or carbine should hold between 50 and 60 grains of powder. Rifles and carbines in .54caliber should hold between 60 and 80 grains of powder. No .45 caliber rifle or carbine should beloaded in excess of 60 grains of powder. No .54 caliber rifle or carbine should be loaded in excess of
80 grains of powder.
The breech should now be carefully closed. When the breech block is returned to the closed position,
any excess powder in the chamber will be pushed away from the back of the chamber.
Once the breech i s closed, th e gun should be turned ov er, al lowin g exce ss pow der to fal l
away from the act ion. This step i s very IMPORTANT to en su re safe operat ion of the gun.
Step 3 – Firing
With the barrel pointed in a safe direction, cap the rifle or carbine with a musket cap and pull thehammer all the way to the rear full -cock position. If your gun has a single trigger, you may now take
aim at the target and fire the gun by pulling the trigger.
DOUBLE SET TRIGGERS:
If you gun has a double set trigger, you may fire it by simply pulling the front firing trigger, or you mayuse the set trigger to gain a much lighter trigger pull. To use the double set trigger feature, you must
first pull the rear set trigger to engage the front firing trigger. Once you have set the trigger you maytake aim at your intended target and fire the gun by applying a very slight pressure to the front firingtrigger. Never load or cock the rifle with the triggers set. The tri ggers should only be set after the
rifle has been laded, the hammer cocked and the rifle pointed at the intended target.
HOW THE DOUBLE SET TRIGGER MECHANISM WORKS:
When the rear trigger is pulled, it clicks into a sear notch on the front trigger. Once this operation isdone, the front trigger can be pulled, releasing the rear trigger which releases and flies upward hitting
the lock sear which discharges the gun.
You may adjust the pressure required to fire the gun by turning the screw located between the two
triggers either clockwise or counter clockwise to obtain the desired trigger pull . THE GUN MUST
BE UNLOADED BEFORE MAKING ANY TRIGGER ADJUSTMENTS!
IN THE EVENT YOUR R IFLE OR CARBINE DOES NOT FIRE WHEN
THE TRIGGER IS PULLED, YOU SHOULD FOLLOW THE
PROCEDURE OUTL INED BELOW :
8/10/2019 Manual 1874 Sharps
http://slidepdf.com/reader/full/manual-1874-sharps 6/17
6
If your rifle or carbine fails to fire when the trigger is pulled, CONTINUE TO POINT THE GUN IN ASAFE DIRECTION FOR AT LEAST TWO MINUTES BEFORE ATTEMPTING TO UNLOAD IT.
After waiting at least two minutes, with the barrel pointing in a safe direction, carefully remove themusket cap.
Next, with the muzzle pointed at the ground, tap the side of the gun a few times to settle any loosepowder away from the breech block. Lower the trigger guard, lever to open the breech and expose
the powder charge.
You should next carefully rotate the gun to place the top of the receiver toward the ground, while
continuing to keep the muzzle pointed at the ground. This will ensure that any loose powder will falldirectly to the ground and not collect inside the lever spring mortise.
Next, raise the muzzle, allowing ALL powder in the chamber to fall to the ground. Once the powder isremoved, you may use a cleaning rod or dowel to push the bullet from the chamber.
Disassembly and Cleaning
Before at tempt ing to disassemb le your r i f le or carbine, you m ust m ake sure i t
is UNLOADED!
FIELD STRIPPING:
With the action closed, pull the hammer rearward to the Safe position.
Locate the lever hinge pin (Part # 02) on the right side of the receiver near the rear
of the forearm. Next to the lever hinge pin is a small plunger pin that acts as a lockto prevent the lever from rotating accidentally.
Depress the small plunger pin which will allow the lever hinge pin to be rotated
approximately 180 degrees. With the rifle turned upside down, rotate the lever hingepin forward and backward slightly while pulling outward to remove it.
Slide the trigger guard/lever and breech block out of the rif le. This completes thefield stripping process.
Further disassembly of your Sharps rifle or carbine should only be attempted by a
competent gunsmith.
Reassembly is accomplished in reverse order.
8/10/2019 Manual 1874 Sharps
http://slidepdf.com/reader/full/manual-1874-sharps 7/17
7
CLEANING:
Due to the corrosive nature of black powder, it is imperative that your Sharps rifle orcarbine be thoroughly cleaned after each shooting session. It may also be
necessary to swab the barrel periodically after a few shots to maintain accuracy.
After field stripping the gun, the action maybe be cleaned using warm soapy water or
a quality black powder solvent. The barrel should also be cleaned to remove anyfouling. After the gun is thoroughly cleaned, it should be lubricated with quality gun
oil.
One area of the Sharps action that requires special attention when cleaning is the
gas check plate located on the front face of the breech block. The purpose of thisplate is to seal the rear of the chamber when the powder is ignited. If the gas check
plate is not removed and cleaned regularly, it will become fouled, rendering itineffective in sealing the breech. This leakage can permanently damage the gas
check plate and possibly cause injury to the shooter. To remove the plate, loosen itby carefully working the edge of a knife blade around the joint between the plate andthe breech block. Clean the gas check plate and breech block with warm soapy
water or solvent. Before reassembly, lubricate the gas check plate with a thin coatof grease. Press the plate back into the breech block prior to re-assembly.
By cleaning your Sharps rifle or carbine after each shooting session, it should giveyou many years of reliable service.
MAKING PAPER CARTRIDGES
During the American Civil War, Sharps rifles and carbines were usually fired using nitrated paper or
linen cartridges. These cartridges are no longer commercially available but are easily made.
The first step is to make the nitrated paper which is simply a light weight, high “rag bond” paper
soaked in a saturated potassium nitrate solution. A saturated solution is made by adding potassiumnitrate to water until it will dissolve no more of the chemical. Best results are achieved if the water isslightly above room temperature.
Place the saturated potassium nitrate solution in a flat pan. Next place the paper into the pan andallow it to become completely saturated with the solution. Remove the saturated paper from the
solution and allow it to completely dry.
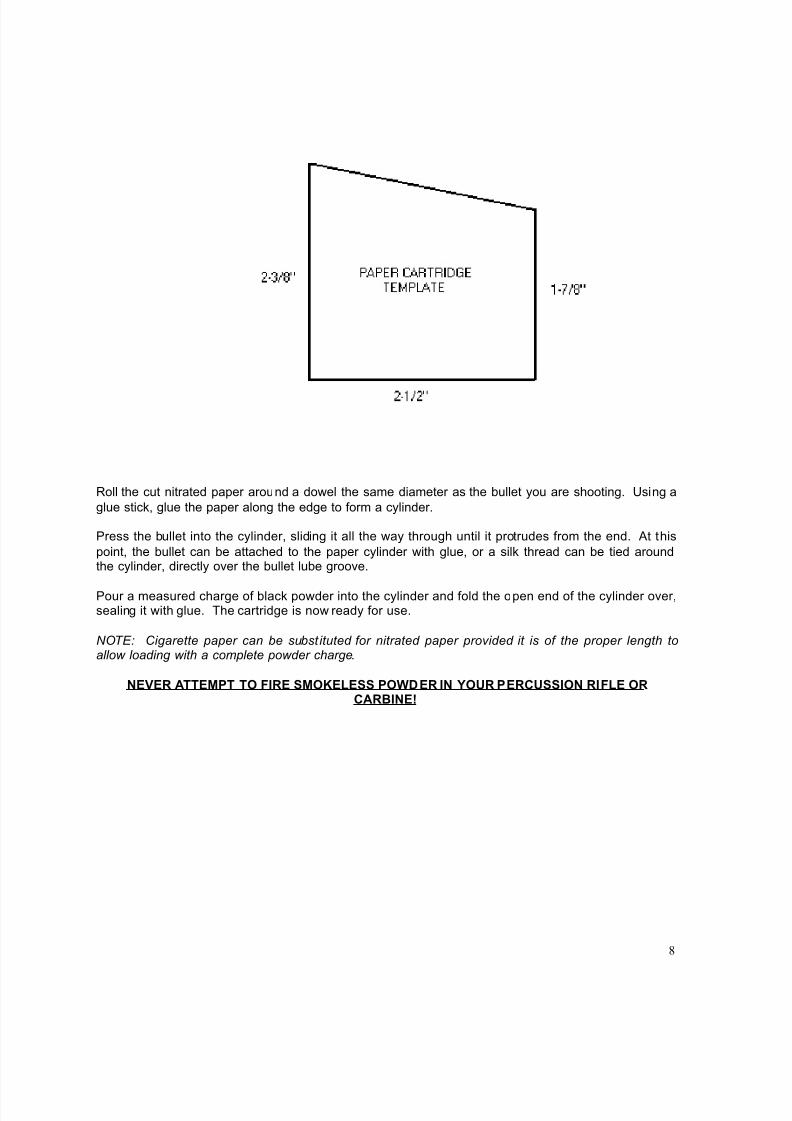
The dried paper is cut to the shape shown below.
8/10/2019 Manual 1874 Sharps
http://slidepdf.com/reader/full/manual-1874-sharps 8/17
8
Roll the cut nitrated paper around a dowel the same diameter as the bullet you are shooting. Using a
glue stick, glue the paper along the edge to form a cylinder.
Press the bullet into the cylinder, sliding it all the way through until it protrudes from the end. At this
point, the bullet can be attached to the paper cylinder with glue, or a silk thread can be tied aroundthe cylinder, directly over the bullet lube groove.
Pour a measured charge of black powder into the cylinder and fold the open end of the cylinder over,sealing it with glue. The cartridge is now ready for use.
NOTE: Cigarette paper can be subst ituted for nitrated paper provided it is of the proper length toallow loading with a complete powder charge.
NEVER ATTEMPT TO FIRE SMOKELESS POWDER IN YOUR PERCUSSION RIFLE ORCARBINE!
8/10/2019 Manual 1874 Sharps
http://slidepdf.com/reader/full/manual-1874-sharps 9/17
9
ADVICE FROM THE FIELD
The Sharps carbine proved to be one of the most effective weapons used
during the American Civil War. As the first practical breech loader, it was
highly sought after by participants from both sides of the conflict. Like anynew weapon, the Sharps were not without its problems. Most of these
problems could be easily solved by proper care and cleaning.
Modern Sharps reproductions share many of the same characteristics of those earlyclassics. It is not uncommon for today’s Sharps shooter to experience some of thesame difficulties encountered by the Civil War soldier.
Today’s modern reproduction Sharps carbines see frequent action with members of
the North-South Skirmish Association (N-SSA). Tony Beck, an active member of theN-SSA has written many articles on the history and use of firearms used in the Civil
War. In an effort to assist N-SSA users of Sharps carbines, he has written an articleentitled “Care of the New Breechloaders.” This highly informative article is written ina style, which creates a Civil War era for the reader. Tony has graciously given the
writer of this manual permission to include the article here for your enjoyment.
Care of the New BreechloadersBy Tony Beck
(Note: The following article on the care and cleaning of breechloaders was originally printed in a
Company Newsletter in a style which creates a Civil War era for the reader. However, all of the
methods mentioned for cleaning etc. are proven modern, safe methods.)
It has come to the attention of the ordnance office that some of the troops have beenexperiencing difficulties with the new breech loading Sharps carbines now being
introduced into our service. These arms are the most perfect yet invented, but dorequire special attention to keep in proper order. The armorors therefore wish toprovide the following advice on the care and maintenance of the Sharps carbine, as
manufactured in Richmond and the north, in order to improve our effectiveness inthe field.
Comments on Reports from the Field
Reports of the Sharps bursting in battle have recently reached headquarters. It hasbeen found that these instances are greatly exaggerated. There is a feature of theSharps system weapons, both as produced in the north and by o ur government,
which may cause the forestock to split on discharge. If the breech is opened with anundischarged round in the chamber, powder trapped in the breech block canaccumulate under the lever spring in the fore stock. When the arm is then closed
and fired, this accumulated powder may also explode. The stock will usually splitand may injure the shooter. If there is a failure of the arm to take fire after repeated
8/10/2019 Manual 1874 Sharps
http://slidepdf.com/reader/full/manual-1874-sharps 10/17
10
attempts, it is imperative that the following procedures be used to clear the weapon.Elevate the muzzle as nearly vertical as possible before opening the breech. With
the breech open, use a cleaning rod introduced through the muzzle to drive out thecartridge. Insert a new round and close the breech. Only then can the muzzle be
lowered. If the breech must be opened with the gun held level, remove the
breechblock and clear any accumulated powder from the recesses at the front of theframe before reloading. When the arm is to be loaded after being cleaned, it must
first be cleared by firing at least two caps. The vent channel in the breech block israther long and tends to accumulate oil when properly cleaned, which can lead to
misfires. A large quantity of smoke should be visible in the barrel on opening thebreech, if the breech block’s vent is clear. Reports have also noted that excessivefriction may develop in the breech after several rounds have been fired. This is due
to an accumulation of fouling within the frame. The breech joint is as perfect as canbe made by modern science, but it does still leak. This causes fouling to deposit
between the breech block and frame. When the lever becomes excessively tight,spitting on the inside of the frame with the breech open will moisten this fouling and
usually relieve the problem. Do not hesitate to take this action; it will not injure themechanism. If the lever is bent in forcing the breech closed, the weapon may nolonger fire as the block will not be restored to its proper position.
Cleaning
Most of the problems experienced with the Sharps pattern guns are the resultof incomplete cleaning. Unlike the musketoons, which can be cleaned withlittle effort, the new carbines require complete disassembly of the breech
mechanism to be cleaned properly. There are many small parts which becomeclogged and jammed with accumulated fouling. These require careful
attention. If not maintained, the joint at the breech will become excessively
tight and leak gas, rendering the weapon unserviceable.
To clean the Sharps, the breech mechanism must be disassembled. To accomplishthis, first open the breech. Next, the lever pivot pin must be withdrawn. Depress the
catch ahead of the pivot pin arm and rotating the arm one quarter turn away from theframe. Next, gently rotate the pin back and forth while pulling it out of the frame. DONOT STRIKE the pin or its arm. If the gun is very foul, the pin may be quite tight.
Moisten the joint between the levers and frame to loosen the pin. With the leverpivot pin removed, the breech block may be withdrawn. This is done by gently
tapping the block out the bottom of the frame with a wooden dowel or the handle of asmall hammer. In order to free the lever from the breechblock, remove the screw in
the right side of the block. Soak the block in HOT soapy water. While the block issoaking, clean the barrel and frame in the usual manner. Original Sharps, and somereproductions, have a sealing sleeve in the breech, which should be removed to be
cleaned and oiled separately. Once the barrel and frame are clean and dry, theymust be thoroughly oiled before being set aside. With the barrel clean, return to thebreechblock. The gas check plate must be removed and cleaned separately. This is
done by gently prying up the sides of the plate with a knife blade. Finally, hold thebreechblock cone under a stream of running water and check that water runs out of
8/10/2019 Manual 1874 Sharps
http://slidepdf.com/reader/full/manual-1874-sharps 11/17
11
the vent in the front of the block. If it only drips, or fails to flow at all, remove the coneand cleanout screw. Thoroughly clean the vent channel with a pipe cleaner or small
drill. Some guns have been found with undersize vents. If excessive fouling of thevent is a problem, it may be necessary to enlarge the passage. Once all the parts
are cleaned and oiled, the weapon can be reassembled. Be careful not to strike the
gas plate with anything but wood when seating it in the breech block, and then onlygently. When reinstalling the lever in the frame, it will be necessary to push it firmly
into place in order to drive the pivot pin home. The federally made carbines have anautomatic priming device incorporated into the lock. This will allow fouling to enter
the mechanism. This area should be kept well oiled and the lock should be removedand cleaned occasionally. When properly cleaned, the Sharps carbine will renderreliable service in the coming campaigns. By using these simple procedures, the
new breechloaders will greatly increase our effectiveness in the field.
© 1998 by A. M. Beck
Section II: Model 1874 Cartr idge Rif le and Carbine
CARTRIDGES
The 1874 Sharps rifle or carbine is available in several calibers. You will find the caliber for whichyour rifle is chamber stamped on the barrel near the rear sight. YOU SHOULD NEVER ATTEMPT
TO FIRE A CARTRIDGE IN YOUR RIFLE THAT IS NOT THE SAME CALIBER AS STAMPED ONTHE BARREL...
Your 1874 Sharps rifle or carbine is a modern copy of a black powder firearm and is intended to usecartridges loaded with black powder, Pyrodex, or an approved black powder substitute. Factoryloaded cartridges can be used provided they are loaded to approximate black powder pressures.
You should verify with the cartridge manufacturer that his cartridges do not exceed black powderpressures.
UNDER NO CIRCUMSTANCES SHOULD SMOKELESS POWDER LOADS BE USED THAT
EXCEED FACTORY LOAD SPECIFICATIONS OF BLACK POWDER PRESSURES AND
VELICITIES.
THE GUN OWNER ASSUMES A LL RISKS A SSOCIATED WITH FIRING RELOA DS .
If you are using cartridges loaded with black powder or Pyrodex, it may be necessary to swab thebore after every few shots to insure good accuracy and easy loading. This is necessary becausefouling builds up in the front of the chamber, interfering with proper cartridge seating. Such fouling
can be removed with a properly sized bore brush dipped in water and used to scrub the front of thechamber clean
Step 1 - Initial Cleaning
Before firing your 1874 Sharps for the first time, you should remove any excess factory lubricantsapplied to protect the gun during shipping. This process will be greatly simplified by field stripping thegun. (Please refer to the “Disassembly and Cleaning” section for field stripping instructions). Once
this initial cleaning is completed, the gun should be re-lubricated with quality gun oil. The initial
8/10/2019 Manual 1874 Sharps
http://slidepdf.com/reader/full/manual-1874-sharps 12/17
12
cleaning process should include swabbing the bore with several dry cleaning patches to remove allexcess oil. The barrel must be clean, dry, and free of obstructions prior to firing.
..Step 2 – Loading
The first step in th e loadin g pro cess is to mak e sure the muzzle of the gun is
pointe d in a SAFE D IRECTION !
To load your metallic cartridge Sharps, first place the hammer in the half-cock notch and engage the
safety by moving it up between the firing ping and breech block. Failure to do this can lead to abroken firing pin should the breech block be lowered with the hammer contacting the firing pin.
With the gun pointed in a safe direction, lower the breech block by moving the lever/trigger guarddownward. Check to be sure there is no fouling or obstructions in the barrel...
Place a cartridge of the proper caliber in the chamber and push it fully forward. The cartridge shouldinsert easily into the chamber. If it does not, remove it immediately and check to be sure it is thecorrect caliber . UNDER NO CIRCUMSTANCES SHOULD YOU ATTEMPT TO FORCE THE
CARTRIDGE INTO THE CHAM BER BY USING ANY OBJE CT OR THE BREECH BLO CK...
You should never attempt to load any cartridge on which the primer is protruding above the surface ofthe shell base. Failure to follow this advice can lead to accidental firing of the cartridge when thebreech block is closed.
With the cartridge correctly seated in the chamber and the gun pointed at the intended target, raisethe breech block by pulling the lever/trigger guard upward Bring the hammer to the full -cock position,
pivot the safety out of the safe position. If your gun is equipped with a single trigger, you may nowfire it by simply pulling the trigger. If your gun is equipped with double set triggers, please refer to thesection below for instructions on firing.
Immediately after firing, moves the hammer to the half cock position, move the safety to the safeposition and lower the breech block. This will allow the extractor to push the fired case out of the
chamber to a point where it can be retrieved with the fingers.
DOUBLE SET TRIGGERS:
If you gun has a double set trigger, you may fire it by simply pulling the front firing trigger, or you mayuse the set trigger to gain a much lighter trigger pull. To use the double set trigger feature, you must
first pull the rear set trigger to engage the front firing trigger. Once you have set the trigger you maytake aim at your intended target and fire the gun by applying a very slight pressure to the front firingtrigger. Never load or cock the rifle with the triggers set. The triggers should only be set after the
rifle has been loaded, the hammer cocked and the rifle pointed at the intended target.
HOW THE DOUBLE SET TRIGGER MECHANISM WORKS:
When the rear trigger is pulled, it clicks into a sear notch on the front trigger. Once this operation isdone, the front trigger can be pulled, releasing the rear trigger which releases and flies upward hitting
the lock sear which discharges the gun.
You may adjust the pressure required to fire the gun by turning the screw located between the two
triggers either clockwise or counter clockwise to obtain the desired trigger pull. THE GUN MUSTBE UNLOADED BEFORE MAKING ANY TRIGGER ADJUSTMENTS!
8/10/2019 Manual 1874 Sharps
http://slidepdf.com/reader/full/manual-1874-sharps 13/17
13
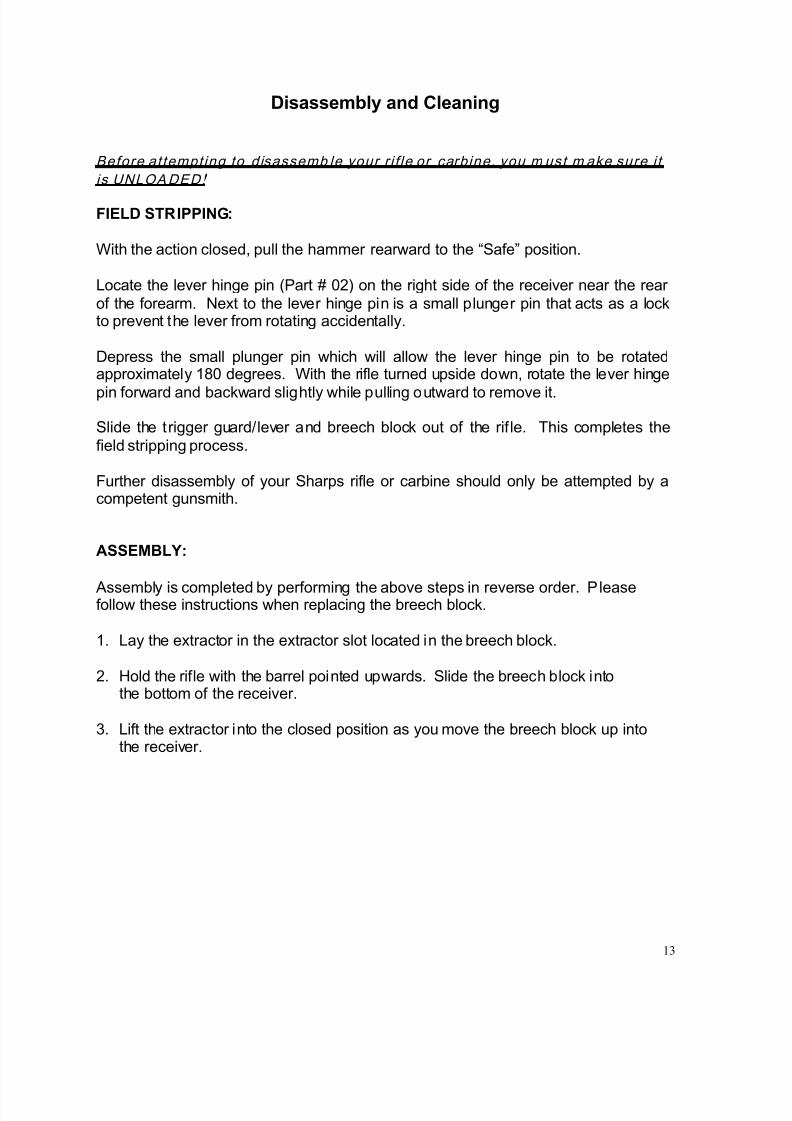
Disassembly and Cleaning
Before at tempt ing to disassemb le your r i f le or carbine, you m ust m ake sure i t
is UNLOADED!
FIELD STRIPPING:
With the action closed, pull the hammer rearward to the “Safe” position.
Locate the lever hinge pin (Part # 02) on the right side of the receiver near the rear
of the forearm. Next to the lever hinge pin is a small plunger pin that acts as a lockto prevent the lever from rotating accidentally.
Depress the small plunger pin which will allow the lever hinge pin to be rotatedapproximately 180 degrees. With the rifle turned upside down, rotate the lever hinge
pin forward and backward slightly while pulling outward to remove it.
Slide the trigger guard/lever and breech block out of the rif le. This completes the
field stripping process.
Further disassembly of your Sharps rifle or carbine should only be attempted by acompetent gunsmith.
ASSEMBLY:
Assembly is completed by performing the above steps in reverse order. Pleasefollow these instructions when replacing the breech block.
1. Lay the extractor in the extractor slot located in the breech block.
2. Hold the rifle with the barrel pointed upwards. Slide the breech block intothe bottom of the receiver.
3. Lift the extractor into the closed position as you move the breech block up intothe receiver.
8/10/2019 Manual 1874 Sharps
http://slidepdf.com/reader/full/manual-1874-sharps 14/17
14
CLEANING:
Due to the corrosive nature of black powder, it is imperative that your Sharps rifle orcarbine be thoroughly cleaned after each shooting session. It may also be
necessary to swab the barrel periodically after a few shots to maintain accuracy.
After field stripping the gun, the action maybe be cleaned using warm soapy water or
a quality black powder solvent. The barrel should also be cleaned to remove anyfouling. After the gun is thoroughly cleaned, it should be lubricated with quality gun
oil.
By cleaning your Sharps rifle or carbine after each shooting session, it should give
you many years of reliable service.
8/10/2019 Manual 1874 Sharps
http://slidepdf.com/reader/full/manual-1874-sharps 15/17
15
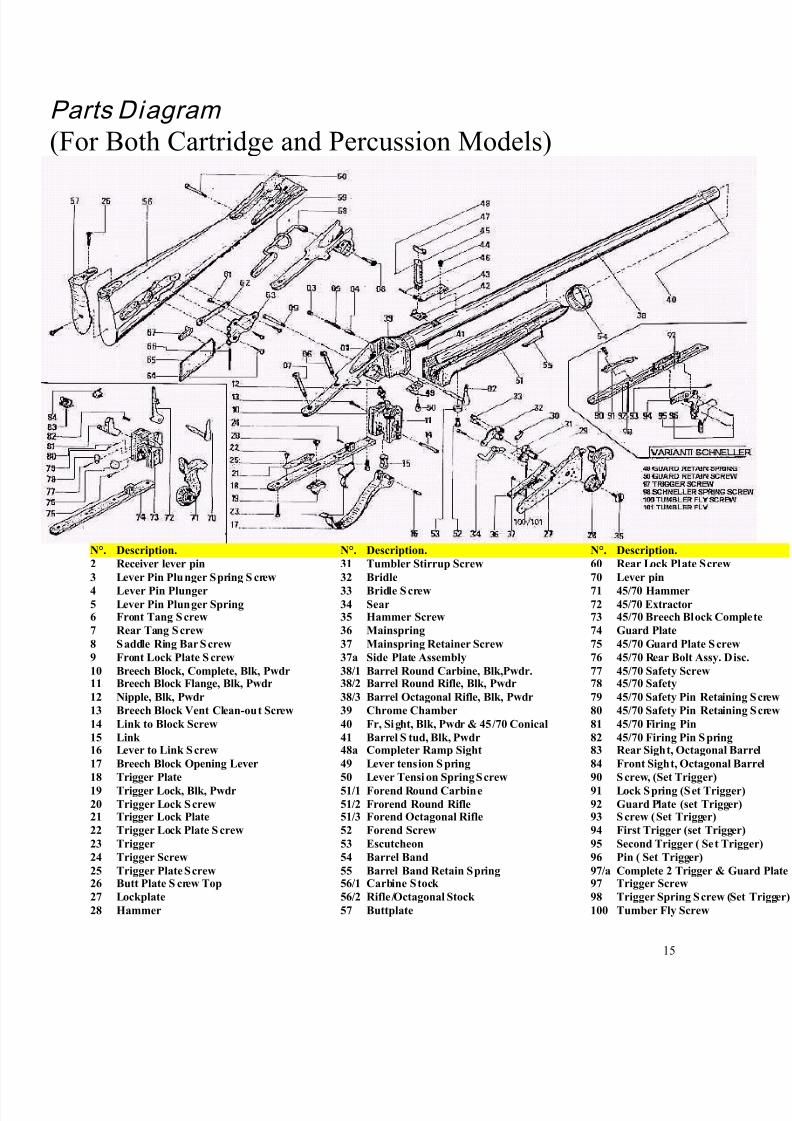
Parts Diagram (For Both Cartridge and Percussion Models)
N°. Description. N°. Description. N°. Description. 2 Receiver lever pin 31 Tumbler Stirrup Screw 60 Rear Lock Plate Screw
3 Lever Pin Plunger Spring S crew 32 Bridle 70 Lever pin
4 Lever Pin Plunger 33 Bridle Screw 71 45/70 Hammer 5 Lever Pin Plunger Spring 34 Sear 72 45/70 Extractor 6 Front Tang Screw 35 Hammer Screw 73 45/70 Breech Block Comp
7 Rear Tang Screw 36 Mainspring 74 Guard Plate
8 Saddle Ring Bar Screw 37 Mainspring Retainer Screw 75 45/70 Guard Plate Screw
9 Front Lock Plate S crew 37a Side Plate Assembly 76 45/70 Rear Bolt Assy. Dis
10 Breech Block, Complete, Blk, Pwdr 38/1 Barrel Round Carbine, Blk,Pwdr. 77 45/70 Safety Screw 11 Breech Block Flange, Blk, Pwdr 38/2 Barrel Round Rifle, Blk, Pwdr 78 45/70 Safety
12 Nipple, Blk, Pwdr 38/3 Barrel Octagonal Rifle, Blk, Pwdr 79 45/70 Safety Pin Retainin
13 Breech Block Vent Clean-out Screw 39 Chrome Chamber 80 45/70 Safety Pin Retainin
14 Link to Block Screw 40 Fr, Sight, Blk, Pwdr & 45/70 Conical 81 45/70 Firing Pin 15 Link 41 Barrel S tud, Blk, Pwdr 82 45/70 Firing Pin Spring 16 Lever to Link Screw 48a Completer Ramp Sight 83 Rear Sight, Octagonal Ba
17 Breech Block Opening Lever 49 Lever tension Spring 84 Front Sight, Octagonal B
18 Trigger Plate 50 Lever Tensi on Spring Screw 90 Screw, (Set Trigger)
19 Trigger Lock, Blk, Pwdr 51/1 Forend Round Carbine 91 Lock Spring (Set Trigger
20 Trigger Lock Screw 51/2 Frorend Round Rifle 92 Guard Plate (set Trigger)21 Trigger Lock Plate 51/3 Forend Octagonal Rifle 93 Screw ( Set Trigger) 22 Trigger Lock Plate S crew 52 Forend Screw 94 First Trigger (set Trigger
23 Trigger 53 Escutcheon 95 Second Trigger ( Set Trig
24 Trigger Screw 54 Barrel Band 96 Pin ( Set Trigger)
25 Trigger Plate Screw 55 Barrel Band Retain Spring 97/a Complete 2 Trigger & Gu26 Butt Plate S crew Top 56/1 Carbine Stock 97 Trigger Screw
27 Lockplate 56/2 Rifle/Octagonal Stock 98 Trigger Spring Screw (Se
28 Hammer 57 Buttplate 100 Tumber Fly Screw
8/10/2019 Manual 1874 Sharps
http://slidepdf.com/reader/full/manual-1874-sharps 16/17
16
29 Tumbler 58 Saddle Ring bar 101 Tumber Fly 30 Tumbler Stirrup 59 Saddle Ring
SPARE PARTS/WARRANTYShip the firearm prepaid to:
TriStar S porting Arms
1816 Linn St.
North Kansas City, MO 64116
THANK YOU
Thank you for purchasing a TriStar Sharps Rifle. We are sure this gun will bring you years of hunting and/or
shooting pleasure. Your satisfaction is the key to our success. Please let us know if we can be or service and
relay any obs ervations about your guns performance or appearance. For your ques tions or comments please
visit www.tristarsportingarms.com
PURCHASER’S RECORD
Model Number ______________________________________________
Purchase Date ______________________________________________
Gauge or Caliber ______________________________________________
Serial Number ______________________________________________
Purchase Price ______________________________________________
Store Name ______________________________________________
SERVICE AGREEMENT AND LIMITED WARRANTY
TriStar agrees to service its products free of charge for defects in materials and workmanship in accordance
with the s ervice agreement listed below. The obligation of TriStar under this agreement is limited to the repair
or replacement of unserviceable parts and does not cover any incidental or consequential damages. Other than
the express warranty contained herein, TriStar makes no warranties, expressed or implied.
TriStar will repair or replace any unserviceable part(s) for (1) year from date of purchase and further will supply
free parts (Wood not included) for an additional four (4) years in accordance with the above warranty statement
provided your firearm had not been altered, abused, willfully damaged, or damaged by overpressure
ammun ition. This agreement is not t ransferable; its benefits apply only to the original purchaser.
To obtain free service during the time this agreement is in effect, make sure your firearm is unloaded and send
to TriStar Sporting Arms.
This agreement and the warranties contained herein are void if your registration is not received within th irty
(30) days from date of purchase.
Please visit www.tristarsportingarms.com to fill out and s ubmit warranty.
8/10/2019 Manual 1874 Sharps
http://slidepdf.com/reader/full/manual-1874-sharps 17/17
17
SHIPPING
When returning your firearm for service, please take care in packing. Disassemble you gun wrap in a safemanner and place it in its original box. (THIS BOX WILL PROTECT THE GUN BUT IS NOT DESIGNED
FOR SHIPPING). Wrap box in a cardboard box approved for interstate shipping. TriStar is not responsible for
damage incurred during shipping.