Embed Size (px)
Citation preview
Copyright Atozed Software
IntraWeb Manual
IntraWeb
A revolutionary approach to web application development
"Makes development of web applications as easy as fallingoff a log..."
PC Plus Magazine, June 2002
All rights reserved. No parts of this work may be reproduced in any form or by any means - graphic, electronic, ormechanical, including photocopying, recording, taping, or information storage and retrieval systems - without thewritten permission of the publisher.
Products that are referred to in this document may be either trademarks and/or registered trademarks of therespective owners. The publisher and the author make no claim to these trademarks.
While every precaution has been taken in the preparation of this document, the publisher and the author assume noresponsibility for errors or omissions, or for damages resulting from the use of information contained in this documentor from the use of programs and source code that may accompany it. In no event shall the publisher and the author beliable for any loss of profit or any other commercial damage caused or alleged to have been caused directly orindirectly by this document.
IntraWeb
Table of Contents
Foreword 1
Part I Welcome 3
................................................................................................................................... 31 Other Documentation
................................................................................................................................... 32 How IntraWeb Works
................................................................................................................................... 33 Limitations of the Evaluation Version
................................................................................................................................... 44 Technical Support
................................................................................................................................... 45 License
................................................................................................................................... 56 Credits, Acknowledgements and Copyrights
................................................................................................................................... 67 Requirements
... ... .... ... .... ... .... .... ... .... ... .... ... .... ... .... .... ... .... ... .... ... .... .... ... .... ... .... ... .... ... .... .... ... .... ... .... ... .... ... .... .... ... .. 6Overview
... ... .... ... .... ... .... .... ... .... ... .... ... .... ... .... .... ... .... ... .... ... .... .... ... .... ... .... ... .... ... .... .... ... .... ... .... ... .... ... .... .... ... .. 7Supported Browsers
... ... .... ... .... ... .... .... ... .... ... .... ... .... ... .... .... ... .... ... .... ... .... .... ... .... ... .... ... .... ... .... .... ... .... ... .... ... .... ... .... .... ... .. 8Development Environments
Part II What's New 10
................................................................................................................................... 101 Overview
................................................................................................................................... 112 PDA Support
Part III Migration Guide 13
................................................................................................................................... 131 Overview
Part IV Installation 18
................................................................................................................................... 181 Installation of License Keys
................................................................................................................................... 182 IntraWeb for Windows
. ... .... ... .... ... .... .... ... .... ... .... ... .... .... ... .... ... .... ... .... ... .... .... ... .... ... .... ... .... ... .... .... ... .... ... .... ... .... ... .... .... ... .... 18Uninstallation
. ... .... ... .... ... .... .... ... .... ... .... ... .... .... ... .... ... .... ... .... ... .... .... ... .... ... .... ... .... ... .... .... ... .... ... .... ... .... ... .... .... ... .... 18Installation
................................................................................................................................... 183 Installing IntraWeb for Linux
................................................................................................................................... 184 Upgrading to a new version
. ... .... ... .... ... .... .... ... .... ... .... ... .... .... ... .... ... .... ... .... ... .... .... ... .... ... .... ... .... ... .... .... ... .... ... .... ... .... ... .... .... ... .... 19Delphi 7 Users
Part V Demos 21
................................................................................................................................... 211 Quick Start
................................................................................................................................... 212 Building A Demo Step By Step
................................................................................................................................... 263 Features
................................................................................................................................... 264 Guess
................................................................................................................................... 265 GuessWB
................................................................................................................................... 266 GuessMulti
................................................................................................................................... 267 FishFact
................................................................................................................................... 268 FishFactDM
................................................................................................................................... 269 Phoenitics Customer Profiler
IntraWeb ManualI
Copyright Atozed Software
................................................................................................................................... 2610 StandAloneSSL
................................................................................................................................... 2611 WebSnapSurvey
................................................................................................................................... 2712 Custom StandAlone
................................................................................................................................... 2713 Back Button
................................................................................................................................... 2714 Page Forms
................................................................................................................................... 2715 FishMarket
................................................................................................................................... 2716 Die, Fly ! Die !
................................................................................................................................... 2817 WebMail32
Part VI Debugging 30
................................................................................................................................... 301 Getting Started
................................................................................................................................... 302 Debug Output
................................................................................................................................... 303 Detecting Errors on Startup
................................................................................................................................... 304 Command Line Parameters
Part VII Development 33
................................................................................................................................... 331 Rethinking the User Interface
................................................................................................................................... 332 Writing Your First IntraWeb Application
................................................................................................................................... 343 Images and Graphics
................................................................................................................................... 354 Extending IntraWeb
................................................................................................................................... 365 Working with COM
................................................................................................................................... 366 Working with ClientDataSet Components
................................................................................................................................... 367 Working with PDA
................................................................................................................................... 378 Miscellaneous
Part VIII Form Management 40
................................................................................................................................... 401 Working with Forms
................................................................................................................................... 402 Update Mode
................................................................................................................................... 403 IntraWeb Frame
................................................................................................................................... 414 Visual Form Inheritance
................................................................................................................................... 425 Managing Forms
................................................................................................................................... 426 Form List
................................................................................................................................... 427 Showing Forms
................................................................................................................................... 428 Hiding Forms
................................................................................................................................... 439 Destroying Forms
................................................................................................................................... 4310 Passing Data Between Forms
................................................................................................................................... 4511 Note for C++ Builder users
Part IX State Management 47
................................................................................................................................... 471 Inherent State
................................................................................................................................... 472 Restrictions
IIContents
II
Copyright Atozed Software
................................................................................................................................... 473 Safe Storage
................................................................................................................................... 494 Complex State and the Back Button
. ... .... ... .... ... .... .... ... .... ... .... ... .... .... ... .... ... .... ... .... ... .... .... ... .... ... .... ... .... ... .... .... ... .... ... .... ... .... ... .... .... ... .... 50Using the OnBackButton Event
Part X Session Management 53
................................................................................................................................... 531 WebApplication Object
................................................................................................................................... 532 Referencing the Session
................................................................................................................................... 533 Lifetime
................................................................................................................................... 544 Implementation
................................................................................................................................... 545 Storing Additional Data
................................................................................................................................... 546 Session Related Events
................................................................................................................................... 557 Memory Consumption
................................................................................................................................... 558 Component Reference
................................................................................................................................... 559 How does Session Management Work?
. ... .... ... .... ... .... .... ... .... ... .... ... .... .... ... .... ... .... ... .... ... .... .... ... .... ... .... ... .... ... .... .... ... .... ... .... ... .... ... .... .... ... .... 55URL
. ... .... ... .... ... .... .... ... .... ... .... ... .... .... ... .... ... .... ... .... ... .... .... ... .... ... .... ... .... ... .... .... ... .... ... .... ... .... ... .... .... ... .... 56Cookies
. ... .... ... .... ... .... .... ... .... ... .... ... .... .... ... .... ... .... ... .... ... .... .... ... .... ... .... ... .... ... .... .... ... .... ... .... ... .... ... .... .... ... .... 56Hidden Fields
Part XI Layout Managers and Templates 58
................................................................................................................................... 581 What is a Layout Manager?
................................................................................................................................... 582 Form Layout
................................................................................................................................... 583 HTML Templates
................................................................................................................................... 604 System Templates
Part XII Server Controller 62
................................................................................................................................... 621 What is the Server Controller?
................................................................................................................................... 622 Properties
Part XIII Writing Custom Components 64
................................................................................................................................... 641 Overview
................................................................................................................................... 642 Under Construction
................................................................................................................................... 643 Source Code
................................................................................................................................... 644 Core Server
................................................................................................................................... 645 Third Party Program
Part XIV Javascript 66
................................................................................................................................... 661 Overview
................................................................................................................................... 662 Areas of Implementation
................................................................................................................................... 663 Using ScriptEvents
. ... .... ... .... ... .... .... ... .... ... .... ... .... .... ... .... ... .... ... .... ... .... .... ... .... ... .... ... .... ... .... .... ... .... ... .... ... .... ... .... .... ... .... 68Writing JavaScript events
. ... .... ... .... ... .... .... ... .... ... .... ... .... .... ... .... ... .... ... .... ... .... .... ... .... ... .... ... .... ... .... .... ... .... ... .... ... .... ... .... .... ... .... 69More Script Events
................................................................................................................................... 704 Javascript Functions
. ... .... ... .... ... .... .... ... .... ... .... ... .... .... ... .... ... .... ... .... ... .... .... ... .... ... .... ... .... ... .... .... ... .... ... .... ... .... ... .... .... ... .... 70Common Functions
IntraWeb ManualIII
Copyright Atozed Software

Part XV Page Mode 73
................................................................................................................................... 731 Introduction to Page Mode
................................................................................................................................... 732 Working with Page Mode
................................................................................................................................... 773 IntraWeb and Websnap
. ... .... ... .... ... .... .... ... .... ... .... ... .... .... ... .... ... .... ... .... ... .... .... ... .... ... .... ... .... ... .... .... ... .... ... .... ... .... ... .... .... ... .... 78Creating the Demo
. ... .... ... .... ... .... .... ... .... ... .... ... .... .... ... .... ... .... ... .... ... .... .... ... .... ... .... ... .... ... .... .... ... .... ... .... ... .... ... .... .... ... .... 84Running the Demo
................................................................................................................................... 874 IntraWeb Pages (IWP)
. ... .... ... .... ... .... .... ... .... ... .... ... .... .... ... .... ... .... ... .... ... .... .... ... .... ... .... ... .... ... .... .... ... .... ... .... ... .... ... .... .... ... .... 87Introduction to IWP
. ... .... ... .... ... .... .... ... .... ... .... ... .... .... ... .... ... .... ... .... ... .... .... ... .... ... .... ... .... ... .... .... ... .... ... .... ... .... ... .... .... ... .... 88Creating the Project
. ... .... ... .... ... .... .... ... .... ... .... ... .... .... ... .... ... .... ... .... ... .... .... ... .... ... .... ... .... ... .... .... ... .... ... .... ... .... ... .... .... ... .... 89Preparing the server
. ... .... ... .... ... .... .... ... .... ... .... ... .... .... ... .... ... .... ... .... ... .... .... ... .... ... .... ... .... ... .... .... ... .... ... .... ... .... ... .... .... ... .... 93Creating an IWP page
. ... .... ... .... ... .... .... ... .... ... .... ... .... .... ... .... ... .... ... .... ... .... .... ... .... ... .... ... .... ... .... .... ... .... ... .... ... .... ... .... .... ... .... 94Creating an IWP form
. ... .... ... .... ... .... .... ... .... ... .... ... .... .... ... .... ... .... ... .... ... .... .... ... .... ... .... ... .... ... .... .... ... .... ... .... ... .... ... .... .... ... .... 95Deploying the files
Part XVI IntraWeb Caching Mechanism 97
................................................................................................................................... 971 Caching Files
Part XVII Deployment 99
................................................................................................................................... 991 Installation
. ... .... ... .... ... .... .... ... .... ... .... ... .... .... ... .... ... .... ... .... ... .... .... ... .... ... .... ... .... ... .... .... ... .... ... .... ... .... ... .... .... ... .... 99Overview
. ... .... ... .... ... .... .... ... .... ... .... ... .... .... ... .... ... .... ... .... ... .... .... ... .... ... .... ... .... ... .... .... ... .... ... .... ... .... ... .... .... ... .... 99External Files
. ... .... ... .... ... .... .... ... .... ... .... ... .... .... ... .... ... .... ... .... ... .... .... ... .... ... .... ... .... ... .... .... ... .... ... .... ... .... ... .... .... ... .... 99Permissions
. ... .... ... .... ... .... .... ... .... ... .... ... .... .... ... .... ... .... ... .... ... .... .... ... .... ... .... ... .... ... .... .... ... .... ... .... ... .... ... .... .... ... .... 99ISAPI
... .... ... .... ... .... .... ... .... ... .... ... .... .... ... .... ... .... ... .... ... .... .... ... .... ... .... ... .... ... .... .... ... .... ... .... ... .... ... .... .... ... .... 99Deploying in IIS
. .... ... .... ... .... .... ... .... ... .... ... .... .... ... .... ... .... ... .... ... .... .... ... .... ... .... ... .... ... .... .... ... .... ... .... ... .... ... .... .... ... .... .. 103ISAPI Utilities
. .... ... .... ... .... .... ... .... ... .... ... .... .... ... .... ... .... ... .... ... .... .... ... .... ... .... ... .... ... .... .... ... .... ... .... ... .... ... .... .... ... .... .. 103ISAPI Hosting
. .... ... .... ... .... .... ... .... ... .... ... .... .... ... .... ... .... ... .... ... .... .... ... .... ... .... ... .... ... .... .... ... .... ... .... ... .... ... .... .... ... .... .. 104Common ISAPI Issues
..... ... .... ... .... .... ... .... ... .... ... .... .... ... .... ... .... ... .... ... .... .... ... .... ... .... ... .... ... .... .... ... .... ... .... ... .... ... .... .... ... .... .. 105Useful ISAPI links
................................................................................................................................... 1052 Methods
.. .... ... .... ... .... .... ... .... ... .... ... .... .... ... .... ... .... ... .... ... .... .... ... .... ... .... ... .... ... .... .... ... .... ... .... ... .... ... .... .... ... .... .. 105Notes
.. .... ... .... ... .... .... ... .... ... .... ... .... .... ... .... ... .... ... .... ... .... .... ... .... ... .... ... .... ... .... .... ... .... ... .... ... .... ... .... .... ... .... .. 105Stand Alone
.. .... ... .... ... .... .... ... .... ... .... ... .... .... ... .... ... .... ... .... ... .... .... ... .... ... .... ... .... ... .... .... ... .... ... .... ... .... ... .... .... ... .... .. 106ISAPI / NSAPI / Apache DSO / CGI / Win-CGI
.. .... ... .... ... .... .... ... .... ... .... ... .... .... ... .... ... .... ... .... ... .... .... ... .... ... .... ... .... ... .... .... ... .... ... .... ... .... ... .... .... ... .... .. 106Windows Service
................................................................................................................................... 1073 Launch URLs
.. .... ... .... ... .... .... ... .... ... .... ... .... .... ... .... ... .... ... .... ... .... .... ... .... ... .... ... .... ... .... .... ... .... ... .... ... .... ... .... .... ... .... .. 107Linking to IntraWeb Applications
.. .... ... .... ... .... .... ... .... ... .... ... .... .... ... .... ... .... ... .... ... .... .... ... .... ... .... ... .... ... .... .... ... .... ... .... ... .... ... .... .... ... .... .. 107Sessions
.. .... ... .... ... .... .... ... .... ... .... ... .... .... ... .... ... .... ... .... ... .... .... ... .... ... .... ... .... ... .... .... ... .... ... .... ... .... ... .... .... ... .... .. 107Passing Parameters
................................................................................................................................... 1094 Converting Project Types
.. .... ... .... ... .... .... ... .... ... .... ... .... .... ... .... ... .... ... .... ... .... .... ... .... ... .... ... .... ... .... .... ... .... ... .... ... .... ... .... .... ... .... .. 109Converting from Standalone to ISAPI
.. .... ... .... ... .... .... ... .... ... .... ... .... .... ... .... ... .... ... .... ... .... .... ... .... ... .... ... .... ... .... .... ... .... ... .... ... .... ... .... .... ... .... .. 110Converting from StandAlone to ISAPI in CBuilder
.. .... ... .... ... .... .... ... .... ... .... ... .... .... ... .... ... .... ... .... ... .... .... ... .... ... .... ... .... ... .... .... ... .... ... .... ... .... ... .... .... ... .... .. 111Converting from ISAPI to StandAlone
................................................................................................................................... 1115 Additional Linux Information
.. .... ... .... ... .... .... ... .... ... .... ... .... .... ... .... ... .... ... .... ... .... .... ... .... ... .... ... .... ... .... .... ... .... ... .... ... .... ... .... .... ... .... .. 111Overview
................................................................................................................................... 1126 Application ports
Part XVIII Performance Evaluations 114
................................................................................................................................... 1141 Tips
IVContents
IV
Copyright Atozed Software
Part XIX Scaling IntraWeb Applications 116
................................................................................................................................... 1161 Scaling Methods
................................................................................................................................... 1162 Distributing the IntraWeb Application
Part XX Secure HTTP / SSL 119
................................................................................................................................... 1191 Introduction
................................................................................................................................... 1192 Enabling SSL
................................................................................................................................... 1193 Converting Certificates to PEM Format
................................................................................................................................... 1204 Example
Index 121
IntraWeb ManualV
Copyright Atozed Software

"In a nutshell, IntraWeb does things the Delphi way. ..... So am Iimpressed? Yes, very much so. ..... As I've examined WebSnap
and compared it with IntraWeb, it's clear to me that IntraWeb is thesort of technology that I would have expected to see from Borland
but didn't."
Delphi Magazine, March 2002
1
Copyright Atozed Software

Section
I
Welcome 3
Copyright Atozed Software
1 Welcome
IntraWeb is a revolutionary new way to create web-based applications. Built upon Web Solution Builderand earlier versions of IntraWeb, it extends the technology of both of these, providing an excellent toolfor creating Internet, Intranet and Extranet applications in a quick and easy to maintain manner.
Many web-based development tools require the user to have knowledge of CGI scripting, state trackingand complex client configurations. IntraWeb does away with all these hassles and overheads. Bysimply creating the application using the component suite within Delphi, and later registering it on theserver, clients can access the application using any browser that complies with HTML version 4. Theseinclude the latest versions of Netscape and Internet Explorer. Both of these have been fully tested withIntraWeb and are 100% compatible. No HTML, CGI or JavaScript coding is required; all the coding isdone using Delphi. For further flexibility, the application can also be run as a stand-alone executablelike any other Desktop application, providing debugging capabilities.
1.1 Other Documentation
Be sure to check the IntraWeb FAQ (available on the Atozed Software website) as well as theinformation available on the website itself. A lot of documentation is contained there that is not in themanual or the help file and to keep it accurate and current we have not duplicated it.
This document is designed to be a manual, not a reference guide. The IntraWeb ComponentReference help file should be consulted when a reference for properties, events, methods andcomponents is needed.
1.2 How IntraWeb Works
IntraWeb works much like a normal executable application, with the exception that the user interface isa web browser instead of a window. After placing the application on a web server, a user can run aninstance of the application by using a URL to start a session. The user's information will be tracked bythe instance of the application in use, thus preventing loss of the information or mixing it up with otheruser information. For each user, new session information is created and tracked automatically andtransparently to the developer. The overhead is low and the capacity of an IntraWeb application issimilar to that of other web solutions such as ISAPI, CGI, or ASP.
IntraWeb is designed to build any sort of web-based application, whether it is a simple data entry form,a poll, or a complex application where clients have to be "logged in" for an extended period of time.
1.3 Limitations of the Evaluation Version
Limitations of the evaluation edition have been designed in such a way so that you can fully evaluateyour application with no time limits and no development restrictions. The only restrictions in theevaluation edition exist to hinder deployment.
Unique Port NumbersWhen using the evaluation version of IntraWeb, the port numbers that your IntraWeb applicationlistens will be unique upon each execution. Any port settings you may specify will be ignored. Testing isfacilitated in evaluation mode by use of the execute menu item as it automatically adjusts its URL forthe changing port.
IP RestrictionIn the evaluation version, IntraWeb applications only listen on the IP 127.0.0.1. No requests from otherIP addresses will be answered.
IntraWeb Manual4
Copyright Atozed Software
No ServicesIntraWeb applications cannot be installed or run as services in the evaluation version. Attempts to doso will result in errors.
No SSLSSL is disabled in the evaluation version.
No Deployment LicenseYou may not deploy any applications created with the evaluation version.
1.4 Technical Support
Up-to date support information is available at http://www.atozedsoftware.com/.
1.5 License
Single User License agreementThis is a legal agreement between you the end user, and Atozed Software (hereafter referred to simplyas Atozed). By using this software package you are agreeing to be bound by the terms of thisagreement. If you do not agree with the terms of this agreement, promptly uninstall this software.
Grant of License - Atozed grants to you the right to use one copy of the enclosed software for asingle developers use. This includes the ability to install on multiple computers so long as theinstallation is only used by the same single developer. In plain English this means you caninstall this software on your desktop and your laptop so long as you are the only one who usesthe software. You may not install on multiple computers for multiple developers to use.Furthermore you may not install on one computer for multiple developers to use aside fromnormal debugging purposes and peer review.You may make one copy of the software for backup purposes for use on your own computer.The original software must be backed up in unmodified form.You may not network the software or use it on more than a single computer or computerterminal at any time, unless a copy is purchased for each developer on the network that willuse the software. You may not rent or lease the software, but you may transfer the softwareand accompanying written material and this license to another person on a permanent basisprovided you retain no copies and the other person agrees to accept the terms and conditionsof this agreement.THIS SOFTWARE MAY NOT BE DISTRIBUTED, IN MODIFIED OR UNMODIFIED FORM, ASPART OF ANY APPLICATION PROGRAM OR OTHER SOFTWARE THAT IS A LIBRARY-TYPE PRODUCT, DEVELOPMENT TOOL OR OPERATING SYSTEM, OR THAT MAY BECOMPETITIVE WITH OR USED IN LIEU OF THE PROGRAM PRODUCT, WITHOUT THEEXPRESS WRITTEN PERMISSION OF Atozed.This license does include the right to distribute applications using the enclosed softwareprovided the above requirements are met.
Term - This agreement is effective until you terminate it by destroying the software, all copies andbackups. It will also terminate if you fail to follow this agreement. You agree upon terminationto destroy the software, together with all copies thereof including backups.
Copyright - The software is owned by Atozed and is protected by International laws and treaties.Therefore, you must treat the software like any other copyrighted material.
Warranty Clause
Limited Warranty - Atozed warrants that the software will perform substantially in accordance withthe accompanying written materials. Atozed does not warrant that the functions contained in
Welcome 5
Copyright Atozed Software
the software will meet your requirements, or any operation of the software will be uninterruptedor free of errors.
Disclaimer of Warranties - Atozed disclaims all other warranties, either expressed or implied,including but not limited to implied warranties of merchantability of fitness from particularpurpose, with respect to the software and accompanying written materials. Atozed will have noconsequential damages. In no event, shall Atozed or its suppliers be liable for damageswhatsoever, (including without limitation, damages for loss of business profits, businessinterruption, loss of business information, or any pecuniary loss), arising out of the use or theinability to this product, even if Atozed has been advised of the possibility of such damages.
Sole Remedy - Atozed holds no liability for remedy.
U.S. Government Restricted Rights - This software and documentation are provided withrestrictive rights. Use, duplication or disclosure by the Government is subject to restrictions setforth in Section c(1)(ii) of the Rights and Technical Data in Computer software clause at52.227-7013.
1.6 Credits, Acknowledgements and Copyrights
Every attempt has been made to provide credit to the proper sources. However in many cases multiplesources have been used only for consultation. In other cases original authors are not known, or nolicensing information was provided.
IntraWebIntraWeb is a commercial product and fully protected by International copyright laws and treaties.
Help and ManualHelp and Manual is used to produce this and other help files and documentation.http://www.ec-software.com/
Doc-O-MaticDoc-O-Matic 1.1 is used to build the IntraWeb Component Reference help file.http://www.doc-o-matic.com
Inno SetupThe IntraWeb installation is performed using Inno Setup which is Copyright © 1998-2001 JordanRussell with portions by Martijn Laan.
The A-Team and TeamZedThanks to the A-Team and TeamZed for their continued support of IntraWeb.
IndyIntraWeb uses Indy to provide much of its functionality. Indy requires that its copyright be included.Please note that this copyright only applies to the Indy code itself. More information on the licensing ofIndy can be found at http://www.nevrona.com/indy/license.html.
CopyrightPortions of this software are Copyright (c) 1993 - 2001, Chad Z. Hower (Kudzu) and the Indy Pit Crew -http://www.nevrona.com/Indy/
LicenseRedistribution and use in source and binary forms, with or without modification, are permitted providedthat the following conditions are met:
Redistributions of source code must retain the above copyright notice, this list of conditions and the
IntraWeb Manual6
Copyright Atozed Software
following disclaimer.
Redistributions in binary form must reproduce the above copyright notice, this list of conditions and thefollowing disclaimer in the documentation, about box and/or other materials provided with thedistribution.
No personal names or organizations names associated with the Indy project may be used to endorseor promote products derived from this software without specific prior written permission of the specificindividual or organization.THIS SOFTWARE IS PROVIDED BY Chad Z. Hower (Kudzu) and the Indy Pit Crew "AS IS'' AND ANYEXPRESS OR IMPLIED WARRANTIES, INCLUDING, BUT NOT LIMITED TO, THE IMPLIEDWARRANTIES OF MERCHANTABILITY AND FITNESS FOR A PARTICULAR PURPOSE AREDISCLAIMED. IN NO EVENT SHALL THE REGENTS OR CONTRIBUTORS BE LIABLE FOR ANYDIRECT, INDIRECT, INCIDENTAL, SPECIAL, EXEMPLARY, OR CONSEQUENTIAL DAMAGES(INCLUDING, BUT NOT LIMITED TO, PROCUREMENT OF SUBSTITUTE GOODS OR SERVICES;LOSS OF USE, DATA, OR PROFITS; OR BUSINESS INTERRUPTION) HOWEVER CAUSED ANDON ANY THEORY OF LIABILITY, WHETHER IN CONTRACT, STRICT LIABILITY, OR TORT(INCLUDING NEGLIGENCE OR OTHERWISE) ARISING IN ANY WAY OUT OF THE USE OF THISSOFTWARE, EVEN IF ADVISED OF THE POSSIBILITY OF SUCH DAMAGE.
Original TIWMenu authorThanks to the person who originally authored this component. However they forgot to mark their namein the .pas file. :)
Jason SouthwellFor contribution of several components and starter components.Contribution of TIWDataModulePool in IntraWeb 6
Thomas Brattlihttp://www.dhtmlcentral.comFor eXperience DHTML cool Menus which are the basis for TIWMainMenu.
Motty AdlerFor contribution of the idea and the source that TIWTimer is based on.
L. Relihan & P. KerlAuthors of the PacText Java applet used in the features demo.
Paul Stockton and Anthony LoweryFor their contribution to the calendar code.
OthersThanks to all the other parties who have assisted with both small and large contributions that we mayhave overlooked.
Jorrit B. JongmaContribution of compression routines and classes for HTTP compression in IntraWeb 6
1.7 Requirements
1.7.1 Overview
The only requirement is that users of IntraWeb developed applications have browsers that are HTML 4compatible *, since extensive use of HTML 4 and JavaScript are made. IntraWeb has been
Welcome 7
Copyright Atozed Software
extensively tested with Netscape and Internet Explorer and is supported with Mozilla, Netscape 6 andhigher and Internet Explorer 4.0 and higher.
NOTE: If you want Netscape 4 support you should use IntraWeb version 4. Which we will continue tomaintain and support. As of version 5.1, IntraWeb supports HTML 3.2 in PDA version. Therefore,Netscape 4 is supported to a certain extent (i.e., no use of CSS or JavaScript).
HTML 4IntraWeb uses HTML 4 and style sheets to achieve the coordinate placement of items and otherfeatures. Usage of templates or page mode can eliminate the need for style sheets.
JavaScriptJavaScript is used to allow many advanced client features. JavaScript also allows IntraWeb to controlthe browser and rendered pages. JavaScript is only required for Application Mode.
PDA (HTML 3.2) supportIntraweb 5.1 introduces PDA support. Based on HTML 3.2, 3.2 mode allows you to developapplications that are compatible with most PDA devices. 3.2 mode does NOT require JavaScript orCSS, making it entirely compatible with any device that supports HTML 3.2. Please note that to use 3.2you are restricted to the 3.2 controls that appear on the palette. Most of these controls are the same asthe standard IW controls, however due to HTML 3.2 restrictions and the lack of JavaScript, they offer insome cases less functionality than their standard counter-part.
1.7.2 Supported Browsers
Even with HTML and JavaScript standards in place, the browsers differ in many areas. IntraWebadjusts for these differences automatically. IntraWeb generates the appropriate HTML and JavaScriptcode for the browser. IntraWeb even knows about certain bugs in specific versions of each browserand works around them dynamically. In other cases, output for each browser is optimized. See thesection on Browser Implementations for more information.
Browser ImplementationsEven with HTML and JavaScript standards in place, the browsers differ in many areas. Much of this isbecause browsers often make extensions before such features are adopted as standards. Oftendifferent browsers implement similar features in incompatible ways.
IntraWeb adjusts for these differences automatically. IntraWeb generates the appropriate HTML andJavaScript code for the browser. IntraWeb even knows about certain bugs in specific versions of eachbrowser and works around them dynamically. In other cases, output for each browser is optimized.IntraWeb performs all of this transparently to you and without using Java, ActiveX, or any plug-ins.
Internet ExplorerInternet Explorer versions 5, and 6 are supported.Internet Explorer 4 is not officially supported anymore. However, any HTML 3.2 application should runwithout any problems on Internet Explorer 4.
NetscapeNetscape 7 is supported.Netscape 6 is not supported. The version 6 of Netscape has serious problems with HTML renderingand JavaScript implementation. A better version is available for download on the Netscape site.
Although Netscape 6 is not officially supported, most of the applications created with IntraWeb will runcorrectly on it. There are known problems with Netscape 6 when using partial updates, when using
IntraWeb Manual8
Copyright Atozed Software
regions, when caching files and when trying to use the TIWMenu control. There might be, however,more issues. When developing for Netscape 6, please make sure to test your application with a newerversion of Netscape (7 or greater) before searching for bugs.
MozillaMozilla is supported. Please make sure you're running the latest Mozilla update.
OperaOpera 7 is fully supported.Due to the amount of restrictions Opera 6 has with support for JavaScript, certain characteristics arenot supported currently in Opera. Many of these have to do with Anchors and alignment. Left and Toppositioning is supported with anchors, however, currently Right and Bottom are not. Other functionalityis supported in Opera.
Other BrowsersAny browser that supports HTML 3.2 rendering is supported. However, HTML 3.2 is limited in manyaspects, most noticeable being the lack of Javascript support.
1.7.3 Development Environments
When purchasing IntraWeb Enterprise Edition (does not apply to special offers), support is provided forthe following development environments:
· Delphi 5 (Pro and Enterprise)· Delphi 6 (Pro and Enterprise)· Delphi 7 (Professional, Enterprise and Architect)· C++ Builder 5· C++ Builder 6· Kylix 2· Kylix 3
There is also a Java edition that supports JBuilder, which is sold as a separate product

Section
II
IntraWeb Manual10
Copyright Atozed Software
2 What's New
2.1 Overview
IntraWeb 7 introduces many new features, including:
Hints ImprovedIn IW 7 it is no longer necessary to add an ESCAPE character when using the single quote(') characterin the hint's text.
Raw TextThe TIWURL, TIWURL32, TIWLink, TIWHyperLink32 controls now have the RawText property. Thisproperty refers to how the caption of those controls is rendered as HMTL. For more information on theRawText property please see the reference guide.
TIWTreeView Control ImprovedThe Font property of the TIWTreeView control contains now a CSSStyle member, that can be edited inthe designer.
Unknown Browser DetectionIn IntraWeb 7, unknown browser detection functions at form level as well as at server level. Thismeans that, when an unknown or unsupported browser is detected at form level, the application willredirect at the URL specified in the server controler' s property UnknownBrowser.
Individual Session TimeoutIn IntraWeb 7, when a session is started, it's timeout is defaulted to that of the global one, defined inthe Server Controller. (For more information about the session timeout in the Server Controller, refer tothe TIWServerControllerBase.SessionTimeout in the Reference Guide.) Later on, the session timeoutcan be set individually.
DeviceNotSupported Property in Server ControllerWhen an unsupported device is accessed (such as a PDA with an WML device), the applicationredirects to the location specified by this property, and if the property is left blank, an exception with themessage "Device not supported" is raised.
Small Changes:
· The ConvertSpaces property of TIWCustomText and TIWCustomText32 is defaulted to false. TheConvertSpaces property indicates wether spaces contained in the Text of the control should berendered as ' ' or ignored.
Features introduced in 6:
· Partial/Progressive page update· Scrollable regions· Slow connection simulation· Server side resizing· IWP file processing
· Templates/subtemplates with TIWRegion and TFrame· SSL on demand· .NET Common Code Base· HTTP compression· Improvements to align/anchors
What's New 11
Copyright Atozed Software
· Font size measured in pixels, instead of points· RGB entry in Color property editor
2.2 PDA Support
Intraweb 5.1 introduces support for hand-held devices (referred to from now on as PDA). By usingHTML 3.2 and no additional JavaScript or CSS, IntraWeb allows you to develop robust and efficientapplications for any HTML 3.2 compliant PDA device.
The following HTML 3.2 components are now available:· TIWLabel32 - label control· TIWEdit32 - edit box
· TIWButton32 - push button· TIWList32 - HTML list· TIWHRule32 - HTML horizontal rule· TIWListBox32 - listbox control· TIWComboBox32 - combobox control· TIWRadioGroup32 - radio group control· TIWImage32 - image control· TIWImageFile32 - image file control
· TIWURL32 - link control· TIWGrid32 - grid control· TIWMemo32 - memo control (HTML textarea)· TIWText32 - text control· TIWRectangle32 - rectangle control· TIWCheckBox32 - check box control· TIWHyperLink32 - link control· TIWDBEdit32 - data aware edit box
· TIWDBCheckBox32 - data aware checkbox· TIWDBComboBox32 - data aware combobox· TIWDBLabel32 - data aware label control· TIWDBListBox32 - data aware listbox control· TIWDBLookupComboBox32 - data aware combobox used for field lookups· TIWDBLookupListBox32 - data aware listbox used for field lookups· TIWDBMemo32 - data aware memo control (HTML textarea)
· TIWDBText32 - data aware text control· TIWDBImage32 - data aware image control· TIWDBRadioGroup32 - data aware radio group control· TIWTemplateProcessorHTML32 - template processor for HTML templates· TIWPageProducer32 - page producer used to work with WebSnap in page mode· TIWLayoutMgrHTML32 - layout manager
Section
III
Migration Guide 13
Copyright Atozed Software
3 Migration Guide
3.1 Overview
Changes required when upgrading from 6.1 to 7.0:
The TimeOutURL property changes to SessionTimeOutURLThe TimeOutURL property of the server controller changes its name to SessionTimeOutURL and is nolonger of type string, but TIWFileReference.
Visual User SessionIntraWeb 7 introduces visual user session object. The user session object is created by the IntraWebProject Wizard and it is in fact a Data Module. Some of the advantages of this approach are:
· components needed by the user session can be added directly by dropping them on the form.· it can be used as a data module, and all the session management is done by the application· new methods and members can be added to the user session, as before.
Previous user session objects are still compatible with IntraWeb 7, so there is no need of updating theuser session to the new type unless taking advantage of the new features is wanted.
Note: Although the new user session can function as a data module, when using data module pooling,a data module is still created.
Changes required when upgrading from 5.1 to 6.0:
The BGColor propertyFor easier and intuitive usage, the BackgroundColor properties of the form (TIWForm) and of the gridcells of dynamic grid (TIWDynGrid) have been renamed to BGColor. The BGColor name has beenchosen as it's used for background colors throughout the components of IntraWeb.When loading forms the contents of the old BackgroundColor property will be lost, and you'll have toset the desired color again in the BGColor property. Same thing applies when loading forms thatcontain TIWDynGrid controls.
ISAPI ProjectsThis change was introduced in the late stages of 5.1. For new applications, the wizard will automaticallycreate the correct DPR automatically. However, for existing projects, you need to add the followingcode to your DPR file (highlighted with bold):
ISAPIApp, IWInitISAPI, ServerController in 'ServerController.pas' {IWServerController:TIWServerController}, Unit1 in 'Unit1.pas' {IWForm1: TIWFormModuleBase};
{$R *.RES}
exports GetExtensionVersion, HttpExtensionProc, TerminateExtension;
Frames
IntraWeb Manual14
Copyright Atozed Software
You need to convert existing TFrame forms to IntraWeb frames. To do so, create a new IntraWebFrame using the project wizard and then cut and paste your components on the new frame. Moreinformation on how to create a IntraWeb Frame can be found in the IntraWeb Frame chapter of thismanual.
Changes required when upgrading from 5.0 to 5.1:
Whenever possible interfaces have remained the same. However is some situations it was deemedbetter to change interfaces for future expansion.
For the most part migrating from a 5.0 application to 5.1 is straightforward and this section is designedto assist you with this migration.
URLBaseTo use URLBase, you need to access it via WebApplication.AppURLBase
TIWImageThe UseBorder property has been deprecated. The new BorderOptions property should be usedinstead.
RWebApplicationRWebApplication is now simply WebApplication. Scope determines whether this threadvar version orthe property version is accessed.
Project FilesThe project files have a new format and standalone debug executables are now separate projects fromthe standalone service executables. Examples of each can be seen by looking at the Guess demo.
A new Standalone project file should look like this:
program Guess;
uses Forms, IWMain, Main in 'Main.pas' {formMain: TIWFormModuleBase}, ServerController in 'ServerController.pas' {IWServerController:TDataModule};
{$R *.res}
begin Application.Initialize; Application.CreateForm(TFormIWMain, formIWMain); Application.Run;end.
When converting Service applications, you need to add IWInitService to the uses clause of the DPRand replace the existing code with:
program GuessService;
uses IWInitService, Main in 'Main.pas' {formMain: TIWFormModuleBase}, ServerController in 'ServerController.pas' {IWServerController:TDataModule};
Migration Guide 15
Copyright Atozed Software
{$R *.res}
begin IWRun;end.
ISAPI and DSO projects have the following layout (DPR file):
library GuessDLL;
uses IWInitISAPI, Main in 'Main.pas' {formMain: TIWFormModuleBase}, ServerController in 'ServerController.pas' {IWServerController:TDataModule};
{$R *.RES}
begin IWRun;end.
library GuessDSO;
uses ApacheApp, IWInitApache, ServerController in 'ServerController.pas' {IWServerController: TIWServerControllerBase}, Main in 'Main.pas' {formMain: TIWFormModuleBase};
{$R *.res}
exports apache_module name 'GuessDSO_module';
begin IWRun;end.
When compiling for Apache 2, you need to make sure that you include IWInitApacheTwo in the usesclause as opposed to IWInitApache. If you create an Apache 2 application using the wizard, this isautomatic.
NOTE: You need to make the appropriate changes to the Delphi 7 VCL before your modules will workwith Apache 2. This information can be obtained on Dr. Bob's website athttp://www.drbob42.com/Delphi7/Apache2040.htm
Setting the main form and server controllerFor all types of projects (Standalone, ISAPI, DSO, Service), two initialization sections have to beadded. The first one should be in the Main form of the project and indicates which form is the mainform. For example, for the Guess project this would be:
initialization TformMain.SetAsMainForm;
IntraWeb Manual16
Copyright Atozed Software
SetAsMainForm is a class procedure of a TIWForm. When working on projects that support bothHTML 4.0 and PDA (HTML 3.2), it is VERY IMPORTANT that both the main form for the 4.0 versionand the 3.2 version each have an initialization section indicating that it is the main form (seeGuessMulti for examples).
The other initialization section is in regard to the server controller. This has to be set in theServerController itself and it is present for new projects:
initialization TIWServerController.SetServerControllerClass;
Here SetServerControllerClass is again a class procedure of IWServerControllerBase.
OnNewSessionThe OnNewSession event handler has a change in the signature. The new signature is:
OnNewSession(ASession: TIWApplication; var VMainForm: TIWBaseForm);
Be sure to include IWBaseForm and IWBaseControl in the uses clause of the ServerController ifconverting from a previous version.
Session and DataModule OwnersIn previous versions (prior to 5.1), the session owner would be ASession and then DataModule owner(if present) would be AOwner. In 5.1, these have changed to nil for the first and Self for the latter.
Deprecated properties on formsIt is recommendable that when you open a previously made project in versions prior to 5.1, you go
through all theforms and ignore any non-existent properties, before compiling your application.
TemplateProcessor propertyThis property has been renamed to LayoutMgr. Assign any TemplateProcessor components on your
form to thisnew property
Application PathIn previous versions of IW, you needed to use gsAppPath to obtain the application path. From 5.1 youcan use WebApplication.ApplicationPath to obtain this.
TIWFileTo obtain the size of a file, you no longer can access the Size property of the file stream. Instead youwill have to get it using the following method:
THTTPFiles(WebApplication.FileList).GetSize(IWFile1.Name)
Where IWFile1 is the TIWFile control used to transfer the file.

Section
IV
IntraWeb Manual18
Copyright Atozed Software
4 Installation
4.1 Installation of License Keys
The download for registered users with license keys is the same as the evaluation edition. If you havethe evaluation edition already installed you merely need to enter your license key using the registrationutility. The registration utility can be run from its icon in the IntraWeb program group.
4.2 IntraWeb for Windows
4.2.1 Uninstallation
Uninstalling IntraWeb is done in the same way as with other Windows applications. SelectAdd/Remove Program from the Control Panel and click on IntraWeb to remove it from the system.
4.2.2 Installation
The installation will automatically integrate IntraWeb into Delphi. Six new tabs will be created on thecomponent palette containing the IntraWeb components. One of them contains the non-databasecomponents (IW Standard), another contains the data-aware ones (IW Data), the third contains controlcomponents (IW Control), the fourth tab is for client side controls (IW Client Side), the fifth tab is forHTML 3.2 non-database components (IW Standard 3.2) and the sixth is for HTML 3.2 data-awarecomponents (IW Data 3.2). A new tab will also be created in the Delphi repository. All IntraWebapplications should be created using the templates contained in the repository under the tab IntraWeb.
The installation process copies the appropriate files to the Windows\System directory and to subfolders of all the Delphi environments selected. It also creates program group, which can be accessedvia the Start menu. The documentation is placed in this program group.
4.3 Installing IntraWeb for Linux
Please see the Linux installation instructions which are linked from the IntraWeb download page.
4.4 Upgrading to a new version
Before upgrading to a new version:
1. Uninstall previous versions of IntraWeb2. Make sure you do not have left-over files on your system. Check for:
· Intra*.bpl· Intra*.dcp· IW*.*
3. Remove any of the files found in step 2. Make sure you check your entire system.4. Install the new version of IntraWeb
Installation 19
Copyright Atozed Software
4.4.1 Delphi 7 Users
If you are using the version of IntraWeb that is included in Delphi 7, and you are entitled to an upgrade(from the version included to version 5.1), you need to perform the following steps to install IntraWeb:
1. Uninstall the version included in Delphi 72. Generate a new key request by using the Key Request Application that can be found on the
Atozed website (www.atozedsoftware.com).3. Install the new version and enter the key obtained from step 2.
Section
V
Demos 21
Copyright Atozed Software
5 Demos
5.1 Quick Start
Until you are ready to deploy, you should use the stand alone versions for development and testing.For evaluation purposes you should start with the simplest demo, "Guess". Guess is a very simplisticdemo (Our version of "Hello World"), but will introduce you to IntraWeb with a simple application. Afterthat you can then look at the other demos to see more advanced features of IntraWeb.
Many of the demos have multiple project files such as Features / FeaturesDLL / FeaturesDSO.Features is the standalone version, FeaturesDLL is the ISAPI version, and FeaturesDSO is the Apacheversion. They are different project files but share the same units and aside from the project file thesource code is identical.
Finally you can finish up with the "Features" demo which is not a "functional" application per se but ademo that demonstrates many of the features of IntraWeb merely to demonstrate them.
There are also additional user contributed source and demos available from the IntraWeb downloadpage on the Atozed website.
5.2 Building A Demo Step By Step
This chapter will follow the development of a simple demo, step by step. The demo is calledFormsDemo and shows how IntraWeb forms can interact with each other during a session.
Description
FormsDemo is a simple application which has two screens: first one displays an edit and a button.Clicking on the button will open the second screen which shows all data entered in the edit field of thefirst form and the number of times the user has visited the second screen. This is an stand aloneapplication developed with IntraWeb.
How Does The StandAlone Application Work?
A standalone application is an executable that listens on port defined by the user and serves backHTML pages.IntraWeb can build this kind of applications. The IntraWeb forms added to the project and the controlson it will be rendered as HTML content and served to the browser.
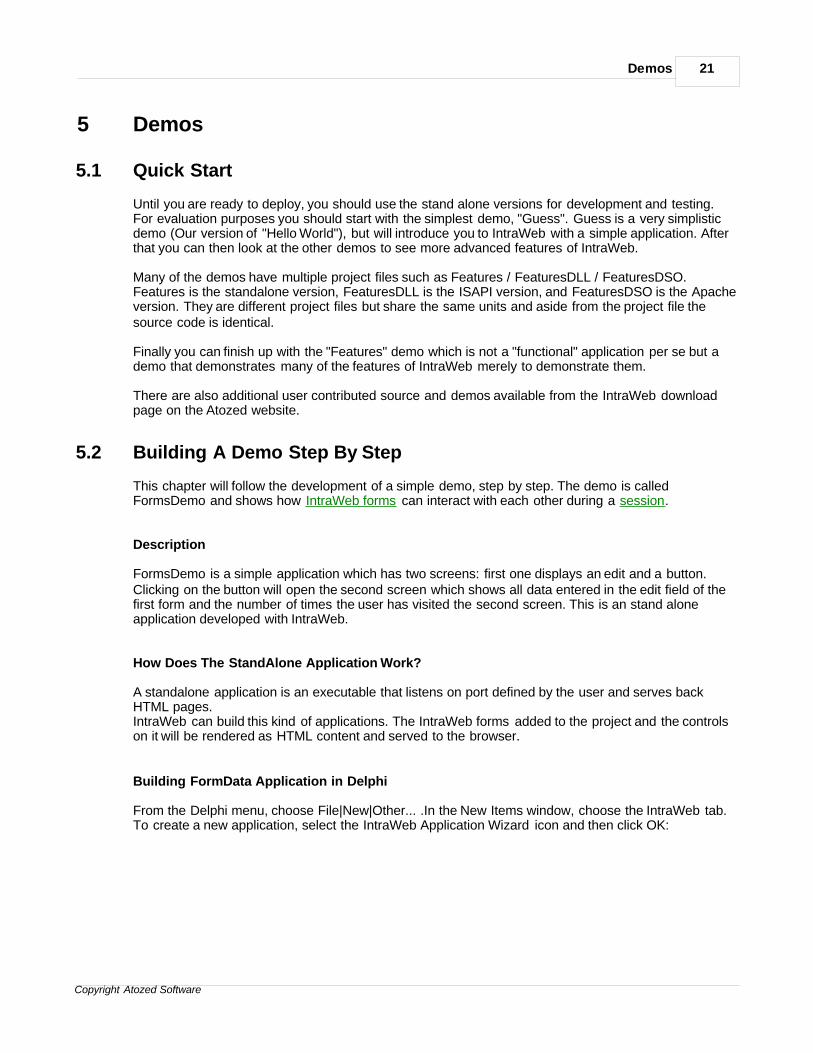
Building FormData Application in Delphi
From the Delphi menu, choose File|New|Other... .In the New Items window, choose the IntraWeb tab.To create a new application, select the IntraWeb Application Wizard icon and then click OK:
IntraWeb Manual22
Copyright Atozed Software
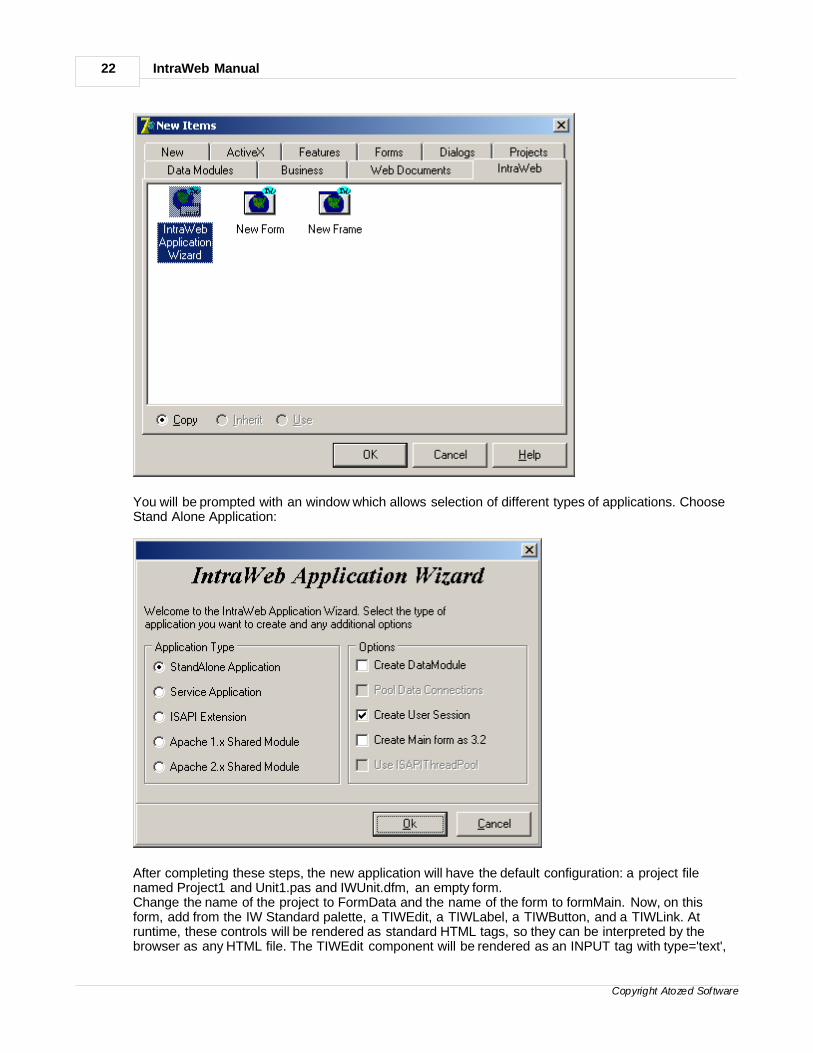
You will be prompted with an window which allows selection of different types of applications. ChooseStand Alone Application:
After completing these steps, the new application will have the default configuration: a project filenamed Project1 and Unit1.pas and IWUnit.dfm, an empty form.Change the name of the project to FormData and the name of the form to formMain. Now, on thisform, add from the IW Standard palette, a TIWEdit, a TIWLabel, a TIWButton, and a TIWLink. Atruntime, these controls will be rendered as standard HTML tags, so they can be interpreted by thebrowser as any HTML file. The TIWEdit component will be rendered as an INPUT tag with type='text',
Demos 23
Copyright Atozed Software
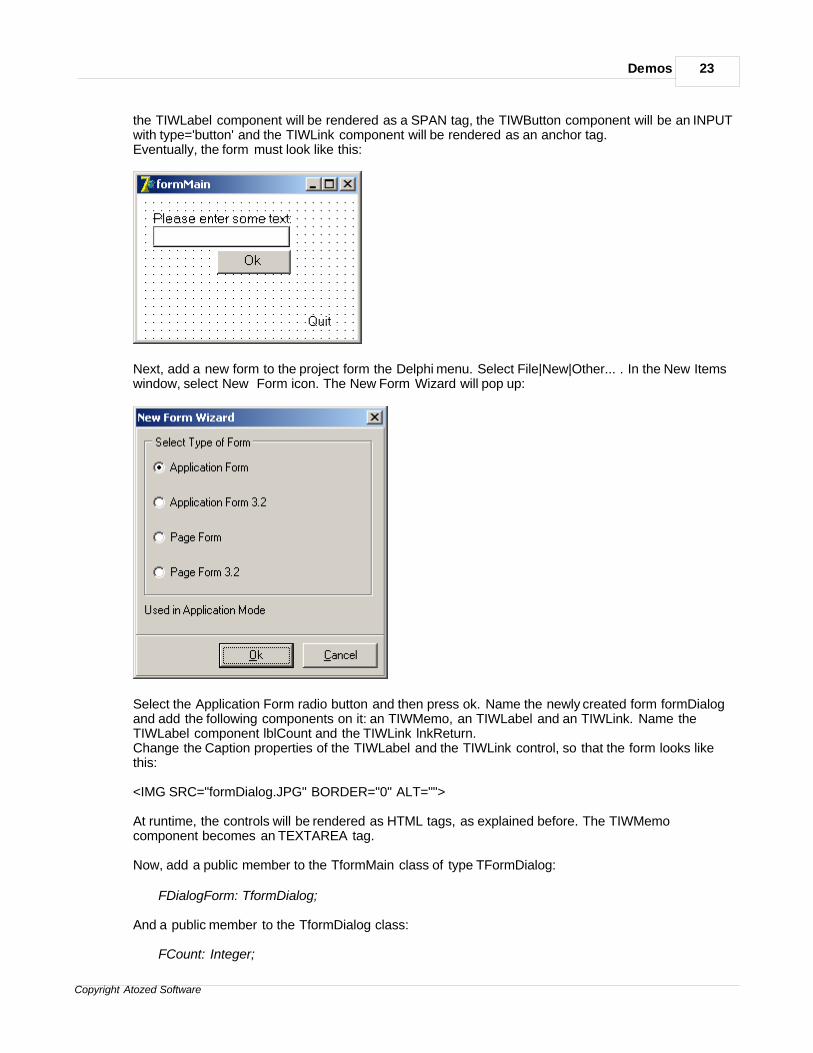
the TIWLabel component will be rendered as a SPAN tag, the TIWButton component will be an INPUTwith type='button' and the TIWLink component will be rendered as an anchor tag.Eventually, the form must look like this:
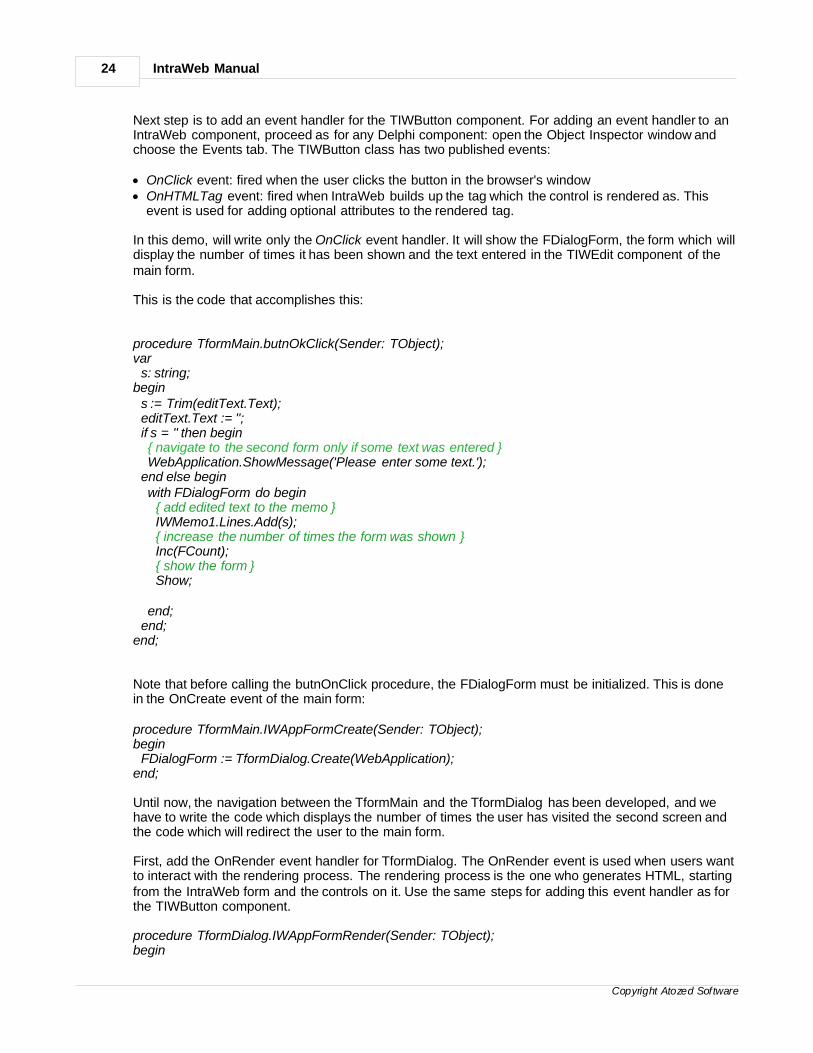
Next, add a new form to the project form the Delphi menu. Select File|New|Other... . In the New Itemswindow, select New Form icon. The New Form Wizard will pop up:
Select the Application Form radio button and then press ok. Name the newly created form formDialogand add the following components on it: an TIWMemo, an TIWLabel and an TIWLink. Name theTIWLabel component lblCount and the TIWLink lnkReturn.Change the Caption properties of the TIWLabel and the TIWLink control, so that the form looks likethis:
<IMG SRC="formDialog.JPG" BORDER="0" ALT="">
At runtime, the controls will be rendered as HTML tags, as explained before. The TIWMemocomponent becomes an TEXTAREA tag.
Now, add a public member to the TformMain class of type TFormDialog:
FDialogForm: TformDialog;
And a public member to the TformDialog class:
FCount: Integer;
IntraWeb Manual24
Copyright Atozed Software
Next step is to add an event handler for the TIWButton component. For adding an event handler to anIntraWeb component, proceed as for any Delphi component: open the Object Inspector window andchoose the Events tab. The TIWButton class has two published events:
· OnClick event: fired when the user clicks the button in the browser's window· OnHTMLTag event: fired when IntraWeb builds up the tag which the control is rendered as. This
event is used for adding optional attributes to the rendered tag.
In this demo, will write only the OnClick event handler. It will show the FDialogForm, the form which willdisplay the number of times it has been shown and the text entered in the TIWEdit component of themain form.
This is the code that accomplishes this:
procedure TformMain.butnOkClick(Sender: TObject);var s: string;begin s := Trim(editText.Text); editText.Text := ''; if s = '' then begin { navigate to the second form only if some text was entered } WebApplication.ShowMessage('Please enter some text.'); end else begin with FDialogForm do begin { add edited text to the memo } IWMemo1.Lines.Add(s); { increase the number of times the form was shown } Inc(FCount); { show the form } Show;
end; end;end;
Note that before calling the butnOnClick procedure, the FDialogForm must be initialized. This is donein the OnCreate event of the main form:
procedure TformMain.IWAppFormCreate(Sender: TObject);begin FDialogForm := TformDialog.Create(WebApplication);end;
Until now, the navigation between the TformMain and the TformDialog has been developed, and wehave to write the code which displays the number of times the user has visited the second screen andthe code which will redirect the user to the main form.
First, add the OnRender event handler for TformDialog. The OnRender event is used when users wantto interact with the rendering process. The rendering process is the one who generates HTML, startingfrom the IntraWeb form and the controls on it. Use the same steps for adding this event handler as forthe TIWButton component.
procedure TformDialog.IWAppFormRender(Sender: TObject);begin
Demos 25
Copyright Atozed Software
lablCount.Caption := 'This form has been shown ' + IntToStr(FCount) + ' times.';end;
This code changes the Caption of lablCount.Then add code for the OnClick event of lnkReturn.
procedure TformDialog.linkReturnClick(Sender: TObject);begin Hide;end;
Why does this code work? When wanting to show a form, you have to call it's Show method. For hidinga form, call it's Hide method. What happens with the forms in memory? They are kept in a stack,depending of the time they were created. When hiding the form from the top of the stack, the onecreated before it is shown.
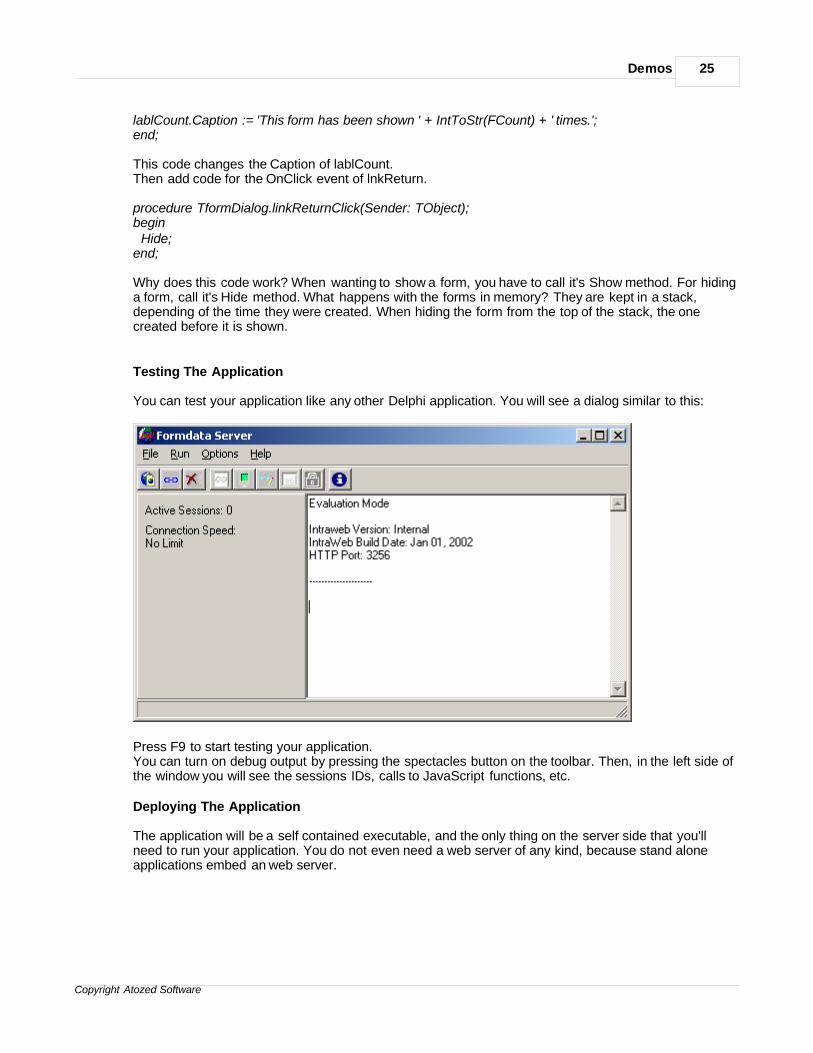
Testing The Application
You can test your application like any other Delphi application. You will see a dialog similar to this:
Press F9 to start testing your application.You can turn on debug output by pressing the spectacles button on the toolbar. Then, in the left side ofthe window you will see the sessions IDs, calls to JavaScript functions, etc.
Deploying The Application
The application will be a self contained executable, and the only thing on the server side that you'llneed to run your application. You do not even need a web server of any kind, because stand aloneapplications embed an web server.
IntraWeb Manual26
Copyright Atozed Software
5.3 Features
The Features demo is not designed as a functional application. It is designed as a demo to show offspecific features of IntraWeb. Use this demo to see how to use specific features in IntraWeb but alsoto see some of the things that IntraWeb can do.
5.4 Guess
Guess is a very simple application and contains only one form. It is however the ideal starter demo tounderstand how IntraWeb works. The demo serves as a simple guess the number game.
5.5 GuessWB
GuessWB is the Guess application implemented using page mode instead of applicationmode.
5.6 GuessMulti
GuessMulti is a demo which simultaneously supports normal browsers as well as PDA's in a singleexecutable.
5.7 FishFact
FishFact is an IntraWeb port of the popular Delphi Demo FishFact. This demo requires DBDemos.
5.8 FishFactDM
FishFactDM is the same as the FishFact demo, but demonstrates how to use Datamodules withIntraWeb. FishFactDM also shows how to present a paged grid. This demo requires DBDemos.
5.9 Phoenitics Customer Profiler
Phonetics Customer Profiler is a sample application that a cellular company might use to createcustom proposals for potential customers and assist them in choosing which calling plan suits thembest. The demo does not use a database, but it does demonstrate how to track information, usemultiple forms, and templates.
5.10 StandAloneSSL
StandAloneSSL demonstrates the use of stand alone mode with an SSL connection using samplecertificates.
5.11 WebSnapSurvey
WebSnap survey shows how to use IntraWeb page mode with WebSnap. This demo only works inDelphi 6 Enterprise and higher as WebSnap is new to Delphi 6 and only included in Delphi Enterprise.
Demos 27
Copyright Atozed Software
5.12 Custom StandAlone
The custom standalone demo demonstrates how to implement a standalone server with a custominterface using the IWStandAlone component.
5.13 Back Button
The Back Button demo demonstrates how to use the OnBackButton event of the IWServerController toenable back-button functionality in the browser.
5.14 Page Forms
PageForms is a simple demo that shows you how to implement PageMode application usingWebBroker. For more information see the PageMode section in the manual
5.15 FishMarket
FishMarket demonstrates how to use Re-Entry command in combination with cookie tracking to allowyou to exit and re-enter an IW application by passing parameters on the URL.
5.16 Die, Fly ! Die !
Die, Fly ! Die ! is a complex demo that demonstrates both basic and advanced techniques to use withIntraWeb.The demo is a virtual shop, when users can buy various fly killing products, ranging from a fly swatterto a nuclear bomb.
This demo is a replica of the well known ASPX demo IBuySpy from Microsoft, and it shows how easilycomplex tasks can be done with IntraWeb, without writing a single line of HTML or JavaScript code.
The demo makes heavy used of databases, and for this purpose the DBISAM engine from ElevateSoftware has been chosen. In order to compile and run the demo, you will need to obtain a copy ofDBISAM. An evaluation version as well as the full version can be obtained from their website athttp://www.elevatesoftware.com. To get the best results, please make sure you are downloading thelatest engine version.
Why DBISAM ?
Long discussions took place before choosing this engine. The choice is base on these facts:· it's fast· it has a small footprint· it compiles into the executable or dll and does not require additional components· is fully SQL 99 compliant· installation takes very little time
Source Code
Source code of Die, Fly ! Die ! has been written with the purpose of serving as a programming tutorialfor IntraWeb users. Browsing the code you can find out how to use frames, how to use theOnHTMLTag, how to program a shopping cart, how to store images in a database and retrieve them toa form and other tips and tricks users have requested over time.
IntraWeb Manual28
Copyright Atozed Software
5.17 WebMail32
WebMail32 is a powerful demo that show how easy you can get a complex PDA application usingIntraWeb.This demo simulates a simplistic web mailer that renders its output to HTML 3.2.
WebMail32 demonstrates the use of several HTML 3.2 controls, as well as the use of static anddynamic templates with IntraWeb and dynamic component creation.
IndyWebMail32 uses the TIdPOP3 component, that is part of the Indy Component Library. Indy is an opensource component library for Internet protocols and connections and comes bundled with Delphi 6 andDelphi 7.
You can also get the latest version of Indy for free from http://www.indyproject.org.
Section
VI
IntraWeb Manual30
Copyright Atozed Software
6 Debugging
6.1 Getting Started
When using standalone mode debugging is the same as any other Delphi application. Just set yourbreak points, watches, etc. and run.
6.2 Debug Output
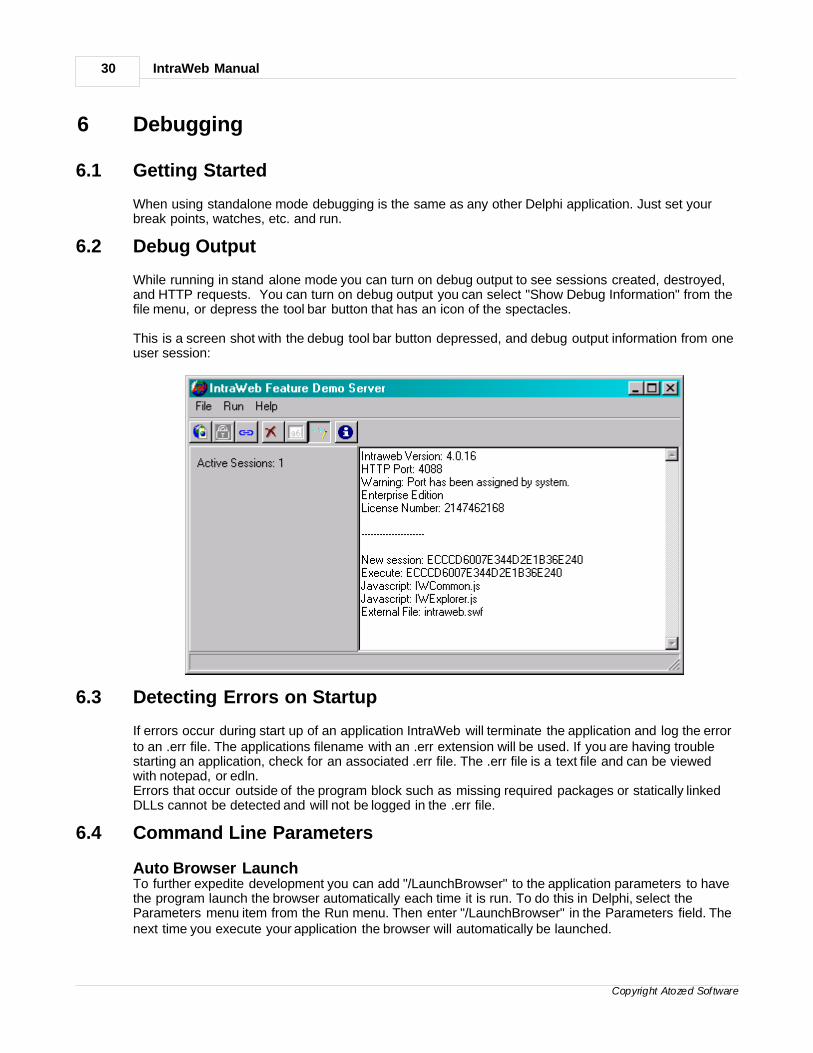
While running in stand alone mode you can turn on debug output to see sessions created, destroyed,and HTTP requests. You can turn on debug output you can select "Show Debug Information" from thefile menu, or depress the tool bar button that has an icon of the spectacles.
This is a screen shot with the debug tool bar button depressed, and debug output information from oneuser session:
6.3 Detecting Errors on Startup
If errors occur during start up of an application IntraWeb will terminate the application and log the errorto an .err file. The applications filename with an .err extension will be used. If you are having troublestarting an application, check for an associated .err file. The .err file is a text file and can be viewedwith notepad, or edln.Errors that occur outside of the program block such as missing required packages or statically linkedDLLs cannot be detected and will not be logged in the .err file.
6.4 Command Line Parameters
Auto Browser LaunchTo further expedite development you can add "/LaunchBrowser" to the application parameters to havethe program launch the browser automatically each time it is run. To do this in Delphi, select theParameters menu item from the Run menu. Then enter "/LaunchBrowser" in the Parameters field. Thenext time you execute your application the browser will automatically be launched.

Debugging 31
Copyright Atozed Software
Auto MinimizeThe debug screen can be told to start minimized by passing /minimize on the command line. This isuseful during development if combined with /LaunchBrowser
Section
VII
Development 33
Copyright Atozed Software
7 Development
7.1 Rethinking the User Interface
Many people try to design their web applications exactly like normal applications. If you try this, you willcreate interfaces that do not work well. Imagine making a windows application behave like a DOSapplication (WordPerfect did this with their initial Windows port). That would be an awkward interfacewould it not? Not only do you need to think differently about your user interface for the web, you alsoneed to realize that the web has limitations and design around them.
One example of this is DBGrids. In a normal Delphi application, it might be considered normal todisplay hundreds or thousands of records in a grid. Doing such on the web will create very large HTMLdocuments and very slow load times for the user.
Once developers realize this fact, they often ask for "Next" and "Previous" buttons and that the DBGridbe expanded to allow partial display. While this could be implemented, it would need to beimplemented either to consume large amounts of memory on the server, or by constantly requiring thedatabase which would consume less memory but would be slow. Instead of approaching it like anormal Delphi application, rethink your interface for the web.
Certainly not the only possibility, but a common one is the following technique. Instead of presentingyour users with thousands of records initially, present them with a blank grid and a search field.Require your users to present some basic criteria to locate the records that they need. Using thesearch criteria, you can then return dozens, or just a few hundred rows. Not only is this good forbandwidth, but it is a good user interface, and will minimize the load on your database.
Allowing users to enter search criteria still allows for the possibility that the results may still number inthe thousands and cause the very same problem that you were trying to avoid. To assist with this,TIWDBGrid has a RowLimit property. It defaults to 0, which means it is disabled. You can set it to amaximum value, and no matter how may rows the query returns, no more than the number in RowLimitwill be returned to the user.
If you think about this, you have probably seen this technique elsewhere. Many search engines limit thenumber of rows that are returned. This is not only for bandwidth reasons. In most cases, the databecomes diminishingly useful after a certain number. In cases where this is not true, simply too muchdata is given to the user at one time and they will likely filter it anyways.
If you still decide that you do want a "paged grid" consisting of small sets of data with next / previousoptions you can accomplish this by setting the TIWDBGrid's StartFirst property to false and setting theRowLimit property to the number of rows you wish to display at a given time. Then by positioning thedataset before display, you can move next / previous.
7.2 Writing Your First IntraWeb Application
All IntraWeb applications should be created using the IntraWeb Application Wizard in the IntraWeb tabin the repository. Click on File -> New -> Other and then choose the IntraWeb tab. Select the IntraWebApplication Wizard. Finally click Ok.
This creates a framework for a new IntraWeb stand alone application. Although the project can becompiled and executed at this stage, it does not do anything. The standard debug form comes updisplaying some information about IW and menu items to debug the application. Selecting the Execute(or pressing the F9 key) menu item will launch the browser with a blank page. This is because mainform does not contain any components or functionality yet.
program Project1;
IntraWeb Manual34
Copyright Atozed Software
uses Forms, IWMain, ServerController in 'ServerController.pas' {IWServerController:TIWServerController}, Unit1 in 'Unit1.pas' {IWForm1: TIWFormModuleBase};
{$R *.res}
begin Application.Initialize; Application.CreateForm(TFormIWMain, formIWMain); Application.Run;end.
The code in the figure above displays the contents of the project file. You can see that it is the same asa standard Delphi application. This is true for stand alone applications.
As mentioned previously, the new project is the basic building block for any IntraWeb application. Likeany other Delphi project, a main IntraWeb form is created and can be used as the main form of theapplication. To demonstrate the power and the facility of IW applications, below, a small example isshown.
1. Open up the default IWForm (IWUnit1.pas) that has been created.2. Drop a TIWButton, TIWEdit and TIWLabel on the form in no particular order.3. Assign the following code to the Button's OnClick event:
procedure TIWFormModule.IWButton1Click(Sender: TObject);begin IWLabel1.Caption := IWEdit1.Text;end;
Once the steps are complete, compile and run the application. To test it, press the F9 key. The defaultbrowser should be launched and display the main form. Enter some text in the text box and click on thebutton. The output is displayed in the label.
Granted what we have shown in this example is not rocket science. But, it has been created usingstandard Delphi code and without any HTML. The example presented has been chosen because of itssimplicity. The purpose is to demonstrate that programming IntraWeb applications is very much thesame as developing any other Delphi application. The same methods, properties, events, etc. can beused in the same way. However, IntraWeb is much more powerful and can be used to create fullyenabled database applications and more.
For a more detailed introduction to creating new applications and detailed tutorials, please see tutorialson the Atozed website at http://www.atozedsoftware.com.
7.3 Images and Graphics
IntraWeb supports graphics via the use of templates, TIWImage, TIWDBImage and TIWImageFile.There are many ways to use graphics with in IntraWeb, but these are the primary methods.
TemplatesUse of graphics in templates is done by inserting the graphics directly into the HTML. Graphics may beserved using the Files directory, or a standard web server.
TIWImageTIWImage is used for dynamic images. Each time an image is requested the image is converted to aJPG. This can be rather resource intensive and thus should only be used for images that will be
Development 35
Copyright Atozed Software
changed as part of an application's function.
For an example of this, please see the Dynamic Interactive Image demonstration in the Featuresdemo.
For static images that are not generated each time, use TIWImageFile.
TIWDBImageTIWDBImage converts images from a database field to a JPG automatically. It is used just like anormal TDBImage, it performs all the work necessary to display the image from the database field intothe browser.For an example of TIWDBImage, see either of the FishFact demos.
TIWImageFileTIWImageFile serves a file directly from a file on disk. Because it does no conversion of the image,TIWImageFile is an extremely efficient way to serve images and is much more efficient thanTIWImage. If you are using images that are completely static, you should always use TIWImageFile.
TIWImageFile provides for design time support as well by displaying the image at design time.However the image is merely displayed, the image data is not stored with the form. Wheneverdisplayed at design time the image is loaded from the file on disk.The filename specifies a full path and filename to the image file to display at design time.At run time, the path is ignored and only the filename is used. At run time, the image is expected to bein the files directory.
GIF SupportIntraWeb can support GIF files however the install does not install GIF support. Please see theIntraWeb FAQ for details on how to use GIF files with IntraWeb.
7.4 Extending IntraWeb
Custom ComponentsAll IntraWeb components are written using an open API that easily allows you to write your owncomponents and add them to IntraWeb just as you can with Delphi. To further facilitate the writing ofcomponents the source code for all IntraWeb components in included, even in the evaluation edition ofIntraWeb.
For further information on creating custom components please see the section "Writing CustomComponents" in this manual.
Embedding Raw HTMLYou can also embed your own HTML in your IntraWeb application without writing a component byusing the TIWText component. Simply drop a TIWText component on your form. Set the RawTextproperty to True, and the WantReturns to False. Finally, put the HTML in the Lines property and yourcustom HTML will be output as part of your form.
HTML TemplatesHTML templates (simply referred to as templates elsewhere) can be used to add advanced HTML intoyour application and customize the look of your application. Please see the section on layout managersfor more details.
IntraWeb Manual36
Copyright Atozed Software
7.5 Working with COM
Initialization of COM
IntraWeb can automatically make the necessary calls to initialize COM. This is very much useful whenworking with components such as ADO to access data. To use this feature, set the propertyComInitialization in the ServerController. It can take one of three possible values:
· ciNone: No COM intialization is called. This is the default.· ciNormal: COM is initialized. This is the method used when deploying Standalone applications built
with IntraWeb. It specifies the concurrency model as single-thread apartment.Internally, IntraWebwill make a call to CoInitialize(nil).
· ciMultiThreaded : Use this setting when requiring COM initialization and when deploying as an ISAPIDLL.This will initialize COM for multi-threaded object concurrency. Internally, IntraWeb will make acall to CoInitializeEx(nil, COINIT_MULTITHREADED).
Uninitialization is also taken care of automatically when the property is set to something other thanciNone.
Threads and COM
Most COM objects cannot be passed between threads. IntraWeb application are multi threaded HTTPservers that reuse threads, therefore you cannot store references to COM objects between twoaccesses to the same session or between sessions.
depending on your problem specific, you can either use a COM object in a single operation (not acrossthe whole session, but at one access at a time), then discard it, or marshal the COM interfaces neededby yourselves.
7.6 Working with ClientDataSet Components
If you are using a ClientDataSet component and you get an Access Violation when exiting theapplication, you need to add the DBClient unit in the application uses clause before IWMain.
The reason for the access violation is that if DBClient is not included in project file usesclause, it's internal interfaces are freed before all sessions are closed and when IW closes it'ssessions it will try to free ClientDataSet component, and you will get the access violation.
When DBClient is placed before IWMain IW will free sessions before DBClient interfaces arefreed.
7.7 Working with PDA
IntraWeb 5.1 introduces support for PDA. This is accomplished by restricting the output generated byIW application using pure HTML 3.2 without any additional JavaScript or Cascading Style Sheets.Although at first this would seem that application development is limited, it is important to understandthat the limitations are mostly imposed by the devices rather than IW. Since HTML 3.2 is a standard
Development 37
Copyright Atozed Software
that nearly all devices on the market support, it is a good option for developing web applicationsfocused on PDA's.
Developing 3.2 applicationsWhen developing PDA applications, you need to use Applications forms (alternatively Page forms) thatare of the class TIWAppForm32 (TIWPageForm32). This can be accomplished either using the Wizardto create a new application and selecting "Main Form 3.2" or adding a 3.2 form to an existingapplication.
Using 3.2 controlsPDA applications are restricted to controls that are of the class 3.2. There are two tabs on thecomponent palette that have the corresponding 3.2 version component of the standard IWcomponents. However, due to the restrictions imposed by HTML 3.2, these counterpart controlssometimes do not have all the functionality that the 4.0 (or normal) IW controls have. You can ONLYuse 3.2 controls for PDA applications.
Rendering and layoutBy default, when placing 3.2 controls on a form, these are rendered in vertically in tab order. This isideal for testing your application before finalizing the UI aspects of it. The reason for the verticalplacement is due to the fact that PDA's do not support CSS and therefore positioning cannot beaccomplished directly. To allow correct positioning, you have two alternatives. The first is to use aTIWLayoutMgrHTML32 component and design your form using the editor. The second option is to usea TIWTemplateProcessor32 and use templates to design the look of the application. However, it isimportant to remember that when using an external editor to design 3.2 forms, you need to restrict theHTML elements to 3.2 standard. Most HTML editors allow you to set this option before editing.
Setting the main formAs with normal IW applications, PDA versions need to have a main form defined. To do this, use theSetAsMainForm32 method in the initialization section of the form you require to be the main form. Thisprovides you with the flexibility of actually having ONE IW application serve both PDA's and non-PDAdevices by defining a main form for each one.
Running the applicationDuring development, it is much easier to test PDA applications using the computer you develop on. IWallows you to do this by launching your normal browser and testing the PDA version. To do so, youhave two alternatives:
1. Using the Standalone application, click on the PDA icon before launching the browser with theLaunch Browser button.2. Directly type the URL in the browser appending 32 at the end, e.g. http://127.0.0.1:8888/32
This will allow you to see the results of your IW PDA application on the browser.
When using the application directly from a PDA device, IW will detect the browser that the PDA deviceuses and automatically launch the PDA application.
Note: The error message "no main form is defined" occurs when you try to access an application thatdoesn't have HTML 3.2 forms with a browser that it's not able to display HTML 4.0. This might occurwith Netscape 4, as Netscape 4 doesn't have full support for HTML 4.0 and JavaScript.
7.8 Miscellaneous
External FilesFiles such as images and download can be accessed using relative paths located under the main
IntraWeb Manual38
Copyright Atozed Software
application folder. Create a folder named files and place all HTML objects referenced inside it. In theHTML page you can reference the images using:
img src="../files/image.jpg"
Be sure to use / and not \. Internet Explorer will correct for \, but other browsers will show brokenimages. In addition, this functionality is not limited to images and can be used for any file type.
Files accessed with the files URL are cached by the browser. If you wish to create dynamic files thatshould not be cached use ../filesnc/<filename> instead of ../files/<filename>. Files will still be retrievedfrom the same place in the files subdirectory, but the browser will be instructed not to cache them.
Other Form PropertiesBe sure to look at the properties on the form as well. There are properties that allow customization ofthe output that are often overlooked. These properties allow control over the HTML output, and more.
Server ControllerEach application has a ServerController unit. The ServerController contains properties to affect howthe application acts and behaves on a global scale. It also contains events that can be defined. Formore information, see the Server Controller chapter.
DatamodulesIf you use datamodules, please see the FishfactDM demo. One thing to note, if you link yourdatasource properties to a datamodule at design time like FishFactDM does, your datamodules MUSTbe owned by the users WebApplication. This is done in FishFactDM by setting the datamodule's ownerto the session data's owner, which is the WebApplication variable. If this is not done, the forms will notbe read in properly and all the forms will be linked to the first and same datamodule.

Section
VIII
IntraWeb Manual40
Copyright Atozed Software
8 Form Management
8.1 Working with Forms
The repository contains another icon, which is the IntraWeb Form. All new IntraWeb forms should becreated using File | New and choosing the IntraWeb Form. All forms used by an IntraWeb applicationmust be an IntraWeb-specific form. Standard Delphi forms are not compatible with IntraWeb. A newunit and form will be created and displayed on the screen. Working with IntraWeb forms differs a littlebit from working with standard Delphi forms. For instance, any form that is displayed must be doneusing the Show method of the form. In other words, ShowModal is not permitted or supported.
8.2 Update Mode
Starting with version 6, IntraWeb uses a revolutionary update model that will greatly improve yourapplication's performance. This is called partial updates.
Application forms (TIWForm) have now a new property, called UpdateMode. Setting this property toumAll will force IntraWeb to use the standard update mode, the traditional mode when the whole formis refreshed. Setting this property to umPartial will cause the form to refresh ony the controls that needrefreshing, this improving significantly the speed of your application, especially over slowerconnections.
Partial update is the most innovative technology in web development. However, due to the heavy useof scripting technologies, this update mode is available only on latest browsers and only in HTML 4.0mode.
Limitations of partial updates
When using partial updates, several things must be taken into the consideration.Here is a list of the situations in which partial updates won't work properly:
· TerminateAndRedirect(AURL, AMsg) won't work correctly if UpdateMode is umPartial· Dynamic component creation won't work if UpdateMode is umPartial. To use dynamic component
creation you'll have to use the umAll update mode· Changing the size of the controls at runtime doesn't work currently when UpdateMode is
umPartial. This is a known issue and will be corrected in a future version, but for the time beingsetting any size of a control (width, height etc.) at runtime does not work.
· The Treeview control won't work with umPartial update mode
· runtime assignment of event handlers won't work in umPartial
All of those situation are happening because of the complex JavaScript coding partial updates use.Some of these issues will be addressed in future versions of the product.
8.3 IntraWeb Frame
For using Delphi frames in your IntraWeb project, you must use the Frame Wizard which will create anIntraWeb frame, inherited form Delphi's TFrame.
First, from Delphi's main menu select File | New | Other... .In the New Items window, choose the IntaWeb tab and select New Frame:
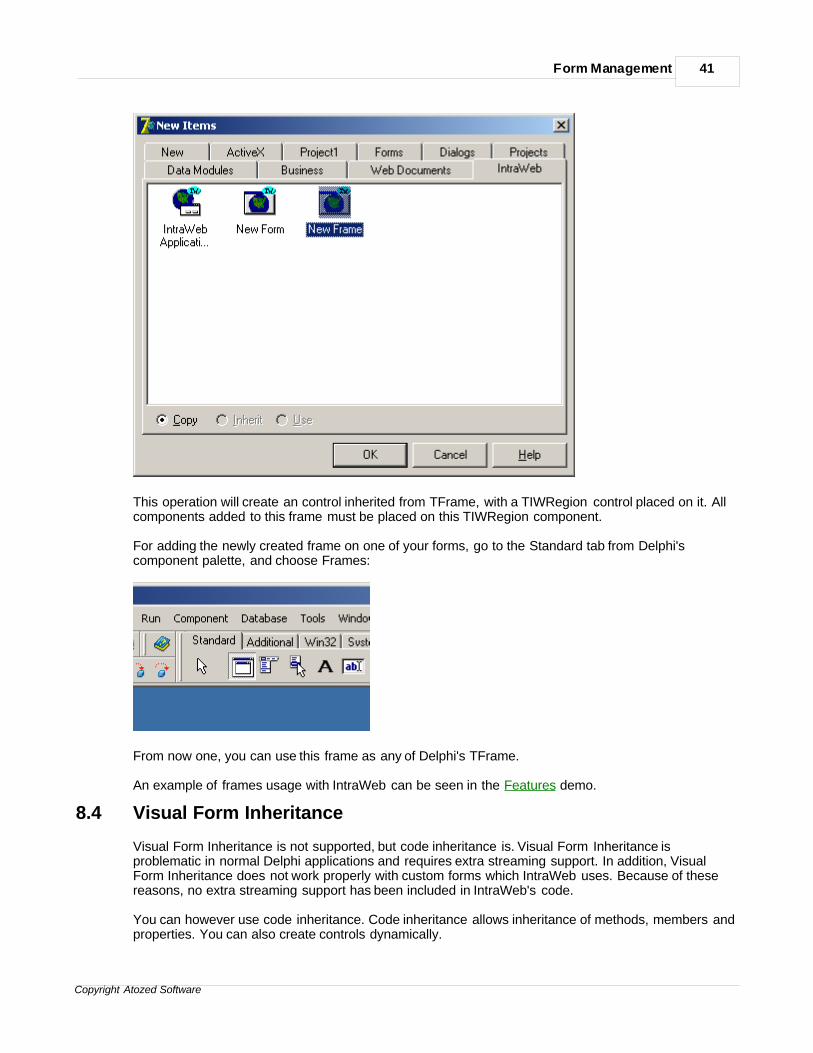
Form Management 41
Copyright Atozed Software
This operation will create an control inherited from TFrame, with a TIWRegion control placed on it. Allcomponents added to this frame must be placed on this TIWRegion component.
For adding the newly created frame on one of your forms, go to the Standard tab from Delphi'scomponent palette, and choose Frames:
From now one, you can use this frame as any of Delphi's TFrame.
An example of frames usage with IntraWeb can be seen in the Features demo.
8.4 Visual Form Inheritance
Visual Form Inheritance is not supported, but code inheritance is. Visual Form Inheritance isproblematic in normal Delphi applications and requires extra streaming support. In addition, VisualForm Inheritance does not work properly with custom forms which IntraWeb uses. Because of thesereasons, no extra streaming support has been included in IntraWeb's code.
You can however use code inheritance. Code inheritance allows inheritance of methods, members andproperties. You can also create controls dynamically.
IntraWeb Manual42
Copyright Atozed Software
8.5 Managing Forms
Form management in an IntraWeb application is very similar to that of a normal Delphi application butwith a few restrictions.Restrictions
1. Only one form may be visible at any time. This is because the form is actually shown in thebrowser.
2. Modal forms may not be used, however since only one form at a time may be visible, essentiallyall forms are modal.
3. Forms must be owned by WebApplication.
8.6 Form List
IntraWeb keeps a list of forms as part of the users session. It is kept in a stack like fashion with newlyshown forms being added to the top. When forms are hidden or released this list is used to determinethe form that should be activated if not explicitly instructed to show another form via a call to the .Showmethod of a form.
Normally the form list is never directly interacted with by the user but instead methods of the forms arecalled. However there are cases where direct interaction with the form list may be necessary. For thesecases TIWApplication contains several methods for interacting with the form list and are documentedin the help file.
8.7 Showing Forms
The general format to display a form is this:
TFormType.Create(WebApplication).Show;
This may be confusing at first, but it is just short hand for:
with TFormType.Create(WebApplication) do begin Show;end;
This should be familiar to you as it is the same as in a standard application except the ownerhere is WebApplication. One thing that is different however is that in a normal application theform is shown immediately when the .Show method is called. With an IntraWeb applicationthe call to the .Show method merely sets the form as the next active form to show after theevent exits and returns to IntraWeb. Only after the event executes will the form be shown.
A given instance of a form can be shown multiple times to bring it to the top. In this case theinstance of the form will be in the form list in multiple places.
8.8 Hiding Forms
In a normal application a form can be hidden without destroying the form by calling the .Hidemethod.The same functionality can be implemented in IntraWeb by calling its simply calling the .Hidemethod. The .Hide method will hide the form without destroying it as .Release does.
Form Management 43
Copyright Atozed Software
.Hide removes all references in the form list as .Release does but does not destroy the form.Because of this you must keep a reference to the form if you wish to redisplay it later,otherwise the form will become orphaned.
8.9 Destroying Forms
In a normal application when a form is no longer needed it can be destroyed using the .Free orthe .Destroy methods.
In an IntraWeb application it is similar, however you must not call the .Free or .Destroymethods directly. Instead you must call the .Release method. The .Release method does notactually destroy the form when called. The form will not be destroyed until the event exits andreturns control to IntraWeb. This is because .Release is usually called from within and eventof the form itself, although this is not always the case.
After release is called, just like in a normal application the active form becomes the one thatwas active prior to the destroyed form became active. If you do not wish to return the user tothe prior form you must call the .Show method for a different form.The .Show method can be called before or after .Release since neither takes effect untilcontrol is returned back to IntraWeb.When a form is released, all references to it in the form list are removed. This causes analteration in the order of the forms that will be shown when forms are hidden or released withno explicit .Show method calls.
8.10 Passing Data Between Forms
Data can be passed between form just like in any normal application. Since forms arepersistent information can be stored in member variables of form classes.
For demonstration purposes we will define two forms, TFormMain and TFormDialog.TFormMain is the main form and contains an button and an edit box. TFormDialog contains amemo field and a label.
When the user presses the button on the first form the text from the edit box will be added tothe memo on the dialog form and the form will be displayed. The dialog form will also displayhow many times it has been displayed and allow the user to return to the main form.
Main Form – Design Time
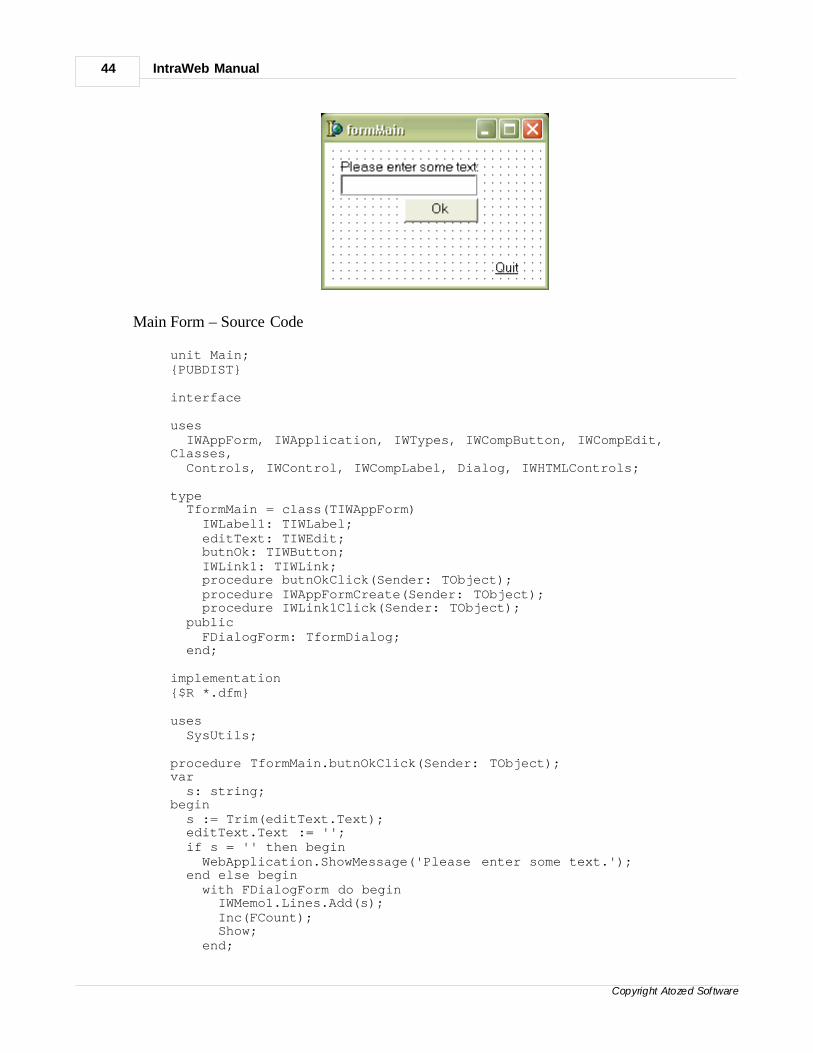
IntraWeb Manual44
Copyright Atozed Software
Main Form – Source Code
unit Main;{PUBDIST}
interface
uses IWAppForm, IWApplication, IWTypes, IWCompButton, IWCompEdit,Classes, Controls, IWControl, IWCompLabel, Dialog, IWHTMLControls;
type TformMain = class(TIWAppForm) IWLabel1: TIWLabel; editText: TIWEdit; butnOk: TIWButton; IWLink1: TIWLink; procedure butnOkClick(Sender: TObject); procedure IWAppFormCreate(Sender: TObject); procedure IWLink1Click(Sender: TObject); public FDialogForm: TformDialog; end;
implementation{$R *.dfm}
uses SysUtils;
procedure TformMain.butnOkClick(Sender: TObject);var s: string;begin s := Trim(editText.Text); editText.Text := ''; if s = '' then begin WebApplication.ShowMessage('Please enter some text.'); end else begin with FDialogForm do begin IWMemo1.Lines.Add(s); Inc(FCount); Show; end;
Form Management 45
Copyright Atozed Software
end;end;
procedure TformMain.IWAppFormCreate(Sender: TObject);begin FDialogForm := TformDialog.Create(WebApplication);end;
procedure TformMain.IWLink1Click(Sender: TObject);begin WebApplication.Terminate('Good bye!');end;
end.
IWLink1 OnClickThis event is hooked to the link with the caption "Quit" and simply terminates the user sessionwhen the user clicks the link.
OnCreateThe OnCreate event is called when the form is created. In this event another form is createdand the reference to it is stored as a member variable of this form so it can be accessed againlater.
butnOk.OnClickIn the OnClick event the edit box is checked for data. If no data existsWebApplication.ShowMessage is called to display a message to the user. After the message isdismissed the main form is shown again.
If the user did enter data, using FDialogForm (which was created in this form's OnCreate) isused. Data is added to the memo, and a member variable of TFormDialog is updated. It is thendisplayed using the .Show method. As you can see, data is very easy to pass between formsand is the same as in a normal Delphi application.
Complete DemoTo see the project in action, please see the FormData.dpr project in the Demos directory.
8.11 Note for C++ Builder users
Due to the way forms work in C++ Builder, the best place to initialize all automatic class instances isinside the form constructor rather than within the OnCreate event handler.
This will avoid the problem of instances being created twice, problem that arises because of thecreation order of the form elements in C++ Builder. In C++ Builder the OnCreate event handler iscalled before the form constructor, and the OnDestroy event handler is called after the form destructor.
To avoid such problems, please move all the automatic class instances initialization in the formconstructor, and keep in the OnCreate event handler only the dynamically allocated instances.

Section
IX
State Management 47
Copyright Atozed Software
9 State Management
9.1 Inherent State
Standard web development tools have automatic session management, but just means that ittracks session info for you. You still have to deal with the state info between pages, or proxyinformation in and out of a state object. The state objects are also usually limited to stringsand data must be marshaled in and out of strings, which is not feasible for complex data types.IntraWeb has something better, and that is inherent state management. What the heck is thatyou say? Some new buzzword? No. Ask yourself this, How do you manage state in a normalDelphi application? What? You do not have to? EXACTLY! That is how you manage state inIntraWeb.
9.2 Restrictions
Global VariablesGlobal variables in general should not be used. If you want to use a global variable that is"global" yet specific to each user session you need use variables that are tied to the usersession as described later.If however you want a variable that is global among all user sessions you can and should infact use a global variable. However as IntraWeb is a threaded environment you must take theproper steps to protect the variable from concurrent access.
ThreadVarsThreadVars should never be used in an IntraWeb application except as temporary storageunder controlled circumstances. IntraWeb is based on HTTP which is stateless. Thisessentially means that threads are not assigned to a specific user and a user is moved betweenthreads between HTTP requests.
9.3 Safe Storage
Form / Datamodule MembersSince IntraWeb forms and datamodules are persistent just like in a normal Delphi applicationyou can store information as member variables and properties. Such members should be usedwhen the form itself needs to store data about its instance or to receive input from anotherform.
User SessionThe user session (covered more in detail in the Session Management section of this manual)contains a .Data property that can hold a reference to an object. When you need to store userspecific information you can store it in the .Data property of the session. Data accepts aTObject instance and will destroy the TObject automatically when the session is destroyed.The easiest way is to create an object and add the fields that you wish, and then create yourobject and store it in the session's Data property when the session is created. The Phoneticsdemo shows an extended example of this.
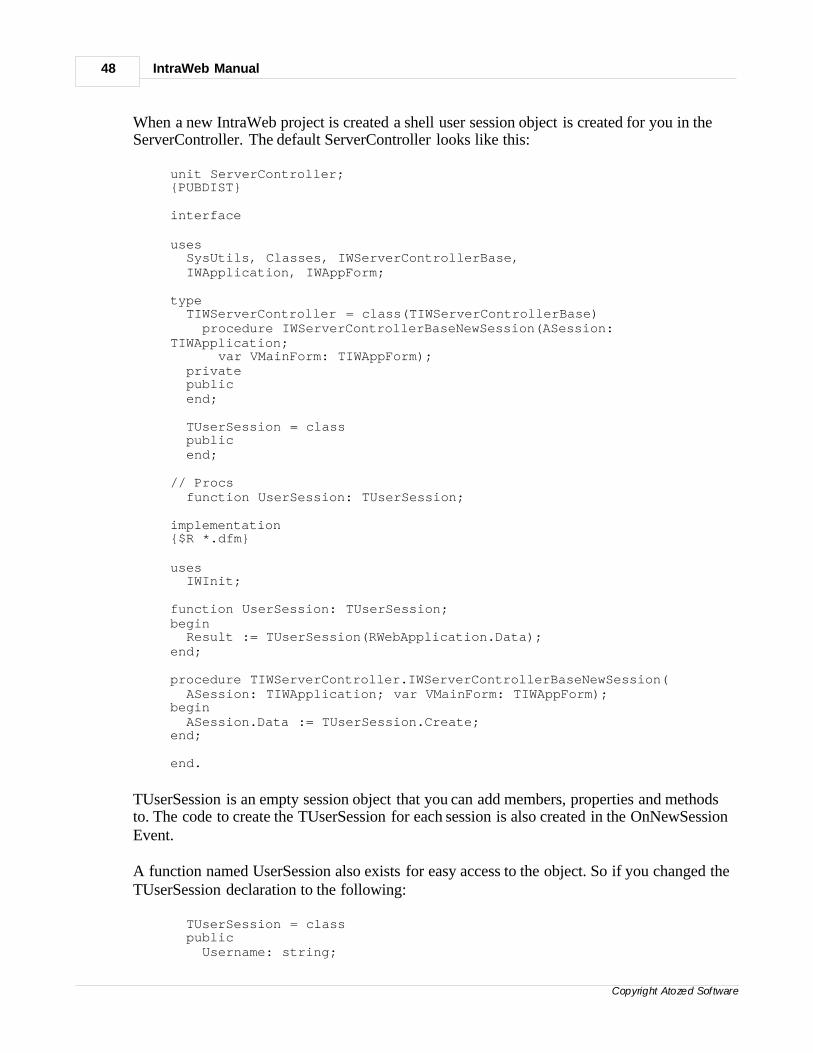
IntraWeb Manual48
Copyright Atozed Software
When a new IntraWeb project is created a shell user session object is created for you in theServerController. The default ServerController looks like this:
unit ServerController;{PUBDIST}
interface
uses SysUtils, Classes, IWServerControllerBase, IWApplication, IWAppForm;
type TIWServerController = class(TIWServerControllerBase) procedure IWServerControllerBaseNewSession(ASession:TIWApplication; var VMainForm: TIWAppForm); private public end;
TUserSession = class public end;
// Procs function UserSession: TUserSession;
implementation{$R *.dfm}
uses IWInit;
function UserSession: TUserSession;begin Result := TUserSession(RWebApplication.Data);end;
procedure TIWServerController.IWServerControllerBaseNewSession( ASession: TIWApplication; var VMainForm: TIWAppForm);begin ASession.Data := TUserSession.Create;end;
end.
TUserSession is an empty session object that you can add members, properties and methodsto. The code to create the TUserSession for each session is also created in the OnNewSessionEvent.
A function named UserSession also exists for easy access to the object. So if you changed theTUserSession declaration to the following:
TUserSession = class public Username: string;
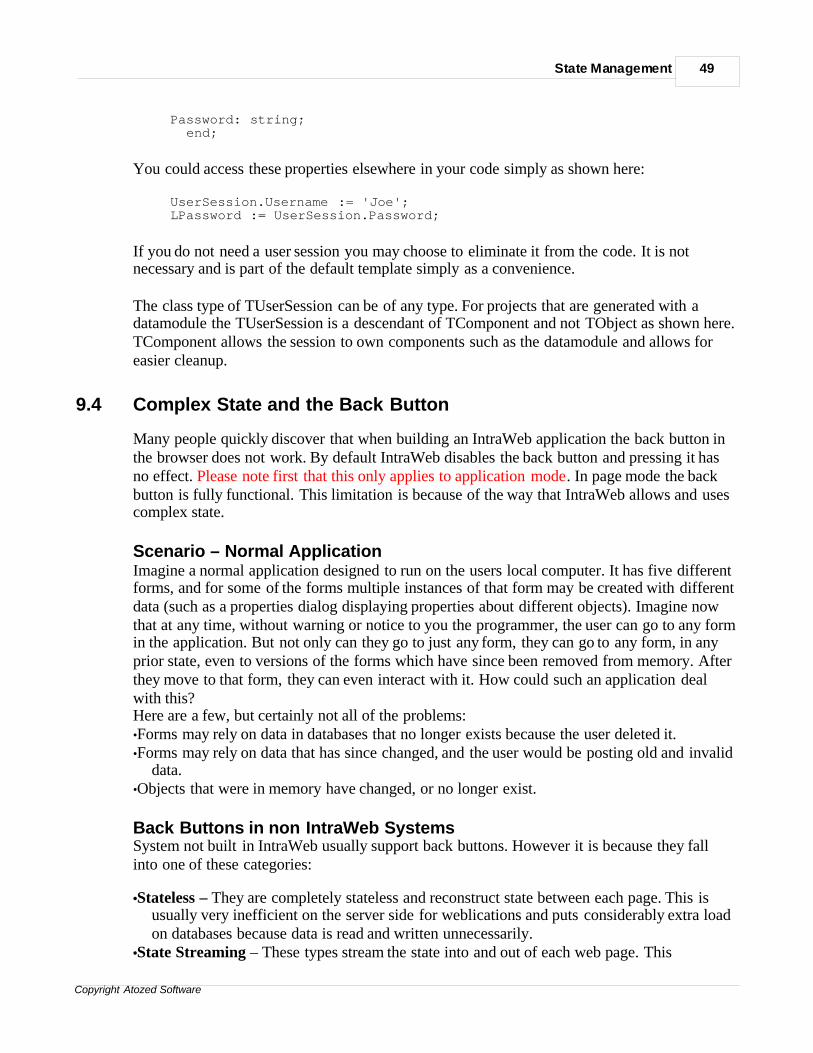
State Management 49
Copyright Atozed Software
Password: string; end;
You could access these properties elsewhere in your code simply as shown here:
UserSession.Username := 'Joe';LPassword := UserSession.Password;
If you do not need a user session you may choose to eliminate it from the code. It is notnecessary and is part of the default template simply as a convenience.
The class type of TUserSession can be of any type. For projects that are generated with adatamodule the TUserSession is a descendant of TComponent and not TObject as shown here.TComponent allows the session to own components such as the datamodule and allows foreasier cleanup.
9.4 Complex State and the Back Button
Many people quickly discover that when building an IntraWeb application the back button inthe browser does not work. By default IntraWeb disables the back button and pressing it hasno effect. Please note first that this only applies to application mode. In page mode the backbutton is fully functional. This limitation is because of the way that IntraWeb allows and usescomplex state.
Scenario – Normal ApplicationImagine a normal application designed to run on the users local computer. It has five differentforms, and for some of the forms multiple instances of that form may be created with differentdata (such as a properties dialog displaying properties about different objects). Imagine nowthat at any time, without warning or notice to you the programmer, the user can go to any formin the application. But not only can they go to just any form, they can go to any form, in anyprior state, even to versions of the forms which have since been removed from memory. Afterthey move to that form, they can even interact with it. How could such an application dealwith this?Here are a few, but certainly not all of the problems:•Forms may rely on data in databases that no longer exists because the user deleted it.•Forms may rely on data that has since changed, and the user would be posting old and invalid
data.•Objects that were in memory have changed, or no longer exist.
Back Buttons in non IntraWeb SystemsSystem not built in IntraWeb usually support back buttons. However it is because they fallinto one of these categories:
•Stateless – They are completely stateless and reconstruct state between each page. This isusually very inefficient on the server side for weblications and puts considerably extra loadon databases because data is read and written unnecessarily.
•State Streaming – These types stream the state into and out of each web page. This
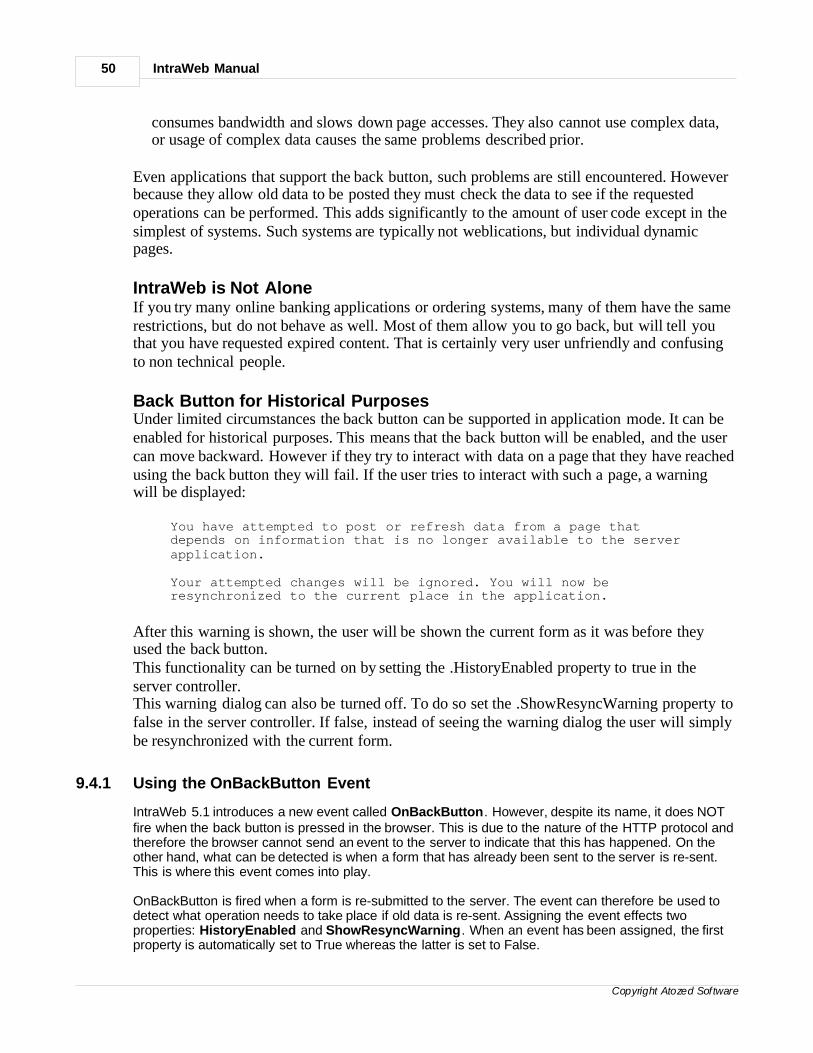
IntraWeb Manual50
Copyright Atozed Software
consumes bandwidth and slows down page accesses. They also cannot use complex data,or usage of complex data causes the same problems described prior.
Even applications that support the back button, such problems are still encountered. Howeverbecause they allow old data to be posted they must check the data to see if the requestedoperations can be performed. This adds significantly to the amount of user code except in thesimplest of systems. Such systems are typically not weblications, but individual dynamicpages.
IntraWeb is Not AloneIf you try many online banking applications or ordering systems, many of them have the samerestrictions, but do not behave as well. Most of them allow you to go back, but will tell youthat you have requested expired content. That is certainly very user unfriendly and confusingto non technical people.
Back Button for Historical PurposesUnder limited circumstances the back button can be supported in application mode. It can beenabled for historical purposes. This means that the back button will be enabled, and the usercan move backward. However if they try to interact with data on a page that they have reachedusing the back button they will fail. If the user tries to interact with such a page, a warningwill be displayed:
You have attempted to post or refresh data from a page thatdepends on information that is no longer available to the serverapplication.
Your attempted changes will be ignored. You will now beresynchronized to the current place in the application.
After this warning is shown, the user will be shown the current form as it was before theyused the back button.This functionality can be turned on by setting the .HistoryEnabled property to true in theserver controller.This warning dialog can also be turned off. To do so set the .ShowResyncWarning property tofalse in the server controller. If false, instead of seeing the warning dialog the user will simplybe resynchronized with the current form.
9.4.1 Using the OnBackButton Event
IntraWeb 5.1 introduces a new event called OnBackButton. However, despite its name, it does NOTfire when the back button is pressed in the browser. This is due to the nature of the HTTP protocol andtherefore the browser cannot send an event to the server to indicate that this has happened. On theother hand, what can be detected is when a form that has already been sent to the server is re-sent.This is where this event comes into play.
OnBackButton is fired when a form is re-submitted to the server. The event can therefore be used todetect what operation needs to take place if old data is re-sent. Assigning the event effects twoproperties: HistoryEnabled and ShowResyncWarning. When an event has been assigned, the firstproperty is automatically set to True whereas the latter is set to False.
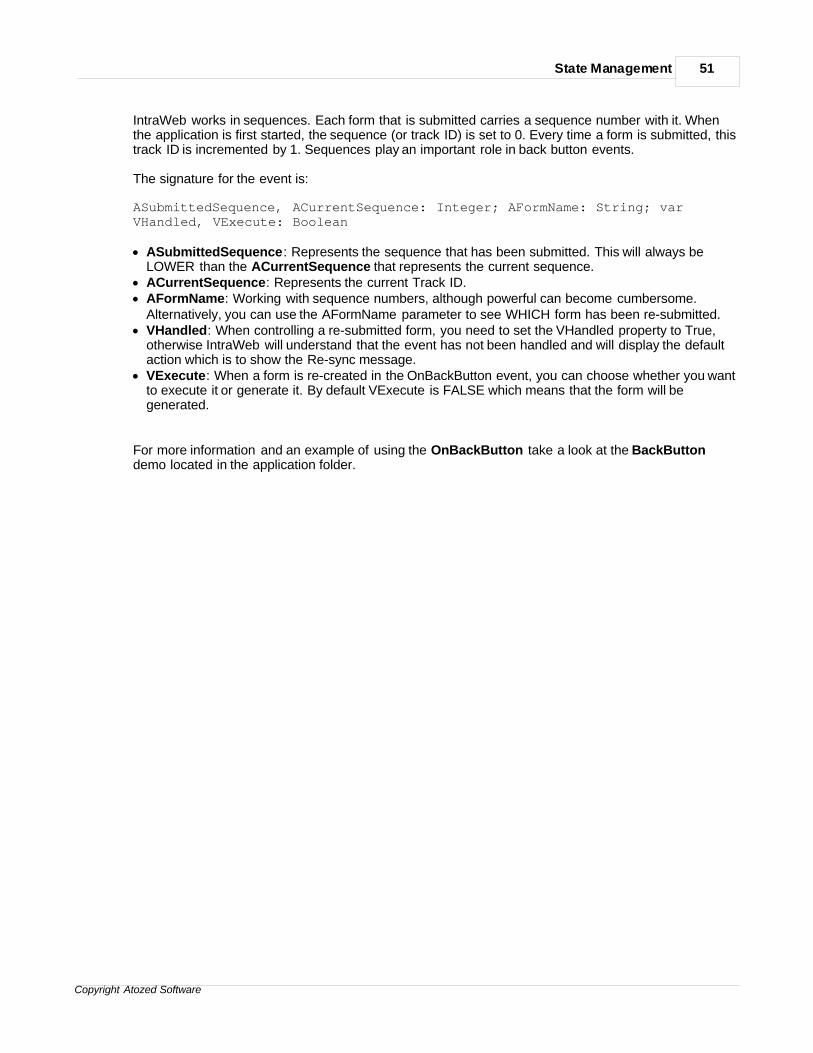
State Management 51
Copyright Atozed Software
IntraWeb works in sequences. Each form that is submitted carries a sequence number with it. Whenthe application is first started, the sequence (or track ID) is set to 0. Every time a form is submitted, thistrack ID is incremented by 1. Sequences play an important role in back button events.
The signature for the event is:
ASubmittedSequence, ACurrentSequence: Integer; AFormName: String; varVHandled, VExecute: Boolean
· ASubmittedSequence: Represents the sequence that has been submitted. This will always beLOWER than the ACurrentSequence that represents the current sequence.
· ACurrentSequence: Represents the current Track ID.· AFormName: Working with sequence numbers, although powerful can become cumbersome.
Alternatively, you can use the AFormName parameter to see WHICH form has been re-submitted.· VHandled: When controlling a re-submitted form, you need to set the VHandled property to True,
otherwise IntraWeb will understand that the event has not been handled and will display the defaultaction which is to show the Re-sync message.
· VExecute: When a form is re-created in the OnBackButton event, you can choose whether you wantto execute it or generate it. By default VExecute is FALSE which means that the form will begenerated.
For more information and an example of using the OnBackButton take a look at the BackButtondemo located in the application folder.
Section
X
Session Management 53
Copyright Atozed Software
10 Session Management
10.1 WebApplication Object
TIWApplication is to an IntraWeb application, what TApplication is to a standard Delphi application.Like the latter, TIWApplication is not a visual component. It does not appear on the property panel andtherefore does not have published properties. However, it has a number of public properties andmethods that can be accessed via code in the IW application. For each user session, a TIWApplicationobject is created. It represents the user's "application" or session.
10.2 Referencing the Session
The users application can be accessed in several ways.
WebApplication Property of the FormIn any event or method of your forms you can simply use WebApplication which will reference theform's WebApplication property. This will meet the requirements in nearly all cases. However somenotable exceptions where this property is not accessible are global procedures, TFrames,datamodules, and non IntraWeb classes.
WebApplication Property of a ControlThe base IntraWeb control also contains a WebApplication property that can be used when writingcustom controls.
WebApplication ThreadVarIn code that is not contained inside of an IntraWeb form or component, the threadvar version can beaccessed. This is especially useful in global procedures, or in TFrame code.
10.3 Lifetime
A users session is automatically managed by IntraWeb. When a new session is started IntraWeb willcreate a new instance of a TIWApplication for the user and track it automatically. It can then be used toacquire information about the user, control the users session, or store additional information. Nomanagement on the developers part is required to implement session management, or to track theuser.
A session exists until it is manually terminated by calling one of TIWApplication's terminate methods,or a timeout occurs. If a user does not access the application within a given time period, the user'ssession will be destroyed. The default timeout period is 10 minutes, but can be adjusted by changingthe SessionTimeout property in the applications ServerController.
Note: To store session related variables, create members of the TUserSession class declared in theserver controller. Do not work with variables declared in the var section, as these are global to allthreads and won't reflect session data properly.
IntraWeb Manual54
Copyright Atozed Software
10.4 Implementation
Sessions are managed automatically by IntraWeb. Sessions are stored in memory on the server andthere fore are secure from users who may attempt to modify the session data.
Each session is assigned a unique session ID that is used to identify the session. The session ID isconstructed in a secure manner so that session IDs are not predictable and thus prone to hacking. Inaddition each session is tied to the users browser and if another browser is detected attempting to usethe same session an error will be returned.
For further security the ServerController's RestrictIPs property. This will check the user's IP addressagainst the session and return an error if the IP address changes. This option is false by default andshould only be set to true in Intranets or Extranets with controlled clients. This is because some proxyservers such as Microsofts ISA proxy server change IP addresses between HTTP requests for a givenuser and will cause multiple IP addresses to be seen by the IntraWeb server.
By default the session ID is embedded in each HTML page and tracked with each HTTP request. Thisallows a single user to have multiple sessions per application. The disadvantage is that once the useris inside the application they cannot leave the application and return to it. Because of this when usingthis method of session ID tracking any non application web pages must be opened in new windowsunless it is in response to the application terminating.
Session tracking can be set to use cookies instead of embedding in the HTML page by setting theServerController's SessionTrackingMethod property to tmCookie. This will instruct IntraWeb to usecookies to track the user's session instead. The advantage is that the user can move in and out of theapplication to other web pages with ease. The disadvantage is that many users disable cookies andalso that the user can only have one session per application.
10.5 Storing Additional Data
Additional data can be stored in the .Data property and is covered in the State Management section ofthis manual.
10.6 Session Related Events
The server controller has events related to session management that are fired for sessioncreation and destruction.
OnNewSessionOnNewSession is fired each time a new user session is created. It passes in two arguments,ASession and VMainForm.ASession is a reference to the newly created session and can be used to query informationabout the user or modified with custom information such as creating an object to be stored inthe .Data property.
VMainForm is passed as a var parameter. It is initialized to nil and if not set the default mainform as specified in the project file (dpr) will be used. VMainForm however can be modifiedbased on parameters passed on the start URL, or based on other criteria to specify a main formfor the user. To specify an alternate main form simply create it and return its instance in theVMainForm argument.
Session Management 55
Copyright Atozed Software
OnCloseSessionOnCloseSession is called when a users session is about to be terminated. This occurs eitherwhen one of the forms of WebApplication.Terminate is called, or the session has timed out.
10.7 Memory Consumption
The base memory consumption per session is quite low and in most cases is not a majorconsideration. The actual size can vary from session to session, but the base memory consumptionexcluding any user data in the .Data property should typically be at maximum 1024 bytes.
Note: This is the typical setting. If you have enough RAM you can safely store as many bytes as youneed.
10.8 Component Reference
More information on the methods and properties of the TIWApplication class is available in theIntraWeb help file.
10.9 How does Session Management Work?
When using Application Mode in IntraWeb, session tracking is performed automatically. Thisallows the user to concentrate on the application and forget about session management. Eventhough this is all automated, it is good to understand how IntraWeb accomplishes this and seehow it can extend it to store certain information.
IntraWeb allows the user to specify how session management is tracked. This providesflexibility since certain situations restrict the user to a certain type of tracking. For example,when the application is deployed to a large corporation, which has certain browser restrictionssuch as not permitting cookies, another form of session tracking can be used. To provide thisflexibility, session tracking can be obtained using one of the following options: Hidden Fields,URL and Cookies.
Developers that are accustomed to implementing session tracking using technologies such asWebBroker are familiar with these since they are the 3 most common (if not the only) way ofimplementing such a feature. The method used is set as a property in the ServerController(SessionTracking).
10.9.1 URL
URL session tracking is the default method. When using this method, the information appearsin the URL at all times. When the application is first called, the URL is of the form:
http://xxx.xxx.xxx.xxx:xxxx/{start_command }
After the first call, the appropriate session information will be appended to the URL, whichwill be:
http://xxx.xxx.xxx.xxx:xxxx/exec_command/Z/YYYYYYYYYYYYYYY
IntraWeb Manual56
Copyright Atozed Software
There are two important values here to understand, Z represents the track ID whereasYYYYYYYYYYYYY represents the session ID. The track ID represents the "state" in which theapplication is. When an IW application starts, the track ID is set to 0. Every time a newrequest is made to the server, the track ID is incremented by 1. Each new request has a highervalue than the previous one. This allows IW to know exactly what state it is in.
The session ID is a random value that is generated from unique values so that it is different foreach user that accesses the application. This makes it virtually impossible for sessions to beintermixed between two users.
One of the disadvantages of using URL as session tracking is that the user will always see theURL in this format. Any change in the session ID will result in a invalid sessionmessage.
10.9.2 Cookies
Cookies is a good alternative when users have cookies enabled in their browser and have noproblems using them. Cookies also offer the advantage of not having a long URL and also re-entry options. By allowing re-entry, the application can link to an external website and fromthat external website link back into the application. For more information regarding this, seethe OnReEntry event in the ServerController.
As for the information stored, the same entries (session Id and track ID) as with tmURL asstored in the cookie.
10.9.3 Hidden Fields
Introduced in Intraweb 5.1, hidden fields can now be used to implement session tracking.Each time a new request is made, two additional fields are rendered inside the FORM tagwhen the page is displayed. Using this method of session tracking, the URL can also be kept"simple" without the need of displaying the track ID and session ID on each request.
What are hidden fields ?
Hidden fields are standard HTML form fields that don't aren't visual. This is, the regular user neversees them.
Hidden fields are rendered to HTML as a <INPUT TYPE="hidden" NAME="my name" VALUE="myvalue"> tag, where "my name" is the name of the hidden field, and "my value" is the actual value thehidden field is holding.
Hidden fields are contained within HTML forms, yet they don't have a visual appearance. They are veryuseful for session tracking, as well as for passing data between forms.
Note: When this session tracking method is used, the ExecCmd string will appear on the URL bar ifserver side resize is active. This behaviour is by design and can't be avoided.

Section
XI
IntraWeb Manual58
Copyright Atozed Software
11 Layout Managers and Templates
11.1 What is a Layout Manager?
A layout manager assembles the HTML pieces from each component into a complete HTML page foroutput to the browser. IntraWeb has a base layout manager, TIWLayoutMgr that can be descendedfrom to create new layout managers. Currently IntraWeb has two layout managers TIWLayoutMgrFormand TIWTemplateProcessorHTML. In the future, there will be other layout managers to support XMLand more.
11.2 Form Layout
This is the default layout manager. If no layout manager is specified, and implicit TIWLayoutMgrFormwill be created and used. TIWLayoutMgrForm creates HTML pages that have the same layout andlook as the designed form.
11.3 HTML Templates
HTML TemplatesTemplates allow for advanced formatting and layout of individual containers (forms,IntraWeb frames, regions). Templates also allow a web designer to design the layout ofcontainers without using Delphi. In short, templates allow presentation and implementation tobe separated. Templates are simply special HTML files.
The use of templates still requires the browser to support HTML and JavaScript.Any framed controls will be rendered without frames when templates are used. If you wish tohave frames in the template, you should frame them by using IFrame or other method in yourtemplate.
To use templates create a 'Templates' sub directory in your application directory and create a<FormName>.html file. Next, for the form that you wish to apply the template to:
1. Add a TIWTemplateProcessorHTML component from the IntraWeb Control tab toyour form.
2. Set the form's LayoutMgr to the new TIWTemplateProcessorHTML component.
Most of the template functionality should be self-explanatory by looking at the examples. Tosee templates in action see the Phonetics Customer Profiler demo.
For each component, the template should contain a tag of the form{%Component.HTMLName%}.Note: This rule does not apply to non visual controls.
HTMLName in most cases is the same as the name. When the form is generated, the tags willbe replaced with the component output. The use of {%%} instead of <> allows for easierediting in WSIWYG HTML editors and is compatible with all HTML editors. The {% %} tagcharacters are also not considered special characters and therefore are not converted to specialtags. By default, a master FORM tag will surround the body to ensure proper function of all
Layout Managers and Templates 59
Copyright Atozed Software
input controls and buttons. However, in some cases this can interfere with the HTML. Forsuch cases, see the help topic for TIWTemplateProcessorHTML.MasterFormTag.
There is a special case when building HTML templates for forms which contain regions orIntraWeb frames.For controls on regions, the following situations can occur:- controls are placed on a region which has it's own subtemplate. In this case, in you do nothave to specify tags for the controls on the region, just reference the region thru a tag. Atruntime, the controls on this region will be rendered according to the subtemplate. For anexample on subtemplates see the Features demo.- controls are placed on a region which does not have a subtemplate associated. In this caserefer to the controls with:{%RegionName.ControlHTMLName%}. If you want the region to be rendered as in designtime, in the HTML template write only the tag for the region: {%RegionHTMLName%}.Note that in the subtemplates for regions, controls must be referred only with the HTMLname: {%Control.HTMLName%}. Please check the Summary Note at the end of this sectionfor an example on how to reference controls on regions with assigned subtemplates.
Controls placed on IntraWeb frames can be referenced by:- {%FrameNameRegionName.ControlHTMLName%} if the parent IntraWeb frame is notrendered thru a subtemplate. RegionName is the name of the region placed on the IntraWebframe.- {%FrameName%}: in this case, the IntraWeb frame is rendered according to an assignedsubtemplate or, if no subtemplate is assigned, it will have the layout and look established atdesign time. If you choose this approach, you do not have to reference through tags any of thecontrols on the IntraWeb frame.
If you wish to use the Borland style tags <#TagName#> instead of the IntraWeb style tags youcan set the TagType property to ttBorland. IntraWeb type tags are easier to use withWSYWIG HTML editors.
Templates and Mozilla: It is not recommended to use IWRegions inside <table> structures,due to some issues with positioning in the Mozilla browser. For example this won't bepossitioned correctly in Mozilla:
<html><body><table><tr> <td>test</td> <td>{%IWRegion1%}</td></tr></table></body></html>
More details on this bug can be found at http://bugzilla.mozilla.org/show_bug.cgi?id=63895and http://bugzilla.mozilla.org/attachment.cgi?id=76045&action=view .
IntraWeb Manual60
Copyright Atozed Software
Summary Note: Controls on regions or frames who have their own templates must be specifiedindividually. Suppose you have a form (IWForm1), and put a region on the form (IWRegion1), an editbox on the form (IWEdit1) and a label on the region (IWLabel1). If you assign templates both to theform and the region, you have to include the controls on the form in the template for the form(IWRegion1 and IWEdit1 in our example), and include the controls on the region in the template for theregion (IWLabel1 in our example). An example with regions and subtemplates can be seen in theFeatures demo.
11.4 System Templates
System templates can be used to modify the look and layout of system messages and dialogsgenerated by IntraWeb.
System DialogsThere are two specific template files called IWShowMessage.html and IWException.html.These are used to provide additional formatting to ShowMessage method and for the displayof uncaught exceptions. The following tags must be present:
{%textMessage%}{%butnOk%}
Note that the template for ShowMessage has no effect when smAlert or smNewWindow ispassed to ShowMessage.
System MessagesSystem Templates support two tags: {%Content%} and {%AppName%} which can be used todisplay the error message. {%AppName%} is as specified in ServerController.AppName. Thetag {%AppID%}. IT refers to the application ID.
IWError.htmlSystem errors are errors that happen outside of your application and in the server portion ofIntraWeb. These errors are rare and usually consist of such things as the user entering invalidrequests via URLs or trying to access expired sessions. These errors can be handled bycreating a template named IWError.html.

Section
XII
IntraWeb Manual62
Copyright Atozed Software
12 Server Controller
12.1 What is the Server Controller?
Every time you create a new IntraWeb Application*, the project wizard creates a form calledIWServerController. All IntraWeb Application projects REQUIRE this form.
Although at first it might not seem too important, and when you create you first IW application, youmight not even open the form; the ServerController plays a very important role in an IW application.From it, you can control properties such as the port, SSL settings, and much more. This chapterexplains the concepts of the ServerController.
* The form is ONLY created when working in APPLICATION mode with IntraWeb. When usingPageMode, the ModuleController creates a server controller internally.
12.2 Properties
Most of the relevant properties of the ServerController are published and therefore accessible via theObject Inspector. To view these properties, choose the IWServerController form from your projectforms by hitting CTRL-F12.
For information on the properties of the ServerController, please see the IntraWeb componentreference help file.

Section
XIII
IntraWeb Manual64
Copyright Atozed Software
13 Writing Custom Components
13.1 Overview
All IntraWeb components are written using an open API that easily allows you to write your owncomponents and add them to IntraWeb just as you can with Delphi. To further facilitate the writing ofcomponents the source code for all IntraWeb components in included, even in the evaluation edition ofIntraWeb.
13.2 Under Construction
This chapter is still under construction and will be expanded in the future. Please feel free to use ournewsgroups to ask any questions related to writing custom components.
13.3 Source Code
Source code is included for most of IntraWeb's components. The source code can be found in thesource subdirectory of the IntraWeb directory. The API is very Delphi like and for most people quiteexplanatory.
13.4 Core Server
In each IntraWeb application there is a core server which is responsible for serving the actual HTTPrequests. This server is of based type TIWServer and is accessible by using the global GIWServervariable in the IWServer unit. The core server has methods that are of use to component writers, andis documented in the help file as TIWServer.
13.5 Third Party Program
If you are creating components for distribution, either free of charge or for a fee, you should considerjoining the IntraWeb Third Party program. Information about this program is available on the IntraWebwebsite. The IntraWeb Third Party program can help you with the development of your components, aswell as the distribution and promotion of your components.

Section
XIV
IntraWeb Manual66
Copyright Atozed Software
14 Javascript
14.1 Overview
IntraWeb heavily uses Javascript to implement its functionality. However some users who arecomfortable with Javascript or want to add custom functionality can add their own Javascript withouthaving to completely bypass IntraWeb. IntraWeb contains many libraries and functions that may behelpful.
This section will not describe every library or function as many are component specific or of little use tothe developer. Instead an overview and introduction will be presented for easy integration into theIntraWeb Javascript libraries.
14.2 Areas of Implementation
There are endless places to add Javascript to an IntraWeb application however the common ones are:
1. Using the forms methods and properties: Javascript, AddToInitProc, AddValidation, ScriptFiles3. From a custom control.4. In a template.5. Using ScriptEvents
14.3 Using ScriptEvents
Many IntraWeb visual controls have events associated to them such as the TIWButton.OnClick event.This allows you to program the events like a standard application. However, there are some specificJavaScript events that are not available. Although events such as OnBlur, OnFocus, etc are notavailable directly, you can still use them via the ScriptEvents property of the control.
By double-clicking on this property, the ScriptEvents editor is displayed.
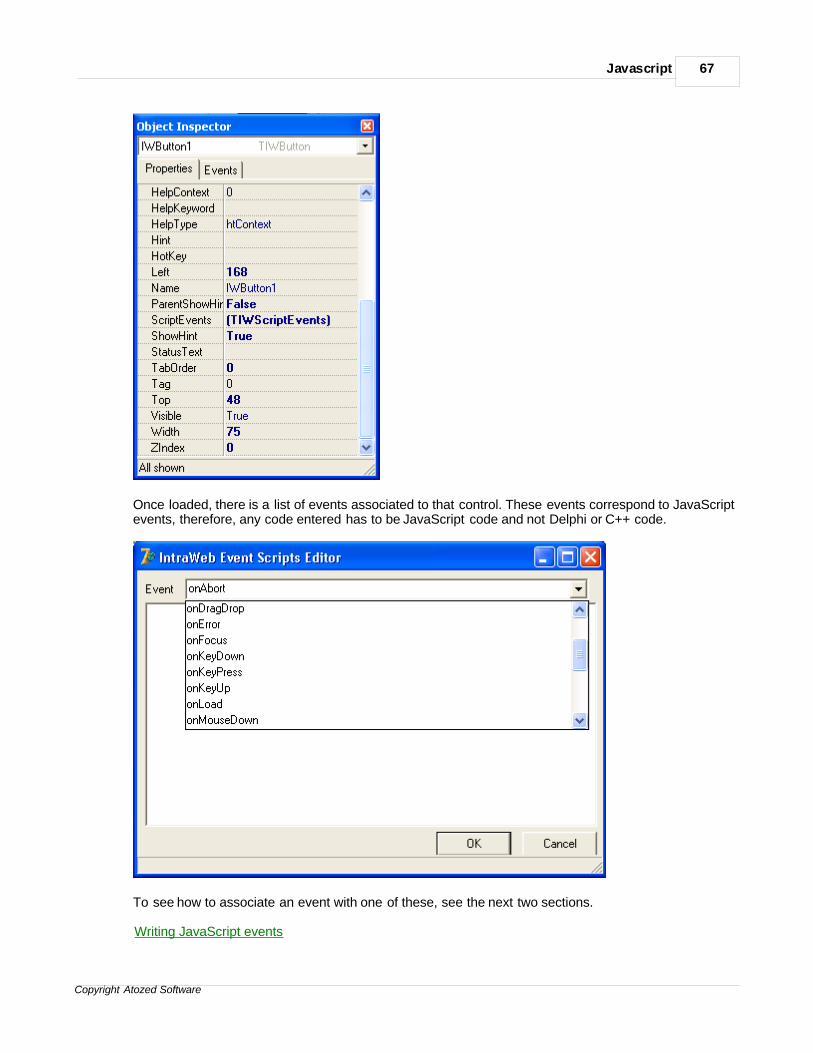
Javascript 67
Copyright Atozed Software
Once loaded, there is a list of events associated to that control. These events correspond to JavaScriptevents, therefore, any code entered has to be JavaScript code and not Delphi or C++ code.
To see how to associate an event with one of these, see the next two sections.
Writing JavaScript events
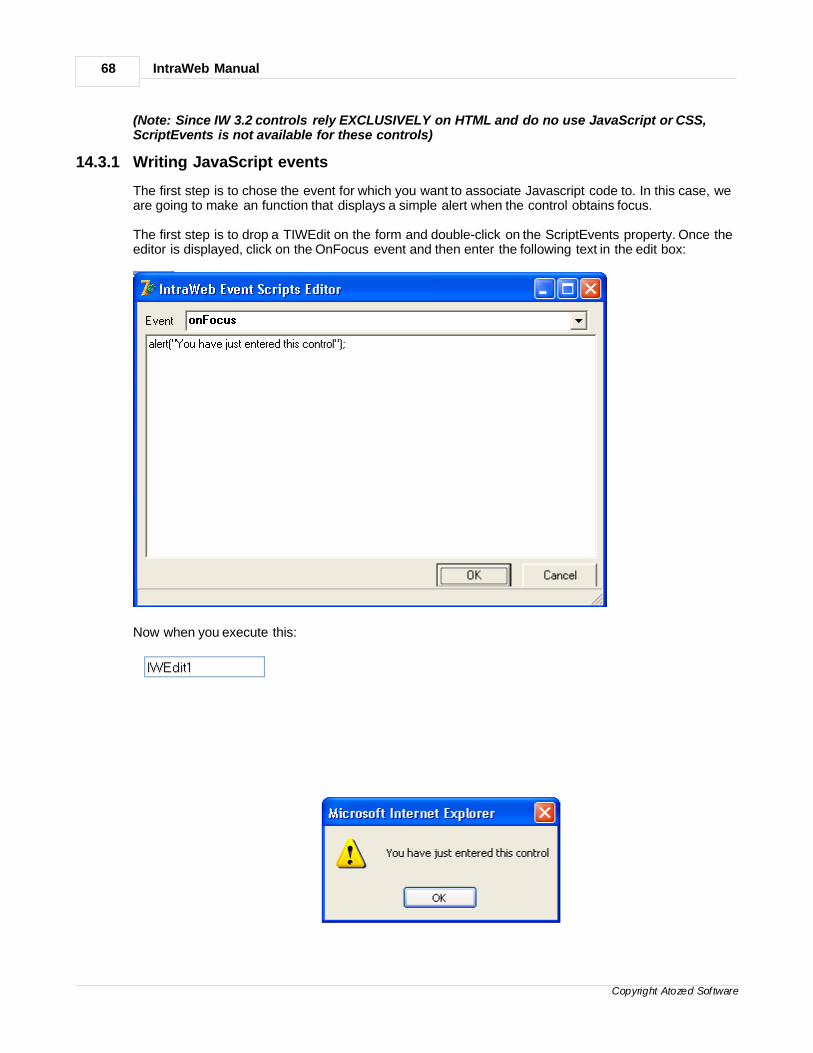
IntraWeb Manual68
Copyright Atozed Software
(Note: Since IW 3.2 controls rely EXCLUSIVELY on HTML and do no use JavaScript or CSS,ScriptEvents is not available for these controls)
14.3.1 Writing JavaScript events
The first step is to chose the event for which you want to associate Javascript code to. In this case, weare going to make an function that displays a simple alert when the control obtains focus.
The first step is to drop a TIWEdit on the form and double-click on the ScriptEvents property. Once theeditor is displayed, click on the OnFocus event and then enter the following text in the edit box:
Now when you execute this:
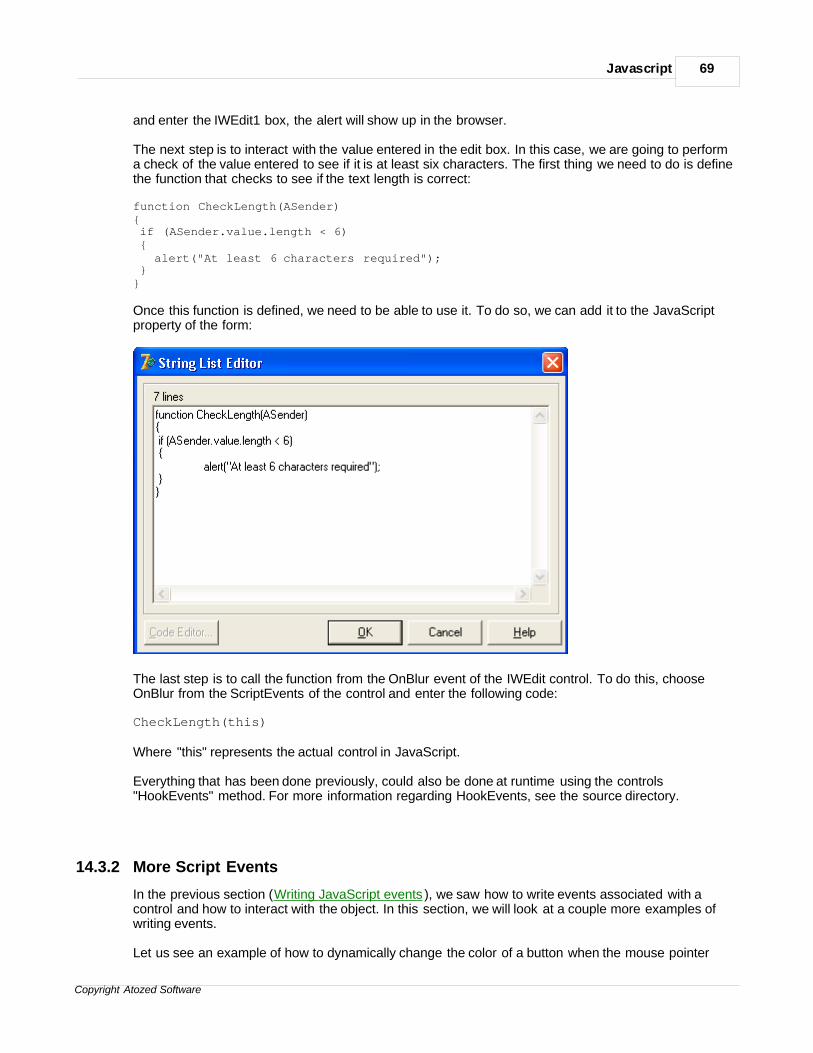
Javascript 69
Copyright Atozed Software
and enter the IWEdit1 box, the alert will show up in the browser.
The next step is to interact with the value entered in the edit box. In this case, we are going to performa check of the value entered to see if it is at least six characters. The first thing we need to do is definethe function that checks to see if the text length is correct:
function CheckLength(ASender){ if (ASender.value.length < 6) { alert("At least 6 characters required"); }}
Once this function is defined, we need to be able to use it. To do so, we can add it to the JavaScriptproperty of the form:
The last step is to call the function from the OnBlur event of the IWEdit control. To do this, chooseOnBlur from the ScriptEvents of the control and enter the following code:
CheckLength(this)
Where "this" represents the actual control in JavaScript.
Everything that has been done previously, could also be done at runtime using the controls"HookEvents" method. For more information regarding HookEvents, see the source directory.
14.3.2 More Script Events
In the previous section (Writing JavaScript events ), we saw how to write events associated with acontrol and how to interact with the object. In this section, we will look at a couple more examples ofwriting events.
Let us see an example of how to dynamically change the color of a button when the mouse pointer

IntraWeb Manual70
Copyright Atozed Software
moves over it. Obviously the events associated to this are OnMouseOver, OnMouseOut. In theOnMouseOver, we place the following code:
this.style.color='white';this.style.backgroundColor='red';
As you can see, this time the code has been entered directly into the event as opposed to calling afunction (not necessary in this case either). You can also contemplate that more than one instructioncan be entered. In the OnMouseOut we place the following code:
this.style.color='white';this.style.backgroundColor='green';
Now when you move the mouse over the button, the background will go red and the text white. Whenthe mouse pointer leaves the button, the background color will change to green.
Up to now, we have seen how to associate events with a particular control and how to interact withvalues/properties of the control. The next step is to see how to interact with other objects on the page.
IW controls are rendered as object named with the following format:
COMPONENT_NAME{IWCL}
For example, if we have a button dropped on the form named IWButton1, the corresponding HTMLelement would be:
IWBUTTON1IWCL
This way, it is easy to refer to other controls. For example, we can enter the following value in theOnChange event of an IWEdit:
IWBUTTON1IWCL.style.color='brown';
This way, when the value in an IWEdit changes, the button color will automatically change to brown.
14.4 Javascript Functions
14.4.1 Common Functions
IntraWeb includes several script files with JavaScript functions that are used internally. Some of thesefunctions can also be called by the developer to perform certain actions. Following is a list of the morecommon ones:
FindElem
FindElem takes as parameter an object name and returns the object if it is found. You can use thisfunction to find the instance of a certain element on the form.
SubmitClickConfirm
SubmitClickConfirm is used very often in IntraWeb. It takes fours parameters:
function SubmitClickConfirm(AObjectName, AParam, ADoValidation,AConfirmation)

Javascript 71
Copyright Atozed Software
The first is the object name, the second is a parameter passed to the action of the form. The third iswhether validation is required or not and the fourth indicates the confirmation string. This function isused every time a confirmation string is entered into any control that supports the property. Whathappens is the following:
When entering a value in the confirmation property of a TIWButton for example, the following code iscalled:
SubmitClickConfirm("IWBUTTON1", "", True, "Did you really want to clickthis button?")
What then happens is that SubmitClickConfirm will call a validation box with the text passed asparameter. If the confirmation box returns True, the form will be submitted. Otherwise it will not besubmitted.
When adding code prior to a SubmitClickConfirm, make sure that the code you add returns a True orFalse so that the form is submitted accordingly.
Section
XV
Page Mode 73
Copyright Atozed Software
15 Page Mode
15.1 Introduction to Page Mode
IntraWeb can be used in either Application Mode or Page Mode. The latter makes use of othertechnologies such as WebBroker or WebSnap, allowing the developer to combine existing knowledgewith RAD technology. Although for most purposes, application mode is the way to go, Page Modeoffers an interesting approach to Web development. To understand the difference between the two, letus see a scenario of where each one would fit in appropriately.
If developing an application (or weblication) where state management is required and each step isinterlinked with the previous, such as a contact relational management system, application mode wouldbe most appropriate. This is because the whole application fits nicely into an automata scenario. Forexample, in normal CRM systems, a user logs in and is presented with a menu from where he/she canaccess different utilities such as contact management, customer invoices, etc. These are all tied to thesame user, where Mr. Smith has certain contacts and Miss Jones has others. Session managementplays an important role here and tracking the entire "session" is very important.
On the other hand, if there is a website where there are various independent sections, such as News,Stock quotes and Guest Book, none of these are really linked together. One person might want to seethe news whereas another person would like to leave his/her signature. There is no "session tracking"as such, no need to remember if the user that requested news also requested stock quotes. This iswhere Page Mode fits in perfectly.
The primary difference when working with Page Mode as opposed to Application Mode, is that theformer does not offer any kind of state or session management. All this needs to be taken care of bythe developer using existing technology such as WebBroker (or WebSnap). Again, in most cases,session management is not required in these cases. It is very important to think through what exactly isthe purpose of the web application before deciding on using Page Mode or Application Mode, i.e., is afull-blown application being developed or a dynamic site.
When developing dynamic sites with Page Mode, the technology behind it (as mentioned previously)has to be either WebBroker or WebSnap. IW allows adding to this backbone by providing "pages" todesign interfaces. Think of Page Mode as pages where each page can be designed using RADtechnology with drag-n-drop of visual IW controls. Therefore, the first step is to decide whetherWebBroker or WebSnap is going to be used.
15.2 Working with Page Mode
The most important thing to remember when working with PageMode, is that it is basically and add-onto other technologies such as WebBroker or WebSnap. Therefore, it is vital that you know andunderstand either of these technologies to successfully develop applications using PageMode. On theAtozed website there is a tutorial about WebBroker for beginners.
WebBroker is a low-level interface. The problem is that it is often pitched as a high-level one.PageMode can be considered as "plugins" that sit on top of WebBroker (or WebSnap), which meansthat you are not actually building an IW application but more a WebBroker application where parts of itare generated using IW. Consider IW in PageMode as a "third-party" add-on to WebBroker.
The first step is to create a new WebBroker application. In this case, an ISAPI DLL will be created. Formore information on WebBroker, see the Delphi online help or tutorials on the Atozed website.
Once the WebBroker application has been created, a new IW form will be added to the project. To dothis, use the IntraWeb wizard page in the Object Repository. Depending on whether the application isgoing to be designed for PDA devices, PageForm 3.2 should be chosen as opposed to PageForm.
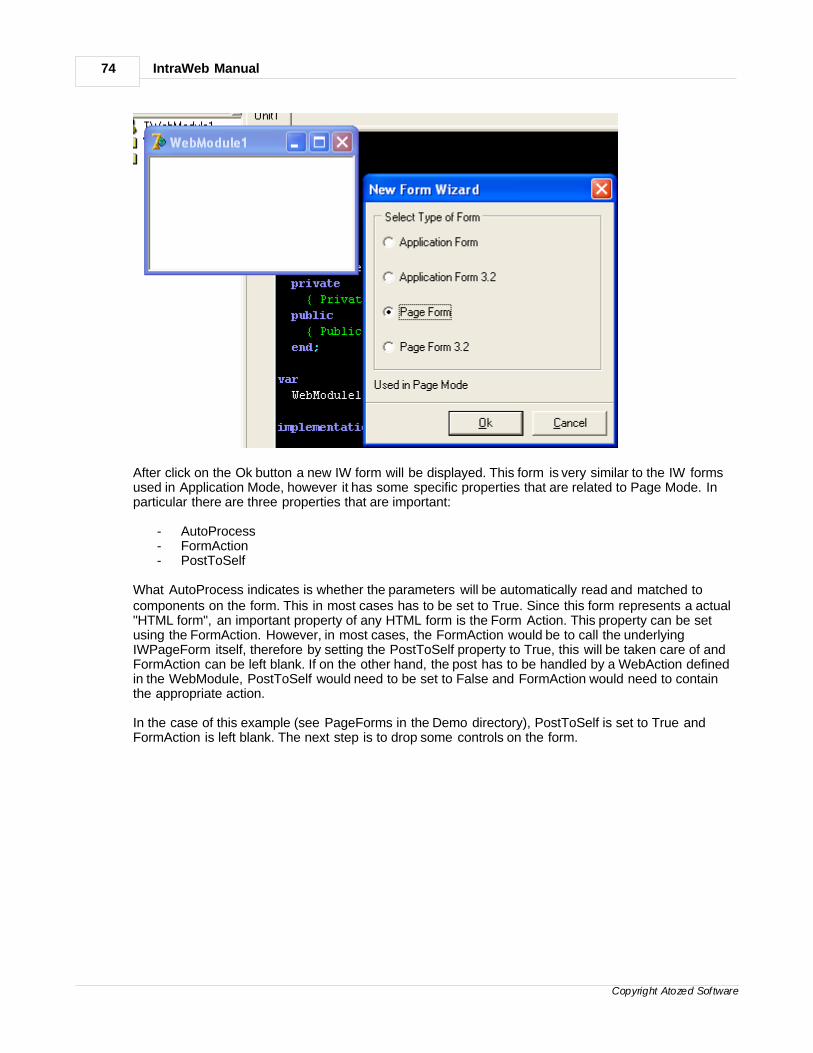
IntraWeb Manual74
Copyright Atozed Software
After click on the Ok button a new IW form will be displayed. This form is very similar to the IW formsused in Application Mode, however it has some specific properties that are related to Page Mode. Inparticular there are three properties that are important:
- AutoProcess- FormAction- PostToSelf
What AutoProcess indicates is whether the parameters will be automatically read and matched tocomponents on the form. This in most cases has to be set to True. Since this form represents a actual"HTML form", an important property of any HTML form is the Form Action. This property can be setusing the FormAction. However, in most cases, the FormAction would be to call the underlyingIWPageForm itself, therefore by setting the PostToSelf property to True, this will be taken care of andFormAction can be left blank. If on the other hand, the post has to be handled by a WebAction definedin the WebModule, PostToSelf would need to be set to False and FormAction would need to containthe appropriate action.
In the case of this example (see PageForms in the Demo directory), PostToSelf is set to True andFormAction is left blank. The next step is to drop some controls on the form.
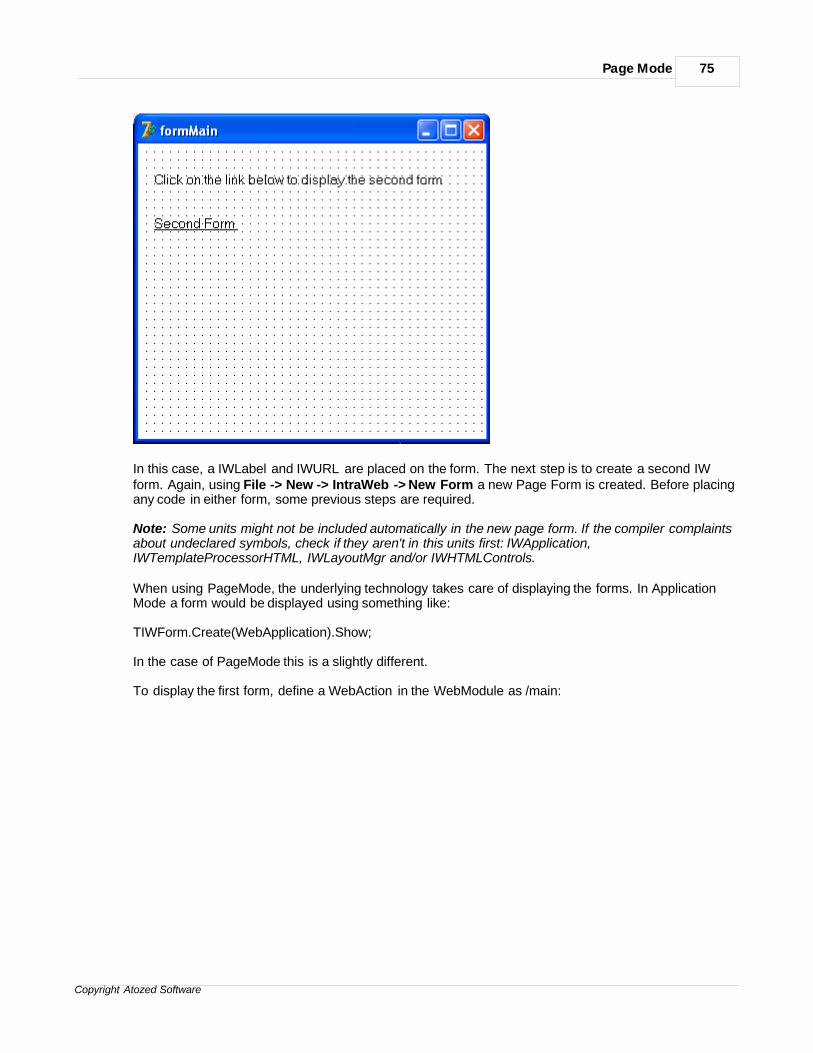
Page Mode 75
Copyright Atozed Software
In this case, a IWLabel and IWURL are placed on the form. The next step is to create a second IWform. Again, using File -> New -> IntraWeb -> New Form a new Page Form is created. Before placingany code in either form, some previous steps are required.
Note: Some units might not be included automatically in the new page form. If the compiler complaintsabout undeclared symbols, check if they aren't in this units first: IWApplication,IWTemplateProcessorHTML, IWLayoutMgr and/or IWHTMLControls.
When using PageMode, the underlying technology takes care of displaying the forms. In ApplicationMode a form would be displayed using something like:
TIWForm.Create(WebApplication).Show;
In the case of PageMode this is a slightly different.
To display the first form, define a WebAction in the WebModule as /main:
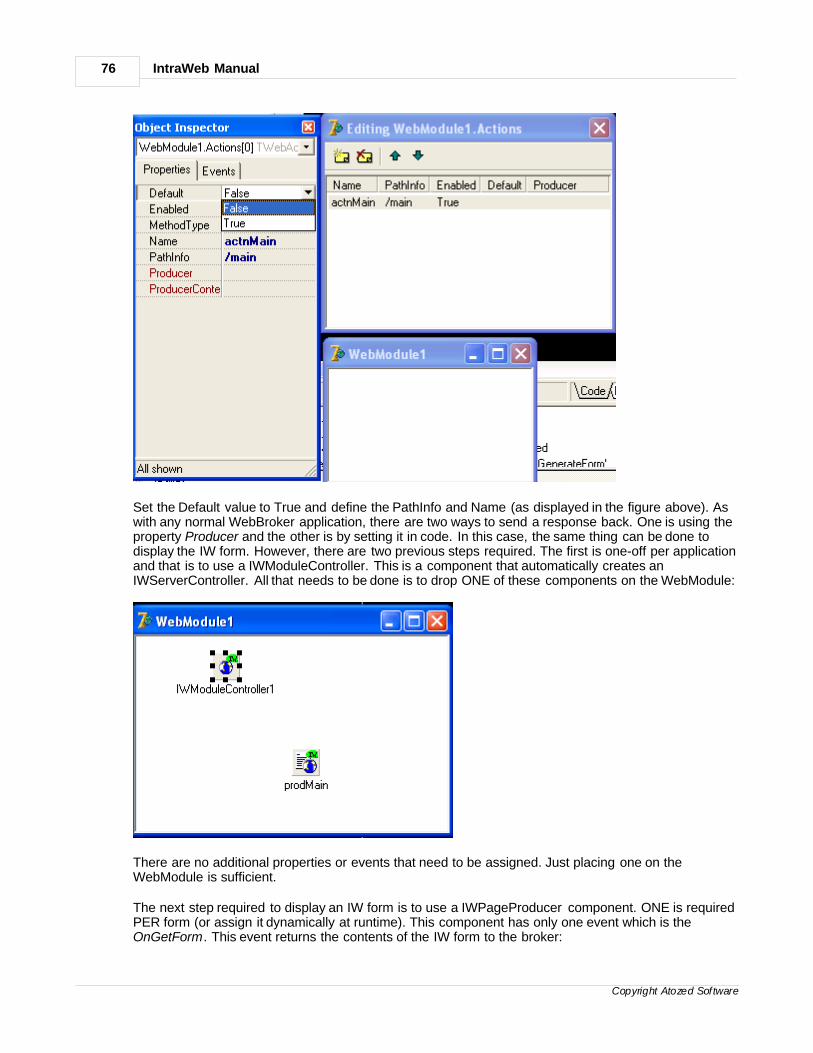
IntraWeb Manual76
Copyright Atozed Software
Set the Default value to True and define the PathInfo and Name (as displayed in the figure above). Aswith any normal WebBroker application, there are two ways to send a response back. One is using theproperty Producer and the other is by setting it in code. In this case, the same thing can be done todisplay the IW form. However, there are two previous steps required. The first is one-off per applicationand that is to use a IWModuleController. This is a component that automatically creates anIWServerController. All that needs to be done is to drop ONE of these components on the WebModule:
There are no additional properties or events that need to be assigned. Just placing one on theWebModule is sufficient.
The next step required to display an IW form is to use a IWPageProducer component. ONE is requiredPER form (or assign it dynamically at runtime). This component has only one event which is theOnGetForm. This event returns the contents of the IW form to the broker:
Page Mode 77
Copyright Atozed Software
procedure TWebModule1.prodMainGetForm(ASender: TIWPageProducer; AWebApplication: TIWApplication; var VForm: TIWPageForm);begin VForm := TformMain.Create(AWebApplication);end;
This is similar to what is used in Application Mode, except that here, instead of doing a Show, theresult of creating the form is assigned to the VForm parameter. The next step is to assign the producerto the WebAction using the Object Inspector. Since there is a second form in this application, the samesteps are performed for the second form. As can be seen from the event, the owner of the form is alsopassed in as a parameter (AWebApplication). A second WebAction needs to be defined to display thesecond form. This is again done in a similar manner to the first WebAction.
Note: When adding a IWPageProducer and assigning the event in the WebModule, two units have tobe added to the uses clause, IWApplication and IWPageForm (IWPageForm32).
What is left is to display the second form from the first one using an IWURL. To do this, all that isneeded is to call the WebAction that produces the second form. The URL can be assigned to theIWURL in the form's OnCreate event:
procedure TformMain.IWPageFormCreate(Sender: TObject);begin IWURL1.URL := WebApplication.URLBase + '/second';end;
The second form prompts for a name and displays a label. This is programmed exactly the same as inapplication mode.
Therefore you can see that working with PageMode gives you the RAD flexibility of IW and allows youto work with existing technologies. Much of the way things are done coincides with Application Mode,apart from some minor differences that have been mentioned in this example.
15.3 IntraWeb and Websnap
This sections provides a brief introduction to how IntraWeb can be integrated with WebSnap. A demowill be built that uses WebSnap to provide the framework, login, and session management. IntraWebwill be used to provide the user interface. In this manner of integration the products are quitecomplimentary.
The demo is a simple demo that takes a survey of two questions that are of vital importance to theprogramming community. The two questions are:
1. Which was the BEST Star Trek movie?2. Which was the WORST Star Trek movie?
It will then collect your vote and tabulate it with other voters. To see this, simply run the demo in thebrowser multiple times. After it tabulates the votes it will generate a small chart displaying the results.Full source code for the demo is included in the demos directory. We have designed it to be simple aspossible so as to make it easy to follow. It demonstrates the following:
1. IntraWeb integration with WebSnap.2. Use of IntraWeb Page Mode.
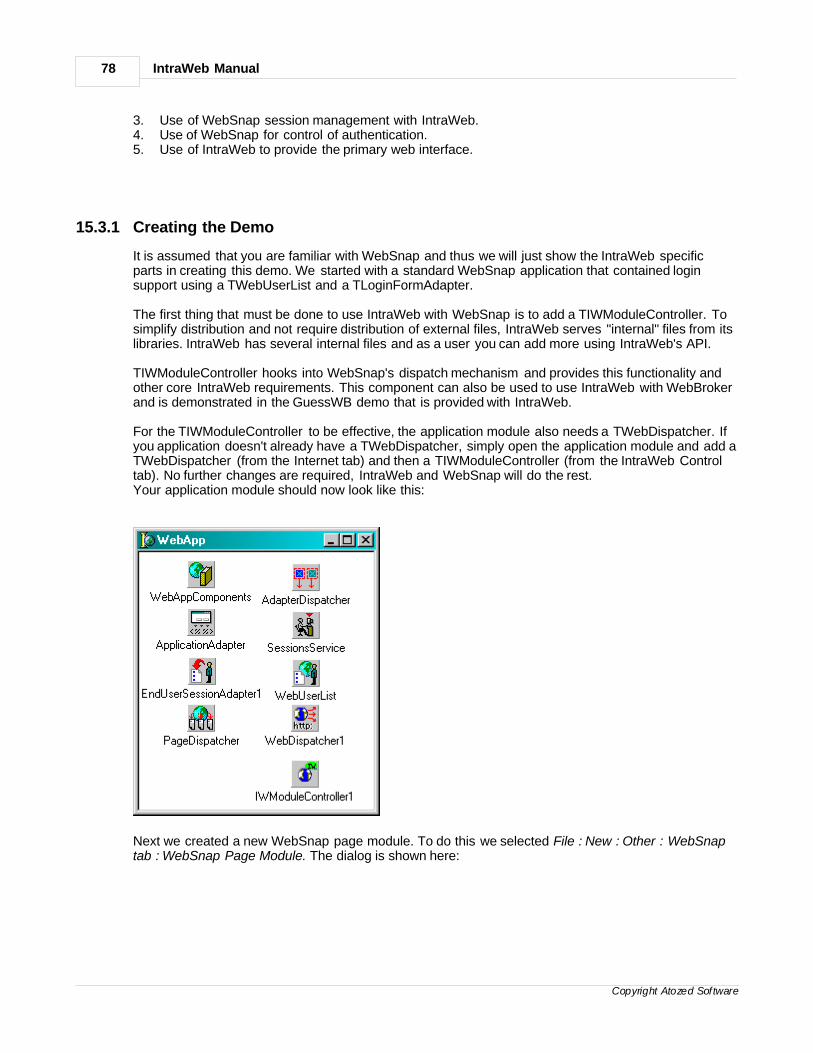
IntraWeb Manual78
Copyright Atozed Software
3. Use of WebSnap session management with IntraWeb.4. Use of WebSnap for control of authentication.5. Use of IntraWeb to provide the primary web interface.
15.3.1 Creating the Demo
It is assumed that you are familiar with WebSnap and thus we will just show the IntraWeb specificparts in creating this demo. We started with a standard WebSnap application that contained loginsupport using a TWebUserList and a TLoginFormAdapter.
The first thing that must be done to use IntraWeb with WebSnap is to add a TIWModuleController. Tosimplify distribution and not require distribution of external files, IntraWeb serves "internal" files from itslibraries. IntraWeb has several internal files and as a user you can add more using IntraWeb's API.
TIWModuleController hooks into WebSnap's dispatch mechanism and provides this functionality andother core IntraWeb requirements. This component can also be used to use IntraWeb with WebBrokerand is demonstrated in the GuessWB demo that is provided with IntraWeb.
For the TIWModuleController to be effective, the application module also needs a TWebDispatcher. Ifyou application doesn't already have a TWebDispatcher, simply open the application module and add aTWebDispatcher (from the Internet tab) and then a TIWModuleController (from the IntraWeb Controltab). No further changes are required, IntraWeb and WebSnap will do the rest.Your application module should now look like this:
Next we created a new WebSnap page module. To do this we selected File : New : Other : WebSnaptab : WebSnap Page Module. The dialog is shown here:
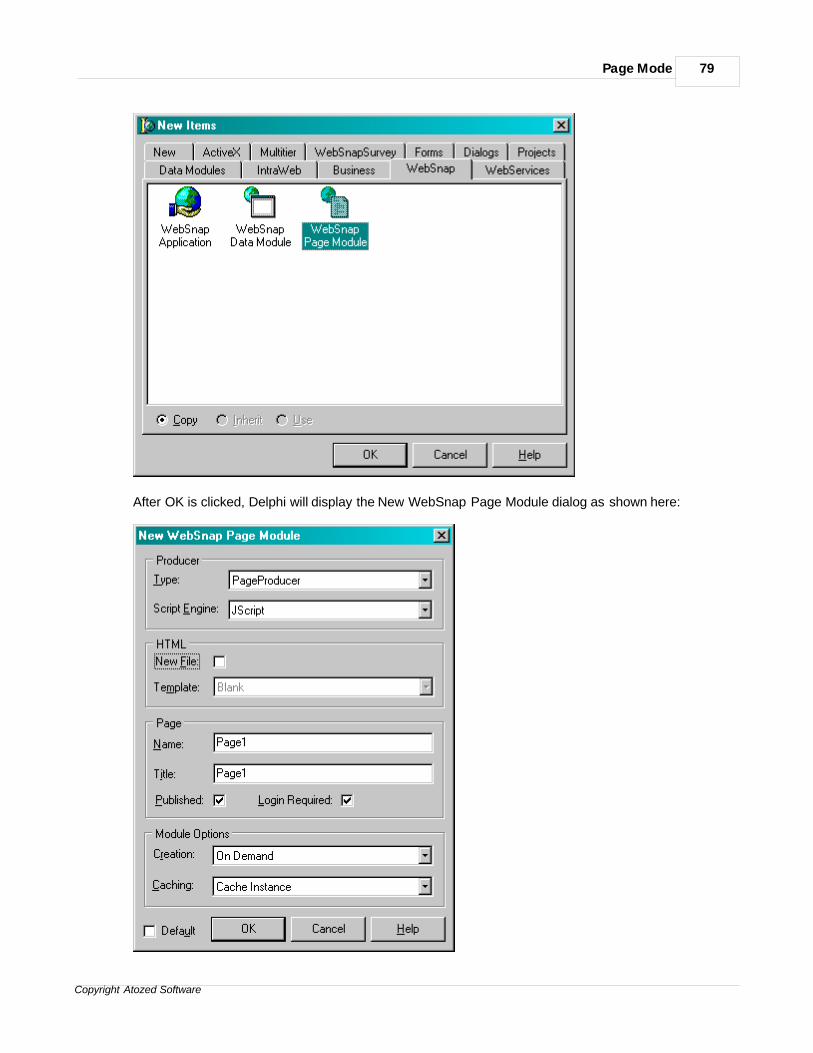
Page Mode 79
Copyright Atozed Software
After OK is clicked, Delphi will display the New WebSnap Page Module dialog as shown here:
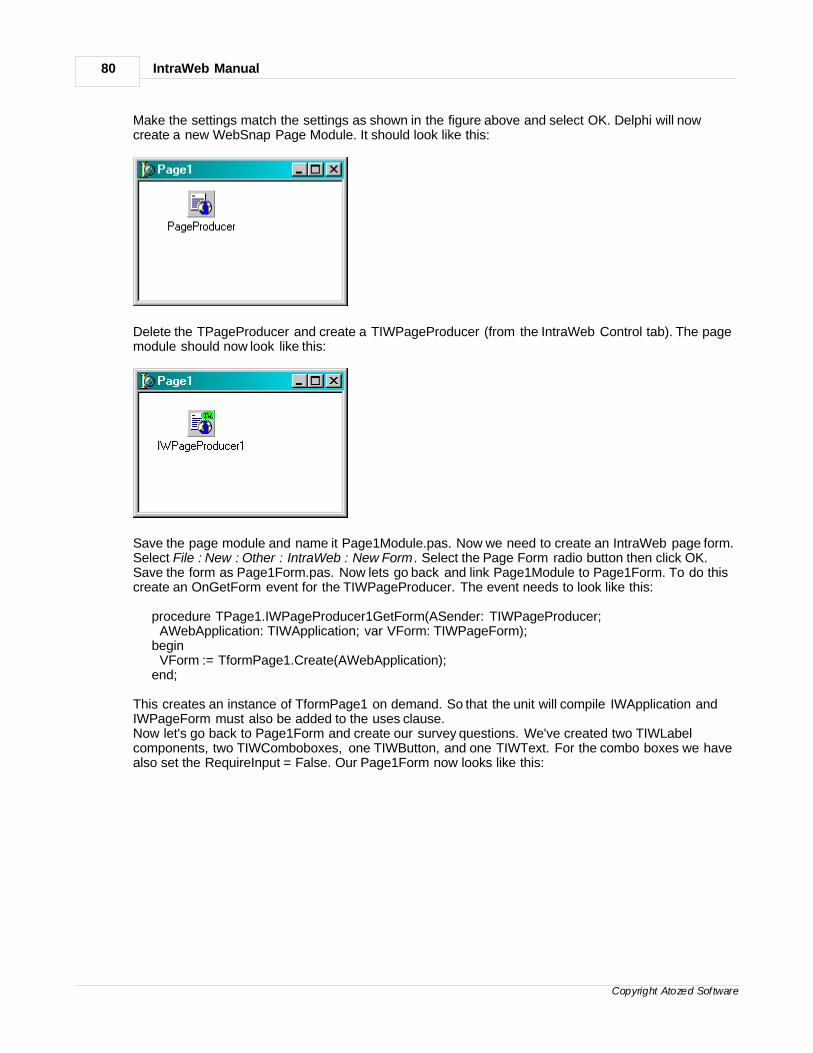
IntraWeb Manual80
Copyright Atozed Software
Make the settings match the settings as shown in the figure above and select OK. Delphi will nowcreate a new WebSnap Page Module. It should look like this:
Delete the TPageProducer and create a TIWPageProducer (from the IntraWeb Control tab). The pagemodule should now look like this:
Save the page module and name it Page1Module.pas. Now we need to create an IntraWeb page form.Select File : New : Other : IntraWeb : New Form . Select the Page Form radio button then click OK.Save the form as Page1Form.pas. Now lets go back and link Page1Module to Page1Form. To do thiscreate an OnGetForm event for the TIWPageProducer. The event needs to look like this:
procedure TPage1.IWPageProducer1GetForm(ASender: TIWPageProducer; AWebApplication: TIWApplication; var VForm: TIWPageForm);begin VForm := TformPage1.Create(AWebApplication);end;
This creates an instance of TformPage1 on demand. So that the unit will compile IWApplication andIWPageForm must also be added to the uses clause.Now let's go back to Page1Form and create our survey questions. We've created two TIWLabelcomponents, two TIWComboboxes, one TIWButton, and one TIWText. For the combo boxes we havealso set the RequireInput = False. Our Page1Form now looks like this:
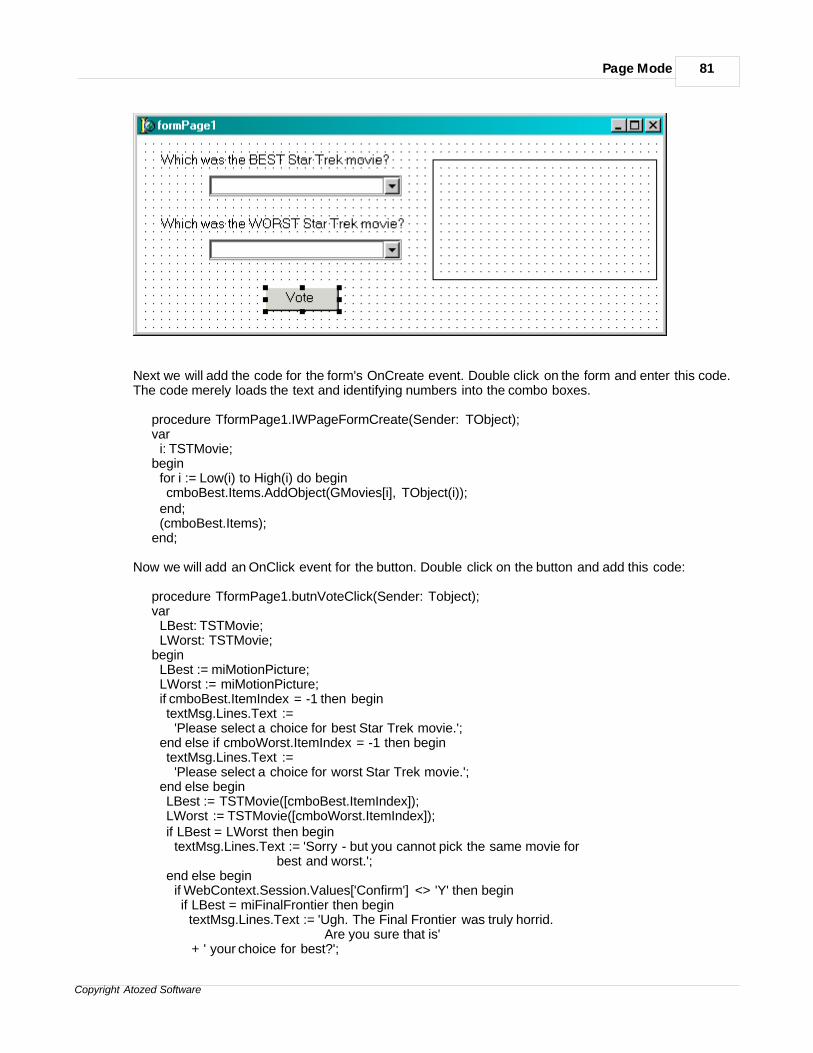
Page Mode 81
Copyright Atozed Software
Next we will add the code for the form's OnCreate event. Double click on the form and enter this code.The code merely loads the text and identifying numbers into the combo boxes.
procedure TformPage1.IWPageFormCreate(Sender: TObject);var i: TSTMovie;begin for i := Low(i) to High(i) do begin cmboBest.Items.AddObject(GMovies[i], TObject(i)); end; (cmboBest.Items);end;
Now we will add an OnClick event for the button. Double click on the button and add this code:
procedure TformPage1.butnVoteClick(Sender: Tobject);var LBest: TSTMovie; LWorst: TSTMovie;begin LBest := miMotionPicture; LWorst := miMotionPicture; if cmboBest.ItemIndex = -1 then begin textMsg.Lines.Text := 'Please select a choice for best Star Trek movie.'; end else if cmboWorst.ItemIndex = -1 then begin textMsg.Lines.Text := 'Please select a choice for worst Star Trek movie.'; end else begin LBest := TSTMovie([cmboBest.ItemIndex]); LWorst := TSTMovie([cmboWorst.ItemIndex]); if LBest = LWorst then begin textMsg.Lines.Text := 'Sorry - but you cannot pick the same movie for
best and worst.'; end else begin if WebContext.Session.Values['Confirm'] <> 'Y' then begin if LBest = miFinalFrontier then begin textMsg.Lines.Text := 'Ugh. The Final Frontier was truly horrid.
Are you sure that is' + ' your choice for best?';
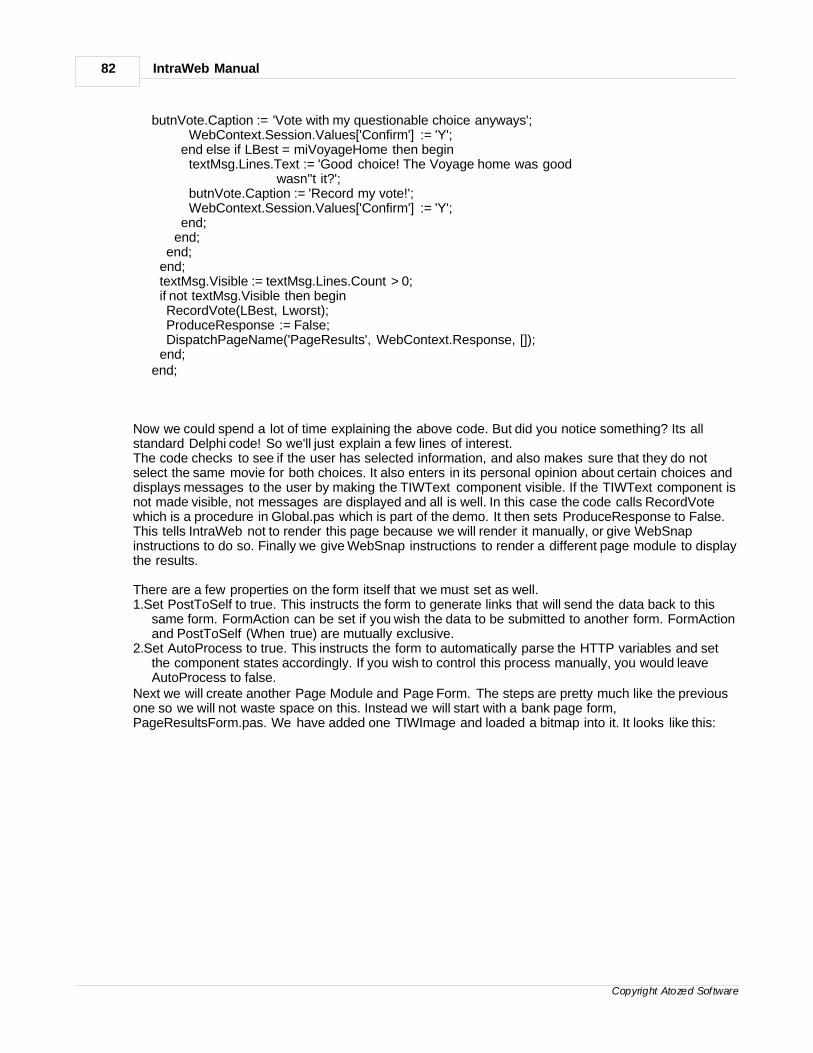
IntraWeb Manual82
Copyright Atozed Software
butnVote.Caption := 'Vote with my questionable choice anyways'; WebContext.Session.Values['Confirm'] := 'Y'; end else if LBest = miVoyageHome then begin textMsg.Lines.Text := 'Good choice! The Voyage home was good
wasn''t it?'; butnVote.Caption := 'Record my vote!'; WebContext.Session.Values['Confirm'] := 'Y'; end; end; end; end; textMsg.Visible := textMsg.Lines.Count > 0; if not textMsg.Visible then begin RecordVote(LBest, Lworst); ProduceResponse := False; DispatchPageName('PageResults', WebContext.Response, []); end;end;
Now we could spend a lot of time explaining the above code. But did you notice something? Its allstandard Delphi code! So we'll just explain a few lines of interest.The code checks to see if the user has selected information, and also makes sure that they do notselect the same movie for both choices. It also enters in its personal opinion about certain choices anddisplays messages to the user by making the TIWText component visible. If the TIWText component isnot made visible, not messages are displayed and all is well. In this case the code calls RecordVotewhich is a procedure in Global.pas which is part of the demo. It then sets ProduceResponse to False.This tells IntraWeb not to render this page because we will render it manually, or give WebSnapinstructions to do so. Finally we give WebSnap instructions to render a different page module to displaythe results.
There are a few properties on the form itself that we must set as well.1.Set PostToSelf to true. This instructs the form to generate links that will send the data back to this
same form. FormAction can be set if you wish the data to be submitted to another form. FormActionand PostToSelf (When true) are mutually exclusive.
2.Set AutoProcess to true. This instructs the form to automatically parse the HTTP variables and setthe component states accordingly. If you wish to control this process manually, you would leaveAutoProcess to false.
Next we will create another Page Module and Page Form. The steps are pretty much like the previousone so we will not waste space on this. Instead we will start with a bank page form,PageResultsForm.pas. We have added one TIWImage and loaded a bitmap into it. It looks like this:
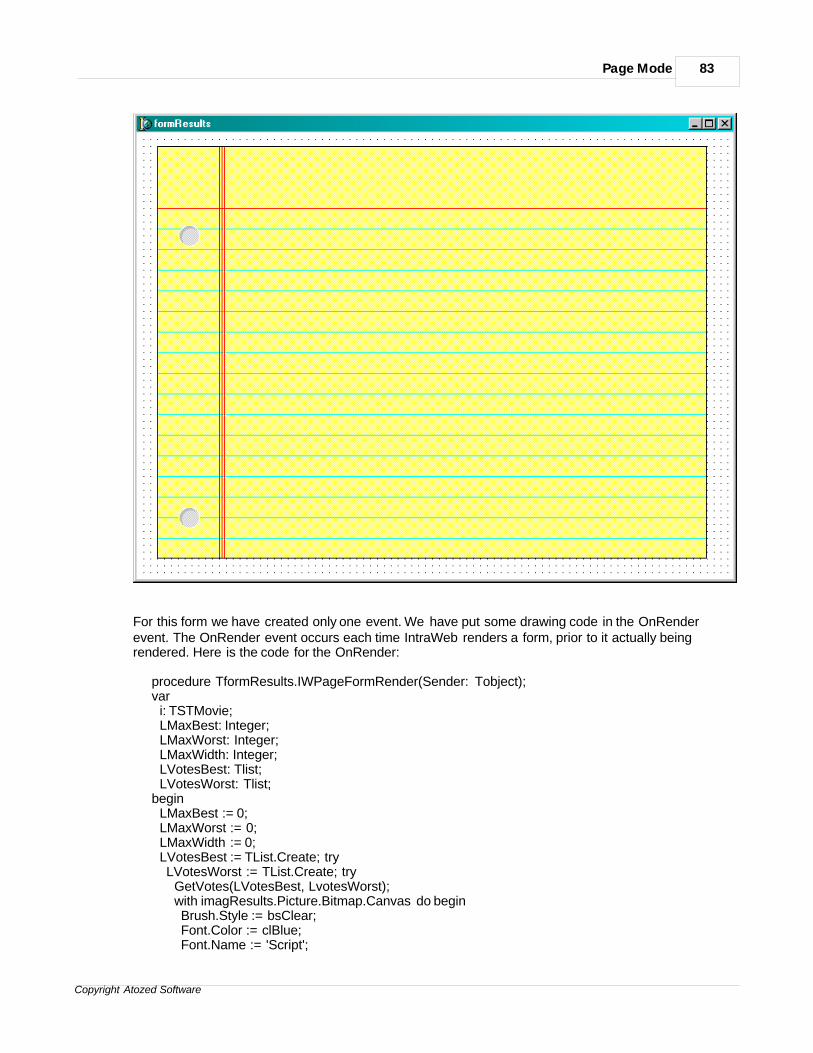
Page Mode 83
Copyright Atozed Software
For this form we have created only one event. We have put some drawing code in the OnRenderevent. The OnRender event occurs each time IntraWeb renders a form, prior to it actually beingrendered. Here is the code for the OnRender:
procedure TformResults.IWPageFormRender(Sender: Tobject);var i: TSTMovie; LMaxBest: Integer; LMaxWorst: Integer; LMaxWidth: Integer; LVotesBest: Tlist; LVotesWorst: Tlist;begin LMaxBest := 0; LMaxWorst := 0; LMaxWidth := 0; LVotesBest := TList.Create; try LVotesWorst := TList.Create; try GetVotes(LVotesBest, LvotesWorst); with imagResults.Picture.Bitmap.Canvas do begin Brush.Style := bsClear; Font.Color := clBlue; Font.Name := 'Script';
IntraWeb Manual84
Copyright Atozed Software
Font.Size := 18; for i := Low(i) to High(i) do begin TextOut(85, 98 + 24 * Ord(i), Gmovies[i]); LMaxWidth := Max(LMaxWidth, TextWidth(GMovies[i])); LMaxBest := Max(LMaxBest, Integer(LVotesBest[Ord(i)])); LMaxWorst := Max(LMaxWorst, Integer(LVotesWorst[Ord(i)])); end; TextOut(330, 74, 'Best'); TextOut(480, 74, 'Worst'); // Brush.Style := bsSolid; for i := Low(i) to High(i) do begin Brush.Color := Gcolors[i]; FillRect(Rect(310, 98 + 24 * Ord(i) , 310 + Trunc((Integer(LVotesBest[Ord(i)]) / LMaxBest) * 150) , 98 + 24 * Ord(i) + 20)); Brush.Color := GColors[TSTMovie(Ord(High(i)) – Ord(i))]; FillRect(Rect(480, 98 + 24 * Ord(i) , 480 + Trunc((Integer(LVotesWorst[Ord(i)]) / LMaxWorst) * 150) , 98 + 24 * Ord(i) + 20)); end; end; finally FreeAndNil(LVotesWorst); end; finally FreeAndNil(LVotesBest); end;end;
15.3.2 Running the Demo
We have now covered the important parts of the demo itself. Let's see what it looks like when we run it.First compile and run the demo and then run the Web Application Debugger from the Tools menu.From the Web Application Debugger click on the URL link and then select WebSnapSurvey.Survey inthe browser. This will start our demo application. It should look like this:
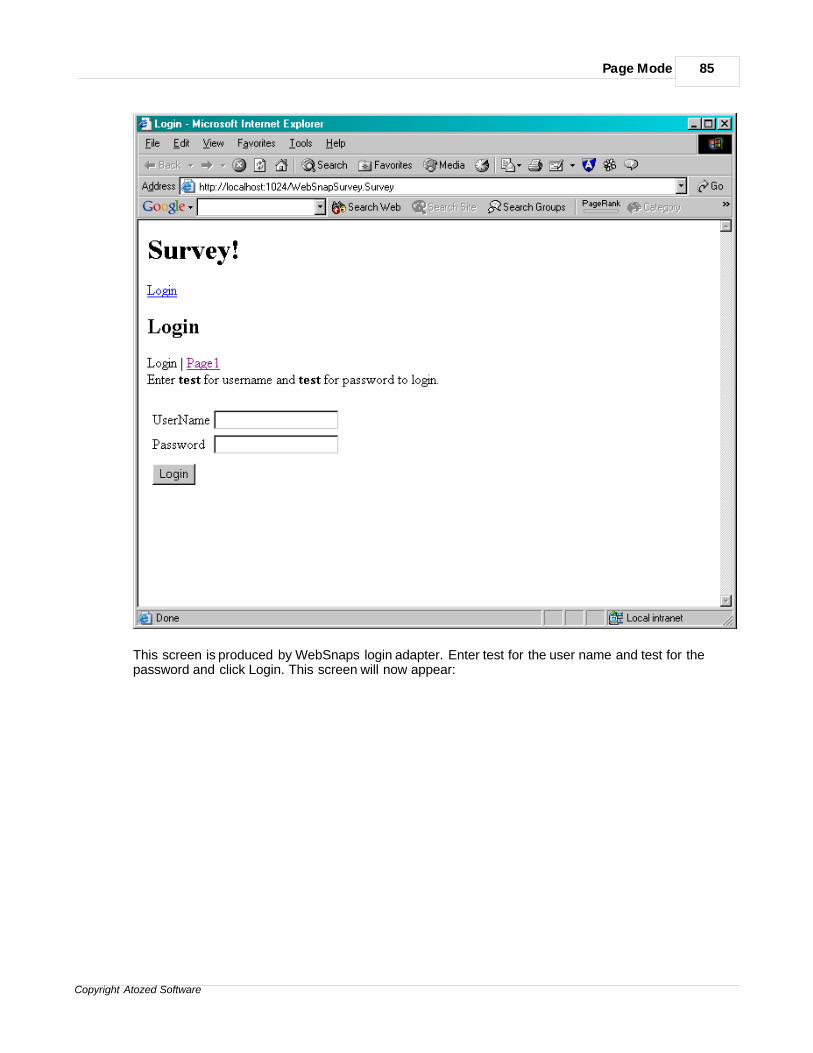
Page Mode 85
Copyright Atozed Software
This screen is produced by WebSnaps login adapter. Enter test for the user name and test for thepassword and click Login. This screen will now appear:
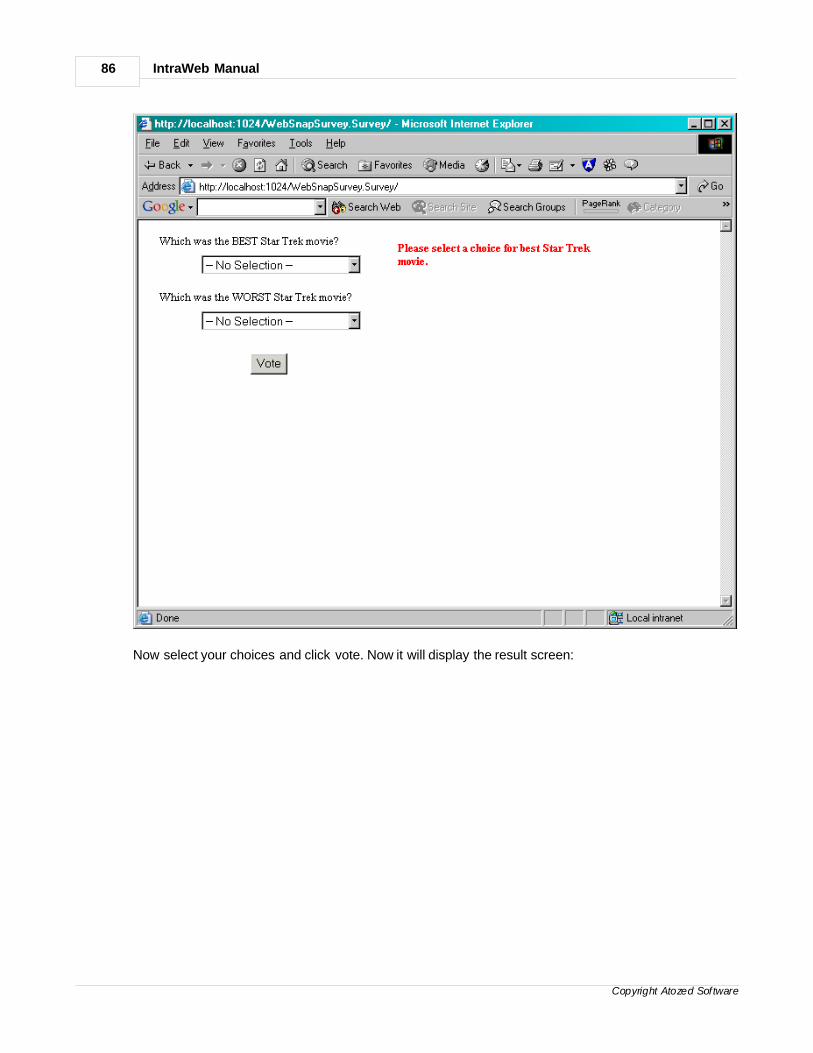
IntraWeb Manual86
Copyright Atozed Software
Now select your choices and click vote. Now it will display the result screen:
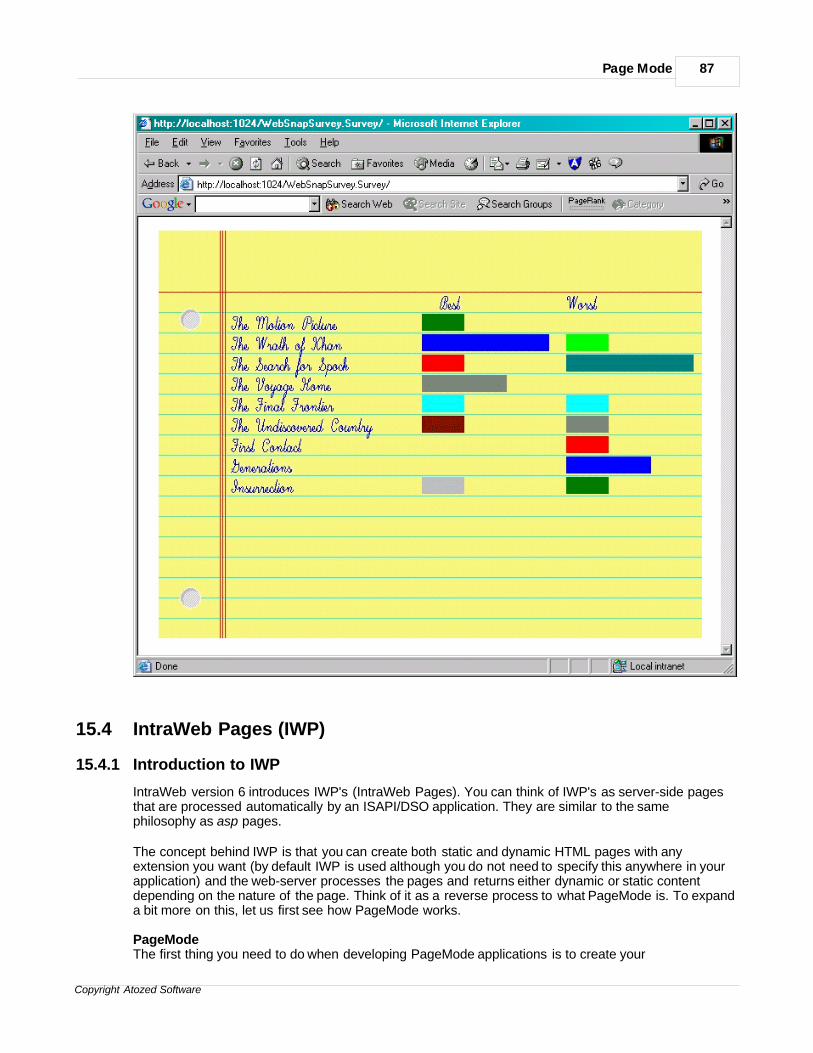
Page Mode 87
Copyright Atozed Software
15.4 IntraWeb Pages (IWP)
15.4.1 Introduction to IWP
IntraWeb version 6 introduces IWP's (IntraWeb Pages). You can think of IWP's as server-side pagesthat are processed automatically by an ISAPI/DSO application. They are similar to the samephilosophy as asp pages.
The concept behind IWP is that you can create both static and dynamic HTML pages with anyextension you want (by default IWP is used although you do not need to specify this anywhere in yourapplication) and the web-server processes the pages and returns either dynamic or static contentdepending on the nature of the page. Think of it as a reverse process to what PageMode is. To expanda bit more on this, let us first see how PageMode works.
PageModeThe first thing you need to do when developing PageMode applications is to create your
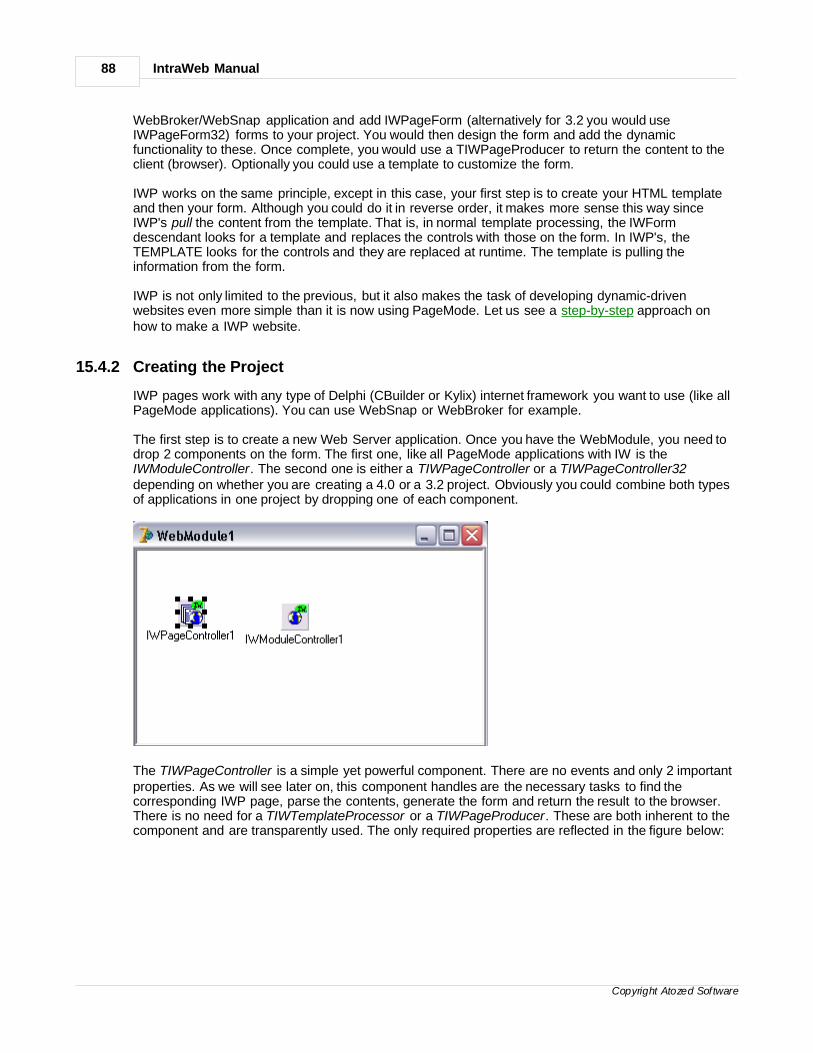
IntraWeb Manual88
Copyright Atozed Software
WebBroker/WebSnap application and add IWPageForm (alternatively for 3.2 you would useIWPageForm32) forms to your project. You would then design the form and add the dynamicfunctionality to these. Once complete, you would use a TIWPageProducer to return the content to theclient (browser). Optionally you could use a template to customize the form.
IWP works on the same principle, except in this case, your first step is to create your HTML templateand then your form. Although you could do it in reverse order, it makes more sense this way sinceIWP's pull the content from the template. That is, in normal template processing, the IWFormdescendant looks for a template and replaces the controls with those on the form. In IWP's, theTEMPLATE looks for the controls and they are replaced at runtime. The template is pulling theinformation from the form.
IWP is not only limited to the previous, but it also makes the task of developing dynamic-drivenwebsites even more simple than it is now using PageMode. Let us see a step-by-step approach onhow to make a IWP website.
15.4.2 Creating the Project
IWP pages work with any type of Delphi (CBuilder or Kylix) internet framework you want to use (like allPageMode applications). You can use WebSnap or WebBroker for example.
The first step is to create a new Web Server application. Once you have the WebModule, you need todrop 2 components on the form. The first one, like all PageMode applications with IW is theIWModuleController. The second one is either a TIWPageController or a TIWPageController32depending on whether you are creating a 4.0 or a 3.2 project. Obviously you could combine both typesof applications in one project by dropping one of each component.
The TIWPageController is a simple yet powerful component. There are no events and only 2 importantproperties. As we will see later on, this component handles are the necessary tasks to find thecorresponding IWP page, parse the contents, generate the form and return the result to the browser.There is no need for a TIWTemplateProcessor or a TIWPageProducer. These are both inherent to thecomponent and are transparently used. The only required properties are reflected in the figure below:
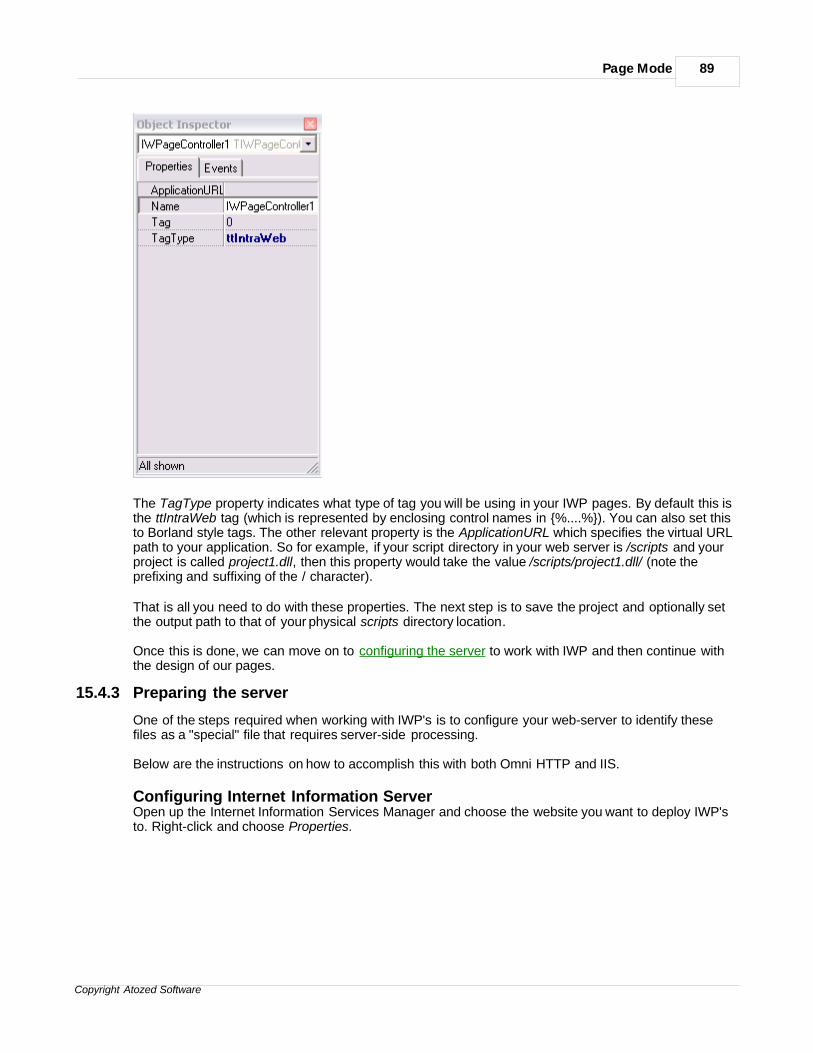
Page Mode 89
Copyright Atozed Software
The TagType property indicates what type of tag you will be using in your IWP pages. By default this isthe ttIntraWeb tag (which is represented by enclosing control names in {%....%}). You can also set thisto Borland style tags. The other relevant property is the ApplicationURL which specifies the virtual URLpath to your application. So for example, if your script directory in your web server is /scripts and yourproject is called project1.dll, then this property would take the value /scripts/project1.dll/ (note theprefixing and suffixing of the / character).
That is all you need to do with these properties. The next step is to save the project and optionally setthe output path to that of your physical scripts directory location .
Once this is done, we can move on to configuring the server to work with IWP and then continue withthe design of our pages.
15.4.3 Preparing the server
One of the steps required when working with IWP's is to configure your web-server to identify thesefiles as a "special" file that requires server-side processing.
Below are the instructions on how to accomplish this with both Omni HTTP and IIS.
Configuring Internet Information ServerOpen up the Internet Information Services Manager and choose the website you want to deploy IWP'sto. Right-click and choose Properties.
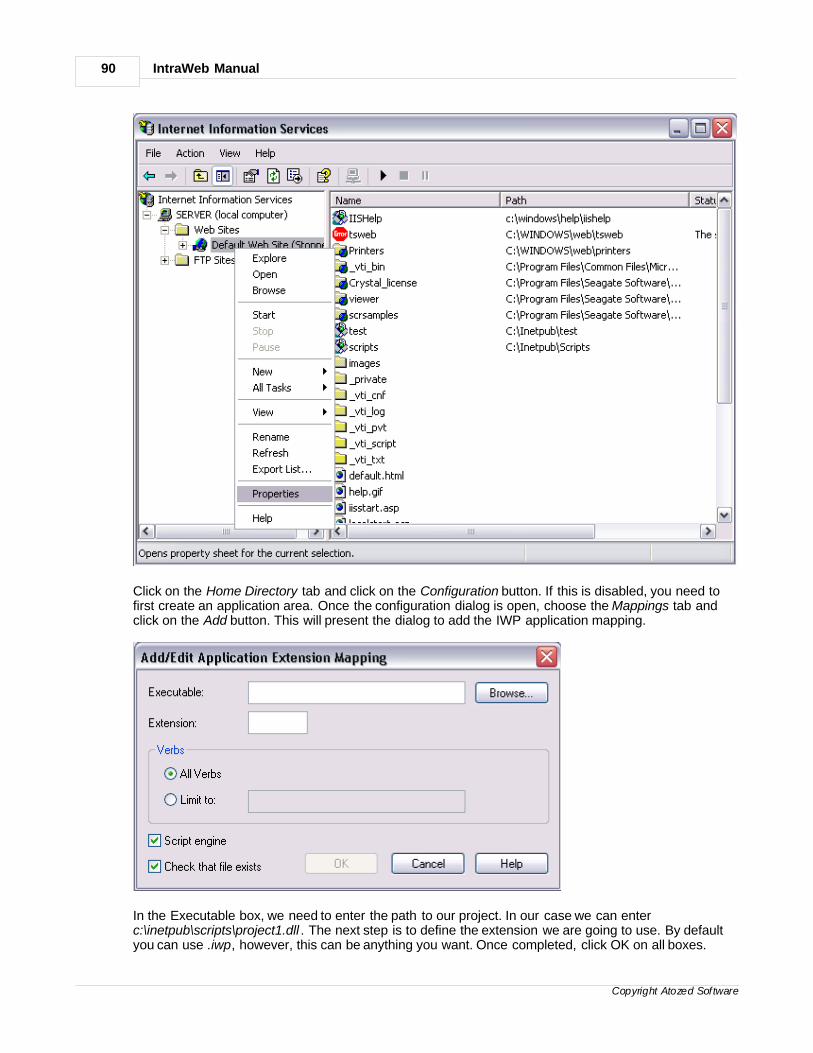
IntraWeb Manual90
Copyright Atozed Software
Click on the Home Directory tab and click on the Configuration button. If this is disabled, you need tofirst create an application area. Once the configuration dialog is open, choose the Mappings tab andclick on the Add button. This will present the dialog to add the IWP application mapping.
In the Executable box, we need to enter the path to our project. In our case we can enterc:\inetpub\scripts\project1.dll . The next step is to define the extension we are going to use. By defaultyou can use .iwp, however, this can be anything you want. Once completed, click OK on all boxes.
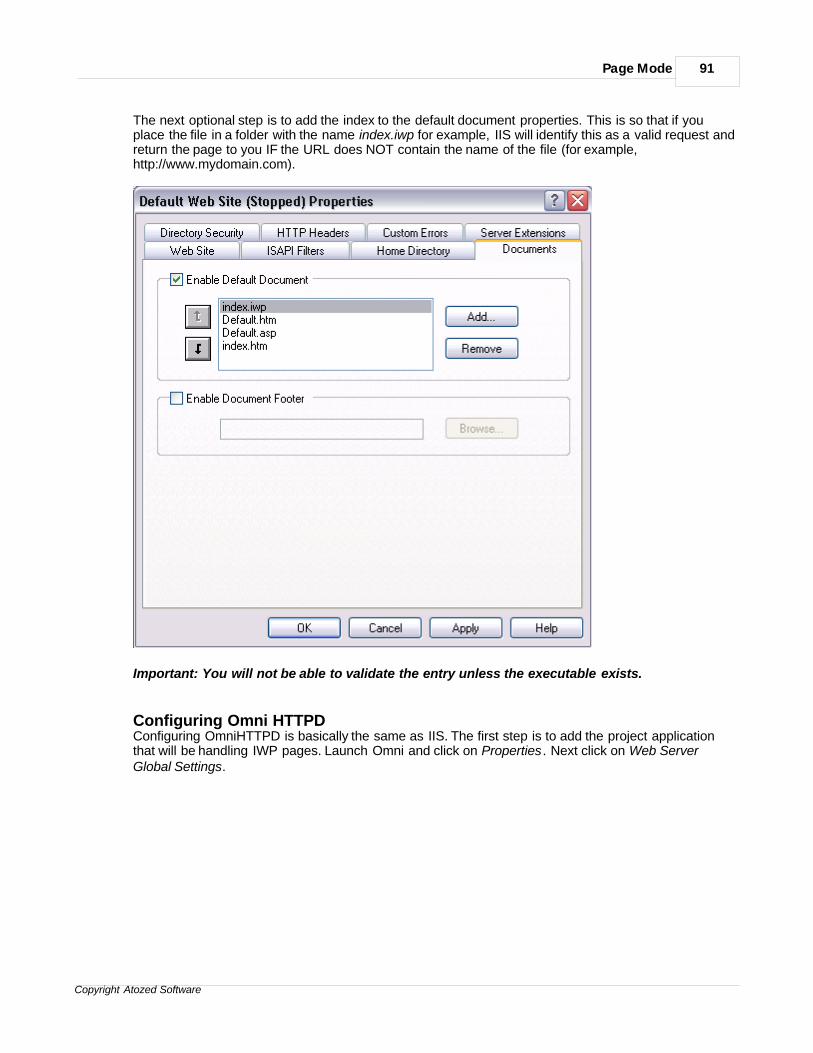
Page Mode 91
Copyright Atozed Software
The next optional step is to add the index to the default document properties. This is so that if youplace the file in a folder with the name index.iwp for example, IIS will identify this as a valid request andreturn the page to you IF the URL does NOT contain the name of the file (for example,http://www.mydomain.com).
Important: You will not be able to validate the entry unless the executable exists.
Configuring Omni HTTPDConfiguring OmniHTTPD is basically the same as IIS. The first step is to add the project applicationthat will be handling IWP pages. Launch Omni and click on Properties . Next click on Web ServerGlobal Settings.
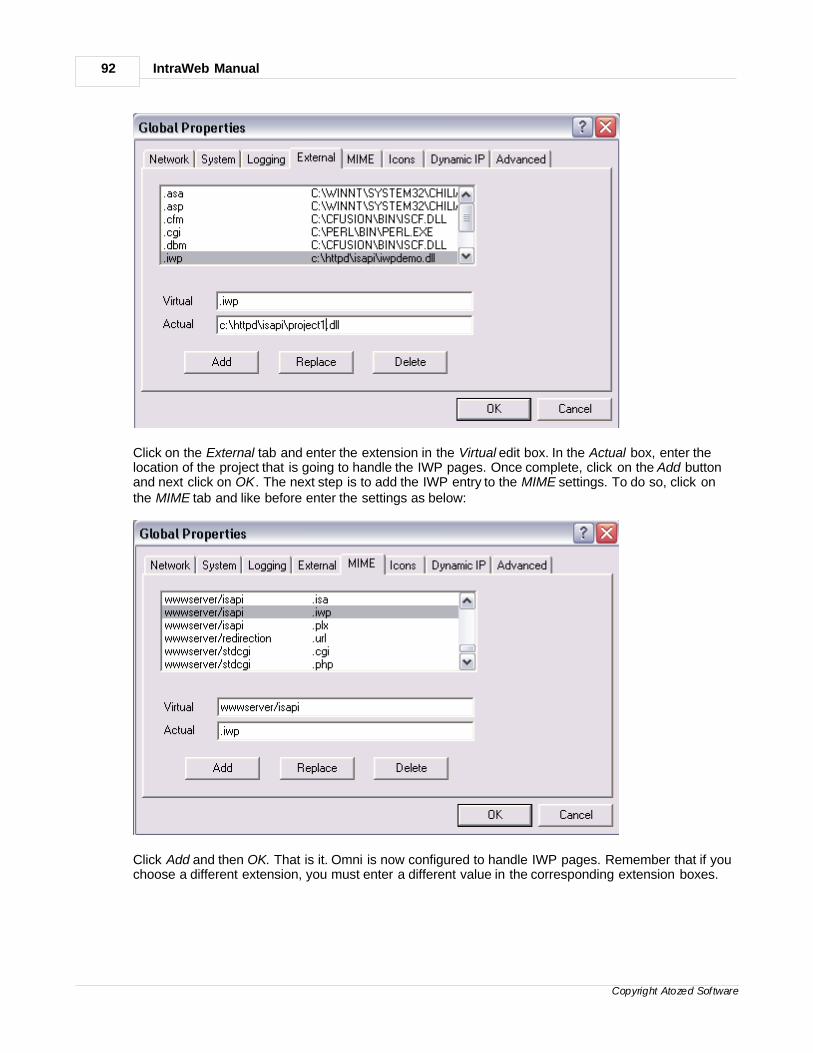
IntraWeb Manual92
Copyright Atozed Software
Click on the External tab and enter the extension in the Virtual edit box. In the Actual box, enter thelocation of the project that is going to handle the IWP pages. Once complete, click on the Add buttonand next click on OK. The next step is to add the IWP entry to the MIME settings. To do so, click onthe MIME tab and like before enter the settings as below:
Click Add and then OK. That is it. Omni is now configured to handle IWP pages. Remember that if youchoose a different extension, you must enter a different value in the corresponding extension boxes.
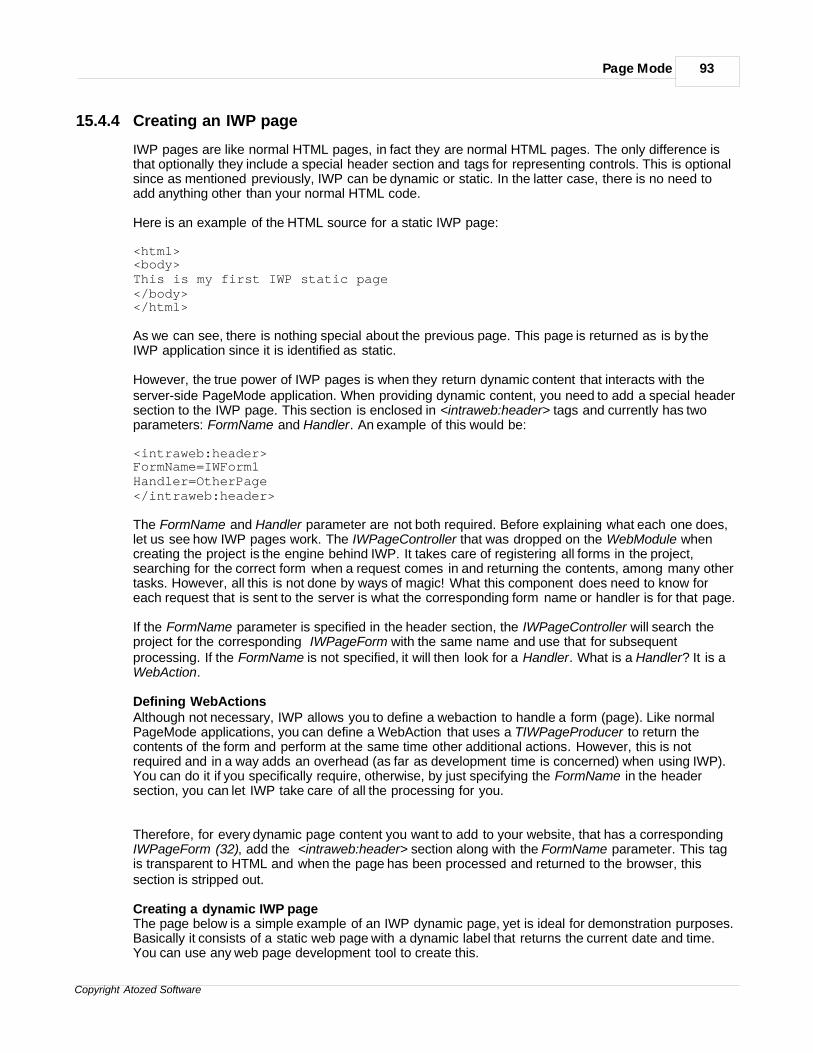
Page Mode 93
Copyright Atozed Software
15.4.4 Creating an IWP page
IWP pages are like normal HTML pages, in fact they are normal HTML pages. The only difference isthat optionally they include a special header section and tags for representing controls. This is optionalsince as mentioned previously, IWP can be dynamic or static. In the latter case, there is no need toadd anything other than your normal HTML code.
Here is an example of the HTML source for a static IWP page:
<html><body>This is my first IWP static page</body></html>
As we can see, there is nothing special about the previous page. This page is returned as is by theIWP application since it is identified as static.
However, the true power of IWP pages is when they return dynamic content that interacts with theserver-side PageMode application. When providing dynamic content, you need to add a special headersection to the IWP page. This section is enclosed in <intraweb:header> tags and currently has twoparameters: FormName and Handler. An example of this would be:
<intraweb:header>FormName=IWForm1Handler=OtherPage</intraweb:header>
The FormName and Handler parameter are not both required. Before explaining what each one does,let us see how IWP pages work. The IWPageController that was dropped on the WebModule whencreating the project is the engine behind IWP. It takes care of registering all forms in the project,searching for the correct form when a request comes in and returning the contents, among many othertasks. However, all this is not done by ways of magic! What this component does need to know foreach request that is sent to the server is what the corresponding form name or handler is for that page.
If the FormName parameter is specified in the header section, the IWPageController will search theproject for the corresponding IWPageForm with the same name and use that for subsequentprocessing. If the FormName is not specified, it will then look for a Handler. What is a Handler? It is aWebAction.
Defining WebActionsAlthough not necessary, IWP allows you to define a webaction to handle a form (page). Like normalPageMode applications, you can define a WebAction that uses a TIWPageProducer to return thecontents of the form and perform at the same time other additional actions. However, this is notrequired and in a way adds an overhead (as far as development time is concerned) when using IWP).You can do it if you specifically require, otherwise, by just specifying the FormName in the headersection, you can let IWP take care of all the processing for you.
Therefore, for every dynamic page content you want to add to your website, that has a correspondingIWPageForm (32), add the <intraweb:header> section along with the FormName parameter. This tagis transparent to HTML and when the page has been processed and returned to the browser, thissection is stripped out.
Creating a dynamic IWP pageThe page below is a simple example of an IWP dynamic page, yet is ideal for demonstration purposes.Basically it consists of a static web page with a dynamic label that returns the current date and time.You can use any web page development tool to create this.
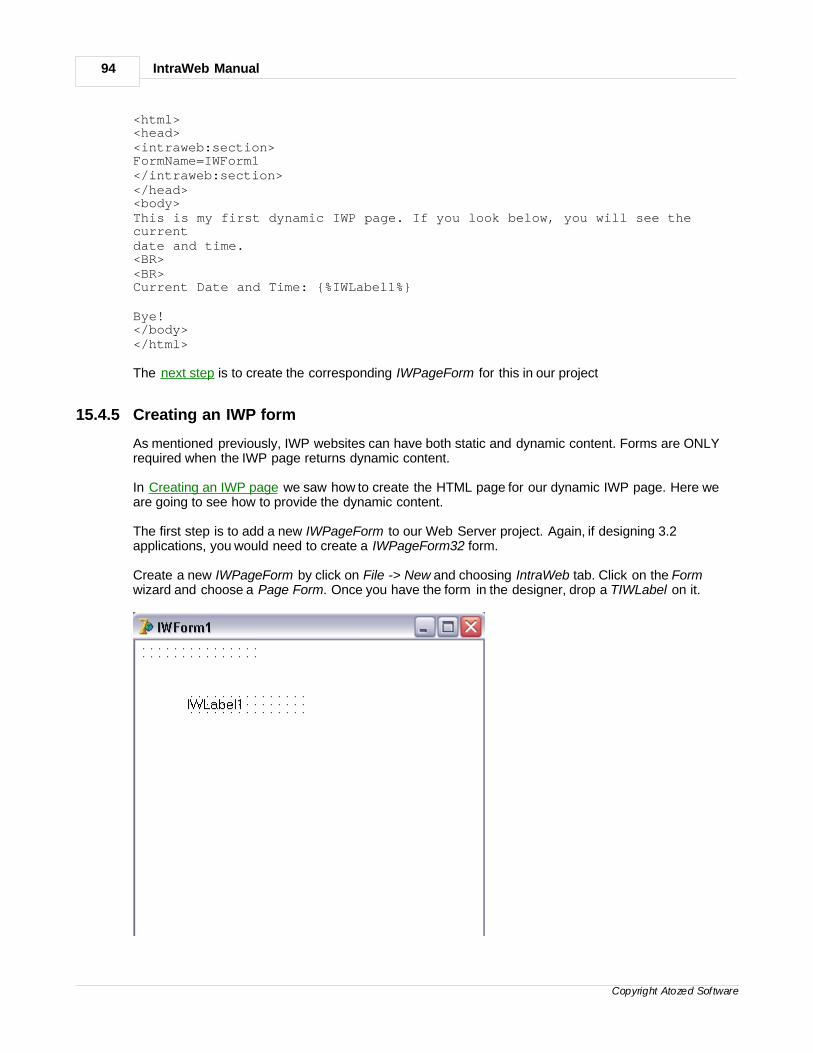
IntraWeb Manual94
Copyright Atozed Software
<html><head><intraweb:section>FormName=IWForm1</intraweb:section></head><body>This is my first dynamic IWP page. If you look below, you will see thecurrentdate and time.<BR><BR>Current Date and Time: {%IWLabel1%}
Bye!</body></html>
The next step is to create the corresponding IWPageForm for this in our project
15.4.5 Creating an IWP form
As mentioned previously, IWP websites can have both static and dynamic content. Forms are ONLYrequired when the IWP page returns dynamic content.
In Creating an IWP page we saw how to create the HTML page for our dynamic IWP page. Here weare going to see how to provide the dynamic content.
The first step is to add a new IWPageForm to our Web Server project. Again, if designing 3.2applications, you would need to create a IWPageForm32 form.
Create a new IWPageForm by click on File -> New and choosing IntraWeb tab. Click on the Formwizard and choose a Page Form. Once you have the form in the designer, drop a TIWLabel on it.
Page Mode 95
Copyright Atozed Software
Make sure the form is named IWForm1 (which corresponding to the FormName parameter in the IWPpage). In the OnRender event, write the following code:
procedure TIWForm1.IWPageFormRender(Sender: TObject);begin IWLabel1.Caption := FormatDateTime('ddd, dd of mmm, yyyy. hh:nn', Now);end;
The only thing left now is to save the project and compile it. Once you have the executable ready, clickon Deploying the files
15.4.6 Deploying the files
Deploying IWP is a very simple task. Other than configuring the web server to process IWP pages, theonly other task is to copy the files to the correct location.
Independently of what web server you use, there are two things that need to be deployed: the staticand dynamic pages is the first, and the actual web application is the second. The pages (independentlyof whether the are static or dynamic) need to be placed in the folder where your web server hosts webpages. In IIS this is normally wwwroot by default. In Omni it is htdocs.
The application needs to be deployed to the physical path where your virtual scripts folder points to.This must coincide with the ApplicationURL value entered in the IWPageController.
Calling the IWP pagesOnce you have deployed all the files, all you need to do is call the page in question. For example, ifyour site is www.mydomain.com, and your IWP page is called first.iwp, then just open the browser andtype http://www.mydomain.com/first.iwp.
The web server (via the association we made in Preparing the Server) automatically knows that whenan IWP extension (or whatever extension you put) is requested, it will launch the corresponding webapplication (in our case project1.dll).
As you can see, IWP introduces a very easy yet powerful way of creating dynamic websites. There ishardly any code that needs to be written on the server side to handle the actual processing of thepages, other than the forms you wish to server dynamic pages with.

Section
XVI
IntraWeb Caching Mechanism 97
Copyright Atozed Software
16 IntraWeb Caching Mechanism
16.1 Caching Files
In order to improve performance, IntraWeb keeps files that can be cached (files from the Filesdirectory etc) in a directory named Cache. By default this directory is created the first time theapplication saves a cached file in the root folder of the application. The user can change the defaultname and location of the cache directory, but in this chapter we will assume for the ease of explanationthat it is named Cache.
There are several rules that apply to the Cache directory:· the application should not save files for later use in the Cache directory, since the directory is
emptied from time to time. The files in this directory are temporary files.
· when deploying an IntraWeb application, always make sure that it has full access (read, write,modify etc) to the Cache directory, otherwise the application will run with unpredictible results(access violations, internal errors etc).

Section
XVII
Deployment 99
Copyright Atozed Software
17 Deployment
17.1 Installation
17.1.1 Overview
IntraWeb applications are completely self contained. This means that you only need to copy thecompiled output (.exe, .so, .dll, etc) to the server. You do not need to copy external files unless youhave created external files.
Demos such as the Guess demo do not rely on any external files and thus simply copying the binarycompiled ouptut to the server is sufficient.
17.1.2 External Files
It is possible that during the development the application created dependencies on external files. In thiscase you will need to copy these files as well.
FilesIf you have files in the files directory or its subdirectories, you may need to copy those to the server aswell. If so, they must resided in a files subdirectory that is placed in the same directory as the binaryexecutable.
TemplatesIf you made use of templates, you will need to copy those to the server as well. They must resided in atemplates subdirectory that is placed in the same directory as the binary executable.
17.1.3 Permissions
By default an IntraWeb application needs very few permissions to execute. These are the minimumrequirements:
1. Read access to the Files if the files subdirectory is used.2. Read access to the Templates subdirectory if templates are used.3. Full access to the Cache subdirectory. By default if this directory does not exist, IntraWeb will
create it and thus have the proper permissions. In this case, it must first have permissions tocreate directories in the directory it is contained in. You will get unpredictable errors, mostprobable access violations and internal server errors if access to this subdirectory is denied orrestricted.
In addition if you are connecting to a database you will need to make sure that the application hasproper permissions. This is especially true for local databases which access database files directly.
If using the BDE, you need to take special care so that the BDE can create its work directories as wellas access the data files.
17.1.4 ISAPI
17.1.4.1 Deploying in IIS
Although an IW ISAPI application is the same as a standard ISAPI application, the steps to deploy anIW ISAPI will be explained step by step. However, due to the number of existing servers that supportISAPI's, this section is restricted to deployment on Microsoft's Internet Information Server. This is oneof the most common servers to deploy ISAPI's on.
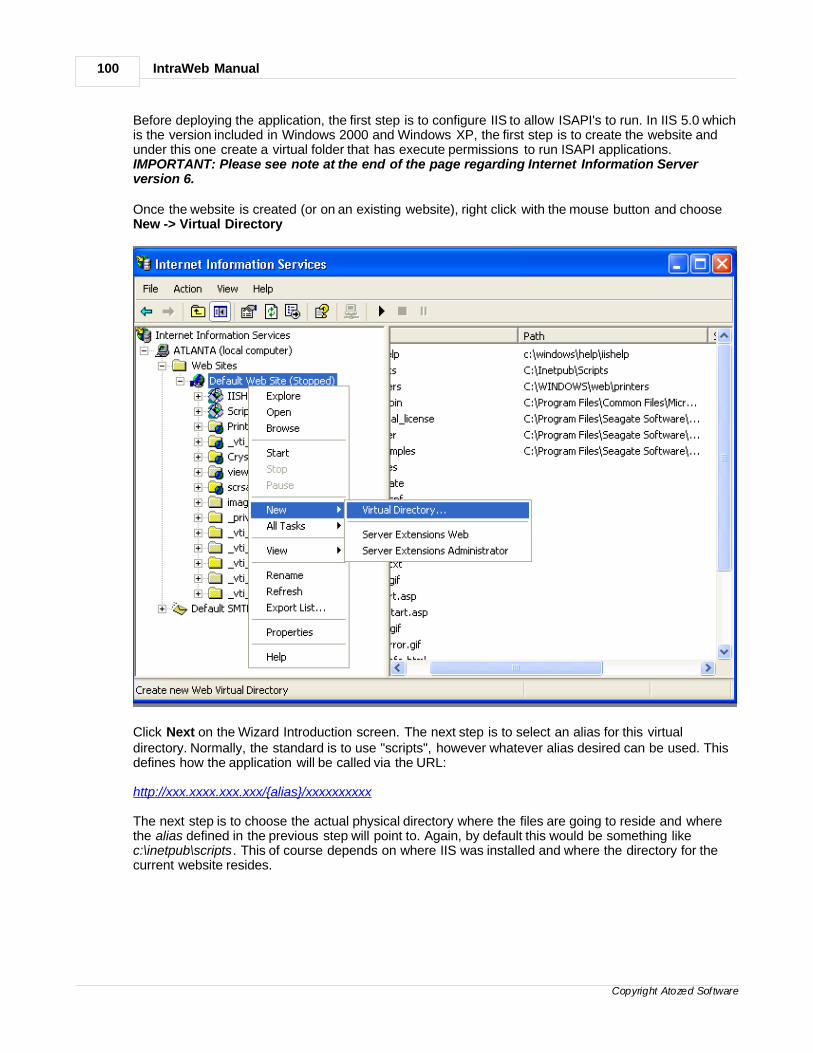
IntraWeb Manual100
Copyright Atozed Software
Before deploying the application, the first step is to configure IIS to allow ISAPI's to run. In IIS 5.0 whichis the version included in Windows 2000 and Windows XP, the first step is to create the website andunder this one create a virtual folder that has execute permissions to run ISAPI applications.IMPORTANT: Please see note at the end of the page regarding Internet Information Serverversion 6.
Once the website is created (or on an existing website), right click with the mouse button and chooseNew -> Virtual Directory
Click Next on the Wizard Introduction screen. The next step is to select an alias for this virtualdirectory. Normally, the standard is to use "scripts", however whatever alias desired can be used. Thisdefines how the application will be called via the URL:
http://xxx.xxxx.xxx.xxx/{alias}/xxxxxxxxxx
The next step is to choose the actual physical directory where the files are going to reside and wherethe alias defined in the previous step will point to. Again, by default this would be something likec:\inetpub\scripts. This of course depends on where IIS was installed and where the directory for thecurrent website resides.
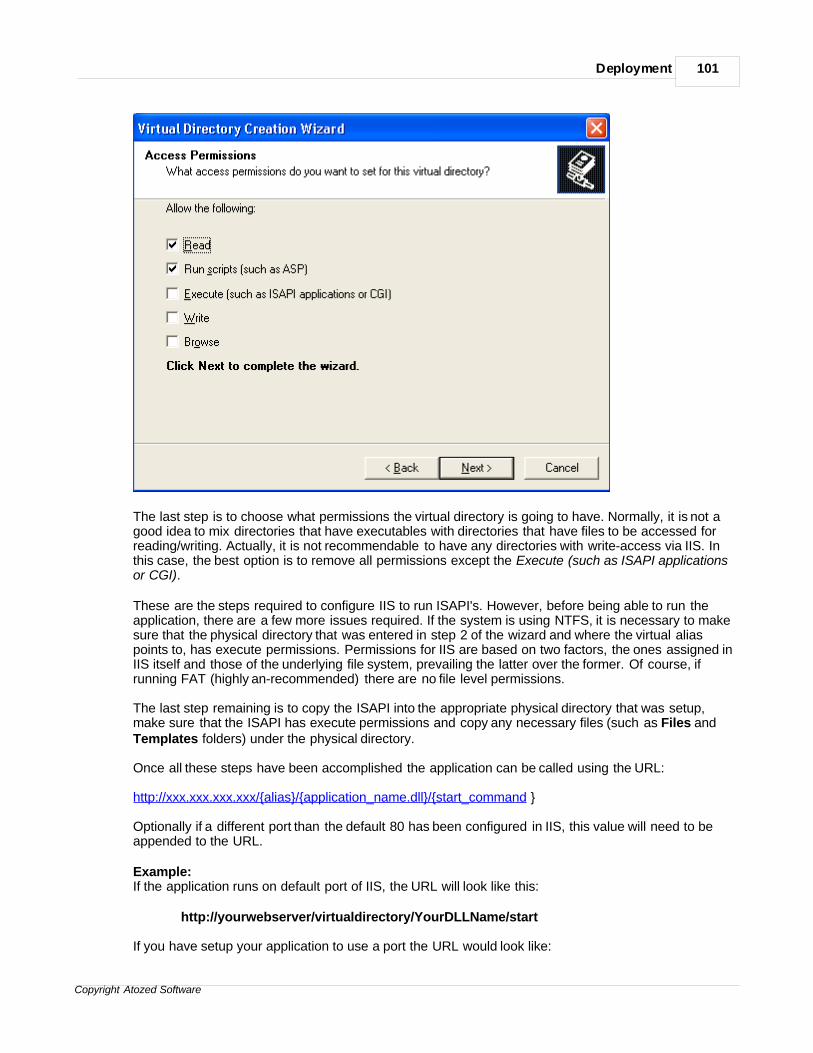
Deployment 101
Copyright Atozed Software
The last step is to choose what permissions the virtual directory is going to have. Normally, it is not agood idea to mix directories that have executables with directories that have files to be accessed forreading/writing. Actually, it is not recommendable to have any directories with write-access via IIS. Inthis case, the best option is to remove all permissions except the Execute (such as ISAPI applicationsor CGI).
These are the steps required to configure IIS to run ISAPI's. However, before being able to run theapplication, there are a few more issues required. If the system is using NTFS, it is necessary to makesure that the physical directory that was entered in step 2 of the wizard and where the virtual aliaspoints to, has execute permissions. Permissions for IIS are based on two factors, the ones assigned inIIS itself and those of the underlying file system, prevailing the latter over the former. Of course, ifrunning FAT (highly an-recommended) there are no file level permissions.
The last step remaining is to copy the ISAPI into the appropriate physical directory that was setup,make sure that the ISAPI has execute permissions and copy any necessary files (such as Files andTemplates folders) under the physical directory.
Once all these steps have been accomplished the application can be called using the URL:
http://xxx.xxx.xxx.xxx/{alias}/{application_name.dll}/{start_command }
Optionally if a different port than the default 80 has been configured in IIS, this value will need to beappended to the URL.
Example:If the application runs on default port of IIS, the URL will look like this:
http://yourwebserver/virtualdirectory/YourDLLName/start
If you have setup your application to use a port the URL would look like:
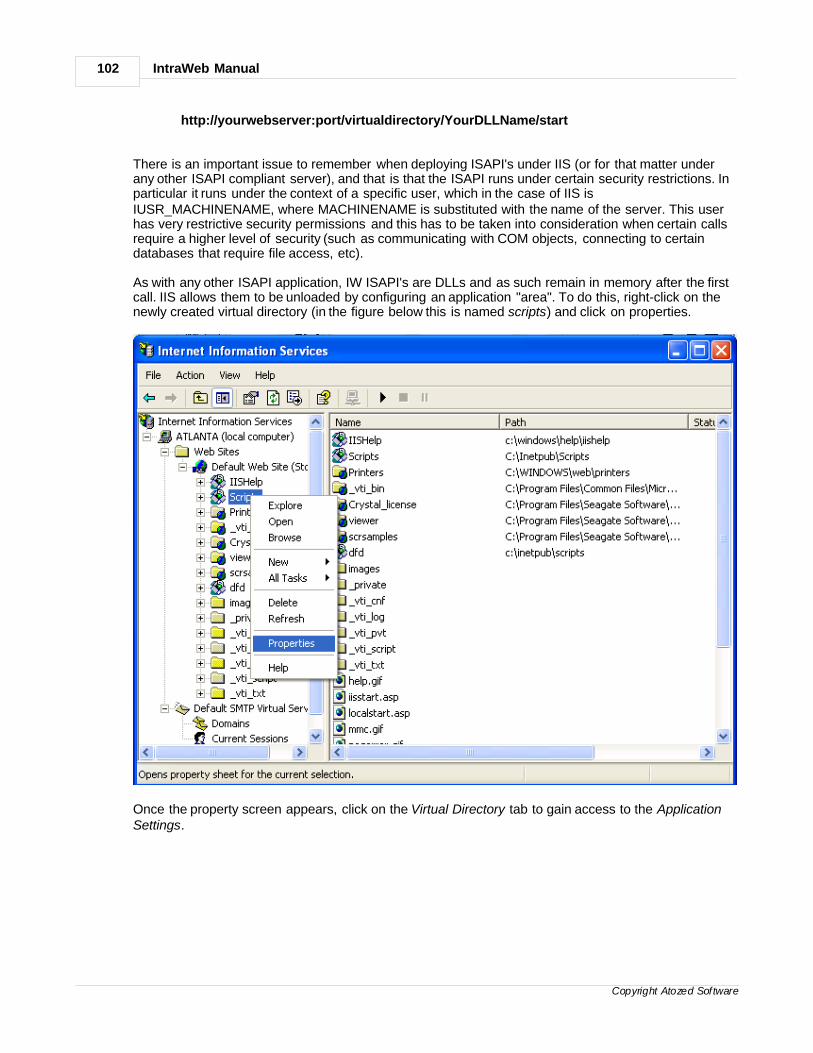
IntraWeb Manual102
Copyright Atozed Software
http://yourwebserver:port/virtualdirectory/YourDLLName/start
There is an important issue to remember when deploying ISAPI's under IIS (or for that matter underany other ISAPI compliant server), and that is that the ISAPI runs under certain security restrictions. Inparticular it runs under the context of a specific user, which in the case of IIS isIUSR_MACHINENAME, where MACHINENAME is substituted with the name of the server. This userhas very restrictive security permissions and this has to be taken into consideration when certain callsrequire a higher level of security (such as communicating with COM objects, connecting to certaindatabases that require file access, etc).
As with any other ISAPI application, IW ISAPI's are DLLs and as such remain in memory after the firstcall. IIS allows them to be unloaded by configuring an application "area". To do this, right-click on thenewly created virtual directory (in the figure below this is named scripts) and click on properties.
Once the property screen appears, click on the Virtual Directory tab to gain access to the ApplicationSettings.
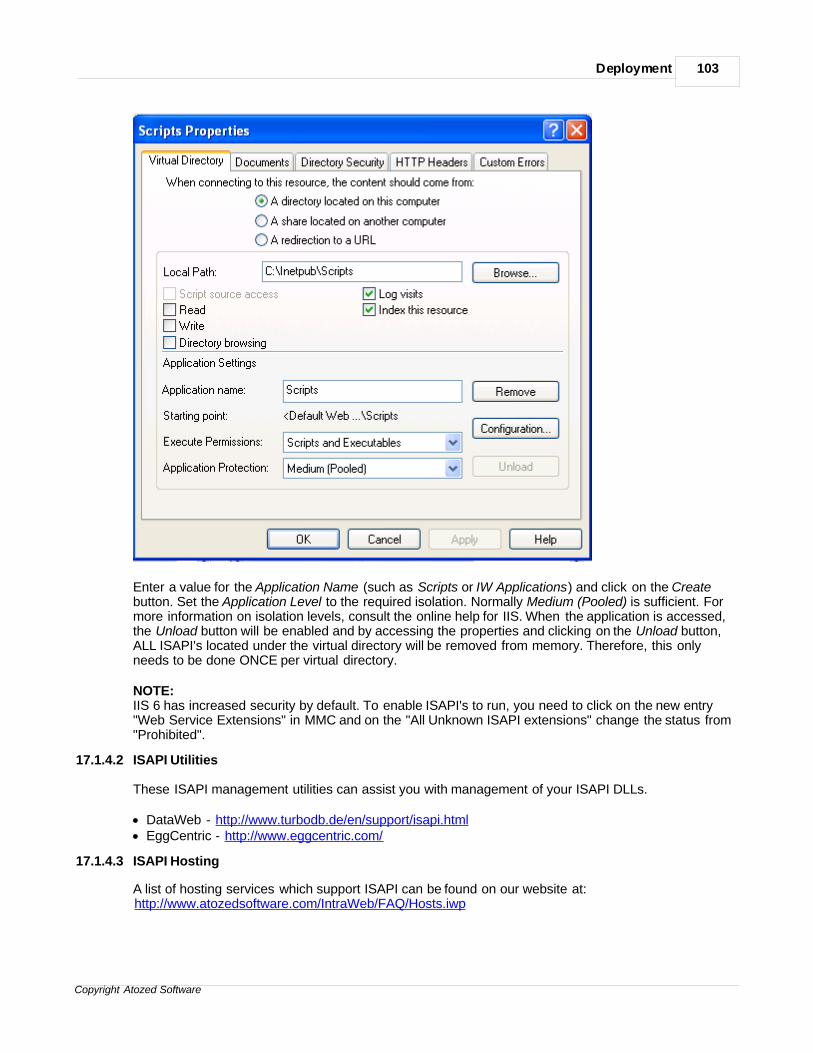
Deployment 103
Copyright Atozed Software
Enter a value for the Application Name (such as Scripts or IW Applications) and click on the Createbutton. Set the Application Level to the required isolation. Normally Medium (Pooled) is sufficient. Formore information on isolation levels, consult the online help for IIS. When the application is accessed,the Unload button will be enabled and by accessing the properties and clicking on the Unload button,ALL ISAPI's located under the virtual directory will be removed from memory. Therefore, this onlyneeds to be done ONCE per virtual directory.
NOTE:IIS 6 has increased security by default. To enable ISAPI's to run, you need to click on the new entry"Web Service Extensions" in MMC and on the "All Unknown ISAPI extensions" change the status from"Prohibited".
17.1.4.2 ISAPI Utilities
These ISAPI management utilities can assist you with management of your ISAPI DLLs.
· DataWeb - http://www.turbodb.de/en/support/isapi.html· EggCentric - http://www.eggcentric.com/
17.1.4.3 ISAPI Hosting
A list of hosting services which support ISAPI can be found on our website at:http://www.atozedsoftware.com/IntraWeb/FAQ/Hosts.iwp
IntraWeb Manual104
Copyright Atozed Software
17.1.4.4 Common ISAPI Issues
ISAPI and thread pooling
Starting with IntraWeb 5.1 the following export clause needs to be added into the project file (.dpr):
exports GetExtensionVersion, HttpExtensionProc, TerminateExtension;
This is necessary because of latest ISAPI and thread pooling modifications in IntraWeb.
ISAPI extensions stay in memory
For people not used to working with ISAPI, a common problem is "My ISAPI is loaded, and it won'tunload, is this normal ?"Yes, it is. The server alone can decide whenever to unload the extensions from memory. Theunloading cannot be done from within the extension itself.This design is intended to give a performance boost - opposed to CGI protocol, where the applicationis loaded every time it's executed. The ISAPI modules stay in memory, this reducing the time requiredto load. This system provides other advantages as well, like improved security and shared memory.
ISAPI extensions must be unloaded to be replaced
You may discover that, while developing, the executable (library) cannot be produced. This is acommon situation when working with ISAPI and it's caused by the web server, which has loaded theISAPI extension and still hasn't unload it. To continue your development you'll have to either unload theISAPI manually, or rename the output file. For instructions on how to remove the ISAPIs manually,please see the documentation of the web server you are using.
ISAPI Manager
A solution to avoid the situation described previously is to use an intermediary DLL, which loads andunloads your application ISAPI as needed. We recommend to use ISAPI Manager, which can bedownloaded from http://www.dataweb.de. Other tools that perform the same task are available.
How to unload from IIS
Apart from stopping and restarting the web server, IIS provides other means to unload the ISAPIs. Thiswill be done automatically if you do the following:
For IIS 3 or lower:
To turn ISAPI caching off you will have to change the following registry entry to 0:HKEY_LOCAL_MACHINE\SYSTEM\CurrentControlSet\Services\W3SVC\Parameters\CacheExtensionsAfter changing this entry, restart the web server and ISAPIs won't be cached anymore.To put the cache option back on, simply set the same value to 1 and restart the web server.
For IIS 4 or higher:
Right click on the script directory of your website, then select "Properties" and on the "VirtualDirectory" tab choose the "Configuration..." button. Deselect the "Cache ISAPI applications"checkbox and click twice on "OK" to save the settings.
What does the Use ISAPIThreadPool checkbox mean ?
Deployment 105
Copyright Atozed Software
When creating a new ISAPI application, the wizard displays the option "Use ISAPIThreadPool". Ifchecked, the unit ISAPIThreadPool unit will be included in the project.
According to Borland, for ISAPI apps the ISAPIThreadPool unit boosts scalability by using poolingthreads and by handling a lot more users and concurrent requests.
This option should be used only when the applications runs under IIS.
17.1.4.5 Useful ISAPI links
For setting up IIS properly:www.microsoft.com/directory/article.asp?ID=kb;en-us;Q300991&SD=MSDN
For building your first Delphi ISAPI:http://www.matlus.com/scripts/website.dll/Tutorials?DelphiISAPI&FirstISAPI&3
For debugging Delphi ISAPIs:http://www.msdelphi.comhttp://codecentral.borland.com/codecentral/ccweb.exe/listing?id=15348http://community.borland.com/article/0,1410,23024,00.html
17.2 Methods
17.2.1 Notes
IntraWeb applications can be deployed as a Windows service / Linux daemon, a standaloneexecutable, an ISAPI application, or an Apache DSO. Using page mode IntraWeb applications can bedeployed by other methods as well.
17.2.2 Stand Alone
While writing your application in Delphi, you will probably use the standalone mode to debug yourapplication. When run as an application, a debugging screen appears with basic statistics. This screenalso contains an Execute (Run | Execute or F9) option, which can be used to test execute theapplication in the browser. By clicking on it, the default browser will be launched with the correspondingURL to test the application.
The StandAlone debug form
The default window in StandAlone mode allows you to perform very basic debugging operations.
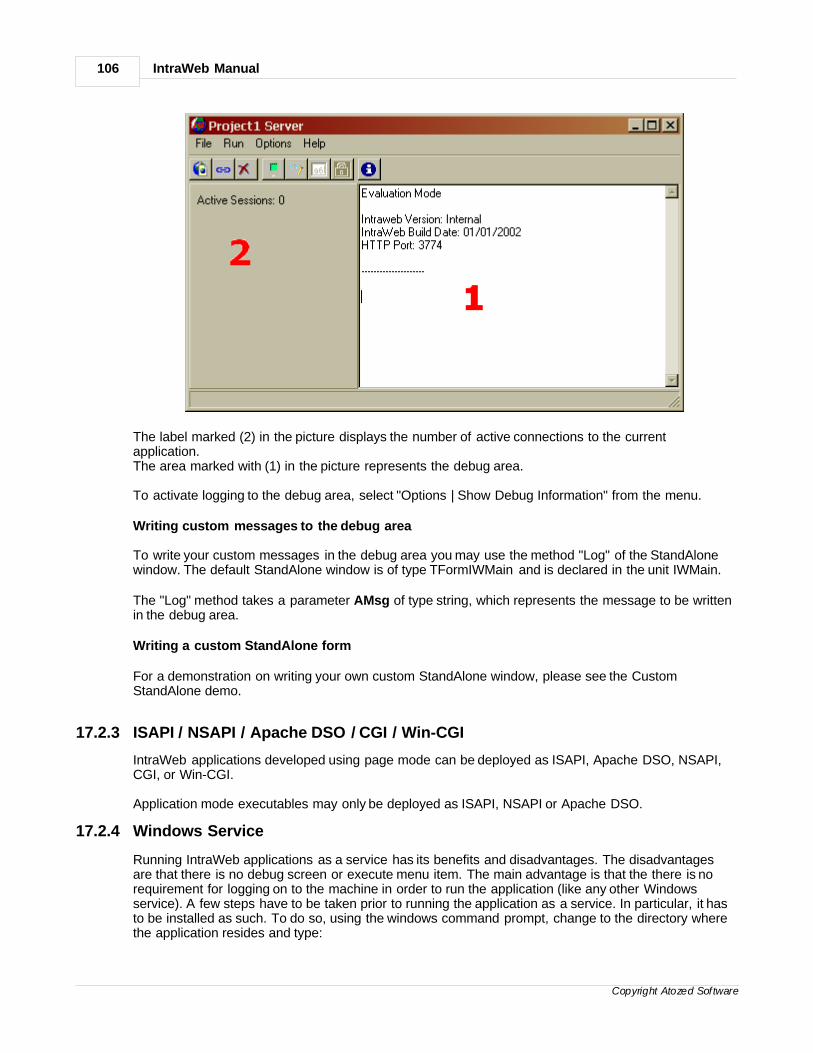
IntraWeb Manual106
Copyright Atozed Software
The label marked (2) in the picture displays the number of active connections to the currentapplication.The area marked with (1) in the picture represents the debug area.
To activate logging to the debug area, select "Options | Show Debug Information" from the menu.
Writing custom messages to the debug area
To write your custom messages in the debug area you may use the method "Log" of the StandAlonewindow. The default StandAlone window is of type TFormIWMain and is declared in the unit IWMain.
The "Log" method takes a parameter AMsg of type string, which represents the message to be writtenin the debug area.
Writing a custom StandAlone form
For a demonstration on writing your own custom StandAlone window, please see the CustomStandAlone demo.
17.2.3 ISAPI / NSAPI / Apache DSO / CGI / Win-CGI
IntraWeb applications developed using page mode can be deployed as ISAPI, Apache DSO, NSAPI,CGI, or Win-CGI.
Application mode executables may only be deployed as ISAPI, NSAPI or Apache DSO.
17.2.4 Windows Service
Running IntraWeb applications as a service has its benefits and disadvantages. The disadvantagesare that there is no debug screen or execute menu item. The main advantage is that the there is norequirement for logging on to the machine in order to run the application (like any other Windowsservice). A few steps have to be taken prior to running the application as a service. In particular, it hasto be installed as such. To do so, using the windows command prompt, change to the directory wherethe application resides and type:
Deployment 107
Copyright Atozed Software
Application_name –install
This will install it and the application will appear in the Services Applet. From there, it can be configuredto run automatically or manually. There is no need to activate the "Interact with Desktop" under theproperties of the service, and doing so will have no effect whatsoever.
In a similar way, if the need arises to uninstall the application, it can be done by typing:
Application_name –uninstall
Before executing this command, be sure to stop your service.
Notes1. Only Windows NT, Windows 2000, and Windows XP support services. Windows 95, Windows 98
and Windows ME do not support services.2. Services do not function in evaluation mode. Attempts to do so will result in errors.
17.3 Launch URLs
17.3.1 Linking to IntraWeb Applications
Since the whole user interface is based on a web browser, calling the application is done using a URL.The URL has a very simple format.
Stand Alone UsageSyntax: http://<server>:<port>Example: http://www.atozedsoftware.com:4000
ISAPI UsageSyntax: http://<server>/<script path>/<dll>Example: http://www.atozedsoftware.com/iw/guess.dll
Apache DSO UsageSyntax: http://<server>/<location>Example: http://www.atozedsoftware.com/myapp
Launch URL OptionURL's are formed by specifying the host and adding the port number (if different to the default 80). Youcan optionally specify a start text on the URL by setting the StartCmd property in the ServerControllerand then adding the value of the URL For example: http://www.atozedsoftware.com:4000/launch
17.3.2 Sessions
Every time this URL is entered into the browser and new session is created and the user is trackedautomatically throughout the whole period that the session lasts. Optionally, parameters can also bespecified when calling a new instance by passing them using POST or GET.
17.3.3 Passing Parameters
Parameters are passed to the application using the interrogation (?) sign after the start URL. Eachparameter consists of a "parameter name" and "parameter value". Parameters are separated fromeach other using the ampersand (&) sign. The following examples show how to pass two parametersnamed "param1" and "param2" with values "value1" and "value" respectively (Example is forstandalone):
http://www.atozedsoftware.com:4000?param1=value1¶m2=value2

IntraWeb Manual108
Copyright Atozed Software
These parameters are available in your application by accessing the RunParams property of theTIWApplication object.In addition, prelaunch changes can be performed in the ServerController.OnNewSession event. Onesuch use may be to read the parameters that have been passed in an offer different users differentstarting forms.
IMPORTANT NOTE:
Some browser on Macintosh require the start parameter to have an additional / before the ?. Forexample, the following:
http://<server>:8888?param1=value1
might not work correctly on some Macintosh browser and should be changed to:
http://<server>:8888/?param1=value1
Since nearly all browser accept /?, there should not be side-effects of adding / before the ? in all calls.
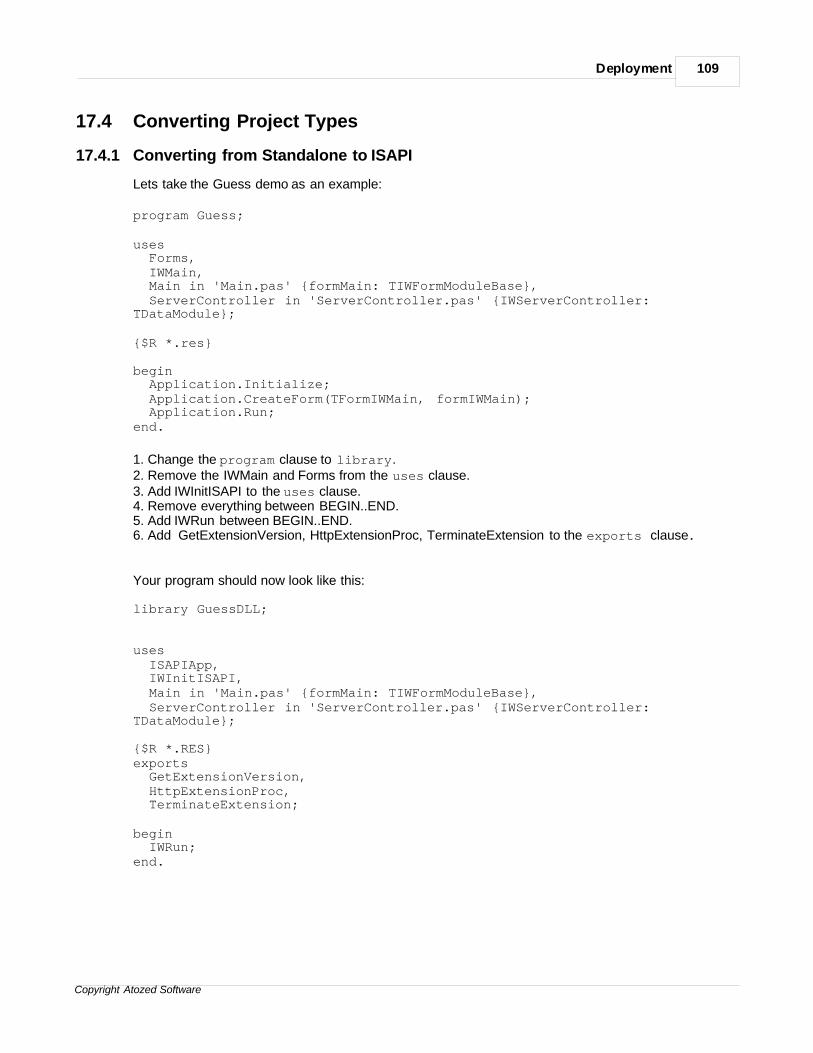
Deployment 109
Copyright Atozed Software
17.4 Converting Project Types
17.4.1 Converting from Standalone to ISAPI
Lets take the Guess demo as an example:
program Guess;
uses Forms, IWMain, Main in 'Main.pas' {formMain: TIWFormModuleBase}, ServerController in 'ServerController.pas' {IWServerController:TDataModule};
{$R *.res}
begin Application.Initialize; Application.CreateForm(TFormIWMain, formIWMain); Application.Run;end.
1. Change the program clause to library.2. Remove the IWMain and Forms from the uses clause.3. Add IWInitISAPI to the uses clause.4. Remove everything between BEGIN..END.5. Add IWRun between BEGIN..END.6. Add GetExtensionVersion, HttpExtensionProc, TerminateExtension to the exports clause.
Your program should now look like this:
library GuessDLL;
uses ISAPIApp, IWInitISAPI, Main in 'Main.pas' {formMain: TIWFormModuleBase}, ServerController in 'ServerController.pas' {IWServerController:TDataModule};
{$R *.RES}exports GetExtensionVersion, HttpExtensionProc, TerminateExtension;
begin IWRun;end.
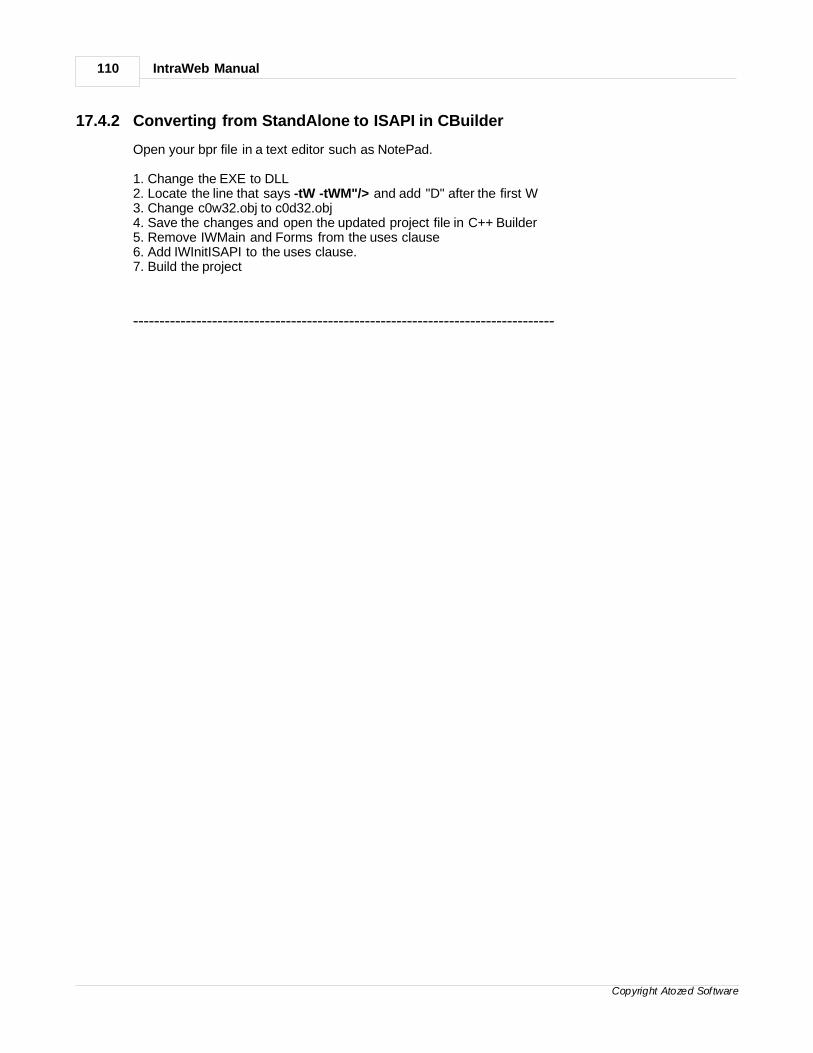
IntraWeb Manual110
Copyright Atozed Software
17.4.2 Converting from StandAlone to ISAPI in CBuilder
Open your bpr file in a text editor such as NotePad.
1. Change the EXE to DLL2. Locate the line that says -tW -tWM"/> and add "D" after the first W3. Change c0w32.obj to c0d32.obj4. Save the changes and open the updated project file in C++ Builder5. Remove IWMain and Forms from the uses clause6. Add IWInitISAPI to the uses clause.7. Build the project
--------------------------------------------------------------------------------
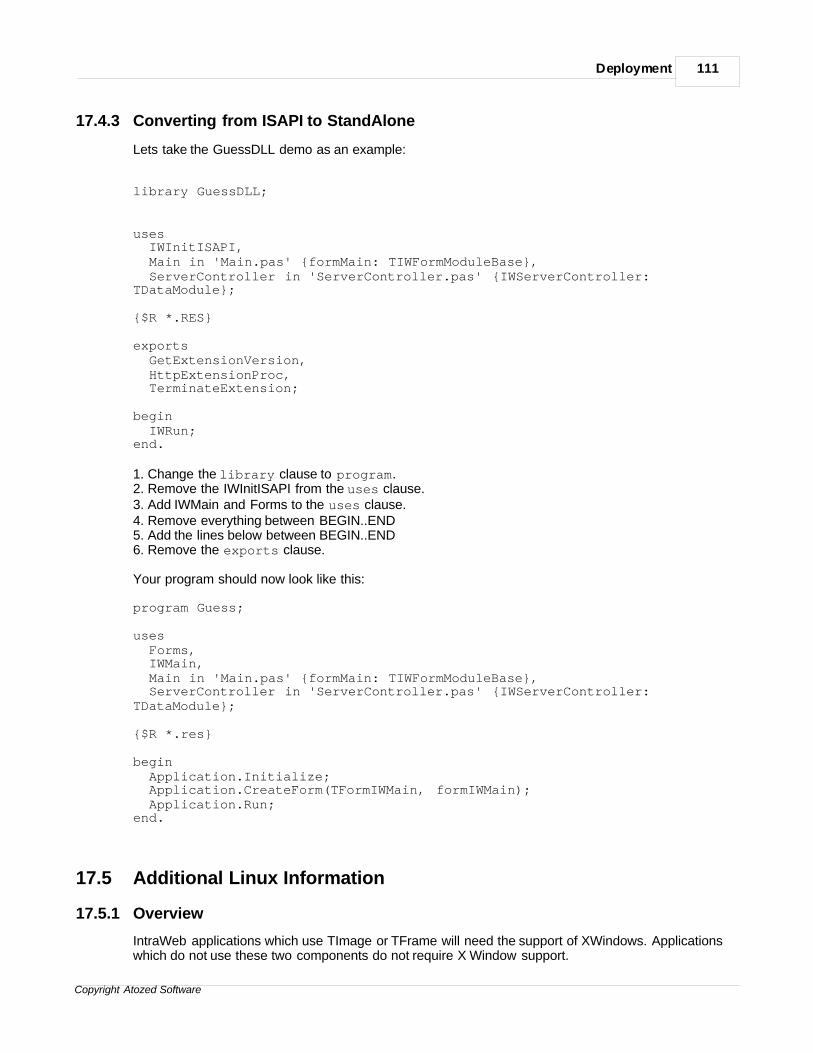
Deployment 111
Copyright Atozed Software
17.4.3 Converting from ISAPI to StandAlone
Lets take the GuessDLL demo as an example:
library GuessDLL;
uses IWInitISAPI, Main in 'Main.pas' {formMain: TIWFormModuleBase}, ServerController in 'ServerController.pas' {IWServerController:TDataModule};
{$R *.RES}
exports GetExtensionVersion, HttpExtensionProc, TerminateExtension;
begin IWRun;end.
1. Change the library clause to program.2. Remove the IWInitISAPI from the uses clause.3. Add IWMain and Forms to the uses clause.4. Remove everything between BEGIN..END5. Add the lines below between BEGIN..END6. Remove the exports clause.
Your program should now look like this:
program Guess;
uses Forms, IWMain, Main in 'Main.pas' {formMain: TIWFormModuleBase}, ServerController in 'ServerController.pas' {IWServerController:TDataModule};
{$R *.res}
begin Application.Initialize; Application.CreateForm(TFormIWMain, formIWMain); Application.Run;end.
17.5 Additional Linux Information
17.5.1 Overview
IntraWeb applications which use TImage or TFrame will need the support of XWindows. Applicationswhich do not use these two components do not require X Window support.
IntraWeb Manual112
Copyright Atozed Software
Installing a full blown X Server on a Linux server machine is not desirable or even possible in manycases. Instead you can run a special X server designed for web servers called X Virtual Frambe Buffer,or Xvfb for short. Xvfb is used by thousands of CGI and Apache DSOs.
Xvfb is included in many distributions such as SUSE. If you do not have Xvfb you can obtain it fromone of the following URLs:
· http://www.xfree86.org/4.0.1/Xvfb.1.html· http://chartworks.com/support/server/XvfbonUnix.html· http://www.slac.stanford.edu/grp/cd/soft/unix/xvfb.html
Once it is installed you can use it by issuing:
Xvfb :99 &
No configuration is required.
Then before starting your IW app issue:
export DISPLAY=localhost:99.0
17.6 Application ports
When deploying the application, the application port should be chosen carefully.
Port numbers below 1024 are always reserved. Linux won't even let you the application them withoutpermissions.Under Windows, the operating system will let the application run on any port, and it's the job of theapplication to select an unused port.
It is in general a good idea to select a port superior to 1024 for your application. A port commonlyopened by firewalls and configured in proxies is 8080.
Whichever port you chose, verify before that no other application is using it.

Section
XVIII
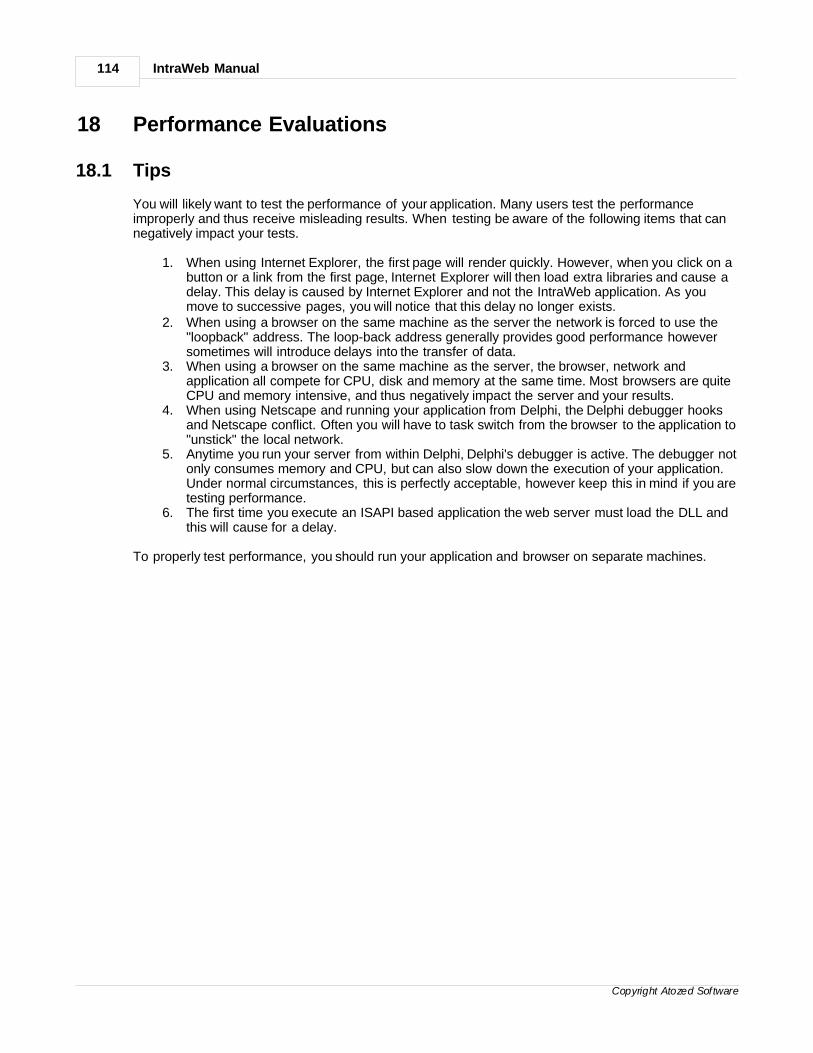
IntraWeb Manual114
Copyright Atozed Software
18 Performance Evaluations
18.1 Tips
You will likely want to test the performance of your application. Many users test the performanceimproperly and thus receive misleading results. When testing be aware of the following items that cannegatively impact your tests.
1. When using Internet Explorer, the first page will render quickly. However, when you click on abutton or a link from the first page, Internet Explorer will then load extra libraries and cause adelay. This delay is caused by Internet Explorer and not the IntraWeb application. As youmove to successive pages, you will notice that this delay no longer exists.
2. When using a browser on the same machine as the server the network is forced to use the"loopback" address. The loop-back address generally provides good performance howeversometimes will introduce delays into the transfer of data.
3. When using a browser on the same machine as the server, the browser, network andapplication all compete for CPU, disk and memory at the same time. Most browsers are quiteCPU and memory intensive, and thus negatively impact the server and your results.
4. When using Netscape and running your application from Delphi, the Delphi debugger hooksand Netscape conflict. Often you will have to task switch from the browser to the application to"unstick" the local network.
5. Anytime you run your server from within Delphi, Delphi's debugger is active. The debugger notonly consumes memory and CPU, but can also slow down the execution of your application.Under normal circumstances, this is perfectly acceptable, however keep this in mind if you aretesting performance.
6. The first time you execute an ISAPI based application the web server must load the DLL andthis will cause for a delay.
To properly test performance, you should run your application and browser on separate machines.

Section
XIX
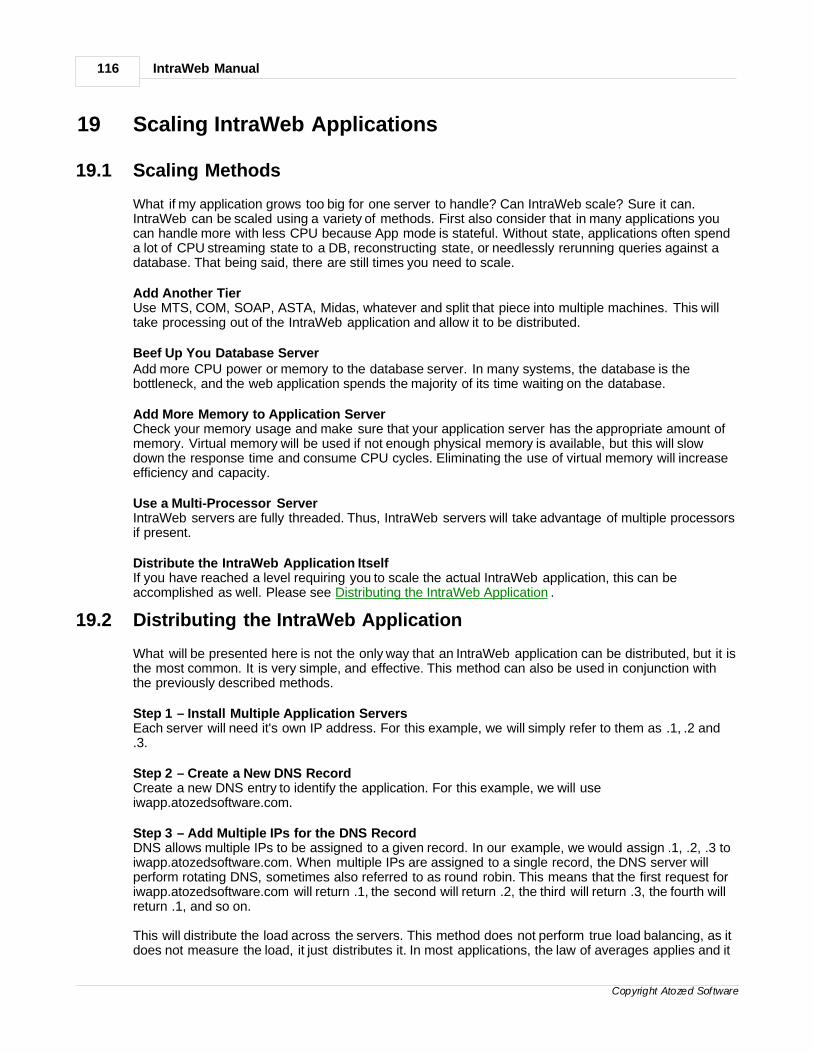
IntraWeb Manual116
Copyright Atozed Software
19 Scaling IntraWeb Applications
19.1 Scaling Methods
What if my application grows too big for one server to handle? Can IntraWeb scale? Sure it can.IntraWeb can be scaled using a variety of methods. First also consider that in many applications youcan handle more with less CPU because App mode is stateful. Without state, applications often spenda lot of CPU streaming state to a DB, reconstructing state, or needlessly rerunning queries against adatabase. That being said, there are still times you need to scale.
Add Another TierUse MTS, COM, SOAP, ASTA, Midas, whatever and split that piece into multiple machines. This willtake processing out of the IntraWeb application and allow it to be distributed.
Beef Up You Database ServerAdd more CPU power or memory to the database server. In many systems, the database is thebottleneck, and the web application spends the majority of its time waiting on the database.
Add More Memory to Application ServerCheck your memory usage and make sure that your application server has the appropriate amount ofmemory. Virtual memory will be used if not enough physical memory is available, but this will slowdown the response time and consume CPU cycles. Eliminating the use of virtual memory will increaseefficiency and capacity.
Use a Multi-Processor ServerIntraWeb servers are fully threaded. Thus, IntraWeb servers will take advantage of multiple processorsif present.
Distribute the IntraWeb Application ItselfIf you have reached a level requiring you to scale the actual IntraWeb application, this can beaccomplished as well. Please see Distributing the IntraWeb Application .
19.2 Distributing the IntraWeb Application
What will be presented here is not the only way that an IntraWeb application can be distributed, but it isthe most common. It is very simple, and effective. This method can also be used in conjunction withthe previously described methods.
Step 1 – Install Multiple Application ServersEach server will need it's own IP address. For this example, we will simply refer to them as .1, .2 and.3.
Step 2 – Create a New DNS RecordCreate a new DNS entry to identify the application. For this example, we will useiwapp.atozedsoftware.com.
Step 3 – Add Multiple IPs for the DNS RecordDNS allows multiple IPs to be assigned to a given record. In our example, we would assign .1, .2, .3 toiwapp.atozedsoftware.com. When multiple IPs are assigned to a single record, the DNS server willperform rotating DNS, sometimes also referred to as round robin. This means that the first request foriwapp.atozedsoftware.com will return .1, the second will return .2, the third will return .3, the fourth willreturn .1, and so on.
This will distribute the load across the servers. This method does not perform true load balancing, as itdoes not measure the load, it just distributes it. In most applications, the law of averages applies and it
Scaling IntraWeb Applications 117
Copyright Atozed Software
is quite effective. If your application is such that it creates large imbalances, you will need to use a loadbalancing DNS server instead.
Step 4 – Create a Redirect EntryOn each application server create a redirect entry using the primary web server's configuration, or apage that performs a redirect to that servers actual IP. When the page or virtual entry is requested, thebrowser will not know that it has been redirected to an IP by the DNS server, as this is part of itsnormal operation. However, we must make sure that subsequent requests are routed to the sameapplication server, as IntraWeb is stateful. Note that this only applies to Application Mode, and notPage mode. This step can be skipped for Page Mode.
The virtual entry or web page merely redirects the web browser to a URL containing its individual IPinstead of iwapp.atozedsoftware.com. For example if our URL is http://iwapp.atozedsoftware.com, thisentry might redirect the browser to . This URL demonstrates a stand alone IntraWeb application, but itcan be adjusted to redirect to a static page, an ISAPI version, or a DSO version. The important thing isthat the browser is redirected to the physical application server so each subsequent request will returnto that server.

Section
XX
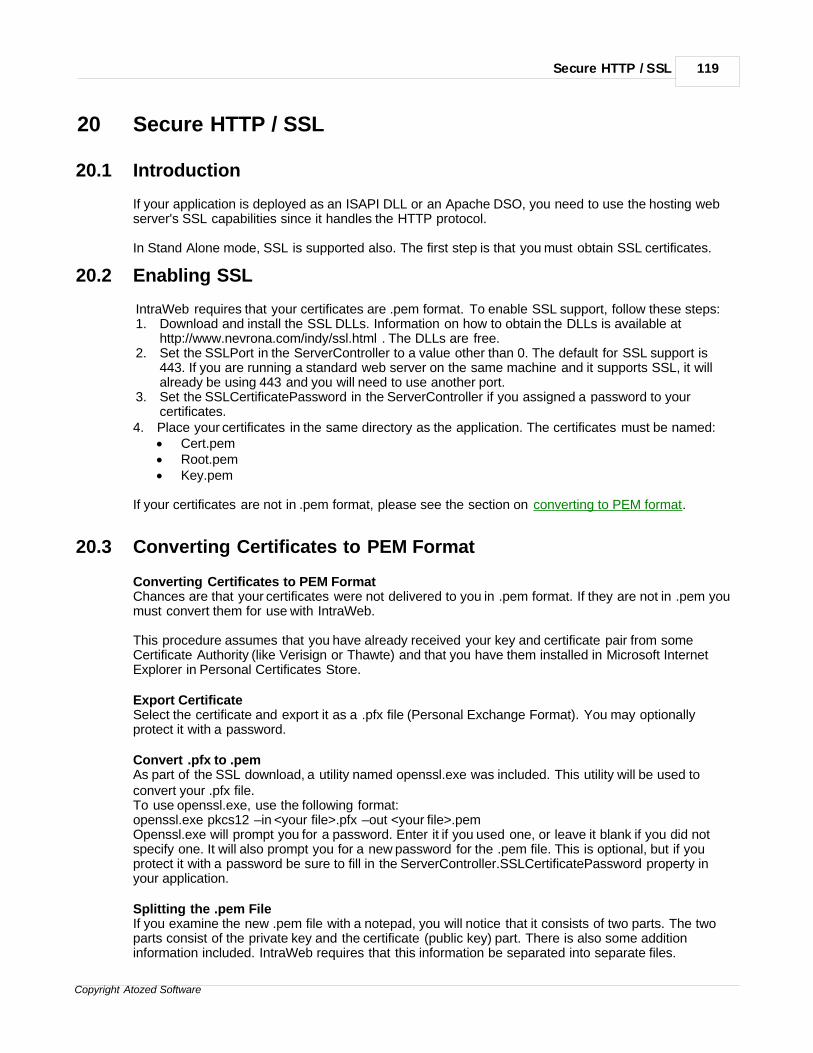
Secure HTTP / SSL 119
Copyright Atozed Software
20 Secure HTTP / SSL
20.1 Introduction
If your application is deployed as an ISAPI DLL or an Apache DSO, you need to use the hosting webserver's SSL capabilities since it handles the HTTP protocol.
In Stand Alone mode, SSL is supported also. The first step is that you must obtain SSL certificates.
20.2 Enabling SSL
IntraWeb requires that your certificates are .pem format. To enable SSL support, follow these steps:1. Download and install the SSL DLLs. Information on how to obtain the DLLs is available at
http://www.nevrona.com/indy/ssl.html . The DLLs are free.2. Set the SSLPort in the ServerController to a value other than 0. The default for SSL support is
443. If you are running a standard web server on the same machine and it supports SSL, it willalready be using 443 and you will need to use another port.
3. Set the SSLCertificatePassword in the ServerController if you assigned a password to yourcertificates.
4. Place your certificates in the same directory as the application. The certificates must be named:· Cert.pem· Root.pem· Key.pem
If your certificates are not in .pem format, please see the section on converting to PEM format.
20.3 Converting Certificates to PEM Format
Converting Certificates to PEM FormatChances are that your certificates were not delivered to you in .pem format. If they are not in .pem youmust convert them for use with IntraWeb.
This procedure assumes that you have already received your key and certificate pair from someCertificate Authority (like Verisign or Thawte) and that you have them installed in Microsoft InternetExplorer in Personal Certificates Store.
Export CertificateSelect the certificate and export it as a .pfx file (Personal Exchange Format). You may optionallyprotect it with a password.
Convert .pfx to .pemAs part of the SSL download, a utility named openssl.exe was included. This utility will be used toconvert your .pfx file.To use openssl.exe, use the following format:openssl.exe pkcs12 –in <your file>.pfx –out <your file>.pemOpenssl.exe will prompt you for a password. Enter it if you used one, or leave it blank if you did notspecify one. It will also prompt you for a new password for the .pem file. This is optional, but if youprotect it with a password be sure to fill in the ServerController.SSLCertificatePassword property inyour application.
Splitting the .pem FileIf you examine the new .pem file with a notepad, you will notice that it consists of two parts. The twoparts consist of the private key and the certificate (public key) part. There is also some additioninformation included. IntraWeb requires that this information be separated into separate files.
IntraWeb Manual120
Copyright Atozed Software
Key.pemCreate key.pem with notepad and paste everything between and including these two statements:
-----BEGIN RSA PRIVATE KEY----------END RSA PRIVATE KEY-----
Cert.pemCreate cert.pem with notepad and paste everything between and including these two statements:
-----BEGIN CERTIFICATE----------END CERTIFICATE-----
Root.pemThe final file that IntraWeb requires is the Certificate Authority certificate file. You can obtain this fromthe Internet Explorer in Trusted Root Certificate Authority dialog. Select the Authority that issued yourcertificate and export it in Base64 (cer) format. This format is also the same as PEM format so afterexport simply rename the file to root.pem.
20.4 Example
An example with a test certificate is included and can be seen by examining the StandAloneSSL demo.

Index- S -step-by-step 87
Index 121
Copyright Atozed Software

IntraWeb Manual122
Copyright Atozed Software