Embed Size (px)
Citation preview

© 2013 by Ryan McGraw, all rights reserved
Manual of Adapted Yoga Poses
Opening Centering
Benefits: Encourages centering and internal awareness. This simple meditation helps to build the
foundation for more advanced meditation1
Setting up the Pose
Sit on a chair in a comfortable position while keeping the spine as straight as possible. You
can place blanket or bolster on the chair behind you to support the spine.
Feet should be flat on ground.
Hands can rest in the lap wherever they are comfortable.
If possible, close eyes and begin to observe your breath coming in and out.
Do not try to control your breath, simply observe and feel it
After several breaths begin to deepen the breath. Begin the inhale from the low belly and
allow the breath to rise up to the collarbones. Exhale normally.
Do this for several rounds, focusing on your breath.
After several rounds of breath open the eyes and begin breathing normally again.
Key Actions
Focus on your breath
To make this pose more comfortable you can do any or all of the following:
Place a bolster or blanket behind you on chair to support spine.
Place blanket on lap to rest hands in
Place blanket or bolster under feet if feet do not reach or are solidly connected with floor.
1All yoga poses in this manual use the following reference: L.Gaspar, Prairie Yoga Teacher Training Manual, 2010.

© 2013 by Ryan McGraw, all rights reserved
2. Cat-Cow
Benefits: Warms up the spine; stretches upper spine on inhale and expands the upper chest.
Stretches lower spine on exhale. Links breath to movement.
Setting up the Pose on hands and knees
*Note: If being on your hands and knees is a challenge for you or you cannot bear weight
on your knees, please do the chair version of this pose. This should be a warm up pose that
does not require a substantial amount of effort.
Set up on hands and knees, with hands under shoulders and knees under hips
Exhale, round low back, contract belly, and look downwards
Inhale, press sternum forward, widen collarbones, and look up slightly
Repeat five times moving rhythmically with your breath
Seated Version
Sit with a tall spine
Feet are solidly grounded on floor
Exhale, round low back, contract belly, and look downwards
Inhale, press sternum forward, widen collarbones, and look up slightly
Repeat five times moving rhythmically with your breath
Key Actions
Initiate movement from spine; not the head and neck
On exhale, focus on bringing belly towards low back
On inhale, focus on expanding the chest

© 2013 by Ryan McGraw, all rights reserved
Hands and Knees Cat-Cow:
Starting Position Exhale
Inhale
Seated Cat-Cow
Starting Position Exhale Inhale

© 2013 by Ryan McGraw, all rights reserved
Tadasana
Benefits: Helps one to become steady, centered, and self-aware.
Setting up the pose:
Seated in Chair or Standing
Stand or sit with feet hip distance apart
Point feet forward and spread the toes wide
Balance your weight evenly between the two feet
Extend your arm down by your sides
Lift your chest
Gaze at the horizon
Key Actions
Press top of the thighs back
Activate arms and reach your fingertips down towards the ground
Lift sternum and broaden collar bones
Lift from the bottom of the belly
Shrug the shoulder blades down the back and press them into the front body to open the chest
Center ears over shoulders
Balance your weight so that it is equal throughout the body.
Adaptations
Stand with the back body against a wall for extension of the spine upwards.
If seated, use bolster or blanket(s) to support spine, between back of chair and spine
If seated, use a blanket under feet to maintain solid connection with the ground. Only use this
adaptation if you feel you need more height to connect with ground.
Seated Tadasana Standing Tadasana

© 2013 by Ryan McGraw, all rights reserved
Uttanasana
Benefits: Lengthens spine and hamstrings. It tones the abdominal organs and stretches the back
body. It also is a very calming pose to the mind
Precautions: Students with low back issues or very tight hamstrings should not go fully into this
standing pose, try variations seated in a chair or go into forward fold halfway with hands on wall
in front of you.
Setting up the Pose, Seated in Chair or Standing
Inhale, raise your arms over head
Exhale, fold forward your upper forward
Allow the arms and hands to slide down the legs and come to rest on a chair, blocks, or the
lower legs.
Keep your neck relaxed and bring the crown of the head towards the floor
Key Actions
Keep feet firmly planted on the floor
Bring the waist and side ribs towards the floor
Adaptations
Fold and bring your hands to a chair, for standing version
Use a bolster or blanket(s) on top of chair to support head and arms for the seated or standing
version of the pose.
Fold and bring your hands to a wall in front of you.

© 2013 by Ryan McGraw, all rights reserved
Standing Uttanasana
Seated Uttanasana
Restorative Seated Uttanasana

© 2013 by Ryan McGraw, all rights reserved
Trikonasana:
Precautions: This is a challenging standing pose. Do the chair version of pose if you are
unsteady or uncomfortable standing in any way. Use caution in this pose if you have any back
discomfort or injury. If you have any neck problems, don't turn your head to look at the top arm;
instead, look straight ahead with the sides of the neck lengthened evenly, or look down at the
floor
Benefits: This pose tones the legs, feet, and ankles. The triangular alignment gives one the
feeling of balance, alignment, openness and expansion.
Setting up the Pose:
Standing Against the Wall
Place chair to the right side of your body
Standing with back against wall, step feet apart about 3 feet wide. The feet can be closer
together for more stability.
Spread arms out wide, parallel to ground, fingers spread.
Turn your right leg and foot out so that it faces towards the chair. Turn the left foot in
slightly.
Right knee should face directly forward.
Inhale and lift the belly, side of the ribs, and sternum.
Exhale and reach out through the right fingers and tilt the pelvis and ribs over the right leg,
while remaining strong in both legs
Allow the right hand to fall on the back of the chair.
The left hand can come to the hip or extend to the sky.
Look down and lift out of pose on an inhale.
Repeat on the left side. Place chair to left side of your body
Seated in Chair
Sit towards the front of chair.
Spread feet out as wide as chair, feet need to be solidly grounded on floor.
Place right hand on the inside of right thigh.
Tilt torso to the right and slide right arm down leg.
Allow right hand to rest on a block, knee, shin, ankle, or floor.
Bring left hand to left side of waist, after few breaths extend left arm overhead if
comfortable.
Look down and lift out of pose on an inhale.
Key Actions
Maintain balance and strength in the legs and feet. Evenly balance your weight between the
legs as much as possible.
Turn the right pelvis away from the right thigh and continue turning your torso if possible.
Stop if you feel pain in low back.

© 2013 by Ryan McGraw, all rights reserved
Standing Trikonasana
Seated Trikonasana
© 2013 by Ryan McGraw, all rights reserved
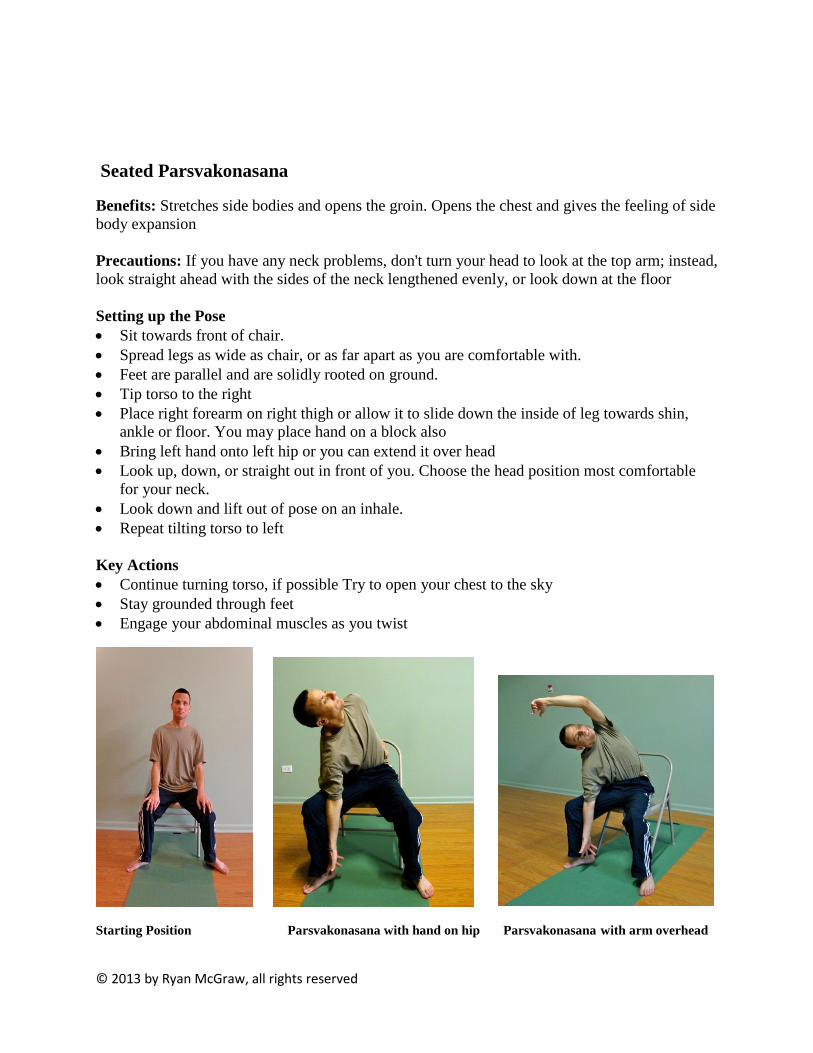
Seated Parsvakonasana
Benefits: Stretches side bodies and opens the groin. Opens the chest and gives the feeling of side
body expansion
Precautions: If you have any neck problems, don't turn your head to look at the top arm; instead,
look straight ahead with the sides of the neck lengthened evenly, or look down at the floor
Setting up the Pose
Sit towards front of chair.
Spread legs as wide as chair, or as far apart as you are comfortable with.
Feet are parallel and are solidly rooted on ground.
Tip torso to the right
Place right forearm on right thigh or allow it to slide down the inside of leg towards shin,
ankle or floor. You may place hand on a block also
Bring left hand onto left hip or you can extend it over head
Look up, down, or straight out in front of you. Choose the head position most comfortable
for your neck.
Look down and lift out of pose on an inhale.
Repeat tilting torso to left
Key Actions
Continue turning torso, if possible Try to open your chest to the sky
Stay grounded through feet
Engage your abdominal muscles as you twist
Starting Position Parsvakonasana with hand on hip Parsvakonasana with arm overhead

© 2013 by Ryan McGraw, all rights reserved
Adho Mukha Svanasana
Benefits: This pose provides benefits for the entire body. It lengthens the spine and hamstrings,
stretches calves, stretches and tones the arms. It also relieves fatigue
Setting up the Pose
Standing against Wall
Face the seat of the chair. The chair should be placed against wall
Bend your knees and fold forward
Place hands on each side of chair seat, you may want to place a pad on seat of chair so hands
do not slip
Press strongly through hands, engaging the arms
Walk legs back and press heels towards floor
Let head hang between arms
Seated in Chair
Sit with chair about a foot or two away from wall
Widen legs to corners of your chair, press feet firmly into ground
Raise arms overhead and press palms strongly into wall with fingers wide
Don't bend the elbows, shrug the shoulders, or narrow the collar bones.
Key Actions
Spread fingers and palms as wide as possible
Keep the palms pressing down, as the forearms lift away from chair or wall
Press thighs firmly back
Stretch calves towards heels
Expand chest and widen collarbones
Standing Ahdo Muhka Svanasana Seated Ahdo Muhka Svanasana
(Begin with chair against wall)

© 2013 by Ryan McGraw, all rights reserved
Dandasana
Benefits: This pose strengthens the back and legs. Your hamstrings stretch. It assists your sitting
posture. It teaches you how to extend and ground legs. As you ground through the legs and sit
bones, the spine extends strongly upward. This pose should bring a feeling of stability.
Setting up the Pose
Sit against wall or front of a chair with your legs straight out in front of you
Flex your feet so that your toes point to the sky
Stretch through the entire leg, foot to hip
Place the palms on the floor by the hips
Lift up through the side ribs, sternum, and head as you ground down through the legs
Shrug the shoulder blades down the back and allow the heart to project forward
Key Actions
Keep thighs, quadriceps, shins pressing down
Lift up through the abdominals, side ribs, and sternum
Adaptations
Sit on a height so that the pelvis tilts slightly forward and you are comfortable
Practice with back against front of chair or wall to get more elongation through the spine
Practice with support (height) under the backs of the legs, if they do not reach the ground
Practice with the legs strapped together, use yoga strap, to allow them to straighten.

© 2013 by Ryan McGraw, all rights reserved
Supta Padangusthasana
Benefits: Stretches the hamstrings, calves and buttocks. Encourages both grounding and
lengthening of body. The body is totally supported in this posture; this minimizes injury risks.
Setting up the Pose
Lie on back and extend both legs straight out in front of you
Bend right knee into chest
Hold the back of the right thigh with both hands
Loop a yoga strap or towel around your right foot
Keep the left leg extended straight on ground.
Hold the strap with both hands and straighten right leg into air
Only lift the right leg as far as you can while keeping it straight.
Flex the right foot and press through the right heel
Keep the left leg active, flex the left foot and press down through the quadriceps and thighs.
Repeat lifting the left leg into the air
Key Actions
Keep both feet flexed
Keep arms straight while holding strap or towel
Keep your head down on floor/blanket, keeping your chest open
Adaptations
Loop a belt around the right foot and hold while right leg is extended. This will give added
leverage to practitioners who cannot reach the right foot.
If the back of left leg does not reach the ground use folded blankets to support it.
Press left foot against wall or block against the wall, this will ensure that the left leg and foot
are active.
Bend the left leg placing the foot on the floor with the shin vertical. This will help release the
hamstring of the right leg.
Starting Position Supta Padangusthasana
© 2013 by Ryan McGraw, all rights reserved
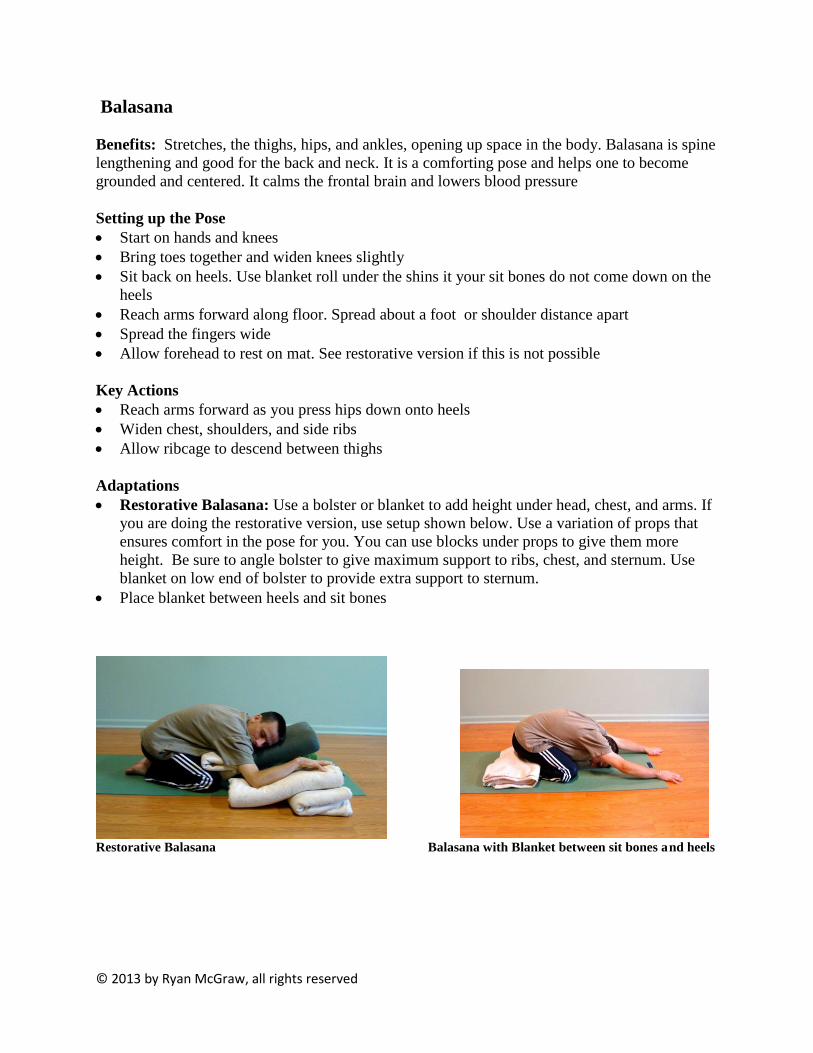
Balasana
Benefits: Stretches, the thighs, hips, and ankles, opening up space in the body. Balasana is spine
lengthening and good for the back and neck. It is a comforting pose and helps one to become
grounded and centered. It calms the frontal brain and lowers blood pressure
Setting up the Pose
Start on hands and knees
Bring toes together and widen knees slightly
Sit back on heels. Use blanket roll under the shins it your sit bones do not come down on the
heels
Reach arms forward along floor. Spread about a foot or shoulder distance apart
Spread the fingers wide
Allow forehead to rest on mat. See restorative version if this is not possible
Key Actions
Reach arms forward as you press hips down onto heels
Widen chest, shoulders, and side ribs
Allow ribcage to descend between thighs
Adaptations
Restorative Balasana: Use a bolster or blanket to add height under head, chest, and arms. If
you are doing the restorative version, use setup shown below. Use a variation of props that
ensures comfort in the pose for you. You can use blocks under props to give them more
height. Be sure to angle bolster to give maximum support to ribs, chest, and sternum. Use
blanket on low end of bolster to provide extra support to sternum.
Place blanket between heels and sit bones
Restorative Balasana Balasana with Blanket between sit bones and heels

© 2013 by Ryan McGraw, all rights reserved
Supta Baddha Konasana
Benefits: This pose stretches inner thighs and groins. It frees energy in the pelvic area and quiets
the mind.
Precautions:
Do not do this pose post-partum until pelvic area muscles that became loose for child birth
have recovered their pre-pregnancy tightness.
Be careful if you have had a groin or knee injury. Use blankets or blocks under the knees for
support.
Be careful in this pose if you have a hip or shoulder injury.
Setting Up the Pose
Sit on mat and place a bolster or folded blanket(s) vertical on mat behind you, a few inches
from tailbone
Place blanket on the far end of bolster or blanket(s) to use as pillow for head
Sit with the soles of your feet together
Wrap belt around sacrum, close to buttocks, and clasp belt at feet in front of you. Make sure
both ends belt come inside of legs and around feet
Place hands on either side of you on ground
Inhale, raise your chest
Exhale, lie back on bolster or folded blanket(s)
Place blankets and/or blocks under upper legs to support them
Arms rest in goal post position
*If you feel discomfort in the low back in this pose, you need to add one or more bolster or
blanket under the upper body or put blocks under bolster as shown in picture below.
Key Actions
Keep chest lifted throughout pose
Release shoulder blades down the back
Allow legs to relax downward

© 2013 by Ryan McGraw, all rights reserved
Supta Baddha Konasana

© 2013 by Ryan McGraw, all rights reserved
Setu Bandha Sarvangasana
Benefits
This pose is a simple backbend that allows the chest, lungs, and shoulders to open. It strengthens
the legs, stretches the belly and tones the spine.
Precautions
Practice restorative version of pose if you have a neck or shoulder injury. Use caution in this
pose if you have a low back pain or injury
Setting up the Pose
Version over Bolster
Place bolster horizontal on mat
Sit on bolster
Lie back on bolster so that back, head, and arms come off bolster
Place arms in goal post position
Knees are bent with feet on floor
To come out of pose bring knees into chest and roll on your right side.
Restorative Version
*Set up shown in picture on next page labeled ‘Restorative Version’
Sit on front edge of bolster placed vertical on mat .
Lie back on bolster. Your upper body will land on the horizontal bolster at the back of mat.
Slide your head, neck, and shoulders off the bolster so the they rest on blankets
Spread arms out to side and rest them on blankets
Legs are straight and feet can rest on block to keep strain off of low back.
If able, strap yoga belts around your legs to keep them together.
Stay in the pose 3 to 5 minutes
To exit the pose, remove straps, bend knees and roll to your side off the bolsters.
Key Actions
Lift and expand the chest
Press the knees forward to energize the legs (version over bolster)
Press arms down to lift the chest up (version over bolster)

© 2013 by Ryan McGraw, all rights reserved
Setu Bandha Sarvangasana Over Bolster
Restorative Setu Bandha Sarvangasana

© 2013 by Ryan McGraw, all rights reserved
Jathara Parivartanasana with Bent Legs
Benefits: Massages abdominal organs. Helps to relieve strain in the lower back and hips
Setting up the Pose
Place bolster a few inches from right hip
Recline in a supine position on floor with knees bent and feet on floor
Press into feet and shift pelvis slightly to the left
Lift and bring knees close to chest
If possible, strap legs together, the strap should be on your lower thighs
Extend your arms out to the sides; arms can be fully extended or in goal post position.
Exhale and lower knees to the bolster
Turn your head so that your gaze is to the left or keep head neutral so that your gaze is
upward.
Stay here for several breaths
Loosen strap if needed and inhale bring knees back center
Bring bolster a few inches from left hip and repeat pose bringing legs to left
Key Actions
Turn the legs from hips
Turn abdomen opposite direction as legs
Keep the chest expanded throughout the pose

© 2013 by Ryan McGraw, all rights reserved
16. Savasana
Benefits: Savasana quiets the mind and body. It restores a healthy blood pressure and respiratory
rate. The relaxation is refreshing to both the nervous system as well as the physical body.
Setting up the Pose Laying on Ground
Place a folded blank at the end of your mat to support your head and neck
Lie down on mat.
Legs are bent with feet on mat. Feet are hip distance apart, flat on ground, near buttocks
Extend your legs one at a time. Legs are slightly wider than hips. Legs and feet release
outward
If your low back is sore place a bolster or rolled blanket under the knees.
The head is centered, not tipping to one side
Release your arms out to the side. Arms are slightly wider legs, at a 45 degree angles; hands
are in line with hips. You can support arms and hands on blankets
Palms are open and can either face up or down
Stay in savasana for 5 to 10 minutes
To come out of savasana, first gently wiggle your fingers and toes
o Roll onto the right side in a fetal position
After a few breaths here, press into hands to slowly lift the torso, coming to a seated position
Seated Version
Sit back in chair
Use bolster or rolled blanket to support back body
Place blanket on ground for feet to rest on
Place blanket(s) in lap for the hands to rest on
You can wrap a blanket around waist to support lower arms
You can wrap blanket loosely around back of neck to support neck
Stay in savasana for 5 to 10 minutes
To come out of savasana, first gently wiggle your fingers and toes
After a few breathes open eyes
Key Actions
Close the eyes
Relax the face
Keep the body still and relaxed
Scan the and body and release tightness where there is any in the body
Take a few long exhales at the beginning of Savasana. Then allow the breath to fall in its
natural rhythm

© 2013 by Ryan McGraw, all rights reserved
Laying Savasana with few Props Laying Savasana with more Props
Seated Savasana with few Props Seated Savasana with more Props