Embed Size (px)
Citation preview

1
Manual TIMVEG PC Program
VRI and CMI (NFI) data collection system Forest Analysis and Inventory Branch
- all field cards and sample types version 2009a
June 19, 2009

2
USER GUIDE MODIFICATIONS AND ADDITIONS
Item Version Pages Date
Added Print to File function to PC program so that Reports can be printed to standard printers using MS Notepad
2007d 19 Aug 31,2007
Validation “Print to File” function 2007d 26 Aug 31, 2007
Version compatibility warning 2007d 4 Aug 31, 2007
Added exta step in Translate process – a verification that validation has been run
2009a 28 June 19,2009

3
INTRODUCTION The TIMVEG PC program is the PC portion of the TIMVEG handheld data collection system for the B.C. Vegetation Resources Inventory (VRI) and Change Monitoring Inventory (CMI) systems. This manual covers data processing methods for all the sample types for both the CMI and VRI PC programs. Terminology: TIMVEG refers to both the CMI (NFI)and VRI data collection systems. TIMVEG NFI refers to only the NFI version of the TIMVEG system. TIMVEG VRI refers to only the VRI version of the TIMVEG system. Two PC versions – NFI (CMI) and VRI This manual covers both the NFI (Change Monitoring Inventory) and VRI (Vegetation Resources Inventory) PC programs. The two PC programs are almost identical as far as user-interface (menu and screens) is concerned. Both programs can reside in the TIMVEG folder (directory) at the same time. This makes it easy for you to remember where the programs are since they are all in the same directory. But, It can also cause confusion if you start the PC programs in a DOS window. It would be easy to start up the wrong program since they both look very similar. In order to reduce this confusion you may want to create two different Windows icons and use them to start the programs (if you plan to use both). The main difference between the programs is that the handheld data files differ in their nomenclature. When on the handheld and when stored and edited in the TIMVEG PC directory the file extensions differ by:
All NFI data files have a .CMI extension All VRI data files have a .VRI extension
A. TIMVEG PC program functions: 1. Transfer plot sample data from handheld to PC. 2. Transfer plot sample data from PC to handheld. 3. Transfer TIMVEG program from PC to handheld (Husky only). 4. Backup transferred data and store in PKZIP file format 5. Print cluster plot field cards, either directly to a serial dot matrix printer (not often used these days). 6. Print cluster plots field cards and validation reports to file so that it can be viewed/printed with MS
Notepad. 7. Ability to edit limited data - header and office plot data, such as:
Office and Field Responsibility (card 1)
Corrected UTM (card 2) – GPS co-ordinates and Mapsheet
Corrected UTM (card 3) – GPS co-ordinates and Mapsheet
Site Trees - Office age, prorate length & count, Physical Age, and radial growth (card10)
Stump and Small Tree plot headers (card 10)
Range, Forb graminoid weights
Any of the notepads in both the header and plot cards. 7. Batch edit check of entire VRI cluster plot and the NFI (sector) plot with print list ability.

4
8. Translate handheld format to Inventory Branch format. Data will be given a date/time stamp during the translation.
9. Ability to run the handheld program.
B. Acknowledgements D.R. systems inc. would like to acknowledge the efforts made by all the people that assisted in this handheld data collection project. Thanks to Ed and Clint Redlin of Azmeth Consulting in Nanaimo and to Jeff Kerley of Kerley and Associates and Michele Jones of Mimulus Biological Consultants who all made contributions in helping us understand field procedures and the requirements of a handheld system for the field. Wayne Murdock of Drake Forest Consultants, Jeff Labelle, and Terry Conville of Atticus Consulting all assisted with field testing. Verne Sundstrom and Lloyd Wilson of the Ministry of Forests contributed to the understanding of field and audit procedures of the VRI and NFI. Nona Phillips: Inventory Branch, Williams Lake helped in reviewing the printouts for the VRI program and provided suggestions for improvement. Jerry Nutter of JBL Consulting, Williams Lake also assisted in providing invaluable suggestions for improving the data collection program. Bob Krahn of the Ministry of Forests assisted in explaining the business requirements of integrating the handheld data into the provincial inventory database. Last, but not least, I would like to thank Attila Dobozi of D.R. systems, whose experience and skill in the development of forestry data collection systems combined with his creativity achieved a new level of excellence in creating this software system.
C. Support If at any time you have any questions or need assistance with installation or running the program you can call the TIMVEG support line at: 1-250-760-1070 The TIMVEG support web site is: www.drsystemsinc.com/vri TIMVEG email support: [email protected]
D. Warning The 2007d version of TIMVEG should be compatible with data created from previous (2007c) TIMVEG versions. However, you may want to keep your older version stored in a separate directory or safe place in case you need to use it to process older samples.

5
TABLE OF CONTENTS
USER GUIDE MODIFICATIONS AND ADDITIONS .............................................................................. 2 INTRODUCTION .................................................................................................................................. 3
A. TIMVEG PC program functions: ................................................................................................. 3 B. Acknowledgements .................................................................................................................... 4 C. Support ................................................................................................................................... 4 D. Warning .................................................................................................................................. 4
INSTALLING THE TIMVEG PC AND HANDHELD PROGRAMS .......................................................... 6 A. Installing the PC and Handheld software - Overview: ................................................................. 6 B. Install the Handheld TIMVEG program on the Husky for the first time: ....................................... 6 C. Update the FS/3 Handheld program (and protect your quick key configuration) ...................... 6 D. Starting the PC Program ......................................................................................................... 7 E. Starting the Print to File Program................................................................................................ 7 F. Starting the Handheld Program .................................................................................................. 7
MENU MAP .......................................................................................................................................... 9 D. VALIDATE ............................................................................................................................ 11
PRINT ................................................................................................................................................. 11 C. CONNECT MENU................................................................................................................. 11 B. EDIT ......................................................................................................................................... 11 A. VRI HH ..................................................................................................................................... 11
PROCEDURES FOR PROCESSING VRI OR CMI FIELD DATA ........................................................ 12 TRANSFERRING DATA AND PROGRAMS ....................................................................................... 13 BETWEEN THE HANDHELD AND PC ............................................................................................... 13
A. Transferring Data from the handheld to the PC ........................................................................ 13 B. Transferring updates and VRI/NFI (CMI) plot data from PC to Handheld .................................. 15
Transferring a program upgrade to the handheld ......................................................................... 16 PRINT PLOT SAMPLE FIELD CARDS ............................................................................................... 17
A. Print to DOS printer .................................................................................................................. 17 B. Print to File (and MS Windows office printers) .......................................................................... 19
EDIT VRI OFFICE DATA .................................................................................................................... 22 A. Editing Site Tree data ............................................................................................................... 22 B. Header Notes and Plot Notes (Notepads) ................................................................................. 23
VALIDATE THE VRI CMI/NFI PLOT SAMPLE .................................................................................... 24 A. Validation ................................................................................................................................. 24
Overview ...................................................................................................................................... 24 Procedure .................................................................................................................................... 25 Print to DOS Printer ..................................................................................................................... 26 Print to File and MS Notepad ....................................................................................................... 26
TRANSLATE THE HANDHELD VRI/CMI DATA .................................................................................. 28 TO THE INVENTORY BRANCH VRI OR CMI/NFI IMPORT FORMAT ............................................... 28
A. Starting the Translate Process ................................................................................................. 28 B. Processing NVAF samples ....................................................................................................... 29 C. Example of filenames and displays for CMI (NFI) and VRI .................................................... 31 D. Instructions and options for translating and submission when multiple handhelds are used on the same Project ............................................................................................................................. 32
BACKUP AND RESTORE THE HANDHELD DATA FILES ................................................................. 34 A. Backup Data Files .................................................................................................................... 34 B. Restore Backup ZIP Files ......................................................................................................... 35
DELETE .............................................................................................................................................. 36 VRI/CMI – HH (HANDHELD PROGRAM) ........................................................................................... 37
A. Procedure. ................................................................................................................................ 37

6
INSTALLING THE TIMVEG PC AND HANDHELD PROGRAMS
A. Installing the PC and Handheld software - Overview: The latest versions of the NFI (CMI) and VRI TIMVEG data collection and PC software can be
found on the web as a .ZIP file on the TIMVEG support web site (www.drsystemsinc.com/vri).
Please note: It is best to contact D.R. systems to ensure that you will be downloading the more recent version available, especially if you are using the system for the first time. At this time support at D.R. systems might be able to supply some tips that may be of value.
Note: Both the PC program(s) and the handheld programs(s) need to be placed in a folder (or directory) named TIMVEG. Note: However, the handheld program can be placed in a different directory if need be. You may need to copy the HCOM.COM communications file to the new directory in order for communications to work with the Husky.
Installation Procedure Note: The handheld and PC program are included in the one ZIPFILE. These directions are for the Husky handheld. If you want to install or update the HP Palmtop please contact D.R. systems inc.
1. Create a directory on your PC named TIMVEG (C:\TIMVEG) 2. Download WINZIP ZIPFILE to your PC 3. Unzip the ZIPFILE using PK or WINZIP into the TIMVEG directory. 4. Connect your serial cable to the handheld and PC (for handheld install) 5. Start a DOS session on the PC 6. At the DOS prompt go to the TIMVEG directory (for example: type CD TIMVEG, then [ENTER])
Handheld Install/Update - Next Steps: You can either install (from scratch) or update the handheld program. B. Install the Handheld TIMVEG program on the Husky for the first time:
7. In the TIMVEG directory on the PC, type Install, Then press [ENTER]. 8. Note: On the handheld create a directory named TIMVEG 9. On the Handheld go into TIMVEG directory and start Husky communications when in the
TIMVEG directory by typing HCOM. 10. On the PC follow the directions to finish installation.
C. Update the FS/3 Handheld program (and protect your quick key configuration)
7. Start up the PC program by typing: VRIPC (or CMIPC if NFI program) 8. Select Transfer - Husky - Upload Program. (If you have an HP contact D.R. systems for
updates and support). 9. On the Handheld go into TIMVEG directory and start Husky communications when in the
TIMVEG directory by typing HCOM 10. Follow directions on PC to finish updating process

7
D. Starting the PC Program
start the TIMVEG VRI PC program by typing TIMVEGPC or VRIPC
start the TIMVEG NFI PC program by typing CMIPC
Note: Both the VRI and NFI programs can exist in the TIMVEG directory at the same time.
E. Starting the Print to File Program A “print to file function was created for TIMVEG version 2007d. The function allows an easy way to print DOS reports using standard office printers. The program file required to print the file exists in the TIMVEG PC directory and is called: showreportVRI.bat or showreportCMI.bat Printing a report is a two step process: 1) Print to File and 2) Running the Showreport.bat file in order to view and finish the printing process. To start the Show print program start a DOS window session and access the TIMVEG directory using DOS commands. Type ShowreportVRI.bat for VRI and ShowreportCMI.bat for CMI For a description of printing procedures go to page 19. F. Starting the Handheld Program
start the TIMVEG VRI program by typing VRI
start the TIMVEG NFI program by typing CMI The version numbers are found: The the menu system: DATA ENTRY - CONFIG – ABOUT in the handheld program. On the upper right-hand corner of the Main Screen in the PC program. Note: Both the VRI and NFI programs can exist in the TIMVEG directory at the same time on the handheld.
Note: updating your handheld or PC version to a newer version will not affect your data!
Note: If you are adept at Windows you can create an icon on your windows desktop that will automatically open a DOS window and run the program. Creating icons will help in keeping the two PC programs (VRI and NFI/CMI) separate in the situation where you have loaded both in the TIMVEG directory and plan to use both. It would be easy in a DOS window to start up the wrong program inadvertently because of their similar looks. However, the NFI program has a blue background while the VRI has a green background.

8
Husky version The only handheld version supported directly off the web is for the Husky FS/2 and FS/3. HP Palmtop 100/200 version If you need an update to an HP version please call or email D.R. systems directly for instructions or to make arrangements to get the installation/update. If you already have the VRI or NFI-CMI program installed on the HP you can easily update the HP program yourself once we send you the update/install file.
Updating handhelds The best method for upgrading your handheld software to a new version is to use the upgrade menu selection from within the TRANSFER menu in the PC program (after upgrading the PC program). Follow the instructions on the PC screen after selecting upgrade. For more information on how to update your handheld go to page Error! Bookmark not
defined..

9
MENU MAP User interface differences between the CMI and VRI PC TIMVEG programs. For the most part the menu selections are almost identical between the two programs. The only difference being that the CMI program will not have any mention of “plot clusters” in the EDIT section of the program. The CMI program will refer to CMI data files for Transfer, Print, Backup, Delete, and Translate commands and the VRI program will refer to VRI data files.
The CMI (NFI) background is a Blue color
The VRI background is a Green colour The diagram on the following page shows the main screen for the TIMVEG PC program. This is the screen that appears upon startup of the TIMVEG PC program.
Parts of TIMVEG startup splash screen Location Name of TIMVEG Program “NFI -CMI or VRI “
Upper Left
Version of TIMVEG Program Upper Right Menu Bottom
The Menu System is a horizontal bar appearing at the bottom of the screen. Move the menu selection via two ways:
1) Use Right and Left Arrow Keys to move highlight, Then press [ENTER] 2) Press the alpha key of the highlighted letter to execute the menu selection.


11
D. VALIDATE Creates a list of all errors in the plot cluster data set or by sector (CMI) and their location in the handheld program.
Print Validation Error List
TRANSLATE Creates a file that can be imported into the MoF inventory database
BACKUP Creates PKzipped compressed handheld VRI files that can be placed on your hard or floppy drive
DELETE Delete selected or all handheld VRI data files
PRINT Print NVAF or VRI All forms Selected forms: CH, CP, CL, C, E, R, O, N, CT6, CT7, CT16, 12, 13, 4, 5,14,15 Plots:
IPC, North, East, South, West Small Tree plot Stump plot
CMI Prints Plot with Sectors
C. CONNECT MENU Get VRI Plots from handheld Send VRI Plots to handheld Update VRI handheld program Select PC Com port
B. EDIT Comments (Notepads):
Header cards IPC Aux Plots: North East South West
GPS coordinates Office responsibility Site Tree office data Stump, Small Tree Plot Size Range Forb Graminoid weight
CMI No Aux plots
A. VRI HH Run the CMI or VRI Handheld program. When done you will have to restart TIMVEGPC from DOS prompt again.
Version Number
VRI or CMI/NFI version
Menu Map

12
PROCEDURES FOR PROCESSING VRI OR CMI FIELD DATA The suggested procedure for preparing your VRI/CMI data for submission is listed below: If you are processing data from multiple handhelds used on the same sample be sure to read the special procedures section found on page 32. 1) Be sure to run all the edit checks in the handheld before transferring the data to the PC.
A common mistake is to forget to go into each header area in the handheld (CH, CP, CL) at the end of the survey to trigger the edit checking routine for the header areas.
2) You have the option of printing VRI or CMI plot sample data directly from a handheld directly to a
serial printer, provided it can do DOS Epson emulation. However, since TIMVEG DOS printing technology has all but disappeared from the office. A second option is available – “Print to File”. This combined with a batch program file allows printing to be accomplished. This allows you to print the field cards and the validation edit report.
3) Transfer the finished VRI plot cluster or CMI plot data into the PC program.
You can also transfer any incomplete plot cluster or CMI plot projects to the PC program as a backup to what is in the handheld. Duplicate handheld samples do not overwrite resident (in PC) samples. Downloading at the end of every field day is a highly recommended practice to reduce the risk of data loss.
4) As a safety precaution you may want to print your TIMVEG plot data from the PC to a printer (that
can do DOS Epson emulation) or by printing to file and using MS Notepad. This can be done at any time - immediately after transfer, or after final editing of office information is done.
5) Edit or add final “office” data to the VRI plot cluster or CMI Plot. You cannot edit all of the data – only a small subset of the VRI data can be edited from within the PC program. Do this via the EDIT menu selection. You can also edit the full data set via the VRI or CMI-HH menu selection on the PC program. The data can also be edited on the handheld then re-transferred.
6) When finished editing you should run the final validation routine on the plot sample data before translating the file and submitting to the Inventory Branch. Do this via the VALIDATE menu selection. The list can be printed for ease of use. Note: you can still submit data that doesn’t pass the validation.
7) Create a data file for the Inventory Branch for submission via the Translate menu selection. 8) At any time you have the option of backing up the handheld data residing on your hard drive to
TIMVEG program directory or the floppy drive. 9) After you have printed out your TIMVEG VRI or CMI Plot cards and backed up your data you can
delete the Plot Project from the handheld. 10) After you have submitted the Plot Cluster Sample or CMI Plot to the Inventory Branch and done
backups you can delete the Plot sample files from the TIMVEGPC program.
Note: if any editing needs to be done on data not accessible from the PC program the original handheld VR/CMI plot data can be transferred back to the handheld where the editing can be done and re-transferred back into the PC. Or, it is possible to run the handheld program directly on the PC program eliminating the need to transfer data between the PC and handheld.
13
EcoSoft VRI
Poor connections between the serial port on the handheld and the PC – loose cable
Bad serial cable or loose wires in the connectors
Wrong type of serial cable (the cable needed is a “null modem” cable)
Wrong serial port being used on the PC
Serial port not working on the PC (bad port or conflict)
Communications protocol software not installed on either the PC or handheld
MOF VRI
+OLD VRI PLOT +DELETE VRI PLOT
+NEW VRI PLOT +
+CONFIG +
+ +
+ +MAIN MENU
VRI Timber Emphasis Plots
D = DATA ENTRY
P – PRINT REPORTS
T = TRANSFER
Q = QUIT
BC Ministry of Forests
PRESS LETTER/NUMBER TO RUN PROGRAM
TRANSFERRING DATA AND PROGRAMS BETWEEN THE HANDHELD AND PC The transfer protocol used for communications is HCOM (Husky), ZIPCOM, and Kermit. The most common problems preventing communications between a handheld and PC are:
. You may want to check these items first when troubleshooting handheld to PC communications.
A. Transferring Data from the handheld to the PC
Transfer of data and programs is done from the Main Menu. This menu appears after the handheld is rebooted or turned on. When in the handheld program you must select MAIN MENU from the VRI or CMI menu. STEPS
1) Connect the serial cable between the handheld and PC.

14
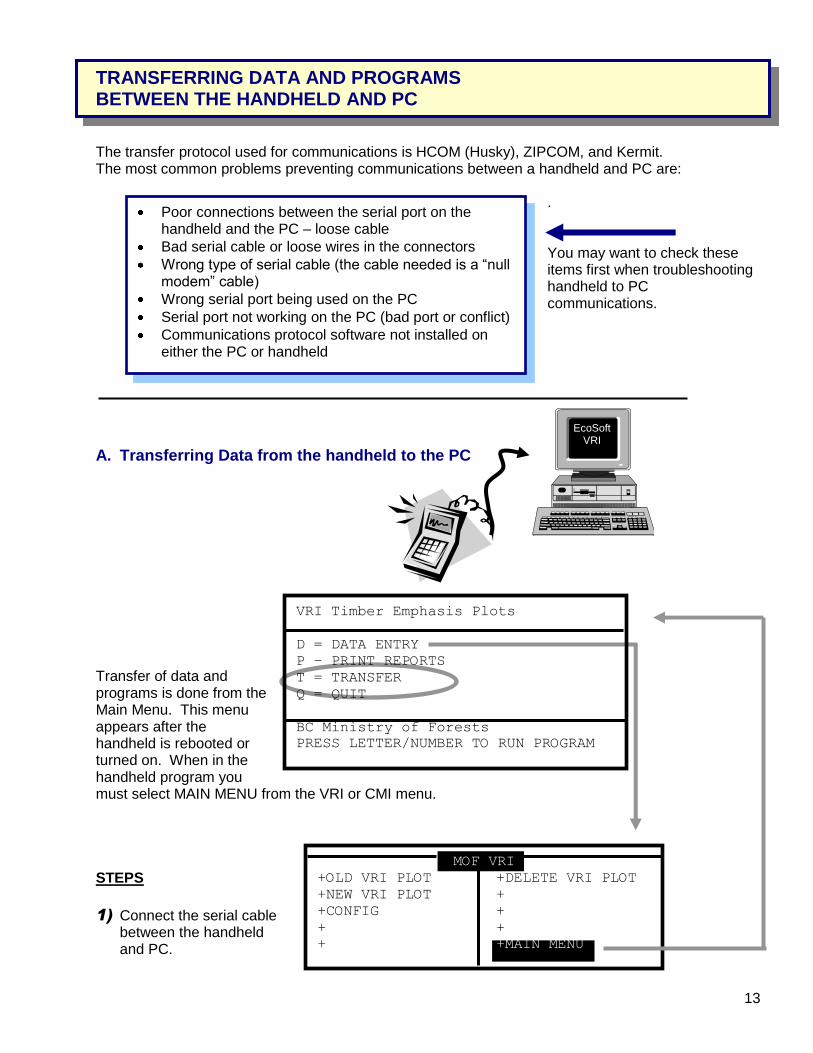
Kermit-MS: V2.29C (Tektronix test) 10 Dec 87
File name: EA293849.VRI Kbytes transferred: 0
Receiving: In progress Number of packets: 9 Number of retries: 0 Last error: None Last warning: Renaming file to EA293841.VRI X cancelsfile, ^C cancels batch, ^E quits protocol, ^C quits, Return retries
These show that transfer is taking place
On the PC
2) Start the PC program by typing TIMVEGPC or VRIPC (for VRI): CMIPC (for CMI)
3) Select TRANSFER
4) Select the type of handheld being used
5) Select Get VRI or CMI plots
6) Make sure the cable connection is secure, then press [ENTER] The next step involves starting the transfer on the handheld On the HANDHELD
6) Select TRANSFER by pressing the “T” key.
A server mode message appears on the display of the handheld The handheld now waits for you to press [ENTER] on the PC keyboard.
On the PC
7) Press [ENTER] on the PC keyboard to start the VRI plot selection transfer process
On the PC a list of the VRI plots in the handheld appears.
8) Select the Plot sample to transfer by: Up or Down Arrow to move highlight between VRI/CMIPlots Space key to tag or untag VRI CMI plots
9) ENTER to start transfer process
During transfer the PC the screen is shown below (the example is kermit, but other protocols are similar.
15
Ecosoft
VRI
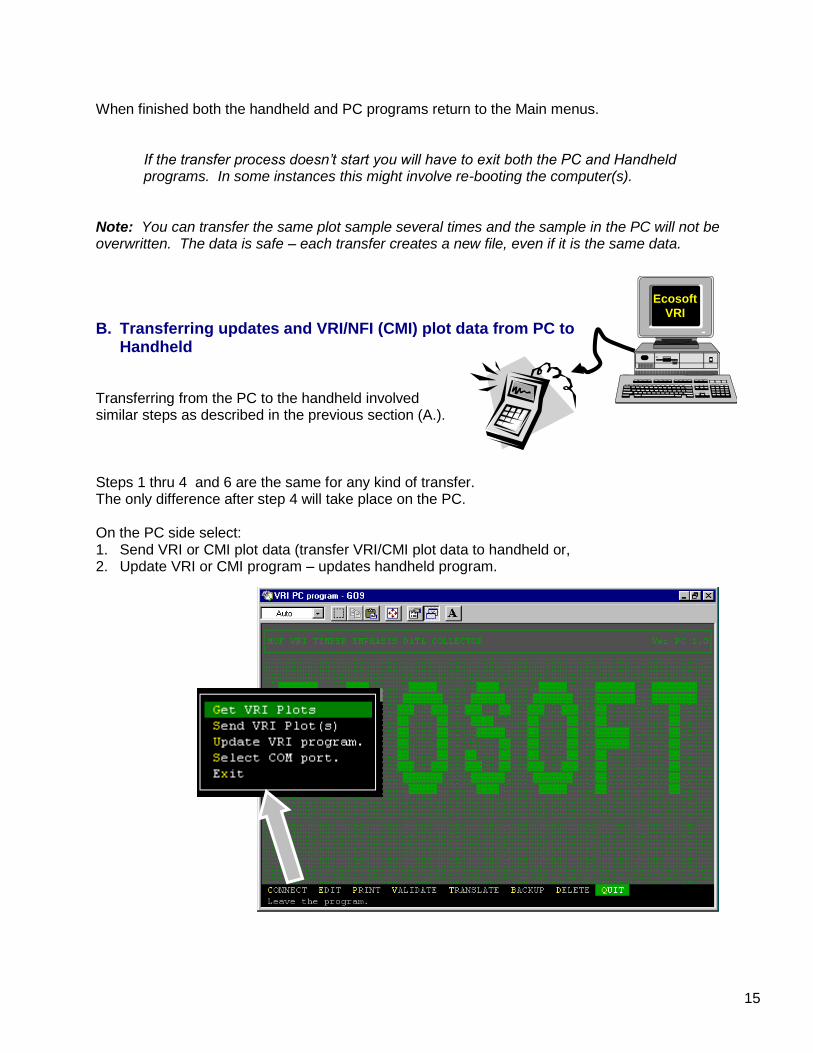
When finished both the handheld and PC programs return to the Main menus.
If the transfer process doesn’t start you will have to exit both the PC and Handheld programs. In some instances this might involve re-booting the computer(s).
Note: You can transfer the same plot sample several times and the sample in the PC will not be overwritten. The data is safe – each transfer creates a new file, even if it is the same data.
B. Transferring updates and VRI/NFI (CMI) plot data from PC to Handheld
Transferring from the PC to the handheld involved similar steps as described in the previous section (A.). Steps 1 thru 4 and 6 are the same for any kind of transfer. The only difference after step 4 will take place on the PC. On the PC side select: 1. Send VRI or CMI plot data (transfer VRI/CMI plot data to handheld or, 2. Update VRI or CMI program – updates handheld program.

16
Transferring a program upgrade to the handheld Transferring a new program update to the handheld should not corrupt or interfere with plot sample data already in the handheld. You should be able to transfer the update then run the program and your data should be present.
If a program upgrade is known to be incompatible with the dataset in the handheld the install instructions that come with the upgrade will notify you of the incompatibility. If an incompatibility exists you will have to delete all the VRI sample plots from the handheld before the upgrade is done. Or, you can copy the VRI sample plots to another directory before deleting the files in the TIMVEG directory.
Update files consist of *.tbl and *.i extensions. You will not need to manually copy these files into the TIMVEG PC program directory C:TIMVEG\. If an install or update is done correctly this will be done for you.
1) Create the install floppy disk from the update ZIP files (off the web) and then 2) Open a DOS windows session 3) Go to the A:\ drive 4) Type INSTALL 5) Press [ENTER] 6) Select update or install PC program from the menu.
Follow Steps 1-3 (on page 13) On the HANDHELD Select Transfer by pressing the [T] key A server mode message appears on the display of the handheld On the PC Select Update VRI or CMI program Press [ENTER] to start program transfer

17
Note: As the project loads the number of trees on each plot is shown in the message box. Use this to confirm that the correct project has been chosen.
PRINT PLOT SAMPLE FIELD CARDS
A. Print to DOS printer Steps 1) Select Print from the main menu; 2) Select Print to Printer; 3) Choose between VRI or NVAF (if the VRI
program); 4) Select “Pick a Cruise” A list of sample plots (projects) appears Note: The CMI “type” code M01will differ from the VRI code Q01 shown in the diagram below.
Note: If you have duplicate Project/Sample numbers (as shown in the diagram) then the same plot sample has been transferred more than once. This is OK, but you will probably need to be sure to select the most recent one (assuming that this is the most correct). 5) Select the desired Plot project by
highlighting the Cruise Plot (move the highlight up and down) then press [ENTER] to load the project.

18
6) Now you can print all the forms (plots in the plot cluster) or selected (plots) forms. If “all” is selected printing starts immediately.
If you decide to select forms a form selection box appears. Move between each selection either using the [ENTER] key or the [] []. The [ENTER] key pops YES/NO selection boxes. When a selection toggle appears you can use the arrow keys to move the highlight or press the letters Y or N. The [+] and [-] keys also toggle the YES/NO selection boxes.
7) The last selection “Print What Forms?” is PRINT Yes/No. When Yes is selected printing begins. About Printers TIMVEG is a DOS program. It cannot print to printers that are “Windows only” printers. A printer that has the ability to print from DOS programs and do Epson emulation is required. We have successfully printed on dot matrix printers and laser printers. If the printer is on a network you should use the “Print to File” menu selection (review procedure, starting on next page).
Note: The CMI program does not have Aux plots. Instead you are given the choice of printing the IPC plot (all sectors).

19
B. Print to File (and MS Windows office printers) Overview You have the option of printing VRI or CMI plot sample data directly from a handheld directly to a serial or parallel printer, provided it can do DOS Epson emulation. However, since TIMVEG DOS printing technology has all but disappeared from the office. A second option is available – “Print to File”. This combined with a batch program file allows printing to be accomplished. This allows you to print the:
1. field cards and; 2. the validation edit report.
The Print to File function involves two components:
1. Print to file via the Print menu selection. 2. Run the ShowreportVri.bat or ShowreportCmi batch file, which opens the file with MS Notepad
and selecting Print from MS Notepad. For the NFI-CMI run the ShowreportCmi.bat Follow the same steps as described in Printing to Printer (page 17), except select “Print to File” in the second step. The other steps remain the same. After step 6 or 7 is done the file is created in the TIMVEG directory and the following message appears.
VRI Print to File Message
NFI (CMI) Print to File Message Note:
The .txt file is placed in the TIMVEG directory (VriRep.txt for VRI and CmiRep.txt for NFI).
The Print to File .txt file is overwritten during each “print to file” creation. So you need to print from MS Notepad after each txt print file creation.
Step 8) Run the “Show Report”.bat file (which is installed in the TIMVEG directory) by clicking on the filename or the desktop icon (if you have created one).
There is a Show Report batch file for VRI and one for NFI (CMI).
ShowReportVRI.bat
ShowReportCMI.bat

20
Scrollbar
MS Notepad opens displaying the reports selected. Step 9) View report using scrollbar Step 10) Select File-Print to print. You can select different printers depending on your PC and network setup.

21
Tip: An easy way to run a series of reports and print them is to create a windows icon for the “Show Report”.bat batch program file and place it on your desktop. Then, run the “Print to File” function (which creates the .txt file), go to the desktop, click the “Show Report” icon which brings up the report in Notepad. Creating an icon for Showreport.bat: 1) Use file explorer to find the Showreport.bat file in the TIMVEG directory. (VRI = ShowreportVri.bat and NFI-CMI = ShowreportCmi.bat) 2) Right mouse click to activate menu. 3) Select Send to, then Create desktop shortcut. 4) The icon is placed on your windows desktop. 5) You can rename the icon filename if you want by right clicking and renaming it.

22
Diagram – TIMVEG CMI(NFI) version
EDIT VRI OFFICE DATA You can edit in the PC program part of the VRI and CMI data collected from the handhelds. The categories are shown in the figure below. In short, you can edit or add an unlimited amount of notes in any of the notepads and data considered “office data’. To edit data - From the Main Menu select EDIT. Select the desired Plot Sample from the pop up list by highlighting the selection and pressing [ENTER] Select the categories of information to edit using the arrow keys to highlight, then [ENTER]. Edit or add data to fields
A. Editing Site Tree data To edit site tree data select (from the Edit menu) – Site Tree Office Data Next, select a desired plot in the plot cluster by highlighting the plot and pressing [ENTER]. Or, In the CMI program select the desired Sector.

23
If there is more than one site tree in the plot or sector the trees can be viewed by the [PGUP] [PGDN] keys, or by using the [][] arrow keys to highlight NEXT or PREV menu selections, then [ENTER] The Edit menu selection allows editing of the “office data”. The only fields that you are allowed to edit are –1) office height bored age and 2) office ring count 3) prorate length, 4) phys age, and radial growth.
B. Header Notes and Plot Notes (Notepads) You can either edit the notes that come in from the handheld, or you can opt to take notes manually on paper and re-enter them into TIMVEG PC using the IBM keyboard. Those using the HP Palmtop will be able to take advantage of the QWERTY IBM keyboard layout. If you are using other handhelds not having a QWERTY layout then re-entering your field notes may be a better option.

24
VALIDATE THE VRI CMI/NFI PLOT SAMPLE
A. Validation Overview The TIMVEG PC program contains a validation function that runs the same edit checks that run on the handheld with a few exceptions. The main exception is: A Mapsheet number and the spatial co-ordinate validation exists only in the PC program due to the fact that the Mapsheet and co-ordinates table is so large. Another difference in the PC program is the edits are run in one run for the entire plot sample in one pass. The edits that don’t pass the check are displayed in one list. The list shows where the affected field is in the handheld program (Header cards, Plot card, etc). The edit list can be scrolled and printed if you are connected to a printer having DOS – EPSON emulation. Or if you only have a DOS printer the screen can be captured in the MS Windows Paint program using the [Print Screen] button (see TIP below). A few of the edits can be corrected in the PC program under EDITS, but most can only be changed in the handheld. This might mean that if the plot sample sample has not been deleted from the handheld it can still be edited, then re-transferred. The other option is to transfer the handheld data set back to the handheld, edited, then transferred back to the PC.
Note: the file does not have to pass all the edits. This is because some errors are not “final” but rather prompts or reminders. However, you may not agree with an error and still opt to translate the file. If you have a problem with rectifying or justifying an error please call the Ministry of Sustainable Resource Management, Terrestial Information Branch or Support at D.R. systems inc.
Tip: How to capture a screen and print it out using MS Windows: 6) Press the [PRINT SCREEN] button. 7) Press the Windows key to activate the Microsoft Start menu. 8) Select Programs – Accessories – Paint. 9) Press [CTRL] + [V]. The window appears in the paint program. 10) Select File – Print and the image is printed on your printer.

25
Note: It is possible that you may have more than one Sample handheld file that are the same Sample. This would have resulted from transferring the same plot cluster sample to the PC more than once. Be sure to select the correct “duplicate”, which is probably the most recent. The last digits of the handheld filename deal with the date and time. The higher the number the more recent the file.
Procedure 1) To Validate a sample select VALIDATE from the main menu. 2) Select a Plot sample from the pick list by highlighting and pressing [ENTER].
The Sample is loaded – a summary box appears during loading.
3) A “Select Cards for Validation” box appears. The box is in two sections – Upper half – the Sample Card Type (as detected from the CH header card “Sample Type” code). Lower half – “Additional Card” – as detected from your data set. You need to manually toggle “ON” the Additional Sample cards to be validated. Toggle ON/OFF the * character using the Space bar. The * means you want the card validated. Also, sometimes the top of the list is hidden – you will need to press the up arrow to reveal the hidden (top of list) selections. 4) After turning “ON” the cards to validate press
“ENTER” to bring up the edit list.

26
Scroll using [ ] [ ] or
[PGUP] [PGDN]
Print the list to a DOS printer
This column denotes the location of the field that triggered the edit check.
Print to File, then use Show Report batch file to open MS Notepad.
Edit Check description column
Print to DOS Printer 5) Make note of the errors
Select Print to print to DOS printer. Print to File and MS Notepad Or print the list by selecting “Print to File”. A message confirmation box appears. Note:
VRI PC program displays the message to right.
The CMI (NFI) PC program displays the same message using CmiRep.txt filename. Run the “Show Report”.bat program file which displays the report in MS Notepad. ShowreportVri.bat for VRI or ShowreportCmi.bat for NFI.
Print the Report using Notepad’s File-Print menu selection. [ESC] to exit.

27
Scrollbar

28
TRANSLATE THE HANDHELD VRI/CMI DATA TO THE INVENTORY BRANCH VRI OR CMI/NFI IMPORT FORMAT
A. Starting the Translate Process After the handheld files in the PC program have been edited and validated a translate needs to be run in order to create a file to be sent to the Inventory Branch. To create a translate 1) Select TRANSLATE from the Main menu 2) Highlight the Plot sample you want translated.
3) Press [ENTER] to begin the process for creating the Inventory Branch VRI or CMI data file. The
file created will be located within the TIMVEG directory and have a .TXT extension. The filename consists of the project and sample numbers.
4) A intermediate plot summary
information box appears for verification. Press [ENTER] to continue to next step
The Sample is loaded – a summary box appears during loading.
5) Before the translation engine starts you are reminded to run the validation function first. If you need to run the validation, press N for abort. From the Main Menu you can run the validation, then when finished return and run the translate.
6) Select Y to continue and run the translate engine.
If a VRI sample the menu on the right appears. If CMI/NFI, the translation runs immediately.
Note: It is possible that you may have more than one Sample handheld file that are the same Sample. This would have resulted from transferring the same plot cluster sample to the PC more than once. Be sure to select the correct “duplicate”, which is probably the most recent. The last digits of the handheld filename deal with the date and time. The higher the number the more recent the file.

29
Note: NVAF combined samples You should not tag* both the O and N sample types in the window example shown in figure A. If NVAF was selected in step 5 then this window does not appear. Instead the window at the right, figure B appears.
Figure B
Figure A
B. Processing NVAF samples 5) The next step for VRI users is to select which translate
data is wanted: NVAF or VRI (normal).
If you have done :
a “N” sample type only - select NVAF.
a VRI plot - select VRI
*a combined NVAF and regular VRI timber plot you will need to run the translate twice – once to create the NVAF submission, a second time to create the regular VRI submission.
6) A “Select Card for Translate” selection
box appears (When VRI Sample is selected)
The upper half of the box shows the sample card type that is detected and will be translated. The lower half of the box lets you select the additional sample card
types that you want included in the translate. 7) Select the desired cards to translate using the [Spacebar] key. The [Spacebar] toggles a *
character ON/OFF. The * means the card type data will be included in the translate file. 8) [ENTER] when done toggling to create the translate file. The VRI Data Translate selection gives the filename message as shown on the example at the right. Note the filename extension of TXT. The Filename consists of Project and Sample number.

30
*Important Note for a combined NVAF survey: The NVAF selection creates a filename with an extension of .NVF. It is only created when the NVAF translate is selected (VRI versus NVAF Data Translate shown on previous page). It is not created by tagging the “N” Sample card as shown on top of page. When you run the second translate (in this example – the regular VRI survey) the same identical filename is generated, but with a TXT extension. These files are placed in the TIMVEG directory.

31
Diagram – TIMVEG VRI program version
Diagram – TIMVEG CMI program version Diagram - TIMVEG CMI program version
C. Example of filenames and displays for CMI (NFI) and VRI Note the filename shown in the message box. This is the file you will send to the Inventory Branch. Press [ENTER] or [ESC]ape to return to the Main menu. The translated files are all located in the TIMVEG program directory. The files must be manually copied to another location or selected from this directory as an email attachment in order to send them to the Inventory Branch. Translate Filename nomenclature:
VRI and CMI filename extensions are .TXT
NVAF extensions are .NVF
Filename body is Combined Project Name + Sample number

32
D. Instructions and options for translating and submission when multiple handhelds are used on the same Project
The Inventory Branch has not developed a “merge” function to handle the ability to provide a seamless method for combining the sample data when more than one handheld is used to collect data on the same Sample. Example of how multiple handhelds might be used to collect plot data.
You cannot use two handhelds to collect the same plot data (like splitting the trees by sector between two handhelds.) All the trees need to be done on one handheld. Another example of what cannot be done is to use one handheld for the IPC trees and another for the Aux plots (in the VRI) – the IPC and Aux plots must be captured on one handheld.
. Example one handheld used to collect Timber Emphasis data (like timber, CWD, Small Trees, Stumps, NVAF). A second handheld used by ecologists to collect Ecology and Range samples. The situation is that both handhelds have separate card type detail data, but have similar header data (like CH, CP, CL data). This presents a problem in creating translate files, data management, and submitting files to the Inventory Branch. Normally, as in the situation above, the Ecologists field sheets might be given to someone on the Timber side that is responsible for keypunching all the field cards into VIDE. One CH, CP, CL header is completed, then all the detail field data is entered to provide one clean sample with a few exceptions. There is not an easy straightforward way to do this with the TIMVEG system. In the example described above the following procedure should be followed: Suggested Procedure (an example):
1) Handheld #1 – Data Manager. There should be one person responsible for filling out the CH,
CL, and CP header card in one handheld (like the one used for timber) as completely as possible – to include the Notes for Access, Compass Card, Cluster Layout, and Map Number Tie Point, Tag numbers etc. Later, this person will be responsible for doing all the data processing in the TIMVEG PC program.
2) Handheld #2 - In the second handheld the CH1, CL, CP Header Cards do not have to be
completely filled out – only the critical information, like Project number, Sample number, SampeType, Surveyor initials (so that they match the Ecology Card Headers), Plot Cluster Record (In CH1). The Header items for the sample cards “below” this level need to be completed as Inventory Branch field procedures dictate.
3) In the office – The Data Manager transfers the sample data from both handhelds into the PC
TIMVEG program.
Note: You do not need to worry about “overwriting” the first handheld data with the second, even if the Project number and Sample type is the same (this will later become part of the filename during the translate process). All raw handheld data is stored sequentially by date/time and is not overwritten, even in the case of transferring the same handheld twice in a row.

33
4) Find the Project Sample from Handheld #1. Remember, there will be two Projects – Sample numbers having the same names (one had timber; the other the Ecology – in this example).
5) Process the data for Handheld #1 (timber) to the point of creating the translate Inventory Branch file. Follow the steps outlined on page 12. This can be considered a “master” sample and needs to have all CH, CL, CP, header and notepad information to be as complete as possible. For example, you may have to add office information like GPS, UTM coordinates, Site Tree ages and measurements, graminoid weights etc. Note the office information should include the office info that would be included in the “Ecology or Range” sample (graminoid weight). Most of this information can be viewed and edited in the EDIT menu command. If not, you can add it via the VR –HH menu selection.
6) When the translate file is created you will need to manually copy this file from the TIMVEG directory to another directory in order to protect it. This is because when you create the second “Ecologists” translate file it will have the same filename, thus overwrite the original in the TIMVEG directory. Be sure to make note in a log of the filename, what is in it and location, in order to keep track of it.
7) Find the second “Ecologists” handheld file and process it using the steps outlined on Page 12. Print out the field cards – and run the validation, etc. If edits need to be made to the data it can be done on either the handheld and re-transferred or via the VRI-HH Menu Command. Also, run the backup for insurance.
8) When confident that the data is correct - create the translate file by selecting the correct Project – Sample to translate. Note that when a project is selected an overview screen appears showing the number of trees, shrubs, range plants, etc. Use this to verify you are translating correct Sample.
9) Now you can email the two files to the Inventory Branch. Since the filenames are identical you will have to send two separate emails to the Inventory Branch database steward, one with the timber file as an attachment and the other with the ecology data as an attachment. Ensure you have a written description in the body of the email explaining what each email attachment contains. The Inventory Branch will “merge” the data before storage. Note – if you have the capability, a text editor can be used to create one proper file. However, you would still need to submit the NVAF portion of a combined survey as a separate file (.NVF). The NVAF translate file is NOT created by selecting “N” as a Card Type, instead it is created by selecting the NVF translate option (VRI versus NVF).
Note: If the Sample consists of both Ecology and Timber (and NVAF) all done at the same time then you will have three files to send to the Inventory Branch: same filenames but NVR extension differs. ****.TXT for Timber ****.TXT for Ecology ****.NVF for NVAF trees – this is produced with the NVF Translate selection in one of the initial translate steps.

34
BACKUP AND RESTORE THE HANDHELD DATA FILES
A. Backup Data Files The handheld files in the TIMVEG directory can be backed up at any time. Backup allows you to select handheld project plot samples. The selected files are then zipped into one PKZIP file that you name using the 8 character DOS filename convention. The file can be stored on a floppy or in the TIMVEG program directory. Note: The backup does not backup the Translated Inventory Branch .txt files! Under the BACKUP menu selection resides the Restore menu item. Restore allows you to select a ZIP file from the floppy or from the TIMVEG program directory. The ZIP file unzips the Plot Samples stored in the ZIP file and places them in the TIMVEG program directory. The restored samples can be edited, printed, translated, or even transferred back to a handheld. BACKUP plot sample sample data 1) Select BACKUP from the Main Menu 2) Tag the plot sample samples to be included in the
ZIP backup file with the [Space] toggle key. To untag highlight the * file and press [SPACE].
3) [ENTER] to continue 4) Select the either a floppy drive or the hard drive to
place the ZIP file in. 5) Type in a filename. The filename is 8
characters in length. It is wise to keep a log of your backup files that contains the filename, date of creation, and the Plot sample samples included in the file.
You might also want to store the files in more than one location, like your hard drive and a floppy for additional security.

35
Note: the Backup ZIP files contain all the handheld plot sample sample files you selected and one additional informational file named contents.txt. This file can be viewed using WINZIP (just click on contents.zip in the WINZIP display box). An example of the file is shown below:
TIMBER EMPHASIS PLOTS CONTAINED IN THIS FILE: FILENAME PROJECT SAMPLE TYPE MEASURE DATE FA205529.VRI 4721 0086 QO1 2000/MAY/12 FA213090.VRI 4721 0087 QO1 2000/MAY/11
This is helpful if you need to quickly find where your handheld sample data is located.
B. Restore Backup ZIP Files Restoring your backup ZIP files is easy. If the backup is on a floppy, place the disk in the floppy drive. Or, if the backup is in a different location copy the ZIP files to a floppy or into the TIMVEG program directory. 1) From the Main Menu select BACKUP 2) Select RESTORE 3) Select the Drive that the ZIP file is located. 4) Select the file to restore using the [][]
arrow keys to highlight and ENTER to select. Note: only one backup file can be unzipped at a time.

36
DELETE The Delete function only deletes the plot sample handheld files residing in the TIMVEG program directory. You may want to back up your files using the BACKUP command before deleting. Delete allows you to select individual sample plot samples. To delete: 1) Select DELETE from the Main Menu 2) Tag the target samples to
delete using the [SPACE] key. The [SPACE]bar key is a toggle. If you accidentally tag the wrong sample to delete, simply highlight the sample and press {SPACEBAR] to untag.
3) After tagging is done.
Press [ENTER] to delete tagged files.

37
VRI/CMI – HH (HANDHELD PROGRAM) The handheld program can be run from within the TIMVEG PC program. It uses the same data file that is transferred from the handheld. Use this menu selection to make final edits and run validation. The other option is to run your data on the handheld itself, then transfer it back to the PC.
A. Procedure. 1) Select HH 2) Select the Project Sample to edit via OLD PLOT 3) Edit the plot. If you have the HP version of the TIMVEG program in the directory remember to use [F9], [F10] for PGUP PGDN. When you [ESC]ape from this module you will not return to the PC program. Instead you will be at a DOS prompt or DOS window. To start the PC program again close the DOS window and start the TIMVEG PC program using the startup commands.
VRIPC for VRI program
CMIPC for CMI/NFI program

38
INDEX
backup data files ................................................................................................................................. 33 delete plot cluster samples from the PC database .............................................................................. 35 edit
notepads (comments) ...................................................................................................................... 22 site tree data.................................................................................................................................... 22
edit office data..................................................................................................................................... 22 edits
printing the error list ......................................................................................................................... 24 filename nomenclature for translates .................................................................................................. 30 handheld menu selection .................................................................................................................... 36 handhelds
multiple handheld use ...................................................................................................................... 31 HH - handheld menu selection ............................................................................................................ 36 Installation overview .............................................................................................................................. 6 installing TIMVEG
on the handheld for the first time ....................................................................................................... 8 menu map ........................................................................................................................................... 11 multiple handhelds used on a sample ................................................................................................. 31 NVAF procedure and filename ............................................................................................................ 32 NVAF samples - processing ................................................................................................................ 28 Print field cards from PC program ....................................................................................................... 17 print screen - printing the error list ....................................................................................................... 24 print the validation/edit list ................................................................................................................... 26 Printers
about printers .................................................................................................................................. 18 printing to a file.................................................................................................................................... 19 procedure for processing TIMVEG data .............................................................................................. 12 restuore ZIP backup files .................................................................................................................... 34 site tree
editing site tree data ........................................................................................................................ 22 transfer
data from handheld to PC ................................................................................................................ 13 troubleshooting problems ................................................................................................................ 13
Transfer plot data from PC to handheld ......................................................................................................... 15 program updates from PC to handheld ............................................................................................ 15
transfer updates between PC and handheld ....................................................................................... 13 translate nomenclature ........................................................................................................................ 30 translate the handheld files to an MoF VRI import file ......................................................................... 28 validation
running the edit check batch function .............................................................................................. 24

39
Sylva Star Forestry Data Collection Software by:
2599 McCullough Road Nanaimo, B.C. V9S 4M9 Canada Phone: (250) 760-1070 Fax (250) 760-1071 Toll Free TIMVEG support line 1-888-565-7819 Email: [email protected] Web site: www.drsystemsinc.com