Embed Size (px)
Citation preview

The Aesthetic and Functional System
visio.lign
crea.lign novo.lign neo.lign visio.CAM visio.paint bond.lign
layering veneering setting up milling staining bonding
perform withvisio.lign
ManualComposite processing techniques

2
NPM individual crowns with distal Vario-Soft 3 attachments to 25 and shear distributor, NPM cast model with neo.lign dentures and red-white aesthetics of the saddles.
Zirconium dioxide bridge with palatinal scalloping (22 pontic)
SKY elegance press abutment, indi-vidually pressed tooth stump made from BioHPP
Coloured zirconium dioxide cap with palatinal collar
NPM individual crowns splinted with distal Vario-Soft 3 attachments to 14 and shear distributor
The following restorations and veneering techniques to be fabricated and employed with visio.lign are described in this manual.
Initial situation
Symbols used in the manual
45°
180 sec30 sec
Sandblasting Waiting time Light-curing time
11
11/12
13, 14
Tooth No.
Tooth No.
Tooth No.
21-23Tooth No.
24, 25Tooth No.
Attention!Do not clean with steam! !
We would like to thank Lars Osemann (MDT),
Wiesbaden (Germany), for providing the photos
and his dedicated support in the preparation of this
visio.lign manual.
Thank you very much on behalf
of bredent GmbH & Co. KG

3
visio.lignThe Aesthetic and Functional System
page
Contents
1. Aesthetic preparation .............................................................................................................................................................................................................................................................4
2. Matrix technique
2.1 Translucent matrix ......................................................................................................................................................................................................................................................................6
2.2 Opaque matrix/kneading silicone ...........................................................................................................................................................................................................................................7
3. Framework design
3.1 Wax up .......................................................................................................................................................................................................................................................................................8
3.2 Framework manufacture ............................................................................................................................................................................................................................................................9
4. Veneering technique/indication of visio.lign primer ............................................................................................................................................................................................... 10
5. Framework conditioning ...................................................................................................................................................................................................................................................... 11
5.1 Zirconium oxide conditioning ................................................................................................................................................................................................................................................. 12
5.2 NPM conditioning ................................................................................................................................................................................................................................................................... 12
5.3 novo.lign veneers conditioning ............................................................................................................................................................................................................................................... 12
6. Applying primer
6.1 Applying MKZ Primer ............................................................................................................................................................................................................................................................. 13
6.2 Applying visio.link ................................................................................................................................................................................................................................................................... 13
7. Applying opaker/zirconium liner
7.1 Applying opaker to zirconium oxide ...................................................................................................................................................................................................................................... 14
7.2 Applying zirconium liner to coloured zirconium oxide ......................................................................................................................................................................................................... 14
7.3 Applying opaquer to NPM framework .................................................................................................................................................................................................................................. 15
8. Veneering using novo.lign veneers (12–23)
8.1 Bonding veneers to the framework ....................................................................................................................................................................................................................................... 16
8.2 Adding crea.lign to novo.lign veneers - harmonious ............................................................................................................................................................................................................ 18
8.3 Realistic staining of veneers (21–23) - harmonious .............................................................................................................................................................................................................. 20
9. Free-form layering
9.1 Free-form layering 21-23 - aesthetic ...................................................................................................................................................................................................................................... 22
9.2 Free-form layering 13/14 using crea.lign paste - harmonious ............................................................................................................................................................................................ 24
9.3 Free-form layering 13/14 using crea.lign paste - aesthetic ................................................................................................................................................................................................. 26
9.4 Free-form layering 24/25 using Gnathoflex - harmonious .................................................................................................................................................................................................. 28
10. Model casting .......................................................................................................................................................................................................................................................................... 30
11. Red-white-customisation of denture saddle ................................................................................................................................................................................................................ 31
12. Preparation and polishing .................................................................................................................................................................................................................................................. 32
13. Polymerisation times and equipment
13.1 bre.Lux PowerUnit 2 .............................................................................................................................................................................................................................................................. 34
13.2 Other suitable light polymerisation devices ........................................................................................................................................................................................................................ 35
14. Layer thickness and shade combination tables
14.1 Polymerisation times for specific layer thicknesses .............................................................................................................................................................................................................. 35
14.2 Shade combination tables ............................................................................................................................................................................................................................................. 34/35
15. Standard and free-form layering instructions ........................................................................................................................................................................................................... 36
16. Red-white-customisation layering instructions
16.1 Layering instructions crea.lign Gel GUM ............................................................................................................................................................................................................................ 37
16.2 Layering instructions crea.lign Paste GUM ......................................................................................................................................................................................................................... 38
17. Tips and tricks
17.1 Gingival mask made from visio.sil (transparent silicone).................................................................................................................................................................................................... 39
17.2 Zirconium liner to improve retention..................................................................................................................................................................................................................................... 40
17.3 Heating and bending novo.lign veneers ............................................................................................................................................................................................................................. 41
18. Important information .......................................................................................................................................................................................................................................................... 42

4
1. Aesthetic preparation
Aesthetic preparation is when the shape, colour and occlusion of the
dentures are checked. Aesthetic preparation is done
using neo.lign anterior and posterior teeth and novo.lign
anterior and posterior veneers.
Find the right novo.lign A
(anterior) tooth shape.1
Find the right novo.lign P
(posterior) tooth shape.2
Model to be prepared
in the articulator.3
If required, the neck area of
novo.lign veneers can be thinned.4

Illus
tra
tions
no
t tru
e to
sca
le. S
ubje
ct to
err
ors
and
cha
nges
.
5
visio.lignThe Aesthetic and Functional System
The veneers are prepared using
tooth-coloured Beauty Set Up wax.5
The prepared anterior section
is checked in the articulator.6
The completed model in the articulator.7
Model using a combination of
novo.lign veneers and neo.lign
dentures.
8

6
2. Matrix technique
2.1 Translucent matrix visio.sil ILT matrix (75 Shore A)
The completed model is fixed using a silicone key. This silicone matrix
can be made from opaque or translucent silicone.
(See matrix technique brochure REF 000465GB).
Combination of kneading silicone
(haptosil D) and visio.sil.
This gives the matrix more
rigidity and allows for better
repositioning.
Apply visio.sil to the model.1
The mixing cannula must be left in
the material to avoid the formation
of bubbles.
2
visio.sil ILT is also applied to the occlusal
areas.3
4
5 6
To smooth out the visio.sil ILT, use a
finger coated with washing-up liquid.

Illus
tra
tions
no
t tru
e to
sca
le. S
ubje
ct to
err
ors
and
cha
nges
.
7
visio.lignThe Aesthetic and Functional System
2.2 Opaque matrix/kneading silicone
The visio.sil fix is applied in order
to create a finely detailed mould. 7
Both the vestibular and oral surfaces
of the model must be overmoulded.8
Haptosil D (90 Shore A) is pressed
into the soft, uncured visio.sil fix.9
The visio.sil fix produces a very pre-
cise mould of the interdental spaces.
Veneers can be fixed without the use
of adhesive, just suction.
10 12
Holes are bored into the silicone double mix
matrix so that the veneers can be polymer-
ised.
11 13

8
3. Framework design
3.1 Wax up
The wax up is prepared in order to check the spaces.
The preparation matrix was poured using modelling wax, creating the
wax up.
This wax up is anatomically reduced to produce the best possible
framework.
The wax up in the articulator so that the
spaces can be checked.
The anatomically modelled
wax up showing the oral surface.
Anatomically reduced wax up.
The anatomically reduced
wax up is checked using the
matrix and the veneers in it.
1
2
3
4

Illus
tra
tions
no
t tru
e to
sca
le. S
ubje
ct to
err
ors
and
cha
nges
.
9
visio.lignThe Aesthetic and Functional System
3.2 Framework manufacture
Manufacture of zirconium oxide framework (12/11/21–23)
Manufacture of NPM crowns (13,14/24,25)
Manufacture of NPM cast model
Titanium press base.
Wax model.
Wax model with retention crystals.
Wax model.
Wax model.
CAD construction/double scan.
Completed crown framework.
Moulded cast model.
Pressed BioHPP abutment.
Completed crown and bridge frameworks.
Making the BioHPP abutment
1
1
1
1
3
3
2
2
2
2

10
MKZ Primer
visio.linkK-Primer
4. Veneering technique/indication of visio.lign primer
+
Oxide ceramics
PEEK/PEKK/
PAEK
Precious metal
alloys (Au, Ag,
Pt, Pd)
Lithium (di)
silicate
eco-alloysTitanium
PMMA
denture resins
Non-precious
metal alloys
CompositeVeneering and
press ceramics
Zirconium
oxide
High-perfor-
mance polymers
BioHPP
MKZ Primer MKZ
EM Activator

Illus
tra
tions
no
t tru
e to
sca
le. S
ubje
ct to
err
ors
and
cha
nges
.
11
visio.lignThe Aesthetic and Functional System
5. Framework conditioning
Preparation of the adhe-
sive bond of composites:
• Titanium
• Non-precious metal alloys
• Zirconium oxide
• Oxide ceramics
Conditioning of metal and zirconium frame-
works (CoCr/NPM/titanium/zirconium)
Sandblast metal frameworks at 3 to 4 bar and zirconium
frameworks at max. 2 bar with 110 µm grain aluminium
oxide.
The framework must not be cleaned with a steam jet after
sandblasting. Any impurities should be removed using
alcohol and a clean brush.
Then apply the MKZ Primer and wait until it evaporates.
Preparation of the adhe-
sive bond of composites:
• PMMA denture resins
• Composite
(veneer composites/
composite teeth)
• High-performance
polymers BioHPP
• PEEK/PEKK/PAEK
Conditioning of plastics (composite/PMMA materi-
als/high-performance polymers such as BioHPP):
Sandblast the plastic/plastic framework with 110 µm
grain aluminium oxide at a pressure of 2 to 3 bar. The
framework must not be cleaned with a steam jet after
sandblasting. Any impurities should be removed using
alcohol and a clean brush. Then apply a thin coating of
visio.link and cure for 90 seconds in a light polymerisa-
tion device (wavelength range 370 nm - 400 nm). The
conditioned area should have a silk-matte finish after light
curing. This shows that the layer thickness is perfect.
45°
30 sec
Sandblasting
Waiting time
Light-curing time
Maximum layer thickness
180 sec
max. 2 mm
MKZ Primer
(Mix 1: 1)
Preparation of the adhe-
sive bond of composites:
• Precious metal alloys
(Au, Ag, Pt, Pd)
• eco-alloys
(low precious
metal alloys)
Conditioning of precious metal frameworks
(palladium-based/silver-based alloy)
Sandblast metal frameworks with 110 µm grain alumini-
um oxide at a pressure of 2 to 3 bar. The framework must
not be cleaned with a steam jet after sandblasting. Any
impurities should be removed using alcohol and a clean
brush. Then mix the MKZ Primer and the MKZ EM-Acti-
vator at a ratio of 1:1, apply and wait until the mixture
evaporates.
MKZ Primer
+
MKZ
EM-Activator
visio.link
Preparation of the adhe-
sive bond of composites:
• Lithium (di)silicate
• Veneering and press ceramics
Also suitable for
silanization of surfaces.
Conditioning of oxide ceramic frameworks
(zirconium oxide/aluminium oxide/spinel ce-
ramic):
Sandblast the ceramic frameworks with 110 μm alumin-
ium oxide at a maximum pressure of 2 bar or roughen
with a diamond grinder. The framework must not be
cleaned with a steam jet after sandblasting/grinding!
Remove any impurities using alcohol and a clean brush.
Then apply the appropriate primer and wait until it evap-
orates.
K-Primer

12
45°
45°
45°
5. Framework conditioning
5.1 Zirconium oxide conditioning
5.2 NPM conditioning
5.3 novo.lign veneers conditioning
Sandblast with 110 μm aluminium oxide grit
at a pressure of 2 bar.
• Angle approx. 45°
• Distance approx. 3 cm
Sandblast with 110 μm aluminium oxide grit
at a pressure of 3–4 bar.
• Angle approx. 45°
• Distance approx. 3 cm
Sandblast with 110 μm aluminium oxide grit
at a pressure of 2–3 bar.
• Angle approx. 45°
• Distance approx. 3 cm
1
1
1

Illus
tra
tions
no
t tru
e to
sca
le. S
ubje
ct to
err
ors
and
cha
nges
.
13
visio.lignThe Aesthetic and Functional System
6. Applying primer
6.1 Applying MKZ Primer
6.2 Applying visio.link
A clean brush is used to apply the MKZ Primer to the conditioned
frameworks, zirconium oxide and NPM. Wait until the applied primer
has evaporated before applying the opaquer.
Thinly coat the sandblasted novo.lign veneers with visio.link and
polymerise for 90 seconds in the bre.Lux PowerUnit 2.
Semi-matt finish.
Drying time.
Drying time.
30 sec
30 sec
90 sec
! Too much applied.
1
2
1 2

14
180 sec
180 sec
7. Applying opaker/zirconium liner
7.1 Applying opaker to zirconium oxide
7.2 Applying zirconium liner to coloured zirconium oxide
Opaker must be applied in order to create a chemical bond to the
zirconium oxide. Once the last coat has been applied, a final polymer-
isation for 360 seconds is required.
The zirconium liner is a transparent, translucent opaker.
This transparent opaker guarantees a chemical bond and high
translucency of the crown.
Apply a thin layer of crea.lign opaker and
polymerise for 180 seconds in
the bre.Lux PowerUnit 2 curing device.
Repeat until the framework is covered. The
final polymerisation for 360 se-
conds is essential.
Apply a thin layer of the crea.lign
zirconium liner (transparent opaker)
to the coloured zirconium framework and
polymerise for 180 seconds.
1
1
2 3
2

Illus
tra
tions
no
t tru
e to
sca
le. S
ubje
ct to
err
ors
and
cha
nges
.
15
visio.lignThe Aesthetic and Functional System
7.3 Applying opaquer to NPM framework
For mechanical retentions, combo.lign must be used as the first layer of
dual-curing opaquer so that the curing reaches the shaded areas. The
colour of combo.lign opaquer was developed specially for use with
veneers. The light-curing crea.lign opaker can be used for free-form
layering as well as for veneering with novo.lign veneers.
! Final polymerisation of crea.lign opaker: 360 seconds
Opaquer combo.lign colour paste.
Opaquer combo.lign catalyst paste.
Prepare a 1:1 mix of the dual-
curing combo.lign opaquer
(opaquer paste: catalyst paste).
The mixed opaquer is applied thinly as a
wash opaquer and polymerised for 180
seconds.
Apply a thin layer of crea.lign opaker and
polymerise for 180 seconds. Repeat until the
framework is covered. The final polymerisa-
tion for 360 seconds is essential.
180 sec
180 sec
1
2
3
4
5
6

16
180 sec
8. Veneering using novo.lign veneers (12–23)
8.1 Bonding veneers to the framework
The sandblasted novo.lign veneers, treated with visio.link, are bonded
using the colour-matched, dual-curing combo.lign luting composite.
combo.lign should not sit on the surface, as it is not easily polished
and can discolour. combo.lign must always be polymerised with light
in order to achieve the maximum mechanical stability possible!
The spacing of the conditioned veneers is
checked in the matrix.
The colour-matched combo.lign is sprayed
onto the veneers.
The matrix is placed onto the model and any
excess combo.lign squeezed out.
Any excess is removed using a brush soaked
in Modelling Liquid so that the combo.lign
does not stick to the brush.
The construction then undergoes final po-
lymerisation for 180 seconds in the bre.Lux
PowerUnit 2 curing device.
1
2
3
4

Illus
tra
tions
no
t tru
e to
sca
le. S
ubje
ct to
err
ors
and
cha
nges
.
17
visio.lignThe Aesthetic and Functional System
180 sec
15 sec
180 sec
10 min
In the matrix, the combo.lign is
polymerised for 15 seconds using
a hand-held lamp before a final
polymerisation for 180 seconds in
the bre.Lux PowerUnit 2 light curing
device. We recommend that it sits
for 10 minutes to enable complete
chemical curing.
combo.lign can be added later
if required.
Carefully apply the combo.lign
and polymerise for 180 seconds in the
bre.Lux PowerUnit 2 curing device.
The bonded veneers on the framework.
5
6
7
8

18
15 sec
8. Veneering using novo.lign veneers
8.2 Adding crea.lign to novo.lign veneers - harmonious
The tooth shape is added using the gel-like crea.lign composite. The
thickness of all crea.lign incisor, GUM, modifier and dentine materials
must not exceed 1 mm, without a 180-second intermediate polymeri-
sation. Once the last coat has been applied, a final polymerisation for
360 seconds is required.
crea.lign is applied to the basal area
of the pontic and the bridge is placed on the
model.
Any excess crea.lign is removed.
The transparent gingival mask means that
the base of the model can be cured for 15
seconds using the hand-held lamp. Final po-
lymerisation for 360 seconds in the bre.Lux
PowerUnit 2 curing device.
The cured basal area just needs to be pol-
ished again.
1
2
3
4

Illus
tra
tions
no
t tru
e to
sca
le. S
ubje
ct to
err
ors
and
cha
nges
.
19
visio.lignThe Aesthetic and Functional System
15 sec
crea.lign is applied where the veneers meet
the edge of the crown and polymerised for
180 seconds in the bre.Lux PowerUnit 2 cur-
ing device.
The completed veneers undergo final
polymerisation for 360 seconds.
The dispersion layer is removed with crea.lign
surface cleaner and a toothbrush.
The completed veneers.
For preparation and polishing
see page 32.
5
6
7
8
9

20
45°
90 sec
90 sec
90 sec
8. Veneering using novo.lign veneers
8.3 Realistic staining of veneers (21–23) - harmonious
The bridge was sandblasted with 110 µm
aluminium oxide grit and 2 bar pressure.
visio.link is applied and polymerised for 90
seconds
Apply Stains orange as well as a 1:1 mix of
Stains brown and visio.paint ebony next to
each other in the neck area.
Mix crea.lign pink and visio.paint ocher to
highlight mamelons. Use visio.paint white and
ivory to simulate calcium deposits and lines.
Layering
Stains orange
Stains brown
and =
visio.paint ebony
1:1
Layering Staining
crea.lign GUM rosa
visio.paint white
+ =
visio.paint ocher
visio.paint ivory
and
1
2
3
4

Illus
tra
tions
no
t tru
e to
sca
le. S
ubje
ct to
err
ors
and
cha
nges
.
21
visio.lignThe Aesthetic and Functional System
90 sec
90 sec
Mix visio.paint blue, crea.lign GUM purple
and crea.lign Transpa clear. This mixture is
used for staining the marginal ridges and the
incisal edge.
Finally, a thin coating of crea.lign
Transpa Clear is applied to the whole
surface.
The dispersion layer is removed with crea.lign
surface cleaner and a toothbrush.
For preparation and polishing
see page 32.
Layering
visio.paint blue
crea.lign GUM lila
+ + =
crea.lign Transpa clear
Layering
crea.lign Transpa clear
5
6
7
8

22
180 sec
180 sec
180 sec
180 sec
9. Free-form layering
9.1 Free-form layering 21-23 - aesthetic
Dentin layering with
crea.lign paste A3.
Accentuating the mamelons
with crea.lign paste A3,5.
Application of BL3 in the body.
The incisal edge is built up with Transpa clear,
Incisal blue and Incisal rose.
1
2
3
4

Illus
tra
tions
no
t tru
e to
sca
le. S
ubje
ct to
err
ors
and
cha
nges
.
23
visio.lignThe Aesthetic and Functional System
180 sec
360 sec
Application of crea.lign umbra
in the cervical area.
Completion of the incisal edge with E2 and
accentuating the marginal ridges with BL3.
The dispersion layer is removed with crea.lign
surface cleaner and a toothbrush.
For preparation and polishing
see page 32.
5
6
7
8

24
360 sec
9. Free-form layering
9.2 Free-form layering 13/14 using crea.lign paste - harmonious
crea.lign paste is applied after the crea.lign opaker.
The maximum layer thickness is 2 mm in order to ensure successful
curing.
Final polymerisation of the crea.lign opaker
for 360 seconds is essential.1
180 sec
crea.lign paste Dentine A3 is
applied and polymerised. 2
360 sec
! crea.lign overhangs without framework
support, combo.lign support or crea.lign
paste support must have a thickness of no
more than 1.5 mm.
The E2 incisal materials are applied and final
polymerisation is carried out for 360 seconds
in the bre.Lux PowerUnit 2 curing device.
3

Illus
tra
tions
no
t tru
e to
sca
le. S
ubje
ct to
err
ors
and
cha
nges
.
25
visio.lignThe Aesthetic and Functional System
The dispersion layer is removed with crea.lign surface cleaner and a toothbrush.
For preparation and polishing
see page 32.
4
5

26
180 sec
9. Free-form layering
9.3 Free-form layering 13/14 using crea.lign paste - aesthetic
crea.lign paste is applied after the crea.lign opaker.
The maximum layer thickness is 2 mm in order to ensure successful
curing.
The dentin body was created with
crea.lign paste Dentin A3. The mamelons
were accentuated with A3,5.
1
360 sec
Application of BL3 in the body area. The
incisal edge was built up with Transpa clear,
Incisal blue and Incisal rose.
2
crea.lign Modifier umbra was applied in the
cervical area. Completion of the incisal edge
with E2 and accentuating the marginal ridges
with BL3.
3

Illus
tra
tions
no
t tru
e to
sca
le. S
ubje
ct to
err
ors
and
cha
nges
.
27
visio.lignThe Aesthetic and Functional System
The dispersion layer is removed with crea.lign
surface cleaner and a toothbrush.
For preparation and polishing
see page 32.
4
5
28
15 sec
30 sec
180 sec
9. Free-form layering
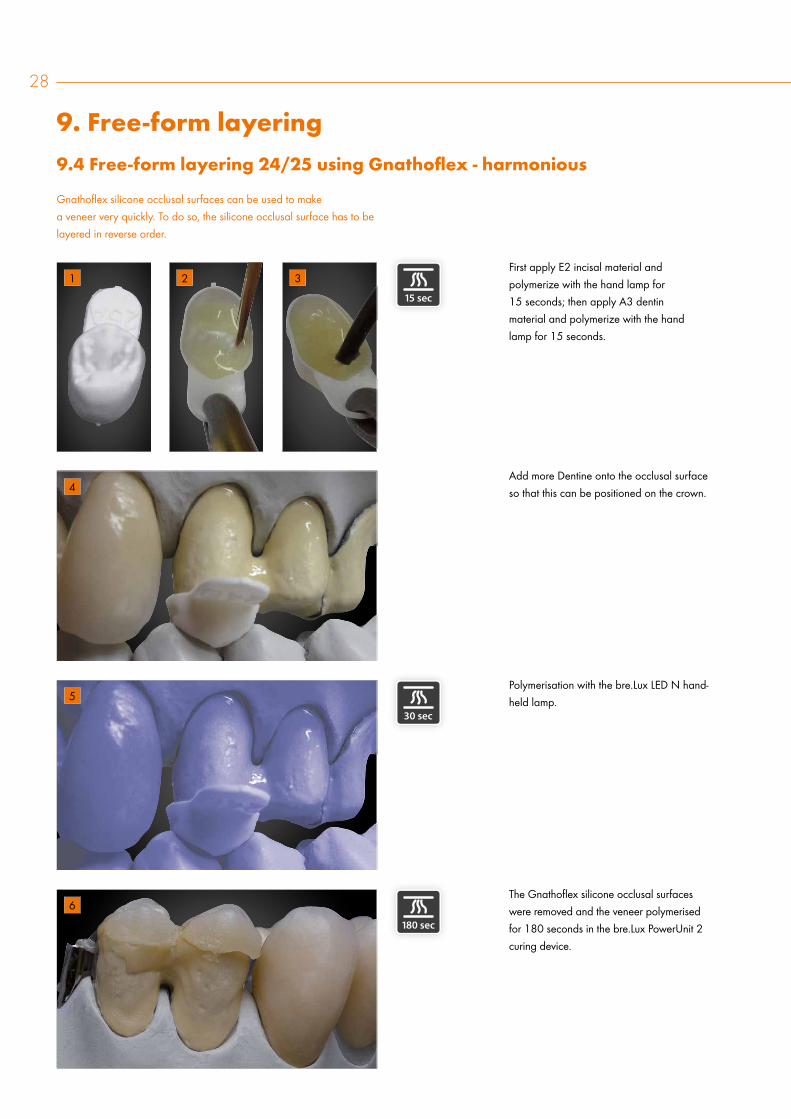
9.4 Free-form layering 24/25 using Gnathoflex - harmonious
Gnathoflex silicone occlusal surfaces can be used to make
a veneer very quickly. To do so, the silicone occlusal surface has to be
layered in reverse order.
First apply E2 incisal material and
polymerize with the hand lamp for
15 seconds; then apply A3 dentin
material and polymerize with the hand
lamp for 15 seconds.
Add more Dentine onto the occlusal surface
so that this can be positioned on the crown.
Polymerisation with the bre.Lux LED N hand-
held lamp.
The Gnathoflex silicone occlusal surfaces
were removed and the veneer polymerised
for 180 seconds in the bre.Lux PowerUnit 2
curing device.
1 2 3
4
5
6

Illus
tra
tions
no
t tru
e to
sca
le. S
ubje
ct to
err
ors
and
cha
nges
.
29
visio.lignThe Aesthetic and Functional System
180 sec
360 sec
The shape of the veneer was completed with
crea.lign Incisal E2 and end polymerisation
was carried out in the bre.Lux PowerUnit 2
polymerisation device for 360 sec.
The dispersion layer is removed with crea.lign
surface cleaner and a toothbrush.
The tooth shape can be added to
using crea.lign paste Dentine A3.
! crea.lign overhangs without framework
support, combo.lign support or crea.lign
paste support must have a thickness of no
more than 1.5 mm
For preparation and polishing
see page 32.
7
8
9
10

30
10. Model casting
The neo.lign full teeth that have been sandblasted with 110 µm
aluminium oxide at 2-3 bar in the matrix are placed in the matrix,
put on the model and cast using uni.lign denture acrylic. This is then
polymerised and prepared in the pressure pot.
The model is ready for bonding the
novo.lign veneers to the attachment cases.
The dual-curing combo.lign GUM opaque
material is used for masking the model cast
retention grids.
Both attachments are covered.
The neo.lign teeth were sandblasted and are
in the matrix. The uni.lign denture acrylic can
be poured in.
The dentures have now been prepared and
can be polished.
1
2
3
4
5

Illus
tra
tions
no
t tru
e to
sca
le. S
ubje
ct to
err
ors
and
cha
nges
.
31
visio.lignThe Aesthetic and Functional System
180 sec
180 sec
180 sec
11. Red-white-customisation of denture saddle
Using crea.lign GUM materials which are part of the red-white aes-
thetics set, the gingival section of artificial dentures can be customised.
The red-white aesthetics set contains layering instructions that will
enable quick and easy customisation. The layer thickness of the GUM
materials should not exceed 1 mm without intermediate polymerisation
of 180 sec.
crea.lign paste GUM PC40 is
applied to the saddle conditioned
with visio.link.
The recesses are filled with GUM
red. Then the gingival margin is shaped with
crea.lign paste GUM PC30.
The remaining recesses are sealed
with crea.lign Transpa.
The dispersion layer is removed with crea.lign
surface cleaner and a toothbrush.
1
2
3
4
5

32
12. Preparation and polishing
Preparing and polishing the veneers is done using the instruments and
polishing pastes in the visio.lign tool kit.
Highlighting the marginal ridges.
Correcting incisal edges.
Optimising interdental space in the neck
area.
Separating veneers with a fine
diamond disc.
1
2
3
4

Illus
tra
tions
no
t tru
e to
sca
le. S
ubje
ct to
err
ors
and
cha
nges
.
33
visio.lignThe Aesthetic and Functional System
Smoothing the surface with the rubber
polisher.
Pre-polishing using the star-shaped brush and
Acrypol polishing paste.
Gloss finish with cotton buff and Abraso-Star-
glanz high-gloss polishing paste.
Prepared and polished veneers.
Surface roughness of 0.02 µm can be
achieved with the visio.lign Toolkit!
5
6
7
8
34
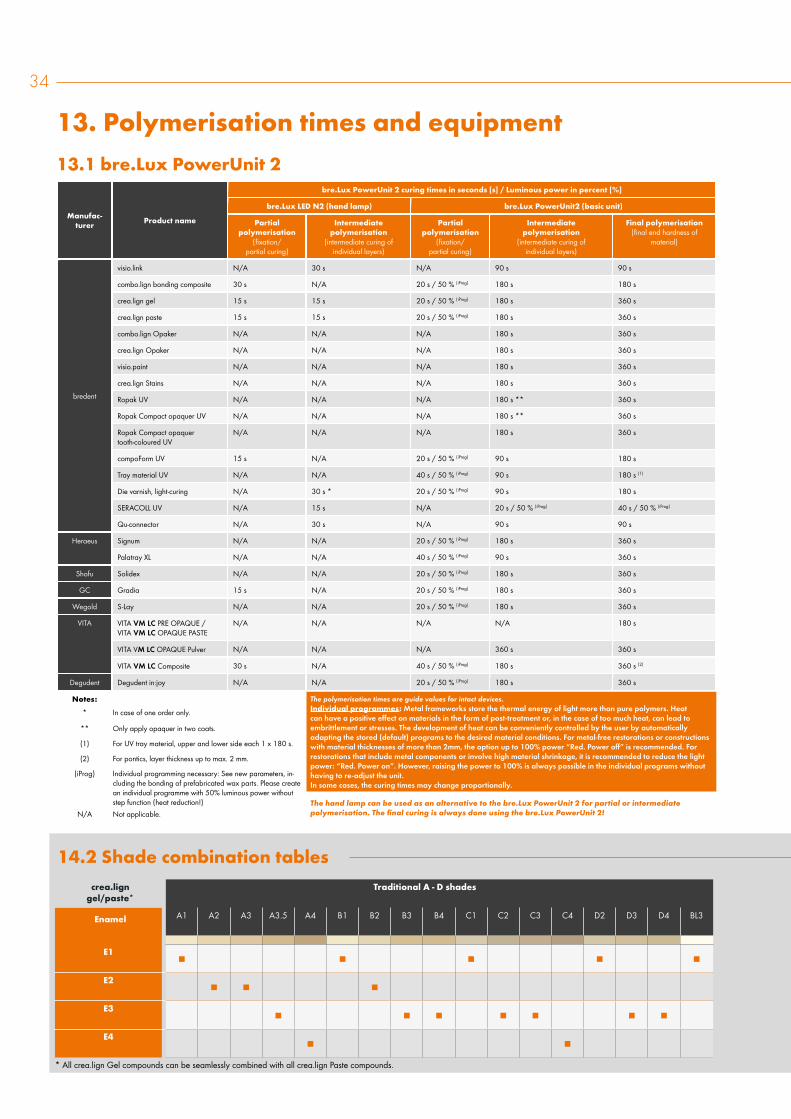
14.2 Shade combination tables
13. Polymerisation times and equipment
13.1 bre.Lux PowerUnit 2
crea.lign gel/paste*
Traditional A - D shades
Enamel A1 A2 A3 A3.5 A4 B1 B2 B3 B4 C1 C2 C3 C4 D2 D3 D4 BL3
E1
E2
E3
E4
* All crea.lign Gel compounds can be seamlessly combined with all crea.lign Paste compounds.
Manufac-turer
Product name
bre.Lux PowerUnit 2 curing times in seconds [s] / Luminous power in percent [%]
bre.Lux LED N2 (hand lamp) bre.Lux PowerUnit2 (basic unit)
Partial polymerisation
(fixation/ partial curing)
Intermediate polymerisation
(intermediate curing of individual layers)
Partial polymerisation
(fixation/ partial curing)
Intermediate polymerisation
(intermediate curing of individual layers)
Final polymerisation(final end hardness of
material)
bredent
visio.link N/A 30 s N/A 90 s 90 s
combo.lign bonding composite 30 s N/A 20 s / 50 % (iProg) 180 s 180 s
crea.lign gel 15 s 15 s 20 s / 50 % (iProg) 180 s 360 s
crea.lign paste 15 s 15 s 20 s / 50 % (iProg) 180 s 360 s
combo.lign Opaker N/A N/A N/A 180 s 360 s
crea.lign Opaker N/A N/A N/A 180 s 360 s
visio.paint N/A N/A N/A 180 s 360 s
crea.lign Stains N/A N/A N/A 180 s 360 s
Ropak UV N/A N/A N/A 180 s ** 360 s
Ropak Compact opaquer UV N/A N/A N/A 180 s ** 360 s
Ropak Compact opaquer tooth-coloured UV
N/A N/A N/A 180 s 360 s
compoForm UV 15 s N/A 20 s / 50 % (iProg) 90 s 180 s
Tray material UV N/A N/A 40 s / 50 % (iProg) 90 s 180 s (1)
Die varnish, light-curing N/A 30 s * 20 s / 50 % (iProg) 90 s 180 s
SERACOLL UV N/A 15 s N/A 20 s / 50 % (iProg) 40 s / 50 % (iProg)
Qu-connector N/A 30 s N/A 90 s 90 s
Heraeus Signum N/A N/A 20 s / 50 % (iProg) 180 s 360 s
Palatray XL N/A N/A 40 s / 50 % (iProg) 90 s 360 s
Shofu Solidex N/A N/A 20 s / 50 % (iProg) 180 s 360 s
GC Gradia 15 s N/A 20 s / 50 % (iProg) 180 s 360 s
Wegold S-Lay N/A N/A 20 s / 50 % (iProg) 180 s 360 s
VITA VITA VM LC PRE OPAQUE / VITA VM LC OPAQUE PASTE
N/A N/A N/A N/A 180 s
VITA VM LC OPAQUE Pulver N/A N/A N/A 360 s 360 s
VITA VM LC Composite 30 s N/A 40 s / 50 % (iProg) 180 s 360 s (2)
Degudent Degudent in:joy N/A N/A 20 s / 50 % (iProg) 180 s 360 s
Notes:
* In case of one order only.
** Only apply opaquer in two coats.
(1) For UV tray material, upper and lower side each 1 x 180 s.
(2) For pontics, layer thickness up to max. 2 mm.
(iProg) Individual programming necessary: See new parameters, in-cluding the bonding of prefabricated wax parts. Please create an individual programme with 50% luminous power without step function (heat reduction!)
N/A Not applicable.
The hand lamp can be used as an alternative to the bre.Lux PowerUnit 2 for partial or intermediate polymerisation. The final curing is always done using the bre.Lux PowerUnit 2!
The polymerisation times are guide values for intact devices. Individual programmes: Metal frameworks store the thermal energy of light more than pure polymers. Heat can have a positive effect on materials in the form of post-treatment or, in the case of too much heat, can lead to embrittlement or stresses. The development of heat can be conveniently controlled by the user by automatically adapting the stored (default) programs to the desired material conditions. For metal-free restorations or constructions with material thicknesses of more than 2mm, the option up to 100% power “Red. Power off” is recommended. For restorations that include metal components or involve high material shrinkage, it is recommended to reduce the light power: “Red. Power on”. However, raising the power to 100% is always possible in the individual programs without having to re-adjust the unit.In some cases, the curing times may change proportionally.

Illus
tra
tions
no
t tru
e to
sca
le. S
ubje
ct to
err
ors
and
cha
nges
.
35
visio.lignThe Aesthetic and Functional System
14. Layer thickness and shade combination tables
14.1 Polymerisation times for specific layer thicknesses
13.2 Other suitable light polymerisation devices Polymerisation times for the visio.lign system components visio.link, combo.lign and crea.lign
crea.lign Opaker
system shades 1 2 3 4 5 6 7 8 9 GUM
shades A1 / B2 A2 A3 B1 / C1 /
BL3
C2 / C3 /
D2 / D4
B3 / B4 A3.5 A4 / C4 D3 Gingiva
shades
The transparent crea.lign opaquer is suitable for pre-coloured frameworks, e.g. zirconia.
combo.lign Opaker
system shades light medium intensiv GUM
shades A1 - A3 / B1 - B2 /
C1 - C2
A3.5 / B3 - B4 /
D2 - D3
A4 / C3 - C4 /
D4
Gingiva shades
Manufacturer Product nameWavelength
[nm]*
Polymerisation times in seconds [s]
visio.link combo.lign crea.lign / crea.lign - Opaker / combo.lign - Opaker
bredent bre.Lux PowerUnit 2 370 - 500 nm 90 s 180 s 360 s
Dentsply Triad 2000 400 - 500 nm 180 s 360 s 600 s
Degudent Eclipse k.A. 60 s 180 s 360 s
Heraeus Kulzer Dentacolor XS, Uni XS, Heraflash 320 - 520 nm 90 s 180 s 360 s
GC Labolight LV-III 380 - 490 nm 120 s 300 s 600 s
Ivoclar Vivadent Targes Power Ofen, Luminat 100 400 - 580 nm 240 s 180 s 480 s
Schütz Dental Spektra 200 310 - 500 nm 120 s 180 s 360 s
Shofu Dental Solidilite 400 - 500 nm 90 s 180 s 360 s
Kuraray Dental CS 110 k.A. 120 s 300 s 480 s
Hager & Werken Speed Labolight 320 - 550 nm 90 s 180 s 480 s
3M ESPE Visio Betaneu: P1 - P4
400 - 500 nm> 240 s (P2) 420 s (P2) 900 s (P1)
alt: U0 - U3 420 s (U1, U3) 900 s (U0) 900 s (U0)
Notes: * Manufacturer’s data
n/a No information
Materialmax. layer
thickness [mm]
bre.Lux PowerUnit 2 polymerisation times in seconds [s]
Intermediate polymerisation(intermediate curing of individual layers)
Final polymerisation(final end hardness of material)
crea.lign Enamel 1 mm 180 s 360 s
crea.lign Incisal 1 mm 180 s 360 s
crea.lign Transpa clear 1 mm 180 s 360 s
crea.lign Dentin 1 mm 180 s 360 s
crea.lign Modifier 1 mm 180 s 360 s
crea.lign GUM 1 mm 180 s 360 s
crea.lign Stains 0,3 mm 180 s 360 s
visio.paint 0,1 mm 180 s 360 s
30% visio.paint mixed with crea.lign 0,3 mm 180 s 360 s
crea.lign paste 2 mm 180 s 360 s
combo.lign 2 mm 180 s 180 s
crea.lign Opaker 0,1 mm 180 s 360 s
combo.lign Opaker 0,1 mm 180 s 180 s

36
1
2
3
4
15. Standard and free-form layering instructions
Standard layering Pronounced customised layering
Customised layering
1 The neck of the tooth is coated with the
dentine mass A3.5 or beige modifier –
one degree darker than the subsequent
tooth colour.
2 The body of the tooth and mamelons are
coated with the dentine mass A3.
3 Almost the entire edge is built up with
Enamel E2.
4 The form of the cutting edge is completed
with Incisal opal.
1 The neck of the tooth is coated with the
dentine mass A3.5 or beige modifier –
one degree darker than the subsequent
tooth colour.
2 The body of the tooth and mamelons are
coated with the dentine mass A3.
3 Add thin enamel cracks using visio.paint
ebony.
4 4 Place alternating layers of Incisal blue
and Incisal rose over the mamelons.
5 Apply Incisal blue in a mesial and distal
direction from the cutting edge.
6 The entire edge is built up with
Enamel E2.
1 The neck of the tooth and the body of the
tooth with mamelons are coated with the
dentine mass A3.
2 Dark contrasts are ground into the
neck area with orange Stains and
brown Stains, which is also mixed with
visio.paint ebony.
3 Add thin cracks using visio.paint ebony.
4 Marginal ridges are built up with Incisal
universal.
5 Place Incisal blue over the mamelons and
on the marginal ridges.
6 Complete the cutting edge area with
Incisal rose.
7 Complete the marginal ridge with
crea.lign Transpa Clear in a distal direc-
tion and laminate the veneer
6
1
3
4
7
5
2
1
3
4
5
55
64
4
3
2
1

Illus
tra
tions
no
t tru
e to
sca
le. S
ubje
ct to
err
ors
and
cha
nges
.
37
visio.lignThe Aesthetic and Functional System
16. Red-white-customisation layering instructions
16.1 Layering instructions crea.lign Gel GUM
The bone is represented with beige. The effect of depth is achieved with lila. Lila is spread from the
mucolabial fold towards the teeth.
The layers that were previously applied are coated with pink. The alveolar sockets are accentuated with rose.
The entire surface is sealed with transpa. Well perfused areas are accentuated with red.
Light is applied to the gingival margin.

38
16.2 Layering instructions crea.lign Paste GUM
Use Paste PO to contour the marginal area. The alveolar sockets are built up with Paste PL.
Use light to apply the gingival margin. The effect of depth is achieved with lila.
Well perfused areas are accentuated with red.
The entire surface is sealed with transpa.
16. Red-white-customisation layering instructions

Illus
tra
tions
no
t tru
e to
sca
le. S
ubje
ct to
err
ors
and
cha
nges
.
39
visio.lignThe Aesthetic and Functional System
30 sec
17. Tips and tricks
crea.lign is applied to the basal area
of the pontic and the bridge is placed on the
model.
Any excess crea.lign is removed.
The transparent gingival mask means that
the base of the model can be cured for 15
seconds using the hand-held lamp. Final po-
lymerisation for 180 seconds in the bre.Lux
PowerUnit 2 curing device.
The cured basal area just needs to be pol-
ished again.
17.1 Gingival mask made from visio.sil (transparent silicone)
1
2
3
4

40
180 sec
180 sec
360 sec
Dual-curing combo.lign opaquer was applied
as a wash opaquer.
A thin layer of zirconium liner was applied to
the crowns to level out the retentions.
After another application of crea.lign opaker
and final polymerisation, the surface looks
smooth and even. This ensures that both ve-
neers have an equal layer thickness.
17.2 Zirconium liner to improve retention
1
2
3
17. Tips and tricks

Illus
tra
tions
no
t tru
e to
sca
le. S
ubje
ct to
err
ors
and
cha
nges
.
41
visio.lignThe Aesthetic and Functional System
Thermo-Pen.
Hot-air blower with Piezo technology without
an open flame.
...creates the required temperature of 250°C
on the inside of the veneer.
In a thermoplastic state, veneers are stretched
using a conical instrument.
17.3 Heating and bending novo.lign veneers
1
2
3
1 mm
Initial situation
before
Thermoplastically formed
after
17. Tips and tricks
42
18. Important information
• Do not use K-Primer on ceramic/glass
surfaces as it will react with the ceramic/
glass surfaces and be ineffective.
• Opaquer combo.lign must only be used
for veneering with novo.lign veneers in or-
der to avoid colour deviations when used
for free-form layering techniques.
• crea.lign opaker can be used for free-
form layering techniques as well as for
veneering using novo.lign veneers.
• Attach circular scalloping using a wrapa-
round technique
• Mechanical retentions must be attached
(retention beads/retention crystals)
• The dual-curing combo.lign
opaquer must be used as the
first layer of opaquer. For further layers,
crea.lign opaker can be used.
• Do not exceed layer thicknesses of max.
1 mm in order to ensure complete polym-
erisation.
• The visio.paint stains must not remain on
the surface to avoid any discoloration.
Please coat the stains with crea.lign Trans-
pa, for example. If the visio.paint stains
are mixed with crea.lign, the mixture must
not remain on the surface!
• The layer thickness of crea.lign must
not exceed 1.5 mm without framework
support, combo.lign support or crea.lign
Paste support.
• Separate adjoining veneers and only seal
them together at the end, prior to the final
polymerisation.
• BioHPP should not be covered with ice. If
areas that are difficult to polish or clean
are to be covered, use crea.lign Transpa
Clear (T1). After conditioning according
to section 5, page 11, apply visio.link
and after polymerisation apply a thin lay-
er of crea.lign Transpa Clear and process
according to the instructions. Opaquer/
zirconium liner is not required.
Important information for veneering BioHPP frameworks

Illus
tra
tions
no
t tru
e to
sca
le. S
ubje
ct to
err
ors
and
cha
nges
.
43
visio.lignThe Aesthetic and Functional System
The Aesthetic and Functional System
visio.lign®
Presentation of the system
perform withvisio.lign®
crea.lign® novo.lign® neo.lign® visio.CAM visio.paint bond.lign
layering veneering setting up milling staining bonding
powered byvisio.lign®
Full teeth
choose natural beauty
neo.lign®
Design chart
bre.Lux PowerUnit 2
Unleash the power of light
visio.lign
Presentation
of the system
A compact summary
of the visio.lign system
product range.
REF 009504GB
REF 000329GB
REF 000590GB
powered byvisio.lign
create natural beauty
Range of pastes
Veneering composite
crea.lign
REF 009907GB
GmbH & Co. KG · Weissenhorner Str.2 · 89250 Senden · Germany · T: +49 7309 872-441 · Fax +49 7309 872-444 · www.visio-lign.com · @: [email protected]
Indication of the visio.lign primers
Titanium CoCr Zirconium oxide/aluminium oxide
Precious metaleco alloy
silver-palladium
Silicate/veneering ceramic
e .max
Composite PMMA/teeth
High-performancepolymers
BioHPP
MKZ PrimerREF MKZ02004
MKZ Primer MKZ EM-Activator REF MKZ02004 REF MKZEM004
K-Primer REF APK25003
visio.link REF VLPMMA10
+
REF 009539GB
More interesting offers for you:
neo.lign
Design chart
Overview of all neo.lign
anterior and posterior
denture teeth.
crea.lign
pastes
Discover the advan-
tages of the veneering
composite crea.lign as
a paste.
bre.Lux
PowerUnit 2
A brief summary of the
most important informa-
tion regarding the LED
light polymerisation unit.
bond.lign
An overview of the
primer/bonder - the
specialist for the secure
bonding of all materials.
powered byvisio.lign®
Veneers
veneer natural beauty
novo.lign®
Range of designs
REF 000202GB
Veneering composite
create natural beauty
© 2016 by DT Andreas Lüdtke, Bayreuth, Germany
Implant-prosthetic restoration
Red-White Aesthetics
powered byvisio.lign®
crea.lign®
REF 000651GB
novo.lign
Range of designs
Overview of all
novo.lign veneer ante-
rior and posterior tooth
designs.
crea.lign
Red-White Aesthetics
Find out more about the
possibilities offered by
crea.lign with red-white
aesthetic.
powered byvisio.lign
veneers
novo.lign
veneer natural beauty
REF 009939GB
novo.lign
veneers
All the advantages and
benefits of the novo.lign
veneers combined.
powered byvisio.lign®
Veneering composite
create natural beauty
Dr. Vincenzo Musella, Modena, Italy
Opalescence of crea.lign®
MDT Jürgen Freitag, Bad Homburg, Germany
Opalescence of natural tooth
crea.lign®
REF 000577GB
crea.lign
Veneering composite
Discover the full range
of crea.lign light-curing
ceramic composites.
create natural beauty
Veneering composite
crea.lign
powered byvisio.lign
Manualcrea.lign freestyle
REF 009833GB
crea.lign
freestyle Manual
Step-by-step guide to the
different applications of
crea.lign.

crea.lign novo.lign neo.lign visio.CAM visio.paint bond.lign
layering veneering setting up milling staining bonding
visio.lign
The Aesthetic and Functional System
Mistake and subject to change reserved
bredent GmbH & Co. KG · Weissenhorner Str. 2 · 89250 Senden · Germany · T: +49 7309 872-441 · F: +49 7309 872-444 · www.visio-lign.com · @: [email protected]
000234GB-20201208