Embed Size (px)
Citation preview
5.1
1
2
3
4
5
6
7
8
Manutenzione
Introduzione 5.2
Tessera di Garanzia 5.3
Manutenzione 5.4
Piano di Manutenzione 5.5
Verifica dei Livelli 5.11
Batteria 5.17
Tergicristallo 5.21
Ruote e Pneumatici 5.23
Pulizia della Vettura 5.26
Sosta Prolungata 5.29
Maintenance
Introduction 5.2
Warranty Card 5.3
Maintenance 5.4
Maintenance Plan 5.5
Level Checks 5.11
Battery 5.17
Windshield Wiper 5.21
Wheels and Tires 5.23
Cleaning the Car 5.26
Long Periods of Inactivity 5.29
Entretien
Introduction 5.2
Carnet de Garantie 5.3
Entretien 5.4
Plan d’Entretien 5.5
Contrôle des Niveaux 5.11
Batterie 5.17
Essuie-glace 5.21
Roues et Pneumatiques 5.23
Nettoyage de la Voiture 5.26
Stationnement Prolongé 5.29
Wartung
Einführung 5.2
Garantiekarte 5.3
Wartung 5.4
Wartungsplan 5.5
Pegelkontrolle 5.11
Batterie 5.17
Scheibenwischer 5.21
Räder und Reifen 5.23
Reinigung des Fahrzeugs 5.26
Längerer Stillstand 5.29
5.2
Introduzione
Mantenere la vettura sempre in per-fetta efficienza è fondamentale pergarantire la sua integrità nel tempo eper evitare che anomalie di funzio-namento, dovute a trascuratezza oinadempienza della manutenzione,possa creare pericoli.
Tutti gli interventi di riparazione diqualsiasi componente del sistema disicurezza devono essere eseguiti dal-la RETE ASSISTENZA FERRARI.
Introduction
It is essential to keep the car in per-fect working order to guarantee along working life and to prevent anyoperating defects, caused by negli-gence or lack of maintenance fromcreating potential hazards.
Any repair work on any part of thesafety system must be carried out bythe FERRARI ASSISTANCE NETWORK.
Introduction
Il est fondamental de toujours main-tenir la voiture en parfait état demarche pour garantir un fonctionne-ment correct et durable du véhiculeet éviter tous risques dus à un mau-vais fonctionnement suite à des né-gligences ou au non respect du pland’entretien.
Toutes les interventions de répara-tion d’un élément du système de sé-curité doivent être effectuées par leRÉSEAU D’ASSISTANCE FERRARI.
Einführung
Es ist von grundlegender Bedeutung,das Fahrzeug stets voll funktionstüch-tig zu erhalten. Nur so kann seineZuverlässigkeit auf Dauer garantiertwerden. Nachlässigkeit in diesemPunkt, und dazu gehört auch man-gelhafte Wartung, kann gefährlicheFolgen haben.
Alle Reparaturmaßnahmen, die Tei-le des Sicherheitssystems betreffen,müssen vom FERRARI KUNDENDIENST
durchgeführt werden.
5.3
1
2
3
4
5
6
7
8
Tessera di Garanzia
La vettura è corredata di “TESSERA DI
GARANZIA” con informazioni detta-gliate sulle seguenti garanzie che co-prono il veicolo:
• Garanzia limitata FERRARI.
• Garanzia FERRARI sul sistema diemissioni.
• Garanzia FERRARI sul funzionamen-to del sistema controllo emissioni.
• Dichiarazione di garanzia per laCalifornia sul sistema controlloemissioni.
• Informazioni generali sulla garan-zia FERRARI.
La tessera di garanzia contiene inol-tre appositi spazi per far registrareda parte dei CENTRI AUTORIZZATI l’av-venuta esecuzione delle manutenzio-ni periodiche prescritte dal pianogenerale inserito nelle pagine seguenti.
Garantiekarte
Das Fahrzeug ist mit dem Heft“GARANTIEKARTE UND WARTUNGS-PROGRAMM” ausgestattet, in dem de-taillierte Informationen über folgen-de Garantien enthalten sind:
• Begrenzte FERRARI-Garantie.
• FERRARI-Garantie auf das Emissions-system.
• FERRARI-Garantie auf den Betrieb desSystems zur Emissionskontrolle.
• Garantieerklärung für Kalifornienbezüglich des Emissionskontrollsy-stems.
• Allgemeine Informationen über dieFERRARI-Garantie.
Die Garantiekarte enthält zudem spe-zielle Felder zur Eintragung der vonden AUTORISIERTEN KUNDENDIENST-STELLEN durchgeführten, regelmäßi-gen Wartungsmaßnahmen, die im aufden folgenden Seiten erläuterten all-gemeinen Wartungsplan festgelegtsind.
Carnet de Garantie
La voiture est livrée avec son “CAR-NET DE GARANTIE” qui donne des in-formations détaillées sur les garan-ties suivantes:
• Garantie limitée FERRARI.
• Garantie FERRARI sur le système decontrôle des émissions.
• Garantie FERRARI sur le fonctionne-ment du système de contrôle desémissions.
• Déclaration de garantie pour laCalifornie sur le système de con-trôle des émissions.
• Informations générales sur la ga-rantie FERRARI.
Le carnet de garantie contient en outredes espaces libres que les CENTRES
AGRÉÉS rempliront lors des travauxd’entretien périodiques effectués sui-vant le plan d’entretien général re-porté dans les pages suivantes.
Warranty Card
The car is supplied with a “WAR-RANTY CARD” containing details onthe following vehicle warranties:
• FERRARI limited warranty.
• FERRARI emission control systemwarranty.
• FERRARI emission control systemperformance warranty.
• State of California emission con-trol system warranty statement.
• FERRARI general warranty.
The warranty card also contains spe-cial blank spaces where the AUTHO-RIZED CENTERS can record the regularmaintenance work carried out as in-dicated in the general maintenanceplan laid out over the following pages.
5.4
Manutenzione
Ad ogni periodo prescritto è neces-sario fare eseguire dai CENTRI ASSI-STENZIALI FERRARI tutte le operazionidi messa a punto ed i relativi con-trolli indicati nel piano di pag. 5.5.
E' comunque buona norma che even-tuali piccole anomalie che si doves-sero riscontrare durante l'uso dellavettura (es: piccole perdite di liquidiessenziali) siano subito segnalate ainostri CENTRI ASSISTENZIALI, senza at-tendere, per eliminare l'inconvenien-te, l'esecuzione del prossimo taglian-do.
E' pure prescritto effettuare le ma-nutenzioni periodiche con intervallinon superiori ad un anno anche senon è stato raggiunto il chilometrag-gio prescritto.
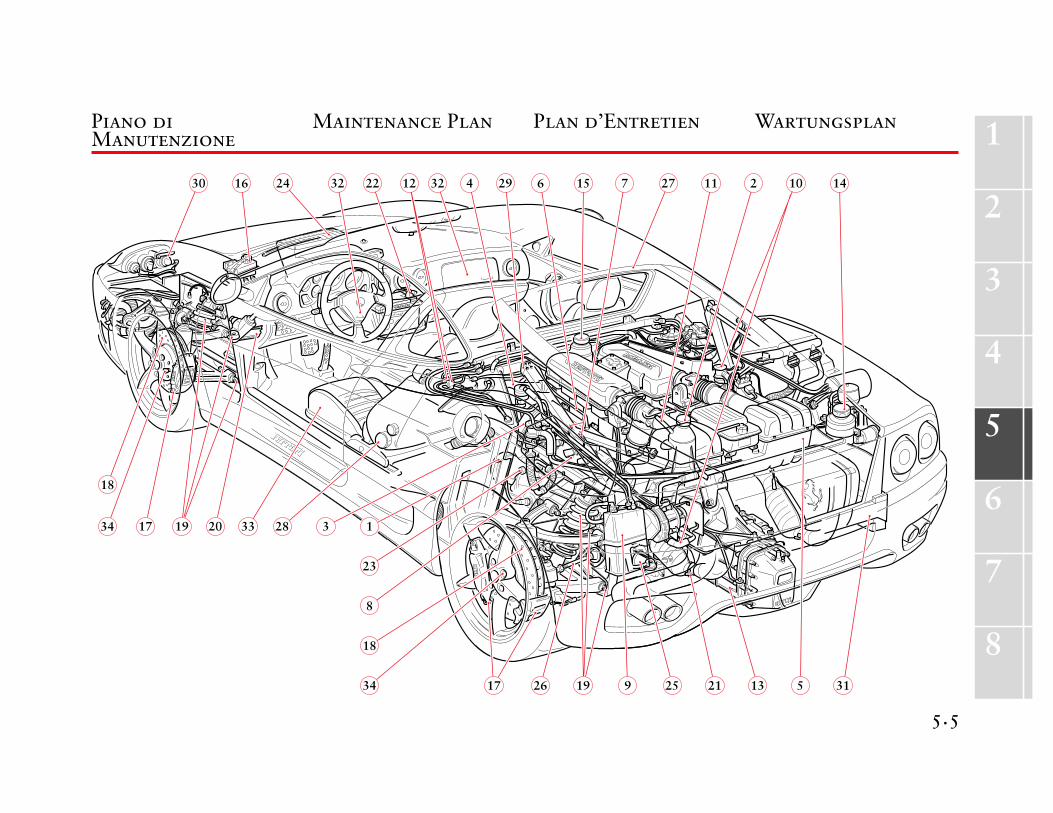
Uso del Pianodi ManutenzioneOgni operazione è contraddistinta daun numero; nella corrispondentelegenda si trova la descrizione del-l'intervento da eseguire.
Per le qualità degli oli da utilizzarevedere a pag. 6.11 la tabella “RIFOR-NIMENTI”.
Maintenance
All the setting-ups and checks indi-cated in the schedule on page 5.5must be carried out at FERRARI SER-VICE CENTERS according to the pre-scribed intervals.
However, it is advisable to informour SERVICE CENTERS of any faults youmay find while using the car (e.g.:small losses of essential fluids) toresolve minor problems immediatelyrather than waiting until the nextservice date.
Furthermore, regular maintenanceprocedures must be carried out atintervals of no more than a year,even if the prescribed mileage hasnot been reached.
Using theMaintenance PlanEach procedure has been assigned anumber and a description of the pro-cedure to be carried out can be foundin the corresponding part of the key.
For the quality of the oil to be used,see the table entitled “REFILLING” onpage 6.11.
Entretien
A échéances prévues, il est nécessairede faire effectuer par les CENTRES D’AS-SISTANCE FERRARI toutes les opérationsde mise au point et les contrôles re-latifs prévus dans le plan de la page5.5.
Il convient toutefois, en cas de peti-tes anomalies détectées lors de l’uti-lisation du véhicule (ex: petites fui-tes de liquides), de les signaler im-médiatement à nos CENTRES D’ASSIS-TANCE FERRARI, sans attendre l’échéan-ce prévue d’un coupon pour éliminerle problème.
Il est conseillé d’effectuer les entre-tiens périodiques à des intervalles depas plus d’un an, même si le kilomé-trage prescrit n’a pas été atteint.
Utilisation duPlan d’EntretienChaque opération est marquée d’unnuméro; la description correspondantà l’intervention à effectuer est indi-quée dans la légende.
Pour la qualité des huiles à utiliser,voir en page 6.11 le tableau “RAVI-TAILLEMENTS”.
Wartung
Es ist unbedingt erforderlich, die War-tungsintervalle einzuhalten und die imWartungsplan auf Seite 5.5 vorgeschrie-benen Einstell- und Kontrollarbeiten ineinem FERRARI KUNDENDIENST-ZENTRUM
vornehmen zu lassen.
In der Regel sollten jedoch auch klei-nere Störungen, die bei Benutzung desFahrzeugs eventuell auftreten (z. B.Austreten kleinerer Mengen der wesent-lichen Betriebsflüssigkeiten) unserenKUNDENDIENSTSTELLEN gemeldet unddort behoben werden, ohne das Endedes nächsten Service-Intervalls abzu-warten.
Es wird zudem vorgeschrieben, dieregelmäßigen Wartungsmaßnahmenin Abständen von höchstens einemJahr durchführen zu lassen, auchwenn der angegebene Kilometerstandnicht erreicht worden ist.
Benutzungdes WartungsplansJeder Vorgang ist mit einer Nummerversehen; die Beschreibung der durch-zuführenden Arbeiten befindet sichin der Legende.
Bezüglich der zu verwendenden Öl-sorten siehe die Tabelle “FÜLLMENGEN”auf Seite 6.11.
5.5
1
2
3
4
5
6
7
8315132125919261734
18
8
23
132820 33191734
18
11 2 10 142732 15 76294321222241630
Piano diManutenzione
Maintenance Plan Plan d’Entretien Wartungsplan
5.6
1
2
3
4
5
6
7
OPERAZIONI PRINCIPALI MIGLIA PERCORSE / COVERED MILES / MILLES PARCOURUES / GEFAHRENE MEILEN
OPERATIONS PRINCIPALES
OPERATIONS PRINCIPALES
ARBEITSGANG 5,000 15,000 30,000 45,000 60,000 75,000 90,000 105,000 120,000
8
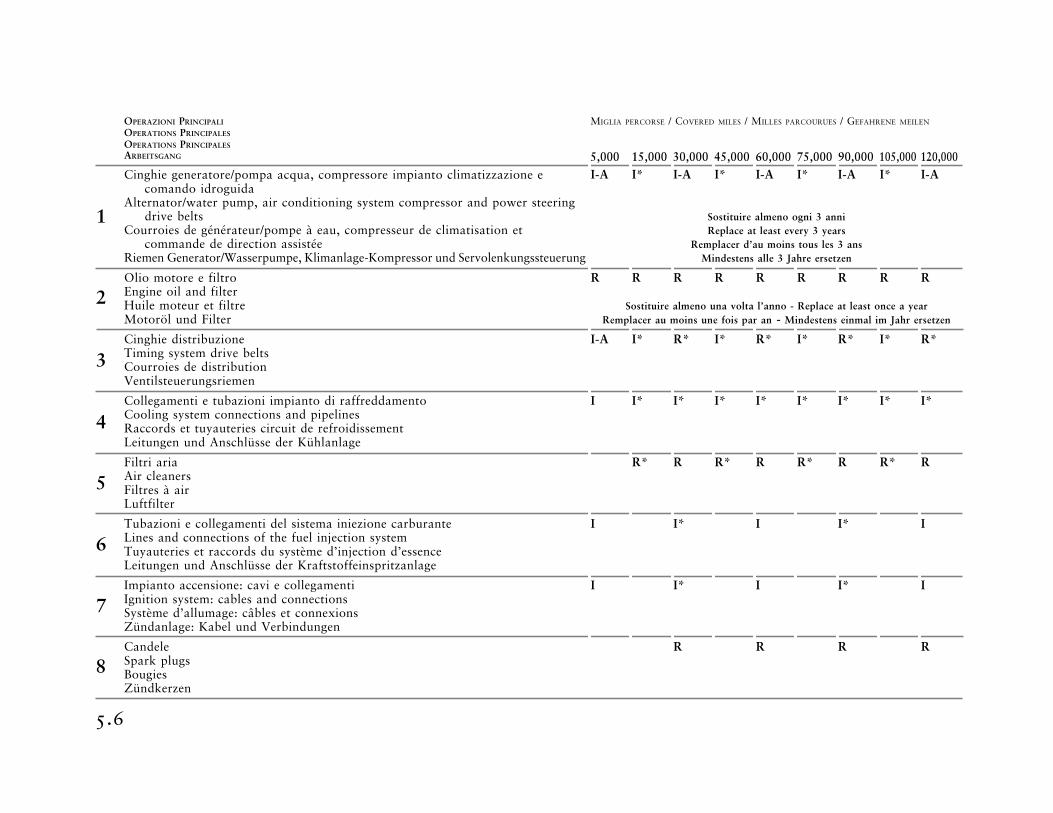
Cinghie generatore/pompa acqua, compressore impianto climatizzazione ecomando idroguida
Alternator/water pump, air conditioning system compressor and power steeringdrive belts
Courroies de générateur/pompe à eau, compresseur de climatisation etcommande de direction assistée
Riemen Generator/Wasserpumpe, Klimanlage-Kompressor und Servolenkungssteuerung
Olio motore e filtroEngine oil and filterHuile moteur et filtreMotoröl und Filter
Cinghie distribuzioneTiming system drive beltsCourroies de distributionVentilsteuerungsriemen
Collegamenti e tubazioni impianto di raffreddamentoCooling system connections and pipelinesRaccords et tuyauteries circuit de refroidissementLeitungen und Anschlüsse der Kühlanlage
Filtri ariaAir cleanersFiltres à airLuftfilter
Tubazioni e collegamenti del sistema iniezione carburanteLines and connections of the fuel injection systemTuyauteries et raccords du système d’injection d’essenceLeitungen und Anschlüsse der Kraftstoffeinspritzanlage
Impianto accensione: cavi e collegamentiIgnition system: cables and connectionsSystème d’allumage: câbles et connexionsZündanlage: Kabel und Verbindungen
CandeleSpark plugsBougiesZündkerzen
I-A I* I-A I* I-A I* I-A I* I-A
Sostituire almeno ogni 3 anniReplace at least every 3 years
Remplacer d’au moins tous les 3 ansMindestens alle 3 Jahre ersetzen
R R R R R R R R R
Sostituire almeno una volta l’anno - Replace at least once a yearRemplacer au moins une fois par an - Mindestens einmal im Jahr ersetzen
I-A I* R* I* R* I* R* I* R*
I I* I* I* I* I* I* I* I*
R* R R* R R* R R* R
I I* I I* I
I I* I I* I
R R R R
5.7
1
2
3
4
5
6
7
8
10
11
14
15
16
12
13
9
OPERAZIONI PRINCIPALI MIGLIA PERCORSE / COVERED MILES / MILLES PARCOURUES / GEFAHRENE MEILEN
OPERATIONS PRINCIPALES
OPERATIONS PRINCIPALES
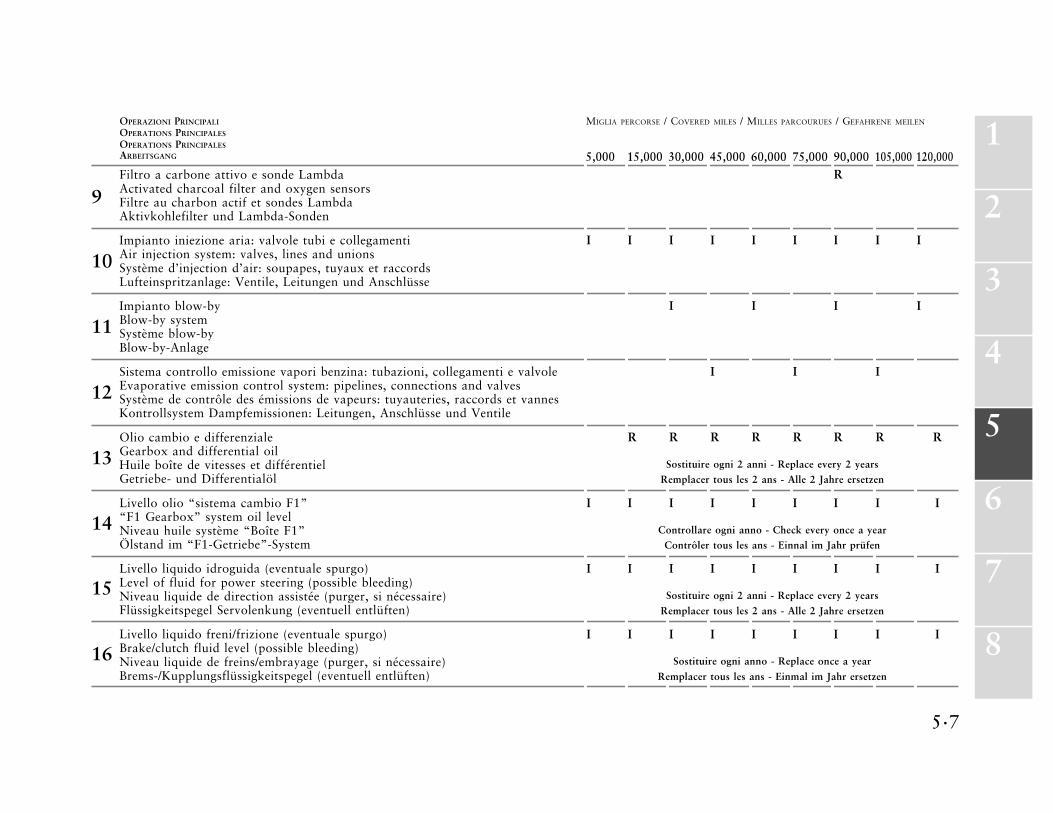
ARBEITSGANG 5,000 15,000 30,000 45,000 60,000 75,000 90,000 105,000 120,000Filtro a carbone attivo e sonde LambdaActivated charcoal filter and oxygen sensorsFiltre au charbon actif et sondes LambdaAktivkohlefilter und Lambda-Sonden
Impianto iniezione aria: valvole tubi e collegamentiAir injection system: valves, lines and unionsSystème d’injection d’air: soupapes, tuyaux et raccordsLufteinspritzanlage: Ventile, Leitungen und Anschlüsse
Impianto blow-byBlow-by systemSystème blow-byBlow-by-Anlage
Sistema controllo emissione vapori benzina: tubazioni, collegamenti e valvoleEvaporative emission control system: pipelines, connections and valvesSystème de contrôle des émissions de vapeurs: tuyauteries, raccords et vannesKontrollsystem Dampfemissionen: Leitungen, Anschlüsse und Ventile
Olio cambio e differenzialeGearbox and differential oilHuile boîte de vitesses et différentielGetriebe- und Differentialöl
Livello olio “sistema cambio F1”“F1 Gearbox” system oil levelNiveau huile système “Boîte F1”Ölstand im “F1-Getriebe”-System
Livello liquido idroguida (eventuale spurgo)Level of fluid for power steering (possible bleeding)Niveau liquide de direction assistée (purger, si nécessaire)Flüssigkeitspegel Servolenkung (eventuell entlüften)
Livello liquido freni/frizione (eventuale spurgo)Brake/clutch fluid level (possible bleeding)Niveau liquide de freins/embrayage (purger, si nécessaire)Brems-/Kupplungsflüssigkeitspegel (eventuell entlüften)
R
I I I I I I I I I
I I I I
I I I
R R R R R R R R
Sostituire ogni 2 anni - Replace every 2 yearsRemplacer tous les 2 ans - Alle 2 Jahre ersetzen
I I I I I I I I I
Controllare ogni anno - Check every once a yearContrôler tous les ans - Einnal im Jahr prüfen
I I I I I I I I I
Sostituire ogni 2 anni - Replace every 2 years
Remplacer tous les 2 ans - Alle 2 Jahre ersetzen
I I I I I I I I I
Sostituire ogni anno - Replace once a year
Remplacer tous les ans - Einmal im Jahr ersetzen

5.8
18
19
22
20
21
17
OPERAZIONI PRINCIPALI MIGLIA PERCORSE / COVERED MILES / MILLES PARCOURUES / GEFAHRENE MEILEN
OPERATIONS PRINCIPALES
OPERATIONS PRINCIPALES
ARBEITSGANG 5,000 15,000 30,000 45,000 60,000 75,000 90,000 105,000 120,000Impianto freni: tubi, calipers, collegamenti.
Efficienza spie cruscotto; funzionamento freno di stazionamento.Brake system: pipes/hoses, calipers, connections.
Dashboard warning light operation; hand brake operationCircuit de freinage: tuyaux, étriers, raccords.
Efficience témoins tableau de bord; fonctionnement frein de stationnement.Bremsanlage: Rohre, Bremszangen, Verbindungen. Betriebstüchtigkeit der
Kontrolleuchten im Armaturenbrett; Funktion der Handbremse.
Stato di usura delle superfici frenanti (dischi, pastiglie); sostituire se necessarioBraking surface wear (disks, pads); replace if necessaryUsure des surfaces de freinage (disques, plaquettes); remplacer, si nécessaireAbnutzung der Bremsoberflächen (Scheiben, Beläge); bei Bedarf ersetzen
Articolazioni sospensioni anteriori e posteriori e loro serraggioFront and rear suspension: joints and tightnessSuspensions avant et arrière: rotules et serrageVordere und hintere Aufhängungen und ihre Befestigung
Organi di direzione, protezione snodi, cuffie della cremagliera sulle leve dellosterzo e sui semiassi
Steering system devices, joint protection, steering rack boots on steering leversand on axle shafts
Organes de direction, protection des rotules, soufflets de la crémaillère sur lesleviers de la colonne de direction et sur les arbres de roue
Lenkungsorgane, Gelenkschutzvorrichtungen, Manchetten der Zahnstange aufLenkungshebeln und Achswellen
Serraggio viti, dadi e bulloni (compresi quelli dell’impianto di scarico),collegamenti, mollette e fascette di tenuta
Tighten screws, nuts and bolts (including those on the exhaust system),connections, clips and clamps
Serrage des vis, écrous et boulons (y compris ceux du système d’échappement),raccords, clips et colliers
Befestigung der Schrauben, Muttern und Bolzen (einschließlich jene derAuspuffanlage), Verbindungen, Klemmen und Halteschellen
Batteria: collegamenti e condizioni di caricaBattery: connections and charge statusBatterie: connexions et état de chargeBatterie: Anschlüsse und Ladezustand
I I I I I I I I I
I I I I I I I I I
I I I I I I I I I
I I I I I I I I
I I I I I I I I I
I I I I I I I I I
5.9
1
2
3
4
5
6
7
8
25
26
29
27
28
24
OPERAZIONI PRINCIPALI MIGLIA PERCORSE / COVERED MILES / MILLES PARCOURUES / GEFAHRENE MEILEN
OPERATIONS PRINCIPALES
OPERATIONS PRINCIPALES
ARBEITSGANG 5,000 15,000 30,000 45,000 60,000 75,000 90,000 105,000 120,000
23
30
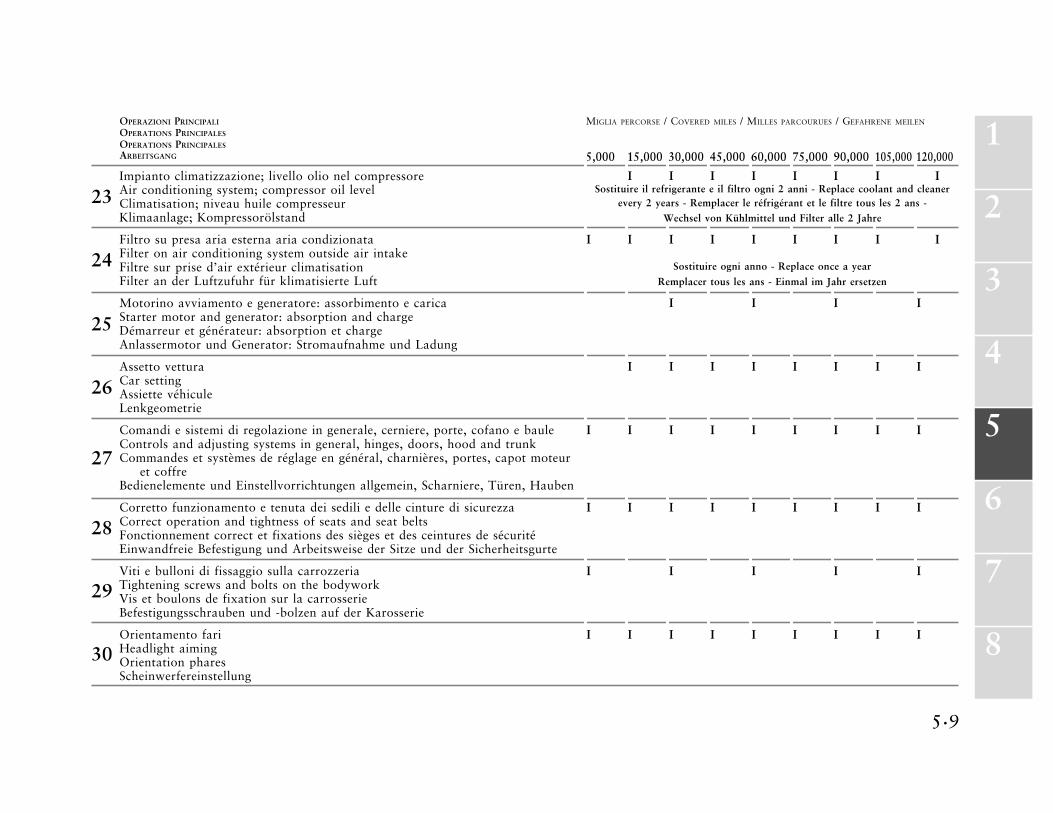
Impianto climatizzazione; livello olio nel compressoreAir conditioning system; compressor oil levelClimatisation; niveau huile compresseurKlimaanlage; Kompressorölstand
Filtro su presa aria esterna aria condizionataFilter on air conditioning system outside air intakeFiltre sur prise d’air extérieur climatisationFilter an der Luftzufuhr für klimatisierte Luft
Motorino avviamento e generatore: assorbimento e caricaStarter motor and generator: absorption and chargeDémarreur et générateur: absorption et chargeAnlassermotor und Generator: Stromaufnahme und Ladung
Assetto vetturaCar settingAssiette véhiculeLenkgeometrie
Comandi e sistemi di regolazione in generale, cerniere, porte, cofano e bauleControls and adjusting systems in general, hinges, doors, hood and trunkCommandes et systèmes de réglage en général, charnières, portes, capot moteur
et coffreBedienelemente und Einstellvorrichtungen allgemein, Scharniere, Türen, Hauben
Corretto funzionamento e tenuta dei sedili e delle cinture di sicurezzaCorrect operation and tightness of seats and seat beltsFonctionnement correct et fixations des sièges et des ceintures de sécuritéEinwandfreie Befestigung und Arbeitsweise der Sitze und der Sicherheitsgurte
Viti e bulloni di fissaggio sulla carrozzeriaTightening screws and bolts on the bodyworkVis et boulons de fixation sur la carrosserieBefestigungsschrauben und -bolzen auf der Karosserie
Orientamento fariHeadlight aimingOrientation pharesScheinwerfereinstellung
I I I I I I I ISostituire il refrigerante e il filtro ogni 2 anni - Replace coolant and cleaner
every 2 years - Remplacer le réfrigérant et le filtre tous les 2 ans -Wechsel von Kühlmittel und Filter alle 2 Jahre
I I I I I I I I I
Sostituire ogni anno - Replace once a year
Remplacer tous les ans - Einmal im Jahr ersetzen
I I I I
I I I I I I I I
I I I I I I I I I
I I I I I I I I I
I I I I I
I I I I I I I I I
5.10
32
OPERAZIONI PRINCIPALI MIGLIA PERCORSE / COVERED MILES / MILLES PARCOURUES / GEFAHRENE MEILEN
OPERATIONS PRINCIPALES
OPERATIONS PRINCIPALES
ARBEITSGANG 5,000 15,000 30,000 45,000 60,000 75,000 90,000 105,000 120,000
31
33
34
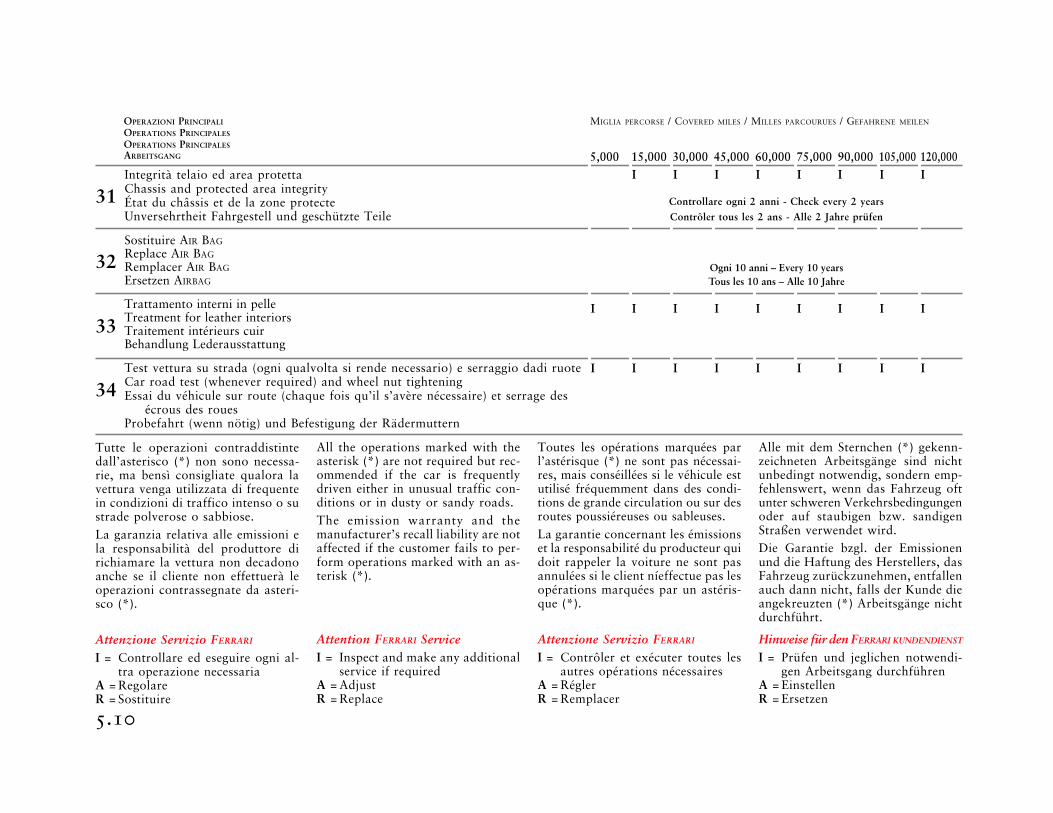
Integrità telaio ed area protettaChassis and protected area integrityÉtat du châssis et de la zone protecteUnversehrtheit Fahrgestell und geschützte Teile
Sostituire AIR BAG
Replace AIR BAG
Remplacer AIR BAG
Ersetzen AIRBAG
Trattamento interni in pelleTreatment for leather interiorsTraitement intérieurs cuirBehandlung Lederausstattung
Test vettura su strada (ogni qualvolta si rende necessario) e serraggio dadi ruoteCar road test (whenever required) and wheel nut tighteningEssai du véhicule sur route (chaque fois qu’il s’avère nécessaire) et serrage des
écrous des rouesProbefahrt (wenn nötig) und Befestigung der Rädermuttern
Tutte le operazioni contraddistintedall’asterisco (*) non sono necessa-rie, ma bensì consigliate qualora lavettura venga utilizzata di frequentein condizioni di traffico intenso o sustrade polverose o sabbiose.La garanzia relativa alle emissioni ela responsabilità del produttore dirichiamare la vettura non decadonoanche se il cliente non effettuerà leoperazioni contrassegnate da asteri-sco (*).
Attenzione Servizio FERRARI
I = Controllare ed eseguire ogni al-tra operazione necessaria
A = RegolareR = Sostituire
All the operations marked with theasterisk (*) are not required but rec-ommended if the car is frequentlydriven either in unusual traffic con-ditions or in dusty or sandy roads.The emission warranty and themanufacturer’s recall liability are notaffected if the customer fails to per-form operations marked with an as-terisk (*).
Attention FERRARI ServiceI = Inspect and make any additional
service if requiredA = AdjustR = Replace
I I I I I I I I
Controllare ogni 2 anni - Check every 2 years
Contrôler tous les 2 ans - Alle 2 Jahre prüfen
Ogni 10 anni – Every 10 yearsTous les 10 ans – Alle 10 Jahre
I I I I I I I I I
I I I I I I I I I
Toutes les opérations marquées parl’astérisque (*) ne sont pas nécessai-res, mais conséillées si le véhicule estutilisé fréquemment dans des condi-tions de grande circulation ou sur desroutes poussiéreuses ou sableuses.La garantie concernant les émissionset la responsabilité du producteur quidoit rappeler la voiture ne sont pasannulées si le client níeffectue pas lesopérations marquées par un astéris-que (*).
Attenzione Servizio FERRARI
I = Contrôler et exécuter toutes lesautres opérations nécessaires
A = RéglerR = Remplacer
Alle mit dem Sternchen (*) gekenn-zeichneten Arbeitsgänge sind nichtunbedingt notwendig, sondern emp-fehlenswert, wenn das Fahrzeug oftunter schweren Verkehrsbedingungenoder auf staubigen bzw. sandigenStraßen verwendet wird.Die Garantie bzgl. der Emissionenund die Haftung des Herstellers, dasFahrzeug zurückzunehmen, entfallenauch dann nicht, falls der Kunde dieangekreuzten (*) Arbeitsgänge nichtdurchführt.
Hinweise für den FERRARI KUNDENDIENST
I = Prüfen und jeglichen notwendi-gen Arbeitsgang durchführen
A = EinstellenR = Ersetzen
5.11
1
2
3
4
5
6
7
8
A
MAX
MIN
Verifica dei Livelli
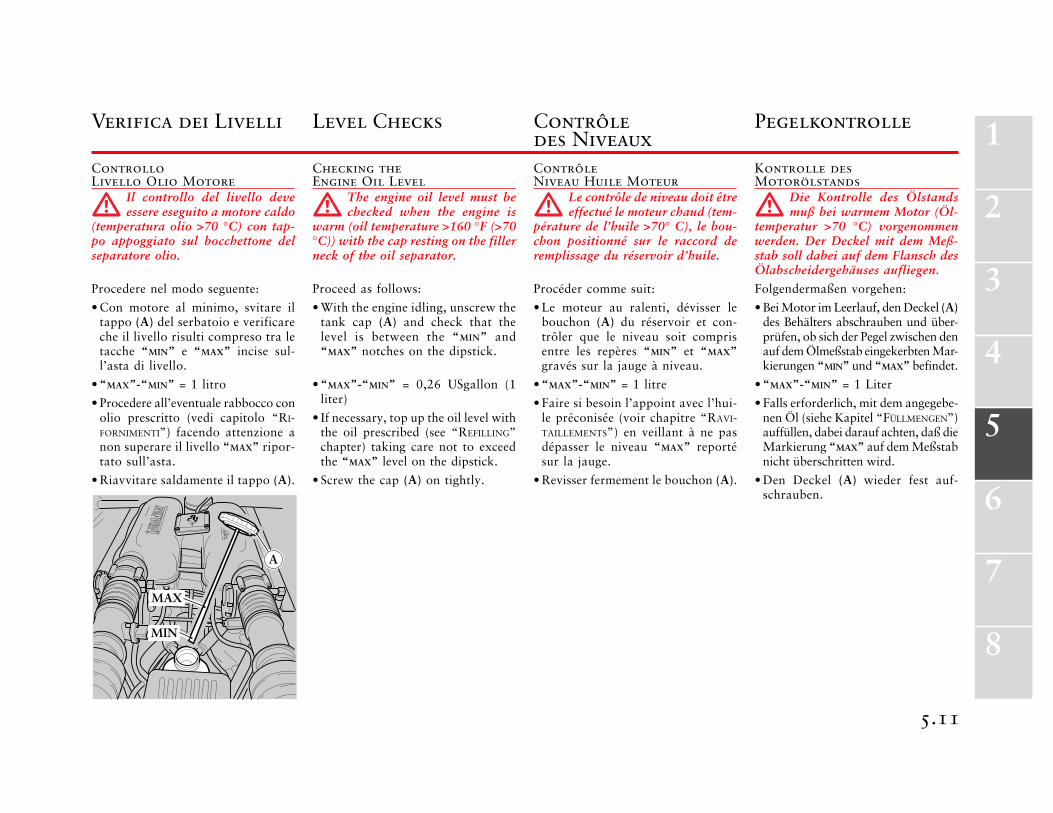
ControlloLivello Olio Motore
Il controllo del livello deveessere eseguito a motore caldo
(temperatura olio >70 °C) con tap-po appoggiato sul bocchettone delseparatore olio.
Procedere nel modo seguente:
• Con motore al minimo, svitare iltappo (A) del serbatoio e verificareche il livello risulti compreso tra letacche “MIN” e “MAX” incise sul-l’asta di livello.
• “MAX”-“MIN” = 1 litro
• Procedere all’eventuale rabbocco conolio prescritto (vedi capitolo “RI-FORNIMENTI”) facendo attenzione anon superare il livello “MAX” ripor-tato sull’asta.
• Riavvitare saldamente il tappo (A).
Level Checks
Checking theEngine Oil Level
The engine oil level must bechecked when the engine is
warm (oil temperature >160 °F (>70°C)) with the cap resting on the fillerneck of the oil separator.
Proceed as follows:
• With the engine idling, unscrew thetank cap (A) and check that thelevel is between the “MIN” and“MAX” notches on the dipstick.
• “MAX”-“MIN” = 0,26 USgallon (1liter)
• If necessary, top up the oil level withthe oil prescribed (see “REFILLING”chapter) taking care not to exceedthe “MAX” level on the dipstick.
• Screw the cap (A) on tightly.
Contrôledes NiveauxContrôleNiveau Huile Moteur
Le contrôle de niveau doit êtreeffectué le moteur chaud (tem-
pérature de l’huile >70° C), le bou-chon positionné sur le raccord deremplissage du réservoir d’huile.
Procéder comme suit:
• Le moteur au ralenti, dévisser lebouchon (A) du réservoir et con-trôler que le niveau soit comprisentre les repères “MIN” et “MAX”gravés sur la jauge à niveau.
• “MAX”-“MIN” = 1 litre
• Faire si besoin l’appoint avec l’hui-le préconisée (voir chapitre “RAVI-TAILLEMENTS”) en veillant à ne pasdépasser le niveau “MAX” reportésur la jauge.
• Revisser fermement le bouchon (A).
Pegelkontrolle
Kontrolle desMotorölstands
Die Kontrolle des Ölstandsmuß bei warmem Motor (Öl-
temperatur >70 °C) vorgenommenwerden. Der Deckel mit dem Meß-stab soll dabei auf dem Flansch desÖlabscheidergehäuses aufliegen.
Folgendermaßen vorgehen:
• Bei Motor im Leerlauf, den Deckel (A)des Behälters abschrauben und über-prüfen, ob sich der Pegel zwischen denauf dem Ölmeßstab eingekerbten Mar-kierungen “MIN” und “MAX” befindet.
• “MAX”-“MIN” = 1 Liter
• Falls erforderlich, mit dem angegebe-nen Öl (siehe Kapitel “FÜLLMENGEN”)auffüllen, dabei darauf achten, daß dieMarkierung “MAX” auf dem Meßstabnicht überschritten wird.
• Den Deckel (A) wieder fest auf-schrauben.

5.12
BMAX
MIN
Se, dal controllo, l’olio risultasotto il livello “MIN”, eseguire
comunque il rabbocco, e far verifi-care l’impianto da un SERVIZIO ASSI-STENZA FERRARI.
Controllo LivelloOlio Impianto IdroguidaIl controllo del livello deve essere ese-guito a motore caldo, dopo aver per-corso almeno 15 Km, con vettura inpiano.
Rimuovere il tappo (B) dal serbatoionel vano motore e verificare che illivello risulti compreso tra le tacchedi “MIN” e “MAX” incise sull’asta dilivello.
Il controllo deve essere eseguito contappo appoggiato sul serbatoio.
Procedere all’eventuale rabbocco conolio prescritto (vedi capitolo “RIFOR-NIMENTI”) fino al livello “MAX”.
Riavvitare saldamente il tappo (B).
When checked, if the oil ap-pears to be under the “MIN”
level, top up the tank and then havethe system checked by a FERRARI SER-VICE CENTER.
Checking the HydraulicSteering System Oil LevelThe level check must be carried outwith the engine warm, after the carhas covered at least 10 miles, withthe car resting on flat ground.
Remove the cap (B) from the tank inthe engine compartment and checkthe level is between the “MIN” and“MAX” notches on the dipstick.
The level check must be carried outwith the cap resting on the tank.
If necessary, top up the oil level us-ing the oil prescribed (see “REFILL-ING” section) to the “MAX” level.
Screw the cap (B) on tightly.
Si, au contrôle, le niveau d’hui-le se place sur “MIN”, effectuer
quand-même l’appoint et faire con-trôler le système par un SERVICE D’AS-SISTANCE FERRARI agréé.
Contrôle du Niveau d’Huile duSystème de Direction AssistéeCe contrôle de niveau doit être effec-tué, le moteur chaud, après un par-cours d’au moins 15 km avec la voi-ture à plat.
Enlever le bouchon (B) du réservoirdu compartiment moteur et contrô-ler que le niveau soit compris entreles repères “MIN” et “MAX” gravéssur la jauge à niveau.
Ce contrôle doit être effectué, le bou-chon en appui sur le réservoir.
Effectuer éventuellement l’appointavec l’huile préconisée (voir chapitre“RAVITAILLEMENTS”) jusqu’au niveau“MAX”.
Revisser fermement le bouchon (B).
Wenn bei der Kontrolle ein Pe-gelstand unterhalb der Mar-
kierung “MIN” festgestellt wird, zu-nächst mit Öl auffüllen und anschlie-ßend die Anlage von einem FERRARI-KUNDENDIENST überprüfen lassen.
Kontrolle desServolenkungsölstandsDie Pegelkontrolle muß bei warmemMotor und Fahrzeug auf einer ebenenFläche nach einer Fahrt von mindestens15 km durchgeführt werden.
Den Deckel (B) vom Behälter im Mo-torraum entfernen und überprüfen, obsich der Pegelstand im Bereich zwischenden Markierungen “MIN” und “MAX”auf dem Ölmeßstab befindet.
Die Kontrolle muß mit auf dem Be-hälter aufliegendem Deckel durchge-führt werden.
Falls erforderlich, mit dem angege-benen Öl (siehe Kapitel “FÜLL-MENGEN”) bis zur Markierung “MAX”auffüllen.
Den Deckel (B) wieder fest aufschrau-ben.
5.13
1
2
3
4
5
6
7
8
C MAXMIN
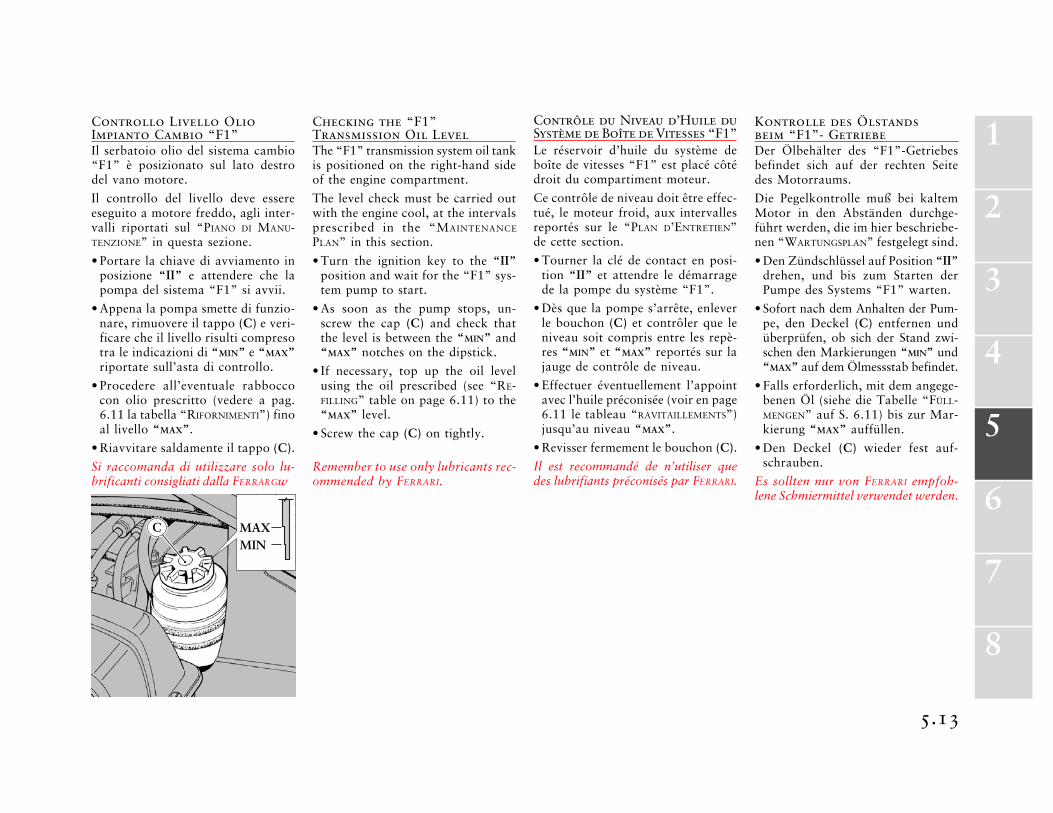
Controllo Livello OlioImpianto Cambio “F1”Il serbatoio olio del sistema cambio“F1” è posizionato sul lato destrodel vano motore.
Il controllo del livello deve essereeseguito a motore freddo, agli inter-valli riportati sul “PIANO DI MANU-TENZIONE” in questa sezione.
• Portare la chiave di avviamento inposizione “II” e attendere che lapompa del sistema “F1” si avvii.
• Appena la pompa smette di funzio-nare, rimuovere il tappo (C) e veri-ficare che il livello risulti compresotra le indicazioni di “MIN” e “MAX”riportate sull’asta di controllo.
• Procedere all’eventuale rabboccocon olio prescritto (vedere a pag.6.11 la tabella “RIFORNIMENTI”) finoal livello “MAX”.
• Riavvitare saldamente il tappo (C).
Si raccomanda di utilizzare solo lu-brificanti consigliati dalla FERRARGw
Kontrolle des Ölstandsbeim “F1”- GetriebeDer Ölbehälter des “F1”-Getriebesbefindet sich auf der rechten Seitedes Motorraums.
Die Pegelkontrolle muß bei kaltemMotor in den Abständen durchge-führt werden, die im hier beschriebe-nen “WARTUNGSPLAN” festgelegt sind.
• Den Zündschlüssel auf Position “II”drehen, und bis zum Starten derPumpe des Systems “F1” warten.
• Sofort nach dem Anhalten der Pum-pe, den Deckel (C) entfernen undüberprüfen, ob sich der Stand zwi-schen den Markierungen “MIN” und“MAX” auf dem Ölmessstab befindet.
• Falls erforderlich, mit dem angege-benen Öl (siehe die Tabelle “FÜLL-MENGEN” auf S. 6.11) bis zur Mar-kierung “MAX” auffüllen.
• Den Deckel (C) wieder fest auf-schrauben.
Es sollten nur von FERRARI empfoh-lene Schmiermittel verwendet werden.
Contrôle du Niveau d’Huile duSystème de Boîte de Vitesses “F1”Le réservoir d’huile du système deboîte de vitesses “F1” est placé côtédroit du compartiment moteur.
Ce contrôle de niveau doit être effec-tué, le moteur froid, aux intervallesreportés sur le “PLAN D’ENTRETIEN”de cette section.
• Tourner la clé de contact en posi-tion “II” et attendre le démarragede la pompe du système “F1”.
• Dès que la pompe s’arrête, enleverle bouchon (C) et contrôler que leniveau soit compris entre les repè-res “MIN” et “MAX” reportés sur lajauge de contrôle de niveau.
• Effectuer éventuellement l’appointavec l’huile préconisée (voir en page6.11 le tableau “RAVITAILLEMENTS”)jusqu’au niveau “MAX”.
• Revisser fermement le bouchon (C).
Il est recommandé de n’utiliser quedes lubrifiants préconisés par FERRARI.
Checking the “F1”Transmission Oil LevelThe “F1” transmission system oil tankis positioned on the right-hand sideof the engine compartment.
The level check must be carried outwith the engine cool, at the intervalsprescribed in the “MAINTENANCE
PLAN” in this section.
• Turn the ignition key to the “II”position and wait for the “F1” sys-tem pump to start.
• As soon as the pump stops, un-screw the cap (C) and check thatthe level is between the “MIN” and“MAX” notches on the dipstick.
• If necessary, top up the oil levelusing the oil prescribed (see “RE-FILLING” table on page 6.11) to the“MAX” level.
• Screw the cap (C) on tightly.
Remember to use only lubricants rec-ommended by FERRARI.
5.14
D
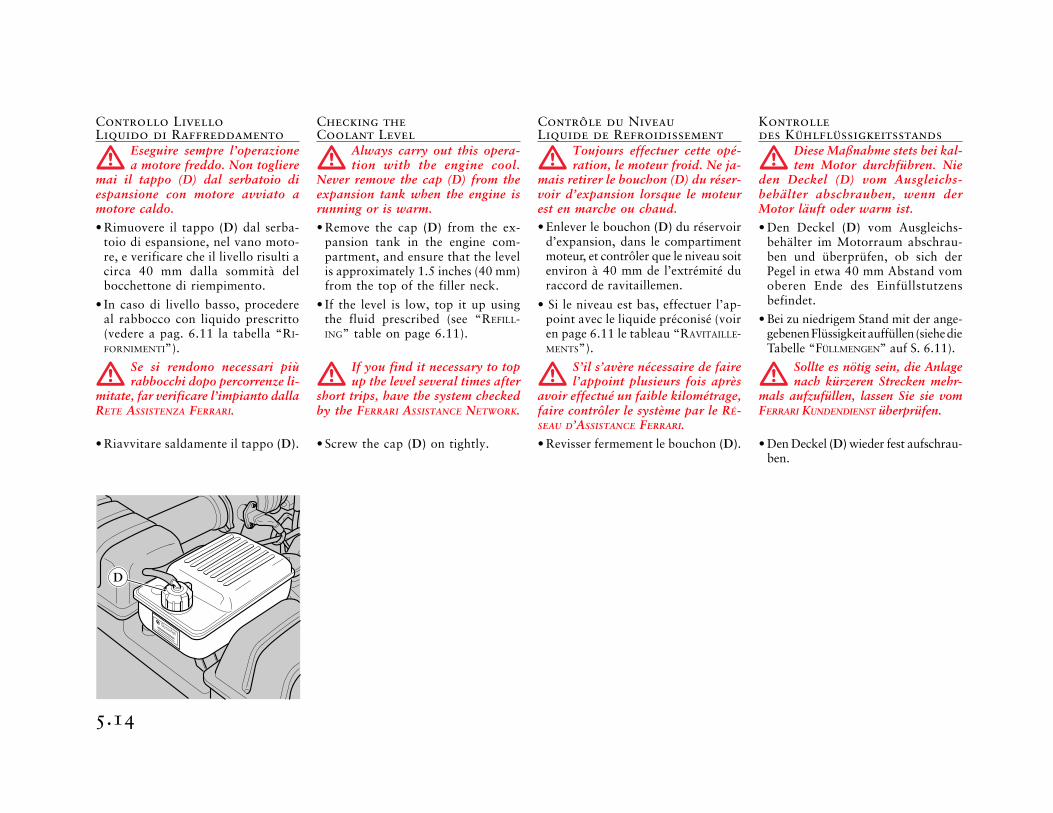
Controllo LivelloLiquido di Raffreddamento
Eseguire sempre l’operazionea motore freddo. Non togliere
mai il tappo (D) dal serbatoio diespansione con motore avviato amotore caldo.
• Rimuovere il tappo (D) dal serba-toio di espansione, nel vano moto-re, e verificare che il livello risulti acirca 40 mm dalla sommità delbocchettone di riempimento.
• In caso di livello basso, procedereal rabbocco con liquido prescritto(vedere a pag. 6.11 la tabella “RI-FORNIMENTI”).
Se si rendono necessari piùrabbocchi dopo percorrenze li-
mitate, far verificare l’impianto dallaRETE ASSISTENZA FERRARI.
• Riavvitare saldamente il tappo (D).
Checking theCoolant Level
Always carry out this opera-tion with the engine cool.
Never remove the cap (D) from theexpansion tank when the engine isrunning or is warm.
• Remove the cap (D) from the ex-pansion tank in the engine com-partment, and ensure that the levelis approximately 1.5 inches (40 mm)from the top of the filler neck.
• If the level is low, top it up usingthe fluid prescribed (see “REFILL-ING” table on page 6.11).
If you find it necessary to topup the level several times after
short trips, have the system checkedby the FERRARI ASSISTANCE NETWORK.
• Screw the cap (D) on tightly.
Contrôle du NiveauLiquide de Refroidissement
Toujours effectuer cette opé-ration, le moteur froid. Ne ja-
mais retirer le bouchon (D) du réser-voir d’expansion lorsque le moteurest en marche ou chaud.• Enlever le bouchon (D) du réservoir
d’expansion, dans le compartimentmoteur, et contrôler que le niveau soitenviron à 40 mm de l’extrémité duraccord de ravitaillemen.
• Si le niveau est bas, effectuer l’ap-point avec le liquide préconisé (voiren page 6.11 le tableau “RAVITAILLE-MENTS”).
S’il s’avère nécessaire de fairel’appoint plusieurs fois après
avoir effectué un faible kilométrage,faire contrôler le système par le RÉ-SEAU D’ASSISTANCE FERRARI.
• Revisser fermement le bouchon (D).
Kontrolledes Kühlflüssigkeitsstands
Diese Maßnahme stets bei kal-tem Motor durchführen. Nie
den Deckel (D) vom Ausgleichs-behälter abschrauben, wenn derMotor läuft oder warm ist.
• Den Deckel (D) vom Ausgleichs-behälter im Motorraum abschrau-ben und überprüfen, ob sich derPegel in etwa 40 mm Abstand vomoberen Ende des Einfüllstutzensbefindet.
• Bei zu niedrigem Stand mit der ange-gebenen Flüssigkeit auffüllen (siehe dieTabelle “FÜLLMENGEN” auf S. 6.11).
Sollte es nötig sein, die Anlagenach kürzeren Strecken mehr-
mals aufzufüllen, lassen Sie sie vomFERRARI KUNDENDIENST überprüfen.
• Den Deckel (D) wieder fest aufschrau-ben.
5.15
1
2
3
4
5
6
7
8
EF G
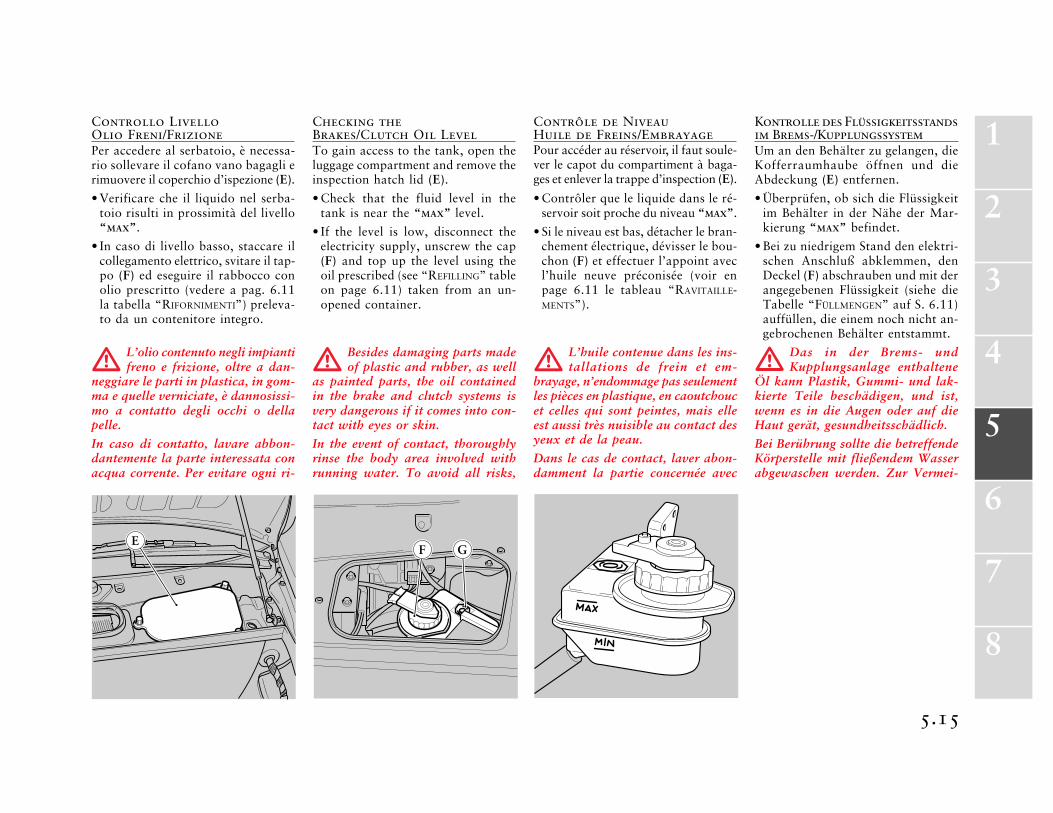
Controllo LivelloOlio Freni/FrizionePer accedere al serbatoio, è necessa-rio sollevare il cofano vano bagagli erimuovere il coperchio d’ispezione (E).
• Verificare che il liquido nel serba-toio risulti in prossimità del livello“MAX”.
• In caso di livello basso, staccare ilcollegamento elettrico, svitare il tap-po (F) ed eseguire il rabbocco conolio prescritto (vedere a pag. 6.11la tabella “RIFORNIMENTI”) preleva-to da un contenitore integro.
L’olio contenuto negli impiantifreno e frizione, oltre a dan-
neggiare le parti in plastica, in gom-ma e quelle verniciate, è dannosissi-mo a contatto degli occhi o dellapelle.
In caso di contatto, lavare abbon-dantemente la parte interessata conacqua corrente. Per evitare ogni ri-
Kontrolle des Flüssigkeitsstandsim Brems-/KupplungssystemUm an den Behälter zu gelangen, dieKofferraumhaube öffnen und dieAbdeckung (E) entfernen.
• Überprüfen, ob sich die Flüssigkeitim Behälter in der Nähe der Mar-kierung “MAX” befindet.
• Bei zu niedrigem Stand den elektri-schen Anschluß abklemmen, denDeckel (F) abschrauben und mit derangegebenen Flüssigkeit (siehe dieTabelle “FÜLLMENGEN” auf S. 6.11)auffüllen, die einem noch nicht an-gebrochenen Behälter entstammt.
Das in der Brems- undKupplungsanlage enthaltene
Öl kann Plastik, Gummi- und lak-kierte Teile beschädigen, und ist,wenn es in die Augen oder auf dieHaut gerät, gesundheitsschädlich.
Bei Berührung sollte die betreffendeKörperstelle mit fließendem Wasserabgewaschen werden. Zur Vermei-
Contrôle de NiveauHuile de Freins/EmbrayagePour accéder au réservoir, il faut soule-ver le capot du compartiment à baga-ges et enlever la trappe d’inspection (E).
• Contrôler que le liquide dans le ré-servoir soit proche du niveau “MAX”.
• Si le niveau est bas, détacher le bran-chement électrique, dévisser le bou-chon (F) et effectuer l’appoint avecl’huile neuve préconisée (voir enpage 6.11 le tableau “RAVITAILLE-MENTS”).
L’huile contenue dans les ins-tallations de frein et em-
brayage, n’endommage pas seulementles pièces en plastique, en caoutchoucet celles qui sont peintes, mais elleest aussi très nuisible au contact desyeux et de la peau.
Dans le cas de contact, laver abon-damment la partie concernée avec
Checking theBrakes/Clutch Oil LevelTo gain access to the tank, open theluggage compartment and remove theinspection hatch lid (E).
• Check that the fluid level in thetank is near the “MAX” level.
• If the level is low, disconnect theelectricity supply, unscrew the cap(F) and top up the level using theoil prescribed (see “REFILLING” tableon page 6.11) taken from an un-opened container.
Besides damaging parts madeof plastic and rubber, as well
as painted parts, the oil containedin the brake and clutch systems isvery dangerous if it comes into con-tact with eyes or skin.
In the event of contact, thoroughlyrinse the body area involved withrunning water. To avoid all risks,
5.16
schio, utilizzare sempre occhiali eguanti protettivi.
Tenere lontano dalla portata deibambini!
Mai disperdere fluido usato nell’am-biente!
Nelle vetture con cambio “F1” il ser-batoio alimenta solamente l’impian-to freni.
Il simbolo (G), posizionato sul ser-batoio indica la presenza nell’impian-to di liquido sintetico.
Usando liquidi di tipi mine-rale si danneggiano irrepara-
bilmente le guarnizioni in gommadell’impianto.
Per il rabbocco non utilizzare liqui-di diversi da quello contenuto nel-l’impianto.
• Eseguito il rabbocco, avvitare il tap-po (F) e ricollegare l’impianto elet-trico.
• Rimontare il coperchio d’ispezione(E).
always wear goggles and protectivegloves.
Keep out of reach of children!
Do not pollute the environment withused fluid!
In the cars with “F1” transmissionsthe tank only supplies the brake sys-tem.
The symbol (G), if found on the tank,indicates the presence of a syntheticfluid.
The use of mineral-based flu-ids will damage the system’s
rubber gaskets irreparably.
Do not use fluids differing from thatcontained in the system for topping-up.
• When the level has been topped up,screw the cap (F) on and reconnectthe electrical system.
• Replace the inspection hatch lid (E).
de l’eau courante. Afin d’éviter toutrisque, mettre toujours des lunetteset des gants protecteurs.
Tenir loin de la portée des enfants!
Ne jamais disperser le fluide dansl’environnement!
Sur les voitures équipées d’une boîtede vitesses “F1”, le réservoir n’ali-mente que le système de freins.
Le symbole (G), placé sur le réser-voir, indique qu’il y a du liquide syn-thétique dans le système.
L’utilisation de liquides detype minéral endommage ir-
rémédiablement les joints en caout-chouc du système.
Pour la remise à niveau, ne pas uti-liser d’autres liquides que celui quiest contenu dans l’installation.
• Une fois l’appoint effectué, revisserle bouchon (F) et rebrancher le sys-tème électrique.
• Refermer la trappe d’inspection (E).
dung von Risiken stets Schutzbrilleund -handschuhe tragen.
Von Kindern fernhalten!
Gebrauchte Hydraulikflüssigkeitumweltgerecht entsorgen!
Bei Fahrzeugen mit “F1”-Getriebeversorgt der Behälter nur die Brems-anlage.
Das auf dem Behälter befindliche Sym-bol (G) zeigt an, daß sich synthetischeFlüssigkeit in der Anlage befindet.
Durch die Verwendung von mi-neralischen Flüssigkeiten wer-
den die Gummidichtungen der An-lage zerstört.
Zum Auffüllen sind andere Flüssig-keiten als diejenige der Anlage nichtzu verwenden.
• Nach dem Auffüllen den Deckel (F)wieder aufschrauben und das abge-zogene Kabel wieder anschließen.
• Die Abdeckung (E) wieder anbrin-gen.
5.17
1
2
3
4
5
6
7
8
A
Batteria
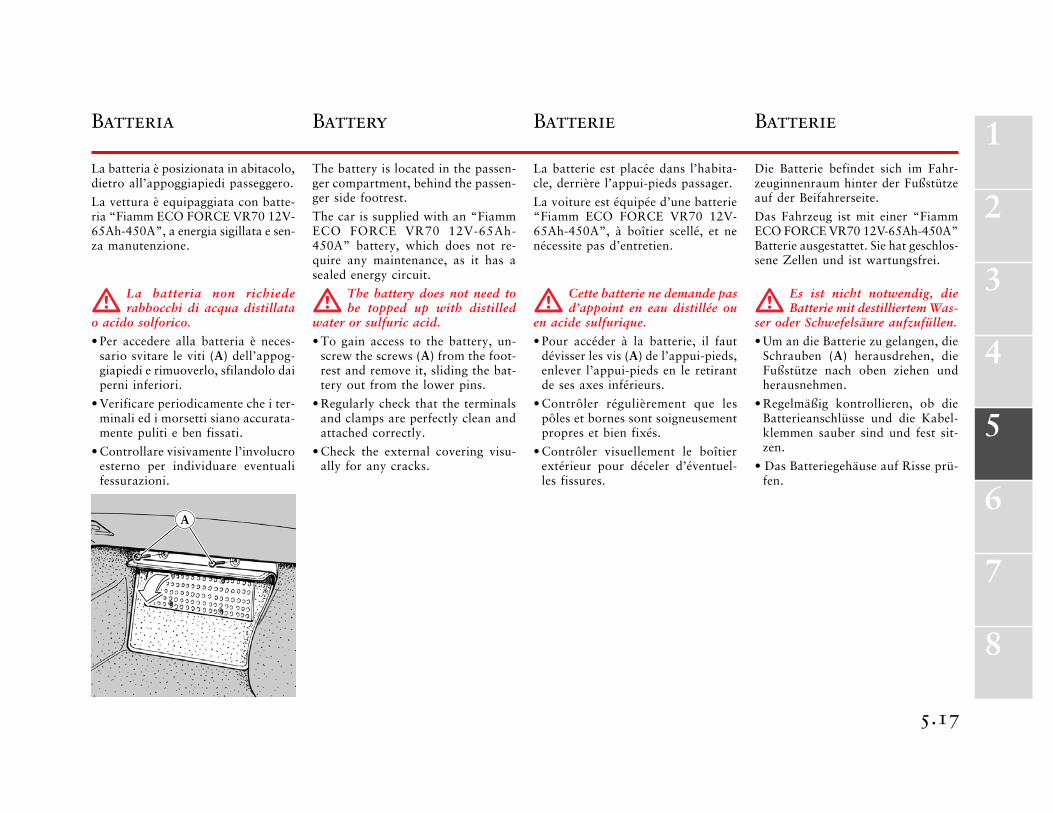
La batteria è posizionata in abitacolo,dietro all’appoggiapiedi passeggero.
La vettura è equipaggiata con batte-ria “Fiamm ECO FORCE VR70 12V-65Ah-450A”, a energia sigillata e sen-za manutenzione.
La batteria non richiederabbocchi di acqua distillata
o acido solforico.
• Per accedere alla batteria è neces-sario svitare le viti (A) dell’appog-giapiedi e rimuoverlo, sfilandolo daiperni inferiori.
• Verificare periodicamente che i ter-minali ed i morsetti siano accurata-mente puliti e ben fissati.
• Controllare visivamente l’involucroesterno per individuare eventualifessurazioni.
Batterie
Die Batterie befindet sich im Fahr-zeuginnenraum hinter der Fußstützeauf der Beifahrerseite.
Das Fahrzeug ist mit einer “FiammECO FORCE VR70 12V-65Ah-450A”Batterie ausgestattet. Sie hat geschlos-sene Zellen und ist wartungsfrei.
Es ist nicht notwendig, dieBatterie mit destilliertem Was-
ser oder Schwefelsäure aufzufüllen.
• Um an die Batterie zu gelangen, dieSchrauben (A) herausdrehen, dieFußstütze nach oben ziehen undherausnehmen.
• Regelmäßig kontrollieren, ob dieBatterieanschlüsse und die Kabel-klemmen sauber sind und fest sit-zen.
• Das Batteriegehäuse auf Risse prü-fen.
Batterie
La batterie est placée dans l’habita-cle, derrière l’appui-pieds passager.
La voiture est équipée d’une batterie“Fiamm ECO FORCE VR70 12V-65Ah-450A”, à boîtier scellé, et nenécessite pas d’entretien.
Cette batterie ne demande pasd’appoint en eau distillée ou
en acide sulfurique.
• Pour accéder à la batterie, il fautdévisser les vis (A) de l’appui-pieds,enlever l’appui-pieds en le retirantde ses axes inférieurs.
• Contrôler régulièrement que lespôles et bornes sont soigneusementpropres et bien fixés.
• Contrôler visuellement le boîtierextérieur pour déceler d’éventuel-les fissures.
Battery
The battery is located in the passen-ger compartment, behind the passen-ger side footrest.
The car is supplied with an “FiammECO FORCE VR70 12V-65Ah-450A” battery, which does not re-quire any maintenance, as it has asealed energy circuit.
The battery does not need tobe topped up with distilled
water or sulfuric acid.
• To gain access to the battery, un-screw the screws (A) from the foot-rest and remove it, sliding the bat-tery out from the lower pins.
• Regularly check that the terminalsand clamps are perfectly clean andattached correctly.
• Check the external covering visu-ally for any cracks.
5.18
C
B
ON
OFF
D
• Se la batteria funziona in sovracca-rica, si rovina rapidamente. Far con-trollare l’impianto elettrico del ve-icolo nel caso in cui la batteria siasoggetta a scaricarsi facilmente.
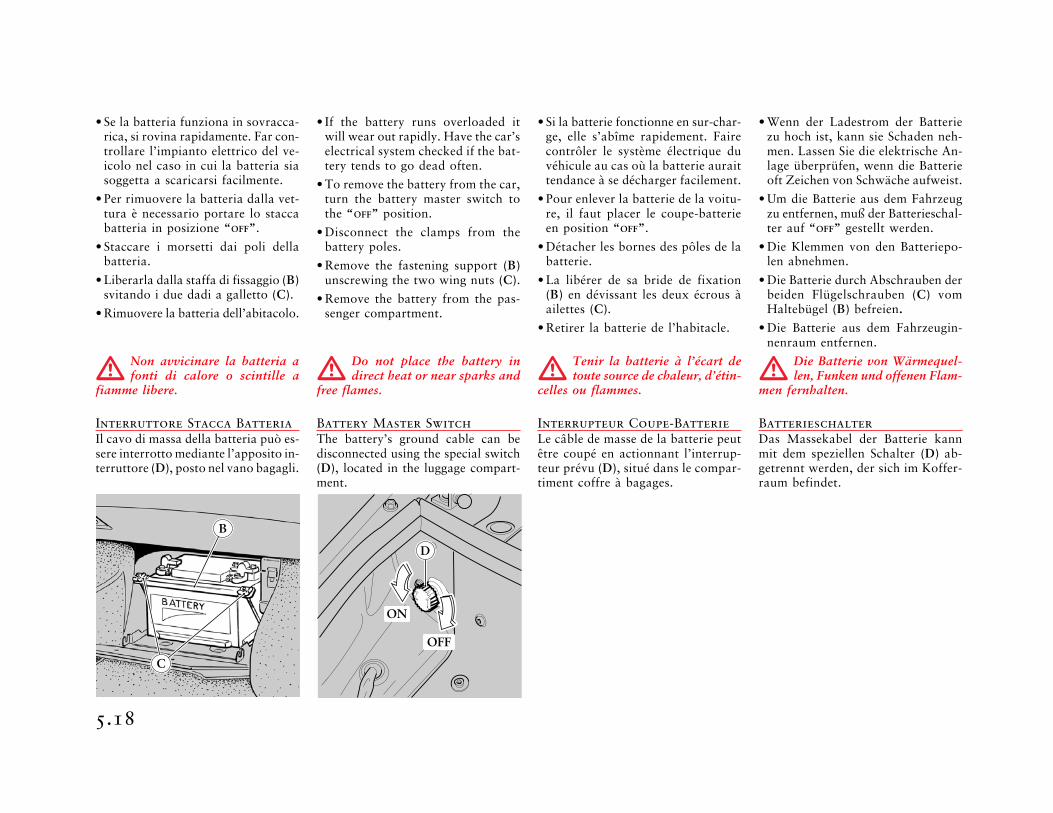
• Per rimuovere la batteria dalla vet-tura è necessario portare lo staccabatteria in posizione “OFF”.
• Staccare i morsetti dai poli dellabatteria.
• Liberarla dalla staffa di fissaggio (B)svitando i due dadi a galletto (C).
• Rimuovere la batteria dell’abitacolo.
Non avvicinare la batteria afonti di calore o scintille a
fiamme libere.
Interruttore Stacca BatteriaIl cavo di massa della batteria può es-sere interrotto mediante l’apposito in-terruttore (D), posto nel vano bagagli.
• If the battery runs overloaded itwill wear out rapidly. Have the car’selectrical system checked if the bat-tery tends to go dead often.
• To remove the battery from the car,turn the battery master switch tothe “OFF” position.
• Disconnect the clamps from thebattery poles.
• Remove the fastening support (B)unscrewing the two wing nuts (C).
• Remove the battery from the pas-senger compartment.
Do not place the battery indirect heat or near sparks and
free flames.
Battery Master SwitchThe battery’s ground cable can bedisconnected using the special switch(D), located in the luggage compart-ment.
• Si la batterie fonctionne en sur-char-ge, elle s’abîme rapidement. Fairecontrôler le système électrique duvéhicule au cas où la batterie auraittendance à se décharger facilement.
• Pour enlever la batterie de la voitu-re, il faut placer le coupe-batterieen position “OFF”.
• Détacher les bornes des pôles de labatterie.
• La libérer de sa bride de fixation(B) en dévissant les deux écrous àailettes (C).
• Retirer la batterie de l’habitacle.
Tenir la batterie à l’écart detoute source de chaleur, d’étin-
celles ou flammes.
Interrupteur Coupe-BatterieLe câble de masse de la batterie peutêtre coupé en actionnant l’interrup-teur prévu (D), situé dans le compar-timent coffre à bagages.
• Wenn der Ladestrom der Batteriezu hoch ist, kann sie Schaden neh-men. Lassen Sie die elektrische An-lage überprüfen, wenn die Batterieoft Zeichen von Schwäche aufweist.
• Um die Batterie aus dem Fahrzeugzu entfernen, muß der Batterieschal-ter auf “OFF” gestellt werden.
• Die Klemmen von den Batteriepo-len abnehmen.
• Die Batterie durch Abschrauben derbeiden Flügelschrauben (C) vomHaltebügel (B) befreien.
• Die Batterie aus dem Fahrzeugin-nenraum entfernen.
Die Batterie von Wärmequel-len, Funken und offenen Flam-
men fernhalten.
BatterieschalterDas Massekabel der Batterie kannmit dem speziellen Schalter (D) ab-getrennt werden, der sich im Koffer-raum befindet.
5.19
1
2
3
4
5
6
7
8
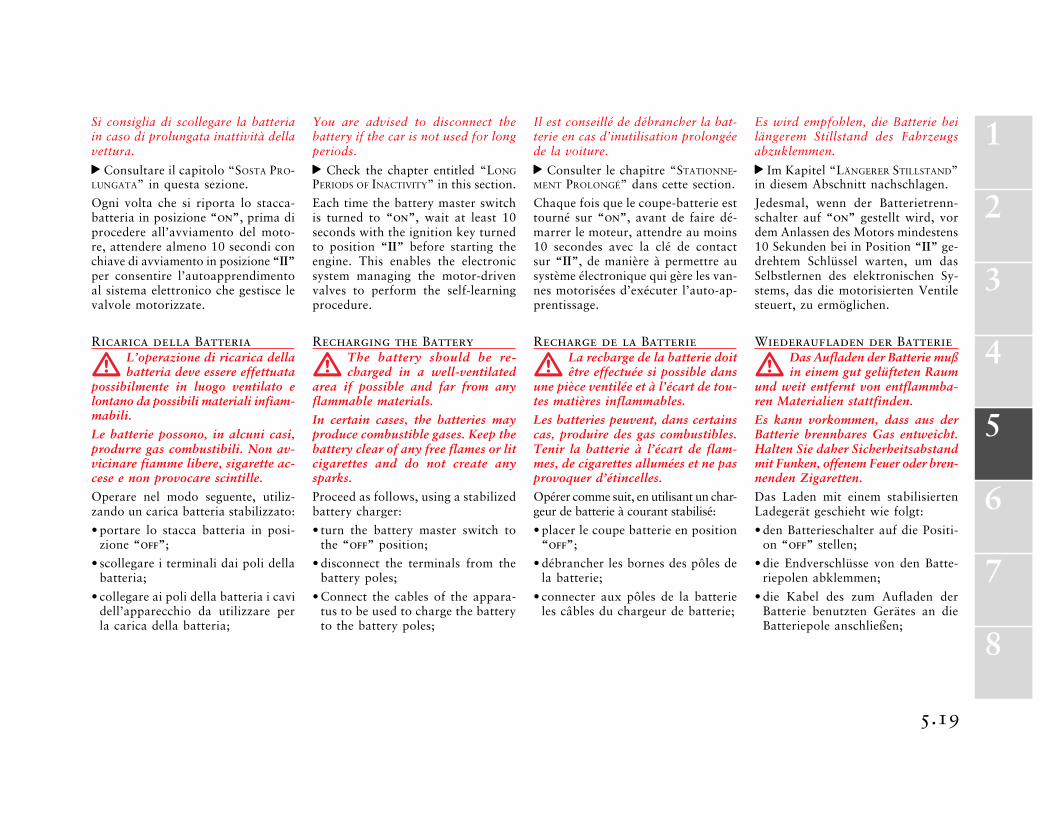
Si consiglia di scollegare la batteriain caso di prolungata inattività dellavettura.
Consultare il capitolo “SOSTA PRO-LUNGATA” in questa sezione.
Ogni volta che si riporta lo stacca-batteria in posizione “ON”, prima diprocedere all’avviamento del moto-re, attendere almeno 10 secondi conchiave di avviamento in posizione “II”per consentire l’autoapprendimentoal sistema elettronico che gestisce levalvole motorizzate.
You are advised to disconnect thebattery if the car is not used for longperiods.
Check the chapter entitled “LONG
PERIODS OF INACTIVITY” in this section.
Each time the battery master switchis turned to “ON”, wait at least 10seconds with the ignition key turnedto position “II” before starting theengine. This enables the electronicsystem managing the motor-drivenvalves to perform the self-learningprocedure.
Il est conseillé de débrancher la bat-terie en cas d’inutilisation prolongéede la voiture.
Consulter le chapitre “STATIONNE-MENT PROLONGÉ” dans cette section.
Chaque fois que le coupe-batterie esttourné sur “ON”, avant de faire dé-marrer le moteur, attendre au moins10 secondes avec la clé de contactsur “II”, de manière à permettre ausystème électronique qui gère les van-nes motorisées d’exécuter l’auto-ap-prentissage.
Es wird empfohlen, die Batterie beilängerem Stillstand des Fahrzeugsabzuklemmen.
Im Kapitel “LÄNGERER STILLSTAND”in diesem Abschnitt nachschlagen.
Jedesmal, wenn der Batterietrenn-schalter auf “ON” gestellt wird, vordem Anlassen des Motors mindestens10 Sekunden bei in Position “II” ge-drehtem Schlüssel warten, um dasSelbstlernen des elektronischen Sy-stems, das die motorisierten Ventilesteuert, zu ermöglichen.
Ricarica della BatteriaL’operazione di ricarica dellabatteria deve essere effettuata
possibilmente in luogo ventilato elontano da possibili materiali infiam-mabili.
Le batterie possono, in alcuni casi,produrre gas combustibili. Non av-vicinare fiamme libere, sigarette ac-cese e non provocare scintille.
Operare nel modo seguente, utiliz-zando un carica batteria stabilizzato:
• portare lo stacca batteria in posi-zione “OFF”;
• scollegare i terminali dai poli dellabatteria;
• collegare ai poli della batteria i cavidell’apparecchio da utilizzare perla carica della batteria;
Recharging the BatteryThe battery should be re-charged in a well-ventilated
area if possible and far from anyflammable materials.
In certain cases, the batteries mayproduce combustible gases. Keep thebattery clear of any free flames or litcigarettes and do not create anysparks.
Proceed as follows, using a stabilizedbattery charger:
• turn the battery master switch tothe “OFF” position;
• disconnect the terminals from thebattery poles;
• Connect the cables of the appara-tus to be used to charge the batteryto the battery poles;
Recharge de la BatterieLa recharge de la batterie doitêtre effectuée si possible dans
une pièce ventilée et à l’écart de tou-tes matières inflammables.
Les batteries peuvent, dans certainscas, produire des gas combustibles.Tenir la batterie à l’écart de flam-mes, de cigarettes allumées et ne pasprovoquer d’étincelles.
Opérer comme suit, en utilisant un char-geur de batterie à courant stabilisé:
• placer le coupe batterie en position“OFF”;
• débrancher les bornes des pôles dela batterie;
• connecter aux pôles de la batterieles câbles du chargeur de batterie;
Wiederaufladen der BatterieDas Aufladen der Batterie mußin einem gut gelüfteten Raum
und weit entfernt von entflammba-ren Materialien stattfinden.
Es kann vorkommen, dass aus derBatterie brennbares Gas entweicht.Halten Sie daher Sicherheitsabstandmit Funken, offenem Feuer oder bren-nenden Zigaretten.
Das Laden mit einem stabilisiertenLadegerät geschieht wie folgt:
• den Batterieschalter auf die Positi-on “OFF” stellen;
• die Endverschlüsse von den Batte-riepolen abklemmen;
• die Kabel des zum Aufladen derBatterie benutzten Gerätes an dieBatteriepole anschließen;
5.20
• nach Beendigung des Ladevorgangsdie Kabel der Elektroanlage wiederan die Batteriepole anschließen, dieSchrauben der Klemmen gut befe-stigen und den Batterieschalter aufdie Position “ON” stellen.
Keine Vorrichtungen an denZigarrenanzünder anschließen.
Vorrichtung fürBatterieladegerät (Optional)Auf Anfrage wird im Fahrzeug einSteckverbinder installiert, an den einBatterieladegerät angeschlossen wer-den kann, das die Beibehaltung desLadezustandes und die Notladung derBatterie ermöglicht.
Für den Einsatz der Vorrichtungsiehe “BETRIEBSANLEITUNG, PROGRAMM
CARROZZERIA SCAGLIETTI” und die demKIT beigelegten Anweisungen.
• la charge de la batterie terminée,rebrancher les câbles du circuit élec-trique aux pôles de la batterie, enserrant fermement les vis des bor-nes et placer le coupe batterie enposition “ON”.
Ne pas utiliser de dispositifs àbrancher sur l’allume-cigares.
Arrangement pour Chargeurde Batterie (en option)Sur demande, le véhicule peut êtredoté d’un connecteur spécial pour leraccordement à un chargeur de bat-terie, qui permet de maintenir lacharge et d’effectuer la charge de se-cours de la batterie.
Pour ce qui est du mode d’emploisur l’utilisation du dispositif, voir“MANUEL D’UTILISATION, PROGRAMME
CARROZZERIA SCAGLIETTI” et les ins-tructions jointes au KIT.
• When the charging procedure iscompleted, reconnect the electricalsystem cables to the battery poles,tightening the clamp screws firmly,and turn the battery master switchto the “ON” position.
Do not use devices to be con-nected to the cigar-lighter.
Arrangement forBattery-Charger (optional)Upon demand, the car can beequipped with a suitable connectorto attach a battery-charger, in orderto keep the battery charged and torecharge it in case of emergency.
For further instructions on the useof the device, see the “OWNER’S
MANUAL, CARROZZERIA SCAGLIETTI
PROGRAMME” and the instructionsenclosed with the KIT.
• terminata la fase di carica ricolle-gare i cavi dell’impianto elettrico aipoli della batteria, serrando salda-mente le viti dei morsetti e portarelo stacca batteria in posizione “ON”.
Non utilizzare dispositivi dacollegare all’accendisigari.
Predisposizione perCaricabatteria (optional)A richiesta la vettura è equipaggiatacon un apposito connettore per il col-legamento di un caricabatteria chepermette il mantenimento dello statodi carica e la carica di emergenzadella batteria.
Per le istruzioni sull’utilizzo deldispositivo vedi “MANUALE D’USO,PROGRAMMA CARROZZERIA SCAGLIETTI”e le istruzioni allegate al KIT.
5.21
1
2
3
4
5
6
7
8B
A
Tergicristallo
Per evitare di danneggiare le spazzo-le evitare l’utilizzo in caso di:
• parabrezza asciutto;
• spazzole incollate al parabrezza pertemperatura sotto zero;
• accenno di neve sul parabrezza esui bracci;
• incrostazioni sul cristallo parabrez-za.
Periodicamente è necessario proce-dere alla pulizia delle spazzole e ve-rificarne lo stato di usura.
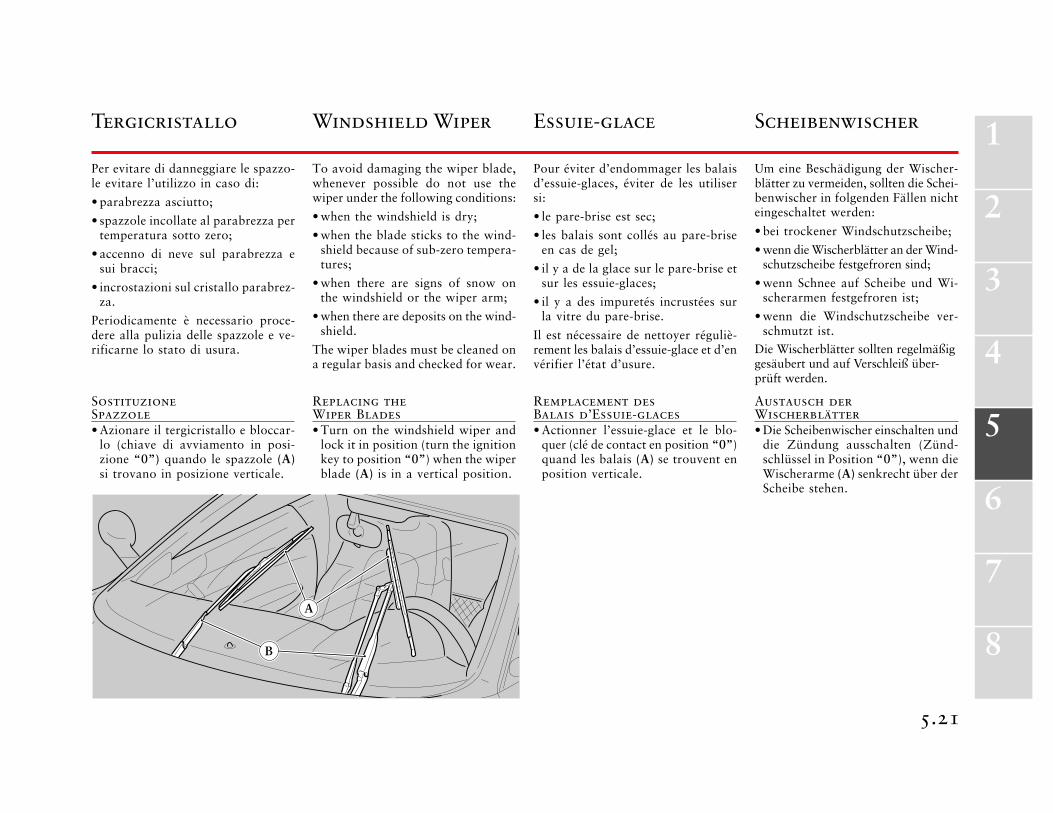
SostituzioneSpazzole• Azionare il tergicristallo e bloccar-
lo (chiave di avviamento in posi-zione “0”) quando le spazzole (A)si trovano in posizione verticale.
Windshield Wiper
To avoid damaging the wiper blade,whenever possible do not use thewiper under the following conditions:
• when the windshield is dry;
• when the blade sticks to the wind-shield because of sub-zero tempera-tures;
• when there are signs of snow onthe windshield or the wiper arm;
• when there are deposits on the wind-shield.
The wiper blades must be cleaned ona regular basis and checked for wear.
Replacing theWiper Blades• Turn on the windshield wiper and
lock it in position (turn the ignitionkey to position “0”) when the wiperblade (A) is in a vertical position.
Essuie-glace
Pour éviter d’endommager les balaisd’essuie-glaces, éviter de les utilisersi:
• le pare-brise est sec;
• les balais sont collés au pare-briseen cas de gel;
• il y a de la glace sur le pare-brise etsur les essuie-glaces;
• il y a des impuretés incrustées surla vitre du pare-brise.
Il est nécessaire de nettoyer réguliè-rement les balais d’essuie-glace et d’envérifier l’état d’usure.
Remplacement desBalais d’Essuie-glaces• Actionner l’essuie-glace et le blo-
quer (clé de contact en position “0”)quand les balais (A) se trouvent enposition verticale.
Scheibenwischer
Um eine Beschädigung der Wischer-blätter zu vermeiden, sollten die Schei-benwischer in folgenden Fällen nichteingeschaltet werden:
• bei trockener Windschutzscheibe;
• wenn die Wischerblätter an der Wind-schutzscheibe festgefroren sind;
• wenn Schnee auf Scheibe und Wi-scherarmen festgefroren ist;
• wenn die Windschutzscheibe ver-schmutzt ist.
Die Wischerblätter sollten regelmäßiggesäubert und auf Verschleiß über-prüft werden.
Austausch derWischerblätter• Die Scheibenwischer einschalten und
die Zündung ausschalten (Zünd-schlüssel in Position “0”), wenn dieWischerarme (A) senkrecht über derScheibe stehen.
5.22
C
• Sollevare il braccio (B), sfilare laspazzola e sostituirla verificando cherisulti correttamente bloccata sulbraccio.
Non alzare mai i bracci del tergicri-stallo dalla posizione di riposo.
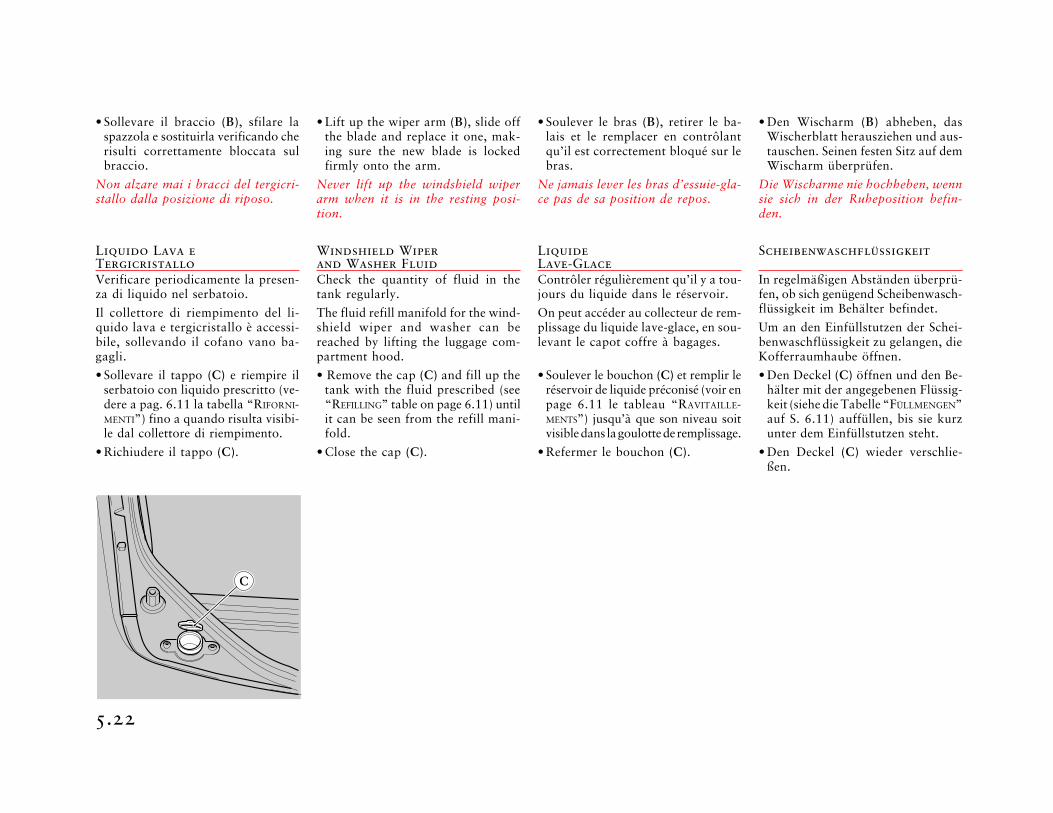
Liquido Lava eTergicristalloVerificare periodicamente la presen-za di liquido nel serbatoio.
Il collettore di riempimento del li-quido lava e tergicristallo è accessi-bile, sollevando il cofano vano ba-gagli.
• Sollevare il tappo (C) e riempire ilserbatoio con liquido prescritto (ve-dere a pag. 6.11 la tabella “RIFORNI-MENTI”) fino a quando risulta visibi-le dal collettore di riempimento.
• Richiudere il tappo (C).
• Lift up the wiper arm (B), slide offthe blade and replace it one, mak-ing sure the new blade is lockedfirmly onto the arm.
Never lift up the windshield wiperarm when it is in the resting posi-tion.
Windshield Wiperand Washer FluidCheck the quantity of fluid in thetank regularly.
The fluid refill manifold for the wind-shield wiper and washer can bereached by lifting the luggage com-partment hood.
• Remove the cap (C) and fill up thetank with the fluid prescribed (see“REFILLING” table on page 6.11) untilit can be seen from the refill mani-fold.
• Close the cap (C).
• Soulever le bras (B), retirer le ba-lais et le remplacer en contrôlantqu’il est correctement bloqué sur lebras.
Ne jamais lever les bras d’essuie-gla-ce pas de sa position de repos.
LiquideLave-GlaceContrôler régulièrement qu’il y a tou-jours du liquide dans le réservoir.
On peut accéder au collecteur de rem-plissage du liquide lave-glace, en sou-levant le capot coffre à bagages.
• Soulever le bouchon (C) et remplir leréservoir de liquide préconisé (voir enpage 6.11 le tableau “RAVITAILLE-MENTS”) jusqu’à que son niveau soitvisible dans la goulotte de remplissage.
• Refermer le bouchon (C).
• Den Wischarm (B) abheben, dasWischerblatt herausziehen und aus-tauschen. Seinen festen Sitz auf demWischarm überprüfen.
Die Wischarme nie hochheben, wennsie sich in der Ruheposition befin-den.
Scheibenwaschflüssigkeit
In regelmäßigen Abständen überprü-fen, ob sich genügend Scheibenwasch-flüssigkeit im Behälter befindet.
Um an den Einfüllstutzen der Schei-benwaschflüssigkeit zu gelangen, dieKofferraumhaube öffnen.
• Den Deckel (C) öffnen und den Be-hälter mit der angegebenen Flüssig-keit (siehe die Tabelle “FÜLLMENGEN”auf S. 6.11) auffüllen, bis sie kurzunter dem Einfüllstutzen steht.
• Den Deckel (C) wieder verschlie-ßen.
5.23
1
2
3
4
5
6
7
8
Ruote ePneumaticiPer conferire la massima resaprestazionale e chilometrica e per-mettere il migliore assestamento delpneumatico sul cerchio, è importan-te, durante i primi 200÷300 km diutilizzo di pneumatici nuovi, attenersialle seguenti raccomandazioni:
• evitare accelerazioni violente;
• evitare brusche frenate e sterzate;
• procedere a velocità moderata siain rettilineo che in curva.
Räderund ReifenUm optimale Fahreigenschaften undein einwandfreies Setzen der Reifenauf den Felgen zu erzielen, solltenSie während der ersten 200÷300 kmfolgende Empfehlungen beachten:
• nicht extrem beschleunigen;
• nicht scharf bremsen oder abrupteinlenken;
• bei Geraden bzw. Kurven immermit mäßigem Tempo fahren.
Roues etPneumatiquesPour tirer le meilleur rendement despneumatiques, du point de vue desperformances aussi bien que du kilo-métrage, et pour permettre l’adapta-tion optimale du pneumatique sur lajante, il est important, pendant les200÷300 premiers kilomètres avec despneumatiques neufs, de respecter lesrecommandations suivantes:
• éviter toute accélération brusque;
• éviter tout freinages et braquagebrusques;
• rouler à une moyenne vitesse, tantsur les rectilignes que dans les vira-ges.
Wheelsand TiresTo guarantee the tyres’ top perfor-mance and a maximum life-span, aswell as to allow the tyre settle on therim, it is important to comply withthe following instructions, when newtyres are used for the first 120-190miles (200÷300 km):
• avoid sudden acceleration;
• avoid sudden braking or steering;
• drive at moderate speed both onstraight roads as well as on curves.
Gebrauchsanweisungfür die ReifenVon grundlegender Bedeutung für dieFahrsicherheit ist ein einwandfreierZustand der Reifen.
Der Reifenluftdruck muß den vorge-schriebenen Werten entsprechen. Ersoll bei kalten Reifen eingestellt wer-den: Der Reifendruck erhöht sich,wenn sich die Reifen erwärmen.
Den Reifendruck nicht verringern,wenn die Reifen warm sind.
Ein zu niedriger Reifendruck erhöhtden Verschleiß und zieht möglicher-weise irreparable Schäden am Auf-bau des Reifens nach sich.
Instructions pourl’Utilisation des PneumatiquesPour une conduite sure, il est pri-mordial de toujours maintenir lespneumatiques en bon état.
Les pressions de gonflage des pneu-matiques doivent respecter les valeursprescrites et ne doivent être contrô-lées que lorsque les pneumatiques sontfroids: la pression en effet augmenteà mesure que la température du pneu-matique augmente.
Ne jamais réduire la pression de gon-flage si les pneumatiques sont chauds.
Une pression de gonflage insuffisanteprovoque un réchauffement excessif dupneumatique et peut endommager irré-médiablement les parois internes et dé-truire par conséquent le pneumatique.
Instructionsfor Tire UseIt is of primary importance for safedriving that the tires be kept perma-nently in good condition.
Tire inflation pressure must corre-spond with the prescribed values andit must be checked only when thetires are cool. In fact, the pressureincreases in direct relation to tire tem-perature.
Never decrease the tire inflation pres-sure when the tires are warm.
Insufficient pressure can lead to thetires overheating, with a risk of ir-reparable internal damage and a con-sequent wearing-down of the tires.
Istruzioni perl’Uso dei PneumaticiPer una guida sicura è di primaria im-portanza che i pneumatici siano mante-nuti costantemente in buone condizioni.
Le pressioni di gonfiaggio dei pneu-matici devono corrispondere ai valo-ri prescritti e devono essere verifica-te solamente quando i pneumaticisono freddi: la pressione, infatti, au-menta con il progressivo aumento ditemperatura del pneumatico.Non ridurre mai la pressione digonfiaggio se i pneumatici sono caldi.Una pressione di gonfiaggio insuffi-ciente è all’origine di un eccessivoriscaldamento del pneumatico conpossibilità di danneggiamenti interniirreparabili e conseguenze distrutti-ve sul pneumatico.

5.24
Urti violenti contro marciapiedi, bu-che stradali e ostacoli di varia natu-ra, così come marcia prolungata sustrade dissestate possono essere cau-sa di lesioni a volte non riscontrabilivisivamente nei pneumatici.
Verificare regolarmente se i pneuma-tici presentano segni di lesioni (es.abrasioni, tagli, screpolature,rigonfiamenti, ecc.).
Corpi estranei penetrati nel pneuma-tico possono aver causato lesionistrutturali che possono essere dia-gnosticate solo smontando il pneu-matico.
In tutti i casi le lesioni devono essereesaminate da un esperto in quantoesse possono limitare seriamente lavita di un pneumatico.
Il pneumatico invecchia anche se usatopoco o non usato mai.
Screpolature nella gomma del batti-strada e dei fianchi, a volte accom-pagnate da rigonfiamenti sono unsegnale di invecchiamento.
Fare accertare da uno specialista laidoneità all’impiego per i pneumaticiinvecchiati. Pneumatici che sonomontati su di un veicolo da oltre 3anni devono comunque essere con-trollati da uno specialista.
Non impiegare mai pneumatici usatidi provenienza dubbia.
Sudden impact with pavements, holesin the road and other obstacles ofvarious nature, as well as use forlong periods on rough roads my causedamage to the tires that is not al-ways visible to the naked eye.
Check the tires for damage regularly(e.g. abrasion, cuts, cracks, swellings,etc.).
Foreign bodies that penetrate the tire’ssurface can also cause structural dam-age, which can only be found by re-moving the tire.
In any case, any type of damage mustbe checked by skilled personnel as itmay markedly reduce the life of thetire.
Tires will age even if used rarely ornever at all.
Cracks in the rubber of the treadand the sides of the tire, sometimesaccompanied by swellings, are signsof aging.
Get assurance from a specialist con-cerning the suitability of any agedtires. Tires that have been mountedon a vehicle for more than 3 yearsmust also be checked by a specialist.
Never use second-hand tires the ori-gin of which is uncertain.
Des chocs violents contre des trot-toirs, des trous sur la route et autresobstacles, de même qu’un usage pro-longé sur route déformée peuventcauser des lésions du pneumatiqueparfois invisibles à l’oeil nu.
Contrôler régulièrement que les pneu-matiques ne présentent pas de signesde lésions (ex.: éraflures, coupures,fissures, gonflements, etc…).
Des corps étrangers présents dans lepneumatique peuvent avoir provo-qué des lésions dans la structure dupneumatique. Ces lésions ne peuventêtre diagnostiquées qu’en démontantle pneumatique.
Dans tous les cas, les lésions doiventêtre examinées par un expert car el-les peuvent limiter sérieusement ladurée de vie du pneumatique.
Le pneumatique vieillit même si onl’utilise peu ou jamais.
Des fissures dans le caoutchouc de labande de roulement et des flancs,parfois accompagnées de gonflements,sont un signe de vieillissement.
Faire contrôler par un expert le bonétat de marche des pneumatiquesusagés. Des pneumatiques montésdepuis plus de 3 ans sur un véhiculedoivent en tout état de cause êtrecontrôlés par un expert.
Ne jamais employer de pneumatiquesdont l’origine n’est pas sûre.
Überfahren von Randsteinen, scharf-kantigen Schlaglöchern oder auf derStraße liegenden Gegenständen kannzu Reifenschäden führen, die sich demAugenschein entziehen.
Die Reifen regelmäßig auf Anzeichenvon Schäden überprüfen (z.B. Abrieb,Schnitte, Risse, Wülste u.ä.).
Gegenstände, die in den Gummi ein-dringen, können auch Schäden amReifenunterbau (Gürtel, Karkasse)verursachen. Solche Defekte lassensich nur nach Demontage des Reifensfeststellen.
In jedem dieser Fälle müssen die Schä-den von einem Fachmann überprüftwerden, da hierdurch die Lebensdauereines Reifens erheblich eingeschränktwerden kann.
Der Reifen altert auch, wenn er nurwenig oder gar nicht benutzt wird.
Risse im Gummi der Lauffläche undder Flanken sowie Ausbeulungen sindAlterungsanzeichen.
Gealterte Reifen von einem Fachmannauf ihre Fahrtauglichkeit überprüfenlassen. Reifen, die seit mehr als 3Jahren auf einem Fahrzeug montiertsind, müssen in jedem Fall von ei-nem Fachmann überprüft werden.
Keine gebrauchten Reifen zweifelhaf-ter Herkunft verwenden.
5.25
1
2
3
4
5
6
7
8
I pneumatici sono di tipo“unidirezionale” e riportano
sul fianco una freccia che indica ilsenso di rotolamento. Per mantenerele prestazioni ottimali è necessario, incaso di sostituzione, che il senso dirotolamento corrisponda a quello in-dicato dalla freccia.
Sostituire sempre i pneumatici incoppia sullo stesso asse.
Controllare regolarmente la profon-dità degli incavi del battistrada (va-lore minimo consentito mm 1,7). Mi-nore è la profondità degli incavi,maggiore è il rischio di slittamento.
Guidare con cautela su stradebagnate diminuisce i rischi di
“aquaplaning”.
EquilibraturaLe ruote complete di pneumatici,debbono essere equilibrate presso laRETE ASSISTENZA FERRARI o da perso-nale specializzato.
Si raccomanda di usare unicamentepesi autoadesivi.
Istruzioni per l’applicazionePer una corretta applicazione deicontrappesi procedere nel modo se-guente:
• pulire accuratamente con eptano laparte del cerchio su cui andrà ap-plicato il contrappeso.
• Togliere la carta protettiva e fissa-re il peso sul cerchio esercitandouna pressione uniforme al fine diottenere una perfetta adesione.
Die verwendeten Reifen sindlaufrichtungsgebunden. Auf
der Flanke befindet sich ein Pfeil,der die Rotationsrichtung angibt. Umgleichmäßige, optimale Leistungenzu erhalten, muß bei einem Austauschdes Reifens die Rotationsrichtung dervon dem Pfeil angegebenen Richtungentsprechen.Die Reifen immer paarweise auf der-selben Achse austauschen.Regelmäßig die Profiltiefe der Lauf-fläche überprüfen (Mindestprofiltiefe1,7 mm). Je geringer die Tiefe derProfilrillen, desto größer ist dieRutschgefahr.
Eine vorsichtige Fahrweise auf nas-sen Straßen verringert die Gefahr
des Aufschwimmens (Aquaplaning).
AuswuchtenDie Räder mit den Reifen müssen beieinem FERRARI KUNDENDIENST oder vonFachpersonal ausgewuchtet werden.
Es wird empfohlen, nur selbstkleben-de Gewichte zu verwenden.
BenutzungshinweiseFür den korrekten Gebrauch derGegengewichte in folgender Weisevorgehen:
• Den Teil der Felge, auf dem dasGegengewicht angebracht wird,gründlich mit Heptan reinigen.
• Das Schutzpapier entfernen und dasGewicht mit gleichmäßigem Druckauf der Felge befestigen, so daß esperfekt aufliegt.
Les pneumatiques sont de type“unidirectionnel” et ont mar-
qué une flèche sur un côté, qui indi-que le sens de roulement. En cas deremplacement, pour garder lesmeilleures prestations, le sens de rou-lement doit correspondre à celui quiest indiqué par la flèche.Remplacer toujours les deux pneu-matiques sur le même essieu.
Contrôler régulièrement la profon-deur des sculptures de la bande deroulement (valeur minimale tolérée1,7 mm). Plus la profondeur des sculp-tures du pneumatique diminue, plusle risque de patinage est important.
Conduire avec prudence surroutes mouillées diminue les
risques d’“aquaplaning”.
EquilibrageL’équilibrage des roues et des pneu-matiques doit être effectué par leRÉSEAU D’ASSISTANCE FERRARI ou parun personnel compétent.
Il est recommandé de n’utiliser quedes poids auto-adhésifs.
Instructions pour l’applicationPour appliquer correctement des con-trepoids, procéder comme suit:
• nettoyer soigneusement avec del’heptane la partie de jante où seraappliqué le contrepoids.
• Enlever le papier protecteur et fixerle poids sur la jante en exerçantune pression uniforme afin d’obte-nir une adhérence parfaite.
Tyres are “one-way” and theyhave an arrow on the side to
indicate the rotation direction. Incase of replacement, maximum per-formance levels can only be reachedif the rotation corresponds with thedirection indicated by the arrow.Tyres on the same axle must be re-placed in pairs.
Check the tread groove depth regu-larly (minimum acceptable depth:1,067 of an inch (1,7 mm)). The shal-lower the groove is, the higher therisk of skidding is.
Careful driving on wet roadsreduces the risk of “aquaplan-
ing”.
BalancingThe wheels and the tires must bebalanced at the FERRARI ASSISTANCE
NETWORK or by skilled personnel.
You are advised to use only self-ad-hesive weights.
Application instructionsTo apply the counterweights correctly,proceed in the following manner:
• Carefully clean the part of the tirerim where the counterweight willbe attached using heptane.
• Remove the protective paper andattach the weight to the hubcap,applying a uniform pressure to en-sure perfect adhesion.
5.26
Puliziadella VetturaPulizia EsternaPer la buona conservazione della vet-tura nel tempo è di estrema importan-za la cura da parte del Proprietario.
Forniamo un elenco delle principaliprecauzioni da seguire:
• Evitare che alcune parti della vet-tura rimangano bagnate o piene disporco stradale per lunghi periodi:in particolare il pavimento internoabitacolo e bagagliaio deve essereconservato pulito ed asciutto; i foridi scarico sotto alle portiere devo-no essere mantenuti aperti per la-sciar defluire l’acqua.
• Il sottoscocca e le superfici inferio-ri della vettura devono essere pe-riodicamente puliti, intensificandola frequenza della pulizia (almeno1 volta alla settimana) quando si èin presenza di strade con sale o conmolto sporco. E’ importante che illavaggio sia completo e a fondo: unlavaggio tale da bagnare solo il fangoincrostato senza asportarlo comple-tamente può essere dannoso.
• La vettura deve essere lavata perio-dicamente con mezzi adeguati. Perla pulizia sia della vernice che dellesuperfici inferiori non usare acquamolto calda o vapore.
Cleaningthe CarCleaning the ExteriorFor long-term paint preservation,proper care by the owner is of ut-most importance.
The list below concerns the mainprecautions to be followed:
• areas of the car that should not beleft wet or dirty for too long. Inparticular, the passenger compart-ment floor and the luggage com-partment should always be cleanand dry. The drain holes under thedoors should remain open, allow-ing water to escape.
• The underbody and the car lowersurfaces should be cleaned regularly.The intervals should be shorter (atleast once a week) if the car is drivenon salty or very dirty roads. Thecar should be washed completelyand carefully. If caked mud onlygets wet and is not removed, thesurface may rust.
• The car must be washed regularlywith suitable means. Never use hotwater or steam to clean the body-work and lower surfaces.
Nettoyagede la VoitureNettoyage ExtérieurPour un bon entretien de la voiture,le soin apporté par le Propriétaireest très important.
On trouvera ci-dessous une liste desprécautions principales à prendre:
• Eviter de laisser certaines partiesde la voiture mouillés ou sales pourlongtemps: en particulier, le plan-cher intérieur de l’habitacle et lecoffre doivent être gardés propreset secs; les orifices d’écoulement sousles portes doivent être toujours li-bres pour permettre le passage del’eau.
• Le dessous de la carrosserie et lessurfaces inférieures de la voituredoivent être nettoyées régulièrement.Le nettoyage doit être effectué plussouvent (au moins 1 fois par semai-ne) si la voiture est utilisée sur desroutes très sales ou en présence desel. Le nettoyage doit être completet profond: pour ne pas causer desdommages, il ne suffit pas simple-ment de mouiller la boue crotté, ilfaut l’enlever complètement.
• La voiture doit être lavée périodi-quement, avec des moyens adéquats.Pour un nettoyage de la peinture etdes parties inférieures ne pas se ser-vir d’eau tres chaude ni de vapeur.
Reinigungdes FahrzeugsAußenreinigungDie Pflege des Fahrzeuges ist für sei-nen Zustand entscheidend.
Nachstehend geben wir Ihnen einigeEmpfehlungen, welche befolgt wer-den sollten:
• Man sollte dafür sorgen, daß keinBereich des Wagens während län-gerer Zeit naß oder verschmutztbleibt. Besonders der Boden imFahrgastraum sowie der Kofferraumsollten immer sauber und trockengehalten werden. Die Öffnungen amunteren Rand der Türen solltenimmer frei gehalten werden, damitdas Wasser abfließen kann.
• Besonders der Unterboden und dieunteren Teile der Karosserie solltenregelmäßig gereinigt werden. Diessollte umso öfter geschehen, wennder Wagen auf gesalzten oderschmutzigen Straßen gefahren wird(mindestens einmal pro Woche).Waschen Sie das Auto am bestensorgfältig von oben bis unten. Nas-ser Schmutz kann ernste Korrosionan Metallteilen hervorrufen.
• Das Fahrzeug sollte mit geeignetenReinigungsmitteln gewaschen wer-den. Zur Reinigung der lackiertenFlächen und des Unterbodens aufkeinen Fall heißes Wasser oderDampf verwenden.
5.27
1
2
3
4
5
6
7
8
E’ consigliabile far rammollire losporco e rimuoverlo successivamentecon un getto d’acqua a temperatu-ra ambiente.
• Evitare di lavare la vettura al sole oquando la carrozzeria e ancora cal-da;
• fare attenzione che il getto dell’ac-qua non colpisca violentemente lavernice;
• lavare con spugna e soluzione diacqua e shampoo neutro;
• sciacquare nuovamente con gettoacqua ed asciugare con pelle di dai-no.
A lavaggio eseguito, prima diriprendere la normale marcia
esercitare una leggera pressione sulpedale del freno a velocità modera-ta affinché i dischi e pastiglie ab-biano a pulirsi.
Per conservare la brillantezza dellavernice ripassarla una o due volteall’anno con appositi polish consi-gliati dalla FERRARI.
• Le zone che presentassero frattureo scoperture causate da sassi, graf-fiature, danni di parcheggio, etc.,devono essere immediatamente trat-tate presso un CENTRO AUTORIZZA-TO FERRARI.
• Evitare di parcheggiare la vetturaper lunghi periodi in ambienti umi-di e non aerati.
It is advisable to soften the incrus-tations with lukewarm water andto remove them subsequently usinga jet of water at a room tempera-ture.
• avoid washing the car in the sun orwhen the bodywork is still warm;
• do not allow the jet of water to hitthe paintwork too violently;
• wash the car with a sponge and asolution of water and neutral sham-poo;
• rinse the car with the water jet againand dry it with a piece of chamoisleather.
Once the car has been washedand before driving it normally
again, apply a little pressure to thebrake pedal at a moderate speed toallow the brake disks and pads toclean.
To maintain the shine of thepaintwork, polish it once or twice ayear with the product recommendedby the FERRARI ASSISTANCE NETWORK.
• Parts broken or damaged by stones,scratches, or during parking ma-neuvers etc. must be immediatelyrepaired at an AUTHORIZED FERRARI
SERVICE CENTER.
• Do not park the car for long peri-ods in damp and unventilated ar-eas.
Il est conseillé d’humidifier les zo-nes sales et de les nettoyer ensuiteau jet d’eau à température ambian-te.
• Eviter de laver la voiture au soleil oulorsque la carrosserie est encore chau-de;
• veiller à ce que le jet d’eau ne soitpas trop fort pour ne pas endomma-ger la peinture;
• laver la voiture avec une éponge, unesolution d’eau et de shampoing neu-tre;
• rincer de nouveau au jet d’eau et sécherà l’aide d’une peau de chamois.
Le lavage terminé, avant dereprendre la marche normale,
effectuer une légère pression sur lapédale de frein à vitesse réduite afind’éliminer les impuretés éventuellesdes disques et des plaquettes de freins.
Pour conserver l’aspect brillant, pas-ser sur la carrosserie les produitspolissants spéciaux conseillés parFERRARI une à deux fois par an.
• Les parties éraflées, rayées, dété-riorées par des pierres ou lors ma-noeuvres de stationnement etc…,doivent être immédiatement traitéespar un CENTRE AGREE FERRARI.
• Eviter de garer la voiture pour long-temps dans des endroits humides etpeu aérés.
Wir empfehlen, den Schmutz mitlauwarmem Wasser einzuweichenund mit einem scharfen Wasserstrahlabzuwaschen.
• Das Fahrzeug nicht in der Sonnewaschen oder wenn die Karosserienoch warm ist;
• darauf achten, daß der Wasserstrahlnicht auf die Lackierung aufprallt;
• mit einem Schwamm und einerMischung aus Wasser und einemneutralen Shampoo waschen;
• mit einem Wasserstrahl abspülenund mit einem Wildledertuch ab-trocknen.
Nach dem Waschen sollten Siezunächst mit mäßigem Tempo
fahren. Mit sanftem Druck auf dasBremspedal geben Sie Bremsscheibenund -belägen Gelegenheit zum Trock-nen und zum Abstreifen von Schmutz.
Um den Glanz der Lackierung zu er-halten, die Oberfläche ein- bis zwei-mal pro Jahr mit dem von FERRARI
empfohlenen Poliermittel behandeln.
• Teile, die durch Steine, Risse oderbeim Parken beschädigt wurden,müssen schnellstens durch einenFERRARI-KUNDENDIENST repariertwerden.
• Den Wagen nicht lange Zeit in ei-ner feuchten Garage oder in einemgeschlossenen Raum abstellen.
5.28
Pulizia Interna -Pulizia e Curadella Selleria in Pelle
Informazioni generali
Un adeguato trattamento periodico,almeno 3-4 volte l’anno, consente dimantenere inalterata nel tempo laqualità, le caratteristiche naturali ela morbidezza della selleria in pelledi una vettura FERRARI.
A questo scopo sono anche disponibiliprodotti specifici per la manutenzionedella pelle (“Cleaner” e “Cream”),messi a punto e testati dalla FERRARI.
Tali prodotti possono essere ordina-ti attraverso il SERVIZIO RICAMBI
FERRARI, sia singolarmente sia comeparte della trousse “CARE KIT” cheinclude la gamma completa dei pro-dotti di pulizia per la vettura.
Per le istruzioni sull’utilizzo deiprodotti “CARE KIT” vedi “MANUA-LE D’USO, PROGRAMMA CARROZZERIA
SCAGLIETTI” e le istruzioni allegate alKIT.
Prodotti assolutamente da evitare,nella pulizia della pelle, sono i deter-genti acidi, trementina, smacchiatoriliquidi, benzina, solventi, prodotti dipulizia domestici, in quanto danneg-giano il materiale naturale.
Cleaning the Interior -Cleaning and Care ofthe Leather Upholstery
General information
Treating the leather upholstery ofyour FERRARI with a suitable productat least 3-4 times a year, will ensurethat the original quality, natural fea-tures and softness of the leather aremaintained over time.
With this in mind, FERRARI has devel-oped approved and put on the mar-ket specific products for the mainte-nance of the leather (“Cleaner” e“Cream”).
Such products can be obtained throughthe FERRARI SPARES SERVICE either indi-vidually or as part of the “CARE KIT”set, which includes the entire range ofcar cleaning products.
See the “OWNER’S MANUAL,CARROZZERIA SCAGLIETTI PROGRAMME”along with the instructions containedin the KIT for the use of the “CAREKIT” products.
Products to be avoided at all costswhen cleaning the leather are acidicdetergents, turpentine, stain remov-ers, fluids, petrol, solvents, domesticcleaning products, as these all dam-age the natural material.
Nettoyage intérieur - Net-toyage et Entretiende la Sellerie en Cuir
Informations générales
Un traitement adapté régulier, 3 à 4fois par an, permet de garantir à lalongue la qualité, les caractéristiquesnaturelles et la souplesse de la selle-rie en cuir d’une voiture FERRARI.
Dans ce but, des produits spécifiques(“Cleaner” et “Cream”), mis au pointet testés par FERRARI, sont aussi dis-ponibles pour l’entretien du cuir.
Ces produits peuvent être comman-dés au SERVICE DE PIÈCES DE RECHANGE
FERRARI, séparément ou faisant par-tie d’une trousse “CARE KIT” com-prenant la gamme complète des pro-duits d’entretien de la voiture.
Pour les instructions d’utilisationdes produits “CARE KIT”, voir le“MANUEL D’UTILISATION, PROGRAMME
CARROZZERIA SCAGLIETTI” et les ins-tructions jointes au KIT.
Les produits détergents agressifs, latérébenthine, les détachants liquides,l’essence, les solvants, les produitsde nettoyage ménagers, sont absolu-ment à éviter car ils endommageraientle cuir naturel.
Innenreinigung -Pflege und Reinigungder Lederverkleidung
Allgemeine Informationen
Durch eine angemessene regelmäßi-ge Behandlung, d.h. mindestens 3-4mal pro Jahr, bewahrt die Lederver-kleidung eines FERRARI-Fahrzeugsdauerhaft ihre natürlichen Eigenschaf-ten, ihre Qualität und Weichheit.
Zu diesem Zweck sind auch einigeSpezialprodukte für die Lederpflege(“Cleaner” und “Cream”) erhältlich,die von FERRARI getestet wurden.
Diese Produkte können über den ER-SATZTEILDIENST FERRARI bestellt wer-den, entweder einzeln oder als Teildes “CARE KIT” , das die vollstän-dige Palette der Pflegeprodukte fürdas Fahrzeug umfaßt.
Für den Einsatz der Produkte“CARE KIT” siehe die “BEDIENUNGS-ANLEITUNG, PROGRAMM CARROZZERIA
SCAGLIETTI” und die mit dem KITgelieferten Anweisungen.
Bei der Reinigung des Leders sind un-ter allen Umständen säurehaltige Rei-nigungsmittel, Terpentin, flüssige Fleck-entferner, Benzin, Lösungsmittel undHaushaltsreiniger zu vermeiden, da siedas Naturmaterial beschädigen.

5.29
1
2
3
4
5
6
7
8
SostaProlungataIn caso di lunga inattività della vet-tura, è consigliabile prendere alcuneprecauzioni:
• sistemare possibilmente la vetturasu una superficie piana in un localecoperto e arieggiato;
• bloccare la vettura inserendo unamarcia, evitando l’utilizzo del fre-no di stazionamento;
• portare la pressione dei pneumatici a3.0 bar e variare periodicamente ilpunto di appoggio con il suolo;
• scollegare la batteria dall’impiantoportando l’interruttore stacca batte-ria su “OFF” come indicato nel capi-tolo “BATTERIA” in questa sezione;
Nel caso in cui non si voglia scollega-re la batteria per mantenere in funzio-ne alcuni servizi quali: memorizzazionecanali autoradio, antifurto, ecc., èindispensabile provvedere alla ricari-ca della batteria almeno ogni mese.
Nel caso in cui si tenga la vetturaferma per un periodo di tempo pro-lungato con la batteria scollegata, ènecessario provvedere alla ricaricadella batteria almeno ogni tre mesi.
• Proteggere la vettura con un telo intessuto traspirante evitando materia-li che impediscano l’evaporazionedell’umidità presente sulla scocca;
Prima di riutilizzare la vettura, dopolunghi periodi di inattività, accertar-si della corretta pressione dei pneu-matici e verificare il livello di tutti iliquidi degli impianti.
Long Periodsof InactivityIf the car remains unused for longperiods of time, it is advisable totake certain precautions:
• place it on a level surface, in a cov-ered or ventilated area;
• lock the car in position by engag-ing a gear and avoid using the park-ing brake;
• bring the tyre pressure to 3,0 barand periodically alter their restingpoint on the ground.
• disconnect the battery from the sys-tem by turning the battery masterswitch to the “OFF” position, as in-dicated in the chapter headed “BAT-TERY”, in this section;
If you do not wish to disconnect thebattery to keep certain devices func-tioning, such as: the radio stationmemorization, the car alarm system,etc., it is essential to recharge thebattery at least once a month.
If the car is not used for long periodswith the battery disconnected, it isnecessary to recharge the battery onceevery three months.
• Protect the car with a fabric coverwhich allows transpiration, avoid-ing materials which prevent the hu-midity on the bodywork from evapo-rating;
Before using the car again after along period of inactivity, ensure thatthe tire pressure is correct and checkthe level of all the system fluids.
StationnementProlongéEn cas d’inutilisation prolongée dela voiture, il est conseillé de prendrequelques précautions:
• installer si possible la voiture surune surface plane dans un localprotégé et ventilé;
• bloquer la voiture en introduisantune vitesse, en évitant d’utiliser lefrein de stationnement.
• amener la pression des pneumatiquesà 3,0 bar et changer périodiquementle point d’appui sur le sol;
• débrancher la batterie du système enplaçant l’interrupteur coupe batteriesur “OFF”, comme indiqué dans lechapitre “BATTERIE” de cette section;
Au cas où on ne voudrait pas dé-brancher la batterie pour mainteniren état de marche certains services(mémorisation des stations radio,antivol, etc…), il est indispensablede recharger la batterie au moins tousles mois.
En cas d’inutilisation prolongée dela voiture, avec batterie débranchée,il est nécessaire de la recharger aumoins tous les trois mois.
• protéger la voiture d’un housse en tis-sus perméable en évitant tous maté-riels qui empêcheraient l’évaporationde l’humidité présente sur la coque;
Avant de réutiliser la voiture, aprèsune inutilisation prolongée, s’assu-rer que la pression des pneumatiquesest correcte et contrôler le niveau detous les liquides des circuits.
LängererStillstandBei längerem Stillstand des Fahrzeugssollten einige Vorsichtsmaßnahmengetroffen werden:• das Fahrzeug möglichst auf einer
ebenen Fläche in einem überdach-ten und belüfteten Raum abstellen;
• das Fahrzeug durch Einlegen einesGangs blockieren, nicht die Hand-bremse benutzen;
• Den Reifendruck auf 3.0 bar bringenund den Latschpunkt periodisch ändern;
• die Batterie von der Anlage abklem-men, indem der Batterieschalter auf“OFF” gestellt wird, wie bereits im Ka-pitel “BATTERIE” dieses Abschnitts an-gegeben;
Falls die Batterie nicht abgeklemmtwerden soll, um einige Funktionen wieSpeicher Autoradiokanäle, Diebstahl-sicherungssystem usw. aufrechtzuer-halten, muß die Batterie mindestenseinmal im Monat aufgeladen werden.
Sollte das Fahrzeug längere Zeit nichtbenutzt werden, und ist die Batterienicht mehr angeschlossen, muß siemindestens alle drei Monate aufgela-den werden.
• Das Fahrzeug mit einer Abdeckungaus luftdurchlässigem Materialschützen. Materialien, welche dieAusdünstung von auf der Karosse-rie vorhandener Feuchtigkeit ver-hindern, sind zu vermeiden.
Vor Benutzung des Fahrzeugs nachlängerem Stillstand den Reifendruckund den Pegel sämtlicher Flüssigkei-ten der Anlagen überprüfen.