Embed Size (px)
Citation preview
8/8/2019 Mapping of the Sword
http://slidepdf.com/reader/full/mapping-of-the-sword 1/18
Mapping of the Sword
We will begin this section by texturing the sword. Before we launch into making the UV co-ordinates though it imaterials we are going apply are made up.
For example here will have a single texture sheet but various other metal materials will be applied
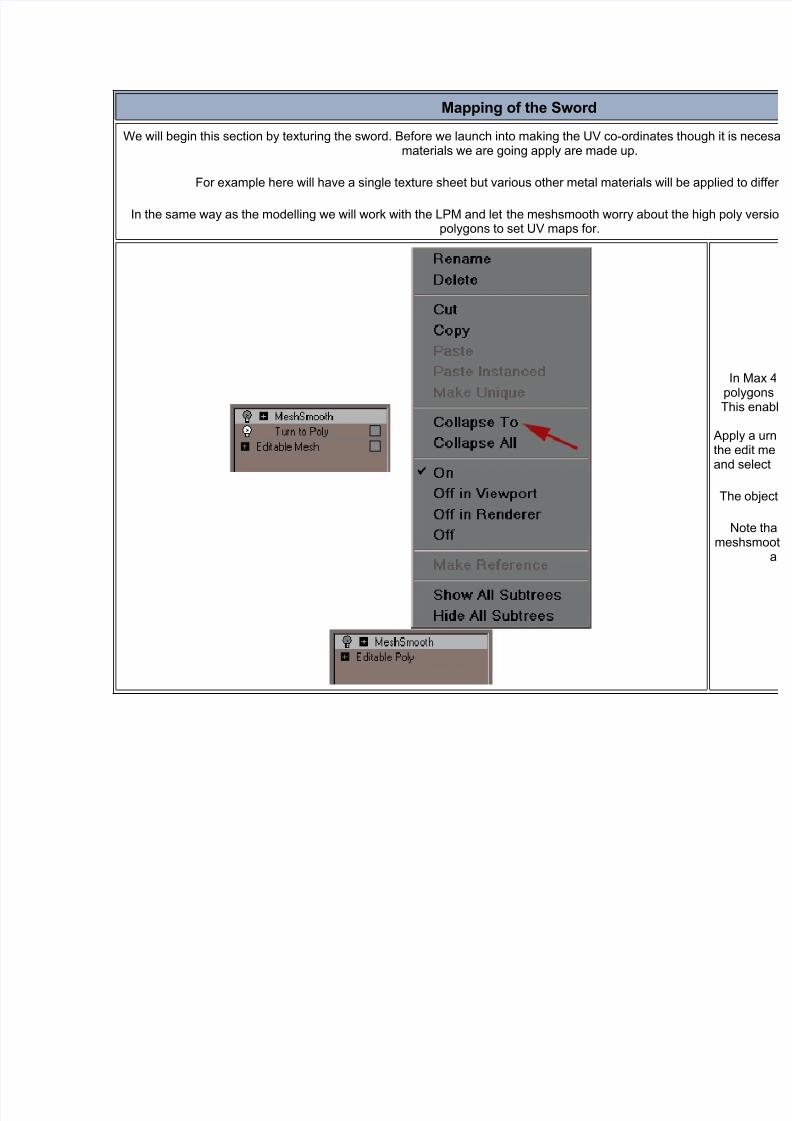
In the same way as the modelling we will work with the LPM and let the meshsmooth worry about the high popolygons to set UV maps for.
pTh
Aptheand
Th
me

8/8/2019 Mapping of the Sword
http://slidepdf.com/reader/full/mapping-of-the-sword 2/18
We will assign a separate material ID for each different part of the sword where a separate material willbe used
Click on the image to see it large.

8/8/2019 Mapping of the Sword
http://slidepdf.com/reader/full/mapping-of-the-sword 3/18
Cr
Thof
d
On
FS
To assign this material to the sword, select when done and drag and drop the material slot on the object.
It may be that some faces of the object have a ID material different from 1, in this case, to clean the ID,select all model in Element mode, enter value 1 in material ID (Surface Properties roll out).

8/8/2019 Mapping of the Sword
http://slidepdf.com/reader/full/mapping-of-the-sword 4/18
All the faces have now the ID 1
Cre
Th
TU
copc
T
in
Th
(do

8/8/2019 Mapping of the Sword
http://slidepdf.com/reader/full/mapping-of-the-sword 5/18
Alf
cFa
Fsq
He
In the stack, right click on the UVW Map, and select Collapse To to simplify it.
Thus helps with memory speedMeshsmooth remains on top and one does not lose the adjustments on Creases or Weights.
Return to Editable Poly in Polygon mode, benefit from the still active selection to hide the faces alreadytextured with Hide.
By making this operation after each UVW Map, it becomes increasingly simple to select the not yettextured faces.

8/8/2019 Mapping of the Sword
http://slidepdf.com/reader/full/mapping-of-the-sword 6/18
In
Ss
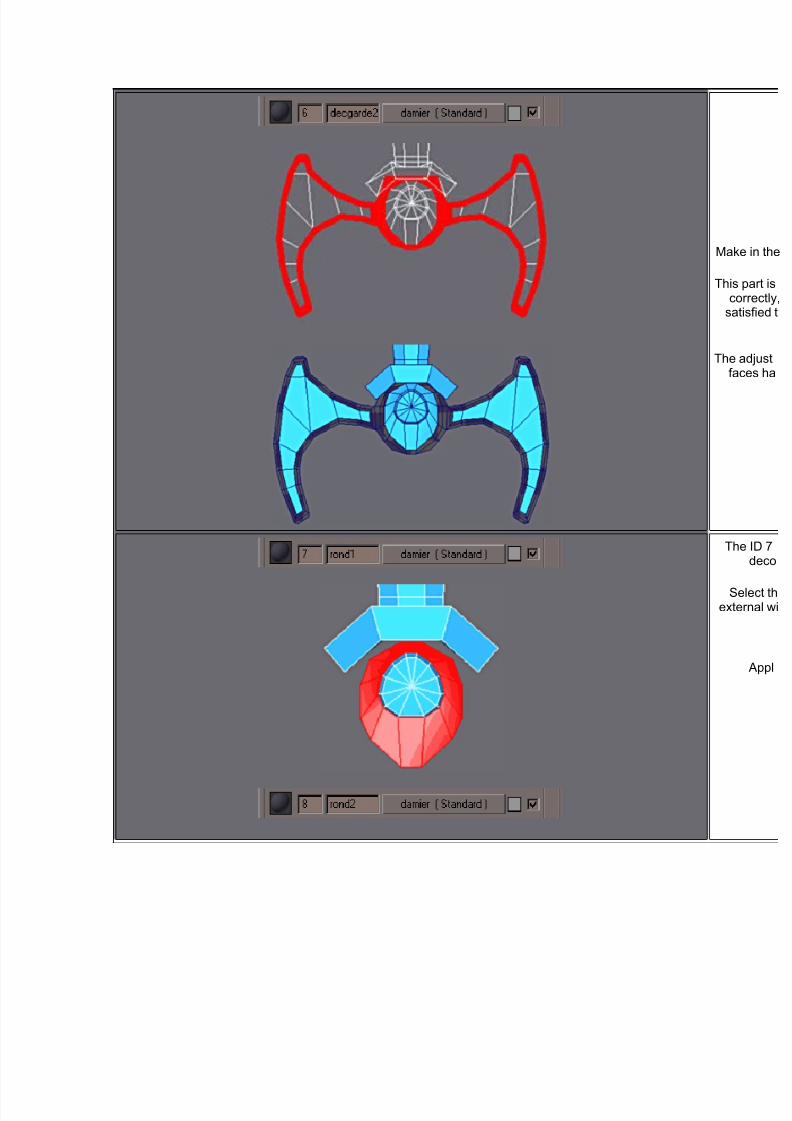
As previously, apply to these faces a planar UVW Map, then enter the same values in Width and Length to hav

8/8/2019 Mapping of the Sword
http://slidepdf.com/reader/full/mapping-of-the-sword 7/18

8/8/2019 Mapping of the Sword
http://slidepdf.com/reader/full/mapping-of-the-sword 8/18
Note that one you can temporarily suspend the effect of a modifier while clicking on the icon bulb next toit.
Crefac
Al
8/8/2019 Mapping of the Sword
http://slidepdf.com/reader/full/mapping-of-the-sword 9/18
Ma
Thc
s
Thef
T
ex

8/8/2019 Mapping of the Sword
http://slidepdf.com/reader/full/mapping-of-the-sword 10/18
F
Wito
sea
Sa

8/8/2019 Mapping of the Sword
http://slidepdf.com/reader/full/mapping-of-the-sword 11/18
A
alw
F
Mapping of the Sword
In the preceding page we used several Material ID's to quickly map all separate sections.

8/8/2019 Mapping of the Sword
http://slidepdf.com/reader/full/mapping-of-the-sword 12/18
We will now finalize the UV's of all the faces while re-examine each checker pattern in Unwrap
Click on Editable Poly ensure that no faces areselected.
Apply Unwrap UVW and continue in 'Select Face'mode.
Open edit UVW.Select the ID 3 Checker.
Using Unwrap Options Show Selected Vertices in
Viewport.
On this ID certain faces have UV's that arestretched because of the planar map for the face of
the preceding page.
Select the faces on top of the blade as shown andapply a
Planar Map.
Rotate and move the mapping Gizmo so that ittakes its orientation from the average normals of
the selected faces.
8/8/2019 Mapping of the Sword
http://slidepdf.com/reader/full/mapping-of-the-sword 13/18
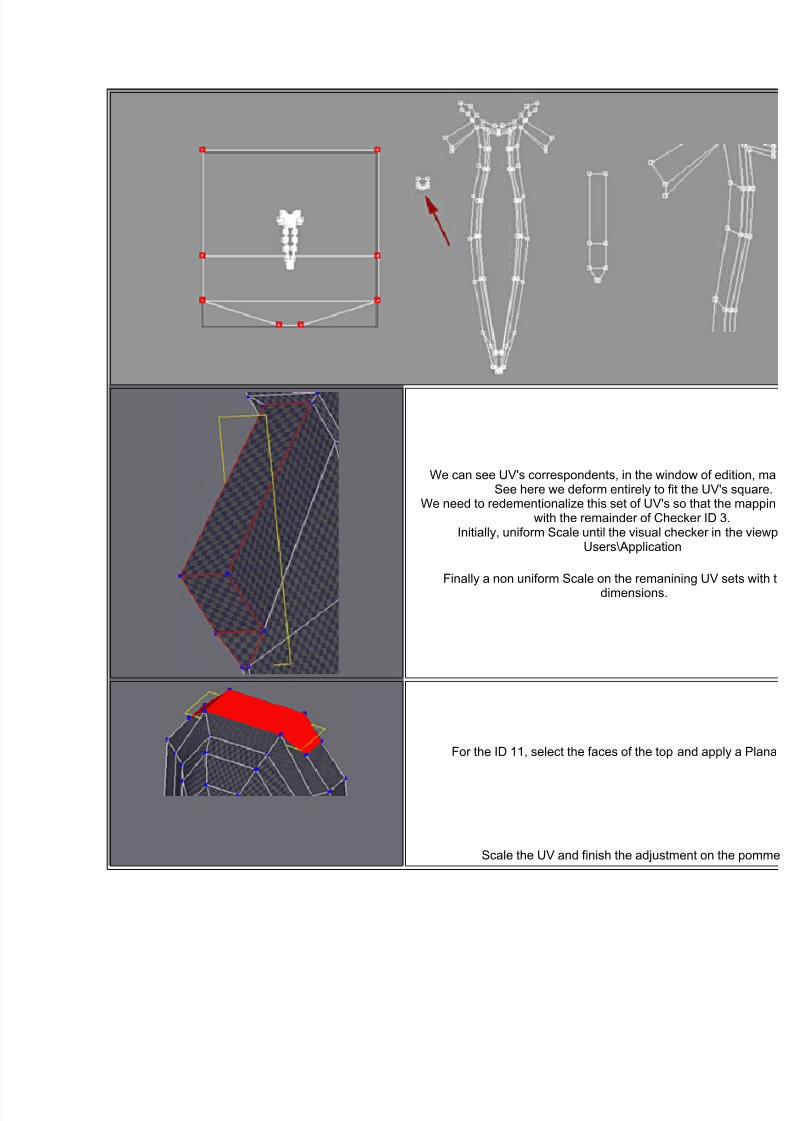
We can see UV's correspondents, in the window of ediSee here we deform entirely to fit the UV's
We need to redementionalize this set of UV's so that thewith the remainder of Checker ID 3.
Initially, uniform Scale until the visual checker in thUsers\Application
Finally a non uniform Scale on the remanining UV sedimensions.
For the ID 11, select the faces of the top and apply
Scale the UV and finish the adjustment on the

8/8/2019 Mapping of the Sword
http://slidepdf.com/reader/full/mapping-of-the-sword 14/18
Mapping of the Sword
Now that all UV are correctly adjusted it is necessary to prepare the final texture.
Select All IDs.With all the ID sets at the same scale. We need to rearrange them so that they
lay flat.

8/8/2019 Mapping of the Sword
http://slidepdf.com/reader/full/mapping-of-the-sword 15/18
With Expand Selection start se
the various sets.At this stage we arange the ot
right of the Blade.
If we leave things like that, allhave no problems but we was
space on the board.
We will split the Blade into two sets of UV and thus will be able to increase its definition on final texture.Select the points top and click on the Break Selected Vertices icon.
Then move the selected points.All the points of the selection are no longer welded anymore, for the remainder it is enough to Weld Selected w
corresponding icon (regulate the threshold with 0.001 in Unwrap Options).
3DTotal Advertisement - We need your support!

8/8/2019 Mapping of the Sword
http://slidepdf.com/reader/full/mapping-of-the-sword 16/18
Then arrange the remaining Ulike a little puzzle.
Note that certain sets of UVincreased the definition on the
They correspond to the parts
sword which need it most like dparts etc.
That also make it possible to uspace available on the bo

8/8/2019 Mapping of the Sword
http://slidepdf.com/reader/full/mapping-of-the-sword 17/18
Now we need to generate a bimage of UV with Texport
Here texture we make is 102
pixels.
I colored the edges in Materialfor locating the ID on the b

8/8/2019 Mapping of the Sword
http://slidepdf.com/reader/full/mapping-of-the-sword 18/18