Embed Size (px)
Citation preview
Mark WalkerAutomotive Portfolio 2016

Mark WalkerWriter/Photo Journalist
As company founder and Managing Director, Mark ran The Bus Station (2002–2013) and Vintage Werks (2006–2007), companies heavily immersed in the VW scene, importing classic Volkswagens from around the world, carrying out sympathetic restoration work and gaining an international reputation for out of the box thinking, high quality suspension modifications and turning out magazine feature-worthy cars.
Under Mark’s control, The Bus Station was responsible for the introduction to the UK and Europe of several suspension modifications and products which were, at the time, unavailable.
Having closed The Bus Station in 2013, Mark continues to write for specialist VW magazines including Volksworld, Volksworld Camper & Bus and, formerly, VW Camper and Commercial magazine.
Mark’s main area of expertise is within the ‘How to’ technical features, where he imparts his honest knowledge, including tricks of the trade from 11 years’ modifying and repairing Volkswagens on a professional basis, and vehicle feature writing, where Mark’s vast knowledge of the marque is evident.
Being an advocate of lifelong personal growth and self improvement, Mark has, more recently, begun writing and blogging in this area and also runs the blog www.theauthenticguy.com where he provides his own slant on men’s issues relating to dating, relationships and personal growth.
Mark also now writes about his travel and road trip experiences in Volksworld magazine and is currently developing a second blog — www.barefootdriver.com, to document this area.
07949 003326 [email protected] @barefootdriver
Get in touch for more information or additional writing samples
Mark has been a monthly contributor
to IPC Media/Time Inc. since 2012, writing 60+ features over
four years.

Swedish RoadtripFirst published
VolksWorld magazine2016
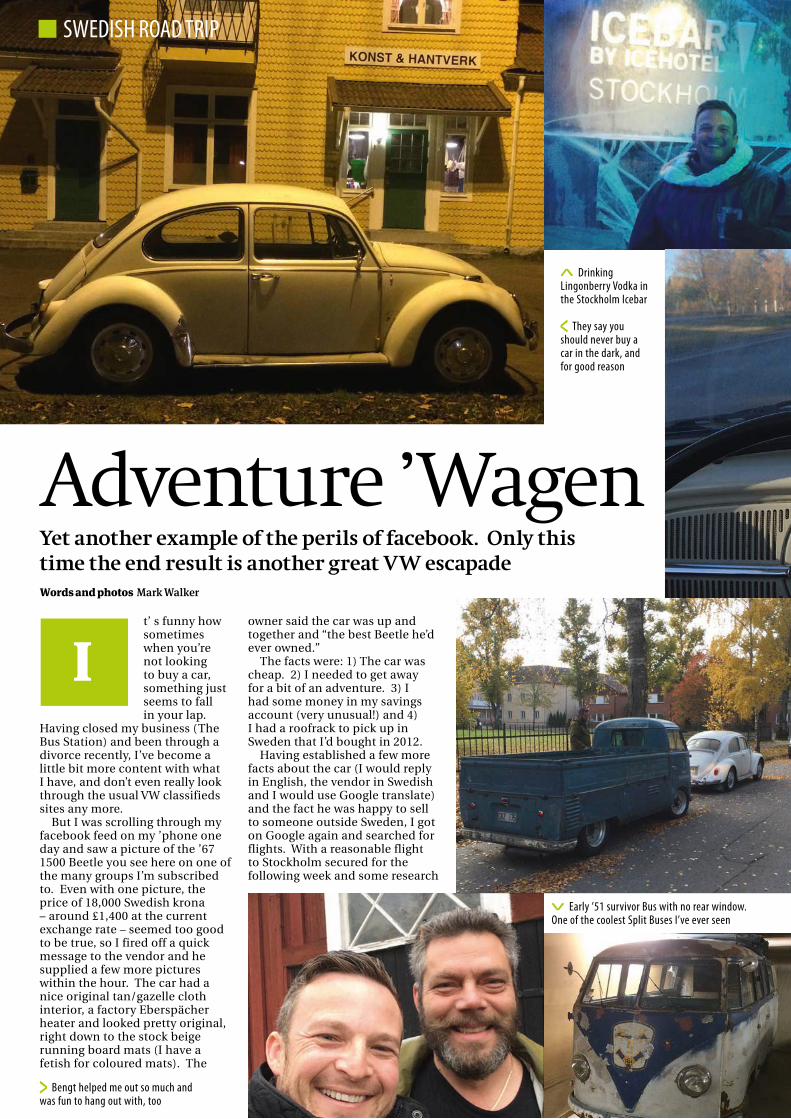
Drinking Lingonberry Vodka in the Stockholm Icebar
The ‘67 awaiting repair in Sala with an older sibling
Early ’51 survivor Bus with no rear window. One of the coolest Split Buses I’ve ever seen
That will be a 12V regulator then. On a 6V system. Not the ideal combination
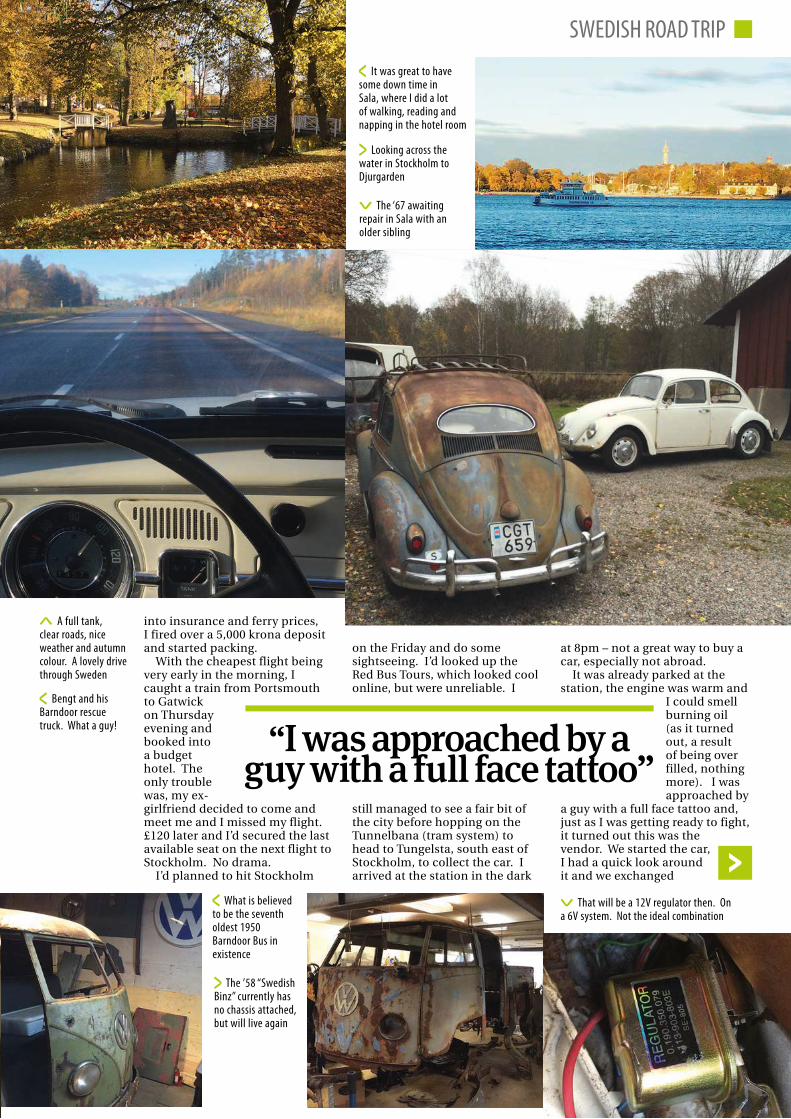
A full tank, clear roads, nice weather and autumn colour. A lovely drive through Sweden
They say you should never buy a car in the dark, and for good reason
Bengt and his Barndoor rescue truck. What a guy!
What is believed to be the seventh oldest 1950 Barndoor Bus in existence
The ’58 “Swedish Binz” currently has no chassis attached, but will live again
Bengt helped me out so much and was fun to hang out with, too
It was great to have some down time in Sala, where I did a lot of walking, reading and napping in the hotel room
Looking across the water in Stockholm to Djurgarden
0 6 0 M A R C H 2 0 1 6 M A R C H 2 0 1 6 0 6 1
SWEDISH ROAD TRIPSWEDISH ROAD TRIP
Words and photos Mark Walker
Yet another example of the perils of facebook. Only this time the end result is another great VW escapade
t’ s funny how sometimes when you’re not looking to buy a car, something just seems to fall in your lap.
Having closed my business (The Bus Station) and been through a divorce recently, I’ve become a little bit more content with what I have, and don’t even really look through the usual VW classifieds sites any more.
But I was scrolling through my facebook feed on my ’phone one day and saw a picture of the ’67 1500 Beetle you see here on one of the many groups I’m subscribed to. Even with one picture, the price of 18,000 Swedish krona – around £1,400 at the current exchange rate – seemed too good to be true, so I fired off a quick message to the vendor and he supplied a few more pictures within the hour. The car had a nice original tan/gazelle cloth interior, a factory Eberspächer heater and looked pretty original, right down to the stock beige running board mats (I have a fetish for coloured mats). The
I
Adventure ’Wagen
into insurance and ferry prices, I fired over a 5,000 krona deposit and started packing.
With the cheapest flight being very early in the morning, I caught a train from Portsmouth to Gatwick on Thursday evening and booked into a budget hotel. The only trouble was, my ex-girlfriend decided to come and meet me and I missed my flight. £120 later and I’d secured the last available seat on the next flight to Stockholm. No drama.
I’d planned to hit Stockholm
on the Friday and do some sightseeing. I’d looked up the Red Bus Tours, which looked cool online, but were unreliable. I
still managed to see a fair bit of the city before hopping on the Tunnelbana (tram system) to head to Tungelsta, south east of Stockholm, to collect the car. I arrived at the station in the dark
“I was approached by a guy with a full face tattoo”
at 8pm – not a great way to buy a car, especially not abroad.
It was already parked at the station, the engine was warm and
I could smell burning oil (as it turned out, a result of being over filled, nothing more). I was approached by
a guy with a full face tattoo and, just as I was getting ready to fight, it turned out this was the vendor. We started the car, I had a quick look around it and we exchanged
owner said the car was up and together and “the best Beetle he’d ever owned.”
The facts were: 1) The car was cheap. 2) I needed to get away for a bit of an adventure. 3) I had some money in my savings account (very unusual!) and 4) I had a roofrack to pick up in Sweden that I’d bought in 2012.
Having established a few more facts about the car (I would reply in English, the vendor in Swedish and I would use Google translate) and the fact he was happy to sell to someone outside Sweden, I got on Google again and searched for flights. With a reasonable flight to Stockholm secured for the following week and some research
Drinking Lingonberry Vodka in the Stockholm Icebar
The ‘67 awaiting repair in Sala with an older sibling
Early ’51 survivor Bus with no rear window. One of the coolest Split Buses I’ve ever seen
That will be a 12V regulator then. On a 6V system. Not the ideal combination
A full tank, clear roads, nice weather and autumn colour. A lovely drive through Sweden
They say you should never buy a car in the dark, and for good reason
Bengt and his Barndoor rescue truck. What a guy!
What is believed to be the seventh oldest 1950 Barndoor Bus in existence
The ’58 “Swedish Binz” currently has no chassis attached, but will live again
Bengt helped me out so much and was fun to hang out with, too
It was great to have some down time in Sala, where I did a lot of walking, reading and napping in the hotel room
Looking across the water in Stockholm to Djurgarden
0 6 0 M A R C H 2 0 1 6 M A R C H 2 0 1 6 0 6 1
SWEDISH ROAD TRIPSWEDISH ROAD TRIP
Words and photos Mark Walker
Yet another example of the perils of facebook. Only this time the end result is another great VW escapade
t’ s funny how sometimes when you’re not looking to buy a car, something just seems to fall in your lap.
Having closed my business (The Bus Station) and been through a divorce recently, I’ve become a little bit more content with what I have, and don’t even really look through the usual VW classifieds sites any more.
But I was scrolling through my facebook feed on my ’phone one day and saw a picture of the ’67 1500 Beetle you see here on one of the many groups I’m subscribed to. Even with one picture, the price of 18,000 Swedish krona – around £1,400 at the current exchange rate – seemed too good to be true, so I fired off a quick message to the vendor and he supplied a few more pictures within the hour. The car had a nice original tan/gazelle cloth interior, a factory Eberspächer heater and looked pretty original, right down to the stock beige running board mats (I have a fetish for coloured mats). The
I
Adventure ’Wagen
into insurance and ferry prices, I fired over a 5,000 krona deposit and started packing.
With the cheapest flight being very early in the morning, I caught a train from Portsmouth to Gatwick on Thursday evening and booked into a budget hotel. The only trouble was, my ex-girlfriend decided to come and meet me and I missed my flight. £120 later and I’d secured the last available seat on the next flight to Stockholm. No drama.
I’d planned to hit Stockholm
on the Friday and do some sightseeing. I’d looked up the Red Bus Tours, which looked cool online, but were unreliable. I
still managed to see a fair bit of the city before hopping on the Tunnelbana (tram system) to head to Tungelsta, south east of Stockholm, to collect the car. I arrived at the station in the dark
“I was approached by a guy with a full face tattoo”
at 8pm – not a great way to buy a car, especially not abroad.
It was already parked at the station, the engine was warm and
I could smell burning oil (as it turned out, a result of being over filled, nothing more). I was approached by
a guy with a full face tattoo and, just as I was getting ready to fight, it turned out this was the vendor. We started the car, I had a quick look around it and we exchanged
owner said the car was up and together and “the best Beetle he’d ever owned.”
The facts were: 1) The car was cheap. 2) I needed to get away for a bit of an adventure. 3) I had some money in my savings account (very unusual!) and 4) I had a roofrack to pick up in Sweden that I’d bought in 2012.
Having established a few more facts about the car (I would reply in English, the vendor in Swedish and I would use Google translate) and the fact he was happy to sell to someone outside Sweden, I got on Google again and searched for flights. With a reasonable flight to Stockholm secured for the following week and some research
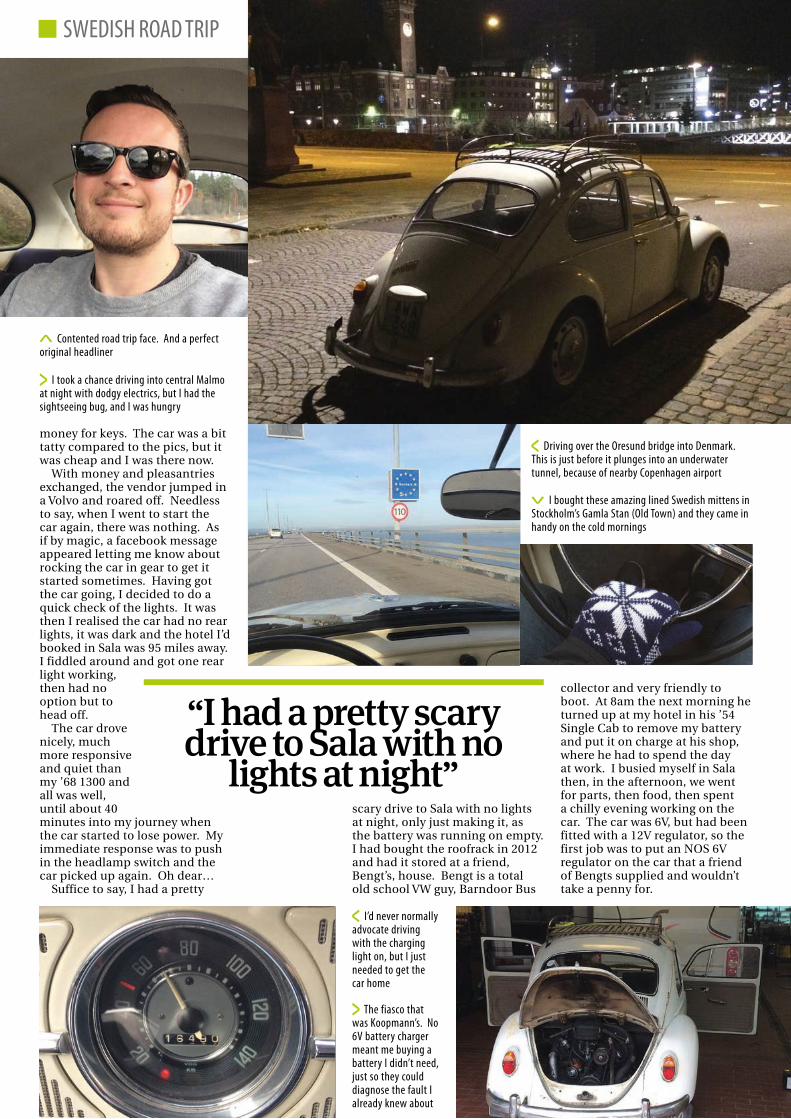
I took a chance driving into central Malmo at night with dodgy electrics, but I had the sightseeing bug, and I was hungry
Driving over the Oresund bridge into Denmark. This is just before it plunges into an underwater tunnel, because of nearby Copenhagen airport
I’d never normally advocate driving with the charging light on, but I just needed to get the car home
The fiasco that was Koopmann’s. No 6V battery charger meant me buying a battery I didn’t need, just so they could diagnose the fault I already knew about
SWEDISH ROAD TRIP SWEDISH ROAD TRIP
M A R C H 2 0 1 6 0 6 3
money for keys. The car was a bit tatty compared to the pics, but it was cheap and I was there now.
With money and pleasantries exchanged, the vendor jumped in a Volvo and roared off. Needless to say, when I went to start the car again, there was nothing. As if by magic, a facebook message appeared letting me know about rocking the car in gear to get it started sometimes. Having got the car going, I decided to do a quick check of the lights. It was then I realised the car had no rear lights, it was dark and the hotel I’d booked in Sala was 95 miles away. I fiddled around and got one rear light working, then had no option but to head off.
The car drove nicely, much more responsive and quiet than my ’68 1300 and all was well, until about 40 minutes into my journey when the car started to lose power. My immediate response was to push in the headlamp switch and the car picked up again. Oh dear…
Suffice to say, I had a pretty
scary drive to Sala with no lights at night, only just making it, as the battery was running on empty. I had bought the roofrack in 2012 and had it stored at a friend, Bengt’s, house. Bengt is a total old school VW guy, Barndoor Bus
collector and very friendly to boot. At 8am the next morning he turned up at my hotel in his ’54 Single Cab to remove my battery and put it on charge at his shop, where he had to spend the day at work. I busied myself in Sala then, in the afternoon, we went for parts, then food, then spent a chilly evening working on the car. The car was 6V, but had been fitted with a 12V regulator, so the first job was to put an NOS 6V regulator on the car that a friend of Bengts supplied and wouldn’t take a penny for.
With this done, Bengt re-polarised the dynamo and fitted different brushes. Having initially been greeted by a negative output, the dynamo was now pumping out 7V. Next morning, I hit the road south, thanking Bengt for all his help and hospitality. Once I reached the motorway, the charging light came on, so every hour or so, I would stop and let the car idle for half an hour, or until the charging light went out. Fortunately, I had been given two keys, so I could lock the car with the engine running and get food.
The car got me to Malmo by 5pm and I booked into a cheap room, as I didn’t want to chance driving with the lights on. The
“I had a pretty scary drive to Sala with no
lights at night”
next morning, the car started and I headed over the Oresund bridge to Denmark, before turning south to catch the Rodby-Puttgarden ferry into Germany. I had arranged to stay overnight with my brother in Cologne, but I was still three hours away when it started to get dark. Within about 20 minutes of switching on the lights, I felt the car losing power again and pulled into the Wildeshausen services to let it sit and charge. But, as the engine promptly died, I realised the dynamo had given up once more.
As I had insured the car on the chassis number before setting off, and paid the extra £55 for
European breakdown cover, I called Footman James and they arranged an ADAC tow to an HGV specialist nearby. I booked a room in a hotel in the village for the night. Despite the garage being clueless, charging me 140 euros for a 6V battery just to diagnose the fault and the total bill being 342 euros, I got off quite lightly. Axa assistance paid for a three-hour taxi ride to my brother’s house, a flight back to the UK and repatriated the car, which took a couple of weeks.
At the time of writing, the ’67 has a fresh MoT and I’m awaiting the UK registration number from the DVLA.
Contented road trip face. And a perfect original headliner
I bought these amazing lined Swedish mittens in Stockholm’s Gamla Stan (Old Town) and they came in handy on the cold mornings
Chilling with a post-breakdown Weissbier in the hotel bar, staffed by the most buxom waitress I’ve ever seen in my life
An all too brief stopover with my brother in Cologne. It’s always good to visit this city, which is great for cycling
On the road in Denmark, with (not so) Great Coffee
Obligatory fuel pump shot. The Split Beetle-era roof rack is already at the powder coaters
The road trip portion of my adventure ended here. Follow my exploits on Instagram @barefootdriver
How To:Cargo Door Repair
First published Volksworld Camper & Bus magazine
2015


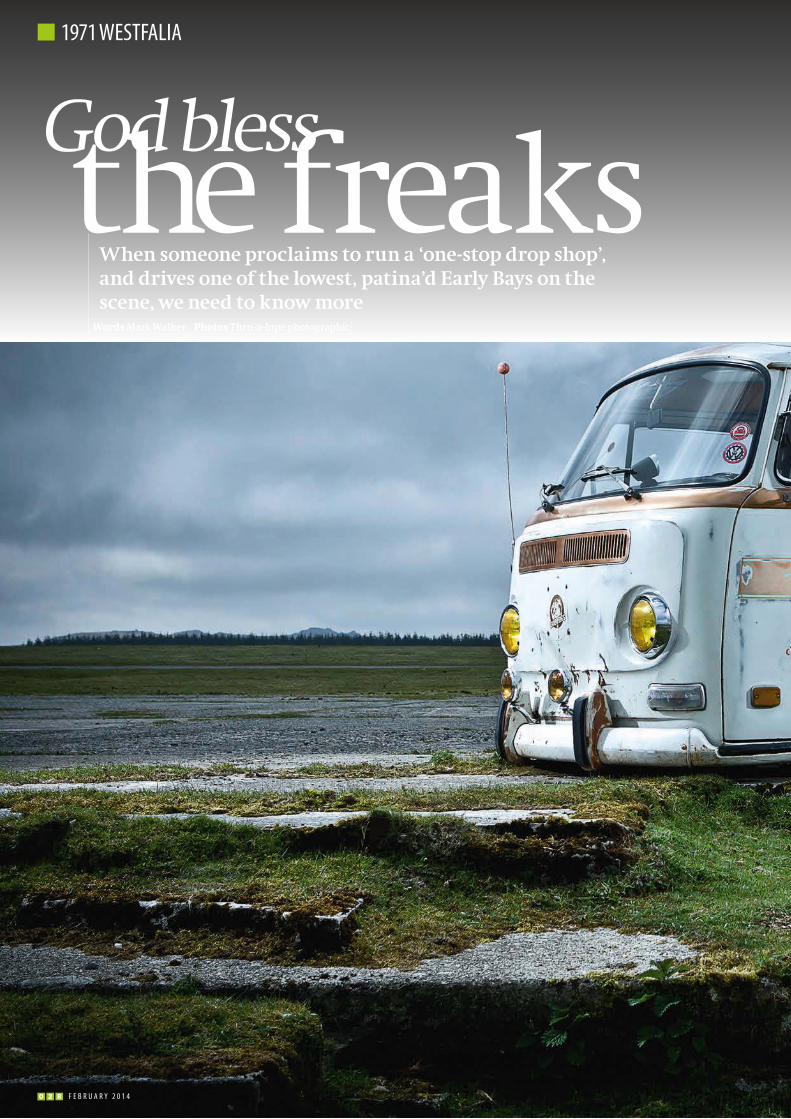
God Bless The FreaksFirst published
VolksWorld magazine2014
F E B R U A R Y 2 0 1 4 0 2 9 0 2 8 F E B R U A R Y 2 0 1 4
1971 WESTFAliA1971 WESTFAliA
Words Mark Walker Photos Thru-a-lupe photographic
When someone proclaims to run a ‘one-stop drop shop’, and drives one of the lowest, patina’d Early Bays on the scene, we need to know more
f you’ve frequented any UK-based VW shows in the past few years, you will have probably happened upon Ben Lewis’ gnarly, slammed Early Bay at some point. Riding super low with its punched-in nose, it has a tough look for sure, but is built to cover the miles in comfort and at speed. But how did
one of the UK’s premier VW restorers come to sell a show-winning Beetle to roll it ratty all over Europe?
It all started in the summer of 2007 when Ben embarked on a European tour that took in the first European Bug-In at Chimay, Belgium. Ben’s ride for that trip was his multi-award-winning Oval, ‘Fendered ’57’, but sometimes it’s the
company you keep that ultimately shape the direction you go in. And as everyone else on that trip was piloting an original paint Early Bay, Ben decided he needed one in his life, whatever the cost.
That cost was his Oval. Once back in Blighty, the decision was made to sell the ’57, with half of the proceeds being used to start up his business, Evil Ben’s (www.evilbens.co.uk ) and the rest siphoned off for a suitable Bus. Alex at nearby Transporterhaus in Truro, Cornwall, had a freshly imported L90D Pastel White ’71 Westfalia, but it was already sold, to a couple who were going to paint it orange. Fortunately, the deal fell through and Ben wasted no time stepping up with a bundle of folding to seal the deal. He was now the owner of a stock Early Bay…
Ithe freaksGod bless
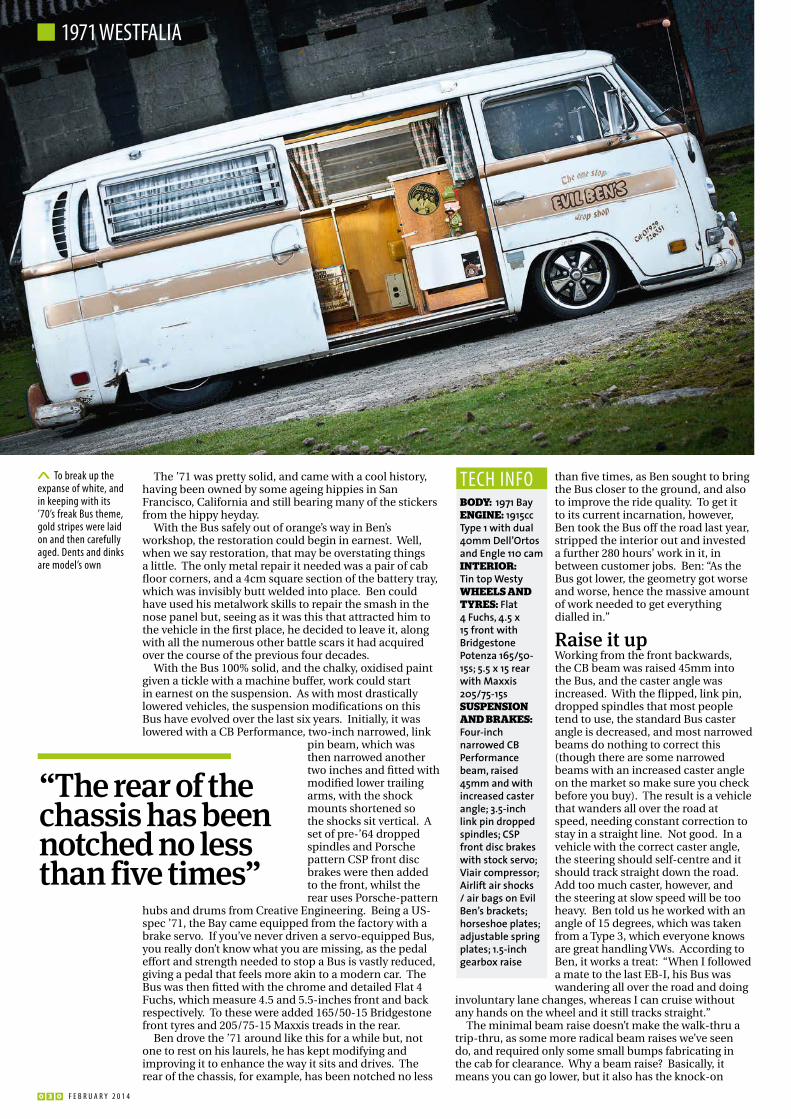
To break up the expanse of white, and in keeping with its ’70’s freak Bus theme, gold stripes were laid on and then carefully aged. Dents and dinks are model’s own
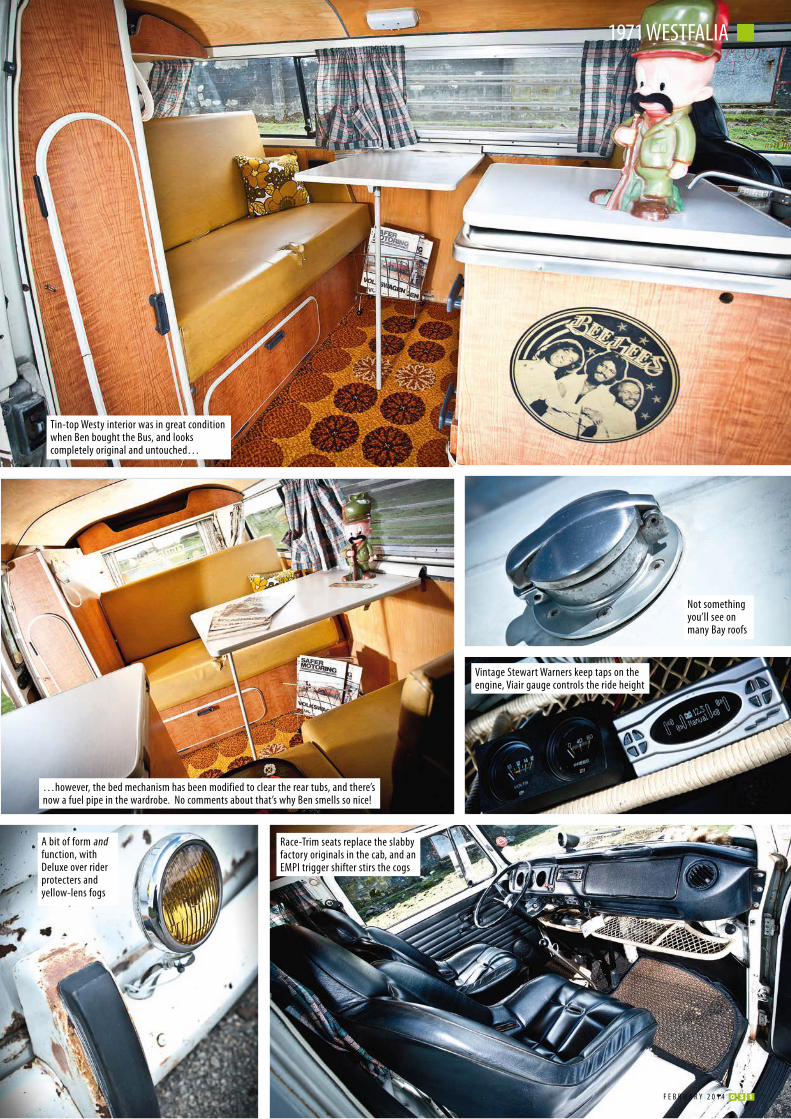
Tin-top Westy interior was in great condition when Ben bought the Bus, and looks completely original and untouched…
…however, the bed mechanism has been modified to clear the rear tubs, and there’s now a fuel pipe in the wardrobe. No comments about that’s why Ben smells so nice!
Vintage Stewart Warners keep taps on the engine, Viair gauge controls the ride height
Not something you’ll see on many Bay roofs
A bit of form and function, with Deluxe over rider protecters and yellow-lens fogs
Race-Trim seats replace the slabby factory originals in the cab, and an EMPi trigger shifter stirs the cogs
F E B R U A R Y 2 0 1 4 0 3 1 0 3 0 F E B R U A R Y 2 0 1 4
1971 WESTFAliA1971 WESTFAliA
than five times, as Ben sought to bring the Bus closer to the ground, and also to improve the ride quality. To get it to its current incarnation, however, Ben took the Bus off the road last year, stripped the interior out and invested a further 280 hours’ work in it, in between customer jobs. Ben: “As the Bus got lower, the geometry got worse and worse, hence the massive amount of work needed to get everything dialled in.”
Raise it upWorking from the front backwards, the CB beam was raised 45mm into the Bus, and the caster angle was increased. With the flipped, link pin, dropped spindles that most people tend to use, the standard Bus caster angle is decreased, and most narrowed beams do nothing to correct this (though there are some narrowed beams with an increased caster angle on the market so make sure you check before you buy). The result is a vehicle that wanders all over the road at speed, needing constant correction to stay in a straight line. Not good. In a vehicle with the correct caster angle, the steering should self-centre and it should track straight down the road. Add too much caster, however, and the steering at slow speed will be too heavy. Ben told us he worked with an angle of 15 degrees, which was taken from a Type 3, which everyone knows are great handling VWs. According to Ben, it works a treat: “When I followed a mate to the last EB-I, his Bus was wandering all over the road and doing
involuntary lane changes, whereas I can cruise without any hands on the wheel and it still tracks straight.”
The minimal beam raise doesn’t make the walk-thru a trip-thru, as some more radical beam raises we’ve seen do, and required only some small bumps fabricating in the cab for clearance. Why a beam raise? Basically, it means you can go lower, but it also has the knock-on
Body: 1971 BayEnginE: 1915cc Type 1 with dual 40mm Dell’Ortos and Engle 110 cam inTERioR:Tin top WestyWhEEls and TyREs: Flat 4 Fuchs, 4.5 x 15 front with Bridgestone Potenza 165/50-15s; 5.5 x 15 rear with Maxxis 205/75-15ssusPEnsion and BRaKEs: Four-inch narrowed CB Performance beam, raised 45mm and with increased caster angle; 3.5-inch link pin dropped spindles; CSP front disc brakes with stock servo; Viair compressor; Airlift air shocks / air bags on Evil Ben’s brackets; horseshoe plates; adjustable spring plates; 1.5-inch gearbox raise
TECH iNFO
“The rear of the chassis has been notched no less than five times”
The ’71 was pretty solid, and came with a cool history, having been owned by some ageing hippies in San Francisco, California and still bearing many of the stickers from the hippy heyday.
With the Bus safely out of orange’s way in Ben’s workshop, the restoration could begin in earnest. Well, when we say restoration, that may be overstating things a little. The only metal repair it needed was a pair of cab floor corners, and a 4cm square section of the battery tray, which was invisibly butt welded into place. Ben could have used his metalwork skills to repair the smash in the nose panel but, seeing as it was this that attracted him to the vehicle in the first place, he decided to leave it, along with all the numerous other battle scars it had acquired over the course of the previous four decades.
With the Bus 100% solid, and the chalky, oxidised paint given a tickle with a machine buffer, work could start in earnest on the suspension. As with most drastically lowered vehicles, the suspension modifications on this Bus have evolved over the last six years. Initially, it was lowered with a CB Performance, two-inch narrowed, link
pin beam, which was then narrowed another two inches and fitted with modified lower trailing arms, with the shock mounts shortened so the shocks sit vertical. A set of pre-’64 dropped spindles and Porsche pattern CSP front disc brakes were then added to the front, whilst the rear uses Porsche-pattern
hubs and drums from Creative Engineering. Being a US-spec ’71, the Bay came equipped from the factory with a brake servo. If you’ve never driven a servo-equipped Bus, you really don’t know what you are missing, as the pedal effort and strength needed to stop a Bus is vastly reduced, giving a pedal that feels more akin to a modern car. The Bus was then fitted with the chrome and detailed Flat 4 Fuchs, which measure 4.5 and 5.5-inches front and back respectively. To these were added 165/50-15 Bridgestone front tyres and 205/75-15 Maxxis treads in the rear.
Ben drove the ’71 around like this for a while but, not one to rest on his laurels, he has kept modifying and improving it to enhance the way it sits and drives. The rear of the chassis, for example, has been notched no less
To break up the expanse of white, and in keeping with its ’70’s freak Bus theme, gold stripes were laid on and then carefully aged. Dents and dinks are model’s own
Tin-top Westy interior was in great condition when Ben bought the Bus, and looks completely original and untouched…
…however, the bed mechanism has been modified to clear the rear tubs, and there’s now a fuel pipe in the wardrobe. No comments about that’s why Ben smells so nice!
Vintage Stewart Warners keep taps on the engine, Viair gauge controls the ride height
Not something you’ll see on many Bay roofs
A bit of form and function, with Deluxe over rider protecters and yellow-lens fogs
Race-Trim seats replace the slabby factory originals in the cab, and an EMPi trigger shifter stirs the cogs
F E B R U A R Y 2 0 1 4 0 3 1 0 3 0 F E B R U A R Y 2 0 1 4
1971 WESTFAliA1971 WESTFAliA
than five times, as Ben sought to bring the Bus closer to the ground, and also to improve the ride quality. To get it to its current incarnation, however, Ben took the Bus off the road last year, stripped the interior out and invested a further 280 hours’ work in it, in between customer jobs. Ben: “As the Bus got lower, the geometry got worse and worse, hence the massive amount of work needed to get everything dialled in.”
Raise it upWorking from the front backwards, the CB beam was raised 45mm into the Bus, and the caster angle was increased. With the flipped, link pin, dropped spindles that most people tend to use, the standard Bus caster angle is decreased, and most narrowed beams do nothing to correct this (though there are some narrowed beams with an increased caster angle on the market so make sure you check before you buy). The result is a vehicle that wanders all over the road at speed, needing constant correction to stay in a straight line. Not good. In a vehicle with the correct caster angle, the steering should self-centre and it should track straight down the road. Add too much caster, however, and the steering at slow speed will be too heavy. Ben told us he worked with an angle of 15 degrees, which was taken from a Type 3, which everyone knows are great handling VWs. According to Ben, it works a treat: “When I followed a mate to the last EB-I, his Bus was wandering all over the road and doing
involuntary lane changes, whereas I can cruise without any hands on the wheel and it still tracks straight.”
The minimal beam raise doesn’t make the walk-thru a trip-thru, as some more radical beam raises we’ve seen do, and required only some small bumps fabricating in the cab for clearance. Why a beam raise? Basically, it means you can go lower, but it also has the knock-on
Body: 1971 BayEnginE: 1915cc Type 1 with dual 40mm Dell’Ortos and Engle 110 cam inTERioR:Tin top WestyWhEEls and TyREs: Flat 4 Fuchs, 4.5 x 15 front with Bridgestone Potenza 165/50-15s; 5.5 x 15 rear with Maxxis 205/75-15ssusPEnsion and BRaKEs: Four-inch narrowed CB Performance beam, raised 45mm and with increased caster angle; 3.5-inch link pin dropped spindles; CSP front disc brakes with stock servo; Viair compressor; Airlift air shocks / air bags on Evil Ben’s brackets; horseshoe plates; adjustable spring plates; 1.5-inch gearbox raise
TECH iNFO
“The rear of the chassis has been notched no less than five times”
The ’71 was pretty solid, and came with a cool history, having been owned by some ageing hippies in San Francisco, California and still bearing many of the stickers from the hippy heyday.
With the Bus safely out of orange’s way in Ben’s workshop, the restoration could begin in earnest. Well, when we say restoration, that may be overstating things a little. The only metal repair it needed was a pair of cab floor corners, and a 4cm square section of the battery tray, which was invisibly butt welded into place. Ben could have used his metalwork skills to repair the smash in the nose panel but, seeing as it was this that attracted him to the vehicle in the first place, he decided to leave it, along with all the numerous other battle scars it had acquired over the course of the previous four decades.
With the Bus 100% solid, and the chalky, oxidised paint given a tickle with a machine buffer, work could start in earnest on the suspension. As with most drastically lowered vehicles, the suspension modifications on this Bus have evolved over the last six years. Initially, it was lowered with a CB Performance, two-inch narrowed, link
pin beam, which was then narrowed another two inches and fitted with modified lower trailing arms, with the shock mounts shortened so the shocks sit vertical. A set of pre-’64 dropped spindles and Porsche pattern CSP front disc brakes were then added to the front, whilst the rear uses Porsche-pattern
hubs and drums from Creative Engineering. Being a US-spec ’71, the Bay came equipped from the factory with a brake servo. If you’ve never driven a servo-equipped Bus, you really don’t know what you are missing, as the pedal effort and strength needed to stop a Bus is vastly reduced, giving a pedal that feels more akin to a modern car. The Bus was then fitted with the chrome and detailed Flat 4 Fuchs, which measure 4.5 and 5.5-inches front and back respectively. To these were added 165/50-15 Bridgestone front tyres and 205/75-15 Maxxis treads in the rear.
Ben drove the ’71 around like this for a while but, not one to rest on his laurels, he has kept modifying and improving it to enhance the way it sits and drives. The rear of the chassis, for example, has been notched no less

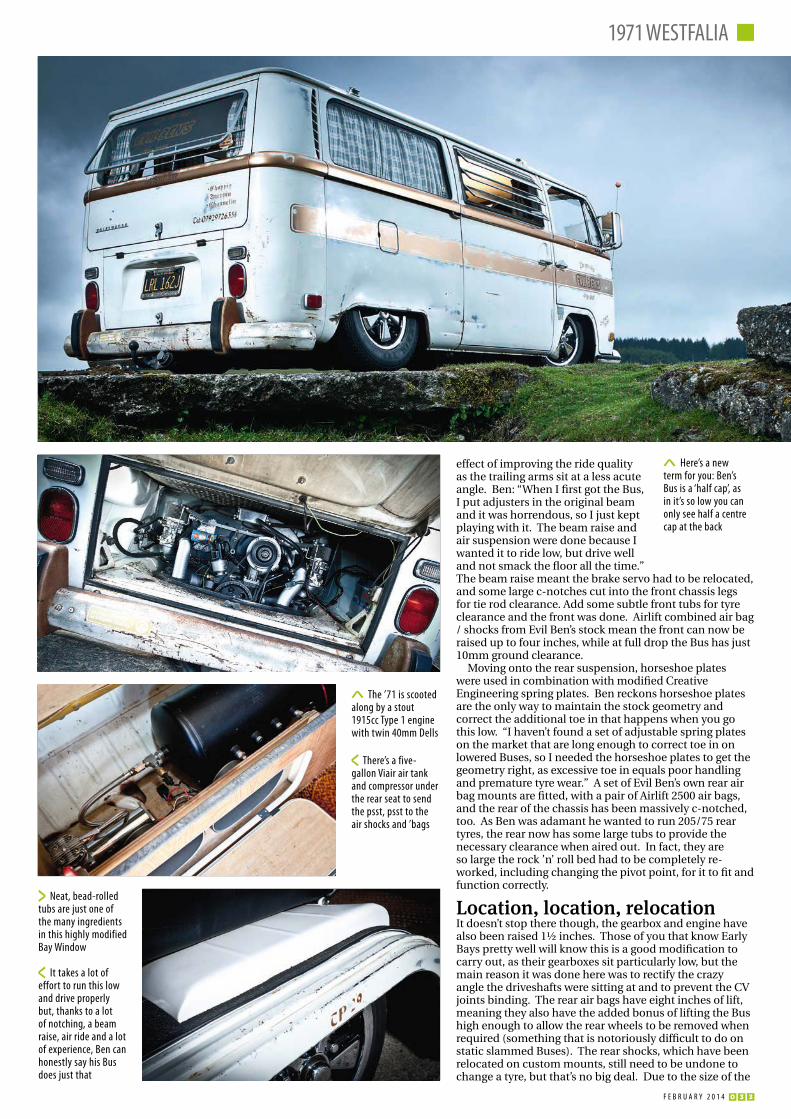
The ’71 is scooted along by a stout 1915cc Type 1 engine with twin 40mm Dells
There’s a five-gallon Viair air tank and compressor under the rear seat to send the psst, psst to the air shocks and ’bags
Neat, bead-rolled tubs are just one of the many ingredients in this highly modified Bay Window
it takes a lot ofeffort to run this low and drive properly but, thanks to a lot of notching, a beam raise, air ride and a lot of experience, Ben can honestly say his Bus does just that
Here’s a newterm for you: Ben’s Bus is a ‘half cap’, as in it’s so low you can only see half a centre cap at the back
1971 WESTFAliA
F E B R U A R Y 2 0 1 4 0 3 3 0 3 2 F E B R U A R Y 2 0 1 4
1971 WESTFAliA
“I wanted it to ride low, but drive well and not smack
the floor all the time”
effect of improving the ride quality as the trailing arms sit at a less acute angle. Ben: “When I first got the Bus, I put adjusters in the original beam and it was horrendous, so I just kept playing with it. The beam raise and air suspension were done because I wanted it to ride low, but drive well and not smack the floor all the time.” The beam raise meant the brake servo had to be relocated, and some large c-notches cut into the front chassis legs for tie rod clearance. Add some subtle front tubs for tyre clearance and the front was done. Airlift combined air bag / shocks from Evil Ben’s stock mean the front can now be raised up to four inches, while at full drop the Bus has just 10mm ground clearance.
Moving onto the rear suspension, horseshoe plates were used in combination with modified Creative Engineering spring plates. Ben reckons horseshoe plates are the only way to maintain the stock geometry and correct the additional toe in that happens when you go this low. “I haven’t found a set of adjustable spring plates on the market that are long enough to correct toe in on lowered Buses, so I needed the horseshoe plates to get the geometry right, as excessive toe in equals poor handling and premature tyre wear.” A set of Evil Ben’s own rear air bag mounts are fitted, with a pair of Airlift 2500 air bags, and the rear of the chassis has been massively c-notched, too. As Ben was adamant he wanted to run 205/75 rear tyres, the rear now has some large tubs to provide the necessary clearance when aired out. In fact, they are so large the rock ’n’ roll bed had to be completely re-worked, including changing the pivot point, for it to fit and function correctly.
Location, location, relocationIt doesn’t stop there though, the gearbox and engine have also been raised 1½ inches. Those of you that know Early Bays pretty well will know this is a good modification to carry out, as their gearboxes sit particularly low, but the main reason it was done here was to rectify the crazy angle the driveshafts were sitting at and to prevent the CV joints binding. The rear air bags have eight inches of lift, meaning they also have the added bonus of lifting the Bus high enough to allow the rear wheels to be removed when required (something that is notoriously difficult to do on static slammed Buses). The rear shocks, which have been relocated on custom mounts, still need to be undone to change a tyre, but that’s no big deal. Due to the size of the
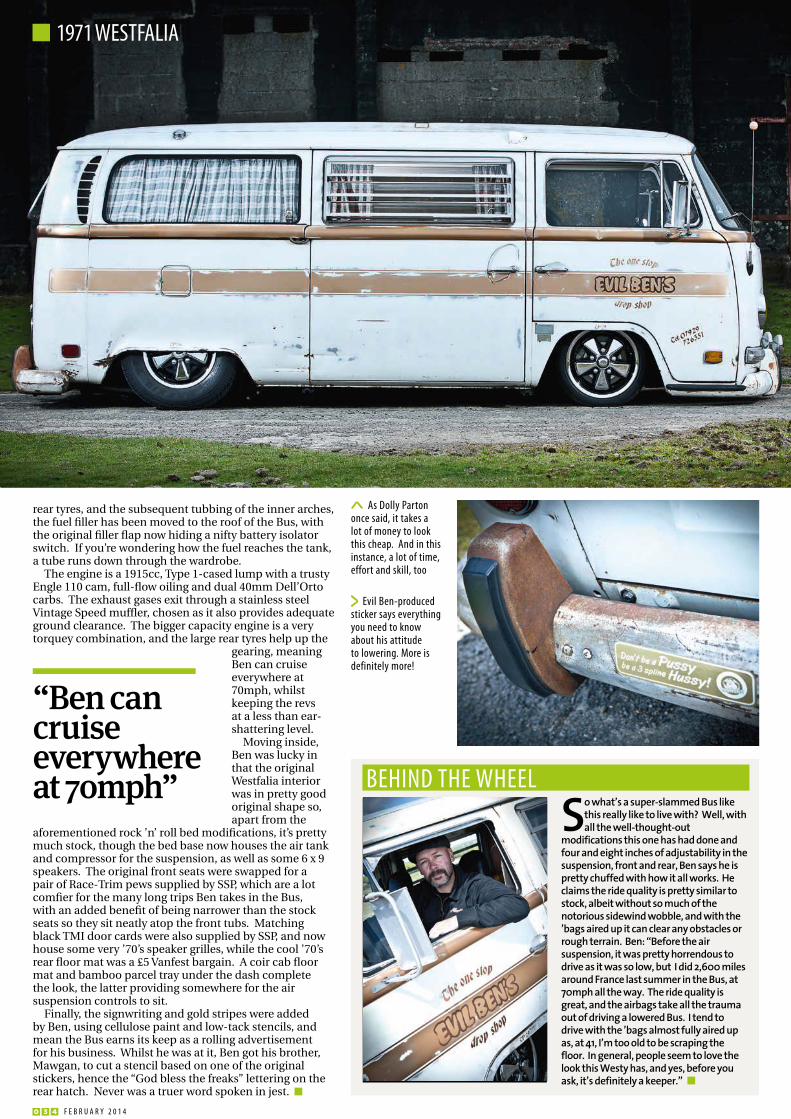
As Dolly Parton once said, it takes a lot of money to look this cheap. And in this instance, a lot of time, effort and skill, too
Evil Ben-produced sticker says everything you need to know about his attitude to lowering. More is definitely more!
0 3 4 F E B R U A R Y 2 0 1 4
1971 WESTFAliA
rear tyres, and the subsequent tubbing of the inner arches, the fuel filler has been moved to the roof of the Bus, with the original filler flap now hiding a nifty battery isolator switch. If you’re wondering how the fuel reaches the tank, a tube runs down through the wardrobe.
The engine is a 1915cc, Type 1-cased lump with a trusty Engle 110 cam, full-flow oiling and dual 40mm Dell’Orto carbs. The exhaust gases exit through a stainless steel Vintage Speed muffler, chosen as it also provides adequate ground clearance. The bigger capacity engine is a very torquey combination, and the large rear tyres help up the
gearing, meaning Ben can cruise everywhere at 70mph, whilst keeping the revs at a less than ear-shattering level.
Moving inside, Ben was lucky in that the original Westfalia interior was in pretty good original shape so, apart from the
aforementioned rock ’n’ roll bed modifications, it’s pretty much stock, though the bed base now houses the air tank and compressor for the suspension, as well as some 6 x 9 speakers. The original front seats were swapped for a pair of Race-Trim pews supplied by SSP, which are a lot comfier for the many long trips Ben takes in the Bus, with an added benefit of being narrower than the stock seats so they sit neatly atop the front tubs. Matching black TMI door cards were also supplied by SSP, and now house some very ’70’s speaker grilles, while the cool ’70’s rear floor mat was a £5 Vanfest bargain. A coir cab floor mat and bamboo parcel tray under the dash complete the look, the latter providing somewhere for the air suspension controls to sit.
Finally, the signwriting and gold stripes were added by Ben, using cellulose paint and low-tack stencils, and mean the Bus earns its keep as a rolling advertisement for his business. Whilst he was at it, Ben got his brother, Mawgan, to cut a stencil based on one of the original stickers, hence the “God bless the freaks” lettering on the rear hatch. Never was a truer word spoken in jest.
“Ben can cruise everywhere at 70mph” BEHiND THE WHEEl
So what’s a super-slammed Bus like this really like to live with? Well, with all the well-thought-out
modifications this one has had done and four and eight inches of adjustability in the suspension, front and rear, Ben says he is pretty chuffed with how it all works. He claims the ride quality is pretty similar to stock, albeit without so much of the notorious sidewind wobble, and with the ’bags aired up it can clear any obstacles or rough terrain. Ben: “Before the air suspension, it was pretty horrendous to drive as it was so low, but I did 2,600 miles around France last summer in the Bus, at 70mph all the way. The ride quality is great, and the airbags take all the trauma out of driving a lowered Bus. I tend to drive with the ’bags almost fully aired up as, at 41, I’m too old to be scraping the floor. In general, people seem to love the look this Westy has, and yes, before you ask, it’s definitely a keeper.”

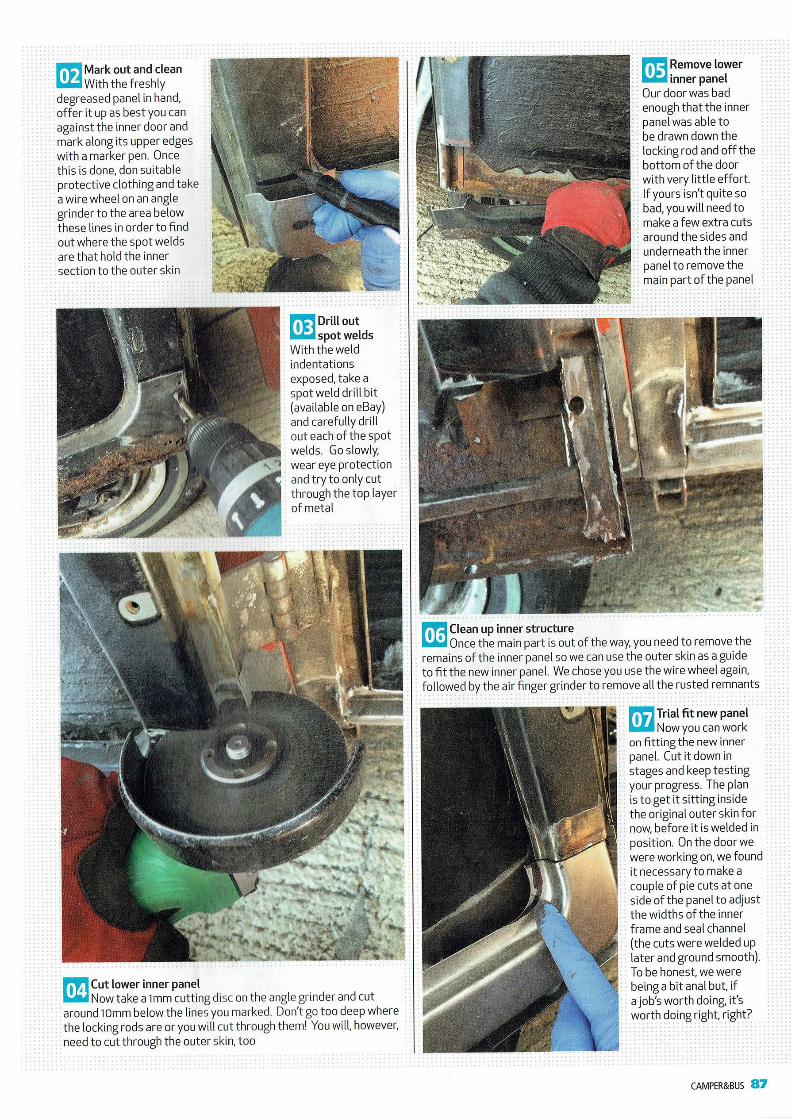
How To & Shop Tour
First published Volksworld Camper & Bus magazine
2015
Camper&bus 87 86 Camper&bus
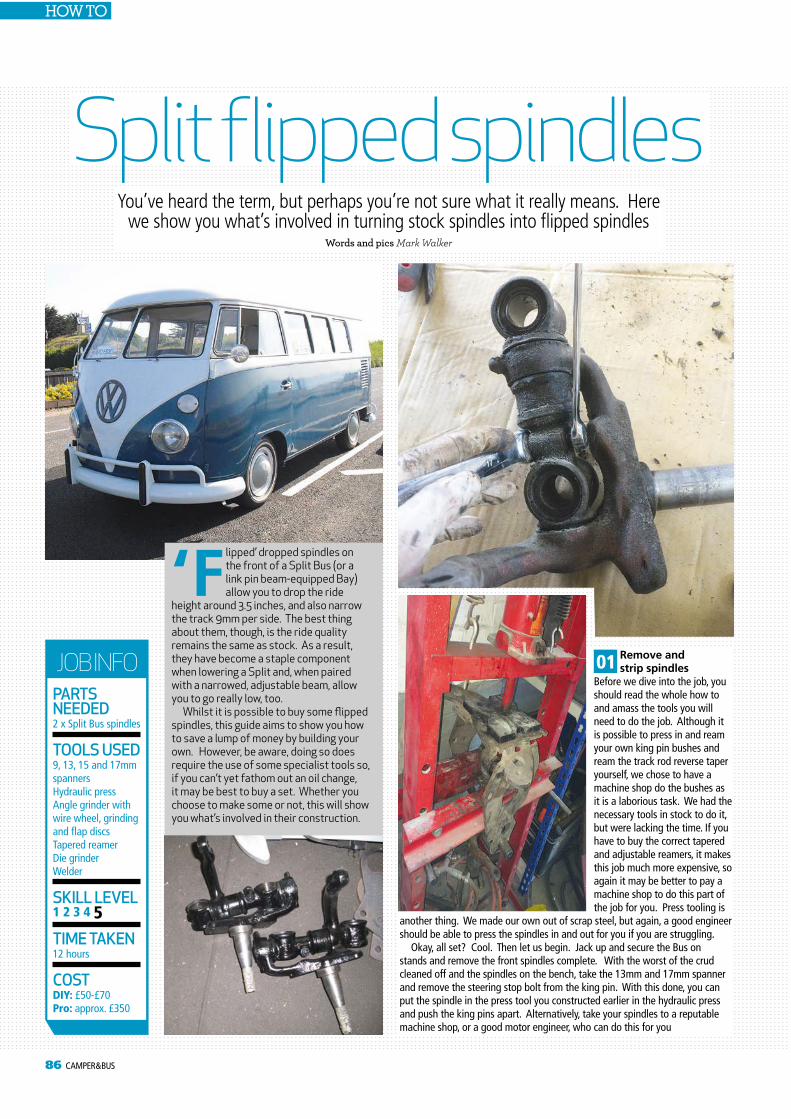
You’ve heard the term, but perhaps you’re not sure what it really means. Here we show you what’s involved in turning stock spindles into flipped spindles
Words and pics Mark Walker
How to
‘Flipped’ dropped spindles on the front of a Split Bus (or a link pin beam-equipped Bay) allow you to drop the ride
height around 3.5 inches, and also narrow the track 9mm per side. The best thing about them, though, is the ride quality remains the same as stock. As a result, they have become a staple component when lowering a Split and, when paired with a narrowed, adjustable beam, allow you to go really low, too.
Whilst it is possible to buy some flipped spindles, this guide aims to show you how to save a lump of money by building your own. However, be aware, doing so does require the use of some specialist tools so, if you can’t yet fathom out an oil change, it may be best to buy a set. Whether you choose to make some or not, this will show you what’s involved in their construction.
Job infoParts needed2 x split bus spindles
tools used9, 13, 15 and 17mm spannersHydraulic pressangle grinder with wire wheel, grinding and flap discsTapered reamerDie grinderWelder
skill level1 2 3 4 5
time taken12 hours
CostDIY: £50-£70Pro: approx. £350
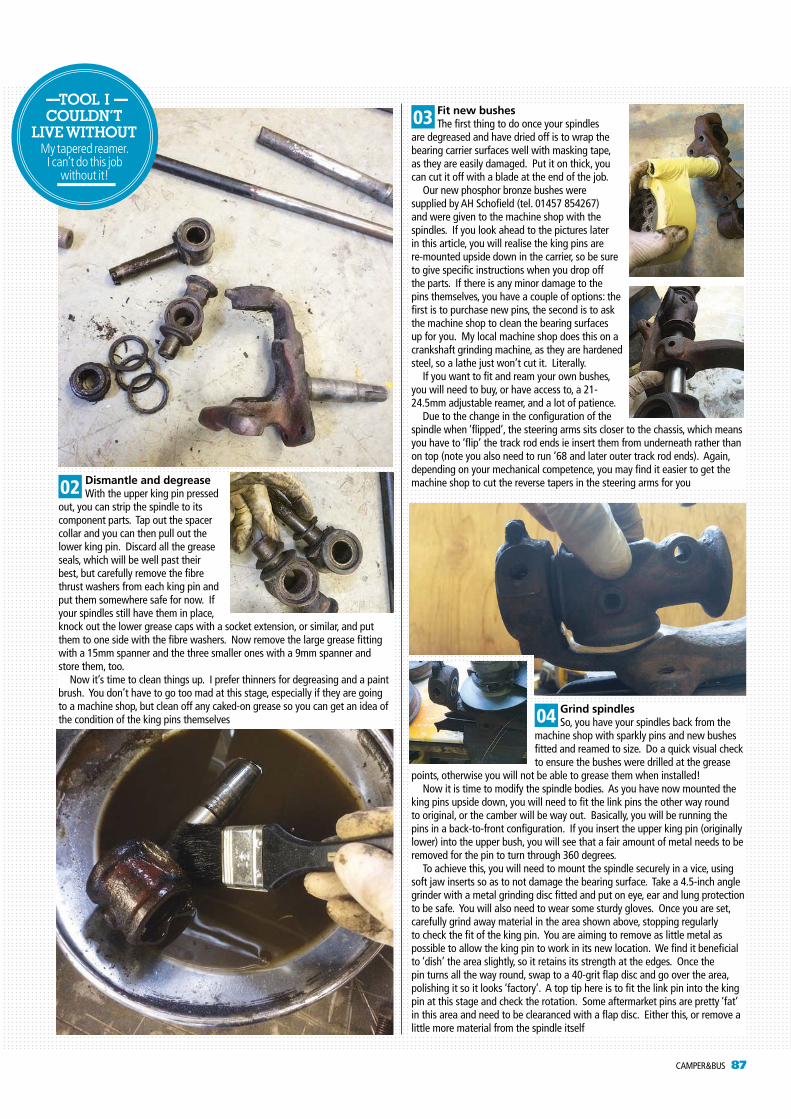
01 Remove andstrip spindles
before we dive into the job, you should read the whole how to and amass the tools you will need to do the job. although it is possible to press in and ream your own king pin bushes and ream the track rod reverse taper yourself, we chose to have a machine shop do the bushes as it is a laborious task. We had the necessary tools in stock to do it, but were lacking the time. If you have to buy the correct tapered and adjustable reamers, it makes this job much more expensive, so again it may be better to pay a machine shop to do this part of the job for you. press tooling is
another thing. We made our own out of scrap steel, but again, a good engineer should be able to press the spindles in and out for you if you are struggling.
Okay, all set? Cool. Then let us begin. Jack up and secure the bus on stands and remove the front spindles complete. With the worst of the crud cleaned off and the spindles on the bench, take the 13mm and 17mm spanner and remove the steering stop bolt from the king pin. With this done, you can put the spindle in the press tool you constructed earlier in the hydraulic press and push the king pins apart. alternatively, take your spindles to a reputable machine shop, or a good motor engineer, who can do this for you
Split flipped spindles
02 Dismantle and degreaseWith the upper king pin pressed
out, you can strip the spindle to its component parts. Tap out the spacer collar and you can then pull out the lower king pin. Discard all the grease seals, which will be well past their best, but carefully remove the fibre thrust washers from each king pin and put them somewhere safe for now. If your spindles still have them in place, knock out the lower grease caps with a socket extension, or similar, and put them to one side with the fibre washers. Now remove the large grease fitting with a 15mm spanner and the three smaller ones with a 9mm spanner and store them, too.
Now it’s time to clean things up. I prefer thinners for degreasing and a paint brush. You don’t have to go too mad at this stage, especially if they are going to a machine shop, but clean off any caked-on grease so you can get an idea of the condition of the king pins themselves
03 Fit new bushesThe first thing to do once your spindles
are degreased and have dried off is to wrap the bearing carrier surfaces well with masking tape, as they are easily damaged. put it on thick, you can cut it off with a blade at the end of the job.
Our new phosphor bronze bushes were supplied by aH schofield (tel. 01457 854267) and were given to the machine shop with the spindles. If you look ahead to the pictures later in this article, you will realise the king pins are re-mounted upside down in the carrier, so be sure to give specific instructions when you drop off the parts. If there is any minor damage to the pins themselves, you have a couple of options: the first is to purchase new pins, the second is to ask the machine shop to clean the bearing surfaces up for you. my local machine shop does this on a crankshaft grinding machine, as they are hardened steel, so a lathe just won’t cut it. Literally.
If you want to fit and ream your own bushes, you will need to buy, or have access to, a 21-24.5mm adjustable reamer, and a lot of patience.
Due to the change in the configuration of the spindle when ‘flipped’, the steering arms sits closer to the chassis, which means you have to ‘flip’ the track rod ends ie insert them from underneath rather than on top (note you also need to run ’68 and later outer track rod ends). again, depending on your mechanical competence, you may find it easier to get the machine shop to cut the reverse tapers in the steering arms for you
04 Grind spindlesso, you have your spindles back from the
machine shop with sparkly pins and new bushes fitted and reamed to size. Do a quick visual check to ensure the bushes were drilled at the grease
points, otherwise you will not be able to grease them when installed!Now it is time to modify the spindle bodies. as you have now mounted the
king pins upside down, you will need to fit the link pins the other way round to original, or the camber will be way out. basically, you will be running the pins in a back-to-front configuration. If you insert the upper king pin (originally lower) into the upper bush, you will see that a fair amount of metal needs to be removed for the pin to turn through 360 degrees.
To achieve this, you will need to mount the spindle securely in a vice, using soft jaw inserts so as to not damage the bearing surface. Take a 4.5-inch angle grinder with a metal grinding disc fitted and put on eye, ear and lung protection to be safe. You will also need to wear some sturdy gloves. Once you are set, carefully grind away material in the area shown above, stopping regularly to check the fit of the king pin. You are aiming to remove as little metal as possible to allow the king pin to work in its new location. We find it beneficial to ‘dish’ the area slightly, so it retains its strength at the edges. Once the pin turns all the way round, swap to a 40-grit flap disc and go over the area, polishing it so it looks ‘factory’. a top tip here is to fit the link pin into the king pin at this stage and check the rotation. some aftermarket pins are pretty ‘fat’ in this area and need to be clearanced with a flap disc. either this, or remove a little more material from the spindle itself
Tool I couldn’T
lIve wIThouTMy tapered reamer.
I can’t do this jobwithout it!
Camper&bus 87 86 Camper&bus
You’ve heard the term, but perhaps you’re not sure what it really means. Here we show you what’s involved in turning stock spindles into flipped spindles
Words and pics Mark Walker
How to
‘Flipped’ dropped spindles on the front of a Split Bus (or a link pin beam-equipped Bay) allow you to drop the ride
height around 3.5 inches, and also narrow the track 9mm per side. The best thing about them, though, is the ride quality remains the same as stock. As a result, they have become a staple component when lowering a Split and, when paired with a narrowed, adjustable beam, allow you to go really low, too.
Whilst it is possible to buy some flipped spindles, this guide aims to show you how to save a lump of money by building your own. However, be aware, doing so does require the use of some specialist tools so, if you can’t yet fathom out an oil change, it may be best to buy a set. Whether you choose to make some or not, this will show you what’s involved in their construction.
Job infoParts needed2 x split bus spindles
tools used9, 13, 15 and 17mm spannersHydraulic pressangle grinder with wire wheel, grinding and flap discsTapered reamerDie grinderWelder
skill level1 2 3 4 5
time taken12 hours
CostDIY: £50-£70Pro: approx. £350
01 Remove andstrip spindles
before we dive into the job, you should read the whole how to and amass the tools you will need to do the job. although it is possible to press in and ream your own king pin bushes and ream the track rod reverse taper yourself, we chose to have a machine shop do the bushes as it is a laborious task. We had the necessary tools in stock to do it, but were lacking the time. If you have to buy the correct tapered and adjustable reamers, it makes this job much more expensive, so again it may be better to pay a machine shop to do this part of the job for you. press tooling is
another thing. We made our own out of scrap steel, but again, a good engineer should be able to press the spindles in and out for you if you are struggling.
Okay, all set? Cool. Then let us begin. Jack up and secure the bus on stands and remove the front spindles complete. With the worst of the crud cleaned off and the spindles on the bench, take the 13mm and 17mm spanner and remove the steering stop bolt from the king pin. With this done, you can put the spindle in the press tool you constructed earlier in the hydraulic press and push the king pins apart. alternatively, take your spindles to a reputable machine shop, or a good motor engineer, who can do this for you
Split flipped spindles
02 Dismantle and degreaseWith the upper king pin pressed
out, you can strip the spindle to its component parts. Tap out the spacer collar and you can then pull out the lower king pin. Discard all the grease seals, which will be well past their best, but carefully remove the fibre thrust washers from each king pin and put them somewhere safe for now. If your spindles still have them in place, knock out the lower grease caps with a socket extension, or similar, and put them to one side with the fibre washers. Now remove the large grease fitting with a 15mm spanner and the three smaller ones with a 9mm spanner and store them, too.
Now it’s time to clean things up. I prefer thinners for degreasing and a paint brush. You don’t have to go too mad at this stage, especially if they are going to a machine shop, but clean off any caked-on grease so you can get an idea of the condition of the king pins themselves
03 Fit new bushesThe first thing to do once your spindles
are degreased and have dried off is to wrap the bearing carrier surfaces well with masking tape, as they are easily damaged. put it on thick, you can cut it off with a blade at the end of the job.
Our new phosphor bronze bushes were supplied by aH schofield (tel. 01457 854267) and were given to the machine shop with the spindles. If you look ahead to the pictures later in this article, you will realise the king pins are re-mounted upside down in the carrier, so be sure to give specific instructions when you drop off the parts. If there is any minor damage to the pins themselves, you have a couple of options: the first is to purchase new pins, the second is to ask the machine shop to clean the bearing surfaces up for you. my local machine shop does this on a crankshaft grinding machine, as they are hardened steel, so a lathe just won’t cut it. Literally.
If you want to fit and ream your own bushes, you will need to buy, or have access to, a 21-24.5mm adjustable reamer, and a lot of patience.
Due to the change in the configuration of the spindle when ‘flipped’, the steering arms sits closer to the chassis, which means you have to ‘flip’ the track rod ends ie insert them from underneath rather than on top (note you also need to run ’68 and later outer track rod ends). again, depending on your mechanical competence, you may find it easier to get the machine shop to cut the reverse tapers in the steering arms for you
04 Grind spindlesso, you have your spindles back from the
machine shop with sparkly pins and new bushes fitted and reamed to size. Do a quick visual check to ensure the bushes were drilled at the grease
points, otherwise you will not be able to grease them when installed!Now it is time to modify the spindle bodies. as you have now mounted the
king pins upside down, you will need to fit the link pins the other way round to original, or the camber will be way out. basically, you will be running the pins in a back-to-front configuration. If you insert the upper king pin (originally lower) into the upper bush, you will see that a fair amount of metal needs to be removed for the pin to turn through 360 degrees.
To achieve this, you will need to mount the spindle securely in a vice, using soft jaw inserts so as to not damage the bearing surface. Take a 4.5-inch angle grinder with a metal grinding disc fitted and put on eye, ear and lung protection to be safe. You will also need to wear some sturdy gloves. Once you are set, carefully grind away material in the area shown above, stopping regularly to check the fit of the king pin. You are aiming to remove as little metal as possible to allow the king pin to work in its new location. We find it beneficial to ‘dish’ the area slightly, so it retains its strength at the edges. Once the pin turns all the way round, swap to a 40-grit flap disc and go over the area, polishing it so it looks ‘factory’. a top tip here is to fit the link pin into the king pin at this stage and check the rotation. some aftermarket pins are pretty ‘fat’ in this area and need to be clearanced with a flap disc. either this, or remove a little more material from the spindle itself
Tool I couldn’T
lIve wIThouTMy tapered reamer.
I can’t do this jobwithout it!
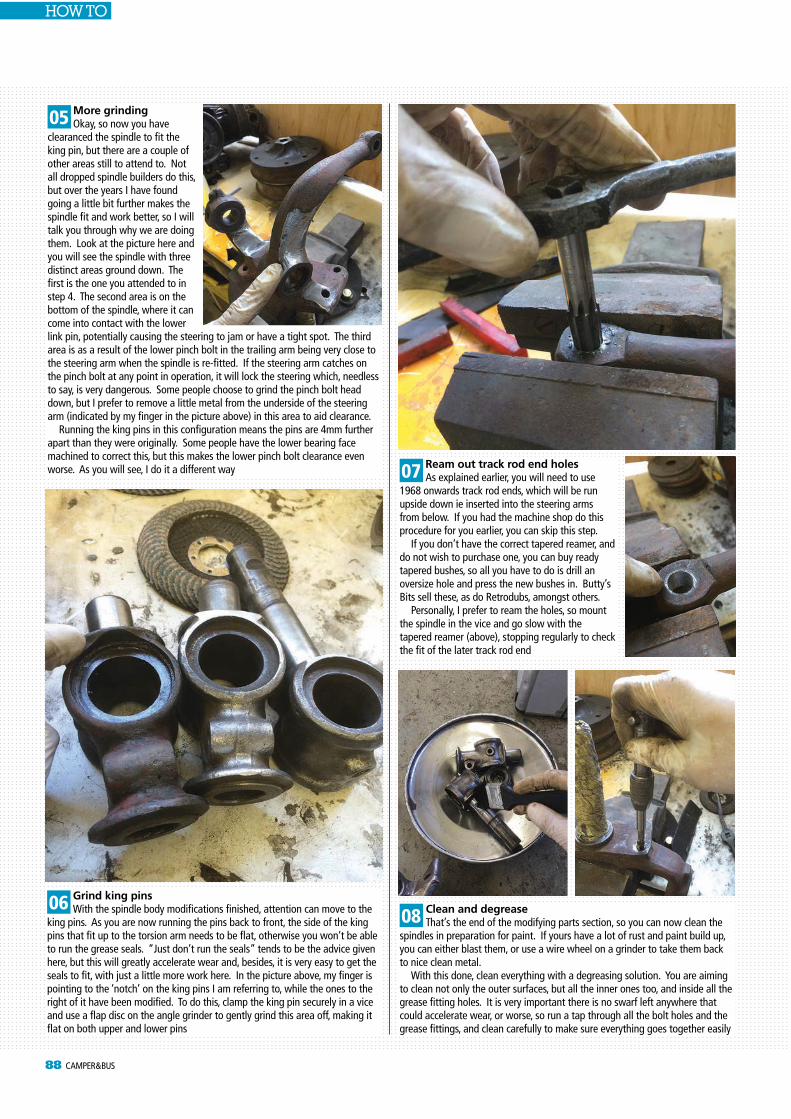
Camper&bus 89 88 Camper&bus
How to
06 Grind king pinsWith the spindle body modifications finished, attention can move to the
king pins. as you are now running the pins back to front, the side of the king pins that fit up to the torsion arm needs to be flat, otherwise you won’t be able to run the grease seals. “Just don’t run the seals” tends to be the advice given here, but this will greatly accelerate wear and, besides, it is very easy to get the seals to fit, with just a little more work here. In the picture above, my finger is pointing to the ‘notch’ on the king pins I am referring to, while the ones to the right of it have been modified. To do this, clamp the king pin securely in a vice and use a flap disc on the angle grinder to gently grind this area off, making it flat on both upper and lower pins
07 Ream out track rod end holesas explained earlier, you will need to use
1968 onwards track rod ends, which will be run upside down ie inserted into the steering arms from below. If you had the machine shop do this procedure for you earlier, you can skip this step.
If you don’t have the correct tapered reamer, and do not wish to purchase one, you can buy ready tapered bushes, so all you have to do is drill an oversize hole and press the new bushes in. butty’s bits sell these, as do retrodubs, amongst others.
personally, I prefer to ream the holes, so mount the spindle in the vice and go slow with the tapered reamer (above), stopping regularly to check the fit of the later track rod end
08 Clean and degreaseThat’s the end of the modifying parts section, so you can now clean the
spindles in preparation for paint. If yours have a lot of rust and paint build up, you can either blast them, or use a wire wheel on a grinder to take them back to nice clean metal.
With this done, clean everything with a degreasing solution. You are aiming to clean not only the outer surfaces, but all the inner ones too, and inside all the grease fitting holes. It is very important there is no swarf left anywhere that could accelerate wear, or worse, so run a tap through all the bolt holes and the grease fittings, and clean carefully to make sure everything goes together easily
10 Assemble spindlesa word here on king pin seals. There have been a lot of problems with
the original-style seals currently available for some time. They tend to split and fall off after a few months, meaning pressing apart the spindle again to rectify. This has been well documented on various VW forums. Consequently, I have been using nitrile o-rings for years now with no problems. To find the correct size, either take your spindle and kingpins, complete with thrust washers, to an o-ring supplier and ask them to find the perfect size, or give martin at Ginger’s VW (www.gingersvw.co.uk) a call as he keeps the correct size in stock. You will need eight in total.
To re-assemble, insert the greased fibre thrust washers onto the king pins, then fit an o-ring to each one. Having greased the pins and bushes, fit everything together, so the spindle looks like the picture above to the right. Don’t forget the two o-rings on the spacer either, which can take a bit of jiggery-pokery to get in place. With this done, insert the lower pin into the upper pin, ready to be pressed into place. To press the pins back together, you will need a hydraulic press. You can build a fixture to keep the pins in line when pressing, but I find a couple of old driveshafts turned down to fit into the link pin bushes works a treat. I then just eyeball it as the pins are pressed together. Don’t lean on the press too hard, as you may make the spindles unnecessarily tight
09 Prime and paint spindlesWith everything cleaned and dried, it is time to put some paint on the
spindles. You don’t have to do this stage, but it makes assembly more pleasant and keeps your bus looking nice and tidy underneath. You can mask off any bearing surfaces or do as I do and hold them in a gloved hand to paint them, then clean off the excess on the bearing surfaces with thinners once dry.
aim to get at least a couple of light coats of suitable primer and a couple more of a decent chassis black on the spindles, allowing the paint to dry thoroughly between coats
05 More grindingOkay, so now you have
clearanced the spindle to fit the king pin, but there are a couple of other areas still to attend to. Not all dropped spindle builders do this, but over the years I have found going a little bit further makes the spindle fit and work better, so I will talk you through why we are doing them. Look at the picture here and you will see the spindle with three distinct areas ground down. The first is the one you attended to in step 4. The second area is on the bottom of the spindle, where it can come into contact with the lower link pin, potentially causing the steering to jam or have a tight spot. The third area is as a result of the lower pinch bolt in the trailing arm being very close to the steering arm when the spindle is re-fitted. If the steering arm catches on the pinch bolt at any point in operation, it will lock the steering which, needless to say, is very dangerous. some people choose to grind the pinch bolt head down, but I prefer to remove a little metal from the underside of the steering arm (indicated by my finger in the picture above) in this area to aid clearance.
running the king pins in this configuration means the pins are 4mm further apart than they were originally. some people have the lower bearing face machined to correct this, but this makes the lower pinch bolt clearance even worse. as you will see, I do it a different way
11 Final assemblyWith the spindles pressed back together, there are a couple of final tasks
to attend to. If you remember, I mentioned earlier on that there will now be a 4mm difference in the pin spacing. This means to get the m8 bolt into the upper pin you will need to grind the pin a little. a rotary burr on a die grinder works best for this. Keep checking the bolt as you go, as a snug fit is optimal.remember the grease caps you knocked out earlier and set aside? Dig them out, clean them up and flatten them if needed. as the upper kingpin now has an open bearing surface, it is advisable to tack weld a grease cap to the top of the spindle to stop ingress of dirt and premature wear. If your original grease caps were missing, you will have to make something. With the caps tacked in position, you can carefully touch up the paint.remember to check the offset of the trailing arms and shim the link pins to factory specs when re-fitting the spindles to the bus. John muir’s book, How To Keep Your Volkswagen alive has the best explanation of this. Finish
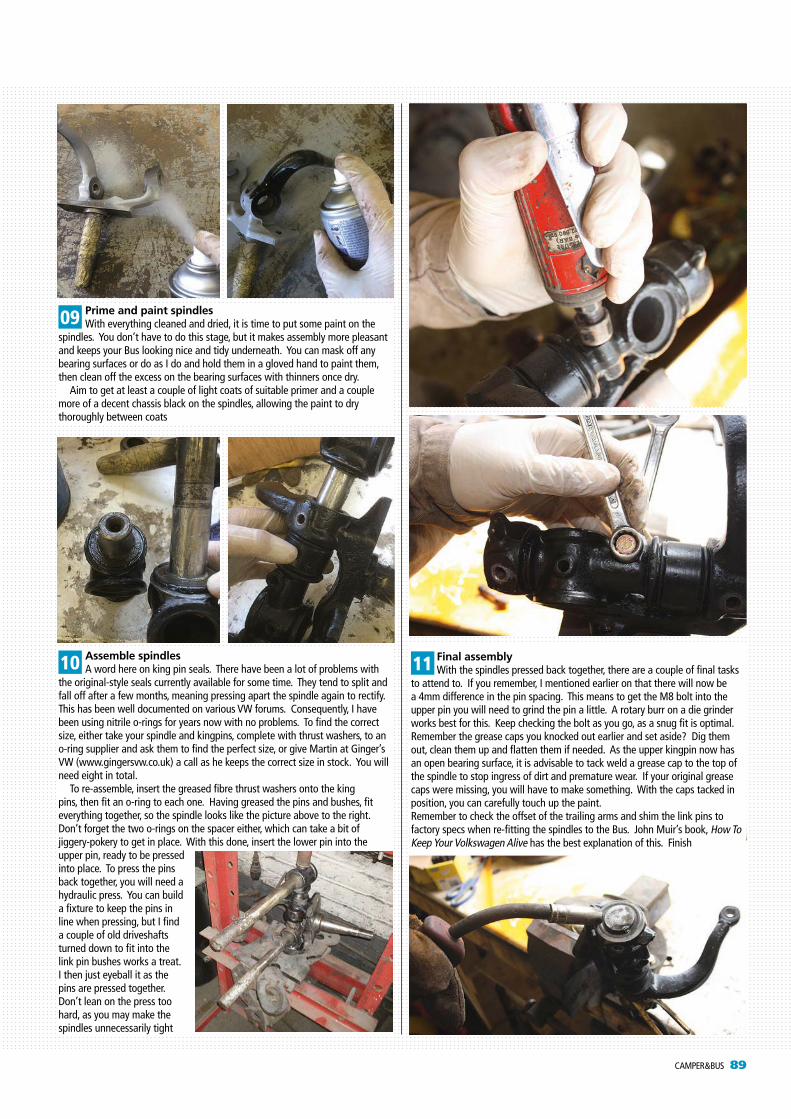
Camper&bus 81 80 Camper&bus
FBI Volkswagen serVIcesHaving been a staple of the UK VW scene since 1999, we decided
it was definitely time to pay Swansea-based FBI VW a visitWords Mark Walker Pics Michael Whitestone
Shop tour
Shop tour
we decided to stop working on customers’ vehicles and focus solely on the cars we import. What this effectively means is we can choose our own timescales - if the mail order side gets busy, we can all down tools and focus on that for a while instead.
What exactly do you specialise in? We import VWs. It used to be mainly Buses, but we now stock a lot of Beetles, too. We try to focus on quality rather than quantity, and alway buy vehicles we wouldn’t mind owning ourselves. At any one time we have around 20-30 vehicles in stock and, of these, we usually have two at any one time undergoing restoration or renovation. The sort of vehicles available nowadays usually need the odd metal repair, a bit of paintwork and some mechanical or interior work, so we focus more on this than complete restorations these days.
Running alongside this are the parts sales. The decent parts are getting harder to find, but we’ve built up a good network of contacts over the past 15 years, so still get a lot of interesting stuff through the doors. If we don’t have it in stock, we can generally source it through our wide range of contacts.
ContaCt detailS
FBI VW SerVIceSunit 2 White City roadFforestfachswanseasa5 4eeTel. 01792 585544 email: [email protected]: wwwfbivw.com
If you’re searching for a replacement original part for your VW, a body cut, rare accessory, or even an entire project vehicle, there are a number of places you can call upon rather than turning to the
internet. Being involved in the VW scene since 1999, FBI VW Services not only have a lot of cool stock, but also the expertise and know how to back it up. The fact that Graham, Keith and Phil at FBI are all old friends and really into VWs goes a heck of a long way too, so we set our compass for Swansea to check out what’s in stock and find out what the future holds.
How did FBI VW services start?I’ve been into VWs since before I could drive, so it was inevitable I’d turn my passion into a business. After finishing art college and university and a trip to California, where I found a lovely 1960 Mango Green Bus, I returned home, quit my job and went for it. In the early days we did a lot of repair work for customers in a smaller unit. Back then, we did a lot of Beetles and, living on the coast, there were always a lot of Bay Windows that needed welding, too. As the business grew though and the import side of things picked up,
▲ Graham Clarke
likes to use his VWs. This Split is his daily driver
▲ Graham is very much hands on with the repair and resto work FBI carry out on the vehicles they import
▲ Keith Usher is the main
metal repair guru of the bunch, and the quality of his work speaks volumes
▲ When the mail order parts side of the business gets busy, it’s all hands on deck
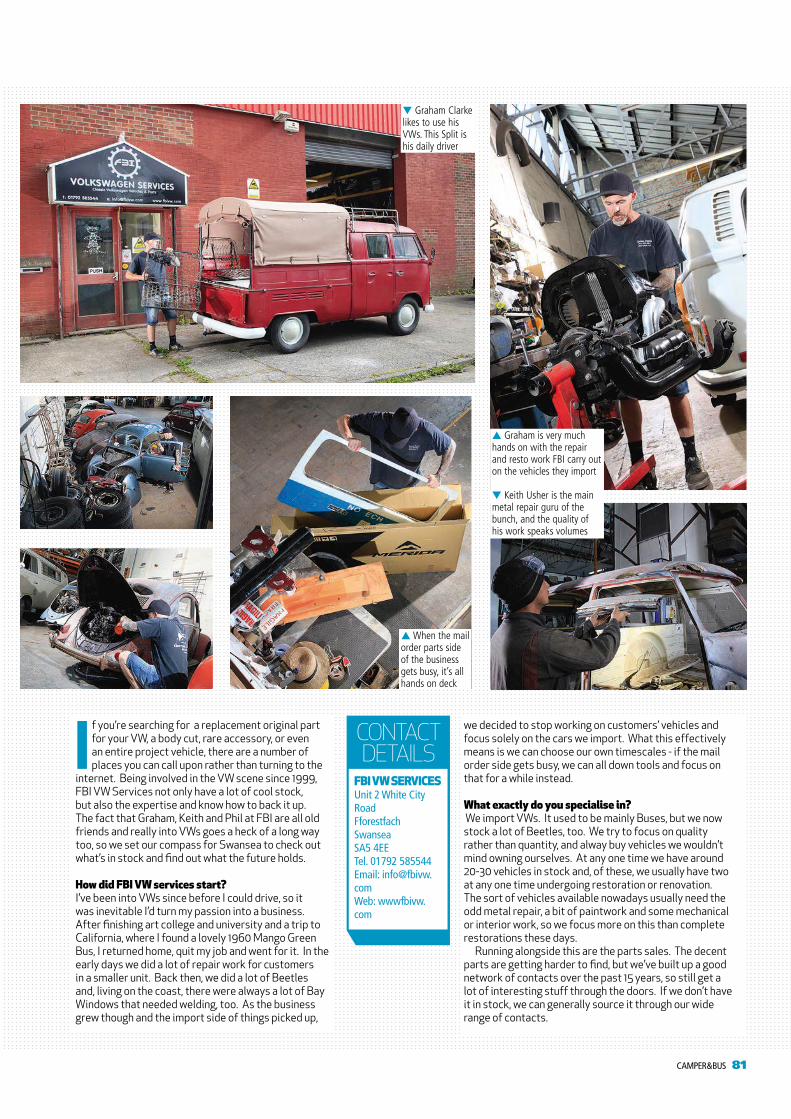
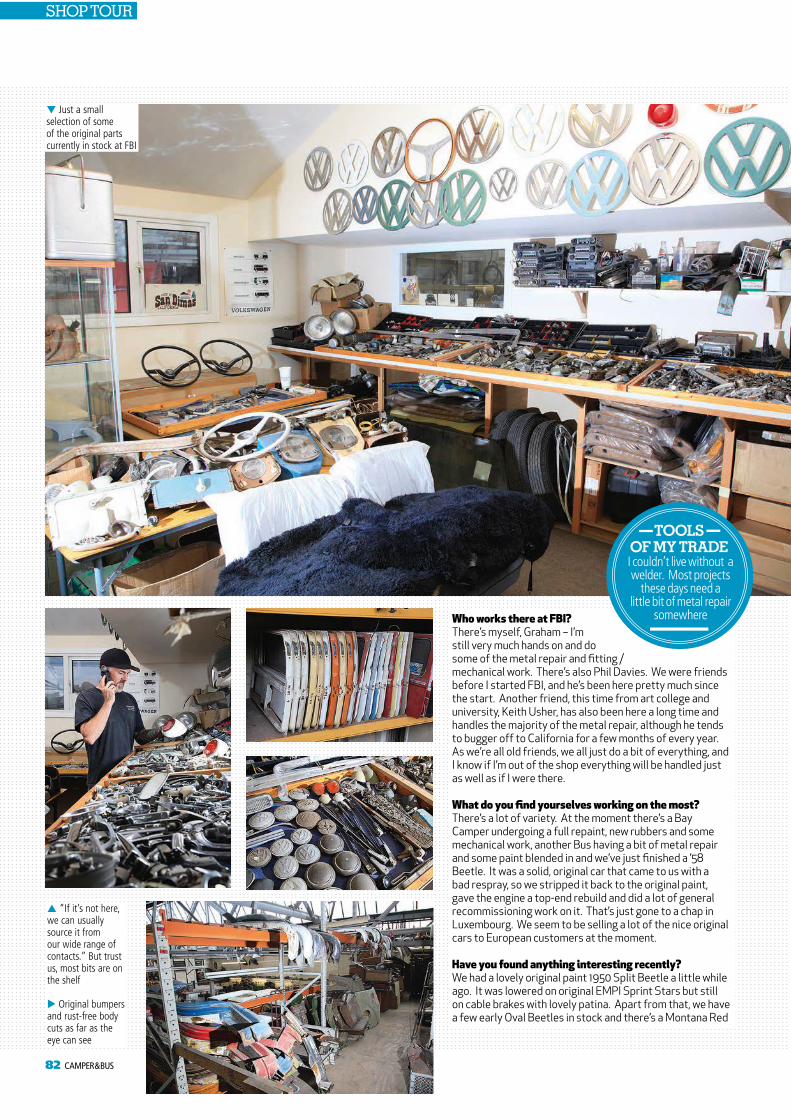
Camper&bus 83 82 Camper&bus
Who works there at FBI?There’s myself, Graham – I’m still very much hands on and do some of the metal repair and fitting / mechanical work. There’s also Phil Davies. We were friends before I started FBI, and he’s been here pretty much since the start. Another friend, this time from art college and university, Keith Usher, has also been here a long time and handles the majority of the metal repair, although he tends to bugger off to California for a few months of every year. As we’re all old friends, we all just do a bit of everything, and I know if I’m out of the shop everything will be handled just as well as if I were there.
What do you find yourselves working on the most?There’s a lot of variety. At the moment there’s a Bay Camper undergoing a full repaint, new rubbers and some mechanical work, another Bus having a bit of metal repair and some paint blended in and we’ve just finished a ’58 Beetle. It was a solid, original car that came to us with a bad respray, so we stripped it back to the original paint, gave the engine a top-end rebuild and did a lot of general recommissioning work on it. That’s just gone to a chap in Luxembourg. We seem to be selling a lot of the nice original cars to European customers at the moment.
Have you found anything interesting recently?We had a lovely original paint 1950 Split Beetle a little while ago. It was lowered on original EMPI Sprint Stars but still on cable brakes with lovely patina. Apart from that, we have a few early Oval Beetles in stock and there’s a Montana Red
Shop tour
1970 Westy fresh out of resto that is a very nice Bus – very, very pretty. The one car recently that got all our collective juices flowing was, unusually, an early Mk1 Golf. It was so different from anything we’ve done before that it just got all of us a little heated, although it still felt very much like a classic car to drive.
Plans for the future?To be perfectly honest, no. We’re quite happy with what we do and have a great time doing it, too. After the Golf we did recently, we will probably do a few early water-cooled cars in the future – it just seems like a natural progression for us, and the early stuff is getting very difficult to find now in good condition.
▲ “If it’s not here, we can usually source it from our wide range of contacts.” But trust us, most bits are on the shelf
▲ Original bumpers and rust-free body cuts as far as the eye can see
▲ Keith loves massaging some German steel back into shape. Peace, brother
▲
Just a small selection of some of the original parts currently in stock at FBI
▲
Attention to detail is key. Here, Phil gets to grips witha sticking door catch
Toolsof my TradeI couldn’t live without a welder. Most projects
these days need a little bit of metal repair
somewhere
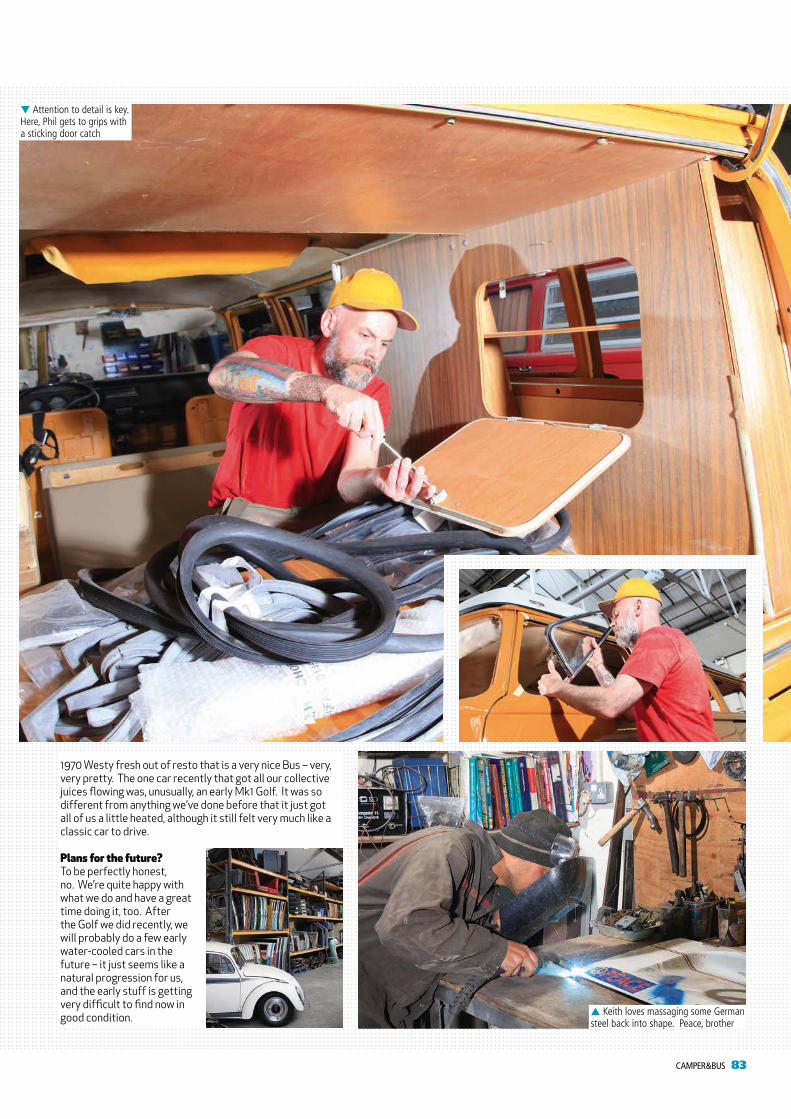

Product FocusFirst published
Volksworld Camper & Bus magazine2015
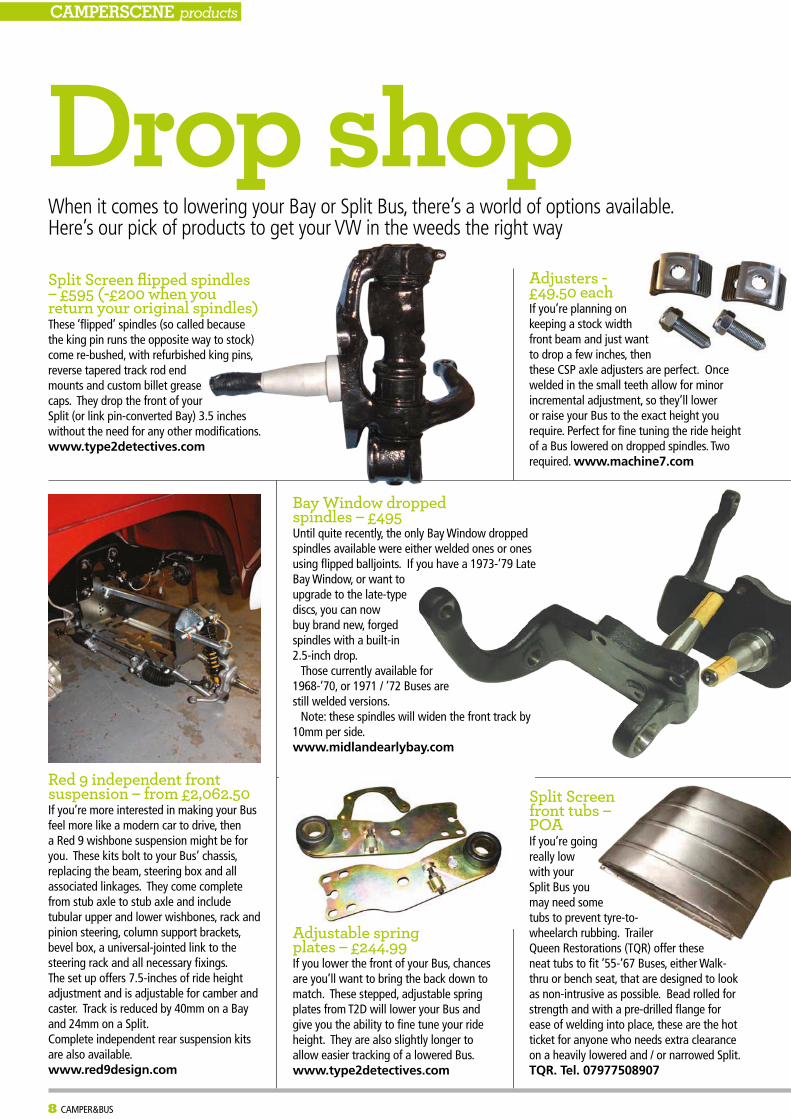
Camper&bus 9 8 Camper&bus
When it comes to lowering your Bay or Split Bus, there’s a world of options available. Here’s our pick of products to get your VW in the weeds the right way
Red 9 independent front suspension – from £2,062.50If you’re more interested in making your bus feel more like a modern car to drive, then a red 9 wishbone suspension might be for you. These kits bolt to your bus’ chassis, replacing the beam, steering box and all associated linkages. They come complete from stub axle to stub axle and include tubular upper and lower wishbones, rack and pinion steering, column support brackets, bevel box, a universal-jointed link to the steering rack and all necessary fixings. The set up offers 7.5-inches of ride height adjustment and is adjustable for camber and caster. Track is reduced by 40mm on a bay and 24mm on a split.Complete independent rear suspension kits are also available.www.red9design.com
Bay Window droppedspindles – £495until quite recently, the only bay Window dropped spindles available were either welded ones or ones using flipped balljoints. If you have a 1973-’79 Late bay Window, or want to upgrade to the late-type discs, you can now buy brand new, forged spindles with a built-in 2.5-inch drop.
Those currently available for 1968-’70, or 1971 / ’72 buses are still welded versions.
Note: these spindles will widen the front track by 10mm per side.www.midlandearlybay.com
Horseshoe plates – £77.50use these if you want to lower the rear of your bay and retain ride quality. If you’re looking to go super slammed, they are a must. Horseshoe plates allow you to retain stock rear dampers and full suspension travel. Note: because of the way they fit between the spring plate and hub, some wheel options will not fit, so check first.www.justkampers.co.uk
Spax dampers – £94.50 eachThere are many different
dampers available for lowered VWs, and the length you need depends on how low you choose to run your bus. We generally recommend using oil-filled
shocks on the front of a bus with a narrowed beam and dropped spindles for the best ride quality.
but, if you want a firmer ride, or want some for the rear of a Camper, you may benefit from a pair of gas-filled or gas adjustable shocks, such as these spax Krypton units.www.machine7.com
Adjusters - £49.50 eachIf you’re planning on keeping a stock width front beam and just want to drop a few inches, then these Csp axle adjusters are perfect. Once welded in the small teeth allow for minor incremental adjustment, so they’ll lower or raise your bus to the exact height you require. perfect for fine tuning the ride height of a bus lowered on dropped spindles. Two required. www.machine7.com
Bay adjustable beam – £589.50Coolair’s height-adjustable, standard-width beams fit all bay Window buses from 1968- 1979 and can also be used on split Window buses if converted to balljoint suspension. manufactured in the uK with laser-cut side plates, cold drawn seamless tubes, a pair of steering damper mounts and dual servo brackets they work on LHD and rHD buses. www.coolairvw.co.uk
Air ride kit – POAair suspension won’t lower your bus, but fitting it will allow you to raise a slammed vehicle a few inches to clear bumps, dips and sleeping policemen. There are a variety of different routes you can take, but the cheapest, and consequently the most popular, option is to run a pair of air shocks on the front with an onboard compressor. If you are considering the options, please speak with one of the specialists who can talk you through the process.www.www.limebug.net or www.vworks.co.uk
Split Screen front tubs – POAIf you’re going really low with your split bus you may need some tubs to prevent tyre-to-wheelarch rubbing. Trailer Queen restorations (TQr) offer these neat tubs to fit ’55-’67 buses, either Walk-thru or bench seat, that are designed to look as non-intrusive as possible. bead rolled for strength and with a pre-drilled flange for ease of welding into place, these are the hot ticket for anyone who needs extra clearance on a heavily lowered and / or narrowed split. TQR. Tel. 07977508907
Adjustable springplates – £244.99If you lower the front of your bus, chances are you’ll want to bring the back down to match. These stepped, adjustable spring plates from T2D will lower your bus and give you the ability to fine tune your ride height. They are also slightly longer to allow easier tracking of a lowered bus.www.type2detectives.com
Split Bus narrowed beam – from £540This replacement slam beam from T2D is a brand new, jig-built front axle that comes with Delron bushings, a raised centre pin for improved ground clearance, new grease nipples and adjusters. Note: these beams also require the use of a pair of narrowed track rods too, available separately.www.type2detectives.com
Steering box raise kit – £110If you’re going low enough to need tubs on a split, you’ll need to address the steering box hanging down at the front of your bus too, and these pre-fabricated, weld-in chassis sections not only raise it up but make it look like it was done that way at the factory.
Note: ‘swooped’ pedal in foreground is not needed on a rHD buswww.hayburner.co.uk
Split Screen flipped spindles – £595 (-£200 when you return your original spindles)These ‘flipped’ spindles (so called because the king pin runs the opposite way to stock) come re-bushed, with refurbished king pins, reverse tapered track rod end mounts and custom billet grease caps. They drop the front of your split (or link pin-converted bay) 3.5 inches without the need for any other modifications.www.type2detectives.com
camperscene products
Drop shop
* al
l pric
es c
orre
ct a
t the
tim
e of
goi
ng to
pre
ss

Import Report 1968 Beetle
First published VolksWorld magazine
2013