Embed Size (px)
Citation preview

WUSTL MARKETPLACE USER GUIDE REQUISITIONER
MarketplacePurchase Requisition
System
Requisitioner
User Guide
Revised 10/081

WUSTL MARKETPLACE USER GUIDE REQUISITIONER
OVERVIEW..............................................................................................................................................................4
ROLES AND TERMINOLOGY.............................................................................................................................5
LOGIN PROCEDURE.............................................................................................................................................7
LOGOUT PROCEDURE.........................................................................................................................................9
CREATE A CART..................................................................................................................................................10
SEARCH METHODS FOR SHOPPING.....................................................................................................13
SEARCHING FOR PRODUCTS USING THE HOSTED CATALOGS IN THE PURCHASING SHOWCASE...........................15PUNCH-OUT ITEM METHOD...................................................................................................................................16
ADDING ITEMS TO YOUR CART.....................................................................................................................17
REMOVING AN ITEM FROM YOUR CART...................................................................................................20
SHOPPING USING THE NON-CATALOG ITEM METHOD.........................................................................20
SHOPPING USING THE NON-CATALOG ITEM METHOD.........................................................................21
REVIEWING AND UPDATING THE CART.....................................................................................................24
THE REVIEW DETAILS PAGE..........................................................................................................................25
HEADER SECTION..................................................................................................................................................26GENERAL SECTION................................................................................................................................................27SHIPPING SECTION................................................................................................................................................29BILLING.................................................................................................................................................................31ADDING ACCOUNTS TO YOUR PR.........................................................................................................................32
Entering accounts at the header level.............................................................................................................32Entering Accounts at the item level.................................................................................................................34Entering accounts at the header level and the item level................................................................................36
ADDING INTERNAL NOTES AND ATTACHMENTS..................................................................................................36ADDING INTERNAL NOTES AND ATTACHMENTS..................................................................................................37
Internal Notes..................................................................................................................................................37Internal Attachments........................................................................................................................................38
ADDING EXTERNAL NOTES AND ATTACHMENTS.................................................................................................39External Notes.................................................................................................................................................39External Attachments.......................................................................................................................................40
NOTIFICATION SECTION........................................................................................................................................41SUPPLIER/LINE ITEMS DETAIL..............................................................................................................................42SUPPLIER SECTION INFORMATION.........................................................................................................................43PRODUCT ITEM DETAIL........................................................................................................................................44
Reviewing Manufacturer Information.............................................................................................................45Entering Asset/Haztrak Information................................................................................................................45Entering Internal/External notes and Attachments at the Item level...............................................................47Adding Internal Notes and Attachments..........................................................................................................47
Revised 10/082

WUSTL MARKETPLACE USER GUIDE REQUISITIONER
Internal Notes..................................................................................................................................................47Internal Attachments........................................................................................................................................48Adding External Notes and Attachments.........................................................................................................49External Notes.................................................................................................................................................49External Attachments.......................................................................................................................................50
SUMMARY TOTAL OF THE REQUISITION................................................................................................................51DISPLAY OF COMPLETED REVIEW DETAILS PAGE................................................................................................52
CREATING THE REQUISITION...................................................................................................................53
REVIEWING THE REQUISITION AFTER IT HAS BEEN SUBMITTED............................................................................53
RESEARCHING THE PO NUMBER..................................................................................................................54
RESEARCHING THE PO NUMBER..................................................................................................................55
REQUISITION STATUS.......................................................................................................................................55
REQUISITION STATUS.......................................................................................................................................56
USING THE APPROVAL FOLDER....................................................................................................................57
WHAT ROUTES TO FOLDERS..................................................................................................................................57FILTERING REQUISITIONS......................................................................................................................................57FILTERING REQUISITIONS......................................................................................................................................58DEPARTMENTAL FOLDER......................................................................................................................................58
Reviewing a PR................................................................................................................................................58Assign a PR to the Personal Approval folder..................................................................................................59Adding notes to the PR....................................................................................................................................60Approve and Completing.................................................................................................................................60
PERSONAL FOLDER...............................................................................................................................................61Review and Edit...............................................................................................................................................61Approve and Completing.................................................................................................................................62Return to Shared folder...................................................................................................................................62Add notes to History........................................................................................................................................63
CREATING FAVORITES.....................................................................................................................................64
FIELDS ON A SHOPPING CART.......................................................................................................................66
FIELDS ON THE REVIEW DETAILS PAGE....................................................................................................71
HOW TO’S AND TROUBLE SHOOTING HINTS............................................................................................78
ADD NOTES (LIKE A TRAILDOC) TO AN EXISTING REQUISITION...........................................................................78THE REQUISITIONER NEEDS TO REJECT OR DELETE A REQUISITION ENTERED BY A SHOPPER..............................79THE REQUISITION HAS NOT MOVED OVER INTO AIS BUT IS ‘STUCK’ AT THE REQUISITIONER REVIEW STEP......80
FAQ’s and Contact Information................................................................................................................................81
Revised 10/083

WUSTL MARKETPLACE USER GUIDE REQUISITIONER
Overview
The WUSTL Marketplace is a Purchase Requisition system that is integrated with the current AISystem (AIS). The Marketplace (MP) brings a modern online ‘cart’ shopping experience to the University faculty/staff involved in procurement. There are numerous benefits to this system including a browser-based application and updates to vendor pricing in real-time, etc.
The Marketplace uses existing AISystem security so the ‘approval’ requirements are consistent with how it works in the current AISystem (i.e. current departmental and central area approvals still apply).
The basic ‘flow’ is as follows:
Revised 10/084

WUSTL MARKETPLACE USER GUIDE REQUISITIONER
1. Cart created2. Purchase Requisition (PR) created 3. Requisition follows appropriate workflow path in Marketplace4. Requisition submitted to AISystem5. Departmental and central area approvals given in AISystem as needed6. Requisition sent back to Marketplace where Purchasing Approvals are given as
needed 7. Purchase order is sent back to AISystem with encumbrance number assigned
The Marketplace supports a system of workflow approvals. This allows any employee in the WUSTL environment to be a ‘shopper’. In turn there are different paths a virtual ‘cart’ can take before it becomes a Purchase Order. The first things to understand are the roles.
Roles and TerminologyAISystem (AIS) - Web-based administrative system. When the purchase requisition is submitted, it flows to this system for University account and central area approvals.
Cart – Items are added to a cart for a virtual shopping experience
Electronic Catalogs (Hosted) – are best used when the specific supplier is unknown or the shopper want to search and compare items from multiple sources.
Electronic Catalogs (Punch-out) – links directly to the University supplier-specific web page and is used when the shopper knows from which supplier the purchase is to be made.
Marketplace (MP) – The web-based method of shopping at Washington University
Non-Catalog Cart – A requisition created for a supplier that does not have an on-line catalog.
Requisition (PR) – After a cart has been reviewed and completed, it becomes a requisition ready to send to AISystems.
Requisitioner (RQ) – All requisitions (PRs) will go through a Requisitioner (RQ). This is the person that had the FIS administration function that has typically entered purchase order documents in FIS legacy and AISystems - (can also be a shopper).
Reviewer (RV) – Optional role – One that reviews and approves shopping carts. Not all departments will utilize the Reviewer; it is a middle tier of workflow approval. The role is often given to a Lab Manager or PI.
Shopper (SH) – One that creates a shopping cart.
Revised 10/085

WUSTL MARKETPLACE USER GUIDE REQUISITIONER
Note: All roles have the ability to shop
Workflow – the routing of the requisition PR through Marketplace and AISystems. Common workflows are as follows:
SHOPPER > REQUISITIONER > AIS APPROVALSHOPPER > REQUISITIONER > AIS APPROVALSHOPPER > REVIEWER > REQUISITIONER > AIS APPROVER
Revised 10/086

WUSTL MARKETPLACE USER GUIDE REQUISITIONER
Login Procedure
Access to the Marketplace is provided through current AISystem security specifications (i.e., employee ID and password).
Follow these steps to access.
Log onto AISystem: http://aisinfo.wustl.edu/ps.html
Enter your User ID (employee ID) and Password. Both of these fields are case sensitive. Press Enter or click the Sign-in button.
Access the Marketplace in the AIS menu
Click on Profile
The AIS Profile page displays
Revised 10/087

WUSTL MARKETPLACE USER GUIDE REQUISITIONER
The AIS Profile page is the ‘portal’ to the Marketplace. It establishes some basic default information in the Marketplace based upon your AISystem information. For example, the default for the ‘Shopping Department’ field will be the default department number used in your shopping cart. Additionally the ‘Ship To’ information will be the default ‘Ship To’ information sent to the vendor. The ‘Marketplace Roles’ section will display the roles assigned to your employee ID.
Revised 10/088

WUSTL MARKETPLACE USER GUIDE REQUISITIONER
Note: These values are only the default and can be overridden by the shopper in the Marketplace at any time.
Click on the yellow ‘GoTo Marketplace’ button and a blue ‘Launch Marketplace Page’ link will display
Click on ‘Launch Marketplace Page’ and the Marketplace will open to the ‘Home page’ in the same browser window. The Organization Message section is on the left-hand side and the shopping information on the right-hand side. The information below the Organization Message area contains the history on the user’s shopping carts and PRs.
Revised 10/089

WUSTL MARKETPLACE USER GUIDE REQUISITIONER
Logout Procedure
When you are finished using the Marketplace, click Logout in the top middle section of the screen.
For security purposes you are automatically taken to an exit screen indicating that you have successfully logged out.
Revised 10/0810

WUSTL MARKETPLACE USER GUIDE REQUISITIONER
Create a Cart
All Purchase Requisitions (PRs) start out as a ‘cart’. Once the cart is submitted it becomes a PR in the Marketplace. Think of the cart as your ‘virtual shopping cart’ that can be filled up with items you intend to purchase. There can be one or multiple items in a cart, but there can only be one vendor per cart. There are two types of carts: Draft Cart and Active Cart. A draft cart is a cart that has been started but not yet submitted to be a PR. Draft carts are editable and can be deleted. You can have multiple draft carts open and in progress at one time. An Active Cart is the Draft Cart that you are currently working on. Let’s discuss how to get your cart started.
Note: You cannot have items from different vendors in one cart.
Follow these steps to create a new cart. There are several different and acceptable ways to access the cart page. For simplicity reasons, these instructions are going to focus on the preferred method of creating a cart.
Log into the Marketplace ‘Home’ page.
Click on the ‘Carts’ tab.
The ‘Carts’ tab will display.
Note: What actually displays will depend upon whether or not you already have an Active Cart in progress. If you do already have one or more Draft Carts in progress you will be taken to the Active Cart tab.
If you do not have any Carts already in progress you will be taken to the Draft Cart tab – Click on ‘Create Cart’.
Revised 10/0811

WUSTL MARKETPLACE USER GUIDE REQUISITIONER
Clicking on ‘Create Cart’ will take you to the ‘Active Cart’ tab and will open a new cart for editing.
Below is the ‘Active Cart’ view. The relevant fields are:
Cart Name: A required field that is the name of the cart. This will be a unique default value that is sequential and can be changed. It is recommended that you change the cart name to a meaningful name.
Description: Optional field designed to allow another more descriptive name for the cart.
Department/Lab: This is a critical field that drives the departmental routing of the requisition. The department number can be changed by clicking on the ‘Select from profile values…’ link that will open a drop down box with different choices. This field also determines if a requisition routes to a Reviewer or a Requisitioner. In order to route to a Reviewer you must choose an option that includes a department and a folder name (i.e. 001036-Roper). To route to a Requisitioner, choose the six-digit department number for the value (i.e. 001036).
Note: The choices presented are derived from the AIS Profile screen.
Once you edit these fields you must click on ‘Save’ to save the data. This cart is still a ‘Draft Cart’ and is not complete, as there are not yet any items in the cart.
After you create a cart you can click on ‘Create Cart’ again and create another cart. You can have many Draft Carts open at once, but can have only one ‘Active Cart’ at a time. To view all of your draft carts, click on the ‘Draft Carts’ tab as highlighted in the example below. When you view a ‘Draft Cart’ it becomes your ‘Active Cart’. If a cart is highlighted, it is your current active cart. To delete a draft cart, click on the ‘Delete’ button located at the far right-hand side of the page.
Revised 10/0812

WUSTL MARKETPLACE USER GUIDE REQUISITIONER
Once the draft cart becomes active, it displays as below.
If applicable, in the Department/Lab field, click on the “Select from Profile Values” function to see a list of values available. The Department/Lab is an important field that drives the workflow routing of your requisition.
Revised 10/0813

WUSTL MARKETPLACE USER GUIDE REQUISITIONER
Search Methods for shopping
There are multiple ways to search for items. The user can use the hosted vendors (located at the top of the Product Search page), punch-out vendors (located at the bottom of the Product Search page) or vendors whose catalogs are not currently available (Non-catalog). For the hosted and punch-out vendors there are two search pages available – the ‘Quick’ search and the ‘Advanced’ search. Both pages allow the user to search by description, catalog number, manufacture name or number and/or category.
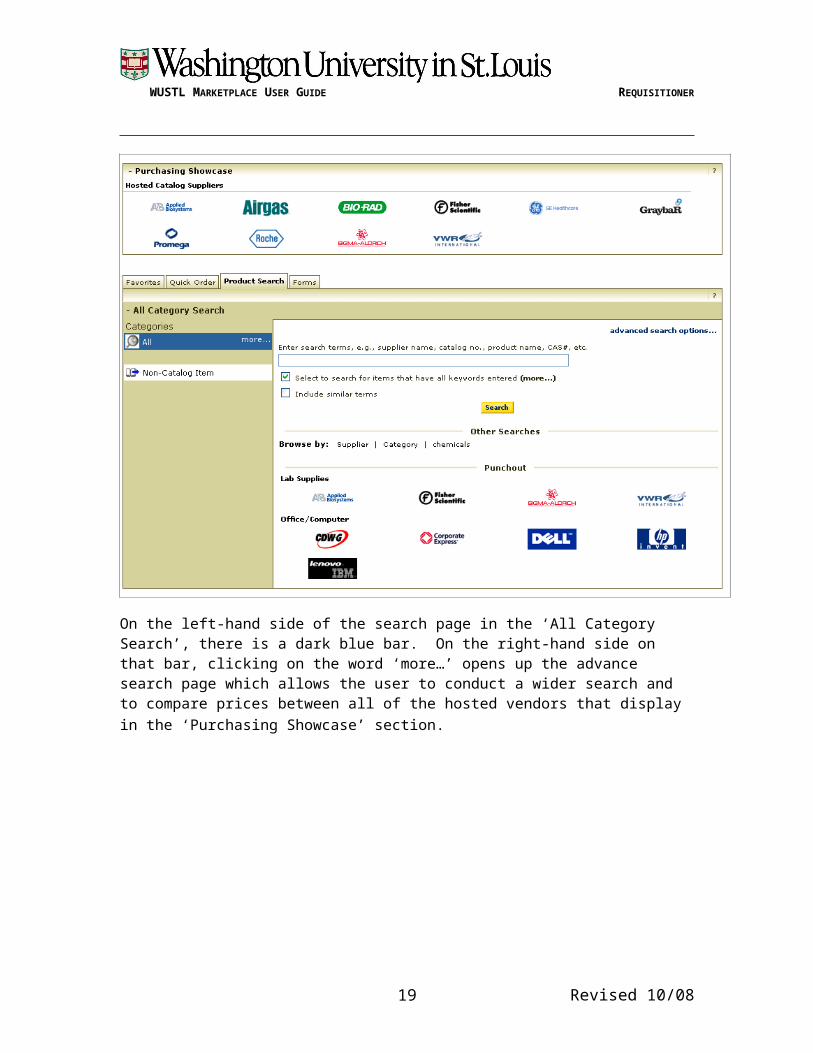
This is the view for the quick search. Notice there is only one search criterion field. The hosted catalogs are at the top of the page in the Purchasing Showcase area and those vendors that are Punch-outs are located at the bottom of the page.
On the left-hand side of the search page in the ‘All Category Search’, there is a dark blue bar. On the right-hand side on that bar, clicking on the word ‘more…’ opens up the advance search page which allows the user to conduct a wider search and to compare prices between all of the hosted vendors that display in the ‘Purchasing Showcase’ section.
Revised 10/0814

WUSTL MARKETPLACE USER GUIDE REQUISITIONER
This is the ‘Advanced Search’ page; users can refine the search by completing more than one search field and/or by selecting one of the categories located on the left-hand side of the screen.
Once results display, the user can sort by clicking on the column headings/filters. Valid values are: Weight, Supplier, Category, Catalog #, Product Description, UOM (Unit of Measure) and Product Size.
Revised 10/0815

WUSTL MARKETPLACE USER GUIDE REQUISITIONER
Searching for products using the Hosted Catalogs in the Purchasing Showcase
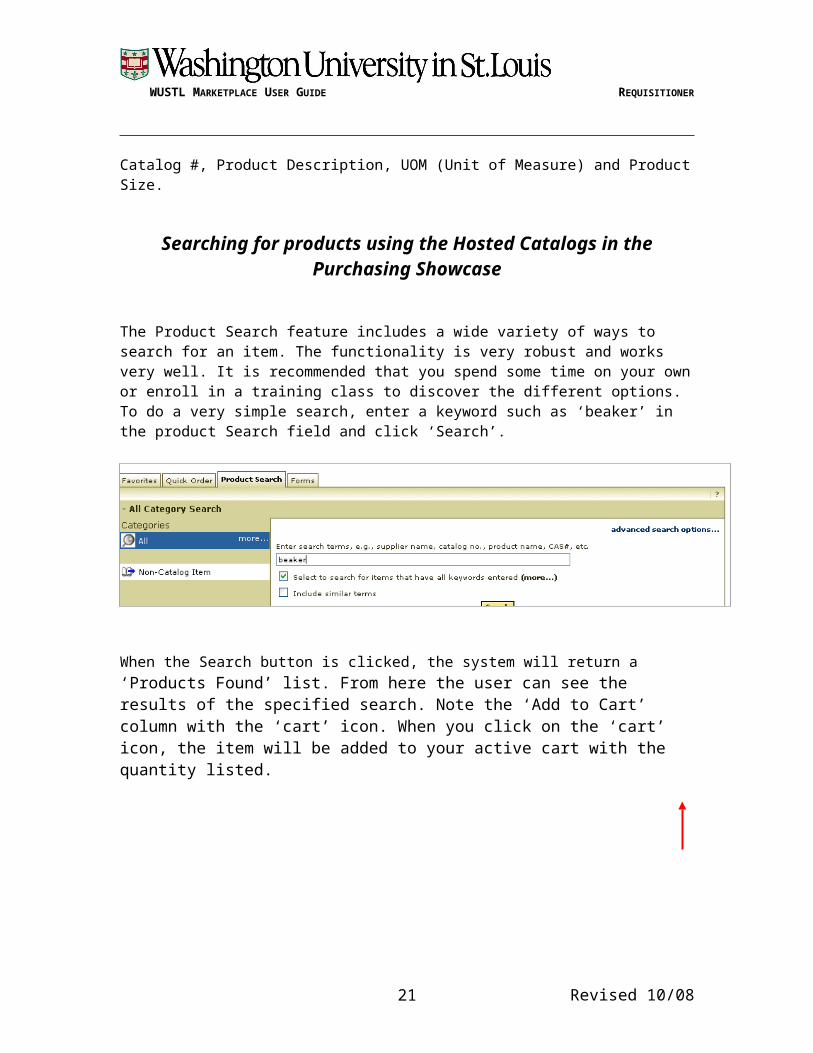
The Product Search feature includes a wide variety of ways to search for an item. The functionality is very robust and works very well. It is recommended that you spend some time on your own or enroll in a training class to discover the different options. To do a very simple search, enter a keyword such as ‘beaker’ in the product Search field and click ‘Search’.
When the Search button is clicked, the system will return a ‘Products Found’ list. From here the user can see the results of the specified search. Note the ‘Add to Cart’ column with the ‘cart’ icon. When you click on the ‘cart’ icon, the item will be added to your active cart with the quantity listed.
Revised 10/0816

WUSTL MARKETPLACE USER GUIDE REQUISITIONER
Punch-out Item method
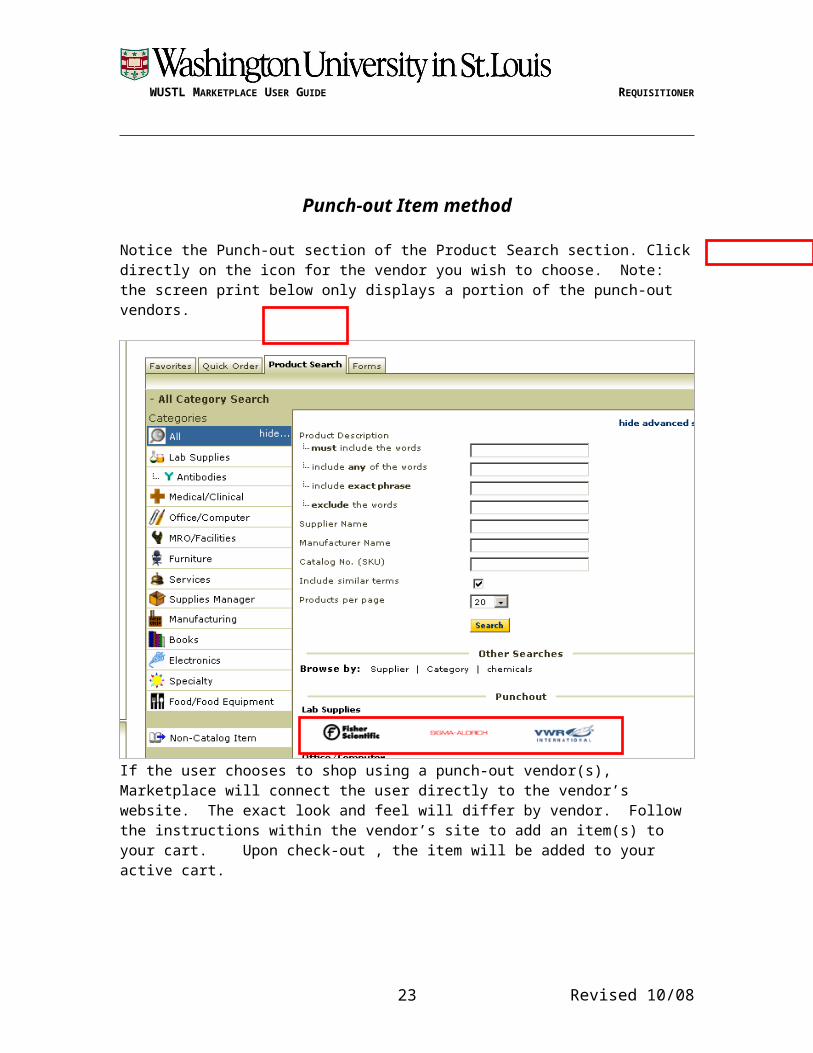
Notice the Punch-out section of the Product Search section. Click directly on the icon for the vendor you wish to choose. Note: the screen print below only displays a portion of the punch-out vendors.
If the user chooses to shop using a punch-out vendor(s), Marketplace will connect the user directly to the vendor’s website. The exact look and feel will differ by vendor. Follow the instructions within the vendor’s site to add an item(s) to your cart. Upon check-out , the item will be added to your active cart.
Revised 10/0817

WUSTL MARKETPLACE USER GUIDE REQUISITIONER
Adding Items to your Cart
Now that the cart is created and named and you have selected the proper Department/Lab value, items can be added to your cart.
Note: It is not a requirement to build your cart in this order. It is possible to select your items first and add them to a cart before you create a cart, name it and select your Department/Lab value.
There are three different types of items that can be added to a cart: Hosted Catalog items, Non-Catalog items, and Punch-out items. We will walk through each type.
Note: In many circumstances it is not possible to mix the different item types in one cart. Some vendors will allow a mix, others will not. It is predefined by each Vendor.
Create your cart and then click on the ‘Add Items to Cart’ button.
The system will advance to the search page. Enter your selection criteria and hit the search button. In the example below, the user has decided to search all of the Hosted Catalogs for beakers.
Revised 10/0818
WUSTL MARKETPLACE USER GUIDE REQUISITIONER
The system returns results based on your search. To purchase the item, enter the appropriate amount in the Quantity box.
There are two ways to add items to the shopping cart:
1. Click on the shopping cart icon located at the far right-hand side of the page and the item will automatically be added into the shopping cart.
2. Select the items by clicking the flag in the ‘Select’ box and then selecting ‘Add to Active Cart’ and clicking on the ‘Go’ button.
The user below has chosen to use the flag in the ‘Select’ column located on the right-hand side of the page.
To get back to the cart, the user clicks on the cart icon located at the top of the page.
The shopping cart displays. More items can be added to this cart by clicking on the ‘Add to Cart’ button. Notice, the item quantity box is still open for editing.
Revised 10/0819

WUSTL MARKETPLACE USER GUIDE REQUISITIONER
This is an example of an in-process shopping cart. The user can continue shopping by clicking on the ‘Add Items’ button. If they are through shopping, they can go to ‘Review Details’ button to complete the requisition.
Revised 10/0820
WUSTL MARKETPLACE USER GUIDE REQUISITIONER
Removing an Item from your cart
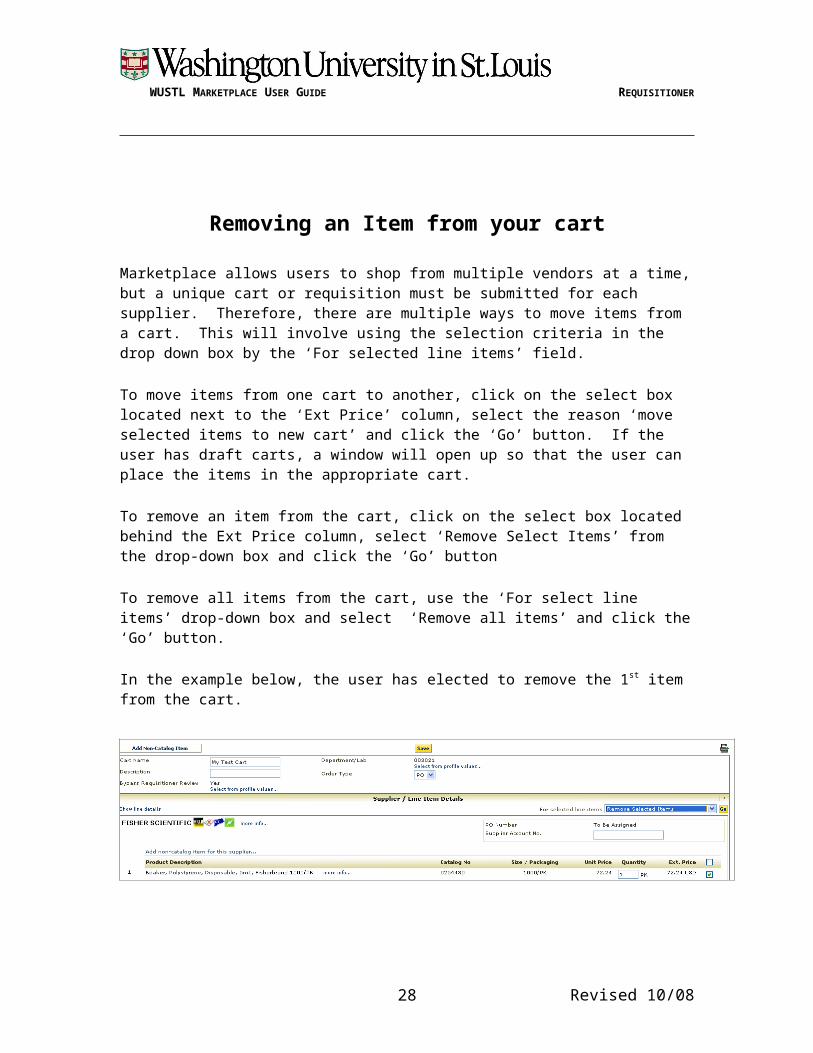
Marketplace allows users to shop from multiple vendors at a time, but a unique cart or requisition must be submitted for each supplier. Therefore, there are multiple ways to move items from a cart. This will involve using the selection criteria in the drop down box by the ‘For selected line items’ field.
To move items from one cart to another, click on the select box located next to the ‘Ext Price’ column, select the reason ‘move selected items to new cart’ and click the ‘Go’ button. If the user has draft carts, a window will open up so that the user can place the items in the appropriate cart. To remove an item from the cart, click on the select box located behind the Ext Price column, select ‘Remove Select Items’ from the drop-down box and click the ‘Go’ button
To remove all items from the cart, use the ‘For select line items’ drop-down box and select ‘Remove all items’ and click the ‘Go’ button.
In the example below, the user has elected to remove the 1st item from the cart.
Revised 10/0821

WUSTL MARKETPLACE USER GUIDE REQUISITIONER
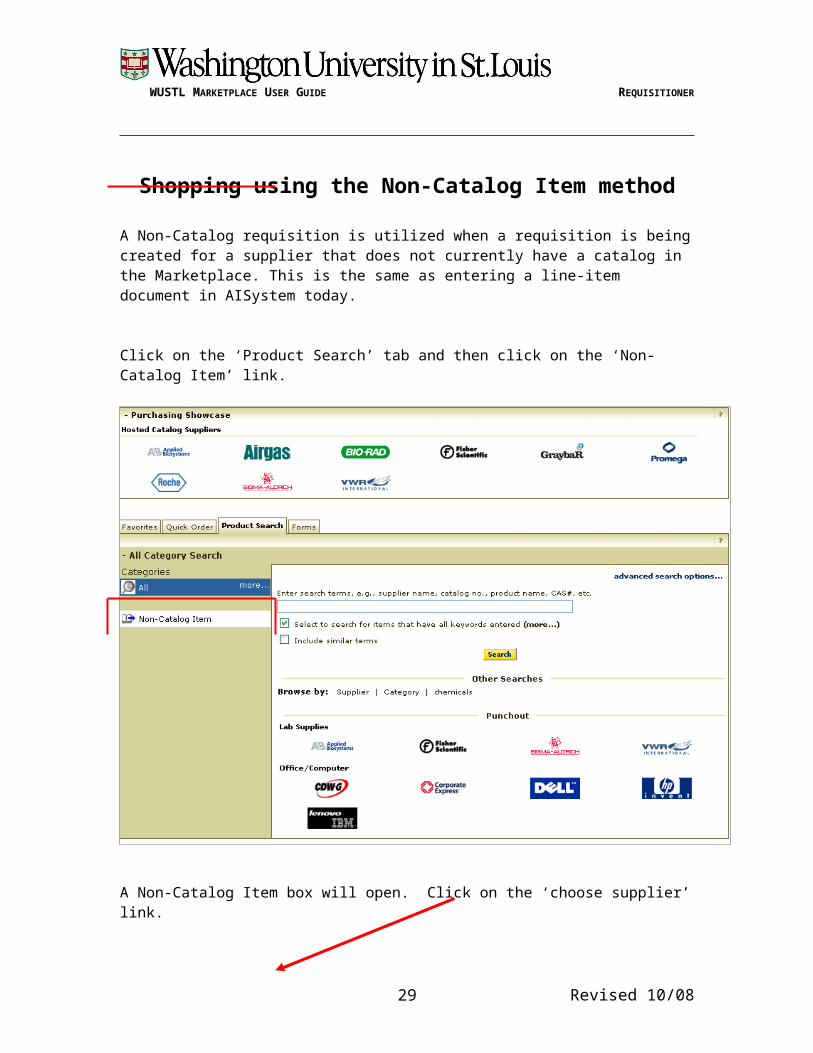
Shopping using the Non-Catalog Item method
A Non-Catalog requisition is utilized when a requisition is being created for a supplier that does not currently have a catalog in the Marketplace. This is the same as entering a line-item document in AISystem today.
Click on the ‘Product Search’ tab and then click on the ‘Non-Catalog Item’ link.
A Non-Catalog Item box will open. Click on the ‘choose supplier’ link.
Revised 10/0822
WUSTL MARKETPLACE USER GUIDE REQUISITIONER
The Search box will display. Enter the name or partial name of the vendor and click the ‘Search’ button. A list of vendors will display.
Click on the ‘Select’ hyperlink on the right-hand side of the page for the vendor that you want to use and the system will pull it into the cart. If you select the wrong vendor, click on the ‘change…’ hyperlink next to the vendor’s name and start the search over again. Clicking on the ‘+ Show distribution methods’ link below the vendor’s name allows the user to see how Marketplace will deliver this order to the vendor.
Revised 10/0823

WUSTL MARKETPLACE USER GUIDE REQUISITIONER
Complete the fields that display with the appropriate information. The ‘Catalog No’ field is not required unless applicable to the order. Use the drop-down box in the Packaging field to select the appropriate unit for the item.
Revised 10/0824

WUSTL MARKETPLACE USER GUIDE REQUISITIONER
The screen shot below displays a non-catalog entry for one item.
To add another item, click the ‘Save and Add Another’ button located at the bottom of the page. The system collapses the previous row and opens up a new row. The item detail does display at the top of the page under the ‘Recently added items’ row.
When all items have been entered, click the ‘Save and Close’ button. The shopping cart will now display.
Revised 10/0825

WUSTL MARKETPLACE USER GUIDE REQUISITIONER
Reviewing and updating the Cart
Users review and finish entering the PR information by clicking on the ‘Review Details’ tab button located at the top of the page.
Marketplace will then display the multiple fields that can be updated. The user can use the scroll bar on the right-hand side to scroll up and down the PR.
Revised 10/0826

WUSTL MARKETPLACE USER GUIDE REQUISITIONER
The Review Details Page
This is the Summary view of the ‘Review Details’ page. The following pages will discuss each section and the fields that display in that section when the user is on the ‘Review Details’ page.
Revised 10/0827
WUSTL MARKETPLACE USER GUIDE REQUISITIONER
Header section
This part of the review page contains 3 sections, ‘General, Shipping and Billing information. Each section has a question mark and an edit box. The question mark opens up a window that will define all of the fields located in that section. The edit box opens up the fields for editing. Each section box will be discussed separately.
Revised 10/0828
WUSTL MARKETPLACE USER GUIDE REQUISITIONER
General Section
This section is an overview of the General information in the requisition. If you put your cursor on any of the field names, Marketplace will define the field. The table below defines the fields located in this section. The screen prints below discusses the fields that are editable when the edit button has been clicked.
Field DescriptionCart Name The system defaults to a formulated name which includes the date, a pseudo
identification number and the number of carts entered that day. It is recommended that the user change this to a name that can easily identify the cart. Clicking on this icon opens a new window and Marketplace will define all of the fields that will display in the section.
Note: Some fields do not display until the requisition number has been created. Opens up a window to allow the user to edit the following the fields located in this section.
Description Assign any description for this requisition that will help you identify the purpose of this requisition. (Optional)
Prepared by Marketplace captures the name of the individual who created the requisition. Prepared for
Allows the user to indicate the individual for whom you are preparing this requisition, if different from yourself.
Department The shopping department that was displayed on the ‘Profile’ page.Bypass Requistioner Review
Valid selection is ‘Yes’ or ‘No’. This is used when the shopper is also the Requisitioner. A selection of ‘Y’ denotes that when the Requisitioner is finished shopping, Marketplace will send the PR to AISystems. A ‘No’
Revised 10/0829

WUSTL MARKETPLACE USER GUIDE REQUISITIONER
instructs Marketplace to send the PR to another Requisitioner for approval.
Revised 10/0830
WUSTL MARKETPLACE USER GUIDE REQUISITIONER
Field DescriptionBypass Lab Mgr Review
This is used for Reviewers that are shopping for labs. Valid values are ‘Yes’ and ‘No’. A selection of ‘Y’ denotes that when the Reviewer is finished shopping, Marketplace will send the PR to the Requisitioner A ‘No’ instructs Marketplace to send the PR to another Lab Reviewer for approval.
Department Lab
The department for which the requisition is being submitted. This will become the ‘Line 1’ department on the Purchase Order in AISystems.Clicking on this edit button, allows the user to edit the Department lab information in the field located to the left of this button
Clicking on the ‘Edit’ button located in the upper-right hand corner of this section opens up this window.
USERS CAN CHANGE THE CART NAME OR ADD A DESCRIPTION FOR THE CART. IF THE PR IS BEING ENTERED FOR ANOTHER PERSON, THE ‘SELECT A DIFFERENT USER…’ HYPERLINK CAN BE USED TO INDICATE THIS INDIVIDUAL (DISCUSSED BELOW). CLICK ON THE APPROPRIATE HYPERLINKS TO EDIT THE ‘BYPASS REQUISITIONER REVIEW’ AND ‘BYPASS LAB MGR REVIEW’ FIELDS. USE THESE BUTTONS TO:SAVE – SAVE INFORMATION ENTEREDCANCEL – CLOSE THE WINDOW WITHOUT SAVING ANY INFORMATION.
This window opens up if the user clicks on the ‘Select a different user….’ hyperlink. Complete either the first name or last name fields (partial names may be entered) and click the ‘Search’ button.
Revised 10/0831

WUSTL MARKETPLACE USER GUIDE REQUISITIONER
A list of employees that have signed into Marketplace and meet the search criteria will display. Select the person for which the requisition is being preparedand click “Choose Select User’.
Shipping Section
Displays the shipping address associated with the purchase requisition. This address defaults from the ‘ship to’ department that was entered on the ‘Profile’ page.
If the user needs to change the address, click the ‘edit’ button located in the upper right hand corner and a new window opens with the following page.
Revised 10/0832

WUSTL MARKETPLACE USER GUIDE REQUISITIONER
The Shopper/Reviewer/Requisitioner can use the drop-down box and select the lab on their profile where the merchandise is to be delivered. The information in the ‘Rm/Attn’ and ‘Contact Line 2’ fields can be overtyped.
Using the ‘from org addresses’ hyperlink located in the ‘Ship To’ section allows the user to research the department’s established shipping addresses. To view all of the established addresses, use the wild card (%) in front of the four (4) digit department number.
Click ‘Search’ and the list of ship to addresses will display. Clicking on the ‘Select’ button located on the right-hand side of the page pulls the selected address into the requisition.
Revised 10/0833

WUSTL MARKETPLACE USER GUIDE REQUISITIONER
Billing
This is the University’s address for Accounts Payable. Nothing can be changed in this section.
Revised 10/0834

WUSTL MARKETPLACE USER GUIDE REQUISITIONER
Adding Accounts to your PR
There are two ways to add accounts to the PR – at the header level and at the item level. The header level is used when all or the majority of the items are charged to the same account. The item level is used when different accounts are used to pay for each item. The items can be paid with one account or multiple accounts by using the ‘Add Split’ hyperlink that displays after the ‘edit’ button is clicked. Both options will be discussed in this section.
Note: The PR requires an account to be entered at the header level, even if the user is entering accounts at the item level.
Entering accounts at the header level
The header level is located in the Accounting Codes section and is required for every PR. This section can be accessed two ways – by scrolling down the PR or by clicking on the ‘Accounting Codes’ tab. To enter account information, click on the edit button in the Accounting Codes section; the fields are now open for entry. It is imperative that the correct format be used when entering account information. Please follow this format when entering your account information – the fields marked with * are required:
*Ledger Class – 2 digits *Department Fund* – six (6) digit department number, a space, and the five (5) or six (6)
digit fund number if applicable. Note 1: There is no hyphen between the department and fund number. Note 2: Zero funds are not allowed in this field
*Subclass/object* – complete with the appropriate four (4) digit combination. (This replaces the budget/object codes in legacy FIS.)
Note: No spaces or dashes are used in this field. SR code – two (2) alpha, numeric or alpha/number characters - (if applicable). If using
alpha characters, they must be in upper case. Zero fund – five (5) or six (6) digit fund number if applicable
Click the ‘Save’ button after entering the account information. Clicking on the ‘Cancel’ button will allow the user to leave this section; Marketplace will not save any information entered.
Revised 10/0835

WUSTL MARKETPLACE USER GUIDE REQUISITIONER
In this example the user has decided to pay for all of the items with one account at the header level.
If the user wanted to split the charges, they would click on the ‘Add Split’ hyperlink located on the far-right hand side of the page.
This link is used to add each additional account row. There are two ways to split the charges at this level:
% of price % of quantity
The percent totals must equal 100%. In the example below, the user has split the charges three ways and then saved the entry. Notice the fields are no longer open for edit. To re-open, click the ‘edit’ button in the upper right-hand corner of this section.
Revised 10/0836

WUSTL MARKETPLACE USER GUIDE REQUISITIONER
Entering Accounts at the item level
To enter accounts at the item level you must click on the ‘Accounting Codes’ section that is located at the top of the PR.
This will advance the user to the Accounting Codes section. To enter accounts at the item level, click on the ‘edit’ button in the lower-right portion of the item.
Notice there is already an account entered at the header level – this is required for all PRs even if the user is charging accounts at the item level.
This will open up the accounting fields for editing.
It is imperative that the correct format be used when entering account information. Please follow this format when entering your account information – fields marked with an * are required:
Revised 10/0837

WUSTL MARKETPLACE USER GUIDE REQUISITIONER
*Ledger Class – 2 digits *Department Fund* – six (6) digit department number, a space, and the five (5) or six (6)
digit fund number if applicable. Note 1: There is no hyphen between the department and fund number. Note 2: Zero funds are not allowed in this field
*Subclass/object* – complete with the appropriate four (4) digit combination. (This replaces the budget/object codes in legacy FIS.)
Note: No spaces or dashes are used in this field. SR code – SR code – two (2) alpha, numeric or alpha/number characters - (if applicable).
If using alpha characters, they must be in upper case. Zero fund – five (5) or six (6) digit fund number if applicable
In the example below, the user has only used one account for distribution.
If the user wanted to split the charges, they would click on the ‘Add Split’ hyperlink located on the far-right hand side.
This link is used to add each additional account row. There are four ways to split the charges at this level:
% of price % of quantity Amount of Price Amount of Qty
Note: The percent options must total 100%. The ‘Amount of Price’ must equal the total price. The ‘Amount of Qty’ must equal the total quantity.
Revised 10/0838

WUSTL MARKETPLACE USER GUIDE REQUISITIONER
In the example below the user has split the charges two ways and then saved the entry. Notice the fields are no longer open for editing. To re-open, click the edit button in the upper right- hand corner of this section.
Entering accounts at the header level and the item level
This option would be used if the majority of the items are being paid from the same account and a single item or a few items are being paid from a different account. The accounts at the item level will supersede the accounts at the header level. The system will also display a message that the account is different on an item.
In this example, item 2 and 3 are being paid from the account at the header level and item 1 is being paid from the account at the item level.
Notice the message in item 1 states that the account value is different from the header account.
Revised 10/0839

WUSTL MARKETPLACE USER GUIDE REQUISITIONER
Revised 10/0840

WUSTL MARKETPLACE USER GUIDE REQUISITIONER
Adding Internal Notes and Attachments
This section allows the user to add internal notes and attachments.
Internal Notes
Internal notes are used to add any additional information that needs to be included with this requisition for internal records or personnel. (Limit 1,000 Characters). To add an internal note to include with the requisition, click on the edit button located on the right-hand side of the page. A new window will open, type in the note (to view a larger note area, click on the expand hyperlink).
.
Click ‘Save’ to save the internal note or ‘Cancel’ to exit the page without saving. After the note has been saved, it can be viewed on the requisition.
If the internal note is more than 100 characters a ‘more…’hyperlink will display in this section.
Revised 10/0841

WUSTL MARKETPLACE USER GUIDE REQUISITIONER
Internal Attachments
Internal attachments are used to attach supporting documentation for internal use.
To attach a document Click on the ‘add attachment…’hyperlink. This will open a new window that will allow the user to browse any drive they have they have access to from their computer. The ‘Attachment Type’ drop-down box allows the user to select either a file or URL link.
Once the file has been selected, the user clicks Save’ and Marketplace goes back to the PR review page where the name of the file is displayed. To remove this attachment, click on the ‘remove…’ link. To add another attachment, click the ‘add attachment…’ hyperlink.
If you add more than one attachment, only the first file name will display on the PR in the review page.
Revised 10/0842

WUSTL MARKETPLACE USER GUIDE REQUISITIONER
Adding External Notes and Attachments
Marketplace allows you to place an external note on the requisition that you intend to have the supplier read. However, be aware that sending an external note to a supplier that receives orders electronically will more likely delay your order or the note will not even be read. The suppliers that receive orders electronically via cXML are noted by this supplier flag - The cXML suppliers that do not read external notes are noted by this supplier flag -
External Notes
The ‘Note to all Suppliers’ is a header level note that allows users to include a message to the vendor. To enter the message, click on the edit button in the right-hand corner of the box. A new window will open for the message to be entered.
Enter message (1000 character limitation) and click ‘Save’. Click the ‘Cancel’ button to exit the page without saving. Marketplace will return the user to the ‘Review Details’ page and the memo will be displaying in the ‘External Notes’ section.
Revised 10/0843

WUSTL MARKETPLACE USER GUIDE REQUISITIONER
If the external note is more than 100 characters a ‘more…’hyperlink will display in this section.
External Attachments
External attachments are used to attach supporting documentation for the vendor’s use.
To attach a document, click on the ‘add attachment…’hyperlink. This will open a new window that will allow the user to browse any drive for which they have access on the PC. The ‘Attachment Type’ drop-down box allows the user to select either a file or URL link.
Once the file has been selected, the user clicks ‘Save’ and Marketplace goes back to the PR review page where the name of the file is displayed. To remove this attachment, click on the ‘remove…’ link. To add another attachment, click the ‘add attachment…’ hyperlink.
If you add more than one attachment, only the first file name will display on the PR in the review page.
Revised 10/0844

WUSTL MARKETPLACE USER GUIDE REQUISITIONER
Notification Section
This section is used by Marketplace to notify the user of supplier order status. The fields in this section are automatically populated if the Requisitioner is doing the shopping. If the shopper or reviewer created the PR, these fields will be blank and the Requisitioner will need to complete them. The ‘edit’ button in the upper-right-hand corner can be clicked to over-ride the default information.
Revised 10/0845

WUSTL MARKETPLACE USER GUIDE REQUISITIONER
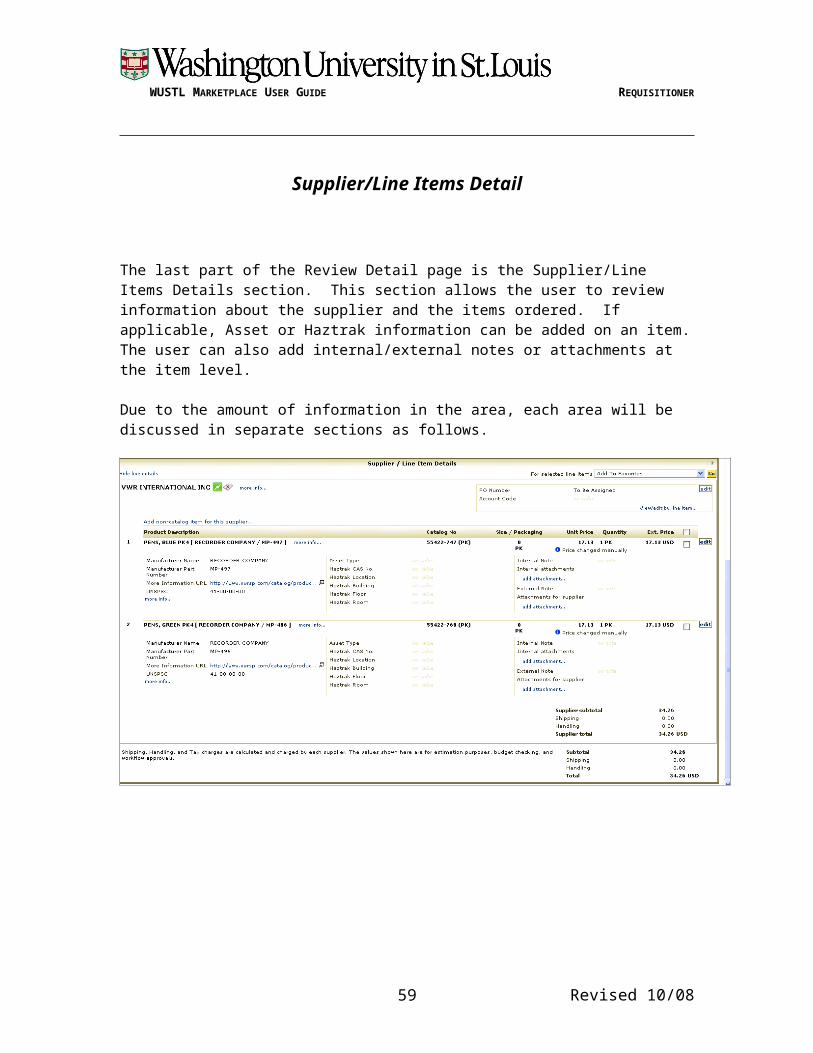
Supplier/Line Items Detail
The last part of the Review Detail page is the Supplier/Line Items Details section. This section allows the user to review information about the supplier and the items ordered. If applicable, Asset or Haztrak information can be added on an item. The user can also add internal/external notes or attachments at the item level.
Due to the amount of information in the area, each area will be discussed in separate sections as follows.
Revised 10/0846

WUSTL MARKETPLACE USER GUIDE REQUISITIONER
Supplier Section information
Field DescriptionClicking on the hyperlink collapses the page and only displays the first row of the item information. Note: Either this hyperlink is displaying or the ‘Show line details’ link is displaying. Clicking on this hyperlink further opens up the page and shows manufacturer product description and information for each line item in the cart. It also displays and opens up fields to enter Asset and Haztrak information if applicable. This is also where the user can see the Internal and External Notes hyperlinks. Clicking on these hyperlinks allows the user to enter notes as appropriate.
For selected line items action fields
This action box is located on the far right-hand side of the page. The values in the action box allow the user to take action for the items in the cart that have a check mark in the selection box located at the far right-hand side of each item. Valid values are:
Add to Favorites Remove Selected items Remove all items (this does not require the user to select any of
the items) Move to another cart Add to Draft cart or Pending PR/PO
This link is by the vendor’s name. Clicking on this link allows the user to view additional vendor information.
PO Number This field is not used while creating the cart. It is populated after the cart becomes a requisition and has received all approvals and all steps are completed.
Account Code Not used during the creation of the cart. Add non-catalog item for this supplier…..
Clicking this hyperlink allows the user to add an item to the cart that is not listed in the vendor’s on-line catalog.
Note: catalog and non-catalog items can not be mixed in the same cart.Hides the header information and displays the item detail that was entered in the cart.
Revised 10/0847

WUSTL MARKETPLACE USER GUIDE REQUISITIONER
Product Item Detail
This section discusses the product information along with displaying fields for Asset, Haztrak, Internal and External notes.
The table below defines the fields that are displayed in this portion of the page.
Field DescriptionProduct Description Description of the product that was put in the cart.
Clicking on this hyperlink (next to the product name) gives additional manufacturer information.
Catalog No Vendor’s catalog number for the item.Size/Packaging How the item is packaged.Unit Price Unit price of the item.Quantity The quantity of the item that was entered into the cart.Ext Price ‘Qty x Unit Price’ equals this amount.
This is the selection box that is located at the far right-hand side of each item and is used in conjunction with the ‘For selected line items’ action drop-down box.Opens up the item for editing, The user can change the quantity ordered, complete the Asset or Haztrak fields or add internal or external notes at the item level.Clicking on this hyperlink allows the user to over-write the item price that was populated from the vendor’s website. The price will display as below until the cart is saved.
Revised 10/0848

WUSTL MARKETPLACE USER GUIDE REQUISITIONER
Reviewing Manufacturer Information
The information in the box below is the product and manufacturer information for the specific item that was ordered.
Field DescriptionProduct Description Description of the product that was put in the cart.
Clicking on this hyperlink (next to the product name) gives additional manufacturer information.
Manufacturer Name Name of the manufacturer of the item.Manufacturer Part/Number
Part number the manufacturer has assigned to the item.
More Information URL
Clicking on this hyperlink takes you to the supplier’s website to order additional items that can be added to a new cart.
UNSPSC Item category numberThis link is located under the UNSPSC and gives additional manufacturer informaiton on the above category number
Entering Asset/Haztrak Information
This section is used when asset items or hazardous materials has been ordered. It opens up for editing when the ‘edit’ button is clicked. If you have ordered multiple items that fall into this category, this information will need to be completed for each item.
Note: Only the departments that are using the University’s Haztrak system should complete the Haztrak information.
Revised 10/0849

WUSTL MARKETPLACE USER GUIDE REQUISITIONER
The edit button was clicked and the fields are now open for editing. The table below defines the fields.
Field DescriptionAsset Type Use the drop down box and identify the type of item: Valid values are as an
A = Asset C = Component
Note: It is imperative that this field is completed if this is an asset PR. If blank, the proper information will not transfer to AISystem for approval.
Haztrak Cas NO. The CAS number for the item.Haztrak Location The location where the item is going to be located.Haztrak Building The building where the item is going to be located.Haztrak Floor The floor where the item is going to be located.Haztrak Room The room where the item is going to located.Save This button saves the information entered and closes the section. Cancel This button cancels out of this section without saving any information
entered.
Revised 10/0850

WUSTL MARKETPLACE USER GUIDE REQUISITIONER
Entering Internal/External notes and Attachments at the Item level
This part of this section opens up to enter internal/external notes or attachments at the item level and not at the header level. This would be used if the notes or attachment were unique to each item. This section will open up for editing when the ‘edit’ button is clicked, located in the right-hand corner of the page.
Adding Internal Notes and Attachments
This section allows the user to add internal notes and attachments.
Internal Notes
Internal notes are used to add any additional information that needs to be included with this requisition for internal records or personnel. (Limit 1,000 Characters). To add an internal note to include with the requisition, click on the edit button located on the right-hand side of the page. A new window will open; type in the note (to view a larger note area, click on the expand hyperlink).
.
Revised 10/0851

WUSTL MARKETPLACE USER GUIDE REQUISITIONER
Click ‘Save’ to save the internal note or ‘Cancel’ to exit the page without saving. After the note has been saved, it can be viewed on the requisition.
If the internal note is more than 100 characters a ‘more…’hyperlink will display in this section.
Internal Attachments
Internal attachments are used to attach supporting documentation for internal use.
To attach a document, click on the ‘add attachment…’hyperlink. This will open a new window that will allow the user to browse any drive for which they can access on the PC. The ‘Attachment Type’ drop-down box allows the user to select either a file or URL link.
Once the file has been selected, the user clicks ‘Save’ and Marketplace goes back to the PR review page where the name of the file is displayed. To remove this attachment, click on the ‘remove…’ link. To add another attachment, click the ‘add attachment…’ hyperlink.
If you add more than one attachment, only the first file name will display on the PR in the review page.
Revised 10/0852

WUSTL MARKETPLACE USER GUIDE REQUISITIONER
Adding External Notes and Attachments
The Marketplace allows you to place an external note on the requisition that you intend to have the supplier read. However, be aware that sending an external note to a supplier that receives orders electronically will more likely delay your order or the note will not even be read. The suppliers that receive orders electronically via cXML are noted by this supplier flag - The cXML suppliers that do not read external notes are noted by this supplier flag -
External Notes
The ‘Note to all Suppliers’ is a header level note that allows users to include a message to the vendor. To enter the message, click on the ‘edit’ button in the right-hand corner of the box. A new window will open for the message to be entered.
Enter the message (1000 character limitation) and ‘Save’. Click the ‘Cancel’ button to exit the page without saving. Marketplace will return the user to the ‘Review Details’ page and the memo will be displayed in the ‘External Notes’ section.
Revised 10/0853

WUSTL MARKETPLACE USER GUIDE REQUISITIONER
If the external note is more than 100 characters a ‘more…’hyperlink will display in this section.
External Attachments
External attachments are used to attach supporting documentation for the vendor’s use.
To attach a document Click on the ‘add attachment…’hyperlink. This will open a new window that will allow the user to browse any drive they have they have access to from their computer. The ‘Attachment Type’ drop-down box allows the user to select either a file or URL link.
Once the file has been selected, the user clicks ‘Save’ and Marketplace goes back to the PR review page where the name of the file is displayed. To remove this attachment, click on the ‘remove…’ link. To add another attachment, click the ‘add attachment…’ hyperlink.
If you add more than one attachment, only the first file name will display on the PR in the review page.
Revised 10/0854

WUSTL MARKETPLACE USER GUIDE REQUISITIONER
Summary total of the Requisition
The final section of this page is the requisition totals. The table below defines the fields that display in this section.
Field DescriptionSupplier subtotal The system subtotals the orderSubtotal The subtotal of the total orderShipping Shipping charges if applicableHandling Handling chargesTotal Total of the Subtotal, shipping and Handling Charges
Revised 10/0855

WUSTL MARKETPLACE USER GUIDE REQUISITIONER
Display of completed Review Details Page
Revised 10/0856

WUSTL MARKETPLACE USER GUIDE REQUISITIONER
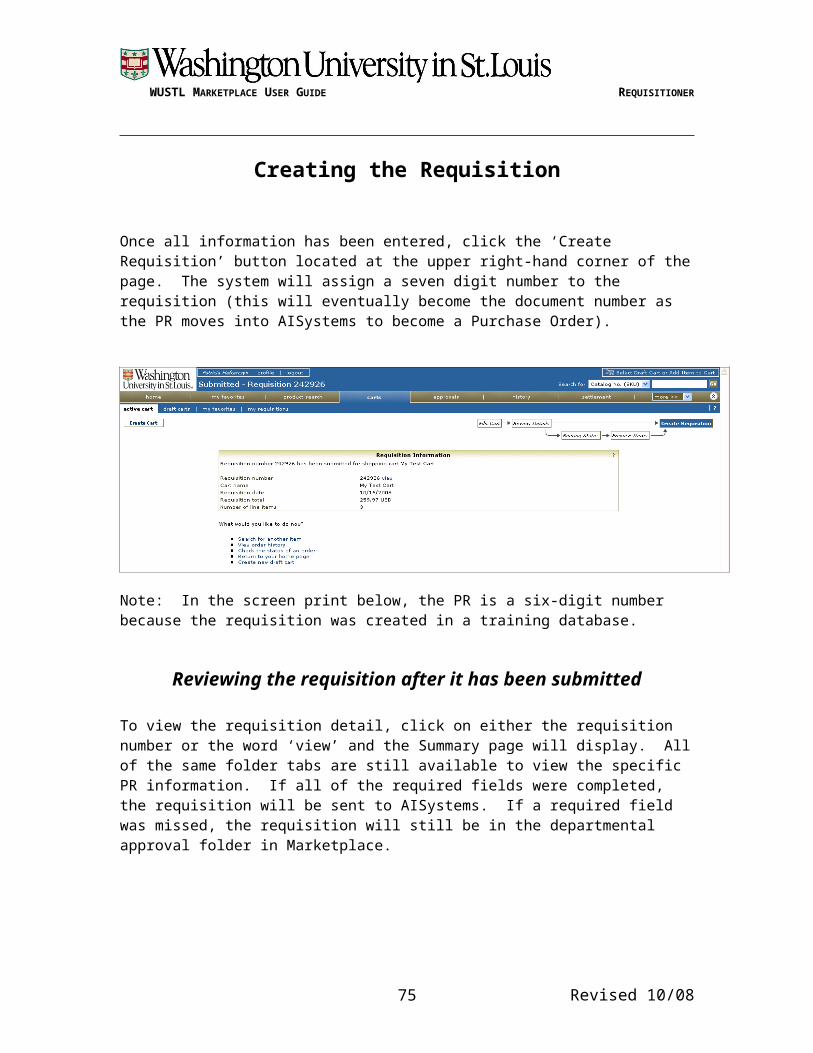
Creating the Requisition
Once all information has been entered, click the ‘Create Requisition’ button located at the upper right-hand corner of the page. The system will assign a seven digit number to the requisition (this will eventually become the document number as the PR moves into AISystems to become a Purchase Order).
Note: In the screen print below, the PR is a six-digit number because the requisition was created in a training database.
Reviewing the requisition after it has been submitted
To view the requisition detail, click on either the requisition number or the word ‘view’ and the Summary page will display. All of the same folder tabs are still available to view the specific PR information. If all of the required fields were completed, the requisition will be sent to AISystems. If a required field was missed, the requisition will still be in the departmental approval folder in Marketplace.
In the example below, the information in the General section displays that the status of the Requisition is ‘Pending’.
Revised 10/0857

WUSTL MARKETPLACE USER GUIDE REQUISITIONER
To see where the PR is in the routing process, click on the ‘Routing Status’ folder tab at the top of the page. This page displays all of the routing steps this PR has to complete before it becomes a purchase order.
The first action shows that it was submitted by Patricia Haftarczyk.
Step 1: Send PR to AIS (has the check mark) – that shows that this step is complete and the PR has been sent to AISystems.
Step 2: Receive PR Approval (has the blue circular arrow) – this means that the requisition is currently at this step and is waiting approval. (This requisition has moved to AISystems as a Purchase Order and is routing for approval in AISystems.)
Step 3: Create PO (has the arrow) – this is the next step in the process.
Once the PR completes all of the steps, the ‘Routing Steps’ will display as below. Notice all boxes have green check marks and the final check mark shows the date and timestamp when the PR completed. The user now has a Purchase Order that has been sent to the vendor.
Revised 10/0858
WUSTL MARKETPLACE USER GUIDE REQUISITIONER
Researching the PO number
If the user wants to obtain the ‘PO’ number that was assigned, they have two choices: clicking on the ‘Requisition’ folder tab or clicking on the ‘History’ tab.
Clicking on the ‘Requisition’ tab displays the ‘Summary’ page again, but notice there is now a green check mark by the status and the PO number (3100749Q) is now displaying.
Clicking on the ‘History’ tab displays an audit trail of all activity on the PR. The ‘PO’ number also displays on this page on the second line.
Revised 10/0859

WUSTL MARKETPLACE USER GUIDE REQUISITIONER
Requisition Status
After a requisition has been created, the user can go to their Personal Requisition folder and view all requisitions that they have. The screen print below displays the four valid statuses and the system-generated symbols that display for each status.
The table below defines the symbol definition.
Symbol MeaningThe requisition has completed all routing steps and has received all required approvals. A PO number has been assigned.
The requisition is still advancing through the routing steps and has not received all required approvals.
The requisition was rejected in Marketplace before it advanced to AISystems, or it did advance to AISystems and the user deleted it through AISystems, which sent a rejection back to Marketplace.
The requisition was withdrawn for submission in Marketplace and never advanced to AISystems.
Revised 10/0860

WUSTL MARKETPLACE USER GUIDE REQUISITIONER
Using the Approval folder
When carts are routed to the Requisitioner from the shopper or reviewer they will appear in the approval folder. There is a filter and two folders in the approval page, the ‘Personal’ and ‘Departmental’ folder. The requisition will first route to the departmental folder; the Requisitioner can either approve within the departmental folder or assign the requisition to themselves for modifications and then approve the requisition.
What routes to folders
Shoppers’ PRs will route to the reviewer’s and/or department folders Reviewers’ PRs will route to the Requisitioner department folder Requisitioner PRs do not route to their department folder unless:
the user selected ‘No’ in the ‘By Pass Requisitioner Review’ field the user does not have security for the shopping department (i.e., the
Requisitioner is shopping for another department for which they do not have an approval folder)
the account information was not entered correctly
The screen print below displays the ‘Personal’ folder and the ‘Departmental’ folder. Notice that there is one PR in ‘My PR Approvals’ folder and two PRs in the departmental (003021) folder. Above each folder there is an ‘Apply Action to Selected PR(s)’ action box. The appropriate action will need to be selected when working with PRs in the corresponding folder.
Revised 10/0861

WUSTL MARKETPLACE USER GUIDE REQUISITIONER
Revised 10/0862

WUSTL MARKETPLACE USER GUIDE REQUISITIONER
Filtering Requisitions
The filter allows the user to filter through the requisitions and only view requisitions with specific criteria. To activate the filter, click on the words ‘Click to filter requisitions’.
Valid filter options are:
All pending requisitions Unassigned approvals Future approvals Manual Filter – this options opens up a calendar to further limit the search by
dates
Departmental Folder
All PRs will first route to departmental folders. The Reviewer or the Requisitioner can:
review the detail of a specific PR assign a single PR or group of PRs to their ‘Personal’ approval folder. This is usually
done if they want to approve it at a later date or if the PR needs to be changed, rejected or withdrawn
add notes to an existing PR that is still in process approve and complete without assigning the PR to their “Personal’ approval folder which
sends the PR to AISystems
Reviewing a PR
Each PR will be listed in its own row. The PR number is located in the upper-left hand corner of the row – click on the number or the ‘view’ hyperlink and the PR will open for review.
Note: To make any changes to this PR, the user must assign the PR to their personal folder.
Revised 10/0863

WUSTL MARKETPLACE USER GUIDE REQUISITIONER
The requisition will then display. While reviewing the cart, the Reviewer or Requisitioner can use the ‘Available Actions:’ drop-down box for other options.
Available actions are: Move to Personal folder – will move the PR to their personal approval folder for
modifications Add notes to history – allows the user to add notes to the PR Approve and complete – approves and completes without assigning the PR to their
‘Personal’ approval folder box which sends the PR to AISystems Copy to a new cart – copies all details of this cart to a new cart
Assign a PR to the Personal Approval folder
Click on the ‘Assign’ box located on the right-hand side of the row for each PR(s) that the Requisitioner wants to assign to their ‘Personal’ approval folder and select ‘Assign’ in the ‘Apply Action to Selected PR(s)’ action box.
Revised 10/0864

WUSTL MARKETPLACE USER GUIDE REQUISITIONER
Adding notes to the PR
Click on the ‘Assign’ box located on the right-hand side of the row for the PR that the user want to adds notes and select ‘Add Notes to History’ in the ‘Apply Action to Selected PRs’ action box.
Once the ‘Go’ button is clicked a new box will open up to add notes. Click the ‘Attach’ button when finished. Note: These notes can not be edited, once the ‘Attach’ button is clicked.
Approve and Completing
Click on the ‘Assign’ box located on the right-hand side of the row for the PR that the user want to approve and complete and select ‘Approve and Complete’ in the ‘Apply Action to Selected PRs action box. This will send the PR to the next step.
Revised 10/0865

WUSTL MARKETPLACE USER GUIDE REQUISITIONER
Personal Folder
Once the PR has been assigned to the Personal folder, the Reviewer and Requisitioner can continue the approval process. While the requisition is in the folder, the Reviewer or the Requisitioner can:
review or edit approve and complete return to shared folder add notes to an existing PR that is still in process
Review and Edit
Each PR will be listed in its own row. The PR number is located in the upper-left hand corner of the row – click on the number or the ‘view’ hyperlink and the PR will open for review or updates.
The requisition will then display. Not only can the requisition be reviewed, but the fields are now editable. The user will click on the ‘edit’ button located in each section and the fields will open up.
Revised 10/0866

WUSTL MARKETPLACE USER GUIDE REQUISITIONER
While reviewing the PR, the Reviewer or Requisitioner can click on the ‘Available Actions:’ selection for other options.
Available actions are:
Move to Personal folder – will move the PR to their personal approval folder for modifications
Add notes to history – allows the user to add notes to the PR Approve and complete – approves and completes without assigning the PR to their
‘Personal’ approval folder which sends the PR to AISystems Copy to a new cart – copies all details of this cart to a new cart
Approve and Completing
Click on the ‘Assign’ box located on the right-hand side of the row for the PR that the user wants to approve and complete and select the appropriate value in the ‘Apply Action to Selected PRs’ action box. This will send the PR to the next step.
Return to Shared folder
This option allows the user to return the requisition to the shared departmental approval folder.
Revised 10/0867

WUSTL MARKETPLACE USER GUIDE REQUISITIONER
Add notes to History
This option allows the user to add notes (similar to a traildoc in AISystems) to the PR.
Once the ‘Go’ button is clicked a new box will open up to add notes. Click the ‘Attach’ button once finished.
Note: These notes can not be edited, once the ‘Attach’ button is clicked.
Revised 10/0868

WUSTL MARKETPLACE USER GUIDE REQUISITIONER
Creating Favorites
Users often have items that they purchase frequently; Marketplace allows the user to create a favorites list with multiple folders. Items can be added while browsing or while shopping. Users can create folders to categorize the items as they are saved to the ‘Favorites’ folders. Once items have been saved to the favorite’s lists or folders, users can go here to do their shopping.
There are several ways to save your favorite items in Marketplace. You can save favorites from the hosted or punch-out catalogs or from a non-contract supplier. However, it is recommended that if you are using a punch-out catalog, you should save your favorite items in the supplier punch-out. This insures that the pricing and description information is always accurate.
Marketplace allows you to create favorites from a punch-out catalog or a non-catalog supplier in your favorite’s folder. However, know that the pricing information may become outdated. Pricing information for "favorites" created from the hosted catalogs is dynamic and will update as the catalog pricing is updated.
There are two places where the user can see their favorites list or folders: the main search navigation bar and the search pages.
One of the easiest ways to add items to your favorites is to search for the item(s), select the item(s) and then use the drop down box and select ‘Add To Favorites” and press the ‘Go’ button.
Revised 10/0869

WUSTL MARKETPLACE USER GUIDE REQUISITIONER
The following page will display:
Click the ‘Submit’ button to verify that you want to add these to your ‘Favorites’ list. You will receive a message that the items have been added to your favorites list.
Revised 10/0870

WUSTL MARKETPLACE USER GUIDE REQUISITIONER
Fields on a Shopping Cart
The screen shot below displays an in-process shopping cart with four items. The table on the following pages defines each field.
Revised 10/0871

WUSTL MARKETPLACE USER GUIDE REQUISITIONER
This is the header page. It will display different tabs to allow the user to navigate between shopping and researching.
Field DescriptionWashington University logo
The University Logo
Name of user System pulls the name of the user from the profileProfile This is a hyperlink that allows the user to view their profile and
permissions in Marketplace Logout Clicking on the link logs the user out of the Marketplace application
This is the active shopping cart. The system shows the cart name, the number of items and the cart total. The number of items and the total is dynamic and will change as the user shops or removes items from the cart.
Search for This allows the user to refine their search as they are shopping or moving through Marketplace. Depending on the value selected depends on the page that displays. Valid values are: Catalog Keyword, CAS No., PO No., PR No., and InvoiceClicking this button allows the user to start the search
Returns to the user to the Marketplace search page
Displays the items the user has added to their favorites
Takes the user to the product search page
If the user has an active cart, the system will advance to that cart. If there is no active cart, the user will have to click on the ‘Add Cart’. Takes the user to the approval folders
Takes the user to the PO/PR history page
Not currently used
These options are not currently being used by the University
Revised 10/0872

WUSTL MARKETPLACE USER GUIDE REQUISITIONER
Field DescriptionWhen this tab is white, it denotes that the user is viewing the active cart. The user can toggle between the active cart and the draft cart without losing any information.Allows the user to view all of their draft carts. The user can toggle between the active cart and the draft cart without losing any information.Displays the user’s favorite’s folders or lists.
Shows the user’s to a list of their requisitions.
This section covers the action that can be taken to the cart or the requisition. The table below defines the fields in this section.
Field DescriptionCreate cart Click this button to create the cart.Add Items Advances the user to the Search pages.Edit Cart Allows the user to edit a cart that has been created. Review Details Allows the user to review all of the cart or PR details. Routing Status Shows the user the current status of the cart of requisition. Preview Items Allows the user to preview items in the cart or on the PR.Create Requistion This button is used when shopping is complete. It creates the
requisition number and advances the requisition to the next step. Add Non-catalog Item Allows the user to shop from a vendor that is not in the Marketplace
showcase or the Punch-outs. It can also be used to place an order for an item or quote to a punch-out or Marketplace showcase vendor that is not in their electronic catalog.
Save This saves the cart information.Printer icon Will print the cart information.
Revised 10/0873

WUSTL MARKETPLACE USER GUIDE REQUISITIONER
Field Description‘For Selected line items’ action box
This action box is located on the upper right-hand side of the page. The values in the action box allow the user to take action against the items in the cart that have a check mark in the selection box located at the far right-hand side of each item. Valid values are:
Add to favorites Remove Selected items Remove all items (this does not require to the user to select any
of the items in the cart) More to another cart Add to Draft Cart or Pending PR/PO
Clicking on this hyperlink further opens up the page and shows manufacturer product description and information for each line item in the cart. It also displays and opens up fields to enter Asset and Haztrak information if applicable. This is also where the user can see the Internal/External notes hyperlinks. Clicking on these hyperlinks allows the user to enter appropriate notes.
Note: To retain any information entered from this page, be sure to click on the ‘Save’ button located at the bottom of the page. This link is by the vendor’s name; clicking on this link allows the user to view additional vendor information.
PO Number This field is not used while creating the cart. It is populated after the cart becomes a requisition and has received all approvals and all steps are completed.
Account Code Not used during the creation of the cart. Add non-catalog item for this supplier…..
Clicking this hyperlink allows the user to add an item to the cart that is not listed in the vendor’s on-line catalog.
Note: catalog and non-catalog items can not be mixed in the same cart.Product Description Description of the product that was put in the cart
Clicking on this hyperlink (next to the product name) gives additional manufacturer information
Catalog No Vendor’s catalog number for the itemSize/Packaging How the item is packagedUnit Price Unit price of the item
Clicking on this hyperlink allows the user to over-write the item price that was populated from the vendor’s website. The price will display as below until the cart is saved.
Revised 10/0874
WUSTL MARKETPLACE USER GUIDE REQUISITIONER
Field DescriptionQuantity The quantity of the item that was entered into the cart.Ext Price ‘Qty x Unit Price’ equals this amount.
This is the selection box that is located at the far right-hand side of each item and is used in conjunction with the “For selected line items’ action drop-down box.
Supplier subtotal The subtotal of the items in the cart.Subtotal The subtotal of the total order.Shipping Shipping charges if applicable.Handling Handling charges if applicable.Total Subtotal + Shipping + Handling charges
Clicking this button saves the information and items in the shopping cart.
Revised 10/0875

WUSTL MARKETPLACE USER GUIDE REQUISITIONER
Fields on the Review Details PageThe table on the following pages will define the fields that display on this page. This page displays the PR information details in sections. In the upper right-hand corner of each box is a question mark (?) and an ‘edit’ button. Marketplace gives a brief description of the fields located in each box when the user clicks on the question mark. If the user clicks on the edit button, the section opens up for editing.
Revised 10/0876

WUSTL MARKETPLACE USER GUIDE REQUISITIONER
This is the header section. It will display different tabs to allow the user to navigate between shopping and researching.
Field DefinitionWashington University logo
The University Logo
Name of user System pulls the name of the user from the profile.Profile This is a hyperlink that allows the user to view their profile and
permissions in Marketplace Logout Clicking on the link logs the user out of the Marketplace application
This is the active shopping cart. The system shows the cart name, the number of items and the cart total. The number of items and the total is dynamic and will change as the user shops or removes items from the cart.
Search for This allows the user to refine their search as they are shopping or moving through Marketplace. Depending on the value selected depends on the page that displays. Valid values are: Catalog Keyword, CAS No., PO No., PR No. and Invoice.Clicking this button allows the user to start the search
Returns the user to the Marketplace search page.
Displays the items the user has added to their favorites.
Takes the user to the product search page.
If the user has an active cart, the system will advance to that cart. If there is no active cart. Takes the user to the approval folders.
Takes the user to the PO/PR history page.
Not currently used
These options are not currently being used by the University.
Revised 10/0877

WUSTL MARKETPLACE USER GUIDE REQUISITIONER
Field DescriptionWhen this tab is white, it denotes that the user is viewing the active cart. The user can toggle back between the active cart and the draft without losing any information.Allows the user to view all of their draft carts. The user can toggle between the active cart and the draft cart without losing any information. Displays the user’s favorite’s folders or list.
Display a list of the user’s requisitions.
This section covers the actions that can be taken to the cart or the requisition.
Field DescriptionCreate cart Click the button to create a shopping cartAdd Items Advance the user to the catalog main search page. User can
shop from punch-out vendors. Edit Cart Allows the user to edit a cart that has been created.Review Details Allows the user to review the cart or PR details. Routing Status Allows the user to see the status of the cart or PR in the
approval process.Preview Items Allows the user to preview items in the cart or on the PR.Create Requisition This button is used when shopping is complete. It creates the
requisition number and advances the requisition to the next step.
Add Non-Catalog Item Allows the user to shop from a vendor that is not in the Marketplace showcase or the Punch-outs. It can also be used to place an order for an item or quote to a punch-out or Showcase vendor that is not in their electronic catalog.
Save This saves the cart informationPrinter icon This icon will print the cart information.
Revised 10/0878

WUSTL MARKETPLACE USER GUIDE REQUISITIONER
This section discusses the general, shipping and billing information about the cart or PR.
Section DescriptionGeneral This section has multiple fields that can be edited.
Cart Name The system defaults to a formulated name which includes the date, a pseudo identification number and the number of carts entered that day. It is recommended that the user change this to one that the user can easily identity the cart.
Description Optional field that can be used to further identify the purpose of the cart.
Prepared by Name of the person that entered the PR.Prepared for Defaults to the name of the person that entered the PR, but can
be changed if applicable.Department The department that was listed on the ‘Profile’ page.Bypass Requisitioner Review
Valid selection is ‘Yes’ or ‘No’. This is used when the shopper is also the Requisitioner. A selection of ‘Y’ denotes that when the Requisitioner is finished shopping, Marketplace will send the PR to AISystems. A ‘No’ instructs Marketplace to send the PR to another Requisitioner for approval.
Bypass Lab MGR Revw
This is used for a Reviewer that is shopping for labs. Valid values are ‘Yes’ and ‘No’. A selection of ‘Y’ denotes that when the Reviewer is finished shopping, Marketplace will send the PR to the Requisitioner. A ‘No’ instructs Marketplace to send the PR to another Lab Reviewer for approval.
Department/Lab
Defaults to the department listed on the ‘Profile’ page, but can be changed if applicable.
Shipping This is the department’s ship-to address. The user can select a valid alternative address if applicable.
Billing The University’s billing address – nothing is editable.
Revised 10/0879

WUSTL MARKETPLACE USER GUIDE REQUISITIONER
There are two ways to enter the account in the PR - at the header level and at the item level. The ‘Review Details’ page defaults to displaying accounts at the header level. The header level is used if all or the majority of the items are charged to the same account. If the user wants to enter a different account than is listed at the header level, then the user will enter accounts at the item level. They should either click on the ‘Accounting Codes’ tab located at the top of the page or use the ‘View/edit by line item..’ hyperlink that is located in the lower right-hand corner of this section. Both areas contain the same information. If a user enters accounts at the item level, it will supersede the accounts entered at the header level.
The table below defines the fields displayed in the section above.
Field DescriptionLC The two-digit ledger class of the account. DepartmentFund
The six-digit department number. If a fund is being used the user would enter the department number, a space, and then the five or six-digit fund number.
Note: It is imperative that the department/fund is entered in the above format.Note: Zero funds can not be entered in this field.
Subclass-Object
The four-digit subclass/object that defines the type of purchase.
SR codes Two-digit alpha, numeric or alpha/numeric reporting code.Zero Fund Five or six-digit reporting fund.HIPAA (Dept) Denotes if this department is included in the University HIPAA program.
Valid values are ‘Y’ or ‘N’. This will default to ‘Y’ if the shopping department is one below:
Student Health – 0273 Human Resources – 0339 Department of Biomedical-Engineering (1360) Psychology – 1065 Social Work – 16XX Medical School – 3XXX – 4XXX
HIPAA Subclass This denotes if the subclass is one that is used for the HIPAA program or not. Valid values are ‘Y’ or ‘N’.
Split hyperlink This hyperlink displays once the ‘edit’ button is clicked. It allows the user to split the account distribution between multiple accounts.
Revised 10/0880

WUSTL MARKETPLACE USER GUIDE REQUISITIONER
Field Description Click on this link; brings the user to the line item information of the cart. The user can then click on the edit button and enter account information at the item level instead of the header level.
This is the Internal and External Notes and Attachments sections. The ‘Notification Information’ section is used by Marketplace for email notification concerning the status of the order.
Marketplace allows the users to add or attach files for a department user’s or vendor’s use. If a note has been entered, the system will display the first 100 characters of the note and then a ‘more…’ hyperlink will display. If a file has been attached, Marketplace will display the file name. (Please review the ‘Attachment’s portion of this training guide before attaching an external file.)
This section of the ‘Review Details’ page displays vendor and item details along with the cart totals. The table on the next page will define the fields in this section.
Field DescriptionProduct Description
Description of the product that is in the cart.
Clicking on this hyperlink (next to the product name) gives additional manufacturer information concerning the item.
Manufacturer Name
Name of the manufacturer of the item.
Manufacturer Part/Number
Part number the manufacturer has assigned to the item.
More Information URL
Clicking on this hyperlink takes the user to the supplier’s website to order additional items – they will be added to a new cart.
UNSPSC Item category numberThis link is located user the UNSPSC and gives additional manufacturer information on the above category number.
Revised 10/0881

WUSTL MARKETPLACE USER GUIDE REQUISITIONER
Asset Type This area is only completed if an asset item is being purchased. Use the drop down box and select the appropriate value.
A= AssetC = Component
Note: It is imperative that this field is completed if this is an asset PR. If not, the order will transfer to AISystems in the correct format and the user will have to start over.
The following fields are used for those departments that are using the University’s Haztrak system Haztrak CAS No. The CAS number for the itemHaztrak Location The location where the item is going to be located.Haztrak Building The building where the item is going to be located. Haztrak Floor The floor where the item is going to located.Haztrak Room The room where the item is going to be locatedThese buttons are used whenever the edit button has been clicked and the user wants to save or exit this section. Save Saves the information entered in this sectionCancel This button cancels out of this section without saving any
information entered.
How To’s and Trouble Shooting Hints
Add notes (like a Traildoc) to an existing requisition
Go to the ‘History’ tab of an existing PR, select the available action of ‘Add Notes to History’ and a pop up box will display for the user to type in the notes. When the notes are finished, click on the Attach button.
Revised 10/0882

WUSTL MARKETPLACE USER GUIDE REQUISITIONER
The notes can then be viewed on the History page by anyone that can see the PR.
Revised 10/0883
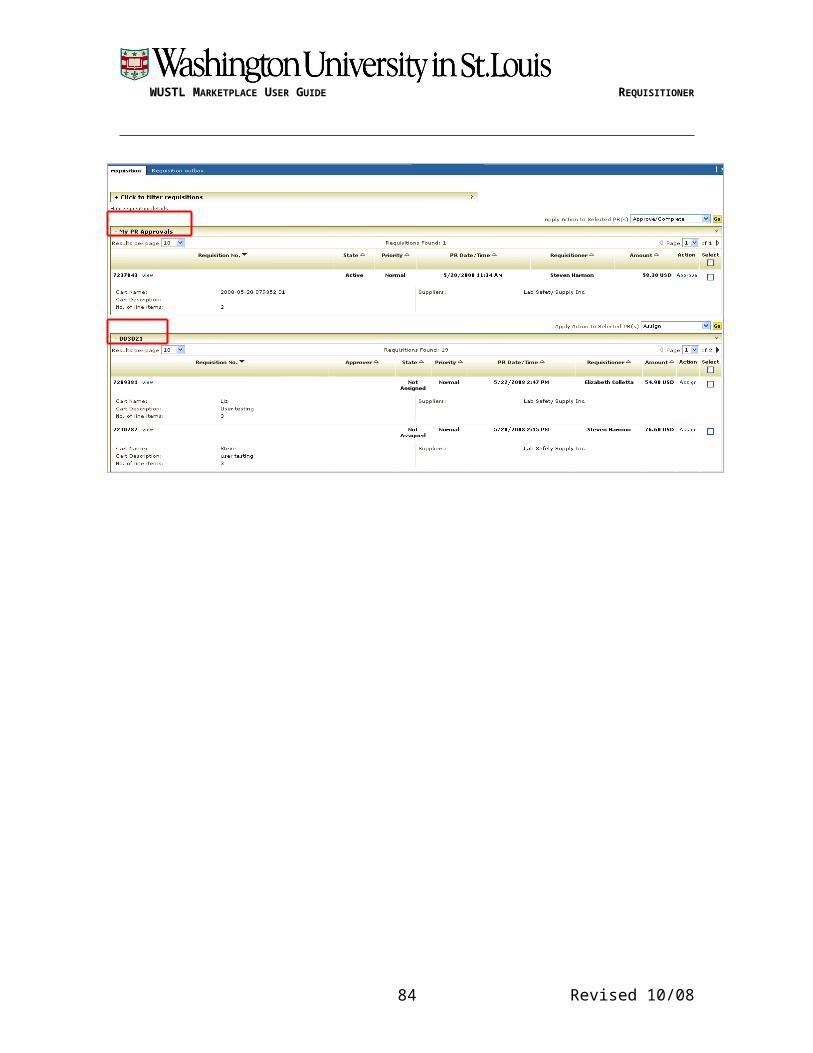
WUSTL MARKETPLACE USER GUIDE REQUISITIONER
The Requisitioner needs to reject or delete a requisition entered by a shopper
Follow these steps to reject or delete a requisition entered by another shopper:
1. Click on the Approvals tab at the top of the screen2. In the departmental folder at the bottom of the screen, check the Select box on the right-
hand side of the PR. Then, from the ‘Apply Action to Selected PR(s)’ box, choose ‘Assign’ and click the Go button. This assigns the PR to yourself.
3. In your ‘My PR Approvals’ folder at the top of the screen, click on the ‘view’ link on the left side of the PR to open it up.
4. Scroll down to where the first line item is located, then select all items by checking the top box in the tan bar above the first line item. This will automatically select all line items.
5. At the ‘For selected line items’ drop down box on the right side above the line items, choose the action ‘Reject Selected Items’, and click the Go button.
6. In the Add Notes box, type in the reason for rejection/deletion, then clickon the Reject Line Item button.
7. At the tope of the screen, make sure that the ‘Approve/Complete’ option is showing in the Available Actions box, and click Go. You are now approving the rejection of the requisition. The requisition will leave the Approvals screen at this point.
8. Click on the ‘History’ tab on the dark brown bar at the top of the screen, then click on the ‘My Requisitions’ tab in the dark blue bar directly below this bar. Verify that there is a red X in the status column for that requisition.
The requisition can be deleted from this view by clicking on the ‘Remove’ button on the far left-
Revised 10/0884
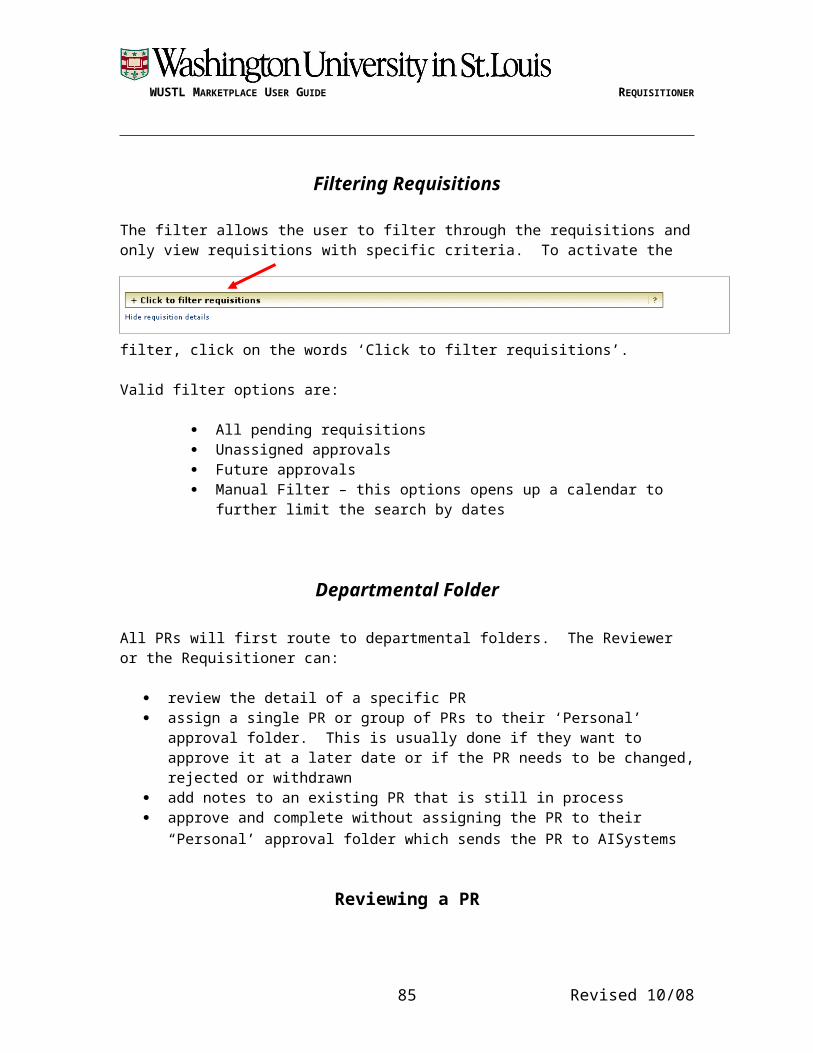
WUSTL MARKETPLACE USER GUIDE REQUISITIONER
hand side of the page.
Revised 10/0885

WUSTL MARKETPLACE USER GUIDE REQUISITIONER
The requisition has not moved over into AIS but is ‘stuck’ at the Requisitioner Review step
The most common time this occurs is when someone did not enter the account information in the proper format or the account information was not entered at all.
1. Click on the Approvals tab at the top of the screen2. In the departmental folder at the bottom of the screen, check the Select box on the right-
hand side of the PR. Then, from the ‘Apply Action to Selected PR(s)’ box, choose ‘Assign’ and click the Go button. This assigns the PR to yourself.
3. In your ‘My PR Approvals’ folder at the top of the screen, click on the ‘view’ link on the left side of the PR to open it up.
4. Go to the ‘Accounting Codes’ section and click on the ‘edit’ button on the left side of the section. Enter the account information in the following format, then click on the Save button:
2-digit Ledger/Class 6-digit Department number, then a space, then the 5- or 6-digit fund number
(if applicable). No dashes are allowed. 4-digit Subclass/Object Code 2-character SR Code (if applicable) Zero Fund (if applicable) HIPAA Dept (if applicable) HIPAA Subclass/Object (if applicable)
5. Once everything is entered correctly, make sure the ‘Available Actions’ box in the upper-right-hand side of the screen has ‘Approve/Complete Step’ listed, and click on the Go button. The requisition should now move over to AIS for approvals.
Revised 10/0886

WUSTL MARKETPLACE USER GUIDE REQUISITIONER
FAQ’s and Contact Information
Please go to Purchasing.wustl.edu > MARKETPLACE for answers to the most common frequently asked questions (FAQ) or helpful hints.
If you would like to see additional information added to this training guide, please send an email to SAP@ wustl.edu and someone will get in touch with you.
Do you need assistance with Marketplace, please contact:
Debbie Marks ------ 935-5016Helpdesk ------------ 935-5707
END OF TRAINING GUIDE
Revised 10/0887